


“Did you hear the laughter echoing from the kitchen?” My niece and I spent an entire afternoon conjuring up adorable treats that would sneak their way to our Halloween gathering. Enter: the Mini Monster Cakes! These delightful Halloween desserts transform simple vanilla cupcakes into whimsical gremlins, complete with colorful buttercream frosting and playful expressions that are sure to enchant both kids and adults. Not only are these cakes a fun project to spark kitchen creativity, but they are also a guaranteed crowd-pleaser at any celebration. As we added eyes and vibrant decorative sprinkles, I couldn’t help but wonder: how will your own Monster Cakes turn out? Grab your baking tools, and let’s dive into this enchanting world together!
Why Are Mini Monster Cakes So Fun?
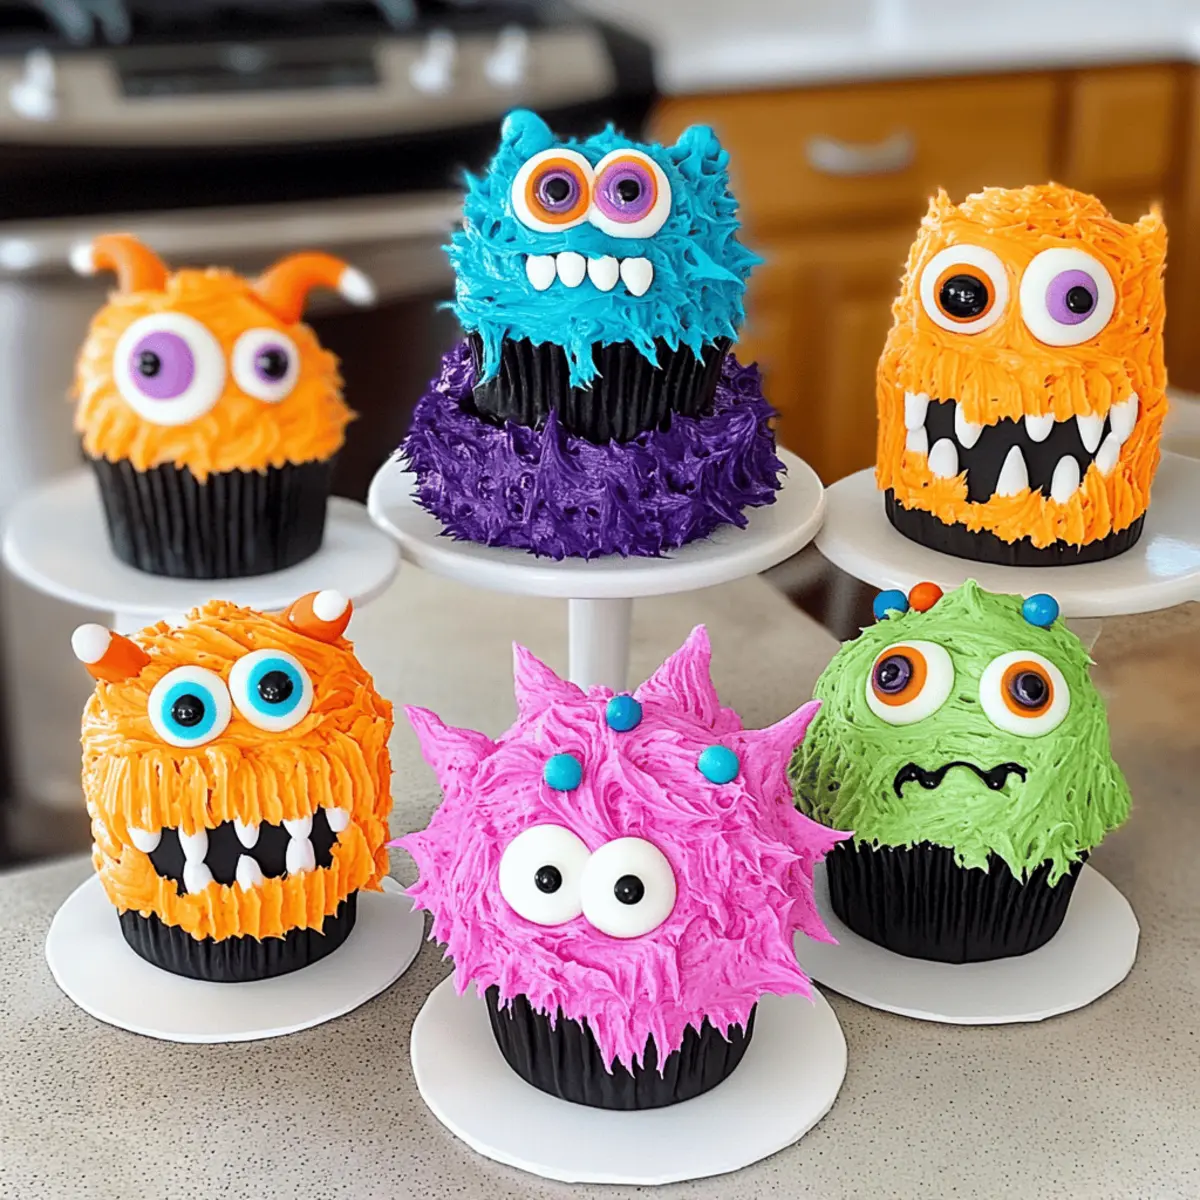
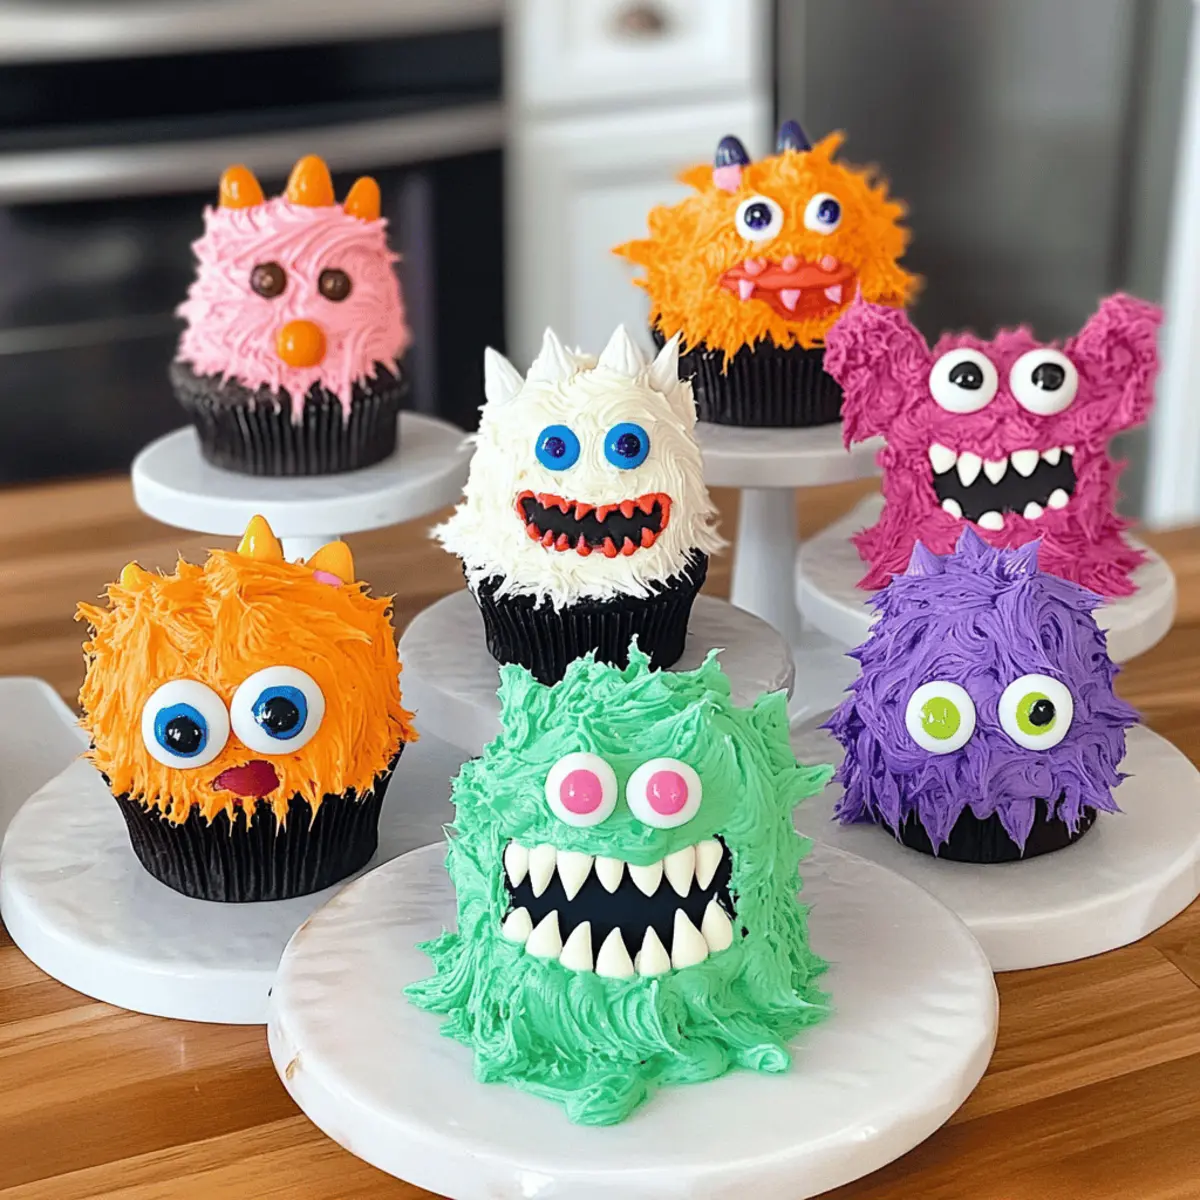
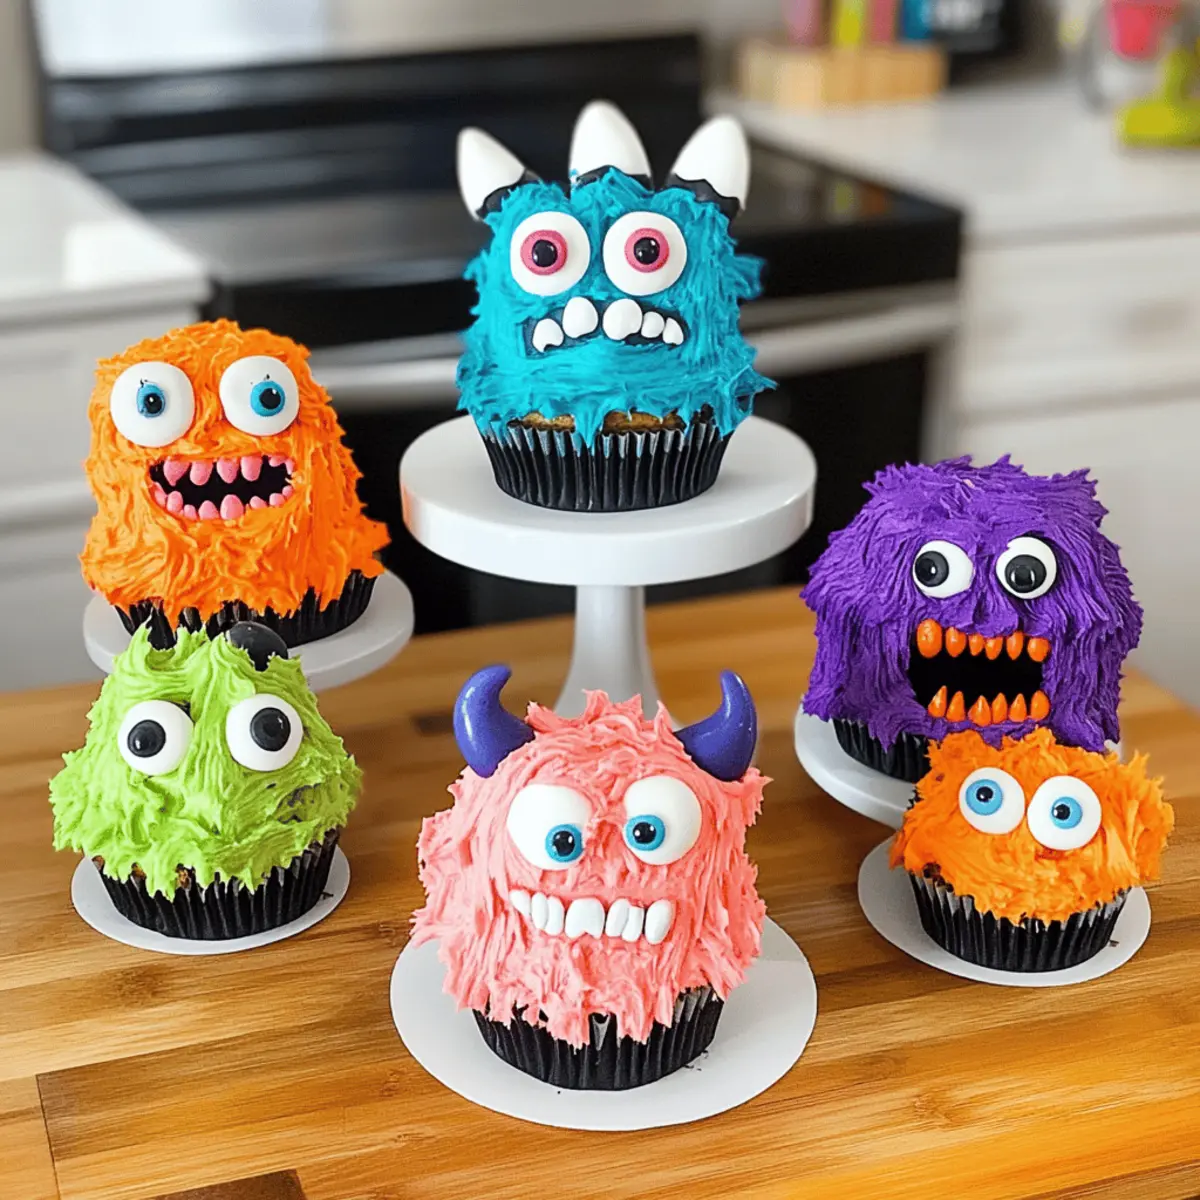
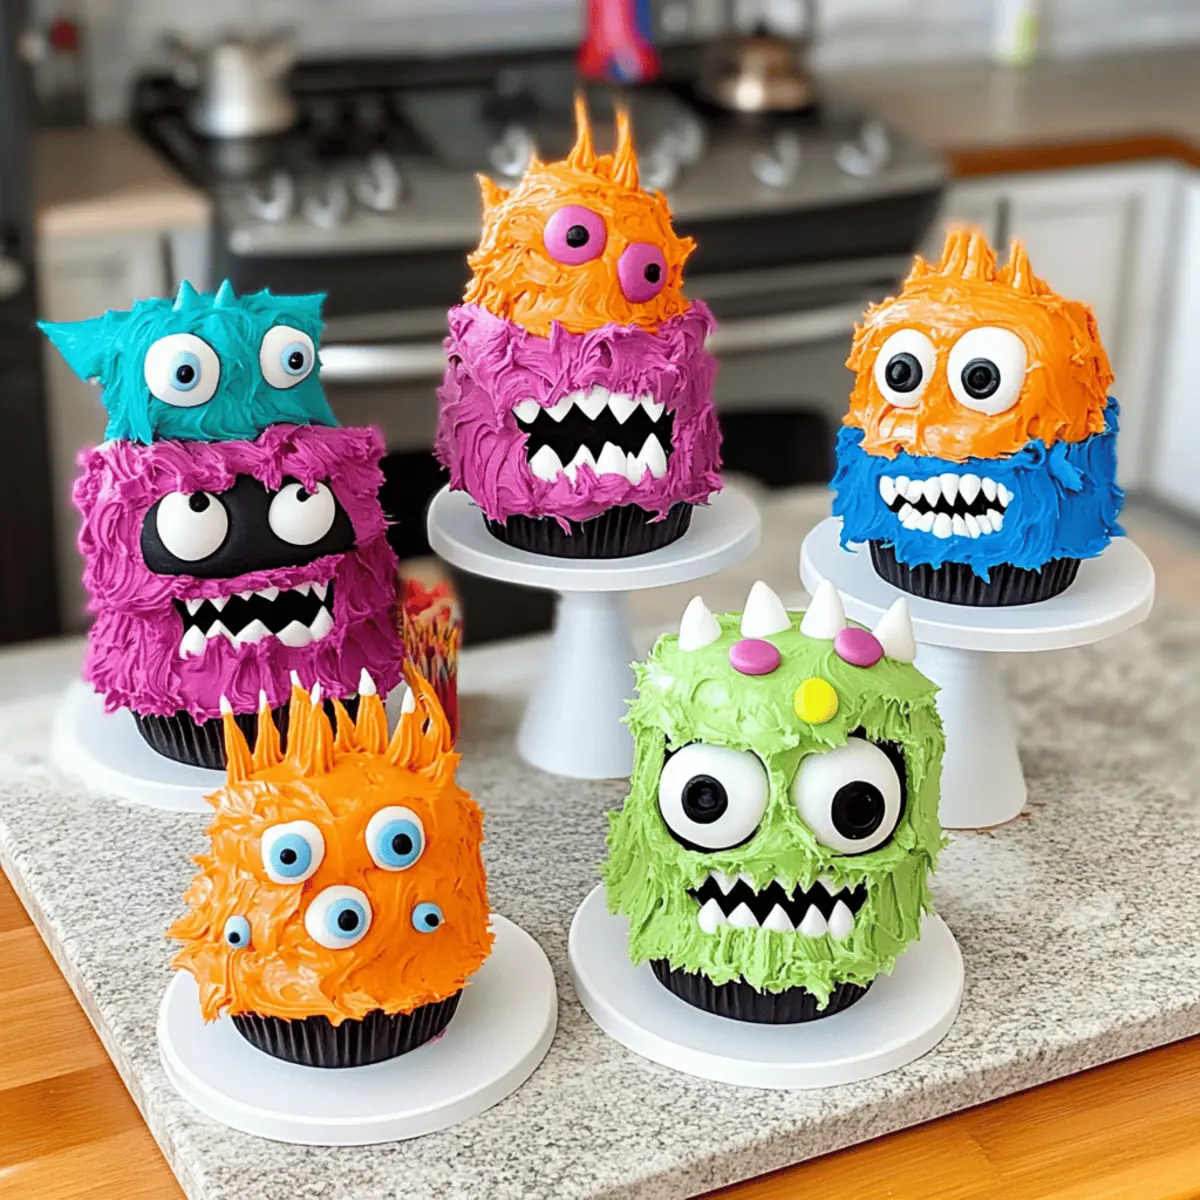
Endless Creativity: The possibilities for decorating these cakes are limitless. You can mix and match colors, toppings, and expressions to craft unique monster creations that reflect your personality or theme.
Baking with Kids: This recipe is an excellent opportunity for quality family time. Kids will love getting their hands messy while creating their own edible monsters, just like our Nutella Pancakes Blend that sparks joy in the kitchen.
Perfect for Any Occasion: Whether it’s a Halloween party, a fall gathering, or just an afternoon treat, Mini Monster Cakes are the perfect festive addition that will impress guests. They are a playful twist to indulge your sweet tooth while bringing laughter to the table.
Quick and Easy: With simple ingredients and straightforward steps, these delightful treats can be whipped up in no time. You’ll have a batch ready to wow your friends and family, much like the instant gratification of our Chocolate Fudge Cupcakes that everyone adores.
A Feast for the Eyes: Not only do they taste good, but their vibrant colors and playful designs make these Monster Cakes a visual delight that invites everyone to dig in, ensuring they’re a hit at any gathering!
Mini Monster Cakes Ingredients
For the Vanilla Cupcakes
- All-purpose flour – Provides structure; substitute with gluten-free flour for a gluten-free option.
- Granulated sugar – Adds sweetness and moistness; can be replaced with coconut sugar for a healthier alternative.
- Baking powder – Leavening agent for rise.
- Fine salt – Enhances flavor.
- Buttermilk – Contributes moistness and tang; regular milk works as a substitute.
- Water – Keeps the batter light.
- Vegetable or canola oil – Adds moisture; swap for melted butter for a richer flavor.
- Large egg – Binds ingredients together; a flax egg can be used for a vegan alternative.
- Vanilla extract – Provides flavor; use vanilla bean paste for a more robust taste.
- Rainbow jimmies – Optional for added fun and color.
For the Vanilla Buttercream Frosting
- Unsalted butter – Creaminess and texture base.
- Vanilla extract – Flavor enhancer.
- Fine salt – Balances sweetness.
- Powdered sugar – Sweetness and structure; use less for a less sweet frosting.
- Heavy whipping cream – Adds smoothness; milk can substitute for a lighter frosting.
For Additional Decorations
- Eyeball sprinkles – Fun addition for a spooky look.
- Fondant – For facial features; colored chocolate can be used as an alternative.
- Gel food coloring – For vibrant frosting colors, perfect for your Mini Monster Cakes.
Step‑by‑Step Instructions for Mini Monster Cakes
Step 1: Prepare Cupcakes
Preheat your oven to 350°F (175°C) and line a cupcake pan with liners. In a large mixing bowl, whisk together the all-purpose flour, granulated sugar, baking powder, and fine salt. In a separate bowl, combine buttermilk, water, oil, egg, and vanilla extract, mixing until smooth. Pour the wet ingredients into the dry mixture, stirring gently until just combined. Fill the liners about two-thirds full and bake for 18-20 minutes, or until a toothpick comes out clean. Let cool for 10 minutes in the pan before transferring to a wire rack.
Step 2: Make Buttercream
While the cupcakes cool, prepare the vanilla buttercream frosting. In a large bowl, beat unsalted butter on medium speed until creamy and smooth, about 2-3 minutes. Gradually add in the powdered sugar, mixing thoroughly. Incorporate the vanilla extract and a pinch of fine salt, adjusting the consistency with heavy whipping cream until you achieve a smooth and spreadable texture. Set aside a portion of the white frosting for crumb coating.
Step 3: Color Frosting
Once your buttercream is ready, divide it into several small bowls for coloring. Add gel food coloring to each bowl, mixing until you achieve vibrant shades for your Mini Monster Cakes. Reserve some white frosting to use as a base layer for crumb coating. This rainbow of colors will add a whimsical touch to your monster creations, making them even more appealing!
Step 4: Assemble Monster Cakes
Take two cooled vanilla cupcakes and place one on top of the other to create a stack. Use a small amount of frosting between the layers to hold them together. Insert a skewer through the center of the stacked cupcakes for additional stability. Next, apply a thin layer of reserved white frosting around the outsides of the cakes to create a crumb coat, which will help seal in any loose crumbs. Freeze the stacked cakes for about 15-20 minutes to firm up.
Step 5: Decorate
Remove the crumb-coated Mini Monster Cakes from the freezer and begin decorating. Use your colored buttercream with various piping tips to create fluffy frosting all around the cupcakes, mimicking monster fur. Add fondant or colored chocolate for eyes and mouths, and sprinkle on eyeball sprinkles for extra fun. Let your creativity shine as you make each monster unique with different facial expressions and colors!
Expert Tips for Mini Monster Cakes
-
Choose Quality Ingredients: Use fresh baking powder and good-quality vanilla extract for the best flavor in your Mini Monster Cakes.
-
Stabilize with Skewers: Don’t forget to insert a skewer in your stacked cupcakes. This ensures the layers stay stable and won’t topple over during decoration.
-
Mix Colors Creatively: Blend different gel food colors for unique frosting shades to bring your monster designs to life, ensuring they stand out.
-
Avoid Overmixing: When combining wet and dry ingredients, mix until just combined. Overmixing can lead to denser cupcakes—nobody wants that!
-
Chill Between Steps: If you find your frosting getting too soft while decorating, chill it briefly in the fridge to make it easier to work with, especially when creating textures.
How to Store and Freeze Mini Monster Cakes
Room Temperature: Store unfrosted Mini Monster Cakes at room temperature in an airtight container for up to 2 days. Ensure they are completely cooled before covering.
Fridge: Frosted Mini Monster Cakes can be stored in the refrigerator for up to 5 days. Keep them in an airtight container to retain moisture and prevent the frosting from drying out.
Freezer: To freeze Mini Monster Cakes, wrap individual cakes in plastic wrap and then in aluminum foil, ensuring they are tightly sealed. They can last in the freezer for up to 3 months. Thaw in the fridge overnight before decorating or serving.
Reheating: If you prefer warm cupcakes, gently reheat them in the microwave for about 10-15 seconds. Avoid overheating to keep the frosting from melting away.
What to Serve with Mini Monster Cakes?
Indulge your family and friends with a complete Halloween-themed feast that pairs perfectly with these whimsical treats!
- Spooky Punch: A brightly colored fruit punch with floating gummy worms sets the perfect festive tone, making every sip an adventure.
- Monster Mac and Cheese: Creamy, cheesy goodness with bright green food coloring draws in the little monsters at your party. Add some breadcrumb “crumbs” on top to mimic monster fur!
- Witch’s Brew Soup: A velvety pumpkin or green pea soup offers a comforting contrast to the sweetness of the cakes, giving a warm, earthy touch that rounds out your meal.
- Mummy Dogs: Wrapped in crescent dough with mustard “eyes,” these easy-to-make snacks are a fun finger food that delightfully complements the sweetness of the Mini Monster Cakes.
- Ghostly Garden Salad: A crunchy medley of greens, topped with ghostly mozzarella cheese cutouts, adds freshness to your table, balancing the sweet-heavy offerings.
- Creepy Crudité Platter: Arrange vegetables like carrots and celery in a “graveyard” theme with dips in small pots—perfect for a wholesome crunch alongside those sugary delights.
- Halloween-Themed Spritz Cookies: These buttery cookies, shaped like bats and ghosts, provide a simpler, but equally fun dessert option alongside your colorful cakes.
- Apple Cider: Warm or cold, spiced apple cider is a quintessential fall beverage that pairs beautifully with cupcakes, enhancing the warm, nostalgic flavors of Halloween.
- Chocolate Bat Cake Pops: These bite-sized treats add another layer of sweetness and fun to your dessert spread, providing a pop of chocolatey goodness to balance out the sugar rush.
Creating a complete meal filled with these whimsical creations will surely make your Halloween gathering unforgettable!
Mini Monster Cakes Variations
Feel free to add your personal touch to these festive cakes for a unique flair.
-
Chocolate Twist: Replace vanilla cupcakes with chocolate cupcakes for a richer flavor that pairs perfectly with colorful frosting.
-
Dairy-Free Delight: Use coconut milk and dairy-free butter to create a luscious vegan frosting that everyone can enjoy. This way, even those with allergies can join in the fun!
-
Nutty Flavor: Incorporate almond extract in the batter for a delightful twist that adds complexity to each bite. Your Monster Cakes will have a unique, aromatic quality that surprises taste buds!
-
Spooky Colors: Mix gel food colors to create themed frosting like eerie greens and purples or candy corn hues for a festive touch reminiscent of our adorable Chocolate Chip Pancakes.
-
Fruity Frosting: Add a hint of fruit puree, like raspberry or mango, to your buttercream for a refreshing twist that balances sweetness and adds a pop of flavor.
-
Crispy Texture: Boost the texture by incorporating crushed cookies, like Oreos, into the frosting or batter for delightful surprise crunches that everyone will love.
-
Spicy Kick: For those who enjoy a bit of heat, sprinkle a dash of cayenne pepper into the frosting for a surprising flavor profile—it’s a wild yet exciting choice!
-
Decorative Themes: Use themed sprinkles or edible glitter for a dazzling effect perfect for Halloween or any gathering. They’ll make your Mini Monster Cakes eye-catching, complementing your memorable dessert table!
Make Ahead Options
These Mini Monster Cakes are perfect for busy home cooks looking to save time! You can prepare the vanilla cupcakes up to 3 days in advance; simply bake them, let them cool completely, and store them in an airtight container in the refrigerator to keep them moist. The vanilla buttercream frosting can also be made ahead and stored in the fridge for up to 5 days; just give it a quick remix with a splash of cream before using. When you’re ready to serve, assemble and decorate the cakes as desired, bringing out the vibrant colors and spooky charm that make these Halloween treats so special. Enjoy the delicious results with minimal last-minute effort!
Mini Monster Cakes Recipe FAQs
What type of flour should I use for Mini Monster Cakes?
Absolutely! For the Mini Monster Cakes, you’ll want to use all-purpose flour to provide structure and a soft texture. If you’re looking for a gluten-free option, feel free to substitute with a certified gluten-free flour blend. Just ensure that it contains xanthan gum, which helps replicate the texture of traditional flour.
How do I store leftover Mini Monster Cakes?
To keep your frosted Mini Monster Cakes fresh, store them in the refrigerator in an airtight container for up to 5 days. This will help maintain their moisture while preventing the frosting from drying out. If they haven’t been frosted, you can keep them at room temperature for up to 2 days.
Can I freeze Mini Monster Cakes?
Yes, you can freeze Mini Monster Cakes! Wrap each unfrosted cake tightly in plastic wrap, then in aluminum foil. They can be stored in the freezer for up to 3 months. When you’re ready to enjoy them, simply thaw in the refrigerator overnight before decorating or serving.
What should I do if my buttercream frosting is too soft?
If your buttercream frosting is too soft to pipe or spread, don’t worry! Just chill it in the refrigerator for about 15-20 minutes until it firms up. Alternatively, you can add more powdered sugar gradually until you achieve the desired consistency.
Can I make these Mini Monster Cakes without eggs?
Absolutely! To make a vegan version, substitute the large egg with a flax egg. To do this, mix 1 tablespoon of ground flaxseed with 2.5 tablespoons of water and let it sit for about 5 minutes until it gels. This will help bind the ingredients together just like an egg would.
Are Mini Monster Cakes safe for kids with food allergies?
It’s essential to customize your Mini Monster Cakes to suit your guests’ dietary needs. Be mindful of potential allergens such as dairy and eggs. For a dairy-free option, use plant-based butter and milk alternatives, and for egg-free cakes, follow the flax egg substitution mentioned earlier. Always double-check ingredient labels to ensure safety!
Delightful Mini Monster Cakes for a Spooktacular Halloween Treat
Ingredients
Equipment
Method
- Preheat your oven to 350°F (175°C) and line a cupcake pan with liners. In a large mixing bowl, whisk together the flour, sugar, baking powder, and salt. In a separate bowl, combine buttermilk, water, oil, egg, and vanilla extract, mixing until smooth. Pour the wet ingredients into the dry mixture, stirring gently until just combined. Fill the liners about two-thirds full and bake for 18-20 minutes, or until a toothpick comes out clean. Let cool for 10 minutes in the pan before transferring to a wire rack.
- While the cupcakes cool, prepare the vanilla buttercream frosting. In a large bowl, beat the unsalted butter on medium speed until creamy and smooth, about 2-3 minutes. Gradually add in the powdered sugar, mixing thoroughly. Incorporate the vanilla extract and a pinch of salt, adjusting the consistency with heavy whipping cream until you achieve a smooth and spreadable texture. Set aside a portion of the white frosting for crumb coating.
- Once your buttercream is ready, divide it into several small bowls for coloring. Add gel food coloring to each bowl, mixing until you achieve vibrant shades for your Mini Monster Cakes. Reserve some white frosting to use as a base layer for crumb coating.
- Take two cooled vanilla cupcakes and place one on top of the other to create a stack. Use a small amount of frosting between the layers to hold them together. Insert a skewer through the center of the stacked cupcakes for additional stability. Next, apply a thin layer of reserved white frosting around the outsides of the cakes to create a crumb coat. Freeze the stacked cakes for about 15-20 minutes to firm up.
- Remove the crumb-coated Mini Monster Cakes from the freezer and begin decorating. Use your colored buttercream with various piping tips to create fluffy frosting all around the cupcakes, mimicking monster fur. Add fondant or colored chocolate for eyes and mouths, and sprinkle on eyeball sprinkles for extra fun.