


The aroma of warm peanut butter dances through my kitchen, instantly transporting me back to sun-soaked afternoons filled with childhood bliss. Who could resist the classic combination of peanut butter and jelly? Today, I’m sharing a recipe that captures that magic in a delightful Peanut Butter + Jelly Cake. This nostalgic bake not only brings a smile to your face, but it’s also incredibly easy to whip up in just 45 minutes! With gluten-free and vegan options, it’s the perfect crowd-pleaser for everyone at your table. Whether you’re making it for a special occasion or just because, this cake promises to become a cherished favorite. What flavor variations will you try?
Why is this Peanut Butter Jelly Cake special?
Nostalgic Flavors: This cake is a sweet trip down memory lane, encapsulating the beloved PB&J sandwich we cherished as kids.
Easy Baking: With just 45 minutes of prep, you’ll have a delightful dessert ready without any fuss!
Vegan & Gluten-Free Options: Everyone can enjoy it, thanks to customizable recipes with gluten-free and vegan alternatives.
Versatile Variations: Mix it up by experimenting with different nut butters and fruit preserves or even transforming it into cupcakes!
Crowd-Pleasing Delight: Perfect for family gatherings or casual get-togethers, this cake is sure to impress both kids and adults alike.
Grab a slice and remember those carefree childhood days while indulging in the richness of this magical cake!
Peanut Butter Jelly Cake Ingredients
• Discover what makes this cake a nostalgic delight!
For the Cake
- Organic All-Purpose Flour – Provides structure; for gluten-free, use Bob’s Red Mill 1-to-1 Baking Flour.
- Baking Powder – Acts as a leavening agent to help the cake rise.
- Organic Cane Sugar – Sweetens the cake and contributes to its fluffy texture.
- Unsalted Butter – Adds moisture and richness; substitute with vegan butter for a dairy-free option.
- Organic Eggs – Binds ingredients and adds moisture; for a vegan version, use flax eggs (1 tbsp flaxseed meal + 2.5 tbsp water = 1 egg).
- Sea Salt – Enhances overall flavor.
- Organic Peanut Butter – The star of the cake, providing richness; any nut butter can be substituted.
- Vegetable Oil – Maintains moisture and adds fat content to the cake.
- Vanilla Extract – Brightens flavor and adds delightful aroma.
- Dairy-Free Buttermilk – Improves texture; made with plant-based milk and vinegar or lemon juice. For classic buttermilk, use cow’s milk instead.
For the Filling & Frosting
- Preserves/Jam (Blueberry or Strawberry) – Adds fruity flavor and moisture; choose your favorite to complement the peanut butter.
- Organic Powdered Sugar – Essential for frosting, offering sweetness and that smooth consistency.
- Almond Milk – Helps achieve the desired fluffiness in frosting; any preferred milk works too.
Mix these ingredients, and you’re on your way to creating a show-stopping Peanut Butter Jelly Cake that captures the essence of childhood joy!
Step‑by‑Step Instructions for Peanut Butter Jelly Cake
Step 1: Preheat the Oven
Begin by preheating your oven to 350°F (175°C). While waiting for the oven to heat, prepare your cake pans by greasing them lightly and lining the bottoms with parchment paper. This will ensure that your Peanut Butter Jelly Cake releases easily once baked.
Step 2: Make Dairy-Free Buttermilk
To create the dairy-free buttermilk, combine 1 cup of almond milk with 1 tablespoon of lemon juice in a small bowl. Let this mixture sit for about 5 to 10 minutes. You’ll notice it thickening slightly, which is exactly what you want for a moist cake.
Step 3: Combine Dry Ingredients
In a large mixing bowl, whisk together 2 cups of organic all-purpose flour, 2 teaspoons of baking powder, and ½ teaspoon of sea salt. Sift these dry ingredients to aerate them, ensuring your Peanut Butter Jelly Cake is light and fluffy. This process makes a difference in the cake’s texture, so take your time.
Step 4: Cream Butter and Sugar
In another bowl, beat ½ cup of unsalted butter and 1 cup of organic cane sugar using an electric mixer for about 2-3 minutes. The mixture should become pale and fluffy. Next, mix in 1 cup of organic peanut butter, followed by three organic eggs, one at a time, ensuring each one is fully incorporated before adding the next.
Step 5: Mix Wet and Dry Ingredients
Gradually add the dry ingredient mixture into the wet mixture, alternating with the prepared dairy-free buttermilk. Mix on low speed until just combined, about 3-4 minutes. The batter should be smooth and creamy, ready to pour into your prepped pans; this is where the magic for your Peanut Butter Jelly Cake begins!
Step 6: Bake the Cake
Divide the batter evenly among the prepared cake pans. Place the pans in the preheated oven and bake for 30-35 minutes. To check for doneness, insert a toothpick into the center of the cakes; it should come out clean or with a few crumbs sticking to it.
Step 7: Cool the Cakes
Once baked, remove the cake pans from the oven and let them cool in the pans for about 10 minutes. Carefully transfer the cakes to a wire cooling rack, allowing them to cool completely for 1-2 hours. Ensuring they are fully cooled prevents the frosting from melting later.
Step 8: Prepare the Filling
While the cakes are cooling, mix together about ½ cup of your favorite preserves or jam (blueberry or strawberry) with a dash of lemon juice. This will be the flavorful filling for your Peanut Butter Jelly Cake, enhancing its nostalgic charm.
Step 9: Make the Frosting
In a mixing bowl, beat together ½ cup of organic peanut butter and ½ cup of unsalted butter until smooth and creamy. Gradually add 2 cups of organic powdered sugar, then mix in almond milk a tablespoon at a time until the frosting reaches your desired consistency—smooth yet spreadable.
Step 10: Assemble the Cake
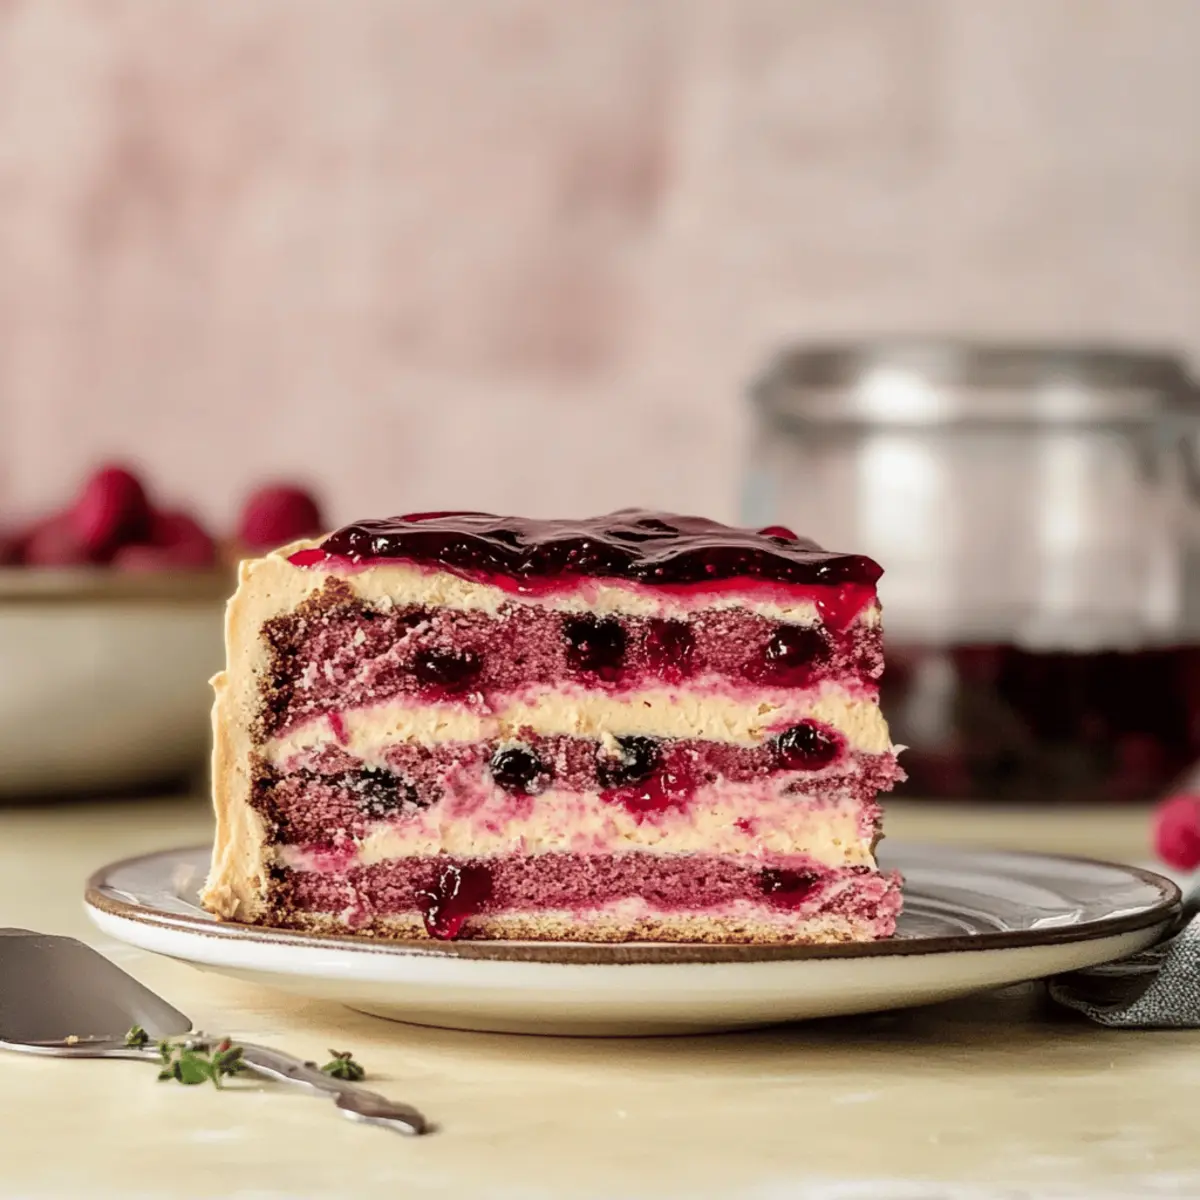
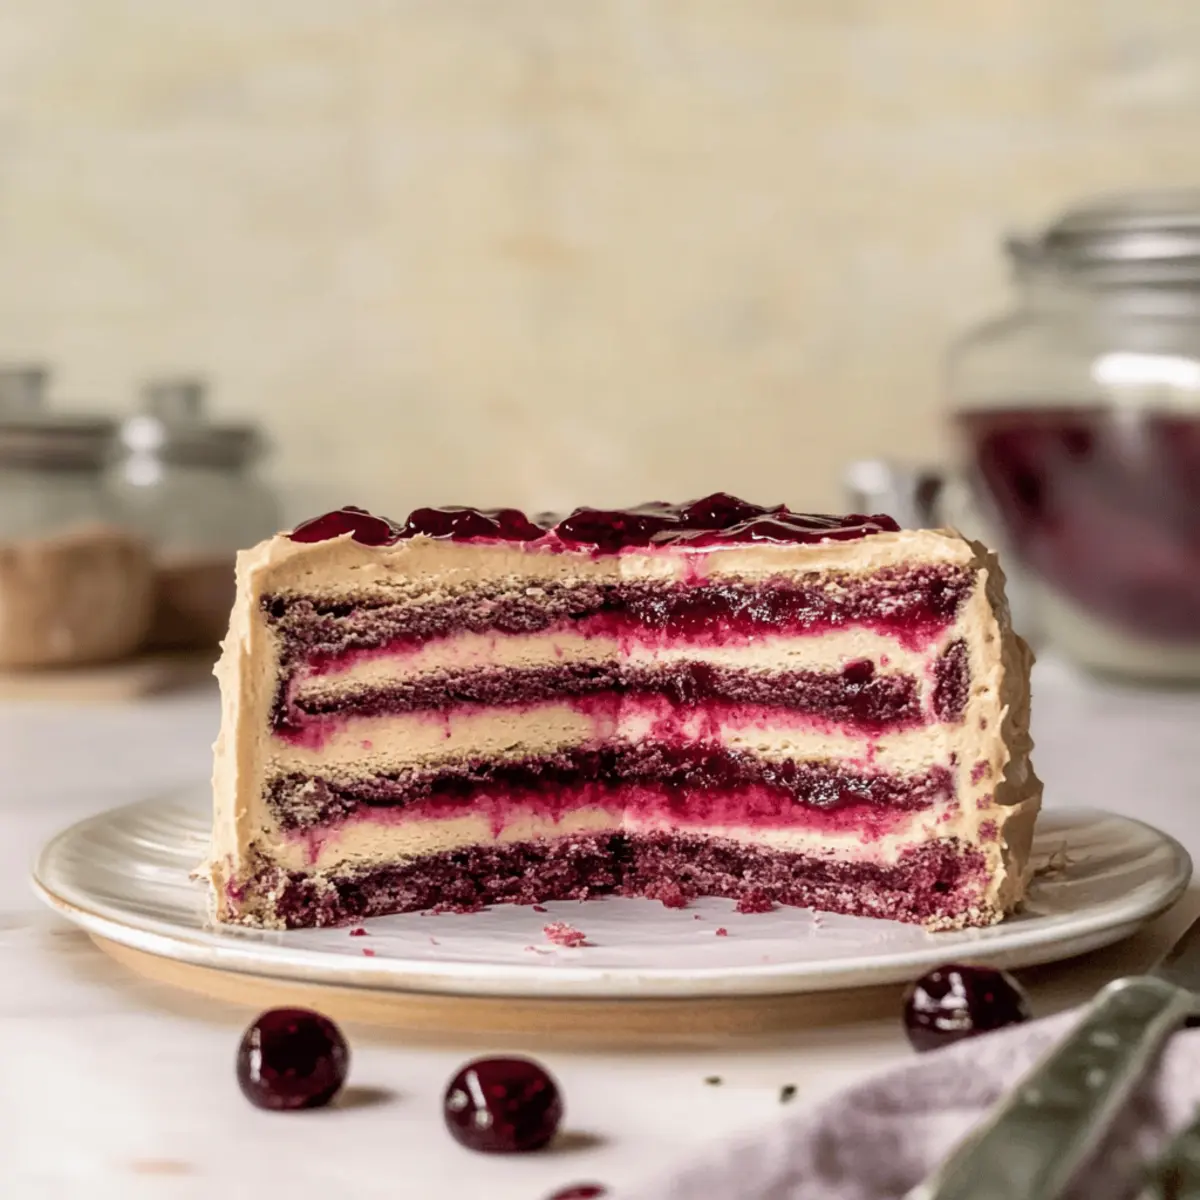
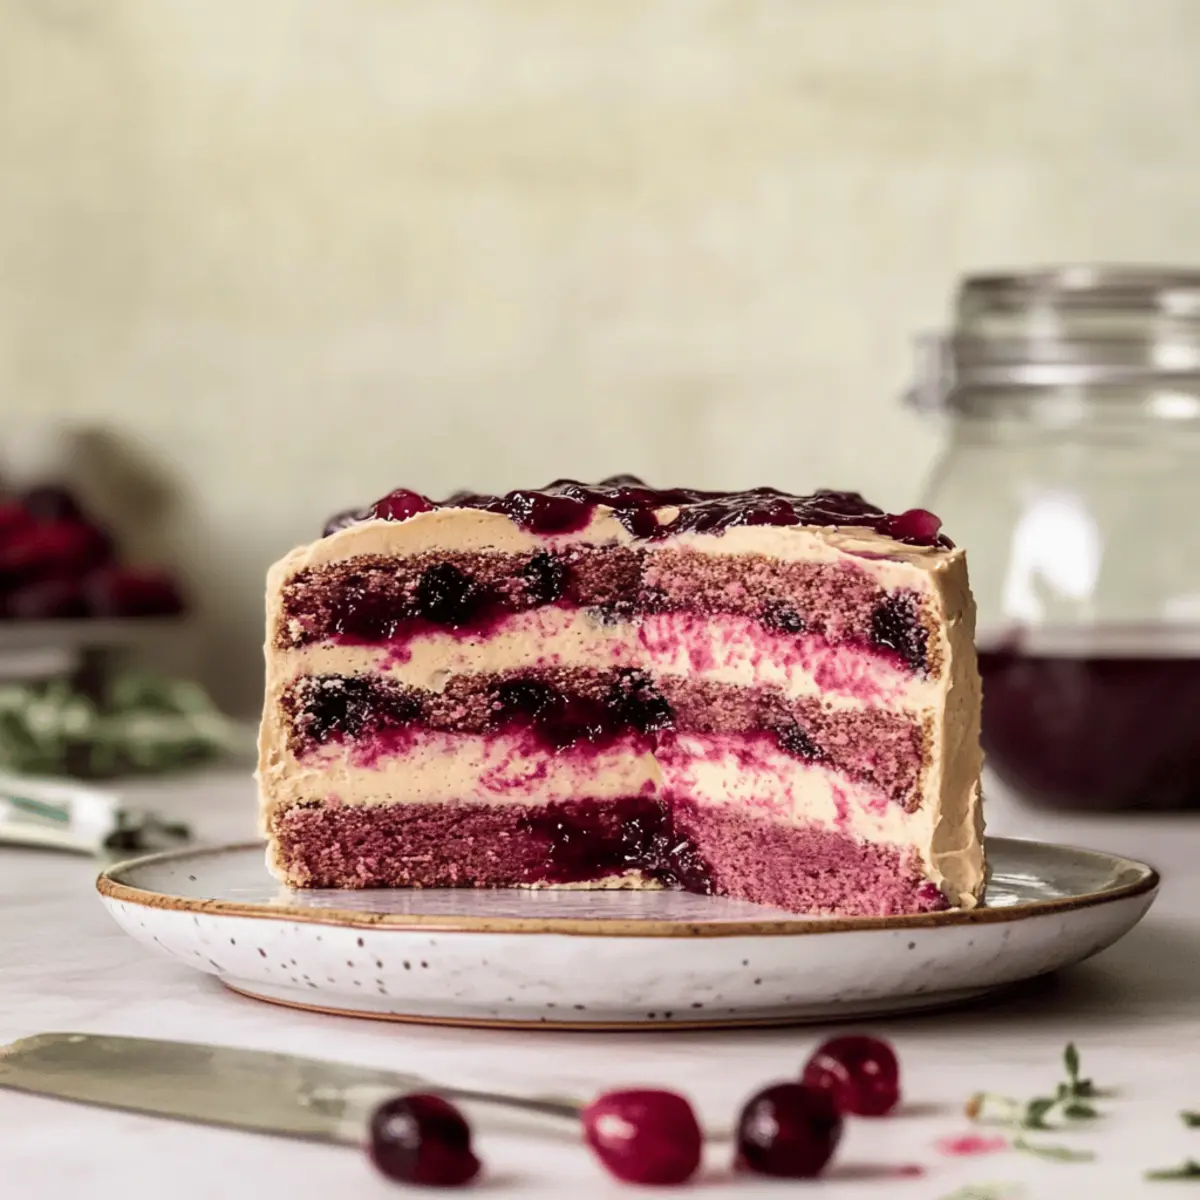
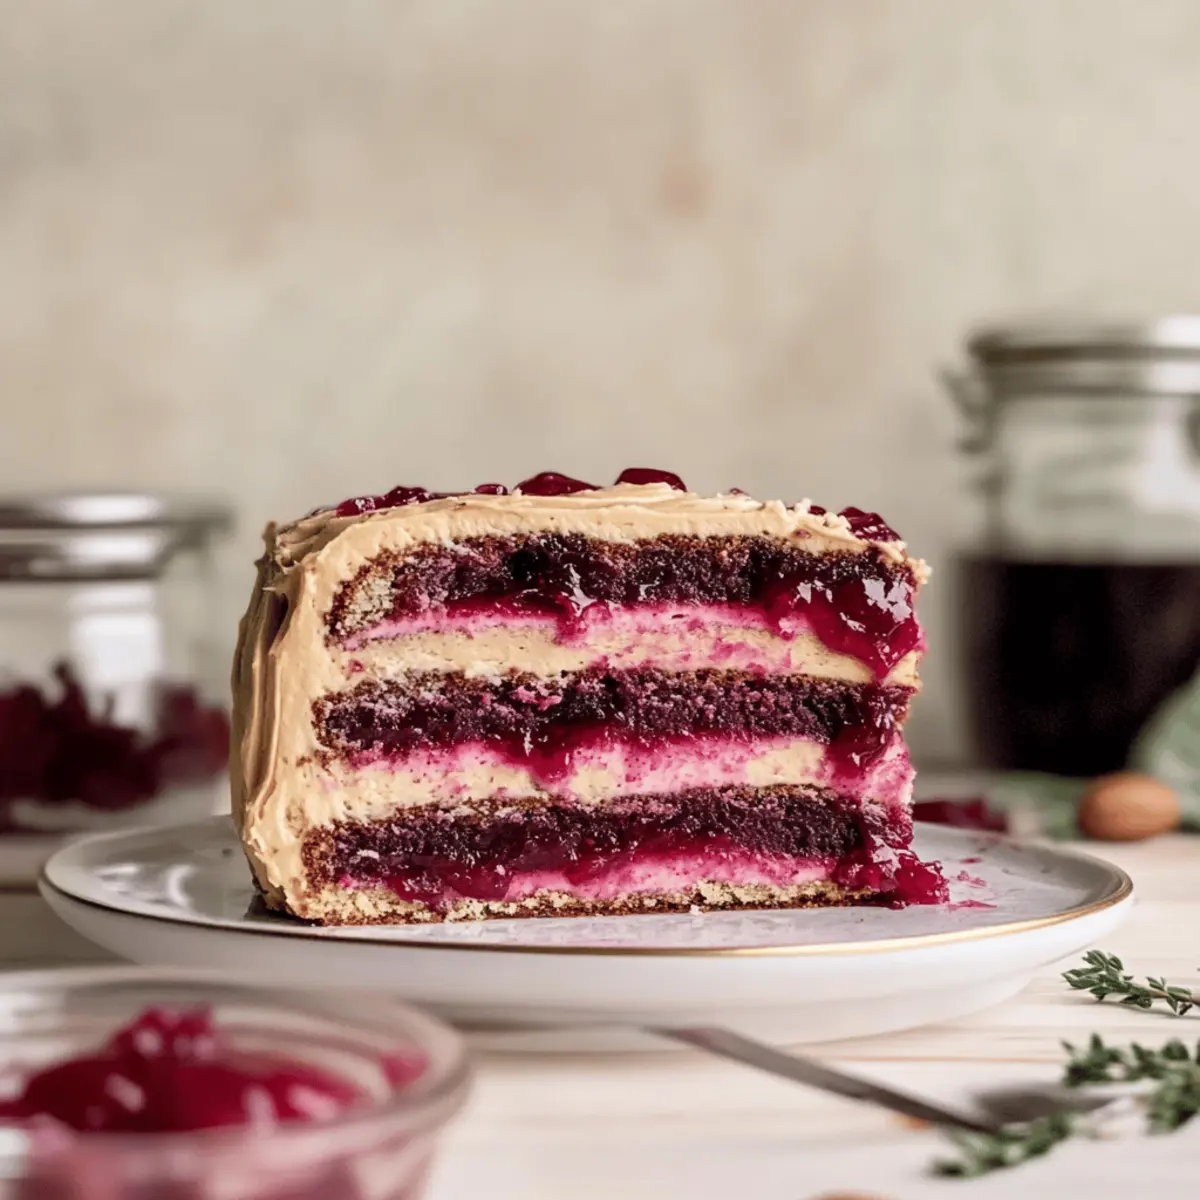
Once the cakes are completely cooled, take one layer and spread a generous amount of the fruit preserves on top. Add a layer of frosting, then repeat with the next layer. If using a third layer, top it with frosting and additional jelly if desired, then frost the entire cake beautifully.
Step 11: Chill and Serve
Refrigerate the assembled Peanut Butter Jelly Cake for about 30 minutes to firm up the frosting. This will help it hold its shape when slicing. Once set, decorate as desired and slice into generous pieces, ready to enjoy this nostalgic treat with family and friends.
How to Store and Freeze Peanut Butter Jelly Cake
Fridge: Keep your Peanut Butter Jelly Cake in an airtight container in the fridge for up to 4-5 days to maintain freshness and flavor.
Freezer: For longer storage, wrap individual slices tightly in plastic wrap and then place them in a freezer-safe bag. The cake can be frozen for up to 3 months.
Reheating: To enjoy your frozen slices, simply thaw them in the refrigerator overnight or leave at room temperature for a couple of hours before serving.
Unassembled Layers: You can also freeze unembellished cake layers wrapped tightly. Just make sure to thaw completely and frost when ready to serve!
Make Ahead Options
These Peanut Butter Jelly Cake are perfect for meal prep enthusiasts! You can prepare the cake layers up to 3 days in advance; simply bake, cool completely, and wrap each layer tightly in plastic wrap before refrigerating to maintain their moisture. The frosting can also be made ahead and stored in an airtight container in the fridge for up to 5 days—just give it a quick stir before spreading. Additionally, the fruit preserves can be mixed and kept sealed in the fridge for up to 1 week. When ready to serve, assemble the cake by layering the frosting and preserves between the cooled cake layers, and refrigerate for about 30 minutes before slicing to ensure cleaner cuts. Enjoy the convenience of this nostalgic bake with minimal effort on busy days!
Expert Tips for Peanut Butter Jelly Cake
-
Sift Your Dry Ingredients: Ensuring the flour and baking powder are sifted can make a big difference in achieving a light and fluffy texture for your Peanut Butter Jelly Cake.
-
Avoid Over-Mixing: Mix the batter until just combined to prevent a dense cake. Over-mixing activates gluten in the flour, leading to a heavier texture.
-
Cool Completely: Allow the cake layers to cool completely before frosting. This prevents the frosting from melting and ensures a beautiful presentation.
-
Proper Storage: Store leftovers in an airtight container for up to 4-5 days in the fridge, or freeze individually wrapped slices for up to 3 months to enjoy later.
-
Customize Your Flavors: Feel free to get creative! Different nut butters or unique fruit preserves can give a special twist to your Peanut Butter Jelly Cake.
What to Serve with Peanut Butter + Jelly Cake
Imagine a delightful feast where flavors harmonize beautifully, complementing the nostalgic bliss of your cake creation.
-
Creamy Vanilla Ice Cream: The cool creaminess balances the warm, rich cake, creating a delightful contrast that’ll make every bite heavenly.
-
Fresh Berries: Serve a medley of strawberries, blueberries, and raspberries for vibrant freshness. Their tartness cuts through the sweetness, adding a refreshing crunch.
-
Chocolate Ganache: Drizzle silky chocolate ganache over each slice to enhance the flavors. This adds a luxurious touch that chocolate lovers won’t resist!
-
Whipped Coconut Cream: Light and fluffy, this dairy-free topping provides a lovely, airy companion to the cake. Its subtle sweetness enhances the rich peanut butter flavor.
-
Nutty Coffee: A warm cup of nutty coffee is the perfect drink pairing. The deep flavor of coffee enhances the cake’s rich peanut butter and jelly notes, making each bite even more enjoyable.
-
Honey Glazed Carrots: Roasted, sweet carrots serve as a delightful side dish. Their tender sweetness complements the cake while adding a savory balance to the meal.
-
Lemonade Spritzer: A refreshing spritzer adds a bright burst of flavor that cuts through the cake’s richness. The citrus note brightens the entire dining experience!
Peanut Butter Jelly Cake: Customize Your Creation
Feel free to tailor this Peanut Butter Jelly Cake to suit your taste buds and dietary needs — let your creativity shine through every bite!
- Gluten-Free: Use Bob’s Red Mill 1-to-1 Baking Flour instead of regular flour for a gluten-free delight. Your friends will never know the difference!
- Vegan Option: Swap regular butter for plant-based vegan butter and replace eggs with flax eggs to enjoy guilt-free goodness. No compromises on taste here!
- Nut Butter Swap: Try almond or cashew butter instead of peanut butter for a different flavor profile that still sings with nostalgia. Each option brings its own delightful twist.
- Cupcake Version: Bake the batter in muffin tins for 18-20 minutes and create adorable cupcakes! Top them with frosting for a fun and festive treat.
- Jelly Flavors: Experiment with jams like raspberry, apricot, or mixed berry for unique flavor combinations that will surprise and delight your guests. Each variation tells its own delicious story.
- Creamy Frosting: Add a dollop of cream cheese to the frosting for an extra tangy richness that perfectly balances the sweetness of the cake.
- Cinnamon Spice: A dash of cinnamon in the batter can amplify warmth and depth, making each bite even more irresistible.
- Chocolate Twist: Swirl in cocoa powder for a chocolatey variant that blends beautifully with the peanut butter, creating luxurious layers of flavor.
With these variations, your Peanut Butter Jelly Cake can be a personal masterpiece, reminding you of happy childhood moments while tantalizing your palate! If you’re feeling adventurous, you might also want to check out some other delightful recipes like the Granola Cups Peanut or the comforting Garlic Butter Baked Chicken for family dinner nights.
Peanut Butter Jelly Cake Recipe FAQs
What type of peanut butter is best for this cake?
I recommend using a creamy, organic peanut butter for a smooth texture and rich flavor. Avoid natural varieties that separate with oil, as they can alter the cake’s moisture. If you’re feeling adventurous, you can substitute it with almond or cashew butter for a unique twist!
How do I know when the cake is fully baked?
To check for doneness, insert a toothpick or cake tester into the center of the cake. It should come out clean or with a few moist crumbs attached. This usually takes about 30-35 minutes in the oven!
How should I store leftover Peanut Butter Jelly Cake?
To keep your cake fresh, store it in an airtight container in the fridge for up to 4-5 days. If you want to preserve it for longer, wrap individual slices tightly in plastic wrap and place them in a freezer bag; it will stay good for up to 3 months!
Can I make this cake ahead of time?
Absolutely! You can prepare the cake layers ahead of time and freeze them unassembled. Wrap the cooled cake layers tightly and freeze. When you’re ready to serve, simply thaw the layers, frost, and enjoy within a few days for optimum freshness.
Are there any dietary considerations I should keep in mind when making this cake?
Yes! For a gluten-free option, substitute organic all-purpose flour with Bob’s Red Mill 1-to-1 Baking Flour. To make it vegan, replace eggs with flax eggs (1 tbsp flaxseed meal and 2.5 tbsp water for each egg) and use dairy-free butter. Always check labels for any potential allergens specific to your guests!
Peanut Butter Jelly Cake for a Nostalgic Sweet Treat
Ingredients
Equipment
Method
- Preheat your oven to 350°F (175°C) and prepare your cake pans.
- Make dairy-free buttermilk by combining 1 cup of almond milk with 1 tablespoon of lemon juice.
- In a bowl, whisk together 2 cups of flour, 2 teaspoons of baking powder, and ½ teaspoon of sea salt.
- Beat ½ cup of butter and 1 cup of sugar until fluffy, then mix in 1 cup of peanut butter and 3 eggs, one at a time.
- Gradually mix in the dry ingredients and dairy-free buttermilk until combined.
- Divide the batter among cake pans and bake for 30-35 minutes.
- Cool the cakes in the pans for 10 minutes, then transfer to a wire rack.
- Mix together ½ cup of your favorite preserves with a dash of lemon juice for the filling.
- Beat together ½ cup of peanut butter and ½ cup of butter, add powdered sugar and almond milk to achieve desired frosting consistency.
- Assemble the cake layers with filling and frosting, and refrigerate for 30 minutes before serving.