


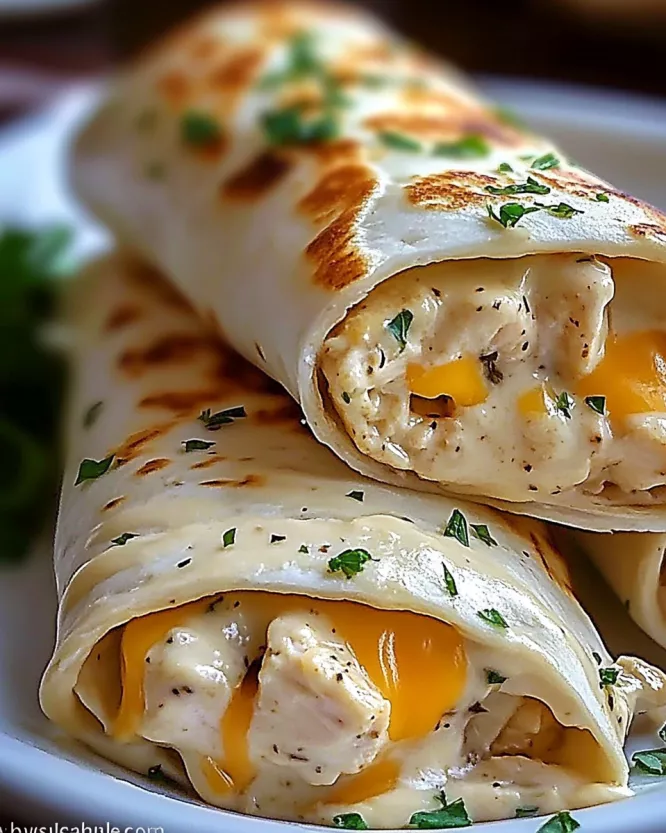
Introduction to Cheesy Garlic Chicken Wraps
After a long day, the last thing I want is to spend hours in the kitchen. That’s where my Cheesy Garlic Chicken Wraps come to the rescue! These wraps are not just a meal; they’re a warm hug on a plate. Packed with tender chicken, creamy cheeses, and vibrant veggies, they’re perfect for a quick dinner or a delightful lunch. Whether you’re feeding a family or just treating yourself, these wraps are sure to impress. Let’s dive into this easy recipe that brings comfort and flavor to your table in no time!
Why You’ll Love This Cheesy Garlic Chicken Wraps
These Cheesy Garlic Chicken Wraps are a game-changer for busy weeknights. They come together in just 23 minutes, making them a lifesaver when time is tight. The combination of gooey cheese and savory chicken creates a flavor explosion that will have everyone asking for seconds. Plus, they’re versatile! You can customize them with your favorite veggies or spices, ensuring every bite is a delightful surprise.
Ingredients for Cheesy Garlic Chicken Wraps
Gathering the right ingredients is the first step to creating these delicious Cheesy Garlic Chicken Wraps. Here’s what you’ll need:
- Cooked chicken, shredded: This is the star of the show! Use leftover rotisserie chicken or any cooked chicken you have on hand.
- Shredded mozzarella cheese: Melty and gooey, mozzarella adds that cheesy goodness we all crave.
- Cream cheese: This soft cheese brings a rich creaminess that binds everything together.
- Sour cream: A dollop of sour cream adds tang and moisture, making the filling irresistible.
- Garlic: Fresh minced garlic and garlic powder enhance the flavor, giving it that aromatic kick.
- Onion powder: This adds depth to the flavor profile without the crunch of fresh onions.
- Salt and black pepper: Essential seasonings that elevate the taste of the wraps.
- Flour tortillas: Choose large tortillas for easy wrapping. Whole wheat or gluten-free options work too!
- Fresh spinach leaves: These add a pop of color and a nutritious crunch.
- Diced tomatoes: Juicy tomatoes bring freshness and a burst of flavor.
- Chopped fresh parsley (optional): A sprinkle of parsley adds a lovely touch of color and freshness.
- Olive oil: For cooking the wraps to golden perfection, olive oil is a must.
For those looking to spice things up, consider adding diced jalapeños or a sprinkle of red pepper flakes to the chicken mixture. If you want to switch things up, cooked shrimp or sautéed vegetables can be great substitutes for the chicken. You can find the exact measurements for each ingredient at the bottom of the article, ready for printing!
How to Make Cheesy Garlic Chicken Wraps
Step 1: Prepare the Filling
Start by grabbing a large mixing bowl. Toss in the shredded chicken, mozzarella, cream cheese, and sour cream. Add the minced garlic, garlic powder, onion powder, salt, and black pepper. This is where the magic happens! Mix everything together until it’s well combined. You want a creamy, cheesy filling that’s bursting with flavor. Don’t be shy—get in there with a spatula or your hands. The more mixed, the better! This filling is the heart of your Cheesy Garlic Chicken Wraps, so make sure it’s just right.
Step 2: Assemble the Wraps
Now, let’s lay out those flour tortillas on a clean surface. Picture them as your canvas! Spoon an even amount of the chicken mixture onto the center of each tortilla. Don’t skimp; you want a generous helping! Next, sprinkle fresh spinach leaves and diced tomatoes on top. These veggies add a refreshing crunch and a pop of color. Feel free to add parsley if you’re using it. This step is all about layering flavors and textures, making your wraps not just tasty but visually appealing too!
Step 3: Roll the Wraps
It’s time to roll! Start by folding in the sides of each tortilla, creating a secure pocket for your filling. Then, begin rolling from the bottom up, tucking the filling in as you go. Make sure to roll tightly; you want these wraps to hold together during cooking. A loose wrap can lead to a messy meal! Once rolled, place the wraps seam-side down on a plate. This will help keep them closed while cooking. You’re almost there—just a few more steps to cheesy goodness!
Step 4: Cook the Wraps
Heat a skillet over medium heat and drizzle in some olive oil. Once the oil is hot, carefully place the wraps seam-side down in the skillet. Cook for about 3-4 minutes until they turn golden brown and crispy. Flip them over and repeat on the other side. The goal is a perfectly toasted wrap that’s warm and melty inside. Keep an eye on them; you want that golden color without burning. The aroma of garlic and cheese will fill your kitchen, making it hard to resist!
Step 5: Serve and Enjoy
Once cooked, remove the wraps from the skillet and let them cool for a minute. This helps the cheese set a bit. Slice each wrap in half for easy eating. Serve them warm, and watch as everyone digs in! These Cheesy Garlic Chicken Wraps are perfect for sharing or enjoying solo. Either way, you’re in for a treat!

Tips for Success
- Use leftover chicken for a quicker prep time; rotisserie chicken works wonders!
- Don’t overfill the wraps; a little goes a long way to keep them secure.
- Experiment with different cheeses like cheddar or pepper jack for a flavor twist.
- For extra crunch, add sliced bell peppers or cucumbers to the filling.
- Keep the skillet at medium heat to avoid burning while ensuring a crispy exterior.
Equipment Needed
- Large mixing bowl: Essential for combining your filling. A sturdy pot can work in a pinch.
- Skillet: A non-stick skillet is ideal for cooking. If you don’t have one, any frying pan will do.
- Spatula: Perfect for mixing and flipping. A wooden spoon can also get the job done.
- Knife and cutting board: For slicing your wraps. A simple plate can serve as a makeshift cutting surface.
Variations
- Spicy Kick: Add diced jalapeños or a sprinkle of red pepper flakes to the filling for a fiery twist.
- Vegetarian Delight: Substitute the chicken with sautéed mushrooms, zucchini, or bell peppers for a hearty vegetarian option.
- Cheese Lovers: Mix in different cheeses like sharp cheddar, pepper jack, or feta for a unique flavor profile.
- Herb Infusion: Incorporate fresh herbs like basil or cilantro into the filling for an aromatic touch.
- Low-Carb Option: Use lettuce leaves instead of tortillas for a lighter, low-carb wrap.
Serving Suggestions
- Fresh Salad: Pair your wraps with a crisp garden salad for a refreshing contrast.
- Dipping Sauce: Serve with ranch or a zesty garlic aioli for extra flavor.
- Drink Pairing: Enjoy with a chilled iced tea or a light white wine.
- Presentation: Arrange wraps on a platter, garnished with parsley for a pop of color.
FAQs about Cheesy Garlic Chicken Wraps
Can I make Cheesy Garlic Chicken Wraps ahead of time?
Absolutely! You can prepare the filling in advance and store it in the fridge for up to two days. Just assemble and cook the wraps when you’re ready to enjoy them. This makes for a quick meal solution on busy nights!
What can I substitute for chicken in this recipe?
If you’re looking for alternatives, cooked shrimp or sautéed vegetables work wonderfully. You can even use canned beans for a vegetarian option. The key is to keep the filling flavorful and satisfying!
How do I store leftovers?
Leftover wraps can be stored in an airtight container in the fridge for up to three days. Reheat them in a skillet for a few minutes to regain that crispy texture. You’ll still get to enjoy the cheesy goodness!
Can I freeze Cheesy Garlic Chicken Wraps?
Yes, you can freeze them! Wrap each one tightly in plastic wrap and place them in a freezer-safe bag. They’ll keep for up to three months. Just thaw in the fridge overnight before reheating.
What sides pair well with these wraps?
These Cheesy Garlic Chicken Wraps go great with a fresh salad, some crispy sweet potato fries, or even a light soup. The options are endless, so feel free to get creative!
Final Thoughts
Creating these Cheesy Garlic Chicken Wraps is more than just cooking; it’s about bringing joy to the table. Each bite is a delightful blend of flavors and textures that can turn an ordinary meal into a memorable experience. Whether you’re sharing them with family or enjoying a quiet night in, these wraps are sure to satisfy. Plus, their versatility means you can adapt them to suit any taste. So, roll up your sleeves, gather your ingredients, and let the magic happen in your kitchen. You’ll be amazed at how something so simple can bring so much happiness!
Cheesy Garlic Chicken Wraps: Delight in Every Bite!
Ingredients
Method
- In a large mixing bowl, combine the shredded chicken, mozzarella cheese, cream cheese, sour cream, minced garlic, garlic powder, onion powder, salt, and black pepper. Mix until well combined.
- Lay out the flour tortillas on a clean surface. Evenly distribute the chicken mixture onto the center of each tortilla.
- Top the chicken mixture with fresh spinach leaves, diced tomatoes, and chopped parsley if using.
- Fold in the sides of each tortilla and then roll it up tightly from the bottom to the top to form a wrap.
- Heat a skillet over medium heat and add a drizzle of olive oil. Place the wraps seam-side down in the skillet and cook for about 3-4 minutes until golden brown. Flip and cook the other side for another 3-4 minutes.
- Remove from the skillet and let cool for a minute before slicing in half. Serve warm.
Nutrition
Notes
- For a spicy kick, add diced jalapeños or a sprinkle of red pepper flakes to the chicken mixture.
- Substitute the chicken with cooked shrimp or sautéed vegetables for a different protein option or a vegetarian version.