


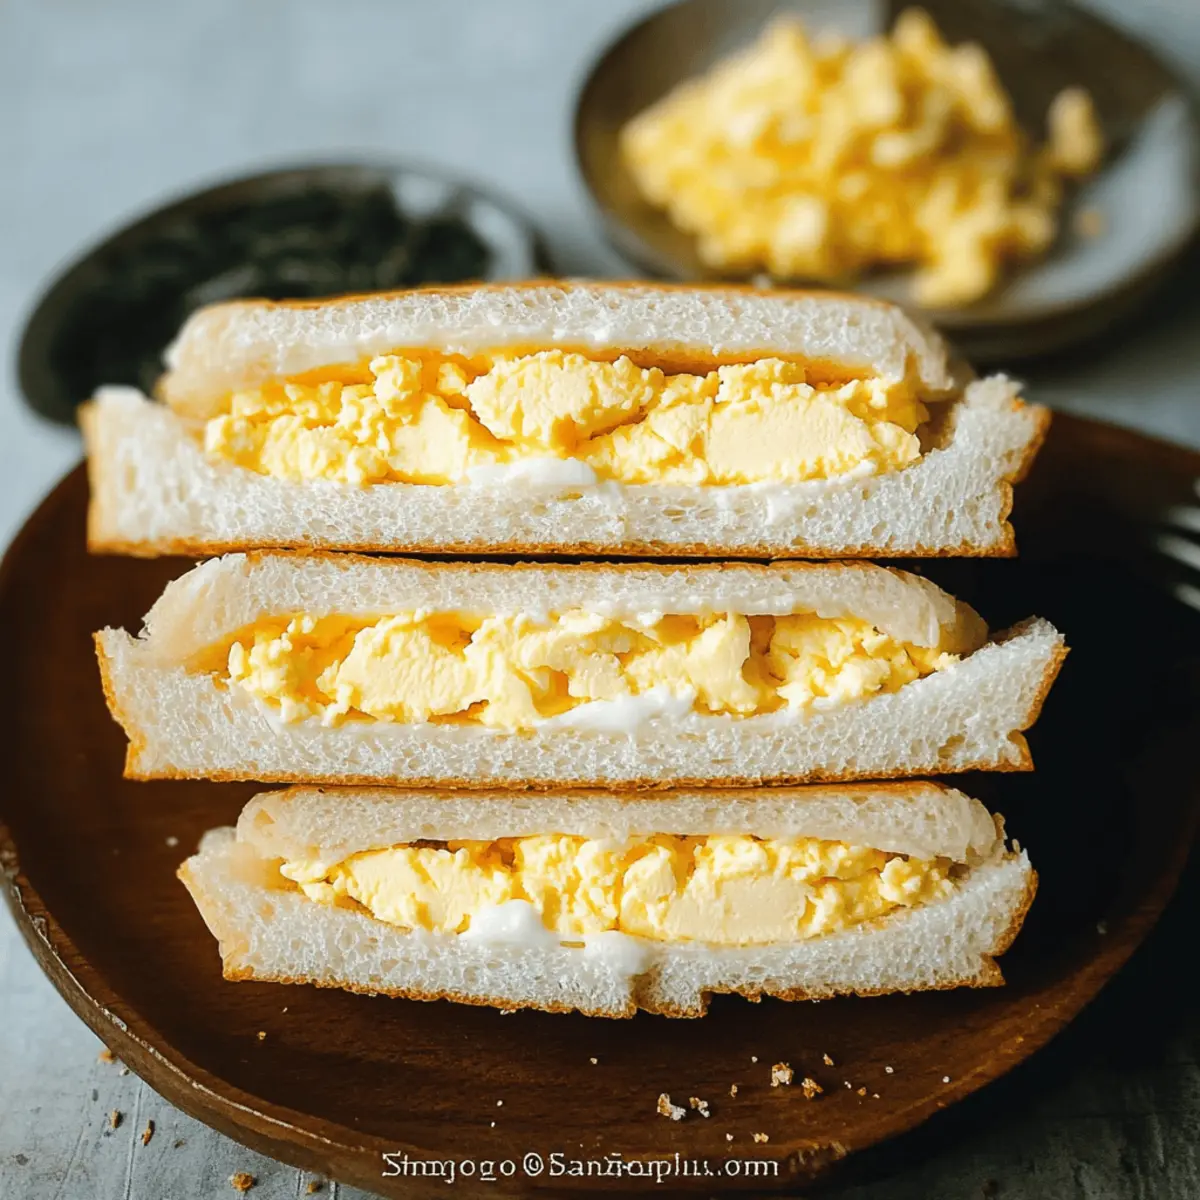
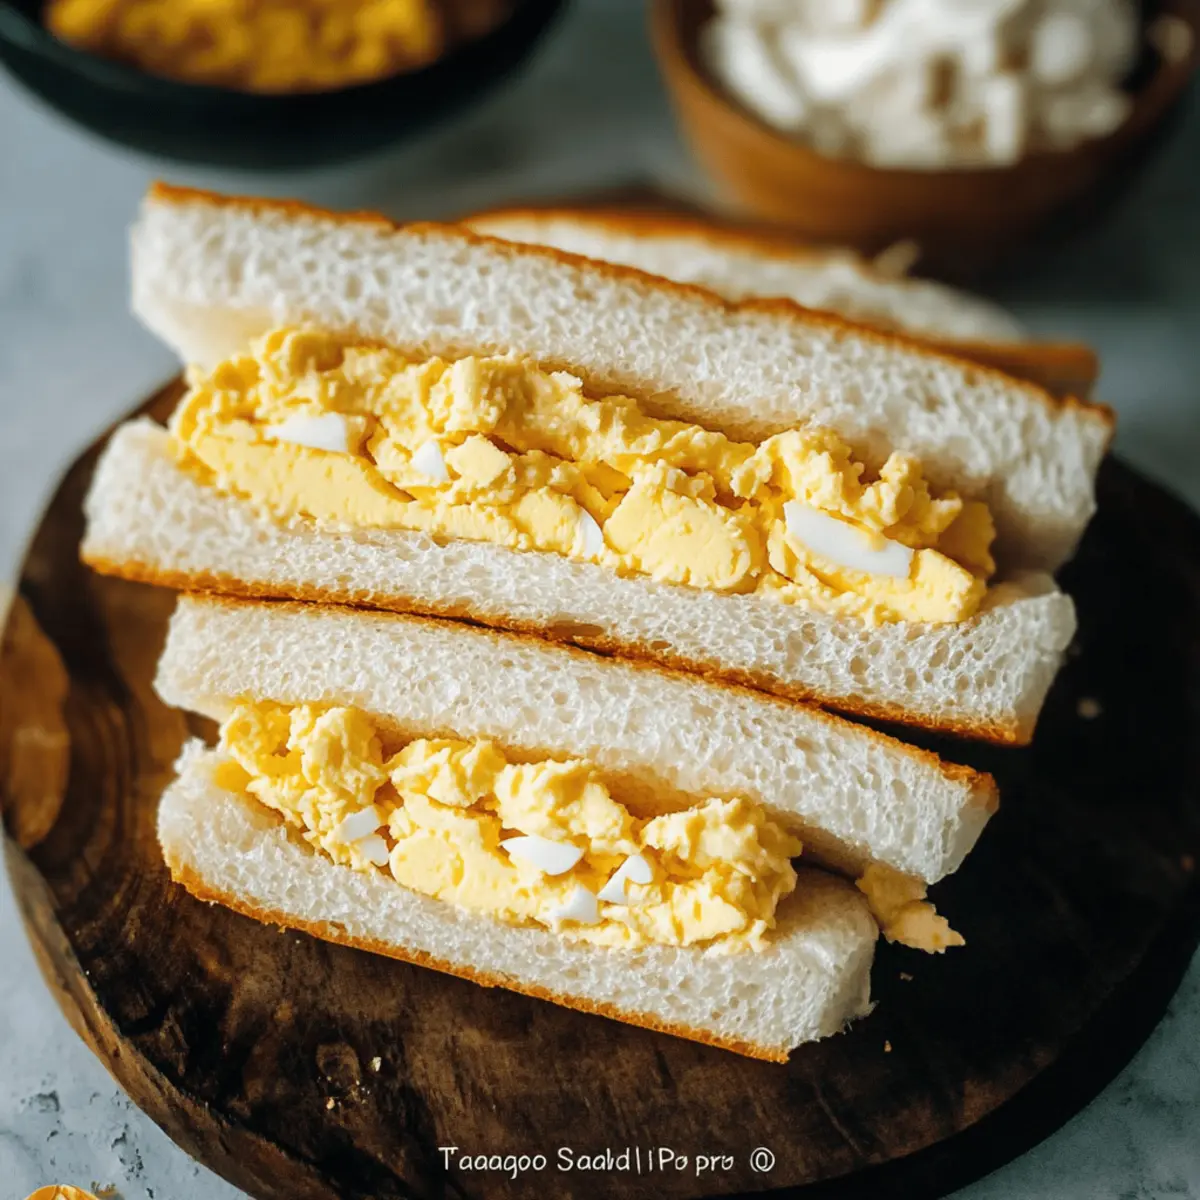
With a light crunch of bread and an explosion of creamy goodness, the Japanese Egg Sandwich, or Tamago Sando, is a delightful treat that takes me straight to the heart of Japan. This quick meal showcases high-quality eggs transformed into a rich, velvety egg salad, lovingly cradled between slices of fluffy Japanese milk bread. What makes this recipe irresistible is its charming simplicity and the ability to cater to both kids and adults, making it perfect for lunchboxes or a cozy snack at home. Not only will you be whipping up a dish that’s bursting with authentic flavors, but you’ll also discover just how rewarding it is to create something so comforting yet sophisticated in your own kitchen. Curious how to bring this Japanese classic to life? Let’s dive into the details!
Why is Tamago Sando So Irresistible?
Authentic Flavors: The unique combination of high-quality eggs and Japanese mayonnaise creates a taste that transports you straight to Tokyo with every bite.
Quick Prep Time: Ready in under 30 minutes, making it perfect for busy weekdays or last-minute meals.
Versatile Enjoyment: Whether you choose soft-boiled or hard-boiled eggs, this recipe allows you to customize your egg salad with ease, catering to every preference.
Crowd Pleaser: Ideal for both kids and adults, it’s a recipe that everyone will adore—perfect for lunchboxes or an afternoon snack! For more delightful sandwich ideas, check out our Honey Banana Sandwich or the Avocado Melt Sandwich.
Delightful Textures: The fluffy Japanese milk bread combined with a creamy filling is a match made in heaven, making each bite a pleasurable experience.
Japanese Egg Sandwich Ingredients
• To recreate the creamy and fluffy delight of the Japanese Egg Sandwich, here’s everything you need to gather!
For the Egg Salad
- 6 large Pete and Gerry’s Organic Eggs – This high-quality egg ensures a rich flavor; use soft-boiled for a creamier texture.
- 1/4 teaspoon sugar – Balances the flavors beautifully without needing a substitute.
- 1/4 teaspoon salt – Enhances the taste; add this only after tasting the mayo for perfect flavor.
- 1/4 teaspoon ground black pepper – A touch of mild spiciness; adjust it to your liking.
- 1 to 2 teaspoons milk or plant milk (optional) – Adds moisture, prefer it in hard-boiled versions; omit if using soft-boiled eggs.
- 4 tablespoons Japanese mayonnaise – This creamier alternative elevates the flavor; if unavailable, American mayo works in a pinch.
For the Sandwich
- 4 slices Japanese milk bread – This soft, slightly sweet bread is essential; high-quality white bread can work as an alternative.
- 2 tablespoons unsalted butter, softened – Adds richness and binds the sandwich together; no substitutions recommended.
For Garnish (optional)
- Chives, sliced – Freshness and visual appeal included; green onions can replace chives if desired.
With these ingredients on hand, you’ll be well on your way to savoring the delightful experience of making an authentic Japanese Egg Sandwich!
Step‑by‑Step Instructions for Japanese Egg Sandwich
Step 1: Prepare Ice Bath
Begin by filling a large bowl with ice water and setting it aside; this will quickly cool the eggs after boiling. Preparing the ice bath ensures that your Japanese Egg Sandwich features perfectly soft-boiled or hard-boiled eggs.
Step 2: Cook Eggs
In a medium pot, bring water to a gentle boil over medium heat. Carefully lower the six organic eggs into the boiling water using a slotted spoon. For soft-boiled eggs, let them cook for 7 minutes, or for hard-boiled, aim for 10 minutes. Once the time is up, turn off the heat and allow the eggs to sit in the hot water for an additional minute.
Step 3: Chill Eggs
Using a slotted spoon, transfer the cooked eggs into the prepared ice bath immediately. Let them chill for about 2 minutes to stop the cooking process. This step is crucial for achieving the ideal texture for your Japanese Egg Sandwich. Once they are cool enough to handle, gently tap the eggs to crack the shells and peel them.
Step 4: Make Egg Salad
In a mixing bowl, mash the peeled eggs with a fork until you have a chunky, yet cohesive texture. Add in the sugar, salt, ground black pepper, and Japanese mayonnaise. If desired, mix in 1 to 2 teaspoons of milk for extra creaminess. Stir everything together until well combined; taste and adjust the seasoning according to your preferences.
Step 5: Assemble Sandwiches
Take the slices of Japanese milk bread and generously spread softened butter on one side of each slice. Place a heaping portion of the egg salad between two slices, buttered side inwards. For a neat presentation, trim off the crusts. If you wish, sprinkle sliced chives on top of the egg salad before adding the second slice of bread.
Step 6: Serve
Finally, slice each assembled Japanese Egg Sandwich in half diagonally for easy handling and visual appeal. Serve immediately to enjoy the delightful combination of creamy filling and fluffy bread. This comforting treat will surely be a hit among family and friends!

Japanese Egg Sandwich Variations
Feel free to play around with this Japanese Egg Sandwich recipe and let your creativity shine!
- Dairy-Free: Substitute milk with plant-based milk for a dairy-free option while maintaining moisture.
- Spicy Kick: Add a pinch of chili flakes or diced jalapeños to the egg salad for a flavorful heat boost.
- Herb Infusion: Experiment with fresh herbs like dill or parsley instead of chives for a garden-fresh flavor.
- Crunchy Texture: Incorporate finely diced cucumber or radishes for an extra crunch that contrasts beautifully with the creamy egg salad.
- Sriracha Swirl: Mix in a tablespoon of sriracha or your favorite hot sauce for a tangy and spicy twist that will excite your palate.
- Avocado Enhancement: Layer thin slices of avocado inside the sandwich for added creaminess and healthy fats. You might also enjoy our delightful Avocado Melt Sandwich.
- Savory Depth: Introduce finely chopped olives or capers to enhance the flavors with a salty, briny twist.
- Gourmet Variation: Swap the Japanese mayonnaise for flavored aioli to elevate this simple sandwich into a gourmet delight.
With these variations, you can make this beloved dish your own while indulging in the comforting flavors of a classic tamago sando!
Expert Tips for Japanese Egg Sandwich
-
Perfectly Boiled Eggs: For soft-boiled eggs, remember to chill quickly in an ice bath after boiling to stop the cooking process, ensuring a creamy texture.
-
Choose Quality Mayo: Authentic Japanese mayonnaise enhances the flavor significantly. If you use American mayo instead, don’t expect the same richness.
-
Adjust Seasoning Wisely: Add salt after mixing the egg salad and tasting it, preventing over-salting from the onset and allowing you to perfect the flavor.
-
Sandwich Storage: Keep assembled Japanese Egg Sandwiches wrapped in plastic wrap in an airtight container for up to 2 days, especially if using milk bread.
-
Butter Generously: Apply softened butter on the bread for a richer taste and to help bind the sandwich together, enhancing the overall experience.
Make Ahead Options
These Japanese Egg Sandwiches are perfect for busy home cooks looking to save time! You can prepare the egg salad filling up to 24 hours in advance. Simply boil and cool the eggs, then mash them with the other ingredients (sugar, salt, pepper, mayonnaise) and store the mixture in an airtight container in the refrigerator. To maintain quality, keep the egg salad separate from the bread until you’re ready to serve. Assemble the sandwiches just before mealtime, spreading butter on the bread and adding the egg salad for that fresh, fluffy taste. This way, you’ll have a delightful lunch or snack ready to go with minimal effort!
What to Serve with Japanese Egg Sandwich (Tamago Sando)?
Elevate your delightful Japanese egg sandwich experience by pairing it with complementary sides that enhance the overall meal.
-
Crispy Potato Chips: The crunch of chips balances the sandwich’s creamy filling, providing a satisfying contrast with every bite. Their salty flavor makes for a delightful indulgence.
-
Fresh Cucumber Salad: A refreshing side packed with hydrating elements and a touch of tanginess, this salad brightens up the meal and adds crunch.
-
Miso Soup: This warm, soothing soup complements the sandwich perfectly, providing umami flavors that resonate beautifully with the egg filling.
-
Fruity Side Dish: Serve with a medley of seasonal fruit like sliced melons or berries for a sweet touch. The natural sweetness of the fruit pairs well with the savory egg salad.
-
Pickled Vegetables: A side of tangy pickles offers a delightful contrast to the rich flavors of the sandwich, cleansing the palate and adding zest.
-
Iced Green Tea: Refreshing and light, this beverage enhances your meal with subtle flavors while keeping you cool and invigorated.
-
Matcha Latte: If you’re looking for warmth, the creamy texture of a matcha latte brings a unique flavor profile, harmonizing with the sandwich’s creaminess.
-
Mochi Dessert: For a sweet finish, a piece of mochi provides a chewy texture and a burst of sweetness, rounding out this refined meal experience.
Storage Tips for Japanese Egg Sandwich
Fridge: Keep assembled Japanese Egg Sandwiches wrapped in plastic wrap or in an airtight container for up to 2 days. This helps maintain freshness and prevents the bread from becoming soggy.
Freezer: While not recommended, you can freeze the egg salad separately in an airtight container for up to 1 month. Thaw in the fridge before assembling your sandwiches.
Reheating: If you prefer to warm the egg salad, do so gently in the microwave, stirring occasionally, but be careful not to overheat as this can change the texture.
Enjoy Freshly Made: For the best taste and texture, always aim to enjoy your tamago sando fresh, ideally within 1 day of assembly.
Japanese Egg Sandwich (Tamago Sando) Recipe FAQs
How do I select the right eggs for this recipe?
Absolutely! For the best flavor and texture in your Japanese Egg Sandwich, I recommend using high-quality organic eggs, like Pete and Gerry’s. Soft-boiled eggs yield a creamier salad, while hard-boiled eggs are firmer. Ensure there are no dark spots or cracks on the eggs before you purchase them.
What is the best way to store leftovers?
Very good question! To keep your assembled Japanese Egg Sandwiches fresh, wrap them tightly in plastic wrap or place them in an airtight container. They will stay delicious for up to 2 days in the fridge. Just remember that sandwiches made with milk bread tend to have a shorter shelf life, so enjoy them as soon as possible!
Can I freeze the egg salad for later use?
Yes, you can! While it’s best to assemble the Japanese Egg Sandwich fresh, you can freeze the egg salad separately. Place it in an airtight container and store it in the freezer for up to 1 month. When you’re ready to enjoy it, simply thaw it in the fridge overnight before putting your sandwich together.
What if my egg salad is too dry?
If you find that your egg salad is on the dry side, don’t worry! You can easily adjust the consistency. Just mix in an extra teaspoon of Japanese mayonnaise or a splash of milk to moisten it up. If you’re using hard-boiled eggs, gently mashing them with a fork will also help create a creamier texture.
Are there any dietary considerations I should be aware of?
Absolutely! If you’re making this Japanese Egg Sandwich for a group, be mindful of allergies. The recipe includes eggs and mayonnaise, both of which are common allergens. For those with egg allergies, consider using egg substitutes like silken tofu blended into a smooth consistency, although it will change the flavor profile significantly.
How can I enhance the flavor of my egg salad?
The more the merrier! To amp up the flavors in your egg salad, consider mixing in some finely chopped cucumber for a refreshing crunch or a pinch of chili flakes for some heat. Adding fresh herbs like dill or parsley can also elevate your Japanese Egg Sandwich to the next level, making it a delightful treat for everyone.

Japanese Egg Sandwich Bliss – Creamy, Fluffy, Irresistible!
Ingredients
Equipment
Method
- Prepare Ice Bath: Fill a large bowl with ice water and set it aside.
- Cook Eggs: Boil water in a pot. Lower in the eggs, cooking for 7 minutes for soft-boiled or 10 minutes for hard-boiled.
- Chill Eggs: Transfer cooked eggs to the ice bath for 2 minutes. Crack and peel the eggs once cool.
- Make Egg Salad: Mash peeled eggs, mix in sugar, salt, pepper, and mayo. Adjust seasoning as needed.
- Assemble Sandwiches: Spread softened butter on bread, add egg salad, and cover with another slice. Trim crusts if desired.
- Serve: Slice sandwiches diagonally and serve immediately.