


As I watched my little one carefully arrange the kitchen table with holiday decorations, I realized that the magic of the season isn’t just in the sights, but also in the flavors we share. Enter the delightful Mini Poinsettia Cakes—these adorable, bite-sized chocolate pastries are perfect for bringing festive cheer to any gathering. With their vibrant presentation and easy preparation, these holiday desserts make it a breeze to impress guests without hours of fuss. Not only will they satisfy your sweet tooth, but they also serve as a playful way to involve kids in the cooking process. Ready to turn your kitchen into a winter wonderland? Let’s dive into these delightful Mini Poinsettia Cakes and create some sweet memories together!
Why are Mini Poinsettia Cakes a must-try?
Festive Presentation: The vibrant colors and charming shapes make these treats a stunning centerpiece for any holiday gathering.
Kid-Friendly Fun: Involve your little helpers! Kids will love decorating their own Mini Poinsettia Cakes while honing essential baking skills.
Quick and Easy: With minimal fuss, you can whip up a batch in no time, perfect for those busy holiday schedules.
Versatile Flavors: Feel free to customize with different fillings or coatings, such as the chocolate cake pop filling or even the delicious Nutella Pancakes Blend.
Crowd-Pleasing Treats: These bite-sized desserts are perfect for sharing, guaranteed to impress family and friends at festive gatherings.
Get ready to delight your taste buds and wow your guests with these adorable Mini Poinsettia Cakes!
Mini Poinsettia Cakes Ingredients
For the Candy Coating
• Orange Candy Coating – Adds sweetness and festive color; alternatively, use colored chocolate melts if unavailable.
For the Cakes
• Mini Flower Pot Chocolate Mold – Essential for shaping the cakes; specialized molds provide the best results, but silicone molds may create similar shapes.
• Brownies or Cake Pop Filling – Acts as the cake base; crumbled brownies give a rich texture, while the chocolate cake pop mix is a lighter option.
For the Decoration
• Royal Icing Poinsettias – Provides decorative elements that enhance visual appeal; consider making homemade royal icing flowers in advance for authenticity.
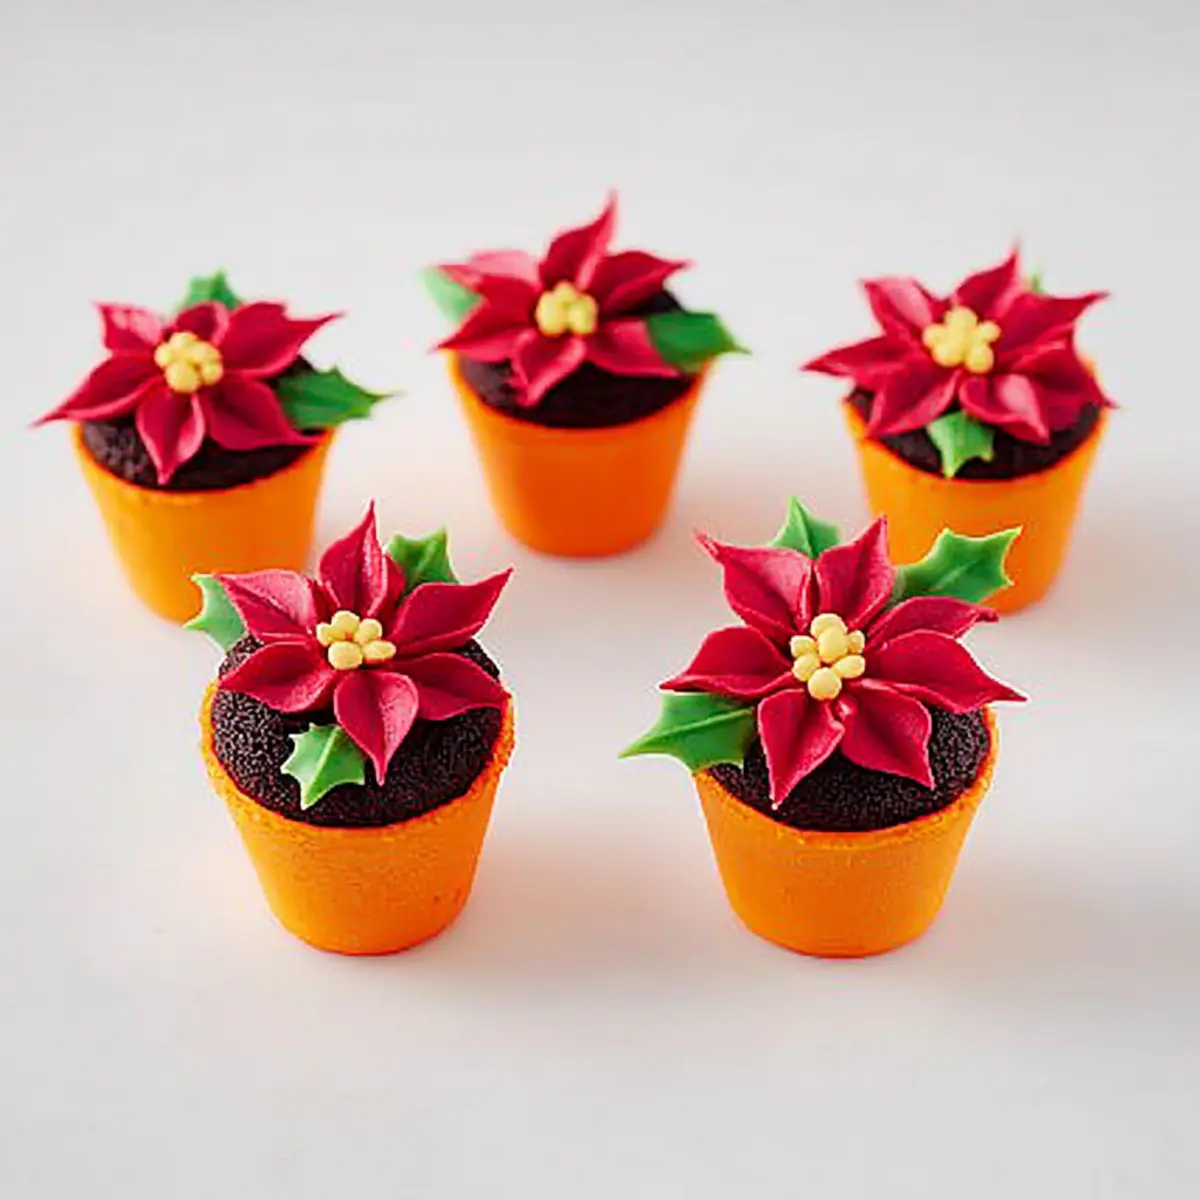
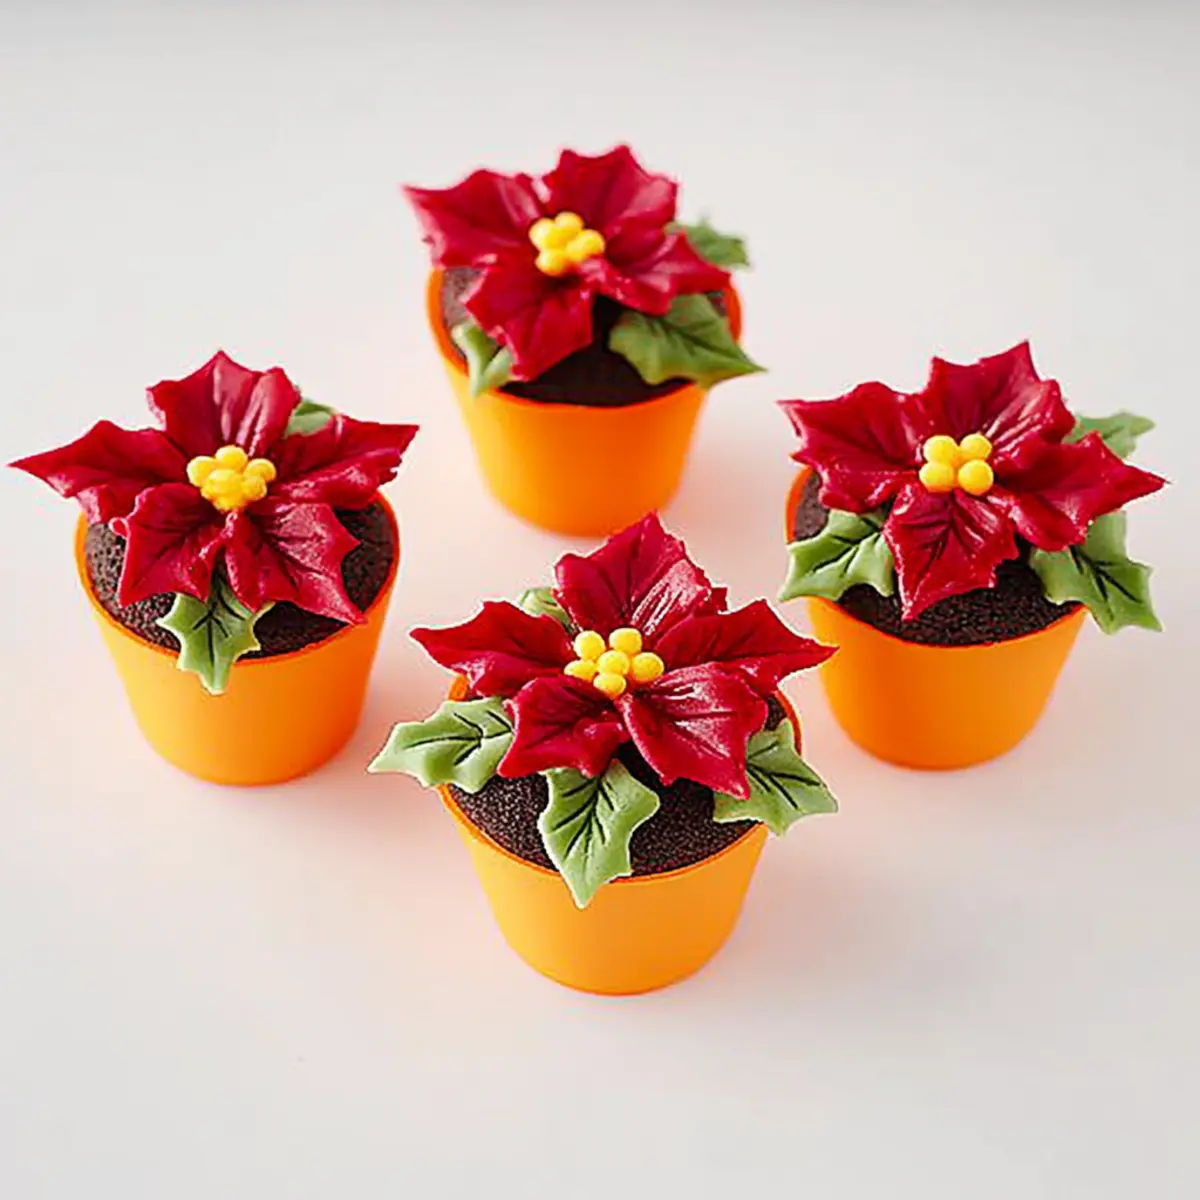
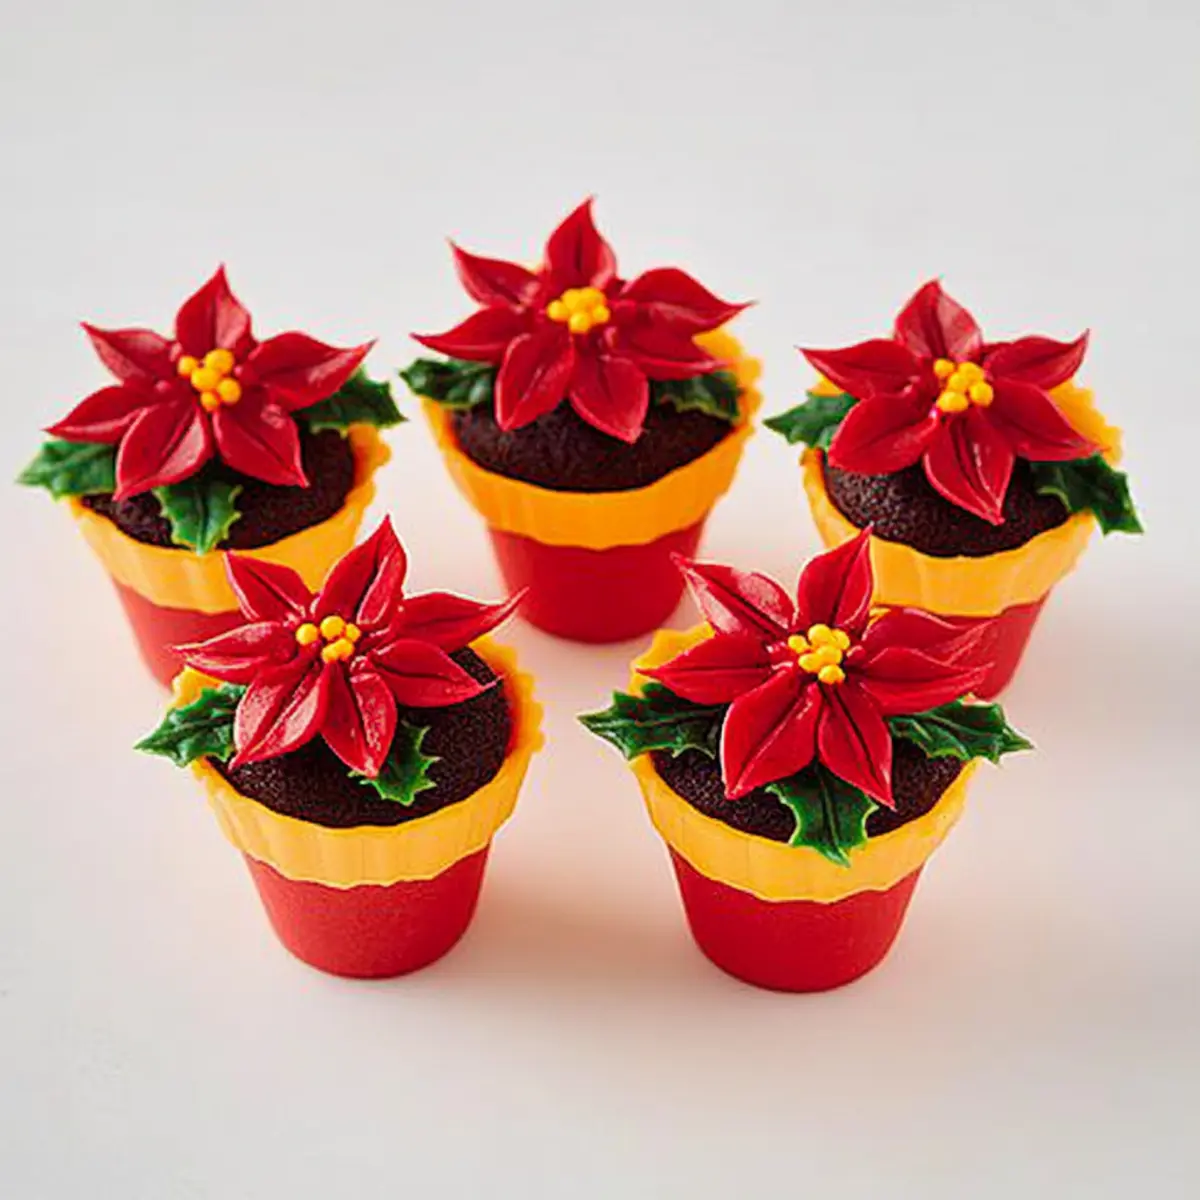
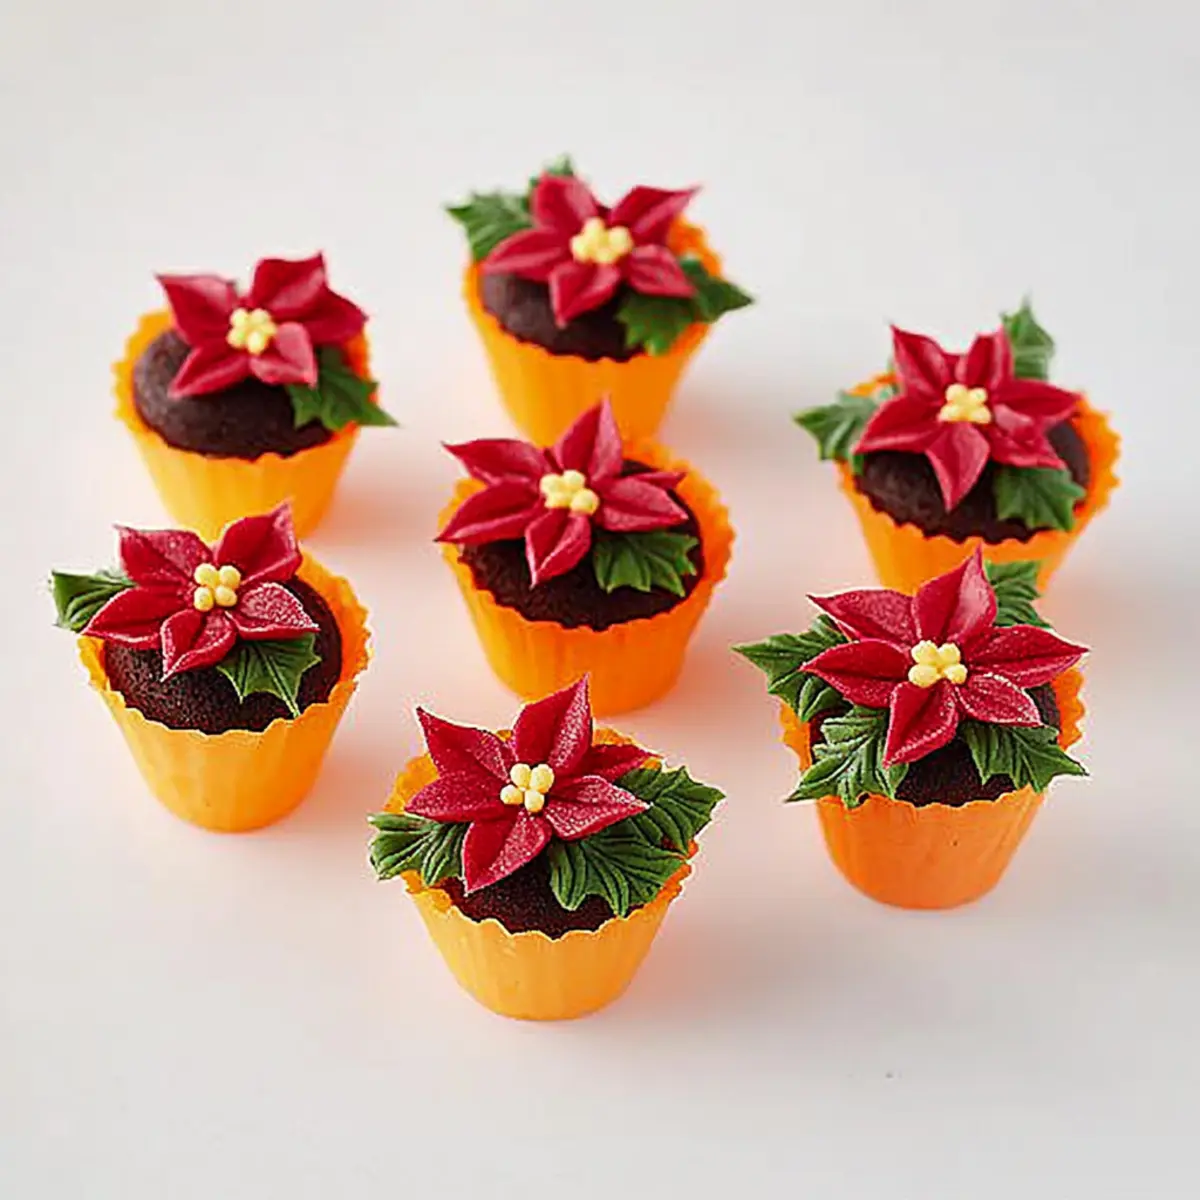
• Candy Foils – Used to wrap the pots for presentation; choose festive colors to match your holiday theme.
Whip up these delightful Mini Poinsettia Cakes and sprinkle your festivities with sweetness!
Step‑by‑Step Instructions for Mini Poinsettia Cakes
Step 1: Prepare Brownie Base
Begin by finely crumbling your brownies in a large mixing bowl until they reach a sand-like texture, allowing for easy molding. Alternatively, prepare your chocolate cake pop filling, mixing thoroughly until smooth. This will be the delicious base for your Mini Poinsettia Cakes and ensures a fudgy center that complements the festive exterior.
Step 2: Melt Candy Coating
In a microwave-safe bowl, add the orange candy coating and heat it at half power in 30-second intervals. Stir after each interval until the mixture is smooth and completely melted, approximately 1-2 minutes total. Be careful not to overheat; the candy should be glossy and fluid, ready for coating the molds.
Step 3: Coat Molds
Using a small paintbrush, apply a layer of the melted orange candy coating to the inside of the mini flower pot mold, creating a shell about 1/8 inch thick. Make sure to cover every corner for a uniform look. Once coated, place the molds in the refrigerator for about 5 minutes, allowing the candy to set firmly.
Step 4: Reinforce Coating
After chilling, carefully check for any thin spots in the candy coating. If you notice any areas needing reinforcement, use more melted candy to fill in these spots. Return the molds to the refrigerator for another 5 minutes to solidify the additional layer, ensuring a sturdy shell for your Mini Poinsettia Cakes.
Step 5: Fill Molds
Once the coating is set, gently press the brownie mixture or cake pop filling into the coated molds. Pack it down firmly to avoid air pockets, creating a solid base. Place the filled molds in the freezer for about 15 minutes, allowing them to firm up for easier removal and perfect shaping.
Step 6: Prepare Decoration
While the filled molds are freezing, prepare your decorations. Take your royal icing poinsettias and, using a bit of melted candy coating, dab it on the back of each icing flower. This will help them adhere beautifully to the top of your Mini Poinsettia Cakes once they’re ready.
Step 7: Final Presentation
Remove the filled molds from the freezer and gently pop out the Mini Poinsettia Cakes, ensuring you maintain their shape. Cut squares of candy foil to fit around each pot, then carefully wrap the foil around, tucking in the edges. Place each pot into the foil for an exquisite and festive presentation that’s sure to impress your guests!
Make Ahead Options
These Mini Poinsettia Cakes are perfect for holiday meal prep! You can prepare the chocolate candy coating and molds up to 24 hours in advance; simply coat the molds and refrigerate them until you’re ready to fill. The brownie base or cake pop filling can also be made and stored in the refrigerator for up to 3 days—just keep it tightly covered to maintain freshness and prevent drying out. When you’re ready to serve, simply fill the prepared molds, freeze for 15 minutes to set, and then add your beautiful royal icing flowers. With a little bit of advance prep, you’ll be able to impress your guests with these delightful treats with minimal last-minute effort!
How to Store and Freeze Mini Poinsettia Cakes
Room Temperature: Keep Mini Poinsettia Cakes in a cool, dry place for up to 3 days to maintain their freshness.
Fridge: If you need to store them longer, place the cakes in an airtight container in the fridge for up to a week. This helps retain their moisture and flavors.
Freezer: For extended storage, freeze unwrapped Mini Poinsettia Cakes in an airtight container for up to 2 months. Thaw in the refrigerator overnight before serving.
Reheating: To enjoy a warm treat, reheat in the microwave for 10-15 seconds on low power. This softens the candy coating while preserving the cake’s festive charm.
Expert Tips for Mini Poinsettia Cakes
-
Crumble Wisely: Ensure the brownie mixture is finely crumbled to avoid clumping. Large chunks can make it difficult to mold your Mini Poinsettia Cakes perfectly.
-
Melt with Care: Slowly melt the candy coating at half power to prevent burning. Overheating can ruin the texture and result in a grainy finish.
-
Check the Coating: After the initial set, inspect your candy coating for any thin spots. Reinforcing these areas will help maintain the integrity of your Mini Poinsettia Cakes.
-
Dab Smartly: When attaching royal icing flowers, use a small amount of melted candy on the back. This will help them stick and enhance your cakes’ overall aesthetic.
-
Wrap Neatly: When presenting, cut candy foil squares to size before wrapping. A clean presentation adds to the festive flair and charm of your treats!
What to Serve with Mini Poinsettia Cakes
These delightful treats will shine even brighter when paired with complementary sides, enticing your loved ones to indulge in every flavorful bite.
-
Festive Fruit Salad: A mix of seasonal fruits adds a refreshing and colorful contrast, enhancing the sweetness of the cakes.
-
Peppermint Hot Chocolate: This warm drink brings a cozy, festive flair, perfect for sipping alongside your sweet treats. It’s a comforting balance to the rich flavors!
-
Vanilla Ice Cream: A scoop of creamy vanilla ice cream provides a delightful contrast, melting beautifully against the fudgy interior of the cakes.
-
Chocolate Fondue: Try serving Mini Poinsettia Cakes with a side of chocolate fondue. Guests can dip their cakes, adding extra indulgence to the experience—the perfect way to get everyone interacting!
-
Gingerbread Cookies: These iconic holiday treats add a spicy crunch that harmonizes well with the chocolatey sweetness of the cakes, rounding out your dessert table beautifully.
-
Eggnog: This classic holiday drink’s creamy, spiced flavor pairs remarkably with chocolate desserts, enhancing the indulgent experience.
-
Mulled Wine: A warm glass of spiced mulled wine elevates the festive spirit and provides a cozy touch against the delicately sweet flavors of your Mini Poinsettia Cakes.
Mini Poinsettia Cakes Variations
Feel free to let your creativity shine and customize these delightful treats with these fun twists!
-
Cookie Base: Substitute brownies with crushed cookies, like Oreos, for a sweet and crunchy texture. This change adds a unique flavor that surprises every bite!
-
Colorful Coatings: Experiment with seasonal colors of candy coating, such as red or green, to fit your holiday theme. Your Mini Poinsettia Cakes can match any festive occasion!
-
Minty Freshness: Incorporate peppermint extract into the cake base for a refreshing holiday twist. It brings a hint of coolness that perfectly complements the sweetness.
-
Fruit Flavors: Add a tablespoon of orange zest or lemon juice to your filling for added brightness. This fruity note enhances the moist chocolate flavor with a zesty kick.
-
Spicy Heat: Include a pinch of cayenne pepper with the cocoa powder for a spicy surprise. This unexpected twist on the classic will leave your guests buzzing about the flavors!
-
Nutty Crunch: Mix in crushed nuts, like walnuts or pecans, into the brownie filling for a delightful crunch. This variation offers a heartier texture that elevates your Mini Poinsettia Cakes.
-
Chocolate Indulgence: Swap the candy coating for dark chocolate ganache for an extra indulgent treat. The rich chocolate pairing will make these cakes irresistible and gourmet!
-
Kids’ Favorites: Let the kids decorate their cakes using colorful sprinkles or edible glitter. This not only makes it fun for them but also adds a whimsical touch to your presentation.
For more sweet inspirations, consider trying your hand at Chocolate Fudge Cupcakes or the delightful Surprise Inside Cakes. Happy baking!
Mini Poinsettia Cakes Recipe FAQs
What type of brownie works best for Mini Poinsettia Cakes?
I recommend using fudgy brownies because they create a moist and rich base for your Mini Poinsettia Cakes. If you prefer a lighter texture, chocolate cake pop mix is a great alternative. Just ensure the brownies are finely crumbled to help mold the cake easily.
How should I store Mini Poinsettia Cakes to keep them fresh?
For keeping your Mini Poinsettia Cakes fresh, you can store them at room temperature in a cool, dry place for up to 3 days. If you need them to last longer, place them in an airtight container in the fridge, where they will stay fresh for up to a week.
Can I freeze Mini Poinsettia Cakes, and how do I do it?
Absolutely! To freeze your Mini Poinsettia Cakes, set them in an airtight container without any wrapping and pop them in the freezer for up to 2 months. Before serving, thaw them in the refrigerator overnight, allowing the flavors to come back without losing any moisture.
What if my candy coating is too thick or too thin?
No worries! If your candy coating is too thick, simply microwave it for a few seconds at low power, stirring frequently until it reaches a smooth, fluid consistency. For thin spots in your mold, you can reinforce the coating by applying additional melted candy in those areas, then refrigerating for a few minutes to set.
Are there any dietary considerations I should keep in mind?
Yes, if you’re concerned about allergies, be sure to check your candy melts and brownies for common allergens like gluten, dairy, and nuts. For a kid-friendly treat, be cautious with small decorations that may pose a choking hazard for younger children. Always adjust your ingredients based on the dietary needs of your guests.
Delicious Mini Poinsettia Cakes: Festive Chocolate Treats
Ingredients
Equipment
Method
- Begin by finely crumbling your brownies in a large mixing bowl until they reach a sand-like texture, or prepare chocolate cake pop filling until smooth.
- In a microwave-safe bowl, add the orange candy coating and heat it at half power in 30-second intervals, stirring until smooth and glossy.
- Using a small paintbrush, apply a layer of the melted orange candy coating to the inside of the mini flower pot mold, then refrigerate for 5 minutes.
- Check for thin spots in the coating and reinforce if necessary, then chill again for 5 minutes.
- Gently press the brownie mixture or cake pop filling into the molds, packing firmly to avoid air pockets, then freeze for 15 minutes.
- Prepare your decorations by attaching royal icing poinsettias with a bit of melted candy coating on the back.
- Remove the molds from the freezer, pop out the cakes, wrap with candy foil squares for presentation.