Get my cookbooks

Cowboy Butter Chicken Linguine Recipe is a must-try!

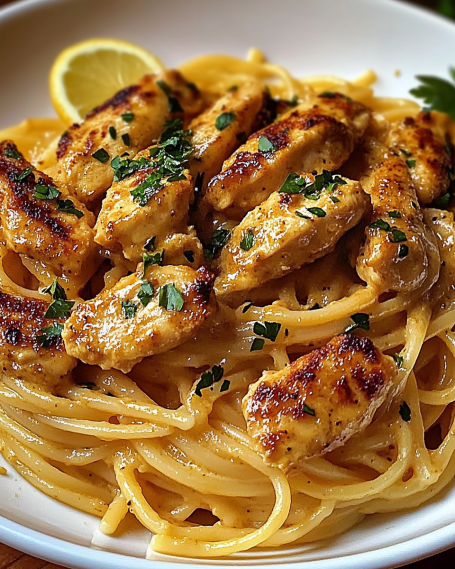
Step-by-Step Preparation of Cowboy Butter Chicken Linguine Recipe

Step 1: Preparing the Chicken

To kick off your Cowboy Butter Chicken Linguine recipe, start by preparing the chicken. First, take your pound of boneless, skinless chicken breasts and cut them into bite-sized pieces. This helps them cook evenly and makes for easy eating. Next, season the chicken with one teaspoon of salt and half a teaspoon of black pepper. This simple seasoning enhances the chicken’s flavor. Now, heat one tablespoon of olive oil in a large skillet over medium-high heat. Once the oil is hot, add the seasoned chicken pieces. Cook them for about 5 to 7 minutes, or until they are browned and cooked through. Once done, remove the chicken from the skillet and set it aside. This step is crucial as it builds the base flavor for your dish.

Step 2: Making the Cowboy Butter Sauce

Now, let’s move on to the Cowboy Butter sauce. In the same skillet, reduce the heat to medium and add two tablespoons of unsalted butter. As the butter melts, it will pick up the delicious flavors left from the chicken. Once melted, add four cloves of minced garlic, one teaspoon of smoked paprika, one teaspoon of dried oregano, and half a teaspoon of red pepper flakes. Sauté this mixture for about 1 to 2 minutes until it becomes fragrant. The aroma will fill your kitchen, making it hard to resist! This sauce is what gives the dish its unique cowboy flair.

Step 3: Cooking the Linguine

While the sauce is simmering, it’s time to cook the linguine. In a large pot, bring salted water to a boil. Add 8 ounces of linguine pasta and cook according to the package instructions until it reaches an al dente texture. This usually takes around 8 to 10 minutes. Once cooked, drain the pasta, but remember to reserve half a cup of the pasta water. This starchy water will help bind the sauce and pasta together later. Set the drained linguine aside while you finish the sauce.

Step 4: Combining Ingredients

Now, it’s time to bring everything together! Return the cooked chicken to the skillet with the Cowboy Butter sauce. Pour in the reserved pasta water, the remaining two tablespoons of butter, and the juice of one lemon. Stir everything together, allowing the flavors to meld for an additional 2 to 3 minutes. This step is essential as it ensures the chicken is coated in the rich sauce. Then, add the cooked linguine to the skillet. Toss everything together until the pasta is well coated. If the mixture seems a bit dry, don’t hesitate to add a little more reserved pasta water. This will help create a luscious, creamy texture.

Step 5: Final Touches and Serving

Finally, remove the skillet from heat. Sprinkle half a cup of grated Parmesan cheese over the top, along with the remaining chopped parsley. This adds a fresh touch and a burst of flavor. Give it one last gentle toss to combine everything. Your Cowboy Butter Chicken Linguine is now ready to serve! Plate it up and enjoy this delightful dish that’s sure to impress your family and friends.

Variations of Cowboy Butter Chicken Linguine Recipe

Vegetarian Alternatives

If you’re looking for a vegetarian twist on the Cowboy Butter Chicken Linguine recipe, you’re in luck! You can easily swap out the chicken for hearty vegetables or plant-based proteins. Consider using mushrooms, zucchini, or bell peppers. These veggies not only add flavor but also a colorful presentation. For protein, try chickpeas or tofu. Simply sauté them in the same way you would the chicken, seasoning them with salt and pepper. The Cowboy Butter sauce will still shine through, making this dish just as delicious without the meat. You can also add spinach or kale during the last few minutes of cooking for an extra nutrient boost. This variation is perfect for those who want to enjoy the rich flavors while keeping it plant-based.

Spicy Twist on Cowboy Butter Chicken Linguine

If you love a bit of heat, why not spice things up? To create a spicy twist on the Cowboy Butter Chicken Linguine, increase the amount of red pepper flakes in the sauce. You can also add diced jalapeños or even a splash of hot sauce for an extra kick. Another great option is to incorporate spicy sausage or shrimp, which pairs wonderfully with the Cowboy Butter sauce. Just remember to adjust the cooking time accordingly. This fiery version will tantalize your taste buds and add an exciting layer to the classic recipe. Serve it with a side of crusty bread to soak up all that delicious sauce!

Cooking Note for Cowboy Butter Chicken Linguine Recipe

When preparing the Cowboy Butter Chicken Linguine recipe, a few cooking notes can enhance your experience. First, always ensure your ingredients are fresh. Fresh garlic, herbs, and chicken will significantly improve the dish’s flavor. Additionally, when cooking the chicken, avoid overcrowding the skillet. This allows the chicken to brown nicely instead of steaming. If your skillet is too crowded, consider cooking the chicken in batches.

Another tip is to keep an eye on the heat. Cooking over medium-high heat is essential for browning the chicken, but once you add the butter and garlic, reduce the heat to medium. This prevents the garlic from burning, which can create a bitter taste. Remember, the key to a great Cowboy Butter sauce is to sauté the garlic just until fragrant.

Lastly, don’t forget to taste as you go! Adjust the seasoning to your preference. If you like it zestier, add more lemon juice. For a richer flavor, consider adding more Parmesan cheese. Cooking is all about personalizing the dish to suit your taste. Enjoy the process, and your Cowboy Butter Chicken Linguine will turn out delicious every time!

Serving Suggestions for Cowboy Butter Chicken Linguine Recipe

When it comes to serving your Cowboy Butter Chicken Linguine, presentation and pairing can elevate the dining experience. Here are some delightful suggestions to consider:

  • Garnish with Fresh Herbs: A sprinkle of fresh parsley or basil on top adds a pop of color and freshness. It also enhances the dish’s aroma, making it even more inviting.
  • Pair with a Side Salad: A light, crisp salad complements the richness of the linguine. Consider a simple mixed greens salad with a lemon vinaigrette. The acidity will balance the buttery flavors beautifully.
  • Serve with Crusty Bread: A slice of warm, crusty bread is perfect for soaking up the delicious Cowboy Butter sauce. You can also serve garlic bread for an extra flavor boost.
  • Wine Pairing: A glass of white wine, such as Chardonnay or Sauvignon Blanc, pairs wonderfully with this dish. The wine’s acidity cuts through the richness of the butter, enhancing the overall meal.
  • Top with Extra Cheese: For cheese lovers, consider adding more grated Parmesan or even a sprinkle of feta cheese. This adds a creamy texture and a salty kick that complements the dish.
  • Include Seasonal Vegetables: If you added vegetables during cooking, consider serving them on the side. Roasted asparagus or sautéed green beans can add a nutritious touch to your meal.

These serving suggestions not only enhance the flavor but also create a beautiful presentation. Whether it’s a family dinner or a gathering with friends, your Cowboy Butter Chicken Linguine will surely impress everyone at the table!

Tips for Perfecting Cowboy Butter Chicken Linguine Recipe

To truly master the Cowboy Butter Chicken Linguine recipe, a few tips can make all the difference. These simple yet effective suggestions will help you create a dish that’s bursting with flavor and sure to impress.

  • Use Quality Ingredients: The foundation of any great dish starts with quality ingredients. Opt for fresh chicken, real butter, and high-quality Parmesan cheese. Fresh herbs like parsley can elevate the flavor profile significantly.
  • Don’t Rush the Cooking: Take your time when cooking the chicken and the sauce. Allow the chicken to brown properly for a deeper flavor. Similarly, sauté the garlic just until fragrant to avoid bitterness.
  • Adjust Seasoning to Taste: Everyone has different taste preferences. Feel free to adjust the salt, pepper, and red pepper flakes to suit your palate. A little taste test can go a long way!
  • Experiment with Add-Ins: Don’t hesitate to get creative! Add-ins like sun-dried tomatoes, olives, or even a splash of white wine can add unique flavors to your Cowboy Butter Chicken Linguine.
  • Perfect the Pasta: Make sure to cook the linguine al dente. This ensures the pasta holds its shape and texture when mixed with the sauce. Remember to reserve that pasta water; it’s a game-changer!
  • Let It Rest: After cooking, let the dish sit for a few minutes before serving. This allows the flavors to meld together, creating a more cohesive taste.
  • Serve Immediately: Cowboy Butter Chicken Linguine is best enjoyed fresh. Serve it right after cooking for the best texture and flavor. If you need to reheat, do so gently to avoid overcooking the chicken.

By following these tips, you’ll be well on your way to perfecting your Cowboy Butter Chicken Linguine recipe. Enjoy the cooking process and the delicious results!

Breakdown of Time for Cowboy Butter Chicken Linguine Recipe

Prep Time

Getting everything ready for your Cowboy Butter Chicken Linguine is a breeze! The prep time typically takes about 15 minutes. During this time, you’ll gather all your ingredients, chop the chicken, mince the garlic, and measure out your spices. Having everything prepped in advance makes the cooking process smoother and more enjoyable. Plus, it helps you stay organized in the kitchen!

Cooking Time

The cooking time for this delicious dish is around 20 minutes. This includes cooking the chicken, making the Cowboy Butter sauce, and boiling the linguine. Each step is quick, allowing you to whip up a flavorful meal in no time. The key is to keep an eye on the chicken and pasta to ensure they are cooked perfectly. With a little attention, you’ll have a delightful dish ready to serve in just 20 minutes!

Total Time

In total, you can expect to spend about 35 minutes from start to finish. This includes both the prep and cooking times. It’s a fantastic option for a weeknight dinner or a quick meal when you’re short on time. With just 35 minutes, you can enjoy a hearty and satisfying Cowboy Butter Chicken Linguine that’s sure to please everyone at the table!

Nutritional Information for Cowboy Butter Chicken Linguine Recipe

Calories

When it comes to enjoying a delicious meal, knowing the calorie content can help you make informed choices. Each serving of Cowboy Butter Chicken Linguine contains approximately 550 calories. This makes it a satisfying option for dinner without going overboard. The balance of protein, carbs, and fats in this dish contributes to its overall calorie count, ensuring you feel full and satisfied after your meal.

Protein

Protein is essential for maintaining muscle health and overall well-being. In this Cowboy Butter Chicken Linguine recipe, you’ll find about 35 grams of protein per serving. This protein primarily comes from the chicken, making it a great choice for those looking to boost their protein intake. Pairing this dish with a side salad can further enhance your meal’s nutritional value while keeping it delicious!

Sodium

Monitoring sodium intake is important for many people. Each serving of Cowboy Butter Chicken Linguine contains around 800 milligrams of sodium. This amount can vary based on the specific ingredients you use, such as the type of chicken broth or cheese. If you’re watching your sodium levels, consider using low-sodium chicken broth or reducing the amount of added salt. This way, you can enjoy the rich flavors of the dish while keeping your sodium intake in check.

FAQs about Cowboy Butter Chicken Linguine Recipe

Can I use other types of pasta for this recipe?

Absolutely! While linguine is a fantastic choice for the Cowboy Butter Chicken Linguine recipe, you can easily substitute it with other pasta types. Options like fettuccine, spaghetti, or even penne work well. Just keep in mind that cooking times may vary slightly, so be sure to check the package instructions. The key is to choose a pasta that can hold onto the delicious Cowboy Butter sauce, ensuring every bite is flavorful!

How can I make Cowboy Butter Chicken Linguine healthier?

Making the Cowboy Butter Chicken Linguine healthier is simple! Start by using whole wheat or gluten-free pasta for added fiber. You can also reduce the amount of butter and cheese to cut down on calories and fat. Consider adding more vegetables, like spinach, broccoli, or bell peppers, to boost the nutritional value. Additionally, using skinless chicken thighs instead of breasts can provide more flavor while still being a healthy option. These small changes can make a big difference without sacrificing taste!

What can I serve with Cowboy Butter Chicken Linguine?

When it comes to serving suggestions, there are plenty of delicious options! A light side salad with mixed greens and a lemon vinaigrette pairs beautifully with the rich flavors of the linguine. You can also serve garlic bread or a crusty baguette to soak up the Cowboy Butter sauce. For a heartier meal, consider adding roasted vegetables or a side of steamed asparagus. These sides not only complement the dish but also add a colorful touch to your table!

Can I prepare Cowboy Butter Chicken Linguine in advance?

Yes, you can prepare Cowboy Butter Chicken Linguine in advance, but with a few considerations. You can cook the chicken and make the Cowboy Butter sauce ahead of time. Store them separately in the refrigerator for up to two days. When you’re ready to serve, simply reheat the chicken and sauce, then toss with freshly cooked pasta. However, it’s best to cook the linguine just before serving to maintain its texture. This way, you’ll enjoy a delicious meal that feels freshly made!

Conclusion on Cowboy Butter Chicken Linguine Recipe

In conclusion, the Cowboy Butter Chicken Linguine recipe is a delightful dish that combines rich flavors with simple ingredients. It’s perfect for busy weeknights or special occasions when you want to impress your family and friends. The combination of tender chicken, savory butter sauce, and perfectly cooked linguine creates a meal that is both satisfying and comforting.

As you explore this recipe, remember that cooking is all about creativity and personal touch. Feel free to experiment with different ingredients and variations to make it your own. Whether you choose to add vegetables, spice it up, or even go vegetarian, the essence of the Cowboy Butter sauce will shine through, making every version delicious.

With its easy preparation and quick cooking time, this dish is not only a treat for your taste buds but also a time-saver in the kitchen. Plus, the nutritional benefits, including a good amount of protein and essential vitamins, make it a wholesome choice for any meal.

So, gather your ingredients, follow the steps, and enjoy the process of creating this mouthwatering Cowboy Butter Chicken Linguine. Your taste buds will thank you, and your loved ones will be asking for seconds. Happy cooking!

Chicken Avocado Melt Sandwich Recipe is a must-try!

Introduction to Chicken Avocado Melt Sandwich Recipe

Are you looking for a delicious and satisfying meal that’s easy to prepare? Look no further than the Chicken Avocado Melt Sandwich Recipe! This delightful sandwich combines tender, shredded chicken with creamy avocado, creating a flavor explosion that will leave your taste buds dancing. Not only is it tasty, but it’s also packed with nutrients, making it a great choice for lunch or dinner.

The beauty of this recipe lies in its simplicity. With just a few ingredients, you can whip up a meal that feels gourmet. The creamy avocado pairs perfectly with the savory chicken, while the melted cheddar cheese adds a rich, comforting touch. Plus, the whole grain bread provides a hearty base that keeps you feeling full and satisfied.

Whether you’re cooking for yourself or feeding a family, this Chicken Avocado Melt Sandwich is sure to please everyone. It’s versatile too! You can easily customize it with your favorite ingredients or spices. So, roll up your sleeves and get ready to create a sandwich that’s not only delicious but also nutritious!

In the following sections, we’ll guide you through the ingredients, preparation steps, and even some fun variations to try. Let’s dive into the world of the Chicken Avocado Melt Sandwich Recipe!

Ingredients for Chicken Avocado Melt Sandwich Recipe

To create the perfect Chicken Avocado Melt Sandwich, you’ll need a handful of fresh and wholesome ingredients. Each component plays a vital role in delivering flavor and nutrition. Here’s what you’ll need:

  • 2 cups cooked chicken, shredded: This is the star of the sandwich. You can use leftover rotisserie chicken or poach your own for a fresh taste.
  • 1 ripe avocado, mashed: The creamy texture of avocado adds richness and healthy fats.
  • 1/4 cup mayonnaise: This helps bind the ingredients together and adds a touch of creaminess.
  • 1 teaspoon lemon juice: A splash of lemon juice brightens the flavors and keeps the avocado from browning.
  • 1/2 teaspoon garlic powder: This adds a subtle garlic flavor that enhances the overall taste.
  • 1/4 teaspoon salt: A pinch of salt brings out the flavors of the other ingredients.
  • 1/4 teaspoon black pepper: This adds a hint of spice to the mix.
  • 4 slices of whole grain bread: Whole grain bread provides fiber and a nutty flavor that complements the filling.
  • 4 slices of cheddar cheese: Cheddar melts beautifully and adds a deliciously sharp flavor.
  • 1 tablespoon olive oil: This is used for cooking the sandwiches, giving them a golden, crispy exterior.
  • 1/2 cup fresh spinach (optional): Adding spinach boosts the nutritional value and adds a fresh crunch.

With these ingredients on hand, you’re ready to embark on your culinary adventure. Each item contributes to the delightful taste and texture of the Chicken Avocado Melt Sandwich. Now, let’s move on to the preparation steps!

Step-by-Step Preparation of Chicken Avocado Melt Sandwich Recipe

Now that you have all your ingredients ready, it’s time to dive into the preparation of your Chicken Avocado Melt Sandwich. This step-by-step guide will help you create a delicious sandwich that’s sure to impress. Let’s get started!

Step 1: Preparing the Chicken for Chicken Avocado Melt Sandwich Recipe

First, you need to prepare the chicken. If you’re using leftover rotisserie chicken, simply shred it into bite-sized pieces. If you’re cooking fresh chicken, you can poach or grill it until fully cooked. Once the chicken is ready, let it cool slightly before shredding. This will make it easier to mix with the other ingredients.

Step 2: Making the Avocado Spread for Chicken Avocado Melt Sandwich Recipe

Next, it’s time to make the creamy avocado spread. In a medium bowl, mash the ripe avocado with a fork until it’s smooth. Then, add the mayonnaise, lemon juice, garlic powder, salt, and black pepper. Mix everything together until well combined. This spread will add a rich and creamy texture to your sandwich, making it extra delicious!

Step 3: Assembling the Chicken Avocado Melt Sandwich Recipe

Now comes the fun part—assembling your sandwich! Take two slices of whole grain bread and spread a generous amount of the chicken and avocado mixture on each slice. Make sure to cover the bread evenly. Then, place a slice of cheddar cheese on top of the mixture. If you’re using fresh spinach, add a handful on top of the cheese for an extra crunch and nutrition boost. Finally, place the remaining slices of bread on top to complete your sandwich.

Step 4: Cooking the Chicken Avocado Melt Sandwich Recipe

It’s time to cook your sandwiches! Heat a skillet over medium heat and add the olive oil. Once the oil is hot, carefully place the assembled sandwiches in the skillet. Cook for about 3-4 minutes on each side, or until the bread is golden brown and the cheese is melted. Keep an eye on them to avoid burning. Once done, remove the sandwiches from the skillet, slice them in half, and serve warm. Enjoy your delicious Chicken Avocado Melt Sandwich!

Variations of Chicken Avocado Melt Sandwich Recipe

The Chicken Avocado Melt Sandwich is a fantastic base for creativity. You can easily switch things up to suit your taste or dietary needs. Let’s explore some exciting variations that can take your sandwich to the next level!

Different Types of Bread for Chicken Avocado Melt Sandwich Recipe

While whole grain bread is a great choice, there are many other options to consider. Here are a few alternatives:

  • Sourdough Bread: This tangy bread adds a unique flavor and a chewy texture that pairs well with the creamy filling.
  • Ciabatta Rolls: These rustic rolls have a crispy crust and a soft interior, making them perfect for a hearty sandwich.
  • Rye Bread: For a more robust flavor, rye bread can add a delightful twist to your Chicken Avocado Melt.
  • Gluten-Free Bread: If you’re avoiding gluten, there are many gluten-free bread options available that work just as well.

Experimenting with different types of bread can change the entire experience of your Chicken Avocado Melt Sandwich. Each bread brings its own flavor and texture, making your meal even more enjoyable!

Adding Extra Ingredients to Chicken Avocado Melt Sandwich Recipe

Want to amp up the flavor or nutrition? Consider adding some extra ingredients to your sandwich. Here are some tasty ideas:

  • Fresh Herbs: Adding fresh herbs like cilantro or basil can brighten the flavors and add a fresh twist.
  • Tomato Slices: Juicy tomato slices can add moisture and a burst of flavor to your sandwich.
  • Red Onion: Thinly sliced red onion can provide a nice crunch and a bit of sharpness.
  • Avocado Slices: For avocado lovers, adding extra slices can enhance the creaminess.
  • Hot Sauce: A few dashes of your favorite hot sauce can give your sandwich a spicy kick.

These additions not only enhance the taste but also boost the nutritional value of your Chicken Avocado Melt Sandwich. Feel free to mix and match to create your perfect sandwich!

Cooking Note for Chicken Avocado Melt Sandwich Recipe

When it comes to cooking the Chicken Avocado Melt Sandwich, a few key tips can help you achieve the best results. These notes will ensure that your sandwich turns out perfectly every time, making it a delightful meal for you and your loved ones.

First, pay attention to the heat level of your skillet. Medium heat is ideal for cooking the sandwiches. If the heat is too high, the bread may burn before the cheese melts. On the other hand, if the heat is too low, the bread will take longer to brown, and the cheese may not melt properly. Finding that sweet spot is crucial for a delicious outcome.

Next, consider using a lid while cooking. Covering the skillet with a lid can help trap heat and steam, which encourages the cheese to melt evenly. This simple trick can elevate your sandwich from good to great!

Additionally, don’t rush the cooking process. Allow each side of the sandwich to cook for the full 3-4 minutes. This will give the bread a nice golden color and a satisfying crunch. If you’re making multiple sandwiches, you may need to cook them in batches to ensure even cooking.

Lastly, let the sandwiches rest for a minute after cooking. This brief pause allows the cheese to set slightly, making it easier to slice without everything spilling out. Plus, it gives you a moment to admire your culinary creation before diving in!

By following these cooking notes, you’ll be well on your way to mastering the Chicken Avocado Melt Sandwich Recipe. Enjoy the process and savor every bite of your delicious creation!

Serving Suggestions for Chicken Avocado Melt Sandwich Recipe

Once you’ve prepared your Chicken Avocado Melt Sandwich, it’s time to think about how to serve it. Presentation can elevate your meal, making it even more enjoyable. Here are some delightful serving suggestions to complement your sandwich:

  • Side Salads: A fresh side salad can add a burst of color and nutrition to your meal. Consider a simple mixed greens salad with a light vinaigrette. You can also add cherry tomatoes, cucumbers, and a sprinkle of feta cheese for extra flavor.
  • Chips or Crisps: For a crunchy side, serve your sandwich with a handful of baked chips or veggie crisps. They provide a satisfying crunch that pairs well with the creamy filling of the sandwich.
  • Fruit Salad: A refreshing fruit salad can balance the savory flavors of the sandwich. Use seasonal fruits like berries, melons, and citrus for a sweet contrast.
  • Pickles: Adding pickles on the side can give your meal a tangy kick. The acidity of pickles complements the richness of the avocado and cheese.
  • Soup: Pair your sandwich with a warm bowl of soup, like tomato or butternut squash. The combination of a hot soup and a melty sandwich is comforting and satisfying.

When serving your Chicken Avocado Melt Sandwich, consider using a nice plate or platter to make the meal feel special. You can also garnish the plate with fresh herbs or a slice of lemon for a pop of color. These small touches can make your meal feel more gourmet.

Don’t forget to enjoy your sandwich while it’s warm! The melted cheese and creamy avocado are best when fresh off the skillet. So, gather your sides, set the table, and dig into your delicious Chicken Avocado Melt Sandwich!

Tips for Perfecting Your Chicken Avocado Melt Sandwich Recipe

Creating the perfect Chicken Avocado Melt Sandwich is all about attention to detail. With a few simple tips, you can elevate your sandwich from good to absolutely delicious. Here are some helpful suggestions to ensure your sandwich turns out just right every time!

  • Choose Ripe Avocados: The key to a creamy avocado spread is using ripe avocados. They should yield slightly when you press them gently. If they’re too firm, they won’t mash well, and if they’re too soft, they may be overripe.
  • Season Generously: Don’t be shy with the seasonings! Adjust the salt and pepper to your taste. You can also experiment with spices like paprika or cayenne for an extra kick.
  • Use Fresh Ingredients: Fresh ingredients make a big difference in flavor. Opt for fresh spinach, high-quality cheese, and freshly cooked chicken whenever possible. This will enhance the overall taste of your sandwich.
  • Toast the Bread: For an extra crispy texture, consider toasting the bread lightly before assembling the sandwich. This adds a delightful crunch and helps prevent the bread from getting soggy.
  • Don’t Overstuff: While it’s tempting to pile on the filling, be careful not to overstuff your sandwich. A well-balanced amount of chicken and avocado spread will make it easier to cook and eat.
  • Experiment with Cheese: While cheddar is a classic choice, don’t hesitate to try different cheeses. Gouda, Swiss, or even a spicy pepper jack can add unique flavors to your sandwich.
  • Let It Rest: After cooking, let your sandwich rest for a minute before slicing. This allows the cheese to set and makes it easier to cut without spilling the filling.
  • Serve Immediately: Enjoy your Chicken Avocado Melt Sandwich while it’s warm. The melted cheese and creamy avocado are best when served fresh off the skillet.

By following these tips, you’ll be well on your way to mastering the Chicken Avocado Melt Sandwich Recipe. Each bite will be a delightful combination of flavors and textures, making it a meal you’ll want to enjoy again and again!

Breakdown of Time for Chicken Avocado Melt Sandwich Recipe

Understanding the time needed for each step of the Chicken Avocado Melt Sandwich Recipe can help you plan your cooking efficiently. Here’s a detailed breakdown of the time required for preparation and cooking, so you can enjoy your delicious sandwich in no time!

Prep Time for Chicken Avocado Melt Sandwich Recipe

The prep time for this delightful sandwich is quite short. You’ll need about 10-15 minutes to gather your ingredients and prepare the filling. This includes shredding the chicken, mashing the avocado, and mixing everything together. If you have leftover chicken, the prep time can be even quicker!

Cooking Time for Chicken Avocado Melt Sandwich Recipe

Once your sandwiches are assembled, the cooking time is approximately 6-8 minutes. You’ll cook each side for about 3-4 minutes until the bread is golden brown and the cheese is melted. Keep an eye on them to ensure they don’t burn. If you’re making multiple sandwiches, you may need to cook them in batches, which could add a few extra minutes.

Total Time for Chicken Avocado Melt Sandwich Recipe

In total, you can expect to spend around 20-25 minutes from start to finish. This includes both prep and cooking time. It’s a quick and easy meal that’s perfect for lunch or dinner, making it a great option for busy days. With just a little time and effort, you’ll have a delicious Chicken Avocado Melt Sandwich ready to enjoy!

Nutritional Information for Chicken Avocado Melt Sandwich Recipe

Understanding the nutritional content of your meals is essential for maintaining a balanced diet. The Chicken Avocado Melt Sandwich is not only delicious but also offers a good mix of nutrients. Let’s break down the key nutritional components of this tasty sandwich.

Calories in Chicken Avocado Melt Sandwich Recipe

Each serving of the Chicken Avocado Melt Sandwich contains approximately 450 calories. This calorie count makes it a satisfying meal option without being overly heavy. The combination of chicken, avocado, and cheese provides a hearty meal that can keep you energized throughout the day.

Protein Content in Chicken Avocado Melt Sandwich Recipe

One of the standout features of this sandwich is its protein content. Each serving provides about 35 grams of protein. This high protein level is primarily due to the shredded chicken, which is an excellent source of lean protein. Protein is essential for muscle repair and growth, making this sandwich a great choice for active individuals.

Sodium Levels in Chicken Avocado Melt Sandwich Recipe

When it comes to sodium, each serving contains around 600 milligrams. While this is a reasonable amount for a meal, it’s always good to be mindful of your sodium intake, especially if you’re watching your salt consumption. You can reduce sodium levels by using low-sodium mayonnaise or cheese alternatives if desired.

Overall, the Chicken Avocado Melt Sandwich is a nutritious option that balances calories, protein, and sodium. It’s a meal that not only satisfies your hunger but also supports your dietary needs. Enjoy this delicious sandwich knowing it’s a wholesome choice!

FAQs about Chicken Avocado Melt Sandwich Recipe

Can I use different meats in the Chicken Avocado Melt Sandwich Recipe?

Absolutely! While shredded chicken is the star of this recipe, you can easily switch it up with other meats. For instance, turkey is a great alternative that offers a similar texture and flavor. If you’re feeling adventurous, try using shredded beef or even pulled pork for a unique twist. Each meat brings its own flavor profile, allowing you to customize your Chicken Avocado Melt Sandwich to your liking. Just ensure that the meat is cooked and shredded for the best results!

How can I make the Chicken Avocado Melt Sandwich Recipe healthier?

Making your Chicken Avocado Melt Sandwich healthier is simple with a few adjustments. First, consider using whole grain or sprouted bread for added fiber and nutrients. You can also reduce the amount of mayonnaise or substitute it with Greek yogurt for a lighter option. Adding more vegetables, like tomatoes or cucumbers, can boost the nutritional value while adding freshness. Lastly, using low-fat cheese or reducing the cheese quantity can help lower the overall fat content. These small changes can make your sandwich a healthier choice without sacrificing flavor!

What sides pair well with Chicken Avocado Melt Sandwich Recipe?

Pairing sides with your Chicken Avocado Melt Sandwich can enhance your meal experience. Here are some delicious options:

  • Sweet Potato Fries: Baked sweet potato fries offer a nutritious and tasty side that complements the sandwich perfectly.
  • Coleslaw: A crunchy coleslaw adds a refreshing contrast to the creamy sandwich, making for a delightful combination.
  • Vegetable Soup: A warm bowl of vegetable soup can be a comforting side that pairs well with the sandwich.
  • Fruit Skewers: Fresh fruit skewers provide a sweet and healthy side that balances the savory flavors of the sandwich.
  • Potato Salad: A light potato salad can add a hearty touch to your meal, making it even more satisfying.

These sides not only complement the Chicken Avocado Melt Sandwich but also add variety to your meal. Enjoy experimenting with different combinations!

Conclusion on Chicken Avocado Melt Sandwich Recipe

In conclusion, the Chicken Avocado Melt Sandwich Recipe is a delightful and nutritious option for any meal. With its combination of tender chicken, creamy avocado, and melted cheese, this sandwich is sure to satisfy your cravings. It’s not just a meal; it’s an experience that brings together flavors and textures in a way that’s both comforting and exciting.

Whether you’re preparing it for a quick lunch or a cozy dinner, this recipe is versatile and easy to customize. You can experiment with different types of bread, cheeses, and additional ingredients to make it your own. Plus, the preparation and cooking process is straightforward, making it accessible for cooks of all skill levels.

As you enjoy your Chicken Avocado Melt Sandwich, remember that it’s not just about the taste. It’s also about the joy of cooking and sharing a meal with loved ones. So, gather your ingredients, follow the steps, and savor every bite of this delicious creation. You’ll find that it’s a meal that not only fills your stomach but also warms your heart.

So, what are you waiting for? Dive into the world of flavors with the Chicken Avocado Melt Sandwich Recipe and make it a staple in your kitchen. Happy cooking!

Korean BBQ Meatballs with Spicy Mayo are irresistible!

Introduction to Korean BBQ Meatballs with Spicy Mayo

Korean BBQ meatballs with spicy mayo are a delightful fusion of flavors that bring a taste of Korea right to your kitchen. These meatballs are not just any ordinary dish; they are packed with savory ingredients that create a unique taste experience. The combination of ground meat, aromatic spices, and a hint of sweetness makes them irresistible. Plus, the spicy mayo dip adds an exciting kick that elevates the dish to a whole new level.

What Makes Korean BBQ Meatballs Unique?

What sets Korean BBQ meatballs apart is their rich flavor profile. The use of ingredients like soy sauce, sesame oil, and gochujang gives these meatballs a distinct umami taste. Unlike traditional meatballs, which may rely on simple seasonings, Korean BBQ meatballs are infused with a variety of spices and herbs. This not only enhances their flavor but also makes them a fun dish to prepare and enjoy.

Additionally, the texture of these meatballs is something to rave about. They are tender on the inside while having a slightly crispy exterior, thanks to the baking process. This contrast makes every bite satisfying. Whether served as an appetizer or a main dish, Korean BBQ meatballs are sure to impress your family and friends.

The Appeal of Spicy Mayo in Korean Cuisine

Spicy mayo is a staple in Korean cuisine, and for good reason. Its creamy texture combined with a spicy kick makes it the perfect accompaniment for many dishes. The blend of mayonnaise, gochujang, and rice vinegar creates a sauce that is both tangy and flavorful. This dip not only complements the meatballs but also adds a layer of complexity to the overall dish.

Moreover, spicy mayo is incredibly versatile. You can adjust the level of heat to suit your taste, making it a favorite among spice lovers and those who prefer milder flavors alike. Whether you drizzle it over the meatballs or serve it on the side for dipping, spicy mayo enhances the dining experience, making every bite a delightful adventure.

Ingredients for Korean BBQ Meatballs with Spicy Mayo

To create delicious Korean BBQ meatballs with spicy mayo, you’ll need a variety of fresh ingredients. Each component plays a crucial role in building the rich flavors that make this dish so special. Here’s a detailed list of what you’ll need:

  • 1 pound ground beef (or ground turkey for a lighter option)
  • 1/2 cup breadcrumbs (helps bind the meatballs)
  • 1/4 cup green onions, finely chopped (adds freshness and crunch)
  • 1/4 cup soy sauce (provides umami flavor)
  • 1 tablespoon sesame oil (adds a nutty aroma)
  • 1 tablespoon minced garlic (for a savory kick)
  • 1 tablespoon grated ginger (adds warmth and spice)
  • 1 teaspoon black pepper (for seasoning)
  • 1 large egg (binds the mixture together)
  • 1 tablespoon brown sugar (balances the flavors with sweetness)
  • 1/4 cup ketchup (adds a touch of tanginess)
  • 1 tablespoon gochujang (Korean chili paste for heat)
  • 1/4 cup mayonnaise (base for the spicy mayo dip)
  • 1 teaspoon rice vinegar (adds acidity to the dip)
  • 1 teaspoon sesame seeds (for garnish)

These ingredients come together to create a mouthwatering dish that is sure to please everyone at the table. The combination of savory, sweet, and spicy elements makes Korean BBQ meatballs a standout choice for any meal. Plus, the spicy mayo dip adds an extra layer of flavor that you won’t want to miss!

Step-by-Step Preparation of Korean BBQ Meatballs with Spicy Mayo

Now that you have all your ingredients ready, it’s time to dive into the fun part: preparing your Korean BBQ meatballs with spicy mayo! Follow these simple steps to create a delicious dish that will impress everyone.

Step 1: Preparing the Meatball Mixture

Start by gathering a large mixing bowl. In this bowl, combine the ground beef (or turkey), breadcrumbs, and finely chopped green onions. Next, add the soy sauce, sesame oil, minced garlic, grated ginger, and black pepper. Don’t forget to crack in the large egg and sprinkle in the brown sugar. Mix everything together using your hands or a spoon until all the ingredients are well combined. This mixture should be sticky but hold together well.

Step 2: Shaping the Meatballs

Once your mixture is ready, it’s time to shape the meatballs. Take a small amount of the mixture, about the size of a golf ball, and roll it between your palms to form a ball. Aim for about 1 inch in diameter. Place each meatball on a baking sheet lined with parchment paper. Make sure to leave some space between each meatball to allow for even cooking.

Step 3: Cooking the Meatballs

Preheat your oven to 400°F (200°C). Once the oven is hot, place the baking sheet with the meatballs inside. Bake them for 20-25 minutes, or until they are cooked through and nicely browned. You can check for doneness by cutting one meatball in half; it should be no longer pink inside. The aroma will fill your kitchen, making it hard to wait!

Step 4: Making the Spicy Mayo

While the meatballs are baking, let’s whip up the spicy mayo dip. In a small bowl, combine the mayonnaise, gochujang, and rice vinegar. Stir the mixture until it’s smooth and well blended. Taste it and adjust the spiciness if needed. If you like it hotter, add a bit more gochujang. This creamy dip will perfectly complement the savory meatballs.

Step 5: Combining and Serving

Once the meatballs are done baking, take them out of the oven and let them cool for a few minutes. This will help them firm up a bit. To serve, arrange the meatballs on a platter and drizzle the spicy mayo dip over the top. For a finishing touch, sprinkle sesame seeds on top for added crunch and flavor. You can also serve the dip on the side for dipping. Enjoy your delicious Korean BBQ meatballs with spicy mayo!

Variations of Korean BBQ Meatballs with Spicy Mayo

While the classic recipe for Korean BBQ meatballs with spicy mayo is delicious, there are many ways to switch things up. Whether you want to cater to dietary preferences or simply try something new, these variations will keep your taste buds excited. Let’s explore some alternative ingredients for the meatballs and different spicy mayo recipes.

Alternative Ingredients for Meatballs

One of the best things about Korean BBQ meatballs is their versatility. You can easily customize the ingredients to suit your taste or dietary needs. Here are some alternative ingredients you might consider:

  • Ground Meat Options: Instead of ground beef, try using ground turkey, chicken, or even pork. Each type of meat brings its own unique flavor and texture.
  • Breadcrumb Substitutes: For a gluten-free option, use gluten-free breadcrumbs or crushed rice crackers. You can also use oats for a healthier twist.
  • Vegetable Additions: Enhance the nutrition by adding finely chopped vegetables like bell peppers, carrots, or zucchini to the meatball mixture. This not only boosts flavor but also adds color.
  • Herbs and Spices: Experiment with fresh herbs like cilantro or parsley for added freshness. You can also try different spices like cumin or coriander for a unique flavor profile.

These alternative ingredients can help you create a version of Korean BBQ meatballs that fits your preferences while still being delicious!

Different Spicy Mayo Recipes

The spicy mayo dip is a fantastic complement to the meatballs, but you can also play around with the recipe to create different flavors. Here are a few variations to consider:

  • Garlic Spicy Mayo: Add minced garlic to the basic spicy mayo recipe for an extra kick of flavor. This will enhance the savory notes and make it even more delicious.
  • Citrus Spicy Mayo: Mix in a teaspoon of lime or lemon juice for a zesty twist. The acidity will brighten the flavors and add a refreshing touch.
  • Herbed Spicy Mayo: Incorporate fresh herbs like cilantro or chives into the mayo for a fresh and vibrant flavor. This adds a nice contrast to the rich meatballs.
  • Sweet and Spicy Mayo: For those who enjoy a sweeter dip, add a teaspoon of honey or maple syrup to the spicy mayo. This will balance the heat with a touch of sweetness.

These variations of spicy mayo can elevate your Korean BBQ meatballs experience, making it even more enjoyable. Feel free to mix and match ingredients to find your perfect combination!

Cooking Note for Korean BBQ Meatballs with Spicy Mayo

When preparing Korean BBQ meatballs with spicy mayo, there are a few important cooking notes to keep in mind. These tips will help ensure that your meatballs turn out perfectly every time, making your cooking experience enjoyable and stress-free.

First, always preheat your oven before baking the meatballs. This step is crucial as it helps the meatballs cook evenly and develop a nice, golden-brown crust. If you skip this step, the meatballs may not cook properly, leading to a less satisfying texture.

Next, consider using a meat thermometer to check for doneness. The internal temperature of the meatballs should reach 160°F (71°C) for ground beef or turkey. This ensures that they are safe to eat while remaining juicy and flavorful.

Another tip is to avoid overmixing the meatball mixture. While it’s important to combine the ingredients well, overmixing can lead to tough meatballs. Mix just until everything is incorporated, and then stop. This will help keep your meatballs tender and light.

Additionally, if you want to add extra flavor, consider marinating the ground meat mixture for a short time before shaping the meatballs. Allowing the mixture to sit for about 30 minutes can enhance the flavors, making your meatballs even more delicious.

Lastly, don’t forget to let the meatballs cool for a few minutes after baking. This resting time allows the juices to redistribute, ensuring that each bite is moist and flavorful. Following these cooking notes will help you create the best Korean BBQ meatballs with spicy mayo, impressing everyone at your table!

Serving Suggestions for Korean BBQ Meatballs with Spicy Mayo

Once your Korean BBQ meatballs with spicy mayo are ready, it’s time to think about how to serve them. The right side dishes and creative serving ideas can elevate your meal, making it even more enjoyable. Here are some suggestions to consider.

Best Side Dishes to Pair

When it comes to side dishes, you want to complement the rich flavors of the meatballs. Here are some tasty options:

  • Steamed Rice: A classic choice, steamed white or brown rice absorbs the savory sauce from the meatballs, making each bite delightful.
  • Korean Kimchi: This fermented side dish adds a spicy and tangy flavor that pairs perfectly with the meatballs. It also provides a crunchy texture.
  • Vegetable Stir-Fry: A colorful mix of stir-fried vegetables like bell peppers, broccoli, and carrots adds freshness and nutrition to your meal.
  • Asian Slaw: A crunchy slaw made with cabbage, carrots, and a sesame dressing can provide a refreshing contrast to the rich meatballs.
  • Pickled Vegetables: Quick-pickled cucumbers or radishes can add a zesty kick that balances the flavors of the dish.

These side dishes not only enhance the meal but also add variety to your dining experience. Feel free to mix and match based on your preferences!

Creative Serving Ideas

Serving your Korean BBQ meatballs can be just as fun as making them! Here are some creative ideas to impress your guests:

  • Skewers: Thread the meatballs onto skewers for a fun and easy-to-eat appetizer. You can serve them with the spicy mayo dip on the side for dipping.
  • Meatball Sliders: Place the meatballs in small buns to create sliders. Add some spicy mayo and a slice of cucumber for a delicious mini sandwich.
  • Meatball Lettuce Wraps: Use large lettuce leaves to wrap the meatballs. This makes for a low-carb option that’s fresh and crunchy.
  • Platter Presentation: Arrange the meatballs on a large platter with colorful garnishes like sliced green onions and sesame seeds. This makes for an eye-catching centerpiece.
  • Rice Bowls: Serve the meatballs over a bed of rice, topped with spicy mayo and your choice of vegetables for a hearty meal.

These creative serving ideas can make your Korean BBQ meatballs with spicy mayo a standout dish at any gathering. Enjoy experimenting with different presentations to find what works best for you!

Tips for Perfecting Korean BBQ Meatballs with Spicy Mayo

Creating the perfect Korean BBQ meatballs with spicy mayo is all about attention to detail. With a few helpful tips, you can avoid common pitfalls and enhance the flavors of this delicious dish. Let’s explore some common mistakes to avoid and ways to elevate the flavor profiles of your meatballs.

Common Mistakes to Avoid

Even the best recipes can go awry if certain mistakes are made. Here are some common pitfalls to watch out for:

  • Overmixing the Meat: Mixing the meatball mixture too much can lead to tough meatballs. Combine the ingredients just until they are mixed well, and then stop.
  • Skipping the Egg: The egg is crucial for binding the meatballs together. Omitting it can result in crumbly meatballs that fall apart during cooking.
  • Not Preheating the Oven: Always preheat your oven before baking. This ensures even cooking and helps achieve that perfect golden-brown crust.
  • Ignoring Cooking Time: Keep an eye on the cooking time. Overcooking can dry out the meatballs, while undercooking can leave them raw. Use a meat thermometer to check for doneness.
  • Neglecting to Let Them Rest: After baking, let the meatballs rest for a few minutes. This allows the juices to redistribute, making them more flavorful and moist.

By avoiding these common mistakes, you can ensure that your Korean BBQ meatballs turn out perfectly every time!

Enhancing Flavor Profiles

To take your Korean BBQ meatballs with spicy mayo to the next level, consider these flavor-enhancing tips:

  • Marinate the Meat: For deeper flavor, marinate the ground meat mixture for at least 30 minutes before shaping the meatballs. This allows the flavors to meld beautifully.
  • Experiment with Spices: Don’t hesitate to add spices like cumin, coriander, or even a pinch of cinnamon to the meat mixture. These can add a unique twist to the flavor profile.
  • Fresh Herbs: Incorporate fresh herbs like cilantro or basil into the meatball mixture. This adds freshness and a burst of flavor that complements the savory elements.
  • Adjust the Sweetness: If you prefer a sweeter flavor, increase the amount of brown sugar or add a touch of honey to the meatball mixture. This balances the savory and spicy notes.
  • Infuse the Mayo: For the spicy mayo, consider adding a splash of lime juice or a dash of sesame oil. This can enhance the creaminess and add a delightful tang.

By implementing these tips, you can create Korean BBQ meatballs with spicy mayo that are not only delicious but also bursting with flavor. Enjoy the process of experimenting and discovering what works best for your taste!

Breakdown of Time for Korean BBQ Meatballs with Spicy Mayo

Understanding the time needed to prepare Korean BBQ meatballs with spicy mayo is essential for planning your cooking session. Here’s a simple breakdown of the time required for each step, so you can manage your kitchen time effectively.

Prep Time

The prep time for Korean BBQ meatballs is relatively short. You’ll need about 15-20 minutes to gather your ingredients and prepare the meatball mixture. This includes chopping the green onions, measuring out the ingredients, and mixing everything together. If you decide to add extra vegetables or herbs, you might need an additional 5 minutes. Overall, aim for around 20 minutes for prep.

Cooking Time

Once your meatballs are shaped and ready, the cooking time is straightforward. Preheating the oven takes about 10 minutes. After that, the meatballs will need to bake for 20-25 minutes. This brings the total cooking time to approximately 30-35 minutes. Keep an eye on them to ensure they reach that perfect golden-brown color!

Total Time

When you combine both prep and cooking times, the total time to make Korean BBQ meatballs with spicy mayo is around 50-55 minutes. This makes it a great option for a weeknight dinner or a fun gathering with friends. With just under an hour, you can serve a delicious and impressive dish that everyone will love!

Nutritional Information for Korean BBQ Meatballs with Spicy Mayo

Understanding the nutritional content of your meals is essential for maintaining a balanced diet. Korean BBQ meatballs with spicy mayo not only offer delightful flavors but also provide valuable nutrients. Here’s a closer look at the nutritional information for this delicious dish.

Calories

Each serving of Korean BBQ meatballs with spicy mayo contains approximately 320 calories. This makes it a satisfying option for a meal or snack without overwhelming your daily caloric intake. The combination of protein and healthy fats helps keep you full and energized.

Protein Content

Protein is a vital nutrient for building and repairing tissues, and Korean BBQ meatballs deliver on this front. Each serving provides about 20 grams of protein. This high protein content is especially beneficial for those looking to maintain muscle mass or support an active lifestyle. The use of ground beef or turkey ensures that you get a good source of protein in every bite.

Sodium Levels

When it comes to sodium, each serving of Korean BBQ meatballs with spicy mayo contains around 800 milligrams. While this is a reasonable amount for a flavorful dish, it’s important to be mindful of your overall sodium intake throughout the day. If you’re watching your sodium levels, consider using low-sodium soy sauce or reducing the amount of added salt in the recipe.

Overall, Korean BBQ meatballs with spicy mayo are a delicious and nutritious option that can fit into a balanced diet. With their satisfying flavors and beneficial nutrients, they make for a great meal choice any day of the week!

FAQs about Korean BBQ Meatballs with Spicy Mayo

Can I make Korean BBQ Meatballs ahead of time?

Absolutely! Making Korean BBQ meatballs ahead of time is a great idea. You can prepare the meatball mixture and shape them into balls, then store them in the refrigerator for up to 24 hours before baking. This allows the flavors to meld together, enhancing the taste. If you want to prepare them even further in advance, you can freeze the uncooked meatballs. Just place them on a baking sheet to freeze individually, then transfer them to a freezer bag. When you’re ready to cook, bake them straight from the freezer, adding a few extra minutes to the cooking time.

What can I substitute for spicy mayo?

If spicy mayo isn’t your thing, there are plenty of alternatives you can try. For a milder dip, mix regular mayonnaise with a bit of sriracha or hot sauce to taste. You can also create a yogurt-based dip by combining plain Greek yogurt with a splash of lemon juice and a pinch of cayenne pepper for a tangy kick. Another option is to use a sweet chili sauce, which offers a sweet and spicy flavor that pairs well with the meatballs. Feel free to experiment with different sauces to find your perfect match!

Are Korean BBQ Meatballs gluten-free?

Traditional Korean BBQ meatballs may not be gluten-free due to the use of soy sauce and breadcrumbs. However, you can easily make them gluten-free by using gluten-free soy sauce and breadcrumbs. Many stores offer gluten-free alternatives that work just as well in the recipe. Additionally, you can use crushed rice crackers or oats as a substitute for breadcrumbs. With these adjustments, you can enjoy delicious Korean BBQ meatballs without worrying about gluten!

How can I adjust the spiciness of the mayo?

Adjusting the spiciness of your mayo is simple! If you prefer a milder flavor, start with a small amount of gochujang and gradually add more until you reach your desired heat level. You can also mix in a bit of honey or sugar to balance out the heat if it becomes too spicy. On the other hand, if you want to kick up the heat, add more gochujang or even a dash of cayenne pepper. Taste as you go to ensure you achieve the perfect level of spiciness for your palate!

Conclusion on Korean BBQ Meatballs with Spicy Mayo

In conclusion, Korean BBQ meatballs with spicy mayo are a delightful dish that brings a burst of flavor to your table. The combination of savory meatballs and a creamy, spicy dip creates a unique culinary experience that is both satisfying and enjoyable. Whether you’re hosting a gathering or simply looking for a tasty weeknight dinner, this dish is sure to impress.

Final Thoughts on Enjoying This Dish

As you prepare and serve these Korean BBQ meatballs, remember that the joy of cooking lies in the creativity and love you put into each dish. Feel free to experiment with different ingredients and variations to make the recipe your own. The versatility of this dish allows you to cater to various tastes and dietary preferences, making it a perfect choice for any occasion.

Don’t forget to pair your meatballs with delicious side dishes and creative serving ideas to elevate the meal. Whether you choose to serve them as sliders, on skewers, or over rice, the possibilities are endless. Enjoy the process of cooking and sharing this delightful dish with family and friends. With every bite, you’ll experience the rich flavors of Korean cuisine, making your dining experience truly memorable.

So, roll up your sleeves, gather your ingredients, and get ready to savor the deliciousness of Korean BBQ meatballs with spicy mayo. Happy cooking!

Sweet and Savory Brown Sugar Pork Chops Recipe delights!

Introduction to Sweet and Savory Brown Sugar Pork Chops Recipe

Sweet and Savory Brown Sugar Pork Chops Recipe is here to impress your family and friends. This dish combines the rich flavors of brown sugar with savory spices, creating a mouthwatering experience that everyone will love.

Pork chops are a versatile protein that can be cooked in many ways. However, this recipe stands out because of its unique blend of sweet and savory elements. The brown sugar caramelizes beautifully during cooking, giving the pork chops a delightful glaze. Plus, the addition of garlic, onion, and smoked paprika adds depth to the flavor profile.

Not only is this recipe tasty, but it’s also simple to prepare. With just a few ingredients and easy steps, you can have a restaurant-quality meal on your table in no time. Whether you’re a seasoned cook or a beginner, you’ll find this recipe approachable and rewarding.

So, gather your ingredients and get ready to create a dish that will have everyone asking for seconds. Let’s dive into the details of what you’ll need to make these scrumptious pork chops!

Ingredients for Sweet and Savory Brown Sugar Pork Chops Recipe

Sweet and Savory Brown Sugar Pork Chops Recipe, you’ll need a few simple ingredients. Each component plays a vital role in building the rich flavors that make this dish so special. Here’s what you’ll need:

  • 1 pound bone-in pork chops (about 2-4 chops) – Bone-in chops add flavor and moisture.
  • 1/4 cup brown sugar – This is the star ingredient that brings sweetness and caramelization.
  • 1 tablespoon olive oil – Used for searing the pork chops to achieve a golden crust.
  • 1 teaspoon garlic powder – Adds a savory depth to the dish.
  • 1 teaspoon onion powder – Enhances the overall flavor profile.
  • 1 teaspoon smoked paprika – Provides a subtle smokiness that complements the sweetness.
  • 1/2 teaspoon salt – Balances the flavors and enhances taste.
  • 1/2 teaspoon black pepper – Adds a hint of spice.
  • 1 tablespoon apple cider vinegar – Introduces acidity, which brightens the dish.
  • 1 tablespoon soy sauce – Adds umami and depth to the marinade.
  • 1 tablespoon Dijon mustard – Offers a tangy kick that pairs well with the sweetness.
  • Fresh parsley, chopped (for garnish) – Adds a pop of color and freshness to the dish.

These ingredients are easy to find and can be adjusted based on your taste preferences. For instance, if you enjoy a bit of heat, consider adding a pinch of cayenne pepper to the spice mix. Now that you have your ingredients ready, let’s move on to the preparation steps!

Step-by-Step Preparation of Sweet and Savory Brown Sugar Pork Chops Recipe

Sweet and Savory Brown Sugar Pork Chops Recipe. This step-by-step guide will help you create a delicious meal that’s sure to impress. Let’s get started!

Step 1: Preparing the Pork Chops

First, take your bone-in pork chops and pat them dry with paper towels. This step is important because it helps the seasoning stick better. Plus, a dry surface allows for a nice sear. Make sure to remove any excess moisture. Once they are dry, set the pork chops aside while you prepare the spice mixture.

Step 2: Making the Brown Sugar Marinade

In a small bowl, combine the brown sugar, garlic powder, onion powder, smoked paprika, salt, and black pepper. Mix these ingredients well until they are evenly blended. This spice mixture is what gives the pork chops their sweet and savory flavor. The brown sugar will caramelize beautifully during cooking, creating a delicious glaze.

Step 3: Marinating the Pork Chops

Now, it’s time to rub the spice mixture onto the pork chops. Take a generous amount of the mixture and rub it evenly over both sides of each chop. Make sure to cover every inch for maximum flavor. If you have time, let the pork chops sit for about 15-30 minutes. This allows the flavors to penetrate the meat, making it even tastier.

Step 4: Cooking the Pork Chops

Next, heat the olive oil in a large oven-safe skillet over medium-high heat. Once the oil is hot, carefully add the pork chops to the skillet. Sear them for about 3-4 minutes on each side until they are golden brown. This step locks in the juices and creates a beautiful crust. After searing, whisk together the apple cider vinegar, soy sauce, and Dijon mustard in a separate bowl. Pour this marinade over the pork chops in the skillet.

Step 5: Finishing Touches

Finally, transfer the skillet to your preheated oven. Bake the pork chops for 15-20 minutes, or until the internal temperature reaches 145°F (63°C). Once done, remove the skillet from the oven and let the pork chops rest for about 5 minutes. This resting period allows the juices to redistribute, ensuring juicy and tender meat. Before serving, garnish with freshly chopped parsley for a pop of color and freshness.

Sweet and Savory Brown Sugar Pork Chops are ready to be enjoyed. The combination of sweet and savory flavors will surely delight your taste buds!

Variations of Sweet and Savory Brown Sugar Pork Chops Recipe

Sweet and Savory Brown Sugar Pork Chops Recipe is delicious as is, there are many ways to customize it to suit your taste. Whether you want to switch up the ingredients or try different cooking methods, these variations will keep your meals exciting. Let’s explore some alternative ingredients and cooking methods!

Alternative Ingredients

Changing a few ingredients can create a whole new flavor profile for your pork chops. Here are some ideas:

  • Honey or Maple Syrup: Instead of brown sugar, try using honey or maple syrup for a different sweetness. Both options will add a unique flavor.
  • Different Mustards: Swap out Dijon mustard for whole grain or spicy brown mustard. This will add texture and a bit of heat.
  • Herbs: Fresh herbs like rosemary or thyme can be added to the spice mix for an aromatic twist. They pair wonderfully with pork.
  • Citrus Juice: A splash of orange or lemon juice can brighten the dish. Add it to the marinade for a zesty kick.
  • Spicy Elements: If you love heat, consider adding chili flakes or sriracha to the marinade. This will give your pork chops a spicy edge.

Feel free to mix and match these ingredients based on what you have on hand or your personal preferences. The beauty of cooking is experimenting!

Cooking Methods

There are several ways to cook your pork chops, each offering a different taste and texture. Here are some popular methods:

  • Grilling: For a smoky flavor, grill the pork chops instead of baking them. Preheat your grill and cook for about 5-7 minutes on each side, depending on thickness.
  • Slow Cooking: If you have more time, consider using a slow cooker. Combine the pork chops with the marinade and cook on low for 6-8 hours. This method makes the meat incredibly tender.
  • Air Frying: For a healthier option, use an air fryer. Cook the seasoned pork chops at 375°F (190°C) for about 12-15 minutes, flipping halfway through.
  • Pan-Frying: If you prefer a quick method, pan-fry the pork chops in a skillet with a bit of oil. This will give them a nice crust while keeping them juicy inside.

Each cooking method brings out different flavors and textures in the pork chops. Choose the one that fits your schedule and taste preferences!

Cooking Note for Sweet and Savory Brown Sugar Pork Chops Recipe

Sweet and Savory Brown Sugar Pork Chops Recipe, there are a few important cooking notes to keep in mind. These tips will help ensure that your pork chops turn out perfectly every time.

First, always check the thickness of your pork chops. Thicker chops may require a longer cooking time, while thinner ones will cook faster. Using a meat thermometer is the best way to ensure they reach the safe internal temperature of 145°F (63°C). This guarantees that the pork is cooked through while remaining juicy and tender.

Next, let the pork chops rest after cooking. This step is crucial as it allows the juices to redistribute throughout the meat. If you cut into them right away, the juices will run out, leaving you with dry pork. A resting time of about 5 minutes is ideal.

Additionally, consider the type of skillet you use. An oven-safe skillet, like cast iron or stainless steel, is perfect for this recipe. It allows for a seamless transition from stovetop to oven, ensuring even cooking and a nice sear.

Lastly, don’t be afraid to adjust the seasoning to your liking. If you prefer a sweeter flavor, add a bit more brown sugar. For a spicier kick, increase the amount of black pepper or cayenne. Cooking is all about personal preference, so feel free to make this recipe your own!

Sweet and Savory Brown Sugar Pork Chops that will impress everyone at your dinner table.

Serving Suggestions for Sweet and Savory Brown Sugar Pork Chops Recipe

Sweet and Savory Brown Sugar Pork Chops are cooked to perfection, it’s time to think about how to serve them. The right sides can elevate your meal and create a balanced plate. Here are some delicious serving suggestions that pair wonderfully with the pork chops:

  • Roasted Vegetables: A medley of roasted vegetables, such as carrots, bell peppers, and zucchini, adds color and nutrition to your plate. The natural sweetness of the veggies complements the brown sugar glaze on the pork.
  • Mashed Potatoes: Creamy mashed potatoes are a classic side that pairs beautifully with pork. You can make them buttery or add garlic for extra flavor. They also soak up the delicious sauce from the pork chops.
  • Rice Pilaf: Fluffy rice pilaf with herbs and spices is another great option. It provides a nice base for the pork and absorbs the savory marinade, enhancing the overall taste.
  • Coleslaw: A fresh coleslaw adds a crunchy texture and a tangy flavor that balances the sweetness of the pork. Consider a vinegar-based dressing for a lighter option.
  • Green Salad: A simple green salad with mixed greens, cherry tomatoes, and a light vinaigrette can brighten up the meal. The freshness of the salad contrasts nicely with the rich flavors of the pork chops.

For a complete dining experience, consider serving your pork chops with a glass of white wine or a refreshing iced tea. The combination of flavors will surely impress your guests and make for a memorable meal.

Feel free to mix and match these sides based on your preferences and what you have on hand. The goal is to create a well-rounded meal that everyone will enjoy!

Tips for Perfecting Sweet and Savory Brown Sugar Pork Chops Recipe

Sweet and Savory Brown Sugar Pork Chops Recipe turns out perfectly every time, consider these helpful tips. They will enhance the flavor and texture of your dish, making it even more enjoyable for you and your guests.

  • Choose Quality Pork: Start with high-quality bone-in pork chops. Look for chops that are well-marbled with fat. This fat will keep the meat juicy and flavorful during cooking.
  • Marinate for Longer: If time allows, marinate the pork chops for a few hours or even overnight. This extra time allows the flavors to penetrate deeper into the meat, resulting in a more flavorful dish.
  • Use a Meat Thermometer: To avoid overcooking, use a meat thermometer to check the internal temperature. Aim for 145°F (63°C) for perfectly cooked pork. This ensures the meat is safe to eat while remaining juicy.
  • Let Them Rest: After cooking, let the pork chops rest for about 5 minutes. This resting period allows the juices to redistribute, making the meat more tender and flavorful.
  • Experiment with Seasonings: Don’t hesitate to adjust the spice mixture to suit your taste. If you prefer a sweeter flavor, add more brown sugar. For a spicier kick, increase the amount of black pepper or cayenne.
  • Garnish for Presentation: A sprinkle of fresh parsley not only adds color but also a fresh flavor that brightens the dish. Presentation matters, so take a moment to make your plate look appealing!
  • Pair with the Right Sides: As mentioned earlier, serving your pork chops with complementary sides can elevate the meal. Choose sides that balance the sweetness of the pork, like roasted vegetables or a tangy salad.

Sweet and Savory Brown Sugar Pork Chops Recipe. Each bite will be a delightful experience, leaving everyone at the table wanting more!

Breakdown of Time for Sweet and Savory Brown Sugar Pork Chops Recipe

Sweet and Savory Brown Sugar Pork Chops Recipe is essential for planning your meal. Here’s a detailed breakdown of the time required for preparation and cooking, so you can manage your kitchen time effectively.

Prep Time

The prep time for this recipe is approximately 15-30 minutes. This includes:

  • Gathering all your ingredients.
  • Patting the pork chops dry.
  • Mixing the spice blend.
  • Rubbing the spice mixture onto the pork chops.
  • Allowing the pork chops to marinate (optional but recommended for enhanced flavor).

Taking a little extra time to marinate the pork chops can significantly improve the taste, so consider this when planning your meal.

Cooking Time

Sweet and Savory Brown Sugar Pork Chops is about 20-25 minutes. This includes:

  • Searing the pork chops in the skillet for 6-8 minutes (3-4 minutes on each side).
  • Baking the pork chops in the oven for 15-20 minutes until they reach the safe internal temperature of 145°F (63°C).

Make sure to keep an eye on the pork chops while they bake to ensure they don’t overcook.

Total Time

In total, you can expect the entire process to take around 35-55 minutes, depending on whether you choose to marinate the pork chops. Here’s a quick summary:

  • Prep Time: 15-30 minutes
  • Cooking Time: 20-25 minutes
  • Total Time: 35-55 minutes

Sweet and Savory Brown Sugar Pork Chops Recipe into your busy schedule. With just a little planning, you can serve a delicious meal that everyone will love!

Nutritional Information for Sweet and Savory Brown Sugar Pork Chops Recipe

Sweet and Savory Brown Sugar Pork Chops Recipe not only offers delicious flavors but also provides valuable nutrients. Here’s a breakdown of the nutritional information per serving, so you can enjoy your meal while keeping track of your dietary needs.

Calories

Sweet and Savory Brown Sugar Pork Chops contains approximately 320 calories. This calorie count makes it a satisfying option for dinner without being overly heavy. The combination of protein and healthy fats helps keep you full and energized.

Protein

In terms of protein, this recipe packs a punch with about 26 grams per serving. Protein is vital for muscle repair and growth, making these pork chops a great choice for anyone looking to maintain or build muscle mass. It also helps keep you feeling satisfied longer, which can be beneficial for weight management.

Sodium

The sodium content in each serving is around 600 milligrams. While this is a moderate amount, it’s important to be mindful of your overall sodium intake, especially if you are watching your salt consumption. You can reduce the sodium by using low-sodium soy sauce or adjusting the amount of added salt in the recipe.

Sweet and Savory Brown Sugar Pork Chops Recipe is a nutritious option that balances flavor and health. With its rich protein content and moderate calorie count, it can fit well into a variety of dietary plans. Enjoy this delicious dish while being mindful of your nutritional goals!

FAQs about Sweet and Savory Brown Sugar Pork Chops Recipe

Can I use other cuts of pork for this recipe?

Absolutely! While bone-in pork chops are recommended for their flavor and moisture, you can use other cuts of pork as well. Boneless pork chops, pork loin, or even pork tenderloin can work nicely. Just keep in mind that cooking times may vary based on the thickness of the meat. Always check the internal temperature to ensure it reaches 145°F (63°C) for safe consumption.

How can I make the pork chops more tender?

To achieve tender pork chops, consider a few techniques. First, marinating the pork for a longer time can help break down the meat fibers, making it more tender. You can also use a meat mallet to gently pound the chops before cooking. This helps to tenderize the meat. Lastly, avoid overcooking the pork, as this can lead to dryness. Using a meat thermometer will help you cook them just right!

What sides pair well with Sweet and Savory Brown Sugar Pork Chops?

Sweet and Savory Brown Sugar Pork Chops. Some great options include:

  • Roasted Vegetables: Carrots, Brussels sprouts, or green beans add color and nutrition.
  • Mashed Potatoes: Creamy mashed potatoes are a classic pairing that soaks up the sauce.
  • Rice Pilaf: Fluffy rice pilaf enhances the meal with its light texture.
  • Coleslaw: A tangy coleslaw provides a refreshing crunch that balances the sweetness.
  • Green Salad: A simple salad with mixed greens and vinaigrette adds freshness to the plate.

Feel free to mix and match these sides based on your preferences and what you have available!

Can I prepare the marinade in advance?

Yes, you can prepare the marinade in advance! In fact, making the marinade ahead of time can enhance the flavors. Simply mix the marinade ingredients and store them in the refrigerator for up to 24 hours. When you’re ready to cook, just marinate the pork chops for at least 30 minutes or longer for even better flavor. This makes meal prep easier and allows you to enjoy a delicious dinner with minimal effort!

Conclusion on Sweet and Savory Brown Sugar Pork Chops Recipe

Sweet and Savory Brown Sugar Pork Chops Recipe is a delightful dish that brings together the perfect balance of flavors. With its sweet brown sugar glaze and savory spices, this recipe is sure to become a favorite in your household. Not only is it easy to prepare, but it also offers a satisfying meal that can impress family and friends alike.

Throughout this article, we’ve explored the essential ingredients, step-by-step preparation, and various ways to customize the recipe. Whether you choose to grill, bake, or slow cook, the versatility of this dish allows you to adapt it to your cooking style and preferences. Plus, the nutritional benefits make it a wholesome choice for any dinner table.

Remember, cooking is all about creativity and personal touch. Feel free to experiment with different ingredients and sides to make this recipe your own. With a little practice and these helpful tips, you’ll be able to serve up perfectly cooked pork chops every time.

Sweet and Savory Brown Sugar Pork Chops. Your taste buds will thank you, and your loved ones will be asking for seconds!

Tater Tot Casserole Recipe is a family favorite dish.

Introduction to Tater Tot Casserole Recipe

Welcome to the delightful world of Tater Tot Casserole! This dish is a comforting classic that brings warmth and joy to any table. Perfect for family dinners or casual gatherings, it combines the savory flavors of ground beef, creamy soup, and crispy tater tots into one delicious meal. Not only is it easy to prepare, but it also satisfies even the pickiest eaters.

The Tater Tot Casserole Recipe is a fantastic way to enjoy a hearty meal without spending hours in the kitchen. With just a few simple ingredients, you can create a dish that is both filling and flavorful. Plus, it’s a great opportunity to get creative! You can customize it with your favorite ingredients or make it healthier by swapping out certain items.

This casserole is not just about taste; it’s also about convenience. You can prepare it ahead of time and pop it in the oven when you’re ready to eat. Whether you’re hosting a game night or just looking for a quick weeknight dinner, this recipe has got you covered.

So, roll up your sleeves and get ready to dive into this easy and delicious Tater Tot Casserole Recipe. Your family and friends will be asking for seconds!

Ingredients for Tater Tot Casserole Recipe

To create a mouthwatering Tater Tot Casserole, you’ll need a few key ingredients. Each one plays a vital role in building the rich flavors and textures that make this dish so beloved. Here’s what you’ll need:

  • 2 pounds ground beef: This is the main protein source, providing a hearty base for the casserole.
  • 1 medium onion, diced: Onions add sweetness and depth to the flavor profile.
  • 2 cloves garlic, minced: Garlic brings a wonderful aroma and enhances the overall taste.
  • 1 can (10.5 ounces) cream of mushroom soup: This creamy soup binds the ingredients together and adds richness.
  • 1 cup sour cream: Sour cream contributes creaminess and a slight tang.
  • 1 cup shredded cheddar cheese: Cheese adds a deliciously gooey layer on top.
  • 1 bag (32 ounces) frozen tater tots: The star of the dish, tater tots provide a crispy topping.
  • 1 teaspoon salt: Salt enhances all the flavors in the casserole.
  • 1/2 teaspoon black pepper: Pepper adds a subtle kick.
  • 1 teaspoon paprika: Paprika gives a hint of smokiness and color.
  • 1/2 teaspoon dried thyme: Thyme adds an earthy flavor that complements the other ingredients.

With these ingredients on hand, you’re well on your way to making a delicious Tater Tot Casserole. Feel free to adjust the quantities or swap out ingredients based on your preferences. For instance, you can use ground turkey for a lighter option or add your favorite vegetables for extra nutrition. The possibilities are endless!

Step-by-Step Preparation of Tater Tot Casserole Recipe

Now that you have all your ingredients ready, it’s time to dive into the step-by-step preparation of your Tater Tot Casserole Recipe. Follow these simple steps to create a dish that will surely impress your family and friends!

Step 1: Preheat the Oven

First things first, preheat your oven to 350°F (175°C). This step is crucial as it ensures that your casserole cooks evenly. While the oven heats up, you can start preparing the meat mixture.

Step 2: Prepare the Meat Mixture

In a large skillet, heat over medium heat. Add the 2 pounds of ground beef, diced onion, and minced garlic. Cook this mixture for about 7-10 minutes. Stir occasionally until the beef is browned and the onions are translucent. Once cooked, drain any excess fat to keep your casserole from becoming greasy.

Step 3: Combine Ingredients

Next, transfer the cooked beef mixture into a large mixing bowl. Add the cream of mushroom soup, sour cream, salt, black pepper, paprika, and dried thyme. Stir everything together until well combined. This mixture will be the flavorful base of your casserole.

Step 4: Layer the Casserole

Now, it’s time to assemble your casserole! Grease a 9×13-inch baking dish to prevent sticking. Spread the beef mixture evenly across the bottom of the dish. Make sure it’s spread out nicely so every bite is packed with flavor.

Step 5: Add Tater Tots

Once the beef mixture is in place, sprinkle the shredded cheddar cheese evenly over the top. Then, take the bag of frozen tater tots and arrange them in a single layer on top of the cheese. This crispy layer will add a delightful crunch to your casserole.

Step 6: Bake the Casserole

Finally, place the baking dish in your preheated oven. Bake for 30-35 minutes, or until the tater tots are golden brown and crispy. Once done, remove the casserole from the oven and let it cool for about 5 minutes before serving. This cooling time helps the layers set, making it easier to serve.

And there you have it! A delicious Tater Tot Casserole ready to be enjoyed. This step-by-step guide ensures that you create a dish that is not only tasty but also visually appealing. Get ready to dig in!

Variations of Tater Tot Casserole Recipe

The beauty of the Tater Tot Casserole Recipe lies in its versatility. You can easily adapt it to suit different tastes and dietary preferences. Here are two popular variations that you can try: a vegetarian option and a spicy twist. Each variation maintains the comforting essence of the original while offering something unique.

Vegetarian Tater Tot Casserole Recipe

If you’re looking for a meat-free alternative, the Vegetarian Tater Tot Casserole is a fantastic choice. This version is packed with vegetables, making it both nutritious and delicious. Here’s how to make it:

  • Replace the ground beef: Use 2 cups of your favorite vegetables, such as bell peppers, zucchini, and mushrooms. You can also add canned beans for extra protein.
  • Keep the base: Use the same cream of mushroom soup and sour cream to maintain the creamy texture.
  • Season well: Add spices like cumin or chili powder to enhance the flavor.

Follow the same preparation steps as the original recipe. The result is a hearty, satisfying dish that everyone will love, even meat-eaters!

Spicy Tater Tot Casserole Recipe

If you enjoy a bit of heat, the Spicy Tater Tot Casserole Recipe is perfect for you. This variation adds a kick that will tantalize your taste buds. Here’s how to spice things up:

  • Add heat: Mix in a can of diced green chilies or jalapeños with the beef mixture. Adjust the amount based on your spice preference.
  • Use spicy cheese: Consider using pepper jack cheese instead of cheddar for an extra layer of flavor.
  • Top with hot sauce: Drizzle your favorite hot sauce over the casserole before serving for an added zing.

Just like the original recipe, follow the same steps for preparation and baking. This spicy version will surely be a hit at your next gathering!

These variations of the Tater Tot Casserole Recipe allow you to explore different flavors while keeping the essence of this beloved dish. Whether you prefer a vegetarian option or a spicy kick, there’s a version for everyone!

Cooking Note for Tater Tot Casserole Recipe

When preparing your Tater Tot Casserole, there are a few cooking notes to keep in mind. These tips will help you achieve the best results and ensure that your dish turns out perfectly every time.

First, always use a large skillet for browning the ground beef. This allows for even cooking and prevents overcrowding, which can lead to steaming instead of browning. Browning the meat properly enhances the flavor of the casserole.

Next, consider the quality of your ingredients. Fresh vegetables and high-quality cheese can elevate the taste of your casserole. If possible, opt for organic or locally sourced products. They often have better flavor and nutritional value.

Additionally, if you’re using frozen tater tots, there’s no need to thaw them before baking. Simply arrange them directly on top of the cheese. They will cook perfectly in the oven, becoming crispy and golden brown.

For those who enjoy a bit of crunch, you can sprinkle some breadcrumbs or crushed potato chips on top of the tater tots before baking. This adds an extra layer of texture that many find delightful.

Lastly, remember to let the casserole cool for a few minutes after baking. This resting time allows the layers to set, making it easier to serve. If you cut into it too soon, the layers may not hold together well.

By following these cooking notes, you’ll ensure that your Tater Tot Casserole is not only delicious but also visually appealing. Happy cooking!

Serving Suggestions for Tater Tot Casserole Recipe

Once your Tater Tot Casserole is baked to perfection, it’s time to serve it up! This dish is not only delicious but also incredibly versatile when it comes to serving. Here are some delightful suggestions to enhance your dining experience:

  • Garnish with Fresh Herbs: A sprinkle of chopped parsley or chives on top adds a pop of color and freshness. It also enhances the flavor, making each bite even more enjoyable.
  • Pair with a Side Salad: A crisp green salad complements the richness of the casserole. Consider a simple mixed greens salad with a light vinaigrette to balance the meal.
  • Serve with Dipping Sauces: Offer a variety of dipping sauces like ranch, barbecue, or hot sauce. These can add an extra layer of flavor and allow guests to customize their plates.
  • Include a Vegetable Side: Steamed broccoli, green beans, or roasted carrots can provide a nutritious contrast to the hearty casserole. This adds color and nutrition to your meal.
  • Make it a Buffet: If you’re hosting a gathering, consider serving the casserole as part of a buffet. Include other sides like garlic bread, coleslaw, or baked beans for a complete meal.
  • Top with Avocado or Guacamole: For a creamy twist, add slices of avocado or a dollop of guacamole on top of each serving. This adds a delicious creaminess that pairs well with the casserole.

These serving suggestions will not only elevate your Tater Tot Casserole but also create a delightful dining experience for you and your guests. Enjoy the warmth and comfort of this classic dish, and don’t forget to share the love!

Tips for Perfecting Your Tater Tot Casserole Recipe

To make your Tater Tot Casserole truly shine, consider these helpful tips. They will guide you in creating a dish that is not only delicious but also visually appealing. With a few simple adjustments, you can elevate your casserole to the next level!

  • Use Fresh Ingredients: Fresh ingredients can make a big difference in flavor. Opt for fresh onions and garlic instead of pre-packaged versions. Fresh herbs can also enhance the taste.
  • Don’t Overcook the Beef: When browning the ground beef, avoid overcooking it. You want it to be just browned, as it will continue to cook in the oven. This keeps the meat tender and juicy.
  • Experiment with Cheese: While cheddar cheese is a classic choice, feel free to mix it up! Try using a blend of cheeses like mozzarella, Monterey Jack, or even a spicy pepper jack for added flavor.
  • Layering is Key: When layering your casserole, make sure to spread the beef mixture evenly. This ensures that every bite is packed with flavor. Don’t forget to cover the entire surface with tater tots for that perfect crispy topping.
  • Adjust Seasonings: Taste your beef mixture before layering it in the baking dish. If you feel it needs more flavor, don’t hesitate to add extra spices or herbs. A little extra seasoning can go a long way!
  • Let it Rest: After baking, allow the casserole to rest for about 5-10 minutes before serving. This helps the layers set and makes it easier to cut and serve.
  • Make it Ahead: If you’re short on time, consider preparing the casserole ahead of time. You can assemble it the night before and store it in the fridge. Just pop it in the oven when you’re ready to eat!
  • Use a Meat Thermometer: If you’re unsure whether the casserole is fully cooked, use a meat thermometer. The internal temperature should reach 160°F (71°C) for safety.

By following these tips, you’ll be well on your way to creating a Tater Tot Casserole that is not only delicious but also a crowd-pleaser. Enjoy the process and have fun experimenting with flavors!

Breakdown of Time for Tater Tot Casserole Recipe

Understanding the time needed for each step of the Tater Tot Casserole Recipe can help you plan your cooking efficiently. Here’s a simple breakdown of the time required for preparation and cooking:

Prep Time

The prep time for this delicious casserole is approximately 15-20 minutes. During this time, you will gather all your ingredients, dice the onion, and mince the garlic. Additionally, you will brown the ground beef with the onion and garlic. This step is essential for building flavor in your casserole.

Cooking Time

Once your casserole is assembled, the cooking time is about 30-35 minutes. This allows the tater tots to become golden brown and crispy while the flavors meld together beautifully. It’s important to keep an eye on the casserole during the last few minutes to ensure it doesn’t overcook.

Total Time

In total, you can expect the entire process to take around 45-55 minutes from start to finish. This includes both prep and cooking time. With such a quick turnaround, you can have a hearty and satisfying meal ready in no time!

By knowing the time breakdown, you can better manage your cooking schedule and enjoy the process of making this delightful Tater Tot Casserole Recipe.

Nutritional Information for Tater Tot Casserole Recipe

Understanding the nutritional content of your meals is essential for maintaining a balanced diet. The Tater Tot Casserole Recipe is not only delicious but also provides a good amount of nutrients. Here’s a breakdown of the nutritional information per serving:

Calories

Each serving of Tater Tot Casserole contains approximately 450 calories. This makes it a hearty meal that can keep you satisfied for hours. The combination of ground beef, cheese, and tater tots contributes to the calorie count, providing energy for your day.

Protein

In terms of protein, this casserole packs a punch with about 25 grams per serving. The ground beef and cheese are excellent sources of protein, which is vital for muscle repair and overall health. Including protein in your meals can help you feel fuller for longer, making this casserole a great option for a filling dinner.

Sodium

However, it’s important to note that the sodium content is around 800 milligrams per serving. This is primarily due to the cream of mushroom soup and added salt. If you’re watching your sodium intake, consider using low-sodium soup or reducing the amount of salt in the recipe. This way, you can enjoy the flavors without compromising your health.

Overall, the Tater Tot Casserole Recipe offers a balanced mix of calories, protein, and flavor. By being mindful of the ingredients, you can adjust the recipe to fit your dietary needs while still enjoying this comforting dish. Whether you’re serving it for a family dinner or a casual gathering, it’s sure to be a hit!

FAQs about Tater Tot Casserole Recipe

Can I make Tater Tot Casserole Recipe ahead of time?

Absolutely! Making Tater Tot Casserole ahead of time is a great way to save time during busy weeknights or when hosting guests. You can prepare the casserole up to the point of baking. Simply assemble all the layers in your greased baking dish, cover it tightly with plastic wrap or aluminum foil, and store it in the refrigerator. When you’re ready to bake, just remove the cover and pop it in the oven. You may need to add a few extra minutes to the cooking time if baking from cold.

What can I substitute for meat in Tater Tot Casserole Recipe?

If you’re looking for a meat substitute, there are plenty of delicious options! You can use 2 cups of cooked lentils or canned beans for a protein-packed vegetarian version. Another option is to use ground turkey or chicken for a leaner meat choice. If you want to keep it plant-based, consider using a mix of sautéed vegetables like bell peppers, zucchini, and mushrooms. These alternatives will still provide a hearty and satisfying casserole while catering to different dietary preferences.

How do I store leftovers of Tater Tot Casserole Recipe?

Storing leftovers of your Tater Tot Casserole is simple! Allow the casserole to cool completely before transferring it to an airtight container. You can store it in the refrigerator for up to 3-4 days. If you want to keep it longer, consider freezing it. To freeze, wrap the casserole tightly in plastic wrap and then in aluminum foil. It can last in the freezer for up to 2-3 months. When you’re ready to enjoy it again, thaw it in the refrigerator overnight and reheat in the oven until warmed through.

Conclusion on Tater Tot Casserole Recipe

In conclusion, the Tater Tot Casserole Recipe is a delightful dish that brings comfort and satisfaction to any meal. Its combination of savory ground beef, creamy ingredients, and crispy tater tots creates a unique flavor profile that appeals to all ages. Whether you’re preparing it for a family dinner, a potluck, or a cozy night in, this casserole is sure to impress.

Not only is it easy to make, but it also offers endless possibilities for customization. You can experiment with different ingredients, such as adding vegetables or trying out various cheeses. The variations, like the vegetarian or spicy versions, allow you to cater to different tastes and dietary needs, making it a versatile choice for any occasion.

Moreover, the Tater Tot Casserole is a practical option for busy weeknights. You can prepare it ahead of time and simply pop it in the oven when you’re ready to eat. This convenience, combined with its hearty nature, makes it a go-to recipe for many home cooks.

As you embark on your cooking journey with this Tater Tot Casserole Recipe, remember to have fun and enjoy the process. Cooking is not just about the end result; it’s also about the joy of creating something delicious for yourself and your loved ones. So gather your ingredients, follow the steps, and savor every bite of this comforting dish!

Happy cooking, and may your Tater Tot Casserole be a hit at your table!

Better Than Takeout Fried Rice is easy to make!

Introduction to Better Than Takeout Fried Rice Recipe

Better Than Takeout Fried Rice Recipe is here to satisfy your taste buds. This dish is not only packed with flavor but also allows you to customize it to your liking. Whether you’re a fan of vegetables, proteins, or both, this recipe has got you covered.

Fried rice is a beloved dish around the world. It’s often enjoyed for its delightful combination of textures and tastes. However, takeout can sometimes be greasy or lack the freshness you desire. By making it at home, you can control the ingredients and ensure a healthier option. Plus, it’s a fantastic way to use up leftover rice and veggies!

In this recipe, we’ll guide you through each step, making it easy for anyone to whip up a batch of fried rice that’s better than what you’d get from your favorite restaurant. With just a few simple ingredients, you can create a meal that’s not only satisfying but also nutritious.

So, roll up your sleeves and get ready to dive into the world of homemade fried rice. Let’s make a dish that will impress your family and friends, and leave them wondering how you did it!

Ingredients for Better Than Takeout Fried Rice Recipe

Better Than Takeout Fried Rice Recipe, you’ll need a handful of simple ingredients. Each component plays a vital role in delivering that authentic fried rice flavor. Here’s what you’ll need:

  • 2 cups cooked jasmine rice: Day-old rice works best as it’s drier and prevents clumping.
  • 2 tablespoons vegetable oil: This oil helps in frying the ingredients and adds a nice flavor.
  • 3 large eggs: Beaten eggs add protein and richness to the dish.
  • 1 cup frozen peas and carrots mix: This mix adds color and nutrition, making the dish more appealing.
  • 1 small onion: Diced onion provides a sweet and savory base for the fried rice.
  • 3 cloves garlic: Minced garlic enhances the overall flavor with its aromatic qualities.
  • 3 green onions: Sliced green onions add a fresh crunch and a pop of color.
  • 3 tablespoons soy sauce: This is the key seasoning that gives fried rice its signature taste.
  • 1 tablespoon oyster sauce (optional): This sauce adds depth and umami flavor.
  • 1 teaspoon sesame oil: A drizzle of sesame oil at the end brings a nutty aroma.
  • Salt and pepper: To taste, these seasonings help balance the flavors.

Gathering these ingredients will set you on the right path to making a delicious fried rice dish. Feel free to adjust the quantities based on your preferences or dietary needs. Now that you have everything ready, let’s move on to the preparation steps!

Step-by-Step Preparation of Better Than Takeout Fried Rice Recipe

Better Than Takeout Fried Rice Recipe. Each step is designed to ensure that your fried rice turns out flavorful and satisfying.

Step 1: Preparing the Rice

First, make sure your rice is ready. If you have day-old jasmine rice, that’s perfect! If not, you can cook fresh rice and let it cool. Spread it out on a baking sheet to cool quickly. This helps to dry it out, making it less sticky. Once cooled, fluff the rice with a fork to separate the grains. This step is crucial for achieving that perfect fried rice texture.

Step 2: Chopping the Vegetables

Next, it’s time to chop your vegetables. Start with the onion. Dice it into small pieces so it cooks evenly. Then, mince the garlic finely to release its wonderful aroma. If you’re adding any extra vegetables, like bell peppers or broccoli, chop them into bite-sized pieces. Having everything prepped and ready will make the cooking process smooth and quick.

Step 3: Cooking the Protein

If you’re adding protein, now’s the time to cook it. Heat a little oil in your skillet or wok over medium-high heat. Add your choice of protein, such as chicken, shrimp, or tofu. Stir-fry until fully cooked, which usually takes about 5-7 minutes. Once done, remove the protein from the skillet and set it aside. This keeps the flavors fresh and prevents overcooking.

Step 4: Stir-Frying the Ingredients

In the same skillet, add the remaining vegetable oil. Start by sautéing the diced onion for about 2-3 minutes until it becomes translucent. Then, add the minced garlic and cook for another 30 seconds. The aroma will fill your kitchen! Next, toss in the frozen peas and carrots. Stir-fry everything together for about 2-3 minutes until the vegetables are heated through and vibrant.

Step 5: Adding the Sauce

Now it’s time to bring everything together! Add the prepared rice to the skillet, breaking up any clumps. Stir-fry for about 5 minutes until the rice is heated and slightly crispy. Pour in the soy sauce, oyster sauce (if using), and sesame oil. Mix everything well to ensure the rice is evenly coated with the sauces. Finally, add the scrambled eggs and sliced green onions, stirring until all ingredients are combined. Season with salt and pepper to taste, and your fried rice is ready to serve!

Variations of Better Than Takeout Fried Rice Recipe

Better Than Takeout Fried Rice Recipe lies in its versatility. You can easily customize it to suit your taste preferences or dietary needs. Here are some exciting variations to consider:

Vegetarian Options

If you’re looking for a meat-free meal, there are plenty of vegetarian options to explore. Start by replacing the eggs with scrambled tofu for a protein boost. You can also add a variety of vegetables like bell peppers, zucchini, or mushrooms. These not only enhance the flavor but also add vibrant colors to your dish. For an extra kick, consider tossing in some bean sprouts or baby corn. This way, you’ll have a delicious and nutritious vegetarian fried rice that everyone will love!

Protein Substitutes

For those who enjoy protein in their meals, there are many substitutes you can use. Chicken, shrimp, and tofu are popular choices, but don’t stop there! You can also try beef, pork, or even tempeh for a different texture. If you’re short on time, pre-cooked proteins like rotisserie chicken or canned tuna can be great options. Just remember to stir-fry them briefly to warm them up before adding the rice. This ensures that your fried rice is hearty and satisfying!

Flavor Enhancements

Better Than Takeout Fried Rice Recipe to the next level, making it even more enjoyable!

Cooking Note for Better Than Takeout Fried Rice Recipe

Better Than Takeout Fried Rice Recipe, there are a few important cooking notes to keep in mind. These tips will help you achieve the best results and ensure your fried rice turns out perfectly every time.

First, using day-old rice is highly recommended. Freshly cooked rice tends to be moist and sticky, which can lead to clumpy fried rice. Day-old rice has dried out a bit, making it easier to separate the grains during cooking. If you don’t have leftover rice, you can cook fresh rice and let it cool completely before using it. Spreading it out on a baking sheet helps speed up the cooling process.

Next, make sure your skillet or wok is hot before adding the ingredients. A hot cooking surface allows for quick stir-frying, which helps to lock in flavors and maintain the crispness of the vegetables. If the pan isn’t hot enough, the ingredients may steam instead of fry, resulting in a less desirable texture.

Additionally, don’t overcrowd the pan. If you’re making a large batch, it’s better to cook in smaller portions. Overcrowding can lower the temperature of the pan, leading to uneven cooking. If you find that your skillet is getting too full, consider transferring some of the cooked ingredients to a separate bowl while you finish cooking the rest.

Lastly, feel free to adjust the seasoning to your taste. The soy sauce and oyster sauce provide a great base flavor, but you can always add more or less depending on your preference. Taste as you go, and don’t hesitate to experiment with different sauces or spices to make the dish your own.

By following these cooking notes, you’ll be well on your way to creating a delicious and satisfying fried rice that’s truly better than takeout!

Serving Suggestions for Better Than Takeout Fried Rice Recipe

Better Than Takeout Fried Rice Recipe, it’s time to think about how to serve it. Presentation can elevate your meal, making it even more enjoyable. Here are some delightful serving suggestions to consider:

  • Garnish with Fresh Herbs: A sprinkle of fresh cilantro or basil on top adds a burst of color and flavor. These herbs not only enhance the dish visually but also provide a refreshing taste.
  • Pair with Protein: Serve your fried rice alongside grilled chicken, shrimp, or tofu for a complete meal. This combination adds extra protein and makes the dish more filling.
  • Accompany with a Side Salad: A light salad with mixed greens, cucumbers, and a tangy dressing can balance the richness of the fried rice. It adds a crunchy texture and freshness to your meal.
  • Offer Dipping Sauces: Consider serving soy sauce, sweet chili sauce, or sriracha on the side. These sauces allow guests to customize their flavor experience, adding a personal touch to each serving.
  • Use Fun Serving Dishes: Present your fried rice in colorful bowls or on a large platter. This makes the meal feel special and inviting, perfect for family dinners or gatherings with friends.

Better Than Takeout Fried Rice Recipe but also create a delightful dining experience. Enjoy your homemade fried rice with loved ones, and watch as they savor every bite!

Tips for Perfecting Better Than Takeout Fried Rice Recipe

Better Than Takeout Fried Rice Recipe, there are several tips that can help you achieve the best flavor and texture. These simple yet effective strategies will elevate your dish and impress your family and friends.

  • Use Day-Old Rice: As mentioned earlier, day-old rice is ideal for fried rice. It’s drier and less sticky, which helps create that perfect fried rice texture. If you don’t have any, cook fresh rice and let it cool completely before using it.
  • Prep All Ingredients First: Before you start cooking, have all your ingredients chopped and ready to go. This makes the cooking process smoother and faster, ensuring that everything cooks evenly.
  • Keep the Heat High: A hot skillet or wok is essential for stir-frying. High heat helps to sear the ingredients quickly, locking in flavors and keeping the vegetables crisp. Don’t be afraid to adjust the heat as needed while cooking.
  • Don’t Overcrowd the Pan: If you’re making a large batch, cook in smaller portions. Overcrowding can lower the temperature of the pan, leading to steaming instead of frying. This can result in soggy fried rice.
  • Season Gradually: Start with the recommended amounts of soy sauce and other seasonings. Taste as you go, and adjust according to your preference. This way, you can control the saltiness and flavor intensity.
  • Add Ingredients in Stages: When cooking, add ingredients in stages based on their cooking times. For example, add the onions first, then the garlic, followed by the vegetables, and finally the rice. This ensures everything is cooked perfectly.
  • Finish with Fresh Ingredients: Adding fresh herbs or green onions at the end of cooking adds a burst of flavor and color. This final touch makes your fried rice look and taste even better.
  • Experiment with Flavors: Don’t hesitate to try different sauces or spices. Adding a splash of rice vinegar or a sprinkle of sesame seeds can enhance the dish. Be creative and make it your own!

Better Than Takeout Fried Rice Recipe that’s bursting with flavor and texture. Enjoy the process, and happy cooking!

Breakdown of Time for Better Than Takeout Fried Rice Recipe

Better Than Takeout Fried Rice Recipe can help you plan your cooking efficiently. Here’s a simple breakdown of the time required for preparation and cooking:

Prep Time

The prep time for this delicious fried rice is approximately 15-20 minutes. This includes gathering your ingredients, chopping vegetables, and preparing any proteins you wish to add. Having everything ready before you start cooking will make the process smoother and quicker.

Cooking Time

Once you’re ready to cook, the actual cooking time is about 15-20 minutes. This includes scrambling the eggs, sautéing the vegetables, and stir-frying the rice. The quick cooking time is one of the reasons why this recipe is so appealing. You can have a tasty meal on the table in no time!

Total Time

Better Than Takeout Fried Rice Recipe a fantastic option for busy weeknights or when you want a quick and satisfying meal. With just a little bit of time and effort, you can enjoy a homemade dish that rivals your favorite takeout!

Nutritional Information for Better Than Takeout Fried Rice Recipe

Better Than Takeout Fried Rice Recipe not only satisfies your taste buds but also provides valuable nutrients. Here’s a breakdown of the nutritional information per serving:

Calories

320 calories. This makes it a satisfying option without being overly heavy. The calorie count can vary based on the specific ingredients you choose, especially if you add proteins or extra vegetables. Keeping track of your portions can help you enjoy this dish while staying within your dietary goals.

Protein

10 grams per serving. The protein comes primarily from the eggs and any additional proteins you may choose to include, such as chicken, shrimp, or tofu. If you’re looking to boost the protein content, consider adding more of these ingredients. This will not only enhance the nutritional value but also make the dish more filling.

Sodium

600 milligrams per serving. Most of the sodium comes from the soy sauce and oyster sauce. If you’re watching your sodium intake, you can opt for low-sodium soy sauce or reduce the amount of sauce used. This way, you can enjoy the flavors without compromising your health.

Better Than Takeout Fried Rice Recipe as part of a balanced diet. Feel free to adjust the ingredients to meet your dietary needs while still savoring this delightful dish!

FAQs about Better Than Takeout Fried Rice Recipe

Can I use leftover rice for this recipe?

Better Than Takeout Fried Rice Recipe. Day-old rice is drier and less sticky, which helps achieve that perfect fried rice texture. If you have fresh rice, make sure to let it cool completely before using it. Spreading it out on a baking sheet can help speed up the cooling process.

What vegetables work best in fried rice?

Fried rice is incredibly versatile when it comes to vegetables. You can use a variety of options based on your preferences. Common choices include peas, carrots, bell peppers, broccoli, and green beans. Feel free to mix and match! Just remember to chop them into small, even pieces for even cooking. The more colorful your vegetable mix, the more appealing your fried rice will look!

How can I make this recipe gluten-free?

Better Than Takeout Fried Rice Recipe gluten-free is simple! Just swap out regular soy sauce for gluten-free soy sauce or tamari. Additionally, ensure that any other sauces you use, like oyster sauce, are also gluten-free. With these adjustments, you can enjoy a delicious fried rice dish without worrying about gluten.

Can I freeze fried rice?

Yes, you can freeze fried rice! To do this, let the fried rice cool completely before transferring it to an airtight container or freezer bag. Make sure to remove as much air as possible to prevent freezer burn. When you’re ready to enjoy it, simply reheat it in the microwave or on the stovetop. Just add a splash of water to help steam it back to life. This makes for a convenient meal option on busy days!

Conclusion on Better Than Takeout Fried Rice Recipe

Better Than Takeout Fried Rice Recipe is a fantastic way to enjoy a beloved dish right in the comfort of your home. With its simple ingredients and easy preparation, you can whip up a delicious meal that rivals your favorite takeout. Not only is it customizable to suit your taste, but it also allows you to control the quality of the ingredients, making it a healthier option.

Whether you prefer a vegetarian version or want to load it up with protein, the possibilities are endless. You can experiment with different vegetables, sauces, and seasonings to create a dish that’s uniquely yours. Plus, the quick cooking time makes it perfect for busy weeknights or when you need a satisfying meal in a hurry.

As you gather your ingredients and follow the steps, remember to have fun with the process. Cooking is not just about the end result; it’s also about enjoying the journey. So, gather your family or friends, and make it a fun cooking experience together!

We hope this recipe inspires you to create your own version of fried rice that’s not only better than takeout but also filled with love and creativity. Enjoy every bite, and don’t forget to share your delicious creations with others. Happy cooking!

Crispy Korean Fried Chicken: Unleash Irresistible Flavor!

Introduction to Crispy Korean Fried Chicken

If you’re craving something crispy, sticky, and irresistibly bold, Crispy Korean Fried Chicken is your answer. Double-fried for that signature crunch and tossed in a sweet, spicy, and savory gochujang-based glaze, each bite is a perfect balance of texture and flavor. Whether served as a show-stopping appetizer or the star of your dinner table, this dish brings the excitement of Korean street food right to your kitchen—no passport required. Get ready to fall in love with every crackly, saucy bite!

Ingredients for Crispy Korean Fried Chicken

Gathering the right ingredients is the first step to creating this mouthwatering Crispy Korean Fried Chicken. Here’s what you’ll need:

  • Chicken wings or drumsticks: These are the stars of the show! Choose your favorite cut for that juicy, tender bite.
  • All-purpose flour: This forms the base of your crispy coating, giving it that delightful crunch.
  • Cornstarch: A secret ingredient for extra crispiness! It helps create that light, airy texture.
  • Baking powder: This helps the coating puff up, making it even crunchier.
  • Garlic powder: Adds a savory depth of flavor that complements the chicken beautifully.
  • Onion powder: Enhances the overall taste, bringing a subtle sweetness to the mix.
  • Salt: Essential for seasoning, it brings out the natural flavors of the chicken.
  • Black pepper: A dash of heat that balances the flavors perfectly.
  • Cayenne pepper (optional): For those who like a kick! Adjust to your spice preference.
  • Buttermilk: This tenderizes the chicken and adds a rich flavor. You can substitute with regular milk mixed with a bit of vinegar if needed.
  • Vegetable oil: Used for frying, it should have a high smoke point for the best results.
  • Gochujang: This Korean chili paste is the heart of the sauce, providing a sweet and spicy kick.
  • Honey: Adds sweetness to balance the heat from the gochujang.
  • Soy sauce: A savory element that deepens the flavor profile of the sauce.
  • Rice vinegar: This adds a tangy brightness to the sauce, enhancing all the flavors.
  • Garlic (minced): Fresh garlic gives a robust flavor that elevates the dish.
  • Sesame oil: A drizzle of this fragrant oil adds a nutty richness to the sauce.
  • Sesame seeds: For garnish, they add a lovely crunch and visual appeal.
  • Chopped green onions: These provide a fresh, vibrant touch to finish off your dish.

For exact measurements, check the bottom of the article where you can find everything listed for easy printing!

How to Make Crispy Korean Fried Chicken

Now that you have all your ingredients ready, let’s dive into the fun part—making this Crispy Korean Fried Chicken! Follow these simple steps, and you’ll be on your way to a delicious meal that will have everyone asking for seconds.

Step 1: Prepare the Coating

In a large bowl, combine the all-purpose flour, cornstarch, baking powder, garlic powder, onion powder, salt, black pepper, and cayenne pepper. Mix everything well until it’s evenly blended. This coating is what gives your chicken that irresistible crunch!

Step 2: Marinate the Chicken

In another bowl, pour the buttermilk over your chicken pieces. Make sure each piece is well-coated. This step is crucial as it tenderizes the chicken and adds flavor. Cover the bowl and let it marinate in the refrigerator for at least 30 minutes. If you have time, letting it sit longer will enhance the flavor even more!

Step 3: Heat the Oil

While the chicken is marinating, heat about 2 inches of vegetable oil in a deep pot or fryer to 350°F. Use a thermometer to check the temperature; this ensures your chicken fries perfectly. If the oil is too hot, the coating will burn before the chicken cooks through.

Step 4: Dredge the Chicken

Once the chicken has marinated, remove it from the buttermilk, allowing any excess to drip off. Dredge each piece in the flour mixture, pressing lightly to ensure it sticks. This step is key for that crispy exterior. Don’t rush it; make sure each piece is well-coated!

Step 5: Fry the Chicken

Carefully place the coated chicken in the hot oil, frying in batches to avoid overcrowding. Fry for about 10-12 minutes, or until golden brown and cooked through. The internal temperature should reach 165°F. Once done, remove the chicken and let it drain on paper towels. This helps keep it crispy!

Step 6: Make the Sauce

In a saucepan over medium heat, combine the gochujang, honey, soy sauce, rice vinegar, minced garlic, and sesame oil. Stir until everything is well combined and heated through. This sauce is the magic that ties everything together, giving your chicken that signature Korean flavor!

Step 7: Toss and Serve

Now comes the fun part! Toss the fried chicken in the sauce until each piece is evenly coated. Serve hot, garnished with sesame seeds and chopped green onions for that extra pop of flavor and color. Enjoy your Crispy Korean Fried Chicken with family and friends!

Tips for Success

  • For extra crunch, consider double frying the chicken. It makes a world of difference!
  • Let the chicken rest for a few minutes after frying to maintain its crispiness.
  • Use a thermometer to ensure your oil is at the right temperature for frying.
  • Feel free to adjust the spice level by adding more or less cayenne pepper.
  • Experiment with different dipping sauces for a fun twist!

Equipment Needed

  • Deep pot or fryer: A heavy-bottomed pot works well if you don’t have a fryer.
  • Thermometer: Essential for checking oil temperature; a candy thermometer is a great alternative.
  • Mixing bowls: Use any size you have on hand for marinating and mixing.
  • Slotted spoon: Perfect for removing the chicken from the oil.
  • Paper towels: Handy for draining excess oil after frying.

Variations

  • Spicy Korean Fried Chicken: Add more cayenne pepper or a splash of hot sauce to the marinade for an extra kick.
  • Gluten-Free Option: Substitute all-purpose flour with a gluten-free flour blend and ensure your cornstarch is certified gluten-free.
  • Baked Version: For a healthier twist, coat the chicken and bake at 425°F for 30-35 minutes, flipping halfway through.
  • Honey Garlic Variation: Replace gochujang with a mix of honey and soy sauce for a sweeter, milder flavor.
  • Herb-Infused Chicken: Add dried herbs like thyme or oregano to the flour mixture for an aromatic touch.

Serving Suggestions

  • Pair your Crispy Korean Fried Chicken with steamed rice or fluffy jasmine rice for a comforting meal.
  • Serve alongside a fresh cucumber salad to balance the richness of the chicken.
  • For drinks, try a light beer or a refreshing iced tea.
  • Garnish with extra green onions and sesame seeds for a beautiful presentation.

FAQs about Crispy Korean Fried Chicken

Can I use chicken breasts instead of wings or drumsticks?

Absolutely! While wings and drumsticks are traditional, chicken breasts can work too. Just remember to adjust the cooking time, as breasts may cook faster. Aim for that golden brown color!

How can I make the chicken less spicy?

If you prefer a milder flavor, simply reduce the amount of gochujang in the sauce. You can also skip the cayenne pepper in the coating. Your Crispy Korean Fried Chicken will still be delicious!

Can I prepare the chicken in advance?

Yes! You can marinate the chicken a few hours ahead or even overnight. Just make sure to dredge it in the coating right before frying for that perfect crunch.

What should I do with leftovers?

Leftover Crispy Korean Fried Chicken can be stored in an airtight container in the fridge for up to three days. To reheat, pop it in the oven at 375°F for about 10-15 minutes to regain that crispy texture.

Is this recipe suitable for meal prep?

Definitely! You can prepare the chicken and sauce ahead of time. Just fry it fresh when you’re ready to serve. It’s a fantastic option for busy weeknights!

Final Thoughts

Making Crispy Korean Fried Chicken is more than just cooking; it’s about creating joyful moments with family and friends. The delightful crunch, the spicy-sweet sauce, and the smiles around the table make it all worthwhile. I love how this dish transforms an ordinary meal into a celebration, bringing everyone together. Whether it’s a busy weeknight or a special occasion, this recipe is sure to impress. So, roll up your sleeves, embrace the mess, and enjoy the delicious journey of making this irresistible dish. Trust me, it will become a cherished favorite in your home!

“`

Crispy Korean Fried Chicken
admin

Crispy Korean Fried Chicken: Unleash Irresistible Flavor!

Crispy Korean Fried Chicken is a deliciously crunchy and flavorful dish, perfect for any occasion.
Prep Time 30 minutes
Cook Time 20 minutes
Total Time 50 minutes
Servings: 4 -6 servings
Course: Main Dish
Cuisine: Korean
Calories: 450

Ingredients
  

  • 2 pounds chicken wings or drumsticks
  • 1 cup all-purpose flour
  • 1 cup cornstarch
  • 1 teaspoon baking powder
  • 1 teaspoon garlic powder
  • 1 teaspoon onion powder
  • 1 teaspoon salt
  • 1/2 teaspoon black pepper
  • 1/2 teaspoon cayenne pepper optional for heat
  • 1 cup buttermilk
  • Vegetable oil for frying
  • 1/2 cup gochujang Korean chili paste
  • 1/4 cup honey
  • 1/4 cup soy sauce
  • 2 tablespoons rice vinegar
  • 2 cloves garlic minced
  • 1 teaspoon sesame oil
  • 1 tablespoon sesame seeds for garnish
  • Chopped green onions for garnish

Method
 

  1. In a large bowl, combine the flour, cornstarch, baking powder, garlic powder, onion powder, salt, black pepper, and cayenne pepper. Mix well.
  2. In another bowl, pour the buttermilk over the chicken pieces, ensuring they are well-coated. Let the chicken marinate for at least 30 minutes in the refrigerator.
  3. Heat about 2 inches of vegetable oil in a deep pot or fryer to 350°F.
  4. Remove the chicken from the buttermilk, allowing excess to drip off, then dredge each piece in the flour mixture, pressing lightly to adhere.
  5. Fry the chicken in batches for about 10-12 minutes, or until golden brown and cooked through (internal temperature should reach 165°F). Remove and drain on paper towels.
  6. In a saucepan over medium heat, combine gochujang, honey, soy sauce, rice vinegar, minced garlic, and sesame oil. Stir until well combined and heated through.
  7. Toss the fried chicken in the sauce until evenly coated.
  8. Serve hot, garnished with sesame seeds and chopped green onions.

Nutrition

Serving: 1servingCalories: 450kcalCarbohydrates: 20gProtein: 30gFat: 25gSaturated Fat: 5gPolyunsaturated Fat: 20gCholesterol: 100mgSodium: 800mgFiber: 1gSugar: 15g

Notes

  • For a lighter version, try baking the chicken instead of frying. Coat the chicken in the flour mixture, place on a baking sheet, and bake at 425°F for 30-35 minutes, flipping halfway through.
  • For extra crunch, double fry the chicken. After the first fry, let the chicken rest for 5 minutes, then fry again for an additional 3-5 minutes until extra crispy.

Tried this recipe?

Let us know how it was!

Hawaiian Roll French Toast Casserole: A Breakfast Delight!

Hawaiian Roll French Toast Casserole

Introduction to Hawaiian Roll French Toast Casserole

The aroma of warm, sweet bread wafting through the house can turn any ordinary morning into a special occasion. That’s where my Hawaiian Roll French Toast Casserole comes in. This delightful dish is not just a quick solution for busy mornings; it’s a way to impress your loved ones with minimal effort. With its fluffy texture and tropical flavors, it’s perfect for brunch gatherings or cozy family breakfasts. Trust me, once you try this recipe, it will become a cherished favorite in your home!

Why You’ll Love This Hawaiian Roll French Toast Casserole

This Hawaiian Roll French Toast Casserole is a game-changer for breakfast lovers! It’s incredibly easy to whip up, making it perfect for those hectic mornings or lazy weekends. The sweet, fluffy rolls soak up the rich custard, creating a dish that’s bursting with flavor. Plus, it’s a crowd-pleaser, so you can impress family and friends without spending hours in the kitchen. Who wouldn’t love that?

Ingredients for Hawaiian Roll French Toast Casserole

Gathering the right ingredients is the first step to creating this delightful Hawaiian Roll French Toast Casserole. Here’s what you’ll need:

  • Hawaiian sweet rolls: These soft, fluffy rolls are the star of the dish, providing a sweet base that soaks up the custard beautifully.
  • Large eggs: Essential for binding the casserole together, eggs create a rich, custardy texture.
  • Whole milk: Adds creaminess and richness to the mixture, making each bite indulgent.
  • Heavy cream: For an extra luxurious touch, this ingredient enhances the overall flavor and texture.
  • Granulated sugar: A touch of sweetness to balance the flavors and enhance the rolls’ natural sweetness.
  • Vanilla extract: This aromatic addition brings warmth and depth to the dish, elevating the overall taste.
  • Ground cinnamon: A sprinkle of this spice adds warmth and a hint of nostalgia, reminiscent of cozy breakfasts.
  • Salt: Just a pinch helps to enhance all the flavors, making them pop.
  • Crushed pineapple (optional): For a tropical twist, this adds a burst of sweetness and moisture.
  • Shredded coconut (optional): This ingredient brings a delightful chewiness and enhances the Hawaiian theme.
  • Powdered sugar: A light dusting on top before serving adds a touch of sweetness and a beautiful presentation.
  • Maple syrup: The perfect finishing touch for drizzling over your casserole, adding a sweet, sticky goodness.

For exact measurements, check the bottom of the article where you can find everything listed for easy printing!

How to Make Hawaiian Roll French Toast Casserole

Creating this Hawaiian Roll French Toast Casserole is a breeze! Follow these simple steps, and you’ll have a delicious breakfast ready in no time. Let’s dive in!

Step 1: Preheat and Prepare

Start by preheating your oven to 350°F (175°C). This is crucial for achieving that perfect bake. While the oven warms up, grab a 9×13-inch baking dish and grease it well. A little butter or cooking spray will do the trick, ensuring your casserole comes out easily.

Step 2: Assemble the Base

Next, take those delightful cubed Hawaiian rolls and place them in the greased baking dish. If you’re feeling adventurous, sprinkle the crushed pineapple and shredded coconut over the top. These optional ingredients add a tropical flair that elevates the dish!

Step 3: Mix the Egg Mixture

In a large mixing bowl, whisk together the eggs, whole milk, heavy cream, granulated sugar, vanilla extract, ground cinnamon, and salt. This rich custard is what makes the casserole so indulgent. Make sure everything is well combined; you want a smooth mixture that will soak into the rolls.

Step 4: Combine and Soak

Pour the egg mixture evenly over the cubed rolls. Use a spatula to gently press down on the rolls, ensuring they soak up all that delicious custard. Let the dish sit for about 15 minutes. This resting time allows the flavors to meld beautifully.

Step 5: Bake

Cover the baking dish with aluminum foil and pop it in the oven. Bake for 25 minutes, then remove the foil and continue baking for another 15-20 minutes. You’re looking for a golden brown top and a center that’s set. The aroma will be irresistible!

Step 6: Serve

Once baked, let the casserole cool for a few minutes. Dust it with powdered sugar for a lovely finish. Serve warm with a drizzle of maple syrup. This delightful breakfast experience is sure to bring smiles all around!

Tips for Success

  • Use day-old Hawaiian rolls for better absorption of the custard.
  • Let the casserole sit overnight in the fridge for a richer flavor.
  • Experiment with different spices like nutmeg for a unique twist.
  • Don’t skip the resting time; it’s key for flavor melding.
  • For a fun presentation, serve with fresh fruit on the side.

Equipment Needed

  • Baking dish: A 9×13-inch dish is ideal, but any similar-sized dish will work.
  • Mixing bowls: Use one large bowl for the egg mixture and another for assembling.
  • Whisk: A whisk is perfect for blending the custard, but a fork can do the job too.
  • Spatula: A spatula helps with pressing the rolls and serving.

Variations

  • Chocolate Chip Delight: Add a half cup of chocolate chips to the mixture for a sweet twist that chocolate lovers will adore.
  • Berry Bliss: Toss in fresh or frozen berries like blueberries or strawberries for a burst of fruity flavor.
  • Nutty Crunch: Sprinkle chopped nuts, such as pecans or walnuts, on top before baking for added texture and flavor.
  • Vegan Option: Substitute eggs with flaxseed meal mixed with water and use almond or coconut milk instead of dairy.
  • Gluten-Free Version: Use gluten-free Hawaiian rolls to make this dish suitable for those with gluten sensitivities.

Serving Suggestions

  • Pair with crispy bacon or sausage for a savory contrast to the sweet casserole.
  • Serve alongside fresh fruit salad for a refreshing touch.
  • Offer a selection of juices, like orange or pineapple, to complement the tropical flavors.
  • Garnish with mint leaves for a pop of color and freshness.

FAQs about Hawaiian Roll French Toast Casserole

Curious about this delightful dish? Here are some frequently asked questions that might help you on your culinary journey with Hawaiian Roll French Toast Casserole!

Can I prepare the casserole the night before?

Absolutely! Preparing it the night before allows the flavors to meld beautifully. Just cover it tightly and refrigerate. In the morning, pop it in the oven straight from the fridge, adding a few extra minutes to the baking time.

What can I substitute for Hawaiian rolls?

If you can’t find Hawaiian rolls, any soft, sweet bread will work. Challah or brioche are excellent alternatives that will still give you that fluffy texture.

Can I make this dish gluten-free?

Yes! Simply use gluten-free Hawaiian rolls. The rest of the ingredients are naturally gluten-free, making it easy to adapt for those with dietary restrictions.

How do I store leftovers?

Store any leftovers in an airtight container in the fridge for up to three days. Reheat in the microwave or oven for a quick breakfast treat!

Can I add other fruits to the casserole?

Definitely! Feel free to mix in your favorite fruits, like bananas or apples, for added flavor and texture. Just remember to adjust the sweetness if needed!

Final Thoughts

Creating this Hawaiian Roll French Toast Casserole is more than just making breakfast; it’s about crafting memories. The joy of gathering around the table, sharing laughter, and indulging in a dish that feels like a warm hug is truly special. Each bite transports you to a tropical paradise, making even the simplest mornings feel extraordinary. Whether it’s a holiday brunch or a casual Sunday, this casserole brings everyone together. I hope you enjoy making it as much as I do, and may it become a beloved tradition in your home, just as it has in mine!

Hawaiian Roll French Toast Casserole
jhessica

Hawaiian Roll French Toast Casserole: A Breakfast Delight!

A delicious and easy-to-make Hawaiian Roll French Toast Casserole, perfect for breakfast or brunch.
Prep Time 15 minutes
Total Time 1 hour
Servings: 6 servings
Course: Breakfast
Cuisine: Hawaiian
Calories: 320

Ingredients
  

  • 8 Hawaiian sweet rolls cut into cubes
  • 4 large eggs
  • 1 cup whole milk
  • 1/2 cup heavy cream
  • 1/4 cup granulated sugar
  • 1 teaspoon vanilla extract
  • 1 teaspoon ground cinnamon
  • 1/4 teaspoon salt
  • 1/2 cup crushed pineapple drained (optional)
  • 1/2 cup shredded coconut optional
  • Powdered sugar for serving
  • Maple syrup for serving

Method
 

  1. Preheat your oven to 350°F (175°C) and grease a 9×13-inch baking dish.
  2. Place the cubed Hawaiian rolls in the prepared baking dish. If using, sprinkle the crushed pineapple and shredded coconut evenly over the top.
  3. In a large mixing bowl, whisk together the eggs, whole milk, heavy cream, granulated sugar, vanilla extract, ground cinnamon, and salt until well combined.
  4. Pour the egg mixture evenly over the cubed rolls, ensuring all pieces are soaked. Gently press down with a spatula to help the rolls absorb the liquid.
  5. Cover the baking dish with aluminum foil and let it sit for 15 minutes to allow the flavors to meld and the rolls to soak up the mixture.
  6. Bake covered for 25 minutes, then remove the foil and bake for an additional 15-20 minutes, or until the top is golden brown and the center is set.
  7. Let the casserole cool for a few minutes before dusting with powdered sugar and serving with warm maple syrup.

Nutrition

Serving: 1servingCalories: 320kcalCarbohydrates: 40gProtein: 6gFat: 15gSaturated Fat: 8gPolyunsaturated Fat: 7gCholesterol: 180mgSodium: 300mgFiber: 1gSugar: 14g

Notes

  • For a twist, try adding chocolate chips or fresh berries to the mixture before baking.
  • For a richer flavor, substitute half of the milk with coconut milk.

Tried this recipe?

Let us know how it was!

A Comforting Classic: The Irresistible Charm of Baked Ham and Cheese Croissants

A Taste of Warmth and Nostalgia

There is something incredibly special about the combination of ham, cheese, and flaky croissants. It’s the kind of meal that instantly transports you back to cozy mornings at home or a cherished café experience with loved ones. I vividly remember the first time I had a warm, buttery ham and cheese croissant—fresh out of the oven, with cheese perfectly melted between the delicate layers of pastry. It wasn’t just a meal; it was a moment of comfort, a simple pleasure that brightened my entire day.

Baked ham and cheese croissants hold a special place in both home kitchens and gourmet brunch menus. Their appeal lies in their simplicity, yet they deliver an explosion of flavors that feels indulgent. The balance between the salty, savory ham, the rich, melty cheese, and the crisp, golden croissant makes it a recipe worth repeating. Whether you’re making them for a quick breakfast, a brunch gathering, or a cozy dinner, these croissants will always impress.

Why This Recipe Works

Baked ham and cheese croissants are a perfect balance of taste, texture, and convenience. The flaky croissant soaks up the delicious flavors of butter, mustard, and seasonings, creating a depth of taste in every bite. The baking process allows the flavors to meld together, creating a sandwich that is far more than the sum of its parts.

Here’s why this recipe stands out:

  • Effortless Elegance – Despite being easy to prepare, these croissants have a gourmet feel, making them ideal for both casual meals and special occasions.
  • Perfect Texture – The flaky layers of the croissant, combined with the gooey cheese and slightly crispy edges, create a textural contrast that’s truly irresistible.
  • Customizable to Your Taste – Whether you prefer Swiss, cheddar, or gouda, or want to add a touch of sweetness with honey ham, the variations are endless.
  • Great for Any Meal – While traditionally a breakfast or brunch dish, these baked croissants also work well for lunch, dinner, or even a hearty snack.

A Symphony of Flavors: Ingredients

  • 4 croissants, sliced in half
  • 8 slices of deli ham
  • 4 slices of Swiss cheese
  • 2 tablespoons Dijon mustard
  • 2 tablespoons unsalted butter, melted
  • 1 teaspoon Worcestershire sauce
  • 1/2 teaspoon garlic powder
  • 1/2 teaspoon onion powder
  • 1 tablespoon poppy seeds
  • 1 tablespoon chopped fresh parsley (optional)

Crafting Perfection: Step-by-Step Directions

  1. Preheat & Prep – Set the oven to 350°F (175°C). Line a baking sheet with parchment paper.
  2. Assemble the Layers – Spread Dijon mustard on the bottom half of each croissant. Layer with ham and Swiss cheese before placing the top half back on.
  3. Create the Buttery Glaze – In a small bowl, mix melted butter, Worcestershire sauce, garlic powder, onion powder, and poppy seeds.
  4. Brush & Bake – Generously brush the buttery glaze over the croissants. Arrange them on the prepared baking sheet and cover loosely with foil.
  5. Bake to Golden Perfection – Bake for 10 minutes covered, then remove the foil and bake for another 5 minutes until the croissants are golden brown and the cheese is melted.
  6. Garnish & Serve – Sprinkle with fresh parsley if desired, then serve warm and enjoy!

Nutritional Breakdown (Per Serving)

  • Calories: ~320 kcal
  • Protein: ~15g
  • Carbohydrates: ~25g
  • Fats: ~18g
  • Sodium: ~600mg
  • Fiber: ~2g

A perfect balance of buttery, flaky croissants with the rich flavors of ham and melted Swiss cheese—ideal for breakfast, brunch, or a quick savory snack!

Tips for the Best Baked Ham and Cheese Croissants

To ensure your croissants come out perfectly every time, keep these tips in mind:

  • Use Quality Croissants – The flakier and fresher the croissant, the better the final result. A bakery-style croissant will elevate the dish.
  • Select the Right Cheese – Swiss cheese provides a classic flavor, but feel free to experiment with gruyère for a more robust taste or brie for extra creaminess.
  • Layer the Ingredients Evenly – This ensures every bite has the perfect balance of ham, cheese, and buttery croissant.
  • Don’t Skip the Butter Glaze – The combination of butter, seasonings, and Worcestershire sauce gives the croissants an added richness that enhances their flavor.
  • Bake Covered First – Covering them for the first half of baking helps melt the cheese without over-browning the croissant. Removing the foil for the last few minutes adds a beautiful golden crisp.

Ways to Customize This Recipe

  • Sweet & Savory Twist – Add a drizzle of honey or a thin layer of fig jam for a delightful contrast of flavors.
  • Spicy Kick – Include a spread of Dijon mustard with a touch of hot sauce, or add sliced jalapeños for a spicy touch.
  • Vegetarian Option – Swap the ham for sautéed mushrooms or spinach for a meat-free version that still delivers on flavor.
  • Breakfast Edition – Add a fried or scrambled egg inside before baking for a complete breakfast sandwich.
  • Gourmet Upgrade – Use prosciutto instead of ham and a gourmet cheese like brie or smoked gouda for an elevated version.

Frequently Asked Questions

Can I prepare these ahead of time?
Yes! You can assemble the croissants, wrap them tightly, and store them in the refrigerator overnight. When ready to bake, simply add a few extra minutes to the cooking time.

What’s the best way to reheat them?
For the best texture, reheat in the oven at 300°F for about 10 minutes. Avoid microwaving, as it can make the croissant soggy.

Can I freeze these croissants?
Absolutely! Wrap them individually in foil and store them in an airtight bag. When ready to eat, bake from frozen at 325°F for 15-20 minutes.

What type of ham works best?
Thinly sliced deli ham works well, but you can also use leftover holiday ham or even black forest ham for added flavor.

Can I make them gluten-free?
Yes! Simply use a gluten-free croissant alternative or swap it for a gluten-free roll while keeping the other ingredients the same.

Perfect Pairings for Your Croissants

While these croissants are fantastic on their own, pairing them with the right side dishes can elevate the meal:

  • Fresh Fruit Salad – A mix of berries and citrus cuts through the richness of the croissant.
  • Simple Green Salad – A light vinaigrette-dressed salad balances out the buttery flavors.
  • Creamy Tomato Soup – The perfect companion for dipping your croissant and enjoying a comforting bite.
  • Herb-Roasted Potatoes – A hearty addition for a full brunch spread.

Conclusion: A Timeless Delight

Baked ham and cheese croissants are proof that the simplest ingredients can create the most satisfying dishes. Whether you’re making them as a nostalgic treat, a quick yet elegant meal, or a brunch centerpiece, they are bound to impress. Their warm, buttery texture and gooey cheese filling offer pure comfort with every bite.

The best part? You can easily make this recipe your own by experimenting with different flavors and ingredients. So, the next time you want a meal that is both indulgent and effortless, turn to this classic croissant bake—it’s sure to become a favorite in your kitchen.

Sheet Pan Chicken Fajitas: A Simple Recipe for Big Flavor

A Family Tradition, Reinvented

Growing up, the sizzle of fajitas was a sound that always brought excitement to our dinner table. My mother would pull out her heavy cast-iron skillet, tossing in marinated chicken and vibrant bell peppers, filling the kitchen with the unmistakable aroma of cumin, lime, and garlic. It was a labor of love, but it also meant standing over a hot stove, flipping ingredients in batches, and dealing with a mountain of dishes afterward.

Fast forward to today, and life is much busier. Between work, family, and endless to-do lists, the idea of an effortless, one-pan meal has become a necessity. That’s where sheet pan chicken fajitas come in—an ingenious twist on a beloved classic. This recipe brings all the bold, smoky flavors of traditional fajitas without the fuss, making it perfect for busy weeknights, meal prepping, or casual get-togethers.

Imagine tossing all your ingredients onto a single pan, letting the oven do the work while you unwind, and ending up with a restaurant-quality dish in just 30 minutes. That’s the magic of sheet pan fajitas—a meal that honors tradition while embracing modern convenience.

Why Sheet Pan Fajitas Are a Game-Changer

Sheet pan meals have revolutionized home cooking, and fajitas are one of the best dishes to make using this method. Here’s why:

  1. Minimal Cleanup – No more scrubbing multiple skillets and bowls. With just one pan to wash, post-dinner clean-up is a breeze.
  2. Even Cooking – The oven ensures everything cooks uniformly, creating perfectly juicy chicken and caramelized veggies.
  3. Hands-Off Cooking – Unlike stovetop fajitas that require constant stirring, sheet pan fajitas let you set it and forget it.
  4. Great for Meal Prep – Cook once and enjoy flavorful leftovers throughout the week.

Whether you’re hosting a crowd or just feeding your family, this recipe makes it easier than ever to enjoy a Tex-Mex classic with minimal effort.

Flavor-Packed Ingredients

For the Fajitas:

  • 2 lbs chicken breasts, sliced into ¼-inch strips
  • 3 bell peppers (red, yellow, and green), sliced
  • 2 large onions, sliced
  • 3 tablespoons olive oil
  • 2 limes, juiced
  • 16-18 small flour or corn tortillas

Homemade Fajita Seasoning:

  • 2 teaspoons chili powder
  • 1 teaspoon ground cumin
  • 1 teaspoon paprika
  • 1 teaspoon garlic powder
  • 1 teaspoon onion powder
  • ½ teaspoon oregano
  • 1 teaspoon salt
  • ½ teaspoon black pepper

Optional Toppings:

  • Fresh cilantro
  • Sour cream
  • Guacamole
  • Pico de gallo
  • Shredded cheese
  • Lime wedges

Step-by-Step Magic

  1. Preheat & Prep (15 minutes)
    • Preheat oven to 425°F (218°C).
    • Line a large sheet pan with parchment paper or foil.
    • Slice chicken into ¼-inch strips.
    • Cut peppers and onions into even strips.
    • Mix all seasoning ingredients in a small bowl.
  2. Season & Arrange (5 minutes)
    • Place chicken and vegetables on the sheet pan.
    • Drizzle with olive oil and lime juice.
    • Sprinkle with seasoning mixture.
    • Toss everything to coat evenly.
    • Spread in a single layer to ensure even cooking.
  3. Bake to Perfection (20-25 minutes)
    • Bake at 425°F for 20-25 minutes.
    • Stir halfway through for even cooking.
    • Ensure chicken reaches an internal temperature of 165°F.
    • Optional: Broil for 2-3 minutes at the end for extra char.
  4. Serve & Enjoy
    • Warm tortillas before serving.
    • Assemble with desired toppings.
    • Squeeze fresh lime juice over top.
    • Serve immediately and enjoy!

Nutritional Breakdown (Per Serving)

  • Calories: 345 kcal
  • Protein: High in lean protein from chicken
  • Carbs: Moderate from tortillas and veggies
  • Fat: Balanced with healthy fats from olive oil

This one-pan wonder is a game-changer for busy weeknights—easy, flavorful, and minimal cleanup!

Secrets to the Best Sheet Pan Fajitas

While this recipe is incredibly simple, a few small tweaks can take your fajitas from good to exceptional.

1. Preheat the Sheet Pan

One of the biggest mistakes people make with sheet pan meals is placing ingredients on a cold pan. Preheating the pan in the oven for 5-10 minutes before adding the chicken and vegetables helps create a beautiful sear and prevents soggy fajitas.

2. Don’t Overcrowd the Pan

It might be tempting to pile everything onto one sheet, but overcrowding leads to steaming instead of roasting. If necessary, use two pans to ensure everything has enough space to caramelize properly.

3. Pat the Chicken Dry

Moisture is the enemy of browning. Before seasoning, use paper towels to pat the chicken dry, allowing the spices to adhere better and develop that delicious, slightly crispy texture.

4. Customize the Spice Blend

Homemade seasoning blends always beat store-bought versions in both flavor and control. Feel free to experiment—add smoked paprika for a deeper flavor, a pinch of cayenne for heat, or extra garlic powder if you’re a garlic lover.

5. Broil for Extra Char

For that authentic, sizzling fajita effect, turn on the broiler for the last 2-3 minutes of cooking. This creates a slightly charred, smoky finish that mimics restaurant-style fajitas.

Serving Suggestions: More Than Just Tortillas

While warm flour or corn tortillas are the traditional choice, there are plenty of creative ways to serve your fajitas:

  • Fajita Bowls: Serve over a bed of rice or quinoa for a satisfying grain-based meal.
  • Lettuce Wraps: For a low-carb option, wrap the filling in crisp romaine or butter lettuce leaves.
  • Stuffed Sweet Potatoes: A surprisingly delicious combination—fill a roasted sweet potato with fajita mix and top with avocado.
  • Over Salad: Toss the fajitas over a bed of greens with a squeeze of lime for a fresh, healthy meal.

And of course, don’t forget the toppings! Fresh guacamole, pico de gallo, shredded cheese, sour cream, or a drizzle of hot sauce can elevate these fajitas even further.

Storage and Reheating Tips

One of the best things about sheet pan fajitas is how well they store for leftovers. Here’s how to keep them fresh:

  • Refrigerate Properly: Store in an airtight container for up to four days.
  • Separate Tortillas: Keep tortillas in a separate container to avoid sogginess.
  • Reheat Correctly: Avoid the microwave if possible—it can make the chicken rubbery. Instead, reheat in a skillet over medium heat for the best texture.
  • Freezing Option: While fajitas taste best fresh, you can freeze the cooked chicken and veggies for up to two months. Just thaw overnight in the fridge before reheating.

Frequently Asked Questions

Can I Use Chicken Thighs Instead of Breasts?

Absolutely! Chicken thighs tend to be juicier and more flavorful, though they may require a few extra minutes of cooking time.

Can I Make This Recipe Ahead of Time?

Yes! You can prep everything—slice the chicken and veggies, mix the seasoning, and store them in the fridge up to 24 hours in advance. When ready to cook, just spread everything on the sheet pan and bake.

Can I Use Frozen Peppers and Onions?

Fresh is always best for fajitas, as frozen vegetables release more moisture and can become soggy. However, if using frozen, be sure to thaw and pat them dry before cooking.

How Can I Add More Heat?

If you love spice, try adding:

  • ½ teaspoon cayenne pepper to the seasoning mix
  • Chopped jalapeños or serrano peppers to the veggies
  • A drizzle of hot sauce before serving

Can I Make This Recipe with Shrimp Instead of Chicken?

Yes! Shrimp makes a fantastic alternative, but be sure to reduce the cooking time. Shrimp typically cook in 8-10 minutes, so add them to the pan about 10 minutes before everything else is done.

Conclusion: A Meal That Brings Everyone Together

There’s something special about fajitas—whether it’s the bold flavors, the sizzling aroma, or the way they invite everyone to customize their plate. This sheet pan version simplifies the process without sacrificing taste, making it easier than ever to bring a little Tex-Mex magic to your table.

With minimal effort, a few smart techniques, and a handful of fresh ingredients, you can create a meal that’s as comforting as it is delicious. Whether you’re making dinner for your family, prepping lunches for the week, or hosting a casual gathering, these sheet pan chicken fajitas are a surefire hit.

So grab your sheet pan, turn on the oven, and let the fiesta begin!

Stay Connected

Get recipes via email: