


Introduction to Peanut Butter Blossom Cookies Recipe
The History of Peanut Butter Blossom Cookies
Peanut Butter Blossom Cookies have a delightful history that dates back to the 1930s. These cookies became popular during the rise of peanut butter in American households. The combination of creamy peanut butter and chocolate was a match made in heaven. In fact, the iconic Hershey’s Kiss was introduced in 1907, but it wasn’t until the 1950s that the two treats came together in this beloved cookie. Over the years, these cookies have become a staple at holiday gatherings and family celebrations. Their unique shape and delicious flavor make them a favorite among both kids and adults alike.
Why You Should Try This Peanut Butter Blossom Cookies Recipe
If you’re looking for a cookie that’s both easy to make and incredibly tasty, this Peanut Butter Blossom Cookies Recipe is for you! Not only do these cookies have a rich, nutty flavor, but they also offer a delightful surprise with each bite. The combination of soft peanut butter dough and the melty chocolate center creates a perfect balance of sweetness and texture. Plus, they are fun to make! Rolling the dough into balls and pressing the chocolate kisses in the center is a great activity for kids and adults alike. Whether you’re baking for a special occasion or just to satisfy a sweet tooth, these cookies are sure to impress. So, roll up your sleeves and get ready to enjoy a classic treat that never goes out of style!
Ingredients for Peanut Butter Blossom Cookies Recipe
To create the perfect Peanut Butter Blossom Cookies, you’ll need a few simple ingredients. Each component plays a vital role in achieving that delightful flavor and texture. Here’s what you’ll need:
- 1 cup creamy peanut butter
- 1 cup granulated sugar
- 1 cup packed brown sugar
- 2 large eggs
- 1 teaspoon vanilla extract
- 2 ½ cups all-purpose flour
- 1 teaspoon baking soda
- ½ teaspoon salt
- 1 cup granulated sugar (for rolling)
- 36 Hershey’s Kisses, unwrapped
These ingredients are easy to find at your local grocery store. The creamy peanut butter gives the cookies their rich flavor, while the combination of granulated and brown sugar adds sweetness and moisture. Eggs help bind everything together, and vanilla extract enhances the overall taste. The flour, baking soda, and salt are essential for the cookie structure. Finally, the Hershey’s Kisses provide that iconic chocolatey touch that makes these cookies so special.
Feel free to experiment with the ingredients! For instance, you can swap creamy peanut butter for chunky peanut butter for added texture. You can also try different types of chocolate or even caramel candies for a fun twist. The possibilities are endless, making this Peanut Butter Blossom Cookies Recipe a versatile choice for any baking enthusiast!
Step-by-Step Preparation of Peanut Butter Blossom Cookies Recipe
Step 1: Prepping Your Ingredients
Before you start baking, it’s important to gather all your ingredients. This makes the process smoother and more enjoyable. First, measure out 1 cup of creamy peanut butter, 1 cup of granulated sugar, and 1 cup of packed brown sugar. Next, crack 2 large eggs into a bowl and have your 1 teaspoon of vanilla extract ready. Don’t forget the dry ingredients! You’ll need 2 ½ cups of all-purpose flour, 1 teaspoon of baking soda, and ½ teaspoon of salt. Lastly, set aside 1 cup of granulated sugar for rolling the cookie dough balls. Having everything organized will help you focus on creating delicious Peanut Butter Blossom Cookies!
Step 2: Mixing the Dough
Now that your ingredients are prepped, it’s time to mix them together. In a large mixing bowl, combine the creamy peanut butter, granulated sugar, brown sugar, eggs, and vanilla extract. Use a hand mixer or a sturdy spoon to mix until everything is well combined and smooth. This step is crucial because it ensures that the sugars dissolve properly, creating a sweet and creamy base for your cookies. Once the mixture is smooth, set it aside. In another bowl, whisk together the flour, baking soda, and salt. This helps to evenly distribute the baking soda and salt throughout the flour.
Step 3: Shaping the Cookies
With your dough ready, it’s time to shape the cookies! Start by rolling the dough into 1-inch balls. This size is perfect for achieving that classic Peanut Butter Blossom look. Once you have your dough balls, roll each one in the extra granulated sugar until they are fully coated. This sugar coating adds a lovely sweetness and a bit of crunch to the cookies. After rolling, place the sugar-coated balls on ungreased baking sheets, making sure to space them about 2 inches apart. This spacing is important because the cookies will spread while baking.
Step 4: Baking the Cookies
Now comes the exciting part—baking! Preheat your oven to 350°F (175°C) if you haven’t done so already. Once the oven is ready, place your baking sheets in and bake the cookies for 10-12 minutes. Keep an eye on them! You want the edges to be lightly golden while the centers remain soft. This balance is key to achieving that perfect chewy texture. When the cookies are done, remove them from the oven and let them sit on the baking sheet for about 5 minutes. This allows them to firm up a bit before transferring them to a wire rack.
Step 5: Adding the Chocolate Kisses
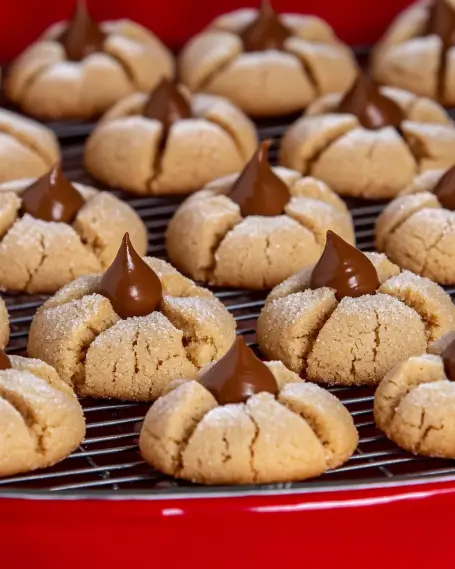
Finally, it’s time to add the star of the show—Hershey’s Kisses! While the cookies are still warm, gently press a Hershey’s Kiss into the center of each cookie. The warmth from the cookie will slightly melt the chocolate, creating a deliciously gooey center. This step not only adds flavor but also gives your cookies that signature look. After adding the kisses, let the cookies cool completely on the wire rack. Once cooled, they are ready to be enjoyed!
Variation of Peanut Butter Blossom Cookies Recipe
Alternative Ingredients for Peanut Butter Blossom Cookies
While the classic Peanut Butter Blossom Cookies Recipe is delicious as is, you can easily switch things up with alternative ingredients. For instance, if you’re looking for a nut-free option, consider using sun butter or soy nut butter instead of peanut butter. These alternatives provide a similar creamy texture and flavor without the nuts.
If you want to reduce sugar, try using a sugar substitute like stevia or monk fruit sweetener. Just remember to check the conversion ratios, as they can differ from regular sugar. For a gluten-free version, substitute all-purpose flour with a gluten-free flour blend. This way, everyone can enjoy these delightful cookies!
Additionally, you can experiment with different types of chocolate. Instead of Hershey’s Kisses, try using chocolate chips, caramel-filled candies, or even white chocolate for a unique twist. Each variation brings a new flavor profile to the table, making your baking experience even more exciting!
Creative Twists on the Classic Peanut Butter Blossom Cookies Recipe
Get creative with your Peanut Butter Blossom Cookies by adding fun twists! One popular variation is to mix in some chopped nuts, like walnuts or pecans, into the dough. This adds a delightful crunch and enhances the nutty flavor of the cookies.
Another fun idea is to incorporate different flavors into the dough. You can add a teaspoon of cocoa powder for a chocolatey version or a sprinkle of cinnamon for a warm, spiced flavor. For a festive touch, consider adding colorful sprinkles on top of the cookies before baking.
For a more indulgent treat, try stuffing the cookies with a piece of chocolate or caramel before baking. This creates a gooey center that will surprise anyone who takes a bite! The possibilities are endless, so don’t hesitate to let your imagination run wild with this Peanut Butter Blossom Cookies Recipe!
Cooking Note for Peanut Butter Blossom Cookies Recipe
When it comes to baking Peanut Butter Blossom Cookies, a few cooking notes can help ensure your cookies turn out perfectly every time. First, make sure all your ingredients are at room temperature. This helps them blend together more smoothly, resulting in a better dough consistency.
Next, be mindful of your oven temperature. Ovens can vary, so it’s a good idea to use an oven thermometer to check if your oven is accurate. If your cookies are browning too quickly, you may need to adjust the temperature slightly. Baking in batches can also help maintain an even temperature, especially if you’re using multiple baking sheets.
Another important tip is to avoid overmixing the dough. Once you combine the dry ingredients with the wet ingredients, mix just until everything is incorporated. Overmixing can lead to tough cookies, which is not what you want!
Lastly, let the cookies cool on the baking sheet for a few minutes before transferring them to a wire rack. This allows them to set properly and prevents them from breaking apart. Following these cooking notes will help you achieve the best results with your Peanut Butter Blossom Cookies Recipe!
Serving Suggestions for Peanut Butter Blossom Cookies Recipe
Once your Peanut Butter Blossom Cookies are baked and cooled, it’s time to think about how to serve them! These cookies are not only delicious but also visually appealing, making them perfect for various occasions. Here are some delightful serving suggestions to enhance your cookie experience:
- Cookie Platter: Arrange your cookies on a decorative platter. You can mix them with other types of cookies for a colorful cookie assortment. This is great for parties or family gatherings!
- Milk Pairing: Serve your cookies with a glass of cold milk. The creamy texture of milk complements the rich peanut butter flavor perfectly. You can even try flavored milk, like chocolate or almond milk, for a fun twist.
- Ice Cream Sandwiches: For a special treat, use two cookies to create ice cream sandwiches. Simply place a scoop of your favorite ice cream between two cookies. This is a fantastic way to enjoy your cookies during warm weather!
- Gift Giving: Package your cookies in a cute box or jar to give as gifts. Tie a ribbon around it for a personal touch. Homemade cookies make thoughtful gifts for friends and family, especially during holidays.
- Decorative Touch: Dust your cookies with powdered sugar or drizzle melted chocolate over them for an elegant presentation. This adds a beautiful finish and makes them look even more tempting!
These serving suggestions can elevate your Peanut Butter Blossom Cookies, making them a delightful treat for any occasion. Whether you’re enjoying them at home or sharing them with others, these cookies are sure to bring smiles and satisfaction!
Tips for Perfect Peanut Butter Blossom Cookies Recipe
To ensure your Peanut Butter Blossom Cookies turn out perfectly every time, consider these helpful tips. Each suggestion can enhance the flavor, texture, and overall experience of your cookies. Let’s dive into some key tips!
- Use Fresh Ingredients: Always check the freshness of your ingredients, especially baking soda and flour. Fresh ingredients contribute to better flavor and texture.
- Measure Accurately: Use proper measuring techniques for your ingredients. For flour, spoon it into the measuring cup and level it off with a knife. This prevents using too much flour, which can make cookies dry.
- Chill the Dough: If your dough feels too soft or sticky, chill it in the refrigerator for about 30 minutes. This makes it easier to roll into balls and helps the cookies maintain their shape while baking.
- Don’t Overbake: Keep a close eye on your cookies as they bake. Remove them from the oven when the edges are golden but the centers still look slightly underbaked. They will continue to cook on the baking sheet.
- Experiment with Toppings: While Hershey’s Kisses are classic, feel free to experiment with different toppings. Try adding crushed nuts, sprinkles, or even a drizzle of caramel for added flavor.
- Store Properly: To keep your cookies fresh, store them in an airtight container at room temperature. You can also layer them with parchment paper to prevent sticking.
- Share the Fun: Baking is more enjoyable with friends or family. Invite loved ones to help you roll the dough or decorate the cookies. It’s a great way to create memories!
By following these tips, you’ll be well on your way to baking the perfect Peanut Butter Blossom Cookies. Each batch will be delicious, and you’ll impress everyone with your baking skills!
Breakdown of Time for Peanut Butter Blossom Cookies Recipe
Prep Time
Getting everything ready for your Peanut Butter Blossom Cookies is a breeze! The prep time for this recipe is about 15-20 minutes. During this time, you’ll gather your ingredients, measure them out, and mix the dough. It’s a fun and straightforward process that sets the stage for delicious cookies!
Cooking Time
Once your dough is ready, it’s time to bake! The cooking time for these cookies is approximately 10-12 minutes. Keep an eye on them as they bake. You want the edges to turn a lovely golden brown while the centers remain soft. This short baking time is what makes these cookies so delightful and chewy!
Total Time
In total, you can expect to spend about 30-35 minutes from start to finish. This includes both prep and cooking time. With such a quick turnaround, you can enjoy fresh Peanut Butter Blossom Cookies in no time! Whether you’re baking for a special occasion or just a sweet treat for yourself, this recipe is perfect for any day.
Nutritional Information for Peanut Butter Blossom Cookies Recipe
Calories
When indulging in Peanut Butter Blossom Cookies, it’s good to know the calorie content. Each cookie contains approximately 120 calories. This makes them a delightful treat without being overly indulgent. Enjoying one or two cookies can satisfy your sweet tooth while keeping your calorie intake in check. Just remember, moderation is key!
Protein
These cookies are not just tasty; they also provide a decent amount of protein. Each cookie offers about 3 grams of protein. The creamy peanut butter is the star here, contributing to this protein content. This makes Peanut Butter Blossom Cookies a more balanced snack option, especially for those looking to add a bit of protein to their diet. Pairing them with a glass of milk can further boost your protein intake!
Sodium
In terms of sodium, each cookie contains around 80 milligrams. This is a relatively low amount, making these cookies a heart-friendly choice. However, if you’re watching your sodium intake, it’s always a good idea to be mindful of portion sizes. Enjoying these cookies as part of a balanced diet can help you maintain a healthy lifestyle while still indulging in delicious treats!

FAQs about Peanut Butter Blossom Cookies Recipe
Can I make Peanut Butter Blossom Cookies without eggs?
Yes, you can make Peanut Butter Blossom Cookies without eggs! If you want to create an egg-free version, consider using a substitute. Common egg replacements include 1/4 cup of unsweetened applesauce, 1/4 cup of mashed banana, or 1 tablespoon of ground flaxseed mixed with 2.5 tablespoons of water. These alternatives help bind the ingredients together while keeping the cookies moist and delicious. Just remember that the texture may vary slightly, but they will still taste great!
How do I store Peanut Butter Blossom Cookies?
To keep your Peanut Butter Blossom Cookies fresh, store them in an airtight container at room temperature. This helps maintain their chewy texture and flavor. If you want to keep them for a longer time, you can layer the cookies with parchment paper to prevent sticking. They should stay fresh for about a week. If you live in a humid area, consider refrigerating them to extend their shelf life. Just make sure to bring them back to room temperature before enjoying!
Can I freeze Peanut Butter Blossom Cookies?
Absolutely! Freezing Peanut Butter Blossom Cookies is a great way to enjoy them later. To freeze, place the cooled cookies in a single layer on a baking sheet and freeze until solid. Then, transfer them to an airtight container or a freezer bag, separating layers with parchment paper. They can be stored in the freezer for up to three months. When you’re ready to enjoy them, simply thaw at room temperature or warm them in the microwave for a few seconds for that fresh-baked taste!
What can I use instead of chocolate kisses in the Peanut Butter Blossom Cookies Recipe?
If you want to switch things up, there are plenty of delicious alternatives to Hershey’s Kisses! You can use chocolate chips, caramel-filled candies, or even mini peanut butter cups for a fun twist. For a fruity option, try adding a piece of dried fruit or a chocolate-covered raisin. You can also experiment with different flavors of chocolate, like dark chocolate or white chocolate. The key is to choose something that complements the peanut butter flavor, so feel free to get creative!
Conclusion on Peanut Butter Blossom Cookies Recipe
In conclusion, the Peanut Butter Blossom Cookies Recipe is a delightful treat that brings joy to any occasion. With its rich peanut butter flavor and the sweet surprise of chocolate in the center, these cookies are sure to please everyone. Whether you’re baking for a holiday gathering, a birthday party, or just a cozy night at home, this recipe is a fantastic choice.
Not only is the process of making these cookies enjoyable, but the end result is also incredibly rewarding. The combination of creamy peanut butter and chocolate creates a perfect harmony of flavors that is hard to resist. Plus, with the various alternatives and creative twists you can add, you can customize the recipe to suit your taste and dietary needs.
Remember to follow the tips and cooking notes provided to ensure your cookies turn out perfectly every time. From measuring ingredients accurately to avoiding overbaking, these small details can make a big difference in the final product. And don’t forget to share the fun of baking with friends and family—after all, the best memories are made in the kitchen!
So, gather your ingredients, roll up your sleeves, and get ready to bake a batch of these scrumptious Peanut Butter Blossom Cookies. Enjoy the process, savor the delicious results, and create sweet moments that will last a lifetime!