


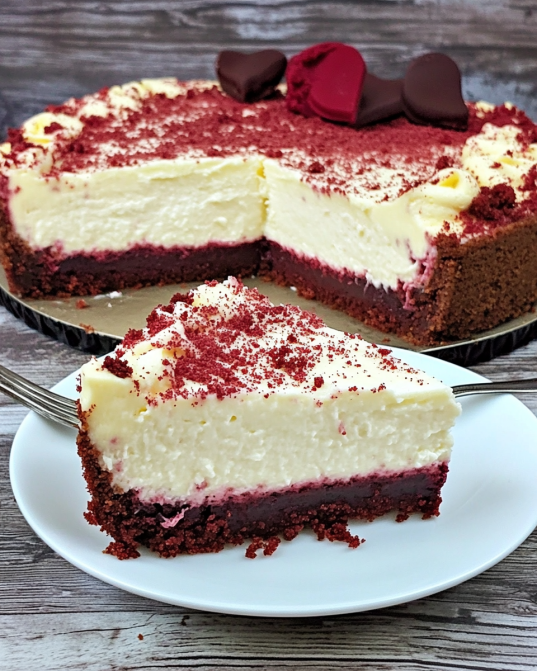
Introduction to Red Velvet Cheesecake Recipe
Red Velvet Cheesecake is a delightful dessert that combines the rich flavors of traditional red velvet cake with the creamy texture of cheesecake. This unique treat is perfect for special occasions or simply to satisfy your sweet tooth. The vibrant red color and velvety texture make it visually appealing, while the combination of flavors creates a delicious experience for your taste buds.
What Makes Red Velvet Cheesecake Unique?
What sets Red Velvet Cheesecake apart from other desserts? First, it features the classic red velvet flavor, which is a blend of cocoa powder and vanilla, giving it a subtle chocolate taste. The addition of cream cheese adds a rich, tangy flavor that perfectly complements the sweetness of the cake. Moreover, the vibrant red hue not only makes it eye-catching but also adds a festive touch to any gathering.
Another unique aspect is the texture. The cheesecake layer is smooth and creamy, while the crust provides a satisfying crunch. This contrast makes each bite a delightful experience. Additionally, the recipe is versatile, allowing for various toppings and mix-ins, such as whipped cream or chocolate chips, to suit your preferences.
In summary, Red Velvet Cheesecake is not just a dessert; it’s a celebration of flavors and textures. Whether you’re serving it at a birthday party, holiday gathering, or just enjoying a slice at home, this cheesecake is sure to impress. So, let’s dive into the ingredients and preparation steps to create this delicious masterpiece!
Ingredients for Red Velvet Cheesecake Recipe
To create a mouthwatering Red Velvet Cheesecake, you’ll need a selection of simple yet essential ingredients. Each component plays a vital role in achieving that perfect balance of flavors and textures. Here’s what you’ll need:
- 2 cups graham cracker crumbs
- 1/2 cup unsalted butter, melted
- 1/4 cup granulated sugar (for the crust)
- 1 (8 oz) package cream cheese, softened
- 1 cup granulated sugar (for the filling)
- 1 teaspoon vanilla extract
- 2 large eggs
- 1 cup sour cream
- 1 cup all-purpose flour
- 1 tablespoon cocoa powder
- 1 tablespoon red food coloring
- 1 teaspoon white vinegar
- 1/2 teaspoon baking soda
These ingredients come together to create a rich and creamy cheesecake with a delightful red velvet twist. The graham cracker crumbs form a crunchy base, while the cream cheese and sour cream provide that signature cheesecake creaminess. The red food coloring and cocoa powder give the cheesecake its iconic color and flavor.
Before you start baking, make sure to gather all your ingredients. This will help streamline the process and ensure you don’t miss anything important. Now that you have everything ready, let’s move on to the step-by-step preparation of this delicious Red Velvet Cheesecake!
Step-by-Step Preparation of Red Velvet Cheesecake Recipe
Now that you have all your ingredients ready, it’s time to dive into the step-by-step preparation of your Red Velvet Cheesecake. Each step is crucial to ensure your cheesecake turns out perfectly. Let’s get started!
Step 1: Preparing the Crust
First, we need to create a delicious crust for our cheesecake. In a medium bowl, combine the graham cracker crumbs, melted butter, and 1/4 cup of granulated sugar. Mix these ingredients until they are well combined. The mixture should resemble wet sand.
Next, press the crumb mixture firmly into the bottom of a greased 9-inch springform pan. Make sure to pack it tightly to create a sturdy base. Once you’ve done that, bake the crust in a preheated oven at 325°F for about 10 minutes. This will help set the crust and give it a nice golden color. After baking, remove it from the oven and let it cool completely.
Step 2: Making the Red Velvet Batter
While the crust is cooling, let’s prepare the red velvet batter. In a large mixing bowl, beat the softened cream cheese with 1 cup of granulated sugar until the mixture is smooth and creamy. This step is important for achieving a light texture.
Once the cream cheese and sugar are well combined, add in the vanilla extract. Mix well, then add the eggs one at a time, ensuring each egg is fully incorporated before adding the next. This will help create a smooth batter.
Step 3: Preparing the Cheesecake Filling
Now it’s time to add the remaining ingredients to the batter. Stir in the sour cream, all-purpose flour, cocoa powder, red food coloring, white vinegar, and baking soda. Mix everything together until fully combined. The batter should be a beautiful red color, and the texture should be smooth and creamy.
Make sure there are no lumps in the batter. This will ensure a silky cheesecake filling. Once you’re satisfied with the consistency, you’re ready to move on to the next step!
Step 4: Assembling the Red Velvet Cheesecake
With the crust cooled and the batter ready, it’s time to assemble your cheesecake. Pour the red velvet batter over the cooled graham cracker crust in the springform pan. Use a spatula to spread the batter evenly, ensuring it covers the crust completely.
Take a moment to admire the vibrant color of the batter! This cheesecake is going to be a showstopper. Now, let’s get it into the oven.
Step 5: Baking the Cheesecake
Place the assembled cheesecake in the preheated oven. Bake for 50-60 minutes, or until the center is set but still slightly jiggly. It’s important not to overbake, as this can lead to cracks in your cheesecake.
Once the baking time is up, turn off the oven and crack the door open. Allow the cheesecake to cool in the oven for about 1 hour. This gradual cooling helps prevent cracks from forming on the surface.
Step 6: Cooling and Chilling
After an hour in the oven, remove the cheesecake and let it cool completely at room temperature. Once it’s cooled, cover it with plastic wrap and refrigerate for at least 4 hours, or overnight if you can wait! Chilling allows the flavors to meld and the cheesecake to set properly.
And there you have it! You’ve successfully prepared your Red Velvet Cheesecake. Now, let’s explore some variations to make this dessert even more exciting!
Variations of Red Velvet Cheesecake Recipe
While the classic Red Velvet Cheesecake is a delightful treat on its own, there are many fun variations you can try. These adaptations allow you to cater to different dietary needs or simply add a twist to the traditional recipe. Let’s explore two popular variations: Gluten-Free Red Velvet Cheesecake and Mini Red Velvet Cheesecakes.
Gluten-Free Red Velvet Cheesecake
If you or someone you know is gluten-sensitive, you can still enjoy this delicious dessert! To make a gluten-free version of Red Velvet Cheesecake, simply substitute the all-purpose flour with a gluten-free flour blend. Many brands offer great alternatives that work well in baking.
Additionally, ensure that your graham cracker crumbs are gluten-free. Some brands offer gluten-free graham crackers, which can be crushed to create the crust. Follow the same steps as in the original recipe, and you’ll have a gluten-free cheesecake that everyone can enjoy!
Mini Red Velvet Cheesecakes
For a fun and adorable twist, consider making Mini Red Velvet Cheesecakes! These bite-sized treats are perfect for parties or gatherings. To create mini versions, use a muffin tin lined with cupcake liners instead of a springform pan.
Prepare the crust as usual, but divide the graham cracker mixture evenly among the muffin cups. Press it down firmly. Then, pour the red velvet batter over each crust, filling the cups about three-quarters full. Bake for about 20-25 minutes, or until the centers are set.
Once baked, let them cool and chill as you would with the full-sized cheesecake. These mini cheesecakes are not only cute but also make for easy serving. Top them with whipped cream and a sprinkle of red velvet cake crumbs for an extra special touch!
These variations allow you to enjoy the rich flavors of Red Velvet Cheesecake in different ways. Whether you choose the gluten-free option or the mini version, you’re sure to impress your guests with these delightful treats!
Cooking Note for Red Velvet Cheesecake Recipe
When it comes to baking a Red Velvet Cheesecake, a few key cooking notes can help ensure your dessert turns out perfectly. First, always use room temperature ingredients. This includes the cream cheese, eggs, and sour cream. Room temperature ingredients blend more easily, resulting in a smoother batter.
Next, be mindful of your oven temperature. Ovens can vary, so it’s a good idea to use an oven thermometer to ensure accuracy. Baking at the correct temperature is crucial for achieving the right texture. If your cheesecake is baking too quickly, it may crack or become dry.
Another important tip is to avoid opening the oven door while the cheesecake is baking. This can cause temperature fluctuations, which may lead to cracks. Instead, use the oven light to check on your cheesecake. If you notice it’s puffing up too much, it may be a sign that it’s overbaking.
Lastly, patience is key when cooling your cheesecake. Allowing it to cool gradually in the oven helps prevent cracks. After cooling at room temperature, refrigerate it for the recommended time. This chilling period is essential for the flavors to develop and the cheesecake to set properly.
By following these cooking notes, you’ll be well on your way to creating a stunning Red Velvet Cheesecake that’s sure to impress everyone at your gathering!
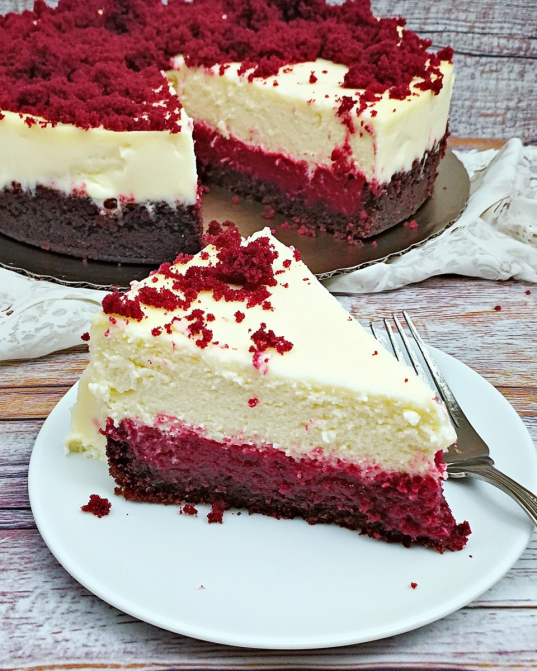
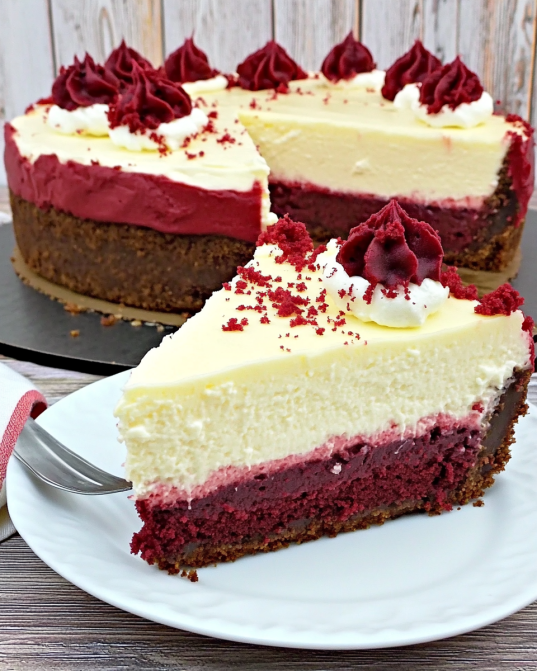
Serving Suggestions for Red Velvet Cheesecake Recipe
Once your Red Velvet Cheesecake is perfectly chilled and ready to serve, it’s time to think about how to present this stunning dessert. The way you serve it can enhance the overall experience, making it even more enjoyable for your guests. Here are some delightful serving suggestions to consider:
- Classic Presentation: Slice the cheesecake into wedges and serve each piece on a dessert plate. This classic approach allows everyone to enjoy a generous slice of the rich, creamy cheesecake.
- Whipped Cream Topping: Add a dollop of freshly whipped cream on top of each slice. The lightness of the whipped cream beautifully contrasts with the dense cheesecake, creating a delightful balance.
- Red Velvet Crumbs: For a decorative touch, sprinkle some crushed red velvet cake crumbs on top of the whipped cream. This not only adds visual appeal but also enhances the red velvet flavor.
- Chocolate Drizzle: Drizzle some chocolate sauce over the cheesecake slices for an extra layer of flavor. The combination of chocolate and red velvet is always a hit!
- Fresh Berries: Serve the cheesecake with a side of fresh berries, such as strawberries or raspberries. The tartness of the berries complements the sweetness of the cheesecake perfectly.
- Mini Cheesecake Bites: If you made mini cheesecakes, serve them on a decorative platter. You can even add toothpicks for easy serving, making them perfect for parties or gatherings.
These serving suggestions not only enhance the presentation of your Red Velvet Cheesecake but also elevate the overall tasting experience. Whether you’re hosting a special occasion or simply enjoying a slice at home, these ideas will surely impress your guests and make your dessert unforgettable!
Tips for Perfecting Your Red Velvet Cheesecake Recipe
Creating the perfect Red Velvet Cheesecake is an art that requires attention to detail. Here are some valuable tips to help you achieve a delicious and visually stunning dessert every time:
- Use Quality Ingredients: The quality of your ingredients can significantly impact the final taste. Opt for high-quality cream cheese and fresh eggs for the best results. Fresh ingredients enhance the flavor and texture of your cheesecake.
- Don’t Overmix: When combining the batter, mix just until the ingredients are incorporated. Overmixing can introduce too much air, leading to cracks during baking. A smooth batter is key, but it should not be whipped.
- Check for Doneness: To ensure your cheesecake is perfectly baked, gently shake the pan. The center should be slightly jiggly but not liquid. If it wobbles too much, it needs more time in the oven.
- Cool Gradually: As mentioned earlier, cooling your cheesecake gradually in the oven helps prevent cracks. After baking, turn off the oven and leave the door ajar for about an hour before transferring it to room temperature.
- Chill Overnight: For the best flavor and texture, chill your cheesecake overnight. This allows the flavors to meld beautifully and ensures a firmer texture, making it easier to slice.
- Experiment with Flavors: Don’t hesitate to add your twist! Consider incorporating spices like cinnamon or nutmeg for added warmth. You can also try different extracts, such as almond or coconut, to create unique flavor profiles.
- Use a Water Bath: For an ultra-smooth cheesecake, consider baking it in a water bath. Wrap the springform pan in aluminum foil and place it in a larger pan filled with hot water. This method helps maintain even baking temperatures.
- Garnish Creatively: When it comes to presentation, let your creativity shine! Use fresh fruits, chocolate shavings, or edible flowers to make your cheesecake visually appealing. A beautiful presentation can elevate the dessert experience.
By following these tips, you’ll be well on your way to mastering the art of Red Velvet Cheesecake. Each step you take will contribute to a dessert that not only looks stunning but also tastes incredible. Happy baking!
Breakdown of Time for Red Velvet Cheesecake Recipe
Understanding the time required for each step in the Red Velvet Cheesecake recipe is essential for planning your baking session. Here’s a detailed breakdown of the time you’ll need to allocate for preparation, cooking, and chilling.
Prep Time
The prep time for your Red Velvet Cheesecake is approximately 30 minutes. This includes gathering all your ingredients, preparing the crust, and mixing the cheesecake batter. Make sure to have everything ready before you start, as this will help streamline the process and make it more enjoyable.
Cooking Time
Once you’ve prepped your cheesecake, the cooking time will take about 60-70 minutes. This includes 10 minutes for baking the crust and 50-60 minutes for baking the cheesecake itself. Remember, the cheesecake should be slightly jiggly in the center when you take it out of the oven, so keep an eye on it during the last few minutes of baking.
Total Time
In total, you should expect to spend around 90-100 minutes actively working on your Red Velvet Cheesecake. However, don’t forget to factor in the chilling time! After baking, the cheesecake needs to cool at room temperature and then chill in the refrigerator for at least 4 hours, or ideally overnight. This brings the total time commitment to about 8-12 hours, including chilling, but most of that is hands-off time.
By planning your time wisely, you can ensure that your Red Velvet Cheesecake turns out perfectly. Enjoy the process, and soon you’ll have a delicious dessert ready to impress your family and friends!
Nutritional Information for Red Velvet Cheesecake Recipe
Understanding the nutritional content of your Red Velvet Cheesecake is essential, especially if you’re mindful of your dietary choices. This delicious dessert can be enjoyed in moderation, and knowing its nutritional breakdown can help you make informed decisions. Here’s a closer look at the key nutritional components per serving:
Calories
350 calories. This calorie count includes the rich ingredients like cream cheese and butter, which contribute to the overall flavor and texture. While it’s a treat, enjoying it in moderation is key to maintaining a balanced diet.
Protein
6 grams per serving. The protein primarily comes from the cream cheese and eggs used in the recipe. Protein is essential for muscle repair and growth, making this dessert a delightful way to indulge while still getting some nutritional benefits.
Sodium
300 mg of sodium. This sodium content is relatively moderate, but it’s always good to be aware, especially for those watching their salt intake. The sodium mainly comes from the cream cheese and butter, which are key ingredients in this recipe.
Overall, while Red Velvet Cheesecake is a rich and indulgent dessert, it can be enjoyed as part of a balanced diet. Just remember to savor each bite and share it with friends and family for a delightful experience!
FAQs about Red Velvet Cheesecake Recipe
Can I use a different type of cheese for the cheesecake filling?
Yes, you can! While cream cheese is the traditional choice for cheesecake, you can experiment with other types of cheese. Mascarpone cheese can add a rich and creamy texture, while ricotta cheese can provide a lighter feel. Just keep in mind that the flavor and texture may vary slightly, so it’s best to choose a cheese that complements the red velvet flavor.
How do I store leftover Red Velvet Cheesecake?
To store leftover Red Velvet Cheesecake, first, make sure it’s completely cooled and chilled. Cover the cheesecake with plastic wrap or aluminum foil to prevent it from drying out. You can also place it in an airtight container. Store it in the refrigerator for up to 5 days. If you want to keep it longer, consider freezing individual slices. Just wrap them tightly in plastic wrap and then in aluminum foil before placing them in the freezer. They can last for up to 3 months!
Can I make Red Velvet Cheesecake ahead of time?
Absolutely! In fact, making Red Velvet Cheesecake ahead of time is a great idea. It allows the flavors to meld and the texture to set perfectly. You can prepare the cheesecake a day or two in advance. Just remember to refrigerate it after cooling. When you’re ready to serve, simply take it out of the fridge, slice, and enjoy!
What can I substitute for buttermilk in the recipe?
If you don’t have buttermilk on hand, don’t worry! You can easily make a substitute. For every cup of buttermilk needed, mix 1 tablespoon of white vinegar or lemon juice with enough milk to make 1 cup. Let it sit for about 5 minutes until it thickens slightly. This will give you a similar tangy flavor and acidity that buttermilk provides, ensuring your cheesecake turns out delicious!
Conclusion on Red Velvet Cheesecake Recipe
In conclusion, the Red Velvet Cheesecake is a delightful dessert that beautifully combines the classic flavors of red velvet cake with the creamy richness of cheesecake. This recipe is not only easy to follow but also allows for creativity and personalization. Whether you’re celebrating a special occasion or simply indulging in a sweet treat, this cheesecake is sure to impress.
By using quality ingredients and following the preparation steps carefully, you can create a stunning dessert that will be the highlight of any gathering. Remember to take your time during the baking and cooling process, as patience is key to achieving that perfect texture. With the tips and variations provided, you can make this recipe your own, whether you opt for a gluten-free version or mini cheesecakes.
As you serve your Red Velvet Cheesecake, consider the presentation options to elevate the experience. From whipped cream to fresh berries, these simple touches can make your dessert even more inviting. Enjoy each slice, savoring the rich flavors and creamy texture that make this cheesecake a true indulgence.
So, gather your ingredients, roll up your sleeves, and get ready to create a delicious Red Velvet Cheesecake that will leave everyone asking for seconds. Happy baking!