


As the Halloween season creeps in, every kitchen starts to stir with whispers of delightful treats. Enter the Mummy Dogs recipe – a whimsical combination of savory sausages shrouded in golden crescent roll dough that will elevate any spooky gathering. Not only are these Mummy Dogs incredibly easy to prepare, but they also make for a playful centerpiece that everyone, from toddlers to grandparents, will adore. Plus, with their customizable nature, you can personalize them to suit your family’s tastes, ensuring a delicious bite for every palate. Ready to conjure up some fun in the kitchen? Let’s unwrap this spooky delight!

Why Will You Love Mummy Dogs?
Family-friendly fun: Mummy Dogs are the perfect treat that will have kids giggling with delight while they help wrap the ‘mummies.’
Easy to prepare: With just a few simple ingredients, this recipe can be whipped up in no time, making it a fantastic choice for busy schedules.
Customizable options: Feel free to swap out sausages for your favorites—chicken, turkey, or even plant-based alternatives can make this dish suit everyone’s tastes.
Creative presentation: Their spooky look not only makes them a hit at Halloween parties but also brings a touch of creativity to any meal, much like my Mexican Taco Soup.
Crowd-pleaser guaranteed: These little mummies will disappear fast at gatherings, leaving your guests raving about their unique and tasty charm!
Mummy Dogs Recipe Ingredients
• To conjure up these delightful treats, gather the following ingredients!
For the Mummy Dogs
- Sausages – Choose any fully cooked variety like beef, turkey, chicken, or vegetarian options for a tasty base.
- Crescent Roll Dough – This flaky outer wrap is essential; feel free to use alternative doughs like puff pastry or even homemade options.
- Cooking Spray (optional) – A light mist will prevent sticking; however, parchment paper can eliminate the need for it.
For Dipping Sauces
- Ketchup – A classic choice that adds a sweet and tangy flavor; perfect for those little mummified morsels!
- Mustard – For a zesty kick, mustard complements the savory sausages beautifully—experiment with different varieties!
Gather these ingredients and get ready to delight your hungry guests with this fun Mummy Dogs recipe!
Step‑by‑Step Instructions for Mummy Dogs Recipe
Step 1: Preheat Your Oven
Begin your culinary adventure by preheating your oven to 375°F (190°C). This temperature is crucial for achieving that perfect golden-brown color on our charming Mummy Dogs. Make sure to set your timer so that your oven is ready when you are!
Step 2: Prepare the Dough
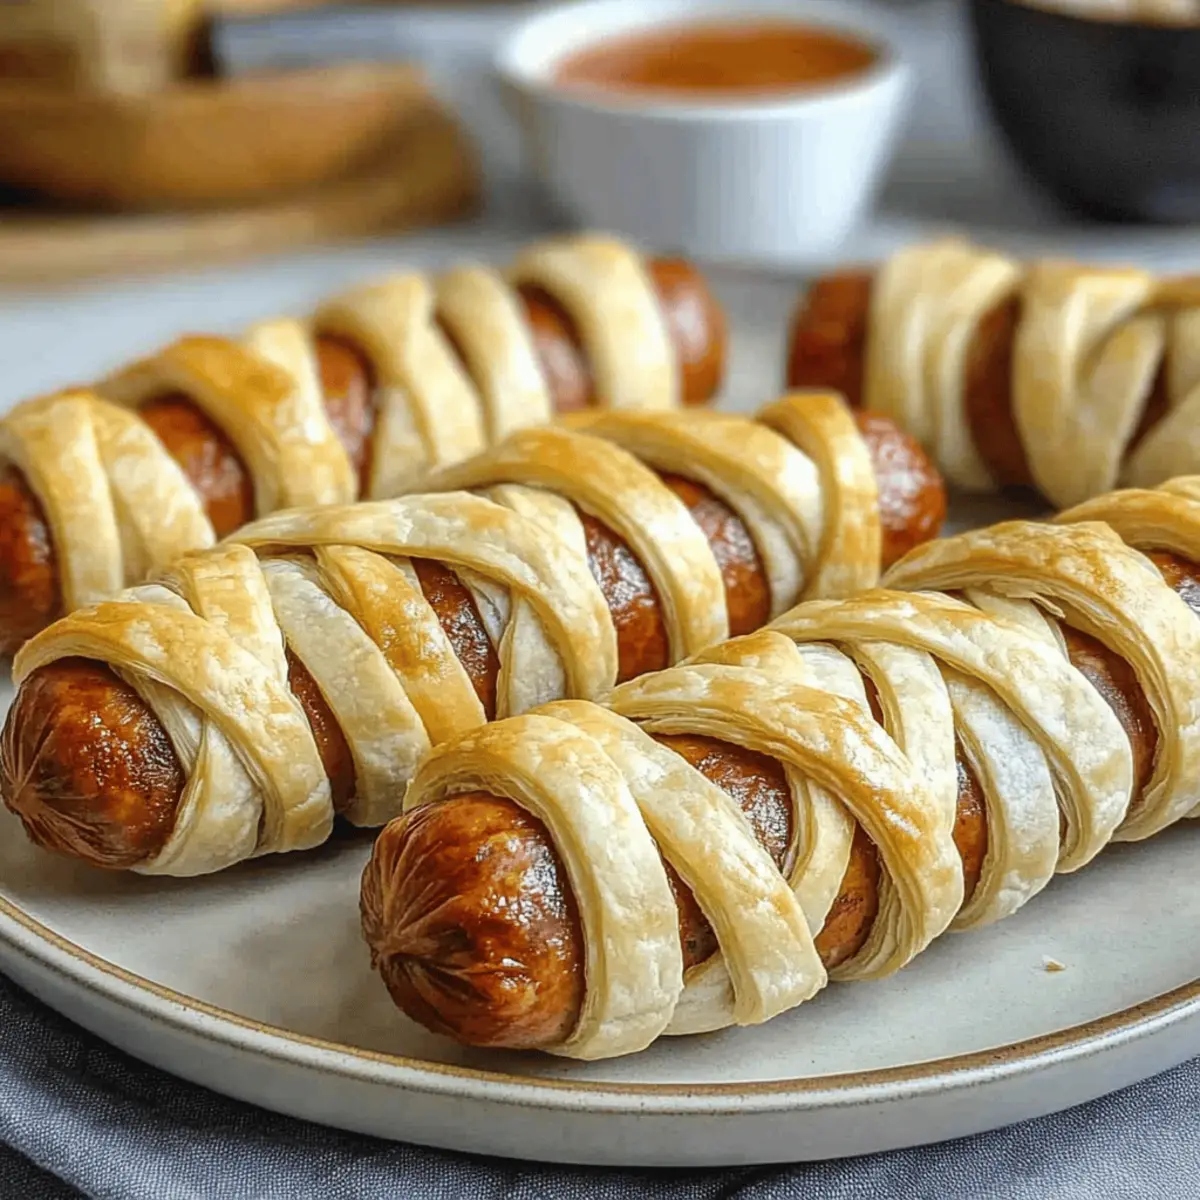
While the oven heats up, carefully unroll your crescent roll dough onto a clean surface. Use a sharp knife or pizza cutter to slice it into thin strips, each about half an inch wide. These strips will serve as the “bandages” for your Mummy Dogs, so aim for even cuts to ensure consistent wrapping.
Step 3: Wrap the Sausages
Take each sausage and begin wrapping the dough strips around it, leaving small gaps to create the mummy effect. Start at one end and overlap the dough slightly as you go along, making sure it’s snug but not overly tight. This will allow the dough to expand during baking, creating that delightful mummy appearance.
Step 4: Arrange on Baking Sheet
Once all the sausages are wrapped, get a baking sheet lined with parchment paper or lightly greased, if necessary. Carefully place each wrapped sausage on the sheet, ensuring they are spaced apart to allow for even baking. This step is essential for keeping the Mummy Dogs from sticking together as they bake.
Step 5: Bake to Perfection
Slide the baking sheet into the preheated oven and bake the Mummy Dogs for about 13-15 minutes. Keep an eye on them as they bake; you want to achieve a lovely golden brown color on the dough. When they’re perfectly baked, the delightful aroma will fill your kitchen and your guests will be eagerly awaiting their treat!
Step 6: Add Finishing Touches
Once baked, remove the Mummy Dogs from the oven and let them cool slightly. Using a toothpick or a small spoon, dab little dots of ketchup or mustard to create “eyes” on each mummy. This playful detail not only enhances their spooky appearance but also adds a burst of flavor, making your Mummy Dogs irresistible!
Step 7: Serve and Enjoy
Serve your beautiful Mummy Dogs warm for the best taste and texture. Arrange them on a festive platter, perhaps alongside some Halloween-themed sides or dipping sauces. These delightful treats are not just a feast for the taste buds; they’re also a cheerful addition to your Halloween festivities!
Expert Tips for Mummy Dogs
-
Cooking Spray Caution: Avoid using too much cooking spray, as it can make the dough overly greasy. A light mist is all you need for a nonstick surface.
-
Dough Thickness Consistency: Make sure your dough strips are evenly cut; uneven thickness can lead to some mummies being undercooked while others get too brown.
-
Sausage Variations: Experiment with different sausages to keep things exciting! Just ensure they are fully cooked, especially if using turkey or chicken options in your Mummy Dogs recipe.
-
Gaps for Eyes: Don’t forget to leave gaps when wrapping the sausages. These small openings will create an adorable mummy look and allow for delicious dipping sauce eyes!
-
Make-Ahead Tips: If time is short, prep the Mummy Dogs in advance and store them in the refrigerator; just bake them fresh when guests arrive for maximum enjoyment!
Make Ahead Options
These Mummy Dogs are perfect for busy home cooks looking to save time on Halloween party prep! You can assemble the Mummy Dogs up to 24 hours in advance. After wrapping the sausages in dough, simply place them on a parchment-lined baking sheet and cover tightly with plastic wrap before refrigerating. This keeps the dough fresh and prevents it from drying out. When you’re ready to bake, preheat your oven and bake the Mummy Dogs right from the fridge for about 13-15 minutes, achieving that golden-brown finish with minimal effort. Enjoy the convenience of this make-ahead option while still serving up delicious, festive treats!
What to Serve with Spooky Mummy Dogs
The perfect accompaniments will elevate your Halloween gathering, creating a memorable feast filled with delightful flavors and textures.
-
Crispy Sweet Potato Fries: These sweet, crispy fries add a delightful contrast to the savory Mummy Dogs, making every bite a flavorful celebration.
-
Spooky Salad: Toss together mixed greens with black olives and mandarin oranges to create a fresh, festive dish that’s as fun to make as it is to eat.
-
Garlicky Green Beans: Sautéed with olive oil and garlic, these vibrant green beans add a fresh crunch, balancing the comforting flavors of the Mummy Dogs seamlessly.
-
Pumpkin Soup Shooters: Serve up warm pumpkin soup in small cups for a cozy, seasonal starter that’s both creamy and gently spiced—ideal for warming up everyone’s spirits!
-
Cranberry Lemonade Spritzers: This refreshing drink, with its tart cranberry and zingy lemon, is a thirst-quencher that complements the richness of the Mummy Dogs perfectly.
-
Chocolate-Covered Pretzel Bites: These sweet and salty delights make for a fun dessert, giving a hint of whimsy to your Halloween spread with every crunchy bite.
-
Cheesy Monster Dip: Serve this hot cheesy dip warm with tortilla chips—its gooey texture and cheesy goodness make it an irresistible option next to Mummy Dogs.
-
Mini Pumpkin Pies: End the meal on a sweet note with these adorable little pies, bringing a nostalgic fall flavor that’s sure to please everyone’s palate.
These pairings not only enhance the flavors of your Spooky Mummy Dogs but also create a festive atmosphere that your guests will love!
How to Store and Freeze Mummy Dogs
Fridge: Store leftover Mummy Dogs in an airtight container for up to 3 days. This keeps them fresh and ready for quick snacks or lunches.
Freezer: Freeze Mummy Dogs individually wrapped in plastic wrap, then place them in a freezer bag for up to 1-2 months. This is a great option for meal prepping!
Reheating: To reheat, bake frozen Mummy Dogs at 375°F (190°C) for 15-20 minutes, or until heated through. This restores their crispy texture perfectly!
Make-Ahead: You can also assemble the Mummy Dogs ahead of time and keep them in the fridge until you’re ready to bake, making it easy to enjoy this fun treat at a moment’s notice!
Mummy Dogs Recipe: Fun Variations
Feel free to sprinkle your own magic on these Mummy Dogs and make them uniquely yours!
-
Dairy-Free: Use dairy-free crescent roll dough and omit cheese for a tasty alternative. It’s perfect for lactose-intolerant family members who still want to join in the fun.
-
Spicy Twist: Consider using spicy sausages or adding jalapeño slices inside for a kick. This adds a delightful heat that’s sure to excite those who love a little extra flair.
-
Cheesy Delight: Place cheese stick slices inside the sausage before wrapping it up. This gooey addition melts beautifully and fills each bite with a warm, cheesy surprise.
-
Puff Pastry Option: Swap out crescent roll dough for puff pastry to give the Mummy Dogs a flakier texture. This twists up the classic recipe and adds a delightful crunch, making them harder to resist!
-
Vegetarian Version: Opt for plant-based sausages like those made from lentils or chickpeas. It’s a fantastic choice that ensures everyone can enjoy this spooky snack!
-
Sweet and Savory: Brush the dough with a bit of honey or maple syrup before baking. This sweet glaze caramelizes during baking, creating a delicious contrast to the savory sausage.
-
Halloween-Themed Dips: Instead of ketchup and mustard, provide some spooky dips like a green avocado sauce or a ghostly white ranch dressing. Fun dips can enhance the whole presentation and entice both kids and adults alike!
For a delightful feast that pairs perfectly with Mummy Dogs, you might also want to consider serving them alongside my Cheesy Hamburger Food or a bowl of Cozy Broccoli Cheddar Soup. The possibilities are endless, making each gathering a unique experience!

Mummy Dogs Recipe FAQs
What type of sausages should I use for Mummy Dogs?
Absolutely! You can use any fully cooked sausages like beef, turkey, chicken, or even vegetarian options. Just make sure they’re precooked to guarantee a delicious end product. Personally, I love a mix of turkey and cheese sausages for added flavor!
How should I store leftover Mummy Dogs?
Leftover Mummy Dogs can be stored in an airtight container in the refrigerator for up to 3 days. This simple storage solution helps maintain their taste and texture, making them perfect for snacks or quick lunches.
Can I freeze Mummy Dogs?
Yes, you can! To freeze Mummy Dogs, wrap each one individually in plastic wrap and then place them in a freezer bag. They can be frozen for up to 1-2 months. When you’re ready to enjoy them, just bake from frozen at 375°F (190°C) for about 15-20 minutes until warmed through—this method keeps them nice and crispy!
What should I do if the crescent roll dough is hard to work with?
Very! If you find the dough difficult to work with, it might help to let it sit at room temperature for a few minutes. This softens the dough and makes it easier to roll out and cut into strips. Also, ensure your work surface is lightly floured, as this will help prevent sticking and tearing.
Are there any allergy considerations for this Mummy Dogs recipe?
Definitely! If you’re making these for guests with allergies, be sure to choose gluten-free crescent roll dough and check the ingredient list on your sausages. This way, everyone can join in the Halloween fun, including those with special dietary needs.

Easy Mummy Dogs Recipe: Fun Halloween Snacks for Everyone
Ingredients
Equipment
Method
- Preheat your oven to 375°F (190°C).
- Unroll the crescent roll dough onto a clean surface and slice it into thin strips, about half an inch wide.
- Wrap the dough strips around each sausage, leaving small gaps to create the mummy effect.
- Place the wrapped sausages on a baking sheet lined with parchment paper, spaced apart for even baking.
- Bake in the preheated oven for about 13-15 minutes until golden brown.
- Remove the Mummy Dogs from the oven and let them cool slightly. Dab dots of ketchup or mustard on each to create 'eyes'.
- Serve warm on a festive platter alongside dipping sauces.