


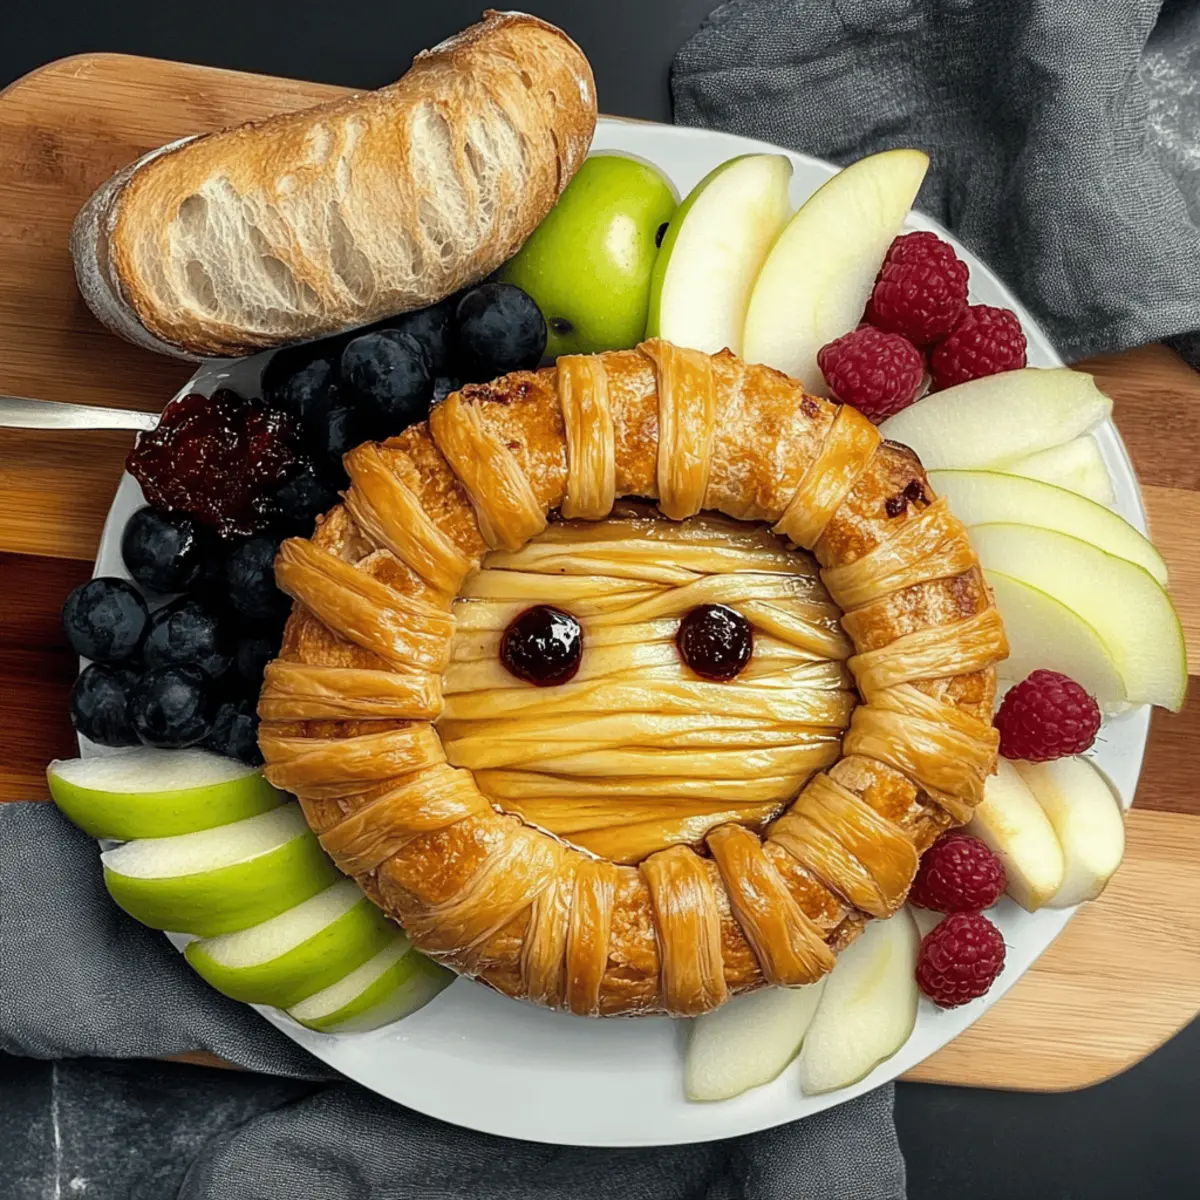
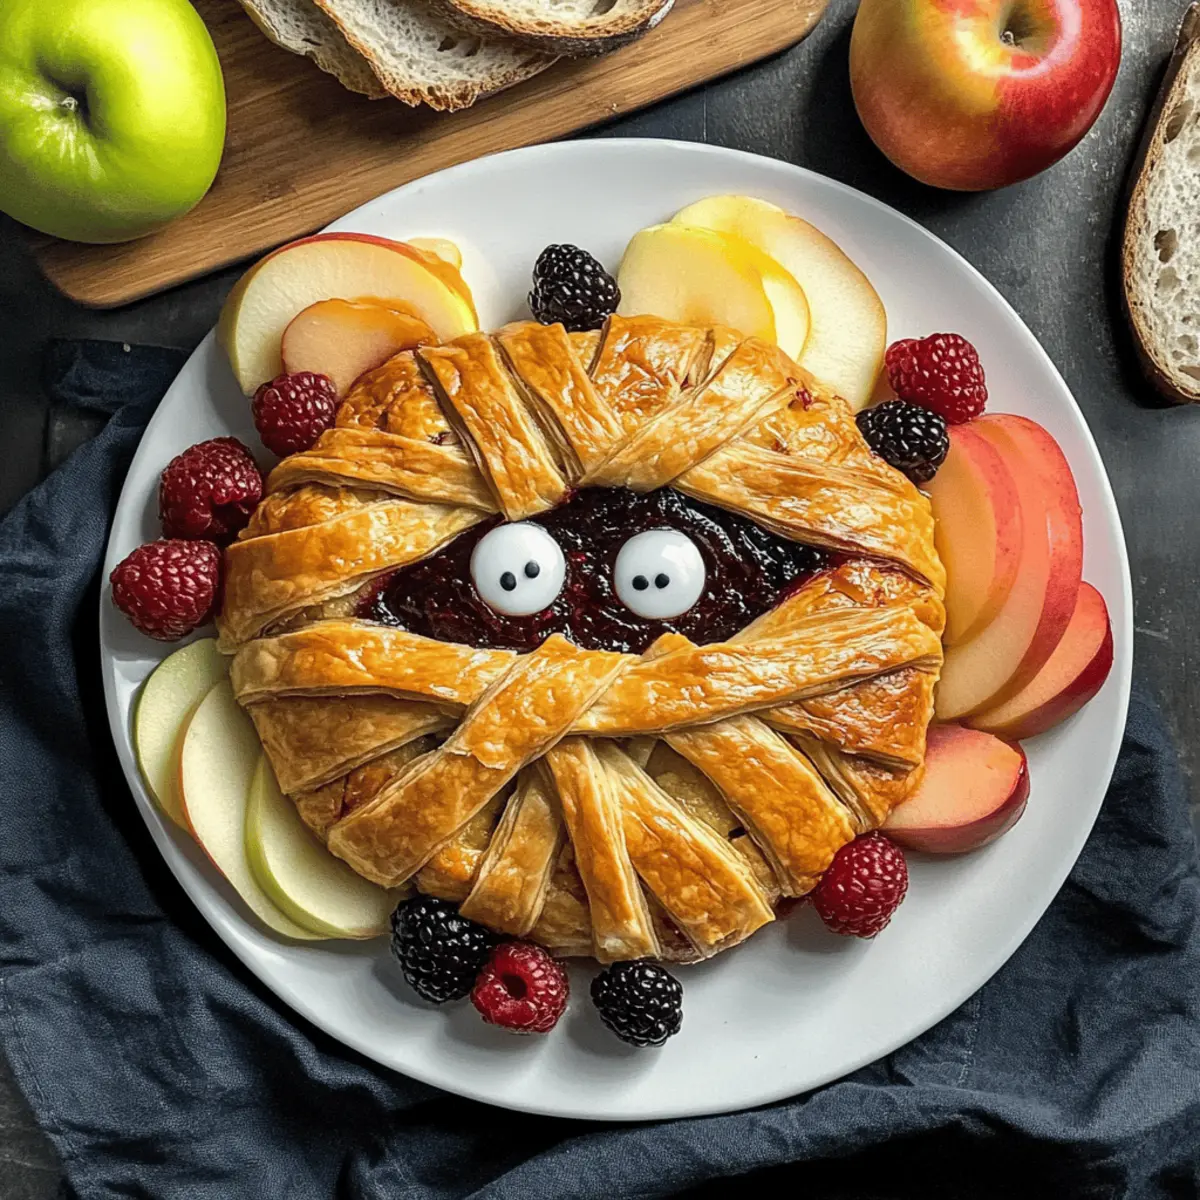
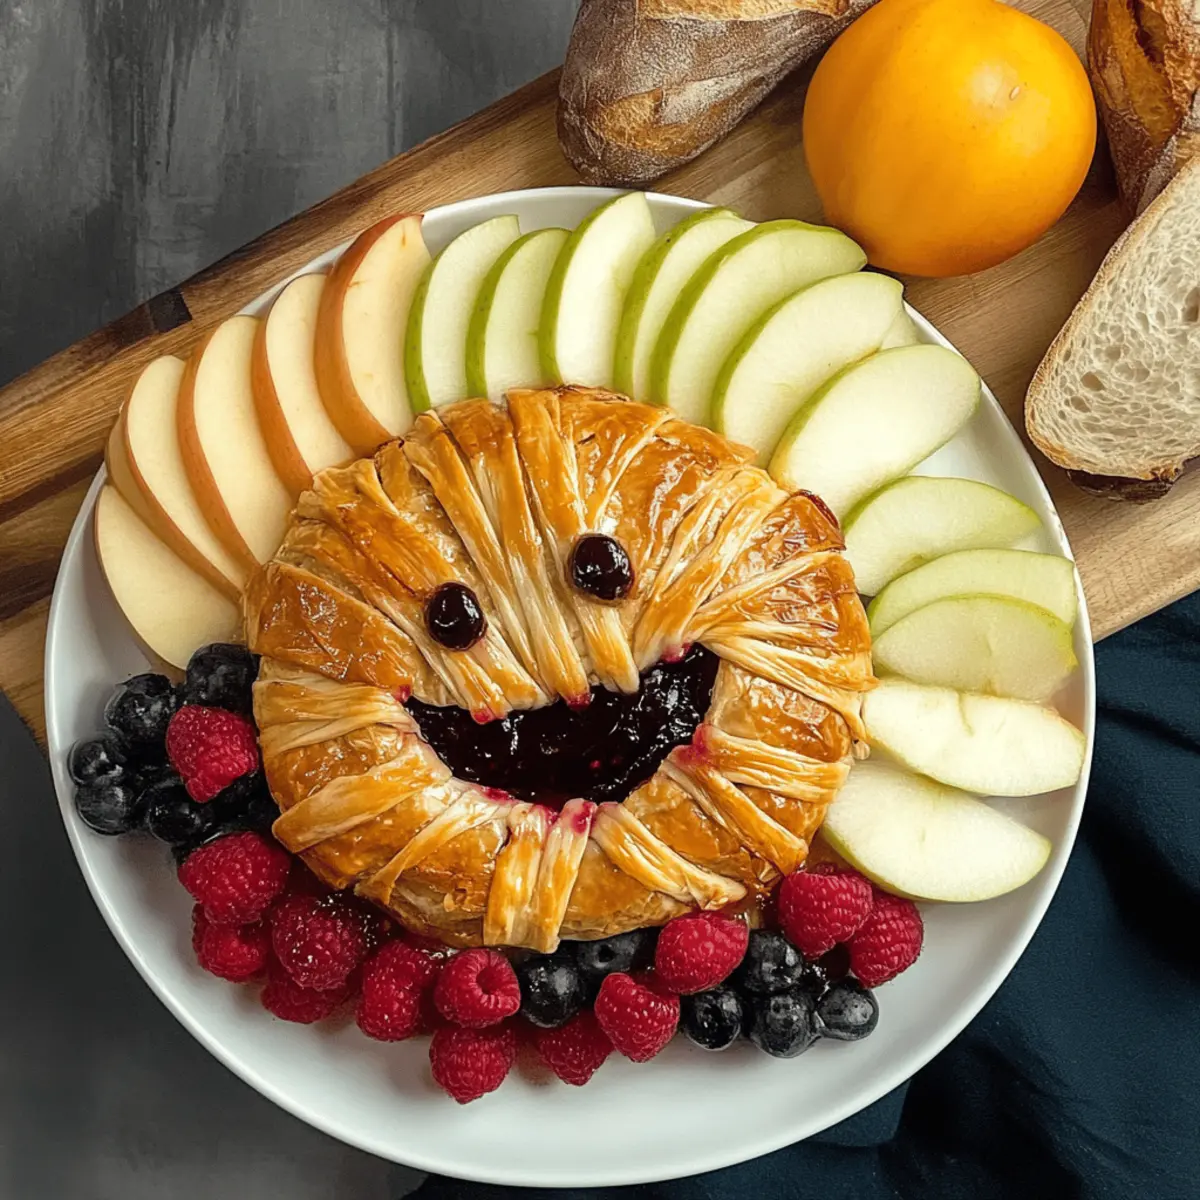
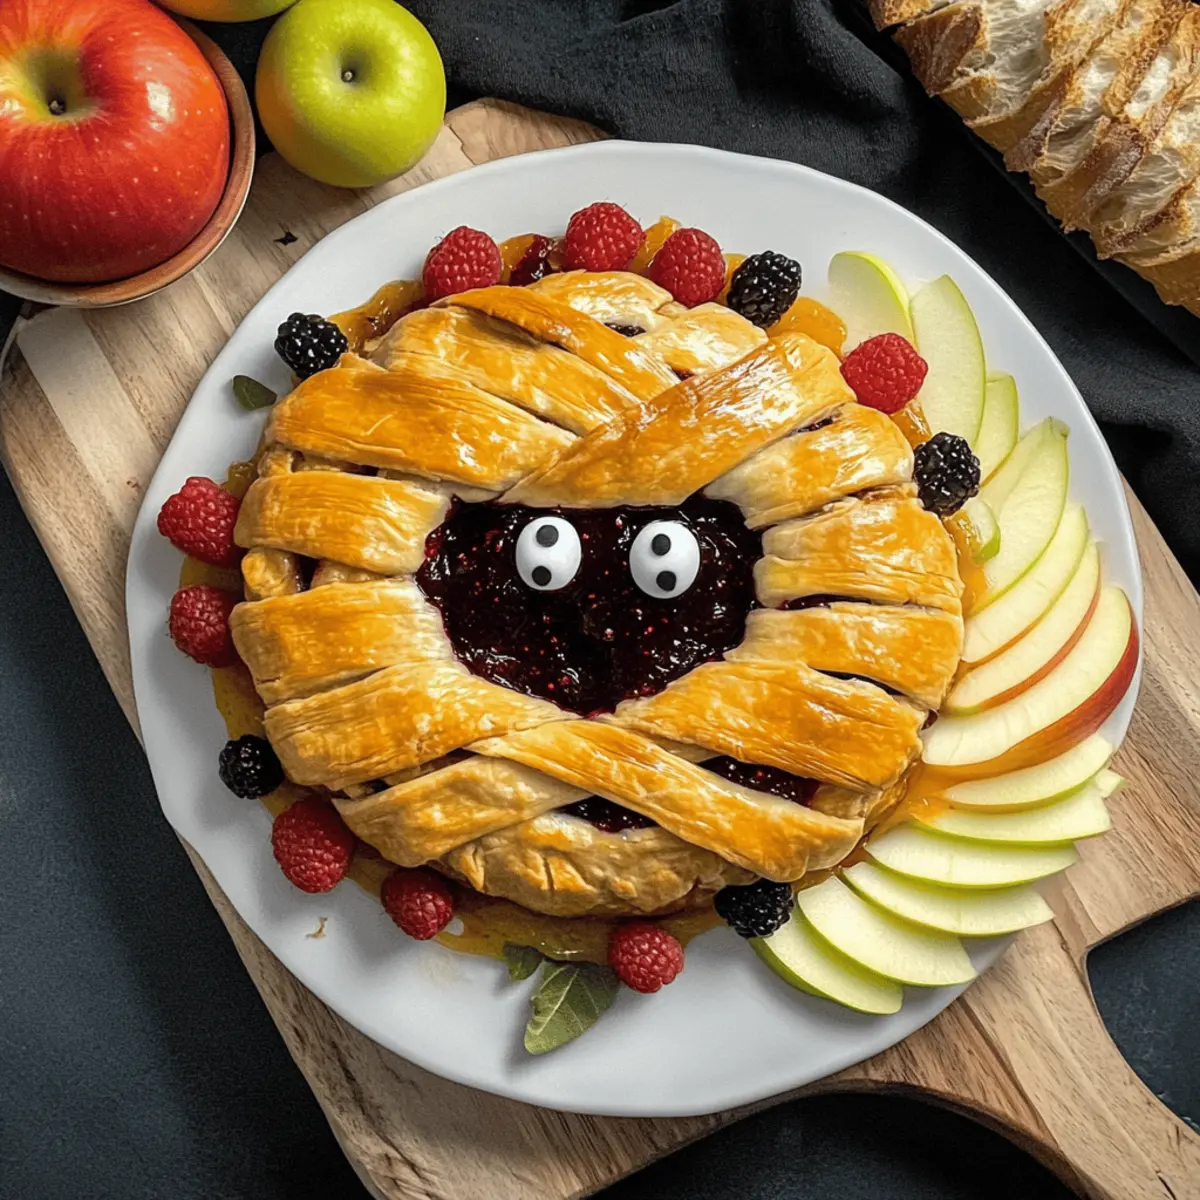
As I sifted through my pantry for Halloween party ideas, my eyes fell on a wheel of brie just waiting to be transformed into something magical. Enter the Mummy Baked Brie—a fun and festive Halloween appetizer that’s not only a cheeky twist on your classic cheese board but also incredibly easy to make! Wrapped in a flaky puff pastry and oozing creamy goodness, this dish can be customized with your favorite jam, elevating your gathering with a delightful balance of sweet and savory flavors. Plus, it’s a great conversation starter and a guaranteed crowd-pleaser, making it perfect for any autumnal celebration. Are you ready to delve into this spooky yet scrumptious creation? Let’s get cooking!
Why Is Mummy Baked Brie a Must-Try?
Adorable Presentation: The mummy wrap creates an eye-catching centerpiece that will steal the show at any Halloween gathering.
Rich, Creamy Texture: That melty brie paired with a flakey puff pastry is a match made in heaven, offering a delightful contrast with every bite.
Customizable Flavors: Whether you prefer sour cherry, raspberry, or even fig jam, this recipe allows for personalization to suit every palate. Try pairing it with a side of sliced apples, like in my Garlic Butter Baked Chicken for a lovely balance of sweetness!
Quick and Easy: With minimal prep time, you can whip this delight up in less than 30 minutes, making it a lifesaver for last-minute entertaining.
Crowd Favorite: Its unique yet accessible flavors are sure to impress your guests, making it a hit at any Halloween celebration. Don’t forget to serve it alongside a charming spread, like a Comforting Charm Baked cheese board!
Mummy Baked Brie Ingredients
For the Brie
• Brie Wheel – This main cheese melts beautifully; you can substitute with Camembert for a similar creamy texture.
For the Jam
• Sour Cherry Jam – Its tartness complements the cheese perfectly; try raspberry or blackberry jam for a tasty twist.
For the Pastry
• Puff Pastry – The flaky wrap creates the mummy effect; be sure it’s fully thawed before using.
For Egg Wash
• Egg – An egg wash gives the pastry a gorgeous golden brown color; substitute with milk for a dairy-free option.
For Serving
• Sliced Baguette (optional) – Adds a crunchy contrast; crackers or crostini work as great alternatives.
• Sliced Apples/Pears (optional) – Fresh fruit balances the richness of the cheese; seasonal varieties are recommended.
• Grapes and Blueberries (optional) – These garnishes enhance color and freshness, making your presentation pop!
Step‑by‑Step Instructions for Mummy Baked Brie
Step 1: Prep the Brie
Start by freezing the brie wheel for 15 minutes; this will help maintain its shape when baked. Once chilled, carefully slice off the top ½ inch to expose the creamy center, and spread your choice of sour cherry jam generously over the exposed surface. This savory-sweet layer will enhance the flavors in your Mummy Baked Brie.
Step 2: Roll Out the Puff Pastry
Next, take the thawed puff pastry and roll it out on a lightly floured surface into a rectangle measuring approximately 14 x 11 inches. Ensure the dough is smooth and even, as this will be the cozy blanket for your Mummy Baked Brie. Place the brie, jam-side up, right in the center of the pastry to get ready for wrapping.
Step 3: Wrap the Brie
With the brie in the center, slice the pastry into long strips, about 1 inch wide, down the sides of the dough. Begin folding these strips over the brie, alternating from side to side to create a criss-cross “mummy” effect. Use shorter pastry strips to create a head wrap at the top; this fun detail adds to the spooky look of your Mummy Baked Brie.
Step 4: Prepare to Bake
Transfer the wrapped brie onto a baking tray lined with parchment paper; this keeps everything from sticking and makes for easy cleanup. Brush the top and edges generously with egg wash to achieve that beautifully golden crust. This step not only adds color but also helps the pastry seal tightly around the cheese.
Step 5: Bake and Enjoy
Preheat your oven to 375°F (190°C) and bake the Mummy Baked Brie for 20-25 minutes. Keep an eye on it, looking for a rich golden brown color on the pastry, indicating it’s ready. Once baked, remove it from the oven and let it cool slightly to avoid any burns while serving.
Step 6: Serve with Flair
As a final touch, add edible eyes to your Mummy Baked Brie for a fun and festive appearance. Serve this delightful creation warm alongside sliced baguette and fresh fruits like apples or pears for a crisp contrast. Gather your loved ones, and prepare to share this cheerful Halloween treat!
Storage Tips for Mummy Baked Brie
Fridge: Store any leftover Mummy Baked Brie in an airtight container and refrigerate for up to 2 days. This will help keep it fresh while retaining its creamy texture.
Freezer: For longer storage, you can freeze the wrapped brie before baking. Just ensure it’s well wrapped in plastic, then aluminum foil, for up to 3 months. Thaw in the fridge before baking.
Reheating: To reheat, place the Mummy Baked Brie in a preheated oven at 350°F (175°C) for 10-15 minutes until warmed through and the pastry regains its crispiness.
Serving Suggestions: Enjoy your Mummy Baked Brie warm, alongside sliced baguette or fresh fruits for a delightful snack that’s sure to impress!
What to Serve with Mummy Baked Brie?
As you gather around the table for Halloween festivities, complement the delightful flavors of this spooky appetizer with enchanting sides and drinks that enhance your gathering’s magic.
- Crispy Sliced Baguette: The crunchiness of toasted baguette slices offers the perfect contrast to the creamy brie, ideal for scooping up every gooey bite.
- Fresh Apple Slices: Sweet and tart, these will balance the richness of the cheese while adding a refreshing crunch to your plate. Pairing apples with brie is a classic that never disappoints!
- Savory Charcuterie Board: Enhance your spread with assorted cured meats, dried fruits, and nuts. The variety of flavors and textures will keep your guests coming back for more.
- Roasted Pumpkin Soup: A warm bowl of this seasonal favorite can be the ultimate comforting companion, providing soothing warmth against the cool autumn weather.
- Spiced Cranberry Sauce: Adding a side of tangy cranberry sauce can elevate the flavor profile, introducing a sweet and zesty element that complements the brie beautifully.
- Festive Mulled Wine: For a cozy drink option, serve warm mulled wine infused with spices like cinnamon and cloves, wrapping your gathering in inviting autumn aromas.
- Caramelized Pear Salad: This salad, with its lightly sweetened pears and nutty dressing, creates a delicious contrast that harmonizes with the creamy, savory brie and adds an elegant touch to your buffet.
Mummy Baked Brie Variations
Feel free to make this delightful recipe your own by incorporating these tasty twists and swaps!
-
Cheese Swap: Try using goat cheese for a tangy flavor, or cheddar for a sharper taste. Each cheese brings its own character to the dish.
-
Jam Alternatives: Switch sour cherry jam for fig spread for a uniquely sweet depth, or opt for a spiced apple jam for a cozy autumn vibe.
-
Herb Infusion: Mix in some fresh herbs like rosemary or thyme with the jam for an aromatic enhancement. This addition creates a fragrant layer of flavor that will surprise your palate.
-
Additional Toppings: Sprinkle with crushed pecans or walnuts before wrapping for a delightful crunch. The texture contrast between the creamy cheese and nuts is simply divine!
-
Heat Factor: Add a drizzle of hot honey or sprinkle red pepper flakes on top before baking for a spicy kick. This twist will impress any heat lover in your crowd.
-
Serving Accents: Include crackers or crostini for added variety; they provide different textures to accompany your Mummy Baked Brie. You can even serve it with a side of seasonal fruits that complement the cheese and jam.
-
Make It Savory: Instead of traditional jams, use a savory onion chutney for a gourmet touch. This creates a sophisticated flavor profile perfect for a more elegant gathering.
Feel inspired? Customize your Mummy Baked Brie with these variations and serve it alongside ideas like a Baked Salmon with Honey Mustard Sauce or a collection of tempting cheeses on a Comforting Charm Baked cheese board. Let your creativity shine this Halloween!
Expert Tips for Mummy Baked Brie
-
Chilling is Key: To avoid a runaway brie, freeze the cheese for at least 15 minutes so it keeps its shape when baked.
-
Perfect Pastry Cuts: Use a sharp knife for slicing the puff pastry; dull blades can tear the dough and ruin your mummy’s appearance.
-
Jam Variations: Don’t hesitate to try different jams! Experimenting with toppings like raspberry or fig can change the flavor profile and make your Mummy Baked Brie uniquely yours.
-
Baking Time Check: Monitor the pastry closely during the last 5 minutes; once it turns a deep golden brown, it’s time to take it out to prevent overcooking.
-
Join the Fun: Get your little ones involved in adding the edible eyes and crafting a spooky atmosphere; it’s a fantastic way to make cooking a family affair.
Make Ahead Options
These Mummy Baked Brie are perfect for meal prep enthusiasts looking to save time on busy days! You can assemble the entire wrapped brie up to 24 hours in advance, simply covering it tightly with plastic wrap to prevent drying out. If you’re planning to prep further ahead, consider freezing the wrapped brie instead; it can be stored for up to 3 months—just be sure to thaw it in the refrigerator overnight before baking. When you’re ready to serve, just brush it with the egg wash and bake it at 375°F (190°C) for 20-25 minutes until golden brown. This way, you’ll ensure the flavors remain just as delicious and your guests will be wowed by the wonderful presentation with minimal effort!
Mummy Baked Brie Recipe FAQs
What type of brie should I use for Mummy Baked Brie?
Using a standard brie wheel is ideal for this recipe because it melts beautifully, creating that creamy, gooey center we love. If you’re looking for a similar but slightly different flavor profile, you can substitute it with Camembert, which offers a similar texture and an earthy taste.
How should I store leftover Mummy Baked Brie?
You can keep any leftovers in an airtight container in the fridge for up to 2 days. Just make sure to store it properly to maintain its creamy texture and delicious flavor. If you have some left over, it’s best enjoyed warm, so you might want to reheat it as instructed below for the best experience.
Can I freeze Mummy Baked Brie?
Absolutely! You can freeze the wrapped brie before baking. First, wrap it tightly in plastic wrap, followed by aluminum foil to prevent freezer burn. It can be stored this way for up to 3 months. When you’re ready to enjoy, simply thaw it in the fridge overnight before baking it as per the original instructions.
What should I do if my pastry looks too dark before the cheese is melted?
If your pastry is getting too dark, but the cheese isn’t melting yet, you can cover the top loosely with aluminum foil to prevent further browning. Lower the oven temperature slightly to around 350°F (175°C) and continue baking until the cheese is melted and ooey-gooey. This way, you’ll have a gorgeous pastry without overcooking it!
Are there any dietary concerns I should be aware of with this recipe?
Good question! The Mummy Baked Brie contains dairy, so it’s not suitable for those with lactose intolerance or a dairy allergy. If you need a non-dairy option, consider using a dairy-free cheese designed for melting, and use milk instead of egg for the wash. Always check labels on pre-made ingredients like puff pastry for any allergens.
Can I use different jams for a different flavor profile?
Absolutely! This recipe is perfect for experimenting. You can try raspberry or blackberry jam for a sweeter twist, or even a fig spread for a touch of sophistication. Just remember that the sweetness of the jam should complement the rich flavor of the brie, so feel free to get creative and find what works best for your taste buds!
Mummy Baked Brie: A Creepy-Creative Halloween Treat
Ingredients
Equipment
Method
- Start by freezing the brie wheel for 15 minutes to help maintain its shape when baked. Slice off the top ½ inch to expose the creamy center, and spread sour cherry jam over it.
- Roll out the thawed puff pastry into a rectangle measuring approximately 14 x 11 inches on a lightly floured surface.
- Slice the pastry into long strips, about 1 inch wide, on each side, and fold these strips over the brie to create a mummy effect.
- Transfer the wrapped brie onto a baking tray lined with parchment paper and brush with egg wash.
- Preheat the oven to 375°F (190°C) and bake for 20-25 minutes until golden brown.
- Add edible eyes to the Mummy Baked Brie and serve warm alongside sliced baguette and fresh fruits.