


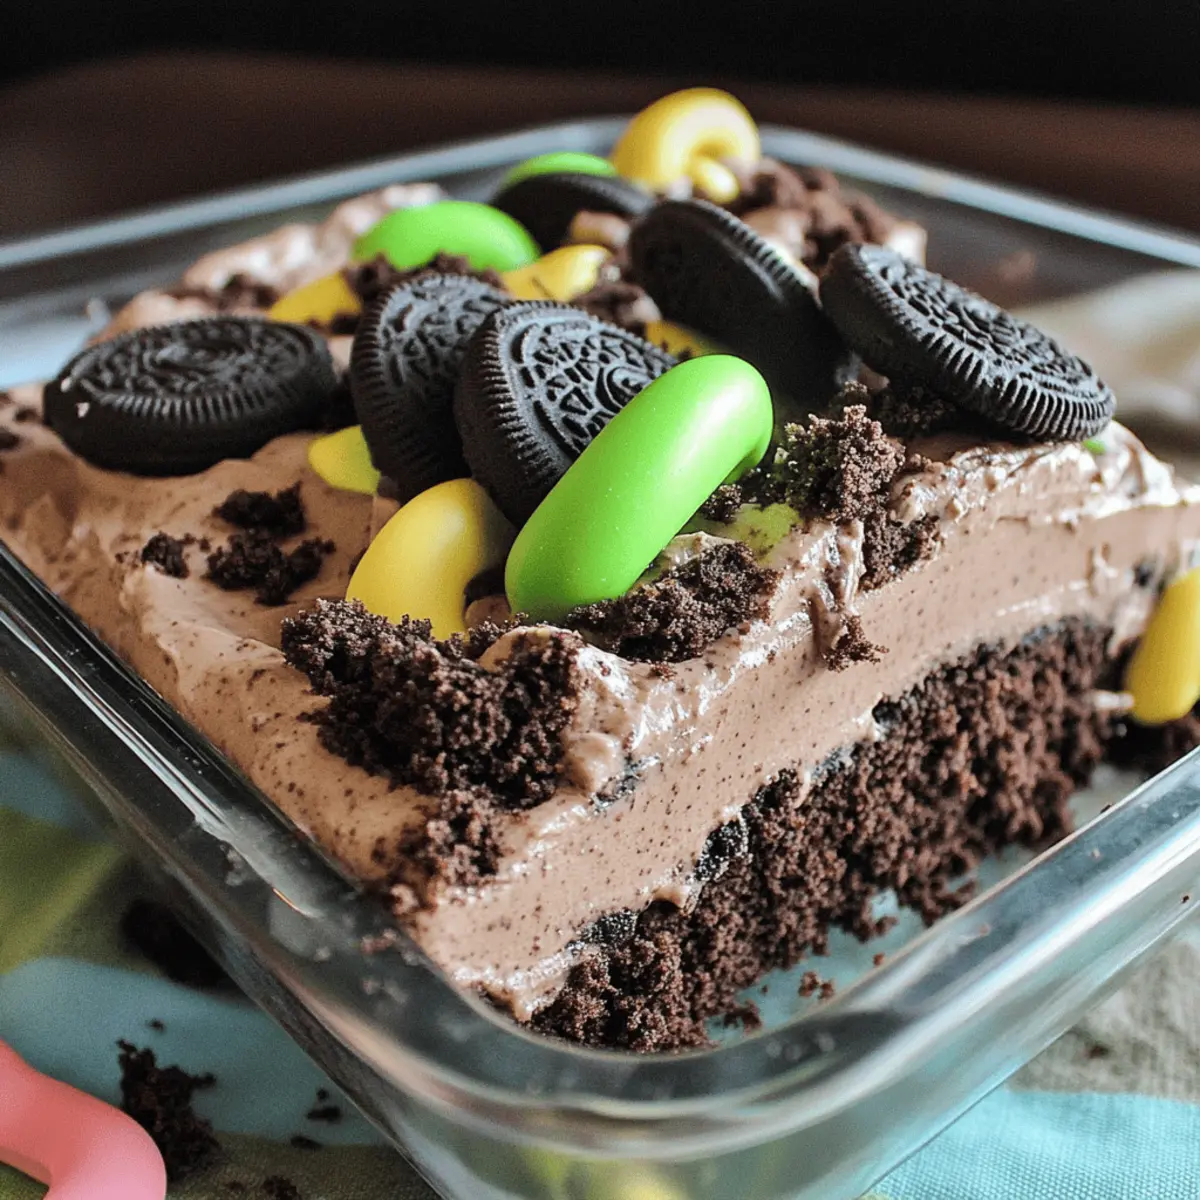
On a sweltering summer afternoon, nothing captures the essence of nostalgia quite like digging into a slice of Chocolate Dirt Cake. This playful dessert combines layers of crushed Oreos with luscious chocolate pudding, creating an eye-catching “dirt” effect that can enchant both kids and adults alike. What I adore about this no-bake Chocolate Dirt Cake is its effortless preparation and the joy it brings to gatherings—it’s the perfect last-minute treat that feels indulgent yet is surprisingly simple to whip up. Plus, you can customize it with your favorite flavors or toppings, making it a versatile favorite for any occasion. Ready to create a delightful dessert that’s bound to impress? Let’s dive in!
Why is Chocolate Dirt Cake a must-try?
Decadent Layers: This no-bake Chocolate Dirt Cake features rich, creamy chocolate pudding nestled between layers of crunchy Oreo crumbs, creating an irresistible treat that’s delightful to the palate.
Effortless Preparation: With simple ingredients and no baking required, you’ll spend less time in the kitchen and more time enjoying the summer sun with friends and family.
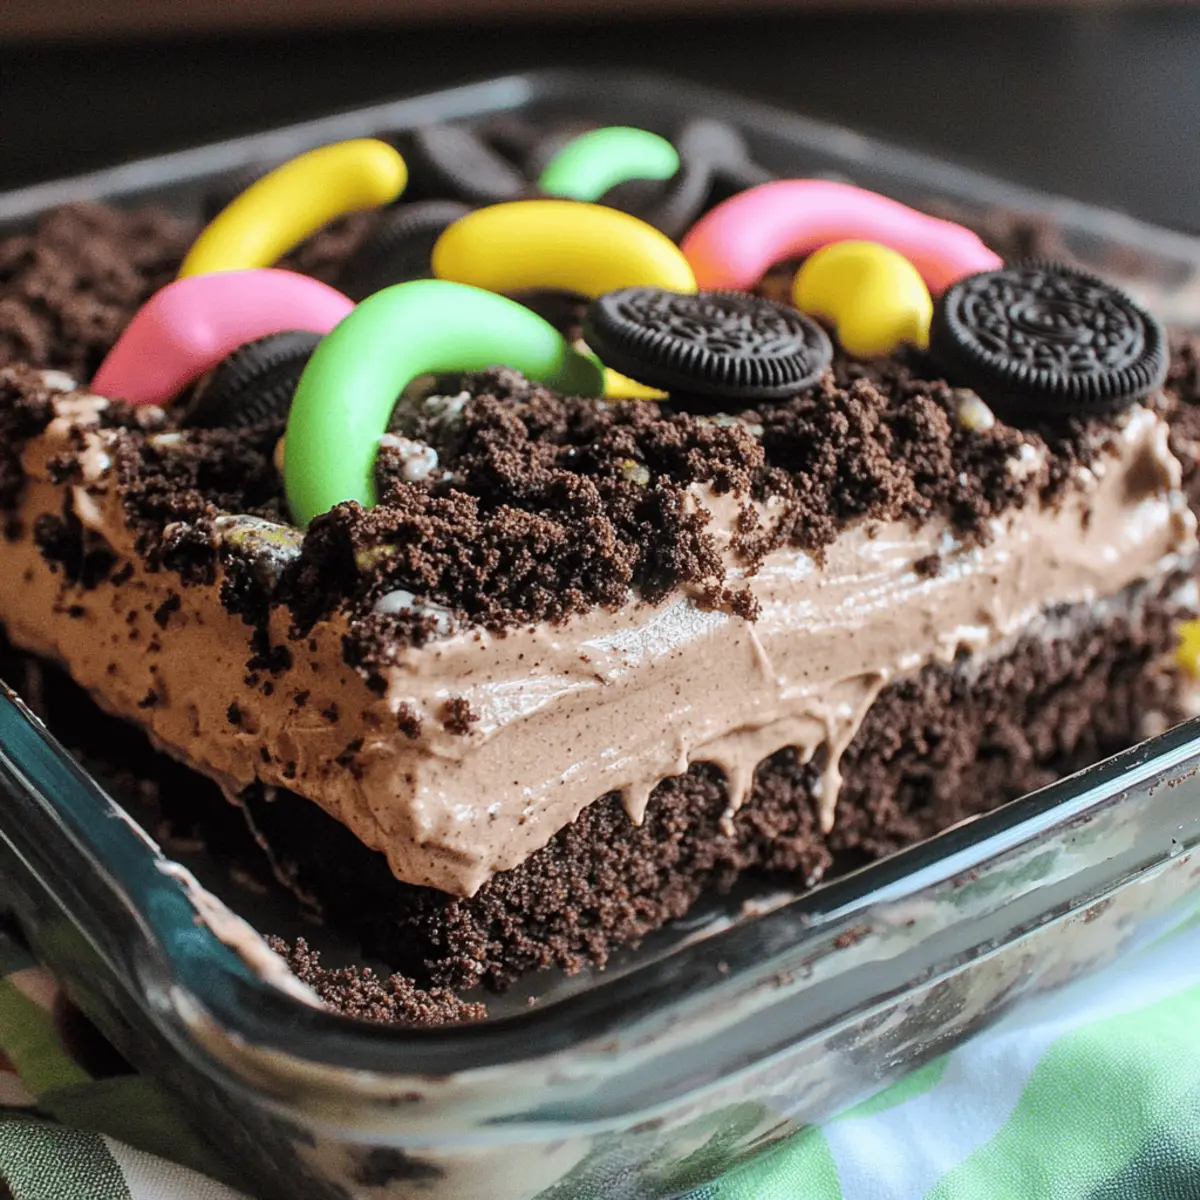
Customizable Options: Satisfy every sweet tooth by adding colorful gummy worms or themed decorations like flowers for parties, making it perfect for any occasion.
Perfect for All Ages: Kids and adults alike rave about the nostalgic appeal of this dessert. It’s a true crowd-pleaser that guarantees seconds!
Serve with Flair: For a stunning presentation, consider individual servings in cups or jars—perfect for gatherings! Pair it with fresh fruits, or even a scoop of vanilla ice cream, and you have a complete indulgence.
Make Ahead Win: Not only does this dessert improve after a day in the fridge, but you can also freeze portions for convenient treats that satisfy sweet cravings anytime. 🎉 If you love easy desserts, don’t miss my take on Chocolate Chip Pancakes for another fantastic recipe!
Chocolate Dirt Cake Ingredients
For the Cake Base
• Oreos – These delicious cookies provide the perfect crunchy texture; feel free to substitute with any chocolate sandwich cookie for a fun twist.
• Milk – Essential for activating the instant pudding mix; choose between dairy or non-dairy alternatives based on your preference.
For the Pudding Filling
• Instant Chocolate Pudding Mix – Creates that fluffy, rich filling; you can switch it up with other flavors like vanilla or butterscotch for a different taste experience.
• Cream Cheese – This adds richness and stability to the pudding layer; make sure it’s softened for easier blending.
• Butter – Helps to achieve a smooth cream cheese mixture; coconut oil or margarine are great dairy-free alternatives.
• Powdered Sugar – Sweetens the cream cheese mixture wonderfully; if you opt for granulated sugar, expect a slight change in texture.
• Whipped Topping (like Cool Whip) – Adds a light, airy touch to the pudding; consider non-dairy whipped topping or homemade whipped cream if preferred.
For the Topping
• Reserved Oreo Crumbs – Use half of the crushed Oreos for that delightful finish; this adds texture and completes the signature “dirt” look!
With these ingredients on hand, you’re just moments away from indulging in a delightful Chocolate Dirt Cake. Trust me, this no-bake dessert will impress everyone at your summer gatherings!
Step‑by‑Step Instructions for Chocolate Dirt Cake
Step 1: Crush the Oreos
Begin by crushing 24 Oreos into fine crumbs using a food processor or by placing them in a zip-top bag and rolling over them with a rolling pin. Ensure the texture is similar to sand, which will serve as the base for your Chocolate Dirt Cake. Set aside half of the crushed Oreos for topping later.
Step 2: Prepare the Pudding
In a mixing bowl, combine 2 cups of milk with one package of instant chocolate pudding mix. Whisk the mixture vigorously for about 2 minutes until it thickens. Let it chill in the refrigerator for about 5 minutes, ensuring it sets perfectly and becomes fluffy for your cake layers.
Step 3: Blend the Cream Cheese Mixture
While the pudding is chilling, in another large bowl, beat together 8 ounces of softened cream cheese and ½ cup of butter until smooth and creamy. Once combined, gradually add 1 cup of powdered sugar, mixing well until you achieve a sweet, creamy consistency that will complement the chocolate pudding beautifully.
Step 4: Combine the Mixtures
Next, gently fold the prepared chocolate pudding into the cream cheese mixture using a spatula. Be careful not to deflate the fluffy texture. Once incorporated, delicately fold in 8 ounces of whipped topping until everything is well blended, creating a luscious filling for your Chocolate Dirt Cake.
Step 5: Layer in the Pan
In a 9×13-inch baking dish, spread half of the reserved Oreo crumbs evenly across the bottom. Pour the creamy pudding mixture over the crumbs, smoothing it out with a spatula. This first layer of the Chocolate Dirt Cake will create a delicious contrast with the crunchy base.
Step 6: Top and Chill
After spreading the pudding mixture, sprinkle the remaining Oreo crumbs evenly over the top layer to create the signature “dirt” effect. Cover the dish with plastic wrap or a lid and place it in the refrigerator. Allow the Chocolate Dirt Cake to chill for at least 2 hours, or preferably overnight for the best flavor and texture.

Storage Tips for Chocolate Dirt Cake
Fridge: Store your Chocolate Dirt Cake tightly covered in the refrigerator for up to 5 days to maintain its creamy texture and flavor.
Freezer: For longer storage, freeze individual portions in airtight containers, allowing you to enjoy a delicious treat anytime. It lasts up to 3 months in the freezer.
Thawing: When ready to enjoy, thaw the frozen portions in the fridge overnight for the best results.
Reheating: There’s no need to heat this dessert; simply serve it chilled for the ultimate indulgence!
Expert Tips for Chocolate Dirt Cake
- Chill Overnight: For the best texture and flavor, make sure to chill your Chocolate Dirt Cake overnight—it’s worth the wait!
- Substitution Flexibility: Don’t hesitate to experiment! Different Oreo flavors and pudding varieties can transform the taste of your cake.
- Presentation Matters: Use clear containers or trifle bowls to showcase the beautiful layers, especially during gatherings where aesthetic counts!
- Avoid Sogginess: To prevent the Oreo crust from becoming soggy, layer the crumbs just before serving if making in advance.
- Serving Size: Consider portioning the dessert into small cups or jars for easy serving and a fun, individual twist.
Make Ahead Options
These no-bake Chocolate Dirt Cake layers are perfect for meal prep, allowing you to save time on busy days! You can crush the Oreos and prepare the pudding mixture up to 24 hours in advance. Simply store the crumb layer in an airtight container to keep them fresh, and refrigerate the pudding mix in a covered bowl. When you’re ready to assemble, layer the reserved Oreo crumbs with the pudding mixture, and top with the remaining crumbs. Cover and chill for at least 2 hours or overnight for the best flavor and texture. By prepping ahead, you’ll have a spectacular dessert ready to impress with minimal last-minute effort!
Chocolate Dirt Cake Variations
Don’t hesitate to make this dessert your own with these fun and delicious twists!
-
Dairy-Free: Swap out the cream cheese and whipped topping with non-dairy alternatives for a creamy texture without dairy.
-
Flavor Infusion: Substitute instant chocolate pudding for butterscotch or vanilla pudding; this adds a whole new flavor experience. Just imagine the delightful surprise!
-
Oreo Alternatives: Use mint or peanut butter Oreos instead for a unique flavor twist that stands out.
-
Texture Play: Incorporate crushed nuts like pecans or walnuts between the layers for a delightful crunch that contrasts beautifully with the creamy pudding.
-
Gummy Worms: Add gummy worms on top to create a whimsical look, perfect for kids’ parties or as a nostalgic nod for adults!
-
Individual Servings: Layer the ingredients in jars or cups for cute, personalized servings that are perfect for gatherings. Plus, they’re easy to grab!
-
Extra Toppings: Drizzle with chocolate or caramel sauce and sprinkle with extra crushed Oreos for an indulgent finish. Each bite is a tasty adventure!
-
Pairing Suggestions: Serve alongside a scoop of vanilla ice cream or fresh berries for a balance of flavors that will elevate your dessert experience. If you love sweet indulgences, don’t miss my take on Chocolate Granola Cups!
What to Serve with No-Bake Chocolate Dirt Cake
Pairing your delightful dessert with complementary flavors will transform a simple sweet into a memorable meal experience.
- Fresh Berries: Juicy strawberries or raspberries provide a tart contrast that balances the rich sweetness of the dirt cake beautifully.
- Vanilla Ice Cream: A scoop of creamy vanilla ice cream on the side creates a decadent pairing; the coldness melts into the cake for an indulgent treat.
- Whipped Cream: Light, fluffy whipped cream enhances texture and creaminess, making every bite of the dirt cake even more heavenly.
- Chocolate Dipped Pretzels: These salty-sweet snacks add a fun crunch that contrasts with the cake’s soft layers, perfect for a whimsical dessert platter.
- Mint Leaves: Fresh mint sprigs not only brighten up presentation but also lend a refreshing hint to each bite of the rich chocolate dessert.
- Iced Coffee or Milk: Pouring a glass of chilled milk or a refreshing iced coffee makes for the perfect drink pairing; both enhance the cake’s chocolate flavors.
- Seasonal Fruit Salad: A colorful array of seasonal fruits adds a light and refreshing touch, allowing the flavors of the dirt cake to shine through without overwhelming the palate.
- Chocolate Sauce Drizzle: A rich chocolate drizzle over each serving can enhance the indulgent experience, making it even more irresistible and appealing.
- Mini Cupcakes: Serve an array of mini cupcakes alongside for a delightful assortment of sweet options, ensuring there’s something for everyone at the gathering.

Chocolate Dirt Cake Recipe FAQs
What type of Oreos should I use for the Chocolate Dirt Cake?
Absolutely! While traditional Oreos create the classic flavor, feel free to experiment with any chocolate sandwich cookie of your choice. Whether it’s mint, peanut butter, or even gluten-free versions, changing the Oreo can add a fun twist to your Chocolate Dirt Cake.
How should I store leftover Chocolate Dirt Cake?
To keep your Chocolate Dirt Cake fresh, store it tightly covered in the refrigerator for up to 5 days. Ensure it’s sealed well to prevent it from absorbing any odors from your fridge. The creamy layers will retain their deliciousness, making it a perfect dessert to enjoy throughout the week!
Can I freeze Chocolate Dirt Cake?
Yes! You can freeze individual portions of the Chocolate Dirt Cake for a sweet treat at a later date. Just store them in airtight containers, and they will last up to 3 months in the freezer. When you’re ready to indulge, simply thaw the portions in the refrigerator overnight for the best texture and flavor.
Why is my pudding layer not setting properly?
If your pudding layer isn’t setting, it could be due to not whisking the instant pudding mix with milk long enough. Make sure to whisk it vigorously for about 2 minutes. Also, chilling the pudding for at least 5 minutes is crucial. If it’s still too runny, try adding a bit more pudding mix to thicken it up. Don’t worry; it will still taste delicious!
Can pets eat Chocolate Dirt Cake?
It’s best to keep Chocolate Dirt Cake away from pets. Ingredients like chocolate, cream cheese, and sugar can be harmful to dogs and cats. Instead, save this delightful dessert for the family, as it’s designed to be a whole lot of fun and indulgence for humans!
What’s the best way to serve Chocolate Dirt Cake?
For a beautiful presentation, consider layering your Chocolate Dirt Cake in a clear trifle bowl or individual cups. This allows everyone to see the lovely layers of crushed Oreos and creamy pudding. Serving with fresh fruits or a scoop of vanilla ice cream can enhance the experience. Enjoy the love that goes into each bite!
Chocolate Dirt Cake: A No-Bake Delight for Summer Fun
Ingredients
Equipment
Method
- Crush the Oreos into fine crumbs. Set aside half of the crushed Oreos for topping.
- Combine 2 cups of milk with one package of instant chocolate pudding mix. Whisk for 2 minutes until thickened, then chill for 5 minutes.
- In another bowl, beat together 8 ounces of softened cream cheese and ½ cup of butter until smooth. Gradually add 1 cup of powdered sugar.
- Fold the chocolate pudding into the cream cheese mixture. Then fold in 8 ounces of whipped topping.
- In a 9x13-inch dish, layer half of the reserved Oreo crumbs on the bottom. Pour the pudding mixture over the crumbs and smooth it.
- Sprinkle remaining Oreo crumbs on top, cover, and chill for at least 2 hours, preferably overnight.