Introduction to Sweet Chili Chicken Bowl with Coconut Lime Sauce
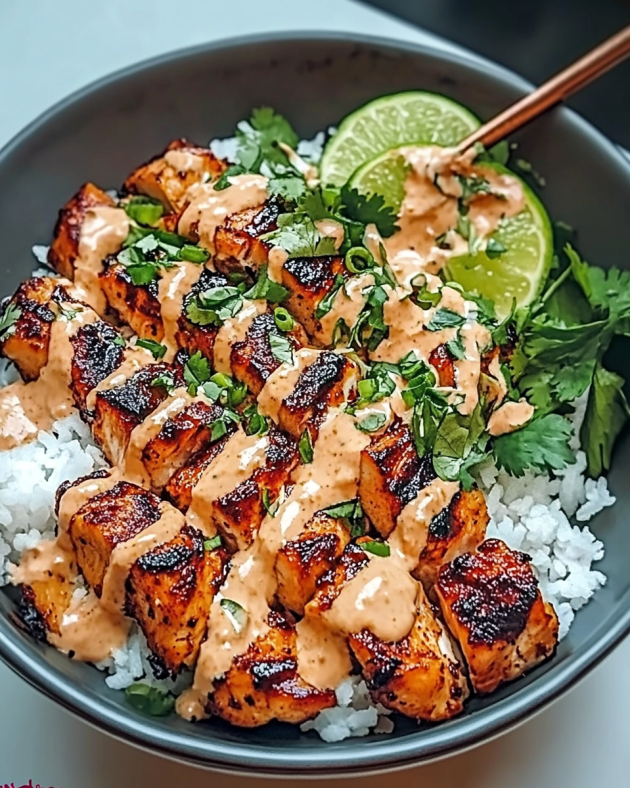
Sweet Chili Chicken Bowl with Coconut Lime Sauce is a delightful dish that brings together vibrant flavors and fresh ingredients. This recipe is not just a meal; it’s an experience that tantalizes your taste buds and warms your heart.
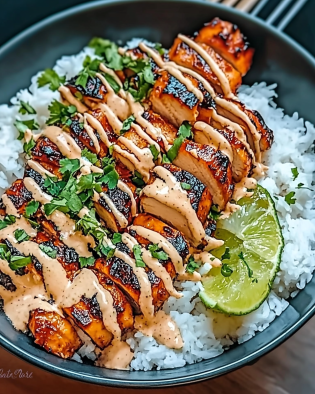
Imagine tender chicken thighs marinated in a sweet and tangy sauce, perfectly paired with colorful vegetables. The addition of jasmine rice creates a comforting base, while the Coconut Lime Drizzle adds a tropical twist that elevates the entire dish. It’s a perfect blend of sweet, savory, and zesty flavors that will leave you craving more.
This bowl is not only delicious but also easy to prepare. Whether you’re cooking for family or hosting friends, this recipe is sure to impress. Plus, it’s versatile! You can customize it to suit your dietary preferences or spice levels. With just a few simple steps, you can create a meal that feels gourmet without spending hours in the kitchen.
Sweet Chili Chicken Bowl with Coconut Lime Sauce. Your taste buds will thank you!
Ingredients for Sweet Chili Chicken Bowl with Coconut Lime Sauce
Sweet Chili Chicken Bowl with Coconut Lime Sauce, you’ll need a selection of fresh ingredients. Each component plays a vital role in building the dish’s unique flavor profile. Here’s what you’ll need:
- 2 cups cooked jasmine rice: This fluffy rice serves as the perfect base for your bowl.
- 1 lb boneless, skinless chicken thighs: Tender and juicy, chicken thighs are ideal for absorbing the marinade.
- 1/2 cup sweet chili sauce: This sauce adds a delightful sweetness and a hint of spice.
- 1 tablespoon soy sauce: A splash of soy sauce enhances the umami flavor.
- 1 tablespoon vegetable oil: Used for cooking the chicken and vegetables.
- 1 red bell pepper, sliced: Adds a pop of color and crunch.
- 1 cup snap peas: These provide a fresh, crisp texture.
- 1/4 cup green onions, chopped: For a mild onion flavor and garnish.
- 1/4 cup cilantro, chopped: This herb adds a refreshing touch.
For the Coconut Lime Drizzle, gather the following ingredients:
- 1/2 cup coconut milk: Creamy and rich, it forms the base of the drizzle.
- 1 tablespoon lime juice: Fresh lime juice brightens the sauce.
- 1 teaspoon lime zest: Adds an extra zing of citrus flavor.
- 1 teaspoon honey: A touch of sweetness balances the tanginess.
- Salt to taste: Enhances all the flavors in the drizzle.
Sweet Chili Chicken Bowl with Coconut Lime Sauce. Each element contributes to a deliciously satisfying meal that’s sure to please everyone at the table!
Step-by-Step Preparation of Sweet Chili Chicken Bowl with Coconut Lime Sauce
Sweet Chili Chicken Bowl with Coconut Lime Sauce. This process is simple and straightforward, making it easy for anyone to follow along. Let’s break it down into manageable steps.
Step 1: Marinating the Chicken
Start by marinating the chicken thighs. In a bowl, combine the sweet chili sauce and soy sauce. Mix them well to create a flavorful marinade. Then, add the chicken thighs to the bowl, ensuring they are fully coated. Cover the bowl and place it in the refrigerator. Let the chicken marinate for at least 30 minutes. This step is crucial as it allows the chicken to absorb all the delicious flavors.
Step 2: Cooking the Chicken
Once the chicken has marinated, it’s time to cook it. Heat the vegetable oil in a large skillet over medium heat. Carefully remove the chicken from the marinade, but don’t throw away the marinade just yet! Cook the chicken thighs in the skillet for about 5-7 minutes on each side. You want them to be fully cooked and golden brown. This will give your chicken a nice texture and flavor.
Step 3: Preparing the Coconut Lime Sauce
While the chicken is cooking, you can prepare the Coconut Lime Drizzle. In a small bowl, whisk together the coconut milk, lime juice, lime zest, honey, and a pinch of salt. This drizzle will add a creamy and zesty finish to your bowl. Make sure to mix it well until all the ingredients are combined. Set it aside for later.
Step 4: Assembling the Sweet Chili Chicken Bowl
After the chicken is cooked, it’s time to add the vegetables. In the same skillet, toss in the sliced red bell pepper and snap peas. Stir-fry them for about 3-4 minutes until they are tender-crisp. This will add a nice crunch to your dish. Once the vegetables are ready, pour the reserved marinade into the skillet. Let it simmer for 2-3 minutes until it thickens slightly.
Sweet Chili Chicken Bowl with Coconut Lime Sauce is now ready to be enjoyed!
Variation of Sweet Chili Chicken Bowl with Coconut Lime Sauce
Sweet Chili Chicken Bowl with Coconut Lime Sauce is delicious as is, there are plenty of ways to mix things up! Whether you want to try different proteins or explore vegetarian options, this dish can easily adapt to your taste. Let’s take a look at some exciting variations.
Alternative Proteins
If you’re looking to switch up the protein in your bowl, consider these alternatives:
- Shrimp: Shrimp cooks quickly and adds a delightful seafood flavor. Just marinate and cook them for about 3-4 minutes until they turn pink.
- Tofu: For a vegetarian option, use firm tofu. Press it to remove excess moisture, then cube and marinate. Cook until golden brown for a satisfying texture.
- Chicken Breast: If you prefer a leaner option, chicken breast works well too. Just adjust the cooking time, as it may cook faster than thighs.
Vegetarian Options
For those who prefer a meat-free meal, there are plenty of delicious vegetarian options:
- Mixed Vegetables: Load your bowl with a variety of colorful vegetables like zucchini, carrots, and broccoli. Stir-fry them until tender-crisp for a vibrant dish.
- Quinoa: Swap out jasmine rice for quinoa. It’s packed with protein and adds a nutty flavor to your bowl.
- Chickpeas: Add roasted chickpeas for a hearty and protein-rich alternative. They provide a nice crunch and pair well with the sweet chili sauce.
Sweet Chili Chicken Bowl with Coconut Lime Sauce to fit your dietary needs and preferences. Feel free to experiment and find your favorite combination!
Cooking Note for Sweet Chili Chicken Bowl with Coconut Lime Sauce
Sweet Chili Chicken Bowl with Coconut Lime Sauce, there are a few cooking notes to keep in mind. These tips will help ensure that your dish turns out perfectly every time.
First, always use fresh ingredients. Fresh vegetables and herbs will enhance the flavor of your bowl. For the chicken, boneless, skinless thighs are recommended for their tenderness and ability to absorb flavors. However, if you prefer chicken breast, just remember to adjust the cooking time, as it may cook faster.
Next, marinating the chicken is crucial. Allowing it to sit in the marinade for at least 30 minutes will infuse it with flavor. If you have more time, marinating for a few hours or even overnight will yield even better results.
When cooking the chicken, ensure your skillet is hot enough before adding the meat. This will help achieve a nice sear and prevent sticking. If you notice the chicken is browning too quickly, reduce the heat slightly to avoid burning.
Lastly, don’t skip the Coconut Lime Drizzle! This sauce adds a creamy, zesty finish that ties all the flavors together. Adjust the lime juice and honey to your taste for a perfect balance of sweetness and tanginess.
Sweet Chili Chicken Bowl with Coconut Lime Sauce that’s sure to impress!
Serving Suggestions for Sweet Chili Chicken Bowl with Coconut Lime Sauce
Sweet Chili Chicken Bowl with Coconut Lime Sauce can be just as fun as preparing it! Here are some suggestions to elevate your dining experience:
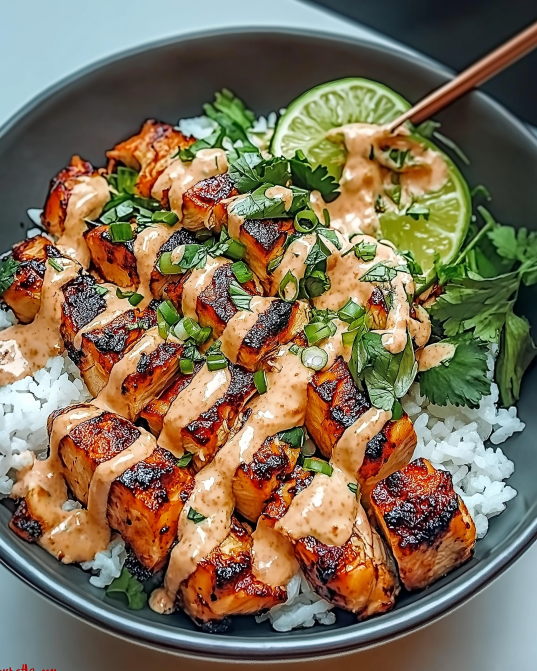
- Garnishes: Fresh herbs like cilantro and green onions not only add flavor but also a pop of color. Consider adding sliced red chili for an extra kick.
- Side Dishes: Pair your bowl with a light salad or steamed vegetables for a refreshing contrast. A simple cucumber salad with lime dressing complements the dish beautifully.
- Serving Style: Serve the bowl family-style, allowing everyone to customize their portions. This makes for a fun and interactive meal.
- Drink Pairings: A refreshing drink like iced tea or coconut water can enhance the tropical vibe of your meal. For something a bit stronger, a light beer or a fruity cocktail works well too.
Sweet Chili Chicken Bowl with Coconut Lime Sauce will not only taste amazing but also look stunning on the table!
Cooking Note for Sweet Chili Chicken Bowl with Coconut Lime Sauce
Sweet Chili Chicken Bowl with Coconut Lime Sauce, there are a few cooking notes to keep in mind. These tips will help ensure that your dish turns out perfectly every time.
First, always use fresh ingredients. Fresh vegetables and herbs will enhance the flavor of your bowl. For the chicken, boneless, skinless thighs are recommended for their tenderness and ability to absorb flavors. However, if you prefer chicken breast, just remember to adjust the cooking time, as it may cook faster.
Next, marinating the chicken is crucial. Allowing it to sit in the marinade for at least 30 minutes will infuse it with flavor. If you have more time, marinating for a few hours or even overnight will yield even better results.
When cooking the chicken, ensure your skillet is hot enough before adding the meat. This will help achieve a nice sear and prevent sticking. If you notice the chicken is browning too quickly, reduce the heat slightly to avoid burning.
Lastly, don’t skip the Coconut Lime Drizzle! This sauce adds a creamy, zesty finish that ties all the flavors together. Adjust the lime juice and honey to your taste for a perfect balance of sweetness and tanginess.
Sweet Chili Chicken Bowl with Coconut Lime Sauce that’s sure to impress!
Serving Suggestions for Sweet Chili Chicken Bowl with Coconut Lime Sauce
Sweet Chili Chicken Bowl with Coconut Lime Sauce can be just as fun as preparing it! Here are some suggestions to elevate your dining experience:
- Garnishes: Fresh herbs like cilantro and green onions not only add flavor but also a pop of color. Consider adding sliced red chili for an extra kick. A sprinkle of sesame seeds can also enhance the visual appeal.
- Side Dishes: Pair your bowl with a light salad or steamed vegetables for a refreshing contrast. A simple cucumber salad with lime dressing complements the dish beautifully. You could also serve it with a side of crispy spring rolls for added crunch.
- Serving Style: Serve the bowl family-style, allowing everyone to customize their portions. This makes for a fun and interactive meal. You can set up a toppings bar with extra cilantro, lime wedges, and chili flakes for guests to personalize their bowls.
- Drink Pairings: A refreshing drink like iced tea or coconut water can enhance the tropical vibe of your meal. For something a bit stronger, a light beer or a fruity cocktail works well too. A mango smoothie can also be a delightful addition to the meal.
Sweet Chili Chicken Bowl with Coconut Lime Sauce will not only taste amazing but also look stunning on the table! Enjoy the vibrant colors and flavors as you share this delicious dish with family and friends.
Tips for Perfecting Your Sweet Chili Chicken Bowl with Coconut Lime Sauce
Sweet Chili Chicken Bowl with Coconut Lime Sauce is all about attention to detail. Here are some helpful tips to ensure your dish turns out delicious every time:
- Choose Quality Ingredients: Fresh, high-quality ingredients make a big difference. Opt for organic chicken and fresh vegetables whenever possible. This will enhance the overall flavor of your dish.
- Marinate Longer: If time allows, marinate the chicken for a few hours or overnight. This extra time allows the flavors to penetrate deeper, resulting in a more flavorful chicken.
- Don’t Overcrowd the Pan: When cooking the chicken, avoid overcrowding the skillet. This ensures even cooking and helps achieve a nice sear. If necessary, cook in batches.
- Adjust Spice Levels: If you enjoy a bit of heat, consider adding sliced jalapeños or red pepper flakes to the stir-fry. This will give your bowl an extra kick!
- Experiment with Textures: For added crunch, consider topping your bowl with toasted nuts or seeds. They provide a delightful contrast to the tender chicken and vegetables.
- Balance Flavors: Taste the Coconut Lime Drizzle before serving. Adjust the lime juice and honey to achieve the perfect balance of sweet and tangy. A little extra lime zest can also brighten the flavor.
- Serve Immediately: For the best experience, serve your bowl right after assembling. This keeps the rice warm and the vegetables crisp, ensuring a delightful texture in every bite.
Sweet Chili Chicken Bowl with Coconut Lime Sauce to new heights. Enjoy the process and savor the delicious results!
Breakdown of Time for Sweet Chili Chicken Bowl with Coconut Lime Sauce
Sweet Chili Chicken Bowl with Coconut Lime Sauce can help you plan your cooking efficiently. Here’s a breakdown of the time required for preparation and cooking:
Prep Time
The prep time for this dish is approximately 10-15 minutes. During this time, you will gather all your ingredients, slice the vegetables, and prepare the marinade for the chicken. Having everything ready before you start cooking will make the process smoother and more enjoyable.
Cooking Time
The cooking time is about 20-25 minutes. This includes:
- Marinating the chicken for at least 30 minutes (this can be done while you prepare other ingredients).
- Cooking the chicken in the skillet for 10-14 minutes until golden brown.
- Stir-frying the vegetables for about 3-4 minutes.
- Simmering the reserved marinade for 2-3 minutes to thicken.
Total Time
Sweet Chili Chicken Bowl with Coconut Lime Sauce. This includes the marinating time, which can overlap with your prep work. With this time breakdown, you can easily fit this delicious meal into your busy schedule!
Nutritional Information for Sweet Chili Chicken Bowl with Coconut Lime Sauce
Sweet Chili Chicken Bowl with Coconut Lime Sauce not only delights your taste buds but also provides a satisfying nutritional profile. Here’s a closer look at the key nutritional components per serving:
Calories
Sweet Chili Chicken Bowl with Coconut Lime Sauce contains approximately 450 calories. This makes it a hearty meal that can fit well into your daily caloric intake, especially when paired with a side salad or steamed vegetables for added nutrients.
Protein
With about 30 grams of protein per serving, this dish is an excellent source of protein. The chicken thighs contribute significantly to this protein content, making it a great option for those looking to build muscle or maintain a healthy diet. Protein is essential for repairing tissues and keeping you feeling full longer.
Sodium
Sweet Chili Chicken Bowl with Coconut Lime Sauce is approximately 800 mg per serving. While this is a reasonable amount for a flavorful dish, it’s important to be mindful of your overall sodium intake throughout the day. If you’re watching your sodium levels, consider using low-sodium soy sauce or reducing the amount of sweet chili sauce in the recipe.
Sweet Chili Chicken Bowl with Coconut Lime Sauce while also making informed choices about your diet. This dish is not only delicious but also provides a good balance of calories, protein, and flavor!
FAQs about Sweet Chili Chicken Bowl with Coconut Lime Sauce
What can I substitute for coconut milk in the sauce?
If you don’t have coconut milk on hand, there are several alternatives you can use. Almond milk or soy milk can work well, but they will change the flavor slightly. For a creamier texture, consider using heavy cream or half-and-half. If you want to keep it dairy-free, try using cashew cream or oat milk. Just remember to adjust the sweetness and flavor to match your taste preferences!
Can I make the Sweet Chili Chicken Bowl ahead of time?
Sweet Chili Chicken Bowl with Coconut Lime Sauce can be prepared ahead of time. You can marinate the chicken and chop the vegetables a day in advance. Store them separately in the refrigerator. When you’re ready to eat, simply cook the chicken and vegetables, and assemble your bowl. However, for the best flavor and texture, it’s recommended to prepare the Coconut Lime Drizzle fresh just before serving.
Is the Sweet Chili Chicken Bowl spicy?
Sweet Chili Chicken Bowl with Coconut Lime Sauce has a mild sweetness with a hint of spice from the sweet chili sauce. If you prefer a spicier dish, you can easily add sliced jalapeños or red pepper flakes to the stir-fry. Adjust the spice level to your liking, and enjoy a bowl that suits your taste!
What sides pair well with Sweet Chili Chicken Bowl with Coconut Lime Sauce?
Sweet Chili Chicken Bowl with Coconut Lime Sauce, consider serving it with light and refreshing sides. A simple cucumber salad with lime dressing works beautifully. You could also serve steamed broccoli or a light Asian slaw for added crunch. For a heartier option, crispy spring rolls or vegetable dumplings make a delightful pairing. These sides will enhance the overall dining experience!
Conclusion on Sweet Chili Chicken Bowl with Coconut Lime Sauce
Sweet Chili Chicken Bowl with Coconut Lime Sauce is a delightful dish that combines vibrant flavors and fresh ingredients. This recipe is not only easy to prepare but also offers a wonderful opportunity to customize it to your taste. Whether you choose to stick with the classic chicken thighs or explore alternative proteins, the possibilities are endless.
The marinated chicken, paired with colorful vegetables and fluffy jasmine rice, creates a satisfying meal that is both nutritious and delicious. The Coconut Lime Drizzle adds a creamy, zesty finish that elevates the entire dish, making it a true crowd-pleaser. Plus, with the tips and variations provided, you can easily adapt this recipe to suit your dietary preferences or spice levels.
As you gather around the table with family and friends, this bowl is sure to spark joy and conversation. It’s a meal that not only nourishes the body but also warms the heart. So, why not give it a try? Your taste buds will thank you for this culinary adventure!
Remember, cooking is all about experimenting and having fun. Don’t hesitate to make this dish your own. Enjoy the process, savor the flavors, and share the love of good food with those around you. Happy cooking!