Get my cookbooks

Buffalo Chicken Spaghetti Squash is a healthy delight.

Introduction to Buffalo Chicken Spaghetti Squash

What is Buffalo Chicken Spaghetti Squash?

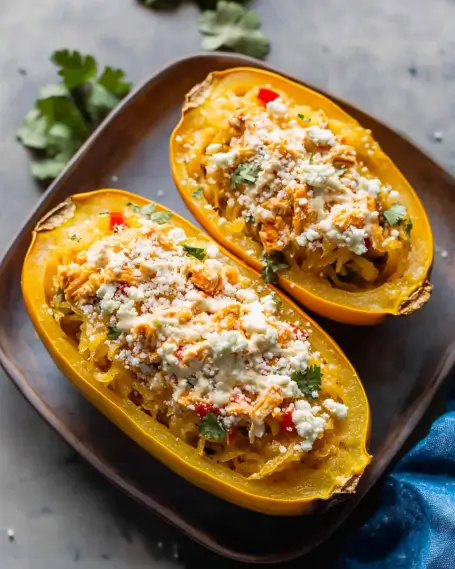
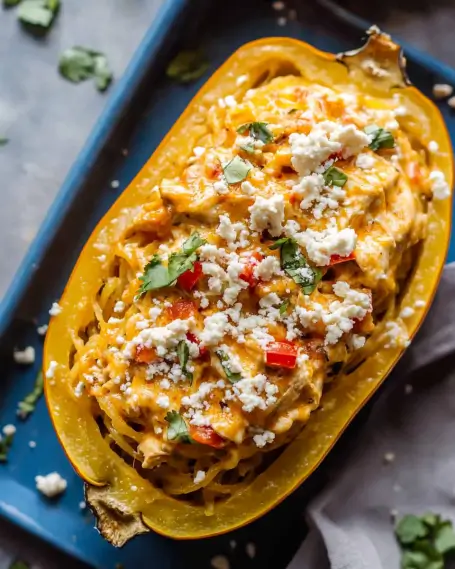
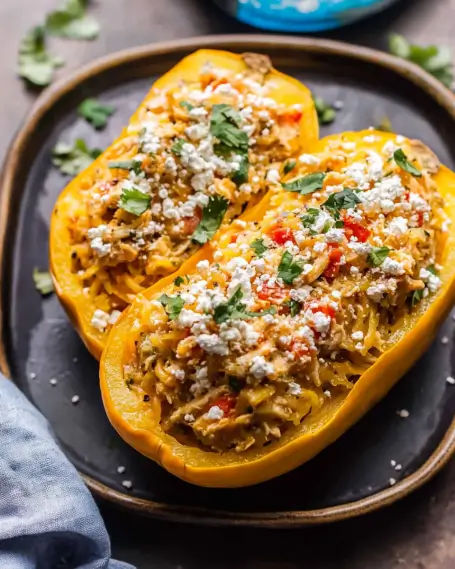
Buffalo Chicken Spaghetti Squash is a delightful dish that combines the flavors of spicy buffalo chicken with the unique texture of spaghetti squash. This recipe features roasted spaghetti squash halves filled with a creamy, zesty mixture of shredded chicken, buffalo sauce, and cheese. It’s a fun and healthy twist on traditional buffalo chicken recipes, making it a perfect option for those looking to enjoy a low-carb meal without sacrificing flavor.

Why Choose Buffalo Chicken Spaghetti Squash?

Choosing Buffalo Chicken Spaghetti Squash offers numerous benefits. First, it’s a healthier alternative to pasta, as spaghetti squash is low in calories and carbohydrates. This makes it an excellent choice for anyone following a low-carb or keto diet. Additionally, the dish is packed with protein from the chicken, making it filling and satisfying.

Moreover, this recipe is incredibly versatile. You can easily customize it by adding your favorite ingredients or adjusting the spice level. Whether you’re hosting a game day gathering or simply looking for a quick weeknight dinner, Buffalo Chicken Spaghetti Squash is sure to impress. Plus, it’s easy to prepare, making it a go-to recipe for busy individuals and families alike.

Ingredients for Buffalo Chicken Spaghetti Squash

To create a delicious Buffalo Chicken Spaghetti Squash, you will need a few simple ingredients. Each component plays a vital role in delivering that rich, spicy flavor while keeping the dish healthy. Here’s what you’ll need:

  • 1 medium spaghetti squash
  • 1 pound cooked shredded chicken
  • 1/2 cup buffalo sauce
  • 1/2 cup cream cheese, softened
  • 1/2 cup shredded cheddar cheese
  • 1/4 cup green onions, chopped
  • Salt and pepper to taste
  • 1 tablespoon olive oil

These ingredients come together to create a mouthwatering dish that is both satisfying and nutritious. The spaghetti squash serves as a fantastic base, while the buffalo sauce adds that signature kick. Cream cheese and cheddar cheese provide a creamy texture that balances the heat, making every bite enjoyable.

Feel free to experiment with the ingredients! For instance, you can add more cheese for a cheesier experience or include vegetables like bell peppers for added nutrition. The possibilities are endless, allowing you to tailor the dish to your taste preferences.

Preparation of Buffalo Chicken Spaghetti Squash

Step 1: Preparing the Spaghetti Squash

To start, you need to prepare the spaghetti squash. First, preheat your oven to 400°F. Then, take the medium spaghetti squash and cut it in half lengthwise. Be careful while cutting, as the squash can be tough. Once you have two halves, scoop out the seeds using a spoon. This step is important to create space for the delicious filling.

Next, drizzle the inside of each half with olive oil. This will help enhance the flavor and promote even cooking. After that, season the squash with salt and pepper to taste. Place the squash cut-side down on a baking sheet. Roast it in the oven for about 30-40 minutes. You’ll know it’s done when the flesh is tender and easily pierced with a fork.

Step 2: Cooking the Chicken

If you don’t have cooked shredded chicken on hand, you can easily prepare it. Start by boiling or baking chicken breasts until fully cooked. This usually takes about 20-30 minutes, depending on the method. Once cooked, let the chicken cool slightly before shredding it with two forks. This shredded chicken will be the star of your filling, so make sure it’s tender and flavorful.

For added flavor, consider seasoning the chicken with a bit of salt, pepper, and garlic powder while cooking. This will enhance the overall taste of your Buffalo Chicken Spaghetti Squash.

Step 3: Combining Ingredients

Now that your spaghetti squash is roasted and your chicken is shredded, it’s time to combine the ingredients. In a mixing bowl, add the shredded chicken, buffalo sauce, softened cream cheese, half of the shredded cheddar cheese, and chopped green onions. Mix everything together until well combined. The cream cheese will help create a creamy texture, while the buffalo sauce adds that signature spicy kick.

Make sure to taste the mixture and adjust the seasoning if needed. You can add more buffalo sauce for extra heat or more cream cheese for creaminess. This step allows you to customize the filling to your liking.

Step 4: Baking the Dish

Once your filling is ready, it’s time to assemble the dish. Take the roasted spaghetti squash halves and use a fork to scrape out the strands into a large bowl. Be careful to leave some squash in the shell for structure. Add the chicken mixture to the bowl and stir until everything is well combined.

Next, spoon the buffalo chicken mixture back into the spaghetti squash halves. Top each half with the remaining shredded cheddar cheese. This will create a delicious cheesy crust as it bakes. Return the stuffed squash to the oven and bake for an additional 10-15 minutes. You’ll know it’s ready when the cheese is melted and bubbly.

After baking, let the dish cool for a few minutes before serving. This will help the flavors meld together and make it easier to handle. Enjoy your Buffalo Chicken Spaghetti Squash!

Variation of Buffalo Chicken Spaghetti Squash

Alternative Ingredients

Buffalo Chicken Spaghetti Squash is a versatile dish that allows for many alternative ingredients. If you want to switch things up, consider using different proteins. For instance, shredded turkey can be a great substitute for chicken. It offers a similar texture and flavor, making it an excellent choice for those who prefer turkey.

If you’re looking for a plant-based option, try using shredded jackfruit or a meat substitute like tempeh or tofu. These alternatives can absorb the buffalo sauce well, providing a satisfying and spicy flavor. Additionally, you can add vegetables like bell peppers, spinach, or even black beans to the filling. This not only boosts the nutritional value but also adds a delightful crunch and color to the dish.

For cheese lovers, feel free to experiment with different types of cheese. Gouda or pepper jack can add a unique twist to the flavor profile. You can also use dairy-free cheese options if you’re following a vegan diet. The key is to find ingredients that complement the spicy buffalo sauce while keeping the dish healthy and delicious.

Different Cooking Methods

While roasting the spaghetti squash is the most common method, there are other ways to prepare this dish. For a quicker option, you can microwave the spaghetti squash. Simply cut it in half, scoop out the seeds, and place it cut-side down in a microwave-safe dish with a little water. Cover it with a microwave-safe lid or plastic wrap and cook on high for about 10-12 minutes. Check for tenderness and adjust the time as needed.

Another method is to use an Instant Pot. Place the halved spaghetti squash on the trivet with a cup of water in the pot. Cook on high pressure for about 7-10 minutes, then do a quick release. This method is fast and yields perfectly cooked squash.

Regardless of the cooking method you choose, the filling remains the same. Just remember to adjust the cooking times accordingly. Each method offers a unique way to enjoy Buffalo Chicken Spaghetti Squash, making it a flexible recipe for any occasion.

Cooking Note for Buffalo Chicken Spaghetti Squash

When preparing Buffalo Chicken Spaghetti Squash, there are a few cooking notes to keep in mind to ensure your dish turns out perfectly every time. First, the size of your spaghetti squash can affect cooking time. A larger squash may require a bit more time in the oven, while a smaller one will cook faster. Always check for tenderness by piercing the flesh with a fork; it should be soft and easily shredded.

Another important tip is to monitor the cheese while baking. If you prefer a golden, crispy top, you can broil the stuffed squash for a couple of minutes at the end of the baking time. Just keep a close eye on it to prevent burning. Additionally, if you find that the filling is too thick, you can add a splash of chicken broth or water to loosen it up before stuffing the squash.

Lastly, remember that the flavors of the buffalo sauce can intensify as the dish bakes. If you’re sensitive to spice, consider using a milder buffalo sauce or reducing the amount you add to the filling. This way, you can enjoy the dish without overwhelming heat. With these cooking notes in mind, you’ll be well on your way to creating a delicious Buffalo Chicken Spaghetti Squash that everyone will love!

Serving Suggestions for Buffalo Chicken Spaghetti Squash

Pairing with Sides

When it comes to serving Buffalo Chicken Spaghetti Squash, choosing the right sides can elevate your meal. A fresh salad is a fantastic option. Consider a simple green salad with mixed greens, cherry tomatoes, and a light vinaigrette. This adds a refreshing crunch that balances the richness of the stuffed squash.

Another great side is roasted vegetables. You can roast broccoli, carrots, or Brussels sprouts with a drizzle of olive oil and a sprinkle of salt. The caramelized flavors of the veggies complement the spicy buffalo chicken perfectly.

If you want something heartier, serve the dish with a side of quinoa or brown rice. These grains provide a wholesome base and soak up any extra buffalo sauce, making every bite delicious. You can also offer some tortilla chips on the side for a fun crunch. They can be used to scoop up the filling, adding a playful element to your meal.

Garnishing Ideas

Garnishing your Buffalo Chicken Spaghetti Squash can make it look even more appetizing. A sprinkle of chopped green onions on top adds a pop of color and a fresh flavor. You can also drizzle a bit of ranch or blue cheese dressing over the top for an extra creamy touch. This not only enhances the taste but also gives a nod to traditional buffalo chicken flavors.

For those who enjoy a bit of heat, consider adding sliced jalapeños or a dash of hot sauce as a garnish. This will appeal to spice lovers and make the dish visually appealing. Additionally, a sprinkle of fresh cilantro or parsley can brighten up the presentation and add a hint of freshness.

Lastly, don’t forget about cheese! A little extra shredded cheddar or crumbled feta can be a delightful finishing touch. These garnishes not only enhance the flavor but also make your Buffalo Chicken Spaghetti Squash look like a restaurant-quality dish. With these serving suggestions, your meal will be both delicious and visually stunning!

Tips for Perfect Buffalo Chicken Spaghetti Squash

Storage Tips

Storing your Buffalo Chicken Spaghetti Squash properly can help maintain its delicious flavor and texture. If you have leftovers, allow the dish to cool completely before storing. Place the stuffed spaghetti squash in an airtight container. It can be kept in the refrigerator for up to 3-4 days. This makes it a great option for meal prep or quick lunches throughout the week.

If you want to store it for a longer period, consider freezing it. To do this, scoop out the filling from the squash and place it in a freezer-safe container. You can also freeze the stuffed halves directly. Just make sure to wrap them tightly in plastic wrap or aluminum foil before placing them in a freezer bag. Frozen Buffalo Chicken Spaghetti Squash can last for up to 2-3 months. When you’re ready to enjoy it again, simply thaw it in the refrigerator overnight before reheating.

Reheating Instructions

Reheating your Buffalo Chicken Spaghetti Squash is easy and can be done in several ways. For the best results, use the oven. Preheat your oven to 350°F. Place the stuffed squash halves on a baking sheet and cover them with aluminum foil to prevent drying out. Heat for about 20-25 minutes, or until warmed through. This method helps retain the dish’s original texture and flavor.

If you’re short on time, you can also use the microwave. Place a half in a microwave-safe dish and cover it with a microwave-safe lid. Heat on high for about 2-3 minutes, checking to see if it’s heated evenly. Stir the filling halfway through to ensure even heating. However, be aware that the microwave may make the squash a bit softer than the oven method.

Regardless of the reheating method you choose, always check the internal temperature to ensure it reaches at least 165°F before serving. This ensures that your Buffalo Chicken Spaghetti Squash is safe to eat and deliciously warm!

Breakdown of Time for Buffalo Chicken Spaghetti Squash

Prep Time

The prep time for Buffalo Chicken Spaghetti Squash is quite manageable. You can expect to spend about 15-20 minutes preparing the ingredients. This includes cutting the spaghetti squash, scooping out the seeds, and shredding the chicken if it’s not already cooked. Gathering all your ingredients and mixing the filling will also take a bit of time, but it’s all part of the fun!

Cooking Time

Cooking time is where the magic happens! Roasting the spaghetti squash takes about 30-40 minutes in the oven. This allows the squash to become tender and easy to shred. After that, you’ll bake the stuffed squash for an additional 10-15 minutes. In total, the cooking time is approximately 40-55 minutes, depending on your oven and the size of the squash.

Total Time

When you combine both prep and cooking times, the total time to make Buffalo Chicken Spaghetti Squash is around 55-75 minutes. This makes it a great option for a weeknight dinner or a weekend meal prep. With a little planning, you can have a delicious and healthy dish ready to serve in just over an hour!

Nutritional Information for Buffalo Chicken Spaghetti Squash

Calories

When it comes to enjoying a delicious meal, knowing the calorie content is essential. Each serving of Buffalo Chicken Spaghetti Squash contains approximately 350 calories. This makes it a satisfying option without overwhelming your daily calorie intake. The combination of spaghetti squash and protein-rich chicken ensures you get a filling meal that won’t leave you feeling guilty.

Protein

Protein is a crucial nutrient for maintaining muscle mass and overall health. In this recipe, each serving provides about 30 grams of protein. This high protein content comes from the shredded chicken and cream cheese, making it an excellent choice for those looking to increase their protein intake. Whether you’re an athlete or just someone who wants to stay healthy, this dish supports your dietary needs.

Sodium

Monitoring sodium intake is important for maintaining heart health. Each serving of Buffalo Chicken Spaghetti Squash contains around 800 milligrams of sodium. This amount can vary based on the buffalo sauce and cheese you choose. If you’re watching your sodium levels, consider using low-sodium buffalo sauce or cheese alternatives. This way, you can enjoy the flavors without compromising your health.

Overall, Buffalo Chicken Spaghetti Squash is a nutritious meal option that balances calories, protein, and sodium. It’s a great way to indulge in a flavorful dish while still keeping your health goals in check. Enjoy this tasty recipe knowing it’s not just delicious but also packed with nutrients!

FAQs about Buffalo Chicken Spaghetti Squash

Can I make Buffalo Chicken Spaghetti Squash ahead of time?

Absolutely! Buffalo Chicken Spaghetti Squash can be made ahead of time, making it a great option for meal prep. You can prepare the spaghetti squash and the filling separately. Store them in airtight containers in the refrigerator for up to 3-4 days. When you’re ready to enjoy it, simply reheat the squash and filling together. This way, you can have a delicious meal ready in no time!

Is Buffalo Chicken Spaghetti Squash healthy?

Yes, Buffalo Chicken Spaghetti Squash is a healthy dish! It is low in calories and carbohydrates, making it suitable for low-carb and keto diets. The dish is also high in protein, thanks to the chicken, which helps keep you full and satisfied. Additionally, spaghetti squash is a nutritious vegetable that provides vitamins and minerals. Overall, this recipe is a wholesome choice for anyone looking to enjoy a tasty yet healthy meal.

What can I substitute for chicken in Buffalo Chicken Spaghetti Squash?

If you want to substitute chicken in Buffalo Chicken Spaghetti Squash, there are several options. Shredded turkey works well and offers a similar taste and texture. For a plant-based alternative, consider using shredded jackfruit, tempeh, or tofu. These options can absorb the buffalo sauce flavor beautifully. You can also use cooked lentils or chickpeas for a protein-packed vegetarian option. Feel free to get creative with your substitutions!

How do I know when the spaghetti squash is cooked?

Knowing when your spaghetti squash is cooked is simple! After roasting it in the oven for 30-40 minutes, check for tenderness by piercing the flesh with a fork. It should be soft and easily shredded into strands. If the fork goes in easily, your spaghetti squash is ready! If it feels firm, give it a few more minutes in the oven. Once cooked, you can scrape out the strands and enjoy your delicious dish!

Conclusion on Buffalo Chicken Spaghetti Squash

In conclusion, Buffalo Chicken Spaghetti Squash is a fantastic dish that brings together the bold flavors of buffalo chicken with the nutritious benefits of spaghetti squash. This recipe not only satisfies your cravings for something hearty and spicy but also aligns with healthy eating habits. With its low-carb profile and high protein content, it’s a meal that can fit into various dietary preferences.

Whether you’re preparing it for a family dinner, a game day gathering, or meal prepping for the week, this dish is sure to impress. The versatility of the ingredients allows you to customize it to your liking, making it a fun and creative cooking experience. Plus, the ease of preparation means you can whip it up even on busy nights.

As you explore the world of Buffalo Chicken Spaghetti Squash, don’t hesitate to experiment with different flavors and ingredients. From adding extra veggies to trying out various proteins, the possibilities are endless. This dish is not just a meal; it’s an opportunity to enjoy cooking and share delicious food with loved ones.

So, gather your ingredients, follow the steps, and enjoy the delightful taste of Buffalo Chicken Spaghetti Squash. It’s a dish that promises to be a hit at your table, bringing smiles and satisfaction with every bite. Happy cooking!

Classic Christmas Prime Rib Recipe for Holiday Joy

Introduction to Classic Christmas Prime Rib Recipe

When it comes to holiday feasts, few dishes evoke the warmth and joy of family gatherings quite like a classic Christmas prime rib. This succulent roast, with its tender meat and rich flavor, has become a beloved centerpiece for many festive tables. The tradition of serving prime rib during the holidays dates back generations, symbolizing abundance and celebration.

The Tradition of Prime Rib During the Holidays

Prime rib is more than just a meal; it’s a tradition that brings people together. Families often gather around the table, sharing stories and laughter while enjoying this delicious roast. The preparation of prime rib can be a labor of love, with many cooks taking pride in their unique seasoning blends and cooking techniques. This dish is often associated with special occasions, making it a perfect choice for Christmas dinner.

In many households, the aroma of prime rib roasting in the oven signals the start of the holiday festivities. The anticipation builds as guests arrive, eager to indulge in this mouthwatering dish. Whether served with classic sides like mashed potatoes and green beans or paired with a rich red wine, prime rib creates a memorable dining experience.

As you embark on your journey to create the perfect classic Christmas prime rib recipe, remember that it’s not just about the food. It’s about the moments shared with loved ones, the laughter around the table, and the memories made. So, let’s dive into the ingredients and preparation steps that will help you craft this holiday masterpiece!

Ingredients for Classic Christmas Prime Rib Recipe

To create a mouthwatering classic Christmas prime rib, you’ll need a few key ingredients. Each component plays a vital role in enhancing the flavor and tenderness of the roast. Here’s what you’ll need:

  • 3 to 4 pounds prime rib roast, bone-in: This cut of meat is known for its rich flavor and tenderness. The bone adds extra juiciness during cooking.
  • 2 tablespoons kosher salt: Salt is essential for seasoning the meat and enhancing its natural flavors.
  • 1 tablespoon black pepper: Freshly ground black pepper adds a nice kick to the seasoning mix.
  • 1 tablespoon garlic powder: Garlic powder provides a savory depth to the roast.
  • 1 tablespoon onion powder: This ingredient adds a subtle sweetness and enhances the overall flavor profile.
  • 1 tablespoon fresh rosemary, chopped (or 1 teaspoon dried): Rosemary brings a fragrant, earthy note to the dish.
  • 1 tablespoon fresh thyme, chopped (or 1 teaspoon dried): Thyme complements the other herbs and adds a hint of freshness.
  • 2 tablespoons olive oil: Olive oil helps the seasoning adhere to the meat and promotes a beautiful crust.
  • 4 cloves garlic, minced: Fresh garlic adds a robust flavor that pairs perfectly with the roast.
  • 1 cup beef broth: This liquid keeps the roast moist and adds richness to the drippings.

With these ingredients on hand, you’re well on your way to preparing a classic Christmas prime rib that will impress your family and friends. Remember, the quality of your ingredients matters. Opt for fresh herbs and a good cut of meat for the best results. Now, let’s move on to the step-by-step preparation of this festive dish!

Step-by-Step Preparation of Classic Christmas Prime Rib Recipe

Now that you have your ingredients ready, it’s time to dive into the step-by-step preparation of your classic Christmas prime rib. Each step is crucial for achieving that perfect roast that will have everyone raving. Let’s get started!

Step 1: Selecting the Perfect Cut of Meat

Choosing the right cut of meat is essential for a delicious prime rib. Look for a prime rib roast that has good marbling. The marbling, or fat running through the meat, helps keep it juicy and flavorful during cooking. A bone-in roast is ideal, as the bone adds extra flavor and moisture. If possible, ask your butcher for a cut that has a nice layer of fat on top, known as the fat cap. This will help create a beautiful crust while roasting.

Step 2: Preparing the Seasoning Rub

Next, it’s time to prepare your seasoning rub. In a small bowl, combine kosher salt, black pepper, garlic powder, onion powder, chopped rosemary, chopped thyme, and minced garlic. Mix these ingredients well to ensure an even distribution of flavors. This rub will enhance the natural taste of the prime rib, making it truly irresistible.

Step 3: Seasoning the Prime Rib

Once your seasoning rub is ready, it’s time to season the prime rib. Start by patting the roast dry with paper towels. This step is important as it helps achieve a nice crust. Then, drizzle olive oil over the roast, ensuring it’s coated evenly. Now, take your seasoning rub and generously apply it all over the roast, making sure to cover all sides. Don’t be shy with the seasoning; it’s what makes the roast flavorful!

Step 4: Prepping the Oven and Roasting Pan

Before you start cooking, preheat your oven to 450°F. This high temperature will help create a beautiful crust on the roast. While the oven is heating, prepare your roasting pan. Place the seasoned prime rib bone-side down in the pan. Pour the beef broth into the bottom of the pan. This will keep the roast moist and add flavor to the drippings, which can be used for gravy later.

Step 5: Cooking the Prime Rib

Now it’s time to cook your prime rib! Place the roasting pan in the preheated oven and roast for 20 minutes. This initial high heat will help develop a nice crust. After 20 minutes, reduce the oven temperature to 325°F. Continue roasting for about 1.5 to 2 hours, or until the internal temperature reaches 130°F for medium-rare. Remember, cooking times may vary based on the size of your roast, so it’s best to use a meat thermometer for accuracy.

Step 6: Resting the Meat

Once your prime rib reaches the desired temperature, remove it from the oven. It’s crucial to let the roast rest for at least 20 minutes before slicing. Tent the roast with aluminum foil to keep it warm. Resting allows the juices to redistribute throughout the meat, ensuring each slice is tender and juicy.

Step 7: Slicing and Serving

After resting, it’s time to slice and serve your classic Christmas prime rib. Use a sharp carving knife to cut the roast into even slices. Serve the prime rib with your favorite sides, and don’t forget to drizzle some of the flavorful drippings over the meat. Enjoy the delicious flavors and the joy of sharing this festive meal with your loved ones!

Variations of Classic Christmas Prime Rib Recipe

While the classic Christmas prime rib recipe is a timeless favorite, there are many ways to put a unique twist on this festive dish. By experimenting with different flavors and ingredients, you can create variations that suit your taste and impress your guests. Here are two delightful variations to consider:

Herb-Crusted Prime Rib Variation

If you love the fresh taste of herbs, this herb-crusted prime rib variation is perfect for you. To enhance the flavor, simply add a mix of your favorite fresh herbs to the seasoning rub. Consider using parsley, sage, or even dill for a unique twist. Here’s how to make it:

  • In addition to the original seasoning mix, add 1 tablespoon of chopped fresh parsley and 1 tablespoon of chopped fresh sage.
  • Mix the herbs well with the other spices to create a fragrant rub.
  • Follow the same preparation and cooking steps as the classic recipe.

This herb-crusted version will give your prime rib a vibrant flavor and a beautiful presentation. The fresh herbs not only enhance the taste but also add a lovely aroma that fills your kitchen.

Garlic and Rosemary Prime Rib Variation

If you’re a fan of garlic, this garlic and rosemary prime rib variation will surely delight your taste buds. The combination of garlic and rosemary creates a rich, savory flavor that pairs perfectly with the beef. Here’s how to prepare it:

  • Increase the amount of garlic in the seasoning rub to 8 cloves of minced garlic for a more robust flavor.
  • Add 2 tablespoons of chopped fresh rosemary instead of 1 tablespoon for an extra herbal kick.
  • Follow the classic recipe’s preparation and cooking steps.

This variation will result in a prime rib that is bursting with flavor. The garlic caramelizes beautifully during roasting, while the rosemary adds a fragrant touch that elevates the dish to new heights.

Feel free to mix and match these variations or create your own! The beauty of cooking is that you can personalize recipes to fit your preferences. Enjoy the process and have fun experimenting with flavors!

Cooking Note for Classic Christmas Prime Rib Recipe

Cooking a classic Christmas prime rib is an art that requires attention to detail. Here are some important notes to keep in mind to ensure your roast turns out perfectly every time.

First, always use a meat thermometer. This tool is essential for checking the internal temperature of the roast. For medium-rare, aim for 130°F. If you prefer your meat more well-done, adjust the temperature accordingly. Remember, the roast will continue to cook slightly while resting, so it’s wise to remove it from the oven a few degrees before it reaches your target temperature.

Next, consider the resting time. Allowing the prime rib to rest for at least 20 minutes is crucial. This step helps the juices redistribute throughout the meat, making each slice tender and juicy. If you cut into the roast too soon, you risk losing those flavorful juices, resulting in a drier roast.

Additionally, the quality of your ingredients matters. Opt for a high-quality prime rib roast from a trusted butcher. The better the meat, the more flavorful and tender your final dish will be. Fresh herbs also make a significant difference in flavor, so don’t hesitate to use them instead of dried when possible.

Lastly, don’t forget about the drippings! The beef broth mixed with the juices from the roast creates a delicious base for gravy. After removing the roast, you can place the roasting pan on the stovetop to heat the drippings. Whisk in a bit of flour or cornstarch to thicken it, and you’ll have a rich sauce to serve alongside your prime rib.

By keeping these cooking notes in mind, you’ll be well on your way to mastering the classic Christmas prime rib recipe. Enjoy the process, and savor the delightful flavors that come from your hard work!

Serving Suggestions for Classic Christmas Prime Rib Recipe

Once your classic Christmas prime rib is perfectly cooked and resting, it’s time to think about how to serve it. The presentation and accompanying dishes can elevate your meal, making it even more special. Here are some delightful serving suggestions to complement your prime rib:

  • Classic Sides: Pair your prime rib with traditional sides like creamy mashed potatoes, roasted Brussels sprouts, or buttery green beans. These sides not only add color to your plate but also balance the rich flavors of the roast.
  • Yorkshire Pudding: This classic British side is a fantastic addition to prime rib. The light and airy texture of Yorkshire pudding soaks up the delicious juices from the roast, making each bite heavenly.
  • Horseradish Sauce: A tangy horseradish sauce is a classic accompaniment for prime rib. Its sharpness cuts through the richness of the meat, providing a delightful contrast. You can serve it on the side or drizzle it over the slices.
  • Gravy: Don’t forget about the drippings! Use the flavorful drippings from the roasting pan to make a rich gravy. Serve it warm in a gravy boat for guests to pour over their slices.
  • Fresh Salad: A light, fresh salad can balance the meal. Consider a simple mixed greens salad with a vinaigrette dressing. The acidity will refresh the palate between bites of the rich prime rib.
  • Wine Pairing: A robust red wine, such as Cabernet Sauvignon or Merlot, pairs beautifully with prime rib. The tannins in the wine complement the meat’s richness, enhancing the overall dining experience.

When serving your classic Christmas prime rib, presentation is key. Arrange the slices on a large platter, garnished with fresh herbs or roasted garlic for an inviting look. This not only makes the dish visually appealing but also sets the stage for a memorable holiday meal.

Remember, the goal is to create a festive atmosphere that encourages sharing and enjoyment. With these serving suggestions, your classic Christmas prime rib will be the star of the show, bringing joy and deliciousness to your holiday table!

Tips for Perfecting Your Classic Christmas Prime Rib Recipe

Creating the perfect classic Christmas prime rib is a rewarding experience. To ensure your roast turns out tender, juicy, and full of flavor, consider these helpful tips. Each suggestion will guide you in perfecting your cooking technique and enhancing the overall taste of your dish.

  • Choose Quality Meat: Always select a high-quality prime rib roast. Look for well-marbled meat, as the fat will keep it moist during cooking. A reputable butcher can help you find the best cut.
  • Season Generously: Don’t be shy with your seasoning rub. A generous application of salt and spices enhances the flavor and creates a delicious crust. Make sure to cover all sides of the roast evenly.
  • Use a Meat Thermometer: Invest in a reliable meat thermometer. This tool is essential for achieving the perfect doneness. For medium-rare, aim for an internal temperature of 130°F. Remember, the roast will continue to cook slightly while resting.
  • Let It Rest: After cooking, allow your prime rib to rest for at least 20 minutes. This step is crucial for redistributing the juices, ensuring each slice is juicy and tender.
  • Experiment with Flavors: Feel free to customize your seasoning rub. Adding different herbs or spices can create unique flavor profiles. Consider experimenting with smoked paprika or even a touch of cayenne for a bit of heat.
  • Make Gravy from Drippings: Don’t waste the flavorful drippings! After roasting, use the drippings to make a rich gravy. Simply whisk in flour or cornstarch to thicken it, and serve it alongside your prime rib.
  • Pair with the Right Sides: Complement your prime rib with classic sides like roasted vegetables, creamy mashed potatoes, or a fresh salad. These dishes balance the richness of the meat and enhance the overall meal.
  • Practice Makes Perfect: Don’t be discouraged if your first attempt isn’t perfect. Cooking is a learning process. Each time you make prime rib, you’ll gain more experience and confidence in your skills.

By following these tips, you’ll be well on your way to mastering the classic Christmas prime rib recipe. Enjoy the process, and savor the delicious results that come from your hard work!

Breakdown of Time for Classic Christmas Prime Rib Recipe

Understanding the time required for each step in preparing your classic Christmas prime rib is essential for a smooth cooking experience. Here’s a detailed breakdown of the time you’ll need for preparation and cooking, ensuring you can plan your holiday meal effectively.

Prep Time

The prep time for your classic Christmas prime rib is approximately 30 minutes. This includes:

  • Gathering and measuring all your ingredients.
  • Patting the roast dry and applying the seasoning rub.
  • Prepping the roasting pan and getting the oven ready.

Taking your time during this stage is important. Properly seasoning the meat and preparing your workspace will set you up for success.

Cooking Time

The cooking time for your prime rib will vary based on the size of the roast and your desired doneness. Generally, you can expect:

  • 20 minutes at 450°F to develop a crust.
  • 1.5 to 2 hours at 325°F until the internal temperature reaches 130°F for medium-rare.

In total, the cooking time will be around 1 hour and 50 minutes to 2 hours and 20 minutes. Always use a meat thermometer to ensure accuracy.

Total Time

When you combine the prep time and cooking time, the total time for your classic Christmas prime rib recipe will be approximately:

  • Prep Time: 30 minutes
  • Cooking Time: 1 hour and 50 minutes to 2 hours and 20 minutes

Total Time: 2 hours and 20 minutes to 2 hours and 50 minutes

Keep in mind that you should also allow for resting time after cooking. Letting the roast rest for at least 20 minutes is crucial for juicy slices. So, plan accordingly to ensure your prime rib is ready to serve at the perfect moment!

Nutritional Information for Classic Christmas Prime Rib Recipe

Understanding the nutritional content of your classic Christmas prime rib recipe can help you make informed choices during your holiday feast. While this dish is a delicious treat, it’s also important to be aware of its nutritional values. Here’s a breakdown of the key nutritional information for a serving of prime rib:

Calories

A typical serving of classic Christmas prime rib contains approximately 450 calories. This calorie count can vary based on the size of the portion and any additional ingredients or sides served with it. While prime rib is a rich and hearty dish, it’s essential to enjoy it in moderation, especially during festive occasions.

Protein

One of the standout features of prime rib is its high protein content. Each serving provides about 50 grams of protein. Protein is vital for building and repairing tissues in the body, making it an essential nutrient for overall health. Enjoying a protein-rich meal like prime rib can help keep you feeling satisfied and energized during the holiday celebrations.

Sodium

When it comes to sodium, a serving of classic Christmas prime rib contains around 1,200 milligrams. This amount can vary depending on the seasoning used and whether additional sauces or gravies are added. While sodium is necessary for bodily functions, it’s important to monitor your intake, especially if you have dietary restrictions. Balancing your meal with fresh vegetables and low-sodium sides can help manage overall sodium consumption.

In summary, while classic Christmas prime rib is a delicious and protein-packed dish, being mindful of its calorie and sodium content can enhance your holiday dining experience. Enjoy this festive meal as part of a balanced diet, and savor the flavors and memories created around the table!

FAQs About Classic Christmas Prime Rib Recipe

What is the best way to cook prime rib?

The best way to cook prime rib is to start with a high temperature to create a crust, then lower the temperature for even cooking. Begin by roasting at 450°F for 20 minutes, then reduce to 325°F until the internal temperature reaches your desired doneness. Using a meat thermometer is key to achieving perfect results. For medium-rare, aim for 130°F. This method ensures a juicy, flavorful roast that will impress your guests.

How long should prime rib rest before slicing?

After cooking, prime rib should rest for at least 20 minutes before slicing. Resting allows the juices to redistribute throughout the meat, making each slice tender and juicy. If you cut into the roast too soon, the juices will run out, resulting in a drier roast. Tent the roast with aluminum foil to keep it warm while it rests.

Can I make prime rib ahead of time?

While prime rib is best served fresh, you can prepare it ahead of time. Season the roast and let it sit in the refrigerator for up to 24 hours before cooking. This allows the flavors to penetrate the meat. If you need to reheat leftovers, slice the prime rib and warm it gently in the oven at a low temperature, covered with foil, to prevent drying out.

What sides pair well with prime rib?

Prime rib pairs beautifully with a variety of sides. Classic options include creamy mashed potatoes, roasted vegetables, and buttery green beans. Yorkshire pudding is a traditional favorite, soaking up the delicious juices from the roast. A fresh salad with a tangy vinaigrette can also balance the richness of the meat. Don’t forget to serve horseradish sauce or gravy for added flavor!

Conclusion on Classic Christmas Prime Rib Recipe

In conclusion, the classic Christmas prime rib recipe is more than just a dish; it’s a celebration of flavors, traditions, and cherished moments with loved ones. This succulent roast, with its rich taste and tender texture, has the power to transform any holiday gathering into a memorable feast. By following the steps outlined in this article, you can create a prime rib that not only impresses your guests but also warms their hearts.

As you prepare your prime rib, remember the importance of quality ingredients and careful cooking techniques. From selecting the perfect cut of meat to allowing it to rest, each step contributes to the overall success of your dish. Don’t hesitate to experiment with variations and serving suggestions to make the meal uniquely yours. Whether you opt for a classic herb crust or a garlic-infused twist, the possibilities are endless.

Moreover, the joy of sharing a beautifully cooked prime rib with family and friends is what truly makes the holiday season special. The laughter, stories, and love shared around the table create lasting memories that go beyond the meal itself. So, as you gather around your festive table this Christmas, take a moment to appreciate the flavors, the company, and the spirit of togetherness that this classic dish embodies.

With this classic Christmas prime rib recipe in hand, you’re well-equipped to create a centerpiece that will delight and satisfy. Embrace the process, enjoy the flavors, and celebrate the moments that make the holiday season truly magical. Happy cooking and happy holidays!

Million Dollar Ravioli Casserole is a must-try dish!

Introduction to Million Dollar Ravioli Casserole Recipe

Are you looking for a dish that combines comfort, flavor, and ease? Look no further than the Million Dollar Ravioli Casserole Recipe! This delightful casserole is not just a meal; it’s an experience that brings family and friends together. With layers of cheesy goodness and rich marinara sauce, it’s sure to become a favorite in your household.

What Makes the Million Dollar Ravioli Casserole Recipe Special?

What sets the Million Dollar Ravioli Casserole apart from other pasta dishes? First, it’s incredibly simple to prepare. You can whip it up in no time, making it perfect for busy weeknights or special occasions. The use of frozen cheese ravioli means you don’t have to spend hours making pasta from scratch. Just layer, bake, and enjoy!

Moreover, the combination of ricotta, mozzarella, and Parmesan cheeses creates a creamy, dreamy texture that melts in your mouth. The Italian seasoning and garlic powder add a burst of flavor that elevates the dish to a whole new level. Each bite is a delightful mix of savory and cheesy goodness, making it feel like a million bucks!

Additionally, this casserole is versatile. You can easily customize it to suit your taste. Whether you want to add veggies, meat, or even a touch of cream for extra richness, the possibilities are endless. This flexibility makes it a go-to recipe for any occasion.

In summary, the Million Dollar Ravioli Casserole Recipe is not just a meal; it’s a celebration of flavors and textures. It’s easy to make, delicious to eat, and perfect for sharing. So, let’s dive into the ingredients and get started on this culinary adventure!

Ingredients for Million Dollar Ravioli Casserole Recipe

To create the delicious Million Dollar Ravioli Casserole, you’ll need a few simple ingredients. Each component plays a vital role in building the layers of flavor and texture that make this dish so special. Here’s what you’ll need:

  • 2 cups marinara sauce
  • 1 (25-ounce) package frozen cheese ravioli
  • 2 cups shredded mozzarella cheese
  • 1 cup ricotta cheese
  • 1/2 cup grated Parmesan cheese
  • 1 teaspoon Italian seasoning
  • 1/2 teaspoon garlic powder
  • 1/4 teaspoon black pepper
  • 1/4 teaspoon salt
  • Fresh basil leaves for garnish (optional)

These ingredients are not only easy to find but also work together to create a comforting and satisfying meal. The marinara sauce provides a rich base, while the ravioli adds heartiness. The blend of cheeses brings creaminess and depth, making every bite a delight.

Feel free to get creative! You can add your favorite vegetables or proteins to enhance the dish. For instance, sautéed spinach or mushrooms can add a nutritious twist. If you prefer meat, cooked ground beef or Italian sausage can elevate the flavor profile even further. The Million Dollar Ravioli Casserole is all about making it your own!

Step-by-Step Preparation of Million Dollar Ravioli Casserole Recipe

Now that you have gathered all the ingredients, it’s time to bring the Million Dollar Ravioli Casserole to life! Follow these simple steps to create a dish that will impress everyone at the table. Let’s get started!

Step 1: Preheat the Oven

First things first, preheat your oven to 375°F (190°C). This step is crucial as it ensures that your casserole cooks evenly and thoroughly. While the oven is heating up, you can prepare the other components of the dish. This way, you’ll save time and be ready to bake as soon as you finish layering!

Step 2: Prepare the Sauce

Next, grab your baking dish and spread 1 cup of marinara sauce evenly on the bottom. This layer acts as a flavorful base for the ravioli. It not only adds moisture but also infuses the dish with rich tomato flavor. Make sure to cover the entire bottom of the dish so that every ravioli gets a taste of that delicious sauce!

Step 3: Layer the Ingredients

Now it’s time to build the layers! Start by placing half of the frozen cheese ravioli over the marinara sauce in a single layer. This creates a hearty foundation. Then, in a separate bowl, mix together the ricotta cheese, Italian seasoning, garlic powder, black pepper, and salt until well combined. Spoon dollops of this creamy mixture over the ravioli layer, spreading it gently with a spatula.

After that, sprinkle 1 cup of shredded mozzarella cheese over the ricotta layer. This will add a gooey, cheesy texture that everyone loves. Pour another cup of marinara sauce over the mozzarella cheese, and then layer the remaining ravioli on top. Finish by spreading the last cup of marinara sauce over the ravioli and topping it with the remaining mozzarella and Parmesan cheese. This final layer will create a beautiful, cheesy crust when baked!

Step 4: Bake the Casserole

Cover the baking dish with aluminum foil and place it in the preheated oven. Bake for 25 minutes. This helps the flavors meld together and ensures the ravioli cooks through. After 25 minutes, carefully remove the foil and bake for an additional 15 minutes. This step allows the cheese to become bubbly and golden, creating a mouthwatering top layer.

Once done, let the casserole cool for 5-10 minutes before serving. This resting time helps the layers set, making it easier to serve. If you like, garnish with fresh basil leaves for a pop of color and flavor. Now, you’re ready to enjoy your delicious Million Dollar Ravioli Casserole!

Variation of Million Dollar Ravioli Casserole Recipe

The beauty of the Million Dollar Ravioli Casserole Recipe lies in its versatility. You can easily adapt it to fit different dietary preferences and tastes. Whether you’re looking for vegetarian options or gluten-free alternatives, there’s a way to make this dish work for everyone. Let’s explore some delicious variations!

Vegetarian Options

If you want to make a vegetarian version of the Million Dollar Ravioli Casserole, it’s simple! Start by choosing cheese ravioli that is meat-free. You can find many brands that offer delicious cheese-filled options. To add more flavor and nutrition, consider mixing in sautéed vegetables. Spinach, mushrooms, and bell peppers are excellent choices. Just sauté them in a little olive oil until they’re tender, then mix them into the ricotta cheese mixture.

Another great addition is fresh herbs. Chopped parsley or oregano can enhance the flavor profile. You can also swap out the marinara sauce for a homemade tomato sauce with added veggies for a unique twist. This way, you’ll have a hearty, satisfying meal that everyone will love!

Gluten-Free Alternatives

For those who need a gluten-free option, you can still enjoy the Million Dollar Ravioli Casserole! Look for gluten-free ravioli made from rice, quinoa, or other gluten-free grains. Many grocery stores now carry these options, making it easier than ever to find suitable pasta.

Additionally, ensure that your marinara sauce is gluten-free. Most store-bought sauces are, but it’s always good to check the label. You can also make your own sauce using fresh tomatoes, garlic, and herbs for a homemade touch. With these adjustments, you can create a delicious gluten-free casserole that everyone can enjoy!

In summary, the Million Dollar Ravioli Casserole Recipe is adaptable to fit various dietary needs. Whether you choose to go vegetarian or gluten-free, you can still savor the rich flavors and comforting textures of this delightful dish. So, don’t hesitate to get creative and make it your own!

Cooking Note for Million Dollar Ravioli Casserole Recipe

When preparing the Million Dollar Ravioli Casserole, a few cooking notes can help you achieve the best results. These tips will ensure that your casserole turns out perfectly every time, making it a dish you’ll want to share with family and friends.

First, always check the cooking instructions on the package of your frozen ravioli. Different brands may have varying cooking times. While the casserole method is generally forgiving, following the package directions can help ensure the ravioli is cooked to perfection.

Next, consider the type of marinara sauce you use. A high-quality sauce can elevate the flavor of your casserole significantly. If you have time, making your own sauce can add a personal touch. Fresh herbs, garlic, and a splash of red wine can enhance the taste even more.

For a creamier texture, you might want to mix a little heavy cream into the marinara sauce before layering. This addition can create a rich, velvety sauce that complements the cheeses beautifully. Just be mindful of the extra calories if you’re watching your intake.

Additionally, if you’re adding meat, make sure it’s cooked beforehand. Ground beef or Italian sausage can add a hearty flavor, but they need to be browned and drained before mixing them into the casserole. This step prevents excess grease from making the dish soggy.

Lastly, let the casserole rest for a few minutes after baking. This resting time allows the layers to set, making it easier to serve. If you cut into it too soon, the layers may slide apart, and you won’t get that beautiful presentation you desire.

By keeping these cooking notes in mind, you’ll be well on your way to creating a delicious Million Dollar Ravioli Casserole that everyone will love. Happy cooking!

Serving Suggestions for Million Dollar Ravioli Casserole Recipe

Once your Million Dollar Ravioli Casserole is baked to perfection, it’s time to serve it up! This dish is not only delicious but also visually appealing, making it a great centerpiece for any meal. Here are some serving suggestions to enhance your dining experience:

  • Pair with a Fresh Salad: A crisp green salad is a perfect complement to the rich flavors of the casserole. Consider a simple mixed greens salad with cherry tomatoes, cucumbers, and a light vinaigrette. The freshness of the salad balances the hearty casserole beautifully.
  • Serve with Garlic Bread: Nothing beats the classic combination of pasta and garlic bread. Serve warm, buttery garlic bread on the side for a delightful crunch. It’s perfect for soaking up any extra marinara sauce!
  • Add a Side of Roasted Vegetables: For a nutritious boost, consider serving roasted vegetables alongside your casserole. Zucchini, bell peppers, and asparagus are great choices. Toss them in olive oil, season with salt and pepper, and roast until tender.
  • Top with Fresh Herbs: Before serving, sprinkle some fresh basil or parsley on top of the casserole. This not only adds a pop of color but also enhances the flavor. Fresh herbs can elevate the dish and make it look even more appetizing.
  • Offer Grated Cheese: Set out a small bowl of grated Parmesan cheese for guests to sprinkle on their servings. This extra touch allows everyone to customize their dish to their liking.

These serving suggestions will not only enhance the flavors of your Million Dollar Ravioli Casserole but also create a delightful dining experience. Whether it’s a family dinner or a gathering with friends, this dish is sure to impress!

Tips for Perfecting Your Million Dollar Ravioli Casserole Recipe

To make your Million Dollar Ravioli Casserole truly shine, consider these helpful tips. Each suggestion will guide you in creating a dish that is not only delicious but also visually appealing. Let’s dive into some expert advice!

First, always use high-quality ingredients. Fresh, flavorful marinara sauce can make a big difference. If you have the time, try making your own sauce. Using ripe tomatoes, fresh garlic, and herbs can elevate the taste of your casserole.

Next, don’t skip the seasoning! The right blend of spices can enhance the overall flavor. Besides Italian seasoning, consider adding a pinch of red pepper flakes for a little heat. This small addition can bring a delightful kick to your dish.

When layering the ingredients, be sure to spread them evenly. This ensures that every bite is packed with flavor. Use a spatula to gently spread the ricotta mixture and marinara sauce, making sure to cover all the ravioli.

For a more decadent casserole, try adding a layer of sautéed vegetables. Spinach, zucchini, or bell peppers can add both nutrition and flavor. Just sauté them lightly before mixing them into the ricotta mixture.

Another tip is to let the casserole rest after baking. This resting period allows the layers to set, making it easier to cut and serve. If you cut into it too soon, the layers may slide apart, and you won’t get that beautiful presentation.

Lastly, don’t be afraid to experiment! The Million Dollar Ravioli Casserole is versatile. Feel free to try different types of cheese or add your favorite proteins. Ground turkey or chicken can be great alternatives to beef or sausage.

By following these tips, you’ll be well on your way to creating a Million Dollar Ravioli Casserole that is not only delicious but also a feast for the eyes. Enjoy the process and happy cooking!

Breakdown of Time for Million Dollar Ravioli Casserole Recipe

Understanding the time needed for the Million Dollar Ravioli Casserole Recipe can help you plan your meal better. Whether you’re preparing it for a busy weeknight or a special gathering, knowing the time breakdown is essential. Here’s how the timing works out:

Prep Time

The prep time for this delicious casserole is quite manageable. You’ll need about 15-20 minutes to gather your ingredients and layer everything in the baking dish. This includes preheating the oven, mixing the ricotta filling, and arranging the ravioli and sauces. With a little organization, you can have everything ready in no time!

Cooking Time

Once your casserole is assembled, it’s time to bake! The cooking time is approximately 40 minutes. First, you’ll cover the dish with aluminum foil and bake it for 25 minutes. Then, remove the foil and bake for an additional 15 minutes. This step ensures that the cheese becomes bubbly and golden, creating that perfect crust.

Total Time

In total, you can expect the Million Dollar Ravioli Casserole Recipe to take about 55-60 minutes from start to finish. This includes both prep and cooking time. With such a quick turnaround, you can enjoy a hearty, homemade meal without spending hours in the kitchen. It’s a win-win for busy cooks!

Nutritional Information for Million Dollar Ravioli Casserole Recipe

Understanding the nutritional information of the Million Dollar Ravioli Casserole Recipe is essential for those who are health-conscious or following specific dietary plans. This dish is not only delicious but also provides a good balance of nutrients. Let’s break down the key nutritional components per serving.

Calories

Each serving of the Million Dollar Ravioli Casserole contains approximately 450 calories. This makes it a satisfying meal that can keep you full without going overboard on calories. The combination of cheese, ravioli, and marinara sauce contributes to the calorie count, but it also provides a hearty and comforting dish that is perfect for family dinners.

Protein

In terms of protein, this casserole packs a punch with about 22 grams per serving. The protein comes primarily from the cheese and ravioli, making it a great option for those looking to increase their protein intake. Protein is essential for muscle repair and growth, making this dish a good choice for active individuals or anyone needing a nutritious meal.

Sodium

When it comes to sodium, the Million Dollar Ravioli Casserole contains around 800 milligrams per serving. While this is a reasonable amount for a hearty dish, it’s important to be mindful of sodium intake, especially for those with dietary restrictions. You can reduce the sodium content by choosing low-sodium marinara sauce and cheese options. This way, you can enjoy the flavors without worrying too much about salt levels.

In summary, the Million Dollar Ravioli Casserole Recipe offers a balanced meal with a good mix of calories, protein, and sodium. It’s a comforting dish that can fit into a healthy diet when enjoyed in moderation. So, gather your ingredients and get ready to indulge in this delicious casserole while keeping your nutritional goals in mind!

FAQs about Million Dollar Ravioli Casserole Recipe

Can I make the Million Dollar Ravioli Casserole Recipe ahead of time?

Absolutely! One of the great things about the Million Dollar Ravioli Casserole Recipe is its make-ahead convenience. You can prepare the casserole a day in advance. Simply layer all the ingredients in the baking dish, cover it tightly with plastic wrap or aluminum foil, and store it in the refrigerator. When you’re ready to bake, just remove the cover and pop it in the oven. You may need to add a few extra minutes to the cooking time since it will be cold from the fridge. This makes it perfect for busy weeknights or when hosting guests!

What type of ravioli works best for the Million Dollar Ravioli Casserole Recipe?

For the Million Dollar Ravioli Casserole Recipe, frozen cheese ravioli works best. The cheese-filled variety is a classic choice, providing a creamy texture that pairs beautifully with the marinara sauce. However, you can also experiment with other flavors! Spinach and ricotta ravioli or even mushroom ravioli can add a unique twist to the dish. Just make sure to choose ravioli that is frozen, as it holds up well during baking and ensures a hearty meal.

Can I freeze the Million Dollar Ravioli Casserole Recipe?

Yes, you can freeze the Million Dollar Ravioli Casserole! To do this, prepare the casserole as directed but do not bake it. Instead, cover it tightly with plastic wrap and then aluminum foil to prevent freezer burn. It can be stored in the freezer for up to three months. When you’re ready to enjoy it, simply thaw it in the refrigerator overnight and bake it as usual. This makes it a fantastic option for meal prep or for those days when you want a comforting meal without the fuss!

Conclusion on Million Dollar Ravioli Casserole Recipe

In conclusion, the Million Dollar Ravioli Casserole Recipe is a delightful dish that combines simplicity, flavor, and comfort. It’s perfect for busy weeknights or special gatherings, making it a versatile addition to your meal rotation. With its layers of cheesy goodness and rich marinara sauce, this casserole is sure to impress family and friends alike.

Not only is it easy to prepare, but it also allows for creativity. You can customize it to suit your taste preferences, whether you prefer a vegetarian version or want to add some protein. The options are endless, making it a dish that can evolve with your culinary adventures.

Moreover, the nutritional benefits of this casserole make it a satisfying choice. With a good balance of calories, protein, and flavor, it fits well into a healthy diet when enjoyed in moderation. Plus, the ability to make it ahead of time or freeze it for later adds to its convenience.

So, gather your ingredients, follow the steps, and enjoy the process of creating this delicious Million Dollar Ravioli Casserole. Whether you’re sharing it with loved ones or savoring it solo, this dish is bound to bring joy to your table. Happy cooking!

Cranberry Balsamic Roast Beef Recipe is a must-try!

Introduction to Cranberry Balsamic Roast Beef Recipe

Cranberry Balsamic Roast Beef Recipe. This delightful meal combines the rich flavors of beef with the tangy sweetness of cranberries and balsamic vinegar. It’s perfect for special occasions or a cozy family dinner. The best part? It’s simple to prepare, making it accessible for cooks of all skill levels.

What Makes Cranberry Balsamic Roast Beef Unique?

What sets this roast beef apart is its unique flavor profile. The tartness of fresh cranberries pairs beautifully with the deep, savory notes of the beef. Balsamic vinegar adds a sweet and tangy kick, enhancing the overall taste. This combination creates a dish that is not only delicious but also visually appealing, thanks to the vibrant colors of the cranberries.

Moreover, the cooking method allows the beef to become tender and juicy. As it roasts, the flavors meld together, creating a mouthwatering sauce that you’ll want to drizzle over every slice. Whether you’re serving it for a holiday feast or a casual Sunday dinner, this recipe is sure to become a family favorite.

In the following sections, we will guide you through the ingredients, preparation steps, and tips to make your Cranberry Balsamic Roast Beef a success. Get ready to impress your guests with this delightful dish!

Ingredients for Cranberry Balsamic Roast Beef Recipe

Cranberry Balsamic Roast Beef Recipe, you’ll need a few key ingredients. Each component plays a vital role in building the rich flavors that make this dish so special. Here’s what you’ll need:

  • 2 to 3 pounds beef roast: Choose either chuck or round for the best results. These cuts are flavorful and become tender when cooked slowly.
  • 1 cup fresh cranberries: These add a tart sweetness that balances the savory beef perfectly.
  • 1/2 cup balsamic vinegar: This ingredient brings a sweet and tangy flavor that enhances the overall dish.
  • 1/2 cup beef broth: Using broth adds depth and richness to the sauce.
  • 1/4 cup brown sugar: This sweetener helps to caramelize the sauce, giving it a beautiful glaze.
  • 1 tablespoon Dijon mustard: This adds a subtle kick and complexity to the marinade.
  • 1 teaspoon garlic powder: Garlic powder infuses the beef with a warm, savory flavor.
  • 1 teaspoon onion powder: This enhances the overall taste, making it more robust.
  • 1 teaspoon salt: Essential for bringing out the flavors of the other ingredients.
  • 1/2 teaspoon black pepper: Adds a hint of spice to the dish.
  • 1 tablespoon olive oil: Used for searing the beef, it helps to lock in moisture and flavor.
  • Fresh rosemary or thyme (optional): These herbs make a lovely garnish and add an aromatic touch.

Gathering these ingredients will set you on the right path to creating a delicious roast beef that your family will love. Each item contributes to the unique flavor profile of the dish, ensuring a delightful dining experience. Now that you have everything you need, let’s move on to the preparation steps!

Step-by-Step Preparation of Cranberry Balsamic Roast Beef Recipe

Cranberry Balsamic Roast Beef Recipe. This step-by-step guide will help you create a delicious roast that is sure to impress. Let’s get started!

Step 1: Preparing the Beef

First, take your beef roast out of the refrigerator. Allow it to sit at room temperature for about 30 minutes. This helps the meat cook evenly. While waiting, you can trim any excess fat from the roast. This step is optional, but it can help reduce greasiness. Once ready, pat the beef dry with paper towels. This will help achieve a nice sear when cooking.

Step 2: Making the Cranberry Balsamic Marinade

Next, it’s time to create the marinade. In a medium bowl, combine the fresh cranberries, balsamic vinegar, beef broth, brown sugar, Dijon mustard, garlic powder, onion powder, salt, and black pepper. Stir the mixture well until the sugar dissolves and all ingredients are blended. This marinade is what gives your roast its unique flavor, so make sure to mix it thoroughly!

Step 3: Marinating the Beef

Now, place the beef roast in a large resealable plastic bag or a shallow dish. Pour the cranberry balsamic marinade over the beef, ensuring it is well coated. Seal the bag or cover the dish with plastic wrap. Let the beef marinate in the refrigerator for at least 1 hour, or up to overnight for deeper flavor. The longer it marinates, the more flavorful it will be!

Step 4: Roasting the Beef

After marinating, preheat your oven to 325°F (163°C). Heat olive oil in a large oven-safe skillet over medium-high heat. Once hot, carefully sear the beef roast on all sides until it’s browned, about 4-5 minutes per side. This step locks in the juices and adds a beautiful crust. After searing, pour the cranberry balsamic mixture over the roast, making sure it’s well coated. Cover the skillet with a lid or aluminum foil and transfer it to the preheated oven. Roast for 2 to 2.5 hours, or until the internal temperature reaches 135°F (57°C) for medium-rare.

Step 5: Resting and Slicing the Roast

Once the roast is done, remove it from the oven and let it rest for 15-20 minutes. This resting period allows the juices to redistribute throughout the meat, ensuring each slice is juicy and tender. After resting, slice the roast against the grain for the best texture. Serve the sliced beef with the delicious cranberry sauce drizzled over the top. If desired, garnish with fresh rosemary or thyme for an aromatic touch.

Cranberry Balsamic Roast Beef Recipe. Each step is designed to enhance the flavors and ensure a delightful dining experience. Now, let’s explore some variations to make this dish even more exciting!

Variations of Cranberry Balsamic Roast Beef Recipe

Cranberry Balsamic Roast Beef Recipe is delicious as is, there are many ways to switch things up! By using alternative ingredients or different cooking methods, you can create a unique twist on this classic dish. Let’s explore some exciting variations!

Alternative Ingredients for Different Flavors

Experimenting with different ingredients can lead to delightful new flavors. Here are some ideas:

  • Fruit Options: Instead of cranberries, try using cherries or pomegranate seeds. These fruits will add a different sweetness and tartness to the dish.
  • Vinegar Choices: If you want a milder flavor, consider using red wine vinegar or apple cider vinegar. Both will still provide a nice tang without overpowering the beef.
  • Herbs and Spices: Add fresh herbs like thyme or sage to the marinade for an aromatic touch. You can also include spices like paprika or cumin for a hint of warmth.
  • Sweeteners: For a different sweetness, try maple syrup or agave nectar instead of brown sugar. These alternatives can add a unique flavor profile to the sauce.

Cranberry Balsamic Roast Beef Recipe to suit your taste preferences or to use what you have on hand. Feel free to get creative!

Cooking Methods for Cranberry Balsamic Roast Beef

While roasting is a fantastic way to prepare this dish, there are other cooking methods you can try:

  • Slow Cooker: For a hands-off approach, use a slow cooker. After searing the beef, place it in the slow cooker with the marinade. Cook on low for 6-8 hours or on high for 3-4 hours until tender.
  • Instant Pot: If you’re short on time, the Instant Pot is a great option. Sear the beef using the sauté function, then add the marinade. Cook on high pressure for about 60 minutes, followed by a natural release.
  • Grilling: For a smoky flavor, consider grilling the beef. Marinate as usual, then grill over medium heat until the desired doneness is reached. This method adds a delicious char to the meat.

Cranberry Balsamic Roast Beef Recipe. Choose the one that best fits your schedule and taste preferences!

Cooking Note for Cranberry Balsamic Roast Beef Recipe

Cranberry Balsamic Roast Beef Recipe, there are a few important cooking notes to keep in mind. These tips will help ensure that your roast turns out perfectly every time, making your cooking experience enjoyable and stress-free.

First, always choose a good quality cut of beef. Chuck and round roasts are excellent choices because they become tender and flavorful when cooked slowly. If you opt for a different cut, be aware that cooking times may vary. Always check the internal temperature with a meat thermometer to ensure it reaches your desired doneness.

Next, marinating the beef is crucial. The longer you let it sit in the marinade, the more flavor it will absorb. If you have time, marinate overnight for the best results. However, even a quick one-hour marinade will still enhance the taste significantly.

When searing the beef, make sure your skillet is hot enough. This step is essential for creating a nice crust that locks in the juices. If the skillet isn’t hot, the meat may steam instead of sear, resulting in a less flavorful roast.

During roasting, keep the skillet covered. This helps to trap moisture and allows the beef to cook evenly. If you notice the sauce thickening too much, you can add a splash of beef broth or water to keep it from drying out.

Lastly, don’t skip the resting period after roasting. Allowing the beef to rest for 15-20 minutes is vital. This step ensures that the juices redistribute throughout the meat, making each slice juicy and tender. Cutting too soon can lead to a dry roast, which is something we want to avoid!

Cranberry Balsamic Roast Beef Recipe. Enjoy the process and the delicious results!

Serving Suggestions for Cranberry Balsamic Roast Beef Recipe

Cranberry Balsamic Roast Beef Recipe, it’s time to think about how to serve it. The right side dishes can elevate your meal, making it even more enjoyable. Let’s explore some ideal pairings and creative ways to use leftovers!

Ideal Side Dishes to Pair with Roast Beef

Choosing the right side dishes can enhance the flavors of your roast beef. Here are some delicious options:

  • Mashed Potatoes: Creamy mashed potatoes are a classic pairing. Their smooth texture complements the tender beef and absorbs the flavorful cranberry sauce.
  • Roasted Vegetables: A mix of seasonal vegetables like carrots, Brussels sprouts, and sweet potatoes adds color and nutrition to your plate. Roasting brings out their natural sweetness, which pairs well with the tangy sauce.
  • Green Beans Almondine: Sautéed green beans with toasted almonds provide a crunchy contrast to the soft roast. The freshness of the green beans balances the richness of the beef.
  • Quinoa Salad: For a lighter option, serve a quinoa salad with fresh herbs, cherry tomatoes, and a lemon vinaigrette. This adds a refreshing touch to your meal.
  • Garlic Bread: A side of warm garlic bread is perfect for soaking up the delicious cranberry sauce. It’s a simple yet satisfying addition.

Cranberry Balsamic Roast Beef but also create a well-rounded meal that everyone will love.

Creative Ways to Serve Leftovers

Leftovers from your roast beef can be just as exciting as the main meal! Here are some creative ideas to use up any extra beef:

  • Beef Sandwiches: Thinly slice the leftover roast and layer it on a crusty roll with some fresh greens and a drizzle of the cranberry sauce. This makes for a delicious sandwich that’s perfect for lunch.
  • Beef Tacos: Shred the leftover beef and use it as a filling for tacos. Top with avocado, salsa, and cheese for a fun twist on traditional tacos.
  • Stir-Fry: Cut the beef into bite-sized pieces and toss it in a stir-fry with your favorite vegetables. Add some soy sauce and serve it over rice for a quick dinner.
  • Beef and Cranberry Salad: Chop the leftover beef and mix it into a salad with mixed greens, walnuts, and feta cheese. Drizzle with a balsamic vinaigrette for a refreshing meal.
  • Beef Pot Pie: Use the leftover beef to create a comforting pot pie. Combine it with vegetables and gravy, then top with a flaky crust for a hearty dish.

Cranberry Balsamic Roast Beef Recipe in new and exciting ways. Don’t let any leftovers go to waste—get creative and savor every bite!

Tips for Perfecting Your Cranberry Balsamic Roast Beef Recipe

Cranberry Balsamic Roast Beef Recipe turns out perfectly every time, consider these helpful tips. Each suggestion is designed to enhance the flavor and texture of your roast, making your cooking experience enjoyable and successful.

First, always start with a quality cut of beef. Chuck and round roasts are excellent choices because they become tender and flavorful when cooked slowly. If you choose a different cut, be mindful that cooking times may vary. Always check the internal temperature with a meat thermometer to ensure it reaches your desired doneness.

Next, marinating the beef is crucial. The longer you let it sit in the marinade, the more flavor it will absorb. If you have time, marinate overnight for the best results. However, even a quick one-hour marinade will still enhance the taste significantly.

When searing the beef, make sure your skillet is hot enough. This step is essential for creating a nice crust that locks in the juices. If the skillet isn’t hot, the meat may steam instead of sear, resulting in a less flavorful roast.

During roasting, keep the skillet covered. This helps to trap moisture and allows the beef to cook evenly. If you notice the sauce thickening too much, you can add a splash of beef broth or water to keep it from drying out.

Lastly, don’t skip the resting period after roasting. Allowing the beef to rest for 15-20 minutes is vital. This step ensures that the juices redistribute throughout the meat, making each slice juicy and tender. Cutting too soon can lead to a dry roast, which is something we want to avoid!

Cranberry Balsamic Roast Beef Recipe. Enjoy the process and the delicious results!

Breakdown of Time for Cranberry Balsamic Roast Beef Recipe

Cranberry Balsamic Roast Beef Recipe is essential for planning your meal. Here’s a detailed breakdown of the time you’ll need for preparation and cooking. This will help you manage your schedule and ensure everything is ready when you want to serve your delicious roast.

Prep Time

The prep time for this recipe is approximately 15 to 20 minutes. This includes gathering your ingredients, trimming the beef, and making the marinade. If you choose to marinate the beef for a longer period, you should factor in additional time. For the best flavor, marinating overnight is recommended, but even a quick one-hour marinade will enhance the taste significantly.

Cooking Time

Cranberry Balsamic Roast Beef Recipe is about 2 to 2.5 hours. This includes the time spent searing the beef and roasting it in the oven. The key is to ensure that the internal temperature reaches 135°F (57°C) for medium-rare. If you prefer your beef more well-done, you may need to adjust the cooking time accordingly.

Total Time

When you combine the prep time and cooking time, the total time for this recipe can range from 2 hours and 15 minutes to over 24 hours if you include marinating overnight. Here’s a quick summary:

  • Prep Time: 15-20 minutes
  • Cooking Time: 2 to 2.5 hours
  • Total Time: 2 hours and 15 minutes to 24 hours (including marinating)

Cranberry Balsamic Roast Beef with confidence!

Nutritional Information for Cranberry Balsamic Roast Beef Recipe

Cranberry Balsamic Roast Beef Recipe not only offers delicious flavors but also provides valuable nutrients. Here’s a breakdown of the nutritional information per serving, so you can enjoy this dish while being mindful of your dietary needs.

Calories

Cranberry Balsamic Roast Beef contains approximately 350 calories. This makes it a hearty option for dinner, providing enough energy to keep you satisfied without being overly heavy. The combination of beef and cranberries contributes to this calorie count, ensuring a fulfilling meal.

Protein Content

One of the standout features of this roast beef recipe is its protein content. Each serving provides about 30 grams of protein. This high protein level is beneficial for muscle repair and growth, making it an excellent choice for those looking to maintain or build muscle mass. Plus, protein helps keep you feeling full longer, which can aid in weight management.

Sodium Levels

When it comes to sodium, each serving contains around 600 milligrams. While this is a reasonable amount for a savory dish, it’s important to be mindful of your overall sodium intake throughout the day. If you’re watching your sodium levels, consider using low-sodium beef broth and adjusting the salt in the marinade to suit your dietary needs.

Cranberry Balsamic Roast Beef Recipe is not only delicious but also packed with essential nutrients. With a good balance of calories, protein, and sodium, it can fit well into a healthy meal plan. Enjoy this flavorful dish while being aware of its nutritional benefits!

FAQs about Cranberry Balsamic Roast Beef Recipe

Can I use a different cut of beef for this recipe?

Absolutely! While chuck and round roasts are recommended for their tenderness and flavor, you can use other cuts of beef. Options like brisket or sirloin can work well too. Just keep in mind that different cuts may require adjustments in cooking time. Always check the internal temperature to ensure your beef is cooked to your liking.

How long should I marinate the beef?

For the best flavor, marinate the beef for at least 1 hour. However, if you have the time, letting it sit overnight in the refrigerator will enhance the taste even more. The longer the beef marinates, the more it absorbs the delicious flavors of the cranberry balsamic mixture. Just be sure not to exceed 24 hours, as the meat can become too soft.

What can I substitute for balsamic vinegar?

If you don’t have balsamic vinegar on hand, there are several substitutes you can use. Red wine vinegar or apple cider vinegar can provide a similar tangy flavor. You can also mix equal parts of red wine vinegar with a bit of honey or sugar to mimic the sweetness of balsamic vinegar. Just remember that the flavor may vary slightly, but it will still be delicious!

Can I make this recipe in a slow cooker?

Cranberry Balsamic Roast Beef Recipe in a slow cooker! After searing the beef, place it in the slow cooker with the marinade. Cook on low for 6-8 hours or on high for 3-4 hours. This method allows the beef to become incredibly tender and flavorful, making it a great option for busy days!

Conclusion on Cranberry Balsamic Roast Beef Recipe

Cranberry Balsamic Roast Beef Recipe is a delightful dish that brings together rich flavors and tender meat. It’s perfect for any occasion, whether you’re hosting a holiday gathering or enjoying a cozy family dinner. The combination of fresh cranberries and balsamic vinegar creates a unique sauce that elevates the beef, making each bite a flavorful experience.

By following the step-by-step preparation guide, you can easily create this mouthwatering roast. Remember to take your time with marinating and searing the beef, as these steps are crucial for achieving the best flavor and texture. Additionally, don’t hesitate to experiment with variations and side dishes to make the meal your own.

As you serve this dish, your guests will be impressed by the beautiful presentation and the delicious aroma wafting through your home. The vibrant colors of the cranberries against the rich beef will make for a stunning centerpiece on your dining table.

Cranberry Balsamic Roast Beef Recipe. With its delightful taste and impressive appearance, this dish is sure to become a cherished favorite in your household. Happy cooking!

Crispy Oven-Baked Chicken Cutlets Recipe is a delight!

Introduction to Crispy Oven-Baked Chicken Cutlets Recipe

Welcome to the delightful world of crispy oven-baked chicken cutlets! This recipe is not just about cooking; it’s about creating a meal that brings joy to your table. Whether you’re preparing a family dinner or hosting friends, these chicken cutlets are sure to impress. They are crispy on the outside and tender on the inside, making them a favorite for both kids and adults alike.

What Makes This Recipe Special?

What sets this crispy oven-baked chicken cutlets recipe apart is its simplicity and flavor. The combination of seasoned breadcrumbs and spices creates a crunchy coating that enhances the chicken’s natural taste. Plus, the use of the oven instead of frying means you can enjoy a healthier version of this classic dish without sacrificing flavor. The optional addition of Parmesan cheese adds a rich, savory note that elevates the dish even further.

Benefits of Oven-Baking Chicken Cutlets

Oven-baking chicken cutlets offers several benefits. First, it significantly reduces the amount of oil needed, making it a healthier choice. This method also allows for even cooking, ensuring that each cutlet is perfectly golden brown. Additionally, baking is a hands-off cooking method, giving you time to prepare side dishes or relax while your meal cooks. Finally, oven-baked chicken cutlets are less messy than frying, making cleanup a breeze!

Ingredients for Crispy Oven-Baked Chicken Cutlets Recipe

To create the perfect crispy oven-baked chicken cutlets, you’ll need a few simple ingredients. Each component plays a vital role in achieving that delightful crunch and flavor. Here’s what you’ll need:

  • 1 pound boneless, skinless chicken breasts: This is the star of the dish. Choose fresh chicken for the best taste.
  • 1 cup all-purpose flour: This helps create a base layer that allows the egg and breadcrumbs to stick.
  • 2 large eggs: Beaten eggs act as a binding agent, ensuring the breadcrumbs adhere well to the chicken.
  • 1 cup breadcrumbs: Preferably seasoned, these provide the crispy coating. You can use panko for extra crunch!
  • 1 teaspoon garlic powder: This adds a wonderful flavor that complements the chicken.
  • 1 teaspoon onion powder: Another layer of flavor that enhances the overall taste.
  • 1 teaspoon paprika: This gives a subtle smokiness and a beautiful color to the cutlets.
  • 1 teaspoon salt: Essential for seasoning the chicken and enhancing its natural flavors.
  • 1/2 teaspoon black pepper: Adds a hint of spice to the dish.
  • 1/4 cup grated Parmesan cheese (optional): For those who love cheese, this adds a rich, savory touch.
  • Cooking spray or olive oil: A light spray or drizzle helps achieve that golden, crispy finish.

Gather these ingredients, and you’re ready to embark on your cooking adventure! Each item contributes to the deliciousness of the crispy oven-baked chicken cutlets, making them a meal everyone will love.

Step-by-Step Preparation of Crispy Oven-Baked Chicken Cutlets Recipe

Now that you have all your ingredients ready, it’s time to dive into the step-by-step preparation of your crispy oven-baked chicken cutlets. Following these simple steps will ensure that your cutlets turn out perfectly every time!

Step 1: Preparing the Chicken

Start by preparing the chicken breasts. First, rinse them under cold water and pat them dry with paper towels. This helps remove any excess moisture. Next, slice the chicken breasts into thin cutlets, about 1/2 inch thick. If you find the chicken is uneven, place it between two pieces of plastic wrap. Then, gently pound it with a meat mallet or rolling pin until it’s an even thickness. This step ensures that the chicken cooks evenly and stays juicy.

Step 2: Setting Up the Breading Station

Creating a breading station is essential for a smooth cooking process. You’ll need three shallow dishes. In the first dish, add the all-purpose flour. In the second dish, beat the two large eggs until they are well mixed. In the third dish, combine the breadcrumbs, garlic powder, onion powder, paprika, salt, pepper, and optional Parmesan cheese. Mixing these ingredients together will ensure that every bite is packed with flavor!

Step 3: Breading the Chicken Cutlets

Now comes the fun part—bread the chicken cutlets! Take one cutlet and dredge it in the flour, making sure to shake off any excess. This flour layer helps the egg stick. Next, dip the cutlet into the beaten eggs, allowing any extra egg to drip off. Finally, coat the cutlet in the breadcrumb mixture, pressing gently to ensure it adheres well. Repeat this process for all the cutlets, placing them on the prepared baking sheet as you go.

Step 4: Baking the Chicken Cutlets

With all your cutlets breaded, it’s time to bake! Preheat your oven to 400°F if you haven’t already. Place the baking sheet in the oven and bake the chicken cutlets for 20-25 minutes. Remember to flip them halfway through the cooking time. This helps them cook evenly and achieve that golden-brown color. The aroma of the baking chicken will fill your kitchen, making it hard to wait!

Step 5: Checking for Doneness

After 20-25 minutes, it’s time to check if your chicken cutlets are done. The internal temperature should reach 165°F for safe consumption. You can use a meat thermometer for accuracy. If you don’t have one, cut into a cutlet to ensure it’s no longer pink inside. Once they’re cooked through, remove the cutlets from the oven and let them rest for a few minutes. This resting time allows the juices to redistribute, making your cutlets even more delicious!

Variations of Crispy Oven-Baked Chicken Cutlets Recipe

While the classic crispy oven-baked chicken cutlets are delicious on their own, there are many ways to add a twist to this recipe. Whether you want to experiment with different flavors or cater to dietary needs, these variations will keep your meals exciting!

Flavor Variations

Adding different flavors to your chicken cutlets can elevate the dish to new heights. Here are some tasty ideas:

  • Italian Style: Mix in Italian seasoning or dried herbs like oregano and basil into the breadcrumb mixture. This will give your cutlets a delightful Mediterranean flair.
  • Spicy Kick: For those who love heat, add cayenne pepper or crushed red pepper flakes to the breadcrumb mixture. This will give your cutlets a spicy crunch!
  • Herb-Infused: Fresh herbs like parsley, thyme, or rosemary can be finely chopped and mixed into the breadcrumbs. This adds a fresh, vibrant flavor to your cutlets.
  • Cheesy Goodness: Besides Parmesan, try adding shredded mozzarella or cheddar cheese to the breadcrumb mixture. This will create a gooey, cheesy layer that’s hard to resist.

Gluten-Free Options

If you or someone you know is gluten-sensitive, you can still enjoy crispy oven-baked chicken cutlets! Here are some gluten-free alternatives:

  • Gluten-Free Breadcrumbs: Use gluten-free breadcrumbs made from rice, corn, or other gluten-free grains. They work just as well for that crispy coating.
  • Almond Flour: For a nutty flavor, substitute the all-purpose flour with almond flour. This adds a unique taste and keeps the cutlets gluten-free.
  • Chickpea Flour: Another great option is chickpea flour, which is high in protein and gives a lovely texture to the cutlets.

These variations not only cater to different tastes but also ensure that everyone can enjoy a delicious meal. Feel free to mix and match these ideas to create your perfect crispy oven-baked chicken cutlets!

Cooking Note for Crispy Oven-Baked Chicken Cutlets Recipe

When preparing crispy oven-baked chicken cutlets, a few cooking notes can help you achieve the best results. These tips will ensure that your cutlets are not only delicious but also perfectly cooked every time.

First, always start with fresh chicken. Fresh chicken breasts yield the best flavor and texture. If you use frozen chicken, make sure to thaw it completely before cooking. This helps in even cooking and prevents the cutlets from becoming rubbery.

Next, pay attention to the thickness of your cutlets. Uniform thickness is key to even cooking. If some pieces are thicker than others, they may not cook at the same rate. Using a meat mallet to pound the chicken to an even thickness can help solve this issue.

Another important note is to avoid overcrowding the baking sheet. If the cutlets are too close together, they may steam instead of bake, resulting in a less crispy texture. Make sure to leave space between each cutlet for proper air circulation.

Additionally, consider using a wire rack on top of your baking sheet. This allows hot air to circulate around the cutlets, promoting even cooking and crispiness on all sides. If you don’t have a wire rack, just ensure that you flip the cutlets halfway through baking for even browning.

Lastly, let the cutlets rest for a few minutes after baking. This resting period allows the juices to redistribute, making the chicken more tender and flavorful. Cutting into the cutlets too soon can cause the juices to run out, leading to dry chicken.

By following these cooking notes, you’ll be well on your way to creating perfectly crispy oven-baked chicken cutlets that everyone will love!

Serving Suggestions for Crispy Oven-Baked Chicken Cutlets Recipe

Now that you’ve prepared your delicious crispy oven-baked chicken cutlets, it’s time to think about how to serve them! Pairing your cutlets with the right side dishes and sauces can elevate your meal to a whole new level. Here are some fantastic serving suggestions to consider.

Side Dishes to Pair

Choosing the right side dishes can complement the flavors of your chicken cutlets beautifully. Here are some tasty options:

  • Fresh Salad: A crisp garden salad with mixed greens, cherry tomatoes, and cucumbers adds a refreshing touch. Drizzle with a light vinaigrette for extra flavor.
  • Roasted Vegetables: Oven-roasted vegetables like carrots, zucchini, and bell peppers make a colorful and nutritious side. Toss them with olive oil and your favorite herbs before roasting.
  • Mashed Potatoes: Creamy mashed potatoes are a classic pairing. They provide a comforting contrast to the crispy cutlets.
  • Rice Pilaf: Fluffy rice pilaf with herbs and spices can be a delightful side. It’s light and complements the chicken well.
  • Pasta Salad: A cold pasta salad with veggies and a tangy dressing can be a great side dish, especially for summer meals.

Sauces and Dips

Adding a delicious sauce or dip can enhance the flavor of your crispy oven-baked chicken cutlets. Here are some popular options:

  • Honey Mustard Sauce: A sweet and tangy honey mustard sauce pairs perfectly with the crispy cutlets. It’s easy to make by mixing equal parts honey and mustard.
  • Ranch Dressing: Creamy ranch dressing is a favorite for dipping. Its coolness balances the warmth of the chicken.
  • Marinara Sauce: For an Italian twist, serve your cutlets with warm marinara sauce. It’s great for dipping or drizzling over the cutlets.
  • Barbecue Sauce: A smoky barbecue sauce adds a bold flavor. It’s perfect for those who enjoy a bit of sweetness with their chicken.
  • Lemon Garlic Aioli: A zesty lemon garlic aioli can add a gourmet touch. Simply mix mayonnaise with minced garlic, lemon juice, and a pinch of salt.

With these side dishes and sauces, your crispy oven-baked chicken cutlets will be a hit at any meal. Enjoy experimenting with different combinations to find your favorite pairings!

Tips for Perfect Crispy Oven-Baked Chicken Cutlets Recipe

To ensure your crispy oven-baked chicken cutlets turn out perfectly every time, it’s essential to keep a few tips in mind. These insights will help you avoid common pitfalls and enhance your cooking experience. Let’s dive into some common mistakes to avoid and storage tips to keep your cutlets fresh!

Common Mistakes to Avoid

Even the best recipes can go awry if certain mistakes are made. Here are some common pitfalls to watch out for:

  • Skipping the Pounding Step: Not pounding the chicken to an even thickness can lead to uneven cooking. Always take the time to pound your cutlets for the best results.
  • Overcrowding the Baking Sheet: Placing too many cutlets on the baking sheet can cause them to steam instead of bake. Make sure to leave space between each cutlet for proper air circulation.
  • Not Preheating the Oven: Baking in a cold oven can result in soggy cutlets. Always preheat your oven to the correct temperature before placing the cutlets inside.
  • Skipping the Resting Period: Cutting into the chicken immediately after baking can cause juices to run out, leading to dry cutlets. Allow them to rest for a few minutes before serving.
  • Using Wet Chicken: If the chicken is too wet, the breading may not stick properly. Pat the chicken dry with paper towels before breading.

Storage Tips

Proper storage is key to keeping your crispy oven-baked chicken cutlets fresh and delicious. Here are some helpful storage tips:

  • Refrigeration: Store any leftover cutlets in an airtight container in the refrigerator. They can last for up to 3 days. Make sure they are completely cooled before sealing.
  • Freezing: If you want to keep your cutlets for a longer period, consider freezing them. Place the cooled cutlets in a single layer on a baking sheet and freeze until solid. Then, transfer them to a freezer-safe bag or container. They can be frozen for up to 3 months.
  • Reheating: To reheat, place the cutlets in a preheated oven at 375°F for about 10-15 minutes. This will help restore their crispiness. Avoid using the microwave, as it can make them soggy.
  • Labeling: If you freeze your cutlets, label the container with the date. This will help you keep track of how long they’ve been stored.

By avoiding these common mistakes and following the storage tips, you’ll be well on your way to enjoying perfectly crispy oven-baked chicken cutlets every time!

Breakdown of Time for Crispy Oven-Baked Chicken Cutlets Recipe

Understanding the time needed for each step in the crispy oven-baked chicken cutlets recipe can help you plan your meal better. Here’s a simple breakdown of the time required for preparation and cooking.

Prep Time

The prep time for this recipe is approximately 15-20 minutes. This includes gathering your ingredients, slicing the chicken breasts into cutlets, and setting up your breading station. If you choose to pound the chicken for even thickness, it may take a few extra minutes. However, this step is essential for ensuring that your cutlets cook evenly.

Cooking Time

Once your cutlets are breaded and ready, the cooking time is about 20-25 minutes. Preheat your oven to 400°F before placing the cutlets inside. Remember to flip them halfway through to achieve that perfect golden-brown color. The cooking time may vary slightly depending on your oven, so keep an eye on them as they bake.

Total Time

In total, you can expect the entire process—from prep to serving—to take around 40-50 minutes. This includes both the prep and cooking times. With this efficient timeline, you can have a delicious meal ready in no time, making it perfect for busy weeknights or special occasions!

Nutritional Information for Crispy Oven-Baked Chicken Cutlets Recipe

Understanding the nutritional content of your meals is essential for maintaining a balanced diet. The crispy oven-baked chicken cutlets recipe not only satisfies your taste buds but also provides valuable nutrients. Here’s a breakdown of the nutritional information per serving:

Calories

Each serving of crispy oven-baked chicken cutlets contains approximately 320 calories. This makes it a great option for a filling meal without going overboard on calories. The combination of chicken and breadcrumbs provides a satisfying dish that can fit into various dietary plans.

Protein

One of the standout features of this recipe is its high protein content. Each serving offers about 30 grams of protein. This is beneficial for muscle repair and growth, making it an excellent choice for active individuals or those looking to maintain a healthy lifestyle. The chicken is a lean source of protein, ensuring you get the nutrients you need without excess fat.

Sodium

In terms of sodium, each serving contains around 600 milligrams. While this is a reasonable amount for a flavorful dish, it’s always good to be mindful of your sodium intake, especially if you are watching your salt consumption. You can reduce the sodium content by using low-sodium breadcrumbs or adjusting the amount of added salt in the recipe.

Overall, the crispy oven-baked chicken cutlets recipe is a nutritious option that provides a good balance of calories, protein, and sodium. Enjoy this delicious meal while keeping your health goals in mind!

FAQs about Crispy Oven-Baked Chicken Cutlets Recipe

Can I use chicken breasts instead of cutlets?

Absolutely! You can use whole chicken breasts instead of cutlets. However, it’s important to slice them into thinner pieces for even cooking. Aim for about 1/2 inch thick slices. This ensures that the chicken cooks through properly and remains juicy. If you prefer, you can also pound the chicken breasts to achieve a uniform thickness. This method helps the chicken cook evenly and enhances the tenderness of the meat.

How do I make the cutlets extra crispy?

If you want your crispy oven-baked chicken cutlets to be extra crispy, here are a few tips to consider:

  • Use Panko Breadcrumbs: Panko breadcrumbs are larger and flakier than regular breadcrumbs, providing a crunchier texture.
  • Double Breading: For an even thicker crust, try double breading your cutlets. After the first coating, dip them back into the egg and then into the breadcrumbs again.
  • Use a Wire Rack: Placing the cutlets on a wire rack while baking allows hot air to circulate around them, promoting even crispiness.
  • Spray with Oil: Lightly spray the tops of the cutlets with cooking spray or drizzle with olive oil before baking. This helps achieve that golden-brown finish.
  • Broil at the End: For an extra crispy top, switch to broil for the last 2-3 minutes of cooking. Just keep a close eye to prevent burning!

Can I freeze the chicken cutlets?

Yes, you can freeze the chicken cutlets! To do this, allow the cooked cutlets to cool completely. Then, place them in a single layer on a baking sheet and freeze until solid. Once frozen, transfer them to a freezer-safe bag or container. They can be stored in the freezer for up to 3 months. When you’re ready to enjoy them, simply reheat in a preheated oven at 375°F for about 10-15 minutes. This method helps maintain their crispy texture while ensuring they are heated through.

Conclusion on Crispy Oven-Baked Chicken Cutlets Recipe

In conclusion, the crispy oven-baked chicken cutlets recipe is a fantastic addition to any meal plan. Not only is it simple to prepare, but it also delivers a delightful combination of flavors and textures that everyone will love. The crispy exterior, paired with the tender chicken inside, creates a satisfying dish that can be enjoyed by both kids and adults alike.

By following the steps outlined in this article, you can easily create a delicious meal that is both healthy and flavorful. The versatility of this recipe allows you to experiment with different flavors and variations, ensuring that you never get bored. Whether you choose to serve it with a fresh salad, roasted vegetables, or your favorite dipping sauce, these chicken cutlets are sure to impress.

Remember, cooking is all about creativity and enjoyment. Don’t hesitate to make this recipe your own by adding your favorite spices or ingredients. With a little practice, you’ll master the art of making crispy oven-baked chicken cutlets that will become a staple in your kitchen.

So, gather your ingredients, preheat your oven, and get ready to enjoy a delicious meal that is sure to bring smiles to the table. Happy cooking!

Baked Chicken Legs with Rice is a family favorite dish.

Introduction to Baked Chicken Legs with Rice

Baked Chicken Legs with Rice is a delightful dish that brings comfort and flavor to your dinner table. This recipe combines juicy chicken legs with fluffy rice, creating a satisfying meal that is both easy to prepare and delicious. Whether you’re cooking for your family or hosting friends, this dish is sure to impress.

The beauty of Baked Chicken Legs with Rice lies in its simplicity. With just a few ingredients, you can create a hearty meal that is packed with flavor. The chicken legs are seasoned to perfection, while the rice absorbs all the savory goodness from the chicken broth and spices. Plus, it’s a one-pan wonder, making cleanup a breeze!

This dish is not only tasty but also versatile. You can easily customize it with different seasonings or add vegetables to suit your taste. Whether you prefer a mild flavor or a spicy kick, Baked Chicken Legs with Rice can be adapted to meet your preferences. It’s a great way to enjoy a wholesome meal without spending hours in the kitchen.

In this article, we will guide you through the ingredients, preparation steps, and tips for making the perfect Baked Chicken Legs with Rice. So, roll up your sleeves and get ready to create a dish that will become a family favorite!

Ingredients for Baked Chicken Legs with Rice

To create a delicious Baked Chicken Legs with Rice, you will need a few key ingredients. Each component plays a vital role in building flavor and texture. Here’s what you’ll need:

  • 3 pounds chicken legs: Choose skin-on and bone-in for the best flavor and juiciness.
  • 2 cups long-grain white rice: This type of rice cooks well and absorbs the flavors beautifully.
  • 4 cups chicken broth: Use low-sodium broth for a healthier option, or homemade for extra richness.
  • 1 medium onion: Diced, it adds sweetness and depth to the dish.
  • 4 cloves garlic: Minced, garlic brings a wonderful aroma and flavor.
  • 1 teaspoon paprika: This spice adds a mild smokiness and vibrant color.
  • 1 teaspoon dried thyme: Thyme complements the chicken and enhances the overall taste.
  • 1 teaspoon salt: Essential for seasoning the dish properly.
  • ½ teaspoon black pepper: Adds a subtle heat and flavor.
  • 2 tablespoons olive oil: Used for sautéing the onion and garlic, it adds richness.
  • 1 cup frozen peas: These add a pop of color and sweetness to the dish.
  • Fresh parsley: Chopped, for garnish and a fresh finish.

Feel free to adjust the quantities based on your preferences or dietary needs. For instance, if you want a spicier kick, consider adding cayenne pepper. This recipe is flexible, allowing you to make it your own!

Preparation of Baked Chicken Legs with Rice

Now that you have gathered all the ingredients, it’s time to prepare your Baked Chicken Legs with Rice. This section will guide you through each step, ensuring that your dish turns out perfectly. Let’s get started!

Step 1: Preheat the Oven

First things first, preheat your oven to 375°F (190°C). This step is crucial as it ensures that your chicken legs cook evenly and thoroughly. While the oven heats up, you can move on to the next steps without wasting any time.

Step 2: Prepare the Chicken Legs

Next, take your chicken legs and pat them dry with paper towels. This helps the skin get crispy when baked. In a large oven-safe skillet or Dutch oven, heat 2 tablespoons of olive oil over medium heat. Once the oil is hot, add the chicken legs, skin side down. Sear them for about 5 minutes until they are golden brown. This step adds flavor and texture to the chicken. After searing, remove the chicken legs and set them aside.

Step 3: Season the Rice

In the same skillet, add the diced onion and cook for about 3-4 minutes until softened. Stir in the minced garlic and cook for an additional minute. Then, add the 2 cups of long-grain white rice to the skillet. Stir it well to coat the rice in the oil and onion mixture. Toast the rice for 2-3 minutes, allowing it to absorb the flavors. This step enhances the taste of the rice, making it even more delicious.

Step 4: Combine Chicken and Rice

Now, it’s time to bring everything together. Pour in 4 cups of chicken broth and add the paprika, dried thyme, salt, and black pepper. Stir to combine all the ingredients. Nestle the seared chicken legs back into the rice mixture, skin side up. Make sure they are evenly spaced to ensure even cooking.

Step 5: Bake the Dish

Cover the skillet or Dutch oven with a lid or aluminum foil. Carefully transfer it to the preheated oven and bake for 45 minutes. After this time, remove the cover and sprinkle 1 cup of frozen peas over the chicken and rice. Return the dish to the oven and bake uncovered for an additional 15-20 minutes. This will allow the chicken skin to become crispy and the rice to absorb all the delicious flavors.

Once the chicken is cooked through and the skin is golden brown, remove the dish from the oven. Let it rest for 5 minutes before serving. Garnish with chopped parsley for a fresh touch. Enjoy your delightful Baked Chicken Legs with Rice!

Variation of Baked Chicken Legs with Rice

While the classic recipe for Baked Chicken Legs with Rice is delicious on its own, there are many ways to switch things up! By experimenting with different seasonings and rice options, you can create a unique dish that suits your taste. Let’s explore some exciting variations!

Different Seasonings and Marinades

One of the easiest ways to change the flavor profile of your Baked Chicken Legs with Rice is by using different seasonings and marinades. Here are a few ideas:

  • Herb Blend: Instead of thyme, try using rosemary or oregano. These herbs add a fragrant touch that pairs well with chicken.
  • Citrus Marinade: Marinate the chicken legs in a mixture of lemon juice, olive oil, and garlic for a zesty flavor. This brightens up the dish!
  • Spicy Kick: For those who love heat, add cayenne pepper or chili powder to the rice mixture. This will give your dish a fiery twist.
  • Asian-Inspired: Use soy sauce, ginger, and sesame oil for a different flavor. You can also add some chopped green onions for freshness.

Feel free to mix and match these ideas! The key is to find a combination that you and your family will enjoy. Remember, the marinade can be applied to the chicken legs a few hours before cooking for deeper flavor.

Alternative Rice Options

While long-grain white rice is a classic choice, there are many other rice varieties you can use to enhance your Baked Chicken Legs with Rice. Here are some alternatives:

  • Brown Rice: This whole grain option is healthier and adds a nutty flavor. Just remember to increase the cooking time and liquid, as brown rice takes longer to cook.
  • Wild Rice: A mix of wild and white rice can add a unique texture and earthy flavor. It’s also packed with nutrients!
  • Jasmine Rice: This fragrant rice adds a lovely aroma and slightly sticky texture, making it a delightful choice for this dish.
  • Quinoa: For a gluten-free option, consider using quinoa. It cooks quickly and adds a protein boost to your meal.

By trying out these alternative rice options, you can create a dish that is not only delicious but also tailored to your dietary preferences. Enjoy the process of experimenting and discovering new flavors!

Cooking Note for Baked Chicken Legs with Rice

When preparing Baked Chicken Legs with Rice, there are a few important cooking notes to keep in mind. These tips will help ensure that your dish turns out perfectly every time. Let’s dive into some key points to consider!

First, always check the freshness of your chicken legs. Fresh chicken will yield the best flavor and texture. If you’re using frozen chicken, make sure to thaw it completely before cooking. This helps the chicken cook evenly and prevents any rubbery texture.

Next, the size of your chicken legs can affect cooking time. Larger legs may require a bit more time in the oven, while smaller ones may cook faster. To ensure that your chicken is fully cooked, use a meat thermometer. The internal temperature should reach 165°F (75°C) for safe consumption.

Another important note is to avoid overcrowding the pan. If your skillet or Dutch oven is too crowded, the chicken legs may not brown properly. This can lead to a less crispy skin. If needed, consider using two pans or cooking in batches.

Additionally, let the dish rest after baking. Allowing it to sit for about 5 minutes before serving helps the flavors meld together and makes it easier to serve. This resting period also allows the juices to redistribute, keeping the chicken moist.

Lastly, feel free to customize the cooking process. If you prefer a more pronounced flavor, consider marinating the chicken legs overnight. This extra step can enhance the taste and make your dish even more delicious.

By keeping these cooking notes in mind, you’ll be well on your way to creating a mouthwatering Baked Chicken Legs with Rice that your family and friends will love!

Serving Suggestions for Baked Chicken Legs with Rice

Once your Baked Chicken Legs with Rice is ready, it’s time to think about how to serve this delightful dish. The way you present your meal can enhance the dining experience and make it even more enjoyable. Here are some serving suggestions to consider:

  • Fresh Salad: Pair your chicken and rice with a light, fresh salad. A simple green salad with mixed greens, cherry tomatoes, and a vinaigrette dressing complements the richness of the chicken.
  • Steamed Vegetables: Serve with a side of steamed vegetables like broccoli, carrots, or green beans. This adds color and nutrition to your plate.
  • Garlic Bread: For a comforting touch, consider serving garlic bread on the side. The buttery, garlicky flavor pairs wonderfully with the savory chicken and rice.
  • Coleslaw: A crunchy coleslaw can provide a refreshing contrast to the warm, hearty dish. The tangy dressing will balance the flavors nicely.
  • Fruit Chutney: For a unique twist, serve a fruit chutney alongside. The sweetness of the chutney can enhance the savory notes of the chicken.

When serving, don’t forget to garnish your dish with freshly chopped parsley. This adds a pop of color and a hint of freshness. You can also sprinkle some lemon zest for an extra zing!

Lastly, consider the dining atmosphere. Set the table with care, perhaps adding candles or flowers for a special touch. Enjoying your meal in a pleasant environment can make the experience even more memorable.

With these serving suggestions, your Baked Chicken Legs with Rice will not only taste amazing but also look appealing on the table. Happy dining!

Tips for Perfect Baked Chicken Legs with Rice

To achieve the best results with your Baked Chicken Legs with Rice, consider these helpful tips. They will guide you in creating a dish that is not only delicious but also visually appealing. Let’s explore some essential tips for perfecting this recipe!

First, always season your chicken legs generously. A good seasoning mix enhances the flavor of the chicken and the rice. Don’t be shy with the salt and spices; they are key to a tasty dish. You can also rub the seasoning directly under the skin for deeper flavor.

Next, ensure that your chicken legs are at room temperature before cooking. This helps them cook evenly. If they are cold from the fridge, they may take longer to cook, leading to uneven results.

Another important tip is to use a meat thermometer. This tool is invaluable for checking the doneness of your chicken. Insert it into the thickest part of the leg, avoiding the bone. The internal temperature should reach 165°F (75°C) for safe consumption.

Additionally, consider adding a splash of lemon juice or vinegar to the rice mixture. This acidity brightens the flavors and balances the richness of the chicken. It’s a simple trick that can elevate your dish!

When baking, avoid opening the oven door too often. Each time you do, heat escapes, which can affect cooking time. Instead, trust the process and check the chicken only when necessary.

Lastly, let your dish rest after baking. This resting period allows the juices to redistribute throughout the chicken, making it more tender and juicy. It also gives the rice a chance to absorb any remaining liquid, enhancing its flavor.

By following these tips, you’ll be well on your way to creating a mouthwatering Baked Chicken Legs with Rice that your family will love. Enjoy the cooking process and the delicious results!

Breakdown of Time for Baked Chicken Legs with Rice

Understanding the time required for each step in preparing Baked Chicken Legs with Rice is essential for a smooth cooking experience. Here’s a detailed breakdown of the time you’ll need for preparation and cooking.

Prep Time

The prep time for this dish is approximately 15-20 minutes. During this time, you will gather all your ingredients, dice the onion, mince the garlic, and prepare the chicken legs. It’s a good idea to have everything ready before you start cooking. This way, you can move through the steps without any interruptions.

Cooking Time

The cooking time for Baked Chicken Legs with Rice is about 60-65 minutes. This includes:

  • 45 minutes: Baking the chicken legs covered with the rice mixture.
  • 15-20 minutes: Baking uncovered after adding the frozen peas, allowing the chicken skin to crisp up.

Keep in mind that cooking times may vary slightly based on your oven and the size of the chicken legs. Always check for doneness using a meat thermometer.

Total Time

In total, you can expect to spend about 75-85 minutes from start to finish. This includes both prep and cooking time. With this timeline, you can plan your meal accordingly, ensuring that everything is ready when you want to serve it. Enjoy the process and the delicious results of your Baked Chicken Legs with Rice!

Nutritional Information for Baked Chicken Legs with Rice

Understanding the nutritional content of your meals is essential for maintaining a balanced diet. Baked Chicken Legs with Rice is not only delicious but also provides a good mix of nutrients. Here’s a closer look at the nutritional information for this hearty dish.

Calories

Each serving of Baked Chicken Legs with Rice contains approximately 450 calories. This makes it a satisfying meal that can fit into a variety of dietary plans. The calories come from a combination of protein, carbohydrates, and healthy fats, providing energy for your day.

Protein

Protein is a vital nutrient for building and repairing tissues. In this dish, you can expect around 30 grams of protein per serving. The chicken legs are an excellent source of high-quality protein, which is essential for muscle health and overall body function. Including protein in your meals can help keep you feeling full and satisfied.

Sodium

When it comes to sodium, each serving contains about 600 milligrams. This amount can vary based on the type of chicken broth used. If you prefer a lower sodium option, consider using low-sodium chicken broth. Monitoring your sodium intake is important for maintaining healthy blood pressure levels.

Overall, Baked Chicken Legs with Rice is a nutritious meal that offers a good balance of calories, protein, and sodium. By being mindful of the ingredients you choose, you can easily adjust the nutritional content to meet your dietary needs. Enjoy this wholesome dish knowing it’s not only tasty but also good for you!

FAQs about Baked Chicken Legs with Rice

Can I use other types of chicken for this recipe?

Absolutely! While this recipe calls for chicken legs, you can easily substitute them with other cuts. Bone-in chicken thighs or breasts work well too. Just keep in mind that cooking times may vary. Thighs may take a bit longer, while breasts might cook faster. Always check for doneness to ensure your chicken is perfectly cooked.

What can I serve with Baked Chicken Legs with Rice?

There are many delicious options to serve alongside Baked Chicken Legs with Rice. A fresh salad is a great choice, adding a light and crunchy contrast. You can also pair it with steamed vegetables like broccoli or green beans for added nutrition. Garlic bread or coleslaw can enhance the meal, providing different textures and flavors. Feel free to get creative with your sides!

How do I know when the chicken is fully cooked?

The best way to check if your chicken is fully cooked is by using a meat thermometer. Insert it into the thickest part of the chicken leg, avoiding the bone. The internal temperature should reach 165°F (75°C) for safe consumption. If you don’t have a thermometer, you can also check if the juices run clear when you cut into the chicken. If they are pink, it needs more time to cook.

Can I make Baked Chicken Legs with Rice ahead of time?

Yes, you can prepare Baked Chicken Legs with Rice ahead of time! You can assemble the dish and store it in the refrigerator for up to 24 hours before baking. Just cover it tightly with plastic wrap or aluminum foil. When you’re ready to cook, simply bake it as directed, adding a few extra minutes to the cooking time if it’s cold from the fridge. This makes it a convenient option for busy days!

Conclusion on Baked Chicken Legs with Rice

In conclusion, Baked Chicken Legs with Rice is a fantastic dish that combines simplicity with rich flavors. This recipe is not only easy to prepare but also offers a comforting meal that can be enjoyed by everyone at the table. With its juicy chicken legs and fluffy rice, it’s a dish that satisfies both hunger and taste buds.

Throughout this article, we’ve explored various aspects of this delightful recipe, from the essential ingredients to preparation steps and serving suggestions. The versatility of Baked Chicken Legs with Rice allows you to customize it to your liking, whether you prefer different seasonings or alternative rice options. This adaptability makes it a perfect choice for any occasion, whether it’s a family dinner or a gathering with friends.

Moreover, the nutritional benefits of this dish make it a wholesome option for your meals. With a good balance of protein, carbohydrates, and essential nutrients, you can feel good about serving it to your loved ones. Plus, the ease of preparation means you can spend less time in the kitchen and more time enjoying the company of those around you.

So, why not give Baked Chicken Legs with Rice a try? Gather your ingredients, follow the steps, and watch as this dish becomes a new favorite in your household. With its delicious flavors and comforting nature, it’s sure to bring smiles to the dinner table. Happy cooking!

Crispy Air Fryer Chicken Legs Recipe for Perfect Flavor

Introduction to Crispy Air Fryer Chicken Legs Recipe

Crispy Air Fryer Chicken Legs Recipe is here to save the day. This recipe not only delivers mouthwatering flavors but also ensures that your chicken legs come out perfectly crispy every time. With the help of an air fryer, you can enjoy a healthier version of fried chicken without sacrificing taste.

Why Choose Air Fryer for Chicken Legs?

Using an air fryer for chicken legs is a game-changer. First, it cooks the chicken evenly, ensuring that every bite is juicy and tender. The hot air circulation mimics frying, giving you that crispy skin we all love. Plus, air frying requires significantly less oil than traditional frying methods. This means you can indulge in your favorite chicken dish while keeping it healthier. It’s a win-win!

Benefits of Making Crispy Air Fryer Chicken Legs

There are numerous benefits to making crispy air fryer chicken legs. For starters, the cooking time is much shorter compared to oven baking. You can have a delicious meal ready in about 30 minutes! Additionally, air fryers are easy to clean, making post-cooking cleanup a breeze. The result? You get to enjoy a tasty meal without the hassle.

Moreover, air frying locks in moisture, ensuring that your chicken legs remain juicy. The seasoning blends beautifully with the chicken, creating a flavor explosion in every bite. Whether you’re serving it for a family dinner or a casual gathering, crispy air fryer chicken legs are sure to impress. So, let’s dive into the ingredients and get cooking!

Ingredients for Crispy Air Fryer Chicken Legs Recipe

Crispy Air Fryer Chicken Legs Recipe, you’ll need a few simple ingredients. These items are easy to find and will help you achieve that delicious, crispy texture. Here’s what you’ll need:

  • 2 pounds chicken legs (about 8 legs)
  • 2 tablespoons olive oil
  • 1 teaspoon garlic powder
  • 1 teaspoon onion powder
  • 1 teaspoon smoked paprika
  • 1 teaspoon salt
  • ½ teaspoon black pepper
  • ½ teaspoon dried thyme

These ingredients work together to create a flavorful and crispy coating on the chicken legs. The olive oil helps the spices stick while also contributing to that golden-brown finish. The garlic and onion powders add depth to the flavor, while smoked paprika gives a hint of smokiness that elevates the dish.

Feel free to adjust the seasonings to suit your taste. If you love a bit of heat, consider adding cayenne pepper or chili powder. For a zesty twist, lemon zest or a splash of lemon juice can brighten up the flavors. The beauty of this recipe lies in its versatility, allowing you to customize it to your liking!

Step-by-Step Preparation of Crispy Air Fryer Chicken Legs Recipe

Crispy Air Fryer Chicken Legs Recipe. Following these simple steps will ensure that your chicken legs turn out perfectly crispy and flavorful. Let’s get started!

Step 1: Marinating the Chicken Legs

First, marinating the chicken legs is essential for infusing flavor. In a large bowl, combine the olive oil, garlic powder, onion powder, smoked paprika, salt, black pepper, and dried thyme. Mix well until you have a smooth marinade. Next, add the chicken legs to the bowl. Toss them gently until they are evenly coated with the marinade. For best results, let the chicken marinate for at least 30 minutes. If you have time, marinating overnight in the refrigerator will enhance the flavors even more!

Step 2: Preheating the Air Fryer

While the chicken legs are marinating, preheat your air fryer to 400°F. Preheating is crucial as it helps achieve that crispy texture right from the start. Most air fryers take about 3-5 minutes to reach the desired temperature. This step ensures that your chicken legs cook evenly and get that golden-brown finish.

Step 3: Preparing the Chicken Legs for Cooking

After marinating, it’s time to prepare the chicken legs for cooking. Pat the chicken legs dry with paper towels. This step is important because removing excess moisture helps achieve maximum crispiness. Once dried, arrange the chicken legs in a single layer in the air fryer basket. Make sure not to overcrowd the basket, as this can prevent proper air circulation and lead to uneven cooking.

Step 4: Cooking the Chicken Legs in the Air Fryer

Now, it’s time to cook! Place the basket in the preheated air fryer and set the timer for 25-30 minutes. Halfway through the cooking time, flip the chicken legs to ensure they cook evenly on both sides. This will help achieve that perfect crispy skin. If you prefer extra crispiness, you can cook them for an additional 5 minutes at the end. Just keep an eye on them to avoid overcooking!

Step 5: Checking for Doneness

Once the cooking time is up, it’s essential to check for doneness. Use a meat thermometer to ensure the internal temperature of the chicken legs reaches 165°F. This temperature guarantees that the chicken is safe to eat. If they haven’t reached this temperature yet, simply return them to the air fryer for a few more minutes. Once done, remove the chicken legs and let them rest for about 5 minutes before serving. This resting period allows the juices to redistribute, making each bite even more flavorful!

Variation of Crispy Air Fryer Chicken Legs Recipe

Crispy Air Fryer Chicken Legs Recipe is its versatility. You can easily switch up the flavors by trying different marinades and seasonings. This allows you to create a unique dish every time you cook. Let’s explore some exciting variations!

Different Marinades and Seasonings

Experimenting with marinades can take your chicken legs to a whole new level. Here are a few ideas:

  • Cajun Marinade: Mix Cajun seasoning with olive oil, lemon juice, and a touch of honey for a spicy kick.
  • Lemon Pepper Marinade: Combine lemon zest, black pepper, garlic powder, and olive oil for a zesty flavor.
  • Teriyaki Marinade: Use teriyaki sauce, ginger, and garlic for a sweet and savory twist.
  • Herb Marinade: Blend fresh herbs like rosemary, parsley, and basil with olive oil and lemon juice for a fresh taste.

Feel free to mix and match spices to create your own signature blend. The key is to let the chicken legs marinate for at least 30 minutes, or even overnight, to absorb all those delicious flavors.

Cooking Time Adjustments for Different Sizes

When it comes to cooking chicken legs, size matters! If you’re using larger or smaller chicken legs, you may need to adjust the cooking time. Here’s a quick guide:

  • Smaller Chicken Legs: If your chicken legs are on the smaller side, reduce the cooking time by about 5 minutes. Check for doneness at around 20-25 minutes.
  • Larger Chicken Legs: For larger legs, increase the cooking time by 5-10 minutes. Always check the internal temperature to ensure they reach 165°F.

By adjusting the cooking time based on the size of your chicken legs, you can ensure they come out perfectly cooked and crispy every time. Enjoy experimenting with these variations to find your favorite flavor combinations!

Cooking Note for Crispy Air Fryer Chicken Legs Recipe

Crispy Air Fryer Chicken Legs Recipe, there are a few important cooking notes to keep in mind. These tips will help you achieve the best results and ensure your chicken legs are not only crispy but also deliciously flavorful.

First, always preheat your air fryer. This step is crucial for achieving that perfect crispy skin. If you skip this, the chicken may not cook evenly, and you might miss out on that delightful crunch. Remember, a hot air fryer is your best friend!

Next, consider the arrangement of the chicken legs in the air fryer basket. It’s essential to place them in a single layer without overcrowding. This allows the hot air to circulate freely around each piece, ensuring even cooking and crispiness. If you have a lot of chicken legs, it’s better to cook them in batches rather than cramming them all in at once.

Additionally, flipping the chicken legs halfway through cooking is a must. This simple action helps both sides get that golden-brown color and crispy texture. Don’t forget to check the internal temperature with a meat thermometer. It should read 165°F to ensure the chicken is safe to eat.

Lastly, let the chicken legs rest for a few minutes after cooking. This resting period allows the juices to redistribute, making each bite juicy and flavorful. Trust us, this step is worth the wait!

By following these cooking notes, you’ll be well on your way to mastering the art of crispy air fryer chicken legs. Enjoy the process and savor the delicious results!

Serving Suggestions for Crispy Air Fryer Chicken Legs Recipe

Crispy Air Fryer Chicken Legs Recipe, it’s time to think about how to serve them. Pairing your chicken legs with the right side dishes and sauces can elevate your meal to a whole new level. Here are some delightful suggestions to complement your crispy chicken legs!

Side Dishes that Pair Well

Choosing the right side dishes can enhance the overall dining experience. Here are some tasty options that go perfectly with crispy chicken legs:

  • Garlic Mashed Potatoes: Creamy mashed potatoes with a hint of garlic make a comforting side that pairs beautifully with chicken.
  • Coleslaw: A fresh and crunchy coleslaw adds a nice contrast to the crispy chicken, providing a refreshing bite.
  • Roasted Vegetables: Colorful roasted veggies like carrots, bell peppers, and zucchini add nutrition and flavor to your plate.
  • Steamed Broccoli: Lightly steamed broccoli is a healthy option that balances the richness of the chicken.
  • Rice Pilaf: Fluffy rice pilaf with herbs and spices can soak up the delicious juices from the chicken.

Feel free to mix and match these sides based on your preferences. Each option brings its own unique flavor and texture, making your meal even more enjoyable!

Sauces and Dips to Enhance Flavor

To take your crispy chicken legs to the next level, consider serving them with a variety of sauces and dips. Here are some delicious options:

  • Honey Mustard Sauce: A sweet and tangy honey mustard sauce is perfect for dipping and adds a delightful flavor contrast.
  • BBQ Sauce: Smoky BBQ sauce is a classic choice that complements the crispy skin and juicy meat.
  • Ranch Dressing: Creamy ranch dressing is a crowd favorite and pairs well with the savory chicken.
  • Buffalo Sauce: For those who love a kick, spicy buffalo sauce adds heat and excitement to your meal.
  • Garlic Aioli: A rich garlic aioli can elevate the dish with its creamy texture and bold flavor.

These sauces and dips not only enhance the flavor of your crispy air fryer chicken legs but also add a fun element to your meal. Encourage your guests to try different combinations for a unique tasting experience!

Tips for Perfect Crispy Air Fryer Chicken Legs Recipe

Crispy Air Fryer Chicken Legs Recipe, there are a few tips and tricks you can follow. These will help you ensure that your chicken legs come out perfectly crispy and delicious every time. Let’s explore some essential tips!

Ensuring Maximum Crispiness

Getting that perfect crispy texture is all about technique. Here are some key points to keep in mind:

  • Dry the Chicken Legs: Before marinating, pat the chicken legs dry with paper towels. Removing excess moisture is crucial for achieving crispiness.
  • Use Enough Oil: While air frying requires less oil, using a little olive oil helps the spices adhere and promotes browning. Don’t skip this step!
  • Don’t Overcrowd the Basket: Arrange the chicken legs in a single layer. Overcrowding can trap steam and prevent the skin from getting crispy.
  • Flip Halfway Through: Flipping the chicken legs halfway through cooking ensures even crispiness on both sides. This simple step makes a big difference!
  • Cook in Batches if Necessary: If you have a lot of chicken legs, cook them in batches. This allows for better air circulation and crispiness.
  • Let Them Rest: After cooking, let the chicken legs rest for a few minutes. This helps the juices redistribute, making them even more flavorful.

Common Mistakes to Avoid

While making crispy air fryer chicken legs is straightforward, there are some common pitfalls to watch out for. Here are a few mistakes to avoid:

  • Skipping the Preheat: Always preheat your air fryer. Skipping this step can lead to uneven cooking and less crispy skin.
  • Not Checking the Temperature: Use a meat thermometer to check for doneness. Chicken legs should reach an internal temperature of 165°F for safety.
  • Using Too Much Marinade: While flavor is important, using too much marinade can make the chicken soggy. Stick to the recommended amounts.
  • Ignoring Cooking Times: Cooking times can vary based on the size of the chicken legs. Always adjust accordingly and check for doneness.
  • Not Experimenting with Flavors: Don’t be afraid to try different marinades and seasonings. Variety keeps the dish exciting and delicious!

By following these tips and avoiding common mistakes, you’ll be well on your way to mastering the art of crispy air fryer chicken legs. Enjoy the process and savor the delightful results!

Breakdown of Time for Crispy Air Fryer Chicken Legs Recipe

Crispy Air Fryer Chicken Legs Recipe is essential for planning your meal. Here’s a quick breakdown of the time you’ll need for preparation and cooking. This will help you manage your time effectively and ensure everything is ready when you want to serve.

Prep Time

The prep time for this recipe is approximately 10-15 minutes. This includes gathering your ingredients, marinating the chicken legs, and preparing them for cooking. If you choose to marinate the chicken overnight, you can save time on the day of cooking. Just remember to factor in that extra time for maximum flavor!

Cooking Time

Cooking the chicken legs in the air fryer takes about 25-30 minutes. This time may vary slightly depending on the size of the chicken legs and your specific air fryer model. Always check for doneness by ensuring the internal temperature reaches 165°F. If you prefer extra crispiness, you can add an additional 5 minutes to the cooking time.

Total Time

In total, you can expect the entire process to take around 35-45 minutes, including both prep and cooking time. If you marinate the chicken overnight, the total time will be longer, but the hands-on time remains the same. This makes it a quick and easy meal option for busy weeknights or casual gatherings!

Nutritional Information for Crispy Air Fryer Chicken Legs Recipe

Crispy Air Fryer Chicken Legs Recipe not only satisfies your taste buds but also provides valuable nutrients. Here’s a breakdown of the nutritional information per serving, which consists of one chicken leg.

Calories

Each serving of crispy air fryer chicken legs contains approximately 320 calories. This makes it a hearty option for a main dish without overwhelming your daily caloric intake. The combination of protein and healthy fats in this recipe helps keep you feeling full and satisfied.

Protein

Protein is a vital nutrient for building and repairing tissues, and each serving of chicken legs provides about 28 grams of protein. This high protein content makes it an excellent choice for those looking to increase their protein intake, whether for muscle building or overall health.

Sodium

The sodium content in each serving is approximately 600 milligrams. While this is a reasonable amount for a flavorful dish, it’s essential to be mindful of your overall sodium intake throughout the day. If you’re watching your sodium levels, consider using low-sodium seasoning options or adjusting the salt in the recipe.

Crispy Air Fryer Chicken Legs Recipe is a nutritious and delicious meal option. It provides a good balance of calories, protein, and flavor, making it a fantastic choice for any occasion. Enjoy this dish knowing you’re treating yourself to something both tasty and nourishing!

FAQs about Crispy Air Fryer Chicken Legs Recipe

Can I use frozen chicken legs for this recipe?

Crispy Air Fryer Chicken Legs Recipe. However, you will need to adjust the cooking time. Start by cooking the frozen chicken legs for about 10-15 minutes longer than the original cooking time. Make sure to check the internal temperature with a meat thermometer to ensure they reach 165°F. If you prefer, you can also thaw the chicken legs in the refrigerator overnight before cooking for more even results.

How do I store leftovers of crispy air fryer chicken legs?

Storing leftovers is easy! Allow the crispy air fryer chicken legs to cool completely before placing them in an airtight container. You can store them in the refrigerator for up to 3-4 days. If you want to keep them longer, consider freezing them. Wrap each chicken leg in plastic wrap and then place them in a freezer-safe bag. They can be frozen for up to 3 months. When ready to eat, simply reheat in the air fryer for a few minutes to regain that crispy texture!

What can I do if my chicken legs are not crispy enough?

If your chicken legs are not crispy enough, don’t worry! There are a few tricks you can try. First, ensure that you pat the chicken legs dry before marinating. Excess moisture can prevent crispiness. If they are already cooked, you can place them back in the air fryer for an additional 3-5 minutes at 400°F. This will help to crisp up the skin. Lastly, consider using a little more oil in the marinade next time, as this can enhance the crispiness of the skin.

Conclusion on Crispy Air Fryer Chicken Legs Recipe

Crispy Air Fryer Chicken Legs Recipe is a fantastic way to enjoy a classic dish with a modern twist. With its simple ingredients and straightforward preparation, this recipe is perfect for both novice cooks and seasoned chefs alike. The air fryer not only makes the cooking process quicker but also ensures that your chicken legs come out crispy and delicious every time.

By following the steps outlined in this article, you can create a meal that is not only satisfying but also packed with flavor. The versatility of this recipe allows you to experiment with different marinades and seasonings, making it easy to customize to your taste preferences. Whether you’re serving it for a family dinner or a casual gathering with friends, crispy air fryer chicken legs are sure to impress.

Remember to keep the tips in mind for achieving maximum crispiness and avoid common mistakes. With a little practice, you’ll master the art of cooking chicken legs in the air fryer. So, gather your ingredients, fire up your air fryer, and get ready to enjoy a delightful meal that everyone will love!

We hope you enjoy making and sharing this recipe as much as we do. Happy cooking!

Spicy Southwest Salad Recipe is a must-try dish!

Introduction to Spicy Southwest Salad Recipe

Spicy Southwest Salad Recipe is just what you need! This salad is not only colorful but also bursting with flavors that will excite your taste buds. It combines a variety of ingredients that are both nutritious and delicious, making it a perfect choice for lunch or dinner.

What Makes the Spicy Southwest Salad Unique?

What sets the Spicy Southwest Salad apart from other salads? First, it features a delightful mix of textures and flavors. The crisp romaine lettuce provides a refreshing base, while the creamy avocado adds richness. The black beans and corn contribute a hearty element, making this salad satisfying and filling.

Moreover, the dressing is where the magic happens! With zesty lime juice, aromatic olive oil, and a kick of chili powder, it elevates the salad to a whole new level. You can even customize the heat by adding jalapeños, making it as spicy as you like. This versatility allows you to cater to different taste preferences, ensuring everyone at the table enjoys it.

In addition to its taste, the Spicy Southwest Salad is packed with nutrients. It’s loaded with vitamins, fiber, and healthy fats, making it a wholesome choice for any meal. Whether you’re a health enthusiast or just someone who loves good food, this salad is sure to impress!

So, let’s dive into the ingredients and preparation steps to create this delightful dish. You’ll be amazed at how easy it is to whip up a salad that’s not only healthy but also bursting with flavor!

Ingredients for Spicy Southwest Salad Recipe

Spicy Southwest Salad Recipe, you’ll need a variety of fresh ingredients. Each component adds its unique flavor and texture, making the salad a delightful experience. Here’s what you’ll need:

  • 2 cups romaine lettuce, chopped
  • 1 cup cherry tomatoes, halved
  • 1 cup black beans, rinsed and drained
  • 1 cup corn (fresh, frozen, or canned)
  • 1 avocado, diced
  • 1/2 cup red onion, finely chopped
  • 1/2 cup shredded cheddar cheese
  • 1/4 cup fresh cilantro, chopped
  • 1/4 cup lime juice
  • 1/4 cup olive oil
  • 1 teaspoon chili powder
  • 1/2 teaspoon cumin
  • Salt and pepper to taste
  • 1 jalapeño, sliced (optional for extra heat)

These ingredients come together to create a salad that is not only visually appealing but also packed with nutrients. The romaine lettuce serves as a crisp base, while the black beans and corn add protein and fiber. The creamy avocado and cheddar cheese provide richness, and the fresh cilantro adds a burst of flavor.

Spicy Southwest Salad Recipe lies in its flexibility, allowing you to make it your own.

Step-by-Step Preparation of Spicy Southwest Salad Recipe

Spicy Southwest Salad Recipe. Follow these simple steps to create a delicious and colorful salad that everyone will love!

Step 1: Preparing the Base

Start by washing the romaine lettuce thoroughly. This step is crucial to remove any dirt or pesticides. After washing, chop the lettuce into bite-sized pieces. Place the chopped lettuce in a large mixing bowl. This will be the base of your salad, providing a crisp and refreshing texture.

Step 2: Adding the Vegetables

Next, it’s time to add the vegetables. Take the cherry tomatoes and slice them in half. Then, rinse and drain the black beans, ensuring they are free from any excess liquid. If you’re using corn from a can, drain it as well. Add the halved tomatoes, black beans, and corn to the bowl with the romaine lettuce. Now, finely chop the red onion and add it to the mix. Finally, dice the avocado and gently fold it in to avoid mashing.

Step 3: Incorporating Proteins

If you want to make your salad heartier, consider adding proteins. Grilled chicken or shrimp are excellent choices. Simply cook them to your liking, then slice or chop them into bite-sized pieces. Add the protein to the salad mixture, ensuring it’s evenly distributed. This step not only boosts the flavor but also makes the salad more filling.

Step 4: Mixing the Dressing

In a separate small bowl, whisk together the lime juice, olive oil, chili powder, cumin, salt, and pepper. This dressing is what brings all the flavors together. Make sure to whisk until the ingredients are well combined. The zesty lime and spices will create a deliciously tangy dressing that complements the salad perfectly.

Step 5: Assembling the Salad

Now it’s time to assemble your salad! Pour the dressing over the salad mixture in the large bowl. Gently toss everything together, ensuring that all ingredients are coated with the dressing. If you like a bit of heat, add sliced jalapeños at this stage. Serve the salad immediately for the freshest taste, or chill it in the refrigerator for 15-30 minutes to let the flavors meld together.

Spicy Southwest Salad Recipe is ready to be enjoyed. This vibrant dish is perfect for any occasion, whether it’s a family dinner or a summer picnic.

Variations of Spicy Southwest Salad Recipe

Spicy Southwest Salad Recipe is incredibly versatile. You can easily modify it to suit different dietary preferences or to simply mix things up. Here are some exciting variations to consider!

Vegetarian Options

If you want to keep your salad vegetarian, there are plenty of delicious options. Instead of using grilled chicken or shrimp, you can add more plant-based ingredients. For instance, consider incorporating roasted sweet potatoes or quinoa. Both options add a hearty texture and boost the nutritional value.

Another great vegetarian option is to include more beans. You can swap black beans for chickpeas or kidney beans. These legumes are packed with protein and fiber, making your salad even more filling. Additionally, you can add diced bell peppers for a crunchy texture and a pop of color.

Don’t forget about the cheese! If you want a creamier texture, try adding crumbled feta or goat cheese. These cheeses will enhance the flavor profile while keeping the salad vegetarian-friendly.

Protein Alternatives

If you’re looking for protein alternatives, there are many delicious choices. Grilled tofu is an excellent option for those who prefer plant-based proteins. Simply marinate the tofu in your favorite spices and grill it until golden brown. Then, chop it into cubes and toss it into your salad.

For a different flavor, consider adding smoked salmon or tuna. These seafood options provide a unique taste and are rich in omega-3 fatty acids. Just be sure to flake the fish before adding it to the salad for even distribution.

Lastly, if you want a quick protein boost, you can sprinkle some nuts or seeds on top. Pumpkin seeds or sunflower seeds add a delightful crunch and extra nutrients. They also make the salad more satisfying!

Spicy Southwest Salad Recipe to fit your taste and dietary needs. Enjoy experimenting with different ingredients to create your perfect salad!

Cooking Note for Spicy Southwest Salad Recipe

Spicy Southwest Salad Recipe, there are a few cooking notes to keep in mind to ensure the best results. These tips will help you create a salad that is not only delicious but also visually appealing and nutritious.

First, freshness is key! Always use fresh ingredients whenever possible. Fresh romaine lettuce, ripe avocados, and vibrant tomatoes will enhance the flavor and texture of your salad. If you can, visit a local farmer’s market to find the freshest produce available.

Next, consider the timing of your preparation. If you plan to serve the salad later, it’s best to keep the dressing separate until just before serving. This will prevent the lettuce from wilting and keep the salad crisp. You can prepare all the ingredients ahead of time and store them in the refrigerator. Just remember to toss everything together with the dressing right before serving.

Additionally, if you’re using canned ingredients like black beans or corn, be sure to rinse them thoroughly. This step helps remove excess sodium and improves the overall taste of your salad. It’s a small but important detail that can make a big difference!

Lastly, don’t be afraid to get creative with your presentation. Use a large, colorful bowl to showcase the vibrant ingredients. You can also layer the salad in individual serving bowls for a more elegant touch. Garnishing with extra cilantro or a sprinkle of cheese on top can elevate the visual appeal and make your salad even more inviting.

Spicy Southwest Salad Recipe that everyone will love. Enjoy the process and have fun experimenting with flavors!

Serving Suggestions for Spicy Southwest Salad Recipe

Spicy Southwest Salad Recipe, there are plenty of delightful options to consider. This salad is not only a meal on its own but also pairs wonderfully with various dishes. Here are some serving suggestions to enhance your dining experience!

First, consider serving the salad as a main dish. It’s hearty enough to stand alone, especially if you’ve added proteins like grilled chicken or shrimp. The combination of flavors and textures makes it satisfying and filling. You can serve it in large bowls for a family-style meal or in individual plates for a more formal setting.

If you prefer to serve the salad as a side dish, it complements many main courses beautifully. For instance, it pairs well with grilled meats, such as steak or pork chops. The zesty dressing and fresh ingredients provide a refreshing contrast to the richness of grilled proteins.

Another great option is to serve the salad alongside tacos or burritos. The Southwest flavors of the salad enhance the overall meal, creating a delicious fusion of tastes. You can even use the salad as a topping for your tacos, adding a crunchy and flavorful element.

For a lighter option, consider serving the salad with a bowl of soup. A spicy tortilla soup or a creamy corn chowder would be perfect companions. The combination of warm soup and a cool salad creates a delightful balance that is sure to please your palate.

Spicy Southwest Salad Recipe makes an excellent dish to share. It’s easy to prepare in large quantities, and its vibrant colors will attract attention on the table. Plus, it’s a crowd-pleaser that caters to various dietary preferences.

Spicy Southwest Salad Recipe in many delicious ways. Whether as a main dish, a side, or a party favorite, this salad is sure to impress!

Tips for Perfecting Your Spicy Southwest Salad Recipe

Spicy Southwest Salad Recipe is all about attention to detail and personal touches. Here are some helpful tips to ensure your salad turns out delicious every time!

First, always choose ripe avocados. A perfectly ripe avocado adds creaminess and flavor. To check for ripeness, gently squeeze the avocado. It should yield slightly to pressure but not feel mushy. If it’s too firm, give it a day or two to ripen.

Spicy Southwest Salad Recipe is all about harmony. If you find the dressing too tangy, add a touch of honey or agave syrup to balance the acidity. Conversely, if it’s too sweet, a splash of lime juice can brighten it up.

Don’t forget about seasoning! While the recipe includes salt and pepper, taste as you go. Adjust the seasoning to your liking. A pinch of smoked paprika can also add a nice depth of flavor.

For added crunch, consider toasting your nuts or seeds before adding them to the salad. Toasting enhances their flavor and adds a delightful crunch. Simply place them in a dry skillet over medium heat for a few minutes, stirring frequently until golden.

Another tip is to let the salad sit for a few minutes after tossing it with the dressing. This allows the flavors to meld together beautifully. However, if you’re using delicate greens, serve immediately to keep them crisp.

Lastly, presentation matters! Use a large, colorful bowl to showcase the vibrant ingredients. You can also garnish with extra cilantro or a sprinkle of cheese on top for an appealing finish. A well-presented salad is always more inviting!

Spicy Southwest Salad Recipe to new heights. Enjoy the process of making it your own, and don’t hesitate to experiment with different ingredients and flavors!

Breakdown of Time for Spicy Southwest Salad Recipe

Spicy Southwest Salad Recipe can help you plan your meal better. Here’s a quick breakdown of the time needed for each step, so you can enjoy this delicious salad without any rush!

Prep Time

The prep time for this salad is quite short. You’ll need about 15-20 minutes to gather and prepare all the ingredients. This includes washing and chopping the romaine lettuce, dicing the avocado, and slicing the cherry tomatoes and red onion. If you’re adding proteins like grilled chicken or shrimp, you may need an extra 10 minutes for cooking. Overall, you can expect to spend around 20-30 minutes on prep work.

Cooking Time

Spicy Southwest Salad Recipe, the cooking time is minimal. If you choose to add grilled chicken or shrimp, cooking them will take about 10-15 minutes, depending on the method you use. However, if you’re sticking to the salad as a vegetarian option, there’s no cooking time involved. Just focus on preparing the fresh ingredients!

Total Time

Spicy Southwest Salad Recipe is a fantastic choice!

Nutritional Information for Spicy Southwest Salad Recipe

Spicy Southwest Salad Recipe is essential for those who are health-conscious or following specific dietary plans. This salad is not only delicious but also packed with nutrients that contribute to a balanced diet. Here’s a breakdown of the key nutritional components per serving:

Calories

Spicy Southwest Salad Recipe contains approximately 320 calories. This makes it a great option for a light meal or a satisfying side dish. The combination of fresh vegetables, healthy fats from the avocado, and protein from the beans ensures that you’re getting a nutritious meal without excessive calories.

Protein

In terms of protein, this salad offers about 10 grams per serving. The black beans and cheese contribute significantly to this protein content. If you choose to add grilled chicken or shrimp, the protein content will increase, making it an even more filling option. This is especially beneficial for those looking to maintain or build muscle while enjoying a flavorful meal.

Sodium

Spicy Southwest Salad Recipe is relatively low, making it a heart-healthy choice. On average, each serving contains around 400 milligrams of sodium. However, this can vary based on the ingredients you use, especially if you opt for canned beans or corn. To keep sodium levels in check, always rinse canned ingredients thoroughly before adding them to your salad.

Spicy Southwest Salad Recipe is a nutritious option that provides a good balance of calories, protein, and low sodium. It’s perfect for anyone looking to enjoy a healthy meal without sacrificing flavor!

FAQs about Spicy Southwest Salad Recipe

Can I make the Spicy Southwest Salad ahead of time?

Spicy Southwest Salad Recipe ahead of time! However, it’s best to keep the dressing separate until you’re ready to serve. This way, the lettuce stays crisp and fresh. You can chop all the vegetables and store them in an airtight container in the refrigerator. When you’re ready to eat, simply mix the dressing and toss everything together. This method ensures that your salad remains vibrant and delicious!

What can I substitute for the dressing in the Spicy Southwest Salad Recipe?

Spicy Southwest Salad Recipe, there are several tasty alternatives. A creamy avocado dressing or a yogurt-based dressing can add a different flavor profile. You could also use a store-bought vinaigrette, like a cilantro-lime or ranch dressing, for convenience. Just make sure the dressing complements the salad’s ingredients for the best taste!

Is the Spicy Southwest Salad Recipe gluten-free?

Spicy Southwest Salad Recipe is naturally gluten-free! All the ingredients, including the vegetables, beans, and dressing, do not contain gluten. However, if you’re using any packaged items, like canned beans or corn, always check the labels to ensure they are certified gluten-free. This way, you can enjoy your salad worry-free!

How can I make the Spicy Southwest Salad Recipe spicier?

Spicy Southwest Salad Recipe. First, you can add more sliced jalapeños or even use serrano peppers for an extra kick. Another option is to include a dash of hot sauce or a sprinkle of cayenne pepper in the dressing. If you enjoy smoky flavors, consider adding chipotle powder. These additions will elevate the heat level and make your salad even more exciting!

Conclusion on Spicy Southwest Salad Recipe

Spicy Southwest Salad Recipe is a delightful dish that combines vibrant flavors, fresh ingredients, and a satisfying crunch. It’s perfect for any occasion, whether you’re enjoying a casual lunch or hosting a dinner party. The versatility of this salad allows you to customize it to your taste, making it a favorite among many.

With its colorful array of vegetables, protein options, and zesty dressing, this salad not only pleases the palate but also nourishes the body. Each bite is a celebration of flavors, from the creamy avocado to the zesty lime dressing. Plus, it’s packed with nutrients, making it a wholesome choice for anyone looking to eat healthily.

Spicy Southwest Salad Recipe, remember to have fun with it! Experiment with different ingredients, adjust the spice level, and make it your own. Whether you’re adding grilled chicken, swapping beans, or trying out new dressings, the possibilities are endless.

So, gather your ingredients, follow the steps, and enjoy the process of creating this delicious salad. Your taste buds will thank you, and your friends and family will be impressed by your culinary skills. Happy cooking!

Overnight French Toast Casserole is a must-try recipe!

Introduction to Overnight French Toast Casserole Recipe

What is Overnight French Toast Casserole?

Overnight French Toast Casserole is a delightful breakfast dish that combines the classic flavors of French toast into a convenient casserole form. This recipe allows you to prepare a delicious meal the night before, making it perfect for busy mornings or special occasions. By soaking bread cubes in a rich mixture of eggs, milk, and spices, you create a soft, custardy texture that is simply irresistible. When baked, the top becomes golden brown and slightly crispy, while the inside remains warm and fluffy. It’s a comforting dish that everyone will love!

Why You Should Try This Recipe

There are many reasons to try this Overnight French Toast Casserole Recipe. First, it saves you time in the morning. You can prepare it the night before and simply pop it in the oven when you wake up. Second, it’s incredibly versatile. You can customize it with your favorite fruits, nuts, or spices to suit your taste. Plus, it serves a crowd, making it ideal for family gatherings or brunch with friends. Lastly, the combination of flavors and textures will leave everyone asking for seconds. So, why not give it a try? You’ll be glad you did!

Ingredients for Overnight French Toast Casserole Recipe

To create a mouthwatering Overnight French Toast Casserole, you’ll need a few simple ingredients. Each component plays a vital role in achieving that perfect blend of flavors and textures. Here’s what you’ll need:

  • 8 slices of bread: Choose challah or brioche for a rich, buttery flavor.
  • 6 large eggs: These provide the custardy base for the casserole.
  • 2 cups milk: Whole milk works best, but you can use any milk you prefer.
  • 1 teaspoon vanilla extract: This adds a lovely sweetness and aroma.
  • 1 teaspoon ground cinnamon: A warm spice that enhances the flavor.
  • 1/4 teaspoon salt: Balances the sweetness and enhances overall taste.
  • 1/4 cup maple syrup: For a natural sweetness that complements the dish.
  • 1/2 cup brown sugar: Adds depth and richness to the flavor.
  • 1/2 cup chopped pecans or walnuts (optional): For a delightful crunch and nutty flavor.
  • Powdered sugar for serving (optional): A sweet finishing touch for presentation.

Gathering these ingredients will set you on the path to creating a delicious breakfast that everyone will enjoy. Remember, the quality of your ingredients can make a big difference in the final result. So, choose fresh and high-quality items for the best flavor!

Step-by-Step Preparation of Overnight French Toast Casserole Recipe

Step 1: Preparing the Bread

To start, you need to prepare the bread. First, take your 8 slices of challah or brioche and cut them into cubes. Aim for about 1-inch pieces. This size helps the bread soak up the egg mixture evenly. Next, grease a 9×13-inch baking dish with butter or cooking spray. Then, place the bread cubes evenly in the dish. Make sure they are spread out nicely, so every piece gets that delicious custard flavor later on.

Step 2: Mixing the Egg Mixture

Now, let’s move on to the egg mixture. In a large mixing bowl, crack open 6 large eggs. Add 2 cups of milk, 1 teaspoon of vanilla extract, 1 teaspoon of ground cinnamon, and 1/4 teaspoon of salt. Then, pour in 1/4 cup of maple syrup and 1/2 cup of brown sugar. Using a whisk, mix everything together until it’s well combined. You want to ensure that the eggs are fully beaten and the sugar is dissolved. This mixture is what will give your casserole that rich, custardy texture.

Step 3: Assembling the Casserole

Next, it’s time to assemble your casserole. Carefully pour the egg mixture over the bread cubes in the baking dish. Make sure to cover all the pieces. Gently press down on the bread with a spatula or your hands to help it soak up the liquid. If you’re using nuts, sprinkle the 1/2 cup of chopped pecans or walnuts over the top. This adds a nice crunch and flavor to your dish.

Step 4: Refrigerating Overnight

Once your casserole is assembled, cover the dish with plastic wrap. Place it in the refrigerator overnight. This step is crucial as it allows the bread to soak up all the delicious flavors. If you’re short on time, let it sit for at least 4 hours. The longer it sits, the better the flavors meld together, creating a truly delightful breakfast.

Step 5: Baking the Casserole

On the day you plan to serve your casserole, preheat your oven to 350°F (175°C). Remove the plastic wrap from the dish and place it in the oven. Bake for 45-50 minutes. You’ll know it’s done when the top is golden brown and the center is set. Let it cool for a few minutes before serving. If you like, dust the top with powdered sugar for a sweet finishing touch. Enjoy your delicious Overnight French Toast Casserole!

Variations of Overnight French Toast Casserole Recipe

Adding Fruits and Nuts

One of the best things about the Overnight French Toast Casserole Recipe is its versatility. You can easily add fruits and nuts to enhance the flavor and texture. For a fruity twist, consider adding sliced bananas, fresh berries, or diced apples to the bread mixture before soaking. These fruits not only add natural sweetness but also provide a burst of freshness. If you love nuts, sprinkle in some chopped pecans or walnuts. They add a delightful crunch and a nutty flavor that pairs beautifully with the soft bread. Feel free to mix and match your favorite fruits and nuts to create a unique version of this classic dish!

Different Types of Bread to Use

While challah and brioche are popular choices for this casserole, you can experiment with different types of bread. For a heartier option, try using whole grain or sourdough bread. These breads will give your casserole a different texture and flavor profile. If you prefer a sweeter taste, cinnamon raisin bread can be a fantastic choice. The possibilities are endless! Just remember to choose a bread that can hold up to soaking without falling apart. This way, you’ll achieve that perfect custardy consistency.

Flavor Enhancements and Spices

To elevate your Overnight French Toast Casserole, consider adding flavor enhancements and spices. Besides cinnamon, you can experiment with nutmeg, cardamom, or even pumpkin spice for a seasonal twist. A splash of orange or lemon zest can brighten the flavors and add a refreshing note. If you enjoy a hint of sweetness, try adding a tablespoon of brown sugar or honey to the egg mixture. These small adjustments can make a big difference in the overall taste of your casserole, making it even more enjoyable for everyone!

Cooking Note for Overnight French Toast Casserole Recipe

When preparing your Overnight French Toast Casserole, there are a few important cooking notes to keep in mind. These tips will help ensure that your dish turns out perfectly every time.

First, always use stale or day-old bread. Fresh bread can become too soggy when soaked in the egg mixture. Stale bread absorbs the liquid better, resulting in a delightful texture. If you only have fresh bread, you can dry it out slightly by toasting the cubes in the oven for a few minutes before assembling the casserole.

Next, consider the size of your baking dish. A 9×13-inch dish is ideal for this recipe, but if you have a smaller or larger dish, adjust the cooking time accordingly. A smaller dish may require less time, while a larger one may need a bit more. Keep an eye on the casserole as it bakes, and check for doneness by inserting a knife in the center. If it comes out clean, your casserole is ready!

Lastly, let the casserole cool for a few minutes after baking. This resting time allows the flavors to settle and makes it easier to cut into portions. If you’re serving it for a special occasion, consider garnishing with fresh fruit or a drizzle of maple syrup for an extra touch of sweetness. With these cooking notes in mind, you’ll be well on your way to creating a delicious Overnight French Toast Casserole that everyone will love!

Serving Suggestions for Overnight French Toast Casserole Recipe

Toppings to Consider

When it comes to serving your Overnight French Toast Casserole, the right toppings can elevate the dish to a whole new level. Here are some delightful options to consider:

  • Fresh Fruits: Sliced strawberries, blueberries, or bananas add a burst of color and flavor. They also provide a refreshing contrast to the warm casserole.
  • Maple Syrup: A drizzle of pure maple syrup enhances the sweetness and complements the flavors beautifully. It’s a classic choice that everyone loves!
  • Whipped Cream: Light and fluffy whipped cream can add a luxurious touch. You can even flavor it with vanilla or a hint of cinnamon for extra flair.
  • Nut Butter: A spoonful of almond or peanut butter can add creaminess and a nutty flavor. It’s a great way to boost the protein content, too!
  • Powdered Sugar: Dusting the top with powdered sugar not only looks pretty but also adds a touch of sweetness. It’s perfect for special occasions!

Feel free to mix and match these toppings to create a personalized serving experience. Your guests will appreciate the extra effort, and it will make the dish even more enjoyable!

Pairing with Beverages

To complete your breakfast or brunch experience, consider pairing your Overnight French Toast Casserole with the right beverages. Here are some delightful options:

  • Coffee: A hot cup of coffee is a classic choice. Whether you prefer it black, with cream, or flavored, it pairs perfectly with the sweetness of the casserole.
  • Tea: For a lighter option, serve a refreshing cup of tea. Herbal or chai teas can complement the spices in the casserole beautifully.
  • Fresh Juice: A glass of freshly squeezed orange juice or apple juice adds a bright, fruity note that balances the richness of the dish.
  • Mimosas: For a festive touch, consider serving mimosas. The combination of sparkling wine and orange juice is always a hit at brunch!

Choosing the right beverage can enhance the overall dining experience. So, think about your guests’ preferences and enjoy a delightful meal together!

Tips for Perfecting Your Overnight French Toast Casserole Recipe

To ensure your Overnight French Toast Casserole turns out perfectly every time, consider these helpful tips. They will guide you in achieving the best flavor and texture, making your dish a hit at any gathering.

First, always use stale bread. Fresh bread can become too soggy when soaked in the egg mixture. Stale bread absorbs the liquid better, resulting in a delightful texture. If you only have fresh bread, you can dry it out slightly by toasting the cubes in the oven for a few minutes before assembling the casserole.

Next, don’t skip the soaking time. Allowing the bread to soak in the egg mixture overnight is crucial. This step ensures that every piece of bread is infused with flavor and achieves that custardy consistency. If you’re short on time, aim for at least 4 hours of soaking.

Consider adding a pinch of salt to the egg mixture. This small addition enhances the overall flavor and balances the sweetness of the maple syrup and brown sugar. It’s a simple trick that can make a big difference!

When baking, keep an eye on the casserole. Ovens can vary in temperature, so check for doneness a few minutes before the suggested baking time. The casserole is ready when the top is golden brown and the center is set. If the top browns too quickly, cover it loosely with aluminum foil to prevent burning.

Lastly, let the casserole cool for a few minutes after baking. This resting time allows the flavors to settle and makes it easier to cut into portions. If you’re serving it for a special occasion, consider garnishing with fresh fruit or a drizzle of maple syrup for an extra touch of sweetness. With these tips in mind, you’ll be well on your way to creating a delicious Overnight French Toast Casserole that everyone will love!

Breakdown of Time for Overnight French Toast Casserole Recipe

Prep Time

The prep time for your Overnight French Toast Casserole is quite manageable. You’ll need about 20-30 minutes to gather your ingredients, cut the bread, and mix the egg mixture. This step is straightforward and allows you to enjoy the process of creating a delicious breakfast. Remember, the more organized you are, the quicker this part will go!

Cooking Time

Once your casserole is ready to bake, it will take approximately 45-50 minutes in the oven. During this time, the magic happens! The bread absorbs the flavors, and the top becomes golden brown and slightly crispy. Keep an eye on it as it bakes, and check for doneness to ensure it’s perfectly cooked.

Total Time

In total, you should plan for about 1 hour and 15 minutes for the entire process, not including the overnight soaking time. This includes both the prep and cooking times. However, don’t forget that the casserole needs to chill in the refrigerator overnight or for at least 4 hours. This soaking time is essential for achieving that delightful custardy texture. So, while the active time is short, the waiting makes all the difference!

Nutritional Information for Overnight French Toast Casserole Recipe

Calories

When enjoying a serving of this delicious Overnight French Toast Casserole, you can expect to consume around 320 calories. This makes it a satisfying yet manageable option for breakfast or brunch. The calorie count comes from the combination of bread, eggs, milk, and sweeteners, all of which contribute to the rich flavor and texture of the dish. While it’s a treat, it’s also important to balance it with other nutritious meals throughout the day.

Protein Content

Each serving of the casserole provides about 10 grams of protein. This protein comes primarily from the eggs and milk used in the recipe. Protein is essential for building and repairing tissues, and it helps keep you feeling full longer. Including this casserole in your breakfast can be a great way to kickstart your day with a good source of protein, especially when paired with some fresh fruit or nuts.

Sodium Levels

The sodium content in each serving of the Overnight French Toast Casserole is approximately 300 milligrams. This level is reasonable for a breakfast dish, but it’s always wise to be mindful of your overall sodium intake throughout the day. If you’re watching your sodium levels, consider using low-sodium bread or reducing the amount of salt in the recipe. This way, you can enjoy your casserole while keeping your dietary needs in check.

FAQs about Overnight French Toast Casserole Recipe

Can I make Overnight French Toast Casserole ahead of time?

Absolutely! One of the best features of the Overnight French Toast Casserole Recipe is its convenience. You can prepare it the night before and let it soak in the refrigerator. This way, all you need to do in the morning is pop it in the oven. It’s perfect for busy mornings or special occasions when you want to serve a delicious breakfast without the hassle of cooking from scratch. Just remember to cover it tightly with plastic wrap to keep it fresh while it chills.

What type of bread is best for Overnight French Toast Casserole?

For the best results, use bread that is slightly stale, like challah or brioche. These types of bread are rich and absorb the egg mixture beautifully, resulting in a soft and custardy texture. However, you can also experiment with other types of bread, such as sourdough, whole grain, or even cinnamon raisin bread. Just make sure the bread can hold up to soaking without falling apart. This will ensure your casserole has the perfect consistency!

How do I store leftovers of Overnight French Toast Casserole?

If you have any leftovers, storing them is easy! Allow the casserole to cool completely, then cover it tightly with plastic wrap or aluminum foil. You can keep it in the refrigerator for up to 3-4 days. When you’re ready to enjoy it again, simply reheat individual portions in the microwave or warm it in the oven at a low temperature. This way, you can savor the delicious flavors of your Overnight French Toast Casserole even after the initial serving!

Can I freeze Overnight French Toast Casserole?

Yes, you can freeze your Overnight French Toast Casserole! To do this, prepare the casserole as directed but do not bake it. Instead, cover it tightly with plastic wrap and then with aluminum foil to prevent freezer burn. It can be stored in the freezer for up to 2 months. When you’re ready to bake it, simply thaw it in the refrigerator overnight and then bake as usual. This makes it a great option for meal prep or for those busy mornings when you want a homemade breakfast without the fuss!

Conclusion on Overnight French Toast Casserole Recipe

In conclusion, the Overnight French Toast Casserole is a fantastic dish that combines convenience with deliciousness. It’s perfect for busy mornings, family gatherings, or special occasions. With its rich, custardy texture and the ability to customize it with your favorite fruits and nuts, this recipe is sure to become a favorite in your household.

By preparing it the night before, you save precious time in the morning, allowing you to enjoy a leisurely breakfast with your loved ones. The delightful aroma that fills your kitchen as it bakes is just the cherry on top! Plus, with the option to freeze leftovers or make it ahead of time, you can always have a delicious meal ready to go.

So, gather your ingredients, follow the steps, and create your own Overnight French Toast Casserole. Whether you serve it with fresh fruit, a drizzle of maple syrup, or a dusting of powdered sugar, it’s bound to impress everyone at the table. Enjoy this comforting dish and make wonderful memories around the breakfast table!

Creamy Mushroom Chicken Thighs are a must-try dish!

Introduction to Creamy Mushroom Chicken Thighs

Creamy Mushroom Chicken Thighs! This dish is not just a meal; it’s an experience that brings comfort and joy to your dining table. Imagine tender chicken thighs, perfectly cooked and enveloped in a rich, creamy mushroom sauce. It’s a dish that warms the heart and satisfies the palate.

What makes this recipe truly special? First, the combination of juicy chicken thighs and earthy mushrooms creates a flavor profile that is both savory and satisfying. The heavy cream adds a luxurious touch, making every bite feel indulgent. Plus, the addition of herbs like thyme and parsley elevates the dish, giving it a fresh and aromatic quality.

Creamy Mushroom Chicken Thighs is its versatility. You can easily customize it to suit your taste. Whether you prefer a hint of spice or a touch of greens, this recipe can adapt to your preferences. It’s perfect for a cozy family dinner or an impressive dish for guests.

In the following sections, we will guide you through the ingredients, preparation steps, and tips to make this dish a success. Get ready to impress your family and friends with a meal that is as delicious as it is easy to prepare!

What Makes Creamy Mushroom Chicken Thighs Special?

Creamy Mushroom Chicken Thighs lies in its simplicity and flavor. The chicken thighs are not only juicy but also packed with flavor, making them a great choice for this creamy dish. The mushrooms add a wonderful umami taste, while the cream brings everything together in a silky sauce.

Moreover, this dish is a one-pan wonder! You can sear, sauté, and bake all in the same skillet, which means less cleanup for you. It’s a practical choice for busy weeknights or leisurely weekends. Plus, the aroma that fills your kitchen while it cooks is simply irresistible!

So, let’s dive into the ingredients and get started on creating this mouthwatering meal!

Ingredients for Creamy Mushroom Chicken Thighs

Creamy Mushroom Chicken Thighs, you’ll need a few simple yet flavorful ingredients. Each component plays a vital role in building the rich taste of this dish. Here’s what you’ll need:

  • 4 chicken thighs (about 2 pounds)
  • 1 tablespoon olive oil
  • 1 teaspoon salt
  • 1/2 teaspoon black pepper
  • 1 cup sliced mushrooms (button or cremini work well)
  • 1 small onion, diced
  • 2 cloves garlic, minced
  • 1 cup chicken broth (low-sodium preferred)
  • 1 cup heavy cream
  • 1 teaspoon dried thyme
  • 1 teaspoon dried parsley
  • 1 tablespoon fresh lemon juice

These ingredients come together to create a dish that is not only comforting but also packed with flavor. The chicken thighs provide a juicy base, while the mushrooms and onions add depth. The heavy cream, combined with herbs and lemon juice, creates a luscious sauce that ties everything together.

Feel free to experiment with the ingredients! You can swap out the mushrooms for other varieties like shiitake or portobello for a different taste. Additionally, using fresh herbs instead of dried can enhance the flavor even more. Now that you have your ingredients ready, let’s move on to the preparation steps!

Step-by-Step Preparation of Creamy Mushroom Chicken Thighs

Creamy Mushroom Chicken Thighs. This process is straightforward and enjoyable, allowing you to create a delicious meal with ease. Let’s get started!

Step 1: Preparing the Chicken Thighs

First, take your chicken thighs and pat them dry with paper towels. This step is important as it helps achieve a nice, crispy skin. Next, season both sides of the chicken thighs with salt and black pepper. The seasoning enhances the flavor and ensures that every bite is delicious. Once seasoned, set the chicken aside while you prepare the skillet.

Step 2: Sautéing the Mushrooms

In a large oven-safe skillet, heat 1 tablespoon of olive oil over medium-high heat. Once the oil is hot, carefully place the chicken thighs in the skillet, skin-side down. Sear them for about 5-7 minutes until the skin turns golden brown. This step locks in the juices and adds a beautiful color.

After searing, flip the chicken thighs and cook for another 5 minutes. Once done, remove the chicken from the skillet and set it aside on a plate. In the same skillet, add the diced onion and sliced mushrooms. Sauté for about 5 minutes until the onions become translucent and the mushrooms are tender. This combination creates a flavorful base for your sauce.

Step 3: Creating the Creamy Sauce

Now it’s time to create the creamy sauce! Add the minced garlic to the skillet and cook for an additional minute, stirring frequently. The garlic will release its wonderful aroma, enhancing the overall flavor of the dish. Next, pour in 1 cup of chicken broth, scraping the bottom of the skillet to deglaze. This step lifts all the delicious bits stuck to the pan, adding depth to your sauce.

After deglazing, stir in 1 cup of heavy cream, 1 teaspoon of dried thyme, 1 teaspoon of dried parsley, and 1 tablespoon of fresh lemon juice. Bring the mixture to a gentle simmer, allowing the flavors to meld together beautifully.

Step 4: Combining Ingredients

Once your sauce is simmering, it’s time to bring everything together. Return the seared chicken thighs to the skillet, placing them skin-side up. Spoon some of the creamy sauce over the chicken to ensure it’s well-coated. This step not only adds flavor but also helps keep the chicken moist during cooking.

Step 5: Cooking the Dish

Now, transfer the skillet to your preheated oven at 375°F. Bake for 25-30 minutes, or until the chicken reaches an internal temperature of 165°F. This ensures that the chicken is fully cooked and safe to eat. The oven will help the chicken absorb all the creamy goodness from the sauce, making it even more delicious.

Creamy Mushroom Chicken Thighs!

Variation of Creamy Mushroom Chicken Thighs

Creamy Mushroom Chicken Thighs is its adaptability. You can easily switch up ingredients and cooking methods to create a dish that suits your taste. Let’s explore some alternative ingredients and cooking methods that can add a unique twist to this classic recipe.

Alternative Ingredients for Different Flavors

To keep things exciting, consider experimenting with different ingredients. Here are some ideas:

  • Mushroom Varieties: Instead of using just button or cremini mushrooms, try shiitake or portobello mushrooms. They offer a deeper flavor and a meaty texture.
  • Herbs and Spices: Fresh herbs like rosemary or basil can replace dried thyme and parsley. For a spicy kick, add a pinch of red pepper flakes or cayenne pepper.
  • Vegetables: Incorporate spinach, kale, or even sun-dried tomatoes into the sauce for added nutrition and color. These ingredients not only enhance the flavor but also make the dish more vibrant.
  • Broth Options: Swap chicken broth for vegetable broth for a lighter version. This is especially great if you want to make the dish vegetarian-friendly.
  • Cream Alternatives: For a lighter sauce, use half heavy cream and half low-fat milk or a plant-based milk. This will reduce the calorie count while still keeping the creaminess.

These alternatives can help you create a dish that feels fresh and new every time you make it. Don’t hesitate to mix and match based on what you have on hand or what flavors you enjoy!

Cooking Methods to Try

Creamy Mushroom Chicken Thighs:

  • Slow Cooker: For a hands-off approach, use a slow cooker. Sear the chicken thighs first, then transfer them to the slow cooker with the sauce ingredients. Cook on low for 6-8 hours or high for 3-4 hours. This method results in incredibly tender chicken.
  • Instant Pot: If you’re short on time, the Instant Pot is a great option. Sear the chicken using the sauté function, then add the sauce ingredients. Seal the lid and cook on high pressure for about 10-12 minutes. Quick and easy!
  • Grilling: For a smoky flavor, grill the chicken thighs instead of baking them. After grilling, toss them in the creamy sauce on the stovetop for a delicious finish.

Creamy Mushroom Chicken Thighs!

Cooking Note for Creamy Mushroom Chicken Thighs

Creamy Mushroom Chicken Thighs, there are a few important cooking notes to keep in mind. These tips will help ensure that your dish turns out perfectly every time, making it a delightful experience for you and your guests.

First, always start with high-quality chicken thighs. Fresh, organic chicken not only tastes better but also cooks more evenly. If you can, choose thighs with the skin on. The skin adds flavor and helps keep the meat juicy during cooking.

Next, don’t rush the searing process. Searing the chicken thighs properly is crucial for developing a rich flavor. Make sure your skillet is hot enough before adding the chicken. This step creates a beautiful golden crust that locks in moisture.

When sautéing the mushrooms and onions, be patient. Allow them to cook until the onions are translucent and the mushrooms are tender. This step builds a flavorful base for your creamy sauce. Stir occasionally to prevent sticking and ensure even cooking.

As you create the sauce, remember to scrape the bottom of the skillet well. This action lifts all the delicious browned bits, known as fond, which adds depth to your sauce. It’s these little details that elevate your dish from good to great!

Lastly, always check the internal temperature of the chicken thighs. Using a meat thermometer is the best way to ensure they are cooked through. The chicken should reach an internal temperature of 165°F for safe consumption. This step guarantees juicy, tender meat without any risk of undercooking.

Creamy Mushroom Chicken Thighs. Enjoy the process and savor the delicious results!

Serving Suggestions for Creamy Mushroom Chicken Thighs

Creamy Mushroom Chicken Thighs, it’s time to think about how to serve this delightful dish. The right side dishes and presentation can elevate your meal, making it even more enjoyable. Let’s explore some fantastic pairing options and presentation tips!

Best Side Dishes to Pair

Choosing the right side dishes can enhance the flavors of your creamy chicken thighs. Here are some delicious options to consider:

  • Mashed Potatoes: Creamy mashed potatoes are a classic choice. Their smooth texture complements the rich sauce beautifully.
  • Steamed Vegetables: Lightly steamed broccoli, green beans, or carrots add a pop of color and freshness to your plate.
  • Rice or Quinoa: Serve your chicken over a bed of fluffy rice or quinoa. These grains soak up the creamy sauce, making every bite delightful.
  • Garlic Bread: A slice of warm garlic bread is perfect for dipping into the sauce. It adds a crunchy texture that contrasts nicely with the creaminess.
  • Salad: A simple green salad with a light vinaigrette can balance the richness of the dish. Consider adding nuts or cheese for extra flavor.

Creamy Mushroom Chicken Thighs but also create a well-rounded meal that is satisfying and delicious.

Presentation Tips

Creamy Mushroom Chicken Thighs beautifully:

  • Use a Large Platter: Arrange the chicken thighs on a large serving platter. This allows guests to see the dish in all its glory.
  • Garnish with Fresh Herbs: Sprinkle fresh parsley or thyme over the top just before serving. This adds a pop of color and freshness.
  • Drizzle the Sauce: Spoon some of the creamy mushroom sauce over the chicken thighs. This not only enhances the flavor but also makes the dish look more inviting.
  • Colorful Side Dishes: When plating, use colorful side dishes to create a vibrant plate. This makes the meal more appealing and appetizing.
  • Serve in Individual Bowls: For a cozy dinner, consider serving the chicken and sauce in individual bowls. This adds a personal touch to the meal.

Creamy Mushroom Chicken Thighs!

Tips for Perfecting Creamy Mushroom Chicken Thighs

Creamy Mushroom Chicken Thighs, a few helpful tips can make all the difference. These suggestions will ensure that your dish turns out perfectly every time, bursting with flavor and texture. Let’s explore some essential tips to elevate your cooking experience!

First, always start with room temperature chicken thighs. Taking them out of the fridge about 30 minutes before cooking allows for even cooking. Cold chicken can lead to uneven cooking, which may result in dry meat. This simple step can enhance the juiciness of your dish.

Next, don’t skip the searing step! Searing the chicken thighs until they are golden brown creates a delicious crust. This not only adds flavor but also helps lock in moisture. Make sure your skillet is hot enough before adding the chicken. A good sear is key to a tasty result.

When sautéing the mushrooms and onions, be patient. Allow them to cook until they are nicely caramelized. This process brings out their natural sweetness and adds depth to your sauce. Stir occasionally to prevent burning, and enjoy the wonderful aroma that fills your kitchen!

For the creamy sauce, consider using a combination of heavy cream and sour cream or cream cheese. This mix adds a tangy flavor that complements the richness of the dish. If you prefer a lighter option, half-and-half or Greek yogurt can also work well without sacrificing creaminess.

Creamy Mushroom Chicken Thighs truly unforgettable.

By following these tips, you’ll be well on your way to creating a delicious and satisfying meal. Enjoy the process and the delightful results of your culinary efforts!

Breakdown of Time for Creamy Mushroom Chicken Thighs

Creamy Mushroom Chicken Thighs can help you plan your cooking efficiently. Here’s a simple breakdown of the time required for preparation and cooking, ensuring you can enjoy this delicious dish without any rush.

Prep Time

Creamy Mushroom Chicken Thighs is approximately 15-20 minutes. During this time, you will gather all your ingredients, season the chicken, and chop the vegetables. Having everything ready before you start cooking makes the process smoother and more enjoyable.

Cooking Time

Once you begin cooking, the total cooking time is about 35-40 minutes. This includes:

  • Searing the Chicken: About 10-12 minutes to achieve a golden brown color.
  • Sautéing the Vegetables: Approximately 5-7 minutes for the onions and mushrooms to become tender.
  • Simmering the Sauce: Around 5 minutes to combine the ingredients and let the flavors meld.
  • Baking in the Oven: 25-30 minutes until the chicken reaches the safe internal temperature of 165°F.

Total Time

Creamy Mushroom Chicken Thighs. This includes both prep and cooking time. It’s a manageable timeframe for a delicious, homemade meal that’s sure to impress!

Nutritional Information for Creamy Mushroom Chicken Thighs

Creamy Mushroom Chicken Thighs not only offer a delightful taste but also provide valuable nutrients. Let’s break down the nutritional information for this delicious dish.

Calories

Creamy Mushroom Chicken Thighs contains approximately 450 calories. This calorie count makes it a satisfying option for dinner without being overly heavy. The combination of chicken, cream, and mushrooms contributes to this total, providing energy and flavor in every bite.

Protein Content

Protein is a vital nutrient for our bodies, and this dish delivers! Each serving contains about 30 grams of protein. The chicken thighs are an excellent source of high-quality protein, which is essential for muscle repair and overall health. Including protein in your meals helps keep you feeling full and satisfied.

Sodium Levels

Creamy Mushroom Chicken Thighs has around 800 milligrams. This amount can vary based on the type of chicken broth used and any additional seasonings. If you’re watching your sodium intake, consider using low-sodium chicken broth to help reduce the overall sodium levels in the dish.

Creamy Mushroom Chicken Thighs is a nutritious meal option that provides a good balance of calories, protein, and flavor. By being mindful of the ingredients, you can enjoy this dish while keeping your dietary goals in check. Enjoy your cooking and the delicious results!

FAQs about Creamy Mushroom Chicken Thighs

Can I use chicken breast instead of thighs?

Creamy Mushroom Chicken Thighs. However, keep in mind that chicken breasts are leaner and may dry out more easily. To prevent this, consider cooking them for a shorter time or brining them beforehand. This will help keep the chicken moist and flavorful. If you prefer a juicier result, chicken thighs are still the best choice due to their higher fat content.

What type of mushrooms are best for this recipe?

Creamy Mushroom Chicken Thighs, button mushrooms and cremini mushrooms are excellent choices. They have a mild flavor that complements the dish well. If you want to experiment, shiitake or portobello mushrooms can add a deeper, earthier taste. Feel free to mix different types of mushrooms for a more complex flavor profile. The key is to choose mushrooms that you enjoy!

How can I make this dish healthier?

Creamy Mushroom Chicken Thighs healthier. First, you can substitute half of the heavy cream with low-fat milk or a plant-based milk. This will reduce the calorie count while still keeping the dish creamy. Additionally, adding more vegetables like spinach or kale can boost the nutritional value. Lastly, using skinless chicken thighs or breasts can lower the fat content without sacrificing flavor.

Can I prepare Creamy Mushroom Chicken Thighs in advance?

Creamy Mushroom Chicken Thighs in advance. To do this, follow the recipe up to the point of baking. After combining the ingredients, cover the skillet and refrigerate it for up to 24 hours. When you’re ready to cook, simply preheat the oven and bake as directed. This makes it a convenient option for meal prep or entertaining guests!

Conclusion on Creamy Mushroom Chicken Thighs

Creamy Mushroom Chicken Thighs is a delightful dish that combines rich flavors and comforting textures. This recipe is not only easy to prepare but also offers a wonderful way to impress your family and friends. The juicy chicken thighs, paired with a creamy mushroom sauce, create a meal that is both satisfying and indulgent.

Throughout this article, we’ve explored various aspects of this dish, from the ingredients and preparation steps to serving suggestions and nutritional information. Each element plays a crucial role in making your cooking experience enjoyable and successful. Remember, the beauty of this recipe lies in its versatility. You can easily adapt it to suit your taste preferences or dietary needs.

Creamy Mushroom Chicken Thighs, don’t hesitate to experiment with different ingredients and cooking methods. Whether you choose to stick to the classic recipe or add your unique twist, the end result is sure to be delicious. So gather your ingredients, follow the steps, and savor the delightful flavors of this comforting dish.

Creamy Mushroom Chicken Thighs!

Stay Connected

Get recipes via email: