Get my cookbooks

Basque Burnt Cheesecake Recipe is a must-try dessert!

Introduction to Basque Burnt Cheesecake Recipe

What is Basque Burnt Cheesecake?

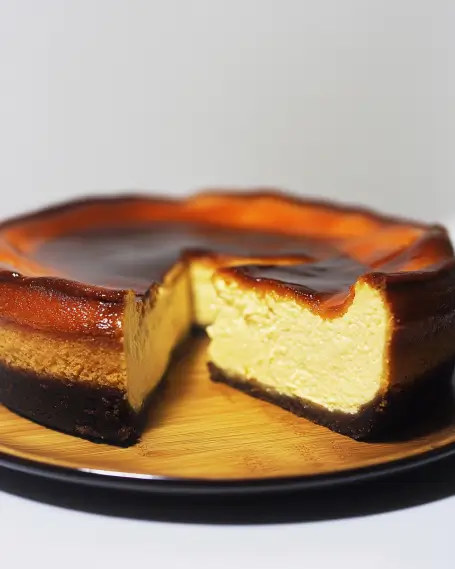
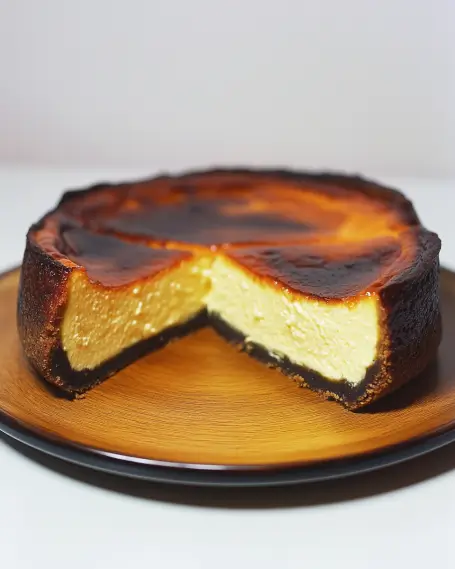
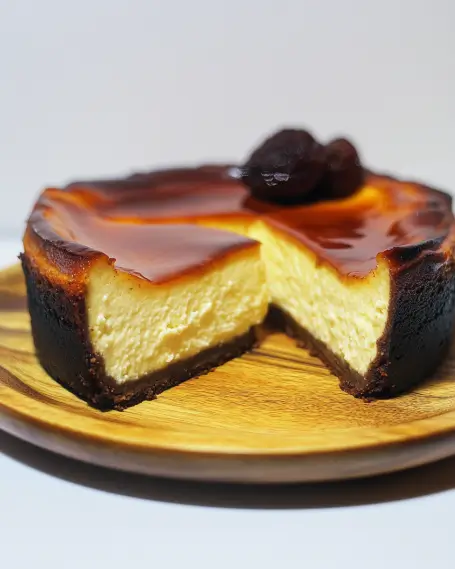
Basque Burnt Cheesecake is a delightful dessert that has taken the culinary world by storm. Unlike traditional cheesecakes, this unique treat is known for its charred top and creamy interior. The burnt exterior gives it a rich, caramelized flavor, while the inside remains smooth and velvety. This cheesecake is often served without a crust, allowing the focus to be on its luscious filling. It’s a perfect blend of sweet and savory, making it a favorite among dessert lovers.

The Origin of Basque Burnt Cheesecake

This cheesecake hails from the Basque region of Spain, specifically from a restaurant called La Viña in San Sebastián. The dessert was created by accident when the chef baked a cheesecake at a high temperature, resulting in a beautifully burnt top. Over time, this happy accident became a beloved staple in Basque cuisine. Today, Basque Burnt Cheesecake is enjoyed worldwide, celebrated for its simplicity and bold flavors. It’s a testament to how a little creativity in the kitchen can lead to something extraordinary.

Ingredients for Basque Burnt Cheesecake Recipe

To create the perfect Basque Burnt Cheesecake, you’ll need a few simple ingredients. Each component plays a vital role in achieving that creamy texture and unique flavor. Here’s what you’ll need:

  • 2 cups cream cheese, softened
  • 1 cup granulated sugar
  • 1 cup heavy cream
  • 3 large eggs
  • 1 teaspoon vanilla extract
  • 1 tablespoon all-purpose flour
  • 1/4 teaspoon salt

These ingredients are easy to find at your local grocery store. Make sure to use high-quality cream cheese for the best results. The heavy cream adds richness, while the eggs help bind everything together. The sugar balances the flavors, and a touch of flour gives the cheesecake a slight structure. Don’t forget the vanilla extract, as it enhances the overall taste!

Once you gather these ingredients, you’ll be ready to embark on your cheesecake-making adventure. The combination of these elements will lead to a deliciously burnt cheesecake that’s sure to impress your family and friends.

Step-by-Step Preparation of Basque Burnt Cheesecake Recipe

Step 1: Preparing the Baking Pan

Before you start mixing your ingredients, it’s essential to prepare your baking pan. Begin by preheating your oven to 400°F (200°C). This high temperature is crucial for achieving that signature burnt top. Next, take a 9-inch springform pan and line it with parchment paper. Make sure the paper extends above the rim of the pan. This will help you remove the cheesecake easily once it’s baked. A well-prepared pan sets the stage for a perfect Basque Burnt Cheesecake!

Step 2: Mixing the Ingredients

Now it’s time to mix your ingredients! In a large mixing bowl, add the softened cream cheese. Using an electric mixer, beat it on medium speed until it’s smooth and creamy, which should take about 2-3 minutes. Gradually add the granulated sugar, continuing to beat until the mixture is fluffy and well combined, about 2 more minutes. This step is vital for creating a light texture.

Next, add the heavy cream, eggs, vanilla extract, flour, and salt to the cream cheese mixture. It’s important to beat on low speed during this step. You want everything to be just combined without overmixing. Overmixing can lead to a dense cheesecake, and we want it to be light and airy!

Step 3: Baking the Cheesecake

Once your batter is ready, pour it into the prepared springform pan. Use a spatula to smooth the top, ensuring an even surface. Now, place the pan in the preheated oven and bake for 25-30 minutes. Keep an eye on it! The top should turn a deep brown, while the center remains slightly jiggly. This contrast is what makes the Basque Burnt Cheesecake so special.

Step 4: Cooling and Serving

After baking, turn off the oven but leave the cheesecake inside for an additional 15 minutes. This gradual cooling helps prevent cracks. Once the time is up, carefully remove the cheesecake from the oven and let it cool to room temperature. Patience is key here! For the best flavor and texture, refrigerate the cheesecake for at least 4 hours or overnight.

When you’re ready to serve, carefully remove the cheesecake from the springform pan. Peel away the parchment paper, and slice it into generous pieces. Enjoy the creamy, burnt goodness of your homemade Basque Burnt Cheesecake!

Variations of Basque Burnt Cheesecake Recipe

Flavor Variations

While the classic Basque Burnt Cheesecake is delicious on its own, you can easily add your personal touch with some flavor variations. Here are a few ideas to inspire your creativity:

  • Citrus Zest: Add 1 tablespoon of lemon or orange zest to the batter. This will give your cheesecake a refreshing citrus flavor that pairs beautifully with the creamy texture.
  • Chocolate Delight: For chocolate lovers, mix in 1/2 cup of melted dark chocolate into the batter. This will create a rich, chocolatey version of the cheesecake.
  • Nutty Flavor: Incorporate 1/2 cup of finely chopped nuts, such as walnuts or pecans, into the batter. This adds a delightful crunch and nutty flavor.
  • Spiced Cheesecake: Add a pinch of cinnamon or nutmeg to the batter for a warm, spiced flavor. This is especially nice during the fall and winter months.

These variations can elevate your Basque Burnt Cheesecake and make it even more enjoyable. Feel free to experiment with different flavors to find your favorite combination!

Alternative Crust Options

Although traditional Basque Burnt Cheesecake is crustless, you can still add a crust if you prefer a bit of texture. Here are some alternative crust options:

  • Graham Cracker Crust: Combine 1 1/2 cups of crushed graham crackers with 1/4 cup of melted butter and 1/4 cup of sugar. Press this mixture into the bottom of your springform pan before adding the cheesecake batter.
  • Almond Flour Crust: For a gluten-free option, mix 1 1/2 cups of almond flour with 1/4 cup of melted butter and 2 tablespoons of sugar. This nutty crust complements the cheesecake beautifully.
  • Oreo Crust: Crush 1 1/2 cups of Oreo cookies and mix with 1/4 cup of melted butter. This chocolatey crust adds a fun twist to the classic cheesecake.

Adding a crust can change the texture and flavor profile of your Basque Burnt Cheesecake, making it a delightful variation to try. Whether you stick with the classic or opt for a crust, your cheesecake will surely impress!

Cooking Note for Basque Burnt Cheesecake Recipe

When making the Basque Burnt Cheesecake, there are a few important cooking notes to keep in mind. These tips will help ensure that your cheesecake turns out perfectly every time.

First, the temperature of your ingredients matters. Make sure your cream cheese is softened before mixing. This helps create a smooth batter without lumps. If your cream cheese is too cold, it can be difficult to blend properly, leading to a dense texture.

Next, pay attention to the baking time. Every oven is different, so keep an eye on your cheesecake as it bakes. The top should be a deep brown, but not burnt. If you notice it browning too quickly, you can cover it loosely with aluminum foil to prevent over-browning while the center continues to cook.

Another key point is the cooling process. Allowing the cheesecake to cool gradually in the oven helps prevent cracks. Sudden temperature changes can cause the cheesecake to crack, so patience is essential. After removing it from the oven, let it cool to room temperature before refrigerating.

Lastly, remember that the cheesecake will continue to set as it cools in the fridge. It’s best to let it chill for at least 4 hours, but overnight is even better. This resting time allows the flavors to meld and the texture to become even creamier.

By following these cooking notes, you’ll be well on your way to creating a delicious Basque Burnt Cheesecake that’s sure to impress your guests!

Serving Suggestions for Basque Burnt Cheesecake Recipe

Serving your Basque Burnt Cheesecake can be just as delightful as making it! This cheesecake is versatile and pairs wonderfully with various accompaniments. Here are some serving suggestions to elevate your dessert experience:

  • Fresh Berries: A handful of fresh berries, such as strawberries, raspberries, or blueberries, adds a burst of color and flavor. Their natural sweetness complements the rich cheesecake beautifully.
  • Berry Compote: Drizzle a homemade berry compote over each slice. To make it, simply simmer your choice of berries with a bit of sugar and lemon juice until thickened. This adds a tangy contrast to the creamy cheesecake.
  • Honey Drizzle: A light drizzle of honey can enhance the cheesecake’s flavor. The sweetness of honey pairs perfectly with the burnt notes of the cheesecake.
  • Whipped Cream: Serve with a dollop of freshly whipped cream. This adds a light and airy texture that balances the richness of the cheesecake.
  • Chocolate Sauce: For chocolate lovers, a drizzle of warm chocolate sauce can take your cheesecake to the next level. It adds a decadent touch that’s hard to resist.
  • Ice Cream: A scoop of vanilla or caramel ice cream on the side can create a delightful contrast in temperature and texture. The cold ice cream pairs wonderfully with the warm, creamy cheesecake.

When serving, consider presenting the cheesecake on a beautiful platter. Garnish with mint leaves or additional berries for an elegant touch. These serving suggestions will not only enhance the flavor but also make your Basque Burnt Cheesecake a stunning centerpiece for any gathering!

Tips for Perfecting Your Basque Burnt Cheesecake Recipe

Creating the perfect Basque Burnt Cheesecake is an art that requires attention to detail. Here are some valuable tips to help you achieve cheesecake perfection every time:

  • Use Room Temperature Ingredients: Ensure your cream cheese, eggs, and heavy cream are at room temperature. This helps create a smooth batter and prevents lumps. Cold ingredients can lead to a dense texture.
  • Don’t Overmix: When combining the ingredients, mix just until combined. Overmixing can introduce too much air, leading to cracks during baking. A gentle hand will yield a creamy texture.
  • Monitor Baking Time: Every oven is different, so keep an eye on your cheesecake as it bakes. The top should be a deep brown, but not burnt. If it browns too quickly, cover it loosely with aluminum foil.
  • Cool Gradually: After baking, turn off the oven and leave the cheesecake inside for 15 minutes. This gradual cooling helps prevent cracks. Then, let it cool to room temperature before refrigerating.
  • Chill Overnight: For the best flavor and texture, refrigerate your cheesecake overnight. This allows the flavors to meld and the cheesecake to set properly, resulting in a creamier slice.
  • Use Quality Ingredients: High-quality cream cheese and fresh eggs make a noticeable difference in flavor. Opt for full-fat cream cheese for a richer taste and texture.
  • Experiment with Flavors: Don’t hesitate to try different flavor variations. Adding citrus zest, chocolate, or spices can elevate your cheesecake and make it uniquely yours.
  • Presentation Matters: When serving, consider garnishing with fresh berries, a drizzle of honey, or a sprinkle of powdered sugar. A beautiful presentation enhances the overall experience.

By following these tips, you’ll be well on your way to mastering the Basque Burnt Cheesecake. Each attempt will bring you closer to that perfect balance of burnt flavor and creamy texture. Enjoy the process and happy baking!

Breakdown of Time for Basque Burnt Cheesecake Recipe

Prep Time

Preparing your Basque Burnt Cheesecake is a straightforward process. The prep time typically takes about 15-20 minutes. During this time, you will gather your ingredients, soften the cream cheese, and mix everything together. Make sure to have all your ingredients ready to ensure a smooth workflow. This initial step is crucial for setting the stage for a delicious cheesecake!

Cooking Time

The cooking time for the Basque Burnt Cheesecake is approximately 25-30 minutes. You’ll want to keep a close eye on it as it bakes. The top should develop a deep brown color, while the center remains slightly jiggly. This unique baking method is what gives the cheesecake its signature burnt flavor. Remember, every oven is different, so adjust the time as needed!

Total Time

In total, you can expect the entire process, from prep to baking, to take around 40-50 minutes. However, don’t forget about the cooling and chilling time! After baking, allow the cheesecake to cool at room temperature and then refrigerate it for at least 4 hours, or ideally overnight. This resting period is essential for achieving the perfect texture and flavor. So, while the active time is short, the total time from start to finish is about 4 hours and 50 minutes, including chilling. Patience is key to enjoying this delightful dessert!

Nutritional Information for Basque Burnt Cheesecake Recipe

Calories

When indulging in a slice of Basque Burnt Cheesecake, it’s essential to be aware of its caloric content. Each serving contains approximately 350 calories. This number can vary slightly based on the specific ingredients used and any variations you may add. While this cheesecake is rich and decadent, it’s important to enjoy it in moderation as part of a balanced diet.

Protein

In addition to its delightful taste, Basque Burnt Cheesecake also provides a decent amount of protein. Each serving contains about 6 grams of protein. The primary source of protein comes from the cream cheese and eggs used in the recipe. This makes it a satisfying dessert that can help curb your sweet cravings while still contributing to your daily protein intake.

Sodium

Sodium content is another factor to consider when enjoying this cheesecake. Each slice contains roughly 200 milligrams of sodium. This amount is relatively moderate, especially when compared to other desserts. However, if you are watching your sodium intake, it’s good to keep this in mind. The salt in the recipe enhances the flavors, but you can adjust it slightly if needed.

Overall, while Basque Burnt Cheesecake is a treat that should be enjoyed occasionally, it can fit into a healthy lifestyle when consumed mindfully. The combination of flavors and textures makes it a delightful dessert that’s worth every bite!

FAQs about Basque Burnt Cheesecake Recipe

What makes Basque Burnt Cheesecake different from regular cheesecake?

Basque Burnt Cheesecake stands out from regular cheesecake due to its unique baking method and appearance. While traditional cheesecakes often have a smooth, pale top, the Basque version is baked at a high temperature, resulting in a deeply browned, almost charred surface. This gives it a rich, caramelized flavor that contrasts beautifully with the creamy interior. Additionally, Basque Burnt Cheesecake is typically crustless, allowing the focus to remain on its luscious filling. This combination of textures and flavors makes it a delightful twist on the classic dessert.

Can I make Basque Burnt Cheesecake ahead of time?

Absolutely! In fact, making Basque Burnt Cheesecake ahead of time is a great idea. This dessert benefits from chilling in the refrigerator for at least 4 hours, but overnight is even better. Preparing it in advance allows the flavors to meld and the texture to set perfectly. Just be sure to cover it well with plastic wrap or foil to keep it fresh. When you’re ready to serve, simply slice and enjoy the creamy goodness of your cheesecake!

How do I store leftover Basque Burnt Cheesecake?

Storing leftover Basque Burnt Cheesecake is simple. First, allow it to cool completely at room temperature. Then, cover it tightly with plastic wrap or aluminum foil to prevent it from drying out. You can store it in the refrigerator for up to 5 days. If you want to keep it longer, consider freezing it. To freeze, wrap individual slices in plastic wrap and then place them in an airtight container. This way, you can enjoy a slice of cheesecake whenever the craving strikes!

What can I serve with Basque Burnt Cheesecake?

Basque Burnt Cheesecake is delicious on its own, but there are many delightful accompaniments you can serve alongside it. Fresh berries, such as strawberries or raspberries, add a burst of color and flavor. A drizzle of berry compote or honey enhances the sweetness and complements the rich cheesecake. For a touch of elegance, consider adding a dollop of whipped cream or a scoop of vanilla ice cream. These additions create a beautiful contrast in texture and flavor, making your dessert experience even more enjoyable!

Conclusion on Basque Burnt Cheesecake Recipe

In conclusion, the Basque Burnt Cheesecake is a remarkable dessert that combines simplicity with bold flavors. Its unique baking method results in a beautifully charred top and a creamy, luscious interior that is hard to resist. Whether you’re a seasoned baker or a novice in the kitchen, this cheesecake is accessible and rewarding to make.

As you explore the recipe, remember that the key to success lies in using quality ingredients and following the steps carefully. The joy of creating this dessert is not just in the final product but also in the process of baking. Each attempt will bring you closer to mastering the art of the Basque Burnt Cheesecake.

Don’t hesitate to experiment with different flavors and variations to make it your own. From adding citrus zest to incorporating a crust, the possibilities are endless. This cheesecake is perfect for any occasion, whether it’s a family gathering, a dinner party, or simply a treat for yourself.

So, gather your ingredients, preheat your oven, and embark on this delightful baking adventure. Your friends and family will surely be impressed by your culinary skills when you serve them a slice of this decadent Basque Burnt Cheesecake. Enjoy every creamy, burnt bite!

Pepperoni Pizza with Hot Honey and Ricotta is Delicious!

Introduction to Pepperoni Pizza with Hot Honey and Ricotta

When it comes to pizza, few combinations are as beloved as pepperoni and cheese. However, the addition of hot honey and ricotta takes this classic dish to a whole new level. This delightful twist on traditional pepperoni pizza offers a unique flavor experience that is both sweet and savory. The creamy ricotta balances the spicy notes of the hot honey, creating a mouthwatering treat that will leave your taste buds dancing.

The Unique Flavor Profile of Pepperoni Pizza with Hot Honey and Ricotta

The flavor profile of pepperoni pizza with hot honey and ricotta is truly one-of-a-kind. The rich, creamy texture of ricotta cheese adds a luxurious touch to the pizza. Meanwhile, the pepperoni provides a satisfying crunch and a burst of savory flavor. But what really sets this pizza apart is the hot honey. This sweet and spicy drizzle elevates the dish, making each bite an exciting adventure.

Imagine biting into a slice where the heat from the honey mingles with the salty pepperoni. The sweetness cuts through the richness of the cheese, creating a perfect balance. Additionally, the fresh basil adds a hint of freshness, enhancing the overall experience. This pizza is not just a meal; it’s a celebration of flavors that will impress your family and friends.

Whether you’re hosting a game night or enjoying a cozy dinner at home, this pepperoni pizza with hot honey and ricotta is sure to be a hit. It’s easy to make and even easier to enjoy. So, let’s dive into the ingredients and preparation steps to create this delicious dish!

Ingredients for Pepperoni Pizza with Hot Honey and Ricotta

To create the perfect pepperoni pizza with hot honey and ricotta, you’ll need a selection of fresh and flavorful ingredients. Each component plays a vital role in achieving that delightful taste. Here’s what you’ll need:

  • 2 cups all-purpose flour: This forms the base of your pizza crust, providing the necessary structure.
  • 1 teaspoon instant yeast: This helps the dough rise, giving it a light and airy texture.
  • 3/4 teaspoon salt: Salt enhances the flavor of the dough and balances the sweetness of the honey.
  • 3/4 cup warm water (about 110°F): Warm water activates the yeast, making the dough rise effectively.
  • 1 tablespoon olive oil: Olive oil adds richness to the dough and helps it stay moist.
  • 1/2 cup ricotta cheese: This creamy cheese adds a luxurious texture and flavor to the pizza.
  • 1/4 cup hot honey: The star ingredient! It brings a sweet and spicy kick to each bite.
  • 1 cup shredded mozzarella cheese: Mozzarella is a classic pizza cheese that melts beautifully.
  • 1 cup sliced pepperoni: This savory topping is a must-have for any pepperoni pizza.
  • 1/2 cup sliced black olives: Olives add a briny flavor that complements the other ingredients.
  • 1/4 cup fresh basil leaves: Fresh basil adds a burst of freshness and aroma to the pizza.
  • Additional olive oil for drizzling: A drizzle of olive oil before serving enhances the flavors.

With these ingredients on hand, you’re ready to embark on your pizza-making adventure. Each element contributes to the overall taste, making this dish a delightful experience. Now, let’s move on to the step-by-step preparation of your pepperoni pizza with hot honey and ricotta!

Step-by-Step Preparation of Pepperoni Pizza with Hot Honey and Ricotta

Now that you have all your ingredients ready, it’s time to dive into the step-by-step preparation of your delicious pepperoni pizza with hot honey and ricotta. Each step is simple and straightforward, ensuring that you can create a mouthwatering pizza right in your kitchen. Let’s get started!

Step 1: Preparing the Dough for Pepperoni Pizza with Hot Honey and Ricotta

First, you’ll want to prepare the dough. In a large bowl, combine the all-purpose flour, instant yeast, and salt. Mix these dry ingredients well. Next, gradually add the warm water and olive oil to the bowl. Stir until a dough begins to form. It’s important to use warm water, as it activates the yeast, helping the dough rise.

Once the dough comes together, transfer it to a floured surface. Knead the dough for about 5-7 minutes. You want it to be smooth and elastic. This process is crucial for developing the gluten, which gives the crust its structure. After kneading, place the dough in a lightly oiled bowl. Cover it with a damp cloth and let it rise in a warm place for about 1 hour, or until it has doubled in size.

Step 2: Making the Sauce for Pepperoni Pizza with Hot Honey and Ricotta

While the dough is rising, you can prepare the sauce. For this pizza, you won’t need a traditional tomato sauce. Instead, the ricotta cheese will serve as the base. Simply take your ricotta cheese and set it aside. You can mix in a pinch of salt and pepper for added flavor if you like. This creamy layer will provide a rich backdrop for the other toppings.

Next, prepare the hot honey. If you’re using regular honey, mix in a pinch of red pepper flakes to give it that spicy kick. This sweet and spicy combination will elevate your pizza, making each bite a delightful experience.

Step 3: Assembling the Pepperoni Pizza with Hot Honey and Ricotta

Once your dough has risen, it’s time to assemble your pizza. Preheat your oven to 475°F (245°C) and place a pizza stone or baking sheet inside to heat. Punch down the risen dough and roll it out on a floured surface to your desired thickness, about 12 inches in diameter.

Carefully transfer the rolled-out dough onto a piece of parchment paper. Spread the ricotta cheese evenly over the surface, leaving a small border around the edges. Drizzle the hot honey over the ricotta, ensuring it’s evenly distributed. Now, sprinkle the shredded mozzarella cheese on top, followed by the sliced pepperoni and black olives. This layering will create a beautiful and flavorful pizza.

Step 4: Baking the Pepperoni Pizza with Hot Honey and Ricotta

Now comes the exciting part—baking your pizza! Carefully slide the pizza (with the parchment paper) onto the preheated pizza stone or baking sheet. Bake for 12-15 minutes, or until the crust is golden and the cheese is bubbly. Keep an eye on it to avoid burning.

Once baked, remove the pizza from the oven and let it cool for a minute. This brief cooling time allows the cheese to set slightly, making it easier to slice. Top your pizza with fresh basil leaves and drizzle with additional olive oil for an extra touch of flavor. Now, it’s ready to be sliced and served!

Variation of Pepperoni Pizza with Hot Honey and Ricotta

While the classic pepperoni pizza with hot honey and ricotta is a delightful dish on its own, there are many ways to customize it. Whether you want to try different toppings or need a gluten-free option, the possibilities are endless. Let’s explore some alternative toppings and gluten-free options to make this pizza even more exciting!

Alternative Toppings for Pepperoni Pizza with Hot Honey and Ricotta

One of the best things about pizza is its versatility. You can easily switch up the toppings to suit your taste. Here are some delicious alternatives to consider:

  • Bell Peppers: Add sliced bell peppers for a sweet crunch. They pair wonderfully with the spicy honey.
  • Mushrooms: Sautéed mushrooms bring an earthy flavor that complements the richness of the ricotta.
  • Jalapeños: For those who love heat, sliced jalapeños can add an extra kick to your pizza.
  • Spinach: Fresh spinach adds a pop of color and a nutritious boost to your pizza.
  • Feta Cheese: Crumbled feta can provide a tangy contrast to the sweetness of the hot honey.

Feel free to mix and match these toppings to create your perfect pizza. The key is to balance flavors and textures, ensuring each bite is a delightful experience.

Gluten-Free Options for Pepperoni Pizza with Hot Honey and Ricotta

If you or someone you know has a gluten intolerance, you can still enjoy this delicious pizza! Here are some gluten-free options:

  • Gluten-Free Pizza Crust: Many stores offer pre-made gluten-free pizza crusts. Look for one that suits your taste.
  • Cauliflower Crust: For a healthier alternative, try making a cauliflower crust. It’s low in carbs and gluten-free!
  • Chickpea Flour Crust: Chickpea flour can be used to create a protein-rich, gluten-free crust that’s both tasty and filling.

When using gluten-free crusts, follow the package instructions for baking times and temperatures. This way, you’ll achieve the perfect texture for your pizza.

With these variations, you can enjoy your pepperoni pizza with hot honey and ricotta in many different ways. Whether you stick to the classic recipe or try something new, each version is sure to be a hit!

Cooking Note for Pepperoni Pizza with Hot Honey and Ricotta

Cooking pizza at home can be a fun and rewarding experience. However, there are a few important notes to keep in mind to ensure your pepperoni pizza with hot honey and ricotta turns out perfectly every time. Here are some tips to help you along the way:

First, the temperature of your oven is crucial. Preheating your oven to 475°F (245°C) is essential for achieving a crispy crust. A hot oven helps the dough rise quickly and creates that delightful golden-brown finish. If you have a pizza stone, make sure to place it in the oven while it preheats. This will help distribute heat evenly and give your crust a nice crunch.

Next, when rolling out your dough, try to keep it even in thickness. This ensures that your pizza cooks uniformly. If the edges are thicker than the center, the crust may not bake properly. Aim for about 1/4 inch thickness for a nice balance between chewy and crispy.

Another important note is to avoid overloading your pizza with toppings. While it’s tempting to add lots of delicious ingredients, too many toppings can make the pizza soggy. Stick to a balanced amount of toppings to allow the crust to cook through and the cheese to melt beautifully.

Lastly, let your pizza cool for a minute after baking. This brief cooling period allows the cheese to set, making it easier to slice. If you cut into it right away, the toppings may slide off, and you’ll miss out on that perfect slice.

By following these cooking notes, you’ll be well on your way to creating a delicious pepperoni pizza with hot honey and ricotta that everyone will love. Enjoy the process, and don’t forget to have fun experimenting with flavors!

Serving Suggestions for Pepperoni Pizza with Hot Honey and Ricotta

Once your delicious pepperoni pizza with hot honey and ricotta is ready, it’s time to think about how to serve it. The right accompaniments can elevate your pizza experience, making it even more enjoyable. Here are some serving suggestions that pair perfectly with this delightful dish:

  • Fresh Salad: A crisp salad is a great way to balance the richness of the pizza. Consider a simple mixed greens salad with a light vinaigrette. The freshness will complement the flavors of the pizza beautifully.
  • Garlic Bread: For those who love bread, garlic bread is a classic side that pairs well with pizza. The buttery, garlicky flavor enhances the overall meal.
  • Antipasto Platter: Create an antipasto platter with olives, cured meats, and cheeses. This adds variety and makes for a fun sharing experience.
  • Wine Pairing: A glass of red wine, like Chianti or Merlot, can enhance the flavors of your pizza. The acidity in the wine complements the richness of the cheese and pepperoni.
  • Craft Beer: If you prefer beer, a light lager or a hoppy IPA can be a refreshing choice. The carbonation helps cleanse the palate between bites.

Don’t forget to serve your pizza hot, right out of the oven! You can also offer extra hot honey on the side for those who want an extra kick. With these serving suggestions, your pepperoni pizza with hot honey and ricotta will be a hit at any gathering. Enjoy your meal and the delightful company of friends and family!

Tips for Perfecting Your Pepperoni Pizza with Hot Honey and Ricotta

Creating the perfect pepperoni pizza with hot honey and ricotta is an art. With a few helpful tips, you can elevate your pizza-making skills and impress your family and friends. Here are some essential tips to ensure your pizza turns out delicious every time:

  • Use Fresh Ingredients: Fresh ingredients make a big difference in flavor. Opt for high-quality ricotta cheese, fresh basil, and good-quality pepperoni. Fresh ingredients enhance the overall taste of your pizza.
  • Don’t Skip the Kneading: Kneading the dough is crucial for developing gluten. This gives your crust the right texture. Make sure to knead for the full 5-7 minutes until the dough is smooth and elastic.
  • Let the Dough Rise: Allowing the dough to rise properly is key. A warm environment helps the yeast work its magic. If your kitchen is cool, consider placing the dough in a slightly warm oven (turned off) to help it rise.
  • Preheat Your Oven: Always preheat your oven to the right temperature. A hot oven ensures a crispy crust. If using a pizza stone, let it heat up for at least 30 minutes before baking.
  • Balance Your Toppings: While it’s tempting to load up on toppings, less is often more. A balanced amount of toppings allows the crust to cook evenly and prevents sogginess.
  • Experiment with Honey: If you want to customize the heat level, try different types of hot honey. Some brands offer varying spice levels, so choose one that suits your taste.
  • Slice with Care: After baking, let your pizza cool for a minute before slicing. This helps the cheese set, making it easier to cut without losing toppings.
  • Garnish Just Before Serving: Add fresh basil and a drizzle of olive oil right before serving. This keeps the basil vibrant and fresh, enhancing the pizza’s flavor.

By following these tips, you’ll be well on your way to mastering the art of making pepperoni pizza with hot honey and ricotta. Enjoy the process, and don’t hesitate to get creative with your toppings and flavors!

Breakdown of Time for Pepperoni Pizza with Hot Honey and Ricotta

Understanding the time needed to prepare and cook your pepperoni pizza with hot honey and ricotta is essential for planning your meal. Here’s a detailed breakdown of the time involved in each step, so you can enjoy a delicious pizza without any surprises!

Prep Time for Pepperoni Pizza with Hot Honey and Ricotta

The prep time for this delightful pizza is approximately 20-30 minutes. This includes gathering your ingredients, mixing the dough, and allowing it to rise. Here’s a quick overview of what to expect:

  • Gathering Ingredients: 5 minutes
  • Mixing and Kneading Dough: 10-15 minutes
  • Letting Dough Rise: 1 hour (this is passive time, so you can prepare other things during this period)

In total, you’ll spend about 20-30 minutes actively preparing the pizza, while the dough rises on its own.

Cooking Time for Pepperoni Pizza with Hot Honey and Ricotta

Once your dough has risen, the cooking time is relatively quick. Here’s how it breaks down:

  • Preheating Oven: 10-15 minutes (this can happen while you roll out the dough)
  • Baking Pizza: 12-15 minutes

So, the total cooking time will be around 22-30 minutes, depending on your oven and how crispy you like your crust.

Total Time for Pepperoni Pizza with Hot Honey and Ricotta

When you combine the prep time and cooking time, the total time to make your pepperoni pizza with hot honey and ricotta is approximately 1 hour and 30 minutes. Here’s a quick summary:

  • Active Prep Time: 20-30 minutes
  • Passive Rising Time: 1 hour
  • Cooking Time: 22-30 minutes

In total, you’re looking at about 1 hour and 30 minutes from start to finish. This makes it a great option for a weekend dinner or a fun cooking project with family and friends. Enjoy the process and the delicious results!

Nutritional Information for Pepperoni Pizza with Hot Honey and Ricotta

Understanding the nutritional content of your pepperoni pizza with hot honey and ricotta is essential for making informed choices. This delicious dish not only satisfies your cravings but also provides a balance of nutrients. Let’s break down the key nutritional components of this pizza.

Calories in Pepperoni Pizza with Hot Honey and Ricotta

Each serving of pepperoni pizza with hot honey and ricotta contains approximately 320 calories. This calorie count includes the crust, cheese, toppings, and the sweet and spicy hot honey. It’s a satisfying meal that can fit into a balanced diet, especially when enjoyed in moderation.

Protein Content in Pepperoni Pizza with Hot Honey and Ricotta

Protein is an important nutrient for building and repairing tissues. Each serving of this pizza provides about 12 grams of protein. The protein comes primarily from the ricotta and mozzarella cheeses, as well as the pepperoni. This makes it a good option for those looking to increase their protein intake while enjoying a tasty meal.

Sodium Levels in Pepperoni Pizza with Hot Honey and Ricotta

Sodium is another important factor to consider. Each serving of pepperoni pizza with hot honey and ricotta contains approximately 700 milligrams of sodium. While sodium is necessary for bodily functions, it’s important to monitor your intake, especially if you are watching your salt consumption. You can reduce sodium levels by using low-sodium cheese or opting for fewer pepperoni slices.

In summary, this pepperoni pizza with hot honey and ricotta offers a delightful mix of flavors and nutrients. With a reasonable calorie count, a good amount of protein, and a moderate sodium level, it can be a delicious part of your meal rotation. Enjoy this pizza as a treat, and feel good about the nutritional benefits it provides!

FAQs about Pepperoni Pizza with Hot Honey and Ricotta

What is hot honey and how does it enhance Pepperoni Pizza with Hot Honey and Ricotta?

Hot honey is a delightful blend of honey infused with chili peppers or spices. This sweet and spicy condiment adds a unique flavor to dishes, especially pizza. When drizzled over pepperoni pizza with ricotta, it creates a perfect balance of sweetness and heat. The hot honey enhances the savory notes of the pepperoni and the creaminess of the ricotta, making each bite an exciting experience. It’s a simple yet effective way to elevate your pizza game!

Can I use different cheeses in Pepperoni Pizza with Hot Honey and Ricotta?

Absolutely! While ricotta and mozzarella are classic choices, you can experiment with various cheeses to suit your taste. For instance, you might try using provolone for a sharper flavor or fontina for a creamier texture. Mixing in some parmesan can add a nice salty kick. Just remember to balance the flavors, so the cheese complements the hot honey and pepperoni without overpowering them.

How can I make Pepperoni Pizza with Hot Honey and Ricotta spicier?

If you love heat, there are several ways to spice up your pepperoni pizza with hot honey and ricotta. First, you can increase the amount of hot honey you drizzle on top. Additionally, consider adding sliced jalapeños or crushed red pepper flakes to the toppings. For an extra kick, try using spicy pepperoni or adding a sprinkle of cayenne pepper to the ricotta. These options will surely satisfy your craving for spice!

What are some side dishes that pair well with Pepperoni Pizza with Hot Honey and Ricotta?

Pairing side dishes with your pepperoni pizza can enhance your meal. Here are some great options:

  • Caesar Salad: A classic Caesar salad with crisp romaine, croutons, and parmesan is a refreshing complement to the rich pizza.
  • Caprese Salad: Fresh tomatoes, mozzarella, and basil drizzled with balsamic glaze provide a light and flavorful side.
  • Garlic Knots: These buttery, garlicky treats are perfect for dipping in marinara sauce.
  • Roasted Vegetables: A medley of roasted seasonal vegetables adds a healthy touch to your meal.
  • Potato Wedges: Crispy potato wedges seasoned with herbs make for a hearty side that pairs well with pizza.

These side dishes will not only complement your pepperoni pizza with hot honey and ricotta but also create a well-rounded dining experience. Enjoy your meal!

Conclusion on Pepperoni Pizza with Hot Honey and Ricotta

In conclusion, pepperoni pizza with hot honey and ricotta is a delightful dish that brings together a medley of flavors and textures. The combination of spicy pepperoni, creamy ricotta, and the sweet kick of hot honey creates a unique pizza experience that is sure to please everyone at the table. Whether you’re a pizza aficionado or just looking for a fun meal to share with family and friends, this recipe is a fantastic choice.

Making this pizza at home allows you to customize it to your liking. You can experiment with different toppings, cheeses, and even crust options. The versatility of this dish means you can enjoy it in many ways, whether you prefer a classic approach or want to try something new. Plus, with the tips and variations provided, you can easily adapt the recipe to suit dietary preferences or personal tastes.

As you gather around the table to enjoy your homemade pepperoni pizza with hot honey and ricotta, remember that cooking is not just about the food; it’s about creating memories. Share the joy of making and eating this delicious pizza with your loved ones. So, roll up your sleeves, get creative in the kitchen, and savor every bite of this mouthwatering dish!

Happy cooking, and enjoy your culinary adventure with pepperoni pizza with hot honey and ricotta!

Buffalo Chicken Grilled Cheese Sandwich is a must-try!

Introduction to Buffalo Chicken Grilled Cheese Sandwich

Buffalo Chicken Grilled Cheese Sandwich is a delightful twist on the classic comfort food. This sandwich combines the rich, gooey goodness of melted cheese with the spicy kick of buffalo chicken. It’s perfect for lunch, dinner, or even a late-night snack. With its crispy exterior and savory filling, this sandwich is sure to satisfy your cravings.

What Makes Buffalo Chicken Grilled Cheese Sandwich Special?

What sets the Buffalo Chicken Grilled Cheese Sandwich apart? First, it’s all about the flavor. The combination of tender, shredded chicken mixed with zesty buffalo sauce creates a mouthwatering filling. Then, when you add the melty cheddar and mozzarella cheeses, you get a creamy texture that perfectly balances the heat of the buffalo sauce.

Moreover, this sandwich is incredibly versatile. You can easily customize it to suit your taste. Want it spicier? Just add some jalapeños! Prefer a vegetarian option? Swap the chicken for roasted cauliflower. The possibilities are endless!

Not only is this sandwich delicious, but it’s also quick and easy to make. In just a few simple steps, you can whip up a satisfying meal that will impress your family and friends. So, let’s dive into the ingredients and preparation of this scrumptious Buffalo Chicken Grilled Cheese Sandwich!

Ingredients for Buffalo Chicken Grilled Cheese Sandwich

Buffalo Chicken Grilled Cheese Sandwich, you’ll need a few simple ingredients. Each component plays a vital role in delivering that delicious flavor and texture. Here’s what you’ll need:

  • 2 slices of bread: Choose your favorite type, such as sourdough or whole wheat. The bread will provide a sturdy base for your sandwich.
  • 1 cup cooked chicken: Shredded chicken is the star of this dish. You can use rotisserie chicken or any leftover chicken you have on hand.
  • 1/4 cup buffalo sauce: This spicy sauce adds the signature kick. Adjust the amount based on your heat preference.
  • 1/2 cup shredded cheddar cheese: Cheddar brings a sharp flavor that complements the buffalo sauce beautifully.
  • 1/2 cup shredded mozzarella cheese: Mozzarella adds creaminess and helps bind the sandwich together.
  • 2 tablespoons butter: Butter is essential for grilling the sandwich to a golden brown perfection.
  • Optional garnishes: Consider adding sliced green onions or blue cheese crumbles for an extra touch of flavor.

These ingredients come together to create a mouthwatering sandwich that’s sure to please. Whether you’re making it for yourself or sharing with friends, this Buffalo Chicken Grilled Cheese Sandwich is a crowd-pleaser. Now that you have your ingredients ready, let’s move on to the preparation steps!

Preparation of Buffalo Chicken Grilled Cheese Sandwich

Buffalo Chicken Grilled Cheese Sandwich. Follow these simple steps to create a delicious meal that’s sure to impress!

Step 1: Gather Your Ingredients

Before you start cooking, make sure you have everything you need. Gather your bread, shredded chicken, buffalo sauce, cheeses, and butter. Having everything in one place will make the cooking process smoother and more enjoyable. Don’t forget your optional garnishes, like green onions or blue cheese crumbles, to add that extra flair!

Step 2: Prepare the Buffalo Chicken Mixture

In a medium bowl, combine the shredded chicken with the buffalo sauce. Use a fork or spoon to mix them well. Ensure that every piece of chicken is coated in the spicy sauce. This step is crucial because it infuses the chicken with flavor. If you like it spicy, feel free to add more buffalo sauce to suit your taste!

Step 3: Assemble the Buffalo Chicken Grilled Cheese Sandwich

Now it’s time to build your sandwich! Start by placing half of the shredded cheddar cheese on one slice of bread. Next, add the buffalo chicken mixture on top of the cheese. Then, sprinkle the mozzarella cheese over the chicken. Finally, top it off with the remaining cheddar cheese and place the second slice of bread on top. This layering ensures that the cheese melts beautifully and holds everything together.

Step 4: Grill the Sandwich to Perfection

Heat a skillet over medium heat and add 1 tablespoon of butter. Once the butter is melted and bubbly, carefully place your assembled sandwich in the skillet. Cook for about 3-4 minutes, or until the bottom is golden brown. Then, flip the sandwich carefully. Add the remaining tablespoon of butter to the skillet and cook the other side for another 3-4 minutes. You want both sides to be crispy and the cheese to be perfectly melted. Once done, remove the sandwich from the skillet and let it cool for a minute before slicing it in half. Garnish with green onions or blue cheese crumbles if desired!

And there you have it! Your Buffalo Chicken Grilled Cheese Sandwich is ready to be enjoyed. The combination of flavors and textures will surely make this a favorite in your household.

Variation of Buffalo Chicken Grilled Cheese Sandwich

Buffalo Chicken Grilled Cheese Sandwich is already a hit, there are many ways to switch things up! By experimenting with different ingredients and flavors, you can create a unique twist that suits your taste buds. Let’s explore some alternative ingredients and the difference between spicy and mild versions of this delicious sandwich.

Alternative Ingredients for a Unique Twist

Want to make your Buffalo Chicken Grilled Cheese Sandwich stand out? Here are some alternative ingredients you can try:

  • Different Breads: Instead of sourdough or whole wheat, consider using ciabatta, rye, or even a bagel. Each type of bread adds its own flavor and texture.
  • Cheese Varieties: Mix it up with pepper jack cheese for an extra kick, or use gouda for a smoky flavor. You can also try a blend of cheeses for a richer taste.
  • Vegetables: Add sliced tomatoes, spinach, or even avocado for a fresh touch. These veggies can enhance the flavor and add some nutrition.
  • Protein Alternatives: For a vegetarian option, swap the chicken for roasted cauliflower or chickpeas tossed in buffalo sauce. You can also use turkey or beef for a different protein source.
  • Spreads: Try spreading a layer of ranch or blue cheese dressing on the bread before assembling. This adds creaminess and complements the buffalo flavor.

These alternative ingredients can transform your sandwich into something new and exciting. Feel free to mix and match based on what you have at home or what you enjoy!

Spicy vs. Mild Buffalo Chicken Grilled Cheese Sandwich

Buffalo Chicken Grilled Cheese Sandwich, you have options! Here’s how to adjust the spice level:

  • Spicy Version: For those who love heat, use extra buffalo sauce or add sliced jalapeños to the chicken mixture. You can also sprinkle some crushed red pepper flakes on the sandwich before grilling.
  • Mild Version: If you prefer a milder taste, reduce the amount of buffalo sauce. You can also mix in some cream cheese with the chicken to tone down the spice while keeping the flavor.

By adjusting the spice level, you can cater to everyone’s preferences. Whether you like it hot or mild, the Buffalo Chicken Grilled Cheese Sandwich can be customized to fit your taste!

Cooking Note for Buffalo Chicken Grilled Cheese Sandwich

Buffalo Chicken Grilled Cheese Sandwich, there are a few cooking tips to keep in mind. These notes will help you achieve the best results and ensure your sandwich is delicious every time.

First, the choice of bread is crucial. A thicker bread, like sourdough, holds up well against the filling. It also provides a nice crunch when grilled. If you opt for a softer bread, be gentle while flipping the sandwich to avoid squishing it.

Next, pay attention to the heat level of your skillet. Cooking on medium heat is ideal. This allows the cheese to melt evenly without burning the bread. If the skillet is too hot, the outside may brown too quickly while the cheese remains unmelted inside.

Another important note is to let the sandwich rest for a minute after grilling. This short cooling period allows the cheese to set slightly, making it easier to slice without spilling the filling everywhere. Plus, it gives you a moment to prepare any garnishes you want to add.

Lastly, don’t hesitate to experiment with cooking methods. If you have a panini press, it can create a perfectly grilled sandwich with minimal effort. Just be sure to adjust the cooking time, as a press may cook faster than a skillet.

By following these cooking notes, you’ll be well on your way to mastering the art of the Buffalo Chicken Grilled Cheese Sandwich. Enjoy the process and savor the delicious results!

Serving Suggestions for Buffalo Chicken Grilled Cheese Sandwich

Buffalo Chicken Grilled Cheese Sandwich, it’s time to think about how to serve it. Pairing your sandwich with the right sides can elevate your meal and create a complete dining experience. Here are some tasty pairing ideas that complement the flavors of your sandwich.

Pairing Ideas for a Complete Meal

To make your meal even more satisfying, consider these side dishes:

  • Classic French Fries: Crispy fries are a timeless side that pairs perfectly with the rich flavors of the sandwich. You can serve them plain or toss them in buffalo sauce for an extra kick!
  • Coleslaw: A refreshing coleslaw adds a crunchy texture and balances the heat of the buffalo chicken. The creamy dressing complements the sandwich beautifully.
  • Vegetable Chips: For a healthier option, try serving your sandwich with baked vegetable chips. They provide a satisfying crunch without the extra calories of traditional chips.
  • Pickles: The tangy flavor of pickles can cut through the richness of the cheese and chicken. Serve a few slices on the side for a delightful contrast.
  • Soup: A warm bowl of tomato soup or a spicy chili can be a comforting addition. Dipping your sandwich into the soup creates a delicious combination.

Buffalo Chicken Grilled Cheese Sandwich perfectly. So, gather your ingredients, whip up your sandwich, and enjoy a delightful meal!

Tips for Making the Best Buffalo Chicken Grilled Cheese Sandwich

Buffalo Chicken Grilled Cheese Sandwich is an art. To help you achieve sandwich perfection, here are some valuable tips and common mistakes to avoid. With these insights, you’ll be well on your way to impressing everyone with your culinary skills!

Common Mistakes to Avoid

Even the best cooks can make mistakes. Here are some common pitfalls to watch out for:

  • Using Cold Ingredients: Make sure your chicken and cheeses are at room temperature before assembling the sandwich. Cold ingredients can prevent the cheese from melting properly, resulting in a less satisfying texture.
  • Overloading the Sandwich: While it’s tempting to pile on the fillings, too much can make the sandwich difficult to grill. Stick to the recommended amounts to ensure even cooking and a manageable sandwich.
  • Not Preheating the Skillet: Always preheat your skillet before adding the sandwich. A hot skillet helps achieve that golden-brown crust while ensuring the cheese melts evenly.
  • Skipping the Butter: Butter is essential for that crispy, golden exterior. Don’t skip this step! It adds flavor and helps the bread toast perfectly.
  • Flipping Too Soon: Patience is key! Allow the first side to cook for 3-4 minutes before flipping. If you flip too early, the bread may not be crispy, and the cheese might not melt.
  • Not Letting It Rest: After grilling, let your sandwich rest for a minute. This allows the cheese to set, making it easier to slice and eat without spilling the filling.

Buffalo Chicken Grilled Cheese Sandwich that everyone will love. Remember, practice makes perfect, so don’t be afraid to experiment and find what works best for you!

Breakdown of Time for Buffalo Chicken Grilled Cheese Sandwich

Buffalo Chicken Grilled Cheese Sandwich, it’s helpful to know how much time you’ll need. This way, you can plan your cooking session better. Here’s a quick breakdown of the time involved in preparing and cooking this delicious sandwich.

Prep Time

Buffalo Chicken Grilled Cheese Sandwich is quite short. You’ll need about 10 minutes to gather your ingredients and prepare the buffalo chicken mixture. This includes shredding the chicken and mixing it with the buffalo sauce. If you have leftover chicken, this step can be even quicker!

Cooking Time

Once your sandwich is assembled, the cooking time is approximately 8 minutes. You’ll grill each side for about 3-4 minutes until they are golden brown and the cheese is melted. Keep an eye on the skillet to ensure it doesn’t get too hot, which can burn the bread before the cheese melts.

Total Time

Buffalo Chicken Grilled Cheese Sandwich is perfect for a satisfying meal any time of day. Whether it’s lunch, dinner, or a late-night snack, you’ll have a delicious sandwich ready in no time!

Nutritional Information for Buffalo Chicken Grilled Cheese Sandwich

Buffalo Chicken Grilled Cheese Sandwich. This section will break down the key nutritional components, helping you make informed choices while enjoying this tasty treat.

Calories

Buffalo Chicken Grilled Cheese Sandwich contains approximately 550 calories. This calorie count includes the bread, chicken, cheese, and butter used in the recipe. While it’s a hearty meal, it’s important to balance it with lighter sides or smaller portions if you’re watching your calorie intake.

Protein

This sandwich is a great source of protein, providing about 36 grams per serving. The shredded chicken and cheese contribute significantly to this protein content. Protein is essential for muscle repair and growth, making this sandwich a satisfying option for those needing a protein boost after a workout or a long day.

Sodium

Buffalo Chicken Grilled Cheese Sandwich contains around 1,200 milligrams. This amount can vary based on the type of buffalo sauce and cheese you use. If you’re watching your sodium intake, consider using low-sodium versions of these ingredients or adjusting the amount of buffalo sauce to suit your dietary needs.

Buffalo Chicken Grilled Cheese Sandwich while being aware of its impact on your diet. Remember, moderation is key, and pairing it with healthy sides can create a balanced meal!

FAQs about Buffalo Chicken Grilled Cheese Sandwich

Can I make Buffalo Chicken Grilled Cheese Sandwich ahead of time?

Buffalo Chicken Grilled Cheese Sandwich ahead of time! To do this, assemble the sandwich without grilling it. Wrap it tightly in plastic wrap or foil and store it in the refrigerator for up to 24 hours. When you’re ready to enjoy it, simply grill the sandwich as directed. This method helps save time, especially on busy days!

What type of cheese works best for Buffalo Chicken Grilled Cheese Sandwich?

Buffalo Chicken Grilled Cheese Sandwich is a combination of cheddar and mozzarella. Cheddar adds a sharp flavor, while mozzarella provides creaminess and stretch. However, feel free to experiment! Pepper jack cheese can add a spicy kick, and gouda offers a smoky flavor. Mixing different cheeses can create a deliciously unique sandwich!

How can I make Buffalo Chicken Grilled Cheese Sandwich healthier?

Buffalo Chicken Grilled Cheese Sandwich, consider these tips:

  • Use Whole Grain Bread: Opt for whole grain or whole wheat bread for added fiber and nutrients.
  • Choose Lean Chicken: Use skinless chicken breast or shredded rotisserie chicken to reduce fat content.
  • Reduce Cheese: Use less cheese or opt for lower-fat cheese options to cut down on calories.
  • Add Vegetables: Incorporate fresh veggies like spinach, tomatoes, or bell peppers for extra nutrients and flavor.
  • Use Less Butter: Instead of butter, try using a light cooking spray or a small amount of olive oil for grilling.

These adjustments can help you enjoy the flavors of the sandwich while keeping it healthier!

Can I use leftover chicken for Buffalo Chicken Grilled Cheese Sandwich?

Buffalo Chicken Grilled Cheese Sandwich even easier. Simply shred the leftover chicken and mix it with buffalo sauce as directed in the recipe. This not only saves time but also reduces food waste. It’s a win-win situation!

Conclusion on Buffalo Chicken Grilled Cheese Sandwich

Buffalo Chicken Grilled Cheese Sandwich is a delightful fusion of flavors that elevates the classic grilled cheese to new heights. With its crispy exterior and spicy, cheesy filling, this sandwich is perfect for any meal or occasion. Whether you’re enjoying it for lunch, dinner, or a late-night snack, it’s sure to satisfy your cravings.

Moreover, the versatility of this sandwich allows you to customize it to your liking. From choosing different types of bread and cheese to adding your favorite toppings, the possibilities are endless. You can easily adjust the spice level to cater to your taste, making it a dish that everyone can enjoy.

Buffalo Chicken Grilled Cheese Sandwich, remember the tips and tricks shared throughout this article. They will help you avoid common mistakes and ensure that your sandwich turns out perfectly every time. With just a few simple steps, you can create a delicious meal that impresses family and friends alike.

Buffalo Chicken Grilled Cheese Sandwich is not just a meal; it’s an experience that brings joy and satisfaction with every bite. Enjoy your culinary adventure, and happy cooking!

Thanksgiving Cheese Board: Create a Festive Delight!

Introduction to Thanksgiving Cheese Board Ideas

Thanksgiving is a time for family, friends, and, of course, delicious food. One delightful addition to your holiday spread is a cheese board. A well-crafted cheese board not only serves as an appetizer but also sparks conversation and brings people together. It’s a feast for the eyes and the palate, making it a perfect centerpiece for your Thanksgiving gathering.

The Importance of a Cheese Board for Thanksgiving

A cheese board is more than just a collection of cheeses; it’s an experience. It allows guests to explore different flavors and textures, creating a fun and interactive dining experience. The variety of cheeses, meats, fruits, and nuts can cater to diverse tastes, ensuring everyone finds something they enjoy.

Moreover, a cheese board can be a great way to kick off your Thanksgiving meal. It keeps guests satisfied while the main course is being prepared. Plus, it adds a touch of elegance to your table setting. With the right arrangement, your cheese board can become a stunning visual display that enhances the festive atmosphere.

In addition, cheese boards are incredibly versatile. You can customize them based on seasonal ingredients, dietary preferences, or even themes. This flexibility allows you to create a unique cheese board that reflects your personal style and the spirit of Thanksgiving.

So, as you plan your Thanksgiving feast, consider the importance of a cheese board. It’s not just food; it’s a way to celebrate togetherness, creativity, and the joy of sharing delicious flavors. Let’s dive into the ingredients and preparation methods that will help you create the perfect Thanksgiving cheese board!

Ingredients for Thanksgiving Cheese Board Ideas

Essential Cheese Selections

Choosing the right cheeses is crucial for your Thanksgiving cheese board. A variety of flavors and textures will delight your guests. Start with a sharp cheddar cheese, which offers a bold taste that many love. Next, include creamy brie cheese, known for its rich and buttery flavor. Goat cheese adds a tangy twist, making it a favorite among cheese lovers.

For a well-rounded selection, consider adding a blue cheese or gouda. Blue cheese has a strong flavor that pairs well with sweet fruits, while gouda is smooth and nutty. This combination ensures that your cheese board caters to different palates. Remember, the key is to balance strong and mild cheeses, creating a delightful experience for everyone.

Accompaniments to Enhance Your Cheese Board

Accompaniments play a vital role in elevating your cheese board. Start with cured meats like salami and prosciutto. Their savory flavors complement the cheeses beautifully. Next, add a variety of crackers. Choose different shapes and textures to provide a crunchy contrast to the creamy cheeses.

Don’t forget about spreads! A drizzle of honey adds sweetness, while a tangy chutney can enhance the flavors of the cheeses. You might also consider including olives or pickles for a briny touch. These accompaniments not only enhance the taste but also add visual interest to your board.

Seasonal Fruits and Nuts for Thanksgiving Cheese Board Ideas

Seasonal fruits and nuts are essential for a Thanksgiving cheese board. Fresh grapes and apple slices bring a refreshing crunch. Dried cranberries add a sweet and tart flavor, perfect for balancing the richness of the cheeses. You can also include slices of pear or figs for an extra touch of sweetness.

Mixed nuts, such as almonds, walnuts, and pecans, provide a satisfying crunch. They also add a nutty flavor that pairs well with cheese. When arranging your board, distribute these fruits and nuts evenly. This not only looks appealing but also ensures that every guest can enjoy a bit of everything.

Preparation of Thanksgiving Cheese Board Ideas

Step 1: Choosing the Right Board or Platter

The first step in creating your Thanksgiving cheese board is selecting the right board or platter. A large wooden or marble board works beautifully, as it provides a rustic and elegant backdrop. If you don’t have a cheese board, a large cutting board or even a clean baking sheet can do the trick. The key is to ensure it has enough space to hold all your delicious ingredients.

Consider the shape of your board. Round boards can create a cozy feel, while rectangular boards offer a more modern look. Whichever you choose, make sure it’s sturdy enough to hold the weight of the cheeses and accompaniments. Once you have your board ready, you can start planning the layout!

Step 2: Selecting and Arranging the Cheeses

Now it’s time to select and arrange your cheeses. Begin by placing the cheeses on the board first. This allows you to see how much space you have left for the other items. Start with the sharp cheddar, brie, and goat cheese, placing them in different sections of the board. You can cut the cheddar into cubes, slice the brie, and crumble the goat cheese for variety.

Make sure to leave some space between the cheeses. This not only looks appealing but also prevents the flavors from mixing too much. If you decide to add additional cheeses, like blue cheese or gouda, arrange them in a way that complements the existing cheeses. Remember, the goal is to create a visually stunning display that invites guests to dig in!

Step 3: Adding Accompaniments and Garnishes

With the cheeses in place, it’s time to add the accompaniments. Start by placing the sliced salami and prosciutto around the cheeses. This creates a beautiful contrast of colors and textures. Next, fill in the board with mixed nuts, dried cranberries, fresh grapes, and apple slices. Distributing these items evenly will ensure a balanced look.

Don’t forget to add your crackers! You can pile them in a small bowl or arrange them in a neat stack on the board. For a final touch, drizzle honey over the goat cheese or place it in a small dish for dipping. This adds a sweet element that pairs wonderfully with the savory cheeses.

Step 4: Final Touches for Presentation

Now that your cheese board is nearly complete, it’s time for the final touches. Garnish your board with fresh rosemary sprigs for a festive touch. Not only do they add a pop of color, but they also bring a lovely aroma to the board. You can also consider adding edible flowers for an extra special touch.

Before serving, take a moment to step back and admire your creation. Make any adjustments to ensure everything looks perfect. If you’re not serving immediately, cover the board with plastic wrap and refrigerate it for up to two hours. This will keep everything fresh and ready for your guests!

Variation of Thanksgiving Cheese Board Ideas

Themed Cheese Boards for Different Tastes

Creating themed cheese boards can add a fun twist to your Thanksgiving celebration. Consider a Mediterranean theme, featuring cheeses like feta and manchego. Pair these with olives, sun-dried tomatoes, and pita chips for a delightful experience. This theme brings a taste of the Mediterranean right to your table.

Another idea is a sweet and savory board. Include cheeses like gouda and mascarpone, along with honey, figs, and dark chocolate. This combination offers a unique flavor profile that will surprise and delight your guests. You can also create a spicy board with pepper jack cheese, spicy salami, and jalapeño-stuffed olives for those who enjoy a kick.

Don’t forget about a seasonal theme! Use pumpkin-flavored cheeses or add roasted butternut squash to your board. This not only celebrates the flavors of fall but also adds a festive touch to your Thanksgiving gathering. Themed boards allow you to showcase your creativity while catering to different tastes.

Dietary Considerations in Thanksgiving Cheese Board Ideas

When planning your Thanksgiving cheese board, it’s essential to consider dietary restrictions. For vegetarian guests, focus on plant-based cheeses and include a variety of fruits and nuts. You can also add roasted vegetables for a hearty touch. This ensures that everyone can enjoy the cheese board without worry.

If you have gluten-free guests, opt for gluten-free crackers or serve the cheeses with fresh vegetables like cucumber and bell pepper slices. This not only accommodates dietary needs but also adds a colorful crunch to your board.

For those who are lactose intolerant, consider including dairy-free cheese options made from nuts or soy. These alternatives can be just as delicious and will ensure that everyone feels included in the festivities. By being mindful of dietary considerations, you create a welcoming atmosphere for all your guests.

Cooking Note for Thanksgiving Cheese Board Ideas

When it comes to preparing a Thanksgiving cheese board, there’s not much cooking involved, which is part of its charm! However, there are a few important notes to keep in mind to ensure your cheese board is a hit.

First, always choose high-quality cheeses. Freshness matters, especially for soft cheeses like brie and goat cheese. Check the expiration dates and opt for artisanal brands if possible. These cheeses often have richer flavors that will elevate your board.

Next, consider the temperature of your cheeses. Cheese is best enjoyed at room temperature, as this enhances its flavor and texture. Take your cheeses out of the refrigerator about 30 minutes before serving. This allows them to soften and become more enjoyable to eat.

Additionally, while you don’t need to cook anything, you can prepare some items in advance. For example, you can slice your apples and soak them in a bit of lemon juice to prevent browning. You can also pre-cut your cheeses and arrange them on the board ahead of time. Just remember to cover it well to keep everything fresh.

Lastly, don’t forget about food safety. If your cheese board will be out for a while, especially at room temperature, keep an eye on it. It’s best to serve it within two hours to ensure the cheeses and meats remain safe to eat. If you’re hosting a longer gathering, consider placing the board on ice or rotating it with a fresh one to keep everything cool.

By following these cooking notes, you’ll create a Thanksgiving cheese board that not only looks stunning but also tastes amazing. Your guests will appreciate the effort, and it will surely be a highlight of your holiday feast!

Serving Suggestions for Thanksgiving Cheese Board Ideas

Pairing Wines with Your Cheese Board

Wine pairing can elevate your Thanksgiving cheese board experience. The right wine enhances the flavors of the cheeses and complements the overall spread. For a classic choice, consider a crisp white wine like Sauvignon Blanc. Its acidity cuts through the creaminess of brie and goat cheese, making each bite refreshing.

If you prefer red wine, a light Pinot Noir is an excellent option. Its fruity notes pair well with sharp cheddar and salami. For those who enjoy a sweeter touch, a sparkling wine or Prosecco can add a festive flair. The bubbles cleanse the palate, making it a delightful match for various cheeses and accompaniments.

Don’t forget about dessert wines! A late-harvest Riesling or a port can be a lovely finish to your cheese board. These wines bring out the sweetness in dried fruits and honey, creating a harmonious balance. When serving wine, consider providing a small tasting note card for guests. This adds an interactive element and helps them choose their perfect pairing.

Creative Serving Ideas for Thanksgiving Cheese Board Ideas

Serving your Thanksgiving cheese board creatively can make it even more memorable. One fun idea is to use mini cheese boards for individual servings. This allows guests to customize their own plates and try different combinations of cheeses and accompaniments. You can use small wooden boards or even slate tiles for a rustic touch.

Another creative approach is to incorporate themed decorations. For a fall vibe, use small pumpkins or gourds as part of your display. You can also add autumn leaves or colorful napkins to enhance the seasonal feel. This not only beautifies your table but also creates a warm and inviting atmosphere.

Consider using small jars or bowls for dips and spreads. This keeps everything organized and makes it easy for guests to serve themselves. You can also label each cheese and accompaniment with cute tags. This adds a personal touch and helps guests know what they’re enjoying.

Lastly, think about the layout of your cheese board. Instead of a traditional flat arrangement, try a tiered display. Use cake stands or small risers to create height and dimension. This not only looks stunning but also makes it easier for guests to access different items. With these creative serving ideas, your Thanksgiving cheese board will be a feast for the eyes and the taste buds!

Tips for Creating the Perfect Thanksgiving Cheese Board Ideas

Timing Your Cheese Board Preparation

Timing is key when preparing your Thanksgiving cheese board. To ensure everything is fresh and delicious, plan to assemble your board about 30 minutes before serving. This allows the cheeses to come to room temperature, enhancing their flavors and textures. Remember, cheese is best enjoyed when it’s not too cold!

If you’re short on time, you can do some prep work in advance. For instance, slice your apples and soak them in lemon juice to prevent browning. You can also pre-cut your cheeses and arrange them on the board ahead of time. Just be sure to cover the board with plastic wrap to keep everything fresh until it’s time to serve.

Additionally, consider the flow of your gathering. If you’re hosting a large group, it might be wise to prepare two cheese boards. This way, guests can easily access the food without crowding around one board. Plus, it adds a fun element to your spread, allowing for different themes or flavors on each board!

Balancing Flavors and Textures

Creating a balanced cheese board is all about mixing flavors and textures. Start with a variety of cheeses, including sharp, creamy, and tangy options. This variety will cater to different tastes and keep your guests intrigued. For example, pair a sharp cheddar with creamy brie and tangy goat cheese for a delightful contrast.

Next, think about the accompaniments. Include a mix of savory and sweet items. Cured meats like salami and prosciutto add a savory touch, while dried cranberries and honey bring sweetness. Fresh fruits like grapes and apple slices provide a refreshing crunch, balancing the richness of the cheeses.

Don’t forget about textures! Incorporate crunchy elements like mixed nuts and crackers alongside the creamy cheeses. This variety not only enhances the eating experience but also makes your cheese board visually appealing. By balancing flavors and textures, you’ll create a Thanksgiving cheese board that delights the senses and keeps everyone coming back for more!

Breakdown of Time for Thanksgiving Cheese Board Ideas

Prep Time

Preparing your Thanksgiving cheese board is a fun and straightforward process. The prep time typically takes about 30 to 45 minutes. This includes selecting your cheeses, slicing fruits, and arranging everything on the board. If you choose to soak your apple slices in lemon juice to prevent browning, add a few extra minutes to your prep time. Remember, the goal is to create a beautiful display that will impress your guests!

Cooking Time

One of the best parts about a cheese board is that there’s no cooking involved! This means you can skip the stove and oven entirely. Instead, focus on assembling your ingredients. The only time you might spend cooking is if you decide to toast your nuts or warm up some bread. If you choose to do this, it will only take about 5 to 10 minutes. Overall, the cooking time for a Thanksgiving cheese board is minimal, making it a stress-free addition to your holiday meal.

Total Time

In total, you can expect to spend about 30 to 55 minutes preparing your Thanksgiving cheese board. This includes the time for prep and any optional cooking. With such a quick assembly time, you can easily fit this task into your Thanksgiving preparations. Plus, the result is a stunning cheese board that will delight your guests and enhance your holiday gathering!

Nutritional Information for Thanksgiving Cheese Board Ideas

Calories

When enjoying a Thanksgiving cheese board, it’s essential to be mindful of the calories. On average, a serving of this delightful spread contains about 300 calories. This number can vary based on the specific cheeses and accompaniments you choose. For instance, adding more nuts or richer cheeses can increase the calorie count. However, with a variety of flavors and textures, each bite is worth it!

Protein

Protein is another important aspect of your Thanksgiving cheese board. Each serving typically provides around 10 grams of protein. This comes from the cheeses and cured meats included in your board. Cheddar, brie, and goat cheese are all excellent sources of protein, making your cheese board not only delicious but also satisfying. Including meats like salami and prosciutto further boosts the protein content, ensuring your guests feel full and happy.

Sodium

Sodium is a factor to consider, especially for those watching their salt intake. A serving of your Thanksgiving cheese board can contain approximately 600 milligrams of sodium. This is primarily due to the cured meats and certain cheeses. If you’re concerned about sodium levels, you can opt for lower-sodium cheese options or include more fresh fruits and nuts, which are naturally low in sodium. Balancing flavors and being mindful of sodium can help create a healthier cheese board without sacrificing taste.

FAQs about Thanksgiving Cheese Board Ideas

What cheeses are best for a Thanksgiving cheese board?

When selecting cheeses for your Thanksgiving cheese board, variety is key! A mix of flavors and textures will delight your guests. Start with a sharp cheddar for its bold taste. Creamy brie adds richness, while tangy goat cheese offers a delightful contrast. You might also consider including a blue cheese for a strong flavor or gouda for its smoothness. This combination ensures that there’s something for everyone to enjoy!

How can I make a Thanksgiving cheese board vegetarian-friendly?

Making a Thanksgiving cheese board vegetarian-friendly is simple! Focus on plant-based cheeses, which are widely available today. Include a variety of fruits, nuts, and vegetables to create a colorful display. Fresh options like cucumber slices, bell peppers, and cherry tomatoes can add crunch. You can also incorporate dips like hummus or olive tapenade for extra flavor. This way, all your guests can enjoy the cheese board without any worries!

What fruits pair well with cheese for Thanksgiving?

Fruits are a fantastic addition to your Thanksgiving cheese board! Fresh grapes and apple slices are classic choices that provide a refreshing crunch. Dried fruits like cranberries and figs add sweetness, balancing the richness of the cheeses. Pear slices are another excellent option, offering a juicy contrast. Feel free to mix and match these fruits to create a vibrant and tasty display that complements your cheeses beautifully!

How far in advance can I prepare a cheese board?

You can prepare your Thanksgiving cheese board up to two hours in advance. This allows the flavors to meld while keeping everything fresh. If you need to prepare it earlier, consider slicing your cheeses and fruits ahead of time. Just be sure to cover the board with plastic wrap to maintain freshness. If you’re making it more than two hours ahead, it’s best to store it in the refrigerator and take it out about 30 minutes before serving. This way, your cheeses will be at the perfect temperature for enjoying!

Conclusion on Thanksgiving Cheese Board Ideas

As you prepare for your Thanksgiving celebration, remember that a cheese board can be a delightful addition to your feast. It’s not just about the cheeses; it’s about creating an experience that brings people together. A well-crafted Thanksgiving cheese board showcases a variety of flavors, textures, and colors, making it a feast for the eyes as well as the palate.

By selecting the right cheeses, accompaniments, and seasonal fruits, you can create a stunning centerpiece that caters to all tastes. Whether you choose to follow traditional pairings or get creative with themed boards, the possibilities are endless. Plus, with thoughtful preparation and presentation, your cheese board can become a highlight of the gathering.

Don’t forget to consider dietary preferences and restrictions, ensuring that everyone can enjoy the spread. With a little planning, you can create a cheese board that is not only delicious but also inclusive. Remember to pair your board with the right wines and serve it in a way that sparks conversation and joy among your guests.

In the end, the Thanksgiving cheese board is more than just food; it’s a way to celebrate togetherness, creativity, and the joy of sharing. So, gather your ingredients, unleash your creativity, and enjoy the process of assembling a beautiful cheese board that will leave a lasting impression on your loved ones. Happy Thanksgiving!

Peanut Butter Blossom Cookies Recipe is a must-try!

Introduction to Peanut Butter Blossom Cookies Recipe

The History of Peanut Butter Blossom Cookies

Peanut Butter Blossom Cookies have a delightful history that dates back to the 1930s. These cookies became popular during the rise of peanut butter in American households. The combination of creamy peanut butter and chocolate was a match made in heaven. In fact, the iconic Hershey’s Kiss was introduced in 1907, but it wasn’t until the 1950s that the two treats came together in this beloved cookie. Over the years, these cookies have become a staple at holiday gatherings and family celebrations. Their unique shape and delicious flavor make them a favorite among both kids and adults alike.

Why You Should Try This Peanut Butter Blossom Cookies Recipe

If you’re looking for a cookie that’s both easy to make and incredibly tasty, this Peanut Butter Blossom Cookies Recipe is for you! Not only do these cookies have a rich, nutty flavor, but they also offer a delightful surprise with each bite. The combination of soft peanut butter dough and the melty chocolate center creates a perfect balance of sweetness and texture. Plus, they are fun to make! Rolling the dough into balls and pressing the chocolate kisses in the center is a great activity for kids and adults alike. Whether you’re baking for a special occasion or just to satisfy a sweet tooth, these cookies are sure to impress. So, roll up your sleeves and get ready to enjoy a classic treat that never goes out of style!

Ingredients for Peanut Butter Blossom Cookies Recipe

To create the perfect Peanut Butter Blossom Cookies, you’ll need a few simple ingredients. Each component plays a vital role in achieving that delightful flavor and texture. Here’s what you’ll need:

  • 1 cup creamy peanut butter
  • 1 cup granulated sugar
  • 1 cup packed brown sugar
  • 2 large eggs
  • 1 teaspoon vanilla extract
  • 2 ½ cups all-purpose flour
  • 1 teaspoon baking soda
  • ½ teaspoon salt
  • 1 cup granulated sugar (for rolling)
  • 36 Hershey’s Kisses, unwrapped

These ingredients are easy to find at your local grocery store. The creamy peanut butter gives the cookies their rich flavor, while the combination of granulated and brown sugar adds sweetness and moisture. Eggs help bind everything together, and vanilla extract enhances the overall taste. The flour, baking soda, and salt are essential for the cookie structure. Finally, the Hershey’s Kisses provide that iconic chocolatey touch that makes these cookies so special.

Feel free to experiment with the ingredients! For instance, you can swap creamy peanut butter for chunky peanut butter for added texture. You can also try different types of chocolate or even caramel candies for a fun twist. The possibilities are endless, making this Peanut Butter Blossom Cookies Recipe a versatile choice for any baking enthusiast!

Step-by-Step Preparation of Peanut Butter Blossom Cookies Recipe

Step 1: Prepping Your Ingredients

Before you start baking, it’s important to gather all your ingredients. This makes the process smoother and more enjoyable. First, measure out 1 cup of creamy peanut butter, 1 cup of granulated sugar, and 1 cup of packed brown sugar. Next, crack 2 large eggs into a bowl and have your 1 teaspoon of vanilla extract ready. Don’t forget the dry ingredients! You’ll need 2 ½ cups of all-purpose flour, 1 teaspoon of baking soda, and ½ teaspoon of salt. Lastly, set aside 1 cup of granulated sugar for rolling the cookie dough balls. Having everything organized will help you focus on creating delicious Peanut Butter Blossom Cookies!

Step 2: Mixing the Dough

Now that your ingredients are prepped, it’s time to mix them together. In a large mixing bowl, combine the creamy peanut butter, granulated sugar, brown sugar, eggs, and vanilla extract. Use a hand mixer or a sturdy spoon to mix until everything is well combined and smooth. This step is crucial because it ensures that the sugars dissolve properly, creating a sweet and creamy base for your cookies. Once the mixture is smooth, set it aside. In another bowl, whisk together the flour, baking soda, and salt. This helps to evenly distribute the baking soda and salt throughout the flour.

Step 3: Shaping the Cookies

With your dough ready, it’s time to shape the cookies! Start by rolling the dough into 1-inch balls. This size is perfect for achieving that classic Peanut Butter Blossom look. Once you have your dough balls, roll each one in the extra granulated sugar until they are fully coated. This sugar coating adds a lovely sweetness and a bit of crunch to the cookies. After rolling, place the sugar-coated balls on ungreased baking sheets, making sure to space them about 2 inches apart. This spacing is important because the cookies will spread while baking.

Step 4: Baking the Cookies

Now comes the exciting part—baking! Preheat your oven to 350°F (175°C) if you haven’t done so already. Once the oven is ready, place your baking sheets in and bake the cookies for 10-12 minutes. Keep an eye on them! You want the edges to be lightly golden while the centers remain soft. This balance is key to achieving that perfect chewy texture. When the cookies are done, remove them from the oven and let them sit on the baking sheet for about 5 minutes. This allows them to firm up a bit before transferring them to a wire rack.

Step 5: Adding the Chocolate Kisses

Finally, it’s time to add the star of the show—Hershey’s Kisses! While the cookies are still warm, gently press a Hershey’s Kiss into the center of each cookie. The warmth from the cookie will slightly melt the chocolate, creating a deliciously gooey center. This step not only adds flavor but also gives your cookies that signature look. After adding the kisses, let the cookies cool completely on the wire rack. Once cooled, they are ready to be enjoyed!

Variation of Peanut Butter Blossom Cookies Recipe

Alternative Ingredients for Peanut Butter Blossom Cookies

While the classic Peanut Butter Blossom Cookies Recipe is delicious as is, you can easily switch things up with alternative ingredients. For instance, if you’re looking for a nut-free option, consider using sun butter or soy nut butter instead of peanut butter. These alternatives provide a similar creamy texture and flavor without the nuts.

If you want to reduce sugar, try using a sugar substitute like stevia or monk fruit sweetener. Just remember to check the conversion ratios, as they can differ from regular sugar. For a gluten-free version, substitute all-purpose flour with a gluten-free flour blend. This way, everyone can enjoy these delightful cookies!

Additionally, you can experiment with different types of chocolate. Instead of Hershey’s Kisses, try using chocolate chips, caramel-filled candies, or even white chocolate for a unique twist. Each variation brings a new flavor profile to the table, making your baking experience even more exciting!

Creative Twists on the Classic Peanut Butter Blossom Cookies Recipe

Get creative with your Peanut Butter Blossom Cookies by adding fun twists! One popular variation is to mix in some chopped nuts, like walnuts or pecans, into the dough. This adds a delightful crunch and enhances the nutty flavor of the cookies.

Another fun idea is to incorporate different flavors into the dough. You can add a teaspoon of cocoa powder for a chocolatey version or a sprinkle of cinnamon for a warm, spiced flavor. For a festive touch, consider adding colorful sprinkles on top of the cookies before baking.

For a more indulgent treat, try stuffing the cookies with a piece of chocolate or caramel before baking. This creates a gooey center that will surprise anyone who takes a bite! The possibilities are endless, so don’t hesitate to let your imagination run wild with this Peanut Butter Blossom Cookies Recipe!

Cooking Note for Peanut Butter Blossom Cookies Recipe

When it comes to baking Peanut Butter Blossom Cookies, a few cooking notes can help ensure your cookies turn out perfectly every time. First, make sure all your ingredients are at room temperature. This helps them blend together more smoothly, resulting in a better dough consistency.

Next, be mindful of your oven temperature. Ovens can vary, so it’s a good idea to use an oven thermometer to check if your oven is accurate. If your cookies are browning too quickly, you may need to adjust the temperature slightly. Baking in batches can also help maintain an even temperature, especially if you’re using multiple baking sheets.

Another important tip is to avoid overmixing the dough. Once you combine the dry ingredients with the wet ingredients, mix just until everything is incorporated. Overmixing can lead to tough cookies, which is not what you want!

Lastly, let the cookies cool on the baking sheet for a few minutes before transferring them to a wire rack. This allows them to set properly and prevents them from breaking apart. Following these cooking notes will help you achieve the best results with your Peanut Butter Blossom Cookies Recipe!

Serving Suggestions for Peanut Butter Blossom Cookies Recipe

Once your Peanut Butter Blossom Cookies are baked and cooled, it’s time to think about how to serve them! These cookies are not only delicious but also visually appealing, making them perfect for various occasions. Here are some delightful serving suggestions to enhance your cookie experience:

  • Cookie Platter: Arrange your cookies on a decorative platter. You can mix them with other types of cookies for a colorful cookie assortment. This is great for parties or family gatherings!
  • Milk Pairing: Serve your cookies with a glass of cold milk. The creamy texture of milk complements the rich peanut butter flavor perfectly. You can even try flavored milk, like chocolate or almond milk, for a fun twist.
  • Ice Cream Sandwiches: For a special treat, use two cookies to create ice cream sandwiches. Simply place a scoop of your favorite ice cream between two cookies. This is a fantastic way to enjoy your cookies during warm weather!
  • Gift Giving: Package your cookies in a cute box or jar to give as gifts. Tie a ribbon around it for a personal touch. Homemade cookies make thoughtful gifts for friends and family, especially during holidays.
  • Decorative Touch: Dust your cookies with powdered sugar or drizzle melted chocolate over them for an elegant presentation. This adds a beautiful finish and makes them look even more tempting!

These serving suggestions can elevate your Peanut Butter Blossom Cookies, making them a delightful treat for any occasion. Whether you’re enjoying them at home or sharing them with others, these cookies are sure to bring smiles and satisfaction!

Tips for Perfect Peanut Butter Blossom Cookies Recipe

To ensure your Peanut Butter Blossom Cookies turn out perfectly every time, consider these helpful tips. Each suggestion can enhance the flavor, texture, and overall experience of your cookies. Let’s dive into some key tips!

  • Use Fresh Ingredients: Always check the freshness of your ingredients, especially baking soda and flour. Fresh ingredients contribute to better flavor and texture.
  • Measure Accurately: Use proper measuring techniques for your ingredients. For flour, spoon it into the measuring cup and level it off with a knife. This prevents using too much flour, which can make cookies dry.
  • Chill the Dough: If your dough feels too soft or sticky, chill it in the refrigerator for about 30 minutes. This makes it easier to roll into balls and helps the cookies maintain their shape while baking.
  • Don’t Overbake: Keep a close eye on your cookies as they bake. Remove them from the oven when the edges are golden but the centers still look slightly underbaked. They will continue to cook on the baking sheet.
  • Experiment with Toppings: While Hershey’s Kisses are classic, feel free to experiment with different toppings. Try adding crushed nuts, sprinkles, or even a drizzle of caramel for added flavor.
  • Store Properly: To keep your cookies fresh, store them in an airtight container at room temperature. You can also layer them with parchment paper to prevent sticking.
  • Share the Fun: Baking is more enjoyable with friends or family. Invite loved ones to help you roll the dough or decorate the cookies. It’s a great way to create memories!

By following these tips, you’ll be well on your way to baking the perfect Peanut Butter Blossom Cookies. Each batch will be delicious, and you’ll impress everyone with your baking skills!

Breakdown of Time for Peanut Butter Blossom Cookies Recipe

Prep Time

Getting everything ready for your Peanut Butter Blossom Cookies is a breeze! The prep time for this recipe is about 15-20 minutes. During this time, you’ll gather your ingredients, measure them out, and mix the dough. It’s a fun and straightforward process that sets the stage for delicious cookies!

Cooking Time

Once your dough is ready, it’s time to bake! The cooking time for these cookies is approximately 10-12 minutes. Keep an eye on them as they bake. You want the edges to turn a lovely golden brown while the centers remain soft. This short baking time is what makes these cookies so delightful and chewy!

Total Time

In total, you can expect to spend about 30-35 minutes from start to finish. This includes both prep and cooking time. With such a quick turnaround, you can enjoy fresh Peanut Butter Blossom Cookies in no time! Whether you’re baking for a special occasion or just a sweet treat for yourself, this recipe is perfect for any day.

Nutritional Information for Peanut Butter Blossom Cookies Recipe

Calories

When indulging in Peanut Butter Blossom Cookies, it’s good to know the calorie content. Each cookie contains approximately 120 calories. This makes them a delightful treat without being overly indulgent. Enjoying one or two cookies can satisfy your sweet tooth while keeping your calorie intake in check. Just remember, moderation is key!

Protein

These cookies are not just tasty; they also provide a decent amount of protein. Each cookie offers about 3 grams of protein. The creamy peanut butter is the star here, contributing to this protein content. This makes Peanut Butter Blossom Cookies a more balanced snack option, especially for those looking to add a bit of protein to their diet. Pairing them with a glass of milk can further boost your protein intake!

Sodium

In terms of sodium, each cookie contains around 80 milligrams. This is a relatively low amount, making these cookies a heart-friendly choice. However, if you’re watching your sodium intake, it’s always a good idea to be mindful of portion sizes. Enjoying these cookies as part of a balanced diet can help you maintain a healthy lifestyle while still indulging in delicious treats!

FAQs about Peanut Butter Blossom Cookies Recipe

Can I make Peanut Butter Blossom Cookies without eggs?

Yes, you can make Peanut Butter Blossom Cookies without eggs! If you want to create an egg-free version, consider using a substitute. Common egg replacements include 1/4 cup of unsweetened applesauce, 1/4 cup of mashed banana, or 1 tablespoon of ground flaxseed mixed with 2.5 tablespoons of water. These alternatives help bind the ingredients together while keeping the cookies moist and delicious. Just remember that the texture may vary slightly, but they will still taste great!

How do I store Peanut Butter Blossom Cookies?

To keep your Peanut Butter Blossom Cookies fresh, store them in an airtight container at room temperature. This helps maintain their chewy texture and flavor. If you want to keep them for a longer time, you can layer the cookies with parchment paper to prevent sticking. They should stay fresh for about a week. If you live in a humid area, consider refrigerating them to extend their shelf life. Just make sure to bring them back to room temperature before enjoying!

Can I freeze Peanut Butter Blossom Cookies?

Absolutely! Freezing Peanut Butter Blossom Cookies is a great way to enjoy them later. To freeze, place the cooled cookies in a single layer on a baking sheet and freeze until solid. Then, transfer them to an airtight container or a freezer bag, separating layers with parchment paper. They can be stored in the freezer for up to three months. When you’re ready to enjoy them, simply thaw at room temperature or warm them in the microwave for a few seconds for that fresh-baked taste!

What can I use instead of chocolate kisses in the Peanut Butter Blossom Cookies Recipe?

If you want to switch things up, there are plenty of delicious alternatives to Hershey’s Kisses! You can use chocolate chips, caramel-filled candies, or even mini peanut butter cups for a fun twist. For a fruity option, try adding a piece of dried fruit or a chocolate-covered raisin. You can also experiment with different flavors of chocolate, like dark chocolate or white chocolate. The key is to choose something that complements the peanut butter flavor, so feel free to get creative!

Conclusion on Peanut Butter Blossom Cookies Recipe

In conclusion, the Peanut Butter Blossom Cookies Recipe is a delightful treat that brings joy to any occasion. With its rich peanut butter flavor and the sweet surprise of chocolate in the center, these cookies are sure to please everyone. Whether you’re baking for a holiday gathering, a birthday party, or just a cozy night at home, this recipe is a fantastic choice.

Not only is the process of making these cookies enjoyable, but the end result is also incredibly rewarding. The combination of creamy peanut butter and chocolate creates a perfect harmony of flavors that is hard to resist. Plus, with the various alternatives and creative twists you can add, you can customize the recipe to suit your taste and dietary needs.

Remember to follow the tips and cooking notes provided to ensure your cookies turn out perfectly every time. From measuring ingredients accurately to avoiding overbaking, these small details can make a big difference in the final product. And don’t forget to share the fun of baking with friends and family—after all, the best memories are made in the kitchen!

So, gather your ingredients, roll up your sleeves, and get ready to bake a batch of these scrumptious Peanut Butter Blossom Cookies. Enjoy the process, savor the delicious results, and create sweet moments that will last a lifetime!

Firecracker Ground Chicken Bowl Recipe is a must-try!

Introduction to the Firecracker Ground Chicken Bowl Recipe

Firecracker Ground Chicken Bowl Recipe is just what you need! This dish combines the savory flavors of ground chicken with vibrant vegetables, all tossed in a sweet and spicy sauce. It’s perfect for busy weeknights when you want something satisfying without spending hours in the kitchen.

The beauty of this recipe lies in its simplicity. With just a few ingredients, you can create a colorful and nutritious bowl that the whole family will love. Plus, it’s versatile! You can easily customize it to suit your taste preferences or dietary needs. Whether you prefer a little extra heat or want to sneak in more veggies, this recipe has got you covered.

Not only is the Firecracker Ground Chicken Bowl quick to prepare, but it also packs a punch in terms of flavor. The combination of garlic, ginger, and sriracha creates a delightful kick that will awaken your taste buds. Serve it over rice, and you have a complete meal that is both filling and satisfying.

So, roll up your sleeves and get ready to whip up this fantastic dish. In the following sections, we’ll dive into the ingredients, preparation steps, and tips to make your Firecracker Ground Chicken Bowl a hit at your dinner table!

Ingredients for the Firecracker Ground Chicken Bowl Recipe

Firecracker Ground Chicken Bowl Recipe, you’ll need a handful of fresh ingredients. Each component plays a vital role in building the flavors and textures of this dish. Here’s what you’ll need:

  • 1 pound ground chicken
  • 1 tablespoon vegetable oil
  • 1 red bell pepper, diced
  • 1 cup broccoli florets
  • 2 cloves garlic, minced
  • 1 tablespoon fresh ginger, minced
  • 1/4 cup soy sauce
  • 2 tablespoons honey
  • 1 tablespoon rice vinegar
  • 1 teaspoon sriracha (adjust to taste)
  • 2 green onions, sliced
  • 2 cups cooked rice (white or brown)
  • Sesame seeds for garnish (optional)

These ingredients come together to create a vibrant and flavorful meal. The ground chicken serves as a lean protein source, while the vegetables add crunch and nutrition. The sauce, made from soy sauce, honey, rice vinegar, and sriracha, brings a perfect balance of sweet and spicy flavors. Feel free to adjust the sriracha to suit your spice tolerance!

Gather these ingredients, and you’ll be ready to start cooking your Firecracker Ground Chicken Bowl. In the next section, we’ll explore how to prepare this delightful dish step by step.

Preparation of the Firecracker Ground Chicken Bowl Recipe

Firecracker Ground Chicken Bowl Recipe. This process is straightforward and quick, making it perfect for a busy weeknight dinner. Let’s break it down into easy steps!

Step 1: Preparing the Chicken

First, heat a large skillet over medium heat. Add 1 tablespoon of vegetable oil and let it warm up. Once the oil is hot, add 1 pound of ground chicken. Use a spatula to break the chicken apart as it cooks. You want it to brown evenly, which should take about 5-7 minutes. Stir occasionally to ensure it cooks through. This step is crucial as it builds the base flavor for your dish.

Step 2: Cooking the Vegetables

Next, it’s time to add some color and nutrition! Toss in the diced red bell pepper and broccoli florets. Also, add 2 cloves of minced garlic and 1 tablespoon of minced ginger. Stir everything together and let it cook for another 3-4 minutes. You want the vegetables to become tender but still crisp. This adds a delightful crunch to your Firecracker Ground Chicken Bowl.

Step 3: Combining Ingredients

Now, let’s bring all the flavors together! In a small bowl, whisk together 1/4 cup of soy sauce, 2 tablespoons of honey, 1 tablespoon of rice vinegar, and 1 teaspoon of sriracha. Pour this sauce over the chicken and vegetables in the skillet. Stir well to combine everything. Cook for an additional 2-3 minutes, allowing the sauce to coat the chicken and veggies evenly. This step is where the magic happens, as the sauce infuses the dish with its sweet and spicy goodness!

Step 4: Final Touches

Once everything is heated through, it’s time to serve! Spoon the firecracker ground chicken mixture over 2 cups of cooked rice. For a pop of freshness, top with sliced green onions and sprinkle sesame seeds on top if you like. These final touches not only enhance the presentation but also add extra flavor and texture to your meal.

And there you have it! Your Firecracker Ground Chicken Bowl is ready to enjoy. This dish is not only delicious but also colorful and inviting. In the next section, we’ll explore some variations to make this recipe even more exciting!

Variation of the Firecracker Ground Chicken Bowl Recipe

Firecracker Ground Chicken Bowl Recipe is incredibly versatile. While ground chicken is a fantastic choice, there are many ways to switch things up. Whether you want to try different proteins or explore vegetarian options, this dish can easily adapt to your preferences. Let’s take a look at some exciting variations!

Alternative Proteins

If you’re looking to change the protein in your Firecracker Bowl, there are several delicious alternatives. Here are a few options:

  • Ground Turkey: This is a leaner option that works well in this recipe. It has a similar texture and flavor profile to chicken.
  • Ground Beef: For a heartier meal, ground beef can be used. It adds a rich flavor that pairs nicely with the sauce.
  • Ground Pork: This option brings a slightly sweeter taste. It’s perfect for those who enjoy a bit of richness in their dishes.
  • Tofu: For a plant-based option, crumbled tofu can be a great substitute. It absorbs flavors well and adds protein to your meal.

When using these alternative proteins, follow the same cooking steps as you would with ground chicken. Adjust cooking times as needed to ensure everything is cooked through.

Vegetarian Options

If you prefer a vegetarian version of the Firecracker Bowl, you can easily make it without meat. Here are some ideas:

  • Chickpeas: Canned or cooked chickpeas can be a great protein source. They add a nice texture and soak up the sauce beautifully.
  • Quinoa: This grain is packed with protein and can be used as a base instead of rice. It adds a nutty flavor to the dish.
  • Mixed Vegetables: Use a variety of colorful vegetables like bell peppers, zucchini, and snap peas. This not only enhances the flavor but also boosts the nutrition.
  • Tempeh: This fermented soy product is rich in protein and has a firm texture. It can be crumbled or cubed and cooked just like ground meat.

Feel free to mix and match these options to create your perfect Firecracker Bowl. The key is to maintain the balance of flavors while keeping it enjoyable for everyone at the table. In the next section, we’ll discuss some cooking notes to ensure your dish turns out perfectly every time!

Cooking Note for the Firecracker Ground Chicken Bowl Recipe

Firecracker Ground Chicken Bowl Recipe is a delightful experience, but a few tips can help you achieve the best results. Here are some important cooking notes to keep in mind:

First, ensure your skillet is hot enough before adding the ground chicken. This helps to sear the meat, locking in moisture and flavor. If the skillet isn’t hot, the chicken may steam instead of brown, which can affect the overall taste.

Next, when adding vegetables, consider their cooking times. For instance, broccoli florets cook quickly, while carrots may take longer. If you choose to add carrots or other denser vegetables, chop them into smaller pieces to ensure they cook evenly. You can also add them to the skillet a minute or two before the broccoli to give them a head start.

Another tip is to taste the sauce before pouring it over the chicken and vegetables. Adjust the sweetness or spiciness according to your preference. If you like it sweeter, add a bit more honey. For extra heat, increase the sriracha. This customization allows you to create a dish that perfectly suits your taste buds.

Lastly, don’t forget to let the dish rest for a minute after cooking. This allows the flavors to meld together, enhancing the overall taste. Serve it warm over rice, and enjoy the explosion of flavors in every bite!

With these cooking notes in mind, you’re well on your way to making a fantastic Firecracker Ground Chicken Bowl. In the next section, we’ll explore some serving suggestions to elevate your meal even further!

Serving Suggestions for the Firecracker Ground Chicken Bowl Recipe

Firecracker Ground Chicken Bowl Recipe is ready, it’s time to think about how to serve it! Presentation can elevate your meal, making it even more enjoyable. Here are some delightful serving suggestions to enhance your dining experience:

  • Colorful Bowls: Use vibrant bowls to serve your Firecracker Ground Chicken. The bright colors of the dish will pop against a contrasting bowl, making it visually appealing.
  • Garnish with Fresh Herbs: Fresh herbs like cilantro or basil can add a burst of flavor. Sprinkle them on top just before serving for a fresh touch.
  • Serve with Lime Wedges: A squeeze of fresh lime juice can brighten the flavors. Place lime wedges on the side for guests to add as they like.
  • Pair with a Side Salad: A light salad with mixed greens, cucumbers, and a simple vinaigrette can complement the bowl nicely. It adds freshness and crunch to the meal.
  • Offer Extra Sauce: If you or your guests enjoy a saucier dish, consider serving extra sauce on the side. This allows everyone to customize their bowl to their liking.
  • Include a Protein Option: For those who want more protein, serve grilled shrimp or tofu on the side. This adds variety and caters to different dietary preferences.

These serving suggestions not only enhance the look of your Firecracker Ground Chicken Bowl but also allow for a more personalized dining experience. Whether you’re hosting a family dinner or a casual get-together, these ideas will impress your guests and make the meal even more enjoyable. In the next section, we’ll share some tips for perfecting your Firecracker Ground Chicken Bowl!

Tips for Perfecting the Firecracker Ground Chicken Bowl Recipe

Firecracker Ground Chicken Bowl Recipe truly shine, consider these helpful tips. They will ensure that every bite is bursting with flavor and that your dish turns out perfectly every time!

  • Use Fresh Ingredients: Fresh vegetables and herbs can elevate the taste of your dish. Whenever possible, choose vibrant, seasonal produce for the best flavor.
  • Don’t Overcook the Chicken: Ground chicken cooks quickly. Keep an eye on it to avoid drying it out. It should be just cooked through and still juicy.
  • Customize the Spice Level: Adjust the amount of sriracha based on your heat preference. Start with less and add more if you like it spicier. This way, everyone can enjoy the dish!
  • Experiment with Sauces: Feel free to try different sauces or marinades. Teriyaki or hoisin sauce can add a unique twist to your Firecracker Bowl.
  • Prep Ahead: To save time, chop your vegetables and prepare the sauce in advance. This makes cooking quicker and easier on busy nights.
  • Serve Immediately: For the best taste and texture, serve your Firecracker Ground Chicken Bowl right after cooking. This keeps the vegetables crisp and the chicken tender.
  • Mix Up the Grains: While rice is a classic base, consider using quinoa, farro, or even noodles for a different texture and flavor. Each option brings its own unique taste to the dish.
  • Garnish Generously: Don’t skimp on the garnishes! Green onions, sesame seeds, and fresh herbs not only add flavor but also make your dish look more appealing.

By following these tips, you’ll be well on your way to creating a delicious and satisfying Firecracker Ground Chicken Bowl. Each suggestion helps enhance the flavors and presentation, making your meal a hit with family and friends. In the next section, we’ll break down the time needed to prepare this delightful dish!

Breakdown of Time for the Firecracker Ground Chicken Bowl Recipe

Firecracker Ground Chicken Bowl Recipe can help you plan your meal better. Whether you’re cooking for a busy weeknight or a special occasion, knowing the prep and cooking times is essential. Here’s a quick breakdown:

Prep Time

The prep time for this delicious dish is quite short. You’ll need about 10-15 minutes to gather and prepare your ingredients. This includes:

  • Chopping the vegetables, such as the red bell pepper and broccoli.
  • Minced garlic and ginger preparation.
  • Measuring out the sauce ingredients.

Having everything ready before you start cooking will make the process smoother and more enjoyable!

Cooking Time

Once you’re prepped, the cooking time is quick, taking about 15-20 minutes. Here’s how it breaks down:

  • Cooking the ground chicken: 5-7 minutes.
  • Cooking the vegetables: 3-4 minutes.
  • Combining and heating everything with the sauce: 2-3 minutes.

This means you can have a hot, flavorful meal on the table in no time!

Total Time

Firecracker Ground Chicken Bowl Recipe an excellent choice for a quick weeknight dinner. With just a little bit of time, you can create a satisfying and nutritious meal that everyone will love!

Nutritional Information for the Firecracker Ground Chicken Bowl Recipe

Firecracker Ground Chicken Bowl Recipe not only offers great flavor but also provides valuable nutrients. Here’s a breakdown of the nutritional information per serving:

Calories

Each serving of the Firecracker Ground Chicken Bowl contains approximately 350 calories. This makes it a satisfying option for lunch or dinner without going overboard on calories. The combination of protein, healthy fats, and carbohydrates ensures you feel full and energized.

Protein

With about 28 grams of protein per serving, this dish is an excellent source of lean protein. Ground chicken is a fantastic choice for those looking to increase their protein intake while keeping their meals light. Protein is essential for muscle repair and growth, making this bowl a great post-workout meal.

Sodium

The sodium content in the Firecracker Ground Chicken Bowl is around 800 milligrams per serving. While this is a reasonable amount, it’s important to be mindful of your overall sodium intake, especially if you’re watching your salt consumption. You can reduce the sodium by using low-sodium soy sauce or adjusting the amount of sauce you add to the dish.

Overall, the Firecracker Ground Chicken Bowl Recipe is a nutritious and balanced meal option. It provides a good mix of calories, protein, and essential nutrients, making it a great choice for anyone looking to enjoy a healthy and delicious dish. In the next section, we’ll answer some frequently asked questions about this recipe!

FAQs about the Firecracker Ground Chicken Bowl Recipe

Can I make the Firecracker Ground Chicken Bowl Recipe ahead of time?

Firecracker Ground Chicken Bowl Recipe can be made ahead of time, making it a great option for meal prep. You can cook the chicken and vegetables, then store them in an airtight container in the refrigerator. This dish stays fresh for up to 3 days. When you’re ready to eat, simply reheat it in a skillet or microwave until warmed through. Just remember to cook the rice fresh or reheat it separately for the best texture!

What can I substitute for ground chicken in the Firecracker Ground Chicken Bowl Recipe?

If you want to switch things up, there are several tasty substitutes for ground chicken. You can use ground turkey, which is lean and has a similar flavor. Ground beef or pork also works well, adding a richer taste. For a vegetarian option, crumbled tofu or tempeh can be used. Both absorb flavors beautifully and provide a good source of protein. Just follow the same cooking steps as you would with ground chicken!

Is the Firecracker Ground Chicken Bowl Recipe spicy?

Firecracker Ground Chicken Bowl Recipe can be adjusted to your liking. The recipe includes sriracha, which adds a nice kick. If you prefer a milder dish, you can reduce the amount of sriracha or omit it altogether. On the other hand, if you love heat, feel free to add more! This flexibility allows everyone to enjoy the dish at their preferred spice level.

How can I store leftovers from the Firecracker Ground Chicken Bowl Recipe?

Firecracker Ground Chicken Bowl Recipe is easy! Allow the dish to cool completely before transferring it to an airtight container. Store it in the refrigerator for up to 3 days. If you want to keep it longer, you can freeze it for up to 2 months. When reheating, make sure to heat it thoroughly to ensure food safety. Enjoy your delicious leftovers!

Conclusion on the Firecracker Ground Chicken Bowl Recipe

Firecracker Ground Chicken Bowl Recipe is a fantastic choice for anyone seeking a quick, nutritious, and flavorful meal. With its vibrant colors and delightful combination of ingredients, this dish is sure to please both the eyes and the palate. The balance of protein, vegetables, and a sweet-spicy sauce makes it a well-rounded option for lunch or dinner.

Not only is this recipe easy to prepare, but it also offers plenty of room for customization. Whether you want to switch up the protein, add more vegetables, or adjust the spice level, the possibilities are endless. This versatility ensures that you can enjoy the Firecracker Bowl time and time again without getting bored.

Moreover, the nutritional benefits of this dish make it a smart choice for those looking to maintain a healthy lifestyle. With a good amount of protein and essential nutrients, it supports your dietary goals while satisfying your hunger. Plus, it’s a great way to introduce more vegetables into your meals, making it a win-win!

So, gather your ingredients and give this recipe a try. Whether you’re cooking for yourself, your family, or friends, the Firecracker Ground Chicken Bowl is bound to impress. Enjoy the explosion of flavors and the joy of cooking something delicious and healthy. Happy cooking!

Hibachi Chicken Fried Rice is a delicious meal option.

Introduction to Hibachi Chicken Fried Rice

Hibachi Chicken Fried Rice is a delightful dish that brings the flavors of Japanese cuisine right to your kitchen. This dish is not only delicious but also easy to prepare, making it a favorite for families and gatherings. The combination of tender chicken, vibrant vegetables, and perfectly cooked rice creates a satisfying meal that everyone will love.

Originating from the hibachi grill, this style of cooking emphasizes quick, high-heat methods that lock in flavors and textures. The sizzling sound of ingredients hitting the hot skillet is music to the ears, and the aroma that fills the air is simply irresistible. With just a few simple ingredients, you can recreate this restaurant-style dish at home.

In this article, we will guide you through the process of making Hibachi Chicken Fried Rice, from gathering your ingredients to serving it hot on your dinner table. Whether you’re a seasoned cook or a beginner, you’ll find this recipe approachable and rewarding. So, roll up your sleeves and get ready to impress your family and friends with this tasty dish!

Ingredients for Hibachi Chicken Fried Rice

To create a mouthwatering Hibachi Chicken Fried Rice, you’ll need a selection of fresh ingredients. Each component plays a vital role in building the dish’s rich flavors and textures. Here’s what you’ll need:

  • 1 pound boneless, skinless chicken thighs: Cut into bite-sized pieces for easy cooking and eating.
  • 2 tablespoons soy sauce: This adds a savory depth to the chicken and rice.
  • 1 tablespoon sesame oil: A little goes a long way in providing that authentic Asian flavor.
  • 1 tablespoon vegetable oil: Used for frying, it helps achieve a nice sear on the chicken.
  • 2 cups cooked white rice: Day-old rice works best as it’s drier and fries better.
  • 1 cup mixed vegetables: A colorful mix of peas, carrots, and corn adds nutrition and crunch.
  • 2 large eggs: Beaten and scrambled, they add richness to the dish.
  • 3 green onions: Chopped for a fresh, mild onion flavor.
  • 2 cloves garlic: Minced to enhance the overall taste.
  • 1 teaspoon ginger: Minced for a hint of warmth and spice.
  • Salt and pepper: To taste, ensuring the dish is well-seasoned.

These ingredients come together to create a delightful meal that’s not only satisfying but also packed with flavor. Feel free to adjust the quantities based on your preferences or dietary needs. Now that you have your ingredients ready, let’s move on to the preparation steps!

Preparation of Hibachi Chicken Fried Rice

Now that you have all your ingredients ready, it’s time to dive into the preparation of your Hibachi Chicken Fried Rice. This process is straightforward and quick, allowing you to enjoy a delicious meal in no time. Let’s break it down step by step.

Step 1: Gather Your Ingredients

Before you start cooking, make sure you have everything within reach. Gather your chicken, rice, vegetables, and seasonings. Having everything prepared will make the cooking process smoother and more enjoyable. It’s like setting the stage for a great performance!

Step 2: Cook the Chicken

First, heat the vegetable oil in a large skillet or wok over medium-high heat. Once the oil is hot, add the marinated chicken pieces. Cook them for about 5-7 minutes, stirring occasionally. You want the chicken to be browned and cooked through. When it’s done, remove the chicken from the skillet and set it aside. This step is crucial as it builds the foundation of flavor for your dish.

Step 3: Prepare the Vegetables

In the same skillet, add the minced garlic and ginger. Sauté them for about 30 seconds until they become fragrant. This will fill your kitchen with a wonderful aroma! Next, push the garlic and ginger to one side of the skillet. This creates space for the next step.

Step 4: Fry the Rice

Pour the beaten eggs into the empty side of the skillet. Scramble the eggs until they are fully cooked. Once done, mix them with the garlic and ginger. Now, it’s time to add the cooked rice and mixed vegetables. Stir everything together well, cooking for about 3-4 minutes until heated through. This step is where the magic happens, as all the flavors meld together beautifully.

Step 5: Combine Ingredients

After the rice and vegetables are heated, return the cooked chicken to the skillet. Mix everything together thoroughly. This ensures that every bite is packed with flavor. The combination of chicken, rice, and veggies creates a colorful and appetizing dish.

Step 6: Season the Dish

Finally, stir in the chopped green onions and adjust the seasoning with salt and pepper to taste. This last touch enhances the overall flavor of your Hibachi Chicken Fried Rice. Once everything is well combined and seasoned, your dish is ready to be served!

With these steps, you’ll have a delicious Hibachi Chicken Fried Rice that’s sure to impress. Now, let’s explore some variations to make this dish even more exciting!

Variation of Hibachi Chicken Fried Rice

While the classic Hibachi Chicken Fried Rice is a favorite, there are many ways to switch things up! Whether you’re looking for a vegetarian option or want to indulge in seafood, these variations will keep your meals exciting and flavorful. Let’s explore two delicious alternatives!

Vegetarian Option

If you’re looking for a meat-free meal, the vegetarian version of Hibachi Fried Rice is a fantastic choice. Simply replace the chicken with a variety of vegetables and plant-based proteins. Here’s how to make it:

  • Protein Substitute: Use tofu or tempeh, cut into bite-sized pieces. Marinate them in soy sauce and sesame oil for added flavor.
  • Vegetable Variety: Add bell peppers, broccoli, and snap peas for a colorful and nutritious mix. You can also include mushrooms for an earthy flavor.
  • Cooking Steps: Follow the same cooking steps as the original recipe. Sauté the tofu or tempeh until golden brown, then add your vegetables and proceed with the rice.

This vegetarian option is not only delicious but also packed with nutrients. It’s a great way to enjoy the flavors of Hibachi without the meat!

Seafood Hibachi Fried Rice

If you’re a seafood lover, why not try a seafood twist on this classic dish? Shrimp, scallops, or even crab can elevate your Hibachi Fried Rice to a whole new level. Here’s how to prepare it:

  • Seafood Choice: Use peeled and deveined shrimp or scallops. You can also mix in some crab meat for a luxurious touch.
  • Cooking Method: Sauté the seafood in the skillet until they turn pink and opaque. This usually takes about 3-4 minutes. Remove them from the skillet and set aside.
  • Combine: After frying the rice and vegetables, return the cooked seafood to the skillet. Mix everything together and season as desired.

This seafood variation adds a delightful taste of the ocean to your Hibachi Fried Rice. It’s perfect for special occasions or when you want to treat yourself!

With these variations, you can enjoy Hibachi Chicken Fried Rice in different ways. Whether you choose the vegetarian option or the seafood delight, each version is sure to please your taste buds!

Cooking Note for Hibachi Chicken Fried Rice

When preparing Hibachi Chicken Fried Rice, a few cooking notes can help you achieve the best results. These tips will ensure that your dish is flavorful, well-cooked, and visually appealing. Let’s dive into some essential cooking notes to keep in mind!

First, using day-old rice is highly recommended. Freshly cooked rice tends to be too moist, which can lead to clumping when frying. Day-old rice has dried out a bit, making it perfect for frying. If you don’t have leftover rice, you can spread freshly cooked rice on a baking sheet and let it cool for about 30 minutes before using it.

Next, make sure your skillet or wok is hot before adding the ingredients. A hot cooking surface helps to sear the chicken and vegetables quickly, locking in their flavors. If the pan isn’t hot enough, the ingredients may steam instead of fry, resulting in a less desirable texture.

Additionally, don’t overcrowd the skillet. If you add too many ingredients at once, the temperature of the pan will drop. This can lead to uneven cooking. It’s better to cook in batches if necessary, especially when frying the chicken or seafood.

Lastly, feel free to customize the seasoning to your taste. While soy sauce and sesame oil are traditional, you can experiment with other sauces like teriyaki or oyster sauce for added depth. Just remember to adjust the salt accordingly, as some sauces can be saltier than others.

By following these cooking notes, you’ll be well on your way to creating a delicious Hibachi Chicken Fried Rice that’s bursting with flavor and texture. Happy cooking!

Serving Suggestions for Hibachi Chicken Fried Rice

Once your Hibachi Chicken Fried Rice is ready, it’s time to think about how to serve it. Presentation can elevate your dish and make it even more enjoyable. Here are some delightful serving suggestions to consider:

  • Garnish with Fresh Herbs: Sprinkle some additional chopped green onions or fresh cilantro on top. This adds a pop of color and freshness to your dish.
  • Serve with Soy Sauce: Offer soy sauce on the side for those who like an extra splash of flavor. You can also provide sriracha for a spicy kick!
  • Pair with a Side Salad: A light cucumber or seaweed salad complements the richness of the fried rice. It adds a refreshing crunch that balances the meal.
  • Accompany with Soup: A warm miso soup or clear broth can be a comforting addition. It’s a traditional pairing that enhances the dining experience.
  • Use Fun Serving Dishes: Consider serving the fried rice in a large bowl or on a wooden platter. This creates a communal feel, perfect for family-style dining.

These serving suggestions not only enhance the visual appeal of your Hibachi Chicken Fried Rice but also add layers of flavor and texture. Whether you’re hosting a dinner party or enjoying a cozy meal at home, these ideas will make your dish stand out. Enjoy your delicious creation!

Tips for Perfect Hibachi Chicken Fried Rice

Creating the perfect Hibachi Chicken Fried Rice is all about attention to detail and a few helpful tips. With these suggestions, you can elevate your dish and impress your family and friends. Let’s explore some essential tips to ensure your Hibachi Chicken Fried Rice turns out delicious every time!

  • Use Day-Old Rice: As mentioned earlier, day-old rice is ideal for frying. It’s drier and less sticky, which helps achieve that perfect fried rice texture. If you don’t have any, cook rice ahead of time and let it cool completely before using.
  • High Heat is Key: Cooking on high heat allows the ingredients to sear quickly, locking in flavors. Make sure your skillet or wok is hot before adding the chicken and vegetables. This will give your dish that authentic hibachi taste.
  • Prep Ingredients Ahead: To make the cooking process smoother, chop all your ingredients before you start cooking. This way, you can focus on frying without interruptions, ensuring everything cooks evenly.
  • Don’t Overcrowd the Pan: If you add too many ingredients at once, the temperature will drop, and your food may steam instead of fry. Cook in batches if necessary, especially when frying the chicken or seafood.
  • Season Gradually: Start with the basic seasonings and adjust to your taste. You can always add more soy sauce or sesame oil, but it’s hard to fix an overly salty dish. Taste as you go!
  • Experiment with Add-Ins: Feel free to get creative! You can add different vegetables like bell peppers, zucchini, or even pineapple for a sweet twist. Each addition can bring a new flavor profile to your dish.
  • Finish with Fresh Herbs: Adding fresh herbs like cilantro or basil at the end can brighten up the dish. It adds a fresh note that complements the savory flavors beautifully.

By following these tips, you’ll be well on your way to mastering Hibachi Chicken Fried Rice. Each step contributes to a dish that’s not only tasty but also visually appealing. So, gather your ingredients and get cooking!

Breakdown of Time for Hibachi Chicken Fried Rice

Understanding the time needed for each step in making Hibachi Chicken Fried Rice can help you plan your meal better. Here’s a simple breakdown of the time required for preparation and cooking. This way, you can enjoy your delicious dish without any rush!

Prep Time

The prep time for Hibachi Chicken Fried Rice is approximately 20 minutes. This includes:

  • Marinating the chicken (15 minutes, can be done while prepping other ingredients).
  • Chopping vegetables, green onions, garlic, and ginger (5 minutes).
  • Beating the eggs (1 minute).

Having everything ready before you start cooking will make the process smoother and more enjoyable!

Cooking Time

The cooking time for Hibachi Chicken Fried Rice is about 15-20 minutes. Here’s how it breaks down:

  • Cooking the chicken (5-7 minutes).
  • Sautéing garlic and ginger (30 seconds).
  • Scrambling the eggs (2-3 minutes).
  • Frying the rice and vegetables (3-4 minutes).
  • Combining all ingredients and final seasoning (2-3 minutes).

Cooking on high heat helps to speed up the process while ensuring everything is cooked perfectly!

Total Time

In total, you can expect to spend about 35-40 minutes from start to finish. This includes both prep and cooking time. It’s a quick and satisfying meal that’s perfect for busy weeknights or when you want to impress guests without spending hours in the kitchen.

With this time breakdown, you can easily plan your cooking session and enjoy a delicious Hibachi Chicken Fried Rice in no time!

Nutritional Information for Hibachi Chicken Fried Rice

Understanding the nutritional content of your meals is essential for maintaining a balanced diet. Hibachi Chicken Fried Rice is not only delicious but also provides a good mix of nutrients. Here’s a breakdown of the key nutritional information per serving:

Calories

450 calories. This makes it a satisfying meal that can fit into various dietary plans. The calorie count comes from the combination of chicken, rice, vegetables, and oils used in the recipe. It’s a hearty dish that provides energy for your day!

Protein

30 grams of protein per serving. The chicken thighs are the primary source of protein, making this dish a great option for those looking to increase their protein intake. Pairing it with rice and vegetables ensures a well-rounded meal.

Sodium

800 milligrams of sodium. This amount primarily comes from the soy sauce used in the recipe. If you’re watching your sodium levels, consider using low-sodium soy sauce or adjusting the amount to suit your dietary needs.

Overall, Hibachi Chicken Fried Rice is a nutritious meal that offers a good balance of calories, protein, and flavor. By being mindful of the ingredients and portion sizes, you can enjoy this dish while keeping your nutritional goals in check!

FAQs about Hibachi Chicken Fried Rice

What is Hibachi Chicken Fried Rice?

Hibachi Chicken Fried Rice is a popular dish that combines tender chicken, flavorful rice, and vibrant vegetables, all cooked together in a hot skillet or wok. The term “hibachi” refers to a style of cooking that originated in Japan, where food is grilled or stir-fried at high temperatures. This dish is known for its savory taste, often enhanced with soy sauce and sesame oil, making it a favorite among many. It’s a quick and satisfying meal that can be enjoyed at home or in restaurants.

Can I use brown rice for Hibachi Chicken Fried Rice?

Yes, you can use brown rice for Hibachi Chicken Fried Rice! Brown rice adds a nutty flavor and is a healthier option, as it contains more fiber and nutrients compared to white rice. However, keep in mind that brown rice takes longer to cook. If you choose to use it, make sure it is fully cooked and cooled before frying. This will help achieve the best texture and flavor in your dish.

How do I store leftover Hibachi Chicken Fried Rice?

Storing leftover Hibachi Chicken Fried Rice is easy! Allow the dish to cool completely before transferring it to an airtight container. You can store it in the refrigerator for up to 3-4 days. When you’re ready to enjoy it again, simply reheat it in a skillet over medium heat or in the microwave until heated through. If you find the rice is a bit dry, you can add a splash of water or soy sauce while reheating to restore moisture.

What vegetables can I add to Hibachi Chicken Fried Rice?

Hibachi Chicken Fried Rice is versatile, and you can add a variety of vegetables to enhance its flavor and nutrition. Some great options include:

  • Bell Peppers: Add color and sweetness.
  • Broccoli: Provides crunch and nutrients.
  • Snap Peas: Adds a fresh, crisp texture.
  • Mushrooms: Introduces an earthy flavor.
  • Zucchini: Offers a mild taste and soft texture.

Feel free to mix and match your favorite vegetables to create a delicious and colorful dish!

Conclusion on Hibachi Chicken Fried Rice

In conclusion, Hibachi Chicken Fried Rice is a delightful dish that brings the vibrant flavors of Japanese cuisine right to your home. With its tender chicken, colorful vegetables, and perfectly cooked rice, this meal is not only satisfying but also easy to prepare. Whether you’re cooking for a family dinner or hosting friends, this dish is sure to impress.

By following the steps outlined in this article, you can create a restaurant-quality meal in your own kitchen. The versatility of Hibachi Chicken Fried Rice allows you to customize it to your taste, whether you prefer a vegetarian option or a seafood twist. Plus, with the tips and variations provided, you can keep your meals exciting and fresh.

Remember, the key to a great Hibachi Chicken Fried Rice lies in using day-old rice, cooking on high heat, and not overcrowding the pan. These simple techniques will help you achieve that perfect texture and flavor that makes this dish so beloved.

So, gather your ingredients, roll up your sleeves, and get ready to enjoy a delicious Hibachi Chicken Fried Rice. It’s a meal that’s not only quick to make but also packed with nutrients, making it a fantastic choice for any occasion. Happy cooking!

Pistachio Shortbread Cookies are a delightful treat!

Introduction to Pistachio Shortbread Cookies Recipe

Pistachio shortbread cookies are a delightful treat that combines the rich, buttery flavor of traditional shortbread with the unique crunch and taste of pistachios. These cookies are not just a snack; they are a celebration of flavors and textures that can brighten any occasion. Whether you’re enjoying them with a cup of tea or serving them at a gathering, these cookies are sure to impress.

What Makes Pistachio Shortbread Cookies Special?

What sets pistachio shortbread cookies apart is their wonderful blend of flavors. The creamy, nutty taste of pistachios adds a delightful twist to the classic shortbread. The buttery base is perfectly complemented by the slight sweetness of powdered sugar, creating a cookie that melts in your mouth. Plus, the vibrant green color of the pistachios makes these cookies visually appealing, making them a great choice for festive occasions.

Moreover, the simplicity of the ingredients allows the pistachios to shine. Each bite offers a satisfying crunch, making them a favorite among cookie lovers. The versatility of this recipe also means you can easily customize it. For instance, adding a hint of almond extract or swapping in different nuts can create a unique flavor profile that suits your taste.

The History of Shortbread Cookies

Shortbread cookies have a rich history that dates back to Scotland in the 12th century. Originally, they were made from leftover bread dough that was sweetened and baked twice. Over time, the recipe evolved, and the use of butter became prominent, leading to the deliciously rich cookies we know today.

Shortbread gained popularity in the 18th century when it was often served at special occasions and celebrations. The cookies were considered a luxury item, enjoyed by the wealthy. Today, shortbread is loved worldwide, and variations like pistachio shortbread cookies showcase how this classic treat can be adapted to include different flavors and ingredients.

As you embark on making your own pistachio shortbread cookies, you’re not just baking; you’re participating in a long-standing tradition that brings joy and comfort to many. So, let’s dive into the ingredients and preparation of this delightful recipe!

Ingredients for Pistachio Shortbread Cookies Recipe

To create the perfect batch of pistachio shortbread cookies, you’ll need a few simple ingredients. Each component plays a vital role in achieving that rich, buttery flavor and delightful texture. Here’s what you’ll need:

  • 1 cup unsalted butter, softened: This is the base of your cookies. Softened butter ensures a smooth dough and a tender cookie.
  • 1/2 cup powdered sugar: This adds sweetness and helps create a melt-in-your-mouth texture.
  • 1 teaspoon vanilla extract: Vanilla enhances the overall flavor, making the cookies even more delicious.
  • 2 cups all-purpose flour: Flour provides structure to the cookies, allowing them to hold their shape while baking.
  • 1/2 teaspoon salt: A pinch of salt balances the sweetness and enhances the flavors of the other ingredients.
  • 1/2 cup shelled pistachios, finely chopped: The star ingredient! Pistachios add a unique flavor and a delightful crunch.

These ingredients come together to create a cookie that is not only tasty but also visually appealing. The vibrant green of the pistachios against the buttery backdrop makes these cookies a feast for the eyes as well. Now that you have your ingredients ready, let’s move on to the step-by-step preparation of these delightful pistachio shortbread cookies!

Step-by-Step Preparation of Pistachio Shortbread Cookies Recipe

Step 1: Gather Your Ingredients

Before you start baking, it’s essential to gather all your ingredients. This makes the process smoother and more enjoyable. Make sure you have:

  • 1 cup unsalted butter, softened
  • 1/2 cup powdered sugar
  • 1 teaspoon vanilla extract
  • 2 cups all-purpose flour
  • 1/2 teaspoon salt
  • 1/2 cup shelled pistachios, finely chopped

Having everything ready will help you focus on creating delicious pistachio shortbread cookies without any interruptions.

Step 2: Prepare the Dough

Now it’s time to make the dough! In a large mixing bowl, cream together the softened butter and powdered sugar. Use an electric mixer or a wooden spoon to mix until the mixture is light and fluffy. This should take about 3-4 minutes. Next, stir in the vanilla extract, which adds a lovely flavor to your cookies.

Gradually add the all-purpose flour and salt to the mixture. Mix until just combined. Be careful not to overmix, as this can make your cookies tough. Finally, fold in the finely chopped pistachios, ensuring they are evenly distributed throughout the dough.

Step 3: Shape the Cookies

Once your dough is ready, it’s time to shape it. Turn the dough out onto a lightly floured surface. With your hands, shape the dough into a log about 2 inches in diameter. This log will be sliced into individual cookies later. Make sure the log is as even as possible for uniform cookie sizes.

Step 4: Chill the Dough

Chilling the dough is a crucial step. Wrap the log in plastic wrap and refrigerate it for at least 30 minutes. Chilling helps the butter firm up, making it easier to slice the cookies. It also enhances the flavors, resulting in a better cookie.

Step 5: Bake the Cookies

After the dough has chilled, preheat your oven to 350°F (175°C). Remove the log from the refrigerator and slice it into 1/4-inch thick rounds. Place the slices on a baking sheet lined with parchment paper, leaving some space between each cookie.

Bake the cookies for 12-15 minutes, or until the edges are lightly golden. Keep an eye on them, as baking times can vary depending on your oven. The aroma of baking cookies will fill your kitchen, making it hard to wait!

Step 6: Cool and Serve

Once baked, allow the cookies to cool on the baking sheet for a few minutes. This helps them set before transferring them to a wire rack. After a few minutes, move the cookies to the rack to cool completely. Once cooled, they are ready to be enjoyed!

These pistachio shortbread cookies are perfect for sharing with friends and family or enjoying with a cup of tea. Their delightful crunch and buttery flavor will surely make them a favorite!

Variations of Pistachio Shortbread Cookies Recipe

While the classic pistachio shortbread cookies are delicious on their own, there are many fun variations you can try. These twists can enhance the flavor and make your cookies even more exciting. Let’s explore some options!

Adding Different Nuts

If you love nuts, consider experimenting with different types. Instead of pistachios, you can use chopped walnuts or almonds. Each nut brings its unique flavor and texture. For instance, walnuts add a rich, earthy taste, while almonds provide a sweet crunch. You can even mix different nuts together for a delightful medley!

To substitute, simply replace the 1/2 cup of pistachios with your chosen nut. Just make sure to chop them finely, so they blend well into the dough. This simple change can create a whole new cookie experience!

Flavoring Options: Citrus Zest and Spices

Another way to elevate your pistachio shortbread cookies is by adding citrus zest or spices. A teaspoon of lemon or orange zest can brighten the flavor, giving your cookies a refreshing twist. The citrus aroma will fill your kitchen, making the baking experience even more enjoyable.

Additionally, you can sprinkle in some spices like cinnamon or nutmeg. Just a pinch can add warmth and depth to the cookies. If you want a more exotic flavor, try adding cardamom or ginger. These spices can transform your cookies into a delightful treat that surprises your taste buds!

Feel free to mix and match these variations to create your perfect pistachio shortbread cookies. The possibilities are endless, and each batch can be a new adventure in baking!

Cooking Note for Pistachio Shortbread Cookies Recipe

When it comes to baking pistachio shortbread cookies, a few cooking notes can help ensure your cookies turn out perfectly every time. These tips will guide you through the process, making it easier and more enjoyable.

First, always use unsalted butter for this recipe. Unsalted butter allows you to control the saltiness of your cookies. If you use salted butter, you might end up with cookies that are too salty, which can overpower the delicate flavors of the pistachios.

Next, make sure your butter is softened but not melted. Softened butter should be at room temperature, allowing it to cream well with the powdered sugar. If your butter is too soft or melted, it can lead to a greasy dough, resulting in cookies that spread too much while baking.

Additionally, when measuring flour, use the spoon-and-level method. This means you should spoon the flour into your measuring cup and then level it off with a knife. Avoid scooping directly from the bag, as this can pack the flour and lead to using too much, making your cookies dense.

Lastly, keep an eye on your cookies while they bake. Ovens can vary in temperature, so it’s essential to check for that light golden edge. If you bake them too long, they may become hard instead of the desired tender texture.

By following these cooking notes, you’ll be well on your way to creating delicious pistachio shortbread cookies that are sure to impress everyone who tries them!

Serving Suggestions for Pistachio Shortbread Cookies Recipe

Pairing with Beverages

When it comes to enjoying your pistachio shortbread cookies, the right beverage can elevate the experience. These cookies pair wonderfully with a variety of drinks, making them perfect for any occasion. Here are some delightful options:

  • Tea: A warm cup of tea is a classic choice. Consider pairing your cookies with green tea or chamomile. The light flavors of these teas complement the buttery richness of the cookies.
  • Coffee: For coffee lovers, a freshly brewed cup of coffee is an excellent match. The boldness of coffee balances the sweetness of the cookies, creating a delightful contrast.
  • Milk: You can never go wrong with a glass of cold milk. The creamy texture of milk enhances the buttery flavor of the cookies, making each bite even more enjoyable.
  • Hot Chocolate: For a cozy treat, serve your cookies with a cup of hot chocolate. The rich chocolate flavor pairs beautifully with the nutty taste of pistachios.

These beverage pairings not only enhance the flavors of the cookies but also create a warm and inviting atmosphere for sharing with friends and family. So, grab your favorite drink and enjoy your pistachio shortbread cookies!

Presentation Ideas for Special Occasions

Presentation is key when serving pistachio shortbread cookies, especially for special occasions. Here are some creative ideas to make your cookies stand out:

  • Cookie Platters: Arrange your cookies on a beautiful platter. You can add some fresh fruits or edible flowers for a pop of color. This makes for an eye-catching centerpiece at any gathering.
  • Gift Boxes: If you’re sharing your cookies as gifts, consider packaging them in decorative boxes. Line the boxes with tissue paper and stack the cookies neatly. This thoughtful presentation adds a personal touch.
  • Cookie Jars: Fill a clear glass jar with your cookies and tie a ribbon around the lid. This not only looks charming but also keeps the cookies fresh. It’s a great way to showcase your baking skills!
  • Festive Themes: For holidays or special events, decorate your serving area with themed decorations. For example, use holiday-themed napkins or plates to match the occasion.

With these presentation ideas, your pistachio shortbread cookies will not only taste amazing but also look stunning. Whether it’s a casual get-together or a formal celebration, these cookies are sure to impress!

Tips for Perfect Pistachio Shortbread Cookies Recipe

Storage Tips

To keep your pistachio shortbread cookies fresh and delicious, proper storage is essential. Here are some helpful tips:

  • Room Temperature: Store your cookies in an airtight container at room temperature. This keeps them soft and prevents them from becoming stale. They can last up to a week this way.
  • Refrigeration: If you want to extend their shelf life, you can refrigerate the cookies. Just make sure to place them in a sealed container to avoid absorbing any odors from the fridge. They can last for about two weeks when refrigerated.
  • Freezing: For longer storage, consider freezing your cookies. Place them in a freezer-safe bag or container, separating layers with parchment paper. They can be frozen for up to three months. When you’re ready to enjoy them, simply thaw at room temperature.

By following these storage tips, you can enjoy your pistachio shortbread cookies for days or even weeks after baking!

Common Mistakes to Avoid

Even the best bakers can make mistakes. Here are some common pitfalls to watch out for when making pistachio shortbread cookies:

  • Using Cold Butter: Make sure your butter is softened to room temperature. Cold butter won’t cream well with the sugar, leading to a dense cookie.
  • Overmixing the Dough: Once you add the flour, mix just until combined. Overmixing can develop gluten, making your cookies tough instead of tender.
  • Not Chilling the Dough: Skipping the chilling step can result in cookies that spread too much while baking. Chilling helps maintain their shape and enhances the flavor.
  • Ignoring Baking Time: Keep an eye on your cookies as they bake. Every oven is different, and baking times can vary. Remove them when the edges are lightly golden for the best texture.

By avoiding these common mistakes, you’ll be on your way to baking perfect pistachio shortbread cookies every time. Happy baking!

Breakdown of Time for Pistachio Shortbread Cookies Recipe

Prep Time

The prep time for making pistachio shortbread cookies is approximately 15-20 minutes. This includes gathering your ingredients, preparing the dough, and shaping it into a log. It’s a quick and straightforward process that allows you to enjoy baking without spending too much time in the kitchen.

Cooking Time

Once your cookies are shaped and ready to bake, the cooking time is about 12-15 minutes. Keep an eye on them as they bake, ensuring they turn a lovely golden color around the edges. This short baking time means you’ll soon be rewarded with delicious cookies!

Total Time

In total, you can expect the entire process to take around 1 hour, including the chilling time for the dough. Chilling the dough for at least 30 minutes is essential for achieving the perfect texture. So, while the active time is minimal, the chilling step is crucial for the best results.

With this breakdown, you can easily plan your baking session. Whether you’re making these cookies for a special occasion or just for yourself, knowing the time involved helps you enjoy the process even more!

Nutritional Information for Pistachio Shortbread Cookies Recipe

Calories and Macronutrients

Understanding the nutritional content of your pistachio shortbread cookies can help you enjoy them mindfully. Each cookie contains approximately 120 calories, making them a delightful treat without being overly indulgent. Here’s a quick breakdown of the macronutrients per serving:

  • Calories: 120
  • Net Carbs: 9g
  • Protein: 2g
  • Fat: 9g

These cookies provide a balance of carbohydrates, protein, and healthy fats, thanks to the inclusion of pistachios. The combination of these macronutrients makes them a satisfying snack that can keep you energized throughout the day.

Health Benefits of Pistachios

Pistachios are not just delicious; they also offer several health benefits. Incorporating them into your diet can be a smart choice. Here are some of the notable benefits:

  • Rich in Nutrients: Pistachios are packed with essential vitamins and minerals, including vitamin B6, copper, and manganese. These nutrients support various bodily functions, from energy production to immune health.
  • Heart Health: The healthy fats found in pistachios can help lower bad cholesterol levels. This can reduce the risk of heart disease, making them a heart-friendly snack.
  • High in Antioxidants: Pistachios contain antioxidants that help protect your cells from damage. This can contribute to overall health and may reduce the risk of chronic diseases.
  • Weight Management: Despite being calorie-dense, pistachios can aid in weight management. Their protein and fiber content can help you feel full, reducing the likelihood of overeating.

By enjoying pistachio shortbread cookies, you not only treat your taste buds but also provide your body with beneficial nutrients. So, indulge in these cookies knowing they come with a side of health benefits!

FAQs about Pistachio Shortbread Cookies Recipe

Can I use salted pistachios in the recipe?

Yes, you can use salted pistachios in your pistachio shortbread cookies. However, it’s important to adjust the amount of salt in the recipe. Since salted pistachios already contain salt, you may want to reduce or omit the 1/2 teaspoon of salt called for in the recipe. This way, your cookies won’t end up too salty, allowing the sweet and nutty flavors to shine through.

How do I store leftover cookies?

To keep your leftover pistachio shortbread cookies fresh, store them in an airtight container at room temperature. This will help maintain their soft texture and prevent them from becoming stale. If stored properly, they can last up to a week. If you want to keep them for a longer period, consider refrigerating them in a sealed container, where they can last for about two weeks.

Can I freeze the dough for later use?

Absolutely! Freezing the dough is a great way to have fresh cookies on hand whenever you want. After shaping the dough into a log, wrap it tightly in plastic wrap and place it in a freezer-safe bag. The dough can be frozen for up to three months. When you’re ready to bake, simply thaw the dough in the refrigerator overnight, slice it, and bake as directed. This makes it easy to enjoy homemade cookies without the wait!

What can I substitute for butter in this recipe?

If you’re looking for a butter substitute, you have a few options. You can use coconut oil or a plant-based butter alternative for a dairy-free version. Make sure to use the same amount as the recipe calls for. Keep in mind that using a substitute may slightly alter the flavor and texture of the cookies, but they will still be delicious. Experimenting with different fats can lead to exciting new flavors!

Conclusion on Pistachio Shortbread Cookies Recipe

In conclusion, the pistachio shortbread cookies recipe is a delightful way to indulge in a classic treat with a nutty twist. These cookies are not only easy to make but also offer a wonderful combination of flavors and textures that everyone will love. The buttery richness paired with the crunch of pistachios creates a satisfying snack that is perfect for any occasion.

Whether you’re baking for a special event, a cozy gathering, or simply to enjoy at home, these cookies are sure to impress. Plus, with the ability to customize the recipe by adding different nuts or flavorings, you can make each batch unique. The health benefits of pistachios also add a nice touch, allowing you to enjoy your treats with a little extra peace of mind.

So, gather your ingredients, follow the steps, and get ready to enjoy the delightful aroma of freshly baked pistachio shortbread cookies wafting through your kitchen. Remember, baking is not just about the end result; it’s about the joy of creating something delicious. Happy baking!

Almond Meltaway Cookies are a must-try treat!

Introduction to Almond Meltaway Cookies

Almond Meltaway Cookies are a delightful treat that brings a touch of elegance to any occasion. These cookies are known for their soft, buttery texture that literally melts in your mouth. With a hint of almond flavor, they offer a unique taste that is both comforting and sophisticated. Whether you’re baking for a special event or just to satisfy a sweet craving, these cookies are sure to impress.

What makes Almond Meltaway Cookies truly special is their simplicity. The ingredients are easy to find, and the preparation is straightforward, making them perfect for bakers of all skill levels. Plus, they can be customized with various add-ins, allowing you to create a version that suits your taste. Imagine serving these cookies at a family gathering or holiday party, where their delicate flavor and beautiful presentation will surely be a hit.

In this article, we will guide you through the ingredients, preparation steps, and even some fun variations to try. So, roll up your sleeves and get ready to bake some delicious Almond Meltaway Cookies that will leave everyone asking for the recipe!

Ingredients for Almond Meltaway Cookies

To create the perfect batch of Almond Meltaway Cookies, you’ll need a few simple ingredients. Each component plays a vital role in achieving that melt-in-your-mouth texture and delightful flavor. Here’s what you’ll need:

  • 1 cup unsalted butter – Make sure it’s softened to room temperature for easy mixing.
  • 1/2 cup powdered sugar – This adds sweetness and helps create a tender cookie.
  • 1 teaspoon almond extract – This is the star ingredient that gives the cookies their signature flavor.
  • 2 cups all-purpose flour – This forms the base of the cookie dough.
  • 1/4 teaspoon salt – A pinch of salt enhances the overall flavor.
  • 1/2 cup sliced almonds (optional) – These add a nice crunch and extra almond flavor.
  • Additional powdered sugar for dusting – This gives the cookies a lovely finish.

These ingredients are not only easy to find but also work together to create a cookie that is both delicious and visually appealing. Feel free to gather everything before you start baking, as it will make the process smoother and more enjoyable. Now that you have your ingredients ready, let’s move on to the preparation steps!

Preparation of Almond Meltaway Cookies

Now that you have gathered all your ingredients, it’s time to dive into the preparation of your Almond Meltaway Cookies. This process is simple and fun, making it a great activity for bakers of all ages. Follow these steps to create your delicious cookies!

Step 1: Preheat the Oven

First things first, preheat your oven to 350°F (175°C). This step is crucial as it ensures that your cookies bake evenly. While the oven heats up, you can focus on mixing your ingredients.

Step 2: Mix the Dry Ingredients

In a medium bowl, combine the all-purpose flour and salt. Whisk them together until they are well mixed. This helps to evenly distribute the salt throughout the flour, ensuring that every bite of your cookies is perfectly seasoned.

Step 3: Cream the Butter and Sugar

Next, take a large mixing bowl and add the softened unsalted butter and powdered sugar. Using an electric mixer or a whisk, cream them together until the mixture is light and fluffy. This usually takes about 2-3 minutes. The air incorporated during this step is what makes your cookies soft and melt-in-your-mouth delicious!

Step 4: Combine Wet and Dry Ingredients

Now, it’s time to add the almond extract to your butter and sugar mixture. Mix well until combined. Gradually add the flour mixture to the wet ingredients, stirring gently until a soft dough forms. If you’re using sliced almonds, fold them in at this stage for added texture and flavor.

Step 5: Shape the Cookies

Once your dough is ready, scoop tablespoon-sized portions and roll them into balls. Place these dough balls on your prepared baking sheet, making sure to space them about 2 inches apart. This spacing allows the cookies to spread without sticking together while baking.

Step 6: Bake the Almond Meltaway Cookies

Now, pop the baking sheet into your preheated oven. Bake the cookies for 12-15 minutes, or until the edges are lightly golden. Keep an eye on them, as baking times can vary slightly depending on your oven.

Step 7: Cool and Dust with Powdered Sugar

Once baked, remove the cookies from the oven and let them cool on the baking sheet for about 5 minutes. This allows them to firm up a bit. After that, transfer the cookies to a wire rack to cool completely. Once cooled, dust them with additional powdered sugar for a beautiful finish. Your Almond Meltaway Cookies are now ready to be enjoyed!

Variation of Almond Meltaway Cookies

While the classic Almond Meltaway Cookies are delicious on their own, there are many ways to add a twist to this beloved recipe. By incorporating alternative flavors and add-ins, you can create a unique version that suits your taste preferences. Let’s explore some exciting variations!

Alternative Flavors and Add-ins

One of the best things about baking is the ability to experiment. Here are some ideas to enhance your Almond Meltaway Cookies:

  • Vanilla Extract: For a richer flavor, add 1/4 teaspoon of vanilla extract along with the almond extract. This combination creates a delightful depth of flavor.
  • Citrus Zest: Grate some lemon or orange zest into the dough for a refreshing citrus twist. This brightens the flavor and adds a lovely aroma.
  • Chocolate Chips: Fold in some mini chocolate chips for a sweet surprise in every bite. The chocolate pairs beautifully with the almond flavor.
  • Spices: Consider adding a pinch of cinnamon or nutmeg to the dough. These warm spices can elevate the cookies, making them perfect for the holiday season.
  • Food Coloring: For a festive touch, add a few drops of food coloring to the dough. This is especially fun for holidays or special occasions!

Feel free to mix and match these ideas to create your own signature Almond Meltaway Cookies. The possibilities are endless, and your creativity will surely impress your family and friends!

Gluten-Free Options

If you or your loved ones are following a gluten-free diet, you can still enjoy these delightful cookies. Here’s how to make gluten-free Almond Meltaway Cookies:

  • Gluten-Free Flour Blend: Substitute the all-purpose flour with a gluten-free flour blend. Make sure it’s a blend that includes xanthan gum for the best texture.
  • Almond Flour: For a nutty flavor, you can use almond flour instead of all-purpose flour. This will create a denser cookie, but it will still be delicious!

By making these simple adjustments, you can enjoy Almond Meltaway Cookies that everyone can savor, regardless of dietary restrictions. Now that you have some variations in mind, let’s move on to cooking notes to ensure your cookies turn out perfectly!

Cooking Note for Almond Meltaway Cookies

When it comes to baking Almond Meltaway Cookies, a few cooking notes can help you achieve the best results. These tips will ensure that your cookies turn out perfectly every time, with that signature melt-in-your-mouth texture and delightful flavor.

room temperature butter. This is crucial for creaming with the powdered sugar. Cold butter can lead to a dense cookie, while softened butter creates a light and airy dough. If you forget to take the butter out in advance, you can cut it into small pieces and let it sit for about 15 minutes to soften.

Next, be careful not to overmix the dough. Once you combine the wet and dry ingredients, mix just until everything is incorporated. Overmixing can develop the gluten in the flour, resulting in tougher cookies instead of the desired meltaway texture.

cookie scoop for uniform cookie sizes. This ensures even baking and makes it easier to shape the dough into balls. If you want to make your cookies extra special, you can slightly flatten the dough balls before baking. This will give them a more traditional cookie shape.

Lastly, keep an eye on the baking time. Ovens can vary, so check your cookies a minute or two before the recommended time. You want the edges to be lightly golden, while the centers should remain soft. Remember, they will continue to cook slightly after being removed from the oven.

By following these cooking notes, you’ll be well on your way to baking Almond Meltaway Cookies that are not only delicious but also visually appealing. Happy baking!

Serving Suggestions for Almond Meltaway Cookies

Almond Meltaway Cookies are not just a treat; they are a delightful addition to any gathering or occasion. Their elegant appearance and melt-in-your-mouth texture make them perfect for various settings. Here are some serving suggestions to elevate your cookie experience:

  • Tea Parties: Serve these cookies alongside a selection of teas. Their delicate flavor pairs beautifully with both herbal and black teas, making them a perfect accompaniment for afternoon tea.
  • Holiday Gatherings: During festive seasons, arrange the cookies on a decorative platter. You can even add some seasonal decorations, like sprigs of holly or festive napkins, to enhance the presentation.
  • Gift Giving: Package the cookies in a beautiful tin or box. Add a ribbon and a personalized note for a thoughtful homemade gift that friends and family will cherish.
  • Picnics: These cookies are easy to transport, making them an excellent choice for picnics. Pair them with fresh fruit and lemonade for a delightful outdoor treat.
  • Ice Cream Sandwiches: For a fun twist, use two cookies to create an ice cream sandwich. Choose your favorite ice cream flavor and let it melt slightly between the cookies for a delicious dessert.

With these serving suggestions, you can enjoy Almond Meltaway Cookies in various delightful ways. Whether you’re hosting a gathering or simply indulging at home, these cookies are sure to impress and satisfy!

Tips for Perfect Almond Meltaway Cookies

To ensure your Almond Meltaway Cookies turn out perfectly every time, consider these helpful tips. With a few simple adjustments and techniques, you can elevate your baking game and impress everyone with your delicious cookies!

  • Measure Ingredients Accurately: Use measuring cups and spoons for precise measurements. Too much flour can lead to dry cookies, while too little can make them too soft. For best results, spoon flour into the measuring cup and level it off with a knife.
  • Chill the Dough: If you find the dough too soft to handle, chill it in the refrigerator for about 30 minutes. This will make it easier to shape the cookies and help them hold their shape while baking.
  • Use Quality Ingredients: The flavor of your cookies greatly depends on the quality of your ingredients. Use fresh almond extract and high-quality butter for the best taste. Organic ingredients can also enhance the flavor.
  • Rotate the Baking Sheet: Halfway through baking, rotate the baking sheet to ensure even baking. This is especially important if your oven has hot spots that can cause uneven cooking.
  • Don’t Overbake: Keep a close eye on your cookies as they bake. They should be lightly golden around the edges but still soft in the center. Remember, they will continue to firm up as they cool.
  • Store Properly: To keep your cookies fresh, store them in an airtight container at room temperature. If you want to keep them longer, consider freezing them. Just make sure to layer them with parchment paper to prevent sticking.

By following these tips, you’ll be well on your way to baking Almond Meltaway Cookies that are not only delicious but also perfectly textured. Enjoy the process and happy baking!

Breakdown of Time for Almond Meltaway Cookies

Understanding the time required for each step in baking Almond Meltaway Cookies can help you plan your baking session better. Here’s a simple breakdown of the time you’ll need for preparation and cooking:

Prep Time

The prep time for Almond Meltaway Cookies is approximately 15-20 minutes. This includes gathering your ingredients, mixing the dough, and shaping the cookies. If you decide to chill the dough, you may want to add an extra 30 minutes to this time. Chilling helps the cookies maintain their shape while baking.

Cooking Time

Once your cookies are shaped and ready to go, the cooking time is about 12-15 minutes. Keep an eye on them as they bake, ensuring the edges turn lightly golden. Remember, every oven is different, so checking a minute or two early can prevent overbaking.

Total Time

In total, you can expect to spend around 30-35 minutes from start to finish, not including any chilling time. This makes Almond Meltaway Cookies a quick and delightful treat to whip up, perfect for any occasion!

Nutritional Information for Almond Meltaway Cookies

When enjoying Almond Meltaway Cookies, it’s helpful to know their nutritional content. This information can assist you in making informed choices, especially if you’re mindful of your diet. Below, we break down the key nutritional components of these delightful cookies.

Calories

120 calories. This makes them a sweet treat that can fit into a balanced diet. Enjoying one or two cookies can satisfy your sweet tooth without overindulging.

Protein

1 gram. While this isn’t a significant source of protein, it does contribute to your overall daily intake. Pairing these cookies with a protein-rich snack can create a more balanced treat.

Sodium

50 milligrams. This is relatively low, making Almond Meltaway Cookies a heart-friendly option. Keeping sodium levels in check is essential for maintaining good health, and these cookies fit the bill.

Overall, Almond Meltaway Cookies can be enjoyed as part of a healthy lifestyle. Their delightful flavor and satisfying texture make them a perfect treat for any occasion. Just remember to enjoy them in moderation, and you’ll be able to savor every bite without any guilt!

FAQs about Almond Meltaway Cookies

What are Almond Meltaway Cookies?

Almond Meltaway Cookies are a type of cookie known for their soft, buttery texture that melts in your mouth. They are made primarily with butter, powdered sugar, almond extract, and flour. The cookies have a delicate almond flavor, making them a delightful treat for any occasion. Often dusted with powdered sugar, they not only taste great but also look elegant on any dessert table.

How do I store Almond Meltaway Cookies?

To keep your Almond Meltaway Cookies fresh, store them in an airtight container at room temperature. This will help maintain their soft texture and flavor. If you want to keep them for a longer period, you can refrigerate them, but be sure to let them come to room temperature before serving. For best results, consume the cookies within a week to enjoy their optimal taste and texture.

Can I freeze Almond Meltaway Cookies?

Yes, you can freeze Almond Meltaway Cookies! To do this, allow the cookies to cool completely after baking. Then, place them in a single layer on a baking sheet and freeze until solid. Once frozen, transfer the cookies to an airtight container or a freezer bag, separating layers with parchment paper to prevent sticking. They can be stored in the freezer for up to three months. When you’re ready to enjoy them, simply thaw at room temperature.

What can I substitute for almond extract in Almond Meltaway Cookies?

If you don’t have almond extract on hand, there are several substitutes you can use. Vanilla extract is a popular alternative that will still provide a lovely flavor. You can also use hazelnut extract for a nutty twist. If you prefer a more natural option, consider using finely grated citrus zest, like lemon or orange, to add a fresh flavor to your cookies. Just remember that these substitutes will change the overall taste slightly, but they can still create delicious cookies!

Conclusion on Almond Meltaway Cookies

In conclusion, Almond Meltaway Cookies are a delightful treat that combines simplicity with elegance. Their soft, buttery texture and rich almond flavor make them a favorite among cookie lovers. Whether you’re baking for a special occasion or just to enjoy a sweet snack, these cookies are sure to impress.

With easy-to-follow steps and a few simple ingredients, anyone can create these delicious cookies. Plus, the variations and tips provided allow for creativity in the kitchen. You can customize your Almond Meltaway Cookies to suit your taste, making them even more special.

Remember, the joy of baking lies not just in the final product but also in the process. So, gather your ingredients, invite your family or friends to join you, and enjoy the experience of making these delightful cookies together. Once baked, share them with loved ones or savor them yourself—either way, you’ll be treated to a melt-in-your-mouth experience that’s hard to resist.

So, why wait? Start baking your Almond Meltaway Cookies today and indulge in a sweet moment that’s sure to bring smiles all around!

To Die For Blueberry Muffins are a must-try treat!

Introduction to To Die For Blueberry Muffins Recipe

The Allure of Blueberry Muffins

Blueberry muffins are a delightful treat that many people adore. Their sweet, fruity flavor and soft, fluffy texture make them a favorite for breakfast or a snack. The combination of juicy blueberries and a tender muffin base creates a mouthwatering experience that is hard to resist. Whether you enjoy them fresh out of the oven or as a quick grab-and-go option, blueberry muffins have a special place in our hearts.

To Die For Blueberry Muffins Recipe stand out? It’s all about the balance of flavors and textures. The sweetness of the blueberries pairs perfectly with the buttery richness of the muffin. Plus, the simple ingredients make it easy for anyone to whip up a batch at home. Imagine the aroma of freshly baked muffins wafting through your kitchen, inviting everyone to gather around the table.

These muffins are not just delicious; they are also versatile. You can enjoy them plain, or you can add a sprinkle of sugar on top for a sweet crunch. You can even mix in other fruits like raspberries or strawberries for a fun twist. The possibilities are endless! This recipe is perfect for family gatherings, brunches, or even a cozy afternoon snack.

To Die For Blueberry Muffins. You’ll be amazed at how easy it is to create this delightful dish that will surely impress your family and friends!

Ingredients for To Die For Blueberry Muffins Recipe

To Die For Blueberry Muffins, you’ll need a few simple ingredients. Each one plays a vital role in achieving that delightful flavor and texture. Here’s what you’ll need:

  • 2 cups all-purpose flour: This is the base of your muffins, providing structure and a soft crumb.
  • 1 cup granulated sugar: This adds sweetness and helps create a lovely golden crust.
  • 1 tablespoon baking powder: This is the leavening agent that makes your muffins rise and become fluffy.
  • 1/2 teaspoon salt: A pinch of salt enhances the flavors and balances the sweetness.
  • 1/2 cup unsalted butter, melted: Butter adds richness and moisture, making the muffins tender.
  • 1 cup milk: Milk contributes to the batter’s moisture and helps create a soft texture.
  • 2 large eggs: Eggs provide structure and help bind the ingredients together.
  • 1 teaspoon vanilla extract: This adds a warm, sweet flavor that complements the blueberries.
  • 2 cups fresh blueberries: The star of the show! Fresh blueberries burst with flavor and add a juicy texture.
  • 1 tablespoon all-purpose flour (for tossing blueberries): Coating the blueberries in flour prevents them from sinking to the bottom of the muffins.

With these ingredients on hand, you’re well on your way to baking a batch of muffins that everyone will love. Remember, using fresh blueberries is key to achieving that burst of flavor in every bite. Now that you have your ingredients ready, let’s move on to the step-by-step preparation!

Step-by-Step Preparation of To Die For Blueberry Muffins Recipe

Step 1: Preheat the Oven

Before you start mixing, it’s important to preheat your oven. Set it to 375°F (190°C). This ensures that your muffins bake evenly and rise beautifully. While the oven heats up, you can prepare the muffin batter. It’s a great way to save time and keep things moving smoothly!

Step 2: Prepare the Muffin Batter

In a large mixing bowl, combine the dry ingredients. Start with 2 cups of all-purpose flour, 1 cup of granulated sugar, 1 tablespoon of baking powder, and 1/2 teaspoon of salt. Mix these together well. In another bowl, whisk together the wet ingredients. You’ll need 1/2 cup of melted unsalted butter, 1 cup of milk, 2 large eggs, and 1 teaspoon of vanilla extract. Make sure everything is well combined. Then, pour the wet mixture into the dry ingredients. Stir gently until just combined. Remember, overmixing can lead to tough muffins!

Step 3: Fold in the Blueberries

Now comes the fun part! Toss 2 cups of fresh blueberries with 1 tablespoon of flour in a small bowl. This helps keep the blueberries from sinking to the bottom of your muffins. Gently fold the floured blueberries into the batter. Be careful not to crush them; you want those lovely bursts of blueberry in every bite!

Step 4: Fill the Muffin Tins

Next, it’s time to fill your muffin tins. Line them with paper liners or grease them lightly to prevent sticking. Using a spoon or an ice cream scoop, divide the batter evenly among the muffin cups. Fill each cup about 2/3 full. This allows room for the muffins to rise without overflowing.

Step 5: Bake to Perfection

Place the muffin tin in your preheated oven. Bake for 20-25 minutes. To check if they’re done, insert a toothpick into the center of a muffin. If it comes out clean, they’re ready! Once baked, let the muffins cool in the pan for about 5 minutes. Then, transfer them to a wire rack to cool completely. The aroma will be irresistible!

Variation of To Die For Blueberry Muffins Recipe

Alternative Ingredients for Different Flavors

To Die For Blueberry Muffins Recipe is its versatility. You can easily switch up the ingredients to create new flavors that everyone will love. For instance, if you want a tropical twist, consider adding shredded coconut or diced pineapple. These ingredients will give your muffins a delightful, fruity flair.

If you’re a fan of nuts, try mixing in chopped walnuts or pecans. They add a nice crunch and pair wonderfully with the blueberries. For a chocolatey treat, fold in some mini chocolate chips along with the blueberries. The combination of chocolate and blueberries is simply divine!

Another fun idea is to use flavored yogurt instead of milk. Vanilla or lemon yogurt can enhance the taste and add a creamy texture. You can also experiment with spices like cinnamon or nutmeg for a warm, cozy flavor. Just a pinch can elevate your muffins to a whole new level!

Gluten-Free and Vegan Options

For those with dietary restrictions, you can still enjoy these delicious muffins! To make a gluten-free version, simply substitute the all-purpose flour with a gluten-free flour blend. Make sure it contains xanthan gum, which helps mimic the texture of regular flour.

If you’re looking for a vegan option, you can replace the eggs with flaxseed meal. Mix 1 tablespoon of flaxseed meal with 2.5 tablespoons of water and let it sit for a few minutes until it thickens. This mixture works great as an egg substitute. Additionally, use almond milk or any plant-based milk in place of regular milk. You can also swap the butter for coconut oil or a vegan butter alternative.

To Die For Blueberry Muffins Recipe no matter your dietary needs. So, feel free to get creative and make these muffins your own!

Cooking Note for To Die For Blueberry Muffins Recipe

To Die For Blueberry Muffins Recipe. Here are some essential cooking notes to keep in mind:

  • Use Fresh Ingredients: Always opt for fresh blueberries and other ingredients. Fresh blueberries not only taste better but also provide that juicy burst in every bite. Check the expiration dates on your baking powder and other ingredients to ensure they are fresh.
  • Room Temperature Ingredients: For the best results, use room temperature eggs and milk. This helps the batter mix more evenly, leading to a better texture in your muffins.
  • Don’t Overmix: As mentioned earlier, overmixing can lead to tough muffins. Mix until just combined, and you’ll achieve a light and fluffy texture.
  • Check for Doneness: Ovens can vary in temperature. Always check your muffins a few minutes before the suggested baking time. If the toothpick comes out clean, they are ready!
  • Cool Properly: Allow the muffins to cool in the pan for a few minutes before transferring them to a wire rack. This helps them set and prevents them from becoming soggy.

To Die For Blueberry Muffins. Enjoy the process, and don’t forget to share your delicious creations with family and friends!

Serving Suggestions for To Die For Blueberry Muffins Recipe

Pairing with Beverages

To Die For Blueberry Muffins, the right beverage can elevate the experience. Here are some delightful pairings:

  • Coffee: A warm cup of coffee complements the sweetness of the muffins perfectly. The rich flavors of coffee balance the fruity notes of the blueberries.
  • Tea: For a lighter option, consider pairing your muffins with a cup of herbal or green tea. The subtle flavors of tea enhance the muffin’s taste without overpowering it.
  • Milk: A classic choice! A glass of cold milk is always a hit, especially for kids. It adds a creamy texture that pairs well with the muffins.
  • Fruit Juice: Freshly squeezed orange juice or apple juice can add a refreshing twist. The fruity flavors will harmonize beautifully with the blueberries.

These beverage options not only enhance the flavor of your muffins but also make for a delightful breakfast or snack time experience. So, grab your favorite drink and enjoy!

Creative Serving Ideas

To Die For Blueberry Muffins can be just as fun as baking them! Here are some creative ideas to make your muffins stand out:

  • Muffin Platter: Arrange the muffins on a beautiful platter. Add some fresh blueberries and mint leaves for a pop of color. This makes for an eye-catching centerpiece at brunch.
  • With Whipped Cream: Top your muffins with a dollop of whipped cream or a scoop of vanilla ice cream. This adds a decadent touch that everyone will love!
  • Drizzle with Honey: A light drizzle of honey or maple syrup can enhance the sweetness. It’s a simple yet effective way to elevate the flavor.
  • Mini Muffin Bites: If you’re serving a crowd, consider making mini muffins. They’re perfect for snacking and allow guests to try different flavors without feeling too full.

To Die For Blueberry Muffins will surely be a hit!

Tips for Perfecting To Die For Blueberry Muffins Recipe

Choosing the Right Blueberries

To Die For Blueberry Muffins, selecting the right blueberries is crucial. Fresh blueberries are ideal, as they burst with flavor and add a juicy texture to your muffins. Here are some tips for choosing the best blueberries:

  • Look for Plump Berries: Choose blueberries that are plump and firm. They should have a deep blue color with a slight white bloom, which indicates freshness.
  • Avoid Wrinkled or Soft Berries: Steer clear of any berries that look shriveled or soft. These may be overripe and could affect the taste of your muffins.
  • Check for Mold: Always inspect the container for any signs of mold. Moldy berries can spoil the entire batch, so it’s best to choose a clean container.
  • Buy Local When Possible: If you can, buy blueberries from local farmers’ markets. They are often fresher and tastier than those found in grocery stores.

To Die For Blueberry Muffins are bursting with flavor and have that delightful juicy texture in every bite!

Storage Tips for Freshness

To Die For Blueberry Muffins stay tasty for days:

  • Cool Completely: Allow your muffins to cool completely on a wire rack before storing. This prevents moisture buildup, which can make them soggy.
  • Use an Airtight Container: Store the muffins in an airtight container at room temperature. This helps maintain their softness and prevents them from drying out.
  • Refrigerate for Longer Freshness: If you want to keep them for more than a few days, consider refrigerating them. Just be sure to wrap them tightly in plastic wrap or place them in a sealed container.
  • Freeze for Future Enjoyment: For longer storage, freeze your muffins. Place them in a freezer-safe bag or container. They can last up to three months in the freezer. When you’re ready to enjoy, simply thaw them at room temperature or warm them in the microwave.

To Die For Blueberry Muffins for days to come, keeping them fresh and delicious!

Breakdown of Time for To Die For Blueberry Muffins Recipe

Prep Time

To Die For Blueberry Muffins is a quick and enjoyable process. You’ll need about 15-20 minutes to gather your ingredients and mix the batter. This includes measuring out the flour, sugar, and other components, as well as whisking the wet ingredients together. It’s a great time to get your kitchen organized and ready for baking!

Cooking Time

Once your batter is ready and the muffin tins are filled, it’s time to bake! The cooking time for these muffins is approximately 20-25 minutes. Keep an eye on them as they bake, and use a toothpick to check for doneness. When the toothpick comes out clean, your muffins are perfectly baked and ready to be enjoyed!

Total Time

In total, you can expect to spend about 40-45 minutes from start to finish. This includes both the prep and cooking time. It’s a small investment for a batch of delicious muffins that will fill your home with a delightful aroma. Plus, the joy of sharing these treats with family and friends makes it all worthwhile!

Nutritional Information for To Die For Blueberry Muffins Recipe

Calories

To Die For Blueberry Muffins Recipe, it’s good to know what you’re consuming. Each muffin contains approximately 210 calories. This makes them a delightful treat that can fit into a balanced diet. Enjoying one muffin as part of your breakfast or snack can provide a satisfying energy boost without overloading on calories.

Protein

Each muffin offers about 3 grams of protein. While this may not seem like a lot, it contributes to your daily protein intake. Protein is essential for building and repairing tissues, and it helps keep you feeling full longer. Pairing your muffin with a protein-rich beverage, like a glass of milk or a yogurt smoothie, can enhance your overall protein consumption for the day.

Sodium

In terms of sodium, each muffin contains around 200 milligrams. This is a moderate amount, making it suitable for most diets. However, if you are watching your sodium intake, consider enjoying these muffins in moderation. Balancing your meals throughout the day can help you maintain a healthy sodium level while still enjoying these delicious treats.

To Die For Blueberry Muffins can help you make informed choices. Whether you’re enjoying them as a breakfast option or a sweet snack, these muffins are a delightful way to treat yourself while keeping an eye on your nutrition!

FAQs about To Die For Blueberry Muffins Recipe

Can I use frozen blueberries in the recipe?

To Die For Blueberry Muffins Recipe. However, there are a few tips to keep in mind. First, do not thaw the blueberries before adding them to the batter. This helps prevent the batter from turning blue. Instead, toss the frozen blueberries with a little flour, just like you would with fresh ones. This will help them stay suspended in the batter and maintain their shape while baking. Your muffins will still be delicious and bursting with flavor!

How do I store leftover muffins?

To Die For Blueberry Muffins is easy! Allow the muffins to cool completely on a wire rack. Once cooled, place them in an airtight container at room temperature. This will keep them fresh for about 2-3 days. If you want to keep them longer, consider refrigerating them. Just make sure to wrap them tightly in plastic wrap or store them in a sealed container. For even longer storage, you can freeze the muffins. They can last up to three months in the freezer. When you’re ready to enjoy, simply thaw them at room temperature or warm them in the microwave.

Can I make mini muffins with this recipe?

To Die For Blueberry Muffins Recipe. Simply adjust the baking time. Fill the mini muffin tins about 2/3 full with batter and bake for about 12-15 minutes. Keep an eye on them, as mini muffins bake faster than regular-sized ones. They make for perfect bite-sized treats that are great for parties or snacks!

What can I substitute for eggs in the recipe?

To Die For Blueberry Muffins Recipe, there are several options. One popular choice is to use flaxseed meal. Mix 1 tablespoon of flaxseed meal with 2.5 tablespoons of water and let it sit for a few minutes until it thickens. This mixture works well as a binding agent. You can also use unsweetened applesauce, mashed banana, or yogurt as substitutes. Each of these options will help keep your muffins moist and delicious while accommodating dietary needs!

Conclusion on To Die For Blueberry Muffins Recipe

To Die For Blueberry Muffins Recipe is a delightful way to enjoy a classic treat that brings joy to any occasion. With its simple ingredients and easy preparation, this recipe is perfect for both novice and experienced bakers alike. The combination of fresh blueberries and a tender muffin base creates a delicious experience that is hard to resist.

Whether you’re baking for a family breakfast, a cozy afternoon snack, or a special gathering, these muffins are sure to impress. The versatility of the recipe allows you to experiment with different flavors and ingredients, making it a fun and creative baking adventure. From adding nuts to trying out gluten-free or vegan options, the possibilities are endless!

To Die For Blueberry Muffins that will leave everyone asking for more!

Happy baking, and enjoy every delicious moment!

Stay Connected

Get recipes via email: