Get my cookbooks

Caramel Apple Cheesecake Bars are a must-try dessert!

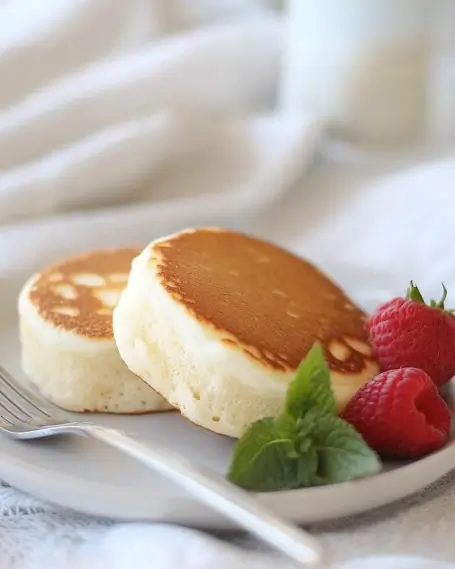
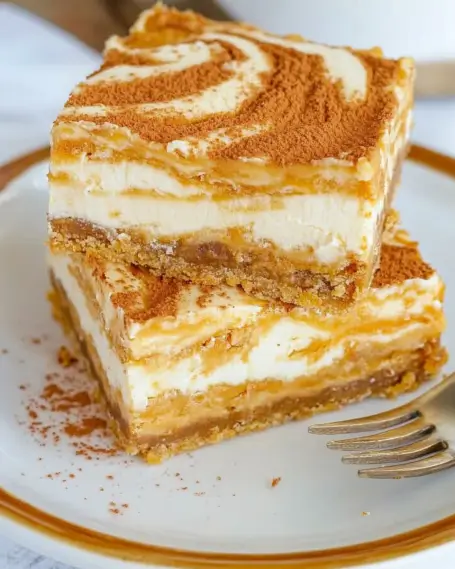
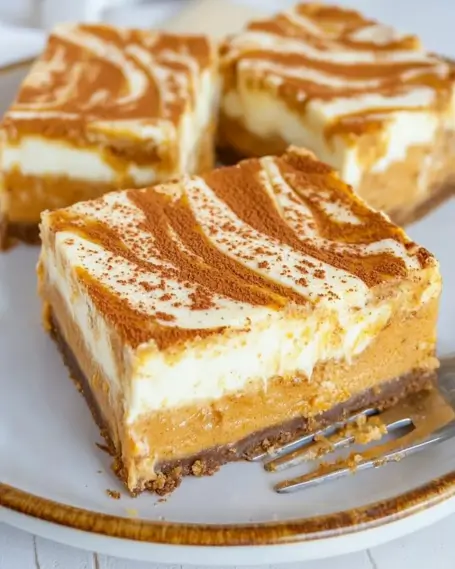
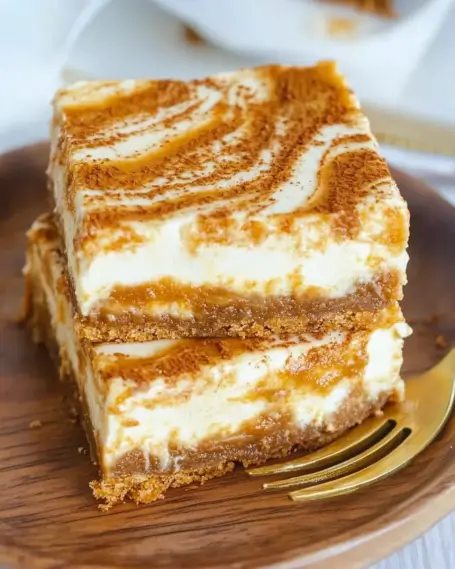
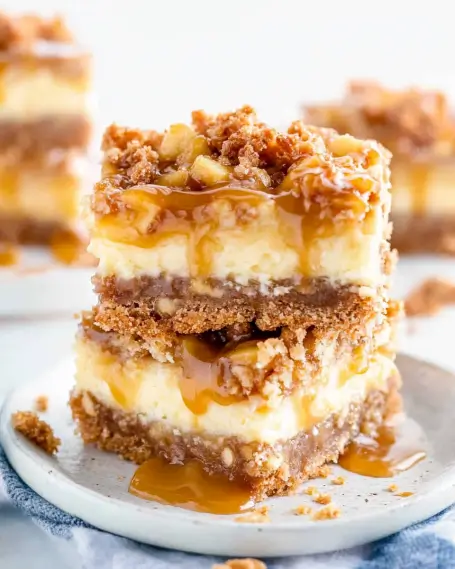
Introduction to Caramel Apple Cheesecake Bars

Caramel Apple Cheesecake Bars are a delightful dessert that combines the rich, creamy texture of cheesecake with the sweet, tart flavor of apples. These bars are perfect for any occasion, whether it’s a family gathering, a holiday celebration, or just a cozy night in. The combination of flavors and textures makes them a favorite among dessert lovers.

What Makes Caramel Apple Cheesecake Bars Special?

What sets Caramel Apple Cheesecake Bars apart is their unique blend of ingredients. The buttery graham cracker crust provides a crunchy base that perfectly complements the smooth cheesecake filling. The addition of diced apples adds a fresh, fruity element, while the cinnamon brings warmth and spice. Finally, the generous drizzle of caramel sauce on top elevates these bars to a whole new level of indulgence.

Moreover, these bars are incredibly versatile. You can easily customize them by using different apple varieties or adding nuts for extra crunch. They are also simple to make, requiring just a few steps and common ingredients. This makes them an excellent choice for both novice bakers and seasoned chefs alike.

In summary, Caramel Apple Cheesecake Bars are not just a treat; they are an experience. The combination of flavors, textures, and the joy of sharing them with loved ones makes these bars a must-try. So, let’s dive into the ingredients and preparation steps to create this delicious dessert!

Ingredients for Caramel Apple Cheesecake Bars

To create the delicious Caramel Apple Cheesecake Bars, you’ll need a selection of simple yet flavorful ingredients. Each component plays a vital role in achieving the perfect balance of taste and texture. Here’s what you’ll need:

  • 1 ½ cups crushed graham crackers: This forms the base of your bars, providing a crunchy texture.
  • ½ cup melted unsalted butter: The butter binds the graham cracker crumbs together, creating a rich crust.
  • 2 tablespoons sugar: A touch of sweetness to enhance the crust.
  • 2 (8-ounce) packages softened cream cheese: This is the star of the show, giving the bars their creamy filling.
  • ¾ cup sugar: Sweetens the cheesecake filling, balancing the tartness of the apples.
  • 1 teaspoon vanilla extract: Adds a warm, aromatic flavor to the cheesecake.
  • 2 large eggs: These help to set the filling, giving it a smooth texture.
  • 2 cups diced and peeled apples: Fresh apples add a fruity element; about 2 medium apples will do.
  • 1 teaspoon cinnamon: This spice brings warmth and enhances the apple flavor.
  • ½ cup caramel sauce: A sweet drizzle that adds richness and decadence.
  • ¼ cup chopped walnuts (optional): For those who enjoy a bit of crunch, walnuts can be added for texture.

These ingredients come together to create a delightful dessert that is sure to impress. Whether you’re baking for a special occasion or just treating yourself, having these items on hand will make the process smooth and enjoyable. Now that we have our ingredients ready, let’s move on to the preparation steps!

Preparation of Caramel Apple Cheesecake Bars

Now that we have gathered all the ingredients, it’s time to dive into the preparation of our Caramel Apple Cheesecake Bars. This process is straightforward and fun, making it a great activity for bakers of all skill levels. Let’s break it down step by step!

Step 1: Preparing the Crust

First, we need to create the crust. In a mixing bowl, combine the crushed graham crackers, melted unsalted butter, and 2 tablespoons of sugar. Stir the mixture until it resembles wet sand. This texture is crucial for a solid base. Next, firmly press this mixture into the bottom of your greased or parchment-lined 9×9-inch baking dish. Make sure it’s even and compact. Bake the crust in a preheated oven at 325°F for about 10 minutes. Once done, set it aside to cool while you prepare the filling.

Step 2: Making the Cheesecake Filling

Now, let’s move on to the cheesecake filling. In a large bowl, use an electric mixer to blend the softened cream cheese with ¾ cup of sugar and 1 teaspoon of vanilla extract. Mix until the mixture is creamy and smooth. This step is essential for a velvety texture. Then, add the eggs one at a time, mixing well after each addition. This ensures that the eggs are fully incorporated, giving your cheesecake a rich consistency.

Step 3: Preparing the Apple Topping

While the filling is coming together, it’s time to prepare the apple topping. In another bowl, take your diced and peeled apples and coat them with 1 teaspoon of cinnamon. Make sure each piece is well covered. This step adds a warm, spicy flavor that pairs beautifully with the apples. Once coated, gently fold the cinnamon apples into the cream cheese mixture. This will distribute the apple flavor throughout the filling.

Step 4: Assembling the Caramel Apple Cheesecake Bars

With the crust cooled and the filling ready, it’s time to assemble the bars. Pour the cream cheese and apple mixture over the cooled graham cracker crust. Use a spatula to smooth it out evenly. This layer is where all the magic happens! If you’re using walnuts, sprinkle them on top for added crunch. They add a delightful texture that complements the creamy filling.

Step 5: Baking the Bars

Now, it’s time to bake! Place the assembled bars in the preheated oven and bake for 35-40 minutes. You’ll know they’re done when the edges are golden brown and the center is set. Keep an eye on them to avoid overbaking. Once baked, remove them from the oven and let them cool at room temperature for about half an hour.

Step 6: Drizzling with Caramel

After the bars have cooled, it’s time for the final touch—drizzling with caramel sauce! Generously drizzle the caramel sauce over the top of the cheesecake layer. This adds a sweet, gooey finish that makes these bars irresistible. For an extra special treat, serve them with a scoop of whipped cream or more caramel sauce on the side.

And there you have it! Your Caramel Apple Cheesecake Bars are now ready to chill in the refrigerator for at least 2 hours before slicing into squares. This chilling time helps the bars set perfectly, making them easier to cut and serve. Enjoy the delightful flavors and textures of this delicious dessert!

Variation of Caramel Apple Cheesecake Bars

While the classic Caramel Apple Cheesecake Bars are delicious on their own, there are many ways to switch things up! Variations can enhance flavors and cater to different dietary needs. Let’s explore some alternative toppings and gluten-free options to make these bars even more delightful.

Alternative Toppings for Caramel Apple Cheesecake Bars

One of the best things about Caramel Apple Cheesecake Bars is their versatility. You can easily customize the toppings to suit your taste. Here are some fun ideas:

  • Chocolate Drizzle: For chocolate lovers, a drizzle of melted chocolate can add a rich flavor. Simply melt some chocolate chips and drizzle over the cooled bars.
  • Toasted Coconut: Sprinkle some toasted coconut flakes on top for a tropical twist. The coconut adds a chewy texture that pairs well with the creamy cheesecake.
  • Fresh Fruit: Consider adding fresh fruit like berries or sliced bananas on top. They add a burst of freshness and color to your dessert.
  • Spiced Pecans: Instead of walnuts, try spiced pecans for a different nutty flavor. Toss them in a bit of cinnamon and sugar before sprinkling on top.

These alternative toppings can elevate your Caramel Apple Cheesecake Bars, making them even more enjoyable for everyone!

Gluten-Free Options for Caramel Apple Cheesecake Bars

If you or your guests are following a gluten-free diet, you can still enjoy these delicious bars! Here’s how to make them gluten-free:

  • Gluten-Free Graham Crackers: Use gluten-free graham crackers for the crust. Many brands offer tasty options that work just as well as traditional ones.
  • Almond Flour Crust: Alternatively, you can create a crust using almond flour mixed with melted butter and a bit of sugar. This gives a nutty flavor and a unique texture.
  • Check Caramel Sauce: Ensure that the caramel sauce you use is gluten-free. Many store-bought options are, but it’s always good to check the label.

By making these simple substitutions, you can create gluten-free Caramel Apple Cheesecake Bars that everyone can enjoy. These variations not only cater to different tastes but also ensure that no one misses out on this delightful dessert!

Cooking Note for Caramel Apple Cheesecake Bars

When preparing Caramel Apple Cheesecake Bars, a few cooking notes can help ensure your dessert turns out perfectly every time. These tips will guide you through the process, making it easier and more enjoyable.

First, always use softened cream cheese. This is crucial for achieving a smooth and creamy filling. If your cream cheese is too cold, it can create lumps in the mixture. To soften it quickly, cut it into small cubes and let it sit at room temperature for about 30 minutes before mixing.

Next, be mindful of the baking time. Every oven is different, so keep an eye on your bars as they bake. The edges should be golden brown, and the center should be set but still slightly jiggly. Overbaking can lead to a dry texture, which we want to avoid.

Additionally, allow the bars to cool completely at room temperature before chilling them in the refrigerator. This step is important for setting the filling properly. If you rush this process, the bars may not hold their shape when cut.

When it comes to slicing the bars, use a sharp knife for clean cuts. For best results, dip the knife in hot water and wipe it dry before each cut. This technique helps prevent the creamy filling from sticking to the knife, giving you neat squares.

Lastly, feel free to experiment with the apple varieties you use. Different apples can bring unique flavors and textures to your bars. For instance, Granny Smith apples add a tartness, while Honeycrisp apples offer a sweet crunch. Mixing varieties can create a delightful flavor profile.

By following these cooking notes, you’ll be well on your way to creating delicious Caramel Apple Cheesecake Bars that are sure to impress your family and friends. Happy baking!

Serving Suggestions for Caramel Apple Cheesecake Bars

Once your Caramel Apple Cheesecake Bars are perfectly chilled and ready to serve, it’s time to think about how to present them. The way you serve these delightful treats can enhance the overall experience. Here are some creative serving suggestions to make your dessert even more enjoyable:

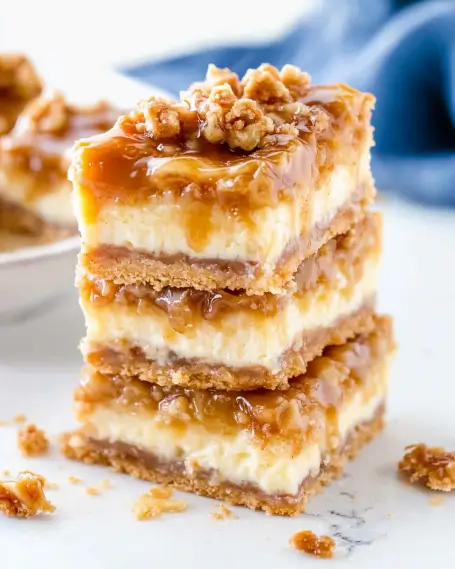
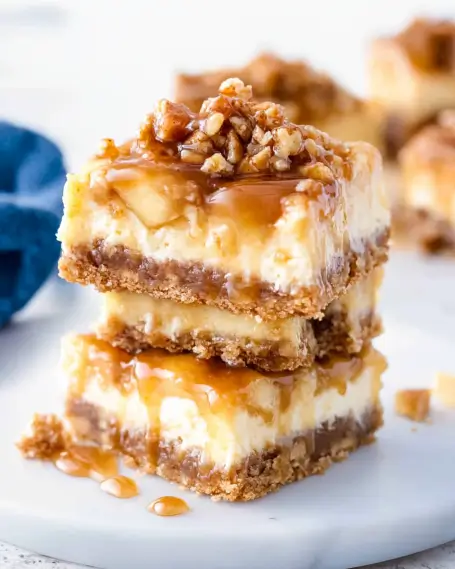
  • Classic Presentation: Cut the bars into neat squares and arrange them on a decorative platter. This simple presentation allows the beautiful layers to shine through, showcasing the creamy filling and caramel drizzle.
  • Individual Servings: For a more personal touch, consider serving each bar on a small dessert plate. You can add a dollop of whipped cream or a scoop of vanilla ice cream on the side for an extra indulgent treat.
  • Garnish with Fresh Apples: Add a few thin apple slices on top of each bar for a fresh and colorful garnish. This not only looks appealing but also ties in the apple flavor beautifully.
  • Drizzle More Caramel: Don’t hold back on the caramel! Serve the bars with an extra drizzle of caramel sauce on top or in a small bowl for dipping. This adds a rich sweetness that everyone will love.
  • Pair with Coffee or Tea: These bars make a perfect dessert alongside a warm cup of coffee or tea. The flavors of the cheesecake and apples complement the warmth of your favorite beverage, making for a cozy dessert experience.
  • Seasonal Touch: If you’re serving these bars during the fall, consider adding a sprinkle of cinnamon or nutmeg on top for a seasonal flair. This enhances the warm flavors and makes them feel even more festive.

These serving suggestions can elevate your Caramel Apple Cheesecake Bars, making them a delightful centerpiece for any gathering. Whether it’s a family dinner, a holiday party, or a casual get-together, these bars are sure to impress your guests. Enjoy the smiles and compliments as everyone savors this delicious dessert!

Tips for Perfecting Caramel Apple Cheesecake Bars

Creating the perfect Caramel Apple Cheesecake Bars is all about attention to detail. With a few helpful tips, you can ensure that your dessert turns out delicious every time. Here are some expert suggestions to help you achieve the best results:

First, always measure your ingredients accurately. Baking is a science, and precise measurements can make a big difference in the final product. Use measuring cups and spoons for dry ingredients and a liquid measuring cup for wet ingredients. This will help you maintain the right balance of flavors and textures.

Next, consider the type of apples you use. Different apple varieties can change the flavor profile of your bars. For a balanced taste, mix sweet and tart apples. For example, combine Granny Smith apples with Fuji or Honeycrisp apples. This mix will give your bars a delightful complexity.

When preparing the crust, make sure to press the graham cracker mixture firmly into the baking dish. A well-packed crust will hold together better and provide a sturdy base for the creamy filling. If you find the crust is too crumbly, add a little more melted butter to help bind it.

Another important tip is to avoid overmixing the cheesecake filling. Once you add the eggs, mix just until combined. Overmixing can introduce too much air, leading to cracks in the surface as the bars bake. A smooth, creamy filling is what you want for that perfect texture.

Additionally, let the bars cool completely before chilling them in the refrigerator. This step is crucial for setting the filling properly. If you place warm bars in the fridge, they may not set correctly, resulting in a gooey texture when cut.

Lastly, don’t skip the chilling time! Allowing the bars to chill for at least two hours helps them firm up, making them easier to slice. If you can, let them chill overnight for the best results. This extra time allows the flavors to meld beautifully, enhancing the overall taste.

By following these tips, you’ll be well on your way to perfecting your Caramel Apple Cheesecake Bars. With a little practice and attention to detail, you’ll impress your family and friends with this delightful dessert every time you bake it!

Breakdown of Time for Caramel Apple Cheesecake Bars

Understanding the time required for each step in making Caramel Apple Cheesecake Bars can help you plan your baking session effectively. Here’s a detailed breakdown of the time you’ll need for preparation, cooking, and chilling.

Prep Time

The prep time for these delicious bars is approximately 20-25 minutes. This includes gathering your ingredients, preparing the crust, mixing the cheesecake filling, and coating the apples with cinnamon. Taking your time during this stage ensures that everything is well-prepared for the baking process.

Cooking Time

Once you have everything ready, the cooking time is about 35-40 minutes. During this time, the bars will bake in the oven until the edges are golden brown and the center is set. Keep an eye on them to avoid overbaking, as this can affect the texture of your cheesecake bars.

Total Time

In total, you should expect to spend around 2 hours and 30 minutes to 3 hours from start to finish. This includes the prep time, cooking time, and the essential chilling time of at least 2 hours. Chilling is crucial as it allows the bars to set properly, making them easier to slice and enhancing their flavor.

By planning your time wisely, you can enjoy the process of making these delightful Caramel Apple Cheesecake Bars without feeling rushed. Happy baking!

Nutritional Information for Caramel Apple Cheesecake Bars

Understanding the nutritional content of your Caramel Apple Cheesecake Bars can help you enjoy them mindfully. While these bars are a delicious treat, knowing their nutritional values can assist in making informed choices. Here’s a breakdown of the key nutritional components:

Calories

Each serving of Caramel Apple Cheesecake Bars contains approximately 250-300 calories. This number can vary based on the specific ingredients used, such as the type of caramel sauce or the addition of nuts. While they are indulgent, enjoying them in moderation can fit into a balanced diet.

Protein

These bars provide about 4-5 grams of protein per serving. The cream cheese and eggs contribute to this protein content, making them a satisfying dessert option. Protein is essential for maintaining muscle and overall health, so these bars can be a tasty way to include some in your diet.

Sodium

In terms of sodium, each serving contains around 150-200 milligrams. This amount is relatively moderate, but it’s always good to be mindful, especially if you are watching your sodium intake. Using unsalted butter and low-sodium ingredients can help keep the sodium levels in check.

Overall, while Caramel Apple Cheesecake Bars are a delightful dessert, they are best enjoyed as an occasional treat. Balancing them with a healthy diet and active lifestyle can allow you to savor their delicious flavors without any guilt. Enjoy your baking and the delightful taste of these bars!

FAQs about Caramel Apple Cheesecake Bars

Can I make Caramel Apple Cheesecake Bars ahead of time?

Absolutely! Caramel Apple Cheesecake Bars are perfect for making ahead of time. In fact, they taste even better after chilling in the refrigerator for a few hours or overnight. This allows the flavors to meld beautifully. Just prepare the bars as directed, let them cool, and then refrigerate. They can be made up to two days in advance, making them a great option for parties or gatherings.

How should I store leftover Caramel Apple Cheesecake Bars?

To store leftover Caramel Apple Cheesecake Bars, first, make sure they are completely cooled and set. Then, cover them tightly with plastic wrap or aluminum foil. You can also place them in an airtight container. Store them in the refrigerator for up to five days. If you want to keep them longer, consider freezing them. Just wrap them well and place them in the freezer. They can last for up to three months in the freezer. When ready to enjoy, simply thaw them in the refrigerator overnight.

Can I use different fruits in place of apples for the bars?

Yes, you can definitely experiment with different fruits! While apples are the star of this recipe, other fruits can work well too. Consider using pears for a similar texture and flavor. Berries, such as blueberries or raspberries, can add a burst of color and sweetness. Just keep in mind that the moisture content may vary, so you might need to adjust the amount of sugar or baking time accordingly. Feel free to get creative and find your favorite fruit combination!

What is the best way to cut Caramel Apple Cheesecake Bars?

Cutting Caramel Apple Cheesecake Bars can be tricky, but with the right technique, you can achieve clean, neat squares. First, use a sharp knife for the best results. To prevent sticking, dip the knife in hot water and wipe it dry before each cut. This helps the knife glide through the creamy filling without pulling it apart. For even more precise cuts, you can score the bars lightly with the knife before cutting all the way through. This method will give you beautiful, uniform pieces to serve!

Conclusion on Caramel Apple Cheesecake Bars

In conclusion, Caramel Apple Cheesecake Bars are a delightful dessert that brings together the best of both worlds: the creamy richness of cheesecake and the sweet, tart flavor of apples. With their buttery graham cracker crust, spiced apple filling, and luscious caramel drizzle, these bars are sure to impress anyone who takes a bite. They are perfect for any occasion, whether it’s a family gathering, a holiday celebration, or simply a treat for yourself.

Not only are these bars delicious, but they are also versatile. You can easily customize them with different toppings or make them gluten-free to accommodate various dietary needs. The preparation process is straightforward, making it accessible for bakers of all skill levels. Plus, with the tips and variations provided, you can create a unique version that suits your taste perfectly.

As you embark on your baking journey, remember to enjoy the process. The joy of creating something delicious to share with friends and family is what makes baking so special. So, gather your ingredients, follow the steps, and soon you’ll have a batch of Caramel Apple Cheesecake Bars that will leave everyone asking for seconds.

Whether you serve them at a gathering or enjoy them at home, these bars are bound to become a favorite. So, go ahead and indulge in the delightful flavors of Caramel Apple Cheesecake Bars. Happy baking!

Soft and Chewy Ginger Snaps are a must-try treat!

Introduction to Soft Chewy Ginger Snaps

Soft chewy ginger snaps are a delightful treat that brings warmth and comfort to any occasion. These cookies are not just a dessert; they are a celebration of flavors that dance on your taste buds. The combination of spices like ginger, cinnamon, and cloves creates a cozy aroma that fills your kitchen, making it feel like home. Whether you enjoy them with a cup of tea or share them with friends, these cookies are sure to please.

The Allure of Soft Chewy Ginger Snaps

What makes soft chewy ginger snaps so special? It’s all about the texture and flavor. The soft center contrasts beautifully with the slightly crisp edges, creating a perfect bite. Each cookie is infused with the warm, spicy notes of ginger, which is known for its comforting properties. Plus, the sweetness from the sugars balances the spices, making every cookie a delightful experience.

These cookies are not only delicious but also versatile. You can enjoy them during the holidays, at family gatherings, or simply as an everyday snack. The joy of baking these cookies is in the process itself. As you mix the ingredients, the anticipation builds, and the aroma that fills your home is simply irresistible. So, gather your ingredients and get ready to create a batch of soft chewy ginger snaps that will warm your heart and satisfy your sweet tooth!

Ingredients for Soft Chewy Ginger Snaps

To create the perfect batch of soft chewy ginger snaps, you’ll need a selection of simple yet essential ingredients. Each component plays a vital role in achieving that delightful flavor and texture. Here’s what you’ll need:

  • 2 1/4 cups all-purpose flour
  • 2 teaspoons ground ginger
  • 1 teaspoon ground cinnamon
  • 1/2 teaspoon ground cloves
  • 1 teaspoon baking soda
  • 1/2 teaspoon salt
  • 3/4 cup unsalted butter, softened
  • 1 cup granulated sugar
  • 1/4 cup packed brown sugar
  • 1 large egg
  • 1/4 cup molasses
  • 1 teaspoon vanilla extract
  • 1/4 cup granulated sugar (for rolling)

These ingredients come together to create a cookie that is not only soft and chewy but also bursting with flavor. The spices, especially ginger, give these cookies their signature taste. The combination of both granulated and brown sugar adds depth, while molasses contributes to the rich, dark color and moist texture. So, gather these ingredients and prepare to embark on a delightful baking adventure!

Step-by-Step Preparation of Soft Chewy Ginger Snaps

Now that you have gathered all your ingredients, it’s time to dive into the fun part: preparing your soft chewy ginger snaps! Follow these simple steps to create cookies that are sure to impress.

Step 1: Prepping Your Ingredients

Start by measuring out all your ingredients accurately. This is crucial for the best results. Make sure your butter is softened, as it will mix better with the sugars. Preheat your oven to 350°F (175°C) and line two baking sheets with parchment paper. This will prevent the cookies from sticking and make cleanup a breeze.

Step 2: Mixing the Dough

In a medium bowl, combine the all-purpose flour, ground ginger, ground cinnamon, ground cloves, baking soda, and salt. Whisk these dry ingredients together until they are well mixed. In a large mixing bowl, beat the softened butter with both granulated and brown sugars. Mix until the mixture is light and fluffy. This process usually takes about 2-3 minutes. Then, add the egg, molasses, and vanilla extract, blending until everything is smooth and creamy.

Step 3: Chilling the Dough

Once your wet ingredients are well combined, slowly add the dry mixture to the wet ingredients. Stir gently until just combined. At this point, you can choose to chill the dough for about 30 minutes. Chilling helps the flavors meld together and makes the dough easier to handle. If you’re short on time, you can skip this step, but chilling is recommended for the best texture.

Step 4: Shaping the Cookies

After chilling, take tablespoon-sized amounts of dough and roll them into smooth balls. This step is fun and allows you to get creative! Once rolled, coat each ball in granulated sugar for a sweet finish. Place the sugar-coated balls on the prepared baking sheets, leaving enough space between them to allow for spreading during baking.

Step 5: Baking the Soft Chewy Ginger Snaps

Now it’s time to bake! Place the baking sheets in the preheated oven and bake for 10-12 minutes. Keep an eye on them; the edges should firm up while the centers remain soft. You’ll notice a slight crack on top, which is a good sign. Once baked, let the cookies rest on the baking sheets for about 5 minutes before transferring them to a wire rack to cool completely. This resting time allows them to set perfectly.

And there you have it! Follow these steps, and you’ll have a delightful batch of soft chewy ginger snaps ready to enjoy.

Variation of Soft Chewy Ginger Snaps

While the classic soft chewy ginger snaps are delicious on their own, experimenting with variations can lead to exciting new flavors. Whether you want to switch things up or cater to dietary needs, there are plenty of alternative ingredients you can use. Let’s explore some fun options!

Alternative Ingredients for Different Flavors

One of the joys of baking is the ability to customize recipes. Here are some alternative ingredients you can try:

  • Chocolate Chips: Add 1 cup of semi-sweet or dark chocolate chips to the dough for a rich, sweet twist.
  • Nutmeg: Substitute 1/2 teaspoon of nutmeg for the ground cloves to give your cookies a warm, nutty flavor.
  • Orange Zest: Incorporate 1 tablespoon of fresh orange zest for a refreshing citrus note that pairs beautifully with ginger.
  • Chopped Nuts: Mix in 1/2 cup of chopped walnuts or pecans for added crunch and flavor.
  • Maple Syrup: Replace molasses with an equal amount of maple syrup for a different sweetness and flavor profile.

These variations can enhance the taste of your soft chewy ginger snaps, making them even more delightful. Feel free to mix and match these ingredients to create your own signature cookie!

Gluten-Free Soft Chewy Ginger Snaps

If you or someone you know has a gluten intolerance, you can still enjoy soft chewy ginger snaps! Here’s how to make a gluten-free version:

  • Gluten-Free Flour Blend: Substitute the all-purpose flour with a gluten-free flour blend. Make sure it contains xanthan gum for the best texture.
  • Oats: Use certified gluten-free oats, ground into a flour, to add a unique flavor and texture.
  • Almond Flour: Incorporate almond flour for a nutty taste and a chewy texture.

By making these simple adjustments, you can create delicious gluten-free soft chewy ginger snaps that everyone can enjoy. Baking is all about creativity, so don’t hesitate to try new things!

Cooking Note for Soft Chewy Ginger Snaps

When it comes to baking soft chewy ginger snaps, a few cooking notes can make a big difference in your results. Understanding the science behind baking can help you achieve the perfect cookie every time. Here are some essential tips to keep in mind:

  • Ingredient Temperature: Ensure your butter is softened but not melted. Softened butter helps create a light and airy texture. If your butter is too warm, it can lead to flat cookies.
  • Measuring Flour: Use the spoon-and-level method to measure flour accurately. Spoon the flour into your measuring cup and level it off with a knife. This prevents adding too much flour, which can make your cookies dry.
  • Mixing Technique: Avoid overmixing the dough once you combine the wet and dry ingredients. Overmixing can develop gluten, leading to tougher cookies. Mix just until combined for that soft, chewy texture.
  • Oven Calibration: Every oven is different. It’s a good idea to use an oven thermometer to ensure your oven is at the correct temperature. Baking at the right temperature is crucial for achieving the perfect cookie.
  • Cooling Time: Allow your cookies to cool on the baking sheet for a few minutes before transferring them to a wire rack. This helps them set and prevents them from breaking apart.

By following these cooking notes, you’ll be well on your way to baking soft chewy ginger snaps that are not only delicious but also perfectly textured. Enjoy the process, and don’t forget to share your delightful creations with family and friends!

Serving Suggestions for Soft Chewy Ginger Snaps

Once your soft chewy ginger snaps are baked to perfection, it’s time to think about how to serve them. These cookies are not just tasty on their own; they can be paired with various beverages and presented in creative ways. Let’s explore some delightful serving suggestions that will elevate your cookie experience!

Pairing with Beverages

Soft chewy ginger snaps have a unique flavor profile that pairs wonderfully with a variety of drinks. Here are some excellent beverage options to enjoy alongside your cookies:

  • Tea: A warm cup of chai or herbal tea complements the spices in the cookies beautifully. The warmth of the tea enhances the cozy feeling of the ginger snaps.
  • Coffee: Brewed coffee, whether black or with cream, balances the sweetness of the cookies. The rich flavors of coffee make for a delightful pairing.
  • Milk: A classic choice! The creaminess of milk contrasts nicely with the spiciness of the cookies, making it a favorite among kids and adults alike.
  • Hot Chocolate: For a sweet treat, serve your cookies with a cup of hot chocolate. The chocolatey goodness pairs perfectly with the warm spices of the ginger snaps.

These beverage pairings not only enhance the flavors of the cookies but also create a comforting and enjoyable experience. So, grab your favorite drink and settle in for a cozy treat!

Creative Serving Ideas

Serving your soft chewy ginger snaps can be as fun as baking them! Here are some creative ideas to make your cookie presentation stand out:

  • Cookie Platter: Arrange your cookies on a decorative platter. Add some fresh fruit or nuts around them for a colorful and inviting display.
  • Gift Jars: Layer the cookies in a mason jar and tie it with a ribbon. This makes for a lovely homemade gift for friends and family.
  • Ice Cream Sandwiches: Use two cookies to create an ice cream sandwich. Choose your favorite ice cream flavor for a delicious twist!
  • Cookie Sundae: Crumble a few cookies over a scoop of vanilla ice cream and drizzle with caramel or chocolate sauce for a decadent dessert.
  • Holiday Treats: During the festive season, decorate your cookies with icing or sprinkles. This adds a fun touch and makes them perfect for holiday gatherings.

These creative serving ideas will not only impress your guests but also make your soft chewy ginger snaps even more enjoyable. So, get creative and have fun with your presentation!

Tips for Perfect Soft Chewy Ginger Snaps

To achieve the ultimate soft chewy ginger snaps, a few handy tips can make all the difference. Baking is both an art and a science, and understanding the nuances can elevate your cookie game. Here are some essential tips to ensure your ginger snaps turn out perfectly every time:

  • Use Fresh Spices: The flavor of your cookies greatly depends on the freshness of your spices. Always check the expiration date on your ground ginger, cinnamon, and cloves. Fresh spices will give your cookies a vibrant flavor that is hard to beat.
  • Don’t Overbake: Keep a close eye on your cookies while they bake. The key to soft chewy ginger snaps is to take them out of the oven when the edges are set but the centers are still soft. They will continue to firm up as they cool.
  • Experiment with Sugar Coating: While granulated sugar is traditional, consider using colored sugar or even cinnamon sugar for a fun twist. This adds a unique touch and can enhance the visual appeal of your cookies.
  • Let Them Rest: After baking, allow your cookies to rest on the baking sheet for a few minutes. This helps them set and makes them easier to transfer without breaking.
  • Store Properly: To keep your cookies soft and chewy, store them in an airtight container. You can also add a slice of bread to the container; it helps maintain moisture and keeps the cookies fresh longer.

By following these tips, you’ll be well on your way to baking soft chewy ginger snaps that are not only delicious but also perfectly textured. Enjoy the process, and don’t hesitate to share your delightful creations with family and friends!

Breakdown of Time for Soft Chewy Ginger Snaps

Understanding the time required for each step in baking soft chewy ginger snaps can help you plan your baking session effectively. Here’s a detailed breakdown of the time you’ll need to create these delightful cookies.

Prep Time

The prep time for soft chewy ginger snaps is approximately 15-20 minutes. This includes gathering your ingredients, measuring them accurately, and mixing the dough. If you choose to chill the dough, you may want to add an additional 30 minutes to this time. Chilling helps enhance the flavors and makes the dough easier to handle.

Cooking Time

Once your dough is ready, the cooking time is relatively short. You’ll need about 10-12 minutes to bake the cookies in a preheated oven at 350°F (175°C). Keep an eye on them as they bake, ensuring the edges firm up while the centers remain soft. This is crucial for achieving that perfect chewy texture.

Total Time

In total, you can expect to spend around 55-62 minutes from start to finish. This includes prep time, chilling (if you choose to do so), and cooking time. With this breakdown, you can easily fit baking soft chewy ginger snaps into your day, whether it’s for a special occasion or just a cozy treat at home.

Nutritional Information for Soft Chewy Ginger Snaps

Understanding the nutritional content of your soft chewy ginger snaps can help you enjoy them in moderation. While these cookies are a delightful treat, knowing their nutritional values can assist in making informed choices. Here’s a breakdown of the key nutritional information for one cookie, based on the recipe provided:

Calories

120 calories. This calorie count can vary slightly based on the specific ingredients used and the size of the cookies. Enjoying these cookies as an occasional treat can fit well into a balanced diet.

Protein

1.5 grams. While this isn’t a significant source of protein, it does contribute to your daily intake. Pairing these cookies with a glass of milk can enhance the protein content of your snack.

Sodium

50 milligrams of sodium. This is a relatively low amount, making these cookies a suitable option for those watching their sodium intake. However, it’s always good to be mindful of overall sodium consumption throughout the day.

By keeping these nutritional values in mind, you can enjoy your soft chewy ginger snaps while maintaining a balanced diet. Remember, moderation is key, and these cookies can be a delightful addition to your treats without compromising your health goals!

FAQs about Soft Chewy Ginger Snaps

What makes ginger snaps chewy?

The chewiness of ginger snaps comes from a few key factors. First, the combination of molasses and butter adds moisture to the dough, which helps create that soft center. Additionally, not overbaking the cookies is crucial. When you take them out of the oven while the centers are still soft, they will firm up as they cool, resulting in a chewy texture. Lastly, using a mix of sugars, like granulated and brown sugar, contributes to the overall softness and chewiness of the cookies.

Can I freeze Soft Chewy Ginger Snaps?

Absolutely! Freezing soft chewy ginger snaps is a great way to enjoy them later. To freeze, let the cookies cool completely, then place them in an airtight container or a freezer bag. Make sure to separate layers with parchment paper to prevent sticking. They can be stored in the freezer for up to three months. When you’re ready to enjoy them, simply thaw at room temperature or warm them in the oven for a few minutes to regain their delightful texture.

How do I store Soft Chewy Ginger Snaps?

To keep your soft chewy ginger snaps fresh, store them in an airtight container at room temperature. This helps maintain their moisture and chewiness. If you want to keep them even softer for longer, consider adding a slice of bread to the container. The bread will help retain moisture, keeping your cookies deliciously chewy. Enjoy your cookies within a week for the best taste and texture!

What can I substitute for molasses in Soft Chewy Ginger Snaps?

If you don’t have molasses on hand, there are several substitutes you can use. One option is to replace it with an equal amount of honey or maple syrup. Both will add sweetness and moisture, though the flavor will be slightly different. Another option is to use dark corn syrup, which can mimic the texture of molasses. Keep in mind that these substitutes may alter the final taste of your cookies, but they will still be delicious!

Conclusion on Soft Chewy Ginger Snaps

In conclusion, soft chewy ginger snaps are more than just cookies; they are a delightful experience that brings warmth and joy to any occasion. With their perfect balance of spices and sweetness, these cookies are sure to become a favorite in your household. Whether you bake them for a special event or simply to enjoy with a cup of tea, the process of making these treats is as enjoyable as eating them.

By following the steps outlined in this article, you can create a batch of soft chewy ginger snaps that are not only delicious but also customizable to suit your taste. From adding chocolate chips to experimenting with gluten-free options, the possibilities are endless. Remember to keep the tips in mind for achieving the perfect texture and flavor.

As you share these cookies with family and friends, you’ll create lasting memories filled with laughter and love. So, gather your ingredients, roll up your sleeves, and embark on this delightful baking adventure. Your kitchen will soon be filled with the irresistible aroma of ginger, cinnamon, and sweetness, making it a cozy haven for all.

Happy baking, and may your soft chewy ginger snaps bring joy to your table and smiles to those you share them with!

Pumpkin Chocolate Chip Muffins Recipe is a must-try!

Introduction to Pumpkin Chocolate Chip Muffins Recipe

Pumpkin Chocolate Chip Muffins Recipe is a delightful treat that perfectly captures the essence of autumn. These muffins are not only delicious but also incredibly easy to make, making them a fantastic choice for both novice and experienced bakers alike.

Imagine biting into a soft, moist muffin filled with rich chocolate chips and the comforting flavors of pumpkin and spices. Each muffin is a little piece of fall, bringing warmth and joy to your day. Whether you enjoy them for breakfast, as a snack, or even as a dessert, these muffins are sure to please everyone in your family.

Moreover, this recipe is versatile. You can easily customize it to suit your taste preferences or dietary needs. From adding nuts for a crunchy texture to swapping out ingredients for healthier options, the possibilities are endless. So, roll up your sleeves and get ready to create a batch of these scrumptious pumpkin chocolate chip muffins that will have everyone asking for seconds!

Ingredients for Pumpkin Chocolate Chip Muffins Recipe

Pumpkin Chocolate Chip Muffins Recipe, you’ll need a selection of simple yet essential ingredients. Each component plays a vital role in achieving that delightful flavor and texture. Here’s what you’ll need:

  • 2 cups all-purpose flour: This forms the base of your muffins, providing structure.
  • 1 teaspoon baking soda: This helps the muffins rise, making them light and fluffy.
  • 1 teaspoon baking powder: Another leavening agent that works alongside baking soda.
  • 1 teaspoon ground cinnamon: Adds a warm, spicy flavor that complements the pumpkin.
  • 1/2 teaspoon ground nutmeg: This spice enhances the autumnal taste of the muffins.
  • 1/2 teaspoon salt: Balances the sweetness and enhances overall flavor.
  • 1 cup pumpkin puree (canned): The star ingredient that gives these muffins their moistness and rich flavor.
  • 1/2 cup granulated sugar: Sweetens the muffins, making them irresistible.
  • 1/2 cup packed brown sugar: Adds depth and a hint of caramel flavor.
  • 1/2 cup vegetable oil: Keeps the muffins moist and tender.
  • 2 large eggs: Binds the ingredients together and adds richness.
  • 1 teaspoon vanilla extract: Enhances the overall flavor profile.
  • 1 cup semi-sweet chocolate chips: The delicious surprise in every bite!

With these ingredients on hand, you’re all set to embark on your baking adventure. Each item contributes to the delightful taste and texture of the muffins, ensuring that every bite is a celebration of autumn flavors. So gather your ingredients, and let’s move on to the preparation!

Preparation of Pumpkin Chocolate Chip Muffins Recipe

Pumpkin Chocolate Chip Muffins Recipe. Follow these simple steps to create delicious muffins that will fill your home with the delightful scent of autumn.

Step 1: Preheat the Oven

First things first, preheat your oven to 350°F (175°C). This step is crucial as it ensures that your muffins bake evenly. A hot oven helps them rise beautifully, giving you that perfect fluffy texture.

Step 2: Prepare the Muffin Tin

While the oven is heating up, prepare your muffin tin. You can use paper liners for easy cleanup or lightly coat the tin with oil. This will prevent the muffins from sticking and make it easier to remove them once they are baked.

Step 3: Mix Dry Ingredients

In a large mixing bowl, combine the all-purpose flour, baking soda, baking powder, ground cinnamon, ground nutmeg, and salt. Stir these dry ingredients together until they are well mixed. This step ensures that the leavening agents are evenly distributed, which is key for a good rise.

Step 4: Combine Wet Ingredients

In a separate bowl, blend the pumpkin puree, granulated sugar, brown sugar, vegetable oil, eggs, and vanilla extract. Use a whisk or a hand mixer to mix until the mixture is smooth and creamy. This combination of wet ingredients will add moisture and flavor to your muffins.

Step 5: Fold in Chocolate Chips

Now, it’s time to bring the two mixtures together. Gradually add the dry ingredients to the wet mixture. Stir gently until just combined. Be careful not to overmix, as this can make your muffins tough. Finally, fold in the semi-sweet chocolate chips, ensuring they are evenly distributed throughout the batter.

Step 6: Fill Muffin Tins

Using a spoon or a scoop, fill each muffin cup about two-thirds full with the batter. This allows room for the muffins to rise without overflowing. Make sure to distribute the batter evenly among the cups for consistent baking.

Step 7: Bake the Muffins

Place the muffin tin in the preheated oven and bake for 18-20 minutes. To check for doneness, insert a toothpick into the center of a muffin. If it comes out clean or with a few crumbs, your muffins are ready!

Step 8: Cool and Serve

Once baked, remove the muffins from the oven and let them cool in the pan for about 5 minutes. Then, transfer them to a wire rack to cool completely. This cooling process helps maintain their texture. Enjoy your warm muffins with a cup of coffee or tea!

Variation of Pumpkin Chocolate Chip Muffins Recipe

Pumpkin Chocolate Chip Muffins Recipe is already a delightful treat, you can easily adapt it to meet different dietary needs or preferences. Here are two popular variations: a gluten-free option and a vegan adaptation. Each variation maintains the delicious flavors while catering to specific dietary requirements.

Gluten-Free Option

If you or someone you know is gluten-sensitive, you can still enjoy these muffins! To make a gluten-free version, simply replace the all-purpose flour with a gluten-free flour blend. Look for a blend that includes xanthan gum, as this helps mimic the texture of traditional flour. You can also use almond flour or coconut flour, but be aware that these may alter the texture slightly. Additionally, ensure that all other ingredients, like baking powder and chocolate chips, are gluten-free. Follow the same preparation steps, and you’ll have delicious gluten-free pumpkin chocolate chip muffins!

Vegan Adaptation

For those following a vegan diet, you can easily modify the recipe to make it plant-based. Start by replacing the eggs with flax eggs. To make a flax egg, mix 1 tablespoon of ground flaxseed with 2.5 tablespoons of water. Let it sit for about 5 minutes until it thickens. Next, substitute the vegetable oil with a plant-based oil, such as coconut oil or applesauce, for a healthier option. Lastly, ensure that your chocolate chips are dairy-free. With these simple swaps, you can enjoy a scrumptious vegan version of pumpkin chocolate chip muffins that everyone will love!

These variations not only make the muffins accessible to more people but also allow you to experiment with flavors and textures. So, whether you choose the gluten-free or vegan route, you can still savor the delightful taste of autumn in every bite!

Cooking Note for Pumpkin Chocolate Chip Muffins Recipe

Pumpkin Chocolate Chip Muffins Recipe. Here are some essential cooking notes to keep in mind as you embark on your baking journey:

First, always measure your ingredients accurately. Using a kitchen scale can help ensure precision, especially with flour. Too much flour can lead to dense muffins, while too little can make them fall flat. For best results, spoon the flour into your measuring cup and level it off with a knife.

Next, consider the freshness of your ingredients. Using fresh baking powder and baking soda is crucial for achieving the right rise. If they are old, your muffins may not rise as expected. A simple test is to add a bit of vinegar to baking soda or water to baking powder. If it bubbles, it’s still good!

Additionally, room temperature ingredients mix better. If your eggs and oil are at room temperature, they will blend more smoothly with the pumpkin puree. This helps create a uniform batter, leading to better texture in your muffins.

Don’t forget to keep an eye on your muffins as they bake. Ovens can vary in temperature, so start checking for doneness a few minutes before the recommended baking time. Remember, muffins continue to cook slightly after being removed from the oven, so it’s okay if they seem a bit soft in the center.

Lastly, allow your muffins to cool completely before storing them. This helps maintain their moisture and prevents them from becoming soggy. Store them in an airtight container at room temperature for up to three days, or freeze them for longer storage.

By following these cooking notes, you’ll be well on your way to baking perfect pumpkin chocolate chip muffins every time. Enjoy the process, and don’t hesitate to share your delicious creations with family and friends!

Serving Suggestions for Pumpkin Chocolate Chip Muffins Recipe

Pumpkin Chocolate Chip Muffins Recipe is baked and cooled, it’s time to think about how to serve them. These muffins are versatile and can be enjoyed in various ways, making them perfect for any occasion. Here are some delightful serving suggestions to enhance your muffin experience:

  • With a Spread: Spread a thin layer of cream cheese or butter on your muffins for added richness. You can also try flavored cream cheese, like pumpkin spice or maple, to complement the muffin’s flavors.
  • As a Breakfast Treat: Serve the muffins warm alongside a steaming cup of coffee or tea. They make a hearty breakfast option that will keep you energized throughout the morning.
  • With Fresh Fruit: Pair your muffins with fresh fruit, such as sliced apples or pears. The natural sweetness and crunch of the fruit balance the rich flavors of the muffins.
  • As a Dessert: Enjoy the muffins as a dessert after dinner. You can serve them with a scoop of vanilla ice cream or a dollop of whipped cream for a delightful treat.
  • For a Festive Touch: During the fall season, consider decorating your muffins with a sprinkle of powdered sugar or a drizzle of caramel sauce. This adds a festive flair and makes them even more appealing.
  • In a Muffin Basket: Create a beautiful muffin basket by arranging your pumpkin chocolate chip muffins with other seasonal treats. This makes for a lovely centerpiece at gatherings or potlucks.

These serving suggestions not only enhance the flavor of your muffins but also make them more enjoyable for everyone. Whether you’re hosting a brunch, enjoying a quiet morning at home, or celebrating a special occasion, these muffins are sure to impress. So, get creative and enjoy your delicious pumpkin chocolate chip muffins in style!

Tips for Perfect Pumpkin Chocolate Chip Muffins Recipe

Pumpkin Chocolate Chip Muffins Recipe turns out perfectly every time, consider these helpful tips. Each suggestion is designed to enhance the flavor, texture, and overall enjoyment of your muffins. Let’s dive in!

  • Use Fresh Ingredients: Always opt for fresh pumpkin puree and check the expiration dates on your baking powder and baking soda. Fresh ingredients contribute to better flavor and rise.
  • Don’t Overmix: When combining the wet and dry ingredients, mix just until combined. Overmixing can lead to tough muffins. A few lumps are perfectly fine!
  • Room Temperature Ingredients: Allow your eggs and oil to reach room temperature before mixing. This helps create a smoother batter and ensures even baking.
  • Experiment with Spices: Feel free to adjust the spices to your liking. Adding a pinch of ginger or cloves can give your muffins a unique twist.
  • Check for Doneness: Use a toothpick to test if your muffins are done. If it comes out clean or with a few crumbs, they’re ready. Avoid opening the oven door too often, as this can affect baking time.
  • Cool Properly: Let your muffins cool in the pan for a few minutes before transferring them to a wire rack. This helps them set and prevents sogginess.
  • Store Correctly: Keep your muffins in an airtight container at room temperature for up to three days. For longer storage, freeze them in a zip-top bag. Just thaw them at room temperature when you’re ready to enjoy!
  • Customize Your Muffins: Don’t hesitate to add your favorite mix-ins! Nuts, dried fruits, or even a swirl of cream cheese can elevate your muffins to the next level.

By following these tips, you’ll be well on your way to baking the most delicious pumpkin chocolate chip muffins. Each batch will be a delightful treat that captures the essence of fall, making every bite a celebration of flavor!

Breakdown of Time for Pumpkin Chocolate Chip Muffins Recipe

Pumpkin Chocolate Chip Muffins Recipe can help you plan your baking session more effectively. Here’s a simple breakdown of the time you’ll need for preparation and cooking:

Prep Time

The prep time for this delightful recipe is approximately 15-20 minutes. This includes gathering your ingredients, measuring them out, and mixing the wet and dry components. Taking your time during this stage ensures that everything is well-prepared for baking.

Cooking Time

Once your muffins are ready to go into the oven, the cooking time is about 18-20 minutes. Keep an eye on them as they bake, and use the toothpick test to check for doneness. Remember, every oven is a bit different, so your muffins might need a minute or two more or less.

Total Time

In total, you can expect to spend around 35-40 minutes from start to finish. This includes both prep and cooking time. With such a quick turnaround, you’ll have a warm batch of pumpkin chocolate chip muffins ready to enjoy in no time!

So, gather your ingredients and get ready to fill your kitchen with the wonderful aroma of freshly baked muffins. Happy baking!

Nutritional Information for Pumpkin Chocolate Chip Muffins Recipe

Pumpkin Chocolate Chip Muffins Recipe can help you make informed choices about your diet. These muffins are not only delicious but also provide a good balance of nutrients. Here’s a breakdown of the key nutritional information for each muffin:

Calories

Each muffin contains approximately 180 calories. This makes them a satisfying treat without being overly indulgent. They are perfect for a quick breakfast or a snack during the day. Enjoying one muffin can give you a nice energy boost, especially during the busy fall season!

Protein

In terms of protein, each muffin offers about 3 grams. While this isn’t a high amount, it contributes to your daily protein intake. Pairing your muffin with a source of protein, like yogurt or a glass of milk, can help create a more balanced meal or snack.

Sodium

The sodium content in each muffin is relatively low, making it a heart-healthy option. Each muffin contains around 200 milligrams of sodium. This is important for those watching their sodium intake, as it allows you to enjoy a tasty treat without worrying too much about excess salt.

Overall, these muffins provide a delightful combination of flavors and nutrients. They can fit well into a balanced diet, especially when enjoyed in moderation. So, go ahead and indulge in these pumpkin chocolate chip muffins, knowing they can be part of a healthy lifestyle!

FAQs about Pumpkin Chocolate Chip Muffins Recipe

Can I use fresh pumpkin instead of canned?

Absolutely! You can use fresh pumpkin instead of canned pumpkin puree. To do this, start by roasting a small pumpkin. Cut it in half, remove the seeds, and place it cut-side down on a baking sheet. Roast it at 350°F (175°C) for about 45 minutes or until tender. Once cooled, scoop out the flesh and blend it until smooth. This fresh pumpkin will add a lovely flavor to your muffins, making them even more special!

How do I store leftover muffins?

To store leftover muffins, let them cool completely first. Then, place them in an airtight container at room temperature. They will stay fresh for up to three days. If you want to keep them longer, consider freezing them. Just wrap each muffin in plastic wrap and place them in a zip-top bag. They can be frozen for up to three months. When you’re ready to enjoy, simply thaw them at room temperature or warm them in the microwave for a few seconds!

Can I freeze pumpkin chocolate chip muffins?

Yes, you can freeze pumpkin chocolate chip muffins! Freezing is a great way to preserve their freshness. After they have cooled completely, wrap each muffin tightly in plastic wrap. Then, place them in a freezer-safe bag or container. When you want to enjoy one, just take it out and let it thaw at room temperature. You can also warm it in the microwave for a quick treat!

What can I substitute for chocolate chips?

If you want to switch things up, there are plenty of delicious substitutes for chocolate chips. You can use white chocolate chips for a sweeter twist or dark chocolate chips for a richer flavor. If you prefer a healthier option, try adding dried fruits like cranberries or raisins. Nuts, such as walnuts or pecans, can also add a nice crunch. Feel free to get creative and mix in your favorite ingredients!

Conclusion on Pumpkin Chocolate Chip Muffins Recipe

Pumpkin Chocolate Chip Muffins Recipe is a delightful way to embrace the flavors of autumn. These muffins are not only easy to make but also incredibly versatile, allowing you to customize them to suit your taste and dietary needs. Whether you enjoy them warm with a spread, as a quick breakfast, or as a sweet treat after dinner, they are sure to bring joy to your table.

With their moist texture and rich chocolatey goodness, each bite is a celebration of fall. The combination of pumpkin and spices creates a comforting flavor that warms the heart. Plus, with the added nutritional benefits of pumpkin, you can feel good about indulging in these tasty treats.

As you embark on your baking adventure, remember to have fun and experiment with different variations. Whether you opt for gluten-free or vegan adaptations, the essence of these muffins remains the same—deliciousness! So gather your ingredients, follow the steps, and enjoy the process of creating something special.

We hope this recipe inspires you to fill your kitchen with the wonderful aroma of freshly baked pumpkin chocolate chip muffins. Share them with family and friends, and watch as they disappear in no time. Happy baking, and may your autumn be filled with warmth, joy, and plenty of delicious muffins!

Banana Streusel Muffins Recipe is a must-try delight!

Introduction to Banana Streusel Muffins Recipe

Welcome to the delightful world of Banana Streusel Muffins! If you love the sweet, comforting taste of bananas, then this recipe is perfect for you. These muffins are not just a treat for your taste buds; they also fill your kitchen with a warm, inviting aroma. Imagine biting into a soft, moist muffin topped with a crunchy streusel that adds a delightful texture. It’s a match made in heaven!

Banana Streusel Muffins are an excellent choice for breakfast, snacks, or even dessert. They are easy to make and require simple ingredients that you might already have in your pantry. Plus, they are a fantastic way to use up those overripe bananas sitting on your counter. Instead of tossing them out, transform them into a delicious batch of muffins that everyone will love.

In this article, we will guide you through the entire process of making these scrumptious muffins. From gathering the ingredients to baking them to perfection, you’ll find everything you need to know. So, roll up your sleeves and get ready to bake some Banana Streusel Muffins that will surely impress your family and friends!

Ingredients for Banana Streusel Muffins Recipe

To create the perfect Banana Streusel Muffins, you’ll need a few simple ingredients. Most of these items are likely already in your kitchen. Here’s what you’ll need:

  • 2 ripe bananas, mashed
  • 1/3 cup melted butter
  • 1/2 cup granulated sugar
  • 1 large egg
  • 1 teaspoon vanilla extract
  • 1 teaspoon baking soda
  • 1/4 teaspoon salt
  • 1 cup all-purpose flour
  • 1/2 cup chopped pecans (optional)

For the crunchy streusel topping, gather these ingredients:

  • 1/4 cup all-purpose flour
  • 1/4 cup brown sugar
  • 2 tablespoons cold butter, diced
  • 1/2 teaspoon nutmeg

These ingredients come together to create a delightful muffin that is both moist and flavorful. The bananas provide natural sweetness, while the streusel topping adds a satisfying crunch. If you want to experiment, feel free to add your favorite mix-ins, like chocolate chips or dried fruits. This recipe is versatile and can be adjusted to suit your taste!

Step-by-Step Preparation of Banana Streusel Muffins Recipe

Now that you have all your ingredients ready, it’s time to dive into the fun part—making your Banana Streusel Muffins! Follow these simple steps to create a batch of muffins that will have everyone asking for seconds.

Step 1: Preheat the Oven

First things first, preheat your oven to 350°F (175°C). This step is crucial as it ensures that your muffins bake evenly. While the oven heats up, you can prepare your muffin tin. Line it with muffin liners or give it a light spray of cooking oil. This will help prevent the muffins from sticking.

Step 2: Prepare the Muffin Batter

In a large mixing bowl, start by mashing the ripe bananas until they are smooth. Then, pour in the melted butter and mix well. Next, add the granulated sugar, egg, and vanilla extract. Stir everything together until it’s nicely blended. Now, sprinkle in the baking soda and salt, mixing thoroughly. Finally, gently fold in the all-purpose flour until just combined. If you’re using chopped pecans, this is the time to add them in!

Step 3: Make the Streusel Topping

In a separate small bowl, it’s time to whip up the crunchy streusel topping. Combine the all-purpose flour, brown sugar, diced cold butter, and nutmeg. Use your fingers or a fork to mix these ingredients together until they form a crumbly texture. This topping will add a delightful crunch to your muffins!

Step 4: Combine and Fill Muffin Cups

Now, it’s time to bring everything together. Spoon the banana muffin batter into the prepared muffin tin, filling each cup about two-thirds full. This allows room for the muffins to rise while baking. Once filled, generously sprinkle the crunchy streusel topping over each muffin cup. This will create a beautiful, golden crust on top!

Step 5: Bake the Muffins

Place the muffin tin in the preheated oven and bake for 18-20 minutes. Keep an eye on them! You’ll know they’re done when a toothpick inserted into the center comes out clean. Once baked, let the muffins cool in the pan for about 5 minutes. Then, transfer them to a wire rack to cool completely. Enjoy the wonderful aroma filling your kitchen!

Variation of Banana Streusel Muffins Recipe

One of the best things about Banana Streusel Muffins is their versatility. You can easily switch up the ingredients to create different flavors that suit your taste. Let’s explore some alternative ingredients and gluten-free options to make these muffins even more delightful!

Alternative Ingredients for Different Flavors

If you want to add a twist to your Banana Streusel Muffins, consider these fun alternatives:

  • Chocolate Chips: Mix in 1/2 cup of semi-sweet or dark chocolate chips for a rich, sweet treat.
  • Dried Fruits: Add 1/2 cup of dried cranberries, raisins, or chopped apricots for a fruity burst.
  • Spices: Experiment with spices like cinnamon or allspice to enhance the flavor profile. Just a teaspoon can make a big difference!
  • Nut Butters: Swirl in a couple of tablespoons of peanut butter or almond butter for a nutty flavor.
  • Yogurt: Replace half of the butter with plain yogurt for a lighter muffin that’s still moist.

These alternatives not only add flavor but also make your muffins unique. Feel free to mix and match to find your favorite combination!

Gluten-Free Options for Banana Streusel Muffins Recipe

If you or someone you know is gluten-sensitive, you can still enjoy these delicious muffins. Here’s how to make them gluten-free:

  • Gluten-Free Flour Blend: Substitute all-purpose flour with a gluten-free flour blend. Make sure it’s a 1:1 ratio for best results.
  • Almond Flour: Use almond flour for a nutty flavor and a moist texture. You may need to adjust the liquid slightly.
  • Coconut Flour: If you prefer coconut flour, remember it absorbs more moisture. Use about 1/4 cup less than the recipe calls for and add an extra egg.

These gluten-free options ensure that everyone can enjoy the delightful taste of Banana Streusel Muffins. With a few simple swaps, you can cater to different dietary needs without sacrificing flavor!

Cooking Note for Banana Streusel Muffins Recipe

When it comes to baking Banana Streusel Muffins, a few cooking notes can help you achieve the best results. These tips will ensure your muffins turn out perfectly every time, making them a delightful treat for any occasion.

First, always use ripe bananas. The riper the bananas, the sweeter and more flavorful your muffins will be. Look for bananas with brown spots on the peel; this indicates they are at their peak sweetness. If you have bananas that are too ripe, don’t worry! You can freeze them for later use. Just thaw them before mashing.

Next, be careful not to overmix the batter. When you combine the flour with the wet ingredients, mix until just combined. Overmixing can lead to dense muffins instead of light and fluffy ones. A few lumps are perfectly fine!

Additionally, consider using room temperature ingredients. If your egg and butter are at room temperature, they will blend more easily into the batter. This can help create a smoother texture in your muffins.

Lastly, keep an eye on the baking time. Every oven is different, so your muffins may bake a little faster or slower than the suggested time. Start checking for doneness a couple of minutes early. When a toothpick comes out clean, it’s time to take them out!

By following these cooking notes, you’ll be well on your way to baking delicious Banana Streusel Muffins that everyone will love. Happy baking!

Serving Suggestions for Banana Streusel Muffins Recipe

Once your Banana Streusel Muffins are baked to perfection, it’s time to enjoy them! These muffins are incredibly versatile and can be served in various delightful ways. Here are some serving suggestions to enhance your muffin experience:

  • With Butter: Spread a thin layer of butter on a warm muffin. The butter melts into the muffin, adding richness and flavor.
  • With Jam or Honey: For a sweet twist, try adding your favorite jam or a drizzle of honey. Strawberry or raspberry jam pairs wonderfully with the banana flavor.
  • As a Breakfast Treat: Serve the muffins alongside a bowl of fresh fruit or yogurt for a balanced breakfast. This combination is not only delicious but also nutritious!
  • With Coffee or Tea: Enjoy your muffins with a hot cup of coffee or tea. The warm beverage complements the sweet, moist muffins perfectly.
  • As a Snack: These muffins make a great on-the-go snack. Pack them in your lunchbox or enjoy them during a mid-afternoon break.

For special occasions, consider serving the muffins on a beautiful platter. You can even dust them with powdered sugar for an elegant touch. No matter how you choose to serve them, Banana Streusel Muffins are sure to be a hit!

Feel free to get creative with your serving ideas. The key is to enjoy these delightful muffins in a way that brings you joy. Happy munching!

Tips for Perfect Banana Streusel Muffins Recipe

To ensure your Banana Streusel Muffins turn out perfectly every time, here are some helpful tips to keep in mind. These simple suggestions will help you achieve that ideal texture and flavor that everyone loves.

First, always use ripe bananas. The sweeter the bananas, the better your muffins will taste. Look for bananas with brown spots, as they are the ripest. If you have overripe bananas, don’t throw them away! They can be frozen and used later for baking.

Next, measure your flour correctly. Too much flour can lead to dense muffins. Use the spoon-and-level method: spoon the flour into your measuring cup and level it off with a knife. This will give you the right amount without packing it down.

Another important tip is to mix the batter gently. Overmixing can make your muffins tough. Stir until just combined, and don’t worry about a few lumps. This will keep your muffins light and fluffy.

Also, consider using room temperature ingredients. If your butter and egg are at room temperature, they will blend more easily into the batter. This can help create a smoother texture in your muffins.

Lastly, keep an eye on the baking time. Ovens can vary, so start checking your muffins a few minutes before the suggested time. When a toothpick inserted into the center comes out clean, they are ready to come out of the oven.

By following these tips, you’ll be well on your way to baking delicious Banana Streusel Muffins that everyone will enjoy. Happy baking!

Breakdown of Time for Banana Streusel Muffins Recipe

Understanding the time needed for each step in the Banana Streusel Muffins recipe can help you plan your baking session better. Here’s a simple breakdown of the time required for preparation and cooking.

Prep Time

The prep time for making Banana Streusel Muffins is approximately 15-20 minutes. This includes gathering your ingredients, mashing the bananas, mixing the batter, and preparing the streusel topping. It’s a quick process, especially if you have everything ready to go!

Cooking Time

Once your muffins are in the oven, the cooking time is about 18-20 minutes. Keep an eye on them as they bake. You’ll want to check for doneness by inserting a toothpick into the center of a muffin. If it comes out clean, they’re ready!

Total Time

In total, you can expect to spend around 35-40 minutes from start to finish. This includes both prep and cooking time. With such a short time commitment, you can enjoy fresh, homemade Banana Streusel Muffins in no time!

Nutritional Information for Banana Streusel Muffins Recipe

Understanding the nutritional content of your Banana Streusel Muffins is essential, especially if you are mindful of your diet. Here’s a breakdown of the key nutritional components per serving. This information will help you enjoy your muffins while keeping track of your daily intake.

Calories

Each Banana Streusel Muffin contains approximately 150 calories. This makes them a satisfying yet light option for breakfast or a snack. The calories come from wholesome ingredients like bananas, butter, and sugar, providing energy to fuel your day.

Protein

In terms of protein, each muffin offers about 2 grams. While this isn’t a high protein snack, it does contribute to your daily intake. Pairing your muffin with a source of protein, like yogurt or a glass of milk, can create a more balanced meal.

Sodium

Each muffin contains roughly 150 mg of sodium. This amount is relatively low, making these muffins a heart-healthy choice. However, if you are watching your sodium intake, be mindful of any additional toppings or spreads you may add.

Overall, Banana Streusel Muffins are a delicious treat that can fit into a balanced diet. They provide a good source of energy and can be enjoyed in moderation. Feel free to experiment with healthier ingredient swaps to further enhance their nutritional profile!

FAQs about Banana Streusel Muffins Recipe

Can I use frozen bananas for the Banana Streusel Muffins Recipe?

Absolutely! Using frozen bananas is a great option for your Banana Streusel Muffins. Just make sure to thaw them first. Once thawed, drain any excess liquid and mash them as you would with fresh bananas. Frozen bananas are often sweeter and can add extra moisture to your muffins, making them even more delicious!

How do I store leftover Banana Streusel Muffins?

Storing your leftover Banana Streusel Muffins is easy! Allow them to cool completely, then place them in an airtight container. You can keep them at room temperature for up to 3 days. If you want to keep them longer, consider freezing them. Wrap each muffin in plastic wrap and place them in a freezer-safe bag. They can last up to 3 months in the freezer. Just thaw them at room temperature when you’re ready to enjoy!

Can I make Banana Streusel Muffins Recipe ahead of time?

Yes, you can definitely make Banana Streusel Muffins ahead of time! They are perfect for meal prep. You can bake them a day or two in advance and store them in an airtight container. If you want to prepare the batter ahead of time, you can mix it and refrigerate it for up to 24 hours. Just remember to give it a gentle stir before filling the muffin cups and baking!

What can I substitute for eggs in the Banana Streusel Muffins Recipe?

If you need an egg substitute for your Banana Streusel Muffins, there are several options! You can use 1/4 cup of unsweetened applesauce or mashed banana for each egg. Another option is to use 1 tablespoon of ground flaxseed mixed with 2.5 tablespoons of water. Let it sit for a few minutes until it thickens. These substitutes will help bind the ingredients together while keeping your muffins moist and delicious!

Conclusion on Banana Streusel Muffins Recipe

In conclusion, the Banana Streusel Muffins Recipe is a delightful way to enjoy the sweet, comforting flavor of bananas. These muffins are not only easy to make but also incredibly versatile. Whether you’re looking for a quick breakfast, a tasty snack, or a sweet treat for dessert, these muffins fit the bill perfectly.

With simple ingredients and straightforward steps, you can whip up a batch in no time. The combination of moist banana bread and crunchy streusel topping creates a delightful texture that will have everyone coming back for more. Plus, the recipe allows for plenty of creativity. Feel free to experiment with different mix-ins or variations to make them your own!

As you bake these muffins, remember to enjoy the process. The aroma of fresh muffins wafting through your kitchen is a joy in itself. And when you take that first bite, you’ll understand why these Banana Streusel Muffins are a favorite among many.

So, gather your ingredients, preheat your oven, and get ready to bake some delicious Banana Streusel Muffins. They are sure to become a staple in your home, bringing smiles and satisfaction to your family and friends. Happy baking!

Banana Dream Cake: Indulge in a Slice of Heaven!

Introduction to Banana Dream Cake

The aroma of freshly baked cake wafting through the house takes me back to my childhood, where my mom would whip up her famous banana cake, filling our home with warmth and sweetness. This Banana Dream Cake is a delightful twist on that memory, perfect for any occasion. Whether you’re celebrating a birthday, hosting a brunch, or simply treating yourself after a long day, this cake is your go-to. It’s moist, flavorful, and incredibly easy to make, ensuring you can impress your loved ones without spending hours in the kitchen.

Why You’ll Love This Banana Dream Cake

This Banana Dream Cake is a true crowd-pleaser, and for good reason! It’s not just delicious; it’s also incredibly easy to whip up, making it perfect for busy weeknights or last-minute gatherings. The combination of ripe bananas and rich frosting creates a flavor explosion that will have everyone asking for seconds. Plus, it’s a fantastic way to use up those overripe bananas sitting on your counter, turning them into a slice of heaven!

Ingredients for Banana Dream Cake

Gathering the right ingredients is the first step to creating your Banana Dream Cake. Here’s what you’ll need:

  • All-purpose flour: This is the backbone of your cake, providing structure and texture.
  • Granulated sugar: Sweetness is key! It helps create that moist, tender crumb.
  • Baking powder and baking soda: These leavening agents work together to give your cake a lovely rise.
  • Salt: A pinch enhances the flavors, balancing the sweetness beautifully.
  • Unsalted butter: Softened butter adds richness and moisture, making every bite heavenly.
  • Eggs: They bind the ingredients together and contribute to the cake’s fluffiness.
  • Vanilla extract: A splash of vanilla elevates the flavor, adding warmth and depth.
  • Mashed ripe bananas: The star of the show! They bring natural sweetness and moisture.
  • Buttermilk: This adds tanginess and helps keep the cake tender.
  • Chopped walnuts (optional): For a delightful crunch, feel free to toss in some nuts!

For the frosting, you’ll need:

  • Unsalted butter: Again, softened for a creamy texture.
  • Powdered sugar: This gives the frosting its sweetness and smooth consistency.
  • Vanilla extract: A touch of vanilla in the frosting ties everything together.
  • Heavy cream: This helps achieve that fluffy, spreadable frosting.
  • Sliced bananas (for garnish): A fresh touch to make your cake look as good as it tastes!

For exact measurements, check the bottom of the article where you can find everything listed for easy printing!

How to Make Banana Dream Cake

Step 1: Preheat and Prepare

Let’s get started! Preheat your oven to 350°F (175°C). While that’s warming up, grab two 9-inch round cake pans. Grease them with butter or cooking spray, then dust with flour to prevent sticking. This little step ensures your Banana Dream Cake comes out perfectly every time. Trust me, there’s nothing worse than a cake that won’t budge from its pan!

Step 2: Mix Dry Ingredients

In a large mixing bowl, whisk together the all-purpose flour, granulated sugar, baking powder, baking soda, and salt. This is where the magic begins! Make sure everything is well combined, as this will help your cake rise beautifully. The dry ingredients are the foundation of your Banana Dream Cake, so take a moment to get it just right. A good mix now means a fluffy cake later!

Step 3: Cream Butter and Eggs

In another bowl, cream the softened butter until it’s light and fluffy. This step is crucial for a moist cake! Next, add the eggs one at a time, mixing well after each addition. Stir in the vanilla extract and mashed bananas, letting those flavors meld together. The bananas will add natural sweetness and moisture, making your cake irresistible. It’s like a hug in a bowl!

Step 4: Combine Mixtures

Now, it’s time to bring it all together! Gradually add the dry ingredients to the wet mixture, alternating with the buttermilk. Start and end with the dry ingredients for the best results. Mix until just combined; overmixing can lead to a dense cake. If you’re feeling adventurous, fold in some chopped walnuts for a delightful crunch. Your Banana Dream Cake batter should be smooth and inviting!

Step 5: Bake the Cake

Divide the batter evenly between the prepared cake pans. Smooth the tops with a spatula for an even bake. Pop them in the oven and bake for 25-30 minutes. You’ll know they’re done when a toothpick inserted in the center comes out clean. Let the cakes cool in the pans for about 10 minutes before transferring them to wire racks. The aroma will be heavenly, and you’ll be counting down the minutes!

Step 6: Make the Frosting

While the cakes cool, let’s whip up that dreamy frosting! In a mixing bowl, beat the softened butter until creamy. Gradually add the powdered sugar, mixing well to avoid a sugary cloud. Then, add the vanilla extract and heavy cream, beating until the frosting is smooth and fluffy. This frosting is the perfect complement to your Banana Dream Cake, adding a rich, sweet layer that everyone will love!

Step 7: Assemble the Cake

Once the cakes are completely cool, it’s time to assemble! Place one layer on a serving plate and spread a generous layer of frosting on top. Carefully place the second layer on top and frost the top and sides of the cake. For a beautiful finish, garnish with sliced bananas. This final touch not only looks stunning but also adds a fresh burst of flavor. Your Banana Dream Cake is now ready to shine!

Tips for Success

  • Use ripe bananas for maximum flavor and sweetness; they should be speckled with brown.
  • Don’t overmix the batter; mix until just combined for a light, fluffy cake.
  • Let the cakes cool completely before frosting to prevent melting.
  • For a fun twist, add a teaspoon of cinnamon to the batter for extra warmth.
  • Store leftovers in an airtight container to keep the cake moist.

Equipment Needed

  • Two 9-inch round cake pans (or one 9×13-inch pan for a single-layer cake)
  • Mixing bowls (a large one for dry ingredients and a medium one for wet ingredients)
  • Whisk (or an electric mixer for easier creaming)
  • Spatula (for spreading frosting and smoothing batter)
  • Cooling racks (or a plate to cool the cakes)

Variations

  • For a tropical twist, add shredded coconut to the batter for a delightful texture and flavor.
  • Swap out half of the all-purpose flour for whole wheat flour for a healthier option.
  • Make it gluten-free by using a 1:1 gluten-free flour blend instead of regular flour.
  • For a vegan version, replace eggs with flax eggs and use plant-based butter and milk.
  • Add a layer of cream cheese frosting between the cake layers for a tangy contrast.

Serving Suggestions

  • Pair your Banana Dream Cake with a scoop of vanilla ice cream for a delightful contrast.
  • Serve with a dollop of whipped cream and a sprinkle of cinnamon for added flair.
  • Enjoy with a cup of freshly brewed coffee or a glass of cold milk.
  • For a beautiful presentation, arrange sliced bananas and walnuts on top of the cake.

FAQs about Banana Dream Cake

  • Can I use frozen bananas for this Banana Dream Cake?

Absolutely! Frozen bananas work wonderfully in this recipe. Just make sure to thaw them and drain any excess liquid before mashing. They’ll add that same delicious flavor and moisture!

  • How do I store leftover Banana Dream Cake?

To keep your cake fresh, store it in an airtight container at room temperature for up to three days. If you want to keep it longer, refrigerate it for up to a week. Just be sure to let it come to room temperature before serving!

  • Can I make this cake ahead of time?

Yes! You can bake the cake layers a day in advance. Just wrap them tightly in plastic wrap and store them at room temperature. Frost the cake on the day you plan to serve it for the best texture and flavor.

  • What can I substitute for buttermilk?

If you don’t have buttermilk on hand, you can easily make a substitute. Just mix one cup of milk with one tablespoon of vinegar or lemon juice. Let it sit for about five minutes, and you’ll have a perfect buttermilk replacement!

  • Can I add other mix-ins to the Banana Dream Cake?

Definitely! Feel free to get creative. Chocolate chips, dried fruit, or even a swirl of peanut butter can add a fun twist to your cake. Just be mindful not to overload it, as too many add-ins can affect the texture.

Final Thoughts

Every slice of this Banana Dream Cake is a celebration of flavor and nostalgia. It’s more than just a dessert; it’s a way to create cherished memories with family and friends. The moist, banana-infused layers paired with creamy frosting make each bite a delightful experience. Whether you’re baking for a special occasion or simply indulging on a quiet evening, this cake brings joy to the table. So, gather your loved ones, share a slice, and let the laughter and stories flow. Trust me, this Banana Dream Cake will become a beloved staple in your home!

Banana Dream Cake
jhessica

Banana Dream Cake: Indulge in a Slice of Heaven!

A deliciously moist and flavorful cake made with ripe bananas, perfect for any occasion.
Prep Time 20 minutes
Cook Time 30 minutes
Total Time 50 minutes
Servings: 12 servings
Course: Dessert
Cuisine: American
Calories: 350

Ingredients
  

  • 2 cups all-purpose flour
  • 1 ½ cups granulated sugar
  • 1 teaspoon baking powder
  • 1 teaspoon baking soda
  • ½ teaspoon salt
  • 1 cup unsalted butter softened
  • 4 large eggs
  • 1 teaspoon vanilla extract
  • 1 cup mashed ripe bananas about 2-3 bananas
  • 1 cup buttermilk
  • 1 cup chopped walnuts optional
For the frosting:
  • 1 cup unsalted butter softened
  • 4 cups powdered sugar
  • 1 teaspoon vanilla extract
  • 2 tablespoons heavy cream
  • 1 cup sliced bananas for garnish

Method
 

  1. Preheat your oven to 350°F (175°C). Grease and flour two 9-inch round cake pans.
  2. In a large mixing bowl, whisk together the flour, granulated sugar, baking powder, baking soda, and salt.
  3. In another bowl, cream the softened butter until light and fluffy. Add the eggs one at a time, mixing well after each addition. Stir in the vanilla extract and mashed bananas.
  4. Gradually add the dry ingredients to the wet mixture, alternating with buttermilk. Mix until just combined. If using, fold in the chopped walnuts.
  5. Divide the batter evenly between the prepared cake pans. Bake for 25-30 minutes, or until a toothpick inserted in the center comes out clean. Allow the cakes to cool in the pans for 10 minutes before transferring to wire racks to cool completely.
  6. For the frosting, beat the softened butter until creamy. Gradually add the powdered sugar, mixing well. Add the vanilla extract and heavy cream, beating until smooth and fluffy.
  7. Once the cakes are completely cool, spread a layer of frosting on top of one cake layer, place the second layer on top, and frost the top and sides of the cake. Garnish with sliced bananas.

Nutrition

Serving: 1sliceCalories: 350kcalCarbohydrates: 45gProtein: 3gFat: 18gSaturated Fat: 10gPolyunsaturated Fat: 8gCholesterol: 70mgSodium: 200mgFiber: 1gSugar: 25g

Notes

  • For a lighter version, substitute half of the butter with unsweetened applesauce.
  • For added flavor, try mixing in a teaspoon of cinnamon into the batter.

Tried this recipe?

Let us know how it was!

Honey Garlic Butter Salmon Bites are a must-try dish!

Introduction to Honey Garlic Butter Salmon Bites

Are you looking for a delicious and easy seafood dish? Look no further! Honey Garlic Butter Salmon Bites are the perfect solution. This recipe combines the rich flavors of salmon with a sweet and savory glaze that will leave your taste buds dancing. Whether you’re hosting a dinner party or just want a quick weeknight meal, these salmon bites are sure to impress.

Salmon is not only tasty but also packed with nutrients. It’s a great source of protein and omega-3 fatty acids, which are essential for heart health. The honey garlic butter sauce adds a delightful twist, making this dish both healthy and indulgent. Plus, it takes just a short time to prepare and cook, making it a fantastic option for busy cooks.

In this article, we will guide you through the ingredients, preparation steps, and variations of Honey Garlic Butter Salmon Bites. You’ll learn how to create this mouthwatering dish that is sure to become a family favorite. So, roll up your sleeves and get ready to enjoy a meal that is as fun to make as it is to eat!

Ingredients for Honey Garlic Butter Salmon Bites

To create the delightful Honey Garlic Butter Salmon Bites, you’ll need a few simple ingredients. Each component plays a vital role in building the rich flavors of this dish. Here’s what you’ll need:

  • 1 pound salmon fillet: Make sure the skin is removed and cut into bite-sized pieces for easy cooking and serving.
  • 1/4 cup unsalted butter: This will be the base of your delicious sauce, adding richness and flavor.
  • 1/4 cup honey: The star of the show! Honey brings sweetness that balances the savory elements.
  • 3 cloves garlic, minced: Fresh garlic adds a wonderful aroma and depth to the sauce.
  • 1 tablespoon soy sauce: This ingredient enhances the umami flavor, making the dish even more savory.
  • 1 teaspoon lemon juice: A splash of acidity brightens the flavors and complements the salmon.
  • 1/2 teaspoon salt: Essential for seasoning the salmon and enhancing all the flavors.
  • 1/4 teaspoon black pepper: Adds a hint of spice to the dish.
  • 1 tablespoon chopped fresh parsley: This is for garnish, adding a pop of color and freshness.

These ingredients come together to create a dish that is not only delicious but also visually appealing. The combination of sweet, savory, and aromatic flavors makes Honey Garlic Butter Salmon Bites a standout meal. Now that you have your ingredients ready, let’s move on to the preparation steps!

Preparation of Honey Garlic Butter Salmon Bites

Now that you have gathered all your ingredients, it’s time to dive into the preparation of your Honey Garlic Butter Salmon Bites. This process is straightforward and quick, making it perfect for any home cook. Let’s break it down into easy steps!

Step 1: Preparing the Salmon

First, take your salmon fillet and ensure it is skinless. Cut it into bite-sized pieces, about 1 to 2 inches each. This size allows for even cooking and makes it easy to enjoy. If you have any skin left, simply remove it with a sharp knife. Once cut, pat the salmon pieces dry with a paper towel. This helps the salmon sear nicely in the pan.

Step 2: Making the Honey Garlic Butter Sauce

Next, let’s whip up that delicious honey garlic butter sauce! In a medium saucepan, melt the unsalted butter over medium heat. Once melted, add the minced garlic. Sauté the garlic for about a minute until it becomes fragrant. Be careful not to let it burn, as burnt garlic can taste bitter.

After the garlic is fragrant, stir in the honey, soy sauce, lemon juice, salt, and black pepper. Bring this mixture to a gentle simmer. Allow it to cook for 2-3 minutes until it thickens slightly. This sauce is what makes the salmon bites so flavorful!

Step 3: Cooking the Salmon Bites

Now, it’s time to cook the salmon! Heat a little oil in a large skillet over medium-high heat. Once the oil is hot, add the salmon bites to the skillet. Cook them for about 2-3 minutes on each side. You want them to be golden brown and cooked through. The salmon should flake easily with a fork when done.

Step 4: Combining and Serving

Once the salmon bites are cooked, pour the honey garlic sauce over them. Toss gently to coat each piece evenly. Let them cook for an additional minute to heat through. This step ensures that every bite is bursting with flavor!

Finally, remove the skillet from heat. Garnish your Honey Garlic Butter Salmon Bites with chopped fresh parsley for a touch of color and freshness. Serve them warm, and enjoy the delightful combination of sweet and savory flavors!

Variation of Honey Garlic Butter Salmon Bites

While the classic Honey Garlic Butter Salmon Bites are delicious on their own, there are many ways to switch things up! You can experiment with alternative ingredients and cooking methods to create new flavors and textures. Let’s explore some exciting variations!

Alternative Ingredients for Different Flavors

Changing a few ingredients can give your Honey Garlic Butter Salmon Bites a whole new twist. Here are some ideas:

  • Maple Syrup: Swap honey for maple syrup for a unique flavor. It adds a rich sweetness that pairs beautifully with salmon.
  • Ginger: Add freshly grated ginger to the sauce for a zesty kick. Ginger complements the garlic and enhances the overall taste.
  • Mustard: Mix in a teaspoon of Dijon mustard for a tangy flavor. It adds depth and a bit of spice to the sauce.
  • Sesame Oil: Replace some of the butter with sesame oil for an Asian-inspired twist. This will give your dish a nutty flavor.
  • Herbs: Experiment with different herbs like dill or cilantro instead of parsley. Each herb brings its own unique flavor profile.

These alternative ingredients can help you customize your Honey Garlic Butter Salmon Bites to suit your taste preferences. Feel free to mix and match to find your favorite combination!

Cooking Methods for Honey Garlic Butter Salmon Bites

Besides the traditional skillet method, there are other ways to cook your salmon bites. Here are a few methods to consider:

  • Grilling: For a smoky flavor, grill the salmon bites on a barbecue. Just be sure to keep an eye on them, as they can cook quickly!
  • Baking: Preheat your oven to 400°F (200°C). Place the salmon bites on a baking sheet and drizzle with the honey garlic sauce. Bake for about 10-12 minutes until cooked through.
  • Air Frying: If you have an air fryer, this is a great option! Cook the salmon bites at 375°F (190°C) for about 8-10 minutes for a crispy texture.

Each cooking method offers a different texture and flavor, so don’t hesitate to try them all! With these variations, your Honey Garlic Butter Salmon Bites will never get boring.

Cooking Note for Honey Garlic Butter Salmon Bites

When preparing Honey Garlic Butter Salmon Bites, a few cooking notes can help ensure your dish turns out perfectly every time. These tips will enhance the flavor and texture of your salmon, making it a delightful experience for you and your guests.

First, always choose fresh salmon. Fresh fish not only tastes better but also has a firmer texture. If you can, buy wild-caught salmon for the best flavor and health benefits. If you must use frozen salmon, make sure to thaw it completely before cooking. This helps it cook evenly and prevents it from becoming rubbery.

Next, pay attention to the cooking temperature. Cooking the salmon over medium-high heat allows it to sear nicely, creating a golden crust. However, be careful not to overcrowd the skillet. If you add too many salmon bites at once, they will steam instead of sear. Cook in batches if necessary to achieve that perfect golden-brown finish.

Another important note is to monitor the cooking time closely. Salmon cooks quickly, usually within 2-3 minutes per side. Overcooking can lead to dry salmon, which is not what you want. The salmon is done when it flakes easily with a fork and has an internal temperature of 145°F (63°C).

Lastly, let the salmon rest for a minute after cooking. This allows the juices to redistribute, keeping the salmon moist and flavorful. When you pour the honey garlic sauce over the salmon, do it gently to avoid breaking the pieces apart. This way, each bite remains intact and delicious.

By following these cooking notes, you’ll create Honey Garlic Butter Salmon Bites that are not only tasty but also visually appealing. Enjoy the process, and don’t forget to savor every bite!

Serving Suggestions for Honey Garlic Butter Salmon Bites

Once your Honey Garlic Butter Salmon Bites are ready, it’s time to think about how to serve them. Presentation can elevate your dish and make it even more enjoyable. Here are some delightful serving suggestions that will complement the flavors of your salmon bites.

First, consider serving the salmon bites over a bed of fluffy rice. White rice, brown rice, or even jasmine rice can be a great base. The rice will soak up the delicious honey garlic sauce, making each bite even tastier. You can also try quinoa for a healthier option, adding a nutty flavor and extra protein.

Another fantastic option is to pair the salmon bites with steamed vegetables. Broccoli, asparagus, or green beans are excellent choices. The freshness and crunch of the vegetables balance the richness of the salmon, creating a well-rounded meal. You can lightly season the veggies with salt and pepper or drizzle a bit of olive oil for added flavor.

If you’re looking for a lighter option, consider serving the salmon bites on a fresh salad. Mixed greens, cherry tomatoes, and cucumber make a refreshing base. Drizzle some of the honey garlic sauce over the salad for a cohesive flavor. This combination is perfect for a warm day or when you want something light yet satisfying.

For a fun twist, you can also serve the salmon bites in lettuce wraps. Use large lettuce leaves, like romaine or butter lettuce, to create a fresh and crunchy wrap. Add some sliced avocado, shredded carrots, or even a sprinkle of sesame seeds for extra texture. This makes for a great appetizer or a light meal.

Lastly, don’t forget about garnishing! A sprinkle of chopped fresh parsley not only adds color but also enhances the dish’s flavor. You can also add lemon wedges on the side for a zesty kick. A squeeze of fresh lemon juice right before eating can brighten the flavors even more.

With these serving suggestions, your Honey Garlic Butter Salmon Bites will shine on the table. Whether you choose rice, vegetables, or a salad, each option will create a delightful dining experience. Enjoy your meal and the compliments that are sure to follow!

Tips for Perfect Honey Garlic Butter Salmon Bites

Creating the perfect Honey Garlic Butter Salmon Bites is all about attention to detail. With a few simple tips, you can elevate your dish and impress your family and friends. Here are some essential tips to ensure your salmon bites turn out delicious every time!

First, always start with high-quality salmon. Fresh, wild-caught salmon is ideal for the best flavor and texture. If you can’t find fresh salmon, make sure to choose frozen salmon that has been properly thawed. This will help maintain the quality of the fish.

Next, don’t skip the drying step! After cutting your salmon into bite-sized pieces, pat them dry with a paper towel. This step is crucial for achieving a nice sear. If the salmon is too wet, it will steam instead of brown, resulting in a less appealing texture.

When it comes to cooking, use a non-stick skillet or a well-seasoned cast-iron pan. This will help prevent the salmon from sticking and ensure even cooking. Additionally, make sure the oil is hot before adding the salmon. A hot pan will create a beautiful golden crust, enhancing the overall flavor.

Another important tip is to avoid overcrowding the skillet. If you add too many salmon bites at once, they will steam rather than sear. Cook in batches if necessary, allowing each piece enough space to cook evenly. This will help you achieve that perfect golden-brown finish.

Keep an eye on the cooking time! Salmon cooks quickly, usually within 2-3 minutes per side. Overcooking can lead to dry salmon, which is not what you want. The salmon is done when it flakes easily with a fork and has an internal temperature of 145°F (63°C). Use a meat thermometer for accuracy if needed.

Don’t forget to let the salmon rest for a minute after cooking. This allows the juices to redistribute, keeping the salmon moist and flavorful. When you pour the honey garlic sauce over the salmon, do it gently to avoid breaking the pieces apart. This way, each bite remains intact and delicious.

Lastly, feel free to adjust the sweetness and seasoning of the sauce to your liking. If you prefer a sweeter glaze, add a bit more honey. For a saltier flavor, increase the soy sauce. Taste as you go to find the perfect balance that suits your palate.

By following these tips, you’ll create Honey Garlic Butter Salmon Bites that are not only tasty but also visually appealing. Enjoy the cooking process, and savor every delicious bite!

Breakdown of Time for Honey Garlic Butter Salmon Bites

Understanding the time needed to prepare and cook Honey Garlic Butter Salmon Bites is essential for planning your meal. This dish is quick and easy, making it perfect for busy weeknights or special occasions. Here’s a detailed breakdown of the time involved in making this delicious recipe.

Prep Time

The prep time for Honey Garlic Butter Salmon Bites is approximately 15 minutes. This includes gathering your ingredients, cutting the salmon into bite-sized pieces, and preparing the honey garlic butter sauce. Having everything ready before you start cooking will make the process smoother and more enjoyable.

Cooking Time

Once you’re prepped and ready, the cooking time is about 10 minutes. This includes sautéing the garlic, cooking the salmon bites, and combining them with the honey garlic sauce. The quick cooking time ensures that the salmon remains tender and juicy, while the sauce adds a burst of flavor.

Total Time

In total, you can expect to spend around 25 minutes from start to finish. This makes Honey Garlic Butter Salmon Bites a fantastic option for a quick yet impressive meal. With just a little bit of time, you can create a dish that is sure to delight your family and friends!

Nutritional Information for Honey Garlic Butter Salmon Bites

When it comes to enjoying a delicious meal, knowing the nutritional information can help you make informed choices. Honey Garlic Butter Salmon Bites not only taste great but also offer a variety of health benefits. Let’s take a closer look at the nutritional content of this delightful dish.

Calories

Each serving of Honey Garlic Butter Salmon Bites contains approximately 280 calories. This makes it a satisfying option without being overly heavy. The balance of flavors and nutrients ensures that you can enjoy a delicious meal while keeping your calorie intake in check.

Protein

One of the standout features of this dish is its protein content. Each serving provides about 23 grams of protein. Salmon is an excellent source of high-quality protein, which is essential for muscle repair and growth. Including protein in your meals can also help you feel fuller for longer, making it a great choice for those watching their weight.

Sodium

In terms of sodium, each serving contains around 500 milligrams. While this is a moderate amount, it’s important to be mindful of your overall sodium intake, especially if you are watching your salt consumption. You can easily adjust the sodium level by using low-sodium soy sauce or reducing the amount of added salt in the recipe.

Overall, Honey Garlic Butter Salmon Bites are a nutritious option that combines great taste with health benefits. With a good balance of calories, protein, and sodium, this dish can fit well into a healthy diet. Enjoy your meal knowing that you’re treating yourself to something both delicious and nourishing!

FAQs about Honey Garlic Butter Salmon Bites

What can I serve with Honey Garlic Butter Salmon Bites?

When it comes to serving Honey Garlic Butter Salmon Bites, there are plenty of delicious options! You can serve them over a bed of fluffy rice, which absorbs the tasty sauce beautifully. Brown rice or jasmine rice are great choices. Alternatively, pair the salmon bites with steamed vegetables like broccoli, asparagus, or green beans for a healthy side. If you prefer something lighter, a fresh salad with mixed greens, cherry tomatoes, and cucumber works wonderfully. You can even create lettuce wraps for a fun twist! Each of these options complements the sweet and savory flavors of the salmon, making for a delightful meal.

Can I use frozen salmon for Honey Garlic Butter Salmon Bites?

Yes, you can absolutely use frozen salmon for Honey Garlic Butter Salmon Bites! Just make sure to thaw the salmon completely before cooking. Thawing helps the salmon cook evenly and prevents it from becoming rubbery. You can thaw it overnight in the refrigerator or use the quick-thaw method by placing it in a sealed bag and submerging it in cold water for about 30 minutes. Once thawed, follow the recipe as usual, and you’ll still enjoy delicious salmon bites!

How do I store leftover Honey Garlic Butter Salmon Bites?

If you have any leftover Honey Garlic Butter Salmon Bites, storing them properly is key to maintaining their flavor and texture. Allow the salmon bites to cool completely before transferring them to an airtight container. You can store them in the refrigerator for up to 2-3 days. If you want to keep them longer, consider freezing them. Place the salmon bites in a freezer-safe container or bag, and they can last for up to 2 months. Just remember to label the container with the date for easy reference!

What is the best way to reheat Honey Garlic Butter Salmon Bites?

Reheating Honey Garlic Butter Salmon Bites can be done in a few ways, but the best method is to use the oven. Preheat your oven to 350°F (175°C) and place the salmon bites on a baking sheet. Cover them with aluminum foil to prevent drying out, and heat for about 10-15 minutes until warmed through. You can also reheat them in a skillet over low heat, adding a splash of water or extra honey garlic sauce to keep them moist. Avoid using the microwave, as it can make the salmon rubbery. With these methods, your leftovers will taste just as good as when they were freshly made!

Conclusion on Honey Garlic Butter Salmon Bites

In conclusion, Honey Garlic Butter Salmon Bites are a delightful dish that combines simplicity with rich flavors. This recipe is not only easy to prepare but also offers a wonderful balance of sweet and savory notes that will please any palate. Whether you are cooking for a special occasion or a casual weeknight dinner, these salmon bites are sure to impress.

With their quick cooking time and minimal ingredients, you can whip up this dish in no time. The nutritional benefits of salmon, paired with the delicious honey garlic butter sauce, make it a meal you can feel good about serving to your family and friends. Plus, the versatility of this recipe allows you to experiment with different flavors and cooking methods, ensuring that you can enjoy it in various ways.

As you explore the world of Honey Garlic Butter Salmon Bites, remember to have fun in the kitchen! Don’t hesitate to try out the variations and serving suggestions we discussed. Each time you make this dish, you can create a new experience that keeps everyone coming back for more.

So, gather your ingredients, follow the steps, and enjoy the delightful taste of Honey Garlic Butter Salmon Bites. Your taste buds will thank you, and your loved ones will be asking for seconds. Happy cooking!

Fluffy Oat Flour Pancakes Recipe for a Healthy Breakfast

Introduction to Fluffy Oat Flour Pancakes Recipe

Are you ready to elevate your breakfast game? Fluffy oat flour pancakes are not just delicious; they are also a healthier alternative to traditional pancakes. Made with oat flour, these pancakes are gluten-free and packed with nutrients. They offer a delightful texture and a subtle nutty flavor that will make your mornings brighter.

Fluffy Oat Flour Pancakes Recipe is incredibly easy to follow. Whether you’re a seasoned chef or a beginner in the kitchen, you’ll find joy in whipping up these fluffy delights. Plus, they can be customized to suit your taste, making them perfect for everyone in the family.

What Makes Fluffy Oat Flour Pancakes Special?

Fluffy oat flour pancakes stand out for several reasons. First, oat flour is a fantastic source of fiber, which helps keep you full longer. This means you can power through your morning without feeling hungry. Additionally, oat flour is rich in vitamins and minerals, making these pancakes a nutritious choice.

Another special aspect is their light and airy texture. When cooked properly, these pancakes rise beautifully, creating a fluffy bite that melts in your mouth. The combination of baking powder and the right mixing technique ensures that each pancake is perfectly fluffy.

Lastly, the versatility of this recipe is unmatched. You can easily add fruits, nuts, or even chocolate chips to the batter. This allows you to create a unique breakfast experience every time you make them. So, let’s dive into the ingredients and get started on this delightful journey of making fluffy oat flour pancakes!

Ingredients for Fluffy Oat Flour Pancakes Recipe

To create the perfect fluffy oat flour pancakes, you’ll need a few simple ingredients. Each component plays a vital role in achieving that delightful texture and flavor. Here’s what you’ll need:

  • 1 cup oat flour: This is the star of the show! Oat flour gives the pancakes their unique taste and fluffy texture.
  • 1 tablespoon baking powder: This ingredient helps the pancakes rise, making them light and airy.
  • 1 tablespoon sugar: A touch of sweetness enhances the flavor of the pancakes.
  • 1/4 teaspoon salt: Salt balances the sweetness and brings out the flavors.
  • 1 cup milk: You can use dairy or non-dairy milk, depending on your preference.
  • 1 large egg: The egg adds richness and helps bind the ingredients together.
  • 2 tablespoons melted butter or coconut oil: This adds moisture and flavor to the pancakes.
  • 1 teaspoon vanilla extract: A splash of vanilla adds a lovely aroma and taste.

Fluffy Oat Flour Pancakes Recipe is that it can be tailored to fit your lifestyle while still delivering delicious results.

Now that you have your ingredients ready, let’s move on to the next step: preparing your fluffy oat flour pancakes!

Step-by-Step Preparation of Fluffy Oat Flour Pancakes Recipe

Now that you have your ingredients ready, it’s time to dive into the fun part: preparing your fluffy oat flour pancakes! Follow these simple steps to create a delicious breakfast that everyone will love.

Step 1: Gather Your Ingredients

Before you start cooking, make sure you have all your ingredients on hand. This will make the process smoother and more enjoyable. Gather your oat flour, baking powder, sugar, salt, milk, egg, melted butter or coconut oil, and vanilla extract. Having everything ready will help you stay organized and focused.

Step 2: Prepare the Oat Flour

If you don’t have oat flour, you can easily make your own! Simply blend rolled oats in a blender or food processor until they reach a fine powder consistency. This homemade oat flour is fresh and perfect for your pancakes. If you already have store-bought oat flour, you can skip this step and move on to mixing the dry ingredients.

Step 3: Mix Dry Ingredients

In a large mixing bowl, combine the oat flour, baking powder, sugar, and salt. Use a whisk to mix them well. This step is crucial because it ensures that the baking powder is evenly distributed throughout the flour. A well-mixed dry mixture will help your pancakes rise beautifully, giving them that fluffy texture we all love.

Step 4: Combine Wet Ingredients

In a separate bowl, mix the milk, egg, melted butter or coconut oil, and vanilla extract. Whisk these ingredients together until they are smooth and well combined. This mixture adds moisture and flavor to your pancakes, making them rich and delicious. Make sure the melted butter or coconut oil is not too hot, as it can cook the egg if added directly.

Step 5: Mix Wet and Dry Ingredients

Now, it’s time to combine the wet and dry ingredients. Pour the wet mixture into the bowl with the dry ingredients. Gently stir the two mixtures together until just combined. Be careful not to overmix; a few lumps are perfectly fine. Overmixing can lead to dense pancakes, and we want them to be light and fluffy!

Step 6: Cook the Pancakes

Heat a non-stick skillet or griddle over medium heat. Lightly grease it with a little butter or oil to prevent sticking. Once the skillet is hot, pour 1/4 cup of batter onto the skillet for each pancake. Cook for 2-3 minutes or until bubbles form on the surface and the edges look set. Then, flip the pancakes and cook for an additional 1-2 minutes until they are golden brown and cooked through. Remove them from the skillet and keep warm while you repeat with the remaining batter.

And there you have it! Your fluffy oat flour pancakes are ready to be enjoyed. Let’s explore some delicious variations and serving suggestions next!

Variations of Fluffy Oat Flour Pancakes Recipe

Fluffy Oat Flour Pancakes Recipe is its versatility. You can easily customize these pancakes to suit your taste preferences or dietary needs. Let’s explore some delightful variations that will take your pancake experience to the next level!

Adding Fruits and Nuts

Fruits and nuts can add a burst of flavor and texture to your pancakes. Here are some tasty options:

  • Blueberries: Fold in 1/2 cup of fresh or frozen blueberries into the batter. They’ll create juicy pockets of sweetness in every bite.
  • Bananas: Mash one ripe banana and mix it into the batter for a natural sweetness and a hint of banana flavor.
  • Chopped Nuts: Add 1/4 cup of chopped walnuts or pecans for a crunchy texture. They also provide healthy fats and protein.
  • Chocolate Chips: For a sweet treat, mix in 1/2 cup of chocolate chips. This is a favorite among kids and adults alike!

Feel free to experiment with different combinations of fruits and nuts. The possibilities are endless, and you can create a new pancake masterpiece each time!

Vegan and Gluten-Free Options

If you follow a vegan or gluten-free diet, you can still enjoy these fluffy pancakes. Here’s how to make them suitable for your needs:

  • Vegan Pancakes: Substitute the egg with 1/4 cup of unsweetened applesauce. This will help bind the ingredients together while keeping the pancakes moist.
  • Plant-Based Milk: Use almond milk, soy milk, or any other non-dairy milk instead of regular milk. This keeps the recipe vegan-friendly.
  • Gluten-Free Pancakes: Ensure that your oat flour is certified gluten-free. This is important for those with gluten sensitivities or celiac disease.

These adjustments will allow everyone to enjoy the fluffy oat flour pancakes, regardless of dietary restrictions. Now that you know how to customize your pancakes, let’s move on to some cooking notes to ensure perfect results every time!

Cooking Note for Fluffy Oat Flour Pancakes Recipe

Cooking fluffy oat flour pancakes is a delightful experience, but a few tips can help you achieve the best results. Here are some essential cooking notes to keep in mind:

First, make sure your skillet or griddle is preheated properly. A medium heat setting is ideal. If the heat is too low, the pancakes may turn out dense and undercooked. Conversely, if the heat is too high, the outside may burn while the inside remains raw. A good test is to sprinkle a few drops of water on the skillet; if they sizzle and evaporate quickly, it’s ready for cooking.

Next, use a non-stick skillet or griddle to prevent the pancakes from sticking. If you don’t have a non-stick surface, be sure to grease the pan lightly with butter or oil. This will help create a golden-brown crust on your pancakes.

When pouring the batter, use a measuring cup or ladle for consistent pancake sizes. This ensures even cooking and makes it easier to stack them later. Remember to leave some space between each pancake, as they will spread slightly while cooking.

Keep an eye on the cooking time. The first side usually takes a bit longer, around 2-3 minutes, while the second side cooks faster, about 1-2 minutes. Look for bubbles forming on the surface and edges that appear set before flipping. This is a sign that they are ready to be turned.

Lastly, if you’re making a large batch, keep the cooked pancakes warm in an oven set to a low temperature (around 200°F or 93°C). This way, everyone can enjoy warm pancakes together without any getting cold.

By following these cooking notes, you’ll ensure that your fluffy oat flour pancakes turn out perfectly every time. Now, let’s explore some serving suggestions to make your breakfast even more delightful!

Serving Suggestions for Fluffy Oat Flour Pancakes Recipe

Now that your fluffy oat flour pancakes are cooked to perfection, it’s time to think about how to serve them. The right toppings can elevate your pancakes from delicious to extraordinary. Here are some delightful serving suggestions that will make your breakfast even more enjoyable!

Toppings to Enhance Your Pancakes

When it comes to toppings, the options are endless! Here are some popular choices that pair wonderfully with fluffy oat flour pancakes:

  • Maple Syrup: A classic choice! Drizzle warm maple syrup over your pancakes for a sweet and rich flavor. It complements the nutty taste of oat flour beautifully.
  • Fresh Fruits: Top your pancakes with a mix of fresh fruits like strawberries, raspberries, or sliced bananas. They add a refreshing touch and a burst of color to your plate.
  • Yogurt: A dollop of Greek yogurt or dairy-free yogurt adds creaminess and a tangy flavor. It’s also a great source of protein!
  • Nuts and Seeds: Sprinkle some chopped nuts, like almonds or walnuts, for added crunch. Chia seeds or flaxseeds can also provide a nutritious boost.
  • Nut Butter: Spread almond butter, peanut butter, or sunflower seed butter on top for a rich and satisfying taste. This adds healthy fats and protein to your meal.
  • Chocolate Sauce: For a special treat, drizzle some chocolate sauce over your pancakes. This is especially popular with kids and makes breakfast feel like dessert!
  • Coconut Whipped Cream: For a light and fluffy topping, try coconut whipped cream. It’s dairy-free and adds a tropical twist to your pancakes.

Feel free to mix and match these toppings to create your perfect pancake stack. You can even create a pancake bar for family or friends, allowing everyone to customize their own plates. This makes breakfast fun and interactive!

With these serving suggestions, your fluffy oat flour pancakes will not only taste amazing but also look beautiful on the plate. Now that you have the perfect toppings in mind, let’s move on to some helpful tips for making your pancakes even better!

Tips for Perfect Fluffy Oat Flour Pancakes Recipe

Creating the perfect fluffy oat flour pancakes is an art, and a few simple tips can make a big difference. Whether you’re a novice or a pancake pro, these tips will help you achieve pancake perfection every time!

First, always use fresh ingredients. Check the expiration dates on your baking powder and flour. Fresh baking powder is crucial for achieving that fluffy rise. If your baking powder is old, your pancakes may turn out flat and dense.

Next, measure your oat flour correctly. Spoon the flour into your measuring cup and level it off with a knife. Avoid scooping directly from the bag, as this can pack the flour and lead to using too much. Accurate measurements are key to getting the right texture.

Another important tip is to let your batter rest for about 5-10 minutes before cooking. This allows the oat flour to absorb the liquid fully, resulting in a thicker batter that yields fluffier pancakes. During this time, the baking powder will also activate, giving your pancakes an extra lift.

When cooking, keep an eye on the heat. If your skillet is too hot, the pancakes may burn on the outside while remaining raw inside. A medium heat setting is usually best. You can test the heat by sprinkling a few drops of water on the skillet; if they sizzle, it’s ready!

Don’t forget to flip your pancakes at the right time. Wait until you see bubbles forming on the surface and the edges looking set. This indicates that the first side is cooked and ready to be flipped. If you flip too early, the pancakes may fall apart.

Lastly, serve your pancakes immediately for the best taste and texture. If you need to keep them warm, place them in a preheated oven at a low temperature. This way, they’ll stay fluffy and delicious until you’re ready to enjoy them.

By following these tips, you’ll be well on your way to mastering the art of fluffy oat flour pancakes. Now that you have the secrets to success, let’s break down the time needed to make this delightful breakfast!

Breakdown of Time for Fluffy Oat Flour Pancakes Recipe

Fluffy Oat Flour Pancakes Recipe can help you plan your breakfast better. Here’s a simple breakdown of the time you’ll need for preparation and cooking.

Prep Time

The prep time for making fluffy oat flour pancakes is quite short. You’ll need about 10 minutes to gather your ingredients and mix them together. This includes:

  • Measuring out the ingredients
  • Mixing the dry and wet ingredients
  • Letting the batter rest for a few minutes

So, in total, expect to spend around 10 minutes on prep work.

Cooking Time

Cooking the pancakes is where the magic happens! This step usually takes about 15 minutes. Here’s how it breaks down:

  • Cooking the first batch of pancakes: 5-7 minutes
  • Cooking the second batch: 5-7 minutes

Depending on your skillet size and how many pancakes you make at once, cooking time may vary slightly. However, you can generally expect to spend around 15 minutes cooking.

Total Time

When you combine both prep and cooking times, the total time to make fluffy oat flour pancakes is approximately 25 minutes. This makes it a quick and easy breakfast option for busy mornings!

With just 25 minutes, you can whip up a delicious stack of fluffy oat flour pancakes that everyone will love. Now that you know the timing, let’s take a look at the nutritional information to see how these pancakes fit into your diet!

Nutritional Information for Fluffy Oat Flour Pancakes Recipe

Fluffy Oat Flour Pancakes Recipe not only satisfies your taste buds but also provides valuable nutrients. Let’s break down the nutritional information for these delightful pancakes.

Calories

Each serving of fluffy oat flour pancakes contains approximately 150 calories. This makes them a relatively low-calorie option for breakfast, especially when compared to traditional pancakes. The calorie count allows you to enjoy a hearty meal without feeling guilty. You can also customize your toppings to keep the calorie count in check while still enjoying a delicious breakfast.

Protein

In each serving, you’ll find about 5 grams of protein. While this may not seem like a lot, it contributes to your daily protein intake, especially when paired with toppings like yogurt or nut butter. Protein is essential for muscle repair and growth, making these pancakes a great start to your day, especially if you have an active lifestyle.

Sodium

The sodium content in a serving of fluffy oat flour pancakes is around 200 milligrams. This is a moderate amount, which is important to consider if you are watching your sodium intake. The salt in the recipe helps enhance the flavors without adding excessive sodium. You can always adjust the salt to suit your dietary needs, ensuring that your pancakes remain delicious while being mindful of your health.

Fluffy Oat Flour Pancakes Recipe offers a nutritious breakfast option that is both satisfying and healthy. With a good balance of calories, protein, and sodium, these pancakes can fit well into a balanced diet. Now that you have a clear understanding of the nutritional benefits, let’s move on to some frequently asked questions about this delightful recipe!

FAQs about Fluffy Oat Flour Pancakes Recipe

Can I use regular flour instead of oat flour?

Yes, you can use regular all-purpose flour instead of oat flour in this recipe. However, keep in mind that the texture and flavor will differ. Oat flour gives a unique nutty taste and a fluffy texture that regular flour may not replicate. If you choose to use all-purpose flour, you may need to adjust the liquid slightly, as oat flour absorbs more moisture. Experimenting with different flours can lead to delicious results!

How do I store leftover pancakes?

Storing leftover pancakes is easy! Allow them to cool completely, then stack them with parchment paper in between each pancake to prevent sticking. Place the stack in an airtight container or a resealable plastic bag. You can store them in the refrigerator for up to 3 days. When you’re ready to enjoy them again, simply reheat in the microwave or on a skillet until warmed through.

Can I freeze Fluffy Oat Flour Pancakes?

Absolutely! Freezing fluffy oat flour pancakes is a great way to have a quick breakfast option on hand. To freeze, follow the same steps as storing leftovers: let them cool completely, then stack with parchment paper in between. Place the stack in a freezer-safe bag or container. They can be frozen for up to 2 months. When you’re ready to eat, just pop them in the toaster or microwave for a quick and easy meal!

What can I substitute for eggs in this recipe?

Fluffy Oat Flour Pancakes Recipe and keep them deliciously fluffy!

Conclusion on Fluffy Oat Flour Pancakes Recipe

Fluffy Oat Flour Pancakes Recipe is a delightful way to start your day. These pancakes are not only easy to make but also offer a healthier alternative to traditional pancakes. With their light and airy texture, they are sure to please everyone at the breakfast table.

By using oat flour, you’re adding a nutritious twist that provides fiber and essential nutrients. Plus, the versatility of this recipe allows you to customize your pancakes with fruits, nuts, or even chocolate chips, making each batch unique and exciting.

Whether you’re enjoying them on a lazy Sunday morning or whipping them up for a busy weekday breakfast, these pancakes are a fantastic choice. They are quick to prepare, delicious, and can be made to fit various dietary needs, including vegan and gluten-free options.

So, gather your ingredients, follow the simple steps, and treat yourself and your loved ones to a stack of fluffy oat flour pancakes. With the tips and variations provided, you can create a breakfast experience that is both satisfying and enjoyable. Happy cooking!

Fluffy Soufflé Pancakes Recipe for a Perfect Breakfast!

Introduction to Fluffy Soufflé Pancakes Recipe

Are you ready to elevate your breakfast game? Fluffy soufflé pancakes are a delightful twist on traditional pancakes. They are light, airy, and oh-so-delicious! These pancakes are not just a treat for your taste buds; they also look stunning on your plate. Imagine fluffy clouds of pancake goodness, ready to be topped with your favorite syrup or fruit. Sounds tempting, right?

What Makes Fluffy Soufflé Pancakes Unique?

What sets fluffy soufflé pancakes apart from regular pancakes? The secret lies in the whipped egg whites. When you beat the egg whites until they form stiff peaks, you introduce air into the batter. This air is what makes the pancakes rise and become incredibly fluffy. Unlike traditional pancakes, which can be dense, these soufflé pancakes are light and airy, giving you a melt-in-your-mouth experience.

Another unique aspect is the cooking method. Fluffy soufflé pancakes are cooked slowly over low heat. This allows them to rise beautifully without burning. The result? A golden-brown exterior with a soft, pillowy interior. Plus, you can customize them with various flavors and toppings, making each batch a new adventure!

In this article, we will guide you through the ingredients, preparation steps, and tips to make the perfect fluffy soufflé pancakes. Whether you’re cooking for yourself or impressing guests, this recipe is sure to be a hit. So, let’s get started on this delicious journey!

Ingredients for Fluffy Soufflé Pancakes Recipe

To create the perfect fluffy soufflé pancakes, you need a few simple ingredients. Each one plays a vital role in achieving that light and airy texture. Here’s what you’ll need:

  • 1 cup all-purpose flour: This is the base of your pancakes. It provides structure and helps them rise.
  • 2 tablespoons granulated sugar: Sugar adds sweetness and helps create a golden crust.
  • 1 teaspoon baking powder: This leavening agent is essential for fluffiness. It helps the pancakes rise as they cook.
  • 1/4 teaspoon salt: A pinch of salt enhances the flavors and balances the sweetness.
  • 3 large eggs, separated: The egg yolks add richness, while the whipped egg whites provide the fluffiness.
  • 1/2 cup milk: Milk adds moisture to the batter, making it smooth and creamy.
  • 1 teaspoon vanilla extract: This adds a lovely flavor that complements the pancakes perfectly.
  • 1 tablespoon unsalted butter, melted: Butter adds richness and helps with browning.
  • Powdered sugar, for serving: A light dusting of powdered sugar makes the pancakes look beautiful and adds a touch of sweetness.
  • Maple syrup or fruit, for serving: These toppings are perfect for drizzling or adding freshness to your pancakes.

Gathering these ingredients is the first step toward making your fluffy soufflé pancakes. Each component contributes to the overall flavor and texture, ensuring a delightful breakfast experience. Now that you have everything ready, let’s move on to the preparation steps!

Step-by-Step Preparation of Fluffy Soufflé Pancakes Recipe

Now that you have all your ingredients ready, it’s time to dive into the preparation of your fluffy soufflé pancakes. Follow these steps carefully to ensure your pancakes turn out light and fluffy. Let’s get started!

Step 1: Preparing the Batter

First, grab a mixing bowl and whisk together the dry ingredients. Combine 1 cup of all-purpose flour, 2 tablespoons of granulated sugar, 1 teaspoon of baking powder, and 1/4 teaspoon of salt. Whisk them until they are well mixed. This step is crucial as it ensures that the baking powder is evenly distributed, which helps the pancakes rise.

Next, in another bowl, beat the 3 large egg yolks. Then, add 1/2 cup of milk, 1 teaspoon of vanilla extract, and 1 tablespoon of melted unsalted butter. Mix these wet ingredients until they are smooth and creamy. Once combined, gradually add the dry mixture to the wet ingredients. Stir gently until just combined. Remember, it’s okay if there are a few lumps; overmixing can lead to dense pancakes.

Step 2: Whipping the Egg Whites

Now, it’s time to whip the egg whites! In a separate clean bowl, beat the 3 large egg whites using an electric mixer or a whisk. Beat them until stiff peaks form. This means that when you lift the whisk, the egg whites should hold their shape and not fall back into the bowl. This step is essential for achieving that fluffy texture in your pancakes.

Be patient while whipping the egg whites. It may take a few minutes, but the result will be worth it. Once you have stiff peaks, set the bowl aside for the next step.

Step 3: Folding Ingredients Together

Now comes the fun part! Gently fold the whipped egg whites into the batter. Use a spatula and carefully lift the egg whites from the bottom of the bowl, folding them into the batter. Be gentle to avoid deflating the air you just whipped into the egg whites. This folding technique is what gives your pancakes that signature soufflé texture.

Continue folding until the egg whites are just incorporated. It’s okay if you see some streaks of white; you don’t want to overmix. The batter should be light and airy, ready for cooking!

Step 4: Cooking the Pancakes

Now that your batter is ready, it’s time to cook! Preheat a non-stick skillet or griddle over low heat. Lightly grease it with a little butter to prevent sticking. Using a 1/4 cup measuring cup, scoop the batter onto the skillet. Cook for about 4-5 minutes until the bottom is golden brown and bubbles form on the surface.

When you see bubbles, it’s time to flip! Carefully turn the pancakes over and cook for another 4-5 minutes. You may want to cover the skillet with a lid to help them rise even more. This will create a warm environment, allowing the pancakes to puff up beautifully.

Once they are golden brown and cooked through, remove them from the skillet. Serve them warm, and get ready to enjoy a delightful breakfast!

Variation of Fluffy Soufflé Pancakes Recipe

Fluffy soufflé pancakes are delicious on their own, but why not take them to the next level? With a few simple tweaks, you can create exciting flavor variations and add-ins. Let’s explore some fun ideas to make your pancakes even more delightful!

Flavor Variations to Try

Adding different flavors to your fluffy soufflé pancakes can make breakfast even more exciting. Here are some tasty variations to consider:

  • Lemon Zest: For a refreshing twist, add the zest of one lemon to the batter. This will give your pancakes a bright, citrusy flavor that pairs wonderfully with syrup.
  • Chocolate Chip: If you’re a chocolate lover, fold in some chocolate chips into the batter before cooking. The melted chocolate will create a rich and indulgent treat.
  • Blueberry Bliss: Toss in fresh or frozen blueberries for a fruity burst. The blueberries will soften as they cook, adding a sweet and juicy surprise in every bite.
  • Cinnamon Spice: Add a teaspoon of ground cinnamon to the dry ingredients for a warm, cozy flavor. This is perfect for chilly mornings!
  • Matcha Magic: For a unique twist, mix in a teaspoon of matcha powder. This will not only add a lovely green color but also a subtle earthy flavor.

Feel free to mix and match these flavors to create your own signature soufflé pancakes. The possibilities are endless!

Toppings and Add-ins for Fluffy Soufflé Pancakes

Once your fluffy soufflé pancakes are cooked, it’s time to think about toppings! Here are some delicious ideas to enhance your pancake experience:

  • Fresh Fruit: Top your pancakes with sliced strawberries, bananas, or a medley of berries. Fresh fruit adds color and natural sweetness.
  • Whipped Cream: A dollop of whipped cream can make your pancakes feel extra special. It’s light and fluffy, just like the pancakes!
  • Maple Syrup: Drizzle warm maple syrup over your pancakes for a classic touch. The sweetness complements the fluffy texture perfectly.
  • Nuts: Sprinkle chopped nuts, like walnuts or pecans, for a crunchy contrast. They add a nice texture and nutty flavor.
  • Chocolate Sauce: For a decadent treat, drizzle chocolate sauce over the top. This is especially great for special occasions or when you want to indulge.

Experimenting with different toppings and add-ins can turn your fluffy soufflé pancakes into a unique masterpiece every time. Enjoy the creativity and deliciousness!

Cooking Note for Fluffy Soufflé Pancakes Recipe

Cooking fluffy soufflé pancakes requires a bit of patience and attention to detail. The key to achieving that perfect rise and fluffy texture lies in the cooking temperature and technique. Here are some important notes to keep in mind while cooking your pancakes:

First, always use low heat. Cooking the pancakes on low heat allows them to rise slowly and evenly. If the heat is too high, the outside may brown too quickly while the inside remains undercooked. This can lead to a disappointing pancake experience. So, take your time and let them cook gently.

Next, don’t rush the flipping process. Wait until you see bubbles forming on the surface of the pancakes before flipping them. This is a sign that they are ready to be turned. If you flip them too early, they may not hold their shape and could deflate.

Additionally, consider covering the skillet with a lid while cooking. This helps trap heat and steam, encouraging the pancakes to rise even more. The steam creates a warm environment that contributes to their fluffy texture. Just be sure to check on them occasionally to avoid overcooking.

Lastly, remember that practice makes perfect! Your first batch may not be flawless, but don’t get discouraged. Each attempt will help you learn the best techniques for your stove and skillet. With a little practice, you’ll be flipping perfect fluffy soufflé pancakes in no time!

Serving Suggestions for Fluffy Soufflé Pancakes Recipe

Once your fluffy soufflé pancakes are cooked to perfection, it’s time to serve them up! Presentation can elevate your breakfast experience, making it even more enjoyable. Here are some delightful serving suggestions to consider:

  • Stack Them High: Create a beautiful stack of pancakes on a plate. Layer them with your favorite toppings in between each pancake. This not only looks appealing but also allows for a delightful mix of flavors in every bite.
  • Garnish with Fresh Herbs: For a unique twist, add a sprig of mint or basil on top of your pancakes. This adds a pop of color and a refreshing flavor that complements the sweetness.
  • Serve with a Side: Pair your pancakes with a side of crispy bacon or sausage. The savory flavors balance the sweetness of the pancakes, creating a well-rounded meal.
  • Drizzle with Sauce: Consider drizzling your pancakes with a homemade fruit sauce or compote. Simply cook down your favorite fruits with a bit of sugar and lemon juice for a delicious topping.
  • Make it a Breakfast Bowl: For a fun twist, crumble the pancakes into a bowl and top with yogurt, granola, and fresh fruit. This creates a delightful breakfast bowl that’s both filling and nutritious.

Don’t forget to serve your fluffy soufflé pancakes warm! The warmth enhances the flavors and makes them even more enjoyable. With these serving suggestions, you can turn a simple breakfast into a delightful feast that everyone will love. Enjoy your delicious creation!

Tips for Perfect Fluffy Soufflé Pancakes Recipe

Making fluffy soufflé pancakes is an art, and with a few helpful tips, you can master this delicious recipe. Here are some essential tips to ensure your pancakes turn out perfectly every time:

  • Use Room Temperature Ingredients: For the best results, make sure your eggs and milk are at room temperature. This helps the batter mix more smoothly and contributes to a fluffier texture.
  • Don’t Overmix: When combining the wet and dry ingredients, mix just until combined. Overmixing can lead to dense pancakes. A few lumps are perfectly fine!
  • Whip Egg Whites Properly: Ensure your mixing bowl and whisk are clean and dry when whipping egg whites. Any grease can prevent them from reaching stiff peaks. Take your time and whip until they hold their shape.
  • Control the Heat: Cooking on low heat is crucial. It allows the pancakes to rise without burning. If you notice they are browning too quickly, lower the heat even more.
  • Use a Lid: Covering the skillet while cooking helps trap steam, which encourages the pancakes to rise. This simple step can make a big difference in fluffiness.
  • Experiment with Add-ins: Don’t hesitate to try different flavors and toppings. Adding ingredients like chocolate chips or fruit can elevate your pancakes to a whole new level.
  • Keep Them Warm: If you’re making multiple pancakes, keep them warm in a low oven (around 200°F) while you finish cooking the rest. This ensures they stay fluffy and delicious until serving.
  • Practice Makes Perfect: Don’t be discouraged if your first batch isn’t perfect. Each attempt will help you learn the best techniques for your kitchen. Enjoy the process!

By following these tips, you’ll be well on your way to creating the most delightful fluffy soufflé pancakes. Each bite will be a testament to your culinary skills, and your family or guests will surely be impressed!

Breakdown of Time for Fluffy Soufflé Pancakes Recipe

Prep Time

Getting everything ready for your fluffy soufflé pancakes is a breeze! The prep time usually takes about 15 minutes. This includes gathering your ingredients, measuring them out, and mixing the batter. Make sure to separate the egg yolks and whites carefully, as this step is crucial for achieving that fluffy texture. With a little organization, you’ll have your batter ready in no time!

Cooking Time

Cooking the pancakes is where the magic happens! The cooking time for fluffy soufflé pancakes is approximately 10-12 minutes. Each pancake takes about 4-5 minutes on one side and another 4-5 minutes after flipping. Remember to keep the heat low to ensure they cook evenly and rise beautifully. Patience is key here, so take your time to achieve that perfect golden-brown color!

Total Time

In total, you can expect to spend around 25-27 minutes from start to finish. This includes both prep and cooking time. With just a little effort, you’ll have a delicious stack of fluffy soufflé pancakes ready to serve. Whether it’s a special occasion or a cozy weekend breakfast, this time investment is well worth it for such a delightful treat!

Nutritional Information for Fluffy Soufflé Pancakes Recipe

Understanding the nutritional content of your fluffy soufflé pancakes can help you enjoy them even more. Whether you’re counting calories or just curious about what’s in your food, here’s a breakdown of the key nutritional information per serving:

Calories

Each serving of fluffy soufflé pancakes contains approximately 180 calories. This makes them a delightful yet manageable treat for breakfast or brunch. The calorie count is reasonable, especially when you consider the fluffy texture and delicious taste. Enjoying these pancakes can be part of a balanced diet!

Protein

In terms of protein, each serving provides about 6 grams. The protein comes mainly from the eggs and milk used in the recipe. Protein is essential for building and repairing tissues, making these pancakes a good option to start your day with energy. Pair them with a side of yogurt or nuts for an extra protein boost!

Sodium

The sodium content in each serving is relatively low, at around 200 milligrams. This is beneficial for those watching their sodium intake. The small amount of salt used in the recipe enhances the flavors without adding excessive sodium. Enjoy your pancakes guilt-free, knowing they fit well within a healthy diet!

Overall, fluffy soufflé pancakes are not only delicious but also provide a good balance of calories, protein, and sodium. They can be a delightful addition to your breakfast table, especially when paired with fresh fruits or a drizzle of maple syrup. Enjoy every fluffy bite!

FAQs about Fluffy Soufflé Pancakes Recipe

Can I make Fluffy Soufflé Pancakes ahead of time?

Yes, you can prepare the batter ahead of time! However, it’s best to whip the egg whites just before cooking. If you mix the batter and store it in the fridge, the pancakes may not be as fluffy. The air in the whipped egg whites is what gives them that light texture. So, for the best results, whip the egg whites fresh when you’re ready to cook. This way, you’ll enjoy the full fluffiness of your soufflé pancakes!

What can I substitute for eggs in Fluffy Soufflé Pancakes?

If you need an egg substitute, there are a few options you can try. For each egg, you can use:

  • 1/4 cup unsweetened applesauce: This adds moisture and a hint of sweetness.
  • 1/4 cup yogurt: This will help bind the ingredients and add creaminess.
  • 1/4 cup silken tofu: Blend it until smooth for a great texture.
  • 1 tablespoon ground flaxseed mixed with 2.5 tablespoons water: Let it sit for a few minutes to thicken before adding it to the batter.

Keep in mind that these substitutes may slightly change the texture and flavor of your pancakes, but they can still be delicious!

How do I store leftover Fluffy Soufflé Pancakes?

If you have leftover fluffy soufflé pancakes, storing them is easy! Allow the pancakes to cool completely, then place them in an airtight container. You can keep them in the refrigerator for up to 2 days. If you want to store them for a longer period, consider freezing them. To freeze, place parchment paper between each pancake to prevent sticking, then store them in a freezer-safe bag or container. They can last up to 2 months in the freezer. When you’re ready to enjoy them, simply reheat in the microwave or toaster until warmed through!

Conclusion on Fluffy Soufflé Pancakes Recipe

In conclusion, fluffy soufflé pancakes are a delightful addition to any breakfast table. Their light and airy texture, combined with the ability to customize flavors and toppings, makes them a favorite for many. Whether you’re cooking for yourself, family, or friends, these pancakes are sure to impress.

By following the steps outlined in this article, you can create a stack of fluffy soufflé pancakes that are not only delicious but also visually stunning. Remember to take your time while cooking, as patience is key to achieving that perfect rise. With practice, you’ll master the art of making these delightful pancakes.

So, gather your ingredients, whip those egg whites, and get ready to enjoy a breakfast that feels like a special treat. Don’t forget to experiment with different flavors and toppings to make each batch unique. Whether you prefer classic maple syrup or a fruity topping, the possibilities are endless!

Now, it’s your turn to bring this fluffy soufflé pancakes recipe to life. Enjoy every fluffy bite, and share your delicious creations with loved ones. Happy cooking!

Fluffy Blueberry Pancakes are a breakfast delight!

Introduction to Fluffy Blueberry Pancakes Recipe

Fluffy Blueberry Pancakes Recipe is not just easy to follow, but it also guarantees a stack of deliciousness that everyone will love. Whether you’re cooking for family or friends, these pancakes are sure to impress!

Why You’ll Love This Fluffy Blueberry Pancakes Recipe

First and foremost, the taste is simply irresistible. The combination of sweet blueberries and fluffy pancake batter creates a perfect harmony of flavors. Each bite is a burst of juicy goodness that will make your taste buds dance with joy. Plus, they are incredibly versatile! You can enjoy them with maple syrup, whipped cream, or even a sprinkle of powdered sugar.

Another reason to love this recipe is its simplicity. With just a few ingredients, you can whip up a batch in no time. The step-by-step instructions make it easy for anyone, even beginners, to create a breakfast masterpiece. You won’t need any fancy equipment or hard-to-find ingredients. Just grab what you have in your kitchen, and you’re ready to go!

Moreover, these pancakes are perfect for any occasion. Whether it’s a lazy Sunday morning, a special holiday breakfast, or a fun brunch with friends, fluffy blueberry pancakes fit right in. They are not only delicious but also visually appealing, making them a great centerpiece for your breakfast table.

Fluffy Blueberry Pancakes Recipe a must-try.

So, gather your ingredients and get ready to create a breakfast that will leave everyone asking for seconds!

Ingredients for Fluffy Blueberry Pancakes Recipe

To make the perfect fluffy blueberry pancakes, you’ll need a few simple ingredients. Each one plays a vital role in creating that light and airy texture we all love. Here’s what you’ll need:

  • 1 cup all-purpose flour: This is the base of your pancakes. It gives them structure and helps them rise.
  • 2 tablespoons granulated sugar: A touch of sweetness enhances the flavor of the pancakes.
  • 2 teaspoons baking powder: This is the leavening agent that makes your pancakes fluffy.
  • 1/2 teaspoon baking soda: It works with the baking powder to create that perfect rise.
  • 1/4 teaspoon salt: A pinch of salt balances the sweetness and enhances the overall flavor.
  • 1 cup buttermilk: This adds moisture and a slight tang, making the pancakes tender.
  • 1 large egg: Eggs help bind the ingredients together and add richness.
  • 2 tablespoons unsalted butter, melted: This adds flavor and helps keep the pancakes moist.
  • 1 teaspoon vanilla extract: A splash of vanilla adds a lovely aroma and flavor.
  • 1 cup fresh blueberries: These juicy berries are the star of the show! You can also use frozen blueberries, just make sure to thaw them first.
  • Butter or oil for cooking: This prevents the pancakes from sticking to the skillet.

With these ingredients on hand, you’re all set to create a delicious stack of fluffy blueberry pancakes. Each component contributes to the overall taste and texture, ensuring that every bite is a delightful experience. Now, let’s move on to the next step in our pancake-making journey!

Step-by-Step Preparation of Fluffy Blueberry Pancakes Recipe

Now that you have all your ingredients ready, it’s time to dive into the fun part: making your fluffy blueberry pancakes! Follow these simple steps to create a delicious breakfast that everyone will love.

Step 1: Gather Your Ingredients

Before you start cooking, make sure you have everything you need. Gather all the ingredients listed above. Having everything in one place makes the cooking process smoother and more enjoyable. Plus, it helps you avoid any last-minute trips to the pantry!

Step 2: Mix the Dry Ingredients

In a large mixing bowl, combine the all-purpose flour, granulated sugar, baking powder, baking soda, and salt. Use a whisk to mix them well. This step is important because it ensures that the leavening agents are evenly distributed. A good mix will help your pancakes rise beautifully!

Step 3: Combine the Wet Ingredients

In another bowl, whisk together the buttermilk, large egg, melted butter, and vanilla extract. Make sure the melted butter isn’t too hot, or it might cook the egg. Mixing these wet ingredients well will create a smooth batter that’s full of flavor.

Step 4: Combine Wet and Dry Ingredients

Now, pour the wet mixture into the bowl with the dry ingredients. Gently stir them together until just combined. It’s okay if there are a few lumps; overmixing can lead to tough pancakes. Remember, we want them fluffy!

Step 5: Fold in the Blueberries

Next, it’s time to add the star of the show—blueberries! Gently fold them into the batter. Be careful not to crush the berries, as you want them to stay whole for that burst of flavor in every bite. This step adds a lovely color and sweetness to your pancakes.

Step 6: Cook the Pancakes

Heat a non-stick skillet or griddle over medium heat. Add a little butter or oil to prevent sticking. Once hot, pour about 1/4 cup of batter for each pancake onto the skillet. Cook until bubbles form on the surface, which should take about 2-3 minutes. Then, flip the pancakes and cook for another 1-2 minutes until they are golden brown. Repeat this process with the remaining batter.

Step 7: Serve and Enjoy

Once your pancakes are cooked, it’s time to serve! Stack them high on a plate and add your favorite toppings. Whether you choose maple syrup, fresh blueberries, or whipped cream, these fluffy blueberry pancakes are sure to be a hit. Enjoy your delicious creation with family and friends!

Variations of Fluffy Blueberry Pancakes Recipe

While the classic fluffy blueberry pancakes are a delight on their own, there are many fun variations you can try! These adaptations allow you to explore different flavors and cater to various dietary needs. Let’s dive into some exciting options!

Adding Different Fruits

Why stop at blueberries? You can easily switch things up by adding other fruits to your pancake batter. For instance, try diced strawberries, raspberries, or even bananas. Each fruit brings its unique flavor and sweetness. If you want a tropical twist, consider adding chopped pineapple or mango. Just remember to adjust the amount of sugar based on the sweetness of the fruit you choose. Mixing different fruits can create a colorful and delicious pancake stack that everyone will love!

Gluten-Free Options

Fluffy Blueberry Pancakes Recipe without sacrificing taste!

Vegan Fluffy Blueberry Pancakes Recipe

For those following a vegan diet, making fluffy blueberry pancakes is still possible! Replace the egg with a flaxseed meal or a chia seed mixture. To do this, mix 1 tablespoon of flaxseed meal or chia seeds with 2.5 tablespoons of water and let it sit for a few minutes until it thickens. Additionally, use plant-based milk, like almond or soy milk, instead of buttermilk. You can also substitute melted butter with coconut oil or a vegan butter alternative. These small changes will give you a delicious vegan pancake that everyone can enjoy!

With these variations, you can customize your fluffy blueberry pancakes to suit your taste and dietary preferences. So, don’t hesitate to get creative in the kitchen! Each variation offers a new way to enjoy this beloved breakfast treat.

Cooking Note for Fluffy Blueberry Pancakes Recipe

Cooking fluffy blueberry pancakes is a delightful experience, but there are a few important notes to keep in mind to ensure your pancakes turn out perfectly every time. These tips will help you achieve that light and airy texture that makes pancakes so enjoyable.

First, make sure your ingredients are at room temperature. Cold ingredients can lead to a dense batter, which affects the fluffiness of your pancakes. If you have time, take the buttermilk and egg out of the fridge about 30 minutes before you start cooking. This simple step can make a big difference!

Next, pay attention to your cooking temperature. A medium heat is ideal for cooking pancakes. If the heat is too high, the outside may cook too quickly while the inside remains raw. Conversely, if the heat is too low, your pancakes may turn out flat and chewy. A good way to test the skillet is to sprinkle a few drops of water on it. If they sizzle and evaporate quickly, you’re ready to go!

Also, avoid overmixing the batter. It’s okay if there are a few lumps; they will disappear during cooking. Overmixing can develop gluten in the flour, leading to tough pancakes instead of the desired fluffiness. Remember, gentle mixing is key!

Lastly, let the pancakes rest for a minute or two after cooking. This allows them to set and become even fluffier. If you’re making a large batch, keep the cooked pancakes warm in an oven set to low heat while you finish cooking the rest. This way, everyone can enjoy warm pancakes together!

By following these cooking notes, you’ll be well on your way to mastering the art of fluffy blueberry pancakes. Enjoy the process, and don’t forget to have fun while cooking!

Serving Suggestions for Fluffy Blueberry Pancakes Recipe

Once your fluffy blueberry pancakes are ready, it’s time to think about how to serve them. The right toppings and beverage pairings can elevate your breakfast experience. Let’s explore some delicious options that will make your pancakes even more delightful!

Toppings to Enhance Your Pancakes

Toppings can transform your fluffy blueberry pancakes into a gourmet breakfast. Here are some tasty ideas:

  • Maple Syrup: A classic choice! Drizzle warm maple syrup over your pancakes for a sweet and rich flavor.
  • Whipped Cream: Add a dollop of whipped cream for a light and airy touch. It pairs perfectly with the blueberries!
  • Fresh Berries: Top your pancakes with extra blueberries, strawberries, or raspberries for a burst of freshness.
  • Powdered Sugar: A light dusting of powdered sugar adds a touch of sweetness and makes your pancakes look beautiful.
  • Yogurt: For a creamy twist, serve your pancakes with a side of yogurt. Greek yogurt adds protein and tanginess.
  • Nuts: Sprinkle chopped nuts like walnuts or pecans for added crunch and flavor.
  • Coconut Flakes: Toasted coconut flakes can add a tropical flair to your pancakes.

Feel free to mix and match these toppings to create your perfect pancake stack. The combination of flavors and textures will make each bite a delightful experience!

Pairing with Beverages

To complete your breakfast, consider what beverages to serve alongside your fluffy blueberry pancakes. Here are some great options:

  • Freshly Squeezed Orange Juice: The bright, citrusy flavor of orange juice complements the sweetness of the pancakes.
  • Coffee: A warm cup of coffee pairs wonderfully with pancakes, providing a nice balance to the sweetness.
  • Tea: Herbal or black tea can be a soothing choice, especially if you prefer a lighter beverage.
  • Milk: A glass of cold milk is a classic pairing that kids and adults alike will enjoy.
  • Smoothies: A fruit smoothie can add a refreshing touch and boost your breakfast with extra nutrients.

Choosing the right beverage can enhance the overall breakfast experience. So, pour yourself a drink and enjoy your fluffy blueberry pancakes to the fullest!

Tips for Perfect Fluffy Blueberry Pancakes Recipe

Creating the perfect fluffy blueberry pancakes is an art, and with a few helpful tips, you can master this delicious breakfast treat. Here are some essential tips to ensure your pancakes turn out light, fluffy, and bursting with flavor every time!

First, always use fresh ingredients. Fresh baking powder and baking soda are crucial for achieving that fluffy texture. If your leavening agents are old, they may not work effectively, leading to flat pancakes. Check the expiration dates and replace them if necessary.

Next, consider the temperature of your ingredients. As mentioned earlier, using room temperature buttermilk and eggs can make a significant difference. Cold ingredients can lead to a denser batter, so let them sit out for a bit before mixing.

When mixing the batter, remember to be gentle. Overmixing can develop gluten, resulting in tough pancakes. Stir until just combined, and don’t worry about a few lumps. They will disappear during cooking, leaving you with fluffy pancakes.

Another tip is to let the batter rest for about 5-10 minutes before cooking. This allows the flour to hydrate fully and the gluten to relax, which contributes to a lighter texture. While the batter rests, you can prepare your cooking surface and toppings!

When it comes to cooking, use a non-stick skillet or griddle and preheat it properly. A medium heat is ideal. If the skillet is too hot, the pancakes may burn on the outside while remaining raw inside. If it’s too cool, they won’t rise properly. A good test is to sprinkle a few drops of water on the skillet; if they sizzle, it’s ready!

Lastly, don’t forget to keep your pancakes warm while you finish cooking the rest. Place them on a baking sheet in a low oven (around 200°F or 93°C) to keep them warm and fluffy until you’re ready to serve. This way, everyone can enjoy a stack of warm pancakes together!

By following these tips, you’ll be well on your way to making the perfect fluffy blueberry pancakes. Enjoy the process, and most importantly, have fun in the kitchen!

Breakdown of Time for Fluffy Blueberry Pancakes Recipe

Understanding the time needed for each step in making fluffy blueberry pancakes can help you plan your breakfast better. Here’s a simple breakdown of the time you’ll need for preparation and cooking.

Prep Time

Fluffy Blueberry Pancakes Recipe is approximately 10-15 minutes. This includes gathering your ingredients, measuring them out, and mixing the dry and wet components. If you take a moment to organize your kitchen, it can make the process even smoother!

Cooking Time

Once your batter is ready, the cooking time will take about 15-20 minutes. Each pancake takes around 2-3 minutes on one side and 1-2 minutes on the other. Depending on the size of your skillet, you can cook multiple pancakes at once, which can speed up the process. Just keep an eye on them to ensure they don’t burn!

Total Time

In total, you can expect to spend about 25-35 minutes from start to finish. This includes both prep and cooking time. With this quick and easy recipe, you’ll have a delicious stack of fluffy blueberry pancakes ready to serve in no time!

Nutritional Information for Fluffy Blueberry Pancakes Recipe

Understanding the nutritional content of your fluffy blueberry pancakes can help you make informed choices about your breakfast. Here’s a breakdown of the key nutritional information per serving, which is based on the recipe serving four people.

Calories

Each serving of these delightful fluffy blueberry pancakes contains approximately 220 calories. This makes them a satisfying yet light breakfast option. The calorie count can vary slightly based on the specific ingredients you use, such as the type of milk or butter. However, this number gives you a good estimate to work with!

Protein

In terms of protein, each serving provides about 5 grams. While this isn’t a high protein meal, it does contribute to your daily intake. Pairing your pancakes with a protein-rich topping, like Greek yogurt or nuts, can help boost the protein content and keep you feeling full longer.

Sodium

The sodium content in each serving is around 300 milligrams. This amount is relatively moderate, especially for a breakfast dish. If you’re watching your sodium intake, consider using unsalted butter and checking the labels on your baking powder and other ingredients to keep it in check.

Overall, these fluffy blueberry pancakes are a delicious and nutritious way to start your day. They provide a good balance of carbohydrates, protein, and fats, making them a well-rounded breakfast choice. Enjoy them as part of a balanced diet, and feel free to customize your toppings to enhance their nutritional value!

FAQs about Fluffy Blueberry Pancakes Recipe

Can I use frozen blueberries in the Fluffy Blueberry Pancakes Recipe?

Fluffy Blueberry Pancakes Recipe. Just make sure to thaw them first and gently pat them dry with a paper towel. This helps prevent excess moisture from making your batter too wet. Frozen blueberries are a great option, especially when fresh ones are out of season. They will still provide that delicious burst of flavor in every bite!

How do I make my pancakes fluffier?

To achieve fluffier pancakes, there are a few key tips to follow. First, ensure your baking powder and baking soda are fresh, as they are essential for leavening. Second, avoid overmixing the batter; mix until just combined to keep the pancakes light. Additionally, letting the batter rest for about 5-10 minutes before cooking allows the flour to hydrate and the gluten to relax, resulting in a fluffier texture. Lastly, cooking on medium heat ensures even cooking without burning, which helps maintain that fluffy quality!

Can I prepare the batter in advance for Fluffy Blueberry Pancakes Recipe?

Yes, you can prepare the batter in advance! If you want to save time in the morning, mix the dry and wet ingredients separately and store them in the fridge. Just remember to combine them right before cooking. However, it’s best to use the batter within 24 hours for optimal fluffiness. If you notice the batter has thickened, you can add a splash of milk to loosen it up before cooking.

What can I substitute for eggs in the Fluffy Blueberry Pancakes Recipe?

Fluffy Blueberry Pancakes Recipe, there are several options! You can use 1/4 cup of unsweetened applesauce, 1/4 cup of mashed banana, or a flaxseed meal mixture. To make the flaxseed mixture, combine 1 tablespoon of flaxseed meal with 2.5 tablespoons of water and let it sit for a few minutes until it thickens. These substitutes will help bind the ingredients together while keeping your pancakes delicious!

Conclusion on Fluffy Blueberry Pancakes Recipe

Fluffy Blueberry Pancakes Recipe is not only simple to follow but also allows for creativity and customization. Whether you stick to the classic version or explore various fruit additions, each pancake is sure to be a hit!

As you gather your ingredients and follow the steps, remember that the key to success lies in the details. From using fresh ingredients to avoiding overmixing, these small tips can make a big difference in achieving that perfect fluffy texture. Plus, the joy of cooking together with family or friends can turn a regular morning into a cherished memory.

So, the next time you’re looking for a delicious breakfast that’s both satisfying and easy to make, reach for this recipe. With its delightful flavors and beautiful presentation, fluffy blueberry pancakes are bound to impress everyone at your breakfast table. Enjoy every bite, and don’t forget to share your pancake creations with loved ones!

Happy cooking, and may your mornings be filled with the sweet aroma of fluffy blueberry pancakes!

Pumpkin Cheesecake Bars Recipe for a Perfect Fall Treat

Introduction to Pumpkin Cheesecake Bars Recipe

Pumpkin Cheesecake Bars Recipe. Perfect for fall gatherings, holiday celebrations, or simply a cozy night in, these bars are sure to impress your family and friends.

Imagine sinking your fork into a luscious layer of pumpkin cheesecake, resting on a buttery graham cracker crust. The blend of spices like cinnamon, nutmeg, and ginger adds a festive touch, making each bite a celebration of autumn. Not only are these bars delicious, but they are also easy to make, requiring just a few simple ingredients and steps.

Whether you’re a seasoned baker or a beginner in the kitchen, this recipe is designed for everyone. With clear instructions and helpful tips, you’ll be able to whip up these scrumptious bars in no time. Plus, they can be made ahead of time, allowing you to enjoy more time with your loved ones.

So, grab your apron and let’s dive into the world of pumpkin cheesecake bars! You’ll soon discover why this dessert is a favorite among many. Get ready to savor the flavors of fall with every delicious bite!

Ingredients for Pumpkin Cheesecake Bars Recipe

Pumpkin Cheesecake Bars Recipe, you’ll need a selection of simple yet essential ingredients. Each component plays a vital role in achieving that creamy texture and delightful flavor. Here’s what you’ll need:

  • 1 ½ cups graham cracker crumbs
  • ½ cup granulated sugar
  • ½ cup unsalted butter, melted
  • 2 (8-ounce) packages cream cheese, softened
  • 1 cup canned pumpkin puree
  • 1 cup powdered sugar
  • 2 large eggs
  • 1 teaspoon vanilla extract
  • 1 teaspoon ground cinnamon
  • ½ teaspoon ground nutmeg
  • ¼ teaspoon ground ginger
  • ¼ teaspoon salt

These ingredients come together to create a rich and flavorful dessert that captures the essence of fall. The graham cracker crumbs form a deliciously crunchy base, while the cream cheese and pumpkin puree create a smooth and creamy filling. The spices add warmth and depth, making each bite a true delight.

Before you start baking, ensure you have all these ingredients on hand. This will make the process smoother and more enjoyable. Now that you know what you need, let’s move on to the next step: preparing the crust!

Step-by-Step Preparation of Pumpkin Cheesecake Bars Recipe

Pumpkin Cheesecake Bars Recipe to life! Follow these simple steps to create a delicious dessert that everyone will love. Each step is designed to guide you through the process, ensuring your bars turn out perfectly every time.

Step 1: Preparing the Crust

First, let’s focus on the crust. This layer is essential as it provides a crunchy base for your creamy filling. In a medium bowl, combine the graham cracker crumbs, granulated sugar, and melted butter. Mix these ingredients well until they resemble wet sand. This ensures that the crust holds together nicely.

Next, press the mixture firmly into the bottom of your prepared 9×13-inch baking dish. Use the back of a measuring cup or your fingers to create an even layer. Make sure it’s packed tightly, as this will help the crust stay intact during baking. Once you’re satisfied with the crust, set it aside while you prepare the filling.

Step 2: Making the Cheesecake Filling

Now, let’s move on to the star of the show—the cheesecake filling! In a large mixing bowl, beat the softened cream cheese with an electric mixer until it’s smooth and creamy. This step is crucial, as it helps to eliminate any lumps in your filling.

Once the cream cheese is ready, add the canned pumpkin puree, powdered sugar, eggs, vanilla extract, cinnamon, nutmeg, ginger, and salt. Mix everything together until fully combined and smooth. The mixture should be thick and creamy, with a beautiful orange hue from the pumpkin. This filling is what makes your bars so delicious!

Step 3: Combining the Layers

With both the crust and filling prepared, it’s time to combine them. Pour the pumpkin cheesecake mixture over the crust in the baking dish. Use a spatula to spread it evenly across the crust. This ensures that every bite has a perfect balance of crust and filling.

Take a moment to admire your creation before moving on to the next step. The layers should look inviting and delicious already!

Step 4: Baking the Pumpkin Cheesecake Bars

Now, it’s time to bake your bars! Place the baking dish in the preheated oven at 350°F (175°C). Bake for 30-35 minutes. You’ll know they’re done when the edges are set, and the center is slightly jiggly. This slight jiggle is normal and will firm up as the bars cool.

Once baked, carefully remove the dish from the oven and let it cool at room temperature. This cooling step is important, as it allows the flavors to meld together beautifully.

Step 5: Cooling and Serving

After your bars have cooled to room temperature, it’s time to refrigerate them. Place the baking dish in the fridge for at least 2 hours. This chilling time helps the bars firm up, making them easier to cut into squares.

Pumpkin Cheesecake Bars Recipe is now ready to be enjoyed!

Variations of Pumpkin Cheesecake Bars Recipe

Pumpkin Cheesecake Bars Recipe is already a crowd-pleaser, there are many ways to customize it to fit different dietary needs and preferences. Here are two popular variations that you can try: gluten-free and vegan pumpkin cheesecake bars. Each variation maintains the delicious flavors of the original recipe while accommodating specific dietary restrictions.

Gluten-Free Pumpkin Cheesecake Bars Recipe

If you or your guests are following a gluten-free diet, you can easily adapt the crust of your pumpkin cheesecake bars. Instead of traditional graham crackers, use gluten-free graham cracker crumbs or almond flour. Here’s how to make the gluten-free version:

  • 1 ½ cups of graham cracker crumbs with 1 ½ cups of gluten-free graham cracker crumbs or almond flour.
  • Follow the same steps for mixing and pressing the crust into the baking dish.
  • Continue with the original filling recipe as it is naturally gluten-free.

This gluten-free variation will still deliver that delightful crunch and creamy filling, making it a perfect treat for everyone to enjoy!

Vegan Pumpkin Cheesecake Bars Recipe

For those who prefer a plant-based option, you can create vegan pumpkin cheesecake bars without sacrificing flavor. Here’s how to make this delicious variation:

  • 2 (8-ounce) packages of cream cheese with 16 ounces of vegan cream cheese.
  • 2 large eggs with 1/2 cup of unsweetened applesauce or 1/4 cup of ground flaxseed mixed with 3/4 cup of water (let it sit for 5 minutes to thicken).
  • Use the same ingredients for the crust, ensuring that any graham crackers used are vegan-friendly.

Pumpkin Cheesecake Bars Recipe will still be rich and creamy, allowing everyone to enjoy a slice of this delightful dessert!

Feel free to experiment with these variations to find the perfect fit for your gathering. Whether you choose the gluten-free or vegan option, your pumpkin cheesecake bars will surely be a hit!

Cooking Note for Pumpkin Cheesecake Bars Recipe

Pumpkin Cheesecake Bars Recipe, there are a few important cooking notes to keep in mind. These tips will help ensure that your bars turn out perfectly every time, with the right texture and flavor.

First, make sure your cream cheese is softened before mixing. This step is crucial for achieving a smooth and creamy filling. If your cream cheese is too cold, it can create lumps in the mixture. To soften it quickly, you can cut it into small cubes and let it sit at room temperature for about 30 minutes.

Next, be mindful of the baking time. Every oven is different, so keep an eye on your bars as they bake. The edges should be set, while the center remains slightly jiggly. If you overbake them, the bars may become dry and lose their creamy texture.

After baking, allow the bars to cool completely at room temperature before refrigerating. This cooling period helps the flavors meld together and enhances the overall taste. If you rush this step, the bars may not set properly.

Lastly, when cutting the bars, use a sharp knife for clean edges. You can dip the knife in hot water and wipe it dry between cuts for even neater slices. This little trick will make your presentation look professional and inviting!

By following these cooking notes, you’ll be well on your way to creating delicious pumpkin cheesecake bars that everyone will love. Enjoy the process and the delightful aroma that fills your kitchen as you bake!

Serving Suggestions for Pumpkin Cheesecake Bars Recipe

Pumpkin Cheesecake Bars Recipe is ready, it’s time to think about how to serve them! Presentation can elevate your dessert experience, making it even more enjoyable for you and your guests. Here are some delightful serving suggestions to consider:

  • Whipped Cream Topping: A dollop of freshly whipped cream on top of each bar adds a light and airy touch. You can sweeten the cream with a bit of powdered sugar and a dash of vanilla extract for extra flavor.
  • Cinnamon Sprinkle: Dust a light sprinkle of ground cinnamon or pumpkin pie spice over the whipped cream. This not only enhances the visual appeal but also adds a warm, aromatic flavor that complements the pumpkin.
  • Caramel Drizzle: For a decadent twist, drizzle some caramel sauce over the bars before serving. The sweet, sticky caramel pairs beautifully with the creamy pumpkin filling.
  • Chopped Nuts: Consider adding a sprinkle of chopped pecans or walnuts on top for a crunchy texture. This adds a delightful contrast to the smooth cheesecake.
  • Fruit Garnish: Fresh fruit, such as slices of apple or pear, can be served alongside the bars. Their crispness and natural sweetness provide a refreshing balance to the rich dessert.
  • Serve with Coffee or Tea: Pair your pumpkin cheesecake bars with a warm cup of coffee or spiced tea. The flavors of the drink will enhance the overall experience, making it a cozy treat.

Pumpkin Cheesecake Bars Recipe look more appealing but also enhance the flavors and textures. Feel free to mix and match these ideas to create a presentation that suits your style and occasion. Enjoy sharing this delightful dessert with family and friends!

Tips for Perfect Pumpkin Cheesecake Bars Recipe

Pumpkin Cheesecake Bars Recipe is all about attention to detail. With a few helpful tips, you can ensure that your bars turn out delicious every time. Here are some essential tips to keep in mind:

  • Use Room Temperature Ingredients: Make sure your cream cheese and eggs are at room temperature before mixing. This helps create a smooth filling without lumps. If you forget to take them out in advance, you can warm the cream cheese in the microwave for a few seconds.
  • Don’t Overmix: When combining the filling ingredients, mix just until everything is combined. Overmixing can introduce too much air, leading to cracks in your cheesecake bars as they bake.
  • Check for Doneness: Keep an eye on your bars while they bake. They should be set around the edges but still slightly jiggly in the center. This ensures a creamy texture once they cool.
  • Cool Gradually: After baking, let your bars cool in the pan at room temperature. This gradual cooling helps prevent cracks and allows the flavors to meld beautifully.
  • Chill Before Cutting: Refrigerate the bars for at least 2 hours before cutting. This helps them firm up, making it easier to achieve clean, neat squares.
  • Use a Sharp Knife: When cutting the bars, use a sharp knife for clean edges. Wipe the knife with a damp cloth between cuts to keep the edges neat and tidy.
  • Experiment with Spices: Feel free to adjust the spices in the filling to suit your taste. Adding a pinch of allspice or cloves can give your bars a unique flavor twist.
  • Store Properly: Keep any leftovers in an airtight container in the refrigerator. They can last up to a week, but they’re best enjoyed within a few days for optimal freshness.

Pumpkin Cheesecake Bars Recipe. Each bite will be a delightful experience, filled with creamy pumpkin goodness and warm spices. Happy baking!

Breakdown of Time for Pumpkin Cheesecake Bars Recipe

Pumpkin Cheesecake Bars Recipe can help you plan your baking session effectively. Here’s a detailed breakdown of the time you’ll need to prepare, cook, and chill your delicious bars.

Prep Time

20-25 minutes. This includes gathering your ingredients, preparing the crust, and mixing the cheesecake filling. Make sure to have everything ready before you start, as this will make the process smoother and more enjoyable.

Cooking Time

30-35 minutes. During this time, your bars will bake in the oven at 350°F (175°C). Keep an eye on them to ensure they are perfectly set with a slightly jiggly center.

Total Time

2 hours and 30 minutes from start to finish. This includes the prep time, cooking time, and the necessary chilling time of at least 2 hours after baking. While it may seem like a long process, the wait is well worth it for the creamy, spiced goodness of your pumpkin cheesecake bars!

By knowing the time breakdown, you can plan your baking day accordingly. Whether you’re making these bars for a special occasion or just for yourself, you’ll be ready to enjoy a delightful treat in no time!

Nutritional Information for Pumpkin Cheesecake Bars Recipe

Pumpkin Cheesecake Bars Recipe can help you enjoy this delicious dessert while keeping track of your dietary needs. Here’s a breakdown of the key nutritional components per serving, which is one square of the bars:

Calories

210 calories. This makes them a satisfying treat without being overly indulgent. The combination of cream cheese and pumpkin puree provides a rich flavor while keeping the calorie count reasonable.

Protein

3 grams. While this may not seem like a lot, it contributes to the overall nutritional value of the dessert. The cream cheese is the primary source of protein, helping to create that creamy texture we all love.

Sodium

150 milligrams. This amount is fairly moderate, making it a suitable option for most diets. However, if you are watching your sodium intake, be mindful of any additional toppings or sauces you may add.

Pumpkin Cheesecake Bars Recipe provides a delightful balance of flavors and textures while offering a reasonable nutritional profile. Enjoy these bars as a special treat, knowing they can fit into a balanced diet!

FAQs about Pumpkin Cheesecake Bars Recipe

Can I make Pumpkin Cheesecake Bars ahead of time?

Pumpkin Cheesecake Bars Recipe is that they can be made ahead of time. In fact, making them a day in advance can enhance their flavor as the ingredients have more time to meld together. Simply follow the recipe, allow the bars to cool, and then refrigerate them. When you’re ready to serve, just cut them into squares and enjoy!

How do I store leftover Pumpkin Cheesecake Bars?

Pumpkin Cheesecake Bars Recipe fresh, store them in an airtight container in the refrigerator. They can last up to a week when stored properly. If you want to keep them for a longer period, consider freezing them. Wrap each bar individually in plastic wrap and then place them in a freezer-safe container. When you’re ready to enjoy, simply thaw them in the refrigerator overnight.

Can I use fresh pumpkin instead of canned for the Pumpkin Cheesecake Bars Recipe?

Pumpkin Cheesecake Bars Recipe. Just keep in mind that fresh pumpkin may have a slightly different moisture content, so adjust the baking time if necessary.

Conclusion on Pumpkin Cheesecake Bars Recipe

Pumpkin Cheesecake Bars Recipe is a delightful treat that perfectly captures the essence of fall. With its creamy filling and crunchy graham cracker crust, this dessert is sure to become a favorite in your household. Whether you’re celebrating a special occasion or simply enjoying a cozy evening at home, these bars offer a delicious way to indulge in the flavors of the season.

By following the simple steps outlined in this recipe, you can create a dessert that not only looks impressive but also tastes incredible. The combination of pumpkin and warm spices like cinnamon and nutmeg creates a comforting flavor that is hard to resist. Plus, with the option to customize the recipe for gluten-free or vegan diets, everyone can enjoy a slice of this delightful dessert.

Remember to take your time during the preparation and baking process. Each step is designed to ensure that your pumpkin cheesecake bars turn out perfectly every time. From the crust to the filling, every detail matters in creating a delicious final product.

Pumpkin Cheesecake Bars Recipe will surely be a hit, leaving everyone asking for seconds. Enjoy the process, savor the flavors, and celebrate the joy of baking!

Stay Connected

Get recipes via email: