Get my cookbooks

Cheesy Ground Beef Pasta Casserole is a family favorite.

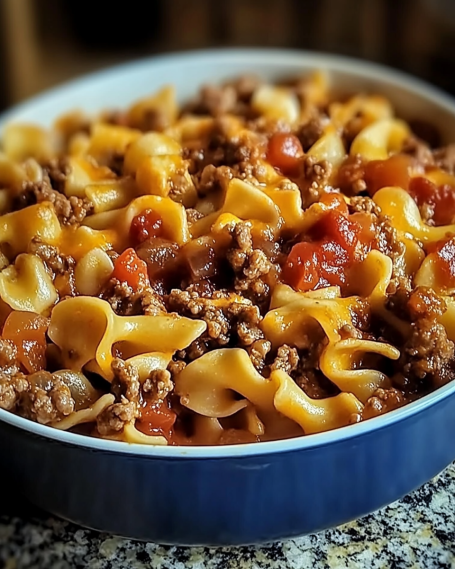
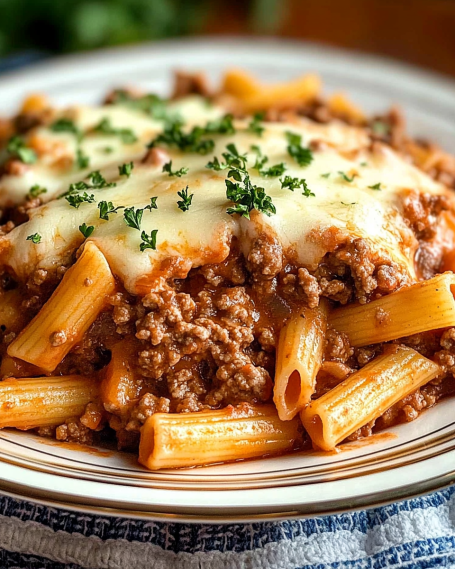
Introduction to Cheesy Ground Beef Pasta Casserole

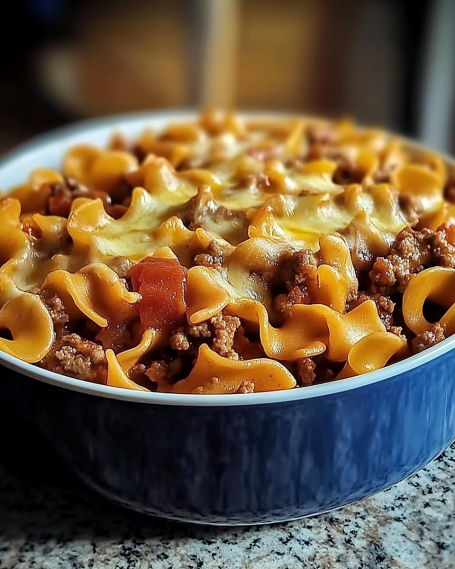
Cheesy Ground Beef Pasta Casserole is a delightful blend of flavors and textures that brings families together around the dinner table. This dish is not only delicious but also incredibly easy to prepare, making it a go-to recipe for busy weeknights or special occasions.

What Makes Cheesy Ground Beef Pasta Casserole a Family Favorite?

Cheesy Ground Beef Pasta Casserole has earned its place as a family favorite. First and foremost, it combines hearty ingredients that appeal to both kids and adults. The savory ground beef, tender pasta, and gooey cheese create a satisfying meal that everyone loves.

Moreover, this casserole is highly versatile. You can easily customize it by adding your favorite vegetables or swapping out the cheese. This flexibility allows you to cater to different tastes and dietary preferences, ensuring that everyone at the table finds something they enjoy.

Another reason for its popularity is the simplicity of preparation. With just a few steps, you can whip up a delicious meal that requires minimal effort. This makes it perfect for busy families who want to enjoy a home-cooked meal without spending hours in the kitchen.

Cheesy Ground Beef Pasta Casserole is a great way to stretch your grocery budget. It’s an affordable dish that can feed a crowd, making it ideal for gatherings or potlucks. With its comforting flavors and easy preparation, it’s no wonder this casserole has become a staple in many households.

Ingredients for Cheesy Ground Beef Pasta Casserole

Cheesy Ground Beef Pasta Casserole, you’ll need a few simple ingredients. Each component plays a vital role in delivering that rich, comforting flavor that everyone loves. Here’s what you’ll need:

  • 1 pound ground beef: This is the star of the dish, providing protein and a savory base.
  • 1 medium onion, diced: Onions add sweetness and depth to the flavor.
  • 2 cloves garlic, minced: Garlic brings a wonderful aroma and enhances the overall taste.
  • 1 (24-ounce) jar marinara sauce: This sauce adds moisture and a rich tomato flavor.
  • 2 cups uncooked elbow macaroni: The pasta absorbs the flavors and gives the casserole its hearty texture.
  • 4 cups water: This helps cook the pasta and meld the ingredients together.
  • 1 teaspoon Italian seasoning: A blend of herbs that adds a delightful Italian flair.
  • 1 teaspoon salt: Essential for enhancing the flavors of the dish.
  • 1/2 teaspoon black pepper: Adds a touch of heat and complexity.
  • 1 cup shredded mozzarella cheese: This cheese melts beautifully, creating that gooey texture we all love.
  • 1/2 cup grated Parmesan cheese: Adds a nutty flavor and a nice finishing touch.
  • Fresh parsley, chopped (for garnish, optional): A sprinkle of parsley adds color and freshness.

Cheesy Ground Beef Pasta Casserole. Each item contributes to the overall taste and texture, ensuring a satisfying meal for everyone at the table.

Step-by-Step Preparation of Cheesy Ground Beef Pasta Casserole

Cheesy Ground Beef Pasta Casserole. This step-by-step guide will help you create a delicious meal that your family will love. Let’s get started!

Step 1: Prepping the Ingredients

Before you start cooking, it’s important to prep your ingredients. Begin by dicing the onion and mincing the garlic. This will ensure that they cook evenly and blend well with the ground beef. Next, measure out your marinara sauce, elbow macaroni, and cheeses. Having everything ready will make the cooking process smoother and more enjoyable.

Step 2: Cooking the Ground Beef

In a large skillet, heat a bit of oil over medium heat. Add the ground beef, diced onion, and minced garlic. Cook until the beef is browned and no longer pink, which usually takes about 5-7 minutes. Make sure to break up the beef into small pieces as it cooks. Once done, drain any excess fat to keep your casserole from becoming greasy.

Step 3: Boiling the Pasta

Next, it’s time to add the fun part—pasta! Stir in the marinara sauce, uncooked elbow macaroni, and water into the skillet with the cooked beef. Add the Italian seasoning, salt, and black pepper. Bring the mixture to a boil, then reduce the heat to low. Cover the skillet and let it simmer for about 10 minutes. Stir occasionally to prevent sticking. The pasta should be tender and most of the liquid absorbed by the end of this step.

Step 4: Combining Ingredients

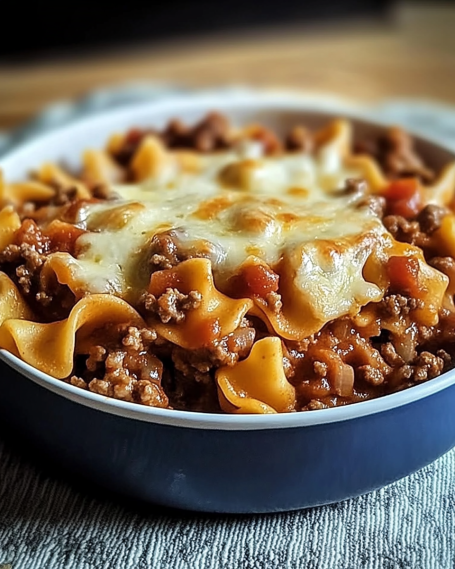
Once the pasta is cooked, remove the skillet from heat. Stir in half of the mozzarella cheese and half of the Parmesan cheese. Mix until the cheese is melted and well combined with the pasta and beef mixture. This step is crucial as it adds that creamy, cheesy goodness that makes this casserole so special.

Step 5: Baking the Casserole

Cheesy Ground Beef Pasta Casserole!

Variations of Cheesy Ground Beef Pasta Casserole

Cheesy Ground Beef Pasta Casserole is a versatile dish that can be easily adapted to suit different tastes and dietary needs. Whether you’re looking to make it vegetarian, switch up the cheese, or add more veggies, there are plenty of options to explore. Let’s dive into some delicious variations!

Vegetarian Options

Cheesy Ground Beef Pasta Casserole, simply replace the ground beef with a plant-based protein. Options like lentils, black beans, or crumbled tofu work wonderfully. You can also use a meat substitute like textured vegetable protein (TVP) or store-bought veggie crumbles. These alternatives provide a hearty texture while keeping the dish satisfying and delicious.

Additionally, consider using vegetable broth instead of water for boiling the pasta. This adds extra flavor to the dish. With these simple swaps, you can enjoy a tasty vegetarian casserole that everyone will love!

Different Cheese Choices

Cheesy Ground Beef Pasta Casserole, and you can easily mix it up to suit your preferences. While mozzarella and Parmesan are classic choices, feel free to experiment with other types of cheese. Cheddar cheese adds a sharp flavor, while Monterey Jack provides a creamy texture. For a gourmet twist, try using Gruyère or fontina cheese.

Mixing different cheeses can create a unique flavor profile. Just remember to keep the total amount of cheese similar to the original recipe to maintain that gooey, cheesy goodness!

Adding Vegetables for Extra Nutrition

Cheesy Ground Beef Pasta Casserole by adding vegetables. You can mix in 1 cup of frozen peas, chopped bell peppers, or diced zucchini before baking. These veggies not only enhance the flavor but also add color and texture to the dish.

For a heartier option, consider adding spinach or kale. Simply stir them in during the last few minutes of cooking the pasta. This way, they wilt down and blend perfectly with the other ingredients. With these additions, your casserole will be even more nutritious and satisfying!

Cooking Note for Cheesy Ground Beef Pasta Casserole

Cheesy Ground Beef Pasta Casserole, there are a few important cooking notes to keep in mind. These tips will help ensure that your casserole turns out perfectly every time, making it a delightful dish for your family and friends.

First, always use a large skillet for cooking the ground beef and other ingredients. A spacious skillet allows for even cooking and prevents overcrowding, which can lead to uneven browning. This is crucial for achieving that rich flavor in your beef.

Next, be mindful of the pasta cooking time. Since the elbow macaroni will continue to cook in the oven, it’s best to slightly undercook it during the stovetop phase. Aim for al dente pasta, which means it should still have a little bite to it. This will prevent the pasta from becoming mushy after baking.

Additionally, if you prefer a creamier casserole, consider adding a splash of heavy cream or sour cream to the mixture before baking. This will enhance the richness and create a velvety texture that everyone will love.

Cheesy Ground Beef Pasta Casserole that will impress everyone at the table!

Serving Suggestions for Cheesy Ground Beef Pasta Casserole

Cheesy Ground Beef Pasta Casserole is baked to perfection, it’s time to think about how to serve it. This dish is not only delicious on its own, but it also pairs wonderfully with various side dishes and is perfect for different occasions. Let’s explore some great serving suggestions!

Pairing with Side Dishes

Cheesy Ground Beef Pasta Casserole with some tasty side dishes. Here are a few ideas:

  • Garlic Bread: A classic choice, garlic bread complements the cheesy flavors of the casserole. The crispy texture and buttery taste make it a favorite.
  • Green Salad: A fresh green salad with a light vinaigrette adds a refreshing contrast to the richness of the casserole. You can include ingredients like cherry tomatoes, cucumbers, and bell peppers.
  • Steamed Vegetables: Steamed broccoli, green beans, or carrots provide a healthy side that balances the meal. Their vibrant colors also make the plate more appealing.
  • Coleslaw: A tangy coleslaw can add a crunchy texture and a burst of flavor. It’s a great way to incorporate more veggies into your meal.

These side dishes not only enhance the overall dining experience but also make your meal more nutritious and satisfying.

Ideal Occasions for Serving

Cheesy Ground Beef Pasta Casserole is a versatile dish that fits perfectly into various occasions. Here are some ideal times to serve it:

  • Family Dinners: This casserole is perfect for a cozy family dinner. It’s hearty enough to satisfy everyone and can be made in advance.
  • Potlucks: If you’re attending a potluck, this dish is a crowd-pleaser. It’s easy to transport and can be served warm or at room temperature.
  • Game Day: Hosting a game day gathering? Your Cheesy Ground Beef Pasta Casserole will be a hit among friends and family. Pair it with some snacks and drinks for a fun atmosphere.
  • Holiday Gatherings: Whether it’s Thanksgiving or a family reunion, this casserole can be a comforting addition to your holiday spread.

Cheesy Ground Beef Pasta Casserole is sure to be a favorite at any occasion. Enjoy serving it with your favorite sides and making lasting memories around the table!

Tips for Perfecting Cheesy Ground Beef Pasta Casserole

Cheesy Ground Beef Pasta Casserole turns out perfectly every time, consider these helpful tips. From storage to reheating, these suggestions will help you enjoy this delicious dish long after it’s made.

Storage Tips

Cheesy Ground Beef Pasta Casserole properly is essential for maintaining its flavor and texture. Here are some effective storage tips:

  • Cool Before Storing: Allow the casserole to cool completely at room temperature before storing. This prevents condensation from forming, which can make the dish soggy.
  • Use Airtight Containers: Transfer leftovers to airtight containers. This helps keep the casserole fresh and prevents it from absorbing other odors in the fridge.
  • Refrigerate Promptly: Store the casserole in the refrigerator within two hours of cooking. It can last for up to 3-4 days when stored properly.
  • Freezing for Later: If you want to keep it longer, consider freezing the casserole. Wrap it tightly in plastic wrap and then in aluminum foil. It can be frozen for up to 3 months.

Cheesy Ground Beef Pasta Casserole even after the initial meal!

Reheating Instructions

When it’s time to enjoy your leftovers, reheating them correctly is key to preserving the dish’s deliciousness. Here’s how to do it:

  • Oven Method: Preheat your oven to 350°F (175°C). Place the casserole in an oven-safe dish and cover it with aluminum foil. Bake for about 20-25 minutes, or until heated through. Remove the foil for the last 5 minutes to crisp up the cheese.
  • Microwave Method: For a quicker option, you can use the microwave. Place a portion of the casserole on a microwave-safe plate. Cover it with a microwave-safe lid or wrap. Heat on medium power for 2-3 minutes, stirring halfway through, until hot.
  • Stovetop Method: If you prefer, you can reheat on the stovetop. Place the casserole in a skillet over low heat. Stir occasionally until warmed through. You may want to add a splash of water or broth to keep it moist.

Cheesy Ground Beef Pasta Casserole will taste just as good as when it was first made!

Breakdown of Time for Cheesy Ground Beef Pasta Casserole

Cheesy Ground Beef Pasta Casserole can help you plan your meal better. Here’s a simple breakdown of the time involved in each step of the process.

Prep Time

The prep time for this delicious casserole is quite manageable. You’ll need about 15-20 minutes to gather and prepare your ingredients. This includes dicing the onion, mincing the garlic, and measuring out the marinara sauce and cheeses. Having everything ready will make the cooking process smoother and more enjoyable.

Cooking Time

Once you start cooking, the total cooking time is approximately 30-35 minutes. This includes:

  • Cooking the Ground Beef: About 5-7 minutes to brown the beef and cook the onions and garlic.
  • Boiling the Pasta: Around 10 minutes for the pasta to cook in the sauce mixture.
  • Baking the Casserole: 20-25 minutes in the oven until the cheese is bubbly and golden brown.

Total Time

Cheesy Ground Beef Pasta Casserole is perfect for busy weeknights or when you want to impress guests without spending hours in the kitchen.

Now that you know the time breakdown, you can easily fit this delightful dish into your schedule. Enjoy the process and the delicious results!

Nutritional Information for Cheesy Ground Beef Pasta Casserole

Cheesy Ground Beef Pasta Casserole not only satisfies your taste buds but also provides a good amount of nutrients. Here’s a closer look at the nutritional information for this delicious dish.

Calories

Cheesy Ground Beef Pasta Casserole contains approximately 450 calories. This makes it a hearty meal that can keep you full and satisfied. The combination of ground beef, pasta, and cheese contributes to the calorie count, providing energy for your day.

Protein Content

One of the standout features of this casserole is its protein content. Each serving offers about 28 grams of protein. This is primarily due to the ground beef and cheese, which are excellent sources of protein. Protein is vital for muscle repair and growth, making this casserole a great option for active individuals and families.

Sodium Levels

Cheesy Ground Beef Pasta Casserole while keeping your health in check.

Cheesy Ground Beef Pasta Casserole is not only delicious but also provides a good balance of calories, protein, and sodium. With its comforting flavors and satisfying ingredients, it’s a meal that can fit well into a healthy diet.

FAQs about Cheesy Ground Beef Pasta Casserole

Can I make Cheesy Ground Beef Pasta Casserole ahead of time?

Cheesy Ground Beef Pasta Casserole is perfect for making ahead of time. You can prepare the entire dish, cover it tightly, and store it in the refrigerator for up to 24 hours before baking. This is a great option for busy weeknights or when you have guests coming over. Just remember to add a few extra minutes to the baking time if you’re cooking it straight from the fridge.

What can I substitute for ground beef in this casserole?

Cheesy Ground Beef Pasta Casserole just as satisfying.

How do I make Cheesy Ground Beef Pasta Casserole gluten-free?

Cheesy Ground Beef Pasta Casserole gluten-free is simple! Just swap out the regular elbow macaroni for gluten-free pasta. Many brands offer gluten-free options that taste great. Additionally, check the marinara sauce label to ensure it’s gluten-free. With these adjustments, you can enjoy this comforting dish without any gluten concerns.

Can I freeze Cheesy Ground Beef Pasta Casserole?

Cheesy Ground Beef Pasta Casserole for later enjoyment! To do this, prepare the casserole as directed, but do not bake it. Instead, cover it tightly with plastic wrap and aluminum foil, then place it in the freezer. It can be frozen for up to 3 months. When you’re ready to eat, simply thaw it in the refrigerator overnight and bake as usual. This makes it a convenient meal option for busy days!

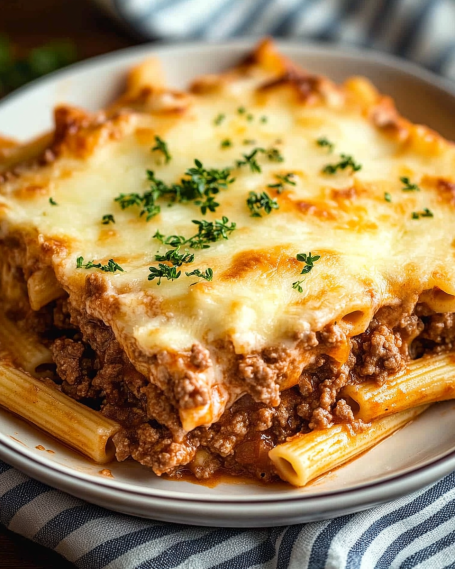
Conclusion on Cheesy Ground Beef Pasta Casserole

Cheesy Ground Beef Pasta Casserole is more than just a meal; it’s a comforting dish that brings families together. With its rich flavors, gooey cheese, and hearty ingredients, it’s no wonder this casserole has become a beloved favorite in many homes. Whether you’re enjoying it on a busy weeknight or serving it at a special gathering, this dish is sure to please everyone at the table.

Cheesy Ground Beef Pasta Casserole allows for endless variations. You can easily customize it to fit your family’s tastes or dietary needs. From adding vegetables to swapping out the protein, the possibilities are endless. This adaptability makes it a fantastic option for any occasion.

Moreover, the ease of preparation means you can whip up this delicious casserole without spending hours in the kitchen. With just a few simple steps, you can create a satisfying meal that will leave your loved ones asking for seconds. Plus, the leftovers are just as tasty, making it a great choice for meal prep.

Cheesy Ground Beef Pasta Casserole is a delightful dish that combines comfort, flavor, and convenience. It’s a recipe that not only nourishes the body but also warms the heart. So, gather your ingredients, follow the steps, and enjoy the deliciousness of this casserole with your family and friends. Happy cooking!

One-Pot Cheddar Ranch Chicken and Sausage Rotini is easy!

Introduction to One-Pot Cheddar Ranch Chicken and Sausage Pasta

Are you looking for a delicious and easy meal that the whole family will love? Look no further than the One-Pot Cheddar Ranch Chicken and Sausage Pasta! This dish combines tender chicken, savory sausage, and creamy cheddar cheese, all cooked together in one pot. It’s not just a meal; it’s a comforting experience that brings everyone to the table.

What Makes One-Pot Cheddar Ranch Chicken and Sausage Pasta Special?

What sets this recipe apart is its simplicity and flavor. First, it’s a one-pot wonder, which means less cleanup for you! You can enjoy a hearty meal without the hassle of multiple dishes. Second, the ranch seasoning adds a burst of flavor that elevates the dish. The combination of chicken and sausage provides a delightful mix of textures and tastes. Plus, the addition of sharp cheddar cheese makes it creamy and satisfying.

Moreover, this dish is versatile. You can easily customize it to suit your family’s preferences. Whether you want to add more veggies or switch up the protein, the possibilities are endless. It’s a great way to use up ingredients you have on hand, making it both economical and practical.

In just a short time, you can whip up a meal that’s not only filling but also packed with nutrients. With a balance of protein, carbs, and fats, this dish is perfect for busy weeknights or a cozy weekend dinner. So, let’s dive into the ingredients and get cooking!

Ingredients for One-Pot Cheddar Ranch Chicken and Sausage Pasta

To create the delightful One-Pot Cheddar Ranch Chicken and Sausage Pasta, you’ll need a few simple ingredients. Each component plays a vital role in building the flavors and textures that make this dish so special. Here’s what you’ll need:

  • 2 cups rotini pasta: This spiral-shaped pasta holds onto the sauce beautifully, making every bite delicious.
  • 1 tablespoon olive oil: A healthy fat that helps to sauté the chicken and sausage, adding flavor.
  • 1 pound boneless, skinless chicken breasts: Cut into bite-sized pieces, this lean protein is the star of the dish.
  • 8 ounces smoked sausage: Sliced for easy cooking, it adds a smoky flavor that complements the chicken.
  • 1 packet (1 ounce) ranch seasoning mix: This seasoning mix is the secret ingredient that brings everything together with its zesty flavor.
  • 2 cups chicken broth: This liquid adds moisture and depth to the dish, making it rich and savory.
  • 1 cup shredded sharp cheddar cheese: The creamy cheese melts into the pasta, creating a comforting texture.
  • 1 cup frozen peas: These little green gems add a pop of color and sweetness to the dish.
  • Salt and pepper to taste: Essential seasonings that enhance the overall flavor.
  • Chopped fresh parsley for garnish (optional): A sprinkle of parsley adds a fresh touch and brightens up the dish.

With these ingredients on hand, you’re ready to embark on a culinary adventure. Each item contributes to the overall taste and makes this meal a family favorite. Now, let’s move on to the step-by-step preparation!

Step-by-Step Preparation of One-Pot Cheddar Ranch Chicken and Sausage Pasta

Now that you have all your ingredients ready, it’s time to dive into the cooking process! This step-by-step guide will help you create the One-Pot Cheddar Ranch Chicken and Sausage Pasta with ease. Let’s get started!

Step 1: Gather Your Ingredients

Before you start cooking, make sure you have everything you need within reach. Gather your rotini pasta, olive oil, chicken, sausage, ranch seasoning, chicken broth, cheddar cheese, peas, salt, and pepper. Having everything organized will make the cooking process smoother and more enjoyable.

Step 2: Prepare the Chicken and Sausage

Next, take your boneless, skinless chicken breasts and cut them into bite-sized pieces. This helps them cook evenly and quickly. Then, slice the smoked sausage into rounds. Both proteins will add great flavor to your dish, so make sure they are ready to go!

Step 3: Sauté the Ingredients

In a large pot or Dutch oven, heat the olive oil over medium heat. Once the oil is hot, add the chicken pieces and sausage slices. Cook them for about 5-7 minutes, stirring occasionally. You want the chicken to be browned and cooked through. Don’t forget to season with salt and pepper to enhance the flavors!

Step 4: Add the Pasta and Liquid

After the chicken and sausage are cooked, it’s time to add the fun part! Stir in the ranch seasoning mix, ensuring that the chicken and sausage are well-coated. Then, pour in the chicken broth and add the rotini pasta. Bring the mixture to a boil, then reduce the heat to a simmer. Cover the pot and let it cook for about 10-12 minutes. This allows the pasta to absorb the flavors and become perfectly al dente.

Step 5: Cook Until Perfectly Done

Keep an eye on the pot as it simmers. You want to make sure most of the liquid is absorbed, and the pasta is cooked just right. Stir occasionally to prevent sticking. Once the pasta is tender, you’ll know it’s time for the next step!

Step 6: Stir in the Cheddar and Ranch Seasoning

Finally, it’s time to add the finishing touches! Stir in the frozen peas and shredded sharp cheddar cheese. Mix everything together until the cheese melts and creates a creamy texture. This is where the magic happens! Let it sit for a few minutes to thicken up, and if you like, garnish with chopped fresh parsley for a pop of color.

And there you have it! Your One-Pot Cheddar Ranch Chicken and Sausage Pasta is ready to be served. It’s a delightful dish that’s sure to please everyone at the table.

Variations of One-Pot Cheddar Ranch Chicken and Sausage Pasta

While the One-Pot Cheddar Ranch Chicken and Sausage Pasta is delicious as is, there are many ways to customize it to suit your taste or dietary needs. Here are some fun variations to consider!

Vegetarian Options

If you want to make this dish vegetarian-friendly, you can easily swap out the meat. Instead of chicken and sausage, try using a mix of hearty vegetables. For example, you can add:

  • Chickpeas: These provide a great source of protein and a nice texture.
  • Bell Peppers: Diced bell peppers add sweetness and color.
  • Mushrooms: Sautéed mushrooms give a meaty flavor without the meat.
  • Spinach: Fresh spinach can be stirred in at the end for added nutrients.

Using vegetable broth instead of chicken broth will enhance the flavors while keeping it vegetarian. You can still use the ranch seasoning mix to maintain that zesty taste!

Different Protein Choices

If you prefer different proteins, there are plenty of options to explore. Here are some ideas:

  • Shrimp: Cooked shrimp can be added in place of chicken for a seafood twist. Just be sure to adjust the cooking time, as shrimp cooks quickly.
  • Tofu: For a plant-based protein, use firm tofu. Cut it into cubes and sauté until golden brown before adding it to the pot.
  • Turkey: Ground turkey is a lean alternative to chicken. Brown it in the pot before adding the other ingredients.

These variations allow you to enjoy the One-Pot Cheddar Ranch Chicken and Sausage Pasta in new and exciting ways. Feel free to mix and match based on what you have on hand or what you’re in the mood for!

Cooking Note for One-Pot Cheddar Ranch Chicken and Sausage Pasta

When preparing the One-Pot Cheddar Ranch Chicken and Sausage Pasta, there are a few important cooking notes to keep in mind. These tips will help ensure that your dish turns out perfectly every time!

First, always use a large pot or Dutch oven. This allows enough space for the ingredients to cook evenly without overcrowding. If the pot is too small, the pasta may stick together, and the flavors won’t blend as well.

Next, be mindful of the heat. Start with medium heat when sautéing the chicken and sausage. This helps to brown the meat nicely without burning it. Once you add the broth and pasta, reduce the heat to a simmer. This gentle cooking method allows the pasta to absorb the flavors without becoming mushy.

Stirring occasionally is also key. It prevents the pasta from sticking to the bottom of the pot. Plus, it helps to distribute the flavors evenly throughout the dish. If you notice that the liquid is evaporating too quickly, feel free to add a splash more chicken broth or water to keep everything moist.

Lastly, let the dish sit for a few minutes after cooking. This resting time allows the sauce to thicken and the flavors to meld together beautifully. It’s tempting to dig in right away, but patience will reward you with a more flavorful meal!

By following these cooking notes, you’ll create a delicious One-Pot Cheddar Ranch Chicken and Sausage Pasta that your family will love. Happy cooking!

Serving Suggestions for One-Pot Cheddar Ranch Chicken and Sausage Pasta

Once your One-Pot Cheddar Ranch Chicken and Sausage Pasta is ready, it’s time to think about how to serve it! This dish is not only delicious but also visually appealing, making it perfect for family dinners or gatherings. Here are some serving suggestions to enhance your meal experience:

  • Garnish with Fresh Herbs: A sprinkle of chopped fresh parsley or chives adds a pop of color and freshness. It brightens up the dish and enhances the overall flavor.
  • Pair with a Side Salad: A crisp green salad complements the richness of the pasta. Consider a simple mixed greens salad with a light vinaigrette to balance the meal.
  • Serve with Garlic Bread: Warm, buttery garlic bread is a fantastic side that pairs well with the creamy pasta. It’s perfect for soaking up any leftover sauce!
  • Offer Grated Cheese: Set out a bowl of extra shredded cheddar cheese for those who want to add more cheesy goodness to their plates.
  • Include a Vegetable Side: Steamed broccoli or roasted asparagus can add a nutritious touch to your meal. These veggies provide a nice contrast to the pasta.

When serving, consider using large bowls or plates to showcase the colorful pasta. This dish is hearty enough to be a main course, so you won’t need much else. However, these suggestions can elevate your dining experience and make it even more enjoyable.

Whether it’s a weeknight dinner or a special occasion, the One-Pot Cheddar Ranch Chicken and Sausage Pasta is sure to impress. Enjoy your meal with family and friends, and don’t forget to share the recipe!

Tips for Perfect One-Pot Cheddar Ranch Chicken and Sausage Pasta

Creating the perfect One-Pot Cheddar Ranch Chicken and Sausage Pasta is all about attention to detail. Here are some helpful tips to ensure your dish turns out delicious every time!

  • Use Quality Ingredients: Start with fresh chicken and high-quality sausage. The better the ingredients, the tastier your dish will be. Opt for sharp cheddar cheese for a more robust flavor.
  • Don’t Overcook the Pasta: Keep an eye on the cooking time for the rotini. You want it to be al dente, which means it should still have a slight bite. Overcooked pasta can become mushy and lose its texture.
  • Adjust Seasoning to Taste: Everyone’s palate is different. Taste your dish before serving and adjust the salt, pepper, or ranch seasoning as needed. This ensures the flavors are just right for you and your family.
  • Experiment with Add-Ins: Feel free to add more vegetables or different spices. Chopped spinach, diced tomatoes, or even corn can enhance the dish. Get creative and make it your own!
  • Let It Rest: After cooking, let the pasta sit for a few minutes before serving. This resting time allows the flavors to meld and the sauce to thicken, making each bite even more satisfying.
  • Store Leftovers Properly: If you have any leftovers, store them in an airtight container in the fridge. This dish can last for up to three days. Reheat gently on the stove or in the microwave, adding a splash of broth if needed to loosen it up.

By following these tips, you’ll create a One-Pot Cheddar Ranch Chicken and Sausage Pasta that’s not only easy to make but also bursting with flavor. Enjoy the process and happy cooking!

Breakdown of Time for One-Pot Cheddar Ranch Chicken and Sausage Pasta

Understanding the time it takes to prepare and cook the One-Pot Cheddar Ranch Chicken and Sausage Pasta can help you plan your meal better. Here’s a simple breakdown of the time involved in each step of the process.

Prep Time

The prep time for this dish is quite short, making it perfect for busy weeknights. You’ll need about 10-15 minutes to gather and prepare your ingredients. This includes cutting the chicken and sausage, measuring out the pasta, and getting your seasonings ready. Having everything prepped in advance will make the cooking process smoother and more enjoyable.

Cooking Time

Once you start cooking, the total cooking time is approximately 20-25 minutes. This includes:

  • Sautéing the chicken and sausage: About 5-7 minutes.
  • Simmering the pasta: Around 10-12 minutes.
  • Melting the cheese and mixing in the peas: 3-5 minutes.

During this time, you’ll be multitasking, which makes it feel even quicker!

Total Time

In total, you can expect to spend about 30-40 minutes from start to finish. This includes both prep and cooking time. It’s a fantastic option for a hearty meal that doesn’t take all evening to prepare. With just one pot and a little bit of time, you’ll have a delicious dish ready to serve!

Nutritional Information for One-Pot Cheddar Ranch Chicken and Sausage Pasta

Understanding the nutritional content of your meals is essential for maintaining a balanced diet. The One-Pot Cheddar Ranch Chicken and Sausage Pasta is not only delicious but also provides a good mix of nutrients. Here’s a breakdown of the nutritional information per serving:

Calories

480 calories. This makes it a satisfying option for dinner without being overly heavy. The combination of protein, carbs, and fats ensures that you feel full and energized after your meal.

Protein

32 grams of protein per serving, this dish is an excellent source of this essential nutrient. Protein is vital for muscle repair and growth, making it a great choice for active individuals or anyone looking to maintain a healthy lifestyle. The chicken and sausage contribute significantly to the protein content, ensuring you get a nutritious meal.

Sodium

800 milligrams of sodium. While sodium is necessary for bodily functions, it’s important to monitor your intake. If you’re watching your sodium levels, consider using low-sodium chicken broth or reducing the amount of ranch seasoning mix. This way, you can enjoy the flavors without exceeding your daily sodium limit.

Overall, the One-Pot Cheddar Ranch Chicken and Sausage Pasta offers a balanced meal option that is both tasty and nutritious. By being mindful of the ingredients and portion sizes, you can enjoy this dish as part of a healthy diet.

FAQs about One-Pot Cheddar Ranch Chicken and Sausage Pasta

Can I make One-Pot Cheddar Ranch Chicken and Sausage Pasta ahead of time?

Absolutely! You can prepare the One-Pot Cheddar Ranch Chicken and Sausage Pasta ahead of time. Simply follow the recipe as usual, and once it’s cooked, let it cool completely. Then, transfer it to an airtight container and store it in the refrigerator. It can be kept for up to three days. When you’re ready to enjoy it, just reheat it on the stove or in the microwave. You may want to add a splash of chicken broth to keep it moist while reheating.

What can I substitute for ranch seasoning in One-Pot Cheddar Ranch Chicken and Sausage Pasta?

If you don’t have ranch seasoning on hand, don’t worry! You can create a homemade version using common spices. Combine equal parts of dried dill, garlic powder, onion powder, and parsley. You can also add a pinch of salt and pepper to taste. This mix will give you a similar flavor profile. Alternatively, you can use Italian seasoning or any other seasoning blend you enjoy. Just remember to adjust the amount to suit your taste!

How do I store leftovers of One-Pot Cheddar Ranch Chicken and Sausage Pasta?

Storing leftovers is easy! Place any remaining One-Pot Cheddar Ranch Chicken and Sausage Pasta in an airtight container. Make sure it’s completely cooled before sealing it. Store it in the refrigerator for up to three days. If you want to keep it longer, you can freeze it for up to three months. When reheating, add a little chicken broth or water to help restore the creamy texture. This way, you can enjoy your delicious meal again!

Can I use gluten-free pasta in One-Pot Cheddar Ranch Chicken and Sausage Pasta?

Yes, you can definitely use gluten-free pasta in this recipe! There are many great gluten-free options available, such as brown rice pasta or chickpea pasta. Just be sure to check the cooking time on the package, as gluten-free pasta may require different cooking times than regular rotini. Follow the same steps in the recipe, and you’ll have a tasty gluten-free version of the One-Pot Cheddar Ranch Chicken and Sausage Pasta!

Conclusion on One-Pot Cheddar Ranch Chicken and Sausage Pasta

In conclusion, the One-Pot Cheddar Ranch Chicken and Sausage Pasta is a fantastic meal that combines convenience, flavor, and nutrition. This dish is perfect for busy families or anyone looking for a quick yet satisfying dinner option. With just one pot, you can create a hearty meal that everyone will love, making it a true weeknight hero.

The beauty of this recipe lies in its versatility. You can easily adapt it to suit your dietary preferences or use up ingredients you have on hand. Whether you choose to go vegetarian, switch up the proteins, or add extra veggies, the possibilities are endless. This adaptability not only keeps your meals exciting but also helps reduce food waste.

Moreover, the creamy texture from the cheddar cheese and the zesty flavor from the ranch seasoning make every bite a delight. It’s a dish that brings comfort and joy to the table, encouraging family and friends to gather and share a meal together. Plus, with the nutritional benefits it offers, you can feel good about serving it to your loved ones.

So, why not give the One-Pot Cheddar Ranch Chicken and Sausage Pasta a try? With its simple preparation and delicious results, it’s sure to become a staple in your household. Enjoy the process of cooking, and most importantly, enjoy the wonderful moments shared around the dinner table!

Creamy Calabrian Chili Pappardelle Recipe is delightful!

Introduction to Creamy Calabrian Chili Pappardelle Recipe

Welcome to the delightful world of Creamy Calabrian Chili Pappardelle! This dish is not just a meal; it’s an experience that brings together rich flavors and comforting textures. If you’re looking for a pasta dish that stands out, you’ve found it. The combination of creamy sauce and spicy Calabrian chili creates a perfect balance that tantalizes your taste buds.

What Makes This Recipe Unique?

What sets this recipe apart is its unique blend of ingredients. The creamy sauce, made with heavy cream and Parmesan cheese, envelops the pappardelle pasta beautifully. The addition of Calabrian chili paste introduces a delightful heat that elevates the dish. This isn’t just any pasta; it’s a celebration of flavors that can transform a simple dinner into a gourmet experience. Plus, it’s easy to prepare, making it perfect for both weeknight meals and special occasions.

The Origins of Calabrian Chili

Calabrian chili peppers hail from the Calabria region in southern Italy. Known for their vibrant red color and moderate heat, these peppers have been a staple in Italian cooking for centuries. They add a unique flavor profile that is both fruity and spicy. The use of Calabrian chili paste in this recipe not only enhances the taste but also pays homage to its Italian roots. By incorporating this ingredient, you’re not just cooking; you’re embracing a piece of culinary history.

Ingredients for Creamy Calabrian Chili Pappardelle Recipe

To create the delicious Creamy Calabrian Chili Pappardelle, you’ll need a few simple yet flavorful ingredients. Each component plays a vital role in bringing this dish to life. Here’s what you’ll need:

  • 8 ounces pappardelle pasta: This wide, flat pasta is perfect for holding onto the creamy sauce.
  • 2 tablespoons olive oil: A healthy fat that adds richness and flavor.
  • 3 cloves garlic, minced: Fresh garlic brings a wonderful aroma and taste.
  • 1 teaspoon Calabrian chili paste: Adjust this to your spice preference for the perfect kick.
  • 1 cup heavy cream: This is the base of the creamy sauce, making it rich and luscious.
  • 1/2 cup grated Parmesan cheese: Adds a savory depth and enhances the creaminess.
  • Salt and pepper to taste: Essential for seasoning and balancing flavors.
  • Fresh basil leaves, for garnish: A pop of color and freshness to finish the dish.

Gathering these ingredients will set you on the path to creating a delightful meal. Each item contributes to the overall flavor, making this dish a true standout. Now that you have everything ready, let’s move on to the preparation steps!

Step-by-Step Preparation of Creamy Calabrian Chili Pappardelle Recipe

Now that you have all your ingredients ready, it’s time to dive into the cooking process. This step-by-step guide will help you create the perfect Creamy Calabrian Chili Pappardelle. Follow along, and soon you’ll have a delicious meal on your table!

Step 1: Preparing the Ingredients

Before you start cooking, it’s essential to prepare your ingredients. Begin by measuring out the pappardelle pasta, olive oil, and heavy cream. Mince the garlic cloves finely to release their flavor. Also, grate the Parmesan cheese if you haven’t done so already. Having everything ready will make the cooking process smooth and enjoyable.

Step 2: Cooking the Pappardelle

Next, bring a large pot of salted water to a boil. Once boiling, add the pappardelle pasta. Cook it according to the package instructions until it reaches an al dente texture. This usually takes about 8 to 10 minutes. Remember to stir occasionally to prevent sticking. Once cooked, drain the pasta, but don’t forget to reserve half a cup of the pasta water. This starchy water will help adjust the sauce later.

Step 3: Making the Creamy Sauce

In a large skillet, heat the olive oil over medium heat. Once hot, add the minced garlic and sauté for about a minute. You want the garlic to become fragrant but not burnt. After that, stir in the Calabrian chili paste. Cook it for another minute to allow the flavors to blend beautifully. Then, pour in the heavy cream and bring the mixture to a gentle simmer. As it heats, add the grated Parmesan cheese, stirring until it melts and creates a smooth sauce. If the sauce seems too thick, add a bit of the reserved pasta water to reach your desired consistency.

Step 4: Combining the Pasta and Sauce

Now it’s time to bring everything together! Add the cooked pappardelle to the skillet with the creamy sauce. Toss the pasta gently to ensure it’s evenly coated with the sauce. This step is crucial, as you want every strand of pasta to be enveloped in that rich, creamy goodness. If needed, you can add more reserved pasta water to help the sauce cling to the pasta.

Step 5: Final Touches and Serving

Once the pasta is well coated, it’s time to serve! Transfer the Creamy Calabrian Chili Pappardelle to plates or a serving dish. For a beautiful presentation, garnish with fresh basil leaves. This not only adds a pop of color but also enhances the flavor. Serve immediately and enjoy the delightful combination of creamy and spicy flavors!

Variations of Creamy Calabrian Chili Pappardelle Recipe

While the original Creamy Calabrian Chili Pappardelle is delicious on its own, there are many ways to customize this dish to suit your taste or dietary needs. Here are some exciting variations to consider!

Vegetarian Options

If you’re looking for a vegetarian twist, you can easily modify this recipe. Instead of using heavy cream, try a plant-based cream alternative. Options like coconut cream or cashew cream work wonderfully. Additionally, replace the Parmesan cheese with nutritional yeast for a cheesy flavor without dairy. You can also add vegetables like spinach, mushrooms, or bell peppers to enhance the dish’s nutrition and flavor. Sauté these veggies along with the garlic for a delightful addition!

Adding Protein: Chicken or Shrimp

For those who want to add some protein, consider incorporating cooked chicken or shrimp. Simply sauté bite-sized pieces of chicken breast or shrimp in the skillet before adding the garlic. Cook until they are golden and cooked through, then proceed with the recipe as usual. This addition not only boosts the protein content but also makes the dish more filling. It’s a great way to turn this pasta into a complete meal!

Gluten-Free Alternatives

If you’re following a gluten-free diet, you can still enjoy this creamy pasta dish. Look for gluten-free pappardelle pasta made from rice, corn, or lentils. These alternatives provide a similar texture and taste. Just be sure to follow the cooking instructions on the package, as gluten-free pasta may require different cooking times. With these adjustments, you can savor the flavors of Creamy Calabrian Chili Pappardelle without any gluten concerns!

Cooking Note for Creamy Calabrian Chili Pappardelle Recipe

When preparing the Creamy Calabrian Chili Pappardelle, a few cooking notes can help ensure your dish turns out perfectly every time. These tips will enhance your cooking experience and the final result, making your meal even more enjoyable.

First, always use high-quality ingredients. Fresh garlic, good olive oil, and authentic Calabrian chili paste can significantly impact the flavor of your dish. Opt for freshly grated Parmesan cheese instead of pre-grated varieties, as it melts better and adds a richer taste.

Next, pay attention to the cooking time of the pappardelle. Overcooking can lead to mushy pasta, which won’t hold the sauce well. Aim for al dente, which means the pasta should be firm to the bite. This texture will allow it to absorb the creamy sauce without losing its shape.

When making the sauce, keep the heat at medium to avoid burning the garlic. If the garlic burns, it can impart a bitter taste to the sauce. Stirring frequently will help prevent this and ensure even cooking.

Lastly, don’t hesitate to adjust the spice level to your liking. If you enjoy a bit more heat, add extra Calabrian chili paste. Conversely, if you prefer a milder flavor, start with less and gradually increase it. Remember, you can always add more, but it’s hard to take it away once it’s in!

By following these cooking notes, you’ll be well on your way to creating a delicious and satisfying Creamy Calabrian Chili Pappardelle that will impress your family and friends. Happy cooking!

Serving Suggestions for Creamy Calabrian Chili Pappardelle Recipe

Once you’ve prepared your Creamy Calabrian Chili Pappardelle, it’s time to think about how to serve it for the best dining experience. Pairing your dish with the right wine and side dishes can elevate your meal to new heights. Here are some suggestions to consider!

Pairing with Wine

Choosing the right wine can enhance the flavors of your Creamy Calabrian Chili Pappardelle. A good rule of thumb is to select a wine that complements the creaminess and spice of the dish. Here are a few options:

  • Chardonnay: A full-bodied Chardonnay, especially one that is oaked, pairs beautifully with creamy sauces. Its buttery notes will harmonize with the richness of the dish.
  • Pinot Grigio: If you prefer a white wine that is lighter, go for a Pinot Grigio. Its crisp acidity will balance the creaminess and cut through the richness.
  • Chianti: For red wine lovers, a Chianti is an excellent choice. This Italian red has enough acidity to complement the dish while enhancing the flavors of the Calabrian chili.

When serving wine, remember to chill white wines and serve red wines at room temperature. This will ensure that you enjoy the full flavor profile of each wine.

Side Dishes to Complement the Meal

To round out your meal, consider serving some delicious side dishes alongside your Creamy Calabrian Chili Pappardelle. Here are a few ideas:

  • Garlic Bread: A classic choice, garlic bread is perfect for soaking up any leftover creamy sauce. You can make it easily by spreading butter and minced garlic on slices of baguette and toasting them.
  • Mixed Green Salad: A fresh salad with mixed greens, cherry tomatoes, and a light vinaigrette can provide a refreshing contrast to the rich pasta. The acidity from the dressing will balance the creaminess.
  • Roasted Vegetables: Roasted seasonal vegetables, such as zucchini, bell peppers, and asparagus, add color and nutrition to your meal. Their natural sweetness pairs well with the spicy sauce.

By thoughtfully pairing your Creamy Calabrian Chili Pappardelle with the right wine and side dishes, you’ll create a delightful dining experience that everyone will enjoy. Bon appétit!

Tips for Perfecting Your Creamy Calabrian Chili Pappardelle Recipe

To ensure your Creamy Calabrian Chili Pappardelle turns out perfectly every time, consider these helpful tips. Each suggestion will enhance your cooking experience and the final dish, making it even more enjoyable for you and your guests.

Choosing the Right Pasta

When it comes to pasta, the type you choose can make a big difference. Pappardelle is ideal for this recipe due to its wide, flat shape, which holds onto the creamy sauce beautifully. However, if you can’t find pappardelle, don’t worry! You can substitute it with other pasta types like fettuccine or tagliatelle. Just ensure that the pasta you select has a similar texture to capture the sauce well. Always check the cooking time on the package, as different pasta shapes may require adjustments.

Adjusting Spice Levels

One of the best parts of the Creamy Calabrian Chili Pappardelle is its customizable spice level. If you love heat, feel free to add more Calabrian chili paste to the sauce. Start with a small amount and taste as you go. This way, you can find the perfect balance for your palate. On the other hand, if you prefer a milder flavor, reduce the amount of chili paste. You can also add a splash of lemon juice or a dollop of sour cream to help tone down the heat while still keeping the dish flavorful.

Storing Leftovers

If you have any leftovers, storing them properly is key to maintaining their deliciousness. Allow the Creamy Calabrian Chili Pappardelle to cool completely before transferring it to an airtight container. It can be stored in the refrigerator for up to three days. When reheating, add a splash of cream or reserved pasta water to help restore the sauce’s creamy texture. Heat gently on the stove or in the microwave, stirring occasionally to ensure even warming. This way, you can enjoy your tasty pasta again without losing its delightful flavors!

Breakdown of Time for Creamy Calabrian Chili Pappardelle Recipe

Understanding the time needed for each step of the Creamy Calabrian Chili Pappardelle recipe can help you plan your cooking efficiently. Here’s a simple breakdown of the time required for preparation and cooking.

Prep Time

The prep time for this delicious dish is quite manageable. You’ll need about 10 to 15 minutes to gather and prepare all your ingredients. This includes measuring the pasta, chopping the garlic, and grating the Parmesan cheese. Having everything ready will make the cooking process smoother and more enjoyable.

Cooking Time

Once you start cooking, the total cooking time is approximately 15 to 20 minutes. This includes boiling the pappardelle pasta, sautéing the garlic, and making the creamy sauce. The key is to keep an eye on the pasta to ensure it reaches that perfect al dente texture. The sauce comes together quickly, so you’ll be enjoying your meal in no time!

Total Time

In total, you can expect to spend around 30 to 35 minutes from start to finish. This makes Creamy Calabrian Chili Pappardelle a fantastic option for a weeknight dinner or a special occasion. With just a little time and effort, you’ll create a flavorful dish that’s sure to impress!

Nutritional Information for Creamy Calabrian Chili Pappardelle Recipe

Understanding the nutritional content of your meals is essential for maintaining a balanced diet. The Creamy Calabrian Chili Pappardelle is not only delicious but also provides a satisfying mix of nutrients. Here’s a breakdown of the nutritional information per serving, which serves as a great guide for those mindful of their dietary intake.

Calories

Each serving of Creamy Calabrian Chili Pappardelle contains approximately 520 calories. This calorie count includes the rich ingredients like heavy cream and Parmesan cheese, which contribute to the dish’s creamy texture and flavor. While it’s a hearty meal, it’s important to enjoy it in moderation, especially if you’re watching your calorie intake.

Protein

In terms of protein, this dish offers about 15 grams per serving. The protein primarily comes from the Parmesan cheese and the pappardelle pasta. If you choose to add chicken or shrimp, the protein content will increase significantly, making it a more filling option. This makes the dish a good choice for those looking to incorporate protein into their meals.

Sodium

The sodium content in each serving is around 600 milligrams. This amount can vary based on the specific brands of ingredients you use, especially the Parmesan cheese and any added salt. If you’re watching your sodium intake, consider using low-sodium broth or cheese alternatives. Balancing the flavors with fresh herbs can also help reduce the need for added salt.

By keeping these nutritional facts in mind, you can enjoy your Creamy Calabrian Chili Pappardelle while being aware of its impact on your diet. Whether you’re indulging for a special occasion or enjoying a comforting weeknight meal, this dish can fit into a balanced lifestyle with thoughtful portion control and ingredient choices.

FAQs about Creamy Calabrian Chili Pappardelle Recipe

Can I make this recipe ahead of time?

Yes, you can prepare parts of the Creamy Calabrian Chili Pappardelle ahead of time! You can cook the pappardelle pasta and make the creamy sauce in advance. Just store them separately in airtight containers in the refrigerator. When you’re ready to serve, simply reheat the sauce gently on the stove and toss it with the pasta. If the sauce has thickened, add a splash of reserved pasta water or cream to restore its creamy texture. This way, you can enjoy a delicious meal without the last-minute rush!

What can I substitute for Calabrian chili?

If you don’t have Calabrian chili paste on hand, there are several alternatives you can use. A good substitute is a mix of crushed red pepper flakes and a bit of tomato paste. This combination will give you a similar heat and flavor profile. You can also use sriracha or harissa for a different twist. Just remember to adjust the amount based on your spice preference, as some substitutes may be spicier than Calabrian chili. Experimenting with these options can lead to exciting new flavors in your dish!

Is this recipe suitable for meal prep?

Absolutely! The Creamy Calabrian Chili Pappardelle is a great option for meal prep. You can prepare the dish in advance and store it in individual portions. Just make sure to keep the pasta and sauce separate until you’re ready to eat. This will help prevent the pasta from becoming mushy. When you’re ready to enjoy your meal, simply reheat the pasta and sauce together, adding a little extra cream or pasta water if needed. It’s a convenient and tasty way to have a delicious meal ready to go!

How can I make the sauce less creamy?

If you prefer a lighter sauce, there are a few ways to reduce the creaminess of the Creamy Calabrian Chili Pappardelle. One option is to use less heavy cream and replace it with low-sodium chicken or vegetable broth. This will still provide flavor without the richness of cream. You can also add more vegetables, like spinach or zucchini, to bulk up the dish while keeping it lighter. Another idea is to incorporate a splash of lemon juice or vinegar, which can brighten the flavors and cut through the creaminess. These adjustments will help you enjoy a delicious pasta dish that suits your taste!

Conclusion on Creamy Calabrian Chili Pappardelle Recipe

In conclusion, the Creamy Calabrian Chili Pappardelle is a delightful dish that combines rich flavors and comforting textures. This recipe is not only easy to prepare but also offers a unique twist on traditional pasta dishes. The creamy sauce, infused with the spicy kick of Calabrian chili, creates a perfect harmony that will leave your taste buds dancing.

Whether you’re cooking for a special occasion or simply enjoying a cozy night in, this pasta dish is sure to impress. With its versatility, you can easily adapt it to suit your dietary preferences, whether you choose to go vegetarian, add protein, or opt for gluten-free alternatives. The possibilities are endless!

As you explore this recipe, remember to have fun in the kitchen. Cooking is an art, and each dish is a canvas for your creativity. Don’t hesitate to experiment with flavors and ingredients to make it your own. With the tips and variations provided, you can tailor the Creamy Calabrian Chili Pappardelle to fit your taste perfectly.

So gather your ingredients, roll up your sleeves, and get ready to create a delicious meal that will surely become a favorite in your household. Enjoy every bite of this creamy, spicy, and utterly satisfying pasta dish. Buon appetito!

Cheesy Ground Beef Noodle Bake Recipe is a must-try!

Introduction to Cheesy Ground Beef Noodle Bake Recipe

Welcome to the delightful world of the Cheesy Ground Beef Noodle Bake Recipe! This dish is not just a meal; it’s a comforting hug on a plate. Perfect for busy weeknights or cozy family gatherings, this recipe combines the rich flavors of ground beef, creamy cheeses, and tender noodles. It’s a dish that brings everyone together, making it a favorite in many households.

What Makes This Recipe Special?

What sets this Cheesy Ground Beef Noodle Bake apart is its simplicity and heartiness. The combination of ingredients creates a symphony of flavors that dance on your taste buds. The creamy cottage cheese and melted cheddar provide a rich texture, while the Italian seasoning adds a delightful aroma. Plus, it’s a one-dish wonder, meaning less cleanup for you!

Another special aspect is its versatility. You can easily customize it to suit your family’s preferences. Want to add some veggies? Toss in some spinach or bell peppers! Prefer a different protein? Ground turkey or chicken works beautifully. This recipe is a canvas for your culinary creativity.

A Brief History of Noodle Bakes

Noodle bakes have a rich history that dates back to the mid-20th century. They emerged as a popular comfort food in American households, especially during the post-war era when convenience was key. Families sought meals that were easy to prepare and could feed a crowd. Noodle bakes fit the bill perfectly, combining pasta with various proteins and sauces.

Over the years, noodle bakes have evolved, with countless variations popping up across different cultures. From classic macaroni and cheese to lasagna-inspired bakes, the concept remains the same: hearty, satisfying meals that bring people together. The Cheesy Ground Beef Noodle Bake is a modern twist on this beloved tradition, ensuring that it remains a staple in kitchens today.

Ingredients for Cheesy Ground Beef Noodle Bake Recipe

To create the delicious Cheesy Ground Beef Noodle Bake, you’ll need a few simple ingredients. Each component plays a vital role in building the flavors and textures that make this dish so special. Here’s what you’ll need:

  • 1 pound ground beef: This is the star of the dish, providing a hearty protein base.
  • 8 ounces egg noodles: These noodles are perfect for soaking up the flavors of the sauce.
  • 1 cup shredded cheddar cheese: This cheese adds a rich, melty goodness that everyone loves.
  • 1 cup cottage cheese: This ingredient brings creaminess and a slight tang to the bake.
  • 1 can (15 ounces) tomato sauce: The tomato sauce adds moisture and a burst of flavor.
  • 1 teaspoon garlic powder: Garlic powder enhances the overall taste with its aromatic flavor.
  • 1 teaspoon onion powder: This adds a subtle sweetness and depth to the dish.
  • 1 teaspoon Italian seasoning: A blend of herbs that gives the bake an Italian flair.
  • Salt and pepper to taste: Essential for seasoning and balancing the flavors.
  • 2 tablespoons olive oil: Used for cooking the ground beef, adding healthy fats.
  • 1/2 cup grated Parmesan cheese: This cheese adds a salty, nutty flavor and a nice crust on top.

With these ingredients on hand, you’re ready to embark on a culinary adventure. Each item contributes to the overall deliciousness of the Cheesy Ground Beef Noodle Bake, making it a dish that’s sure to please everyone at the table. So gather your ingredients, and let’s get cooking!

Step-by-Step Preparation of Cheesy Ground Beef Noodle Bake Recipe

Now that you have all your ingredients ready, it’s time to dive into the step-by-step preparation of the Cheesy Ground Beef Noodle Bake Recipe. Following these simple steps will ensure that your dish turns out perfectly every time. Let’s get started!

Step 1: Prepping the Ingredients

First things first, gather all your ingredients on the counter. This makes the cooking process smoother. Start by measuring out the ground beef, egg noodles, and cheeses. Open the can of tomato sauce and have your spices ready. Prepping everything in advance saves time and keeps you organized.

Step 2: Cooking the Ground Beef

Next, heat 2 tablespoons of olive oil in a large skillet over medium heat. Once the oil is hot, add the pound of ground beef. Use a wooden spoon to break it apart as it cooks. Stir occasionally until the beef is browned and no longer pink. This usually takes about 5 to 7 minutes. After cooking, drain any excess fat to keep your dish from being greasy.

Step 3: Boiling the Noodles

While the beef is cooking, bring a large pot of salted water to a boil. Add the 8 ounces of egg noodles and cook them according to the package instructions until they are al dente. This usually takes around 6 to 8 minutes. Once cooked, drain the noodles and set them aside. Make sure not to overcook them, as they will continue to cook in the oven.

Step 4: Combining Ingredients

In a large mixing bowl, combine the cooked noodles, the browned ground beef mixture, 1 cup of cottage cheese, and half of the shredded cheddar cheese. Stir everything together until well combined. This step is crucial as it ensures that every bite is packed with flavor. Don’t be shy; mix it well!

Step 5: Assembling the Bake

Now it’s time to transfer the mixture into a greased 9×13 inch baking dish. Spread it evenly across the dish. Once that’s done, sprinkle the remaining cheddar cheese on top. Finally, add the grated Parmesan cheese for an extra layer of flavor. This cheesy topping will create a delicious crust as it bakes.

Step 6: Baking to Perfection

Preheat your oven to 350°F (175°C) if you haven’t done so already. Place the baking dish in the oven and bake for 25 to 30 minutes. You’ll know it’s ready when the cheese is bubbly and golden brown. Once done, let it cool for about 5 minutes before serving. This cooling time helps the dish set, making it easier to serve.

And there you have it! Following these steps will lead you to a delicious Cheesy Ground Beef Noodle Bake that’s sure to impress your family and friends. Enjoy your cooking adventure!

Variations of Cheesy Ground Beef Noodle Bake Recipe

The Cheesy Ground Beef Noodle Bake Recipe is incredibly versatile. While the original recipe is delicious, you can easily adapt it to suit different dietary preferences or simply to mix things up. Here are some tasty variations to consider:

Vegetarian Options

If you want to make a vegetarian version of this dish, you can replace the ground beef with a variety of plant-based ingredients. Here are some ideas:

  • Vegetable Medley: Use a mix of your favorite vegetables, such as bell peppers, zucchini, and mushrooms. Sauté them in olive oil until tender before adding them to the noodle mixture.
  • Meat Alternatives: Consider using plant-based ground meat, like lentils or crumbled tofu. These options provide protein while keeping the dish meat-free.
  • Beans: Black beans or kidney beans can add a hearty texture and flavor. Rinse and drain canned beans before mixing them in.

These vegetarian options not only make the dish suitable for non-meat eaters but also add a colorful twist to your Cheesy Ground Beef Noodle Bake.

Gluten-Free Alternatives

For those who need to avoid gluten, there are simple swaps you can make to enjoy this comforting dish without worry:

  • Gluten-Free Noodles: Substitute regular egg noodles with gluten-free pasta. Many brands offer gluten-free egg noodles that work just as well.
  • Thickening Agents: If you’re using a gluten-free flour blend, you can thicken the sauce with a bit of cornstarch mixed with water instead of traditional flour.
  • Check Labels: Always ensure that your tomato sauce and cheese are labeled gluten-free, as some brands may contain gluten.

With these gluten-free alternatives, everyone can enjoy a delicious Cheesy Ground Beef Noodle Bake without compromising on taste or texture.

Cooking Note for Cheesy Ground Beef Noodle Bake Recipe

When preparing the Cheesy Ground Beef Noodle Bake, there are a few important cooking notes to keep in mind. These tips will help ensure that your dish turns out perfectly every time, making it a delightful experience for you and your loved ones.

First, always use fresh ingredients. Fresh ground beef and quality cheeses will enhance the flavor of your bake. If possible, choose grass-fed beef for a richer taste and better nutrition. Fresh ingredients not only taste better but also contribute to the overall quality of the dish.

Next, be mindful of the cooking times. Overcooking the noodles can lead to a mushy texture in the final bake. Aim for al dente noodles, as they will absorb the sauce while baking without losing their structure. Remember, they will continue to cook in the oven, so slightly undercooking them is a good strategy.

Additionally, don’t skip the resting time after baking. Allowing the Cheesy Ground Beef Noodle Bake to cool for about 5 minutes before serving helps it set. This makes it easier to cut and serve, ensuring that each portion holds its shape. Plus, it gives the flavors a moment to meld together, enhancing the overall taste.

Lastly, feel free to experiment with spices and herbs. While the recipe calls for garlic powder, onion powder, and Italian seasoning, you can add your favorite herbs like basil or oregano for an extra flavor boost. A pinch of red pepper flakes can also add a delightful kick if you enjoy a bit of heat.

By keeping these cooking notes in mind, you’ll be well on your way to creating a delicious and satisfying Cheesy Ground Beef Noodle Bake that everyone will love!

Serving Suggestions for Cheesy Ground Beef Noodle Bake Recipe

Once your Cheesy Ground Beef Noodle Bake is ready, it’s time to think about how to serve it. This dish is hearty and filling on its own, but pairing it with the right sides and beverages can elevate your meal. Here are some ideal serving suggestions to complement your delicious bake.

Ideal Side Dishes

To balance the richness of the Cheesy Ground Beef Noodle Bake, consider serving it with lighter side dishes. Here are a few great options:

  • Garden Salad: A fresh garden salad with mixed greens, cherry tomatoes, and cucumbers adds a refreshing crunch. Drizzle with a light vinaigrette for a zesty touch.
  • Steamed Vegetables: Steamed broccoli, green beans, or carrots provide a nutritious and colorful addition to your meal. They also help cut through the creaminess of the bake.
  • Garlic Bread: For those who love bread, garlic bread is a classic choice. It’s perfect for soaking up any leftover sauce on your plate.
  • Coleslaw: A tangy coleslaw can add a nice crunch and a bit of acidity, balancing the flavors of the cheesy bake.

These side dishes not only enhance the meal but also add variety to your dining experience. Choose one or two to serve alongside your Cheesy Ground Beef Noodle Bake for a well-rounded dinner.

Perfect Pairings with Beverages

When it comes to beverages, you want something that complements the flavors of your Cheesy Ground Beef Noodle Bake. Here are some perfect pairings:

  • Red Wine: A medium-bodied red wine, like Merlot or Chianti, pairs beautifully with the savory flavors of the beef and cheese.
  • White Wine: If you prefer white, a crisp Sauvignon Blanc can provide a refreshing contrast to the richness of the dish.
  • Sparkling Water: For a non-alcoholic option, sparkling water with a slice of lemon or lime adds a refreshing touch without overpowering the meal.
  • Iced Tea: Unsweetened iced tea is another great choice. It’s light and can be flavored with lemon for a bit of zest.

Choosing the right beverages can enhance your dining experience, making your Cheesy Ground Beef Noodle Bake even more enjoyable. So, set the table, pour your drinks, and get ready to savor this delightful meal!

Tips for Perfecting Your Cheesy Ground Beef Noodle Bake Recipe

To ensure your Cheesy Ground Beef Noodle Bake turns out perfectly every time, it’s essential to keep a few tips in mind. These insights will help you avoid common pitfalls and make the most of your cooking experience. Let’s dive into some helpful advice!

Common Mistakes to Avoid

Even the best cooks can make mistakes. Here are some common ones to watch out for:

  • Overcooking the Noodles: One of the biggest mistakes is cooking the noodles too long. Remember, they will continue to cook in the oven. Aim for al dente, which means they should still have a slight bite to them.
  • Not Draining the Beef: After browning the ground beef, be sure to drain any excess fat. This step is crucial to prevent your bake from becoming greasy.
  • Skipping the Resting Time: Allowing the dish to cool for about 5 minutes after baking is important. This helps the layers set, making it easier to serve and enhancing the flavors.
  • Ignoring Seasoning: Don’t forget to taste and adjust the seasoning. Salt and pepper can make a big difference in flavor. Always season to your preference!

By avoiding these common mistakes, you’ll be on your way to creating a delicious Cheesy Ground Beef Noodle Bake that everyone will love.

Storage Tips for Leftovers

If you find yourself with leftovers, don’t worry! The Cheesy Ground Beef Noodle Bake stores well and can be enjoyed later. Here are some storage tips:

  • Cool Before Storing: Allow the bake to cool completely before transferring it to an airtight container. This helps prevent condensation, which can make the dish soggy.
  • Refrigerate: Store leftovers in the refrigerator for up to 3-4 days. Make sure to cover the container tightly to keep it fresh.
  • Freezing: If you want to keep it longer, you can freeze the bake. Wrap it tightly in plastic wrap and then in aluminum foil. It can last up to 2-3 months in the freezer.
  • Reheating: To reheat, simply place the leftovers in the oven at 350°F (175°C) until heated through. You can also microwave individual portions for a quick meal.

With these storage tips, you can enjoy your Cheesy Ground Beef Noodle Bake even after the first serving. It’s a great way to savor the flavors again!

Breakdown of Time for Cheesy Ground Beef Noodle Bake Recipe

Understanding the time needed for each step of the Cheesy Ground Beef Noodle Bake Recipe can help you plan your cooking efficiently. Here’s a breakdown of the time required for preparation, cooking, and the total time to enjoy this delicious dish.

Prep Time

The prep time for this recipe is approximately 15 minutes. During this time, you will gather all your ingredients, measure them out, and prepare the ground beef and noodles. Having everything ready before you start cooking makes the process smoother and more enjoyable.

Cooking Time

The cooking time for the Cheesy Ground Beef Noodle Bake is about 30 to 35 minutes. This includes browning the ground beef, boiling the egg noodles, and baking the assembled dish in the oven. Each step is essential for achieving the perfect texture and flavor in your bake.

Total Time

In total, you can expect to spend around 45 to 50 minutes from start to finish. This includes both prep and cooking times. With this quick and easy recipe, you can have a hearty meal ready in less than an hour, making it perfect for busy weeknights or family gatherings.

Now that you know the time breakdown, you can confidently plan your cooking session. Enjoy the process and the delicious results of your Cheesy Ground Beef Noodle Bake!

Nutritional Information for Cheesy Ground Beef Noodle Bake Recipe

Understanding the nutritional content of your meals is essential for maintaining a balanced diet. The Cheesy Ground Beef Noodle Bake is not only delicious but also provides a good amount of nutrients. Here’s a breakdown of the nutritional information per serving, which serves as a helpful guide for you and your family.

Calories

Each serving of the Cheesy Ground Beef Noodle Bake contains approximately 380 calories. This makes it a satisfying meal that can fit into a variety of dietary plans. The calorie count comes from the combination of ground beef, cheeses, and noodles, providing a hearty dish that keeps you full.

Protein Content

Protein is an essential nutrient for building and repairing tissues, and this recipe delivers a solid amount. Each serving contains about 25 grams of protein. The ground beef and cottage cheese are the primary sources of protein in this dish, making it a great option for those looking to increase their protein intake.

Sodium Levels

When it comes to sodium, each serving of the Cheesy Ground Beef Noodle Bake has around 800 milligrams. While this is a reasonable amount for a hearty meal, it’s important to be mindful of your overall sodium intake throughout the day. You can reduce sodium levels by using low-sodium tomato sauce or by adjusting the amount of added salt in the recipe.

By keeping these nutritional facts in mind, you can enjoy your Cheesy Ground Beef Noodle Bake while being aware of its health benefits. It’s a delicious way to nourish your body and satisfy your taste buds!

FAQs about Cheesy Ground Beef Noodle Bake Recipe

Can I use different types of cheese?

Absolutely! The beauty of the Cheesy Ground Beef Noodle Bake Recipe lies in its versatility. You can experiment with various cheeses to suit your taste. For instance, mozzarella cheese can add a delightful stretchiness, while pepper jack cheese can introduce a spicy kick. Feel free to mix and match your favorites. Just remember to keep the total amount of cheese similar to the original recipe for the best texture and flavor.

How can I make this dish spicier?

If you’re looking to add some heat to your Cheesy Ground Beef Noodle Bake, there are several easy ways to do so. One simple method is to add 1/2 teaspoon of red pepper flakes to the ground beef mixture while it simmers. You can also include diced jalapeños or a splash of hot sauce for an extra kick. Adjust the spice level according to your preference, and enjoy the added flavor!

Can I prepare this dish in advance?

Yes, you can prepare the Cheesy Ground Beef Noodle Bake in advance, making it a great option for busy days. You can assemble the dish up to a day ahead and store it in the refrigerator. Just cover it tightly with plastic wrap or aluminum foil. When you’re ready to bake, remove it from the fridge and let it sit at room temperature for about 30 minutes before placing it in the oven. This helps ensure even cooking.

What can I substitute for ground beef?

If you prefer a different protein or need a leaner option, there are plenty of substitutes for ground beef. Ground turkey or chicken works well and provides a lighter flavor. For a vegetarian option, consider using lentils, crumbled tofu, or plant-based meat alternatives. Each of these substitutes will bring its unique taste and texture to the dish, allowing you to customize it to your liking.

Conclusion on Cheesy Ground Beef Noodle Bake Recipe

In conclusion, the Cheesy Ground Beef Noodle Bake Recipe is a delightful dish that combines comfort, flavor, and simplicity. It’s perfect for busy weeknights or family gatherings, offering a satisfying meal that everyone will love. With its rich blend of ground beef, creamy cheeses, and tender noodles, this recipe is sure to become a staple in your kitchen.

Not only is it easy to prepare, but it also allows for endless customization. Whether you choose to add vegetables, switch up the protein, or experiment with different cheeses, the possibilities are endless. This versatility makes it a fantastic option for families with varying tastes and dietary needs.

As you embark on your cooking journey, remember the tips and variations shared throughout this article. They will help you create a Cheesy Ground Beef Noodle Bake that is not only delicious but also tailored to your preferences. So gather your ingredients, follow the steps, and enjoy the process of making this comforting dish.

Finally, don’t forget to share your culinary creations with family and friends. The joy of cooking is best experienced when shared. We hope this recipe brings warmth and happiness to your table, making mealtime a cherished occasion. Happy cooking!

Jerk Salmon Bites Recipe is a must-try dish!

Introduction to Jerk Salmon Bites Recipe

What are Jerk Salmon Bites?

Jerk Salmon Bites are a delightful twist on traditional jerk cuisine. Originating from Jamaica, jerk seasoning is known for its bold flavors and spicy kick. In this recipe, fresh salmon fillet is marinated in a mixture of jerk spices, honey, and lime juice, creating a perfect balance of heat and sweetness. The salmon is then grilled to perfection, resulting in tender, juicy bites that are bursting with flavor. These bites are not only delicious but also easy to prepare, making them a fantastic option for any gathering or a quick weeknight dinner.

Why You Should Try This Jerk Salmon Bites Recipe

There are many reasons to try this Jerk Salmon Bites recipe. First, it’s a healthy choice packed with protein and omega-3 fatty acids, which are great for heart health. Second, the vibrant flavors of the marinade will impress your family and friends. Whether you’re hosting a barbecue or simply looking for a tasty meal, these bites are sure to be a hit. Plus, they can be ready in under an hour, making them a convenient option for busy days. So, if you’re looking for a dish that’s both nutritious and full of flavor, this recipe is a must-try!

Ingredients for Jerk Salmon Bites Recipe

To create the mouthwatering Jerk Salmon Bites, you’ll need a few simple ingredients. Each component plays a vital role in building the dish’s unique flavor profile. Here’s what you’ll need:

  • 1 pound salmon fillet, skin removed and cut into bite-sized pieces
  • 2 tablespoons olive oil
  • 2 tablespoons jerk seasoning
  • 1 tablespoon honey
  • 1 tablespoon lime juice
  • 1/2 teaspoon garlic powder
  • 1/2 teaspoon salt
  • 1/4 teaspoon black pepper
  • Fresh lime wedges, for serving
  • Chopped fresh cilantro, for garnish

These ingredients come together to create a delightful blend of flavors. The jerk seasoning adds a spicy kick, while honey and lime juice provide a sweet and tangy contrast. Olive oil helps to keep the salmon moist during cooking, ensuring each bite is tender and juicy. With these ingredients on hand, you’re well on your way to making a delicious dish that everyone will love!

Step-by-Step Preparation of Jerk Salmon Bites Recipe

Step 1: Preparing the Salmon

First things first, let’s get the salmon ready! Start by selecting a fresh salmon fillet. Make sure it’s skinless, as this will help the marinade soak in better. Cut the salmon into bite-sized pieces, about one inch each. This size is perfect for grilling and ensures even cooking. Once you’ve cut the salmon, place the pieces in a large bowl. This will be the base for your delicious Jerk Salmon Bites!

Step 2: Making the Jerk Marinade

Now, it’s time to whip up that flavorful jerk marinade! In a separate bowl, combine the olive oil, jerk seasoning, honey, lime juice, garlic powder, salt, and black pepper. Use a whisk or a fork to mix everything together until it’s well blended. The marinade should have a nice balance of spicy, sweet, and tangy flavors. This is what will make your salmon bites truly special!

Step 3: Marinating the Salmon

Next, pour the jerk marinade over the salmon pieces in the large bowl. Make sure each piece is evenly coated with the marinade. This step is crucial, as it allows the salmon to absorb all those wonderful flavors. Once coated, cover the bowl with plastic wrap or a lid and place it in the refrigerator. Let it marinate for at least 30 minutes. If you have more time, marinating for a few hours will enhance the flavor even more!

Step 4: Cooking the Salmon Bites

After marinating, it’s time to cook those salmon bites! Preheat your grill or grill pan over medium-high heat. While it’s heating up, thread the marinated salmon pieces onto skewers. Leave a little space between each piece to ensure even cooking. Once the grill is hot, place the skewers on it. Grill the salmon for about 3-4 minutes on each side. You’ll know they’re done when the salmon is cooked through and has beautiful grill marks. After grilling, let the skewers rest for a couple of minutes before serving. This helps keep the salmon juicy!

Variations of Jerk Salmon Bites Recipe

Alternative Ingredients

If you want to switch things up, there are plenty of alternative ingredients you can use in your Jerk Salmon Bites recipe. For instance, if salmon isn’t your favorite, consider using shrimp or chicken. Both options will absorb the jerk marinade beautifully, giving you a different yet equally delicious flavor. You can also experiment with different types of fish, like tilapia or mahi-mahi, which can provide a lighter taste.

Additionally, if you’re looking for a vegetarian option, try using firm tofu. Cut the tofu into bite-sized cubes and marinate it just like the salmon. The marinade will infuse the tofu with flavor, making it a tasty alternative. You can also add vegetables like bell peppers, zucchini, or mushrooms to the skewers for a colorful and nutritious twist. These variations will keep your meals exciting and cater to different dietary preferences!

Different Cooking Methods

While grilling is a fantastic way to prepare Jerk Salmon Bites, there are other cooking methods you can try. For example, you can bake the salmon bites in the oven. Preheat your oven to 400°F (200°C) and place the marinated salmon pieces on a baking sheet lined with parchment paper. Bake for about 12-15 minutes, or until the salmon is cooked through. This method is great for those who prefer a hands-off approach.

Another option is to pan-sear the salmon bites. Heat a little olive oil in a skillet over medium-high heat. Add the marinated salmon pieces and cook for about 3-4 minutes on each side, just like on the grill. This method gives you a nice crust on the outside while keeping the inside tender and juicy. No matter which cooking method you choose, your Jerk Salmon Bites will be a hit!

Cooking Note for Jerk Salmon Bites Recipe

When preparing Jerk Salmon Bites, there are a few important cooking notes to keep in mind. First, always ensure your grill or grill pan is preheated properly. This step is crucial for achieving those beautiful grill marks and a nice sear on the salmon. If the grill isn’t hot enough, the salmon may stick and not cook evenly.

Next, consider the thickness of your salmon pieces. If they are cut too thick, they may require a longer cooking time. Conversely, if they are too thin, they can overcook quickly. Aim for uniform pieces, about one inch in size, to ensure even cooking throughout.

Additionally, keep an eye on the salmon while it cooks. Salmon can go from perfectly cooked to overdone in a matter of minutes. Look for a change in color and texture; the salmon should be opaque and flake easily with a fork when done. If you have a meat thermometer, the internal temperature should reach 145°F (63°C) for safe consumption.

Lastly, let the salmon rest for a couple of minutes after grilling. This resting period allows the juices to redistribute, making each bite tender and juicy. By following these cooking notes, you’ll ensure that your Jerk Salmon Bites turn out delicious every time!

Serving Suggestions for Jerk Salmon Bites Recipe

Pairing with Dips and Sauces

When it comes to serving Jerk Salmon Bites, the right dips and sauces can elevate the dish even further. A refreshing mango salsa is a fantastic choice. The sweetness of the mango complements the spicy jerk flavors beautifully. Simply dice fresh mango, red onion, and cilantro, then mix with lime juice for a zesty topping.

Another great option is a creamy avocado dip. Mash ripe avocados and mix them with lime juice, garlic powder, and a pinch of salt. This dip adds a rich, creamy texture that balances the heat of the jerk seasoning. You can also try a tangy yogurt sauce. Combine plain yogurt with lime juice, chopped cilantro, and a dash of salt for a cooling effect.

For those who enjoy a bit of heat, a spicy sriracha mayo can be a hit. Mix mayonnaise with sriracha sauce to taste, creating a creamy dip with a kick. These dips not only enhance the flavor of the salmon bites but also add a fun element to your meal. Feel free to get creative and mix and match different sauces to find your favorite combination!

Ideal Side Dishes

To round out your meal, consider serving Jerk Salmon Bites with some delicious side dishes. A fresh garden salad is always a great choice. Toss together mixed greens, cherry tomatoes, cucumber, and a light vinaigrette for a refreshing contrast to the spicy salmon.

Another excellent side is coconut rice. The creamy coconut flavor pairs wonderfully with the jerk seasoning, creating a tropical vibe. Simply cook rice in coconut milk instead of water for a rich, flavorful side. You can also add black beans for extra protein and fiber.

If you’re in the mood for something heartier, grilled vegetables make a perfect accompaniment. Bell peppers, zucchini, and asparagus can be tossed in olive oil and grilled alongside the salmon for a colorful and nutritious side. These options not only complement the Jerk Salmon Bites but also create a well-rounded meal that everyone will enjoy!

Tips for Perfecting Your Jerk Salmon Bites Recipe

To ensure your Jerk Salmon Bites turn out perfectly every time, consider these helpful tips. They will enhance the flavor and texture of your dish, making it even more enjoyable for you and your guests.

First, always use fresh ingredients. Fresh salmon will have a better taste and texture than frozen. If you must use frozen salmon, make sure to thaw it completely before marinating. This will help the marinade penetrate the fish more effectively.

Next, don’t skip the marinating step! Allowing the salmon to soak in the jerk marinade for at least 30 minutes is essential. If you have time, marinate it for a few hours or even overnight. This extra time will deepen the flavors and make your bites even more delicious.

When grilling, keep an eye on the temperature. Medium-high heat is ideal for cooking salmon. If the heat is too high, the outside may burn before the inside is fully cooked. Conversely, if it’s too low, the salmon may dry out. A good rule of thumb is to aim for a grill temperature of around 375°F (190°C).

Another tip is to use a fish spatula when flipping the salmon bites. This tool is designed to handle delicate fish without breaking it apart. If you don’t have one, a regular spatula will work, but be gentle when flipping to keep the pieces intact.

Lastly, don’t forget to garnish! A sprinkle of chopped fresh cilantro and a squeeze of lime juice right before serving can elevate the dish. These finishing touches add a burst of freshness that complements the rich flavors of the salmon. By following these tips, you’ll create Jerk Salmon Bites that are not only tasty but also visually appealing!

Breakdown of Time for Jerk Salmon Bites Recipe

Prep Time

Getting everything ready for your Jerk Salmon Bites is quick and easy! The prep time for this recipe is about 15 minutes. This includes gathering your ingredients, cutting the salmon into bite-sized pieces, and making the jerk marinade. With just a little bit of organization, you can have everything prepped and ready to go in no time!

Cooking Time

Once your salmon is marinated, the cooking time is quite short. Grilling the salmon bites takes about 8-10 minutes. You’ll grill them for 3-4 minutes on each side, ensuring they are cooked through and have those lovely grill marks. If you choose to bake or pan-sear the salmon, the cooking time may vary slightly, but it will still be a quick process!

Total Time

In total, you can expect to spend around 50-60 minutes from start to finish. This includes the 30 minutes of marinating time, which is essential for flavor development. So, in less than an hour, you can have a delicious and healthy meal ready to serve. Perfect for busy weeknights or when you want to impress guests without spending all day in the kitchen!

Nutritional Information for Jerk Salmon Bites Recipe

Calories

When it comes to enjoying Jerk Salmon Bites, you can feel good about the calories. Each serving contains approximately 220 calories. This makes it a great option for those who are mindful of their calorie intake but still want a flavorful meal. The combination of healthy ingredients ensures that you’re not just filling up on empty calories, but rather nourishing your body with wholesome food.

Protein

One of the standout features of this recipe is its high protein content. Each serving provides around 24 grams of protein. Salmon is an excellent source of protein, which is essential for muscle repair and growth. Including protein in your meals can also help you feel fuller for longer, making it easier to maintain a balanced diet. So, not only are you enjoying a delicious dish, but you’re also fueling your body with the nutrients it needs!

Sodium

For those watching their sodium intake, it’s important to note that each serving of Jerk Salmon Bites contains about 500 milligrams of sodium. While this is a reasonable amount for a flavorful dish, you can always adjust the seasoning to suit your dietary needs. For instance, using low-sodium jerk seasoning or reducing the added salt can help lower the sodium content without sacrificing taste. This way, you can enjoy your meal while keeping your health goals in mind!

FAQs about Jerk Salmon Bites Recipe

Can I use frozen salmon for this recipe?

Yes, you can use frozen salmon for this recipe! However, it’s important to thaw the salmon completely before marinating. Thawing allows the marinade to penetrate the fish better, enhancing the flavor. To thaw, simply place the salmon in the refrigerator overnight or use the defrost setting on your microwave. Once thawed, follow the recipe as usual for delicious Jerk Salmon Bites!

How spicy are Jerk Salmon Bites?

The spiciness of Jerk Salmon Bites can vary based on the jerk seasoning you use. Traditional jerk seasoning has a nice kick, but it’s not overwhelmingly spicy. If you prefer a milder flavor, you can reduce the amount of jerk seasoning in the marinade. On the other hand, if you love heat, feel free to add a pinch of cayenne pepper or extra jerk seasoning. This way, you can customize the spice level to suit your taste!

What can I substitute for jerk seasoning?

If you don’t have jerk seasoning on hand, there are several substitutes you can use. A mix of spices like paprika, allspice, thyme, and cayenne pepper can create a similar flavor profile. Alternatively, you can use a store-bought spice blend labeled as “Caribbean seasoning” or “spicy seasoning.” Just keep in mind that the flavor may differ slightly, but it will still be delicious!

How long can I store leftover Jerk Salmon Bites?

Leftover Jerk Salmon Bites can be stored in an airtight container in the refrigerator for up to 3 days. To reheat, simply place them in a skillet over low heat until warmed through. You can also enjoy them cold in salads or wraps for a quick meal. However, for the best taste and texture, it’s recommended to consume them within a couple of days. This way, you can savor the flavors while they’re still fresh!

Conclusion on Jerk Salmon Bites Recipe

In conclusion, the Jerk Salmon Bites recipe is a fantastic way to enjoy a flavorful and healthy meal. With its vibrant blend of spices, sweet honey, and zesty lime, this dish is sure to impress anyone who tries it. Not only is it easy to prepare, but it also offers a variety of options for customization, making it suitable for different tastes and dietary preferences.

Whether you’re grilling for a summer barbecue or looking for a quick weeknight dinner, these salmon bites are a perfect choice. The high protein content and healthy fats from the salmon make it a nutritious option that can help you feel satisfied and energized. Plus, with the ability to pair them with various dips and sides, you can create a complete meal that’s both delicious and visually appealing.

So, gather your ingredients, fire up the grill, and get ready to enjoy a delightful culinary experience. With just a little preparation and cooking time, you can serve up a dish that’s not only tasty but also brings a taste of the Caribbean to your table. Don’t forget to share this recipe with friends and family, as they’ll surely want to join in on the fun of making and enjoying these Jerk Salmon Bites!

Salisbury Steak Meatballs with Mushroom Gravy Recipe is delicious!

Introduction to Salisbury Steak Meatballs with Mushroom Gravy Recipe

What Makes Salisbury Steak Meatballs Unique?

Salisbury steak meatballs are a delightful twist on the classic Salisbury steak dish. Traditionally, Salisbury steak is a seasoned ground beef patty served with rich gravy. However, by transforming it into meatballs, you create a fun and easy-to-eat version that’s perfect for family dinners. The combination of ground beef, breadcrumbs, and savory seasonings makes these meatballs incredibly flavorful. Plus, the addition of mushroom gravy elevates the dish, adding a creamy texture and earthy taste that complements the meatballs beautifully.

The Comfort of Homemade Meals

There’s something special about homemade meals that brings warmth and comfort to our hearts. Cooking Salisbury steak meatballs with mushroom gravy at home allows you to control the ingredients and flavors. You can adjust the seasonings to suit your taste, ensuring every bite is just right. Moreover, the aroma of meatballs simmering in gravy fills your kitchen, creating a cozy atmosphere that invites everyone to gather around the table. This recipe not only satisfies hunger but also nurtures connections with loved ones, making it a perfect choice for any occasion.

Ingredients for Salisbury Steak Meatballs with Mushroom Gravy Recipe

Essential Ingredients

To create delicious Salisbury steak meatballs with mushroom gravy, you’ll need a few key ingredients. These essentials ensure that your meatballs are flavorful and the gravy is rich. Here’s what you’ll need:

  • 1 pound ground beef: This is the main ingredient, providing the meatiness and flavor.
  • 1/2 cup breadcrumbs: Breadcrumbs help bind the meatballs together and add texture.
  • 1/4 cup grated Parmesan cheese: This adds a savory depth to the meatballs.
  • 1/4 cup finely chopped onion: Onions bring sweetness and moisture to the mixture.
  • 1/4 cup milk: Milk keeps the meatballs tender and juicy.
  • 1 large egg: The egg acts as a binder, helping the meatballs hold their shape.
  • 1 teaspoon garlic powder: Garlic powder adds a wonderful flavor.
  • 1 teaspoon Worcestershire sauce: This sauce enhances the umami taste.
  • 1 teaspoon salt: Salt is essential for seasoning.
  • 1/2 teaspoon black pepper: Pepper adds a bit of heat.
  • 1 tablespoon olive oil: Olive oil is used for cooking the meatballs.

Optional Ingredients for Customization

While the essential ingredients create a fantastic dish, you can customize your Salisbury steak meatballs with additional ingredients. Here are some options to consider:

  • Fresh herbs: Chopped parsley or thyme can add freshness and flavor.
  • Ground turkey or chicken: For a lighter version, substitute ground beef with turkey or chicken.
  • Spices: Experiment with spices like paprika or Italian seasoning for a unique twist.
  • Vegetables: Finely chopped bell peppers or carrots can add extra nutrition and flavor.
  • Cheese: Try adding shredded cheese into the meatball mixture for a cheesy surprise.

These optional ingredients allow you to tailor the recipe to your preferences, making it even more enjoyable for you and your family.

Preparation of Salisbury Steak Meatballs with Mushroom Gravy Recipe

Step 1: Preparing the Meatball Mixture

To start, gather all your essential ingredients. In a large bowl, combine the ground beef, breadcrumbs, grated Parmesan cheese, finely chopped onion, milk, egg, garlic powder, Worcestershire sauce, salt, and black pepper. Use your hands or a spoon to mix everything together until well combined. Be careful not to overmix, as this can make the meatballs tough. The mixture should be moist and hold together well.

Step 2: Shaping the Meatballs

Once your meatball mixture is ready, it’s time to shape them. Take a small amount of the mixture, about the size of a golf ball, and roll it between your palms to form a meatball. Aim for a size of about 1.5 inches in diameter. Place the shaped meatballs on a plate or a baking sheet. This step is fun and allows you to get creative. You can even let your kids help with this part!

Step 3: Cooking the Meatballs

Next, heat the olive oil in a large skillet over medium heat. Once the oil is hot, carefully add the meatballs to the skillet. Cook them for about 8-10 minutes, turning occasionally. You want them to be browned on all sides. This browning adds flavor and texture. Once they are nicely browned, remove the meatballs from the skillet and set them aside on a plate.

Step 4: Making the Mushroom Gravy

In the same skillet, melt the butter over medium heat. Add the sliced mushrooms and sauté them for about 5-7 minutes until they are browned and tender. The mushrooms will soak up the delicious flavors from the skillet. Next, stir in the beef broth, soy sauce, and dried thyme. Bring the mixture to a gentle simmer, allowing the flavors to meld together.

Step 5: Combining Meatballs and Gravy

Now it’s time to bring everything together! Carefully add the browned meatballs back into the skillet with the mushroom gravy. Cover the skillet and let it simmer for 15-20 minutes. This allows the meatballs to cook through and absorb the gravy’s flavors. Finally, stir in the cornstarch mixture to thicken the gravy. Cook for an additional 2-3 minutes until the gravy reaches your desired consistency. Your Salisbury steak meatballs with mushroom gravy are now ready to be served!

Variations of Salisbury Steak Meatballs with Mushroom Gravy Recipe

Alternative Protein Options

If you’re looking to switch things up, there are several alternative protein options you can use in your Salisbury steak meatballs. Ground turkey or chicken is a popular choice for those wanting a lighter meal. These lean meats still provide great flavor and work well with the mushroom gravy. Just keep in mind that they may cook a bit faster than beef, so adjust your cooking time accordingly.

Another option is to use ground pork. It adds a slightly sweeter flavor and pairs nicely with the savory gravy. If you prefer a more robust taste, consider using a mix of ground beef and pork. This combination can enhance the overall flavor profile of your meatballs.

For a unique twist, try using ground lamb. It brings a rich, earthy flavor that complements the mushroom gravy beautifully. Just remember to season it well, as lamb can have a stronger taste. These alternative proteins allow you to enjoy Salisbury steak meatballs in new and exciting ways!

Vegetarian and Vegan Adaptations

For those following a vegetarian or vegan diet, you can still enjoy Salisbury steak meatballs! Start by using plant-based ground meat alternatives, which are widely available in grocery stores. These products mimic the texture and flavor of ground beef, making them a great substitute.

Another option is to create meatballs using lentils or chickpeas. Cooked lentils can be mashed and mixed with breadcrumbs, spices, and vegetables to form a delicious meatball. Chickpeas can be blended into a smooth mixture and combined with herbs and spices for added flavor. Both options are nutritious and packed with protein.

For the gravy, simply replace beef broth with vegetable broth. This keeps the dish flavorful while making it suitable for vegetarians and vegans. You can also add nutritional yeast to the gravy for a cheesy flavor without dairy. These adaptations ensure that everyone can enjoy the comforting taste of Salisbury steak meatballs with mushroom gravy!

Cooking Note for Salisbury Steak Meatballs with Mushroom Gravy Recipe

Tips for Perfectly Cooked Meatballs

Cooking meatballs to perfection can be a bit tricky, but with a few simple tips, you can achieve delicious results every time. First, ensure that your meatball mixture is well combined but not overmixed. Overmixing can lead to tough meatballs. Instead, mix just until the ingredients are incorporated.

When shaping the meatballs, try to keep them uniform in size. This helps them cook evenly. Using a cookie scoop can make this task easier and more consistent. Additionally, make sure your skillet is hot enough before adding the meatballs. A hot skillet helps to sear the meatballs, locking in moisture and flavor.

As you cook the meatballs, turn them gently to avoid breaking them apart. If you notice any meatballs starting to fall apart, you can reduce the heat slightly. This will allow them to cook through without losing their shape. Finally, always check the internal temperature of the meatballs. They should reach 160°F (71°C) to ensure they are fully cooked and safe to eat.

Adjusting Gravy Consistency

The gravy is a key component of this dish, and getting the right consistency is essential. If you prefer a thicker gravy, you can add more cornstarch mixed with water. Just remember to stir it in gradually, allowing the gravy to thicken as it cooks. Keep in mind that the gravy will continue to thicken as it cools, so aim for a slightly thinner consistency while cooking.

On the other hand, if your gravy turns out too thick, you can easily adjust it by adding a bit more beef broth or water. Stir it in slowly until you reach your desired consistency. For a smoother gravy, consider using an immersion blender to blend the mixture after cooking. This will create a velvety texture that coats the meatballs beautifully.

By following these tips, you can ensure that your Salisbury steak meatballs with mushroom gravy are not only flavorful but also have the perfect texture and consistency!

Serving Suggestions for Salisbury Steak Meatballs with Mushroom Gravy Recipe

Best Side Dishes to Pair

When it comes to serving Salisbury steak meatballs with mushroom gravy, choosing the right side dishes can elevate your meal. Here are some delicious options that pair perfectly with this comforting dish:

  • Mashed Potatoes: Creamy mashed potatoes are a classic choice. They soak up the rich mushroom gravy beautifully, making every bite delightful.
  • Egg Noodles: Tender egg noodles are another fantastic option. Their soft texture complements the meatballs and gravy, creating a satisfying combination.
  • Rice: Fluffy white or brown rice can serve as a great base for the meatballs and gravy. It adds a nice texture and absorbs the flavors well.
  • Steamed Vegetables: For a healthier balance, consider serving steamed broccoli, green beans, or carrots. They add color and nutrition to your plate.
  • Salad: A fresh garden salad with a light vinaigrette can provide a refreshing contrast to the hearty meatballs. It’s a great way to add some crunch!

These side dishes not only enhance the meal but also make it more visually appealing. Choose one or a combination to create a well-rounded dinner that everyone will love!

Creative Serving Ideas

Serving Salisbury steak meatballs with mushroom gravy can be fun and creative! Here are some ideas to make your presentation stand out:

  • Meatball Sub: For a twist, serve the meatballs in a toasted sub roll. Top with extra gravy and cheese for a delicious meatball sub sandwich.
  • Gravy Bowl: Create a “gravy bowl” by serving the meatballs over a bed of mashed potatoes or rice in a deep dish. This makes for a hearty and comforting meal.
  • Skillet Presentation: Serve the meatballs directly from the skillet for a rustic look. This adds a homey touch and keeps the dish warm longer.
  • Garnish: Don’t forget to garnish your dish! A sprinkle of fresh parsley or thyme on top of the meatballs adds a pop of color and freshness.
  • Family Style: For a family gathering, serve the meatballs and gravy in a large bowl, allowing everyone to help themselves. This encourages sharing and conversation.

These creative serving ideas can make your Salisbury steak meatballs with mushroom gravy not just a meal, but an experience. Enjoy experimenting with different presentations to impress your family and friends!

Tips for Making Salisbury Steak Meatballs with Mushroom Gravy Recipe

Common Mistakes to Avoid

When making Salisbury steak meatballs with mushroom gravy, a few common mistakes can affect the final dish. First, be careful not to overmix the meatball mixture. Overmixing can lead to tough meatballs, which are not enjoyable. Instead, mix just until the ingredients are combined.

Another mistake is not browning the meatballs properly. Browning adds flavor and texture, so make sure your skillet is hot enough before adding the meatballs. If the skillet is too cool, the meatballs will steam instead of sear.

Also, avoid skipping the simmering step after adding the meatballs to the gravy. This step is crucial for allowing the meatballs to cook through and absorb the flavors of the gravy. Lastly, always check the internal temperature of the meatballs. They should reach 160°F (71°C) to ensure they are safe to eat.

Storage and Reheating Tips

If you have leftovers, storing them properly is essential to maintain their flavor and texture. Allow the Salisbury steak meatballs with mushroom gravy to cool completely before transferring them to an airtight container. They can be stored in the refrigerator for up to three days.

For longer storage, consider freezing the meatballs. Place them in a freezer-safe container or bag, separating layers with parchment paper to prevent sticking. They can be frozen for up to three months.

When reheating, you can use the microwave or stovetop. If using the microwave, heat in short intervals, stirring in between to ensure even heating. If reheating on the stovetop, add a splash of beef broth or water to the skillet to keep the gravy from thickening too much. Heat over low to medium heat until warmed through.

By following these tips, you can enjoy your Salisbury steak meatballs with mushroom gravy even after the initial meal!

Breakdown of Time for Salisbury Steak Meatballs with Mushroom Gravy Recipe

Prep Time

Preparing Salisbury steak meatballs with mushroom gravy is a straightforward process. The prep time for this recipe is approximately 15-20 minutes. During this time, you will gather all your ingredients, mix the meatball mixture, and shape the meatballs. This step is crucial as it sets the foundation for the delicious meal ahead. Make sure to have everything ready before you start cooking to streamline the process.

Cooking Time

The cooking time for the Salisbury steak meatballs is about 25-30 minutes. This includes browning the meatballs in the skillet for about 8-10 minutes and then simmering them in the mushroom gravy for 15-20 minutes. The simmering step is essential as it allows the meatballs to cook through and absorb the rich flavors of the gravy. Keep an eye on them to ensure they don’t overcook, which can lead to dryness.

Total Time

In total, you can expect to spend around 40-50 minutes from start to finish when making Salisbury steak meatballs with mushroom gravy. This includes both the prep and cooking times. It’s a relatively quick meal to prepare, making it perfect for busy weeknights or family gatherings. With just a little time and effort, you can create a comforting dish that everyone will love!

Nutritional Information for Salisbury Steak Meatballs with Mushroom Gravy Recipe

Calories and Macronutrients

Understanding the nutritional content of your meals is essential for maintaining a balanced diet. Each serving of Salisbury steak meatballs with mushroom gravy contains approximately 350 calories. This makes it a hearty yet manageable option for dinner. Here’s a breakdown of the macronutrients per serving:

  • Net Carbs: 10g
  • Protein: 25g
  • Fat: 20g

These values indicate that the dish is rich in protein, making it a great choice for muscle repair and growth. The moderate fat content comes from the ground beef and olive oil, providing essential fatty acids that support overall health. The low net carbs make it suitable for those watching their carbohydrate intake.

Health Benefits of Ingredients

The ingredients in Salisbury steak meatballs with mushroom gravy not only contribute to its delicious flavor but also offer various health benefits:

  • Ground Beef: A great source of high-quality protein, iron, and B vitamins, which are vital for energy production and overall health.
  • Breadcrumbs: Whole grain breadcrumbs can provide fiber, which aids in digestion and helps maintain a healthy gut.
  • Parmesan Cheese: This cheese is rich in calcium and protein, supporting bone health and muscle function.
  • Onions: Onions are packed with antioxidants and have anti-inflammatory properties, which can help boost the immune system.
  • Mushrooms: Mushrooms are low in calories and high in nutrients, including vitamins D and B, selenium, and antioxidants, which can support heart health.
  • Thyme: This herb is known for its antibacterial properties and can aid in digestion, making it a healthy addition to the dish.

By incorporating these wholesome ingredients, Salisbury steak meatballs with mushroom gravy not only satisfy your taste buds but also contribute positively to your health. Enjoy this comforting meal knowing it’s both delicious and nutritious!

FAQs about Salisbury Steak Meatballs with Mushroom Gravy Recipe

Can I freeze Salisbury Steak Meatballs?

Yes, you can freeze Salisbury steak meatballs! To do this, allow the meatballs to cool completely after cooking. Then, place them in a freezer-safe container or bag. Make sure to separate layers with parchment paper to prevent sticking. They can be frozen for up to three months. When you’re ready to enjoy them, simply thaw in the refrigerator overnight and reheat in the microwave or on the stovetop.

What can I substitute for mushrooms in the gravy?

If you’re not a fan of mushrooms or have an allergy, there are several substitutes you can use in the gravy. One option is to use finely chopped onions or shallots for a different flavor profile. You can also try adding diced bell peppers or zucchini for a veggie twist. If you want a similar texture, consider using canned artichoke hearts or even cooked lentils. These alternatives will still create a delicious gravy to accompany your meatballs!

How do I know when the meatballs are fully cooked?

To ensure your meatballs are fully cooked, the best method is to check their internal temperature. Use a meat thermometer to confirm they reach 160°F (71°C). If you don’t have a thermometer, you can cut one meatball in half. The inside should be no longer pink, and the juices should run clear. This ensures that they are safe to eat and perfectly cooked!

Can I make Salisbury Steak Meatballs ahead of time?

Absolutely! You can prepare Salisbury steak meatballs ahead of time. You can mix the meatball ingredients and shape them, then store them in the refrigerator for up to 24 hours before cooking. Alternatively, you can cook the meatballs and store them in the gravy. Just keep them in an airtight container in the fridge for up to three days. Reheat gently on the stovetop or in the microwave when you’re ready to serve!

Conclusion on Salisbury Steak Meatballs with Mushroom Gravy Recipe

Recap of Key Points

In summary, Salisbury steak meatballs with mushroom gravy is a delightful dish that combines comfort and flavor. The recipe is straightforward, making it perfect for both novice and experienced cooks. You start with a simple mixture of ground beef, breadcrumbs, and seasonings, shaping them into meatballs that are then browned to perfection. The rich mushroom gravy adds a savory touch, enhancing the overall experience. With various options for customization, you can easily adapt the recipe to suit your dietary preferences or to use what you have on hand.

From the essential ingredients to the cooking techniques, each step is designed to ensure a delicious outcome. Remember to pay attention to the cooking times and temperatures to achieve perfectly cooked meatballs. Pairing the dish with sides like mashed potatoes or egg noodles can elevate your meal, making it a hit at the dinner table.

Encouragement to Try the Recipe

Now that you have all the information you need, it’s time to roll up your sleeves and give this Salisbury steak meatballs with mushroom gravy recipe a try! Whether you’re cooking for your family or hosting friends, this dish is sure to impress. The comforting flavors and hearty texture will warm hearts and create lasting memories around the dinner table. So, gather your ingredients, follow the steps, and enjoy the delightful experience of making and sharing this classic meal. Happy cooking!

Cincinnati Chili is a unique dish that delights all!

Introduction to Cincinnati Chili Recipe

Cincinnati chili is not just any chili; it’s a beloved dish with a rich history and a unique flavor profile. Originating in the early 1920s, this dish has become a staple in Cincinnati, Ohio, and beyond. Unlike traditional chili, which often focuses on heat and beans, Cincinnati chili is known for its sweet and savory blend of spices. It’s typically served over spaghetti, making it a comforting meal that warms the heart.

What Makes Cincinnati Chili Unique?

What sets Cincinnati chili apart from other chili recipes? First, it features a distinctive combination of spices, including cinnamon and cocoa powder, which adds a surprising depth of flavor. This sweet and spicy mix creates a unique taste that many find irresistible. Additionally, Cincinnati chili is often served with a variety of toppings, such as shredded cheddar cheese, chopped onions, and sour cream, allowing for a customizable dining experience.

Another unique aspect is its serving style. While most chili is served in a bowl, Cincinnati chili is traditionally served over a bed of spaghetti, creating a delightful fusion of flavors and textures. This dish is often enjoyed as a quick meal or a festive gathering dish, making it a versatile option for any occasion.

In summary, Cincinnati chili is a one-of-a-kind dish that combines sweet and savory elements, served in a way that is both comforting and satisfying. Whether you’re a long-time fan or trying it for the first time, this Cincinnati chili recipe is sure to impress!

Ingredients for Cincinnati Chili Recipe

To create a delicious Cincinnati chili, you’ll need a variety of ingredients that come together to form its unique flavor. Here’s a list of what you’ll need:

  • 1 pound ground beef: This is the base of your chili, providing rich flavor and protein.
  • 1 medium onion, finely chopped: Onions add sweetness and depth to the dish.
  • 2 cloves garlic, minced: Garlic enhances the overall flavor with its aromatic qualities.
  • 2 cups beef broth: This adds moisture and a savory taste to the chili.
  • 1 (15-ounce) can tomato sauce: Tomato sauce gives the chili its rich, tomatoey base.
  • 2 tablespoons chili powder: This is essential for that classic chili flavor.
  • 1 tablespoon apple cider vinegar: This adds a tangy kick that balances the sweetness.
  • 1 tablespoon Worcestershire sauce: This sauce brings umami and depth to the dish.
  • 1 teaspoon ground cumin: Cumin adds a warm, earthy flavor.
  • 1 teaspoon cinnamon: A surprising ingredient that gives Cincinnati chili its signature taste.
  • 1 teaspoon salt: Essential for enhancing all the flavors.
  • 1/2 teaspoon black pepper: Adds a mild heat and depth.
  • 1/4 teaspoon cayenne pepper (optional): For those who enjoy a bit of heat.
  • 1 (15-ounce) can kidney beans, drained and rinsed (optional): Beans can be added for extra texture and protein.
  • Cooked spaghetti: The traditional base for serving Cincinnati chili.
  • Shredded cheddar cheese: A must-have topping that adds creaminess.
  • Chopped onions: For a fresh crunch on top.
  • Sour cream: Adds a cool, creamy finish to the dish.

Gathering these ingredients will set you on the right path to making a delightful Cincinnati chili. Each component plays a vital role in creating the dish’s signature flavor, making it a favorite for many. Now that you have your ingredients ready, let’s move on to the preparation steps!

Step-by-Step Preparation of Cincinnati Chili Recipe

Step 1: Gather Your Ingredients

Before you start cooking, it’s important to have everything ready. Gather all the ingredients listed above. This includes the ground beef, onions, garlic, and spices. Having everything in one place makes the cooking process smoother and more enjoyable. Plus, it helps you avoid any last-minute trips to the store!

Step 2: Prepare the Base for Cincinnati Chili

Now that you have your ingredients, it’s time to start cooking. In a large pot, heat it over medium heat. Add the ground beef and cook it until it’s browned. Use a spoon to break it apart as it cooks. This step is crucial because it gives your chili a rich flavor. If there’s excess fat, drain it off to keep your chili from being greasy.

Next, add the finely chopped onion and minced garlic to the pot. Cook these for about 3-4 minutes, or until the onion becomes translucent. This step adds sweetness and depth to your chili, making it even more delicious!

Step 3: Add the Spices and Simmer

Once your base is ready, it’s time to add the magic! Stir in the beef broth, tomato sauce, chili powder, apple cider vinegar, Worcestershire sauce, cumin, cinnamon, salt, black pepper, and cayenne pepper if you like it spicy. Mix everything well to combine the flavors.

Bring the mixture to a boil, then reduce the heat to low. Let it simmer uncovered for 30-45 minutes. Stir occasionally to prevent sticking. This simmering time allows the flavors to meld together beautifully, creating that signature Cincinnati chili taste.

Step 4: Final Touches for Cincinnati Chili

As your chili simmers, it’s time to think about the final touches. If you’re using kidney beans, add them to the pot during the last 10 minutes of cooking. This will warm them up without making them mushy.

Once the chili is done simmering, it’s ready to serve! Ladle the chili over a bed of cooked spaghetti. Top it with shredded cheddar cheese, chopped onions, and a dollop of sour cream. These toppings add flavor and texture, making your Cincinnati chili even more enjoyable!

Variations of Cincinnati Chili Recipe

Vegetarian Cincinnati Chili Recipe

If you’re looking for a meat-free option, a vegetarian Cincinnati chili recipe is a fantastic choice! You can easily substitute the ground beef with lentils or a plant-based meat alternative. Lentils are a great source of protein and add a hearty texture to the dish. Here’s how to make it:

  • 1 pound lentils: Use brown or green lentils for the best texture.
  • Follow the same steps: Prepare the base with onions and garlic as you would in the traditional recipe.
  • Use vegetable broth: This will keep the dish flavorful while keeping it vegetarian.

By using lentils, you’ll still enjoy the rich flavors of Cincinnati chili without any meat. Serve it over spaghetti and top it with your favorite toppings for a delicious meal that everyone can enjoy!

Cincinnati Chili Recipe with Different Meats

While ground beef is the classic choice, you can experiment with different meats to create your own twist on Cincinnati chili. Here are a few options:

  • Ground Turkey: A leaner alternative that still provides great flavor. It’s perfect for those looking to cut down on fat.
  • Ground Chicken: This option is light and can be seasoned well to match the traditional taste.
  • Pork: Ground pork adds a unique richness to the chili. It pairs well with the spices and gives a different flavor profile.

Regardless of the meat you choose, follow the same preparation steps. The spices and cooking method will ensure that your Cincinnati chili remains delicious and satisfying. Enjoy the versatility of this dish by trying out different meats!

Cooking Note for Cincinnati Chili Recipe

When preparing your Cincinnati chili, there are a few important cooking notes to keep in mind. These tips will help you achieve the best flavor and texture, ensuring your dish is a hit with family and friends.

First, the choice of ground beef is crucial. Opt for a leaner blend, such as 80/20, to reduce excess fat while still maintaining flavor. If you prefer a healthier option, consider using ground turkey or chicken. These alternatives can provide a lighter taste without sacrificing the essence of Cincinnati chili.

Next, the simmering time is key. Allowing the chili to simmer for at least 30 minutes helps the flavors meld together beautifully. If you have the time, letting it simmer for longer can enhance the taste even more. Just remember to stir occasionally to prevent sticking.

Another tip is to adjust the spices according to your taste. If you enjoy a spicier chili, feel free to increase the cayenne pepper or add a dash of hot sauce. Conversely, if you prefer a milder flavor, you can reduce the chili powder or omit the cayenne altogether.

Lastly, Cincinnati chili is known for its unique sweetness. If you find your chili is too tangy, consider adding a pinch of sugar or a splash of maple syrup. This can balance the flavors and bring out the sweetness that makes Cincinnati chili so special.

By keeping these cooking notes in mind, you’ll be well on your way to creating a delicious Cincinnati chili that everyone will love. Happy cooking!

Serving Suggestions for Cincinnati Chili Recipe

Traditional Serving Styles

When it comes to serving Cincinnati chili, tradition plays a big role. The classic way to enjoy this dish is over a bed of cooked spaghetti. This unique combination of flavors and textures is what makes Cincinnati chili so special. Here’s how to serve it traditionally:

  • Spaghetti Base: Start with a generous portion of cooked spaghetti on the plate. This acts as the foundation for your chili.
  • Ladle the Chili: Pour the hot Cincinnati chili over the spaghetti, ensuring it covers the noodles well.
  • Add Toppings: Top your chili with a hearty sprinkle of shredded cheddar cheese, a handful of chopped onions, and a dollop of sour cream. These toppings not only enhance the flavor but also add a delightful creaminess and crunch.

This traditional serving style is often referred to as a “3-way” when it includes just the chili and cheese, or a “4-way” when you add onions or beans. It’s a comforting meal that’s perfect for family dinners or gatherings with friends.

Creative Twists on Serving Cincinnati Chili

If you’re feeling adventurous, there are plenty of creative ways to serve Cincinnati chili that can add a fun twist to this classic dish. Here are some ideas to inspire you:

  • Chili Dogs: Serve Cincinnati chili over hot dogs for a delicious twist. Top with cheese and onions for a tasty treat!
  • Chili Nachos: Spread tortilla chips on a baking sheet, ladle the chili over them, and sprinkle with cheese. Bake until the cheese melts for a fun appetizer.
  • Chili Bowls: For a low-carb option, serve Cincinnati chili in a bowl without spaghetti. Top with your favorite toppings for a hearty meal.
  • Stuffed Peppers: Use Cincinnati chili as a filling for bell peppers. Bake them until tender for a unique and flavorful dish.

These creative serving ideas can make your Cincinnati chili experience even more enjoyable. Whether you stick to tradition or try something new, this dish is sure to please everyone at the table!

Tips for Perfecting Your Cincinnati Chili Recipe

Making a delicious Cincinnati chili is an art, and with a few helpful tips, you can elevate your dish to perfection. Here are some tried-and-true suggestions to ensure your Cincinnati chili is a hit every time.

First, consider the quality of your ingredients. Fresh, high-quality ground beef or meat alternatives will significantly enhance the flavor. If possible, choose grass-fed beef for a richer taste. Additionally, using fresh spices rather than old ones can make a noticeable difference in the overall flavor profile.

Next, don’t rush the cooking process. Allowing your chili to simmer for a longer time can deepen the flavors. If you have the time, let it simmer for an hour or more. Just remember to stir occasionally to prevent sticking. This slow cooking method allows the spices to meld beautifully, creating that signature Cincinnati chili taste.

Another tip is to balance the sweetness. Cincinnati chili is known for its unique sweet and savory flavor. If you find your chili is too sweet, try adding a splash of vinegar or a pinch of salt to balance it out. Conversely, if it’s too tangy, a small amount of sugar can help bring back the sweetness.

Don’t forget about the toppings! The right toppings can elevate your Cincinnati chili experience. Experiment with different cheeses, such as pepper jack for a spicy kick, or add diced jalapeños for extra heat. Fresh herbs like cilantro or parsley can also add a refreshing touch.

Lastly, serve your Cincinnati chili with a side of crusty bread or cornbread. This not only complements the dish but also provides a great way to soak up the delicious sauce. Enjoying your chili with a side can make the meal even more satisfying.

By following these tips, you’ll be well on your way to perfecting your Cincinnati chili recipe. Each batch will be a delightful experience, bringing warmth and comfort to your table!

Breakdown of Time for Cincinnati Chili Recipe

Prep Time

Preparing Cincinnati chili is a straightforward process. The prep time typically takes about 15-20 minutes. During this time, you’ll gather all your ingredients, chop the onions, and mince the garlic. Having everything ready before you start cooking makes the process smoother and more enjoyable. Plus, it helps you stay organized in the kitchen!

Cooking Time

The cooking time for Cincinnati chili is approximately 30-45 minutes. This includes browning the ground beef and simmering the chili to allow the flavors to meld together. It’s essential to let the chili simmer uncovered for at least 30 minutes. This step is crucial for developing that rich, savory taste that Cincinnati chili is known for. If you have extra time, letting it simmer longer can enhance the flavors even more!

Total Time

In total, you can expect to spend about 45-65 minutes from start to finish when making Cincinnati chili. This includes both the prep and cooking times. It’s a relatively quick dish to prepare, making it perfect for weeknight dinners or gatherings with friends. With just a little time and effort, you can create a delicious meal that everyone will love!

Nutritional Information for Cincinnati Chili Recipe

Calories

When enjoying a hearty Cincinnati chili, it’s important to be aware of its nutritional content. Each serving of this delicious dish contains approximately 350 calories. This makes it a satisfying meal that can fit into a balanced diet. The combination of ground beef, beans, and toppings contributes to the overall calorie count, providing energy and flavor in every bite.

Protein

Protein is a key component of Cincinnati chili, making it a great choice for those looking to boost their protein intake. Each serving offers about 25 grams of protein. This protein comes primarily from the ground beef and optional kidney beans, which help keep you feeling full and satisfied. Including protein in your meals is essential for muscle repair and overall health, making this chili a nutritious option.

Sodium

Sodium content is another important factor to consider when enjoying Cincinnati chili. Each serving contains around 800 milligrams of sodium. This amount can vary based on the specific ingredients used, such as the type of broth and sauces. If you’re watching your sodium intake, consider using low-sodium broth and sauces to help reduce the overall sodium content. Balancing your meals with fresh vegetables and whole grains can also help manage sodium levels while enjoying this flavorful dish.

FAQs about Cincinnati Chili Recipe

What is Cincinnati Chili typically served with?

Cincinnati chili is traditionally served over a bed of cooked spaghetti. This unique serving style sets it apart from other chili recipes. However, you can also enjoy it with hot dogs, in a bowl with toppings, or even as a filling for stuffed peppers. The versatility of Cincinnati chili allows you to customize your meal according to your preferences!

Can I make Cincinnati Chili in advance?

Absolutely! Cincinnati chili is a great dish to make in advance. In fact, the flavors often improve after sitting for a day. You can prepare it ahead of time and store it in the refrigerator for up to three days. Just reheat it on the stove or in the microwave before serving. If you want to keep it longer, consider freezing it. Cincinnati chili can be frozen for up to three months. Just remember to let it cool completely before transferring it to an airtight container.

How spicy is Cincinnati Chili?

The spice level of Cincinnati chili can vary based on your preferences. The recipe includes chili powder and optional cayenne pepper, which can add some heat. If you enjoy a milder flavor, you can reduce the amount of chili powder or omit the cayenne altogether. Conversely, if you like it spicy, feel free to add more cayenne or even some hot sauce. The beauty of Cincinnati chili is that you can adjust the spices to suit your taste!

What are the key spices in Cincinnati Chili?

Cincinnati chili is known for its unique blend of spices that create its signature flavor. The key spices include:

  • Chili powder: This is essential for that classic chili taste.
  • Cumin: Adds a warm, earthy flavor.
  • Cinnamon: A surprising ingredient that gives Cincinnati chili its distinctive sweetness.
  • Apple cider vinegar: This adds a tangy kick that balances the sweetness.
  • Worcestershire sauce: Provides depth and umami flavor.

These spices work together to create a deliciously complex flavor profile that makes Cincinnati chili so special. Experimenting with these spices can help you find the perfect balance for your taste!

Conclusion on Cincinnati Chili Recipe

In conclusion, Cincinnati chili is a delightful dish that brings together a unique blend of flavors and textures. Its sweet and savory profile, combined with the comforting base of spaghetti, makes it a favorite for many. Whether you’re enjoying it at a family gathering or a cozy night in, this dish is sure to please everyone at the table.

By following the steps outlined in this recipe, you can create a delicious Cincinnati chili that captures the essence of this beloved dish. Remember, the key to a great chili lies in the quality of your ingredients and the time you allow for the flavors to meld together. Don’t hesitate to experiment with different meats or even try a vegetarian version to suit your dietary preferences.

As you serve your Cincinnati chili, consider the traditional toppings of shredded cheddar cheese, chopped onions, and sour cream. These additions not only enhance the flavor but also add a delightful crunch and creaminess to each bite. And if you’re feeling adventurous, try out some creative serving ideas like chili dogs or nachos for a fun twist!

So, gather your ingredients, roll up your sleeves, and get ready to enjoy a bowl of Cincinnati chili that’s bursting with flavor. With its rich history and comforting taste, this dish is more than just a meal; it’s an experience that brings people together. Happy cooking!

Buffalo Chicken Potato Cups are a must-try recipe!

Introduction to Buffalo Chicken Potato Cups

Are you looking for a fun and delicious way to enjoy a classic flavor combination? Look no further than Buffalo Chicken Potato Cups! These delightful little bites are perfect for parties, game days, or even a cozy family dinner. They combine the creamy goodness of mashed potatoes with the spicy kick of buffalo chicken, creating a dish that is both satisfying and full of flavor.

Imagine crispy potato cups filled with tender chicken, zesty buffalo sauce, and topped with melted cheese. Each bite is a burst of flavor that will leave your taste buds dancing. Plus, they are easy to make and can be customized to suit your preferences. Whether you love extra spice or prefer a milder taste, these potato cups can be adjusted to fit your cravings.

Not only are Buffalo Chicken Potato Cups delicious, but they are also a great way to use up leftover chicken. With just a few simple ingredients, you can whip up a batch that will impress your family and friends. So, roll up your sleeves and get ready to dive into this tasty recipe that is sure to become a favorite in your household!

Ingredients for Buffalo Chicken Potato Cups

To create these mouthwatering Buffalo Chicken Potato Cups, you’ll need a handful of simple ingredients. Each component plays a vital role in delivering that perfect blend of flavors. Here’s what you’ll need:

  • 2 cups cooked and mashed potatoes
  • 1 cup shredded cooked chicken
  • 1/2 cup buffalo sauce
  • 1/2 cup shredded cheddar cheese
  • 1/4 cup sour cream
  • 1/4 cup green onions, chopped
  • 1 teaspoon garlic powder
  • Salt and pepper to taste
  • Olive oil for drizzling

These ingredients come together to create a delightful dish that is both hearty and flavorful. The mashed potatoes provide a creamy base, while the shredded chicken adds protein and texture. The buffalo sauce gives it that signature spicy kick, making it a favorite among spice lovers. Topping it off with cheddar cheese and sour cream adds richness and creaminess, balancing the heat perfectly.

Feel free to get creative! You can adjust the amount of buffalo sauce to suit your taste. If you prefer a milder flavor, simply reduce the sauce. On the other hand, if you love a fiery kick, add a bit more! The green onions not only add a pop of color but also a fresh crunch that complements the other ingredients beautifully.

Now that you have your ingredients ready, let’s move on to the preparation of these delicious Buffalo Chicken Potato Cups!

Preparation of Buffalo Chicken Potato Cups

Now that you have gathered all your ingredients, it’s time to prepare your Buffalo Chicken Potato Cups. This process is simple and fun! Follow these steps to create your delicious treats.

Step 1: Preparing the Potatoes for Buffalo Chicken Potato Cups

First, you need to prepare the mashed potatoes. If you haven’t done so already, cook your potatoes until they are tender. You can use any type of potato, but russet or Yukon gold works best for a creamy texture. Once cooked, drain the potatoes and mash them in a large bowl. Add a pinch of salt and pepper to taste. This will enhance the flavor of your potato base. Make sure there are no lumps, as smooth potatoes will create a better cup.

Step 2: Making the Buffalo Chicken Filling

Next, it’s time to make the buffalo chicken filling. In a separate bowl, combine the shredded cooked chicken with the buffalo sauce, garlic powder, and a bit of salt and pepper. Mix everything together until the chicken is well coated in the sauce. This mixture is where the magic happens! The buffalo sauce adds a spicy kick that pairs perfectly with the creamy potatoes.

Step 3: Assembling the Buffalo Chicken Potato Cups

Now, let’s assemble the cups! Take your greased muffin tin and scoop the mashed potato mixture into each cup, filling them about three-quarters full. Use the back of a spoon to create a small indentation in the center of each cup. This will hold the buffalo chicken filling nicely. Make sure to pack the potatoes down gently to create a sturdy base.

Step 4: Baking the Buffalo Chicken Potato Cups

It’s time to bake! Drizzle a little olive oil over the top of each potato cup to help them crisp up in the oven. Place the muffin tin in your preheated oven at 400°F and bake for 20-25 minutes. You want the tops to turn golden brown and slightly crispy. Once they are done, take them out and sprinkle shredded cheddar cheese on top of each cup. Return them to the oven for an additional 5 minutes, or until the cheese is melted and bubbly. The aroma will be irresistible!

After baking, let the cups cool for a few minutes. This will make them easier to remove from the muffin tin. Now, you’re ready to top them with sour cream and green onions before serving. Enjoy your delicious Buffalo Chicken Potato Cups!

Variation of Buffalo Chicken Potato Cups

While the classic Buffalo Chicken Potato Cups are a hit, there are many ways to switch things up! Variations can enhance flavors and cater to different dietary needs. Let’s explore some alternative ingredients and cooking methods that can make your potato cups even more exciting.

Alternative Ingredients for Buffalo Chicken Potato Cups

One of the best things about Buffalo Chicken Potato Cups is their versatility. You can easily swap out ingredients to suit your taste or dietary preferences. Here are some ideas:

  • Protein Options: Instead of shredded chicken, try using shredded turkey or even cooked ground beef. For a vegetarian option, consider using black beans or chickpeas mixed with buffalo sauce.
  • Cheese Choices: While cheddar cheese is a classic choice, you can experiment with mozzarella, pepper jack, or even crumbled feta for a unique twist.
  • Spicy Alternatives: If you want to change the flavor profile, substitute buffalo sauce with BBQ sauce or a spicy ranch dressing. This will give your cups a different but equally delicious taste.
  • Vegetable Additions: Add some finely chopped bell peppers, spinach, or corn to the chicken mixture for extra flavor and nutrition. These veggies will add color and crunch!

Feel free to mix and match these alternatives to create your perfect Buffalo Chicken Potato Cups. The possibilities are endless!

Different Cooking Methods for Buffalo Chicken Potato Cups

In addition to ingredient variations, you can also try different cooking methods to prepare your Buffalo Chicken Potato Cups. Here are a few options:

  • Air Fryer: For a quicker cooking time and extra crispiness, use an air fryer. Preheat the air fryer to 375°F and cook the cups for about 15-20 minutes. Keep an eye on them to ensure they don’t burn!
  • Oven Baking: The traditional oven method is great, but you can also bake them on a baking sheet instead of a muffin tin. Just shape the potato mixture into small cups on the sheet and follow the same baking instructions.
  • Grilling: If you’re feeling adventurous, try grilling the potato cups! Use a grill-safe pan or wrap them in aluminum foil. This method will give them a smoky flavor that pairs wonderfully with buffalo sauce.

Experimenting with these cooking methods can add a new dimension to your Buffalo Chicken Potato Cups. Whether you prefer them baked, air-fried, or grilled, you’re sure to enjoy the delicious results!

Cooking Note for Buffalo Chicken Potato Cups

When preparing Buffalo Chicken Potato Cups, a few cooking notes can help ensure your dish turns out perfectly every time. These tips will guide you through the process and enhance your cooking experience.

First, always use freshly cooked potatoes for the best texture. If you’re using leftover mashed potatoes, make sure they are creamy and not too dry. If they seem a bit stiff, add a splash of milk or a dollop of sour cream to loosen them up. This will help create a smooth base for your cups.

Next, when mixing the buffalo sauce with the chicken, taste as you go! Everyone has different spice tolerances. Start with a smaller amount of sauce and gradually add more until you reach your desired heat level. This way, you can customize the flavor to suit your preferences.

Additionally, greasing the muffin tin is crucial. Use cooking spray or a light coating of olive oil to prevent the potato cups from sticking. This will make it easier to remove them after baking. If you find that some cups are sticking, gently run a butter knife around the edges to help release them.

Lastly, let the cups cool for a few minutes after baking. This cooling time allows them to set, making them easier to handle. If you try to remove them too soon, they may fall apart. Patience is key!

By following these cooking notes, you’ll be well on your way to creating delicious Buffalo Chicken Potato Cups that are sure to impress your family and friends. Happy cooking!

Serving Suggestions for Buffalo Chicken Potato Cups

Once your Buffalo Chicken Potato Cups are baked to perfection, it’s time to think about how to serve them! These delightful bites are not only tasty on their own, but they can also be paired with various sides and dips to elevate your meal. Here are some serving suggestions that will make your dish even more enjoyable:

  • Fresh Veggies: Serve your potato cups with a side of fresh vegetable sticks, such as carrots, celery, or bell peppers. These crunchy veggies provide a refreshing contrast to the creamy and spicy flavors of the cups.
  • Dipping Sauces: Offer a variety of dipping sauces for guests to enjoy. Classic ranch dressing, blue cheese dressing, or even a spicy sriracha mayo can complement the buffalo flavor beautifully.
  • Salad: Pair your potato cups with a light salad. A simple green salad with mixed greens, cherry tomatoes, and a tangy vinaigrette can balance the richness of the cups.
  • Pickles: For a tangy twist, serve dill pickles or pickled jalapeños on the side. The acidity from the pickles can cut through the richness and add a zesty flavor.
  • Buffalo Sauce Drizzle: For those who love extra heat, drizzle additional buffalo sauce over the top of the potato cups just before serving. This will enhance the flavor and make them even more appealing.

These serving suggestions not only enhance the overall dining experience but also allow your guests to customize their plates. Whether you’re hosting a party or enjoying a family dinner, these ideas will make your Buffalo Chicken Potato Cups a hit!

Tips for Perfect Buffalo Chicken Potato Cups

Creating the perfect Buffalo Chicken Potato Cups is all about attention to detail. With a few helpful tips, you can ensure that your cups turn out delicious every time. Here are some essential tips to keep in mind:

  • Choose the Right Potatoes: For the best texture, opt for starchy potatoes like russet or Yukon gold. They mash easily and create a creamy base that holds up well in the oven.
  • Don’t Overmix: When combining the mashed potatoes with the chicken and buffalo sauce, mix just until combined. Overmixing can make the potatoes gummy, which you want to avoid.
  • Use a Muffin Tin: A standard muffin tin works perfectly for shaping your potato cups. If you want larger portions, consider using a jumbo muffin tin. Just remember to adjust the baking time accordingly.
  • Pack the Mixture Firmly: When filling the muffin tin, pack the potato mixture firmly. This helps the cups hold their shape during baking and prevents them from collapsing.
  • Experiment with Toppings: While cheddar cheese is a classic choice, don’t hesitate to try different toppings. Crumbled blue cheese, diced jalapeños, or even crispy bacon bits can add extra flavor and texture.
  • Monitor Baking Time: Keep an eye on your potato cups as they bake. Ovens can vary, so check for that golden brown color and bubbly cheese. If they need a little more time, don’t hesitate to leave them in for a few extra minutes.
  • Let Them Cool: After baking, allow the cups to cool for a few minutes before removing them from the tin. This cooling period helps them set and makes them easier to handle.
  • Serve Immediately: For the best taste and texture, serve your Buffalo Chicken Potato Cups right after baking. They are at their peak flavor when warm and fresh out of the oven.

By following these tips, you’ll be well on your way to making Buffalo Chicken Potato Cups that are not only delicious but also visually appealing. Enjoy the process and have fun experimenting with flavors!

Breakdown of Time for Buffalo Chicken Potato Cups

Prep Time for Buffalo Chicken Potato Cups

Getting everything ready for your Buffalo Chicken Potato Cups is a breeze! The prep time typically takes about 15-20 minutes. This includes cooking and mashing the potatoes, shredding the chicken, and mixing all the ingredients together. If you have leftover chicken, this step can be even quicker! Just make sure to have all your ingredients measured and ready to go. This will help streamline the process and make cooking more enjoyable.

Cooking Time for Buffalo Chicken Potato Cups

Once your ingredients are prepped, the cooking time is around 25-30 minutes. This includes baking the potato cups for 20-25 minutes until they are golden brown, followed by an additional 5 minutes to melt the cheese on top. Keep an eye on them during the last few minutes to ensure they don’t overcook. The aroma will fill your kitchen, making it hard to wait!

Total Time for Buffalo Chicken Potato Cups

In total, you can expect to spend about 40-50 minutes from start to finish. This includes both prep and cooking time. With such a quick turnaround, these Buffalo Chicken Potato Cups are perfect for a weeknight dinner or a last-minute gathering. Plus, the delicious results are well worth the time spent in the kitchen!

Nutritional Information for Buffalo Chicken Potato Cups

Understanding the nutritional content of your food is essential, especially when preparing delicious dishes like Buffalo Chicken Potato Cups. This section will break down the calories, protein content, and sodium levels in each serving, helping you make informed choices while enjoying this tasty treat.

Calories in Buffalo Chicken Potato Cups

Each Buffalo Chicken Potato Cup contains approximately 180 calories. This makes them a satisfying option for a snack or appetizer without being overly heavy. The combination of mashed potatoes and chicken provides a hearty base, while the buffalo sauce adds a flavorful kick. If you’re watching your calorie intake, these cups can fit nicely into a balanced diet.

Protein Content in Buffalo Chicken Potato Cups

Protein is an important nutrient, and each cup offers about 8 grams of protein. The shredded chicken is the primary source of protein in this dish, making it a great option for those looking to increase their protein intake. Pairing these cups with a side of veggies or a salad can further enhance your meal’s nutritional value.

Sodium Levels in Buffalo Chicken Potato Cups

When it comes to sodium, each Buffalo Chicken Potato Cup contains around 300 mg. This level is moderate, but it’s important to be mindful, especially if you are watching your sodium intake. You can reduce the sodium content by using low-sodium buffalo sauce or by adjusting the amount of salt you add during preparation. This way, you can enjoy the flavors without worrying too much about sodium levels.

Overall, Buffalo Chicken Potato Cups are a delicious and nutritious option that can be enjoyed in moderation. With their balanced mix of calories, protein, and sodium, they make for a delightful addition to any meal or gathering!

FAQs about Buffalo Chicken Potato Cups

Can I make Buffalo Chicken Potato Cups ahead of time?

Absolutely! You can prepare Buffalo Chicken Potato Cups ahead of time, making them a great option for busy days or gatherings. To do this, follow the recipe up to the baking step. Once you’ve filled the muffin tin with the potato mixture, cover it with plastic wrap and store it in the refrigerator for up to 24 hours. When you’re ready to bake, simply remove the wrap and bake as directed. You may need to add a few extra minutes to the baking time if they are cold from the fridge.

What can I serve with Buffalo Chicken Potato Cups?

Buffalo Chicken Potato Cups are delicious on their own, but they pair wonderfully with various sides. Consider serving them with fresh veggie sticks like carrots and celery for a crunchy contrast. Dipping sauces like ranch or blue cheese dressing can enhance the flavor. A light salad or pickles can also complement the richness of the cups. These options will create a well-rounded meal that everyone will enjoy!

How do I store leftover Buffalo Chicken Potato Cups?

If you have any leftovers, storing them is easy! Allow the Buffalo Chicken Potato Cups to cool completely, then place them in an airtight container. They can be stored in the refrigerator for up to 3 days. To reheat, simply pop them in the oven at 350°F for about 10-15 minutes, or until heated through. You can also use a microwave, but the oven will help maintain their crispy texture.

Can I use a different protein in Buffalo Chicken Potato Cups?

Yes, you can definitely use different proteins in your Buffalo Chicken Potato Cups! While shredded chicken is the classic choice, you can substitute it with shredded turkey, cooked ground beef, or even a vegetarian option like black beans or chickpeas. Just make sure to mix them with the buffalo sauce for that signature flavor. This flexibility allows you to customize the recipe to suit your dietary preferences or what you have on hand!

Conclusion on Buffalo Chicken Potato Cups

In conclusion, Buffalo Chicken Potato Cups are a delightful and versatile dish that brings together the best of both worlds: creamy mashed potatoes and spicy buffalo chicken. They are perfect for any occasion, whether it’s a casual family dinner, a game day snack, or a fun party appetizer. With their crispy edges and flavorful filling, these cups are sure to impress your guests and satisfy your cravings.

Not only are they easy to prepare, but they also allow for endless customization. You can experiment with different proteins, sauces, and toppings to create a version that suits your taste. Plus, with the option to make them ahead of time, they fit seamlessly into your busy lifestyle.

As you gather around the table to enjoy these tasty treats, remember that cooking is all about having fun and sharing good food with loved ones. So, roll up your sleeves, get creative in the kitchen, and enjoy the deliciousness of Buffalo Chicken Potato Cups. Your taste buds will thank you!

Smoky Cajun Sausage Alfredo Recipe is a must-try!

Introduction to Smoky Cajun Sausage Alfredo Recipe

Welcome to the delightful world of Smoky Cajun Sausage Alfredo! This dish combines the creamy richness of Alfredo sauce with the bold flavors of Cajun spices and smoky sausage. It’s a perfect meal for those who crave comfort food with a twist. Whether you’re cooking for family or friends, this recipe is sure to impress.

What Makes This Recipe Unique?

What sets this Smoky Cajun Sausage Alfredo recipe apart is its unique blend of flavors. The smoked sausage adds a deep, savory taste that pairs beautifully with the creamy Alfredo sauce. The Cajun seasoning brings a hint of spice, making each bite exciting. This dish is not just about taste; it’s also about texture. The fettuccine pasta provides a satisfying chew, while the sauce envelops it in a luscious coating. Plus, it’s quick and easy to prepare, making it a fantastic option for busy weeknights or special occasions.

The Origins of Cajun Cuisine

Cajun cuisine has its roots in the French-speaking Acadian people who settled in Louisiana. Over time, they blended their culinary traditions with local ingredients and flavors, creating a vibrant and diverse food culture. Cajun dishes often feature bold spices, smoked meats, and fresh vegetables. This Smoky Cajun Sausage Alfredo recipe pays homage to those rich traditions while incorporating a classic Italian favorite. The result is a fusion of cultures that brings warmth and joy to your dining table.

Ingredients for Smoky Cajun Sausage Alfredo Recipe

To create the mouthwatering Smoky Cajun Sausage Alfredo, you’ll need a few key ingredients. Each component plays a vital role in building the dish’s rich flavors and creamy texture. Here’s what you’ll need:

  • 1 pound smoked sausage: Choose your favorite type, such as andouille or kielbasa, for that smoky flavor.
  • 8 ounces fettuccine pasta: This pasta shape is perfect for holding onto the creamy sauce.
  • 2 tablespoons olive oil: This will help brown the sausage and add a touch of richness.
  • 3 cloves garlic, minced: Fresh garlic adds a wonderful aroma and flavor to the dish.
  • 1 cup heavy cream: This is the base of your Alfredo sauce, giving it that creamy consistency.
  • 1 cup grated Parmesan cheese: Freshly grated cheese melts beautifully and enhances the flavor.
  • 1 teaspoon Cajun seasoning: This spice blend brings the heat and depth characteristic of Cajun cuisine.
  • Salt and pepper to taste: Essential for seasoning and balancing the flavors.
  • Fresh parsley, chopped: This is for garnish, adding a pop of color and freshness.

Feel free to customize the ingredients based on your preferences. For instance, you can swap the smoked sausage for grilled chicken or shrimp if you prefer a different protein. The beauty of this recipe lies in its versatility, allowing you to make it your own!

Step-by-Step Preparation of Smoky Cajun Sausage Alfredo Recipe

Now that you have all your ingredients ready, it’s time to dive into the cooking process! This step-by-step guide will help you create a delicious Smoky Cajun Sausage Alfredo that’s sure to impress. Let’s get started!

Step 1: Preparing the Ingredients

Before you start cooking, it’s essential to prepare all your ingredients. Begin by slicing the smoked sausage into rounds. This will help it cook evenly and allow the flavors to meld beautifully. Next, mince the garlic cloves finely. This will ensure that the garlic releases its flavor quickly when sautéed. Finally, measure out your heavy cream and grated Parmesan cheese, so they’re ready to go when needed. Having everything prepped will make the cooking process smooth and enjoyable!

Step 2: Cooking the Sausage

In a large skillet, heat the olive oil over medium heat. Once the oil is hot, add the sliced smoked sausage. Cook the sausage for about 5-7 minutes, stirring occasionally. You want it to become nicely browned and crispy on the edges. This browning adds a wonderful depth of flavor to your dish. The aroma will fill your kitchen, making it hard to resist! Once browned, remove the sausage from the skillet and set it aside.

Step 3: Making the Alfredo Sauce

In the same skillet, add the minced garlic. Sauté it for 1-2 minutes until it becomes fragrant. Be careful not to burn the garlic, as it can turn bitter. Next, pour in the heavy cream and bring it to a gentle simmer. Stir in the Cajun seasoning, salt, and pepper. Allow the sauce to simmer for about 3-4 minutes. This will help it thicken slightly and develop a rich flavor. The combination of cream and spices will create a luscious sauce that perfectly complements the sausage.

Step 4: Combining Ingredients

Once your sauce has thickened, it’s time to bring everything together. Add the cooked fettuccine pasta to the skillet, tossing it gently to coat the pasta evenly with the sauce. Then, stir in the browned sausage. Finally, sprinkle in the grated Parmesan cheese. Stir until the cheese melts and combines with the sauce, creating a creamy, cheesy delight. This step is where the magic happens, as all the flavors meld together beautifully!

Step 5: Final Touches

Your Smoky Cajun Sausage Alfredo is almost ready! Serve it immediately for the best taste and texture. Garnish each plate with freshly chopped parsley for a pop of color and freshness. This final touch not only enhances the presentation but also adds a hint of herbal flavor. Enjoy your delicious creation with family and friends, and watch as they savor every bite!

Variation of Smoky Cajun Sausage Alfredo Recipe

While the Smoky Cajun Sausage Alfredo is a delightful dish as is, there are plenty of ways to adapt it to suit different dietary needs and preferences. Whether you’re looking for vegetarian alternatives or gluten-free options, this recipe can easily be modified without sacrificing flavor. Let’s explore some tasty variations!

Vegetarian Alternatives

If you’re looking to make a vegetarian version of this dish, you can easily swap out the smoked sausage for a variety of plant-based ingredients. Here are some ideas:

  • Grilled Vegetables: Bell peppers, zucchini, and mushrooms can add a smoky flavor when grilled. Sauté them in olive oil before adding the garlic.
  • Plant-Based Sausage: Many brands offer delicious plant-based sausages that mimic the flavor and texture of traditional sausage. Look for ones with Cajun spices for an extra kick.
  • Chickpeas: For added protein, toss in some canned chickpeas. They will absorb the flavors of the sauce beautifully.

These alternatives will keep the dish hearty and satisfying while ensuring it remains meat-free. You won’t miss the sausage at all!

Gluten-Free Options

If you need a gluten-free version of Smoky Cajun Sausage Alfredo, the good news is that it’s easy to make adjustments. Here’s how:

  • Gluten-Free Pasta: Substitute regular fettuccine with gluten-free pasta made from rice, quinoa, or chickpeas. These options are widely available and cook similarly to traditional pasta.
  • Check the Sausage: Ensure that the smoked sausage you choose is gluten-free. Many brands offer gluten-free options, so read the labels carefully.
  • Thickening Agents: If you want a thicker sauce, consider adding a gluten-free thickener like cornstarch or arrowroot powder mixed with a little water.

With these simple swaps, you can enjoy a delicious Smoky Cajun Sausage Alfredo that fits your dietary needs without compromising on taste!

Cooking Note for Smoky Cajun Sausage Alfredo Recipe

When preparing the Smoky Cajun Sausage Alfredo, there are a few cooking notes to keep in mind to ensure your dish turns out perfectly every time. These tips will help you achieve the best flavor and texture, making your meal even more enjoyable.

First, always use high-quality ingredients. Fresh garlic, good-quality smoked sausage, and freshly grated Parmesan cheese can significantly enhance the overall taste of your dish. Avoid pre-grated cheese, as it often contains anti-caking agents that can affect melting.

Next, be mindful of the heat when cooking the sausage. Medium heat is ideal for browning the sausage without burning it. If the heat is too high, the sausage may cook too quickly on the outside while remaining undercooked inside. A nice, even browning will add depth to the flavor.

When making the Alfredo sauce, remember to stir continuously after adding the heavy cream. This will help prevent the sauce from sticking to the bottom of the skillet and burning. A gentle simmer is key; boiling the sauce can cause it to separate, leading to a less creamy texture.

Lastly, don’t forget to taste as you go! Adjust the seasoning to your liking, adding more Cajun seasoning, salt, or pepper as needed. This will ensure that the flavors are balanced and tailored to your preferences.

By following these cooking notes, you’ll create a Smoky Cajun Sausage Alfredo that’s not only delicious but also a true crowd-pleaser!

Serving Suggestions for Smoky Cajun Sausage Alfredo Recipe

Once you’ve prepared your Smoky Cajun Sausage Alfredo, it’s time to think about how to serve it. The right sides and beverages can elevate your meal, making it even more enjoyable. Here are some fantastic serving suggestions to complement your dish!

Pairing with Sides

When it comes to sides, you want to choose options that balance the richness of the Alfredo sauce. Here are a few ideas:

  • Garlic Bread: A classic choice, garlic bread is perfect for soaking up the creamy sauce. You can make it easily by spreading butter and minced garlic on slices of baguette, then toasting them until golden.
  • Steamed Vegetables: Lightly steamed broccoli, asparagus, or green beans add a fresh crunch to your meal. They also provide a nice contrast to the creamy pasta.
  • Caesar Salad: A crisp Caesar salad with romaine lettuce, croutons, and a tangy dressing can cut through the richness of the Alfredo. The crunch and flavor will enhance your dining experience.
  • Coleslaw: A tangy coleslaw can add a refreshing element to your meal. The crunchiness of the cabbage and the zesty dressing will balance the creamy pasta beautifully.

These sides not only complement the Smoky Cajun Sausage Alfredo but also add variety to your plate, making for a well-rounded meal.

Ideal Wine Pairings

Pairing the right wine with your Smoky Cajun Sausage Alfredo can enhance the flavors of the dish. Here are some excellent wine options to consider:

  • Sauvignon Blanc: This white wine is crisp and refreshing, with citrus notes that can cut through the richness of the Alfredo sauce. Its acidity complements the Cajun spices beautifully.
  • Chardonnay: A lightly oaked Chardonnay can add a creamy texture that matches the Alfredo sauce. Look for one with balanced acidity to avoid overwhelming the dish.
  • Pinot Noir: If you prefer red wine, a light-bodied Pinot Noir works well. Its fruity notes and low tannins won’t overpower the flavors of the dish.
  • Rosé: A dry rosé can be a versatile choice, offering a refreshing taste that pairs nicely with both the sausage and the creamy sauce.

Choosing the right wine can elevate your dining experience, making your Smoky Cajun Sausage Alfredo even more delightful. Cheers to a wonderful meal!

Tips for Perfecting Your Smoky Cajun Sausage Alfredo Recipe

To ensure your Smoky Cajun Sausage Alfredo turns out perfectly every time, it’s essential to be aware of common pitfalls and ways to enhance the dish’s flavor. Here are some helpful tips to guide you through the cooking process.

Common Mistakes to Avoid

Even the best cooks can make mistakes! Here are a few common errors to watch out for:

  • Overcooking the Pasta: Always cook your fettuccine until it’s al dente. Overcooked pasta can become mushy and lose its texture. Remember, it will continue to cook slightly when mixed with the sauce.
  • Burning the Garlic: Garlic can turn bitter if cooked too long. Sauté it just until fragrant, about 1-2 minutes. Keep an eye on it to avoid burning.
  • Not Tasting the Sauce: Always taste your sauce before serving. Adjust the seasoning as needed. A little extra salt or Cajun seasoning can make a big difference!
  • Using Pre-Grated Cheese: Pre-grated Parmesan often contains anti-caking agents that prevent it from melting smoothly. For the best results, use freshly grated cheese.
  • Skipping the Garnish: Don’t forget to garnish with fresh parsley! It adds a pop of color and freshness that enhances the dish visually and flavor-wise.

Enhancing Flavor Profiles

To take your Smoky Cajun Sausage Alfredo to the next level, consider these flavor-enhancing tips:

  • Add a Splash of Lemon Juice: A squeeze of fresh lemon juice can brighten the dish and balance the richness of the sauce. It adds a refreshing zing!
  • Incorporate Fresh Herbs: Besides parsley, try adding fresh basil or thyme for an aromatic touch. These herbs can elevate the overall flavor profile.
  • Experiment with Spices: If you love heat, consider adding a pinch of cayenne pepper or red pepper flakes to the sauce. This will give your dish an extra kick!
  • Include Vegetables: Adding sautéed bell peppers, spinach, or mushrooms can enhance the dish’s flavor and add nutritional value. They also provide a nice texture contrast.
  • Finish with a Drizzle of Olive Oil: A light drizzle of high-quality olive oil just before serving can add richness and depth to the dish.

By avoiding common mistakes and enhancing the flavors, you’ll create a Smoky Cajun Sausage Alfredo that’s not only delicious but also memorable. Happy cooking!

Breakdown of Time for Smoky Cajun Sausage Alfredo Recipe

Understanding the time required for each step of the Smoky Cajun Sausage Alfredo recipe can help you plan your cooking efficiently. Here’s a breakdown of the time you’ll need for preparation and cooking, ensuring you can enjoy this delicious dish without any rush.

Prep Time

The prep time for this recipe is approximately 15 minutes. During this time, you will gather all your ingredients, slice the smoked sausage, and mince the garlic. It’s essential to have everything ready before you start cooking. This will make the cooking process smoother and more enjoyable!

Cooking Time

The cooking time for the Smoky Cajun Sausage Alfredo is about 20 minutes. This includes browning the sausage, sautéing the garlic, simmering the Alfredo sauce, and combining everything together. The quick cooking time makes this dish perfect for busy weeknights or when you want a delicious meal in a hurry.

Total Time

In total, you can expect to spend around 35 minutes from start to finish. This includes both prep and cooking time. With such a short time commitment, you can whip up a flavorful and satisfying meal that your family and friends will love!

Nutritional Information for Smoky Cajun Sausage Alfredo Recipe

Understanding the nutritional content of your meals is essential for maintaining a balanced diet. The Smoky Cajun Sausage Alfredo is not only delicious but also provides a good amount of nutrients. Here’s a breakdown of the nutritional information per serving, so you can enjoy this dish while being mindful of your dietary needs.

Calories

550 calories. This calorie count includes the rich ingredients like heavy cream and Parmesan cheese, which contribute to the creamy texture and flavor. While it’s a hearty meal, it’s important to enjoy it in moderation, especially if you’re watching your calorie intake.

Protein

25 grams of protein per serving. The smoked sausage and Parmesan cheese are the primary contributors to this protein content. Protein is essential for muscle repair and growth, making this meal a satisfying option after a workout or a long day.

Sodium

1,200 milligrams of sodium. This amount can vary based on the type of sausage used and how much salt you add during cooking. If you’re watching your sodium intake, consider using low-sodium sausage or reducing the added salt in the recipe. Balancing sodium levels is crucial for maintaining healthy blood pressure and overall health.

By being aware of the nutritional information, you can enjoy your Smoky Cajun Sausage Alfredo while making informed choices about your diet. Remember, it’s all about balance and moderation!

FAQs about Smoky Cajun Sausage Alfredo Recipe

Can I use different types of sausage?

Absolutely! One of the great things about the Smoky Cajun Sausage Alfredo recipe is its versatility. You can use various types of sausage based on your taste preferences. Andouille sausage is a popular choice for its bold flavor, but you can also try kielbasa, chorizo, or even turkey sausage for a lighter option. Each type of sausage will bring its unique flavor to the dish, so feel free to experiment and find your favorite!

How can I make this dish spicier?

If you love a little heat, there are several ways to spice up your Smoky Cajun Sausage Alfredo. First, you can add a pinch of cayenne pepper or red pepper flakes to the sauce while it simmers. This will give the dish a nice kick. Additionally, consider using a spicier Cajun seasoning blend or adding diced jalapeños for an extra layer of flavor. Just remember to taste as you go, so you can adjust the spice level to your liking!

Can I prepare the sauce in advance?

Yes, you can prepare the Alfredo sauce in advance! To do this, follow the recipe up to the point of making the sauce. Once it’s ready, let it cool, then store it in an airtight container in the refrigerator for up to 2 days. When you’re ready to serve, gently reheat the sauce over low heat, stirring frequently. You may need to add a splash of cream or milk to loosen it up, as it may thicken in the fridge. This makes it a convenient option for meal prep!

What pasta works best for this recipe?

Fettuccine is the traditional choice for Alfredo dishes, and it works wonderfully in this Smoky Cajun Sausage Alfredo recipe. However, you can use other pasta shapes if you prefer. Penne, rigatoni, or even linguine can be great alternatives. Just make sure to choose a pasta that can hold onto the creamy sauce well. The key is to cook the pasta al dente, so it maintains its texture when mixed with the sauce.

Conclusion on Smoky Cajun Sausage Alfredo Recipe

In conclusion, the Smoky Cajun Sausage Alfredo recipe is a delightful fusion of flavors that brings together the creamy richness of Alfredo sauce and the bold, spicy notes of Cajun cuisine. This dish is not only easy to prepare but also offers a satisfying meal that can be enjoyed on any occasion. Whether you’re cooking for a family dinner or hosting friends, this recipe is sure to impress.

With its versatility, you can easily customize the ingredients to suit your dietary preferences. From vegetarian alternatives to gluten-free options, the Smoky Cajun Sausage Alfredo can be adapted to meet various needs without sacrificing flavor. Plus, the tips and variations provided will help you perfect your dish, ensuring that every bite is delicious.

As you gather around the table to enjoy this hearty meal, remember that cooking is not just about the food; it’s about creating memories with loved ones. So, roll up your sleeves, get cooking, and savor the delightful experience of making and sharing your Smoky Cajun Sausage Alfredo. Bon appétit!

Wild Rice Stuffing Recipe: A Delicious Side Dish!

Introduction to Wild Rice Stuffing Recipe

Wild rice stuffing is a delightful dish that brings together the earthy flavors of wild rice with a medley of vegetables and nuts. This recipe is not just a side dish; it’s a celebration of textures and tastes that can elevate any meal. Whether you’re preparing for a holiday feast or a cozy family dinner, this stuffing is sure to impress.

What Makes Wild Rice Stuffing Unique?

What sets wild rice stuffing apart from traditional stuffing is its unique flavor and texture. Wild rice, which is actually a grass, has a nutty taste and chewy texture that adds depth to the dish. Unlike regular white rice, wild rice is packed with nutrients, making it a healthier choice. The combination of sautéed vegetables, crunchy nuts, and sweet dried cranberries creates a harmonious blend that tantalizes the taste buds. Plus, it’s versatile! You can easily customize it to suit your dietary preferences or the season.

The History of Stuffing in Culinary Traditions

Stuffing has a rich history that dates back centuries. It is believed that the practice of stuffing food originated in ancient times when cooks would fill animal carcasses with various ingredients to enhance flavor and preserve the meat. Over the years, stuffing evolved into a beloved dish in many cultures. In the United States, stuffing is often associated with Thanksgiving, where it is traditionally served alongside turkey. Each region has its own twist on stuffing, incorporating local ingredients and flavors. Wild rice stuffing, with its roots in Native American cuisine, showcases the unique ingredients of North America, making it a special addition to any table.

Ingredients for Wild Rice Stuffing Recipe

Essential Ingredients

To create a delicious wild rice stuffing, you’ll need a few key ingredients. These essentials work together to provide flavor, texture, and nutrition. Here’s what you’ll need:

  • Wild Rice: 2 cups, rinsed and drained. This is the star of the dish, offering a nutty flavor and chewy texture.
  • Vegetable Broth: 4 cups. This adds moisture and depth to the rice.
  • Olive Oil: 1 tablespoon. Used for sautéing the vegetables, it adds healthy fats.
  • Onion: 1 medium, diced. This provides a sweet and savory base.
  • Celery: 2 stalks, diced. Adds crunch and freshness.
  • Carrots: 2, diced. They bring sweetness and color to the stuffing.
  • Garlic: 3 cloves, minced. This ingredient enhances the overall flavor.
  • Dried Thyme: 1 teaspoon. A classic herb that complements the dish.
  • Dried Sage: 1 teaspoon. This herb adds an earthy aroma.
  • Salt: 1/2 teaspoon. Enhances all the flavors.
  • Black Pepper: 1/4 teaspoon. Adds a hint of spice.
  • Mushrooms: 1 cup, chopped. They provide a savory, umami flavor.
  • Nuts: 1 cup, chopped pecans or walnuts. These add crunch and richness.
  • Dried Cranberries: 1/2 cup. They introduce a sweet and tart element.
  • Fresh Parsley: 1/4 cup, chopped. This brightens the dish and adds freshness.

Optional Ingredients for Customization

While the essential ingredients create a fantastic wild rice stuffing, you can customize it to suit your taste. Here are some optional ingredients to consider:

  • Cooked Sausage or Ground Turkey: For a heartier stuffing, add cooked meat to the vegetable mixture.
  • Raisins or Chopped Apples: Swap out dried cranberries for these options to change the flavor profile.
  • Spinach or Kale: Adding greens can boost the nutritional value and add color.
  • Spices: Experiment with spices like cumin or paprika for a different twist.
  • Cheese: A sprinkle of feta or goat cheese can add creaminess and flavor.

Feel free to mix and match these ingredients to create a wild rice stuffing that’s uniquely yours!

Step-by-Step Preparation of Wild Rice Stuffing Recipe

Step 1: Preparing the Wild Rice

To start, you need to prepare the wild rice. First, rinse the wild rice under cold water. This helps remove any dust or impurities. Next, in a large pot, combine the rinsed wild rice with 4 cups of vegetable broth. Bring the mixture to a boil over high heat. Once boiling, reduce the heat to low. Cover the pot and let it simmer for about 45-50 minutes. During this time, the rice will absorb the broth and become tender. After cooking, remove the pot from heat and let it sit for 10 minutes. Finally, fluff the rice with a fork to separate the grains.

Step 2: Sautéing the Vegetables

While the wild rice is cooking, it’s time to sauté the vegetables. Heat 1 tablespoon of olive oil in a large skillet over medium heat. Once the oil is hot, add the diced onion, celery, and carrots. Sauté these vegetables for about 5-7 minutes. You want them to soften and become fragrant. After that, stir in the minced garlic, dried thyme, dried sage, salt, and black pepper. Cook this mixture for an additional 2 minutes. The herbs will release their wonderful aromas, enhancing the flavor of your stuffing.

Step 3: Combining Ingredients

Now that both the wild rice and vegetables are ready, it’s time to combine them. In a large bowl, mix the cooked wild rice with the sautéed vegetable mixture. Gently fold in the chopped mushrooms, nuts, and dried cranberries. These ingredients add texture and flavor to the stuffing. Finally, stir in the fresh parsley for a burst of color and freshness. Make sure everything is well combined, so each bite is packed with deliciousness!

Step 4: Baking the Stuffing

To finish off your wild rice stuffing, transfer the mixture to a greased baking dish. Spread it out evenly. Preheat your oven to 350°F (175°C). Once the oven is ready, place the baking dish inside. Bake the stuffing for 20-25 minutes. This will heat it through and create a slightly crispy top. The aroma will fill your kitchen, making it hard to wait! Once done, remove it from the oven and let it cool for a few minutes before serving.

Variation of Wild Rice Stuffing Recipe

Vegetarian and Vegan Options

Wild rice stuffing is naturally vegetarian, making it a great choice for those who prefer plant-based meals. To ensure it’s vegan-friendly, simply stick to the original recipe without any meat additions. You can enhance the flavor by using vegetable broth instead of chicken broth. Additionally, consider adding more vegetables like bell peppers or zucchini for extra nutrition and color. If you want a creamier texture, try incorporating a plant-based cream or a dollop of vegan sour cream. This will make your stuffing rich and satisfying without any animal products.

Another fantastic option is to include legumes, such as lentils or chickpeas. These not only add protein but also create a hearty texture. You can also experiment with different herbs and spices to give your stuffing a unique twist. For instance, adding a pinch of smoked paprika can introduce a delightful smoky flavor. With these variations, your wild rice stuffing will be a hit at any gathering!

Gluten-Free Adaptations

For those following a gluten-free diet, wild rice stuffing is an excellent choice since wild rice is naturally gluten-free. However, it’s essential to ensure that all other ingredients are also gluten-free. When selecting vegetable broth, check the label to confirm it’s gluten-free. Most fresh vegetables, nuts, and dried fruits are safe, but always double-check for any added ingredients that may contain gluten.

If you want to add a bit more texture, consider using gluten-free bread crumbs or croutons. These can be mixed in just before baking to create a delightful crunch. You can also add gluten-free grains like quinoa or millet for added variety. These grains will complement the wild rice beautifully while keeping the dish gluten-free. With these adaptations, everyone can enjoy this delicious wild rice stuffing without worry!

Cooking Note for Wild Rice Stuffing Recipe

Tips for Perfectly Cooked Wild Rice

Cooking wild rice can be a bit different from cooking regular rice, but with a few tips, you can achieve perfect results every time. First, always rinse the wild rice before cooking. This step removes any dust and helps the grains cook evenly. Next, use the right water-to-rice ratio. For wild rice, a good rule of thumb is to use 2 cups of water or broth for every 1 cup of wild rice. This ensures the rice absorbs enough liquid to become tender.

When boiling the rice, bring the liquid to a rolling boil before reducing the heat. Cover the pot tightly to trap steam, which helps the rice cook properly. Remember, wild rice takes longer to cook than white rice, usually around 45-50 minutes. If you find the rice is still tough after the cooking time, add a little more liquid and continue cooking until tender. Lastly, let the rice sit covered for about 10 minutes after cooking. This resting period allows the grains to finish cooking and become fluffy.

Common Mistakes to Avoid

While making wild rice stuffing, there are a few common mistakes to watch out for. One mistake is not rinsing the wild rice. Skipping this step can lead to a gritty texture. Another common error is using too little liquid. Wild rice needs enough broth or water to cook properly, so be sure to measure accurately.

Overcooking the rice is another pitfall. If you cook it for too long, the grains can burst and become mushy. Keep an eye on the cooking time and check for doneness. Additionally, be cautious with seasoning. Since wild rice has a unique flavor, it’s best to start with less salt and adjust to taste. Finally, don’t forget to let the stuffing cool slightly before serving. This allows the flavors to meld together beautifully, making each bite even more delicious!

Serving Suggestions for Wild Rice Stuffing Recipe

Pairing with Main Dishes

Wild rice stuffing is a versatile dish that pairs wonderfully with a variety of main courses. Its rich flavors and hearty texture complement many proteins, making it a perfect side dish for any meal. Here are some great options to consider:

  • Roasted Turkey: This classic pairing is a favorite during the holidays. The savory stuffing enhances the flavors of the turkey, creating a delightful combination.
  • Grilled Chicken: The nutty taste of wild rice stuffing contrasts beautifully with the juicy, grilled chicken. Add a light sauce or glaze for extra flavor.
  • Stuffed Peppers: For a vegetarian option, serve wild rice stuffing inside bell peppers. Bake them until tender for a colorful and nutritious meal.
  • Salmon: The rich flavor of salmon pairs well with the earthy notes of wild rice stuffing. A squeeze of lemon over the fish brightens the dish.
  • Vegetable Lasagna: For a comforting meal, serve wild rice stuffing alongside a hearty vegetable lasagna. The combination of flavors will satisfy everyone at the table.

Creative Serving Ideas

Looking to impress your guests? Here are some creative serving ideas for wild rice stuffing that will elevate your dining experience:

  • Stuffed Acorn Squash: Hollow out acorn squash and fill it with wild rice stuffing. Roast until the squash is tender for a beautiful presentation.
  • Stuffing Balls: Form the stuffing into small balls and bake until crispy. These bite-sized treats make for a fun appetizer or party snack.
  • Layered Salad: Create a layered salad with wild rice stuffing, mixed greens, and your favorite vegetables. Drizzle with a light vinaigrette for a refreshing dish.
  • Stuffed Mushrooms: Use the wild rice stuffing to fill large mushroom caps. Bake until golden for a delicious appetizer that’s sure to impress.
  • Savory Waffles: Mix wild rice stuffing into a savory waffle batter. Serve with a dollop of sour cream or yogurt for a unique brunch option.

With these serving suggestions, your wild rice stuffing will shine as a star dish at any gathering. Whether you choose to pair it with a classic main course or get creative with your presentation, this stuffing is sure to delight your guests!

Tips for the Best Wild Rice Stuffing Recipe

Ingredient Substitutions

When making wild rice stuffing, you might find yourself in need of ingredient substitutions. Luckily, this recipe is quite flexible! Here are some great alternatives to consider:

  • Wild Rice: If you can’t find wild rice, you can use brown rice or a mix of quinoa and brown rice. These options will still provide a hearty texture.
  • Vegetable Broth: You can substitute vegetable broth with chicken broth for a non-vegetarian option. If you prefer a lighter flavor, use water with a splash of soy sauce.
  • Olive Oil: Instead of olive oil, you can use coconut oil or avocado oil. Both will add a unique flavor while keeping the dish healthy.
  • Nuts: If you have nut allergies, feel free to skip the nuts or replace them with seeds like sunflower or pumpkin seeds for a similar crunch.
  • Dried Cranberries: Swap dried cranberries for dried cherries or apricots. These fruits will add a different sweetness and flavor to your stuffing.

These substitutions can help you create a wild rice stuffing that fits your dietary needs while still being delicious!

Storage and Reheating Tips

After enjoying your wild rice stuffing, you may have leftovers. Here’s how to store and reheat them properly:

  • Storage: Allow the stuffing to cool completely before transferring it to an airtight container. Store it in the refrigerator for up to 4 days. If you want to keep it longer, consider freezing it.
  • Freezing: To freeze, place the stuffing in a freezer-safe container or bag. It can last for up to 3 months in the freezer. Be sure to label the container with the date for easy tracking.
  • Reheating: To reheat, thaw the stuffing in the refrigerator overnight if frozen. Then, place it in a baking dish and cover with foil. Heat in a preheated oven at 350°F (175°C) for about 20-25 minutes, or until heated through. You can also microwave individual portions for a quick meal.

Following these storage and reheating tips will ensure your wild rice stuffing remains tasty and enjoyable for days to come!

Breakdown of Time for Wild Rice Stuffing Recipe

Prep Time

Preparing wild rice stuffing is a straightforward process. The prep time mainly involves gathering your ingredients and chopping the vegetables. On average, you can expect to spend about 15-20 minutes on this step. This includes rinsing the wild rice, dicing the onion, celery, and carrots, and mincing the garlic. Having everything ready before you start cooking will make the process smoother and more enjoyable.

Cooking Time

The cooking time for wild rice stuffing is divided into two main parts. First, the wild rice needs to cook in the vegetable broth. This takes approximately 45-50 minutes. While the rice is simmering, you can sauté the vegetables, which takes about 10 minutes. So, the total cooking time is around 50-60 minutes. This allows the flavors to meld beautifully, creating a delicious stuffing.

Total Time

When you combine the prep time and cooking time, the total time for making wild rice stuffing is about 1 hour and 10-20 minutes. This makes it a great option for a weeknight dinner or a special occasion. With just a little time and effort, you can create a flavorful dish that everyone will love!

Nutritional Information for Wild Rice Stuffing Recipe

Calories and Macronutrients

Understanding the nutritional content of your wild rice stuffing is essential for maintaining a balanced diet. Each serving of this delicious dish contains approximately 290 calories. Here’s a breakdown of the macronutrients:

  • Net Carbohydrates: 35g
  • Protein: 8g
  • Fat: 12g

This stuffing is not only flavorful but also provides a good balance of carbohydrates, protein, and healthy fats. The wild rice serves as a great source of complex carbohydrates, while the nuts contribute healthy fats and protein. The vegetables add fiber and essential vitamins, making this dish a nutritious addition to your meal.

Health Benefits of Wild Rice

Wild rice is more than just a tasty ingredient; it’s packed with health benefits that make it a smart choice for your diet. Here are some of the key advantages:

  • High in Nutrients: Wild rice is rich in vitamins and minerals, including magnesium, phosphorus, and B vitamins. These nutrients support overall health and well-being.
  • Antioxidant Properties: Wild rice contains antioxidants that help combat oxidative stress in the body. This can reduce the risk of chronic diseases and promote longevity.
  • Heart Health: The fiber content in wild rice can help lower cholesterol levels, supporting heart health. Additionally, the healthy fats from nuts contribute to cardiovascular wellness.
  • Gluten-Free: Wild rice is naturally gluten-free, making it an excellent option for those with gluten sensitivities or celiac disease.
  • Weight Management: The combination of fiber and protein in wild rice stuffing can help you feel full longer, aiding in weight management.

Incorporating wild rice into your meals not only enhances flavor but also boosts your nutritional intake. Enjoying this wild rice stuffing recipe is a delicious way to reap these health benefits!

FAQs about Wild Rice Stuffing Recipe

Can I make Wild Rice Stuffing ahead of time?

Absolutely! Making wild rice stuffing ahead of time is a great way to save time on busy days. You can prepare the stuffing up to a day in advance. Simply follow the recipe until the baking step, then cover the mixture and store it in the refrigerator. When you’re ready to serve, transfer it to a greased baking dish and bake as directed. This allows the flavors to meld beautifully, making it even tastier!

What can I substitute for wild rice?

If you can’t find wild rice, don’t worry! You can substitute it with brown rice or a mix of quinoa and brown rice. These alternatives will still provide a hearty texture and delicious flavor. However, keep in mind that cooking times may vary. Brown rice typically takes about 40-45 minutes to cook, while quinoa cooks in about 15 minutes. Adjust your cooking time accordingly to ensure your stuffing turns out perfectly!

How long can I store leftover Wild Rice Stuffing?

Leftover wild rice stuffing can be stored in the refrigerator for up to 4 days. Make sure to place it in an airtight container to keep it fresh. If you want to keep it longer, consider freezing it. Properly stored, it can last for up to 3 months in the freezer. Just remember to label the container with the date for easy tracking!

Is Wild Rice Stuffing suitable for freezing?

Yes, wild rice stuffing is suitable for freezing! To freeze, allow the stuffing to cool completely, then transfer it to a freezer-safe container or bag. When you’re ready to enjoy it again, thaw the stuffing in the refrigerator overnight. Reheat it in a preheated oven at 350°F (175°C) for about 20-25 minutes, or until heated through. This way, you can enjoy the delicious flavors of wild rice stuffing even on busy days!

Conclusion on Wild Rice Stuffing Recipe

Recap of Key Points

In summary, wild rice stuffing is a delightful dish that combines the unique flavors of wild rice with a variety of vegetables, nuts, and herbs. This recipe is not only nutritious but also versatile, allowing for numerous adaptations to suit your taste and dietary needs. From the essential ingredients like wild rice and vegetable broth to the optional additions such as cooked sausage or different dried fruits, you can create a stuffing that is truly your own. The step-by-step preparation ensures that even novice cooks can achieve delicious results, while the baking process adds a lovely crispy texture on top.

Moreover, wild rice is packed with health benefits, making this stuffing a wholesome choice for any meal. Whether you serve it alongside roasted turkey, grilled chicken, or as a standalone dish, wild rice stuffing is sure to impress your family and friends. Remember to store any leftovers properly, so you can enjoy this tasty dish for days to come!

Encouragement to Try the Recipe

Now that you have all the information you need, it’s time to roll up your sleeves and try making this wild rice stuffing recipe! Whether it’s for a holiday gathering, a family dinner, or just a cozy night in, this dish is bound to be a hit. Don’t hesitate to experiment with different ingredients and flavors to make it your own. Cooking should be fun and creative, so let your imagination run wild!

So, gather your ingredients, follow the steps, and enjoy the wonderful aroma that fills your kitchen. Your taste buds will thank you for this delicious and nutritious wild rice stuffing. Happy cooking!

Stay Connected

Get recipes via email: