


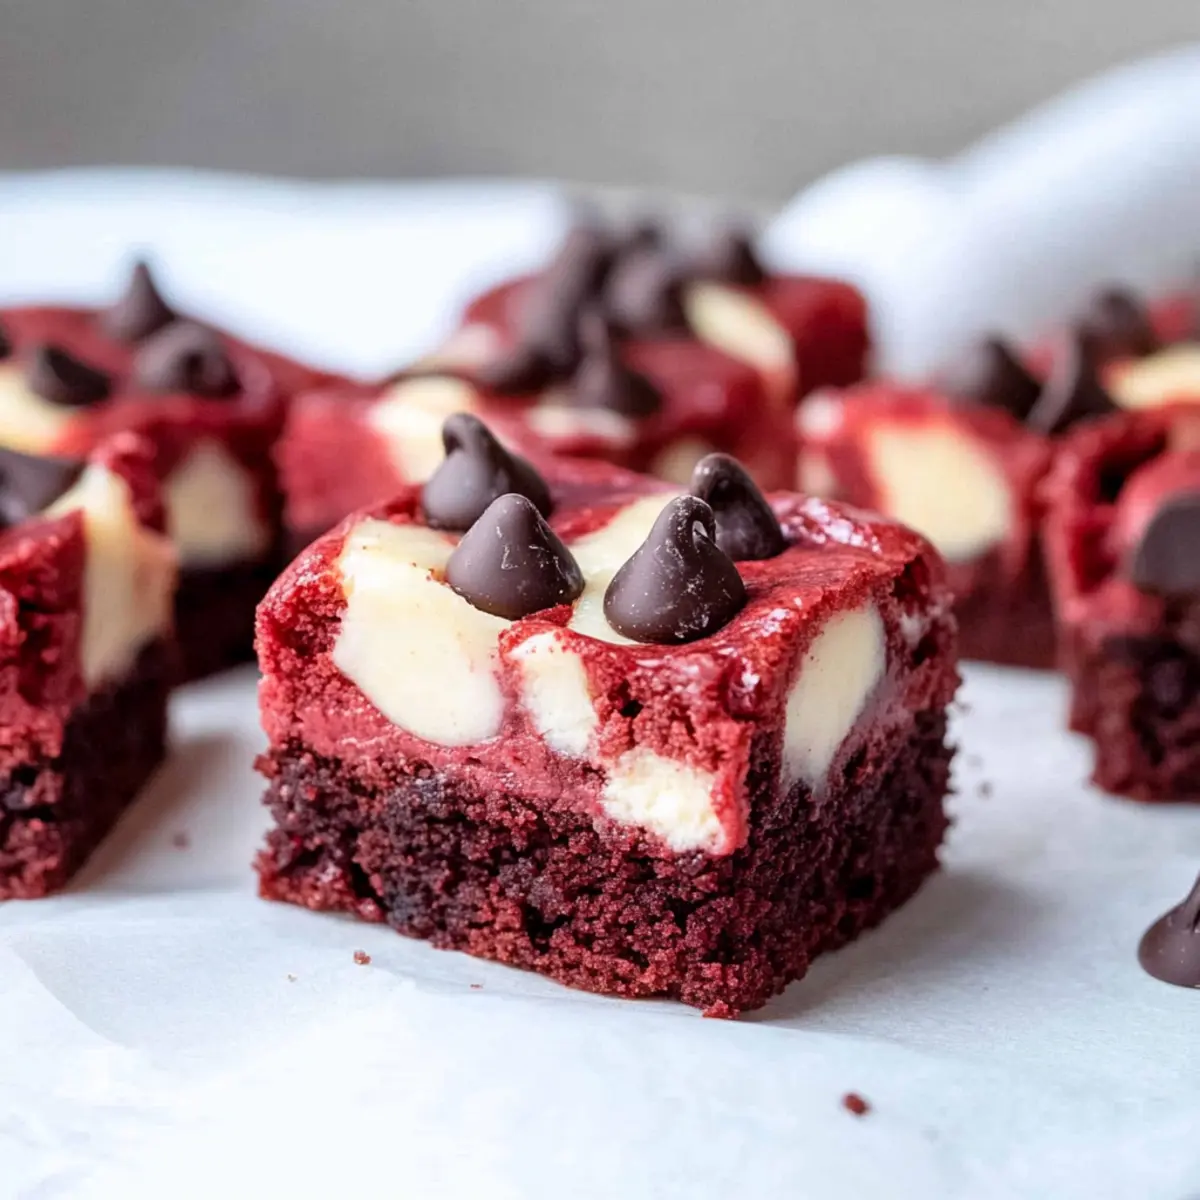
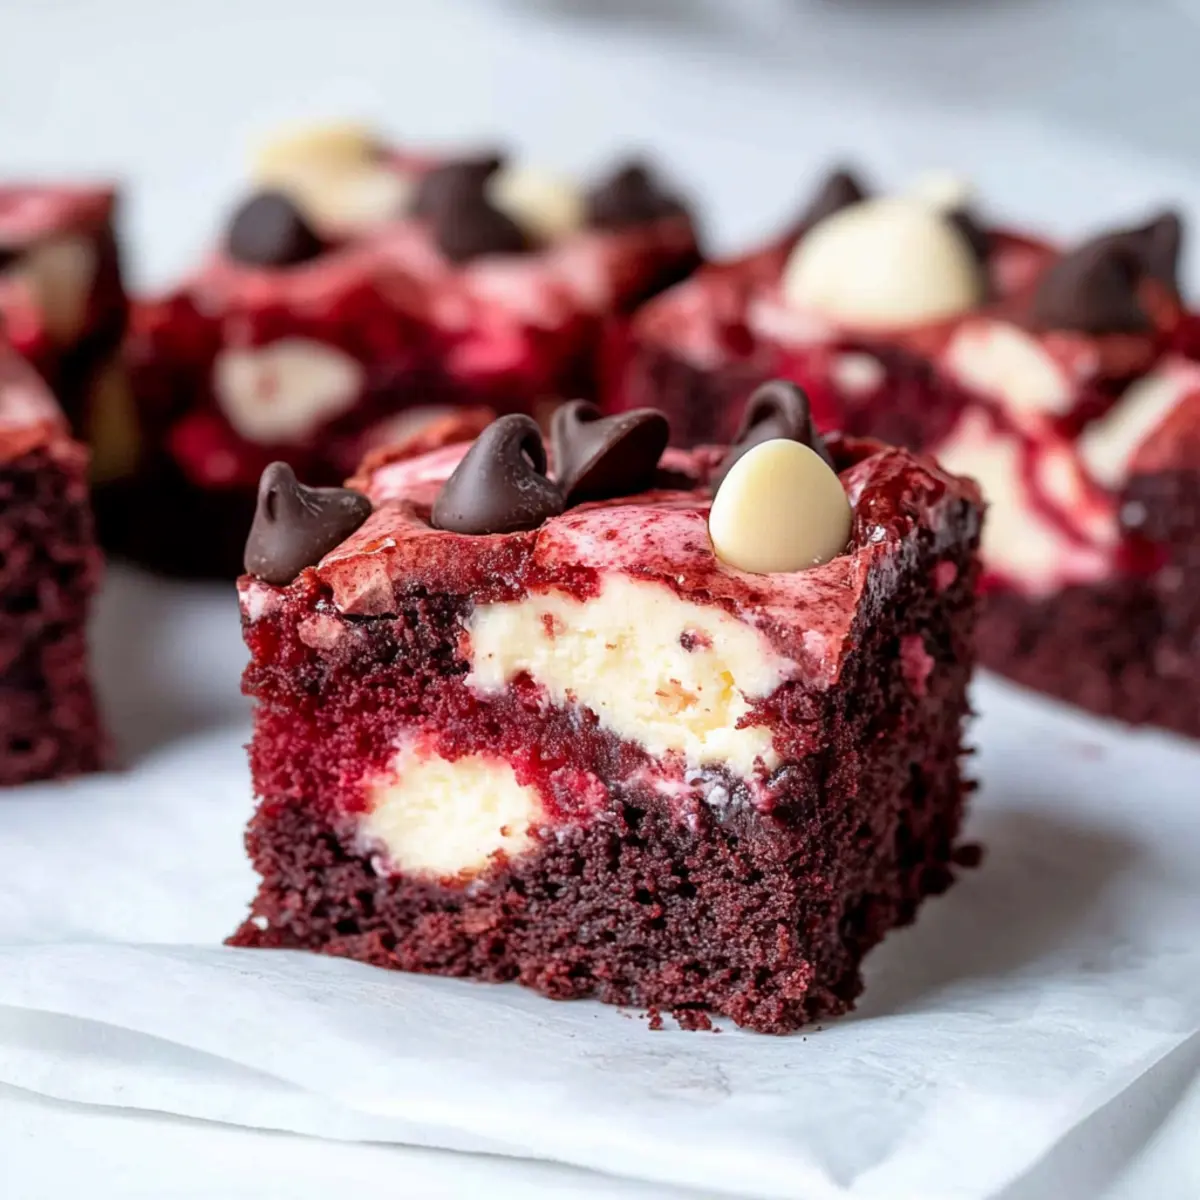
The vibrant red of these Red Velvet Brownies beckons me to the kitchen, conjuring memories of festive gatherings filled with laughter and indulgence. What makes this dessert so special is its harmonious blend of rich chocolate and creamy cheesecake, creating a harmonious swirl that’s both visually stunning and utterly delicious. This easy-to-make recipe is perfect for celebrating Christmas or Valentine’s Day, making it a lovely surprise for any loved one—or even a delightful treat for yourself! Plus, they offer a unique twist on a classic favorite that’s sure to impress. Are you ready to dive into a world of chocolatey goodness and create a showstopping dessert that will leave everyone asking for seconds?

Why Are These Brownies Irresistible?
Decadent, creamy goodness: These Red Velvet Brownies boast a luscious cheesecake swirl that elevates them to dessert royalty.
Easy to make: With just a few simple steps, this recipe is perfect for bakers of all skill levels.
Visually stunning: The vibrant red color provides an eye-catching dessert that brings festive cheer to any gathering.
Perfect for any occasion: Whether it’s Christmas or Valentine’s Day, they are sure to impress guests and loved ones alike.
Delightfully versatile: Feel free to explore variations like fudgy matcha brownies or peppermint brownies for a fun twist! Check out our Cajun Steak Alfredo for another festive dish that complements this sweet treat!
Irresistible crowd-pleaser: With flavors and textures everyone loves, these brownies will keep your guests coming back for more!
Red Velvet Brownies Ingredients
For the Brownie Base
- Unsalted Butter – Provides richness and moisture; remember to melt before mixing for the best texture.
- Granulated Sugar – Sweetens the brownies and contributes to their delightful texture.
- Vanilla Extract – Enhances the overall flavor profile beautifully.
- Unsweetened Cocoa Powder – Adds a subtle chocolate flavor that pairs perfectly with red velvet.
- Salt – Balances sweetness and elevates all the flavors in the mix.
- Liquid Food Coloring – Gives these brownies their signature red hue; gel food coloring is a great substitute if you desire a more concentrated color.
- White Vinegar – Adds acidity, enhancing the red color and balancing sweetness; white balsamic works too!
- Large Eggs – Essential for binding the ingredients and creating structure.
- All-Purpose Flour – The key component for building structure in these scrumptious brownies.
For the Cheesecake Layer
- Cream Cheese – Creates a luscious, creamy layer; ensure it’s softened for easy mixing.
- Granulated Sugar – Sweetens the cheesecake layer, harmonizing with the brownie base.
- Large Egg – Helps bind the cheesecake ingredients together for a smooth texture.
- Vanilla Extract – Enhances the flavor of the cheesecake, making it even more delicious.
For the Topping
- Semi-Sweet Chocolate Chips – Adds extra chocolatey goodness and delightful texture to the brownies; feel free to swap for white chocolate chips for a unique spin!
These Red Velvet Brownies are a wonderful blend of flavors and textures, making them a festive dessert perfect for any gathering—especially during Christmas and Valentine’s Day!
Step‑by‑Step Instructions for Irresistible Red Velvet Brownies with Creamy Cheesecake Swirl
Step 1: Preheat the Oven
Begin by preheating your oven to 350°F (175°C). While the oven is heating, grease an 8×8-inch baking pan with cooking spray or butter to ensure your Red Velvet Brownies release easily once baked. This step is crucial for achieving that perfect, gooey texture later.
Step 2: Prepare the Brownie Base
In a medium saucepan, melt ½ cup of unsalted butter over low heat. Once melted, remove it from the heat and whisk in 1 cup of granulated sugar, 1 teaspoon of vanilla extract, 1 teaspoon of unsweetened cocoa powder, a pinch of salt, several drops of liquid food coloring, and 1 teaspoon of white vinegar. Mix until smooth, and then add 2 large eggs, stirring until fully combined. Finally, fold in 1 cup of all-purpose flour just until mixed for a rich brownie base.
Step 3: Reserve Some Batter
After mixing all the ingredients for your brownie base, scoop out 4 tablespoons of the batter and set it aside in a small bowl. This reserved batter will be used later to create a delightful swirl on top of your brownies, enhancing both appearance and flavor.
Step 4: Assemble the Base Layer
Pour the remaining brownie batter into the prepared baking pan, spreading it evenly with a spatula. Make sure the layer is smooth and reaches the corners of the pan. This sets the foundation for your Red Velvet Brownies, ensuring a perfectly baked bottom layer that’s rich and fudgy.
Step 5: Make the Cheesecake Layer
In a medium bowl, beat together 8 ounces of softened cream cheese, ¼ cup of sugar, 1 large egg, and 1 teaspoon of vanilla extract until the mixture is smooth and creamy. This cheesecake layer adds a luxurious texture and flavor to your brownies, so take your time to ensure it’s well combined and free of lumps.
Step 6: Combine the Layers
Dollop the cheesecake mixture over the brownie batter in the baking pan, allowing it to sit in spaced-out mounds. Next, take the reserved brownie batter and spoon it in small dollops over the cheesecake layer. This layering provides those delightful swirls you’ll see once the brownies are baked.
Step 7: Swirl for Effect
Using a knife or a toothpick, gently swirl the cheesecake and brownie layers together, creating a marbled effect. Aim for a balance of both batters in each swirl to achieve a beautiful contrast once baked. This step will help the flavors meld beautifully as it bakes in the oven.
Step 8: Bake the Brownies
Place the assembled pan in the preheated oven. Bake for 20-25 minutes, or until a toothpick inserted in the center comes out with moist crumbs but no wet batter. Keep a close eye as they bake; the top should look set but still have a slight jiggle when you gently shake the pan.
Step 9: Cool and Serve
Once baked, remove your Red Velvet Brownies from the oven and let them cool in the pan on a wire rack. Allow them to cool completely before slicing into squares. This cooling time lets the layers set and ensures that each piece holds its shape, revealing that stunning swirl when served.

Make Ahead Options
These Red Velvet Brownies are a fantastic choice for meal prep, allowing you to enjoy the baking experience now while saving time later! You can prepare the brownie base and cheesecake layer up to 24 hours in advance, just be sure to keep them refrigerated in separate airtight containers. When you’re ready to bake, simply pour the brownie base into the pan, dollop on the cheesecake layer, and swirl as directed before baking. This method not only saves you time but helps maintain the brownies’ super moist texture. Just remember to allow them to cool completely before slicing to ensure that perfect presentation for your festive gatherings!
Red Velvet Brownies Variations
Feel free to play with flavors and textures; these ideas will help you create your own perfect twist on this classic treat!
-
White Chocolate: Swap semi-sweet chocolate chips for white chocolate to add a creamy sweetness that complements the red velvet.
-
Espresso Boost: Add a teaspoon of espresso powder to the brownie mix for a delightful coffee undertone that enhances the chocolate flavor. It’ll become your new favorite!
-
Peanut Butter Swirl: Replace the cream cheese layer with peanut butter for a heavenly combo that brings a nutty richness to each bite.
-
Minty Freshness: Add a few drops of peppermint extract to the cheesecake layer for a refreshing twist—perfect for holiday gatherings! Pair it with our Cajun Steak Alfredo for a delicious meal.
-
Fudgy Matcha: For an earthy twist, replace half of the cocoa powder with matcha powder in the brownie base. The vibrant color will surprise and delight!
-
Nutty Crunch: Toss in chopped nuts, like pecans or walnuts, to the brownie batter for an added crunch. The textures will elevate your experience even more.
-
Fruit Infusion: Add a layer of raspberry or strawberry preserves beneath the cheesecake layer for a fruity touch that brightens the flavor profile.
Exploring these variations can lead to delicious discoveries, making your Red Velvet Brownies a true reflection of your taste!
Expert Tips for Red Velvet Brownies
-
Room Temperature Cream Cheese: Ensure your cream cheese is at room temperature to mix smoothly and achieve a creamy cheesecake layer.
-
Careful Mixing: Avoid over-mixing the brownie batter after adding the flour; this keeps the brownies beautifully tender.
-
Swirling Technique: Don’t be afraid to swirl! Use a knife to create marbled patterns; it beautifully enhances the presentation of your Red Velvet Brownies.
-
Monitor Baking Time: Every oven is different. Check your brownies a few minutes early with a toothpick for the perfect baked texture—moist crumbs but no wet batter.
-
Storage Secrets: To keep brownies fresh, store them in an airtight container at room temperature for up to 3 days, or refrigerate for up to a week.
How to Store and Freeze Red Velvet Brownies
Room Temperature: Store brownies in an airtight container at room temperature for up to 3 days to maintain their fudgy texture.
Fridge: For longer freshness, refrigerate the brownies in an airtight container for up to 1 week. This can enhance the cream cheese flavor over time.
Freezer: Freeze brownies by wrapping them individually in plastic wrap, then placing them in a sealed freezer bag. They can last for up to 3 months in the freezer.
Reheating: For a warm treat, reheat a brownie in the microwave for about 10-15 seconds; topped with a scoop of ice cream, it becomes an indulgent dessert experience!
What to Serve with Decadent Red Velvet Cheesecake Brownies
Nothing pairs better with these delightful brownies than the right accompaniments to elevate your dessert experience!
-
Vanilla Ice Cream: The creamy, cool richness of vanilla ice cream beautifully complements the fudgy texture of the brownies, creating a heavenly contrast. A scoop on top transforms every bite into an indulgent delight!
-
Fresh Berries: Bright, tangy berries like raspberries or strawberries add a burst of freshness, making the flavors pop. Their natural sweetness enhances the rich chocolate notes, balancing each forkful.
-
Chocolate Sauce: Drizzling warm chocolate sauce over each serving takes the decadence to the next level. This luscious addition enhances the chocolatey goodness, making every piece more irresistible!
-
Whipped Cream: Light and fluffy whipped cream adds a sweet, airy element that plays well with the dense brownies. It’s a classic pairing that lightens up the experience without overshadowing the rich flavors.
-
Milk or Coffee: A tall glass of cold milk or a warm cup of coffee perfectly complements the sweetness of the brownies. The creamy or bitter notes balance the richness, ensuring each bite is enjoyable.
-
Chocolate-Covered Strawberries: For a romantic touch, serve these brownies alongside chocolate-covered strawberries. This combination adds a festive feel, making them perfect for special occasions like Valentine’s Day.
These wonderful pairings not only enhance the enjoyment of your Red Velvet Brownies but also create a memorable dessert experience for everyone gathered around the table!
Red Velvet Brownies Recipe FAQs
How do I choose the right food coloring for my brownies?
Absolutely! For the best results, I recommend using liquid food coloring as it mixes easily into the batter. If you prefer a more intense color, gel food coloring works wonders too—just remember to use a smaller amount, as it’s more concentrated. Aim for a vibrant red hue without any unnatural flavors in the final product!
What is the best way to store leftover brownies?
To keep your delicious Red Velvet Brownies fresh, store them in an airtight container at room temperature for up to 3 days. If you want them to last a bit longer, transferring them to the refrigerator can extend their shelf life up to 1 week. The cool temperature can even enhance the cheesecake flavor, making each bite a delightful surprise!
Can I freeze my Red Velvet Brownies for later?
Absolutely! To freeze your brownies, first let them cool completely. Then, wrap each brownie individually in plastic wrap and place them in a sealed freezer bag. They can last for up to 3 months in the freezer. When you’re ready to enjoy them, simply thaw overnight in the fridge or microwave for a quick 10-15 seconds for a warm, fudgy treat!
What should I do if my brownies turn out dry?
If you find your brownies are dry, don’t be discouraged! This typically happens when they are over-baked. To prevent this, ensure you check for doneness a few minutes before the timer goes off, looking for moist crumbs on a toothpick inserted into the center. If they’re still underdone, you can always bake them a bit more, but keep a close eye to avoid overcooking!
Are these brownies safe for people with allergies?
It’s essential to consider dietary needs! The Red Velvet Brownies contain gluten and dairy, so they are not suitable for those with gluten intolerance or a dairy allergy. However, feel free to substitute gluten-free flour and a dairy-free cream cheese alternative. I often make modifications to suit my loved ones’ tastes, and it works beautifully!
Irresistible Red Velvet Brownies with Creamy Cheesecake Swirl
Ingredients
Equipment
Method
- Preheat the oven to 350°F (175°C). Grease an 8x8-inch baking pan.
- Melt the unsalted butter, then mix with sugar, vanilla, cocoa, salt, food coloring, vinegar, and eggs. Fold in flour.
- Reserve 4 tablespoons of the brownie batter for later.
- Pour the brownie batter into the baking pan, smoothing it evenly.
- Beat cream cheese, sugar, egg, and vanilla in a bowl until smooth for the cheesecake layer.
- Dollop the cheesecake mixture over the brownie batter, then add reserved brownie batter in dollops.
- Use a knife to swirl the cheesecake and brownie layers together.
- Bake in the preheated oven for 20-25 minutes or until a toothpick comes out with moist crumbs.
- Cool the brownies in the pan on a wire rack before slicing.