Get my cookbooks

Korean Ground Beef Bowl Recipe is a must-try dish!

Introduction to the Korean Ground Beef Bowl Recipe

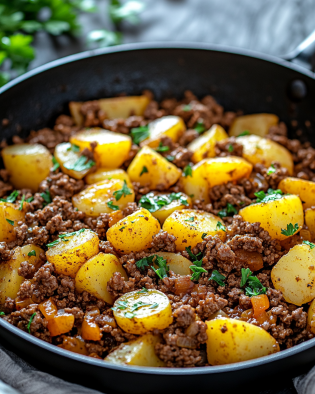
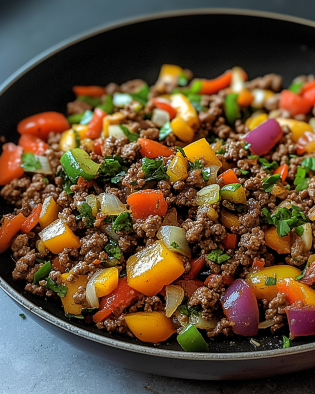
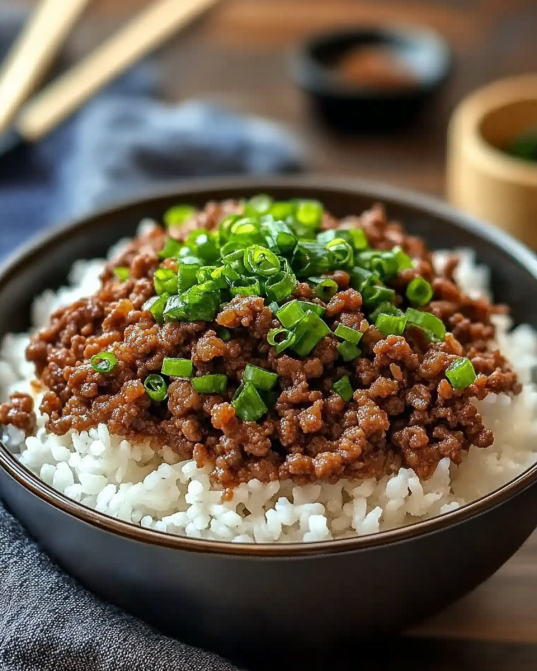
The Korean Ground Beef Bowl is a delightful dish that brings together savory flavors and vibrant colors. This recipe is not just a meal; it’s an experience that transports you to the bustling streets of Korea. With its rich taste and easy preparation, it has become a favorite for many home cooks. Whether you’re a seasoned chef or a beginner, this dish is sure to impress.

What Makes the Korean Ground Beef Bowl Unique?

What sets the Korean Ground Beef Bowl apart is its perfect balance of flavors. The combination of soy sauce, brown sugar, and sesame oil creates a sweet and savory sauce that coats the ground beef beautifully. Additionally, the freshness of garlic and ginger adds a fragrant touch that elevates the dish. The vibrant vegetables, like broccoli and carrots, not only add color but also provide essential nutrients. This bowl is a complete meal that satisfies both the palate and the body.

The Popularity of Korean Cuisine

Korean cuisine has gained immense popularity worldwide, and for good reason. It offers a variety of dishes that are both delicious and healthy. The use of fresh ingredients, bold flavors, and unique cooking techniques makes Korean food stand out. Dishes like kimchi, bibimbap, and bulgogi have captured the hearts of food lovers everywhere. The Korean Ground Beef Bowl is a perfect introduction to this vibrant culinary world. It’s easy to make and can be customized to suit your taste, making it a go-to recipe for busy weeknights or special occasions.

Ingredients for the Korean Ground Beef Bowl Recipe

Essential Ingredients

To create a delicious Korean Ground Beef Bowl, you’ll need a few essential ingredients. These components work together to deliver that authentic flavor you crave. Here’s what you’ll need:

  • 1 pound ground beef: This is the star of the dish, providing a rich and hearty base.
  • 1 tablespoon vegetable oil: Used for cooking the beef, it helps achieve a nice sear.
  • 4 cloves garlic, minced: Garlic adds a wonderful aroma and depth of flavor.
  • 1 teaspoon ginger, minced: Ginger brings a hint of warmth and spice.
  • 1/4 cup soy sauce: This salty ingredient is key for that umami taste.
  • 2 tablespoons brown sugar: Brown sugar balances the saltiness with sweetness.
  • 1 tablespoon sesame oil: This oil adds a nutty flavor that enhances the dish.
  • 1/2 teaspoon red pepper flakes (optional): For those who enjoy a bit of heat, this is a great addition.
  • 3 cups cooked rice: White or brown rice serves as the perfect base for your bowl.
  • 1 cup broccoli florets: Broccoli adds color and crunch, making the dish more nutritious.
  • 1 carrot, julienned: Carrots provide sweetness and a pop of color.
  • 2 green onions, sliced: These are used as a fresh garnish.
  • 1 tablespoon sesame seeds (for garnish): Sesame seeds add a delightful crunch and visual appeal.

Optional Ingredients for Customization

One of the best things about the Korean Ground Beef Bowl is its versatility. You can easily customize it to suit your taste or dietary needs. Here are some optional ingredients you might consider:

  • Ground turkey or chicken: For a lighter version, swap out the beef for turkey or chicken.
  • Bell peppers: Adding sliced bell peppers can enhance the flavor and add more color.
  • Snap peas: These can provide a sweet crunch and additional nutrients.
  • Sriracha: Drizzling some sriracha on top can give your bowl a spicy kick.
  • Kimchi: Serve it on the side for a traditional Korean touch.

With these ingredients, you’re well on your way to creating a delightful Korean Ground Beef Bowl that’s sure to please everyone at the table!

Step-by-Step Preparation of the Korean Ground Beef Bowl Recipe

Step 1: Preparing the Ingredients

Before you start cooking, it’s important to prepare all your ingredients. This makes the cooking process smoother and more enjoyable. Begin by measuring out the ground beef, soy sauce, and sesame oil. Next, mince the garlic and ginger finely. Then, julienne the carrot and slice the green onions. Finally, wash the broccoli florets and set everything aside. Having everything ready will help you cook efficiently and keep your kitchen organized.

Step 2: Cooking the Ground Beef

Now it’s time to cook the ground beef. Heat a large skillet over medium-high heat and add the vegetable oil. Once the oil is hot, add the ground beef. Cook it for about 5-7 minutes, breaking it apart with a spatula. You want it to be nicely browned. If there’s excess fat, drain it off to keep the dish lighter. This step is crucial as it forms the base of your Korean Ground Beef Bowl.

Step 3: Making the Sauce

After the beef is cooked, it’s time to add flavor. Lower the heat slightly and add the minced garlic and ginger to the skillet. Sauté them for 1-2 minutes until they become fragrant. Then, stir in the soy sauce, brown sugar, sesame oil, and red pepper flakes if you like some heat. Cook this mixture for another 2-3 minutes. This allows the flavors to meld beautifully, creating a delicious sauce that will coat the beef.

Step 4: Combining Ingredients

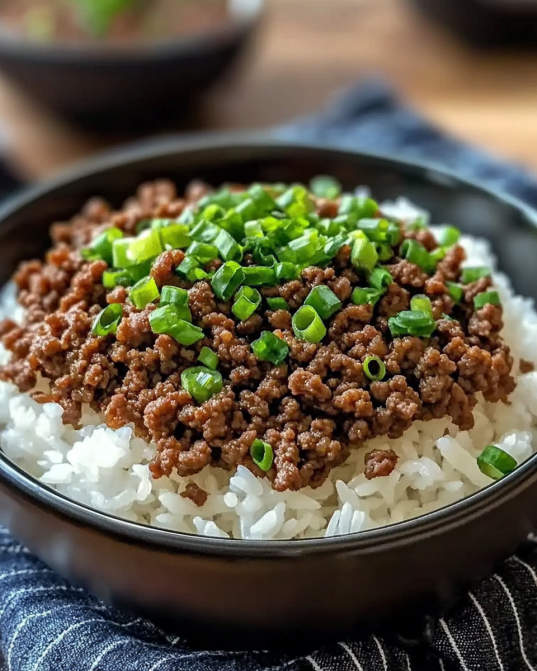
While the beef is cooking, you can prepare the vegetables. Steam the broccoli florets and julienned carrot in a separate pot for about 4-5 minutes until they are tender but still crisp. Once everything is ready, it’s time to combine. In a bowl, place a scoop of cooked rice as the base. Top it with the Korean ground beef mixture and then add the steamed vegetables. This layering creates a beautiful presentation and ensures every bite is packed with flavor.

Step 5: Serving the Dish

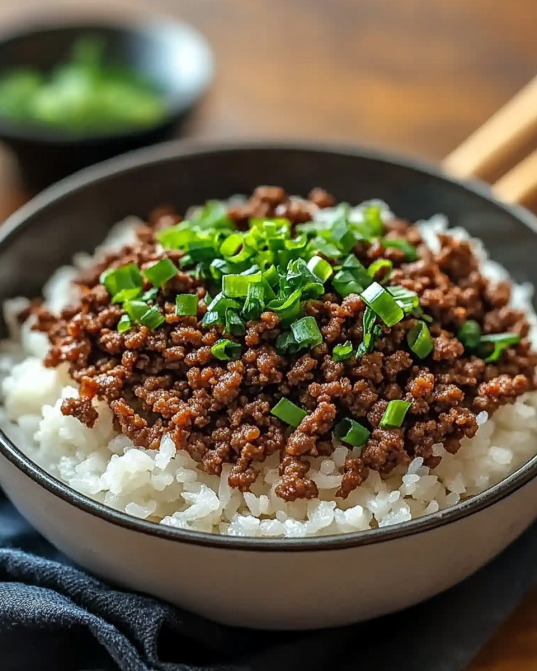
Finally, it’s time to serve your Korean Ground Beef Bowl! Garnish it with sliced green onions and a sprinkle of sesame seeds for that extra touch. You can also add a drizzle of sriracha or serve kimchi on the side for those who enjoy a spicy kick. This dish is not only visually appealing but also bursting with flavors. Enjoy your meal with family or friends, and watch them be impressed by your culinary skills!

Variations of the Korean Ground Beef Bowl Recipe

Vegetarian Alternatives

If you’re looking for a vegetarian option, you can easily adapt the Korean Ground Beef Bowl. Instead of ground beef, consider using plant-based proteins. Options like crumbled tofu, tempeh, or even lentils can provide a hearty base. For a delightful twist, try using mushrooms. They add a rich, umami flavor that mimics the taste of meat.

To prepare a vegetarian version, follow the same steps as the original recipe. Sauté the tofu or tempeh in vegetable oil until golden brown. Then, add the garlic and ginger, followed by the soy sauce, brown sugar, and sesame oil. This will create a delicious sauce that complements the vegetables beautifully. You can still include the broccoli, carrots, and any other veggies you love. This way, you’ll have a colorful and nutritious bowl that everyone can enjoy!

Spicy Versions of the Korean Ground Beef Bowl Recipe

If you crave a bit more heat, there are several ways to spice up your Korean Ground Beef Bowl. One simple method is to increase the amount of red pepper flakes in the sauce. You can also add fresh chili peppers or a dash of hot sauce to the beef mixture while cooking. This will give your dish a fiery kick that spice lovers will appreciate.

Another exciting option is to incorporate gochujang, a Korean chili paste. Just a tablespoon or two can transform your bowl into a spicy delight. Mix it in with the soy sauce and brown sugar for a rich, spicy flavor. For an extra layer of heat, consider topping your bowl with sliced jalapeños or a drizzle of sriracha. These spicy variations will surely satisfy your taste buds and make your Korean Ground Beef Bowl even more exciting!

Cooking Note for the Korean Ground Beef Bowl Recipe

Tips for Perfectly Cooked Ground Beef

Cooking ground beef to perfection is essential for a delicious Korean Ground Beef Bowl. Here are some helpful tips to ensure your beef is cooked just right:

  • Choose the Right Meat: Opt for ground beef with a fat content of around 80/20. This balance provides flavor without being too greasy.
  • Don’t Overcrowd the Pan: If you’re cooking a large batch, do it in batches. Overcrowding can cause the beef to steam instead of brown.
  • Use High Heat: Cooking on medium-high heat helps achieve a nice sear. This adds flavor and texture to the beef.
  • Break It Up: Use a spatula to break the beef into small pieces as it cooks. This ensures even cooking and browning.
  • Drain Excess Fat: If there’s too much fat after cooking, drain it off. This keeps your dish lighter and allows the flavors to shine.

Adjusting Flavor Profiles

One of the best parts of the Korean Ground Beef Bowl is how easily you can adjust the flavors to suit your taste. Here are some tips for tweaking the flavor profile:

  • Sweetness Level: If you prefer a sweeter sauce, add a bit more brown sugar. Start with an extra teaspoon and taste as you go.
  • Saltiness: For a saltier flavor, increase the soy sauce. However, be cautious, as too much can overpower the dish.
  • Spice Level: To amp up the heat, add more red pepper flakes or a splash of hot sauce. You can also mix in gochujang for a deeper flavor.
  • Umami Boost: For an extra umami kick, consider adding a splash of fish sauce or a sprinkle of mushroom powder.
  • Fresh Herbs: Adding fresh herbs like cilantro or basil can brighten the dish and add a fresh twist.

By following these tips, you can create a Korean Ground Beef Bowl that’s perfectly tailored to your taste buds. Enjoy experimenting with flavors and make this dish your own!

Serving Suggestions for the Korean Ground Beef Bowl Recipe

Ideal Side Dishes

When serving your Korean Ground Beef Bowl, consider adding some delightful side dishes to enhance the meal. Here are a few suggestions that pair perfectly:

  • Kimchi: This traditional Korean side dish made from fermented vegetables adds a spicy and tangy flavor that complements the beef bowl beautifully.
  • Pickled Vegetables: Quick-pickled cucumbers or radishes can provide a refreshing crunch and balance the richness of the beef.
  • Seaweed Salad: A light and flavorful seaweed salad can add a unique texture and a hint of umami to your meal.
  • Egg Rolls: Crispy egg rolls filled with vegetables or meat can be a delightful addition, offering a satisfying crunch.
  • Asian Slaw: A colorful slaw made with cabbage, carrots, and a sesame dressing can add a fresh and crunchy element to your meal.

These side dishes not only enhance the flavors of your Korean Ground Beef Bowl but also create a well-rounded dining experience. Feel free to mix and match based on your preferences!

Pairing with Rice and Vegetables

The base of your Korean Ground Beef Bowl is the rice, which plays a crucial role in balancing the flavors. Here are some tips for pairing rice and vegetables:

  • Rice Options: While white rice is a classic choice, brown rice offers a nuttier flavor and more fiber. Quinoa is another great alternative, providing a protein boost.
  • Vegetable Variety: In addition to broccoli and carrots, consider adding bell peppers, snap peas, or zucchini for extra color and nutrition.
  • Herbs and Greens: Fresh herbs like cilantro or basil can brighten the dish. You can also add baby spinach or arugula for a fresh touch.
  • Flavorful Broths: If you want to elevate the rice, cook it in vegetable or chicken broth instead of water. This adds depth and flavor to the base of your bowl.

By thoughtfully pairing your rice and vegetables, you can create a Korean Ground Beef Bowl that is not only delicious but also visually appealing. Enjoy the harmony of flavors and textures in every bite!

Tips for Making the Korean Ground Beef Bowl Recipe

Common Mistakes to Avoid

When preparing your Korean Ground Beef Bowl, avoiding common mistakes can make a big difference in the final dish. Here are some pitfalls to watch out for:

  • Overcooking the Beef: Cooking the ground beef for too long can make it tough. Aim for a nice brown color, but don’t let it dry out.
  • Skipping the Garlic and Ginger: These ingredients are essential for flavor. Don’t skip them, as they add depth and aroma to the dish.
  • Not Draining Excess Fat: If you don’t drain the fat after cooking the beef, your dish may become greasy. Always drain it for a lighter meal.
  • Using Low-Quality Soy Sauce: The soy sauce is a key ingredient. Using a low-quality brand can affect the overall taste. Opt for a good quality soy sauce for the best results.
  • Ignoring the Vegetables: Don’t overlook the importance of vegetables. They add nutrition and color. Make sure to include them for a balanced bowl.

Enhancing Flavor and Texture

To take your Korean Ground Beef Bowl to the next level, consider these tips for enhancing flavor and texture:

  • Marinate the Beef: For extra flavor, marinate the ground beef in soy sauce, garlic, and ginger for 30 minutes before cooking. This adds depth to the meat.
  • Toast the Sesame Seeds: Lightly toasting sesame seeds before garnishing can enhance their nutty flavor. Just a minute in a dry pan will do the trick.
  • Add Fresh Herbs: Fresh herbs like cilantro or basil can brighten the dish. Sprinkle them on top just before serving for a fresh burst of flavor.
  • Incorporate Crunchy Toppings: Consider adding crunchy toppings like crushed peanuts or crispy fried onions for added texture and flavor contrast.
  • Experiment with Sauces: Don’t hesitate to drizzle additional sauces like sriracha or gochujang on top for an extra kick. This can elevate the dish even further.

By avoiding common mistakes and enhancing the flavors and textures, you can create a Korean Ground Beef Bowl that is not only delicious but also memorable. Enjoy the process and have fun experimenting!

Breakdown of Time for the Korean Ground Beef Bowl Recipe

Prep Time

Preparing your ingredients is a crucial step in making the Korean Ground Beef Bowl. The prep time for this recipe is approximately 15 minutes. During this time, you will measure out the ground beef, soy sauce, and sesame oil. You’ll also mince the garlic and ginger, julienne the carrot, and slice the green onions. Additionally, washing the broccoli florets is essential. Having everything ready will make the cooking process smoother and more enjoyable.

Cooking Time

The cooking time for the Korean Ground Beef Bowl is about 20 minutes. This includes browning the ground beef, sautéing the garlic and ginger, and preparing the sauce. While the beef is cooking, you can steam the broccoli and carrots simultaneously. This multitasking helps you save time and ensures that everything is ready to serve at once.

Total Time

In total, you can expect to spend around 35 minutes from start to finish. This includes both the prep and cooking times. With such a quick turnaround, the Korean Ground Beef Bowl is perfect for busy weeknights or when you want a delicious meal without spending hours in the kitchen. Enjoy the process and savor the delightful flavors of this dish!

Nutritional Information for the Korean Ground Beef Bowl Recipe

Calories and Macronutrients

Understanding the nutritional content of your meals is essential for maintaining a balanced diet. The Korean Ground Beef Bowl is not only delicious but also provides a good mix of macronutrients. Here’s a breakdown of the calories and macronutrients per serving:

  • Calories: 450
  • Net Carbohydrates: 40g
  • Protein: 25g
  • Fat: 20g

This meal offers a satisfying amount of protein, making it a great option for those looking to build muscle or maintain energy levels throughout the day. The carbohydrates from the rice provide a quick source of energy, while the healthy fats from sesame oil contribute to overall satiety.

Health Benefits of Ingredients

The ingredients in the Korean Ground Beef Bowl not only create a flavorful dish but also offer various health benefits:

  • Ground Beef: A rich source of protein, iron, and B vitamins, ground beef supports muscle growth and overall health.
  • Broccoli: Packed with vitamins C and K, broccoli is known for its antioxidant properties and supports immune health.
  • Carrots: High in beta-carotene, carrots promote good vision and skin health while providing dietary fiber.
  • Garlic: Known for its anti-inflammatory and immune-boosting properties, garlic can help reduce the risk of chronic diseases.
  • Ginger: This spice aids digestion and has anti-nausea effects, making it a great addition to any meal.
  • Soy Sauce: While it adds flavor, opt for low-sodium versions to keep your sodium intake in check.
  • Sesame Oil: Rich in antioxidants, sesame oil can help reduce inflammation and improve heart health.

By incorporating these nutritious ingredients, the Korean Ground Beef Bowl becomes a wholesome meal that not only satisfies your taste buds but also supports your overall health. Enjoy this delightful dish knowing it’s good for you!

FAQs about the Korean Ground Beef Bowl Recipe

Can I use a different type of meat?

Absolutely! The Korean Ground Beef Bowl is quite versatile. You can substitute ground beef with ground turkey, chicken, or even pork. Each option brings its unique flavor and texture. If you prefer a leaner option, ground turkey or chicken is a great choice. Just remember to adjust the cooking time slightly, as lean meats may cook faster than beef. Enjoy experimenting with different meats to find your favorite combination!

How can I make this dish gluten-free?

Making the Korean Ground Beef Bowl gluten-free is simple! The main ingredient to replace is soy sauce. You can use gluten-free soy sauce or tamari, which is a great alternative. Additionally, ensure that any other sauces or condiments you use are gluten-free. With these adjustments, you can enjoy this delicious dish without worrying about gluten!

What are some good toppings for the Korean Ground Beef Bowl?

Toppings can elevate your Korean Ground Beef Bowl and add extra flavor and texture. Here are some tasty options:

  • Sliced Avocado: Creamy avocado adds richness and balances the flavors.
  • Chopped Cilantro: Fresh cilantro brings a burst of freshness to the dish.
  • Fried Egg: A sunny-side-up egg on top adds a delicious creaminess.
  • Crushed Peanuts: For a crunchy texture, sprinkle some crushed peanuts on top.
  • Kimchi: This traditional Korean side dish adds a spicy and tangy kick.

Feel free to mix and match these toppings to create a bowl that suits your taste!

How long can I store leftovers?

Leftovers from your Korean Ground Beef Bowl can be stored in an airtight container in the refrigerator for up to 3-4 days. To reheat, simply warm it in the microwave or on the stovetop until heated through. If you want to keep it longer, consider freezing the beef mixture. It can last in the freezer for up to 3 months. Just make sure to separate the rice and vegetables before freezing, as they may not reheat as well. Enjoy your delicious leftovers!

Conclusion on the Korean Ground Beef Bowl Recipe

Recap of Key Points

The Korean Ground Beef Bowl is a delightful dish that combines savory flavors, vibrant colors, and nutritious ingredients. With its easy preparation and customizable options, it’s perfect for any occasion. We explored the essential ingredients, step-by-step preparation, and various ways to adapt the recipe to suit your taste. Whether you prefer a vegetarian version or a spicy kick, this dish can be tailored to meet your preferences. Plus, the nutritional benefits of the ingredients make it a wholesome choice for a satisfying meal.

Encouragement to Try the Recipe

Now that you have all the information, it’s time to roll up your sleeves and try making the Korean Ground Beef Bowl! This recipe is not only quick and easy but also a fun way to explore Korean cuisine. Gather your ingredients, invite your family or friends, and enjoy the cooking process together. You’ll be amazed at how delicious and satisfying this dish can be. So, don’t hesitate—give it a go and savor the delightful flavors of your homemade Korean Ground Beef Bowl!

Mediterranean Grilled Shrimp and Orzo Salad is delicious!

Introduction to Mediterranean Shrimp and Orzo Salad

Are you looking for a dish that bursts with flavor and is easy to prepare? Look no further than the Mediterranean Shrimp and Orzo Salad! This delightful salad combines the freshness of Mediterranean ingredients with the satisfying texture of orzo pasta. It’s perfect for a light lunch, a picnic, or even a dinner party.

The Mediterranean diet is known for its health benefits, including heart health and weight management. This salad not only tastes great but also packs a nutritional punch. With shrimp as the star ingredient, you get a good source of protein, while the colorful vegetables add vitamins and minerals. Plus, the zesty lemon and aromatic herbs elevate the dish, making it a feast for your senses.

Whether you’re a seasoned cook or a beginner in the kitchen, this recipe is straightforward and quick. In just a few steps, you can create a vibrant and delicious meal that everyone will love. So, roll up your sleeves and get ready to dive into the world of Mediterranean flavors with this scrumptious shrimp and orzo salad!

Ingredients for Mediterranean Shrimp and Orzo Salad

To create a mouthwatering Mediterranean Shrimp and Orzo Salad, you’ll need a variety of fresh and flavorful ingredients. Here’s what you’ll need:

  • 1 pound large shrimp – peeled and deveined for easy cooking.
  • 1 cup orzo pasta – this small pasta shape adds a delightful texture.
  • 2 tablespoons olive oil – for marinating the shrimp and adding richness.
  • 2 cloves garlic – minced to infuse the dish with aromatic flavor.
  • 1 teaspoon dried oregano – a classic herb that brings Mediterranean essence.
  • 1 teaspoon lemon zest – for a bright, citrusy kick.
  • Salt and pepper to taste – to enhance all the flavors.
  • 1 cup cherry tomatoes – halved for sweetness and color.
  • 1 cucumber – diced for a refreshing crunch.
  • 1/2 red onion – finely chopped for a bit of sharpness.
  • 1/2 cup feta cheese – crumbled for a creamy, tangy touch.
  • 1/4 cup fresh parsley – chopped for a burst of freshness.
  • Juice of 1 lemon – to tie all the flavors together.

These ingredients come together to create a colorful and nutritious salad that is sure to impress. The combination of shrimp, orzo, and fresh vegetables makes this dish not only delicious but also visually appealing. So gather your ingredients and get ready to whip up this delightful Mediterranean Shrimp and Orzo Salad!

Preparation of Mediterranean Shrimp and Orzo Salad

Now that you have all your ingredients ready, it’s time to prepare your Mediterranean Shrimp and Orzo Salad. This section will guide you through each step, ensuring that your dish turns out perfectly every time. Let’s get started!

Step 1: Cooking the Orzo

First, bring a large pot of salted water to a boil. Once boiling, add the orzo pasta. Cook it according to the package instructions, usually around 8-10 minutes. Stir occasionally to prevent sticking. When the orzo is al dente, drain it in a colander. Rinse it under cold water to stop the cooking process. This step is crucial as it helps keep the orzo firm and prevents it from becoming mushy. Set the orzo aside to cool while you prepare the shrimp.

Step 2: Preparing the Shrimp

While the orzo cools, it’s time to prepare the shrimp. In a mixing bowl, combine the peeled and deveined shrimp with olive oil, minced garlic, dried oregano, lemon zest, salt, and pepper. Toss everything together until the shrimp are well coated. This marinade not only adds flavor but also helps keep the shrimp juicy. Let the shrimp marinate for about 15 minutes. This short wait allows the flavors to meld beautifully.

Step 3: Mixing the Salad Ingredients

Once the shrimp are marinated, it’s time to mix the salad ingredients. In a large bowl, combine the cooled orzo, halved cherry tomatoes, diced cucumber, finely chopped red onion, crumbled feta cheese, and chopped parsley. Each ingredient adds its unique flavor and texture, making the salad vibrant and delicious. Gently toss the ingredients together to ensure they are evenly distributed.

Step 4: Combining Everything Together

Now, it’s time to bring everything together! Add the grilled shrimp to the orzo mixture. Drizzle the fresh lemon juice over the top. Gently toss everything together until well combined. This final step is where all the flavors unite, creating a delightful Mediterranean experience. You can serve the salad immediately or chill it in the refrigerator for about 30 minutes. Chilling enhances the flavors and makes it even more refreshing!

And there you have it! Your Mediterranean Shrimp and Orzo Salad is ready to be enjoyed. This dish is not only easy to prepare but also a feast for the eyes and the palate.

Variation of Mediterranean Shrimp and Orzo Salad

While the classic Mediterranean Shrimp and Orzo Salad is delicious as is, there are many ways to switch things up! You can easily customize this dish to suit your taste or dietary needs. Let’s explore some alternative ingredients and different cooking methods that can add a unique twist to your salad.

Alternative Ingredients to Consider

One of the best things about the Mediterranean Shrimp and Orzo Salad is its versatility. Here are some alternative ingredients you might want to try:

  • Quinoa: For a gluten-free option, substitute orzo with quinoa. It adds a nutty flavor and is packed with protein.
  • Olives: Adding Kalamata or green olives can enhance the Mediterranean flair. They bring a briny taste that complements the shrimp.
  • Avocado: Diced avocado adds creaminess and healthy fats. It also pairs well with the other fresh ingredients.
  • Bell Peppers: Chopped bell peppers can add a sweet crunch and vibrant color to your salad.
  • Spinach or Arugula: Mixing in some fresh greens can boost the nutritional value and add a peppery flavor.

Feel free to mix and match these ingredients based on what you have on hand or what you enjoy most. The possibilities are endless!

Different Cooking Methods

In addition to ingredient variations, you can also experiment with different cooking methods for the shrimp. Here are a few ideas:

  • Stovetop Searing: If you don’t have a grill, sear the marinated shrimp in a hot skillet. This method gives the shrimp a nice caramelized flavor.
  • Baking: Preheat your oven to 400°F (200°C) and bake the shrimp on a lined baking sheet for about 8-10 minutes. This is a hands-off method that works well.
  • Broiling: Broil the shrimp in the oven for a quick and easy cooking method. Just keep an eye on them to avoid overcooking.

By trying out these alternative ingredients and cooking methods, you can create a Mediterranean Shrimp and Orzo Salad that’s uniquely yours. Enjoy the process of experimenting and discovering new flavors!

Cooking Note for Mediterranean Shrimp and Orzo Salad

When preparing the Mediterranean Shrimp and Orzo Salad, a few cooking notes can help ensure your dish turns out perfectly every time. These tips will enhance the flavors and textures, making your salad even more enjoyable.

First, always choose fresh shrimp for the best taste. Fresh shrimp has a sweet flavor and firm texture that frozen shrimp may lack. If you do use frozen shrimp, make sure to thaw it completely before marinating. This will help the shrimp absorb the flavors better.

Next, pay attention to the cooking time for the shrimp. Overcooking can lead to rubbery shrimp, which is not pleasant. Grill or cook the shrimp just until they turn pink and opaque. This usually takes about 2-3 minutes per side, depending on their size. If you’re unsure, a quick cut into one shrimp can help you check for doneness.

Additionally, when cooking the orzo, make sure to salt the water generously. This step is crucial as it enhances the flavor of the pasta. Remember to drain the orzo well and rinse it under cold water to stop the cooking process. This will keep the orzo from becoming mushy and ensure it maintains a nice bite.

Lastly, don’t skip the marinating step for the shrimp. Even a short marination of 15 minutes allows the flavors to meld beautifully. If you have more time, consider marinating the shrimp for up to an hour in the refrigerator. This extra time can deepen the flavors, making your salad even more delicious.

By following these cooking notes, you’ll create a Mediterranean Shrimp and Orzo Salad that is bursting with flavor and sure to impress your family and friends. Happy cooking!

Serving Suggestions for Mediterranean Shrimp and Orzo Salad

Once your Mediterranean Shrimp and Orzo Salad is ready, it’s time to think about how to serve it. This dish is not only delicious but also visually appealing, making it perfect for various occasions. Here are some serving suggestions to elevate your dining experience:

  • Chilled Delight: For a refreshing twist, serve the salad chilled. After mixing all the ingredients, let it sit in the refrigerator for about 30 minutes. This allows the flavors to meld beautifully and makes for a cool, satisfying dish on a warm day.
  • Garnish with Fresh Herbs: Just before serving, sprinkle some extra chopped parsley or fresh basil on top. This adds a pop of color and enhances the fresh flavors of the salad.
  • Pair with Grilled Bread: Serve the salad alongside slices of warm, grilled bread. A drizzle of olive oil or a spread of hummus on the bread complements the Mediterranean theme perfectly.
  • Accompany with a Side of Tzatziki: Tzatziki sauce, made from yogurt, cucumber, and garlic, is a fantastic dip that pairs well with the salad. It adds a creamy texture and a refreshing taste.
  • Serve as a Main Course: This salad is hearty enough to be a main dish. Serve it in large bowls for a satisfying lunch or dinner. It’s perfect for gatherings or family meals.
  • Use as a Filling: For a fun twist, use the salad as a filling for pita pockets. Stuff the salad into whole wheat pita bread for a portable meal that’s great for picnics or lunch on the go.

These serving suggestions will not only enhance the presentation of your Mediterranean Shrimp and Orzo Salad but also make it a delightful experience for your guests. Enjoy the vibrant flavors and the joy of sharing this delicious dish!

Tips for Making the Best Mediterranean Shrimp and Orzo Salad

Creating the perfect Mediterranean Shrimp and Orzo Salad is all about attention to detail. Here are some helpful tips to ensure your dish turns out delicious every time:

  • Use Fresh Ingredients: Fresh vegetables and herbs make a big difference in flavor. Choose ripe cherry tomatoes, crisp cucumbers, and vibrant parsley for the best results.
  • Don’t Overcook the Shrimp: Keep an eye on the shrimp while grilling. They cook quickly, usually in just 2-3 minutes per side. Overcooked shrimp can become tough and rubbery.
  • Season Generously: Don’t be shy with the salt and pepper. Proper seasoning enhances the flavors of all the ingredients. Taste as you go to find the right balance.
  • Chill Before Serving: For a refreshing taste, chill the salad in the refrigerator for at least 30 minutes before serving. This allows the flavors to meld beautifully.
  • Experiment with Herbs: While parsley is a great choice, feel free to mix in other herbs like dill or mint. They can add a unique twist to your salad.
  • Make it Ahead: If you’re preparing for a gathering, you can make the salad a few hours in advance. Just keep it covered in the fridge until you’re ready to serve.
  • Adjust the Acidity: If you prefer a tangier flavor, add more lemon juice or even a splash of red wine vinegar. This can brighten up the dish even more.
  • Serve with a Side: Pair your salad with a light side dish, like a simple green salad or grilled vegetables, to create a well-rounded meal.

By following these tips, you’ll elevate your Mediterranean Shrimp and Orzo Salad to new heights. Enjoy the process of cooking and the delightful flavors that come together in this vibrant dish!

Breakdown of Time for Mediterranean Shrimp and Orzo Salad

Understanding the time needed to prepare your Mediterranean Shrimp and Orzo Salad can help you plan your cooking efficiently. Here’s a simple breakdown of the time required for each step, ensuring you can enjoy this delicious dish without any rush.

Prep Time

The prep time for this salad is approximately 20 minutes. This includes gathering your ingredients, peeling and deveining the shrimp, chopping vegetables, and measuring out the orzo and seasonings. Taking your time during this step ensures that everything is ready for cooking and mixing.

Cooking Time

Cooking the orzo and grilling the shrimp will take about 15 minutes. The orzo usually cooks in about 8-10 minutes, while the shrimp only needs 2-3 minutes on each side on the grill. This quick cooking time makes the salad a great option for busy weeknights or last-minute gatherings.

Total Time

In total, you can expect to spend around 35 minutes from start to finish. This includes both prep and cooking time. If you choose to chill the salad before serving, you might want to add an additional 30 minutes for the flavors to meld beautifully. Overall, this Mediterranean Shrimp and Orzo Salad is a quick and satisfying dish that fits perfectly into any schedule!

Nutritional Information for Mediterranean Shrimp and Orzo Salad

Understanding the nutritional content of your Mediterranean Shrimp and Orzo Salad can help you make informed choices about your meals. This salad is not only delicious but also packed with nutrients that contribute to a balanced diet. Let’s break down the key nutritional components of this delightful dish.

Calories

350 calories. This makes it a great option for a light meal or a satisfying side dish. The combination of shrimp, orzo, and fresh vegetables provides a good balance of energy without being overly heavy.

Protein

25 grams of protein. Shrimp is an excellent source of lean protein, which is essential for muscle repair and overall health. This makes the salad a great choice for those looking to increase their protein intake while enjoying a flavorful meal.

Sodium

600 milligrams. This includes the natural sodium found in shrimp and the added salt used during cooking. While this is a moderate amount, it’s always a good idea to adjust the seasoning based on your dietary needs. If you’re watching your sodium intake, consider using less salt or opting for low-sodium feta cheese.

Overall, the Mediterranean Shrimp and Orzo Salad is a nutritious option that provides a good balance of calories, protein, and other essential nutrients. Enjoy this vibrant dish as part of a healthy lifestyle!

FAQs about Mediterranean Shrimp and Orzo Salad

Can I make Mediterranean Shrimp and Orzo Salad ahead of time?

Absolutely! You can prepare the Mediterranean Shrimp and Orzo Salad ahead of time. In fact, making it a few hours in advance can enhance the flavors as they meld together. Just be sure to store it in an airtight container in the refrigerator. If you plan to serve it later, consider adding the shrimp just before serving to keep them fresh and prevent them from becoming soggy.

What can I substitute for orzo in this salad?

If you’re looking for a substitute for orzo, there are several great options! Quinoa is a popular choice, as it’s gluten-free and adds a nutty flavor. You can also use couscous, farro, or even small pasta shapes like ditalini or mini shells. Each of these alternatives will provide a unique texture while still complementing the other ingredients in the salad.

Is Mediterranean Shrimp and Orzo Salad gluten-free?

The traditional Mediterranean Shrimp and Orzo Salad is not gluten-free due to the orzo pasta. However, you can easily make it gluten-free by substituting orzo with quinoa or gluten-free pasta. This way, you can still enjoy the delicious flavors of the salad without any gluten concerns!

How long does Mediterranean Shrimp and Orzo Salad last in the fridge?

When stored properly in an airtight container, Mediterranean Shrimp and Orzo Salad can last in the fridge for about 2-3 days. However, for the best taste and texture, it’s recommended to enjoy it within the first day or two. After that, the vegetables may start to lose their crispness, and the flavors may not be as vibrant. Always check for freshness before consuming!

Conclusion on Mediterranean Shrimp and Orzo Salad

In conclusion, the Mediterranean Shrimp and Orzo Salad is a delightful dish that brings together vibrant flavors and nutritious ingredients. This salad is not only easy to prepare but also offers a refreshing taste that can brighten any meal. With its combination of succulent shrimp, tender orzo, and fresh vegetables, it’s a perfect choice for lunch, dinner, or even a picnic.

As you explore the various ways to customize this salad, you’ll find that it can easily adapt to your personal preferences. Whether you choose to add olives, substitute quinoa, or experiment with different herbs, the possibilities are endless. This versatility makes it a fantastic option for any occasion, from casual family dinners to elegant gatherings.

Moreover, the health benefits of this dish are noteworthy. Packed with protein, vitamins, and healthy fats, the Mediterranean Shrimp and Orzo Salad supports a balanced diet while satisfying your taste buds. It’s a meal that not only nourishes your body but also delights your senses.

So, gather your ingredients, follow the simple steps, and enjoy the process of creating this delicious salad. Whether you serve it chilled or at room temperature, your Mediterranean Shrimp and Orzo Salad is sure to impress. Embrace the flavors of the Mediterranean and make this dish a staple in your culinary repertoire. Happy cooking!

Savory Ground Beef and Potato Skillet Recipe is easy!

Introduction to Savory Ground Beef and Potato Skillet Recipe

Savory Ground Beef and Potato Skillet Recipe is a fantastic choice. This one-pan dish combines hearty ground beef with tender potatoes, making it both filling and satisfying. Plus, it’s easy to prepare, which is perfect for busy weeknights.

This recipe is not only simple but also versatile. You can customize it with your favorite vegetables or spices. Whether you’re a seasoned cook or just starting, this dish is sure to impress. The combination of flavors from the beef, spices, and potatoes creates a comforting meal that warms the heart.

Savory Ground Beef and Potato Skillet in no time. So, let’s dive in and discover how to make this delightful dish!

Ingredients for Savory Ground Beef and Potato Skillet Recipe

Savory Ground Beef and Potato Skillet Recipe, you will need a few simple ingredients. These items are easy to find and can often be found in your pantry or local grocery store. Here’s what you’ll need:

  • 2 tablespoons olive oil
  • 1 pound ground beef
  • 1 medium onion, diced
  • 2 cloves garlic, minced
  • 4 medium potatoes, diced (about 4 cups)
  • 1 teaspoon paprika
  • 1 teaspoon dried oregano
  • Salt and pepper to taste
  • 1 cup beef broth
  • 1 cup frozen peas (optional)
  • 1 cup shredded cheddar cheese (optional)

These ingredients come together to create a hearty meal that is both flavorful and satisfying. The ground beef provides protein, while the potatoes add a comforting texture. The spices, like paprika and oregano, enhance the overall taste, making each bite delightful.

Savory Ground Beef and Potato Skillet Recipe is all about flexibility, so feel free to get creative!

Step-by-Step Preparation of Savory Ground Beef and Potato Skillet Recipe

Savory Ground Beef and Potato Skillet Recipe is straightforward and fun to make. Follow these steps to create a delicious meal that your family will love!

Step 1: Preparing the Ingredients

Before you start cooking, it’s essential to prepare your ingredients. Begin by washing and dicing the potatoes into small cubes. This helps them cook evenly. Next, dice the onion and mince the garlic. Having everything ready will make the cooking process smoother and quicker.

Step 2: Cooking the Ground Beef

Heat the olive oil in a large skillet over medium heat. Once the oil is hot, add the diced onion. Cook it for about 3-4 minutes until it becomes soft and translucent. Then, stir in the minced garlic and cook for an additional minute. This step adds a wonderful aroma to your dish.

Next, add the ground beef to the skillet. Use a spatula to break it apart as it cooks. Brown the beef for about 5-7 minutes. Make sure to drain any excess fat if necessary. This keeps your dish from becoming greasy and allows the flavors to shine.

Step 3: Adding the Potatoes

Once the beef is browned, it’s time to add the diced potatoes. Stir them into the skillet, ensuring they mix well with the beef and onions. This combination creates a hearty base for your meal. The potatoes will absorb the flavors from the beef and spices, making them even more delicious.

Step 4: Seasoning the Dish

Savory Ground Beef and Potato Skillet Recipe. Stir everything together to ensure the spices coat the potatoes and beef evenly.

Step 5: Final Cooking Steps

Pour in the beef broth and bring the mixture to a simmer. Cover the skillet with a lid and let it cook for 15-20 minutes. During this time, the potatoes will become tender. Remember to stir occasionally to prevent sticking. If you’re using frozen peas, add them during the last 5 minutes of cooking. This will keep them bright and fresh.

For a cheesy finish, sprinkle shredded cheddar cheese over the top. Cover the skillet again and let it melt for 2-3 minutes before serving. This adds a creamy texture that complements the dish perfectly.

Savory Ground Beef and Potato Skillet is ready to be enjoyed. It’s a simple yet satisfying meal that brings everyone together at the dinner table.

Variation of Savory Ground Beef and Potato Skillet Recipe

Savory Ground Beef and Potato Skillet Recipe is a fantastic base that allows for plenty of creativity. You can easily switch up the ingredients or try different cooking methods to suit your taste. Let’s explore some alternative ingredients and cooking methods that can add a unique twist to this beloved dish.

Alternative Ingredients

Savory Ground Beef and Potato Skillet Recipe is its versatility. Here are some alternative ingredients you can use:

  • Ground Turkey or Chicken: For a leaner option, substitute ground beef with ground turkey or chicken. This change reduces the fat content while still providing a hearty meal.
  • Sweet Potatoes: Swap regular potatoes for sweet potatoes for a healthier twist. They add a natural sweetness and extra nutrients.
  • Vegetables: Mix in diced bell peppers, zucchini, or mushrooms for added flavor and nutrition. These veggies not only enhance the taste but also add vibrant colors to your dish.
  • Spices: Experiment with different spices like cumin, chili powder, or Italian seasoning. These can give your skillet a whole new flavor profile.
  • Cheese Varieties: Instead of cheddar, try using mozzarella or pepper jack cheese for a different cheesy experience.

Savory Ground Beef and Potato Skillet Recipe is all about making it your own!

Different Cooking Methods

While the traditional skillet method is quick and easy, you can also try other cooking methods to prepare this dish. Here are a few options:

  • Oven-Baked: After browning the beef and adding the potatoes and broth, transfer everything to a baking dish. Cover with foil and bake at 375°F (190°C) for about 30-40 minutes, or until the potatoes are tender.
  • Slow Cooker: For a hands-off approach, use a slow cooker. Brown the beef and onions in a skillet, then transfer to the slow cooker. Add the potatoes, broth, and seasonings. Cook on low for 6-8 hours or high for 3-4 hours.
  • Instant Pot: If you’re short on time, the Instant Pot is a great option. Sauté the beef and onions using the sauté function, then add the potatoes and broth. Seal the lid and cook on high pressure for 10 minutes. Quick-release the pressure when done.

Savory Ground Beef and Potato Skillet Recipe will always be a hit!

Cooking Note for Savory Ground Beef and Potato Skillet Recipe

Savory Ground Beef and Potato Skillet Recipe, there are a few important cooking notes to keep in mind. These tips will help ensure that your dish turns out perfectly every time, making it a delightful experience for you and your family.

First, always use a large skillet. A spacious skillet allows for even cooking and prevents overcrowding. This is crucial for browning the ground beef properly. If the skillet is too small, the beef may steam instead of brown, which can affect the flavor.

Next, consider the size of your potato cubes. Dicing the potatoes into uniform pieces ensures they cook evenly. If some pieces are larger than others, they may take longer to become tender. Aim for about 1-inch cubes for the best results.

Additionally, don’t skip the step of draining excess fat after browning the beef. This step is essential for keeping the dish from becoming greasy. It also allows the flavors of the spices and broth to shine through without being masked by excess fat.

Savory Ground Beef and Potato Skillet Recipe.

Lastly, remember to taste and adjust the seasoning. Everyone’s palate is different, so feel free to add more salt, pepper, or spices according to your preference. This final touch can elevate your dish and make it truly your own.

Savory Ground Beef and Potato Skillet that your family will love!

Serving Suggestions for Savory Ground Beef and Potato Skillet Recipe

Savory Ground Beef and Potato Skillet Recipe is ready, it’s time to think about how to serve it. This dish is hearty and filling on its own, but pairing it with the right sides can elevate your meal even further. Here are some delightful serving suggestions to consider:

  • Fresh Salad: A crisp green salad is a perfect complement to the rich flavors of the skillet. Consider a simple mixed greens salad with a light vinaigrette. The freshness of the salad balances the hearty dish beautifully.
  • Garlic Bread: Serve some warm garlic bread on the side. The buttery, garlicky flavor pairs wonderfully with the savory beef and potatoes, making each bite even more enjoyable.
  • Steamed Vegetables: For a nutritious boost, add a side of steamed vegetables. Broccoli, green beans, or carrots are great options. They add color and nutrients to your meal.
  • Coleslaw: A tangy coleslaw can provide a nice crunch and contrast to the warm skillet dish. The creamy dressing adds a delightful flavor that complements the savory elements.
  • Pickles or Relish: For a zesty touch, consider serving pickles or relish on the side. Their tangy flavor can cut through the richness of the beef and potatoes, adding a refreshing element.

Savory Ground Beef and Potato Skillet Recipe, don’t forget to garnish it with fresh herbs like parsley or chives. This not only adds a pop of color but also enhances the flavor profile. You can also offer hot sauce or additional cheese on the side for those who like a little extra kick.

Savory Ground Beef and Potato Skillet brings to your table!

Tips for Perfecting Your Savory Ground Beef and Potato Skillet Recipe

Savory Ground Beef and Potato Skillet Recipe truly shine, consider these helpful tips. They will guide you in achieving the best flavor and texture, ensuring that every bite is delicious and satisfying.

First, always choose high-quality ground beef. Look for meat with a good balance of fat, ideally around 80/20. This ratio provides enough fat for flavor without making the dish too greasy. If you prefer a leaner option, ground turkey or chicken can work well too.

Savory Ground Beef and Potato Skillet Recipe. Stir occasionally, but let it sit for a minute or two to achieve that nice golden color.

When it comes to potatoes, consider using waxy varieties like Yukon Gold or red potatoes. These types hold their shape better during cooking, providing a delightful texture. If you prefer a creamier texture, russet potatoes can also work, but they may break down more easily.

For added depth of flavor, try sautéing the garlic and onions until they are caramelized. This extra step brings out their natural sweetness and adds a wonderful aroma to your dish. It’s a small change that can make a big difference!

Savory Ground Beef and Potato Skillet Recipe is tailored to your taste.

Lastly, let your dish rest for a few minutes before serving. This allows the flavors to meld together, making each bite even more enjoyable. Plus, it gives you a moment to prepare your serving dishes or set the table.

Savory Ground Beef and Potato Skillet Recipe. Enjoy the process and the delicious results!

Breakdown of Time for Savory Ground Beef and Potato Skillet Recipe

Savory Ground Beef and Potato Skillet Recipe can help you plan your cooking efficiently. Here’s a simple breakdown of the time required for preparation and cooking.

Prep Time

The prep time for this delicious dish is quite short. You’ll need about 10-15 minutes to gather and prepare your ingredients. This includes washing and dicing the potatoes, chopping the onion, and mincing the garlic. Having everything ready before you start cooking makes the process smoother and more enjoyable.

Cooking Time

Once your ingredients are prepped, the cooking time is approximately 25-30 minutes. This includes:

  • Cooking the onions and garlic: 4-5 minutes
  • Browning the ground beef: 5-7 minutes
  • Cooking the potatoes with broth: 15-20 minutes

If you choose to add frozen peas, include an additional 5 minutes during the last part of cooking. This ensures they stay bright and fresh.

Total Time

Savory Ground Beef and Potato Skillet Recipe to take about 35-45 minutes from start to finish. This makes it a perfect option for a weeknight dinner when you want something quick yet satisfying. With just one skillet and a little bit of time, you’ll have a hearty meal ready to serve!

Nutritional Information for Savory Ground Beef and Potato Skillet Recipe

Savory Ground Beef and Potato Skillet Recipe not only offers great taste but also provides a good mix of nutrients. Here’s a breakdown of the key nutritional information for this hearty dish.

Calories

Savory Ground Beef and Potato Skillet Recipe contains approximately 450 calories. This makes it a filling option for dinner without being overly heavy. The combination of ground beef and potatoes provides a satisfying meal that can keep you energized throughout the evening.

Protein

Protein is an essential nutrient for building and repairing tissues, and this recipe delivers! Each serving contains about 30 grams of protein. The ground beef is a fantastic source of high-quality protein, which is vital for muscle health and overall well-being. If you opt for ground turkey or chicken, the protein content will remain similar, making it a great choice for a healthy meal.

Sodium

Savory Ground Beef and Potato Skillet Recipe is approximately 600 milligrams per serving. This amount can vary based on the beef broth used and any additional seasonings you add. If you’re watching your sodium intake, consider using low-sodium broth or adjusting the salt to suit your dietary needs. Balancing flavors without excess sodium is possible and can still yield a delicious dish!

Savory Ground Beef and Potato Skillet Recipe is a nutritious option that provides a good balance of calories, protein, and sodium. It’s a meal that not only satisfies your hunger but also supports your health goals. Enjoy this delightful dish knowing it’s both tasty and nourishing!

FAQs about Savory Ground Beef and Potato Skillet Recipe

Can I use other types of meat in the Savory Ground Beef and Potato Skillet Recipe?

Savory Ground Beef and Potato Skillet Recipe is quite versatile. You can easily substitute ground beef with other types of meat. Ground turkey or chicken are excellent alternatives for a leaner option. They provide similar flavors while reducing the fat content. If you prefer a different taste, you can also use ground pork or even plant-based meat substitutes. Each option will give a unique twist to the dish, so feel free to experiment!

How can I make the Savory Ground Beef and Potato Skillet Recipe healthier?

Savory Ground Beef and Potato Skillet Recipe healthier is simple! Here are a few tips:

  • Use Lean Meat: Opt for lean ground beef (90/10) or ground turkey to cut down on fat.
  • Incorporate More Vegetables: Add extra veggies like spinach, bell peppers, or carrots. This boosts the nutritional value and adds color.
  • Choose Whole Potatoes: Stick with skin-on potatoes for added fiber and nutrients.
  • Reduce Sodium: Use low-sodium beef broth and limit added salt. This helps keep the dish heart-healthy.

By making these small adjustments, you can enjoy a delicious and nutritious meal without sacrificing flavor!

What are some side dishes that pair well with the Savory Ground Beef and Potato Skillet Recipe?

Savory Ground Beef and Potato Skillet Recipe can enhance your meal experience. Here are some great options:

  • Mixed Green Salad: A fresh salad with a light vinaigrette complements the hearty skillet nicely.
  • Garlic Bread: Warm garlic bread adds a delicious touch and is perfect for soaking up any juices.
  • Steamed Broccoli: This nutritious side adds color and crunch, balancing the richness of the skillet.
  • Coleslaw: A tangy coleslaw provides a refreshing contrast to the warm dish.

These sides not only enhance the meal but also add variety to your dining experience!

Can I prepare the Savory Ground Beef and Potato Skillet Recipe in advance?

Savory Ground Beef and Potato Skillet Recipe in advance! This dish is perfect for meal prep. You can cook it ahead of time and store it in the refrigerator for up to 3 days. Just make sure to let it cool completely before transferring it to an airtight container. When you’re ready to eat, simply reheat it on the stove or in the microwave until warmed through. This makes it a convenient option for busy weeknights!

Conclusion on Savory Ground Beef and Potato Skillet Recipe

Savory Ground Beef and Potato Skillet Recipe is a delightful dish that brings comfort and satisfaction to your dinner table. Its simplicity and versatility make it an ideal choice for busy weeknights or family gatherings. With just a few ingredients and easy steps, you can create a hearty meal that everyone will enjoy.

This recipe not only offers a delicious combination of flavors but also allows for creativity. You can easily customize it with different meats, vegetables, and spices to suit your taste. Whether you prefer a classic version or want to experiment with new ingredients, the possibilities are endless!

Savory Ground Beef and Potato Skillet Recipe can be both filling and nourishing.

So, gather your ingredients, follow the steps, and enjoy the process of cooking this wonderful meal. Your family will appreciate the effort, and you’ll love the delicious results. Happy cooking!

Honey Dijon Baked Chicken is a must-try recipe!

Introduction to Honey Dijon Baked Chicken Recipe

Honey Dijon Baked Chicken Recipe. This dish combines the sweet taste of honey with the tangy flavor of Dijon mustard, creating a mouthwatering experience for your taste buds. Not only is it simple to prepare, but it also offers a delightful balance of flavors that will impress your family and friends.

What Makes Honey Dijon Baked Chicken Special?

What sets this recipe apart? First, the marinade is a game-changer. The mixture of honey and Dijon mustard not only adds flavor but also helps to tenderize the chicken. As the chicken bakes, it absorbs all those wonderful flavors, resulting in juicy, succulent meat. Plus, the skin becomes beautifully crispy, making every bite satisfying.

Another reason this dish shines is its versatility. You can easily customize it to suit your taste. Want a little heat? Add some red pepper flakes! Prefer a herbaceous touch? Toss in fresh herbs like rosemary or thyme. The possibilities are endless, making it a fantastic choice for any occasion.

Finally, this recipe is perfect for busy weeknights. With minimal prep time and straightforward cooking steps, you can have a hearty meal on the table in no time. Serve it with your favorite sides, and you have a complete dinner that everyone will love. So, let’s dive into the ingredients and get started on this delightful culinary adventure!

Ingredients for Honey Dijon Baked Chicken Recipe

Honey Dijon Baked Chicken Recipe, you’ll need a few simple ingredients. Each component plays a vital role in building the flavor profile of this dish. Here’s what you’ll need:

  • 2 pounds bone-in, skin-on chicken thighs: These provide rich flavor and moisture.
  • 1/4 cup Dijon mustard: This adds a tangy kick that complements the sweetness of honey.
  • 1/4 cup honey: The star ingredient that brings sweetness and caramelization.
  • 2 tablespoons olive oil: This helps to keep the chicken moist and enhances the marinade.
  • 2 cloves garlic, minced: Garlic adds depth and aroma to the dish.
  • 1 teaspoon dried thyme: This herb adds an earthy flavor that pairs well with chicken.
  • 1 teaspoon salt: Essential for enhancing all the flavors in the dish.
  • 1/2 teaspoon black pepper: A touch of spice to balance the sweetness.
  • 1 tablespoon apple cider vinegar: This adds acidity, brightening the overall flavor.
  • Fresh parsley, chopped (for garnish): A pop of color and freshness to finish the dish.

Gathering these ingredients is the first step toward creating a delightful meal. Each item contributes to the overall taste, making this recipe a favorite for many. Now that you have everything ready, let’s move on to the preparation steps!

Step-by-Step Preparation of Honey Dijon Baked Chicken Recipe

Honey Dijon Baked Chicken Recipe. This step-by-step guide will help you create a delicious meal that’s sure to impress. Let’s get started!

Step 1: Prepping the Chicken

First things first, you need to prep the chicken. Start by rinsing the chicken thighs under cold water. This helps to remove any residual blood or impurities. After rinsing, pat them dry with paper towels. Drying the chicken is important because it helps the skin get crispy during baking.

Next, place the chicken thighs in a large bowl or directly in your greased baking dish. Make sure they are arranged in a single layer, skin-side up. This allows the heat to circulate evenly, ensuring that every piece cooks perfectly.

Step 2: Making the Honey Dijon Marinade

Now, let’s whip up that delicious marinade! In a medium-sized bowl, combine the Dijon mustard, honey, olive oil, minced garlic, dried thyme, salt, black pepper, and apple cider vinegar. Use a whisk to mix everything together until it’s smooth and well combined. The mixture should be thick and glossy, with a perfect balance of sweet and tangy flavors.

This marinade is what makes the chicken so flavorful. The honey caramelizes while baking, creating a beautiful glaze that enhances the dish’s overall appeal.

Step 3: Marinating the Chicken

Once your marinade is ready, it’s time to coat the chicken. Pour the honey Dijon mixture over the chicken thighs, ensuring each piece is generously coated. You can use a brush or your hands to spread the marinade evenly. Make sure to get some under the skin for maximum flavor!

If you have time, let the chicken marinate for at least 30 minutes. This allows the flavors to penetrate the meat. However, if you’re short on time, you can bake it right away. The chicken will still be delicious!

Step 4: Baking the Chicken

Preheat your oven to 375°F (190°C) if you haven’t done so already. Once the oven is ready, place the baking dish with the marinated chicken inside. Bake for 35-40 minutes, or until the chicken reaches an internal temperature of 165°F (75°C). The skin should be golden brown and crispy.

For an extra crispy finish, you can broil the chicken for an additional 2-3 minutes at the end of baking. Just keep a close eye on it to prevent burning. Once done, remove the chicken from the oven and let it rest for about 5 minutes before serving. This resting period allows the juices to redistribute, making the chicken even juicier.

Honey Dijon Baked Chicken Recipe is now ready to be enjoyed. The combination of sweet and tangy flavors, along with the crispy skin, makes this dish a true winner!

Variations of Honey Dijon Baked Chicken Recipe

Honey Dijon Baked Chicken Recipe is already a hit, there are many ways to switch things up! These variations allow you to explore new flavors and ingredients, making each meal unique. Let’s take a look at two delightful options: adding herbs and incorporating vegetables.

Honey Dijon Baked Chicken with Herbs

Honey Dijon Baked Chicken to new heights. For this variation, consider adding fresh or dried herbs to the marinade. Popular choices include:

  • Rosemary: This herb adds a fragrant, woodsy flavor that pairs beautifully with chicken.
  • Oregano: A classic herb that brings a Mediterranean touch to your dish.
  • Parsley: Fresh parsley can brighten the flavors and add a pop of color.

To incorporate herbs, simply mix them into the marinade along with the other ingredients. You can use about 1-2 teaspoons of dried herbs or a tablespoon of fresh herbs. This addition will create a more complex flavor profile, making your baked chicken even more delicious!

Honey Dijon Baked Chicken with Vegetables

Honey Dijon Baked Chicken Recipe is by adding vegetables. This not only enhances the meal but also makes it a complete dish. Here are some great vegetable options:

  • Carrots: Cut into sticks or rounds, they add sweetness and color.
  • Potatoes: Diced or sliced, they soak up the delicious marinade.
  • Broccoli: This adds a nice crunch and vibrant green color.

To prepare, simply toss your chosen vegetables in a bit of olive oil, salt, and pepper. Arrange them around the chicken in the baking dish before pouring the honey Dijon marinade over everything. The vegetables will roast alongside the chicken, absorbing all those wonderful flavors!

Honey Dijon Baked Chicken Recipe will surely impress!

Cooking Note for Honey Dijon Baked Chicken Recipe

Honey Dijon Baked Chicken Recipe, there are a few important cooking notes to keep in mind. These tips will help ensure that your chicken turns out perfectly every time, making your meal a delightful experience.

First, always check the freshness of your ingredients. Fresh chicken and high-quality Dijon mustard can significantly enhance the flavor of your dish. If possible, opt for organic honey, as it adds a richer taste to the marinade.

Next, consider the size of your chicken thighs. If they are larger than average, you may need to adjust the cooking time. Always use a meat thermometer to check for doneness. The internal temperature should reach 165°F (75°C) to ensure the chicken is safe to eat.

Another tip is to let the chicken rest after baking. This step is crucial as it allows the juices to redistribute throughout the meat. If you cut into the chicken too soon, you may lose those flavorful juices, resulting in drier meat.

Honey Dijon Baked Chicken Recipe that perfectly suits your palate.

By following these cooking notes, you’ll be well on your way to mastering this delicious recipe. Enjoy the process and the wonderful aromas that fill your kitchen!

Serving Suggestions for Honey Dijon Baked Chicken Recipe

Honey Dijon Baked Chicken Recipe is ready, it’s time to think about what to serve alongside it. The right side dishes and sauces can elevate your meal, making it even more enjoyable. Here are some fantastic suggestions to complement your delicious chicken.

Side Dishes to Pair with Honey Dijon Baked Chicken

Honey Dijon Baked Chicken. Here are some tasty options:

  • Roasted Vegetables: A mix of seasonal vegetables like carrots, bell peppers, and zucchini roasted with olive oil and herbs pairs perfectly with the chicken.
  • Garlic Mashed Potatoes: Creamy mashed potatoes with a hint of garlic provide a comforting side that balances the tangy chicken.
  • Quinoa Salad: A light quinoa salad with cucumbers, tomatoes, and a lemon vinaigrette adds freshness and a healthy touch.
  • Steamed Broccoli: Simple steamed broccoli drizzled with a little olive oil and lemon juice offers a nutritious and colorful addition.
  • Rice Pilaf: Fluffy rice pilaf with herbs and spices can soak up the delicious juices from the chicken, making every bite delightful.

These side dishes not only complement the flavors of the chicken but also create a well-rounded meal that everyone will love.

Ideal Sauces and Condiments

Honey Dijon Baked Chicken is flavorful on its own, adding sauces and condiments can take it to the next level. Here are some great options:

  • Honey Mustard Sauce: A simple mix of honey and Dijon mustard can be drizzled over the chicken for an extra kick.
  • Barbecue Sauce: A tangy barbecue sauce can add a smoky flavor that pairs well with the sweetness of the honey.
  • Chimichurri: This fresh herb sauce made with parsley, garlic, and olive oil adds a vibrant touch to the dish.
  • Yogurt Sauce: A cool yogurt sauce with herbs can provide a refreshing contrast to the warm, baked chicken.
  • Hot Sauce: For those who enjoy a bit of heat, a few dashes of hot sauce can spice things up!

Honey Dijon Baked Chicken Recipe with these delightful pairings!

Tips for Perfecting Your Honey Dijon Baked Chicken Recipe

Honey Dijon Baked Chicken Recipe, a few tips can make all the difference. These simple yet effective suggestions will help you achieve the best flavor and texture every time you prepare this dish. Let’s explore some key tips to elevate your cooking experience!

First, marinating the chicken is crucial. If you have the time, let the chicken sit in the marinade for at least an hour, or even overnight in the refrigerator. This allows the flavors to penetrate deeply, resulting in a more flavorful dish. If you’re short on time, even a quick 30-minute marinade will still yield tasty results.

Next, consider the cooking method. For the crispiest skin, make sure to pat the chicken dry before applying the marinade. This helps the skin crisp up nicely in the oven. Additionally, using a wire rack in your baking dish can promote even cooking and better airflow around the chicken, enhancing the crispiness.

Another important tip is to monitor the cooking temperature. Using a meat thermometer is the best way to ensure your chicken is cooked perfectly. Aim for an internal temperature of 165°F (75°C). This guarantees that the chicken is safe to eat while remaining juicy and tender.

Don’t forget about resting the chicken after baking! Allowing it to rest for about 5-10 minutes before serving helps the juices redistribute throughout the meat. This step is essential for keeping your chicken moist and flavorful.

Lastly, feel free to get creative with the marinade. Experiment with different herbs and spices to find your perfect blend. Adding a splash of lemon juice or a dash of soy sauce can introduce new flavors that complement the honey and Dijon beautifully.

Honey Dijon Baked Chicken Recipe. Enjoy the process and the delicious results!

Breakdown of Time for Honey Dijon Baked Chicken Recipe

Honey Dijon Baked Chicken Recipe can help you plan your meal better. Here’s a detailed breakdown of the time you’ll need for preparation and cooking.

Prep Time

The prep time for this delicious dish is quite manageable. You’ll need about 15-20 minutes to gather your ingredients and prepare the chicken. This includes rinsing and drying the chicken thighs, making the marinade, and coating the chicken. If you choose to marinate the chicken for a longer period, you can add an extra 30 minutes to an hour, depending on your schedule.

Cooking Time

Once your chicken is prepped and marinated, the cooking time is straightforward. Bake the chicken in a preheated oven at 375°F (190°C) for 35-40 minutes. If you opt for the broiling step to achieve extra crispy skin, add an additional 2-3 minutes. Always check the internal temperature to ensure it reaches 165°F (75°C) for safe consumption.

Total Time

Honey Dijon Baked Chicken Recipe to take about 50-60 minutes from start to finish, including prep and cooking time. If you decide to marinate the chicken longer, the total time could extend to 1 hour and 30 minutes or more, depending on how long you let it sit. This makes it a great option for a weeknight dinner or a weekend gathering!

Nutritional Information for Honey Dijon Baked Chicken Recipe

Honey Dijon Baked Chicken Recipe not only offers delicious flavors but also provides valuable nutrients. Here’s a breakdown of the key nutritional information per serving:

Calories

Honey Dijon Baked Chicken Recipe contains approximately 350 calories. This makes it a satisfying option for dinner without being overly heavy. The combination of chicken and the honey Dijon marinade provides a good balance of energy and flavor.

Protein

Protein is vital for muscle repair and overall health. This recipe delivers about 25 grams of protein per serving. The bone-in, skin-on chicken thighs are an excellent source of high-quality protein, making this dish a great choice for those looking to increase their protein intake.

Sodium

When it comes to sodium, each serving contains around 600 milligrams. While this is a reasonable amount for a flavorful dish, it’s always good to be mindful of your sodium intake, especially if you are watching your salt consumption. You can reduce the sodium by using low-sodium Dijon mustard and adjusting the salt in the marinade.

Honey Dijon Baked Chicken Recipe is a nutritious option that fits well into a balanced diet. With its combination of protein, healthy fats, and flavorful ingredients, it’s a meal that you can feel good about serving to your family and friends!

FAQs about Honey Dijon Baked Chicken Recipe

Can I use other types of mustard in the Honey Dijon Baked Chicken Recipe?

Honey Dijon Baked Chicken Recipe, you can experiment with other types of mustard. Yellow mustard will give a milder flavor, while spicy brown mustard adds a bit more heat. If you enjoy a tangy kick, consider using whole grain mustard. Each type will bring its unique taste, so feel free to choose based on your preference!

How long should I marinate the chicken for the best flavor?

For the best flavor, marinating the chicken for at least 30 minutes is recommended. However, if you have more time, letting it sit for 1-2 hours or even overnight in the refrigerator will enhance the taste even further. The longer the chicken marinates, the more flavorful it becomes, as the marinade seeps into the meat. Just remember to cover it well if you’re marinating overnight!

What can I substitute for honey in the Honey Dijon Baked Chicken Recipe?

If you need a substitute for honey, there are several options you can try. Maple syrup is a popular alternative that offers a similar sweetness. Agave nectar is another great choice, providing a mild flavor. For a lower-calorie option, you can use a sugar substitute like stevia or monk fruit sweetener. Just keep in mind that the flavor profile may change slightly, but your dish will still be delicious!

Can I make Honey Dijon Baked Chicken Recipe ahead of time?

Honey Dijon Baked Chicken Recipe ahead of time! You can marinate the chicken and store it in the refrigerator for up to 24 hours before baking. This allows the flavors to develop even more. If you want to prepare the dish entirely, you can bake the chicken and then reheat it later. Just ensure it reaches an internal temperature of 165°F (75°C) when reheating to keep it safe and tasty!

Conclusion on Honey Dijon Baked Chicken Recipe

Honey Dijon Baked Chicken Recipe is a delightful dish that combines simplicity with incredible flavor. This recipe is perfect for busy weeknights or special occasions, offering a satisfying meal that everyone will enjoy. The sweet and tangy marinade not only enhances the chicken’s taste but also helps keep it juicy and tender.

As you’ve seen, this recipe is versatile. You can easily customize it with different herbs or vegetables to suit your preferences. Whether you choose to stick with the classic version or experiment with variations, you’re sure to create a dish that impresses your family and friends.

Moreover, the nutritional benefits of this recipe make it a great choice for those looking to maintain a balanced diet. With a good amount of protein and healthy fats, it provides the energy needed for a busy day. Plus, the ease of preparation means you can spend less time in the kitchen and more time enjoying your meal.

Honey Dijon Baked Chicken Recipe. Happy cooking!

Crispy Orange Chicken Recipe is a must-try dish!

Introduction to Crispy Orange Chicken Recipe

What Makes Crispy Orange Chicken Special?

Crispy Orange Chicken is a delightful dish that brings together the best of both worlds: crispy texture and a tangy, sweet flavor. The chicken is coated in a crunchy layer that locks in moisture, making each bite juicy and satisfying. The star of the show is the vibrant orange sauce, which adds a burst of citrusy goodness. This combination creates a dish that is not only delicious but also visually appealing. Whether you’re serving it for a family dinner or a special occasion, Crispy Orange Chicken is sure to impress everyone at the table.

A Brief History of Orange Chicken

Orange Chicken has its roots in Chinese-American cuisine, where it has become a beloved staple. The dish is thought to have originated in the 1980s, gaining popularity in Chinese restaurants across the United States. It is often associated with the fast-casual dining chain Panda Express, which helped introduce this tasty dish to a wider audience. Over the years, Orange Chicken has evolved, with many variations emerging, but the core elements of crispy chicken and zesty orange sauce remain the same. Today, it is enjoyed by many and has become a favorite comfort food for those who love a sweet and savory flavor profile.

Ingredients for Crispy Orange Chicken Recipe

Essential Ingredients

To create the perfect Crispy Orange Chicken, you’ll need a few essential ingredients. These components work together to deliver that delightful crunch and zesty flavor. Here’s what you’ll need:

  • 2 pounds boneless, skinless chicken thighs: Cut into bite-sized pieces for easy cooking and eating.
  • 1 cup all-purpose flour: This helps create a crispy coating.
  • 1 teaspoon salt: Enhances the flavor of the chicken.
  • 1 teaspoon black pepper: Adds a bit of spice.
  • 2 large eggs: Beaten, these help the coating stick to the chicken.
  • 1 cup cornstarch: This is key for achieving that extra crispy texture.
  • 1 cup vegetable oil: Used for frying, it gives the chicken a golden brown finish.

Optional Ingredients for Extra Flavor

While the essential ingredients are crucial, you can also add some optional ingredients to elevate the flavor of your Crispy Orange Chicken. Consider these additions:

  • Red pepper flakes: For those who enjoy a spicy kick, sprinkle some into the orange sauce.
  • Sesame seeds: These can be sprinkled on top for added texture and flavor.
  • Green onions: Chopped green onions make a great garnish, adding freshness and color.
  • Additional citrus zest: A bit of lemon or lime zest can enhance the citrus flavor in the sauce.

These optional ingredients can help you customize your dish to suit your taste preferences. Feel free to experiment and make this Crispy Orange Chicken your own!

Step-by-Step Preparation of Crispy Orange Chicken Recipe

Step 1: Preparing the Chicken

Start by preparing the chicken. First, take your 2 pounds of boneless, skinless chicken thighs. Cut them into bite-sized pieces. This size helps the chicken cook evenly and makes it easy to eat. Once cut, place the chicken in a large bowl. You can set it aside while you prepare the coating and sauce.

Step 2: Making the Marinade

While the chicken rests, you can make the marinade. In a separate bowl, combine the flour, salt, and black pepper. This mixture will add flavor to the chicken. Mix well to ensure the salt and pepper are evenly distributed. This step is crucial for enhancing the overall taste of your Crispy Orange Chicken.

Step 3: Coating the Chicken

Now it’s time to coat the chicken. Take each piece of chicken and dredge it in the flour mixture. Make sure to shake off any excess flour. Next, dip the floured chicken into the beaten eggs. This helps the cornstarch stick better. After that, coat the chicken with cornstarch, pressing lightly to ensure it adheres well. This three-step coating process is what gives the chicken its signature crunch.

Step 4: Frying the Chicken

Heat 1 cup of vegetable oil in a large skillet or wok over medium-high heat. Once the oil is hot, carefully add the coated chicken in batches. Fry the chicken for about 5-7 minutes, or until it turns golden brown and is cooked through. Be sure not to overcrowd the pan, as this can lower the oil temperature and affect crispiness. Once done, remove the chicken and place it on a paper towel-lined plate to drain any excess oil.

Step 5: Preparing the Orange Sauce

While the chicken is frying, you can prepare the orange sauce. In a separate saucepan, combine 1 cup of orange juice, 1 tablespoon of orange zest, 1/2 cup of sugar, 1/4 cup of soy sauce, 1 tablespoon of rice vinegar, 1 teaspoon of minced garlic, and 1 teaspoon of minced ginger. Bring this mixture to a simmer over medium heat. Stir occasionally to ensure the sugar dissolves completely.

Step 6: Combining Chicken and Sauce

Once the sauce is simmering, stir in the cornstarch mixture that you prepared earlier. This will help thicken the sauce. Cook for about 2-3 minutes until it reaches your desired consistency. Finally, toss the fried chicken in the orange sauce until it is well coated. Serve your Crispy Orange Chicken immediately over steamed rice or alongside stir-fried vegetables for a complete meal.

Variations of Crispy Orange Chicken Recipe

Healthier Alternatives

If you’re looking to enjoy Crispy Orange Chicken while keeping it on the healthier side, there are several alternatives you can try. One popular method is to bake the chicken instead of frying it. To do this, follow the same coating process: dredge the chicken in flour, dip it in eggs, and coat it with cornstarch. Then, place the coated chicken pieces on a baking sheet lined with parchment paper. Bake at 400°F for 20-25 minutes, or until the chicken is golden and cooked through. This method significantly reduces the amount of oil used, making it a lighter option.

Another way to make this dish healthier is by using skinless chicken breasts instead of thighs. Chicken breasts are leaner and lower in fat, which can help cut down on calories. Additionally, you can reduce the sugar in the orange sauce. Try using a natural sweetener like honey or agave syrup, or simply cut the sugar amount in half. These small adjustments can make a big difference without sacrificing flavor.

Vegetarian and Vegan Options

For those who prefer a vegetarian or vegan version of Crispy Orange Chicken, there are plenty of delicious substitutes. Instead of chicken, you can use tofu or tempeh. Both options absorb flavors well and can be prepared to achieve a crispy texture. To prepare tofu, press it to remove excess moisture, then cut it into bite-sized cubes. Follow the same coating process as you would for chicken, using the flour, egg (or a vegan egg substitute), and cornstarch.

Another great alternative is to use cauliflower. Cauliflower florets can be coated and baked or fried just like chicken. This vegetable not only provides a satisfying crunch but also adds a unique flavor to the dish. When making the orange sauce, ensure that all ingredients are vegan-friendly, such as using a plant-based soy sauce. These variations allow everyone to enjoy the delightful taste of Crispy Orange Chicken, regardless of dietary preferences.

Cooking Note for Crispy Orange Chicken Recipe

Tips for Achieving the Perfect Crispiness

Getting that perfect crispy texture for your Crispy Orange Chicken is essential. Here are some helpful tips to ensure your chicken turns out crunchy and delicious every time:

  • Use Cornstarch: Cornstarch is key for achieving that extra crunch. Make sure to coat the chicken well with it after dipping in the egg. This will create a light, crispy layer when fried.
  • Maintain Oil Temperature: It’s important to keep the oil at the right temperature. If the oil is too cool, the chicken will absorb more oil and become soggy. Aim for a temperature of around 350°F to 375°F for frying.
  • Fry in Batches: Avoid overcrowding the pan. Fry the chicken in small batches to ensure even cooking and crispiness. This allows the chicken to fry properly without steaming.
  • Drain Excess Oil: After frying, place the chicken on a paper towel-lined plate. This helps absorb any excess oil, keeping the chicken crispy.
  • Serve Immediately: Crispy Orange Chicken is best served right after cooking. If it sits too long, it may lose its crunch. Serve it hot for the best experience.

By following these tips, you can achieve that delightful crunch that makes Crispy Orange Chicken so irresistible. Enjoy the process and savor the delicious results!

Serving Suggestions for Crispy Orange Chicken Recipe

Best Side Dishes to Pair

When serving your Crispy Orange Chicken, choosing the right side dishes can enhance the meal. Here are some delicious options that pair perfectly:

  • Steamed Rice: A classic choice, steamed white or brown rice absorbs the flavorful orange sauce beautifully.
  • Stir-Fried Vegetables: Colorful veggies like bell peppers, broccoli, and snap peas add nutrition and crunch to your plate.
  • Fried Rice: For a heartier option, serve your chicken with fried rice. The savory flavors complement the sweetness of the orange sauce.
  • Asian Noodles: Noodles tossed in a light soy sauce or sesame oil can be a delightful base for your chicken.
  • Spring Rolls: These crispy appetizers can add a fun touch to your meal, providing a nice contrast to the chicken.

These side dishes not only balance the flavors but also create a well-rounded meal that everyone will enjoy.

Presentation Ideas

Presentation plays a key role in making your Crispy Orange Chicken look as good as it tastes. Here are some creative ideas to elevate your dish:

  • Garnish with Green Onions: Chopped green onions sprinkled on top add a pop of color and freshness.
  • Sesame Seeds: A sprinkle of toasted sesame seeds can enhance the visual appeal and add a nutty flavor.
  • Serve in a Wok: Presenting the chicken in a traditional wok can give a fun, authentic touch to your meal.
  • Use Colorful Plates: Brightly colored plates can make the vibrant orange sauce stand out, making the dish more inviting.
  • Arrange with Citrus Slices: Placing orange slices or wedges around the dish can enhance the citrus theme and add a refreshing touch.

With these serving suggestions and presentation ideas, your Crispy Orange Chicken will not only taste amazing but also look stunning on the table. Enjoy your culinary creation!

Tips for Perfecting Your Crispy Orange Chicken Recipe

Common Mistakes to Avoid

When making Crispy Orange Chicken, it’s easy to make a few common mistakes that can affect the final dish. Here are some pitfalls to watch out for:

  • Skipping the Cornstarch: Cornstarch is essential for that crispy texture. Don’t skip this step; it makes a big difference!
  • Overcrowding the Pan: Frying too many pieces at once can lower the oil temperature. This leads to soggy chicken instead of crispy bites. Fry in small batches for the best results.
  • Not Draining the Chicken: After frying, always place the chicken on a paper towel-lined plate. This helps remove excess oil and keeps the chicken crispy.
  • Using Cold Oil: Make sure the oil is hot enough before adding the chicken. If the oil is too cool, the chicken will absorb more oil and become greasy.
  • Letting the Chicken Sit Too Long: Crispy Orange Chicken is best served immediately. If it sits too long, it can lose its crunch. Serve it hot for the best experience.

By avoiding these common mistakes, you can ensure that your Crispy Orange Chicken turns out perfectly every time!

Storage Tips for Leftovers

If you have any leftovers, storing them properly is key to maintaining their flavor and texture. Here are some helpful tips:

  • Cool Before Storing: Allow the chicken to cool completely before placing it in the refrigerator. This helps prevent condensation, which can make the chicken soggy.
  • Use an Airtight Container: Store the chicken in an airtight container to keep it fresh. This will help prevent it from absorbing other odors in the fridge.
  • Reheat Carefully: When reheating, use an oven or air fryer to restore some of the crispiness. Avoid using a microwave, as it can make the chicken rubbery.
  • Consume Within 3 Days: For the best taste and quality, try to eat your leftovers within three days. This ensures you enjoy the flavors at their peak.

By following these storage tips, you can enjoy your Crispy Orange Chicken even after the initial meal, keeping it delicious and satisfying!

Breakdown of Time for Crispy Orange Chicken Recipe

Prep Time

Preparing your Crispy Orange Chicken is a straightforward process. The prep time typically takes about 20-30 minutes. This includes cutting the chicken into bite-sized pieces, mixing the flour and seasoning, and preparing the orange sauce ingredients. Having everything ready before you start cooking will make the process smoother and more enjoyable.

Cooking Time

The cooking time for Crispy Orange Chicken is approximately 15-20 minutes. This includes frying the chicken until it is golden brown and cooking the orange sauce until it thickens. Remember, frying in batches may take a little longer, but it ensures that each piece of chicken gets that perfect crispy texture.

Total Time

In total, you can expect to spend around 35-50 minutes from start to finish. This includes both prep and cooking time. With a little organization, you can have a delicious meal ready in no time. Enjoy the process and the delightful aroma that fills your kitchen as you prepare this tasty dish!

Nutritional Information for Crispy Orange Chicken Recipe

Calories and Macronutrients

Understanding the nutritional content of your Crispy Orange Chicken is important, especially if you’re mindful of your diet. Each serving of this delicious dish contains approximately 480 calories. Here’s a breakdown of the macronutrients:

  • Net Carbohydrates: 30g
  • Protein: 28g
  • Fat: 25g

This balance of macronutrients makes Crispy Orange Chicken a satisfying meal. The protein from the chicken helps keep you full, while the carbohydrates provide energy. The fat content, primarily from the frying oil, contributes to the dish’s rich flavor and crispy texture. Enjoying this dish in moderation can fit well into a balanced diet.

Sodium Content

Another important aspect to consider is the sodium content in your Crispy Orange Chicken. The sodium level can vary based on the soy sauce used and any additional seasonings. On average, one serving contains about 800mg of sodium. This is a significant amount, especially for those watching their sodium intake.

To reduce sodium levels, consider using low-sodium soy sauce or adjusting the amount of soy sauce in the recipe. Additionally, you can enhance flavors with fresh herbs and spices instead of relying solely on salt. By making these small adjustments, you can enjoy your Crispy Orange Chicken while keeping your sodium intake in check.

FAQs about Crispy Orange Chicken Recipe

Can I make Crispy Orange Chicken in advance?

Yes, you can prepare some components of Crispy Orange Chicken in advance. You can coat the chicken and store it in the refrigerator for a few hours before frying. However, it’s best to fry the chicken just before serving to maintain its crispy texture. If you have leftover cooked chicken, store it in an airtight container in the fridge. Reheat it in an oven or air fryer to help restore its crunchiness.

What can I substitute for orange juice?

If you don’t have orange juice on hand, there are several substitutes you can use. Lemon juice can provide a similar tangy flavor, though it will be more tart. You can also use a mix of lemon and lime juice for a citrusy kick. Another option is to use a store-bought orange-flavored drink or even a citrus soda. Just keep in mind that these alternatives may alter the sweetness and overall flavor of the sauce.

How do I make the chicken extra crispy?

To achieve extra crispy chicken, follow these tips: First, ensure you coat the chicken well with cornstarch after dipping it in the egg. This is crucial for that crunchy texture. Second, maintain the oil temperature between 350°F and 375°F while frying. Frying in small batches prevents overcrowding, which can lead to soggy chicken. Lastly, allow the fried chicken to drain on paper towels to remove excess oil, keeping it crispy.

Is there a gluten-free version of Crispy Orange Chicken?

Absolutely! To make a gluten-free version of Crispy Orange Chicken, simply substitute the all-purpose flour with a gluten-free flour blend. You can also use gluten-free cornstarch for the coating. For the soy sauce, opt for a gluten-free soy sauce or tamari. These adjustments will allow you to enjoy the same delicious flavors without gluten.

Conclusion on Crispy Orange Chicken Recipe

Final Thoughts and Encouragement to Try the Recipe

In conclusion, the Crispy Orange Chicken Recipe is a delightful dish that combines the perfect balance of flavors and textures. With its crispy coating and zesty orange sauce, it’s no wonder this dish has become a favorite for many. Whether you’re cooking for family, friends, or just treating yourself, this recipe is sure to impress.

Don’t be afraid to experiment with the ingredients and make it your own. You can adjust the sweetness, add some spice, or even try different proteins or vegetables. The beauty of this recipe lies in its versatility. Plus, with the tips and variations provided, you can easily tailor it to fit your dietary preferences.

So, gather your ingredients and give this Crispy Orange Chicken a try! You’ll not only enjoy the cooking process but also savor the delicious results. Remember, cooking is all about having fun and creating something special. Enjoy every bite of your homemade Crispy Orange Chicken!

Mini No-Bake Banana Cream Pies are a must-try dessert!

Introduction to Mini No-Bake Banana Cream Pies Recipe

Mini No-Bake Banana Cream Pies Recipe is a perfect choice for any occasion. These little treats are not only delicious but also incredibly simple to whip up. With just a few ingredients, you can create a dessert that’s creamy, sweet, and bursting with banana flavor.

What makes these mini pies so special? First, they require no baking, which means you can enjoy them without heating up your kitchen. This is especially great during hot summer days when you want something cool and refreshing. Plus, they are served in individual portions, making them perfect for parties, picnics, or even a cozy night in.

In this recipe, you’ll find a delightful combination of a buttery graham cracker crust, rich vanilla pudding, and fresh banana slices. Topped with whipped cream, these mini pies are a treat for both the eyes and the taste buds. Whether you’re a seasoned baker or a beginner, this recipe is straightforward and fun to make.

Mini No-Bake Banana Cream Pies Recipe.

Ingredients for Mini No-Bake Banana Cream Pies Recipe

Mini No-Bake Banana Cream Pies, you’ll need a handful of simple ingredients. Each component plays a vital role in building the flavor and texture of this delicious dessert. Here’s what you’ll need:

  • 1 cup graham cracker crumbs
  • 4 tablespoons unsalted butter, melted
  • 2 tablespoons granulated sugar
  • 1 (3.4-ounce) package instant vanilla pudding mix
  • 2 cups cold milk
  • 2 ripe bananas, sliced
  • 1 cup whipped topping (like Cool Whip)
  • 1 teaspoon vanilla extract
  • Chocolate shavings or additional whipped topping for garnish (optional)

These ingredients are easy to find at your local grocery store. The graham cracker crumbs form a delicious crust, while the instant pudding mix creates a creamy filling. The ripe bananas add a natural sweetness and flavor that pairs perfectly with the other ingredients. Finally, the whipped topping gives a light and airy finish to each mini pie.

Mini No-Bake Banana Cream Pies Recipe a versatile dessert option.

Preparation of Mini No-Bake Banana Cream Pies Recipe

Mini No-Bake Banana Cream Pies Recipe. This process is simple and fun, making it a great activity for the whole family. Let’s break it down into easy steps.

Step 1: Prepare the Crust

First, you’ll want to create the crust for your mini pies. In a medium bowl, combine the graham cracker crumbs, melted butter, and granulated sugar. Mix everything together until it’s well combined. The mixture should resemble wet sand.

Next, take your mixture and press it evenly into the bottom and up the sides of 6 small ramekins or dessert cups. This will form the base of your pies. Make sure to press firmly so that the crust holds together well. Once you’ve shaped the crusts, place them in the refrigerator for about 15 minutes. This chilling time helps the crust set, making it easier to fill later.

Step 2: Make the Banana Cream Filling

While the crust is chilling, it’s time to prepare the delicious banana cream filling. In another bowl, whisk together the instant vanilla pudding mix and cold milk. Keep whisking for about 2 minutes until the mixture thickens. This step is crucial as it creates the creamy texture that will fill your pies.

After the pudding has thickened, stir in the vanilla extract. This adds an extra layer of flavor to your filling. Now, set the bowl aside for a moment while you get ready to assemble your mini pies.

Step 3: Assemble the Mini No-Bake Banana Cream Pies

Once your crusts are set and your filling is ready, it’s time to assemble your mini pies. Start by removing the crusts from the refrigerator. Place a layer of sliced bananas at the bottom of each crust. The bananas not only add flavor but also a lovely texture.

Next, spoon a generous layer of the pudding mixture over the bananas in each crust. Make sure to fill them evenly so that every bite is delicious. Finally, top each pie with a generous dollop of whipped topping. This adds a light and fluffy finish to your mini pies.

Step 4: Chill the Pies

After assembling your mini pies, it’s important to let them chill in the refrigerator for at least 30 minutes. This chilling time allows the flavors to meld together beautifully. Plus, it helps the whipped topping set, making your pies even more delightful when served.

Mini No-Bake Banana Cream Pies are ready to be enjoyed! You can garnish them with chocolate shavings or extra whipped topping if you like. Now, let’s explore some fun variations you can try with this recipe.

Variation of Mini No-Bake Banana Cream Pies Recipe

Mini No-Bake Banana Cream Pies Recipe is delicious on its own, there are plenty of ways to mix things up! Whether you want to try a different crust or experiment with the filling, these variations will keep your dessert exciting and fresh. Let’s dive into some alternative crust options and flavor variations for the filling.

Alternative Crust Options

If you’re looking to switch up the crust, there are several tasty alternatives to graham crackers. Here are a few ideas:

  • Chocolate Cookie Crust: Use crushed chocolate sandwich cookies instead of graham crackers. This will give your mini pies a rich, chocolatey flavor that pairs wonderfully with bananas.
  • Oreo Crust: Similar to the chocolate cookie crust, crushed Oreos can create a deliciously sweet and crunchy base. Just mix the crushed cookies with melted butter and press into your ramekins.
  • Almond Flour Crust: For a gluten-free option, try using almond flour mixed with melted butter and a bit of sugar. This crust will add a nutty flavor and a unique texture to your pies.
  • Shortbread Crust: If you prefer a buttery flavor, a shortbread crust can be a great choice. Simply crush shortbread cookies and mix with melted butter to form the base.

Mini No-Bake Banana Cream Pies Recipe, making them even more delightful!

Flavor Variations for the Filling

Now, let’s talk about the filling! While the vanilla pudding and bananas are a classic combination, you can easily switch things up. Here are some fun flavor variations:

  • Chocolate Banana Cream: Substitute the vanilla pudding mix with chocolate pudding mix. This will create a rich chocolate flavor that complements the bananas perfectly.
  • Strawberry Banana Cream: Replace the bananas with fresh strawberries. You can also use strawberry pudding mix for an extra fruity twist.
  • Peanut Butter Banana Cream: Add a few tablespoons of creamy peanut butter to the vanilla pudding mixture. This will give your pies a deliciously nutty flavor that pairs well with bananas.
  • Coconut Banana Cream: Mix in some shredded coconut into the pudding filling. This will add a tropical flair to your mini pies!

Mini No-Bake Banana Cream Pies Recipe to suit your taste preferences. Feel free to get creative and mix and match flavors!

Cooking Note for Mini No-Bake Banana Cream Pies Recipe

Mini No-Bake Banana Cream Pies Recipe, there are a few important cooking notes to keep in mind. These tips will help ensure that your mini pies turn out perfectly every time.

First, make sure to use ripe bananas. Ripe bananas are sweeter and have a softer texture, which makes them ideal for this recipe. They will blend beautifully with the creamy filling and enhance the overall flavor of your pies.

Next, when mixing the pudding, be sure to whisk it thoroughly. This step is crucial for achieving the right consistency. If the pudding is not mixed well, it may not thicken properly, leading to a runny filling. Whisking for the full two minutes is essential to get that perfect creamy texture.

Additionally, chilling the crust before adding the filling is a key step. This helps the crust firm up, making it easier to fill and serve. If you skip this step, the crust may crumble when you try to scoop out the pie.

Lastly, consider the serving temperature. These mini pies are best served chilled. The coolness enhances the flavors and provides a refreshing treat, especially on warm days. If you have leftovers, store them in the refrigerator to maintain their freshness.

Mini No-Bake Banana Cream Pies that are sure to impress your family and friends. Now, let’s move on to some serving suggestions to make your dessert even more appealing!

Serving Suggestions for Mini No-Bake Banana Cream Pies Recipe

Mini No-Bake Banana Cream Pies are ready, it’s time to think about how to serve them! Presentation can elevate your dessert, making it even more enjoyable for your guests. Here are some delightful serving suggestions to consider:

  • Individual Dessert Cups: Serve each mini pie in its own cute ramekin or dessert cup. This not only looks appealing but also makes it easy for guests to grab their own treat.
  • Garnish with Fresh Fruit: Add a slice of banana or a few berries on top of each pie for a pop of color. Fresh fruit not only enhances the visual appeal but also adds a burst of flavor.
  • Chocolate Drizzle: For a touch of elegance, drizzle some melted chocolate over the whipped topping. This adds a rich flavor and makes your pies look extra special.
  • Serve with a Side of Whipped Cream: Place a dollop of whipped cream on the side of each plate. This allows guests to add more cream if they desire, enhancing the creamy experience.
  • Pair with Coffee or Tea: These mini pies make a perfect dessert after a meal. Pair them with a cup of coffee or tea for a delightful end to your dining experience.

Mini No-Bake Banana Cream Pies Recipe look stunning but also enhance the overall enjoyment of this delicious dessert. Remember, the way you present your food can make a big difference in how it’s received. So, get creative and have fun with it!

Tips for Perfect Mini No-Bake Banana Cream Pies Recipe

Mini No-Bake Banana Cream Pies Recipe is all about attention to detail. With a few helpful tips, you can ensure that your mini pies turn out delicious every time. Here are some essential tips to keep in mind:

  • Use Fresh Ingredients: Always opt for fresh, ripe bananas. They not only taste better but also provide the right texture for your pies. Avoid overripe bananas, as they can become mushy and affect the overall presentation.
  • Chill Your Ingredients: For the best results, chill your milk before mixing it with the pudding. Cold milk helps the pudding set faster and creates a creamier filling.
  • Don’t Skip the Chilling Time: Allow your assembled pies to chill for at least 30 minutes. This step is crucial for the flavors to meld and for the filling to firm up, making it easier to serve.
  • Layering is Key: When assembling, layer the bananas and pudding carefully. This not only looks appealing but also ensures that every bite has a balanced flavor of banana and cream.
  • Experiment with Toppings: Get creative with your toppings! Besides whipped cream, consider adding crushed nuts, sprinkles, or even a sprinkle of cinnamon for added flavor and texture.
  • Keep It Cool: If you’re serving these pies at a gathering, keep them in the refrigerator until it’s time to serve. This will maintain their freshness and prevent the whipped topping from melting.
  • Make Ahead: If you’re short on time, you can prepare the crust and filling a day in advance. Just assemble the pies the day you plan to serve them for the best texture.

Mini No-Bake Banana Cream Pies that are not only delicious but also visually appealing. Your guests will be impressed, and you’ll enjoy the satisfaction of making a delightful dessert!

Breakdown of Time for Mini No-Bake Banana Cream Pies Recipe

Mini No-Bake Banana Cream Pies Recipe can help you plan better. Here’s a simple breakdown of the time required for preparation, chilling, and serving. This way, you can enjoy the process without feeling rushed!

Prep Time

The prep time for this delightful dessert is quite short. You’ll need about 20 minutes to gather your ingredients and prepare the crust and filling. This includes mixing the graham cracker crumbs, butter, and sugar, as well as whisking the pudding mix with milk. It’s a quick and easy process that anyone can manage!

Cooking Time

Since this is a no-bake recipe, there’s no actual cooking time involved. However, you will need to chill the crust for about 15 minutes to set it properly. After assembling the mini pies, they should chill for at least 30 minutes to allow the flavors to meld together. This chilling time is essential for achieving the perfect texture and taste.

Total Time

Mini No-Bake Banana Cream Pies for any occasion!

Nutritional Information for Mini No-Bake Banana Cream Pies Recipe

Mini No-Bake Banana Cream Pies is essential, especially if you’re mindful of your diet. This dessert is not only delicious but also provides a balance of nutrients. Here’s a breakdown of the key nutritional information per serving:

Calories

Each serving of these delightful mini pies contains approximately 250 calories. This makes them a satisfying treat without being overly indulgent. The combination of graham cracker crust, creamy filling, and fresh bananas contributes to this calorie count, ensuring you enjoy a sweet dessert while keeping your calorie intake in check.

Protein

In terms of protein, each serving offers about 3 grams. While this may not seem like a lot, it’s a nice addition to the dessert, especially when paired with the other ingredients. The protein content comes mainly from the whipped topping and the milk used in the pudding, providing a small boost to your daily intake.

Sodium

When it comes to sodium, each serving contains around 150 milligrams. This is a moderate amount, making these mini pies a reasonable choice for those watching their sodium intake. The sodium primarily comes from the graham cracker crumbs and the whipped topping. If you’re looking to reduce sodium further, consider using low-sodium options for these ingredients.

Mini No-Bake Banana Cream Pies Recipe offers a delightful balance of flavors and nutrients. They can be enjoyed as an occasional treat without compromising your dietary goals. Now that you know the nutritional information, let’s answer some frequently asked questions about this delicious dessert!

FAQs about Mini No-Bake Banana Cream Pies Recipe

Can I use other fruits in the Mini No-Bake Banana Cream Pies Recipe?

Mini No-Bake Banana Cream Pies Recipe, you can easily swap them out for other fruits. Strawberries, blueberries, or even peaches can add a delightful twist. Just make sure to slice the fruits thinly so they layer nicely in the crust. This way, you can enjoy a variety of flavors while keeping the same creamy filling!

How long can I store Mini No-Bake Banana Cream Pies?

These mini pies are best enjoyed fresh, but you can store them in the refrigerator for up to 2 days. Just cover them with plastic wrap or a lid to keep them fresh. However, keep in mind that the bananas may brown slightly over time. To maintain their appearance, consider adding the banana slices just before serving if you plan to store them for a while.

Can I make Mini No-Bake Banana Cream Pies Recipe ahead of time?

Mini No-Bake Banana Cream Pies ahead of time! You can make the crust and filling a day in advance. Just assemble the pies and chill them in the refrigerator until you’re ready to serve. This makes them a great option for parties or gatherings, allowing you to enjoy the event without rushing in the kitchen!

What can I substitute for bananas in the Mini No-Bake Banana Cream Pies Recipe?

Mini No-Bake Banana Cream Pies.

Conclusion on Mini No-Bake Banana Cream Pies Recipe

Mini No-Bake Banana Cream Pies Recipe is a delightful dessert that combines simplicity with deliciousness. With its creamy filling, buttery crust, and fresh banana slices, this treat is sure to please everyone. Whether you’re hosting a gathering or simply craving something sweet, these mini pies are the perfect solution.

Not only are they easy to prepare, but they also allow for creativity. You can experiment with different crusts and fillings, making each batch unique. From chocolate to strawberry variations, the possibilities are endless. Plus, the no-bake aspect means you can whip them up without heating your kitchen, making them ideal for warm days.

Mini No-Bake Banana Cream Pies.

We hope you enjoy making and sharing this recipe as much as we do. Happy baking, or rather, happy assembling! Your taste buds will thank you!

Mediterranean Beef Stir-Fry is a quick, flavorful meal.

Introduction to Mediterranean Beef Stir-Fry

Are you looking for a quick and delicious meal that bursts with flavor? Look no further than Mediterranean Beef Stir-Fry! This dish combines the rich tastes of the Mediterranean with the convenience of a stir-fry. It’s perfect for busy weeknights or when you want to impress guests with minimal effort.

What sets Mediterranean Beef Stir-Fry apart is its vibrant mix of fresh vegetables and aromatic herbs. The combination of ground beef, colorful bell peppers, and juicy cherry tomatoes creates a delightful medley that is both satisfying and nutritious. Plus, the addition of feta cheese adds a creamy, tangy finish that elevates the dish to new heights.

What Makes Mediterranean Beef Stir-Fry Unique?

One of the standout features of Mediterranean Beef Stir-Fry is its versatility. You can easily customize it to suit your taste preferences or dietary needs. Whether you prefer a leaner protein like turkey or want to load up on seasonal vegetables, this recipe adapts beautifully. The use of Mediterranean herbs like oregano and basil not only enhances the flavor but also brings a touch of the Mediterranean lifestyle to your kitchen.

Moreover, this dish is not just about taste; it’s also about health. Packed with protein, vitamins, and minerals, Mediterranean Beef Stir-Fry is a wholesome option for any meal. The low net carbs make it suitable for various dietary plans, including low-carb and keto diets. So, whether you’re cooking for yourself or a family of four, this dish is sure to please everyone at the table.

In the following sections, we will dive deeper into the ingredients, preparation steps, and tips to make your Mediterranean Beef Stir-Fry a hit. Get ready to enjoy a meal that’s not only easy to make but also bursting with Mediterranean flair!

Ingredients for Mediterranean Beef Stir-Fry

To create a delicious Mediterranean Beef Stir-Fry, you’ll need a variety of fresh ingredients that come together to form a flavorful dish. Here’s a list of what you’ll need:

  • 1 pound ground beef: This is the main protein source, providing rich flavor and texture.
  • 1 tablespoon olive oil: A healthy fat that adds depth to the dish and helps cook the ingredients evenly.
  • 1 medium onion, diced: Onions add sweetness and aroma, enhancing the overall flavor.
  • 2 cloves garlic, minced: Garlic brings a wonderful fragrance and taste that complements the beef.
  • 1 red bell pepper, diced: This adds a pop of color and sweetness to the stir-fry.
  • 1 zucchini, diced: Zucchini is a great way to add more vegetables and nutrients.
  • 1 cup cherry tomatoes, halved: These juicy tomatoes provide freshness and a burst of flavor.
  • 1 teaspoon dried oregano: A classic Mediterranean herb that adds a warm, earthy flavor.
  • 1 teaspoon dried basil: This herb brings a sweet and slightly peppery taste to the dish.
  • Salt and pepper to taste: Essential seasonings that enhance all the flavors.
  • 1/4 cup feta cheese, crumbled: Feta adds a creamy, tangy finish that elevates the dish.
  • Fresh parsley, chopped (for garnish): A sprinkle of parsley adds a fresh touch and brightens the dish.

These ingredients not only create a delightful flavor profile but also ensure that your Mediterranean Beef Stir-Fry is packed with nutrients. Feel free to adjust the quantities based on your preferences or dietary needs. Now that you have your ingredients ready, let’s move on to the preparation steps!

Step-by-Step Preparation of Mediterranean Beef Stir-Fry

Now that you have gathered all your ingredients, it’s time to dive into the preparation of your Mediterranean Beef Stir-Fry. This step-by-step guide will help you create a delicious meal that’s both quick and easy. Let’s get started!

Step 1: Preparing the Ingredients

First things first, you need to prepare your ingredients. Start by washing all your vegetables thoroughly. Dice the onion, red bell pepper, and zucchini into bite-sized pieces. Halve the cherry tomatoes and set them aside. Mince the garlic cloves finely. Having everything prepped and ready will make the cooking process smooth and efficient.

Step 2: Marinating the Beef

While marinating is not a must for this recipe, it can enhance the flavor of the beef. If you choose to marinate, mix the ground beef with a tablespoon of olive oil, a pinch of salt, and a sprinkle of dried oregano and basil. Let it sit for about 15 minutes. This step allows the flavors to meld together, making your Mediterranean Beef Stir-Fry even tastier.

Step 3: Cooking the Beef

Heat a large skillet over medium heat and add the tablespoon of olive oil. Once the oil is hot, add the diced onion. Sauté for about 3-4 minutes until the onion becomes translucent. Next, add the minced garlic and cook for an additional minute until fragrant. Now, increase the heat to medium-high and add the marinated ground beef. Cook it for about 5-7 minutes, breaking it apart with a spatula until it’s browned. If there’s excess fat, drain it off to keep the dish light.

Step 4: Adding Vegetables

Once the beef is cooked, it’s time to add the vegetables. Stir in the diced red bell pepper and zucchini. Cook for 3-4 minutes until the vegetables are tender but still crisp. Then, add the halved cherry tomatoes, dried oregano, dried basil, salt, and pepper. Cook for another 2-3 minutes until the tomatoes soften and release their juices, creating a delicious sauce.

Step 5: Final Touches and Serving

After cooking, remove the skillet from heat. Sprinkle the crumbled feta cheese over the top of the stir-fry. The warm ingredients will slightly melt the cheese, adding a creamy texture. For a fresh finish, garnish with chopped parsley. Serve your Mediterranean Beef Stir-Fry hot, and enjoy the delightful flavors!

Variations of Mediterranean Beef Stir-Fry

While the classic Mediterranean Beef Stir-Fry is delicious as is, there are many ways to switch things up! Whether you want to try different proteins or add a variety of vegetables, these variations can keep your meals exciting. Let’s explore some alternative proteins and vegetable substitutions that can enhance your Mediterranean Beef Stir-Fry.

Alternative Proteins to Use

If you’re looking for a change from ground beef, there are several alternative proteins you can use. Here are some tasty options:

  • Ground Turkey: This leaner option is a great substitute. It has a mild flavor that pairs well with Mediterranean spices.
  • Ground Chicken: Another healthy choice, ground chicken is light and cooks quickly, making it perfect for stir-frying.
  • Tofu: For a vegetarian twist, try using firm tofu. Press it to remove excess moisture, then crumble it before cooking.
  • Tempeh: This fermented soy product adds a nutty flavor and is packed with protein. Crumble it and sauté it just like ground beef.

Each of these proteins brings its own unique flavor and texture to the dish. Feel free to experiment and find your favorite combination!

Vegetable Substitutions for Mediterranean Beef Stir-Fry

Vegetables are a key component of Mediterranean Beef Stir-Fry, and you can easily swap them out based on what you have on hand or your personal preferences. Here are some great vegetable substitutions:

  • Spinach or Kale: Add a handful of fresh spinach or kale towards the end of cooking for a nutrient boost.
  • Broccoli: This crunchy vegetable adds texture and pairs well with the Mediterranean flavors.
  • Carrots: Diced or julienned carrots can add a touch of sweetness and color to your stir-fry.
  • Eggplant: Diced eggplant can provide a hearty texture and absorb the flavors of the dish beautifully.

Feel free to mix and match these vegetables to create a stir-fry that suits your taste. The beauty of Mediterranean Beef Stir-Fry lies in its flexibility, allowing you to enjoy a different dish every time!

Cooking Note for Mediterranean Beef Stir-Fry

When preparing Mediterranean Beef Stir-Fry, there are a few cooking notes to keep in mind. These tips will help you achieve the best flavor and texture, ensuring your dish turns out perfectly every time.

First, always use a large skillet or wok. This allows for even cooking and prevents overcrowding. If the pan is too small, the ingredients may steam instead of stir-frying, which can lead to a less desirable texture.

Next, make sure your skillet is hot before adding the oil. A hot pan helps to sear the beef quickly, locking in juices and flavor. If the oil starts to smoke, it’s a sign that the pan is ready for the next step.

When cooking the ground beef, break it apart into small pieces. This ensures that it cooks evenly and allows for better flavor absorption from the spices and vegetables. Stir frequently to prevent sticking and burning.

As you add vegetables, remember to cook them just until tender. Overcooking can lead to mushy vegetables, which detracts from the overall dish. Aim for a balance of crispness and tenderness for the best results.

Lastly, don’t forget to taste as you go! Adjust the seasoning with salt, pepper, or herbs to suit your preferences. This step is crucial for creating a dish that’s bursting with flavor.

By following these cooking notes, you’ll be well on your way to mastering Mediterranean Beef Stir-Fry. Enjoy the process and savor the delicious results!

Serving Suggestions for Mediterranean Beef Stir-Fry

Once your Mediterranean Beef Stir-Fry is ready, it’s time to think about how to serve it. This dish is versatile and pairs well with various sides and sauces. Here are some ideal serving suggestions to enhance your meal experience.

Ideal Side Dishes

To complement the flavors of your Mediterranean Beef Stir-Fry, consider these side dishes:

  • Rice or Quinoa: A fluffy bed of rice or quinoa is perfect for soaking up the delicious juices from the stir-fry. Both options are nutritious and filling.
  • Pita Bread: Warm pita bread can be served on the side. It’s great for scooping up the stir-fry and adds a delightful texture.
  • Greek Salad: A fresh Greek salad with cucumbers, olives, and feta cheese adds a refreshing crunch that balances the warm stir-fry.
  • Roasted Vegetables: Roasted seasonal vegetables, such as bell peppers, zucchini, and eggplant, can enhance the Mediterranean theme and provide extra nutrients.

These side dishes not only complement the Mediterranean Beef Stir-Fry but also add variety to your meal. Choose one or two to create a well-rounded dining experience.

Pairing with Sauces and Dips

Adding sauces and dips can elevate your Mediterranean Beef Stir-Fry even further. Here are some tasty options to consider:

  • Tzatziki Sauce: This creamy yogurt-based sauce with cucumber and garlic is a classic Mediterranean dip. It adds a cool contrast to the warm stir-fry.
  • Hummus: A side of hummus can be a delightful addition. It’s rich in flavor and pairs well with pita bread or fresh veggies.
  • Chimichurri Sauce: This vibrant sauce made with parsley, garlic, and vinegar adds a zesty kick that complements the beef beautifully.
  • Hot Sauce: For those who enjoy a bit of heat, a drizzle of your favorite hot sauce can spice things up and add an exciting flavor dimension.

By incorporating these sauces and dips, you can customize your Mediterranean Beef Stir-Fry to suit your taste. Enjoy experimenting with different combinations to find your perfect pairing!

Tips for Perfect Mediterranean Beef Stir-Fry

To make your Mediterranean Beef Stir-Fry truly exceptional, consider these helpful tips. They will guide you in selecting the best ingredients and using effective cooking techniques. With these insights, you’ll create a dish that’s bursting with flavor and texture!

Choosing the Right Cut of Beef

When it comes to making Mediterranean Beef Stir-Fry, the choice of beef is crucial. Ground beef is the most common option, but not all ground beef is created equal. Here are some tips for selecting the best cut:

  • Lean Ground Beef: Look for ground beef that is at least 80% lean. This ensures a good balance of flavor without excessive fat. Leaner beef will also help keep your dish lighter.
  • Grass-Fed Beef: If possible, choose grass-fed beef. It tends to have a richer flavor and is often more nutritious than grain-fed options.
  • Freshness Matters: Always check the expiration date and choose the freshest ground beef available. Fresh meat will enhance the overall taste of your stir-fry.
  • Consider Other Cuts: If you prefer, you can use diced beef cuts like sirloin or flank steak. Just slice them thinly against the grain for tender bites.

By selecting the right cut of beef, you’ll set the foundation for a delicious Mediterranean Beef Stir-Fry that everyone will love!

Cooking Techniques for Optimal Flavor

Cooking techniques play a significant role in achieving the best flavor in your Mediterranean Beef Stir-Fry. Here are some effective methods to keep in mind:

  • High Heat Cooking: Stir-frying requires high heat. This helps to sear the beef quickly, locking in juices and flavor. Make sure your skillet is hot before adding the ingredients.
  • Don’t Overcrowd the Pan: If you add too many ingredients at once, they may steam instead of fry. Cook in batches if necessary to ensure even cooking.
  • Season as You Go: Add salt, pepper, and herbs at different stages of cooking. This layering of flavors will create a more complex and delicious dish.
  • Use Fresh Herbs: Whenever possible, use fresh herbs instead of dried ones. Fresh parsley, basil, or oregano can elevate the flavor profile significantly.

By applying these cooking techniques, you’ll enhance the taste and texture of your Mediterranean Beef Stir-Fry. Enjoy the process and savor the delightful results!

Breakdown of Time for Mediterranean Beef Stir-Fry

Understanding the time required for each step in preparing Mediterranean Beef Stir-Fry can help you plan your cooking efficiently. Here’s a breakdown of the time you’ll need for preparation and cooking.

Prep Time

The prep time for Mediterranean Beef Stir-Fry is relatively short. You’ll need about 10-15 minutes to gather and prepare your ingredients. This includes washing, dicing, and mincing the vegetables and garlic. Having everything ready before you start cooking will make the process smoother and more enjoyable.

Cooking Time

Once your ingredients are prepped, the cooking time is quick! Expect to spend around 15-20 minutes cooking the beef and vegetables. This includes sautéing the onions and garlic, browning the beef, and stir-frying the vegetables until they are tender yet crisp. The entire cooking process is designed to be fast, allowing you to enjoy a delicious meal in no time.

Total Time

In total, you can expect to spend about 25-35 minutes from start to finish when making Mediterranean Beef Stir-Fry. This includes both prep and cooking time. It’s a perfect option for busy weeknights when you want a healthy and flavorful meal without spending hours in the kitchen.

With this time breakdown, you can easily fit Mediterranean Beef Stir-Fry into your schedule. Enjoy the process and the delightful flavors that come together in this quick and satisfying dish!

Nutritional Information for Mediterranean Beef Stir-Fry

Understanding the nutritional content of your meals is essential for maintaining a balanced diet. Mediterranean Beef Stir-Fry not only delights your taste buds but also provides a range of nutrients. Let’s break down the key nutritional components of this dish.

Calories

Each serving of Mediterranean Beef Stir-Fry contains approximately 350 calories. This makes it a satisfying yet light option for lunch or dinner. The calorie count comes from the combination of ground beef, vegetables, and feta cheese, all of which contribute to a well-rounded meal. If you’re watching your calorie intake, this dish fits nicely into a healthy eating plan.

Protein Content

One of the standout features of Mediterranean Beef Stir-Fry is its high protein content. Each serving provides about 28 grams of protein. This protein comes primarily from the ground beef, making it an excellent choice for those looking to build muscle or maintain a healthy weight. Protein is essential for repairing tissues and keeping you feeling full longer, which is a great benefit for anyone on a weight management journey.

Sodium Levels

When it comes to sodium, Mediterranean Beef Stir-Fry contains approximately 600 milligrams per serving. This level is reasonable for a savory dish, but it’s always wise to monitor your sodium intake, especially if you have dietary restrictions. To reduce sodium, consider using low-sodium feta cheese or adjusting the amount of added salt during cooking. This way, you can enjoy the flavors without compromising your health.

Overall, Mediterranean Beef Stir-Fry is a nutritious meal option that provides a good balance of calories, protein, and sodium. It’s a great way to enjoy a delicious dish while also fueling your body with essential nutrients. Whether you’re cooking for yourself or your family, this stir-fry is sure to be a hit!

FAQs about Mediterranean Beef Stir-Fry

Can I use chicken instead of beef in Mediterranean Beef Stir-Fry?

Absolutely! You can use chicken in place of beef for your Mediterranean Beef Stir-Fry. Ground chicken is a leaner option that cooks quickly and absorbs flavors well. Just follow the same cooking steps as you would with ground beef. You might want to adjust the cooking time slightly, as chicken can cook faster. This substitution is perfect for those looking for a lighter meal without sacrificing taste!

What vegetables work best in Mediterranean Beef Stir-Fry?

When it comes to vegetables, the options are endless! Some of the best choices for Mediterranean Beef Stir-Fry include:

  • Bell Peppers: They add sweetness and color.
  • Zucchini: This vegetable is tender and nutritious.
  • Cherry Tomatoes: They provide a juicy burst of flavor.
  • Spinach or Kale: These leafy greens add nutrients and color.
  • Broccoli: This crunchy vegetable pairs well with the beef.

Feel free to mix and match based on your preferences or what you have on hand. The beauty of this dish is its versatility!

How can I make Mediterranean Beef Stir-Fry gluten-free?

Making Mediterranean Beef Stir-Fry gluten-free is quite simple! Here are a few tips:

  • Check Labels: Ensure that any sauces or condiments you use, like feta cheese or hot sauce, are labeled gluten-free.
  • Use Gluten-Free Grains: If you serve the stir-fry with rice or quinoa, both are naturally gluten-free options.
  • Avoid Soy Sauce: If you typically use soy sauce, opt for gluten-free alternatives like tamari.

By following these tips, you can enjoy a delicious gluten-free Mediterranean Beef Stir-Fry without any worries!

Can I prepare Mediterranean Beef Stir-Fry in advance?

Yes, you can prepare Mediterranean Beef Stir-Fry in advance! Here’s how:

  • Cook Ahead: You can cook the stir-fry and store it in an airtight container in the refrigerator for up to 3 days.
  • Reheat: When you’re ready to eat, simply reheat it in a skillet over medium heat until warmed through.
  • Prep Ingredients: If you prefer, you can also chop the vegetables and marinate the beef ahead of time. Just store them separately in the fridge until you’re ready to cook.

Preparing in advance can save you time during busy weeknights while still allowing you to enjoy a flavorful meal!

Conclusion on Mediterranean Beef Stir-Fry

In conclusion, Mediterranean Beef Stir-Fry is a delightful dish that brings together the vibrant flavors of the Mediterranean in a quick and easy meal. With its colorful mix of fresh vegetables, aromatic herbs, and savory ground beef, this stir-fry is not only delicious but also packed with nutrients. It’s a perfect option for busy weeknights or when you want to impress your family and friends with minimal effort.

What makes this dish truly special is its versatility. You can easily customize it by swapping proteins or adding your favorite vegetables. Whether you choose ground turkey, chicken, or even tofu, the Mediterranean Beef Stir-Fry adapts beautifully to your preferences. Plus, the addition of feta cheese and fresh herbs elevates the dish, making it a feast for both the eyes and the palate.

As you prepare this meal, remember the cooking tips and serving suggestions shared throughout the article. They will help you achieve the best flavor and texture, ensuring that your Mediterranean Beef Stir-Fry is a hit every time. From pairing it with rice or quinoa to serving it alongside a refreshing Greek salad, the possibilities are endless.

So, gather your ingredients, follow the steps, and enjoy the delightful experience of cooking and savoring Mediterranean Beef Stir-Fry. It’s a dish that not only nourishes the body but also brings a taste of the Mediterranean right to your kitchen. Happy cooking!

Creamy Garlic Parmesan Pasta Recipe is a must-try!

Introduction to Creamy Garlic Parmesan Pasta Recipe

Creamy Garlic Parmesan Pasta Recipe is just what you need. This dish combines the rich flavors of garlic and Parmesan cheese with the creamy texture of a delightful sauce. It’s perfect for a weeknight dinner or a special occasion. Plus, it’s easy to make, even for those who are new to cooking!

The beauty of this recipe lies in its simplicity. With just a handful of ingredients, you can create a dish that feels gourmet. Imagine twirling your fork around perfectly cooked pasta, coated in a luscious garlic sauce. It’s a meal that warms the heart and satisfies the taste buds.

Not only is this pasta recipe quick to prepare, but it also allows for plenty of customization. You can add proteins like chicken or shrimp, or toss in some fresh vegetables for added nutrition. Whether you’re cooking for yourself or entertaining guests, this creamy pasta dish is sure to impress.

In the following sections, we will guide you through the ingredients, preparation steps, and variations to make this recipe your own. So, let’s dive into the world of creamy garlic goodness!

Ingredients for Creamy Garlic Parmesan Pasta Recipe

Creamy Garlic Parmesan Pasta Recipe, you’ll need a few simple ingredients. Each one plays a vital role in building the rich flavors and creamy texture of the dish. Here’s what you’ll need:

  • 8 ounces pasta: Choose your favorite type, such as spaghetti, fettuccine, or penne.
  • 2 tablespoons olive oil: This adds a nice flavor and helps sauté the garlic.
  • 4 cloves garlic: Minced garlic is essential for that aromatic kick.
  • 8 ounces cream cheese: Softened cream cheese creates the creamy base of the sauce.
  • 1 cup chicken or vegetable broth: This adds depth and richness to the sauce.
  • 1 cup grated Parmesan cheese: Freshly grated Parmesan gives the best flavor and texture.
  • 1 teaspoon Italian seasoning: A blend of herbs that enhances the overall taste.
  • Salt and pepper: To taste, these seasonings will elevate the dish.
  • Fresh parsley: Chopped, for garnish and a pop of color.

Gathering these ingredients will set you on the path to creating a delightful meal. Each component contributes to the overall flavor, making this pasta dish a favorite for many. Now that you have everything ready, let’s move on to the preparation steps!

Step-by-Step Preparation of Creamy Garlic Parmesan Pasta Recipe

Creamy Garlic Parmesan Pasta Recipe. Each step is designed to ensure that your pasta turns out perfectly creamy and flavorful.

Step 1: Cooking the Pasta

Start by bringing a large pot of salted water to a boil. Once boiling, add your chosen pasta. Cook it according to the package instructions until it reaches an al dente texture. This usually takes about 8 to 10 minutes, depending on the type of pasta you choose. Remember, al dente means the pasta should be firm to the bite.

After cooking, drain the pasta in a colander. Be sure to reserve about 1/2 cup of the pasta water. This starchy water will help adjust the sauce’s consistency later. Set the drained pasta aside while you prepare the sauce.

Step 2: Preparing the Garlic Sauce

In a large skillet, heat 2 tablespoons of olive oil over medium heat. Once the oil is hot, add the minced garlic. Sauté the garlic for about 1 minute, stirring frequently. You want it to become fragrant but be careful not to let it burn, as burnt garlic can taste bitter.

Next, add the softened cream cheese to the skillet. Stir it continuously until it melts and becomes smooth. This creamy base is what makes your sauce rich and delicious.

Step 3: Combining Pasta and Sauce

Once the cream cheese is melted, gradually pour in the chicken or vegetable broth. Stir the mixture continuously until everything is well combined and creamy. If the sauce seems too thick, don’t worry! You can add a little of the reserved pasta water to reach your desired consistency.

Now, it’s time to add the cooked pasta to the skillet. Toss the pasta gently in the sauce, ensuring every strand is coated with that creamy goodness. This step is crucial for flavor, so take your time to mix it well.

Step 4: Adding Parmesan Cheese

Finally, stir in the grated Parmesan cheese and the Italian seasoning. The cheese will melt into the sauce, adding a wonderful flavor. Taste your pasta and season with salt and pepper as needed. If you want a little extra kick, consider adding a pinch of red pepper flakes at this stage.

Creamy Garlic Parmesan Pasta Recipe is ready to serve! Garnish with freshly chopped parsley for a pop of color and freshness.

Variation of Creamy Garlic Parmesan Pasta Recipe

Creamy Garlic Parmesan Pasta Recipe is incredibly versatile. You can easily customize it to suit your taste or dietary needs. Here are some delicious variations to consider, including protein options and vegetable additions.

Adding Protein Options

If you want to make your pasta dish heartier, adding protein is a great idea. Here are some tasty options:

  • Grilled Chicken: Sliced grilled chicken breast adds a wonderful flavor and makes the dish more filling.
  • Shrimp: Sautéed shrimp can bring a delightful seafood twist to your pasta. Just cook them in the skillet before adding the sauce.
  • Bacon or Pancetta: Crispy bacon or pancetta can add a smoky flavor that pairs beautifully with the creamy sauce.
  • Tofu: For a vegetarian option, add cubed, sautéed tofu. It absorbs flavors well and adds protein.

Feel free to mix and match these proteins based on what you have on hand or your personal preferences. Each option will enhance the dish and make it even more satisfying!

Vegetable Additions for Creamy Garlic Parmesan Pasta Recipe

Creamy Garlic Parmesan Pasta Recipe. Here are some great choices:

  • Spinach: Fresh spinach wilts beautifully in the sauce, adding color and nutrients.
  • Mushrooms: Sautéed mushrooms bring an earthy flavor that complements the garlic and cheese.
  • Broccoli: Steamed or sautéed broccoli florets add a nice crunch and vibrant color.
  • Cherry Tomatoes: Halved cherry tomatoes can add a burst of sweetness and freshness.

Adding vegetables not only enhances the flavor but also makes the dish more colorful and appealing. You can use any combination of these vegetables to create a pasta dish that’s both delicious and nutritious!

Cooking Note for Creamy Garlic Parmesan Pasta Recipe

Creamy Garlic Parmesan Pasta Recipe, there are a few important cooking notes to keep in mind. These tips will help ensure that your dish turns out perfectly every time.

First, always use fresh ingredients when possible. Fresh garlic and high-quality Parmesan cheese can significantly enhance the flavor of your pasta. If you can, opt for freshly grated Parmesan instead of pre-packaged cheese. It melts better and has a richer taste.

Next, pay attention to the cooking time of your pasta. Overcooked pasta can become mushy and lose its appealing texture. Aim for al dente, which means the pasta should be firm yet tender. This texture will hold up well when mixed with the creamy sauce.

Additionally, when sautéing the garlic, keep a close eye on it. Garlic can burn quickly, leading to a bitter taste. Stir it frequently and remove it from the heat as soon as it becomes fragrant. This will ensure that you get the best flavor without any bitterness.

Another tip is to adjust the sauce’s consistency to your liking. If you find the sauce too thick, simply add a bit more of the reserved pasta water. This starchy water not only helps thin the sauce but also helps it cling to the pasta better.

Lastly, don’t forget to taste your dish before serving. Adjust the seasoning with salt and pepper as needed. A little extra seasoning can make a big difference in flavor. Enjoy the process, and remember that cooking is all about experimenting and finding what works best for you!

Serving Suggestions for Creamy Garlic Parmesan Pasta Recipe

Creamy Garlic Parmesan Pasta Recipe, it’s time to think about how to serve it. Presentation can elevate your dish, making it even more enjoyable. Here are some delightful serving suggestions to consider:

  • Garnish with Fresh Herbs: A sprinkle of freshly chopped parsley or basil adds a vibrant touch. It not only enhances the visual appeal but also adds a fresh flavor that complements the creamy sauce.
  • Pair with a Side Salad: A light side salad with mixed greens, cherry tomatoes, and a simple vinaigrette can balance the richness of the pasta. The crispness of the salad provides a refreshing contrast.
  • Serve with Garlic Bread: For a truly indulgent meal, serve your pasta with warm garlic bread. The buttery, garlicky bread is perfect for soaking up any leftover sauce.
  • Top with Extra Cheese: If you’re a cheese lover, don’t hesitate to add more grated Parmesan on top before serving. It melts slightly and adds an extra layer of flavor.
  • Include a Protein: If you’ve added protein to your pasta, consider serving it alongside grilled chicken or shrimp. This not only makes the meal heartier but also adds a beautiful presentation.

When serving, consider using large, shallow bowls. This allows the creamy sauce to spread out, making it visually appealing. You can also drizzle a little olive oil on top for an extra touch of flavor and shine.

Creamy Garlic Parmesan Pasta Recipe even more delightful!

Tips for Perfecting Your Creamy Garlic Parmesan Pasta Recipe

Creamy Garlic Parmesan Pasta Recipe, there are several tips and tricks you can follow. These will help you achieve the perfect balance of flavors and textures, ensuring that your dish is a hit every time you make it.

First, always start with high-quality ingredients. Fresh garlic and real Parmesan cheese can make a world of difference in flavor. Avoid using pre-grated cheese, as it often contains anti-caking agents that can affect melting. Instead, grate your cheese fresh for the best results.

Next, don’t rush the cooking process. Allow the garlic to sauté slowly over medium heat. This will help release its natural oils and flavors without burning. Remember, patience is key when it comes to building flavor!

When it comes to the creaminess of your sauce, feel free to adjust the amount of cream cheese. If you prefer a lighter sauce, you can reduce the cream cheese slightly and add more broth. This will still give you a creamy texture without being too heavy.

Another important tip is to reserve that pasta water! The starchy water is a secret weapon for achieving the perfect sauce consistency. If your sauce is too thick, just add a splash of the reserved water until it reaches your desired creaminess.

Don’t forget to taste as you go! Adjust the seasoning with salt and pepper to suit your palate. A little extra seasoning can elevate the dish and bring out the flavors of the garlic and cheese.

Lastly, consider letting your pasta sit for a minute after mixing it with the sauce. This allows the pasta to absorb some of the sauce, enhancing the overall flavor. Serve it hot, and enjoy the creamy goodness!

Creamy Garlic Parmesan Pasta Recipe. Happy cooking!

Breakdown of Time for Creamy Garlic Parmesan Pasta Recipe

Creamy Garlic Parmesan Pasta Recipe can help you plan your cooking efficiently. Here’s a simple breakdown of the time required for preparation and cooking.

Prep Time

The prep time for this delicious pasta dish is quite short. You’ll need about 10 minutes to gather and prepare your ingredients. This includes measuring out the pasta, chopping the garlic, and grating the Parmesan cheese. Having everything ready before you start cooking will make the process smoother and more enjoyable.

Cooking Time

Once you start cooking, the total cooking time is approximately 15 to 20 minutes. This includes:

  • Cooking the Pasta: About 8 to 10 minutes, depending on the type of pasta you choose.
  • Preparing the Garlic Sauce: Around 5 to 7 minutes to sauté the garlic and combine it with the cream cheese and broth.
  • Mixing Pasta and Sauce: About 2 to 3 minutes to toss everything together and ensure the pasta is well coated.

Total Time

Creamy Garlic Parmesan Pasta Recipe a perfect option for a quick weeknight dinner or a last-minute meal. With just a little time and effort, you can enjoy a creamy, flavorful pasta dish that’s sure to please!

Nutritional Information for Creamy Garlic Parmesan Pasta Recipe

Creamy Garlic Parmesan Pasta Recipe not only satisfies your taste buds but also provides valuable nutrients. Here’s a breakdown of the nutritional information per serving:

Calories

450 calories. This makes it a hearty option for lunch or dinner. While it’s rich and filling, it’s important to enjoy it in moderation, especially if you’re watching your calorie intake.

Protein

Creamy Garlic Parmesan Pasta Recipe offers about 15 grams per serving. This protein content comes primarily from the Parmesan cheese and any additional protein you may choose to add, such as chicken or shrimp. Protein is vital for muscle repair and overall health, making this dish a good choice for a balanced meal.

Sodium

800 milligrams per serving. This amount can vary based on the broth and cheese used. If you’re concerned about sodium intake, consider using low-sodium broth and adjusting the salt added to the dish. Keeping an eye on sodium levels is important for heart health and overall wellness.

Creamy Garlic Parmesan Pasta Recipe is a delicious and satisfying meal that can fit into a balanced diet. By being mindful of portion sizes and ingredient choices, you can enjoy this creamy delight while maintaining your nutritional goals!

FAQs about Creamy Garlic Parmesan Pasta Recipe

Can I make Creamy Garlic Parmesan Pasta Recipe ahead of time?

Creamy Garlic Parmesan Pasta Recipe ahead of time! To do this, cook the pasta and prepare the sauce as directed. However, it’s best to store them separately. When you’re ready to serve, simply reheat the sauce on the stove and add the pasta. If the sauce has thickened, you can add a splash of reserved pasta water to bring it back to the right consistency. This way, you’ll enjoy a fresh and creamy dish even after some time!

What can I substitute for Parmesan cheese in this recipe?

Grana Padano or Pecorino Romano for a similar flavor profile. For a dairy-free option, consider using nutritional yeast, which adds a cheesy flavor without the dairy. Additionally, some people enjoy using vegan Parmesan available in stores. Just keep in mind that the taste and texture may vary slightly from traditional Parmesan.

How can I make Creamy Garlic Parmesan Pasta Recipe gluten-free?

Creamy Garlic Parmesan Pasta Recipe gluten-free, simply choose a gluten-free pasta variety. There are many options available, such as those made from rice, quinoa, or chickpeas. Just cook the gluten-free pasta according to the package instructions. The rest of the recipe remains the same, allowing you to enjoy a creamy and delicious meal without gluten!

Can I add more garlic to the Creamy Garlic Parmesan Pasta Recipe?

Creamy Garlic Parmesan Pasta Recipe. You can increase the amount to 6 or even 8 cloves, depending on your taste preference. Just remember to sauté it carefully to avoid burning. More garlic will enhance the flavor and aroma of your dish, making it even more delightful!

Conclusion on Creamy Garlic Parmesan Pasta Recipe

Creamy Garlic Parmesan Pasta Recipe is a delightful dish that brings comfort and flavor to your table. With its rich, creamy sauce and the aromatic essence of garlic, this pasta is sure to become a favorite in your household. Whether you’re cooking for family, friends, or just for yourself, this recipe is both satisfying and easy to prepare.

As we’ve explored, the versatility of this dish allows you to customize it to your liking. You can add proteins like chicken or shrimp, or toss in vibrant vegetables for added nutrition. The possibilities are endless, making it a great option for any occasion. Plus, with simple ingredients and straightforward steps, even novice cooks can create a restaurant-quality meal at home.

Remember to take your time while cooking, and don’t hesitate to adjust the flavors to suit your palate. The key to a great pasta dish lies in the quality of ingredients and the love you put into it. So, gather your ingredients, follow the steps, and enjoy the creamy goodness of this pasta recipe!

Creamy Garlic Parmesan Pasta Recipe. Happy cooking, and bon appétit!

Baked Honey Cod Recipe: A Delicious and Healthy Meal

Introduction to Baked Honey Cod Recipe

Baked Honey Cod Recipe is just what you need! This dish combines the delicate flavor of cod with a sweet and savory honey glaze. It’s not only easy to prepare but also packed with nutrients. Let’s dive into what makes this recipe special and explore the health benefits of cod fish.

What Makes Baked Honey Cod Special?

What sets the Baked Honey Cod apart from other fish recipes? First, the honey glaze adds a unique sweetness that perfectly complements the mild taste of cod. This combination creates a delightful balance of flavors. Additionally, baking the cod keeps it moist and tender, making every bite enjoyable.

Moreover, this recipe is versatile. You can easily adjust the sweetness or add spices to suit your taste. Whether you’re cooking for a family dinner or a special occasion, this dish is sure to impress. Plus, it’s quick to prepare, allowing you to spend more time with your loved ones.

Health Benefits of Cod Fish

Cod fish is not just tasty; it’s also very healthy! It’s low in calories and high in protein, making it a great choice for those watching their weight. A serving of cod provides essential nutrients like omega-3 fatty acids, which are good for your heart. These healthy fats can help reduce inflammation and improve brain function.

Additionally, cod is rich in vitamins and minerals. It contains vitamin B12, which supports nerve health, and selenium, an antioxidant that helps protect your cells. Eating cod regularly can contribute to a balanced diet and promote overall well-being.

In summary, the Baked Honey Cod Recipe is a delightful dish that combines flavor and health benefits. With its unique glaze and nutritious ingredients, it’s a meal you can feel good about serving. Now, let’s gather the ingredients and get started on this delicious recipe!

Ingredients for Baked Honey Cod Recipe

Baked Honey Cod Recipe, you’ll need a few simple ingredients. Each one plays a vital role in enhancing the flavor and texture of the dish. Here’s what you’ll need:

  • Cod fillets: 4 pieces, about 6 ounces each. Fresh or thawed frozen cod works well.
  • Honey: 1/4 cup. This will be the star of your glaze, adding sweetness.
  • Soy sauce: 2 tablespoons. It adds a savory depth to the glaze.
  • Lemon juice: 1 tablespoon. Freshly squeezed is best for a bright flavor.
  • Garlic: 2 cloves, minced. This will give your dish a lovely aroma.
  • Olive oil: 1 tablespoon. It helps keep the cod moist while baking.
  • Salt and pepper: to taste. These basic seasonings enhance all the flavors.
  • Fresh parsley: for garnish. It adds a pop of color and freshness.

These ingredients are easy to find and can be adjusted based on your preferences. For instance, if you like a bit of heat, consider adding a pinch of red pepper flakes to the glaze. Now that you have everything ready, let’s move on to the preparation steps!

Step-by-Step Preparation of Baked Honey Cod Recipe

Baked Honey Cod Recipe. Follow these simple steps to create a delicious meal that everyone will love!

Step 1: Prepping the Cod

First, you need to prepare the cod fillets. Start by rinsing them under cold water. This helps remove any excess salt or ice if you’re using frozen cod. After rinsing, gently pat the fillets dry with paper towels. This step is important because it helps the glaze stick better. Once dried, place the cod in a baking dish, ready for the next step.

Step 2: Making the Honey Glaze

Next, let’s make the honey glaze that will elevate your cod. In a small bowl, combine the honey, soy sauce, lemon juice, minced garlic, and olive oil. Whisk these ingredients together until they are well blended. The mixture should be smooth and slightly thick. This glaze is what gives the cod its sweet and savory flavor, so make sure to mix it well!

Step 3: Marinating the Cod

Now it’s time to marinate the cod. Pour the honey glaze over the prepared cod fillets in the baking dish. Make sure each piece is well coated. For the best flavor, let the cod marinate for at least 15 minutes. If you have more time, you can let it sit for up to an hour in the refrigerator. This allows the flavors to soak into the fish, making it even tastier!

Step 4: Baking the Cod

After marinating, it’s time to bake the cod. Preheat your oven to 400°F (200°C). Once heated, place the baking dish in the oven. Bake the cod for about 15-20 minutes, or until it flakes easily with a fork. The cooking time may vary depending on the thickness of your fillets. Keep an eye on it to avoid overcooking!

Step 5: Final Touches and Serving

Once the cod is cooked, remove it from the oven. Drizzle any remaining glaze from the baking dish over the top for extra flavor. Garnish with fresh parsley for a pop of color. Serve your Baked Honey Cod with your favorite side dishes, and enjoy this delightful meal with family and friends!

Variations of Baked Honey Cod Recipe

Baked Honey Cod Recipe is delicious as is, there are many ways to customize it. Adding spices and herbs can enhance the flavor, while alternative glazes can give it a unique twist. Let’s explore some exciting variations!

Adding Spices and Herbs

Spices and herbs can elevate your Baked Honey Cod to new heights. Here are some ideas to consider:

  • Smoked Paprika: A sprinkle of smoked paprika adds a warm, smoky flavor that pairs beautifully with the sweetness of honey.
  • Thyme: Fresh or dried thyme can bring an earthy note to the dish. Just a teaspoon mixed into the glaze will do!
  • Chili Powder: If you enjoy a bit of heat, add a pinch of chili powder to the glaze. It will create a delightful contrast with the honey.
  • Fresh Dill: Dill complements fish wonderfully. Sprinkle some fresh dill on top before serving for a refreshing taste.

Feel free to experiment with your favorite spices and herbs. Each addition can create a new flavor profile, making your Baked Honey Cod even more exciting!

Alternative Glazes for Baked Honey Cod

If you want to switch things up, consider trying different glazes. Here are a few alternatives:

  • Maple Syrup Glaze: Replace honey with maple syrup for a rich, sweet flavor. Combine it with soy sauce and lemon juice for balance.
  • Teriyaki Sauce: For an Asian twist, use teriyaki sauce instead of the honey glaze. It adds a savory and sweet flavor that’s irresistible.
  • Mustard and Honey: Mix equal parts of Dijon mustard and honey for a tangy glaze. This combination adds a zesty kick to the cod.
  • Orange Glaze: Substitute lemon juice with fresh orange juice and add orange zest for a citrusy twist. It brightens the dish beautifully!

These alternative glazes can transform your Baked Honey Cod into a whole new dish. Don’t hesitate to mix and match flavors to find your perfect combination!

Cooking Note for Baked Honey Cod Recipe

Baked Honey Cod Recipe, there are a few important cooking notes to keep in mind. These tips will help ensure that your dish turns out perfectly every time.

First, always choose fresh cod if possible. Fresh fish has a better texture and flavor compared to frozen. However, if you must use frozen cod, make sure to thaw it completely before cooking. This helps the fish cook evenly and prevents it from becoming rubbery.

Next, pay attention to the thickness of your cod fillets. Thicker pieces may require a longer cooking time, while thinner ones will cook faster. A good rule of thumb is to bake the cod for about 10 minutes per inch of thickness. Always check for doneness by using a fork; the fish should flake easily when it’s fully cooked.

Additionally, consider using a meat thermometer to check the internal temperature. Cod is perfectly cooked when it reaches 145°F (63°C). This ensures that the fish is safe to eat while remaining moist and tender.

Lastly, don’t forget to let the cod rest for a few minutes after baking. This allows the juices to redistribute, making each bite even more flavorful. With these cooking notes in mind, you’re well on your way to creating a delicious Baked Honey Cod that everyone will love!

Serving Suggestions for Baked Honey Cod Recipe

Baked Honey Cod Recipe, it’s time to think about how to serve it. The right side dishes and beverages can enhance the meal and create a delightful dining experience. Let’s explore some ideal side dishes and wine pairings that will complement your cod perfectly!

Ideal Side Dishes

When it comes to side dishes, you want to choose options that balance the sweetness of the honey glaze while adding texture and flavor. Here are some great ideas:

  • Steamed Vegetables: A mix of broccoli, carrots, and green beans adds color and nutrients. The light seasoning will not overpower the cod.
  • Quinoa Salad: A refreshing quinoa salad with cucumbers, tomatoes, and a lemon vinaigrette pairs well with the fish. It’s light yet filling!
  • Garlic Mashed Potatoes: Creamy mashed potatoes with a hint of garlic provide a comforting side that complements the cod’s flavors.
  • Rice Pilaf: Fluffy rice pilaf with herbs and nuts adds a nice crunch and a subtle flavor that works well with the honey glaze.
  • Coleslaw: A tangy coleslaw can add a crunchy texture and a refreshing contrast to the sweet cod.

Feel free to mix and match these sides based on your preferences. Each option will enhance your meal and make it even more enjoyable!

Wine Pairings

Choosing the right wine can elevate your dining experience. Here are some excellent wine pairings for your Baked Honey Cod:

  • Sauvignon Blanc: This white wine has bright acidity and citrus notes that complement the sweetness of the honey glaze.
  • Chardonnay: A lightly oaked Chardonnay can add a creamy texture that pairs beautifully with the cod’s delicate flavor.
  • Pinot Grigio: This wine is crisp and refreshing, making it a great match for the lightness of the fish.
  • Riesling: A semi-sweet Riesling can enhance the honey flavor while balancing the dish’s savory elements.
  • Rosé: A chilled rosé offers a fruity and floral profile that pairs well with the dish, especially in warmer months.

When selecting a wine, consider your personal taste and the overall flavor profile of the meal. Enjoying a glass of wine with your Baked Honey Cod can make the experience even more delightful!

Tips for Perfecting Your Baked Honey Cod Recipe

Baked Honey Cod Recipe truly shine, consider these helpful tips. They will ensure that your dish is not only delicious but also visually appealing. Let’s explore some expert advice to elevate your cooking game!

First, always use high-quality cod. Fresh fish will have a mild scent and firm texture. If you’re using frozen cod, ensure it’s properly thawed. This prevents the fish from becoming mushy during cooking.

Next, don’t skip the marinating step. Allowing the cod to soak in the honey glaze for at least 15 minutes enhances the flavor. If you have time, marinate it for up to an hour. This extra time allows the fish to absorb all the delicious flavors.

When baking, use a shallow baking dish. This helps the heat circulate evenly around the fish, ensuring it cooks thoroughly. Additionally, lining the dish with parchment paper can make cleanup easier and prevent sticking.

Keep an eye on the cooking time. Cod cooks quickly, so check it a few minutes before the recommended time. The fish is done when it flakes easily with a fork and is opaque throughout. Overcooking can lead to a dry texture, so be cautious!

For added flavor, consider basting the cod halfway through baking. Use a spoon to drizzle some of the glaze over the fish. This keeps it moist and enhances the sweetness of the dish.

Finally, let the cod rest for a few minutes after baking. This allows the juices to redistribute, making each bite tender and flavorful. With these tips in mind, you’re set to create a perfect Baked Honey Cod that will impress everyone at the table!

Breakdown of Time for Baked Honey Cod Recipe

Baked Honey Cod Recipe can help you plan your meal better. Here’s a simple breakdown of the time required for preparation and cooking. This way, you can enjoy a delicious meal without any rush!

Prep Time

The prep time for this recipe is quite short. You’ll need about 10-15 minutes to gather your ingredients and prepare the cod. This includes rinsing the fish, making the honey glaze, and marinating the cod. If you’re using fresh ingredients, the process will be quick and easy!

Cooking Time

Once your cod is marinated, the cooking time is approximately 15-20 minutes. Preheat your oven to 400°F (200°C) before placing the cod inside. Keep an eye on it, as cooking times can vary based on the thickness of the fillets. The cod is ready when it flakes easily with a fork.

Total Time

Baked Honey Cod Recipe into your schedule!

Nutritional Information for Baked Honey Cod Recipe

Baked Honey Cod Recipe not only tastes great but also offers a variety of health benefits. Let’s take a closer look at the nutritional information for this delicious dish.

Calories

One serving of Baked Honey Cod, which includes a 6-ounce fillet, contains approximately 250 calories. This makes it a low-calorie option for those looking to enjoy a flavorful meal without overindulging. The honey glaze adds a touch of sweetness without significantly increasing the calorie count, making it a smart choice for health-conscious eaters.

Protein

Cod is an excellent source of protein, providing about 30 grams per serving. Protein is vital for building and repairing tissues, and it helps keep you feeling full longer. Including this dish in your diet can support muscle health and overall wellness, making it a great option for active individuals and families.

Sodium

The sodium content in Baked Honey Cod is around 600 milligrams per serving. This amount comes primarily from the soy sauce used in the honey glaze. While sodium is necessary for bodily functions, it’s important to monitor your intake. If you’re watching your sodium levels, consider using low-sodium soy sauce to reduce the overall sodium content without sacrificing flavor.

Baked Honey Cod Recipe is not only delicious but also nutritious. With its low calorie count, high protein content, and manageable sodium levels, it’s a meal you can feel good about serving to your family. Enjoy this healthy dish as part of a balanced diet!

FAQs about Baked Honey Cod Recipe

Can I use frozen cod for this recipe?

Baked Honey Cod Recipe. Just make sure to thaw it completely before cooking. Thawing helps the fish cook evenly and prevents it from becoming rubbery. You can thaw the cod overnight in the refrigerator or place it in a sealed bag and submerge it in cold water for quicker results. Once thawed, follow the recipe as usual for a delicious meal!

How do I know when the cod is fully cooked?

To check if your cod is fully cooked, use a fork to gently flake the fish. It should flake easily and appear opaque throughout. The internal temperature should reach 145°F (63°C) for safe consumption. If you don’t have a meat thermometer, just keep an eye on the cooking time. Cod typically cooks in about 15-20 minutes at 400°F (200°C), depending on the thickness of the fillets.

What can I substitute for honey in the glaze?

If you want to substitute honey in the glaze, there are several options. Maple syrup is a great alternative, providing a similar sweetness with a unique flavor. You can also use agave nectar or brown sugar mixed with a bit of water to create a syrupy consistency. Each substitute will give a different taste, so feel free to experiment and find the one you like best!

Can I make this recipe ahead of time?

Baked Honey Cod Recipe ahead of time. Marinate the cod in the honey glaze and store it in the refrigerator for up to an hour before baking. If you want to prepare it even earlier, you can marinate the cod and freeze it. Just remember to thaw it in the refrigerator before cooking. This makes it a convenient option for busy weeknights or meal prep!

Conclusion on Baked Honey Cod Recipe

Baked Honey Cod Recipe is a delightful dish that combines simplicity with flavor. Its sweet and savory honey glaze enhances the natural taste of cod, making it a favorite for many. Not only is this recipe easy to prepare, but it also offers numerous health benefits, thanks to the nutritious qualities of cod fish.

Whether you’re cooking for a family dinner or a special occasion, this recipe is sure to impress. The versatility of the dish allows you to customize it with various spices and glazes, ensuring that it can cater to different tastes. Plus, with quick prep and cooking times, you can enjoy a delicious meal without spending hours in the kitchen.

As you serve your Baked Honey Cod, consider pairing it with fresh sides and a glass of wine to elevate the dining experience. Remember, the key to a perfect dish lies in the quality of ingredients and the love you put into cooking. So, gather your ingredients, follow the steps, and enjoy the wonderful flavors of this healthy and satisfying meal!

Baked Honey Cod Recipe a try and share it with your loved ones. Happy cooking!

Mexican Street Corn Pasta Salad Recipe is a must-try!

Introduction to Mexican Street Corn Pasta Salad Recipe

What is Mexican Street Corn Pasta Salad?

Mexican Street Corn Pasta Salad is a delightful twist on traditional pasta salads. It combines the vibrant flavors of Mexican street corn, known as “elote,” with the comforting texture of elbow macaroni. This dish is not only colorful but also packed with flavor, making it a perfect side dish for barbecues, picnics, or family gatherings.

At its core, this salad features sweet corn, which can be grilled or sautéed to bring out its natural sweetness. The addition of spices like chili powder and cumin gives it a warm, zesty kick. Fresh vegetables such as red onion and bell pepper add crunch and color, while creamy feta cheese and a tangy dressing elevate the dish to new heights.

What makes this recipe truly special is its versatility. You can easily customize it to suit your taste preferences or dietary needs. Whether you want to add protein, make it vegetarian, or even vegan, the options are endless. This salad is not just a meal; it’s an experience that brings the flavors of Mexico right to your table.

In the following sections, we will explore the ingredients, preparation steps, and variations of this delicious Mexican Street Corn Pasta Salad Recipe. Get ready to impress your friends and family with this easy-to-make, flavorful dish!

Ingredients for Mexican Street Corn Pasta Salad Recipe

To create a delicious Mexican Street Corn Pasta Salad, you’ll need a variety of fresh and flavorful ingredients. Each component plays a vital role in bringing the dish to life. Here’s what you’ll need:

  • 8 ounces elbow macaroni: This serves as the base of the salad, providing a hearty texture.
  • 1 cup corn kernels: You can use fresh, frozen, or canned corn. This adds sweetness and a pop of color.
  • 1 tablespoon olive oil: Used for sautéing the corn, it adds richness to the dish.
  • 1/2 teaspoon chili powder: This spice gives the salad a warm, zesty flavor.
  • 1/2 teaspoon cumin: Adds an earthy depth that complements the other spices.
  • 1/4 teaspoon garlic powder: Enhances the overall flavor with a hint of garlic.
  • 1/4 teaspoon salt: Essential for bringing out the flavors of the ingredients.
  • 1/4 teaspoon black pepper: Adds a mild heat and enhances the taste.
  • 1/2 cup diced red onion: Provides a crunchy texture and a sharp flavor.
  • 1/2 cup diced bell pepper: Any color works! It adds sweetness and color to the salad.
  • 1/4 cup chopped fresh cilantro: This herb adds freshness and a burst of flavor.
  • 1/2 cup crumbled feta cheese: Adds creaminess and a tangy flavor. You can substitute with cotija cheese for a more authentic taste.
  • 1/4 cup mayonnaise: This creates a creamy dressing that binds the salad together.
  • 1/4 cup sour cream: Adds tanginess and creaminess to the dressing.
  • 2 tablespoons lime juice: This brightens the flavors and adds a refreshing zing.

With these ingredients, you’re well on your way to making a vibrant and tasty Mexican Street Corn Pasta Salad. Each element contributes to the overall flavor, making it a delightful dish for any occasion!

Step-by-Step Preparation of Mexican Street Corn Pasta Salad Recipe

Step 1: Cooking the Pasta

To start, bring a large pot of salted water to a boil. Add the 8 ounces of elbow macaroni and cook according to the package instructions. This usually takes about 7-9 minutes. You want the pasta to be al dente, which means it should be firm to the bite. Once cooked, drain the pasta in a colander and rinse it under cold water. This helps stop the cooking process and cools the pasta down. Set it aside while you prepare the other ingredients.

Step 2: Preparing the Corn

Next, heat 1 tablespoon of olive oil in a large skillet over medium heat. Once the oil is hot, add 1 cup of corn kernels. You can use fresh, frozen, or canned corn, depending on what you have on hand. Sprinkle in 1/2 teaspoon of chili powder, 1/2 teaspoon of cumin, 1/4 teaspoon of garlic powder, 1/4 teaspoon of salt, and 1/4 teaspoon of black pepper. Sauté the corn mixture for about 5-7 minutes. You want the corn to be slightly charred, which adds a wonderful flavor. After cooking, remove the skillet from heat and let the corn cool.

Step 3: Mixing the Dressing

While the corn is cooling, it’s time to make the dressing. In a separate bowl, whisk together 1/4 cup of mayonnaise, 1/4 cup of sour cream, and 2 tablespoons of lime juice. Mix until the dressing is smooth and creamy. This dressing will bring all the flavors together, so make sure it’s well combined.

Step 4: Combining Ingredients

Now, it’s time to bring everything together! In a large mixing bowl, combine the cooled elbow macaroni, the sautéed corn mixture, 1/2 cup of diced red onion, 1/2 cup of diced bell pepper, 1/4 cup of chopped fresh cilantro, and 1/2 cup of crumbled feta cheese. Pour the creamy dressing over the top and toss gently. Make sure all the ingredients are evenly coated with the dressing. This step is crucial for ensuring every bite is packed with flavor!

Step 5: Chilling the Salad

After combining all the ingredients, cover the salad with plastic wrap or a lid. Place it in the refrigerator for at least 30 minutes. Chilling allows the flavors to meld together, making the salad even tastier. When you’re ready to serve, give it a quick stir and enjoy your delicious Mexican Street Corn Pasta Salad!

Variations of Mexican Street Corn Pasta Salad Recipe

Adding Protein Options

If you want to make your Mexican Street Corn Pasta Salad more filling, consider adding protein. There are several delicious options to choose from. Grilled chicken is a popular choice, as it adds a savory flavor that complements the salad’s ingredients. Simply dice the cooked chicken and mix it in with the other components.

For a seafood twist, try adding shrimp. Cook the shrimp in a skillet with a bit of olive oil and seasonings before tossing them into the salad. If you prefer a meatless option, canned black beans or chickpeas are excellent sources of protein. They not only boost the nutritional value but also add a nice texture to the dish.

Another great option is to include diced hard-boiled eggs. They provide a creamy richness that pairs well with the other flavors. No matter which protein you choose, these additions will make your salad heartier and more satisfying!

Vegetarian and Vegan Alternatives

For those following a vegetarian or vegan diet, there are plenty of ways to adapt this Mexican Street Corn Pasta Salad. To keep it vegetarian, simply omit any meat and stick with the delicious vegetables and cheese. You can also replace the feta cheese with a vegetarian-friendly cheese or leave it out entirely for a lighter version.

If you want to make the salad vegan, substitute the mayonnaise and sour cream with plant-based alternatives. There are many vegan mayonnaise options available that taste just as creamy. For the sour cream, you can use coconut yogurt or cashew cream, which adds a nice tang without dairy.

Additionally, consider adding more vegetables to enhance the salad. Chopped avocado, diced tomatoes, or even roasted zucchini can add flavor and nutrition. With these simple swaps, you can enjoy a vibrant and tasty Mexican Street Corn Pasta Salad that fits your dietary needs!

Cooking Note for Mexican Street Corn Pasta Salad Recipe

When preparing your Mexican Street Corn Pasta Salad, there are a few important cooking notes to keep in mind. These tips will help ensure that your dish turns out perfectly every time.

First, always cook the pasta al dente. This means it should be firm to the bite. Overcooked pasta can become mushy when mixed with the dressing, which can affect the overall texture of the salad. Rinsing the pasta under cold water after cooking is crucial. It stops the cooking process and cools the pasta down, making it perfect for a salad.

Next, when sautéing the corn, make sure to let it get slightly charred. This step enhances the flavor, giving it that delicious smoky taste reminiscent of traditional Mexican street corn. If you’re using frozen corn, there’s no need to thaw it before cooking. Just add it directly to the skillet.

For the dressing, whisking the mayonnaise, sour cream, and lime juice together until smooth is essential. This ensures that the dressing coats the pasta and vegetables evenly. If you prefer a thinner dressing, you can add a splash of water or extra lime juice to achieve your desired consistency.

Lastly, don’t skip the chilling step! Allowing the salad to sit in the refrigerator for at least 30 minutes helps the flavors meld together beautifully. This waiting period is key to achieving a well-balanced taste. When you’re ready to serve, give the salad a gentle stir to redistribute the dressing and ingredients.

By following these cooking notes, you’ll create a vibrant and flavorful Mexican Street Corn Pasta Salad that everyone will love!

Serving Suggestions for Mexican Street Corn Pasta Salad Recipe

When it comes to serving your Mexican Street Corn Pasta Salad, the possibilities are endless! This dish is not only delicious but also visually appealing, making it a great centerpiece for any meal. Here are some serving suggestions to elevate your dining experience:

  • As a Side Dish: This pasta salad pairs wonderfully with grilled meats, such as chicken, steak, or fish. Serve it alongside your favorite barbecue dishes for a refreshing contrast.
  • In a Taco Bar: Set up a taco bar and include the pasta salad as a unique topping. Guests can add it to their tacos for an extra burst of flavor and texture.
  • With Fresh Tortilla Chips: Serve the salad with a side of crispy tortilla chips. This adds a delightful crunch and makes for a fun appetizer or snack.
  • As a Light Lunch: Enjoy the salad on its own for a light and satisfying lunch. You can also add a side of fruit or a simple green salad to round out the meal.
  • At Potlucks and Picnics: This pasta salad is perfect for gatherings! It travels well and can be made ahead of time, making it an ideal dish for potlucks, picnics, or family reunions.
  • Garnished with Avocado: For an extra touch, top the salad with sliced avocado or diced avocado just before serving. This adds creaminess and a beautiful presentation.

With these serving suggestions, your Mexican Street Corn Pasta Salad will shine at any occasion. Whether you’re hosting a barbecue or enjoying a quiet dinner at home, this dish is sure to impress!

Tips for Perfecting Your Mexican Street Corn Pasta Salad Recipe

Creating the perfect Mexican Street Corn Pasta Salad is all about attention to detail. Here are some helpful tips to ensure your dish turns out delicious every time:

  • Use Fresh Ingredients: Whenever possible, opt for fresh corn and vegetables. Fresh ingredients enhance the flavor and texture of the salad. If using frozen corn, make sure it’s high quality for the best taste.
  • Adjust the Spice Level: If you enjoy a bit of heat, feel free to increase the amount of chili powder or add diced jalapeños. This will give your salad an extra kick that many will love!
  • Let It Chill: As mentioned earlier, chilling the salad is crucial. The longer it sits, the more the flavors meld together. Aim for at least 30 minutes, but if you can, let it chill for a few hours for even better results.
  • Mix Gently: When combining the ingredients, be gentle. Over-mixing can break the pasta and make the salad mushy. A light toss is all you need to ensure everything is well combined.
  • Experiment with Add-Ins: Don’t hesitate to get creative! Consider adding diced avocado, cherry tomatoes, or even black olives for added flavor and texture. Each addition can bring a new twist to the salad.
  • Serve with Lime Wedges: For an extra burst of freshness, serve the salad with lime wedges on the side. Guests can squeeze fresh lime juice over their portions for a zesty kick.
  • Store Properly: If you have leftovers, store them in an airtight container in the fridge. The salad is best enjoyed within 2-3 days. However, keep in mind that the pasta may absorb some dressing over time, so you might want to add a little extra dressing before serving leftovers.

By following these tips, you’ll elevate your Mexican Street Corn Pasta Salad to new heights. Each bite will be bursting with flavor, making it a hit at any gathering!

Breakdown of Time for Mexican Street Corn Pasta Salad Recipe

Prep Time

The prep time for your Mexican Street Corn Pasta Salad is quite manageable. You’ll need about 15 minutes to gather and prepare all the ingredients. This includes chopping the vegetables, measuring out the spices, and getting everything ready for cooking. If you’re quick with a knife, you might even finish in less time!

Cooking Time

Cooking the pasta and sautéing the corn will take approximately 15 minutes. The pasta usually cooks in about 7-9 minutes, while the corn needs about 5-7 minutes to get that perfect char. So, in total, you can expect to spend around 15 minutes on cooking.

Total Time

When you combine the prep and cooking times, the total time for making your Mexican Street Corn Pasta Salad is about 30 minutes. However, don’t forget to factor in the chilling time! It’s best to let the salad chill in the refrigerator for at least 30 minutes before serving. So, if you include the chilling time, the overall time from start to finish is about 1 hour. This makes it a quick and easy dish to prepare, perfect for any occasion!

Nutritional Information for Mexican Street Corn Pasta Salad Recipe

Calories

When enjoying a serving of Mexican Street Corn Pasta Salad, you can expect to consume approximately 290 calories. This makes it a satisfying yet light option for a side dish or a light lunch. The balance of ingredients ensures that you get a flavorful experience without overwhelming your calorie intake.

Protein

Each serving of this delicious pasta salad contains about 9 grams of protein. This protein content comes from the elbow macaroni, corn, and feta cheese. If you choose to add protein options like grilled chicken or beans, you can easily increase the protein content, making it even more filling and nutritious.

Sodium

The sodium content in a serving of Mexican Street Corn Pasta Salad is around 400 milligrams. This amount is reasonable for a side dish, but if you’re watching your sodium intake, consider using low-sodium mayonnaise and cheese. Additionally, you can adjust the salt added during cooking to suit your dietary needs.

FAQs about Mexican Street Corn Pasta Salad Recipe

Can I make Mexican Street Corn Pasta Salad ahead of time?

Absolutely! Making Mexican Street Corn Pasta Salad ahead of time is a great idea. In fact, it often tastes even better after sitting in the fridge for a few hours or overnight. This allows the flavors to meld together beautifully. Just prepare the salad as directed, cover it tightly, and store it in the refrigerator. When you’re ready to serve, give it a quick stir to redistribute the dressing and ingredients.

What can I substitute for mayonnaise in the dressing?

If you’re looking for a substitute for mayonnaise in the dressing, there are several options. You can use Greek yogurt for a healthier twist, which adds creaminess and a tangy flavor. Another option is to use avocado, which will give the dressing a rich texture. For a vegan alternative, consider using plant-based mayonnaise or a mixture of silken tofu blended until smooth. Each of these substitutes will work well and keep your salad delicious!

How long does Mexican Street Corn Pasta Salad last in the fridge?

Mexican Street Corn Pasta Salad can last in the fridge for about 2-3 days when stored in an airtight container. However, keep in mind that the pasta may absorb some of the dressing over time, which can change the texture. If you find the salad a bit dry after a day or two, simply add a splash of lime juice or a bit more dressing to refresh it before serving.

Can I use frozen corn for this recipe?

Yes, you can definitely use frozen corn for this recipe! In fact, frozen corn is a convenient option and works just as well as fresh corn. There’s no need to thaw it before cooking; just add it directly to the skillet when sautéing. The heat will cook it perfectly, and you’ll still get that delicious sweet flavor that makes this salad so enjoyable.

Conclusion on Mexican Street Corn Pasta Salad Recipe

In conclusion, the Mexican Street Corn Pasta Salad Recipe is a delightful and versatile dish that brings a burst of flavor to any table. With its combination of sweet corn, zesty spices, and creamy dressing, this salad is sure to impress your family and friends. Whether you serve it at a summer barbecue, a picnic, or as a light lunch, it’s a crowd-pleaser that everyone will enjoy.

This recipe is not only easy to prepare but also allows for endless customization. You can add proteins, swap out ingredients, or adjust the spice level to suit your taste. Plus, it’s a fantastic way to incorporate fresh vegetables into your meals. The vibrant colors and textures make it visually appealing, while the flavors meld beautifully after chilling in the refrigerator.

Remember, the key to a perfect Mexican Street Corn Pasta Salad lies in using fresh ingredients and allowing the flavors to develop. So, don’t hesitate to experiment with different add-ins and dressings. With a little creativity, you can make this dish your own!

So, gather your ingredients, follow the steps, and enjoy the deliciousness of this Mexican Street Corn Pasta Salad. It’s a recipe that’s not just about food; it’s about sharing joy and flavor with those you love. Happy cooking!

Stay Connected

Get recipes via email: