Get my cookbooks

Honey Dijon Baked Chicken Recipe is a must-try dish!

Introduction to Honey Dijon Baked Chicken Recipe

Honey Dijon Baked Chicken Recipe is a perfect choice for busy weeknights or special occasions. This dish combines the sweet taste of honey with the tangy flavor of Dijon mustard, creating a mouthwatering glaze that will have everyone asking for seconds.

Not only is this recipe simple to prepare, but it also requires minimal ingredients. With just a few pantry staples, you can create a flavorful meal that is sure to impress. The chicken thighs become tender and juicy as they bake, while the skin turns crispy and golden brown. Plus, the aroma that fills your kitchen while it cooks is simply irresistible!

This recipe serves four, making it ideal for family dinners or gatherings with friends. You can easily double the recipe if you have a larger crowd to feed. Whether you serve it with roasted vegetables, a fresh salad, or your favorite side dish, this Honey Dijon Baked Chicken will be a hit at your table.

So, roll up your sleeves and get ready to enjoy a delightful meal that is both satisfying and nutritious. Let’s dive into the ingredients and get started on this tasty journey!

Ingredients for Honey Dijon Baked Chicken Recipe

Honey Dijon Baked Chicken Recipe, you’ll need a few simple ingredients. These items are easy to find and often already in your pantry. Here’s what you’ll need:

  • 2 pounds bone-in, skin-on chicken thighs
  • 1/4 cup Dijon mustard
  • 1/4 cup honey
  • 2 tablespoons olive oil
  • 2 cloves garlic, minced
  • 1 teaspoon dried thyme
  • 1 teaspoon salt
  • 1/2 teaspoon black pepper
  • 1 tablespoon apple cider vinegar

These ingredients come together to create a delightful blend of flavors. The chicken thighs are the star of the show, providing a juicy and tender base. The Dijon mustard adds a zesty kick, while the honey brings a touch of sweetness. Olive oil helps to keep the chicken moist, and garlic adds a savory depth. Thyme, salt, and pepper enhance the overall taste, making each bite a delight.

Feel free to adjust the quantities based on your taste preferences. For instance, if you love garlic, you can add an extra clove. Or, if you prefer a sweeter glaze, a bit more honey will do the trick. The beauty of this recipe lies in its flexibility, allowing you to make it your own!

Now that you have all the ingredients ready, let’s move on to the next step: preparing the marinade!

Step-by-Step Preparation of Honey Dijon Baked Chicken Recipe

Honey Dijon Baked Chicken Recipe. Follow these simple steps to create a delicious meal that will impress your family and friends!

Step 1: Preheat the Oven

First things first, preheat your oven to 375°F (190°C). This step is crucial as it ensures that your chicken cooks evenly and thoroughly. While the oven heats up, you can move on to the next step.

Step 2: Prepare the Marinade

In a small bowl, whisk together the Dijon mustard, honey, olive oil, minced garlic, dried thyme, salt, black pepper, and apple cider vinegar. Mix until all the ingredients are well combined. This marinade is what gives your chicken its amazing flavor, so make sure it’s blended nicely!

Step 3: Marinate the Chicken

Next, take your bone-in, skin-on chicken thighs and place them in a large baking dish, skin side up. Pour the honey Dijon mixture over the chicken, ensuring each piece is well coated. This step is essential for infusing the chicken with flavor. If you have time, let the chicken marinate for at least 30 minutes. This allows the flavors to penetrate the meat, making it even tastier!

Step 4: Arrange Chicken in Baking Dish

Once the chicken is marinated, arrange the thighs in the baking dish. Make sure they are spaced out evenly. This helps them cook properly and allows the skin to crisp up nicely. You want each piece to have enough room to breathe!

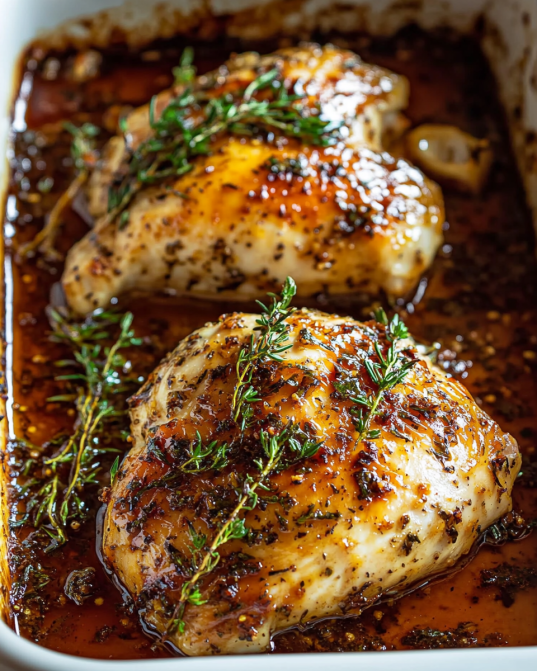
Step 5: Bake the Chicken

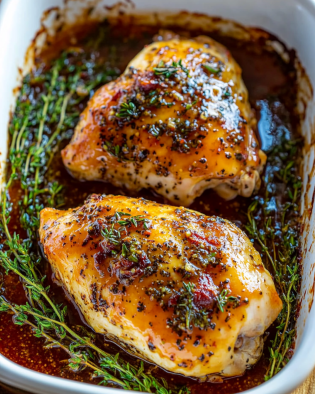
Now it’s time to bake! Place the baking dish in the preheated oven and let the chicken bake for 45-50 minutes. The chicken should reach an internal temperature of 165°F (74°C) when it’s done. During this time, the honey Dijon glaze will caramelize, creating a beautiful golden brown color.

Step 6: Check for Doneness

After the baking time is up, check the chicken for doneness. Use a meat thermometer to ensure it has reached the safe temperature. If you want extra crispy skin, you can broil the chicken for an additional 2-3 minutes. Just keep an eye on it to prevent burning!

Once the chicken is cooked to perfection, let it rest for about 5 minutes before serving. This allows the juices to redistribute, making each bite juicy and flavorful. Now you’re ready to enjoy your delicious Honey Dijon Baked Chicken!

Variations of Honey Dijon Baked Chicken Recipe

Honey Dijon Baked Chicken Recipe is not only delicious but also versatile. You can easily customize it to suit your taste or to use up ingredients you have on hand. Here are two delightful variations that will add a twist to your classic recipe!

Honey Dijon Baked Chicken Recipe with Herbs

If you love the fresh taste of herbs, this variation is for you! Adding herbs can elevate the flavor of your chicken, making it even more aromatic and delicious. Here’s how to do it:

  • In addition to the original marinade, add 1 tablespoon of fresh rosemary or thyme, finely chopped.
  • You can also include 1 tablespoon of fresh parsley for a pop of color and flavor.
  • Mix the herbs into the marinade along with the other ingredients.

The herbs will infuse the chicken with a delightful fragrance as it bakes. This variation pairs wonderfully with roasted potatoes or a light salad, making it a perfect choice for a spring or summer meal.

Honey Dijon Baked Chicken Recipe with Vegetables

Honey Dijon Baked Chicken Recipe. This not only enhances the flavor but also makes for an easy cleanup. Here’s how to incorporate veggies:

  • Chop up your favorite vegetables, such as carrots, bell peppers, and zucchini.
  • Place the vegetables around the chicken in the baking dish.
  • Drizzle a little olive oil and sprinkle some salt and pepper over the veggies for added flavor.

As the chicken bakes, the vegetables will absorb the delicious honey Dijon glaze, creating a tasty side dish. This variation is perfect for busy nights when you want a wholesome meal without much fuss!

Feel free to experiment with different herbs and vegetables to find your favorite combination. The possibilities are endless, and each variation will bring a new flavor profile to your table!

Cooking Note for Honey Dijon Baked Chicken Recipe

Honey Dijon Baked Chicken Recipe, there are a few important cooking notes to keep in mind. These tips will help ensure that your chicken turns out perfectly every time, making your meal a delightful experience.

First, always use a meat thermometer to check the internal temperature of the chicken. This is crucial for food safety. The chicken should reach an internal temperature of 165°F (74°C) to be safe to eat. If you don’t have a meat thermometer, you can cut into the thickest part of the chicken to check that the juices run clear and there is no pink meat.

Next, consider the size of your chicken thighs. If they are larger or smaller than the standard size, you may need to adjust the cooking time. Larger thighs may require a few extra minutes in the oven, while smaller ones may cook faster. Keep an eye on them to avoid overcooking or undercooking.

Another tip is to let the chicken rest after baking. Allowing it to rest for about 5 minutes before serving helps the juices redistribute throughout the meat. This results in a juicier and more flavorful chicken. It’s a simple step that can make a big difference!

Lastly, don’t forget about the skin! If you prefer extra crispy skin, broiling the chicken for a few minutes at the end of cooking is a great option. Just be sure to watch it closely, as it can burn quickly under the broiler.

Honey Dijon Baked Chicken Recipe. Enjoy the process and savor the delicious results!

Serving Suggestions for Honey Dijon Baked Chicken Recipe

Honey Dijon Baked Chicken Recipe, it’s time to think about how to serve it! The right sides can elevate your meal and create a balanced plate. Here are some delightful serving suggestions that pair perfectly with your flavorful chicken.

  • Roasted Vegetables: A colorful mix of roasted vegetables, such as carrots, broccoli, and bell peppers, complements the sweet and tangy flavors of the chicken. Toss them in olive oil, salt, and pepper, and roast them alongside the chicken for a simple yet delicious side.
  • Fresh Salad: A light salad with mixed greens, cherry tomatoes, and cucumbers adds a refreshing crunch. Drizzle with a simple vinaigrette to enhance the meal. The crispness of the salad balances the richness of the chicken.
  • Mashed Potatoes: Creamy mashed potatoes are a classic comfort food that pairs wonderfully with the honey Dijon glaze. You can make them with butter and cream for extra richness or keep them lighter with olive oil and garlic.
  • Quinoa or Rice: Serve the chicken over a bed of fluffy quinoa or rice. These grains soak up the delicious juices from the chicken, making each bite flavorful. You can also add herbs or spices to the grains for an extra kick.
  • Garlic Bread: For a fun twist, serve your chicken with warm garlic bread. The buttery, garlicky flavor complements the dish beautifully and is perfect for soaking up any leftover sauce.

Honey Dijon Baked Chicken Recipe is versatile enough to pair with a variety of dishes, making it a great option for any occasion. Enjoy your meal with family and friends, and watch as they savor every bite!

Tips for Perfecting Your Honey Dijon Baked Chicken Recipe

Honey Dijon Baked Chicken Recipe truly shine, consider these helpful tips. They will ensure that your chicken is not only delicious but also perfectly cooked every time!

  • Choose Quality Chicken: Start with fresh, high-quality chicken thighs. Look for ones that are plump and have a good amount of fat under the skin. This will help keep the chicken moist and flavorful during cooking.
  • Marinate Longer: If you have the time, marinate the chicken for a few hours or even overnight. This allows the flavors to penetrate deeper into the meat, resulting in a more flavorful dish.
  • Use Fresh Ingredients: Whenever possible, use fresh garlic and herbs. Fresh ingredients can elevate the taste of your marinade, making your chicken even more delicious.
  • Adjust Seasoning: Don’t be afraid to taste your marinade before adding it to the chicken. If you prefer a stronger flavor, add a bit more mustard or honey. Adjust the salt and pepper to your liking as well.
  • Let It Rest: After baking, let the chicken rest for at least 5 minutes. This step is crucial as it allows the juices to redistribute, making the chicken more tender and juicy.
  • Experiment with Glazes: For a unique twist, try adding different glazes or sauces. A splash of soy sauce or a sprinkle of brown sugar can add a new layer of flavor to your honey Dijon glaze.
  • Serve with Sauce: Don’t forget to drizzle any leftover honey Dijon sauce over the chicken when serving. It adds an extra burst of flavor that everyone will love!
  • Pair with Sides: Think about the sides you serve with your chicken. A good balance of flavors and textures can enhance the overall meal experience. Consider adding something crunchy or refreshing to complement the rich chicken.

Honey Dijon Baked Chicken Recipe. Each bite will be bursting with flavor, and your family and friends will be asking for your secret!

Breakdown of Time for Honey Dijon Baked Chicken Recipe

Honey Dijon Baked Chicken Recipe is essential for planning your meal. Here’s a simple breakdown of the time involved in preparing and cooking this delicious dish.

Prep Time

The prep time for this recipe is quite minimal. You’ll need about 15-20 minutes to gather your ingredients and prepare the marinade. This includes whisking together the Dijon mustard, honey, olive oil, garlic, thyme, salt, pepper, and apple cider vinegar. Additionally, you’ll spend a few minutes marinating the chicken. If you choose to let it marinate longer, you can adjust this time accordingly.

Cooking Time

Once your chicken is marinated, the cooking time is approximately 45-50 minutes. During this time, the chicken will bake in the oven at 375°F (190°C). If you opt for broiling at the end for extra crispy skin, add an additional 2-3 minutes. Always check the internal temperature to ensure it reaches 165°F (74°C) for safe consumption.

Total Time

Honey Dijon Baked Chicken Recipe to take about 1 hour and 5-10 minutes from start to finish. This includes both prep and cooking time. If you allow for longer marination, the total time may increase slightly, but the wait will be worth it for the enhanced flavor!

With this time breakdown, you can easily plan your meal and enjoy a delicious dinner without any stress. Happy cooking!

Nutritional Information for Honey Dijon Baked Chicken Recipe

Honey Dijon Baked Chicken Recipe not only offers great flavor but also provides valuable nutrients. Here’s a breakdown of the nutritional information per serving:

Calories

Honey Dijon Baked Chicken Recipe contains approximately 350 calories. This makes it a satisfying option for dinner without being overly heavy. The combination of chicken and the honey Dijon glaze provides a delicious meal that fits well into a balanced diet.

Protein

Protein is essential for building and repairing tissues, and this recipe delivers! Each serving contains about 25 grams of protein. Chicken thighs are a great source of protein, making this dish a perfect choice for those looking to increase their protein intake while enjoying a tasty meal.

Sodium

When it comes to sodium, each serving has around 600 milligrams. While this is a reasonable amount for a flavorful dish, it’s always good to be mindful of your sodium intake, especially if you are watching your salt consumption. You can reduce the sodium by using low-sodium Dijon mustard and adjusting the salt in the marinade to suit your dietary needs.

Honey Dijon Baked Chicken Recipe is a nutritious option that provides a good balance of calories, protein, and flavor. Enjoy this dish knowing that you are treating yourself to a meal that is both delicious and beneficial for your health!

FAQs about Honey Dijon Baked Chicken Recipe

Can I use other types of mustard in the Honey Dijon Baked Chicken Recipe?

Honey Dijon Baked Chicken Recipe calls for Dijon mustard, you can experiment with other types. Yellow mustard will give a milder flavor, while spicy brown mustard adds a bit more heat. If you enjoy a tangy kick, consider using whole grain mustard. Each type will create a unique taste, so feel free to try different options based on your preference!

How long should I marinate the chicken for the Honey Dijon Baked Chicken Recipe?

For the best flavor, marinate the chicken for at least 30 minutes. However, if you have more time, letting it sit for a few hours or even overnight in the refrigerator will enhance the taste even further. The longer the chicken marinates, the more flavorful it will become, allowing the honey and Dijon to penetrate the meat thoroughly.

What sides pair well with Honey Dijon Baked Chicken Recipe?

Honey Dijon Baked Chicken Recipe. Some great options include:

  • Roasted vegetables like carrots, broccoli, and bell peppers
  • A fresh salad with mixed greens and a light vinaigrette
  • Creamy mashed potatoes or garlic mashed potatoes
  • Fluffy quinoa or rice to soak up the honey Dijon glaze
  • Warm garlic bread for a comforting touch

These sides not only enhance the meal but also create a balanced plate that everyone will enjoy!

Can I make the Honey Dijon Baked Chicken Recipe ahead of time?

Honey Dijon Baked Chicken Recipe ahead of time! You can marinate the chicken and store it in the refrigerator for up to 24 hours before baking. This is a great option for meal prep or if you want to save time on a busy day. Just remember to let the chicken come to room temperature for about 15-20 minutes before baking to ensure even cooking. Enjoy the convenience of having a delicious meal ready to go!

Conclusion on Honey Dijon Baked Chicken Recipe

Honey Dijon Baked Chicken Recipe is a fantastic choice for anyone looking to create a delicious and satisfying meal with minimal effort. This recipe combines the sweet and tangy flavors of honey and Dijon mustard, resulting in a dish that is both flavorful and easy to prepare. Whether you’re cooking for your family or hosting friends, this chicken recipe is sure to impress.

With its simple ingredients and straightforward steps, you can whip up this dish in no time. Plus, the versatility of the recipe allows you to customize it to your liking. From adding fresh herbs to incorporating vegetables, the possibilities are endless. You can make it your own and cater to your taste preferences.

Not only is this recipe delicious, but it also provides valuable nutrients, making it a healthy option for dinner. With a good balance of protein and flavor, you can enjoy a meal that satisfies your hunger without compromising on taste.

Honey Dijon Baked Chicken Recipe. It’s a dish that brings joy to the table and leaves everyone asking for more. Happy cooking, and enjoy every bite of this delightful meal!

Sizzling Steak Fajitas are a must-try dinner delight!

Introduction to Sizzling Steak Fajitas Recipe

sizzling steak fajitas recipe is a delightful dish that brings the vibrant flavors of Mexican cuisine right to your table. This recipe is not just about cooking; it’s about creating an experience. The sizzling sound of the steak and vegetables hitting the hot skillet is music to the ears, and the aroma that fills your kitchen is simply irresistible. Let’s dive into what makes this dish so special and explore its rich history.

What Makes Sizzling Steak Fajitas Special?

Sizzling steak fajitas are more than just a meal; they are a celebration of flavors and textures. The combination of tender flank steak, colorful bell peppers, and onions creates a feast for the eyes and the palate. The spices used in the marinade add a warm, zesty kick that elevates the dish. When served in warm tortillas, each bite is a perfect blend of juicy meat and crunchy vegetables, making it a favorite for many.

Moreover, fajitas are incredibly versatile. You can customize them with your favorite toppings, such as sour cream, salsa, or fresh cilantro. This flexibility allows everyone to create their own perfect bite, making fajitas a hit at gatherings and family dinners. Plus, they are quick to prepare, making them an excellent choice for busy weeknights.

The History of Fajitas

The history of fajitas dates back to the 1930s in Texas, where Mexican ranch workers, known as “vaqueros,” would grill skirt steak over open flames. They would serve the meat with tortillas, creating a simple yet delicious meal. The term “fajita” comes from the Spanish word “faja,” meaning “belt” or “strip,” referring to the cut of meat used.

Over the years, fajitas have evolved. Today, they are enjoyed with various proteins, including chicken, shrimp, and even vegetables for a vegetarian twist. The dish has gained popularity across the United States and beyond, becoming a staple in many Mexican restaurants. Whether you’re enjoying them at a restaurant or making them at home, sizzling steak fajitas are sure to bring joy to your dining experience.

Ingredients for Sizzling Steak Fajitas Recipe

sizzling steak fajitas recipe, you’ll need a selection of fresh ingredients that come together to create a mouthwatering dish. Here’s what you’ll need:

  • 1 pound flank steak: This cut is ideal for fajitas due to its tenderness and flavor.
  • 2 tablespoons olive oil: Used for cooking the steak and sautéing the vegetables.
  • 1 teaspoon chili powder: Adds a warm, spicy kick to the marinade.
  • 1 teaspoon cumin: Provides a rich, earthy flavor that complements the steak.
  • 1 teaspoon garlic powder: Enhances the overall taste with a savory touch.
  • 1 teaspoon onion powder: Adds depth to the flavor profile.
  • 1 teaspoon salt: Essential for seasoning the meat and vegetables.
  • 1/2 teaspoon black pepper: Offers a subtle heat that balances the spices.
  • 1 red bell pepper, sliced: Brings sweetness and color to the dish.
  • 1 green bell pepper, sliced: Adds a fresh, crisp texture.
  • 1 medium onion, sliced: Provides a savory base for the fajitas.
  • 8 small flour tortillas: Perfect for wrapping up the delicious filling.
  • 1 lime, juiced: Adds a zesty brightness to the dish.
  • Fresh cilantro, for garnish: Offers a burst of freshness and color.
  • Sour cream, for serving: Creamy and cool, it complements the spices.
  • Salsa, for serving: Adds a tangy kick and enhances the flavor.

Gathering these ingredients will set you on the right path to making a delicious meal. Each component plays a vital role in creating the vibrant flavors that make sizzling steak fajitas a beloved dish. Now that you have everything you need, let’s move on to the step-by-step preparation!

Step-by-Step Preparation of Sizzling Steak Fajitas Recipe

sizzling steak fajitas recipe. Follow these simple steps to create a delicious meal that will impress your family and friends!

Step 1: Marinating the Steak

Start by marinating the flank steak. In a small bowl, mix together the chili powder, cumin, garlic powder, onion powder, salt, and black pepper. This spice blend is what gives your steak that amazing flavor. Rub the mixture all over the flank steak, ensuring it’s evenly coated. Let it sit for at least 15 minutes. If you have more time, marinating for a few hours or overnight in the fridge will enhance the flavor even more.

Step 2: Preparing the Vegetables

While the steak is marinating, it’s time to prepare the vegetables. Slice the red and green bell peppers, as well as the onion. Aim for thin slices to ensure they cook evenly and quickly. Having your vegetables ready will make the cooking process smoother and faster.

Step 3: Cooking the Steak

Heat 1 tablespoon of olive oil in a large skillet over medium-high heat. Once the oil is hot, add the marinated flank steak. Cook for about 4-5 minutes on each side for medium-rare, or until it reaches your desired doneness. The steak should be nicely browned on the outside. After cooking, remove it from the skillet and let it rest for 5 minutes. This resting period allows the juices to redistribute, making the steak more tender.

Step 4: Sautéing the Vegetables

In the same skillet, add the remaining tablespoon of olive oil. Once the oil is hot, toss in the sliced bell peppers and onion. Sauté the vegetables for about 5-7 minutes. You want them to be tender and slightly charred, which adds a wonderful flavor. Stir occasionally to ensure even cooking.

Step 5: Combining Ingredients

After the vegetables are cooked, it’s time to bring everything together. Slice the rested steak thinly against the grain. Add the sliced steak back into the skillet with the sautéed vegetables. Squeeze fresh lime juice over the mixture and stir to combine. The lime juice adds a zesty brightness that enhances the overall flavor.

Step 6: Serving the Fajitas

Now comes the fun part—serving your sizzling steak fajitas! Warm the flour tortillas in a separate pan or microwave until soft. Then, fill each tortilla with the steak and vegetable mixture. Garnish with fresh cilantro for a pop of color and flavor. Serve with sour cream and salsa on the side for everyone to enjoy. Your delicious fajitas are ready to be devoured!

Variations of Sizzling Steak Fajitas Recipe

sizzling steak fajitas recipe is a crowd-pleaser, there are many ways to switch things up! Whether you’re looking for vegetarian options or alternative proteins, these variations will keep your fajita nights exciting and delicious.

Vegetarian Options

If you want to enjoy fajitas without meat, there are plenty of tasty vegetarian options. You can replace the flank steak with a variety of vegetables and plant-based proteins. Here are some ideas:

  • Portobello Mushrooms: These meaty mushrooms are perfect for fajitas. Slice them and sauté with the same spices for a rich flavor.
  • Tofu: Firm tofu can be marinated and grilled or sautéed. It absorbs flavors well and adds protein to your meal.
  • Bell Peppers and Onions: Simply load up on more bell peppers and onions. You can add zucchini, corn, or even eggplant for extra texture and taste.
  • Black Beans: For a protein boost, add black beans to your vegetable mix. They are hearty and pair well with the spices.

These vegetarian options are not only delicious but also colorful, making your fajitas visually appealing. Plus, they are a great way to enjoy a healthy meal!

Alternative Proteins

If you’re in the mood for something different, consider using alternative proteins. Here are some tasty substitutes for flank steak:

  • Chicken Breast: Chicken fajitas are a popular choice. Simply slice the chicken breast and follow the same cooking steps as the steak.
  • Shrimp: For a seafood twist, shrimp cooks quickly and adds a delightful flavor. Just sauté them until they turn pink and opaque.
  • Beef Skirt Steak: If you want a richer flavor, skirt steak is another great option. It’s similar to flank steak but has a bit more fat, making it juicy and flavorful.
  • Seitan: For a plant-based protein that mimics meat, seitan is an excellent choice. It has a chewy texture and absorbs flavors beautifully.

These alternative proteins can easily be incorporated into your fajitas, allowing you to enjoy a variety of flavors and textures. No matter which option you choose, your sizzling steak fajitas will be a hit!

Cooking Note for Sizzling Steak Fajitas Recipe

sizzling steak fajitas recipe, there are a few cooking notes to keep in mind to ensure your dish turns out perfectly every time. These tips will help you achieve the best flavor and texture, making your fajitas a delightful experience for everyone at the table.

First, always choose high-quality flank steak. Look for meat that is bright red with a good amount of marbling. This marbling helps keep the steak juicy and flavorful during cooking. If flank steak is not available, consider using skirt steak or sirloin as alternatives.

Next, don’t skip the marinating step. Marinating the steak not only infuses it with flavor but also helps tenderize the meat. If you have time, let the steak marinate for a few hours or even overnight in the refrigerator. This extra time allows the spices to penetrate deeply, enhancing the overall taste.

When cooking the steak, make sure your skillet is hot enough. A hot skillet will sear the meat, creating a delicious crust while keeping the inside tender. Avoid overcrowding the pan, as this can lower the temperature and result in steaming rather than searing. If you have a lot of steak, consider cooking it in batches.

Lastly, let the steak rest after cooking. This resting period is crucial as it allows the juices to redistribute throughout the meat. If you slice the steak too soon, the juices will run out, leaving you with a dry piece of meat. A 5-minute rest is usually sufficient.

By following these cooking notes, you’ll ensure that your sizzling steak fajitas are not only flavorful but also juicy and tender. Enjoy the process, and get ready to impress your family and friends with this delicious dish!

Serving Suggestions for Sizzling Steak Fajitas Recipe

sizzling steak fajitas recipe is ready, it’s time to think about how to serve them. The right accompaniments and presentation can elevate your meal, making it even more enjoyable for everyone. Here are some great serving suggestions to consider.

Accompaniments and Sides

To create a well-rounded meal, consider serving your fajitas with a variety of accompaniments and sides. Here are some delicious options:

  • Mexican Rice: Fluffy, seasoned rice pairs perfectly with fajitas. It adds a nice texture and helps soak up the juices.
  • Refried Beans: Creamy refried beans are a classic side that complements the flavors of the fajitas. They add protein and richness to the meal.
  • Guacamole: Fresh guacamole is a must-have! Its creamy texture and zesty flavor enhance the fajitas beautifully.
  • Chips and Salsa: Serve tortilla chips with a side of salsa for a crunchy appetizer. It’s a great way to start the meal!
  • Grilled Corn: Sweet, grilled corn on the cob adds a delightful sweetness that balances the spices in the fajitas.

These sides not only complement the fajitas but also create a festive atmosphere. Feel free to mix and match based on your preferences and what you have on hand!

Presentation Tips

Presentation is key when serving your sizzling steak fajitas. Here are some tips to make your dish look as good as it tastes:

  • Use a Hot Skillet: Serve the fajitas in a sizzling hot skillet. The sound and aroma will excite your guests and create a fun dining experience.
  • Colorful Garnishes: Add fresh cilantro, lime wedges, and sliced jalapeños on top of the fajitas for a pop of color. This makes the dish visually appealing.
  • Arrange Tortillas Neatly: Stack the warm tortillas on a plate or in a tortilla warmer. This keeps them soft and ready for filling.
  • Offer a Toppings Bar: Set up a toppings bar with sour cream, salsa, guacamole, and any other favorites. This allows everyone to customize their fajitas.
  • Use Vibrant Plates: Serve the fajitas on colorful plates to enhance the overall presentation. Bright colors make the meal more inviting.

By following these serving suggestions and presentation tips, your sizzling steak fajitas will not only taste amazing but also look fantastic on the table. Enjoy the compliments from your family and friends as they dig into this delicious meal!

Tips for Perfect Sizzling Steak Fajitas Recipe

sizzling steak fajitas recipe, there are a few essential tips to keep in mind. These tips will help you select the right ingredients and ensure that your fajitas are bursting with flavor and tenderness. Let’s explore how to choose the perfect cut of steak and the best practices for marinating.

Choosing the Right Cut of Steak

The cut of steak you choose can make a significant difference in the final taste and texture of your fajitas. Here are some tips for selecting the right cut:

  • Flank Steak: This is the traditional choice for fajitas. It’s flavorful and tender when cooked correctly. Look for a cut with good marbling, as this will enhance the juiciness.
  • Skirt Steak: Another excellent option, skirt steak is similar to flank steak but has a richer flavor. It’s slightly fattier, which can add extra juiciness to your fajitas.
  • Sirloin Steak: If you prefer a leaner option, sirloin steak is a great choice. It’s still tender and flavorful but has less fat than flank or skirt steak.
  • Ribeye Steak: For a more indulgent option, ribeye steak offers incredible flavor and tenderness. It’s well-marbled, making it juicy and delicious.

When selecting your steak, always choose cuts that are bright red and have a good amount of marbling. This ensures that your fajitas will be juicy and full of flavor.

Best Marinade Practices

Marinating your steak is crucial for infusing flavor and tenderizing the meat. Here are some best practices to follow:

  • Time Matters: For the best flavor, marinate your steak for at least 15 minutes. However, if you have time, letting it sit for a few hours or overnight in the refrigerator will yield even better results.
  • Use Acid: Incorporating an acidic ingredient, like lime juice or vinegar, in your marinade helps break down the meat fibers, making it more tender. Just be careful not to marinate for too long, as the acid can make the meat mushy.
  • Balance Flavors: Ensure your marinade has a good balance of flavors. Combine spices, herbs, and a bit of sweetness, like honey or brown sugar, to create a well-rounded taste.
  • Coat Evenly: Make sure to coat the steak evenly with the marinade. You can use a resealable bag or a shallow dish to ensure all sides are covered.

By following these tips for choosing the right cut of steak and mastering your marinade practices, you’ll be well on your way to creating the perfect sizzling steak fajitas. Enjoy the process and the delicious results!

Breakdown of Time for Sizzling Steak Fajitas Recipe

sizzling steak fajitas recipe can help you plan your cooking efficiently. Here’s a breakdown of the time you’ll need for preparation and cooking, ensuring that your meal is ready to serve in no time!

Prep Time

The prep time for your sizzling steak fajitas is relatively short. You’ll need about 15-20 minutes to gather and prepare all your ingredients. This includes:

  • Marinating the steak (15 minutes minimum, longer if possible)
  • Slicing the bell peppers and onion (5 minutes)
  • Warming the tortillas (optional, about 2-3 minutes)

In total, you can expect to spend around 20-25 minutes on prep work, especially if you allow the steak to marinate longer for enhanced flavor.

Cooking Time

The cooking time for your sizzling steak fajitas is quick and efficient. Here’s how it breaks down:

  • Cooking the steak (8-10 minutes, depending on desired doneness)
  • Sautéing the vegetables (5-7 minutes)
  • Combining the steak and vegetables (2-3 minutes)

Overall, the cooking time will take about 15-20 minutes. This means you can have your fajitas sizzling and ready to serve in no time!

Total Time

sizzling steak fajitas recipe is approximately 35-45 minutes. This makes it a fantastic option for a weeknight dinner or a fun gathering with friends and family. With a little planning, you can enjoy a delicious meal that’s both quick and satisfying!

Nutritional Information for Sizzling Steak Fajitas Recipe

sizzling steak fajitas recipe is essential for maintaining a balanced diet. This dish not only satisfies your taste buds but also provides a good mix of nutrients. Here’s a breakdown of the key nutritional components per serving:

Calories

Each serving of sizzling steak fajitas contains approximately 350 calories. This makes it a hearty yet manageable meal option. The calorie count comes from the combination of flank steak, vegetables, and tortillas, providing energy to fuel your day. If you’re watching your calorie intake, consider adjusting portion sizes or opting for lighter toppings.

Protein

Protein is a vital nutrient, and this recipe delivers! Each serving offers about 25 grams of protein. The flank steak is the primary source of protein, which is essential for muscle repair and growth. Including protein in your meals can help keep you feeling full and satisfied, making these fajitas a great choice for a nutritious dinner.

Sodium

When it comes to sodium, each serving contains around 600 milligrams. This amount is reasonable for a flavorful dish, but it’s important to be mindful of your overall sodium intake throughout the day. If you’re looking to reduce sodium, consider using low-sodium versions of seasonings or skipping added salt in the recipe.

By keeping these nutritional facts in mind, you can enjoy your sizzling steak fajitas while also being aware of their health benefits. This dish is not only delicious but also a great way to incorporate protein and vegetables into your diet!

FAQs about Sizzling Steak Fajitas Recipe

Can I use chicken instead of steak for fajitas?

Absolutely! Chicken is a popular alternative to steak in fajitas. You can use boneless, skinless chicken breasts or thighs. Simply slice the chicken into thin strips and follow the same marinating and cooking steps as you would for the steak. Chicken fajitas are just as delicious and can be seasoned with the same spices for that classic fajita flavor.

What toppings are best for steak fajitas?

When it comes to toppings, the options are endless! Some of the best toppings for steak fajitas include:

  • Sour Cream: Adds a creamy texture that balances the spices.
  • Guacamole: Fresh and creamy, it enhances the flavor of the fajitas.
  • Salsa: A tangy kick that complements the savory meat and veggies.
  • Shredded Cheese: Cheddar or Monterey Jack cheese melts beautifully on warm fajitas.
  • Fresh Cilantro: Adds a burst of freshness and color.
  • Sliced Jalapeños: For those who enjoy a spicy kick!

Feel free to mix and match your favorite toppings to create your perfect fajita!

How do I store leftover fajitas?

Storing leftover fajitas is easy! First, let the steak and vegetables cool down to room temperature. Then, place them in an airtight container. You can store the fajitas in the refrigerator for up to 3 days. If you have leftover tortillas, store them separately to keep them from getting soggy. When you’re ready to enjoy them again, simply reheat the steak and veggies in a skillet or microwave until warmed through.

Can I make fajitas in advance?

Yes, you can prepare some components of your fajitas in advance! You can marinate the steak a day ahead and store it in the refrigerator. Additionally, you can slice the vegetables and keep them in an airtight container. However, it’s best to cook the steak and vegetables just before serving to maintain their freshness and flavor. This way, you can enjoy sizzling steak fajitas that taste freshly made!

Conclusion on Sizzling Steak Fajitas Recipe

sizzling steak fajitas recipe is a delightful dish that brings together vibrant flavors, colorful ingredients, and a fun dining experience. Whether you’re cooking for a family dinner or hosting friends, this recipe is sure to impress. The combination of tender flank steak, sautéed bell peppers, and onions wrapped in warm tortillas creates a satisfying meal that everyone will love.

Not only is this dish easy to prepare, but it also allows for plenty of customization. With various toppings and alternative proteins, you can cater to different tastes and dietary preferences. Plus, the quick cooking time makes it a perfect option for busy weeknights or spontaneous gatherings.

As you explore the world of fajitas, remember to experiment with different ingredients and flavors. Whether you stick to the classic recipe or try out vegetarian options, the key is to enjoy the process and share the meal with loved ones. So gather your ingredients, fire up the skillet, and get ready to savor the deliciousness of sizzling steak fajitas!

Happy cooking, and may your fajita nights be filled with laughter, good food, and great company!

Fluffy Vegan Pancakes Recipe will delight your taste buds!

Introduction to Fluffy Vegan Pancakes Recipe

Fluffy Vegan Pancakes? This delightful recipe is not only easy to follow but also caters to those who prefer a plant-based diet. Whether you are vegan or just looking to try something new, these pancakes are sure to impress!

Why Choose Vegan Pancakes?

Choosing vegan pancakes is a fantastic option for several reasons. First, they are made without any animal products, making them suitable for vegans and those with dairy allergies. Second, vegan pancakes can be just as fluffy and tasty as traditional ones. By using plant-based ingredients, you can enjoy a delicious breakfast while being kind to animals and the environment.

Moreover, vegan pancakes often contain healthier ingredients. For instance, using almond milk instead of cow’s milk reduces cholesterol and adds a nutty flavor. Additionally, you can control the sugar content, making them a healthier choice for breakfast. So, if you want to start your day on a positive note, vegan pancakes are a great way to do it!

The Benefits of Making Fluffy Vegan Pancakes

Fluffy Vegan Pancakes at home comes with numerous benefits. First, you can customize the recipe to suit your taste. Want to add blueberries or chocolate chips? Go for it! You can also adjust the sweetness or even add spices like cinnamon for extra flavor.

Another benefit is the ease of preparation. With just a few simple ingredients, you can whip up a batch in no time. Plus, cooking at home allows you to know exactly what goes into your food, ensuring it’s fresh and wholesome.

Lastly, these pancakes are perfect for sharing. Whether it’s a family breakfast or a brunch with friends, everyone will love the fluffy texture and delightful taste. So, gather your ingredients and get ready to enjoy a delicious stack of vegan pancakes!

Ingredients for Fluffy Vegan Pancakes Recipe

Fluffy Vegan Pancakes, you’ll need a few simple ingredients. Each component plays a vital role in achieving that light and airy texture we all love. Here’s what you’ll need:

  • 1 cup all-purpose flour: This is the base of your pancakes, providing structure and fluffiness.
  • 2 tablespoons sugar: A touch of sweetness enhances the flavor of the pancakes.
  • 2 teaspoons baking powder: This is the secret ingredient that makes your pancakes rise and become fluffy.
  • 1/2 teaspoon salt: A pinch of salt balances the sweetness and enhances the overall taste.
  • 1 cup almond milk: You can use any plant-based milk, but almond milk adds a nice nutty flavor.
  • 2 tablespoons vegetable oil: This keeps the pancakes moist. You can also use melted coconut oil for a tropical twist.
  • 1 teaspoon vanilla extract: This adds a lovely aroma and flavor to your pancakes.

These ingredients are not only easy to find but also affordable. You might already have most of them in your pantry! With these simple components, you’re just a few steps away from enjoying a delicious stack of fluffy pancakes. So, gather your ingredients and let’s move on to the next step!

Step-by-Step Preparation of Fluffy Vegan Pancakes Recipe

Fluffy Vegan Pancakes! Follow these simple steps to create a delicious breakfast that everyone will love.

Step 1: Gather Your Ingredients

Before you start cooking, make sure you have everything you need. Gather your all-purpose flour, sugar, baking powder, salt, almond milk, vegetable oil, and vanilla extract. Having all your ingredients in one place makes the cooking process smoother and more enjoyable!

Step 2: Mix Dry Ingredients

In a large mixing bowl, combine the dry ingredients. Start by adding the flour, sugar, baking powder, and salt. Use a whisk to mix them together until they are well combined. This step is important because it ensures that the baking powder is evenly distributed, which helps your pancakes rise beautifully.

Step 3: Combine Wet Ingredients

In a separate bowl, mix the wet ingredients. Pour in the almond milk, vegetable oil, and vanilla extract. Whisk these together until they are fully blended. This mixture will add moisture and flavor to your pancakes, making them extra delicious!

Step 4: Combine Wet and Dry Mixtures

Now it’s time to bring the two mixtures together! Pour the wet ingredients into the bowl with the dry ingredients. Gently stir the mixture until just combined. Remember, it’s okay if there are a few lumps. Overmixing can lead to dense pancakes, and we want them to be fluffy!

Step 5: Cook the Pancakes

Preheat a non-stick skillet or griddle over medium heat. If needed, lightly grease it with oil or cooking spray. Once hot, pour about 1/4 cup of batter onto the skillet for each pancake. Cook until bubbles form on the surface, which should take about 2-3 minutes. Then, flip the pancake and cook for another 2-3 minutes until golden brown. Repeat this process with the remaining batter, adjusting the heat as necessary to avoid burning.

Step 6: Serve and Enjoy

Once all your pancakes are cooked, it’s time to serve! Stack them high on a plate and add your favorite toppings. Maple syrup, fresh fruit, or nut butter are all great choices. Enjoy your fluffy vegan pancakes warm, and share them with family and friends for a delightful breakfast experience!

Variations of Fluffy Vegan Pancakes Recipe

Fluffy Vegan Pancakes recipe is delicious on its own, there are many fun ways to mix things up! Adding different ingredients can enhance the flavor and make your pancakes even more exciting. Here are some tasty variations to consider:

Adding Fruits to Your Fluffy Vegan Pancakes

Fruits are a fantastic way to add natural sweetness and flavor to your pancakes. You can easily incorporate them into the batter or use them as toppings. Here are some popular fruit options:

  • Blueberries: Fold in a handful of fresh or frozen blueberries into the batter for a burst of flavor in every bite.
  • Bananas: Mash a ripe banana and mix it into the batter. This adds sweetness and moisture, making your pancakes extra fluffy.
  • Apples: Grate an apple and mix it into the batter. You can also sprinkle some cinnamon for a delicious apple pie flavor.
  • Strawberries: Chop fresh strawberries and add them to the batter or use them as a topping with a drizzle of maple syrup.

These fruity additions not only enhance the taste but also provide extra nutrients. So, feel free to get creative and experiment with your favorite fruits!

Gluten-Free Options for Fluffy Vegan Pancakes

Fluffy Vegan Pancakes, you can easily make some adjustments. Here are a few tips to create gluten-free pancakes:

  • Use Gluten-Free Flour: Substitute all-purpose flour with a gluten-free flour blend. Look for blends that contain a mix of rice flour, almond flour, and tapioca flour for the best results.
  • Oat Flour: You can also make your own oat flour by blending rolled oats in a blender until fine. This gives a lovely texture and flavor to your pancakes.
  • Chickpea Flour: For a protein-packed option, try using chickpea flour. It adds a unique taste and is naturally gluten-free.

When making gluten-free pancakes, be sure to check that your baking powder is also gluten-free. With these simple swaps, you can enjoy fluffy pancakes without any gluten!

Cooking Note for Fluffy Vegan Pancakes Recipe

Fluffy Vegan Pancakes is a delightful experience, but there are a few important notes to keep in mind to ensure your pancakes turn out perfectly every time. Here are some tips to help you achieve the best results:

  • Preheat Your Pan: Make sure your skillet or griddle is properly preheated before pouring in the batter. A hot surface helps create that golden-brown crust while keeping the inside fluffy.
  • Don’t Overmix: When combining the wet and dry ingredients, mix just until combined. Overmixing can lead to tough pancakes instead of light and fluffy ones.
  • Adjust Heat as Needed: If your pancakes are browning too quickly, lower the heat. Conversely, if they’re taking too long to cook, increase the heat slightly. Finding the right temperature is key!
  • Use a Measuring Cup: For uniform pancakes, use a measuring cup to pour the batter onto the skillet. This ensures each pancake is the same size and cooks evenly.
  • Keep Pancakes Warm: If you’re making a large batch, keep the cooked pancakes warm in an oven set to low heat (around 200°F or 93°C) while you finish cooking the rest.

By following these cooking notes, you’ll be well on your way to making the fluffiest vegan pancakes that everyone will love. Enjoy the process and the delicious results!

Serving Suggestions for Fluffy Vegan Pancakes Recipe

Fluffy Vegan Pancakes, it’s time to think about how to serve them! The right toppings can elevate your pancakes from delicious to extraordinary. Here are some delightful serving suggestions to consider:

  • Maple Syrup: A classic choice! Drizzle warm maple syrup over your pancakes for a sweet and sticky treat. The rich flavor pairs perfectly with the fluffy texture.
  • Fresh Fruits: Top your pancakes with a colorful array of fresh fruits. Sliced bananas, strawberries, or blueberries not only add flavor but also make your dish visually appealing.
  • Nuts and Seeds: Sprinkle some chopped nuts like walnuts or pecans for a crunchy texture. You can also add chia seeds or hemp seeds for a nutritious boost.
  • Nut Butters: Spread almond butter, peanut butter, or cashew butter on top for a creamy and satisfying addition. This adds healthy fats and protein to your meal.
  • Vegan Whipped Cream: For a special treat, add a dollop of vegan whipped cream. It adds a light and fluffy element that complements the pancakes beautifully.
  • Chocolate Chips: If you’re in the mood for something sweet, sprinkle some dairy-free chocolate chips on top. They melt slightly and create a deliciously indulgent experience.
  • Coconut Flakes: Toasted coconut flakes can add a tropical twist to your pancakes. They provide a delightful chewiness and a hint of sweetness.

Feel free to mix and match these toppings to create your perfect pancake stack. Whether you prefer a simple drizzle of syrup or a lavish spread of fruits and nuts, the possibilities are endless. Enjoy your fluffy vegan pancakes with your favorite combinations, and don’t forget to share with family and friends!

Tips for Perfect Fluffy Vegan Pancakes Recipe

Fluffy Vegan Pancakes is all about attention to detail. With a few helpful tips, you can ensure that your pancakes turn out light, airy, and absolutely delicious every time. Here are some essential tips to keep in mind:

  • Use Fresh Ingredients: Always check the expiration dates on your baking powder and flour. Fresh ingredients will help your pancakes rise better and taste their best.
  • Let the Batter Rest: After mixing the wet and dry ingredients, let the batter sit for about 5-10 minutes. This allows the baking powder to activate and results in fluffier pancakes.
  • Don’t Skip the Oil: Adding oil to the batter keeps the pancakes moist and prevents them from sticking to the pan. It also contributes to a tender texture.
  • Use a Non-Stick Pan: A good non-stick skillet or griddle is key to preventing your pancakes from sticking. If you don’t have one, make sure to grease your pan well.
  • Check for Doneness: Look for bubbles forming on the surface of the pancakes before flipping. This indicates that they are ready to be turned. Cook until golden brown on both sides.
  • Experiment with Flavors: Don’t hesitate to add spices or extracts to your batter. A pinch of cinnamon or a splash of almond extract can elevate the flavor profile.
  • Keep Them Warm: If you’re making a large batch, keep the pancakes warm in a low oven (around 200°F or 93°C) while you finish cooking. This way, they stay fluffy and delicious until serving.

Fluffy Vegan Pancakes. Enjoy the process, and most importantly, enjoy every bite!

Breakdown of Time for Fluffy Vegan Pancakes Recipe

Fluffy Vegan Pancakes can help you plan your breakfast better. Here’s a simple breakdown of the time required for each step of the process:

Prep Time

The prep time for making these delicious pancakes is quite short. You’ll need about 10 minutes to gather your ingredients and mix the dry and wet components. This includes measuring out the flour, sugar, and other ingredients, as well as whisking them together. It’s a quick and easy process that gets you ready for the fun part—cooking!

Cooking Time

Once your batter is ready, the cooking time is also minimal. You can expect to spend around 15-20 minutes cooking the pancakes. Each pancake takes about 2-3 minutes on one side and another 2-3 minutes after flipping. Depending on how many pancakes you make at once, you might need to adjust the cooking time slightly. If you’re making a large batch, just keep an eye on the heat to ensure they cook evenly.

Total Time

Fluffy Vegan Pancakes can fit perfectly into your schedule!

Nutritional Information for Fluffy Vegan Pancakes Recipe

Fluffy Vegan Pancakes recipe is not only delicious but also provides a balanced meal to start your day. Here’s a breakdown of the key nutritional information per serving:

Calories

Each serving of these delightful pancakes contains approximately 170 calories. This makes them a satisfying yet light option for breakfast. You can enjoy them without feeling guilty, especially when topped with fresh fruits or a drizzle of maple syrup!

Protein

In terms of protein, each serving offers about 3 grams. While this may seem modest, it contributes to your daily protein intake. Pairing your pancakes with nut butter or a side of plant-based yogurt can boost the protein content even further, making your breakfast more filling and nutritious.

Sodium

The sodium content in each serving is around 200 milligrams. This is a reasonable amount, especially considering that pancakes are often enjoyed with toppings that may contain additional sodium. Keeping an eye on your overall sodium intake throughout the day is always a good practice.

Fluffy Vegan Pancakes recipe provides a balanced mix of calories, protein, and sodium, making it a great choice for a wholesome breakfast. Enjoy them as part of a varied diet, and feel free to customize your toppings to enhance both flavor and nutrition!

FAQs about Fluffy Vegan Pancakes Recipe

Can I use regular milk instead of plant-based milk in the Fluffy Vegan Pancakes Recipe?

While the recipe is designed for plant-based milk, you can use regular milk if you prefer. However, this will change the pancakes from being vegan to vegetarian. If you’re looking for a dairy-free option, stick with almond milk or any other plant-based milk. They provide a similar texture and flavor while keeping the pancakes light and fluffy!

How can I make my Fluffy Vegan Pancakes even fluffier?

To achieve even fluffier pancakes, consider letting the batter rest for 5-10 minutes before cooking. This allows the baking powder to activate fully, resulting in a lighter texture. Additionally, be careful not to overmix the batter; a few lumps are perfectly fine. Lastly, ensure your skillet is hot enough before pouring in the batter, as this helps create that perfect rise!

What toppings go well with Fluffy Vegan Pancakes?

The possibilities for toppings are endless! Some popular choices include:

  • Maple syrup: A classic sweet addition.
  • Fresh fruits: Sliced bananas, strawberries, or blueberries add flavor and nutrition.
  • Nut butters: Almond or peanut butter for a creamy texture.
  • Vegan whipped cream: For a light and fluffy touch.
  • Chocolate chips: For a sweet treat!

Feel free to mix and match these toppings to create your perfect pancake experience!

Can I store leftover Fluffy Vegan Pancakes?

Fluffy Vegan Pancakes! Allow them to cool completely, then place them in an airtight container. They can be stored in the refrigerator for up to 3 days. For longer storage, you can freeze them. Just layer parchment paper between pancakes to prevent sticking, and store them in a freezer-safe bag. When you’re ready to enjoy, simply reheat them in the toaster or microwave!

Conclusion on Fluffy Vegan Pancakes Recipe

Fluffy Vegan Pancakes is a delightful way to start your day. This recipe is not only simple but also allows for endless customization. Whether you prefer them plain or loaded with fruits and toppings, these pancakes are sure to satisfy your cravings.

By choosing plant-based ingredients, you’re not only treating yourself to a delicious breakfast but also making a healthier choice. The fluffy texture and delightful taste will impress everyone at the table, making them perfect for family gatherings or a cozy brunch with friends.

Remember, the key to perfect pancakes lies in the details. From using fresh ingredients to letting the batter rest, each step contributes to the final result. So, don’t hesitate to experiment with flavors and toppings to make this recipe your own!

Fluffy Vegan Pancakes. Enjoy the process, share with loved ones, and savor every bite. Happy cooking!

Lemon Garlic Butter Pasta Recipe is a must-try dish!

Introduction to Lemon Garlic Butter Pasta Recipe

Lemon Garlic Butter Pasta is a delightful dish that brings together the bright flavors of lemon and the rich taste of butter. This recipe is not only simple to prepare but also incredibly satisfying. Whether you’re cooking for yourself or hosting a dinner party, this pasta dish is sure to impress. The combination of garlic and lemon creates a refreshing sauce that perfectly coats the pasta, making each bite a burst of flavor.

What Makes Lemon Garlic Butter Pasta Special?

What sets Lemon Garlic Butter Pasta apart from other pasta dishes? First, it’s the balance of flavors. The zesty lemon juice cuts through the richness of the butter, creating a harmonious blend that excites the palate. Additionally, the garlic adds a savory depth that enhances the overall taste. This dish is versatile, allowing you to customize it with various proteins or vegetables, making it suitable for any occasion.

Moreover, the preparation is quick and easy. In just a few steps, you can whip up a delicious meal that feels gourmet. The use of fresh ingredients, like lemon and parsley, not only elevates the dish but also adds a vibrant touch to your plate. Plus, it’s a great way to enjoy a comforting meal without spending hours in the kitchen.

In summary, Lemon Garlic Butter Pasta is special because it combines simplicity with flavor, making it a go-to recipe for busy weeknights or special gatherings. Let’s dive into the ingredients and preparation steps to create this delightful dish!

Ingredients for Lemon Garlic Butter Pasta Recipe

To create the perfect Lemon Garlic Butter Pasta, you’ll need a few simple yet flavorful ingredients. Each component plays a vital role in bringing this dish to life. Here’s what you’ll need:

  • 8 ounces spaghetti or linguine: Choose your favorite pasta type for a delightful base.
  • 1/4 cup unsalted butter: This adds richness and a creamy texture to the sauce.
  • 4 cloves garlic, minced: Fresh garlic provides a robust flavor that complements the lemon.
  • 1/2 teaspoon red pepper flakes (optional): For those who enjoy a little heat, this adds a nice kick.
  • 1/2 cup freshly squeezed lemon juice: About two lemons will give you the zesty flavor that brightens the dish.
  • 1 teaspoon lemon zest: This enhances the lemon flavor and adds a fragrant aroma.
  • 1/2 cup grated Parmesan cheese: A sprinkle of cheese adds a savory depth to the pasta.
  • Salt and pepper to taste: Essential for seasoning and enhancing all the flavors.
  • Fresh parsley, chopped (for garnish): This adds a pop of color and freshness to your dish.

These ingredients come together to create a delicious Lemon Garlic Butter Pasta that is sure to please everyone at the table. Feel free to adjust the quantities based on your taste preferences or dietary needs. Now that you have your ingredients ready, let’s move on to the step-by-step preparation!

Step-by-Step Preparation of Lemon Garlic Butter Pasta Recipe

Now that you have gathered all your ingredients, it’s time to dive into the step-by-step preparation of your Lemon Garlic Butter Pasta. This process is straightforward and will have your kitchen smelling amazing in no time. Let’s get started!

Step 1: Preparing the Ingredients

Before you start cooking, it’s essential to prepare all your ingredients. Begin by measuring out the spaghetti or linguine. Next, mince the garlic cloves finely to release their flavor. If you’re using red pepper flakes, have them ready as well. Squeeze the lemons to get fresh juice and zest them for added flavor. Finally, chop the fresh parsley for garnish. Having everything prepped will make the cooking process smooth and enjoyable!

Step 2: Cooking the Pasta

Fill a large pot with water and add a generous amount of salt. Bring the water to a rolling boil. Once boiling, add the spaghetti or linguine. Cook according to the package instructions until the pasta is al dente. This usually takes about 8-10 minutes. Remember to stir occasionally to prevent sticking. When done, reserve one cup of the pasta water, then drain the pasta in a colander. Set it aside while you prepare the sauce.

Step 3: Making the Lemon Garlic Butter Sauce

In a large skillet, melt the unsalted butter over medium heat. Once melted, add the minced garlic and red pepper flakes (if using). Sauté for about 1-2 minutes until the garlic becomes fragrant. Be careful not to let it burn, as burnt garlic can taste bitter. Next, pour in the freshly squeezed lemon juice and add the lemon zest. Stir everything together and let it simmer for about 2 minutes. This will allow the flavors to meld beautifully.

Step 4: Combining Pasta and Sauce

Now it’s time to bring everything together! Add the drained pasta to the skillet with the lemon garlic butter sauce. Toss the pasta gently to coat it evenly in the sauce. If the pasta seems a bit dry, gradually add some of the reserved pasta water until you reach your desired consistency. This step is crucial for achieving that perfect, silky sauce that clings to the pasta.

Step 5: Final Touches and Serving

Once the pasta is well coated, stir in the grated Parmesan cheese. This adds a rich, savory flavor that complements the lemon and garlic. Season with salt and pepper to taste, adjusting as needed. Finally, serve the pasta immediately, garnished with chopped fresh parsley and extra Parmesan cheese if desired. Enjoy your delicious Lemon Garlic Butter Pasta!

Variations of Lemon Garlic Butter Pasta Recipe

While the classic Lemon Garlic Butter Pasta is delightful on its own, there are many ways to customize this dish. By adding different proteins or vegetables, you can create a unique meal that suits your taste. Let’s explore some delicious variations!

Adding Protein: Chicken or Shrimp

If you want to make your Lemon Garlic Butter Pasta heartier, consider adding protein. Chicken and shrimp are excellent choices that pair beautifully with the lemony sauce. For chicken, you can use grilled or sautéed pieces. Simply cook the chicken separately, then toss it with the pasta and sauce at the end. This will ensure the chicken stays juicy and flavorful.

For shrimp, use peeled and deveined shrimp. Sauté them in the skillet after cooking the garlic, allowing them to cook until they turn pink. Then, proceed with adding the lemon juice and zest. The shrimp will absorb the flavors of the sauce, making each bite delicious. Both options not only enhance the dish but also provide a satisfying protein boost!

Vegetarian Options: Adding Vegetables

If you prefer a vegetarian version, adding vegetables is a fantastic way to enhance the dish. Consider incorporating seasonal vegetables like spinach, cherry tomatoes, or asparagus. You can sauté these veggies in the skillet after the garlic, allowing them to soften and absorb the flavors of the butter and lemon.

Another great option is to add broccoli or zucchini. Simply steam or sauté them until tender, then mix them into the pasta. This not only adds color but also boosts the nutritional value of your meal. Feel free to get creative with your vegetable choices, as they can bring new textures and flavors to your Lemon Garlic Butter Pasta!

Cooking Note for Lemon Garlic Butter Pasta Recipe

When preparing your Lemon Garlic Butter Pasta, there are a few cooking notes to keep in mind to ensure the best results. First, always use fresh ingredients whenever possible. Fresh garlic and lemons will provide a vibrant flavor that dried or bottled alternatives simply can’t match. The zest of the lemon is particularly important, as it adds a fragrant aroma that enhances the overall dish.

Another tip is to pay attention to the cooking time of the pasta. Cooking it to al dente is crucial, as it will continue to cook slightly when combined with the sauce. This helps prevent the pasta from becoming mushy. Additionally, reserving that cup of pasta water is a game-changer. It’s a great way to adjust the sauce’s consistency without losing flavor.

When making the sauce, be cautious with the heat. Cooking the garlic over medium heat allows it to become fragrant without burning. Burnt garlic can ruin the dish, so keep an eye on it! If you prefer a creamier sauce, consider adding heavy cream after the lemon juice. This will create a rich, velvety texture that many find irresistible.

Lastly, don’t hesitate to experiment with flavors. Adding herbs like basil or thyme can elevate the dish even further. Remember, cooking is all about personal taste, so feel free to adjust the ingredients to suit your preferences. Enjoy the process, and your Lemon Garlic Butter Pasta will surely be a hit!

Serving Suggestions for Lemon Garlic Butter Pasta Recipe

When it comes to serving your Lemon Garlic Butter Pasta, presentation and pairing can elevate the dining experience. Here are some delightful serving suggestions to consider:

  • Garnish with Fresh Herbs: After plating, sprinkle additional chopped parsley or even fresh basil on top. This adds a pop of color and freshness, making the dish visually appealing.
  • Pair with a Side Salad: A light, crisp salad complements the richness of the pasta. Consider a simple arugula salad with lemon vinaigrette or a classic Caesar salad for a refreshing contrast.
  • Serve with Garlic Bread: For those who love garlic, serving warm garlic bread on the side is a perfect match. The buttery, garlicky flavor pairs wonderfully with the pasta.
  • Wine Pairing: A chilled glass of white wine, such as Sauvignon Blanc or Pinot Grigio, enhances the lemony notes of the dish. The acidity in the wine balances the richness of the butter.
  • Top with Extra Cheese: For cheese lovers, offering extra grated Parmesan at the table allows guests to customize their servings. It adds a savory touch that many enjoy.
  • Include Seasonal Vegetables: If you’ve added vegetables to your pasta, consider serving them on the side as well. Roasted asparagus or sautéed zucchini can add a colorful and nutritious element to the meal.

These serving suggestions not only enhance the flavor of your Lemon Garlic Butter Pasta but also create a delightful dining experience. Whether it’s a casual family dinner or a special occasion, these ideas will surely impress your guests and make the meal memorable!

Tips for Perfecting Your Lemon Garlic Butter Pasta Recipe

To ensure your Lemon Garlic Butter Pasta turns out perfectly every time, consider these helpful tips. They will enhance the flavors and textures, making your dish even more delightful!

  • Use Fresh Ingredients: Fresh garlic and lemons are key to achieving vibrant flavors. Freshly squeezed lemon juice and zest will elevate your dish, making it taste restaurant-quality.
  • Don’t Overcook the Pasta: Cooking the pasta to al dente is crucial. This means it should be firm to the bite. Overcooked pasta can become mushy and lose its appealing texture.
  • Reserve Pasta Water: Always save a cup of pasta water before draining. This starchy water is perfect for adjusting the sauce’s consistency without diluting the flavor.
  • Control the Heat: When sautéing garlic, keep the heat at medium. This prevents the garlic from burning, which can create a bitter taste. Stir frequently to ensure even cooking.
  • Experiment with Flavors: Feel free to add herbs like basil or thyme for extra flavor. A pinch of lemon zest can also enhance the dish’s brightness.
  • Adjust Seasoning: Taste your dish before serving. Adjust the salt and pepper to your liking. A little extra seasoning can make a big difference in flavor.
  • Serve Immediately: Lemon Garlic Butter Pasta is best enjoyed fresh. Serve it right after mixing with the sauce to maintain its texture and flavor.
  • Try Different Pasta Shapes: While spaghetti and linguine are classic choices, feel free to experiment with other pasta shapes. Penne or fettuccine can also work wonderfully with this sauce.

By following these tips, you’ll be well on your way to creating a delicious Lemon Garlic Butter Pasta that impresses everyone at the table. Enjoy the cooking process and savor every bite!

Breakdown of Time for Lemon Garlic Butter Pasta Recipe

Prep Time

Preparing your Lemon Garlic Butter Pasta is quick and easy. The prep time typically takes about 10-15 minutes. During this time, you will gather all your ingredients, measure them out, and chop the garlic and parsley. Squeezing the lemons and zesting them will also be part of this prep work. Having everything ready will make the cooking process smooth and enjoyable!

Cooking Time

The cooking time for this delicious pasta dish is around 15-20 minutes. This includes boiling the pasta until it reaches the perfect al dente texture, which usually takes about 8-10 minutes. While the pasta cooks, you will prepare the lemon garlic butter sauce in a skillet. The sauce comes together quickly, allowing you to combine everything seamlessly once the pasta is ready.

Total Time

In total, you can expect to spend about 25-35 minutes from start to finish. This makes Lemon Garlic Butter Pasta a fantastic option for a weeknight dinner or a last-minute meal. With its quick preparation and cooking times, you can enjoy a flavorful dish without spending hours in the kitchen. So, gather your ingredients and get ready to savor this delightful pasta!

Nutritional Information for Lemon Garlic Butter Pasta Recipe

Understanding the nutritional content of your meals is essential for maintaining a balanced diet. The Lemon Garlic Butter Pasta is not only delicious but also provides a good mix of nutrients. Here’s a breakdown of the key nutritional information for this delightful dish:

Calories

Each serving of Lemon Garlic Butter Pasta contains approximately 400 calories. This makes it a satisfying meal that can fit into various dietary plans. The calorie count comes from the combination of pasta, butter, and cheese, which provide energy and flavor. If you’re looking to reduce calories, consider using less butter or opting for a lighter pasta option.

Protein

This recipe offers about 12 grams of protein per serving. The protein primarily comes from the Parmesan cheese and the pasta itself. If you want to boost the protein content, adding grilled chicken or shrimp is a great option. This not only enhances the flavor but also makes the dish more filling and nutritious.

Sodium

The sodium content in Lemon Garlic Butter Pasta is around 600 milligrams per serving. This amount can vary based on the type of pasta and cheese used, as well as how much salt you add during cooking. To lower the sodium levels, consider using low-sodium butter or cheese, and be mindful of the salt you add to the pasta water.

Overall, Lemon Garlic Butter Pasta is a well-rounded dish that can be enjoyed as part of a healthy diet. By being aware of the nutritional information, you can make informed choices that align with your dietary goals. Enjoy this flavorful pasta dish while keeping your health in mind!

FAQs about Lemon Garlic Butter Pasta Recipe

Can I use gluten-free pasta for this recipe?

Absolutely! You can use gluten-free pasta in your Lemon Garlic Butter Pasta recipe. There are many great options available, such as rice pasta or chickpea pasta. Just be sure to follow the cooking instructions on the package, as gluten-free pasta may have different cooking times. This way, you can enjoy a delicious meal without gluten!

How can I make Lemon Garlic Butter Pasta spicier?

If you love a bit of heat, there are several ways to spice up your Lemon Garlic Butter Pasta. One simple method is to increase the amount of red pepper flakes you add to the sauce. You can also include diced fresh chili peppers or a dash of hot sauce for an extra kick. Just remember to start with a small amount and adjust to your taste. Enjoy the heat!

What can I substitute for butter in this recipe?

If you’re looking for a butter substitute, there are several options you can try. Olive oil is a popular choice that adds a lovely flavor to the dish. You can also use vegan butter or coconut oil for a dairy-free version. Each substitute will give a slightly different taste, so feel free to experiment and find what you like best!

How long can I store leftovers of Lemon Garlic Butter Pasta?

Leftover Lemon Garlic Butter Pasta can be stored in an airtight container in the refrigerator for up to 3 days. When you’re ready to enjoy it again, simply reheat it in a skillet over low heat. You may want to add a splash of water or a little extra butter to help loosen the sauce. This way, you can savor the delicious flavors all over again!

Conclusion on Lemon Garlic Butter Pasta Recipe

In conclusion, the Lemon Garlic Butter Pasta is a delightful dish that combines simplicity with vibrant flavors. This recipe is perfect for anyone looking to create a quick yet impressive meal. With just a handful of ingredients, you can whip up a dish that feels gourmet and satisfies the taste buds.

Whether you choose to stick with the classic version or explore variations by adding proteins or vegetables, this pasta recipe is versatile and adaptable. The bright notes of lemon, the richness of butter, and the savory garlic create a harmonious blend that is hard to resist. Plus, the ease of preparation makes it an ideal choice for busy weeknights or special occasions.

As you embark on your culinary journey with this Lemon Garlic Butter Pasta Recipe, remember to enjoy the process. Cooking is not just about the end result; it’s about the experience and the joy of sharing delicious food with loved ones. So gather your ingredients, follow the steps, and savor every bite of this delightful dish!

We hope you find this recipe as enjoyable to make as it is to eat. Happy cooking!

Shrimp Scampi Pasta Recipe: A Quick and Delicious Meal

Introduction to Shrimp Scampi Pasta Recipe

Welcome to the delightful world of Shrimp Scampi Pasta! This dish is a perfect blend of flavors that will tantalize your taste buds. Imagine succulent shrimp sautéed in a rich garlic butter sauce, tossed with perfectly cooked pasta. It’s a meal that’s not only delicious but also quick to prepare, making it ideal for busy weeknights or special occasions.

Originating from Italian cuisine, Shrimp Scampi has become a favorite in many households. The combination of garlic, lemon, and fresh herbs creates a vibrant taste that pairs beautifully with the shrimp. Plus, the dish is versatile, allowing you to customize it to your liking. Whether you prefer a bit of heat from red pepper flakes or a creamy texture with added heavy cream, this recipe can adapt to your preferences.

In this article, we will guide you through the ingredients, preparation steps, and variations of this classic dish. You’ll learn how to make a Shrimp Scampi Pasta Recipe that not only impresses your family and friends but also brings joy to your dining table. So, let’s dive into the details and get cooking!

Ingredients for Shrimp Scampi Pasta Recipe

To create a mouthwatering Shrimp Scampi Pasta, you’ll need a few key ingredients. Each component plays a vital role in building the dish’s rich flavor profile. Here’s what you’ll need:

  • 8 ounces linguine or spaghetti: Choose your favorite pasta type for the perfect base.
  • 1 pound large shrimp: Make sure they are peeled and deveined for easy cooking.
  • 4 tablespoons unsalted butter: This adds a creamy richness to the sauce.
  • 4 tablespoons olive oil: A healthy fat that enhances the flavor of the dish.
  • 4 cloves garlic: Minced garlic brings a wonderful aroma and taste.
  • 1/2 teaspoon red pepper flakes: Adjust this to your spice preference for a kick.
  • 1/2 cup dry white wine: This adds depth; you can substitute with chicken broth if preferred.
  • 1 lemon: Both the juice and zest will brighten the dish.
  • 1/4 cup fresh parsley: Chopped parsley adds freshness and color.
  • Salt and pepper: Essential for seasoning to taste.
  • Grated Parmesan cheese: Optional, but it adds a delicious finishing touch.

Gathering these ingredients will set you on the right path to making a delightful Shrimp Scampi Pasta Recipe. Each item contributes to the overall taste, ensuring a satisfying meal that everyone will love. Now that you have your ingredients ready, let’s move on to the preparation steps!

Preparation of Shrimp Scampi Pasta Recipe

Now that you have gathered all your ingredients, it’s time to prepare your Shrimp Scampi Pasta. This process is straightforward and quick, allowing you to enjoy a delicious meal in no time. Let’s break it down into easy steps.

Step 1: Preparing the Shrimp

First, ensure your shrimp are ready to go. If you haven’t done so already, peel and devein the shrimp. This step is crucial as it removes the shell and the digestive tract, making the shrimp more enjoyable to eat. Rinse the shrimp under cold water and pat them dry with a paper towel. This helps the shrimp sear nicely in the pan. Once prepared, season them lightly with salt and pepper. This simple seasoning enhances their natural flavor.

Step 2: Cooking the Pasta

Next, bring a large pot of salted water to a boil. Add your linguine or spaghetti and cook according to the package instructions until al dente. This usually takes about 8-10 minutes. Remember to stir occasionally to prevent the pasta from sticking together. Once cooked, reserve 1/2 cup of the pasta water, then drain the pasta in a colander. Set it aside while you prepare the sauce. This step is essential as the reserved pasta water can help adjust the sauce’s consistency later.

Step 3: Making the Scampi Sauce

In a large skillet, heat the butter and olive oil over medium heat. Once melted, add the minced garlic and red pepper flakes. Sauté for about 1 minute until the garlic is fragrant but not browned. Burning the garlic can lead to a bitter taste, so keep an eye on it! After that, add the shrimp to the skillet. Cook for 2-3 minutes, stirring occasionally, until the shrimp turn pink and opaque. This indicates they are cooked through. Next, pour in the white wine (or chicken broth) and lemon juice. Stir well and let it simmer for 2-3 minutes to reduce slightly, allowing the flavors to meld together.

Step 4: Combining Ingredients

Now it’s time to bring everything together! Add the drained pasta to the skillet with the shrimp and sauce. Toss gently to coat the pasta evenly. If the mixture seems dry, gradually add the reserved pasta water until you reach your desired consistency. Finally, stir in the lemon zest and chopped parsley. Taste and adjust the seasoning with more salt and pepper if needed. Your Shrimp Scampi Pasta is now ready to be served!

Variation of Shrimp Scampi Pasta Recipe

While the classic Shrimp Scampi Pasta Recipe is delicious on its own, there are many ways to switch things up! You can experiment with alternative ingredients or try different cooking methods to create a unique dish that suits your taste. Let’s explore some exciting variations!

Alternative Ingredients for Shrimp Scampi Pasta Recipe

One of the best things about cooking is the ability to customize recipes. Here are some alternative ingredients you can use in your Shrimp Scampi Pasta:

  • Protein Substitutes: If shrimp isn’t your favorite, consider using scallops or chicken. Both options work well with the garlic and lemon flavors.
  • Pasta Choices: While linguine or spaghetti is traditional, you can use fettuccine, penne, or even gluten-free pasta for a different texture.
  • Herbs and Greens: Fresh basil or arugula can replace parsley for a different flavor profile. You can also add spinach for extra nutrition.
  • Vegetables: Toss in some cherry tomatoes, bell peppers, or zucchini for added color and crunch. These veggies can enhance the dish’s freshness.
  • Spice Level: Adjust the red pepper flakes to your liking. For a milder dish, reduce the amount, or for more heat, add a dash of hot sauce.

These alternative ingredients can help you create a Shrimp Scampi Pasta Recipe that feels fresh and exciting every time you make it!

Different Cooking Methods for Shrimp Scampi Pasta Recipe

In addition to changing ingredients, you can also try different cooking methods to prepare your Shrimp Scampi Pasta. Here are a few ideas:

  • Oven-Baked Version: For a baked twist, combine the cooked pasta, shrimp, and sauce in a baking dish. Top with breadcrumbs and cheese, then bake at 350°F for about 15-20 minutes until golden and bubbly.
  • Grilled Shrimp: Instead of sautéing, marinate the shrimp in olive oil, garlic, and lemon juice, then grill them. Toss the grilled shrimp with the pasta and sauce for a smoky flavor.
  • One-Pan Method: To save on dishes, cook the pasta directly in the sauce. Add the uncooked pasta, shrimp, and sauce ingredients to a large skillet with enough liquid. Cook until the pasta is tender and absorbs the flavors.

These cooking methods can add variety to your Shrimp Scampi Pasta Recipe, making it a fun dish to prepare and enjoy!

Cooking Note for Shrimp Scampi Pasta Recipe

When preparing your Shrimp Scampi Pasta, a few cooking notes can help ensure your dish turns out perfectly every time. These tips will enhance the flavors and textures, making your meal even more enjoyable.

First, always use fresh shrimp if possible. Fresh shrimp not only taste better but also have a firmer texture. If you must use frozen shrimp, make sure to thaw them completely before cooking. This helps them cook evenly and prevents a rubbery texture.

Next, timing is crucial in this recipe. The shrimp cook quickly, so keep an eye on them. Overcooking can lead to tough shrimp, which is not what you want. As soon as they turn pink and opaque, they are ready to be removed from the heat.

Another important note is to adjust the seasoning to your taste. The balance of salt, pepper, and lemon juice can make a big difference. Taste the sauce before adding the pasta, and feel free to tweak it. A little extra lemon juice can brighten the dish, while more red pepper flakes can add heat.

Lastly, remember that the reserved pasta water is your friend! This starchy water can help bind the sauce to the pasta, creating a silky texture. Add it gradually until you reach your desired consistency. This step is especially helpful if you prefer a saucier dish.

By keeping these cooking notes in mind, you’ll be well on your way to mastering the Shrimp Scampi Pasta Recipe. Enjoy the process, and don’t hesitate to make it your own!

Serving Suggestions for Shrimp Scampi Pasta Recipe

Once your Shrimp Scampi Pasta is ready, it’s time to think about how to serve it! Presentation can elevate your dining experience, making the meal even more enjoyable. Here are some delightful serving suggestions to consider:

  • Garnish with Fresh Herbs: A sprinkle of fresh parsley or basil on top adds a pop of color and freshness. It also enhances the dish’s aroma, making it more inviting.
  • Pair with a Side Salad: A light green salad with a simple vinaigrette complements the richness of the pasta. Consider using mixed greens, cherry tomatoes, and cucumbers for a refreshing contrast.
  • Serve with Garlic Bread: Crispy garlic bread is a classic side that pairs perfectly with Shrimp Scampi Pasta. It’s great for soaking up the delicious sauce!
  • Offer Lemon Wedges: Serving lemon wedges on the side allows guests to add a splash of fresh lemon juice to their plates. This can brighten the flavors even more.
  • Wine Pairing: A chilled glass of white wine, such as Sauvignon Blanc or Pinot Grigio, complements the dish beautifully. The wine’s acidity balances the richness of the butter and shrimp.
  • Top with Cheese: If you enjoy cheese, sprinkle some grated Parmesan on top just before serving. It adds a savory touch that enhances the overall flavor.

These serving suggestions can help you create a memorable dining experience with your Shrimp Scampi Pasta Recipe. Whether it’s a casual family dinner or a special occasion, these ideas will impress your guests and make the meal feel complete. Enjoy your delicious creation!

Tips for Perfecting Your Shrimp Scampi Pasta Recipe

To truly master the art of making Shrimp Scampi Pasta, a few tips can elevate your dish from good to great. These simple yet effective suggestions will help you achieve the perfect balance of flavors and textures. Let’s dive into some expert tips that will make your cooking experience enjoyable and your meal unforgettable!

  • Choose Quality Ingredients: The quality of your shrimp and other ingredients can significantly impact the final dish. Opt for fresh, wild-caught shrimp whenever possible. Fresh ingredients not only taste better but also provide a more vibrant flavor.
  • Don’t Overcook the Shrimp: Keep a close eye on the shrimp while cooking. They only need 2-3 minutes to become perfectly tender. Overcooking can lead to a rubbery texture, so remove them from the heat as soon as they turn pink and opaque.
  • Use the Right Pasta: While linguine and spaghetti are traditional choices, feel free to experiment with other pasta types. Just ensure that the pasta you choose can hold the sauce well. Thicker pastas like fettuccine can also work beautifully.
  • Balance the Flavors: Taste your sauce before adding the pasta. Adjust the seasoning with salt, pepper, and lemon juice to achieve the perfect balance. A little extra lemon juice can brighten the dish, while more red pepper flakes can add a kick.
  • Incorporate Fresh Herbs: Fresh herbs like parsley or basil can enhance the dish’s flavor. Add them at the end of cooking to preserve their bright taste and color. This small touch can make a big difference!
  • Experiment with Add-Ins: Don’t hesitate to add your favorite vegetables or proteins. Spinach, cherry tomatoes, or even asparagus can add color and nutrition. Just remember to adjust cooking times accordingly.
  • Save Some Pasta Water: The reserved pasta water is a secret weapon! It contains starch that helps bind the sauce to the pasta. Add it gradually until you reach your desired consistency, ensuring a silky finish.
  • Serve Immediately: Shrimp Scampi Pasta is best enjoyed fresh. Serve it right after cooking to maintain the perfect texture and flavor. If you let it sit too long, the pasta can absorb the sauce and become dry.

By following these tips, you’ll be well on your way to perfecting your Shrimp Scampi Pasta Recipe. Each suggestion is designed to enhance your cooking experience and ensure that every bite is bursting with flavor. Happy cooking!

Breakdown of Time for Shrimp Scampi Pasta Recipe

Understanding the time needed for each step in your Shrimp Scampi Pasta Recipe can help you plan your cooking efficiently. Here’s a simple breakdown of the time required for preparation and cooking, ensuring you can enjoy this delicious meal without any rush.

Prep Time

The prep time for this Shrimp Scampi Pasta Recipe is approximately 15 minutes. During this time, you will gather all your ingredients, peel and devein the shrimp, and chop the garlic and parsley. Having everything ready before you start cooking makes the process smoother and more enjoyable.

Cooking Time

The cooking time is about 15 minutes. This includes boiling the pasta, sautéing the shrimp, and combining everything in the skillet. The quick cooking time is one of the reasons this dish is perfect for busy weeknights. You can have a delicious meal on the table in no time!

Total Time

In total, you can expect to spend around 30 minutes from start to finish. This includes both prep and cooking time. With just half an hour, you can create a flavorful Shrimp Scampi Pasta that will impress your family and friends. It’s a fantastic option for those who want a quick yet satisfying meal!

Nutritional Information for Shrimp Scampi Pasta Recipe

Understanding the nutritional content of your meals is essential for maintaining a balanced diet. The Shrimp Scampi Pasta Recipe not only delights your taste buds but also provides a good source of nutrients. Here’s a breakdown of the nutritional information per serving, helping you make informed choices while enjoying this delicious dish.

Calories

450 calories. This calorie count includes the pasta, shrimp, and the flavorful sauce made from butter, olive oil, and garlic. While it’s a satisfying meal, it’s important to enjoy it in moderation, especially if you’re watching your calorie intake.

Protein

30 grams per serving. The shrimp contributes significantly to this protein content, making it an excellent choice for those looking to increase their protein intake. Protein is essential for muscle repair and growth, making this meal a nutritious option for active individuals.

Sodium

800 milligrams per serving. This amount can vary based on the type of broth or seasoning used. If you’re concerned about sodium levels, consider using low-sodium broth and adjusting the salt to your taste. Balancing sodium intake is crucial for maintaining healthy blood pressure levels.

By keeping these nutritional facts in mind, you can enjoy your Shrimp Scampi Pasta Recipe while being aware of its health benefits. This dish not only satisfies your cravings but also provides essential nutrients to fuel your day!

FAQs about Shrimp Scampi Pasta Recipe

What type of pasta is best for Shrimp Scampi?

When it comes to Shrimp Scampi, the best pasta choices are linguine or spaghetti. These types of pasta have a long, thin shape that allows them to hold onto the delicious sauce well. However, you can also use fettuccine or even penne if you prefer. The key is to choose a pasta that can soak up the flavors of the garlic butter sauce, making every bite delightful!

Can I use frozen shrimp for Shrimp Scampi Pasta Recipe?

Absolutely! Frozen shrimp can be a convenient option for your Shrimp Scampi Pasta Recipe. Just make sure to thaw them completely before cooking. You can do this by placing them in the refrigerator overnight or running them under cold water for a quick thaw. Once thawed, follow the same cooking instructions as you would for fresh shrimp. They will still turn out delicious!

How can I make Shrimp Scampi Pasta Recipe gluten-free?

Making a gluten-free version of Shrimp Scampi Pasta is easy! Simply substitute regular pasta with gluten-free pasta. There are many options available, such as rice pasta or quinoa pasta, that work well in this recipe. Just be sure to follow the cooking instructions on the package, as gluten-free pasta may have different cooking times. Enjoy your gluten-free meal without missing out on flavor!

What can I serve with Shrimp Scampi Pasta Recipe?

There are plenty of delicious options to serve alongside your Shrimp Scampi Pasta. A light green salad with a simple vinaigrette is a great choice, as it adds freshness to the meal. Garlic bread is another classic side that pairs perfectly, allowing you to soak up the tasty sauce. You can also serve it with steamed vegetables or a glass of white wine to enhance the dining experience. These sides will complement your dish beautifully!

Conclusion on Shrimp Scampi Pasta Recipe

In conclusion, the Shrimp Scampi Pasta Recipe is a delightful dish that brings together the best of flavors and textures. With its quick preparation and simple ingredients, it’s perfect for both busy weeknights and special occasions. The combination of succulent shrimp, garlic, and a zesty lemon sauce creates a meal that is not only satisfying but also impressive.

As you’ve learned throughout this article, there are numerous ways to customize your Shrimp Scampi Pasta. Whether you choose to experiment with different proteins, pasta types, or cooking methods, the possibilities are endless. This versatility allows you to make the dish your own, ensuring that it remains a favorite in your household.

Remember to pay attention to the cooking notes and tips provided. They will help you achieve the perfect balance of flavors and textures, making your Shrimp Scampi Pasta a standout dish. Don’t forget to serve it with your favorite sides and garnishes to elevate the dining experience.

So, gather your ingredients, follow the steps, and enjoy the process of creating this delicious meal. Your family and friends will surely appreciate the effort, and you’ll find joy in sharing this delightful dish. Happy cooking, and may your Shrimp Scampi Pasta always be a hit!

Crispy Air Fryer Pasta Chips Recipe is a must-try!

Introduction to Crispy Air Fryer Pasta Chips Recipe

What Are Pasta Chips?

Pasta chips are a delightful twist on traditional snacks. They are made by cooking pasta until it’s just right, then seasoning and crisping it up. The result? A crunchy, flavorful treat that’s perfect for munching. These chips can be enjoyed on their own or paired with dips. They offer a fun way to enjoy pasta in a new form, making them a hit at parties or as a quick snack at home.

Why Choose the Air Fryer for This Recipe?

The air fryer is a fantastic tool for making crispy pasta chips. It uses hot air to cook food, which means you can achieve that perfect crunch without deep frying. This method is healthier, as it requires less oil. Plus, the air fryer cooks quickly, making it easy to whip up a batch of pasta chips in no time. With the air fryer, you can enjoy a delicious snack that’s both crispy and guilt-free!

Ingredients for Crispy Air Fryer Pasta Chips Recipe

To create your own crispy air fryer pasta chips, you’ll need a few simple ingredients. Here’s what you’ll need:

  • 8 ounces uncooked pasta (choose your favorite type, like rotini or penne)
  • 2 tablespoons olive oil
  • 1 teaspoon garlic powder
  • 1 teaspoon onion powder
  • 1 teaspoon Italian seasoning
  • ½ teaspoon salt
  • ¼ teaspoon black pepper
  • ¼ cup grated Parmesan cheese
  • Fresh parsley, chopped (for garnish, optional)

These ingredients come together to create a deliciously crunchy snack. The pasta serves as the base, while the olive oil helps the seasonings stick and adds flavor. Garlic powder and onion powder bring a savory taste, while Italian seasoning adds a hint of herbiness. The salt and pepper enhance the overall flavor, and the Parmesan cheese gives a delightful cheesy finish. Don’t forget the fresh parsley for a pop of color and freshness!

Step-by-Step Preparation of Crispy Air Fryer Pasta Chips Recipe

Step 1: Cook the Pasta

First, you need to cook the pasta. Start by boiling a pot of water. Once the water is bubbling, add your uncooked pasta. Cook it according to the package instructions until it’s al dente. This usually takes about 8 to 10 minutes. After cooking, drain the pasta in a colander. Rinse it under cold water to stop the cooking process. This step is important to keep the pasta from getting mushy. Finally, pat the pasta dry with a paper towel. This helps the seasoning stick better.

Step 2: Season the Pasta

Now it’s time to add flavor! In a large bowl, combine the cooked pasta with olive oil. Then, sprinkle in the garlic powder, onion powder, Italian seasoning, salt, and black pepper. Toss everything together until the pasta is evenly coated. Make sure every piece of pasta gets some seasoning. This will ensure that each chip is bursting with flavor!

Step 3: Preheat the Air Fryer

Before you start cooking, preheat your air fryer. Set it to 400°F (200°C) and let it heat up for about 5 minutes. Preheating is crucial because it helps the pasta chips cook evenly and become crispy. While the air fryer is warming up, you can prepare the pasta for frying.

Step 4: Air Fry the Pasta

Once the air fryer is ready, it’s time to cook the pasta. Place the seasoned pasta in a single layer in the air fryer basket. If you have a small air fryer, you may need to do this in batches. Cooking in a single layer allows the hot air to circulate properly, giving you that perfect crunch. Cook the pasta for 8 to 10 minutes. Remember to shake the basket halfway through to ensure even cooking. Keep an eye on them; you want them golden brown and crispy!

Step 5: Cool and Serve

After cooking, carefully remove the pasta chips from the air fryer. They will be hot, so use tongs or a spatula. Immediately sprinkle the grated Parmesan cheese over the chips while they are still hot. This helps the cheese melt slightly and stick to the chips. Toss gently to coat. Finally, serve your crispy air fryer pasta chips warm. You can garnish them with fresh parsley for a touch of color and flavor. Enjoy your delicious snack!

Variations of Crispy Air Fryer Pasta Chips Recipe

Different Seasoning Options

One of the best things about making crispy air fryer pasta chips is the ability to customize the flavors. You can easily switch up the seasonings to suit your taste. For a spicy kick, consider adding ½ teaspoon of red pepper flakes to the seasoning mix. This will give your chips a delightful heat that pairs well with dips.

If you prefer a more savory flavor, try adding smoked paprika or cumin. These spices can add a unique twist to your pasta chips. You can also experiment with different herbs, such as dill or rosemary, for a fresh taste. Don’t hesitate to mix and match your favorite spices to create a flavor profile that you love!

Using Different Types of Pasta

While rotini and penne are popular choices, you can use various types of pasta for your chips. Each type will give a different texture and taste. For instance, bowtie pasta (farfalle) can add a fun shape and crunch. Or, try using fusilli for a spiral twist that holds onto the seasoning beautifully.

If you’re feeling adventurous, consider using whole wheat or gluten-free pasta. These options can provide a healthier alternative while still delivering that satisfying crunch. Just remember to adjust the cooking time slightly, as different pasta shapes may require different cooking durations. Enjoy experimenting with your favorite pasta shapes to find the perfect crispy air fryer pasta chips!

Cooking Note for Crispy Air Fryer Pasta Chips Recipe

When making crispy air fryer pasta chips, there are a few important cooking notes to keep in mind. First, ensure that your pasta is cooked al dente. This means it should be firm to the bite. Overcooked pasta can lead to soggy chips, which we want to avoid. Rinsing the pasta under cold water after cooking is crucial. It stops the cooking process and helps to remove excess starch, which can make the chips stick together.

Another key point is to dry the pasta thoroughly after rinsing. Use a paper towel to pat it dry. This step is essential because moisture can prevent the pasta from becoming crispy in the air fryer. If the pasta is too wet, it may steam instead of fry, resulting in a less desirable texture.

When air frying, remember to arrange the pasta in a single layer. This allows hot air to circulate around each piece, ensuring even cooking. If your air fryer is small, it’s better to cook in batches. Overcrowding the basket can lead to unevenly cooked chips.

Lastly, keep an eye on the cooking time. Air fryers can vary in performance, so check your pasta chips a minute or two before the suggested cooking time. You want them to be golden brown and crispy, but not burnt. With these tips in mind, you’ll be well on your way to making the perfect crispy air fryer pasta chips!

Serving Suggestions for Crispy Air Fryer Pasta Chips Recipe

Dipping Sauces

One of the best parts of crispy air fryer pasta chips is how well they pair with various dipping sauces. These chips are versatile and can complement many flavors. Here are some delicious dipping options to consider:

  • Marinara Sauce: A classic choice! The rich tomato flavor pairs perfectly with the crispy chips.
  • Ranch Dressing: Creamy and tangy, ranch dressing adds a delightful contrast to the crunch of the chips.
  • Garlic Aioli: For a gourmet touch, try garlic aioli. Its creamy texture and garlic flavor enhance the chips beautifully.
  • Cheese Dip: Melted cheese dip is a crowd-pleaser. It’s warm, gooey, and perfect for dipping!
  • Spicy Salsa: If you like a bit of heat, spicy salsa can add a zesty kick to your snack.

Feel free to mix and match these sauces based on your mood or the occasion. You can even create a dipping sauce platter for parties, allowing guests to choose their favorites!

Pairing with Other Dishes

Crispy air fryer pasta chips can also be a fun addition to your meal. Here are some ideas for pairing them with other dishes:

  • Salads: Serve the pasta chips on top of a fresh salad for added crunch. They can replace croutons and add a unique twist.
  • Charcuterie Boards: Include them on a charcuterie board alongside meats, cheeses, and fruits. They add a delightful crunch to the mix.
  • Soup: Use the chips as a crunchy topping for soups. They can add texture to creamy soups like tomato or butternut squash.
  • Appetizer Platters: Serve them as part of an appetizer platter with other finger foods. They’re perfect for parties or game nights!

These serving suggestions can elevate your crispy air fryer pasta chips experience. Whether you enjoy them as a snack or as part of a meal, they are sure to impress!

Tips for Perfecting Your Crispy Air Fryer Pasta Chips Recipe

To make the best crispy air fryer pasta chips, a few tips can help you achieve that perfect crunch and flavor. Here are some helpful suggestions to keep in mind:

  • Choose the Right Pasta: Opt for pasta shapes that have ridges or curves, like rotini or fusilli. These shapes hold onto the seasoning better and create a more satisfying crunch.
  • Don’t Skip the Drying Step: After rinsing your pasta, ensure it’s thoroughly dried. Excess moisture can lead to soggy chips. Patting them dry with a paper towel is essential for achieving that crispy texture.
  • Use Quality Olive Oil: A good quality olive oil not only enhances flavor but also helps the seasoning stick to the pasta. It’s worth investing in a nice bottle for this recipe!
  • Experiment with Seasonings: Don’t be afraid to get creative! Try adding different spices or herbs to your seasoning mix. You can even create a sweet version by using cinnamon and sugar for a dessert twist.
  • Monitor Cooking Time: Every air fryer is different. Keep an eye on your pasta chips as they cook. Check them a minute or two before the suggested time to prevent burning.
  • Shake the Basket: Remember to shake the air fryer basket halfway through cooking. This ensures even cooking and helps all sides of the pasta chips get crispy.
  • Serve Immediately: For the best taste and texture, serve your pasta chips right after cooking. They are at their crispiest when fresh out of the air fryer.
  • Store Properly: If you have leftovers, store them in an airtight container. However, keep in mind that they may lose some crispiness over time. Reheat them in the air fryer for a few minutes to regain that crunch.

By following these tips, you’ll be well on your way to creating the ultimate crispy air fryer pasta chips. Enjoy experimenting and perfecting your recipe!

Breakdown of Time for Crispy Air Fryer Pasta Chips Recipe

Prep Time

The prep time for your crispy air fryer pasta chips is quite quick. You’ll need about 15 minutes to gather your ingredients and prepare the pasta. This includes boiling the water, cooking the pasta, and mixing in the seasonings. It’s a simple process that won’t take much of your time, making it perfect for a quick snack or appetizer.

Cooking Time

Once your pasta is seasoned and your air fryer is preheated, the cooking time is around 8 to 10 minutes. During this time, you’ll want to shake the basket halfway through to ensure even cooking. This short cooking time is one of the best features of using an air fryer. You’ll have crispy pasta chips ready in no time!

Total Time

In total, you can expect to spend about 25 to 30 minutes from start to finish. This includes both prep and cooking time. With such a quick turnaround, you can easily whip up a batch of crispy air fryer pasta chips whenever the craving strikes. Whether for a movie night or a gathering with friends, these chips are a fantastic choice!

Nutritional Information for Crispy Air Fryer Pasta Chips Recipe

Calories

When it comes to snacking, knowing the calorie content is essential. Each serving of crispy air fryer pasta chips contains approximately 210 calories. This makes them a relatively light snack option compared to traditional fried snacks. You can enjoy these chips without feeling guilty, especially when you’re looking for a tasty treat that won’t derail your healthy eating goals.

Protein

Protein is an important nutrient that helps keep you full and satisfied. Each serving of these pasta chips provides about 8 grams of protein. This protein content comes from the pasta and the added Parmesan cheese. Including protein in your snacks can help curb hunger and provide energy, making these chips a smart choice for a quick bite.

Sodium

Sodium is another key factor to consider in your diet. Each serving of crispy air fryer pasta chips contains around 400 milligrams of sodium. While this is a moderate amount, it’s always good to be mindful of your sodium intake, especially if you’re watching your salt consumption. You can adjust the salt in the recipe to suit your dietary needs, ensuring you enjoy these chips while keeping your health in check.

FAQs About Crispy Air Fryer Pasta Chips Recipe

Can I use gluten-free pasta for this recipe?

Absolutely! You can use gluten-free pasta to make crispy air fryer pasta chips. Many brands offer gluten-free options that work just as well as traditional pasta. Just be sure to follow the cooking instructions on the package, as gluten-free pasta may have different cooking times. Once cooked, season and air fry them just like you would with regular pasta. Enjoy your delicious, gluten-free snack!

How do I store leftover pasta chips?

If you have leftover crispy air fryer pasta chips, store them in an airtight container. This will help keep them fresh. However, keep in mind that they may lose some of their crispiness over time. To revive their crunch, simply reheat them in the air fryer for a few minutes at 350°F (175°C). This quick reheating will help restore their delightful texture, making them enjoyable even after the first serving!

Can I make these pasta chips in the oven instead of an air fryer?

Yes, you can definitely make pasta chips in the oven! To do this, preheat your oven to 400°F (200°C). Spread the seasoned pasta in a single layer on a baking sheet lined with parchment paper. Bake for about 15 to 20 minutes, tossing them halfway through to ensure even cooking. Keep an eye on them to prevent burning. While the oven method may take a bit longer, you’ll still achieve deliciously crispy pasta chips!

Conclusion on Crispy Air Fryer Pasta Chips Recipe

In conclusion, the crispy air fryer pasta chips recipe is a delightful and innovative way to enjoy pasta. With just a few simple ingredients and steps, you can create a crunchy snack that’s perfect for any occasion. Whether you’re hosting a party, enjoying a movie night, or simply craving a tasty treat, these pasta chips are sure to impress.

The versatility of this recipe allows you to customize flavors and experiment with different types of pasta. From savory seasonings to spicy variations, the possibilities are endless. Plus, using an air fryer means you can achieve that satisfying crunch without the guilt of deep frying. It’s a win-win!

Don’t forget to pair your crispy pasta chips with delicious dipping sauces or serve them alongside your favorite dishes. They can elevate any meal or snack time, making them a fantastic addition to your culinary repertoire. So, gather your ingredients, fire up the air fryer, and enjoy the delightful crunch of homemade pasta chips!

Happy cooking, and may your crispy air fryer pasta chips bring joy and flavor to your table!

Pineapple Cream Cheese Pie Recipe is a must-try dessert!

Introduction to Pineapple Cream Cheese Pie Recipe

Welcome to the delightful world of desserts! Today, we’re diving into a sweet treat that’s sure to brighten your day: the Pineapple Cream Cheese Pie. This recipe combines the creamy richness of cream cheese with the tropical sweetness of pineapple, creating a dessert that’s both refreshing and indulgent. Whether you’re hosting a summer barbecue or simply craving something sweet, this pie is a perfect choice.

What Makes Pineapple Cream Cheese Pie Special?

What sets the Pineapple Cream Cheese Pie apart from other desserts? First, it’s all about the flavor. The combination of tangy cream cheese and sweet pineapple creates a harmonious balance that dances on your taste buds. Plus, the graham cracker crust adds a delightful crunch, making each bite a delightful experience.

Another reason this pie shines is its simplicity. With just a few ingredients and easy steps, you can whip up this delicious dessert in no time. It’s perfect for both novice bakers and seasoned chefs. The best part? You can prepare it ahead of time, allowing the flavors to meld beautifully in the refrigerator.

Lastly, the Pineapple Cream Cheese Pie is versatile. You can customize it with various fruits or toppings, making it a fun dessert to experiment with. So, gather your ingredients and let’s embark on this sweet journey together!

Ingredients for Pineapple Cream Cheese Pie Recipe

To create the delightful Pineapple Cream Cheese Pie, you’ll need a handful of simple ingredients. Each one plays a crucial role in building the flavors and textures that make this dessert so special. Here’s what you’ll need:

  • 1 cup crushed graham crackers: This will form the base of your pie, providing a crunchy texture.
  • 1/4 cup granulated sugar: This adds sweetness to the crust and balances the flavors.
  • 1/2 cup unsalted butter, melted: The butter helps bind the crust together and adds richness.
  • 8 ounces cream cheese, softened: Cream cheese is the star of the filling, giving it a creamy and smooth consistency.
  • 1 cup powdered sugar: This sweetens the cream cheese mixture and helps achieve a light texture.
  • 1 teaspoon vanilla extract: Vanilla enhances the overall flavor, making it more aromatic.
  • 1 cup crushed pineapple, drained: Pineapple adds a tropical twist and juicy sweetness to the filling.
  • 1 cup whipped topping: This lightens the filling and gives it a fluffy texture.

With these ingredients on hand, you’re ready to create a delicious Pineapple Cream Cheese Pie that will impress your family and friends. Let’s move on to the next step and learn how to prepare this delightful dessert!

Step-by-Step Preparation of Pineapple Cream Cheese Pie Recipe

Now that you have all your ingredients ready, it’s time to dive into the fun part: preparing your Pineapple Cream Cheese Pie! Follow these simple steps to create a delicious dessert that everyone will love.

Step 1: Preparing the Crust

First, let’s focus on the crust. Start by preheating your oven to 350°F (175°C). In a medium bowl, combine the crushed graham crackers, granulated sugar, and melted butter. Mix everything together until it’s well combined. The mixture should resemble wet sand.

Next, take a 9-inch pie pan and press the graham cracker mixture firmly into the bottom and up the sides. Make sure it’s even and compact. This will help create a sturdy crust. Bake the crust in the preheated oven for about 8-10 minutes, or until it turns lightly golden. Once done, remove it from the oven and let it cool completely.

Step 2: Making the Cream Cheese Filling

While the crust is cooling, let’s prepare the cream cheese filling. In a large mixing bowl, take the softened cream cheese and beat it with an electric mixer until it’s smooth and creamy. This step is crucial, as it ensures a lump-free filling.

Gradually add the powdered sugar and vanilla extract to the cream cheese. Continue mixing until everything is well combined. The mixture should be light and fluffy, making it a perfect base for your pie.

Step 3: Adding the Pineapple

Now it’s time to add the star ingredient: pineapple! Take your drained crushed pineapple and gently fold it into the cream cheese mixture. Be careful not to overmix, as you want to keep the filling light and airy. The pineapple will add a burst of flavor and moisture to your pie.

Step 4: Assembling the Pie

With the crust cooled and the filling ready, it’s time to assemble your pie. Pour the cream cheese and pineapple mixture into the cooled graham cracker crust. Use a spatula to spread it evenly across the crust. This will ensure that every slice has the perfect amount of filling.

Step 5: Chilling the Pie

After assembling the pie, it’s important to let it chill. Cover the pie with plastic wrap and place it in the refrigerator. Allow it to chill for at least 4 hours, or for the best results, overnight. This chilling time helps the flavors meld together and allows the pie to set properly.

Once chilled, your Pineapple Cream Cheese Pie will be ready to slice and serve. Get ready to enjoy a refreshing dessert that’s sure to impress!

Variations of Pineapple Cream Cheese Pie Recipe

While the classic Pineapple Cream Cheese Pie is delicious on its own, there are many fun variations you can try! These twists can add new flavors and textures, making your dessert even more exciting. Let’s explore some tropical twists and alternative crust options that will elevate your pie to the next level.

Tropical Twist Variations

If you want to add a little more tropical flair to your Pineapple Cream Cheese Pie, consider these delightful variations:

  • Shredded Coconut: Mix in 1/2 cup of shredded coconut into the cream cheese filling. This will give your pie a chewy texture and enhance the tropical vibe.
  • Mango or Passion Fruit: Swap out some of the crushed pineapple for crushed mango or passion fruit. This will add a unique flavor and a beautiful color to your pie.
  • Banana Slices: Layer fresh banana slices on top of the cream cheese filling before chilling. This adds a sweet and creamy element that pairs wonderfully with pineapple.
  • Citrus Zest: Add a teaspoon of lime or orange zest to the filling for a zesty kick. The citrus will brighten the flavors and make your pie even more refreshing.

These tropical twists will not only enhance the flavor but also make your Pineapple Cream Cheese Pie a standout dessert at any gathering!

Alternative Crust Options

If you’re looking to change up the crust, there are several alternative options you can try. Each one brings its own unique taste and texture:

  • Chocolate Cookie Crust: Use crushed chocolate cookies instead of graham crackers for a rich and decadent crust. This pairs beautifully with the creamy filling.
  • Almond Flour Crust: For a gluten-free option, combine almond flour with melted butter and a bit of sugar. This crust will add a nutty flavor and a crumbly texture.
  • Oreo Crust: Crush Oreo cookies and mix them with melted butter for a sweet and chocolatey crust. This is a fun twist that kids will love!
  • Shortbread Crust: Use a shortbread cookie base for a buttery and crumbly crust. This will add a rich flavor that complements the cream cheese filling.

These alternative crust options allow you to customize your Pineapple Cream Cheese Pie to suit your taste preferences. Feel free to mix and match these ideas to create your perfect dessert!

Cooking Note for Pineapple Cream Cheese Pie Recipe

When preparing your Pineapple Cream Cheese Pie, there are a few important cooking notes to keep in mind. These tips will help ensure that your pie turns out perfectly every time.

First, make sure your cream cheese is softened before you start mixing. This will make it easier to blend and create a smooth filling. You can leave it out at room temperature for about 30 minutes or microwave it for a few seconds. Just be careful not to melt it!

Next, draining the crushed pineapple is crucial. Excess moisture can make your filling too runny, which may affect the pie’s texture. Use a fine mesh strainer to remove as much liquid as possible. You want the pineapple to add flavor without making the filling soggy.

Also, remember to let your pie chill for the recommended time. Chilling not only helps the pie set but also allows the flavors to meld together beautifully. If you can, prepare it a day in advance. This will enhance the taste and make it even more delicious!

Lastly, when serving, consider garnishing your pie with fresh fruit or a sprinkle of toasted coconut. This adds a lovely touch and makes your dessert look even more inviting. Enjoy your baking adventure, and get ready to impress your friends and family with this delightful treat!

Serving Suggestions for Pineapple Cream Cheese Pie Recipe

Once your Pineapple Cream Cheese Pie is chilled and ready to serve, it’s time to think about how to present this delightful dessert. Here are some serving suggestions that will enhance the experience and make your pie even more enjoyable:

  • Garnish with Whipped Topping: A dollop of whipped topping on each slice adds a light and fluffy texture. It also enhances the visual appeal, making your pie look even more inviting.
  • Fresh Fruit Toppings: Consider adding fresh pineapple slices, strawberries, or kiwi on top of the pie. This not only adds color but also a burst of freshness that complements the creamy filling.
  • Drizzle with Chocolate or Caramel Sauce: A light drizzle of chocolate or caramel sauce can elevate the flavor profile. It adds a sweet touch that pairs beautifully with the tangy cream cheese and pineapple.
  • Serve with Ice Cream: For an extra indulgent treat, serve slices of pie with a scoop of vanilla or coconut ice cream. The cold ice cream contrasts nicely with the creamy pie.
  • Use a Decorative Plate: Present your pie on a decorative serving plate. A beautiful plate can make even the simplest dessert feel special and festive.
  • Pair with a Beverage: Consider serving your pie with a refreshing drink, such as iced tea, lemonade, or a tropical smoothie. This will enhance the overall experience and make it feel like a special occasion.

These serving suggestions will not only make your Pineapple Cream Cheese Pie look stunning but also enhance the flavors and textures. Whether it’s a family gathering or a casual get-together with friends, your pie is sure to be a hit!

Tips for Perfecting Your Pineapple Cream Cheese Pie Recipe

Creating the perfect Pineapple Cream Cheese Pie is all about attention to detail. With a few helpful tips, you can elevate your dessert to new heights. Here are some expert suggestions to ensure your pie turns out delicious every time:

  • Use Room Temperature Ingredients: For the best results, make sure your cream cheese and whipped topping are at room temperature. This helps them blend smoothly, resulting in a creamy filling without lumps.
  • Don’t Skip the Chilling Time: Allowing your pie to chill for at least 4 hours is essential. This not only helps the filling set but also allows the flavors to meld together beautifully. For optimal taste, chill overnight if possible.
  • Adjust Sweetness to Taste: Everyone has different preferences when it comes to sweetness. Feel free to adjust the amount of powdered sugar in the filling to suit your taste. Just remember, the pineapple adds natural sweetness too!
  • Experiment with Toppings: Get creative with your toppings! Consider adding toasted coconut, chopped nuts, or even a sprinkle of cinnamon for added flavor. These little touches can make a big difference.
  • Keep It Fresh: If you’re making the pie ahead of time, consider adding fresh fruit toppings just before serving. This keeps them vibrant and fresh, enhancing the overall presentation.
  • Use Quality Ingredients: The quality of your ingredients can greatly affect the final taste. Opt for fresh, high-quality cream cheese and real vanilla extract for the best flavor.
  • Practice Patience: When folding in the pineapple and whipped topping, be gentle. This helps maintain the light and airy texture of the filling, making each slice delightful.

By following these tips, you’ll be well on your way to mastering the Pineapple Cream Cheese Pie Recipe. Each bite will be a delicious reminder of your baking skills, and your friends and family will surely be impressed!

Breakdown of Time for Pineapple Cream Cheese Pie Recipe

Understanding the time needed for each step of the Pineapple Cream Cheese Pie Recipe is essential for planning your baking session. Here’s a detailed breakdown of the time you’ll need to prepare, cook, and chill your pie.

Prep Time

The prep time for this delightful dessert is approximately 20-25 minutes. This includes gathering your ingredients, preparing the graham cracker crust, and mixing the cream cheese filling. Make sure to have everything ready before you start, as this will make the process smoother and more enjoyable.

Cooking Time

The cooking time for the crust is about 8-10 minutes. You’ll want to keep an eye on it to ensure it turns lightly golden without burning. Once the crust is baked, you can move on to the next steps without any additional cooking time required for the filling.

Total Time

In total, you should expect to spend around 30-35 minutes actively working on the pie. However, don’t forget about the chilling time! For the best results, allow your pie to chill for at least 4 hours, or overnight if possible. This means the total time from start to finish, including chilling, can be up to 24 hours. But don’t worry, most of that time is hands-off, allowing you to relax while your pie sets!

By planning your time wisely, you can enjoy the process of making this delicious Pineapple Cream Cheese Pie without any stress. Happy baking!

Nutritional Information for Pineapple Cream Cheese Pie Recipe

Understanding the nutritional content of your Pineapple Cream Cheese Pie is important, especially if you’re mindful of your diet. This delicious dessert not only satisfies your sweet tooth but also provides some nutritional benefits. Here’s a breakdown of the key nutritional information per serving:

Calories

Each slice of Pineapple Cream Cheese Pie contains approximately 220 calories. This makes it a delightful treat that can fit into a balanced diet. While it’s important to enjoy desserts in moderation, this pie offers a satisfying sweetness without being overly indulgent.

Protein

In terms of protein, each serving provides about 2 grams. While this isn’t a high-protein dessert, the cream cheese does contribute some protein to the mix. Pairing this pie with a protein-rich snack or meal can help balance your overall intake for the day.

Sodium

The sodium content in each slice is around 150 milligrams. This is relatively low, making it a suitable option for those watching their sodium intake. However, if you’re on a strict low-sodium diet, it’s always good to keep track of all ingredients used in the recipe.

Overall, the Pineapple Cream Cheese Pie is a delightful dessert that can be enjoyed without too much guilt. With its refreshing flavors and creamy texture, it’s a perfect addition to any gathering or a sweet treat for yourself. Just remember to enjoy it in moderation!

FAQs about Pineapple Cream Cheese Pie Recipe

Can I use fresh pineapple instead of canned?

Absolutely! You can use fresh pineapple in your Pineapple Cream Cheese Pie. Just make sure to chop it finely and drain any excess juice. Fresh pineapple will add a vibrant flavor and a delightful texture to your pie. It’s a great way to enhance the tropical taste!

How long can I store the Pineapple Cream Cheese Pie?

Your Pineapple Cream Cheese Pie can be stored in the refrigerator for up to 3-4 days. Make sure to cover it with plastic wrap or store it in an airtight container to keep it fresh. However, for the best taste and texture, it’s recommended to enjoy it within the first couple of days after making it.

Can I make Pineapple Cream Cheese Pie ahead of time?

Yes, you can definitely make this pie ahead of time! In fact, preparing it a day in advance is a great idea. This allows the flavors to meld together beautifully and ensures that the pie sets properly. Just remember to keep it refrigerated until you’re ready to serve!

What can I substitute for cream cheese in this recipe?

If you’re looking for a substitute for cream cheese, there are a few options you can try. One popular alternative is Greek yogurt, which provides a similar creamy texture with a tangy flavor. You can also use mascarpone cheese for a richer taste. For a dairy-free option, consider using a vegan cream cheese made from nuts or tofu. Just keep in mind that the flavor and texture may vary slightly with these substitutes.

Conclusion on Pineapple Cream Cheese Pie Recipe

In conclusion, the Pineapple Cream Cheese Pie is a delightful dessert that brings together the best of both worlds: creamy and fruity. With its simple preparation and refreshing flavors, it’s a perfect treat for any occasion. Whether you’re celebrating a special event or just want to enjoy a sweet moment at home, this pie is sure to impress.

As you’ve seen, the recipe is versatile, allowing for various twists and adaptations. From adding tropical ingredients like coconut to experimenting with different crusts, the possibilities are endless. This means you can make it your own, tailoring it to your taste preferences and those of your guests.

Remember, the key to a successful Pineapple Cream Cheese Pie lies in the quality of your ingredients and the time you allow it to chill. By following the tips and variations provided, you can create a pie that not only looks beautiful but also tastes incredible.

So, gather your ingredients, roll up your sleeves, and get ready to create a dessert that will leave everyone asking for seconds. Enjoy the process, and most importantly, enjoy every delicious bite of your Pineapple Cream Cheese Pie!

Baked Italian Herb Chicken Meatballs that Wow Your Tastebuds!

Why You’ll Love This Baked Italian Herb Chicken Meatballs

These Baked Italian Herb Chicken Meatballs are a game-changer for your dinner routine. They come together in just 40 minutes, making them perfect for those hectic evenings. The blend of herbs creates a burst of flavor that dances on your taste buds. Plus, they’re baked, not fried, so you can enjoy a healthier option without sacrificing taste. Trust me, your family will be asking for seconds!

Ingredients for Baked Italian Herb Chicken Meatballs

Gathering the right ingredients is the first step to creating these delightful Baked Italian Herb Chicken Meatballs. Here’s what you’ll need:

  • Ground chicken: The star of the show! It’s lean and packed with protein, making it a healthier choice.
  • Breadcrumbs: These add texture and help bind the meatballs together. You can use regular or whole wheat for a healthier twist.
  • Parmesan cheese: A sprinkle of this adds a rich, savory flavor that elevates the dish.
  • Fresh parsley: This herb brings a pop of color and freshness. Feel free to substitute with basil or cilantro if you prefer.
  • Garlic powder: For that aromatic kick! It’s a convenient way to infuse flavor without the fuss of fresh garlic.
  • Onion powder: Adds depth to the flavor profile, complementing the other ingredients beautifully.
  • Dried oregano: A classic Italian herb that gives these meatballs their signature taste.
  • Dried basil: Another essential herb that enhances the Italian flair of the dish.
  • Salt and black pepper: Essential seasonings that bring all the flavors together.
  • Egg: This acts as a binder, ensuring your meatballs hold their shape while baking.
  • Marinara sauce: Perfect for dipping! It adds a delicious, tangy contrast to the savory meatballs.

For those looking to spice things up, consider adding red pepper flakes to the mixture. If you want a leaner option, ground turkey works just as well. You can find the exact measurements for each ingredient at the bottom of the article, ready for printing!

How to Make Baked Italian Herb Chicken Meatballs

Creating these Baked Italian Herb Chicken Meatballs is a breeze! Follow these simple steps, and you’ll have a plateful of deliciousness ready in no time. Let’s dive in!

Step 1: Preheat the Oven

First things first, preheat your oven to 400°F. This is crucial for even cooking. While the oven warms up, line a baking sheet with parchment paper. This little trick makes cleanup a snap!

Step 2: Mix the Ingredients

In a large mixing bowl, combine the ground chicken, breadcrumbs, Parmesan cheese, parsley, garlic powder, onion powder, oregano, basil, salt, and pepper. Use a fork or your hands to mix everything well. You want every bite to be bursting with flavor!

Step 3: Add the Egg

Now, it’s time to incorporate the egg into your mixture. This helps bind the meatballs together, ensuring they hold their shape while baking. Mix until everything is fully combined. You’ll know it’s ready when the mixture feels cohesive and slightly sticky.

Step 4: Form the Meatballs

Using your hands, shape the mixture into meatballs about 1 to 1.5 inches in diameter. Don’t worry about being perfect; a little variation adds character! Place them on the prepared baking sheet, making sure they’re evenly spaced. This allows them to cook evenly.

Step 5: Bake the Meatballs

Pop the baking sheet into your preheated oven and bake for 20-25 minutes. Keep an eye on them! You want the meatballs to be golden brown and cooked through. This step ensures they’re juicy and flavorful, just the way we like them.

Step 6: Serve with Marinara Sauce

Once they’re done, take the meatballs out of the oven and let them cool for a minute. Serve them warm with marinara sauce for dipping. This adds a delicious touch to your meal, making it even more enjoyable!

Tips for Success

  • Use a cookie scoop for uniform meatballs; it makes shaping easier and quicker.
  • Don’t overmix the meatball mixture; this keeps them tender.
  • For extra flavor, let the mixture sit for 10 minutes before forming the meatballs.
  • Check for doneness with a meat thermometer; they should reach 165°F internally.
  • Store leftovers in an airtight container for up to three days.

Equipment Needed

  • Baking sheet: A standard sheet works, but a rimmed one prevents spills.
  • Parchment paper: For easy cleanup; aluminum foil is a good alternative.
  • Mixing bowl: Any large bowl will do; a stand mixer can save time.
  • Cookie scoop: Helps shape uniform meatballs; your hands work just fine too!

Variations

  • Spicy Kick: Add 1/4 teaspoon of red pepper flakes to the mixture for a zesty twist.
  • Herb Swap: Experiment with different herbs like thyme or rosemary for a unique flavor profile.
  • Cheese Lovers: Mix in some mozzarella cheese for a gooey surprise in the center of each meatball.
  • Gluten-Free: Substitute breadcrumbs with gluten-free options like almond flour or crushed gluten-free crackers.
  • Vegetarian Option: Use a plant-based ground meat alternative for a delicious meat-free version.

Serving Suggestions

  • Pair with a fresh garden salad for a light, balanced meal.
  • Serve alongside garlic bread to soak up the marinara sauce.
  • A glass of red wine complements the Italian flavors beautifully.
  • Garnish with extra parsley for a pop of color.
  • Present on a rustic wooden board for a charming touch.

FAQs about Baked Italian Herb Chicken Meatballs

Can I use ground turkey instead of ground chicken?

Absolutely! Ground turkey is a great substitute for ground chicken. It’s leaner and still delivers delicious flavor in these Baked Italian Herb Chicken Meatballs.

How do I store leftovers?

Store any leftover meatballs in an airtight container in the fridge. They’ll stay fresh for up to three days. Just reheat them in the oven or microwave when you’re ready to enjoy!

Can I freeze these meatballs?

Yes, you can freeze them! After baking, let the meatballs cool completely, then place them in a freezer-safe bag. They’ll keep well for up to three months. Just thaw and reheat when you’re ready to serve.

What can I serve with these meatballs?

These Baked Italian Herb Chicken Meatballs pair wonderfully with marinara sauce, but you can also serve them over pasta, in a sub sandwich, or alongside a fresh salad for a complete meal.

How can I make these meatballs spicier?

If you’re looking for a kick, add 1/4 teaspoon of red pepper flakes to the mixture. It’ll give your meatballs a delightful heat without overpowering the Italian flavors!

Final Thoughts

Cooking these Baked Italian Herb Chicken Meatballs is more than just preparing a meal; it’s about creating memories. The delightful aroma fills your kitchen, inviting everyone to gather around the table. Each bite bursts with flavor, making it hard to resist going back for seconds. Whether you’re serving them for a family dinner or a casual get-together, these meatballs are sure to impress. Plus, they’re simple enough to whip up on a busy weeknight. I hope this recipe brings as much joy to your home as it has to mine. Happy cooking!

Baked Italian Herb Chicken Meatballs
jhessica

Baked Italian Herb Chicken Meatballs that Wow Your Tastebuds!

Delicious and flavorful baked chicken meatballs infused with Italian herbs, perfect for a quick meal or appetizer.
Prep Time 15 minutes
Cook Time 25 minutes
Total Time 40 minutes
Servings: 4 servings
Course: Main Dish
Cuisine: Italian
Calories: 250

Ingredients
  

  • 1 pound ground chicken
  • 1/2 cup breadcrumbs
  • 1/4 cup grated Parmesan cheese
  • 1/4 cup fresh parsley chopped
  • 1 teaspoon garlic powder
  • 1 teaspoon onion powder
  • 1 teaspoon dried oregano
  • 1 teaspoon dried basil
  • 1/2 teaspoon salt
  • 1/4 teaspoon black pepper
  • 1 large egg
  • 1/4 cup marinara sauce for serving

Method
 

  1. Preheat your oven to 400°F. Line a baking sheet with parchment paper.
  2. In a large mixing bowl, combine the ground chicken, breadcrumbs, Parmesan cheese, parsley, garlic powder, onion powder, oregano, basil, salt, and pepper.
  3. Add the egg to the mixture and mix until everything is well combined.
  4. Using your hands, form the mixture into meatballs, about 1 to 1.5 inches in diameter, and place them on the prepared baking sheet.
  5. Bake in the preheated oven for 20-25 minutes, or until the meatballs are cooked through and golden brown.
  6. Serve with warm marinara sauce for dipping.

Nutrition

Serving: 1meatballCalories: 250kcalCarbohydrates: 10gProtein: 30gFat: 12gSaturated Fat: 3gPolyunsaturated Fat: 9gCholesterol: 80mgSodium: 400mgFiber: 1gSugar: 1g

Notes

  • For a spicier kick, add 1/4 teaspoon of red pepper flakes to the meatball mixture.
  • You can substitute ground turkey for ground chicken for a leaner option.

Tried this recipe?

Let us know how it was!

Chocolate Brownie Truffles Recipe: A Sweet Delight!

Introduction to Chocolate Brownie Truffles Recipe

Chocolate Brownie Truffles Recipe is a perfect blend of rich chocolate flavor and creamy texture. These truffles are not just a dessert; they are a celebration of chocolate goodness! Whether you’re hosting a party, looking for a sweet gift, or simply craving something delicious, these truffles will surely impress.

Imagine biting into a soft, fudgy brownie that melts in your mouth, followed by a smooth chocolate coating. Sounds tempting, right? The best part is that they are easy to make! With just a few simple ingredients, you can create these delightful bites of joy in your own kitchen.

In this recipe, we’ll guide you through each step, ensuring that you achieve the perfect truffles every time. From preparing the brownie base to rolling them in cocoa powder, we’ll cover it all. Plus, we’ll share some fun variations to customize your truffles to suit your taste.

So, grab your apron and let’s dive into the world of chocolate brownie truffles. Your taste buds will thank you!

Ingredients for Chocolate Brownie Truffles Recipe

Chocolate Brownie Truffles Recipe, you will need a few simple ingredients. Each component plays a vital role in achieving that rich, chocolatey flavor and creamy texture. Here’s what you’ll need:

  • 1 cup brownie mix
  • 2 tablespoons vegetable oil
  • 1 large egg
  • 2 tablespoons water
  • 1 cup semi-sweet chocolate chips
  • 1/2 cup heavy cream
  • 1 teaspoon vanilla extract
  • 1/2 cup cocoa powder (for coating)

These ingredients are easy to find at your local grocery store. The brownie mix serves as the base, while the chocolate chips and heavy cream create a luscious ganache that binds everything together. The cocoa powder adds a delightful finish, giving your truffles that classic chocolatey taste.

Feel free to get creative! You can substitute the brownie mix with homemade brownies if you prefer. Just ensure they are fudgy for the best results. Now that you have your ingredients ready, let’s move on to the next step of preparing these delightful truffles!

Step-by-Step Preparation of Chocolate Brownie Truffles Recipe

Chocolate Brownie Truffles Recipe. Follow these simple steps to create your delicious truffles. Each step is designed to ensure that your truffles turn out perfectly every time!

Step 1: Preparing the Brownie Base

First, preheat your oven to 350°F. This is an important step, as a properly heated oven ensures even baking. In a mixing bowl, combine the brownie mix, vegetable oil, egg, and water. Stir the mixture until it’s well combined. You want a smooth batter without any lumps.

Next, pour the batter into a greased 8×8-inch baking pan. Spread it evenly to ensure that it bakes uniformly. Bake for 20-25 minutes. To check if they are done, insert a toothpick into the center. If it comes out clean, your brownies are ready! Once baked, let them cool completely in the pan.

Step 2: Chilling the Brownie Mixture

After your brownies have cooled, it’s time to crumble them. Place the cooled brownies into a large bowl and crumble them into small pieces using your hands. This step is crucial, as it helps to create the perfect texture for your truffles.

Now, let’s prepare the chocolate ganache. In a small saucepan, heat the heavy cream over medium heat until it starts to simmer. Remove it from the heat and add the semi-sweet chocolate chips and vanilla extract. Stir until the chocolate is fully melted and the mixture is smooth. Pour this luscious chocolate mixture over the crumbled brownies and mix until everything is well combined.

Step 3: Forming the Truffles

Once your brownie and chocolate mixture is ready, it’s time to form the truffles! Using your hands, take small portions of the mixture and roll them into balls about 1 inch in diameter. This is where the fun begins! You can make them as big or small as you like, but keeping them uniform will help with presentation.

Place each truffle on a baking sheet lined with parchment paper. This will prevent them from sticking and make cleanup easier. Once you’ve formed all the truffles, it’s time to chill them in the refrigerator for at least 30 minutes. Chilling helps them firm up, making them easier to coat.

Step 4: Coating the Truffles

After chilling, it’s time to give your truffles a delicious coating! Take each truffle and roll it in cocoa powder until it’s fully coated. This adds a rich chocolate flavor and a beautiful finish. If you want to mix things up, consider rolling them in crushed nuts or shredded coconut for a different texture.

Chocolate Brownie Truffles are ready to serve! You can enjoy them immediately or store them in an airtight container in the refrigerator for up to one week. These truffles are sure to be a hit with family and friends!

Variation of Chocolate Brownie Truffles Recipe

Chocolate Brownie Truffles Recipe is absolutely delicious, there are many ways to customize these treats to suit your taste. Let’s explore some alternative coatings and flavor variations that can take your truffles to the next level!

Alternative Coatings for Chocolate Brownie Truffles

Coating your truffles can add a fun twist to their appearance and flavor. Here are some exciting alternatives to cocoa powder:

  • Crushed Nuts: Roll your truffles in finely chopped nuts like almonds, walnuts, or hazelnuts. This adds a delightful crunch and nutty flavor.
  • Shredded Coconut: For a tropical touch, roll the truffles in unsweetened shredded coconut. This gives them a chewy texture and a hint of sweetness.
  • Chocolate Sprinkles: If you want a festive look, coat your truffles in colorful chocolate sprinkles. They’re perfect for parties!
  • Powdered Sugar: For a sweet and snowy finish, dust your truffles with powdered sugar. This adds a touch of elegance.

Feel free to mix and match these coatings to create your own unique combinations. The possibilities are endless!

Flavor Variations for Chocolate Brownie Truffles

Want to add a little extra flair to your truffles? Here are some flavor variations to consider:

  • Mint Chocolate: Add a few drops of peppermint extract to the chocolate ganache for a refreshing minty flavor.
  • Espresso: Mix in a teaspoon of instant coffee or espresso powder to the brownie mixture for a rich coffee flavor.
  • Peanut Butter: Swirl in some creamy peanut butter into the brownie mixture for a deliciously nutty twist.
  • Orange Zest: Add a teaspoon of orange zest to the chocolate ganache for a bright, citrusy flavor.

Chocolate Brownie Truffles Recipe and make them even more enjoyable. Experiment with different flavors and coatings to find your favorite combination!

Cooking Note for Chocolate Brownie Truffles Recipe

Chocolate Brownie Truffles Recipe, there are a few important cooking notes to keep in mind. These tips will help ensure that your truffles turn out perfectly every time, making your baking experience enjoyable and successful.

First, always check the expiration date on your brownie mix and chocolate chips. Fresh ingredients yield the best flavor and texture. If your brownie mix is old, it may not rise properly, affecting the overall quality of your truffles.

Next, be mindful of the baking time. Ovens can vary, so keep an eye on your brownies as they bake. If you overbake them, they may become dry, which can lead to crumbly truffles. A toothpick test is a great way to check for doneness. Remember, a few moist crumbs on the toothpick are okay!

When crumbling the brownies, ensure they are completely cooled. Warm brownies can become mushy and difficult to handle. Crumbling them into small, even pieces will help create a uniform texture for your truffles.

While preparing the chocolate ganache, make sure to stir the mixture thoroughly until it’s smooth. This ensures that the chocolate chips melt completely, creating a luscious coating for your truffles. If the ganache seems too thick, you can add a splash of warm cream to loosen it up.

Lastly, don’t rush the chilling process. Allowing the truffles to chill for at least 30 minutes helps them firm up, making them easier to roll and coat. If you’re in a hurry, you can place them in the freezer for about 15 minutes, but keep an eye on them to avoid freezing.

Chocolate Brownie Truffles that are sure to impress. Happy baking!

Serving Suggestions for Chocolate Brownie Truffles Recipe

Chocolate Brownie Truffles, it’s time to think about how to serve them! These truffles are not only delicious but also versatile. Here are some creative serving suggestions to make your dessert experience even more enjoyable.

  • On a Dessert Platter: Arrange your truffles on a beautiful dessert platter. You can mix different coatings and flavors for a colorful display. This makes for an eye-catching centerpiece at any gathering.
  • With Fresh Berries: Serve your truffles alongside fresh strawberries, raspberries, or blueberries. The tartness of the berries complements the rich chocolate flavor perfectly.
  • With a Dipping Sauce: Create a simple chocolate sauce or caramel sauce for dipping. This adds an extra layer of indulgence and allows guests to customize their experience.
  • As Party Favors: Package individual truffles in small boxes or bags tied with a ribbon. These make for delightful party favors that your guests will love to take home.
  • With Coffee or Tea: Pair your truffles with a cup of coffee or tea. The warm beverage enhances the chocolate flavor and makes for a cozy treat.

Chocolate Brownie Truffles are sure to be a hit!

Tips for Perfecting Your Chocolate Brownie Truffles Recipe

Chocolate Brownie Truffles Recipe is all about attention to detail. With a few helpful tips, you can elevate your truffles from good to absolutely amazing! Here are some expert suggestions to ensure your truffles turn out perfectly every time.

  • Use Quality Ingredients: The flavor of your truffles greatly depends on the quality of your ingredients. Opt for high-quality chocolate chips and fresh brownie mix. This will enhance the overall taste and texture of your truffles.
  • Don’t Overmix: When combining the brownie mix and wet ingredients, mix just until combined. Overmixing can lead to tough brownies, which may affect the texture of your truffles.
  • Chill Thoroughly: After forming the truffles, make sure to chill them for at least 30 minutes. This step is crucial for achieving a firm texture, making them easier to coat and handle.
  • Experiment with Coatings: Don’t be afraid to try different coatings! From crushed nuts to colorful sprinkles, experimenting can lead to delightful surprises. Each coating adds a unique flavor and texture.
  • Keep Your Hands Cool: When rolling the truffles, keep your hands cool to prevent the mixture from melting. You can rinse your hands with cold water or use gloves for easier handling.
  • Store Properly: To maintain freshness, store your truffles in an airtight container in the refrigerator. This will keep them from drying out and ensure they stay delicious for up to a week.
  • Try Different Shapes: While round truffles are classic, feel free to get creative! You can shape them into squares or even hearts for special occasions.

Chocolate Brownie Truffles Recipe. Each batch will be a delightful treat that everyone will love!

Breakdown of Time for Chocolate Brownie Truffles Recipe

Chocolate Brownie Truffles Recipe can help you plan your baking session better. Here’s a detailed breakdown of the time you’ll need to create these delicious treats.

Prep Time

The prep time for this recipe is approximately 15 minutes. This includes gathering your ingredients, mixing the brownie batter, and preparing the chocolate ganache. Make sure to have everything ready before you start, as it will make the process smoother and more enjoyable!

Cooking Time

Cooking time is about 20-25 minutes. This is the time it takes to bake the brownies in the oven. Keep an eye on them as they bake, and use the toothpick test to check for doneness. Remember, a little patience here will lead to perfectly fudgy brownies!

Total Time

Chocolate Brownie Truffles Recipe. This includes the prep time, cooking time, and chilling time for the truffles. The chilling step is essential, as it helps the truffles firm up, making them easier to handle and coat.

So, set aside a little over an hour, and you’ll be rewarded with a batch of delightful chocolate brownie truffles that are sure to impress!

Nutritional Information for Chocolate Brownie Truffles Recipe

Chocolate Brownie Truffles Recipe is essential, especially if you’re mindful of your diet. These truffles are not only delicious but also provide a satisfying treat. Here’s a breakdown of the key nutritional information per serving:

Calories

Each serving of these delightful truffles contains approximately 150 calories. This makes them a great option for a sweet treat without going overboard. Enjoying one or two truffles can satisfy your chocolate cravings while keeping your calorie intake in check.

Protein

In terms of protein, each truffle offers about 2 grams. While this isn’t a high protein snack, it does contribute to your daily intake. Pairing these truffles with a protein-rich food, like a handful of nuts, can create a more balanced snack.

Sodium

The sodium content in each serving is relatively low, making these truffles a heart-friendly option. With only a small amount of sodium, you can enjoy these treats without worrying about excessive salt intake. This is especially important for those monitoring their sodium levels.

Chocolate Brownie Truffles Recipe provides a delightful balance of flavors and textures while being mindful of nutritional content. Enjoy them as an occasional treat, and feel good about indulging in these chocolatey bites!

FAQs about Chocolate Brownie Truffles Recipe

Can I use store-bought brownies for this recipe?

Chocolate Brownie Truffles Recipe. Crumble them as you would with homemade brownies, and follow the rest of the recipe as usual. It’s a great shortcut for busy days!

How long do chocolate brownie truffles last?

Chocolate Brownie Truffles can last up to one week when stored properly. Keep them in an airtight container in the refrigerator to maintain their freshness. If you find yourself with leftovers, they make a great treat for later!

Can I freeze chocolate brownie truffles?

Yes, you can freeze your truffles! To do this, place them in a single layer on a baking sheet and freeze until solid. Then, transfer them to an airtight container or freezer bag. They can be stored in the freezer for up to three months. When you’re ready to enjoy them, simply let them thaw in the refrigerator for a few hours.

What is the best way to store chocolate brownie truffles?

Chocolate Brownie Truffles is in an airtight container in the refrigerator. This keeps them fresh and prevents them from drying out. If you’ve coated them in cocoa powder, be aware that it may absorb moisture over time. To maintain their appearance, you can re-coat them with cocoa powder just before serving.

Conclusion on Chocolate Brownie Truffles Recipe

Chocolate Brownie Truffles Recipe is a delightful way to satisfy your sweet tooth. These truffles combine the rich, fudgy goodness of brownies with a smooth chocolate coating, creating a treat that is both indulgent and satisfying. Whether you’re making them for a special occasion or just to enjoy at home, they are sure to impress everyone who tries them.

With simple ingredients and easy steps, you can whip up a batch of these truffles in no time. Plus, the variations and coating options allow you to customize them to your liking. From crushed nuts to minty flavors, the possibilities are endless! This recipe not only brings joy to your taste buds but also offers a fun baking experience.

Remember to follow the tips and cooking notes provided to ensure your truffles turn out perfectly every time. With a little patience and creativity, you’ll master the art of making these delicious treats. So, gather your ingredients, roll up your sleeves, and get ready to create some chocolate magic in your kitchen!

Chocolate Brownie Truffles and share them with family and friends. They are bound to become a favorite in your household. Happy baking!

Crispy Asian Cucumber Salad Recipe is a must-try dish!

Introduction to Crispy Asian Cucumber Salad Recipe

Crispy Asian Cucumber Salad Recipe. This refreshing dish is not just a salad; it’s a burst of flavors and textures that can brighten up any meal. With its crunchy cucumbers and zesty dressing, this salad is perfect for warm days or as a side dish for your favorite Asian-inspired meals. Let’s dive into what makes this salad so special and explore the health benefits of cucumbers.

What Makes This Salad Unique?

What sets the Crispy Asian Cucumber Salad apart is its unique combination of ingredients. The cucumbers are salted to draw out moisture, making them extra crunchy. The dressing, made with rice vinegar, soy sauce, and sesame oil, adds a tangy and savory flavor that complements the fresh cucumbers beautifully. Additionally, the inclusion of garlic and ginger gives the salad a delightful kick. Topped with sesame seeds and green onions, this salad is not only tasty but also visually appealing.

Health Benefits of Cucumbers

Cucumbers are a powerhouse of nutrition. They are low in calories, making them an excellent choice for those watching their weight. Rich in water content, cucumbers help keep you hydrated, especially during hot weather. They also contain vitamins and minerals, such as vitamin K, which is essential for bone health. Furthermore, cucumbers are a good source of antioxidants, which help combat free radicals in the body. Including cucumbers in your diet can promote healthy skin and support digestion, making this salad a smart choice for your health.

Ingredients for Crispy Asian Cucumber Salad Recipe

Crispy Asian Cucumber Salad Recipe, you’ll need a few simple yet flavorful ingredients. Each component plays a vital role in achieving that delightful crunch and zesty taste. Here’s what you’ll need:

  • 2 large cucumbers, thinly sliced
  • 1 teaspoon salt
  • 1 tablespoon sugar
  • 3 tablespoons rice vinegar
  • 1 tablespoon soy sauce
  • 1 tablespoon sesame oil
  • 1 teaspoon minced garlic
  • 1 teaspoon minced ginger
  • 1 tablespoon sesame seeds
  • 2 green onions, sliced

These ingredients come together to create a salad that is not only refreshing but also packed with flavor. The cucumbers provide a crisp base, while the dressing adds a tangy and savory kick. The sesame seeds and green onions enhance the dish with added texture and taste. Feel free to gather these ingredients before moving on to the preparation steps!

Step-by-Step Preparation of Crispy Asian Cucumber Salad Recipe

Crispy Asian Cucumber Salad Recipe. Follow these simple steps to create a delicious and refreshing salad that everyone will love.

Step 1: Preparing the Cucumbers

Start by washing the cucumbers thoroughly under cold water. This step is important to remove any dirt or pesticides. Next, slice the cucumbers thinly. You can use a sharp knife or a mandoline for even slices. Once sliced, place the cucumbers in a large bowl and sprinkle them with 1 teaspoon of salt. Toss the cucumbers gently to ensure they are well-coated. Let them sit for about 10 minutes. This process helps draw out excess moisture, making the cucumbers extra crispy.

Step 2: Making the Dressing

While the cucumbers are resting, it’s time to prepare the dressing. In a separate bowl, combine 1 tablespoon of sugar, 3 tablespoons of rice vinegar, 1 tablespoon of soy sauce, and 1 tablespoon of sesame oil. Add 1 teaspoon of minced garlic and 1 teaspoon of minced ginger to the mixture. Whisk everything together until the sugar dissolves completely. This dressing is what gives the salad its tangy and savory flavor, so make sure to mix it well!

Step 3: Combining Ingredients

After the cucumbers have rested, drain them and gently pat them dry with paper towels. This step is crucial to remove any excess moisture. Now, pour the dressing over the cucumbers. Toss everything together until the cucumbers are evenly coated with the dressing. This is where the magic happens! The flavors will meld beautifully, creating a deliciously refreshing salad.

Step 4: Chilling the Salad

For the best flavor, it’s recommended to let the salad chill in the refrigerator for at least 15 minutes before serving. This allows the cucumbers to absorb the dressing and enhances the overall taste. While it’s chilling, you can prepare any additional toppings, like sesame seeds and sliced green onions. Once ready to serve, sprinkle these toppings over the salad for an extra crunch and burst of flavor!

Variations of Crispy Asian Cucumber Salad Recipe

Crispy Asian Cucumber Salad Recipe is versatile and can be customized to suit your taste. Whether you want to add proteins for a heartier meal or incorporate different vegetables for added nutrition, there are plenty of options. Let’s explore some delicious variations that can elevate your salad experience!

Adding Proteins

If you’re looking to make your salad more filling, consider adding proteins. Grilled chicken, shrimp, or tofu are excellent choices. Simply cook your protein of choice and slice it into bite-sized pieces. Toss the protein with the cucumbers and dressing for a satisfying meal. For a vegetarian option, try adding edamame or chickpeas. These additions not only enhance the flavor but also boost the nutritional value of your salad.

Incorporating Different Vegetables

Crispy Asian Cucumber Salad Recipe is by incorporating different vegetables. Thinly sliced bell peppers, shredded carrots, or even radishes can add color and crunch. You can also experiment with ingredients like snap peas or shredded cabbage for a unique twist. Mixing in these vegetables not only enhances the texture but also provides additional vitamins and minerals. Feel free to get creative and use whatever fresh vegetables you have on hand!

These variations allow you to tailor the salad to your preferences, making it a delightful dish for any occasion. Enjoy experimenting with different flavors and textures to find your perfect combination!

Cooking Note for Crispy Asian Cucumber Salad Recipe

Crispy Asian Cucumber Salad Recipe, there are a few cooking notes to keep in mind to ensure the best results. These tips will help you achieve that perfect crunch and flavor balance that makes this salad so delightful.

First, always choose fresh cucumbers. Look for firm cucumbers with smooth skin and no blemishes. English cucumbers are a great option as they have fewer seeds and a thinner skin, making them ideal for salads. If you prefer, you can also use Persian cucumbers, which are smaller and sweeter.

Next, the salting process is crucial. Allowing the cucumbers to sit with salt for about 10 minutes helps draw out excess moisture. This step not only enhances the crunchiness but also prevents the salad from becoming soggy. After draining, pat the cucumbers dry to remove any remaining moisture.

When making the dressing, feel free to adjust the ingredients to suit your taste. If you prefer a sweeter dressing, add a bit more sugar. For a tangier flavor, increase the rice vinegar. Experimenting with the dressing can lead to a personalized taste that you and your guests will love.

Lastly, remember that chilling the salad is essential. Allowing it to rest in the refrigerator for at least 15 minutes helps the flavors meld together beautifully. If you have time, letting it chill for longer can enhance the taste even more. Just be sure to add the sesame seeds and green onions right before serving to keep them fresh and crunchy.

Crispy Asian Cucumber Salad that is not only delicious but also visually appealing. Enjoy the process and have fun experimenting with flavors!

Serving Suggestions for Crispy Asian Cucumber Salad Recipe

Crispy Asian Cucumber Salad Recipe, it’s time to think about how to serve it. This salad is incredibly versatile and can complement a variety of dishes. Here are some great serving suggestions to enhance your meal experience!

Pairing with Main Dishes

Crispy Asian Cucumber Salad pairs wonderfully with many main dishes. For a complete meal, consider serving it alongside grilled meats like teriyaki chicken or beef skewers. The refreshing crunch of the salad balances the savory flavors of the grilled dishes perfectly.

If you’re in the mood for seafood, try serving the salad with grilled shrimp or salmon. The lightness of the salad complements the richness of the fish, creating a delightful contrast. Additionally, this salad works well with Asian-inspired dishes like stir-fried noodles or rice bowls. The zesty dressing adds a burst of flavor that enhances the overall meal.

Crispy Asian Cucumber Salad will surely elevate your dining experience!

Serving as a Side Dish

Crispy Asian Cucumber Salad is a crowd-pleaser. Its refreshing taste and crunchy texture make it a perfect accompaniment to rich or heavy dishes.

Serve it alongside grilled meats, fried rice, or even spicy dishes to help cool the palate. The salad’s tangy dressing can cut through the richness of creamy sauces, making it a great choice for dishes like curry or creamy pasta. You can also serve it at potlucks or gatherings, as it’s easy to prepare and transport.

Crispy Asian Cucumber Salad Recipe is sure to impress!

Tips for Perfecting Your Crispy Asian Cucumber Salad Recipe

Crispy Asian Cucumber Salad Recipe, there are a few tips that can help you achieve the best results. From selecting the right cucumbers to adjusting the flavor profiles, these suggestions will ensure your salad is a hit every time!

Choosing the Right Cucumbers

When it comes to cucumbers, not all varieties are created equal. For the best results, opt for fresh, firm cucumbers. English cucumbers are a popular choice because they have fewer seeds and a thinner skin, making them perfect for salads. Their mild flavor and crisp texture enhance the overall dish.

Pursue cucumbers that are bright in color and free from blemishes. If you can, choose organic cucumbers to avoid pesticides. If you prefer a sweeter taste, Persian cucumbers are another excellent option. They are smaller and have a delightful crunch, adding a unique twist to your salad.

Crispy Asian Cucumber Salad Recipe.

Adjusting Flavor Profiles

Crispy Asian Cucumber Salad Recipe is the ability to customize the flavors to your liking. If you enjoy a sweeter dressing, feel free to add a bit more sugar. On the other hand, if you prefer a tangier taste, increase the amount of rice vinegar.

Don’t hesitate to experiment with the soy sauce as well. If you’re looking for a gluten-free option, consider using tamari instead. For a spicier kick, add a dash of chili oil or red pepper flakes to the dressing. This can elevate the flavor and add an exciting twist to your salad.

Crispy Asian Cucumber Salad that’s perfectly tailored to your taste buds!

Breakdown of Time for Crispy Asian Cucumber Salad Recipe

Crispy Asian Cucumber Salad Recipe can help you plan your meal better. Here’s a simple breakdown of the time you’ll need to prepare this refreshing salad.

Prep Time

The prep time for this salad is quite minimal. You’ll need about 15 minutes to wash, slice, and salt the cucumbers. This includes the time it takes to prepare the dressing. So, gather your ingredients and get ready to create a delicious salad in no time!

Cooking Time

Interestingly, there’s no actual cooking involved in this recipe. The only time you’ll spend is letting the cucumbers sit with salt for about 10 minutes. This step is crucial for achieving that perfect crunch. After that, you’ll mix everything together, and your salad will be ready to chill.

Total Time

In total, you can expect to spend around 25 to 30 minutes from start to finish. This includes the prep time, the resting time for the cucumbers, and the chilling time in the refrigerator. If you let the salad chill longer, it will enhance the flavors even more. So, if you have a little extra time, feel free to let it sit for up to an hour!

Crispy Asian Cucumber Salad Recipe into your meal planning. Enjoy the process and the delightful flavors that come together in this quick and easy dish!

Nutritional Information for Crispy Asian Cucumber Salad Recipe

Crispy Asian Cucumber Salad Recipe is not only delicious but also offers a variety of health benefits. Let’s break down the key nutritional components of this refreshing salad.

Calories

Crispy Asian Cucumber Salad contains approximately 70 calories. This makes it a light and guilt-free option for those looking to enjoy a flavorful dish without consuming too many calories. The low-calorie count is primarily due to the cucumbers, which are mostly water and provide a satisfying crunch without adding excess calories.

Protein

In terms of protein, this salad offers about 1 gram per serving. While cucumbers are not a significant source of protein, the addition of proteins like grilled chicken, shrimp, or tofu can easily boost the protein content. This makes the salad a versatile option that can be tailored to meet your dietary needs.

Sodium

Crispy Asian Cucumber Salad is around 200 mg per serving. This amount comes from the soy sauce and salt used in the recipe. If you’re watching your sodium intake, consider using low-sodium soy sauce or reducing the amount of added salt. This way, you can enjoy the salad while keeping your sodium levels in check.

Crispy Asian Cucumber Salad Recipe is a nutritious choice that can fit into various dietary plans. With its low calorie and sodium content, along with the option to add protein, this salad is a fantastic addition to any meal. Enjoy the fresh flavors and health benefits it brings!

FAQs about Crispy Asian Cucumber Salad Recipe

Can I make this salad ahead of time?

Crispy Asian Cucumber Salad Recipe is perfect for making ahead of time. In fact, preparing it a few hours in advance can enhance the flavors. Just follow the recipe as usual, and after combining the cucumbers with the dressing, store it in an airtight container in the refrigerator. This allows the cucumbers to soak up the dressing, making them even tastier. However, it’s best to add the sesame seeds and green onions just before serving to keep them fresh and crunchy. Enjoy the convenience of having a delicious salad ready to go!

What can I substitute for soy sauce?

Crispy Asian Cucumber Salad Recipe, there are several options. For a gluten-free alternative, you can use tamari, which has a similar flavor profile. Coconut aminos is another great choice; it’s slightly sweeter and less salty than soy sauce, making it a healthier option. If you prefer a homemade version, mix equal parts of balsamic vinegar and water with a pinch of salt. This can mimic the savory taste of soy sauce while adding a unique twist to your salad. Feel free to experiment and find the substitute that best suits your taste!

Is this salad gluten-free?

Crispy Asian Cucumber Salad Recipe can easily be made gluten-free. The main ingredient to watch out for is soy sauce, which typically contains gluten. To ensure your salad is gluten-free, simply use tamari or coconut aminos instead of regular soy sauce. Additionally, all the other ingredients in the recipe, such as cucumbers, rice vinegar, and sesame oil, are naturally gluten-free. With these simple adjustments, you can enjoy this refreshing salad without any gluten concerns!

Conclusion on Crispy Asian Cucumber Salad Recipe

Crispy Asian Cucumber Salad Recipe is a delightful addition to any meal. Its refreshing taste, combined with the crunch of cucumbers and the zesty dressing, makes it a favorite among many. Not only is it easy to prepare, but it also offers numerous health benefits, thanks to the nutritious ingredients. Whether you serve it as a side dish or a light main course, this salad is sure to impress your family and friends.

Moreover, the versatility of this recipe allows you to customize it to your liking. You can add proteins, incorporate different vegetables, or adjust the flavors to suit your taste buds. This adaptability makes it a perfect choice for various occasions, from casual dinners to festive gatherings.

Crispy Asian Cucumber Salad stands out for its simplicity and flavor. With just a few ingredients and minimal preparation time, you can create a dish that is both satisfying and healthy. So, gather your ingredients, follow the steps, and enjoy the burst of flavors that this salad brings to your table!

We hope you enjoy making and sharing this recipe with your loved ones. Happy cooking!

Stay Connected

Get recipes via email: