Get my cookbooks

Savory Salmon Tartare Recipe: A Quick Delightful Dish

Introduction to Savory Salmon Tartare Recipe

What is Salmon Tartare?

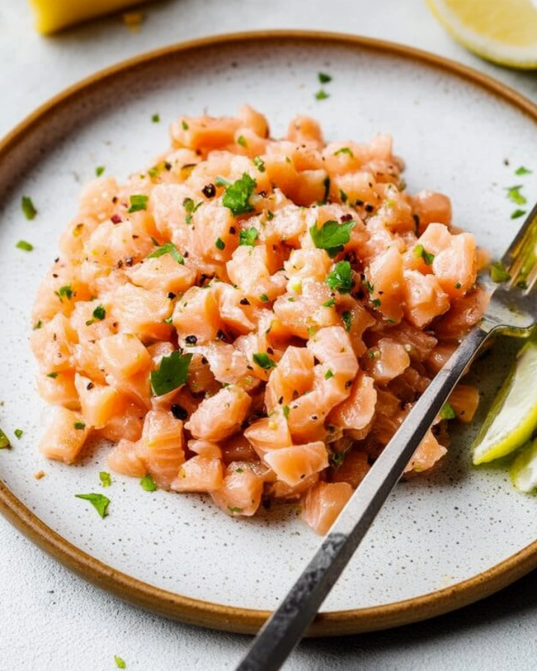
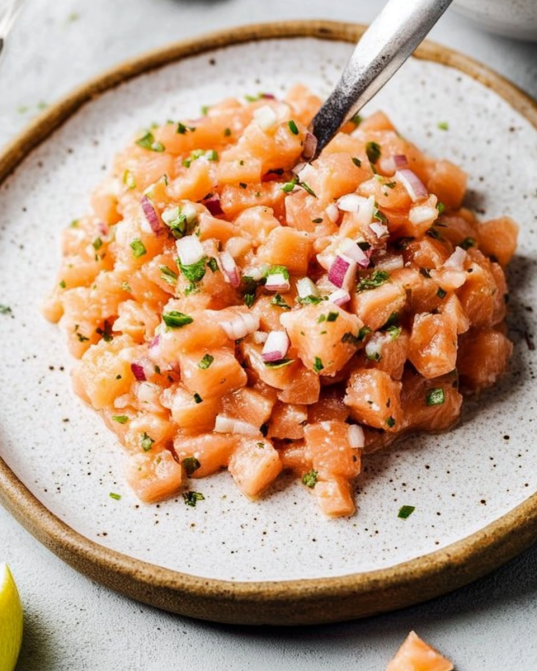
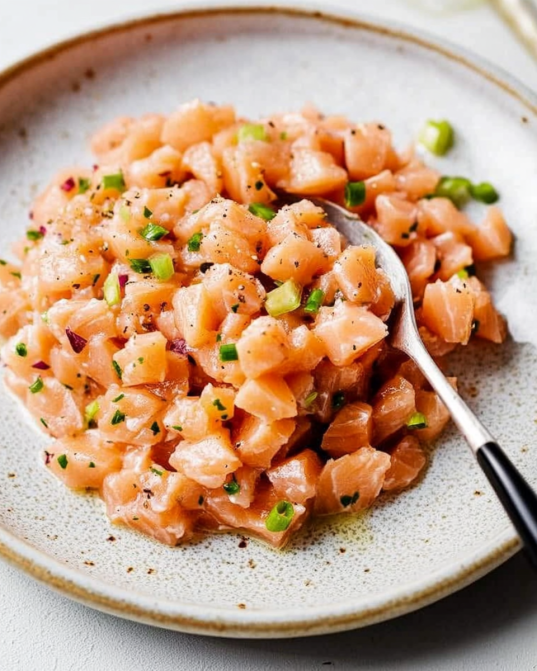
Salmon tartare is a delightful dish made from fresh, raw salmon. It’s typically diced into small pieces and mixed with various ingredients to enhance its flavor. This dish is often served cold, making it a refreshing option for appetizers or light meals. The combination of textures and flavors in salmon tartare creates a unique culinary experience. The creamy avocado, crunchy onions, and zesty dressing all come together to elevate the natural taste of the salmon. It’s a dish that not only looks beautiful but also offers a burst of freshness in every bite.

Why Choose This Savory Salmon Tartare Recipe?

This savory salmon tartare recipe stands out for its simplicity and flavor. With just a handful of fresh ingredients, you can create a dish that impresses your guests and satisfies your taste buds. The use of sushi-grade salmon ensures that you’re enjoying the highest quality fish, which is essential for raw preparations. Additionally, the recipe is versatile, allowing you to customize it to your liking. Whether you prefer a hint of spice or a different protein, this recipe serves as a fantastic base. Plus, it’s quick to prepare, making it perfect for busy weeknights or special occasions. Dive into this savory salmon tartare recipe and discover a new favorite dish that’s both healthy and delicious!

Ingredients for Savory Salmon Tartare Recipe

To create a delicious savory salmon tartare, you’ll need a few fresh ingredients. Each component plays a vital role in enhancing the overall flavor and texture of the dish. Here’s what you’ll need:

  • 1 pound fresh sushi-grade salmon, diced: This is the star of the dish. Make sure it’s high quality for the best taste.
  • 1 ripe avocado, diced: The creamy avocado adds richness and balances the flavors.
  • 1 small red onion, finely chopped: This adds a nice crunch and a bit of sharpness.
  • 2 tablespoons capers, rinsed and chopped: Capers bring a briny flavor that complements the salmon.
  • 2 tablespoons fresh cilantro, chopped: Fresh herbs brighten the dish and add a burst of flavor.
  • 1 tablespoon soy sauce: This adds umami and depth to the tartare.
  • 1 tablespoon sesame oil: The nutty flavor of sesame oil enhances the overall taste.
  • 1 teaspoon lime juice: A splash of lime juice adds acidity and freshness.
  • Salt and pepper to taste: These seasonings help to bring all the flavors together.
  • Tortilla chips or cucumber slices for serving: These make perfect dippers for your tartare.

Gathering these ingredients will set you on the right path to making a delightful savory salmon tartare. Each ingredient contributes to the dish’s unique flavor profile, ensuring a satisfying experience for your taste buds. Now that you have everything ready, let’s move on to the preparation steps!

Step-by-Step Preparation of Savory Salmon Tartare Recipe

Step 1: Selecting the Right Salmon

Choosing the right salmon is crucial for your savory salmon tartare recipe. Look for sushi-grade salmon, which is safe to eat raw. Freshness is key! The salmon should have a bright, vibrant color and a clean, ocean-like smell. Avoid any fish that looks dull or has a strong fishy odor. If possible, buy from a reputable fishmonger who can provide information about the fish’s source. This ensures you’re getting the best quality salmon for your dish.

Step 2: Preparing the Ingredients

Once you have your salmon, it’s time to prepare the other ingredients. Start by dicing the salmon into small, even pieces. This helps with the texture and makes it easier to eat. Next, take your ripe avocado and cut it into small cubes. Be gentle to avoid mashing it. Finely chop the red onion, capers, and cilantro. Having all your ingredients prepped and ready will make mixing them together a breeze. Remember, fresh ingredients make all the difference in flavor!

Step 3: Mixing the Tartare

Now that your ingredients are ready, it’s time to mix them! In a medium bowl, combine the diced salmon, avocado, red onion, capers, and cilantro. In a separate small bowl, whisk together the soy sauce, sesame oil, lime juice, salt, and pepper. Pour this dressing over the salmon mixture. Gently toss everything together, being careful not to mash the avocado. You want to keep the chunks intact for a delightful texture. Taste the mixture and adjust the seasoning if needed. This step is essential to ensure every bite is bursting with flavor!

Step 4: Plating the Savory Salmon Tartare

Presentation is key when serving your savory salmon tartare. Use a ring mold or a small bowl to shape the tartare on a plate. This gives it a beautiful, professional look. Once plated, you can garnish with a sprinkle of extra cilantro or a few capers on top. Serve immediately with tortilla chips or cucumber slices on the side. This not only adds a crunchy element but also makes for a fun and interactive dining experience. Enjoy your delicious creation!

Variation of Savory Salmon Tartare Recipe

Alternative Ingredients for Different Flavors

One of the best things about the savory salmon tartare recipe is its versatility. You can easily switch up the ingredients to create new flavor profiles. For instance, if you want a spicy kick, consider adding diced jalapeño or a dash of sriracha. This will give your tartare a delightful heat that pairs well with the cool salmon and creamy avocado.

If you’re looking for a different protein, try substituting the salmon with sushi-grade tuna. Tuna tartare has a slightly firmer texture and a unique taste that many enjoy. You can also mix both salmon and tuna for a delicious combination. Another option is to use diced scallops, which offer a sweet and delicate flavor.

For those who prefer a vegetarian option, consider using diced mango or papaya instead of fish. These fruits provide a sweet and tropical twist to the dish. You can also add finely chopped bell peppers or cucumbers for extra crunch. The key is to keep the balance of flavors and textures, ensuring that each bite is satisfying and enjoyable.

Serving Suggestions for Variations

When it comes to serving your savory salmon tartare variations, the possibilities are endless! If you’ve added a spicy element, consider serving it with cooling sides like avocado slices or a dollop of sour cream. This will help balance the heat and enhance the overall experience.

For a more gourmet touch, serve your tartare on a bed of mixed greens or alongside a light salad. This adds freshness and makes for a beautiful presentation. You can also use small lettuce leaves as wraps, allowing guests to create their own bites. This interactive approach is perfect for parties or gatherings.

Don’t forget about the dipping options! While tortilla chips and cucumber slices are classic choices, you can also try serving your tartare with crispy wonton chips or even toasted baguette slices. These alternatives add a delightful crunch and elevate the dish even further. No matter how you choose to serve it, your savory salmon tartare will surely impress!

Cooking Note for Savory Salmon Tartare Recipe

When preparing your savory salmon tartare, there are a few important cooking notes to keep in mind. First and foremost, always prioritize freshness. Since this dish is served raw, using the freshest ingredients is essential for both flavor and safety. Make sure to purchase sushi-grade salmon from a trusted source. This ensures that the fish has been handled properly and is safe to eat.

Another key point is to keep everything cold. Before you start preparing your tartare, chill your mixing bowl and utensils in the refrigerator. This helps maintain the freshness of the ingredients and keeps the salmon at a safe temperature. If you’re working in a warm kitchen, consider placing the salmon back in the fridge while you prepare the other ingredients.

Additionally, be mindful of cross-contamination. Use separate cutting boards and utensils for raw fish and other ingredients. This practice not only keeps your dish safe but also preserves the integrity of the flavors. Always wash your hands thoroughly before and after handling raw fish.

Lastly, remember that the beauty of this dish lies in its simplicity. Avoid over-mixing the ingredients, especially the avocado. You want to maintain the distinct textures of each component. A gentle hand will ensure that your savory salmon tartare looks as good as it tastes. With these cooking notes in mind, you’re well on your way to creating a delicious and safe dish that everyone will love!

Serving Suggestions for Savory Salmon Tartare Recipe

Serving your savory salmon tartare is just as important as preparing it. The way you present this dish can enhance the overall dining experience. Here are some delightful serving suggestions to make your tartare shine:

  • Chilled Plates: Start by chilling your serving plates in the refrigerator. This keeps the tartare cool and refreshing, which is perfect for a warm day.
  • Garnishes: Consider garnishing your tartare with a sprinkle of sesame seeds or microgreens. These add a touch of elegance and a pop of color to your dish.
  • Accompaniments: Serve your tartare with a variety of accompaniments. Tortilla chips and cucumber slices are classic choices, but you can also include crispy wonton chips or toasted pita bread for added texture.
  • Interactive Platter: Create an interactive platter by placing the tartare in the center and surrounding it with various dipping options. This encourages guests to customize their bites and makes for a fun dining experience.
  • Salad Base: For a lighter option, serve the tartare on a bed of mixed greens or arugula. This adds freshness and a crunchy element that complements the creamy avocado.
  • Small Bites: If you’re hosting a party, consider serving the tartare in small shot glasses or on individual spoons. This makes for elegant, bite-sized portions that are easy for guests to enjoy.
  • Flavor Pairings: Pair your tartare with a light, crisp white wine or a refreshing cocktail. A glass of Sauvignon Blanc or a citrusy mojito can enhance the flavors of the dish.

These serving suggestions will not only elevate your savory salmon tartare but also create a memorable dining experience for you and your guests. Remember, presentation matters, and a well-served dish can make all the difference!

Tips for Perfecting Your Savory Salmon Tartare Recipe

Creating the perfect savory salmon tartare is all about attention to detail. Here are some helpful tips to ensure your dish turns out delicious every time:

  • Use Fresh Ingredients: Always opt for the freshest ingredients. Fresh salmon, ripe avocados, and crisp vegetables will enhance the flavor and texture of your tartare.
  • Keep It Cold: As mentioned earlier, keeping your ingredients cold is crucial. Chill your mixing bowl and utensils to maintain the freshness of the salmon and other components.
  • Be Gentle: When mixing the ingredients, use a gentle hand. Over-mixing can lead to a mushy texture, especially with the avocado. Aim for a light toss to keep the chunks intact.
  • Season Gradually: Start with a small amount of salt and pepper, then taste as you go. This allows you to adjust the seasoning to your preference without overpowering the dish.
  • Experiment with Flavors: Don’t hesitate to try different herbs, spices, or sauces. Adding a splash of hot sauce or a sprinkle of smoked paprika can give your tartare a unique twist.
  • Presentation Matters: Take the time to plate your tartare beautifully. Use a ring mold for a professional look, and don’t forget to garnish with fresh herbs or sesame seeds.
  • Serve Immediately: For the best taste and texture, serve your tartare right after preparing it. This ensures that the ingredients remain fresh and vibrant.
  • Pair Wisely: Consider what you serve alongside your tartare. Light, crisp accompaniments like cucumber slices or tortilla chips complement the dish perfectly.

By following these tips, you’ll be well on your way to mastering the art of savory salmon tartare. Each step contributes to a delightful dish that’s sure to impress your family and friends. Enjoy the process and have fun experimenting with flavors!

Breakdown of Time for Savory Salmon Tartare Recipe

Prep Time

The prep time for your savory salmon tartare recipe is quite short, making it an ideal choice for a quick meal or appetizer. You can expect to spend about 15 to 20 minutes preparing the ingredients. This includes selecting and dicing the salmon, chopping the vegetables, and mixing everything together. Having all your ingredients ready will streamline the process, allowing you to enjoy your dish sooner!

Cooking Time

Interestingly, there is no actual cooking time involved in this recipe. Since salmon tartare is served raw, the focus is on the preparation and assembly of the ingredients. This means you can skip the cooking altogether, making it a fantastic option for those who want a fresh and healthy meal without the hassle of cooking. Just remember to keep everything cold and fresh!

Total Time

In total, you’ll need about 15 to 20 minutes to prepare your savory salmon tartare. This quick turnaround makes it perfect for busy weeknights or last-minute gatherings. With no cooking required, you can whip up this delicious dish in no time, impressing your guests with your culinary skills. So, gather your ingredients and get ready to enjoy a delightful meal that’s both easy and satisfying!

Nutritional Information for Savory Salmon Tartare Recipe

Calories

When it comes to enjoying a delicious savory salmon tartare, you might be curious about its nutritional value. Each serving of this delightful dish contains approximately 280 calories. This makes it a great option for those looking for a light yet satisfying meal. The balance of fresh ingredients ensures that you’re not only indulging in flavor but also keeping your calorie intake in check. Enjoying this dish as an appetizer or a light meal can fit well into a balanced diet.

Protein

Protein is an essential nutrient, and this savory salmon tartare recipe delivers! Each serving provides about 22 grams of protein. Salmon is known for being a fantastic source of high-quality protein, which is important for muscle repair and overall health. Including protein-rich foods like salmon in your diet can help keep you feeling full and satisfied. This makes the savory salmon tartare not just a tasty treat but also a nutritious choice!

Sodium

When it comes to sodium content, this savory salmon tartare recipe contains a moderate amount. The sodium level primarily comes from the soy sauce used in the dressing. Each serving has around 500 milligrams of sodium. If you’re watching your sodium intake, consider using low-sodium soy sauce or adjusting the amount to suit your dietary needs. Balancing flavors while keeping sodium in check is key to enjoying this dish without compromising your health goals.

Overall, the savory salmon tartare is a nutritious option that combines fresh ingredients with a delightful taste. With its low calorie count, high protein content, and manageable sodium levels, it’s a dish you can feel good about enjoying. Whether you’re serving it at a gathering or enjoying it as a light meal, this tartare is sure to please your palate while providing essential nutrients!

FAQs about Savory Salmon Tartare Recipe

Can I use frozen salmon for tartare?

Using frozen salmon for your savory salmon tartare is possible, but there are some important considerations. First, ensure that the salmon is labeled as sushi-grade. This means it has been frozen at a specific temperature to kill any potential parasites. Thaw the salmon in the refrigerator overnight for the best results. Once thawed, check for freshness by looking for a bright color and a clean smell. If it meets these criteria, you can safely use it in your tartare. However, fresh salmon is always the best choice for flavor and texture.

How do I know if the salmon is fresh enough?

Fresh salmon should have a vibrant color, typically a bright pink or orange hue. It should also have a clean, ocean-like smell, not a strong fishy odor. When you press the flesh, it should spring back and not leave an indentation. Additionally, the skin should look shiny and moist. If you’re buying from a fishmonger, don’t hesitate to ask about the fish’s source and how long it has been on display. Trust your senses; if something seems off, it’s best to choose another piece.

What can I serve with salmon tartare?

Salmon tartare pairs wonderfully with a variety of accompaniments. Classic options include tortilla chips or cucumber slices, which provide a nice crunch. You can also serve it with crispy wonton chips or toasted baguette slices for a gourmet touch. For a lighter option, consider placing the tartare on a bed of mixed greens or arugula. This adds freshness and makes for a beautiful presentation. Don’t forget to offer a selection of dipping sauces, like a spicy mayo or a tangy vinaigrette, to enhance the flavors even further!

How long can I store leftover salmon tartare?

Leftover salmon tartare is best enjoyed fresh, but if you have any leftovers, you can store them in the refrigerator. Place the tartare in an airtight container and consume it within 24 hours for the best quality. After this time, the freshness may decline, and the flavors can change. Always check for any off smells or changes in texture before consuming leftovers. If you’re unsure, it’s safer to discard it. Remember, the key to enjoying salmon tartare is to keep it fresh!

Conclusion on Savory Salmon Tartare Recipe

In conclusion, the savory salmon tartare recipe is a delightful dish that combines fresh ingredients with vibrant flavors. It’s not only easy to prepare but also offers a healthy option for those looking to enjoy a light meal or appetizer. The creamy avocado, crunchy vegetables, and rich salmon create a perfect harmony of textures and tastes that will impress your family and friends.

This recipe is versatile, allowing you to customize it to suit your preferences. Whether you choose to add a spicy kick or experiment with different proteins, the possibilities are endless. Plus, with its quick preparation time, you can whip up this dish in no time, making it ideal for busy weeknights or special occasions.

Remember to prioritize freshness and quality when selecting your ingredients. Using sushi-grade salmon ensures that you’re enjoying a safe and delicious meal. With the right techniques and a little creativity, you can master the art of making savory salmon tartare that will leave everyone asking for seconds.

So, gather your ingredients, follow the steps, and enjoy the process of creating this beautiful dish. Whether served at a gathering or enjoyed as a personal treat, the savory salmon tartare is sure to be a hit. Dive into this culinary adventure and savor every bite of your creation!

Red Velvet Cheesecake Recipe: A Delicious Delight!

Introduction to Red Velvet Cheesecake Recipe

Red Velvet Cheesecake is a delightful dessert that combines the rich flavors of traditional red velvet cake with the creamy texture of cheesecake. This unique treat is perfect for special occasions or simply to satisfy your sweet tooth. The vibrant red color and velvety texture make it visually appealing, while the combination of flavors creates a delicious experience for your taste buds.

What Makes Red Velvet Cheesecake Unique?

What sets Red Velvet Cheesecake apart from other desserts? First, it features the classic red velvet flavor, which is a blend of cocoa powder and vanilla, giving it a subtle chocolate taste. The addition of cream cheese adds a rich, tangy flavor that perfectly complements the sweetness of the cake. Moreover, the vibrant red hue not only makes it eye-catching but also adds a festive touch to any gathering.

Another unique aspect is the texture. The cheesecake layer is smooth and creamy, while the crust provides a satisfying crunch. This contrast makes each bite a delightful experience. Additionally, the recipe is versatile, allowing for various toppings and mix-ins, such as whipped cream or chocolate chips, to suit your preferences.

In summary, Red Velvet Cheesecake is not just a dessert; it’s a celebration of flavors and textures. Whether you’re serving it at a birthday party, holiday gathering, or just enjoying a slice at home, this cheesecake is sure to impress. So, let’s dive into the ingredients and preparation steps to create this delicious masterpiece!

Ingredients for Red Velvet Cheesecake Recipe

To create a mouthwatering Red Velvet Cheesecake, you’ll need a selection of simple yet essential ingredients. Each component plays a vital role in achieving that perfect balance of flavors and textures. Here’s what you’ll need:

  • 2 cups graham cracker crumbs
  • 1/2 cup unsalted butter, melted
  • 1/4 cup granulated sugar (for the crust)
  • 1 (8 oz) package cream cheese, softened
  • 1 cup granulated sugar (for the filling)
  • 1 teaspoon vanilla extract
  • 2 large eggs
  • 1 cup sour cream
  • 1 cup all-purpose flour
  • 1 tablespoon cocoa powder
  • 1 tablespoon red food coloring
  • 1 teaspoon white vinegar
  • 1/2 teaspoon baking soda

These ingredients come together to create a rich and creamy cheesecake with a delightful red velvet twist. The graham cracker crumbs form a crunchy base, while the cream cheese and sour cream provide that signature cheesecake creaminess. The red food coloring and cocoa powder give the cheesecake its iconic color and flavor.

Before you start baking, make sure to gather all your ingredients. This will help streamline the process and ensure you don’t miss anything important. Now that you have everything ready, let’s move on to the step-by-step preparation of this delicious Red Velvet Cheesecake!

Step-by-Step Preparation of Red Velvet Cheesecake Recipe

Now that you have all your ingredients ready, it’s time to dive into the step-by-step preparation of your Red Velvet Cheesecake. Each step is crucial to ensure your cheesecake turns out perfectly. Let’s get started!

Step 1: Preparing the Crust

First, we need to create a delicious crust for our cheesecake. In a medium bowl, combine the graham cracker crumbs, melted butter, and 1/4 cup of granulated sugar. Mix these ingredients until they are well combined. The mixture should resemble wet sand.

Next, press the crumb mixture firmly into the bottom of a greased 9-inch springform pan. Make sure to pack it tightly to create a sturdy base. Once you’ve done that, bake the crust in a preheated oven at 325°F for about 10 minutes. This will help set the crust and give it a nice golden color. After baking, remove it from the oven and let it cool completely.

Step 2: Making the Red Velvet Batter

While the crust is cooling, let’s prepare the red velvet batter. In a large mixing bowl, beat the softened cream cheese with 1 cup of granulated sugar until the mixture is smooth and creamy. This step is important for achieving a light texture.

Once the cream cheese and sugar are well combined, add in the vanilla extract. Mix well, then add the eggs one at a time, ensuring each egg is fully incorporated before adding the next. This will help create a smooth batter.

Step 3: Preparing the Cheesecake Filling

Now it’s time to add the remaining ingredients to the batter. Stir in the sour cream, all-purpose flour, cocoa powder, red food coloring, white vinegar, and baking soda. Mix everything together until fully combined. The batter should be a beautiful red color, and the texture should be smooth and creamy.

Make sure there are no lumps in the batter. This will ensure a silky cheesecake filling. Once you’re satisfied with the consistency, you’re ready to move on to the next step!

Step 4: Assembling the Red Velvet Cheesecake

With the crust cooled and the batter ready, it’s time to assemble your cheesecake. Pour the red velvet batter over the cooled graham cracker crust in the springform pan. Use a spatula to spread the batter evenly, ensuring it covers the crust completely.

Take a moment to admire the vibrant color of the batter! This cheesecake is going to be a showstopper. Now, let’s get it into the oven.

Step 5: Baking the Cheesecake

Place the assembled cheesecake in the preheated oven. Bake for 50-60 minutes, or until the center is set but still slightly jiggly. It’s important not to overbake, as this can lead to cracks in your cheesecake.

Once the baking time is up, turn off the oven and crack the door open. Allow the cheesecake to cool in the oven for about 1 hour. This gradual cooling helps prevent cracks from forming on the surface.

Step 6: Cooling and Chilling

After an hour in the oven, remove the cheesecake and let it cool completely at room temperature. Once it’s cooled, cover it with plastic wrap and refrigerate for at least 4 hours, or overnight if you can wait! Chilling allows the flavors to meld and the cheesecake to set properly.

And there you have it! You’ve successfully prepared your Red Velvet Cheesecake. Now, let’s explore some variations to make this dessert even more exciting!

Variations of Red Velvet Cheesecake Recipe

While the classic Red Velvet Cheesecake is a delightful treat on its own, there are many fun variations you can try. These adaptations allow you to cater to different dietary needs or simply add a twist to the traditional recipe. Let’s explore two popular variations: Gluten-Free Red Velvet Cheesecake and Mini Red Velvet Cheesecakes.

Gluten-Free Red Velvet Cheesecake

If you or someone you know is gluten-sensitive, you can still enjoy this delicious dessert! To make a gluten-free version of Red Velvet Cheesecake, simply substitute the all-purpose flour with a gluten-free flour blend. Many brands offer great alternatives that work well in baking.

Additionally, ensure that your graham cracker crumbs are gluten-free. Some brands offer gluten-free graham crackers, which can be crushed to create the crust. Follow the same steps as in the original recipe, and you’ll have a gluten-free cheesecake that everyone can enjoy!

Mini Red Velvet Cheesecakes

For a fun and adorable twist, consider making Mini Red Velvet Cheesecakes! These bite-sized treats are perfect for parties or gatherings. To create mini versions, use a muffin tin lined with cupcake liners instead of a springform pan.

Prepare the crust as usual, but divide the graham cracker mixture evenly among the muffin cups. Press it down firmly. Then, pour the red velvet batter over each crust, filling the cups about three-quarters full. Bake for about 20-25 minutes, or until the centers are set.

Once baked, let them cool and chill as you would with the full-sized cheesecake. These mini cheesecakes are not only cute but also make for easy serving. Top them with whipped cream and a sprinkle of red velvet cake crumbs for an extra special touch!

These variations allow you to enjoy the rich flavors of Red Velvet Cheesecake in different ways. Whether you choose the gluten-free option or the mini version, you’re sure to impress your guests with these delightful treats!

Cooking Note for Red Velvet Cheesecake Recipe

When it comes to baking a Red Velvet Cheesecake, a few key cooking notes can help ensure your dessert turns out perfectly. First, always use room temperature ingredients. This includes the cream cheese, eggs, and sour cream. Room temperature ingredients blend more easily, resulting in a smoother batter.

Next, be mindful of your oven temperature. Ovens can vary, so it’s a good idea to use an oven thermometer to ensure accuracy. Baking at the correct temperature is crucial for achieving the right texture. If your cheesecake is baking too quickly, it may crack or become dry.

Another important tip is to avoid opening the oven door while the cheesecake is baking. This can cause temperature fluctuations, which may lead to cracks. Instead, use the oven light to check on your cheesecake. If you notice it’s puffing up too much, it may be a sign that it’s overbaking.

Lastly, patience is key when cooling your cheesecake. Allowing it to cool gradually in the oven helps prevent cracks. After cooling at room temperature, refrigerate it for the recommended time. This chilling period is essential for the flavors to develop and the cheesecake to set properly.

By following these cooking notes, you’ll be well on your way to creating a stunning Red Velvet Cheesecake that’s sure to impress everyone at your gathering!

Serving Suggestions for Red Velvet Cheesecake Recipe

Once your Red Velvet Cheesecake is perfectly chilled and ready to serve, it’s time to think about how to present this stunning dessert. The way you serve it can enhance the overall experience, making it even more enjoyable for your guests. Here are some delightful serving suggestions to consider:

  • Classic Presentation: Slice the cheesecake into wedges and serve each piece on a dessert plate. This classic approach allows everyone to enjoy a generous slice of the rich, creamy cheesecake.
  • Whipped Cream Topping: Add a dollop of freshly whipped cream on top of each slice. The lightness of the whipped cream beautifully contrasts with the dense cheesecake, creating a delightful balance.
  • Red Velvet Crumbs: For a decorative touch, sprinkle some crushed red velvet cake crumbs on top of the whipped cream. This not only adds visual appeal but also enhances the red velvet flavor.
  • Chocolate Drizzle: Drizzle some chocolate sauce over the cheesecake slices for an extra layer of flavor. The combination of chocolate and red velvet is always a hit!
  • Fresh Berries: Serve the cheesecake with a side of fresh berries, such as strawberries or raspberries. The tartness of the berries complements the sweetness of the cheesecake perfectly.
  • Mini Cheesecake Bites: If you made mini cheesecakes, serve them on a decorative platter. You can even add toothpicks for easy serving, making them perfect for parties or gatherings.

These serving suggestions not only enhance the presentation of your Red Velvet Cheesecake but also elevate the overall tasting experience. Whether you’re hosting a special occasion or simply enjoying a slice at home, these ideas will surely impress your guests and make your dessert unforgettable!

Tips for Perfecting Your Red Velvet Cheesecake Recipe

Creating the perfect Red Velvet Cheesecake is an art that requires attention to detail. Here are some valuable tips to help you achieve a delicious and visually stunning dessert every time:

  • Use Quality Ingredients: The quality of your ingredients can significantly impact the final taste. Opt for high-quality cream cheese and fresh eggs for the best results. Fresh ingredients enhance the flavor and texture of your cheesecake.
  • Don’t Overmix: When combining the batter, mix just until the ingredients are incorporated. Overmixing can introduce too much air, leading to cracks during baking. A smooth batter is key, but it should not be whipped.
  • Check for Doneness: To ensure your cheesecake is perfectly baked, gently shake the pan. The center should be slightly jiggly but not liquid. If it wobbles too much, it needs more time in the oven.
  • Cool Gradually: As mentioned earlier, cooling your cheesecake gradually in the oven helps prevent cracks. After baking, turn off the oven and leave the door ajar for about an hour before transferring it to room temperature.
  • Chill Overnight: For the best flavor and texture, chill your cheesecake overnight. This allows the flavors to meld beautifully and ensures a firmer texture, making it easier to slice.
  • Experiment with Flavors: Don’t hesitate to add your twist! Consider incorporating spices like cinnamon or nutmeg for added warmth. You can also try different extracts, such as almond or coconut, to create unique flavor profiles.
  • Use a Water Bath: For an ultra-smooth cheesecake, consider baking it in a water bath. Wrap the springform pan in aluminum foil and place it in a larger pan filled with hot water. This method helps maintain even baking temperatures.
  • Garnish Creatively: When it comes to presentation, let your creativity shine! Use fresh fruits, chocolate shavings, or edible flowers to make your cheesecake visually appealing. A beautiful presentation can elevate the dessert experience.

By following these tips, you’ll be well on your way to mastering the art of Red Velvet Cheesecake. Each step you take will contribute to a dessert that not only looks stunning but also tastes incredible. Happy baking!

Breakdown of Time for Red Velvet Cheesecake Recipe

Understanding the time required for each step in the Red Velvet Cheesecake recipe is essential for planning your baking session. Here’s a detailed breakdown of the time you’ll need to allocate for preparation, cooking, and chilling.

Prep Time

The prep time for your Red Velvet Cheesecake is approximately 30 minutes. This includes gathering all your ingredients, preparing the crust, and mixing the cheesecake batter. Make sure to have everything ready before you start, as this will help streamline the process and make it more enjoyable.

Cooking Time

Once you’ve prepped your cheesecake, the cooking time will take about 60-70 minutes. This includes 10 minutes for baking the crust and 50-60 minutes for baking the cheesecake itself. Remember, the cheesecake should be slightly jiggly in the center when you take it out of the oven, so keep an eye on it during the last few minutes of baking.

Total Time

In total, you should expect to spend around 90-100 minutes actively working on your Red Velvet Cheesecake. However, don’t forget to factor in the chilling time! After baking, the cheesecake needs to cool at room temperature and then chill in the refrigerator for at least 4 hours, or ideally overnight. This brings the total time commitment to about 8-12 hours, including chilling, but most of that is hands-off time.

By planning your time wisely, you can ensure that your Red Velvet Cheesecake turns out perfectly. Enjoy the process, and soon you’ll have a delicious dessert ready to impress your family and friends!

Nutritional Information for Red Velvet Cheesecake Recipe

Understanding the nutritional content of your Red Velvet Cheesecake is essential, especially if you’re mindful of your dietary choices. This delicious dessert can be enjoyed in moderation, and knowing its nutritional breakdown can help you make informed decisions. Here’s a closer look at the key nutritional components per serving:

Calories

350 calories. This calorie count includes the rich ingredients like cream cheese and butter, which contribute to the overall flavor and texture. While it’s a treat, enjoying it in moderation is key to maintaining a balanced diet.

Protein

6 grams per serving. The protein primarily comes from the cream cheese and eggs used in the recipe. Protein is essential for muscle repair and growth, making this dessert a delightful way to indulge while still getting some nutritional benefits.

Sodium

300 mg of sodium. This sodium content is relatively moderate, but it’s always good to be aware, especially for those watching their salt intake. The sodium mainly comes from the cream cheese and butter, which are key ingredients in this recipe.

Overall, while Red Velvet Cheesecake is a rich and indulgent dessert, it can be enjoyed as part of a balanced diet. Just remember to savor each bite and share it with friends and family for a delightful experience!

FAQs about Red Velvet Cheesecake Recipe

Can I use a different type of cheese for the cheesecake filling?

Yes, you can! While cream cheese is the traditional choice for cheesecake, you can experiment with other types of cheese. Mascarpone cheese can add a rich and creamy texture, while ricotta cheese can provide a lighter feel. Just keep in mind that the flavor and texture may vary slightly, so it’s best to choose a cheese that complements the red velvet flavor.

How do I store leftover Red Velvet Cheesecake?

To store leftover Red Velvet Cheesecake, first, make sure it’s completely cooled and chilled. Cover the cheesecake with plastic wrap or aluminum foil to prevent it from drying out. You can also place it in an airtight container. Store it in the refrigerator for up to 5 days. If you want to keep it longer, consider freezing individual slices. Just wrap them tightly in plastic wrap and then in aluminum foil before placing them in the freezer. They can last for up to 3 months!

Can I make Red Velvet Cheesecake ahead of time?

Absolutely! In fact, making Red Velvet Cheesecake ahead of time is a great idea. It allows the flavors to meld and the texture to set perfectly. You can prepare the cheesecake a day or two in advance. Just remember to refrigerate it after cooling. When you’re ready to serve, simply take it out of the fridge, slice, and enjoy!

What can I substitute for buttermilk in the recipe?

If you don’t have buttermilk on hand, don’t worry! You can easily make a substitute. For every cup of buttermilk needed, mix 1 tablespoon of white vinegar or lemon juice with enough milk to make 1 cup. Let it sit for about 5 minutes until it thickens slightly. This will give you a similar tangy flavor and acidity that buttermilk provides, ensuring your cheesecake turns out delicious!

Conclusion on Red Velvet Cheesecake Recipe

In conclusion, the Red Velvet Cheesecake is a delightful dessert that beautifully combines the classic flavors of red velvet cake with the creamy richness of cheesecake. This recipe is not only easy to follow but also allows for creativity and personalization. Whether you’re celebrating a special occasion or simply indulging in a sweet treat, this cheesecake is sure to impress.

By using quality ingredients and following the preparation steps carefully, you can create a stunning dessert that will be the highlight of any gathering. Remember to take your time during the baking and cooling process, as patience is key to achieving that perfect texture. With the tips and variations provided, you can make this recipe your own, whether you opt for a gluten-free version or mini cheesecakes.

As you serve your Red Velvet Cheesecake, consider the presentation options to elevate the experience. From whipped cream to fresh berries, these simple touches can make your dessert even more inviting. Enjoy each slice, savoring the rich flavors and creamy texture that make this cheesecake a true indulgence.

So, gather your ingredients, roll up your sleeves, and get ready to create a delicious Red Velvet Cheesecake that will leave everyone asking for seconds. Happy baking!

Savory Oven-Baked Beef Ribs are a must-try dish!

Introduction to Savory Oven-Baked Beef Ribs

When it comes to comfort food, few dishes can compete with the rich, mouthwatering flavor of savory oven-baked beef ribs. These tender, juicy ribs are perfect for family gatherings, weekend barbecues, or simply a cozy dinner at home. The beauty of this recipe lies not only in its delicious taste but also in its simplicity. With just a handful of ingredients and a little patience, you can create a dish that will impress your family and friends.

Beef back ribs are known for their rich flavor and meaty texture. They are cut from the back of the cow, near the spine, and are often overlooked in favor of more popular cuts. However, when cooked properly, they become incredibly tender and flavorful. The slow baking process allows the meat to absorb all the spices and seasonings, resulting in a dish that is bursting with flavor.

This recipe for savory oven-baked beef ribs is designed to be easy to follow, even for novice cooks. You’ll find that the preparation is straightforward, and the cooking time allows you to relax while the ribs bake to perfection. Plus, the addition of your favorite barbecue sauce at the end gives these ribs a delightful glaze that is simply irresistible.

Whether you’re a seasoned chef or just starting out in the kitchen, this recipe will guide you through each step. So, roll up your sleeves and get ready to enjoy a delicious meal that will have everyone asking for seconds!

Ingredients for Savory Oven-Baked Beef Ribs

To create the perfect savory oven-baked beef ribs, you’ll need a few simple ingredients. Each component plays a vital role in enhancing the flavor and tenderness of the ribs. Here’s what you’ll need:

  • 2 racks of beef back ribs (about 4 pounds total) – This is the star of the dish, providing rich flavor and tenderness.
  • 1 tablespoon olive oil – This helps the spices stick to the meat and adds a touch of healthy fat.
  • 2 teaspoons garlic powder – Garlic powder adds a savory depth to the flavor profile.
  • 2 teaspoons onion powder – This ingredient complements the garlic and enhances the overall taste.
  • 2 teaspoons smoked paprika – Smoked paprika gives the ribs a delightful smoky flavor.
  • 1 teaspoon ground black pepper – This adds a bit of heat and enhances the other flavors.
  • 1 teaspoon salt – Salt is essential for bringing out the natural flavors of the meat.
  • 1 teaspoon cayenne pepper (optional for heat) – If you like a little kick, this is a great addition.
  • 1 cup barbecue sauce (your favorite brand) – The finishing touch that adds sweetness and a sticky glaze.

These ingredients are easy to find at your local grocery store. Feel free to adjust the spices according to your taste preferences. For instance, if you enjoy a sweeter flavor, consider adding honey or brown sugar to your barbecue sauce. With these ingredients, you’re well on your way to making delicious savory oven-baked beef ribs that everyone will love!

Preparation of Savory Oven-Baked Beef Ribs

Now that you have gathered all the ingredients, it’s time to prepare your savory oven-baked beef ribs. This section will guide you through each step, ensuring that your ribs turn out tender and flavorful. Let’s dive into the preparation process!

Step 1: Prepping the Beef Ribs

First, rinse the beef back ribs under cold water. This helps remove any residue and ensures a clean surface. After rinsing, pat them dry with paper towels. Drying the ribs is important as it allows the spice rub to adhere better. Once they are dry, place the ribs on a clean cutting board, bone side up, ready for seasoning.

Step 2: Marinating the Ribs

In a small bowl, mix together the olive oil, garlic powder, onion powder, smoked paprika, black pepper, salt, and cayenne pepper (if you’re using it). This spice mixture is what will give your ribs that delicious flavor. Rub the mixture evenly over both sides of the ribs. Make sure to cover every inch, as this will enhance the taste. Once coated, let the ribs sit for about 15-30 minutes. This allows the flavors to penetrate the meat.

Step 3: Preparing the Oven

While the ribs are marinating, preheat your oven to 300°F (150°C). This low temperature is key to achieving tender ribs. Line a large baking sheet with aluminum foil for easy cleanup. The foil will catch any drippings and make washing up a breeze. Once the oven is ready, you’re all set to bake!

Step 4: Baking the Ribs

Place the marinated ribs on the prepared baking sheet, bone side down. Cover the ribs tightly with another piece of aluminum foil. This step is crucial as it traps moisture, helping the meat cook evenly and become tender. Bake in the preheated oven for 2.5 to 3 hours. You’ll know they’re done when the meat pulls away from the bone easily. The aroma will fill your kitchen, making it hard to wait!

Step 5: Finishing Touches

After baking, carefully remove the ribs from the oven. Take off the top layer of foil, being cautious of the steam. Brush the ribs generously with your favorite barbecue sauce. This adds a sweet and tangy glaze that complements the savory flavors. Increase the oven temperature to 400°F (200°C) and return the ribs to the oven, uncovered, for an additional 15-20 minutes. This step caramelizes the sauce, giving the ribs a beautiful finish. Once done, let the ribs rest for about 10 minutes before slicing. This resting period allows the juices to redistribute, ensuring every bite is juicy and flavorful.

Variation of Savory Oven-Baked Beef Ribs

While the classic recipe for savory oven-baked beef ribs is delicious on its own, there are many ways to switch things up! Variations can enhance the flavor and make your meal even more exciting. Let’s explore some different marinade options and cooking techniques that you can try.

Different Marinade Options

Marinades are a fantastic way to infuse your beef ribs with unique flavors. Here are a few ideas to consider:

  • Teriyaki Marinade: Combine soy sauce, brown sugar, ginger, and garlic for a sweet and savory twist. Let the ribs marinate for at least an hour before cooking.
  • Spicy Chipotle Marinade: Blend chipotle peppers in adobo sauce with lime juice, honey, and cumin. This will give your ribs a smoky and spicy kick.
  • Herb and Citrus Marinade: Mix olive oil, lemon juice, rosemary, and thyme for a fresh and zesty flavor. This option is perfect for those who prefer lighter tastes.
  • Mustard and Honey Marinade: Combine Dijon mustard, honey, and apple cider vinegar for a tangy and sweet flavor. This marinade pairs well with the richness of the beef.

Feel free to experiment with these marinades! Just remember to let the ribs soak in the flavors for a few hours or overnight for the best results.

Cooking Techniques for Savory Oven-Baked Beef Ribs

In addition to marinades, you can also try different cooking techniques to achieve the perfect savory oven-baked beef ribs. Here are some methods to consider:

  • Slow Cooker: If you prefer a hands-off approach, use a slow cooker. After seasoning the ribs, place them in the slow cooker with a bit of barbecue sauce. Cook on low for 6-8 hours for tender, fall-off-the-bone ribs.
  • Grilling: For a smoky flavor, finish the ribs on the grill. After baking, transfer the ribs to a preheated grill and cook for 5-10 minutes on each side, brushing with barbecue sauce.
  • Pressure Cooking: If you’re short on time, use a pressure cooker. Cook the seasoned ribs on high pressure for about 30 minutes, then finish them in the oven for caramelization.
  • Smoking: For a true barbecue experience, smoke the ribs. After marinating, smoke them at a low temperature for several hours, then finish in the oven for a tender texture.

These cooking techniques can add variety to your savory oven-baked beef ribs, making each meal a new adventure. Enjoy experimenting with flavors and methods to find your favorite combination!

Cooking Note for Savory Oven-Baked Beef Ribs

Cooking savory oven-baked beef ribs is a delightful experience, but there are a few important notes to keep in mind to ensure your dish turns out perfectly every time. Understanding the nuances of cooking beef ribs can elevate your meal and impress your guests. Here are some key points to consider:

First, always choose high-quality beef back ribs. Look for ribs with a good amount of meat and marbling. The marbling, or fat within the meat, helps keep the ribs juicy and flavorful during cooking. If possible, buy your ribs from a trusted butcher or a reputable grocery store.

Next, patience is key. Cooking beef ribs low and slow is essential for achieving that tender, fall-off-the-bone texture. Avoid the temptation to increase the oven temperature too much, as this can lead to tough meat. The slow cooking process allows the collagen in the meat to break down, resulting in a more tender bite.

Additionally, consider using a meat thermometer to check for doneness. The ideal internal temperature for beef ribs is around 190°F (88°C). At this temperature, the meat will be tender and juicy. If you don’t have a thermometer, look for the meat to pull away from the bone easily as a sign that it’s ready.

Lastly, don’t skip the resting period after baking. Allowing the ribs to rest for about 10 minutes before slicing helps the juices redistribute throughout the meat. This simple step can make a big difference in the overall flavor and texture of your savory oven-baked beef ribs.

By keeping these cooking notes in mind, you’ll be well on your way to creating delicious, savory oven-baked beef ribs that everyone will love. Happy cooking!

Serving Suggestions for Savory Oven-Baked Beef Ribs

Once your savory oven-baked beef ribs are perfectly cooked and resting, it’s time to think about how to serve them. The right sides and accompaniments can elevate your meal and create a delightful dining experience. Here are some tasty serving suggestions that pair wonderfully with your savory oven-baked beef ribs:

  • Classic Coleslaw: A refreshing coleslaw adds a crunchy texture and balances the rich flavors of the ribs. The tangy dressing complements the sweetness of the barbecue sauce.
  • Grilled Corn on the Cob: Sweet, juicy corn on the cob is a summer favorite. Grilling it adds a smoky flavor that pairs perfectly with the savory ribs.
  • Baked Beans: A hearty side of baked beans brings a sweet and savory element to the meal. The beans are filling and add a nice contrast to the tender meat.
  • Garlic Bread: Soft, buttery garlic bread is always a hit. It’s perfect for soaking up any extra barbecue sauce left on your plate.
  • Potato Salad: Creamy potato salad is another classic side that complements the ribs. The coolness of the salad balances the warmth of the meat.
  • Macaroni and Cheese: For a comforting touch, serve your ribs with creamy macaroni and cheese. The cheesy goodness is a crowd-pleaser!
  • Pickles and Jalapeños: For those who enjoy a bit of zing, serve pickles or jalapeños on the side. They add a nice contrast to the rich flavors of the ribs.

When it comes to drinks, consider serving iced tea, lemonade, or a light beer. These beverages can refresh your palate and enhance the overall meal experience. Don’t forget to have extra barbecue sauce on the table for those who want to add more flavor to their ribs!

With these serving suggestions, your savory oven-baked beef ribs will be the star of the meal. Enjoy the delicious flavors and the company of your loved ones as you dig into this delightful dish!

Tips for Perfect Savory Oven-Baked Beef Ribs

Creating the perfect savory oven-baked beef ribs is an art that can be mastered with a few helpful tips. Whether you’re a beginner or an experienced cook, these suggestions will ensure your ribs turn out tender, flavorful, and absolutely delicious. Let’s explore some essential tips to elevate your cooking game!

First, always start with quality meat. Look for beef back ribs that have a good amount of meat and marbling. The marbling, or fat within the meat, is crucial for keeping the ribs juicy during cooking. If you can, buy your ribs from a trusted butcher or a reputable grocery store.

Next, don’t rush the marinating process. Allowing the ribs to marinate for several hours or even overnight can significantly enhance the flavor. The longer the ribs soak in the spices, the more delicious they will be. If you’re short on time, even a quick 30-minute marinade will still add flavor.

When it comes to baking, patience is key. Cooking the ribs at a low temperature for a longer time is essential for achieving that tender, fall-off-the-bone texture. Avoid cranking up the heat, as this can lead to tough meat. Instead, let the ribs bake slowly, allowing the collagen to break down and the flavors to meld.

Using a meat thermometer can also be a game-changer. The ideal internal temperature for beef ribs is around 190°F (88°C). This temperature ensures that the meat is tender and juicy. If you don’t have a thermometer, look for the meat to pull away from the bone easily as a sign that it’s ready.

Lastly, don’t skip the resting period after baking. Allowing the ribs to rest for about 10 minutes before slicing helps the juices redistribute throughout the meat. This simple step can make a big difference in the overall flavor and texture of your savory oven-baked beef ribs.

By following these tips, you’ll be well on your way to creating mouthwatering savory oven-baked beef ribs that will impress your family and friends. Happy cooking!

Breakdown of Time for Savory Oven-Baked Beef Ribs

Understanding the time required for each step in preparing savory oven-baked beef ribs is essential for a smooth cooking experience. Here’s a detailed breakdown of the time you’ll need for preparation and cooking, ensuring that you can plan your meal effectively.

Prep Time

The prep time for savory oven-baked beef ribs is relatively short. You’ll spend about 15-30 minutes getting everything ready. This includes rinsing and drying the ribs, mixing the spice rub, and marinating the meat. If you choose to marinate the ribs for longer, you can let them sit in the refrigerator for several hours or overnight. This extra time will enhance the flavor even more!

Cooking Time

Once your ribs are prepped, the cooking time is where the magic happens. You’ll bake the ribs at a low temperature of 300°F (150°C) for 2.5 to 3 hours. This slow cooking process is crucial for achieving tender, juicy meat. After the initial baking, you’ll increase the oven temperature to 400°F (200°C) for an additional 15-20 minutes. This step caramelizes the barbecue sauce, giving the ribs a delicious glaze.

Total Time

In total, you can expect to spend around 3 to 4 hours from start to finish. This includes both the prep and cooking times. While it may seem like a long process, most of this time is hands-off, allowing you to relax or prepare your sides while the ribs bake. The end result will be well worth the wait, as you’ll have a mouthwatering dish that everyone will love!

Nutritional Information for Savory Oven-Baked Beef Ribs

Understanding the nutritional content of your savory oven-baked beef ribs can help you make informed choices about your meals. This section will break down the key nutritional components, including calories, protein, and sodium. Knowing these values can assist you in planning balanced meals while still enjoying delicious flavors.

Calories

Each serving of savory oven-baked beef ribs contains approximately 450 calories. This calorie count includes the meat, spices, and barbecue sauce. While this dish is rich in flavor, it’s important to enjoy it in moderation, especially if you are watching your calorie intake. Pairing the ribs with lighter sides can help balance your meal.

Protein

One of the standout features of savory oven-baked beef ribs is their high protein content. Each serving provides about 35 grams of protein. Protein is essential for building and repairing tissues, making it a vital part of a healthy diet. Enjoying these ribs can help you meet your daily protein needs, especially when served alongside nutritious sides.

Sodium

The sodium content in savory oven-baked beef ribs is approximately 800 milligrams per serving. This amount can vary based on the barbecue sauce you choose and the amount of salt used in the spice rub. If you are watching your sodium intake, consider using low-sodium barbecue sauce or reducing the added salt in the recipe. Balancing your meal with fresh vegetables can also help offset sodium levels.

By being aware of the nutritional information for savory oven-baked beef ribs, you can enjoy this delicious dish while keeping your dietary goals in mind. Remember, moderation is key, and pairing these ribs with healthy sides can create a well-rounded meal that satisfies your taste buds!

FAQs about Savory Oven-Baked Beef Ribs

What is the best way to season Savory Oven-Baked Beef Ribs?

The best way to season savory oven-baked beef ribs is to use a flavorful spice rub. A combination of garlic powder, onion powder, smoked paprika, black pepper, salt, and cayenne pepper works wonders. This mix enhances the natural flavors of the meat. You can also experiment with different marinades, such as teriyaki or chipotle, to add unique tastes. Remember, the longer you let the ribs marinate, the more flavorful they will be!

How long should I bake Savory Oven-Baked Beef Ribs?

You should bake savory oven-baked beef ribs for about 2.5 to 3 hours at 300°F (150°C). This low and slow cooking method ensures the meat becomes tender and juicy. After the initial baking, increase the temperature to 400°F (200°C) for an additional 15-20 minutes. This step caramelizes the barbecue sauce, giving the ribs a delicious glaze. Always check that the meat pulls away from the bone easily to ensure they are done!

Can I use a different cut of meat for Savory Oven-Baked Beef Ribs?

Yes, you can use different cuts of meat for savory oven-baked beef ribs. While beef back ribs are ideal for their flavor and tenderness, you can also try short ribs or even pork ribs. Just keep in mind that cooking times may vary depending on the cut. Always ensure the meat is cooked to the right temperature for the best results. Each cut will bring its unique flavor and texture to the dish!

What sides pair well with Savory Oven-Baked Beef Ribs?

There are many delicious sides that pair well with savory oven-baked beef ribs. Classic options include coleslaw, baked beans, and garlic bread. Grilled corn on the cob and potato salad also make great accompaniments. For a comforting touch, consider serving macaroni and cheese. These sides balance the rich flavors of the ribs and create a well-rounded meal. Don’t forget to have extra barbecue sauce on hand for dipping!

Conclusion on Savory Oven-Baked Beef Ribs

In conclusion, savory oven-baked beef ribs are a delightful dish that brings comfort and joy to any meal. With their tender texture and rich flavors, these ribs are sure to impress your family and friends. The simplicity of the recipe makes it accessible for cooks of all skill levels, allowing anyone to create a mouthwatering feast.

By following the steps outlined in this article, you can master the art of preparing savory oven-baked beef ribs. From selecting quality ingredients to experimenting with marinades and cooking techniques, the possibilities are endless. Remember, the key to success lies in patience and attention to detail. Allowing the ribs to cook slowly at a low temperature ensures they become tender and flavorful.

As you serve your savory oven-baked beef ribs, don’t forget to pair them with delicious sides that complement their rich taste. Whether it’s classic coleslaw, baked beans, or creamy macaroni and cheese, the right accompaniments can elevate your meal to new heights.

So, gather your loved ones, fire up the oven, and enjoy the process of creating this delectable dish. With each bite, you’ll savor the fruits of your labor and create lasting memories around the dinner table. Happy cooking, and may your savory oven-baked beef ribs become a cherished favorite in your home!

Pesto Tortellini Salad is a delicious and easy recipe.

Introduction to Pesto Tortellini Salad

Pesto Tortellini Salad is a delightful dish that combines the rich flavors of cheese tortellini with fresh vegetables and a zesty pesto dressing. This salad is not only vibrant and colorful but also packed with nutrients, making it a perfect choice for a light lunch or a side dish at dinner. The creamy mozzarella and juicy cherry tomatoes add a burst of flavor, while the baby spinach provides a healthy crunch.

What makes this salad truly special is its versatility. You can enjoy it as a refreshing meal on a warm day or serve it at gatherings and picnics. Plus, it’s easy to prepare, requiring minimal cooking time. With just a few simple ingredients, you can whip up a dish that impresses family and friends alike.

Whether you’re a seasoned cook or a beginner in the kitchen, this Pesto Tortellini Salad is a fantastic recipe to add to your collection. It’s not only delicious but also allows for creativity. You can customize it with your favorite proteins or vegetables, making it a dish that suits your taste perfectly.

So, let’s dive into the ingredients and preparation steps to create this mouthwatering Pesto Tortellini Salad!

Ingredients for Pesto Tortellini Salad

To create a delicious Pesto Tortellini Salad, you will need a few fresh ingredients that come together beautifully. Here’s what you’ll need:

  • 8 ounces cheese tortellini: This is the star of the dish, providing a rich and creamy base.
  • 1 cup cherry tomatoes: Halved for a burst of sweetness and color.
  • 1 cup fresh mozzarella balls: These add a delightful creaminess to the salad.
  • 1 cup baby spinach: Roughly chopped for a healthy crunch and vibrant green color.
  • 1/2 cup pesto sauce: This zesty sauce ties all the flavors together.
  • 1/4 cup grated Parmesan cheese: For an extra layer of flavor and richness.
  • Salt and pepper to taste: Essential for enhancing the overall taste.
  • 1 tablespoon olive oil: Adds a smooth texture and richness.
  • 1 tablespoon balsamic vinegar: This gives a tangy kick that balances the flavors.

These ingredients are not only easy to find but also work harmoniously to create a refreshing and satisfying salad. Feel free to adjust the quantities based on your preferences or the number of servings you need. Now that you have your ingredients ready, let’s move on to the preparation steps!

Preparation of Pesto Tortellini Salad

Now that you have gathered all your ingredients, it’s time to prepare your Pesto Tortellini Salad. The steps are simple and straightforward, making it easy for anyone to follow. Let’s get started!

Step 1: Cook the Tortellini

First, bring a large pot of salted water to a boil. Once boiling, add the 8 ounces of cheese tortellini. Cook according to the package instructions, usually around 3 to 5 minutes, until they float to the top. This indicates they are done. After cooking, drain the tortellini in a colander and rinse them under cold water. This helps cool them down quickly and stops the cooking process.

Step 2: Prepare the Vegetables

While the tortellini cools, it’s time to prepare the vegetables. Take 1 cup of cherry tomatoes and cut them in half. This will release their sweet juices and make them easier to eat. Next, grab 1 cup of fresh mozzarella balls and cut them in half as well. Finally, take 1 cup of baby spinach and roughly chop it. This will add a nice crunch and vibrant color to your salad.

Step 3: Combine Ingredients

In a large mixing bowl, combine the cooled tortellini, halved cherry tomatoes, halved mozzarella balls, and chopped baby spinach. Gently mix these ingredients together to ensure they are evenly distributed. This colorful mixture is the base of your salad and will look beautiful once dressed.

Step 4: Add the Pesto

In a small bowl, whisk together the 1/2 cup of pesto sauce, 1 tablespoon of olive oil, 1 tablespoon of balsamic vinegar, and a pinch of salt and pepper. This dressing will bring all the flavors together. Pour the dressing over the tortellini mixture and toss gently to coat everything evenly. Make sure every piece is covered in that delicious pesto!

Step 5: Toss and Serve

After mixing, sprinkle 1/4 cup of grated Parmesan cheese on top of the salad. Toss everything again to combine. For the best flavor, chill the salad in the refrigerator for at least 30 minutes before serving. This allows the flavors to meld beautifully. When you’re ready to serve, give it one last gentle toss and enjoy your delightful Pesto Tortellini Salad!

Variation of Pesto Tortellini Salad

One of the best things about Pesto Tortellini Salad is its versatility. You can easily modify the recipe to suit your taste or dietary needs. Here are some great variations to consider!

Adding Proteins

If you want to make your Pesto Tortellini Salad more filling, adding protein is a fantastic option. Grilled chicken is a popular choice. Simply slice it into bite-sized pieces and mix it in with the other ingredients. This addition not only boosts the protein content but also adds a savory flavor.

Another great option is chickpeas. They are a wonderful plant-based protein source. Just rinse and drain a can of chickpeas, then fold them into the salad. This makes the dish hearty and satisfying, perfect for a lunch or dinner.

For seafood lovers, consider adding shrimp. Cook the shrimp until they are pink and tender, then toss them in. The combination of shrimp and pesto is simply delightful!

Vegetarian Options

If you prefer a vegetarian version, there are plenty of delicious options to explore. You can add roasted vegetables like bell peppers, zucchini, or asparagus. Roasting brings out their natural sweetness and adds a lovely depth of flavor to the salad.

Another tasty addition is artichoke hearts. They add a unique taste and texture that pairs well with the other ingredients. Simply chop them up and mix them in for a delightful twist.

For a bit of crunch, consider adding nuts like pine nuts or walnuts. They not only enhance the flavor but also provide healthy fats and a satisfying crunch. Just toast them lightly before adding for an extra layer of flavor.

With these variations, you can easily customize your Pesto Tortellini Salad to fit your preferences. Whether you’re looking for added protein or a vegetarian twist, the possibilities are endless!

Cooking Note for Pesto Tortellini Salad

When preparing your Pesto Tortellini Salad, there are a few cooking notes to keep in mind. These tips will help ensure that your salad turns out perfectly every time. Let’s explore some important points to consider!

First, always check the cooking time on the tortellini package. Different brands may have varying instructions. Overcooking can lead to mushy pasta, which isn’t ideal for a salad. Aim for al dente, where the pasta is tender but still has a slight bite.

Next, rinsing the tortellini under cold water is crucial. This step not only cools the pasta but also helps remove excess starch. This prevents the tortellini from sticking together, ensuring a light and fluffy salad.

When it comes to the pesto sauce, feel free to adjust the amount based on your taste. If you love a stronger flavor, add a bit more pesto. Conversely, if you prefer a milder taste, use less. The beauty of this salad is that you can customize it to your liking!

Additionally, consider the freshness of your ingredients. Using fresh vegetables and high-quality pesto will elevate the overall taste of your salad. If you have the time, making homemade pesto can add a delightful touch. It’s simple to prepare and allows you to control the flavors.

Lastly, remember to chill the salad before serving. This step is essential for allowing the flavors to meld together. A well-chilled salad is refreshing and enhances the overall experience. Aim for at least 30 minutes in the refrigerator, but if you can, let it sit longer for even better flavor.

By keeping these cooking notes in mind, you’ll create a delicious Pesto Tortellini Salad that’s sure to impress. Enjoy the process and have fun experimenting with different ingredients!

Serving Suggestions for Pesto Tortellini Salad

When it comes to serving your Pesto Tortellini Salad, there are many delightful ways to present this colorful dish. Whether you’re hosting a gathering or enjoying a quiet meal at home, these serving suggestions will enhance your dining experience.

First, consider serving the salad in a large, beautiful bowl. This allows everyone to see the vibrant colors of the ingredients. You can also use individual bowls for a more personal touch. Garnish each serving with a sprinkle of extra Parmesan cheese or a few fresh basil leaves for an appealing look.

Pairing your Pesto Tortellini Salad with complementary dishes can elevate the meal. Here are some great options:

  • Grilled Chicken: Serve alongside grilled chicken breasts for a hearty meal. The smoky flavor of the chicken pairs wonderfully with the fresh salad.
  • Garlic Bread: A side of warm garlic bread is perfect for soaking up any leftover pesto dressing. It adds a comforting touch to your meal.
  • Caprese Skewers: For a fun appetizer, consider serving Caprese skewers made with cherry tomatoes, mozzarella, and basil. They echo the flavors in the salad.
  • Mixed Green Salad: A simple mixed green salad with a light vinaigrette can complement the richness of the tortellini salad, providing a refreshing contrast.

For a picnic or potluck, pack the Pesto Tortellini Salad in a portable container. It travels well and can be served cold, making it an ideal dish for outdoor gatherings. Just remember to keep it chilled until serving time.

Lastly, don’t forget about beverages! A chilled glass of white wine or sparkling water with lemon can enhance the flavors of your meal. For a non-alcoholic option, consider iced tea or lemonade for a refreshing drink.

With these serving suggestions, your Pesto Tortellini Salad will not only taste amazing but also look inviting on the table. Enjoy sharing this delightful dish with family and friends!

Tips for Making the Best Pesto Tortellini Salad

Creating the perfect Pesto Tortellini Salad is all about attention to detail and a few helpful tips. With these suggestions, you can elevate your salad to a whole new level of deliciousness. Let’s explore some key tips to ensure your dish is a hit!

First, always use fresh ingredients. Fresh vegetables and high-quality pesto make a significant difference in flavor. If possible, opt for homemade pesto. It’s easy to make and allows you to control the ingredients, ensuring a fresher taste.

Next, consider the timing of your preparation. To keep the salad crisp, add the dressing just before serving. This prevents the tortellini and vegetables from becoming soggy. If you’re making it ahead of time, store the dressing separately and mix it in right before serving.

Another great tip is to customize the texture. For added crunch, toss in some toasted nuts or seeds. Pine nuts, walnuts, or sunflower seeds can enhance the flavor and provide a satisfying bite. Just remember to toast them lightly to bring out their natural oils.

Don’t forget about seasoning! While the pesto adds flavor, a pinch of salt and pepper can enhance the overall taste. Taste your salad before serving and adjust the seasoning as needed. A little extra seasoning can make a big difference!

For a pop of color and flavor, consider adding fresh herbs. Chopped basil or parsley can brighten up the dish and add a fresh aroma. Just sprinkle them on top before serving for a beautiful presentation.

Lastly, experiment with different ingredients. The beauty of Pesto Tortellini Salad is its versatility. Try adding roasted vegetables, olives, or even fruits like diced avocado or apples for a unique twist. Don’t be afraid to get creative!

By following these tips, you’ll create a Pesto Tortellini Salad that’s not only delicious but also visually appealing. Enjoy the process and have fun making this delightful dish!

Breakdown of Time for Pesto Tortellini Salad

Understanding the time needed to prepare your Pesto Tortellini Salad can help you plan your meal better. Here’s a simple breakdown of the time involved in each step of the process.

Prep Time

The prep time for this delightful salad is quite short. You’ll need about 10 to 15 minutes to gather your ingredients and prepare the vegetables. This includes washing and chopping the cherry tomatoes, mozzarella, and spinach. It’s a quick and easy process that anyone can manage!

Cooking Time

Cooking the cheese tortellini takes approximately 3 to 5 minutes. Just boil them in salted water until they float to the top. After cooking, remember to drain and rinse them under cold water. This step is essential to cool them down quickly and stop the cooking process.

Total Time

In total, you can expect to spend around 30 to 40 minutes from start to finish. This includes prep time, cooking time, and the chilling time in the refrigerator. Chilling the salad for at least 30 minutes allows the flavors to meld beautifully, making it even more delicious when served.

With this time breakdown, you can easily fit the preparation of Pesto Tortellini Salad into your schedule. It’s a quick and satisfying dish that’s perfect for any occasion!

Nutritional Information for Pesto Tortellini Salad

Understanding the nutritional content of your Pesto Tortellini Salad is essential for making informed choices about your meals. This salad is not only delicious but also provides a good balance of nutrients. Let’s break down the key nutritional components of this delightful dish.

Calories

Each serving of Pesto Tortellini Salad contains approximately 320 calories. This makes it a satisfying option for lunch or dinner without being overly heavy. The combination of cheese tortellini, fresh vegetables, and pesto sauce contributes to the calorie count, providing energy and flavor in every bite.

Protein

In terms of protein, this salad offers about 12 grams per serving. The cheese tortellini and mozzarella balls are excellent sources of protein, which is essential for muscle repair and overall health. If you choose to add grilled chicken or chickpeas, the protein content will increase, making it an even more filling meal.

Sodium

The sodium content in each serving is around 600 milligrams. This amount can vary based on the specific brands of tortellini and pesto used. It’s important to keep an eye on sodium intake, especially if you are watching your salt consumption. Opting for low-sodium versions of these ingredients can help reduce the overall sodium content of the salad.

Overall, Pesto Tortellini Salad is a nutritious choice that provides a good mix of calories, protein, and other essential nutrients. By being mindful of the ingredients you use, you can easily tailor the salad to fit your dietary needs while still enjoying its delicious flavors!

FAQs about Pesto Tortellini Salad

Can I make Pesto Tortellini Salad ahead of time?

Absolutely! Making Pesto Tortellini Salad ahead of time is a great idea. In fact, it often tastes even better after sitting for a while. The flavors have time to meld together, creating a more delicious dish. You can prepare the salad a day in advance and store it in the refrigerator. Just remember to keep the dressing separate until you’re ready to serve. This will help keep the tortellini and vegetables crisp and fresh.

What can I substitute for pesto in Pesto Tortellini Salad?

If you don’t have pesto on hand or prefer a different flavor, there are several tasty substitutes. You can use a homemade sauce made from fresh herbs, garlic, nuts, and olive oil. Another option is to use a store-bought sun-dried tomato pesto for a unique twist. If you want a lighter dressing, consider a simple vinaigrette made with olive oil, lemon juice, and herbs. These alternatives will still provide a delicious flavor to your salad!

Is Pesto Tortellini Salad gluten-free?

Traditional cheese tortellini is made with wheat flour, which means it is not gluten-free. However, you can easily make this salad gluten-free by using gluten-free tortellini. Many brands offer gluten-free pasta options made from rice, corn, or other gluten-free grains. Just be sure to check the packaging to ensure it meets your dietary needs. With this simple swap, you can enjoy a gluten-free version of Pesto Tortellini Salad!

How long does Pesto Tortellini Salad last in the fridge?

Pesto Tortellini Salad can last in the refrigerator for about 3 to 5 days when stored properly in an airtight container. However, the freshness of the ingredients may start to decline after a couple of days. To maintain the best flavor and texture, it’s best to consume the salad within the first few days. If you notice any changes in smell or appearance, it’s best to discard it. Enjoy your salad while it’s fresh for the best experience!

Conclusion on Pesto Tortellini Salad

In conclusion, Pesto Tortellini Salad is a delightful dish that brings together the rich flavors of cheese tortellini, fresh vegetables, and a zesty pesto dressing. This salad is not only easy to prepare but also offers a burst of color and nutrition, making it a perfect choice for any meal. Whether you’re enjoying it as a light lunch, a side dish at dinner, or bringing it to a picnic, it’s sure to impress everyone at the table.

The versatility of this salad allows you to customize it to your liking. You can add proteins like grilled chicken or chickpeas for a heartier meal, or incorporate roasted vegetables for a vegetarian twist. With so many options, you can make this dish your own and cater to various dietary preferences.

Moreover, the nutritional benefits of Pesto Tortellini Salad make it a smart choice. With a good balance of calories, protein, and essential nutrients, it’s a satisfying option that won’t weigh you down. Plus, the simple preparation and quick cooking time make it an ideal recipe for busy days.

So, gather your ingredients, follow the steps, and enjoy the delightful flavors of Pesto Tortellini Salad. Whether you’re sharing it with family or savoring it solo, this dish is sure to bring a smile to your face. Happy cooking!

Shrimp Cocktail Delight: A Tasty Grill Recipe You’ll Love

Shrimp Cocktail Delight

Introduction to Shrimp Cocktail Delight

This Shrimp Cocktail Delight takes me back to summer gatherings, where laughter mingled with the scent of grilled seafood. This recipe is not just a quick solution for a busy day; it’s a delightful way to impress your loved ones. With its vibrant flavors and easy preparation, you’ll find yourself reaching for this dish time and again. Whether it’s a casual weeknight dinner or a festive celebration, this shrimp cocktail will surely steal the show and bring smiles to the table.

Why You’ll Love This Shrimp Cocktail Delight

This Shrimp Cocktail Delight is a game-changer for busy weeknights or spontaneous gatherings. It’s incredibly easy to whip up, taking just 16 minutes from start to finish. The combination of juicy, grilled shrimp and zesty cocktail sauce creates a flavor explosion that’s hard to resist. Plus, it’s a low-calorie option that doesn’t skimp on taste, making it perfect for anyone looking to indulge without the guilt.

Ingredients for Shrimp Cocktail Delight

Gathering the right ingredients is the first step to creating your Shrimp Cocktail Delight. Here’s what you’ll need:

  • Large shrimp: Fresh or frozen, peeled and deveined shrimp are the stars of this dish. They’re juicy and cook quickly on the grill.
  • Olive oil: This adds richness and helps the seasoning stick to the shrimp. You can substitute with avocado oil for a different flavor.
  • Garlic powder: A must-have for that aromatic kick. Fresh garlic works too, but be careful not to burn it on the grill.
  • Paprika: This spice brings a subtle smokiness and vibrant color. Smoked paprika can elevate the flavor even more.
  • Salt: Essential for enhancing the natural flavors of the shrimp. Sea salt or kosher salt are great options.
  • Black pepper: Freshly ground black pepper adds a hint of heat. You can adjust the amount to your taste.
  • Lemon: Fresh lemon wedges brighten the dish and add a refreshing zing when squeezed over the shrimp.
  • Cocktail sauce: A classic pairing with shrimp, this tangy sauce complements the grilled flavors perfectly. You can make your own or buy a ready-made version.
  • Fresh parsley: This is for garnish, adding a pop of color and a hint of freshness to your presentation.

For those looking to spice things up, consider adding a pinch of cayenne pepper to the seasoning mix. And if you want a refreshing twist, serve with avocado slices or a side of mixed greens. Exact quantities for each ingredient can be found at the bottom of the article, ready for printing!

How to Make Shrimp Cocktail Delight

Creating your Shrimp Cocktail Delight is a breeze! Follow these simple steps, and you’ll have a delicious dish ready in no time. Let’s dive in!

Step 1: Preheat the Grill

Start by preheating your grill or grill pan over medium-high heat. This step is crucial for even cooking and enhances the flavors of the shrimp. A hot grill ensures that the shrimp sear beautifully, locking in their natural juices. Trust me, you want that perfect char!

Step 2: Prepare the Shrimp

In a mixing bowl, toss the shrimp with olive oil, garlic powder, paprika, salt, and black pepper. Each ingredient plays a role: olive oil adds richness, garlic powder brings aroma, and paprika gives a lovely color. The salt enhances the shrimp’s natural sweetness, while black pepper adds a subtle kick. Make sure every shrimp is evenly coated for maximum flavor!

Step 3: Skewer the Shrimp

If you’re using skewers, thread the shrimp onto them for easier grilling and a beautiful presentation. This not only makes flipping the shrimp a breeze but also adds a fun touch to your dish. If you’re using wooden skewers, remember to soak them in water for about 30 minutes to prevent burning on the grill.

Step 4: Grill the Shrimp

Place the shrimp on the grill and cook for 2-3 minutes on each side. You’ll know they’re done when they turn pink and opaque. Keep an eye on them; shrimp cook quickly! Overcooking can lead to rubbery shrimp, and nobody wants that. Just a few minutes of grilling will give you that perfect texture.

Step 5: Serve and Garnish

Once grilled, remove the shrimp from the heat and let them cool slightly. Arrange them on a serving platter with lemon wedges and a bowl of cocktail sauce in the center. This not only looks inviting but also allows everyone to squeeze fresh lemon juice over their shrimp. Finish with a sprinkle of fresh parsley for a pop of color. Your Shrimp Cocktail Delight is now ready to impress!

Tips for Success

  • Always use fresh shrimp for the best flavor and texture.
  • Don’t overcrowd the grill; give each shrimp space for even cooking.
  • Experiment with different spices to customize your shrimp cocktail.
  • Let the shrimp rest for a minute after grilling to enhance juiciness.
  • Serve immediately for the best taste and presentation.

Equipment Needed

  • Grill or Grill Pan: Essential for that smoky flavor. A stovetop grill pan works well if you don’t have an outdoor grill.
  • Skewers: Use metal or soaked wooden skewers for easy handling.
  • Mixing Bowl: For tossing the shrimp with seasonings.
  • Tongs: Perfect for flipping the shrimp on the grill.

Variations of Shrimp Cocktail Delight

  • Spicy Shrimp Cocktail: Add a pinch of cayenne pepper or chili flakes to the seasoning for a fiery kick.
  • Herb-Infused Shrimp: Mix in fresh herbs like dill or cilantro for a burst of freshness.
  • Garlic Butter Shrimp: Brush the shrimp with melted garlic butter before grilling for a rich flavor.
  • Avocado Shrimp Cocktail: Serve the shrimp on a bed of avocado slices for a creamy twist.
  • Low-Carb Option: Skip the cocktail sauce and serve with a homemade avocado dip for a keto-friendly version.

Serving Suggestions for Shrimp Cocktail Delight

  • Pair with a crisp white wine, like Sauvignon Blanc, to complement the shrimp’s flavors.
  • Serve alongside a fresh garden salad for a light, refreshing meal.
  • Include crusty bread or garlic bread for dipping in the cocktail sauce.
  • Garnish with lemon slices and extra parsley for an elegant touch.

FAQs about Shrimp Cocktail Delight

Curious about making the perfect Shrimp Cocktail Delight? Here are some common questions I often hear, along with helpful answers to guide you through the process.

Can I use frozen shrimp for this recipe?

Absolutely! Just make sure to thaw them completely before grilling. This ensures even cooking and the best flavor.

What can I substitute for cocktail sauce?

If you’re looking for alternatives, try a homemade avocado dip or a spicy aioli. Both add a unique twist to your shrimp cocktail.

How do I know when the shrimp are done cooking?

Perfectly cooked shrimp turn pink and opaque. They should also curl slightly. Keep an eye on them; overcooking can lead to a rubbery texture!

Can I make this dish ahead of time?

While it’s best served fresh, you can marinate the shrimp in the seasoning a few hours in advance. Just grill them right before serving for the best taste.

What sides pair well with Shrimp Cocktail Delight?

Fresh salads, crusty bread, or even a light pasta dish complement the shrimp beautifully. They enhance the overall dining experience!

Final Thoughts

Creating this Shrimp Cocktail Delight is more than just cooking; it’s about bringing joy to your table. The vibrant flavors and quick preparation make it a go-to recipe for any occasion. Whether you’re hosting friends or enjoying a cozy family dinner, this dish is sure to spark smiles and compliments. The combination of grilled shrimp and zesty cocktail sauce is a match made in culinary heaven. So, fire up that grill, gather your loved ones, and savor the delightful moments that come with sharing good food. Trust me, this recipe will become a cherished favorite in your home!

Shrimp Cocktail Delight
jhessica

Shrimp Cocktail Delight: A Tasty Grill Recipe You’ll Love

A delicious and easy-to-make shrimp cocktail recipe perfect for grilling.
Prep Time 10 minutes
Cook Time 6 minutes
Total Time 16 minutes
Servings: 4 servings
Course: Appetizer
Cuisine: American
Calories: 180

Ingredients
  

  • 1 pound large shrimp peeled and deveined
  • 1 tablespoon olive oil
  • 1 teaspoon garlic powder
  • 1 teaspoon paprika
  • 1 teaspoon salt
  • 1/2 teaspoon black pepper
  • 1 lemon cut into wedges
  • 1 cup cocktail sauce
  • Fresh parsley for garnish

Method
 

  1. Preheat your grill or a grill pan over medium-high heat.
  2. In a bowl, toss the shrimp with olive oil, garlic powder, paprika, salt, and black pepper until evenly coated.
  3. Thread the shrimp onto skewers, if using, for easier grilling.
  4. Grill the shrimp for 2-3 minutes on each side, or until they turn pink and opaque.
  5. Remove the shrimp from the grill and let them cool slightly.
  6. Arrange the shrimp on a serving platter with lemon wedges and a bowl of cocktail sauce in the center.
  7. Garnish with fresh parsley before serving.

Nutrition

Serving: 1servingCalories: 180kcalCarbohydrates: 5gProtein: 25gFat: 7gSaturated Fat: 1gPolyunsaturated Fat: 6gCholesterol: 150mgSodium: 800mgSugar: 1g

Notes

  • For a spicy kick, add a pinch of cayenne pepper to the shrimp seasoning.
  • Serve with avocado slices or a side of mixed greens for a refreshing twist.

Tried this recipe?

Let us know how it was!

Creamy Parmesan Spinach and Mushroom Pasta made easy!

Introduction to Creamy Parmesan Spinach and Mushroom Pasta

There’s something magical about a bowl of pasta that warms the soul, isn’t there? Creamy Parmesan Spinach and Mushroom Pasta is one of those dishes that feels like a hug on a plate. Whether you’re racing against the clock after a long day or looking to impress your family with minimal effort, this recipe is your go-to. With its rich, velvety sauce and vibrant greens, it’s not just a meal; it’s a moment of comfort.

Let’s dive into this delightful dish that’s sure to become a weeknight favorite!

Why You’ll Love This Creamy Parmesan Spinach and Mushroom Pasta

This Creamy Parmesan Spinach and Mushroom Pasta is a lifesaver for busy weeknights. In just 30 minutes, you can whip up a dish that’s not only delicious but also packed with nutrients. The combination of earthy mushrooms and fresh spinach creates a flavor explosion, while the creamy sauce wraps everything in a comforting embrace. It’s a quick, satisfying meal that will leave your family asking for seconds!

Ingredients for Creamy Parmesan Spinach and Mushroom Pasta

Creating this Creamy Parmesan Spinach and Mushroom Pasta is a breeze with just a handful of ingredients. Here’s what you’ll need:

  • Pasta: Fettuccine is my favorite, but any pasta you love will work. Think spaghetti or penne for a fun twist!
  • Olive Oil: A splash of this liquid gold adds flavor and helps sauté the veggies to perfection.
  • Onion: Diced onion brings a sweet, aromatic base to the dish. It’s the unsung hero of many recipes!
  • Garlic: Minced garlic adds a punch of flavor. You can never go wrong with garlic in pasta!
  • Mushrooms: Sliced mushrooms provide an earthy depth. They soak up the creamy sauce beautifully.
  • Fresh Spinach: This leafy green not only adds color but also packs a nutritional punch. Feel free to swap it for kale if you prefer!
  • Heavy Cream: The star of the show! It creates that luscious, creamy sauce that clings to every noodle.
  • Parmesan Cheese: Grated Parmesan adds a salty, nutty flavor. It’s the finishing touch that elevates the dish.
  • Salt and Pepper: Essential for seasoning. Adjust to your taste for the perfect balance.
  • Italian Seasoning: A blend of herbs that brings warmth and depth. You can also use fresh herbs if you have them on hand!
  • Fresh Parsley: Chopped parsley is optional but adds a lovely pop of color and freshness for garnish.

For those looking to customize, consider adding cooked chicken or shrimp for extra protein. And if you want to switch things up, sun-dried tomatoes can add a delightful tang. Exact quantities for each ingredient are available at the bottom of the article for easy printing!

How to Make Creamy Parmesan Spinach and Mushroom Pasta

Cooking this Creamy Parmesan Spinach and Mushroom Pasta is a delightful journey. With each step, you’ll see how simple ingredients transform into a comforting meal. Let’s get started!

Step 1: Cook the Pasta

  • Begin by boiling a large pot of salted water.
  • Add your pasta and cook according to the package instructions until al dente.
  • This usually takes about 8-10 minutes.
  • Once done, drain the pasta, but don’t forget to reserve ½ cup of that starchy pasta water.
  • It’s a secret weapon for adjusting your sauce later!

Step 2: Sauté the Onion

  • In a large skillet, heat the olive oil over medium heat.
  • Add the diced onion and sauté for about 3 minutes.
  • You want them to become translucent and fragrant.
  • This step builds a flavorful base for your dish!

Step 3: Add Garlic and Mushrooms

  • Next, toss in the minced garlic and sliced mushrooms.
  • Cook for an additional 5-7 minutes until the mushrooms are browned and tender.
  • Their earthy aroma will fill your kitchen, making it hard to resist sneaking a taste!

Step 4: Incorporate Spinach

  • Now, it’s time to add the fresh spinach.
  • Stir it in and cook until it wilts, which should take about 2-3 minutes.
  • The vibrant green color will brighten your dish and add a nutritional boost!

Step 5: Create the Creamy Sauce

  • Lower the heat and pour in the heavy cream.
  • Stir to combine, then add the grated Parmesan cheese, salt, pepper, and Italian seasoning.
  • Mix until the cheese melts and the sauce becomes creamy. This is where the magic happens!

Step 6: Combine Pasta and Sauce

  • Add the cooked pasta to the skillet, tossing it gently to coat in the creamy sauce.
  • If the sauce feels too thick, add a splash of the reserved pasta water. This will help achieve that perfect, silky consistency.

Step 7: Serve and Garnish

  • Finally, serve your pasta immediately.
  • Garnish with fresh parsley for a pop of color and flavor.
  • Enjoy the comforting warmth of this Creamy Parmesan Spinach and Mushroom Pasta with your loved ones.

It’s a dish that’s sure to bring smiles all around!

Tips for Success

  • Always salt your pasta water; it enhances the flavor of the noodles.
  • Don’t rush the sautéing process; letting the onions and mushrooms caramelize adds depth.
  • For a lighter version, substitute half of the heavy cream with vegetable broth.
  • Experiment with different cheeses like Asiago or Pecorino for a unique twist.
  • Make it ahead! This pasta reheats beautifully for lunch the next day.

Equipment Needed

  • Large Pot: Essential for boiling pasta. A Dutch oven works well too!
  • Skillet: A non-stick skillet is ideal for sautéing. Any large frying pan will do.
  • Colander: For draining pasta. A slotted spoon can be a handy alternative.
  • Wooden Spoon: Perfect for stirring. A silicone spatula is a great substitute.

Variations

  • Protein Boost: Add cooked chicken, shrimp, or even crispy bacon for a heartier meal.
  • Vegetable Medley: Toss in other veggies like bell peppers, zucchini, or cherry tomatoes for added color and nutrition.
  • Gluten-Free Option: Use gluten-free pasta to make this dish suitable for those with dietary restrictions.
  • Vegan Twist: Substitute heavy cream with coconut milk and use nutritional yeast instead of Parmesan for a dairy-free version.
  • Spicy Kick: Add red pepper flakes or a dash of hot sauce to give your pasta a little heat.

Serving Suggestions

  • Side Salad: Pair your pasta with a crisp Caesar or mixed greens salad for a refreshing contrast.
  • Bread: Serve with warm garlic bread or a crusty baguette to soak up the creamy sauce.
  • Wine: A chilled glass of white wine, like Pinot Grigio, complements the dish beautifully.
  • Presentation: Serve in shallow bowls and sprinkle extra Parmesan on top for an elegant touch.

FAQs about Creamy Parmesan Spinach and Mushroom Pasta

  • Can I make this pasta dish ahead of time?

Absolutely! You can prepare the sauce and cook the pasta in advance. Just store them separately in the fridge. When you’re ready to eat, reheat the sauce and toss in the pasta. It reheats beautifully!

  • What can I substitute for heavy cream?

If you’re looking for a lighter option, you can use half-and-half or even a combination of milk and Greek yogurt. For a dairy-free version, coconut milk works well, giving a unique flavor.

  • Can I add more vegetables to this recipe?

Definitely! Feel free to toss in bell peppers, zucchini, or even broccoli. The more veggies, the more nutrients and color in your Creamy Parmesan Spinach and Mushroom Pasta!

  • Is this dish suitable for meal prep?

Yes! This pasta is perfect for meal prep. Just store it in airtight containers, and it will last for up to three days in the fridge. Reheat it gently on the stove or in the microwave.

  • How can I make this dish spicier?

For a spicy kick, add red pepper flakes or a dash of hot sauce while cooking. You can also toss in some sliced jalapeños for an extra layer of heat!

Final Thoughts

Cooking Creamy Parmesan Spinach and Mushroom Pasta is more than just preparing a meal; it’s about creating a moment of joy. The rich, creamy sauce envelops the pasta, while the vibrant spinach and mushrooms add a burst of color and flavor.

This dish is perfect for busy weeknights or cozy gatherings, bringing everyone together around the table. With each bite, you’ll savor the warmth and comfort it offers. So, gather your loved ones, share stories, and enjoy this delightful pasta that’s sure to become a cherished favorite in your home!

Creamy Parmesan Spinach and Mushroom Pasta
jhessica

Creamy Parmesan Spinach and Mushroom Pasta made easy!

A delicious and creamy pasta dish featuring spinach and mushrooms, perfect for a quick weeknight dinner.
Prep Time 10 minutes
Cook Time 20 minutes
Total Time 30 minutes
Servings: 4 servings
Course: Main Course
Cuisine: Italian
Calories: 450

Ingredients
  

  • 8 ounces fettuccine or your favorite pasta
  • 2 tablespoons olive oil
  • 1 small onion diced
  • 3 cloves garlic minced
  • 8 ounces mushrooms sliced
  • 5 cups fresh spinach
  • 1 cup heavy cream
  • 1 cup grated Parmesan cheese
  • Salt and pepper to taste
  • 1 teaspoon Italian seasoning
  • Fresh parsley chopped (for garnish)

Method
 

  1. Cook the pasta according to package instructions in a large pot of salted boiling water until al dente. Drain and set aside, reserving ½ cup of pasta water.
  2. In a large skillet, heat olive oil over medium heat. Add the diced onion and sauté for about 3 minutes until translucent.
  3. Add the minced garlic and sliced mushrooms to the skillet. Cook for an additional 5-7 minutes until the mushrooms are browned and tender.
  4. Stir in the fresh spinach and cook until wilted, about 2-3 minutes.
  5. Lower the heat and pour in the heavy cream, stirring to combine. Add the grated Parmesan cheese, salt, pepper, and Italian seasoning. Mix until the cheese has melted and the sauce is creamy.
  6. Add the cooked pasta to the skillet, tossing to coat the pasta in the sauce. If the sauce is too thick, add a little reserved pasta water until the desired consistency is reached.
  7. Serve immediately, garnished with fresh parsley.

Nutrition

Serving: 1servingCalories: 450kcalCarbohydrates: 40gProtein: 15gFat: 25gSaturated Fat: 15gPolyunsaturated Fat: 10gCholesterol: 80mgSodium: 400mgFiber: 3gSugar: 2g

Notes

  • For added protein, consider adding cooked chicken or shrimp to the dish.
  • Swap out the spinach for kale or add sun-dried tomatoes for a different flavor profile.

Tried this recipe?

Let us know how it was!

Beef Stir-Fry Noodles with Sticky Sauce is delicious!

Introduction to Beef Stir-Fry Noodles with Sticky Sauce

Are you looking for a quick and delicious meal that packs a punch of flavor? Look no further! Beef Stir-Fry Noodles with Sticky Sauce is the perfect dish for busy weeknights or a cozy weekend dinner. This recipe combines tender beef, colorful vegetables, and savory noodles, all coated in a rich, sticky sauce that will leave your taste buds dancing.

Stir-frying is a cooking method that originated in China, and it has become popular worldwide. It’s not just fast; it also helps retain the nutrients in the ingredients. With just a few simple steps, you can whip up a delightful meal that your family will love. Plus, it’s versatile! You can easily customize it to suit your preferences.

In this article, we will guide you through the ingredients, preparation steps, and variations of this tasty dish. Whether you’re a seasoned chef or a beginner in the kitchen, you’ll find this recipe easy to follow. So, roll up your sleeves and get ready to create a mouthwatering Beef Stir-Fry Noodles with Sticky Sauce that everyone will enjoy!

Ingredients for Beef Stir-Fry Noodles with Sticky Sauce

To create a delicious Beef Stir-Fry Noodles with Sticky Sauce, you’ll need a variety of fresh ingredients. Each component plays a vital role in building flavor and texture. Here’s what you’ll need:

  • 1 pound beef sirloin, thinly sliced
  • 8 ounces egg noodles
  • 2 tablespoons vegetable oil
  • 1 red bell pepper, sliced
  • 1 cup broccoli florets
  • 1 cup snap peas
  • 3 cloves garlic, minced
  • 1 tablespoon fresh ginger, minced
  • 1/4 cup soy sauce
  • 2 tablespoons hoisin sauce
  • 1 tablespoon cornstarch
  • 1 tablespoon sesame oil
  • 1 tablespoon brown sugar
  • 1/2 teaspoon crushed red pepper flakes (optional)
  • 2 green onions, chopped (for garnish)
  • Sesame seeds (for garnish)

These ingredients come together to create a delightful dish that is not only satisfying but also packed with nutrients. The beef provides protein, while the colorful vegetables add vitamins and minerals. The sticky sauce, made from soy sauce and hoisin sauce, brings everything together with a sweet and savory flavor.

Feel free to adjust the ingredients based on your preferences. For instance, you can swap out the beef for chicken or tofu if you prefer a different protein. The vegetables can also be customized to include your favorites, making this dish versatile and fun to prepare!

Step-by-Step Preparation of Beef Stir-Fry Noodles with Sticky Sauce

Now that you have all your ingredients ready, it’s time to dive into the cooking process! Follow these simple steps to create your Beef Stir-Fry Noodles with Sticky Sauce. Each step is designed to ensure that your dish turns out flavorful and satisfying.

Step 1: Preparing the Ingredients

Start by gathering all your ingredients. This makes the cooking process smoother. Slice the beef sirloin into thin strips. Next, wash and chop the vegetables. Slice the red bell pepper, and cut the broccoli into small florets. Rinse the snap peas and set everything aside. Having everything prepped will help you cook quickly and efficiently.

Step 2: Making the Sticky Sauce

In a small bowl, mix together the soy sauce, hoisin sauce, cornstarch, sesame oil, brown sugar, and crushed red pepper flakes if you like a bit of heat. Stir well until the cornstarch is fully dissolved. This sticky sauce is what gives your dish its delicious flavor. Set it aside for later use.

Step 3: Cooking the Beef

Heat the vegetable oil in a large skillet or wok over medium-high heat. Once the oil is hot, add the sliced beef. Stir-fry the beef for about 3-4 minutes until it turns brown and is cooked through. Make sure to keep stirring to avoid burning. Once done, remove the beef from the skillet and set it aside on a plate. This step ensures that the beef stays tender and juicy.

Step 4: Stir-Frying the Noodles

In the same skillet, add the minced garlic and ginger. Sauté them for about 30 seconds until fragrant. Then, toss in the sliced bell pepper, broccoli florets, and snap peas. Stir-fry the vegetables for 4-5 minutes until they are tender-crisp. This keeps the veggies vibrant and full of nutrients. After that, add the cooked egg noodles to the skillet.

Step 5: Combining Everything Together

Now it’s time to bring everything together! Return the cooked beef to the skillet. Pour the sticky sauce mixture over the beef and vegetables. Stir well to combine all the ingredients. Cook for an additional 2-3 minutes until the sauce thickens and coats everything nicely. This is where the magic happens! The noodles, beef, and veggies will soak up all that delicious flavor.

Once everything is well mixed, your Beef Stir-Fry Noodles with Sticky Sauce is ready to serve. Enjoy the delightful aroma as you prepare to dish it out!

Variations of Beef Stir-Fry Noodles with Sticky Sauce

One of the best things about Beef Stir-Fry Noodles with Sticky Sauce is its versatility. You can easily switch up the ingredients to suit your taste or dietary needs. Here are some fun variations to consider!

Alternative Proteins

If you’re looking to change the protein in your dish, there are plenty of options! Instead of beef, you can use:

  • Chicken: Thinly sliced chicken breast works great. It cooks quickly and absorbs flavors well.
  • Pork: Pork tenderloin is another tasty alternative. Just slice it thinly and follow the same cooking steps.
  • Tofu: For a vegetarian option, use firm tofu. Press it to remove excess moisture, then cube and stir-fry until golden.
  • Shrimp: Shrimp cooks fast and adds a delightful seafood flavor. Just be careful not to overcook them!

Each protein brings its unique taste and texture, making your stir-fry exciting every time you make it.

Vegetable Additions

Feel free to get creative with the vegetables! You can add or substitute any of your favorites. Here are some great options:

  • Carrots: Thinly sliced or julienned carrots add a nice crunch and sweetness.
  • Mushrooms: Sliced mushrooms, like shiitake or button, enhance the umami flavor of the dish.
  • Baby Corn: These little veggies add a fun texture and are a great addition.
  • Spinach: Toss in some fresh spinach at the end for a pop of color and nutrients.

Mixing different vegetables not only boosts the nutrition but also makes your dish visually appealing. The more colors on your plate, the better!

With these variations, you can enjoy Beef Stir-Fry Noodles with Sticky Sauce in countless ways. So, don’t hesitate to experiment and find your perfect combination!

Cooking Note for Beef Stir-Fry Noodles with Sticky Sauce

When preparing Beef Stir-Fry Noodles with Sticky Sauce, a few cooking notes can help you achieve the best results. Stir-frying is a quick method, so it’s essential to have everything ready before you start cooking. Here are some tips to keep in mind:

First, ensure your ingredients are prepped and within reach. This includes slicing the beef, chopping vegetables, and mixing the sauce. Having everything organized will make the cooking process smoother and faster.

Next, use high heat when stir-frying. This helps to sear the beef quickly, locking in its juices and flavor. If your skillet or wok isn’t hot enough, the beef may steam instead of sear, resulting in a less desirable texture.

Also, avoid overcrowding the pan. If you add too much beef or vegetables at once, they will release moisture and steam rather than fry. If necessary, cook in batches to maintain that perfect stir-fry texture.

Another important note is to keep stirring! Stir-frying requires constant movement to ensure even cooking. This helps prevent burning and allows all ingredients to cook uniformly.

Lastly, don’t forget to taste as you go! Adjust the seasoning if needed. If you prefer a sweeter sauce, add a bit more brown sugar. For extra heat, increase the crushed red pepper flakes. This way, you can customize the flavor to your liking.

By following these cooking notes, you’ll create a delicious Beef Stir-Fry Noodles with Sticky Sauce that’s sure to impress. Happy cooking!

Serving Suggestions for Beef Stir-Fry Noodles with Sticky Sauce

Once your Beef Stir-Fry Noodles with Sticky Sauce is ready, it’s time to think about how to serve it! Presentation can elevate your dish and make it even more enjoyable. Here are some delightful serving suggestions to consider:

  • Garnish with Fresh Ingredients: Top your stir-fry with chopped green onions and a sprinkle of sesame seeds. This adds a pop of color and a nice crunch.
  • Serve with Lime Wedges: A squeeze of fresh lime juice over the dish can brighten the flavors. It adds a zesty kick that complements the sticky sauce beautifully.
  • Pair with a Side Salad: A light cucumber or Asian-style salad can balance the richness of the stir-fry. Toss together some sliced cucumbers, carrots, and a light vinaigrette for a refreshing side.
  • Offer Extra Sauce: If you love the sticky sauce, consider serving some on the side. This way, everyone can add more to their liking!
  • Use a Fun Serving Dish: Present your stir-fry in a large bowl or on a colorful platter. This makes it more inviting and encourages sharing.

For a complete meal, you can also serve your Beef Stir-Fry Noodles with Sticky Sauce alongside steamed rice or cauliflower rice. This adds more texture and makes the meal even more filling.

Lastly, don’t forget to enjoy your meal with family or friends! Sharing food is a wonderful way to create memories. With these serving suggestions, your Beef Stir-Fry Noodles with Sticky Sauce will not only taste amazing but also look fantastic on the table!

Tips for Perfect Beef Stir-Fry Noodles with Sticky Sauce

Creating the perfect Beef Stir-Fry Noodles with Sticky Sauce is all about technique and attention to detail. Here are some valuable tips to ensure your dish turns out delicious every time:

  • Choose the Right Cut of Beef: For the best flavor and tenderness, opt for cuts like sirloin or flank steak. These cuts are lean and cook quickly, making them ideal for stir-frying.
  • Slice Against the Grain: When slicing the beef, always cut against the grain. This helps to break down the muscle fibers, resulting in a more tender bite.
  • Marinate for Extra Flavor: If you have time, marinate the beef in a bit of soy sauce and ginger for 15-30 minutes before cooking. This adds depth to the flavor.
  • Prep All Ingredients First: As mentioned earlier, having everything prepped and ready to go is crucial. This ensures you can cook quickly and maintain the right texture.
  • Use High Heat: Stir-frying requires high heat to achieve that perfect sear. Make sure your skillet or wok is hot before adding the ingredients.
  • Don’t Overcrowd the Pan: If you add too much beef or vegetables at once, they will steam instead of fry. Cook in batches if necessary to keep everything crispy.
  • Keep Stirring: Constant movement is key in stir-frying. This helps to cook the ingredients evenly and prevents burning.
  • Adjust the Sauce to Your Taste: Feel free to tweak the sticky sauce to suit your preferences. If you like it sweeter, add more brown sugar. For more heat, increase the red pepper flakes.
  • Serve Immediately: Stir-fry is best enjoyed fresh. Serve it right after cooking to keep the noodles and vegetables crisp and vibrant.
  • Experiment with Flavors: Don’t hesitate to add your favorite spices or sauces. A splash of rice vinegar or a dash of sesame oil can elevate the dish even further.

By following these tips, you’ll be well on your way to mastering Beef Stir-Fry Noodles with Sticky Sauce. Each bite will be packed with flavor, and your family and friends will be asking for seconds!

Breakdown of Time for Beef Stir-Fry Noodles with Sticky Sauce

When it comes to cooking, time management is key. Knowing how long each step takes can help you plan your meal better. Here’s a breakdown of the time needed for preparing and cooking Beef Stir-Fry Noodles with Sticky Sauce.

Prep Time

The prep time for this dish is approximately 15-20 minutes. During this time, you will gather all your ingredients, slice the beef, and chop the vegetables. Having everything ready before you start cooking will make the process smoother and more enjoyable. Remember, the more organized you are, the quicker you can get to the delicious part!

Cooking Time

The cooking time for Beef Stir-Fry Noodles with Sticky Sauce is about 15 minutes. This includes stir-frying the beef, cooking the vegetables, and combining everything with the sticky sauce. Stir-frying is a fast method, so keep an eye on the ingredients to ensure they cook evenly and don’t burn.

Total Time

In total, you can expect to spend around 30-35 minutes from start to finish. This makes it a perfect option for a weeknight dinner when you want something quick yet satisfying. With just a little bit of time, you can create a flavorful meal that your family will love!

Nutritional Information for Beef Stir-Fry Noodles with Sticky Sauce

Understanding the nutritional content of your meals is essential for maintaining a balanced diet. Beef Stir-Fry Noodles with Sticky Sauce not only tastes great but also provides a good mix of nutrients. Here’s a breakdown of the nutritional information per serving:

Calories

450 calories. This makes it a satisfying meal that can fit into a variety of dietary plans. The calories come from a combination of protein, carbohydrates, and healthy fats, providing energy for your day.

Protein

30 grams per serving. The beef sirloin contributes significantly to this protein content, which is essential for muscle repair and growth. Including protein in your meals can help keep you feeling full and satisfied.

Sodium

800 milligrams. Most of this sodium comes from the soy sauce and hoisin sauce used in the sticky sauce. If you’re watching your sodium intake, consider using low-sodium soy sauce or adjusting the amount of sauce you add to the dish. This way, you can enjoy the flavors without going overboard on sodium.

Overall, Beef Stir-Fry Noodles with Sticky Sauce is a nutritious option that balances flavor and health. With its protein-rich ingredients and colorful vegetables, it’s a meal that can support your dietary needs while satisfying your taste buds!

FAQs about Beef Stir-Fry Noodles with Sticky Sauce

What type of noodles are best for Beef Stir-Fry Noodles with Sticky Sauce?

When it comes to noodles for Beef Stir-Fry Noodles with Sticky Sauce, egg noodles are a popular choice. They are soft and absorb the sauce well, enhancing the overall flavor. However, you can also use other types of noodles. Rice noodles, udon noodles, or even whole wheat noodles work great too! Each type brings its unique texture, so feel free to experiment and find your favorite.

Can I make Beef Stir-Fry Noodles with Sticky Sauce ahead of time?

Yes, you can prepare Beef Stir-Fry Noodles with Sticky Sauce ahead of time! You can cook the beef and vegetables, then store them in the refrigerator. When you’re ready to eat, simply reheat everything in a skillet and add the cooked noodles and sauce. However, for the best texture, it’s recommended to cook the noodles fresh just before serving. This way, they stay nice and chewy!

What vegetables can I add to Beef Stir-Fry Noodles with Sticky Sauce?

The beauty of Beef Stir-Fry Noodles with Sticky Sauce is its versatility with vegetables! You can add a variety of colorful veggies to boost nutrition and flavor. Some great options include:

  • Carrots
  • Mushrooms
  • Baby corn
  • Bell peppers
  • Spinach
  • Zucchini

Feel free to mix and match based on your preferences. The more colors you add, the more appealing and nutritious your dish will be!

How can I adjust the spice level in Beef Stir-Fry Noodles with Sticky Sauce?

If you want to adjust the spice level in your Beef Stir-Fry Noodles with Sticky Sauce, there are a few easy ways to do it. If you prefer a milder dish, simply reduce or omit the crushed red pepper flakes in the sauce. On the other hand, if you like it spicy, you can add more red pepper flakes or even a splash of sriracha sauce. Tasting as you go is key! This way, you can find the perfect balance that suits your taste buds.

Conclusion on Beef Stir-Fry Noodles with Sticky Sauce

In conclusion, Beef Stir-Fry Noodles with Sticky Sauce is a delightful dish that brings together the best of flavors, textures, and nutrition. With its tender beef, vibrant vegetables, and savory noodles, this meal is sure to please everyone at the table. Whether you’re cooking for a busy weeknight or a special occasion, this recipe is both quick and satisfying.

As you’ve seen, the versatility of this dish allows you to customize it to your liking. You can easily swap proteins, add your favorite vegetables, or adjust the sauce to suit your taste. This means you can enjoy a different version of Beef Stir-Fry Noodles with Sticky Sauce every time you make it!

Moreover, the cooking process is straightforward, making it accessible for cooks of all skill levels. With just a few simple steps, you can create a restaurant-quality meal right in your kitchen. Plus, the nutritional benefits of this dish make it a smart choice for those looking to maintain a balanced diet.

So, gather your ingredients, follow the steps, and get ready to enjoy a delicious plate of Beef Stir-Fry Noodles with Sticky Sauce. Your family and friends will be impressed, and you’ll feel great knowing you’ve prepared a meal that’s both tasty and nutritious. Happy cooking!

Classic Chocolate Chip Cookies Recipe for Everyone’s Delight

Introduction to Classic Chocolate Chip Cookies Recipe

The History of Chocolate Chip Cookies

Chocolate chip cookies have a delightful history that dates back to the 1930s. Ruth Wakefield, the inventor of this beloved treat, owned the Toll House Inn in Massachusetts. One day, she decided to add chopped chocolate to her cookie dough, expecting it to melt and create a chocolate cookie. Instead, the chocolate held its shape, and the classic chocolate chip cookie was born! This sweet creation quickly gained popularity, leading to the famous Toll House cookie recipe. Today, chocolate chip cookies are a staple in many households, cherished for their warm, gooey centers and crispy edges.

Why This Classic Chocolate Chip Cookies Recipe Stands Out

This classic chocolate chip cookies recipe stands out for its simplicity and deliciousness. With just a few basic ingredients, you can create cookies that are soft, chewy, and bursting with chocolate flavor. The balance of granulated and brown sugar gives these cookies a perfect sweetness and a rich, caramel-like taste. Plus, the addition of semi-sweet chocolate chips ensures that every bite is a delightful experience. Whether you’re baking for a special occasion or just to satisfy a sweet tooth, this recipe is sure to impress. It’s easy to follow, making it perfect for both novice bakers and seasoned pros. So, roll up your sleeves and get ready to enjoy the magic of homemade classic chocolate chip cookies!

Ingredients for Classic Chocolate Chip Cookies Recipe

To create the perfect batch of classic chocolate chip cookies, you’ll need a few essential ingredients. Each component plays a vital role in achieving that delightful taste and texture. Here’s what you’ll need:

  • 2 1/4 cups all-purpose flour
  • 1 teaspoon baking soda
  • 1 teaspoon salt
  • 1 cup unsalted butter, softened
  • 3/4 cup granulated sugar
  • 3/4 cup packed brown sugar
  • 1 teaspoon vanilla extract
  • 2 large eggs
  • 2 cups semi-sweet chocolate chips
  • 1 cup chopped nuts (optional)

These ingredients are commonly found in most kitchens, making this recipe accessible for everyone. The combination of all-purpose flour, baking soda, and salt creates a solid base for the cookies. Meanwhile, the unsalted butter, sugars, and vanilla extract contribute to the rich flavor and soft texture. The chocolate chips are, of course, the star of the show, providing that irresistible chocolatey goodness. If you want to add a little crunch, feel free to toss in some chopped nuts!

Gather these ingredients, and you’ll be well on your way to baking a batch of classic chocolate chip cookies that everyone will love. Let’s move on to the next step and learn how to prepare the dough!

Step-by-Step Preparation of Classic Chocolate Chip Cookies Recipe

Step 1: Prepping Your Ingredients

Before you start baking, it’s essential to prep your ingredients. First, gather all the items listed in the ingredients section. This makes the process smoother and more enjoyable. Measure out the flour, baking soda, and salt in a small bowl. Whisk them together to ensure they are well combined. This step helps to evenly distribute the baking soda and salt throughout the dough. Next, take the unsalted butter out of the fridge and let it soften at room temperature. Softened butter is crucial for achieving that light and fluffy texture in your cookies.

Step 2: Mixing the Dough

Now, it’s time to mix the dough! In a large mixing bowl, cream together the softened butter, granulated sugar, brown sugar, and vanilla extract. Use an electric mixer or a sturdy wooden spoon to beat the mixture until it becomes light and fluffy. This usually takes about 2 to 3 minutes. Next, add the eggs one at a time, mixing well after each addition. This ensures that the eggs are fully incorporated into the mixture. Gradually add the flour mixture to the wet ingredients, mixing until just combined. Be careful not to overmix, as this can lead to tough cookies.

Step 3: Chilling the Dough

Chilling the dough is an optional but beneficial step. If you want chewier cookies, consider chilling the dough for at least 30 minutes. This allows the flavors to meld and helps the cookies maintain their shape while baking. Simply cover the bowl with plastic wrap or transfer the dough to an airtight container. Place it in the refrigerator and wait patiently. While you wait, you can clean up your workspace or prepare your baking sheets.

Step 4: Baking the Cookies

Once the dough is chilled, it’s time to bake! Preheat your oven to 375°F (190°C) if you haven’t done so already. Line a baking sheet with parchment paper to prevent sticking. Using a spoon or cookie scoop, drop rounded tablespoons of dough onto the prepared baking sheet. Make sure to space them about 2 inches apart to allow for spreading. Bake in the preheated oven for 9 to 11 minutes. Keep an eye on them; the edges should be golden brown while the centers may look slightly underbaked. They will continue to cook on the baking sheet after being removed from the oven.

Step 5: Cooling and Storing

After baking, allow the cookies to cool on the baking sheet for about 5 minutes. This helps them set and makes transferring them easier. Then, use a spatula to transfer the cookies to a wire rack to cool completely. Once cooled, store your classic chocolate chip cookies in an airtight container. They can last for up to a week, but we doubt they’ll last that long! Enjoy your delicious homemade cookies with family and friends!

Variations of Classic Chocolate Chip Cookies Recipe

Adding Nuts for Extra Crunch

If you love a little crunch in your cookies, adding nuts is a fantastic option! Chopped walnuts or pecans can elevate the texture and flavor of your classic chocolate chip cookies. Simply mix in about 1 cup of your favorite nuts when you fold in the chocolate chips. The nuts add a delightful contrast to the soft, chewy cookie, making each bite even more enjoyable. Plus, they provide healthy fats and protein, making your treat a bit more nutritious!

Using Different Types of Chocolate

Why stick to just semi-sweet chocolate chips? Experimenting with different types of chocolate can create exciting flavor profiles! You can try dark chocolate chips for a richer taste or white chocolate chips for a sweeter twist. For a fun mix, combine various types of chocolate in one batch. This not only enhances the flavor but also adds visual appeal to your cookies. Imagine biting into a cookie with melty dark and white chocolate—pure bliss!

Gluten-Free Options

For those who are gluten-sensitive or prefer gluten-free options, you can still enjoy classic chocolate chip cookies! Simply substitute the all-purpose flour with a gluten-free flour blend. Many blends are available that work well in baking. Just make sure to check the packaging for any specific instructions. You can also add a bit of xanthan gum to help with the texture. With these adjustments, you can savor delicious gluten-free chocolate chip cookies without missing out on the classic taste!

Cooking Note for Classic Chocolate Chip Cookies Recipe

When it comes to baking classic chocolate chip cookies, a few cooking notes can make a big difference in your results. First, always use room temperature ingredients. This includes the butter and eggs. Room temperature butter creams better with sugars, leading to a lighter cookie. Cold eggs can cause the mixture to seize up, so let them sit out for about 30 minutes before using.

Next, be mindful of your oven temperature. Ovens can vary, so it’s a good idea to use an oven thermometer to ensure accuracy. If your cookies are baking too quickly or unevenly, consider rotating the baking sheet halfway through the baking time. This helps achieve that perfect golden-brown color on all sides.

Another tip is to avoid overbaking. Cookies will continue to cook on the baking sheet after being removed from the oven. So, if the edges are golden brown and the centers look slightly underbaked, it’s time to take them out. This will ensure your cookies remain soft and chewy.

Lastly, if you want to enhance the flavor, consider adding a pinch of sea salt on top of the cookies right before baking. This little touch can elevate the sweetness and create a delightful contrast. With these cooking notes in mind, you’ll be well on your way to baking the best classic chocolate chip cookies!

Serving Suggestions for Classic Chocolate Chip Cookies Recipe

Pairing with Milk or Coffee

One of the best ways to enjoy classic chocolate chip cookies is by pairing them with a cold glass of milk or a warm cup of coffee. The creamy texture of milk complements the rich chocolate flavor perfectly. It’s a classic combination that brings back childhood memories for many. Simply dip your cookie into the milk for a few seconds, and you’ll experience a delightful blend of flavors and textures.

If you prefer coffee, try pairing your cookies with a nice cup of brewed coffee or espresso. The bitterness of the coffee balances the sweetness of the cookies, creating a harmonious taste experience. You can even experiment with flavored coffees, like vanilla or hazelnut, to add an extra layer of flavor. Whether you’re enjoying a quiet moment alone or sharing with friends, these pairings make for a delightful treat!

Creative Ways to Serve Cookies

Serving classic chocolate chip cookies can be fun and creative! Here are a few ideas to elevate your cookie experience:

  • Cookie Ice Cream Sandwiches: Take two cookies and place a scoop of your favorite ice cream in between. Press gently to create a delicious ice cream sandwich. This treat is perfect for warm days!
  • Cookie Platter: Arrange your cookies on a decorative platter. Add some fresh fruit, like strawberries or raspberries, for a pop of color. This makes for an attractive dessert display at parties or gatherings.
  • Cookie Gift Jars: Layer your cookie dough in a mason jar and attach a recipe card. This makes a thoughtful gift for friends or family who love to bake. It’s a fun way to share your classic chocolate chip cookies recipe!
  • Chocolate Chip Cookie Sundae: Crumble a cookie over a bowl of ice cream and drizzle with chocolate or caramel sauce. Top with whipped cream and a cherry for a decadent dessert!

These creative serving suggestions will not only enhance your cookie experience but also impress your guests. Whether you’re enjoying them solo or sharing with others, classic chocolate chip cookies are sure to bring smiles all around!

Tips for Perfecting Your Classic Chocolate Chip Cookies Recipe

Common Mistakes to Avoid

Baking classic chocolate chip cookies can be a delightful experience, but there are a few common mistakes to watch out for. First, be careful not to overmix the dough. Overmixing can lead to tough cookies instead of the soft, chewy texture we all love. Mix until just combined, and you’ll be on the right track!

Another mistake is using cold ingredients. Always ensure your butter and eggs are at room temperature. Cold butter doesn’t cream well with sugars, which can affect the final texture of your cookies. Also, don’t skip the chilling step if you want chewier cookies. Chilling the dough helps the flavors develop and keeps the cookies from spreading too much while baking.

Lastly, keep an eye on your baking time. Every oven is different, so it’s essential to check your cookies a minute or two before the suggested baking time. If the edges are golden brown and the centers look slightly underbaked, it’s time to take them out. They will continue to cook on the baking sheet, ensuring a perfect texture!

How to Achieve the Perfect Texture

Achieving the perfect texture in your classic chocolate chip cookies is all about balance. Start with the right ratio of ingredients. The combination of granulated and brown sugar is key. Granulated sugar helps the cookies spread, while brown sugar adds moisture and chewiness. Stick to the recipe for the best results!

Another tip is to use softened butter. This allows for better incorporation of air, leading to a lighter cookie. If you want a thicker cookie, consider adding a bit more flour. Just a couple of tablespoons can make a difference in how your cookies turn out.

Don’t forget about the baking soda! It’s essential for helping your cookies rise and achieve that perfect texture. Make sure it’s fresh and properly measured. Lastly, let your cookies cool on the baking sheet for a few minutes before transferring them to a wire rack. This helps them set and maintain their shape, giving you that ideal soft center and crispy edge.

Breakdown of Time for Classic Chocolate Chip Cookies Recipe

Prep Time

The prep time for your classic chocolate chip cookies is about 15 to 20 minutes. This includes gathering your ingredients, measuring them out, and mixing the dough. If you choose to chill the dough, you may want to add an extra 30 minutes to this time. Chilling helps enhance the flavor and texture of the cookies, making them even more delicious!

Cooking Time

Once your dough is ready, the cooking time is relatively quick. You’ll need about 9 to 11 minutes to bake the cookies in a preheated oven at 375°F (190°C). Keep an eye on them as they bake. The edges should turn golden brown while the centers may look slightly underbaked. This is perfectly normal, as they will continue to cook on the baking sheet after being removed from the oven.

Total Time

In total, you can expect the entire process to take around 45 minutes to 1 hour. This includes prep time, cooking time, and the cooling period. If you decide to chill the dough, the total time may extend to about 1 hour and 30 minutes. However, the wait is worth it for those warm, gooey cookies that everyone loves!

Nutritional Information for Classic Chocolate Chip Cookies Recipe

Calories per Cookie

150 calories. This makes them a delightful treat without going overboard on your daily calorie intake. Enjoying one or two cookies can satisfy your sweet tooth while keeping your calorie count in check!

Protein Content

2 grams of protein. While cookies aren’t a primary source of protein, they do offer a small boost. Pairing your cookies with a glass of milk can enhance the protein intake, making it a more balanced snack option!

Sodium Levels

100 milligrams. This is a moderate amount, especially considering that sodium is often found in many other foods we consume daily. If you’re watching your sodium intake, enjoying these cookies in moderation is a great way to treat yourself without exceeding your daily limits.

FAQs about Classic Chocolate Chip Cookies Recipe

Can I use brown sugar instead of white sugar?

Absolutely! You can use brown sugar instead of white sugar in your classic chocolate chip cookies recipe. In fact, using only brown sugar can make your cookies chewier and add a deeper flavor. However, if you want a balance of sweetness and texture, it’s best to use a mix of both sugars. This combination gives you that perfect cookie experience with a delightful taste!

How do I store leftover cookies?

Storing leftover cookies is easy! To keep your classic chocolate chip cookies fresh, place them in an airtight container. You can also layer them with parchment paper to prevent sticking. Store the container at room temperature for up to a week. If you want to keep them longer, consider freezing the cookies. Just place them in a freezer-safe bag or container, and they can last for up to three months. When you’re ready to enjoy them, simply thaw at room temperature!

What can I substitute for eggs in the recipe?

If you need an egg substitute, there are several options! You can use 1/4 cup of unsweetened applesauce for each egg. This will keep your cookies moist and add a hint of sweetness. Another option is to use 1/4 cup of mashed banana, which also works well. If you prefer a more neutral flavor, try using 1 tablespoon of ground flaxseed mixed with 2.5 tablespoons of water. Let it sit for a few minutes until it thickens. These substitutes will help you achieve delicious cookies without eggs!

How do I make my cookies chewier?

To make your classic chocolate chip cookies chewier, there are a few simple tricks you can try. First, chill the dough for at least 30 minutes before baking. This helps the cookies maintain their shape and enhances the texture. Additionally, using more brown sugar than granulated sugar can increase chewiness. Finally, be careful not to overbake your cookies. Taking them out when the edges are golden and the centers are slightly underbaked will ensure a soft, chewy cookie!

Conclusion on Classic Chocolate Chip Cookies Recipe

In conclusion, the classic chocolate chip cookies recipe is a timeless treat that brings joy to many. With its simple ingredients and easy preparation, anyone can create these delicious cookies at home. Whether you’re baking for a special occasion or just to enjoy a sweet snack, this recipe is sure to impress.

From the rich history of chocolate chip cookies to the delightful variations you can try, there’s something for everyone. Remember to follow the tips for perfecting your cookies, and don’t hesitate to experiment with different flavors and textures. The joy of baking lies in creativity, so feel free to make this recipe your own!

As you savor each warm, gooey bite, you’ll appreciate the love and effort that went into making them. So gather your ingredients, roll up your sleeves, and embark on a baking adventure. Your family and friends will thank you for the delicious classic chocolate chip cookies that are sure to become a favorite in your home!

Happy baking!

Fluffy Buttermilk Pancakes Recipe for a Perfect Breakfast.

Introduction to Fluffy Buttermilk Pancakes Recipe

Welcome to the delightful world of fluffy buttermilk pancakes! These pancakes are not just a breakfast staple; they are a warm hug on a plate. Imagine waking up to the smell of freshly cooked pancakes wafting through your home. It’s a comforting thought, isn’t it? Fluffy buttermilk pancakes are light, airy, and oh-so-delicious. They are perfect for lazy Sunday mornings or special occasions like birthdays and brunches.

What makes these pancakes truly special is the buttermilk. It adds a rich flavor and helps create that fluffy texture we all love. The combination of baking powder and baking soda gives them a lift, making them rise beautifully on the skillet. Plus, they are easy to make! With just a few simple ingredients, you can whip up a batch in no time.

In this article, we will guide you through the entire process of making fluffy buttermilk pancakes. From gathering your ingredients to serving them hot off the griddle, we’ve got you covered. Whether you’re a seasoned chef or a beginner in the kitchen, this recipe is straightforward and fun. So, grab your apron, and let’s get started on this delicious journey!

Ingredients for Fluffy Buttermilk Pancakes Recipe

To create the perfect fluffy buttermilk pancakes, you’ll need a few essential ingredients. Each one plays a vital role in achieving that light and airy texture. Here’s what you’ll need:

  • 2 cups all-purpose flour: This is the base of your pancakes. It provides structure and helps them rise.
  • 2 tablespoons granulated sugar: A touch of sweetness enhances the flavor of the pancakes.
  • 1 tablespoon baking powder: This leavening agent is key for fluffiness, helping the pancakes rise as they cook.
  • 1/2 teaspoon baking soda: It works alongside baking powder to create that perfect lift.
  • 1/2 teaspoon salt: A pinch of salt balances the sweetness and enhances the overall flavor.
  • 2 large eggs: Eggs add richness and help bind the ingredients together.
  • 2 cups buttermilk: The star ingredient! Buttermilk adds moisture and a tangy flavor, making the pancakes tender.
  • 1/4 cup unsalted butter, melted: Butter adds richness and flavor, making the pancakes even more delicious.
  • 1 teaspoon vanilla extract: This adds a lovely aroma and enhances the sweetness.
  • Cooking spray or additional butter for the skillet: This prevents the pancakes from sticking to the pan.

With these ingredients on hand, you’re ready to embark on your pancake-making adventure. Each component contributes to the delightful taste and texture of fluffy buttermilk pancakes. So, gather them up, and let’s move on to the next step!

Step-by-Step Preparation of Fluffy Buttermilk Pancakes Recipe

Now that you have all your ingredients ready, it’s time to dive into the fun part: making your fluffy buttermilk pancakes! Follow these simple steps to create a delicious stack that will impress everyone at the breakfast table.

Step 1: Gather Your Ingredients

Before you start cooking, make sure you have everything you need. Gather your ingredients and tools. You’ll need a large mixing bowl, a whisk, a measuring cup, and a non-stick skillet or griddle. Having everything in one place makes the process smoother and more enjoyable.

Step 2: Mix Dry Ingredients

In your large mixing bowl, combine the dry ingredients. Start by adding the all-purpose flour, granulated sugar, baking powder, baking soda, and salt. Use a whisk to mix them together thoroughly. This step is important because it ensures that the leavening agents are evenly distributed, which helps your pancakes rise perfectly.

Step 3: Combine Wet Ingredients

In a separate bowl, crack the two large eggs. Beat them lightly with a fork or whisk. Then, add the buttermilk, melted butter, and vanilla extract. Mix these wet ingredients until they are smooth and well combined. This mixture will add moisture and flavor to your pancakes.

Step 4: Combine Wet and Dry Mixtures

Now, it’s time to bring the two mixtures together! Pour the wet ingredients into the bowl with the dry ingredients. Gently stir the mixture with a spatula or wooden spoon. Be careful not to overmix; it’s okay if there are a few lumps. Overmixing can lead to tough pancakes, and we want them to be fluffy!

Step 5: Cook the Pancakes

Heat your non-stick skillet or griddle over medium heat. Once it’s hot, lightly grease it with cooking spray or a little butter. Pour about 1/4 cup of batter onto the skillet for each pancake. Cook until you see bubbles forming on the surface and the edges look set, which should take about 2-3 minutes. Then, flip the pancakes and cook for another 1-2 minutes until they are golden brown. Adjust the heat if necessary to prevent burning.

Step 6: Serve and Enjoy

Once your pancakes are cooked, it’s time to serve! Stack them high on a plate and add your favorite toppings. Maple syrup, fresh fruit, or whipped cream are all great choices. Enjoy your fluffy buttermilk pancakes while they’re warm for the best experience!

Variations of Fluffy Buttermilk Pancakes Recipe

While the classic fluffy buttermilk pancakes are delicious on their own, there are many fun variations to try! Adding different ingredients can elevate your pancake experience. Here are a couple of tasty ideas to get you started.

Adding Fruits to Fluffy Buttermilk Pancakes Recipe

Fruits can add a burst of flavor and nutrition to your pancakes. You can mix in fresh or frozen fruits right into the batter. Here are some popular options:

  • Blueberries: Add 1/2 cup of fresh or frozen blueberries to the batter for a sweet and tangy twist.
  • Bananas: Mash one ripe banana and mix it into the batter. This will give your pancakes a lovely banana flavor.
  • Strawberries: Chop up some fresh strawberries and fold them into the batter for a fruity delight.
  • Apples: Grate one apple and mix it in for a hint of sweetness and a bit of crunch.

These fruity variations not only taste great but also add color and texture to your pancakes. Plus, they make for a healthier breakfast option!

Chocolate Chip Fluffy Buttermilk Pancakes Recipe

If you’re a chocolate lover, this variation is for you! Adding chocolate chips to your fluffy buttermilk pancakes can turn breakfast into a special treat. Here’s how to do it:

  • Simply fold in 1/2 cup of semi-sweet or dark chocolate chips into the batter after combining the wet and dry ingredients.
  • For an extra indulgent touch, you can sprinkle a few more chocolate chips on top of the pancakes while they cook on the skillet.

These chocolate chip pancakes are perfect for special occasions or when you want to treat yourself. Serve them with a drizzle of chocolate syrup or a dollop of whipped cream for an extra special breakfast!

Feel free to get creative with these variations. The possibilities are endless, and you can mix and match to find your favorite combinations. Enjoy experimenting with your fluffy buttermilk pancakes!

Cooking Note for Fluffy Buttermilk Pancakes Recipe

Cooking fluffy buttermilk pancakes is a delightful experience, but there are a few important notes to keep in mind to ensure your pancakes turn out perfectly every time. Here are some tips to help you achieve pancake perfection:

First, always preheat your skillet or griddle before pouring in the batter. A hot cooking surface is essential for creating that golden-brown exterior while keeping the inside fluffy and tender. If the skillet is not hot enough, your pancakes may turn out flat and undercooked.

Next, consider the consistency of your batter. It should be thick but pourable. If it seems too thick, you can add a splash of buttermilk to loosen it up. Conversely, if it’s too runny, a little extra flour can help. Remember, a well-balanced batter is key to achieving the desired fluffiness.

When cooking, resist the urge to press down on the pancakes with a spatula. This can cause them to lose their airy texture. Instead, let them cook undisturbed until bubbles form on the surface. This is a sign that they are ready to be flipped.

Lastly, keep an eye on the cooking time. Each pancake may cook slightly differently depending on your stove and skillet. Adjust the heat as needed to prevent burning. If you notice that the pancakes are browning too quickly, lower the heat slightly. Cooking them at a steady medium heat will yield the best results.

By following these cooking notes, you’ll be well on your way to making fluffy buttermilk pancakes that are sure to impress. Happy cooking!

Serving Suggestions for Fluffy Buttermilk Pancakes Recipe

Now that you’ve mastered the art of making fluffy buttermilk pancakes, it’s time to think about how to serve them! The way you present your pancakes can elevate the entire breakfast experience. Here are some delightful serving suggestions to make your pancakes even more enjoyable:

  • Classic Maple Syrup: Drizzle warm maple syrup over your stack of pancakes. The sweet, rich flavor pairs perfectly with the fluffy texture.
  • Fresh Fruits: Top your pancakes with a medley of fresh fruits like sliced strawberries, blueberries, or banana slices. This adds a refreshing touch and a pop of color.
  • Whipped Cream: A dollop of whipped cream can make your pancakes feel like a special treat. You can even add a sprinkle of cocoa powder or cinnamon for extra flavor.
  • Nuts: Sprinkle some chopped nuts, like walnuts or pecans, on top for a crunchy texture. This adds a nice contrast to the soft pancakes.
  • Yogurt: For a healthier option, serve your pancakes with a side of Greek yogurt. It adds creaminess and a tangy flavor that complements the sweetness.
  • Chocolate Sauce: If you’re in the mood for something indulgent, drizzle chocolate sauce over your pancakes. This is especially great for chocolate chip pancakes!
  • Peanut Butter or Nutella: Spread a layer of peanut butter or Nutella on top of your pancakes for a rich and satisfying flavor. You can even add sliced bananas for a delicious combination.

Feel free to mix and match these toppings to create your perfect pancake plate. Whether you prefer a classic approach or something more adventurous, the right toppings can make your fluffy buttermilk pancakes shine. Enjoy your delicious creation with family and friends, and watch them smile with every bite!

Tips for Perfect Fluffy Buttermilk Pancakes Recipe

Making the perfect fluffy buttermilk pancakes is an art, and with a few helpful tips, you can elevate your pancake game to new heights! Here are some tried-and-true suggestions to ensure your pancakes turn out light, fluffy, and utterly delicious every time.

  • Use Fresh Ingredients: Always check the expiration dates on your baking powder and baking soda. Fresh leavening agents are crucial for achieving that fluffy texture.
  • Room Temperature Ingredients: For best results, let your eggs and buttermilk sit at room temperature for about 30 minutes before mixing. This helps create a smoother batter and better rise.
  • Don’t Overmix: When combining the wet and dry ingredients, mix just until combined. A few lumps are perfectly fine! Overmixing can lead to dense pancakes.
  • Let the Batter Rest: Allow your batter to rest for about 5-10 minutes before cooking. This gives the flour time to hydrate and can lead to fluffier pancakes.
  • Adjust the Heat: Cooking pancakes on medium heat is ideal. If they brown too quickly, lower the heat. You want them to cook evenly without burning.
  • Test the Skillet: Before pouring in the batter, test the skillet by sprinkling a few drops of water on it. If they sizzle and evaporate, the skillet is ready!
  • Keep Them Warm: If you’re making a large batch, keep the cooked pancakes warm in a low oven (around 200°F) while you finish cooking the rest. This keeps them fluffy and delicious.
  • Experiment with Add-ins: Don’t hesitate to try different mix-ins like nuts, spices, or flavored extracts. This can add a unique twist to your pancakes!

By following these tips, you’ll be well on your way to mastering the art of fluffy buttermilk pancakes. Each pancake will be a delightful treat, perfect for any breakfast or brunch occasion. Enjoy the process and happy cooking!

Breakdown of Time for Fluffy Buttermilk Pancakes Recipe

Understanding the time it takes to prepare and cook your fluffy buttermilk pancakes is essential for planning your breakfast. Here’s a simple breakdown to help you manage your time effectively.

Prep Time

The prep time for fluffy buttermilk pancakes is quite short. You’ll need about 10-15 minutes to gather your ingredients and mix the batter. This includes measuring out the flour, sugar, and other components, as well as combining the wet and dry ingredients. If you’re adding fruits or chocolate chips, factor in a few extra minutes for that as well.

Cooking Time

Once your batter is ready, cooking the pancakes will take approximately 15-20 minutes. Each pancake takes about 2-3 minutes on one side and 1-2 minutes after flipping. Depending on the size of your skillet and how many pancakes you can cook at once, you may need to adjust this time slightly. If you’re making a large batch, be prepared to spend a bit more time at the stove.

Total Time

In total, you can expect to spend around 30-35 minutes from start to finish. This includes both prep and cooking time. With this quick and easy process, you’ll have a delicious stack of fluffy buttermilk pancakes ready to serve in no time!

Nutritional Information for Fluffy Buttermilk Pancakes Recipe

Understanding the nutritional content of your fluffy buttermilk pancakes can help you make informed choices about your breakfast. Here’s a breakdown of the key nutritional components per serving, which is about two pancakes.

Calories

Each serving of fluffy buttermilk pancakes contains approximately 310 calories. This makes them a satisfying option for breakfast, providing energy to kickstart your day. While they are delicious, it’s always good to enjoy them in moderation, especially if you’re watching your calorie intake.

Protein

In terms of protein, each serving offers around 8 grams. Protein is essential for building and repairing tissues, and it helps keep you feeling full longer. Pairing your pancakes with a protein-rich topping, like Greek yogurt or nut butter, can enhance the nutritional value of your meal.

Sodium

The sodium content in a serving of fluffy buttermilk pancakes is about 400 milligrams. While this is a reasonable amount for a breakfast item, it’s important to be mindful of your overall sodium intake throughout the day. If you’re looking to reduce sodium, consider using less salt in the recipe or opting for low-sodium butter.

By keeping these nutritional facts in mind, you can enjoy your fluffy buttermilk pancakes while also maintaining a balanced diet. Remember, it’s all about moderation and making smart choices that fit your lifestyle!

FAQs about Fluffy Buttermilk Pancakes Recipe

What makes pancakes fluffy?

The secret to fluffy pancakes lies in the combination of ingredients and the cooking method. Buttermilk is a key player, as its acidity reacts with baking soda and baking powder, creating bubbles that make the pancakes rise. Additionally, not overmixing the batter is crucial. A few lumps are okay! This helps keep the pancakes light and airy. Lastly, cooking them on a hot skillet ensures they puff up beautifully.

Can I use regular milk instead of buttermilk?

Yes, you can use regular milk if you don’t have buttermilk on hand. However, to mimic the acidity of buttermilk, you can add a tablespoon of vinegar or lemon juice to one cup of milk. Let it sit for about 5 minutes before using it in your recipe. This will help achieve a similar fluffy texture in your pancakes.

How do I store leftover pancakes?

If you have leftover pancakes, storing them is easy! Allow them to cool completely, then stack them with parchment paper in between each pancake to prevent sticking. Place the stack in an airtight container or a resealable plastic bag. You can store them in the refrigerator for up to 3 days or freeze them for up to 2 months. To reheat, simply pop them in the toaster or microwave until warm.

Can I make the batter ahead of time?

Yes, you can prepare the batter ahead of time! However, it’s best to use it within a few hours for optimal fluffiness. If you need to store it longer, keep it in the refrigerator. Just remember to give it a gentle stir before cooking, as it may thicken while sitting. If the batter seems too thick, add a splash of buttermilk to loosen it up before cooking.

Conclusion on Fluffy Buttermilk Pancakes Recipe

In conclusion, fluffy buttermilk pancakes are a delightful addition to any breakfast table. They are not only easy to make but also incredibly versatile. Whether you enjoy them plain, topped with fresh fruits, or drizzled with syrup, these pancakes are sure to please everyone. The combination of buttermilk, baking powder, and baking soda creates that perfect fluffy texture we all crave.

As you’ve learned throughout this article, the key to achieving pancake perfection lies in the ingredients and the cooking method. By following the steps and tips provided, you can create a stack of pancakes that are light, airy, and bursting with flavor. Remember, practice makes perfect! Don’t hesitate to experiment with different variations and toppings to find your favorite combination.

So, the next time you’re in the mood for a comforting breakfast, whip up a batch of fluffy buttermilk pancakes. They are perfect for family gatherings, special occasions, or simply treating yourself on a lazy morning. Enjoy the process, savor each bite, and share the joy of homemade pancakes with your loved ones. Happy cooking!

Creamy Smothered Chicken with Rice is a must-try dish!

Introduction to Creamy Smothered Chicken with Rice

Creamy Smothered Chicken with Rice. This dish is not just a meal; it’s a warm hug on a plate. Imagine tender chicken, perfectly cooked rice, and a rich, creamy sauce all coming together to create a comforting experience. Whether you’re cooking for your family or hosting friends, this recipe is sure to impress.

What Makes Creamy Smothered Chicken with Rice Special?

Creamy Smothered Chicken with Rice apart is its unique blend of flavors and textures. The chicken is seasoned to perfection, providing a savory base. The creamy sauce adds a luxurious touch, making each bite feel indulgent. Plus, the rice absorbs all the delicious flavors, creating a satisfying dish that feels both hearty and comforting.

Another special aspect is its versatility. You can easily customize it to suit your taste. Want to add some spice? Toss in red pepper flakes. Prefer a vegetarian option? Swap the chicken for tofu. This dish can adapt to any dietary preference, making it a favorite for many.

A Brief History of Creamy Smothered Chicken Dishes

The roots of creamy smothered chicken dishes can be traced back to Southern cooking in the United States. Traditionally, these meals were made to feed large families, using simple ingredients that were readily available. Over time, the dish evolved, incorporating various flavors and cooking techniques.

Today, creamy smothered chicken is enjoyed in many households, often served during family gatherings or special occasions. Its rich history and comforting nature make it a beloved classic. As you prepare this dish, you’re not just cooking; you’re participating in a culinary tradition that has brought joy to many.

Ingredients for Creamy Smothered Chicken with Rice

Creamy Smothered Chicken with Rice, you’ll need a few key ingredients. Each component plays a vital role in building the rich flavors and creamy texture that make this dish so special. Here’s what you’ll need:

  • 2 tablespoons olive oil: This will be used to cook the chicken and add a nice flavor.
  • 4 boneless, skinless chicken breasts (about 1.5 pounds): The star of the dish, providing protein and heartiness.
  • 1 teaspoon salt: Essential for seasoning the chicken and enhancing flavors.
  • 1/2 teaspoon black pepper: Adds a mild kick to the dish.
  • 1 teaspoon garlic powder: Brings a wonderful aroma and depth of flavor.
  • 1 teaspoon onion powder: Complements the garlic and adds sweetness.
  • 1 cup long-grain white rice: The base of the dish, soaking up all the creamy goodness.
  • 2 cups chicken broth: Provides moisture and enhances the chicken flavor.
  • 1 cup heavy cream: This is what makes the dish creamy and rich.
  • 1 cup frozen mixed vegetables (peas, carrots, corn): Adds color, nutrition, and texture.
  • 1 teaspoon dried thyme: A fragrant herb that pairs beautifully with chicken.
  • 1 teaspoon paprika: Adds a subtle smokiness and vibrant color.
  • 1/4 cup grated Parmesan cheese: For a cheesy finish that enhances the creaminess.
  • Fresh parsley for garnish (optional): Adds a pop of color and freshness to the dish.

Creamy Smothered Chicken with Rice a delightful experience.

Step-by-Step Preparation of Creamy Smothered Chicken with Rice

Creamy Smothered Chicken with Rice is straightforward and fun. Follow these steps to create a delicious meal that will warm your heart and satisfy your taste buds.

Step 1: Preparing the Chicken

Start by heating 2 tablespoons of olive oil in a large skillet over medium heat. While the oil warms up, season the 4 boneless, skinless chicken breasts with 1 teaspoon of salt, 1/2 teaspoon of black pepper, 1 teaspoon of garlic powder, and 1 teaspoon of onion powder. This seasoning will enhance the chicken’s flavor.

Once the oil is hot, carefully add the chicken breasts to the skillet. Cook them for about 5-7 minutes on each side. You want them to be golden brown and fully cooked. After cooking, remove the chicken from the skillet and set it aside on a plate. This step ensures the chicken stays juicy and flavorful.

Step 2: Making the Creamy Sauce

In the same skillet, you’ll create the creamy sauce. First, add 1 cup of long-grain white rice to the skillet. Stir the rice for about 1 minute until it becomes slightly toasted. This step adds a nutty flavor to the rice.

Next, pour in 2 cups of chicken broth and bring the mixture to a boil. Once boiling, reduce the heat to low, cover the skillet, and let it simmer for 15 minutes. This allows the rice to absorb the broth, making it flavorful and tender.

Step 3: Cooking the Rice

After the rice has simmered for 15 minutes, it’s time to add the creamy elements. Stir in 1 cup of heavy cream, 1 cup of frozen mixed vegetables, 1 teaspoon of dried thyme, and 1 teaspoon of paprika. These ingredients will create a rich and colorful sauce.

Creamy Smothered Chicken with Rice.

Step 4: Combining Ingredients

Now, it’s time to bring everything together. Place the cooked chicken breasts back into the skillet, nestling them into the rice mixture. This allows the chicken to soak up the creamy flavors while it heats through.

Cover the skillet again and cook for an additional 10 minutes. This step ensures that the chicken is heated thoroughly and the flavors meld beautifully. The aroma will fill your kitchen, making it hard to wait!

Step 5: Final Cooking Steps

Once the chicken is heated through, remove the skillet from the heat. Sprinkle 1/4 cup of grated Parmesan cheese over the top. The cheese will melt into the creamy sauce, adding an extra layer of richness.

Creamy Smothered Chicken with Rice is now ready to be enjoyed!

Variations of Creamy Smothered Chicken with Rice

Creamy Smothered Chicken with Rice is delicious on its own, there are many ways to switch things up. By experimenting with different ingredients, you can create a unique dish that suits your taste. Here are some fun variations to consider:

Different Types of Rice to Use

Rice is the foundation of this dish, and using different types can change the flavor and texture. Here are a few options:

  • Brown Rice: For a healthier twist, use brown rice. It has a nutty flavor and is higher in fiber. Just remember, it may require a longer cooking time.
  • Jasmine Rice: This fragrant rice adds a lovely aroma to your dish. It cooks quickly and pairs well with the creamy sauce.
  • Wild Rice: For a unique texture, try wild rice. It has a chewy consistency and a rich, earthy flavor that complements the chicken beautifully.

Feel free to experiment with these options to find your favorite combination!

Adding Vegetables for Extra Flavor

Creamy Smothered Chicken with Rice. Here are some tasty additions:

  • Spinach: Fresh or frozen spinach can be stirred in for a boost of vitamins. It wilts down nicely and adds a lovely green color.
  • Mushrooms: Sautéed mushrooms bring an earthy flavor that pairs well with the creamy sauce. Add them when cooking the chicken for extra depth.
  • Bell Peppers: Chopped bell peppers add sweetness and crunch. They can be added along with the mixed vegetables for a colorful mix.

Mix and match your favorite veggies to create a dish that’s both delicious and nutritious!

Alternative Proteins for Creamy Smothered Chicken

Creamy Smothered Chicken with Rice, there are plenty of options:

  • Turkey: Ground turkey or turkey cutlets can be used instead of chicken. They provide a leaner option while still being flavorful.
  • Tofu: For a vegetarian version, use firm tofu. Press and cube it, then sauté until golden before adding it to the creamy sauce.
  • Shrimp: For a seafood twist, shrimp can be a delightful alternative. Cook them quickly in the skillet before adding the rice.

These alternatives can bring new flavors and textures to your dish, making it exciting every time you cook!

Cooking Note for Creamy Smothered Chicken with Rice

Creamy Smothered Chicken with Rice, a few cooking notes can help ensure your dish turns out perfectly every time. These tips will guide you through the process, making it easier and more enjoyable.

First, always ensure your chicken is at room temperature before cooking. This helps it cook evenly and stay juicy. If you take the chicken out of the fridge about 20 minutes before cooking, it will reach the right temperature.

Next, when seasoning the chicken, don’t be shy! The seasoning is crucial for flavor. Make sure to coat the chicken evenly with salt, pepper, garlic powder, and onion powder. This will enhance the overall taste of your dish.

While cooking the rice, keep an eye on the liquid levels. If you notice the rice absorbing the broth too quickly, you can add a little more chicken broth or water. This will prevent the rice from becoming too dry.

Additionally, when adding the heavy cream and vegetables, stir gently to avoid breaking the rice grains. You want to keep the rice fluffy and intact for the best texture.

Lastly, let the dish rest for a few minutes after cooking. This resting time allows the flavors to meld together beautifully. It also makes serving easier, as the rice will firm up slightly, making it less likely to fall apart on your plate.

Creamy Smothered Chicken with Rice that everyone will love. Happy cooking!

Serving Suggestions for Creamy Smothered Chicken with Rice

Creamy Smothered Chicken with Rice is ready, it’s time to think about how to serve it. The right side dishes and beverages can elevate your meal, making it even more enjoyable. Here are some great suggestions to complement your dish.

Ideal Side Dishes

Pairing your creamy chicken with the right sides can enhance the overall dining experience. Here are some ideal side dishes to consider:

  • Garlic Bread: A warm slice of garlic bread is perfect for soaking up the creamy sauce. It adds a delightful crunch and flavor.
  • Steamed Broccoli: This vibrant green vegetable adds color and nutrition. Its slight bitterness balances the richness of the chicken.
  • Caesar Salad: A fresh Caesar salad with crisp romaine, crunchy croutons, and creamy dressing provides a refreshing contrast to the warm dish.
  • Coleslaw: A tangy coleslaw can add a nice crunch and a bit of acidity, which helps cut through the creaminess.

Creamy Smothered Chicken with Rice but also add variety to your meal.

Pairing with Beverages

Choosing the right beverage can enhance your dining experience. Here are some beverage options that pair well with this dish:

  • White Wine: A chilled glass of Chardonnay or Sauvignon Blanc can complement the creamy sauce beautifully. The acidity in the wine balances the richness of the dish.
  • Iced Tea: A refreshing glass of iced tea, sweetened or unsweetened, can be a great non-alcoholic option. It’s light and refreshing.
  • Lemonade: The tartness of lemonade can provide a nice contrast to the creamy flavors, making it a delightful pairing.
  • Sparkling Water: For a simple and refreshing choice, sparkling water with a slice of lemon or lime can cleanse the palate between bites.

Creamy Smothered Chicken with Rice. Enjoy your culinary creation!

Tips for Perfecting Creamy Smothered Chicken with Rice

Creamy Smothered Chicken with Rice truly exceptional, it’s important to avoid common pitfalls and enhance the flavors. Here are some helpful tips to ensure your dish turns out perfectly every time.

Common Mistakes to Avoid

Even the best cooks can make mistakes. Here are a few common ones to watch out for:

  • Overcooking the Chicken: Cooking the chicken for too long can make it dry. Aim for a golden brown color and check for doneness with a meat thermometer. The internal temperature should reach 165°F (75°C).
  • Not Toasting the Rice: Skipping the toasting step can lead to a bland flavor. Toasting the rice for a minute enhances its nuttiness and adds depth to the dish.
  • Using Low-Quality Broth: The chicken broth is a key ingredient. Using low-quality or overly salty broth can affect the overall taste. Opt for a good-quality broth for the best results.
  • Skipping the Resting Time: Allowing the dish to rest for a few minutes after cooking is essential. This helps the flavors meld and makes serving easier.

By avoiding these mistakes, you’ll create a delicious and satisfying meal that everyone will love.

Enhancing Flavor Profiles

Creamy Smothered Chicken with Rice to the next level, consider these flavor-enhancing tips:

  • Fresh Herbs: Adding fresh herbs like basil or cilantro just before serving can brighten the dish. They add a burst of freshness that complements the creamy sauce.
  • Acidic Elements: A splash of lemon juice or a drizzle of balsamic vinegar can cut through the richness. This adds a delightful contrast and enhances the overall flavor.
  • Cheese Variations: While Parmesan is delicious, experimenting with other cheeses like mozzarella or cheddar can create a different flavor profile. Each cheese brings its unique taste and texture.
  • Spices and Seasonings: Don’t hesitate to experiment with spices. A pinch of cayenne pepper or a dash of Worcestershire sauce can add depth and complexity to the dish.

Creamy Smothered Chicken with Rice into a truly memorable meal. Enjoy the process of cooking and the delicious results!

Breakdown of Time for Creamy Smothered Chicken with Rice

Creamy Smothered Chicken with Rice can help you plan your cooking session better. Here’s a simple breakdown of the time required for each step, ensuring you can enjoy this delicious meal without any rush.

Prep Time

The prep time for this dish is quite manageable. You’ll need about 15-20 minutes to gather and prepare your ingredients. This includes:

  • Measuring out the spices and seasonings.
  • Chopping any additional vegetables you wish to add.
  • Seasoning the chicken breasts.

Taking this time to prepare will make the cooking process smoother and more enjoyable.

Cooking Time

Creamy Smothered Chicken with Rice is approximately 35-40 minutes. Here’s how it breaks down:

  • Cooking the chicken: 10-14 minutes.
  • Simmering the rice: 15 minutes.
  • Combining and final cooking: 10 minutes.

This total cooking time allows the flavors to meld beautifully, resulting in a rich and creamy dish.

Total Time

Creamy Smothered Chicken with Rice is about 50-60 minutes. This makes it a perfect option for a weeknight dinner or a cozy weekend meal. With just under an hour, you can create a comforting dish that will delight your family and friends.

Nutritional Information for Creamy Smothered Chicken with Rice

Creamy Smothered Chicken with Rice is not only delicious but also provides a good mix of nutrients. Here’s a breakdown of the key nutritional information per serving:

Calories

Creamy Smothered Chicken with Rice contains approximately 480 calories. This makes it a satisfying meal that can fit into a variety of dietary plans. The calorie content comes from the combination of chicken, rice, cream, and vegetables, providing a hearty dish that keeps you full.

Protein Content

One of the standout features of this dish is its protein content. Each serving offers about 36 grams of protein. This high protein level is primarily due to the chicken, which is an excellent source of lean protein. Protein is vital for muscle repair and growth, making this dish a great option for active individuals.

Sodium Levels

When it comes to sodium, each serving contains around 800 milligrams. While this is a reasonable amount for a meal, it’s important to be mindful of your overall sodium intake throughout the day. Using low-sodium chicken broth can help reduce the sodium levels if you’re watching your salt intake.

Creamy Smothered Chicken with Rice is a well-rounded meal that provides essential nutrients. It’s perfect for a comforting dinner while still being mindful of your dietary needs. Enjoy this delicious dish knowing it’s not just tasty but also nourishing!

FAQs about Creamy Smothered Chicken with Rice

Can I make Creamy Smothered Chicken with Rice ahead of time?

Creamy Smothered Chicken with Rice ahead of time! To do this, follow the recipe up until the final cooking step. After combining the chicken with the rice mixture, let it cool completely. Then, store it in an airtight container in the refrigerator for up to 2 days. When you’re ready to serve, simply reheat it on the stove over low heat, adding a splash of chicken broth or cream to loosen the sauce if needed. This makes it a convenient option for busy weeknights!

What can I substitute for rice in this recipe?

Creamy Smothered Chicken with Rice, there are several great options. Quinoa is a popular choice, as it cooks quickly and adds a nutty flavor. Cauliflower rice is another excellent low-carb alternative, providing a similar texture without the carbs. For a heartier option, consider using barley or farro, which will add a chewy texture and extra nutrients. Just be sure to adjust the cooking times according to the substitute you choose!

How do I store leftovers of Creamy Smothered Chicken with Rice?

Creamy Smothered Chicken with Rice is easy! Allow the dish to cool to room temperature, then transfer it to an airtight container. It can be stored in the refrigerator for up to 3 days. If you want to keep it longer, consider freezing it. Place the cooled dish in a freezer-safe container, and it will last for up to 3 months. When you’re ready to enjoy it again, thaw it in the refrigerator overnight and reheat on the stove or in the microwave until heated through.

Is Creamy Smothered Chicken with Rice suitable for meal prep?

Creamy Smothered Chicken with Rice is perfect for meal prep. You can make a large batch and portion it into individual containers for easy lunches or dinners throughout the week. Just follow the recipe as usual, and once it’s cooked, divide it into servings. This dish reheats well, making it a convenient and satisfying option for busy days. Plus, you can customize each portion with different vegetables or spices to keep things interesting!

Conclusion on Creamy Smothered Chicken with Rice

Recap of Key Points

Creamy Smothered Chicken with Rice is a delightful dish that combines tender chicken, creamy sauce, and fluffy rice into a comforting meal. We explored the essential ingredients, step-by-step preparation, and various ways to customize the dish to suit your taste. From using different types of rice to adding colorful vegetables, the possibilities are endless. We also discussed helpful cooking notes, serving suggestions, and nutritional information, ensuring you have all the tools needed to create this delicious meal.

Encouragement to Try the Recipe

Creamy Smothered Chicken with Rice is sure to impress. The rich flavors and creamy texture will make it a favorite at your dinner table. So, gather your ingredients, follow the steps, and enjoy the process of creating a meal that brings warmth and joy. Happy cooking!

Stay Connected

Get recipes via email: