Get my cookbooks

Churro Cheesecake Bars: A Sweet Treat You Can’t Resist!

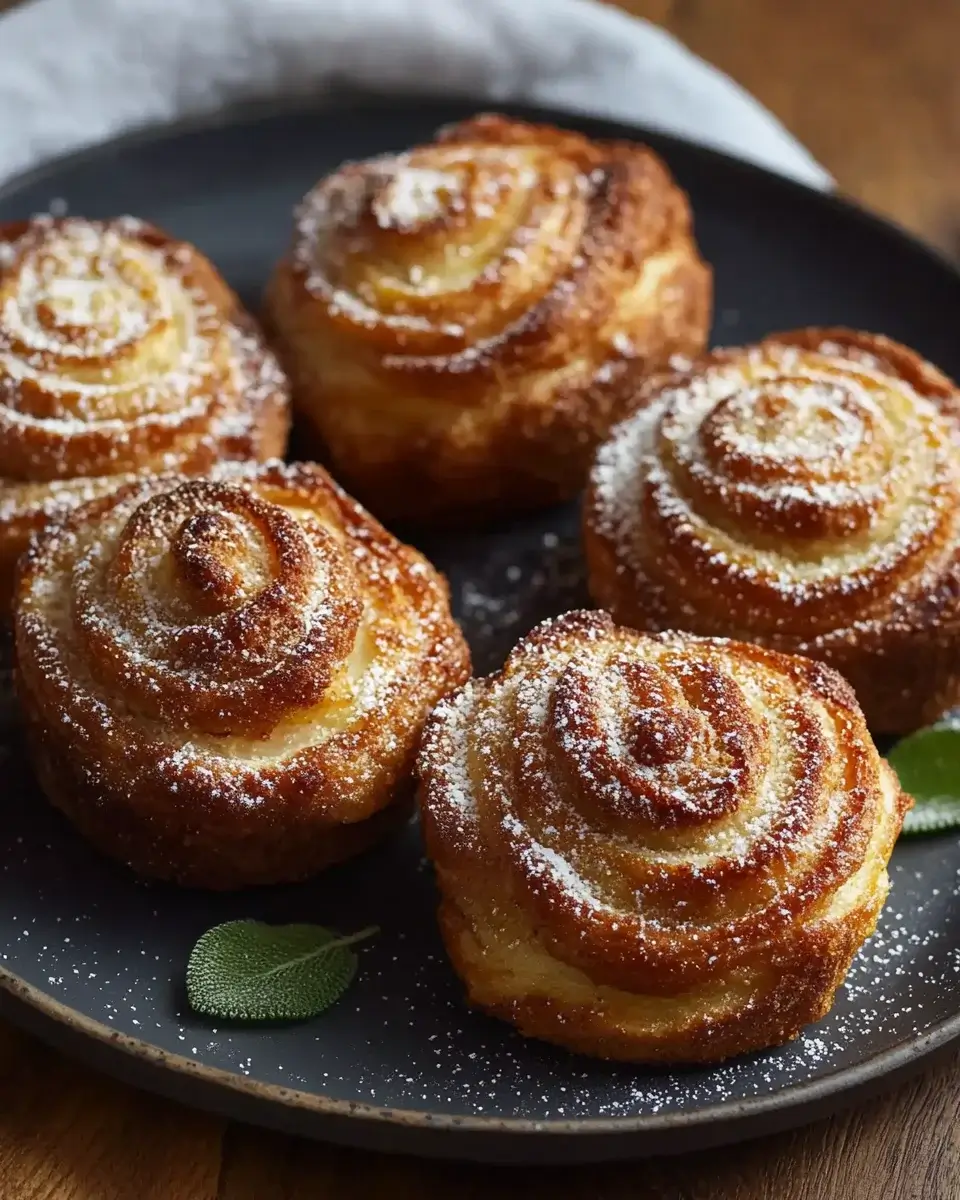
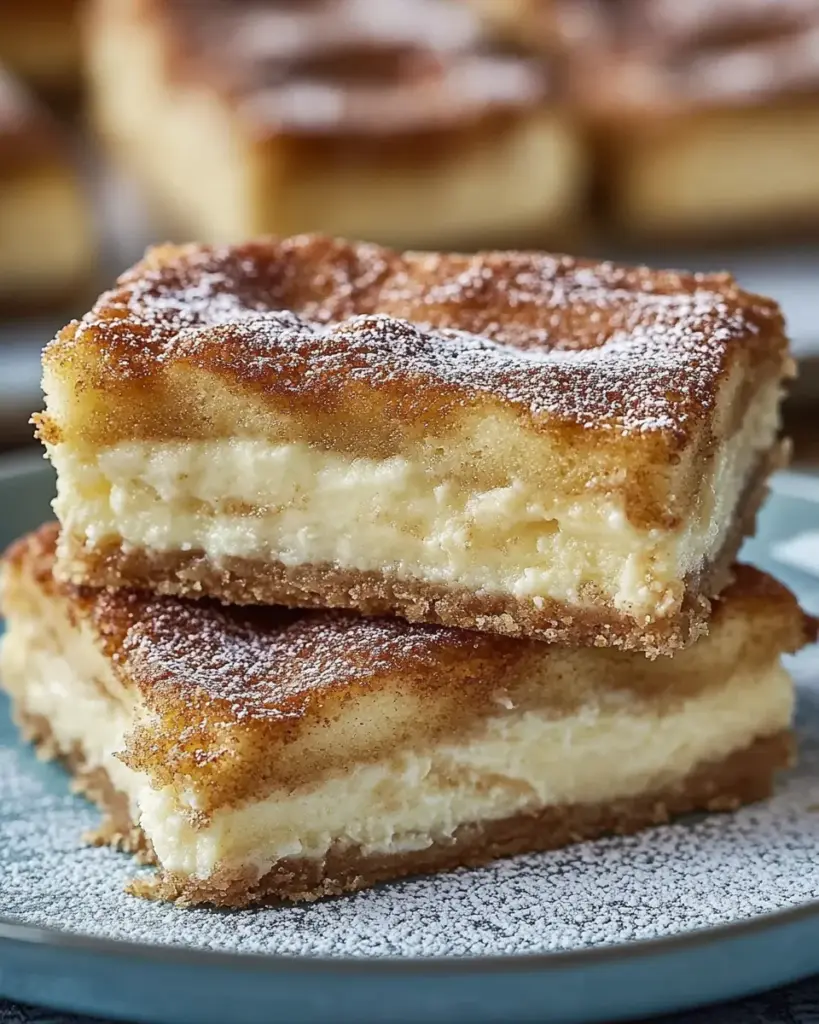
Introduction to Churro Cheesecake Bars

There’s something magical about desserts that blend textures and flavors, and Churro Cheesecake Bars are a prime example. Growing up, I always looked forward to family gatherings where sweet treats took center stage. These bars are a delightful fusion of creamy cheesecake and the warm, cinnamon-sugar goodness of churros. Perfect for impressing friends or simply indulging after a long day, this recipe is a quick solution for busy evenings. With just a few ingredients and simple steps, you can create a dessert that feels special without the fuss. Let’s dive into this sweet adventure!

Why You’ll Love This Churro Cheesecake Bars

Churro Cheesecake Bars are the ultimate dessert for anyone who craves a sweet escape without spending hours in the kitchen. They’re easy to whip up, making them perfect for last-minute gatherings or a cozy night in. The combination of creamy cheesecake and the nostalgic taste of churros creates a flavor explosion that’s hard to resist. Plus, they’re a hit with both kids and adults, ensuring everyone leaves with a smile!

Ingredients for Churro Cheesecake Bars

Gathering the right ingredients is the first step to creating these delightful Churro Cheesecake Bars. Here’s what you’ll need:

  • Graham cracker crumbs: These form the base of your bars, providing a sweet and crunchy texture.
  • Granulated sugar: A touch of sweetness for both the crust and the topping, enhancing the overall flavor.
  • Unsalted butter: This adds richness to the crust, helping it hold together beautifully.
  • Cream cheese: The star of the show! It gives the cheesecake its creamy, luscious texture.
  • Powdered sugar: This sweetens the cheesecake filling and helps achieve that smooth consistency.
  • Vanilla extract: A splash of vanilla elevates the flavor, adding warmth and depth.
  • Large eggs: Essential for binding the filling together, creating that perfect cheesecake texture.
  • Ground cinnamon: This spice brings the churro flavor to life, making every bite feel like a warm hug.
  • Granulated sugar (for topping): Sprinkled on top, it adds a sweet crunch that mimics the churro experience.

For those looking to mix things up, consider adding chocolate chips or a drizzle of caramel sauce on top before serving. If you want a different flavor profile, crushed vanilla wafers can be used instead of graham cracker crumbs. The exact quantities for each ingredient are listed at the bottom of the article for easy printing!

How to Make Churro Cheesecake Bars

Creating Churro Cheesecake Bars is a delightful journey that’s as easy as pie—well, easier! Follow these simple steps, and you’ll have a dessert that’s sure to impress.

Step 1: Preheat and Prepare

First things first, preheat your oven to 350°F (175°C). This is crucial for achieving that perfect bake. While the oven warms up, grab a 9×13-inch baking dish and grease it well. This will ensure your bars come out easily and don’t stick. Trust me, no one wants a crumbly mess!

Step 2: Make the Crust

In a medium bowl, combine your graham cracker crumbs, sugar, and melted butter. Mix until everything is well combined. The mixture should resemble wet sand. Now, press this mixture evenly into the bottom of your prepared baking dish. This solid base is essential for holding all that creamy goodness!

Step 3: Prepare the Cheesecake Filling

In a large mixing bowl, beat the softened cream cheese with an electric mixer until it’s smooth and creamy. Gradually add in the powdered sugar and vanilla extract, mixing until well combined. Now, add the eggs one at a time, mixing just until incorporated after each addition. This step is key for a silky cheesecake texture—no one likes a lumpy filling!

Step 4: Assemble the Bars

Pour the luscious cheesecake mixture over your crust, spreading it evenly. To bring that churro flavor to life, mix together the ground cinnamon and granulated sugar in a small bowl. Sprinkle this delightful mixture evenly over the cheesecake layer. It’s like a warm hug for your taste buds!

Step 5: Bake to Perfection

Now it’s time to bake! Place your dish in the preheated oven and let it bake for 30-35 minutes. You’ll know it’s done when the edges are set, but the center is still slightly jiggly. Once baked, remove it from the oven and let it cool at room temperature for about 30 minutes. This cooling period is crucial for the best texture.

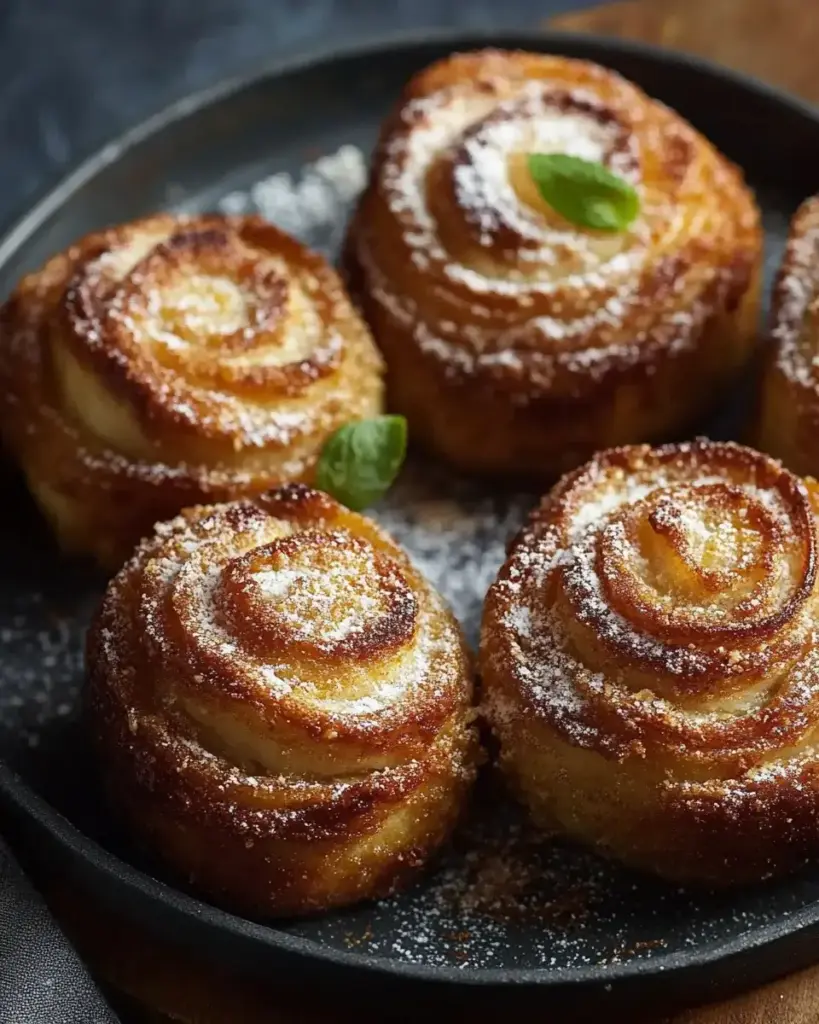
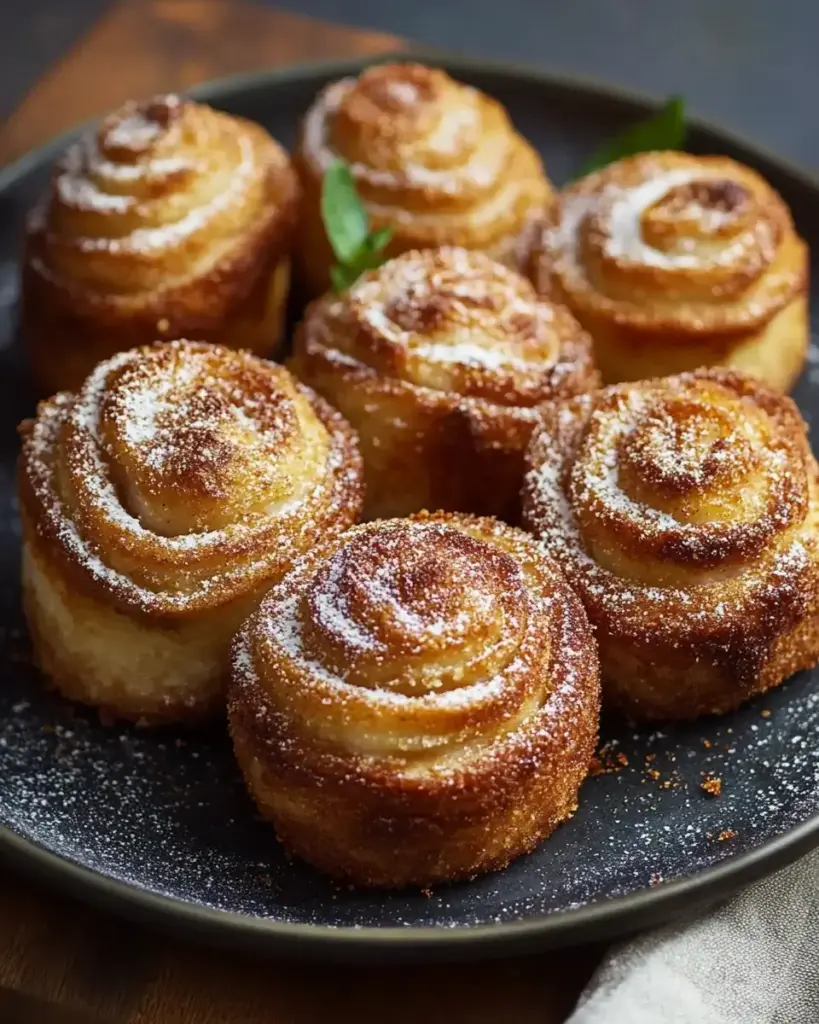
Step 6: Cut and Serve

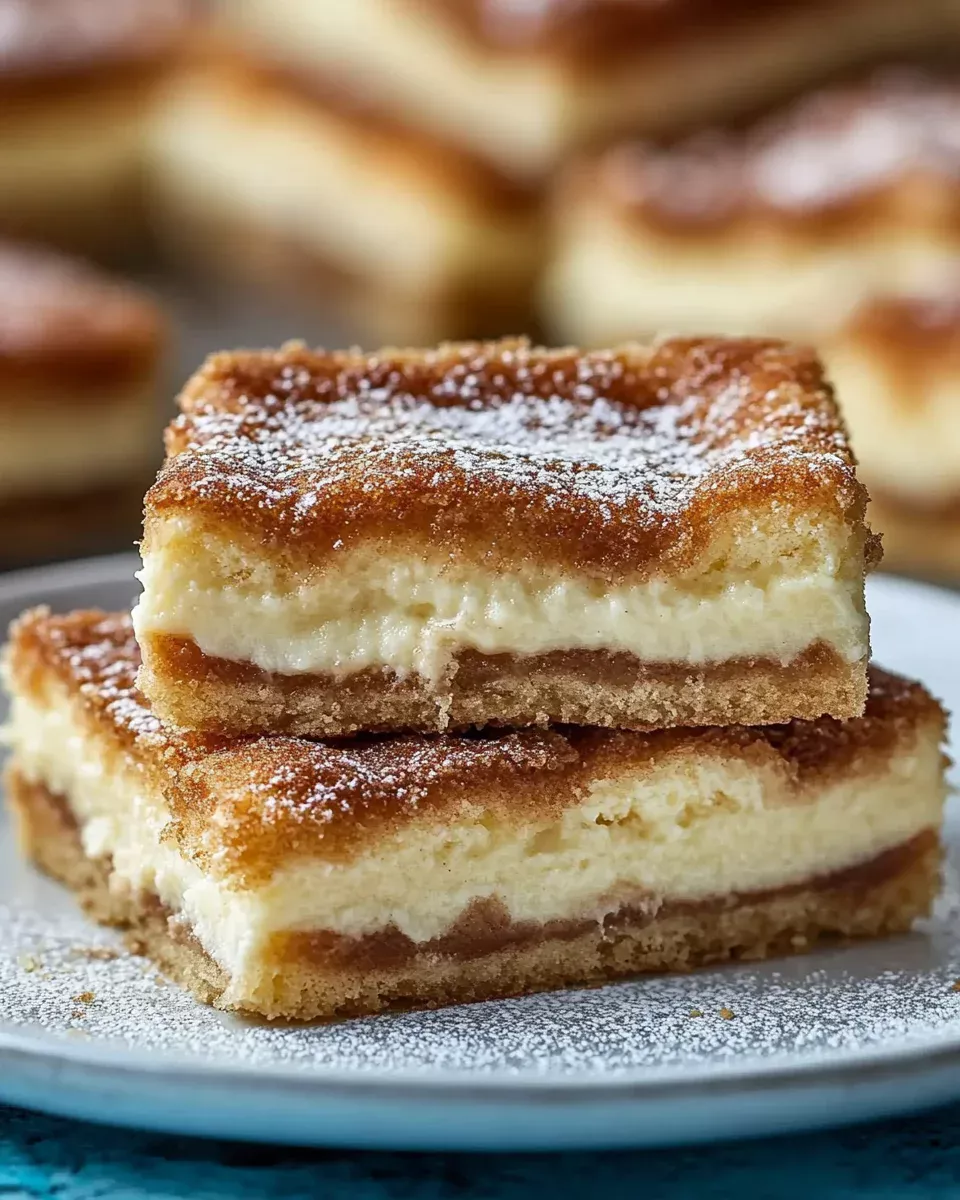
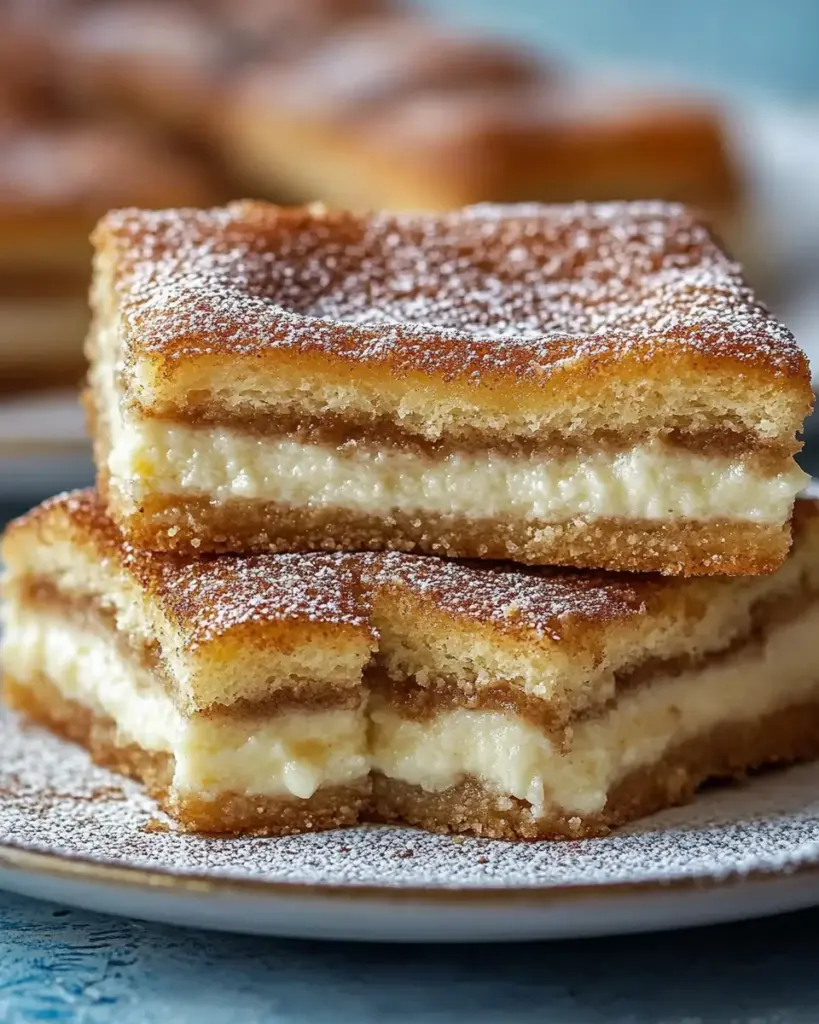
After your bars have cooled, pop them in the refrigerator for at least 2 hours. This chilling time helps them firm up beautifully. Once chilled, cut them into squares and serve. Enjoy your delicious Churro Cheesecake Bars chilled or at room temperature. Either way, they’re a treat you won’t want to miss!

Tips for Success

  • Make sure your cream cheese is softened for easy mixing; this prevents lumps.
  • Don’t skip the chilling time; it’s essential for the perfect texture.
  • Use a sharp knife to cut the bars for clean edges.
  • Experiment with toppings like chocolate chips or caramel for a fun twist.
  • Store leftovers in an airtight container in the fridge for up to a week.

Equipment Needed

  • 9×13-inch baking dish: Essential for baking your bars; a glass or metal dish works well.
  • Mixing bowls: Use medium and large bowls for mixing crust and filling.
  • Electric mixer: A hand mixer or stand mixer makes beating the cream cheese a breeze.
  • Spatula: Perfect for spreading the cheesecake mixture evenly.
  • Sharp knife: For cutting the bars into neat squares.

Variations

  • Chocolate Chip Churro Cheesecake Bars: Add a cup of chocolate chips to the cheesecake mixture for a rich, decadent twist.
  • Caramel Drizzle: Drizzle warm caramel sauce over the top before serving for an extra layer of sweetness.
  • Gluten-Free Option: Substitute graham cracker crumbs with gluten-free cookie crumbs or almond flour for a gluten-free version.
  • Spiced Up: Add a pinch of nutmeg or allspice to the cinnamon-sugar topping for a unique flavor profile.
  • Fruit Topping: Serve with fresh berries or sliced bananas on top for a fruity contrast to the creamy cheesecake.

Serving Suggestions

  • Pair with a scoop of vanilla ice cream for a delightful contrast in temperature and texture.
  • Serve alongside fresh fruit like strawberries or raspberries for a refreshing touch.
  • Drizzle with chocolate or caramel sauce for an extra indulgent experience.
  • Garnish with whipped cream and a sprinkle of cinnamon for a beautiful presentation.

FAQs about Churro Cheesecake Bars

Can I make Churro Cheesecake Bars ahead of time?

Absolutely! These bars can be made a day in advance. Just store them in the refrigerator after they’ve cooled. This actually enhances the flavors, making them even more delicious!

How do I store leftovers?

Keep any leftover Churro Cheesecake Bars in an airtight container in the fridge. They’ll stay fresh for up to a week, but I doubt they’ll last that long!

Can I freeze Churro Cheesecake Bars?

Yes, you can freeze them! Just wrap individual bars in plastic wrap and place them in a freezer-safe container. They’ll keep well for up to three months. Thaw in the fridge before serving.

What can I substitute for cream cheese?

If you’re looking for a lighter option, you can use Greek yogurt or mascarpone cheese. Just keep in mind that the texture and flavor will vary slightly.

Are Churro Cheesecake Bars suitable for vegetarians?

Yes! This recipe is vegetarian-friendly, making it a great dessert option for everyone at your gathering.

Final Thoughts

Churro Cheesecake Bars are more than just a dessert; they’re a celebration of flavors and memories. Each bite transports you to a cozy kitchen filled with laughter and warmth. The creamy cheesecake paired with the sweet, cinnamon-sugar topping creates a delightful contrast that’s hard to resist. Whether you’re sharing them with friends or enjoying a quiet moment alone, these bars bring joy to any occasion. So, roll up your sleeves and dive into this sweet adventure. Trust me, once you make them, they’ll become a staple in your dessert repertoire!

jhessica

Churro Cheesecake Bars: A Sweet Treat You Can’t Resist!

Churro Cheesecake Bars are a delicious dessert that combines the creamy texture of cheesecake with the sweet and spicy flavor of churros.
Prep Time 20 minutes
Cook Time 35 minutes
Total Time 2 hours 55 minutes
Servings: 12 servings
Course: Dessert
Cuisine: American
Calories: 250

Ingredients
  

  • 1 ½ cups graham cracker crumbs
  • ½ cup granulated sugar
  • ½ cup unsalted butter melted
  • 2 8-ounce packages cream cheese, softened
  • 1 cup powdered sugar
  • 1 teaspoon vanilla extract
  • 2 large eggs
  • 1 teaspoon ground cinnamon
  • 1 tablespoon granulated sugar for topping

Method
 

  1. Preheat your oven to 350°F (175°C). Grease a 9×13-inch baking dish.
  2. In a medium bowl, combine graham cracker crumbs, ½ cup granulated sugar, and melted butter. Mix until well combined. Press the mixture evenly into the bottom of the prepared baking dish to form the crust.
  3. In a large mixing bowl, beat the softened cream cheese with an electric mixer until smooth. Gradually add in the powdered sugar and vanilla extract, mixing until well combined. Add the eggs one at a time, mixing until just incorporated after each addition.
  4. Pour the cream cheese mixture over the prepared crust, spreading it evenly. In a small bowl, mix together the ground cinnamon and 1 tablespoon of granulated sugar. Sprinkle this mixture evenly over the cheesecake layer.
  5. Bake in the preheated oven for 30-35 minutes, or until the edges are set and the center is slightly jiggly. Remove from the oven and let cool at room temperature for about 30 minutes. Then, refrigerate for at least 2 hours before cutting into bars.
  6. Cut into squares and serve chilled or at room temperature.

Nutrition

Serving: 1barCalories: 250kcalCarbohydrates: 18gProtein: 4gFat: 18gSaturated Fat: 10gPolyunsaturated Fat: 8gCholesterol: 70mgSodium: 200mgFiber: 1gSugar: 14g

Notes

  • For a twist, try adding chocolate chips or caramel sauce on top before serving.
  • You can also substitute the graham cracker crumbs with crushed vanilla wafers for a different flavor.

Tried this recipe?

Let us know how it was!

Mexican Fideo Soup: Discover a Flavorful 30-Minute Recipe!

Introduction to Mexican Fideo Soup

There’s something magical about a warm bowl of soup, especially when it’s as comforting as Mexican Fideo Soup. This dish takes me back to my childhood, where my grandmother would whip up a pot of this flavorful goodness on chilly evenings. It’s a quick solution for those busy days when you crave something hearty yet simple. In just 30 minutes, you can create a vibrant, nourishing meal that’s perfect for impressing your loved ones or simply enjoying on your own. Trust me, once you try this recipe, it’ll become a staple in your kitchen!

Why You’ll Love This Mexican Fideo Soup

This Mexican Fideo Soup is a game-changer for anyone juggling a busy schedule. It’s not just quick to make; it’s bursting with flavor that will have your taste buds dancing. The combination of fresh vegetables and spices creates a delightful harmony in every spoonful. Plus, it’s versatile enough to adapt to your pantry staples. Whether you’re cooking for yourself or a crowd, this soup is sure to impress!

Ingredients for Mexican Fideo Soup

Gathering the right ingredients is the first step to creating a delicious Mexican Fideo Soup. Here’s what you’ll need:

  • Olive oil: This is your base for sautéing, adding a rich flavor to the soup.
  • Onion: Diced onion brings sweetness and depth to the dish.
  • Garlic: Minced garlic adds a punch of flavor that elevates the entire soup.
  • Carrot: Diced carrots add a touch of sweetness and vibrant color.
  • Zucchini: This veggie contributes a mild flavor and a nice texture.
  • Bell pepper: Choose your favorite color for a pop of sweetness and crunch.
  • Ground cumin: This spice gives the soup its warm, earthy flavor.
  • Chili powder: A must for that classic Mexican kick!
  • Smoked paprika: Adds a subtle smokiness that enhances the overall taste.
  • Fideo noodles: These thin noodles are traditional, but you can use broken spaghetti if needed.
  • Vegetable broth: The heart of the soup, providing a savory base.
  • Diced tomatoes: Canned tomatoes add acidity and richness; don’t forget the juices!
  • Corn kernels: Fresh or frozen, they add sweetness and texture.
  • Salt and pepper: Essential for seasoning to your taste.
  • Fresh cilantro: A fragrant garnish that brightens the dish.
  • Lime wedges: A squeeze of lime adds a refreshing zing.

For those looking to mix things up, consider adding heavy cream or coconut milk for a creamier texture, or toss in some shredded chicken or black beans for extra protein. You can find the exact quantities for these ingredients at the bottom of the article, ready for printing!

How to Make Mexican Fideo Soup

Now that you have all your ingredients ready, let’s dive into making this delicious Mexican Fideo Soup. Follow these simple steps, and you’ll have a warm, flavorful meal in no time!

Step 1: Sauté the Vegetables

Start by heating a tablespoon of olive oil in a large pot over medium heat. Once the oil is shimmering, toss in the diced onion. Sauté it for about 3-4 minutes until it becomes translucent. This step builds a flavorful base for your soup.

Step 2: Add More Veggies

Next, stir in the minced garlic, diced carrot, zucchini, and bell pepper. Cook these vibrant veggies for about 5-7 minutes until they’re tender. The colors will brighten, and the aroma will fill your kitchen, making it hard to resist!

Step 3: Spice It Up

Now it’s time to add some flavor! Sprinkle in the ground cumin, chili powder, and smoked paprika. Stir everything together and let it cook for about 1 minute until the spices become fragrant. This is where the magic happens, and your soup starts to come alive!

Step 4: Toast the Noodles

Next, add the fideo noodles to the pot. Toast them for 2-3 minutes, stirring frequently until they start to turn golden. This step adds a delightful nuttiness to the noodles, enhancing the overall flavor of your soup.

Step 5: Combine and Simmer

Pour in the vegetable broth and the can of diced tomatoes, juices included. Bring the mixture to a boil, then reduce the heat to low. Let it simmer for 10-12 minutes, or until the noodles are cooked through. The broth will thicken slightly, creating a comforting soup.

Step 6: Final Touches

Finally, stir in the corn and season with salt and pepper to taste. Let it simmer for an additional 2-3 minutes. This last step ensures everything is heated through and perfectly seasoned. Your Mexican Fideo Soup is now ready to be served!

Tips for Success

  • Prep your ingredients ahead of time to streamline the cooking process.
  • Don’t skip toasting the noodles; it adds a wonderful depth of flavor.
  • Adjust the spices to your taste; feel free to add more chili powder for heat.
  • For a heartier soup, include protein like shredded chicken or beans.
  • Garnish with fresh cilantro and lime for a burst of freshness.

Equipment Needed

  • Large pot: A sturdy pot is essential for making the soup. A Dutch oven works great too.
  • Wooden spoon: Perfect for stirring and preventing the noodles from sticking.
  • Measuring cups and spoons: Handy for accurate ingredient measurements.
  • Cutting board and knife: Essential for chopping your veggies.

Variations

  • Spicy Kick: Add diced jalapeños or a splash of hot sauce for an extra kick.
  • Protein Boost: Incorporate cooked shrimp or chorizo for a heartier soup.
  • Vegan Delight: Use coconut milk instead of cream for a creamy, dairy-free option.
  • Herb Infusion: Experiment with fresh herbs like oregano or thyme for added flavor.
  • Cheesy Twist: Stir in some shredded cheese just before serving for a creamy finish.

Serving Suggestions

  • Pair your Mexican Fideo Soup with warm, crusty bread or homemade tortillas for a satisfying meal.
  • Serve alongside a fresh avocado salad for a refreshing contrast.
  • For drinks, consider a cold cerveza or a zesty limeade to complement the flavors.
  • Garnish each bowl with extra cilantro and lime wedges for a vibrant presentation.

FAQs about Mexican Fideo Soup

Can I make Mexican Fideo Soup ahead of time?

Absolutely! This soup can be made ahead and stored in the fridge for up to three days. Just reheat it on the stove, adding a splash of broth if it thickens too much.

Is Mexican Fideo Soup gluten-free?

Traditional fideo noodles contain gluten, but you can easily substitute them with gluten-free pasta or rice noodles for a gluten-free version of this delicious soup.

Can I freeze Mexican Fideo Soup?

Yes, you can freeze the soup! Just make sure to leave out the noodles if you plan to freeze it. Add them fresh when you reheat the soup for the best texture.

What can I serve with Mexican Fideo Soup?

This soup pairs wonderfully with crusty bread, a fresh salad, or even some cheesy quesadillas. The options are endless!

How can I make this soup spicier?

If you like a bit of heat, add diced jalapeños or a dash of hot sauce while cooking. You can also increase the chili powder for an extra kick!

Final Thoughts

Cooking Mexican Fideo Soup is more than just preparing a meal; it’s about creating a moment of joy and warmth. The vibrant colors and rich aromas fill your kitchen, inviting everyone to gather around the table. In just 30 minutes, you can serve up a bowl of comfort that warms the soul. Whether it’s a busy weeknight or a cozy weekend, this soup is a delightful reminder of the simple pleasures in life. So grab your ingredients, unleash your inner chef, and enjoy the deliciousness that is Mexican Fideo Soup. Your taste buds will thank you!

jhessica

Mexican Fideo Soup: Discover a Flavorful 30-Minute Recipe!

A flavorful and quick Mexican Fideo Soup that can be prepared in just 30 minutes.
Prep Time 10 minutes
Cook Time 20 minutes
Total Time 30 minutes
Servings: 4 servings
Course: Soup
Cuisine: Mexican
Calories: 210

Ingredients
  

  • 1 tablespoon olive oil
  • 1 medium onion diced
  • 2 cloves garlic minced
  • 1 medium carrot diced
  • 1 medium zucchini diced
  • 1 bell pepper diced
  • 1 teaspoon ground cumin
  • 1 teaspoon chili powder
  • 1/2 teaspoon smoked paprika
  • 8 ounces fideo noodles or thin spaghetti, broken into pieces
  • 4 cups vegetable broth
  • 1 14.5-ounce can diced tomatoes, with juices
  • 1 cup corn kernels fresh or frozen
  • Salt and pepper to taste
  • Fresh cilantro for garnish
  • Lime wedges for serving

Method
 

  1. In a large pot, heat the olive oil over medium heat. Add the diced onion and sauté for 3-4 minutes until translucent.
  2. Stir in the minced garlic, diced carrot, zucchini, and bell pepper. Cook for an additional 5-7 minutes until the vegetables are tender.
  3. Add the ground cumin, chili powder, and smoked paprika to the pot, stirring well to combine. Cook for 1 minute until fragrant.
  4. Add the fideo noodles to the pot and toast them for 2-3 minutes, stirring frequently until they start to turn golden.
  5. Pour in the vegetable broth and diced tomatoes with their juices. Bring the mixture to a boil, then reduce the heat to low and simmer for 10-12 minutes, or until the noodles are cooked through.
  6. Stir in the corn and season with salt and pepper to taste. Simmer for an additional 2-3 minutes.
  7. Serve hot, garnished with fresh cilantro and lime wedges on the side.

Nutrition

Serving: 1bowlCalories: 210kcalCarbohydrates: 30gProtein: 6gFat: 6gSaturated Fat: 1gPolyunsaturated Fat: 5gSodium: 500mgFiber: 4gSugar: 4g

Notes

  • For a creamier soup, add 1/2 cup of heavy cream or coconut milk during the last few minutes of cooking.
  • For added protein, include cooked shredded chicken or black beans.

Tried this recipe?

Let us know how it was!

Smoky Ham Hock, Bean, and Cabbage Soup Made Easy!

Introduction to Smoky Ham Hock, Bean, and Cabbage Soup

There’s something magical about a warm bowl of soup on a chilly evening. The aroma of Smoky Ham Hock, Bean, and Cabbage Soup wafting through the kitchen can instantly transport you back to simpler times. This recipe is not just a meal; it’s a comforting hug in a bowl. Perfect for busy weeknights or when you want to impress your loved ones, it combines hearty ingredients that come together effortlessly. With just a few steps, you’ll create a dish that warms the soul and fills the belly, making it a go-to for any occasion.

Why You’ll Love This Smoky Ham Hock, Bean, and Cabbage Soup

This Smoky Ham Hock, Bean, and Cabbage Soup is a game-changer for your dinner routine. It’s not only easy to make but also packed with flavor that will have everyone asking for seconds. In just over an hour, you can whip up a hearty meal that’s perfect for chilly nights or casual gatherings. Plus, it’s a fantastic way to use up pantry staples while delivering a comforting dish that feels like home.

Ingredients for Smoky Ham Hock, Bean, and Cabbage Soup

Gathering the right ingredients is the first step to creating your Smoky Ham Hock, Bean, and Cabbage Soup. Here’s what you’ll need:

  • Olive oil: A splash of this liquid gold helps sauté the vegetables, adding a rich flavor.
  • Onion: Diced onion brings sweetness and depth to the soup, forming the aromatic base.
  • Garlic: Minced garlic adds a punch of flavor that elevates the entire dish.
  • Carrot: Diced carrots contribute a subtle sweetness and vibrant color.
  • Celery: This crunchy vegetable adds a refreshing crunch and enhances the soup’s overall flavor.
  • Smoked ham hock: The star of the show! It infuses the soup with a deep, smoky flavor that’s hard to resist.
  • Low-sodium chicken broth: A flavorful base that keeps the soup hearty without overwhelming saltiness.
  • White beans: These creamy beans add protein and texture, making the soup more filling.
  • Green cabbage: Chopped cabbage adds a lovely crunch and balances the richness of the ham.
  • Dried thyme: A sprinkle of thyme brings an earthy note that complements the other ingredients.
  • Smoked paprika: This spice adds a warm, smoky flavor that enhances the ham hock’s essence.
  • Salt and pepper: Essential for seasoning, these staples help bring all the flavors together.
  • Fresh parsley: Chopped parsley is a bright garnish that adds a pop of color and freshness.

For those looking to spice things up, consider adding a pinch of red pepper flakes while sautéing the vegetables. If you prefer a vegetarian version, swap the ham hock for smoked paprika and add extra beans for protein. You can find the exact quantities for each ingredient at the bottom of the article, ready for printing!

How to Make Smoky Ham Hock, Bean, and Cabbage Soup

Step 1: Sauté the Vegetables

Start by heating a tablespoon of olive oil in a large pot over medium heat. Once the oil shimmers, toss in the diced onion, carrot, and celery. Sauté these colorful veggies for about 5 minutes, stirring occasionally, until they soften and release their delightful aromas. This step builds the foundation of flavor for your Smoky Ham Hock, Bean, and Cabbage Soup. Trust me, your kitchen will start to feel like home!

Step 2: Add Garlic and Ham Hock

Next, stir in the minced garlic and let it cook for about a minute, just until fragrant. Now, it’s time to introduce the star of the show: the smoked ham hock. Add it to the pot along with the low-sodium chicken broth. Bring the mixture to a boil, then reduce the heat to low. Let it simmer for 30 minutes, allowing the flavors to meld beautifully. This is where the magic begins!

Step 3: Simmer and Shred

After 30 minutes, carefully remove the ham hock from the pot and set it aside to cool slightly. While it’s cooling, let the soup continue to simmer. Once the ham hock is cool enough to handle, shred the meat from the bone, discarding any excess fat. Return the shredded meat to the pot, stirring it back into the soup. This step adds a hearty texture that makes every spoonful satisfying.

Step 4: Add Beans and Cabbage

Now, it’s time to add the white beans and chopped cabbage to the pot. Sprinkle in the dried thyme and smoked paprika for that extra depth of flavor. Stir everything together and let it simmer for another 20 minutes. This allows the cabbage to soften and the beans to soak up all those smoky, savory flavors. Your soup is starting to look and smell incredible!

Step 5: Final Touches

Once the cabbage is tender, it’s time for the final touches. Return the shredded ham to the pot and give everything a good stir. Season with salt and pepper to taste, adjusting as needed. Serve your Smoky Ham Hock, Bean, and Cabbage Soup hot, garnished with fresh parsley for a pop of color. Enjoy the warmth and comfort of this delicious dish!

Tips for Success

  • Prep your ingredients ahead of time to streamline the cooking process.
  • Don’t skip the sautéing step; it builds essential flavor for your Smoky Ham Hock, Bean, and Cabbage Soup.
  • Adjust the seasoning gradually; taste as you go for the best results.
  • For a thicker soup, mash some of the beans before adding them.
  • Store leftovers in an airtight container for up to three days.

Equipment Needed

  • Large pot: A sturdy stockpot works best, but any large pot will do.
  • Cutting board: Essential for chopping veggies; a plastic or wooden board is fine.
  • Sharp knife: A good chef’s knife makes prep a breeze.
  • Wooden spoon: Perfect for stirring and scraping the bottom of the pot.
  • Measuring cups: Handy for precise ingredient measurements, though you can eyeball it!

Variations

  • Spicy Kick: Add diced jalapeños or a pinch of cayenne pepper for a fiery twist.
  • Vegetarian Delight: Replace the ham hock with smoked paprika and add extra beans like kidney or black beans for protein.
  • Herb Infusion: Experiment with fresh herbs like rosemary or bay leaves for a fragrant touch.
  • Root Veggie Boost: Toss in diced potatoes or parsnips for added heartiness and flavor.
  • Smoky Flavor Upgrade: Use liquid smoke for an extra layer of smokiness without the ham hock.

Serving Suggestions

  • Crusty Bread: Serve with a warm, crusty baguette or sourdough for dipping.
  • Salad Pairing: A light green salad with a tangy vinaigrette complements the soup perfectly.
  • Wine Selection: Enjoy with a glass of dry white wine or a light red.
  • Garnish: Top with extra parsley or a sprinkle of smoked paprika for a pop of color.

FAQs about Smoky Ham Hock, Bean, and Cabbage Soup

Can I use a different type of meat instead of ham hock?

Absolutely! You can substitute the ham hock with smoked sausage or even diced ham for a different flavor profile. Just keep in mind that the smoky essence may vary.

How can I make this soup vegetarian?

To create a vegetarian version of Smoky Ham Hock, Bean, and Cabbage Soup, simply replace the ham hock with smoked paprika and add extra beans for protein. You can also use vegetable broth instead of chicken broth.

Can I freeze leftovers?

Yes! This soup freezes well. Just let it cool completely, then transfer it to an airtight container. It can be stored in the freezer for up to three months. When ready to enjoy, thaw in the fridge overnight and reheat on the stovetop.

What can I serve with this soup?

Pair your Smoky Ham Hock, Bean, and Cabbage Soup with crusty bread, a light salad, or even a side of cornbread for a complete meal. The options are endless!

How long does it take to make this soup?

The total time for this hearty soup is about 1 hour and 5 minutes, including prep and cooking. It’s a quick and satisfying meal that’s perfect for any night of the week!

Final Thoughts

Cooking Smoky Ham Hock, Bean, and Cabbage Soup is more than just preparing a meal; it’s about creating memories and sharing warmth with those you love. Each spoonful is a reminder of cozy nights and hearty conversations. The rich flavors and comforting textures make it a dish that brings everyone together, whether it’s a family dinner or a gathering with friends. Plus, the simplicity of the recipe means you can whip it up even on the busiest days. So, grab your ingredients, and let this soup become a cherished part of your culinary repertoire!

jhessica

Smoky Ham Hock, Bean, and Cabbage Soup Made Easy!

A hearty and flavorful soup made with smoky ham hock, beans, and cabbage, perfect for a comforting meal.
Prep Time 15 minutes
Cook Time 50 minutes
Total Time 1 hour 5 minutes
Servings: 6 servings
Course: Soup
Cuisine: American
Calories: 220

Ingredients
  

  • 1 tablespoon olive oil
  • 1 medium onion diced
  • 2 cloves garlic minced
  • 1 large carrot diced
  • 1 large celery stalk diced
  • 1 pound smoked ham hock
  • 6 cups low-sodium chicken broth
  • 1 can 15 ounces white beans, drained and rinsed
  • 1 small head of green cabbage chopped (about 4 cups)
  • 1 teaspoon dried thyme
  • 1 teaspoon smoked paprika
  • Salt and pepper to taste
  • 2 tablespoons fresh parsley chopped (for garnish)

Method
 

  1. Heat the olive oil in a large pot over medium heat. Add the diced onion, carrot, and celery. Sauté for about 5 minutes until the vegetables are softened.
  2. Stir in the minced garlic and cook for an additional minute.
  3. Add the smoked ham hock to the pot, followed by the chicken broth. Bring the mixture to a boil, then reduce the heat to low and let it simmer for 30 minutes.
  4. After 30 minutes, remove the ham hock and set it aside to cool slightly.
  5. Stir in the white beans, chopped cabbage, thyme, and smoked paprika. Simmer for another 20 minutes until the cabbage is tender.
  6. While the soup is simmering, shred the meat from the ham hock, discarding the bone and any excess fat. Return the shredded meat to the pot and stir to combine.
  7. Season with salt and pepper to taste.
  8. Serve hot, garnished with fresh parsley.

Nutrition

Serving: 1cupCalories: 220kcalCarbohydrates: 18gProtein: 18gFat: 8gSaturated Fat: 2gPolyunsaturated Fat: 6gCholesterol: 30mgSodium: 600mgFiber: 5gSugar: 2g

Notes

  • For a spicier kick, add a pinch of red pepper flakes while sautéing the vegetables.
  • To make it vegetarian, substitute the ham hock with smoked paprika and add additional beans for protein.

Tried this recipe?

Let us know how it was!

Crispy Creamy Chicken Cordon Bleu: A Delicious Twist!

Introduction to Crispy Creamy Chicken Cordon Bleu

There’s something magical about the aroma of chicken sizzling in the kitchen, isn’t there?

Crispy Creamy Chicken Cordon Bleu is not just a meal; it’s a delightful experience that brings comfort and joy to the dinner table.

Whether you’re looking to impress your loved ones or simply want a quick solution for a busy weeknight, this dish has you covered.

With its crispy exterior and creamy, cheesy filling, it’s a guaranteed crowd-pleaser.

Let’s dive into this culinary adventure that’s as satisfying to make as it is to eat!

Why You’ll Love This Crispy Creamy Chicken Cordon Bleu

This Crispy Creamy Chicken Cordon Bleu is a game-changer for your dinner routine.

It’s easy to whip up, taking just about 50 minutes from start to finish.

The combination of crispy chicken, savory ham, and gooey Swiss cheese creates a flavor explosion that will have everyone asking for seconds.

Plus, it’s versatile enough to impress guests or satisfy a hungry family.

What’s not to love?

Ingredients for Crispy Creamy Chicken Cordon Bleu

Gathering the right ingredients is the first step to culinary success.

For this Crispy Creamy Chicken Cordon Bleu, you’ll need:

  • Boneless, skinless chicken breasts: The star of the show, providing a tender and juicy base.
  • Ham: Adds a savory, salty punch that pairs beautifully with the chicken.
  • Swiss cheese: Melts perfectly, creating that creamy, gooey texture we all crave.
  • All-purpose flour: Essential for the breading process, giving the chicken that crispy exterior.
  • Eggs: Help the breadcrumbs stick, ensuring a golden crust.
  • Breadcrumbs: The secret to achieving that satisfying crunch.
  • Garlic powder: A must-have for flavor; it adds depth without overpowering.
  • Onion powder: Complements the garlic and enhances the overall taste.
  • Paprika: Brings a hint of smokiness and a beautiful color to the dish.
  • Salt and pepper: The classic seasoning duo that elevates every ingredient.
  • Olive oil: Used for pan-frying, it adds richness and helps achieve that golden brown.
  • Heavy cream: The base for the creamy sauce, making it rich and indulgent.
  • Dijon mustard: Adds a tangy kick to the sauce, balancing the richness.
  • Fresh parsley: A pop of color and freshness for garnish.

Feel free to get creative!

You can swap out the Swiss cheese for cheddar or provolone for a different flavor profile.

And if you’re looking for a lighter option, consider using turkey ham or even skipping the frying step altogether.

For exact quantities, check the bottom of the article where you can find everything available for printing.

How to Make Crispy Creamy Chicken Cordon Bleu

Creating this Crispy Creamy Chicken Cordon Bleu is a delightful journey.

Follow these simple steps, and you’ll have a dish that’s not only delicious but also visually stunning.

Step 1: Preheat the Oven

Start by preheating your oven to 375°F.

This step is crucial for even cooking.

A hot oven ensures that your chicken rolls cook through while achieving that perfect golden crust.

Step 2: Prepare the Chicken

Next, take your boneless, skinless chicken breasts and place them between two sheets of plastic wrap.

Using a meat mallet, pound the chicken to an even thickness of about 1/2 inch.

This helps the chicken cook evenly and makes it easier to roll.

Don’t forget to season both sides with salt, pepper, garlic powder, onion powder, and paprika for optimal flavor.

Step 3: Assemble the Rolls

Now it’s time to layer the goodness.

Lay a slice of ham and a slice of Swiss cheese on each chicken breast.

Roll the chicken tightly, making sure the filling stays inside.

If needed, secure the rolls with toothpicks to keep everything in place.

Step 4: Set Up the Breading Station

Prepare your breading station to make the coating process smooth.

In one shallow dish, place all-purpose flour.

In another, beat the eggs until frothy.

Finally, mix breadcrumbs with a pinch of salt and pepper in a third dish.

This setup will help you achieve that crispy exterior.

Step 5: Bread the Chicken Rolls

Now, let’s get those chicken rolls coated!

Dredge each roll in the flour, shaking off any excess.

Next, dip it into the beaten eggs, ensuring it’s fully coated.

Finally, roll it in the breadcrumbs, pressing gently to adhere.

This three-step process is key to achieving that satisfying crunch.

Step 6: Cook the Chicken

In a large oven-safe skillet, heat olive oil over medium heat.

Add the chicken rolls and cook for about 3-4 minutes on each side until they’re golden brown.

This pan-frying step is essential for texture, giving your chicken that crispy outer layer.

Step 7: Bake the Chicken

Once browned, transfer the skillet to your preheated oven.

Bake for 20-25 minutes, or until the chicken is cooked through.

You’ll want to check that the internal temperature reaches 165°F for safety.

Step 8: Make the Creamy Sauce

While the chicken bakes, let’s whip up the creamy sauce.

In a small saucepan, combine heavy cream and Dijon mustard over medium heat.

Stir until heated through and slightly thickened.

This sauce will elevate your dish, adding a rich, tangy flavor.

Step 9: Serve and Garnish

Once the chicken is done, remove it from the oven and let it rest for a few minutes.

Drizzle the creamy sauce over the chicken rolls and garnish with fresh parsley.

This final touch not only adds flavor but also makes your dish look restaurant-worthy.

Tips for Success

  • Use a meat mallet to pound the chicken evenly for consistent cooking.
  • Don’t skip the seasoning; it’s key to flavoring the chicken.
  • Let the chicken rest after baking to keep it juicy.
  • Experiment with different cheeses for a unique twist.
  • For extra crunch, consider double-breading the chicken rolls.
  • Keep an eye on the sauce; stir frequently to prevent burning.

Equipment Needed

  • Meat mallet: A rolling pin works in a pinch for pounding the chicken.
  • Shallow dishes: Use pie plates or any flat dishes for breading.
  • Oven-safe skillet: A cast-iron skillet is perfect, but any oven-safe pan will do.
  • Toothpicks: If you don’t have these, kitchen twine can secure the rolls.

Variations of Crispy Creamy Chicken Cordon Bleu

  • Cheese Swap: Try using cheddar or provolone instead of Swiss for a different flavor profile.
  • Herb-Infused: Add fresh herbs like thyme or basil to the chicken for an aromatic twist.
  • Spicy Kick: Incorporate jalapeño slices or pepper jack cheese for a spicy version.
  • Vegetarian Option: Substitute chicken with eggplant or zucchini slices for a meatless delight.
  • Gluten-Free: Use gluten-free breadcrumbs and flour to make this dish suitable for gluten-sensitive diners.
  • Low-Calorie Version: Bake the chicken rolls without frying and use low-fat cheese for a lighter meal.

Serving Suggestions for Crispy Creamy Chicken Cordon Bleu

  • Side Salad: A fresh green salad with a light vinaigrette complements the richness of the chicken.
  • Roasted Vegetables: Serve with seasonal roasted veggies for a colorful and nutritious addition.
  • Wine Pairing: A crisp white wine, like Chardonnay, enhances the flavors beautifully.
  • Presentation: Plate the chicken on a bed of mashed potatoes for a comforting touch.

FAQs about Crispy Creamy Chicken Cordon Bleu

Can I make Crispy Creamy Chicken Cordon Bleu ahead of time?

Absolutely! You can prepare the chicken rolls and store them in the fridge for up to 24 hours before baking. Just remember to cover them tightly to keep them fresh.

What can I serve with Crispy Creamy Chicken Cordon Bleu?

This dish pairs wonderfully with a side salad, roasted vegetables, or creamy mashed potatoes. A crisp white wine also complements the flavors beautifully.

Can I freeze the chicken rolls?

Yes, you can freeze the unbaked chicken rolls. Just wrap them tightly in plastic wrap and store them in an airtight container. When you’re ready to cook, bake them straight from the freezer, adding a few extra minutes to the cooking time.

What if I don’t have Dijon mustard?

If you’re out of Dijon mustard, you can substitute it with yellow mustard or even a bit of mayonnaise mixed with vinegar for a similar tangy flavor.

How do I know when the chicken is done cooking?

The best way to check is by using a meat thermometer. The internal temperature should reach 165°F for safe consumption. If you don’t have one, cut into the chicken to ensure it’s no longer pink inside.

Final Thoughts

Cooking Crispy Creamy Chicken Cordon Bleu is more than just preparing a meal; it’s about creating memories.

The joy of rolling up those chicken breasts, the satisfying crunch of the breadcrumbs, and the rich, creamy sauce all come together to make a dish that warms the heart.

Whether it’s a weeknight dinner or a special occasion, this recipe brings a touch of elegance to your table.

So, gather your loved ones, serve up this delightful dish, and watch as smiles spread around the room.

Trust me, it’s a culinary experience you won’t want to miss!

jhessica

Crispy Creamy Chicken Cordon Bleu: A Delicious Twist!

A delicious twist on the classic chicken cordon bleu, featuring crispy chicken rolls filled with ham and Swiss cheese, topped with a creamy Dijon sauce.
Prep Time 20 minutes
Cook Time 30 minutes
Total Time 50 minutes
Servings: 4 servings
Course: Main Course
Cuisine: French
Calories: 480

Ingredients
  

  • 1 pound boneless skinless chicken breasts
  • 4 ounces ham sliced
  • 4 ounces Swiss cheese sliced
  • 1 cup all-purpose flour
  • 2 large eggs
  • 1 cup breadcrumbs
  • 1 teaspoon garlic powder
  • 1 teaspoon onion powder
  • 1 teaspoon paprika
  • Salt and pepper to taste
  • 1 tablespoon olive oil
  • 1 cup heavy cream
  • 1 tablespoon Dijon mustard
  • 1 tablespoon fresh parsley chopped (for garnish)

Method
 

  1. Preheat your oven to 375°F.
  2. Place the chicken breasts between two sheets of plastic wrap and pound them to an even thickness of about 1/2 inch. Season both sides with salt, pepper, garlic powder, onion powder, and paprika.
  3. Lay a slice of ham and a slice of Swiss cheese on each chicken breast. Roll the chicken tightly, securing the filling inside. Use toothpicks to hold the rolls together if necessary.
  4. Set up a breading station: Place the flour in one shallow dish, beat the eggs in another dish, and mix the breadcrumbs with a pinch of salt and pepper in a third dish.
  5. Dredge each chicken roll in flour, shaking off the excess. Dip it in the beaten eggs, then coat it with breadcrumbs, pressing gently to adhere.
  6. In a large oven-safe skillet, heat the olive oil over medium heat. Add the chicken rolls and cook for about 3-4 minutes on each side until golden brown.
  7. Once browned, transfer the skillet to the preheated oven and bake for 20-25 minutes, or until the chicken is cooked through (internal temperature should reach 165°F).
  8. While the chicken is baking, prepare the creamy sauce. In a small saucepan, combine the heavy cream and Dijon mustard over medium heat. Stir until heated through and slightly thickened.
  9. Remove the chicken from the oven and let it rest for a few minutes. Drizzle the creamy sauce over the chicken rolls and garnish with fresh parsley before serving.

Nutrition

Serving: 1rollCalories: 480kcalCarbohydrates: 12gProtein: 36gFat: 30gSaturated Fat: 10gPolyunsaturated Fat: 15gCholesterol: 150mgSodium: 800mgSugar: 1g

Notes

  • For a healthier option, you can bake the chicken rolls without frying them first. Just spray them lightly with cooking spray before baking.
  • Try adding different types of cheese, such as cheddar or provolone, for a unique flavor twist.

Tried this recipe?

Let us know how it was!

Honey Pineapple Glazed Salmon: A Flavorful Delight!

Introduction to Honey Pineapple Glazed Salmon

There’s something magical about the combination of sweet and savory flavors, especially when it comes to cooking.

Honey Pineapple Glazed Salmon is a dish that brings those flavors together beautifully.

Whether you’re looking to impress your family or just want a quick solution for a busy weeknight dinner, this recipe has you covered.

With minimal prep and a burst of tropical goodness, it’s perfect for any occasion.

Trust me, once you try this dish, it’ll become a staple in your kitchen.

Let’s dive into this delightful culinary adventure!

Why You’ll Love This Honey Pineapple Glazed Salmon

This Honey Pineapple Glazed Salmon is a game-changer for your dinner routine.

It’s incredibly easy to whip up, taking just 35 minutes from start to finish.

The sweet and tangy glaze elevates the salmon, making it taste like a gourmet meal without the fuss.

Plus, it’s versatile enough to pair with various sides, ensuring everyone at the table leaves satisfied.

You’ll love how quickly it becomes a family favorite!

Ingredients for Honey Pineapple Glazed Salmon

Creating the perfect Honey Pineapple Glazed Salmon starts with gathering the right ingredients.

Here’s what you’ll need:

  • Salmon fillets: Fresh or frozen, salmon is rich in omega-3 fatty acids and provides a delicious base for the glaze.
  • Honey: This natural sweetener adds a delightful sweetness and helps create that beautiful glaze.
  • Pineapple juice: Fresh or canned, it brings a tropical twist and balances the flavors with its acidity.
  • Soy sauce: A staple in many kitchens, it adds depth and umami to the dish.
  • Dijon mustard: This tangy ingredient enhances the glaze and gives it a bit of a kick.
  • Minced garlic: Fresh garlic infuses the dish with aromatic flavor, making it irresistible.
  • Ground ginger: A pinch of this spice adds warmth and complements the sweetness of the honey and pineapple.
  • Salt and pepper: Essential for seasoning, they enhance the natural flavors of the salmon.
  • Chopped green onions: These are optional but make for a fresh and colorful garnish.

Feel free to get creative!

For a spicier kick, consider adding a pinch of red pepper flakes to the glaze.

If you’re looking for a different protein option, chicken breasts work wonderfully as a substitute.

All ingredient quantities are listed at the bottom of the article for easy printing.

Happy cooking!

How to Make Honey Pineapple Glazed Salmon

Making Honey Pineapple Glazed Salmon is a straightforward process that anyone can master.

Follow these simple steps, and you’ll have a delicious meal ready in no time!

Step 1: Preheat Your Grill or Oven

Preheating is crucial for achieving that perfect cook.

Set your grill or oven to 400°F (200°C).

If you’re using a grill, lightly oil the grates to prevent sticking.

This step ensures your salmon cooks evenly and develops a lovely caramelized exterior.

Step 2: Prepare the Glaze

In a small bowl, whisk together the honey, pineapple juice, soy sauce, Dijon mustard, minced garlic, and ground ginger.

Mix until everything is well combined.

This glaze is the star of the show, bringing a sweet and tangy flavor that perfectly complements the salmon.

Feel free to taste it and adjust the sweetness or tanginess to your liking!

Step 3: Season the Salmon

Seasoning is key to enhancing the natural flavors of the salmon.

Sprinkle salt and pepper on both sides of the fillets.

Don’t be shy! A good seasoning will elevate your dish.

This simple step makes a world of difference in taste.

Step 4: Marinate the Salmon

Place the seasoned salmon fillets in a shallow dish.

Pour half of the honey-pineapple glaze over them, reserving the other half for later.

Let the salmon marinate for about 15-20 minutes.

This process allows the flavors to penetrate the fish, making it even more delicious.

Step 5: Cooking the Salmon

Now it’s time to cook!

If grilling, place the salmon skin-side down on the grill.

Cook for about 6-8 minutes, brushing with the reserved glaze halfway through.

If baking, place the salmon on a lined baking sheet and bake for 12-15 minutes.

Check for doneness by ensuring it flakes easily with a fork and reaches an internal temperature of 145°F (63°C).

Step 6: Finishing Touches

Once cooked, remove the salmon from the grill or oven.

Let it rest for a few minutes to lock in the juices.

Drizzle any remaining glaze over the top and garnish with chopped green onions.

This final touch adds a pop of color and freshness to your dish.

Now, you’re ready to serve up a plate of Honey Pineapple Glazed Salmon that’s sure to impress!

Tips for Success

  • Always use fresh salmon for the best flavor and texture.
  • Don’t skip the marinating step; it’s key for infusing flavor.
  • Keep an eye on the cooking time to avoid overcooking.
  • Experiment with the glaze by adding your favorite spices.
  • Let the salmon rest before serving to enhance juiciness.
  • Pair with a light salad or steamed veggies for a balanced meal.

Equipment Needed

  • Grill or Oven: Either works well; choose based on your preference.
  • Shallow Dish: For marinating the salmon; a baking dish or plate will do.
  • Whisk: Essential for mixing the glaze; a fork can work in a pinch.
  • Baking Sheet: If baking, use one lined with parchment paper for easy cleanup.
  • Meat Thermometer: To check the salmon’s doneness; a fork can also help.

Variations

  • Spicy Honey Pineapple Glazed Salmon: Add a teaspoon of sriracha or a pinch of cayenne pepper to the glaze for a fiery kick.
  • Herb-Infused Glaze: Incorporate fresh herbs like cilantro or basil into the glaze for an aromatic twist.
  • Fruit Salsa Topping: Top the cooked salmon with a fresh pineapple salsa made from diced pineapple, red onion, and jalapeño for added texture and flavor.
  • Maple Pineapple Glazed Salmon: Substitute honey with maple syrup for a different sweet profile that pairs beautifully with salmon.
  • Vegetarian Option: Use the glaze on grilled tofu or portobello mushrooms for a delicious plant-based alternative.

Serving Suggestions

  • Steamed Rice: A fluffy bed of jasmine or basmati rice complements the glaze perfectly.
  • Fresh Salad: Pair with a light green salad topped with citrus vinaigrette for a refreshing contrast.
  • Grilled Vegetables: Serve alongside seasonal grilled veggies for a colorful plate.
  • White Wine: A chilled glass of Sauvignon Blanc enhances the meal beautifully.
  • Presentation: Garnish with extra green onions and lime wedges for a vibrant touch.

FAQs about Honey Pineapple Glazed Salmon

Can I use frozen salmon for this recipe?

Absolutely! Just make sure to thaw the salmon completely before marinating. Frozen salmon can still be delicious when cooked properly.

What can I substitute for honey in the glaze?

If you’re looking for an alternative, maple syrup works wonderfully. It adds a unique flavor while keeping that sweet profile intact.

How do I know when the salmon is done cooking?

The salmon is ready when it flakes easily with a fork and reaches an internal temperature of 145°F (63°C). A meat thermometer is your best friend here!

Can I make the glaze ahead of time?

Yes! You can prepare the honey pineapple glaze a day in advance. Just store it in the fridge and give it a good stir before using.

What sides pair well with Honey Pineapple Glazed Salmon?

This dish goes great with steamed rice, fresh salads, or grilled vegetables. The sweet and savory flavors complement a variety of sides beautifully!

Final Thoughts

Cooking Honey Pineapple Glazed Salmon is more than just preparing a meal; it’s about creating a moment.

The sweet aroma wafting through your kitchen as it cooks is enough to make anyone’s mouth water.

This dish brings together family and friends, sparking conversations and laughter around the table.

With its vibrant flavors and simple preparation, it’s a recipe that fits seamlessly into any busy lifestyle.

So, whether you’re celebrating a special occasion or just enjoying a weeknight dinner, this salmon will surely bring joy to your plate and warmth to your heart.

Happy cooking!

jhessica

Honey Pineapple Glazed Salmon: A Flavorful Delight!

A delicious and easy recipe for Honey Pineapple Glazed Salmon that combines sweet and savory flavors.
Prep Time 20 minutes
Cook Time 15 minutes
Total Time 35 minutes
Servings: 2 servings
Course: Main Course
Cuisine: American
Calories: 350

Ingredients
  

  • 2 6-ounce salmon fillets
  • 1/4 cup honey
  • 1/4 cup pineapple juice
  • 2 tablespoons soy sauce
  • 1 tablespoon Dijon mustard
  • 1 teaspoon minced garlic
  • 1/2 teaspoon ground ginger
  • Salt and pepper to taste
  • 2 tablespoons chopped green onions for garnish

Method
 

  1. Preheat your grill or oven to 400°F (200°C). If using a grill, lightly oil the grates to prevent sticking.
  2. In a small bowl, whisk together the honey, pineapple juice, soy sauce, Dijon mustard, minced garlic, and ground ginger until well combined.
  3. Season the salmon fillets with salt and pepper on both sides.
  4. Place the salmon fillets in a shallow dish and pour half of the honey-pineapple glaze over them, reserving the other half for later. Let the salmon marinate for about 15-20 minutes.
  5. If grilling, place the salmon skin-side down on the grill and cook for about 6-8 minutes. Brush with the reserved glaze halfway through cooking. If baking, place the salmon on a lined baking sheet and bake for 12-15 minutes, brushing with the reserved glaze halfway through.
  6. The salmon is done when it flakes easily with a fork and reaches an internal temperature of 145°F (63°C).
  7. Remove the salmon from the grill or oven and let it rest for a few minutes. Drizzle any remaining glaze over the top and garnish with chopped green onions before serving.

Nutrition

Serving: 1filletCalories: 350kcalCarbohydrates: 20gProtein: 34gFat: 15gSaturated Fat: 3gPolyunsaturated Fat: 10gCholesterol: 70mgSodium: 600mgSugar: 30g

Notes

  • For a spicier kick, add a pinch of red pepper flakes to the glaze.
  • You can also substitute the salmon with chicken breasts for a different protein option.
  • Serve with steamed rice or a fresh salad for a complete meal.

Tried this recipe?

Let us know how it was!

Balsamic Glazed Meatloaf: A Must-Try Recipe Today!

Introduction to Balsamic Glazed Meatloaf

There’s something comforting about a home-cooked meal, especially when it’s a classic like Balsamic Glazed Meatloaf.

Growing up, meatloaf was a staple in my house, a dish that brought everyone together after a long day.

This recipe is not just about nostalgia; it’s a quick solution for busy weeknights or a dish to impress your loved ones.

With its savory flavors and a sweet balsamic glaze, it’s sure to become a family favorite.

Let’s dive into this delicious journey and create a meal that warms the heart and fills the belly!

Why You’ll Love This Balsamic Glazed Meatloaf

This Balsamic Glazed Meatloaf is a game-changer for your dinner routine.

It’s incredibly easy to whip up, making it perfect for those hectic evenings when time is tight.

The combination of ground beef and pork creates a juicy texture, while the balsamic glaze adds a delightful sweetness that elevates the dish.

Plus, it’s a crowd-pleaser, ensuring everyone at the table leaves satisfied and asking for seconds!

Ingredients for Balsamic Glazed Meatloaf

Creating a mouthwatering Balsamic Glazed Meatloaf starts with gathering the right ingredients.

Here’s what you’ll need:

  • Ground beef: This is the heart of the meatloaf, providing rich flavor and texture.
  • Ground pork: Adds moisture and a hint of sweetness, balancing the beef perfectly.
  • Breadcrumbs: These help bind the meatloaf together while keeping it tender.
  • Parmesan cheese: A sprinkle of this cheese brings a savory depth to the dish.
  • Onion: Chopped onion adds a subtle sweetness and aromatic flavor.
  • Garlic: Minced garlic infuses the meatloaf with a robust, savory kick.
  • Eggs: These act as a binder, helping to hold everything together.
  • Fresh parsley: Chopped parsley adds a pop of color and freshness.
  • Salt and black pepper: Essential seasonings that enhance all the flavors.
  • Dried oregano and thyme: These herbs bring an earthy aroma and depth to the meatloaf.
  • Balsamic vinegar: The star of the show, it gives the glaze its signature tangy sweetness.
  • Brown sugar: This balances the acidity of the balsamic vinegar, creating a luscious glaze.
  • Worcestershire sauce: Adds a savory umami flavor that rounds out the dish.

Feel free to get creative!

You can substitute ground turkey for a leaner option or toss in some chopped bell peppers or carrots for extra nutrition.

If you like a bit of heat, consider mixing in crushed red pepper flakes or a dash of hot sauce.

For exact measurements, check the bottom of the article where you can find everything available for printing.

How to Make Balsamic Glazed Meatloaf

Creating a delicious Balsamic Glazed Meatloaf is easier than you might think.

Follow these simple steps, and you’ll have a hearty meal ready in no time!

Step 1: Preheat the Oven

Start by preheating your oven to 350°F.

This ensures that your meatloaf cooks evenly and thoroughly.

Step 2: Prepare the Meat Mixture

In a large bowl, combine the ground beef and ground pork.

Add in the breadcrumbs, grated Parmesan cheese, chopped onion, minced garlic, and fresh parsley.

Crack in the eggs, then sprinkle in the salt, black pepper, oregano, and thyme.

Mix everything together until well combined.

Don’t be afraid to get your hands in there; it’s the best way to ensure everything is evenly mixed!

Step 3: Shape the Meatloaf

Transfer the meat mixture into a loaf pan.

Shape it into a loaf, making sure it’s compact but not too tight.

This helps it cook evenly and stay juicy.

Step 4: Make the Balsamic Glaze

In a small saucepan over medium heat, combine the balsamic vinegar, brown sugar, and Worcestershire sauce.

Bring it to a simmer and let it cook for about 5 minutes.

You want it to thicken slightly, creating a luscious glaze that will coat your meatloaf beautifully.

Step 5: Bake the Meatloaf

Pour half of the balsamic glaze over the shaped meatloaf.

Place it in the preheated oven and bake for 1 hour.

After 30 minutes, brush the remaining glaze over the top.

This will give it a beautiful, sticky finish.

Step 6: Rest and Serve

Once the meatloaf is cooked, let it rest for about 10 minutes.

This allows the juices to redistribute, making each slice tender and flavorful.

Slice it up and serve warm, perhaps with some mashed potatoes or a fresh salad on the side.

Enjoy the delightful flavors of your homemade Balsamic Glazed Meatloaf!

Tips for Success

  • Use a meat thermometer to ensure your meatloaf reaches an internal temperature of 160°F for safety.
  • Let the meatloaf rest before slicing to keep it juicy and flavorful.
  • Experiment with different herbs and spices to customize the flavor to your liking.
  • For a crispy top, broil the meatloaf for the last few minutes of baking.
  • Store leftovers in an airtight container for up to three days for easy meals.

Equipment Needed

  • Loaf pan: Essential for shaping your meatloaf. A baking dish works too!
  • Mixing bowl: Use a large bowl for combining ingredients. A sturdy pot can work in a pinch.
  • Small saucepan: Needed for making the balsamic glaze. A microwave-safe bowl can substitute.
  • Meat thermometer: Ensures perfect doneness. If you don’t have one, just cut into the meatloaf to check.

Variations

  • Turkey Meatloaf: Swap out the beef and pork for ground turkey for a leaner option that still packs flavor.
  • Vegetarian Version: Use lentils or black beans as a base, adding oats and veggies for texture and taste.
  • Spicy Kick: Mix in some diced jalapeños or crushed red pepper flakes for a fiery twist.
  • Cheesy Delight: Add shredded mozzarella or cheddar cheese into the meat mixture for a gooey surprise.
  • Herb Infusion: Experiment with fresh herbs like basil or cilantro to give your meatloaf a unique flavor profile.

Serving Suggestions

  • Classic Sides: Pair your meatloaf with creamy mashed potatoes or buttery corn for a comforting meal.
  • Fresh Salad: A crisp garden salad with a tangy vinaigrette adds a refreshing contrast.
  • Wine Pairing: Enjoy a glass of red wine, like Merlot, to complement the rich flavors.
  • Presentation: Serve on a rustic wooden board for a homey touch, garnished with fresh parsley.

FAQs about Balsamic Glazed Meatloaf

Can I make Balsamic Glazed Meatloaf ahead of time?

Absolutely! You can prepare the meat mixture a day in advance and store it in the fridge. Just shape it into a loaf when you’re ready to bake. This makes dinner even easier on busy nights!

What can I serve with Balsamic Glazed Meatloaf?

This meatloaf pairs wonderfully with classic sides like mashed potatoes, roasted vegetables, or a fresh garden salad. You can also serve it with crusty bread to soak up the delicious glaze.

How do I store leftovers?

Leftover Balsamic Glazed Meatloaf can be stored in an airtight container in the fridge for up to three days. Reheat it in the oven or microwave for a quick meal.

Can I freeze Balsamic Glazed Meatloaf?

Yes! You can freeze the meatloaf before or after baking. Just wrap it tightly in plastic wrap and then foil. It can last up to three months in the freezer. Thaw it in the fridge before reheating.

What makes this meatloaf different from traditional recipes?

The addition of balsamic vinegar and brown sugar creates a unique glaze that adds a sweet and tangy flavor, elevating the classic meatloaf experience. It’s a delightful twist that everyone will love!

Final Thoughts

Cooking Balsamic Glazed Meatloaf is more than just preparing a meal; it’s about creating memories around the dinner table.

The aroma wafting through your kitchen will draw everyone in, sparking conversations and laughter.

Each slice, with its perfect balance of savory and sweet, is a reminder of home and comfort.

Whether it’s a weeknight dinner or a special occasion, this dish brings joy and satisfaction.

So roll up your sleeves, embrace the process, and enjoy the delightful experience of sharing this delicious meatloaf with your loved ones.

Happy cooking!

jhessica

Balsamic Glazed Meatloaf: A Must-Try Recipe Today!

A delicious and savory meatloaf glazed with a sweet balsamic sauce, perfect for family dinners.
Prep Time 15 minutes
Cook Time 1 hour
Total Time 1 hour 15 minutes
Servings: 6 servings
Course: Main Dish
Cuisine: American
Calories: 350

Ingredients
  

  • 1 pound ground beef
  • 1 pound ground pork
  • 1 cup breadcrumbs
  • 1/2 cup grated Parmesan cheese
  • 1/2 cup chopped onion
  • 2 cloves garlic minced
  • 2 large eggs
  • 1/4 cup fresh parsley chopped
  • 1 teaspoon salt
  • 1/2 teaspoon black pepper
  • 1/2 teaspoon dried oregano
  • 1/2 teaspoon dried thyme
  • 1/2 cup balsamic vinegar
  • 1/4 cup brown sugar
  • 1 tablespoon Worcestershire sauce

Method
 

  1. Preheat your oven to 350°F.
  2. In a large bowl, combine the ground beef, ground pork, breadcrumbs, Parmesan cheese, chopped onion, minced garlic, eggs, parsley, salt, pepper, oregano, and thyme. Mix until well combined.
  3. Transfer the meat mixture to a loaf pan and shape it into a loaf.
  4. In a small saucepan over medium heat, combine the balsamic vinegar, brown sugar, and Worcestershire sauce. Bring to a simmer and cook for about 5 minutes until slightly thickened.
  5. Pour half of the balsamic glaze over the meatloaf.
  6. Bake in the preheated oven for 1 hour. After 30 minutes, brush the remaining glaze over the top of the meatloaf.
  7. Once cooked, let the meatloaf rest for 10 minutes before slicing. Serve warm.

Nutrition

Serving: 1sliceCalories: 350kcalCarbohydrates: 12gProtein: 28gFat: 20gSaturated Fat: 8gPolyunsaturated Fat: 12gCholesterol: 120mgSodium: 600mgFiber: 1gSugar: 8g

Notes

  • For a healthier twist, substitute ground turkey for the beef and pork.
  • You can also add chopped bell peppers or carrots to the meat mixture for extra flavor and nutrition.
  • If you prefer a spicier kick, mix in some crushed red pepper flakes or a dash of hot sauce into the meat mixture.

Tried this recipe?

Let us know how it was!

Honey BBQ Chicken and Rice: A Recipe to Savor Today!

Introduction to Honey BBQ Chicken and Rice

There’s something magical about the aroma of Honey BBQ Chicken and Rice wafting through the kitchen. It takes me back to family dinners where laughter filled the air, and everyone gathered around the table. This recipe is not just a meal; it’s a quick solution for those busy weeknights when you want to impress your loved ones without spending hours in the kitchen. With its sweet and tangy flavors, this dish is sure to become a favorite in your home. Let’s dive into this delightful recipe that’s as easy to make as it is delicious!

Why You’ll Love This Honey BBQ Chicken and Rice

This Honey BBQ Chicken and Rice recipe is a game-changer for busy nights. It’s incredibly easy to whip up, taking just 40 minutes from start to finish. The combination of sweet honey and smoky BBQ sauce creates a flavor explosion that will have your taste buds dancing. Plus, it’s a one-pan dish, making cleanup a breeze. Trust me, your family will be asking for seconds!

Ingredients for Honey BBQ Chicken and Rice

Gathering the right ingredients is the first step to creating a mouthwatering Honey BBQ Chicken and Rice dish. Here’s what you’ll need:

  • Cooked white rice: This serves as the perfect base for your chicken, soaking up all those delicious flavors.
  • Boneless, skinless chicken breasts: Tender and juicy, they’re the star of the show, absorbing the sweet and tangy sauce beautifully.
  • BBQ sauce: Choose your favorite brand or homemade version; it adds that smoky depth that pairs perfectly with honey.
  • Honey: This natural sweetener balances the BBQ sauce, creating a delightful glaze that caramelizes beautifully in the oven.
  • Olive oil: A splash of this helps to sear the chicken, locking in moisture and flavor.
  • Garlic powder: A must-have for that aromatic kick, enhancing the overall taste of the dish.
  • Onion powder: This adds a subtle sweetness and depth, complementing the garlic perfectly.
  • Salt and pepper: Essential for seasoning, these simple ingredients elevate the flavors of the chicken.
  • Chopped green onions: These are for garnish, adding a fresh crunch and a pop of color to your plate.

For those looking to spice things up, consider adding a teaspoon of cayenne pepper to the BBQ sauce mixture. If you prefer a healthier grain option, brown rice or quinoa can be substituted for white rice. You can find the exact quantities for each ingredient at the bottom of the article, ready for printing!

How to Make Honey BBQ Chicken and Rice

Now that you have your ingredients ready, let’s get cooking! This Honey BBQ Chicken and Rice recipe is straightforward and fun. Follow these steps, and you’ll have a delicious meal on the table in no time.

Step 1: Preheat the Oven

Start by preheating your oven to 375°F (190°C). Preheating is crucial because it ensures even cooking. You want that chicken to bake perfectly, not just warm up. Trust me, a hot oven makes all the difference!

Step 2: Prepare the BBQ Sauce Mixture

In a large bowl, mix together the BBQ sauce and honey until they’re well combined. This mixture is where the magic happens! The sweetness of the honey balances the smoky flavor of the BBQ sauce, creating a glaze that will make your chicken shine.

Step 3: Season the Chicken

Next, season your chicken breasts with garlic powder, onion powder, salt, and pepper. This step is essential for flavor. The seasoning seeps into the chicken, enhancing every bite. Don’t be shy—make sure to coat them evenly!

Step 4: Sear the Chicken

Heat olive oil in a large oven-safe skillet over medium-high heat. Once hot, add the chicken breasts and sear them for about 3-4 minutes on each side until they’re golden brown. Searing locks in moisture and adds a beautiful crust. It’s like giving your chicken a warm hug!

Step 5: Coat with Sauce

Now, pour the honey BBQ mixture over the seared chicken, ensuring it’s well coated. This is where the flavor really comes alive! Make sure every piece is covered, so you get that sweet and tangy goodness in every bite.

Step 6: Bake the Chicken

Transfer the skillet to your preheated oven and bake for 25-30 minutes. To check for doneness, use a meat thermometer; the internal temperature should reach 165°F. This ensures your chicken is cooked through and safe to eat. Plus, it keeps it juicy!

Step 7: Prepare the Rice

While the chicken is baking, prepare your cooked rice according to package instructions if it’s not already done. If you’re short on time, using pre-cooked rice can save you a few minutes. Just heat it up, and you’re good to go!

Step 8: Serve and Garnish

Once the chicken is done, remove it from the oven and let it rest for 5 minutes before slicing. This helps keep the juices in. Serve the sliced chicken over a bed of rice, drizzling any remaining BBQ sauce from the skillet on top. Don’t forget to garnish with chopped green onions for that fresh crunch!

Tips for Success

  • Always preheat your oven for even cooking.
  • Let the chicken rest after baking to retain moisture.
  • Use a meat thermometer to ensure perfect doneness.
  • Feel free to customize the BBQ sauce with your favorite spices.
  • For extra flavor, marinate the chicken in the sauce for a few hours before cooking.

Equipment Needed

  • Oven-safe skillet: A cast-iron skillet works great, but any oven-safe pan will do.
  • Meat thermometer: Essential for checking chicken doneness; a simple kitchen thermometer is perfect.
  • Mixing bowl: Use any large bowl for combining the BBQ sauce and honey.
  • Spatula: Handy for flipping the chicken and serving.

Variations

  • Spicy Honey BBQ Chicken: Add a teaspoon of cayenne pepper or your favorite hot sauce to the BBQ sauce mixture for a fiery kick.
  • Honey BBQ Tofu: For a vegetarian option, substitute chicken with firm tofu. Press and cube the tofu, then follow the same cooking steps.
  • Grilled Version: Instead of baking, grill the chicken for a smoky flavor. Just marinate it in the sauce and cook on medium heat until done.
  • Honey BBQ Cauliflower: For a low-carb option, use cauliflower florets. Toss them in the sauce and roast until tender and caramelized.
  • Herb-Infused Rice: Cook the rice with chicken broth and fresh herbs like thyme or parsley for added flavor.

Serving Suggestions

  • Steamed Vegetables: Pair your Honey BBQ Chicken and Rice with a side of steamed broccoli or green beans for a colorful plate.
  • Refreshing Salad: A crisp garden salad with a light vinaigrette complements the dish beautifully.
  • Drink Pairing: Serve with iced tea or a cold beer to enhance the flavors.
  • Presentation Tip: Use a large platter to serve, garnishing with extra green onions for a pop of color.

FAQs about Honey BBQ Chicken and Rice

Can I use brown rice instead of white rice for this recipe?

Absolutely! Brown rice is a great alternative and adds a nutty flavor. Just keep in mind that it may require a longer cooking time, so adjust accordingly.

What can I do if I don’t have BBQ sauce on hand?

If you’re out of BBQ sauce, you can whip up a quick homemade version using ketchup, vinegar, and spices. It won’t be the same, but it’ll still be tasty!

How can I make this dish spicier?

For a spicy kick, add cayenne pepper or your favorite hot sauce to the BBQ sauce mixture. You can also marinate the chicken in the spicy sauce for a few hours before cooking.

Can I prepare this dish ahead of time?

Yes! You can marinate the chicken in the sauce a day in advance. Just store it in the fridge and bake it when you’re ready to eat. It’ll save you time and enhance the flavors!

Is this recipe gluten-free?

Yes, this Honey BBQ Chicken and Rice recipe is gluten-free as long as you use gluten-free BBQ sauce. Always check the labels to be sure!

Final Thoughts

Cooking Honey BBQ Chicken and Rice is more than just preparing a meal; it’s about creating memories. The sweet and smoky flavors dance together, bringing warmth to your kitchen and joy to your table. Whether it’s a weeknight dinner or a gathering with friends, this dish has a way of making everyone feel at home. Plus, the simplicity of the recipe means you can focus on what truly matters—sharing laughter and stories with loved ones. So, roll up your sleeves, embrace the process, and savor every bite of this delightful dish. You won’t regret it!

jhessica

Honey BBQ Chicken and Rice: A Recipe to Savor Today!

A delicious and easy recipe for Honey BBQ Chicken served over rice, perfect for a family meal.
Prep Time 10 minutes
Cook Time 30 minutes
Total Time 40 minutes
Servings: 4 servings
Course: Main Course
Cuisine: American
Calories: 380

Ingredients
  

  • 2 cups cooked white rice
  • 1 pound boneless skinless chicken breasts
  • 1 cup BBQ sauce
  • 1/4 cup honey
  • 1 tablespoon olive oil
  • 1 teaspoon garlic powder
  • 1 teaspoon onion powder
  • Salt and pepper to taste
  • 1/2 cup chopped green onions for garnish

Method
 

  1. Preheat your oven to 375°F (190°C).
  2. In a large bowl, mix together the BBQ sauce and honey until well combined.
  3. Season the chicken breasts with garlic powder, onion powder, salt, and pepper.
  4. Heat olive oil in a large oven-safe skillet over medium-high heat. Add the chicken breasts and sear for about 3-4 minutes on each side until golden brown.
  5. Pour the honey BBQ mixture over the chicken, ensuring it’s well coated.
  6. Transfer the skillet to the preheated oven and bake for 25-30 minutes or until the chicken is cooked through (internal temperature should reach 165°F).
  7. While the chicken is baking, prepare the cooked rice according to package instructions if not already done.
  8. Once the chicken is done, remove it from the oven and let it rest for 5 minutes before slicing.
  9. Serve the sliced chicken over a bed of rice and drizzle with any remaining BBQ sauce from the skillet. Garnish with chopped green onions.

Nutrition

Serving: 1servingCalories: 380kcalCarbohydrates: 45gProtein: 30gFat: 8gSaturated Fat: 1gPolyunsaturated Fat: 7gCholesterol: 70mgSodium: 800mgFiber: 1gSugar: 15g

Notes

  • For a spicier kick, add a teaspoon of cayenne pepper to the BBQ sauce mixture.
  • Substitute brown rice or quinoa for a healthier grain option.

Tried this recipe?

Let us know how it was!

Cruffin Delight: Discover the Perfect Recipe Today!

Introduction to Cruffin Delight

There’s something magical about the aroma of freshly baked goods wafting through the kitchen. It takes me back to my childhood, where weekends were filled with the sweet scent of pastries. Today, I want to share a recipe that combines the best of both worlds: the flaky layers of a croissant and the comforting shape of a muffin. Enter the Cruffin Delight! This delightful treat is perfect for impressing your loved ones or simply indulging yourself after a long day. With its creamy filling and dusting of powdered sugar, it’s a quick solution for a busy day or a special occasion.

Why You’ll Love This Cruffin Delight

This Cruffin Delight is not just a treat; it’s a game-changer in the kitchen. The ease of preparation means you can whip these up even on a busy morning. Plus, the taste? It’s a heavenly blend of buttery, flaky goodness with a luscious filling that will have everyone asking for seconds. Whether you’re a novice or a seasoned pro, this recipe is sure to impress and satisfy your cravings.

Ingredients for Cruffin Delight

Gathering the right ingredients is the first step to creating your Cruffin Delight. Here’s what you’ll need:

  • All-purpose flour: The backbone of your dough, providing structure and texture.
  • Granulated sugar: Adds sweetness and helps with browning during baking.
  • Instant yeast: This little powerhouse makes your cruffins rise, giving them that fluffy texture.
  • Salt: Enhances flavor and balances the sweetness.
  • Whole milk: Warmed milk helps activate the yeast and adds richness to the dough.
  • Unsalted butter: Melted butter brings a rich, buttery flavor and tender texture.
  • Large egg: Acts as a binding agent, adding moisture and richness.
  • Vanilla extract: A splash of vanilla elevates the flavor profile, making it more aromatic.
  • Pastry cream or your favorite filling: This is where you can get creative! Use pastry cream, chocolate ganache, or even fruit preserves for a delightful surprise.
  • Powdered sugar: For that final touch, a dusting of powdered sugar adds sweetness and a beautiful presentation.

For those looking to switch things up, consider adding a sprinkle of cinnamon to the dough for an extra layer of flavor. You can find all the exact measurements at the bottom of the article, ready for printing!

How to Make Cruffin Delight

Step 1: Prepare the Dough

Start by grabbing a large mixing bowl. Combine the all-purpose flour, granulated sugar, instant yeast, and salt. Mix these dry ingredients well, ensuring there are no lumps. This step is crucial for even flavor and texture in your Cruffin Delight. The yeast needs to be evenly distributed to work its magic later. Trust me, a well-mixed dry base sets the stage for deliciousness!

Step 2: Mix Wet Ingredients

In a separate bowl, whisk together the warmed whole milk, melted unsalted butter, large egg, and vanilla extract. Make sure everything is smooth and well combined. The warmth of the milk helps activate the yeast, while the butter adds richness. This mixture is the heart of your cruffins, bringing moisture and flavor. Don’t rush this step; a good blend makes all the difference!

Step 3: Combine Ingredients

Now, it’s time to bring the two mixtures together. Gradually add the wet ingredients to the dry ingredients, stirring gently until a dough forms. You want to mix until everything is just combined; overmixing can lead to tough cruffins. The dough should be slightly sticky but manageable. This is where the magic begins, transforming simple ingredients into something extraordinary!

Step 4: Knead the Dough

Transfer the dough to a lightly floured surface. Knead it for about 5 minutes until it becomes smooth and elastic. This step is essential for developing gluten, which gives your cruffins that delightful texture. If the dough sticks to your hands, sprinkle a little more flour. Enjoy the tactile experience; it’s therapeutic and rewarding!

Step 5: Let the Dough Rise

Place the kneaded dough in a greased bowl, covering it with a kitchen towel. Let it rise in a warm place for about 1 hour or until it doubles in size. This is the dough’s time to shine! The yeast will work its magic, creating air pockets that make your cruffins light and fluffy. Patience is key here; good things come to those who wait!

Step 6: Preheat the Oven

While the dough is rising, preheat your oven to 375°F (190°C). This ensures that your cruffins will bake evenly and achieve that perfect golden brown color. A hot oven is essential for a great bake!

Step 7: Roll Out the Dough

Once the dough has risen, punch it down gently to release the air. Roll it out into a rectangle about 1/4 inch thick. This thickness is crucial for achieving those flaky layers. Use a rolling pin and don’t be afraid to sprinkle a little flour to prevent sticking. The more even your dough, the better your cruffins will turn out!

Step 8: Add the Filling

Spread the pastry cream evenly over the rolled-out dough. Make sure to leave a small border around the edges. This filling is where you can get creative! Whether you choose pastry cream, chocolate ganache, or fruit preserves, it’s the heart of your Cruffin Delight.

Step 9: Shape the Cruffins

Starting from one long side, roll the dough tightly into a log. Once rolled, slice the log into 12 equal pieces. Each piece will become a beautiful cruffin. The tighter you roll, the more layers you’ll have. This step is where the magic of the cruffin truly begins to take shape!

Step 10: Let Them Rise Again

Place each piece upright in a greased muffin tin, allowing some space between them. Cover the muffin tin with a towel and let the cruffins rise for another 30 minutes. This second rise is crucial for achieving that fluffy texture. You’ll see them puff up beautifully, ready for the oven!

Step 11: Bake the Cruffins

Bake your cruffins in the preheated oven for 18-20 minutes or until they are golden brown. The aroma will fill your kitchen, making it hard to resist. Keep an eye on them; every oven is different, and you want that perfect golden hue!

Step 12: Dust with Powdered Sugar

Once baked, remove the cruffins from the oven and let them cool slightly. Before serving, dust them with powdered sugar for that final touch. This not only adds sweetness but also makes them look irresistible. Your Cruffin Delight is now ready to be enjoyed!

Tips for Success

  • Ensure your ingredients are at room temperature for better mixing.
  • Don’t skip the kneading; it’s key for texture.
  • Use a kitchen thermometer to check the milk temperature—around 110°F is ideal.
  • For a richer flavor, let the dough rise longer if time allows.
  • Experiment with different fillings to find your favorite Cruffin Delight combination!

Equipment Needed

  • Mixing bowls: A large bowl for mixing dough and a smaller one for wet ingredients.
  • Whisk: For blending wet ingredients; a fork works in a pinch.
  • Rolling pin: Essential for rolling out dough; a wine bottle can substitute.
  • Muffin tin: Use a standard muffin tin; silicone molds are a great alternative.
  • Kitchen towel: To cover the dough while it rises; any clean cloth will do.

Variations

  • Chocolate Ganache: Swap out the pastry cream for rich chocolate ganache for a decadent twist.
  • Fruit Preserves: Use your favorite fruit preserves, like raspberry or apricot, for a fruity burst of flavor.
  • Cinnamon Sugar: Add a sprinkle of cinnamon sugar to the dough before rolling for a warm, spiced flavor.
  • Nutty Crunch: Incorporate chopped nuts, like almonds or hazelnuts, into the filling for added texture.
  • Gluten-Free Option: Substitute all-purpose flour with a gluten-free blend to accommodate dietary needs.

Serving Suggestions

  • Pair your Cruffin Delight with a hot cup of coffee or tea for a delightful breakfast experience.
  • Serve alongside fresh fruit, like berries or sliced bananas, for a refreshing contrast.
  • For a brunch spread, arrange cruffins on a beautiful platter, dusted with powdered sugar.
  • Consider adding a dollop of whipped cream or a scoop of ice cream for an indulgent dessert.

FAQs about Cruffin Delight

What is a cruffin?

A cruffin is a delightful hybrid of a croissant and a muffin. It features flaky layers like a croissant but is shaped like a muffin, often filled with delicious pastry cream or other sweet fillings. This unique treat is perfect for breakfast or dessert!

Can I make cruffins ahead of time?

Absolutely! You can prepare the dough and let it rise, then shape the cruffins and refrigerate them overnight. Just let them come to room temperature and rise again before baking. This makes for a convenient morning treat!

What fillings can I use for my cruffins?

The beauty of Cruffin Delight lies in its versatility. You can use pastry cream, chocolate ganache, fruit preserves, or even a savory filling like cheese and herbs. Get creative and find your favorite combination!

How do I store leftover cruffins?

Store any leftover cruffins in an airtight container at room temperature for up to two days. For longer storage, consider freezing them. Just reheat in the oven for a few minutes to restore their flaky texture.

Can I make cruffins gluten-free?

Yes! You can substitute all-purpose flour with a gluten-free flour blend. Just ensure that the blend contains xanthan gum or another binding agent to help maintain the texture of your Cruffin Delight.

Final Thoughts

Creating Cruffin Delight is more than just baking; it’s an experience that fills your kitchen with warmth and joy. Each flaky layer, combined with a luscious filling, brings a sense of accomplishment and satisfaction. Whether you’re sharing them with family or savoring one with your morning coffee, these cruffins are sure to create lasting memories. The beauty of this recipe lies in its simplicity and versatility, allowing you to experiment and make it your own. So roll up your sleeves, embrace the process, and enjoy every delicious bite of your homemade cruffins!

jhessica

Cruffin Delight: Discover the Perfect Recipe Today!

A delightful recipe for cruffins, a hybrid of croissants and muffins, filled with pastry cream and dusted with powdered sugar.
Prep Time 1 hour
Cook Time 20 minutes
Total Time 1 hour 20 minutes
Servings: 12 cruffins
Course: Dessert
Cuisine: American
Calories: 180

Ingredients
  

  • 2 cups all-purpose flour
  • 1/4 cup granulated sugar
  • 1 teaspoon instant yeast
  • 1/2 teaspoon salt
  • 1/2 cup whole milk warmed
  • 1/4 cup unsalted butter melted
  • 1 large egg
  • 1 teaspoon vanilla extract
  • 1/2 cup pastry cream or your favorite filling e.g., chocolate, fruit
  • 1/4 cup powdered sugar for dusting

Method
 

  1. In a large mixing bowl, combine the flour, granulated sugar, instant yeast, and salt. Mix well.
  2. In a separate bowl, whisk together the warmed milk, melted butter, egg, and vanilla extract until smooth.
  3. Gradually add the wet ingredients to the dry ingredients, stirring until a dough forms.
  4. Knead the dough on a lightly floured surface for about 5 minutes until smooth and elastic.
  5. Place the dough in a greased bowl, cover with a kitchen towel, and let it rise in a warm place for about 1 hour or until doubled in size.
  6. Preheat the oven to 375°F (190°C).
  7. Once the dough has risen, punch it down and roll it out into a rectangle about 1/4 inch thick.
  8. Spread the pastry cream evenly over the dough.
  9. Starting from one long side, roll the dough tightly into a log. Slice the log into 12 equal pieces.
  10. Place each piece upright in a greased muffin tin, allowing some space between them.
  11. Cover the muffin tin with a towel and let the cruffins rise for another 30 minutes.
  12. Bake in the preheated oven for 18-20 minutes or until golden brown.
  13. Remove from the oven and let cool slightly before dusting with powdered sugar.

Nutrition

Serving: 1cruffinCalories: 180kcalCarbohydrates: 24gProtein: 3gFat: 7gSaturated Fat: 4gPolyunsaturated Fat: 2gCholesterol: 30mgSodium: 150mgFiber: 1gSugar: 6g

Notes

  • For a chocolate twist, substitute the pastry cream with chocolate ganache.
  • You can also add a sprinkle of cinnamon to the dough for extra flavor.

Tried this recipe?

Let us know how it was!

Hearty Tomato and Cannellini Bean Soup: A Must-Try Delight!

Introduction to Hearty Tomato and Cannellini Bean Soup

There’s something magical about a warm bowl of soup on a chilly evening. The aroma wafting through the kitchen, the vibrant colors dancing in the pot—it’s pure comfort. My go-to recipe for those cozy nights is the Hearty Tomato and Cannellini Bean Soup. It’s not just a meal; it’s a hug in a bowl. Perfect for busy days, this soup comes together quickly, making it an ideal choice for anyone looking to impress family or friends without spending hours in the kitchen. Trust me, once you try it, you’ll want to make it a regular in your meal rotation.

Why You’ll Love This Hearty Tomato and Cannellini Bean Soup

This Hearty Tomato and Cannellini Bean Soup is a game-changer for your weeknight dinners. It’s not only quick to prepare, but it also packs a punch of flavor that will leave your taste buds dancing. With just a handful of ingredients, you can whip up a nutritious meal that warms the soul. Plus, it’s vegetarian-friendly, making it a versatile option for everyone at the table. What’s not to love?

Ingredients for Hearty Tomato and Cannellini Bean Soup

Gathering the right ingredients is the first step to creating this delightful soup. Here’s what you’ll need:

  • Olive oil: A staple in Italian cooking, it adds richness and depth to the soup.
  • Onion: Diced onion brings sweetness and a savory base to the dish.
  • Garlic: Minced garlic infuses the soup with aromatic flavor, elevating every bite.
  • Carrot: Diced carrot adds a touch of natural sweetness and vibrant color.
  • Celery: This crunchy vegetable contributes a fresh, earthy taste to the mix.
  • Diced tomatoes: Canned tomatoes provide a juicy, tangy foundation for the soup.
  • Cannellini beans: These creamy beans are packed with protein and fiber, making the soup hearty.
  • Vegetable broth: A flavorful base that ties all the ingredients together; feel free to use homemade or store-bought.
  • Dried basil and oregano: These herbs add an Italian flair, enhancing the overall flavor profile.
  • Salt and pepper: Essential for seasoning, adjust to your taste for the perfect balance.
  • Fresh spinach: Roughly chopped spinach adds a pop of color and nutrients, making the soup even healthier.
  • Lemon juice: A splash of lemon juice brightens the flavors and adds a refreshing zing.
  • Fresh parsley: Chopped parsley is a lovely garnish that adds a fresh finish to your bowl.

For those looking to customize, consider adding diced cooked chicken or turkey for extra protein. If you prefer a creamier texture, blending half of the soup before adding the spinach can create a delightful twist. You can find exact measurements for these ingredients at the bottom of the article, ready for printing!

How to Make Hearty Tomato and Cannellini Bean Soup

Step 1: Sauté the Vegetables

Start by heating a tablespoon of olive oil in a large pot over medium heat. Once the oil shimmers, toss in the diced onion, minced garlic, diced carrot, and celery. Sauté these veggies for about 5-7 minutes. You want them softened and fragrant, creating a savory base for your Hearty Tomato and Cannellini Bean Soup. The aroma will fill your kitchen, making it hard to resist sneaking a taste!

Step 2: Combine Ingredients

Next, stir in the undrained diced tomatoes, rinsed cannellini beans, and vegetable broth. Sprinkle in the dried basil and oregano for that Italian flair. Give everything a good stir to combine. This is where the magic begins! Bring the mixture to a boil, letting those flavors mingle and dance together. It’s a simple step, but it sets the stage for a delicious soup.

Step 3: Simmer the Soup

Once boiling, reduce the heat and let the soup simmer for about 20 minutes. This simmering process is crucial; it allows the flavors to meld beautifully. You’ll notice the soup thickening slightly, and the vibrant colors will deepen. Stir occasionally, and take a moment to enjoy the delightful aroma wafting through your kitchen. It’s a comforting reminder of the deliciousness to come!

Step 4: Final Touches

After simmering, it’s time to season your soup. Add salt and pepper to taste, adjusting according to your preference. Then, fold in the roughly chopped spinach and a splash of lemon juice. Cook for an additional 5 minutes until the spinach wilts. This final touch not only adds color but also boosts the nutritional value of your Hearty Tomato and Cannellini Bean Soup. It’s all about those fresh flavors!

Step 5: Serve and Enjoy

Now, it’s time to serve your masterpiece! Ladle the soup into bowls and garnish with freshly chopped parsley for a pop of color. This Hearty Tomato and Cannellini Bean Soup is best enjoyed hot, perhaps with a slice of crusty bread on the side. Gather your loved ones, and watch as they savor each spoonful. Trust me, this soup will warm both hearts and bellies!

Tips for Success

  • Prep your ingredients ahead of time to streamline the cooking process.
  • Don’t skip the sautéing step; it builds a flavorful base for your soup.
  • Adjust seasoning gradually; taste as you go for the best results.
  • For a thicker soup, blend a portion before adding spinach.
  • Store leftovers in an airtight container for up to three days.

Equipment Needed

  • Large pot: A sturdy pot is essential; a Dutch oven works great too.
  • Cutting board: A good cutting board makes chopping veggies a breeze.
  • Knife: A sharp chef’s knife is your best friend in the kitchen.
  • Wooden spoon: Perfect for stirring and combining ingredients.
  • Measuring cups: Handy for precise ingredient measurements, if needed.

Variations

  • Protein Boost: Add diced cooked chicken or turkey for a heartier meal.
  • Spicy Kick: Toss in a pinch of red pepper flakes for a bit of heat.
  • Herb Swap: Experiment with fresh herbs like thyme or rosemary for a different flavor profile.
  • Vegetable Medley: Incorporate other veggies like zucchini or bell peppers for added nutrition and color.
  • Vegan Option: Ensure your vegetable broth is vegan-friendly and skip any animal-based proteins.

Serving Suggestions

  • Crusty Bread: Serve with a warm, crusty baguette or garlic bread for dipping.
  • Salad Pairing: A fresh green salad with a light vinaigrette complements the soup beautifully.
  • Wine Selection: Enjoy with a glass of Chianti or a crisp white wine.
  • Presentation: Drizzle a bit of olive oil on top for an elegant touch.

FAQs about Hearty Tomato and Cannellini Bean Soup

Can I freeze Hearty Tomato and Cannellini Bean Soup?
Absolutely! This soup freezes well. Just let it cool completely, then transfer it to an airtight container. It can be stored in the freezer for up to three months. When you’re ready to enjoy it, simply thaw and reheat on the stovetop.

What can I serve with this soup?
Hearty Tomato and Cannellini Bean Soup pairs wonderfully with crusty bread, a fresh salad, or even a grilled cheese sandwich. These sides enhance the meal and make it even more satisfying.

Is this soup suitable for meal prep?
Yes! This soup is perfect for meal prep. You can make a big batch and portion it out for the week. It tastes even better the next day as the flavors continue to develop.

Can I make this soup in a slow cooker?
Definitely! To make Hearty Tomato and Cannellini Bean Soup in a slow cooker, sauté the vegetables first, then add all ingredients to the slow cooker. Cook on low for 6-8 hours or high for 3-4 hours for a delicious, hands-off meal.

What if I don’t have cannellini beans?
If you can’t find cannellini beans, feel free to substitute them with great northern beans or navy beans. They’ll provide a similar creamy texture and flavor, keeping your soup hearty and delicious.

Final Thoughts

Cooking is more than just a task; it’s an experience that brings joy and warmth to our lives. This Hearty Tomato and Cannellini Bean Soup embodies that spirit perfectly. Each spoonful is a reminder of home, comfort, and the simple pleasures of good food. Whether you’re sharing it with family or enjoying a quiet moment alone, this soup has a way of making everything feel right. So, roll up your sleeves, gather your ingredients, and let the magic unfold in your kitchen. Trust me, this recipe will become a cherished favorite in your culinary repertoire!

jhessica

Hearty Tomato and Cannellini Bean Soup: A Must-Try Delight!

A hearty and nutritious soup made with tomatoes and cannellini beans, perfect for a comforting meal.
Prep Time 10 minutes
Cook Time 30 minutes
Total Time 40 minutes
Servings: 6 servings
Course: Soup
Cuisine: Italian
Calories: 180

Ingredients
  

  • 1 tablespoon olive oil
  • 1 medium onion diced
  • 2 cloves garlic minced
  • 1 carrot diced
  • 1 celery stalk diced
  • 1 can 14.5 ounces diced tomatoes, undrained
  • 1 can 15 ounces cannellini beans, rinsed and drained
  • 4 cups vegetable broth
  • 1 teaspoon dried basil
  • 1 teaspoon dried oregano
  • Salt and pepper to taste
  • 2 cups fresh spinach roughly chopped
  • 1 tablespoon lemon juice
  • Fresh parsley chopped (for garnish)

Method
 

  1. In a large pot, heat the olive oil over medium heat. Add the diced onion, garlic, carrot, and celery. Sauté for about 5-7 minutes, or until the vegetables are softened.
  2. Stir in the diced tomatoes (with their juice), cannellini beans, vegetable broth, dried basil, and dried oregano. Bring the mixture to a boil.
  3. Reduce the heat and let it simmer for 20 minutes, allowing the flavors to meld together.
  4. Season with salt and pepper to taste. Add the chopped spinach and lemon juice, cooking for an additional 5 minutes until the spinach is wilted.
  5. Serve hot, garnished with fresh parsley.

Nutrition

Serving: 1bowlCalories: 180kcalCarbohydrates: 24gProtein: 8gFat: 5gSaturated Fat: 1gPolyunsaturated Fat: 4gSodium: 400mgFiber: 6gSugar: 3g

Notes

  • For added protein, consider including diced cooked chicken or turkey.
  • If you prefer a creamier soup, blend half of the soup and then stir it back into the pot before adding the spinach.

Tried this recipe?

Let us know how it was!

Crab Bombs: Discover the Irresistible Recipe Today!

Introduction to Crab Bombs

Crab bombs are a delightful treat that can turn any gathering into a special occasion. I remember the first time I made them; the aroma of baked crab wafting through the kitchen had everyone rushing to the table. These little bites of joy are not just delicious; they’re also a quick solution for busy weeknights or a fantastic way to impress your friends at a party. With a creamy cheese filling and lump crab meat, they’re sure to be a hit. Let’s dive into this irresistible recipe that’s perfect for any seafood lover!

Why You’ll Love This Crab Bombs

These crab bombs are a game-changer in the kitchen. They’re incredibly easy to whip up, making them perfect for those hectic evenings when you need a quick meal. The taste? Absolutely mouthwatering! With a crispy exterior and a creamy, savory filling, they’re a crowd-pleaser. Plus, they’re versatile enough to serve as an appetizer or a main dish. Trust me, once you try them, you’ll be hooked!

Ingredients for Crab Bombs

Gathering the right ingredients is key to making these crab bombs a success. Here’s what you’ll need:

  • Lump crab meat: The star of the show! Fresh or canned, it brings that sweet, oceanic flavor.
  • Cream cheese: This adds a rich, creamy texture that binds everything together beautifully.
  • Shredded cheddar cheese: For a cheesy kick, this adds depth and a bit of sharpness to the filling.
  • Green onions: These provide a fresh, mild onion flavor that brightens up the dish.
  • Worcestershire sauce: A splash of this adds umami and complexity to the crab mixture.
  • Garlic powder: A must for that aromatic punch that elevates the overall flavor.
  • Old Bay seasoning: This classic seafood seasoning brings a blend of spices that perfectly complements crab.
  • Black pepper: Just a pinch for a subtle heat that balances the richness.
  • Panko breadcrumbs: These are essential for that crispy, golden crust. They’re lighter than regular breadcrumbs.
  • Mayonnaise: Adds moisture and richness to the crab mixture, making it even more delectable.
  • Lemon juice: A squeeze of this brightens the flavors and adds a refreshing zing.
  • Cooking spray or oil: To ensure your crab bombs bake to perfection without sticking.

For those looking to spice things up, consider adding a teaspoon of hot sauce to the crab mixture. If you’re watching your carbs, crushed pork rinds can be a great substitute for panko breadcrumbs. You’ll find the exact measurements for these ingredients at the bottom of the article, ready for printing!

How to Make Crab Bombs

Creating these crab bombs is a straightforward process that will have your kitchen smelling divine. Follow these simple steps, and you’ll be on your way to serving up a delicious seafood treat that everyone will love!

Step 1: Preheat the Oven

Start by preheating your oven to 375°F. This step is crucial because it ensures that your crab bombs cook evenly and develop that beautiful golden crust. A hot oven is your best friend when it comes to baking!

Step 2: Prepare the Crab Mixture

In a large mixing bowl, combine the lump crab meat, cream cheese, shredded cheddar cheese, green onions, Worcestershire sauce, garlic powder, Old Bay seasoning, and black pepper. Gently mix everything together. Be careful not to overmix; you want to keep the crab’s delicate texture intact. It’s all about balance here!

Step 3: Form the Crab Balls

Now comes the fun part! Using your hands, take a scoop of the crab mixture and form it into small balls, about 1 to 1.5 inches in diameter. This size is perfect for even cooking and easy eating. If the mixture feels too sticky, wet your hands slightly to help shape the balls without making a mess.

Step 4: Coat with Panko Breadcrumbs

Next, place the panko breadcrumbs in a shallow dish. Roll each crab ball in the breadcrumbs until they are fully coated. This step is essential for achieving that crispy texture we all crave. Panko breadcrumbs are lighter and airier than regular breadcrumbs, giving your crab bombs that perfect crunch!

Step 5: Bake the Crab Bombs

Arrange the coated crab bombs on a baking sheet lined with parchment paper. Drizzle or spray them lightly with cooking oil to help them brown nicely. Bake in the preheated oven for 20-25 minutes. You’ll know they’re done when they turn golden brown and are heated through. The aroma will be irresistible!

Step 6: Prepare the Dipping Sauce

While the crab bombs are baking, mix the mayonnaise and lemon juice in a small bowl. This simple dipping sauce adds a zesty kick that complements the rich flavors of the crab bombs. It’s the perfect finishing touch!

Step 7: Serve and Enjoy

Once your crab bombs are out of the oven, let them cool for a minute. Serve them hot with the dipping sauce on the side. For an attractive presentation, arrange them on a platter with lemon wedges and fresh herbs. Your guests will be impressed, and you’ll be the star of the show!

Tips for Success

  • Use fresh lump crab meat for the best flavor; canned works too, but fresh is unbeatable.
  • Don’t overmix the crab mixture; keep it gentle to maintain that lovely texture.
  • Wet your hands when forming the balls to prevent sticking.
  • For extra crunch, double-coat the crab bombs in panko breadcrumbs.
  • Let them cool slightly before serving to avoid burning your mouth!

Equipment Needed

  • Baking sheet: A standard sheet works, but a rimmed one prevents spills.
  • Parchment paper: This keeps the crab bombs from sticking; aluminum foil is a good alternative.
  • Mixing bowl: Any large bowl will do; a glass one lets you see the mixture.
  • Spoon or spatula: For mixing; a rubber spatula is great for gentle folding.
  • Measuring cups and spoons: Essential for accuracy; you can use a kitchen scale if preferred.

Variations

  • Spicy Crab Bombs: Add a teaspoon of your favorite hot sauce to the crab mixture for a fiery kick.
  • Herbed Crab Bombs: Mix in fresh herbs like dill or parsley for an aromatic twist.
  • Cheesy Crab Bombs: Swap out the cheddar for pepper jack cheese to add a spicy, cheesy flavor.
  • Low-Carb Option: Use crushed pork rinds instead of panko breadcrumbs for a keto-friendly version.
  • Vegetarian Version: Replace crab meat with a mixture of sautéed mushrooms and artichokes for a delicious meatless alternative.

Serving Suggestions

  • Pair with a crisp green salad for a refreshing contrast.
  • Serve alongside a tangy coleslaw to add crunch and flavor.
  • Complement with a chilled white wine, like Sauvignon Blanc, for a delightful pairing.
  • Garnish with fresh herbs and lemon wedges for an attractive presentation.

FAQs about Crab Bombs

Can I use imitation crab meat instead of lump crab meat?

Absolutely! Imitation crab meat can be a budget-friendly alternative. Just keep in mind that the flavor and texture will differ slightly, but they’ll still be delicious!

How do I store leftover crab bombs?

Store any leftovers in an airtight container in the fridge for up to three days. Reheat them in the oven for the best texture, or microwave them if you’re in a hurry.

Can I freeze crab bombs before baking?

Yes! You can freeze the formed crab bombs before baking. Just place them on a baking sheet to freeze individually, then transfer them to a freezer bag. Bake from frozen, adding a few extra minutes to the cooking time.

What can I serve with crab bombs?

Crab bombs pair wonderfully with a zesty dipping sauce, a fresh salad, or even some crispy fries. They make a great appetizer or a light main dish!

Are crab bombs gluten-free?

Yes, as long as you use gluten-free panko breadcrumbs or a suitable substitute, these crab bombs can be enjoyed by those following a gluten-free diet!

Final Thoughts

Making crab bombs is more than just cooking; it’s about creating moments that bring people together. The joy of watching friends and family savor each bite is truly rewarding. These little bites of heaven are perfect for any occasion, whether it’s a casual weeknight dinner or a festive gathering. The combination of flavors and textures is simply irresistible. Plus, the ease of preparation means you can focus on what really matters—enjoying time with your loved ones. So, roll up your sleeves, get cooking, and let the deliciousness of crab bombs elevate your next meal!

jhessica

Crab Bombs: Discover the Irresistible Recipe Today!

Delicious crab bombs made with lump crab meat and a creamy cheese filling, baked to golden perfection.
Prep Time 15 minutes
Cook Time 25 minutes
Total Time 40 minutes
Servings: 6 servings
Course: Appetizer
Cuisine: American
Calories: 210

Ingredients
  

  • 1 pound lump crab meat
  • 1 cup cream cheese softened
  • 1/2 cup shredded cheddar cheese
  • 1/4 cup green onions finely chopped
  • 1 tablespoon Worcestershire sauce
  • 1 teaspoon garlic powder
  • 1 teaspoon Old Bay seasoning
  • 1/2 teaspoon black pepper
  • 1 cup panko breadcrumbs
  • 1/4 cup mayonnaise
  • 1 tablespoon lemon juice
  • Cooking spray or oil for baking

Method
 

  1. Preheat the oven to 375°F.
  2. In a large mixing bowl, combine the lump crab meat, cream cheese, shredded cheddar cheese, green onions, Worcestershire sauce, garlic powder, Old Bay seasoning, and black pepper. Gently mix until well combined.
  3. Using your hands, form the mixture into small balls, about 1 to 1.5 inches in diameter.
  4. Place the panko breadcrumbs in a shallow dish and roll each crab ball in the breadcrumbs until fully coated.
  5. Arrange the crab bombs on a baking sheet lined with parchment paper and drizzle or spray with cooking oil.
  6. Bake in the preheated oven for 20-25 minutes, or until golden brown and heated through.
  7. While the crab bombs are baking, mix the mayonnaise and lemon juice in a small bowl to create a dipping sauce.
  8. Serve the crab bombs hot with the dipping sauce on the side.

Nutrition

Serving: 1crab bombCalories: 210kcalCarbohydrates: 5gProtein: 12gFat: 15gSaturated Fat: 6gPolyunsaturated Fat: 9gCholesterol: 60mgSodium: 400mgSugar: 1g

Notes

  • For a spicier kick, add a teaspoon of hot sauce to the crab mixture.
  • If you prefer a lower-carb option, substitute the panko breadcrumbs with crushed pork rinds.

Tried this recipe?

Let us know how it was!

Stay Connected

Get recipes via email: