Get my cookbooks

Paloma Cupcakes: Discover a Zesty Dessert Recipe!

Introduction to Paloma Cupcakes

There’s something magical about a dessert that brings a burst of sunshine to your day. Paloma Cupcakes do just that! These delightful treats are infused with zesty grapefruit, making them a refreshing choice for any occasion. Whether you’re looking to impress friends at a gathering or simply want to indulge in a sweet escape after a long day, these cupcakes are your answer. They’re quick to whip up and even quicker to disappear. Trust me, once you take a bite, you’ll understand why they’re a must-try for any home cook!

Why You’ll Love This Paloma Cupcakes

Paloma Cupcakes are the perfect blend of ease and flavor. They come together in just 40 minutes, making them a fantastic option for busy weeknights or last-minute gatherings. The zesty grapefruit flavor adds a unique twist that will surprise and delight your taste buds. Plus, who can resist a cupcake topped with creamy buttercream? These treats are sure to impress, whether you’re baking for yourself or sharing with friends!

Ingredients for Paloma Cupcakes

Gathering the right ingredients is the first step to creating your delicious Paloma Cupcakes. Here’s what you’ll need:

  • All-purpose flour: The backbone of your cupcakes, providing structure and texture.
  • Granulated sugar: Sweetens the batter and helps create that light, fluffy texture.
  • Unsalted butter: Adds richness and moisture; make sure it’s softened for easy mixing.
  • Large eggs: They bind the ingredients together and contribute to the cupcakes’ rise.
  • Fresh grapefruit juice: The star of the show! It infuses your cupcakes with a refreshing citrus flavor.
  • Grapefruit zest: A little sprinkle of zest enhances the grapefruit flavor, giving it a fragrant kick.
  • Baking powder: This leavening agent helps your cupcakes rise to fluffy perfection.
  • Baking soda: Works alongside baking powder to ensure your cupcakes are light and airy.
  • Salt: Just a pinch balances the sweetness and enhances the overall flavor.
  • Buttermilk: Adds moisture and a slight tang, making your cupcakes tender.
  • Vanilla extract: A classic flavor that complements the grapefruit beautifully.

For the frosting, you’ll need:

  • Unsalted butter: Again, softened to create a creamy, spreadable frosting.
  • Powdered sugar: Sweetens the frosting and gives it that smooth texture.
  • Fresh grapefruit juice: Adds a zesty flavor to the frosting, tying it back to the cupcakes.
  • Grapefruit zest: Just like in the batter, it enhances the flavor and adds a pop of color.
  • Vanilla extract: A touch of vanilla rounds out the flavors in the frosting.
  • Pinch of salt: Balances the sweetness of the frosting.

For those looking to mix things up, consider adding a splash of tequila to the frosting for an adult twist. If grapefruit isn’t your thing, fresh orange juice can be a delightful substitute. You can find the exact measurements for these ingredients at the bottom of the article, ready for printing!

How to Make Paloma Cupcakes

Now that you have your ingredients ready, let’s dive into the fun part: making these zesty Paloma Cupcakes! Follow these simple steps, and you’ll be on your way to a delightful dessert that will impress everyone.

Step 1: Preheat and Prepare

First things first, preheat your oven to 350°F (175°C). This ensures your cupcakes bake evenly. While the oven warms up, line a cupcake pan with paper liners. This not only makes for easy cleanup but also adds a pop of color to your treats!

Step 2: Cream Butter and Sugar

In a mixing bowl, cream together the softened butter and granulated sugar. Use an electric mixer for about 3-5 minutes until the mixture is light and fluffy. This step is crucial; it incorporates air into the batter, giving your cupcakes that perfect rise.

Step 3: Add Eggs and Citrus

Next, add the eggs one at a time, mixing well after each addition. This helps to create a smooth batter. Then, stir in the fresh grapefruit juice and zest. The citrus aroma will fill your kitchen, and trust me, it’s a delightful scent!

Step 4: Combine Dry Ingredients

In a separate bowl, whisk together the all-purpose flour, baking powder, baking soda, and salt. This ensures that your leavening agents are evenly distributed, which is key for fluffy cupcakes. It’s a small step that makes a big difference!

Step 5: Mix Wet and Dry Ingredients

Now, gradually add the dry ingredients to the wet mixture. Alternate this with the buttermilk, starting and ending with the dry ingredients. Mix until just combined. Overmixing can lead to dense cupcakes, and nobody wants that!

Step 6: Fill and Bake

Divide the batter evenly among the cupcake liners, filling each about two-thirds full. This allows room for them to rise without overflowing. Bake in your preheated oven for 18-20 minutes. You’ll know they’re done when a toothpick inserted into the center comes out clean.

Step 7: Cool and Frost

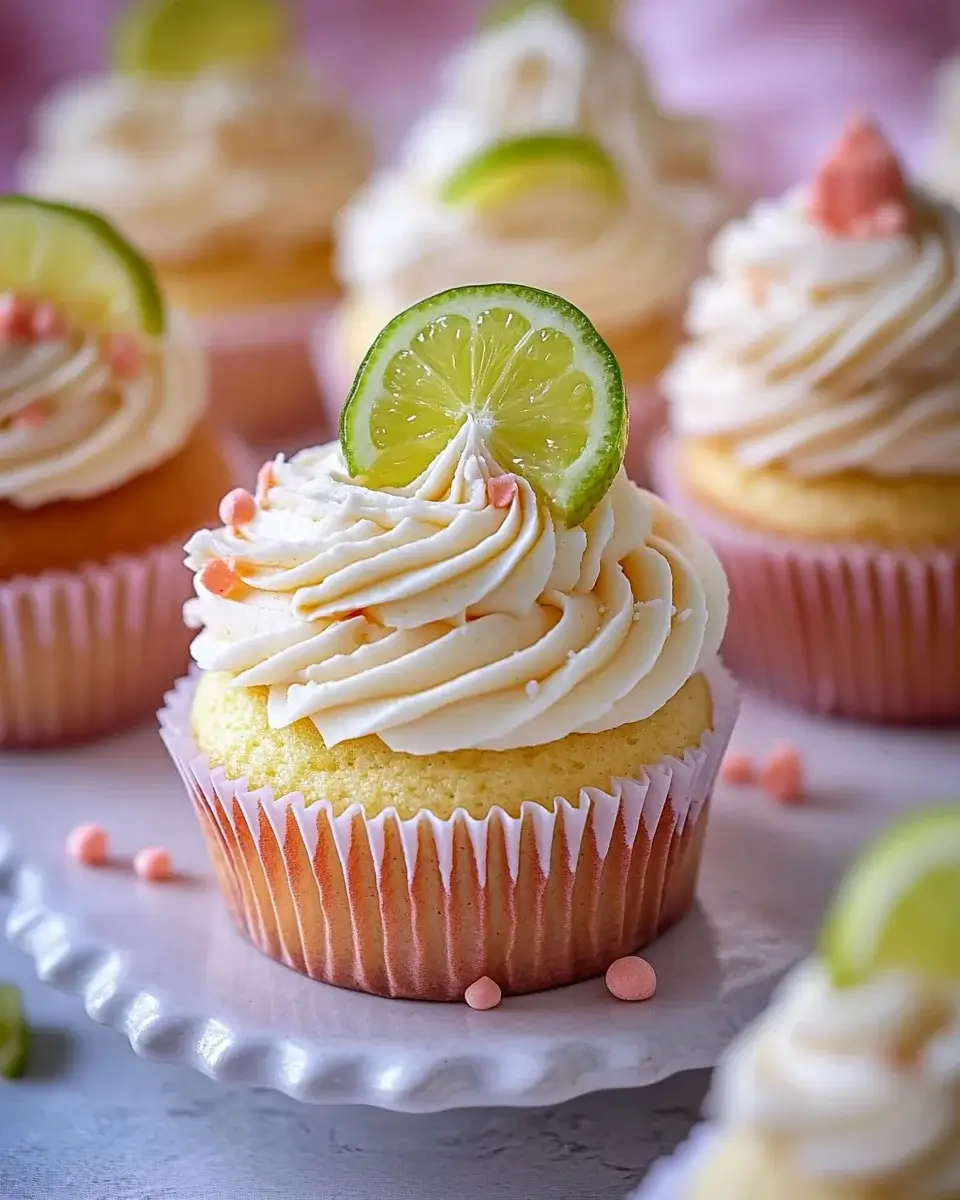
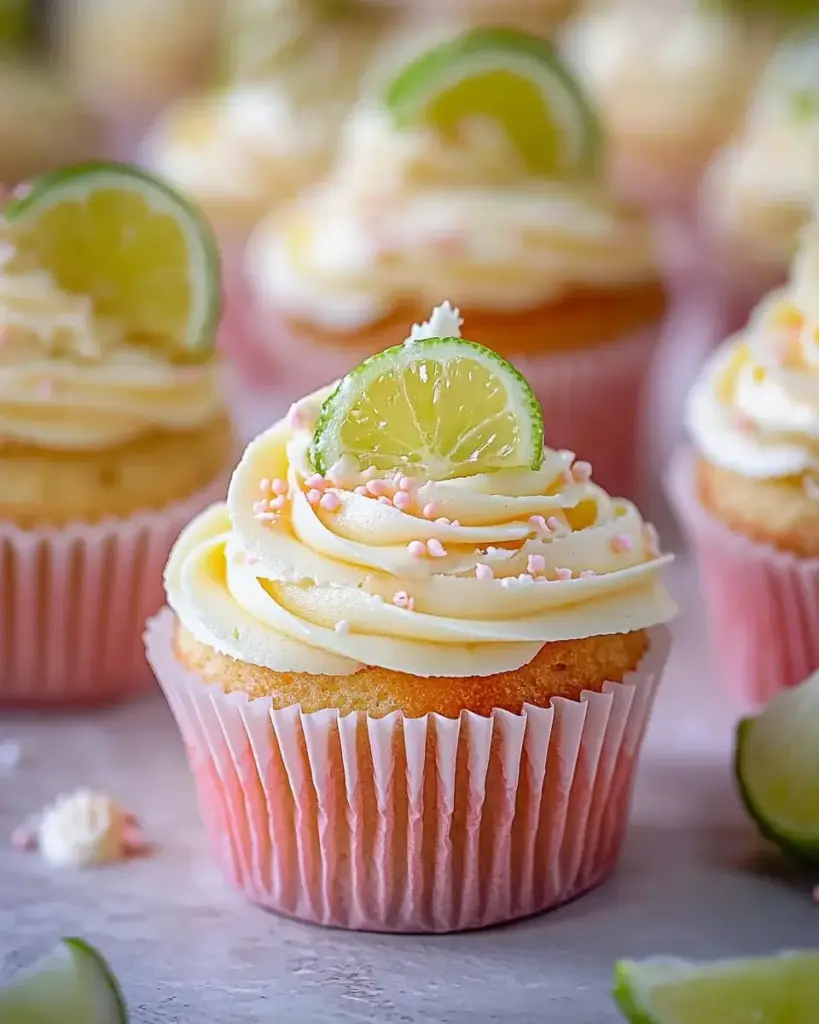
Once baked, allow the cupcakes to cool in the pan for about 5 minutes. Then, transfer them to a wire rack to cool completely. This step is important; frosting warm cupcakes can lead to a melty mess. Once they’re cool, frost them generously with the creamy grapefruit buttercream. Enjoy the zesty goodness!

Tips for Success

  • Always use room temperature ingredients for better mixing.
  • Don’t skip the zest; it enhances the flavor significantly.
  • Check your oven temperature with an oven thermometer for accuracy.
  • Let the cupcakes cool completely before frosting to avoid melting.
  • For a fun twist, try adding a pinch of cayenne pepper to the frosting for a spicy kick!

Equipment Needed

  • Cupcake pan: Essential for baking; a muffin tin works in a pinch.
  • Mixing bowls: Use any size; just ensure they’re large enough for mixing.
  • Electric mixer: A hand mixer is great; a whisk can work too, but it’ll take longer.
  • Measuring cups and spoons: Accurate measurements are key; use a kitchen scale for precision.
  • Wire rack: Ideal for cooling; a plate can substitute if needed.

Variations on Paloma Cupcakes

  • Tequila Infusion: For an adult twist, add a splash of tequila to the frosting. It enhances the flavor and gives your cupcakes a fun kick!
  • Orange Zest: Swap out grapefruit juice for fresh orange juice and zest for a sweeter, citrusy flavor that’s equally delightful.
  • Gluten-Free Option: Use a gluten-free all-purpose flour blend to make these cupcakes gluten-free without sacrificing taste.
  • Vegan Version: Replace eggs with flax eggs and use plant-based butter and milk for a vegan-friendly treat.
  • Chocolate Drizzle: Top your frosted cupcakes with a drizzle of dark chocolate for a rich contrast to the zesty grapefruit.

Serving Suggestions for Paloma Cupcakes

  • Pair with Coffee: A rich cup of coffee complements the zesty flavors beautifully.
  • Serve with Fresh Fruit: A side of mixed berries adds a refreshing touch.
  • Presentation: Garnish with a slice of grapefruit or a sprig of mint for a pop of color.
  • Enjoy with Sparkling Water: A fizzy drink enhances the cupcake’s citrus notes.

FAQs about Paloma Cupcakes

Can I make Paloma Cupcakes ahead of time?

Absolutely! You can bake the cupcakes a day in advance. Just store them in an airtight container at room temperature. Frost them on the day you plan to serve for the best texture and flavor.

What can I substitute for grapefruit juice?

If grapefruit isn’t your favorite, fresh orange juice works wonderfully! It gives a sweeter, citrusy flavor that still keeps the cupcakes zesty and delicious.

How do I store leftover cupcakes?

Store any leftover Paloma Cupcakes in an airtight container at room temperature for up to three days. If you want to keep them longer, refrigerate them for up to a week.

Can I freeze Paloma Cupcakes?

Yes, you can freeze the cupcakes! Just make sure they are completely cool, then wrap them tightly in plastic wrap and place them in a freezer-safe container. They’ll stay fresh for up to three months.

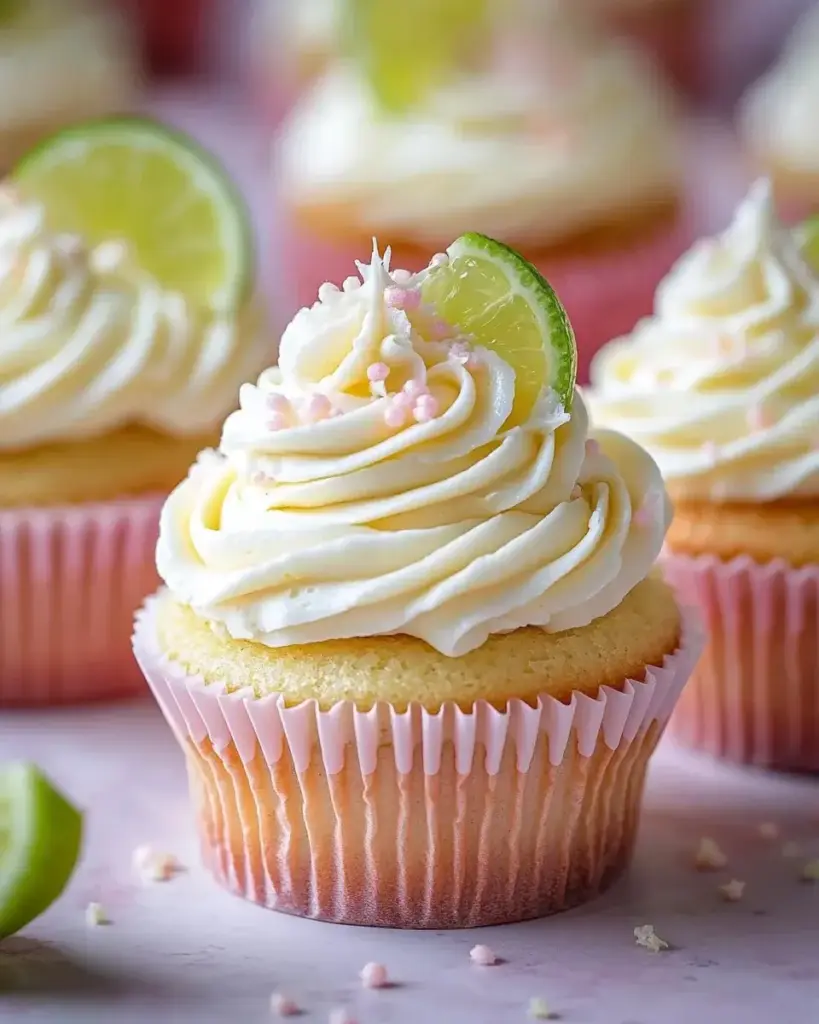
What’s the best way to frost these cupcakes?

For a smooth finish, use a piping bag fitted with a star tip. This adds a professional touch and makes it easy to create beautiful swirls of grapefruit buttercream on top of your cupcakes!

Final Thoughts

Creating Paloma Cupcakes is more than just baking; it’s about bringing a little joy into your kitchen and sharing it with others. The zesty grapefruit flavor dances on your palate, making each bite a delightful experience. Whether you’re celebrating a special occasion or simply treating yourself, these cupcakes are sure to brighten your day. Plus, the smiles on your friends’ faces when they taste them? Priceless! So, roll up your sleeves, embrace the citrusy goodness, and let these cupcakes become a cherished part of your baking repertoire. Trust me, you won’t regret it!

jhessica

Paloma Cupcakes: Discover a Zesty Dessert Recipe!

Delicious and zesty Paloma Cupcakes infused with grapefruit flavor, topped with a creamy grapefruit buttercream frosting.
Prep Time 20 minutes
Cook Time 20 minutes
Total Time 40 minutes
Servings: 12 cupcakes
Course: Dessert
Cuisine: American
Calories: 320

Ingredients
  

  • 1 ½ cups all-purpose flour
  • 1 cup granulated sugar
  • ½ cup unsalted butter softened
  • 2 large eggs
  • ½ cup fresh grapefruit juice
  • 1 tablespoon grapefruit zest
  • 1 teaspoon baking powder
  • ½ teaspoon baking soda
  • ¼ teaspoon salt
  • ½ cup buttermilk
  • 1 teaspoon vanilla extract
For the Frosting:
  • 1 cup unsalted butter softened
  • 4 cups powdered sugar
  • 2 tablespoons fresh grapefruit juice
  • 1 tablespoon grapefruit zest
  • 1 teaspoon vanilla extract
  • Pinch of salt

Method
 

  1. Preheat your oven to 350°F (175°C) and line a cupcake pan with paper liners.
  2. Cream together the softened butter and granulated sugar until light and fluffy.
  3. Add the eggs one at a time, mixing well after each addition.
  4. Stir in the grapefruit juice and zest.
  5. In a separate bowl, whisk together the flour, baking powder, baking soda, and salt.
  6. Gradually add the dry ingredients to the wet mixture, alternating with the buttermilk.
  7. Mix until just combined, then stir in the vanilla extract.
  8. Divide the batter evenly among the cupcake liners, filling each about two-thirds full.
  9. Bake for 18-20 minutes, or until a toothpick inserted into the center comes out clean.
  10. Allow the cupcakes to cool in the pan for 5 minutes before transferring them to a wire rack to cool completely.
  11. For the frosting, beat the softened butter in a bowl until creamy.
  12. Gradually add the powdered sugar, mixing until smooth.
  13. Add the grapefruit juice, zest, vanilla extract, and a pinch of salt, then beat until fluffy.
  14. Once the cupcakes are completely cool, frost them generously with the grapefruit buttercream.

Nutrition

Serving: 1cupcakeCalories: 320kcalCarbohydrates: 40gProtein: 2gFat: 15gSaturated Fat: 9gPolyunsaturated Fat: 6gCholesterol: 40mgSodium: 150mgSugar: 30g

Notes

  • For an adult version, add a splash of tequila to the frosting.
  • Substitute grapefruit juice with fresh orange juice for a different citrus flavor.

Tried this recipe?

Let us know how it was!

Savory Mushroom, Lentil, and Walnut Tart Recipe You’ll Love!

Introduction to Savory Mushroom, Lentil, and Walnut Tart

There’s something magical about a dish that brings warmth and comfort to the table. The Savory Mushroom, Lentil, and Walnut Tart is just that—a delightful blend of flavors that feels like a hug in every bite. Whether you’re hosting friends or simply looking for a quick solution for a busy day, this tart is your go-to. It’s hearty enough to satisfy, yet elegant enough to impress. Plus, it’s packed with nutrients, making it a guilt-free indulgence. Trust me, once you try this recipe, it’ll become a staple in your kitchen!

Why You’ll Love This Savory Mushroom, Lentil, and Walnut Tart

This Savory Mushroom, Lentil, and Walnut Tart is a game-changer for your weeknight dinners. It’s easy to whip up, taking just over an hour from start to finish. The rich, earthy flavors of mushrooms and walnuts create a satisfying dish that even the pickiest eaters will love. Plus, it’s versatile enough to serve as a main course or a side, making it perfect for any occasion!

Ingredients for Savory Mushroom, Lentil, and Walnut Tart

Gathering the right ingredients is the first step to creating this delicious Savory Mushroom, Lentil, and Walnut Tart. Here’s what you’ll need:

  • Mushrooms: Finely chopped, they add a rich, umami flavor. Any variety works, but I love using cremini or button mushrooms for their tenderness.
  • Cooked Lentils: Green or brown lentils provide protein and a hearty texture. You can use canned lentils for convenience or cook them from scratch.
  • Walnuts: Chopped walnuts bring a delightful crunch and nutty flavor. They also add healthy fats, making this tart even more satisfying.
  • Onion: Diced onion adds sweetness and depth. Sautéing it with garlic creates a fragrant base for the filling.
  • Garlic: Minced garlic enhances the overall flavor profile. Fresh is best, but you can use garlic powder in a pinch.
  • Dried Thyme and Rosemary: These herbs infuse the tart with aromatic notes. Feel free to experiment with fresh herbs if you have them on hand.
  • Salt and Black Pepper: Essential for seasoning, they elevate the flavors of the other ingredients.
  • Olive Oil: Used for sautéing, it adds richness. You can substitute with vegetable oil if needed.
  • Soy Sauce: This adds a savory depth to the filling. For a gluten-free option, use tamari.
  • Balsamic Vinegar: A splash of balsamic vinegar brightens the flavors and adds a hint of sweetness.
  • Refrigerated Pie Crust: A convenient base for the tart. You can also make your own if you’re feeling adventurous!
  • Egg: Beaten for an egg wash, it gives the crust a beautiful golden finish. For a vegan option, use plant-based milk instead.
  • Fresh Parsley: Optional for garnish, it adds a pop of color and freshness to the finished dish.

Exact quantities for each ingredient are listed at the bottom of the article, making it easy for you to print and follow along!

How to Make Savory Mushroom, Lentil, and Walnut Tart

Creating this Savory Mushroom, Lentil, and Walnut Tart is a straightforward process that yields delicious results. Follow these simple steps, and you’ll have a hearty dish that impresses everyone at the table.

Step 1: Preheat the Oven

First things first, preheat your oven to 375°F (190°C). This ensures it’s hot and ready for baking when your tart is assembled. A well-preheated oven is key to achieving that perfect golden crust!

Step 2: Sauté the Aromatics

In a large skillet, heat a tablespoon of olive oil over medium heat. Add the diced onion and minced garlic, cooking until softened, about 3-4 minutes. The aroma will fill your kitchen, setting the stage for the savory goodness to come.

Step 3: Cook the Mushrooms

Next, toss in the finely chopped mushrooms. Cook them until they release their moisture and become tender, which should take about 5-7 minutes. Stir occasionally to ensure even cooking. This step is crucial for developing that rich, umami flavor!

Step 4: Combine Ingredients

Now, stir in the cooked lentils, chopped walnuts, dried thyme, dried rosemary, salt, black pepper, soy sauce, and balsamic vinegar. Cook for an additional 2-3 minutes until everything is well combined. Remove from heat and let the mixture cool slightly. This filling is packed with flavor and texture!

Step 5: Prepare the Crust

Roll out the refrigerated pie crust and fit it into a 9-inch tart pan. Don’t forget to trim any excess crust hanging over the edges. A neat crust not only looks good but also helps keep the filling intact.

Step 6: Fill the Tart

Spoon the mushroom, lentil, and walnut mixture into the crust, spreading it evenly. Make sure to pack it in gently, so every slice is filled with that delicious filling. Your tart is starting to take shape!

Step 7: Brush the Crust

For a beautiful finish, brush the edges of the crust with the beaten egg. This will give it a lovely golden color as it bakes. If you’re going vegan, a splash of plant-based milk works just as well!

Step 8: Bake the Tart

Place the tart in the preheated oven and bake for 30-35 minutes, or until the crust is golden brown. The aroma wafting through your home will be irresistible, and your guests will be eagerly awaiting the first slice!

Step 9: Cool and Serve

Once baked, allow the tart to cool for about 10 minutes before slicing. This helps the filling set a bit more. Garnish with fresh parsley if desired, and get ready to enjoy a slice of savory heaven!

Tips for Success

  • Prep your ingredients ahead of time to streamline the cooking process.
  • Don’t rush the sautéing; letting the onions and mushrooms caramelize enhances flavor.
  • Feel free to customize the filling with your favorite veggies or herbs.
  • Let the tart cool slightly before slicing for cleaner pieces.
  • Store leftovers in an airtight container for up to three days.

Equipment Needed

  • Tart Pan: A 9-inch tart pan is ideal, but a pie dish works too.
  • Large Skillet: For sautéing the filling; a non-stick skillet makes cleanup easier.
  • Mixing Spoon: A wooden or silicone spoon is perfect for combining ingredients.
  • Rolling Pin: Use this to roll out the pie crust; a wine bottle can substitute in a pinch.
  • Measuring Cups and Spoons: Essential for accurate ingredient portions.

Variations

  • Spinach or Kale: Add a layer of sautéed spinach or kale for extra nutrition and flavor. It pairs beautifully with the earthy mushrooms.
  • Cheese Lover’s Delight: Sprinkle some feta or goat cheese on top before baking for a creamy, tangy twist.
  • Spicy Kick: Add a pinch of red pepper flakes or a dash of hot sauce to the filling for a bit of heat.
  • Gluten-Free Option: Use a gluten-free pie crust to make this tart suitable for gluten-sensitive friends.
  • Herb Variations: Experiment with fresh herbs like basil or cilantro for a different flavor profile.

Serving Suggestions

  • Side Salad: Pair the tart with a fresh arugula or mixed greens salad drizzled with lemon vinaigrette for a refreshing contrast.
  • Wine Pairing: A light-bodied red wine, like Pinot Noir, complements the earthy flavors beautifully.
  • Presentation: Serve slices on a wooden board, garnished with extra parsley for a rustic touch.

FAQs about Savory Mushroom, Lentil, and Walnut Tart

Can I make this Savory Mushroom, Lentil, and Walnut Tart ahead of time?

Absolutely! You can prepare the filling and assemble the tart a day in advance. Just cover it and store it in the fridge. When you’re ready to bake, simply pop it in the oven. This makes it a great option for meal prep!

What can I serve with the tart?

This tart pairs wonderfully with a light salad or roasted vegetables. A side of garlic bread also complements the flavors beautifully. You can even serve it with a dollop of yogurt or a drizzle of balsamic reduction for an extra touch.

Is this tart suitable for vegetarians?

<pYes, this Savory Mushroom, Lentil, and Walnut Tart is entirely vegetarian! It’s packed with protein from the lentils and walnuts, making it a hearty meal. Plus, it’s a fantastic way to enjoy a meatless dish without sacrificing flavor.

Can I freeze leftovers?

Yes, you can freeze the tart! Just make sure it’s completely cooled before wrapping it tightly in plastic wrap and aluminum foil. It can be stored in the freezer for up to three months. When you’re ready to enjoy it, thaw it in the fridge overnight and reheat in the oven.

What are some variations I can try?

Feel free to get creative! You can add different vegetables like bell peppers or zucchini, or even mix in some cheese for a richer flavor. For a spicy twist, consider adding jalapeños or a sprinkle of cayenne pepper. The possibilities are endless!

Final Thoughts

Cooking this Savory Mushroom, Lentil, and Walnut Tart is more than just preparing a meal; it’s about creating a moment of joy. The aroma that fills your kitchen as it bakes is simply irresistible, drawing everyone in. Each slice offers a delightful combination of flavors and textures that warms the heart. Whether you’re sharing it with family or enjoying it solo, this tart brings a sense of satisfaction that’s hard to beat. It’s a dish that not only nourishes the body but also feeds the soul, making it a cherished addition to any table.

jhessica

Savory Mushroom, Lentil, and Walnut Tart Recipe You’ll Love!

A delicious and hearty Savory Mushroom, Lentil, and Walnut Tart that is perfect for any occasion.
Prep Time 15 minutes
Cook Time 40 minutes
Total Time 55 minutes
Servings: 6 servings
Course: Main Dish
Cuisine: Vegetarian
Calories: 220

Ingredients
  

  • 2 cups mushrooms finely chopped
  • 1 cup cooked lentils green or brown
  • 1 cup walnuts chopped
  • 1 medium onion diced
  • 2 cloves garlic minced
  • 1 teaspoon dried thyme
  • 1 teaspoon dried rosemary
  • 1 teaspoon salt
  • ½ teaspoon black pepper
  • 1 tablespoon olive oil
  • 1 tablespoon soy sauce
  • 1 tablespoon balsamic vinegar
  • 1 package 1 sheet refrigerated pie crust
  • 1 egg beaten (for egg wash)
  • Fresh parsley for garnish (optional)

Method
 

  1. Preheat the oven to 375°F (190°C).
  2. In a large skillet, heat the olive oil over medium heat. Add the diced onion and garlic, cooking until softened, about 3-4 minutes.
  3. Add the chopped mushrooms to the skillet and cook until they release their moisture and become tender, about 5-7 minutes.
  4. Stir in the cooked lentils, chopped walnuts, thyme, rosemary, salt, pepper, soy sauce, and balsamic vinegar. Cook for an additional 2-3 minutes until everything is well combined. Remove from heat and let cool slightly.
  5. Roll out the pie crust and fit it into a 9-inch tart pan. Trim any excess crust hanging over the edges.
  6. Spoon the mushroom, lentil, and walnut mixture into the crust, spreading it evenly.
  7. Brush the edges of the crust with the beaten egg for a golden finish.
  8. Bake in the preheated oven for 30-35 minutes, or until the crust is golden brown.
  9. Allow the tart to cool for 10 minutes before slicing. Garnish with fresh parsley if desired.

Nutrition

Serving: 1sliceCalories: 220kcalCarbohydrates: 18gProtein: 8gFat: 14gSaturated Fat: 1.5gPolyunsaturated Fat: 12.5gCholesterol: 30mgSodium: 300mgFiber: 4gSugar: 2g

Notes

  • For a vegan option, replace the egg wash with a plant-based milk wash and omit the egg.
  • Add a layer of spinach or kale to the tart for extra nutrition and flavor. Sauté the greens with the onion and garlic before adding the mushrooms.

Tried this recipe?

Let us know how it was!

Rhubarb Cream Cheese Puff Pastries: A Delightful Recipe!

Introduction to Rhubarb Cream Cheese Puff Pastries

There’s something magical about the combination of tart rhubarb and creamy cheese, especially when wrapped in flaky puff pastry. Rhubarb Cream Cheese Puff Pastries are not just a treat; they’re a delightful way to bring a touch of elegance to your kitchen. Whether you’re looking for a quick dessert to impress your friends or a sweet snack to enjoy with your morning coffee, this recipe has you covered. It’s simple, satisfying, and perfect for any occasion. Trust me, once you take that first bite, you’ll be hooked!

Why You’ll Love This Rhubarb Cream Cheese Puff Pastries

These Rhubarb Cream Cheese Puff Pastries are a game-changer in the kitchen. They come together quickly, making them perfect for busy weeknights or last-minute gatherings. The balance of sweet and tart flavors will have your taste buds dancing. Plus, the flaky pastry adds a delightful crunch that complements the creamy filling. You’ll impress your family and friends without spending hours in the kitchen. What’s not to love?

Ingredients for Rhubarb Cream Cheese Puff Pastries

Gathering the right ingredients is the first step to creating these delightful pastries. Here’s what you’ll need:

  • Rhubarb: Fresh, chopped rhubarb brings that signature tartness. Look for firm, vibrant stalks for the best flavor.
  • Granulated Sugar: This sweetener balances the tartness of the rhubarb. You can adjust the amount based on your taste preference.
  • Vanilla Extract: A splash of vanilla adds depth and warmth to the filling, enhancing the overall flavor.
  • Cornstarch: This thickening agent helps bind the rhubarb mixture, giving it a nice texture.
  • Cream Cheese: Softened cream cheese creates a rich, creamy filling that pairs perfectly with the rhubarb.
  • Powdered Sugar: This sweetener is used to make the cream cheese mixture smooth and sweet. It’s also great for dusting on top!
  • Lemon Juice: A touch of acidity brightens the cream cheese filling and complements the rhubarb.
  • Puff Pastry: The star of the show! Frozen puff pastry sheets are easy to work with and create that flaky texture we love.
  • Egg: Beaten egg is used for an egg wash, giving the pastries a beautiful golden color when baked.
  • Powdered Sugar for Dusting: Optional, but a light dusting adds a lovely finishing touch to your pastries.

For those looking to mix things up, feel free to substitute strawberries or blueberries for the rhubarb. The exact measurements for each ingredient can be found at the bottom of the article, ready for printing!

How to Make Rhubarb Cream Cheese Puff Pastries

Creating these Rhubarb Cream Cheese Puff Pastries is a delightful journey. Follow these simple steps, and you’ll have a batch of delicious pastries ready to impress. Let’s dive in!

Step 1: Preheat the Oven

Start by preheating your oven to 400°F. This step is crucial because it ensures that your pastries bake evenly and achieve that perfect golden-brown color. A hot oven helps the puff pastry rise beautifully, creating that flaky texture we all love.

Step 2: Prepare the Rhubarb Filling

In a medium saucepan over medium heat, combine the chopped rhubarb, granulated sugar, vanilla extract, and cornstarch. Stir occasionally for about 5-7 minutes. You want the rhubarb to soften and the mixture to thicken. Once it’s done, remove it from the heat and let it cool. The filling should be thick and slightly jammy, perfect for our pastries!

Step 3: Make the Cream Cheese Mixture

In a mixing bowl, beat the softened cream cheese, powdered sugar, and lemon juice until smooth and creamy. This mixture should be thick yet spreadable. If it’s too stiff, you can add a splash of milk to loosen it up. The cream cheese adds a rich, tangy flavor that pairs wonderfully with the rhubarb.

Step 4: Roll Out the Puff Pastry

On a lightly floured surface, roll out the thawed puff pastry sheets. Cut each sheet into 4 squares. Don’t worry if they’re not perfect; a little rustic charm adds character! Make sure to keep the pastry cold while you work, as this helps maintain its flakiness.

Step 5: Assemble the Pastries

Now comes the fun part! Place a spoonful of the cream cheese mixture in the center of each square, followed by a spoonful of the rhubarb filling. Fold the corners of the pastry squares over the filling to create a pocket. Pinch the edges to seal them tightly. This step is key to keeping all that delicious filling inside while baking!

Step 6: Bake the Pastries

Place the assembled pastries on a baking sheet lined with parchment paper. Brush the tops with the beaten egg for that golden finish. Bake in the preheated oven for 15-20 minutes, or until they’re puffed and golden brown. Keep an eye on them; every oven is a little different!

Step 7: Cool and Dust

Once baked, allow the pastries to cool slightly on a wire rack. This helps them set and makes them easier to handle. If you like, dust them with powdered sugar for a sweet finishing touch. It adds a lovely contrast to the tart rhubarb and creamy filling!

Tips for Success

  • Keep your puff pastry cold until you’re ready to use it for the best flakiness.
  • Don’t overfill the pastries; a spoonful of each filling is just right.
  • Use a sharp knife to cut the pastry for clean edges.
  • Experiment with different fruits like strawberries or blueberries for a twist.
  • Let the pastries cool completely before dusting with powdered sugar for a beautiful finish.

Equipment Needed

  • Baking Sheet: A standard baking sheet works well. If you have a stone baking sheet, it can enhance browning.
  • Parchment Paper: This prevents sticking. If you don’t have it, a silicone baking mat is a great alternative.
  • Mixing Bowls: Use any size you have on hand for mixing fillings.
  • Rolling Pin: A simple rolling pin is perfect. A wine bottle can work in a pinch!
  • Wire Rack: For cooling the pastries. If you don’t have one, a plate will do.

Variations

  • Berry Bliss: Substitute rhubarb with fresh strawberries or blueberries for a sweeter twist.
  • Nutty Delight: Add chopped walnuts or pecans to the cream cheese mixture for added crunch and flavor.
  • Spiced Up: Incorporate a pinch of cinnamon or nutmeg into the rhubarb filling for a warm, cozy flavor.
  • Gluten-Free Option: Use gluten-free puff pastry to make this recipe suitable for those with gluten sensitivities.
  • Vegan Version: Replace cream cheese with a plant-based alternative and use a flax egg for the egg wash.

Serving Suggestions

  • Pair these pastries with a scoop of vanilla ice cream for a delightful dessert experience.
  • Serve alongside a cup of freshly brewed coffee or tea to complement the flavors.
  • For a brunch spread, arrange them on a platter with fresh fruit and whipped cream.
  • Dust with powdered sugar just before serving for an elegant touch.

FAQs about Rhubarb Cream Cheese Puff Pastries

Can I use fresh rhubarb instead of frozen?

Absolutely! Fresh rhubarb works wonderfully in this recipe. Just make sure to chop it into small pieces for even cooking. The tartness will shine through beautifully!

How do I store leftover pastries?

Store any leftover Rhubarb Cream Cheese Puff Pastries in an airtight container in the fridge. They’re best enjoyed within a couple of days, but you can reheat them in the oven for a few minutes to regain that flaky texture.

Can I freeze these pastries?

Yes, you can freeze the assembled pastries before baking. Just place them on a baking sheet, freeze until solid, then transfer to a freezer bag. When you’re ready to bake, no need to thaw—just add a few extra minutes to the baking time!

What can I substitute for cream cheese?

If you’re looking for a lighter option, you can use Greek yogurt or a dairy-free cream cheese alternative. Both will give you a creamy texture while adding their unique flavors to the filling.

How can I make these pastries more visually appealing?

For a stunning presentation, brush the tops with the egg wash and sprinkle with coarse sugar before baking. This will give them a beautiful shine and a little extra crunch!

Final Thoughts

Making Rhubarb Cream Cheese Puff Pastries is more than just a cooking task; it’s an experience filled with joy and creativity. The moment you pull those golden pastries from the oven, the aroma fills your kitchen, inviting everyone to gather around. Each bite offers a delightful contrast of flavors and textures, making it a memorable treat for any occasion. Whether you’re sharing them with family or enjoying a quiet moment with coffee, these pastries bring a sense of warmth and satisfaction. Trust me, once you try them, they’ll become a cherished recipe in your home!

jhessica

Rhubarb Cream Cheese Puff Pastries: A Delightful Recipe!

Delicious puff pastries filled with a creamy rhubarb and cream cheese mixture.
Prep Time 20 minutes
Cook Time 20 minutes
Total Time 40 minutes
Servings: 8 servings
Course: Dessert
Cuisine: American
Calories: 210

Ingredients
  

  • 1 cup rhubarb chopped
  • 1/2 cup granulated sugar
  • 1 teaspoon vanilla extract
  • 1 tablespoon cornstarch
  • 1 package 8 ounces cream cheese, softened
  • 1/4 cup powdered sugar
  • 1 teaspoon lemon juice
  • 1 package 17.3 ounces frozen puff pastry sheets, thawed
  • 1 egg beaten (for egg wash)
  • Powdered sugar for dusting optional

Method
 

  1. Preheat the oven to 400°F.
  2. In a medium saucepan over medium heat, combine the chopped rhubarb, granulated sugar, vanilla extract, and cornstarch. Cook for about 5-7 minutes, stirring occasionally, until the rhubarb is tender and the mixture thickens. Remove from heat and let cool.
  3. In a mixing bowl, beat the softened cream cheese, powdered sugar, and lemon juice until smooth and creamy.
  4. On a lightly floured surface, roll out the thawed puff pastry sheets. Cut each sheet into 4 squares.
  5. Place a spoonful of the cream cheese mixture in the center of each square, followed by a spoonful of the rhubarb mixture.
  6. Fold the corners of the pastry squares over the filling to create a pocket and pinch to seal.
  7. Place the pastries on a baking sheet lined with parchment paper. Brush the tops with the beaten egg.
  8. Bake in the preheated oven for 15-20 minutes or until golden brown.
  9. Allow to cool slightly before dusting with powdered sugar, if desired.

Nutrition

Serving: 1pastryCalories: 210kcalCarbohydrates: 15gProtein: 3gFat: 14gSaturated Fat: 7gPolyunsaturated Fat: 5gCholesterol: 40mgSodium: 150mgFiber: 1gSugar: 8g

Notes

  • For a sweeter filling, add an extra tablespoon of sugar to the rhubarb mixture.
  • You can also substitute strawberries or blueberries for the rhubarb for a different flavor profile.

Tried this recipe?

Let us know how it was!

Creamy White Bean Soup with Bacon: A Delicious Delight

Introduction to Creamy White Bean Soup with Bacon

There’s something magical about a warm bowl of soup on a chilly evening.

Creamy White Bean Soup with Bacon is not just a meal; it’s a hug in a bowl.

I remember my grandmother making a similar soup, filling the house with a savory aroma that made everyone gather around the kitchen.

This recipe is perfect for those busy days when you need comfort without the fuss.

With just a handful of ingredients and a little time, you can create a dish that will impress your loved ones and warm your soul.

Why You’ll Love This Creamy White Bean Soup with Bacon

This Creamy White Bean Soup with Bacon is a game-changer for your weeknight dinners.

It’s quick to whip up, taking just 40 minutes from start to finish.

The rich, velvety texture combined with the smoky bacon creates a flavor explosion that’s hard to resist.

Plus, it’s a one-pot wonder, making cleanup a breeze.

You’ll find yourself reaching for this recipe again and again, especially on those chilly nights.

Ingredients for Creamy White Bean Soup with Bacon

Creating a delicious Creamy White Bean Soup with Bacon starts with gathering the right ingredients.

Here’s what you’ll need:

  • Olive oil: A staple in many kitchens, it adds richness and helps sauté the vegetables.
  • Bacon: The star of the show! It brings a smoky flavor and crispy texture that elevates the soup.
  • Onion: Diced onion adds sweetness and depth to the base of the soup.
  • Garlic: Minced garlic infuses the dish with a fragrant aroma and enhances the overall flavor.
  • Carrot: Diced carrots contribute a subtle sweetness and vibrant color.
  • Celery: This adds a nice crunch and balances the flavors in the soup.
  • Low-sodium chicken broth: A flavorful base that keeps the soup hearty without overwhelming saltiness.
  • White beans: Canned white beans provide creaminess and protein, making the soup filling.
  • Dried thyme: A classic herb that adds an earthy note to the dish.
  • Smoked paprika: This spice brings a warm, smoky flavor that complements the bacon beautifully.
  • Salt and pepper: Essential for seasoning, adjust to your taste.
  • Heavy cream: The secret to that luscious, creamy texture that makes this soup irresistible.
  • Fresh parsley: A sprinkle of chopped parsley adds a pop of color and freshness when serving.

Feel free to get creative!

For a vegetarian version, simply omit the bacon and swap in vegetable broth.

And if you want a zesty kick, a squeeze of lemon juice before serving can brighten up the flavors.

Exact quantities for each ingredient are available at the bottom of the article for easy printing.

How to Make Creamy White Bean Soup with Bacon

Making this Creamy White Bean Soup with Bacon is a straightforward process that anyone can master.

Let’s break it down step by step, ensuring you have all the tips you need for a perfect bowl of comfort.

Step 1: Cook the Bacon

Start by heating olive oil in a large pot over medium heat.

Add the chopped bacon and let it sizzle until crispy, about 5-7 minutes.

The aroma will be heavenly!

Once done, remove the bacon with a slotted spoon and set it aside, leaving those delicious drippings in the pot.

Step 2: Sauté the Vegetables

In the same pot, toss in the diced onion, minced garlic, carrot, and celery.

Sauté for about 5 minutes until the vegetables soften and the onion turns translucent.

This step builds the flavor base for your soup.

Step 3: Add Broth and Beans

Pour in the low-sodium chicken broth and add the drained white beans.

Sprinkle in the dried thyme, smoked paprika, salt, and pepper.

Bring the mixture to a boil, then reduce the heat and let it simmer for 15 minutes.

This allows the flavors to meld beautifully.

Step 4: Blend the Soup

Using an immersion blender, puree the soup until smooth.

If you prefer a chunkier texture, blend only half of the soup.

This gives you that creamy consistency while still enjoying some bean bites.

Step 5: Stir in the Cream

Now, stir in the heavy cream and let the soup simmer for an additional 5 minutes.

This is where the magic happens!

The cream transforms the soup into a rich, velvety delight.

Step 6: Serve and Garnish

Serve the soup hot, garnished with the reserved crispy bacon and a sprinkle of fresh parsley.

This adds a pop of color and freshness, making your dish visually appealing.

Enjoy every spoonful of this comforting bowl of goodness!

Tips for Success

  • Use a good quality bacon for the best flavor; thick-cut works wonders.
  • Don’t rush the sautéing process; it builds a rich flavor base.
  • Adjust the thickness of the soup by blending to your preference.
  • For extra depth, try adding a splash of white wine before simmering.
  • Garnish generously with parsley for a fresh finish.

Equipment Needed

  • Large pot: A sturdy pot is essential for cooking the soup. A Dutch oven works great too.
  • Slotted spoon: Perfect for removing the bacon without the grease.
  • Immersion blender: This makes blending easy. A regular blender can work, but be careful with hot liquids.
  • Cutting board and knife: For chopping your veggies efficiently.

Variations of Creamy White Bean Soup with Bacon

  • Vegetarian Delight: Omit the bacon and use vegetable broth for a lighter, plant-based version.
  • Spicy Kick: Add a pinch of red pepper flakes or diced jalapeños for a spicy twist.
  • Herb Infusion: Experiment with fresh herbs like rosemary or sage for a fragrant flavor boost.
  • Cheesy Goodness: Stir in some grated Parmesan or cheddar cheese for an extra creamy texture.
  • Seasonal Veggies: Toss in seasonal vegetables like spinach or kale for added nutrition and color.

Serving Suggestions for Creamy White Bean Soup with Bacon

  • Crusty Bread: Serve with a warm, crusty baguette or sourdough for dipping.
  • Salad Pairing: A light arugula salad with lemon vinaigrette complements the richness of the soup.
  • Wine Selection: A glass of Chardonnay or a light red wine enhances the meal.
  • Garnish: Top with extra crispy bacon and a drizzle of olive oil for a gourmet touch.

FAQs about Creamy White Bean Soup with Bacon

Can I make this soup ahead of time?
Absolutely! This Creamy White Bean Soup with Bacon tastes even better the next day. Just store it in an airtight container in the fridge. Reheat gently on the stove, adding a splash of broth if it thickens too much.

What can I use instead of heavy cream?
If you want a lighter option, you can substitute heavy cream with half-and-half or even coconut milk for a dairy-free version. Just keep in mind that the flavor will change slightly.

How do I store leftovers?
Leftovers can be stored in the fridge for up to 3 days. Make sure to let the soup cool completely before transferring it to a container. You can also freeze it for up to 3 months!

Can I add more vegetables to the soup?
Definitely! Feel free to add your favorite vegetables like spinach, zucchini, or bell peppers. Just sauté them along with the other veggies for a nutritious boost.

Is this soup gluten-free?
Yes! This Creamy White Bean Soup with Bacon is naturally gluten-free, making it a great option for those with dietary restrictions. Just double-check your broth to ensure it’s gluten-free as well.

Final Thoughts

There’s something truly special about a bowl of Creamy White Bean Soup with Bacon.

It’s more than just a meal; it’s a moment of comfort and warmth that brings people together.

Each spoonful is a reminder of cozy nights spent with family, laughter echoing in the kitchen.

This recipe is not only easy to make but also adaptable to your taste.

Whether you’re enjoying it solo or sharing with loved ones, it’s bound to become a favorite.

So, grab your ingredients and let the magic of this soup fill your home with joy and deliciousness!

jhessica

Creamy White Bean Soup with Bacon: A Delicious Delight

A creamy and delicious white bean soup with crispy bacon, perfect for a comforting meal.
Prep Time 10 minutes
Cook Time 30 minutes
Total Time 40 minutes
Servings: 6 servings
Course: Soup
Cuisine: American
Calories: 320

Ingredients
  

  • 1 tablespoon olive oil
  • 4 ounces bacon chopped
  • 1 medium onion diced
  • 2 cloves garlic minced
  • 1 carrot diced
  • 1 celery stalk diced
  • 4 cups low-sodium chicken broth
  • 2 15-ounce cans white beans, drained and rinsed
  • 1 teaspoon dried thyme
  • 1 teaspoon smoked paprika
  • Salt and pepper to taste
  • 1 cup heavy cream
  • Fresh parsley chopped (for garnish)

Method
 

  1. In a large pot, heat the olive oil over medium heat. Add the chopped bacon and cook until crispy, about 5-7 minutes. Remove the bacon with a slotted spoon and set aside, leaving the drippings in the pot.
  2. Add the diced onion, garlic, carrot, and celery to the pot. Sauté for about 5 minutes, or until the vegetables are softened.
  3. Pour in the chicken broth and add the white beans, thyme, smoked paprika, salt, and pepper. Bring the mixture to a boil, then reduce the heat and let it simmer for 15 minutes.
  4. Using an immersion blender, puree the soup until smooth. If you prefer a chunkier texture, blend only half of the soup.
  5. Stir in the heavy cream and let the soup simmer for an additional 5 minutes. Adjust seasoning if necessary.
  6. Serve hot, garnished with the reserved bacon and fresh parsley.

Nutrition

Serving: 1bowlCalories: 320kcalCarbohydrates: 22gProtein: 12gFat: 20gSaturated Fat: 10gPolyunsaturated Fat: 8gCholesterol: 40mgSodium: 600mgFiber: 6gSugar: 1g

Notes

  • For a vegetarian version, omit the bacon and use vegetable broth instead of chicken broth.
  • Add a squeeze of lemon juice before serving for a bright flavor boost.

Tried this recipe?

Let us know how it was!

Easter Egg Fruit Pizzas: A Delightful Spring Treat!

Introduction to Easter Egg Fruit Pizzas

Spring is in the air, and with it comes the joy of celebrating Easter with family and friends. One of my favorite ways to embrace the season is by whipping up delightful Easter Egg Fruit Pizzas. These colorful treats are not only visually stunning but also incredibly easy to make. Whether you’re looking for a quick solution for a busy day or a dish to impress your loved ones, this recipe has you covered. With a sweet sugar cookie base and a creamy topping, these fruit pizzas are sure to bring smiles to everyone at your table.

Why You’ll Love This Easter Egg Fruit Pizzas

These Easter Egg Fruit Pizzas are a game-changer for any spring gathering. They come together in no time, making them perfect for busy schedules. The combination of a soft, sweet cookie base and a creamy topping is simply irresistible. Plus, you can customize them with your favorite fruits, ensuring everyone gets a taste they love. They’re not just a treat; they’re a celebration of spring on a plate!

Ingredients for Easter Egg Fruit Pizzas

Gathering the right ingredients is the first step to creating these delightful Easter Egg Fruit Pizzas. Here’s what you’ll need:

  • Sugar Cookie Dough: The foundation of your pizza, providing a sweet and soft base. You can use store-bought dough for convenience or make your own if you’re feeling adventurous.
  • Cream Cheese: This creamy delight adds richness and a tangy flavor to the topping. Make sure it’s softened for easy mixing.
  • Powdered Sugar: A touch of sweetness that balances the cream cheese. It helps create that smooth, frosting-like texture.
  • Vanilla Extract: A splash of this aromatic essence enhances the overall flavor, making each bite more delightful.
  • Greek Yogurt: This adds creaminess and a slight tang. You can choose plain or vanilla-flavored, depending on your preference.
  • Assorted Fresh Fruits: The star of the show! Think strawberries, blueberries, kiwi, and bananas. They not only add color but also a burst of freshness.
  • Shredded Coconut (optional): For those who love a tropical twist, this adds texture and a hint of sweetness.
  • Mini Chocolate Chips (optional): A fun addition for chocolate lovers, these little gems can be sprinkled on top for extra indulgence.

For exact measurements, check the bottom of the article where you can find everything listed for easy printing. Enjoy the process of gathering these ingredients, as each one plays a role in creating a delicious spring treat!

How to Make Easter Egg Fruit Pizzas

Creating these Easter Egg Fruit Pizzas is a fun and straightforward process. Follow these steps, and you’ll have a delightful spring treat ready in no time!

Step 1: Preheat the Oven

Start by preheating your oven to 350°F. This step is crucial because it ensures even baking. If the oven isn’t hot enough, your cookies may spread too much or bake unevenly. Trust me, a well-preheated oven is the secret to achieving that perfect cookie base!

Step 2: Prepare the Cookie Base

Next, take your sugar cookie dough log and slice it into 1/4-inch thick rounds. Place these rounds on a baking sheet lined with parchment paper. Make sure to leave some space between each cookie, as they will spread a little while baking. This is where the magic begins!

Step 3: Bake the Cookies

Pop the baking sheet into the oven and bake for 10-12 minutes. Keep an eye on them! You want them to be lightly golden around the edges. If you overbake, they can become too hard. A little golden hue is your cue that they’re ready to come out!

Step 4: Make the Cream Cheese Mixture

While the cookies cool, it’s time to whip up the creamy topping. In a mixing bowl, combine the softened cream cheese, powdered sugar, vanilla extract, and Greek yogurt. Beat everything together until it’s smooth and creamy. You’re aiming for a texture that’s spreadable but not too runny. This mixture is the heart of your Easter Egg Fruit Pizzas!

Step 5: Assemble the Pizzas

Now comes the fun part! Take each cooled cookie and spread a generous layer of the cream cheese mixture on top. Don’t be shy—make it thick! Then, arrange your assorted fresh fruits on top, decorating them to resemble colorful Easter eggs. Get creative! The more vibrant, the better!

Step 6: Add Optional Toppings

If you want to take your pizzas to the next level, sprinkle some shredded coconut and mini chocolate chips over the fruit. These toppings add texture and a delightful surprise in every bite. Plus, they make your pizzas look even more festive!

Step 7: Serve or Chill

Finally, you can serve your Easter Egg Fruit Pizzas immediately or refrigerate them for up to 2 hours. Chilling them enhances the flavors and makes for a refreshing treat. Either way, they’re sure to be a hit at your spring gathering!

Tips for Success

  • Use room temperature cream cheese for easier mixing and a smoother texture.
  • Experiment with different fruits based on what’s in season for the best flavor.
  • Don’t skip the parchment paper; it prevents sticking and makes cleanup a breeze.
  • For a fun twist, try adding a drizzle of honey or chocolate sauce over the fruit.
  • Make sure to let the cookies cool completely before adding the cream cheese mixture.

Equipment Needed

  • Baking Sheet: A standard sheet works well, but a silicone mat can help with even baking.
  • Parchment Paper: Essential for easy cleanup and preventing sticking.
  • Mixing Bowl: Any size will do, but a medium bowl is perfect for the cream cheese mixture.
  • Electric Mixer: A hand mixer is great, but a whisk can work if you’re feeling strong!
  • Spatula: Useful for spreading the cream cheese mixture evenly on the cookies.

Variations

  • Gluten-Free Option: Substitute the sugar cookie dough with a gluten-free cookie mix or almond flour-based dough for a gluten-free treat.
  • Fruit Swap: Use seasonal fruits like peaches, raspberries, or even citrus slices for a different flavor profile.
  • Yogurt Flavors: Experiment with flavored Greek yogurt, such as honey or berry, to add an extra layer of taste.
  • Nutty Crunch: Add chopped nuts like almonds or walnuts for a delightful crunch and added nutrition.
  • Vegan Version: Use a vegan cream cheese alternative and a plant-based cookie dough to make this recipe vegan-friendly.

Serving Suggestions

  • Pair with Fresh Lemonade: A refreshing glass of lemonade complements the sweetness of the fruit pizzas perfectly.
  • Serve with Whipped Cream: A dollop of whipped cream on the side adds a creamy touch.
  • Garnish with Mint: Fresh mint leaves not only enhance presentation but also add a burst of flavor.
  • Display on a Colorful Platter: Arrange the pizzas on a vibrant platter for an eye-catching centerpiece.
  • Include a Fruit Salad: A side of mixed fruit salad can elevate the spring theme and provide extra freshness.

FAQs about Easter Egg Fruit Pizzas

Can I make Easter Egg Fruit Pizzas ahead of time?

Absolutely! You can prepare the cookie base and the cream cheese mixture a day in advance. Just assemble the pizzas on the day you plan to serve them for the freshest taste. If you need to chill them, do so for up to 2 hours before serving.

What fruits work best for Easter Egg Fruit Pizzas?

While strawberries, blueberries, kiwi, and bananas are popular choices, feel free to get creative! Seasonal fruits like peaches or raspberries can add a unique twist. Just ensure they’re fresh and vibrant for the best presentation.

Can I use a different base instead of sugar cookie dough?

Definitely! If you want a different texture, try using a graham cracker crust or even a gluten-free cookie mix. Each option brings its own flavor and crunch to the table.

How do I store leftover Easter Egg Fruit Pizzas?

Store any leftovers in an airtight container in the refrigerator. They’re best enjoyed within 2 days, as the cookie base may become soft over time. But trust me, they’re so delicious, leftovers might be a rare occurrence!

Can I make these Easter Egg Fruit Pizzas vegan?

Yes! Simply swap the cream cheese for a vegan alternative and use a plant-based cookie dough. You can still enjoy the same delightful flavors while keeping it vegan-friendly!

Final Thoughts

Creating Easter Egg Fruit Pizzas is more than just a recipe; it’s a celebration of spring and togetherness. Each colorful slice brings joy, laughter, and a sense of accomplishment. As you gather around the table with family and friends, these delightful treats become the centerpiece of your gathering, sparking conversations and smiles. The combination of sweet cookie, creamy topping, and fresh fruits is a reminder of the simple pleasures in life. So, roll up your sleeves, embrace the creativity, and let these Easter Egg Fruit Pizzas bring a touch of sweetness to your spring festivities!

jhessica

Easter Egg Fruit Pizzas: A Delightful Spring Treat!

Easter Egg Fruit Pizzas are a delightful spring treat featuring a sugar cookie base topped with a creamy mixture and assorted fresh fruits, perfect for celebrating Easter.
Prep Time 20 minutes
Cook Time 12 minutes
Total Time 32 minutes
Servings: 12 servings
Course: Dessert
Cuisine: American
Calories: 180

Ingredients
  

  • 1 large sugar cookie dough log 16 oz
  • 1 cup cream cheese softened
  • 1/2 cup powdered sugar
  • 1 teaspoon vanilla extract
  • 1/4 cup Greek yogurt plain or vanilla
  • 1 cup assorted fresh fruits strawberries, blueberries, kiwi, bananas, etc.
  • 1/4 cup shredded coconut optional
  • 1/4 cup mini chocolate chips optional

Method
 

  1. Preheat the oven to 350°F.
  2. Slice the sugar cookie dough log into 1/4-inch thick rounds and place them on a baking sheet lined with parchment paper.
  3. Bake for 10-12 minutes or until lightly golden. Let cool completely.
  4. In a mixing bowl, combine the softened cream cheese, powdered sugar, vanilla extract, and Greek yogurt. Beat until smooth and creamy.
  5. Spread a generous layer of the cream cheese mixture onto each cooled cookie round.
  6. Arrange the assorted fresh fruits on top of the cream cheese layer, decorating them to resemble Easter eggs.
  7. If desired, sprinkle shredded coconut and mini chocolate chips over the fruit for added texture and flavor.
  8. Serve immediately or refrigerate for up to 2 hours before serving for a chilled treat.

Nutrition

Serving: 1pizzaCalories: 180kcalCarbohydrates: 22gProtein: 3gFat: 8gSaturated Fat: 4gPolyunsaturated Fat: 2gCholesterol: 20mgSodium: 150mgFiber: 1gSugar: 10g

Notes

  • For a fun twist, try using different flavored yogurt or adding a drizzle of honey over the fruit for extra sweetness.
  • You can also substitute the sugar cookie base with a graham cracker crust for a different texture.

Tried this recipe?

Let us know how it was!

Savory Morel Bourbon Cream Sauce: Elevate Your Dishes!

Introduction to Savory Morel Bourbon Cream Sauce

When I think of comfort food, the rich aroma of Savory Morel Bourbon Cream Sauce wafts through my memories. This sauce is not just a recipe; it’s a culinary hug that elevates any dish.

Whether you’re looking to impress guests or simply want to treat yourself after a long day, this sauce is your go-to.

With just a handful of ingredients, you can create a creamy masterpiece that pairs beautifully with meats, pasta, or even vegetables.

Let’s dive into this delightful journey of flavors that will surely become a staple in your kitchen!

Why You’ll Love This Savory Morel Bourbon Cream Sauce

This Savory Morel Bourbon Cream Sauce is a game-changer in the kitchen.

It’s quick to whip up, taking just 30 minutes from start to finish.

The combination of earthy morels and smooth bourbon creates a flavor explosion that’s hard to resist.

Whether you’re a seasoned chef or a weekend warrior, this sauce makes any meal feel special without the fuss.

Trust me, your taste buds will thank you!

Ingredients for Savory Morel Bourbon Cream Sauce

Creating this Savory Morel Bourbon Cream Sauce is a breeze with the right ingredients. Here’s what you’ll need:

  • Fresh morel mushrooms: These delicate fungi bring an earthy flavor. Look for firm, clean specimens at your local market or specialty store.
  • Unsalted butter: Adds richness and depth. Unsalted allows you to control the seasoning better.
  • Olive oil: A splash of this liquid gold helps sauté the onions and mushrooms, enhancing their flavors.
  • Onion: A small, finely chopped onion provides a sweet base that complements the morels beautifully.
  • Garlic: Minced garlic adds a punch of flavor. Fresh is best, but jarred can work in a pinch.
  • Bourbon: This is the star of the show! It adds a warm, smoky sweetness. Choose a bourbon you enjoy sipping.
  • Heavy cream: For that luscious, velvety texture. If you’re looking for a lighter option, consider using half-and-half or a plant-based cream.
  • Dijon mustard: Just a teaspoon adds a subtle tang that balances the richness of the sauce.
  • Salt and black pepper: Essential for seasoning. Adjust to your taste for the perfect flavor.
  • Fresh parsley: A sprinkle of chopped parsley not only adds color but also a fresh note to finish off the dish.

For exact measurements, check the bottom of the article where you can find everything listed for easy printing. Enjoy the process of gathering these ingredients; each one plays a vital role in crafting this delightful sauce!

How to Make Savory Morel Bourbon Cream Sauce

Creating this Savory Morel Bourbon Cream Sauce is a delightful experience.

Follow these simple steps, and you’ll have a rich, creamy sauce that will impress anyone at your table.

Step 1: Melt the Butter and Olive Oil

Start by heating a large skillet over medium heat.

Add the unsalted butter and olive oil.

Let them melt together, creating a luscious base for your sauce.

The combination of these fats will enhance the flavor of the morels.

Step 2: Sauté the Onion

Once the butter is melted, toss in the finely chopped onion.

Sauté it for about five minutes until it turns translucent.

This step builds a sweet foundation that complements the earthy morels beautifully.

Step 3: Add Garlic

Next, stir in the minced garlic.

Cook it for an additional minute until fragrant.

Garlic adds a punch of flavor that elevates the sauce to new heights.

Step 4: Cook the Morel Mushrooms

Now, it’s time for the star of the show: the morel mushrooms.

Add them to the skillet and cook for about 5-7 minutes.

You want them tender and slightly browned.

This step brings out their unique, earthy flavor.

Step 5: Pour in the Bourbon

With the mushrooms cooked, pour in the bourbon.

Let it simmer for 2-3 minutes.

This allows the alcohol to cook off, leaving behind a warm, smoky sweetness that enhances the sauce.

Step 6: Stir in the Cream and Seasonings

Reduce the heat to low and stir in the heavy cream, Dijon mustard, salt, and black pepper.

Mix everything well, allowing the flavors to meld together.

This is where the sauce gets its creamy texture and rich taste.

Step 7: Simmer to Thicken

Let the sauce simmer for another 5-10 minutes.

Stir occasionally until it thickens to your desired consistency.

The longer you simmer, the richer the flavor becomes.

Step 8: Garnish and Serve

Finally, remove the skillet from heat.

Garnish your Savory Morel Bourbon Cream Sauce with fresh parsley.

Serve it warm over your favorite dish, and watch everyone enjoy the explosion of flavors!

Tips for Success

  • Always clean morel mushrooms gently with a damp cloth to preserve their delicate texture.
  • For a deeper flavor, let the sauce simmer a bit longer; it enhances the richness.
  • Don’t rush the sautéing process; caramelizing the onions adds sweetness.
  • Adjust the seasoning to your taste; a pinch of smoked paprika can add a nice twist.
  • Serve immediately for the best texture; the sauce thickens as it cools.

Equipment Needed

  • Large skillet: A non-stick skillet works wonders, but any heavy-bottomed pan will do.
  • Wooden spoon: Perfect for stirring and scraping up those delicious bits.
  • Measuring cups and spoons: Essential for accuracy, but eyeballing can be fun too!
  • Knife and cutting board: For chopping onions and garlic with ease.

Variations of Savory Morel Bourbon Cream Sauce

  • Vegan Option: Substitute heavy cream with coconut cream or a plant-based cream alternative for a dairy-free version.
  • Spicy Kick: Add a pinch of red pepper flakes or a dash of hot sauce to give the sauce a fiery twist.
  • Herb Infusion: Experiment with fresh herbs like thyme or tarragon for an aromatic touch that complements the morels.
  • Cheesy Delight: Stir in some grated Parmesan or a dairy-free cheese alternative for an extra layer of flavor.
  • Smoky Flavor: Incorporate a splash of liquid smoke or smoked paprika to enhance the bourbon’s depth.

Serving Suggestions for Savory Morel Bourbon Cream Sauce

  • Pasta: Drizzle the sauce over fettuccine or gnocchi for a luxurious meal.
  • Grilled Chicken: Pair it with grilled chicken breasts for a delightful flavor combination.
  • Steak: Serve it over a perfectly cooked steak for an elevated dining experience.
  • Wine: Enjoy with a glass of Chardonnay or a smooth bourbon to complement the sauce.
  • Presentation: Garnish with fresh parsley and serve in a warm bowl for an inviting look.

FAQs about Savory Morel Bourbon Cream Sauce

Can I use dried morel mushrooms instead of fresh?

Absolutely! If fresh morels aren’t available, dried morels can work. Just rehydrate them in warm water for about 30 minutes before using. This will help bring back their unique flavor and texture.

What can I serve with Savory Morel Bourbon Cream Sauce?

This sauce pairs beautifully with grilled meats, pasta, or even roasted vegetables. It’s versatile enough to elevate any dish you choose!

How do I store leftovers of the sauce?

Store any leftover Savory Morel Bourbon Cream Sauce in an airtight container in the fridge for up to three days. Reheat gently on the stovetop, adding a splash of cream if it thickens too much.

Can I make this sauce ahead of time?

Yes! You can prepare the sauce a day in advance. Just reheat it gently before serving, and it will still taste fantastic!

Is this sauce gluten-free?

Yes, this Savory Morel Bourbon Cream Sauce is gluten-free! Just ensure that any additional ingredients you use, like Worcestershire sauce, are also gluten-free.

Final Thoughts

Creating this Savory Morel Bourbon Cream Sauce is more than just cooking; it’s an experience that brings joy to your kitchen.

The rich flavors and creamy texture transform simple meals into something extraordinary.

Whether you’re sharing it with family or savoring it solo, this sauce has a way of making every bite feel special.

It’s a reminder that cooking can be both an art and a comfort.

So, roll up your sleeves, gather those ingredients, and let this sauce elevate your culinary adventures.

Trust me, your taste buds will be forever grateful!

jhessica

Savory Morel Bourbon Cream Sauce: Elevate Your Dishes!

A rich and creamy sauce made with fresh morel mushrooms and bourbon, perfect for elevating your dishes.
Prep Time 10 minutes
Cook Time 20 minutes
Total Time 30 minutes
Servings: 4 servings
Course: Sauce
Cuisine: American
Calories: 320

Ingredients
  

  • 8 ounces fresh morel mushrooms cleaned and sliced
  • 2 tablespoons unsalted butter
  • 1 tablespoon olive oil
  • 1 small onion finely chopped
  • 2 cloves garlic minced
  • 1/2 cup bourbon
  • 1 cup heavy cream
  • 1 teaspoon Dijon mustard
  • 1/2 teaspoon salt
  • 1/4 teaspoon black pepper
  • 1 tablespoon fresh parsley chopped (for garnish)

Method
 

  1. Melt the butter and olive oil in a large skillet over medium heat.
  2. Add the chopped onion and sauté until translucent, about 5 minutes.
  3. Stir in the minced garlic and cook for an additional minute until fragrant.
  4. Add the sliced morel mushrooms to the skillet and cook for about 5-7 minutes, or until they are tender and browned.
  5. Pour in the bourbon and let it simmer for 2-3 minutes, allowing the alcohol to cook off slightly.
  6. Reduce the heat to low and stir in the heavy cream, Dijon mustard, salt, and black pepper.
  7. Simmer for another 5-10 minutes, stirring occasionally, until the sauce thickens to your desired consistency.
  8. Remove from heat and garnish with fresh parsley before serving.

Nutrition

Serving: 1/4 of the recipeCalories: 320kcalCarbohydrates: 5gProtein: 4gFat: 30gSaturated Fat: 18gPolyunsaturated Fat: 10gCholesterol: 80mgSodium: 300mgSugar: 1g

Notes

  • For a richer flavor, try adding a splash of Worcestershire sauce or a pinch of smoked paprika.
  • If you want a lighter version, substitute half of the heavy cream with low-fat milk or a plant-based cream alternative.

Tried this recipe?

Let us know how it was!

Chicken Shawarma with Garlic Sauce: A Flavorful Delight

Introduction to Chicken Shawarma with Garlic Sauce

There’s something magical about the aroma of spices wafting through the kitchen, isn’t there? When I think of comfort food, Chicken Shawarma with Garlic Sauce always comes to mind. This dish is not just a meal; it’s an experience that brings people together. Whether you’re looking for a quick solution for a busy weeknight or a dish to impress your loved ones, this recipe has you covered. The tender, marinated chicken paired with that creamy garlic sauce is a flavor explosion that will have everyone asking for seconds. Let’s dive into this culinary adventure!

Why You’ll Love This Chicken Shawarma with Garlic Sauce

This Chicken Shawarma with Garlic Sauce is a game-changer for your dinner routine. It’s incredibly easy to whip up, making it perfect for those hectic evenings. The vibrant spices create a taste that transports you straight to the streets of the Middle East. Plus, the creamy garlic sauce adds a rich, tangy twist that elevates every bite. Trust me, this dish will quickly become a family favorite!

Ingredients for Chicken Shawarma with Garlic Sauce

Gathering the right ingredients is the first step to creating a delicious Chicken Shawarma with Garlic Sauce. Here’s what you’ll need:

  • Boneless, skinless chicken thighs: These are juicy and flavorful, perfect for absorbing the marinade.
  • Olive oil: Adds richness and helps the spices stick to the chicken.
  • Ground cumin: This spice brings a warm, earthy flavor that’s essential in Middle Eastern cuisine.
  • Ground coriander: Adds a citrusy note that brightens the dish.
  • Paprika: For a hint of sweetness and vibrant color.
  • Ground turmeric: This golden spice not only adds color but also a subtle warmth.
  • Ground cinnamon: A surprising addition that enhances the overall flavor profile.
  • Cayenne pepper: Adjust this to your heat preference; it gives a nice kick!
  • Garlic: Freshly minced garlic is a must for that aromatic punch.
  • Salt and black pepper: Essential for seasoning and enhancing all the flavors.
  • Lemon juice: Freshly squeezed juice brightens the dish and tenderizes the chicken.
  • Plain yogurt: Adds creaminess to the garlic sauce and balances the spices.
  • Mayonnaise: For a rich, creamy texture in the sauce.
  • Apple cider vinegar: A splash adds tanginess to the garlic sauce.
  • Dijon mustard: This gives a subtle depth of flavor to the sauce.
  • Pita bread or flatbreads: Perfect for wrapping up the delicious chicken.
  • Fresh vegetables: Think tomatoes, cucumbers, and lettuce for a refreshing crunch.

For exact measurements, check the bottom of the article where you can find everything listed for easy printing. Feel free to get creative with your ingredients; cooking is all about personal touches!

How to Make Chicken Shawarma with Garlic Sauce

Now that you have your ingredients ready, let’s get cooking! This Chicken Shawarma with Garlic Sauce is straightforward and fun to make. Follow these steps, and you’ll be savoring a delicious meal in no time.

Step 1: Prepare the Marinade

Start by grabbing a large bowl. Combine the olive oil, cumin, coriander, paprika, turmeric, cinnamon, cayenne pepper, minced garlic, salt, black pepper, and lemon juice. Mix everything well until it forms a smooth marinade. The aroma will be incredible! This marinade is the heart of your Chicken Shawarma, so don’t rush it.

Step 2: Marinate the Chicken

Next, add the boneless, skinless chicken thighs to the marinade. Make sure each piece is well coated. Cover the bowl with plastic wrap and pop it in the fridge. Let it marinate for at least an hour, but if you can, let it sit overnight. The longer it marinates, the more flavorful it becomes!

Step 3: Cook the Chicken

When you’re ready to cook, preheat your grill or a large skillet over medium-high heat. Remove the chicken from the marinade, shaking off any excess. Grill or cook the chicken for about 6-7 minutes on each side. You want it to reach an internal temperature of 165°F and have a nice golden-brown color. The sizzling sound will make your mouth water!

Step 4: Make the Garlic Sauce

While the chicken is cooking, let’s whip up that creamy garlic sauce. In a small bowl, whisk together the plain yogurt, mayonnaise, apple cider vinegar, Dijon mustard, and a pinch of salt. Taste it and adjust the seasoning if needed. This sauce is the perfect complement to your Chicken Shawarma, adding a tangy richness that ties everything together.

Step 5: Slice and Serve

Once the chicken is cooked, remove it from the heat and let it rest for about 5 minutes. This helps keep it juicy. Slice the chicken into thin strips. Now, it’s time to assemble! Serve the sliced chicken in pita bread or flatbreads, topped with fresh vegetables and a generous drizzle of garlic sauce. Enjoy every bite of this flavorful delight!

Tips for Success

  • Let the chicken marinate overnight for maximum flavor.
  • Use a meat thermometer to ensure perfect doneness at 165°F.
  • For extra juiciness, let the chicken rest before slicing.
  • Experiment with spices; add more cayenne for heat or extra cumin for depth.
  • Serve with a side of tabbouleh or a simple salad for a complete meal.

Equipment Needed

  • Grill or Skillet: A grill gives that smoky flavor, but a skillet works just as well.
  • Large Bowl: For mixing the marinade; any mixing bowl will do.
  • Whisk: Essential for blending the garlic sauce; a fork can work in a pinch.
  • Meat Thermometer: To check chicken doneness; a knife can help, too.

Variations

  • Spicy Shawarma: Add sliced jalapeños or a drizzle of your favorite hot sauce to the wraps for an extra kick.
  • Vegetarian Option: Substitute chicken with marinated grilled vegetables like zucchini, bell peppers, and eggplant for a delicious plant-based version.
  • Gluten-Free: Use gluten-free pita or lettuce wraps to make this dish suitable for gluten-sensitive diets.
  • Herb-Infused: Mix fresh herbs like parsley or cilantro into the garlic sauce for a fresh twist.
  • Different Proteins: Try using lamb or beef for a different flavor profile while keeping the same marinade.

Serving Suggestions

  • Fresh Salad: Pair your Chicken Shawarma with a crisp salad of cucumbers, tomatoes, and parsley for a refreshing contrast.
  • Rice Pilaf: Serve with fragrant rice pilaf to soak up the delicious garlic sauce.
  • Cold Beverages: Enjoy with a chilled lemonade or mint tea to balance the spices.
  • Presentation: Garnish with lemon wedges and fresh herbs for a vibrant touch.

FAQs about Chicken Shawarma with Garlic Sauce

Can I use chicken breasts instead of thighs for this Chicken Shawarma?

Absolutely! While chicken thighs are juicier, chicken breasts can be used for a leaner option. Just be careful not to overcook them, as they can dry out more easily.

How can I make the garlic sauce spicier?

If you’re looking to add some heat, consider mixing in a pinch of cayenne pepper or a splash of hot sauce. You can also add minced jalapeños for an extra kick!

Can I prepare the marinade in advance?

Yes! You can prepare the marinade a day ahead and store it in the fridge. Just add the chicken when you’re ready to cook. This will save you time and enhance the flavors.

What sides pair well with Chicken Shawarma?

Fresh salads, rice pilaf, or even roasted vegetables make excellent sides. They complement the flavors of the Chicken Shawarma with Garlic Sauce beautifully.

Is this Chicken Shawarma recipe gluten-free?

Yes, it is! Just make sure to use gluten-free pita or opt for lettuce wraps instead. Enjoy this delicious dish without any worries!

Final Thoughts

Cooking Chicken Shawarma with Garlic Sauce is more than just preparing a meal; it’s about creating memories. The vibrant spices and creamy sauce come together to form a dish that warms the heart and satisfies the soul. Whether you’re sharing it with family or enjoying it solo, each bite is a reminder of the joy that good food brings. This recipe is a celebration of flavors, perfect for any occasion. So, roll up your sleeves, embrace the process, and let the deliciousness unfold. You’ll find that this dish quickly becomes a cherished favorite in your kitchen!

jhessica

Chicken Shawarma with Garlic Sauce: A Flavorful Delight

A flavorful Chicken Shawarma recipe served with a creamy garlic sauce, perfect for a delicious meal.
Prep Time 1 hour
Cook Time 15 minutes
Total Time 1 hour 15 minutes
Servings: 4 servings
Course: Main Course
Cuisine: Middle Eastern
Calories: 450

Ingredients
  

  • 2 pounds boneless skinless chicken thighs
  • 1/4 cup olive oil
  • 1 tablespoon ground cumin
  • 1 tablespoon ground coriander
  • 1 tablespoon paprika
  • 1 teaspoon ground turmeric
  • 1 teaspoon ground cinnamon
  • 1 teaspoon cayenne pepper adjust to taste
  • 4 cloves garlic minced
  • 1 teaspoon salt
  • 1/2 teaspoon black pepper
  • Juice of 2 lemons
  • 1/4 cup plain yogurt
  • 1/4 cup mayonnaise
  • 1 tablespoon apple cider vinegar
  • 1 teaspoon Dijon mustard
  • 1/4 teaspoon salt
  • Pita bread or flatbreads for serving
  • Fresh vegetables tomatoes, cucumbers, lettuce for garnish

Method
 

  1. In a large bowl, combine olive oil, cumin, coriander, paprika, turmeric, cinnamon, cayenne pepper, minced garlic, salt, black pepper, and lemon juice. Mix well to create a marinade.
  2. Add the chicken thighs to the marinade, ensuring they are well coated. Cover and refrigerate for at least 1 hour, or up to overnight for best flavor.
  3. Preheat your grill or a large skillet over medium-high heat. Remove the chicken from the marinade and discard any excess marinade.
  4. Grill or cook the chicken for about 6-7 minutes per side, or until the internal temperature reaches 165°F and the chicken is nicely browned.
  5. While the chicken is cooking, prepare the garlic sauce by whisking together yogurt, mayonnaise, apple cider vinegar, Dijon mustard, and salt in a small bowl. Adjust seasoning to taste.
  6. Once cooked, remove the chicken from the heat and let it rest for 5 minutes before slicing it into thin strips.
  7. Serve the sliced chicken in pita bread or flatbreads, topped with fresh vegetables and drizzled with garlic sauce.

Nutrition

Serving: 1servingCalories: 450kcalCarbohydrates: 10gProtein: 30gFat: 30gSaturated Fat: 6gPolyunsaturated Fat: 24gCholesterol: 120mgSodium: 800mgFiber: 2gSugar: 2g

Notes

  • For a spicier kick, add sliced jalapeños or a drizzle of hot sauce to the wraps.
  • You can also substitute chicken thighs with chicken breasts for a leaner option.
  • Serve with a side of tabbouleh or a simple salad for a complete meal.

Tried this recipe?

Let us know how it was!

Mongolian Ground Beef Noodles: A Flavorful Dinner Idea

Introduction to Mongolian Ground Beef Noodles

There’s something magical about a dish that brings comfort and flavor together, and Mongolian Ground Beef Noodles does just that. After a long day, when the thought of cooking feels overwhelming, this recipe shines as a quick solution. It’s not just about filling your stomach; it’s about savoring every bite. The tender egg noodles, seasoned ground beef, and vibrant veggies create a symphony of taste that’s sure to impress your loved ones. Whether it’s a weeknight dinner or a casual gathering, this dish is your ticket to a satisfying meal that everyone will love.

Why You’ll Love This Mongolian Ground Beef Noodles

This dish is a game-changer for busy nights. It’s quick to whip up, taking just 30 minutes from start to finish. The flavors are bold yet comforting, making it a hit with everyone at the table. Plus, it’s versatile! You can easily customize it with your favorite veggies or proteins. With Mongolian Ground Beef Noodles, you get a delicious meal that satisfies cravings without the fuss.

Ingredients for Mongolian Ground Beef Noodles

Gathering the right ingredients is the first step to creating a delicious plate of Mongolian Ground Beef Noodles. Here’s what you’ll need:

  • Egg Noodles: These are the backbone of the dish, providing a chewy texture that soaks up the sauce beautifully.
  • Ground Beef: The star protein! It adds richness and flavor. You can swap it for ground turkey or chicken for a lighter option.
  • Vegetable Oil: Used for sautéing, it helps to cook the ingredients evenly without sticking.
  • Onion: Diced onions bring sweetness and depth to the dish. They’re essential for building flavor.
  • Garlic: Minced garlic adds a punch of aroma and taste, elevating the overall flavor profile.
  • Bell Pepper: Sliced bell peppers add a pop of color and crunch. Feel free to use any color you like!
  • Broccoli Florets: These not only add nutrition but also a lovely green contrast to the dish.
  • Soy Sauce: This savory sauce is key for that umami flavor. Low-sodium options are available if you’re watching your salt intake.
  • Brown Sugar: A touch of sweetness balances the saltiness of the soy sauce, creating a harmonious flavor.
  • Rice Vinegar: This adds a tangy note that brightens the dish. You can substitute it with apple cider vinegar if needed.
  • Ground Ginger: A hint of warmth and spice, ginger complements the other flavors beautifully.
  • Red Pepper Flakes: Optional, but they add a nice kick if you enjoy a bit of heat.
  • Green Onions: Sliced for garnish, they add freshness and a mild onion flavor to finish off the dish.

For exact quantities, check the bottom of the article where you can find everything listed for easy printing!

How to Make Mongolian Ground Beef Noodles

Creating Mongolian Ground Beef Noodles is a straightforward process that yields a delicious meal. Follow these simple steps, and you’ll have a flavorful dish ready in no time!

Step 1: Cook the Egg Noodles

Start by boiling a pot of water. Once it’s bubbling, add the egg noodles and cook them according to the package instructions. Usually, this takes about 5-7 minutes. You want them al dente, so they hold up when mixed with the beef and veggies. After cooking, drain the noodles and set them aside. A quick rinse under cold water can help prevent sticking.

Step 2: Sauté the Onions and Garlic

In a large skillet or wok, heat the vegetable oil over medium-high heat. Toss in the diced onion and sauté for about 2-3 minutes until they soften and become translucent. This step is crucial; it builds the flavor base for your dish. Next, add the minced garlic and cook for another 30 seconds. You’ll know it’s ready when the kitchen fills with that irresistible aroma!

Step 3: Brown the Ground Beef

Now, it’s time for the ground beef to shine. Add it to the skillet, breaking it apart with a spatula. Cook for about 5-7 minutes until it’s browned and no longer pink. Make sure to stir occasionally to ensure even cooking. This step is essential for achieving that rich, savory flavor that makes Mongolian Ground Beef Noodles so satisfying.

Step 4: Add Vegetables

Once the beef is cooked through, it’s time to add the sliced bell pepper and broccoli florets. Stir them in and cook for another 3-4 minutes. You want the veggies to be tender but still vibrant. This timing ensures they retain some crunch, adding texture to your dish.

Step 5: Prepare the Sauce

In a small bowl, whisk together the soy sauce, brown sugar, rice vinegar, ground ginger, and red pepper flakes (if you’re feeling spicy). This sauce is the heart of the dish, bringing all the flavors together. Pour it over the beef and vegetables in the skillet, stirring to coat everything evenly.

Step 6: Combine Everything

Finally, add the cooked egg noodles to the skillet. Toss everything together gently, ensuring the noodles are well coated with the sauce and mixed with the beef and veggies. Heat through for about 2-3 minutes. This step is where the magic happens, transforming all the ingredients into a cohesive, mouthwatering dish!

Tips for Success

  • Don’t overcook the noodles; they should be al dente for the best texture.
  • Use a large skillet or wok to give everything room to cook evenly.
  • Feel free to customize with your favorite vegetables for added nutrition.
  • For extra flavor, let the sauce simmer for a minute before adding the noodles.
  • Garnish with fresh herbs for a pop of color and taste!

Equipment Needed

  • Large Skillet or Wok: Essential for sautéing and combining ingredients. A deep frying pan works too.
  • Pot: For boiling the egg noodles. Any large pot will do.
  • Spatula: Perfect for breaking apart the beef and stirring.
  • Measuring Cups and Spoons: Handy for accurate ingredient measurements.

Variations

  • Protein Swaps: Try using ground turkey, chicken, or even tofu for a vegetarian option.
  • Vegetable Medley: Add snap peas, carrots, or zucchini for extra color and nutrition.
  • Spicy Kick: Incorporate sriracha or chili paste for a bolder flavor profile.
  • Gluten-Free Option: Use gluten-free noodles or spiralized vegetables like zucchini or sweet potatoes.
  • Herb Infusion: Toss in fresh basil or cilantro at the end for a fresh twist.

Serving Suggestions

  • Side Salad: A crisp green salad with a tangy vinaigrette complements the richness of the noodles.
  • Steamed Rice: Serve with a side of jasmine or basmati rice to soak up the delicious sauce.
  • Drink Pairing: A light beer or iced tea balances the flavors perfectly.
  • Presentation: Garnish with extra green onions and sesame seeds for a pop of color.

FAQs about Mongolian Ground Beef Noodles

Can I make Mongolian Ground Beef Noodles ahead of time?

Absolutely! You can prepare the beef and vegetable mixture in advance and store it in the fridge. Just cook the noodles fresh when you’re ready to serve. This way, you’ll have a quick meal ready to go!

What can I substitute for ground beef?

If you’re looking for alternatives, ground turkey or chicken works well. For a vegetarian option, try using crumbled tofu or tempeh. Each option brings its own unique flavor to the dish!

How can I make this dish spicier?

To amp up the heat, add more red pepper flakes or a splash of sriracha to the sauce. You can also toss in some sliced jalapeños for an extra kick. Adjust to your taste!

Is this recipe gluten-free?

Yes, you can make Mongolian Ground Beef Noodles gluten-free by using gluten-free egg noodles or spiralized vegetables like zucchini. Just ensure your soy sauce is gluten-free as well.

Can I add more vegetables to this dish?

Definitely! Feel free to get creative with your veggie choices. Snap peas, carrots, or even baby corn can add color and nutrition. Just remember to adjust the cooking time for optimal tenderness.

Final Thoughts

Cooking Mongolian Ground Beef Noodles is more than just preparing a meal; it’s about creating a moment of joy. The aroma wafting through your kitchen, the vibrant colors on your plate, and the satisfaction of a dish that pleases everyone at the table make it all worthwhile. This recipe is a reminder that delicious food doesn’t have to be complicated. With just a few ingredients and a little love, you can whip up a comforting dinner that brings smiles and full bellies. So, roll up your sleeves and dive into this culinary adventure—you won’t regret it!

jhessica

Mongolian Ground Beef Noodles: A Flavorful Dinner Idea

Mongolian Ground Beef Noodles is a flavorful and satisfying dish that combines tender egg noodles with seasoned ground beef and fresh vegetables, all tossed in a savory sauce.
Prep Time 10 minutes
Cook Time 20 minutes
Total Time 30 minutes
Servings: 4 servings
Course: Dinner
Cuisine: Mongolian
Calories: 450

Ingredients
  

  • 8 ounces of egg noodles
  • 1 pound of ground beef
  • 2 tablespoons of vegetable oil
  • 1 small onion diced
  • 3 cloves of garlic minced
  • 1 cup of bell pepper sliced
  • 1 cup of broccoli florets
  • 1/4 cup of soy sauce
  • 2 tablespoons of brown sugar
  • 1 tablespoon of rice vinegar
  • 1 teaspoon of ground ginger
  • 1/2 teaspoon of red pepper flakes optional
  • 2 green onions sliced (for garnish)

Method
 

  1. Cook the egg noodles according to package instructions. Drain and set aside.
  2. In a large skillet or wok, heat the vegetable oil over medium-high heat. Add the diced onion and cook for 2-3 minutes until softened.
  3. Add the minced garlic and cook for an additional 30 seconds until fragrant.
  4. Add the ground beef to the skillet, breaking it apart with a spatula. Cook until browned and cooked through, about 5-7 minutes.
  5. Stir in the sliced bell pepper and broccoli florets. Cook for another 3-4 minutes until the vegetables are tender.
  6. In a small bowl, whisk together the soy sauce, brown sugar, rice vinegar, ground ginger, and red pepper flakes (if using). Pour this sauce over the beef and vegetables in the skillet.
  7. Add the cooked egg noodles to the skillet and toss everything together until well combined and heated through, about 2-3 minutes.
  8. Serve hot, garnished with sliced green onions.

Nutrition

Serving: 1servingCalories: 450kcalCarbohydrates: 45gProtein: 25gFat: 20gSaturated Fat: 7gPolyunsaturated Fat: 13gCholesterol: 70mgSodium: 800mgFiber: 2gSugar: 8g

Notes

  • For a healthier option, substitute ground turkey or chicken for the beef.
  • Add additional vegetables like snap peas or carrots for extra color and nutrition.

Tried this recipe?

Let us know how it was!

Irish Soda Bread Muffins: Enjoy a Delightful Recipe!

Introduction to Irish Soda Bread Muffins

There’s something magical about the aroma of freshly baked goods wafting through the kitchen. It takes me back to my childhood, where my grandmother would whip up her famous Irish Soda Bread. Now, I’ve transformed that classic into delightful Irish Soda Bread Muffins. These muffins are not just easy to make; they’re a quick solution for busy mornings or a cozy snack to share with friends. With a tender crumb and a hint of sweetness, they’re perfect for breakfast or an afternoon treat. Trust me, once you try these, they’ll become a staple in your home!

Why You’ll Love This Irish Soda Bread Muffins

These Irish Soda Bread Muffins are a game-changer in the kitchen. They come together in just 35 minutes, making them perfect for those hectic mornings. The combination of all-purpose and whole wheat flour gives them a hearty texture, while the buttermilk adds a delightful tang. Plus, they’re versatile! Whether you enjoy them plain or with a handful of raisins, each bite is a warm hug for your taste buds.

Ingredients for Irish Soda Bread Muffins

Gathering the right ingredients is the first step to creating these delightful Irish Soda Bread Muffins. Here’s what you’ll need:

  • All-purpose flour: This forms the base of your muffins, providing structure and a light texture.
  • Whole wheat flour: Adds a nutty flavor and extra fiber, making your muffins heartier.
  • Baking soda: The leavening agent that helps the muffins rise, giving them that perfect fluffy texture.
  • Salt: Enhances the flavors and balances the sweetness in the muffins.
  • Granulated sugar: Just a touch of sweetness to complement the savory elements.
  • Buttermilk: This ingredient adds moisture and a tangy flavor, making the muffins tender.
  • Large egg: Binds the ingredients together and adds richness.
  • Unsalted butter: Melted for a rich flavor and moist texture; it’s a must for that homemade taste.
  • Raisins or currants (optional): These dried fruits add a sweet burst, but feel free to skip them if you prefer a more traditional muffin.

For those looking to mix things up, consider substituting the raisins with dried cranberries or chopped dried apricots for a different flavor profile. You can find the exact measurements for these ingredients at the bottom of the article, ready for printing!

How to Make Irish Soda Bread Muffins

Step 1: Preheat the Oven

Start by preheating your oven to 375°F (190°C). This step is crucial for achieving that perfect rise and golden color. While the oven warms up, prepare your muffin tin by lining it with paper liners or giving it a light grease. This ensures easy removal later!

Step 2: Mix Dry Ingredients

In a large mixing bowl, combine the all-purpose flour, whole wheat flour, baking soda, salt, and sugar. Whisk them together until they’re well blended. This step is essential for evenly distributing the baking soda, which helps your muffins rise beautifully. A good mix sets the stage for success!

Step 3: Combine Wet Ingredients

In a separate bowl, whisk together the buttermilk, egg, and melted butter until smooth. This mixture brings moisture and richness to your muffins. The buttermilk adds a delightful tang, enhancing the overall flavor. Make sure everything is well combined for a consistent batter!

Step 4: Combine Wet and Dry Ingredients

Now, pour the wet ingredients into the dry ingredients. Gently stir until just combined. Be careful not to overmix; a few lumps are perfectly fine! If you’re adding raisins or currants, fold them in at this stage. This keeps your muffins light and fluffy.

Step 5: Fill Muffin Cups

Using a spoon or a scoop, fill each muffin cup about ¾ full with batter. This allows room for the muffins to rise without overflowing. An even fill ensures that all your muffins bake uniformly, giving you that perfect shape and texture!

Step 6: Bake the Muffins

Place the muffin tin in the preheated oven and bake for 18-20 minutes. Keep an eye on them! You’ll know they’re done when they’re golden brown and a toothpick inserted in the center comes out clean. This is the moment you’ve been waiting for!

Step 7: Cool and Serve

Once baked, let the muffins cool in the pan for about 5 minutes. Then, transfer them to a wire rack to cool completely. Serve them warm or at room temperature. They’re delightful on their own or with a pat of butter. Enjoy every bite!

Tips for Success

  • Measure your flour accurately; too much can lead to dense muffins.
  • Use room temperature ingredients for better mixing.
  • Don’t overmix the batter; it’s okay if it’s a bit lumpy.
  • Experiment with add-ins like nuts or chocolate chips for extra flavor.
  • Store leftover muffins in an airtight container to keep them fresh.

Equipment Needed

  • Muffin tin: Essential for baking your muffins. If you don’t have one, use a cupcake pan as an alternative.
  • Mixing bowls: A set of various sizes is handy for combining ingredients.
  • Whisk: Perfect for mixing dry and wet ingredients smoothly.
  • Spoon or scoop: For filling muffin cups evenly.
  • Wire rack: Ideal for cooling your muffins after baking.

Variations

  • Nutty Delight: Add ½ cup of chopped walnuts or pecans for a crunchy texture and nutty flavor.
  • Chocolate Lovers: Mix in ½ cup of chocolate chips for a sweet twist that’s sure to please.
  • Fruit Fusion: Substitute raisins with dried cranberries, apricots, or even chopped apples for a fruity kick.
  • Herb-Infused: Add a teaspoon of dried herbs like rosemary or thyme for a savory version that pairs well with soups.
  • Gluten-Free Option: Use a gluten-free flour blend to make these muffins suitable for those with gluten sensitivities.

Serving Suggestions

  • Pair your muffins with a steaming cup of Irish breakfast tea for a cozy experience.
  • Spread a little butter or cream cheese on warm muffins for added richness.
  • Serve alongside a fresh fruit salad for a balanced breakfast.
  • For a sweet touch, drizzle honey or maple syrup over the muffins.

FAQs about Irish Soda Bread Muffins

Can I make these muffins ahead of time?

Absolutely! You can prepare the batter the night before and store it in the fridge. Just remember to give it a gentle stir before baking. Freshly baked Irish Soda Bread Muffins in the morning? Yes, please!

What can I substitute for buttermilk?

If you don’t have buttermilk on hand, mix one cup of milk with a tablespoon of vinegar or lemon juice. Let it sit for about 5 minutes, and you’ll have a perfect buttermilk substitute for your muffins.

How do I store leftover muffins?

To keep your muffins fresh, store them in an airtight container at room temperature for up to three days. You can also freeze them for longer storage. Just thaw and enjoy whenever you crave a tasty treat!

Can I add other ingredients to the batter?

Definitely! Feel free to get creative. You can add nuts, chocolate chips, or even spices like cinnamon for a unique twist on these Irish Soda Bread Muffins. The possibilities are endless!

Are these muffins suitable for a vegetarian diet?

Yes, these muffins are vegetarian-friendly! They contain no meat or animal-derived ingredients, making them a great option for anyone following a vegetarian lifestyle.

Final Thoughts

Making Irish Soda Bread Muffins is more than just baking; it’s about creating memories and sharing joy. The simplicity of the recipe allows anyone to whip up a batch, filling the kitchen with warmth and delightful aromas. Each muffin is a little piece of comfort, perfect for breakfast or a snack. Whether you enjoy them plain or with your favorite add-ins, these muffins are sure to bring smiles to your table. So, roll up your sleeves, gather your ingredients, and let the magic of baking transform your day. Trust me, you won’t regret it!

jhessica

Irish Soda Bread Muffins: Enjoy a Delightful Recipe!

Delicious and easy-to-make Irish Soda Bread Muffins, perfect for breakfast or a snack.
Prep Time 15 minutes
Cook Time 20 minutes
Total Time 35 minutes
Servings: 12 muffins
Course: Baking
Cuisine: Irish
Calories: 150

Ingredients
  

  • 2 cups all-purpose flour
  • 1 cup whole wheat flour
  • 1 teaspoon baking soda
  • 1 teaspoon salt
  • 1 tablespoon granulated sugar
  • 1 ¾ cups buttermilk
  • 1 large egg
  • 4 tablespoons unsalted butter melted
  • ½ cup raisins or currants optional

Method
 

  1. Preheat your oven to 375°F (190°C) and line a muffin tin with paper liners or grease it lightly.
  2. In a large mixing bowl, whisk together the all-purpose flour, whole wheat flour, baking soda, salt, and sugar until well combined.
  3. In a separate bowl, mix the buttermilk, egg, and melted butter until smooth.
  4. Pour the wet ingredients into the dry ingredients and stir gently until just combined. If using, fold in the raisins or currants. Be careful not to overmix.
  5. Divide the batter evenly among the muffin cups, filling each about ¾ full.
  6. Bake in the preheated oven for 18-20 minutes, or until the muffins are golden brown and a toothpick inserted in the center comes out clean.
  7. Allow the muffins to cool in the pan for 5 minutes before transferring them to a wire rack to cool completely.

Nutrition

Serving: 1muffinCalories: 150kcalCarbohydrates: 25gProtein: 4gFat: 5gSaturated Fat: 3gPolyunsaturated Fat: 2gCholesterol: 20mgSodium: 200mgFiber: 1gSugar: 1g

Notes

  • For a sweeter muffin, add ½ cup of chopped nuts or chocolate chips to the batter.
  • Substitute the raisins with dried cranberries or chopped dried apricots for a different flavor profile.

Tried this recipe?

Let us know how it was!

Cream Cheese Banana Bread: Discover a Delicious Twist!

Introduction to Cream Cheese Banana Bread

There’s something magical about the aroma of freshly baked bread wafting through the house. It takes me back to my childhood, where my mom would whip up banana bread on lazy Sunday mornings. This Cream Cheese Banana Bread is a delightful twist on that classic recipe, adding a rich creaminess that elevates every bite. Whether you’re looking for a quick solution for a busy day or a dish to impress your loved ones, this recipe is your answer. It’s simple, satisfying, and perfect for any occasion, making it a must-try for every home cook.

Why You’ll Love This Cream Cheese Banana Bread

This Cream Cheese Banana Bread is a game-changer in the kitchen. It’s incredibly easy to whip up, making it perfect for those busy mornings or last-minute gatherings. The rich cream cheese adds a depth of flavor that takes the traditional banana bread to new heights. Plus, it’s a crowd-pleaser! Your family and friends will be begging for seconds, and you’ll love how quickly it disappears.

Ingredients for Cream Cheese Banana Bread

Gathering the right ingredients is the first step to creating this delicious Cream Cheese Banana Bread. Here’s what you’ll need:

  • Ripe Bananas: The star of the show! Look for bananas that are brown-speckled for maximum sweetness and flavor.
  • Cream Cheese: This adds a rich, creamy texture that elevates the bread. Make sure it’s softened for easy mixing.
  • Unsalted Butter: A must for that buttery flavor. Softened butter blends seamlessly with the cream cheese.
  • Granulated Sugar: Sweetness is key! It balances the flavors and helps create a lovely crust.
  • Large Eggs: These provide structure and moisture. They also help bind everything together.
  • Vanilla Extract: A splash of vanilla enhances the overall flavor, making each bite more delightful.
  • Baking Soda: This is your leavening agent, helping the bread rise to perfection.
  • Salt: Just a pinch! It enhances the sweetness and balances the flavors.
  • All-Purpose Flour: The base of your bread. It gives it structure and a nice crumb.
  • Chopped Walnuts or Pecans (optional): For a delightful crunch! Feel free to skip them if you prefer a smoother texture.

For those interested in variations, you can substitute half of the all-purpose flour with whole wheat flour for a healthier twist. If you’re feeling adventurous, consider adding chocolate chips for a sweet surprise!

Exact measurements for these ingredients can be found at the bottom of the article, ready for printing.

How to Make Cream Cheese Banana Bread

Now that you have your ingredients ready, let’s dive into the fun part—making this Cream Cheese Banana Bread! Follow these simple steps, and you’ll have a delicious loaf in no time.

Step 1: Preheat the Oven

First things first, preheat your oven to 350°F (175°C). This ensures your bread bakes evenly. While the oven warms up, prepare your loaf pan by greasing it or lining it with parchment paper. This will make it easier to remove the bread later.

Step 2: Cream the Butter and Cream Cheese

In a large mixing bowl, beat the softened cream cheese and butter together until smooth and creamy. This step is crucial! The creaminess will give your banana bread that rich texture we all love. Use a hand mixer or a sturdy whisk—whatever you have on hand.

Step 3: Combine with Sugar

Next, add the granulated sugar to the cream cheese mixture. Beat it all together until well combined. You want the sugar to dissolve into the creamy goodness, creating a sweet base for your bread.

Step 4: Mix in Bananas and Eggs

Now, it’s time to incorporate the mashed bananas, eggs, and vanilla extract. Mix until everything is fully combined. The bananas add moisture and flavor, while the eggs help bind the ingredients together. Don’t be shy—get in there and mix it up!

Step 5: Combine Dry Ingredients

In a separate bowl, whisk together the baking soda, salt, and flour. Gradually add this dry mixture to the wet ingredients. Stir gently until just combined. Be careful not to overmix; a few lumps are perfectly fine. This will keep your bread light and fluffy.

Step 6: Fold in Nuts

If you’re using nuts, now’s the time to gently fold in the chopped walnuts or pecans. They add a delightful crunch and flavor. If you prefer a smoother texture, feel free to skip this step.

Step 7: Pour and Bake

Pour the batter into your prepared loaf pan. Smooth the top with a spatula to ensure even baking. Pop it in the preheated oven and bake for 55-65 minutes. You’ll know it’s done when a toothpick inserted into the center comes out clean. The aroma will be irresistible!

Step 8: Cool and Serve

Once baked, allow the bread to cool in the pan for about 10 minutes. Then, transfer it to a wire rack to cool completely. This step is essential for achieving the perfect texture. Slice it up and enjoy your delicious Cream Cheese Banana Bread!

Tips for Success

  • Use overripe bananas for maximum sweetness and flavor.
  • Don’t overmix the batter; a few lumps are okay!
  • Let the cream cheese and butter soften at room temperature for easier blending.
  • Check for doneness with a toothpick; it should come out clean.
  • Store leftovers in an airtight container to keep it fresh.

Equipment Needed

  • Loaf Pan: A standard 9×5-inch loaf pan works best. If you don’t have one, a round cake pan can do in a pinch.
  • Mixing Bowls: Use a large bowl for mixing. A sturdy whisk or hand mixer will make your life easier.
  • Spatula: A rubber spatula is perfect for scraping down the sides and smoothing the batter.
  • Measuring Cups and Spoons: Essential for accuracy, but you can eyeball it if you’re feeling adventurous!

Variations

  • Chocolate Chip Cream Cheese Banana Bread: Add 1/2 cup of chocolate chips to the batter for a sweet twist that chocolate lovers will adore.
  • Whole Wheat Option: Substitute half of the all-purpose flour with whole wheat flour for a healthier version that still tastes amazing.
  • Spiced Banana Bread: Add a teaspoon of cinnamon or nutmeg to the dry ingredients for a warm, spiced flavor that complements the bananas beautifully.
  • Nut-Free Version: Simply omit the nuts for a smooth texture, perfect for those with nut allergies.
  • Fruit Add-Ins: Toss in some dried cranberries or blueberries for a fruity burst in every slice.

Serving Suggestions

  • Fresh Fruit: Serve slices with a side of fresh berries or sliced apples for a refreshing contrast.
  • Coffee or Tea: Pair your banana bread with a hot cup of coffee or herbal tea for a cozy treat.
  • Toast with Butter: A pat of butter on warm slices enhances the flavor and adds richness.
  • Presentation: Dust with powdered sugar or drizzle with a simple glaze for an elegant touch.

FAQs about Cream Cheese Banana Bread

Can I use frozen bananas for this recipe?

Absolutely! Frozen bananas work great in this Cream Cheese Banana Bread. Just thaw them first and mash them up. They’ll add the same delicious flavor and moisture.

How do I store leftover banana bread?

To keep your Cream Cheese Banana Bread fresh, store it in an airtight container at room temperature for up to three days. You can also refrigerate it for a week or freeze it for longer storage.

Can I make this recipe without cream cheese?

While cream cheese adds a unique richness, you can substitute it with sour cream or Greek yogurt for a similar texture. The flavor will differ slightly, but it’ll still be delicious!

What can I serve with Cream Cheese Banana Bread?

This banana bread pairs wonderfully with a hot cup of coffee or tea. You can also enjoy it with a dollop of whipped cream or a smear of butter for extra indulgence.

How can I tell when my banana bread is done baking?

Check for doneness by inserting a toothpick into the center of the bread. If it comes out clean or with a few crumbs, it’s ready! If it’s wet, give it a few more minutes in the oven.

Final Thoughts

Baking this Cream Cheese Banana Bread is more than just a culinary task; it’s an experience filled with warmth and nostalgia. The rich, creamy texture combined with the sweet aroma brings back memories of family gatherings and cozy mornings. Each slice is a delightful treat, perfect for sharing or savoring alone with a cup of coffee. Whether you’re a seasoned baker or just starting out, this recipe invites you to create something special. So, roll up your sleeves, embrace the joy of baking, and let this delicious twist on a classic become a staple in your kitchen!

jhessica

Cream Cheese Banana Bread: Discover a Delicious Twist!

A delicious twist on traditional banana bread, featuring creamy cream cheese for added richness.
Prep Time 15 minutes
Cook Time 1 hour
Total Time 1 hour 15 minutes
Servings: 8 servings
Course: Dessert
Cuisine: American
Calories: 210

Ingredients
  

  • 3 ripe bananas mashed
  • 8 ounces cream cheese softened
  • 1/2 cup unsalted butter softened
  • 1 cup granulated sugar
  • 2 large eggs
  • 1 teaspoon vanilla extract
  • 1 teaspoon baking soda
  • 1/2 teaspoon salt
  • 1 1/2 cups all-purpose flour
  • 1/2 cup chopped walnuts or pecans optional

Method
 

  1. Preheat your oven to 350°F (175°C). Grease a 9×5-inch loaf pan or line it with parchment paper.
  2. In a large mixing bowl, beat the softened cream cheese and butter together until smooth and creamy.
  3. Add the granulated sugar to the cream cheese mixture and beat until well combined.
  4. Mix in the mashed bananas, eggs, and vanilla extract until fully incorporated.
  5. In a separate bowl, whisk together the baking soda, salt, and flour. Gradually add this dry mixture to the wet ingredients, mixing until just combined. Be careful not to overmix.
  6. If using, fold in the chopped walnuts or pecans.
  7. Pour the batter into the prepared loaf pan and smooth the top with a spatula.
  8. Bake in the preheated oven for 55-65 minutes, or until a toothpick inserted into the center comes out clean.
  9. Allow the bread to cool in the pan for about 10 minutes before transferring it to a wire rack to cool completely.

Nutrition

Serving: 1sliceCalories: 210kcalCarbohydrates: 30gProtein: 3gFat: 9gSaturated Fat: 5gPolyunsaturated Fat: 4gCholesterol: 40mgSodium: 200mgFiber: 1gSugar: 15g

Notes

  • For a chocolate twist, add 1/2 cup of chocolate chips to the batter before baking.
  • You can substitute half of the all-purpose flour with whole wheat flour for a healthier version.

Tried this recipe?

Let us know how it was!

Stay Connected

Get recipes via email: