Get my cookbooks

Black Bean Quinoa Enchilada Bake is a must-try dish!

Introduction to Black Bean Quinoa Enchilada Bake

What is Black Bean Quinoa Enchilada Bake?

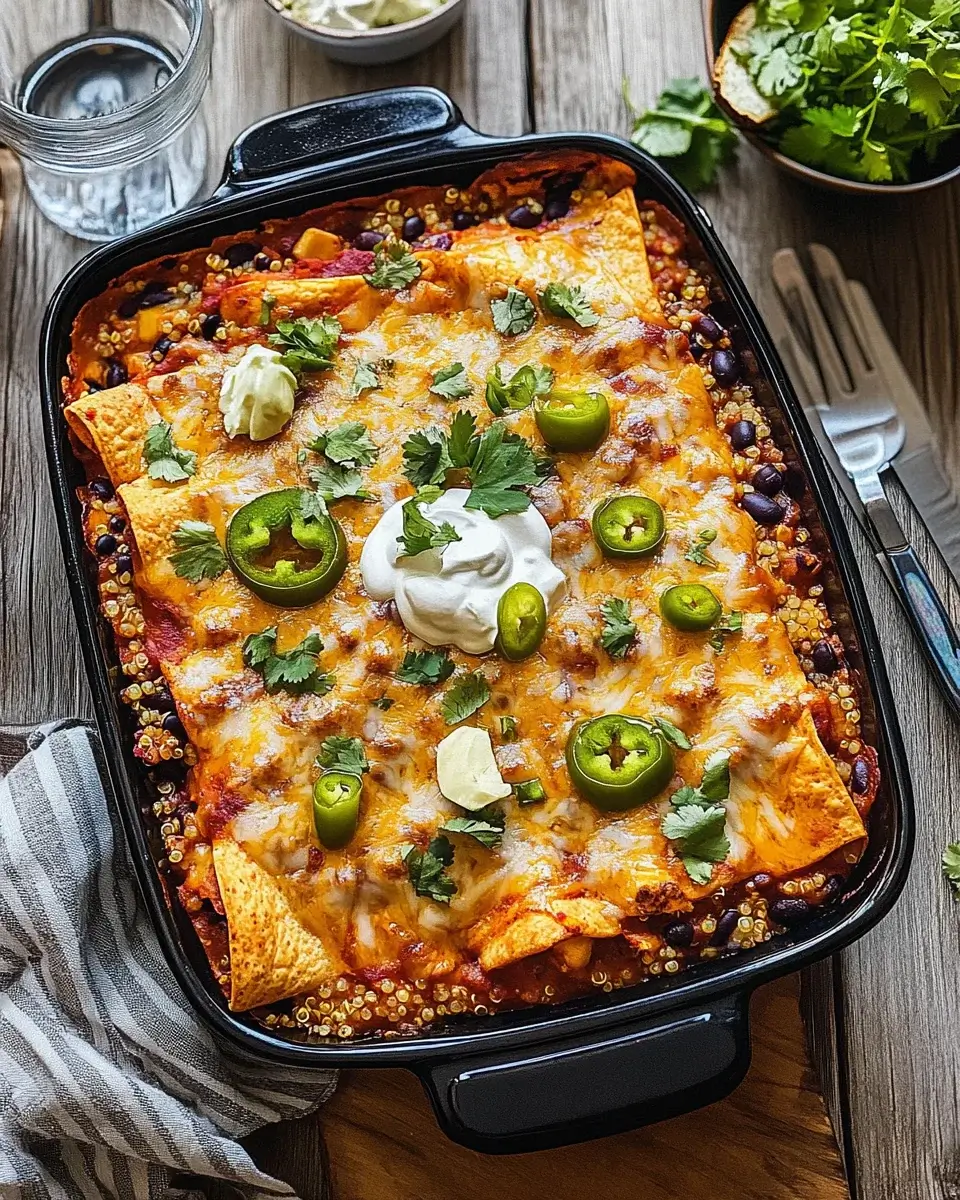
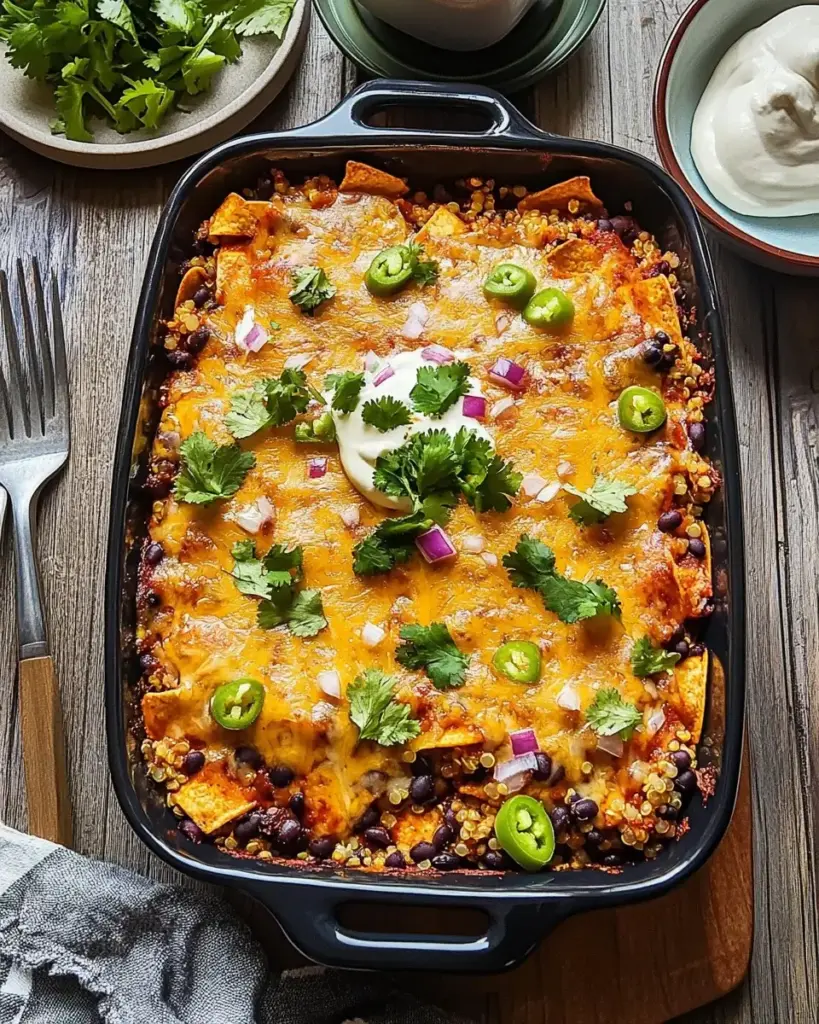
The Black Bean Quinoa Enchilada Bake is a delightful dish that combines the rich flavors of traditional enchiladas with the wholesome goodness of quinoa and black beans. This dish is not only colorful but also packed with nutrients. Imagine layers of fluffy quinoa, hearty black beans, and zesty enchilada sauce, all baked to perfection. It’s a one-dish meal that’s perfect for family dinners or meal prep for the week ahead.

In essence, this bake is a fusion of Mexican cuisine and healthy eating. The quinoa serves as a fantastic base, providing a nutty flavor and a great source of protein. Meanwhile, black beans add a creamy texture and are loaded with fiber. Together, they create a satisfying meal that everyone will love.

Why You Should Try Black Bean Quinoa Enchilada Bake

There are many reasons to give the Black Bean Quinoa Enchilada Bake a try. First and foremost, it’s incredibly easy to make. With just a few simple steps, you can whip up a delicious meal that’s sure to impress. Plus, it’s a great way to sneak in some extra veggies and nutrients into your diet.

Another reason to try this dish is its versatility. You can customize it to suit your taste preferences. Whether you prefer spicy or mild, you can adjust the seasoning and toppings accordingly. Additionally, it’s a fantastic option for those following vegetarian or gluten-free diets. The combination of quinoa and black beans ensures that you’re getting a complete protein, making it a healthy choice for everyone.

Lastly, the Black Bean Quinoa Enchilada Bake is perfect for leftovers. It reheats beautifully, making it an excellent option for busy weeknights. So, if you’re looking for a nutritious, delicious, and easy-to-make meal, this bake is definitely worth a try!

Ingredients for Black Bean Quinoa Enchilada Bake

To create a mouthwatering Black Bean Quinoa Enchilada Bake, you’ll need a variety of fresh and wholesome ingredients. Here’s a list of what you’ll need to gather:

  • 1 cup quinoa: This will serve as the base of your dish, providing protein and fiber.
  • 2 cups vegetable broth: Using broth instead of water adds extra flavor to the quinoa.
  • 1 can (15 oz) black beans: Rinse and drain them to add creaminess and protein.
  • 1 cup corn: Fresh, frozen, or canned corn will add sweetness and texture.
  • 1 cup enchilada sauce: Choose your favorite brand or make your own for a personal touch.
  • 1 bell pepper: Diced, for a crunchy texture and vibrant color.
  • 1 small onion: Chopped, to enhance the flavor of the dish.
  • 1 teaspoon cumin: This spice adds warmth and depth to the flavor profile.
  • 1 teaspoon chili powder: For a little kick, adjust according to your spice preference.
  • 1 cup shredded cheese: Optional, but it adds a delicious gooeyness to the bake.
  • Fresh cilantro: Chopped, for garnish and a burst of freshness.
  • Salt and pepper: To taste, ensuring all flavors are balanced.

These ingredients come together to create a hearty and satisfying meal. Feel free to adjust the quantities based on your preferences or dietary needs. The beauty of the Black Bean Quinoa Enchilada Bake lies in its flexibility, allowing you to make it your own!

Step-by-Step Preparation of Black Bean Quinoa Enchilada Bake

Step 1: Prepping the Quinoa

First things first, let’s get that quinoa ready! Start by rinsing 1 cup of quinoa under cold water. This step is important as it removes any bitterness. After rinsing, place the quinoa in a pot with 2 cups of vegetable broth. Bring it to a boil over medium heat. Once it starts boiling, reduce the heat to low, cover the pot, and let it simmer for about 15 minutes. When the quinoa is fluffy and the liquid is absorbed, remove it from heat and let it sit for a few minutes. Fluff it with a fork before moving on to the next step.

Step 2: Preparing the Black Beans

While the quinoa is cooking, it’s time to prepare the black beans. Open a can of black beans (15 oz) and pour them into a colander. Rinse them under cold water to remove excess sodium. After rinsing, let them drain well. You can also use cooked black beans if you prefer. Set them aside for later use in the bake.

Step 3: Mixing the Enchilada Sauce

Next, let’s mix the enchilada sauce. In a large bowl, combine 1 cup of your favorite enchilada sauce with the cooked quinoa, black beans, 1 cup of corn, diced bell pepper, chopped onion, cumin, and chili powder. Stir everything together until well combined. This mixture will be the heart of your Black Bean Quinoa Enchilada Bake, so make sure all the ingredients are evenly distributed.

Step 4: Assembling the Bake

Now it’s time to assemble your bake! Preheat your oven to 350°F (175°C). Grease a baking dish with a little oil or cooking spray. Pour half of the quinoa mixture into the bottom of the dish. Spread it out evenly. If you’re using cheese, sprinkle half of the shredded cheese on top. Then, add the remaining quinoa mixture on top of the cheese layer. Finally, top it off with the rest of the cheese for that gooey goodness!

Step 5: Baking the Dish

With everything assembled, it’s time to bake! Place the dish in the preheated oven and bake for about 25-30 minutes. You want the cheese to be melted and bubbly, and the edges to be slightly golden. Once it’s done, remove it from the oven and let it cool for a few minutes. This will make it easier to serve. Garnish with fresh cilantro before digging in!

Variations of Black Bean Quinoa Enchilada Bake

Adding Different Vegetables

The beauty of the Black Bean Quinoa Enchilada Bake lies in its versatility. You can easily customize it by adding different vegetables. For instance, consider incorporating diced zucchini or yellow squash for a fresh twist. Spinach or kale can also be great additions, providing extra nutrients and a pop of color.

If you enjoy a bit of crunch, try adding chopped carrots or even some sliced mushrooms. These vegetables not only enhance the flavor but also boost the nutritional value of your dish. Feel free to mix and match based on what you have on hand or what’s in season. The more colorful your bake, the more appealing it will be!

Cheese Alternatives for Black Bean Quinoa Enchilada Bake

If you’re looking for cheese alternatives, there are plenty of options to consider. For a dairy-free version, try using vegan cheese. Many brands offer delicious plant-based cheeses that melt well and taste great. Nutritional yeast is another fantastic option. It adds a cheesy flavor without any dairy, making it perfect for those with lactose intolerance.

Additionally, you can experiment with different types of cheese. For a sharper taste, consider using pepper jack or feta cheese. These cheeses can add a unique flavor profile to your Black Bean Quinoa Enchilada Bake. Remember, the key is to choose what you love and what fits your dietary needs!

Cooking Note for Black Bean Quinoa Enchilada Bake

When preparing the Black Bean Quinoa Enchilada Bake, there are a few cooking notes to keep in mind to ensure your dish turns out perfectly every time. First, always rinse your quinoa before cooking. This step is crucial as it removes the saponins, which can give quinoa a bitter taste. Rinsing helps to enhance the nutty flavor that makes quinoa so delightful.

Next, consider the type of enchilada sauce you use. Store-bought sauces can vary in flavor and spice level. If you prefer a milder taste, opt for a mild sauce. On the other hand, if you enjoy a bit of heat, a spicy enchilada sauce will elevate the dish. You can also make your own sauce at home for a personal touch, allowing you to control the ingredients and spice level.

Another important note is to keep an eye on the baking time. Ovens can vary, so check your bake a few minutes before the suggested time. You want the cheese to be melted and bubbly, but not overcooked. If you notice the cheese browning too quickly, you can cover the dish with aluminum foil to prevent burning while the rest of the bake finishes cooking.

Lastly, let the dish cool for a few minutes after baking. This cooling time allows the layers to set, making it easier to serve. If you cut into it too soon, it may fall apart. Patience is key here! With these cooking notes in mind, you’ll be well on your way to creating a delicious Black Bean Quinoa Enchilada Bake that everyone will love.

Serving Suggestions for Black Bean Quinoa Enchilada Bake

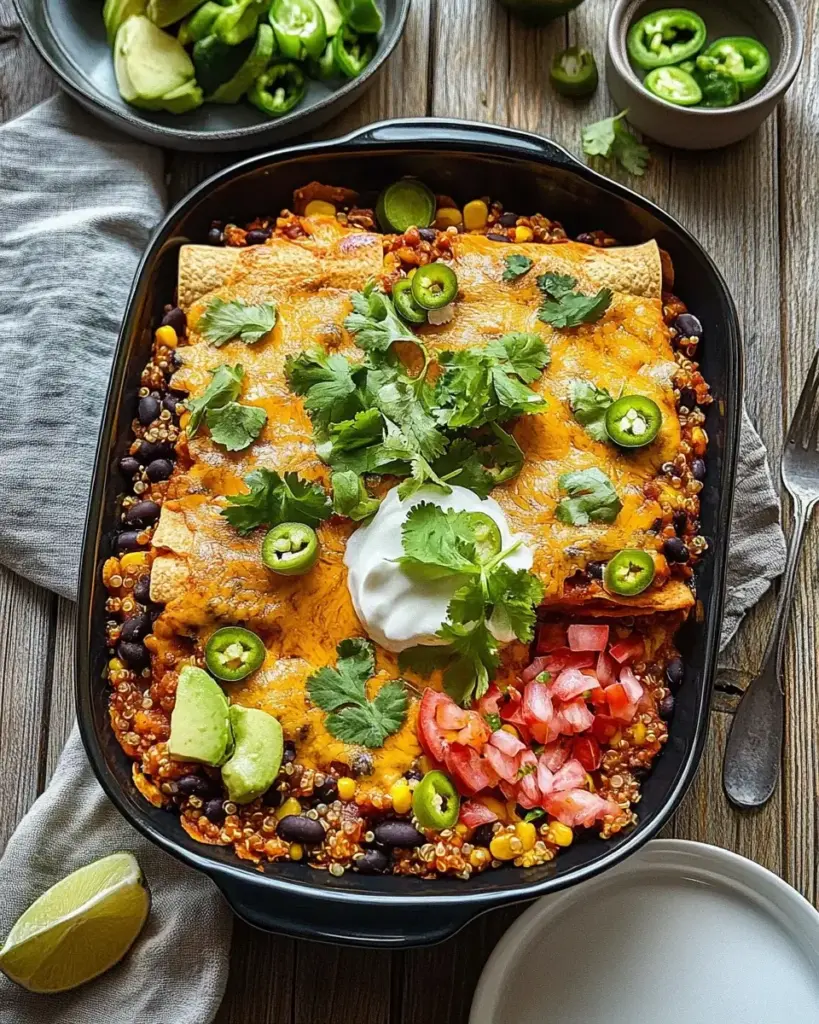
Once your Black Bean Quinoa Enchilada Bake is out of the oven and cooled slightly, it’s time to serve it up! This dish is not only delicious but also visually appealing, making it perfect for gatherings or family dinners. Here are some serving suggestions to enhance your meal experience:

  • Garnish with Fresh Herbs: Sprinkle chopped fresh cilantro or parsley on top just before serving. This adds a burst of color and freshness that complements the flavors beautifully.
  • Pair with a Side Salad: A light side salad with mixed greens, cherry tomatoes, and a simple vinaigrette can balance the richness of the bake. The crispness of the salad contrasts nicely with the warm, hearty dish.
  • Serve with Avocado: Sliced or diced avocado adds creaminess and healthy fats. You can also serve it as guacamole on the side for an extra treat!
  • Top with Sour Cream or Yogurt: A dollop of sour cream or Greek yogurt can add a tangy flavor that pairs well with the spices in the bake. For a dairy-free option, consider using coconut yogurt.
  • Offer Lime Wedges: A squeeze of fresh lime juice over the top can brighten the flavors and add a zesty kick. It’s a simple addition that makes a big difference!
  • Accompany with Tortilla Chips: Serve your bake with crispy tortilla chips for a fun crunch. They can be used to scoop up the bake or enjoyed on the side.

These serving suggestions not only enhance the flavor but also make your Black Bean Quinoa Enchilada Bake a complete meal. Feel free to mix and match based on your preferences and what you have on hand. Enjoy your delicious creation with family and friends!

Tips for Perfecting Your Black Bean Quinoa Enchilada Bake

To ensure your Black Bean Quinoa Enchilada Bake turns out perfectly every time, consider these helpful tips. They will enhance the flavor, texture, and overall experience of this delightful dish.

  • Use Fresh Ingredients: Fresh vegetables and high-quality enchilada sauce can make a big difference in taste. Whenever possible, opt for fresh produce to elevate your bake.
  • Adjust the Spice Level: If you love heat, feel free to add diced jalapeños or a pinch of cayenne pepper to the quinoa mixture. On the other hand, if you prefer a milder flavor, stick with mild enchilada sauce and omit any spicy additions.
  • Experiment with Herbs: Fresh herbs like oregano or thyme can add depth to your dish. Consider adding a teaspoon of dried herbs to the quinoa mixture for an extra layer of flavor.
  • Layering Technique: For a more visually appealing bake, try layering the ingredients. Alternate layers of quinoa mixture and cheese to create a beautiful presentation that will impress your guests.
  • Don’t Overcook the Quinoa: Make sure to follow the cooking instructions for the quinoa closely. Overcooked quinoa can become mushy, which may affect the texture of your bake.
  • Let It Rest: After baking, allow the dish to rest for about 10 minutes before serving. This resting time helps the layers set, making it easier to cut and serve without falling apart.
  • Customize Your Toppings: Get creative with toppings! Consider adding sliced olives, diced tomatoes, or even a sprinkle of crushed tortilla chips for added crunch and flavor.
  • Make It Ahead: If you’re short on time, prepare the bake ahead of time. Assemble it the night before and store it in the fridge. Just pop it in the oven when you’re ready to eat!

By following these tips, you’ll be well on your way to creating a Black Bean Quinoa Enchilada Bake that’s not only delicious but also visually stunning. Enjoy the process and have fun experimenting with flavors!

Breakdown of Time for Black Bean Quinoa Enchilada Bake

Prep Time

Preparing the Black Bean Quinoa Enchilada Bake is a breeze! The prep time typically takes about 15-20 minutes. This includes rinsing the quinoa, chopping vegetables, and mixing the ingredients together. If you have everything ready, you can whip it up even faster. Having your ingredients prepped in advance can make the cooking process smoother and more enjoyable.

Cooking Time

Once you’ve assembled your dish, the cooking time is around 25-30 minutes. During this time, the bake will be in the oven, allowing the flavors to meld together beautifully. You’ll want to keep an eye on it to ensure the cheese melts perfectly and the edges turn golden brown. This is the time when your kitchen will fill with delicious aromas, making it hard to wait!

Total Time

In total, you can expect to spend about 40-50 minutes from start to finish. This includes both prep and cooking time. It’s a quick and satisfying meal that’s perfect for busy weeknights or when you want to impress guests without spending hours in the kitchen. With just under an hour, you can serve a hearty and nutritious Black Bean Quinoa Enchilada Bake that everyone will love!

Nutritional Information for Black Bean Quinoa Enchilada Bake

Calories

The Black Bean Quinoa Enchilada Bake is not only delicious but also a nutritious option for your meals. A typical serving contains approximately 300-350 calories. This makes it a satisfying choice without being overly heavy. The combination of quinoa and black beans provides a good balance of energy and nutrients, making it a great option for lunch or dinner.

Protein

One of the standout features of this dish is its protein content. Each serving of the Black Bean Quinoa Enchilada Bake offers around 15-20 grams of protein. This is largely due to the quinoa and black beans, both of which are excellent sources of plant-based protein. This makes the dish particularly appealing for vegetarians and those looking to increase their protein intake without relying on meat.

Sodium

When it comes to sodium, the Black Bean Quinoa Enchilada Bake can vary based on the ingredients you choose. On average, a serving contains about 500-600 mg of sodium. To keep the sodium levels in check, consider using low-sodium vegetable broth and rinsing the black beans thoroughly. This way, you can enjoy the flavors without worrying too much about sodium intake.

Overall, the Black Bean Quinoa Enchilada Bake is a well-rounded meal that provides essential nutrients while being mindful of calories and sodium. It’s a fantastic option for anyone looking to enjoy a healthy and hearty dish!

FAQs about Black Bean Quinoa Enchilada Bake

Can I make Black Bean Quinoa Enchilada Bake ahead of time?

Absolutely! The Black Bean Quinoa Enchilada Bake is perfect for meal prep. You can assemble the dish a day in advance and store it in the refrigerator. Just cover it tightly with plastic wrap or aluminum foil. When you’re ready to bake, simply pop it in the oven. You may need to add a few extra minutes to the cooking time since it will be cold from the fridge. This makes it a convenient option for busy weeknights!

Is Black Bean Quinoa Enchilada Bake gluten-free?

Yes, the Black Bean Quinoa Enchilada Bake is naturally gluten-free! Quinoa is a gluten-free grain, and as long as you use gluten-free enchilada sauce, you’re all set. Always check the labels of your ingredients to ensure they meet your dietary needs. This dish is a great choice for those with gluten sensitivities or celiac disease.

How can I store leftovers of Black Bean Quinoa Enchilada Bake?

Storing leftovers is easy! Allow the Black Bean Quinoa Enchilada Bake to cool completely before transferring it to an airtight container. You can keep it in the refrigerator for up to 3-4 days. When you’re ready to enjoy it again, simply reheat it in the oven or microwave until warmed through. This dish retains its flavor and texture well, making it a great option for next-day meals!

Can I freeze Black Bean Quinoa Enchilada Bake?

Yes, you can freeze the Black Bean Quinoa Enchilada Bake! To do this, assemble the dish but do not bake it. Instead, cover it tightly with plastic wrap and then aluminum foil to prevent freezer burn. It can be stored in the freezer for up to 2-3 months. When you’re ready to enjoy it, thaw it in the refrigerator overnight and then bake as directed. This makes it a fantastic make-ahead meal for busy days!

Conclusion on Black Bean Quinoa Enchilada Bake

In conclusion, the Black Bean Quinoa Enchilada Bake is a delightful and nutritious dish that brings together the best of both worlds: flavor and health. With its vibrant ingredients and easy preparation, it’s a meal that can fit into any busy lifestyle. Whether you’re cooking for family, friends, or just for yourself, this bake is sure to impress.

Not only does it offer a satisfying combination of protein, fiber, and essential nutrients, but it also allows for endless customization. You can easily adapt the recipe to suit your taste preferences or dietary needs. From adding different vegetables to experimenting with cheese alternatives, the possibilities are truly endless.

Moreover, the Black Bean Quinoa Enchilada Bake is perfect for meal prep. It stores well, making it a convenient option for those hectic weeknights when you need a quick and healthy meal. Plus, it’s a dish that everyone can enjoy, regardless of dietary restrictions, as it can be made gluten-free and vegetarian.

So, why not give this delicious bake a try? Gather your ingredients, follow the simple steps, and enjoy a hearty meal that’s packed with flavor and nutrition. Your taste buds and your body will thank you!

Lemon Pepper Chicken Pasta is a must-try recipe!

Introduction to Lemon Pepper Chicken Pasta Recipe

Welcome to the delightful world of Lemon Pepper Chicken Pasta! This dish is not just a meal; it’s an experience that brings together the zesty brightness of lemon and the savory goodness of chicken. Perfect for a weeknight dinner or a special occasion, this recipe is sure to impress your family and friends.

What makes this Lemon Pepper Chicken Pasta unique? It’s all about the balance of flavors. The combination of tender chicken, creamy sauce, and the refreshing zing of lemon creates a symphony of taste that dances on your palate. The addition of garlic and onion powder enhances the overall flavor, making each bite a burst of deliciousness. Plus, the vibrant green parsley adds a pop of color, making the dish visually appealing.

This recipe is also versatile. You can easily customize it to suit your preferences. Whether you want to add vegetables or switch up the protein, the possibilities are endless. With simple ingredients and straightforward steps, you’ll find that making this dish is as enjoyable as eating it!

So, let’s dive into the ingredients and get started on this mouthwatering Lemon Pepper Chicken Pasta Recipe!

What Makes Lemon Pepper Chicken Pasta Unique?

The uniqueness of Lemon Pepper Chicken Pasta lies in its refreshing flavor profile. The bright acidity of lemon juice cuts through the richness of the cream, creating a perfect balance. The seasoning of black pepper adds a subtle heat that complements the dish beautifully. Additionally, the creamy texture of the sauce clings to the penne pasta, ensuring that every bite is flavorful.

Moreover, this recipe is quick and easy to prepare, making it ideal for busy weeknights. In just under 30 minutes, you can have a delicious meal on the table. The use of fresh ingredients, like lemon zest and parsley, elevates the dish, making it feel gourmet without the fuss.

In summary, Lemon Pepper Chicken Pasta is not just a meal; it’s a celebration of flavors that brings joy to your dining table. Ready to learn how to make it? Let’s move on to the ingredients!

Ingredients for Lemon Pepper Chicken Pasta Recipe

To create the delightful Lemon Pepper Chicken Pasta, you’ll need a few simple yet flavorful ingredients. Each component plays a vital role in bringing this dish to life. Here’s what you’ll need:

  • 8 ounces penne pasta: This pasta shape holds the creamy sauce well, making every bite delicious.
  • 1 pound boneless, skinless chicken breasts: A lean protein that cooks quickly and absorbs the flavors beautifully.
  • 2 tablespoons olive oil: This adds richness and helps in cooking the chicken to perfection.
  • 1 teaspoon salt: Essential for enhancing the overall flavor of the dish.
  • 1 teaspoon black pepper: Provides a mild heat that complements the lemony taste.
  • 1 teaspoon garlic powder: Adds a savory depth to the chicken.
  • 1 teaspoon onion powder: Enhances the flavor profile with a hint of sweetness.
  • 1 teaspoon lemon zest: This brings a concentrated lemon flavor that brightens the dish.
  • 1/4 cup freshly squeezed lemon juice: The star ingredient that gives the dish its refreshing zing.
  • 1/2 cup heavy cream: Creates a rich and creamy sauce that coats the pasta.
  • 1/2 cup grated Parmesan cheese: Adds a nutty flavor and helps thicken the sauce.
  • 1/4 cup chopped fresh parsley: A vibrant garnish that adds freshness and color.

These ingredients come together to create a dish that is not only tasty but also visually appealing. The combination of creamy sauce, tender chicken, and zesty lemon makes this Lemon Pepper Chicken Pasta a standout meal. Now that you have your ingredients ready, let’s move on to the step-by-step preparation!

Step-by-Step Preparation of Lemon Pepper Chicken Pasta Recipe

Now that you have gathered all the ingredients, it’s time to bring this Lemon Pepper Chicken Pasta Recipe to life! Follow these simple steps to create a delicious meal that your family will love. Each step is designed to ensure that the flavors meld perfectly, resulting in a dish that is both satisfying and delightful.

Step 1: Preparing the Chicken

Start by preparing the chicken breasts. First, take the boneless, skinless chicken and place it on a cutting board. Use a meat mallet or rolling pin to gently pound the chicken to an even thickness. This helps it cook evenly. Next, season both sides of the chicken with salt, black pepper, garlic powder, and onion powder. Make sure to rub the spices in well for maximum flavor.

Once seasoned, set the chicken aside for a few minutes. This allows the spices to penetrate the meat, enhancing the overall taste. While you wait, you can gather your cooking tools and prepare for the next step.

Step 2: Cooking the Pasta

While the chicken is resting, it’s time to cook the penne pasta. Bring a large pot of salted water to a boil. Once boiling, add the penne pasta and cook according to the package instructions until it reaches an al dente texture. This usually takes about 8-10 minutes.

After the pasta is cooked, drain it in a colander, but don’t forget to reserve about 1/2 cup of the pasta water. This starchy water will help adjust the sauce’s consistency later. Set the drained pasta aside while you move on to cooking the chicken.

Step 3: Making the Lemon Pepper Sauce

Now, let’s cook the chicken! In a large skillet, heat 2 tablespoons of olive oil over medium-high heat. Once the oil is hot, carefully add the seasoned chicken breasts. Cook them for about 6-7 minutes on each side, or until they are golden brown and fully cooked through. You can check for doneness by cutting into the thickest part of the chicken; it should be white and no longer pink.

Once cooked, remove the chicken from the skillet and let it rest on a cutting board for a few minutes. In the same skillet, reduce the heat to medium. Add the lemon zest and freshly squeezed lemon juice, scraping any browned bits from the bottom of the skillet. This adds extra flavor to your sauce!

Next, stir in the heavy cream and bring it to a gentle simmer. As the cream heats, add the grated Parmesan cheese, stirring until it melts and creates a smooth sauce. This creamy lemon pepper sauce is what makes the dish so special!

Step 4: Combining Ingredients

Now it’s time to bring everything together! Add the cooked penne pasta to the skillet with the lemon pepper sauce. Toss the pasta gently to coat it evenly with the sauce. If the sauce seems too thick, gradually add the reserved pasta water until you reach your desired consistency.

Finally, slice the rested chicken into strips and place it on top of the pasta. Garnish with chopped fresh parsley for a pop of color and freshness. Your Lemon Pepper Chicken Pasta is now ready to be served!

Enjoy this delightful dish with your loved ones, and watch as they savor every bite of this creamy, zesty goodness!

Variations of Lemon Pepper Chicken Pasta Recipe

While the classic Lemon Pepper Chicken Pasta is delicious on its own, there are many ways to enhance this dish. By adding vegetables or swapping out proteins, you can create a unique version that suits your taste. Let’s explore some exciting variations!

Adding Vegetables for Extra Flavor

Incorporating vegetables into your Lemon Pepper Chicken Pasta not only boosts the nutritional value but also adds vibrant colors and textures. Here are some great options:

  • Spinach: Fresh spinach wilts beautifully in the creamy sauce. Add it just before combining the pasta to keep it bright and tender.
  • Cherry Tomatoes: Halved cherry tomatoes add a sweet burst of flavor. Sauté them in the skillet for a few minutes before adding the sauce.
  • Zucchini: Sliced zucchini can be sautéed along with the chicken. It absorbs the flavors of the sauce and adds a nice crunch.
  • Bell Peppers: Colorful bell peppers can be diced and cooked with the chicken. They add sweetness and a lovely crunch.

Feel free to mix and match your favorite vegetables. This not only makes the dish more colorful but also allows you to enjoy a variety of flavors in every bite!

Alternative Proteins for Lemon Pepper Chicken Pasta Recipe

If you’re looking to switch up the protein in your Lemon Pepper Chicken Pasta, there are plenty of delicious alternatives. Here are some ideas:

  • Shrimp: Shrimp cooks quickly and pairs wonderfully with lemon. Sauté them in the skillet until pink and tender, then follow the same steps for the sauce.
  • Tofu: For a vegetarian option, use firm tofu. Press and cube it, then sauté until golden brown. It absorbs the flavors of the sauce beautifully.
  • Salmon: Grilled or pan-seared salmon adds a rich flavor. Flake it into the pasta just before serving for a gourmet touch.
  • Turkey: Ground turkey can be used instead of chicken. Cook it in the skillet until browned, then proceed with the sauce as usual.

These alternative proteins not only change the flavor profile but also cater to different dietary preferences. Experimenting with these variations can lead to exciting new meals that keep your dinner routine fresh and enjoyable!

Cooking Note for Lemon Pepper Chicken Pasta Recipe

When preparing the Lemon Pepper Chicken Pasta, a few cooking notes can help ensure your dish turns out perfectly every time. These tips will enhance your cooking experience and the final result, making your meal even more enjoyable.

First, always use fresh ingredients when possible. Fresh lemon juice and zest will provide a brighter flavor compared to bottled alternatives. The same goes for herbs like parsley; fresh herbs add a burst of flavor and color that dried herbs simply can’t match.

Next, pay attention to the cooking times. Overcooking the chicken can lead to dry meat, while undercooking can be unsafe. Use a meat thermometer to check that the internal temperature of the chicken reaches 165°F (75°C). This ensures that your chicken is both safe to eat and juicy.

Additionally, when cooking the pasta, make sure to salt the water generously. This is your chance to season the pasta itself, which enhances the overall flavor of the dish. Remember to reserve that pasta water! It’s a secret weapon for adjusting the sauce’s consistency, making it creamy without being too thick.

Lastly, don’t rush the sauce. Allow the heavy cream to simmer gently with the lemon juice and zest. This step is crucial for melding the flavors together. Stirring in the Parmesan cheese slowly will help create a smooth, creamy sauce that clings beautifully to the pasta.

By following these cooking notes, you’ll elevate your Lemon Pepper Chicken Pasta to a new level of deliciousness. Enjoy the process, and savor the delightful flavors that come together in this wonderful dish!

Serving Suggestions for Lemon Pepper Chicken Pasta Recipe

Once you’ve prepared your delicious Lemon Pepper Chicken Pasta, it’s time to think about how to serve it. The right side dishes and beverages can elevate your meal, making it even more enjoyable. Here are some fantastic serving suggestions to complement your dish!

Pairing with Side Dishes

Choosing the right side dishes can enhance the flavors of your Lemon Pepper Chicken Pasta. Here are some delightful options:

  • Garlic Bread: A classic choice, garlic bread is perfect for soaking up the creamy sauce. You can make it easily by spreading butter and minced garlic on slices of baguette, then toasting them until golden.
  • Caesar Salad: A fresh Caesar salad adds a crunchy texture and a tangy flavor that pairs well with the creamy pasta. The crisp romaine lettuce and crunchy croutons provide a nice contrast.
  • Steamed Vegetables: Lightly steamed broccoli, asparagus, or green beans add color and nutrition to your meal. They also balance the richness of the pasta.
  • Caprese Salad: This salad, made with fresh mozzarella, tomatoes, and basil, offers a refreshing taste that complements the lemony pasta beautifully.

These side dishes not only enhance the meal but also provide a variety of flavors and textures that make dining more enjoyable. Feel free to mix and match based on your preferences!

Ideal Wine Pairings

Pairing the right wine with your Lemon Pepper Chicken Pasta can elevate your dining experience. Here are some excellent wine options to consider:

  • Sauvignon Blanc: This white wine is known for its crisp acidity and citrus notes, making it a perfect match for the lemony flavors in the pasta.
  • Chardonnay: A lightly oaked Chardonnay can complement the creamy sauce beautifully. Its buttery notes enhance the richness of the dish.
  • Pinot Grigio: This light and refreshing wine pairs well with chicken and lemon. Its fruity flavors balance the dish nicely.
  • Prosecco: If you prefer sparkling wine, Prosecco is a great choice. Its bubbles and slight sweetness can add a festive touch to your meal.

When selecting a wine, consider your personal taste and the overall flavor profile of the dish. Enjoying a glass of wine with your Lemon Pepper Chicken Pasta can make your meal feel even more special!

Tips for Perfecting Your Lemon Pepper Chicken Pasta Recipe

To make your Lemon Pepper Chicken Pasta truly shine, a few tips can help you achieve the best results. These simple yet effective suggestions will enhance the flavors and textures of your dish, ensuring that every bite is a delight. Let’s explore some key tips for perfecting this recipe!

First, consider marinating the chicken. For added flavor, marinate the chicken breasts in a mixture of lemon juice, olive oil, and spices for at least 30 minutes before cooking. This step infuses the chicken with a zesty taste and keeps it juicy during cooking.

Next, pay attention to the cooking temperature. When cooking the chicken, ensure your skillet is hot enough before adding the meat. This helps to sear the chicken, creating a golden crust while keeping the inside tender and moist. Avoid overcrowding the skillet, as this can lower the temperature and lead to steaming instead of searing.

When it comes to the sauce, don’t rush the process. Allow the heavy cream to simmer gently with the lemon juice and zest. This slow cooking helps the flavors meld together beautifully. Stirring in the Parmesan cheese gradually will create a smooth, creamy sauce that clings perfectly to the pasta.

Another tip is to taste as you go. Adjust the seasoning to your liking. If you prefer a stronger lemon flavor, add a bit more lemon juice or zest. If you like it spicier, a pinch of red pepper flakes can add a nice kick.

Lastly, remember to serve your Lemon Pepper Chicken Pasta immediately. This dish is best enjoyed fresh, as the creamy sauce can thicken as it cools. If you need to store leftovers, keep the pasta and sauce separate to maintain the best texture.

By following these tips, you’ll elevate your Lemon Pepper Chicken Pasta to a new level of deliciousness. Enjoy the cooking process, and savor the delightful flavors that come together in this wonderful dish!

Breakdown of Time for Lemon Pepper Chicken Pasta Recipe

Understanding the time needed for each step in the Lemon Pepper Chicken Pasta Recipe can help you plan your cooking efficiently. Here’s a breakdown of the time required for preparation and cooking, so you can enjoy this delicious meal without any rush!

Prep Time

The prep time for this Lemon Pepper Chicken Pasta is approximately 15 minutes. During this time, you will gather all your ingredients, season the chicken, and prepare the pasta. It’s a good idea to have everything ready before you start cooking. This way, you can move smoothly from one step to the next without any interruptions.

Cooking Time

The cooking time for this dish is about 20 minutes. This includes cooking the chicken, making the lemon pepper sauce, and cooking the pasta. The chicken takes around 12-14 minutes to cook through, while the pasta will take about 8-10 minutes. Since you can cook the chicken and pasta simultaneously, this helps save time!

Total Time

In total, you can expect to spend about 35 minutes from start to finish. This includes both prep and cooking time. With this quick and easy recipe, you can have a delicious Lemon Pepper Chicken Pasta ready to serve in no time. It’s perfect for busy weeknights or when you want to impress guests without spending hours in the kitchen!

Nutritional Information for Lemon Pepper Chicken Pasta Recipe

Understanding the nutritional content of your meals is essential for maintaining a balanced diet. The Lemon Pepper Chicken Pasta is not only delicious but also provides a good mix of nutrients. Here’s a breakdown of the nutritional information per serving, so you can enjoy this dish while keeping track of your dietary needs.

Calories

Each serving of Lemon Pepper Chicken Pasta contains approximately 550 calories. This calorie count includes the creamy sauce, chicken, and pasta, making it a satisfying meal. The combination of protein, carbohydrates, and fats provides energy to fuel your day.

Protein Content

This dish is a great source of protein, offering about 35 grams per serving. The boneless, skinless chicken breasts contribute significantly to this protein content, making it an excellent choice for those looking to increase their protein intake. Protein is essential for muscle repair and growth, making this meal a smart option for active individuals.

Sodium Levels

The sodium content in each serving of Lemon Pepper Chicken Pasta is approximately 800 milligrams. While this is a reasonable amount for a flavorful dish, it’s important to be mindful of your overall sodium intake, especially if you are watching your salt consumption. You can reduce sodium levels by using low-sodium chicken broth or less salt during cooking.

In summary, the Lemon Pepper Chicken Pasta is a well-rounded meal that provides a good balance of calories, protein, and flavor. Enjoy this dish as part of a healthy diet, and feel free to adjust the ingredients to meet your nutritional goals!

Nutritional Information for Lemon Pepper Chicken Pasta Recipe

Understanding the nutritional content of your meals is essential for maintaining a balanced diet. The Lemon Pepper Chicken Pasta is not only delicious but also provides a good mix of nutrients. Here’s a breakdown of the nutritional information per serving, so you can enjoy this dish while keeping track of your dietary needs.

Calories

Each serving of Lemon Pepper Chicken Pasta contains approximately 550 calories. This calorie count includes the creamy sauce, chicken, and pasta, making it a satisfying meal. The combination of protein, carbohydrates, and fats provides energy to fuel your day. If you’re looking to manage your calorie intake, consider adjusting portion sizes or pairing it with lighter side dishes.

Protein Content

This dish is a great source of protein, offering about 35 grams per serving. The boneless, skinless chicken breasts contribute significantly to this protein content, making it an excellent choice for those looking to increase their protein intake. Protein is essential for muscle repair and growth, making this meal a smart option for active individuals. If you prefer a vegetarian option, consider substituting chicken with tofu or chickpeas to maintain a good protein level.

Sodium Levels

The sodium content in each serving of Lemon Pepper Chicken Pasta is approximately 800 milligrams. While this is a reasonable amount for a flavorful dish, it’s important to be mindful of your overall sodium intake, especially if you are watching your salt consumption. You can reduce sodium levels by using low-sodium chicken broth or less salt during cooking. Additionally, rinsing canned ingredients, like beans, can help lower sodium content in your meals.

In summary, the Lemon Pepper Chicken Pasta is a well-rounded meal that provides a good balance of calories, protein, and flavor. Enjoy this dish as part of a healthy diet, and feel free to adjust the ingredients to meet your nutritional goals!

FAQs about Lemon Pepper Chicken Pasta Recipe

Can I use whole wheat pasta for this recipe?

Absolutely! Whole wheat pasta is a great alternative to traditional penne. It adds a nutty flavor and extra fiber, making your Lemon Pepper Chicken Pasta even healthier. Just keep in mind that whole wheat pasta may require a slightly longer cooking time, so be sure to check the package instructions for the best results.

How can I make Lemon Pepper Chicken Pasta Recipe gluten-free?

To make this dish gluten-free, simply substitute the penne pasta with a gluten-free pasta option. There are many varieties available, such as rice, quinoa, or chickpea pasta. Additionally, ensure that any sauces or seasonings you use are gluten-free. This way, you can enjoy the same delicious flavors without the gluten!

What can I substitute for lemon juice in the recipe?

If you don’t have lemon juice on hand, you can use lime juice as a substitute. It offers a similar acidity and brightness. Alternatively, vinegar, such as white wine vinegar or apple cider vinegar, can work in a pinch, but use it sparingly to avoid overpowering the dish. Just remember, the lemon flavor is key to this recipe, so choose a substitute that complements the other ingredients.

How long can I store leftovers of Lemon Pepper Chicken Pasta?

You can store leftovers of Lemon Pepper Chicken Pasta in an airtight container in the refrigerator for up to 3 days. When reheating, add a splash of water or extra cream to loosen the sauce, as it may thicken in the fridge. Enjoy your leftovers for a quick and tasty meal!

Conclusion on Lemon Pepper Chicken Pasta Recipe

In conclusion, the Lemon Pepper Chicken Pasta is a delightful dish that combines the zesty brightness of lemon with the savory goodness of chicken. This recipe is not only easy to prepare but also offers a wonderful balance of flavors that will leave your taste buds dancing. With its creamy sauce, tender chicken, and perfectly cooked penne pasta, it’s a meal that can impress family and friends alike.

Whether you choose to stick to the classic recipe or explore the various variations, this dish is sure to become a favorite in your household. The addition of fresh vegetables or alternative proteins can make it even more versatile, catering to different dietary preferences and tastes. Plus, with the tips and serving suggestions provided, you can elevate your dining experience to new heights.

So, gather your ingredients, roll up your sleeves, and get ready to create a delicious Lemon Pepper Chicken Pasta that will not only satisfy your hunger but also bring joy to your dining table. Enjoy every bite of this creamy, zesty goodness, and don’t forget to share your culinary creations with loved ones!

Happy cooking!

Pasta Primavera Recipe: A Fresh and Easy Delight!

Introduction to Pasta Primavera Recipe

What is Pasta Primavera?

Pasta Primavera is a delightful dish that celebrates fresh vegetables and pasta. The name “Primavera” means “spring” in Italian, which perfectly captures the essence of this recipe. It features a colorful mix of seasonal vegetables, tossed with pasta and a light sauce. This dish is not only vibrant but also packed with nutrients, making it a favorite among health-conscious eaters. The combination of flavors and textures creates a satisfying meal that can be enjoyed any time of the year.

The Origins of Pasta Primavera

The origins of Pasta Primavera are quite interesting. While many believe it hails from Italy, it actually gained popularity in the United States during the 1970s. The dish was created by Italian chefs who wanted to showcase the fresh produce available in spring. Over time, it evolved into a staple in Italian-American cuisine. Today, Pasta Primavera is loved worldwide for its versatility and the ability to highlight seasonal vegetables. Whether you’re a vegetarian or just looking for a light meal, this recipe is sure to please!

Ingredients for Pasta Primavera Recipe

To create a delicious Pasta Primavera, you’ll need a variety of fresh ingredients. This recipe is simple and allows for flexibility based on what you have on hand. Here’s a list of what you’ll need:

  • 8 ounces of pasta (penne or fusilli)
  • 2 tablespoons olive oil
  • 1 medium onion, chopped
  • 2 cloves garlic, minced
  • 1 medium zucchini, sliced
  • 1 medium bell pepper (red or yellow), sliced
  • 1 cup cherry tomatoes, halved
  • 1 cup broccoli florets
  • 1 cup asparagus, cut into 1-inch pieces
  • 1 teaspoon dried oregano
  • Salt and pepper to taste
  • 1/4 cup grated Parmesan cheese
  • Fresh basil leaves for garnish (optional)

These ingredients come together to create a colorful and nutritious dish. The combination of pasta and fresh vegetables makes it a perfect meal for any occasion. Feel free to adjust the quantities based on your preferences or the number of servings you need. Now that you have your ingredients ready, let’s move on to the preparation steps!

Step-by-Step Preparation of Pasta Primavera Recipe

Step 1: Preparing the Vegetables

First things first, let’s get those vegetables ready! Start by washing all your fresh produce. Then, chop the onion and mince the garlic. Slice the zucchini and bell pepper into thin strips. For the broccoli, cut it into small florets. Lastly, trim the asparagus and cut it into 1-inch pieces. Having everything prepped will make cooking a breeze!

Step 2: Cooking the Pasta

Next, it’s time to cook the pasta. Bring a large pot of salted water to a boil. Once boiling, add the pasta of your choice, either penne or fusilli. Cook according to the package instructions until it’s al dente. This usually takes about 8-10 minutes. Once done, drain the pasta in a colander, but don’t forget to save about 1/2 cup of the pasta cooking water. This starchy water will help bring everything together later!

Step 3: Sautéing the Vegetables

Now, let’s sauté those vibrant vegetables! In a large skillet, heat 2 tablespoons of olive oil over medium heat. Add the chopped onion and sauté for about 3 minutes until it turns translucent. Then, stir in the minced garlic and cook for another minute until it’s fragrant. Next, toss in the zucchini, bell pepper, broccoli, and asparagus. Sauté these veggies for about 5-7 minutes until they are tender-crisp. This step is crucial as it brings out the natural flavors of the vegetables!

Step 4: Combining Pasta and Vegetables

Once your vegetables are perfectly sautéed, it’s time to combine them with the pasta. Add the drained pasta to the skillet with the sautéed vegetables. If the mixture looks a bit dry, don’t worry! Just add a splash of the reserved pasta cooking water until you reach your desired consistency. This will help the pasta and veggies blend beautifully together.

Step 5: Adding the Sauce

Finally, let’s finish off this delicious dish! Remove the skillet from heat and stir in 1/4 cup of grated Parmesan cheese. Toss everything together until well combined. The cheese will melt slightly, creating a creamy texture that coats the pasta and vegetables. Season with salt and pepper to taste. If you like, you can garnish with fresh basil leaves for an extra pop of flavor. Serve immediately and enjoy your delightful Pasta Primavera!

Variations of Pasta Primavera Recipe

Vegetarian Variations

Pasta Primavera is naturally a vegetarian dish, but you can enhance its flavors with various seasonal vegetables. For instance, consider adding spinach, peas, or even artichoke hearts. These ingredients not only add color but also boost the nutritional value. You can also experiment with different herbs like thyme or parsley to give your dish a unique twist. If you want a creamier texture, try adding a splash of cream or a dollop of ricotta cheese. This will make your Pasta Primavera even more delightful!

Protein Additions

If you’re looking to add some protein to your Pasta Primavera, there are plenty of options! Grilled chicken or shrimp can be excellent choices. Simply cook them separately and toss them in with the pasta and vegetables. For a vegetarian protein source, consider adding chickpeas or white beans. These legumes are not only filling but also add a nice texture to the dish. You can also use tofu for a plant-based protein option. Just sauté it until golden before mixing it in!

Gluten-Free Options

For those who need a gluten-free option, don’t worry! You can easily substitute regular pasta with gluten-free pasta made from rice, quinoa, or lentils. These alternatives are widely available and cook similarly to traditional pasta. Additionally, ensure that your other ingredients, like sauces and seasonings, are gluten-free. This way, everyone can enjoy a delicious bowl of Pasta Primavera without any dietary concerns!

Cooking Note for Pasta Primavera Recipe

When preparing your Pasta Primavera, there are a few important cooking notes to keep in mind. These tips will help you achieve the best flavor and texture for your dish.

First, always use fresh vegetables. Fresh produce not only enhances the taste but also adds vibrant colors to your meal. Look for seasonal vegetables at your local market. They are often more flavorful and nutritious.

Next, be mindful of the cooking times for your vegetables. Each type of vegetable has a different cooking time. For instance, asparagus and broccoli take a bit longer to cook than zucchini and bell peppers. To ensure everything is perfectly tender, add the harder vegetables first and the softer ones later.

Another key point is to avoid overcooking the pasta. Cooking it al dente is crucial, as it will continue to cook slightly when mixed with the hot vegetables. This helps maintain the pasta’s texture and prevents it from becoming mushy.

Lastly, don’t forget to reserve some pasta cooking water! This starchy water is a secret weapon in many pasta dishes. It helps to create a silky sauce that binds the pasta and vegetables together. Just add a little at a time until you reach your desired consistency.

By following these cooking notes, you’ll create a delicious and satisfying Pasta Primavera that everyone will love!

Serving Suggestions for Pasta Primavera Recipe

Pairing with Proteins

When it comes to serving your Pasta Primavera, adding a protein can elevate the dish to a whole new level. Grilled chicken is a popular choice, as its smoky flavor complements the fresh vegetables beautifully. Simply season the chicken with salt, pepper, and your favorite herbs before grilling. For seafood lovers, shrimp is another fantastic option. Sauté the shrimp in olive oil with a pinch of garlic until they turn pink and tender. If you prefer a vegetarian option, consider adding chickpeas or white beans. These legumes not only provide protein but also add a hearty texture to the dish. Tofu is another great plant-based protein that can be sautéed until golden and crispy. No matter which protein you choose, it will make your Pasta Primavera even more satisfying!

Ideal Side Dishes

To round out your meal, consider serving your Pasta Primavera with some delicious side dishes. A simple green salad is always a great choice. Toss together mixed greens, cherry tomatoes, and a light vinaigrette for a refreshing contrast to the warm pasta. You could also serve garlic bread on the side. The crispy, buttery bread pairs perfectly with the flavors of the dish. For a heartier option, roasted vegetables can complement the Pasta Primavera nicely. Just toss seasonal veggies like carrots, bell peppers, and zucchini with olive oil, salt, and pepper, then roast them until tender. This adds an extra layer of flavor and nutrition to your meal. With these side dishes, your Pasta Primavera will be a complete and satisfying dining experience!

Tips for Perfecting Your Pasta Primavera Recipe

Choosing the Right Pasta

When it comes to Pasta Primavera, selecting the right pasta is essential for achieving the perfect texture and flavor. While penne and fusilli are popular choices, you can experiment with other types as well. For instance, spaghetti or linguine can create a delightful twist on this classic dish. The key is to choose a pasta shape that holds onto the sauce and vegetables well. Short pasta shapes, like farfalle or rotini, are great for capturing bits of veggies in every bite.

Additionally, consider the cooking time of your chosen pasta. Different types may require varying cooking times, so always check the package instructions. Remember to cook the pasta al dente, as it will continue to cook slightly when mixed with the hot vegetables. This ensures that your dish remains flavorful and the pasta retains its delightful bite!

Seasonal Vegetable Selection

One of the best aspects of Pasta Primavera is its versatility with seasonal vegetables. Choosing fresh, in-season produce not only enhances the flavor but also adds vibrant colors to your dish. For spring, look for asparagus, zucchini, and peas. In summer, cherry tomatoes, bell peppers, and eggplant shine. Fall brings options like butternut squash and Brussels sprouts, while winter offers hearty vegetables like kale and root vegetables.

When selecting vegetables, aim for a variety of colors and textures. This not only makes your dish visually appealing but also provides a range of nutrients. Don’t hesitate to visit your local farmer’s market for the freshest options. You can even ask the vendors for their recommendations on what’s in season. By incorporating seasonal vegetables, you’ll create a Pasta Primavera that’s not only delicious but also celebrates the bounty of nature!

Breakdown of Time for Pasta Primavera Recipe

Prep Time

Preparing your Pasta Primavera is quick and easy! The prep time usually takes about 15 minutes. During this time, you’ll wash and chop all your vegetables, mince the garlic, and get your pasta ready. Having everything prepped in advance makes the cooking process smooth and enjoyable. So, take a moment to gather your ingredients and get them ready!

Cooking Time

The cooking time for Pasta Primavera is approximately 20 minutes. This includes boiling the pasta and sautéing the vegetables. First, you’ll cook the pasta until it’s al dente, which takes about 8-10 minutes. While the pasta cooks, you can sauté the vegetables in a skillet. This step usually takes around 10-12 minutes. The combination of these two processes allows you to create a delicious meal in no time!

Total Time

In total, you can expect to spend about 35 minutes from start to finish when making Pasta Primavera. This includes both the prep and cooking times. With such a quick turnaround, it’s perfect for a weeknight dinner or a last-minute gathering. Plus, the vibrant flavors and fresh ingredients will impress your family and friends!

Nutritional Information for Pasta Primavera Recipe

Calories

When it comes to enjoying a delicious Pasta Primavera, knowing the calorie content can help you make informed choices. Each serving of this delightful dish contains approximately 320 calories. This makes it a great option for a light yet satisfying meal. The combination of pasta and fresh vegetables provides a balanced source of energy, perfect for fueling your day!

Protein

Protein is an essential nutrient for our bodies, and Pasta Primavera offers a decent amount. Each serving contains about 12 grams of protein. This protein primarily comes from the pasta and the addition of Parmesan cheese. If you choose to add grilled chicken, shrimp, or legumes, you can easily boost the protein content even further. This makes Pasta Primavera a versatile dish that can cater to various dietary needs!

Sodium

Keeping an eye on sodium intake is important for maintaining a healthy diet. Each serving of Pasta Primavera has around 400 milligrams of sodium. This amount can vary based on the ingredients you use, especially if you add salt or pre-packaged sauces. To keep sodium levels in check, consider using low-sodium broth or cheese. This way, you can enjoy your meal without worrying too much about sodium intake!

FAQs about Pasta Primavera Recipe

Can I make Pasta Primavera ahead of time?

Yes, you can make Pasta Primavera ahead of time! This dish is great for meal prep. To do this, cook the pasta and sauté the vegetables as usual. However, it’s best to store them separately. This way, the pasta won’t become mushy, and the vegetables will stay crisp. When you’re ready to eat, simply reheat the pasta and veggies together in a skillet. You can add a splash of reserved pasta water to help bring everything back to life. Enjoy your delicious meal without the last-minute rush!

What vegetables are best for Pasta Primavera?

Pasta Primavera is all about fresh, seasonal vegetables! Some of the best options include zucchini, bell peppers, cherry tomatoes, broccoli, and asparagus. However, feel free to get creative! You can also use spinach, peas, carrots, or even artichokes. The key is to choose vegetables that you enjoy and that are in season. This not only enhances the flavor but also adds a beautiful variety of colors to your dish. So, pick your favorites and make your Pasta Primavera uniquely yours!

Can I use a different type of pasta for this recipe?

Absolutely! You can use any type of pasta you like for your Pasta Primavera. While penne and fusilli are popular choices, you can also try spaghetti, linguine, or even gluten-free pasta. The important thing is to choose a pasta shape that holds onto the sauce and vegetables well. Just remember to adjust the cooking time according to the type of pasta you choose. This way, you’ll create a delicious dish that suits your taste!

Is Pasta Primavera a healthy dish?

Yes, Pasta Primavera is considered a healthy dish! It’s packed with fresh vegetables, which provide essential vitamins and minerals. The dish is also relatively low in calories, making it a great option for a light meal. Additionally, you can customize it by adding protein sources like chicken, shrimp, or legumes to boost its nutritional value. With its colorful ingredients and balanced flavors, Pasta Primavera is a delicious way to enjoy a healthy meal!

Conclusion on Pasta Primavera Recipe

In conclusion, the Pasta Primavera recipe is a delightful and versatile dish that brings together the best of fresh vegetables and pasta. Its vibrant colors and flavors make it a perfect choice for any meal, whether it’s a casual weeknight dinner or a special gathering with friends and family. The beauty of this recipe lies in its adaptability; you can easily customize it with seasonal vegetables, proteins, or even gluten-free pasta to suit your dietary needs.

Not only is Pasta Primavera delicious, but it also offers a wealth of nutritional benefits. Packed with vitamins, minerals, and fiber from the vegetables, it provides a satisfying meal without excessive calories. Plus, the addition of protein can enhance its nutritional profile even further, making it a well-rounded dish.

As you prepare your Pasta Primavera, remember to embrace the freshness of the ingredients. Using seasonal produce not only elevates the dish but also supports local farmers and promotes sustainability. So, gather your favorite vegetables, cook up some pasta, and enjoy the delightful flavors of this classic recipe!

Whether you’re a seasoned chef or a beginner in the kitchen, Pasta Primavera is a recipe that anyone can master. With its simple steps and quick cooking time, you’ll have a delicious meal ready in no time. So, roll up your sleeves, get cooking, and savor the joy of creating your very own Pasta Primavera!

Pizza Pasta Salad Recipe: A Delicious and Easy Dish

Introduction to Pizza Pasta Salad Recipe

What is Pizza Pasta Salad?

Pizza Pasta Salad is a delightful dish that combines the best of both worlds: pizza and pasta! This fun and colorful salad features rotini pasta mixed with fresh vegetables, savory pepperoni, and creamy mozzarella cheese. Tossed in a zesty Italian dressing, it’s a perfect dish for picnics, potlucks, or a quick weeknight dinner. The combination of flavors and textures makes it a hit with both kids and adults alike. Plus, it’s easy to prepare and can be customized to suit your taste!

Why You Should Try This Pizza Pasta Salad Recipe

There are many reasons to give this Pizza Pasta Salad Recipe a try. First, it’s incredibly versatile. You can add your favorite ingredients or swap out items based on what you have on hand. Second, it’s a great way to sneak in some veggies while still enjoying the flavors of pizza. The colorful ingredients not only make the dish visually appealing but also pack it with nutrients.

Moreover, this salad is perfect for meal prep. You can make it ahead of time and store it in the fridge, allowing the flavors to meld beautifully. It’s also a fantastic option for gatherings, as it serves a crowd and can be enjoyed cold or at room temperature. So, whether you’re looking for a quick lunch or a side dish for a barbecue, this Pizza Pasta Salad is sure to impress!

Ingredients for Pizza Pasta Salad Recipe

To create a delicious Pizza Pasta Salad, you’ll need a variety of fresh ingredients that come together to make this dish a crowd-pleaser. Here’s what you’ll need:

  • 8 ounces rotini pasta
  • 1 cup cherry tomatoes, halved
  • 1 cup cucumber, diced
  • 1 cup bell pepper, diced
  • 1 cup mozzarella cheese, cubed
  • 1/2 cup pepperoni slices
  • 1/4 cup red onion, finely chopped
  • 1/2 cup black olives, sliced
  • 1/2 cup Italian dressing
  • 1 teaspoon Italian seasoning
  • Salt and pepper to taste

These ingredients come together to create a vibrant and flavorful salad. The rotini pasta serves as a hearty base, while the fresh vegetables add crunch and color. The mozzarella cheese and pepperoni bring that classic pizza flavor, making this dish irresistible. Don’t forget the Italian dressing, which ties everything together with its zesty taste!

Feel free to adjust the quantities based on your preferences or dietary needs. For instance, if you love olives, add more! If you prefer a lighter salad, reduce the amount of cheese. The beauty of this Pizza Pasta Salad Recipe lies in its flexibility, allowing you to make it your own.

Step-by-Step Preparation of Pizza Pasta Salad Recipe

Step 1: Cook the Pasta

To start your Pizza Pasta Salad, you’ll need to cook the rotini pasta. Begin by bringing a large pot of salted water to a boil. Once boiling, add the rotini pasta and cook according to the package instructions until it’s al dente. This usually takes about 8 to 10 minutes. Remember, you want it firm enough to hold up in the salad. After cooking, drain the pasta in a colander and rinse it under cold water. This step cools the pasta and stops the cooking process, ensuring it doesn’t become mushy.

Step 2: Prepare the Vegetables

While the pasta is cooking, it’s time to prepare the vegetables. Start by washing the cherry tomatoes and cutting them in half. Next, dice the cucumber and bell pepper into bite-sized pieces. For added flavor, finely chop the red onion. Lastly, slice the black olives. Having all your vegetables prepped and ready will make mixing everything together much easier. Plus, it adds a beautiful array of colors to your salad!

Step 3: Mix the Dressing

Now, let’s whip up the dressing! In a small bowl, combine the Italian dressing, Italian seasoning, salt, and pepper. Use a whisk to mix everything together until well combined. This dressing is what brings all the flavors together, so make sure to taste it. If you like it a bit tangier, feel free to add more dressing or seasoning to suit your taste!

Step 4: Combine All Ingredients

In a large mixing bowl, combine the cooled pasta, cherry tomatoes, cucumber, bell pepper, mozzarella cheese, pepperoni, red onion, and black olives. Pour the dressing over the top and gently toss everything together. Be careful not to break the pasta or cheese while mixing. You want all the ingredients to be evenly coated with the dressing, ensuring every bite is packed with flavor!

Step 5: Chill and Serve

Once everything is mixed, cover the bowl with plastic wrap or a lid. Place it in the refrigerator for at least 30 minutes. This chilling time allows the flavors to meld beautifully, making the salad even tastier. When you’re ready to serve, you can enjoy it chilled or at room temperature. Either way, your Pizza Pasta Salad will be a delightful dish that everyone will love!

Variations of Pizza Pasta Salad Recipe

Vegetarian Options

If you want to make a vegetarian version of the Pizza Pasta Salad, there are plenty of delicious options! Start by omitting the pepperoni and adding more veggies. You can include ingredients like artichoke hearts, zucchini, or even roasted red peppers for extra flavor. Another great addition is chickpeas, which provide a nice protein boost. You can also toss in some fresh spinach or arugula for a vibrant touch. These changes will keep the salad colorful and nutritious while still capturing that pizza essence!

Protein Additions

For those looking to add more protein to their Pizza Pasta Salad, there are several tasty options. Grilled chicken or turkey is a fantastic choice, as it complements the flavors of the salad beautifully. Simply dice the cooked chicken and mix it in with the other ingredients. If you prefer seafood, consider adding shrimp or diced tuna for a unique twist. For a vegetarian protein source, try adding cubed tofu or tempeh. These additions will make your salad more filling and satisfying!

Different Dressings to Try

While the Italian dressing is a classic choice, you can experiment with different dressings to change up the flavor profile of your Pizza Pasta Salad. A balsamic vinaigrette adds a sweet and tangy taste, while a ranch dressing gives it a creamy texture. For a spicy kick, try using a chipotle dressing or a zesty lemon vinaigrette. You can even make your own dressing by mixing olive oil, vinegar, and your favorite herbs. The possibilities are endless, so feel free to get creative!

Cooking Note for Pizza Pasta Salad Recipe

When preparing your Pizza Pasta Salad, there are a few cooking notes to keep in mind to ensure the best results. First, always cook the pasta according to the package instructions. This ensures that it reaches the perfect al dente texture, which is crucial for a salad. Overcooked pasta can become mushy and lose its appealing bite.

Next, rinsing the pasta under cold water after cooking is essential. This step not only cools the pasta but also helps to remove excess starch. By doing this, you prevent the pasta from sticking together, allowing for a more enjoyable eating experience.

Additionally, when chopping your vegetables, aim for uniform sizes. This not only makes the salad look more appealing but also ensures that every bite is balanced with flavors. For instance, if you cut the cucumbers too large, they may overpower the other ingredients.

Lastly, don’t hesitate to taste as you go! Adjusting the seasoning and dressing to your liking is key. Everyone has different preferences, so feel free to add more salt, pepper, or dressing until it’s just right for you. Remember, cooking is all about making it your own!

Serving Suggestions for Pizza Pasta Salad Recipe

When it comes to serving your Pizza Pasta Salad, there are plenty of delightful options to consider. This dish is not only versatile but also perfect for various occasions. Here are some serving suggestions to elevate your meal:

  • As a Side Dish: Pizza Pasta Salad makes a fantastic side dish for barbecues, picnics, or family gatherings. Pair it with grilled meats, such as chicken or burgers, for a complete meal.
  • As a Main Course: If you want to enjoy it as a main dish, simply add more protein. Grilled chicken, shrimp, or even chickpeas can turn this salad into a satisfying meal.
  • In Individual Portions: For a fun presentation, serve the salad in individual cups or jars. This makes it easy for guests to grab and enjoy, especially at parties or potlucks.
  • With Bread: Serve your Pizza Pasta Salad alongside garlic bread or breadsticks. The combination of flavors will complement each other beautifully, making for a hearty meal.
  • As a Lunch Option: Pack the salad in a lunchbox for a quick and nutritious meal. It’s perfect for work or school, and it tastes just as good cold!

Don’t forget to garnish your Pizza Pasta Salad with fresh herbs, like basil or parsley, for an extra pop of color and flavor. You can also sprinkle some grated Parmesan cheese on top for a cheesy finish. With these serving suggestions, your Pizza Pasta Salad will be a hit at any gathering!

Tips for Perfecting Your Pizza Pasta Salad Recipe

Creating the perfect Pizza Pasta Salad is all about attention to detail and personal touches. Here are some helpful tips to ensure your salad turns out delicious every time:

  • Choose Quality Ingredients: Fresh, high-quality ingredients make a big difference in flavor. Opt for ripe cherry tomatoes, crisp cucumbers, and fresh mozzarella. The better the ingredients, the tastier your salad will be!
  • Don’t Overcook the Pasta: As mentioned earlier, cooking the rotini pasta to al dente is crucial. This ensures it holds its shape and texture in the salad. Keep an eye on the cooking time and taste a piece before draining.
  • Let It Chill: Allowing the salad to chill for at least 30 minutes is essential. This resting time helps the flavors meld together, making each bite more flavorful. If you can, let it sit even longer for the best taste!
  • Adjust Seasoning: Everyone has different taste preferences. After mixing the salad, taste it and adjust the seasoning as needed. You might want to add a pinch more salt, pepper, or even a splash of extra dressing.
  • Mix Gently: When combining the ingredients, be gentle. You want to avoid breaking the pasta or cheese. A light hand will help keep everything intact and looking beautiful.
  • Experiment with Add-Ins: Don’t be afraid to get creative! Try adding different vegetables, herbs, or proteins. Ingredients like sun-dried tomatoes, fresh basil, or even a sprinkle of crushed red pepper can elevate your salad.
  • Store Properly: If you have leftovers, store them in an airtight container in the fridge. The salad will keep well for a few days, but the pasta may absorb some dressing. You can always add a little more dressing before serving again.

By following these tips, you’ll be well on your way to mastering the art of Pizza Pasta Salad. Enjoy the process and have fun experimenting with flavors!

Breakdown of Time for Pizza Pasta Salad Recipe

Prep Time

The prep time for your Pizza Pasta Salad is quite minimal. You’ll spend about 15 minutes gathering and chopping your ingredients. This includes washing the vegetables, dicing the cucumbers and bell peppers, halving the cherry tomatoes, and slicing the olives. If you have everything ready, you can whip up this salad in no time!

Cooking Time

Cooking the rotini pasta will take around 10 minutes. Bring a large pot of salted water to a boil, add the pasta, and cook until al dente. Remember to keep an eye on the clock! After cooking, you’ll need a few minutes to drain and rinse the pasta under cold water. This step is crucial for cooling the pasta and stopping the cooking process.

Total Time

In total, you can expect to spend about 30 to 40 minutes preparing your Pizza Pasta Salad. This includes the prep time, cooking time, and the chilling time of at least 30 minutes. While the salad chills, you can clean up your kitchen or prepare other dishes. The wait will be worth it when you enjoy a refreshing and flavorful salad!

Nutritional Information for Pizza Pasta Salad Recipe

Calories

When it comes to enjoying a delicious Pizza Pasta Salad, knowing the calorie content can help you make informed choices. Each serving of this delightful salad contains approximately 320 calories. This makes it a satisfying option for lunch or dinner without overwhelming your daily calorie intake. The combination of pasta, vegetables, and protein-rich ingredients ensures that you’re getting a balanced meal while still enjoying a tasty dish.

Protein Content

Protein is an essential nutrient that helps build and repair tissues in our bodies. In this Pizza Pasta Salad, you can expect to find about 12 grams of protein per serving. The protein comes from the mozzarella cheese and pepperoni, making it a great option for those looking to increase their protein intake. If you choose to add grilled chicken or chickpeas, you can boost the protein content even further, making it a more filling meal.

Sodium Levels

Sodium is another important factor to consider when enjoying your Pizza Pasta Salad. Each serving contains around 800 milligrams of sodium. This level is typical for dishes that include processed ingredients like pepperoni and Italian dressing. If you’re watching your sodium intake, consider using low-sodium versions of these ingredients or making your own dressing. This way, you can enjoy the flavors of the salad while keeping your sodium levels in check.

FAQs about Pizza Pasta Salad Recipe

Can I make Pizza Pasta Salad ahead of time?

Absolutely! Making Pizza Pasta Salad ahead of time is a great idea. In fact, it often tastes even better after sitting in the fridge for a while. The flavors have time to meld together, creating a more delicious dish. You can prepare the salad a day in advance and store it in an airtight container in the refrigerator. Just remember to give it a gentle toss before serving to redistribute the dressing and ingredients!

What types of pasta work best for this recipe?

While rotini pasta is the star of this Pizza Pasta Salad Recipe, you can use other types of pasta as well. Penne, fusilli, or even bowtie pasta work wonderfully. The key is to choose a pasta shape that holds the dressing and ingredients well. Avoid very small pasta shapes, as they may get lost among the other ingredients. Just make sure to cook it al dente for the best texture!

How can I make Pizza Pasta Salad gluten-free?

Making a gluten-free version of Pizza Pasta Salad is simple! Just swap out the regular rotini pasta for gluten-free pasta. Many brands offer gluten-free options made from rice, quinoa, or chickpeas. These alternatives work well and maintain a similar texture. Additionally, check the labels on your other ingredients, like the Italian dressing and pepperoni, to ensure they are gluten-free. With these adjustments, you can enjoy this tasty salad without any gluten!

Can I add meat to the Pizza Pasta Salad Recipe?

Yes, you can definitely add meat to your Pizza Pasta Salad! Grilled chicken, turkey, or even diced ham are excellent choices that complement the flavors of the salad. If you prefer seafood, shrimp or crab meat can add a delightful twist. Just make sure to cook any raw meat beforehand and let it cool before mixing it into the salad. Adding meat not only enhances the flavor but also boosts the protein content, making it a more filling meal!

Conclusion on Pizza Pasta Salad Recipe

In conclusion, the Pizza Pasta Salad Recipe is a delightful and versatile dish that brings together the beloved flavors of pizza and pasta in a refreshing salad form. With its colorful ingredients and zesty dressing, this salad is not only visually appealing but also packed with nutrients. Whether you’re preparing it for a family dinner, a picnic, or a potluck, it’s sure to be a crowd-pleaser.

This recipe allows for endless customization, making it easy to cater to different tastes and dietary preferences. You can add more vegetables, switch up the proteins, or even try different dressings to create a unique version that suits your palate. The tips and variations provided will help you perfect your Pizza Pasta Salad, ensuring that every bite is bursting with flavor.

Moreover, the nutritional information highlights that this salad can be a balanced meal option, providing a good source of protein and essential nutrients. With a little planning, you can make this dish ahead of time, allowing the flavors to meld beautifully while saving you time on busy days.

So, gather your ingredients, follow the steps, and enjoy the delightful experience of making and sharing this Pizza Pasta Salad. It’s a dish that brings joy to the table and is sure to become a favorite in your household. Happy cooking!

Savory Egg and Ham Sandwich: A Delicious Breakfast Delight

Introduction to the Savory Egg and Ham Sandwich

Savory Egg and Ham Sandwich. This delightful dish combines the rich flavors of eggs, ham, and cheese, all nestled between warm, toasted English muffins. It’s a perfect way to kickstart your day with a hearty meal that is both quick to prepare and incredibly tasty.

The beauty of this sandwich lies in its simplicity. With just a few ingredients, you can create a breakfast that feels special. Whether you’re rushing out the door or enjoying a leisurely morning at home, this sandwich is versatile enough to fit any schedule. Plus, it’s a great way to fuel your body with protein and essential nutrients.

Savory Egg and Ham Sandwich easy to make, but it also allows for plenty of customization. You can add your favorite toppings or swap out ingredients to suit your taste. From spicy hot sauce to fresh vegetables, the options are endless. This means you can enjoy a different flavor experience every time you make it!

Savory Egg and Ham Sandwich and discover how to make this delightful breakfast treat!

Ingredients for the Savory Egg and Ham Sandwich

Savory Egg and Ham Sandwich, you’ll need a handful of simple ingredients. Each component plays a vital role in delivering that delicious flavor and satisfying texture. Here’s what you’ll need:

  • 4 large eggs
  • 4 slices of ham
  • 4 slices of cheddar cheese
  • 4 English muffins, split
  • 2 tablespoons butter
  • Salt and pepper to taste
  • Optional: hot sauce or your favorite condiment

These ingredients are not only easy to find but also allow for flexibility. For instance, you can choose different types of cheese or ham based on your preferences. If you’re looking for a lighter option, turkey or chicken ham works wonderfully. Additionally, feel free to experiment with various condiments to add a personal touch to your sandwich.

Savory Egg and Ham Sandwich. Let’s move on to the preparation steps to bring this tasty breakfast to life!

Step-by-Step Preparation of the Savory Egg and Ham Sandwich

Savory Egg and Ham Sandwich. Follow these simple steps to create a delicious breakfast that will surely impress your family or friends!

Step 1: Gather Your Ingredients

Before you start cooking, make sure you have everything you need within reach. Gather your eggs, ham, cheddar cheese, English muffins, butter, salt, and pepper. If you plan to use any optional condiments, like hot sauce, have those ready too. This will make the cooking process smooth and enjoyable!

Step 2: Prepare the Eggs

In a non-stick skillet, melt 1 tablespoon of butter over medium heat. Once the butter is melted and bubbly, crack the eggs into the skillet. Season them with a pinch of salt and pepper. Cook the eggs until the whites are set, which should take about 3-4 minutes. If you prefer your yolks cooked through, you can flip the eggs gently and cook for an additional minute.

Step 3: Cook the Ham

While the eggs are cooking, take another skillet and melt the remaining tablespoon of butter over medium heat. Add the slices of ham to the skillet. Cook the ham for about 2-3 minutes on each side, or until it’s heated through and slightly crispy. This step adds a wonderful texture and flavor to your sandwich!

Step 4: Assemble the Sandwich

Savory Egg and Ham Sandwich. Start by placing a slice of ham on the bottom half of each toasted English muffin. Next, add a cooked egg on top of the ham, followed by a slice of cheddar cheese. The cheese will melt slightly from the heat of the egg, creating a deliciously gooey texture.

Step 5: Toast the Bread

Before serving, make sure your English muffins are toasted to a golden brown. You can do this in a toaster or on a griddle. The crispy texture of the toasted muffins perfectly complements the soft egg and ham. Once everything is assembled, place the top half of the English muffin on your sandwich. Serve immediately, and don’t forget to add hot sauce or your favorite condiment if desired!

Savory Egg and Ham Sandwich ready to enjoy. It’s a simple yet satisfying breakfast that can be made in no time!

Variations of the Savory Egg and Ham Sandwich

Savory Egg and Ham Sandwich is a fantastic base for creativity. While the classic version is delicious, there are many ways to switch things up. Let’s explore some fun variations that can enhance your breakfast experience!

Adding Cheese to Your Savory Egg and Ham Sandwich

Savory Egg and Ham Sandwich. Here are some tasty options:

  • Swiss Cheese: This cheese melts beautifully and adds a nutty flavor.
  • Pepper Jack: For those who enjoy a little heat, pepper jack cheese brings a spicy kick.
  • Feta Cheese: Crumbled feta can add a tangy twist, especially if you include some spinach.
  • American Cheese: This classic choice melts perfectly and gives a creamy texture.

Feel free to mix and match cheeses for a delightful flavor explosion. The melted cheese will enhance the overall taste of your sandwich, making it even more satisfying!

Vegetarian Alternatives to the Savory Egg and Ham Sandwich

Savory Egg and Ham Sandwich. Here are some ideas to create a delicious meat-free version:

  • Replace Ham with Avocado: Sliced or mashed avocado adds creaminess and healthy fats.
  • Use Grilled Vegetables: Bell peppers, zucchini, or mushrooms can add a savory depth to your sandwich.
  • Try Tofu: Cooked and seasoned tofu can be a great protein substitute that absorbs flavors well.
  • Incorporate Spinach or Kale: Adding fresh greens not only boosts nutrition but also adds a nice crunch.

Savory Egg and Ham Sandwich so appealing!

With these variations, you can customize your sandwich to suit your taste preferences. Whether you’re a cheese enthusiast or a vegetarian, there’s a delicious option waiting for you!

Cooking Note for the Savory Egg and Ham Sandwich

Savory Egg and Ham Sandwich, a few cooking tips can elevate your dish to the next level. These notes will help ensure that your sandwich turns out perfectly every time!

First, using a non-stick skillet is essential for cooking the eggs. This prevents them from sticking and makes flipping easier if you prefer over-easy eggs. If you don’t have a non-stick skillet, a well-seasoned cast-iron skillet works well too.

Next, pay attention to the heat. Cooking on medium heat is key. If the heat is too high, the eggs may cook too quickly, resulting in rubbery whites. You want the whites to be set while keeping the yolks creamy and delicious.

Savory Egg and Ham Sandwich.

Don’t forget about the English muffins! Toasting them until they are golden brown not only enhances the flavor but also adds a satisfying crunch. If you want to take it a step further, you can spread a little butter on the muffins before toasting for added richness.

Lastly, feel free to experiment with seasonings. Besides salt and pepper, you can add a sprinkle of garlic powder or paprika to the eggs for a flavor boost. A dash of your favorite herbs can also enhance the overall taste of your sandwich.

Savory Egg and Ham Sandwich that is not only delicious but also visually appealing. Enjoy the process and savor every bite!

Serving Suggestions for the Savory Egg and Ham Sandwich

Savory Egg and Ham Sandwich, it’s time to think about how to serve it. Presentation can enhance the overall dining experience, making your breakfast feel even more special. Here are some delightful serving suggestions to consider:

  • Fresh Fruit: Pair your sandwich with a side of fresh fruit. Slices of juicy watermelon, strawberries, or a mix of berries add a refreshing touch. The sweetness of the fruit balances the savory flavors of the sandwich.
  • Hash Browns: Crispy hash browns or home fries make a hearty side. Their crunchy texture complements the soft sandwich perfectly. You can season them with herbs or spices for extra flavor.
  • Green Salad: A light green salad with mixed greens, cherry tomatoes, and a simple vinaigrette can add a healthy element to your meal. The freshness of the salad contrasts nicely with the richness of the sandwich.
  • Yogurt Parfait: For a sweet option, consider serving a yogurt parfait. Layer yogurt with granola and fruit for a delicious and nutritious side. This adds a creamy texture and a bit of sweetness to your breakfast.
  • Hot Sauce or Condiments: Don’t forget to offer a selection of hot sauces or condiments on the side. This allows everyone to customize their sandwich to their liking. A little kick can elevate the flavors even more!

Savory Egg and Ham Sandwich, consider using colorful plates or serving trays. A visually appealing presentation can make your breakfast feel like a special occasion. You can also garnish the plate with fresh herbs or a sprinkle of paprika for an extra pop of color.

Savory Egg and Ham Sandwich even more enjoyable!

Tips for Making the Perfect Savory Egg and Ham Sandwich

Savory Egg and Ham Sandwich is all about attention to detail. With a few helpful tips, you can elevate your breakfast game and impress everyone at the table. Here are some essential tips to ensure your sandwich turns out delicious every time!

First, choose high-quality ingredients. Fresh eggs, good-quality ham, and flavorful cheese make a big difference. Look for local or organic options if possible. The better the ingredients, the tastier your sandwich will be!

Next, don’t rush the cooking process. Cooking the eggs and ham at the right temperature is crucial. Medium heat allows for even cooking without burning. This way, your eggs will be fluffy, and your ham will be perfectly crispy.

Consider adding a splash of milk or cream to your eggs before cooking. This simple addition can make your scrambled eggs creamier and richer. If you prefer fried eggs, try cooking them sunny-side up for a beautiful presentation.

When it comes to assembling your sandwich, layering is key. Start with the ham, then add the egg, and finish with cheese. This order helps the cheese melt perfectly over the warm egg, creating a delightful gooey texture.

Savory Egg and Ham Sandwich truly special.

Lastly, serve your sandwich immediately after assembling. The freshness of the ingredients and the warmth of the toasted muffins make a big difference in taste. If you let it sit too long, the texture may change, and you’ll miss out on that delightful crunch!

Savory Egg and Ham Sandwich. Enjoy the process, and most importantly, savor every delicious bite!

Breakdown of Time for the Savory Egg and Ham Sandwich

Savory Egg and Ham Sandwich, knowing how much time you’ll need can help you plan your breakfast better. Here’s a simple breakdown of the time required for each step, so you can enjoy this delicious meal without any stress!

Prep Time

Savory Egg and Ham Sandwich is quite short. You’ll need about 10 minutes to gather your ingredients and get everything ready. This includes cracking the eggs, slicing the ham and cheese, and splitting the English muffins. Having everything organized will make the cooking process smoother!

Cooking Time

Once you’re prepped, the cooking time is approximately 10-15 minutes. Cooking the eggs takes about 3-4 minutes, while the ham will need around 4-6 minutes to get crispy and warm. Toasting the English muffins can be done simultaneously, which saves time. Overall, you can expect to spend about 10-15 minutes cooking your sandwich.

Total Time

Savory Egg and Ham Sandwich. This makes it a quick and easy breakfast option, perfect for busy mornings or leisurely weekends. With just a little time, you can enjoy a hearty and satisfying meal that will keep you energized throughout the day!

Nutritional Information for the Savory Egg and Ham Sandwich

Savory Egg and Ham Sandwich not only satisfies your taste buds but also provides a good amount of nutrients. Here’s a breakdown of the key nutritional information for this delicious breakfast option:

Calories

Savory Egg and Ham Sandwich contains approximately 350 calories. This makes it a filling choice for breakfast without being overly heavy. The combination of eggs, ham, and cheese provides a hearty meal that can keep you satisfied until lunchtime.

Protein

Savory Egg and Ham Sandwich a great option for those looking to boost their protein intake in the morning.

Sodium

Savory Egg and Ham Sandwich, it’s also important to be mindful of sodium intake. Each serving contains around 800 milligrams of sodium. This amount can vary based on the type of ham and cheese you use. If you’re watching your sodium levels, consider using low-sodium ham or cheese options. Additionally, you can skip adding extra salt during cooking to help reduce the overall sodium content.

Savory Egg and Ham Sandwich is not only delicious but also provides a good balance of calories, protein, and sodium. By being aware of these nutritional aspects, you can enjoy this tasty breakfast while keeping your dietary goals in mind!

FAQs about the Savory Egg and Ham Sandwich

Can I use different types of bread for the Savory Egg and Ham Sandwich?

Savory Egg and Ham Sandwich, you can experiment with various types of bread. Consider using whole grain bread for added fiber or bagels for a heartier option. Croissants can add a flaky, buttery texture, while sourdough offers a tangy flavor. The key is to choose a bread that complements the savory ingredients of your sandwich. Feel free to get creative and find your favorite combination!

How can I make the Savory Egg and Ham Sandwich healthier?

Savory Egg and Ham Sandwich healthier is easy with a few simple swaps. Start by using whole grain or low-calorie English muffins. You can also substitute regular ham with turkey or chicken ham for a leaner option. Adding fresh vegetables like spinach, tomatoes, or avocado not only boosts nutrition but also adds flavor. Additionally, consider using low-fat cheese or skipping the cheese altogether. These small changes can help you enjoy a delicious sandwich while keeping it nutritious!

What are some good sides to serve with the Savory Egg and Ham Sandwich?

Savory Egg and Ham Sandwich with the right sides can enhance your breakfast experience. Fresh fruit, such as berries or sliced apples, adds a refreshing touch. Crispy hash browns or home fries make for a hearty side that complements the sandwich well. A light green salad can provide a healthy balance, while yogurt parfaits offer a sweet contrast. You can also serve it with a side of your favorite hot sauce for an extra kick. Choose sides that you enjoy to create a well-rounded meal!

Conclusion on the Savory Egg and Ham Sandwich

Savory Egg and Ham Sandwich is a delightful breakfast option that combines simplicity with flavor. With just a few ingredients, you can create a satisfying meal that is perfect for any time of the day. Whether you’re in a rush or have time to savor each bite, this sandwich fits the bill.

Not only is it easy to prepare, but it also offers endless possibilities for customization. From different types of cheese to various condiments, you can make each sandwich uniquely yours. Plus, the nutritional benefits, including a good amount of protein and essential vitamins, make it a smart choice for a balanced diet.

Savory Egg and Ham Sandwich can be adapted to suit your taste preferences and dietary needs. Whether you’re enjoying it solo or sharing it with family and friends, this sandwich is sure to please everyone at the table.

Savory Egg and Ham Sandwich that will brighten your morning. With its rich flavors and satisfying textures, it’s a breakfast that you’ll want to make again and again!

Honey Garlic Shrimp Recipe: A Quick and Tasty Delight

Introduction to Honey Garlic Shrimp Recipe

Are you looking for a quick and delicious meal? Look no further than the honey garlic shrimp recipe! This dish combines the sweetness of honey with the savory flavor of garlic, creating a delightful taste that will please your palate. Not only is it easy to prepare, but it also packs a punch of flavor that makes it a favorite among seafood lovers.

What Makes Honey Garlic Shrimp Special?

Honey garlic shrimp stands out for several reasons. First, the combination of honey and garlic creates a unique flavor profile. The honey adds a touch of sweetness, while the garlic provides a savory depth. Together, they create a sauce that clings beautifully to the shrimp, making every bite a burst of flavor.

Moreover, this dish is incredibly versatile. You can serve it over rice or quinoa, making it a filling meal. Additionally, it can be customized with various ingredients. Want a spicy kick? Just add some red pepper flakes! Prefer a vegetarian option? Substitute shrimp with tofu or chicken. The possibilities are endless!

The Popularity of Honey Garlic Shrimp

Honey garlic shrimp has gained immense popularity in recent years. It’s not just a dish you find in restaurants; many home cooks are embracing it too. The ease of preparation and the delightful taste make it a go-to recipe for busy weeknights or special occasions.

Social media platforms are filled with mouth-watering photos of this dish, inspiring many to try their hand at cooking it. Its appeal lies in its simplicity and the ability to impress guests with minimal effort. Whether you’re a novice cook or a seasoned chef, this recipe is sure to become a staple in your kitchen.

Ingredients for Honey Garlic Shrimp Recipe

To create the perfect honey garlic shrimp, you’ll need a few simple ingredients. Each one plays a vital role in building the dish’s delicious flavor. Here’s what you’ll need:

  • 1 pound large shrimp: Make sure they are peeled and deveined for easy cooking.
  • 1/4 cup honey: This adds sweetness and helps create a sticky sauce.
  • 1/4 cup soy sauce: It brings a savory umami flavor to the dish.
  • 2 tablespoons minced garlic: Fresh garlic enhances the overall taste.
  • 1 tablespoon fresh ginger, grated: Ginger adds a warm, spicy note.
  • 2 tablespoons vegetable oil: This is used for cooking the shrimp.
  • 1 teaspoon sesame oil: A drizzle at the end gives a nutty flavor.
  • 1/4 teaspoon red pepper flakes (optional): For those who enjoy a bit of heat.
  • 2 green onions, chopped: These are for garnish, adding a fresh touch.
  • Cooked rice or quinoa: Serve this dish over rice or quinoa for a complete meal.

Gathering these ingredients is the first step to making your honey garlic shrimp recipe a success. Each component contributes to the dish’s delightful taste and texture. So, let’s get cooking!

Step-by-Step Preparation of Honey Garlic Shrimp Recipe

Now that you have all your ingredients ready, it’s time to dive into the cooking process. This honey garlic shrimp recipe is straightforward and quick, making it perfect for any night of the week. Follow these steps to create a delicious meal that everyone will love!

Step 1: Preparing the Shrimp

First, you need to prepare the shrimp. If you haven’t done so already, make sure the shrimp are peeled and deveined. This step is crucial as it ensures that your shrimp are clean and ready to cook. Rinse them under cold water and pat them dry with a paper towel. This helps the shrimp sear nicely in the skillet. Once they are dry, set them aside while you prepare the sauce.

Step 2: Making the Honey Garlic Sauce

Next, let’s whip up the honey garlic sauce. In a medium bowl, combine the honey, soy sauce, minced garlic, and grated ginger. If you like a bit of heat, add the red pepper flakes at this stage. Whisk everything together until well blended. The mixture should be smooth and fragrant. This sauce is what makes your honey garlic shrimp recipe truly special, so take a moment to enjoy the aroma!

Step 3: Cooking the Shrimp

Now, it’s time to cook the shrimp. Heat the vegetable oil in a large skillet over medium-high heat. Once the oil is hot, add the shrimp in a single layer. Cook them for about 2-3 minutes on one side. You’ll know they are ready to flip when they turn pink and opaque. This quick cooking method keeps the shrimp tender and juicy.

Step 4: Combining Shrimp and Sauce

After the shrimp are cooked, pour the honey garlic sauce over them. Stir gently to coat each shrimp evenly with the sauce. Allow the mixture to cook for an additional 2-3 minutes. This will help the sauce thicken slightly and cling to the shrimp. Finally, drizzle the sesame oil over the shrimp and give it a good stir. This adds a lovely nutty flavor that enhances the dish. Once everything is well combined, remove the skillet from heat.

And there you have it! Your honey garlic shrimp is ready to be served. The next steps will guide you on how to present this delightful dish.

Variations of Honey Garlic Shrimp Recipe

While the classic honey garlic shrimp recipe is delicious on its own, there are many ways to customize it. Adding different flavors or ingredients can create exciting new dishes. Here are two popular variations that you can try!

Spicy Honey Garlic Shrimp

If you love a bit of heat, the spicy honey garlic shrimp variation is perfect for you! To make this dish spicier, simply increase the amount of red pepper flakes in the sauce. You can also add a splash of sriracha or your favorite hot sauce for an extra kick. This spicy twist balances the sweetness of the honey beautifully, creating a flavor explosion in every bite. Serve it over rice or quinoa, and enjoy the fiery goodness!

Honey Garlic Shrimp with Vegetables

For a more nutritious meal, consider adding vegetables to your honey garlic shrimp. Bell peppers, broccoli, and snap peas work wonderfully in this dish. To prepare, simply chop your chosen vegetables into bite-sized pieces. Sauté them in the skillet before adding the shrimp. This way, the veggies will be tender yet crisp, adding color and texture to your meal. The honey garlic sauce will coat both the shrimp and the vegetables, making every bite delicious and satisfying!

These variations not only enhance the flavor but also allow you to tailor the dish to your preferences. Whether you prefer it spicy or loaded with veggies, the honey garlic shrimp recipe is versatile enough to accommodate your taste!

Cooking Note for Honey Garlic Shrimp Recipe

When preparing your honey garlic shrimp, there are a few important cooking notes to keep in mind. These tips will help ensure that your dish turns out perfectly every time. First, always use fresh shrimp if possible. Fresh shrimp not only taste better but also have a firmer texture. If you must use frozen shrimp, make sure to thaw them completely before cooking. This prevents them from becoming rubbery.

Next, be mindful of the cooking time. Shrimp cook very quickly, usually within 2-3 minutes per side. Overcooking can lead to tough, chewy shrimp. Keep an eye on them as they change color from gray to pink. Once they are opaque, they are ready to be removed from the heat.

Another tip is to adjust the sauce to your liking. If you prefer a sweeter flavor, feel free to add a bit more honey. On the other hand, if you enjoy a saltier taste, a splash more soy sauce can enhance the dish. Taste the sauce before adding it to the shrimp to ensure it meets your preferences.

Lastly, don’t forget to let the sauce thicken slightly in the skillet. This step is crucial as it allows the flavors to meld together beautifully. A thicker sauce will cling to the shrimp better, making each bite more flavorful. With these cooking notes in mind, you’re all set to create a delicious honey garlic shrimp dish that will impress your family and friends!

Serving Suggestions for Honey Garlic Shrimp Recipe

Once your honey garlic shrimp is ready, it’s time to think about how to serve it. The right side dishes can elevate your meal and create a balanced plate. Here are some excellent suggestions to complement your delicious shrimp dish!

Best Side Dishes to Pair with Honey Garlic Shrimp

When it comes to side dishes, you have plenty of options that pair beautifully with honey garlic shrimp. Here are some favorites:

  • Steamed Rice: A classic choice, steamed white or brown rice absorbs the sweet and savory sauce perfectly.
  • Quinoa: For a healthier alternative, serve your shrimp over fluffy quinoa. It adds a nutty flavor and extra protein.
  • Stir-Fried Vegetables: A mix of colorful vegetables like bell peppers, broccoli, and snap peas can add crunch and nutrition.
  • Garlic Bread: For a fun twist, serve honey garlic shrimp with warm garlic bread. It’s great for soaking up the sauce!
  • Asian Noodles: Tossed with a bit of sesame oil, noodles can be a delightful base for your shrimp.

These side dishes not only enhance the meal but also provide a variety of textures and flavors. Choose one or mix and match to create a well-rounded dinner!

Creative Serving Ideas

Presentation can make your honey garlic shrimp even more appealing. Here are some creative serving ideas to impress your guests:

  • Skewers: Thread the cooked shrimp onto skewers for a fun, finger-food option. This is perfect for parties or casual gatherings.
  • Rice Bowls: Create a rice bowl by layering cooked rice or quinoa, topped with shrimp, and garnished with green onions and sesame seeds.
  • Salad: Serve the shrimp over a bed of mixed greens with a light vinaigrette. This adds freshness and crunch to your meal.
  • Wraps: Use lettuce leaves or tortillas to make wraps filled with shrimp, veggies, and a drizzle of sauce for a tasty handheld option.
  • Platter: Arrange the shrimp on a large platter with lemon wedges and fresh herbs for a beautiful centerpiece at your table.

These creative serving ideas not only make your dish look appealing but also add a fun twist to your dining experience. Enjoy your honey garlic shrimp in style!

Tips for Perfecting Your Honey Garlic Shrimp Recipe

To make your honey garlic shrimp truly shine, consider these helpful tips. They will ensure that your dish is not only delicious but also visually appealing. With a few simple adjustments, you can elevate your cooking game and impress your family and friends!

  • Choose Quality Shrimp: Always opt for fresh, high-quality shrimp. Look for shrimp that are firm and have a mild ocean scent. If using frozen shrimp, ensure they are completely thawed and patted dry before cooking.
  • Marinate for Extra Flavor: For an added depth of flavor, marinate the shrimp in the honey garlic sauce for 15-30 minutes before cooking. This allows the shrimp to absorb the flavors, making each bite even more delicious.
  • Don’t Overcrowd the Pan: When cooking the shrimp, avoid overcrowding the skillet. Cook in batches if necessary. This ensures that the shrimp sear properly and don’t steam, keeping them tender and juicy.
  • Adjust the Sauce to Taste: Feel free to tweak the sauce ingredients to suit your taste. If you prefer a sweeter sauce, add more honey. For a saltier flavor, increase the soy sauce. Always taste the sauce before adding it to the shrimp.
  • Garnish Generously: Don’t skip the garnish! Chopped green onions and sesame seeds not only add a pop of color but also enhance the dish’s flavor. A sprinkle of fresh herbs can also brighten up the presentation.
  • Serve Immediately: Honey garlic shrimp is best enjoyed fresh off the stove. Serve it immediately for the best texture and flavor. If you need to keep it warm, cover it loosely with foil until ready to serve.
  • Experiment with Add-Ins: Feel free to get creative! Add-ins like bell peppers, snap peas, or even pineapple can add a delightful twist to your dish. Just make sure to adjust the cooking time accordingly.

By following these tips, you’ll be well on your way to mastering the honey garlic shrimp recipe. Each step will help you create a dish that is not only tasty but also visually stunning. Happy cooking!

Breakdown of Time for Honey Garlic Shrimp Recipe

Understanding the time needed for each step in the honey garlic shrimp recipe can help you plan your meal better. Here’s a quick breakdown of the time required for preparation and cooking. This will ensure that you can enjoy your delicious dish without any rush!

Prep Time

The prep time for this honey garlic shrimp recipe is quite short. You’ll need about 10-15 minutes to gather and prepare your ingredients. This includes peeling and deveining the shrimp, chopping the green onions, and measuring out the sauce ingredients. Having everything ready before you start cooking will make the process smoother and more enjoyable!

Cooking Time

Once you’re ready to cook, the cooking time is approximately 5-7 minutes. This includes:

  • 2-3 minutes for cooking the shrimp until they turn pink and opaque.
  • 2-3 minutes for combining the shrimp with the honey garlic sauce and allowing it to thicken slightly.

Overall, the cooking process is quick, making this dish perfect for busy weeknights or last-minute dinner plans.

Total Time

In total, you can expect the entire honey garlic shrimp recipe to take about 15-20 minutes from start to finish. This includes both prep and cooking time. With such a quick turnaround, you can have a flavorful and satisfying meal ready in no time!

So, whether you’re cooking for yourself or entertaining guests, this honey garlic shrimp recipe is a fantastic choice that won’t take up your whole evening. Enjoy your cooking adventure!

Nutritional Information for Honey Garlic Shrimp Recipe

Understanding the nutritional content of your meals is essential for maintaining a balanced diet. The honey garlic shrimp recipe not only delights your taste buds but also provides valuable nutrients. Here’s a closer look at the nutritional information for this delicious dish.

Calories in Honey Garlic Shrimp

Each serving of honey garlic shrimp contains approximately 280 calories. This makes it a relatively light meal option, especially when paired with healthy sides like steamed vegetables or quinoa. The balance of flavors and the moderate calorie count make it a great choice for those watching their intake.

Protein Content

One of the standout features of honey garlic shrimp is its high protein content. Each serving provides about 25 grams of protein. This is beneficial for muscle repair and growth, making it an excellent option for active individuals. The shrimp itself is a lean source of protein, which helps keep you feeling full and satisfied.

Sodium Levels

When it comes to sodium, each serving of honey garlic shrimp contains around 800 milligrams. This is primarily due to the soy sauce used in the recipe. While sodium is necessary for bodily functions, it’s important to monitor your intake. If you’re watching your sodium levels, consider using low-sodium soy sauce or reducing the amount used in the recipe.

Overall, the honey garlic shrimp recipe offers a delightful combination of flavors and nutrients. With its moderate calorie count, high protein content, and mindful sodium levels, it can fit well into a healthy eating plan. Enjoy this dish knowing you’re treating yourself to something both tasty and nutritious!

FAQs about Honey Garlic Shrimp Recipe

Can I use frozen shrimp for this recipe?

Yes, you can use frozen shrimp for this honey garlic shrimp recipe! However, it’s important to thaw them completely before cooking. To do this, place the frozen shrimp in the refrigerator overnight or run them under cold water for about 10-15 minutes. Once thawed, make sure to pat them dry with a paper towel. This helps achieve a nice sear when cooking, ensuring your shrimp remain tender and juicy.

How can I make the sauce thicker?

If you prefer a thicker sauce for your honey garlic shrimp, there are a couple of easy methods to achieve this. One option is to let the sauce simmer for a longer time in the skillet after adding it to the shrimp. This allows the liquid to reduce and thicken naturally. Another method is to mix a teaspoon of cornstarch with a tablespoon of water to create a slurry. Stir this mixture into the sauce while it’s cooking, and it will thicken up quickly. Just be sure to stir continuously to avoid lumps!

What can I substitute for honey in the recipe?

If you’re looking for a substitute for honey in your honey garlic shrimp recipe, there are several options. Maple syrup is a popular alternative that provides a similar sweetness. Agave nectar is another great choice, as it has a mild flavor and is also vegan-friendly. If you want a lower-calorie option, consider using a sugar-free honey substitute or a sweetener like stevia. Just keep in mind that the flavor may vary slightly depending on the substitute you choose.

How long can I store leftover honey garlic shrimp?

Leftover honey garlic shrimp can be stored in an airtight container in the refrigerator for up to 3 days. To reheat, simply warm it in a skillet over low heat until heated through. You can also microwave it for a quick option, but be careful not to overcook it, as shrimp can become rubbery. If you want to keep it longer, consider freezing the shrimp. They can be frozen for up to 2 months. Just make sure to thaw them in the refrigerator before reheating!

Conclusion on Honey Garlic Shrimp Recipe

In conclusion, the honey garlic shrimp recipe is a delightful dish that combines simplicity with incredible flavor. Whether you’re a busy parent, a novice cook, or someone looking to impress guests, this recipe is perfect for any occasion. The balance of sweet honey and savory garlic creates a sauce that elevates the shrimp to new heights, making it a favorite among many.

Not only is this dish quick to prepare, but it also offers versatility. You can easily customize it to suit your taste preferences, whether you prefer it spicy or loaded with vegetables. The nutritional benefits, including high protein content and moderate calorie count, make it a smart choice for a healthy meal.

As you explore the various serving suggestions and creative ideas, you’ll find that honey garlic shrimp can fit seamlessly into your dining routine. From rice bowls to skewers, the possibilities are endless. So, gather your ingredients, follow the steps, and enjoy a delicious meal that’s sure to please everyone at the table.

Remember, cooking is all about experimenting and having fun. Don’t hesitate to make this recipe your own. With each attempt, you’ll refine your technique and discover new flavors. Happy cooking, and enjoy your honey garlic shrimp adventure!

Asian BBQ Chuck Roast: A Tender Flavor Explosion!

Asian BBQ Chuck Roast

Introduction to Asian BBQ Chuck Roast

The Asian BBQ Chuck Roast is one of those dishes that brings warmth and comfort, perfect for any occasion. Whether you’re hosting a family gathering or simply looking for a quick solution for a busy weeknight, this recipe delivers tender, flavorful meat that will impress everyone at the table. With a delightful blend of savory and sweet flavors, it’s a dish that not only satisfies hunger but also creates lasting memories around the dinner table.

Why You’ll Love This Asian BBQ Chuck Roast

This Asian BBQ Chuck Roast is a game-changer for busy cooks like us. It’s incredibly easy to prepare, requiring just a few minutes of hands-on time. The slow cooking process transforms the chuck roast into a melt-in-your-mouth delight, bursting with flavor. Plus, the sweet and savory marinade makes every bite a taste sensation. You’ll love how it brings everyone together, making mealtime a cherished experience.

Ingredients for Asian BBQ Chuck Roast

Gathering the right ingredients is the first step to creating a mouthwatering Asian BBQ Chuck Roast. Here’s what you’ll need:

  • Chuck Roast: This cut of beef is perfect for slow cooking, becoming tender and juicy as it cooks.
  • Soy Sauce: Adds a rich umami flavor and saltiness that enhances the overall taste.
  • Hoisin Sauce: This sweet and tangy sauce brings depth and a hint of sweetness to the marinade.
  • Brown Sugar: Balances the savory elements with its sweetness, creating a delicious caramelization.
  • Rice Vinegar: Provides a subtle acidity that brightens the flavors and cuts through the richness.
  • Sesame Oil: Adds a nutty aroma and flavor, making the dish feel authentically Asian.
  • Garlic: Freshly minced garlic infuses the roast with a robust flavor that complements the other ingredients.
  • Fresh Ginger: Grated ginger adds warmth and a slight spiciness, enhancing the overall flavor profile.
  • Black Pepper: A simple seasoning that adds a touch of heat and depth.
  • Red Pepper Flakes (optional): For those who enjoy a bit of spice, these flakes can elevate the dish.
  • Beef Broth: Keeps the roast moist and tender while adding extra flavor during cooking.
  • Green Onions: Sliced for garnish, they add a fresh crunch and a pop of color.
  • Sesame Seeds: A final touch that adds a delightful crunch and visual appeal.

For exact measurements, check the bottom of the article where you can find everything listed for easy printing. Feel free to experiment with these ingredients based on your taste preferences or what you have on hand!

How to Make Asian BBQ Chuck Roast

Creating the perfect Asian BBQ Chuck Roast is a delightful journey that fills your kitchen with mouthwatering aromas. Follow these simple steps to ensure your roast turns out tender and bursting with flavor.

Step 1: Preheat the Oven

Start by preheating your oven to 300°F (150°C). This step is crucial because it ensures even cooking throughout the roast. A properly preheated oven helps the meat cook slowly, allowing the flavors to meld beautifully while keeping it tender.

Step 2: Prepare the Marinade

In a mixing bowl, whisk together soy sauce, hoisin sauce, brown sugar, rice vinegar, sesame oil, minced garlic, grated ginger, black pepper, and red pepper flakes. Each ingredient plays a role: soy sauce adds umami, hoisin brings sweetness, and ginger adds warmth. This marinade is the heart of your dish, so mix it well to combine all those delicious flavors.

Step 3: Coat the Chuck Roast

Place the chuck roast in a large oven-safe pot or Dutch oven. Pour the marinade over the roast, ensuring it’s well coated. This step is vital for maximum flavor infusion. The more the meat absorbs the marinade, the tastier it will be once cooked. Don’t be shy—use your hands to rub the marinade into the meat!

Step 4: Add Beef Broth

Next, pour in the beef broth until it covers the roast halfway. The broth is essential for keeping the meat moist and tender during the long cooking process. It also adds depth to the sauce that will develop as the roast cooks. Think of it as a flavorful bath for your chuck roast!

Step 5: Cook the Roast

Cover the pot with a lid and place it in the preheated oven. Cook for 3 to 4 hours, or until the roast is tender and easily shreds with a fork. To check for doneness, simply insert a fork into the meat; if it pulls apart effortlessly, you’re good to go! The slow cooking allows the flavors to deepen and the meat to become incredibly tender.

Step 6: Rest and Slice

Once cooked, remove the pot from the oven and let the roast rest for about 15 minutes before slicing. Resting is crucial because it allows the juices to redistribute throughout the meat, ensuring every bite is juicy and flavorful. After resting, slice the roast against the grain for the best texture, and prepare to enjoy a flavor explosion!

Tips for Success

  • Marinate the chuck roast overnight for deeper flavor.
  • Use a meat thermometer to check for doneness; aim for 190°F (88°C) for perfect tenderness.
  • Don’t skip the resting time; it’s key for juicy slices.
  • Feel free to adjust the spice level by adding more red pepper flakes or fresh chilies.
  • Pair with steamed rice or noodles to soak up the delicious sauce.

Equipment Needed

  • Oven-safe pot or Dutch oven: A heavy pot retains heat well; a slow cooker can be used too.
  • Mixing bowl: For whisking the marinade; any bowl will do.
  • Meat thermometer: Optional, but helpful for checking doneness.
  • Cutting board and sharp knife: Essential for slicing the roast.

Variations of Asian BBQ Chuck Roast

  • Spicy Asian BBQ: Add more red pepper flakes or fresh sliced jalapeños to the marinade for an extra kick.
  • Vegetarian Option: Substitute the chuck roast with a hearty portobello mushroom or jackfruit for a plant-based twist.
  • Sweet and Tangy: Incorporate pineapple juice into the marinade for a tropical sweetness that complements the savory flavors.
  • Herb-Infused: Add fresh herbs like cilantro or basil to the marinade for a fragrant and fresh flavor profile.
  • Gluten-Free: Ensure all sauces used, like soy sauce, are gluten-free; tamari is a great alternative.

Serving Suggestions for Asian BBQ Chuck Roast

  • Serve over fluffy steamed rice or noodles to soak up the savory sauce.
  • Pair with a crisp cucumber salad for a refreshing contrast.
  • Offer a side of sautéed bok choy or stir-fried vegetables for added color and nutrition.
  • Complement with a light Asian-inspired cocktail, like a lychee martini.
  • Garnish with extra green onions and sesame seeds for a beautiful presentation.

FAQs about Asian BBQ Chuck Roast

As you embark on your culinary adventure with this Asian BBQ Chuck Roast, you might have a few questions. Here are some common queries that can help you navigate this delicious recipe:

Can I use a different cut of meat?

Absolutely! While chuck roast is ideal for its tenderness, you can also use brisket or round roast. Just keep in mind that cooking times may vary.

How do I store leftovers?

Store any leftover Asian BBQ Chuck Roast in an airtight container in the refrigerator for up to 3 days. Reheat gently in the oven or microwave to maintain its tenderness.

Can I freeze the roast?

Yes! This dish freezes beautifully. Just make sure to cool it completely before transferring it to a freezer-safe container. It can last up to 3 months in the freezer.

What can I serve with this dish?

Pair your Asian BBQ Chuck Roast with steamed rice, noodles, or a fresh salad. The savory sauce is perfect for drizzling over any side dish!

Is this recipe gluten-free?

Yes, as long as you use gluten-free soy sauce or tamari. Always check labels to ensure all ingredients meet your dietary needs.

Final Thoughts

Cooking the Asian BBQ Chuck Roast is more than just preparing a meal; it’s about creating a moment of joy and connection. The tender, flavorful meat brings everyone to the table, sparking laughter and conversation. Each bite is a reminder of the love and care that goes into home-cooked meals. Whether it’s a cozy family dinner or a gathering with friends, this dish is sure to impress. I hope you find as much joy in making it as I do. So roll up your sleeves, embrace the process, and enjoy the delicious rewards of your culinary adventure!

Asian BBQ Chuck Roast
jhessica

Asian BBQ Chuck Roast: A Tender Flavor Explosion!

A tender and flavorful Asian BBQ Chuck Roast that is perfect for any occasion.
Prep Time 15 minutes
Total Time 3 hours 15 minutes
Servings: 6 servings
Course: Main Dish
Cuisine: Asian
Calories: 350

Ingredients
  

  • 2.5 pounds chuck roast
  • 1/4 cup soy sauce
  • 1/4 cup hoisin sauce
  • 1/4 cup brown sugar
  • 2 tablespoons rice vinegar
  • 1 tablespoon sesame oil
  • 4 cloves garlic minced
  • 1 tablespoon fresh ginger grated
  • 1 teaspoon black pepper
  • 1/2 teaspoon red pepper flakes optional
  • 1 cup beef broth
  • 2 green onions sliced (for garnish)
  • Sesame seeds for garnish

Method
 

  1. Preheat your oven to 300°F (150°C).
  2. In a bowl, whisk together soy sauce, hoisin sauce, brown sugar, rice vinegar, sesame oil, garlic, ginger, black pepper, and red pepper flakes until well combined.
  3. Place the chuck roast in a large oven-safe pot or Dutch oven. Pour the marinade over the roast, ensuring it is well coated.
  4. Add the beef broth to the pot, covering the roast halfway.
  5. Cover the pot with a lid and place it in the preheated oven. Cook for 3 to 4 hours, or until the roast is tender and easily shreds with a fork.
  6. Once cooked, remove the pot from the oven and let the roast rest for 15 minutes before slicing.
  7. Serve the sliced roast with the cooking liquid spooned over the top. Garnish with sliced green onions and sesame seeds.

Nutrition

Serving: 1servingCalories: 350kcalCarbohydrates: 10gProtein: 30gFat: 20gSaturated Fat: 5gPolyunsaturated Fat: 15gCholesterol: 90mgSodium: 800mgSugar: 10g

Notes

  • For a spicier kick, increase the amount of red pepper flakes or add sliced jalapeños to the marinade.
  • Serve the roast over steamed rice or noodles to soak up the delicious sauce.

Tried this recipe?

Let us know how it was!

Cheesy Hamburger Broccoli Skillet: A Quick Dinner Delight!

Cheesy Hamburger Broccoli Skillet

Introduction to Cheesy Hamburger Broccoli Skillet

After a long day, the last thing I want to do is spend hours in the kitchen. That’s where my Cheesy Hamburger Broccoli Skillet comes to the rescue! This one-pan wonder is not just quick; it’s a delightful blend of flavors that will have your family asking for seconds. With tender broccoli, savory ground beef, and gooey cheddar cheese, it’s comfort food at its finest. Whether you’re juggling work, kids, or just life in general, this recipe is a simple solution that brings everyone together around the dinner table.

Ingredients for Cheesy Hamburger Broccoli Skillet

Gathering the right ingredients is the first step to creating your Cheesy Hamburger Broccoli Skillet. Here’s what you’ll need:

  • Ground beef: The star of the dish, providing rich flavor and protein. You can also use ground turkey or chicken for a lighter option.
  • Broccoli florets: Fresh or frozen, they add a vibrant color and crunch. Broccoli is packed with nutrients, making it a great addition.
  • Shredded cheddar cheese: This melty goodness brings everything together. Feel free to experiment with other cheeses like Monterey Jack or mozzarella.
  • Diced onion: Adds sweetness and depth to the dish. Yellow or white onions work best, but red onions can add a nice twist.
  • Minced garlic: A must for flavor! Fresh garlic elevates the taste, but garlic powder can be a quick substitute.
  • Salt and black pepper: Essential seasonings that enhance all the flavors. Adjust to your taste preference.
  • Paprika: This spice adds a subtle smokiness and a pop of color. You can use smoked paprika for an extra kick.
  • Olive oil: Used for sautéing, it’s a healthier fat option. You can swap it for butter if you prefer a richer flavor.
  • Beef broth: This adds moisture and depth. Vegetable broth can be a great alternative for a lighter version.
  • Cooked rice (optional): If you want to make it heartier, stir in some cooked rice. Quinoa or cauliflower rice are excellent low-carb substitutes.

Exact quantities for each ingredient can be found at the bottom of the article, ready for printing!

How to Make Cheesy Hamburger Broccoli Skillet

Creating your Cheesy Hamburger Broccoli Skillet is a breeze! Follow these simple steps, and you’ll have a delicious meal ready in no time.

Step 1: Sauté the Onions

Start by heating olive oil in a large skillet over medium heat. Once the oil is shimmering, toss in the diced onions. Sauté them for about 3-4 minutes until they turn translucent. This step builds a flavorful base for your dish.

Step 2: Brown the Beef

Next, add the minced garlic and ground beef to the skillet. Cook until the beef is browned, breaking it apart with a spatula, which should take about 5-7 minutes. If there’s excess fat, don’t forget to drain it. You want the beef to be lean and flavorful!

Step 3: Season the Mixture

Now it’s time to add some flavor! Stir in the salt, black pepper, and paprika. Mix everything well to ensure the spices coat the beef evenly. This is where the magic begins!

Step 4: Add Broccoli and Broth

Incorporate the broccoli florets and pour in the beef broth. Cover the skillet and let it cook for about 5-7 minutes. This will steam the broccoli until it’s tender but still vibrant. The aroma will be irresistible!

Step 5: Mix in Rice

If you’re using rice, now’s the time to stir it in. Mix it well until everything is combined. This step makes the dish heartier and perfect for a filling dinner.

Step 6: Melt the Cheese

Finally, sprinkle the shredded cheddar cheese over the top. Cover the skillet again and let it cook for an additional 2-3 minutes until the cheese is melted and bubbly. This is the moment you’ve been waiting for!

Tips for Success

  • Prep your ingredients ahead of time to streamline the cooking process.
  • Don’t rush the browning of the beef; it adds depth to the flavor.
  • Feel free to swap in your favorite veggies for added nutrition.
  • For extra creaminess, mix in a splash of heavy cream before adding cheese.
  • Leftovers can be stored in the fridge for up to three days—perfect for lunch!

Equipment Needed

  • Large skillet: A non-stick skillet works wonders, but any large pan will do.
  • Spatula: Use a sturdy spatula for breaking up the beef and mixing ingredients.
  • Measuring cups: Handy for measuring rice and broth, though you can eyeball it if you’re confident!
  • Knife and cutting board: Essential for dicing onions and mincing garlic.

Variations

  • Vegetarian Option: Swap the ground beef for lentils or chickpeas for a hearty, plant-based meal.
  • Spicy Kick: Add diced jalapeños or a sprinkle of red pepper flakes for some heat.
  • Cheese Lovers: Mix in a blend of cheeses like pepper jack or gouda for a unique flavor twist.
  • Low-Carb Delight: Replace rice with cauliflower rice or skip it altogether for a lighter dish.
  • Herb Infusion: Toss in fresh herbs like parsley or basil at the end for a burst of freshness.

Serving Suggestions

  • Pair your Cheesy Hamburger Broccoli Skillet with a crisp green salad for a refreshing contrast.
  • Serve with warm, crusty bread to soak up all that cheesy goodness.
  • A chilled glass of iced tea or lemonade complements the meal perfectly.
  • For a fun presentation, serve in colorful bowls to brighten up the table.

FAQs about Cheesy Hamburger Broccoli Skillet

Can I use frozen broccoli for this recipe?

Absolutely! Frozen broccoli works just as well as fresh. Just add it directly to the skillet, and it will cook down beautifully.

How can I make this Cheesy Hamburger Broccoli Skillet healthier?

For a healthier twist, consider using ground turkey or chicken instead of beef. You can also add more vegetables or use low-fat cheese.

Can I prepare this dish ahead of time?

Yes! You can prep the ingredients in advance and store them in the fridge. Just follow the cooking steps when you’re ready to eat.

What can I serve with this dish?

This skillet pairs wonderfully with a side salad or some crusty bread. You could also serve it over quinoa for a nutritious boost.

How do I store leftovers?

Leftovers can be stored in an airtight container in the fridge for up to three days. Just reheat in the microwave or on the stovetop when you’re ready to enjoy it again!

Final Thoughts

Cooking should be a joyful experience, and my Cheesy Hamburger Broccoli Skillet embodies that spirit. It’s not just a meal; it’s a chance to gather around the table, share stories, and create memories. The blend of flavors and textures makes every bite satisfying, while the simplicity of preparation means you can focus on what truly matters—time with loved ones. Whether it’s a busy weeknight or a cozy weekend, this dish brings warmth and comfort to your home. I hope it becomes a cherished part of your family’s dinner tradition, just as it has in mine!

Cheesy Hamburger Broccoli Skillet
jhessica

Cheesy Hamburger Broccoli Skillet: A Quick Dinner Delight!

A quick and delicious one-pan meal featuring ground beef, broccoli, and melted cheddar cheese.
Prep Time 10 minutes
Cook Time 20 minutes
Total Time 30 minutes
Servings: 4 servings
Course: Dinner
Cuisine: American
Calories: 350

Ingredients
  

  • 1 pound ground beef
  • 2 cups broccoli florets fresh or frozen
  • 1 cup shredded cheddar cheese
  • 1 medium onion diced
  • 2 cloves garlic minced
  • 1 teaspoon salt
  • 1/2 teaspoon black pepper
  • 1 teaspoon paprika
  • 1 tablespoon olive oil
  • 1/2 cup beef broth
  • 1 cup cooked rice optional

Method
 

  1. In a large skillet, heat the olive oil over medium heat. Add the diced onion and sauté for about 3-4 minutes until translucent.
  2. Add the minced garlic and ground beef to the skillet. Cook until the beef is browned, breaking it apart with a spatula, about 5-7 minutes. Drain any excess fat if necessary.
  3. Stir in the salt, black pepper, and paprika. Mix well to combine.
  4. Add the broccoli florets and beef broth to the skillet. Cover and cook for about 5-7 minutes, or until the broccoli is tender.
  5. If using, stir in the cooked rice until well combined.
  6. Sprinkle the shredded cheddar cheese over the top, cover, and let it cook for an additional 2-3 minutes until the cheese is melted.
  7. Serve warm and enjoy!

Nutrition

Serving: 1servingCalories: 350kcalCarbohydrates: 6gProtein: 28gFat: 24gSaturated Fat: 10gPolyunsaturated Fat: 14gCholesterol: 80mgSodium: 600mgFiber: 2gSugar: 2g

Notes

  • For a healthier version, substitute ground turkey or chicken for the beef.
  • Add other vegetables like bell peppers or carrots for extra color and nutrition.

Tried this recipe?

Let us know how it was!

Bakery-Style Blueberry Muffins Recipe for Everyone!

Introduction to Bakery-Style Blueberry Muffins Recipe

There’s something truly special about biting into a warm, fluffy blueberry muffin. The sweet, juicy bursts of blueberries combined with a soft, buttery texture make for a delightful treat. Whether you enjoy them for breakfast, as a snack, or even as a dessert, bakery-style blueberry muffins are a favorite for many. This recipe brings the bakery experience right into your kitchen, allowing you to create delicious muffins that rival those from your local café.

Why Bakery-Style Blueberry Muffins?

Bakery-style blueberry muffins are known for their tall, domed tops and moist interiors. They are often larger than standard muffins, making them perfect for sharing or indulging. The secret to achieving that bakery-style look and taste lies in the right balance of ingredients and careful preparation. This recipe ensures that you get a perfect rise and a tender crumb, all while being easy to follow.

Moreover, these muffins are versatile. You can enjoy them plain or customize them with various add-ins. The fresh blueberries provide a burst of flavor, while the coarse sugar topping adds a delightful crunch. Plus, baking at home allows you to control the ingredients, making it a healthier option compared to store-bought versions.

So, roll up your sleeves and get ready to impress your family and friends with these scrumptious bakery-style blueberry muffins. They are sure to become a staple in your baking repertoire!

Ingredients for Bakery-Style Blueberry Muffins Recipe

To create the perfect bakery-style blueberry muffins, you’ll need a few simple ingredients. Each component plays a vital role in achieving that delightful taste and texture. Here’s what you’ll need:

  • 2 cups all-purpose flour: This forms the base of your muffins, giving them structure.
  • 1 cup granulated sugar: This adds sweetness and helps create a tender crumb.
  • 1 tablespoon baking powder: This is essential for leavening, helping the muffins rise beautifully.
  • 1/2 teaspoon baking soda: This works with the baking powder to ensure a light and fluffy texture.
  • 1/2 teaspoon salt: A pinch of salt enhances the flavors of the other ingredients.
  • 1/2 cup unsalted butter, melted and slightly cooled: This adds richness and moisture to the muffins.
  • 1 large egg: The egg binds the ingredients together and adds structure.
  • 1 teaspoon vanilla extract: This provides a warm, sweet flavor that complements the blueberries.
  • 1 cup buttermilk: Buttermilk keeps the muffins moist and adds a slight tang.
  • 2 cups fresh blueberries: These juicy berries are the star of the show, bursting with flavor in every bite.
  • 1 tablespoon coarse sugar (for topping): This adds a delightful crunch and sweetness to the muffin tops.

Gathering these ingredients is the first step toward baking your delicious muffins. Make sure to use fresh blueberries for the best flavor, but frozen ones can work too. Now that you have everything ready, let’s move on to the preparation!

Step-by-Step Preparation of Bakery-Style Blueberry Muffins Recipe

Now that you have all your ingredients ready, it’s time to dive into the fun part—baking! Follow these simple steps to create your delicious bakery-style blueberry muffins. Each step is designed to ensure that your muffins turn out perfectly every time.

Step 1: Preheat the Oven

First things first, preheat your oven to 375°F (190°C). This step is crucial as it ensures that your muffins bake evenly. A hot oven helps them rise beautifully, giving you that perfect dome shape. While the oven heats up, you can prepare the muffin tin.

Step 2: Prepare the Muffin Tin

Next, line your muffin tin with paper liners or lightly grease it with cooking spray. This will prevent the muffins from sticking and make cleanup a breeze. If you prefer a more rustic look, you can skip the liners and just grease the tin. Either way, your muffins will come out delicious!

Step 3: Mix Dry Ingredients

In a large mixing bowl, whisk together the all-purpose flour, granulated sugar, baking powder, baking soda, and salt. Mixing these dry ingredients well is important. It ensures that the baking powder and soda are evenly distributed, which helps your muffins rise properly. Set this bowl aside for now.

Step 4: Combine Wet Ingredients

In another bowl, mix the melted butter, egg, vanilla extract, and buttermilk until smooth. This mixture should be creamy and well combined. The melted butter adds richness, while the buttermilk keeps the muffins moist. Make sure to mix thoroughly, but don’t worry if there are a few small lumps!

Step 5: Fold in Blueberries

Now, it’s time to bring the two mixtures together. Pour the wet ingredients into the bowl with the dry ingredients. Stir gently until just combined. Be careful not to overmix; a few lumps are perfectly fine. Then, fold in the fresh blueberries gently. This step is crucial as you want to keep the blueberries intact for those juicy bursts of flavor in every bite.

Step 6: Fill Muffin Cups

Using a spoon or a scoop, divide the batter evenly among the muffin cups. Fill each cup about 3/4 full. This allows room for the muffins to rise without overflowing. Once filled, sprinkle a little coarse sugar on top of each muffin. This adds a delightful crunch and sweetness to the tops.

Step 7: Bake the Muffins

Place the muffin tin in the preheated oven and bake for 20-25 minutes. Keep an eye on them! You’ll know they’re done when a toothpick inserted into the center comes out clean. The tops should be golden brown and slightly domed. The aroma of baking muffins will fill your kitchen, making it hard to wait!

Step 8: Cool and Serve

Once baked, allow the muffins to cool in the pan for about 5 minutes. This helps them set and makes them easier to remove. After that, transfer them to a wire rack to cool completely. Enjoy them warm or at room temperature. They’re perfect for breakfast, snacks, or even dessert!

Variations of Bakery-Style Blueberry Muffins Recipe

While the classic bakery-style blueberry muffins are delicious on their own, there are many fun ways to mix things up! Here are a couple of variations that can add a unique twist to your muffins. These ideas will keep your baking exciting and allow you to cater to different tastes.

Adding Lemon Zest for Extra Flavor

If you love a refreshing citrus flavor, adding lemon zest is a fantastic option. Simply grate the zest of one lemon and mix it into the wet ingredients. The bright, zesty flavor pairs beautifully with the sweetness of the blueberries. It adds a lovely brightness that makes each bite feel like a sunny day. Plus, lemon zest is a great way to elevate your muffins without much effort!

Using Different Berries

Another fun variation is to experiment with different berries. Instead of just blueberries, you can substitute half of them with chopped strawberries or raspberries. This creates a mixed berry muffin that’s bursting with flavor. You can even try blackberries or a combination of all these berries for a colorful treat. Each berry brings its own unique taste, making your muffins even more delightful!

Feel free to get creative with these variations. You can even combine them! Imagine a lemon-blueberry muffin bursting with flavor. The possibilities are endless, and each variation can make your bakery-style blueberry muffins feel new and exciting. Happy baking!

Cooking Note for Bakery-Style Blueberry Muffins Recipe

When it comes to baking, a few key tips can make all the difference in achieving the perfect bakery-style blueberry muffins. Here are some important cooking notes to keep in mind as you embark on your baking adventure.

First, always use fresh ingredients. Fresh blueberries are essential for that juicy burst of flavor. If you opt for frozen blueberries, make sure to add them directly from the freezer. This helps prevent them from bleeding into the batter and turning it a purple hue. Additionally, using fresh baking powder and baking soda ensures that your muffins rise properly.

Next, be mindful of your mixing technique. Overmixing the batter can lead to dense muffins. Instead, mix until just combined, allowing for a few lumps. This will help maintain a light and fluffy texture. Remember, the goal is to create a tender crumb, so gentle handling is key.

Another important note is to let your muffins cool properly. Cooling them in the pan for a few minutes before transferring them to a wire rack allows them to set. This step prevents them from becoming soggy and helps maintain their shape.

Lastly, consider the storage of your muffins. If you have leftovers, store them in an airtight container at room temperature for up to three days. For longer storage, you can freeze them. Just wrap each muffin tightly in plastic wrap and place them in a freezer bag. They can be enjoyed later, simply thawed or warmed in the microwave.

By following these cooking notes, you’ll be well on your way to baking delicious, bakery-style blueberry muffins that everyone will love. Happy baking!

Serving Suggestions for Bakery-Style Blueberry Muffins Recipe

Once your bakery-style blueberry muffins are baked to perfection, it’s time to think about how to serve them. These muffins are not only delicious on their own but can also be paired with various accompaniments to enhance your experience. Here are some delightful serving suggestions that will make your muffins even more enjoyable.

  • With Butter: Spread a little butter on a warm muffin for a rich and creamy addition. The melted butter seeps into the muffin, adding extra moisture and flavor.
  • With Jam or Jelly: Try pairing your muffins with your favorite fruit jam or jelly. Blueberry jam complements the muffins perfectly, creating a delightful burst of flavor.
  • With Whipped Cream: For a special treat, top your muffins with a dollop of whipped cream. This adds a light and airy texture that contrasts beautifully with the dense muffin.
  • As a Breakfast Sandwich: Slice a muffin in half and fill it with cream cheese or even a slice of cheese. This makes for a delicious breakfast sandwich that’s both sweet and savory.
  • With Fresh Fruit: Serve your muffins alongside a bowl of fresh fruit. Slices of strawberries, bananas, or even a fruit salad can add a refreshing touch to your meal.
  • With Coffee or Tea: Enjoy your muffins with a warm cup of coffee or tea. The combination of flavors makes for a perfect morning or afternoon snack.

These serving suggestions can elevate your bakery-style blueberry muffins from a simple treat to a delightful experience. Whether you’re hosting a brunch or enjoying a quiet moment at home, these muffins are sure to impress. So, gather your friends and family, and enjoy these delicious muffins together!

Tips for Perfect Bakery-Style Blueberry Muffins Recipe

To achieve the ultimate bakery-style blueberry muffins, a few tips can make a world of difference. These simple yet effective suggestions will help you create muffins that are fluffy, flavorful, and visually appealing. Let’s dive into some expert tips that will elevate your baking game!

  • Use Room Temperature Ingredients: For the best results, ensure your egg and buttermilk are at room temperature. This helps the batter mix more evenly, resulting in a better texture.
  • Don’t Overmix: When combining the wet and dry ingredients, mix just until combined. Overmixing can lead to tough muffins. A few lumps are perfectly fine!
  • Coat Blueberries in Flour: Before folding in the blueberries, toss them in a little flour. This helps prevent them from sinking to the bottom of the batter during baking.
  • Fill Muffin Cups Generously: Don’t be shy when filling the muffin cups! Filling them about 3/4 full allows for that beautiful dome shape that bakery muffins are known for.
  • Check for Doneness: Use a toothpick to check if your muffins are done. If it comes out clean or with a few crumbs, they’re ready. Avoid overbaking, as this can dry them out.
  • Let Them Cool: Allow your muffins to cool in the pan for a few minutes before transferring them to a wire rack. This helps them set and makes them easier to remove.
  • Experiment with Add-Ins: Feel free to get creative! Add-ins like nuts, chocolate chips, or spices can enhance the flavor and texture of your muffins.
  • Store Properly: To keep your muffins fresh, store them in an airtight container at room temperature. If you have leftovers, consider freezing them for later enjoyment.

By following these tips, you’ll be well on your way to baking perfect bakery-style blueberry muffins every time. Enjoy the process and the delicious results!

Breakdown of Time for Bakery-Style Blueberry Muffins Recipe

Understanding the time needed for each step in the baking process can help you plan better. Here’s a simple breakdown of the time required to make your delicious bakery-style blueberry muffins. This will ensure you have everything ready and can enjoy your muffins without any rush!

Prep Time

The prep time for this bakery-style blueberry muffins recipe is approximately 15-20 minutes. This includes gathering your ingredients, measuring them out, and mixing the dry and wet components. Taking your time during this stage is important. It allows you to ensure everything is measured accurately, which is key to achieving the best results.

Cooking Time

Once your batter is ready, the cooking time is about 20-25 minutes. During this time, the muffins will rise and bake to a beautiful golden brown. Keep an eye on them as they bake, and use the toothpick test to check for doneness. This step is crucial to ensure your muffins are perfectly fluffy and moist.

Total Time

In total, you can expect to spend around 40-50 minutes from start to finish. This includes both prep and cooking time. With just a little patience, you’ll have a batch of warm, delicious bakery-style blueberry muffins ready to enjoy. So, gather your ingredients and get ready to bake!

Nutritional Information for Bakery-Style Blueberry Muffins Recipe

Understanding the nutritional content of your bakery-style blueberry muffins can help you enjoy them guilt-free. Here’s a breakdown of the key nutritional information per serving. This will give you a clearer picture of what you’re indulging in while savoring these delightful treats.

Calories

Each muffin contains approximately 210 calories. This makes them a satisfying option for breakfast or a snack without being overly indulgent. The calorie count comes from a balanced mix of carbohydrates, fats, and proteins, making these muffins a wholesome choice.

Protein

In terms of protein, each muffin provides about 3 grams. While this isn’t a high protein snack, it does contribute to your daily intake. Pairing your muffin with a protein-rich food, like yogurt or a glass of milk, can enhance the nutritional value of your meal.

Sodium

Each muffin contains roughly 200 milligrams of sodium. This amount is reasonable for a baked good, especially considering that sodium is often necessary for flavor enhancement. If you’re watching your sodium intake, you can adjust the salt in the recipe to suit your dietary needs.

Overall, these bakery-style blueberry muffins are a delicious treat that can fit into a balanced diet. Enjoy them as part of a nutritious breakfast or a delightful snack throughout the day!

FAQs about Bakery-Style Blueberry Muffins Recipe

Can I use frozen blueberries in the Bakery-Style Blueberry Muffins Recipe?

Absolutely! You can use frozen blueberries in your bakery-style blueberry muffins. In fact, frozen blueberries can be a great option, especially when fresh ones are out of season. Just remember to add them directly from the freezer to the batter. This helps prevent them from bleeding into the mixture and turning your muffins a purple color. Using frozen blueberries may slightly change the texture, but they will still taste delicious!

How do I store leftover Bakery-Style Blueberry Muffins?

Storing your leftover bakery-style blueberry muffins is easy! Place them in an airtight container at room temperature. They will stay fresh for up to three days. If you want to keep them longer, consider freezing them. Wrap each muffin tightly in plastic wrap and place them in a freezer bag. They can be stored in the freezer for up to three months. When you’re ready to enjoy them, simply thaw them at room temperature or warm them in the microwave for a few seconds.

Can I make Bakery-Style Blueberry Muffins gluten-free?

Yes, you can make gluten-free bakery-style blueberry muffins! To do this, simply substitute the all-purpose flour with a gluten-free flour blend. Make sure to choose a blend that includes xanthan gum, as this helps mimic the texture of regular flour. You may need to adjust the liquid slightly, as gluten-free flours can absorb moisture differently. With these adjustments, you can enjoy delicious gluten-free muffins that are just as tasty!

Conclusion on Bakery-Style Blueberry Muffins Recipe

In conclusion, baking bakery-style blueberry muffins is a delightful experience that brings joy to both the baker and those who enjoy the finished product. With their fluffy texture, sweet bursts of blueberries, and a crunchy sugar topping, these muffins are sure to impress anyone who takes a bite. Whether you’re making them for a special occasion, a cozy breakfast, or just because, this recipe is simple and rewarding.

By following the steps outlined in this article, you can create muffins that rival those from your favorite bakery. Remember to use fresh ingredients, mix gently, and have fun with variations. The addition of lemon zest or different berries can elevate your muffins to new heights, making each batch unique.

As you bake, don’t forget to enjoy the process. The aroma of muffins baking in the oven is a treat in itself! Once they’re ready, share them with family and friends, or savor them all to yourself. Either way, these bakery-style blueberry muffins are a delicious way to brighten your day.

So, gather your ingredients, preheat that oven, and get ready to create a batch of warm, scrumptious muffins. Happy baking!

Buttered Honey Mustard Salmon Recipe is a must-try!

Introduction to Buttered Honey Mustard Salmon Recipe

Are you looking for a delicious and easy way to prepare salmon? Look no further! The Buttered Honey Mustard Salmon Recipe is a delightful dish that combines the rich flavors of butter, honey, and mustard. This recipe is not only simple to make but also packed with nutrients, making it a perfect choice for a healthy meal. Whether you’re cooking for yourself or entertaining guests, this dish is sure to impress.

What Makes Buttered Honey Mustard Salmon Special?

What sets this recipe apart is its unique blend of sweet and savory flavors. The honey adds a touch of sweetness, while the Dijon mustard provides a tangy kick. Together, they create a mouthwatering glaze that perfectly complements the tender salmon. Plus, the addition of garlic powder and lemon juice enhances the overall taste, making each bite a burst of flavor.

Another reason this recipe shines is its versatility. You can easily customize it to suit your taste preferences. Want a bit of heat? Just add some cayenne pepper! Prefer a different type of fish? Feel free to substitute with trout or tilapia. The possibilities are endless!

Not only is this dish delicious, but it’s also quick to prepare. In just about 30 minutes, you can have a restaurant-quality meal on your table. This makes it an excellent option for busy weeknights or special occasions. So, let’s dive into the ingredients and get started on this delightful Buttered Honey Mustard Salmon Recipe!

Ingredients for Buttered Honey Mustard Salmon Recipe

To create the mouthwatering Buttered Honey Mustard Salmon, you’ll need a few simple ingredients. Each component plays a vital role in building the dish’s rich flavor profile. Here’s what you’ll need:

  • 2 (6-ounce) salmon fillets: Fresh salmon is the star of this recipe. Look for fillets that are bright in color and firm to the touch.
  • 2 tablespoons unsalted butter, melted: Butter adds richness and helps the glaze stick to the salmon.
  • 2 tablespoons honey: This natural sweetener balances the tanginess of the mustard.
  • 2 tablespoons Dijon mustard: The mustard provides a zesty flavor that elevates the dish.
  • 1 tablespoon lemon juice: Fresh lemon juice brightens the flavors and adds a refreshing touch.
  • 1 teaspoon garlic powder: Garlic powder enhances the overall taste with its savory notes.
  • Salt and pepper to taste: These basic seasonings are essential for bringing out the flavors of the salmon.
  • Fresh parsley, chopped (for garnish): A sprinkle of parsley adds a pop of color and freshness to the dish.

These ingredients are not only easy to find but also work together beautifully to create a delicious meal. Make sure to gather everything before you start cooking, so you can enjoy a smooth and enjoyable cooking experience!

Step-by-Step Preparation of Buttered Honey Mustard Salmon Recipe

Now that you have all your ingredients ready, it’s time to dive into the step-by-step preparation of the Buttered Honey Mustard Salmon Recipe. Following these simple steps will ensure that your salmon turns out perfectly every time. Let’s get started!

Step 1: Preparing the Salmon

First, you need to prepare the salmon fillets. Start by rinsing them under cold water. This helps remove any residual scales or impurities. After rinsing, gently pat the fillets dry with paper towels. This step is crucial because it helps the glaze stick better to the salmon.

Next, place the salmon fillets skin-side down on a lined baking sheet. This will prevent the fish from sticking and make cleanup easier. Now, season the fillets with salt and pepper. Don’t be shy with the seasoning; it enhances the natural flavors of the salmon.

Step 2: Making the Honey Mustard Sauce

In a small bowl, it’s time to whip up the delicious honey mustard sauce. Start by melting the unsalted butter in the microwave or on the stove. Once melted, add the honey, Dijon mustard, lemon juice, and garlic powder. Whisk everything together until the mixture is smooth and well combined.

This sauce is what makes the salmon so special. The sweet honey and tangy mustard create a delightful glaze that will caramelize beautifully in the oven. Feel free to taste the sauce and adjust the flavors to your liking. If you want it sweeter, add more honey. For a tangier kick, add a bit more mustard!

Step 3: Cooking the Salmon

Now that your salmon is prepared and the sauce is ready, it’s time to cook! Preheat your oven to 400°F (200°C). This temperature is perfect for baking salmon, ensuring it cooks evenly and stays moist.

Once the oven is preheated, brush the honey mustard sauce generously over the top of each salmon fillet. Make sure to cover the fillets well, as this will create a flavorful crust as it bakes. Place the baking sheet in the oven and bake for 12-15 minutes. The salmon is done when it flakes easily with a fork and reaches an internal temperature of 145°F (63°C).

Step 4: Adding the Butter

After baking, remove the salmon from the oven and let it rest for a couple of minutes. This resting period allows the juices to redistribute, making the salmon even more tender. Before serving, drizzle any remaining honey mustard sauce over the fillets for an extra burst of flavor.

Finally, garnish your beautifully baked salmon with freshly chopped parsley. This adds a lovely touch of color and freshness to your dish. Now, your Buttered Honey Mustard Salmon is ready to be enjoyed!

Variation of Buttered Honey Mustard Salmon Recipe

While the Buttered Honey Mustard Salmon Recipe is delicious as is, there are many ways to switch things up! By using alternative ingredients or different cooking methods, you can create a unique dish every time. Let’s explore some exciting variations!

Alternative Ingredients for Different Flavors

One of the best parts about cooking is experimenting with flavors. Here are some alternative ingredients you can use to give your salmon a new twist:

  • Maple Syrup: Swap honey for maple syrup for a deeper, richer sweetness. This pairs wonderfully with the mustard.
  • Spicy Mustard: Use a spicy brown mustard instead of Dijon for an extra kick. It adds a nice heat to the dish.
  • Herbs: Try adding fresh herbs like dill or thyme to the honey mustard sauce. These herbs complement salmon beautifully.
  • Orange Juice: Replace lemon juice with fresh orange juice for a sweeter, citrusy flavor. It brightens the dish!
  • Sesame Oil: For an Asian twist, add a teaspoon of sesame oil to the sauce. It gives a nutty flavor that pairs well with salmon.

Feel free to mix and match these ingredients based on what you have at home. Each variation can create a delightful new experience!

Cooking Methods: Grilling vs. Baking

While baking is a fantastic way to prepare your salmon, grilling is another excellent option. Each method offers a different flavor and texture. Here’s a quick comparison:

  • Grilling: Grilling salmon gives it a smoky flavor and crispy edges. Preheat your grill to medium-high heat. Place the salmon fillets on a greased grill grate, skin-side down. Cook for about 6-8 minutes per side, brushing with the honey mustard sauce as you go. This method is perfect for summer barbecues!
  • Baking: Baking is simple and hands-off. It allows the salmon to cook evenly and stay moist. As mentioned earlier, bake at 400°F (200°C) for 12-15 minutes. This method is great for busy weeknights when you want a quick meal.

Both methods yield delicious results, so choose the one that fits your mood or occasion. Whether you grill or bake, your Buttered Honey Mustard Salmon will surely be a hit!

Cooking Note for Buttered Honey Mustard Salmon Recipe

Cooking salmon can be a delightful experience, but there are a few important notes to keep in mind to ensure your Buttered Honey Mustard Salmon turns out perfectly every time. Here are some tips to help you achieve the best results:

First, always choose fresh salmon. Freshness is key to a delicious dish. Look for salmon fillets that have a bright color and a firm texture. If you can, buy wild-caught salmon for the best flavor and quality. If you opt for frozen salmon, make sure to thaw it completely before cooking. This helps it cook evenly.

Next, pay attention to the cooking time. Salmon can easily go from perfectly cooked to overdone. Keep an eye on it while it bakes. The general rule is to cook salmon for about 4-6 minutes per half-inch of thickness. If your fillets are thicker, they may need a bit more time. Use a fork to check for flakiness; if it flakes easily, it’s done!

Another important note is to let the salmon rest after cooking. This resting period allows the juices to redistribute throughout the fish, making it more tender and flavorful. Just a few minutes will make a big difference in the final texture.

Lastly, don’t forget to adjust the seasoning to your taste. Everyone has different preferences, so feel free to add more salt, pepper, or even a splash of hot sauce to the honey mustard mixture. Personalizing the flavors will make your Buttered Honey Mustard Salmon even more enjoyable!

By keeping these cooking notes in mind, you’ll be well on your way to creating a delicious and satisfying meal that everyone will love. Happy cooking!

Serving Suggestions for Buttered Honey Mustard Salmon Recipe

Once your Buttered Honey Mustard Salmon is ready, it’s time to think about how to serve it. The right side dishes and presentation can elevate your meal, making it even more enjoyable. Here are some ideal side dishes and presentation tips to consider!

Ideal Side Dishes to Pair

Choosing the right side dishes can enhance the flavors of your salmon and create a well-rounded meal. Here are some delicious options:

  • Sautéed Spinach: Lightly sautéed spinach with garlic complements the salmon beautifully. The greens add a fresh touch and are packed with nutrients.
  • Roasted Vegetables: A mix of roasted carrots, bell peppers, and zucchini brings color and flavor to your plate. Toss them in olive oil and season with salt and pepper before roasting.
  • Quinoa Salad: A light quinoa salad with cherry tomatoes, cucumber, and a lemon vinaigrette pairs well with the sweet and tangy salmon. It adds a nice crunch and is very filling.
  • Mashed Potatoes: Creamy mashed potatoes provide a comforting side that balances the flavors of the salmon. You can even add garlic or herbs for extra flavor.
  • Rice Pilaf: Fluffy rice pilaf with herbs and nuts is another great option. It absorbs the delicious honey mustard sauce and adds a lovely texture.

Feel free to mix and match these sides based on your preferences. Each option will complement the Buttered Honey Mustard Salmon perfectly!

Presentation Tips for Serving

Presentation is key when serving your Buttered Honey Mustard Salmon. A beautifully arranged plate can make your meal feel special. Here are some tips to enhance your presentation:

  • Use a White Plate: A simple white plate allows the vibrant colors of the salmon and sides to stand out. It creates a clean and elegant look.
  • Garnish with Fresh Herbs: Sprinkle freshly chopped parsley or dill over the salmon for a pop of color. It adds freshness and makes the dish visually appealing.
  • Arrange Neatly: Place the salmon fillet in the center of the plate, with sides arranged around it. This creates a balanced and inviting presentation.
  • Add Lemon Wedges: Serve with lemon wedges on the side. Not only do they look great, but they also allow guests to add a splash of citrus if they desire.
  • Drizzle Extra Sauce: If you have any leftover honey mustard sauce, drizzle it around the plate for an artistic touch. It enhances the flavor and looks beautiful!

By following these serving suggestions and presentation tips, your Buttered Honey Mustard Salmon will not only taste amazing but also look stunning on the table. Enjoy your meal!

Tips for Perfecting Your Buttered Honey Mustard Salmon Recipe

To make your Buttered Honey Mustard Salmon truly shine, consider these helpful tips. Each suggestion will enhance the flavor and texture of your dish, ensuring a delightful dining experience. Let’s explore how to perfect this recipe!

First, always start with high-quality salmon. Fresh, wild-caught salmon is ideal for the best flavor. If you can’t find fresh salmon, frozen fillets are a good alternative. Just be sure to thaw them completely before cooking. This helps the salmon cook evenly and maintain its moisture.

Next, don’t skip the seasoning! A generous sprinkle of salt and pepper enhances the natural flavors of the salmon. You can also experiment with other seasonings, like paprika or lemon zest, to add extra depth to your dish.

When preparing the honey mustard sauce, whisk it well to ensure all ingredients are fully combined. This will create a smooth glaze that clings beautifully to the salmon. If you prefer a thicker sauce, you can simmer it on low heat for a few minutes until it thickens slightly.

Pay close attention to the cooking time. Salmon can go from perfectly cooked to dry very quickly. Use a meat thermometer to check for doneness. The internal temperature should reach 145°F (63°C). If you don’t have a thermometer, look for the salmon to flake easily with a fork.

After baking, let the salmon rest for a few minutes. This resting period allows the juices to redistribute, making the fish more tender and flavorful. It’s a small step that makes a big difference!

Lastly, feel free to get creative with your garnishes. Fresh herbs, like dill or chives, can add a burst of flavor and color. You can also sprinkle some toasted nuts or seeds for added crunch. These finishing touches will elevate your Buttered Honey Mustard Salmon to a whole new level!

By following these tips, you’ll be well on your way to creating a delicious and impressive Buttered Honey Mustard Salmon that everyone will love. Happy cooking!

Breakdown of Time for Buttered Honey Mustard Salmon Recipe

Understanding the time needed for each step in the Buttered Honey Mustard Salmon Recipe can help you plan your cooking efficiently. Here’s a quick breakdown of the time required for preparation and cooking, so you can enjoy a delicious meal without any stress!

Prep Time

The prep time for this recipe is quite short, making it perfect for busy weeknights. You’ll need about 10 minutes to gather your ingredients and prepare the salmon. This includes rinsing the fillets, patting them dry, and mixing the honey mustard sauce. With everything ready, you’ll be set to move on to the cooking phase!

Cooking Time

Once your salmon is prepped, the cooking time is approximately 12-15 minutes. This is the time it takes for the salmon to bake in the oven at 400°F (200°C). During this time, the honey mustard glaze caramelizes, creating a delicious crust on the salmon. Keep an eye on it to ensure it reaches the perfect flakiness!

Total Time

In total, you can expect the Buttered Honey Mustard Salmon Recipe to take about 22-25 minutes from start to finish. This includes both the prep and cooking times. With such a quick turnaround, you can have a flavorful and healthy meal ready in no time!

Nutritional Information for Buttered Honey Mustard Salmon Recipe

Understanding the nutritional content of your meals is essential for maintaining a balanced diet. The Buttered Honey Mustard Salmon Recipe not only delights your taste buds but also provides valuable nutrients. Here’s a breakdown of the nutritional information per serving, so you can enjoy this dish guilt-free!

Calories

Each serving of Buttered Honey Mustard Salmon contains approximately 350 calories. This makes it a satisfying yet light option for dinner. The combination of healthy fats from the salmon and the sweetness from honey ensures that you feel full without overindulging.

Protein Content

One of the standout features of this recipe is its high protein content. Each serving provides about 34 grams of protein. Salmon is an excellent source of protein, which is essential for muscle repair and growth. Including this dish in your diet can help you meet your daily protein needs while enjoying a delicious meal.

Sodium Levels

When it comes to sodium, this recipe contains a moderate amount. The sodium levels can vary based on how much salt you add during preparation. On average, you can expect around 500-600 mg of sodium per serving. If you’re watching your sodium intake, consider using less salt or opting for low-sodium mustard to keep the dish flavorful without the extra sodium.

Overall, the Buttered Honey Mustard Salmon Recipe is a nutritious choice that fits well into a healthy eating plan. With its balance of calories, protein, and moderate sodium levels, it’s a meal you can feel good about serving to your family or enjoying on your own!

FAQs about Buttered Honey Mustard Salmon Recipe

Can I use frozen salmon for this recipe?

Yes, you can use frozen salmon for the Buttered Honey Mustard Salmon Recipe! Just make sure to thaw it completely before cooking. Thawing helps the salmon cook evenly and prevents it from becoming rubbery. You can thaw the salmon overnight in the refrigerator or place it in a sealed bag and submerge it in cold water for quicker results. Once thawed, follow the recipe as usual for a delicious meal!

What can I substitute for honey in the Buttered Honey Mustard Salmon Recipe?

If you’re looking for a substitute for honey, there are several options you can try. Maple syrup is a great alternative that adds a rich sweetness. You can also use agave nectar or brown sugar mixed with a little water to create a similar consistency. If you prefer a sugar-free option, consider using a sugar substitute like stevia or monk fruit sweetener. Each of these alternatives will give your salmon a delightful flavor, so feel free to experiment!

How do I know when the salmon is cooked through?

To determine if your salmon is cooked through, you can use a fork to check for flakiness. When the salmon flakes easily, it’s done! Additionally, the internal temperature should reach 145°F (63°C). If you have a meat thermometer, this is the most accurate way to check doneness. If you don’t have one, look for the salmon to change from a translucent pink to an opaque color. This visual cue is a good indicator that your salmon is ready to enjoy!

Can I make the sauce ahead of time?

Absolutely! You can make the honey mustard sauce ahead of time. Simply mix all the ingredients together and store the sauce in an airtight container in the refrigerator. It will keep well for up to a week. When you’re ready to cook the salmon, just give the sauce a quick stir to recombine the ingredients before brushing it on the fillets. This makes meal prep even easier and allows you to enjoy a delicious dinner in no time!

Conclusion on Buttered Honey Mustard Salmon Recipe

In conclusion, the Buttered Honey Mustard Salmon Recipe is a fantastic choice for anyone looking to enjoy a delicious and nutritious meal. With its perfect balance of sweet and savory flavors, this dish is sure to please your taste buds. The simplicity of the recipe makes it accessible for cooks of all skill levels, allowing you to create a restaurant-quality meal right in your own kitchen.

Not only is this salmon recipe quick to prepare, but it also offers a wealth of nutritional benefits. Packed with protein and healthy fats, it supports a balanced diet while keeping you satisfied. Plus, the versatility of the ingredients means you can easily customize the dish to suit your preferences or dietary needs.

Whether you choose to bake or grill your salmon, the result will be a tender, flaky fish that pairs beautifully with a variety of side dishes. From sautéed greens to roasted vegetables, the options are endless. And don’t forget the presentation! A beautifully arranged plate can elevate your dining experience, making it feel special.

So, gather your ingredients, follow the steps, and enjoy the delightful flavors of Buttered Honey Mustard Salmon. It’s a meal that not only nourishes the body but also brings joy to the table. Happy cooking, and bon appétit!

Stay Connected

Get recipes via email: