Get my cookbooks

Buttery Garlic Shrimp Pasta Recipe is a must-try dish!

Introduction to Buttery Garlic Shrimp Pasta Recipe

Welcome to the delightful world of Buttery Garlic Shrimp Pasta! This dish is not just a meal; it’s an experience that brings together the rich flavors of garlic, the sweetness of shrimp, and the comforting texture of pasta. Whether you’re cooking for a special occasion or just a cozy dinner at home, this recipe is sure to impress. Let’s dive into what makes this dish so special and explore its fascinating history.

What Makes This Dish Special?

What sets Buttery Garlic Shrimp Pasta apart is its simplicity and flavor. The combination of fresh ingredients creates a dish that is both satisfying and elegant. The buttery sauce, infused with garlic and a hint of lemon, perfectly complements the succulent shrimp. Plus, it’s quick to prepare, making it ideal for busy weeknights or last-minute gatherings. The vibrant colors and aromas will fill your kitchen, inviting everyone to the table.

Moreover, this dish is versatile. You can easily customize it by adding vegetables or adjusting the spice level. It’s a fantastic way to enjoy seafood while also indulging in a comforting pasta dish. With just a few ingredients, you can create a meal that feels gourmet without spending hours in the kitchen.

A Brief History of Shrimp Pasta Dishes

Shrimp pasta dishes have a rich history that dates back to coastal regions around the world. In Italy, seafood pasta is a staple, especially in areas like Sicily and Naples. The combination of pasta and seafood reflects the Mediterranean lifestyle, where fresh ingredients are celebrated. Over the years, shrimp has become a popular choice due to its delicate flavor and quick cooking time.

In the United States, shrimp pasta gained popularity in the late 20th century, often featuring in Italian-American cuisine. Dishes like shrimp scampi and shrimp Alfredo showcase the versatility of shrimp in pasta recipes. Today, Buttery Garlic Shrimp Pasta stands out as a beloved favorite, combining traditional flavors with modern simplicity. It’s a dish that brings people together, making it perfect for family dinners or gatherings with friends.

Ingredients for Buttery Garlic Shrimp Pasta Recipe

Essential Ingredients

To create the perfect Buttery Garlic Shrimp Pasta, you’ll need a few essential ingredients. These components work together to deliver a delicious and satisfying meal. Here’s what you’ll need:

  • 8 ounces spaghetti or linguine: Choose your favorite pasta type. Spaghetti is classic, while linguine offers a slightly wider shape.
  • 1 pound large shrimp: Make sure they are peeled and deveined for easy cooking and eating.
  • 4 tablespoons unsalted butter: This adds richness and flavor to the dish.
  • 4 cloves garlic: Minced garlic brings a wonderful aroma and taste.
  • 1 teaspoon red pepper flakes: Adjust this to your spice preference for a little kick.
  • 1 lemon: You’ll need both the juice and zest for a fresh, zesty flavor.
  • 1/4 cup fresh parsley: Chopped parsley adds a pop of color and freshness.
  • Salt and pepper: Essential for seasoning your dish to perfection.
  • Grated Parmesan cheese: For serving, this adds a savory finish to your pasta.

Optional Ingredients for Extra Flavor

If you want to elevate your Buttery Garlic Shrimp Pasta, consider adding some optional ingredients. These can enhance the dish and make it even more delightful:

  • Cherry tomatoes: Halved tomatoes can add a burst of sweetness and color.
  • Spinach or arugula: Adding greens can boost the nutritional value and add a lovely texture.
  • White wine: A splash of white wine can deepen the flavor of the sauce.
  • Crushed garlic: For those who love garlic, adding more can intensify the flavor.
  • Other herbs: Fresh basil or thyme can provide additional aromatic notes.

With these ingredients, you’re well on your way to creating a mouthwatering Buttery Garlic Shrimp Pasta that everyone will love. Let’s move on to the preparation steps to bring this dish to life!

Step-by-Step Preparation of Buttery Garlic Shrimp Pasta Recipe

Step 1: Preparing the Pasta

First things first, let’s get that pasta cooking! Bring a large pot of salted water to a boil. Once it’s bubbling, add your spaghetti or linguine. Cook according to the package instructions, usually around 8-10 minutes, until it’s al dente. Remember, you want it to have a slight bite. Before draining, reserve about 1/2 cup of the pasta water. This starchy water will help create a silky sauce later. After reserving the water, drain the pasta and set it aside.

Step 2: Sautéing the Garlic

Now, let’s move on to the garlic! In a large skillet, melt 4 tablespoons of unsalted butter over medium heat. As the butter melts, it will start to bubble. This is the perfect time to add the minced garlic and red pepper flakes. Sauté them for about 1-2 minutes. You want to cook them just until they become fragrant, but be careful not to burn the garlic. A burnt garlic taste can ruin your dish!

Step 3: Cooking the Shrimp

Next up, it’s time for the star of the show: the shrimp! Add the peeled and deveined shrimp to the skillet. Season them with salt and pepper to taste. Cook the shrimp for about 2-3 minutes on each side. You’ll know they’re done when they turn pink and opaque. This step is crucial, as overcooked shrimp can become rubbery. So, keep an eye on them!

Step 4: Combining Ingredients

Once the shrimp are perfectly cooked, it’s time to bring everything together. Squeeze the juice of one lemon into the skillet and add the lemon zest for that extra zing. Now, add the drained pasta to the skillet. Toss everything together gently, ensuring the pasta is well coated in the buttery garlic sauce. If the mixture seems dry, gradually add the reserved pasta water, a little at a time, until you reach your desired sauce consistency. This will help the sauce cling to the pasta beautifully.

Step 5: Final Touches and Serving

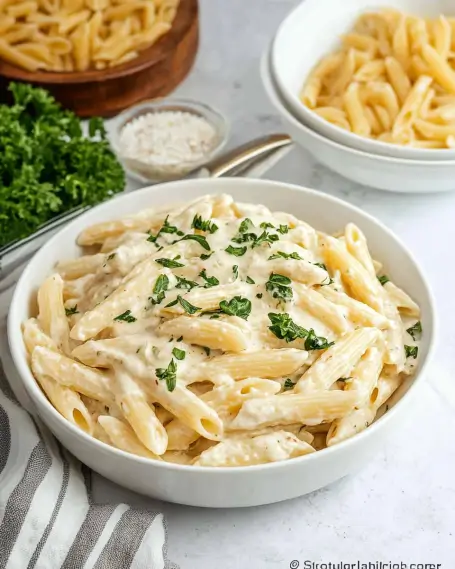
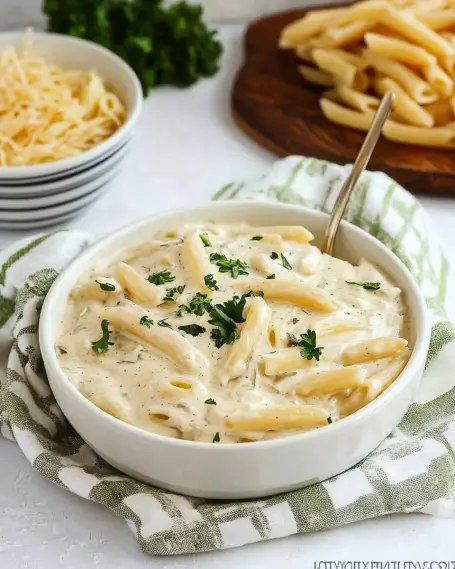
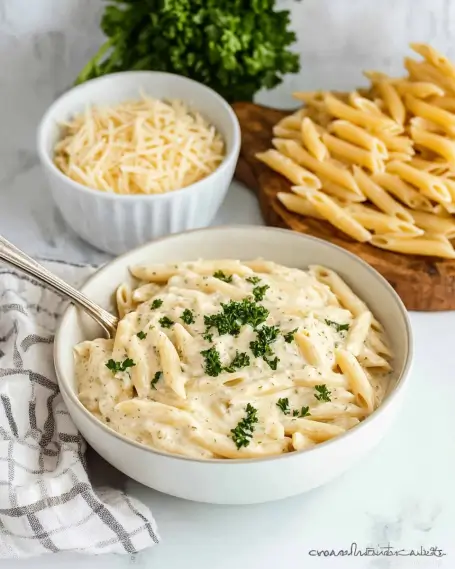
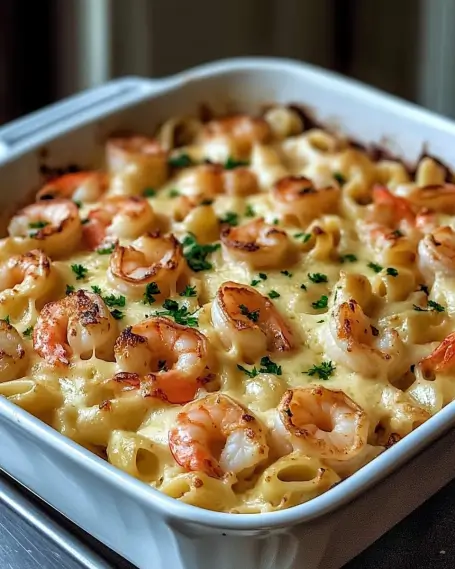
Finally, remove the skillet from heat and stir in the chopped fresh parsley. This adds a lovely pop of color and freshness to your dish. Taste your pasta and adjust the seasoning if needed. Now, it’s time to serve! Plate your Buttery Garlic Shrimp Pasta and sprinkle generously with grated Parmesan cheese. Serve it hot, and watch as everyone gathers around the table, eager to dig in!

Variations of Buttery Garlic Shrimp Pasta Recipe

Adding Vegetables for a Healthier Twist

If you’re looking to boost the nutritional value of your Buttery Garlic Shrimp Pasta, adding vegetables is a fantastic option. Not only do they enhance the dish’s flavor, but they also provide extra vitamins and minerals. Here are some great vegetable options to consider:

  • Broccoli: Steam or sauté small florets and toss them in with the pasta for a crunchy texture.
  • Zucchini: Spiralize or slice zucchini and add it to the skillet during the last few minutes of cooking.
  • Bell Peppers: Sauté sliced bell peppers along with the garlic for a sweet and colorful addition.
  • Asparagus: Cut asparagus into bite-sized pieces and add them to the skillet for a fresh, spring-like flavor.
  • Spinach: Toss in fresh spinach just before serving. It wilts quickly and adds a lovely green color.

These vegetables not only add flavor but also make your dish more filling and satisfying. Plus, they create a beautiful presentation with vibrant colors. Feel free to mix and match based on your preferences or what you have on hand!

Spicy Version: Incorporating Red Pepper Flakes

If you enjoy a bit of heat in your meals, consider making a spicy version of Buttery Garlic Shrimp Pasta. The red pepper flakes in the original recipe provide a nice kick, but you can amp it up even more. Here are some ideas to spice things up:

  • Increase Red Pepper Flakes: Simply add more red pepper flakes to the garlic and butter mixture. Start with an extra 1/2 teaspoon and adjust to your taste.
  • Fresh Jalapeños: Slice fresh jalapeños and sauté them with the garlic for a fresh, spicy flavor.
  • Hot Sauce: Drizzle your favorite hot sauce over the finished dish for an extra layer of heat.
  • Cayenne Pepper: A pinch of cayenne pepper can add a different kind of heat that complements the garlic beautifully.

These spicy variations will surely satisfy those who love bold flavors. Just remember to balance the heat with the buttery sauce to keep the dish enjoyable for everyone!

Cooking Note for Buttery Garlic Shrimp Pasta Recipe

Tips for Perfectly Cooked Shrimp

Cooking shrimp perfectly is key to a delicious Buttery Garlic Shrimp Pasta. Here are some helpful tips to ensure your shrimp turn out just right:

  • Choose Fresh Shrimp: Always opt for fresh or high-quality frozen shrimp. Fresh shrimp should smell like the ocean, not fishy.
  • Don’t Overcrowd the Pan: Cook shrimp in batches if necessary. Overcrowding can lead to steaming instead of sautéing, making them rubbery.
  • Watch the Color: Shrimp cook quickly. They turn pink and opaque when done. Remove them from heat as soon as they reach this stage.
  • Use High Heat: Cooking shrimp over medium-high heat helps achieve a nice sear, enhancing flavor and texture.
  • Season Well: Don’t forget to season your shrimp with salt and pepper before cooking. This simple step boosts their natural flavor.

By following these tips, you’ll ensure your shrimp are tender and flavorful, making your Buttery Garlic Shrimp Pasta a standout dish!

Importance of Pasta Water

Pasta water is often an overlooked ingredient, but it plays a crucial role in creating the perfect sauce for your Buttery Garlic Shrimp Pasta. Here’s why it’s important:

  • Starchiness: The reserved pasta water contains starch, which helps thicken the sauce and allows it to cling to the pasta better.
  • Adjusting Consistency: If your sauce is too thick, adding a splash of pasta water can help loosen it without diluting the flavor.
  • Flavor Enhancement: The salty, flavorful water adds depth to your sauce, enhancing the overall taste of the dish.
  • Perfect Emulsification: Mixing pasta water with the butter and garlic creates a silky, cohesive sauce that coats the pasta beautifully.

Always remember to reserve some pasta water before draining your noodles. This small step can make a big difference in the final result of your Buttery Garlic Shrimp Pasta!

Serving Suggestions for Buttery Garlic Shrimp Pasta Recipe

Ideal Pairings with Sides and Drinks

When it comes to serving Buttery Garlic Shrimp Pasta, the right sides and drinks can elevate your meal. Here are some delightful pairings to consider:

  • Garlic Bread: A classic choice! The crispy, buttery bread complements the pasta perfectly and is great for soaking up any leftover sauce.
  • Caesar Salad: A fresh Caesar salad adds a crunchy texture and a tangy flavor that balances the richness of the pasta.
  • Steamed Vegetables: Lightly steamed broccoli or asparagus can add color and nutrition to your meal without overpowering the main dish.
  • White Wine: A chilled glass of white wine, like Sauvignon Blanc or Pinot Grigio, pairs beautifully with shrimp and enhances the dish’s flavors.
  • Lemonade or Sparkling Water: For a non-alcoholic option, refreshing lemonade or sparkling water with a slice of lemon can cleanse the palate.

These pairings not only complement the Buttery Garlic Shrimp Pasta but also create a well-rounded dining experience. Feel free to mix and match based on your preferences and the occasion!

Presentation Tips for a Beautiful Plate

Presentation is key when serving Buttery Garlic Shrimp Pasta. A beautifully plated dish can make your meal feel extra special. Here are some tips to impress your guests:

  • Use a Large Serving Bowl: Serve the pasta in a large, shallow bowl. This allows the vibrant colors of the dish to shine and makes it easy for guests to help themselves.
  • Garnish Generously: Sprinkle extra chopped parsley and a bit of lemon zest on top for a pop of color. This adds freshness and makes the dish visually appealing.
  • Parmesan Cheese: Serve grated Parmesan cheese on the side in a small bowl. This allows everyone to add as much cheese as they like.
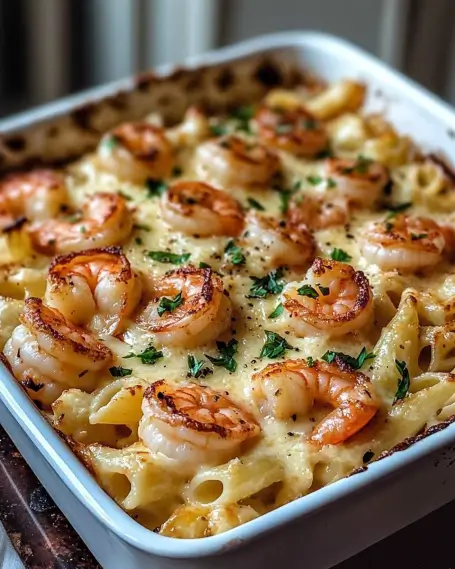
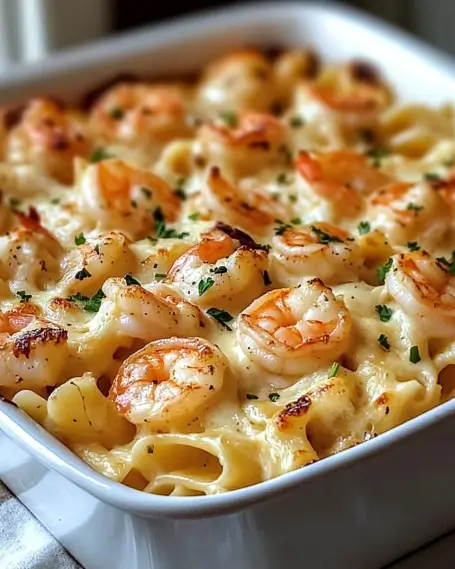
  • Arrange Shrimp Neatly: When plating, arrange the shrimp on top of the pasta in a circular pattern. This creates an inviting look and showcases the shrimp.
  • Serve with Lemon Wedges: Adding lemon wedges on the side not only looks great but also allows guests to add a splash of citrus to their dish.

With these presentation tips, your Buttery Garlic Shrimp Pasta will not only taste amazing but also look stunning on the table. Enjoy the compliments from your family and friends!

Tips for Perfecting Your Buttery Garlic Shrimp Pasta Recipe

Common Mistakes to Avoid

When making Buttery Garlic Shrimp Pasta, a few common mistakes can affect the final dish. Here are some pitfalls to watch out for:

  • Overcooking the Shrimp: Shrimp cook quickly. If you leave them on the heat too long, they can become rubbery. Always remove them from the skillet as soon as they turn pink and opaque.
  • Not Salting the Pasta Water: Salting the water is essential. It enhances the pasta’s flavor. Without it, your dish may taste bland.
  • Skipping the Pasta Water: Remember to reserve some pasta water! It helps create a silky sauce that clings to the pasta. Don’t skip this step!
  • Using Low-Quality Shrimp: Fresh or high-quality frozen shrimp make a big difference. Avoid shrimp that smells fishy or has a slimy texture.
  • Not Tasting as You Go: Always taste your dish while cooking. Adjust the seasoning as needed to ensure the flavors are balanced.

By avoiding these common mistakes, you’ll be on your way to creating a delicious Buttery Garlic Shrimp Pasta that everyone will love!

Enhancing Flavor with Fresh Herbs

Fresh herbs can elevate your Buttery Garlic Shrimp Pasta, adding depth and brightness. Here are some great options to consider:

  • Parsley: As mentioned, parsley adds freshness. Use it generously for a pop of color and flavor.
  • Basil: Fresh basil brings a sweet, aromatic flavor. Tear the leaves and sprinkle them on just before serving.
  • Thyme: Thyme adds an earthy note. You can sauté a few sprigs with the garlic for a subtle flavor boost.
  • Chives: Chopped chives offer a mild onion flavor. They make a lovely garnish that adds a touch of elegance.
  • Oregano: A sprinkle of fresh oregano can enhance the Mediterranean flavors of the dish.

Feel free to mix and match these herbs based on your taste preferences. Fresh herbs not only enhance the flavor but also make your dish look beautiful. Enjoy experimenting with different combinations to find your perfect blend!

Breakdown of Time for Buttery Garlic Shrimp Pasta Recipe

Prep Time

Preparing your Buttery Garlic Shrimp Pasta is quick and easy! The prep time typically takes about 10-15 minutes. During this time, you’ll gather all your ingredients, peel and devein the shrimp if necessary, and chop the garlic and parsley. Having everything ready before you start cooking will make the process smoother and more enjoyable.

Cooking Time

The cooking time for this delicious dish is around 15-20 minutes. This includes boiling the pasta, sautéing the garlic, cooking the shrimp, and combining everything together. The quick cooking time is one of the reasons this recipe is perfect for busy weeknights. You can have a gourmet meal on the table in no time!

Total Time

In total, you can expect to spend about 25-35 minutes from start to finish. This includes both prep and cooking time. With such a short time commitment, you can enjoy a flavorful and satisfying meal without spending hours in the kitchen. So, gather your ingredients and get ready to impress your family or guests with this delightful Buttery Garlic Shrimp Pasta!

Nutritional Information for Buttery Garlic Shrimp Pasta Recipe

Calories and Macronutrients

Understanding the nutritional content of your meals is essential for maintaining a balanced diet. The Buttery Garlic Shrimp Pasta is not only delicious but also provides a good mix of macronutrients. Here’s a breakdown of the nutritional information per serving:

  • Calories: 450
  • Net Carbohydrates: 45g
  • Protein: 30g
  • Fat: 15g

This dish offers a satisfying amount of protein from the shrimp, which is essential for muscle repair and growth. The carbohydrates from the pasta provide energy, making it a great meal for active individuals. The healthy fats from the butter contribute to flavor and help with the absorption of fat-soluble vitamins.

Health Benefits of Shrimp and Pasta

Both shrimp and pasta come with their own set of health benefits, making this dish a nutritious choice. Here are some key benefits:

  • Shrimp: Shrimp is low in calories and high in protein. It’s also a great source of selenium, which supports immune function and thyroid health. Additionally, shrimp contains omega-3 fatty acids, which are beneficial for heart health.
  • Pasta: Whole grain pasta, if used, provides fiber, which aids digestion and helps maintain a healthy weight. It also contains B vitamins, which are important for energy metabolism.
  • Garlic: Garlic is known for its health benefits, including boosting the immune system and reducing blood pressure. It also has anti-inflammatory properties.
  • Parsley: This herb is rich in vitamins A, C, and K. It also contains antioxidants that help protect your body from damage caused by free radicals.

By enjoying Buttery Garlic Shrimp Pasta, you’re not just treating your taste buds; you’re also nourishing your body with wholesome ingredients. It’s a perfect example of how delicious food can also be good for you!

FAQs about Buttery Garlic Shrimp Pasta Recipe

Can I use frozen shrimp for this recipe?

Absolutely! Using frozen shrimp is a convenient option for this Buttery Garlic Shrimp Pasta recipe. Just make sure to thaw the shrimp before cooking. You can do this by placing them in the refrigerator overnight or by running them under cold water for a few minutes. Once thawed, they can be cooked just like fresh shrimp. This way, you can enjoy a delicious meal without the need for fresh shrimp every time!

What type of pasta works best for buttery garlic shrimp pasta?

Both spaghetti and linguine are excellent choices for Buttery Garlic Shrimp Pasta. Spaghetti offers a classic texture, while linguine provides a slightly wider shape that holds the sauce well. You can also experiment with other pasta types, such as fettuccine or even whole grain options. The key is to choose a pasta that you enjoy and that complements the buttery garlic sauce. Feel free to get creative!

How can I make this dish gluten-free?

Making Buttery Garlic Shrimp Pasta gluten-free is simple! Just substitute regular pasta with gluten-free pasta made from rice, quinoa, or chickpeas. These alternatives are widely available and cook similarly to traditional pasta. Be sure to check the cooking instructions on the package, as gluten-free pasta may require different cooking times. With this swap, you can enjoy a delicious gluten-free version of this delightful dish!

Can I prepare the sauce in advance?

Yes, you can prepare the sauce in advance! To do this, follow the steps for sautéing the garlic and cooking the shrimp. Once the shrimp are cooked, remove them from the heat and let the sauce cool. Store it in an airtight container in the refrigerator for up to 2 days. When you’re ready to serve, simply reheat the sauce in a skillet, add the cooked pasta, and toss everything together. This makes for a quick and easy meal on busy nights!

Conclusion on Buttery Garlic Shrimp Pasta Recipe

Recap of Key Points

In conclusion, the Buttery Garlic Shrimp Pasta is a delightful dish that combines simplicity with rich flavors. We explored the essential ingredients, including fresh shrimp, garlic, and pasta, which come together to create a satisfying meal. The step-by-step preparation ensures that even novice cooks can whip up this dish with ease. We also discussed various ways to customize the recipe, from adding vegetables to adjusting the spice level, making it versatile for any palate.

Moreover, we highlighted the importance of cooking techniques, such as not overcooking the shrimp and utilizing pasta water for a silky sauce. The nutritional benefits of shrimp and pasta were also emphasized, showcasing how this dish can be both delicious and nourishing. Finally, we provided serving suggestions and presentation tips to elevate your dining experience.

Encouragement to Try the Recipe

Now that you have all the tools and knowledge, it’s time to try your hand at making Buttery Garlic Shrimp Pasta! Whether you’re cooking for family, friends, or just treating yourself, this recipe is sure to impress. The combination of flavors and textures will leave everyone asking for seconds. So, gather your ingredients, follow the steps, and enjoy the delightful experience of creating this mouthwatering dish. Happy cooking!

Crab Casserole Recipe is a must-try for seafood lovers.

Introduction to Crab Casserole Recipe

Crab casserole is a delightful dish that brings the taste of the ocean right to your dinner table. This creamy, cheesy, and savory meal is perfect for family gatherings or special occasions. With its rich flavors and comforting texture, it’s no wonder that crab casserole has become a beloved favorite among seafood lovers. In this section, we will explore what makes this dish so special and take a brief look at its history.

What Makes Crab Casserole Special?

What sets crab casserole apart from other dishes? First, it’s the star ingredient: lump crab meat. This tender and sweet seafood adds a luxurious touch to the casserole. The combination of creamy mayonnaise, sharp cheddar cheese, and zesty seasonings creates a flavor explosion that is hard to resist. Moreover, the crispy breadcrumb topping adds a delightful crunch, making each bite a perfect balance of textures.

Another reason crab casserole is special is its versatility. You can easily customize the recipe to suit your taste. Whether you prefer a creamier texture or want to add different seafood, the options are endless. Plus, it’s a dish that can be prepared ahead of time, making it a convenient choice for busy weeknights or festive gatherings.

A Brief History of Crab Casserole

The origins of crab casserole can be traced back to coastal regions where fresh seafood was abundant. Casseroles, in general, have a long history in American cuisine, often serving as a way to combine leftovers into a hearty meal. As seafood became more popular, especially in areas like New England, crab casserole emerged as a delicious way to showcase this prized ingredient.

Over the years, crab casserole has evolved, with various recipes popping up across the country. From the classic versions to modern twists, this dish continues to be a staple in many households. Today, it’s not just a comfort food; it’s a dish that brings people together, celebrating the flavors of the sea and the joy of sharing a meal with loved ones.

Ingredients for Crab Casserole Recipe

To create a mouthwatering crab casserole, you need a selection of fresh and flavorful ingredients. Each component plays a vital role in building the dish’s rich taste and creamy texture. Below is a list of the essential ingredients you’ll need to prepare this delightful meal.

  • 1 pound lump crab meat: Ensure it’s picked over for shells to avoid any unwanted surprises.
  • 1 cup cooked white rice: This adds substance and helps bind the casserole together.
  • 1 cup shredded cheddar cheese: For that creamy, cheesy goodness that melts beautifully.
  • 1 cup mayonnaise: This ingredient provides a rich and creamy base.
  • 1 tablespoon Dijon mustard: Adds a tangy flavor that enhances the overall taste.
  • 1 tablespoon Worcestershire sauce: This brings depth and umami to the dish.
  • 1 teaspoon Old Bay seasoning: A classic seafood seasoning that elevates the crab’s flavor.
  • 1 teaspoon garlic powder: For a hint of savory goodness.
  • 1 teaspoon onion powder: Adds a subtle sweetness and depth.
  • 1/2 teaspoon salt: To enhance all the flavors.
  • 1/4 teaspoon black pepper: For a touch of heat.
  • 1/2 cup chopped green onions: These add freshness and a pop of color.
  • 1/2 cup breadcrumbs: For a crispy topping that contrasts with the creamy filling.
  • 2 tablespoons melted butter: This helps to brown the breadcrumbs and adds richness.

These ingredients come together to create a delicious crab casserole that is sure to impress your family and friends. Feel free to experiment with the ingredients to make the dish your own. For instance, you can add more seafood or even some vegetables for added nutrition. The possibilities are endless!

Step-by-Step Preparation of Crab Casserole Recipe

Now that you have gathered all the ingredients, it’s time to dive into the preparation of your crab casserole. This step-by-step guide will help you create a delicious dish that is sure to impress. Let’s get started!

Step 1: Prepping the Ingredients

First things first, you need to prep your ingredients. Start by picking through the lump crab meat to remove any shells. This step is crucial to ensure a smooth eating experience. Next, measure out your cooked white rice. If you don’t have any on hand, you can easily cook some rice according to package instructions. While the rice is cooking, shred your cheddar cheese and chop the green onions. Having everything ready will make the mixing process much easier.

Step 2: Mixing the Base

In a large mixing bowl, combine the mayonnaise, Dijon mustard, Worcestershire sauce, Old Bay seasoning, garlic powder, onion powder, salt, and black pepper. Use a whisk or a spatula to mix these ingredients until they are well blended. This creamy base is what gives the casserole its rich flavor. Make sure there are no lumps, as a smooth mixture will ensure even distribution of flavors throughout the dish.

Step 3: Combining the Crab

Once your base is ready, it’s time to add the crab meat. Gently fold the lump crab meat into the mixture. Be careful not to break up the crab too much; you want to keep those lovely chunks intact. After that, add the cooked rice and half of the chopped green onions. Fold everything together until well combined. This step is where the magic happens, as the flavors meld together beautifully.

Step 4: Assembling the Casserole

Now that your mixture is ready, it’s time to assemble the casserole. Grease a 9×13-inch baking dish with cooking spray or butter. Transfer the crab mixture into the dish, spreading it evenly. This ensures that every bite is packed with flavor. In a separate small bowl, mix the breadcrumbs with the melted butter until the crumbs are well coated. Sprinkle this breadcrumb mixture generously over the top of the casserole. This will create a deliciously crispy topping once baked.

Step 5: Baking the Casserole

Preheat your oven to 350°F (175°C). Once the oven is ready, place the assembled casserole inside. Bake for 25-30 minutes, or until the casserole is hot and bubbly, and the top is golden brown. The aroma will fill your kitchen, making it hard to wait! After baking, allow the casserole to cool for a few minutes before serving. This will help the flavors settle and make it easier to serve.

And there you have it! A step-by-step guide to preparing a delightful crab casserole. With these simple steps, you’ll create a dish that is not only delicious but also a joy to share with family and friends.

Variation of Crab Casserole Recipe

While the classic crab casserole recipe is a hit, there are many ways to switch things up. Whether you want to try different ingredients or explore various cooking methods, these variations can add a unique twist to your dish. Let’s dive into some alternative ingredients and cooking methods that can enhance your crab casserole experience.

Alternative Ingredients for Crab Casserole

One of the best things about crab casserole is its versatility. You can easily substitute or add ingredients to suit your taste. Here are some alternative ingredients to consider:

  • Shrimp: Swap out crab meat for shrimp for a different seafood flavor. Shrimp cooks quickly and adds a delightful sweetness.
  • Mixed Seafood: Combine crab with scallops, lobster, or even fish for a seafood medley that’s bursting with flavor.
  • Vegetables: Add chopped bell peppers, spinach, or mushrooms for extra nutrition and color. These veggies can enhance the dish’s texture and flavor.
  • Cheese Variations: Experiment with different cheeses like Monterey Jack or cream cheese for a creamier texture.
  • Spices and Herbs: Try adding fresh herbs like parsley or dill, or spices like cayenne pepper for a kick of heat.

These alternative ingredients can help you create a crab casserole that’s uniquely yours. Feel free to mix and match based on what you have on hand or what flavors you enjoy!

Different Cooking Methods for Crab Casserole

In addition to ingredient variations, you can also explore different cooking methods for your crab casserole. Here are a few options:

  • Slow Cooker: For a hands-off approach, try making your crab casserole in a slow cooker. Combine all ingredients in the slow cooker and cook on low for 4-6 hours. This method allows the flavors to meld beautifully.
  • Individual Servings: Instead of a large casserole, consider making individual servings in ramekins. This is perfect for dinner parties and makes for a lovely presentation.
  • Grilling: If you’re feeling adventurous, you can grill your crab casserole in a cast-iron skillet. This method adds a smoky flavor and is great for summer gatherings.

By trying out these different cooking methods, you can enjoy crab casserole in new and exciting ways. Each method brings its own unique flavor and texture, making your meal even more enjoyable.

Cooking Note for Crab Casserole Recipe

When preparing your crab casserole, there are a few important cooking notes to keep in mind. These tips will help ensure that your dish turns out perfectly every time. Let’s explore some key points to consider while cooking.

First, always use fresh crab meat if possible. Fresh crab meat has a sweeter flavor and a firmer texture compared to canned or frozen options. If you do choose to use frozen crab, make sure to thaw it completely and drain any excess liquid before adding it to your mixture. This will help maintain the casserole’s consistency.

Next, be mindful of the cooking time. Every oven is different, so keep an eye on your casserole as it bakes. You want the top to be golden brown and the filling to be bubbling. If the top browns too quickly, you can cover it loosely with aluminum foil to prevent burning while the inside continues to cook.

Additionally, let the casserole cool for a few minutes after baking. This resting time allows the flavors to settle and makes it easier to serve. If you cut into it too soon, the filling may be too runny, and you won’t get those beautiful, clean slices.

Lastly, feel free to experiment with the baking dish. While a 9×13-inch dish is standard, you can use smaller or larger dishes depending on your serving needs. Just remember to adjust the cooking time accordingly. A smaller dish may cook faster, while a larger one may take a bit longer.

By following these cooking notes, you’ll be well on your way to creating a delicious crab casserole that will impress your family and friends. Happy cooking!

Serving Suggestions for Crab Casserole Recipe

Once your crab casserole is baked to perfection, it’s time to think about how to serve it. The right side dishes and pairings can elevate your meal and create a delightful dining experience. Here are some ideal side dishes and perfect pairings to consider when serving your crab casserole.

Ideal Side Dishes

When it comes to side dishes, you want to choose options that complement the rich flavors of the crab casserole. Here are some great ideas:

  • Garlic Bread: A warm, buttery garlic bread is a classic choice. It’s perfect for soaking up the creamy sauce from the casserole.
  • Steamed Vegetables: Lightly steamed broccoli, asparagus, or green beans add a fresh and healthy touch to your meal. Their crispness balances the richness of the casserole.
  • Caesar Salad: A crisp Caesar salad with romaine lettuce, croutons, and a tangy dressing provides a refreshing contrast to the warm casserole.
  • Coleslaw: A tangy coleslaw can add a crunchy texture and a bit of acidity, which helps cut through the richness of the dish.
  • Rice Pilaf: If you want to keep it simple, a light rice pilaf can be a great side. It complements the flavors without overpowering them.

Perfect Pairings with Crab Casserole

In addition to side dishes, consider what beverages and additional items can enhance your crab casserole experience. Here are some perfect pairings:

  • White Wine: A chilled glass of white wine, such as Chardonnay or Sauvignon Blanc, pairs beautifully with crab. The acidity in the wine complements the richness of the casserole.
  • Sparkling Water: For a non-alcoholic option, sparkling water with a slice of lemon or lime adds a refreshing touch that cleanses the palate.
  • Light Beer: A light lager or pilsner can also be a great choice. The crispness of the beer balances the creamy texture of the casserole.
  • Fresh Lemon Wedges: Serving lemon wedges on the side allows guests to add a splash of citrus, enhancing the seafood flavors.
  • Herb Butter: A small dish of herb-infused butter can be served alongside the casserole for those who want an extra touch of flavor.

By thoughtfully selecting side dishes and pairings, you can create a well-rounded meal that highlights the deliciousness of your crab casserole. Enjoy your culinary creation with family and friends!

Tips for Perfecting Your Crab Casserole Recipe

Creating the perfect crab casserole is an art that combines the right ingredients, techniques, and a little bit of love. To help you achieve a dish that will wow your family and friends, here are some valuable tips. These insights will guide you in avoiding common mistakes and enhancing the flavors of your crab casserole.

Common Mistakes to Avoid

Even the best cooks can make mistakes. Here are some common pitfalls to watch out for when making your crab casserole:

  • Using Old Crab Meat: Always use fresh or properly thawed crab meat. Old or improperly stored crab can ruin the dish’s flavor.
  • Overmixing the Ingredients: When combining the crab meat with the other ingredients, be gentle. Overmixing can break up the crab and make the casserole dense.
  • Skipping the Seasoning: Don’t forget to season your mixture well. A lack of seasoning can lead to a bland casserole. Taste as you go!
  • Not Preheating the Oven: Always preheat your oven before baking. This ensures even cooking and helps achieve that golden-brown top.
  • Ignoring Cooking Times: Keep an eye on your casserole as it bakes. Every oven is different, and cooking times may vary. Check for doneness to avoid overcooking.

Enhancing Flavor in Crab Casserole

To take your crab casserole to the next level, consider these flavor-enhancing tips:

  • Add Fresh Herbs: Incorporate fresh herbs like parsley, dill, or chives into the mixture. They add brightness and freshness to the dish.
  • Use Quality Cheese: Opt for high-quality cheddar cheese for a richer flavor. You can also mix in some Gruyère or Parmesan for added depth.
  • Incorporate Citrus: A squeeze of fresh lemon juice or a sprinkle of lemon zest can brighten the flavors and enhance the seafood taste.
  • Experiment with Spices: Don’t hesitate to try different spices. A pinch of cayenne pepper or smoked paprika can add a delightful kick.
  • Top with Fresh Ingredients: Consider garnishing your casserole with additional green onions or fresh herbs right before serving for a pop of color and flavor.

By avoiding common mistakes and enhancing the flavors, you’ll create a crab casserole that is not only delicious but also memorable. Enjoy the process and happy cooking!

Breakdown of Time for Crab Casserole Recipe

Understanding the time required for each step of your crab casserole recipe is essential for planning your meal. Knowing how long it takes to prep and cook will help you serve a delicious dish right on time. Here’s a breakdown of the time involved in making this delightful casserole.

Prep Time

The prep time for your crab casserole is approximately 20-30 minutes. This includes gathering all your ingredients, picking through the crab meat, cooking the rice, shredding the cheese, and chopping the green onions. Taking your time during this stage ensures that everything is ready for mixing, making the process smoother and more enjoyable.

Cooking Time

Once your casserole is assembled, the cooking time is about 25-30 minutes. During this time, the casserole bakes in the oven at 350°F (175°C). You’ll want to keep an eye on it to ensure the top becomes golden brown and the filling is bubbling. This is when the wonderful aroma fills your kitchen, making it hard to resist!

Total Time

In total, you can expect to spend around 50-60 minutes from start to finish. This includes both the prep and cooking times. With just under an hour, you’ll have a delicious crab casserole ready to serve. It’s a perfect option for a weeknight dinner or a special occasion, allowing you to enjoy quality time with your loved ones while the casserole bakes.

Nutritional Information for Crab Casserole Recipe

Understanding the nutritional content of your crab casserole is essential for making informed choices about your meals. This dish is not only delicious but also provides a good balance of nutrients. Below, we will break down the calories, protein content, and sodium levels in a serving of crab casserole.

Calories in Crab Casserole

Each serving of crab casserole contains approximately 320 calories. This calorie count makes it a satisfying meal option without being overly heavy. The combination of crab meat, cheese, and mayonnaise contributes to the calorie content, providing a rich and flavorful dish that is perfect for special occasions or family dinners.

Protein Content in Crab Casserole

One of the standout features of crab casserole is its protein content. Each serving offers about 20 grams of protein. This high protein level comes primarily from the lump crab meat, which is an excellent source of lean protein. Including protein in your meals is important for muscle health and overall well-being, making this casserole a nutritious choice.

Sodium Levels in Crab Casserole

When it comes to sodium, each serving of crab casserole contains around 600 milligrams. While this is a moderate amount, it’s essential to be mindful of sodium intake, especially for those watching their salt consumption. The sodium content comes from ingredients like mayonnaise, Worcestershire sauce, and Old Bay seasoning. If you prefer a lower sodium option, consider using low-sodium versions of these ingredients or reducing the amount of added salt.

In summary, crab casserole is a delicious dish that provides a good balance of calories, protein, and sodium. By being aware of these nutritional aspects, you can enjoy this delightful meal while maintaining a healthy diet.

FAQs about Crab Casserole Recipe

Can I use frozen crab for the Crab Casserole Recipe?

Yes, you can use frozen crab for your crab casserole recipe! Just make sure to thaw it completely before using. To do this, place the frozen crab in the refrigerator overnight or run it under cold water for a quicker thaw. After thawing, drain any excess liquid to prevent your casserole from becoming watery. Using frozen crab can be a convenient option, especially if fresh crab is not available.

How can I make my Crab Casserole Recipe gluten-free?

Making your crab casserole gluten-free is simple! The main ingredient to watch out for is the breadcrumbs. You can easily substitute regular breadcrumbs with gluten-free breadcrumbs. Many stores offer gluten-free options that work just as well. Additionally, check the labels on your mayonnaise and Worcestershire sauce to ensure they are gluten-free. With these adjustments, you can enjoy a delicious gluten-free crab casserole without sacrificing flavor!

What type of crab is best for the Crab Casserole Recipe?

When it comes to choosing crab for your casserole, lump crab meat is the best option. It has a sweet flavor and a tender texture that works beautifully in casseroles. You can also use backfin crab meat, which is a mix of larger and smaller pieces, providing a good balance of flavor and texture. If you prefer a more budget-friendly option, imitation crab can be used, but it may not have the same rich taste as real crab. Ultimately, the choice depends on your preference and budget!

Can I prepare the Crab Casserole in advance?

Absolutely! Preparing your crab casserole in advance is a great way to save time. You can assemble the casserole a day ahead and store it in the refrigerator until you’re ready to bake. Just be sure to cover it tightly with plastic wrap or aluminum foil to keep it fresh. When you’re ready to cook, simply remove it from the fridge and bake as directed. You may need to add a few extra minutes to the cooking time if it’s cold from the fridge. This makes it a perfect dish for gatherings or busy weeknights!

Conclusion on Crab Casserole Recipe

In conclusion, the crab casserole recipe is a delightful dish that combines the rich flavors of seafood with creamy textures and a crispy topping. It’s not just a meal; it’s an experience that brings family and friends together around the dinner table. With its versatility, you can easily customize the recipe to suit your taste preferences, making it a dish that can be enjoyed time and time again.

Whether you’re preparing it for a special occasion or a cozy weeknight dinner, this casserole is sure to impress. The combination of lump crab meat, savory seasonings, and gooey cheese creates a flavor profile that is both comforting and satisfying. Plus, with the option to prepare it in advance, you can enjoy the process of cooking without the last-minute rush.

As you explore the various ingredients and cooking methods, remember that the key to a perfect crab casserole lies in using fresh ingredients and paying attention to the details. From the selection of crab to the seasoning, each step contributes to the overall success of the dish.

So, gather your loved ones, whip up this delicious crab casserole, and savor the joy of sharing a meal together. With every bite, you’ll be reminded of the wonderful flavors of the sea and the warmth of home-cooked comfort food. Happy cooking!

Bourbon Glazed Salmon is a must-try gourmet dish!

Introduction to Bourbon Glazed Salmon Recipe

If you’re looking for a dish that combines rich flavors with a touch of elegance, look no further than the Bourbon Glazed Salmon Recipe. This delightful meal not only pleases the palate but also impresses your guests. The sweet and smoky notes of bourbon blend beautifully with the tender salmon, creating a dish that is both satisfying and memorable.

What Makes Bourbon Glazed Salmon Unique?

The uniqueness of Bourbon Glazed Salmon lies in its special marinade. The bourbon adds a depth of flavor that is hard to replicate. When combined with brown sugar, soy sauce, and Dijon mustard, it creates a glaze that caramelizes beautifully on the grill. This results in a crispy exterior while keeping the salmon moist and flaky inside. The balance of sweet and savory makes each bite a delightful experience.

Moreover, the use of fresh garlic and black pepper enhances the overall taste, making it a standout dish. Whether you’re a seasoned chef or a beginner, this recipe is easy to follow and yields impressive results. The bourbon glaze not only elevates the salmon but also adds a touch of sophistication to your dining table.

The Perfect Dish for Any Occasion

Bourbon Glazed Salmon is versatile enough to be served on various occasions. Whether it’s a casual family dinner, a festive gathering, or a romantic date night, this dish fits right in. Its vibrant colors and enticing aroma make it visually appealing, while the flavors cater to a wide range of tastes.

Additionally, this recipe is quick to prepare, making it ideal for busy weeknights. You can whip it up in under 30 minutes, allowing you to enjoy a gourmet meal without spending hours in the kitchen. Pair it with your favorite sides, and you have a complete meal that everyone will love.

In summary, the Bourbon Glazed Salmon Recipe is not just a meal; it’s an experience. With its unique flavor profile and ease of preparation, it’s sure to become a favorite in your household.

Ingredients for Bourbon Glazed Salmon Recipe

To create the delicious Bourbon Glazed Salmon, you’ll need a few simple yet flavorful ingredients. Each component plays a vital role in achieving that perfect balance of sweet and savory. Here’s what you’ll need:

  • 2 (6-ounce) salmon fillets: Fresh salmon is the star of this dish. Look for fillets that are bright in color and have a fresh smell.
  • 1/4 cup bourbon: This adds a rich, smoky flavor to the glaze. Choose a bourbon that you enjoy drinking.
  • 1/4 cup brown sugar: The brown sugar caramelizes beautifully, giving the salmon a sweet crust.
  • 2 tablespoons soy sauce: This adds a salty depth to the glaze, enhancing the overall flavor.
  • 1 tablespoon Dijon mustard: The mustard provides a tangy kick that balances the sweetness of the sugar.
  • 1 tablespoon olive oil: This helps to keep the salmon moist while cooking.
  • 2 cloves garlic, minced: Fresh garlic adds a wonderful aroma and flavor to the glaze.
  • 1/2 teaspoon black pepper: A little heat from the pepper complements the sweetness of the glaze.
  • 1/4 teaspoon salt: This enhances all the flavors in the dish.
  • 1 tablespoon chopped fresh parsley (for garnish): Fresh parsley adds a pop of color and freshness to the finished dish.

Gathering these ingredients will set you on the path to creating a mouthwatering Bourbon Glazed Salmon. Each item contributes to the overall taste, making this dish a delightful experience for your taste buds.

Step-by-Step Preparation of Bourbon Glazed Salmon Recipe

Now that you have all your ingredients ready, it’s time to dive into the step-by-step preparation of the Bourbon Glazed Salmon Recipe. Following these simple steps will ensure that your dish turns out perfectly every time. Let’s get started!

Step 1: Preparing the Marinade

First, you’ll want to prepare the marinade. In a small saucepan, combine the bourbon, brown sugar, soy sauce, Dijon mustard, olive oil, minced garlic, black pepper, and salt. Place the saucepan over medium heat. Stir the mixture occasionally as it heats up. You want to bring it to a gentle simmer. This process will help dissolve the sugar and blend the flavors together. After about 5-7 minutes, the sauce should thicken slightly. Once done, remove it from the heat and let it cool for a few minutes.

Step 2: Marinating the Salmon

Next, it’s time to marinate the salmon. Place your salmon fillets skin-side down on a plate. Using a brush or spoon, generously coat the top of the fillets with the bourbon glaze you just made. Make sure to reserve some of the glaze for basting later. Cover the salmon with plastic wrap and let it marinate in the refrigerator for at least 15 minutes. This allows the flavors to penetrate the fish, making it even more delicious.

Step 3: Cooking the Salmon

Once the salmon has marinated, it’s time to cook it. Preheat your grill or grill pan over medium-high heat. When the grill is hot, carefully place the salmon fillets on it, skin-side down. Cook the salmon for about 4-5 minutes without moving it. This will help create a nice sear. After that, carefully flip the fillets over using a spatula. Cook for another 4-5 minutes. The salmon is done when it flakes easily with a fork and reaches an internal temperature of 145°F.

Step 4: Glazing the Salmon

While the salmon is cooking, it’s time to add more flavor. After flipping the fillets, brush them with the reserved bourbon glaze. This will enhance the taste and create a beautiful caramelized crust. The glaze will bubble and thicken as it cooks, adding a lovely shine to the salmon. Keep an eye on it to prevent burning.

Step 5: Final Touches and Serving

Once the salmon is cooked to perfection, remove it from the grill and let it rest for a couple of minutes. This resting period allows the juices to redistribute, keeping the salmon moist. Drizzle any remaining glaze over the top for an extra burst of flavor. Finally, garnish with chopped fresh parsley for a pop of color. Your Bourbon Glazed Salmon is now ready to be served!

Variations of Bourbon Glazed Salmon Recipe

While the classic Bourbon Glazed Salmon Recipe is delicious on its own, there are many ways to switch things up. Whether you want to try different flavors or cooking methods, these variations will keep your meals exciting. Let’s explore some alternative ingredients and cooking methods that can enhance your culinary experience.

Alternative Ingredients

Experimenting with different ingredients can lead to delightful new flavors. Here are some alternatives you might consider:

  • Maple Syrup: Swap out brown sugar for maple syrup. This will give your glaze a unique sweetness and a hint of earthiness.
  • Honey: For a different sweetener, honey works wonderfully. It adds a floral note that pairs nicely with salmon.
  • Mustard Variations: Instead of Dijon mustard, try whole grain or spicy brown mustard for a different flavor profile.
  • Citrus Zest: Add some lemon or orange zest to the glaze for a refreshing citrus twist. This brightens the dish and adds a lovely aroma.
  • Herbs: Fresh herbs like thyme or dill can be added to the glaze for an aromatic touch. They complement the salmon beautifully.

These alternative ingredients can help you customize the Bourbon Glazed Salmon to suit your taste preferences. Feel free to mix and match to create your perfect glaze!

Cooking Methods

In addition to ingredient variations, you can also explore different cooking methods. Here are a few options:

  • Oven-Baking: If you don’t have a grill, you can bake the salmon in the oven. Preheat your oven to 400°F. Place the salmon on a lined baking sheet, brush with glaze, and bake for about 12-15 minutes.
  • Broiling: Broiling is another great option. Place the salmon on a broiler pan, brush with glaze, and broil for about 6-8 minutes. Keep a close eye to prevent burning.
  • Pan-Seering: For a quick method, sear the salmon in a hot skillet with a little olive oil. Cook for about 4-5 minutes on each side, then add the glaze during the last minute of cooking.
  • Smoking: If you have a smoker, try smoking the salmon for a unique flavor. Use wood chips like hickory or applewood for a delicious smoky taste.

These cooking methods can add variety to your Bourbon Glazed Salmon experience. Each method brings out different textures and flavors, making your meal even more enjoyable.

Cooking Note for Bourbon Glazed Salmon Recipe

Cooking Bourbon Glazed Salmon is a delightful experience, but there are a few important notes to keep in mind to ensure your dish turns out perfectly every time. Understanding the nuances of cooking salmon can elevate your meal and impress your guests. Here are some key points to consider:

First, always choose high-quality salmon. Freshness is crucial for the best flavor and texture. Look for salmon that is bright in color and has a clean, ocean-like smell. If possible, opt for wild-caught salmon, as it tends to have a richer flavor compared to farmed varieties.

Next, pay attention to the thickness of your salmon fillets. Thicker fillets may require a bit more cooking time, while thinner ones will cook faster. A good rule of thumb is to cook salmon for about 4-5 minutes per half-inch of thickness. This ensures that the fish cooks evenly and remains moist.

When grilling, make sure your grill is preheated to the right temperature. A hot grill helps to sear the salmon, creating a delicious crust while keeping the inside tender. If you’re using a grill pan, ensure it is well-oiled to prevent sticking.

Additionally, don’t skip the resting period after cooking. Allowing the salmon to rest for a few minutes helps the juices redistribute, resulting in a more flavorful and moist dish. This step is often overlooked but can make a significant difference in the final outcome.

Lastly, feel free to adjust the glaze to your liking. If you prefer a sweeter taste, add a bit more brown sugar or honey. For a spicier kick, consider adding red pepper flakes or a dash of hot sauce. The beauty of this recipe lies in its versatility, so don’t hesitate to make it your own!

By keeping these cooking notes in mind, you’ll be well on your way to mastering the Bourbon Glazed Salmon Recipe. Enjoy the process and savor the delicious results!

Serving Suggestions for Bourbon Glazed Salmon Recipe

Once you’ve prepared your Bourbon Glazed Salmon, it’s time to think about how to serve it. The right side dishes and beverages can elevate your meal, making it even more enjoyable. Here are some ideal side dishes and wine pairings that complement the rich flavors of the salmon.

Ideal Side Dishes

Pairing your Bourbon Glazed Salmon with the right sides can enhance the overall dining experience. Here are some delicious options:

  • Steamed Vegetables: Fresh, steamed vegetables like broccoli, asparagus, or green beans add a healthy crunch. Their lightness balances the richness of the salmon.
  • Rice or Quinoa: Serving the salmon over a bed of fluffy rice or nutty quinoa provides a hearty base. You can even flavor the grains with herbs or a squeeze of lemon for added zest.
  • Mashed Potatoes: Creamy mashed potatoes are a comforting side that pairs beautifully with the sweet glaze. Consider adding garlic or chives for extra flavor.
  • Coleslaw: A refreshing coleslaw can add a nice crunch and a tangy contrast to the sweet salmon. Use a vinegar-based dressing for a lighter option.
  • Salad: A simple green salad with mixed greens, cherry tomatoes, and a light vinaigrette can provide a fresh and crisp element to your meal.

These side dishes not only complement the flavors of the Bourbon Glazed Salmon but also create a well-rounded meal that is both satisfying and nutritious.

Wine Pairings

Choosing the right wine can enhance the flavors of your Bourbon Glazed Salmon. Here are some excellent wine pairings to consider:

  • Sauvignon Blanc: This white wine is crisp and refreshing, with citrus notes that complement the sweetness of the glaze.
  • Chardonnay: A lightly oaked Chardonnay can add a creamy texture that pairs well with the richness of the salmon.
  • Pinot Noir: If you prefer red wine, a light-bodied Pinot Noir offers fruity notes that harmonize with the glaze without overpowering the dish.
  • Riesling: A semi-sweet Riesling can enhance the sweetness of the bourbon glaze, making it a delightful pairing.
  • Rosé: A dry rosé provides a refreshing option that works well with the flavors of the salmon and the glaze.

By selecting the right side dishes and wine, you can create a memorable dining experience that highlights the deliciousness of your Bourbon Glazed Salmon. Enjoy your meal with family and friends, and savor every bite!

Tips for Perfecting Your Bourbon Glazed Salmon Recipe

To truly master the Bourbon Glazed Salmon Recipe, a few tips can help you elevate your dish to new heights. From selecting the best salmon to fine-tuning the glaze, these insights will ensure your meal is nothing short of spectacular. Let’s dive into some essential tips!

Choosing the Right Salmon

When it comes to salmon, quality matters. Here are some tips for selecting the best salmon for your dish:

  • Freshness: Always look for salmon that is bright in color and has a clean, ocean-like smell. Fresh salmon should not have a fishy odor.
  • Wild-Caught vs. Farmed: If possible, opt for wild-caught salmon. It tends to have a richer flavor and firmer texture compared to farmed salmon.
  • Skin-On vs. Skinless: Skin-on fillets are great for grilling, as the skin helps keep the fish moist. If you prefer skinless, just be cautious while cooking to prevent drying out.
  • Thickness: Choose fillets that are evenly thick. This ensures even cooking and helps prevent overcooking the thinner parts.

By selecting high-quality salmon, you set the foundation for a delicious Bourbon Glazed Salmon that will impress everyone at your table.

Adjusting the Glaze to Your Taste

The bourbon glaze is the star of this recipe, and customizing it to your liking can make a big difference. Here are some ways to adjust the glaze:

  • Sweetness Level: If you prefer a sweeter glaze, feel free to add more brown sugar or honey. Start with a small amount and taste as you go.
  • Spice It Up: For those who enjoy a bit of heat, consider adding red pepper flakes or a dash of hot sauce to the glaze. This will give your salmon a spicy kick!
  • Herb Infusion: Fresh herbs can enhance the flavor profile. Try adding chopped thyme, dill, or even cilantro to the glaze for a fresh twist.
  • Citrus Zest: A little lemon or orange zest can brighten the glaze and add a refreshing note. Just a teaspoon can make a big difference!

Feel free to experiment with these adjustments until you find the perfect balance that suits your taste buds. The beauty of this recipe lies in its versatility, allowing you to create a glaze that is uniquely yours.

Breakdown of Time for Bourbon Glazed Salmon Recipe

Understanding the time required for each step of the Bourbon Glazed Salmon Recipe can help you plan your meal better. Whether you’re cooking for a special occasion or a weeknight dinner, knowing the prep and cooking times will ensure everything runs smoothly. Here’s a breakdown of the time involved:

Prep Time

The prep time for this delicious dish is quite minimal. You’ll need about 10-15 minutes to gather your ingredients and prepare the marinade. This includes measuring out the bourbon, brown sugar, and other ingredients, as well as mincing the garlic. If you choose to marinate the salmon for a longer period, you can extend this time accordingly. However, a quick 15-minute marination will still yield great results!

Cooking Time

Once your salmon is marinated, the cooking time is relatively short. Grilling the salmon takes about 8-10 minutes total. You’ll cook it for 4-5 minutes on each side, ensuring it reaches that perfect flaky texture. If you opt for baking or broiling, the cooking time may vary slightly, but it generally stays within the same range. Just keep an eye on the salmon to avoid overcooking.

Total Time

In total, you can expect the entire process to take around 25-30 minutes. This includes both prep and cooking time. If you decide to marinate the salmon for longer, you might want to add an additional 15 minutes or so. Overall, this makes the Bourbon Glazed Salmon Recipe a quick and easy option for a delicious meal that doesn’t require hours in the kitchen!

Nutritional Information for Bourbon Glazed Salmon Recipe

Understanding the nutritional content of your meals is essential for maintaining a balanced diet. The Bourbon Glazed Salmon Recipe not only delights your taste buds but also provides valuable nutrients. Here’s a breakdown of the key nutritional information per serving:

Calories

Each serving of Bourbon Glazed Salmon contains approximately 350 calories. This makes it a satisfying yet manageable option for those watching their caloric intake. The combination of healthy fats from the salmon and the sweetness of the glaze contributes to the overall calorie count, ensuring you enjoy a fulfilling meal without overindulging.

Protein

Salmon is renowned for being a fantastic source of protein. In this recipe, each serving provides about 34 grams of protein. This high protein content is beneficial for muscle repair and growth, making it an excellent choice for active individuals. Additionally, protein helps keep you feeling full longer, which can aid in weight management.

Sodium

The sodium content in each serving of Bourbon Glazed Salmon is approximately 600 milligrams. This includes the sodium from soy sauce and other ingredients. While this is a moderate amount, it’s important to be mindful of your overall sodium intake, especially if you are watching your salt consumption. You can reduce the sodium by using low-sodium soy sauce or adjusting the amount of salt added to the glaze.

In summary, the Bourbon Glazed Salmon Recipe offers a balanced meal with a good mix of calories, protein, and sodium. It’s a delicious way to enjoy a healthy dish that supports your dietary goals while satisfying your cravings.

FAQs about Bourbon Glazed Salmon Recipe

Can I use other types of fish for this recipe?

Absolutely! While salmon is the star of this Bourbon Glazed Salmon Recipe, you can easily substitute it with other types of fish. Options like trout, tilapia, or even halibut work well. Just keep in mind that cooking times may vary based on the thickness and type of fish you choose. For example, thinner fillets will cook faster, so be sure to monitor them closely to avoid overcooking. The bourbon glaze will still add a delicious flavor, no matter which fish you select!

How long should I marinate the salmon?

For the best flavor, marinate the salmon for at least 15 minutes. This allows the glaze to penetrate the fish, enhancing its taste. However, if you have more time, marinating for up to 30 minutes can deepen the flavor even further. Just be cautious not to marinate for too long, as the acidity in the marinade can start to break down the fish, making it mushy. A quick soak in the glaze is all you need for a delicious result!

What can I substitute for bourbon in the glaze?

If you prefer not to use bourbon, there are several alternatives you can try. For a non-alcoholic option, consider using apple cider vinegar or a mixture of apple juice and a splash of vanilla extract. These substitutes can mimic the sweetness and depth of flavor that bourbon provides. If you still want an alcoholic option, whiskey or rum can also work well in the glaze. Just remember that each substitute will slightly alter the flavor profile, so feel free to experiment until you find your favorite!

Is Bourbon Glazed Salmon healthy?

Yes, Bourbon Glazed Salmon can be a healthy choice! Salmon is rich in omega-3 fatty acids, which are beneficial for heart health. It also provides a good amount of protein, making it a satisfying meal. The glaze, while sweet, is made with natural ingredients like brown sugar and bourbon, which can be enjoyed in moderation. To keep the dish healthy, consider pairing it with steamed vegetables or a fresh salad. Overall, this recipe can fit well into a balanced diet while still being delicious!

Conclusion on Bourbon Glazed Salmon Recipe

In conclusion, the Bourbon Glazed Salmon Recipe is a delightful dish that brings together rich flavors and a touch of sophistication. With its sweet and savory glaze, this recipe transforms simple salmon fillets into a gourmet meal that is sure to impress. Whether you’re cooking for a special occasion or a casual weeknight dinner, this dish is versatile and easy to prepare.

By following the step-by-step instructions, you can create a perfectly cooked salmon that is both flaky and moist. The bourbon glaze not only enhances the flavor but also adds a beautiful caramelized finish that makes the dish visually appealing. Plus, with the option to customize the glaze and experiment with different cooking methods, you can make this recipe your own.

As you serve your Bourbon Glazed Salmon, consider pairing it with delicious side dishes and a refreshing wine to elevate the dining experience. The combination of flavors will surely delight your taste buds and leave your guests asking for seconds.

So, gather your ingredients, fire up the grill, and enjoy the process of creating this mouthwatering dish. With its ease of preparation and impressive results, the Bourbon Glazed Salmon Recipe is bound to become a favorite in your household. Happy cooking!

Hoisin Beef Noodles: A Quick, Flavor-Packed Delight!

Introduction to Hoisin Beef Noodles

If you’re looking for a quick and flavorful weeknight dinner, these Hoisin Beef Noodles are just the ticket. Tender strips of beef are tossed with vibrant vegetables and chewy noodles, all coated in a rich, sweet-savory hoisin sauce that brings bold flavor in every bite. This dish comes together in under 25 minutes, making it perfect for busy evenings when you want something comforting yet exciting. It’s an irresistible blend of texture and taste that will have everyone coming back for seconds!

Ingredients for Hoisin Beef Noodles

Gathering the right ingredients is key to making these Hoisin Beef Noodles a hit. Here’s what you’ll need:

  • Rice noodles: These are the base of the dish, providing a soft and chewy texture that soaks up the delicious sauce.
  • Flank Steak: This cut is perfect for stir-frying, as it’s tender and flavorful when sliced thinly.
  • Vegetable oil: A neutral oil that helps to achieve that perfect sear on the beef and veggies.
  • Bell pepper: Adds a pop of color and sweetness, balancing the savory flavors of the dish.
  • Snap peas: These provide a delightful crunch and a fresh taste that complements the other ingredients.
  • Green onions: A sprinkle of these adds a mild onion flavor and a fresh finish.
  • Garlic: Minced garlic brings a warm, aromatic quality that enhances the overall flavor.
  • Fresh ginger: This adds a zesty kick and a hint of warmth, making the dish even more aromatic.
  • Hoisin sauce: The star of the show! This sweet and savory sauce is what gives the dish its signature flavor. Choose low-sugar or reduced-fat version if available.
  • Soy sauce: Adds depth and umami, enhancing the overall taste of the dish.
  • Sesame oil: A drizzle of this oil adds a nutty flavor that rounds out the dish beautifully. Use minimal for flavor.
  • Red pepper flakes: Optional, but if you like a bit of heat, these will spice things up!
  • Salt and pepper: Essential for seasoning, ensuring every bite is flavorful.

For those looking to mix things up, you can substitute flank steak with chicken or tofu for a different protein option. And if you want to elevate the dish, consider garnishing with chopped cilantro or crushed peanuts for added texture and flavor. You can find the exact quantities of these ingredients at the bottom of the article, ready for printing!

How to Make Hoisin Beef Noodles

Now that you have all your ingredients ready, let’s dive into the cooking process! Making Hoisin Beef Noodles is straightforward and fun. Follow these simple steps, and you’ll have a delicious meal on the table in no time.

Step 1: Cook the Rice Noodles

Start by boiling water in a large pot. Once it’s bubbling, add the rice noodles. Cook them according to the package instructions, usually around 4-6 minutes. You want them tender but not mushy. Once done, drain the noodles and rinse them under cold water to stop the cooking process. This keeps them from sticking together later.

Step 2: Prepare the Flank Steak

While the noodles are cooking, it’s time to prepare the flank steak. Thinly slice the steak against the grain. This helps it stay tender when cooked. Season the slices with salt and pepper. If you have time, marinating the beef in soy sauce and minced garlic for about 30 minutes can add an extra layer of flavor.

Step 3: Stir-Fry the Vegetables

In a large skillet or wok, heat the vegetable oil over medium-high heat. Once hot, toss in the sliced bell pepper, snap peas, green onions, garlic, and ginger. Stir-fry these vibrant veggies for about 2-3 minutes. You want them to be tender-crisp, retaining their bright colors and nutrients. The aroma will be heavenly!

Step 4: Combine Ingredients

Now, it’s time to bring everything together. Add the seasoned flank steak back into the skillet with the vegetables. Pour in the hoisin sauce, soy sauce, and sesame oil. If you like a little heat, sprinkle in the red pepper flakes. Stir everything well, allowing the flavors to meld for about 2 minutes. The sauce should coat the beef and veggies beautifully.

Step 5: Toss in the Noodles

Next, add the cooked rice noodles to the skillet. Gently toss everything together, ensuring the noodles are well coated with the savory sauce. This is where the magic happens! The noodles will soak up all those delicious flavors. Cook for another minute or two until everything is heated through.

Step 6: Serve and Enjoy

Your Hoisin Beef Noodles are ready to shine! Serve them immediately, garnished with extra green onions if desired. The vibrant colors and enticing aroma will make your family eager to dig in. Enjoy this quick, flavor-packed delight that’s sure to become a favorite!

Tips for Success

  • Prep all your ingredients before you start cooking. It makes the process smoother!
  • Don’t overcrowd the skillet; cook in batches if necessary for even cooking.
  • Adjust the hoisin sauce to your taste. If you love it sweet, add a bit more!
  • For a gluten-free option, ensure your soy sauce is gluten-free.
  • Feel free to add more veggies like broccoli or carrots for extra nutrition.

Equipment Needed

  • Large pot: For boiling the rice noodles. A deep skillet works too!
  • Skillet or wok: Essential for stir-frying. A non-stick pan can be a great alternative.
  • Cutting board and knife: For slicing the flank steak and veggies.
  • Measuring spoons: Handy for measuring sauces and oils.

Variations

  • Protein Swap: Substitute flank steak with chicken, shrimp, or tofu for a different protein option.
  • Vegetable Medley: Add or replace vegetables with broccoli, carrots, or bok choy for a colorful twist.
  • Spicy Kick: Incorporate sliced jalapeños or a dash of sriracha for an extra layer of heat.
  • Gluten-Free Version: Use gluten-free soy sauce and ensure your rice noodles are certified gluten-free.
  • Herb Infusion: Toss in fresh basil or cilantro at the end for a burst of freshness.

Serving Suggestions

  • Side Salad: Pair your Hoisin Beef Noodles with a light cucumber and carrot salad for a refreshing crunch.
  • Drink Pairing: Enjoy with a chilled iced tea or a light white wine to complement the flavors.
  • Presentation: Serve in a large bowl, garnished with sesame seeds and extra green onions for a pop of color.

FAQs about Hoisin Beef Noodles

Can I make Hoisin Beef Noodles ahead of time?


Absolutely! You can prepare the ingredients in advance and store them separately in the fridge. Just stir-fry everything together when you’re ready to eat. This makes it a fantastic quick meal option for busy nights!


What can I substitute for hoisin sauce?


If you don’t have hoisin sauce on hand, you can create a quick substitute using soy sauce, peanut butter, and a bit of honey. It won’t be exactly the same, but it will still add a delicious flavor to your dish.


Can I use other types of noodles?


Yes! While rice noodles are traditional, you can use egg noodles, udon, or even whole wheat spaghetti in a pinch. Just adjust the cooking time according to the type of noodles you choose.


Is this dish suitable for meal prep?


Definitely! Hoisin Beef Noodles store well in the fridge for up to three days. Just reheat in a skillet or microwave, and you’ll have a tasty meal ready to go!


How can I make this dish vegetarian?


To make a vegetarian version, simply swap the flank steak for tofu or tempeh. You can also add more vegetables to make it heartier. The hoisin sauce will still provide that rich flavor you love!

Final Thoughts

Cooking Hoisin Beef Noodles is more than just preparing a meal; it’s about creating a moment of joy for you and your family. The vibrant colors and enticing aromas fill your kitchen, making it a warm and inviting space. This dish is a reminder that even on the busiest days, you can whip up something delicious and satisfying in no time. Whether it’s a weeknight dinner or a special occasion, these noodles bring smiles and happy bellies to the table. I hope you enjoy every bite as much as I do!

“`

Hoisin Beef Noodles
admin

Hoisin Beef Noodles: A Quick, Flavor-Packed Delight!

A quick and flavorful dish featuring rice noodles and tender flank steak, tossed in a savory hoisin sauce.
Prep Time 10 minutes
Cook Time 15 minutes
Total Time 25 minutes
Servings: 4 servings
Course: Main Course
Cuisine: Asian
Calories: 450

Ingredients
  

  • 8 ounces of rice noodles
  • 1 pound of flank steak thinly sliced
  • 2 tablespoons of vegetable oil
  • 1 bell pepper sliced
  • 1 cup of snap peas
  • 3 green onions chopped
  • 3 cloves of garlic minced
  • 1 tablespoon of fresh ginger minced
  • 1/4 cup of hoisin sauce
  • 2 tablespoons of soy sauce
  • 1 tablespoon of sesame oil
  • 1 teaspoon of red pepper flakes optional
  • Salt and pepper to taste

Method
 

  1. Cook the rice noodles according to package instructions. Drain and set aside.
  2. In a large skillet or wok, heat the vegetable oil over medium-high heat.
  3. Add the sliced flank steak to the skillet, season with salt and pepper, and stir-fry for about 3-4 minutes until browned. Remove the beef from the skillet and set aside.
  4. In the same skillet, add the bell pepper, snap peas, green onions, garlic, and ginger. Stir-fry for about 2-3 minutes until the vegetables are tender-crisp.
  5. Return the beef to the skillet and add the hoisin sauce, soy sauce, sesame oil, and red pepper flakes (if using). Stir well to combine and heat through for another 2 minutes.
  6. Add the cooked rice noodles to the skillet, tossing everything together until the noodles are well coated with the sauce and heated through.
  7. Serve immediately, garnished with additional green onions if desired.

Nutrition

Serving: 1servingCalories: 450kcalCarbohydrates: 50gProtein: 30gFat: 15gSaturated Fat: 3gPolyunsaturated Fat: 12gCholesterol: 70mgSodium: 800mgFiber: 2gSugar: 5g

Notes

  • For extra flavor, marinate the flank steak in a mixture of soy sauce and garlic for 30 minutes before cooking.
  • You can substitute the flank steak with chicken or tofu for a different protein option.
  • Add chopped cilantro or crushed peanuts as a garnish for added texture and flavor.

Tried this recipe?

Let us know how it was!

Skillet Chicken Thighs with Broccoli and Cheddar Orzo made easy!

Skillet Chicken Thighs with Broccoli and Cheddar Orzo

Introduction to Skillet Chicken Thighs with Broccoli and Cheddar Orzo

There’s a certain charm to a one-pan meal that makes dinnertime feel effortless and inviting—and this Skillet Chicken Thighs with Broccoli and Cheddar Orzo is exactly that. Imagine a hectic weeknight, time slipping away, and you need something fast yet full of flavor. This dish comes together easily but tastes like you spent all evening on it. Tender chicken thighs, crisp-tender broccoli, and creamy, cheesy orzo all mingle in one skillet to create a cozy, satisfying meal that’s sure to win over everyone at the table.

Why You’ll Love This Skillet Chicken Thighs with Broccoli and Cheddar Orzo

This Skillet Chicken Thighs with Broccoli and Cheddar Orzo is a game-changer for busy nights. It’s quick to prepare, taking just 40 minutes from start to finish. The combination of tender chicken, fresh broccoli, and creamy orzo creates a symphony of flavors that will delight your taste buds. Plus, it’s all made in one skillet, which means less cleanup and more time to enjoy with your family.

Ingredients for Skillet Chicken Thighs with Broccoli and Cheddar Orzo

Gathering the right ingredients is the first step to creating this delicious Skillet Chicken Thighs with Broccoli and Cheddar Orzo. Here’s what you’ll need:

  • Olive oil: A staple in my kitchen, it adds richness and helps achieve that perfect sear on the chicken.
  • Bone-in, skin-on chicken thighs: These are juicy and flavorful, making them ideal for this dish. You can also use skinless thighs for a lighter option.
  • Salt and pepper: Essential for seasoning, they enhance the natural flavors of the chicken and orzo.
  • Garlic powder: A quick way to add depth and aroma without the fuss of fresh garlic.
  • Onion powder: This brings a subtle sweetness and savory note to the dish.
  • Uncooked orzo pasta: This tiny pasta cooks quickly and absorbs all the delicious flavors from the broth.
  • Chicken broth: It’s the base for cooking the orzo, infusing it with rich flavor. Homemade is best, but store-bought works just fine.
  • Broccoli florets: Fresh and vibrant, they add color and nutrition. Feel free to swap in other veggies like bell peppers or spinach.
  • Shredded sharp cheddar cheese: This is the star of the show, creating a creamy, cheesy sauce that ties everything together.
  • Lemon juice: A splash of acidity brightens the dish and balances the richness of the cheese.
  • Fresh parsley: Optional, but it adds a pop of color and freshness when garnished on top.

For exact measurements, check the bottom of the article where you can find everything listed for easy printing.

Happy cooking!

How to Make Skillet Chicken Thighs with Broccoli and Cheddar Orzo

Creating this Skillet Chicken Thighs with Broccoli and Cheddar Orzo is a breeze. Follow these simple steps, and you’ll have a delicious meal ready in no time. Let’s dive in!

Step 1: Sear the Chicken Thighs

  • Start by heating the olive oil in a large skillet over medium-high heat.
  • Season the chicken thighs generously with salt, pepper, garlic powder, and onion powder.
  • Once the oil is hot, place the chicken thighs skin-side down in the skillet.
  • Cook for about 6-7 minutes until the skin is golden brown and crispy.
  • Flip the chicken and cook for another 6-7 minutes until fully cooked.
  • Remove the chicken from the skillet and set it aside.
  • This step is crucial for locking in flavor and moisture.

Step 2: Toast the Orzo

  • In the same skillet, add the uncooked orzo.
  • Toast it for about 1-2 minutes, stirring frequently.
  • This quick toasting enhances the flavor of the orzo, making it even more delicious.
  • You’ll notice a nutty aroma filling your kitchen—it’s a sign you’re on the right track!

Step 3: Cook the Broccoli and Orzo

  • Pour in the chicken broth and bring it to a boil.
  • Once boiling, reduce the heat to low and add the broccoli florets.
  • Stir everything together, then cover the skillet.
  • Let it simmer for about 10 minutes, or until the orzo is tender and most of the liquid is absorbed.
  • This is where the magic happens, as the orzo absorbs all those savory flavors.

Step 4: Add Cheese and Combine

  • Stir in the shredded sharp cheddar cheese and lemon juice.
  • Mix until the cheese is melted and creamy, creating a luscious sauce.
  • Return the chicken thighs to the skillet, nestling them into the orzo mixture.
  • Cover and cook for an additional 2-3 minutes to heat the chicken through.
  • The combination of cheese and lemon brightens the dish, making it irresistible.

Step 5: Serve and Enjoy

  • Once everything is heated through, it’s time to serve!
  • Spoon the cheesy orzo onto plates, topping it with a chicken thigh.
  • Garnish with fresh parsley if desired for a pop of color.
  • Enjoy this comforting meal with your loved ones, and watch them savor every bite.
  • This Skillet Chicken Thighs with Broccoli and Cheddar Orzo is sure to become a family favorite!

Tips for Success

  • Always let the chicken rest for a few minutes after cooking to keep it juicy.
  • For extra flavor, consider marinating the chicken thighs in your favorite spices beforehand.
  • Don’t skip toasting the orzo; it adds a wonderful depth of flavor.
  • Feel free to mix in other veggies for added nutrition and color.
  • Adjust the cheese to your liking—more cheese equals more creaminess!

Equipment Needed

  • Large skillet: A non-stick skillet works best, but any large pan will do.
  • Wooden spoon or spatula: Perfect for stirring and mixing ingredients.
  • Meat thermometer: Optional, but great for ensuring chicken is cooked through.
  • Measuring cups: For accurate ingredient portions, especially the orzo and broth.

Variations

  • Herb-Infused: Add fresh herbs like thyme or rosemary for an aromatic twist.
  • Spicy Kick: Incorporate red pepper flakes or diced jalapeños for some heat.
  • Vegetarian Option: Substitute chicken with chickpeas or tofu and use vegetable broth.
  • Cheese Lovers: Experiment with different cheeses like gouda or pepper jack for unique flavors.
  • Whole Grain: Swap orzo for whole wheat orzo or quinoa for a healthier grain option.

Serving Suggestions

  • Side Salad: Pair with a light mixed greens salad drizzled with vinaigrette for a refreshing contrast.
  • Crusty Bread: Serve with warm, crusty bread to soak up the creamy orzo.
  • Wine Pairing: A chilled white wine, like Sauvignon Blanc, complements the dish beautifully.
  • Presentation: Serve in shallow bowls for a cozy, inviting look.

FAQs about Skillet Chicken Thighs with Broccoli and Cheddar Orzo

Can I use boneless chicken thighs instead of bone-in?

Absolutely! Boneless chicken thighs will work just fine. They may cook a bit faster, so keep an eye on them to avoid overcooking.

What can I substitute for orzo?

If you don’t have orzo on hand, you can use other small pasta shapes like ditalini or even quinoa for a gluten-free option. Just adjust the cooking time as needed.

Can I make this dish ahead of time?

Yes! You can prepare the chicken and orzo mixture ahead of time. Just reheat gently on the stove, adding a splash of broth if needed to loosen it up.

How do I store leftovers?

Store any leftovers in an airtight container in the fridge for up to three days. Reheat in the microwave or on the stovetop, adding a little broth to keep it creamy.

Is this dish suitable for meal prep?

Definitely! This Skillet Chicken Thighs with Broccoli and Cheddar Orzo is perfect for meal prep. Just portion it out into containers for easy lunches or dinners throughout the week.

Final Thoughts

Cooking is more than just a task; it’s a way to create memories and share love.

This Skillet Chicken Thighs with Broccoli and Cheddar Orzo embodies that spirit perfectly.

With its creamy, cheesy goodness and tender chicken, it’s a dish that brings everyone to the table, eager to dig in.

Whether it’s a busy weeknight or a cozy family gathering, this recipe is a delightful reminder that good food can be simple and satisfying.

So, roll up your sleeves, gather your loved ones, and enjoy the joy that comes from sharing a delicious meal together.

Skillet Chicken Thighs with Broccoli and Cheddar Orzo
jhessica

Skillet Chicken Thighs with Broccoli and Cheddar Orzo made easy!

A delicious and easy recipe for skillet chicken thighs served with broccoli and creamy cheddar orzo.
Prep Time 10 minutes
Cook Time 30 minutes
Total Time 40 minutes
Servings: 4 servings
Course: Main Course
Cuisine: American
Calories: 450

Ingredients
  

  • 2 tablespoons olive oil
  • 4 bone-in skin-on chicken thighs (about 1.5 pounds)
  • Salt and pepper to taste
  • 1 teaspoon garlic powder
  • 1 teaspoon onion powder
  • 1 cup uncooked orzo pasta
  • 2 cups chicken broth
  • 2 cups broccoli florets
  • 1 cup shredded sharp cheddar cheese
  • 1 tablespoon lemon juice
  • Fresh parsley for garnish optional

Method
 

  1. In a large skillet, heat the olive oil over medium-high heat. Season the chicken thighs with salt, pepper, garlic powder, and onion powder. Place the chicken thighs skin-side down in the skillet and cook for about 6-7 minutes until the skin is golden brown and crispy. Flip the chicken and cook for an additional 6-7 minutes until cooked through. Remove the chicken from the skillet and set aside.
  2. In the same skillet, add the uncooked orzo and toast it for about 1-2 minutes, stirring frequently. This will enhance the flavor of the pasta.
  3. Pour in the chicken broth and bring to a boil. Once boiling, reduce the heat to low and add the broccoli florets. Stir to combine, then cover the skillet and let it simmer for about 10 minutes, or until the orzo is tender and most of the liquid is absorbed.
  4. Stir in the shredded cheddar cheese and lemon juice until the cheese is melted and creamy. Return the chicken thighs to the skillet, nestling them into the orzo mixture. Cover and cook for an additional 2-3 minutes to heat the chicken through.
  5. Serve hot, garnished with fresh parsley if desired.

Nutrition

Serving: 1servingCalories: 450kcalCarbohydrates: 35gProtein: 30gFat: 20gSaturated Fat: 8gPolyunsaturated Fat: 10gCholesterol: 100mgSodium: 600mgFiber: 2gSugar: 2g

Notes

  • For a lighter version, use skinless chicken thighs or chicken breasts.
  • Add other vegetables like bell peppers or spinach for extra nutrition and flavor.

Tried this recipe?

Let us know how it was!

Ranch Chicken Thighs: Discover the Secret to Crispy Goodness!

Introduction to Ranch Chicken Thighs

There’s something magical about the aroma of chicken roasting in the oven, isn’t there? When I think of cozy family dinners, Ranch Chicken Thighs always come to mind. This dish is not just a meal; it’s a warm hug on a plate. Perfect for those busy weeknights or when you want to impress your loved ones without spending hours in the kitchen. With its crispy skin and flavorful seasoning, this recipe is a delightful way to bring everyone together. Trust me, once you try it, you’ll be adding it to your regular rotation!

Why You’ll Love This Ranch Chicken Thighs

Ranch Chicken Thighs are a game-changer for any home cook. They’re incredibly easy to prepare, making them perfect for those hectic evenings when time is short. The combination of crispy skin and savory ranch seasoning creates a flavor explosion that will have your family asking for seconds. Plus, with just a handful of ingredients, you can whip up a delicious dinner that feels special without the fuss. What’s not to love?

Ingredients for Ranch Chicken Thighs

Gathering the right ingredients is the first step to creating mouthwatering Ranch Chicken Thighs. Here’s what you’ll need:
  • Bone-in, skin-on chicken thighs: These are the stars of the dish, providing juicy meat and crispy skin.
  • Ranch seasoning mix: This magical blend adds that signature flavor. You can find it in any grocery store, or make your own with herbs and spices.
  • Olive oil: A drizzle of this liquid gold helps the seasoning stick and enhances the crispiness.
  • Garlic powder: A must-have for that savory depth. Fresh garlic works too if you prefer.
  • Onion powder: This adds a subtle sweetness and complexity to the flavor profile.
  • Paprika: For a hint of smokiness and a beautiful color.
  • Salt: Essential for bringing out all the flavors in the dish.
  • Black pepper: A dash of this adds a little kick.
  • Fresh parsley: This is optional but adds a lovely pop of color and freshness when garnished.
For those looking to mix things up, consider substituting the ranch seasoning with Italian seasoning for a different flavor twist. Exact measurements for each ingredient can be found at the bottom of the article, ready for printing!

How to Make Ranch Chicken Thighs

Creating Ranch Chicken Thighs is a straightforward process that yields delicious results. Follow these simple steps, and you’ll have a crispy, flavorful dinner ready in no time!

Step 1: Preheat the Oven

Start by preheating your oven to 400°F (200°C). This ensures that your chicken thighs cook evenly and develop that irresistible crispy skin. While the oven heats up, you can prepare the seasoning mix.

Step 2: Prepare the Seasoning Mix

In a large bowl, combine the ranch seasoning mix, garlic powder, onion powder, paprika, salt, and black pepper. Mix these dry ingredients well. Then, add the olive oil to the bowl. Stir until a thick paste forms. This paste will cling beautifully to the chicken, infusing it with flavor.

Step 3: Coat the Chicken Thighs

Take each chicken thigh and coat it generously with the seasoning mixture. Make sure every inch is covered. This step is crucial for achieving that bold ranch flavor. The skin will crisp up nicely, creating a delightful texture.

Step 4: Arrange on Baking Sheet

Line a baking sheet with parchment paper for easy cleanup. Place the seasoned chicken thighs on the sheet, skin side up. Give them a little space to breathe; this helps them cook evenly and get crispy.

Step 5: Bake to Perfection

Slide the baking sheet into your preheated oven. Bake the chicken thighs for 35-40 minutes. You’ll know they’re done when the internal temperature reaches 165°F (74°C) and the skin is golden brown and crispy. If you want an extra crunch, broil them for an additional 2-3 minutes at the end.

Step 6: Rest and Garnish

Once baked, remove the chicken from the oven and let it rest for about 5 minutes. This allows the juices to redistribute, keeping the meat tender. Before serving, sprinkle with fresh parsley for a pop of color and freshness. Enjoy your delicious Ranch Chicken Thighs!

Tips for Success

  • For extra crispy skin, pat the chicken thighs dry with paper towels before seasoning.
  • Let the chicken sit at room temperature for about 15 minutes before baking for even cooking.
  • Use a meat thermometer to ensure the chicken reaches the perfect internal temperature.
  • Feel free to double the seasoning mix for a bolder flavor.
  • Experiment with different herbs to customize the taste to your liking.

Equipment Needed

  • Baking sheet: A standard sheet works, but a cast iron skillet can add extra crispiness.
  • Parchment paper: This makes cleanup a breeze; aluminum foil is a good alternative.
  • Mixing bowl: Any large bowl will do for combining the seasoning.
  • Meat thermometer: Essential for checking doneness; a simple knife can also help.

Variations

  • Spicy Ranch Chicken Thighs: Add a teaspoon of cayenne pepper or red pepper flakes to the seasoning mix for a kick of heat.
  • Herb-Infused Ranch: Mix in fresh herbs like thyme or rosemary for an aromatic twist.
  • Honey Mustard Ranch: Blend in a tablespoon of honey mustard with the olive oil for a sweet and tangy flavor.
  • Low-Carb Option: Serve with a side of roasted vegetables instead of starchy sides for a healthier meal.
  • Gluten-Free Ranch: Ensure your ranch seasoning is certified gluten-free for a safe option.

Serving Suggestions

  • Classic Sides: Pair with creamy mashed potatoes or buttery corn on the cob for a comforting meal.
  • Fresh Salad: A crisp garden salad with a tangy vinaigrette complements the richness of the chicken.
  • Drink Pairing: Serve with a chilled glass of white wine or a refreshing iced tea.
  • Presentation: Arrange the chicken on a rustic platter, garnished with lemon wedges and fresh herbs for a beautiful display.

FAQs about Ranch Chicken Thighs

Curious about Ranch Chicken Thighs? Here are some common questions I often hear, along with helpful answers to guide you through this delicious recipe. Can I use boneless chicken thighs instead of bone-in? Absolutely! Boneless chicken thighs will work just fine. Just keep an eye on the cooking time, as they may cook a bit faster. What can I serve with Ranch Chicken Thighs? These flavorful thighs pair wonderfully with sides like roasted vegetables, creamy mashed potatoes, or a fresh garden salad. The options are endless! Can I make this recipe ahead of time? Yes! You can season the chicken thighs a few hours in advance and store them in the fridge. Just remember to let them come to room temperature before baking for the best results. How do I store leftovers? Store any leftover Ranch Chicken Thighs in an airtight container in the fridge for up to 3 days. Reheat in the oven for that crispy skin! Can I freeze Ranch Chicken Thighs? Definitely! You can freeze the seasoned chicken thighs before cooking. Just thaw them in the fridge overnight before baking. Enjoy the convenience of a ready-to-cook meal!

Final Thoughts

Ranch Chicken Thighs are more than just a meal; they’re a celebration of flavor and comfort. Each bite brings a satisfying crunch, paired with the savory goodness of ranch seasoning that dances on your taste buds. This recipe is a reminder that cooking can be simple yet rewarding, perfect for busy nights or special gatherings. I love how it brings my family together around the table, sharing stories and laughter. So, roll up your sleeves, embrace the joy of cooking, and let these crispy delights become a cherished part of your culinary repertoire!
Ranch Chicken Thighs
jhessica

Ranch Chicken Thighs: Discover the Secret to Crispy Goodness!

Crispy and flavorful Ranch Chicken Thighs, perfect for a delicious dinner.
Prep Time 10 minutes
Cook Time 40 minutes
Total Time 50 minutes
Servings: 4 servings
Course: Main Dish
Cuisine: American
Calories: 350

Ingredients
  

  • 2 pounds bone-in skin-on chicken thighs
  • 1 packet 1 ounce ranch seasoning mix
  • 2 tablespoons olive oil
  • 1 teaspoon garlic powder
  • 1 teaspoon onion powder
  • 1 teaspoon paprika
  • 1 teaspoon salt
  • 1/2 teaspoon black pepper
  • 1 tablespoon fresh parsley chopped (for garnish)

Method
 

  1. Preheat your oven to 400°F (200°C).
  2. In a large bowl, combine the ranch seasoning mix, garlic powder, onion powder, paprika, salt, and black pepper.
  3. Add the olive oil to the bowl and mix until a paste forms.
  4. Coat each chicken thigh with the seasoning mixture, ensuring they are well covered.
  5. Place the seasoned chicken thighs on a baking sheet lined with parchment paper, skin side up.
  6. Bake in the preheated oven for 35-40 minutes, or until the chicken reaches an internal temperature of 165°F (74°C) and the skin is crispy.
  7. Remove from the oven and let rest for 5 minutes before serving.
  8. Garnish with chopped fresh parsley before serving.

Nutrition

Serving: 1chicken thighCalories: 350kcalCarbohydrates: 1gProtein: 28gFat: 25gSaturated Fat: 6gPolyunsaturated Fat: 19gCholesterol: 120mgSodium: 800mg

Notes

  • For a crispy skin, broil the chicken for an additional 2-3 minutes at the end of cooking.
  • Try substituting the ranch seasoning with Italian seasoning for a different flavor profile.

Tried this recipe?

Let us know how it was!

Hearty Slow Cooker Beef Stew Recipe for Cozy Nights

Introduction to Hearty Slow Cooker Beef Stew Recipe

Hearty Slow Cooker Beef Stew Recipe is a classic dish that brings together tender beef, fresh vegetables, and rich flavors. This recipe is not just about filling your belly; it’s about creating a delightful experience for your taste buds. Let’s dive into what makes this stew so special and why using a slow cooker is a game-changer.

What Makes This Recipe Special?

This stew stands out for several reasons. First, the combination of ingredients creates a symphony of flavors. The beef chuck becomes incredibly tender as it cooks slowly, absorbing the essence of the broth and spices. The vegetables, including carrots, potatoes, and celery, add both texture and nutrition. Plus, the addition of red wine enhances the stew’s depth, making each bite a savory delight.

Another special aspect is the ease of preparation. With just a few simple steps, you can set it and forget it. The slow cooker does all the hard work, allowing you to enjoy your day while the stew simmers to perfection. This recipe is perfect for busy families or anyone looking to enjoy a hearty meal without spending hours in the kitchen.

Benefits of Using a Slow Cooker

Using a slow cooker offers numerous benefits. First, it saves time. You can prepare your ingredients in the morning, set the cooker, and return home to a delicious meal. This method also enhances flavors. Slow cooking allows the ingredients to meld together, creating a rich and satisfying taste that’s hard to achieve with quick cooking methods.

Hearty Slow Cooker Beef Stew Recipe, you’ll discover just how easy and rewarding slow cooking can be!

Ingredients for Hearty Slow Cooker Beef Stew Recipe

Hearty Slow Cooker Beef Stew Recipe, you’ll need a selection of fresh ingredients that come together to form a delicious meal. Here’s what you’ll need:

  • 2 pounds beef chuck: Cut into 1-inch cubes for tender bites.
  • 1 tablespoon olive oil: For browning the beef and adding flavor.
  • 1 medium onion: Chopped to enhance the stew’s aroma.
  • 3 cloves garlic: Minced for a savory kick.
  • 4 medium carrots: Sliced to add sweetness and color.
  • 3 medium potatoes: Diced for heartiness and texture.
  • 1 cup celery: Chopped to provide crunch and flavor.
  • 1 cup beef broth: The base for a rich and savory stew.
  • 1 cup red wine: Optional, but it deepens the flavor; you can substitute with more beef broth.
  • 2 tablespoons tomato paste: For added richness and depth.
  • 1 tablespoon Worcestershire sauce: To enhance the umami flavor.
  • 1 teaspoon dried thyme: A classic herb that complements beef.
  • 1 teaspoon dried rosemary: Adds a fragrant touch.
  • Salt and pepper: To taste, enhancing all the flavors.
  • 2 bay leaves: For a subtle aromatic flavor.
  • 2 tablespoons cornstarch: Optional, for thickening the stew.
  • 2 tablespoons water: Optional, to mix with cornstarch if thickening.

Gathering these ingredients will set you on the path to a delightful meal. Each component plays a vital role in creating the rich, hearty flavor that makes this stew a family favorite. Now that you have everything ready, let’s move on to the step-by-step preparation!

Step-by-Step Preparation of Hearty Slow Cooker Beef Stew Recipe

Hearty Slow Cooker Beef Stew Recipe. This process is straightforward and enjoyable, making it perfect for cooks of all skill levels. Let’s get started!

Step 1: Preparing the Ingredients

First, gather all your ingredients on a clean countertop. Start by washing and peeling the carrots and potatoes. Slice the carrots into rounds and dice the potatoes into bite-sized pieces. Next, chop the celery and onion. Finally, mince the garlic cloves. Having everything prepped and ready will make the cooking process smooth and efficient.

Step 2: Browning the Beef

In a large skillet, heat the olive oil over medium-high heat. Once the oil is hot, add the beef cubes. Brown the beef on all sides, which should take about 5-7 minutes. This step is crucial as it locks in the flavors and gives the beef a nice color. After browning, transfer the beef to the slow cooker. Don’t worry if some bits stick to the skillet; they will add flavor to your stew!

Step 3: Adding Vegetables and Seasonings

In the same skillet, add the chopped onion and minced garlic. Sauté them for 2-3 minutes until they become soft and fragrant. This step enhances the overall flavor of the stew. Once done, add the onion and garlic mixture to the slow cooker with the beef. Now, it’s time to add the sliced carrots, diced potatoes, and chopped celery. Pour in the beef broth and red wine (or additional beef broth if you prefer). Stir in the tomato paste, Worcestershire sauce, thyme, rosemary, salt, pepper, and bay leaves. Mix everything well to ensure the flavors combine beautifully.

Step 4: Cooking in the Slow Cooker

Cover the slow cooker with its lid and set it to cook. You can choose to cook on low for 8 hours or on high for 4 hours. The slow cooking process allows the beef to become tender and the vegetables to cook through, creating a rich and hearty stew. While it cooks, you can relax or take care of other tasks around the house!

Step 5: Final Touches and Serving

Hearty Slow Cooker Beef Stew Recipe!

Variations of Hearty Slow Cooker Beef Stew Recipe

Hearty Slow Cooker Beef Stew Recipe is delicious as is, there are many ways to customize it to suit your taste or dietary needs. Let’s explore some alternative ingredients and different cooking methods that can add a unique twist to this classic dish.

Alternative Ingredients

One of the best things about stew is its versatility. You can easily swap out ingredients to create a new flavor profile. Here are some ideas:

  • Meat Alternatives: Instead of beef, try using chicken or turkey for a lighter option. You can also use pork for a different taste.
  • Vegetable Variations: Feel free to add other vegetables like peas, green beans, or bell peppers. These can add color and nutrition.
  • Herbs and Spices: Experiment with different herbs like oregano or basil. A pinch of smoked paprika can add a delightful smoky flavor.
  • Broth Options: For a richer taste, use homemade beef broth or add a splash of balsamic vinegar for extra depth.
  • Thickening Agents: Instead of cornstarch, you can use flour or even mashed potatoes to thicken the stew.

These alternatives can help you create a stew that’s uniquely yours while still being hearty and satisfying.

Different Cooking Methods

While the slow cooker is a fantastic way to prepare this stew, you can also try other cooking methods. Here are a couple of options:

  • Stovetop Method: If you’re short on time, you can make this stew on the stovetop. Brown the beef in a large pot, then add the vegetables and liquids. Bring it to a boil, then reduce the heat and let it simmer for about 1.5 to 2 hours, or until the beef is tender.
  • Instant Pot Method: For a quick version, use an Instant Pot. Brown the beef using the sauté function, then add the remaining ingredients. Seal the lid and cook on high pressure for about 35 minutes. Allow for a natural release before serving.

Hearty Slow Cooker Beef Stew Recipe that your family will love!

Cooking Note for Hearty Slow Cooker Beef Stew Recipe

Hearty Slow Cooker Beef Stew Recipe, there are a few important cooking notes to keep in mind. These tips will help ensure that your stew turns out perfectly every time, enhancing both flavor and texture.

First, choose the right cut of beef. Beef chuck is ideal for stews because it becomes tender and flavorful when cooked slowly. Avoid lean cuts, as they can dry out during the long cooking process. If you prefer a leaner option, consider using beef round, but be aware that it may not be as tender.

Next, don’t skip the browning step. Browning the beef in olive oil before adding it to the slow cooker is crucial. This step adds depth to the flavor and creates a rich base for your stew. The caramelization that occurs during browning enhances the overall taste, making your stew even more delicious.

Also, be mindful of the vegetables you choose. Cut them into uniform sizes to ensure even cooking. Harder vegetables like carrots and potatoes should be cut slightly larger than softer ones like celery and onions. This way, they will cook at a similar rate, preventing any mushiness.

Lastly, avoid lifting the lid of the slow cooker during cooking. Each time you open the lid, heat escapes, which can extend the cooking time. Trust the process! The slow cooker is designed to maintain a consistent temperature, allowing the flavors to meld beautifully.

Hearty Slow Cooker Beef Stew Recipe that is not only satisfying but also bursting with flavor. Enjoy the process and the delightful aroma that fills your kitchen as it cooks!

Serving Suggestions for Hearty Slow Cooker Beef Stew Recipe

Hearty Slow Cooker Beef Stew Recipe is ready, it’s time to think about how to serve it. The right side dishes and pairings can elevate your meal, making it even more enjoyable. Here are some fantastic serving suggestions to complement your stew.

Best Side Dishes

When it comes to side dishes, you want something that balances the rich flavors of the stew. Here are a few great options:

  • Crusty Bread: A warm, crusty loaf of bread is perfect for soaking up the delicious broth. Consider sourdough or a rustic baguette.
  • Green Salad: A light, fresh salad with mixed greens, cherry tomatoes, and a simple vinaigrette can provide a refreshing contrast to the hearty stew.
  • Roasted Vegetables: Roasted seasonal vegetables, such as Brussels sprouts or butternut squash, can add a delightful sweetness and texture to your meal.
  • Mashed Potatoes: For an extra comforting touch, serve your stew over creamy mashed potatoes. This combination is sure to please!

These side dishes not only complement the stew but also add variety to your meal, making it more satisfying.

Pairing with Bread and Wine

Hearty Slow Cooker Beef Stew Recipe with the right bread and wine can enhance the dining experience. Here are some suggestions:

  • Wine Pairing: A full-bodied red wine, such as Cabernet Sauvignon or Merlot, pairs beautifully with beef stew. The wine’s tannins complement the richness of the beef, creating a harmonious flavor profile.
  • Artisan Bread: Consider serving your stew with artisan bread, like a rosemary focaccia or a hearty whole grain. These breads add texture and flavor, making each bite more enjoyable.
  • Garlic Bread: For a twist, garlic bread can be a delightful addition. Its buttery, garlicky flavor pairs well with the savory stew.

Hearty Slow Cooker Beef Stew Recipe. Enjoy the warmth and comfort of this delicious dish with your loved ones!

Tips for Perfecting Hearty Slow Cooker Beef Stew Recipe

Hearty Slow Cooker Beef Stew Recipe turns out perfectly every time, it’s essential to be aware of common mistakes and ways to enhance the flavor. Here are some helpful tips to guide you through the process.

Common Mistakes to Avoid

Even the best cooks can make mistakes. Here are a few common pitfalls to watch out for:

  • Skipping the Browning Step: As mentioned earlier, browning the beef is crucial. Skipping this step can lead to a less flavorful stew. Always take the time to brown the meat for the best results.
  • Overcrowding the Slow Cooker: If you add too many ingredients, the stew may not cook evenly. Stick to the recommended amounts to ensure everything cooks properly.
  • Adding Dairy Too Early: If you plan to add cream or milk for richness, do so at the end of cooking. Adding dairy too early can cause it to curdle.
  • Not Adjusting Seasoning: Always taste your stew before serving. You may need to add more salt, pepper, or herbs to enhance the flavors. Don’t be afraid to adjust to your liking!
  • Ignoring Cooking Times: Cooking times can vary based on your slow cooker model. Always check for tenderness and adjust the time as needed. Trust your instincts!

Enhancing Flavor Profiles

Hearty Slow Cooker Beef Stew Recipe to the next level, consider these flavor-enhancing tips:

  • Use Fresh Herbs: Fresh herbs can elevate the flavor significantly. Consider adding fresh thyme or parsley just before serving for a burst of freshness.
  • Incorporate Umami: Adding ingredients like mushrooms, soy sauce, or even a bit of anchovy paste can deepen the umami flavor in your stew.
  • Experiment with Spices: Don’t hesitate to try different spices. A pinch of cumin or coriander can add a unique twist to the traditional flavor profile.
  • Finish with Acid: A splash of vinegar or a squeeze of lemon juice just before serving can brighten the flavors and balance the richness of the stew.
  • Let It Rest: If you have time, let the stew sit for a while after cooking. This resting period allows the flavors to meld together, making it even tastier.

Hearty Slow Cooker Beef Stew Recipe that is not only delicious but also memorable. Enjoy the process and the delightful results!

Breakdown of Time for Hearty Slow Cooker Beef Stew Recipe

Hearty Slow Cooker Beef Stew Recipe can help you plan your day better. Here’s a simple breakdown of the time you’ll need for each step, ensuring a smooth cooking experience.

Prep Time

The prep time for this stew is relatively short. You can expect to spend about 20-30 minutes gathering and preparing your ingredients. This includes washing, peeling, and chopping the vegetables, as well as cutting the beef into cubes. Having everything ready will make the cooking process much easier and more enjoyable.

Cooking Time

Once you’ve prepped your ingredients, the cooking time is where the magic happens. If you choose to cook on low, it will take about 8 hours for the stew to reach its full flavor potential. Alternatively, cooking on high will take around 4 hours. During this time, the beef will become tender, and the flavors will meld beautifully.

Total Time

Hearty Slow Cooker Beef Stew Recipe is well worth the wait, providing a warm and comforting meal for you and your family.

Nutritional Information for Hearty Slow Cooker Beef Stew Recipe

Hearty Slow Cooker Beef Stew Recipe not only satisfies your taste buds but also provides a good mix of nutrients. Here’s a breakdown of the nutritional information per serving, helping you make informed choices.

Calories

Each serving of this delicious stew contains approximately 350 calories. This makes it a hearty yet manageable option for dinner. The combination of beef, vegetables, and broth provides a filling meal without excessive calories. It’s perfect for those chilly evenings when you want something warm and comforting!

Protein Content

Protein is vital for muscle repair and overall health. This stew packs a punch with about 30 grams of protein per serving. The beef chuck is a great source of high-quality protein, which helps keep you feeling full and satisfied. Including protein in your meals is essential for maintaining energy levels throughout the day.

Sodium Levels

When it comes to sodium, each serving contains around 800 milligrams. While this is a reasonable amount for a hearty stew, it’s important to be mindful of your overall sodium intake, especially if you’re watching your salt consumption. You can reduce sodium levels by using low-sodium beef broth or adjusting the amount of added salt to suit your dietary needs.

Hearty Slow Cooker Beef Stew Recipe while also maintaining a balanced diet. This stew is not only delicious but also a nutritious option for your family meals!

FAQs about Hearty Slow Cooker Beef Stew Recipe

Can I use frozen beef for this recipe?

Hearty Slow Cooker Beef Stew Recipe. However, it’s important to thaw the beef before browning it. Cooking frozen beef directly in the slow cooker can lead to uneven cooking and may not achieve the desired tenderness. To thaw, simply place the beef in the refrigerator overnight or use the defrost setting on your microwave. Once thawed, follow the browning step as usual to enhance the flavor of your stew.

How long can I store leftovers?

Hearty Slow Cooker Beef Stew can be stored in the refrigerator for up to 3-4 days. Make sure to place it in an airtight container to maintain freshness. If you want to keep it longer, consider freezing the stew. It can be frozen for up to 3 months. When you’re ready to enjoy it again, simply thaw it in the refrigerator overnight and reheat on the stove or in the microwave until heated through.

Can I make this stew in advance?

Hearty Slow Cooker Beef Stew Recipe is perfect for making in advance. You can prepare the ingredients the night before and store them in the refrigerator. In the morning, simply add everything to the slow cooker and set it to cook. This makes it a convenient option for busy days. Additionally, the flavors often improve after sitting, making it even tastier when reheated!

Conclusion on Hearty Slow Cooker Beef Stew Recipe

Hearty Slow Cooker Beef Stew Recipe is a wonderful dish that brings warmth and comfort to any table. With its rich flavors and tender ingredients, it’s a meal that can be enjoyed by everyone. The beauty of this recipe lies not only in its taste but also in its simplicity. You can prepare it with minimal effort, allowing you to spend more time with your loved ones.

As you’ve seen, the versatility of this stew allows for countless variations. Whether you choose to stick to the classic ingredients or experiment with new flavors, the result will always be a satisfying meal. Plus, the slow cooker makes it easy to create a delicious dish without constant supervision. Just set it and let it work its magic!

Remember to take advantage of the tips and variations shared throughout this article. They can help you perfect your stew and make it uniquely yours. Whether you’re serving it on a chilly evening or at a family gathering, this hearty stew is sure to impress.

Hearty Slow Cooker Beef Stew Recipe. Your family will thank you for it, and you’ll find yourself returning to this recipe time and again. Happy cooking!

Philly Cheesesteak Sloppy Joe Recipe is a must-try!

Introduction to Philly Cheesesteak Sloppy Joe Recipe

Philly Cheesesteak Sloppy Joe Recipe combines two beloved comfort foods into one mouthwatering dish. Imagine the rich flavors of a classic Philly cheesesteak, all wrapped up in a messy, satisfying Sloppy Joe. This recipe is not just a meal; it’s an experience that brings joy to your dinner table.

What Makes This Recipe Unique?

What sets this recipe apart is its delightful fusion of flavors and textures. The savory ground beef, sautéed vegetables, and gooey provolone cheese create a symphony of taste. Each bite is a perfect balance of hearty and cheesy goodness. Plus, it’s easy to prepare, making it a fantastic option for busy weeknights or casual gatherings. You can whip it up in under 30 minutes, which is a win for any home cook!

Another unique aspect is the versatility of the recipe. You can customize it to suit your preferences. Want it spicier? Toss in some jalapeños! Prefer a leaner option? Swap the ground beef for turkey or chicken. The possibilities are endless, allowing you to make this dish your own.

The Origin of Sloppy Joes and Philly Cheesesteaks

Philly Cheesesteak Sloppy Joe Recipe, it’s essential to understand the origins of its components. Sloppy Joes have a rich history, believed to have originated in the 1930s in the United States. They were named after a cook named Joe who created a loose meat sandwich in a small café. This dish quickly became a favorite for its simplicity and flavor.

On the other hand, the Philly cheesesteak hails from Philadelphia, Pennsylvania. It was created in the 1930s by Pat and Harry Olivieri, who served it from their hot dog stand. The combination of thinly sliced beef, melted cheese, and sautéed onions became an instant hit. Today, it’s a staple in many households and restaurants across the country.

By merging these two iconic dishes, the Philly Cheesesteak Sloppy Joe brings together the best of both worlds. It’s a celebration of flavors that pays homage to its roots while offering a fresh twist. So, let’s dive into the ingredients and get cooking!

Ingredients for Philly Cheesesteak Sloppy Joe Recipe

Essential Ingredients

Philly Cheesesteak Sloppy Joe Recipe, you’ll need a few key ingredients. These essentials will ensure that your dish is flavorful and satisfying. Here’s what you’ll need:

  • 1 pound ground beef
  • 1 medium onion, diced
  • 1 medium green bell pepper, diced
  • 2 cloves garlic, minced
  • 1 teaspoon Worcestershire sauce
  • 1 teaspoon salt
  • 1/2 teaspoon black pepper
  • 1 cup provolone cheese, shredded
  • 4 hamburger buns
  • 1 tablespoon olive oil

These ingredients come together to create a deliciously rich and hearty meal. The ground beef serves as the base, while the vegetables add texture and flavor. The provolone cheese melts beautifully, making every bite creamy and indulgent. Don’t forget the hamburger buns, as they hold everything together!

Optional Ingredients for Extra Flavor

Philly Cheesesteak Sloppy Joe Recipe, consider adding some optional ingredients. These can enhance the taste and make your dish even more exciting:

  • 1 cup sliced mushrooms (for an earthy flavor)
  • Sliced jalapeños (for a spicy kick)
  • A dash of hot sauce (for those who love heat)
  • Ground turkey or chicken (for a leaner option)
  • Different types of cheese, like cheddar or mozzarella

Feel free to mix and match these optional ingredients based on your preferences. Adding mushrooms can give a nice depth to the dish, while jalapeños can spice things up. The beauty of this recipe lies in its flexibility, allowing you to create a version that suits your taste buds perfectly!

Step-by-Step Preparation of Philly Cheesesteak Sloppy Joe Recipe

Step 1: Preparing the Meat

Philly Cheesesteak Sloppy Joe Recipe.

Step 2: Sautéing the Vegetables

Next, it’s time to add some flavor with vegetables! In the same skillet, add 1 tablespoon of olive oil if needed. Toss in the diced onion and green bell pepper. Sauté them for about 5 minutes until they soften. If you’re using mushrooms, add them now and cook for an additional 3 minutes. Finally, stir in the minced garlic and cook for another minute. The aroma will be irresistible!

Step 3: Combining Ingredients

Philly Cheesesteak Sloppy Joe Recipe.

Step 4: Simmering the Mixture

Reduce the heat to low and sprinkle 1 cup of shredded provolone cheese over the beef mixture. Cover the skillet with a lid and let it sit for about 2 to 3 minutes. This allows the cheese to melt beautifully, creating a creamy texture that will make your Sloppy Joes even more delicious. Keep an eye on it to avoid burning!

Step 5: Toasting the Buns

While the cheese is melting, you can prepare the buns. If you like a little crunch, toast the hamburger buns. You can do this in a toaster or on a skillet for a few minutes until they’re golden brown. Toasting adds a nice texture and helps hold the filling without getting soggy.

Step 6: Assembling the Sloppy Joes

Philly Cheesesteak Sloppy Joe Recipe immediately while it’s warm and gooey. Enjoy every messy bite!

Variations of Philly Cheesesteak Sloppy Joe Recipe

Vegetarian Options

Philly Cheesesteak Sloppy Joe Recipe into a delicious vegetarian dish. Instead of ground beef, use plant-based meat substitutes like lentils, black beans, or crumbled tofu. These options provide a hearty texture while absorbing the flavors of the seasonings.

For added flavor, consider incorporating diced zucchini or eggplant. These vegetables can be sautéed alongside the onions and bell peppers. You can also add some cooked quinoa for extra protein. Top it off with your favorite cheese or a vegan cheese alternative to keep that creamy goodness intact. This way, everyone can enjoy a tasty Sloppy Joe, regardless of their dietary preferences!

Spicy Additions

Philly Cheesesteak Sloppy Joe Recipe. Start by adding sliced jalapeños to the sautéed vegetables. They’ll bring a fresh, zesty kick to the dish. You can also mix in a dash of hot sauce or red pepper flakes when combining the ingredients for an extra punch.

For those who enjoy smoky flavors, consider adding chipotle peppers in adobo sauce. These will not only add heat but also a rich, smoky taste. Don’t forget to adjust the amount based on your spice tolerance. With these spicy additions, your Sloppy Joes will be a hit at any gathering!

Different Cheese Choices

Philly Cheesesteak Sloppy Joe Recipe, and there are many options to explore. While provolone is a classic choice, you can experiment with other cheeses to find your favorite combination. Cheddar cheese adds a sharp flavor, while mozzarella provides a gooey, stretchy texture.

For a more gourmet twist, try using gouda or fontina cheese. These cheeses melt beautifully and add a rich, creamy taste. You can even mix different cheeses for a unique flavor profile. The choice of cheese can elevate your Sloppy Joes, making them even more delightful!

Cooking Note for Philly Cheesesteak Sloppy Joe Recipe

Tips for Perfecting the Recipe

Philly Cheesesteak Sloppy Joe Recipe turns out perfectly every time, here are some helpful tips. First, choose high-quality ground beef. A blend with a bit of fat will keep the meat juicy and flavorful. If you prefer a leaner option, ground turkey or chicken works well too.

Next, don’t rush the sautéing process. Allow the onions and bell peppers to soften fully. This step enhances their sweetness and adds depth to the dish. If you’re using mushrooms, make sure they’re cooked until they release their moisture and become tender.

When it comes to seasoning, taste as you go! Adjust the salt and pepper according to your preference. You can also add a splash of soy sauce for an umami boost. Lastly, let the cheese melt completely before serving. This creates that gooey, cheesy goodness that makes every bite irresistible.

Common Mistakes to Avoid

Philly Cheesesteak Sloppy Joe Recipe, there are a few common pitfalls to watch out for. One mistake is overcooking the ground beef. Keep an eye on it and remove it from the heat as soon as it’s browned. Overcooked meat can become tough and dry.

Another mistake is not draining excess fat. If you skip this step, your Sloppy Joes may end up greasy. Make sure to drain the fat after browning the meat for a cleaner taste. Additionally, avoid using stale buns. Fresh, soft buns will hold the filling better and enhance the overall experience.

Philly Cheesesteak Sloppy Joe Recipe that everyone will love!

Serving Suggestions for Philly Cheesesteak Sloppy Joe Recipe

Side Dishes That Pair Well

Philly Cheesesteak Sloppy Joe Recipe, choosing the right side dishes can elevate your meal. Here are some delicious options that complement the rich flavors of the Sloppy Joes:

  • French Fries: Crispy, golden fries are a classic choice. You can serve them plain or with a sprinkle of seasoning for extra flavor.
  • Coleslaw: A refreshing coleslaw adds a crunchy texture and balances the richness of the Sloppy Joes. Try a tangy vinaigrette for a zesty kick.
  • Potato Chips: For a quick and easy option, serve your Sloppy Joes with a side of crunchy potato chips. They add a satisfying crunch!
  • Pickles: Tangy pickles are a great way to cut through the richness of the dish. They add a burst of flavor that pairs perfectly with the cheesesteak.
  • Vegetable Sticks: Fresh carrot and celery sticks with ranch dressing make for a healthy and crunchy side. They’re perfect for dipping!

These side dishes not only enhance your meal but also provide a variety of textures and flavors. Feel free to mix and match based on your preferences and what you have on hand!

Creative Serving Ideas

Philly Cheesesteak Sloppy Joe Recipe can be fun and creative! Here are some ideas to make your meal even more exciting:

  • Sloppy Joe Bar: Set up a Sloppy Joe bar where guests can customize their sandwiches. Provide different toppings like jalapeños, sautéed onions, and various cheeses.
  • Mini Sloppy Joes: For parties, consider making mini versions of the Sloppy Joes. Use slider buns and serve them as appetizers. They’re perfect for sharing!
  • Stuffed Peppers: For a twist, use the cheesesteak mixture to stuff bell peppers. Bake them until tender for a delicious and colorful presentation.
  • Wraps: Instead of buns, use tortillas to create wraps. This is a fun way to enjoy the flavors in a different format.
  • Cheesy Nachos: Pour the cheesesteak mixture over tortilla chips and top with extra cheese. Bake until bubbly for a tasty nacho dish!

Philly Cheesesteak Sloppy Joe Recipe and make your meal memorable!

Tips for Making the Best Philly Cheesesteak Sloppy Joe Recipe

Ingredient Substitutions

Philly Cheesesteak Sloppy Joe Recipe is all about flexibility. If you find yourself missing an ingredient, don’t worry! Here are some easy substitutions that can still deliver delicious results:

  • Ground Beef: If you want a leaner option, ground turkey or chicken works great. They provide a similar texture while being lower in fat.
  • Provolone Cheese: While provolone is a classic choice, you can swap it for cheddar, mozzarella, or even pepper jack for a spicy twist.
  • Bell Peppers: If you don’t have green bell peppers, try using red, yellow, or even poblano peppers for a different flavor profile.
  • Worcestershire Sauce: If you’re out of Worcestershire sauce, soy sauce or balsamic vinegar can add a similar depth of flavor.
  • Hamburger Buns: For a healthier option, consider using whole grain or gluten-free buns. You can even use lettuce wraps for a low-carb version!

Philly Cheesesteak Sloppy Joe Recipe based on what you have at home. Feel free to experiment and find the combination that suits your taste best!

Storage and Reheating Tips

Philly Cheesesteak Sloppy Joe Recipe, you might have some leftovers. Here’s how to store and reheat them properly:

  • Storage: Allow the cheesesteak mixture to cool completely before transferring it to an airtight container. It can be stored in the refrigerator for up to 3 days.
  • Freezing: If you want to keep it longer, you can freeze the mixture. Place it in a freezer-safe container or bag, and it will last for up to 3 months. Just remember to label it with the date!
  • Reheating: To reheat, simply thaw the frozen mixture in the refrigerator overnight. Then, warm it in a skillet over medium heat until heated through. You can also microwave it in short intervals, stirring in between.
  • Serving: When ready to serve, toast fresh buns to enhance the texture. This will make your leftovers feel like a brand-new meal!

Philly Cheesesteak Sloppy Joe Recipe even after the initial meal. It’s a great way to save time and reduce food waste!

Breakdown of Time for Philly Cheesesteak Sloppy Joe Recipe

Prep Time

Philly Cheesesteak Sloppy Joe Recipe is quick and easy! The prep time usually takes about 10 to 15 minutes. During this time, you’ll chop the vegetables, mince the garlic, and measure out your ingredients. Having everything prepped in advance makes the cooking process smoother and more enjoyable. Plus, it helps you stay organized in the kitchen!

Cooking Time

The cooking time for this delicious dish is approximately 15 to 20 minutes. This includes browning the ground beef, sautéing the vegetables, and allowing the cheese to melt. It’s a fast process, making it perfect for busy weeknights. You’ll be amazed at how quickly you can whip up this hearty meal!

Total Time

Philly Cheesesteak Sloppy Joe Recipe is an excellent choice for a satisfying dinner that doesn’t require hours in the kitchen. So, gather your ingredients and get ready to enjoy a delightful meal in no time!

Nutritional Information for Philly Cheesesteak Sloppy Joe Recipe

Calories and Macronutrients

Philly Cheesesteak Sloppy Joe Recipe offers a hearty serving that is both satisfying and nutritious. Here’s a breakdown of the calories and macronutrients per serving:

  • Calories: 450
  • Net Carbs: 30g
  • Protein: 30g
  • Fat: 25g

This recipe provides a good balance of protein and carbohydrates, making it a filling option for lunch or dinner. The ground beef contributes to the protein content, while the vegetables add essential vitamins and minerals. The cheese and olive oil provide healthy fats, which are important for overall health.

Health Considerations

Philly Cheesesteak Sloppy Joe Recipe, it’s important to consider your dietary needs. While this dish is delicious, moderation is key. Here are some health considerations to keep in mind:

  • Portion Control: If you’re watching your calorie intake, consider serving smaller portions. Pairing the Sloppy Joes with a side salad can help balance the meal.
  • Lean Meat Options: For a healthier twist, opt for lean ground turkey or chicken instead of beef. This can reduce the overall fat content while still providing protein.
  • Vegetable Additions: Feel free to load up on extra vegetables. Adding spinach, zucchini, or even carrots can boost the nutritional value without significantly increasing calories.
  • Whole Grain Buns: Consider using whole grain or whole wheat buns for added fiber. This can help keep you feeling full longer and support digestive health.

Philly Cheesesteak Sloppy Joe Recipe while still adhering to your health goals. Remember, it’s all about balance and making choices that work for you!

FAQs about Philly Cheesesteak Sloppy Joe Recipe

Can I make Philly Cheesesteak Sloppy Joes ahead of time?

Philly Cheesesteak Sloppy Joe Recipe ahead of time. Simply cook the cheesesteak mixture and let it cool. Then, store it in an airtight container in the refrigerator for up to 3 days. When you’re ready to serve, just reheat it on the stove or in the microwave. This makes it a great option for meal prep or busy weeknights!

What type of bread is best for this recipe?

Philly Cheesesteak Sloppy Joe Recipe is a soft hamburger bun. However, you can also use other types of bread like hoagie rolls or even whole grain buns for a healthier option. The key is to choose a bread that can hold the filling without getting soggy. Toasting the buns slightly can also help maintain their structure and add a nice crunch!

Can I freeze Philly Cheesesteak Sloppy Joes?

Yes, you can freeze the cheesesteak mixture! To do this, let it cool completely and then transfer it to a freezer-safe container or bag. It can be frozen for up to 3 months. When you’re ready to enjoy it, thaw it in the refrigerator overnight and reheat it on the stove. Just remember to toast fresh buns when serving for the best experience!

How can I make this recipe healthier?

Philly Cheesesteak Sloppy Joe Recipe healthier is easy! Here are a few tips:

  • Use Lean Meat: Opt for lean ground turkey or chicken instead of beef to reduce fat content.
  • Add More Vegetables: Load up on extra veggies like spinach, zucchini, or mushrooms to increase fiber and nutrients.
  • Whole Grain Buns: Choose whole grain or whole wheat buns for added fiber and better nutrition.
  • Control Portions: Serve smaller portions and pair with a side salad to balance the meal.

Philly Cheesesteak Sloppy Joe Recipe without sacrificing flavor!

Conclusion on Philly Cheesesteak Sloppy Joe Recipe

Recap of Key Points

Philly Cheesesteak Sloppy Joe Recipe is a delightful blend of two classic dishes that brings comfort and satisfaction to your table. With its savory ground beef, sautéed vegetables, and melted provolone cheese, this recipe is sure to please everyone. The ease of preparation makes it perfect for busy weeknights, while its versatility allows you to customize it to your taste.

We explored essential and optional ingredients, step-by-step preparation, and various ways to enhance the dish. From vegetarian options to spicy additions, the possibilities are endless. Plus, we discussed helpful tips for perfecting the recipe and serving suggestions that elevate your meal experience. Remember, whether you’re enjoying it with crispy fries or a fresh salad, this dish is all about bringing joy to your dining experience.

Encouragement to Try the Recipe

Philly Cheesesteak Sloppy Joe Recipe a try! Gather your ingredients, invite your family or friends, and enjoy the process of cooking together. This recipe is not just about the food; it’s about creating memories and sharing delicious moments.

So, don’t hesitate! Dive into this flavorful adventure and savor every bite of your homemade Sloppy Joes. We’re confident that once you try this recipe, it will become a regular on your dinner menu. Happy cooking!

Twisted Green Bean Casserole is a must-try dish!

Introduction to Twisted Green Bean Casserole

Welcome to the delightful world of Twisted Green Bean Casserole! This dish is not just your average green bean casserole; it brings a fresh twist to a classic favorite. Perfect for family gatherings, holiday dinners, or even a cozy weeknight meal, this casserole is sure to impress your guests and loved ones alike.

Imagine tender green beans enveloped in a creamy, savory sauce, topped with crispy French fried onions. It’s a comforting dish that combines rich flavors and textures, making it a standout on any table. The best part? It’s easy to prepare, allowing you to spend more time enjoying the company of your friends and family.

In this recipe, we’ll guide you through each step, ensuring that your Twisted Green Bean Casserole turns out perfectly every time. Whether you’re a seasoned cook or a beginner in the kitchen, you’ll find this recipe straightforward and rewarding. Plus, with a few simple variations, you can customize it to suit your taste or dietary needs.

So, roll up your sleeves and get ready to create a dish that will become a new family favorite. Let’s dive into the ingredients and preparation of this delicious Twisted Green Bean Casserole!

Ingredients for Twisted Green Bean Casserole

To create the perfect Twisted Green Bean Casserole, you’ll need a selection of fresh and flavorful ingredients. Each component plays a vital role in bringing this dish to life. Here’s what you’ll need:

  • 2 pounds fresh green beans, trimmed and cut into 2-inch pieces
  • 1 can (10.5 ounces) cream of mushroom soup
  • 1 cup sour cream
  • 1 cup shredded cheddar cheese
  • 1 teaspoon garlic powder
  • 1 teaspoon onion powder
  • 1 cup French fried onions, divided
  • Salt and pepper to taste
  • 1 tablespoon olive oil

These ingredients come together to create a creamy, cheesy, and crunchy casserole that everyone will love. The fresh green beans provide a vibrant color and a satisfying crunch, while the cream of mushroom soup and sour cream add a rich, velvety texture. The cheddar cheese brings a delightful sharpness, and the French fried onions give that irresistible crispy topping.

Feel free to get creative! You can swap out some ingredients or add your favorites to make this dish your own. For instance, using Greek yogurt instead of sour cream can give it a tangy twist, while adding cooked bacon bits can enhance the flavor profile. The possibilities are endless!

Now that you have your ingredients ready, let’s move on to the preparation of this delicious Twisted Green Bean Casserole.

Preparation of Twisted Green Bean Casserole

Now that you have gathered all your ingredients, it’s time to prepare your Twisted Green Bean Casserole. This process is simple and fun! Follow these steps to create a dish that will delight everyone at your table.

Step 1: Prepping the Green Beans

First, let’s get those green beans ready! Start by trimming the ends of the beans. Then, cut them into 2-inch pieces. This size is perfect for even cooking and easy serving. Next, bring a large pot of salted water to a boil. Once boiling, add the green beans and cook for about 5 minutes. You want them to be bright green and slightly tender, but not mushy.

After cooking, drain the beans and immediately transfer them to a bowl filled with ice water. This step is crucial as it stops the cooking process and helps maintain that vibrant color. Once cooled, drain the beans again and set them aside. Your green beans are now perfectly prepped!

Step 2: Making the Sauce

Now, let’s whip up the creamy sauce that will coat our green beans. In a large mixing bowl, combine the cream of mushroom soup, sour cream, and shredded cheddar cheese. Add the garlic powder, onion powder, salt, and pepper to taste. Mix everything together until it’s smooth and well combined. This sauce is what makes the casserole rich and flavorful!

Step 3: Combining Ingredients

With your sauce ready, it’s time to bring everything together. Add the blanched green beans to the bowl with the sauce. Gently stir until all the green beans are well coated with the creamy mixture. Make sure every piece is covered; this will ensure a delicious flavor in every bite!

Step 4: Assembling the Casserole

Next, it’s time to assemble your casserole. Take a greased 9×13-inch baking dish and transfer the green bean mixture into it. Spread it out evenly. To add a delightful crunch, sprinkle half of the French fried onions on top. This will create a tasty layer that contrasts beautifully with the creamy filling.

Step 5: Baking the Twisted Green Bean Casserole

Now, let’s bake this delicious creation! Place the casserole in your preheated oven at 350°F. Bake for about 25 minutes. After this time, remove it from the oven and give it a gentle stir. Then, top it with the remaining French fried onions. This will ensure they stay crispy and golden. Return the casserole to the oven and bake for an additional 10-15 minutes, or until the onions are golden brown and the casserole is bubbly.

Once done, let the casserole cool for about 5 minutes before serving. This will help the flavors settle and make it easier to serve. Your Twisted Green Bean Casserole is now ready to be enjoyed!

Variation of Twisted Green Bean Casserole

One of the best things about the Twisted Green Bean Casserole is its versatility. You can easily switch up ingredients to create a dish that suits your taste or dietary needs. Let’s explore some alternative ingredients and dietary modifications that can make this casserole even more delightful!

Alternative Ingredients for Twisted Green Bean Casserole

If you’re looking to mix things up, consider these alternative ingredients:

  • Broccoli: Swap out green beans for fresh broccoli florets. This adds a different flavor and a pop of color.
  • Cauliflower: For a low-carb option, use cauliflower instead of green beans. It pairs wonderfully with the creamy sauce.
  • Mushrooms: Add sautéed mushrooms for an extra earthy flavor. They complement the cream of mushroom soup beautifully.
  • Cheese Variations: Experiment with different cheeses like mozzarella or pepper jack for a unique twist.
  • Herbs: Fresh herbs like thyme or rosemary can elevate the flavor profile. Just sprinkle them in the sauce for a fragrant touch.

These alternatives can help you create a new version of the casserole that still retains its comforting essence. Feel free to get creative and make it your own!

Dietary Modifications for Twisted Green Bean Casserole

For those with specific dietary needs, there are several modifications you can make:

  • Gluten-Free: Ensure that the cream of mushroom soup is gluten-free. You can also make your own using gluten-free flour.
  • Low-Fat: Use low-fat cream of mushroom soup and reduced-fat cheese to cut down on calories without sacrificing flavor.
  • Vegan: Substitute the cream of mushroom soup with a vegan alternative and use plant-based sour cream and cheese.
  • Dairy-Free: For a dairy-free option, use coconut cream or cashew cream instead of sour cream and cheese.
  • Low-Carb: Replace the cream of mushroom soup with a homemade sauce made from blended cauliflower for a low-carb version.

These modifications allow everyone to enjoy the Twisted Green Bean Casserole, regardless of dietary restrictions. With a little creativity, you can make this dish accessible and delicious for all!

Cooking Note for Twisted Green Bean Casserole

When preparing your Twisted Green Bean Casserole, there are a few cooking notes to keep in mind. These tips will help ensure that your dish turns out perfectly every time, making it a hit at any gathering.

First, always choose fresh green beans. They should be bright green and firm to the touch. Avoid beans that look wilted or have brown spots. Fresh beans will give your casserole a vibrant color and a satisfying crunch.

Next, blanching the green beans is a crucial step. This process not only enhances their color but also helps maintain their crispness. Remember to plunge them into ice water immediately after boiling. This stops the cooking process and locks in that beautiful green hue.

When mixing the sauce, ensure that all ingredients are well combined. A smooth sauce will coat the green beans evenly, providing a rich flavor in every bite. If you prefer a thicker sauce, you can add a bit more cheese or reduce the amount of soup.

While baking, keep an eye on the casserole. Ovens can vary in temperature, so it’s wise to check for doneness a few minutes before the suggested baking time. You want the onions to be golden brown and the casserole to be bubbly, but not overcooked.

Lastly, let the casserole cool for a few minutes before serving. This allows the flavors to meld together and makes it easier to serve. Enjoying your Twisted Green Bean Casserole at the right temperature enhances the overall experience!

By following these cooking notes, you’ll create a delicious Twisted Green Bean Casserole that everyone will love. Happy cooking!

Serving Suggestions for Twisted Green Bean Casserole

Now that your Twisted Green Bean Casserole is baked to perfection, it’s time to think about how to serve it! This dish is not only delicious but also versatile, making it a great addition to various meals. Here are some serving suggestions to elevate your dining experience:

  • Pair with Proteins: Serve your casserole alongside roasted chicken, turkey, or ham. The creamy texture of the casserole complements the savory flavors of these meats beautifully.
  • Include a Salad: A fresh green salad with a light vinaigrette can balance the richness of the casserole. Consider adding ingredients like cherry tomatoes, cucumbers, and avocado for a refreshing touch.
  • Serve with Bread: Offer some warm, crusty bread or dinner rolls on the side. This is perfect for soaking up any leftover creamy sauce on your plate.
  • Make it a Buffet: If you’re hosting a gathering, set up a buffet-style meal. Include the Twisted Green Bean Casserole as one of the main dishes, along with other sides like mashed potatoes or stuffing.
  • Garnish for Presentation: For an extra touch, garnish the casserole with fresh herbs like parsley or chives before serving. This adds a pop of color and a hint of freshness.

These serving suggestions will not only enhance the flavor of your Twisted Green Bean Casserole but also create a delightful dining experience for you and your guests. Enjoy every bite!

Tips for Perfecting Twisted Green Bean Casserole

To ensure your Twisted Green Bean Casserole turns out perfectly every time, consider these helpful tips. They will guide you in achieving the best flavor, texture, and presentation for this delightful dish.

  • Use Fresh Ingredients: Always opt for fresh green beans. They should be firm and vibrant. Fresh ingredients enhance the overall taste and texture of your casserole.
  • Don’t Overcook the Beans: When blanching, keep an eye on the cooking time. Overcooked beans can become mushy. Aim for a bright green color and slight tenderness.
  • Mix Thoroughly: When combining the sauce and green beans, ensure everything is well mixed. This guarantees that every bite is packed with flavor.
  • Adjust Seasoning: Taste your sauce before adding the green beans. Feel free to adjust the salt and pepper to suit your preference. A little extra seasoning can make a big difference!
  • Layer the Onions: For the best crunch, layer the French fried onions. Adding some before baking and some after creates a delightful texture contrast.
  • Experiment with Cheese: Don’t hesitate to try different cheeses. Mixing cheddar with mozzarella or pepper jack can add a unique twist to the flavor profile.
  • Let it Rest: After baking, allow the casserole to rest for a few minutes. This helps the flavors meld and makes serving easier.
  • Presentation Matters: For a beautiful presentation, garnish with fresh herbs like parsley or thyme. This adds a pop of color and freshness to your dish.

By following these tips, you’ll create a Twisted Green Bean Casserole that is not only delicious but also visually appealing. Enjoy the process and the delightful results!

Breakdown of Time for Twisted Green Bean Casserole

Understanding the time required for each step in preparing your Twisted Green Bean Casserole can help you plan your cooking efficiently. Here’s a detailed breakdown of the time you’ll need for prepping and cooking this delicious dish.

Prep Time

The prep time for your Twisted Green Bean Casserole is approximately 20 minutes. This includes:

  • Trimming and cutting the green beans (5 minutes)
  • Blanching the green beans (5 minutes)
  • Preparing the sauce and mixing ingredients (10 minutes)

By organizing your tasks, you can streamline the process and make the most of your time in the kitchen.

Cooking Time

The cooking time for the casserole is about 35-40 minutes. This consists of:

  • Baking the casserole for the first 25 minutes
  • Stirring and adding the French fried onions, then baking for an additional 10-15 minutes

Keep an eye on the casserole during the last few minutes of baking to ensure the onions reach that perfect golden brown color.

Total Time

In total, you can expect to spend around 55-60 minutes from start to finish. This includes both prep and cooking time. With this efficient timeline, you’ll have your Twisted Green Bean Casserole ready to serve in no time!

Nutritional Information for Twisted Green Bean Casserole

Understanding the nutritional content of your Twisted Green Bean Casserole is essential for making informed choices about your meals. This dish not only delights the taste buds but also provides a good balance of nutrients. Let’s break down the nutritional information to see what makes this casserole a great addition to your dining table.

Calories in Twisted Green Bean Casserole

Each serving of Twisted Green Bean Casserole contains approximately 210 calories. This makes it a relatively light option for a side dish, especially when compared to heavier casseroles. The combination of fresh green beans, creamy sauce, and cheese contributes to the calorie count while providing essential nutrients. Enjoying this casserole as part of a balanced meal can help you stay within your daily caloric needs.

Protein Content in Twisted Green Bean Casserole

In terms of protein, each serving offers about 6 grams. The protein comes primarily from the cheddar cheese and sour cream used in the recipe. While this may not be a high-protein dish, it does contribute to your daily intake when paired with protein-rich main courses like chicken or turkey. For those looking to boost the protein content, consider adding cooked chicken or turkey to the casserole.

Sodium Levels in Twisted Green Bean Casserole

The sodium content in each serving of Twisted Green Bean Casserole is approximately 400 milligrams. This level is moderate, but it’s important to be mindful of sodium intake, especially for those on a low-sodium diet. To reduce sodium levels, you can opt for low-sodium cream of mushroom soup and limit the amount of added salt. This way, you can enjoy the flavors without compromising your dietary needs.

Overall, the Twisted Green Bean Casserole is a delicious and nutritious option that can fit into a variety of meal plans. With its balance of calories, protein, and sodium, it’s a dish that can be enjoyed by many. Whether you’re serving it at a holiday gathering or a casual family dinner, this casserole is sure to please!

FAQs about Twisted Green Bean Casserole

Can I make Twisted Green Bean Casserole ahead of time?

Absolutely! Making your Twisted Green Bean Casserole ahead of time is a great way to save time on busy days. You can prepare the casserole up to the point of baking. Simply cover it tightly with plastic wrap or aluminum foil and store it in the refrigerator for up to 24 hours. When you’re ready to bake, just remove it from the fridge and let it sit at room temperature for about 30 minutes before placing it in the oven. This helps ensure even cooking. You may need to add a few extra minutes to the baking time since it will be cold from the fridge.

What can I substitute for green beans in Twisted Green Bean Casserole?

If you’re looking to switch things up, there are several delicious substitutes for green beans in your Twisted Green Bean Casserole. Broccoli florets make a great alternative, adding a different flavor and texture. Cauliflower is another excellent choice, especially for a low-carb option. You can also use asparagus or even mixed vegetables for a colorful twist. Just remember to adjust the cooking time based on the vegetable you choose, as some may require less or more time to cook.

How do I store leftovers of Twisted Green Bean Casserole?

Storing leftovers of your Twisted Green Bean Casserole is easy! Allow the casserole to cool completely before transferring it to an airtight container. You can keep it in the refrigerator for up to 3-4 days. When you’re ready to enjoy it again, simply reheat it in the oven at 350°F until warmed through, or you can microwave individual portions for a quick meal. Just be sure to cover it to prevent it from drying out during reheating.

Can I freeze Twisted Green Bean Casserole?

Yes, you can freeze your Twisted Green Bean Casserole! To do this, prepare the casserole as directed but do not bake it. Instead, cover it tightly with plastic wrap and then with aluminum foil to prevent freezer burn. It can be stored in the freezer for up to 2-3 months. When you’re ready to bake it, thaw it in the refrigerator overnight and then bake as directed. If you’re short on time, you can bake it from frozen, but it will take longer to cook through. Just keep an eye on it to ensure it doesn’t overcook.

Conclusion on Twisted Green Bean Casserole

In conclusion, the Twisted Green Bean Casserole is a delightful dish that brings a fresh perspective to a beloved classic. With its creamy texture, savory flavors, and crispy topping, it’s sure to be a hit at any gathering. Whether you’re serving it for a holiday feast or a casual family dinner, this casserole is both comforting and satisfying.

Throughout this article, we’ve explored the ingredients, preparation steps, and variations that make this dish so versatile. From alternative ingredients to dietary modifications, there’s a version of this casserole for everyone. Plus, the tips and serving suggestions provided will help you create a memorable dining experience.

As you embark on your cooking journey, remember that the key to a great Twisted Green Bean Casserole lies in using fresh ingredients and taking the time to prepare each component with care. With a little creativity, you can customize this dish to suit your taste and dietary needs, ensuring that it becomes a staple in your kitchen.

So, gather your ingredients, roll up your sleeves, and get ready to impress your family and friends with this delicious Twisted Green Bean Casserole. Enjoy the process, savor the flavors, and most importantly, share the joy of good food with those you love!

Creamy Garlic Pasta Sauce transforms your meals effortlessly.

Introduction to Creamy Garlic Pasta Sauce

Are you ready to elevate your pasta game? Creamy Garlic Pasta Sauce is a delightful addition to any meal. This sauce is not just about flavor; it’s about creating a comforting experience. With its rich, creamy texture and aromatic garlic, it transforms simple pasta into a gourmet dish. Whether you’re cooking for family or friends, this sauce is sure to impress.

What Makes Creamy Garlic Pasta Sauce Special?

What sets Creamy Garlic Pasta Sauce apart? First, it’s the combination of ingredients. The blend of butter and olive oil creates a luscious base. Then, the minced garlic adds a punch of flavor that’s hard to resist. The heavy cream brings everything together, making the sauce smooth and velvety.

Moreover, the addition of Parmesan cheese gives it a savory depth. This sauce is versatile, too! You can easily customize it to suit your taste. Want to add some protein? Toss in grilled chicken or shrimp. Prefer a vegetarian option? Add sautéed mushrooms or spinach for extra nutrition.

In just a few simple steps, you can whip up this delicious sauce. It’s perfect for busy weeknights or special occasions. Plus, it pairs beautifully with various pasta types, making it a go-to recipe for any pasta lover. So, let’s dive into the ingredients and get started on this creamy, garlicky delight!

Ingredients for Creamy Garlic Pasta Sauce

To create the perfect Creamy Garlic Pasta Sauce, you’ll need a few simple ingredients. Each one plays a vital role in building the rich flavor and creamy texture that makes this sauce so special. Here’s what you’ll need:

  • 2 tablespoons unsalted butter: This adds richness and a smooth base for the sauce.
  • 2 tablespoons olive oil: A healthy fat that enhances flavor and helps prevent the butter from burning.
  • 4 cloves garlic, minced: Fresh garlic is key for that aromatic punch. It brings the sauce to life!
  • 1 cup heavy cream: This is what makes the sauce creamy and indulgent. It’s the heart of the recipe.
  • 1 cup grated Parmesan cheese: This adds a savory depth and a touch of saltiness to the sauce.
  • 1 teaspoon Italian seasoning: A blend of herbs that complements the garlic and cheese beautifully.
  • Salt and pepper to taste: Essential for enhancing all the flavors in the sauce.
  • Fresh parsley, chopped (for garnish): This adds a pop of color and freshness when serving.

These ingredients are easy to find and often staples in many kitchens. If you want to lighten the sauce, consider substituting half of the heavy cream with low-fat milk or half-and-half. This way, you can enjoy the creamy goodness without the extra calories.

For those looking to add more flavor, think about incorporating sautéed mushrooms or spinach into the sauce. These additions not only enhance the taste but also boost the nutritional value. Now that you have your ingredients ready, let’s move on to the step-by-step preparation of this delicious Creamy Garlic Pasta Sauce!

Step-by-Step Preparation of Creamy Garlic Pasta Sauce

Now that you have all your ingredients ready, it’s time to dive into the preparation of your Creamy Garlic Pasta Sauce. This process is straightforward and quick, making it perfect for any home cook. Let’s break it down step by step!

Step 1: Gather Your Ingredients

Before you start cooking, make sure you have everything you need within reach. Gather your butter, olive oil, minced garlic, heavy cream, grated Parmesan cheese, Italian seasoning, salt, pepper, and fresh parsley. Having everything organized will make the cooking process smoother and more enjoyable.

Step 2: Prepare the Garlic

Next, it’s time to prepare the garlic. Mince the garlic cloves finely. This step is crucial because the smaller the pieces, the more flavor they will release into the sauce. You want that delicious garlic aroma to fill your kitchen! Set the minced garlic aside for the next step.

Step 3: Cook the Base for the Sauce

In a medium saucepan, melt the unsalted butter and olive oil over medium heat. This combination creates a rich base for your sauce. Once the butter is melted, add the minced garlic. Sauté it for about 1-2 minutes. Be careful not to let it brown, as burnt garlic can taste bitter. You want it fragrant and golden!

Step 4: Combine Ingredients for Creaminess

Now, pour in the heavy cream and stir to combine. Bring the mixture to a gentle simmer. This is where the magic happens! Gradually whisk in the grated Parmesan cheese until it melts and the sauce becomes smooth. The cheese adds a wonderful creaminess and depth of flavor that makes this sauce irresistible.

Step 5: Adjust Seasoning and Consistency

Finally, stir in the Italian seasoning. Taste your sauce and season it with salt and pepper as needed. If the sauce is too thick, you can add a splash of pasta water or more cream to reach your desired consistency. Once everything is well combined, remove the sauce from heat and let it cool slightly before serving.

And there you have it! Your Creamy Garlic Pasta Sauce is ready to be tossed with your favorite pasta. It’s a simple yet delicious recipe that will surely impress anyone at your dinner table.

Variations of Creamy Garlic Pasta Sauce

While the classic Creamy Garlic Pasta Sauce is delightful on its own, there are many ways to customize it. By adding different ingredients, you can create variations that suit your taste preferences or dietary needs. Let’s explore some exciting options!

Adding Protein to Your Creamy Garlic Pasta Sauce

If you want to make your Creamy Garlic Pasta Sauce more filling, consider adding protein. This not only enhances the dish but also makes it a complete meal. Here are some tasty options:

  • Grilled Chicken: Sliced grilled chicken breast adds a savory flavor and pairs wonderfully with the creamy sauce.
  • Shrimp: Sautéed shrimp brings a touch of elegance. Their sweetness complements the garlic perfectly.
  • Bacon or Pancetta: Crispy bits of bacon or pancetta add a smoky flavor that elevates the sauce.
  • Tofu: For a vegetarian protein option, add cubed, sautéed tofu. It absorbs the sauce’s flavors beautifully.

Simply cook your chosen protein separately and mix it into the sauce before serving. This way, you can enjoy a hearty meal that satisfies your hunger!

Vegetarian Options for Creamy Garlic Pasta Sauce

If you prefer a vegetarian version of Creamy Garlic Pasta Sauce, there are plenty of delicious options to consider. Adding vegetables not only enhances the flavor but also boosts the nutritional value. Here are some ideas:

  • Mushrooms: Sautéed mushrooms add a rich, earthy flavor. They pair well with garlic and cream.
  • Spinach: Fresh or sautéed spinach adds color and nutrients. It wilts down nicely in the sauce.
  • Broccoli: Steamed or roasted broccoli florets add a nice crunch and vibrant color.
  • Peas: Sweet peas bring a pop of color and a hint of sweetness to the dish.

Feel free to mix and match these ingredients to create your perfect vegetarian Creamy Garlic Pasta Sauce. The possibilities are endless, and you can enjoy a delicious meal that caters to your dietary preferences!

Cooking Note for Creamy Garlic Pasta Sauce

When preparing your Creamy Garlic Pasta Sauce, a few cooking notes can help ensure your dish turns out perfectly every time. These tips will enhance the flavor and texture of your sauce, making it even more enjoyable.

First, always use fresh garlic. Freshly minced garlic provides a stronger flavor compared to pre-minced or powdered garlic. The aroma of fresh garlic sautéing in butter and olive oil is simply irresistible!

Next, be mindful of the heat. Cooking the garlic over medium heat is crucial. If the heat is too high, the garlic can burn quickly, leading to a bitter taste. You want it to become fragrant and slightly golden, not brown.

Additionally, when adding the heavy cream, make sure to stir continuously. This helps prevent the cream from curdling and ensures a smooth sauce. If you notice any lumps, whisking vigorously can help break them down.

Another important note is to taste as you go. Adjusting the seasoning is key to achieving the perfect balance of flavors. Don’t hesitate to add more salt, pepper, or Italian seasoning based on your preference.

Lastly, remember that the sauce thickens as it cools. If you find it too thick after cooking, simply add a splash of pasta water or more cream to reach your desired consistency. This will help keep the sauce creamy and easy to coat your pasta.

By following these cooking notes, you’ll create a delicious Creamy Garlic Pasta Sauce that’s sure to impress. Enjoy the process and savor the delightful flavors that come together in this comforting dish!

Serving Suggestions for Creamy Garlic Pasta Sauce

Now that your Creamy Garlic Pasta Sauce is ready, it’s time to think about how to serve it. The right pasta and garnishes can elevate your dish even further. Let’s explore some delicious pairing options and garnishing ideas that will make your meal truly special!

Pairing Pasta Types with Creamy Garlic Pasta Sauce

Choosing the right pasta is essential for a delightful dining experience. Different pasta shapes can hold the sauce in unique ways, enhancing each bite. Here are some excellent pasta options to pair with your Creamy Garlic Pasta Sauce:

  • Fettuccine: This flat, wide pasta is perfect for creamy sauces. It clings beautifully to the sauce, ensuring every bite is rich and flavorful.
  • Spaghetti: A classic choice, spaghetti works well with the sauce. Its long strands allow for a delightful twirl on your fork.
  • Penne: The tube shape of penne captures the sauce inside, making each piece a burst of flavor.
  • Shells: Pasta shells are fun and playful. Their shape holds the sauce, creating a creamy pocket of goodness.
  • Rotini: The spirals of rotini are great for trapping the sauce, ensuring a deliciously coated bite every time.

Feel free to experiment with different pasta types based on your preference. Each shape brings a unique texture and experience to your Creamy Garlic Pasta Sauce!

Garnishing Ideas for Creamy Garlic Pasta Sauce

Garnishing your dish adds a touch of elegance and enhances the overall presentation. Here are some delightful garnishing ideas to consider:

  • Fresh Parsley: Chopped fresh parsley adds a pop of color and freshness. It complements the creamy sauce beautifully.
  • Grated Parmesan: A sprinkle of extra grated Parmesan cheese on top enhances the cheesy flavor and adds a nice finishing touch.
  • Cracked Black Pepper: A dash of freshly cracked black pepper adds a hint of spice and visual appeal.
  • Red Pepper Flakes: For those who enjoy a bit of heat, a sprinkle of red pepper flakes can elevate the dish.
  • Lemon Zest: A touch of lemon zest brightens the flavors and adds a refreshing twist to the creamy sauce.

These garnishing ideas not only make your dish look appealing but also enhance the flavors. With the right pasta and garnishes, your Creamy Garlic Pasta Sauce will be a feast for the eyes and the palate!

Tips for Perfecting Your Creamy Garlic Pasta Sauce

Creating the perfect Creamy Garlic Pasta Sauce is an art. With a few helpful tips, you can elevate your sauce to new heights. These suggestions will ensure that your sauce is not only delicious but also consistent every time you make it.

First, always use high-quality ingredients. Fresh garlic, real Parmesan cheese, and good olive oil make a noticeable difference in flavor. When you start with quality ingredients, your sauce will shine!

Next, pay attention to the cooking time. Garlic can go from fragrant to burnt in seconds. Sauté it just until it’s golden and aromatic. This step is crucial for achieving that perfect garlic flavor without bitterness.

When adding the heavy cream, do so gradually. This allows the cream to blend smoothly with the other ingredients. Stir continuously to prevent any lumps from forming. If you notice any, whisking vigorously can help break them down.

Another tip is to reserve some pasta water before draining your pasta. This starchy water can be added to your sauce to adjust the consistency. It helps the sauce cling to the pasta better, creating a more cohesive dish.

Don’t forget to taste as you go! Adjust the seasoning to your liking. A little extra salt or a pinch of pepper can make a big difference. Remember, the flavors should be balanced and harmonious.

Lastly, let your sauce sit for a few minutes before serving. This resting time allows the flavors to meld together beautifully. When you finally toss it with your pasta, the result will be a rich, creamy sauce that’s bursting with flavor.

By following these tips, you’ll be well on your way to mastering your Creamy Garlic Pasta Sauce. Enjoy the process and the delicious results!

Breakdown of Time for Creamy Garlic Pasta Sauce

Understanding the time needed to prepare your Creamy Garlic Pasta Sauce can help you plan your meal better. Whether you’re cooking for a special occasion or a quick weeknight dinner, knowing the time breakdown is essential. Here’s how it all adds up:

Prep Time

The prep time for your Creamy Garlic Pasta Sauce is quite short. You’ll need about 10 minutes to gather and prepare your ingredients. This includes mincing the garlic and measuring out the cream, cheese, and seasonings. Having everything ready will make the cooking process smooth and enjoyable!

Cooking Time

Once you start cooking, the actual time to make the sauce is around 15 minutes. This includes melting the butter, sautéing the garlic, and combining the cream and cheese. It’s a quick process, allowing you to whip up a delicious sauce in no time!

Total Time

In total, you can expect to spend about 25 minutes from start to finish. This includes both prep and cooking time. With such a quick turnaround, you can enjoy a homemade Creamy Garlic Pasta Sauce that’s rich and flavorful without spending hours in the kitchen. Perfect for any pasta lover!

Nutritional Information for Creamy Garlic Pasta Sauce

Understanding the nutritional content of your Creamy Garlic Pasta Sauce can help you make informed choices about your meals. This sauce is not only delicious but also provides essential nutrients. Let’s break down the key nutritional components!

Calories

One serving of Creamy Garlic Pasta Sauce contains approximately 350 calories. This makes it a satisfying addition to your pasta dishes without overwhelming your daily caloric intake. The richness of the heavy cream and cheese contributes to the calorie count, but they also provide a creamy texture that many love.

Protein

In each serving, you’ll find about 10 grams of protein. This protein comes primarily from the Parmesan cheese, which not only adds flavor but also helps in building and repairing tissues in the body. If you add protein-rich ingredients like chicken or shrimp, the protein content will increase, making it a more balanced meal.

Sodium

The sodium content in Creamy Garlic Pasta Sauce is around 600 milligrams per serving. This amount can vary based on how much salt you add and the type of Parmesan cheese used. If you’re watching your sodium intake, consider using low-sodium cheese or adjusting the salt in the recipe. Balancing flavors while keeping sodium in check is key to a healthy diet.

By being aware of the nutritional information, you can enjoy your Creamy Garlic Pasta Sauce while keeping your dietary goals in mind. Whether you’re indulging in a comforting meal or looking for a quick weeknight dinner, this sauce can fit into a balanced diet!

FAQs about Creamy Garlic Pasta Sauce

Can I make Creamy Garlic Pasta Sauce ahead of time?

Yes, you can make Creamy Garlic Pasta Sauce ahead of time! This sauce stores well in the refrigerator for up to three days. To do this, simply prepare the sauce as directed and let it cool completely. Then, transfer it to an airtight container. When you’re ready to use it, reheat the sauce gently on the stove over low heat. Stir occasionally to ensure it heats evenly. If the sauce thickens, you can add a splash of milk or pasta water to reach your desired consistency.

What can I substitute for heavy cream in Creamy Garlic Pasta Sauce?

If you’re looking for a lighter option, there are several substitutes for heavy cream in Creamy Garlic Pasta Sauce. You can use half-and-half or whole milk for a less rich sauce. For a dairy-free alternative, consider using coconut cream or cashew cream. These options will still provide a creamy texture while catering to different dietary needs. Just keep in mind that the flavor may vary slightly, so adjust your seasonings accordingly!

How can I make Creamy Garlic Pasta Sauce spicier?

To add some heat to your Creamy Garlic Pasta Sauce, there are a few simple ways to spice it up. One option is to include red pepper flakes while cooking the garlic. Start with a pinch and adjust to your taste. Another idea is to add a dash of hot sauce or a sprinkle of cayenne pepper for an extra kick. If you enjoy spicy flavors, consider sautéing some diced jalapeños or adding a bit of crushed black pepper. These additions will enhance the flavor and give your sauce a delightful zing!

Is Creamy Garlic Pasta Sauce suitable for vegans?

Traditional Creamy Garlic Pasta Sauce is not vegan due to the use of heavy cream and Parmesan cheese. However, you can easily make a vegan version! Substitute the heavy cream with coconut cream or a plant-based cream alternative. For the cheese, use nutritional yeast or a vegan Parmesan cheese. These swaps will give you a creamy and flavorful sauce without any animal products. Enjoy your vegan Creamy Garlic Pasta Sauce with your favorite pasta for a delicious meal!

Conclusion on Creamy Garlic Pasta Sauce

In conclusion, Creamy Garlic Pasta Sauce is a delightful and versatile addition to your culinary repertoire. Its rich, creamy texture and robust garlic flavor make it a favorite among pasta lovers. Whether you’re preparing a quick weeknight dinner or impressing guests at a dinner party, this sauce is sure to shine.

With just a handful of ingredients, you can create a dish that feels indulgent yet is simple to make. The beauty of this sauce lies in its adaptability. You can easily customize it by adding proteins, vegetables, or even spices to suit your taste. This flexibility allows you to enjoy it in various ways, ensuring that it never gets boring.

Moreover, the nutritional information shows that while it’s a rich sauce, it can fit into a balanced diet when enjoyed in moderation. By being mindful of your ingredients and portion sizes, you can savor the creamy goodness without guilt.

So, why not give this Creamy Garlic Pasta Sauce a try? Gather your ingredients, follow the steps, and enjoy the delightful flavors that come together in this comforting dish. Whether you’re twirling spaghetti or tossing penne, this sauce will elevate your pasta experience to new heights. Happy cooking!

Stay Connected

Get recipes via email: