Get my cookbooks

One Pan Chili Lime Chicken & Rice Recipe

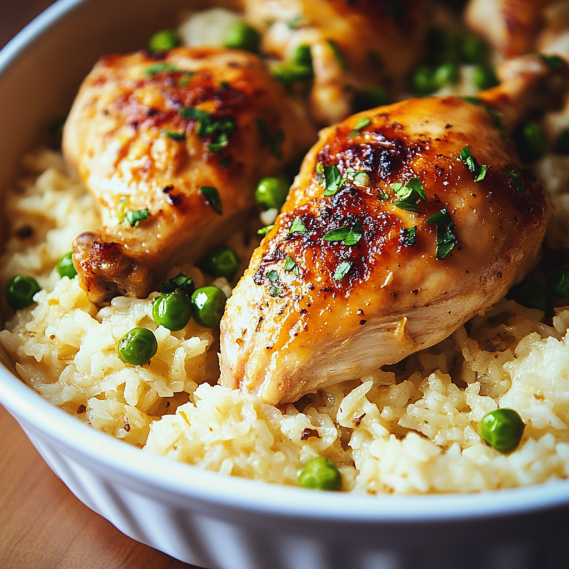
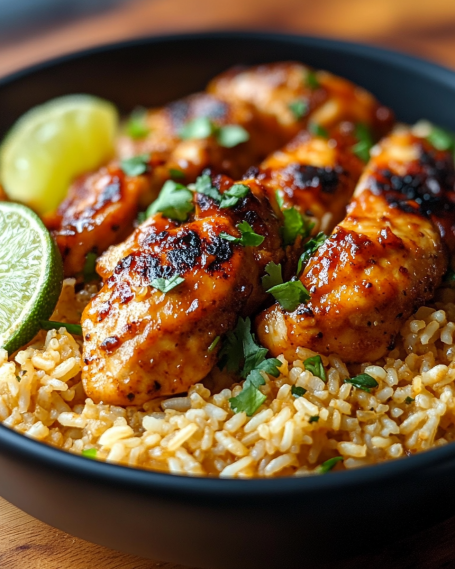
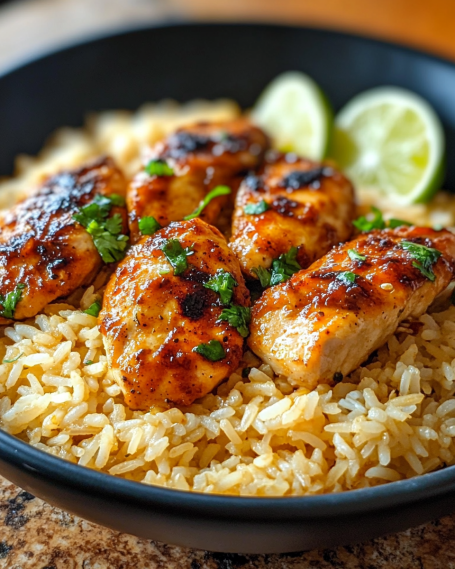
Imagine it’s a busy Thursday night, and your to-do list is long. The kids are getting restless, and you’re hungry but short on time. That’s when the One Pan Chili Lime Chicken & Rice recipe saves the day. It’s a quick dish that’s ready in about 30 minutes, ideal for those hectic weeknights.

This recipe combines juicy chicken marinated in chili and lime with fluffy rice. It’s a complete meal that everyone will love. Plus, it’s easy to add your favorite veggies like jalapeños or corn for a tasty twist. Ready to try this amazing dish? Find the full recipe here!

Key Takeaways

  • The One Pan Chili Lime Chicken & Rice is a quick and flavorful dish.
  • It’s perfect for busy weeknights when you need an easy dinner.
  • This recipe features juicy chicken paired with fluffy rice.
  • Minimal ingredients make it a convenient choice for any family meal.
  • Customization options allow you to easily add your favorite flavors.
  • It’s a family-friendly recipe that appeals to both children and adults.

Introduction to One Pan Meals

One pan meals are a hit because they’re easy and tasty. They mix different ingredients in one skillet. This makes the food taste better and makes cooking easier.

These meals are great because they combine flavors well. They also save time on cooking and cleaning up. This is perfect for busy days.

What Makes One Pan Meals Special?

One pan meals are special because they cook everything together. This lets the flavors mix and create a delicious dish. It’s like a party in your mouth.

They’re perfect for quick weeknight meals. You can make a tasty chicken skillet or a veggie medley. Try the One Pan Chili Lime Chicken for a simple yet flavorful dish.

Benefits of Cooking in One Pan

One pan meals are a time-saver. They’re great for busy people because they’re easy to prepare. You only need to wash one pan, making cleanup a breeze.

They’re ideal for family dinners or parties. You get a complete meal in one dish. It’s all about ease, variety, and deliciousness.

Ingredients for Chili Lime Chicken & Rice

Making a tasty One Pan Chili Lime Chicken & Rice requires the right ingredients. Fresh ingredients are key to getting that bright, zesty flavor. Your meal will be both healthy and filling. You’ll need a mix of fresh produce and pantry staples for this recipe.

Fresh Ingredients You’ll Need

  • Boneless chicken breasts
  • Lime juice
  • Garlic, minced
  • Bell peppers, chopped
  • Cilantro, for garnish

These vibrant ingredients add color and boost the dish’s flavor. Fresh chicken fillets are best. They soak up the marinade well, making the chicken tender and flavorful.

Pantry Staples for Extra Flavor

  • Olive oil
  • Salt and pepper
  • Cumin, to spice things up

Adding these pantry staples takes the meal to the next level. A simple ingredient mix can transform your dish. It’s the perfect base for a wonderful family dinner.

Preparing the Chicken

To make a dish unforgettable, preparing the chicken right is key. A good chicken marinade can turn simple chicken into a tasty treat. A chili lime marinade with lime juice, olive oil, garlic, and spices does just that. It not only boosts flavor but also makes the meat tender. This step is a game-changer for an easy weeknight dinner.

Marinade Essentials for Flavor

The secret to a tasty marinade is in its ingredients. For a zesty chili lime chicken marinade, you’ll need:

  • Lime juice
  • Olive oil
  • Garlic, minced
  • Chili powder or crushed red pepper
  • Salt and black pepper

Mix these in a bowl and add the chicken for at least 30 minutes. This lets the chicken soak up all the flavors.

Tips for Perfectly Seasoning Chicken

Seasoning chicken right can take your dish to the next level. Start by salting and peppering it to your liking. This basic step lays the flavor foundation. For more taste, add extra spices or herbs as you prefer. Even seasoning ensures every bite is balanced and matches the marinade’s flavors.

Cooking the Rice

Cooking rice might seem simple, but picking the right type and using the best techniques can make a big difference. Choosing fragrant rice like jasmine or basmati adds flavor and texture to your dish. It pairs well with the other ingredients.

Choosing the Right Rice for This Dish

For the best results, choose rice that absorbs flavors well. Jasmine and basmati are great choices. They offer a light, aromatic base that complements the chili lime chicken’s bold spices and fresh ingredients.

Cooking Techniques for Fluffy Rice

To get fluffy rice, use a few important fluffy rice techniques. Start by rinsing the rice in cold water to remove starch. This prevents it from becoming sticky. Then, use a 1:1.5 water-to-rice ratio for jasmine rice.

Let the rice simmer gently. Once it’s cooked, let it rest for a few minutes. Then, fluff it with a fork. This simple process makes your meal balanced and flavorful. For more ideas, check out this one skillet chicken recipe.

Combining Flavors

Cooking is all about mixing flavors to make a dish that excites your taste buds. In this chili lime recipe, adding ingredients in layers is key. Each part adds its own taste, making every bite of chicken and rice a full experience.

Layering Ingredients for Maximum Taste

Layering ingredients is vital for great flavor. Begin by seasoning the chicken well. This lets the spices soak into the meat. Then, add fresh veggies for crunch and color.

When you add rice, it soaks up all the juices from the chicken and veggies. This creates a dish that smells amazing and tastes even better.

The Role of Chili and Lime in This Recipe

Lime and chili are the stars of this recipe. Lime adds a zesty freshness that cuts through the richness of the chicken. Chili brings a warm, deep flavor that adds complexity.

This mix of flavors makes each bite of chicken and rice burst with taste. It turns a simple meal into something unforgettable.

Cooking Method

The one pan cooking method makes dinner prep easy, perfect for busy weeknights. Here are the cooking steps to make this quick dinner. Follow these to cook the chicken and rice just right, with lots of flavor.

Step-by-Step Instructions

  1. Start by marinating the chicken in lime juice, chili powder, garlic, and salt. Let it sit for at least 15 minutes to soak up the flavors.
  2. Heat olive oil in a large skillet over medium heat. Add the marinated chicken. Cook each side for 5-7 minutes until it’s golden.
  3. Add the rice to the skillet, mixing it with the chicken for even flavor.
  4. Pour in chicken broth and bring to a boil. Then, lower the heat to low, cover, and simmer for about 20 minutes. This lets the rice cook fully.
  5. After 20 minutes, check if the chicken is cooked through. It should be at least 165°F. If it needs more time, cover and cook a bit longer.

Cooking Time for Chicken and Rice

This one pan method cooks in about 30-35 minutes. Here’s a quick guide:

IngredientCooking Time
Chicken (Searing)10-14 minutes
Rice (Simmering)20 minutes

Serving Suggestions

Make your One Pan Chili Lime Chicken & Rice even better with some serving suggestions. This dish goes great with many ideal side dishes. Try a fresh garden salad for a crisp contrast, or grilled veggies for smokiness. A zesty avocado salsa adds a creamy touch.

Ideal Sides to Pair with Your Dish

  • Fresh Garden Salad with vinaigrette
  • Grilled Asparagus or Zucchini
  • Corn on the Cob with lime butter
  • Avocado Salsa with diced tomatoes and red onion
  • Quinoa Salad topped with citrus dressing

Presentation Tips to Impress Guests

Good presentation can really elevate your meal. Use bright garnishes like chopped cilantro and lime wedges. A sprinkle of chili flakes adds a decorative flair. Serving in a large, colorful bowl makes it fun for everyone to share.

Storing Leftovers

Storing leftovers from your one pan chili lime chicken and rice is key to keeping them fresh and flavorful. It makes meal prep easier and more fun. Here are some tips for refrigerating and reheating your dish.

Best Practices for Refrigerating Leftovers

Let the dish cool down to room temperature before refrigerating. Use airtight containers to keep moisture in and odors out. Label them with the date to track freshness.

If you’re making multiple meals, this helps a lot. For longer storage, freeze parts of the dish. Remember, eat refrigerated leftovers within three to four days for the best taste and safety.

Reheating Instructions to Maintain Flavor

Reheating chicken and rice safely keeps the taste great. The microwave is quick. Put it in a microwave-safe dish, add water, and cover it to keep moisture in.

Heat in short bursts, stirring often, until it’s warm. For stovetop reheating, put it in a skillet with a bit of broth or water. Heat on low, stirring often, until it’s hot. These methods help keep the flavors and textures you love.

Variations on the Recipe

Trying different recipe variations can make your One Pan Chili Lime Chicken & Rice even more exciting. Whether you want spicy chicken or vegetarian options, there’s something for everyone. Here are a few ideas to make this dish your own.

Spicy Alternatives for Heat Lovers

If you love a little heat in your meals, try adding jalapeños or a spicy seasoning blend. This not only boosts the flavor but also makes the meal more exciting. Here are some spicy chicken ideas:

  • Chipotle powder for a smoky taste
  • Fresh diced habaneros for extra heat
  • Hot sauce in the marinade for a zesty finish

Vegetarian Options for Plant-Based Eaters

For those who prefer vegetarian meals, chickpeas or tofu are great substitutes for chicken. They add plenty of flavor. Here are some tasty vegetarian options:

  • Roasted chickpeas seasoned with chili lime for extra protein
  • Marinated tofu for a filling plant-based meal
  • Colorful veggies like bell peppers and zucchini for freshness

Conclusion

The One Pan Chili Lime Chicken & Rice recipe is a great choice for a quick dinner. It’s easy to make and has bold flavors. The chili and lime add a zesty touch to the chicken and rice, making every bite enjoyable.

This dish is perfect for families because it’s tasty and easy to make. It’s also a great way to spend time together. Plus, it’s made in one skillet, so cleaning up is a breeze.

We suggest you give this recipe a try. It will add excitement to your dinner table. The One Pan Chili Lime Chicken & Rice will make mealtime a happy event for you and your family.

FAQ

What makes the One Pan Chili Lime Chicken & Rice recipe so unique?

This dish is special because of its zesty chili and lime flavors. They mix with the juicy chicken and fluffy rice. It’s a meal that’s both simple and full of flavor, loved by all.

How long does it take to prepare this meal?

It takes about 45 minutes to make, from marinating the chicken to serving. It’s a quick and tasty dinner for any weeknight.

Can I use other proteins or veggies in this recipe?

Yes! You can change the chicken to shrimp, chickpeas, or tofu for a veggie option. Just cook each ingredient for the right amount of time.

What type of rice works best for this recipe?

Jasmine or basmati rice is best. They match the flavors and stay fluffy. Rinsing the rice before cooking helps too.

How can I store leftovers from this meal?

Store leftovers in an airtight container in the fridge. Eat them within 3-4 days. Reheat with a splash of water to keep it moist.

What are some great side dishes to serve with this meal?

Try fresh salad, grilled veggies, or avocado salsa. They all go well with the One Pan Chili Lime Chicken & Rice.

Is this recipe suitable for meal prep?

Yes! It’s perfect for meal prep. Make a big batch and enjoy it all week. It’s great for busy families.

Classic Stuffed Bell Peppers Recipe – Family Favorite

Nothing brings a family together like the smell of a home-cooked meal. Classic stuffed bell peppers are a perfect example. Imagine a kitchen full of laughter as everyone waits for dinner. This dish combines colorful bell peppers with savory meat and rice, making it more than just a meal.

As you read this article, you’ll learn how to make this vibrant dish. It’s not just delicious but also feeds the soul.

Key Takeaways

  • Classic stuffed bell peppers are a family favorite meal, perfect for gatherings.
  • The recipe includes bell peppers filled with savory meat and rice.
  • This dish is visually appealing, making it ideal for dinner parties.
  • Homemade stuffed bell peppers can be customized for various tastes.
  • Learning to prepare this meal can become a cherished family tradition.

Introduction to Stuffed Bell Peppers

Stuffed bell peppers are a mix of tasty flavors and good health that people love everywhere. They are bell peppers filled with a mix of proteins, grains, and spices. This makes them a favorite for family dinners because of their colorful veggies and filling ingredients.

What Are Stuffed Bell Peppers?

Stuffed bell peppers are bell peppers filled with different things. They usually have ground meat, rice, veggies, and spices. Families like to make their own versions, changing the filling to suit their taste. Each bite is full of flavor, showing how versatile this dish is.

Brief History of the Dish

The idea of stuffed peppers comes from Mediterranean, Spanish, and Italian cooking. For ages, these cultures stuffed veggies as a smart way to use what they had. Now, stuffed bell peppers are a beloved dish around the world, known for their great taste and texture.

Ingredients for Classic Stuffed Bell Peppers

To make classic stuffed bell peppers, you need to pick the right ingredients. This ensures the dish tastes great and feels good in your mouth. From the freshest bell peppers to the best protein, every part matters.

Fresh Bell Peppers

Begin with top-notch fresh bell peppers. They’re the base of your dish. Bell peppers come in colors like green, red, yellow, and orange. Each color has its own taste:

  • Green bell peppers are a bit bitter and crunchy.
  • Red bell peppers are sweeter and softer.
  • Yellow and orange bell peppers mix sweetness with a hint of acidity.

Protein Choices

Think about what protein to put inside your peppers. Classic choices are:

  • Ground beef
  • Ground turkey
  • Ground chicken

If you want something different, try black beans, quinoa, or lentils. They’re great for those who don’t eat meat.

Seasonings and Spices

Seasonings and spices add the final flavor to your peppers. You’ll often use:

  • Garlic powder
  • Onion powder
  • Oregano
  • Parsley
  • Chili powder

Playing with these seasonings can make your dish unforgettable. It’s a great way to create special family meals.

Preparation Steps Before Cooking

Preparing stuffed bell peppers is a fun process that leads to a tasty meal. A few key steps ensure your dish turns out great every time. This guide will help you wash and prep the peppers, make the filling, and put everything together for cooking.

Washing and Preparing Peppers

Begin by washing your bell peppers under cold water. After cleaning, cut off the tops and remove the seeds. This makes a perfect space for your filling. Keep the peppers ready until you’re ready to fill them.

Making the Filling

Next, heat a skillet over medium heat. Cook chopped onions and garlic to add flavor. Then, add ground beef or your preferred protein and cook until it’s done.

Add cooked rice, diced tomatoes, and seasonings like oregano and cumin. Stir until everything is well mixed and hot.

Assembling the Stuffed Peppers

It’s time to put the peppers together. Fill each pepper with the meat and rice mix until they’re full. Place them in a baking dish, standing upright, to keep them stable while cooking. Drizzle with olive oil or sprinkle cheese on top for extra flavor.

Discovering the joy of preparing stuffed bell peppers can spark creativity in the kitchen. For a full recipe and tips, visit this link. Enjoy the process and the amazing smells that fill your home as you prepare for a delicious meal.

Cooking Methods for Stuffed Bell Peppers

There are different ways to cook stuffed bell peppers. You can choose based on what you like and what you have in your kitchen. Each method makes your meal tasty and fulfilling.

Baking in the Oven

Baking is a favorite way to cook stuffed peppers. First, heat your oven to 375°F (190°C). Put the peppers in a baking dish and add some broth or sauce to prevent sticking. Then, cover with foil and bake for 30-40 minutes, until they’re soft. This method blends the flavors well, making a delicious meal.

Cooking on the Stovetop

For a quick meal, try cooking on the stovetop. Heat oil in a big skillet and place the peppers upright. Add enough water or broth to cover the bottom. Cover and cook on medium for 20-25 minutes. This way, you get a fast dinner.

Slow Cooker Option

The slow cooker makes cooking easy. Just put the peppers in the slow cooker, add a little liquid, and cover. Cook on low for 6-8 hours or high for 3-4 hours. This method makes the peppers tender and flavorful.

MethodCooking TimeAdvantages
Baking in the Oven30-40 minutesEnhanced flavors and tender texture
Cooking on the Stovetop20-25 minutesQuick and convenient
Slow Cooker3-8 hoursHands-off cooking with deep flavors


Tips for Perfect Stuffed Bell Peppers

Making perfect stuffed bell peppers is an art that needs focus. With some key tips, you can make a dish that wows everyone. From picking the right peppers to making sure the filling is just right, these tips will help you succeed.

Choosing the Right Bell Peppers

For the best results, choose bell peppers that are firm and without blemishes. Look for colors like red, yellow, or green to show they’re fresh. Make sure the peppers are all the same size for even cooking.

Ideal Filling Consistency

Getting the filling just right is key. It should be moist but not too wet to avoid leaks. Mix cooked grains, lean proteins, and fresh veggies for a filling that stays together well.

Cooking Times and Temperatures

Cooking times and temperatures affect the peppers’ texture. Bake them at 350°F for 30 to 40 minutes for a tender yet crisp texture. Use a thermometer to check the filling reaches 165°F for safety and flavor.

Variations on the Classic Recipe

Stuffed bell peppers are a fun way to get creative in the kitchen. There are many variations, including vegetarian options that are just as tasty as the meat ones. Here are some exciting changes you might like to try.

Vegetarian Stuffed Bell Peppers

Vegetarian stuffed peppers are great for those who want a meat-free meal. You can fill them with things like quinoa, lentils, or beans for protein and taste. Fresh herbs and spices add a burst of freshness, making them a hit with plant-based eaters. For a detailed recipe, check out this classic version that can easily be adapted for vegetarians.

Mexican-Inspired Stuffed Peppers

Mexican-inspired stuffed peppers add a zesty twist. They include ingredients like black beans, corn, diced tomatoes, and salsa for a burst of flavor. Add shredded cheese and avocado for creaminess, making each bite irresistible.

Mediterranean Style

Mediterranean style variations add feta cheese, olives, and herbs to stuffed bell peppers. This mix offers a savory taste that feels like a trip to the Mediterranean. It’s a delightful vegetarian option that will wow your guests.

Serving Suggestions

Adding a twist to your meal with stuffed peppers can be fun. Serving them with the right side dishes can make the dish even better. It brings out the full flavor of the peppers.

Pairing with Side Dishes

Choosing the right side dishes can make a big difference. A fresh garden salad with colorful veggies is a great choice. Or, try garlic bread for a crunchy contrast to the soft filling.

Roasted veggies with herbs add a warm, earthy touch. They balance out the meal nicely.

Best Accompaniments and Sauces

There are many sauces that pair well with stuffed peppers. Creamy ranch or yogurt dressings add a cool twist. Fresh salsa adds a zesty flavor that’s exciting.

Some people love drizzling balsamic glaze over their peppers. It’s a sweet and tangy mix that complements the peppers perfectly.

Storing and Reheating Leftovers

Enjoying stuffed bell peppers for the first time is amazing. But knowing how to store leftovers is just as important. This way, you can enjoy them again and again. Leftovers can be stored in airtight containers in the fridge for up to four days. Freezing is also an option, though it might change the texture a bit.

There are several ways to reheat stuffed bell peppers. The oven is best for even heating and melted cheese. Just preheat it to 350°F (175°C) and bake until warm. For a quicker option, the microwave works well. Place the peppers on a microwave-safe plate, covered with a damp paper towel, and heat for a few minutes.

Using a Dutch oven on the stovetop is another good choice. It ensures even heat. For a crispy exterior, try an air fryer.

For more tips on reheating stuffed bell peppers, check out this guide. With these methods, your leftovers will taste just as good as the first time.

Nutritional Information

Stuffed peppers are not just tasty; they’re also good for you. Knowing the nutritional facts can help you enjoy this dish while staying healthy. Each serving has the right mix of calories and nutrients for a balanced diet.

Calories and Macronutrients

ComponentPer Serving (1 stuffed pepper)
Calories200
Protein15g
Carbohydrates30g
Fat5g
Fiber4g

Health Benefits of Bell Peppers

Bell peppers are full of vitamins and antioxidants. They offer many health benefits, including:

  • Rich in Vitamin C: Boosts your immune system and keeps your skin healthy.
  • Source of Antioxidants: They fight inflammation and reduce oxidative stress.
  • Low in Calories: Perfect for those watching their weight.
  • High in Fiber: Good for your digestive health and blood sugar control.


Frequently Asked Questions

Stuffed bell peppers are great for meal prep. This section answers common questions about freezing and making ahead. These tips make it easy to enjoy this tasty meal anytime, saving you kitchen time.

Can You Freeze Stuffed Bell Peppers?

Yes, you can freeze stuffed bell peppers. Cool them down first. Then, wrap each pepper in plastic or foil and put them in a freezer-safe bag.

When you’re ready, thaw them in the fridge overnight. Adjust cooking times if you bake them frozen or thawed.

How to Make Ahead and Store?

To make ahead, prepare the filling and stuff the peppers. Store them in the fridge for up to 24 hours before baking. This makes for a quick, flavorful meal.

For longer storage, freeze them. Reheat in the oven or microwave for a convenient, hearty dish. For a detailed recipe, check out this link.

Conclusion: Enjoying Family Meals with Stuffed Bell Peppers

Classic stuffed peppers are more than just food; they bring families closer. They satisfy our taste buds and create moments of laughter and stories. Whether it’s a quick weeknight dinner or a special Sunday, these peppers make us feel at home.

Preparing classic stuffed peppers together is a joy. It turns dinner into a special family activity. Everyone can help, from chopping veggies to mixing the filling. This recipe is flexible, so you can make it your own for any event.

Let classic stuffed peppers warm your family’s hearts. They’re not just a meal; they’re a tradition. By making them, you create memories that last a lifetime. Try this recipe and see why it’s a beloved favorite in many American homes.


FAQ

Can you freeze stuffed bell peppers?

Yes, you can freeze stuffed bell peppers! For the best results, slightly undercook them before freezing. Wrap each pepper in plastic wrap. Store them in an airtight container or freezer bag. They’ll last about 3 months in the freezer.

How do you make ahead and store stuffed bell peppers?

To make ahead, prepare the stuffed peppers but don’t bake them. Cover them tightly and store in the fridge for up to 24 hours. When you’re ready, just bake them following the instructions. You can also freeze them for longer storage.

What ground beef should I use for stuffed peppers?

Use lean ground beef, like sirloin or 90% lean, for the best stuffed peppers. This reduces excess grease while keeping the meat tasty.

Can I use rice substitutes in stuffed bell peppers?

Absolutely! Try cooked quinoa, couscous, or lentils as rice substitutes. They add flavor and health benefits to your stuffed bell peppers.

What are some seasoning ideas for stuffed bell peppers?

Use garlic powder, onion powder, cumin, Italian herbs, and chili powder for flavor. Experiment with your favorite spices for a unique taste!

Do I need to precook the rice for stuffed bell peppers?

Yes, precooking the rice is best for traditional stuffed peppers. It makes the rice tender by the time the peppers are done.

What side dishes go well with stuffed bell peppers?

Try a fresh garden salad, garlic bread, or roasted vegetables. Serving with creamy sauces or fresh salsas adds a delightful contrast.

Cheesy Spinach Artichoke Chicken Bake Recipe

On a chilly Sunday evening, I was searching for a warm dish for my family. That’s when I thought of a Cheesy Spinach Artichoke Chicken Bake. It promised gooey cheese and tasty veggies, making it a perfect comfort food.

This recipe is easy to make and quickly became a family favorite. It’s great for weeknights and special occasions alike.

This dish is quick to prepare, giving you more time to relax with your loved ones. It’s a culinary adventure that’s both fun to make and delicious to eat!

Key Takeaways

  • Combines rich flavors for a comforting meal.
  • Easy preparation, suitable for busy weeknights.
  • Perfect for family gatherings and special occasions.
  • Mix of chicken and vegetables for a balanced dish.
  • Can be customized with various ingredients.

Introduction to Cheesy Spinach Artichoke Chicken Bake

The Cheesy Spinach Artichoke Chicken Bake is more than just a casserole. It’s a mix of flavors that brings comfort to your dinner table. This special recipe combines creamy spinach and artichoke dip with tender chicken and pasta. It’s a hit with families.

It’s packed with three types of cheese, artichoke hearts, and fresh spinach. This makes it a rich and satisfying one-dish meal.

What Makes This Dish Special?

This casserole takes classic flavors to a new level, making it family-friendly. The mix of ingredients gives it a unique taste. It’s great for weeknight dinners or special occasions.

It’s also easy to customize with different ingredients. For more ideas, check out this link for creative variations.

Cooking Time and Servings

Making the Cheesy Spinach Artichoke Chicken Bake takes about 45 minutes. It’s perfect for busy weekdays. The recipe serves 4-6 people, making it great for family meals.

This dish is ideal for those who want to serve delicious comfort food quickly. You won’t spend all day in the kitchen.

Ingredients for the Chicken Bake

Making a tasty Cheesy Spinach Artichoke Chicken Bake begins with picking the right ingredients. Knowing the key ingredients and adding optional flavors can make it even better. Whether it’s for a cozy family dinner or a special occasion, having the right pantry items is key.

Essential Ingredients

The base of a great Cheesy Spinach Artichoke Chicken Bake includes:

  • Chicken breasts
  • Fresh spinach
  • Artichoke hearts
  • Cream cheese
  • A mix of cheeses like mozzarella and parmesan

These ingredients combine to make a creamy, tasty dish that everyone will love. For more on how to make it, see the recipe.

Optional Ingredients for Extra Flavor

To add more flavor, consider these optional ingredients:

  • Garlic
  • Onion
  • Herbs like thyme or basil
  • Spices like paprika or crushed red pepper

Preparing the Chicken

These can take your Cheesy Spinach Artichoke Chicken Bake to the next level. They let you add your own twist to the dish. This way, you can make it just how you like it.

Preparing the chicken is key for the Cheesy Spinach Artichoke Chicken Bake. It’s where flavor and texture start. Choosing the right cut and marinating or seasoning it right can make a big difference. Let’s look at the best ways to prepare your chicken.

Choosing the Right Cut of Chicken

The right chicken cut is important for a great Cheesy Spinach Artichoke Chicken Bake. Boneless, skinless chicken breasts are a top choice for their even cooking and mild taste. Chicken thighs offer a richer flavor if you prefer.

Whatever you pick, make sure it’s high quality. This will help you get the best results.

Marinating vs. Seasoning

Marinating and seasoning are two different ways to prepare chicken. Marinating adds moisture and flavor, making the meat tender. Use a marinade with olive oil, vinegar, and herbs for the best results.

Seasoning with salt, pepper, and garlic powder is quicker and can be just as good. The choice depends on how much time you have and what flavor you want.

Making the Spinach and Artichoke Mixture

Making the perfect spinach artichoke mixture is key for the Cheesy Spinach Artichoke Chicken Bake. This blend not only makes the chicken taste better but also adds more flavor. We’ll look at how to cook spinach and artichokes right, and how to mix in rich cheeses and spices.

Cooking Spinach and Artichokes

Start by picking fresh or frozen spinach. If it’s fresh, rinse and chop it, then cook it in a pan until it’s soft. For frozen spinach, thaw it and squeeze out extra water before mixing it in. Artichokes can be canned or frozen; if canned, drain them well to avoid too much liquid.

Cooking both ingredients until they’re tender helps bring out their flavors. This step is important for the next part of making the spinach artichoke mixture.

Adding Cheese and Seasonings

After the spinach and artichokes are cooked, it’s time to add cheese. Cream cheese makes it creamy, while mozzarella or Parmesan add flavor. Mix in minced garlic, salt, pepper, and any other spices you like.

This mix creates a creamy base that brings together the spinach and artichokes. It’s perfect for the Cheesy Spinach Artichoke Chicken Bake.

Assembling the Bake

Creating a tasty Cheesy Spinach Artichoke Chicken Bake needs careful layering. Start by getting a big baking dish. It should fit all the layers without being too full. A big dish helps with even cooking.

Layering Your Ingredients

First, put cooked chicken at the bottom. It’s the base of your dish. Then, spread the spinach and artichoke mix over the chicken. Make sure it covers everything well.

Next, sprinkle more cheese on top. This adds creaminess and a golden crust. Make sure the cheese is spread out evenly for a good melt.

Tips for Even Cooking

For even cooking, don’t pack the layers too tight. Give each layer space. Preheat your oven as directed to cook the chicken and melt the cheese right.

Check the bake halfway through. This helps make sure it turns out perfectly. You’ll get a beautiful and tasty Cheesy Spinach Artichoke Chicken Bake.

Baking Instructions

Getting the baking process right is key for a perfect Cheesy Spinach Artichoke Chicken Bake. The right timing and temperature ensure even cooking. This makes the dish golden brown and bubbly. Follow these steps to impress your guests.

Preheating the Oven

Begin by preheating your oven to 375°F. This temperature cooks the chicken well and melts the cheese perfectly. It boosts the dish’s flavor and texture.

Timing and Temperature Guide

Bake the Cheesy Spinach Artichoke Chicken Bake for about 25 to 30 minutes. Watch it closely in the last few minutes. You want it to be bubbly and golden brown. This means it’s ready to enjoy.

Serving Suggestions

The Cheesy Spinach Artichoke Chicken Bake is a treat for your taste buds. It goes well with many sides. Here are some ideas to make your meal complete.

Pairing with Sides

  • Garlic bread adds a crunchy texture and a burst of flavor.
  • A fresh garden salad brings a cool contrast.
  • Roasted vegetables are a healthy choice that pairs well with the bake.

Presentation Tips

Make your meal look as good as it tastes. Here are some presentation ideas:

  • Top with fresh herbs like parsley or basil for a splash of color.
  • Use an attractive dish to show off the bake’s layers.
  • Drizzle with balsamic reduction for a fancy touch.

Storage and Reheating

Storing and reheating your Cheesy Spinach Artichoke Chicken Bake right keeps it tasty. Use the right storage tips to keep flavors fresh. The best reheating methods help keep the dish’s texture and taste great.

How to Store Leftovers

Let your Cheesy Spinach Artichoke Chicken Bake cool before storing. This stops moisture buildup. For short-term, refrigerate it. It stays good for 3 to 4 days.

If you want to keep it longer, freeze it. It can last 2 to 3 months in the freezer. Always label containers with the date.

Reheating Best Practices

Reheating your dish is key. The oven is best. Preheat to 350°F and cover with foil. Heat for 20-25 minutes until warm.

If you’re in a hurry, the microwave is okay. But be careful not to make it soggy. Heat in short bursts, stirring often.

By following these tips, your Cheesy Spinach Artichoke Chicken Bake stays delicious. Enjoy every leftover meal just as much as the first time.

Variations and Customization

Creating the perfect Cheesy Spinach Artichoke Chicken Bake is all about creativity. You can make it fit your diet or taste by trying different variations and add-ins. Let’s look at some gluten-free options and fun substitutions to make this meal even better.

Gluten-Free Alternatives

For those who need gluten-free, swapping breadcrumbs for gluten-free options is easy. Try using ground almonds, crushed gluten-free crackers, or store-bought gluten-free breadcrumbs. These keep the dish crunchy without losing flavor. You can also serve it over gluten-free pasta or rice for a meal that meets dietary needs.

Add-Ins and Substitutions

Adding your favorite ingredients to the Cheesy Spinach Artichoke Chicken Bake is a great way to play with flavors. Adding shrimp or diced cooked turkey can boost the protein. Vegetarian options like mushrooms, bell peppers, or zucchini can add texture and taste. Feel free to mix and match to create a version that you love. For more ideas, check out this resource.

Conclusion: Enjoy Your Cheesy Spinach Artichoke Chicken Bake

The Cheesy Spinach Artichoke Chicken Bake is more than just a meal. It’s a mix of flavors that can become a family favorite. Its creamy texture and savory chicken make it a comfort food many love.

This dish is balanced with nutrients and cheesy goodness. It brings everyone to the table, eager to eat.

Think of this recipe as a canvas for your creativity. You can try many variations and add-ins to make it even better. Don’t be afraid to experiment in the kitchen. Try new cheeses, spices, or veggies to make it your own.

Reflecting on this recipe, its versatility and appeal stand out. With each try, you’ll find new ways to improve it, making it uniquely yours. So, get your ingredients ready, be creative, and enjoy cooking this amazing bake. Happy cooking!


FAQ

What can I serve with the Cheesy Spinach Artichoke Chicken Bake?

This dish goes great with garlic bread, a fresh garden salad, or roasted veggies. You can also add rice or pasta for a fuller meal.

Can I make this dish ahead of time?

Yes! Prepare the Cheesy Spinach Artichoke Chicken Bake in advance. Store it in the fridge. Just assemble and cover it before baking. Bake it fresh when you’re ready.

How do I store leftovers?

Let the dish cool, then put it in an airtight container. Store it in the fridge for 3-4 days or freeze for 2-3 months.

Can I substitute other types of cheese?

Yes! Mix your favorite cheeses. Cream cheese, cheddar, or gouda work well with mozzarella and parmesan for a cheesy dish.

Is this dish suitable for gluten-free diets?

Yes! Make it gluten-free by using gluten-free breadcrumbs or pasta. Just check that any sauces or ingredients are gluten-free.

How can I make this recipe healthier?

To make it healthier, use Greek yogurt instead of cream cheese. Choose lower-fat cheese. Add extra veggies for more nutrition.

Can I add other vegetables to the mixture?

Yes! Add your favorite veggies like bell peppers, mushrooms, or zucchini. They add flavor and nutrition.

How do I know when the dish is done baking?

The dish is done when the top is bubbly and golden. Also, make sure the chicken is cooked to 165°F for safety.

Lebanese Kafta Kebabs: Authentic Recipe Guide

When fragrant spices fill the air, it’s like a warm hug. They remind us of family and laughter. Lebanese Kafta Kebabs are more than just food; they’re a tradition that brings people together.

These meat bites are filled with Mediterranean flavors. They’re perfect for any meal, from weeknight dinners to big celebrations. Whether it’s a casual get-together or a family feast, everyone looks forward to these kebabs.

The history of Lebanese Kafta Kebabs is as rich as the dish itself. It’s not just about the ingredients. It’s about the culture and traditions that make it special in Middle Eastern cuisine. Let’s dive into the world of these kebabs and discover why they’re loved by so many.

Key Takeaways

  • Discover the rich cultural significance of Lebanese Kafta Kebabs.
  • Learn about the essential ingredients and their importance in flavoring.
  • Get insights into various preparation methods to achieve the perfect kebab.
  • Find out how to serve and pair Kafta Kebabs with traditional side dishes.
  • Explore tips for making juicy and flavorful Kafta Kebabs at home.

What Are Lebanese Kafta Kebabs?

Lebanese kafta kebabs are a favorite in Lebanese cuisine. They are known for their tasty flavors and deep cultural roots. These grilled meat skewers bring warmth and hospitality, often enjoyed at festivals and family gatherings.

Origin and Cultural Significance

Kafta kebabs have ancient roots in the Middle East. They are a symbol of Lebanese culture, where food brings people together. At special times, kafta is the star, making the occasion even more festive.

Key Ingredients Used

Kafta kebabs are made with ground beef or lamb, onions, and spices like allspice, cumin, and salt. These ingredients mix to create a taste that’s true to Lebanese cuisine.

Variations Across Regions

Across Lebanon, kafta recipes vary. In the north, spices and herbs are used differently. The south has its own unique flavors. This shows how Lebanese cooking adapts to different places.

Essential Ingredients for Kafta Kebabs

To make authentic Kafta Kebabs, you need to pick the right ingredients. The quality of the ground meat is key. It sets the stage for delicious ground beef kebabs. Aromatics and spices add to the flavor, making these kebabs special.

Fresh herbs bring in extra flavor and freshness. This is a big part of Lebanese cooking.

Ground Meat Selection

Choosing the right ground meat is important for Kafta Kebabs. While lamb is common, ground beef is also popular. Look for high-quality meat with some fat for moisture and flavor.

This mix makes the kebabs juicy and full of taste.

Aromatics and Spices

Don’t skip the aromatics like chopped onion and minced garlic. Spices like cumin, allspice, and cinnamon add depth to the flavor. They turn simple ground beef into a standout dish.

Fresh Herbs Importance

Fresh herbs like parsley and mint add a lot to the dish. They make the kebabs not only tasty but also look great. Using fresh herbs is a key part of Lebanese cooking.

Preparation Steps for Perfect Kafta Kebabs

Making delicious Lebanese Kafta Kebabs needs careful preparation. Knowing the steps helps make these dishes tasty and fulfilling. Start by mixing the right ingredients, shaping them into kebabs, and using marinades to boost flavor.

Mixing the Ingredients

Begin by picking the right ground meat, like beef, lamb, or chicken. In a big bowl, mix the meat with chopped onions, garlic, and spices like cumin, allspice, and cinnamon. This step is key for great flavor. Make sure the mix is smooth for the best taste.

For a detailed recipe, check out Lebanese Kafta Kebabs.

Shaping the Kebabs

After mixing, shape the meat into kebabs. Use wet hands to avoid sticking. Try to make them all the same thickness for even cooking and a nice look. This step is important for keeping the kebabs juicy and flavorful.

Recommended Marinades

Marinating the kebabs can really improve their taste. A mix of olive oil, lemon juice, and herbs adds freshness and depth. Let the kebabs marinate for at least an hour, but overnight is best for the best flavor. Using these marinades will make your dishes truly authentic.

Cooking Methods for Kafta Kebabs

To make delicious Kafta Kebabs, you need to know how to cook them. You can grill, oven roast, or pan-fry them. Each method brings out different flavors and textures. Here are the best ways to cook Kafta Kebabs, perfect for authentic Lebanese dishes.

Grilling Techniques

Grilling is the most traditional way to cook Kafta Kebabs. First, heat the grill to a high temperature. This helps the meat get a nice char. Adding wood chips can make the flavors even better.

Make sure to oil the skewers so they don’t stick. Turn them often for even cooking. Getting those perfect grill marks and a juicy inside is key to great Kafta Kebabs.

Oven Roasting Tips

If you don’t have a grill, oven roasting is a great alternative. Heat your oven to 400°F (200°C). Put the skewers on a lined baking sheet to let heat circulate around them.

Roasting takes about 20-25 minutes, depending on the kebab size. This method makes the meat juicy and flavorful, perfect for any kitchen.

Pan-Frying Alternatives

Pan-frying is another excellent way to cook Kafta Kebabs. Use a cast-iron skillet or nonstick pan. Heat a bit of oil over medium-high heat.

Put the kebabs in the skillet carefully, so they don’t crowd. Fry for 5-7 minutes on each side, until they’re golden and cooked through. This method lets you control the temperature and gets the meat crispy on the outside while staying juicy inside.

Serving Suggestions for Kafta Kebabs

Enhancing your dining experience with Kafta Kebabs is more than just the main dish. Thoughtful serving suggestions can make the meal better. They include traditional dishes and accompaniments from Lebanese cuisine. These pairings not only match the kebabs’ flavors but also celebrate Lebanon’s rich culinary culture.

Traditional Side Dishes

Adding traditional side dishes makes the meal more satisfying and authentic. Consider these options:

  • Pilaf rice with vermicelli
  • Grilled vegetables, such as zucchini and bell peppers
  • Simple fattoush or tabbouleh salad
  • Stuffed grape leaves (dolmas)

Sauces and Dips Pairings

These flavorful sauces and dips can enhance your Kafta Kebabs’ taste:

  • Tahini sauce featuring sesame paste and lemon
  • Garlic sauce for a creamy, savory touch
  • Spicy harissa to add an extra kick
  • Cilantro yogurt for a refreshing contrast

Garnishing Ideas

Visually appealing garnishes add color and freshness to your plate. Try these:

  • Fresh parsley or mint
  • Lemon wedges for a zesty punch
  • Pomegranate seeds for a burst of sweetness
  • Thinly sliced red onions

By combining these serving suggestions, you can create a memorable dining experience. It will highlight the flavors of Lebanese cuisine and bring people together.

Tips for Making Juicy Kafta Kebabs

To make juicy Kafta Kebabs, focus on a few key areas. The right mix of meat and fat is key for juiciness. Seasoning adds a lot to the flavor, making each bite better.

Knowing the best cooking times and temperatures is also important. This ensures your meat stays tender and full of flavor, no matter how you cook it.

Achieving the Right Meat-Fat Ratio

For the best taste, aim for an 80/20 meat-fat ratio. This mix keeps the kebabs juicy without being too greasy. Ground beef is a top choice, but lamb can also add a great flavor.

Choosing the right meat mix is key to making your Kafta Kebabs juicy and satisfying.

Importance of Proper Seasoning

Seasoning is vital for great-tasting kebabs. Use spices like cumin, paprika, allspice, and cinnamon. Add onions and fresh herbs like parsley for extra flavor.

Season the meat before shaping the kebabs. This lets the spices soak in, making the meat taste better.

Cooking Times and Temperatures

Cook Kafta Kebabs over medium-high heat for 10 to 15 minutes. Flip them often to get a nice sear on the outside and keep the inside juicy. Use a meat thermometer to check if they’re done, aiming for 160°F.

Whether grilling or baking, cooking them right is essential for tender meat.

For a detailed recipe, visit this link. It shows how to make flavorful Kafta Kebabs. Follow these tips for delicious results every time.

Storing and Reheating Kafta Kebabs

To keep Kafta Kebabs tasty, it’s key to store them right. Good food storage keeps every bite as tasty as the first. We’ll look at how to keep them fresh in the fridge and freezer, and the best ways to reheat them.

Refrigeration Tips

For fridge storage, cool the kebabs to room temperature first. Then, put them in an airtight container. This stops moisture from making them soggy. Keep them sealed and eat within three days for the best taste.

Freezing Instructions

Freezing is great for keeping Kafta Kebabs longer. Wrap each kebab in plastic wrap first. Then, put them in a freezer-safe bag or container. Don’t forget to label it with the date. This way, your kebabs will stay good for up to three months.

Best Reheating Methods

How you reheat your kebabs is important for keeping them tasty. The best method is to use an oven at 350°F. Cover them with foil to keep them moist, then heat for 15-20 minutes. You can also use the microwave on low, but be careful not to overheat and dry them out. Reheating your leftovers can make them taste like they were just made!

Popular Sides to Accompany Kafta Kebabs

Kafta Kebabs are a star of any meal. They pair well with many side dishes. These sides not only make the meal better but also highlight Middle Eastern flavors. Here are some tasty ideas to make your meal unforgettable.

Classic Hummus Recipes

Hummus is a must-have dip. It’s tasty and can be made in many ways. Here are some favorites:

  • Roasted Garlic Hummus: It has a smooth texture and a deep, savory taste.
  • Spicy Hummus: It’s spicy and great for those who like a little heat.
  • Beet Hummus: It’s colorful and has a sweet, earthy flavor that goes well with kafta.

Tabbouleh Salad Variations

Tabbouleh is a cool contrast to the richness of kafta. Here are some tasty versions:

  • Traditional Tabbouleh: It’s made with fresh parsley, tomatoes, and bulgur for a classic taste.
  • Quinoa Tabbouleh: It’s a gluten-free option that keeps the flavor bright.
  • Mango Tabbouleh: It adds a sweet twist with diced mango.

Pita Bread Choices

Pita bread is key for dipping and scooping. Here are some top picks:

  • Classic Pita: It’s soft and warm, perfect for with hummus and kafta.
  • Whole Wheat Pita: It’s a healthier choice with a nutty taste.
  • Herbed Pita: It’s flavored with garlic or oregano, boosting the meal’s taste.

Lebanese Festivities Featuring Kafta Kebabs

Kafta Kebabs are a big deal in Lebanese celebrations. They bring people together and add joy to any event. Whether it’s a big party or a small family dinner, these kebabs are always a hit.

Celebratory Dishes

At Eid and weddings, Kafta Kebabs take center stage. People gather to share celebratory meals filled with delicious kebabs. The mix of flavors and the company of loved ones make these moments unforgettable.

Special Occasions

Lebanese celebrations are known for their amazing food, and Kafta Kebabs are a favorite. They add to the excitement of any event, big or small. This dish shows off the rich culinary traditions of Lebanon.

Family Gatherings Traditions

Making Kafta Kebabs is a family tradition in many Lebanese homes. Kids and adults work together to make these tasty kebabs. Sharing meals with Kafta Kebabs strengthens family bonds and sparks interesting conversations.

Kafta Kebabs Around the World

Kafta Kebabs have spread far beyond Lebanon, winning hearts worldwide. Chefs and home cooks love to mix these flavors with new techniques. This creates exciting *fusion dishes* that show off Kafta’s flexibility.

Global Influences on Recipes

Every place puts its own spin on Kafta Kebabs. In Greece, they add cinnamon. Turkey uses a special herb mix. Mint or chili peppers are common, showing Kafta’s adaptability in *global cuisine*.

Fusion Dishes Incorporating Kafta

Chefs worldwide have made *fusion dishes* with Kafta. Here are a few examples:

  • Kafta Pizza – A mix of Italian and Lebanese, with ground Kafta on pizza.
  • Kafta Tacos – A mix of Mexican and Middle Eastern, with Kafta in corn tortillas.
  • Kafta Burgers – A creative twist, using Kafta for juicy burgers with Mediterranean toppings.

Popular Restaurants and Chefs

Many top restaurants feature Kafta Kebabs. They celebrate the dish’s versatility. Places like Zaitunay Bay in Lebanon and Tanoreen in Brooklyn offer amazing versions. They prove Kafta’s place in *global cuisine*.

Nutritional Benefits of Kafta Kebabs

Kafta Kebabs are not just tasty; they’re also good for you. They’re packed with protein from the beef, onions, and herbs. This makes them great for adding protein to your diet in a tasty way.

When cooking Kafta Kebabs, you can choose healthy methods. Grilling or baking keeps them moist and flavorful without extra fats. You can find more healthy cooking tips to enjoy this dish without losing your dietary goals.

It’s important to control your portions when eating Kafta Kebabs. Serving them with salads or veggies makes for a balanced meal. This way, you can enjoy the flavors while staying healthy.


FAQ

What is the main ingredient in Lebanese Kafta Kebabs?

Lebanese Kafta Kebabs mainly use ground beef or lamb. They mix it with spices like allspice and onion. Fresh herbs like parsley and mint add to the Mediterranean taste.

How do I achieve the best flavor in my Kafta Kebabs?

For the best flavor, use top-quality ground meat. Season it well with fresh herbs and spices. Marinating for at least 30 minutes makes the flavors blend beautifully.

Can I prepare Kafta Kebabs in advance?

Yes, you can make the kebab mixture ahead of time. Shape it into skewers and refrigerate for up to 24 hours. Or freeze for longer. Just thaw completely before cooking.

What cooking methods can I use for Kafta Kebabs?

You can grill, oven roast, or pan-fry Kafta Kebabs. Grilling adds a smoky taste. Oven roasting or pan-frying are good alternatives without a grill.

What are some traditional side dishes to serve with Kafta Kebabs?

Serve Kafta Kebabs with rice pilaf, grilled veggies, tabbouleh salad, and dips like hummus or garlic sauce. These pair perfectly.

How can I store leftover Kafta Kebabs?

Store leftovers in an airtight container in the fridge for up to three days. Freeze for longer storage. Reheat well before eating.

Are Kafta Kebabs a healthy option?

Yes, Kafta Kebabs are healthy. They’re full of protein and nutrients. Adding fresh herbs and veggies to sides makes them even healthier.

What kind of sauces or dips pair well with Kafta Kebabs?

Tahini, garlic sauce, or spicy chili dips are great with Kafta Kebabs. They enhance the kebab’s flavors and make the meal better.

Garlic Parmesan Roasted Shrimp Recipe

Imagine a kitchen full of laughter and the smell of garlic. You’re with friends, all excited for a great meal. Garlic Parmesan Roasted Shrimp is the star of this show. It’s a hit at any gathering, whether it’s a quick dinner or a big event.

This recipe is easy to make and packed with flavor. It has juicy shrimp, garlic, and parmesan. It’s a seafood lover’s dream. So, let’s get cooking and make a dish that everyone will love!

Key Takeaways

  • This Garlic Parmesan Roasted Shrimp recipe is quick and easy to make.
  • Perfect for casual dinners or special gatherings.
  • Features a flavorful combination of garlic and parmesan.
  • Succulent shrimp makes for a tasty seafood dish.
  • Simple ingredients create an impressive meal.

Introduction to Garlic Parmesan Roasted Shrimp

Garlic Parmesan Roasted Shrimp is a seafood delight with a mix of flavors. The garlic parmesan marinade adds a savory punch. It turns simple shrimp into the best roasted shrimp you can imagine.

This dish is perfect for seafood lovers and casual diners. It’s great for gatherings or weeknight dinners.

What Makes This Dish Special?

The secret to this flavorful shrimp recipe is its balanced ingredients. Fresh shrimp, a quality garlic parmesan marinade, and careful roasting make every bite special. It highlights the shrimp’s natural sweetness and adds a depth of flavor.

A Brief Overview of the Ingredients

To make the best roasted shrimp, start with the right ingredients. Fresh shrimp is the base, and the garlic parmesan marinade takes it to the next level. Garlic adds an aromatic quality, parmesan cheese brings a rich umami flavor, and olive oil binds everything together.

With just a few high-quality items, this recipe is a delightful experience for the senses.

Ingredients You’ll Need

To make a tasty Garlic Parmesan Roasted Shrimp, you need the right stuff. Fresh shrimp gives it a great texture and flavor. Essential aromatics take it to the next level. Here’s what you’ll need for this yummy recipe.

Fresh Shrimp Selection

Fresh shrimp is the main attraction. Choose shrimp with a salty smell and firm feel. Large or jumbo shrimp are best because they hold flavors well. Opt for shrimp in their shells for the best taste. You can devein them or leave them as is.

Essential Aromatics and Spices

Aromatics are key to the dish’s flavor. You’ll need:

  • Garlic: Fresh minced garlic adds a strong taste.
  • Parsley: Chopped parsley adds color and freshness.
  • Lemon zest: It adds a citrusy touch.
  • Black pepper and salt: These enhance the flavors.

These ingredients make a savory mix that goes well with the shrimp.

Equipment for Cooking

Right tools make cooking easier. You’ll need:

  • Baking sheet: A solid surface for roasting.
  • Mixing bowl: For mixing the ingredients.
  • Spoon or spatula: For mixing and spreading.
  • Using parchment paper: Optional for easy cleanup.

Preparing the Shrimp

Getting the shrimp ready is key to a tasty dish. First, clean and devein them for a better taste. Then, marinate them in a garlic mix to boost the flavor.

Cleaning and Deveining

Rinse the shrimp under cold water to get rid of dirt. Use scissors or a knife to open them up and take out the dark vein. This makes the shrimp look and taste better.

Marinating Tips for Enhanced Flavor

Marinate the shrimp for 15 to 30 minutes to add flavor. A garlic marinade is great for this. Mix minced garlic, olive oil, and lemon juice for the marinade. Coat the shrimp well for even flavor.

For a detailed recipe, check out this link. These tips will make every bite full of flavor.

Making the Garlic Parmesan Sauce

Making the perfect garlic parmesan sauce is key for a great meal. This sauce makes the shrimp taste rich and creamy. It’s made with parmesan cheese, butter, and spices, making it easy to make.

Key Ingredients for the Sauce

  • 1 cup of grated parmesan cheese
  • 1/2 cup of unsalted butter
  • 4 cloves of minced garlic
  • 1/4 cup of heavy cream
  • 1 teaspoon of Italian seasoning
  • Salt and pepper to taste

Step-by-Step Sauce Preparation

Here’s how to make a creamy sauce for shrimp that will wow everyone:

  1. In a medium saucepan, melt the butter over medium heat.
  2. Add the minced garlic and sauté for about 2 minutes until fragrant.
  3. Pour in the heavy cream, stirring continuously to combine.
  4. Gradually mix in the grated parmesan cheese until smooth.
  5. Stir in the Italian seasoning, salt, and pepper to taste.
  6. Allow the sauce to simmer for an additional 3-5 minutes, stirring occasionally until it reaches the desired thickness.

This garlic parmesan sauce recipe is great with shrimp, pasta, or veggies. It’s a simple way to add creamy, delicious flavor to your dishes.

Cooking the Shrimp

Choosing the right way to cook Garlic Parmesan Roasted Shrimp is key. Both stovetop and oven methods have their own perks. The right choice can make your meal taste amazing, with perfectly cooked shrimp.

Stovetop vs. Oven Methods

The stovetop method cooks shrimp fast and lets you watch them closely. Sautéing in a skillet mixes flavors well. It needs high heat to get a golden outside and soft inside.

Oven-roasted shrimp, on the other hand, cooks evenly and gets a bit caramelized. It’s great for letting the flavors soak in while you do other things. It’s perfect for making a lot of shrimp, like for a party.

Cooking Times for Perfect Shrimp

It’s important to watch the cooking time, no matter the method. Shrimp can get tough if cooked too long. Here’s a quick guide for cooking times:

Cooking MethodCooking Time
Stovetop Sautéing2-4 minutes
Oven Roasting6-8 minutes

Shrimp should be cooked until they’re white and pink. Adjust the time based on shrimp size for the best taste and texture.

Serving Suggestions

When serving Garlic Parmesan Roasted Shrimp, think carefully to make the meal special. Different shrimp serving ideas can boost the taste and look of the dish. Choosing the right side dishes is key to a complete meal.

Ideal Side Dishes to Pair

  • Garlic bread, perfect for soaking up the delicious sauce
  • A crisp garden salad with a light vinaigrette to balance flavors
  • Scampi-style pasta tossed with lemon and parsley for a delightful combination
  • Seasoned rice or quinoa for a hearty and nutritious option

Presentation Tips for an Impressive Meal

Make your garlic shrimp look good to wow your guests. Here are some tips:

  • Use colorful plates to make the shrimp stand out
  • Garnish with fresh herbs, such as parsley or basil, for a pop of color
  • Arrange the shrimp in a circular pattern on the plate
  • Include a lemon wedge on the side for a burst of freshness

Nutritional Information

Knowing the nutritional value of your meals can make your cooking more enjoyable and healthy. Garlic Parmesan Roasted Shrimp is not just tasty but also good for you. It has a lot of protein, healthy fats, and important vitamins. Here’s a detailed look at the calories in roasted shrimp and the health benefits of its ingredients.

Caloric Breakdown of the Dish

ComponentCaloriesProtein (g)Fat (g)Carbohydrates (g)
Shrimp (4 oz)1202220
Garlic (1 clove)40.201
Parmesan Cheese (1 oz)1101071
Total (per serving)23432.292

Health Benefits of Garlic and Shrimp

Eating healthy garlic shrimp can be very beneficial. Shrimp are low in calories but high in protein, which is great for muscle and weight control. Garlic has anti-inflammatory effects, helps the heart, and boosts the immune system. These ingredients make a delicious meal that’s also good for your health.

Storage and Reheating Tips

Storing leftovers of Garlic Parmesan Roasted Shrimp right is key to enjoying it later. It keeps the flavor and texture just right. Here are some tips for storing shrimp and reheating them to keep the taste perfect.

How to Store Leftovers Properly

After you’ve eaten, store any leftover shrimp quickly. Here’s how to keep them fresh:

  • Let the shrimp cool down to room temperature before refrigerating them.
  • Use an airtight container to keep air and moisture out.
  • Freeze shrimp in a vacuum-sealed bag for longer storage.

Best Practices for Reheating

Reheating garlic shrimp the right way is important. It keeps the flavor and texture great. Try these methods:

  1. Stovetop: Put the shrimp in a skillet over medium heat. Add a bit of olive oil or water to prevent sticking. Stir occasionally until they’re hot.
  2. Oven: Heat your oven to 350°F (175°C). Place shrimp on a baking sheet and cover with foil. Heat for about 10 minutes until warm.

Variations to Try

Try new things with garlic shrimp to spice up your meals. The Garlic Parmesan Roasted Shrimp can get even better with some tweaks. For a kick, try a spicy garlic shrimp recipe. It mixes garlic and Parmesan with a spicy kick from red pepper flakes or sriracha.

Spicy Garlic Parmesan Roasted Shrimp

Spice lovers will love this twist. Add red pepper flakes to the garlic butter sauce for a spicy kick. Or, drizzle sriracha on top for more heat. This makes the dish even more flavorful and pairs well with the shrimp’s sweetness.

Adding Vegetables for Extra Flavor

Adding veggies to your shrimp dish is a great idea. Try using asparagus, bell peppers, or cherry tomatoes. They add a nice crunch and soak up the garlic and Parmesan sauce. This makes your dish not only tasty but also colorful and healthy.

Common Mistakes to Avoid

Cooking shrimp can be simple, but there are common mistakes that can spoil your Garlic Parmesan Roasted Shrimp. Knowing these mistakes can help you make a better dish. This way, you can enjoy a meal that’s perfectly cooked.

One big mistake is overcooking shrimp. This seafood should only be cooked until it’s pink and looks opaque. If you overcook it, the shrimp will be tough and dry. To avoid this, watch the cooking time closely. A little extra time can make a big difference.

Overcooking Shrimp

When shrimp is overcooked, it can change the texture of your dish. Shrimp cooks fast, usually in just a few minutes. Here are some tips to cook it right:

  • Use a timer, set it for just a couple of minutes.
  • Look for that vivid pink color and opaque look.
  • Take the shrimp off the heat a bit before the timer goes off; they’ll finish cooking from the heat left.

Another mistake is not using enough garlic and cheese. These are key for flavor. Without enough, your dish won’t taste as good. The right mix of garlic and Parmesan will make your dish stand out.

Skimping on Garlic and Cheese

Not using enough garlic and cheese can make your meal dull. Here’s how to make sure your dish is full of flavor:

  • Choose fresh garlic for the best taste; minced garlic releases more aroma than powdered.
  • Don’t be shy with the cheese! More Parmesan means more richness and creaminess.
  • Try different amounts to find the perfect balance, so the flavors complement each other.

Why You’ll Love This Recipe

This Garlic Parmesan Roasted Shrimp recipe is a hit because it’s tasty and quick. It’s perfect for families who are always on the go. You can make it fast, so you have more time to enjoy with your loved ones.

Family-Friendly and Quick Meal Option

This dish is great for any family event. It’s made with just a few ingredients and ready in under 30 minutes. Shrimp is a quick-cooking protein that fits well into your busy weeknights.

The Garlic Parmesan Roasted Shrimp is not only delicious but also healthy. For the full recipe, visit here.

Perfect for Entertaining Guests

Serving shrimp can make your gatherings more special. Garlic Parmesan Roasted Shrimp is a beautiful dish that impresses everyone. It’s perfect for both small and big parties, thanks to its vibrant flavors and great looks.

This recipe is also great because it pairs well with many sides. Try it with a light salad or fragrant rice for a complete meal. Its simplicity and taste make it a favorite for quick seafood meals.

Conclusion

As we finish our journey through Garlic Parmesan Roasted Shrimp, it’s clear this dish is a hit. It’s a mix of tasty flavors and easy to make. Succulent shrimp in garlic butter sauce, topped with Parmesan cheese, make for a satisfying meal.

This recipe is great for quick weeknight dinners or impressing guests. It’s perfect for both family meals and special occasions. With a few ingredients and some time, you can make a memorable dish.

So, why not give it a try? With the tips from this article, you’re ready to cook something amazing. Try the garlic Parmesan shrimp recipe and enjoy the flavors. For the full recipe, check out this link and start your cooking adventure today!


FAQ

What makes Garlic Parmesan Roasted Shrimp a great seafood dish?

Garlic Parmesan Roasted Shrimp is a tasty seafood dish. It combines garlic and parmesan flavors, making it aromatic and flavorful. It’s also easy to make, perfect for family meals or parties.

Can I use frozen shrimp for this recipe?

Yes, you can use frozen shrimp! Just thaw it completely and pat it dry. This ensures the best texture and flavor in your Garlic Parmesan Roasted Shrimp.

How long should I marinate the shrimp for optimal flavor?

Marinate the shrimp for at least 15-30 minutes. This lets the garlic parmesan flavors soak into the shrimp, making the dish taste better.

What are some ideal side dishes to serve with Garlic Parmesan Roasted Shrimp?

Serve it with garlic bread, a fresh salad, or light pasta. These sides complement the creamy garlic parmesan flavors well.

How can I make this dish spicier?

Add red pepper flakes or hot sauce to the marinade for a spicy kick. This adds a delightful flavor without overpowering the dish.

What is the best way to store leftovers?

Store leftovers in an airtight container in the fridge for up to 3 days. For longer storage, freeze the shrimp. Reheat gently to keep it tender.

Is this Garlic Parmesan Shrimp recipe healthy?

Absolutely! This recipe is low in calories but high in protein and nutrients. The garlic also has health benefits, making it a nutritious meal choice.

Can I add vegetables to the Garlic Parmesan Roasted Shrimp?

Yes, adding vegetables like asparagus, bell peppers, or cherry tomatoes boosts flavor and nutrition. It also makes the dish more colorful and tasty.

Easy Oven Chicken and Rice

Imagine coming home after a long day and smelling a delicious meal. The scent of Easy Oven Chicken and Rice greets you, making you feel better instantly. This recipe is a favorite for families who need a quick dinner on busy weeknights.

It’s a tasty one-pot dish that everyone loves. Plus, it’s easy to make and clean up. Its hearty flavors and simple prep make it a staple in many homes. Are you ready to make this comforting dish?

Key Takeaways

  • Easy Oven Chicken and Rice is a quick dinner solution for busy nights.
  • It’s a simple chicken and rice recipe that appeals to the whole family.
  • One-pot chicken and rice means easier cleanup.
  • This dish offers delicious flavors with minimal effort.
  • Perfect for anyone looking to make mealtime enjoyable and stress-free.

Introduction to Easy Oven Chicken and Rice

Easy Oven Chicken and Rice is a hit for families looking for tasty and easy meals. It combines chicken and rice in a simple way. This makes it a favorite in many homes.

Why This Recipe Is a Family Favorite

This dish is loved because it tastes great for everyone. It’s warm and satisfying, making it a top pick for family dinners.

Perfect for Busy Weeknights

Weeknights can be hectic. This recipe makes dinner easy, saving time for busy parents. It’s cooked in one pan, so cleaning up is quick.

Nutritious and Delicious

This meal is also good for you. It uses healthy ingredients like chicken and rice. It’s a great way to keep your family healthy and happy.

Ingredients You’ll Need

This easy oven chicken and rice recipe needs a few key ingredients for a tasty one-pan meal. Knowing the best chicken cuts, the right rice, and the perfect herbs and spices makes it a hit with the family.

Chicken: What Cuts Work Best

Some chicken cuts are better than others in this recipe. Chicken thighs are great because they’re tender and stay juicy. They also add rich flavors that mix well with the dish.

Chicken breasts are a leaner choice but don’t lack in taste. Make sure to season them well to boost the flavor.

Rice: Choosing the Right Type

The right rice is key in this recipe. Long-grain rice is best because it’s fluffy and absorbs juices well. It makes a savory base for the dish.

Parboiled or jasmine rice can also be good choices. They add different textures and scents that go well with chicken.

Herbs and Spices for Flavor

Herbs and spices make this dish pop. Use fresh herbs like parsley or thyme for a fresh taste. Spices like garlic powder or paprika add depth.

Experiment with different herbs and spices to make each meal special. A bit of rosemary or Italian seasoning can change the whole dish. For a reliable recipe, visit this link.

Preparing the Chicken and Rice Mixture

Preparing your chicken and rice dish is a fun process. It involves marinating chicken, cooking rice, and mixing everything together. These steps will make your meal delicious and full of flavor.

Marinating the Chicken for Extra Flavor

Marinating chicken makes it taste better. Use a mix of olive oil, lemon juice, garlic, and herbs. Let it marinate for at least 30 minutes or even a few hours. This way, the flavors soak into the meat, making it juicy and tasty.

Cooking the Rice: Tips and Tricks

To cook perfect rice, rinse it well first. This removes extra starch, preventing it from sticking. Use a 2:1 water to rice ratio. Boil the water, add rice, cover, and lower the heat. Simmer for 18 minutes. These tips will help you get fluffy, non-sticky rice.

Mixing Everything Together

After marinating the chicken and cooking the rice, mix them together. In a big bowl, combine the rice and chicken. This step is key as it blends all the flavors. It makes every bite full of savory goodness.

Steps to Bake Chicken and Rice

Baking chicken and rice needs precision for a tasty dish. Knowing each step helps make cooking easier and more enjoyable. It ensures your meal will be a hit with everyone.

Preheating the Oven Properly

First, preheat your oven to 375°F (190°C). This step is key for even cooking and keeping moisture in. Make sure the oven is at the right temperature before putting your dish in.

Arranging Ingredients in the Baking Dish

When setting up the dish, layer the ingredients for better heat distribution. Start with rice at the bottom, then add the chicken. This way, the chicken’s juices can flavor the rice. Adding broth or water keeps the rice moist and flavorful.

Recommended Cooking Time and Temperature

Chicken and rice usually take about 45 minutes to an hour to cook. Check the chicken’s internal temperature to ensure it’s 165°F (75°C). This keeps the chicken juicy and the rice cooked right. Adjust cooking time based on chicken size for perfect results.

Flavor Variations to Try

Getting creative with your chicken and rice recipe can elevate dinner. There are many ways to add flavor, nutrition, and make it your own. Trying different chicken and rice recipes can lead to meals everyone will love.

Adding Vegetables for Extra Nutrition

Adding vegetables can make your dish healthier. Try adding peas, carrots, or bell peppers near the end of cooking. These veggies not only add nutrition but also color and texture, making the dish look great.

Different Spice Blends to Experiment With

Trying different spice blends can change your chicken and rice’s flavor. Italian seasoning gives a Mediterranean twist, while Cajun spices add heat. Each blend offers a new taste, pleasing different tastes.

Making It Cheesy: How to Add Cheese

For a creamy twist, add cheese to your chicken and rice. Mozzarella, cheddar, or cream cheese can make it creamy. Add cheese towards the end to melt and mix well without overpowering the dish.

Exploring these flavor variations can make your chicken and rice better. For a simple recipe to customize, check out this guide to simple oven chicken and for inspiration.

Serving Suggestions

Serving chicken and rice makes any meal more comforting. But, choosing the right sides can make it even better. A mix of flavors and textures makes the meal more enjoyable.

Side Dishes That Pair Well

Steamed veggies like green beans or carrots add nutrition. A fresh garden salad is a light option. Crusty bread is great for dipping in sauces.

For something different, try Mamaw’s Chicken and Rice Casserole. It’s a tasty twist that complements your meal well.

How to Garnish for Presentation

Garnishing your chicken and rice makes it look good and adds flavor. Sprinkle chopped herbs like parsley on top. A few lemon slices add brightness.

Recommended Wine Pairings

For wine with chicken and rice, choose light-bodied whites like Chardonnay or Sauvignon Blanc. They enhance the flavors without overpowering. A fruit-forward red like Pinot Noir can also add complexity.

Storing Leftovers

Storing chicken and rice properly is key to keeping them fresh and flavorful. Use airtight containers to stop moisture loss and keep bacteria away. This way, you can enjoy your meal again later.

Proper Storage Techniques

Let your chicken and rice cool down before storing. Put it in airtight containers and refrigerate. For longer storage, freeze parts of it. Always label containers with the date.

Reheating Tips for Best Flavor

Reheating your leftovers right is important for their taste and texture. Use the microwave, covering it to keep steam in. This stops the rice from drying out. Or, reheat on the stovetop with a bit of broth or water.

How Long Leftovers Last

Leftover chicken and rice can stay in the fridge for three to four days. If you freeze it, it can last two to six months. Remember, quality might drop, but safety is always first.

Common Mistakes to Avoid

When making Easy Oven Chicken and Rice, knowing common mistakes can make a big difference. Avoiding chicken overcooking, skipping the marinating step, and choosing the wrong rice are key. These tips will help improve the taste and texture of your dish.

Overcooking the Chicken

Overcooking chicken makes it dry and tough. It’s important to check the chicken’s internal temperature. Aim for 165°F to keep it tender and juicy. A meat thermometer is the best way to ensure this.

Skipping the Marinating Step

Marinating the chicken adds flavor and moisture. Skipping this step can make your dish taste bland. Marinate for at least 30 minutes to several hours. This will help your chicken stay moist and flavorful.

Using the Wrong Rice

Choosing the right rice is important for the dish’s texture. Some rice types, like long-grain or jasmine, might not be the best choice. Instead, use short- or medium-grain rice. These varieties absorb moisture well, making the dish cohesive.

Making It a One-Pan Meal

One-pan meals can change how you cook. Easy Oven Chicken and Rice is tasty and convenient for busy nights. It uses quick methods, saving you time to enjoy your meal.

Convenient Cooking Methods

Choosing the right cooking methods makes a big difference. Non-stick baking pans are key for easy cleanup. They prevent food from sticking, making serving and cleaning up a breeze.

Cleaning Up Made Easy

One-pan meals make cleaning up simple. Everything cooks in one dish, so you can quickly move from oven to table. Just rinse the pan, and it’s ready for the next meal. This makes meal prep stress-free, even on busy days.

Time-Saving Tips

Using time-saving tips can make meal prep easier. Pre-measuring ingredients helps cooking go smoothly. Think about using leftovers for the next day’s meal. These tips help you cook quickly without sacrificing flavor.

Nutritional Benefits of Chicken and Rice

Chicken and rice together make a great mix of nutrients for a healthy diet. This combo is not only tasty but also good for your health. It has many benefits that help keep you feeling your best.

Protein Power of Chicken

Chicken is known for its chicken nutrition, with lots of protein. This protein is key for building and fixing muscles. It also gives you the amino acids your body needs to stay healthy and strong.

Chicken helps you feel full longer than carbs alone. This can help you keep a healthy weight.

Fiber-Rich Benefits of Rice

Choosing the right rice can make your meal even better. Whole grain rice, like brown rice, is full of fiber. This fiber is good for your digestion and keeps you energized for longer.

Fiber is also great for your gut health. It helps you feel full, making it easier to eat the right amount of food.

Balancing Your Meal for Nutrition

To make your meal really nutritious, add some veggies. Leafy greens, bell peppers, or carrots are all great choices. They add color and extra vitamins and minerals to your dish.

Remember to watch your portion sizes. This helps make sure you’re getting a balanced meal. It’s good for your health and the health of your family.

Conclusion: Why You’ll Love This Recipe

The Easy Oven Chicken and Rice recipe is perfect for busy families. It needs just a few ingredients and is easy to make. This makes it great for both kids and adults, perfect for family dinners.

Sharing meals at home brings families closer together. This recipe not only feeds but also sparks conversations. It’s a chance to connect over a delicious meal. For more on this recipe, check out this oven-baked chicken and rice guide.

This recipe will soon be a favorite for quick dinners. It’s affordable and can be made in many ways. Enjoy the simple yet tasty results of Easy Oven Chicken and Rice.


FAQ

How long does it take to prepare Easy Oven Chicken and Rice?

It takes about 45 minutes to prepare and cook. This makes it a quick and perfect choice for busy weeknights.

Can I use brown rice instead of white rice?

Yes, you can use brown rice. But, it cooks longer. Adjust the liquid and baking time for the best texture.

What type of chicken is best for this recipe?

Chicken thighs are tender and juicy. Boneless chicken breasts are leaner if you prefer.

How can I make this dish vegetarian?

Use tofu or chickpeas as a substitute for chicken. Use vegetable broth for flavor. Adjust cooking time as needed.

Can I add vegetables to the Easy Oven Chicken and Rice?

Yes! Adding peas, carrots, or bell peppers boosts nutrition and flavor. Mix them in before baking.

What spices work well with this chicken and rice recipe?

Try Italian seasoning, paprika, or Cajun spices. Garlic and onion powder also add flavor.

How should I store leftovers?

Store leftovers in an airtight container in the fridge for 3-4 days. Cool it first for best texture and flavor.

Can I freeze Easy Oven Chicken and Rice?

Yes! Cool it completely, then freeze in a freezer-safe container. It lasts 2 months in the freezer. Thaw in the fridge before reheating.

What sides pair well with chicken and rice?

Try steamed broccoli, a garden salad, or crusty bread. They soak up the dish’s flavors well.

How can I make this dish cheesy?

Sprinkle shredded cheese on top during the last 10 minutes. Mozzarella or cheddar works great for a gooey topping.

Authentic Soup Joumou (Haitian Pumpkin Soup) Recipe

As Manami stirred the pot, the smell of spices filled the air. It took her back to her childhood in Haiti. In her kitchen now, the fresh ingredients brought back memories of family gatherings.

At those gatherings, Soup Joumou was more than food. It was a symbol of freedom and resilience, celebrated on Haitian Independence Day. Every spoonful of this Haitian Pumpkin Soup brought back laughter, stories, and traditions. Today, she shares her favorite Soup Joumou Recipe with others, inviting them to taste the magic of this cultural dish.

Key Takeaways

  • Soup Joumou is a traditional Haitian dish symbolizing freedom and resilience.
  • The main ingredient is pumpkin, which provides a rich and hearty base.
  • Served during New Year celebrations, it holds great cultural significance.
  • Making an authentic Soup Joumou means using fresh, vibrant ingredients.
  • This recipe creates an opportunity to share and celebrate Haitian culture.
  • Enjoying Soup Joumou brings back cherished memories of family and tradition.

What is Soup Joumou?

Soup Joumou is a beloved dish in Haitian cuisine. It’s celebrated for its rich history and cultural importance. This pumpkin soup has its roots in the Haitian Revolution, a key moment in the fight for freedom by enslaved Africans.

This dish symbolizes victory, enjoyed to celebrate independence and the strength of the Haitian people.

The Historical Significance of Soup Joumou

January 1st is a big day in Haitian culture, marking Independence Day. On this day, families come together to make and enjoy Soup Joumou. It’s a time filled with deep meaning.

The soup stands for freedom and reminds us of our ancestors’ struggles. It’s a dish that connects us to our past, showing unity and strength through generations.

Cultural Celebrations Featuring Soup Joumou

Festivals and gatherings celebrate traditional Soup Joumou. It brings families and communities together. During these events, the soup is the star, showing the joy and spirit of Haitian culture.

Every spoonful connects us to our history and strengthens our bonds. For more on this dish, check out this article about its connection to charities helping Haitian communities.

Key Ingredients for Soup Joumou

Making authentic Soup Joumou starts with picking the right ingredients. These ingredients add to its rich taste and cultural value. Knowing them is key to making a dish that honors tradition.

Pumpkin: The Star of the Dish

Pumpkin is the heart of Soup Joumou. It brings sweetness and a bright orange color. For the best flavor, choose a ripe, firm pumpkin. A medium-sized one is ideal for a hearty soup.

Vegetables and Seasonings

Other than pumpkin, fresh veggies add to the soup’s flavor. Common ones are:

  • Carrots
  • Celery
  • Onions

These veggies are sautéed to bring out their sweetness. Seasonings are also key for authentic Haitian taste. Important ones include:

  • Thyme
  • Garlic
  • Scotch bonnet pepper

These seasonings give the soup its unique aroma.

Protein Options for a Heartier Soup

Adding protein makes the soup more filling. Beef or chicken are classic choices for their flavor. For a plant-based option, lentils or chickpeas work well. They keep the soup nutritious and tasty.

Step-by-Step Instructions for Making Soup Joumou

Making Soup Joumou is a fun process that brings Haitian flavors to your kitchen. Follow these easy steps to make a comforting bowl of this traditional pumpkin soup. Each step makes sure the ingredients shine and gives you a warm, authentic taste.

Preparing the Ingredients

Start by picking a fresh pumpkin. Choose one that’s firm and has a nice color. Cut it in half, remove the seeds, and chop it into pieces. Also, get carrots, onions, and bell peppers for extra flavor. Make sure they’re all chopped the same size for even cooking.

Cooking the Pumpkin and Vegetables

Boil water in a big pot and add the pumpkin pieces. Let them cook for 20 minutes or until they’re soft. Then, blend the pumpkin until it’s smooth for a creamy base.

Add your chopped vegetables to the pot and let them simmer until they’re soft. This step is key to your delicious soup.

Adding the Seasoning and Protein

Now, add garlic, thyme, and spices like allspice and black pepper for flavor. If you’re using beef or chicken, add it now and let it cook. Let the soup simmer for 15-20 minutes to blend the flavors.

Tips for Perfecting Your Soup Joumou

Making an authentic Soup Joumou means picking the right ingredients and mastering cooking techniques. Follow these tips to make a delicious and fulfilling dish.

Choosing the Right Pumpkin

Choosing the right pumpkin is key for the best Soup Joumou flavor. Look for Haitian calabaza or butternut squash. They have a sweet flavor that makes the soup taste amazing.

When you shop, pick pumpkins that are firm and bright in color. Make sure they are free from blemishes for the best quality.

Flavor Enhancements

Adding fresh herbs like parsley or thyme can make your Soup Joumou more aromatic. A squeeze of lime juice at the end adds a refreshing touch. Try spices like allspice or coriander to make it your own.

Common Mistakes to Avoid

Don’t let common mistakes ruin your Soup Joumou. Avoid overcooking vegetables to keep them tender. Seasoning is important, so taste as you go. This ensures your soup stays balanced and delicious.

Pairing Suggestions for Soup Joumou

Enjoying traditional Soup Joumou is more than just the soup. Adding the right sides and drinks can make it a complete meal. Here are some ideas to enhance your Soup Joumou experience.

Traditional Haitian Dishes

Pairing Soup Joumou with Haitian classics makes for a memorable meal. Try it with griot (fried pork) for a savory touch. Or add pikliz (spicy pickled vegetables) for a zesty kick. These pairings bring out the best in Soup Joumou.

Best Sides and Accompaniments

Adding sides to your Soup Joumou can really boost the meal. Here are some favorites:

  • Rice: It soaks up the soup’s flavors.
  • Fried plantains: Their sweetness contrasts with the soup’s richness.
  • Crusty bread: Great for dipping in the broth.

Beverage Pairings

Choosing the right drinks can complete your meal. Haitian rum adds a festive vibe. Refreshing fruit juices, like pineapple or mango, cool down the soup’s warmth. These drinks enhance the flavors of traditional Soup Joumou.

Storing and Reheating Soup Joumou

To enjoy your delicious Soup Joumou later, proper storage techniques are essential. Knowing how to store leftovers effectively helps maintain the flavors and texture of this delightful dish. With the right methods, you can savor the Soup Joumou ingredients for days to come.

How to Properly Store Leftovers

Storing Soup Joumou properly involves a few simple steps:

  • Allow the soup to cool to room temperature before storing.
  • Divide the soup into smaller portions for easier reheating later.
  • Use airtight containers to prevent moisture loss and avoid freezer burn.
  • Label the containers with the date for easy reference.
  • For long-term storage, freeze the soup, which can keep its flavors for up to three months.

Tips for Reheating Without Losing Flavor

When it’s time to enjoy your stored Soup Joumou, reheating correctly is key:

  • For stovetop reheating, place the soup in a pot over medium heat, stirring occasionally until thoroughly heated.
  • If using a microwave, transfer the soup to a microwave-safe container, cover loosely, and heat in increments, stirring in between to ensure even warming.
  • Adding a splash of water or broth while reheating can help maintain moisture and enhance the flavors.

Creative Variations of Soup Joumou

Trying out different Soup Joumou recipes can make your cooking more fun and meaningful. These new takes on the dish fit various diets, so everyone can enjoy it. It’s a great way to honor a cherished tradition.

Vegan and Vegetarian Adaptations

If you follow a vegan or vegetarian diet, Soup Joumou can be made just for you. Just replace the meat with plant-based foods. Here are some good options:

  • Lentils: They’re full of protein and give the soup a thick texture.
  • Chickpeas: These add a nutty taste and can make the soup creamy when blended.
  • Tofu: Marinate and cook it, and it becomes a tasty addition to your soup.

These ingredients make your Soup Joumou tasty and plant-based, satisfying everyone’s taste buds.

Spicy Versions of Soup Joumou

If you like a little heat, a spicy Soup Joumou is perfect. Here’s how to add some spice:

  • Extra Scotch Bonnet Peppers: These will make your soup really hot.
  • Hot Sauce: A little bit can enhance the flavor.
  • Red Pepper Flakes: Sprinkle these in to adjust the heat to your liking.

These changes make your Soup Joumou easy to make and full of flavor. It’s a fun twist on the classic dish.

Serving Suggestions for a Festive Meal

Presenting traditional Soup Joumou makes it even more special. It’s a dish that can be beautifully garnished. This makes it a highlight at any gathering.

Garnishes and Presentation Ideas

Garnishing your Soup Joumou adds flavor and color. Here are some great options:

  • Freshly chopped parsley or cilantro for a touch of greenery
  • A drizzle of olive oil to enhance richness and flavor
  • Sprinkling freshly cracked black pepper for a bit of heat
  • Serving alongside slices of lime for a zesty kick

Using a vibrant bowl or platter can also add visual appeal. A sprinkle of colorful herbs can attract attention. This makes your traditional Soup Joumou stand out during any meal.

Ideal Occasions for Serving Soup Joumou

This cherished Soup Joumou recipe is perfect for various celebrations. Consider these occasions to highlight its cultural importance:

  • New Year’s Day, honoring Haitian independence and heritage
  • Family gatherings, bringing everyone together with warmth and nostalgia
  • Holiday feasts, showing off the rich flavors and traditions of Haitian cuisine

Enjoying traditional Soup Joumou together fosters connection. It creates lasting memories around the table.

Nutritional Benefits of Soup Joumou

Soup Joumou, or Haitian Pumpkin Soup, is more than just a warm meal. It’s packed with health benefits. The main ingredient, pumpkin, makes it a nutritious choice for your diet.

Health Benefits of Pumpkin

Pumpkin is the star of Soup Joumou, full of good stuff. It’s rich in vitamins A and C, which are great for your eyes and immune system. It also helps your skin look good.

Plus, pumpkin has lots of fiber. This helps your digestion and keeps you feeling full. So, Soup Joumou is not only tasty but also good for you.

Other Nutrients in the Dish

But there’s more to Soup Joumou than just pumpkin. It also has carrots, celery, and onions, adding extra vitamins and minerals. These veggies boost the soup’s health benefits.

The proteins in the soup, like beef or chicken, give you the amino acids you need. This mix makes Haitian Pumpkin Soup a healthy and balanced meal. It’s perfect for anyone looking to eat well.

Conclusion: Enjoying Your Homemade Soup Joumou

Making Soup Joumou is more than just cooking a meal. It’s a way to connect families and celebrate Haitian culture. This soup is filled with meaning, showing unity and the value of shared traditions. As you enjoy it, you’re also diving into the Soup Joumou history that has touched many lives for years.

Share your homemade Soup Joumou with your family and friends. It’s a chance to make memories and highlight the importance of being together. Every spoonful tells a story of love, culture, and family, reminding us of the bonds we form over food.

So, get ready to cook and share authentic Soup Joumou with your loved ones. It’s a chance to learn about Haitian culture and feel connected to a larger community. It’s more than just cooking; it’s about embracing a part of history that makes our meals special.


FAQ

What is Soup Joumou?

Soup Joumou is a traditional Haitian pumpkin soup. It symbolizes freedom and resilience. It’s a hearty dish made with pumpkin, enjoyed during New Year celebrations.

What are the key ingredients for making Soup Joumou?

Key ingredients include pumpkin, carrots, celery, onions, garlic, thyme, scotch bonnet pepper, and beef or chicken. This mix gives it the authentic Haitian flavor.

How do I prepare Soup Joumou?

Start by preparing the ingredients. Then, cook the pumpkin and vegetables. Add seasonings and protein, following a step-by-step guide for rich flavors and creamy texture.

Can I make a vegan version of Soup Joumou?

Yes! For a vegan version, use plant-based proteins like lentils or beans. Keep the traditional vegetables and spices for authenticity.

What are some common mistakes to avoid when making Soup Joumou?

Avoid overcooking vegetables, not seasoning enough, or using old pumpkin. Follow the recipe closely for the best results.

How should I store leftovers of Soup Joumou?

Store leftovers in airtight containers in the fridge for up to three days. Freeze for longer storage. Reheat on the stovetop to keep flavors.

What dishes pair well with Soup Joumou?

Pair Soup Joumou with rice, fried plantains, and crusty bread. Haitian favorites like griot or pikliz also pair well.

Is there a specific occasion when Soup Joumou is traditionally served?

Soup Joumou is celebrated on January 1st, Haiti’s Independence Day. It’s also enjoyed at family gatherings and festive occasions.

What are the nutritional benefits of Soup Joumou?

Soup Joumou is nutritious, thanks to pumpkin’s vitamins A and C, fiber, and antioxidants. The vegetables and proteins make it a balanced meal.

Sausage Tortellini Soup: Creamy Comfort in Every Bite!

As autumn’s chill sets in, nothing beats a warm bowl of soup. On a cold evening, I craved something tasty and fulfilling. I made Sausage Tortellini Soup with what I had, and it was a hit. It felt like a cozy Italian kitchen in every spoonful.

This Creamy Tortellini Soup was more than food; it was a warm hug. It brought happiness to my family after a long day. It’s easy to make, full of flavor, and healthy, making it great for dinner any night. For inspiration, I checked out this amazing resource for comforting meals.

Now, let’s explore why Sausage Tortellini Soup is a favorite for families. We’ll look at the ingredients and how to serve it.

Key Takeaways

  • Sausage Tortellini Soup combines rich flavors with nutritious ingredients.
  • This Creamy Tortellini Soup is quick to prepare, ideal for busy weeknights.
  • Customizable with various sausages and veggies for added nutrition.
  • Great for leftovers or freezing for later enjoyment.
  • A comforting option that appeals to both children and adults.

What is Sausage Tortellini Soup?

Sausage Tortellini Soup is a mix of creamy broth and tasty ingredients. It has tortellini, small Italian pasta pockets filled with cheese or meat. Italian sausage, vegetables, and spices make it a hearty meal.

This soup is great for cold nights. It’s a favorite among families.

A Quick Overview

This Homemade Tortellini Soup captures the heart of Italian food. It’s smooth and full of flavor. Each spoonful brings warmth and joy.

Vegetables like spinach or carrots add nutrition and taste. The Tortellini Soup Recipe is simple. It lets home cooks make a top-notch meal easily.

Origins of the Dish

The Sausage Tortellini Soup comes from Italy. Tortellini, filled with meats or cheeses, are from the Emilia-Romagna region. This pasta has a rich history.

The soup combines tortellini with a creamy base. It shows how Italian ingredients can make a nourishing dish. Over time, the soup has changed, but its roots remain strong.

Key Ingredients for the Perfect Soup

Making a great Sausage Tortellini Soup means picking the right ingredients. Sausage, tortellini, and broth are key. They make the soup tasty and satisfying. Here are the main things to think about when you’re cooking.

Sausage Varieties to Use

Start with Italian sausage, mild or spicy. It adds a lot of flavor to your soup. For a lighter soup, try chicken or turkey sausage. It’s leaner but just as tasty.

Choosing the Right Tortellini

Choosing the right tortellini is important too. Fresh or frozen, and filled with cheese, spinach, or meat, are good options. Pick what you like and what goes well with your sausage.

Essential Broth Options

The broth is the soup’s heart. Choose a rich, flavorful one. Chicken or vegetable broth adds depth. For even more flavor, make your own broth. It makes the soup even heartier.

Preparing Your Sausage Tortellini Soup

Making a tasty Sausage Tortellini Soup is easy and fun. Follow this simple guide to make a creamy tortellini soup. You’ll learn how to avoid common mistakes.

Step-by-Step Cooking Guide

Start by heating a big pot over medium heat. Cook your sausage until it’s nicely browned. Then, add chopped garlic and onion and let them cook until they smell great.

Next, pour in your broth and bring it to a boil. Add the tortellini and wait until they float. This means they’re cooked. Finish with some cream for a rich, creamy soup.

Tips for Efficient Prep Time

Being efficient can make cooking more enjoyable. Chop your veggies ahead of time to save time. Using canned broth is a quick way to add flavor without extra effort.

Having your ingredients ready can make cooking a breeze. This makes your Tortellini Soup Recipe easy to make.

Common Mistakes to Avoid

Many people make mistakes that can ruin their dish. One common mistake is overcooking the tortellini, making it mushy. Make sure to season your broth and sausage well.

Enhancing Flavor with Seasonings

A well-crafted Sausage Tortellini Soup can elevate your dining experience with the right seasonings. The right herbs and spices add complex flavors, making it unforgettable. It’s all about freshness and balance to create a Comforting Tortellini Soup that’s satisfying and delightful.

Herbs and Spices That Shine

Choosing the right herbs and spices can make your Homemade Tortellini Soup more savory. Italian herbs like basil, oregano, and thyme warm up the broth. A pinch of red pepper flakes adds a nice kick without overpowering the flavors.

Fresh garlic and onion, sautéed with the sausage, create an irresistible aroma. This sets the stage for the soup’s flavors.

How to Balance Flavors

Flavor balance is key, and it’s all about tasting as you go. Season slowly and adjust as needed. If it’s too acidic, a bit of sugar can help balance it out.

A splash of red wine adds depth, enriching the soup’s profile. These steps are essential for a delicious Sausage Tortellini Soup.

The Role of Cream in the Recipe

Cream adds a luxurious feel and softens strong flavors. Heavy cream or half-and-half enriches the broth. It makes the soup creamy and comforting.

For a special touch, add cream towards the end. This way, it blends perfectly with the other ingredients.

Creating a flavorful Sausage Tortellini Soup fills every bowl with comfort and warmth. Don’t be afraid to try different spice and herb combinations. They can greatly enhance both taste and enjoyment.

For more inspiration, check out this Homemade Tortellini Soup recipe. It’s sure to impress.

Customizing Your Soup

Customizing your Easy Tortellini Soup lets you make it just right for you. It’s a comforting choice for everyone. You can adjust it to fit your taste and dietary needs.

Adding Vegetables for Extra Nutrition

Adding spinach, kale, or carrots makes your soup healthier. It also adds color and texture. These veggies mix well with the broth, making the soup even tastier.

Replacing Ingredients for Dietary Needs

Need to make changes for dietary reasons? It’s simple. Try gluten-free tortellini or plant-based sausage for a veggie option. This way, everyone can enjoy a warm, tasty bowl of soup. For more ideas, check out this recipe.

Serving Suggestions for Sausage Tortellini Soup

Enjoying Sausage Tortellini Soup is more than just the taste. It’s about the whole experience of a meal. Choosing the right sides can really make your meal better. Here are some great pairings and garnishes to try with your Tortellini Soup Recipe.

Ideal Pairings with Bread

Pairing Sausage Tortellini Soup with crusty bread or garlic breadsticks is perfect. The crunchy outside and soft inside of fresh bread go great with the soup’s creaminess. Warm sourdough or a baguette is perfect for dipping into the broth.

Creative Garnishes to Try

Garnishes can turn a simple soup into a fancy dish. Try adding fresh parsley for color, grated Parmesan cheese for flavor, or olive oil for richness. These touches not only look good but also add more taste to your soup.

Storing and Reheating Tips

Storing your Homemade Tortellini Soup right is key to keeping its flavors fresh. The right steps ensure you can enjoy it again, just as you did the first time.

Best Practices for Storage

For fresh soup, store leftovers in airtight containers. This keeps out bad smells. In the fridge, it stays good for up to three days. For longer, freeze it in portions.

Freezing keeps it longer, but the tortellini might get softer. Freezing in single servings makes reheating easier and cuts down on waste.

Reheating Methods That Work

Reheat your Homemade Tortellini Soup on the stovetop for the best taste. It heats evenly and keeps the soup creamy. If it’s thicker, add some broth or cream while it’s warming up.

Using the microwave can mess up the texture and heat. It’s better to avoid it for a better soup experience.

MethodDescription
RefrigerationStore in airtight containers for up to 3 days.
FreezingFreeze individual portions to extend shelf life; texture may change.
Stovetop ReheatingFor even heating, add broth or cream if thickened.
Microwave ReheatingAvoid this method to maintain the soup’s quality and texture.

Health Benefits of Sausage Tortellini Soup

Enjoying Sausage Tortellini Soup is not just about taste. It’s also good for your health. The mix of savory sausage, soft tortellini, and colorful veggies makes a meal that’s both nourishing and satisfying. Knowing what’s in it helps us see why it’s so comforting and filling.

Nutritional Value of Main Ingredients

The main parts of this dish offer different nutrients. Italian chicken sausage is packed with protein, which is key for muscle health. Fresh veggies add vitamins and minerals, boosting your immune system. They also have natural fibers that help with digestion.

Adding cream to the soup brings calcium, which is good for your bones. So, when you eat this soup, you’re getting a lot of health benefits.

Comfort Food That Comforts the Soul

Food often has emotional value, and this Hearty Tortellini Soup is no exception. It’s perfect for cold days or when you’re feeling tired. The warm flavors make you feel better, lifting your mood.

Enjoying this soup can help you relax and feel comforted. It’s great for self-care, whether it’s a chilly evening or when you’re not feeling well. The mix of ingredients is good for both your body and mind.

For more tips on making this delicious soup, check out a detailed recipe at The Mediterranean Dish.

Variations on the Classic Recipe

Exploring different versions of Sausage Tortellini Soup can really spice up your meals. The classic recipe is great, but adding new ingredients can make it even better. You can try adding a spicy kick or even make a vegetarian version.

Spicy Sausage Tortellini Soup

For those who like a bit of heat, a spicy twist can make your soup amazing. Use hot Italian sausage or add chili peppers. This adds a nice warmth to the dish, perfect for cold days.

Vegetarian Versions to Explore

Vegetarians can enjoy this soup too. Just swap the sausage for lentils or mushrooms. Use vegetable broth instead of chicken or beef broth. This keeps the soup rich and savory, so everyone can enjoy it.

VersionMain IngredientsFlavor Profile
Classic Sausage Tortellini SoupItalian sausage, cheese tortellini, chicken brothSavory and creamy
Spicy Sausage Tortellini SoupHot Italian sausage, cheese tortellini, chicken broth, chili peppersSpicy with a kick
Vegetarian Tortellini SoupLentils or mushrooms, cheese tortellini, vegetable brothEarthy and rich

Why You’ll Love This Soup

Enjoying Sausage Tortellini Soup is more than just eating. It’s like getting a warm hug in a bowl. Every spoonful mixes creamy textures with bold flavors. This creates a sense of comfort and happiness.

This soup is perfect for any time of year. It’s great for cold winter nights or a light lunch in spring. It’s easy to make, so you can serve it at family dinners or just for yourself.

This soup is about more than just filling your belly. It’s about making a moment of joy. With quality ingredients and care, your bowl of Sausage Tortellini Soup invites you to slow down and enjoy life’s simple pleasures.

FAQ

What is Sausage Tortellini Soup?

Sausage Tortellini Soup is a creamy, hearty dish. It combines tender tortellini, savory sausage, and flavorful broth. It’s a comforting Italian soup perfect for chilly evenings.

Can I make this soup vegetarian?

Absolutely! You can make a vegetarian version. Just swap the sausage for plant-based sausage or lentils. Use vegetable broth instead of chicken broth.

What type of tortellini should I use?

You can use fresh or frozen tortellini. Cheese-filled varieties are popular. Both options are great in this soup.

How do I enhance the flavor of my Sausage Tortellini Soup?

To boost the flavor, add Italian herbs like basil and oregano. A pinch of red pepper flakes adds heat. A splash of cream makes it richer.

What vegetables can I add for extra nutrition?

Adding spinach, kale, or carrots boosts nutrition. They also add color and texture to your soup.

How should I store leftovers?

Store leftovers in airtight containers in the fridge for up to three days. For longer storage, freeze portions. Note that tortellini’s texture may change when thawed.

What’s the best way to reheat Sausage Tortellini Soup?

Reheat the soup on the stovetop. Warm it gently over medium heat. Add broth or cream to keep it creamy.

Are there any common mistakes to avoid when making this soup?

Yes! Avoid overcooking the tortellini and skimping on seasoning. Taste as you go to achieve the perfect flavor balance.

Is Sausage Tortellini Soup a nutritious option?

Yes, it can be nutritious. Vegetables add vitamins, and sausage provides protein. It’s both comforting and nourishing.

Can I use a different type of sausage?

Definitely! You can use chicken or turkey sausage for a lighter dish. Or try spicy sausage for an extra kick!

Savory Homemade Corned Beef Recipe Delights

Imagine a cozy Sunday afternoon in your kitchen. The rich aroma of spices fills your home as you make homemade corned beef. With each step, you learn the secrets of this beloved dish that has brought families together for generations.

This dish is more than just a St. Patrick’s Day tradition. The best homemade corned beef can make any meal special. It invites memories of family dinners. In this article, we’ll explore the history of corned beef, how to make it, and how to make it a hit at your family gatherings.

Key Takeaways

  • Exploring the rich history and origin of corned beef.
  • Benefits of making homemade corned beef over store-bought alternatives.
  • Key ingredients and spices for achieving the best flavor.
  • Step-by-step guide to brining and cooking your homemade corned beef.
  • Tips for tender and flavorful corned beef every time.
  • Creative ways to enjoy and pair your corned beef dishes.
  • Storing and reheating homemade corned beef for maximum freshness.

What is Corned Beef?

Corned beef is a dish loved by many, showing the passion for traditional cooking. It’s a preserved beef brisket with roots in the 16th century, mainly from Europe. The name “corned” comes from the big salt grains used to cure it, making the meat taste better and last longer.

Understanding Corned Beef’s Origin

The story of corned beef goes back centuries, showing the cooking methods and tastes of old times. As people moved, they brought their cooking traditions with them. This made corned beef a favorite in many cultures, like Irish cuisine.

The Process of Corned Beef Brining

To make corned beef, you need to brine the brisket. This means soaking it in a mix of water, salt, sugar, and spices. A good brine recipe lets the meat soak up these flavors for 5 to 10 days. This process not only keeps the meat fresh but also gives it a rich taste, just like in a traditional corned beef recipe.

If you want to try making homemade corned beef, knowing these steps is key. Make sure to check out a reliable guide like this one for more details.

Why Make Homemade Corned Beef?

Making your own corned beef at home is not just tasty. It also comes with many benefits. It lets you add a personal touch to your meals, something store-bought can’t offer.

Healthier Alternatives to Store-Bought

Homemade corned beef is a healthier choice than store-bought. You can pick the best beef and control the brine ingredients. This means you avoid preservatives and additives, making it better for you.

Customizable Flavor Profiles

When you make your own corned beef, you can try out different flavors. You can follow an easy recipe and add your favorite spices. This way, you can make it taste exactly how you like it. For tips on making it your own, check out this resource.

Essential Ingredients for Homemade Corned Beef

Making the best homemade corned beef starts with knowing the key ingredients. The cut of beef is critical for flavor and tenderness. Spices also play a big role in the taste. Using top-notch ingredients makes every meal special.

Choosing the Right Cut of Beef

The main ingredient in homemade corned beef is the meat. Beef brisket is a top choice because of its fat and tenderness. Choose a brisket rated USDA Choice or higher for the best taste. A marbled brisket keeps the meat juicy and flavorful.

Key Spices for Flavoring

The spices used in brining greatly affect corned beef’s taste. Essential spices include:

  • Black peppercorns
  • Coriander seeds
  • Mustard seeds
  • Garlic
  • Bay leaves

These spices make a brine that enhances the beef’s flavor. The right mix of spices can make your corned beef dish unforgettable, perfect for sharing with loved ones.

Step-by-Step Guide to Making Corned Beef

Making homemade corned beef needs careful steps. First, you must brine and cure the meat. This guide will help you make Corned Beef at home easily.

Preparing the Brine

The first step is to make the brine. Mix water, kosher salt, sugar, and spices in a pot. Heat it until everything dissolves, then cool it down. This cooled mixture is the base for your corned beef brine.

Curing the Beef

Then, cure the brisket in the brine. Keep it in the fridge for 5 to 10 days. This lets the flavors and salt soak into the meat. It’s key for that classic corned beef taste and soft texture.

For more detailed steps, check out this step-by-step corned beef guide.

Cooking Methods for Corned Beef

There are many ways to cook corned beef, each bringing out its unique flavors and tender texture. Two top methods are traditional boiling and using a slow cooker. Both offer tasty results in different ways.

Traditional Boiling Techniques

Boiling is a classic way to cook corned beef. Start by simmering the cured brisket in water. Add spices like mustard seeds and peppercorns for extra flavor. This method takes several hours, making the meat tender and flavorful.

The result is a dish perfect for sandwiches or with classic sides.

Slow Cooker Approach

The slow cooker is great for easy slow-cooked corned beef. Just put the brisket and some liquid with spices in the cooker. Set it on low for 8-10 hours. This keeps the meat moist and adds to its taste.

After cooking, the beef is tender and can be shredded or sliced. It’s a hit with family and friends.

Tips for Perfectly Tender Corned Beef

Making tender homemade corned beef requires careful techniques. These can make your dish much better. By avoiding common mistakes, you can have a great cooking experience. Following the best practices will give you consistently tasty results.

Avoiding Common Mistakes

To get tender homemade corned beef, don’t boil it at too high a temperature. This can make it tough instead of tender. Also, cutting the meat against the grain is a mistake. Slice it with the grain for better tenderness.

Ensuring the Right Cooking Time

Cooking time is key for corned beef. It depends on the brisket size and cooking method. Using a meat thermometer is important. It helps you reach the perfect internal temperature of 190°F.

This temperature is safe and makes the meat tender. It ensures your meal is unforgettable.

Pairing Suggestions for Corned Beef Dishes

Finding the right sides for corned beef can make your meal better. Classic sides bring out the flavors and textures of corned beef. But, you can also try unique pairings to make your dinner special. Here are some classic and unique side dish ideas that go well with corned beef.

Classic Sides to Complement Corned Beef

  • Cabbage: A long-time favorite that pairs perfectly with corned beef.
  • Potatoes: Whether boiled, mashed, or roasted, potatoes are always a hit.
  • Carrots: Sweet, tender carrots add a natural sweetness to the salty meat.
  • Whole Grain Mustard: A zesty kick enhances the corned beef flavor.

Unique Pairing Ideas to Try

  • Pickled Vegetables: Their acidity contrasts beautifully with the richness of the beef.
  • Kimchi: This spicy, fermented vegetable dish adds an unexpected heat.
  • Coleslaw: A crunchy, creamy side that brings texture to the plate.
  • Sweet Potato Fries: An interesting twist with slight sweetness and crispiness.

Storing and Reheating Homemade Corned Beef

Proper handling and storing corned beef are key to keeping its flavor and texture. It’s important to follow the right steps, even with leftovers. These tips will help keep your corned beef delicious from start to finish.

Best Practices for Storage

First, let your homemade corned beef cool down completely before storing. This stops moisture from building up, which can cause it to spoil. Put the cooled corned beef in an airtight container and refrigerate it. This keeps it fresh for up to four days.

If you need to store it longer, freeze the homemade corned beef. Wrap it in plastic wrap or aluminum foil, then put it in a freezer bag. This keeps it from getting freezer burn and keeps it good for up to three months.

Freezing Tips for Longevity

To freeze homemade corned beef well, slice it before freezing if you want. This makes it easier to serve later. Also, label your containers with the date so you know how long it’s been stored.

When you’re ready to eat your frozen corned beef, thaw it in the fridge overnight. Then, gently reheat it in a skillet or oven. Use slow and low heat to keep it juicy and avoid drying it out.

Creative Recipes Using Corned Beef

Leftover corned beef can make your meals more exciting. It adds a rich flavor and versatility. Try out Creative corned beef recipes for dishes that everyone will love.

Reuben Sandwich Variations

The Reuben sandwich is a great way to enjoy corned beef. Use hearty rye bread and layer it with corned beef, sauerkraut, and Swiss cheese. Add Russian dressing and grill until the bread is golden.

Try adding avocado or different cheeses for a twist. These Reuben sandwich ideas are perfect for lunch or dinner.

Corned Beef Hash Ideas

Making a corned beef hash is easy and tasty. Dice the leftover corned beef and mix it with potatoes and onions. Pan-fry until the potatoes are golden.

This easy corned beef hash is great for breakfast or brunch. Top it with fried eggs for extra protein. You can also add veggies like bell peppers or spinach for more nutrition.

Conclusion: Enjoying Your Homemade Corned Beef

Homemade corned beef is more than just food; it’s a way to bring families closer. Sharing a meal made with love satisfies more than just our hunger. It strengthens bonds and creates lasting memories.

Whether it’s for a big celebration or a simple family dinner, homemade corned beef is special. It’s a dish that brings people together, making every moment memorable.

Sharing the Experience with Family

Sharing corned beef around the table creates warmth and connection. As you pass around the meat, stories and laughter start to flow. This shared experience is key to family bonding.

It brings everyone closer, making family gatherings even more special. These moments are what make our traditions so meaningful.

Celebrating with Homemade Meals

Corned beef is perfect for any occasion, from St. Patrick’s Day to cozy Sundays. Making your own corned beef shows off your cooking skills. It’s a way to celebrate the joy of home-cooked meals.

With every bite, you’re not just enjoying the taste. You’re also celebrating the love and effort that goes into making a meal at home.


FAQ

What is the best cut of meat for homemade corned beef?

Beef brisket is the top choice for homemade corned beef. It’s full of fat and tender, making it perfect. Use a USDA Choice cut or higher for the best taste.

How long should I brine the corned beef?

Brining corned beef takes 5 to 10 days in the fridge. This lets the brine flavors soak into the meat, making it delicious.

Can I use a slow cooker for corned beef?

Yes! A slow cooker is great for cooking corned beef. Cook it on low for 8-10 hours. It will be tender and full of flavor.

What spices do I need for corned beef brine?

For a tasty brine, use black peppercorns, coriander seeds, mustard seeds, garlic, and bay leaves. You can adjust these spices to your liking.

How do I ensure my corned beef is tender?

For tender corned beef, cook it at a low temperature and cut against the grain. Use a meat thermometer to check for 190°F. This ensures tenderness.

What side dishes pair well with corned beef?

Classic sides include cabbage, potatoes, and carrots. Try pickled vegetables or spicy kimchi for a unique twist.

How should I store leftover corned beef?

Store leftover corned beef in an airtight container in the fridge for up to 4 days. Wrap it tightly for freezing up to 3 months. Reheat gently to keep it moist.

What can I make with leftover corned beef?

Use leftover corned beef in a Reuben sandwich with sauerkraut and Swiss cheese. Or, make a corned beef hash with diced potatoes and onions for a tasty breakfast.

Classic Shrimp Scampi: Perfect Pasta Every Time

Imagine the smell of garlic and butter filling your home. It’s a sign that dinner is ready. Coming home to a homemade shrimp scampi that impresses everyone is special. The shrimp in a buttery sauce make everyone happy.

This dish is loved for its taste and is easy to make. It’s perfect for any day, making dinner unforgettable. Whether it’s a quick weeknight meal or a special event, this shrimp scampi recipe will make it memorable.

Key Takeaways

  • Classic Shrimp Scampi blends seafood with pasta in a rich, garlicky sauce.
  • This dish is an ideal choice for both casual family dinners and festive gatherings.
  • Homemade shrimp scampi is easy to make and can be tailored to personal tastes.
  • The balance of buttery richness and fresh shrimp creates an unforgettable meal.
  • By using fresh ingredients, you elevate your shrimp scampi recipe to new heights.

What is Classic Shrimp Scampi?

Classic shrimp scampi is a dish from Italian-American cuisine. It’s made with shrimp, garlic, and olive oil. This mix is loved for its simple yet tasty flavor.

A Brief History of Shrimp Scampi

The word “scampi” means a certain shrimp type. But in the U.S., it means a cooking style. It comes from Italy’s coastal areas, where seafood is common.

Traditional recipes use fresh ingredients. Americans made it their own, adding a buttery sauce and fresh herbs. This shows the true taste of shrimp scampi.

Traditional Ingredients Overview

Traditional shrimp scampi needs a few key things:

  • Shrimp: Fresh, high-quality shrimp are the base.
  • Garlic: It adds a lot of flavor.
  • Olive Oil: It’s rich and comes from Italian cooking.
  • Pasta: Linguine or spaghetti are the usual choices.
  • Herbs: Fresh parsley or basil adds a bright note.

These ingredients together show the dish’s freshness and quality. That’s why shrimp scampi is a classic.

Variations Around the World

Shrimp scampi has many versions worldwide. Each place adds its own twist. For example, in Asia, it might have chili and ginger. In Latin America, lime and cilantro are common.

These changes keep the dish true to its roots but also make it exciting. It’s a favorite everywhere, thanks to its adaptability.

Essential Ingredients for Shrimp Scampi

The secret to easy shrimp scampi is in its ingredients. Each part adds a lot to the taste and feel of the dish. Knowing the best shrimp, pasta, and aromatics is key for a great shrimp scampi.

Fresh vs. Frozen Shrimp: Which is Better?

Fresh shrimp is often the best choice for its taste and texture. It adds a sweet flavor that makes the dish stand out. Frozen shrimp is a good backup when fresh is hard to find. It works well if it’s high-quality and thawed right.

Choosing the Right Pasta

The pasta you pick is important for enjoying shrimp scampi. Linguine and fettuccine are top picks. Their shapes help the garlic butter sauce stick, making the dish even better.

Key Aromatics: Garlic and Herbs

Garlic is the heart of shrimp scampi’s flavor. A lot of garlic is cooked to fill the dish with its smell. Adding fresh herbs like parsley adds a bright touch to the rich sauce. Together, they create a perfect mix.

Using these key ingredients is vital for making the best shrimp scampi. For more ideas, check out this page. Feel free to try different things to make the dish your own.

The Cooking Method: Step-by-Step

Making homemade shrimp scampi is all about following precise steps. Each part is key to getting the flavors and textures right. Paying close attention to detail is what makes a meal truly special.

Preparing the Shrimp

Begin by cleaning and deveining the shrimp. This step is important for both looks and taste. Rinse them under cold water to get rid of grit or sand.

Try to use fresh shrimp for the best taste. Check for freshness by looking for a slight sheen and no bad smells. Properly prepared shrimp make the dish better.

Cooking the Pasta

While you’re getting the shrimp ready, start cooking the pasta. Choose spaghetti or linguine and cook it al dente. This texture helps the pasta absorb the sauce without getting mushy.

Follow the package instructions for cooking time. Also, save a cup of pasta water. This starchy water can help adjust the sauce’s consistency.

Making the Sauce

The sauce is the heart of garlic butter shrimp scampi. Start by melting butter in a large skillet over medium heat. Add minced garlic and cook until it’s fragrant but not brown.

This balance is key to the dish’s flavors. Once the garlic is ready, add the shrimp. Cook until they’re pink, which takes just a few minutes. Then, stir in the cooked pasta to mix the flavors well.

For a final touch, add a bit of fresh lemon juice and some parsley. This adds a fresh and inviting finish.

Tips for Perfectly Cooked Shrimp

Cooking shrimp right is key to a tasty shrimp scampi. Overcooked shrimp become tough and lose their flavor. To avoid this, focus on the cooking time and method.

How to Avoid Overcooking

To keep shrimp tender, cook them just until they’re opaque and firm. This should take about 2-3 minutes per side, depending on their size. Remember, they’ll keep cooking a bit after you take them off the heat.

Signs of Perfectly Cooked Shrimp

Look for a pinkish color and a slight curl to know your shrimp are done. These signs mean they’re ready for your shrimp scampi recipe. Watching for these visual cues will keep your dish vibrant and tasty.

Flavoring Tips for Extra Zest

Adding extra flavors can make your shrimp scampi even better. A squeeze of lemon or a sprinkle of red pepper flakes can add a nice kick. These touches make sure every bite is full of flavor, making your meal unforgettable.

Pairing Wines with Shrimp Scampi

Choosing the right drink can make your meal better. Wines pair well with shrimp scampi, bringing out the dish’s flavors. You can try crisp whites or even non-alcoholic drinks.

Crisp White Wines to Enjoy

Crisp white wines are great with shrimp scampi. Sauvignon Blanc and Pinot Grigio are top choices. They balance the buttery sauce with their refreshing taste.

Alternative Pairings: Red Wines and Rosé

If you prefer reds, try Pinot Noir. It’s a lighter option that pairs well with shrimp scampi. A chilled rosé also adds a lively touch without overpowering the dish.

Non-Alcoholic Drink Options

Drinks don’t have to be wine to enjoy a meal. Herbal teas or sparkling water with lemon or lime are perfect for non-drinkers. They refresh your palate and match the flavors of shrimp scampi.

Serving Suggestions for Shrimp Scampi

Serving homemade shrimp scampi is a treat for both taste and sight. How you present it can make a big difference. By arranging the pasta and shrimp in a neat circle, you make your meal look great.

Plating Techniques to Impress

Use a big platter to serve your garlic butter shrimp scampi. Place the pasta in the middle, letting it spill over a bit. Then, put the shrimp in a circle around the pasta. Don’t forget to drizzle some garlic butter sauce on top for color.

Accompaniments: Bread and Salads

Pair your shrimp scampi with garlic bread for dipping. A fresh salad with greens, tomatoes, and a light dressing is also a great choice. For more side dish ideas, check out this detailed guide.

Garnishing for Visual Appeal

Adding a few garnishes can really make your dish stand out. Sprinkle some parsley for color and freshness. A squeeze of lemon zest adds a zesty touch. These touches not only look good but also taste great.

Shrimp Scampi for Special Occasions

Classic shrimp scampi is perfect for many special occasions. It adds a touch of elegance to any event. Whether it’s a romantic dinner, a pasta night with friends, or a family gathering, it’s a hit.

Romantic Dinner Ideas

For a romantic dinner, try a candlelit setting with shrimp scampi. Pair it with white wine and soft music for a magical night. A simple salad and light dessert complete the meal nicely.

Hosting a Pasta Night

Host a pasta night with shrimp scampi as the main attraction. Let everyone help with the preparation. Set up a toppings bar for a fun, interactive meal.

Celebrating Family Gatherings

Shrimp scampi makes family gatherings unforgettable. It’s loved by both kids and adults. Serve it with garlic bread and a salad for a complete, satisfying meal.

Common Mistakes to Avoid

Making a tasty shrimp scampi recipe is easy and rewarding. But, it’s easy to make mistakes. Knowing how to avoid these can make your dish even better. It’s all about cooking times, using fresh ingredients, and knowing what you like.

Overcooking Ingredients

One big mistake is overcooking the shrimp. They only need a few minutes on the heat. If you cook them too long, they get tough and lose their sweetness.

It’s important to watch them closely. Take them off the stove when they’re pink and look opaque.

Skipping the Fresh Ingredients

Using fresh ingredients is key for a great shrimp scampi. Don’t swap fresh herbs for dried ones or use old shrimp. Fresh garlic, bright herbs, and top-notch shrimp are needed for that authentic taste.

Not Adjusting for Personal Taste

Everyone likes different flavors. Not adjusting the seasoning or garlic can make the dish off-balance. Try adding more garlic, lemon, or chili flakes to match your taste.

Storing and Reheating Leftovers

Leftovers from a shrimp scampi meal can be just as tasty when stored and reheated right. Keeping the shrimp’s flavor and texture is important. Follow these easy tips to enjoy your leftovers as much as the first time.

Best Practices for Refrigeration

Start by cooling your shrimp scampi quickly to stop bacteria from growing. Put it in an airtight container and then in the fridge. It will stay fresh for up to two days, perfect for quick meals.

How to Reheat Without Overcooking

Reheat on the stovetop, not in the microwave, to avoid tough shrimp. Heat it on low, adding a bit of water or broth to keep it moist. Stir gently to heat evenly, so you can enjoy it just like new.

Creative Leftover Recipes

Turn your leftover shrimp scampi into something new. Try making shrimp scampi tacos with fresh avocado and cilantro. Or, serve it over rice for a tasty shrimp scampi bowl. It’s a fun way to use up leftovers and try something different.

Nutritive Benefits of Shrimp Scampi

Homemade shrimp scampi is not just tasty but also good for you. It has many health benefits. Knowing these can make your meals more enjoyable and encourage you to try new recipes.

High Protein Content

Shrimp is a lean protein source with all the amino acids you need. A serving of homemade shrimp scampi gives you a lot of protein. This is great for building and repairing your body and keeping you full.

Nutritional Value of Key Ingredients

The nutritional value of homemade shrimp scampi depends on the ingredients you use. Choosing whole-grain pasta adds fiber and nutrients. Olive oil and butter provide healthy fats, giving you energy without too many calories.

Balancing with Healthy Sides

To make your shrimp scampi even healthier, add some healthy sides. Try steamed veggies or a fresh salad. They add vitamins and minerals, making your meal both tasty and nutritious.

Popular Shrimp Scampi Recipes

Shrimp scampi is versatile and exciting in many recipes. These dishes keep the core flavors of classic shrimp scampi. But they also add new twists for different tastes and events.

Classic Italian Shrimp Scampi

This recipe is a true taste of Italy. It uses top-notch olive oil, fresh garlic, and perfectly cooked shrimp. Paired with al dente pasta, it’s a dish that everyone loves.

Creamy Spinach Shrimp Scampi

The creamy spinach shrimp scampi adds a rich twist to the classic. It mixes the traditional flavors with a creamy sauce. Fresh spinach boosts the taste and nutrition, making it a hit.

Spicy Shrimp Scampi with Cajun Flavors

For those who like a little spice, try the spicy shrimp scampi with Cajun seasonings. It adds bold, aromatic spices to the mix. This version is perfect for those who enjoy a bit of heat in their food.

Conclusion: Mastering Classic Shrimp Scampi

Mastering classic shrimp scampi means understanding its key elements. It’s about choosing fresh ingredients and honing your cooking skills. Each step is vital for making the best shrimp scampi. With the right tips and ideas, anyone can start cooking with confidence.

Enjoying the process of adding your own twist to shrimp scampi is rewarding. You can spice it up or use fresh herbs. This way, you can make the dish your own. Your cooking can inspire others in your community.

Share your shrimp scampi creations with others. It’s a way to share your passion for cooking. For more ideas and recipes, check out what makes up the essence of shrimp. Let your creativity shine in the kitchen!


FAQ

What is the best shrimp for shrimp scampi?

For the best shrimp scampi, use fresh large or jumbo shrimp. Wild-caught is ideal. But, high-quality frozen shrimp are great if fresh is not available.

Can I use a different type of pasta for shrimp scampi?

Yes! You can use linguine or spaghetti, but also fettuccine, angel hair, or your favorite pasta.

How can I make shrimp scampi spicier?

Add red pepper flakes or Cajun seasoning for a spicy kick. This will keep the garlic butter sauce traditional.

Is shrimp scampi a healthy dish?

Shrimp scampi is healthy, with lots of protein from shrimp. Use whole-grain pasta and add extra veggies for a healthier version.

How do I store leftovers of shrimp scampi?

Keep leftovers in an airtight container in the fridge for up to 2 days. Reheat on low heat, adding water or broth to keep it moist.

Can I make shrimp scampi without wine?

Yes! Use chicken broth or clam juice instead of wine for a similar flavor.

What herbs are best for shrimp scampi?

Use fresh parsley, but basil or oregano are good too. They add freshness and flavor.

How do I achieve the perfect garlic flavor without burning it?

Sauté minced garlic over medium heat. Add shrimp just before it browns. This way, the garlic won’t burn.

Is shrimp scampi gluten-free?

Classic shrimp scampi isn’t gluten-free because of the pasta. But, use gluten-free pasta to make it gluten-free.

What side dishes pair well with shrimp scampi?

Try garlic bread, a fresh salad, or roasted veggies. They balance the rich flavors of shrimp scampi.

Stay Connected

Get recipes via email: