The smell of warm spices wafting through the kitchen instantly transports me to my favorite coffee shop, where Biscoff cookies and creamy spreads reign supreme. Now, I’m excited to share an extraordinary dessert that brings that café experience home: fudgy Biscoff brownies with a cookie butter center! These brownies are not just an indulgent dessert; they combine the rich chocolatey goodness we crave with the unique, caramelized flavors of Biscoff that we can’t resist. What’s even better? They’re quick to whip up, making them perfect for both personal treat sessions and gatherings with friends. And trust me—once you take a bite of that warm, gooey center, you’ll be the star of your next event. Curious to see how simple it is to make these delightful brownies? Let’s dive into the deliciousness!
Why Are These Brownies So Irresistible?
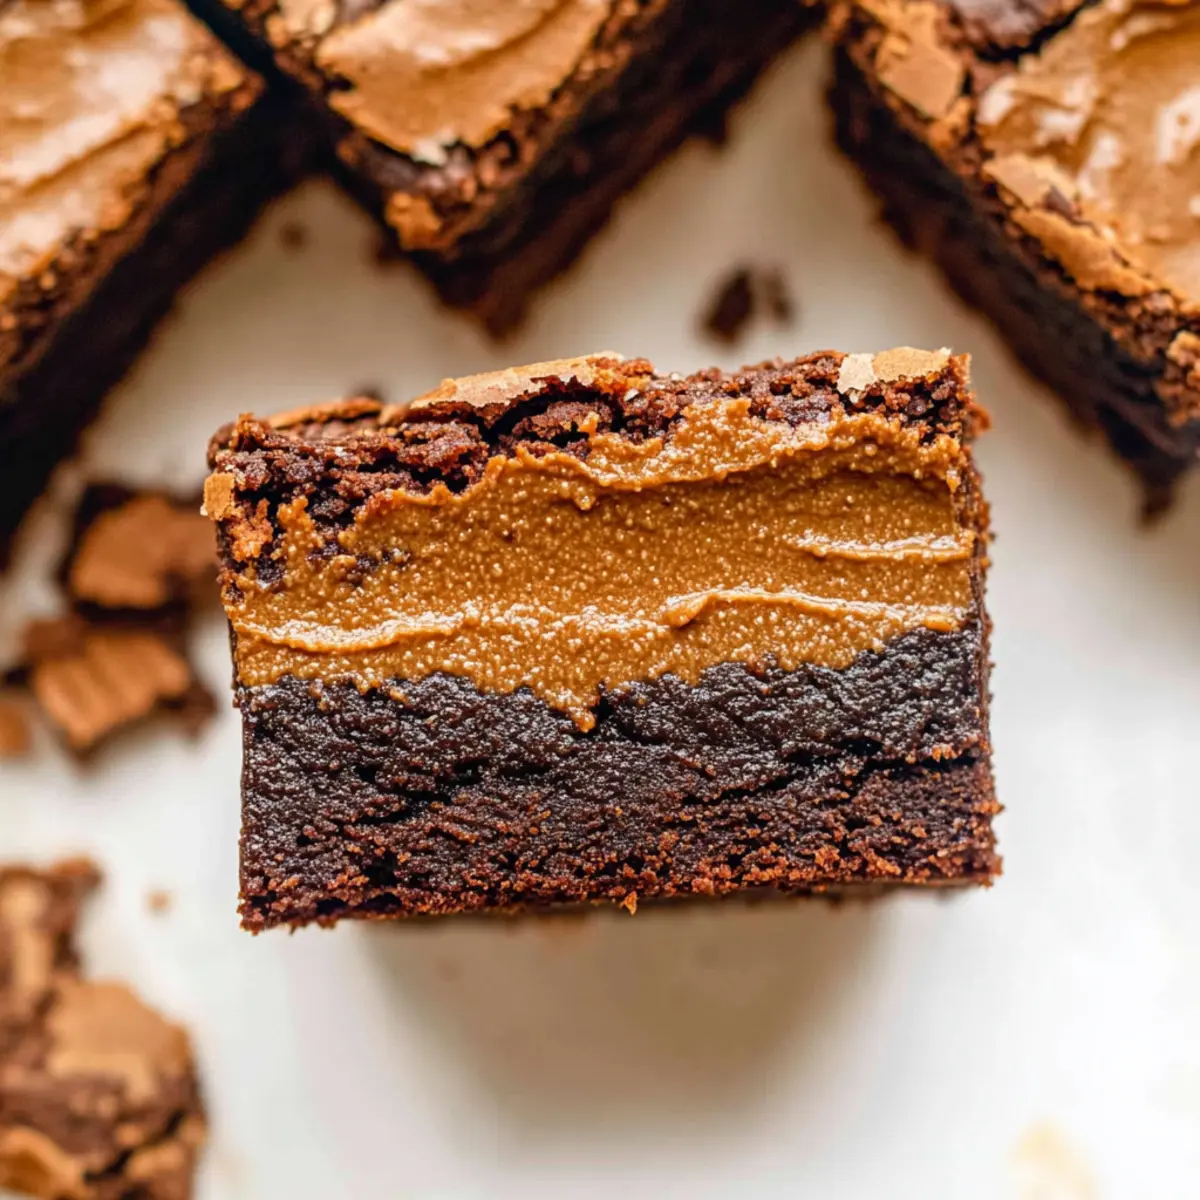
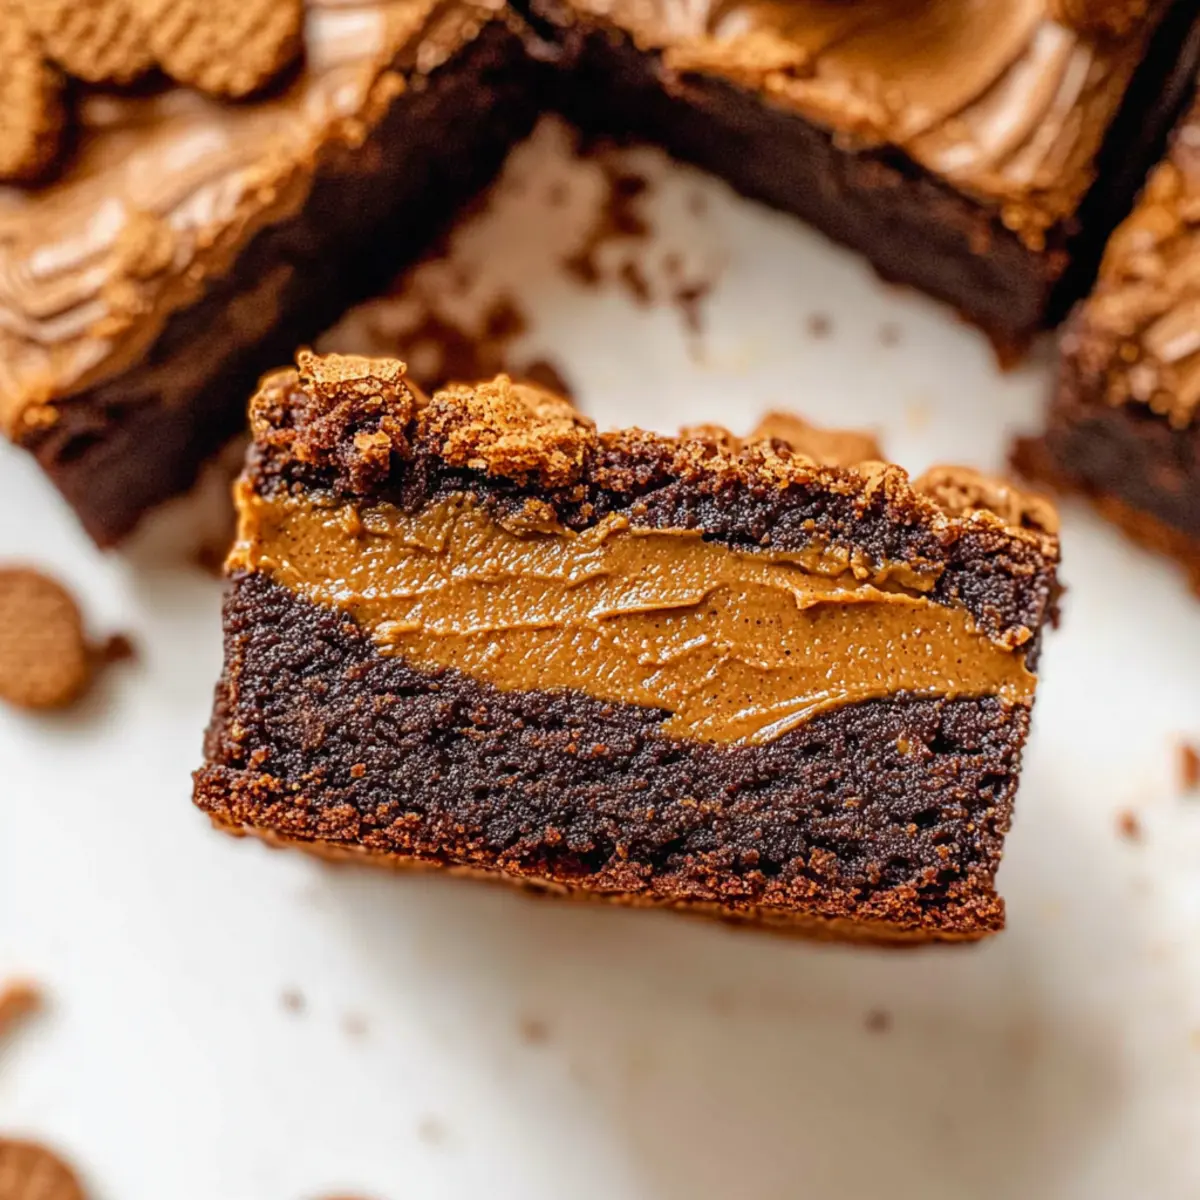
Decadent, fudgy goodness: These Biscoff brownies boast a rich chocolate base and an ooey-gooey cookie butter center, making each bite a heavenly experience.
Quick to prepare: You don’t need to be a pro baker to whip these up—perfect for a spontaneous dessert craving or an impromptu gathering!
Loaded with flavor: The warm spices of Biscoff meld beautifully with chocolate, creating a taste sensation that’s hard to forget.
Versatile cravings: Want to mix it up? Try swapping out the cookie butter for nut butter or customize with your favorite chocolate chips!
Crowd-pleaser: These brownies are bound to impress whether you serve them warm with ice cream or at your next potluck. Enjoy a slice, and you’ll understand why everyone keeps coming back for more!
Fudgy Biscoff Brownie Ingredients
- For the Brownies
• Biscoff Cookie Spread – Adds sweetness and a smooth texture. Use a similar cookie butter if unavailable.
• Unsalted Butter – Provides moisture and richness. Can substitute with coconut oil for a dairy-free option.
• Chopped Semi-sweet Chocolate – Enhances chocolate flavor and texture. Use dark chocolate for a richer taste.
• White Granulated Sugar – Sweetens and contributes to the brownie’s structure. Brown sugar can add extra moisture.
• Large Eggs (2) & Egg Yolk (1) – Provide structure and moisture. For vegan options, consider egg substitute products.
• Pure Vanilla Extract – Adds depth of flavor. No substitutes recommended for flavor integrity.
• Canola or Vegetable Oil – Contributes lightness and moisture. Any neutral oil can be used.
• All-purpose Flour – Provides structure. Can use gluten-free flour blend for a gluten-free version.
• Dutch Process Cocoa Powder – Gives a rich chocolate flavor. Regular cocoa powder may be substituted, but results may vary slightly.
• Cornstarch – Adds tenderness to the brownies. Can be omitted if necessary.
• Salt – Balances sweetness and enhances flavor. Essential for overall taste.
• Biscoff Cookie Pieces – Adds crunch and flavor throughout. Crushed graham crackers can be a substitute.
• Mini Chocolate Chips – Provides extra chocolatey bites. Use dark, milk, or white chocolate chips based on preference.
• Biscoff Cookies (for decoration) – Scenic finishing touch. Skip if not available, or use chocolate shavings.
Now that you have all the delightful ingredients ready to go, get ready to embark on a baking adventure that transforms your kitchen into a haven of Biscoff-infused joy!
Step‑by‑Step Instructions for Fudgy Biscoff Brownies with Cookie Butter Center
Step 1: Prepare Cookie Butter
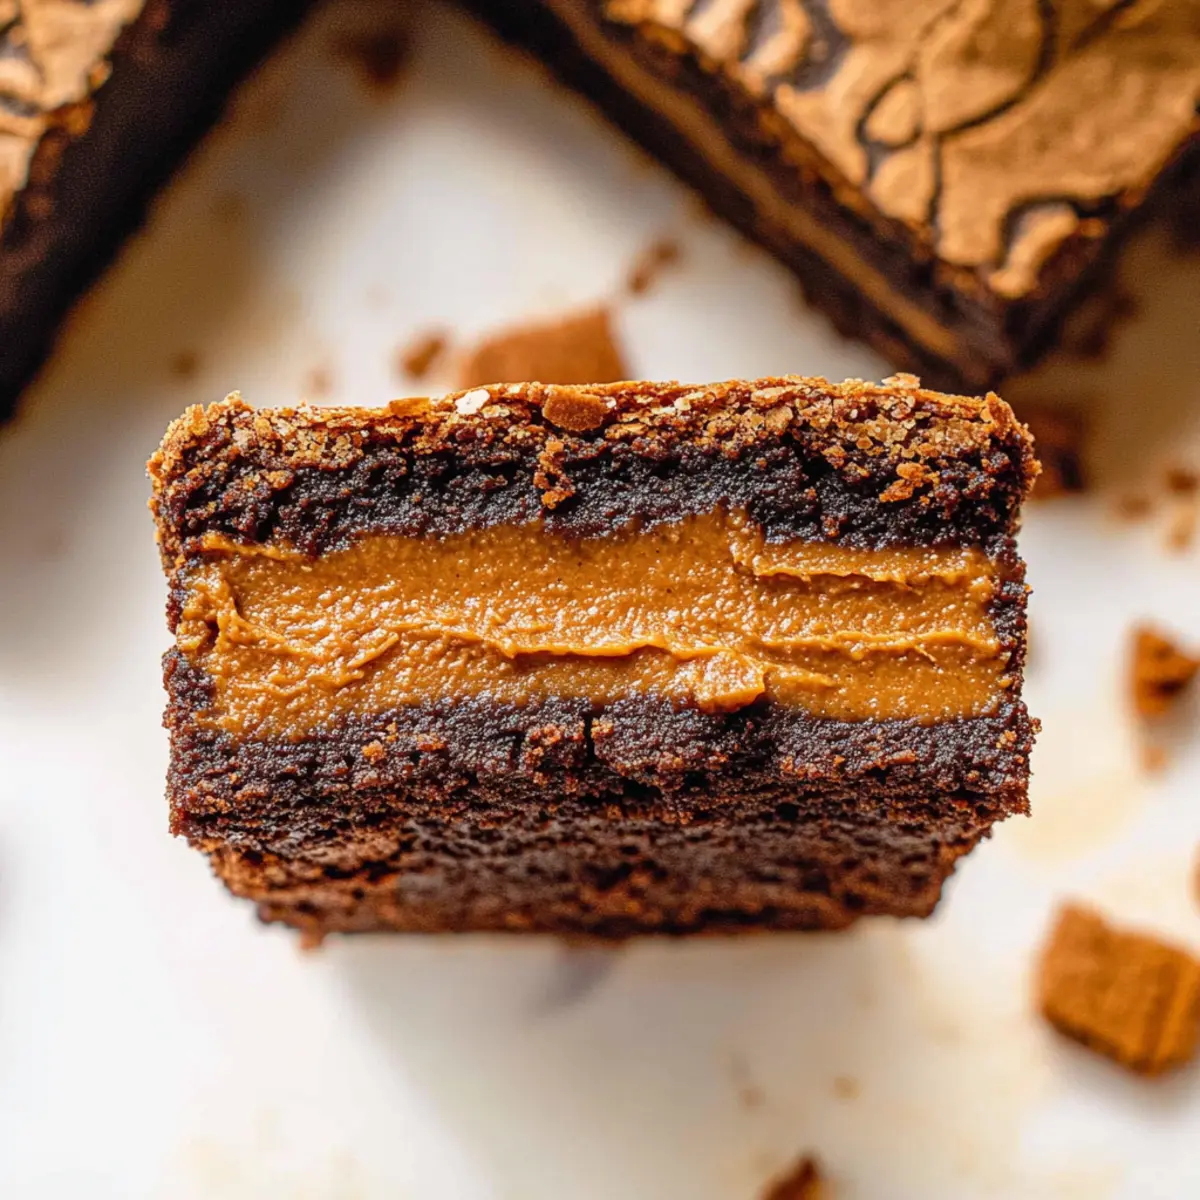
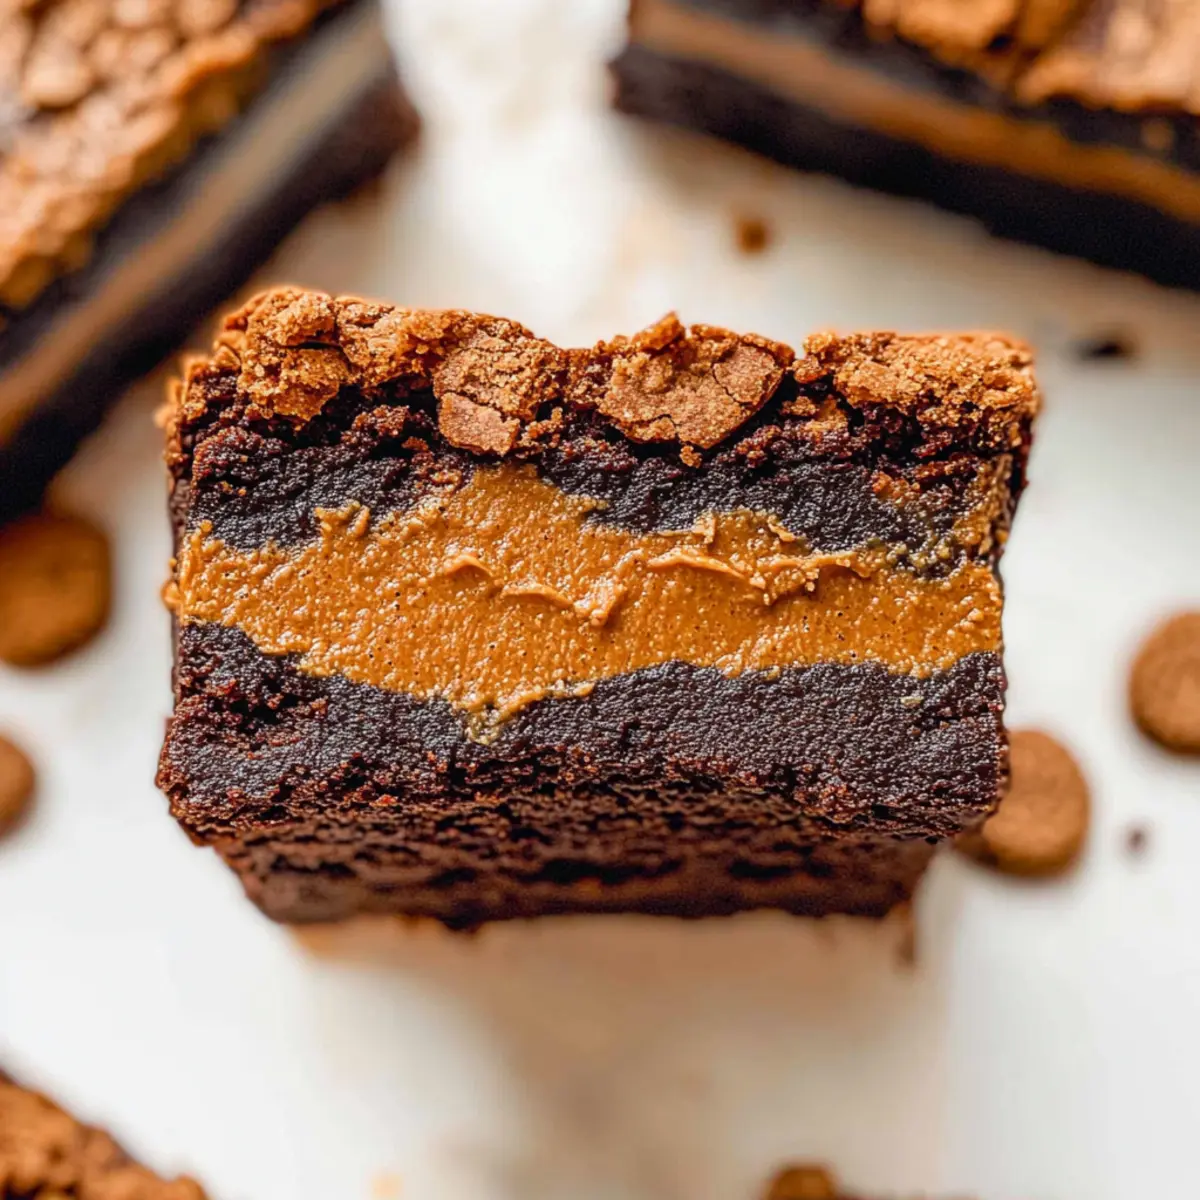
Begin by slightly melting the Biscoff cookie spread in the microwave for about 15-20 seconds, making it easier to work with. Spread it onto a piece of parchment paper in a thin layer and place it in the freezer for at least 2 hours to firm up, ensuring a beautifully gooey center for your fudgy Biscoff brownies.
Step 2: Preheat Oven
While the cookie butter is chilling, preheat your oven to 325°F (160°C). Grease an 8×8 inch baking pan with butter or line it with parchment paper, allowing for easy removal later. This step is crucial to ensure your fudgy brownies cook evenly and lift out perfectly.
Step 3: Melt Chocolate
In a medium saucepan, combine the chopped semi-sweet chocolate and unsalted butter over low heat. Stir continuously for about 5 minutes until everything is melted and smooth. Remove from heat and let it cool slightly before incorporating it into the brownie mixture for that rich chocolatey goodness.
Step 4: Mix Wet Ingredients
In a large mixing bowl, whisk together the large eggs, egg yolk, and white granulated sugar for about 5 minutes until the mixture is light and fluffy. Add in the pure vanilla extract and canola oil, mixing until fully combined. This fluffy mixture will give your fudgy Biscoff brownies their delightful texture.
Step 5: Combine Mixtures
Carefully fold the cooled chocolate mixture into the egg mixture using a spatula until just combined. Then, gradually add the all-purpose flour, cocoa powder, cornstarch, and salt, stirring gently until no dry ingredients remain. Finally, fold in the Biscoff cookie pieces and mini chocolate chips, ensuring an even distribution.
Step 6: Layer Brownies
Pour half of the brownie batter into your prepared baking pan, smoothing it out evenly. Carefully place the frozen Biscoff cookie butter layer on top, then spoon the remaining batter over it. Gently spread the batter to cover the cookie butter entirely. Top with crushed Biscoff cookies for that extra crunch and flavor.
Step 7: Bake
Bake the fudgy Biscoff brownies in the preheated oven for 40-50 minutes, or until the edges are set but the center is slightly underbaked. A toothpick should come out with a few moist crumbs. Let them cool completely in the pan on a wire rack before slicing, allowing all those delicious layers to meld together perfectly.
What to Serve with Fudgy Biscoff Brownies
Indulging in fudgy Biscoff brownies is like wrapping yourself in a warm, cozy blanket on a chilly evening. Let’s create a full meal experience with delightful pairings that complement these decadent treats.
-
Vanilla Ice Cream: A scoop of creamy vanilla ice cream contrasts beautifully with the rich chocolate and spiced Biscoff flavors, making each bite heavenly.
-
Coffee: A steaming cup of freshly brewed coffee awakens the aromas of chocolate and adds a touch of sophistication, perfect for a dessert pairing.
-
Whipped Cream: Light and fluffy, a dollop of whipped cream enhances the richness of the brownies, offering a luscious balance to each decadent bite.
-
Chocolate Sauce: Drizzling a warm chocolate sauce over the brownies amplifies the indulgent experience, adding extra sweetness and a delightful texture.
For a more festive touch, try serving alongside a glass of milk for that classic pairing or a scoop of salted caramel gelato to add an enticing savory twist. Each combination brings out the fudge factor while ensuring a delightful end to your meal!
Storage Tips for Fudgy Biscoff Brownies
- Room Temperature: Store your fudgy Biscoff brownies in an airtight container at room temperature for up to 4 days to maintain their deliciously soft texture.
- Refrigerator: If you prefer a firmer brownie, chill them in the fridge for up to a week, making sure to seal them securely to prevent drying out.
- Freezer: For longer storage, freeze the brownies in a single layer in an airtight container for up to 30 days. Thaw them at room temperature for about an hour before enjoying.
- Reheating: To enjoy warm brownies again, gently heat individual pieces in the microwave for 10-15 seconds, just until they’re warmed through, allowing that gooey cookie butter center to shine!
Expert Tips for Fudgy Biscoff Brownies
- Freeze Cookie Butter: Ensure the Biscoff cookie spread is frozen for easier layering; it melts rapidly during baking.
- Don’t Overmix: Gently fold the batters to avoid tough brownies; overmixing can lead to a dense texture instead of fudgy.
- Check Baking Time: Monitor closely towards the end; the brownies should be slightly underbaked in the center for that gooey texture.
- Spoon Flour Correctly: Remember to spoon flour into the measuring cup instead of scooping to prevent compacting, leading to denser brownies.
- Let Them Cool: Allow the brownies to cool completely in the pan before slicing; this helps them set up perfectly for that ideal fudgy experience.
- Customize Flavors: Feel free to mix in different types of chocolate chips or even a dash of sea salt on top for a delightful contrast in flavors!
Make Ahead Options
These fudgy Biscoff brownies are perfect for busy home cooks looking to save time on dessert prep! You can prepare the brownie batter and refrigerate it up to 3 days in advance, ensuring fresh brownies whenever you crave them. Simply mix everything together and store it in an airtight container. For the cookie butter center, freeze the prepared layer on parchment paper for up to 24 hours. When you’re ready to bake, just pour half the batter into your pan, layer it with the frozen cookie butter, cover with the remaining batter, and bake as instructed. This way, you’ll enjoy deliciously fudgy brownies with all the wonderful Biscoff flavors without the last-minute rush!
Fudgy Biscoff Brownies Variations
Customize your brownies for a delightful twist that suits your cravings!
-
Nut Butter: Swap Biscoff cookie spread with almond or peanut butter for a nutty flavor. This buttery richness adds a whole new layer of taste!
-
Chocolate Variety: Consider using dark chocolate or even milk chocolate for a unique twist. Each variation gives the brownies a distinct character, enhancing your overall experience.
-
Brown Sugar: Replace white granulated sugar with brown sugar for extra moisture and a deeper flavor profile. You’ll love the warm, caramel notes it adds!
-
Gluten-Free: Use a gluten-free flour blend instead of all-purpose flour to make a gluten-free version. This way, everyone can enjoy these fudgy delights without compromise.
-
Spice it Up: Add a pinch of cinnamon or nutmeg for a warm, aromatic flavor that complements the Biscoff perfectly. It’s a delightful secret ingredient that offers a cozy hug in each bite.
-
Chocolate Chips: Mix in white chocolate, toffee bits, or even butterscotch chips in place of mini chocolate chips for fun texture variations. Each option brings a burst of sweetness!
-
Cookie Topping: Instead of Biscoff cookies, try crushed Oreos or chocolate wafer cookies as a topping to elevate your brownies’ crunch factor. The combination of flavors will leave everyone asking for more.
-
Heat Levels: For a little kick, add a dash of cayenne pepper or chili powder to the batter. This unexpected twist juxtaposes the sweetness beautifully, creating a delightful flavor explosion!
Looking for more delicious ideas? Don’t forget to explore our Storage Tips for Fudgy Biscoff Brownies to keep them fresh, or check out some tasty Serving Suggestions to elevate that indulgent experience!
Fudgy Biscoff Brownies Recipe FAQs
How do I know if the Biscoff cookie spread is ripe or good to use?
Absolutely! Look for a smooth, creamy texture and a warm, spiced aroma. If you see any dark spots or an unusual separation, it’s best to replace it. Fresh Biscoff cookie spread should be a uniform color and the flavors should be vibrant and enticing!
What’s the best way to store leftover brownies?
Very! Store your fudgy Biscoff brownies in an airtight container at room temperature for up to 4 days. If you want to keep them longer, pop them in the fridge where they can last up to a week while remaining soft and delicious. Just remember, they love to stay cozy and sealed!
Can I freeze Biscoff brownies? If so, how?
For sure! To freeze, allow the brownies to cool completely. Then cut them into squares and arrange them in a single layer in an airtight container, separating layers with parchment paper. They can be frozen for up to 30 days. When ready to enjoy, let them thaw at room temperature for about an hour, or warm them gently in the microwave for a delicious treat!
What if my brownies come out too dry or crumbly?
Don’t fret! If your brownies turn out dry, it might be due to overbaking. Aim for that slightly underbaked center; they will continue to cook in the pan afterward. Keep an eye on the baking time, especially towards the end—about 40-50 minutes should do the trick! Another tip is to ensure all ingredients are at room temperature and properly measured.
Are these brownies safe for people with allergies?
Great question! These fudgy Biscoff brownies contain eggs, dairy, and gluten. If you have allergies or dietary restrictions, consider substitutions—like using a gluten-free flour blend or an egg replacer. Always check the labels on your Biscoff cookie spread to ensure it aligns with any dietary needs. For dog lovers, be sure to keep these treats away from your furry friends as chocolate is harmful to them!
Decadent Fudgy Biscoff Brownies for Cookie Butter Lovers
Ingredients
Equipment
Method
- Begin by slightly melting the Biscoff cookie spread in the microwave for about 15-20 seconds, making it easier to work with. Spread it onto a piece of parchment paper in a thin layer and place it in the freezer for at least 2 hours to firm up, ensuring a beautifully gooey center for your fudgy Biscoff brownies.
- While the cookie butter is chilling, preheat your oven to 325°F (160°C). Grease an 8x8 inch baking pan with butter or line it with parchment paper.
- In a medium saucepan, combine the chopped semi-sweet chocolate and unsalted butter over low heat. Stir continuously for about 5 minutes until melted and smooth. Remove from heat and let it cool slightly.
- In a large mixing bowl, whisk together the large eggs, egg yolk, and white granulated sugar for about 5 minutes until light and fluffy. Add pure vanilla extract and canola oil, mixing until fully combined.
- Carefully fold the cooled chocolate mixture into the egg mixture using a spatula until just combined. Gradually add all-purpose flour, cocoa powder, cornstarch, and salt, stirring gently until no dry ingredients remain. Fold in Biscoff cookie pieces and mini chocolate chips.
- Pour half of the brownie batter into your prepared baking pan, smoothing it out evenly. Carefully place the frozen Biscoff cookie butter layer on top, then spoon the remaining batter over it.
- Bake the fudgy Biscoff brownies in the preheated oven for 40-50 minutes, or until the edges are set but the center is slightly underbaked. Let them cool completely in the pan on a wire rack before slicing.