Get my cookbooks

Fluffy Oat Flour Pancakes: A Light & Tasty Delight!

Introduction to Fluffy Oat Flour Pancakes

There’s something magical about pancakes, isn’t there? Fluffy oat flour pancakes, in particular, bring a delightful twist to your breakfast table.

Whether you’re rushing to get the kids ready for school or looking to impress a special someone, these pancakes are a quick solution that never disappoints.

With their light texture and wholesome ingredients, they make mornings feel a little brighter.

Plus, they’re easy to whip up, so you can savor every bite without the stress. Let’s dive into this delicious recipe that’s sure to become a family favorite!

Why You’ll Love This Fluffy Oat Flour Pancakes

These fluffy oat flour pancakes are a game changer for busy mornings.

They come together in just 25 minutes, making them perfect for a quick breakfast or a leisurely weekend brunch.

The taste? Absolutely divine!

With a subtle nuttiness from the oat flour, each bite is light and satisfying.

Plus, they’re versatile enough to cater to various dietary needs, ensuring everyone at the table can enjoy them.

Ingredients for Fluffy Oat Flour Pancakes

Creating fluffy oat flour pancakes starts with gathering the right ingredients.

Here’s what you’ll need:

  • Oat Flour: The star of the show! It gives these pancakes a unique flavor and a light, fluffy texture.
  • Sugar: Just a touch to balance the flavors. You can use brown sugar for a deeper taste.
  • Baking Powder: This is your leavening agent, ensuring the pancakes rise beautifully.
  • Salt: A pinch enhances all the flavors, making each bite more delicious.
  • Milk: Dairy or non-dairy, it adds moisture. Almond or oat milk works great for a dairy-free option.
  • Egg: It binds everything together and adds richness. For a vegan twist, try a flax egg instead.
  • Melted Butter or Coconut Oil: Adds a lovely richness. Coconut oil gives a subtle tropical flavor.
  • Vanilla Extract: A splash of this elevates the flavor profile, making your pancakes taste gourmet.

Feel free to get creative!

You can mix in a teaspoon of cinnamon for warmth or toss in some blueberries for a fruity burst.

For exact measurements, check the bottom of the article where you can find everything available for printing.

How to Make Fluffy Oat Flour Pancakes

Making fluffy oat flour pancakes is a breeze!

Follow these simple steps, and you’ll have a stack of delicious pancakes in no time.

Step 1: Combine Dry Ingredients

Start by grabbing a large bowl.

Whisk together the oat flour, sugar, baking powder, and salt until everything is well mixed.

This step is crucial; it ensures your pancakes rise perfectly.

The aroma of the oat flour will already start to fill your kitchen, hinting at the deliciousness to come.

Step 2: Mix Wet Ingredients

In another bowl, mix the milk, egg, melted butter, and vanilla extract.

Stir until the mixture is smooth and creamy.

This is where the magic happens!

The melted butter adds richness, while the vanilla gives a warm, inviting scent.

Step 3: Combine Mixtures

Now, pour the wet ingredients into the dry ingredients.

Gently stir until just combined.

Don’t worry about a few lumps; they’re perfectly fine!

Overmixing can lead to tough pancakes, and we want them light and fluffy.

Step 4: Preheat the Skillet

Heat a non-stick skillet or griddle over medium heat.

Lightly grease it with butter or oil to prevent sticking.

You want the skillet hot enough that a drop of water sizzles when it hits the surface.

This ensures a golden-brown pancake every time.

Step 5: Cook the Pancakes

Pour 1/4 cup of batter onto the skillet for each pancake.

Watch for bubbles to form on the surface, which takes about 2-3 minutes.

When you see those bubbles, it’s time to flip!

Cook for another 1-2 minutes until golden brown.

Repeat with the remaining batter, adjusting the heat as needed.

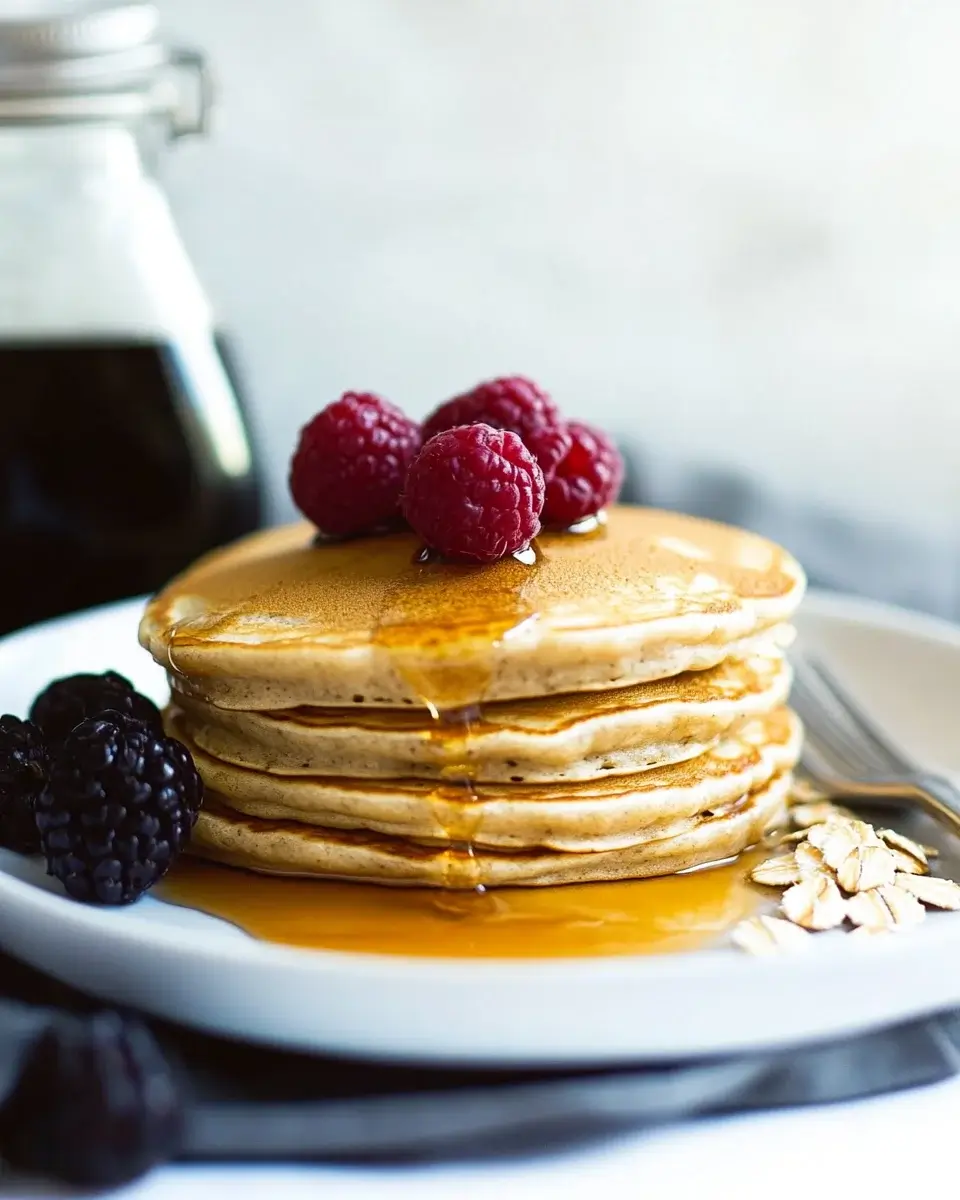
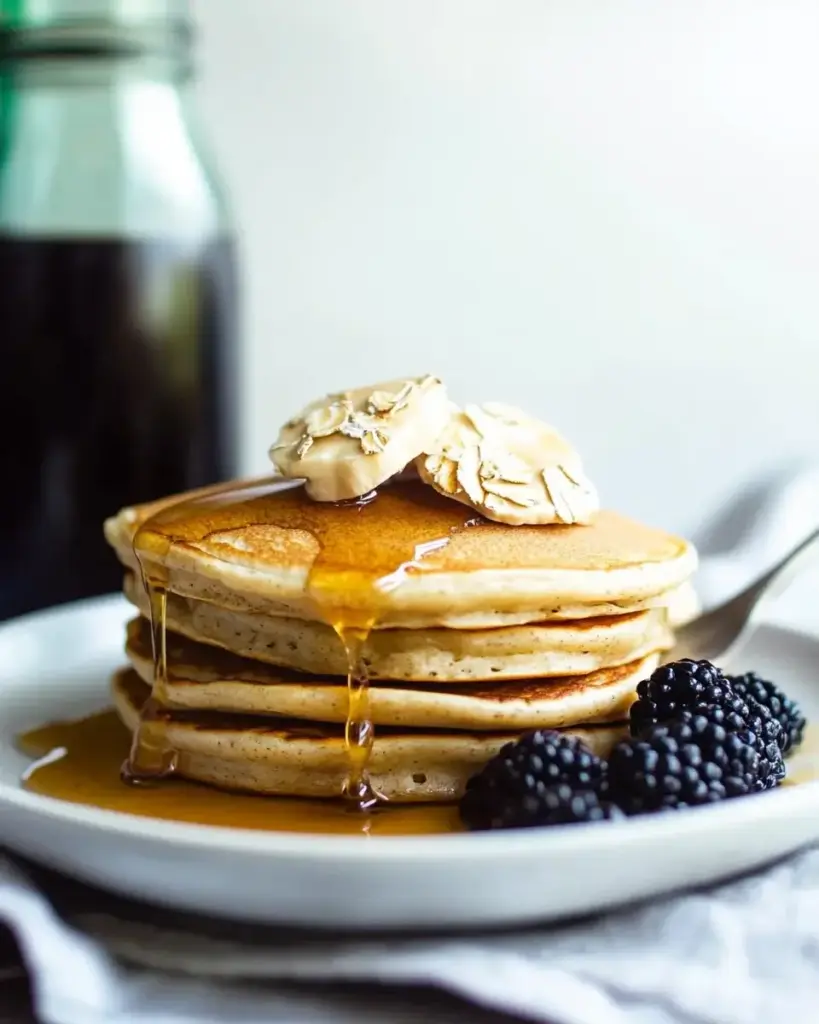
Step 6: Serve and Enjoy

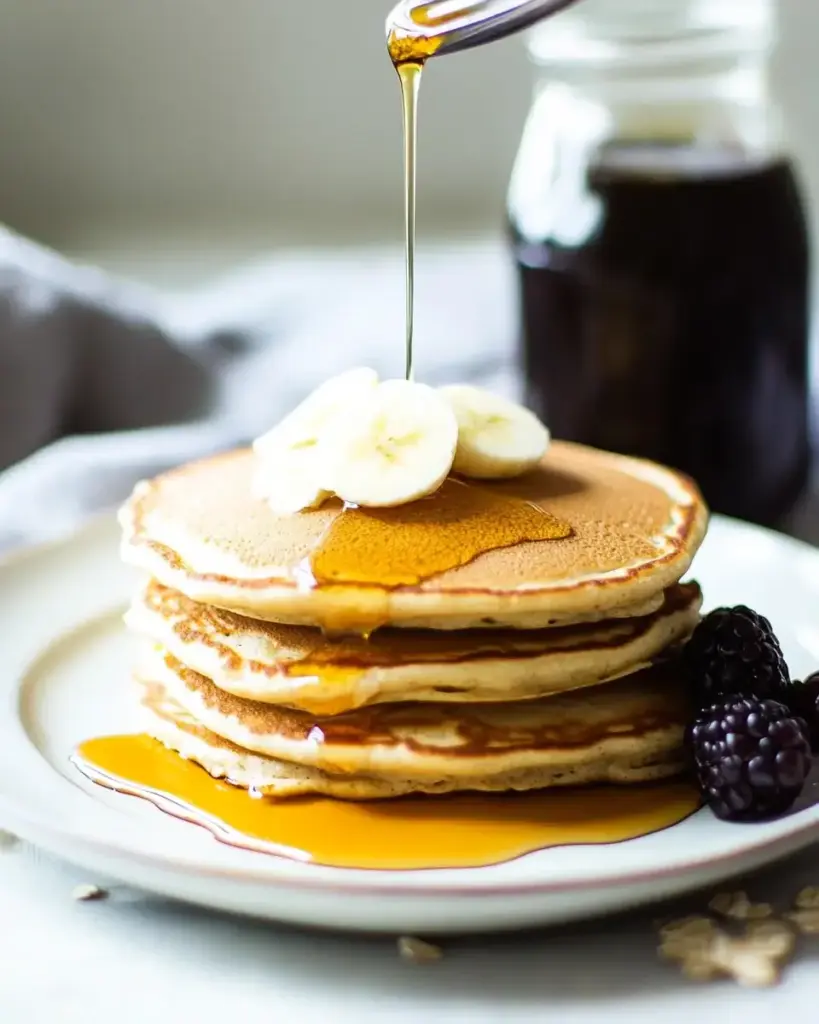
Once cooked, stack those fluffy oat flour pancakes high on a plate.

Serve them warm with your favorite toppings like maple syrup, fresh fruit, or yogurt.

Each bite is a delightful experience, and you’ll be left wanting more.

Enjoy the smiles around the breakfast table!

Tips for Success

  • Use a kitchen scale for precise measurements, especially for oat flour.
  • Let the batter rest for a few minutes; it helps the pancakes become fluffier.
  • Keep the heat at medium to avoid burning while ensuring even cooking.
  • Experiment with toppings like nut butter or yogurt for added flavor.
  • Store leftover pancakes in the fridge for a quick breakfast later!

Equipment Needed

  • Mixing Bowls: A set of various sizes is ideal. You can use any large bowl you have on hand.
  • Whisk: Essential for mixing. A fork works in a pinch!
  • Non-Stick Skillet or Griddle: Perfect for cooking pancakes. A regular skillet with a bit of oil will do.
  • Measuring Cups: For accurate ingredient portions. If you don’t have them, use a standard coffee mug.

Variations of Fluffy Oat Flour Pancakes

  • Chocolate Chip Pancakes: Add a handful of chocolate chips to the batter for a sweet treat that’s sure to please.
  • Blueberry Bliss: Toss in fresh or frozen blueberries for a burst of fruity flavor in every bite.
  • Cinnamon Swirl: Mix in a teaspoon of cinnamon for a warm, cozy flavor that pairs perfectly with maple syrup.
  • Vegan Option: Substitute the egg with a flax egg and use non-dairy milk to make these pancakes vegan-friendly.
  • Nutty Delight: Stir in chopped nuts like walnuts or pecans for added crunch and nutrition.
  • Banana Pancakes: Mash a ripe banana and mix it into the batter for natural sweetness and moisture.

Serving Suggestions for Fluffy Oat Flour Pancakes

  • Maple Syrup: Drizzle warm maple syrup over the pancakes for a classic touch.
  • Fresh Fruit: Top with sliced bananas, strawberries, or blueberries for a refreshing burst.
  • Yogurt: A dollop of Greek yogurt adds creaminess and protein.
  • Nuts: Sprinkle chopped nuts for extra crunch and flavor.
  • Presentation: Stack pancakes high and garnish with a dusting of powdered sugar for a beautiful finish.

FAQs about Fluffy Oat Flour Pancakes

Can I use regular flour instead of oat flour?

Absolutely! While oat flour gives these pancakes a unique flavor and texture, you can substitute it with all-purpose flour. Just keep in mind that the pancakes may not be as fluffy or have the same nutty taste.

How can I make these pancakes gluten-free?

To make fluffy oat flour pancakes gluten-free, ensure you use certified gluten-free oat flour. This way, you can enjoy the same deliciousness without any gluten concerns.

Can I prepare the batter in advance?

Yes! You can prepare the batter the night before and store it in the fridge. Just give it a gentle stir before cooking, as it may thicken overnight.

What toppings pair well with these pancakes?

These pancakes are incredibly versatile! Try them with maple syrup, fresh fruit, yogurt, or even a sprinkle of nuts for added crunch. The options are endless!

How do I store leftover pancakes?

Store any leftover pancakes in an airtight container in the fridge for up to three days. You can reheat them in the microwave or on a skillet for a quick breakfast treat!

Final Thoughts

Fluffy oat flour pancakes are more than just a breakfast option; they’re a delightful experience that brings joy to your mornings.

Each bite is a reminder of the simple pleasures in life, whether enjoyed solo or shared with loved ones.

The ease of preparation means you can whip them up any day of the week, making breakfast feel special without the fuss.

With endless variations and toppings, these pancakes can be tailored to suit any palate.

So, grab your skillet and let the aroma of these fluffy delights fill your kitchen, creating memories one pancake at a time!

jhessica

Fluffy Oat Flour Pancakes: A Light & Tasty Delight!

Fluffy Oat Flour Pancakes: A Light & Tasty Delight!
Prep Time 10 minutes
Cook Time 15 minutes
Total Time 25 minutes
Servings: 4 servings
Course: Breakfast
Cuisine: American
Calories: 150

Ingredients
  

  • 1 cup oat flour
  • 2 tablespoons sugar
  • 1 tablespoon baking powder
  • 1/2 teaspoon salt
  • 1 cup milk dairy or non-dairy
  • 1 large egg
  • 2 tablespoons melted butter or coconut oil
  • 1 teaspoon vanilla extract

Method
 

  1. In a large bowl, whisk together the oat flour, sugar, baking powder, and salt until well combined.
  2. In another bowl, mix the milk, egg, melted butter, and vanilla extract until smooth.
  3. Pour the wet ingredients into the dry ingredients and stir until just combined. Be careful not to overmix; a few lumps are okay.
  4. Preheat a non-stick skillet or griddle over medium heat. Lightly grease with butter or oil.
  5. Pour 1/4 cup of batter onto the skillet for each pancake. Cook until bubbles form on the surface, about 2-3 minutes. Flip and cook for another 1-2 minutes until golden brown.
  6. Repeat with the remaining batter, adjusting the heat as necessary to prevent burning.
  7. Serve warm with your favorite toppings such as maple syrup, fresh fruit, or yogurt.

Nutrition

Serving: 1pancakeCalories: 150kcalCarbohydrates: 22gProtein: 4gFat: 5gSaturated Fat: 2gPolyunsaturated Fat: 3gCholesterol: 30mgSodium: 200mgFiber: 2gSugar: 2g

Notes

  • For added flavor, mix in a teaspoon of cinnamon or a handful of blueberries or chocolate chips into the batter before cooking.
  • To make these pancakes vegan, substitute the egg with a flax egg (1 tablespoon ground flaxseed mixed with 2.5 tablespoons water) and use a non-dairy milk.

Tried this recipe?

Let us know how it was!

Brown Butter Chocolate Chip Cookies: Taste the Magic!

Introduction to Brown Butter Chocolate Chip Cookies

There’s something magical about the aroma of freshly baked cookies wafting through the house. Brown Butter Chocolate Chip Cookies take that magic to a whole new level. The nutty flavor of browned butter combined with gooey chocolate chips creates a treat that’s hard to resist. Whether you’re looking to impress friends at a gathering or simply want a quick solution for a busy day, this recipe is your go-to. It’s easy, delicious, and perfect for satisfying that sweet tooth. Trust me, once you try these cookies, you’ll be hooked!

Why You’ll Love This Brown Butter Chocolate Chip Cookies

These Brown Butter Chocolate Chip Cookies are a game changer. They’re quick to whip up, making them perfect for those last-minute cravings or surprise guests. The rich, nutty flavor of the brown butter elevates the classic cookie experience, while the chewy texture keeps you coming back for more. Plus, they’re a crowd-pleaser, guaranteed to impress anyone who takes a bite. Who wouldn’t love that?

Ingredients for Brown Butter Chocolate Chip Cookies

Gathering the right ingredients is the first step to cookie perfection. Here’s what you’ll need for these delightful Brown Butter Chocolate Chip Cookies:

  • Unsalted Butter: The star of the show! Browning it adds a rich, nutty flavor that transforms your cookies.
  • Brown Sugar: This sugar brings moisture and a deep caramel flavor, making your cookies chewy and delicious.
  • Granulated Sugar: A touch of sweetness that balances the richness of the brown sugar.
  • Large Eggs: They bind everything together and add moisture, ensuring a soft texture.
  • Vanilla Extract: A splash of this classic flavor enhances the overall taste, making each bite irresistible.
  • All-Purpose Flour: The foundation of your cookie dough, providing structure and chewiness.
  • Baking Soda: This leavening agent helps your cookies rise and gives them that perfect texture.
  • Salt: Just a pinch enhances all the flavors, making the cookies taste even better.
  • Semi-Sweet Chocolate Chips: The gooey goodness that melts in your mouth, adding sweetness and richness.

For those looking to mix things up, consider adding chopped nuts or dried fruit for extra texture. You can find the exact measurements for each ingredient at the bottom of the article, ready for printing!

How to Make Brown Butter Chocolate Chip Cookies

Now that you have your ingredients ready, let’s dive into the fun part: making these Brown Butter Chocolate Chip Cookies! Follow these simple steps, and you’ll be on your way to cookie bliss.

Step 1: Brown the Butter

Start by melting the unsalted butter in a medium saucepan over medium heat. Keep stirring it frequently. You want to watch it closely as it transforms from yellow to a beautiful golden brown. The nutty aroma will fill your kitchen, and that’s when you know it’s ready. Remove it from the heat and let it cool slightly.

Step 2: Mix the Sugars

In a large mixing bowl, combine the brown sugar and granulated sugar. Pour in the slightly cooled browned butter. Mix them together until well combined. This step is crucial; the sugars will dissolve better in the warm butter, creating a smooth base for your cookies.

Step 3: Add the Eggs and Vanilla

Next, crack in the large eggs, one at a time. Mix well after each addition to ensure everything is blended smoothly. Then, add the vanilla extract. This will enhance the flavor, making your cookies even more irresistible!

Step 4: Combine Dry Ingredients

In a separate bowl, whisk together the all-purpose flour, baking soda, and salt. This helps to evenly distribute the baking soda and salt throughout the flour. Gradually add this dry mixture to your wet ingredients, stirring until just combined. Be careful not to overmix; a few flour streaks are okay!

Step 5: Fold in Chocolate Chips

Now comes the best part! Gently fold in the semi-sweet chocolate chips. Make sure they’re evenly distributed throughout the dough. Each bite should be packed with that gooey goodness!

Step 6: Chill the Dough

Cover the dough with plastic wrap and refrigerate it for at least 30 minutes to 1 hour. Chilling the dough helps the flavors meld together and improves the texture of your cookies. Trust me, it’s worth the wait!

Step 7: Preheat and Prepare Baking Sheet

While the dough chills, preheat your oven to 350°F (175°C). Line a baking sheet with parchment paper. This will prevent the cookies from sticking and make cleanup a breeze.

Step 8: Scoop and Bake

Once the dough is chilled, scoop tablespoon-sized portions onto the prepared baking sheet. Make sure to space them about 2 inches apart. Bake for 10-12 minutes, or until the edges are golden brown and the centers are set. Your kitchen will smell heavenly!

Step 9: Cool and Enjoy

After baking, let the cookies cool on the baking sheet for about 5 minutes. This allows them to firm up a bit. Then, transfer them to a wire rack to cool completely. Now, grab a glass of milk and enjoy your delicious Brown Butter Chocolate Chip Cookies!

Tips for Success

  • Use room temperature eggs for better mixing and texture.
  • Don’t skip the chilling step; it enhances flavor and texture.
  • For a gourmet touch, sprinkle a pinch of sea salt on top before baking.
  • Experiment with different chocolate types, like dark or milk chocolate.
  • Store cookies in an airtight container to keep them fresh longer.

Equipment Needed

  • Medium Saucepan: For browning the butter. A small pot works too!
  • Mixing Bowls: Use a large bowl for wet ingredients and a smaller one for dry. Any size will do.
  • Whisk: Perfect for mixing. A fork can work in a pinch.
  • Baking Sheet: A standard sheet is ideal, but a stone or glass dish can also work.
  • Parchment Paper: For easy cleanup. Aluminum foil is a good alternative.

Variations

  • Nutty Delight: Add chopped walnuts or pecans for a crunchy texture that complements the chewy cookies.
  • Fruit Fusion: Mix in dried cranberries or cherries for a sweet and tart contrast to the chocolate.
  • Spiced Up: Incorporate a teaspoon of cinnamon or nutmeg for a warm, cozy flavor that’s perfect for fall.
  • Gluten-Free Option: Substitute all-purpose flour with a gluten-free blend to accommodate dietary needs.
  • Vegan Twist: Replace butter with coconut oil and eggs with flaxseed meal mixed with water for a plant-based version.

Serving Suggestions

  • Milk Pairing: Serve your cookies with a cold glass of milk for the classic combo.
  • Ice Cream Sandwich: Sandwich a scoop of vanilla ice cream between two cookies for a decadent treat.
  • Presentation: Arrange cookies on a rustic wooden board for a charming display.
  • Coffee Companion: Enjoy with a hot cup of coffee or espresso for a delightful afternoon snack.

FAQs about Brown Butter Chocolate Chip Cookies

Can I use salted butter instead of unsalted?

Yes, you can use salted butter, but reduce the added salt in the recipe to avoid overpowering the cookies. The brown butter flavor will still shine through!

How do I store leftover cookies?

Store your Brown Butter Chocolate Chip Cookies in an airtight container at room temperature. They’ll stay fresh for about a week, but I doubt they’ll last that long!

Can I freeze the cookie dough?

Absolutely! You can freeze the dough for up to three months. Just scoop the dough onto a baking sheet, freeze until solid, then transfer to a freezer bag. Bake straight from the freezer, adding a couple of extra minutes to the baking time.

What makes brown butter different from regular butter?

Brown butter is simply butter that has been cooked until the milk solids turn golden brown, giving it a rich, nutty flavor. This adds depth to your Brown Butter Chocolate Chip Cookies that regular butter just can’t match!

Can I substitute chocolate chips with something else?

Definitely! You can use chopped chocolate bars, white chocolate chips, or even butterscotch chips for a different flavor profile. Get creative!

Final Thoughts

There’s a certain joy that comes from baking Brown Butter Chocolate Chip Cookies. The process is simple, yet the results are extraordinary. Each bite delivers a delightful crunch followed by a chewy center, all wrapped in that irresistible nutty flavor. Whether you’re sharing them with friends or savoring them solo, these cookies bring warmth and comfort to any occasion. They’re not just cookies; they’re a sweet reminder of home and happiness. So, roll up your sleeves, embrace the magic of brown butter, and let these cookies create delicious memories in your kitchen!

jhessica

Brown Butter Chocolate Chip Cookies: Taste the Magic!

Delicious Brown Butter Chocolate Chip Cookies with a nutty flavor and chewy texture.
Prep Time 15 minutes
Cook Time 12 minutes
Total Time 1 hour 27 minutes
Servings: 24 cookies
Course: Dessert
Cuisine: American
Calories: 150

Ingredients
  

  • 2 sticks unsalted butter 1 cup
  • 1 cup brown sugar packed
  • 1/2 cup granulated sugar
  • 2 large eggs
  • 1 teaspoon vanilla extract
  • 3 cups all-purpose flour
  • 1 teaspoon baking soda
  • 1/2 teaspoon salt
  • 2 cups semi-sweet chocolate chips

Method
 

  1. In a medium saucepan, melt the butter over medium heat. Continue to cook, stirring frequently, until the butter turns a golden brown color and has a nutty aroma. Remove from heat and let it cool slightly.
  2. In a large mixing bowl, combine the brown sugar and granulated sugar. Pour in the browned butter and mix until well combined.
  3. Add the eggs one at a time, mixing well after each addition. Stir in the vanilla extract.
  4. In a separate bowl, whisk together the flour, baking soda, and salt. Gradually add the dry ingredients to the wet mixture, stirring until just combined.
  5. Fold in the chocolate chips until evenly distributed throughout the dough.
  6. Cover the dough with plastic wrap and refrigerate for at least 30 minutes to 1 hour. This helps the flavors meld and improves the texture.
  7. Preheat your oven to 350°F (175°C). Line a baking sheet with parchment paper.
  8. Scoop tablespoon-sized portions of dough onto the prepared baking sheet, spacing them about 2 inches apart.
  9. Bake for 10-12 minutes, or until the edges are golden brown and the centers are set. Let the cookies cool on the baking sheet for 5 minutes before transferring them to a wire rack to cool completely.

Nutrition

Serving: 1cookieCalories: 150kcalCarbohydrates: 20gProtein: 2gFat: 7gSaturated Fat: 4gPolyunsaturated Fat: 2gCholesterol: 30mgSodium: 100mgFiber: 1gSugar: 10g

Notes

  • For a richer flavor, try adding a pinch of sea salt on top of the cookies before baking.
  • Substitute half of the chocolate chips with chopped nuts or dried fruit for added texture and flavor.

Tried this recipe?

Let us know how it was!

Bourbon Peach Glazed Salmon that Elevates Your Dinner!

Introduction to Bourbon Peach Glazed Salmon

There’s something magical about a dish that combines sweet and savory, and this Bourbon Peach Glazed Salmon is just that. I remember the first time I tried a peach glaze; it was like a burst of summer on my plate. This recipe is perfect for those busy weeknights when you want to impress your loved ones without spending hours in the kitchen. With just a handful of ingredients and a quick grilling method, you can elevate your dinner to a whole new level. Trust me, your taste buds will thank you!

Why You’ll Love This Bourbon Peach Glazed Salmon

This Bourbon Peach Glazed Salmon is a game-changer for your dinner routine. It’s incredibly easy to whip up, taking just 25 minutes from start to finish. The sweet and tangy glaze adds a burst of flavor that will have everyone asking for seconds. Plus, it’s a healthy option packed with protein, making it perfect for those who want to eat well without sacrificing taste. You’ll love how simple yet impressive it is!

Ingredients for Bourbon Peach Glazed Salmon

Gathering the right ingredients is key to making this Bourbon Peach Glazed Salmon shine. Here’s what you’ll need:

  • Salmon fillets: Fresh, high-quality salmon is essential. Look for vibrant color and firm texture.
  • Fresh peaches: Juicy and ripe peaches bring sweetness. If they’re out of season, frozen peaches work too.
  • Bourbon: This adds depth and a hint of smokiness. Choose a bourbon you enjoy sipping.
  • Brown sugar: It caramelizes beautifully, enhancing the glaze’s sweetness.
  • Soy sauce: A touch of umami that balances the sweetness of the peaches.
  • Dijon mustard: Adds a tangy kick that complements the glaze perfectly.
  • Garlic powder: For a subtle garlic flavor without overpowering the dish.
  • Salt and black pepper: Essential for seasoning the salmon and enhancing flavors.
  • Olive oil: Helps prevent sticking on the grill and adds richness.
  • Chopped fresh parsley: A vibrant garnish that adds a pop of color and freshness.

For those looking to spice things up, consider adding a pinch of cayenne pepper to the glaze. If peaches aren’t your thing, feel free to swap them out for mango or pineapple for a tropical twist. Exact measurements for these ingredients can be found at the bottom of the article, ready for printing!

How to Make Bourbon Peach Glazed Salmon

Creating this Bourbon Peach Glazed Salmon is a breeze. Follow these simple steps, and you’ll have a delicious meal ready in no time. Let’s dive in!

Step 1: Prepare the Glaze

Start by grabbing a small saucepan. Toss in the diced peaches, bourbon, brown sugar, soy sauce, Dijon mustard, garlic powder, salt, and black pepper. Stir everything together and bring it to a simmer over medium heat. You’ll want to cook this for about 5-7 minutes. Keep an eye on it, stirring occasionally. The peaches should soften, and the sauce will thicken slightly. Once done, remove it from the heat and set it aside. This glaze is the star of the show!

Step 2: Preheat the Grill

While your glaze is cooling, it’s time to preheat your grill or grill pan. Set it to medium-high heat. A hot grill is crucial for achieving those beautiful grill marks and ensuring the salmon cooks evenly. If you’re using a grill pan, a little olive oil can help prevent sticking.

Step 3: Cook the Salmon

Now, let’s get to the salmon! Brush both sides of the fillets with olive oil and season them with salt and pepper. Place the salmon fillets skin-side down on the grill. Cook them for about 4-5 minutes. When the edges start to turn opaque, it’s time to flip. Carefully turn the fillets and cook for another 3-4 minutes. You’ll know they’re done when they flake easily with a fork. Perfectly grilled salmon is a thing of beauty!

Step 4: Glaze the Salmon

During the last minute of cooking, it’s time to brush on that luscious bourbon peach glaze. Use a basting brush to apply it generously over the salmon. Let it caramelize slightly on the grill. This step adds a delightful layer of flavor that you won’t want to skip!

Step 5: Serve and Garnish

Once the salmon is cooked to perfection, remove it from the grill. Drizzle any remaining glaze over the top for an extra burst of flavor. Finally, garnish with chopped fresh parsley. This adds a pop of color and freshness that makes the dish even more appealing. Serve it up and watch your loved ones dig in!

Tips for Success

  • Always use fresh, ripe peaches for the best flavor in your glaze.
  • Don’t skip the resting time for the salmon; it helps retain moisture.
  • Experiment with different fruits in the glaze for unique flavor profiles.
  • Keep an eye on the grill temperature to avoid overcooking the salmon.
  • Let the glaze cool slightly before brushing it on for better adherence.

Equipment Needed

  • Grill or Grill Pan: A standard outdoor grill works best, but a stovetop grill pan is a great alternative.
  • Small Saucepan: Essential for making the glaze; any small pot will do.
  • Basting Brush: Use this to apply the glaze; a spoon can work in a pinch.
  • Spatula: For flipping the salmon without breaking it apart.

Variations

  • Mango Peach Glaze: Swap out peaches for ripe mangoes for a tropical twist that adds a different sweetness.
  • Pineapple Bourbon Glaze: Use fresh pineapple instead of peaches for a tangy and refreshing flavor.
  • Spicy Bourbon Glaze: Add a pinch of cayenne pepper or red pepper flakes to the glaze for a spicy kick.
  • Herb-Infused Glaze: Incorporate fresh herbs like thyme or rosemary into the glaze for an aromatic touch.
  • Gluten-Free Option: Ensure your soy sauce is gluten-free or substitute with tamari for a gluten-free version.

Serving Suggestions

  • Side Dishes: Pair with grilled asparagus or a fresh garden salad for a light meal.
  • Starch Options: Serve over a bed of fluffy quinoa or alongside roasted sweet potatoes.
  • Drink Pairing: Enjoy with a chilled glass of white wine or a refreshing iced tea.
  • Presentation: Serve on a wooden board with lemon wedges for a rustic touch.

FAQs about Bourbon Peach Glazed Salmon

Can I use frozen peaches for the glaze?

Absolutely! Frozen peaches work well in this Bourbon Peach Glazed Salmon recipe. Just make sure to thaw and drain any excess liquid before using them in the glaze.

What can I substitute for bourbon?

If you prefer not to use bourbon, you can substitute it with apple juice or a splash of white wine. While it won’t have the same depth, it will still add a nice flavor to the glaze.

How do I know when the salmon is cooked through?

The salmon is done when it flakes easily with a fork and has an opaque appearance. A good rule of thumb is to cook it for about 4-5 minutes per side, depending on thickness.

Can I make the glaze ahead of time?

Yes! You can prepare the bourbon peach glaze in advance and store it in the refrigerator for up to three days. Just reheat it gently before using it on the salmon.

What sides pair well with Bourbon Peach Glazed Salmon?

This dish pairs beautifully with grilled vegetables, a fresh salad, or even a light rice pilaf. The sweet and tangy flavors complement a variety of sides!

Final Thoughts

Cooking this Bourbon Peach Glazed Salmon is more than just preparing a meal; it’s about creating a moment. The sweet aroma of peaches mingling with bourbon fills your kitchen, inviting everyone to gather around the table. Each bite offers a delightful balance of flavors that dances on your palate, making it a dish to remember. Whether it’s a weeknight dinner or a special occasion, this recipe brings joy and satisfaction. I hope you enjoy making it as much as I do. Here’s to delicious meals and cherished memories shared with loved ones!

jhessica

Bourbon Peach Glazed Salmon that Elevates Your Dinner!

A delicious and flavorful Bourbon Peach Glazed Salmon recipe that elevates your dinner with a sweet and tangy glaze.
Prep Time 10 minutes
Cook Time 15 minutes
Total Time 25 minutes
Course: Dinner
Cuisine: American
Calories: 350

Ingredients
  

  • 2 6-ounce salmon fillets
  • 1 cup fresh peaches diced
  • 1/4 cup bourbon
  • 2 tablespoons brown sugar
  • 1 tablespoon soy sauce
  • 1 tablespoon Dijon mustard
  • 1 teaspoon garlic powder
  • 1/2 teaspoon salt
  • 1/4 teaspoon black pepper
  • 1 tablespoon olive oil
  • Chopped fresh parsley for garnish

Method
 

  1. In a small saucepan over medium heat, combine the diced peaches, bourbon, brown sugar, soy sauce, Dijon mustard, garlic powder, salt, and black pepper. Bring to a simmer and cook for about 5-7 minutes, stirring occasionally, until the peaches are soft and the sauce thickens slightly. Remove from heat and set aside.
  2. Preheat your grill or a grill pan over medium-high heat. Brush the salmon fillets with olive oil and season with salt and pepper.
  3. Place the salmon fillets skin-side down on the grill. Cook for about 4-5 minutes, then carefully flip and cook for an additional 3-4 minutes, or until the salmon is cooked through and flakes easily with a fork.
  4. During the last minute of cooking, brush the bourbon peach glaze over the salmon fillets. Allow it to caramelize slightly on the grill.
  5. Remove the salmon from the grill and drizzle any remaining glaze over the top. Garnish with chopped fresh parsley before serving.

Nutrition

Serving: 1filletCalories: 350kcalCarbohydrates: 15gProtein: 34gFat: 18gSaturated Fat: 3gPolyunsaturated Fat: 15gCholesterol: 70mgSodium: 500mgFiber: 1gSugar: 10g

Notes

  • For a spicier kick, add a pinch of cayenne pepper to the glaze while cooking.
  • Substitute the peaches with other fruits like mango or pineapple for a different flavor profile.

Tried this recipe?

Let us know how it was!

Grilled Chicken Margherita: A Simple, Flavorful Delight!

Introduction to Grilled Chicken Margherita

There’s something magical about the combination of fresh ingredients and simple preparation.

Grilled Chicken Margherita embodies that spirit perfectly.

This dish is not just a meal; it’s a celebration of flavors that can brighten any busy weeknight or impress your friends at a weekend barbecue.

With juicy chicken, vibrant tomatoes, creamy mozzarella, and fragrant basil, it’s a feast for the senses.

Whether you’re a seasoned grill master or just starting out, this recipe is your ticket to a delicious dinner that’s quick and easy.

Let’s dive into this culinary delight that’s sure to become a favorite!

Why You’ll Love This Grilled Chicken Margherita

This Grilled Chicken Margherita is a game-changer for your dinner routine.

It’s quick to prepare, taking just 25 minutes from start to finish.

The vibrant flavors of fresh ingredients make every bite a delight.

Plus, it’s versatile enough to please picky eaters and impress guests alike.

With minimal cleanup and maximum taste, this dish is perfect for busy weeknights or casual gatherings.

You’ll find yourself reaching for this recipe again and again!

Ingredients for Grilled Chicken Margherita

Creating a mouthwatering Grilled Chicken Margherita starts with fresh, quality ingredients.

Here’s what you’ll need:

  • Boneless, skinless chicken breasts: The star of the dish, providing a lean protein base.
  • Salt: Essential for enhancing the natural flavors of the chicken.
  • Black pepper: Adds a subtle kick that complements the other ingredients.
  • Olive oil: Helps to keep the chicken moist and adds richness.
  • Cherry tomatoes: Their sweetness and juiciness bring a burst of flavor.
  • Fresh mozzarella balls: Creamy and mild, they melt beautifully on the chicken.
  • Fresh basil leaves: A fragrant herb that adds a refreshing touch.
  • Balsamic glaze: A drizzle of this adds a tangy sweetness that ties everything together.
  • Garlic powder: A quick way to infuse a savory depth into the dish.

Feel free to get creative!

You can marinate the chicken in Italian dressing for extra flavor or swap cherry tomatoes for sun-dried tomatoes for a different twist.

For exact quantities, check the bottom of the article where you can find everything available for printing.

Happy cooking!

How to Make Grilled Chicken Margherita

Making Grilled Chicken Margherita is a straightforward process that yields delicious results.

Follow these simple steps, and you’ll be on your way to a flavorful meal that impresses everyone at the table.

Step 1: Preheat the Grill

Preheating your grill is crucial for achieving that perfect sear on the chicken.

When the grill is hot, it locks in juices and creates those beautiful grill marks.

Aim for medium-high heat, around 375°F to 400°F.

This ensures your chicken cooks evenly and doesn’t stick to the grates.

Step 2: Season the Chicken

Seasoning is where the magic begins.

Sprinkle salt, black pepper, and garlic powder generously on both sides of the chicken breasts.

This simple blend enhances the chicken’s natural flavors and adds depth.

Don’t rush this step; let the seasoning work its wonders!

Step 3: Prepare the Chicken for Grilling

Drizzling olive oil over the seasoned chicken is a game-changer.

It not only adds richness but also helps prevent sticking.

Make sure to coat the chicken evenly.

This little step ensures a juicy, flavorful bite every time.

Step 4: Grill the Chicken

Now it’s time for the main event!

Place the chicken on the grill and cook for about 6-7 minutes on each side.

To check for doneness, use a meat thermometer; the internal temperature should reach 165°F.

This guarantees your chicken is safe to eat and perfectly cooked.

Step 5: Add Toppings

During the last few minutes of grilling, toss the cherry tomatoes and mozzarella balls onto the grill.

This warms them up and enhances their flavors.

The tomatoes will burst with sweetness, while the mozzarella will melt slightly, creating a delightful topping for your chicken.

Step 6: Rest and Serve

Once the chicken is cooked, let it rest for about 5 minutes.

This step is essential; it allows the juices to redistribute, keeping the chicken moist.

After resting, top each chicken breast with the grilled tomatoes, mozzarella, and fresh basil.

A drizzle of balsamic glaze adds the finishing touch.

Now, you’re ready to serve a dish that’s as beautiful as it is delicious!

Tips for Success

  • Always preheat your grill for even cooking and great sear marks.
  • Let the chicken rest after grilling to keep it juicy.
  • Experiment with different herbs like oregano or thyme for added flavor.
  • Use a meat thermometer to ensure perfect doneness every time.
  • For a smoky flavor, add wood chips to your grill while cooking.

Equipment Needed

  • Grill: A gas or charcoal grill works well; a grill pan is a great indoor alternative.
  • Meat thermometer: Essential for checking chicken doneness; a simple knife can also help.
  • Tongs: Perfect for flipping the chicken without losing juices.
  • Cutting board: Use for resting and slicing the chicken.

Variations of Grilled Chicken Margherita

  • Herb-Infused Chicken: Marinate the chicken in a mix of olive oil, lemon juice, and your favorite herbs like rosemary or thyme for a zesty twist.
  • Spicy Kick: Add red pepper flakes to the seasoning for a bit of heat that complements the sweetness of the tomatoes.
  • Caprese Style: Layer fresh basil leaves and slices of ripe avocado on top for a creamy, fresh addition.
  • Low-Carb Option: Serve the grilled chicken over a bed of zucchini noodles instead of traditional pasta for a healthier alternative.
  • Vegan Version: Substitute chicken with grilled portobello mushrooms and use vegan mozzarella for a plant-based delight.

Serving Suggestions for Grilled Chicken Margherita

  • Pair with a crisp side salad dressed in balsamic vinaigrette for a refreshing contrast.
  • Serve alongside grilled vegetables like zucchini and bell peppers for a colorful plate.
  • A chilled glass of white wine, like Pinot Grigio, complements the flavors beautifully.
  • For presentation, garnish with extra basil leaves and a drizzle of balsamic glaze.

FAQs about Grilled Chicken Margherita

Can I use chicken thighs instead of breasts?

Absolutely! Chicken thighs are juicier and can add a different flavor profile. Just adjust the cooking time, as thighs may take a bit longer to reach the safe internal temperature of 165°F.

What can I substitute for fresh mozzarella?

If fresh mozzarella isn’t available, you can use shredded mozzarella or even burrata for a creamier texture. Just keep in mind that the melting point may vary slightly.

How do I store leftovers?

Store any leftovers in an airtight container in the fridge for up to three days. Reheat gently in the microwave or on the grill to maintain the chicken’s juiciness.

Can I make this dish ahead of time?

While it’s best enjoyed fresh, you can marinate the chicken and prepare the toppings in advance. Just grill everything right before serving for the best flavor.

Is Grilled Chicken Margherita gluten-free?

Yes! This dish is naturally gluten-free, making it a great option for those with dietary restrictions. Just ensure that any additional sauces or dressings you use are also gluten-free.

Final Thoughts

Grilled Chicken Margherita is more than just a meal; it’s an experience that brings joy to the table.

The vibrant colors and fresh flavors create a feast for the senses, making every bite a celebration.

Whether you’re grilling for family or friends, this dish sparks conversations and laughter.

It’s a reminder that cooking can be simple yet incredibly rewarding.

So, fire up that grill and let the aroma of basil and tomatoes fill your kitchen.

With this recipe, you’re not just serving dinner; you’re creating memories that will linger long after the last bite.

jhessica

Grilled Chicken Margherita: A Simple, Flavorful Delight!

A simple and flavorful grilled chicken dish topped with fresh tomatoes, mozzarella, and basil.
Prep Time 10 minutes
Cook Time 15 minutes
Total Time 25 minutes
Servings: 4 servings
Course: Main Course
Cuisine: Italian
Calories: 320

Ingredients
  

  • 2 large boneless skinless chicken breasts
  • 1 teaspoon salt
  • 1/2 teaspoon black pepper
  • 1 tablespoon olive oil
  • 1 cup cherry tomatoes halved
  • 1 cup fresh mozzarella balls drained
  • 1/4 cup fresh basil leaves chopped
  • 1 tablespoon balsamic glaze
  • 1 teaspoon garlic powder

Method
 

  1. Preheat your grill to medium-high heat.
  2. Season the chicken breasts with salt, pepper, and garlic powder on both sides.
  3. Drizzle olive oil over the chicken to coat.
  4. Place the chicken on the grill and cook for about 6-7 minutes on each side, or until the internal temperature reaches 165°F.
  5. During the last few minutes of cooking, add the cherry tomatoes and mozzarella balls to the grill to warm them slightly.
  6. Once the chicken is cooked, remove it from the grill and let it rest for 5 minutes.
  7. Top each chicken breast with grilled tomatoes, mozzarella, and chopped basil.
  8. Drizzle with balsamic glaze before serving.

Nutrition

Serving: 1chicken breast with toppingsCalories: 320kcalCarbohydrates: 4gProtein: 30gFat: 20gSaturated Fat: 5gPolyunsaturated Fat: 15gCholesterol: 90mgSodium: 500mgFiber: 1gSugar: 2g

Notes

  • This dish pairs well with a side salad or grilled vegetables.
  • For added flavor, marinate the chicken in Italian dressing for 30 minutes before grilling.
  • You can also substitute the cherry tomatoes with sun-dried tomatoes for a different taste.

Tried this recipe?

Let us know how it was!

Savory Italian Meatballs: Discover the Perfect Recipe!

Introduction to Savory Italian Meatballs

There’s something undeniably comforting about a plate of savory Italian meatballs. They remind me of family gatherings, where laughter mingled with the aroma of garlic and herbs wafting through the air. This recipe is not just about food; it’s about creating memories. Whether you’re looking for a quick solution for a busy weeknight or a dish to impress your loved ones, these meatballs are your answer. They’re easy to whip up, packed with flavor, and perfect for any occasion. Let’s dive into this culinary adventure and bring a taste of Italy to your kitchen!

Why You’ll Love This Savory Italian Meatballs

These savory Italian meatballs are a game-changer for any home cook. They come together in just 45 minutes, making them perfect for busy weeknights. The flavor? Absolutely irresistible! With a blend of herbs and spices, each bite bursts with taste. Plus, they’re versatile enough to serve with pasta, in a sub, or on their own. Trust me, once you try them, they’ll become a staple in your kitchen!

Ingredients for Savory Italian Meatballs

Gathering the right ingredients is the first step to crafting these savory Italian meatballs. Here’s what you’ll need:

  • Ground beef: The star of the show! Choose a good quality beef for rich flavor and juiciness.
  • Breadcrumbs: These add texture and help bind the meatballs together. You can use store-bought or make your own from stale bread.
  • Grated Parmesan cheese: This brings a nutty, salty kick that elevates the flavor profile.
  • Fresh parsley: Adds a pop of color and freshness. If you’re in a pinch, dried parsley works too.
  • Onion: Finely chopped, it provides sweetness and depth. Sautéing it first can enhance its flavor.
  • Garlic: Minced garlic is a must for that aromatic punch. You can never have too much garlic!
  • Egg: Acts as a binder, helping the meatballs hold their shape while cooking.
  • Salt and black pepper: Essential seasonings that enhance all the other flavors.
  • Dried oregano: A classic Italian herb that adds warmth and earthiness.
  • Red pepper flakes: Optional, but they bring a delightful heat. Adjust to your taste!
  • Marinara sauce: The perfect companion for your meatballs. Use your favorite jarred sauce or make your own for a personal touch.

For exact measurements, check the bottom of the article where you can find everything listed for easy printing. Happy cooking!

How to Make Savory Italian Meatballs

Now that you have your ingredients ready, let’s get cooking! Making savory Italian meatballs is a straightforward process that anyone can master. Follow these simple steps, and you’ll have a delicious meal in no time.

Step 1: Preheat the Oven

First things first, preheat your oven to 400°F. This ensures that your meatballs cook evenly and get that lovely golden-brown color. While the oven heats up, you can prepare the meatball mixture.

Step 2: Mix the Ingredients

In a large mixing bowl, combine the ground beef, breadcrumbs, grated Parmesan cheese, chopped parsley, finely chopped onion, minced garlic, egg, salt, black pepper, oregano, and red pepper flakes if you’re feeling adventurous. Use your hands to mix everything together until just combined. Be careful not to overmix; you want tender meatballs, not tough ones!

Step 3: Shape the Meatballs

Now comes the fun part! Using your hands, shape the mixture into meatballs about 1 to 1.5 inches in diameter. This size is perfect for cooking through without drying out. Place them on a baking sheet lined with parchment paper. This makes cleanup a breeze!

Step 4: Bake the Meatballs

Pop the baking sheet into your preheated oven and bake the meatballs for 20-25 minutes. You’ll know they’re done when they’re cooked through and nicely browned. The aroma will fill your kitchen, making it hard to resist sneaking a taste!

Step 5: Heat the Marinara Sauce

While the meatballs are baking, grab a large skillet and heat your marinara sauce over medium heat. Stir occasionally to prevent it from sticking. This step is crucial because the sauce will add moisture and flavor to your meatballs.

Step 6: Simmer and Serve

Once the meatballs are done baking, carefully transfer them to the skillet with the marinara sauce. Let them simmer for an additional 5-10 minutes. This allows the flavors to meld beautifully. Serve your savory Italian meatballs with pasta, on a sub roll, or simply on their own with extra sauce. Enjoy every bite!

Tips for Success

  • Use fresh ingredients for the best flavor. Fresh herbs and quality meat make a difference!
  • Don’t overmix the meatball mixture; it can lead to tough meatballs.
  • For even cooking, try to make all meatballs the same size.
  • Let the meatballs rest for a few minutes after baking for juicier results.
  • Experiment with different herbs and spices to customize the flavor!

Equipment Needed

  • Mixing bowl: A large bowl for combining ingredients. A sturdy pot can work in a pinch.
  • Baking sheet: Essential for baking meatballs. Use a cast-iron skillet if you don’t have one.
  • Parchment paper: Helps with easy cleanup. Aluminum foil is a good alternative.
  • Skillet: For heating marinara sauce. Any non-stick pan will do!

Variations of Savory Italian Meatballs

  • Turkey Meatballs: Swap ground beef for ground turkey for a lighter option. They’re just as delicious!
  • Vegetarian Meatballs: Use lentils or chickpeas as a base, adding breadcrumbs and spices for flavor. Perfect for meatless meals!
  • Cheesy Meatballs: Mix in small cubes of mozzarella cheese for a gooey surprise in every bite.
  • Spicy Meatballs: Increase the red pepper flakes or add chopped jalapeños for a fiery kick.
  • Herb-Infused Meatballs: Experiment with different herbs like basil or thyme to create unique flavor profiles.

Serving Suggestions for Savory Italian Meatballs

  • Pasta: Serve over spaghetti or penne for a classic Italian meal.
  • Sub Rolls: Place meatballs in a toasted sub roll, topped with marinara and melted cheese.
  • Salad: Pair with a fresh green salad for a lighter option.
  • Wine: Enjoy with a glass of red wine, like Chianti, to complement the flavors.

FAQs about Savory Italian Meatballs

Can I use ground turkey instead of beef for savory Italian meatballs?

Absolutely! Ground turkey is a great alternative for a lighter version of savory Italian meatballs. Just keep in mind that turkey can be a bit drier, so adding a little extra moisture, like a splash of broth, can help.

How do I store leftover meatballs?

Leftover savory Italian meatballs can be stored in an airtight container in the fridge for up to three days. You can also freeze them for up to three months. Just make sure to separate layers with parchment paper to prevent sticking!

What can I serve with savory Italian meatballs?

These meatballs are incredibly versatile! Serve them over pasta, in a sub roll, or alongside a fresh salad. They also pair wonderfully with garlic bread for a complete meal.

Can I make the meatball mixture ahead of time?

Yes! You can prepare the meatball mixture a day in advance. Just cover it tightly and store it in the fridge. When you’re ready to cook, shape and bake them as usual.

What’s the best way to reheat meatballs?

The best way to reheat savory Italian meatballs is in the oven or on the stovetop in marinara sauce. This keeps them moist and flavorful. Just heat until warmed through, and enjoy!

Final Thoughts

Cooking these savory Italian meatballs is more than just preparing a meal; it’s about creating a moment of joy. The aroma that fills your kitchen, the laughter shared around the table, and the satisfaction of a dish well made are all part of the experience. Whether you’re serving them for a family dinner or a casual get-together with friends, these meatballs are sure to impress. They embody comfort and warmth, reminding us of the simple pleasures in life. So roll up your sleeves, embrace the process, and enjoy every delicious bite!

jhessica

Savory Italian Meatballs: Discover the Perfect Recipe!

A delicious recipe for savory Italian meatballs that are perfect for any occasion.
Prep Time 15 minutes
Cook Time 30 minutes
Total Time 45 minutes
Servings: 4 -6 servings
Course: Main Dish
Cuisine: Italian
Calories: 290

Ingredients
  

  • 1 pound ground beef
  • 1/2 cup breadcrumbs
  • 1/4 cup grated Parmesan cheese
  • 1/4 cup chopped fresh parsley or 2 tablespoons dried parsley
  • 1/4 cup finely chopped onion
  • 2 cloves garlic minced
  • 1 large egg
  • 1 teaspoon salt
  • 1/2 teaspoon black pepper
  • 1 teaspoon dried oregano
  • 1/2 teaspoon red pepper flakes optional
  • 1 jar 24 ounces marinara sauce

Method
 

  1. Preheat your oven to 400°F.
  2. In a large mixing bowl, combine the ground beef, breadcrumbs, Parmesan cheese, parsley, onion, garlic, egg, salt, black pepper, oregano, and red pepper flakes. Mix until just combined; do not overmix.
  3. Using your hands, shape the mixture into meatballs about 1 to 1.5 inches in diameter and place them on a baking sheet lined with parchment paper.
  4. Bake for 20-25 minutes or until cooked through and browned.
  5. While the meatballs are baking, heat the marinara sauce in a large skillet over medium heat.
  6. Once the meatballs are done, transfer them to the skillet and simmer in the sauce for an additional 5-10 minutes.
  7. Serve the meatballs with pasta, on a sub roll, or on their own with extra sauce.

Nutrition

Serving: 1meatballCalories: 290kcalCarbohydrates: 10gProtein: 22gFat: 18gSaturated Fat: 7gPolyunsaturated Fat: 8gCholesterol: 70mgSodium: 600mgFiber: 1gSugar: 2g

Notes

  • For added flavor, try mixing in some chopped bell peppers or mushrooms into the meatball mixture.
  • If you prefer a lighter version, substitute ground turkey for the beef.

Tried this recipe?

Let us know how it was!

Avocado Corn Salad: A Refreshing, Flavor-Packed Dish!

Introduction to Avocado Corn Salad

There’s something magical about a dish that feels like summer on a plate. My love for Avocado Corn Salad began on a sunny afternoon, when I craved something fresh and vibrant. This salad is not just a meal; it’s a celebration of flavors and textures. Perfect for a quick solution on a busy day or a delightful side to impress your loved ones, it combines creamy avocados with crunchy corn and zesty lime. With just a handful of ingredients, you can whip up a healthy, satisfying dish that’s sure to please everyone at the table.

Why You’ll Love This Avocado Corn Salad

This Avocado Corn Salad is a game-changer for anyone looking for a quick, delicious meal. It comes together in just 15 minutes, making it perfect for those hectic weeknights. The combination of creamy avocados and sweet corn creates a flavor explosion that’s hard to resist. Plus, it’s vegan and packed with nutrients, so you can feel good about serving it to your family or friends. Who wouldn’t love that?

Ingredients for Avocado Corn Salad

Gathering the right ingredients is the first step to creating this vibrant Avocado Corn Salad. Here’s what you’ll need:

  • Ripe avocados: These creamy gems are the star of the show, adding richness and healthy fats.
  • Black beans: Packed with protein and fiber, they add a hearty texture and a touch of earthiness.
  • Corn kernels: Whether fresh, frozen, or canned, corn brings a sweet crunch that brightens the dish.
  • Cherry tomatoes: Their juicy sweetness complements the other ingredients beautifully.
  • Red onion: Finely chopped, it adds a sharp bite that balances the creaminess of the avocados.
  • Fresh cilantro: This herb adds a burst of freshness and a hint of citrusy flavor.
  • Lime juice: A splash of lime juice brightens the salad and enhances all the flavors.
  • Olive oil: A drizzle of good-quality olive oil adds richness and helps the flavors meld.
  • Cumin: This spice brings a warm, earthy note that elevates the overall taste.
  • Salt and pepper: Essential for seasoning, they help bring out the best in every ingredient.

For those looking to customize, consider adding diced bell peppers or cucumber for extra crunch. If you like a kick, toss in some diced jalapeños or a pinch of cayenne pepper. You can find the exact quantities for each ingredient at the bottom of the article, ready for printing!

How to Make Avocado Corn Salad

Creating this Avocado Corn Salad is as easy as pie, or should I say, as easy as salad? Follow these simple steps, and you’ll have a vibrant dish ready in no time. Let’s dive in!

Step 1: Combine the Base Ingredients

Start by grabbing a large mixing bowl. Toss in the diced avocados, black beans, corn, cherry tomatoes, red onion, and cilantro. The colors will pop, and the aroma will make your mouth water. Gently mix everything together, being careful not to mash the avocados. You want those creamy chunks to stay intact!

Step 2: Prepare the Dressing

In a small bowl, whisk together the lime juice, olive oil, cumin, salt, and pepper. This dressing is where the magic happens! The lime juice adds a zesty kick, while the cumin brings warmth. Make sure it’s well combined; you want every drop to be flavorful.

Step 3: Mix the Salad

Now, pour that delicious dressing over your salad mixture. Gently toss everything together until the ingredients are well coated. Remember, the goal is to combine without turning the avocados into mush. You want to keep that lovely texture!

Step 4: Taste and Adjust

Here’s where you can get a little creative. Take a moment to taste your salad. Does it need more salt? A little extra lime juice? Adjust the seasoning to your liking. This is your salad, after all!

Step 5: Serve or Chill

Finally, you can serve your Avocado Corn Salad right away or let it chill in the refrigerator for about 30 minutes. Chilling allows the flavors to meld beautifully. Either way, it’s going to be a hit!

Tips for Success

  • Choose ripe avocados for the best creaminess; they should yield slightly to gentle pressure.
  • Rinse black beans thoroughly to remove excess sodium and improve flavor.
  • For extra flavor, let the salad sit for a few minutes before serving.
  • Use fresh lime juice for a brighter taste; bottled juice can’t compare.
  • Experiment with different herbs like parsley or basil for a unique twist.

Equipment Needed

  • Large mixing bowl: A sturdy bowl for combining all your ingredients. A salad bowl works great too.
  • Small bowl: Perfect for whisking the dressing. A measuring cup can do the trick.
  • Whisk or fork: Use either to mix the dressing. A spoon can also work in a pinch.
  • Cutting board and knife: Essential for chopping veggies and avocados.

Variations of Avocado Corn Salad

  • Southwestern Twist: Add diced bell peppers, corn, and a sprinkle of chili powder for a spicy kick.
  • Protein Boost: Toss in grilled chicken or shrimp for a heartier meal that’s still refreshing.
  • Quinoa Addition: Mix in cooked quinoa for added texture and protein, making it even more filling.
  • Fruit Fusion: Incorporate diced mango or pineapple for a sweet contrast to the savory ingredients.
  • Nutty Crunch: Sprinkle some toasted pumpkin seeds or walnuts on top for an extra crunch and healthy fats.

Serving Suggestions for Avocado Corn Salad

  • Pair with grilled chicken or fish for a complete meal that’s both satisfying and healthy.
  • Serve alongside tortilla chips for a crunchy, fun appetizer.
  • Drizzle with extra lime juice just before serving for a fresh burst of flavor.
  • Garnish with additional cilantro for a vibrant presentation.

FAQs about Avocado Corn Salad

Can I make Avocado Corn Salad ahead of time?

Absolutely! You can prepare the salad a few hours in advance. Just keep the dressing separate until you’re ready to serve. This helps prevent the avocados from browning and keeps everything fresh.

How long does Avocado Corn Salad last in the fridge?

This salad is best enjoyed fresh, but it can last in the fridge for about 1-2 days. Just be aware that the avocados may brown slightly over time.

Can I use frozen corn in this recipe?

Yes, frozen corn works perfectly! Just thaw it before adding it to the salad. It’s a great time-saver and still delivers that sweet crunch.

Is this salad gluten-free?

Yes! This Avocado Corn Salad is naturally gluten-free, making it a fantastic option for those with gluten sensitivities.

What can I serve with Avocado Corn Salad?

This salad pairs wonderfully with grilled meats, tacos, or even as a topping for nachos. It’s versatile enough to complement many dishes!

Final Thoughts

Creating this Avocado Corn Salad is more than just preparing a dish; it’s about bringing joy to the table. Each bite bursts with flavor, reminding me of sunny days and good company. The creamy avocados, sweet corn, and zesty lime come together in a delightful harmony that’s hard to resist. Whether you’re serving it at a backyard barbecue or enjoying it as a light lunch, this salad is sure to impress. It’s a simple yet satisfying way to nourish yourself and those you love. So grab your ingredients and let the flavor adventure begin!

jhessica

Avocado Corn Salad: A Refreshing, Flavor-Packed Dish!

A refreshing and flavor-packed Avocado Corn Salad that combines creamy avocados with black beans, corn, and fresh vegetables.
Prep Time 15 minutes
Total Time 15 minutes
Servings: 4 servings
Course: Salad
Cuisine: Mexican
Calories: 250

Ingredients
  

  • 2 ripe avocados diced
  • 1 can 15 ounces black beans, rinsed and drained
  • 1 cup corn kernels fresh, frozen, or canned
  • 1 cup cherry tomatoes halved
  • 1/2 red onion finely chopped
  • 1/4 cup fresh cilantro chopped
  • 1 lime juiced
  • 2 tablespoons olive oil
  • 1 teaspoon cumin
  • Salt and pepper to taste

Method
 

  1. In a large mixing bowl, combine the diced avocados, black beans, corn, cherry tomatoes, red onion, and cilantro.
  2. In a small bowl, whisk together the lime juice, olive oil, cumin, salt, and pepper.
  3. Pour the dressing over the salad mixture and gently toss to combine, being careful not to mash the avocados.
  4. Taste and adjust seasoning if necessary.
  5. Serve immediately or chill in the refrigerator for 30 minutes to allow the flavors to meld.

Nutrition

Serving: 1servingCalories: 250kcalCarbohydrates: 18gProtein: 7gFat: 16gSaturated Fat: 2gPolyunsaturated Fat: 14gSodium: 200mgFiber: 7gSugar: 2g

Notes

  • For added crunch, toss in some diced bell peppers or cucumber.
  • To make it spicier, add diced jalapeños or a pinch of cayenne pepper to the salad.

Tried this recipe?

Let us know how it was!

Greek Orzo Salad: Fresh, Flavorful, and Easy to Make!

Introduction to Greek Orzo Salad

There’s something magical about a dish that brings together vibrant colors and fresh flavors, and that’s exactly what you get with Greek Orzo Salad. This delightful salad is not just a feast for the eyes; it’s a quick solution for those busy days when you want something healthy yet satisfying. I remember the first time I made it for a summer barbecue, and it was gone in minutes! Whether you’re looking to impress your loved ones or simply want a refreshing meal, this Greek Orzo Salad is your go-to recipe.

Why You’ll Love This Greek Orzo Salad

This Greek Orzo Salad is a game-changer in the kitchen. It’s incredibly easy to whip up, taking just about 25 minutes from start to finish. The flavors are fresh and vibrant, making it a crowd-pleaser at any gathering. Plus, it’s versatile enough to serve as a side dish or a light main course. Trust me, once you try it, you’ll be hooked!

Ingredients for Greek Orzo Salad

Gathering the right ingredients is key to making a delicious Greek Orzo Salad. Here’s what you’ll need:

  • Orzo pasta: This tiny pasta shape is the star of the dish, providing a hearty base that absorbs all the flavors.
  • Cherry tomatoes: Sweet and juicy, they add a burst of color and freshness.
  • Cucumber: Crisp and refreshing, cucumbers bring a cool crunch to the salad.
  • Red onion: Finely chopped, it adds a sharp bite that balances the other flavors.
  • Kalamata olives: These briny gems contribute a rich, savory depth to the dish.
  • Feta cheese: Creamy and tangy, feta crumbles elevate the salad with a delightful richness.
  • Fresh parsley: Chopped parsley adds a pop of color and a hint of herbal brightness.
  • Olive oil: A drizzle of good-quality olive oil ties everything together, enhancing the flavors.
  • Red wine vinegar: This adds a tangy kick that complements the other ingredients beautifully.
  • Dried oregano: A classic herb in Greek cuisine, it brings an aromatic touch.
  • Salt and pepper: Essential for seasoning, they help to bring out the flavors of the salad.

For those looking to customize, consider adding grilled chicken or chickpeas for extra protein. If you’re not a fan of feta, goat cheese works wonderfully, or you can skip the cheese altogether for a dairy-free version. You can find the exact quantities for each ingredient at the bottom of the article, ready for printing!

How to Make Greek Orzo Salad

Creating a Greek Orzo Salad is a straightforward process that anyone can master. Follow these simple steps, and you’ll have a delicious dish ready in no time!

Step 1: Cook the Orzo Pasta

Start by boiling a pot of salted water. Once it’s bubbling, add the orzo pasta. Cook it according to the package instructions until it’s al dente, which usually takes about 8-10 minutes. This means it should be firm to the bite, not mushy. After draining the pasta, rinse it under cold water. This step is crucial! Rinsing cools the orzo and stops the cooking process, ensuring it stays perfectly tender.

Step 2: Combine the Ingredients

In a large mixing bowl, combine the cooled orzo with the cherry tomatoes, diced cucumber, finely chopped red onion, Kalamata olives, crumbled feta cheese, and fresh parsley. Gently mix everything together. The colors and textures will start to come alive, making your salad not just tasty but visually appealing too!

Step 3: Prepare the Dressing

In a small bowl, whisk together the olive oil, red wine vinegar, dried oregano, salt, and pepper. This dressing is the magic that ties all the flavors together. Make sure to whisk it well until it’s nicely blended. The aroma of the olive oil and vinegar will make your mouth water!

Step 4: Toss the Salad

Now, pour the dressing over the salad mixture. Using a large spoon, toss everything gently to combine. You want to ensure that every bite is coated in that delicious dressing. Be careful not to mash the feta; you want those lovely crumbles to stay intact!

Step 5: Chill and Serve

For the best flavor, cover the salad and chill it in the refrigerator for at least 30 minutes. This allows the ingredients to meld together beautifully. When you’re ready to serve, give it a quick toss again. Your Greek Orzo Salad is now ready to impress!

Tips for Success

  • Always salt your pasta water; it enhances the flavor of the orzo.
  • Use fresh ingredients for the best taste; ripe tomatoes and crisp cucumbers make a difference.
  • Let the salad chill longer if you can; the flavors deepen with time.
  • Adjust the dressing to your taste; add more vinegar for tang or olive oil for richness.
  • Experiment with herbs; fresh basil or mint can add a unique twist!

Equipment Needed

  • Large pot: For boiling the orzo. A deep skillet can work too.
  • Colander: To drain the pasta. A fine mesh strainer is a good alternative.
  • Mixing bowl: A large bowl for combining ingredients. Any big bowl will do!
  • Whisk: For mixing the dressing. A fork can also get the job done.
  • Serving spoon: To toss and serve the salad. A spatula works well too.

Variations of Greek Orzo Salad

  • Protein-Packed: Add grilled chicken, shrimp, or chickpeas for a heartier meal.
  • Veggie Delight: Toss in roasted bell peppers, artichoke hearts, or spinach for extra nutrition.
  • Herb Infusion: Experiment with fresh herbs like dill or mint to elevate the flavor profile.
  • Spicy Kick: Add a pinch of red pepper flakes or diced jalapeños for some heat.
  • Grain Swap: Substitute orzo with quinoa or farro for a different texture and taste.

Serving Suggestions for Greek Orzo Salad

  • Pair with Grilled Meats: This salad complements grilled chicken or lamb beautifully.
  • Serve with Pita Bread: Warm pita or crusty bread makes for a delightful side.
  • Refreshing Drinks: Enjoy with a chilled glass of white wine or lemonade.
  • Presentation: Serve in a large bowl garnished with extra parsley for a pop of color.

FAQs about Greek Orzo Salad

Can I make Greek Orzo Salad ahead of time?

Absolutely! This salad actually tastes better after sitting for a while. You can prepare it a day in advance and let the flavors meld in the fridge. Just give it a quick toss before serving!

Is Greek Orzo Salad gluten-free?

Traditional orzo pasta is made from wheat, so it’s not gluten-free. However, you can easily substitute it with gluten-free orzo or another gluten-free grain like quinoa for a similar texture.

How long does Greek Orzo Salad last in the fridge?

When stored in an airtight container, this salad can last up to 3-5 days in the fridge. Just keep in mind that the vegetables may lose some crunch over time.

Can I add more vegetables to the salad?

Definitely! Feel free to get creative. Bell peppers, zucchini, or even roasted vegetables can add extra flavor and nutrition to your Greek Orzo Salad.

What can I serve with Greek Orzo Salad?

This salad pairs wonderfully with grilled meats, seafood, or even as a side to a hearty soup. It’s versatile enough to complement many dishes!

Final Thoughts

Making Greek Orzo Salad is more than just preparing a meal; it’s about creating a vibrant experience that brings people together. The fresh ingredients and zesty flavors make every bite a celebration of summer, no matter the season. I love how this salad can be a quick lunch or a stunning side at a dinner party. It’s versatile, easy to customize, and always a hit. So, whether you’re cooking for yourself or sharing with friends, this Greek Orzo Salad is sure to bring joy to your table and smiles to your loved ones.

jhessica

Greek Orzo Salad: Fresh, Flavorful, and Easy to Make!

A refreshing and flavorful Greek Orzo Salad that is easy to make and perfect for any occasion.
Prep Time 15 minutes
Cook Time 10 minutes
Total Time 55 minutes
Servings: 6 servings
Course: Salad
Cuisine: Greek
Calories: 280

Ingredients
  

  • 2 cups orzo pasta
  • 1 cup cherry tomatoes halved
  • 1 cucumber diced
  • 1/2 red onion finely chopped
  • 1/2 cup Kalamata olives pitted and sliced
  • 1 cup feta cheese crumbled
  • 1/4 cup fresh parsley chopped
  • 1/4 cup olive oil
  • 2 tablespoons red wine vinegar
  • 1 teaspoon dried oregano
  • Salt and pepper to taste

Method
 

  1. Cook the orzo pasta according to package instructions until al dente. Drain and rinse under cold water to cool.
  2. In a large bowl, combine the cooled orzo, cherry tomatoes, cucumber, red onion, olives, feta cheese, and parsley.
  3. In a small bowl, whisk together the olive oil, red wine vinegar, dried oregano, salt, and pepper.
  4. Pour the dressing over the orzo salad and toss gently to combine.
  5. Chill the salad in the refrigerator for at least 30 minutes before serving to allow the flavors to meld.

Nutrition

Serving: 1servingCalories: 280kcalCarbohydrates: 30gProtein: 8gFat: 14gSaturated Fat: 4gPolyunsaturated Fat: 10gCholesterol: 20mgSodium: 400mgFiber: 2gSugar: 3g

Notes

  • For added protein, consider adding grilled chicken or chickpeas.
  • Substitute the feta cheese with goat cheese or omit it for a dairy-free version.

Tried this recipe?

Let us know how it was!

Garden-Style Italian Salad: A Refreshing Delight Awaits!

Introduction to Garden-Style Italian Salad

There’s something magical about a vibrant salad that can brighten up any meal. The Garden-Style Italian Salad is just that—a refreshing delight that brings a burst of color and flavor to your table. Whether you’re looking for a quick solution for a busy day or a dish to impress your loved ones, this salad fits the bill perfectly. With its crisp greens and zesty dressing, it’s not just a side; it’s a celebration of fresh ingredients. Trust me, once you try this, it’ll become a staple in your kitchen!

Why You’ll Love This Garden-Style Italian Salad

This Garden-Style Italian Salad is a game-changer for anyone who craves flavor without the fuss. It’s quick to whip up, taking just 10 minutes from start to finish. The combination of fresh ingredients creates a taste explosion that’s both satisfying and healthy. Plus, it’s versatile enough to pair with any meal or stand alone as a light lunch. You’ll love how easy it is to make and how great it tastes!

Ingredients for Garden-Style Italian Salad

Gathering fresh ingredients is half the fun of making a Garden-Style Italian Salad. Here’s what you’ll need:

  • Romaine lettuce: This leafy green adds a satisfying crunch and is packed with nutrients.
  • Iceberg lettuce: Known for its crisp texture, it complements the romaine perfectly.
  • Cherry tomatoes: These bite-sized gems bring sweetness and a pop of color to your salad.
  • Red onion: Thinly sliced, it adds a sharp flavor that balances the sweetness of the tomatoes.
  • Cucumber: Cool and refreshing, cucumber slices provide a nice crunch.
  • Black olives: These add a briny depth that enhances the overall flavor profile.
  • Pepperoncini peppers: For a little kick, these tangy peppers are a delightful addition.
  • Croutons: They bring a satisfying crunch and can be store-bought or homemade.
  • Parmesan cheese: Grated, it adds a savory richness that ties all the flavors together.
  • Italian dressing: This zesty dressing is the finishing touch, bringing everything together.

Feel free to customize your salad! You can add bell peppers for extra color or chickpeas for a protein boost. The exact quantities of each ingredient are listed at the bottom of the article for your convenience, making it easy to print and follow.

How to Make Garden-Style Italian Salad

Creating a Garden-Style Italian Salad is as easy as pie—no baking required! Follow these simple steps to whip up a colorful and delicious salad that will impress everyone at the table.

Step 1: Prepare the Greens

Start by washing your romaine and iceberg lettuce thoroughly. Once clean, chop them into bite-sized pieces. I like to mix them in a large bowl, creating a fresh base that’s both crunchy and satisfying. The combination of these two lettuces gives your salad a delightful texture.

Step 2: Add the Vegetables

Next, it’s time to bring in the color! Halve the cherry tomatoes and toss them in. Thinly slice the red onion and cucumber, then add those too. Don’t forget the black olives and pepperoncini peppers; they add a burst of flavor and a bit of zing. Each ingredient contributes to the overall taste, making your salad vibrant and exciting.

Step 3: Toss the Salad

Now comes the fun part—mixing it all together! Use your hands or a large spoon to toss the salad gently. This step is crucial for ensuring that every bite is packed with flavor. You want the greens and veggies to be evenly distributed, so everyone gets a taste of everything.

Step 4: Dress the Salad

Drizzle the Italian dressing over your salad. I recommend starting with a little and adding more as needed. Toss the salad again to coat all the ingredients evenly. This dressing is the magic that ties all the flavors together, making each bite a delightful experience.

Step 5: Finish with Toppings

To elevate your salad, sprinkle croutons on top for that satisfying crunch. Then, add a generous amount of grated Parmesan cheese. This final touch not only enhances the flavor but also adds a lovely visual appeal. Your Garden-Style Italian Salad is now ready to be served!

Tips for Success

  • Use fresh, crisp ingredients for the best flavor and texture.
  • Chill your salad for 15 minutes before serving to enhance the refreshing taste.
  • Experiment with different dressings to find your favorite flavor combination.
  • Make it a meal by adding grilled chicken or chickpeas for protein.
  • Store leftovers in an airtight container to keep them fresh for the next day.

Equipment Needed

  • Large salad bowl: A big bowl is essential for mixing all those vibrant ingredients. A mixing bowl works too!
  • Cutting board: A sturdy surface for chopping your veggies.
  • Sharp knife: A good knife makes slicing and dicing a breeze.
  • Serving utensils: Tongs or a large spoon for tossing and serving.

Variations

  • Protein-Packed: Add grilled chicken, shrimp, or chickpeas for a heartier salad that’s perfect as a main dish.
  • Vegan Twist: Substitute the Parmesan cheese with nutritional yeast or a vegan cheese alternative for a plant-based option.
  • Spicy Kick: Toss in some jalapeños or a dash of hot sauce for those who love a little heat in their salad.
  • Herb Infusion: Fresh herbs like basil or parsley can elevate the flavor profile and add a fragrant touch.
  • Seasonal Additions: Incorporate seasonal vegetables like bell peppers in summer or roasted butternut squash in fall for a unique twist.

Serving Suggestions

  • Pair your Garden-Style Italian Salad with grilled chicken or fish for a complete meal.
  • Serve it alongside crusty garlic bread for a delightful Italian feast.
  • For drinks, a chilled white wine or sparkling water complements the salad beautifully.
  • Present the salad in a large bowl for a family-style meal or in individual bowls for a more elegant touch.

FAQs about Garden-Style Italian Salad

Can I make Garden-Style Italian Salad ahead of time?

Absolutely! You can prepare the salad a few hours in advance. Just keep the dressing separate until you’re ready to serve. This way, the greens stay crisp and fresh.

What can I substitute for Italian dressing?

If you’re not a fan of Italian dressing, try a balsamic vinaigrette or a homemade lemon-olive oil dressing. Both options will add a delightful flavor to your salad.

Is this salad suitable for meal prep?

Yes! The Garden-Style Italian Salad is perfect for meal prep. Just store the ingredients separately and combine them when you’re ready to eat. It stays fresh for a couple of days in the fridge.

Can I add protein to this salad?

Definitely! Grilled chicken, shrimp, or even chickpeas are great additions. They not only enhance the flavor but also make the salad more filling.

How can I make this salad gluten-free?

To make your Garden-Style Italian Salad gluten-free, simply use gluten-free croutons or skip them altogether. The salad will still be delicious and satisfying!

Final Thoughts

Creating a Garden-Style Italian Salad is more than just preparing a dish; it’s about embracing the joy of fresh ingredients and vibrant flavors. Each bite is a celebration of color and crunch, making it a delightful addition to any meal. Whether you’re enjoying it on a sunny afternoon or serving it at a family gathering, this salad brings a refreshing touch that everyone will love. Plus, its versatility means you can customize it to suit your taste. So, roll up your sleeves, gather your ingredients, and let this salad become a cherished part of your culinary adventures!

jhessica

Garden-Style Italian Salad: A Refreshing Delight Awaits!

A refreshing and colorful Garden-Style Italian Salad perfect for any occasion.
Prep Time 10 minutes
Total Time 10 minutes
Servings: 4 servings
Course: Salad
Cuisine: Italian
Calories: 150

Ingredients
  

  • 2 cups romaine lettuce chopped
  • 1 cup iceberg lettuce chopped
  • 1 cup cherry tomatoes halved
  • 1/2 cup red onion thinly sliced
  • 1/2 cup cucumber sliced
  • 1/2 cup black olives sliced
  • 1/2 cup pepperoncini peppers sliced
  • 1/2 cup croutons
  • 1/4 cup grated Parmesan cheese
  • 1/4 cup Italian dressing

Method
 

  1. In a large salad bowl, combine the romaine lettuce, iceberg lettuce, cherry tomatoes, red onion, cucumber, black olives, and pepperoncini peppers.
  2. Toss the salad ingredients together until well mixed.
  3. Drizzle the Italian dressing over the salad and toss again to coat all the ingredients evenly.
  4. Top the salad with croutons and sprinkle with grated Parmesan cheese.
  5. Serve immediately or chill in the refrigerator for about 15 minutes before serving for a refreshing taste.

Nutrition

Serving: 1servingCalories: 150kcalCarbohydrates: 8gProtein: 4gFat: 12gSaturated Fat: 3gPolyunsaturated Fat: 9gCholesterol: 10mgSodium: 300mgFiber: 2gSugar: 2g

Notes

  • For added protein, consider topping the salad with grilled chicken or chickpeas.
  • Customize the salad by adding your favorite vegetables, such as bell peppers or carrots, for extra crunch and color.

Tried this recipe?

Let us know how it was!

Classic Egg Salad Sandwiches: A Delightful Recipe to Try

Introduction to Classic Egg Salad Sandwiches

There’s something undeniably comforting about a classic egg salad sandwich.

Growing up, I remember my mom whipping up this simple dish on busy afternoons.

It was a quick solution for lunch, yet it always felt special.

With just a handful of ingredients, you can create a delightful meal that satisfies both hunger and nostalgia.

Whether you’re looking for a fast bite during a hectic workday or a dish to impress your loved ones at a picnic, these classic egg salad sandwiches are the answer.

Let’s dive into this timeless recipe that’s sure to become a favorite in your kitchen!

Why You’ll Love This Classic Egg Salad Sandwiches

These classic egg salad sandwiches are a game-changer for anyone short on time.

They come together in under 30 minutes, making them perfect for a quick lunch or snack.

The creamy texture and zesty flavor will have your taste buds dancing.

Plus, they’re versatile! You can customize them with your favorite herbs or spices.

Trust me, once you try this recipe, it’ll become a staple in your meal rotation.

Ingredients for Classic Egg Salad Sandwiches

Creating the perfect classic egg salad sandwich starts with the right ingredients.

Here’s what you’ll need:

  • Large eggs: The star of the show! Fresh eggs yield the best flavor and texture.
  • Mayonnaise: This creamy base brings everything together. You can use regular or light, depending on your preference.
  • Dijon mustard: A touch of tanginess that elevates the flavor profile. Feel free to adjust to your taste.
  • Fresh lemon juice: Adds brightness and balances the richness of the mayo.
  • Salt and black pepper: Essential seasonings that enhance the overall taste.
  • Celery: For a satisfying crunch and a hint of freshness. You can substitute with chopped pickles for a different twist.
  • Red onion: Adds a mild sweetness and a pop of color. If you prefer a milder flavor, try green onions instead.
  • Whole wheat bread: A hearty choice that complements the creamy filling. You can also use white or gluten-free bread if you like.
  • Lettuce leaves: Optional, but they add a nice crunch and freshness to your sandwich.

For exact measurements, check the bottom of the article where you can find everything listed for easy printing.

With these ingredients, you’re well on your way to crafting a delicious classic egg salad sandwich that’s sure to impress!

How to Make Classic Egg Salad Sandwiches

Making classic egg salad sandwiches is a breeze!

Follow these simple steps, and you’ll have a delicious meal ready in no time.

Let’s get started!

Step 1: Boil the Eggs

To achieve the perfect boiled egg, place your eggs in a saucepan.

Cover them with cold water, ensuring there’s about an inch of water above the eggs.

Bring the water to a boil over medium-high heat.

Once boiling, cover the pot and remove it from the heat.

Let the eggs sit for 12 minutes.

This method gives you firm whites and creamy yolks, just right for your egg salad.

Step 2: Cool the Eggs

Cooling the eggs quickly is crucial for easy peeling.

Transfer the boiled eggs to a bowl filled with ice water.

Let them sit for about 5 minutes.

This shock of cold water stops the cooking process and helps separate the shell from the egg.

Trust me, you’ll thank yourself later when peeling is a breeze!

Step 3: Chop the Eggs

Once the eggs are cool, it’s time to chop them.

Peel the eggs gently, then place them on a cutting board.

Use a sharp knife to chop them into small, even pieces.

Aim for a consistency that’s not too fine; you want some texture in your salad.

This will give your classic egg salad sandwiches that delightful bite!

Step 4: Mix the Ingredients

In a mixing bowl, combine the chopped eggs with mayonnaise, Dijon mustard, lemon juice, salt, and pepper.

Stir gently until everything is well mixed.

This is where you can get creative!

Feel free to add in fresh herbs like dill or chives for an extra flavor boost.

Taste as you go; adjust the seasoning to your liking.

Step 5: Prepare the Bread

Now, let’s talk about the bread.

You can toast the slices for a bit of crunch or leave them soft for a classic feel.

If you choose to toast, a light golden brown is perfect.

This adds a nice contrast to the creamy egg salad.

Whichever way you go, make sure the bread is fresh!

Step 6: Assemble the Sandwiches

It’s time to put it all together!

Spread a generous amount of the egg salad mixture onto two slices of bread.

If you’re using lettuce, place a leaf on top of the egg salad for added crunch.

Top with the remaining slices of bread, and cut the sandwiches in half.

Serve them up, and watch your friends and family enjoy every bite!

Tips for Success

  • Use fresh eggs for the best flavor and texture in your classic egg salad sandwiches.
  • Don’t skip the ice bath; it makes peeling the eggs so much easier.
  • Adjust the seasoning to your taste; a little extra salt or pepper can make a big difference.
  • Experiment with different herbs for a unique twist on the classic recipe.
  • Make extra egg salad; it keeps well in the fridge for a quick snack later!

Equipment Needed

  • Medium saucepan: Essential for boiling the eggs. A large pot works too.
  • Mixing bowl: For combining the egg salad ingredients. Any bowl will do!
  • Cutting board: A must for chopping the eggs. A plate can work in a pinch.
  • Sharp knife: For chopping eggs and spreading the salad. A butter knife is fine for spreading.

Variations

  • Herbed Egg Salad: Mix in fresh herbs like dill, chives, or parsley for a burst of flavor.
  • Spicy Twist: Add a dash of hot sauce or diced jalapeños for a kick that’ll wake up your taste buds.
  • Avocado Egg Salad: Substitute half of the mayonnaise with mashed avocado for a creamy, healthier option.
  • Curried Egg Salad: Stir in curry powder for a unique twist that adds warmth and depth to the flavor.
  • Low-Carb Version: Serve the egg salad in lettuce wraps instead of bread for a lighter, low-carb meal.

Serving Suggestions

  • Pair your classic egg salad sandwiches with a side of crispy potato chips for a satisfying crunch.
  • A fresh garden salad drizzled with vinaigrette complements the creamy egg salad beautifully.
  • For drinks, consider iced tea or a light lemonade to refresh your palate.
  • Serve on a colorful platter for an inviting presentation at gatherings.

FAQs about Classic Egg Salad Sandwiches

Can I make classic egg salad sandwiches ahead of time?

Absolutely! You can prepare the egg salad a day in advance. Just store it in an airtight container in the fridge. This allows the flavors to meld beautifully. Just remember to assemble the sandwiches right before serving to keep the bread fresh.

What can I substitute for mayonnaise in the egg salad?

If you’re looking for a lighter option, Greek yogurt is a fantastic substitute. It adds creaminess while cutting down on calories. You can also try avocado for a rich, buttery flavor.

How long can I store leftover egg salad?

Leftover egg salad can be stored in the fridge for up to three days. Just make sure it’s in a sealed container. If it starts to look or smell off, it’s best to toss it.

Can I add other ingredients to my egg salad?

Definitely! Feel free to get creative. Chopped pickles, diced bell peppers, or even crumbled bacon can add a delightful twist to your classic egg salad sandwiches.

Is this recipe suitable for a vegetarian diet?

Yes! Classic egg salad sandwiches are vegetarian-friendly, making them a great option for those who don’t eat meat. Just ensure your bread is also vegetarian-friendly.

Final Thoughts

Classic egg salad sandwiches are more than just a meal; they’re a nostalgic journey back to simpler times.

Each bite is a reminder of family gatherings and sunny picnics, where laughter mingles with the aroma of fresh bread.

This recipe is not only quick and easy but also allows for endless creativity.

Whether you’re enjoying them solo or sharing with friends, these sandwiches bring joy to the table.

So, roll up your sleeves and dive into this delightful dish.

I promise, once you make them, they’ll become a cherished staple in your kitchen!

jhessica

Classic Egg Salad Sandwiches: A Delightful Recipe to Try

A delightful recipe for classic egg salad sandwiches, perfect for a quick lunch or snack.
Prep Time 15 minutes
Cook Time 12 minutes
Total Time 27 minutes
Course: Sandwich
Cuisine: American
Calories: 350

Ingredients
  

  • 6 large eggs
  • 1/4 cup mayonnaise
  • 1 teaspoon Dijon mustard
  • 1 tablespoon fresh lemon juice
  • 1/4 teaspoon salt
  • 1/4 teaspoon black pepper
  • 1/4 cup finely chopped celery
  • 1/4 cup finely chopped red onion
  • 4 slices of whole wheat bread
  • Lettuce leaves optional

Method
 

  1. Place the eggs in a saucepan and cover them with water. Bring to a boil over medium-high heat. Once boiling, cover the pot, remove it from heat, and let it sit for 12 minutes.
  2. After 12 minutes, transfer the eggs to a bowl of ice water and let them cool for about 5 minutes.
  3. Peel the cooled eggs and chop them into small pieces.
  4. In a mixing bowl, combine the chopped eggs, mayonnaise, Dijon mustard, lemon juice, salt, and pepper. Mix until well combined.
  5. Fold in the chopped celery and red onion until evenly distributed.
  6. Toast the bread slices if desired.
  7. Spread the egg salad mixture onto two slices of bread, add lettuce leaves if using, and top with the remaining slices. Cut in half and serve.

Nutrition

Serving: 1sandwichCalories: 350kcalCarbohydrates: 20gProtein: 12gFat: 28gSaturated Fat: 5gPolyunsaturated Fat: 23gCholesterol: 370mgSodium: 400mgFiber: 3gSugar: 1g

Notes

  • For added flavor, mix in chopped fresh herbs like dill or chives.
  • Substitute Greek yogurt for half of the mayonnaise for a lighter version.

Tried this recipe?

Let us know how it was!

Creamy White Turkey Chili: Discover a New Favorite Dish!

Introduction to Creamy White Turkey Chili

There’s something magical about a warm bowl of chili on a chilly evening.

Creamy White Turkey Chili is not just a meal; it’s a hug in a bowl.

After a long day, this dish offers a quick solution that’s both comforting and satisfying.

With its rich flavors and creamy texture, it’s perfect for impressing family or friends.

Plus, it’s a fantastic way to sneak in some protein and veggies without anyone noticing!

So, grab your apron and let’s dive into this delightful recipe that’s bound to become a new favorite.

Why You’ll Love This Creamy White Turkey Chili

This Creamy White Turkey Chili is a game-changer for busy weeknights.

It comes together in just 40 minutes, making it a quick and easy option for dinner.

The combination of tender turkey, creamy broth, and zesty spices creates a flavor explosion that will have everyone asking for seconds.

Plus, it’s a healthier alternative to traditional chili, packed with protein and fiber.

What’s not to love?

Ingredients for Creamy White Turkey Chili

Creating a delicious Creamy White Turkey Chili starts with gathering the right ingredients.

Here’s what you’ll need:

  • Ground turkey: A lean protein that keeps the dish light yet filling.
  • Olive oil: For sautéing the aromatics, adding a touch of healthy fat.
  • Onion: Diced to bring sweetness and depth to the chili.
  • Garlic: Minced for that aromatic kick that elevates the flavor.
  • White beans: These add creaminess and a hearty texture, making the chili more substantial.
  • Corn: Sweet kernels that provide a pop of color and flavor.
  • Diced green chilies: For a mild heat and a hint of tanginess.
  • Ground cumin: This spice adds warmth and earthiness to the dish.
  • Chili powder: A blend of spices that gives the chili its signature flavor.
  • Salt and black pepper: Essential seasonings to enhance all the flavors.
  • Chicken broth: The base of the chili, adding richness and depth.
  • Heavy cream: This is what makes the chili creamy and indulgent.
  • Cilantro: Freshly chopped for garnish, adding a burst of freshness.
  • Lime wedges: For serving, they add a zesty brightness that complements the chili.

Feel free to customize your chili!

For a spicier kick, toss in a diced jalapeño or a pinch of cayenne pepper.

If you’re short on time, shredded rotisserie chicken is a fantastic substitute for ground turkey.

All ingredient quantities are listed at the bottom of the article for easy reference and printing.

How to Make Creamy White Turkey Chili

Making Creamy White Turkey Chili is a straightforward process that anyone can master.

With just a few simple steps, you’ll have a hearty meal ready to warm your soul.

Let’s get cooking!

Step 1: Sauté the Aromatics

Start by heating the olive oil in a large pot over medium heat.

Once the oil shimmers, toss in the diced onion.

Cook it for about 5 minutes until it softens and becomes translucent.

Then, add the minced garlic and stir for another minute.

The aroma will fill your kitchen, making it hard to resist!

Step 2: Brown the Turkey

Next, add the ground turkey to the pot.

Break it up with a spoon as it cooks.

You want it browned and cooked through, which should take about 7 to 10 minutes.

This step is crucial for building flavor, so don’t rush it!

Step 3: Combine the Ingredients

Now it’s time to bring everything together.

Stir in the white beans, corn, and diced green chilies.

Add the ground cumin, chili powder, salt, and black pepper.

Mix well to ensure all the ingredients are coated in those delicious spices.

Step 4: Simmer the Chili

Pour in the chicken broth and bring the mixture to a boil.

Once boiling, reduce the heat and let it simmer for 15 minutes.

This allows the flavors to meld beautifully.

You’ll notice the chili thickening up, making it even more inviting.

Step 5: Add the Cream

After simmering, it’s time for the star of the show: the heavy cream.

Stir it in gently and let the chili simmer for another 5 minutes.

This is where the magic happens, transforming your chili into a creamy delight.

Step 6: Serve and Garnish

Finally, ladle the chili into bowls.

Garnish with freshly chopped cilantro for a pop of color and flavor.

Don’t forget the lime wedges on the side!

A squeeze of lime adds a refreshing brightness that elevates the dish.

Enjoy your Creamy White Turkey Chili with family or friends, and watch it disappear!

Tips for Success

  • Prep your ingredients ahead of time to streamline the cooking process.
  • Don’t skip the simmering step; it’s key for flavor development.
  • Adjust the spices to your taste; add more chili powder for heat.
  • For a thicker chili, let it simmer a bit longer.
  • Store leftovers in an airtight container for up to three days.

Equipment Needed

  • Large pot: A sturdy pot is essential for even cooking. A Dutch oven works great too.
  • Wooden spoon: Perfect for stirring and breaking up the turkey.
  • Measuring cups and spoons: For accurate ingredient measurements.
  • Cutting board and knife: Essential for chopping veggies.

Variations

  • Spicy Kick: Add diced jalapeños or a pinch of cayenne pepper for an extra layer of heat.
  • Vegetarian Option: Substitute ground turkey with a mix of mushrooms and lentils for a hearty plant-based version.
  • Cheesy Delight: Stir in shredded cheese like Monterey Jack or cheddar just before serving for a creamy, cheesy twist.
  • Low-Carb Version: Replace white beans with cauliflower rice to keep it low-carb while still enjoying the flavors.
  • Herb Infusion: Experiment with fresh herbs like thyme or oregano for a unique flavor profile.

Serving Suggestions

  • Crusty Bread: Serve with a side of warm, crusty bread for dipping.
  • Salad: A fresh green salad pairs perfectly to balance the richness.
  • Beer: Enjoy with a light lager or a crisp IPA for a refreshing contrast.
  • Presentation: Serve in colorful bowls and garnish with extra cilantro for a vibrant look.

FAQs about Creamy White Turkey Chili

Can I make Creamy White Turkey Chili ahead of time?

Absolutely! This chili tastes even better the next day as the flavors meld together. Just store it in an airtight container in the fridge for up to three days.

Is this chili spicy?

The Creamy White Turkey Chili has a mild heat from the diced green chilies. If you prefer more spice, feel free to add jalapeños or cayenne pepper to kick it up a notch!

Can I freeze leftovers?

Yes, you can freeze this chili! Just let it cool completely, then transfer it to a freezer-safe container. It will keep well for up to three months. Thaw in the fridge before reheating.

What can I serve with Creamy White Turkey Chili?

This chili pairs wonderfully with crusty bread, a fresh salad, or even some tortilla chips for a crunchy contrast. A squeeze of lime on top adds a refreshing touch!

Can I use a different protein?

Definitely! You can substitute ground turkey with shredded rotisserie chicken or even a plant-based protein for a vegetarian option. The flavors will still shine through!

Final Thoughts

Cooking this Creamy White Turkey Chili is more than just preparing a meal; it’s about creating moments.

The warmth of the spices, the creaminess of the broth, and the satisfaction of a hearty bowl bring everyone together.

Whether it’s a cozy night in or a gathering with friends, this dish is sure to impress.

Plus, it’s a fantastic way to nourish your loved ones with wholesome ingredients.

So, roll up your sleeves, embrace the process, and enjoy the delightful flavors that will make this chili a cherished recipe in your home.

Happy cooking!

jhessica

Creamy White Turkey Chili: Discover a New Favorite Dish!

A delicious and creamy white turkey chili that is perfect for a cozy meal.
Prep Time 10 minutes
Cook Time 30 minutes
Total Time 40 minutes
Servings: 6 servings
Course: Main Dish
Cuisine: American
Calories: 320

Ingredients
  

  • 1 pound ground turkey
  • 1 tablespoon olive oil
  • 1 medium onion diced
  • 2 cloves garlic minced
  • 1 can 15 ounces white beans, drained and rinsed
  • 1 can 15 ounces corn, drained
  • 1 can 4 ounces diced green chilies
  • 1 teaspoon ground cumin
  • 1 teaspoon chili powder
  • 1/2 teaspoon salt
  • 1/4 teaspoon black pepper
  • 4 cups chicken broth
  • 1 cup heavy cream
  • 1/4 cup fresh cilantro chopped (for garnish)
  • Lime wedges for serving

Method
 

  1. In a large pot, heat the olive oil over medium heat. Add the diced onion and cook until softened, about 5 minutes. Stir in the minced garlic and cook for an additional minute until fragrant.
  2. Add the ground turkey to the pot, breaking it up with a spoon. Cook until browned and cooked through, about 7-10 minutes.
  3. Stir in the white beans, corn, diced green chilies, cumin, chili powder, salt, and black pepper. Mix well to combine.
  4. Pour in the chicken broth and bring the mixture to a boil. Reduce heat and let it simmer for 15 minutes.
  5. Stir in the heavy cream and let the chili simmer for another 5 minutes until heated through.
  6. Serve hot, garnished with fresh cilantro and lime wedges on the side.

Nutrition

Serving: 1bowlCalories: 320kcalCarbohydrates: 20gProtein: 25gFat: 15gSaturated Fat: 6gPolyunsaturated Fat: 9gCholesterol: 80mgSodium: 800mgFiber: 5gSugar: 2g

Notes

  • For a spicier chili, add a diced jalapeño or a pinch of cayenne pepper.
  • Substitute ground turkey with shredded rotisserie chicken for a quicker option.

Tried this recipe?

Let us know how it was!

Stay Connected

Get recipes via email: