Get my cookbooks

Pumpkin Tres Leches Cake: A Fall Dessert That Delights

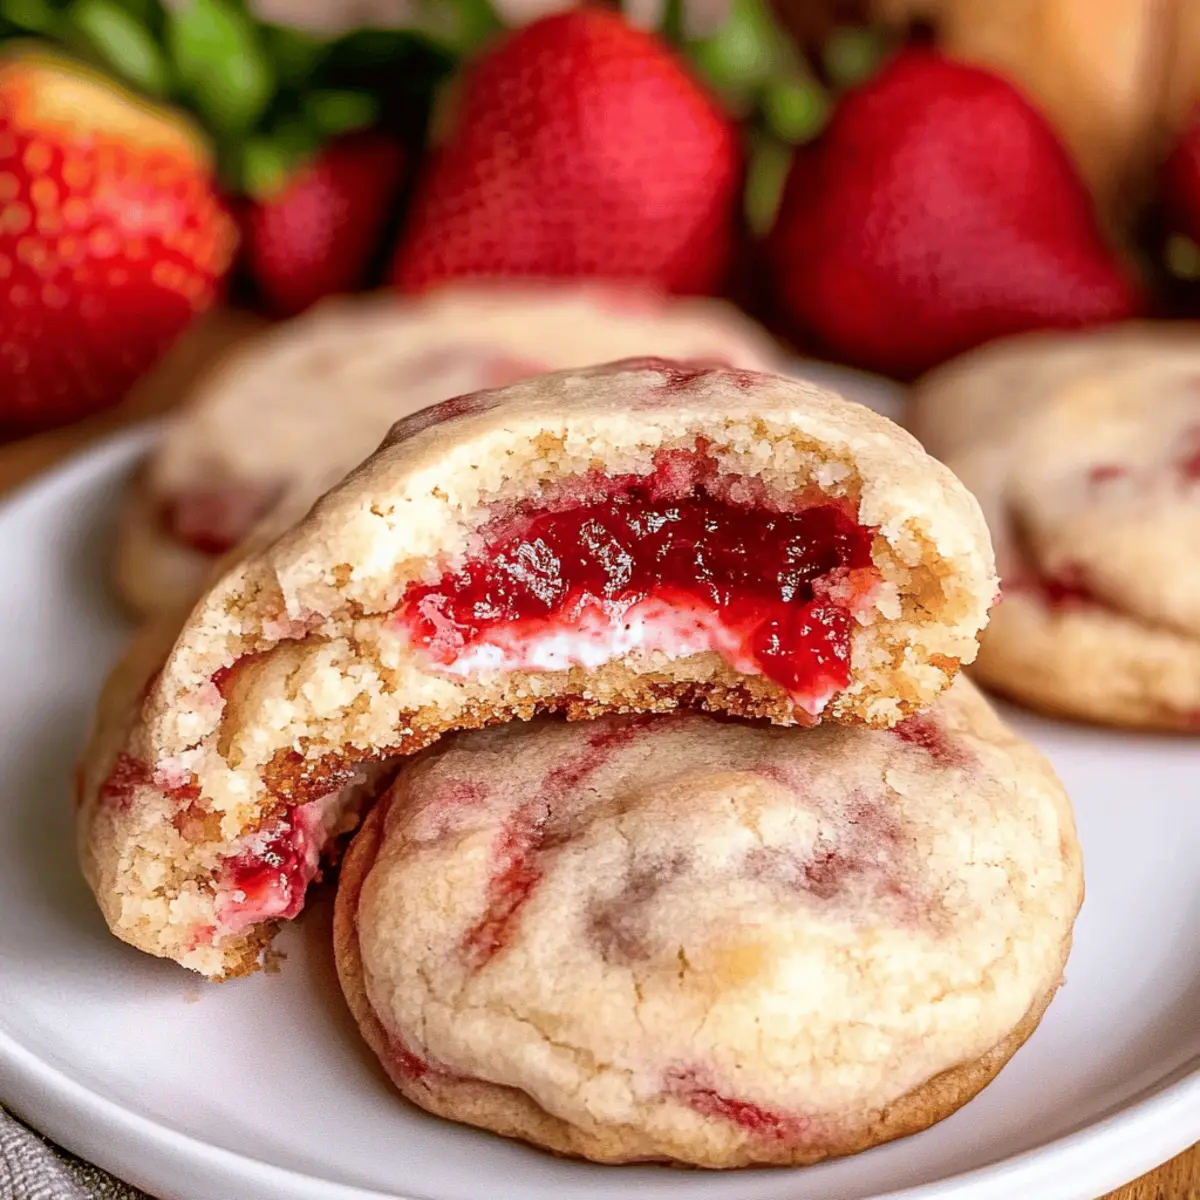
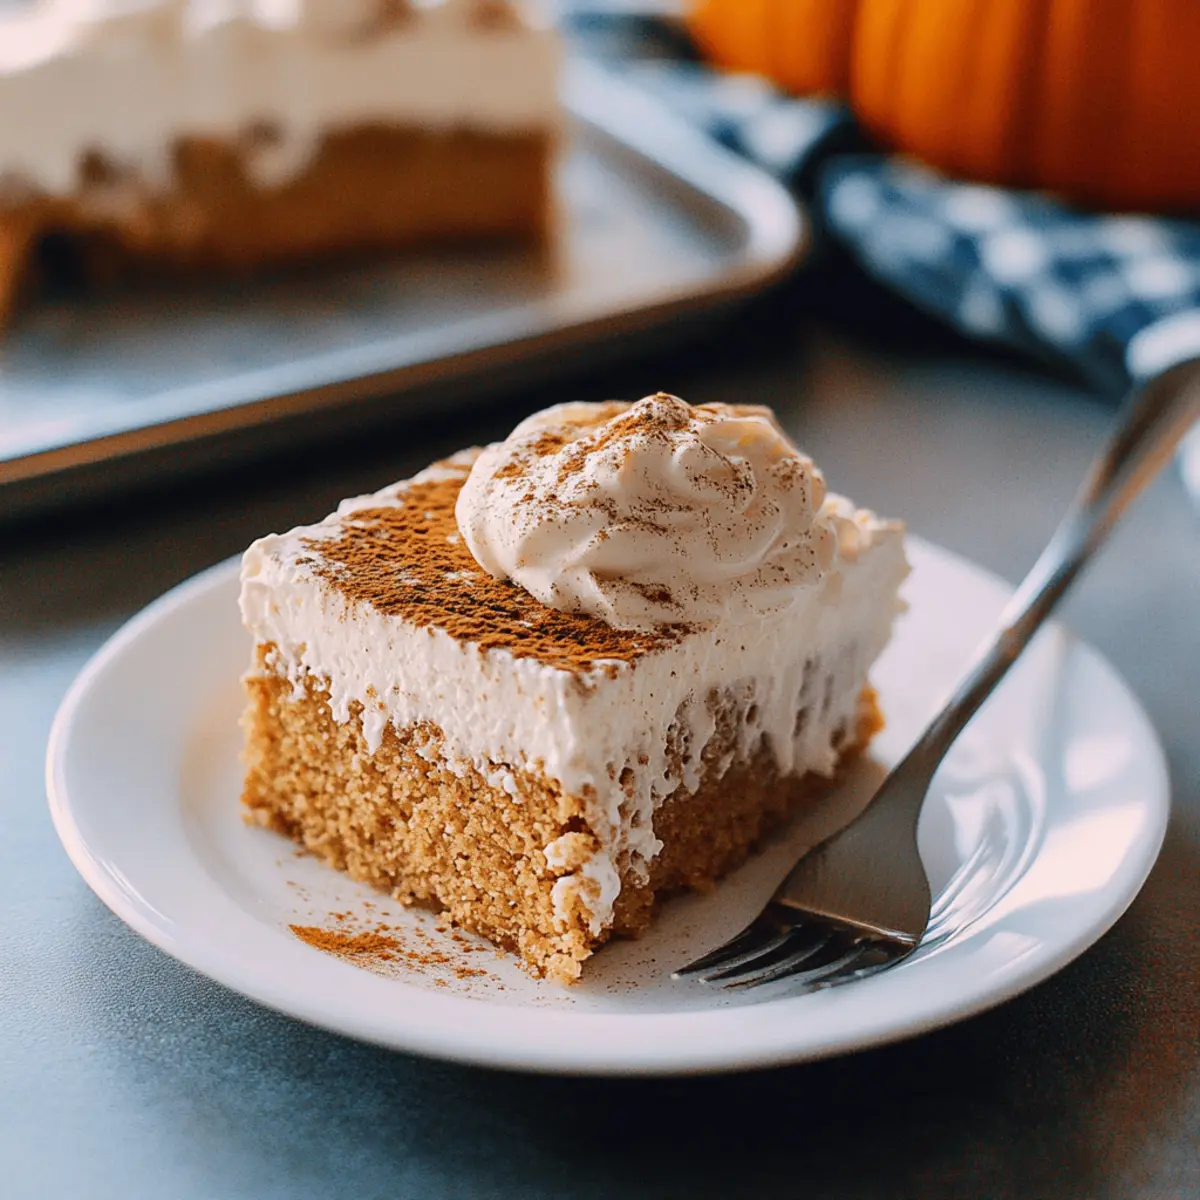
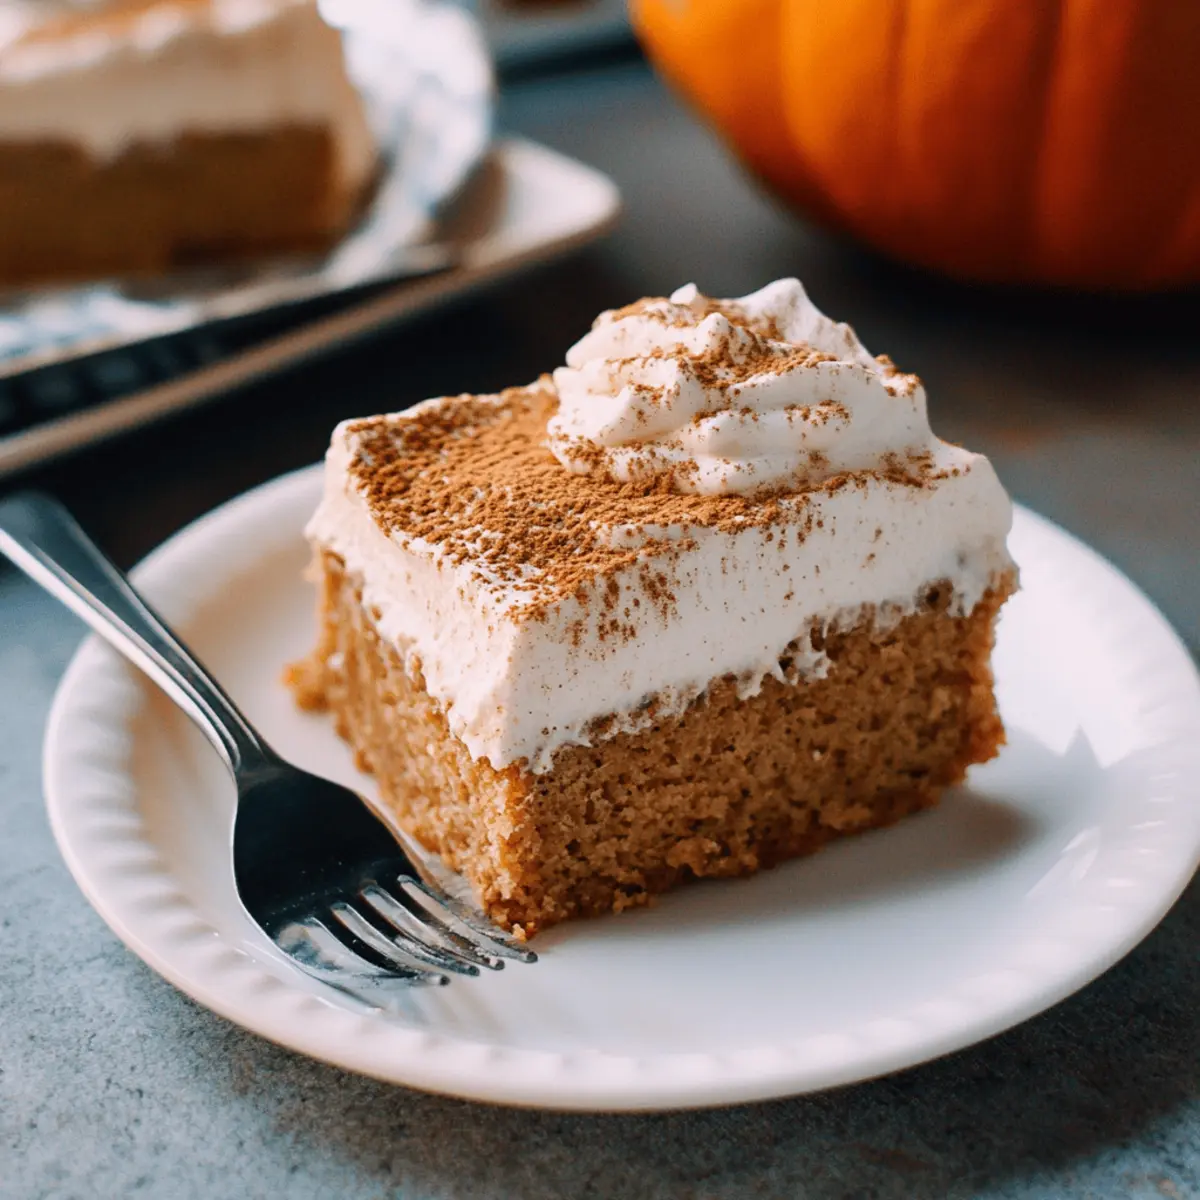
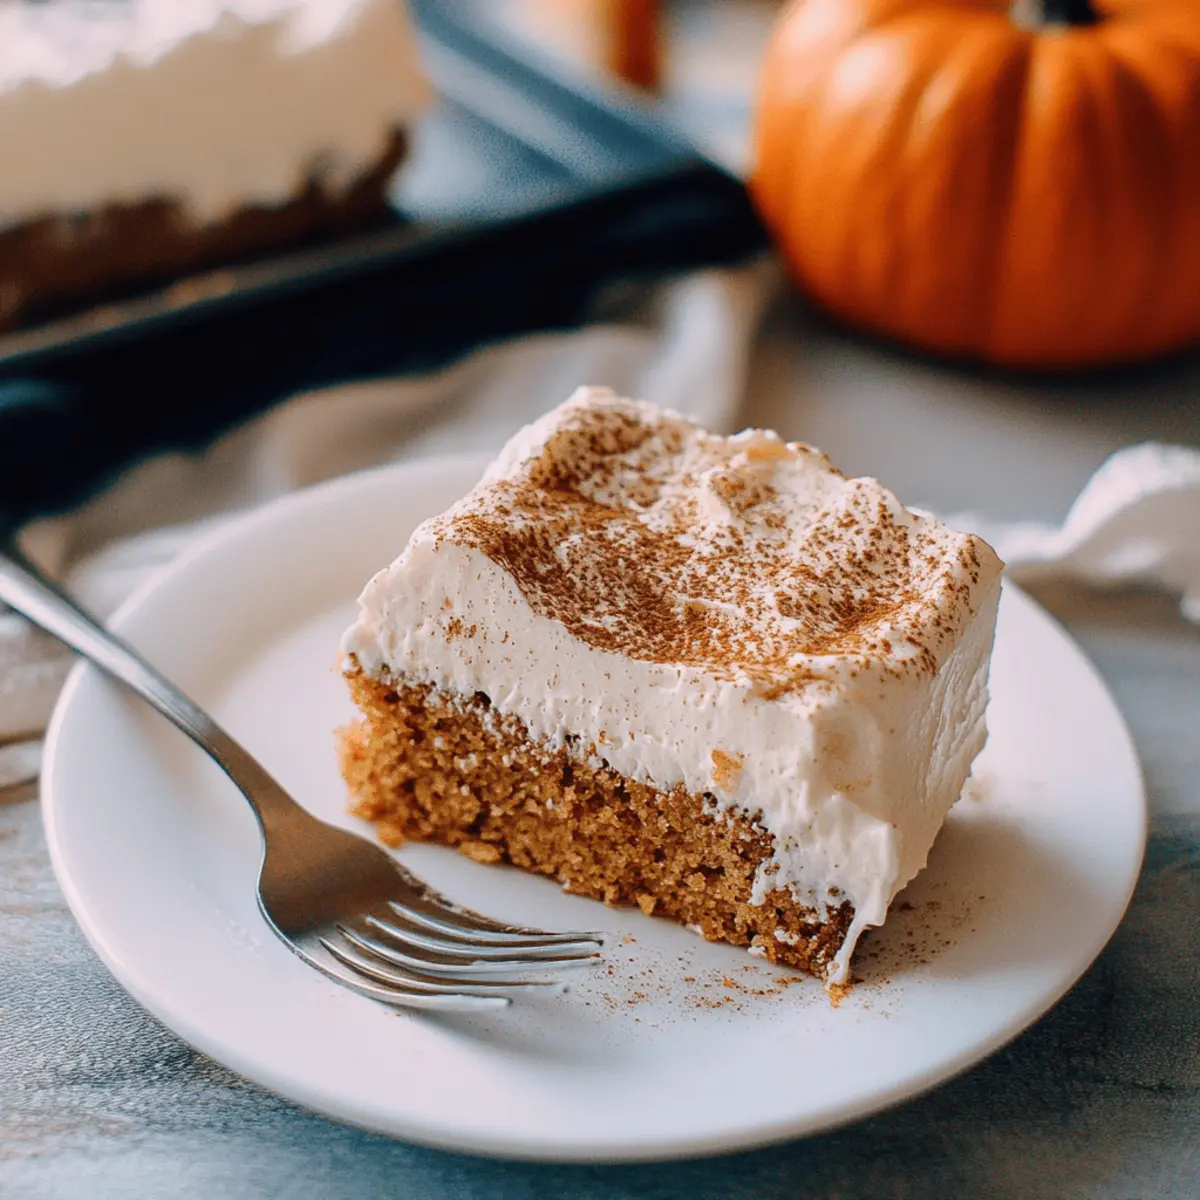
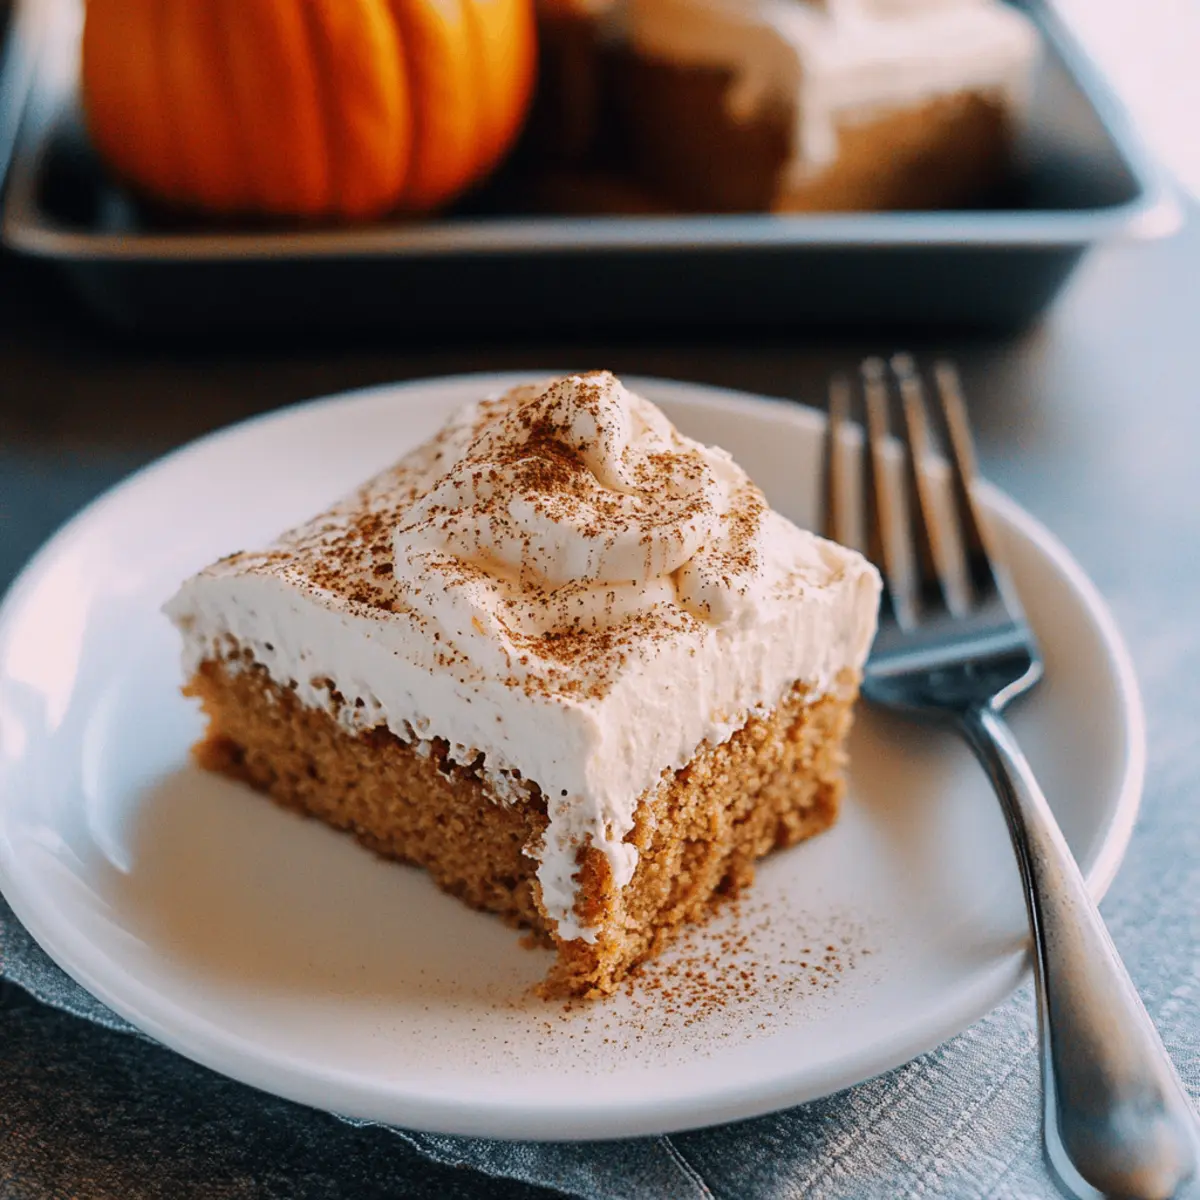
While leafing through old cookbooks, I stumbled upon a family favorite that never fails to bring back memories of chilly autumn evenings—the Pumpkin Tres Leches Cake. With its irresistible blend of spiced pumpkin flavors and a creamy, milky soaking, this fall dessert transforms the classic tres leches into something special. I love how easy it is to whip up, making it the perfect choice for holiday gatherings where time might be limited. Plus, the moist, tender texture ensures every slice is a delightful experience, sure to impress both family and friends. If you’re looking for a dessert that captures the essence of autumn while being crowd-pleasing and comforting, you’ve found it. Are you ready to create a delicious slice of autumn for your table?

Why is Pumpkin Tres Leches Cake irresistible?

Delightful flavors: The blend of spiced pumpkin and milky goodness creates a comforting taste that captures the essence of fall.
Simple preparation: This recipe requires basic baking skills, making it accessible for everyone, from seasoned chefs to home cooks.
Crowd-pleaser: Perfect for holiday gatherings, it’s a dessert that brings friends and family together, just like my Honeybun Carrot Cake.
Moist texture: Each slice offers an indulgent softness, soaking up the milks beautifully for a delightful mouthfeel.
Versatile options: Customize it by swapping pumpkin with sweet potato or adding nuts, just as in my delicious Strawberry Cheesecake Dump Cake.
Perfect for the season: Celebrate autumn by serving this exquisite cake, enhancing your seasonal spread like my Easter Poke Cake.

Pumpkin Tres Leches Cake Ingredients

• Discover the perfect components for a delicious fall dessert!

  • For the Cake

  • All Purpose Flour – Provides structure; use cake flour for a lighter texture.

  • Baking Powder – A leavening agent that helps the cake rise; ensure it’s fresh for best results.

  • Baking Soda – Additional leavening for a fluffy texture; can be substituted with baking powder (adjust amounts accordingly).

  • Salt – Enhances flavor and balances sweetness; essential for overall taste.

  • Cinnamon – Adds warmth and spice; can be replaced with pumpkin pie spice for a festive touch.

  • Nutmeg – Contributes a nutty flavor; consider using fresh nutmeg for enhanced aroma.

  • Allspice – Gives a complex flavor profile; omit if unavailable or substitute with more cinnamon.

  • Ground Ginger – Adds a touch of heat; fresh ginger can provide a more vibrant flavor.

  • Sugar – Sweetens and adds moisture; brown sugar can be used for a richer flavor.

  • Vegetable Oil – Keeps the cake moist; can substitute with melted coconut oil or unsalted butter.

  • Vanilla Extract – Enhances sweetness and flavor; use pure vanilla for the best taste.

  • Pumpkin Puree – Provides moisture and flavor; canned is convenient, or use homemade puree.

  • Eggs – Binds ingredients and adds richness; ensure they are at room temperature for better mixing.

  • Evaporated Milk – Key liquid for soaking; can substitute with coconut milk for a non-dairy version.

  • Sweetened Condensed Milk – Sweetens and thickens; can use a low-sugar version for a lighter option.

  • Half-and-Half – Adds creaminess to the milk soak; substitute with whole milk for a lighter version.

  • For the Spiced Cream Topping

  • Heavy Whipping Cream – Base for the topping, providing stability; alternatives include coconut cream for non-dairy.

  • Sugar – Sweetens the whipped cream; omit for a less sweet topping.

  • Cinnamon – Enhances the whipped cream’s flavor; adjust to your taste.

  • Vanilla Extract (splash) – Adds depth of flavor.

Step‑by‑Step Instructions for Pumpkin Tres Leches Cake

Step 1: Preheat and Prepare
Preheat your oven to 350°F (175°C) and take a moment to grease and flour a 9×13 inch sheet pan. This step ensures that your Pumpkin Tres Leches Cake will release easily once baked. Be generous with the oil or butter, paying special attention to the corners to avoid any sticking.

Step 2: Mix Dry Ingredients
In a medium bowl, whisk together the all-purpose flour, baking powder, baking soda, salt, cinnamon, nutmeg, allspice, and ground ginger. This blend is essential for creating the delightful spiced flavor profile of your cake. Ensure there are no clumps; a well-mixed dry ingredient mix will lead to an even-textured cake.

Step 3: Combine Wet Ingredients
In a large mixing bowl, combine the sugar, vegetable oil, vanilla extract, and pumpkin puree using a whisk until fully combined. This mixture should be smooth and creamy, creating a flavorful base for your Pumpkin Tres Leches Cake. Make sure the sugar is well dissolved, as this sweetness enhances the flavor throughout.

Step 4: Add Eggs
Beat in the eggs one at a time into the wet mixture, mixing until each egg is completely incorporated before adding the next. This step adds richness to your cake, making it tender and moist. The mixture should become lighter in color and fluffy as you progress.

Step 5: Combine Mixtures
Gradually add the dry ingredients to the wet mixture, mixing just until smooth and no flour streaks remain. Avoid over-mixing, as this can lead to a denser cake. You’ll want a thick, homogenous batter that captures the warmth of autumn flavors, making it perfect for your Pumpkin Tres Leches Cake.

Step 6: Bake the Cake
Pour the batter into the prepared sheet pan and smooth the top using a spatula. Bake in your preheated oven for 30-35 minutes, or until a toothpick inserted into the center comes out clean. The cake should have a light golden hue and a springy surface, indicating it’s ready to absorb all the milky goodness.

Step 7: Cool the Cake
After removing the cake from the oven, let it cool in the pan for about 15 minutes. Then, carefully transfer it to a serving plate upside down, allowing the top to face down for a flat surface. This will help you achieve a beautiful presentation once the cake is fully prepared.

Step 8: Poke Holes
Using a fork, gently poke holes all over the top of the cake to allow the soaking mixture to penetrate deeply. Be generous with the holes, as this is essential for the flavor infusion that makes your Pumpkin Tres Leches Cake so moist and rich.

Step 9: Prepare Milk Mixture
In a measuring cup, whisk together the evaporated milk, sweetened condensed milk, and half-and-half until well combined. This creamy milk mixture is key to achieving the tres leches effect, adding layers of sweetness and moisture to your cake, so take your time to get it just right.

Step 10: Soak the Cake
Slowly pour the milk mixture over the poked cake, ensuring it soaks evenly. It’s best to do this slowly to prevent the cake from collapsing. Aim for full coverage to allow the flavors to meld into the pumpkin goodness. This soaking is what makes your tres leches cake irresistibly tender.

Step 11: Chill to Perfection
Place the cake in the refrigerator to soak for at least 4 hours, though overnight is best for maximum flavor infusion. This period allows the milk to fully saturate the cake, ensuring that each slice is lush and creamy, making your Pumpkin Tres Leches Cake truly unforgettable.

Step 12: Whip the Cream
For the spiced cream topping, beat the heavy whipping cream, sugar, cinnamon, and vanilla extract together until stiff peaks form. This luscious cream will crown your cake, offering a delightful contrast to the milky base. Use a whisk attachment for the best results, creating an airy topping that enhances the fall flavors.

Step 13: Assemble and Serve
Spread the whipped spiced cream evenly over the chilled cake, making sure to cover the surface beautifully. Slice into squares and serve to friends and family. As they taste this Pumpkin Tres Leches Cake, they’ll experience the delightful blend of flavors that make this dessert such a beloved fall favorite.

Make Ahead Options

These Pumpkin Tres Leches Cakes are perfect for meal prep enthusiasts! You can bake the cake up to 24 hours in advance, allowing it to cool completely before refrigerating. Once cooled, poke holes in the cake and prepare the milks (evaporated milk, sweetened condensed milk, and half-and-half) to soak the cake, allowing it to absorb the flavors overnight for optimal moisture. For the whipped spiced cream topping, prepare it a few hours before serving, but it’s best made just before you intend to serve your cake to maintain its airy texture. This way, you’ll have a delicious and indulgent dessert ready to impress with minimal effort!

What to Serve with Pumpkin Tres Leches Cake

Immerse yourself in the cozy flavors of fall by pairing your dessert with these delightful options.

  • Cinnamon-Spiced Coffee: A warm cup adds a rich aroma and enhances the spices in the cake, creating a soothing experience.
  • Roasted Apples: Tender apples with a sprinkle of cinnamon create a sweet contrast, adding a comforting texture to your meal.
  • Whipped Cream with Pecans: Rich whipped cream topped with crushed pecans provides a lovely crunch, beautifully balancing the moistness of the cake.
  • Creamy Vanilla Ice Cream: The cold, creamy vanilla offers a deliciously refreshing contrast to the spiced warmth of the pumpkin cake.
  • Bourbon Hot Chocolate: This indulgent drink pairs wonderfully with the cake’s sweetness, elevating your dessert experience to new heights.
  • Caramel Sauce Drizzle: A drizzle of warm caramel enhances the flavor depth, adding a luscious sweetness with every bite.
  • Maple Glazed Walnuts: The sweet crunch complements the soft texture of the Pumpkin Tres Leches Cake, making each slice even more delightful.
  • Coconut Flavored Tea: This aromatic tea adds a light, crisp flavor, refreshing your palate and balancing the richness of the dessert.
  • Pumpkin Spice Latte: A festive drink that echoes the cake’s flavor, creating a harmonious fall treat that envelops you in seasonal cheer.

Helpful Tricks for Pumpkin Tres Leches Cake

  • Soaking Time: Allow the cake to soak overnight for the best flavor and moisture retention. This step elevates the taste of your Pumpkin Tres Leches Cake significantly.

  • Proper Poking: Use a fork to make generous holes all over the cake. This ensures the milky mixture penetrates deeply, resulting in a wonderfully moist dessert.

  • Milk Mixture Care: Pour the milk mixture slowly and evenly across the surface of the cake. This prevents it from collapsing while allowing each bite to be perfectly saturated.

  • Whipped Cream Peaks: Use a whisk attachment when whipping the heavy cream for the topping. This will help create stiff peaks that are easy to spread and keep their shape on the cake.

  • Flavor Adjustments: Feel free to tweak the spices in the cake according to your taste. Adding a pinch more cinnamon or ginger can enhance the fall flavors in your Pumpkin Tres Leches Cake.

Pumpkin Tres Leches Cake Variations

Feel free to let your creativity shine and customize this delightful dessert to suit your taste!

  • Sweet Potato Substitute: Replace pumpkin puree with sweet potato puree for a unique twist that adds a rich flavor.

  • Cream Cheese Layer: Add a luscious layer of cream cheese frosting for extra creaminess and a tangy kick, balancing the sweetness perfectly. This addition elevates the cake, giving each bite a divine richness that’s hard to resist.

  • Nutty Crunch: Mix in chopped walnuts or pecans to the batter for a delightful crunch and added texture that complements the cake’s tenderness. These nuts will introduce a nutty aroma that enhances the fall vibes.

  • Chocolate Twist: Stir in chocolate chips or chunks for a decadent chocolate-pumpkin combination. The melted chocolate contrasts beautifully with the milky layers, creating a satisfying and indulgent treat.

  • Warm Spices: Enhance the spice profile by doubling the cinnamon or adding a pinch of cardamom. This subtle change can infuse every slice with a warming essence that speaks to cozy gatherings and delightful memories.

  • Dairy-Free Delight: Use coconut milk and coconut cream to replace the evaporated milk, sweetened condensed milk, and heavy cream for a delicious non-dairy version. The tropical notes will add a fun twist to this classic dish.

  • Fruity Infusion: Layer fresh fruits, such as sliced pears or apples, in between the cake and the whipped cream for a vibrant pop of flavor, making each bite fruity, moist, and refreshing—perfect for any fall celebration!

  • Extra Spice: For those who enjoy a kick, add a pinch of cayenne pepper or ground black pepper to the batter. This surprising twist will give your cake a delightful warmth that keeps your taste buds guessing.

As you explore these variations, remember to enjoy the process! This Pumpkin Tres Leches Cake is all about warmth, comfort, and sharing great flavors with loved ones. Looking for more scrumptious fall-inspired recipes? Check out my Strawberry Cheesecake Dump Cake and Joumou Haitian Pumpkin Soup for delightful autumn treats to warm your heart and home!

How to Store and Freeze Pumpkin Tres Leches Cake

Fridge: Refrigerate the cake in an airtight container for up to 4 days. This keeps it moist and flavorful, ready to brighten your dessert table.

Freezer: For longer storage, wrap individual slices tightly in plastic wrap and aluminum foil, then place in a freezer-safe container. It can be frozen for up to 3 months.

Thawing: When ready to enjoy, transfer the frozen slices to the fridge overnight to thaw gradually. This ensures the texture remains delightful with the rich soaking.

Reheating: If you prefer warm slices, gently reheat in the microwave for about 10–15 seconds before topping with spiced cream. Enjoy the comforting flavors of Pumpkin Tres Leches Cake!

Pumpkin Tres Leches Cake Recipe FAQs

How do I choose the best pumpkin puree for this recipe?
Absolutely! For the best flavor and moisture, I recommend using pure pumpkin puree, either canned or homemade. If using canned, look for 100% pumpkin with no added sugar or spices for the sweetest results. If you’re feeling adventurous, try roasting and pureeing a sugar pumpkin yourself—it’s fresher and you’ll love the flavor!

How should I store leftover Pumpkin Tres Leches Cake?
You can easily refrigerate leftovers in an airtight container for up to 4 days. Be sure to cover the cake’s surface with plastic wrap or foil before sealing the container. This will help maintain its moisture and sponge-like texture, ensuring each slice remains delightful.

Can I freeze Pumpkin Tres Leches Cake?
Very! To freeze, allow the cake to soak and then wrap individual slices tightly in plastic wrap followed by aluminum foil. Place the wrapped slices in a freezer-safe container. This will keep them fresh for up to 3 months.

What’s the best way to thaw frozen slices of cake?
Simply transfer the frozen slices to the refrigerator and let them thaw overnight. This gentle method helps maintain the cake’s delightful texture as it will continue to soak in the milks, retaining that fall flavor. If you’d like to enjoy it warm, pop it in the microwave for 10–15 seconds after thawing!

Why is my Pumpkin Tres Leches Cake flat or dense?
If your cake didn’t rise as expected, it could be due to expired leavening agents like baking powder or baking soda. Make sure to check their freshness before starting! Also, avoid over-mixing the batter after adding flour; this can create a dense texture. Gentle mixing is key to a light, fluffy cake.

Is this cake safe for people with nut allergies?
Yes! The Pumpkin Tres Leches Cake does not contain any nuts in the base recipe, making it suitable for those with nut allergies. However, always double-check your specific ingredients (especially toppings) to ensure there are no cross-contaminations if you’re serving someone with severe allergies.

Pumpkin Tres Leches Cake

Pumpkin Tres Leches Cake: A Fall Dessert That Delights

This Pumpkin Tres Leches Cake is a delightful fall dessert that combines spiced pumpkin with creamy milks for an irresistible treat.
Prep Time 30 minutes
Cook Time 35 minutes
Chilling Time 4 hours
Total Time 5 hours 5 minutes
Servings: 12 slices
Course: Dessert
Cuisine: American
Calories: 320

Ingredients
  

For the Cake
  • 2 cups All Purpose Flour Use cake flour for a lighter texture.
  • 1 tbsp Baking Powder Ensure it’s fresh for best results.
  • 1 tsp Baking Soda Can substitute with baking powder.
  • 1/2 tsp Salt Essential for overall taste.
  • 1 tbsp Cinnamon Can be replaced with pumpkin pie spice.
  • 1/2 tsp Nutmeg Fresh nutmeg enhances aroma.
  • 1/2 tsp Allspice Omit if unavailable.
  • 1 tsp Ground Ginger Fresh ginger adds vibrant flavor.
  • 1 cup Sugar Brown sugar can be used for a richer flavor.
  • 1/2 cup Vegetable Oil Can substitute with melted coconut oil.
  • 2 tsps Vanilla Extract Use pure vanilla for the best taste.
  • 1 cup Pumpkin Puree Canned is convenient or use homemade.
  • 4 large Eggs Ensure they are at room temperature.
  • 1 cup Evaporated Milk Can substitute with coconut milk.
  • 1 cup Sweetened Condensed Milk Can use a low-sugar version.
  • 1 cup Half-and-Half Substitute with whole milk for lighter.
For the Spiced Cream Topping
  • 1 cup Heavy Whipping Cream Coconut cream can be used for non-dairy.
  • 1/4 cup Sugar Omit for less sweet topping.
  • 1 tsp Cinnamon Adjust to taste.
  • 1 tsps Vanilla Extract Adds depth of flavor.

Equipment

  • 9x13 inch sheet pan
  • medium bowl
  • large mixing bowl
  • whisk
  • spatula
  • Measuring cup
  • Electric mixer

Method
 

Preparation
  1. Preheat your oven to 350°F (175°C) and grease and flour a 9x13 inch sheet pan.
  2. In a medium bowl, whisk together flour, baking powder, baking soda, salt, cinnamon, nutmeg, allspice, and ginger.
  3. In a large mixing bowl, combine sugar, vegetable oil, vanilla extract, and pumpkin puree.
  4. Beat in eggs one at a time into the wet mixture.
  5. Gradually add dry ingredients to wet mixture, and mix until smooth.
  6. Pour the batter into the prepared sheet pan and smooth the top.
  7. Bake for 30-35 minutes or until a toothpick comes out clean.
  8. Let it cool in the pan for about 15 minutes, then transfer it to a serving plate.
  9. Poke holes all over the top of the cake using a fork.
  10. Whisk together evaporated milk, sweetened condensed milk, and half-and-half.
  11. Slowly pour the milk mixture over the poked cake.
  12. Place the cake in the refrigerator to soak for at least 4 hours.
  13. Beat heavy whipping cream, sugar, cinnamon, and vanilla together until stiff peaks form.
  14. Spread whipped spiced cream over the chilled cake, slice and serve.

Nutrition

Serving: 1sliceCalories: 320kcalCarbohydrates: 45gProtein: 5gFat: 15gSaturated Fat: 8gMonounsaturated Fat: 5gCholesterol: 70mgSodium: 180mgPotassium: 250mgFiber: 1gSugar: 22gVitamin A: 2000IUCalcium: 150mgIron: 1mg

Notes

Allow the cake to soak overnight for the best flavor and moisture retention.

Tried this recipe?

Let us know how it was!

Creamy Chicken Gnocchi Skillet for Quick Cozy Dinners

Racing against the clock on a busy weeknight, I found myself in a mini crisis: dinner was looming, and the kids were already asking, “What’s for dinner?” That’s when I decided to whip up my trusty Garlic Chicken Gnocchi Skillet. This quick dinner has become a beloved staple in our home, transforming simple ingredients like juicy chicken thighs and pillowy gnocchi into an effortless one-pan meal. In just 30 minutes, this dish delivers a creamy richness that feels indulgent yet is remarkably easy to make, perfect for meal prepping or satisfying the entire family. Plus, it even includes a gluten-free option for those who need it! Curious to see how this delightful skillet can turn your dinner routine around? Let’s dive into the recipe!

Why is Chicken Gnocchi Skillet a Must-Try?

Quick and Easy: This recipe is perfect for hectic weeknights, allowing you to create a wholesome meal in just 30 minutes.

One-Pan Wonder: Say goodbye to endless dishes! Everything cooks in one skillet, making cleanup a breeze.

Creamy Goodness: The combination of rich cream sauce and cheesy goodness hugs every bit of gnocchi, making each bite a comforting delight.

Versatile Ingredients: Customize it to your taste! Swap in your favorite veggies or choose gluten-free options, keeping mealtime exciting.

Crowd-Pleasing Recipe: It’s a family favorite that even picky eaters will love, ensuring everyone leaves the table satisfied.

Try it alongside our irresistible Chicken Gnocchi Skillet to amp up your dinner rotation!

Chicken Gnocchi Skillet Ingredients

For the Chicken
Boneless, Skinless Chicken Thighs – The main protein source; you can substitute bone-in thighs but adjust cooking time accordingly.

For the Gnocchi
Potato Gnocchi – The dish’s delightful base, offering a chewy texture; opt for gluten-free gnocchi if needed.

For the Sauce
Butter (or Ghee) – Adds richness to the sauce; substitute with olive oil for a dairy-free option.
Chicken Broth – Forms the liquid base for your creamy sauce and enhances flavor.
Half and Half – Provides a creamy texture; coconut cream is a great substitute for a dairy-free version.
Shredded Mozzarella – Melts beautifully into the sauce for creamy goodness; feel free to try other melting cheeses.

For the Veggies
Diced Yellow Onion – Brings sweetness and depth of flavor to your dish.
Diced White Mushrooms – Adds umami taste and texture; can be swapped out for other vegetables if desired.
Spinach – Not only adds color but also packs nutrition; substitute with kale or leave it out if preferred.

For Flavor
Garlic – Infuses the dish with aromatic flavor; adjust quantity for a more intense taste.
Paprika, Italian Seasoning, Salt, and Pepper – Essential pantry spices to elevate the dish; customize according to your personal taste.

Feel free to gather your ingredients and prepare for a cozy and comforting dinner with this delightful Chicken Gnocchi Skillet!

Step‑by‑Step Instructions for Chicken Gnocchi Skillet

Step 1: Boil Gnocchi
Begin by bringing a large pot of salted water to a rolling boil. Add the potato gnocchi and cook according to package directions, typically around 2-3 minutes, or until they float to the surface. Once cooked, gently drain and set the gnocchi aside while you prepare the creamy sauce in the skillet.

Step 2: Sauté Chicken
In a large skillet, melt 2 tablespoons of butter over medium-high heat. Season the boneless, skinless chicken thighs with salt, pepper, and paprika to taste. Add the seasoned chicken to the skillet and cook for about 5-10 minutes on each side until golden brown and cooked through. Once done, transfer the chicken to a plate and cover to keep warm.

Step 3: Cook Aromatics
In the same skillet, melt the remaining 1 tablespoon of butter, scraping up any delicious brown bits left from the chicken. Add the diced yellow onion, chopped garlic, and diced white mushrooms to the skillet. Sauté for 3-4 minutes until the onions are translucent and the mushrooms are tender, filling your kitchen with inviting aromas.

Step 4: Prepare Sauce
Whisk in 1 cup of chicken broth to deglaze the skillet, ensuring you incorporate any residue from the bottom. Next, slowly add 1 cup of half and half, stirring continuously to combine. Let the mixture simmer for about 2-3 minutes until it thickens slightly and begins to bubble gently.

Step 5: Melt Cheese
Sprinkle in 1 cup of shredded mozzarella cheese, whisking vigorously until completely melted and the sauce achieves a creamy texture. This cheesy goodness is the heart of the Chicken Gnocchi Skillet, so take a moment to enjoy the luscious sight before moving on.

Step 6: Combine Ingredients
Gently stir in the cooked gnocchi and fresh spinach into the creamy sauce, ensuring everything is well-coated. Nestle the previously cooked chicken back into the skillet, allowing it to soak in the flavors as you let the dish simmer for an additional 2-3 minutes until heated through and the spinach is wilted.

Step 7: Serve
Spoon the Chicken Gnocchi Skillet into colorful bowls, topping each serving with freshly chopped parsley, a sprinkle of parmesan cheese, and red pepper flakes for an added kick. Enjoy this comforting and creamy dish with your family, knowing it’s a quick and satisfying meal made with love.

What to Serve with Garlic Chicken Gnocchi Skillet

Imagine the warmth of a cozy family dinner, where every bite transports you to comfort and satisfaction.

  • Garlic Butter Bread: Perfectly toasted, this bread soaks up the creamy sauce and adds an irresistible crunch to your meal.
  • Simple Green Salad: A refreshing side with mixed greens, cherry tomatoes, and a light vinaigrette balances the richness of the skillet—add toasted nuts for crunch!
  • Roasted Vegetables: Colorful, caramelized veggies like zucchini and bell peppers elevate the dish with their sweet flavors and vibrant appeal.
  • Steamed Broccoli: Tender, bright green florets add a nutritious bite and complement the creamy consistency of the Chicken Gnocchi Skillet.
  • Herbed Rice: Fluffy rice tossed with fresh herbs enhances every bite and serves as a neutral backdrop for the robust flavors of the dish.
  • Chilled White Wine: A chilled glass of Sauvignon Blanc or Pinot Grigio pairs beautifully, cutting through the creaminess and refreshing your palate.

Create a delightful table and enjoy every bite of your Chicken Gnocchi Skillet with these perfect pairings!

How to Store and Freeze Chicken Gnocchi Skillet

Fridge: Store any leftovers in an airtight container for up to 4 days. When reheating, add a splash of water to maintain the creamy texture.

Freezer: For longer storage, freeze in individual portions for up to 3 months. Ensure cooled Chicken Gnocchi Skillet is packed tightly before freezing to prevent freezer burn.

Thawing: To thaw, transfer the frozen portions to the fridge overnight. Reheat gently on the stovetop over low heat, stirring occasionally until warmed through.

Meal Prep: This recipe is perfect for meal prep! Divide into meal-sized portions and freeze for easy, wholesome dinners on busy nights.

Expert Tips for Chicken Gnocchi Skillet

  • Check Temperature: Use a meat thermometer for chicken, ensuring it reaches 165°F for safety and juiciness.
  • Crispy Skin: For extra flavor, try bone-in, skin-on chicken thighs. Sear them skin-side down first for a delightful crispness.
  • Season Thoughtfully: Remember to adjust salt and pepper during cooking for optimal flavor; tasting as you go is the secret!
  • Reheating Caution: When reheating leftovers, add a splash of water to maintain moisture and prevent the gnocchi from becoming chewy.
  • Flavor Variations: Experiment with spices like crushed red pepper flakes or fresh herbs to elevate your Chicken Gnocchi Skillet experience.

Make Ahead Options

These Garlic Chicken Gnocchi Skillets are perfect for busy weeknights when you need a meal ready to go! You can prep the chicken and the sauce up to 24 hours in advance by cooking the chicken and allowing it to cool before storing it in an airtight container in the refrigerator. Sauté the onions, mushrooms, and garlic, then combine them with the chicken broth and cream sauce mixture, refrigerating until needed. The gnocchi can be cooked fresh, or you can refrigerate uncooked gnocchi up to 3 days before use. When ready to serve, simply reheat the chicken and sauce in a large skillet, stir in freshly cooked gnocchi and spinach until heated through, and enjoy a delicious meal just as satisfying as when freshly made!

Chicken Gnocchi Skillet Variations

Feel free to get creative and make this dish your own! The following ideas will add a delightful twist to your Chicken Gnocchi Skillet.

  • Gluten-Free: Use gluten-free gnocchi to ensure everyone can enjoy this tasty meal without worry. It’s easy to swap, and you won’t lose flavor!

  • Add Extra Veggies: Incorporate colorful veggies like zucchini or bell peppers to boost nutrition and add vibrant flavors. You can mix and match based on what’s in season or what you have on hand.

  • Crispy Pancetta: Toss in crispy pancetta or bacon for a savory crunch that elevates the dish wonderfully. The smoky flavor complements the creamy sauce perfectly!

  • Dairy-Free: Substitute half and half with coconut cream and opt for dairy-free cheese to enjoy a creamy yet vegan-friendly version. You’ll love how the coconut adds a subtle sweetness!

  • Spice it Up: Add crushed red pepper flakes for a spicy kick or fresh lemon zest for a zesty brightness. A little heat can transform the whole experience!

  • Herb Infusion: Try adding fresh herbs like basil or thyme for an aromatic twist that sings summer flavors. The freshness makes each bite feel like a garden delight!

  • Protein Boost: Swap the chicken for grilled shrimp or even some sautéed mushrooms for a fun, different protein option. This is a perfect way to keep the dish diverse.

  • Creamy Garlic Sauce: Increase garlic to three cloves for a more robust flavor profile, giving a delightful punch to the overall taste that garlic lovers will adore!

Pairing this recipe with options like Sizzling Chicken Pepper or an easy BLT Chicken Salad can expand your dinner horizon. Enjoy the adventure in flavors!

Chicken Gnocchi Skillet Recipe FAQs

How do I choose ripe ingredients for my Chicken Gnocchi Skillet?
Absolutely! When selecting your ingredients, look for firm and plump chicken thighs without dark spots or an off smell. For vegetables, opt for fresh spinach that’s vibrant green and free from wilting. Choose gnocchi that’s soft with no cracks for the best texture.

How should I store the Chicken Gnocchi Skillet leftovers?
Very! After enjoying your meal, cool the Chicken Gnocchi Skillet completely before transferring it to an airtight container. Stored in the fridge, it will keep fresh for up to 4 days. When reheating, add a splash of water to prevent the sauce from becoming too thick.

Can I freeze the Chicken Gnocchi Skillet?
Absolutely! This recipe freezes well for up to 3 months. First, let the skillet cool completely. Then, portion it into individual airtight containers, ensuring they are tightly packed to avoid freezer burn. When you’re ready to enjoy it, thaw overnight in the fridge and reheat gently on the stovetop over low heat.

What if my sauce isn’t thickening as expected?
No worries! If your sauce feels too runny, boost its thickness by letting it simmer a bit longer, stirring frequently. For an immediate fix, you can mix a tablespoon of cornstarch with a little cold water, then whisk it into the sauce until it thickens. Just give it a few more minutes to heat through.

Is this recipe suitable for anyone with dietary restrictions?
Absolutely! This Chicken Gnocchi Skillet is adaptable to meet various dietary needs. Use gluten-free gnocchi to accommodate gluten sensitivities. For a dairy-free option, substitute half and half with coconut cream and replace shredded mozzarella with a dairy-free cheese alternative. Always ensure that the chicken broth is free from allergens, if necessary.

How can I enhance the flavor of my Chicken Gnocchi Skillet?
The more the merrier! You can elevate the flavors by adding a pinch of crushed red pepper flakes for heat or a dash of lemon zest for brightness. Fresh herbs like basil or parsley can make a great finishing touch as well—add them just before serving to preserve their freshness!

Chicken Gnocchi Skillet

Creamy Chicken Gnocchi Skillet for Quick Cozy Dinners

This Chicken Gnocchi Skillet combines juicy chicken and pillowy gnocchi in a creamy sauce for a quick and satisfying dinner.
Prep Time 10 minutes
Cook Time 20 minutes
Total Time 30 minutes
Servings: 4 servings
Course: Dinner
Cuisine: Italian
Calories: 450

Ingredients
  

For the Chicken
  • 1 pound Boneless, Skinless Chicken Thighs Adjust cooking time for bone-in thighs.
For the Gnocchi
  • 1 pound Potato Gnocchi Opt for gluten-free gnocchi if needed.
For the Sauce
  • 2 tablespoons Butter Substitute with ghee or olive oil for dairy-free.
  • 1 cup Chicken Broth
  • 1 cup Half and Half Coconut cream is a great substitute.
  • 1 cup Shredded Mozzarella Other melting cheeses can be used.
For the Veggies
  • 1 cup Diced Yellow Onion
  • 1 cup Diced White Mushrooms Can substitute with other vegetables.
  • 2 cups Spinach Substitute with kale or omit if preferred.
For Flavor
  • 3 cloves Garlic Adjust quantity for more intense flavor.
  • 1 teaspoon Paprika
  • 1 teaspoon Italian Seasoning
  • 1 teaspoon Salt Customize to taste.
  • 1 teaspoon Pepper Customize to taste.

Equipment

  • Skillet
  • Large pot

Method
 

Step-by-Step Instructions
  1. Bring a large pot of salted water to a boil. Add the potato gnocchi and cook until they float to the surface, about 2-3 minutes. Drain and set aside.
  2. In a large skillet, melt 2 tablespoons of butter over medium-high heat. Season chicken thighs with salt, pepper, and paprika, then add to the skillet. Cook for about 5-10 minutes on each side until golden and cooked through. Transfer to a plate and keep warm.
  3. Melt 1 tablespoon of butter in the same skillet. Add diced onion, garlic, and mushrooms. Sauté for 3-4 minutes until onions are translucent.
  4. Whisk in 1 cup of chicken broth and then 1 cup of half and half, stirring continuously. Let simmer for 2-3 minutes until it thickens slightly.
  5. Add 1 cup of shredded mozzarella and whisk until melted and creamy.
  6. Stir in the cooked gnocchi and spinach, then nestle the chicken back into the skillet. Simmer for an additional 2-3 minutes until heated through.
  7. Serve the Chicken Gnocchi Skillet in bowls, topping with parsley, parmesan cheese, and red pepper flakes.

Nutrition

Serving: 1bowlCalories: 450kcalCarbohydrates: 40gProtein: 30gFat: 20gSaturated Fat: 10gPolyunsaturated Fat: 3gMonounsaturated Fat: 5gCholesterol: 100mgSodium: 900mgPotassium: 600mgFiber: 2gSugar: 3gVitamin A: 500IUVitamin C: 15mgCalcium: 200mgIron: 2mg

Notes

Perfect for meal prep; store in airtight containers for up to 4 days in the fridge or freeze for up to 3 months.

Tried this recipe?

Let us know how it was!

Louisiana Red Beans and Rice: Comforting Cajun Goodness

“Just the other day, a friend described Louisiana Red Beans and Rice as ‘the warm hug your taste buds never knew they needed.’ And it’s true! This genuine Cajun comfort food is a symphony of flavors, bringing together smoky bacon, zesty andouille sausage, and tender red beans simmered to perfection. Not only is this dish an authentic representation of New Orleans cuisine, but it also offers quick prep and a hearty meal that comforts the soul, making it an unwavering favorite in my kitchen. Pair it with cornbread or a side of green beans, and you have a delicious family feast that gets better with time. Are you ready to discover the secrets behind this Southern classic?”

Why is Louisiana Red Beans and Rice special?

Rich, Authentic Cajun Flavor: This dish captures the heart of New Orleans with its smoky bacon and zesty andouille sausage, delivering a taste that’s undeniably comforting.

Easy Meal Prep: With a straightforward preparation method, you can whip up a hearty meal without fuss. Plus, the flavors intensify, making it perfect for leftovers!

Versatile Pairings: Serve alongside hot cornbread or smothered green beans, and you’ve got a meal that pleases every palate. For more variations, check out my recipe for Comfort Sausage Rice.

Crowd-Pleasing Dish: Whether for a family dinner or a gathering with friends, this dish never fails to impress and satisfy.

Freezes Well: Cooking in bulk? No problem! This meal can be stored for months, allowing you to savor Louisiana flavor anytime.

Louisiana Red Beans and Rice Ingredients

For the Beans
Dried Red Kidney Beans – Soaking overnight ensures they cook evenly and absorb flavors beautifully.
Thick Cut Bacon (½ pound, diced) – This provides a smoky richness that’s essential for that authentic taste.
Andouille or Smoked Sausage (1 pound, sliced) – Opt for a flavorful sausage to enhance the savory depth; any smoked sausage works too.
Chicken Stock (10 cups) – A rich broth that adds a delicious base for cooking the beans.

For the Vegetables
Diced Onions (1½ cups, about 2 medium onions) – These sweeten the dish as they cook down.
Diced Celery (1 cup, 2-3 stalks) – Adds crunch and aroma, a key element in Cajun “holy trinity.”
Diced Green Bell Pepper (1 cup, 1 large) – Enhances the savory flavor profile, making every bite memorable.
Minced Garlic (4 cloves) – Infuses the dish with pungency and depth, enhancing overall flavor.

For Seasoning and Garnishing
Dried Oregano (2 teaspoons) – Provides a fragrant, herbaceous note that complements the dish.
Dried Thyme (1 teaspoon) – A must-have herb that pairs perfectly with the other seasonings.
Black Pepper (½ teaspoon, or to taste) – Essential for balancing flavors; adjust based on your preference.
Bay Leaves (3) – Imparts aromatic depth to the cooking beans for that rich, comforting taste.
Cajun Seasoning – Add to taste for that characteristic Cajun kick that makes this dish authentic.
Green Onion Shoots (½ cup, thinly sliced, divided) – Freshness on top makes for a delightful garnish.
Fresh Parsley (¼ cup, finely chopped, divided) – Adds a burst of color and flavor that livens up each serving.

For Serving
Long Grain White Rice – The perfect neutral base to pair with the robust flavors of Louisiana Red Beans and Rice.

Embrace the joy of authentic Louisiana Red Beans and Rice and bring a comforting Cajun experience to your dinner table!

Step‑by‑Step Instructions for Louisiana Red Beans and Rice

Step 1: Soak the Beans
Begin by sorting 1 pound of dried red kidney beans, discarding any debris. Place the beans in a large bowl and cover them with cold water, ensuring they’re submerged by a couple of inches. Let them soak overnight for at least 12 hours. This helps the beans cook evenly and absorb all the robust flavors of the dish.

Step 2: Sear the Bacon
In a large heavy-bottom pot or Dutch oven, cook ½ pound of diced thick-cut bacon over medium heat. Stir occasionally, allowing the bacon to render its fat and crisp up, which should take about 8–10 minutes. Once crispy, remove the bacon with a slotted spoon and set it aside, leaving the rendered fat in the pot for the next step.

Step 3: Brown the Sausage
Utilize the residual bacon fat to brown 1 pound of sliced andouille or smoked sausage in the same pot over medium-high heat. Cook the sausage for approximately 6–8 minutes until it develops a golden brown crust. Once browned, reserve the sausage with the bacon, maintaining the flavorful grease for the aromatic vegetables you’ll cook next.

Step 4: Sauté the Vegetables
In the same pot, add 1½ cups of diced onions, 1 cup of diced celery, and 1 cup of diced green bell pepper. Sauté these vegetables over medium heat for about 5–7 minutes, stirring occasionally, until they soften and the onions become translucent. Add 4 minced garlic cloves during the last minute to release its fragrant aroma before moving on to the next step.

Step 5: Combine the Ingredients
Add the soaked beans, 10 cups of chicken stock, the reserved bacon and sausage, 2 teaspoons of dried oregano, 1 teaspoon of dried thyme, and 3 bay leaves into the pot. Season with ½ teaspoon of black pepper and incorporate Cajun seasoning to taste. Bring the mixture to a boil, then reduce heat, allowing it to simmer uncovered for about 2 hours. Stir occasionally and watch for the beans to become tender.

Step 6: Mash Some Beans
Once the beans have simmered and softened, use a potato masher or the back of a spoon to gently mash some beans against the sides of the pot. This will thicken the Louisiana Red Beans and Rice and create a creamy texture. Continue to simmer for an additional 10–15 minutes, ensuring the mixture thickens to your liking.

Step 7: Season and Serve
Finally, taste and adjust the seasonings as needed by adding more Cajun seasoning, salt, or black pepper. Before serving, remove the bay leaves. Spoon the rich, flavorful mixture over cooked long-grain white rice, and garnish with thinly sliced green onions and finely chopped fresh parsley. Prepare to enjoy a true taste of Louisiana!

Make Ahead Options

These Louisiana Red Beans and Rice are perfect for meal prep enthusiasts! You can soak the dried red kidney beans up to 24 hours in advance to ensure they cook evenly when it’s time to prepare the dish. Additionally, you may chop the onions, celery, and bell pepper, placing them in an airtight container in the refrigerator for up to 3 days. When you’re ready to serve, simply follow the cooking steps, and your beans will still be just as delicious and richly flavored. By prepping ahead, you’ll save valuable time during busy weeknights while enjoying an authentic Cajun meal that’s simple and comforting!

Expert Tips for Louisiana Red Beans and Rice

Soak Properly: Make sure to soak the beans for at least 12 hours. This is crucial for even cooking and softer beans.

Use Good Quality Meat: Choose high-quality bacon and andouille sausage for the best flavor. The smokiness enhances the authentic taste of Louisiana Red Beans and Rice.

Control Your Seasoning: Salt is key! Rely on the natural saltiness of bacon and sausage before adding more. Too much salt can overpower the dish.

Simmer Open: Cooking uncovered helps thicken the mixture. If it’s too soupy, continue simmering until you reach your desired consistency.

Adjust for Leftovers: If your leftovers become too salty, toss in a quartered potato while reheating. It absorbs excess salt, saving your meal!

Embrace Variations: Don’t hesitate to experiment! Try adding different beans or veggies to keep it exciting while retaining that comforting Louisiana essence.

How to Store and Freeze Louisiana Red Beans and Rice

Fridge: Store leftovers in an airtight container for up to 3-4 days. The flavors of Louisiana Red Beans and Rice deepen over time, making it even more delightful for a quick meal.

Freezer: Portion the beans into freezer-safe containers and freeze for up to 6 months. This allows you to grab a taste of Louisiana comfort whenever you crave it!

Reheating: Thaw overnight in the fridge before reheating on the stovetop or in the microwave. Add a splash of chicken stock or water to restore creaminess as needed.

Make-Ahead: This dish is fantastic for meal prep. You can make it a day in advance, as the flavors meld together beautifully overnight, delivering an even more satisfying experience at your table.

Louisiana Red Beans and Rice Variations

Feel free to explore different twists on this classic dish, engaging your senses in delightful new ways!

  • Vegetarian: Swap out the bacon and sausage for smoked tempeh or mushrooms, pairing with extra spices for a savory kick. This option is versatile and still full of flavor.
  • Spicy Kick: Add diced jalapeños or crushed red pepper flakes for an extra heat boost. The spice will elevate the dish and excite your palate.
  • Herb-Infused: Incorporate fresh herbs like thyme or sage, adding them towards the end of cooking for a bright, aromatic touch. The additional freshness complements the rich base beautifully.
  • Coconut Cream: For a creamy twist, blend in a bit of coconut cream during the last few minutes of cooking. This introduces a subtle sweetness that balances the dish’s flavors surprisingly well.
  • Caribbean Style: Mix in diced sweet potatoes or black beans. The sweet notes from these additions enhance your dish while staying true to the comfort of beans and rice.
  • Lemon Zest: A squeeze of fresh lemon juice before serving can work wonders, cutting through the richness with zesty brightness. This simple addition can refresh your bowl and awaken the flavors.
  • Serve Over Quinoa: Instead of traditional rice, try serving the beans over quinoa for a nutritious, gluten-free alternative. The texture pairs wonderfully with the dish’s creaminess.
  • Cornbread Garnish: Crumble cornbread on top for a delightful textural contrast. Not only does this feel festive, but it also infuses additional Southern charm, reminiscent of hearty family meals.

Whether you try a flavor twist or a texture variation, you’ll find something to love! If you’re looking for more comforting ideas, check out my recipe for Oven Chicken Rice or my soulful Corn Chicken Rice Bowl.

What to Serve with Louisiana Red Beans and Rice

Experience a delightful medley of flavors and textures that will elevate your meal and satisfy your loved ones.

  • Hot Cornbread: The slightly sweet, fluffy cornbread offers a perfect contrast to the savory, spicy beans, making it a match made in heaven.

  • Smothered Green Beans: Lightly seasoned with garlic and onions, these crisp green beans add a refreshing element, balancing the richness of the red beans and rice.

  • Coleslaw: A tangy, crunchy slaw provides a delightful crunch and zesty brightness, harmonizing beautifully with the hearty dish.

  • Fried Catfish: Crunchy on the outside and tender inside, fried catfish embodies Southern comfort, creating a satisfying meal that transports you straight to New Orleans.

  • Pickled Onions: These add a tangy punch to each bite, cutting through the creaminess of the red beans for a refreshing contrast.

  • Sweet Tea: No Southern meal is complete without a glass of sweet tea. Its sweetness perfectly complements the spicy flavors of the dish, refreshing your palate.

  • Banana Pudding: End your meal with this classic dessert featuring velvety pudding, layers of banana, and crispy wafers for a delightful finish.

Create a memorable dining experience and share the flavors of the South with each of these delicious pairings!

Louisiana Red Beans and Rice Recipe FAQs

What type of beans is best for Louisiana Red Beans and Rice?
I recommend using dried red kidney beans, as they are traditional and provide the best flavor and texture for this dish. However, small red beans can also be used for a softer feel—just keep an eye on them during cooking.

How should I store leftover Louisiana Red Beans and Rice?
Store any leftovers in an airtight container in the fridge for up to 3-4 days. The flavors deepen over time, making it a delightful meal for lunch or dinner. Be sure to reheat thoroughly before enjoying!

Can I freeze Louisiana Red Beans and Rice?
Absolutely! Portion the beans into freezer-safe containers and freeze for up to 6 months. When you’re ready to enjoy, thaw the mixture overnight in the fridge and reheat on the stovetop. To restore creaminess, add a splash of chicken stock or water as you reheat.

What if my Louisiana Red Beans and Rice is too salty?
If your dish turns out too salty, simply add a quartered potato while reheating. The potato will absorb some of the excess salt without changing the flavor of the dish. Just remember to remove it before serving!

Are there any dietary considerations with Louisiana Red Beans and Rice?
This dish contains meat, so it’s not suitable for strict vegetarians or vegans. For allergy concerns, it’s essential to check the ingredient labels for any preservatives or additives. Feel free to adapt the recipe by using plant-based sausage or omitting the meat entirely for a delicious vegetarian option.

Can I make Louisiana Red Beans and Rice ahead of time?
Yes! In fact, this dish tastes even better the next day as the flavors meld together beautifully. I often prepare it a day in advance for gatherings to ensure a rich and satisfying meal. Just heat it up on the stovetop and serve!

Louisiana Red Beans and Rice

Louisiana Red Beans and Rice: Comforting Cajun Goodness

Experience the comforting flavors of Louisiana Red Beans and Rice, a Cajun classic with smoky bacon and zesty sausage.
Prep Time 15 minutes
Cook Time 2 hours
Soaking Time 12 hours
Total Time 14 hours 15 minutes
Servings: 6 servings
Course: Dinner
Cuisine: Cajun, Southern
Calories: 350

Ingredients
  

For the Beans
  • 1 pound Dried Red Kidney Beans Soaking overnight ensures they cook evenly.
  • 0.5 pound Thick Cut Bacon, diced Provides smoky richness.
  • 1 pound Andouille or Smoked Sausage, sliced Enhances savory depth.
  • 10 cups Chicken Stock Adds a rich base for cooking.
For the Vegetables
  • 1.5 cups Diced Onions About 2 medium onions.
  • 1 cup Diced Celery 2-3 stalks.
  • 1 cup Diced Green Bell Pepper 1 large.
  • 4 cloves Minced Garlic Infuses the dish with flavor.
For Seasoning and Garnishing
  • 2 teaspoons Dried Oregano Provides a fragrant note.
  • 1 teaspoon Dried Thyme Pairs perfectly with other seasonings.
  • 0.5 teaspoon Black Pepper Essential for balancing flavors.
  • 3 Bay Leaves Adds aromatic depth.
  • Cajun Seasoning Add to taste.
  • 0.5 cup Green Onion Shoots, thinly sliced Divided for garnish.
  • 0.25 cup Fresh Parsley, finely chopped Divided for garnish.
For Serving
  • Long Grain White Rice The perfect base.

Equipment

  • Large bowl
  • heavy-bottom pot or Dutch oven
  • slotted spoon
  • potato masher

Method
 

Step-by-Step Instructions
  1. Sort and soak 1 pound of dried red kidney beans in cold water overnight for at least 12 hours.
  2. Cook ½ pound of diced thick-cut bacon over medium heat in a large pot until crispy, about 8–10 minutes, then remove and set aside.
  3. Brown 1 pound of sliced andouille sausage in the same pot over medium-high heat for about 6–8 minutes.
  4. Sauté 1½ cups of diced onions, 1 cup of diced celery, and 1 cup of diced green bell pepper for about 5–7 minutes, then add 4 minced garlic cloves for the last minute.
  5. Add soaked beans, 10 cups of chicken stock, the reserved bacon and sausage, 2 teaspoons of dried oregano, 1 teaspoon of dried thyme, and 3 bay leaves to the pot.
  6. Season with ½ teaspoon of black pepper and incorporate Cajun seasoning to taste. Bring to a boil, then reduce and simmer uncovered for about 2 hours.
  7. Mash some beans against the pot's sides to thicken the dish and simmer for an additional 10–15 minutes.
  8. Adjust seasonings to taste, remove the bay leaves, and serve the mixture over rice, garnished with green onions and parsley.

Nutrition

Serving: 1cupCalories: 350kcalCarbohydrates: 45gProtein: 20gFat: 10gSaturated Fat: 3gPolyunsaturated Fat: 2gMonounsaturated Fat: 4gCholesterol: 30mgSodium: 800mgPotassium: 600mgFiber: 12gSugar: 3gVitamin A: 5IUVitamin C: 10mgCalcium: 50mgIron: 3mg

Notes

For best results, soak the beans properly and use quality meats. This dish is perfect for meal prep and can be frozen for later enjoyment.

Tried this recipe?

Let us know how it was!

Crockpot Cheese Tortellini: Creamy Comfort in Every Bite

As I watched the steam rise from my crockpot, I could almost taste the savory aroma filling the kitchen. This is the moment I fell in love with my Crockpot Cheese Tortellini and Sausage dish—one that effortlessly combines delectable Italian sausage with creamy cheese tortellini and vibrant spinach. Perfect for busy weeknights or cozy family gatherings, this recipe offers the comforting embrace we all crave from homemade food. Plus, with minimal prep time, it becomes your go-to for a hearty meal without the fuss. Whether you’re seeking a gluten-free option or simply a delightful twist on comfort food, this dish has you covered. Curious to see how easy it is to whip up this creamy masterpiece? Let’s get started!

Why is Crockpot Cheese Tortellini a Must-Try?

Simplicity: This recipe requires minimal effort, perfect for busy cooks who crave comfort food without the hassle.

Creamy Texture: Thanks to the cream cheese, each bite offers a luxuriously smooth and satisfying consistency that clings beautifully to the tortellini.

Versatile: Customizable to your taste—swap in chicken sausage or try different veggies like bell peppers—makes it a great weeknight staple.

Crowd-Pleaser: Loved by both kids and adults, it promises hearty satisfaction that will have everyone coming back for seconds.

Make-Ahead Friendly: This dish is perfect for meal prepping; simply refrigerate or freeze leftovers for an easy, quick reheatable meal!

For other comforting meals, check out my Sausage Tortellini Soup or indulge in a Banana Grilled Cheese for something uniquely delightful.

Crockpot Cheese Tortellini Ingredients

Get ready to whip up this creamy delight with just a few simple ingredients!

For the Main Dish

  • Italian Sausage – Provides a savory and hearty flavor base; you can substitute with chicken or turkey sausage for a leaner option.
  • Cheese Tortellini – Acts as the main carbohydrate source, absorbing flavors; frozen tortellini works best for convenience, but fresh can be added later in cooking.
  • Diced Tomatoes – Adds moisture and acidity to balance the richness; don’t forget to include the juice for optimal flavor.
  • Minced Garlic – Enhances aroma and taste; fresh garlic is ideal, but garlic powder can work in a pinch.
  • Chicken Broth – Serves as the cooking liquid, developing into a creamy sauce; opt for low-sodium for a healthier choice.
  • Cream Cheese – Creates a rich, creamy sauce enveloping the tortellini; Greek yogurt can be used as a lighter alternative, but may alter the texture slightly.
  • Fresh Spinach – Adds nutrition and freshness to the dish; you can swap it with kale or other leafy greens if desired.
  • Italian Seasoning – A blend of herbs essential for flavor depth; can be substituted with individual herbs like oregano and basil.

Optional Garnish

  • Parmesan Cheese – Sprinkle for an extra layer of flavor; freshly grated cheese adds a delightful touch to the finished dish!

Step‑by‑Step Instructions for Crockpot Cheese Tortellini

Step 1: Brown Sausage
In a skillet over medium heat, brown the Italian sausage for about 5-7 minutes until it’s cooked through and no longer pink. Use a spatula to break it into smaller pieces as it cooks. Once browned, drain any excess fat and set the sausage aside to allow for a less greasy final dish.

Step 2: Prepare Crockpot
In your crockpot, combine the cooked sausage, diced tomatoes (with juice), minced garlic, Italian seasoning, and chicken broth. Stir everything together well to ensure the flavors meld nicely. The saucy mixture will set a delicious base for your Crockpot Cheese Tortellini as it simmers gently.

Step 3: Add Cream Cheese
Cube the cream cheese into small pieces and scatter it evenly over the top of the mixture in the crockpot. Allow it to sit atop the ingredients for a moment—it will melt beautifully as the dish cooks, creating that luxurious creamy texture you desire in your comfort meal.

Step 4: Cook
Cover the crockpot and set it to cook on low for 4-5 hours or on high for 2-3 hours. During this time, the flavors will meld and the cream cheese will dissolve into a smooth sauce. You’ll know it’s ready when the mixture is bubbling and aromatic, filling your kitchen with a warm, inviting scent.

Step 5: Add Tortellini and Spinach
About 30 minutes before you’re ready to serve, gently stir in the frozen cheese tortellini and fresh spinach. Cover again and continue to cook until the tortellini is tender, which usually takes about 20-30 minutes. You’ll see the spinach wilt into the sauce, adding a pop of color and nutrition to your dish.

Step 6: Season and Serve
Finally, taste the Crockpot Cheese Tortellini and adjust seasoning with salt and pepper as desired. Serve warm in bowls, optionally garnishing with freshly grated Parmesan cheese for a delightful finishing touch. This hearty comfort meal is perfect for family gatherings or cozy weeknight dinners!

Make Ahead Options

These Crockpot Cheese Tortellini and Sausage are perfect for meal prep enthusiasts looking to save time during busy weeknights! You can prepare the sausage and create the base with diced tomatoes, garlic, and seasonings up to 24 hours in advance. Simply combine these ingredients in your crockpot, cover, and refrigerate until you’re ready to cook. For optimal flavor, refrigerate the added cream cheese separately and mix it into the crockpot when ready to cook. Just before serving, stir in frozen tortellini and spinach, and let it cook on high for about 30 minutes. This ensures your meal remains just as delicious with fresh, vibrant flavors!

Expert Tips for Crockpot Cheese Tortellini

Choose the Right Sausage: Use Italian sausage for authentic flavor, but feel free to switch to chicken or turkey sausage for a healthier twist.

Draining is Key: Always drain excess fat from the browned sausage to ensure a creamy, not greasy, sauce in your Crockpot Cheese Tortellini.

Cooking Time Matters: Pay attention to the cooking times based on the type of tortellini you use; frozen works best to avoid mushiness.

Add Freshness Last: Introduce spinach about 30 minutes before serving to keep it vibrant and full of nutrients while enhancing the dish’s overall texture.

Leftover Magic: This dish stores beautifully. Refrigerate leftovers in an airtight container for up to 3 days, or freeze for up to 3 months for a quick future meal!

Crockpot Cheese Tortellini Variations

Customize your Crockpot Cheese Tortellini with these delightful twists that enhance flavor and accommodate different diets!

  • Gluten-Free: Use gluten-free cheese tortellini for a suitable option without sacrificing taste. Just ensure all other ingredients are also gluten-free.
  • Dairy-Free: Substitute cream cheese with cashew cream or a dairy-free cream cheese alternative for a luscious, creamy consistency without the dairy.
  • Hearty Veggie Boost: Toss in chopped zucchini or bell peppers alongside the spinach to add vibrant color and nutrition to the dish. They cook down beautifully in the crockpot.
  • Lean & Flavorful: Swap Italian sausage for lean chicken or turkey sausage for a lighter version that doesn’t skimp on flavor. The mildness allows other ingredients to shine through!
  • Kick Up the Heat: For a spicy kick, use hot Italian sausage or add red pepper flakes while cooking. It’s a surefire way to bring warmth and excitement to every bite.
  • Creamy Spinach Delight: Instead of fresh spinach, try using kale or Swiss chard, which add a different texture and enrich the dish with extra nutrients.
  • Herbal Infusion: Try fresh herbs like basil or thyme instead of Italian seasoning for a more aromatic and personalized herb blend. It’s a great way to bring your unique touch into the dish.
  • Flavorful Broth Swap: Experiment with homemade or vegetable broth instead of chicken broth for a unique flavor profile that suits vegetarian diets.

For another comforting creation, dive into my Strawberry Cheesecake for a sweet finish to your meal!

How to Store and Freeze Crockpot Cheese Tortellini

Fridge: Store leftover Crockpot Cheese Tortellini in an airtight container for up to 3 days. Reheat in the microwave or on the stovetop, adding a splash of broth if needed.

Freezer: For longer storage, freeze the dish in a freezer-safe container for up to 3 months. Thaw overnight in the fridge before reheating for best results.

Reheating: Gently reheat on the stovetop over low heat, stirring occasionally, or microwave in short intervals, ensuring it’s heated through without drying out.

Meal Prep: Consider preparing a double batch to enjoy on busier days; this comforting meal is perfect for make-ahead options!

What to Serve with Crockpot Cheese Tortellini and Sausage?

Elevate your Crockpot Cheese Tortellini and Sausage dish into a full meal with these delightful pairings that complement its creamy, hearty goodness.

  • Garlic Bread: Crunchy and buttery, it’s perfect for soaking up the creamy sauce and adds a delightful contrast in texture.

  • Caesar Salad: Crisp romaine and a tangy dressing provide a refreshing balance to the rich tortellini, making each bite satisfying.

  • Roasted Veggies: Seasonal vegetables like zucchini or bell peppers add a touch of earthiness while enhancing the color and nutritional value of your meal.

  • Herbed Focaccia: The soft, herby bread pairs beautifully, offering a delightful contrast and inviting aroma that enhances the Italian feel.

  • Red Wine: A glass of Chianti or Merlot complements the meaty sausage and creamy sauce, bringing out the dish’s flavors harmoniously.

  • Steamed Broccoli: Bright green florets add a pop of freshness and required crunch to contrast the rich pasta, making it possible to sneak in some extra veggies.

  • Chocolate Lava Cake: Finish the meal with a warm, gooey dessert that balances indulgence with a sweet burst of flavor, leaving everyone with a smile.

Crockpot Cheese Tortellini and Sausage Recipe FAQs

What type of cheese tortellini should I use?
For this recipe, I recommend using frozen cheese tortellini for convenience, but if you prefer fresh, just add it to the crockpot later in the cooking process to prevent it from getting mushy.

How should I store leftovers?
Absolutely! Store leftover Crockpot Cheese Tortellini in an airtight container in the refrigerator for up to 3 days. When reheating, you may want to add a splash of chicken broth to keep the dish moist and creamy.

Can I freeze Crockpot Cheese Tortellini?
Yes! This dish freezes beautifully. Allow it to cool completely, then transfer to a freezer-safe container and store for up to 3 months. To reheat, thaw it overnight in the refrigerator and warm it gently on the stovetop or in the microwave.

How can I avoid overcooking the tortellini?
To prevent overcooking, monitor the cooking times closely. Since frozen tortellini generally cooks faster, add it to the crockpot about 30 minutes before serving, stirring in the fresh spinach at the same time.

Is this recipe suitable for gluten-free diets?
Definitely! Simply use gluten-free pasta and ensure all other ingredients, such as the broth, are certified gluten-free. This way, you can enjoy a hearty and comforting meal without compromising dietary needs.

What should I do if my sauce is too thick?
If you find the sauce is too thick for your liking, don’t worry! You can thin it out by adding a little more chicken broth or water, one tablespoon at a time, while gently stirring until you’ve reached your desired consistency.

Crockpot Cheese Tortellini

Crockpot Cheese Tortellini: Creamy Comfort in Every Bite

Enjoy the creamy and comforting flavors of Crockpot Cheese Tortellini, combining savory sausage and cheese tortellini for a delightful meal.
Prep Time 15 minutes
Cook Time 4 hours 30 minutes
Total Time 4 hours 45 minutes
Servings: 6 servings
Course: Pasta
Cuisine: Italian
Calories: 450

Ingredients
  

For the Main Dish
  • 1 pound Italian Sausage Can substitute with chicken or turkey sausage for a leaner option.
  • 20 ounces Cheese Tortellini Use frozen for convenience.
  • 14.5 ounces Diced Tomatoes Include juice for optimal flavor.
  • 3 cloves Minced Garlic Fresh is best, but garlic powder can work.
  • 2 cups Chicken Broth Opt for low-sodium for a healthier choice.
  • 8 ounces Cream Cheese Greek yogurt can be used but may alter texture.
  • 4 ounces Fresh Spinach Can swap with kale or other leafy greens.
  • 2 teaspoons Italian Seasoning Can substitute with individual herbs like oregano and basil.
Optional Garnish
  • 1/2 cup Parmesan Cheese Freshly grated adds flavor.

Equipment

  • Crockpot

Method
 

Step-by-Step Instructions
  1. In a skillet over medium heat, brown the Italian sausage for about 5-7 minutes until it's cooked through and no longer pink. Drain excess fat.
  2. In your crockpot, combine the cooked sausage, diced tomatoes (with juice), minced garlic, Italian seasoning, and chicken broth. Stir together.
  3. Cube the cream cheese into small pieces and scatter it over the mixture in the crockpot.
  4. Cover and set it to cook on low for 4-5 hours or on high for 2-3 hours until the mixture is bubbling.
  5. 30 minutes before serving, stir in the frozen cheese tortellini and fresh spinach. Cover and cook until tortellini is tender.
  6. Taste and adjust seasoning with salt and pepper. Serve warm, optionally garnishing with Parmesan cheese.

Nutrition

Serving: 1bowlCalories: 450kcalCarbohydrates: 45gProtein: 25gFat: 20gSaturated Fat: 10gPolyunsaturated Fat: 2gMonounsaturated Fat: 8gCholesterol: 75mgSodium: 900mgPotassium: 600mgFiber: 3gSugar: 5gVitamin A: 650IUVitamin C: 15mgCalcium: 250mgIron: 2mg

Notes

This dish stores beautifully. Refrigerate leftovers for up to 3 days or freeze for up to 3 months.

Tried this recipe?

Let us know how it was!

Cheeseburger Lasagna Recipe: Comfort Food Bliss Awaits

As I pulled that bubbling lasagna from the oven, the rich, savory aroma enveloped the kitchen, instantly shifting my focus from the hustle of daily life to this heartwarming dish. This Parmesan Garlic Bacon Cheeseburger Lasagna recipe is a delightful mashup that combines the comfort of a cheeseburger with the cozy charm of lasagna. Packed with layers of seasoned beef, crispy bacon, and a creamy béchamel sauce, this hearty meal is an easy dinner solution perfect for busy weeknights or when you want to impress your friends at a dinner party. Bonus: it’s a total crowd-pleaser and can even be made ahead for those busy evenings when you want to skip the takeout. Who wouldn’t want to dig into a plate of cheesy, comforting goodness? Let’s dive into how you can make this deliciousness happen!

Why is this lasagna so special?

Ultimate Comfort: This dish brings together the best of both worlds—comfort food at its finest! Hearty and Satisfying: Each layer is packed with savory goodness, making it perfect for chilly nights or family gatherings. Easy Preparation: You’ll be amazed at how simple it is to whip up such a gourmet meal. Flavor Explosion: The fusion of garlic, Parmesan, and crispy bacon takes every bite to the next level. Plus, if you’re a fan of other comforting soups like Cheeseburger Soup Comforting or Mexican Taco Soup, this lasagna will surely capture your heart, too!

Cheeseburger Lasagna Ingredients

• Here’s everything you need to create your own delicious Cheeseburger Lasagna!

For the Meat Sauce

  • Ground Beef (80/20) – Main protein source; adds rich flavor. Use ground turkey for a leaner option.
  • Onion (diced) – Adds sweetness and depth. Any onion variety works, or use shallots for a milder taste.
  • Garlic (minced) – Enhances flavor with aromatic notes. Substitute with garlic powder in a pinch.
  • Crispy Cooked Bacon (crumbled) – Adds texture and savory flavor. Turkey bacon can be used for a lighter version.
  • Marinara Sauce (24 oz) – Base sauce for the lasagna. Homemade or jarred sauce is acceptable.
  • Italian Seasoning – Provides herby flavor. Substitute with a mix of dried oregano, basil, and thyme.
  • Smoked Paprika – Adds a subtle smokiness. Regular paprika can be used if unavailable.
  • Salt & Pepper – Essential for seasoning. Adjust to taste.

For the Béchamel

  • Unsalted Butter – Used for béchamel; creates richness. Margarine can serve as a substitute.
  • All-Purpose Flour – Thickens béchamel sauce. Gluten-free flour can replace for gluten-free versions.
  • Whole Milk – Forms the whip for the béchamel. Use any milk or cream for a richer béchamel.
  • Grated Parmesan Cheese – Key flavor component in béchamel. Pecorino Romano is a viable alternative.
  • Garlic Powder – Adds depth to béchamel; can omit or substitute with fresh garlic.

For the Layers

  • Lasagna Noodles (12) – Base layer of the dish. Use no-boil noodles to save time.
  • Shredded Mozzarella & Cheddar – Provides creaminess and flavor. Swap with any melting cheese.
  • Grated Parmesan (for topping) – Crispy finish. Additional cheese can enhance texture.
  • Chopped Fresh Parsley – Optional garnish for brightness. Can replace with fresh basil or omit.

Step‑by‑Step Instructions for Cheeseburger Lasagna Recipe

Step 1: Prepare the Meat Sauce
In a large skillet, heat a drizzle of olive oil over medium heat. Add 1 pound of ground beef and cook until browned, about 5-7 minutes. Stir in 1 diced onion and 2 cloves of minced garlic, cooking until softened, around 3-4 minutes. Mix in 24 oz of marinara sauce, 1 cup of crumbled bacon, 1 teaspoon of Italian seasoning, and 1 teaspoon of smoked paprika. Let the sauce simmer on low for 10 minutes, allowing all flavors to meld.

Step 2: Make the Parmesan Garlic Béchamel
In a saucepan, melt 4 tablespoons of unsalted butter over medium heat. Once melted, whisk in 4 tablespoons of all-purpose flour, stirring constantly for about 1-2 minutes until lightly golden. Gradually add 2 cups of whole milk while whisking to prevent lumps. Continue cooking until thickened, roughly 5 minutes. Remove from heat and stir in 1 cup of grated Parmesan cheese and ½ teaspoon of garlic powder until smooth and creamy.

Step 3: Assemble the Lasagna
Preheat your oven to 375°F (190°C). In a baking dish, start layering your cheeseburger lasagna by spreading a thin layer of the meat sauce at the bottom. Add 3 lasagna noodles on top, followed by half of the béchamel sauce and a sprinkle of shredded mozzarella and cheddar cheese. Repeat the layers, finishing with remaining meat sauce, béchamel, and a generous topping of remaining cheeses for a gooey finish.

Step 4: Bake and Rest
Cover the assembled lasagna with aluminum foil and bake in the preheated oven for 30 minutes. Afterward, remove the foil and bake for an additional 15 minutes until the top is golden and bubbly. Once done, take it out and let it rest for about 10 minutes before slicing. This resting time allows the layers to set beautifully, making serving much easier.

Make Ahead Options

These Parmesan Garlic Bacon Cheeseburger Lasagna are perfect for busy home cooks looking to save time! You can prepare the meat sauce and béchamel up to 24 hours in advance. Simply allow them to cool, then store in airtight containers in the refrigerator. To maintain quality, reheat the sauces gently on the stovetop before assembling. The lasagna can also be completely assembled and refrigerated up to three days ahead of time—just cover it tightly with foil. When you’re ready to serve, bake it directly from the fridge, adding about 10-15 minutes to the baking time. This way, you’ll have a hearty, comforting meal ready to enjoy with minimal effort!

Storage Tips for Cheeseburger Lasagna

  • Fridge: Store any leftovers in an airtight container in the refrigerator for up to 3 days. Ensure the lasagna has cooled completely before sealing to maintain quality.
  • Freezer: For longer storage, freeze the unbaked cheeseburger lasagna. Wrap it tightly in plastic wrap and aluminum foil; it can last in the freezer for up to 3 months.
  • Thawing: When ready to enjoy, thaw in the refrigerator overnight before baking. If cooking from frozen, increase baking time by about 30 minutes.
  • Reheating: Reheat individual slices in the microwave for 1-2 minutes or in the oven at 350°F (175°C) for about 20 minutes until heated through, ensuring it remains creamy and delicious.

Expert Tips for Cheeseburger Lasagna

  • Brown the Beef Well: Ensure your ground beef is browned properly to develop rich flavors. Undercooked beef can lead to a less savory sauce, impacting the overall taste of your cheeseburger lasagna.
  • Rest Before Slicing: Don’t skip letting the lasagna rest after baking; this crucial step helps it set up, making slicing easier and allowing flavors to meld beautifully.
  • Don’t Skip Covering: Covering the lasagna with foil while baking helps cook the noodles thoroughly. Leaving it uncovered can result in undercooked noodles and a drier texture.
  • Layer Similar Ingredients: When assembling, layer similar ingredients together—like béchamel and cheese—to ensure every slice delivers that delightful cheeseburger flavor throughout the dish.
  • Customize with Extras: Don’t hesitate to add your favorite ingredients! Whether it’s spicy jalapeños or veggies, customizing your cheeseburger lasagna can lead to exciting flavor discoveries.

What to Serve with Parmesan Garlic Bacon Cheeseburger Lasagna

Enhance your dining experience with delightful sides that perfectly complement this cheesy, savory masterpiece.

  • Garlic Bread: Crisp and buttery, this classic favorite pairs perfectly with the saucy lasagna, making it even more indulgent.
  • Caesar Salad: Fresh, tangy, and crunchy, a Caesar salad brings a refreshing contrast to the richness of the lasagna, balancing textures beautifully.
  • Roasted Garlic Green Beans: Their tender yet crisp texture and mild garlic flavor make them an excellent pairing with the hearty lasagna, adding a wholesome touch.
  • Coleslaw: The crispy cabbage and tangy dressing provide a delightful crunch, cutting through the creamy layers of the lasagna for added contrast.
  • Stuffed Mushrooms: These savory bites provide a delightful umami flavor that enhances the cheeseburger profile of the lasagna, inviting cozy comfort in every bite.
  • Macaroni and Cheese: A double dose of cheesy goodness! This creamy side is perfect for those cheese enthusiasts, elevating comfort food to new heights.
  • Sweet Potato Fries: These crispy, slightly sweet fries offer a fun twist, bringing a touch of sweetness that complements the savory notes of the lasagna.
  • Wine Pairing: A robust red wine, like Cabernet Sauvignon, pairs beautifully with the rich flavors of the lasagna, making each bite feel like a special occasion.

Cheeseburger Lasagna Recipe Variations

Feel free to put your own twist on this scrumptious dish, and let your creativity shine in the kitchen!

  • Spicy Kick: Add crushed red pepper or diced jalapeños to the meat sauce for a flavorful heat that amplifies the cheeseburger experience.
  • Low-Carb Delight: Swap out traditional lasagna noodles for zucchini noodles for a lighter, low-carb version that still feels hearty.
  • Make-Ahead Magic: Prepare the lasagna without baking, freeze it, and enjoy a ready-to-go meal on a busy night. Just thaw and bake when needed!
  • Vegetarian Option: For a meat-free masterpiece, replace the beef with seasoned lentils or plant-based ground meat—no one will miss the meat!
  • Extra Cheesy: Go all out on cheese by using a melty mix of Gouda or Fontina for a richer flavor experience. Extra cheese can never go wrong!
  • Herb Infusion: Toss in some fresh basil or spinach into the meat sauce for added greenery and flavor that brightens up the dish.
  • Flavorful Sauce Swap: Mix up the marinara with a spicy arrabbiata sauce for an adventurous twist that brings an extra zing to each bite!
  • Dress It Up: Finish your lasagna with a fresh sprinkle of chopped parsley or scallions just before serving to add a lovely pop of color and fresh flavor.

And if you’re inspired by heartwarming recipes, don’t forget to check out Cheeseburger Soup Comforting or give Easter Chocolate Lasagna a try for another delicious take on classic comfort food!

Cheeseburger Lasagna Recipe FAQs

What type of ground beef should I use for the meat sauce?
I recommend using ground beef with an 80/20 fat ratio as it delivers a rich flavor and maintains juiciness. If you’re looking for a leaner option, ground turkey works wonderfully too, albeit with a different flavor profile.

How should I store leftovers?
To keep your cheeseburger lasagna fresh, allow it to cool completely before placing it in an airtight container. It can be kept in the refrigerator for up to 3 days. If you want to enjoy it later, freezing is an excellent option!

Can I freeze cheeseburger lasagna?
Absolutely! Prepare the lasagna but do not bake it. Wrap the unbaked dish tightly in plastic wrap and then in aluminum foil—this helps prevent freezer burn. It can be frozen for up to 3 months. When you’re ready to bake, let it thaw overnight in the refrigerator before cooking.

What can I do if my béchamel is too thick?
If your béchamel sauce turns out too thick, don’t fret! Simply return it to low heat and slowly whisk in a bit of milk until you reach the desired consistency. This saves your sauce and ensures a creamy texture in your lasagna!

Are there any dietary considerations for this recipe?
Yes! For those with gluten sensitivities, you can substitute the all-purpose flour with a gluten-free flour blend for the béchamel. Additionally, swapping the regular bacon for turkey bacon provides a lighter version while still retaining that classic flavor. Also, for a vegetarian option, consider using seasoned lentils or plant-based ground meat instead of beef.

How can I make sure my lasagna slices nicely?
To get those picture-perfect slices, it’s essential to let your cheeseburger lasagna rest for about 10 minutes after baking. This allows it to set and makes cutting through the layers much easier. Plus, you’ll be able to enjoy a beautiful, cohesive slice every time!

Cheeseburger Lasagna Recipe

Cheeseburger Lasagna Recipe: Comfort Food Bliss Awaits

Delicious Cheeseburger Lasagna combining cheeseburger flavors in a comforting layered dish.
Prep Time 15 minutes
Cook Time 45 minutes
Resting Time 10 minutes
Total Time 1 hour 10 minutes
Servings: 8 slices
Course: Casserole
Cuisine: American
Calories: 450

Ingredients
  

For the Meat Sauce
  • 1 pound Ground Beef (80/20) Main protein source; use ground turkey for a leaner option.
  • 1 medium Onion (diced) Any onion variety works, or use shallots for a milder taste.
  • 2 cloves Garlic (minced) Substitute with garlic powder in a pinch.
  • 1 cup Crispy Cooked Bacon (crumbled) Turkey bacon can be used for a lighter version.
  • 24 oz Marinara Sauce Homemade or jarred sauce is acceptable.
  • 1 teaspoon Italian Seasoning Substitute with a mix of dried oregano, basil, and thyme.
  • 1 teaspoon Smoked Paprika Regular paprika can be used if unavailable.
  • Salt & Pepper Essential for seasoning; adjust to taste.
For the Béchamel
  • 4 tablespoons Unsalted Butter Margarine can serve as a substitute.
  • 4 tablespoons All-Purpose Flour Gluten-free flour can replace for gluten-free versions.
  • 2 cups Whole Milk Use any milk or cream for a richer béchamel.
  • 1 cup Grated Parmesan Cheese Pecorino Romano is a viable alternative.
  • 1/2 teaspoon Garlic Powder Can omit or substitute with fresh garlic.
For the Layers
  • 12 pieces Lasagna Noodles Use no-boil noodles to save time.
  • 2 cups Shredded Mozzarella & Cheddar Swap with any melting cheese.
  • 1/2 cup Grated Parmesan (for topping) Additional cheese can enhance texture.
  • Chopped Fresh Parsley Optional garnish; can replace with fresh basil or omit.

Equipment

  • Large skillet
  • Saucepan
  • baking dish

Method
 

Step-by-Step Instructions for Cheeseburger Lasagna Recipe
  1. In a large skillet, heat a drizzle of olive oil over medium heat. Add 1 pound of ground beef and cook until browned, about 5-7 minutes. Stir in 1 diced onion and 2 cloves of minced garlic, cooking until softened, around 3-4 minutes. Mix in 24 oz of marinara sauce, 1 cup of crumbled bacon, 1 teaspoon of Italian seasoning, and 1 teaspoon of smoked paprika. Let the sauce simmer on low for 10 minutes, allowing all flavors to meld.
  2. In a saucepan, melt 4 tablespoons of unsalted butter over medium heat. Once melted, whisk in 4 tablespoons of all-purpose flour, stirring constantly for about 1-2 minutes until lightly golden. Gradually add 2 cups of whole milk while whisking to prevent lumps. Continue cooking until thickened, roughly 5 minutes. Remove from heat and stir in 1 cup of grated Parmesan cheese and ½ teaspoon of garlic powder until smooth and creamy.
  3. Preheat your oven to 375°F (190°C). In a baking dish, start layering your cheeseburger lasagna by spreading a thin layer of the meat sauce at the bottom. Add 3 lasagna noodles on top, followed by half of the béchamel sauce and a sprinkle of shredded mozzarella and cheddar cheese. Repeat the layers, finishing with remaining meat sauce, béchamel, and a generous topping of remaining cheeses for a gooey finish.
  4. Cover the assembled lasagna with aluminum foil and bake in the preheated oven for 30 minutes. Afterward, remove the foil and bake for an additional 15 minutes until the top is golden and bubbly. Once done, take it out and let it rest for about 10 minutes before slicing.

Nutrition

Serving: 1sliceCalories: 450kcalCarbohydrates: 35gProtein: 25gFat: 25gSaturated Fat: 12gCholesterol: 85mgSodium: 800mgPotassium: 600mgFiber: 3gSugar: 4gVitamin A: 20IUVitamin C: 4mgCalcium: 30mgIron: 15mg

Notes

Allow flavors to meld together and let the lasagna rest for easier slicing. Experiment with additional ingredients for a personal touch.

Tried this recipe?

Let us know how it was!

Soft and Chewy Pumpkin Cookies Recipe for Cozy Fall Nights

As the leaves start to turn, an irresistible aroma wafts through my kitchen, hinting at the cozy fall treats to come. Today, I’m excited to share my beloved Pumpkin Cookies Recipe, which captures the essence of the season with every soft, chewy bite. What makes these cookies truly special is the nutty flavor of brown butter combined with warm, aromatic pumpkin spices—perfectly sweet, yet comforting. Not only is this an easy recipe that doesn’t require any fancy equipment, but these delightful cookies are a crowd-pleaser that will have everyone reaching for seconds. Trust me, you won’t want to miss out on these scrumptious cookies! Shall we preheat the oven and get baking together?

Why are these pumpkin cookies a must-try?

Simplicity reigns supreme here: This Pumpkin Cookies Recipe is effortless, requiring no mixers or complicated techniques. Deliciously Chewy: Each cookie boasts a soft, chewy texture that melts in your mouth, enhanced by the warm spices. Nutty Brown Butter: The rich flavor of brown butter elevates these cookies, making them a standout treat for your fall gatherings. Pair them with a warm beverage, like coffee or tea, for the ultimate cozy experience. Versatile Options: Want to switch it up? Consider adding chocolate chips or nuts for an extra crunch. Store these beauties for a week, or freeze the dough for fresh cookies anytime—just like our Cabbage Fat Burning Soup!

Pumpkin Cookies Recipe Ingredients

For the Cookie Batter

  • Unsalted Butter – Adds richness and moisture to cookies; try European-style butter for an enhanced flavor.
  • Light Brown Sugar – Provides depth of flavor and moisture; substitute with dark brown sugar for a stronger molasses taste.
  • White Sugar – Sweetness and texture; regular granulated sugar is best—avoid substitutes for optimal results.
  • Egg Yolk – Adds richness; use at room temperature for better emulsification.
  • Vanilla Extract – Enhances flavor profile; prefer pure vanilla for best quality.
  • Maple Syrup – Adds complexity and a mild sweetness; can be omitted if unavailable.
  • Pumpkin Puree – The star of this Pumpkin Cookies Recipe; use 100% pumpkin puree, not pumpkin pie filling.
  • Pumpkin Pie Spice – Contributes warm spices; substitute with a mix of cinnamon, nutmeg, and ginger if needed.
  • Ground Cinnamon – Adds warmth; it’s essential for that classic pumpkin flavor.
  • All-Purpose Flour – Provides structure to cookies; don’t use whole wheat flour for this recipe.
  • Baking Soda – Helps cookies rise; ensure it’s fresh for the best results.
  • Baking Powder – Adds fluffiness; both baking powder and soda are needed for the right texture.
  • Kosher Salt – Balances sweetness; fine salt can be used at half the amount.

For the Coating

  • Pumpkin Pie Sugar – A delightful mix of white sugar and pumpkin pie spice, perfect for rolling the cookies.

Step‑by‑Step Instructions for Soft and Chewy Pumpkin Cookies Recipe

Step 1: Brown the Butter
Begin by melting ½ cup of unsalted butter in a small saucepan over medium-low heat. Stir continuously until it turns a rich golden-brown color and releases a nutty aroma, taking about 5-7 minutes. Once browned, remove it from heat and let it cool for about 10 minutes while you prepare the other ingredients.

Step 2: Mix Wet Ingredients
In a large mixing bowl, whisk together the cooled brown butter with ¾ cup light brown sugar, ½ cup white sugar, 2 tablespoons maple syrup, 1 egg yolk, 1 teaspoon vanilla extract, and ½ cup pumpkin puree. Blend until the mixture is smooth and well combined, achieving a creamy texture that brings warmth to your Pumpkin Cookies Recipe.

Step 3: Combine Dry Ingredients
In a separate bowl, whisk together 2 cups all-purpose flour, 1 teaspoon baking powder, ½ teaspoon baking soda, ½ teaspoon kosher salt, 1 teaspoon pumpkin pie spice, and 1 teaspoon ground cinnamon. This dry mixture should be fluffy and well blended, ensuring a balanced flavor and structure for your cookies.

Step 4: Form Dough
Carefully fold the dry ingredients into the wet mixture until just combined, avoiding overmixing to maintain that soft and chewy texture. Once fully blended, cover the dough with plastic wrap and chill it in the refrigerator for 30 minutes. Chilling helps develop flavors and prevents spreading during baking.

Step 5: Preheat Oven & Prepare Baking Sheets
While the dough chills, preheat your oven to 350°F (175°C). Line two baking sheets with parchment paper to ensure easy removal of the cookies after baking, creating a non-stick surface for your delightful pumpkin cookies.

Step 6: Shape Cookies
Once chilled, use a cookie scoop or tablespoon to form balls of dough, about 1 to 2 inches in diameter. Roll each ball in the pumpkin pie sugar mixture for a sweet coating, then place them on the prepared baking sheets, leaving ample space between each for spreading.

Step 7: Bake
Slide the baking sheets into the preheated oven and bake the cookies for 10-14 minutes. Look for slightly set edges and a soft center that appears underbaked. The cookies will firm up as they cool, reveling in a perfectly soft and chewy texture for your Pumpkin Cookies Recipe.

Step 8: Cool
After baking, let the cookies cool on the baking sheets for about 5 minutes. This allows them to set before carefully transferring them to a wire rack to cool completely. Enjoy the warm, inviting aroma wafting through your kitchen as they cool!

Expert Tips for the Best Pumpkin Cookies

  • Chill the Dough: Refrigerating the dough for at least 30 minutes allows the flavors to meld and helps keep the cookies from spreading too much during baking.

  • Even Sizing: Use a cookie scoop to ensure uniform cookie sizes for even baking. This helps achieve that delightful soft and chewy texture throughout your Pumpkin Cookies Recipe.

  • Don’t Overbake: Keep an eye on the cookies as they bake; removing them when they look slightly underbaked allows them to maintain their soft, chewy center as they cool.

  • Quality Ingredients: Opt for high-quality vanilla extract and fresh spices for the best flavor in your cookies. Quality really shines through in this Pumpkin Cookies Recipe!

  • Experiment with Mix-ins: Feel free to get creative! Adding chocolate chips or nuts can bring a new texture and flavor to your cookies, making each bite even more enjoyable.

What to Serve with Soft and Chewy Pumpkin Cookies

Pair these delightful cookies with warm treats and comforting sides that enhance their cozy charm.

  • Creamy Hot Cocoa: A rich, velvety hot cocoa pairs beautifully with pumpkin cookies, accentuating their sweetness with a creamy chocolate delight.

  • Spiced Chai Latte: This aromatic beverage infused with spices complements the pumpkin flavors, creating a warm, comforting experience perfect for chilly evenings.

  • Coffee or Espresso: The boldness of coffee balances the sweetness of the cookies. Either a classic cup or a frothy latte will enhance the flavor profile with each bite.

  • Whipped Cream: A dollop of homemade whipped cream adds a light, airy contrast, offering a delightful creaminess that mingles beautifully with the spiced cookies.

  • Pumpkin Soup: For a cozy fall meal, serve these cookies alongside a bowl of creamy pumpkin soup. The flavors harmonize to create a comforting dining experience that celebrates the season.

  • Apple Pie: Integrating traditional favorites, a slice of warm apple pie with cinnamon will evoke lovely memories of harvest gatherings, making your dessert spread feel complete.

How to Store and Freeze Pumpkin Cookies

Room Temperature: Store baked pumpkin cookies in an airtight container at room temperature for up to 7 days to maintain their soft, chewy texture.

Fridge: If you prefer a longer shelf-life, pumpkin cookies can be refrigerated for up to 10 days, but they might become slightly firmer. Be sure to seal tightly!

Freezer: Freeze unbaked dough balls in a single layer on a baking sheet, then transfer to a zip-top bag for up to 2 months. Bake directly from the freezer, adding a few minutes to the baking time.

Reheating: To enjoy cookies that taste freshly baked, warm them in the microwave for about 10-15 seconds. This will revive their softness and bring back that irresistible flavor.

Make Ahead Options

These delightful Soft and Chewy Pumpkin Cookies are perfect for busy home cooks looking to save time during the week! You can prepare the dough and refrigerate it for up to 3 days; this chilling not only enhances the flavor but also helps maintain the chewy texture. Alternatively, you can roll the cookie dough into balls and freeze them for up to 2 months—just bake them straight from the freezer, adding a minute or two to the baking time. When you’re ready to serve, simply preheat the oven, place the cookies on a baking sheet, and you’ll enjoy that fresh-baked aroma in no time. Trust me, these pumpkin cookies will be just as delicious as when made fresh!

Pumpkin Cookies Recipe Variations

Feel free to get creative and personalize your pumpkin cookies with these delightful twists!

  • Chocolate Chip: Add ¾ cup of chocolate chips for a deliciously sweet surprise in each bite.

  • Nutty Crunch: Incorporate ½ cup of chopped nuts, like pecans or walnuts, to introduce a satisfying crunch to your cookies.
    They’re absolutely delightful when paired with a warm cup of coffee!

  • Oat Flour Blend: Substitute half of the all-purpose flour with oat flour for a heartier texture.
    This adds a unique flavor and a wholesome twist, making them even more comforting.

  • Gluten-Free Option: Use a gluten-free all-purpose flour blend instead of regular flour.
    You can still enjoy the same soft and chewy texture without compromising on flavor.

  • Spicy Kick: Add a pinch of cayenne pepper or a sprinkle of ground cloves for a nice heat that complements the pumpkin spice beautifully.
    It’s a surprising twist that will leave everyone asking for your secret ingredient!

  • Maple Bliss: Substitute the white sugar with an equal amount of maple sugar for a richer, deeper sweetness.
    This creates a uniquely flavored cookie that pairs wonderfully with a cup of tea, especially in fall.

  • Dipped Delights: Once cooled, dip half of each cookie in melted chocolate for an indulgent treat.
    This sweet touch elevates an already delicious cookie to a whole new level of enjoyment.

  • Mouthwatering Pumpkin Pie Filling: For a decadent twist, fill the center of each cookie with a teaspoon of pumpkin pie filling before baking.
    This yields a deliciously gooey center reminiscent of the flavors we adore in pumpkin pie!

For more delicious inspiration, consider trying a comforting bowl of our Cabbage Fat Burning Soup or enjoy the delightful flavors of Shepherd’s Pie Soup. Happy baking!

Soft and Chewy Pumpkin Cookies Recipe FAQs

How do I select the right pumpkin puree?
Absolutely! When choosing pumpkin puree, opt for 100% pure pumpkin puree instead of pumpkin pie filling, which contains added sugars and spices. Look for labels that read “pure pumpkin” or “100% pumpkin” for the best flavor in your Soft and Chewy Pumpkin Cookies Recipe.

What’s the best way to store leftover pumpkin cookies?
Very! You can store your baked pumpkin cookies in an airtight container at room temperature for up to 7 days. For extended freshness, consider refrigerating them for up to 10 days, but be aware they may become a bit firmer. A tightly sealed container is key to keeping them soft!

Can I freeze the pumpkin cookie dough?
Yes, you can! To freeze unbaked dough balls, first, place them in a single layer on a baking sheet. Once frozen solid, transfer them to a zip-top bag and store for up to two months. You can bake them directly from frozen; just add an extra minute or two to the baking time for perfectly soft cookies!

Why did my cookies turn out flat?
If your pumpkin cookies spread too much, it could be due to several factors. Ensure your butter is chilled before mixing in the dough. Overmixing the batter can also cause the cookies to spread. Finally, be sure to chill the dough for at least 30 minutes; this helps maintain structure during baking.

Are these cookies safe for pets or those with allergies?
No, this Soft and Chewy Pumpkin Cookies Recipe contains ingredients like butter and sugar that may not be suitable for pets. Additionally, be cautious of potential allergies to nuts, gluten, or dairy. Always check ingredient labels and consult with your healthcare provider if you have specific dietary concerns.

How do I know when the cookies are done baking?
Perfect question! Bake your cookies for 10-14 minutes, or until the edges are set but the center still looks slightly underbaked. They will continue to firm up as they cool. Trust your instincts, and if they look too soft, they’re likely just right for that chewy texture!

Pumpkin Cookies Recipe

Soft and Chewy Pumpkin Cookies Recipe for Cozy Fall Nights

This Pumpkin Cookies Recipe delivers soft, chewy, and spiced cookies perfect for fall.
Prep Time 30 minutes
Cook Time 14 minutes
Chilling Time 30 minutes
Total Time 1 hour 14 minutes
Servings: 24 cookies
Course: Dessert
Cuisine: American
Calories: 120

Ingredients
  

For the Cookie Batter
  • 1/2 cup Unsalted Butter Use European-style for enhanced flavor.
  • 3/4 cup Light Brown Sugar Substitute with dark brown sugar for a stronger taste.
  • 1/2 cup White Sugar Regular granulated sugar is best.
  • 1 large Egg Yolk Use at room temperature.
  • 1 teaspoon Vanilla Extract Prefer pure vanilla for best quality.
  • 2 tablespoons Maple Syrup Can be omitted if unavailable.
  • 1/2 cup Pumpkin Puree Use 100% pure pumpkin.
  • 1 teaspoon Pumpkin Pie Spice Substitute with cinnamon, nutmeg, and ginger if needed.
  • 1 teaspoon Ground Cinnamon Essential for classic pumpkin flavor.
  • 2 cups All-Purpose Flour Do not use whole wheat flour.
  • 1 teaspoon Baking Soda Ensure it's fresh.
  • 1 teaspoon Baking Powder Needed for the right texture.
  • 1/2 teaspoon Kosher Salt Fine salt can be used at half the amount.
For the Coating
  • 1/4 cup Pumpkin Pie Sugar Mix of white sugar and pumpkin pie spice.

Equipment

  • Oven
  • Saucepan
  • Mixing Bowl
  • whisk
  • Cookie Scoop
  • Baking Sheets
  • Parchment Paper

Method
 

Step-by-Step Instructions
  1. Brown the Butter: Melt ½ cup of unsalted butter in a small saucepan over medium-low heat, stirring until golden-brown, about 5-7 minutes. Let cool for 10 minutes.
  2. Mix Wet Ingredients: In a large bowl, whisk together the cooled brown butter, ¾ cup light brown sugar, ½ cup white sugar, 2 tablespoons maple syrup, 1 egg yolk, 1 teaspoon vanilla extract, and ½ cup pumpkin puree until smooth.
  3. Combine Dry Ingredients: In a separate bowl, whisk together 2 cups all-purpose flour, 1 teaspoon baking powder, ½ teaspoon baking soda, ½ teaspoon kosher salt, 1 teaspoon pumpkin pie spice, and 1 teaspoon ground cinnamon.
  4. Form Dough: Fold the dry ingredients into the wet mixture until just combined. Cover the dough with plastic wrap and chill in the refrigerator for 30 minutes.
  5. Preheat Oven & Prepare Sheets: Preheat your oven to 350°F (175°C). Line two baking sheets with parchment paper.
  6. Shape Cookies: Use a cookie scoop to form balls of dough, about 1 to 2 inches in diameter. Roll in pumpkin pie sugar and place on prepared sheets.
  7. Bake: Bake the cookies for 10-14 minutes, until slightly set at the edges and soft in the center.
  8. Cool: Let the cookies cool on the sheets for about 5 minutes, then transfer to a wire rack to cool completely.

Nutrition

Serving: 1cookieCalories: 120kcalCarbohydrates: 15gProtein: 1gFat: 6gSaturated Fat: 4gPolyunsaturated Fat: 0.5gMonounsaturated Fat: 3gCholesterol: 20mgSodium: 50mgPotassium: 60mgFiber: 0.5gSugar: 8gVitamin A: 1500IUVitamin C: 1mgCalcium: 20mgIron: 0.5mg

Notes

Chill the dough for optimum texture and flavor. Enjoy with coffee or tea!

Tried this recipe?

Let us know how it was!

Amish Harvest Casserole: Cozy One-Pot Comfort Food Magic

There’s something truly enchanting about the first chill of autumn air that beckons us back to our kitchens, where hearty meals simmer in the background. Enter the Amish Harvest Casserole, a delightful one-pot comfort food that embodies warmth and home. This recipe combines ground beef, colorful veggies, and a luscious mushroom soup, topped with gooey sharp cheddar cheese, making it the centerpiece for cozy family dinners. With just a few minutes of prep and a slow cooker doing the heavy lifting, this dish not only nourishes the body but comforts the soul—a perfect solution for busy evenings when you crave a hearty meal without the fuss. Ready to gather your loved ones around a table filled with smiles and deliciousness? Let’s dive into making this Amish Harvest Casserole that promises to be a new favorite!

Why is Amish Harvest Casserole special?

Hearty and Satisfying: This casserole is all about comfort, featuring a perfect blend of ground beef and tender vegetables that creates a filling meal your family will adore.
One-Pot Wonder: Loading everything into a slow cooker means minimal cleanup—just one pot to wash after your delicious dinner!
Crowd-Pleaser: With its rich layers of flavor and gooey cheese, this dish is bound to impress family and friends alike.
Easy Prep Time: You can set it up in just a few minutes, leaving you free to focus on other evening activities.
Versatile Ingredients: Feel free to experiment by adding your favorite vegetables or substituting proteins, like ground turkey in place of beef for a lighter option. For more delicious one-pot recipes, check out this Tater Tot Casserole or the comforting French Toast Casserole.

Amish Harvest Casserole Ingredients

For the Beef Base

  • Ground Beef – Provides richness and serves as the primary protein source. Substitution: Use ground turkey for a leaner version.
  • Onion – Adds depth of flavor when sautéed. Substitution: Shallots can be used for a milder taste.

For the Vegetables

  • Carrots – Offer sweetness and color to the dish. Substitution: Peas can be added for a different texture.
  • Potatoes – Contribute heartiness and absorb flavors. Substitution: Frozen diced potatoes can be used for convenience.
  • Corn – Adds sweetness and crunch. Substitution: Substitute with frozen corn or other mixed vegetables.
  • Green Beans – Provide a fresh element. Substitution: Any chopped green veggie (like zucchini) can work.

For the Sauce & Topping

  • Mushroom Soup – Brings creaminess and ties ingredients together. Substitution: Choose a cream of chicken soup for a different taste.
  • Sharp Cheddar Cheese – Creates a delicious, gooey topping. Substitution: Gruyère or mozzarella can also be used for a different flavor profile.

Step‑by‑Step Instructions for Amish Harvest Casserole

Step 1: Brown the Beef
In a large skillet over medium-high heat, add ground beef and chopped onions. Cook for about 5-7 minutes, breaking the meat apart with a spatula, until the beef is browned and the onions are translucent. Drain any excess fat before transferring the mixture to your slow cooker. This rich mixture sets the flavor for your Amish Harvest Casserole.

Step 2: Layer Ingredients
Begin layering the casserole in the slow cooker by adding the browned beef and onions at the bottom. Next, add sliced carrots and diced potatoes evenly over the beef, followed by corn and green beans. Each layer should be spread out without mixing, ensuring that the flavors meld beautifully as the casserole cooks.

Step 3: Mix Sauce
In a separate bowl, combine the mushroom soup with half a cup of water, stirring until smooth. Pour this creamy sauce over the layered ingredients in the slow cooker, ensuring everything is well covered. This sauce will bind all the flavors together as your Amish Harvest Casserole cooks, creating a deliciously comforting dish.

Step 4: Cook
Cover the slow cooker with the lid and set it to low heat. Allow the casserole to simmer for 6-8 hours, checking occasionally. As it cooks, the aroma will fill your kitchen, signaling a cozy meal is on the way. The vegetables should be tender and the flavors fully developed by the time cooking is complete.

Step 5: Add Cheese
About 15 minutes before serving, sprinkle a generous layer of sharp cheddar cheese on top of the casserole. Re-cover the slow cooker and let it melt into a bubbly, gooey topping. This final touch enhances the dish, making your Amish Harvest Casserole even more delightful and comforting.

Make Ahead Options

These Amish Harvest Casserole ingredients are perfect for meal prep enthusiasts! You can brown the ground beef and sauté the onions up to 24 hours in advance, then refrigerate them in an airtight container. To save even more time, layer the beef, onions, carrots, potatoes, corn, and green beans in the slow cooker and refrigerate overnight, covered. Just remember, to maintain quality, avoid adding the sauce and cheese until you are ready to start cooking. When you’re set to enjoy your casserole, simply mix the mushroom soup with water, pour it over the ingredients, and cook on low for 6-8 hours. This way, you’ll have a comforting meal ready with minimal effort!

How to Store and Freeze Amish Harvest Casserole

Fridge: Store leftover Amish Harvest Casserole in an airtight container for up to 3 days. Make sure to cool it completely before sealing to preserve freshness.

Freezer: If you want to keep it for longer, the casserole can be frozen in a freezer-safe container for up to 3 months. Thaw in the refrigerator overnight before reheating.

Reheating: To reheat, warm the casserole in the microwave or oven until heated through. You might want to add a splash of milk or water to keep it creamy and moist when reheating.

Serving: Always allow cooled portions to reach room temperature before reheating, ensuring even warming and tasty results each time.

Expert Tips for Amish Harvest Casserole

  • Brown the Beef Well: Ensure you brown the ground beef thoroughly to develop rich flavors for your Amish Harvest Casserole, avoiding any bland taste.

  • Layer Carefully: Layer the ingredients without mixing them in the slow cooker. This prevents the vegetables from becoming mushy and allows for better flavor melding.

  • Cheese Matters: Don’t skimp on the cheddar cheese! Its gooey texture is essential; skip it, and you’ll miss that comforting finish to your dish.

  • Adjust Vegetables: If using frozen vegetables, be mindful of cooking times as they may finish more quickly. Adjust to preserve texture and flavor.

  • Prep Ahead: For an even quicker meal on a busy evening, prep everything the night before. Just pop it in the slow cooker in the morning, and enjoy your Amish Harvest Casserole later!

What to Serve with Amish Harvest Casserole?

Nothing compliments the warmth and heartiness of a slow-cooked dish quite like the perfect sides that elevate your cozy meal experience.

  • Crusty Bread: This delightful addition offers a crunchy texture that pairs beautifully with the creamy casserole, perfect for mopping up every last bite.

  • Simple Green Salad: A fresh mix of greens with a light vinaigrette adds a refreshing contrast, balancing the rich flavors of the Amish Harvest Casserole.

  • Steamed Broccoli: Tender and vibrant, steamed broccoli provides a wonderful pop of color and a nutritious crunch that harmonizes well with the hearty dish.

  • Garlic Breadsticks: Soft, garlicky breadsticks invite you to indulge further, making them an irresistible companion to soak up the deliciousness of your casserole.

  • Savory Roasted Vegetables: Roasted carrots, bell peppers, and zucchini bring out the sweetness in the veggies, enhancing the overall flavor profile of your meal.

  • Apple Crisp: For dessert, the warmth of cinnamon-sugar apples with a crunchy topping offers a sweet finish that rounds off a comforting dinner beautifully.

  • Hot Cocoa or Sweet Tea: Pair your comforting meal with a warm beverage, like hot cocoa for a sweet touch or iced tea for a refreshing sip, enhancing the overall experience.

Creating the perfect meal around your Amish Harvest Casserole is all about mixing flavors and textures, ensuring everyone at your table enjoys an unforgettable dining experience.

Amish Harvest Casserole Variations & Substitutions

Let your creativity shine with these delightful twists on the classic Amish Harvest Casserole, enhancing flavors and textures effortlessly!

  • Vegetarian Delight: Replace ground beef with lentils or chickpeas for a hearty, plant-based option. This swap not only supports your veggie cravings but also adds a lovely earthy flavor reminiscent of home-cooked goodness.

  • Cheese Swap: Try Monterey Jack cheese for a milder flavor, or mix in a bit of pepper jack for a zesty kick! The creaminess will still deliver that comforting finish, making it just as indulgent.

  • Veggie Boost: Add diced bell peppers for a pop of color and sweetness, or mix in spinach for a burst of freshness. Each additional vegetable is another layer of joy you can savor in every bite!

  • Dairy-Free: Use coconut milk and a dairy-free cream sauce to keep the creamy texture without the dairy. This option is perfect for lactose-intolerant friends while keeping the dish luscious and satisfying.

  • Heat It Up: Incorporate diced jalapeños for a spicy touch that elevates the casserole. This twist introduces a delightful warmth that dances on your palate, making every serving feel extraordinary.

  • Flavorful Stock: Instead of water, use beef or vegetable broth while mixing the sauce to amplify the flavor. This simple adjustment will create a richer, more savory experience, bringing your taste buds to life.

  • Other Toppings: Swap sharp cheddar with Gruyère or mozzarella for a different cheese experience. Each cheese presents a unique flavor profile that can transform your casserole into something intriguing and delicious.

  • Ingredient Play: Experiment with other vegetables like sweet potatoes or zucchini, which add sweetness and moisture. Don’t be afraid to explore combinations that resonate with your family’s taste preferences. If you’re intrigued by more one-pot wonders, check out this comforting French Toast Casserole or the crowd-pleasing Tater Tot Casserole, both of which offer heartwarming variations to inspire your cooking!

Amish Harvest Casserole Recipe FAQs

How do I select ripe vegetables for my Amish Harvest Casserole?
Absolutely! Look for vibrant, firm vegetables. Carrots should be bright orange with smooth skin, potatoes should be free from dark spots, and green beans should be crisp and without wilting. Fresh onions should feel heavy and firm, and corn should be bright yellow without any dark blemishes.

What’s the best way to store leftover Amish Harvest Casserole?
Very! Store your leftover casserole in an airtight container in the fridge for up to 3 days. Be sure to let it cool completely before sealing it up to maintain its freshness. Keeping it chilled prevents spoilage and keeps those delicious flavors intact.

Can I freeze Amish Harvest Casserole? If so, how?
Absolutely! To freeze, first, let the casserole cool completely, then transfer it to a freezer-safe container or wrap it tightly in plastic wrap. It can be safely frozen for up to 3 months. When you’re ready to enjoy it, thaw it overnight in the refrigerator, and reheat it in the oven or microwave until heated through.

What if my casserole is too watery after cooking?
No worries! If your Amish Harvest Casserole comes out watery, you can thicken it by letting it simmer uncovered on low heat for an additional 15–30 minutes. Alternatively, mix a tablespoon of cornstarch with an equal amount of cold water and stir it into the hot casserole. This will help thicken it while enhancing the flavors.

Is there a vegetarian option for this recipe?
The more the merrier! For a vegetarian version of the Amish Harvest Casserole, simply replace the ground beef with lentils or chickpeas. You can also increase the variety of vegetables, ensuring you still have a hearty meal packed with flavors and textures.

Can I use frozen vegetables instead of fresh ones?
Definitely! Frozen vegetables can be a great alternative, especially for convenience. Just keep in mind that they may cook faster than fresh ones, so you might want to reduce the cooking time by about 1–2 hours for the best texture in your Amish Harvest Casserole.

Amish Harvest Casserole

Amish Harvest Casserole: Cozy One-Pot Comfort Food Magic

Amish Harvest Casserole is a delightful one-pot comfort food that combines ground beef, colorful veggies, and mushroom soup, perfect for cozy family dinners.
Prep Time 15 minutes
Cook Time 8 hours
Total Time 8 hours 15 minutes
Servings: 6 servings
Course: Casserole
Cuisine: American
Calories: 450

Ingredients
  

For the Beef Base
  • 1 lb Ground Beef Substitution: Use ground turkey for a leaner version.
  • 1 medium Onion Substitution: Shallots can be used for a milder taste.
For the Vegetables
  • 2 medium Carrots Substitution: Peas can be added for a different texture.
  • 2 cups Potatoes Substitution: Frozen diced potatoes can be used for convenience.
  • 1 cup Corn Substitution: Substitute with frozen corn or other mixed vegetables.
  • 1 cup Green Beans Substitution: Any chopped green veggie (like zucchini) can work.
For the Sauce & Topping
  • 1 can Mushroom Soup Substitution: Choose a cream of chicken soup for a different taste.
  • 2 cups Sharp Cheddar Cheese Substitution: Gruyère or mozzarella can also be used for a different flavor profile.

Equipment

  • Slow Cooker
  • Large skillet
  • Mixing Bowl

Method
 

Step-by-Step Instructions for Amish Harvest Casserole
  1. In a large skillet over medium-high heat, add ground beef and chopped onions. Cook for about 5-7 minutes, breaking the meat apart with a spatula until browned and onions are translucent. Drain excess fat before transferring to the slow cooker.
  2. Begin layering the casserole in the slow cooker with the browned beef and onions at the bottom. Add sliced carrots and diced potatoes evenly over the beef, followed by corn and green beans.
  3. In a separate bowl, combine mushroom soup with half a cup of water, stirring until smooth. Pour this cream sauce over layered ingredients in the slow cooker, ensuring everything is covered.
  4. Cover the slow cooker with the lid and set to low heat. Allow to simmer for 6-8 hours, checking occasionally.
  5. About 15 minutes before serving, sprinkle a generous layer of sharp cheddar cheese on top. Re-cover and let melt into a bubbly topping.

Nutrition

Serving: 1servingCalories: 450kcalCarbohydrates: 30gProtein: 25gFat: 25gSaturated Fat: 12gPolyunsaturated Fat: 2gMonounsaturated Fat: 8gTrans Fat: 1gCholesterol: 80mgSodium: 800mgPotassium: 800mgFiber: 4gSugar: 5gVitamin A: 200IUVitamin C: 15mgCalcium: 200mgIron: 3mg

Notes

For an even quicker meal, prep everything the night before and pop it in the slow cooker in the morning.

Tried this recipe?

Let us know how it was!

Cozy Apple Cider Cookies with Sweet Cinnamon Sugar Bliss

As the leaves turn golden and the air grows crisp, I find myself longing for the comforting essence of fall—the scent of warm spices wafting through the kitchen, inviting friends and family to gather. That’s the magic behind these delightful Apple Cider Cookies, a cozy dessert that perfectly captures the season’s charm. With an enticing blend of apple cider reduction and brown butter, they offer a soft, chewy texture that stands as a true indulgence. Coated in spiced cinnamon sugar and drizzled with a tangy apple cider glaze, these cookies are not only a joy to make but also a wonderful way to elevate any gathering. Plus, they can easily be prepared ahead of time, making them a stress-free addition to your autumn festivities. Ready to fill your home with an aroma that feels like a warm embrace? Let’s bake!

Why are Apple Cider Cookies a Must-Try?

Nostalgic Flavor: These cookies encapsulate the warmth of autumn with every bite, boasting the rich essence of apple cider and brown butter.
Effortless Baking: With simple ingredients and straightforward steps, even beginner bakers can create these delicious treats.
Versatile Treat: Perfect for cozy evenings or festive gatherings, they pair wonderfully with hot beverages, cheese boards, or simply as a delightful snack.
Make-Ahead Convenience: Prepare the dough a day in advance for easy baking, allowing you more time to enjoy the season with loved ones.
Irresistible Texture: Soft, chewy centers with a crisp cinnamon sugar coating make these cookies a crowd favorite.
Ready to explore more seasonal delights? Check out my Apple Crisp Cinnamon Roll Casserole for another cozy recipe!

Apple Cider Cookies Ingredients

• Capture the fall flavors with these must-have ingredients!

For the Cookie Dough

  • Apple Cider – Enhances moisture and flavor; ensure it’s high-quality without preservatives for the best taste.
  • Brown Butter – Adds a rich, nutty aroma; cool it before mixing to achieve the perfect dough consistency.
  • All-Purpose Flour – Provides essential structure; you can substitute with gluten-free blends if needed.
  • Baking Powder/Soda – These leavening agents help achieve that delightful rise.
  • Cornstarch – Contributes to a uniquely chewy texture in each cookie.
  • Apple Pie Spice – Brings depth of flavor to your cookies; feel free to swap it with ground cinnamon or another warm spice blend.
  • Light Brown Sugar – Sweetens the dough while adding a rich, moist texture; a mix with granulated sugar creates complexity.
  • Granulated Sugar – Balances sweetness and promotes browning in the cookies.
  • Egg & Egg Yolk – Provides moisture and richness for a soft, tender bite.
  • Vanilla Extract – Elevates overall flavor; opt for pure extract for the best results.

For the Cinnamon Sugar Coating

  • Cinnamon – Infuses warmth and spice into the sugar mix; makes every bite irresistible.
  • Granulated Sugar – Combines with cinnamon to create that signature crust.

For the Apple Cider Glaze

  • Powdered Sugar – Sweetens and adds a glossy finish; mix with apple cider for the right consistency.
  • Apple Cider – Use in the glaze for a tangy twist that complements the cookie’s flavors.

Baking these Apple Cider Cookies will fill your kitchen with the delightful scents of autumn—prepare to indulge!

Step‑by‑Step Instructions for Apple Cider Cookies

Step 1: Reduce Apple Cider
Pour high-quality apple cider into a saucepan and bring it to a gentle simmer over medium heat. Let it simmer for about 15-20 minutes, stirring occasionally, until it reduces to about ¼ cup. You’ll know it’s ready when the cider becomes syrupy and fragrant. Once done, remove it from heat and allow it to cool completely.

Step 2: Brown Butter
In a small skillet, melt unsalted butter over low heat, stirring frequently, until it turns golden brown and develops a nutty aroma, which should take about 5-7 minutes. Watch closely to avoid burning. Once browned, remove from heat and let the butter cool slightly while you prepare the dry ingredients for the Apple Cider Cookies.

Step 3: Mix Dry Ingredients
In a medium bowl, whisk together all-purpose flour, baking powder, baking soda, cornstarch, apple pie spice, and a pinch of salt. This blend of dry ingredients will provide the structure and flavor your Apple Cider Cookies need. Mix until evenly combined, ensuring there are no lumps that could affect the texture of your cookies.

Step 4: Combine Wet Ingredients
In a large mixing bowl, whisk the cooled brown butter with light brown and granulated sugars until the mixture is smooth and creamy. Then, add in one egg, an extra egg yolk, the cooled reduced cider, and vanilla extract. Mix until well combined, creating a rich and flavorful base for your cookie dough.

Step 5: Make the Dough
Gradually incorporate the dry ingredient mixture into the wet ingredients using a spatula. Mix until just combined; be careful not to overmix, as this can lead to tough cookies. The dough will be soft and slightly sticky, perfect for your luscious Apple Cider Cookies.

Step 6: Chill the Dough
Cover the mixing bowl with plastic wrap or a clean kitchen towel and let the dough rest in the refrigerator for 30 minutes. This step not only firms the dough but also enhances the flavors in your cookies. Meanwhile, preheat the oven to 375°F (190°C) to ensure it’s hot and ready when you are.

Step 7: Bake
After chilling, use a cookie scoop or tablespoon to drop dough balls onto a lined baking sheet, spacing them about 2 inches apart. Bake in the preheated oven for 9-11 minutes or until the edges are set and the centers look slightly underbaked. They will firm up as they cool, creating those delightful soft and chewy Apple Cider Cookies.

Step 8: Prepare Glaze and Coating
While the cookies are baking, prepare the glaze by whisking together melted butter and apple cider in a small bowl until smooth. In another shallow dish, combine granulated sugar and cinnamon to create a sweet coating for your cookies. This will add a delightful sweetness to complement the warm spices of the cookies.

Step 9: Glaze and Coat
Once the cookies have cooled for a few minutes on the baking sheet, brush the warm cookies with the apple cider glaze. Immediately dip the tops into the cinnamon-sugar mixture, ensuring an even coating. Finally, let the cookies cool completely on a wire rack, allowing the glaze to set for a beautifully finished Apple Cider Cookie.

Make Ahead Options

These Apple Cider Cookies are perfect for meal prep enthusiasts! You can prepare the cookie dough up to 24 hours in advance and refrigerate it, allowing the flavors to deepen harmoniously. Simply follow the steps to make the dough, then wrap it tightly in plastic wrap. If you want to prep even further in advance, you can freeze the dough for up to 3 months; just scoop the dough into balls, freeze on a baking sheet, and transfer to a zip-top bag once solid. When you’re ready to bake, simply add a couple of extra minutes to the baking time to ensure they cook properly. Trust me, you’ll still enjoy the same delicious results!

How to Store and Freeze Apple Cider Cookies

Room Temperature: Keep your Apple Cider Cookies in an airtight container layered with parchment paper for up to 5 days to maintain freshness and avoid stickiness.

Fridge: If you prefer, store them in the fridge for a longer shelf life—up to 1 week. Just remember to bring them back to room temperature before enjoying to restore their delightful chewiness.

Freezer: Uncoated cookies can be frozen for 2-3 months. Place them in an airtight container or freezer bag, separating layers with parchment paper to prevent sticking, ensuring they stay just as heavenly when thawed.

Reheating: For a warm, fresh experience, gently reheat cookies in a preheated oven at 300°F (150°C) for about 5-7 minutes. Avoid microwaving, as it can affect their beautiful texture.

What to Serve with Apple Cider Cookies

As the cozy aroma of freshly baked cookies wafts through your home, take a moment to think about the perfect accompaniments for these delightful treats.

  • Chai Tea: The spicy warmth of chai tea complements the cinnamon and apple flavors, creating a comforting pairing for chilly afternoons.

  • Hot Apple Cider: For an extra indulgent experience, sip on spiced hot apple cider that echoes the cookie’s flavors, making each bite feel like a warm hug.

  • Cheese Board: A selection of creamy cheeses like brie or a sharp cheddar contrasts beautifully with the sweetness of the cookies, adding a savory balance to your snack time.

  • Vanilla Ice Cream: Serve warm cookies atop a scoop of vanilla ice cream for a delicious contrast of temperature, creamy texture, and rich flavor.

  • Pumpkin Spice Latte: Celebrate the season with a pumpkin spice latte, whose warm spices blend seamlessly with the cozy notes of the cookies.

  • Dried Fruit: A mix of dried apples and cranberries adds a chewy texture and enhances the autumnal theme, offering a quick and healthy snack alongside your cookies.

  • Caramel Sauce: Drizzling a bit of warm caramel sauce on top takes indulgence to the next level, allowing you to savor each cookie as a decadent dessert.

Tips for the Best Apple Cider Cookies

  • Cool the Butter: Always let browned butter cool slightly before mixing to avoid cooking the eggs in the batter.

  • Avoid Overmixing: Stir the dough only until combined; overmixing can lead to tough cookies instead of the soft, chewy texture you want.

  • Chill for Flavor: Chilling the dough enhances the flavors and helps the cookies hold shape during baking, leading to better results.

  • Quality Cider Matters: Choose high-quality apple cider free of preservatives for richer taste; this makes a significant difference in your Apple Cider Cookies.

  • Don’t Microwave to Reheat: For maintaining texture, refresh cookies in the oven instead of the microwave; this keeps them soft and inviting.

Apple Cider Cookies: Variations & Substitutions

Embrace your creativity and give these cookies a personalized twist that tantalizes your taste buds!

  • Pumpkin Spice: Substitute apple pie spice with pumpkin spice for a seasonal twist that brings fall vibes to life. The comforting warmth of pumpkin adds a delightful alternative that’s simply irresistible.

  • Gluten-Free Flour: Use a gluten-free flour blend to make these cookies suitable for gluten-sensitive friends. Just ensure the blend includes xanthan gum to maintain that perfect chewy texture.

  • Chopped Nuts: Add walnuts or pecans to the dough for a crunchy texture that complements the soft centers. Toasting the nuts beforehand will enhance their flavor and add an extra layer of deliciousness!

  • Dried Cranberries: For a pop of color and an unexpected tartness, mix in some dried cranberries or raisins. This not only adds chewiness but also a burst of flavor that pairs beautifully with apple.

  • Cinnamon Chip Boost: Fold in cinnamon chips for an extra sweet and spicy flavor. They will melt slightly during baking, creating pockets of cinnamon goodness that are hard to resist.

  • Maple Drizzle: Swap the apple cider glaze for a maple syrup glaze for a richer sweetness. Drizzle it over the warm cookies to bring a new dimension to their flavor that feels like a cozy hug.

  • Spicy Variation: For a touch of heat, add a dash of cayenne pepper to the dough. This unexpected hint will surprise your taste buds and leave a delightful warmth with each bite.

  • Caramel Drizzle: Top with a homemade or store-bought caramel drizzle to add an indulgent finish. The sweet richness of caramel provides a fantastic contrast with the spiced cookies.

Excited for more autumn flavors? Don’t miss out on my delectable Blueberry Breakfast Cookies for a delightful twist on breakfast treats, or spoil yourself with an easy recipe for Apple Crisp Cinnamon that will surely become a family favorite!

Apple Cider Cookies Recipe FAQs

What type of apple cider should I use for these cookies?
Absolutely! It’s best to use high-quality, preservative-free apple cider for a richer flavor. Look for cider that is freshly pressed, as this will enhance the cookie’s taste and essence of autumn. The better the cider, the more flavorful your Apple Cider Cookies will be!

How should I store my Apple Cider Cookies?
Store your Apple Cider Cookies in an airtight container layered with parchment paper at room temperature for up to 5 days. If you prefer, you can also refrigerate them for up to a week; just be sure to let them come back to room temperature before enjoying, as this helps maintain their delightful chewiness.

Can I freeze Apple Cider Cookies, and if so, how?
Very! Uncoated cookies can be frozen for up to 2-3 months. To freeze, first, let the cookies cool completely. Then, place them in an airtight container or freezer bag, separating layers with parchment paper to prevent sticking. When ready to enjoy, simply thaw at room temperature or reheat gently in the oven for a freshly baked treat.

What should I do if my cookie dough is too sticky?
If your dough is too sticky, it may need a little time in the refrigerator. Chill the dough for 20-30 minutes to help solidify the fats and make it easier to handle. Additionally, you can lightly flour your hands or the workspace when shaping the cookies, which should help reduce stickiness while maintaining the desired chewy texture.

Are these cookies suitable for those with gluten sensitivity?
The more the merrier! You can easily make gluten-free Apple Cider Cookies by using a gluten-free all-purpose flour blend instead of regular flour. This substitution works well and still provides the soft and chewy texture we all love. Just ensure you select a blend that includes binding agents to maintain the dough’s consistency.

Can I make the dough ahead of time, and how does it affect the cookies?
Absolutely! You can prepare the dough a day in advance and refrigerate it for enhanced flavor. Cover the mixing bowl tightly with plastic wrap to prevent it from drying out, then bake the cookies fresh when you’re ready. This resting time allows the flavors to meld beautifully, resulting in even more delicious Apple Cider Cookies!

Apple Cider Cookies

Cozy Apple Cider Cookies with Sweet Cinnamon Sugar Bliss

Delight in soft, chewy Apple Cider Cookies coated in cinnamon sugar, capturing the essence of fall in every bite.
Prep Time 30 minutes
Cook Time 11 minutes
Chilling Time 30 minutes
Total Time 1 hour 11 minutes
Servings: 24 cookies
Course: Dessert
Cuisine: American
Calories: 120

Ingredients
  

For the Cookie Dough
  • 1 cup Apple Cider High-quality without preservatives
  • 1/2 cup Brown Butter Cool before mixing
  • 2 1/4 cups All-Purpose Flour Can substitute with gluten-free blends
  • 1 tsp Baking Powder
  • 1 tsp Baking Soda
  • 1/4 cup Cornstarch
  • 2 tsps Apple Pie Spice Can substitute with cinnamon
  • 1/2 cup Light Brown Sugar A mix with granulated sugar is ideal
  • 1/2 cup Granulated Sugar
  • 1 each Egg
  • 1 each Egg Yolk
  • 1 tsp Vanilla Extract Use pure extract for best results
For the Cinnamon Sugar Coating
  • 1 tbsp Cinnamon
  • 1/4 cup Granulated Sugar
For the Apple Cider Glaze
  • 1 cup Powdered Sugar
  • 2 tbsp Apple Cider

Equipment

  • Saucepan
  • Skillet
  • Mixing Bowl
  • whisk
  • spatula
  • Baking Sheet
  • Cookie Scoop

Method
 

Directions
  1. Pour apple cider into a saucepan and bring to a gentle simmer for 15-20 minutes until reduced to ¼ cup.
  2. Melt unsalted butter in a skillet over low heat until golden brown and nutty, about 5-7 minutes.
  3. Whisk together flour, baking powder, baking soda, cornstarch, apple pie spice, and pinch of salt in a bowl.
  4. In a mixing bowl, whisk brown butter with sugars, then add egg, yolk, reduced cider, and vanilla extract.
  5. Gradually mix dry ingredients into wet ingredients until just combined; the dough will be soft and slightly sticky.
  6. Chill the dough in the refrigerator for 30 minutes; preheat the oven to 375°F (190°C).
  7. Drop dough balls onto a lined baking sheet, spacing 2 inches apart; bake for 9-11 minutes until edges set.
  8. Prepare the glaze by whisking together melted butter and apple cider; mix sugar with cinnamon for coating.
  9. Brush warm cookies with glaze, then dip tops into cinnamon-sugar mixture; cool on a wire rack.

Nutrition

Serving: 1cookieCalories: 120kcalCarbohydrates: 16gProtein: 1gFat: 6gSaturated Fat: 4gMonounsaturated Fat: 2gCholesterol: 20mgSodium: 80mgPotassium: 30mgSugar: 8gVitamin A: 300IUCalcium: 10mgIron: 0.5mg

Notes

Cool browned butter before mixing and avoid overmixing to prevent tough cookies. Chill dough for better flavor and structure.

Tried this recipe?

Let us know how it was!

Soft Strawberry Cheesecake Cookies That Melt in Your Mouth

As I stirred the mixture of cream cheese and sugar, a waft of whispery sweetness filled my kitchen, instantly transporting me to a sunlit bakery on a warm summer day. That’s when it hit me: these Soft and Chewy Strawberry Cheesecake Cookies are not just cookies; they’re a nostalgia-fueled treat that combines the joy of fresh strawberries with the creamy goodness of cheesecake. What sets them apart? Their easy prep means they can delight any crowd with minimal fuss, and their melt-in-your-mouth texture will have you reaching for seconds (or thirds). If you’re ready to impress your family or simply treat yourself, let’s dive into the delightful world of these cookies. Are you curious about how a cookie can capture the essence of a beloved dessert?

How do these cookies stand out?

Irresistible Flavor: These cookies pack a punch of strawberry goodness, marrying the fruity essence with a creamy cheesecake-like filling that will have you reminiscing about summer.

Easy Preparation: You’re just a few steps away from a delicious treat. Even novice bakers can whip these up effortlessly!

Melt-in-Your-Mouth Texture: Expect a delightful contrast of soft and chewy exteriors with a luscious center, reminiscent of the best strawberry cheesecake you’ve ever tasted.

Versatile Treat: Feel free to switch things up! Try adding blueberries or raspberries, or even mix in some crushed graham crackers for a cheesecake crust vibe.

Perfect for Any Occasion: Whether it’s a family gathering or a cozy night in, these cookies are sure to impress. Pair them with coffee or tea for a sweet afternoon pick-me-up!

Elevate your cookie game with these strawberry cheesecake cookies, and if you’re in the mood for something different, you might also enjoy Strawberry Cheesecake Dump or Blueberry Breakfast Cookies to satisfy your sweet tooth.

Strawberry Cheesecake Cookie Ingredients

For the Cookie Dough

  • Unsalted Butter – must be very softened for easy mixing and a rich flavor.
  • Granulated Sugar – provides sweetness; feel free to use coconut sugar for a caramel twist.
  • Egg – at room temperature helps bind the dough and adds moisture.
  • Vanilla Extract – introduces aromatic sweetness; always opt for pure extract if possible.
  • All-Purpose Flour – forms the structure; spoon and level it to avoid excess.
  • Baking Powder & Baking Soda – essential for helping cookies rise; make sure they’re fresh!
  • Salt – enhances overall flavors; it’s the secret weapon of deliciousness.

For the Cream Cheese Filling

  • Cream Cheese – use full-fat for a delectably creamy filling that mimics cheesecake.
  • Granulated Sugar – sweetens the creamy center, bringing that classic cheesecake flavor.

For the Strawberry Layer

  • Fresh Strawberries – these create the beautiful fruity flavor essential in strawberry cheesecake cookies; ripeness boosts sweetness.
  • Sugar – used in the strawberry jam; it balances the flavors and thickens the mixture.

For Rolling

  • Sugar for Rolling – adds a delightful crunch and extra sweetness to the outer layer of your cookies.

These Strawberry Cheesecake Cookies are not just a treat; they’re a love letter to summer flavors and soft textures. Enjoy every delicious bite!

Step‑by‑Step Instructions for Strawberry Cheesecake Cookies

Step 1: Prepare Cheesecake Filling
Begin by mixing the softened cream cheese, granulated sugar, and vanilla extract in a medium bowl. Use an electric mixer on medium speed until the mixture is smooth and fluffy, about 2-3 minutes. Once ready, scoop the creamy filling into 18 equal portions using a cookie scoop, then place them on a parchment-lined tray. Freeze the portions for at least 1 hour or until solid.

Step 2: Make Strawberry Jam
Next, take your fresh strawberries and dice them into small pieces. In a medium saucepan, combine the diced strawberries and sugar over medium heat. Cook the mixture while stirring occasionally for about 45 minutes, or until it thickens and forms a jam-like consistency. Once done, remove it from heat and let it cool completely before using it in your cookies.

Step 3: Prepare Cookie Dough
Preheat your oven to 350°F (175°C) and line your baking sheets with parchment paper. In a large mixing bowl, whisk together the all-purpose flour, baking powder, baking soda, and salt until well combined. In a separate bowl, cream the softened unsalted butter and granulated sugar using an electric mixer until light and fluffy, which should take around 3-4 minutes. Add the room-temperature egg and vanilla extract, mixing until smooth and pale in color.

Step 4: Incorporate Dry Ingredients
Gradually add the dry ingredient mixture to the wet ingredients, mixing on low speed until just combined. Avoid overmixing, as this can lead to dense cookies. The dough should be soft but hold its shape well. Cover the bowl with plastic wrap and let it rest at room temperature for about 15 minutes, allowing flavors to meld and the butter to firm slightly.

Step 5: Layer Strawberry Jam
Once your cookie dough is rested, take a portion of dough (approximately 1.5 tablespoons) and flatten it in your palm. Place about a teaspoon of the cooled strawberry jam in the center. Carefully layer another piece of dough on top, then fold and pinch the edges together to encase the jam, making sure it is completely covered. Gently flatten the filled cookie dough slightly.

Step 6: Assemble Cookies
Roll each dough ball in sugar to create a sweet, crunchy outer layer before transferring them to the prepared baking sheet, spacing them about 2 inches apart. Repeat this process until all the dough and jam has been used. For an extra touch, you can slightly flatten each ball to ensure even baking.

Step 7: Bake Cookies
Bake the assembled Strawberry Cheesecake Cookies in the preheated oven for 11-12 minutes, or until the edges are lightly golden. The centers may look slightly underbaked, but they will continue to set as they cool. Remove the baking sheets from the oven and allow the cookies to cool on the sheets for about 5 minutes before transferring them to a wire rack to cool completely.

How to Store and Freeze Strawberry Cheesecake Cookies

  • Room Temperature: Store cookies in an airtight container at room temperature for up to 3 days to maintain their soft texture.

  • Fridge: Refrigerate cookies in a covered container for up to 5 days if you prefer a chilled treat, but expect some texture change.

  • Freezer: For longer storage, freeze the cookies individually wrapped and placed in a freezer-safe bag for up to 2 weeks.

  • Reheating: Reheat frozen cookies in the microwave for about 15-20 seconds or in the oven at 350°F (175°C) for 5 minutes for a fresh-out-of-the-oven taste.

What to Serve with Strawberry Cheesecake Cookies

These delightful treats can shine on their own, yet pairing them with complementary flavors can create a truly magical dining experience.

  • Creamy Vanilla Ice Cream: This classic pairing adds a rich and creamy contrast to the fruity cookies.

  • Fresh Berries Medley: A simple side of strawberries, blueberries, and raspberries enhances the fresh flavors found within the cookies.

  • Whipped Cream Topping: A dollop of freshly whipped cream provides an airy lightness that perfectly balances the cookie’s density.

  • Coffee or Espresso: The richness of coffee complements the sweetness of the cookies and makes for a perfect afternoon pick-me-up.

  • Herbal Tea: A soothing cup of chamomile or mint tea offers a refreshing contrast and can mellow the sweet notes nicely.

  • Chocolate Dipping Sauce: Drizzling warm chocolate adds a decadent layer of indulgence, inviting every bite to be savored slowly.

These serving ideas will elevate your moment with Strawberry Cheesecake Cookies, creating a shared experience that invites everyone to indulge in the joy of delicious flavors and comforting textures.

Strawberry Cheesecake Cookies Variations

Feel free to explore these delightful twists and substitutions that can customize your cookies to fit your taste and pantry!

  • Berry Swap: Substitute strawberries with raspberries or blueberries for a fruity twist that adds vibrant color and flavor. Each berry brings its unique sweetness, making every batch a new experience.

  • Graham Cracker Crust: Incorporate crushed graham crackers into the cookie dough for a delightful crunch reminiscent of classic cheesecake crust. It’ll add an extra layer of texture and flavor that makes every bite divine.

  • Citrus Zest: Mix in some lemon zest for a refreshing citrus kick that perfectly complements the sweetness of strawberries. The zest elevates flavor and adds a wonderful aromatic quality that brings joy with each cookie.

  • Gluten-Free: Use gluten-free flour instead of all-purpose flour without compromising texture or flavor. These cookies will still turn out soft and chewy; your gluten-sensitive friends will thank you!

  • Nutty Delight: Add chopped pecans or walnuts for a crunchy contrast. The nuts deepen the flavor profile and bring a wholesome complexity that enriches your experience.

  • Chocolate Drizzle: Top the finished cookies with a chocolate drizzle for a rich, indulgent finish. Chocolate and strawberries are a classic combination that never goes out of style—pure bliss!

  • Spicy Kick: Incorporate a pinch of cinnamon or nutmeg into the dough for a warm and spicy flavor profile. The spices add warmth and depth, making these cookies perfect for cozy gatherings.

As you venture into the world of flavors, don’t forget to enjoy the journey! If you ever want to switch things up, try these variations of a classic treat like the Carrot Cake Cheesecake to keep your sweet tooth satisfied.

Expert Tips for Strawberry Cheesecake Cookies

  • Frozen Filling: Ensure your cheesecake balls are fully frozen before encasing them in dough; this prevents leakage during baking.

  • Jam Consistency: Prepare a homemade thick strawberry jam for the most flavor; overly thin jam can lead to a soggy filling.

  • Proper Flour Measuring: Avoid dense cookies by accurately measuring your flour—spoon and level it rather than scooping directly from the bag.

  • Cool Down: Let your cookies cool completely after baking for the best texture; warm cookies can be too soft and lose their shape.

  • Sugar Roll: Don’t skip rolling the cookie dough in sugar before baking; it adds a delightful crunch and extra sweetness to your Strawberry Cheesecake Cookies!

Make Ahead Options

These Strawberry Cheesecake Cookies are perfect for busy home cooks looking to save time! You can prepare the cheesecake filling and freeze it up to 24 hours in advance—just scoop it into portions and store them in the freezer to ensure they’re solid before using. Additionally, the strawberry jam can be made up to 3 days ahead; simply refrigerate it in an airtight container. When you’re ready to bake, whip up the cookie dough and assemble the cookies with the chilled filling and jam. This allows you to enjoy all the delightful flavors of freshly baked cookies with minimal fuss, making your baking experience just as delicious and rewarding!

Strawberry Cheesecake Cookies Recipe FAQs

What kind of strawberries should I use for the cookies?
Absolutely use fresh, ripe strawberries for these cookies! They not only contribute to the sweet flavor but also add a lovely texture. If you spot any dark spots or mushiness, it’s best to choose others that are plump and bright red.

How should I store my Strawberry Cheesecake Cookies?
To keep your cookies fresh, simply store them in an airtight container at room temperature for up to 3 days. If you prefer them chilled, you can refrigerate them for up to 5 days, though this may change their texture slightly.

Can I freeze these cookies? If so, how?
Absolutely! For perfect fresh-tasting cookies later, freeze them after they’ve cooled completely. Wrap each cookie individually in plastic wrap, then place them in a freezer-safe bag. They’ll last up to 2 weeks. To enjoy, just reheat in the microwave for 15-20 seconds or pop them in the oven at 350°F (175°C) for about 5 minutes.

What if my cookies turn out too dense?
A common culprit for dense cookies is overmixing the dough or inaccurately measuring flour. Make sure to spoon and level the flour instead of scooping it directly from the bag. Also, remember, when mixing, you’re aiming for a soft dough, so mix until just combined!

Are there any allergies I should be aware of with this recipe?
Yes, these Strawberry Cheesecake Cookies contain dairy (cream cheese and butter) and gluten (all-purpose flour). If you have dietary restrictions, feel free to substitute with gluten-free flour and dairy-free cream cheese to accommodate your needs.

How can I make these cookies ahead of time?
You can prepare the cookie dough up to a day in advance! Just wrap it in plastic wrap and store it in the fridge. When you’re ready to bake, allow it to come to room temperature for about 15 minutes before proceeding with the rest of the steps. This helps the cookies maintain their lovely texture.

Strawberry Cheesecake Cookies

Soft Strawberry Cheesecake Cookies That Melt in Your Mouth

These Soft Strawberry Cheesecake Cookies combine nostalgic flavors of fresh strawberries and creamy cheesecake in a delightful treat.
Prep Time 30 minutes
Cook Time 12 minutes
Freezing Time 1 hour
Total Time 1 hour 42 minutes
Servings: 18 cookies
Course: Dessert
Cuisine: American
Calories: 150

Ingredients
  

For the Cookie Dough
  • 1 cup Unsalted Butter must be very softened
  • 1 cup Granulated Sugar or coconut sugar for a caramel twist
  • 1 large Egg at room temperature
  • 1 teaspoon Vanilla Extract preferably pure extract
  • 2 cups All-Purpose Flour spoon and level to avoid excess
  • 1 teaspoon Baking Powder ensure freshness
  • 1 teaspoon Baking Soda ensure freshness
  • 1/2 teaspoon Salt enhances flavors
For the Cream Cheese Filling
  • 8 ounces Cream Cheese full-fat for creaminess
  • 1/4 cup Granulated Sugar for sweetness
For the Strawberry Layer
  • 2 cups Fresh Strawberries diced
  • 1 cup Sugar for jam
For Rolling
  • 1/4 cup Sugar for Rolling adds crunch and sweetness

Equipment

  • medium bowl
  • large mixing bowl
  • Electric mixer
  • Cookie Scoop
  • Saucepan
  • Parchment Paper
  • Baking Sheets

Method
 

Step-by-Step Instructions
  1. Mix softened cream cheese, granulated sugar, and vanilla in a medium bowl until smooth and fluffy. Scoop into 18 portions and freeze for at least 1 hour.
  2. Dice fresh strawberries and combine with sugar in a saucepan. Cook over medium heat, stirring regularly for about 45 minutes until thickened, then cool.
  3. Preheat oven to 350°F (175°C) and line baking sheets with parchment paper. Whisk flour, baking powder, baking soda, and salt in a bowl. Cream butter and sugar in another bowl until light and fluffy, then add egg and vanilla; mix until smooth.
  4. Gradually blend dry ingredients into wet ingredients on low speed until just combined. Let the dough rest at room temperature for about 15 minutes.
  5. Flatten a portion of dough in your palm, add a teaspoon of cooled strawberry jam in the center, encase with dough and gently flatten.
  6. Roll dough balls in sugar and place on the baking sheet, spacing them about 2 inches apart. Flatten slightly for even baking.
  7. Bake for 11-12 minutes until edges are golden. Cool on sheet for 5 minutes before transferring to a wire rack.

Nutrition

Serving: 1cookieCalories: 150kcalCarbohydrates: 20gProtein: 2gFat: 7gSaturated Fat: 4gMonounsaturated Fat: 3gCholesterol: 20mgSodium: 100mgPotassium: 50mgFiber: 1gSugar: 10gVitamin A: 200IUVitamin C: 5mgCalcium: 30mgIron: 0.5mg

Notes

Ensure cheesecake filling is fully frozen before encasing in dough to prevent leakage during baking. Measure flour accurately for best texture. Let cookies cool completely after baking for ideal taste and shape.

Tried this recipe?

Let us know how it was!

Ultimate Lasagna Soup Recipe for Cozy Family Nights

As I ladled the last of my cozy lasagna soup into bowls, a wave of nostalgia washed over me, reminding me of family dinners around the table. This Lasagna Soup Recipe captures all the flavors we adore in traditional lasagna, but with the warmth and heartiness of a comforting broth. It’s perfect for busy weeknights, allowing you to whip up a satisfying meal in no time. Not only does it boast tender pasta and rich, seasoned beef, but the melty three-cheese topping elevates it into a delightful experience everyone will love. Plus, it’s super adaptable—feel free to swap in your favorite noodles or ground meat for a personalized touch! What’s your favorite twist on classic comfort food?

Why is Lasagna Soup So Irresistible?

Comforting Warmth: This lasagna soup wraps you in its cozy embrace, combining rich flavors with tender pasta that feels like a hug in a bowl.
Versatile Ingredients: Customize it with your choice of ground meat or pasta shapes—ground turkey or rib-sticking rigatoni work wonders!
Family Favorites: Perfect for busy weeknights, this dish brings everyone together at the table, reminiscent of traditional family dinners.
Easy Prep: With straightforward instructions, it’s a hassle-free way to create a gourmet meal without fuss.
Crowd-Pleasing Appeal: Topped with a melty three-cheese blend, it’s a guaranteed hit that will have your loved ones begging for seconds! Pair it with a side of Cheeseburger Soup for a delightful dinner duo!

Lasagna Soup Ingredients

For the Soup Base

  • Olive Oil – Provides fat for sautéing the meat and vegetables; can be replaced with any preferred cooking oil.
  • Ground Beef – Main protein source; substitute with ground turkey or Italian sausage for a lighter option.
  • Large Onion – Adds sweetness and depth to the soup’s base; shallots can be used if desired.
  • Garlic – Fresh minced garlic enhances flavor; avoid garlic powder for a richer taste.
  • Diced Tomatoes – Provides acidity and texture; use canned without draining for the best results.
  • Tomato Sauce – Contributes to the soup’s richness; swap for tomato puree if you prefer.
  • Tomato Paste – Deepens the tomato flavor; about half of a 6-ounce can works well.
  • Chicken Broth – Base liquid for the soup; opt for vegetable broth for a vegetarian version.
  • Water – Adjusts soup consistency; add as needed to achieve the desired thickness.
  • Italian Seasoning – Brings herb flavor; a mix of dried basil and oregano can be substituted.
  • Sea Salt – Enhances flavor; adjust according to personal taste.
  • Black Pepper – Adds a little spice; feel free to adjust to your preference.

For the Pasta

  • Bowtie Pasta – Provides structure and heartiness; consider using penne or macaroni as alternative shapes.

For the Cheese Topping

  • Ricotta Cheese – Creamy topping that mimics lasagna layers; cottage cheese can substitute or omit if desired.
  • Mozzarella Cheese – Melts perfectly into the soup; shredded is recommended for even melting.
  • Parmesan Cheese – Adds a delicious umami flavor; fresh grated is preferred for the best taste.

For Garnish

  • Fresh Parsley – Provides color and freshness, making your lasagna soup even more appetizing.

This Lasagna Soup Recipe is sure to become a cherished part of your family’s dinner rotation!

Step‑by‑Step Instructions for Lasagna Soup Recipe

Step 1: Sauté the Base
In a 4.5-quart soup pot, heat 2 tablespoons of olive oil over medium-high heat until it shimmers. Add 1 pound of ground beef, 1 diced large onion, and 3 minced garlic cloves. Sauté for about 8-10 minutes until the beef is browned and onions are translucent, stirring occasionally. You’ll know it’s ready when the beef is no longer pink and the onions are soft.

Step 2: Add the Tomatoes and Broth
Stir in a can of diced tomatoes (with juice), 1 cup of tomato sauce, and 3 tablespoons of tomato paste to your pot. Pour in 4 cups of chicken broth and sprinkle in 2 teaspoons of Italian seasoning, 1 teaspoon of sea salt, and ½ teaspoon of black pepper. Mix well to combine everything, letting the fragrant aromas mingle for a minute.

Step 3: Incorporate the Pasta
Add 2 cups of bowtie pasta directly to the simmering soup mixture. Increase the heat to bring it to a rolling boil, then reduce to a gentle simmer. Cover the pot partially and allow it to cook for 10-15 minutes, or until the pasta is tender and has absorbed some of the delicious flavors. Stir occasionally to prevent sticking.

Step 4: Adjust Consistency
Check the soup’s consistency and flavor, adding water or broth as needed to reach your desired thickness. If the soup seems too thick, gradually stir in ½ to 1 cup of water or additional broth. Let it simmer for a few more minutes while ensuring the flavors meld beautifully together.

Step 5: Prepare the Cheese Topping
While the soup finishes simmering, gather your cheese topping ingredients. In a small bowl, mix 1 cup of ricotta cheese with 1 cup of shredded mozzarella. Set this aside to allow the flavors to combine. You can also have freshly grated Parmesan cheese ready for garnish as well.

Step 6: Serve with a Flourish
Ladle the warm lasagna soup into bowls, and top generously with the ricotta and mozzarella mixture. Finish with a sprinkle of fresh parsley for a pop of color and vibrant flavor. Serve extra Parmesan on the side to let everyone customize their cheesy delight as they enjoy this comforting lasagna soup.

Lasagna Soup Recipe Variations

Feel free to get creative with this lasagna soup recipe and make it your own with these tasty variations!

  • Ground Turkey: Swap out ground beef for ground turkey for a leaner option that’s equally delicious. The mild flavor takes on the soup’s zest beautifully.

  • Italian Sausage: For a flavor boost, use spicy or sweet Italian sausage instead of ground beef. The herbs and spices in the sausage will ignite your taste buds!

  • Pasta Shapes: Experiment with hearty pasta shapes like ziti, penne, or even rotini—these shapes hold onto the broth and flavors like a warm hug.

  • Vegetarian Delight: Replace the meat with a medley of hearty vegetables like zucchini, mushrooms, and bell peppers. This veggie version is just as comforting and nourishing.

  • Cheese Swaps: Try cottage cheese for a lighter twist in place of ricotta, or use a vegan cheese alternative if you’re looking for dairy-free options.

  • Heat it Up: Add a pinch of red pepper flakes or diced jalapeños for a spicier kick. Let the flavors simmer together for a warming bowl of goodness!

  • Broth Variety: For a deeper flavor, consider using beef broth instead of chicken broth. Better yet, homemade broth will have guests asking for your secret!

  • Tomato Style: If you prefer a smoother texture, substitute diced tomatoes with crushed tomatoes or even a jar of marinara for a thicker soup base. The possibilities are endless!

Trust me, this lasagna soup can adapt to whatever cravings you have! If you’re looking for further inspiration, don’t forget to check out my delightful Cheeseburger Soup or a cozy bowl of Shepherds Pie Soup. Enjoy your adventure in customizing this family favorite!

Make Ahead Options

These cozy lasagna soup recipes are perfect for meal prep enthusiasts! You can prep the soup base—everything from the sautéed beef and vegetables to the seasoned broth—up to 3 days in advance (just store it in an airtight container in the refrigerator). The pasta can be cooked and added right before serving to avoid overcooking. If you want to assemble the entire dish beforehand, prepare it up to 24 hours prior and refrigerate; simply reheat on the stove over low heat, adding a splash of water or broth if it thickens too much. For that fresh taste, mix in the cheese right before serving, ensuring it melts beautifully, and enjoy a hearty, comforting meal with minimal fuss!

How to Store and Freeze Lasagna Soup

Fridge: Store cooled lasagna soup in an airtight container for up to 5 days. Reheat on the stove or microwave, adding water or broth as needed to reach your desired consistency.

Freezer: For longer storage, freeze in a freezer-safe container for up to 90 days. Ensure to leave some space for expansion. Thaw overnight in the fridge before reheating.

Reheating: To reheat, pour the soup into a saucepan over medium heat. Stir occasionally, adding extra broth or water if the soup has thickened too much during storage.

Keep It Fresh: Always cool the soup completely before storing for optimal taste and texture. Enjoy this delicious lasagna soup recipe without worry!

Expert Tips for the Best Lasagna Soup

  • Pasta Choice: Use sturdy pasta like bowtie or rigatoni to prevent mushiness after storing. Avoid using traditional lasagna noodles.
  • Reheating Consistency: When reheating, always add extra broth or water to adjust the thickness and prevent the soup from becoming too dense.
  • Meat Variety: Experiment with ground turkey or Italian sausage for different flavor profiles; they pair wonderfully with the rich tomato base of the lasagna soup recipe.
  • Broth Quality: Opt for fresh or homemade chicken broth for an authentic taste, but vegetable broth works great for a vegetarian alternative.
  • Cheese Layers: For a creamier effect, mix the ricotta cheese into the soup as it’s served rather than just dolloping it on top; this creates a more indulgent experience.

What to Serve with Cozy Lasagna Soup

As you curl up with a bowl of warm lasagna soup, the notion of a complete meal is almost too delicious to resist!

  • Crunchy Garlic Bread: Perfect for dipping, this classic accompaniment enhances the soup’s flavors while adding a satisfying crunch. The buttery garlic aroma wafting from the oven is simply irresistible!
  • Fresh Kale Salad: A light, colorful salad with a tangy vinaigrette adds a refreshing contrast to the hearty soup. Toss in some nuts for extra crunch and nutrition.
  • Creamy Mashed Potatoes: Indulge in a generous scoop of creamy mashed potatoes on the side to soak up the comforting broth. The fluffy texture pairs beautifully with the savory soup!
  • Roasted Vegetables: A medley of seasonal roasted vegetables brings brightness and health to your meal. Their sweetness complements the rich tomato broth perfectly!
  • Homemade Focaccia: Soft and slightly crispy, focaccia adds a touch of elegance while being perfect for sopping up every last bit of lasagna soup. Consider adding herbs or cheese for extra flavor.
  • Chilled White Wine: A crisp Sauvignon Blanc or a light Pinot Grigio gives a refreshing balance to the meal, enhancing the rich and savory soup without overpowering it.
  • Tiramisu: End on a sweet note with a classic Italian dessert. The coffee and cocoa flavors create a delightful contrast after your hearty lasagna soup, wrapping up meal time perfectly.

Lasagna Soup Recipe FAQs

How do I choose the right tomatoes for my lasagna soup?
When selecting tomatoes for your lasagna soup, go for high-quality canned diced tomatoes without added sugars or preservatives for the best flavor. If you prefer a thicker broth, consider using crushed tomatoes instead, as they provide a heartier texture and richer flavor. Choosing organic options can also elevate the taste!

What is the best way to store leftovers of lasagna soup?
Absolutely! Once your lasagna soup has cooled completely, transfer it to an airtight container and refrigerate. It will keep for up to 5 days. If you know you won’t finish it in that time, freezing is a great option. Pour the cooled soup into a labeled freezer-safe container, leaving some space at the top for expansion, and it will last for up to 3 months!

Can I freeze lasagna soup, and how should I do it?
Yes, you can! To freeze your lasagna soup, first cool it completely. Then, pour the soup into a freezer-safe container or heavy-duty freezer bag. Be sure to leave a bit of space at the top for the soup to expand as it freezes. It’s best enjoyed within 3 months. When you’re ready to enjoy it, thaw it overnight in the fridge and gently reheat on the stove, adding water or broth as needed.

What should I do if my lasagna soup is too thick after storage?
If your soup has thickened during storage, don’t worry! Simply place it in a saucepan over medium heat and gradually stir in small amounts of water or broth until you reach your desired consistency. Heat it gently, stirring occasionally until it’s warmed through. This method will help maintain its lovely flavor and texture.

Are there any dietary considerations for this lasagna soup recipe?
Absolutely! This lasagna soup is easily adaptable for various dietary preferences. If you want to make it vegetarian, simply substitute the ground beef with lentils or extra vegetables and switch to vegetable broth. For those who are lactose intolerant, omitting or substituting the cheese with dairy-free alternatives can also work beautifully. Always check the labels for allergens like gluten, especially in pasta and broth.

Can I use different types of pasta in the lasagna soup?
Very much so! The beauty of this lasagna soup is its versatility. While bowtie pasta is a great choice, feel free to try other sturdy shapes such as penne or rotini. Just take note to adjust cooking times appropriately, as different pasta types may require more or less time to reach that perfect tenderness. Enjoy experimenting with what you have on hand!

Lasagna Soup Recipe

Ultimate Lasagna Soup Recipe for Cozy Family Nights

This Lasagna Soup Recipe combines the beloved flavors of classic lasagna with the warmth of a hearty broth, perfect for cozy family meals.
Prep Time 15 minutes
Cook Time 30 minutes
Total Time 45 minutes
Servings: 6 bowls
Course: Pasta
Cuisine: Italian
Calories: 430

Ingredients
  

For the Soup Base
  • 2 tablespoons Olive Oil can be replaced with any preferred cooking oil
  • 1 pound Ground Beef substitute with ground turkey or Italian sausage
  • 1 large Onion adds sweetness; shallots can be used if desired
  • 3 cloves Garlic fresh minced enhances flavor
  • 1 can Diced Tomatoes do not drain, for best results
  • 1 cup Tomato Sauce swap for tomato puree if preferred
  • 3 tablespoons Tomato Paste about half of a 6-ounce can
  • 4 cups Chicken Broth opt for vegetable broth for vegetarian version
  • as needed Water to adjust consistency
  • 2 teaspoons Italian Seasoning a mix of dried basil and oregano can be substituted
  • 1 teaspoon Sea Salt adjust according to taste
  • ½ teaspoon Black Pepper adjust to preference
For the Pasta
  • 2 cups Bowtie Pasta consider using penne or macaroni as alternatives
For the Cheese Topping
  • 1 cup Ricotta Cheese cottage cheese can substitute or omit if desired
  • 1 cup Mozzarella Cheese shredded is recommended for even melting
  • as needed Parmesan Cheese fresh grated is preferred
For Garnish
  • as needed Fresh Parsley for color and freshness

Equipment

  • 4.5 quart soup pot

Method
 

Step‑by‑Step Instructions
  1. In a 4.5-quart soup pot, heat 2 tablespoons of olive oil over medium-high heat until it shimmers. Add 1 pound of ground beef, 1 diced large onion, and 3 minced garlic cloves. Sauté for about 8-10 minutes until the beef is browned and onions are translucent, stirring occasionally.
  2. Stir in a can of diced tomatoes (with juice), 1 cup of tomato sauce, and 3 tablespoons of tomato paste to your pot. Pour in 4 cups of chicken broth and sprinkle in 2 teaspoons of Italian seasoning, 1 teaspoon of sea salt, and ½ teaspoon of black pepper. Mix well to combine everything.
  3. Add 2 cups of bowtie pasta directly to the soup mixture. Bring it to a rolling boil, then reduce to a gentle simmer. Cover the pot partially and allow it to cook for 10-15 minutes, or until the pasta is tender.
  4. Check the soup's consistency and flavor, adding water or broth as needed to reach your desired thickness.
  5. In a small bowl, mix 1 cup of ricotta cheese with 1 cup of shredded mozzarella. Set this aside to allow the flavors to combine.
  6. Ladle the warm lasagna soup into bowls, and top generously with the ricotta and mozzarella mixture. Finish with a sprinkle of fresh parsley.

Nutrition

Serving: 1bowlCalories: 430kcalCarbohydrates: 50gProtein: 30gFat: 15gSaturated Fat: 7gPolyunsaturated Fat: 1gMonounsaturated Fat: 6gCholesterol: 75mgSodium: 1200mgPotassium: 800mgFiber: 4gSugar: 6gVitamin A: 600IUVitamin C: 10mgCalcium: 300mgIron: 3mg

Notes

This Lasagna Soup Recipe is adaptable; feel free to swap your favorite noodles or ground meat for a personalized flavor.

Tried this recipe?

Let us know how it was!

Stay Connected

Get recipes via email: