Get my cookbooks

Creamy Tortellini w Spinach & Mushrooms for Cozy Nights

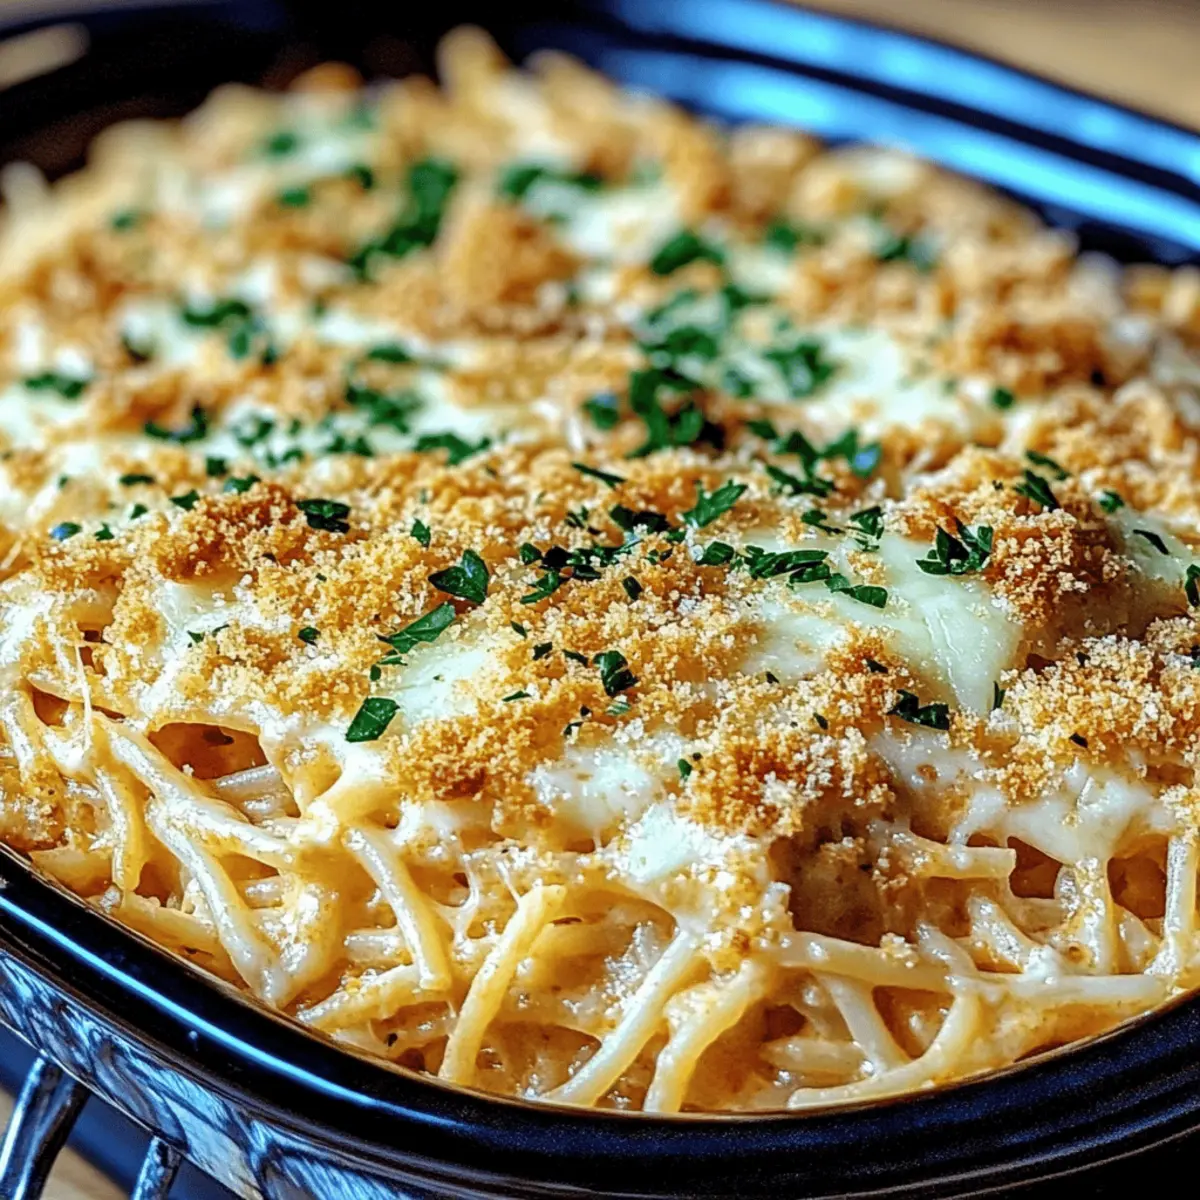
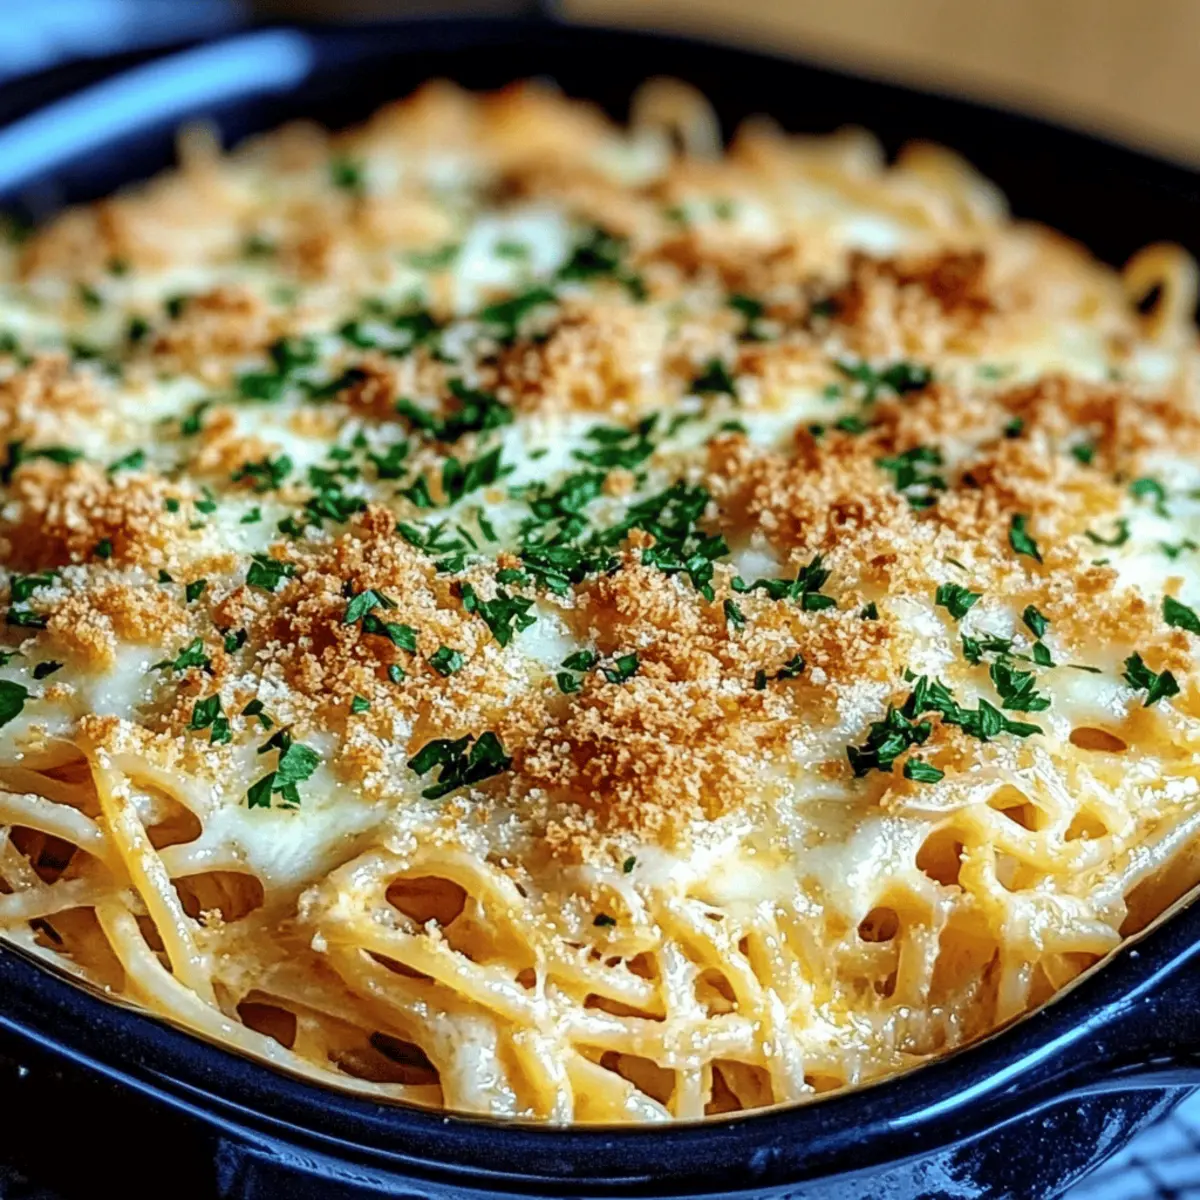
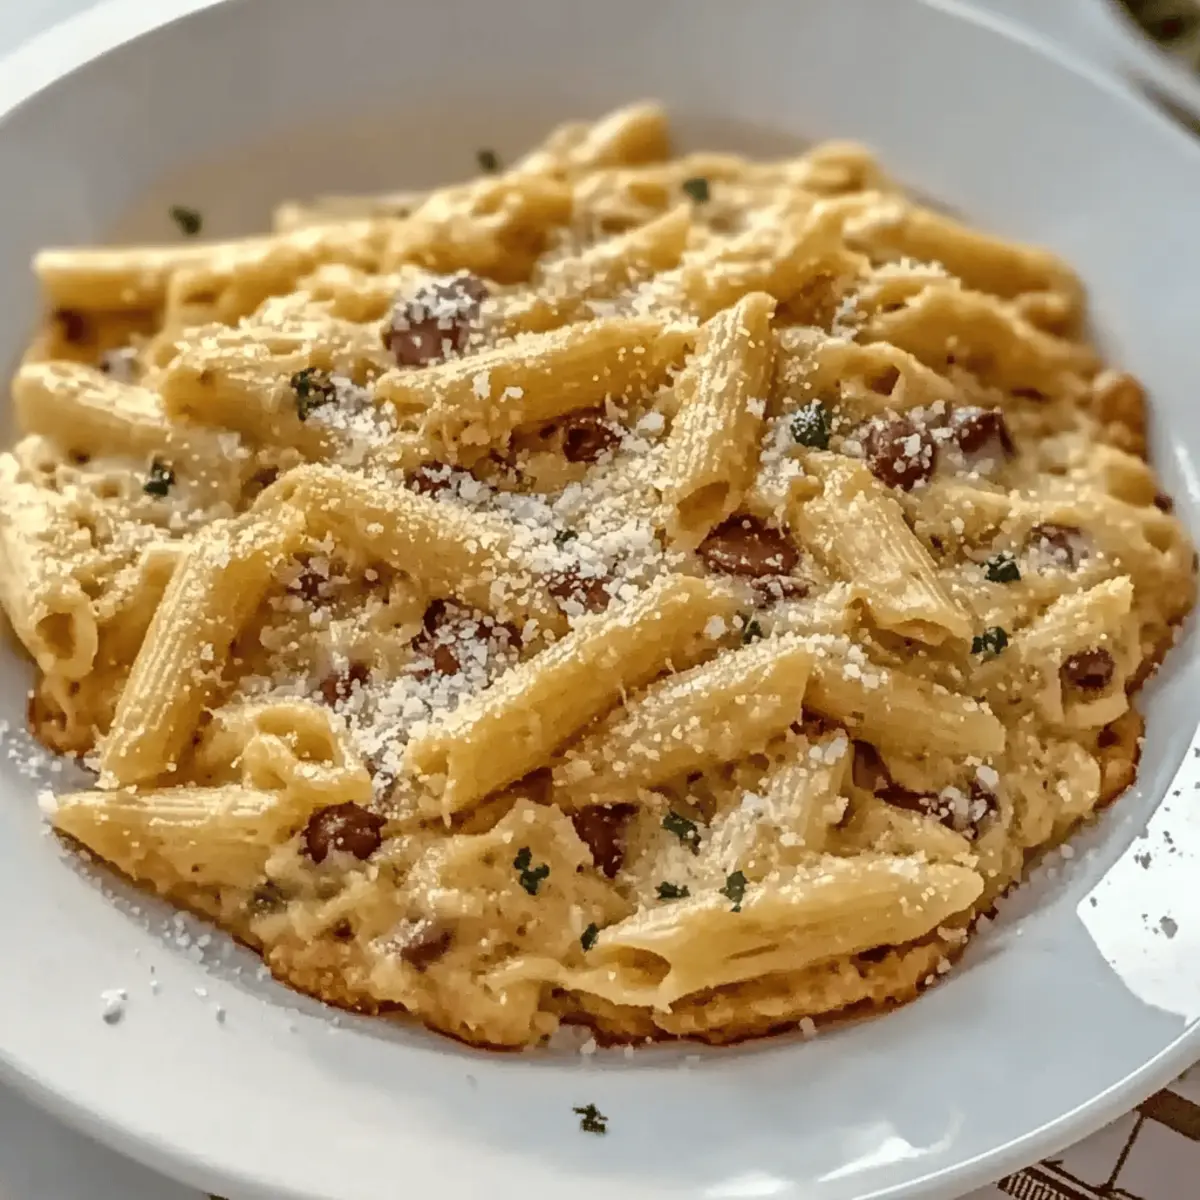
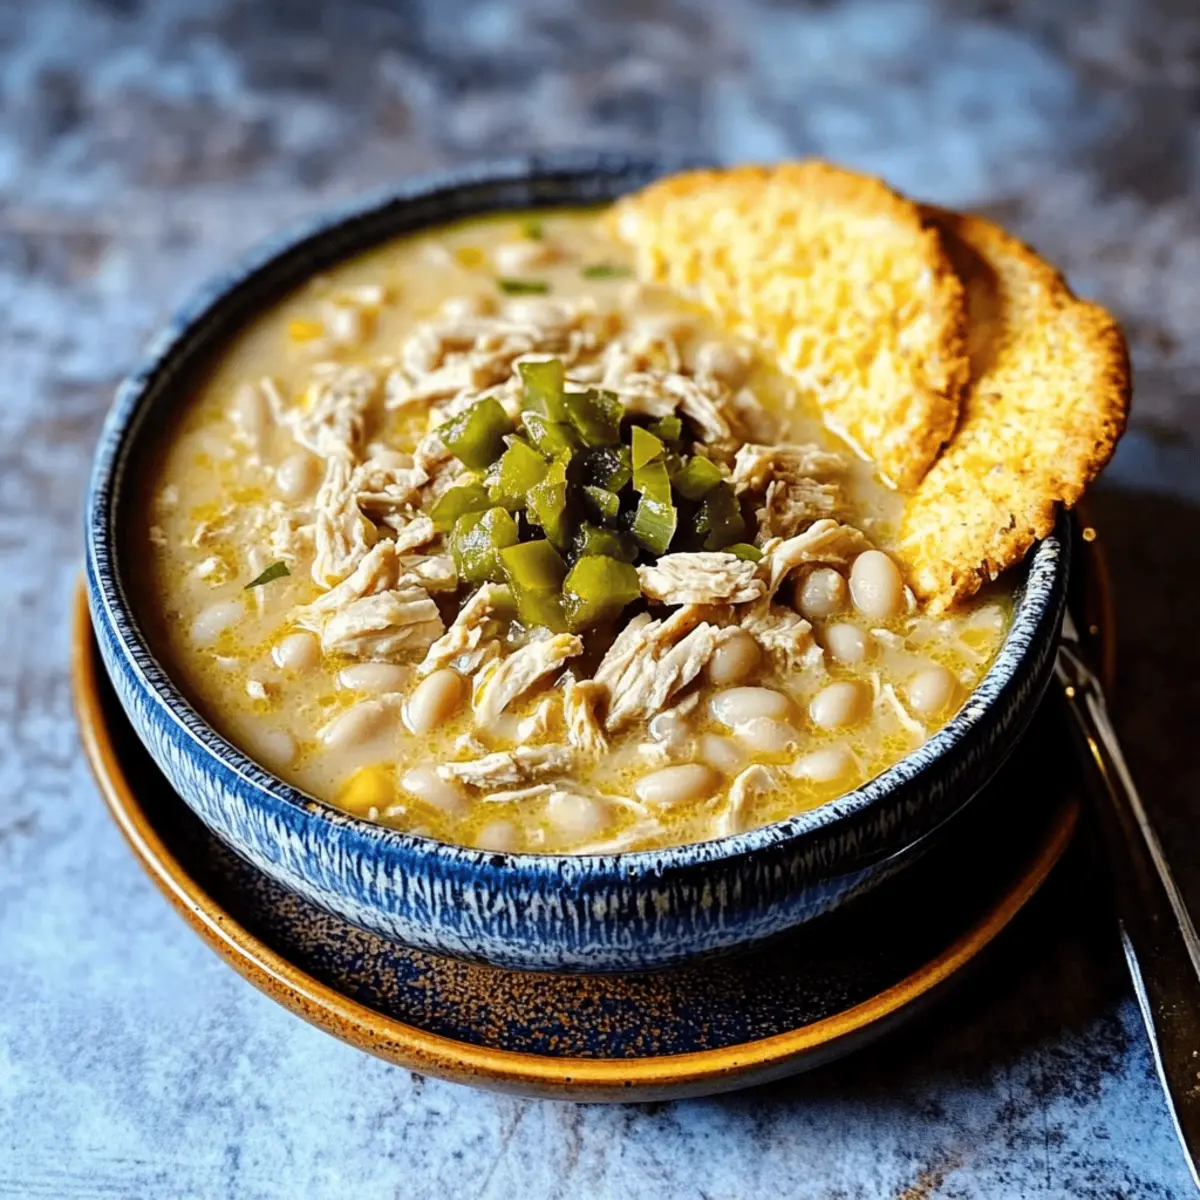
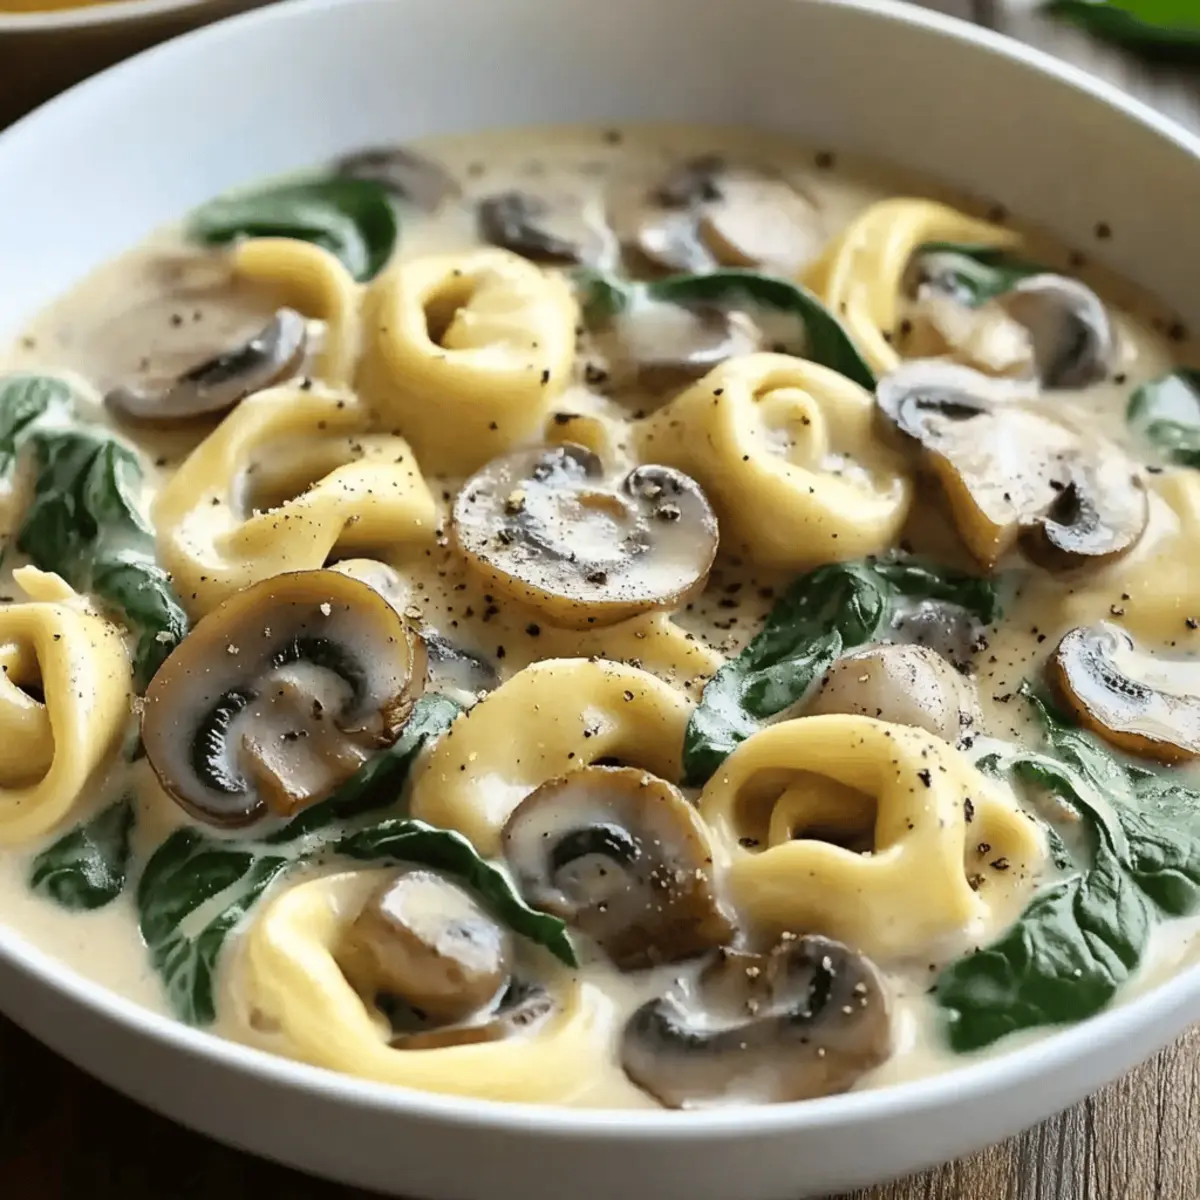
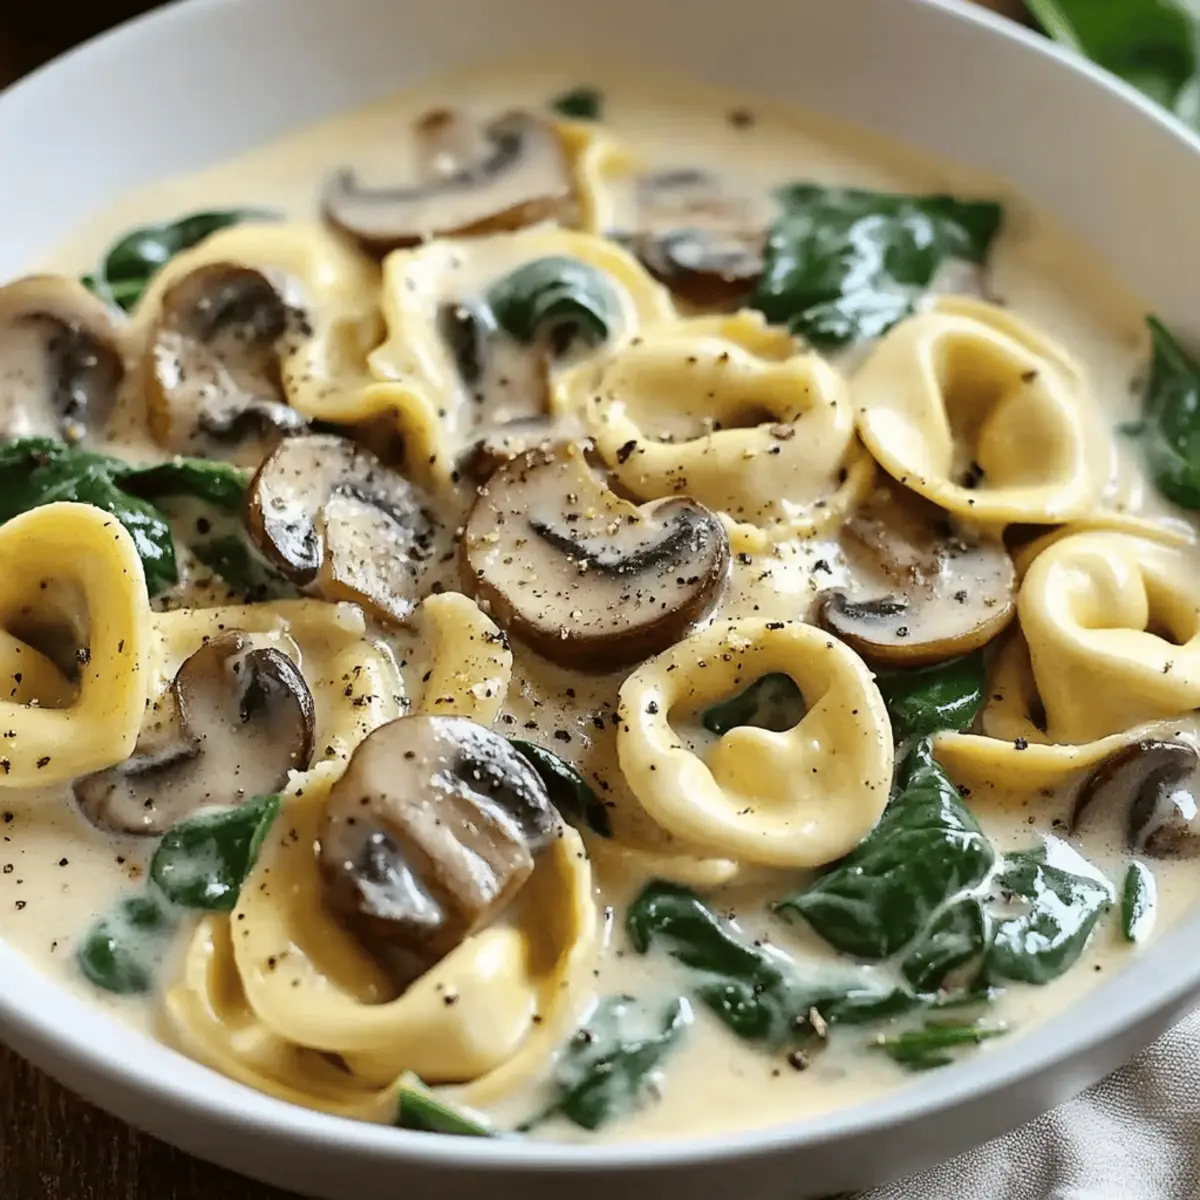
The aroma of sautéed mushrooms and garlic fills the kitchen, instantly transporting me to a cozy Italian trattoria. This Quick & Creamy Spinach and Mushroom Tortellini brings that same comforting vibe right to your dinner table in under 30 minutes. With plump, cheesy tortellini enveloped in a luscious creamy sauce, this dish is not only a treat for the taste buds but also a simple solution for busy weeknights. Packed with fresh spinach and earthy mushrooms, it strikes the perfect balance between indulgence and nutrition, making it ideal for both vegetarians and pasta enthusiasts alike. Plus, its versatility means you can easily adapt it for dairy-free or protein-rich diets. Ready to elevate your next meal with this delightful recipe? Let’s get started!

Why is this tortellini recipe a must-try?

Easy and Quick: In just 30 minutes, you can create a dish that feels like a 5-star restaurant experience. Perfect for those busy weeknights!

Rich, Creamy Sauce: The combination of heavy cream and sautéed garlic adds an irresistible richness that perfectly complements the tender cheese tortellini.

Versatile Options: This recipe is a true crowd-pleaser, easily adaptable for dairy-free or protein-rich variations. Try adding tofu for extra nutrition or swapping in your favorite veggies!

Hearty and Satisfying: Bursting with earthy mushrooms and vibrant spinach, you’ll relish every bite. It delivers comfort food without compromising on health.

Explore more delicious meals like our Sausage Tortellini Soup or the Cheesy Spinach Artichoke Chicken Bake for delightful dinner inspiration!

Tortellini w Spinach & Mushrooms Ingredients

  • For the Pasta
    Cheese Tortellini – the star of the dish; use fresh for a delightful taste or frozen for convenience.

  • For the Sauce
    Heavy Cream – provides a luxurious, creamy base; swap with coconut or cashew cream for a dairy-free version.
    Garlic Cloves – fresh garlic boosts flavor with aromatic notes; avoid jarred garlic for maximum taste.
    Grated Parmesan Cheese – enhances umami flavor and thickens the sauce; use nutritional yeast for a vegan option.
    Olive Oil – ideal for sautéing, adds depth; can be replaced with butter for added richness.

  • For the Vegetables
    Fresh Spinach – vibrant color and nutritional benefits; ensure it’s thoroughly washed and dried before adding to the dish.
    Fresh Mushrooms – offers earthy richness and texture; opt for cremini or shiitake varieties for optimal flavor.

  • Seasonings
    Salt and Pepper – essential for enhancing flavors; adjust to your personal taste.

This creamy tortellini w spinach & mushrooms recipe is designed to be indulgent yet adaptable, allowing you to tailor it to your dietary preferences while keeping that comforting vibe every family craves!

Step‑by‑Step Instructions for Creamy Tortellini w Spinach & Mushrooms

Step 1: Prepare Tortellini
Bring a large pot of salted water to a boil and cook the cheese tortellini according to package instructions, usually about 3-5 minutes for fresh or 7-10 minutes for frozen. Once cooked, drain the tortellini well and set aside, making sure to reserve a cup of the pasta water in case you need it later to adjust the sauce.

Step 2: Sauté Vegetables
In a large non-stick skillet, heat 2 tablespoons of olive oil over medium heat. Add 2 minced garlic cloves and 1 cup of sliced fresh mushrooms, sautéing for 3-4 minutes. Cook until the mushrooms are soft and golden, releasing their earthy aroma that will fill your kitchen and signal it’s time for the next layer of flavor.

Step 3: Make Sauce
Pour in 1 cup of heavy cream into the skillet with the sautéed mushrooms. Stir well, and bring the mixture to a gentle simmer for about 2 minutes, allowing the cream to thicken slightly. You’re looking for a beautifully silky texture that will coat the tortellini perfectly in the upcoming steps.

Step 4: Combine Ingredients
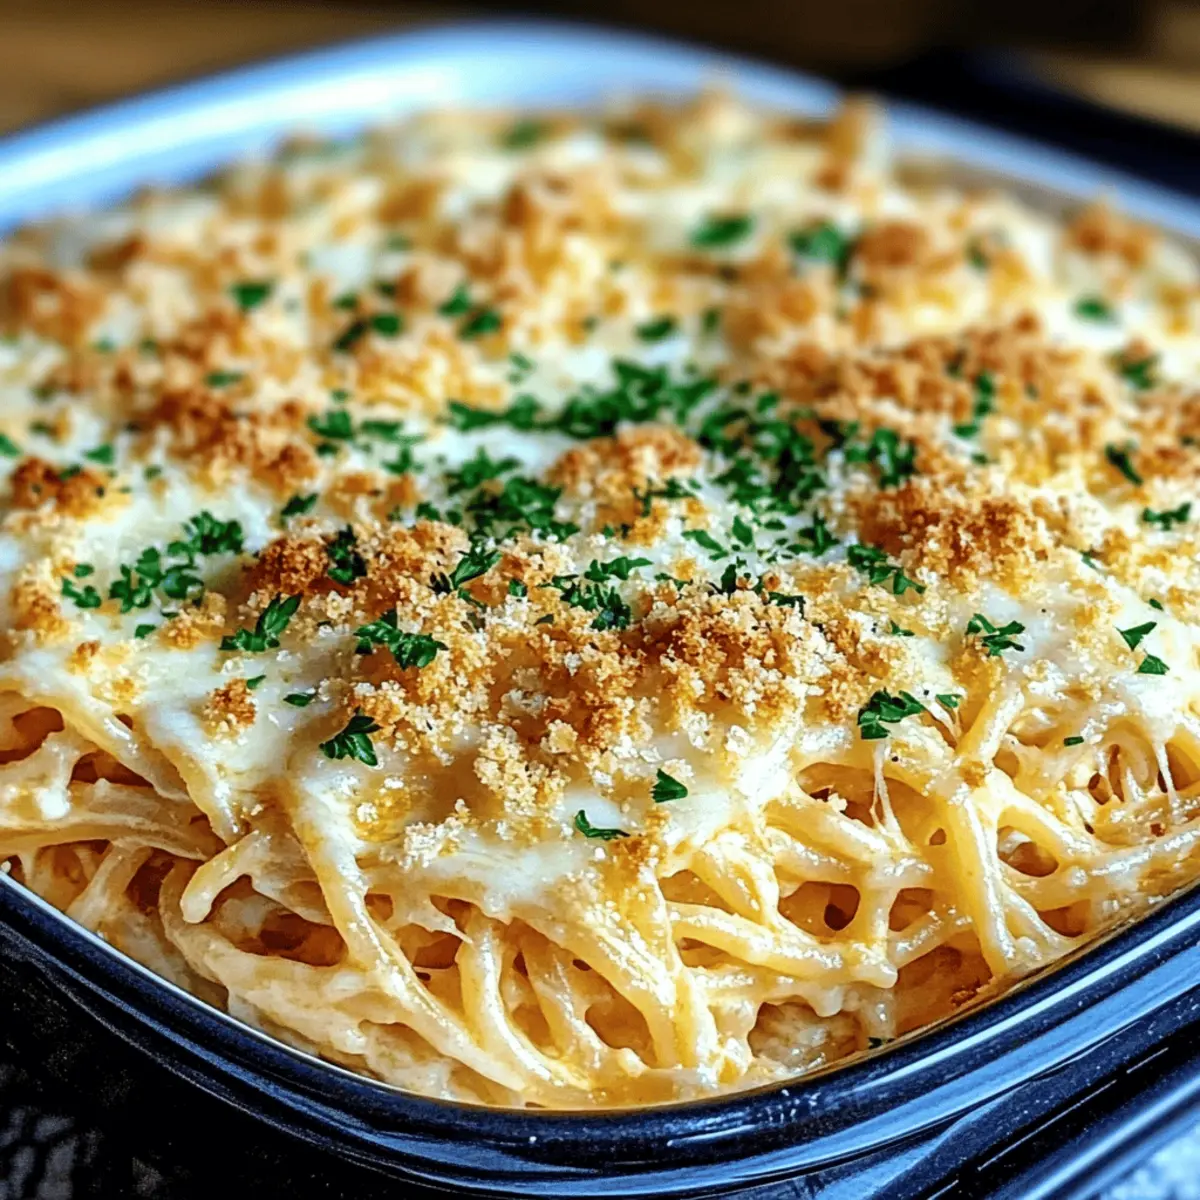
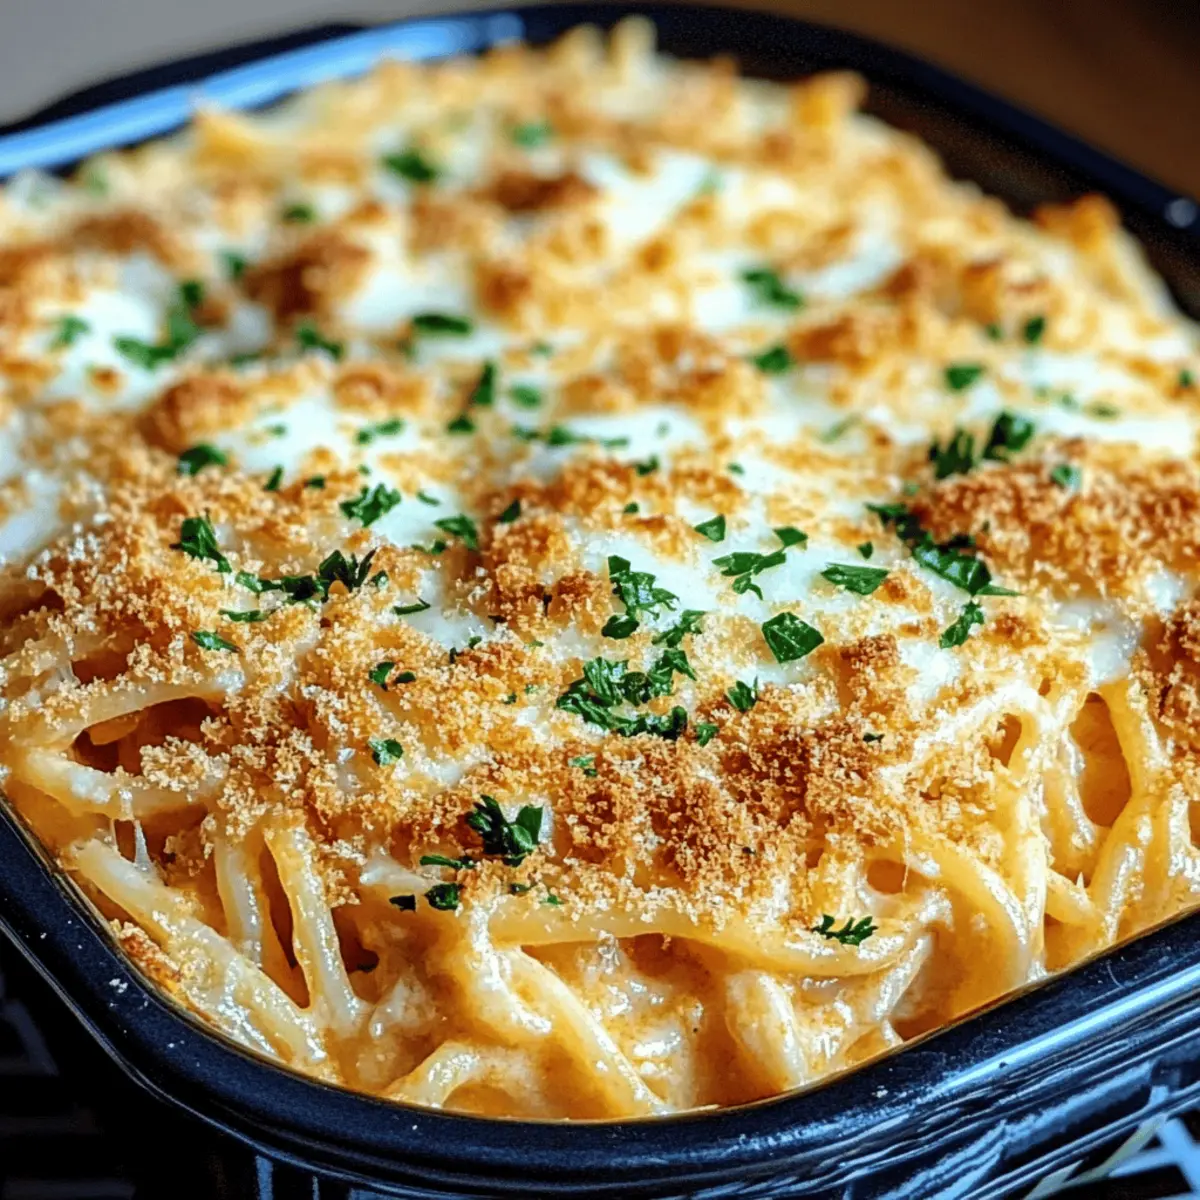
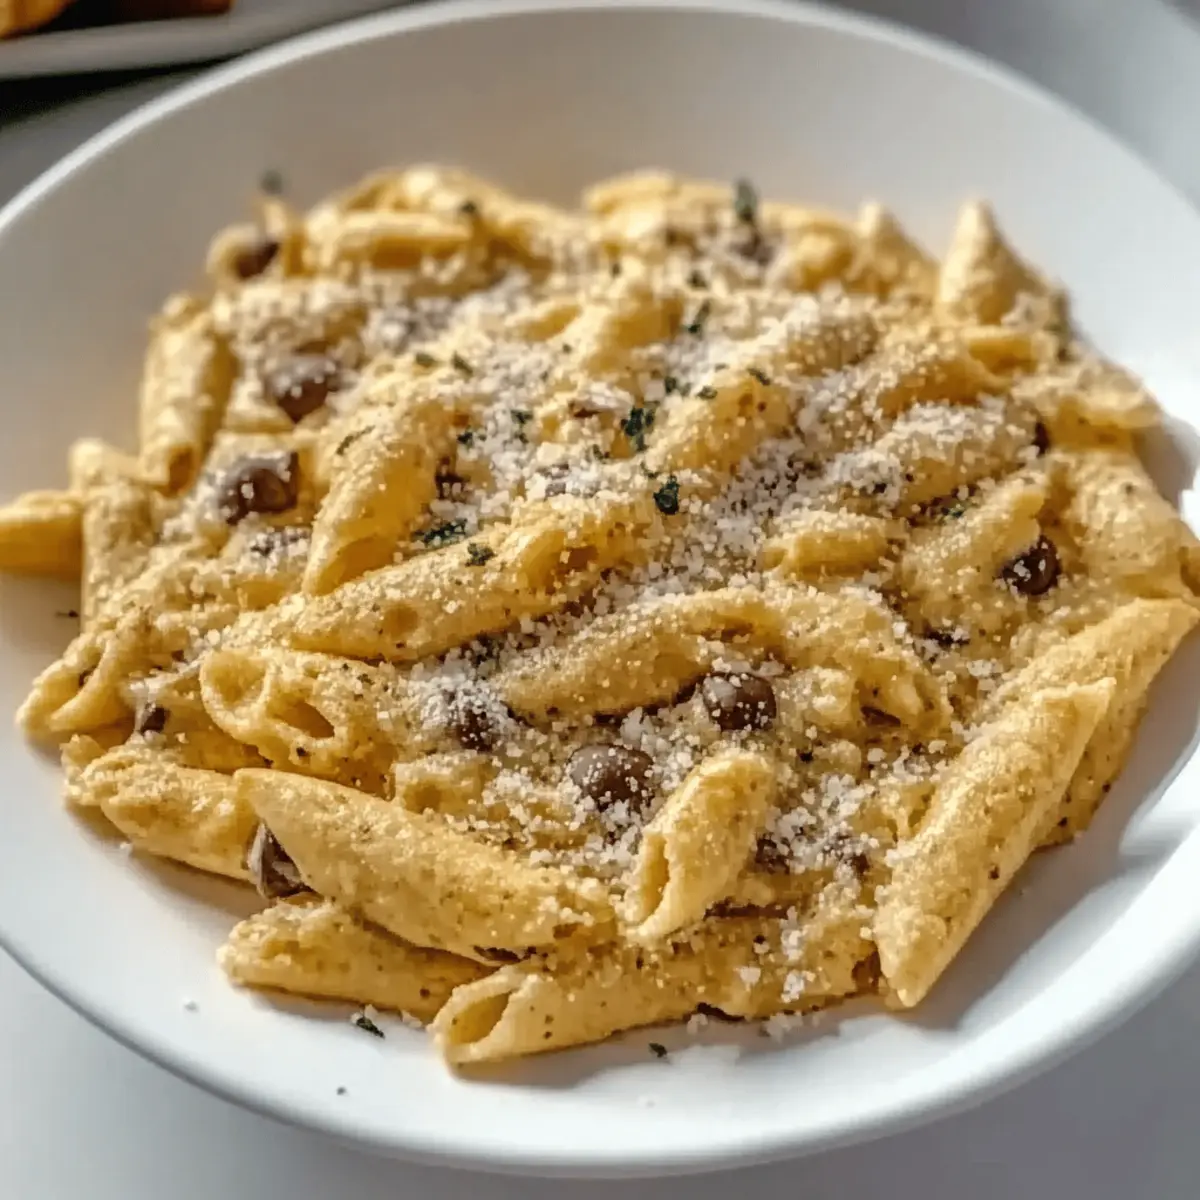
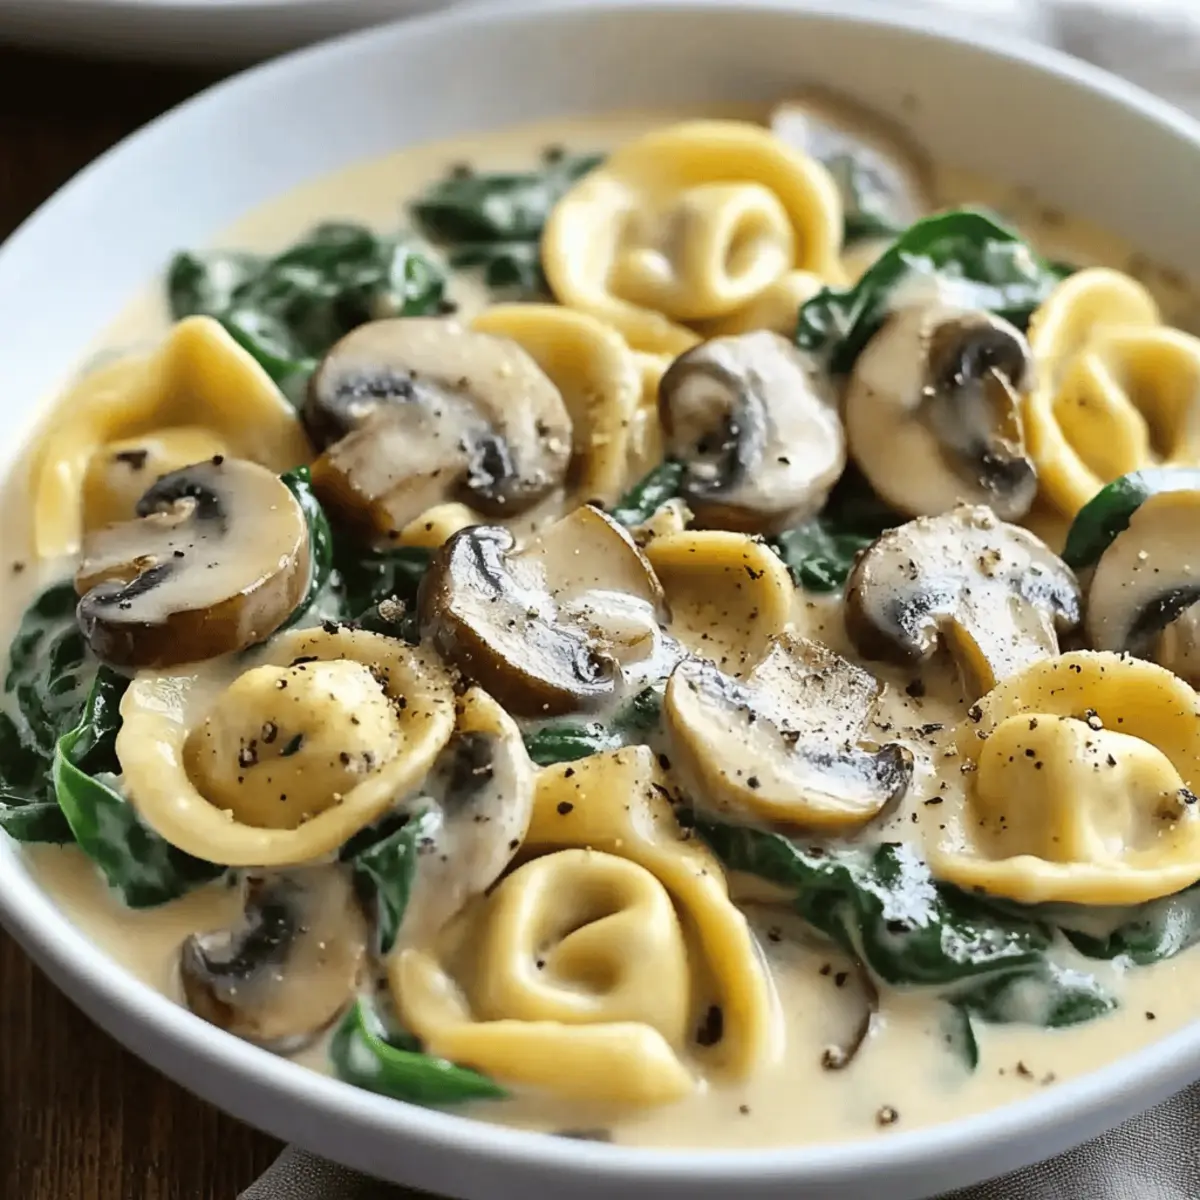
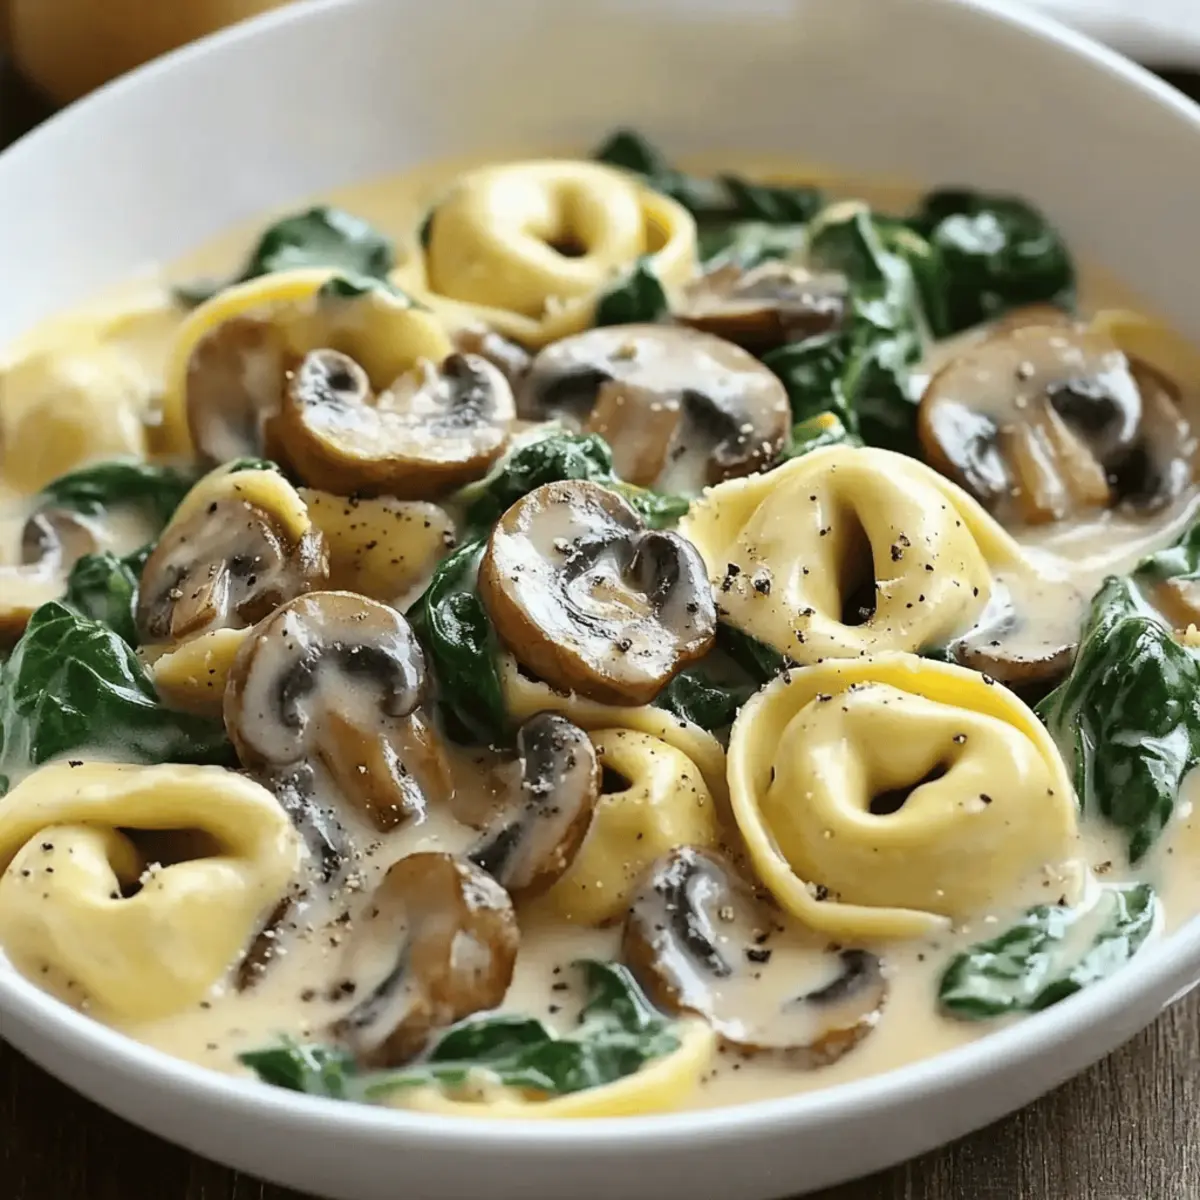
Carefully fold the drained tortellini into the creamy sauce, ensuring each piece is enveloped in that luscious mixture. Add in 2 cups of fresh spinach and ½ cup of grated Parmesan cheese. Stir and cook everything together for about 2 minutes, or until the spinach is wilted and the cheese is melted, creating a harmonious blend of flavors for your tortellini w spinach & mushrooms.

Step 5: Season
Taste your creamy tortellini w spinach & mushrooms, and season with salt and pepper to enhance the flavors. If the sauce appears too thick, stir in a splash of the reserved pasta water until you reach the desired consistency. Serve your comforting dish immediately and savor the delightful aroma wafting around your dining space.

How to Store and Freeze Tortellini w Spinach & Mushrooms

Room Temperature: Store leftovers at room temperature for no more than 2 hours to maintain safety.

Fridge: Keep in an airtight container in the refrigerator for up to 3 days. Reheat gently on the stove or microwave, adding a splash of milk or cream to restore creaminess.

Freezer: Freeze portions in airtight containers for up to 2 months. Thaw overnight in the fridge before reheating for best results.

Reheating: For optimal texture, reheat in a skillet over low heat, stirring frequently. Add reserved pasta water if needed for a creamy consistency in your tortellini w spinach & mushrooms.

What to Serve with Creamy Tortellini w Spinach & Mushrooms

Elevate your dining experience by pairing this comforting pasta dish with delightful accompaniments that balance the rich flavors and textures.

  • Garlic Bread: Perfect for soaking up the creamy sauce, this buttery classic adds a crunchy contrast that your guests will love. A delightful blend of herbs and garlic makes each bite irresistible!

  • Crisp Green Salad: A fresh arugula salad with lemon vinaigrette offers a refreshing and light counterpoint to the richness of the tortellini. Its vibrant greens brighten the plate, making it a feast for your eyes and palate.

  • Roasted Vegetables: A medley of roasted seasonal vegetables brings a heartiness and depth of flavor to your meal. Carrots, bell peppers, and zucchini add color and nutrients, making every bite satisfying.

  • White Wine: A chilled glass of Sauvignon Blanc or Pinot Grigio complements the creamy sauce wonderfully. The light acidity in these wines cuts through the richness of the dish, enhancing the overall flavor experience.

Pairing your creamy tortellini w spinach & mushrooms with these delightful sides adds a perfect harmony to your meal, making it an unforgettable dining occasion.

Tortellini w Spinach & Mushrooms Variations

Feel free to get creative with this recipe and make it your own—your taste buds will thank you!

  • Dairy-Free: Substitute heavy cream with coconut milk or cashew cream for a rich, non-dairy sauce that doesn’t skimp on flavor.
  • Protein-Packed: Toss in cubed tofu or cooked chicken for an extra protein boost that makes this dish even more filling and satisfying.
  • Spicy Kick: Add red pepper flakes or a splash of hot sauce while sautéing the vegetables for a delightful warmth that awakens the taste buds.
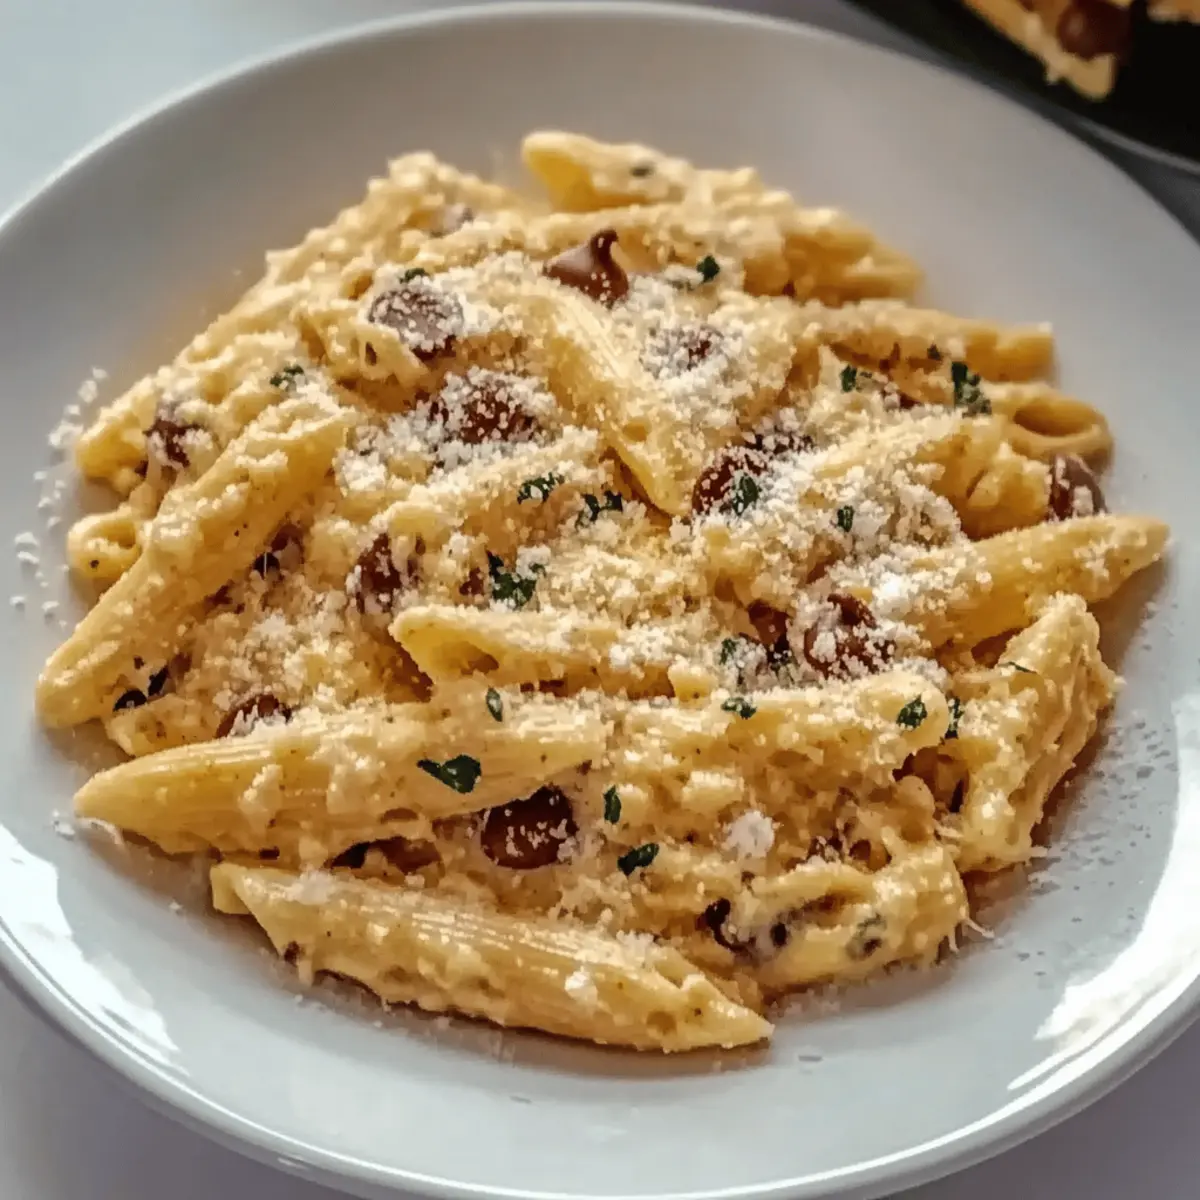
  • Veggie Medley: Mix in other vegetables like zucchini, bell peppers, or cherry tomatoes for added color and nutrients. Don’t forget to sauté them until tender!
  • Herb Infusion: Incorporate fresh herbs like basil or parsley to enhance the dish with aromatic freshness and a burst of flavor.
  • Nutty Twist: Sprinkle in toasted pine nuts or walnuts at the end for a delightful crunch alongside the creamy sauce.
  • Gourmet Upgrade: Drizzle with truffle oil before serving—this luxury ingredient turns an everyday meal into something truly special.
  • Mushroom Variety: Experiment with different mushrooms such as portobello, shiitake, or even a wild mushroom blend for unique flavors and textures.

Embrace the spirit of cooking by trying out these variations and transforming your Tortellini w Spinach & Mushrooms into a dish that fits any palate! For more culinary inspirations, don’t miss out on our Sausage Tortellini Soup and Cheesy Spinach Artichoke Chicken Bake. Happy cooking!

Expert Tips for Tortellini w Spinach & Mushrooms

  • Perfect Pasta Timing: Ensure to boil the cheese tortellini just until tender, usually 3-5 minutes for fresh. Overcooking can lead to mushy pasta.

  • Flavorful Sautéing: Always sauté garlic and mushrooms together until the mushrooms are golden. This enhances their flavors and brings out a delicious aroma.

  • Creamy Consistency: Reserve a bit of pasta water before draining; adding it can help adjust the sauce to a silky, creamy texture when mixing.

  • Combine Off Heat: Once you mix the tortellini into the sauce, turn off the heat before adding spinach and cheese. This prevents overcooking and preserves freshness.

  • Season to Taste: Don’t forget to season with salt and pepper! Taste your dish before serving, as it can elevate the flavors beautifully in this tortellini w spinach & mushrooms recipe.

Make Ahead Options

These Creamy Tortellini with Spinach and Mushrooms are perfect for meal prep enthusiasts! You can prepare the tortellini and sauté the mushrooms and garlic up to 24 hours in advance. Simply store the cooked tortellini in an airtight container in the refrigerator, and keep the sautéed vegetables in a separate container. When ready to serve, reheat the mushrooms gently before adding the heavy cream and spinach, then fold in the tortellini and any remaining ingredients. This method not only saves you time on busy weeknights but also ensures your dish remains just as delicious when served fresh! Enjoy the comforting flavors without the last-minute rush!

Creamy Tortellini w Spinach and Mushrooms Recipe FAQs

How do I select the right tortellini?
Absolutely! For the best results in your Creamy Tortellini w Spinach and Mushrooms, opt for fresh cheese tortellini if available, as it provides a delightful texture. If using frozen, make sure it’s properly thawed according to package instructions before cooking.

How should I store leftovers?
Very! Leftovers can be kept in an airtight container in the refrigerator for up to 3 days. To reheat, gently warm on the stove or microwave, adding a splash of milk or cream to maintain the creamy sauce’s velvety texture.

Can I freeze creamy tortellini?
Yes! You can freeze portions of the dish in airtight containers for up to 2 months. To do this, let the dish cool completely before packaging. Thaw overnight in the fridge before reheating. When warming it up, stir in some reserved pasta water for that creamy consistency.

What should I do if my sauce is too thick?
No worries! If your sauce seems too thick while combining with the tortellini, simply stir in a splash of the reserved pasta water. Start with a little—about a tablespoon at a time—until you reach your desired creaminess for your delicious tortellini with spinach & mushrooms!

Are there any dietary considerations for this recipe?
Definitely! This recipe is vegetarian-friendly, and you can easily adapt it for a dairy-free version by using coconut or cashew cream, along with vegan tortellini. Always check for allergies, particularly with cheese and gluten if necessary, to accommodate everyone’s needs at your table.

What type of mushrooms should I use?
Great question! For the best flavor in your Creamy Tortellini w Spinach and Mushrooms, I recommend using fresh varieties like cremini or shiitake. Look for mushrooms that are firm, smooth, and free from dark spots. They add a wonderful earthy richness that elevates the dish beautifully.

Tortellini w Spinach & Mushrooms

Creamy Tortellini w Spinach & Mushrooms for Cozy Nights

This Tortellini w Spinach & Mushrooms combines rich flavors in a creamy sauce, perfect for cozy dinners.
Prep Time 10 minutes
Cook Time 20 minutes
Total Time 30 minutes
Servings: 4 servings
Course: Pasta
Cuisine: Italian
Calories: 450

Ingredients
  

For the Pasta
  • 1 pkg Cheese Tortellini use fresh or frozen
For the Sauce
  • 1 cup Heavy Cream or coconut/cashew cream for dairy-free
  • 2 cloves Garlic fresh, minced
  • ½ cup Grated Parmesan Cheese or nutritional yeast for vegan option
  • 2 tbsp Olive Oil or butter for added richness
For the Vegetables
  • 2 cups Fresh Spinach washed and dried
  • 1 cup Fresh Mushrooms sliced, cremini or shiitake recommended
Seasonings
  • to taste Salt
  • to taste Pepper

Equipment

  • Large pot
  • Non-stick skillet

Method
 

Step-by-Step Instructions
  1. Bring a large pot of salted water to a boil and cook the cheese tortellini according to package instructions, about 3-5 minutes for fresh or 7-10 minutes for frozen. Drain and reserve a cup of pasta water.
  2. In a large non-stick skillet, heat olive oil over medium heat. Add minced garlic and sliced mushrooms, sautéing for 3-4 minutes until soft and golden.
  3. Pour in heavy cream into the skillet with sautéed mushrooms. Stir well and bring to a gentle simmer for about 2 minutes, allowing it to thicken slightly.
  4. Fold drained tortellini into the creamy sauce, then add fresh spinach and grated Parmesan cheese. Cook for 2 minutes until spinach wilts and cheese melts.
  5. Season with salt and pepper to taste. If the sauce is too thick, stir in a splash of reserved pasta water. Serve immediately.

Nutrition

Serving: 1servingCalories: 450kcalCarbohydrates: 52gProtein: 15gFat: 20gSaturated Fat: 10gPolyunsaturated Fat: 1gMonounsaturated Fat: 9gCholesterol: 45mgSodium: 600mgPotassium: 400mgFiber: 3gSugar: 2gVitamin A: 1500IUVitamin C: 10mgCalcium: 250mgIron: 2mg

Notes

This recipe allows for various adaptations. You can substitute the heavy cream with dairy-free options, or add tofu for extra protein.

Tried this recipe?

Let us know how it was!

Delicious Ground Beef Stovetop Chili for Cozy Nights

There’s nothing quite like the smell of chili simmering on the stove, wrapping you in its comforting embrace after a long day. My Best Ground Beef Stovetop Chili is the answer to those busy weeknights when you crave something hearty and satisfying without spending hours in the kitchen. This one-pot meal not only comes together in under an hour but also offers the flexibility to customize with your favorite ingredients or whatever you have on hand. It’s a delicious way to reconnect with friends and family, all while serving up a bowl of warmth and love. Are you ready to dive into this cozy bowl of goodness?

Why is This Chili So Irresistible?

Hearty Comfort: This Ground Beef Stovetop Chili is a warm hug in a bowl, perfect for any chilly evening. One-Pot Wonder: Minimal cleanup is required, allowing you to enjoy the delicious result without the hassle. Customizable Flavor: Tailor it to your taste by adding your favorite beans or extra veggies—think Sweet Chili Chicken for a sweet twist! Quick Prep Time: Ready in under an hour, it’s your go-to solution for those busy weeknights. Crowd-Pleasing Meal: Serve it at your next gathering, and watch everyone come back for seconds!

Ground Beef Stovetop Chili Ingredients

For the Base
Olive Oil – Provides a cooking medium and adds richness; substitute with vegetable oil if needed.
Onion (1 large, diced) – Adds sweetness and depth to the flavor; yellow or white onions work best.
Garlic (2 cloves, minced) – Enhances flavor with its pungent aroma; fresh garlic is recommended, powder can be used in a pinch.
Ground Beef (1 lb, 80/20 or leaner) – The main protein source for heartiness; can substitute with turkey or textured vegetable protein for a leaner or vegetarian option.
Salt & Pepper – Essential for seasoning; use to taste.

For the Spices
Chili Powder (2 tbsp) – Key spice for traditional chili flavor; optional to adjust amount based on desired spice level.
Cumin (1 tsp) – Adds earthy warmth; can substitute with coriander if unavailable.
Smoked Paprika (½ tsp) – Contributes smokiness to the chili; regular paprika can replace but will lack smokiness.
Cayenne Pepper (½ tsp, optional) – Adds heat; reduce or omit for a milder dish.

For the Liquid & Beans
Tomato Paste (1 can, 6 oz) – Thickens the chili and enhances tomato flavor.
Diced Tomatoes (1 can, 15 oz, fire-roasted if possible) – Adds acidity and texture for a delightful kick.
Beef Broth (2 cups, low-sodium preferred) – Provides the base liquid; chicken broth or vegetable broth can be used for alternatives.
Red Kidney Beans (1 can, 15 oz, drained & rinsed) – Offers protein and fiber; can substitute with black beans or pinto beans.
Black Beans (1 can, 15 oz, drained & rinsed) – Additional beans for a protein boost; adjust quantity to taste.

This Ground Beef Stovetop Chili will become a cherished recipe in your home, bringing warmth and flavor to your family dinner table!

Step‑by‑Step Instructions for Ground Beef Stovetop Chili

Step 1: Sauté Aromatics
In a heavy-bottomed pot or Dutch oven, heat 2 tablespoons of olive oil over medium heat. Add the diced onion and sauté for 3-4 minutes until it becomes soft and translucent, creating an aromatic base for your Ground Beef Stovetop Chili. Stir occasionally to prevent sticking and ensure even cooking.

Step 2: Add Garlic
Next, stir in 2 minced garlic cloves and continue cooking for 30 seconds until fragrant, but be careful not to let it brown. The combination of sautéed onion and garlic will enhance the flavor profile of your chili, creating layers of richness that invite everyone to the table.

Step 3: Brown Beef
Now, add 1 pound of ground beef to the pot, breaking it apart with a wooden spoon. Cook for 5-7 minutes or until the beef is browned and no longer pink. If there’s excess fat, drain it carefully—this step ensures your Ground Beef Stovetop Chili maintains a great texture without being greasy.

Step 4: Bloom Spices
Stir in 2 tablespoons of chili powder, 1 teaspoon of cumin, ½ teaspoon of smoked paprika, and optional ½ teaspoon of cayenne pepper. Season with salt and pepper to taste. Cook for about 1 minute to bloom the spices, allowing their aromatic oils to infuse the beef mixture, which deepens the flavors.

Step 5: Create Base
Add 6 ounces of tomato paste to the pot, stirring for 1 minute until it’s well combined with the meat and spices. Then, incorporate 15 ounces of diced tomatoes and 2 cups of beef broth, scraping up any browned bits from the bottom of the pot. This step forms the savory base of your Ground Beef Stovetop Chili.

Step 6: Simmer
Stir in 15 ounces each of drained red kidney beans and black beans, mixing everything together well. Bring the mixture to a simmer over medium heat, then reduce the heat to low and let it simmer uncovered for 30-40 minutes. Stir occasionally until the chili thickens to your desired consistency, creating an irresistible, hearty dish.

Step 7: Taste & Adjust
Finally, take a moment to taste your chili and adjust the seasoning with extra salt or pepper if needed. This last touch ensures your Ground Beef Stovetop Chili is perfectly balanced, allowing the flavors to shine through in every comforting bowlful.

Make Ahead Options

These delicious Ground Beef Stovetop Chili bowls are perfect for meal prep! You can chop your onions and mince the garlic up to 24 hours in advance—store them in an airtight container in the refrigerator to keep them fresh. Additionally, you can brown your ground beef and combine it with the spices, then refrigerate this mixture for up to 3 days, ensuring that the flavors meld beautifully. When you’re ready to serve, simply heat everything in a pot, add the remaining ingredients, and simmer until heated through. This way, you’ll enjoy a hearty, comforting chili with minimal effort on busy weeknights, just as delicious as if made from scratch!

What to Serve with Ground Beef Stovetop Chili

Nothing pairs better with a warming bowl of chili than sides that enhance its comforting richness and add a touch of freshness.

  • Creamy Cornbread: The sweetness and texture of cornbread perfectly balances the savory chili while adding a delightful crunch to each bite. A slice of warm cornbread, slathered with butter, makes for a cozy accompaniment that everyone will love.

  • Crunchy Tortilla Chips: These chips provide the ideal crunch to contrast with the silky chili. Serve them alongside for dipping, or crumble them on top for that extra texture and flavor.

  • Zesty Lime Wedges: A squeeze of lime brightens the dish, enhancing the chili’s robust flavors. This simple addition brings a refreshing twist and cuts through the richness.

  • Cool, Creamy Sour Cream: Topping your chili with a dollop of sour cream adds a rich, tangy element that balances the heat beautifully. It makes each bite feel indulgent and luxurious.

  • Fresh Avocado Slices: Topping chili with creamy, ripe avocado not only looks beautiful but adds a smooth texture that’s oh-so-satisfying. It softens the spices and complements the dish’s heartiness.

  • Crisp Green Salad: A simple green salad tossed with a light vinaigrette offers freshness that counteracts the warmth of the chili. Crunchy greens liven up the meal, making it feel light and balanced.

  • Savory Grilled Cheese Sandwiches: Gooey grilled cheese is quite possibly the ultimate companion to chili. Dip it into the bowl for the blissful union of cheese and chili in every delicious bite.

  • Fruity Red Wine: Pairing your meal with a glass of fruity red wine enhances the experience, bringing out the flavors of the meal while warming your soul.

These sides not only elevate the Ground Beef Stovetop Chili but transform your meal into a delightful experience that keeps everyone coming back for more!

Helpful Tricks for Ground Beef Stovetop Chili

  • Perfect Beef Browning: Ensure the ground beef is at room temperature before adding it to the pot. This helps achieve a nice brown color, enhancing your chili’s flavor.

  • Layered Spice Flavor: Blooming the spices in the oil before adding other ingredients is crucial for maximizing their impact. Stir for at least one minute to draw out their aromas.

  • Consistent Texture: If your chili is too thin, let it simmer uncovered longer or add a cornstarch slurry to thicken it quickly. For a heartier Ground Beef Stovetop Chili, consider reducing the liquid slightly.

  • Balancing Acidity: Always taste and adjust the seasoning towards the end of cooking. A touch of sugar or even a dash of vinegar can help balance out the acidity from the tomatoes if desired.

  • Make Ahead Magic: Chili tastes even better the next day! Make your Ground Beef Stovetop Chili in advance to allow the flavors to meld beautifully.

  • Versatile Varieties: Feel free to swap beans as desired. Mixing different beans not only boosts nutrition but can also create interesting texture variations in your chili!

Ground Beef Stovetop Chili Variations

Feel free to let your cooking creativity shine and customize your chili to your heart’s content!

  • Turkey Substitute: Swap ground beef for ground turkey for a leaner option that still packs a flavorful punch.

  • Vegetarian Friendly: Use textured vegetable protein or lentils instead of meat for a satisfying plant-based meal that doesn’t skimp on comfort.

  • Spicy Kick: For more heat, add diced jalapeños or increase cayenne pepper to create a chili that brings the fire, perfect for those who love a little heat.

  • Sweet Surprise: Add a cup of corn kernels or diced sweet potatoes for a touch of sweetness and delightful texture. It’s a wholesome twist that balances the spices beautifully.

  • Extra Veggies: Toss in bell peppers or zucchini during the sautéing stage to boost nutrition and add vibrant colors that make the dish visually appealing.

  • Seasoning Boost: Enhance the flavors by stirring in a tablespoon of taco seasoning or a hint of smoked salt for another layer of complexity.

  • Rich and Creamy: Stir in a dollop of sour cream or Greek yogurt right before serving for a creamy finish that complements the chili’s heat and spices.

  • Herb Infusion: Fresh herbs like cilantro or parsley not only brighten up the flavors but also add a fresh element that elevates the dish. Try it with a side of Chili Lime Chicken Rice for a complete meal experience!

With these variations, your Ground Beef Stovetop Chili can become a new creation every time you make it, delighting both you and your loved ones!

How to Store and Freeze Ground Beef Stovetop Chili

Fridge: Store chili in an airtight container in the refrigerator for up to 3-4 days. Make sure it’s completely cooled before sealing to avoid moisture build-up.

Freezer: Freeze for up to 3 months in freezer-safe bags or containers. Portion out individual servings for easy, quick meals later; just remember to label with the date!

Reheating: Thaw overnight in the fridge before reheating on the stove or in the microwave, adding a splash of broth if needed to restore creaminess and flavor.

Make-Ahead Tip: This Ground Beef Stovetop Chili actually improves after a day or two in the fridge, so consider making it ahead to enjoy those rich, melded flavors!

Ground Beef Stovetop Chili Recipe FAQs

What type of ground beef should I use?
For the best flavor and texture, I recommend using 80/20 ground beef, which has a nice balance of fat for richness. However, you can substitute with leaner ground beef or even turkey for a lighter option.

Can I freeze Ground Beef Stovetop Chili?
Absolutely! To freeze, let the chili cool completely and then transfer it into freezer-safe containers or bags. It can be stored for up to 3 months. Consider portioning it out for easy meals! When ready to enjoy, thaw it overnight in the refrigerator before reheating.

How long can I store leftover chili in the fridge?
Your Ground Beef Stovetop Chili can be safely stored in an airtight container in the fridge for 3-4 days. Just be sure it cools fully before sealing it to prevent any moisture build-up.

What’s the best way to reheat my chili?
To reheat, transfer the chili to a pot and warm it over medium heat, stirring occasionally. If it seems a bit thick, add a splash of beef broth or water to restore its creamy texture. Alternatively, you can also reheat in the microwave, making sure to cover it to prevent splatters—just give it a good stir halfway through!

Can I add different beans or veggies to my chili?
Very! Feel free to customize your Ground Beef Stovetop Chili by incorporating black beans, pinto beans, or even corn for added sweetness. You can also toss in bell peppers or zucchini to amp up the nutrition while keeping all that delicious flavor.

Ground Beef Stovetop Chili

Delicious Ground Beef Stovetop Chili for Cozy Nights

A hearty and comforting Ground Beef Stovetop Chili, perfect for busy weeknights, customizable with your favorite ingredients.
Prep Time 15 minutes
Cook Time 30 minutes
Total Time 45 minutes
Servings: 4 bowls
Course: Dinner
Cuisine: American
Calories: 450

Ingredients
  

For the Base
  • 2 tablespoons Olive Oil Substitute with vegetable oil if needed.
  • 1 large Onion, diced Yellow or white onions work best.
  • 2 cloves Garlic, minced Fresh garlic is recommended.
  • 1 lb Ground Beef, 80/20 or leaner Can substitute with turkey or textured vegetable protein.
  • Salt & Pepper Essential for seasoning, use to taste.
For the Spices
  • 2 tablespoons Chili Powder Optional to adjust amount based on desired spice level.
  • 1 teaspoon Cumin Can substitute with coriander if unavailable.
  • ½ teaspoon Smoked Paprika Regular paprika can replace but will lack smokiness.
  • ½ teaspoon Cayenne Pepper, optional Add for heat, reduce or omit for a milder dish.
For the Liquid & Beans
  • 1 can Tomato Paste, 6 oz Thickens the chili and enhances tomato flavor.
  • 1 can Diced Tomatoes, 15 oz Fire-roasted if possible for added flavor.
  • 2 cups Beef Broth Low-sodium preferred; chicken or vegetable broth can be used.
  • 1 can Red Kidney Beans, 15 oz Drained & rinsed, offers protein and fiber.
  • 1 can Black Beans, 15 oz Drained & rinsed, for an additional protein boost.

Equipment

  • heavy-bottomed pot or Dutch oven

Method
 

Step-by-Step Instructions
  1. Heat 2 tablespoons of olive oil in a heavy-bottomed pot over medium heat. Add the diced onion and sauté for 3-4 minutes until soft and translucent.
  2. Stir in 2 minced garlic cloves and cook for 30 seconds until fragrant.
  3. Add 1 pound of ground beef, breaking it apart. Cook for 5-7 minutes until browned.
  4. Stir in 2 tablespoons of chili powder, 1 teaspoon of cumin, ½ teaspoon of smoked paprika, and optional ½ teaspoon of cayenne pepper. Season with salt and pepper to taste.
  5. Add 6 ounces of tomato paste, stirring for 1 minute. Then incorporate 15 ounces of diced tomatoes and 2 cups of beef broth.
  6. Stir in 15 ounces of drained red kidney beans and black beans. Bring to a simmer over medium heat.
  7. Reduce heat to low and let it simmer uncovered for 30-40 minutes, stirring occasionally.
  8. Taste your chili and adjust seasoning with extra salt or pepper if needed.

Nutrition

Serving: 1bowlCalories: 450kcalCarbohydrates: 40gProtein: 32gFat: 20gSaturated Fat: 8gPolyunsaturated Fat: 2gMonounsaturated Fat: 10gCholesterol: 80mgSodium: 600mgPotassium: 800mgFiber: 10gSugar: 5gVitamin A: 15IUVitamin C: 20mgCalcium: 6mgIron: 15mg

Notes

This chili tastes even better the next day! Make in advance to allow flavors to meld beautifully.

Tried this recipe?

Let us know how it was!

Savory Chinese Chicken and Broccoli Recipe in 30 Minutes

As the fragrant aroma of sizzling garlic wafts through my kitchen, I can’t help but smile at the thought of my favorite takeout dish, Chicken and Broccoli with Rich Brown Sauce. This quick and easy Chinese chicken and broccoli recipe transforms simple ingredients into a vibrant, flavorful feast that feels like a warm hug after a long day. With perfectly tender chicken and crisp broccoli coated in a savory brown sauce, this dish is not only a crowd-pleaser but also a fantastic way to introduce more homemade goodness into your weekly meals. Ready in just 30 minutes, you’ll find it’s easier than you think to recreate that beloved restaurant experience at home. Want to learn how to elevate your dinner table with this delightful recipe? Let’s dive in!

Why is this Chicken and Broccoli Recipe special?

Quick and Easy: In just 30 minutes, you can whip up this comforting dish that rivals your favorite takeout, making it a perfect weeknight meal.

Savory Brown Sauce: The rich brown sauce is a game-changer, combining savory umami flavors that elevate both the chicken and broccoli to new heights.

Vegetable Variety: Not a fan of broccoli? Feel free to switch it up with bell peppers or bok choy, showcasing your creativity in the kitchen.

Perfect Texture: Experience the perfect marriage of textures—tender chicken and crisp broccoli, all coated in a glossy sauce that clings to every bite.

Homemade Goodness: Say goodbye to fast food and embrace handmade flavors that nourish both body and soul.

Meal Prep Versatile: This dish is not just a meal; it can be prepped in advance and stored, making it ideal for leftovers or lunchboxes!

Chinese Chicken and Broccoli Recipe Ingredients

• Get ready to bring the flavors of your favorite takeout to your kitchen with these essential components!

For the Chicken Marinade

  • Boneless Skinless Chicken Breast (or Thighs) – Your main protein choice; thighs offer a juicier texture.
  • Water – Essential for marinating, ensuring the chicken remains moist and tender.
  • Oyster Sauce – Adds depth and umami; substitute with soy sauce for a vegetarian option.
  • Cornstarch – Tenderizes the chicken and thickens the sauce; tapioca starch works as a substitute.
  • Vegetable Oil – For searing the chicken; canola or peanut oil can replace it.

For the Sauce

  • Low Sodium Chicken Stock – A flavorful liquid base; vegetable broth serves as a great vegetarian alternative.
  • Sugar (or Brown Sugar) – Balances the sauce flavors; use honey or agave syrup for sweetness.
  • Soy Sauce – Primary seasoning in the sauce; tamari is a gluten-free option.
  • Dark Soy Sauce – Enhances color and flavor depth; use regular soy sauce in a pinch, albeit with slight flavor changes.
  • Sesame Oil – Infuses a rich, nutty flavor; can be omitted if allergic.
  • White Pepper – Adds subtle heat; black pepper can substitute but will slightly alter the taste.

For the Vegetables

  • Broccoli Florets – Main vegetable component for nutrition and crunch; substitute with snow peas or bok choy if desired.
  • Garlic – An aromatic that elevates overall flavor; fresh ginger can be added for an additional zing.

For Finishing Touches

  • Shaoxing Wine – Traditional for flavor enhancement; omit or substitute with dry sherry for a non-alcoholic version.
  • Cornstarch (for slurry) – Used to adjust the sauce’s thickness as needed.

Now you’re all set with the ingredients for this vibrant Chinese Chicken and Broccoli Recipe!

Step‑by‑Step Instructions for Chinese Chicken and Broccoli Recipe

Step 1: Marinate the Chicken
In a bowl, combine sliced boneless skinless chicken breast with water, oyster sauce, cornstarch, and vegetable oil. Mix well to ensure each piece is coated. Allow the chicken to marinate for about 10 minutes, which will enhance its tenderness and flavor as you prepare the remaining ingredients.

Step 2: Prepare the Sauce
In a separate bowl, mix together the low sodium chicken stock, sugar, soy sauces, oyster sauce, sesame oil, and white pepper. This savory blend will create the rich brown sauce that defines your Chinese Chicken and Broccoli Recipe. Set the sauce aside while you focus on cooking the chicken and broccoli.

Step 3: Blanch the Broccoli
Bring a pot of water to a rolling boil and add the broccoli florets. Blanch them for 1-2 minutes until they turn bright green and slightly tender. Once done, drain and set the broccoli aside, ensuring it’s ready to mix with the other ingredients later.

Step 4: Sear the Chicken
Heat a wok over high heat until it starts to smoke. Add a splash of vegetable oil, then carefully add the marinated chicken. Sear the chicken for about 3 minutes, stirring occasionally, until it turns opaque and is just cooked through. This step ensures your chicken is flavorful and golden brown.

Step 5: Aromatics in the Wok
Remove the cooked chicken from the wok and set aside. In the same wok, add minced garlic (and fresh ginger if using) and stir-fry for about 5 seconds until fragrant. This quick step infuses the oil with savory aromas, setting the base for your rich sauce.

Step 6: Mix the Sauce
Pour the prepped sauce mixture into the wok, stirring continuously to deglaze the bottom, scraping up any caramelized bits. Allow it to simmer for a moment, creating a luscious base, and watch as the sauce starts to thicken.

Step 7: Thicken the Sauce
Gradually mix in the cornstarch slurry, stirring until the sauce reaches your desired thickness. You’re aiming for a glossy finish that clings to the chicken and broccoli, elevating your Chinese Chicken and Broccoli Recipe to restaurant-quality perfection.

Step 8: Combine Everything
Once the sauce has thickened, return the seared chicken and blanched broccoli to the wok. Toss everything together until coated with the savory sauce. Adjust seasoning and consistency if needed, ensuring every bite is bursting with flavor.

Step 9: Serve and Enjoy
Transfer your delicious Chinese Chicken and Broccoli to a platter and serve immediately over steamed rice or lo mein noodles. Relish the vibrant colors and enticing aroma—a perfect meal ready to warm both heart and soul.

Chinese Chicken and Broccoli Recipe Variations

Feel free to personalize this delightful dish to suit your taste buds and dietary needs!

  • Tofu Swap: Use cubed tofu in place of chicken for a vegetarian delight that’s rich in protein.

  • Shrimp Option: Substitute chicken with shrimp for a seafood twist that cooks in no time. Just adjust your cooking time accordingly for perfect tenderness.

  • Veggie Medley: Replace broccoli with a mix of colorful vegetables like bell peppers, carrots, or snap peas to brighten up the dish and add diverse textures.

  • Heat It Up: Add sliced chili peppers or a splash of sriracha to the sauce for a spicy kick that will awaken your taste buds.

  • Noodle Base: Serve over lo mein or rice noodles instead of steamed rice for a hearty, noodle-loving family! This adds a wonderful chewy texture that complements the dish well.

  • Sweet & Sour Twist: Mix in a bit of pineapple for a delightful sweet and sour flavor that contrasts beautifully with the savory sauce.

  • Cashew Crunch: Toss in some toasted cashews or almonds right before serving. This addition adds a satisfying crunch and healthy fats to your meal.

  • Coconut Milk Creaminess: For a creamy indulgence, stir in a splash of coconut milk into the sauce. This will provide a subtly sweet flavor that enhances the overall richness.

For more mouthwatering ideas, check out Chicken Avocado Melt or try the savory Cowboy Butter Chicken for a fun take on chicken! Enjoy experimenting!

Storage Tips for Chinese Chicken and Broccoli Recipe

  • Room Temperature: Best enjoyed fresh, but if left out, consume within 2 hours for safety.
  • Fridge: Store leftovers in an airtight container for up to 3 days. Ensure it’s completely cooled before sealing to maintain freshness.
  • Freezer: This Chinese Chicken and Broccoli Recipe can be frozen for up to 2 months. Portion it in freezer-safe containers for easy meal prep.
  • Reheating: For the best results, reheat gently on the stove over low heat, adding a splash of water or chicken stock to restore the sauciness of the dish.

What to Serve with Chicken and Broccoli with Rich Brown Sauce

Transform your meal into a feast with delightful pairings that complement this savory dish.

  • Steamed Jasmine Rice: This fragrant rice absorbs the delicious brown sauce, enhancing every bite of chicken and broccoli.
  • Lo Mein Noodles: Soft and chewy, these noodles provide a satisfying contrast that balances the dish’s textures.
  • Sesame Cucumber Salad: Crisp cucumbers with a tangy sesame dressing add freshness, lightness, and a pop of color to your plate.
  • Egg Rolls: Crunchy and filled with savory ingredients, these can act as the perfect appetizer, setting the stage for a delightful meal.
  • Garlic Naan Bread: This fluffy bread is not only excellent for scooping but is also a unique twist that melds beautifully with the rich sauce.
  • Green Tea: Light and refreshing, this beverage cleanses the palate, making it the perfect accompaniment to the hearty dish.
  • Mango Sticky Rice: For dessert, this sweet and creamy classic offers a beautiful contrast to the savory flavors of your main course.
  • Stir-Fried Snow Peas: Quick to prepare, these peas add a splash of bright green and a satisfying crunch, keeping your meal well-rounded.
  • Pickled Vegetables: A tangy counterpoint that brings brightness and a kick to balance the richness of the brown sauce.
  • Chardonnay: A crisp white wine with fruit and floral notes that elevate the meal while harmonizing with the umami of the dish.

Expert Tips for Chinese Chicken and Broccoli Recipe

  • Chicken Tenderness: Use boneless thighs for juicier bites. If you prefer breasts, don’t overcook them; they should remain slightly underdone as they’ll finish cooking in the sauce.

  • Timing is Key: Prep all your ingredients beforehand. Stir-frying happens quickly, and having everything ready will prevent any burnt garlic or overcooked chicken.

  • Sauce Thickness: Adjust the cornstarch slurry carefully. For a thicker sauce, incorporate it gradually until you reach the desired consistency—don’t rush the process!

  • Flavor Boost: Don’t skip the aromatics! Fresh garlic and ginger infuse essential flavors into the dish, enhancing your Chinese Chicken and Broccoli experience.

  • Vegetable Variability: Feel free to swap broccoli for your favorites like bok choy or snap peas. This flexibly showcases your creativity while keeping the dish vibrant and nutritious.

  • Storage Sense: Store leftovers in an airtight container in the fridge for up to 3 days. Reheat gently on the stove to preserve flavor and texture.

Make Ahead Options

These Chicken and Broccoli with Rich Brown Sauce are perfect for busy weeknights and meal prep! You can marinate the chicken and prepare the sauce up to 24 hours in advance—this enhances the flavors while saving you valuable time. Simply keep the marinated chicken in an airtight container in the refrigerator, while the sauce can be stored separately. Blanch the broccoli ahead and refrigerate it for up to 3 days; this helps maintain its vibrant color and crispness. When you’re ready to serve, just sear the chicken, mix in the sauce, add the broccoli, and enjoy restaurant-quality Chinese Chicken and Broccoli right at home!

Chinese Chicken and Broccoli Recipe Recipe FAQs

What type of chicken should I use for this recipe?
You can use either boneless skinless chicken breast or thighs. I often recommend thighs for a juicier texture, as they hold up well during cooking and add richness to the dish.

How do I know if the broccoli is fresh enough for this recipe?
When selecting broccoli, look for vibrant green florets that are firm and tightly packed. Avoid any with dark spots all over or a yellowish hue, as these signs indicate that the broccoli may be past its prime.

What is the best way to store leftovers from this recipe?
Store any leftovers in an airtight container in the refrigerator. They’ll stay fresh for up to 3 days. Allow the dish to cool completely before sealing to help maintain its flavor and texture.

Can I freeze the chicken and broccoli dish? How?
Absolutely! To freeze this Chinese Chicken and Broccoli Recipe, let it cool entirely before transferring it to freezer-safe containers. It can be frozen for up to 2 months. When you’re ready to enjoy it again, thaw it in the refrigerator overnight and reheat gently on the stove, adding a splash of water or chicken stock to revive its sauciness.

Are there any common issues when making this dish that I should watch out for?
One common concern is overcooking the chicken, which can make it dry. Sear the chicken until it’s just cooked through, as it will continue to cook when added back to the sauce. Also, if your sauce is too thin, gradually add a cornstarch slurry until you achieve your desired consistency.

Is this recipe suitable for those with dietary restrictions?
If you’re catering to dietary concerns, you can make simple adjustments. For a vegetarian version, try substituting the chicken with tofu and using vegetable broth instead of chicken stock. Additionally, if anyone in your household has a sesame allergy, you can simply omit the sesame oil from the recipe without sacrificing too much flavor.

Chinese Chicken and Broccoli Recipe

Savory Chinese Chicken and Broccoli Recipe in 30 Minutes

This Chinese Chicken and Broccoli Recipe delivers a comforting meal in just 30 minutes, combining tender chicken and crisp broccoli with a rich brown sauce.
Prep Time 10 minutes
Cook Time 20 minutes
Total Time 30 minutes
Servings: 4 servings
Course: Dinner
Cuisine: Chinese
Calories: 400

Ingredients
  

For the Chicken Marinade
  • 1 pound Boneless Skinless Chicken Breast or Thighs
  • 1/4 cup Water
  • 2 tablespoons Oyster Sauce substitute with soy sauce for vegetarian
  • 2 tablespoons Cornstarch or tapioca starch
  • 2 tablespoons Vegetable Oil canola or peanut oil
For the Sauce
  • 1 cup Low Sodium Chicken Stock or vegetable broth
  • 1 tablespoon Sugar or brown sugar
  • 2 tablespoons Soy Sauce tamari for gluten-free
  • 1 tablespoon Dark Soy Sauce regular soy sauce in pinch
  • 1 teaspoon Sesame Oil can be omitted if allergic
  • 1/2 teaspoon White Pepper black pepper can substitute
For the Vegetables
  • 4 cups Broccoli Florets or snow peas, bok choy
  • 3 cloves Garlic minced
For Finishing Touches
  • 2 tablespoons Shaoxing Wine omit or substitute with dry sherry
  • 1 tablespoon Cornstarch for slurry

Equipment

  • wok
  • Mixing Bowl
  • Pot

Method
 

Step-by-Step Instructions
  1. Marinate the Chicken: In a bowl, combine sliced boneless skinless chicken breast with water, oyster sauce, cornstarch, and vegetable oil. Mix well and allow to marinate for about 10 minutes.
  2. Prepare the Sauce: In a separate bowl, mix low sodium chicken stock, sugar, soy sauces, oyster sauce, sesame oil, and white pepper.
  3. Blanch the Broccoli: Bring a pot of water to a boil, add broccoli florets, and blanch for 1-2 minutes. Drain and set aside.
  4. Sear the Chicken: Heat a wok over high heat, add vegetable oil, then add marinated chicken. Sear for about 3 minutes until cooked through.
  5. Aromatics in the Wok: Remove the chicken and add minced garlic (and ginger if using) to the wok, stir-fry for about 5 seconds until fragrant.
  6. Mix the Sauce: Pour in the sauce mixture into the wok, stirring to deglaze. Allow it to simmer and thicken.
  7. Thicken the Sauce: Gradually mix in cornstarch slurry until desired thickness is reached.
  8. Combine Everything: Return the chicken and broccoli to the wok, tossing everything together until coated with sauce.
  9. Serve and Enjoy: Transfer to platter and serve immediately over steamed rice or lo mein noodles.

Nutrition

Serving: 1servingCalories: 400kcalCarbohydrates: 20gProtein: 30gFat: 20gSaturated Fat: 3gPolyunsaturated Fat: 8gMonounsaturated Fat: 9gCholesterol: 90mgSodium: 800mgPotassium: 700mgFiber: 4gSugar: 5gVitamin A: 500IUVitamin C: 70mgCalcium: 80mgIron: 2mg

Notes

Store leftovers in an airtight container in the fridge for up to 3 days. Reheat gently on the stove to preserve flavor and texture.

Tried this recipe?

Let us know how it was!

Spaghetti Casserole Heaven: Creamy Comfort in Every Bite

“Can you believe I used to think casseroles were just for potluck dinner parties?” I chuckled to myself while stirring up my latest culinary experiment: the Creamy Baked Cream Cheese Spaghetti Casserole. This family-friendly dish is a revelation, transforming tender spaghetti noodles into a creamy dream wrapped in a savory tomato embrace. With an indulgent topping of melted cheese that bubbles to golden perfection, it’s truly Spaghetti Casserole Heaven! Not only is this casserole packed with comfort and warmth, but it also comes together quickly—perfect for those busy weeknights. Plus, its rich flavors make it a sure-fire hit not just for the family table, but also for gatherings with friends. Curious about how to whip up this cozy dish that will leave everyone asking for seconds? Let’s dive into the details!

Why is this spaghetti casserole so amazing?

Comforting, Creamy Goodness: This Baked Cream Cheese Spaghetti Casserole brings unmatched warmth to any table, making it a fantastic choice for family dinners or potluck gatherings.

Quick and Easy: You can whip it up in no time, perfect for those busy weeknights when you still want a wholesome, homemade meal.

Crowd-Pleaser: Boasting rich flavors and a cheesy topping that bubbles beautifully, this dish will have everyone going back for seconds.

Versatile Twist: Feel free to customize the recipe by swapping in your favorite pasta shapes or veggie additions, making it as unique as your family’s tastes.

Homemade vs. Fast Food: With the heavenly combination of cream cheese and marinara, you’ll forget all about fast food—this luscious casserole is pure comfort food you can feel good about serving!

For more comforting casserole ideas, check out this Tater Tot Casserole or explore an irresistible French Toast Casserole.

Spaghetti Casserole Heaven Ingredients

For the Base

  • Spaghetti – The essential foundation of your casserole; whole grain or gluten-free options work wonderfully too.
  • Cream Cheese – This key ingredient lends a creamy texture and a slight tang; make sure to soften it for smooth mixing.
  • Marinara Sauce – Provides a rich flavor and moisture; feel free to substitute with a homemade sauce for a personal touch.
  • Garlic Powder – Adds savory depth; using fresh minced garlic can elevate the flavor even further.

For Seasoning

  • Italian Seasoning – Blends herbs for a fragrant touch; mix dried basil, oregano, and thyme if you don’t have this on hand.
  • Salt and Pepper – Base seasonings to enhance overall flavor; tailor to your family’s taste preferences.

For the Topping

  • Shredded Mozzarella – Melts beautifully for that gooey texture; try a dairy-free alternative for a lactose-free option.
  • Shredded Cheddar – Adds a sharp flavor contrast; opt for mild cheddar for a subtler taste.
  • Grated Parmesan – Completes the dish with a savory finish; nutritional yeast offers a great vegan substitute.
  • Sour Cream (optional) – Adds extra creaminess when blended with the cream cheese; Greek yogurt can serve as a healthy twist.

With these ingredients, you’re just steps away from creating your delicious Spaghetti Casserole Heaven!

Step‑by‑Step Instructions for Spaghetti Casserole Heaven

Step 1: Cook the Spaghetti
Begin by bringing a large pot of salted water to a boil. Add your spaghetti and cook according to the package instructions until al dente, usually about 8-10 minutes. Once done, drain the spaghetti in a colander and set it aside to cool slightly while you prepare the creamy sauce.

Step 2: Prepare the Cream Cheese Sauce
In a mixing bowl, combine the softened cream cheese, marinara sauce, garlic powder, Italian seasoning, salt, and pepper. Use a spatula or mixer to blend the ingredients until smooth and creamy, which should take about 2-3 minutes. If you prefer a richer texture, feel free to fold in some sour cream at this stage.

Step 3: Combine Pasta and Sauce
Add the drained spaghetti to the bowl with the cream cheese sauce. Gently toss the noodles with the sauce until every strand is generously coated. Aim for a uniform mixture, ensuring the creamy sauce envelops the spaghetti beautifully, which should take about 1-2 minutes.

Step 4: Assemble the Casserole
Preheat your oven to 375°F (190°C). Lightly grease a 9×13 inch baking dish with cooking spray or butter to prevent sticking. Spoon the spaghetti mixture into the prepared dish, spreading it evenly to create a uniform base for your Spaghetti Casserole Heaven.

Step 5: Top with Cheese
Sprinkle the shredded mozzarella, cheddar, and grated Parmesan evenly over the spaghetti mixture. Make sure all areas are covered to achieve that deliciously cheesy crust. This should take about 1 minute, but ensure that the topping is generous for maximum meltiness.

Step 6: Bake to Perfection
Place the assembled casserole in the preheated oven and bake for 25-30 minutes. Keep an eye on it; you’re looking for the cheese to be wonderfully melted, bubbling, and turning golden brown on top, indicating that it’s ready to enjoy.

Step 7: Garnish and Serve
Once baked, remove the casserole from the oven and let it cool for about 5-10 minutes. This brief resting period helps firm up the dish. If desired, garnish with fresh basil or parsley for a pop of color before serving your delicious Spaghetti Casserole Heaven to family and friends.

Make Ahead Options

These Creamy Baked Cream Cheese Spaghetti Casserole delights are perfect for meal prep, making busy weeknights much simpler! You can prepare the entire casserole up to 24 hours in advance by assembling it as directed and covering it tightly with foil. To maintain quality, refrigerate the uncooked casserole; this helps prevent the noodles from absorbing too much moisture before baking. When you’re ready to serve, bake it directly from the fridge, adding an extra 5-10 minutes to the cooking time to ensure it’s heated thoroughly. Alternatively, you can also cook the spaghetti and mix the sauce a day ahead, storing each component separately to ensure freshness. Enjoy hassle-free dinners with this flavorful dish!

How to Store and Freeze Spaghetti Casserole Heaven

  • Room Temperature: Allow the casserole to cool before covering and storing at room temperature for up to 2 hours. Longer storage is not recommended to prevent bacterial growth.
  • Fridge: Store leftovers in an airtight container in the refrigerator for up to 3 days. Reheat in the microwave or oven until heated through for the best flavor.
  • Freezer: To freeze, wrap the casserole tightly in plastic wrap and aluminum foil. It can be frozen for up to 3 months. Thaw in the refrigerator overnight before reheating.
  • Reheating: Reheat individual portions in the microwave or the entire casserole in the oven at 350°F (175°C) until bubbly and warmed through, ensuring that you rediscover the creamy goodness of your Spaghetti Casserole Heaven!

Spaghetti Casserole Variations

Customizing your spaghetti casserole can elevate it even further, making it personal and delicious!

  • Gluten-Free: Swap traditional spaghetti for gluten-free pasta to accommodate dietary needs without sacrificing flavor.
  • Veggie Boost: Stir in sautéed spinach, zucchini, or bell peppers for added nutrients and a pop of color. These veggies meld beautifully with the creamy sauce.
  • Ricotta Replacement: Replace cream cheese with ricotta for a light, fluffy texture; mixing it with an egg can add richness too.
  • Protein Packed: Add cooked ground beef, turkey, or sausage to the sauce for a heartier dish that satisfies hungry appetites.
  • Spicy Kick: Spice things up by incorporating red pepper flakes into the sauce or topping with jalapeños before baking for heat lovers!
  • Herb Infusion: Experiment with fresh herbs like basil or parsley mixed into the sauce for a burst of freshness that brightens the dish.
  • Cheesy Delight: Level up on the cheesy goodness by adding cream cheese to both the sauce and the layer of toppings; double the deliciousness!
  • Creamier Texture: Incorporate a dollop of Greek yogurt or sour cream into your sauce before tossing with spaghetti for an ultra-creamy consistency.

For more comforting casserole ideas, check out this Tater Tot Casserole or explore an irresistible French Toast Casserole.

Helpful Tricks for Spaghetti Casserole Heaven

  • Soften Cream Cheese: Ensure your cream cheese is softened well, as this prevents lumps in your sauce, creating that smooth, creamy consistency we love in spaghetti casserole heaven.
  • Mix it Up: Feel free to add sautéed veggies or proteins like chicken or ground beef to elevate flavor and nutrition, making your casserole even more delightful.
  • Bake Beautifully: Keep an eye on the baking time; every oven is different. You’re looking for a bubbly, golden-brown cheese topping that’s irresistibly inviting!
  • Let it Rest: Allow the casserole to cool for 5-10 minutes after baking. This helps the layers set, making it easier to serve without falling apart.
  • Storage Savvy: Leftovers? Store in an airtight container for up to 3 days. Reheat in the oven or microwave to enjoy your Spaghetti Casserole Heaven all over again!

What to Serve with Creamy Baked Cream Cheese Spaghetti Casserole

Looking to create a full meal experience that complements the rich, creamy spaghetti casserole you’re about to serve?

  • Garlic Bread: Its buttery, toasted crunch perfectly contrasts the creamy casserole, making every bite a blissful experience. The fragrant garlic and herbs will fill your home with warmth and nostalgia, enhancing your meal further.
  • Caesar Salad: Crisp romaine lettuce and tangy dressing add a refreshing crunch that balances the richness of the casserole. Toss in some croutons for texture and enjoy the delightful contrast!
  • Roasted Vegetables: Seasonal veggies like zucchini, bell peppers, and carrots bring color and nutrition, providing a light and hearty element to your meal. The caramelized edges add an irresistible sweetness that pairs beautifully.
  • Steamed Broccoli: This bright green side adds vibrant color and a nutritious touch to your table, while the slight bitterness of the broccoli balances the creaminess of the dish perfectly.
  • Italian Wine: A crisp white wine, such as Pinot Grigio, complements the savory flavors while refreshing your palate between bites. It’s the ideal sip to toast your delicious creation!
  • Chocolate Mousse: For dessert, a light and airy chocolate mousse is a perfect way to end your meal on a sweet note, contrasting the savory main dish while still offering richness. It proves that indulgence can be elegant too!
  • Lemon Sorbet: A refreshing and light sorbet not only cleanses the palate but also brings a lovely citrusy brightness that perfectly complements the richness of your casserole. It’s a delightful conclusion to a cozy meal.

Spaghetti Casserole Heaven Recipe FAQs

What type of spaghetti should I use for the casserole?
You can use traditional spaghetti, but whole grain or gluten-free pasta works beautifully as well. Choose your preferred type to suit your dietary needs and enjoy the same comforting flavors!

How should I store leftovers?
Leftovers can be stored in an airtight container in the refrigerator for up to 3 days. When ready to enjoy, simply reheat in the microwave or oven until heated through, which helps restore that delicious creamy texture.

Can I freeze the spaghetti casserole?
Absolutely! To freeze, first allow the casserole to cool completely. Then, wrap it tightly in plastic wrap followed by aluminum foil, preventing freezer burn. You can freeze it for up to 3 months. When you’re ready to eat, thaw it overnight in the refrigerator before reheating it in the oven at 350°F (175°C) until bubbly and warmed through.

What if my cream cheese is lumpy when mixing?
No worries! If your cream cheese is too cold and lumpy, you can microwave it for about 15-20 seconds to soften it further, making it easier to mix. You can also employ a mixer for about 1-2 minutes for a smoother consistency before adding it to the sauce.

Are there any dietary considerations with this recipe?
Yes, you can easily make this dish suitable for various dietary needs. Substitute regular cream cheese with dairy-free cream cheese and use gluten-free pasta for a lactose-free and gluten-free version. Additionally, pay attention to any allergies you or your guests may have and adjust ingredients accordingly.

Spaghetti Casserole Heaven

Spaghetti Casserole Heaven: Creamy Comfort in Every Bite

Discover the bliss of Spaghetti Casserole Heaven with creamy cheese and savory tomato flavors, perfect for any gathering.
Prep Time 15 minutes
Cook Time 30 minutes
Cooling Time 10 minutes
Total Time 55 minutes
Servings: 6 servings
Course: Casserole
Cuisine: Italian
Calories: 450

Ingredients
  

For the Base
  • 8 oz Spaghetti whole grain or gluten-free options work
  • 8 oz Cream Cheese softened for smooth mixing
  • 2 cups Marinara Sauce homemade or store-bought
  • 1 tsp Garlic Powder or use fresh minced garlic
For Seasoning
  • 1 tsp Italian Seasoning dried herbs mix
  • to taste Salt
  • to taste Pepper
For the Topping
  • 1 cup Shredded Mozzarella or dairy-free alternative
  • 1 cup Shredded Cheddar or mild cheddar
  • 1/2 cup Grated Parmesan nutritional yeast for vegan substitute
  • 1/2 cup Sour Cream optional, Greek yogurt as alternative

Equipment

  • Large pot
  • Mixing Bowl
  • spatula or mixer
  • 9x13 inch baking dish

Method
 

Step-by-Step Instructions
  1. Cook the Spaghetti. Begin by bringing a large pot of salted water to a boil. Add your spaghetti and cook according to the package instructions until al dente, usually about 8-10 minutes. Once done, drain the spaghetti in a colander and set it aside to cool slightly while you prepare the creamy sauce.
  2. Prepare the Cream Cheese Sauce. In a mixing bowl, combine the softened cream cheese, marinara sauce, garlic powder, Italian seasoning, salt, and pepper. Use a spatula or mixer to blend the ingredients until smooth and creamy, which should take about 2-3 minutes. If you prefer a richer texture, feel free to fold in some sour cream at this stage.
  3. Combine Pasta and Sauce. Add the drained spaghetti to the bowl with the cream cheese sauce. Gently toss the noodles with the sauce until every strand is generously coated. Aim for a uniform mixture, ensuring the creamy sauce envelops the spaghetti beautifully, which should take about 1-2 minutes.
  4. Assemble the Casserole. Preheat your oven to 375°F (190°C). Lightly grease a 9x13 inch baking dish with cooking spray or butter to prevent sticking. Spoon the spaghetti mixture into the prepared dish, spreading it evenly to create a uniform base for your Spaghetti Casserole Heaven.
  5. Top with Cheese. Sprinkle the shredded mozzarella, cheddar, and grated Parmesan evenly over the spaghetti mixture. Make sure all areas are covered to achieve that deliciously cheesy crust. This should take about 1 minute, but ensure that the topping is generous for maximum meltiness.
  6. Bake to Perfection. Place the assembled casserole in the preheated oven and bake for 25-30 minutes. Keep an eye on it; you’re looking for the cheese to be wonderfully melted, bubbling, and turning golden brown on top, indicating that it’s ready to enjoy.
  7. Garnish and Serve. Once baked, remove the casserole from the oven and let it cool for about 5-10 minutes. This brief resting period helps firm up the dish. If desired, garnish with fresh basil or parsley for a pop of color before serving your delicious Spaghetti Casserole Heaven to family and friends.

Nutrition

Serving: 1servingCalories: 450kcalCarbohydrates: 52gProtein: 18gFat: 20gSaturated Fat: 10gPolyunsaturated Fat: 1gMonounsaturated Fat: 8gCholesterol: 50mgSodium: 800mgPotassium: 400mgFiber: 3gSugar: 5gVitamin A: 500IUVitamin C: 4mgCalcium: 250mgIron: 2mg

Notes

Store leftovers in an airtight container for up to 3 days. Reheat in the microwave or oven for the best flavor.

Tried this recipe?

Let us know how it was!

Creamy Garlic Pasta – A Comforting, Flavor-Packed Delight!

There’s nothing quite like the aroma of fresh cookies wafting through your home, a sweet scent that instantly warms the heart and draws in family and friends. When it comes to the ultimate comfort food, nothing beats my go-to recipe for Ultimate Chocolate Chip Cookies. These delightful treats are not only quick and easy to whip up, but they’re also completely customizable to suit any chocolate lover’s cravings. Imagine sinking your teeth into a cookie with a crispy edge and a soft, chewy center, each bite oozing with melted chocolate. Whether you’re baking for a special occasion or just indulging in a cozy night at home, these cookies are sure to please. Are you ready to create some unforgettable moments in your kitchen? Let’s dive in!

Why Are These Cookies So Irresistible?

Irresistible, the aroma of freshly baked chocolate chip cookies fills your home, creating a warm and inviting atmosphere. Quick and easy, these cookies come together in just a few simple steps, perfect for those busy days! Customizable options allow you to mix in nuts or swap for dark chocolate, catering to every taste. Crowd-pleaser quality ensures they’re a hit at gatherings or family nights, leaving everyone wanting more. Plus, paired with a glass of milk, they elevate snack time to a whole new level! If you love comforting dishes, don’t miss out on my Creamy Garlic Pasta or Honey Garlic Salmon for more delicious ideas!

Ultimate Chocolate Chip Cookie Ingredients

• Transform your baking with these classic chocolate chip cookies!

For the Batter

  • All-Purpose Flour – Provides structure; substitute with gluten-free flour for a gluten-free option.
  • Unsalted Butter – Adds richness and moisture; can substitute with plant-based butter for a dairy-free version.
  • Granulated Sugar – Sweetens and helps cookies spread; can reduce the quantity for a less sweet treat.
  • Brown Sugar – Enhances moisture and depth of flavor; dark brown sugar can intensify the taste.
  • Eggs – Binds the ingredients and adds moisture; use a flax egg for a vegan option.
  • Vanilla Extract – Adds aromatic flavor; pure vanilla extract is preferred but imitation can be used as a substitute.
  • Baking Soda – Leavening agent that promotes rising; avoid substituting with baking powder without adjusting quantity.
  • Salt – Balances sweetness; use kosher salt for a coarser texture.
  • Chocolate Chips – Main flavor component; can replace with chunks or mix in dried fruits or nuts for variations.

These ingredients come together in a delightful symphony of flavors, making your homemade cookies a true crowd-pleaser!

Step-by-Step Instructions for Ultimate Chocolate Chip Cookies

Step 1: Preheat the Oven
Begin by preheating your oven to 350°F (175°C). While the oven warms, line your baking sheets with parchment paper to ensure that your cookies won’t stick. This setup will create a non-stick surface that helps the cookies bake evenly, giving you that perfect golden edge.

Step 2: Cream the Butter and Sugars
In a large mixing bowl, add the softened unsalted butter along with granulated and brown sugars. Use an electric mixer to beat these ingredients together on medium speed for about 2-3 minutes until the mixture is light and fluffy. This creaminess is essential for achieving that irresistible texture in your Ultimate Chocolate Chip Cookies.

Step 3: Incorporate Eggs and Vanilla
Add the eggs one at a time to the creamed mixture, mixing well after each addition until fully combined. Then, pour in the vanilla extract and continue to beat until everything is smooth and silky. This step not only enhances flavor but also creates a moist base for your cookies.

Step 4: Combine Dry Ingredients
In a separate bowl, whisk together the all-purpose flour, baking soda, and salt until well mixed. Gradually add this dry mixture into your wet ingredients, stirring gently until just combined. Take care not to overmix, as this could create tougher cookies, but ensure no flour pockets remain.

Step 5: Fold in the Chocolate Chips
Using a spatula, fold in the chocolate chips gently until they are evenly distributed throughout the dough. This is where your Ultimate Chocolate Chip Cookies truly earn their name, as those rich, melted chocolate morsels will create a delightful burst of flavor in every bite.

Step 6: Scoop the Dough
Scoop rounded tablespoons of dough onto the prepared baking sheets, ensuring there is enough space (about 2 inches) between each mound. This spacing allows the cookies to spread without merging. For an appealing presentation, you can press a few extra chocolate chips into the tops of each dough ball.

Step 7: Bake the Cookies
Place the baking sheets in the preheated oven and bake for 10-12 minutes. Keep an eye on them; the edges should turn golden while the centers look slightly underbaked. This visual cue is key to achieving that chewy center that everyone loves in cookies.

Step 8: Cool Before Serving
Once baked, remove the cookies from the oven and allow them to cool on the baking sheets for about 5 minutes. This step lets them firm up slightly before transferring them to wire racks, where they can cool completely. The final result will be perfectly crispy edges with a soft, gooey inside, ready to enjoy!

Variations & Substitutions for Chocolate Chip Cookies

Feel free to get creative with these chocolate chip cookies by exploring delightful twists that suit your taste!

  • Nuts: Add chopped walnuts or pecans for a delightful crunch that amplifies both texture and flavor. Nuts offer a wonderful contrast to the gooey chocolate, making every bite even more satisfying.

  • Oatmeal: Swap in oats for part of the flour for a heartier texture. This adds a rustic quality that makes the cookies feel more wholesome and filling.

  • Dark Chocolate: Use dark chocolate chips instead of semi-sweet for a richer and more indulgent flavor profile. Dark chocolate gives the cookies a sophisticated twist that chocolate lovers will adore.

  • Butterscotch Chips: Substitute half of the chocolate chips with butterscotch chips for a sweet and buttery flavor explosion. The combination of chocolate and butterscotch will surprise and delight your taste buds!

  • Spices: Add a pinch of cinnamon or nutmeg for a warm, spiced flavor that brings a new complexity to your cookies. These subtle spices evoke a sense of coziness, perfect for chilly evenings.

  • Sea Salt: Sprinkle coarse sea salt on top of the cookie dough before baking to enhance the sweetness and add a savory contrast. It’s a simple trick that elevates the overall taste experience.

  • Vegan Option: Replace eggs with a flax egg (1 tablespoon flaxseed meal + 2.5 tablespoons water). This easy switch allows your cookies to remain delicious while accommodating a vegan lifestyle.

  • Gluten-Free: Substitute all-purpose flour with a gluten-free blend to create a cookie that’s friendly for those with gluten sensitivities. Just ensure the blend includes xanthan gum for proper texture.

Whether you’re reminiscing with a classic batch or experimenting with new flavors, these variations will surely make your baking experience enjoyable. If you’re ever in the mood for something different, why not try these alongside my Cheesy Garlic Chicken or Garlic Chicken Gnocchi? Happy baking!

What to Serve with Ultimate Chocolate Chip Cookies

There’s something magical about pairing warm, gooey cookies with complementary flavors that elevate your snack time experience.

  • Cold Glass of Milk: The classic choice! Milk’s cool creaminess perfectly balances the rich, warm chocolate, making each bite unforgettable.
  • Rich Vanilla Ice Cream: Place a warm cookie on top of a scoop for a delightful melting experience; the creamy warmth contrasts beautifully with the soft cookie.
  • Fresh Berries: Juicy strawberries or raspberries add a vibrant freshness that cuts through the sweetness, providing a refreshing bite alongside your cookies.
  • Chocolate Fondue: Dip your cookies into a warm chocolate fountain for an indulgent treat; it’s a fun twist that’s perfect for gatherings or special occasions!
  • Nutty Granola: Sprinkle some granola on your milk or yogurt for a satisfying crunch that pairs wonderfully with the cookies’ textures, adding depth to your dessert.
  • Hot Coffee or Espresso: The rich, bitter notes of coffee balance beautifully with the sweet cookies, creating a warm hug in a mug that’s perfect for cozy evenings.
  • Homemade Chocolate Sauce: Drizzle warm, thick chocolate sauce over cookies for an extra-rich treat that’ll satisfy any chocolate lover’s cravings!

Pairing these delicious options with your Ultimate Chocolate Chip Cookies will create memorable moments filled with warmth and joy!

Storage Tips for Ultimate Chocolate Chip Cookies

Room Temperature: Store cooled cookies in an airtight container at room temperature for up to 1 week to maintain their chewy texture.

Fridge: If you want to extend freshness, keep the cookies in the fridge for up to 2 weeks, but allow them to come to room temperature before serving for better taste.

Freezer: For longer storage, freeze the cookies in an airtight container or freezer bag for up to 3 months. Place parchment between layers to prevent sticking.

Reheating: To enjoy warm cookies again, reheat them in the oven at 350°F (175°C) for 5-7 minutes. This will revive that soft, gooey center we all love in creamy chocolate chip cookies!

Expert Tips for Ultimate Chocolate Chip Cookies

Room Temperature Ingredients: Ensure your butter and eggs are at room temperature for better mixing, creating a consistent and smooth dough.

Avoid Overmixing: After adding flour, mix just until combined. Overmixing can lead to tough cookies instead of the chewy texture you desire.

Chill the Dough: For optimal flavor and cookie control, chill the dough for at least 30 minutes before baking. This helps prevent excessive spreading.

Bake Time Sensitivity: Ovens can vary! Check your cookies a minute or two early; the key is golden edges with slightly underbaked centers for that chewy perfection.

Customize Creatively: Don’t be afraid to adjust your chocolate chip cookies by adding nuts or different chocolate varieties. This will let you express your culinary creativity!

Make Ahead Options

These Ultimate Chocolate Chip Cookies are perfect for busy home cooks looking to save time! You can prepare the cookie dough up to 3 days in advance, keeping it tightly wrapped in plastic wrap in the refrigerator to maintain freshness. Alternatively, you can scoop the dough into mounds on a baking sheet, freeze them for up to 24 hours, and then transfer the frozen dough balls to a zip-top bag for longer storage. When you’re ready to bake, simply preheat your oven and add a minute or two to the baking time for the frozen dough. With these make-ahead tips, you can enjoy freshly baked cookies anytime with minimal effort – just as delicious and perfect for any occasion!

Ultimate Chocolate Chip Cookies Recipe FAQs

How do I choose the best ripe ingredients for my cookies?
Absolutely! When selecting your ingredients, especially the butter, ensure it’s at room temperature for optimal mixing. The eggs should also be at room temperature to combine seamlessly with the rest of the ingredients. For chocolate chips, I recommend semi-sweet for a classic chocolate experience, but feel free to mix in milk chocolate for a sweeter touch or dark chocolate for a richer flavor profile.

What’s the best way to store my chocolate chip cookies?
Very! Store cooled cookies in an airtight container at room temperature for up to 1 week. For extended freshness, keep them in the fridge where they can last for up to 2 weeks. Just remember to let them come to room temperature for the best taste when serving!

Can I freeze these cookies for future use?
Absolutely! You can freeze baked cookies for up to 3 months. Just stack them between layers of parchment paper in an airtight container or a freezer bag to prevent sticking. To enjoy them later, simply reheat in the oven at 350°F (175°C) for about 5-7 minutes—this way, your cookies will be warm and delicious all over again!

What should I do if my cookies turn out too tough?
Ah, a common baking conundrum! If your cookies are tough, it’s likely due to overmixing after adding the flour. To prevent this, mix just until you no longer see flour pockets. Also, ensuring your butter is softened (but not melted) helps create that tender texture. Remember, chilling the dough for at least 30 minutes is also a great way to enhance both flavor and texture!

Are there any dietary considerations I should be aware of?
Definitely! If you have allergies, be cautious with the chocolate chips and any nuts you choose to add, as they can contain common allergens like dairy, nuts, or soy. For a gluten-free option, you can substitute all-purpose flour with a gluten-free blend. If you’re vegan, simply use a flax egg instead of regular eggs and substitute the butter with plant-based alternatives.

How long does the cookie dough last in the refrigerator?
Very! The cookie dough can be stored in the refrigerator for up to 3 days. Just make sure to cover it tightly to prevent it from drying out. If you’re ready to bake, there’s no need to let it come to room temperature; you can scoop and bake it directly from the fridge for thicker cookies!

Creamy Garlic Pasta

Creamy Garlic Pasta – A Comforting, Flavor-Packed Delight!

Discover the delightful taste of Creamy Garlic Pasta, an irresistible comfort food that's sure to please.
Prep Time 10 minutes
Cook Time 15 minutes
Total Time 25 minutes
Servings: 4 plates
Course: Pasta
Cuisine: Italian
Calories: 450

Ingredients
  

Pasta Ingredients
  • 12 oz Fettuccine Can substitute with any pasta of choice.
  • 4 cloves Garlic Minced.
  • 1 cup Heavy cream For a richer sauce.
  • 1 cup Parmesan cheese Grated.
  • 2 tbsp Olive oil
  • 1 tsp Salt To taste.
  • 1 tsp Black pepper To taste.
  • 2 tbsp Fresh parsley Chopped for garnish.

Equipment

  • Large pot
  • Colander
  • Mixing Bowl
  • Saucepan
  • Wooden spoon

Method
 

Cooking Instructions
  1. Boil a large pot of salted water and cook fettuccine according to package instructions. Drain and set aside.
  2. In a saucepan, heat olive oil over medium heat and sauté minced garlic until fragrant.
  3. Add heavy cream to the saucepan and bring to a simmer.
  4. Stir in Parmesan cheese until melted and the sauce thickens.
  5. Season with salt and black pepper to taste, then add cooked pasta to the sauce.
  6. Toss to coat the pasta evenly with the creamy garlic sauce.
  7. Garnish with fresh parsley before serving.

Nutrition

Serving: 1plateCalories: 450kcalCarbohydrates: 50gProtein: 15gFat: 20gSaturated Fat: 10gPolyunsaturated Fat: 0.5gMonounsaturated Fat: 10gCholesterol: 50mgSodium: 800mgPotassium: 300mgFiber: 3gSugar: 2gVitamin A: 1000IUVitamin C: 2mgCalcium: 250mgIron: 2mg

Notes

For extra flavor, consider adding cooked chicken or shrimp to the pasta before serving.

Tried this recipe?

Let us know how it was!

Garlic Chicken Wraps: Quick, Cheesy Comfort in Every Bite

As I stood in my kitchen, the savory aroma of sautéing garlic began to swirl around me, instantly transforming the space into a cozy haven. That’s when the idea for these Cheesy Garlic Chicken Wraps sparked— a delightful twist on a classic comfort food, perfect for any night of the week. Not only do they come together in a flash, but they also invite endless customization; whether you’re in the mood for a spicy kick with pepper jack or a creamy richness from gouda, the possibilities are deliciously endless. Plus, they cater to both gluten-free eaters and those simply craving a satisfying meal. Ready to whisk away the mundane takeout routine? Let’s dive into making these wraps that promise to bring warmth and joy to your dining table!

Why are these wraps a game-changer?

Quick and Easy: This recipe is a lifesaver for busy nights, taking just about 30 minutes from start to finish.

Customizable Goodness: Feel free to swap in your favorite cheeses, spices, and veggies. Add spinach or peppers for a wholesome twist!

Crowd-Pleasing Flavor: The combination of garlic and melty cheese makes these wraps irresistible for family dinners or casual gatherings, just like my Garlic Chicken Gnocchi.

Comfort Food Vibes: With a warm, gooey filling wrapped in a crispy tortilla, each bite feels like a hug—perfect for anyone looking to ditch bland takeout.

Health-Conscious Options: Gluten-free tortillas can easily accommodate those with dietary restrictions, making this a versatile recipe for everyone!

Garlic Chicken Wraps Ingredients

For the Filling

  • Chicken – Provides hearty protein; using rotisserie chicken can speed up prep time.
  • Olive Oil – Ideal for sautéing garlic and chicken, enhancing the overall flavor.
  • Garlic (Minced) – Infuses bold, aromatic flavor, making it essential for the wrap.
  • Cheese (e.g., cheddar, mozzarella) – Melts beautifully to create a creamy filling; gouda adds richness, while pepper jack gives a spicy kick.

For the Wraps

  • Tortillas (flour/corn) – Holds all the delicious filling; swap for gluten-free tortillas to accommodate dietary needs.
  • Butter – Essential for toasting the wraps, giving them a crispy exterior; garlic butter can enhance the taste even more.

For Garnish

  • Parsley (optional) – Adds a fresh pop of color and flavor to your wraps before serving.

These Garlic Chicken Wraps are sure to become a staple in your home, easy to make and tailor to your own taste!

Step‑by‑Step Instructions for Garlic Chicken Wraps

Step 1: Cook Chicken
Begin by preheating your oven to 375°F (190°C) if baking the chicken. Season chicken pieces with salt and pepper, then bake for about 20-25 minutes, or until cooked through with an internal temperature of 165°F (74°C). Alternatively, you can sauté or grill the chicken for a quicker option. Once cooked, dice the chicken into small, bite-sized pieces.

Step 2: Sauté Garlic
In a large skillet, heat 2 tablespoons of olive oil over medium heat. Once hot, add 2-3 cloves of minced garlic, sautéing for 30 seconds to 1 minute until the garlic becomes fragrant and golden. Keep an eye on it to avoid burning, as you want that lovely garlicky aroma to perfume your kitchen, setting the stage for the Garlic Chicken Wraps.

Step 3: Combine Filling
Add the diced chicken to the skillet with the sautéed garlic, tossing well to coat all the chicken with the flavorful oil. Off the heat, stir in your choice of cheese—about 1 cup of shredded cheddar or mozzarella—to allow it to melt slightly from the residual heat. The combination of warm chicken and gooey cheese is what makes these wraps so delightful.

Step 4: Assemble Wraps
Lay a tortilla (flour or corn) on a clean surface and spoon a portion of the cheesy chicken mixture onto the center. Fold the sides of the tortilla inwards and then roll it tightly from the bottom up, similar to a burrito, ensuring all the filling is securely tucked. Repeat this process until all the filling is used, creating the perfect Garlic Chicken Wraps.

Step 5: Toast Wraps
In the same skillet, melt 1-2 tablespoons of butter over medium heat. Once melted, carefully place the wraps seam-side down into the skillet, cooking for 2-3 minutes until golden brown and crispy. Flip the wraps and repeat on the other side, giving them that irresistible crunchy exterior while the cheese inside remains warm and gooey.

Step 6: Serve
Remove the wraps from the skillet and let them rest for a minute to cool slightly. This step helps prevent the filling from spilling out when you slice them. Once rested, slice each wrap in half, garnish with fresh parsley if desired, and serve alongside your favorite dipping sauce or salad for a comforting and satisfying meal.

Make Ahead Options

These Cheesy Garlic Chicken Wraps are an ideal choice for meal prep enthusiasts! You can prepare the delicious filling (chicken, garlic, and cheese mixture) up to 24 hours in advance and store it in an airtight container in the refrigerator to maintain its freshness. Simply assemble the wraps right before serving; this way, they’ll be just as gooey and flavorful! You can also wrap the assembled but un-toasted wraps tightly in plastic wrap and refrigerate them for up to 3 days. When it’s time to enjoy, toast them in a skillet or oven to achieve that crispy exterior, ensuring a comforting meal that’s quick, easy, and just as delicious as if made fresh!

What to Serve with Cheesy Garlic Chicken Wraps

Transform your weeknight dinner with side dishes that harmonize beautifully with the flavors of these cheesy delights!

  • Fresh Green Salad: A light, crisp salad with mixed greens and a tangy vinaigrette balances the warm, cheesy wraps, adding a refreshing crunch.

  • Seasoned Potato Wedges: Crispy potato wedges seasoned with herbs offer a satisfying textural contrast and enhance the wrap’s comforting vibe. Pairing these two together makes for a delightful bite.

  • Tomato Soup: A warm bowl of creamy tomato soup brings nostalgia and comfort, inviting you to dip those wraps into its savory goodness; it’s a match made in comfort food heaven.

  • Coleslaw: The creamy and crunchy elements of coleslaw complement the savory wraps while adding a pop of brightness and freshness to your plate.

  • Roasted Veggies: Colorful roasted vegetables like bell peppers and zucchini not only provide vitamins but also add roasted sweetness that pairs beautifully with the garlic and cheese.

  • Garlic Butter Knots: For the ultimate garlic experience, serve soft, buttery garlic knots on the side; they are perfect for mopping up any leftover cheese or sauce.

  • Crispy Pickles: Tangy, crunchy pickles create a satisfying contrast to the wraps, enhancing each bite with their zesty flavor profile.

  • A Light Beer or Lemonade: A chilled bottle of light beer or refreshing lemonade can be the perfect beverage pairing, elevating the entire meal’s experience and aiding in its comforting nature.

Let your meal assembly shine by mixing and matching these sides with your Cheesy Garlic Chicken Wraps for a dinner that warms the heart!

Garlic Chicken Wraps: Customize Your Way

Feel free to make these wraps your own by mixing and matching ingredients for an exciting twist on a classic!

  • Cheese Swap: Use gouda for a creamier experience or pepper jack for a spicy bite. The cheese you choose can completely change the flavor profile!
  • Veggie Power: Add fresh spinach, sautéed mushrooms, or bell peppers to incorporate some vibrant colors and healthy nutrients. Each veggie brings its own unique flavor and texture!
  • Protein Alternatives: Swap ground turkey or chicken for the diced chicken if you’d like a different texture; you could even try tofu for a vegetarian option. There’s so much versatility in protein!
  • Spice It Up: Incorporate jalapeños or crushed red pepper for an extra kick, perfect if you love heat. Just a little can make a big difference in flavor.
  • Herb Infusion: Experiment with different herbs such as cilantro or taco seasoning for a distinct taste. Fresh herbs can elevate the dish and surprise your taste buds!
  • Low-Carb Option: Try using lettuce wraps instead of tortillas for a lighter, low-carb variant; they are still delicious and refreshing. Keep your meals light and fresh during warm weather!
  • Garlic Butter Finish: Brush your tortillas with garlic butter before toasting for extra aromatic layers of flavor; it’s a simple way to enhance every bite.
  • Zesty Dipping Sauces: Pair these wraps with zesty sauces like salsa verde or a creamy chipotle sauce for an exciting flavor contrast. Dipping can make meal times even more enjoyable!

For even more delicious ideas, check out my Garlic Parmesan Chicken or try something a little more adventurous with Chilli Chicken Takeout.

Expert Tips for Garlic Chicken Wraps

  • Use Rotisserie Chicken: For an even quicker dinner, opt for rotisserie chicken instead of cooking from scratch—saving time without sacrificing flavor.
  • Avoid Burnt Garlic: Watch the garlic closely while sautéing; it can burn quickly. Aim for golden, not brown, to maintain the lovely aroma inherent in these Garlic Chicken Wraps.
  • Perfectly Crispy Wraps: Ensure your skillet is adequately heated before adding the wraps to achieve that golden, crispy exterior. A non-stick skillet can help prevent sticking.
  • Resting Time Matters: Allowing the wraps to rest for a minute after cooking before slicing helps prevent the warm filling from spilling out, ensuring neat servings.
  • Customize Generously: Don’t hesitate to adjust spices and fillings based on your family’s preferences. More veggies or different cheeses can elevate your Garlic Chicken Wraps to the next level!

How to Store and Freeze Garlic Chicken Wraps

Fridge: Store leftover wraps in an airtight container for up to 3 days. Reheat in a skillet over medium heat to maintain crispiness.

Freezer: Wrap individual portions tightly in plastic wrap or foil, then place in a freezer bag. They can last up to 2 months. Thaw overnight in the fridge before reheating.

Reheating: For best results, reheat frozen wraps in a skillet or toaster oven for 10-15 minutes at 350°F (175°C) until heated through and crispy.

Make-Ahead: Prepare the filling in advance and store it in the fridge for up to 2 days. Assemble and toast the wraps when ready to enjoy your Garlic Chicken Wraps.

Cheesy Garlic Chicken Wraps Recipe FAQs

What type of chicken is best for the wraps?
Absolutely! You can use any cooked chicken, but rotisserie chicken is a fantastic choice for convenience. It cuts down prep time significantly while still being juicy and flavorful.

How should I store leftover wraps?
After enjoying these cheesy delights, store any leftovers in an airtight container in the fridge for up to 3 days. To reheat, pop them in a skillet over medium-low heat for about 5-7 minutes to maintain their crispy texture.

Can I freeze the Cheesy Garlic Chicken Wraps?
Very! To freeze, wrap each prepared wrap tightly in plastic wrap or foil. Then, place them in a freezer bag. They can be stored in the freezer for up to 2 months. When ready to eat, simply thaw them overnight in the fridge and reheat in a skillet for the best results!

What if my cheese doesn’t melt properly?
If you find that your cheese isn’t melting well, try using a lower moisture cheese, such as cheddar or gouda. Also, ensure your skillet is appropriately heated before adding the wraps. Consider covering the pan for a minute or two to trap heat and help the cheese melt perfectly.

Are these wraps suitable for those with gluten allergies?
Absolutely! You can easily make these Cheesy Garlic Chicken Wraps gluten-free by opting for gluten-free tortillas, which have become widely available. Just double-check the packaging for any allergens to suit your needs.

How do I customize the fillings in my wraps?
The more the merrier! Feel free to get creative: add sautéed spinach, diced bell peppers, or even beans for added texture and nutrition. Adjust your spices by adding crushed red pepper or jalapeños for a spicy twist—your wraps, your rules!

Garlic Chicken Wraps

Garlic Chicken Wraps: Quick, Cheesy Comfort in Every Bite

Garlic Chicken Wraps offer a quick, customizable comfort food solution for busy nights.
Prep Time 10 minutes
Cook Time 20 minutes
Resting Time 1 minute
Total Time 30 minutes
Servings: 4 wraps
Course: Lunch
Cuisine: American
Calories: 350

Ingredients
  

For the Filling
  • 2 cups cooked chicken, diced preferably rotisserie chicken
  • 2 tablespoons olive oil for sautéing
  • 2-3 cloves garlic, minced aromatic flavor
  • 1 cup cheese, shredded cheddar, mozzarella, gouda, or pepper jack
For the Wraps
  • 4 large tortillas flour/corn or gluten-free
  • 1-2 tablespoons butter for toasting
For Garnish
  • 2 tablespoons parsley, chopped optional, for garnish

Equipment

  • Large skillet
  • Oven
  • airtight container

Method
 

Cooking Instructions
  1. Preheat your oven to 375°F (190°C). Season chicken with salt and pepper, bake for 20-25 minutes or until cooked through. Dice into small pieces.
  2. Heat olive oil in a skillet over medium heat. Sauté minced garlic until fragrant, about 30 seconds to 1 minute, without burning.
  3. Add diced chicken to the skillet and toss to coat. Off heat, stir in shredded cheese, allowing it to melt slightly.
  4. Lay a tortilla on a surface, spoon filling into the center, fold the sides, and roll tightly.
  5. Melt butter in the skillet. Place wraps seam-side down and cook 2-3 minutes on each side until golden and crispy.
  6. Let wraps rest for a minute, slice in half, garnish with parsley, and serve with dipping sauce or salad.

Nutrition

Serving: 1wrapCalories: 350kcalCarbohydrates: 36gProtein: 23gFat: 15gSaturated Fat: 9gPolyunsaturated Fat: 1gMonounsaturated Fat: 8gCholesterol: 70mgSodium: 600mgPotassium: 300mgFiber: 2gSugar: 1gVitamin A: 500IUVitamin C: 2mgCalcium: 250mgIron: 2mg

Notes

Wraps can be customized with different vegetables and cheeses to suit personal taste. Rotisserie chicken can save time in preparation.

Tried this recipe?

Let us know how it was!

Decadent Chocolate Cherry Cheesecake to Impress Your Guests

There’s something truly magical about a dessert that comes together effortlessly—like this no-bake Chocolate Cherry Cheesecake! One slice transports you to a blissful state where rich, creamy chocolate meets the tart kiss of cherries. This delightful treat not only satisfies your sweet tooth but also saves you time in the kitchen, making it a gem for both casual gatherings and special occasions. With minimal prep, you’ll be amazed at how quickly you can whip up a decadent dessert that’s as impressive as it is delicious. Ready to treat yourself and your loved ones? Let’s dive into this easy recipe that’s sure to become a staple in your home!

Why is This Cheesecake So Irresistible?

Decadence at Its Finest: This no-bake Chocolate Cherry Cheesecake offers an indulgent escape that doesn’t require a baking marathon.

Stunning Presentation: The vibrant cherry topping against a rich chocolate base is visually striking, guaranteed to impress your guests.

Easy and Quick: With simple ingredients, you can create a restaurant-quality dessert in no time.

Flavor Burst: The combination of creamy chocolate and tangy cherries will make your taste buds dance with delight.

Versatile Choice: Change up the fruit with raspberries or strawberries for a custom touch, or try a Chocolate Fudge Cupcake as an alternative dessert!

Your gatherings will never be the same after this showstopper.

Chocolate Cherry Cheesecake Ingredients

For the Crust

  • Chocolate Cookie Crumbs – Provides a chocolatey, crunchy base; substitute with graham cracker crumbs for a milder flavor.
  • Melted Butter – Binds the crust ingredients together; ensure it’s unsalted for better flavor control.
  • Sugar – Sweetens the crust; adjust the amount based on your preferred sweetness level.

For the Cheesecake Filling

  • Cream Cheese (softened) – Forms the creamy filling; make sure it’s at room temperature for a smooth mix.
  • Granulated Sugar – Enhances sweetness of the cheesecake filling; can be refined sugar or replaced with a sweetener of choice.
  • Unsweetened Cocoa Powder – Adds delicious chocolate flavor and richness; ensure it’s pure cocoa for the best taste.
  • Eggs – Provide structure to the filling; use a commercial egg substitute for a vegetarian option if desired.
  • Vanilla Extract – Adds depth of flavor; pure extract is recommended for a more robust taste.
  • Sour Cream – Contributes to the tangy flavor and creamy texture; plain yogurt can be used as a substitute.
  • Melted Dark Chocolate – Increases the chocolate intensity of the filling; opt for high-quality chocolate for the richest flavor.

For the Cherry Topping

  • Fresh or Canned Cherries (pitted) – Offers a fruity topping; fresh provides vibrant flavor while canned can be more convenient.
  • Sugar (for cherry topping) – Sweetens the cherry mix; adjust as necessary based on the tartness of the cherries used.
  • Cornstarch – Thickens the cherry sauce for a pleasing consistency; arrowroot powder is a suitable alternative.
  • Lemon Juice – Adds acidity to balance the sweetness of cherries; using fresh lemon juice is highly recommended.

Step‑by‑Step Instructions for Chocolate Cherry Cheesecake

Step 1: Prepare the Crust
Begin by preheating your oven to 325°F (163°C). In a mixing bowl, combine chocolate cookie crumbs, melted unsalted butter, and sugar until evenly moistened. Press this mixture firmly into the bottom of a springform pan, creating an even layer. Bake for 10 minutes or until set, then remove from the oven and allow it to cool completely before adding the filling.

Step 2: Make the Cheesecake Filling
In a large mixing bowl, beat the softened cream cheese and granulated sugar together with an electric mixer until smooth and creamy. Gradually add the unsweetened cocoa powder, mixing well. Next, incorporate the eggs one at a time, mixing thoroughly after each addition. Stir in vanilla extract, sour cream, and melted dark chocolate until fully combined, ensuring a velvety texture for your Chocolate Cherry Cheesecake.

Step 3: Bake the Cheesecake
Pour the luscious cheesecake filling over the cooled crust in the springform pan, spreading it evenly. To prevent cracking, place a shallow pan filled with water below the Cheesecake in the oven. Bake for 55-60 minutes or until the edges are set but the center slightly wobbles. Turn off the oven and let the cheesecake cool inside for 1 hour to help retain moisture and maximize creaminess.

Step 4: Prepare the Cherry Topping
While the cheesecake is cooling, prepare the cherry topping by combining fresh or canned pitted cherries, sugar, and lemon juice in a saucepan. Cook over medium heat, stirring occasionally, until the mixture begins to simmer. In a small bowl, mix cornstarch with a bit of water to create a slurry, then stir this into the cherry mixture. Continue cooking for about 5 minutes until thickened, then remove from heat and allow to cool.

Step 5: Chill & Assemble
Once the cheesecake has cooled, transfer it to the refrigerator to chill for at least 4 hours, preferably overnight. This chilling process allows the flavors to meld beautifully. When you’re ready to serve, gently top the cheesecake with the cooled cherry mixture, allowing excess sauce to cascade down the sides. Slice your decadent Chocolate Cherry Cheesecake and prepare to delight your guests!

How to Store and Freeze Chocolate Cherry Cheesecake

Fridge: Store your no-bake Chocolate Cherry Cheesecake in the refrigerator, tightly covered, for up to 2 days. This will keep it fresh and delicious for your next dessert craving.

Freezer: For longer storage, freeze the cheesecake for up to 2 months. Wrap it tightly in plastic wrap and then in aluminum foil to prevent freezer burn.

Reheating: If desired, thaw the cheesecake in the refrigerator overnight before serving. For a treat, you can also gently warm individual slices in the microwave for about 15 seconds.

Storage Tip: To maintain the fresh cherry topping’s vibrancy and flavor, add it just before serving if you plan to store leftovers!

Make Ahead Options

These no-bake Chocolate Cherry Cheesecake treats are perfect for meal prep! You can prepare the crust and filling up to 24 hours in advance; simply store them separately in the refrigerator to maintain freshness and prevent the crust from becoming soggy. Additionally, the cherry topping can be made up to 3 days ahead and kept in a sealed container. When you’re ready to serve, just assemble the cheesecake by pouring the chilled filling onto the crust and topping it with the cooled cherry sauce. This makes for an effortlessly delicious dessert that will impress your guests while saving you time during busy weeknights!

Chocolate Cherry Cheesecake Variations

Feel free to make this delightful dessert your own by exploring these fun variations, sure to tantalize your taste buds!

  • Fruit Swap: Experiment with different fruits, like raspberries or strawberries, to give your cheesecake a unique twist. Each berry brings its own delightful flavor to the party!

  • Dairy-Free: Use vegan cream cheese and coconut milk instead of traditional dairy ingredients for a rich, dairy-free version that everyone can enjoy.

  • Sugar-Free: Substitute granulated sugar with your favorite sugar alternative, like Stevia or erythritol, for a lower-calorie option without sacrificing sweetness!

  • Chocolate Lovers: Add extra melted dark chocolate into the filling for a more intense chocolate experience. This little addition will leave every chocolate lover in bliss!

  • Whipped Cream Top: Layer fresh whipped cream over the cherry topping for an airy texture and a fluffy look. This delightful touch will make your cheesecake extra decadent!

  • Nutty Base: Swap the chocolate cookie crumbs for ground nuts, such as almonds or pecans, for a wholesome and crunchier crust. The nuttiness adds incredible depth to flavors.

  • Spicy Kick: Incorporate a pinch of cayenne or chili powder into the filling for a surprising, warm spice that enhances the chocolate’s richness. It’s an unexpected flavor adventure!

  • Layered Delight: Create a layered dessert by alternating between cheesecake and layers of chocolate pudding or mousse. The added textures elevate this dessert experience, making it even more memorable.

Ready to dive into delicious creativity? And if you’re in the mood for more delightful sweetness, why not check out this tempting Chocolate Fudge Cupcake or explore a refreshing Strawberry Cheesecake option? The only limit is your imagination!

What to Serve with No-Bake Chocolate Cherry Cheesecake

Looking to elevate your dessert experience? Here are delightful accompaniments that will transform your cheesecake into a memorable meal.

  • Whipped Cream: Adds a light, airy touch that complements the creamy cheesecake beautifully; bonus points for a hint of vanilla!
  • Fresh Berries: A medley of strawberries, blueberries, and raspberries brings a burst of freshness that brightens each rich bite.
  • Chocolate Sauce: Drizzling luscious chocolate sauce over the cheesecake enhances the chocolate flavor and adds a touch of decadence.

For an unforgettable pairing, consider a lightly brewed espresso or rich coffee. They create a stunning contrast to the sweetness of the cheesecake.

  • Mint Leaves: A sprinkle of fresh mint can invigorate the senses, providing a pop of color and a cooling effect.
  • Caramel Sauce: Swirl warm caramel over the cheesecake for a sweet, buttery flavor that pairs excellently with chocolate.
  • Ice Cream: A scoop of vanilla or cherry ice cream on the side amplifies the dessert’s indulgence and offers a delightful temperature contrast.
  • Fruit Tart: Serve alongside a light fruit tart for an elegant dessert trio that balances flavors and textures wonderfully.
  • Chilled Wine: A glass of sweet dessert wine, like Port, enhances the rich notes of the cheesecake while harmonizing with the cherries.

Expert Tips for No-Bake Chocolate Cherry Cheesecake

  • Smooth Struggle: Always beat your cream cheese until it’s completely smooth. This helps avoid pesky lumps in your creamy filling, creating a velvety texture.

  • Chill Time Matters: Make sure to chill your cheesecake adequately before serving. This step allows the flavors to intensify and ensures the texture sets perfectly.

  • Crack Prevention: Utilize a water bath while baking your cheesecake. This simple trick not only prevents cracking but also delivers a luxuriously creamy texture.

  • Cherry Choices: Fresh cherries provide a vibrant flavor, but if you’re short on time, canned cherries work great too. Just adjust the sugar to taste based on the type of cherries you choose.

  • Flavor Adjustments: For a custom touch, feel free to swap out the cherries for other fruits like raspberries or strawberries, keeping the spotlight on the Chocolate Cherry Cheesecake!

Chocolate Cherry Cheesecake Recipe FAQs

What type of cherries should I use?
You can use either fresh or canned cherries for this recipe. Fresh cherries will provide a vibrant and juicy flavor, while canned cherries are convenient and still taste great. Just remember to adjust the sugar level when using canned cherries, depending on how sweet or tart they are.

How long can I store the Chocolate Cherry Cheesecake in the fridge?
Your no-bake Chocolate Cherry Cheesecake can be stored in the refrigerator for up to 2 days when tightly covered. Make sure to keep it well-wrapped to prevent any odors from other foods affecting its delicious flavor!

Can I freeze the Chocolate Cherry Cheesecake?
Absolutely! To freeze your cheesecake, wrap it tightly in plastic wrap and then in aluminum foil to prevent freezer burn. It can be stored for up to 2 months. When you’re ready to enjoy it, thaw it in the fridge overnight for the best texture and flavor.

How can I prevent my cheesecake from cracking?
Using a water bath is key to a creamy texture and cracking prevention! To do this, place a shallow pan filled with hot water beneath your cheesecake in the oven. This gentle heat helps keep the moisture level consistent and results in a beautiful, crack-free top.

Can I make this cheesecake gluten-free?
Certainly! To make a gluten-free Chocolate Cherry Cheesecake, simply choose gluten-free chocolate cookie crumbs for the crust. Ensure that all other ingredients, including dark chocolate and vanilla extract, are labeled gluten-free. Now, everyone can enjoy this decadent dessert!

Chocolate Cherry Cheesecake

Decadent Chocolate Cherry Cheesecake to Impress Your Guests

This no-bake Chocolate Cherry Cheesecake combines rich chocolate and tart cherries for a delightful dessert experience.
Prep Time 20 minutes
Cook Time 1 hour
Chilling Time 4 hours
Total Time 5 hours 20 minutes
Servings: 8 slices
Course: Dessert
Cuisine: American
Calories: 300

Ingredients
  

Crust
  • 2 cups Chocolate Cookie Crumbs Substitute with graham cracker crumbs for a milder flavor.
  • 1/2 cup Melted Unsalted Butter Ensure it’s unsalted for better flavor control.
  • 1/4 cup Sugar Adjust based on preferred sweetness level.
Cheesecake Filling
  • 16 oz Cream Cheese Softened and at room temperature.
  • 3/4 cup Granulated Sugar Can be refined sugar or a sweetener of choice.
  • 1/2 cup Unsweetened Cocoa Powder Ensure it’s pure cocoa for the best taste.
  • 3 large Eggs Use a commercial egg substitute for a vegetarian option.
  • 1 tsp Vanilla Extract Pure extract is recommended.
  • 1/2 cup Sour Cream Plain yogurt can be used as a substitute.
  • 4 oz Melted Dark Chocolate Opt for high-quality chocolate.
Cherry Topping
  • 2 cups Fresh or Canned Cherries Pitted.
  • 1/4 cup Sugar Adjust based on tartness of cherries.
  • 2 tbsp Cornstarch Arrowroot powder is a suitable alternative.
  • 1 tbsp Lemon Juice Using fresh lemon juice is highly recommended.

Equipment

  • Springform Pan
  • Mixing Bowl
  • Electric mixer
  • Saucepan

Method
 

Preparation
  1. Preheat your oven to 325°F (163°C). In a mixing bowl, combine chocolate cookie crumbs, melted unsalted butter, and sugar until evenly moistened. Press firmly into the bottom of a springform pan, then bake for 10 minutes or until set. Let it cool completely.
  2. In a large mixing bowl, beat softened cream cheese and granulated sugar together until smooth. Gradually add unsweetened cocoa powder, incorporating each egg one at a time. Stir in vanilla extract, sour cream, and melted dark chocolate until fully combined.
  3. Pour the cheesecake filling over the cooled crust, spreading it evenly. Bake for 55-60 minutes until the edges are set but the center slightly wobbles. Let cool inside the oven for 1 hour.
  4. Prepare the cherry topping by combining cherries, sugar, and lemon juice in a saucepan. Cook until simmering, then mix cornstarch with water and stir into the cherry mixture. Cook for about 5 minutes until thickened, then cool.
  5. Transfer the cheesecake to the refrigerator to chill for at least 4 hours. Top with cooled cherry mixture just before serving.

Nutrition

Serving: 1sliceCalories: 300kcalCarbohydrates: 25gProtein: 5gFat: 20gSaturated Fat: 10gPolyunsaturated Fat: 2gMonounsaturated Fat: 6gCholesterol: 50mgSodium: 150mgPotassium: 150mgFiber: 1gSugar: 15gVitamin A: 500IUVitamin C: 2mgCalcium: 50mgIron: 1mg

Notes

Ensure to beat cream cheese until smooth to avoid lumps. Chilling is essential for flavor and texture. Utilize a water bath while baking to prevent cracks.

Tried this recipe?

Let us know how it was!

Delicious Pumpkin Pie Tacos for a Unique Fall Dessert Experience

As I tossed leftover Halloween pumpkins into the kitchen, a brilliant idea struck: what if I turned that classic pumpkin pie into an exciting dessert taco? That’s how these Pumpkin Pie Tacos were born! With a crunchy, sweet shell cradling a creamy pumpkin filling, this quick and easy recipe is perfect for Thanksgiving gatherings or cozy nights at home. Not only do these delightful tacos bring a fun twist to a beloved seasonal favorite, but they’re also ready in just 30 minutes! Whether you’re entertaining friends or looking for a unique way to celebrate fall, these satisfying treats will have everyone asking for seconds. Curious about how to whip up this festive dessert? Let’s dive into the recipe!

Why Try Pumpkin Pie Tacos?

Uniquely Delicious: The combination of pumpkin pie spices and creamy filling wrapped in a sweet taco shell creates a flavor experience unlike any traditional dessert.

Quick to Prepare: Ready in just 30 minutes, these delightful treats save you time while impressing guests at your fall festivities.

Versatile Options: Enjoy them with a scoop of ice cream for an extra indulgence or garnish with chopped pecans for added crunch!

Crowd-Pleasing: These tacos are sure to steal the show at Halloween and Thanksgiving gatherings, making them the highlight of your dessert table.

For more delightful fall flavors, check out our Joumou Haitian Pumpkin Soup or enjoy a twist on dessert with these Key Lime Pie Rice Treats.

Pumpkin Pie Tacos Ingredients

For the Taco Shells

  • Flour Tortillas – Essential for creating the crunchy taco shells; substitute with corn tortillas for a gluten-free option.
  • Granulated Sugar – Sweetens the shells for that delightful crunch; you can opt for coconut sugar as a less processed substitute.
  • Ground Cinnamon – Introduces warmth and depth of flavor to the shells.
  • Butter – Binds the ingredients and adds rich flavor; coconut oil is a great dairy-free alternative.

For the Pumpkin Filling

  • Cream Cheese – Offers a creamy base for the pumpkin filling; silken tofu works as a vegan substitute.
  • Powdered Sugar – Sweetens the filling beautifully.
  • Canned Pumpkin Puree – The star ingredient that brings pumpkin flavor to these tacos; using fresh pumpkin (cooked and pureed) is an excellent alternative.
  • Pure Vanilla Extract – Enhances the overall flavor profile, making it truly decadent.
  • Pumpkin Pie Spice – Delivers that signature fall flavor; you can mix your own with cinnamon, nutmeg, and ginger if needed.

For the Topping

  • Heavy Whipping Cream – Transforms into light and fluffy whipped cream for a delightful topping; opt for coconut cream for a dairy-free variation.
  • Chopped Pecans – Sprinkle on top for a delightful crunch and added flavor; they’re optional but recommended!

These Pumpkin Pie Tacos are not just a unique dessert; they’re an experience of fall flavors wrapped in a fun format!

Step‑by‑Step Instructions for Pumpkin Pie Tacos

Step 1: Preheat the Oven
Begin by preheating your oven to 400°F (200°C). This ensures that when you bake your taco shells, they become perfectly crispy and golden. While the oven warms up, gather your ingredients and equipment, including a muffin tin and a round cookie cutter, for easy assembly of the Pumpkin Pie Tacos.

Step 2: Prepare the Taco Shells
Using your round cookie cutter, cut out 3-4 rounds per tortilla, ensuring each round is about 4-4.5 inches in diameter. You will need approximately 20 taco shells. Poke the tortilla rounds with a fork to prevent bubbling during baking, allowing for an evenly crisp shell that will cradle your delicious pumpkin filling.

Step 3: Mix Cinnamon and Sugar
On a flat plate, combine granulated sugar and ground cinnamon. This sweet and spicy mixture will enhance the flavor of your taco shells. Ensure you have your melted butter ready as you’ll need it next for brushing on the tortillas, helping the cinnamon-sugar coat adhere beautifully.

Step 4: Coat the Tortillas
Brush each tortilla round lightly with melted butter, ensuring complete coverage for maximum flavor and crunch. Once coated, dip each round into the cinnamon-sugar mixture, turning to coat both sides thoroughly. This step is crucial for imparting that delightful sweetness to your Pumpkin Pie Tacos.

Step 5: Shape the Taco Shells
Flip a muffin tin upside down and place the coated tortilla rounds between the cups. This shapes the tortillas into tacos that will bake beautifully. Bake in the preheated oven for about 10 minutes, or until they appear golden brown and crisp. Keep a close eye to prevent overbaking!

Step 6: Cool the Taco Shells
Remove the muffin tin from the oven and allow the taco shells to cool for a few minutes. The shells will continue to firm up as they cool, ensuring they hold the pumpkin filling perfectly. Set them aside while you prepare the luscious whipped cream topping.

Step 7: Make the Whipped Cream
In a chilled bowl, beat heavy whipping cream with a touch of powdered sugar and pure vanilla extract until stiff peaks form. This takes about 3-5 minutes with an electric mixer. Be cautious not to overmix; you want a light and airy texture for the topping that will complement the richness of the Pumpkin Pie Tacos.

Step 8: Prepare the Pumpkin Filling
In another bowl, beat softened cream cheese and powdered sugar until smooth. Gradually mix in the canned pumpkin puree, vanilla extract, and pumpkin pie spice until thoroughly combined. This creamy, spiced pumpkin mixture is the heart of your Pumpkin Pie Tacos and should have a luscious texture for easy filling.

Step 9: Assemble the Tacos
Once the taco shells are completely cool, pipe or spoon the pumpkin filling into each shell, filling them generously. This step brings the Pumpkin Pie Tacos to life, as the creamy orange filling contrasts beautifully with the crunchy taco shell you’ve created.

Step 10: Garnish and Serve
Top each filled taco with a dollop of freshly-made whipped cream, adding a touch of sweetness and lightness. Optional: sprinkle chopped pecans on top for an extra layer of flavor and crunch. Serve your delightful Pumpkin Pie Tacos immediately and watch as they become the star of your dessert table!

How to Store and Freeze Pumpkin Pie Tacos

Room Temperature: Pumpkin Pie Tacos can be kept at room temperature for up to 2 hours before serving, ensuring the taco shells maintain their crunch.

Fridge: If you have leftover filled tacos, store them in an airtight container in the fridge for up to 3 days. Reheat the shells gently in the oven for a few minutes to regain their crispness.

Freezer: To extend their life, freeze the taco shells alone (not filled) in a tightly sealed bag for up to 2 months. Let them thaw in the fridge before reheating.

Reheating: To restore the delightful crunch, reheat taco shells in an oven at 350°F (175°C) for about 5-7 minutes before filling with the creamy pumpkin mixture.

What to Serve with Pumpkin Pie Tacos

Create a feast that embraces the flavors of fall and warms the heart.

  • Creamy Mashed Potatoes: This classic side dish adds a comforting element to your meal, providing a smooth contrast to the crunch of the tacos.
  • Roasted Brussels Sprouts: The slight bitterness and char from these sprouts enhance the sweetness of the pumpkin filling, making for a delightful balance of flavors.
  • Cranberry Sauce: A tart and fruity topping, cranberry sauce beautifully complements the sweetness of the Pumpkin Pie Tacos, adding a festive touch.
  • Apple Cider: Serve chilled or warm, this drink infuses seasonal flavors in every sip, making it an ideal partner for the tacos.
  • Pumpkin Soup: An autumn staple, a warm bowl of pumpkin soup will create a cozy dining atmosphere and tie in the flavors of your main dessert.
  • Spiced Chai Tea: The aromatic spices in chai tea mirror the flavors of your tacos, creating a harmonious dining experience perfect for cozy gatherings.
  • Caramel Apple Slices: Drizzling caramel over fresh apple slices offers a sweet, crisp contrast to the creamy pumpkin filling and enhances the festive feel.
  • Pecan Pie Bites: For a dessert duo, these bites echo the flavors of the season while providing another crunchy sweetness, perfect for sharing.
  • Vanilla Ice Cream: A scoop of this creamy delight offers a cool complement to the warm pumpkin tacos, making for a deliciously indulgent treat!

Expert Tips for Pumpkin Pie Tacos

  • Shell Perfection: Ensure tortillas are well-brushed with melted butter; this adds flavor and helps the shells crisp without burning during baking.

  • Whipped Cream Care: Beat the heavy cream until just stiff peaks form to maintain an airy texture; overmixing can result in a dense topping that weighs down the dish.

  • Watch the Baking Time: Keep a close eye on the taco shells while baking; even a minute too long can lead to a burnt taste. Aim for a golden brown finish at the 10-minute mark.

  • Cool Completely: Allow the taco shells to cool completely before filling them. This ensures the shells maintain their crispiness and hold up to the creamy pumpkin filling perfectly.

  • Flavor Variations: Get creative! Add a splash of maple syrup or a pinch of nutmeg to the pumpkin filling for an extra dimension of flavor in your Pumpkin Pie Tacos.

Pumpkin Pie Tacos Variations

Feel free to mix things up and make these tasty tacos your own! Let your imagination run wild with these fun twists.

  • Dairy-Free: Substitute cream cheese with silken tofu blended until smooth for a vegan-friendly filling that’s just as creamy.
  • Gluten-Free: Use corn tortillas instead of flour for crunchy taco shells that are suitable for those avoiding gluten.
  • Chocolate Lovers: Mix a tablespoon of cocoa powder into the pumpkin filling for a rich, chocolaty twist on the classic flavor.
  • Spice It Up: Add a dash of cayenne pepper to the filling if you’re craving a bit of heat—it’s an unexpected but delightful contrast!
  • Nutty Flavor: Swap in crushed almonds or walnuts for a crunchy alternative to pecans; this adds a new texture and delicious taste.
  • Pumpkin Spice Twist: Consider using chai spice instead of pumpkin pie spice for an exciting flavor profile perfect for fall.
  • Ice Cream Delight: Serve each taco with a scoop of vanilla ice cream on the side—imagine all those warm and cold textures mingling!
  • Fruity Surprise: Add a layer of caramelized apples or pears inside the tacos for a lovely fruity addition that balances with the pumpkin filling.

If you’re inspired by creative delights, you might enjoy experimenting with these Pumpkin Pie Tacos or taking a comforting spin on fall flavors with our Shepherd’s Pie Soup.

Make Ahead Options

These Pumpkin Pie Tacos are perfect for meal prep, allowing you to enjoy delicious fall flavors even on the busiest of days! You can prepare the taco shells up to 2 days in advance; simply bake and then store them in an airtight container to maintain their crunch. The creamy pumpkin filling can be made 24 hours ahead as well—just refrigerate it in a sealed container. When it’s time to serve, fill the taco shells with the pumpkin mixture and top with freshly whipped cream for that light, airy touch. This approach not only saves time but ensures your Pumpkin Pie Tacos remain just as delightful as when freshly made!

Pumpkin Pie Tacos Recipe FAQs

How do I choose ripe pumpkins for the filling?
Absolutely! When selecting a pumpkin, look for one that is firm and has a rich, vibrant color. The skin should be free from soft spots or blemishes. For pumpkin pie, a musky or sugar pumpkin is ideal, as it offers a sweeter flavor and smoother texture.

How should I store leftover Pumpkin Pie Tacos?
You can store any leftover filled tacos in an airtight container in the refrigerator for up to 3 days. Be sure to keep them chilled to maintain freshness. If you’re storing the taco shells separately, they can be kept at room temperature for up to 2 hours without losing their crunch.

Can I freeze Pumpkin Pie Tacos?
Yes, you can! To freeze the taco shells, place them in a tightly sealed bag for up to 2 months. Make sure they are completely cooled before freezing to avoid moisture. When you’re ready to enjoy them again, thaw them in the fridge and reheat in an oven at 350°F (175°C) for about 5-7 minutes to restore their crunch before filling with the pumpkin mixture.

What should I do if my taco shells turn out too hard or burnt?
If your taco shells are too hard, it could be from overbaking. To prevent this, keep a close eye on your shells during baking, aiming for a golden brown color at around the 10-minute mark. If they do turn out burnt, consider mixing in a little bit of crushed graham crackers in the next batch for added sweetness and to mask any burnt flavors!

Can I modify this recipe for dietary restrictions?
Very! For a gluten-free version, simply swap out the flour tortillas for corn tortillas. If you’re looking for a dairy-free alternative, replace cream cheese with silken tofu and use coconut cream instead of heavy whipping cream for the topping. These modifications still keep the delicious essence of Pumpkin Pie Tacos while catering to various dietary needs.

Is it safe for pets to eat pumpkin in my recipe?
Absolutely! Plain, cooked pumpkin is safe for dogs and can even be beneficial for their digestion. However, make sure they don’t consume any of the added sugars or spices from your Pumpkin Pie Tacos, as those can be harmful. Always check with your vet before introducing new treats into your pet’s diet.

Pumpkin Pie Tacos

Delicious Pumpkin Pie Tacos for a Unique Fall Dessert Experience

Pumpkin Pie Tacos are a fun twist on a classic dessert, perfect for fall gatherings.
Prep Time 15 minutes
Cook Time 15 minutes
Total Time 30 minutes
Servings: 8 tacos
Course: Dessert
Cuisine: American
Calories: 250

Ingredients
  

For the Taco Shells
  • 20 pieces Flour Tortillas Substitute with corn tortillas for gluten-free option.
  • 1/2 cup Granulated Sugar Coconut sugar can be used as a substitute.
  • 1 teaspoon Ground Cinnamon
  • 4 tablespoons Butter Coconut oil is a great dairy-free alternative.
For the Pumpkin Filling
  • 8 ounces Cream Cheese Silken tofu works as a vegan substitute.
  • 1/2 cup Powdered Sugar
  • 1 cup Canned Pumpkin Puree Fresh pumpkin (cooked and pureed) is an excellent alternative.
  • 1 teaspoon Pure Vanilla Extract
  • 2 teaspoons Pumpkin Pie Spice You can mix your own with cinnamon, nutmeg, and ginger.
For the Topping
  • 1 cup Heavy Whipping Cream Coconut cream can be used for a dairy-free variation.
  • 1/4 cup Chopped Pecans Optional but recommended!

Equipment

  • Muffin Tin
  • round cookie cutter
  • Electric mixer
  • chilled bowl

Method
 

Step‑by‑Step Instructions for Pumpkin Pie Tacos
  1. Preheat your oven to 400°F (200°C). Gather your ingredients and equipment.
  2. Cut out 3-4 rounds per tortilla using a round cookie cutter. Poke the tortilla rounds with a fork.
  3. Combine granulated sugar and ground cinnamon on a flat plate.
  4. Brush the tortillas lightly with melted butter and dip into the cinnamon-sugar mixture.
  5. Shape tortillas in an upside-down muffin tin and bake for about 10 minutes until golden brown.
  6. Allow taco shells to cool for a few minutes.
  7. Beat heavy whipping cream with powdered sugar and vanilla extract until stiff peaks form.
  8. In another bowl, beat cream cheese and powdered sugar until smooth; mix in pumpkin, vanilla, and spice.
  9. Pipe or spoon the pumpkin filling into cooled taco shells.
  10. Top with freshly-made whipped cream and optional pecans; serve immediately.

Nutrition

Serving: 1tacoCalories: 250kcalCarbohydrates: 30gProtein: 4gFat: 14gSaturated Fat: 8gPolyunsaturated Fat: 1gMonounsaturated Fat: 5gCholesterol: 30mgSodium: 180mgPotassium: 120mgFiber: 1gSugar: 10gVitamin A: 2000IUVitamin C: 1mgCalcium: 50mgIron: 1mg

Notes

These Pumpkin Pie Tacos are not just a unique dessert; they’re an experience of fall flavors wrapped in a fun format!

Tried this recipe?

Let us know how it was!

Homemade Almond Kringle Recipe: Flaky Pastry Bliss Awaits

As the warm scent of freshly baked treats fills the air, nothing captures the heart quite like a Homemade Almond Kringle. This delightful pastry is not just a feast for the senses; it’s a wonderful way to celebrate the joy of homemade cooking with family and friends. Experience the magic of flaky layers encasing a rich almond filling with this easy-to-follow Homemade Almond Kringle Recipe. It’s a show-stopping centerpiece that’s perfect for gatherings or a cozy afternoon treat. Plus, this recipe is wonderfully versatile, allowing you to freeze any leftovers or prepare the dough in advance, making baking a breeze. Are you ready to create a flaky masterpiece that will impress your loved ones?

Why is Almond Kringle so special?

Irresistible Aroma: The scent of toasted almonds wafting through your kitchen creates an inviting atmosphere that no store-bought pastry can match.

Showstopper Presentation: With its gorgeous shape and glossy glaze, this Homemade Almond Kringle is the perfect centerpiece for any gathering.

Easy to Make: Don’t let the flaky layers intimidate you! This recipe is straightforward and accessible, even for beginner bakers.

Versatile Delights: Feel free to experiment with fillings! Try our delicious Cabbage Fat Burning or mix in seasonal flavors for a unique twist.

Prep Ahead: Make the dough in advance and store it in the fridge or freezer for an effortless baking experience. Your guests will be impressed, and you’ll have a delightful treat ready in no time!

Homemade Almond Kringle Ingredients

For the Dough

  • All-purpose flour – Essential for structure; consider using a gluten-free flour blend for a gluten-free version.
  • Butter – Adds rich flavor and flakiness; use very cold butter for best results.
  • Sugar – Provides sweetness; granulated sugar is recommended, but brown sugar adds depth.
  • Yeast – Leavens the dough; use instant yeast for convenience and ensure it’s fresh.
  • Water – Hydration is key; use ice-cold water to keep the dough cold.

For the Filling

  • Almond paste – The star flavor of the kringle; for a nut-free option, sunflower seed spread works well.
  • Powdered sugar – Sweetens and enhances texture; adjust quantity to match your sweetness preference.
  • Vanilla extract – Amplifies flavor; almond extract can substitute for a stronger almond taste.
  • Toasted almonds – Adds appealing texture; freshly ground almonds bring out the best flavor, though almond flour is a suitable alternative.

For the Glaze

  • Powdered sugar – Sweetness for the glaze; adjust to achieve your desired consistency for drizzling.
  • Milk or cream – Provides liquid for the glaze; feel free to use nondairy milk instead.
  • Vanilla extract – Enhances the glaze’s flavor; consider almond extract for a unique twist to complement the homemade almond kringle recipe.

Step‑by‑Step Instructions for Homemade Almond Kringle Recipe

Step 1: Make the Dough
In a large mixing bowl, combine the all-purpose flour, granulated sugar, and instant yeast. Cut in the very cold butter with a pastry cutter or fork until the mixture resembles coarse crumbs. Gradually stir in the ice-cold water until fully incorporated, forming a soft dough. Cover the bowl with plastic wrap and chill in the refrigerator for at least 30 minutes to ensure the butter stays cold.

Step 2: Prepare the Filling
In a medium bowl, mix together the almond paste, powdered sugar, and your choice of vanilla or almond extract. Use a fork or a spatula to combine until the mixture is smooth and creamy. Gently fold in the ground toasted almonds until evenly distributed. This filling will add a rich, nutty flavor to your Homemade Almond Kringle, providing a delightful contrast to the flaky pastry.

Step 3: Assemble the Kringle
After chilling the dough, turn it out onto a floured surface and roll it into a rectangle about 1/4 inch thick. Spread the almond filling evenly over the dough, leaving a small border around the edges. Carefully fold the dough lengthwise to form a log, then shape it into a loop, pinching the ends together to seal well. Transfer the shaped kringle to a baking sheet lined with parchment paper.

Step 4: Bake
Preheat your oven to 350°F (175°C). Once preheated, bake the assembled Homemade Almond Kringle for approximately 25-30 minutes, or until golden brown and puffed. Keep an eye on it during the last few minutes of baking to achieve that perfect golden hue. Your kitchen will soon fill with the irresistible aroma of baking almonds, promising a delicious treat.

Step 5: Glaze and Finish
While the kringle is cooling on a wire rack, prepare the glaze by whisking together powdered sugar and milk or cream until smooth. Adjust the consistency by adding more liquid or sugar as needed. Once the kringle is cool, drizzle the glaze generously over the top, allowing it to set slightly. This sweet glaze adds a wonderful finishing touch to your Homemade Almond Kringle, making it even more appealing.

How to Store and Freeze Homemade Almond Kringle

Room Temperature: Keep the kringle in an airtight container at room temperature for up to 3 days. This keeps it fresh while maintaining its delightful texture.

Fridge: If you prefer, you can store the kringle in the fridge for up to a week. Just make sure to wrap it tightly to avoid moisture loss.

Freezer: For longer storage, wrap the kringle well in plastic wrap and then foil, and freeze for up to 2-3 months. Thaw in the fridge overnight before enjoying.

Reheating: To revive the flaky texture, warm slices in a 350°F (175°C) oven for 10–15 minutes before serving. Your Homemade Almond Kringle will taste freshly baked again!

What to Serve with Homemade Almond Kringle

Warm up your gathering with delightful additions that perfectly complement this flaky treat.

  • Rich Coffee: This aromatic beverage enhances the almond flavor while providing a cozy warmth, perfect for breakfast or an afternoon treat.
  • Herbal Tea: Opt for chamomile or peppermint; their light flavors contrast beautifully with the sweetness of the kringle and promote relaxation.
  • Fresh Berries: Serve a vibrant medley of strawberries, blueberries, and raspberries to add a refreshing burst of color and acidity. These juicy fruits balance the richness of the almond filling.
  • Vanilla Ice Cream: A scoop of creamy vanilla paired with a warm slice of kringle creates an indulgent dessert that’s hard to resist.
  • Yogurt Parfait: Layer tangy yogurt with granola and fruits for a wholesome breakfast or snack. This adds a nice contrast in texture and flavor.
  • Sparkling Water: A crisp, bubbly drink cleanses the palate, making it a great choice alongside rich pastries like the Homemade Almond Kringle.
  • Lemon Curd: The tartness of lemon curd pairs beautifully with the sweetness of the kringle, creating a delightful balance of flavors that will impress your guests.
  • Cheese Platter: Include creamy brie or tangy goat cheese to add depth to the dessert and create a lovely, savory counterpoint.
  • Pecan Pie Bars: For a sweet treat combo, serve these rich bars along with the kringle; the nutty flavor echoes the almond filling and provides a delightful texture contrast.

Homemade Almond Kringle Recipe Variations

Feel free to let your creativity soar as you explore these delightful twists on the classic Homemade Almond Kringle!

  • Nut-Free: Substitute almond paste with sunflower seed spread for a delicious nut-free alternative that still brings flavor and richness.

  • Fruit-Filled Delight: Think outside the box by using fruit preserves like raspberry or cherry for a vibrant and fruity filling. It’s a refreshing change from the traditional almond!

  • Chocolate Lovers: For a rich twist, replace almond paste with chocolate hazelnut spread. The combination of chocolate and flaky pastry is a match made in heaven.

  • Spiced Almond Filling: Add warmth to your filling by incorporating a dash of cinnamon or nutmeg. These cozy spices give your kringle a lovely seasonal flair.

  • Savory Spin: Transform your kringle into a savory delight by filling it with a blend of cream cheese, herbs, and sautéed onions. Serve it as an eye-catching appetizer!

  • Gluten-Free: Use a gluten-free flour blend instead of all-purpose flour to make this flaky pastry suitable for gluten-sensitive friends and family.

  • Maple Infusion: Substitute vanilla extract with maple extract in the filling for a warm, sweet flavor that will have everyone asking for seconds.

  • Layered Texture: Incorporate a layer of chopped dark chocolate or a swirl of chocolate spread into the filling for an unexpected surprise in every bite.

Embrace the spirit of baking with these variations, which allow you to personalize your Homemade Almond Kringle. Whether it’s for a birthday brunch or a cozy evening treat with a cup of tea, these delightful options bring a new sparkle to your tradition. And hey, if you’re feeling adventurous, why not pair it with a warm bowl of Shepherd’s Pie Soup for a comforting meal experience?

Make Ahead Options

These Homemade Almond Kringle are perfect for meal prep enthusiasts! You can prepare the dough up to 48 hours in advance, storing it in an airtight container in the refrigerator to maintain its freshness and flakiness. Additionally, the almond filling can be made up to 3 days ahead; simply store it in the fridge. When you’re ready to bake, roll out the chilled dough and assemble the kringle before baking. To ensure your kringle remains just as delicious, avoid letting the dough sit out at room temperature for too long. This way, you can enjoy a delightful pastry with minimal effort on busy mornings or unexpected gatherings!

Expert Tips for the Best Almond Kringle

  • Chill Ingredients: Keeping your butter and water very cold is essential for achieving that flaky texture. Warm ingredients can lead to a dense pastry.

  • Prevent Stickiness: If dough becomes sticky while rolling, quickly chill it again and use extra flour on your surface to avoid sticking.

  • Seal Properly: Ensure you pinch the ends of the kringle tightly together when shaping; this helps keep the filling inside and prevents leakage during baking.

  • Glaze Consistency: Adjust your glaze by slowly adding liquid to reach your desired consistency—too thick won’t drizzle nicely, and too thin will run off the kringle.

  • Storage Tips: Store any leftover Homemade Almond Kringle in an airtight container at room temperature for up to 3 days or freeze for longer preservation without losing quality.

Homemade Almond Kringle Recipe FAQs

How do I select the best almonds for the filling?
Absolutely! When choosing almonds, look for ones that are whole and fresh. Avoid those with dark spots or a rancid smell, as this indicates they’re past their prime. If you can, opt for certified organic almonds for the best flavor and quality.

How long can I store my Almond Kringle?
Your Homemade Almond Kringle can be stored in an airtight container at room temperature for up to 3 days. If you decide to refrigerate it, it can last up to a week, but remember to wrap it tightly to keep it fresh.

Can I freeze my Homemade Almond Kringle?
Very much! Wrap the kringle tightly in plastic wrap and then in foil to prevent freezer burn. It can be stored in the freezer for up to 2-3 months. To enjoy, simply thaw in the fridge overnight and warm in a 350°F (175°C) oven for 10–15 minutes before serving for that fresh-baked taste.

What should I do if my dough becomes sticky?
If you find your dough is becoming sticky while working with it, don’t panic! Simply chill it again briefly in the refrigerator to firm it up. Always have extra flour on hand to dust your work surface and rolling pin as needed to avoid sticking.

Are there any dietary considerations for this recipe?
Absolutely! If you’re making the kringle for someone with nut allergies, you can substitute the almond paste with sunflower seed spread for a nut-free option. Additionally, for lactose-intolerant individuals, opt for non-dairy substitutes in the glaze, such as almond or oat milk.

What if my kringle spills filling during baking?
It happens, no worries! Ensure you pinch the ends tightly when forming your Kringle to avoid leaks. If you do experience spilling, simply use a baking sheet lined with parchment paper to catch any drippings and prevent burns in your oven. It will still taste delicious, I promise!

Homemade Almond Kringle Recipe

Homemade Almond Kringle Recipe: Flaky Pastry Bliss Awaits

Experience the joy of homemade cooking with this delightful Homemade Almond Kringle featuring flaky layers and rich almond filling.
Prep Time 30 minutes
Cook Time 30 minutes
Chilling Time 30 minutes
Total Time 1 hour 30 minutes
Servings: 8 slices
Course: Dessert
Cuisine: American
Calories: 250

Ingredients
  

For the Dough
  • 2 cups All-purpose flour Consider gluten-free flour for a gluten-free version.
  • 1 cup Butter Use very cold butter.
  • 1 tablespoon Granulated sugar Brown sugar adds depth.
  • 2 teaspoons Instant yeast Ensure it's fresh.
  • 1/4 cup Ice-cold water Hydration is key.
For the Filling
  • 1 cup Almond paste For a nut-free option, use sunflower seed spread.
  • 1/2 cup Powdered sugar Adjust to match your sweetness preference.
  • 1 teaspoon Vanilla extract Almond extract can substitute.
  • 1/2 cup Toasted almonds Freshly ground almonds are best.
For the Glaze
  • 1 cup Powdered sugar Adjust for desired consistency.
  • 2 tablespoons Milk or cream Nondairy milk can be used.
  • 1 teaspoon Vanilla extract Almond extract adds a unique twist.

Equipment

  • Mixing Bowl
  • pastry cutter
  • Baking Sheet
  • Parchment Paper
  • whisk

Method
 

Step‑by‑Step Instructions
  1. In a large mixing bowl, combine the all-purpose flour, granulated sugar, and instant yeast. Cut in the very cold butter until the mixture resembles coarse crumbs. Gradually stir in the ice-cold water until fully incorporated, forming a soft dough. Cover and chill for at least 30 minutes.
  2. In a medium bowl, mix together the almond paste, powdered sugar, and vanilla or almond extract. Combine until smooth, then fold in the ground toasted almonds.
  3. Roll the chilled dough into a rectangle about 1/4 inch thick. Spread the almond filling evenly over the dough, then fold lengthwise to form a log and shape into a loop. Pinch the ends to seal and transfer to a parchment-lined baking sheet.
  4. Preheat the oven to 350°F (175°C). Bake the kringle for approximately 25-30 minutes until golden brown. Monitor during the last few minutes for perfect color.
  5. Prepare the glaze by whisking powdered sugar and milk or cream until smooth. Drizzle over the cooled kringle for a lovely finish.

Nutrition

Serving: 1sliceCalories: 250kcalCarbohydrates: 34gProtein: 3gFat: 12gSaturated Fat: 7gPolyunsaturated Fat: 0.5gMonounsaturated Fat: 4.5gCholesterol: 30mgSodium: 150mgPotassium: 100mgFiber: 1gSugar: 10gVitamin A: 500IUCalcium: 50mgIron: 1mg

Notes

Store leftovers in an airtight container at room temperature for up to 3 days, or freeze for longer storage.

Tried this recipe?

Let us know how it was!

Killer White Chili: Creamy Comfort for Cozy Nights

As the rich aroma of spices fills the air, my kitchen transforms into a cozy haven—an invitation to indulge in my Award-Winning Creamy White Chicken Chili. This creamy comfort food is not just a meal; it’s a celebration of warmth and flavor, perfect for relishing on a chilly evening. The simplicity of the slow cooker makes this killer white chili not only a time-saver but also a crowd-pleaser that turns weeknight dinners into delightful feasts. With just a handful of wholesome ingredients, you’ll discover how easily you can whip up this satisfying dish that balances creaminess and subtle spice. Are you ready to warm your heart and soul with a bowl of this irresistible chili? Let’s dive in!

Why is This Chili a Must-Try?

Comforting, Creamy Delight: This killer white chili combines the richness of cream cheese with a medley of spices, resulting in a dish that’s pure bliss.
Easy Slow Cooker Magic: Simply set it and forget it! This recipe is perfect for busy weeknights, allowing flavors to meld while you take care of everything else.
Crowd-Pleasing Flavor: Whether you’re hosting friends or feeding family, this chili will have everyone coming back for seconds. Serve with some cornbread for a complete meal!
Versatile Base Ingredients: Customize with your favorite ingredients by adding corn or more veggies, or even substituting chicken for turkey.
Make-Ahead and Freezer Friendly: This chili stores well for future meals, making it a convenient option for meal prep or last-minute dinners.
You can also explore more flavors with Sweet Chili Chicken or a quick One Pan Chili for a delightful twist!

Killer White Chili Ingredients

For the Base
Chicken Breast – Main protein; provides tender texture. Use thighs for a richer taste if preferred.
White Beans – Serve as the base, adding creaminess; can substitute with navy beans.
Chicken Broth – Adds depth and flavor; low-sodium recommended. You can use vegetable broth for a vegetarian option.
Cream Cheese – Contributes to the creamy consistency; can replace with Greek yogurt for a healthier alternative.

For the Aromatics
Onion – Provides foundational flavor; yellow or white are best.
Garlic – Enhances overall flavor; fresh is preferred, but minced may suffice.

For the Spice
Green Chiles – Adds a mild heat and tang; substitute jalapeños for extra spice if desired.
Cumin and Oregano – Key spices for traditional chili flavor; ensure freshness for best results.
Salt and Pepper – Essential for seasoning; adjust to taste.

With these wholesome ingredients, you’re on your way to creating this killer white chili that will warm your heart and soul!

Step‑by‑Step Instructions for killer white chili

Step 1: Prep the Chicken
Begin by cutting the chicken breast into bite-sized pieces, ensuring they’re even for uniform cooking. This will help the chicken cook thoroughly and blend seamlessly into your killer white chili. Set aside while you prepare the aromatics for the next step, as this will enhance the overall flavor profile of your dish.

Step 2: Sauté Aromatics
In a skillet, heat a tablespoon of oil over medium heat. Add the chopped onion and minced garlic, sautéing for about 5 minutes until they turn translucent and fragrant. Stir occasionally to prevent burning. This aromatic base will infuse your killer white chili with rich flavors as you continue the cooking process.

Step 3: Combine Ingredients
Transfer the sautéed onion and garlic into a slow cooker. Add the chicken pieces, white beans, chicken broth, softened cream cheese, and diced green chiles. Sprinkle in the cumin, oregano, salt, and pepper. Gently stir to combine, ensuring the cream cheese is well integrated. This mixture sets the stage for a delicious, creamy white chili.

Step 4: Cook the Chili
Cover your slow cooker and set it to low heat, cooking for about 6 hours. As it simmers, the flavors will meld beautifully, and the chicken will become tender and juicy. You’ll know it’s ready when the chicken is easily shredded with a fork and the chili has thickened to a creamy consistency, perfect for serving.

Step 5: Final Touch
Once cooking is complete, give the chili a good stir to fully incorporate the cream cheese. Taste and adjust seasoning if needed, adding more salt or pepper to suit your palate. This final step ensures your killer white chili is bursting with flavor, ready to provide comfort in every bowl.

Killer White Chili: Customization Ideas

Feel free to get creative with this recipe and make it your own; let the flavors take you on a delicious adventure!

  • Dairy-Free: Replace cream cheese with cashew cream or silken tofu for a creamy texture without dairy.

  • Add Heat: Throw in diced jalapeños or a splash of hot sauce for those who love a spicy kick, elevating your chili to new levels.

  • Flavor Boost: Stir in a teaspoon of smoked paprika for a smoky depth that adds a whole new dimension to your killer white chili.

  • Veggie Power: Incorporate bell peppers, corn, or zucchini to boost the nutrition and add delightful textures that complement the creamy base beautifully.

  • Quinoa Twist: Mix in cooked quinoa for an extra protein punch and a pleasantly chewy texture that enhances the overall heartiness of your dish.

  • Turkey Option: Swap the chicken for ground turkey for a lighter, yet equally delicious, alternative that your family will enjoy.

  • Southwestern Vibe: Add black beans and corn for a southwestern flair; the combination adds color and flavor that brightens each bowl.

  • Fragrant Herbs: Top with fresh cilantro or parsley right before serving for a burst of freshness that brightens the rich, creamy chili.

You might also want to explore the rich flavors of Sweet Chili Chicken or indulge in the effortless delight of a One Pan Chili to bring even more variety to your dining table!

How to Store and Freeze Killer White Chili

  • Fridge: Store leftover killer white chili in an airtight container for up to 4 days. Ensure it’s completely cooled before refrigerating to maintain freshness.
  • Freezer: For long-term storage, freeze the chili in portions using freezer-safe containers or bags. It will stay fresh for up to 3 months.
  • Thawing: When ready to enjoy, thaw overnight in the fridge or use the microwave’s defrost setting. Heat thoroughly before serving.
  • Reheating: Reheat on the stove over low-medium heat, stirring occasionally until warmed through. Add a splash of broth if needed to restore creaminess.

Make Ahead Options

These creamy white chicken chili preparations are perfect for meal prep enthusiasts! You can chop the chicken, sauté the onions and garlic, and mix all the ingredients up to 24 hours in advance. Store everything in an airtight container in the refrigerator (this helps maintain the chili’s flavor and texture). When you’re ready to serve, simply transfer the mixture to your slow cooker and cook as directed for about 6 hours on low. For even better flavor, consider making the chili completely and refrigerating it for up to 3 days—the flavors will deepen over time, making it just as delicious. Don’t forget to stir well before serving to integrate the creamy goodness fully!

What to Serve with Award-Winning White Chicken Chili

Looking to elevate your cozy chili night? These delightful pairings will enhance your experience, bringing warmth and flavor to your table.

  • Cornbread: This sweet, buttery side perfectly contrasts the creamy chili, adding a delightful texture and flavor diversity that’ll leave you craving more.

  • Tortilla Chips: Their crispy crunch provides a satisfying balance to the smooth chili, perfect for dipping and adds a fun twist to your meal.

  • Avocado Slices: Creamy avocado slices not only add a beautiful pop of color but also bring a refreshing coolness that complements the spicy notes of the chili.

  • Cheesy Garlic Bread: A warm, cheesy loaf is wonderful for sopping up each hearty spoonful of chili, creating a comforting combination that’s simply irresistible.

  • Cilantro Lime Rice: This bright, zesty side pairs wonderfully with the rich flavors of the dish, enhancing the overall dining experience with a fresh burst of flavor.

  • Margaritas: Sip on a refreshing margarita to balance the rich creaminess of the chili, making each bite even more enjoyable with a citrusy kick.

Expert Tips for Killer White Chili

  • Flavor Enhancement: Allow for longer cooking time; the flavors deepen as they meld, creating an irresistible taste in your killer white chili.
  • Salt Wisely: Taste before adding more salt; it’s easier to adjust at the end than to fix an overly salty chili.
  • Cream Cheese Prep: Soften cream cheese beforehand to ensure it blends smoothly into the chili, avoiding any lumps in your creamy base.
  • Ingredient Flexibility: Feel free to incorporate more veggies like corn or bell peppers to elevate nutrition without compromising taste.
  • Storage Tips: Store leftover chili in an airtight container in the fridge for up to 4 days, or freeze for up to 3 months for easy future meals.

Killer White Chili Recipe FAQs

What type of chicken should I use for the best flavor?
Absolutely! For the best flavor and tenderness, I recommend using chicken thighs instead of chicken breasts. Thighs have a richer taste and stay juicier, adding to the overall creaminess of your killer white chili.

Can I substitute white beans with another type of bean?
Very! While white beans are perfect for the creamy texture of this chili, you can easily substitute them with navy beans or even black beans if you prefer. Just be mindful that the flavor profile may change slightly, but each option will yield a delicious result!

How should I store leftover chili, and how long will it last?
Store your killer white chili in an airtight container in the refrigerator for up to 4 days. Make sure it cools completely before sealing to keep it fresh. If you’d like to save some for later, freeze it for up to 3 months!

What is the best way to freeze killer white chili?
To freeze, portion your chili into freezer-safe containers or bags. Before sealing, remove as much air as possible to avoid freezer burn. Label with the date and freeze for up to 3 months. When you’re ready to enjoy it, thaw it overnight in the fridge or use the microwave’s defrost setting, and then reheat on the stove until thoroughly warmed.

Are there any dietary considerations I should keep in mind?
Absolutely! This chili contains cream cheese, which may not be suitable for dairy-free diets. If you have lactose intolerance or are looking for a lighter option, I recommend substituting the cream cheese with Greek yogurt. This still gives a creamy consistency without the dairy!

What if my chili turns out too thick or too thin?
If your chili is too thick, stir in a bit more chicken broth or water until you reach your desired consistency. Conversely, if it’s too thin, let it simmer uncovered for a little longer to thicken. You can also mash a few beans with a fork to create a creamier texture. The more you experiment, the better it will get!

killer white chili

Killer White Chili: Creamy Comfort for Cozy Nights

This killer white chili is a creamy and flavorful comfort food perfect for chilly evenings.
Prep Time 15 minutes
Cook Time 6 hours
Total Time 6 hours 15 minutes
Servings: 6 servings
Course: Dinner
Cuisine: American
Calories: 350

Ingredients
  

For the Base
  • 1 pound Chicken Breast Can substitute with thighs for richer taste
  • 2 cups White Beans Can substitute with navy beans
  • 4 cups Chicken Broth Low-sodium recommended; use vegetable broth for vegetarian option
  • 8 ounces Cream Cheese Can replace with Greek yogurt for healthier alternative
For the Aromatics
  • 1 Onion Yellow or white are best
  • 3 cloves Garlic Fresh is preferred, minced may suffice
For the Spice
  • 1 can Green Chiles Substitute jalapeños for extra spice if desired
  • 1 teaspoon Cumin
  • 1 teaspoon Oregano Ensure freshness for best results
  • to taste Salt Essential for seasoning
  • to taste Pepper Essential for seasoning

Equipment

  • Slow Cooker
  • Skillet
  • Knife
  • Cutting board

Method
 

Step-by-Step Instructions for killer white chili
  1. Prep the chicken by cutting it into bite-sized pieces and set aside.
  2. Sauté onion and garlic in a skillet over medium heat for about 5 minutes until translucent.
  3. Combine sautéed onion and garlic in a slow cooker with chicken, white beans, broth, cream cheese, green chiles, and spices. Stir to mix.
  4. Cover and cook on low for about 6 hours until chicken is tender and chili is creamy.
  5. Stir to incorporate cream cheese, taste, and adjust seasoning before serving.

Nutrition

Serving: 1bowlCalories: 350kcalCarbohydrates: 30gProtein: 30gFat: 15gSaturated Fat: 7gPolyunsaturated Fat: 1gMonounsaturated Fat: 6gCholesterol: 90mgSodium: 800mgPotassium: 800mgFiber: 8gSugar: 2gVitamin A: 500IUVitamin C: 5mgCalcium: 150mgIron: 2mg

Notes

This chili is perfect for meal prep and can be easily frozen for later enjoyment.

Tried this recipe?

Let us know how it was!

Stay Connected

Get recipes via email: