Get my cookbooks

Cozy Tomato Soup with Cheese Dumplings for Ultimate Comfort

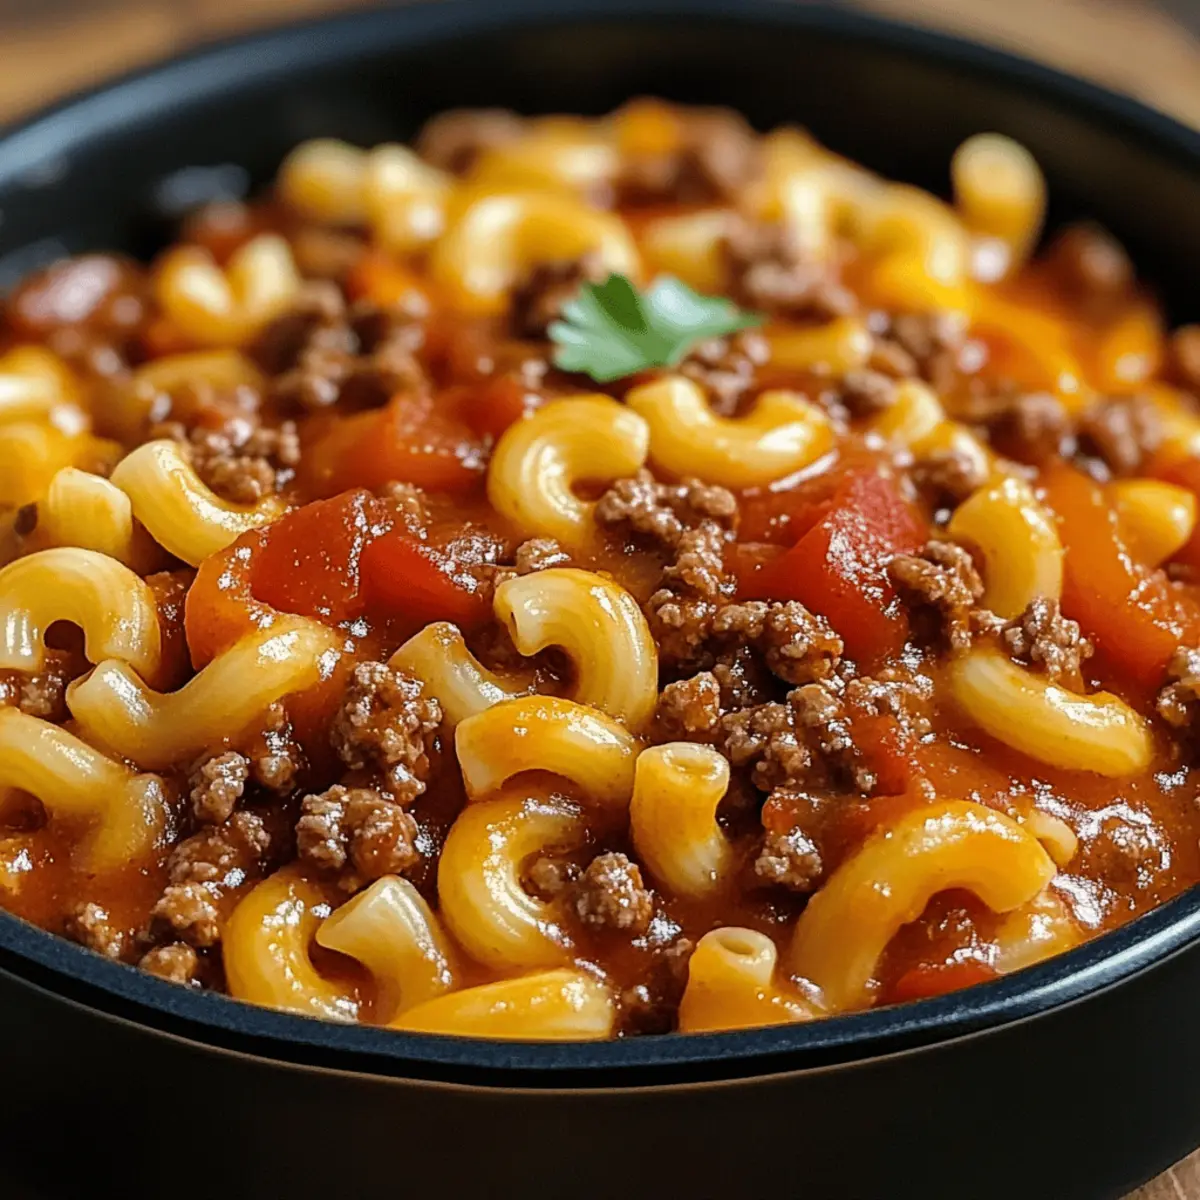
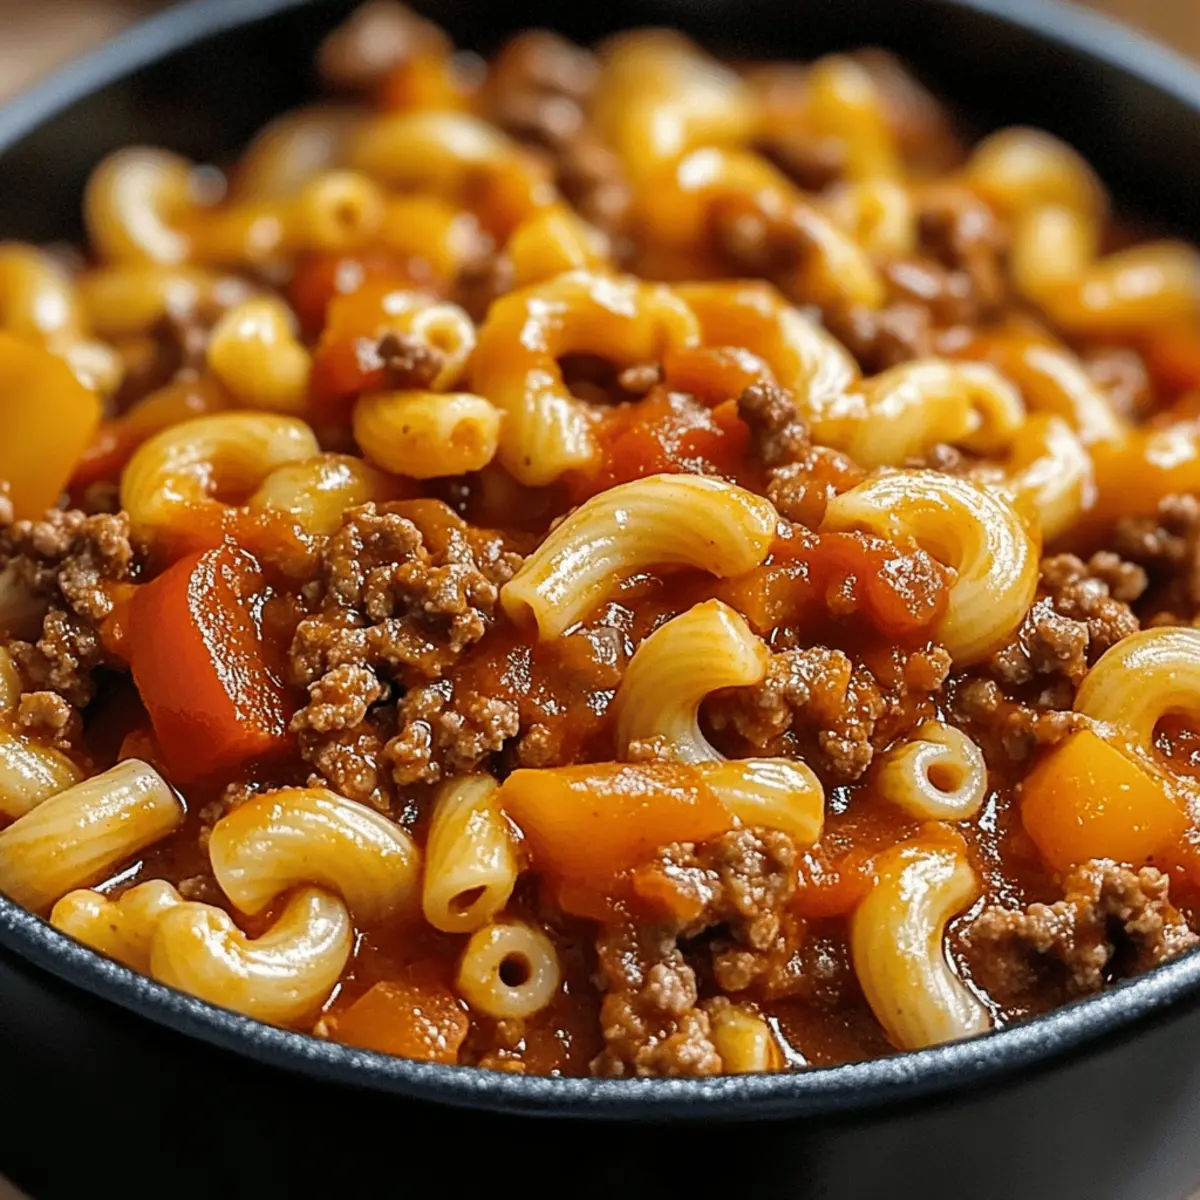
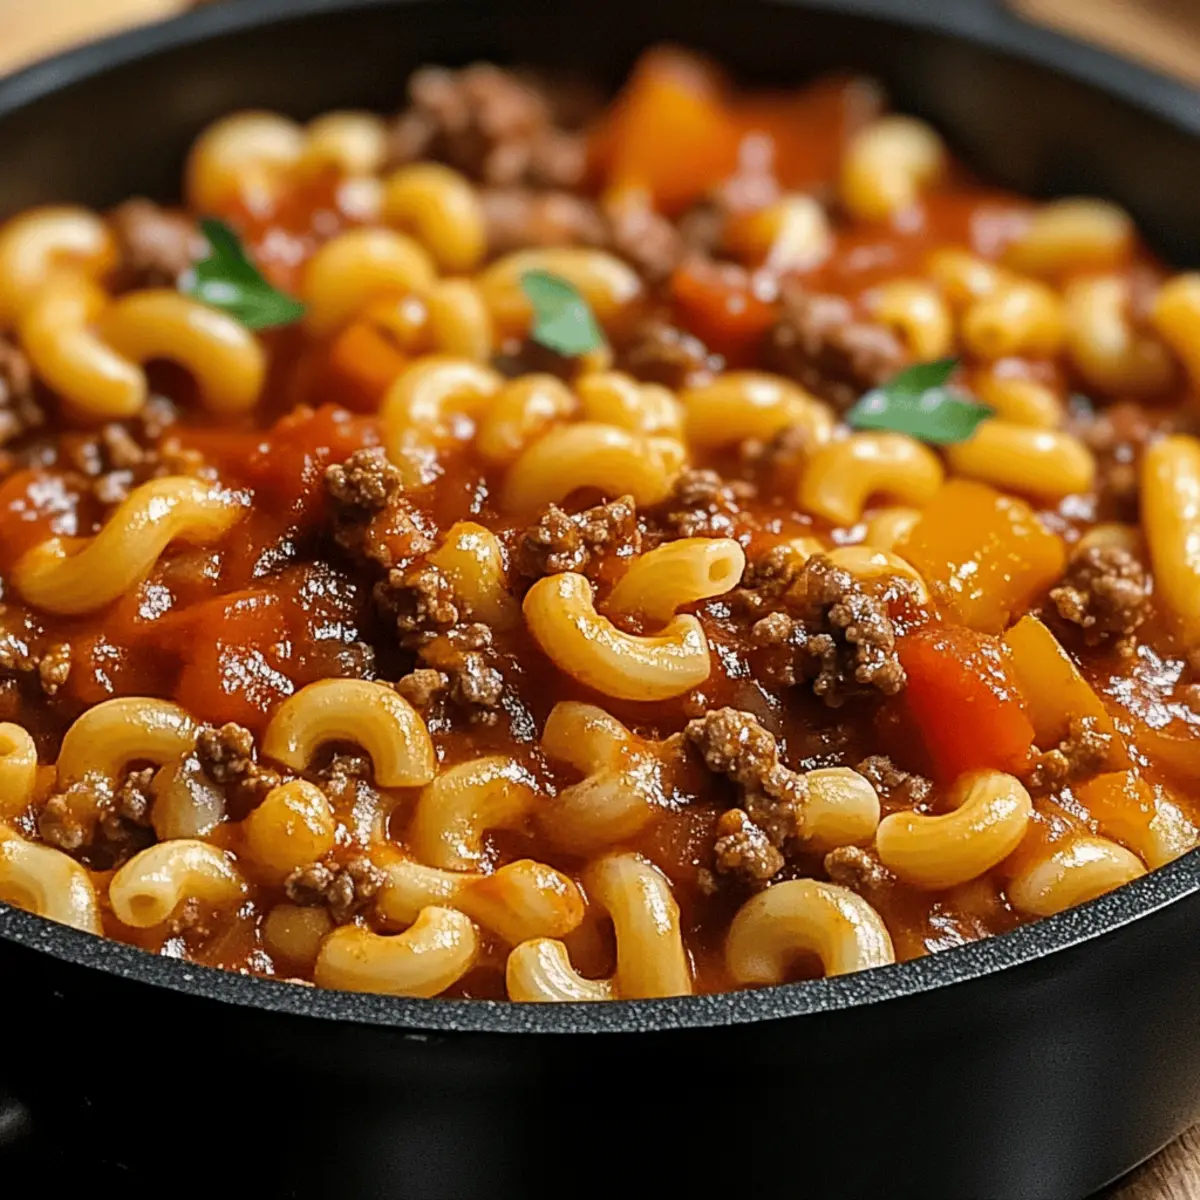
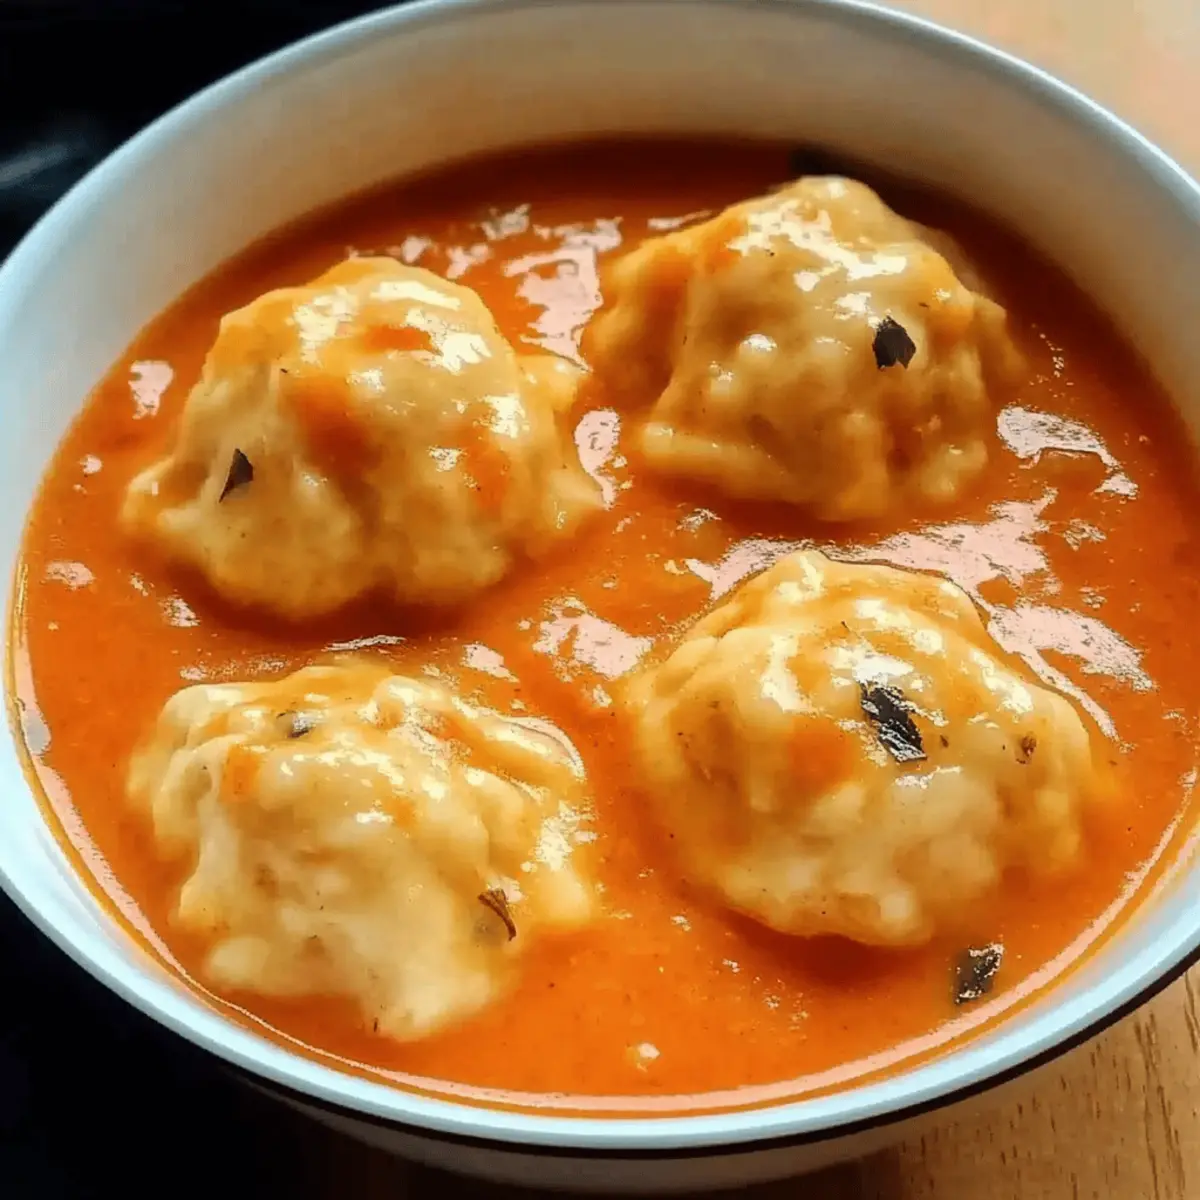
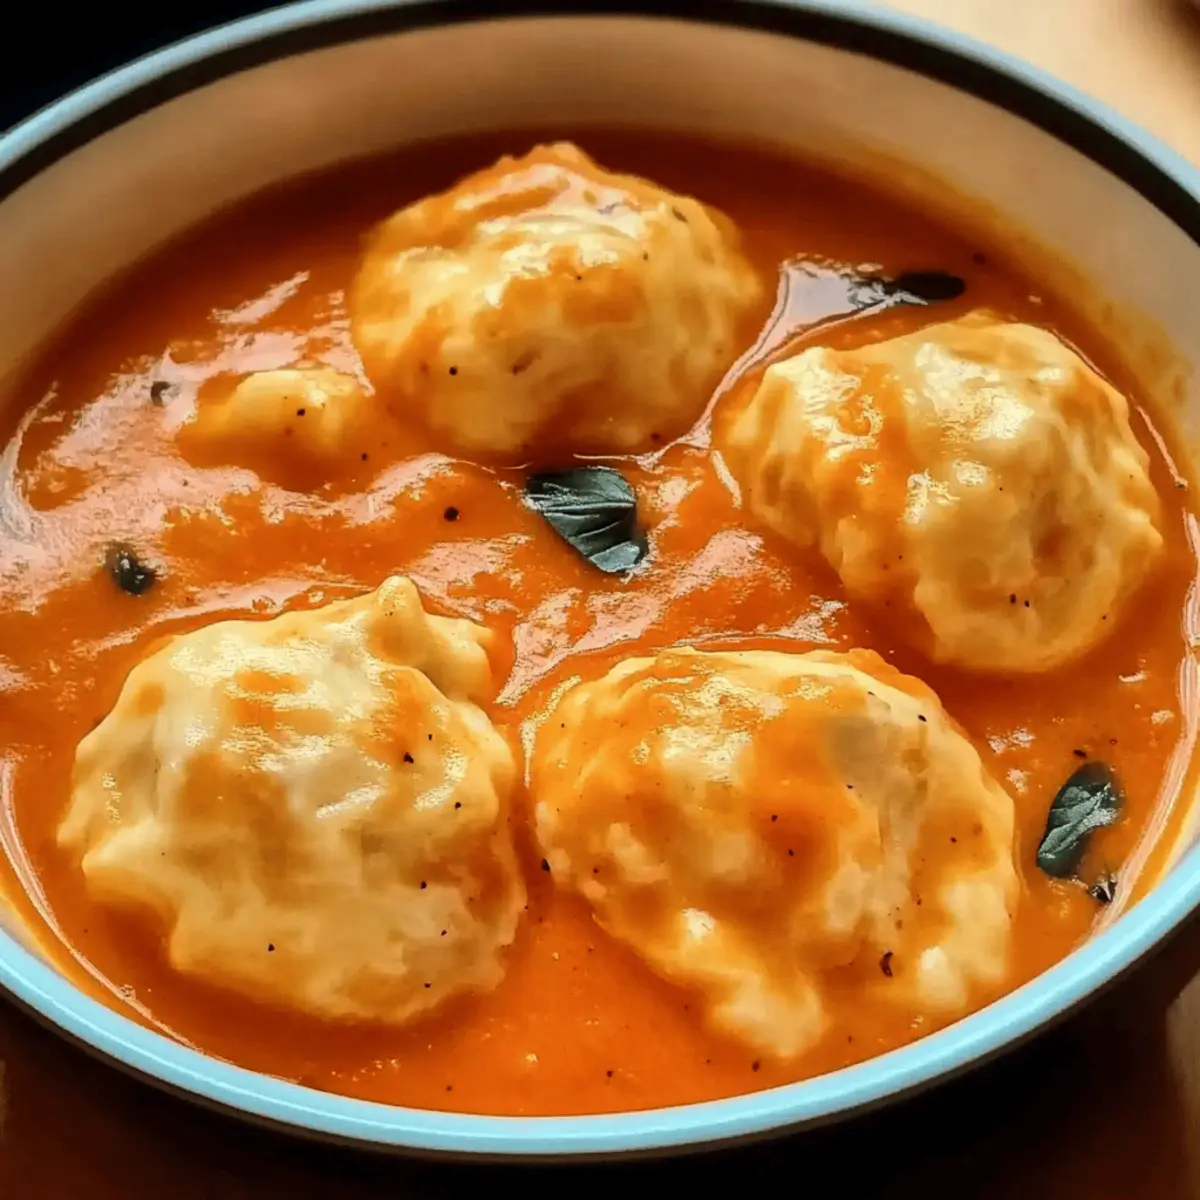
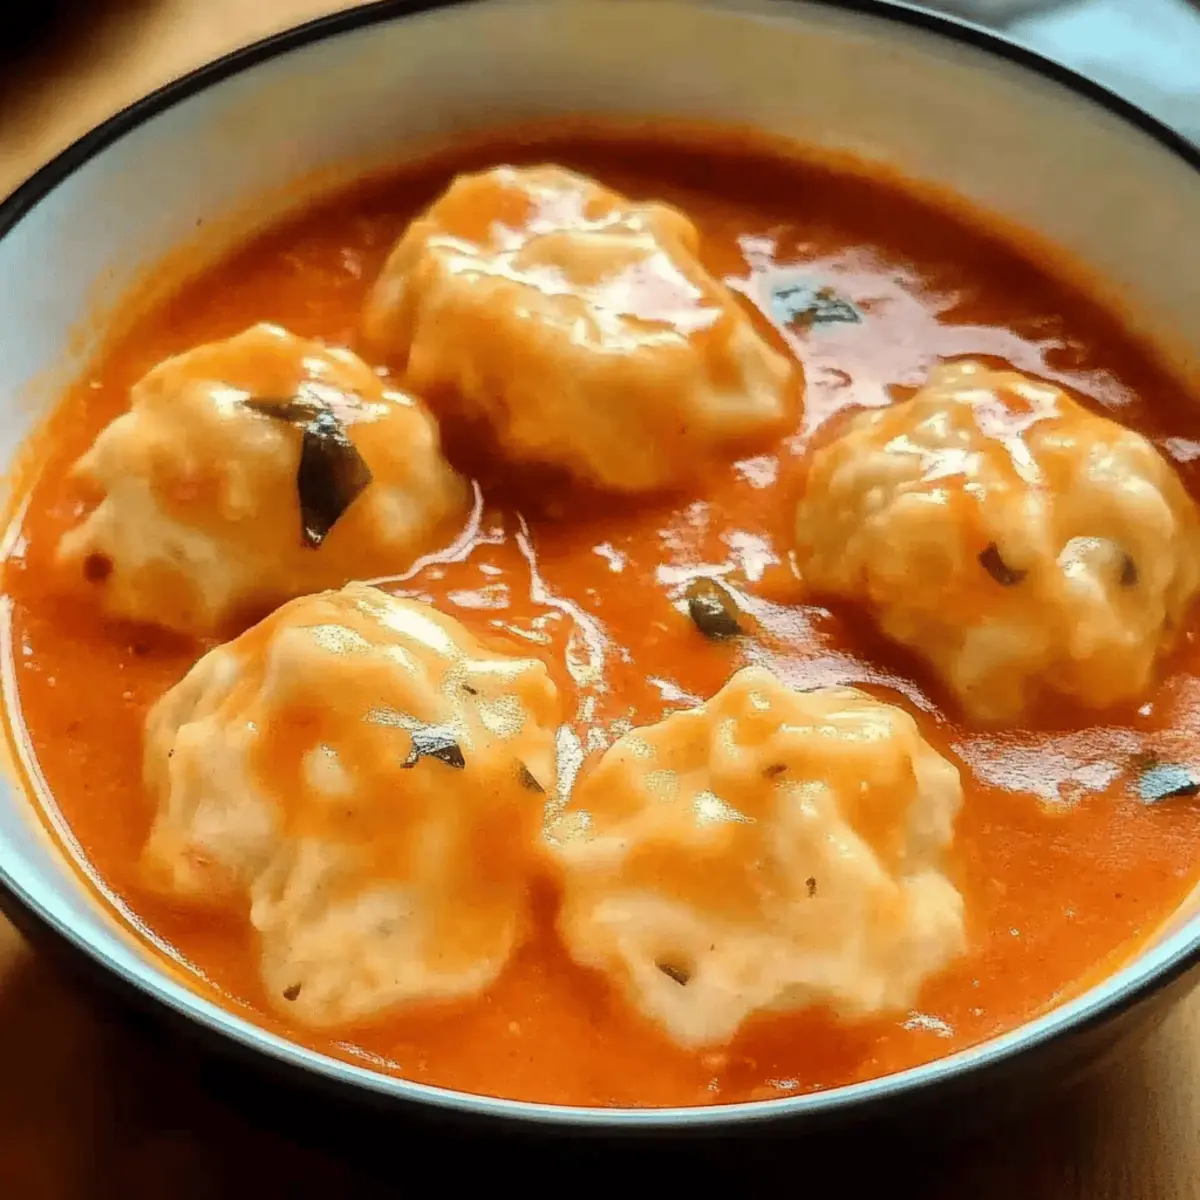
As I stood in my kitchen, the aroma of sweet potatoes mingling with fresh basil enveloped me like a warm hug. This Cozy Tomato Soup with Cheese Dumplings is a dish that takes me back to those chilly evenings spent huddled around the dinner table, sharing stories and laughter. Rich, velvety, and utterly satisfying, this vegetarian comfort food is not only simple to prepare but also a fabulous family meal that will please even the pickiest eaters. Imagine sinking your spoon into a bowl simmering with the vibrant flavors of garden-fresh tomatoes and cheesy herb dumplings that cook right in the soup! Ready to warm your soul and fill your heart? Join me as we dive into creating this heartwarming dish perfect for cozy nights in.

Why will you adore this soup?

Comforting Warmth: This Cozy Tomato Soup with Cheese Dumplings wraps you in a blanket of deliciousness, perfect for chilly evenings.

Easy to Prepare: With minimal prep and simple ingredients, it’s a breeze to whip up—ideal for busy nights.

Flavorful Fusion: The rich tomato base melds beautifully with sweet potatoes and fresh basil, creating a mouthwatering experience.

Family-Friendly: Kids and adults alike will love the cheesy dumplings, turning dinner into a nostalgic event.

Versatile Variations: Customize it with your favorite hard cheeses or herbs for a unique twist every time!
For more delightful soup ideas, check out my Cheeseburger Soup Comforting recipe or warm up with the Mexican Soup Flavorful for added variety!

Tomato Soup with Cheese Dumplings Ingredients

For the Soup

  • Olive Oil – For sautéing; feel free to use other cooking oils if you’d like a different flavor.
  • Butter – Adds richness; can be substituted with olive oil for a dairy-free option.
  • Onion – Provides depth of flavor; yellow or white onions work best for this recipe.
  • Sweet Potato – Adds natural sweetness and creaminess to the soup; substitute with regular potatoes if you need to.
  • Garlic – Adds a punch of flavor; fresh garlic is preferred over powdered varieties.
  • Ground Cinnamon – Enhances warmth and depth; can be omitted if it’s not your thing.
  • Fresh Basil – Infuses the soup with freshness; if fresh isn’t available, use dried basil (1 tsp).
  • Canned Chopped Tomatoes – This forms the soup’s base; opt for high-quality canned tomatoes for the best flavor.
  • Chicken Stock – Adds savory depth; use vegetable stock for a vegetarian version.
  • Sugar – Balances acidity from tomatoes; adjust to taste or leave it out if you prefer.
  • Single Cream – For richness; substitute with coconut cream or omit for a lighter soup.

For the Dumplings

  • Dried Breadcrumbs – Binds dumplings together; plain breadcrumbs are best to avoid flavor conflicts.
  • Baking Powder – Leavens the dumplings, making them fluffy and light.
  • Mature Cheddar – Provides a strong flavor; can be swapped for Gruyere, aged Gouda, or sharp provolone.
  • Mustard Powder – Adds depth to flavors; can be omitted if you don’t have it on hand.
  • Dried Oregano – Enhances the soup’s flavor; fresh oregano can be a lovely substitute.
  • Egg – Acts as a binder for the dumplings; for a vegan option, consider using a flax egg.
  • Cream Cheese – Adds creaminess and tang to the dumplings; substitute with vegan cream cheese if desired.

Now you’re all set to bring a bowl of cozy comfort filled with flavors of Tomato Soup with Cheese Dumplings that your family will cherish!

Step‑by‑Step Instructions for Cozy Tomato Soup with Cheese Dumplings

Step 1: Sauté Vegetables
In a large pot, heat 2 tablespoons of olive oil and 1 tablespoon of butter over medium heat. Add 1 chopped onion and 1 diced sweet potato, and cook for 5–10 minutes until the vegetables are softened and the onion is translucent. Stir occasionally, allowing the mixture to become aromatic and inviting.

Step 2: Add Garlic and Spices
Stir in 3 minced garlic cloves and 1/2 teaspoon of ground cinnamon, cooking for an additional minute. This will enhance the flavor base of your Cozy Tomato Soup with Cheese Dumplings. You should begin to smell the fragrant spices mingling with the vegetables—this indicates they are ready for the next step.

Step 3: Incorporate Broth and Tomatoes
Next, add a handful of torn fresh basil leaves, a can of chopped tomatoes, and 4 cups of chicken stock. Bring the mixture to a boil over high heat, then reduce the heat to low and cover the pot. Let it simmer for 20 minutes, allowing the flavors to meld together beautifully.

Step 4: Prepare the Dumplings
While the soup simmers, prepare the dumpling mixture. In a separate bowl, combine 1 cup of dried breadcrumbs, 1 tablespoon of baking powder, 1 cup of grated mature cheddar, 1 teaspoon of mustard powder, 1 teaspoon of dried oregano, 1 beaten egg, and 4 ounces of cream cheese. Mix until a stiff dough forms, then shape it into 8 equal balls.

Step 5: Blend the Soup
After the soup has simmered, use an immersion blender to carefully blend the soup until smooth. If you prefer velvety consistency, blend until there are no chunks. Stir in 1 tablespoon of sugar, salt, and pepper to taste, followed by 1 cup of single cream. This adds richness to your comforting bowl of soup.

Step 6: Cook the Dumplings
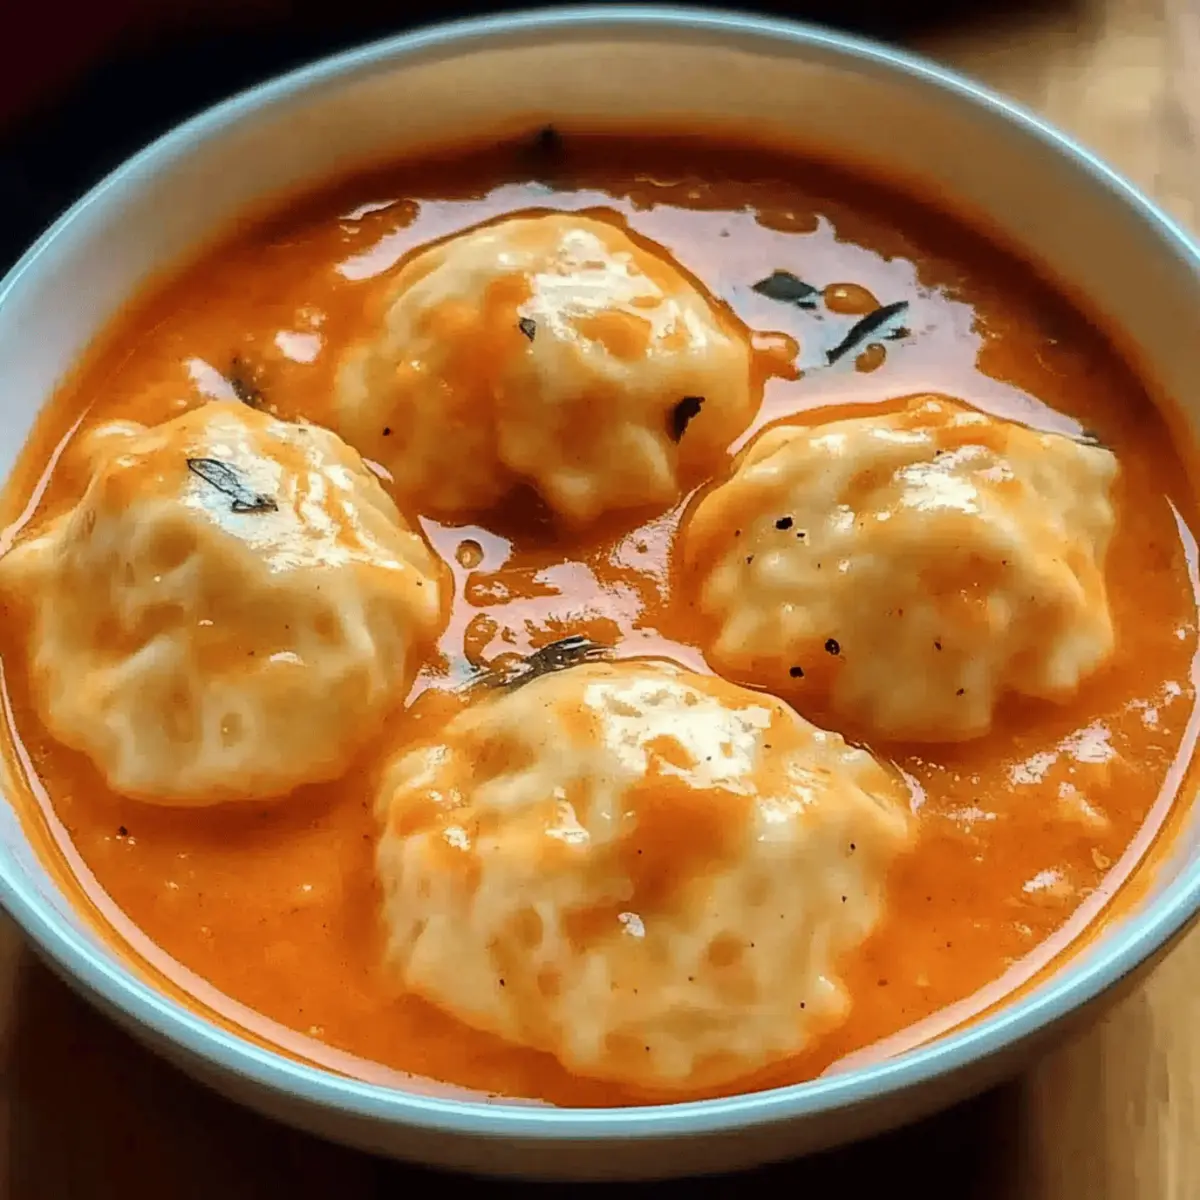
Gently drop the dumplings into the simmering soup. Avoid stirring for about 10 minutes to allow them to cook properly and remain intact. You’ll know they’re done when they appear fluffy and have floated to the surface, ready to join the aromatic soup.

Step 7: Serve and Savor
Ladle the cozy tomato soup into bowls, ensuring each serving has 2 dumplings nestled in it. Enjoy the delightful warmth of this dish as you dig in, letting the cheesy dumplings and rich soup wrap you in comfort. Feel free to garnish with extra basil for an inviting presentation!

Tomato Soup with Cheese Dumplings Variations

Feel free to embrace your culinary creativity and make this dish your own with these delightful twists!

  • Different Cheeses: Swap mature cheddar for aged Gouda or sharp provolone for a flavor upgrade. Each cheese brings its own unique character to the dumplings, crafting a different taste experience.

  • Herb Swap: Use fresh thyme or parsley instead of basil for complimentary notes. These herbs brighten the soup, creating a refreshing contrast to the rich tomato base.

  • Potato Substitutes: Replace sweet potatoes with butternut squash for a slightly sweeter flavor. The squash offers a creamy texture and adds a nice autumn vibe to your soup.

  • Spicy Kick: Add a pinch of red pepper flakes or a splash of hot sauce to the soup for a fiery twist. Infusing warmth will make your cozy bowl even more comforting on chilly nights.

  • Vegan Version: Opt for vegan cream cheese and replace the egg with a flax egg for dairy-free dumplings. This ensures everyone can enjoy the heartiness of the soup without compromising on flavor.

  • Seasoned Dumplings: Incorporate dried herbs like thyme or rosemary into the dumpling mixture for added depth. The aromatic flavors will elevate each bite to new heights!

  • Extra Veggies: Toss in some diced bell peppers or spinach while sautéing for additional nutrition and color. This not only boosts the health factor but adds a delightful crunch.

For those looking to explore more soup options, my comforting Potato Bacon Soup is a brilliant choice, and if you’re feeling adventurous, try the warming Tuscan Chicken Soup for a hearty meal that warms the soul!

Make Ahead Options

These Cozy Tomato Soup with Cheese Dumplings are perfect for meal prep, saving you precious time on busy weeknights! You can prepare the soup base up to 3 days in advance by cooking it completely for the richest flavors, allowing it to cool, and then refrigerating it in an airtight container. The dumpling mixture can also be prepped and shaped into balls and stored in the fridge for up to 24 hours. When you’re ready to serve, simply reheat the soup gently on the stove, add in the dumplings, and cook for about 10 minutes until fluffy. This way, you’ll enjoy the same comforting warmth with just minimal effort!

Expert Tips for Tomato Soup with Cheese Dumplings

  • Dumpling Freshness: Always cook the dumplings fresh for the best texture; preparing them in advance may lead to sogginess.

  • Quality Ingredients: Use high-quality canned chopped tomatoes and fresh basil; these enhance the overall flavor of your cozy tomato soup.

  • Simmering Technique: Let dumplings cook undisturbed in simmering soup to maintain their fluffy texture—stirring can cause them to break apart.

  • Adjusting Flavors: Taste the soup before serving. If needed, adjust with sugar, salt, and even a pinch more cream for the perfect balance.

  • Storage Solutions: Store leftover soup and dumplings separately in the fridge to preserve texture, ensuring a delightful experience when reheating.

What to Serve with Cozy Tomato Soup with Cheese Dumplings

Cozying up with a bowl of this luscious soup invites the perfect opportunity to complement it with delightful sides and treats.

  • Crusty Bread: Grab a loaf of fresh, crusty bread that’s perfect for dipping. The warmth and texture will make each bite of soup even more satisfying.
  • Simple Green Salad: A light and refreshing salad with mixed greens, cherry tomatoes, and a tangy vinaigrette balances the richness of the soup, adding brightness to your meal.
  • Grilled Cheese Sandwich: Elevate your comfort food experience with a classic grilled cheese. The gooey, melted cheese offers a harmonious flavor combination with the tomato soup, echoing childhood nostalgia.
  • Roasted Vegetables: A medley of roasted seasonal vegetables brings an earthy note to the table, enhancing the soup’s wholesome goodness with crispy texture and flavorful depth.
  • Herbed Rice: A side of fluffy herbed rice adds a pleasant nuttiness while soaking in the delicious tomato flavors, ideal for those who crave a heartier meal.
  • Red Wine: Pour yourself a glass of full-bodied red wine, like Merlot or Cabernet Sauvignon, to bring out the deep, rich flavors of the tomatoes and cheese.
  • Chocolate Chip Cookies: For dessert, indulge in warm chocolate chip cookies. The sweet treat creates a delightful contrast to the savory soup, leaving everyone at the table with a happy heart.

How to Store and Freeze Tomato Soup with Cheese Dumplings

Fridge: Store the soup and dumplings separately in airtight containers for up to 3 days to maintain their textures and flavors.

Freezer: For long-term storage, freeze the soup base (without cream) in a freezer-safe container for up to 3 months. Add cream when reheating for the best texture.

Reheating: Gently reheat the soup on the stove over low heat, stirring occasionally. If needed, add a splash of cream to restore its silky consistency.

Prep Ahead: Make the dumplings in advance but cook them fresh with the soup for optimal fluffiness.

Tomato Soup with Cheese Dumplings Recipe FAQs

How do I select ripe tomatoes for the soup?
Absolutely! For the best flavor, look for tomatoes that are vibrant in color, firm but slightly soft to the touch, and free from blemishes. If you prefer canned tomatoes, choose high-quality options with a short ingredient list; San Marzano tomatoes are a fantastic choice.

What is the best way to store leftover tomato soup with cheese dumplings?
Store the soup and dumplings separately in airtight containers in the fridge for up to 3 days. This prevents the dumplings from soaking up too much moisture and becoming soggy. When you’re ready to enjoy it again, simply reheat gently on the stove.

Can I freeze tomato soup with cheese dumplings?
Yes! For freezing, it’s best to freeze just the soup base (without cream) in a freezer-safe container for up to 3 months. When you’re ready to eat, simply thaw in the fridge overnight, reheat on the stove, and stir in the cream right before serving for a smoother texture.

What should I do if the dumplings fall apart while cooking?
Very good question! To prevent this, make sure your dumpling dough isn’t too wet. If it feels sticky, add a little more breadcrumbs. When cooking, gently place the dumplings in the simmering soup and avoid stirring for the first 10 minutes, allowing them to set without breaking.

Are there any dietary considerations I should keep in mind?
Definitely! If you’re cooking for someone with dairy allergies, you can substitute dairy products with alternatives—use vegan cream cheese and coconut cream instead of regular cream. For a vegan option, replace the egg in the dumplings with a flax egg (1 tablespoon ground flaxseed mixed with 2.5 tablespoons water, let sit for 5 minutes).

How can I enhance the flavor of the soup?
A wonderful enhancement would be to incorporate freshly cracked black pepper and a pinch of cayenne pepper for heat. You could also experiment with adding different herbs like thyme or parsley alongside the basil, or try a splash of balsamic vinegar for a depth of flavor.

Tomato Soup with Cheese Dumplings

Cozy Tomato Soup with Cheese Dumplings for Ultimate Comfort

This Tomato Soup with Cheese Dumplings is a comforting dish perfect for chilly evenings, featuring rich flavors and satisfying dumplings.
Prep Time 15 minutes
Cook Time 40 minutes
Total Time 55 minutes
Servings: 4 bowls
Course: Dinner
Cuisine: Vegetarian
Calories: 400

Ingredients
  

For the Soup
  • 2 tablespoons Olive Oil For sautéing
  • 1 tablespoon Butter Adds richness
  • 1 Onion Chopped; yellow or white
  • 1 Sweet Potato Diced
  • 3 Garlic Minced; fresh preferred
  • 1/2 teaspoon Ground Cinnamon Enhances warmth
  • 1 cup Fresh Basil Torn, adds freshness
  • 1 can Canned Chopped Tomatoes Opt for high-quality
  • 4 cups Chicken Stock Use vegetable stock for vegetarian
  • 1 tablespoon Sugar Balances acidity
  • 1 cup Single Cream For richness
For the Dumplings
  • 1 cup Dried Breadcrumbs Plain breadcrumbs preferred
  • 1 tablespoon Baking Powder Leavens dumplings
  • 1 cup Mature Cheddar Grated; strong flavor
  • 1 teaspoon Mustard Powder Adds depth
  • 1 teaspoon Dried Oregano Enhances flavor
  • 1 Egg Beaten, acts as binder
  • 4 ounces Cream Cheese Adds creaminess

Equipment

  • Large pot
  • Mixing Bowl
  • Immersion blender

Method
 

Step-by-Step Instructions
  1. In a large pot, heat olive oil and butter over medium heat. Add chopped onion and diced sweet potato, cook for 5–10 minutes until softened.
  2. Stir in minced garlic and ground cinnamon, cooking for an additional minute.
  3. Add torn basil, chopped tomatoes, and chicken stock. Bring to a boil, then reduce heat and simmer for 20 minutes.
  4. In a separate bowl, combine breadcrumbs, baking powder, grated cheddar, mustard powder, oregano, beaten egg, and cream cheese. Mix until a stiff dough forms.
  5. Blend the soup until smooth, add sugar, salt, pepper, and single cream.
  6. Drop dumplings into the simmering soup and cook for 10 minutes without stirring.
  7. Serve the soup in bowls with dumplings, garnished with extra basil.

Nutrition

Serving: 1bowlCalories: 400kcalCarbohydrates: 45gProtein: 12gFat: 20gSaturated Fat: 10gPolyunsaturated Fat: 2gMonounsaturated Fat: 6gCholesterol: 60mgSodium: 800mgPotassium: 800mgFiber: 5gSugar: 5gVitamin A: 5000IUVitamin C: 20mgCalcium: 200mgIron: 2mg

Notes

Cook dumplings fresh for the best texture. Use high-quality ingredients and adjust flavors as needed.

Tried this recipe?

Let us know how it was!

Slow Cooker Chili Mac: Comfort Food Loved by All

As I walked into the kitchen, the rich aroma of spices and simmering goodness enveloped me, instantly transporting me to my favorite childhood memories of cozy family dinners. This Slow Cooker Chili Mac is more than just a meal; it’s a warm embrace after a long day, combining savory ground turkey with comforting pasta and a medley of spices that come together effortlessly. Perfect for busy evenings, this hearty dish not only provides satisfaction for the whole family but also leaves you with leftovers that taste even better the next day. Plus, with a simple gluten-free adaptation, it’s adaptable for everyone at the table. Ready to dig into a bowl of nostalgia? Let’s dive into making this ultimate comfort food!

Why is Slow Cooker Chili Mac so irresistible?

Comforting in every bite, this Slow Cooker Chili Mac is like a hug on a plate, delivering rich flavors that everyone will crave. Easy to prepare, you can set it and forget it—perfect for busy weeknights! Nutrient-packed options are at your fingertips; simply swap out ingredients to meet dietary needs. Family-approved and great for gatherings, it’s always a crowd-pleaser! Plus, if you enjoy this, you might also love our Sweet Chili Chicken for a delightful twist, or try our One Pan Chili for a quick alternative!

Slow Cooker Chili Mac Ingredients

Discover the key components that make this Slow Cooker Chili Mac a family favorite!

For the Chili

  • Ground Turkey – A lean protein that keeps this dish hearty without excessive calories.
  • Canned Light Red Kidney Beans – Adds fiber and texture; feel free to swap with black beans for variety.
  • Canned Diced Tomatoes – Introduces moisture and acidity, balancing out the rich flavors.
  • Tomato Sauce – This thickens the chili base—use low-sodium for a healthier option.
  • Chili Powder – The primary spice that brings the heat; add cayenne if you like it spicy or omit completely for a milder taste.
  • Ancho Chili Powder – Delivers depth of flavor; you can substitute with regular chili powder if needed.
  • Chipotle Chili Powder – Contributes a smoky note; use sparingly if you prefer a milder dish.
  • Cumin – An earthy spice that elevates the chili profile beautifully.
  • Garlic Powder – Enhances flavor; fresh garlic can be a stronger alternative.
  • Onion Powder – Provides a sweet and rich nuance to the chili.
  • Dried Cilantro – A finishing touch for flavor; fresh cilantro makes a great garnish.
  • Dried Elbow Noodles – This creates the mac component; choose gluten-free pasta to accommodate dietary needs.

For the Cheese Sauce

  • Butter – The base for a creamy cheese sauce; margarine or oil can be used for dairy-free preferences.
  • Flour – Thickens the cheese sauce; corn starch serves as a gluten-free alternative.
  • Milk – Gives a creamy consistency; plant-based milk works perfectly for a dairy-free option.
  • Shredded Colby Jack/Cheddar Jack Cheese – Adds rich creaminess; shred your own for the best texture—substitute with your favorite cheese if desired.

These ingredients combine perfectly to create the ultimate Slow Cooker Chili Mac that your family will love!

Step‑by‑Step Instructions for Slow Cooker Chili Mac

Step 1: Brown the Ground Turkey
In a skillet over medium-high heat, add the ground turkey and cook for about 5–7 minutes until browned and cooked through. Stir occasionally to break the meat apart. Once browned, drain any excess fat and transfer the turkey to your slow cooker.

Step 2: Add the Beans and Tomatoes
To the slow cooker, add the drained kidney beans, canned diced tomatoes, and tomato sauce. Sprinkle in all the spices: chili powder, ancho chili powder, chipotle chili powder, cumin, garlic powder, onion powder, and dried cilantro. Stir well until all ingredients are combined beautifully.

Step 3: Set the Cooker
Cover the slow cooker and set it to cook on high for 3–4 hours or low for 6–8 hours. The slow cooking will bring out the deep flavors in your Slow Cooker Chili Mac, so resist the urge to peek too often!

Step 4: Cook the Elbow Noodles
About 30 minutes before serving, cook the dried elbow noodles according to the package directions. Be sure to drain them well to avoid excess water, which will dilute your chili’s flavor. Set aside once cooked.

Step 5: Make the Cheese Sauce
In a saucepan over medium-high heat, melt the butter, then whisk in flour until smooth, about 1–2 minutes. Gradually add in milk while whisking continuously. Cook for 3–4 minutes until the sauce thickens and begins to bubble gently.

Step 6: Add the Cheese
Remove the thickened sauce from heat and stir in the shredded Colby Jack or Cheddar Jack cheese. Mix until the cheese is completely melted and the sauce is creamy. This rich cheese sauce will enhance your Slow Cooker Chili Mac’s flavor.

Step 7: Combine Everything
Pour the cheese sauce into the slow cooker, mixing it thoroughly to combine with the chili and noodles. Cover the slow cooker again and let it sit on low or warm for 20 minutes. This helps thicken the dish and meld the flavors together wonderfully.

Step 8: Serve and Enjoy
Once thickened, give your Slow Cooker Chili Mac a final stir. Serve hot, garnished with fresh cilantro, a dollop of sour cream, or sliced avocado if desired. Enjoy a delightful meal that’s perfect for family gatherings or cozy evenings in!

How to Store and Freeze Slow Cooker Chili Mac

Fridge: Store leftovers in an airtight container in the refrigerator for up to 3 days. This ensures your Slow Cooker Chili Mac stays fresh and flavorful.

Freezer: For longer storage, freeze portions of Chili Mac in zip-top bags or airtight containers for up to 3 months. Thaw in the refrigerator before reheating.

Reheating: Reheat in the microwave or on the stovetop with a splash of milk to restore creaminess. Heat until warmed through, stirring occasionally for even heating.

Make-Ahead: You can prepare this meal ahead of time and refrigerate it before the cheese sauce step. Add the cheese just before serving!

Slow Cooker Chili Mac Variations

Customize your Slow Cooker Chili Mac with these delightful twists that enhance flavor, texture, and dietary needs!

  • Protein Swap: Substitute ground turkey with lean beef or vegetarian crumbles for a different protein profile. Each option brings its unique taste and texture.

  • Cheese Alternatives: Experiment with pepper jack cheese for a spicy kick, or go with mozzarella for a milder and creamier experience.

  • Vegetable Boost: Add bell peppers, corn, or even zucchini for additional flavor and nutrition. Not only do these veggies elevate textures, but they brighten up the dish visually.

  • Gluten-Free Pasta: Opt for gluten-free elbow noodles instead of traditional pasta. This simple swap makes the dish accessible for those with dietary restrictions without compromising the taste.

  • Spice It Up: For an extra kick, incorporate cayenne pepper or more chipotle chili powder. This not only enhances heat but also adds layers of smokiness that many love.

  • Creaminess Upgrade: Use cream cheese or sour cream in the cheese sauce for a luscious texture. It complements the chili and makes every bite more indulgent.

  • Herb Freshness: Add fresh basil or parsley before serving. The fresh herbs provide a bright contrast to the rich flavors and can transform your meal into something extraordinary.

For more inspiration, if you love this comforting dish, check out our Sweet Chili Chicken for a delicious twist, or try our One Pan Chili for an easy weeknight favorite!

What to Serve with Slow Cooker Chili Mac

Bring your dining table alive by pairing this savory dish with scrumptious sides that elevate your meal experience!

  • Cornbread Muffins: Their sweet, moist texture balances the chili’s spice while providing a delightful crunch. Serve warm with a pat of butter on top for extra comfort.

  • Caesar Salad: Crisp romaine lettuce with tangy dressing adds a refreshing contrast to the hearty chili mac, making every bite a balance of flavors.

  • Avocado Slices: Creamy avocado complements the rich cheese sauce, adding a buttery texture that enhances the overall richness of the dish.

  • Grilled Veggies: Smoky grilled bell peppers and zucchini provide a colorful, nutritious side that balances out the dense pasta. A sprinkle of fresh herbs will brighten every bite!

  • Garlic Bread: Crispy, buttery garlic bread is perfect for dipping into the chili mac, making it a favorite with both adults and kids alike.

  • Ice-cold Lemonade: This refreshing drink cuts through the warmth, providing a zingy contrast to the chili’s savory depth, ensuring you stay refreshed throughout the meal.

  • Chocolate Brownies: To finish, serve up fudgy brownies that offer a sweet counterpart to the savory chili, making your dinner unforgettable and bringing back dessert memories.

Each of these options beautifully complements the Slow Cooker Chili Mac, creating a meal that is not just delicious but also memorable!

Helpful Tricks for Slow Cooker Chili Mac

  • Perfect Cheese Sauce: Shred your own cheese before melting to avoid graininess; pre-packaged cheese often contains anti-caking agents that disrupt smoothness.
  • Adjusting Cooking Times: Slow cooker heat settings can vary; monitor cooking times closely to prevent drying out your Slow Cooker Chili Mac.
  • Pre-Prep Possibilities: Make this dish ahead of time and refrigerate for up to 3 days or freeze it in portions for an easy meal later.
  • Meal Customization: Feel free to swap proteins or add veggies, like bell peppers, for extra flavor and nutrition in your Slow Cooker Chili Mac.
  • Ensure Flavor Balance: When making substitutions, especially for beans or spices, taste and adjust seasonings to maintain the depth of flavor.

Make Ahead Options

These Slow Cooker Chili Mac preparations are perfect for meal prep enthusiasts! You can brown the ground turkey and combine it with the beans, tomatoes, and spices up to 24 hours in advance; simply refrigerate the mixture in an airtight container. Additionally, you can prepare the cheese sauce up to 3 days beforehand and store it separately. When you’re ready to cook, transfer everything to the slow cooker and set it to the desired cooking time. For best results, make sure to reheat the cheese sauce gently before mixing it in, ensuring a creamy texture. This way, you’ll enjoy a hearty, comforting meal without sacrificing precious time during your busy week!

Slow Cooker Chili Mac Recipe FAQs

How do I know if my ingredients are fresh enough to use?
Absolutely! When selecting ingredients, look for ground turkey that is pink in color and has no off smell. For canned items, ensure the cans are free from dents or rust, and the labels haven’t expired. Fresh vegetables should feel firm and vibrant; avoid beans with dark spots or bulging cans, as these may not be fresh.

What’s the best way to store leftovers of Slow Cooker Chili Mac?
Very! Leftovers can be stored in an airtight container in the refrigerator for up to 3 days. Ensure it’s cooled to room temperature before sealing. If you prefer to enjoy it later, freeze the portions in zip-top bags or airtight containers, where it will keep well for up to 3 months.

Can I freeze the Slow Cooker Chili Mac?
Absolutely! To freeze your Chili Mac, allow it to cool entirely, then portion it into freezer-safe containers or bags. Make sure to remove as much air as possible before sealing. Thaw it overnight in the refrigerator before reheating. When ready to enjoy, reheat in the microwave or on the stovetop with a splash of milk to restore the creamy texture.

What do I do if my cheese sauce is too thick?
No problem! If your cheese sauce comes out thicker than expected, simply add a little more milk while continuously stirring over low heat until you reach your desired consistency. This will help loosen it up and keep it creamy, ensuring a delightful coating for the pasta and chili.

Is this recipe compatible with gluten-free diets?
Very! To make Slow Cooker Chili Mac gluten-free, simply swap the elbow noodles with gluten-free pasta. Additionally, use cornstarch instead of regular flour for the cheese sauce. Always check labels to ensure all canned ingredients and spices are marked gluten-free.

Can I adjust this recipe for my kids’ tastes or dietary restrictions?
Absolutely! This recipe is highly adaptable. You can substitute ground turkey with lean beef or even plant-based proteins for a vegetarian option. Feel free to omit or reduce spicy ingredients based on your family’s preferences. Adding more vegetables, like bell peppers or corn, can also enhance the nutrition without sacrificing taste.

Slow Cooker Chili Mac

Slow Cooker Chili Mac

Slow Cooker Chili Mac is a comforting dish combining savory ground turkey, pasta, and spices, perfect for busy evenings and family gatherings.
Prep Time 20 minutes
Cook Time 4 hours
Resting Time 20 minutes
Total Time 4 hours 20 minutes
Servings: 6 servings
Course: Dinner
Cuisine: American
Calories: 450

Ingredients
  

For the Chili
  • 1 lb Ground Turkey Lean protein
  • 1 can Canned Light Red Kidney Beans Can substitute with black beans
  • 1 can Canned Diced Tomatoes Adds moisture and acidity
  • 1 cup Tomato Sauce Use low-sodium for a healthier option
  • 2 tbsp Chili Powder Add cayenne for extra heat
  • 1 tbsp Ancho Chili Powder Substitute with regular chili powder if needed
  • 1 tbsp Chipotle Chili Powder Use sparingly for a smoky note
  • 1 tbsp Cumin
  • 1 tsp Garlic Powder Fresh garlic can be used instead
  • 1 tsp Onion Powder
  • 1 tbsp Dried Cilantro Fresh cilantro for garnish
  • 2 cups Dried Elbow Noodles Can choose gluten-free pasta
For the Cheese Sauce
  • 4 tbsp Butter Can substitute with margarine or oil
  • 1/4 cup Flour Corn starch can be used for gluten-free
  • 2 cups Milk Plant-based milk can also work
  • 2 cups Shredded Colby Jack/Cheddar Jack Cheese Shred your own for best texture

Equipment

  • Slow Cooker
  • Skillet
  • Saucepan

Method
 

Cooking Instructions
  1. Brown the ground turkey in a skillet over medium-high heat for 5–7 minutes, then transfer to slow cooker.
  2. Add beans, diced tomatoes, and tomato sauce to slow cooker along with all spices. Stir well.
  3. Cover and set slow cooker on high for 3–4 hours or low for 6–8 hours.
  4. About 30 minutes before serving, cook the elbow noodles according to package instructions and drain.
  5. In a saucepan, melt butter and whisk in flour. Gradually add milk while whisking until sauce thickens.
  6. Remove from heat and stir in shredded cheese until melted.
  7. Pour cheese sauce into slow cooker and mix thoroughly. Let sit on low or warm for 20 minutes.
  8. Serve hot, garnished with cilantro, sour cream, or avocado.

Nutrition

Serving: 1cupCalories: 450kcalCarbohydrates: 45gProtein: 30gFat: 18gSaturated Fat: 10gPolyunsaturated Fat: 1gMonounsaturated Fat: 5gCholesterol: 80mgSodium: 800mgPotassium: 600mgFiber: 10gSugar: 6gVitamin A: 500IUVitamin C: 8mgCalcium: 300mgIron: 3mg

Notes

Shred cheese before melting for a smoother sauce. Monitor cooking times closely to prevent drying out. Can be made ahead and refrigerated before cheese step.

Tried this recipe?

Let us know how it was!

Hostess Cupcake Layer Cake: A Nostalgic Chocolate Dream

As I sifted through the flour and cocoa, a wave of nostalgia washed over me, reminiscent of childhood birthday parties filled with laughter and sweet indulgence. That’s when I realized I was about to recreate something truly special: a Hostess Cupcake Layer Cake. This cake is not just a treat; it’s an emotional journey back to those simpler times, layered with rich, fudgy chocolate, creamy marshmallow filling, and a luscious whipped ganache frosting. Beyond its deliciousness, this delightful recipe is easy to whip up and is guaranteed to impress your guests, making it the ultimate crowd-pleaser for any occasion. Whether you’re celebrating or simply satisfying a sweet tooth, this cake will not only satisfy your cravings but also spark joyful memories. Are you ready to elevate dessert to the next level?

Why is this cake a must-bake?

Nostalgic Delight: This Hostess Cupcake Layer Cake captures the essence of childhood treats, evoking joyous memories with every bite.
Easy to Make: Whether you’re a novice baker or a seasoned chef, the straightforward steps ensure success.
Decadently Rich: With a moist chocolate base and creamy marshmallow filling, this cake delivers a heavenly flavor experience.
Versatile Options: Transform it into cupcakes or experiment with different flavors to impress guests or tailor to dietary needs!
Showstopper Presentation: The whipped ganache frosting beautifully enhances the cake, making it perfect for celebrations or special gatherings. Pair it with a scoop of vanilla ice cream for the ultimate indulgence!

Hostess Cupcake Layer Cake Ingredients

• This decadent cake is layered with nostalgia!

For the Cake

  • All-purpose flour – Provides structure; substitute with a 1:1 gluten-free flour blend for a gluten-free version.
  • Granulated sugar – Adds sweetness; brown sugar can enhance depth of flavor.
  • Natural unsweetened cocoa powder – For rich chocolate flavor; Dutch-processed cocoa gives a deeper taste.
  • Baking soda – A vital leavening agent for that perfect rise.
  • Baking powder – Enhances leavening to keep the cake light and airy.
  • Salt – Elevates the flavor profile of your cake.
  • Vegetable oil – Brings moisture and tenderness; substitute with melted butter for a richer taste.
  • Large eggs – Acts as a binding agent for a smooth texture.
  • Pure vanilla extract – Infuses delightful flavors into the cake.
  • Buttermilk – Ensures moisture; can be replaced with milk plus 1 tbsp vinegar as a DIY buttermilk.
  • Hot coffee or hot water – Enhances the chocolate richness and adds moisture.

For the Whipped Ganache Frosting

  • Semi-sweet chocolate chips – The base for a luscious ganache; swap for dark chocolate for a less sweet frosting.
  • Heavy whipping cream – Provides the ideal consistency; coconut cream can be used for a non-dairy option.

For the Marshmallow Filling

  • Unsalted butter – Adds richness to the filling.
  • Powdered sugar – A sweet component that contributes to the texture.
  • Marshmallow fluff – Creates a wonderfully creamy filling; homemade marshmallow cream works as an alternative.
  • Pure vanilla extract – Enhances flavor in the filling too.

This Hostess Cupcake Layer Cake combines indulgent flavors and nostalgic charm, making it a delightful addition to any dessert table!

Step‑by‑Step Instructions for Hostess Cupcake Layer Cake

Step 1: Preheat and Prepare
Begin by preheating your oven to 350°F (175°C). While the oven warms up, prepare your two 9-inch round cake pans by spraying them with non-stick spray. To ensure easy removal later, line the bottom of each pan with parchment paper, and gently spray the top of the parchment as well.

Step 2: Combine Dry Ingredients
In a large stand mixer bowl, combine the all-purpose flour, granulated sugar, natural cocoa powder, baking soda, baking powder, and salt. Mix these dry ingredients on low speed for about 30 seconds, allowing the flavors to meld together. This step sets a solid foundation for your Hostess Cupcake Layer Cake, ensuring even texture and taste.

Step 3: Mix in Wet Ingredients
Next, add the vegetable oil, large eggs, pure vanilla extract, and buttermilk to your mixer. Blend these ingredients on low speed until just combined. Gradually pour in the hot coffee or hot water while mixing; this enhances the chocolate flavor and keeps the batter moist. Continue to mix until you have a smooth, well-combined batter.

Step 4: Bake the Cake Layers
Pour the batter evenly into your prepared cake pans. Place them in the preheated oven and bake for 32-36 minutes, or until a toothpick inserted in the center comes out clean with a few moist crumbs. Once baked, remove the pans from the oven and allow the cakes to cool in the pans for about 10 minutes before transferring them to a wire rack to cool completely.

Step 5: Prepare the Ganache
While the cakes cool, heat the heavy whipping cream in a small saucepan over medium heat until it is just about to simmer. Pour the hot cream over the semi-sweet chocolate chips in a mixing bowl. Let it sit for 5 minutes, then whisk until smooth and glossy. Allow the ganache to cool to room temperature to achieve the perfect consistency for frosting later.

Step 6: Whip the Ganache
Once your ganache has cooled, use a stand mixer to whip it on medium-high speed for about 3 minutes. Watch for it to become light and fluffy—the whipped ganache should hold a soft peak. Be careful not to overbeat, as this can change the texture, making it less smooth.

Step 7: Make the Marshmallow Filling
In another mixing bowl, add the unsalted butter and powdered sugar. Beat them together on medium speed until creamy and well combined. Gradually mix in the marshmallow fluff and the pure vanilla extract until the mixture is smooth and airy. This marshmallow filling adds a delightful touch to your Hostess Cupcake Layer Cake.

Step 8: Assemble the Cake
Once the cakes are completely cool, level the tops with a serrated knife to ensure even stacking. Place one cake layer on a serving plate. Spread a layer of marshmallow filling on top, followed by a thin layer of the whipped ganache. Carefully place the second cake layer on top, repeating the marshmallow filling and ganache combination to create a stunning layered effect.

Step 9: Crumb Coat and Chill
To keep the layers neat, apply a crumb coat using the whipped ganache by spreading a thin layer over the whole cake. This helps keep any stray crumbs from showing in the final decoration. Chill the cake in the refrigerator for about 30 minutes to set the crumb coat, making it easier to apply the final layer of frosting.

Step 10: Final Frosting
Take the chilled cake out of the refrigerator and using the remaining whipped ganache, apply a smooth and even layer over the entire cake. For an added touch, reserve some of the marshmallow filling to pipe decorative details on top. This will elevate your Hostess Cupcake Layer Cake, making it truly special for any occasion.

Hostess Cupcake Layer Cake Variations

Customize your Hostess Cupcake Layer Cake to match your cravings and dietary needs with these exciting twists!

  • Gluten-Free: Substitute all-purpose flour with a 1:1 gluten-free flour blend for a cake everyone can enjoy. It will still be rich and delicious.
  • Vegan: Use plant-based butter, almond milk, and flax eggs to create a dairy-free and egg-free cake without sacrificing moisture or flavor. Play with variations to achieve that nostalgic taste!
  • Chocolate Chips: Fold in mini chocolate chips into the batter for added bursts of chocolate in every bite. This will take your cake to chocolaty heights!
  • Coffee Infusion: Add a tablespoon of instant coffee granules to the batter for a sophisticated mocha flavor that pairs beautifully with chocolate. It’s a cozy touch that warms the heart.
  • Fruity Layers: Introduce layers of fresh cherries or raspberries in between the fillings! This fruity surprise adds brightness and compliments the chocolate beautifully.
  • Minty Fresh: Mix in mint extract to the ganache or marshmallow filling for a refreshing twist. This creates a delightful contrast that will have everyone talking!
  • Cupcakes: Transform this cake into nostalgic cupcakes by using the same batter in cupcake tins. Bake for 15-18 minutes and fill with marshmallow fluff and ganache for a portable treat.
  • Spicy Kick: Add a pinch of cayenne pepper or cinnamon to the cake batter for a subtle warm flavor that will dazzle your taste buds. Adventure awaits with this unexpected heat!

For more sweet ideas, consider serving your cake alongside a scoop of vanilla ice cream or some fresh berries to elevate the dessert experience. Enjoy the delicious journey!

What to Serve with Hostess Cupcake Layer Cake

Delight your senses with mouthwatering accompaniments that elevate the experience of this nostalgic treat!

  • Vanilla Ice Cream: A scoop of creamy vanilla adds a refreshing contrast to the rich chocolate layers, enhancing every bite of cake and frosting.
  • Fresh Berries: Strawberries or raspberries provide a tart juxtaposition, cutting through the sweetness while adding vibrant color and texture to your dessert plate.
  • Chocolate Sauce: Drizzling warm chocolate sauce over a slice offers an extra indulgent touch, making every forkful an irresistible chocolate lover’s dream.
  • Whipped Cream: Light and airy, whipped cream complements the dense cake and offers a luscious mouthfeel that balances the rich flavors beautifully.
  • Coffee: A cup of strong coffee rounds out dessert time splendidly, bringing forth the chocolate notes and adding a comforting warmth.
  • Milk: For a classic pairing, serve with a cold glass of milk—it’s reminiscent of childhood treats and makes for a simplistic yet perfect match to the cake’s sweetness.
  • Mocha: A frothy mocha drink harmonizes deliciously with the cake’s chocolate flavor, combining the richness of chocolate with the boldness of coffee.
  • Caramel Sauce: Drizzling caramel adds a delightful sweetness and a touch of decadence, enhancing the cake’s charm with an additional layer of flavor.
  • Coconut Macaroons: These chewy treats provide a contrasting texture that pairs well, making every bite of cake even more memorable and special with their coconut goodness.

How to Store and Freeze Hostess Cupcake Layer Cake

Room Temperature: Keep the cake at room temperature in an airtight container for up to 5 days to maintain its delicious flavor and freshness.

Fridge: If decorated, refrigerate the cake to preserve the look and keep it fresh; it can last up to a week in the fridge.

Freezer: You can freeze the cake layers for up to 3 months; wrap each layer tightly in plastic wrap followed by aluminum foil to prevent freezer burn.

Reheating: To enjoy, simply thaw in the refrigerator overnight and bring to room temperature before serving your delightful Hostess Cupcake Layer Cake.

Expert Tips for Hostess Cupcake Layer Cake

  • Use Room Temperature Ingredients: Ensure your eggs, buttermilk, and other refrigerated ingredients are at room temperature for better incorporation and a fluffier texture.

  • Don’t Overmix: Once you combine wet and dry ingredients, mix until just combined. Overmixing can lead to a dense Hostess Cupcake Layer Cake.

  • Focus on Cooling: Allow the cake layers to cool completely before frosting. This ensures your ganache remains smooth and doesn’t melt the filling.

  • Leveling is Key: Level the tops of the cake layers using a serrated knife. This helps create a stable base for stacking and prevents a lopsided cake.

  • Avoid Over-beating Ganache: When whipping the ganache, watch the consistency closely—stop once it holds a soft peak to prevent curdling.

  • Chill Between Layers: After applying the crumb coat, chill the cake before the final frosting. This step helps achieve a neat, polished look for your Hostess Cupcake Layer Cake.

Make Ahead Options

These Hostess Cupcake Layer Cake components are perfect for busy weeknights or last-minute gatherings! You can prepare the chocolate cake layers up to 3 days in advance; just bake them, cool completely, and wrap tightly in plastic wrap before refrigerating. The marshmallow filling can also be made ahead and stored in an airtight container in the fridge for up to 2 days. For the ganache, make it and refrigerate it for up to 24 hours; whip it just before assembly for that light and fluffy texture. When you’re ready to serve, simply layer the chilled components as directed, and you’ll enjoy a delicious dessert with minimal effort!

Hostess Cupcake Layer Cake Recipe FAQs

How do I choose the right cocoa powder for this cake?
For the deepest chocolate flavor, I recommend using Dutch-processed cocoa powder. It offers a smoother, richer taste compared to natural cocoa powder. However, if you only have unsweetened cocoa, that works just fine for this recipe!

How should I store leftover Hostess Cupcake Layer Cake?
To keep your cake fresh, store it at room temperature in an airtight container for up to 5 days. If you’ve decorated the cake, it’s best to refrigerate it, which will allow it to last up to a week in the fridge, keeping both flavor and aesthetics intact!

Can I freeze the Hostess Cupcake Layer Cake?
Absolutely! To freeze, wrap each cake layer tightly in plastic wrap and then in aluminum foil to prevent freezer burn. It can be stored in the freezer for up to 3 months. When you’re ready to enjoy, simply thaw it in the refrigerator overnight and bring it to room temperature before serving.

What should I do if my ganache isn’t thickening?
If your ganache isn’t thickening, it might not have cooled long enough. Allow it to sit at room temperature for a bit longer or lightly whip it until it reaches the desired fluffiness. Also, make sure you are using a correct ratio of chocolate to cream—generally, a 1:1 ratio works best!

Can I modify the ingredients for dietary restrictions?
Yes! You can make it gluten-free by using a 1:1 gluten-free flour blend or a vegan version with plant-based butter and non-dairy cream. If you or your guests have allergies, always check the ingredient labels, especially for items like butter and marshmallow fluff, which can contain allergens.

How can I prevent my cake from doming?
To avoid doming, ensure that you’re using room temperature ingredients and not overmixing the batter after combining wet and dry ingredients. Additionally, leveling the cake layers after baking with a serrated knife will help maintain an even stack when assembling your Hostess Cupcake Layer Cake.

Hostess Cupcake Layer Cake

Hostess Cupcake Layer Cake: A Nostalgic Chocolate Dream

This Hostess Cupcake Layer Cake is a nostalgic treat filled with rich chocolate, creamy marshmallow, and luscious ganache, perfect for any celebration.
Prep Time 30 minutes
Cook Time 36 minutes
Cooling Time 30 minutes
Total Time 1 hour 36 minutes
Servings: 12 slices
Course: Dessert
Cuisine: American
Calories: 450

Ingredients
  

For the Cake
  • 2 cups all-purpose flour substitute with a 1:1 gluten-free flour blend for gluten-free
  • 2 cups granulated sugar brown sugar can enhance flavor
  • 3/4 cup natural unsweetened cocoa powder use Dutch-processed for deeper taste
  • 1 tsp baking soda vital leavening agent
  • 1 tsp baking powder enhances leavening
  • 1/2 tsp salt elevates flavor
  • 1 cup vegetable oil substitute with melted butter for richer taste
  • 4 large eggs acts as a binding agent
  • 2 tsp pure vanilla extract
  • 1 cup buttermilk replace with milk + 1 tbsp vinegar
  • 1 cup hot coffee or hot water enhances chocolate richness
For the Whipped Ganache Frosting
  • 2 cups semi-sweet chocolate chips swap for dark chocolate for less sweet
  • 1 cup heavy whipping cream coconut cream for non-dairy option
For the Marshmallow Filling
  • 1/2 cup unsalted butter
  • 2 cups powdered sugar
  • 1 cup marshmallow fluff homemade marshmallow cream works as alternative
  • 1 tsp pure vanilla extract

Equipment

  • Stand mixer
  • 9-inch round cake pans
  • Parchment Paper
  • Mixing bowls
  • Saucepan

Method
 

Step-by-Step Instructions for Hostess Cupcake Layer Cake
  1. Preheat your oven to 350°F (175°C) and prepare two 9-inch round cake pans with non-stick spray and parchment.
  2. In a large stand mixer bowl, combine flour, sugar, cocoa, baking soda, baking powder, and salt; mix on low for 30 seconds.
  3. Add vegetable oil, eggs, vanilla, and buttermilk; blend until just combined. Gradually pour in hot coffee or water.
  4. Pour the batter into prepared pans and bake for 32-36 minutes until a toothpick comes out clean.
  5. While cakes cool, heat cream in a saucepan, pour over chocolate chips, let sit for 5 minutes, then whisk until smooth.
  6. Whip the cooled ganache on medium-high until light and fluffy, about 3 minutes.
  7. In another bowl, beat butter and sugar until creamy, then add marshmallow fluff and vanilla until smooth.
  8. Level the tops of the cakes, spread marshmallow filling on one layer, then top with ganache and second layer.
  9. Apply a crumb coat with ganache, chill for about 30 minutes, and then frost the whole cake.
  10. Decorate with reserved filling as desired.

Nutrition

Serving: 1sliceCalories: 450kcalCarbohydrates: 56gProtein: 6gFat: 24gSaturated Fat: 12gPolyunsaturated Fat: 2gMonounsaturated Fat: 8gCholesterol: 120mgSodium: 300mgPotassium: 200mgFiber: 3gSugar: 30gVitamin A: 600IUCalcium: 50mgIron: 2mg

Notes

Ensure ingredients are at room temperature for better mixing and texture. Avoid overmixing to maintain cake fluffiness.

Tried this recipe?

Let us know how it was!

Crispy Pizza Chips for Guilt-Free Snacking Bliss

As I rifled through my pantry one evening, I stumbled upon a treasure: a block of mozzarella just begging to be transformed. That’s when the idea of making 2-Ingredient Pizza Chips struck me—a super simple, low-carb snack that captures all the cheesy goodness of pizza. In just a few minutes, you can whip up a batch of these crispy delights, perfect for satisfying those late-night cravings or impressing friends at your next gathering. These pizza chips are not only quick and easy to make, but they also cater to gluten-free diets, proving that snacking doesn’t have to mean sacrificing flavor for health. What toppings would you choose to elevate yours?

Why are Pizza Chips the ultimate snack?

Simplicity at its best: With just two ingredients, you’ll have a delightful snack in minutes.

Crispy, Cheesy Goodness: Each bite offers that satisfying pizza flavor without the guilt!

Versatile Toppings: Customize with your favorite spices or toppings like bell peppers or olives—creativity is encouraged!

Low-Carb Snack: Ideal for those following a low-carb or gluten-free lifestyle without compromising taste.

Crowd-Pleasing Appetizer: Perfect for parties or game days, they’ll be a hit with family and friends.

Elevate your snacking game and enjoy these delicious pizza chips today!

Pizza Chips Ingredients

• Create your crispy snack with these essentials!

For the Chips

  • Mozzarella Cheese – The star of the show, providing that irresistible cheesy flavor and texture. You can replace it with dairy-free mozzarella for a lactose-free alternative.

For the Seasonings

  • Italian Herbs – Sprinkle these for a touch of classic pizza flavor; think oregano or basil for that authentic taste.
  • Hot Sauce (Optional) – For those who like a spicy kick, drizzling this on adds a zesty punch to your pizza chips!

Feel free to mix and match toppings to make your pizza chips uniquely yours!

Step‑by‑Step Instructions for Pizza Chips

Step 1: Preheat the Oven
Start by preheating your oven to 375°F (190°C). This important first step ensures that your pizza chips will bake evenly and get that perfect crispy texture. While the oven is warming up, prepare your baking sheet by lining it with parchment paper to prevent sticking and make cleanup a breeze.

Step 2: Prepare Cheese
Grate about one cup of mozzarella cheese finely, ensuring a good melt and crunch. Next, take small amounts of grated cheese and spread them into thin, circular rounds on the lined baking sheet, leaving space between each for expansion. Aim for about 2 to 3 inches in diameter for optimal crispiness.

Step 3: Add Seasoning
Sprinkle your prepared cheese rounds with your desired Italian herbs—think oregano or basil. If you’re feeling adventurous, a dash of hot sauce can be added for a spicy kick! The toppings will enhance the flavor, making your pizza chips truly irresistible.

Step 4: Bake
Place the baking sheet in your preheated oven and bake the cheese rounds for approximately 10 minutes. Keep a close eye on them as they bake; you’ll know they’re ready when the edges turn golden and the cheese is bubbling beautifully.

Step 5: Cool
Once baked, carefully remove the baking sheet from the oven and let the pizza chips cool for a few minutes. This cooling period allows them to crisp up even more, ensuring that delightful crunch with every bite.

Step 6: Serve & Enjoy
Once fully cooled, gently lift the pizza chips off the parchment paper and serve. They’re perfect for dipping into marinara sauce or enjoying on their own. These 2-Ingredient Pizza Chips are a low-carb snack that brings the flavors you love without the guilt!

How to Store and Freeze Pizza Chips

Airtight Container: Store your pizza chips in an airtight container at room temperature for up to 2 days to keep them crispy. Avoid moisture to maintain their crunch.

Fridge: If you need to keep them longer, refrigerate in an airtight container for 3-5 days; however, be aware that they may lose some crispiness.

Freezer: For long-term storage, freeze your pizza chips in a single layer on a baking sheet and transfer them to a freezer bag once frozen. They can be kept for up to 2 months.

Reheating: To restore crispiness, reheat frozen pizza chips in a preheated oven at 350°F (175°C) for about 5-7 minutes before serving.

What to Serve with 2-Ingredient Pizza Chips

Looking to create a snack spread that’s as delightful as it is delicious? Pair these crispy pizza chips with complementary flavors and textures for an unforgettable experience.

  • Marinara Sauce: A classic pairing, this tangy sauce enhances the pizza flavor while providing a perfect dip for your chips.
  • Creamy Guacamole: Its smoothness contrasts beautifully with the crunch of the chips, adding a fresh and vibrant taste.
  • Italian Salad: A light, crisp salad with greens, tomatoes, and olives brings a refreshing balance to the cheesy chips.
  • Roasted Veggies: Caramelized vegetables add a hearty and flavorful side that harmonizes with the savory pizza elements.
  • Cheesy Dip: A warm, melted cheese dip can take snacking to another level, offering extra indulgence alongside the chips.
  • Sparkling Water with Lemon: The zesty citrus notes in your drink refresh your palate, making each bite of pizza chips even more satisfying.
  • Fruit Skewers: Fresh fruits like strawberries, grapes, or pineapple introduce a sweet contrast, enhancing the overall snacking experience.

These pairings cater to various tastes and textures, transforming your 2-Ingredient Pizza Chips into a delightful feast!

Pizza Chips Variations & Substitutions

Get ready to unleash your creativity in the kitchen! These delightful pizza chips are ready to be tailored to your taste buds.

  • Cheese Swap: Try using Parmesan or cheddar for a different flavor profile. Each cheese brings a unique twist, turning your snack into a gourmet experience!
  • Dairy-Free Option: Replace mozzarella with dairy-free mozzarella for a lactose-free alternative. This way, everyone can enjoy these crispy chips without worry!
  • Spice It Up: Add a sprinkle of red pepper flakes for a fiery touch that complements the cheese beautifully, elevating the flavor to new heights.
  • Veggie Delight: Top your cheese rounds with bell peppers or diced olives before baking; these add both color and a delicious crunch to your chips.
  • Herb Boost: Experiment with different herbs like rosemary or thyme for an aromatic lift that delights your senses! The unique flavors will make each bite memorable.
  • Bacon-Lover’s Dream: Crumble some crispy bacon on top of the cheese before baking for an indulgent twist that is perfect for any celebration.
  • Salsa Dipping: Serve with a side of fresh salsa alongside your pizza chips to bring a refreshing contrast to the rich, cheesy flavor.
  • Marinara Upgrade: Try making a homemade marinara sauce for dipping—its fresh flavor perfectly complements the crispy texture of the chips!

Let your imagination run wild, and enjoy the adventure of creating your perfect pizza chips!

Make Ahead Options

These 2-Ingredient Pizza Chips are perfect for busy home cooks looking to save time! You can prep the grated mozzarella cheese and spread it into rounds on the baking sheet up to 24 hours in advance. Simply cover the baking sheet with plastic wrap and refrigerate to keep the cheese fresh. When you’re ready to enjoy your crispy pizza chips, remove the baking sheet from the fridge and follow the baking instructions. Bake as directed, and enjoy just how delightful and crunchy they are! These prepped components not only save you time but also ensure that you have a quick, low-carb snack ready whenever cravings strike.

Expert Tips for Pizza Chips

  • Use Fresh Cheese: Opt for fresh mozzarella instead of pre-shredded varieties for better melting and crisping results.

  • Watch the Oven: Cheese can burn quickly! Keep an eye on your pizza chips during baking, especially around the 8-minute mark.

  • Cooling Time: Allow chips to cool on the baking sheet for a few minutes post-baking. This step enhances their crunchiness and prevents mess!

  • Spacing Matters: Make sure your cheese rounds are adequately spaced on the baking sheet to avoid melding together, ensuring perfect pizza chips.

  • Experiment with Flavors: Don’t hesitate to try different seasonings like garlic powder or smoked paprika to make your pizza chips uniquely yours!

2-Ingredient Crispy Pizza Chips Recipe FAQs

What type of mozzarella cheese should I use?
Absolutely, I recommend using fresh mozzarella for the best melting and crisping results! Fresh mozzarella tends to give off less moisture, making your chips crunchier. If you’re looking for a dairy-free option, dairy-free mozzarella alternatives work just as well!

How should I store leftover pizza chips?
To keep your pizza chips crispy, store them in an airtight container at room temperature for up to 2 days. If you need to keep them longer, popping them in the fridge can extend their life to 3-5 days; just remember, they may lose some crunch!

Can I freeze pizza chips? How?
Yes, you can freeze your pizza chips! First, lay them out in a single layer on a baking sheet and freeze until solid. Once frozen, transfer them to a freezer bag, removing excess air to prevent freezer burn. They will stay fresh for up to 2 months.

Why are my pizza chips not crispy?
If your pizza chips aren’t turning out crispy, it might be due to the cheese being too thick or moisture-rich when spread out. Ensure that your cheese rounds are thin (about 1/8 inch) and well-spaced. They should also be baked in a preheated oven at the right temperature. If they’re cooling on the baking sheet, allow them enough time to firm up!

Are these pizza chips safe for my pet?
While these chips are a tasty snack for you, they aren’t pet-friendly. The cheese content and seasonings (like hot sauce) might upset your pet’s stomach. Make sure to enjoy these delicious pizza chips yourself and offer them pet-friendly treats instead.

Pizza chips

Crispy Pizza Chips for Guilt-Free Snacking Bliss

Enjoy these guilt-free pizza chips, a low-carb snack bursting with cheesy goodness.
Prep Time 5 minutes
Cook Time 10 minutes
Cooling Time 5 minutes
Total Time 20 minutes
Servings: 4 servings
Course: Appetizers
Cuisine: Italian
Calories: 150

Ingredients
  

For the Chips
  • 1 cup Mozzarella Cheese Can be replaced with dairy-free mozzarella for a lactose-free alternative.
For the Seasonings
  • 1 teaspoon Italian Herbs Oregano or basil for authentic pizza flavor.
  • 1 tablespoon Hot Sauce Optional for a spicy kick.

Equipment

  • Oven
  • Baking Sheet
  • Parchment Paper
  • Grater

Method
 

Step-by-Step Instructions for Pizza Chips
  1. Preheat your oven to 375°F (190°C) and line a baking sheet with parchment paper.
  2. Grate about one cup of mozzarella cheese finely and spread them into thin, circular rounds on the lined baking sheet.
  3. Sprinkle your cheese rounds with Italian herbs and optionally a dash of hot sauce.
  4. Bake the cheese rounds for approximately 10 minutes until the edges turn golden.
  5. Remove the baking sheet from the oven and let the pizza chips cool for a few minutes.
  6. Serve the pizza chips and enjoy with marinara sauce or on their own.

Nutrition

Serving: 1servingCalories: 150kcalCarbohydrates: 2gProtein: 11gFat: 12gSaturated Fat: 7gPolyunsaturated Fat: 0.5gMonounsaturated Fat: 4gCholesterol: 40mgSodium: 300mgPotassium: 150mgSugar: 1gVitamin A: 200IUCalcium: 200mgIron: 1mg

Notes

Use fresh mozzarella for better melting results and space cheese rounds adequately to avoid melding together. Experiment with different toppings and seasonings for unique flavors.

Tried this recipe?

Let us know how it was!

Toffee Almond Cookies: Creamy, Chewy Delight for Everyone

As I mixed the buttery batter, a sweet nostalgia washed over me—a scent reminiscent of cozy afternoons spent baking with loved ones. These Toffee Almond Cookies are my go-to for bringing joy to any gathering. With just the right amount of chewy toffee bits and crunchy toasted almonds, these nut-based delights are not only easy to whip up but also crowd-pleasers that everyone will love. Plus, they can easily be adapted for gluten-free or nut-free diets, ensuring everyone can join in on the fun. Ready to fill your kitchen with an irresistible aroma? Let’s get baking!

Why Are Toffee Almond Cookies a Must-Try?

Irresistible combination of flavors: The buttery base paired with chewy toffee and crunchy almonds creates a mouthwatering experience.
Crowd-pleaser for any occasion: These cookies are perfect for gatherings, holidays, or just a cozy night in.
Easily adaptable for everyone: Swap ingredients to cater to gluten-free or nut-free diets without sacrificing taste.
Quick and simple to make: With straightforward steps, you’ll have these delicious treats in no time.
A nostalgic aroma fills your home: The delightful scent of baking cookies will bring back cherished memories for you and your loved ones. Don’t forget to try these alongside my Blueberry Breakfast Cookies for another irresistible treat!

Toffee Almond Cookies Ingredients

For the Batter

  • Unsalted Butter – Provides richness and tenderness; avoid salted butter to control saltiness.
  • Brown Sugar – Adds moisture and a caramel-like flavor; you can substitute with all granulated sugar for a less moist cookie.
  • Granulated Sugar – Helps with structure and spread; essential for balancing texture with brown sugar.
  • Egg – Binds ingredients and adds richness; a large egg is recommended for optimal results.
  • Vanilla Extract – Enhances flavor and aroma; opt for pure vanilla for the best quality.
  • All-Purpose Flour – Provides structure and chew; swap up to half for cake flour for a lighter texture.
  • Baking Powder – Works with baking soda for leavening; ensures cookies rise properly.
  • Baking Soda – Activates with an acid like brown sugar; essential for achieving a fluffy texture.
  • Salt – Balances sweetness; a sprinkle on top enhances flavor.

For the Sweetness

  • Toffee Bits – Star ingredient for sweetness and chewiness; choose a variety based on preference, as they will melt in baking.
  • Chopped Almonds – Adds crunch and nuttiness; toast them for a richer flavor.
  • Sea Salt (for sprinkling) – Enhances overall taste; use sparingly to avoid overpowering sweetness.

Now that you have the essential ingredients, it’s time to create these delightful Toffee Almond Cookies! Whether for a gathering or just a sweet treat for yourself, these cookies are sure to impress.

Step‑by‑Step Instructions for Toffee Almond Cookies

Step 1: Preheat and Prepare
Start by preheating your oven to 350°F (175°C) and lining two baking sheets with parchment paper. This preparation ensures your Toffee Almond Cookies bake evenly without sticking. While the oven heats, gather all your ingredients and equipment, so everything is at your fingertips for a smooth baking experience.

Step 2: Cream the Butters and Sugars
In a large mixing bowl, use an electric mixer to cream together 1 cup of softened unsalted butter, 3/4 cup of brown sugar, and 1/2 cup of granulated sugar. Beat on medium speed for 2-3 minutes until the mixture is light and fluffy, showcasing a pale color. This step is vital for achieving that rich, buttery base in the cookies.

Step 3: Add Egg and Vanilla
Add 1 large egg and 1 teaspoon of pure vanilla extract to the creamed mixture. Mix on low speed until just combined, allowing the egg to bind the ingredients and the vanilla to infuse its rich aroma. This will enhance the overall flavor of your Toffee Almond Cookies, making them irresistibly delightful.

Step 4: Combine Dry Ingredients
In a separate bowl, whisk together 2 cups of all-purpose flour, 1 teaspoon of baking powder, 1/2 teaspoon of baking soda, and 1/4 teaspoon of salt. This mixture of dry ingredients is essential for providing structure to your cookies. Once combined, slowly integrate the dry mix into the wet batter until no flour streaks remain, being careful not to overmix.

Step 5: Fold in Sweet Additions
Gently fold 1 cup of toffee bits and 1 cup of chopped and toasted almonds into the cookie batter using a spatula. Ensure the toffee and almonds are evenly distributed throughout the dough, as they add that signature chewy sweetness and nutty crunch to your Toffee Almond Cookies.

Step 6: Scoop the Dough
Using a cookie scoop or two tablespoons, drop rounded balls of dough onto the prepared baking sheets, spacing them 2 inches apart. This spacing is crucial as it allows room for expansion during baking, resulting in beautifully shaped cookies with the perfect texture.

Step 7: Sprinkle Some Sea Salt
Lightly sprinkle a pinch of sea salt over each cookie dough ball before baking. This step adds an extra flavor layer, balancing the sweetness of the toffee and enriching the overall taste of the Toffee Almond Cookies.

Step 8: Bake Until Golden
Place the baking sheets in the preheated oven and bake for 10-12 minutes. Keep an eye on the cookies; the edges should turn golden brown while the centers remain slightly soft. This visual cue is essential for achieving that chewy texture we love in Toffee Almond Cookies.

Step 9: Cool and Enjoy
Once baked, remove the sheets from the oven and let the cookies cool on the sheets for 5 minutes. This allows them to set properly before transferring them to wire racks for cooling. Enjoy the delightful aroma wafting through your kitchen as the cookies cool completely, ready to be savored by all!

How to Store and Freeze Toffee Almond Cookies

Room Temperature: Store your Toffee Almond Cookies in an airtight container at room temperature for up to 5 days to keep them fresh and chewy.

Fridge: For extended freshness, you can refrigerate the cookies in an airtight container for up to 1 week; however, they may lose some chewiness.

Freezer: To freeze, place cookies in a single layer in an airtight container separated by parchment paper. They can be frozen for up to 3 months without losing quality.

Reheating: To enjoy them warm again, simply reheat the cookies in a preheated oven at 350°F (175°C) for 5-10 minutes. This restores their lovely chewy texture and enhances the delightful aroma!

Toffee Almond Cookies Variations & Substitutions

Customize these Toffee Almond Cookies to match your cravings or dietary needs, making every batch uniquely delightful!

  • Gluten-Free: Replace all-purpose flour with a gluten-free blend and add xanthan gum as needed for perfect texture.
  • Nut-Free: Substitute chopped almonds with sunflower seeds or pumpkin seeds for similar crunch in every bite.
  • Dairy-Free: Use vegan butter and coconut cream instead of regular butter for a dairy-free version without losing richness.
  • Flavor Enhancements: Add spices like cinnamon or nutmeg for warmth, or incorporate almond extract for an extra nutty essence.
  • Cookie Size Adjustments: For mini cookies, scoop smaller amounts and reduce baking time; for jumbo cookies, increase scoop size and adjust baking time accordingly.
  • Dark Chocolate Twists: Fold in dark chocolate chips alongside toffee bits for a rich chocolatey flavor that pairs wonderfully with almonds.
  • Caramel Swirl: Drizzle melted caramel atop baked cookies while they’re still warm for an indulgent, gooey topping.
  • Spicy Kick: Add a pinch of cayenne or chili powder to the dough for an unexpected spicy twist that complements the sweetness.

These variations offer endless opportunities to enjoy these Toffee Almond Cookies, and if you’re feeling adventurous, why not pair them with a batch of my Blueberry Breakfast Cookies for a delightful treat spread? Happy baking!

Expert Tips for Toffee Almond Cookies

Softened Butter: Ensure your butter is softened, not melted, for optimal creaming. This is key to achieving the perfect fluffy texture.

Don’t Overmix: Avoid overmixing after adding dry ingredients. This will help prevent tough cookies and ensure they remain chewy and delightful.

Proper Spacing: Space cookie dough balls 2 inches apart on the baking sheet. This helps prevent them from spreading too much while baking, creating a nice shape.

Golden Edges: Keep an eye on the cookies during baking; look for golden edges. Remember, they’ll continue to firm up as they cool, maintaining that chewy center.

Toast Your Nuts: Toast chopped almonds for a richer flavor. This simple step enhances the nuttiness of your Toffee Almond Cookies, making them even more delicious.

What to Serve with Toffee Almond Cookies?

Indulging in the warmth of freshly baked cookies deserves a delightful companion to enhance your experience.

  • Freshly Brewed Coffee: The strong, rich flavor pairs beautifully with the buttery sweetness, creating a delightful balance that awakens the senses.
  • Chai Tea: Spicy and aromatic, chai tea complements the nutty undertones of the cookies, making each bite feel even more special.
  • Vanilla Ice Cream: The creamy texture of vanilla ice cream envelops the warmth of the cookies, offering a delicious contrast in temperatures that’s irresistibly comforting.
  • Milk: Classic and simple, a glass of cold milk enhances the sweet, chewy goodness of Toffee Almond Cookies while washing down their delightful richness.
  • Fruit Salad: A light, refreshing fruit salad adds a healthy contrast, bringing a burst of freshness and a splash of color to your dessert table.
  • Dark Chocolate Drizzle: Melted dark chocolate drizzled over the cookies elevates them to a gourmet level, balancing their sweetness with a hint of bitterness.
  • Caramel Sauce: For an extra indulgence, serve with warm caramel sauce for dipping, embracing the decadent sweetness of toffee alongside the comforting nuttiness of almonds.
  • Spiced Apple Cider: The warm, spiced notes of apple cider create a cozy atmosphere, making your cookie experience feel like a sweet hug on a chilly day.

Make Ahead Options

These Toffee Almond Cookies are perfect for busy home cooks looking to save time! You can prepare the cookie dough up to 24 hours in advance by mixing all the ingredients and scooping the dough onto baking sheets lined with parchment. Simply cover the trays with plastic wrap and refrigerate until you’re ready to bake. To maintain the cookies’ delightful texture, it’s best to bake them straight from the fridge; just add an extra minute or two to the baking time if needed. When you’re ready to enjoy warm, chewy Toffee Almond Cookies, simply pop them in the oven and delight in their irresistible aroma!

Toffee Almond Cookies Recipe FAQs

What type of almonds should I use for the Toffee Almond Cookies?
I recommend using raw or roasted almonds for your Toffee Almond Cookies. Toasting the almonds brings out a richer flavor and enhances the nuttiness, making each bite even more delightful. Simply place chopped almonds on a baking sheet and toast them in a preheated oven at 350°F (175°C) for about 8-10 minutes, stirring occasionally until they are lightly browned and fragrant.

How should I store my Toffee Almond Cookies?
Store your Toffee Almond Cookies in an airtight container at room temperature for up to 5 days. This will help maintain their chewy texture and fresh flavor. If you want to keep them for longer, you can refrigerate them in an airtight container for up to a week, though they’ll lose a bit of their delightful chewiness.

Can I freeze Toffee Almond Cookies? How do I do it?
Absolutely! To freeze your Toffee Almond Cookies, place them in a single layer within an airtight container, making sure to separate each layer with parchment paper to prevent sticking. They can be frozen for up to 3 months. When you’re ready to enjoy them, simply reheat them in a preheated oven at 350°F (175°C) for about 5-10 minutes to bring back their fresh-baked texture.

What if my cookies spread too much while baking?
If your Toffee Almond Cookies spread too much, it could be due to overly soft butter or not chilling the dough before baking. To prevent this in the future, ensure your butter is softened but not melted. Also, chilling the cookie dough for about 30 minutes before scooping can help control spreading and maintain their shape.

What are some common allergies to consider when making Toffee Almond Cookies?
When making Toffee Almond Cookies, consider nut allergies due to the almonds. For a nut-free version, you can substitute chopped almonds with sunflower seeds or pumpkin seeds, which will still provide a pleasant crunch. Additionally, if you need to make these cookies gluten-free, simply replace all-purpose flour with a gluten-free blend and consider adding xanthan gum as needed for texture.

Can I use salted butter in this recipe?
I highly advise against using salted butter for this recipe. Unsalted butter is essential for controlling the overall saltiness and allowing the rich flavors of the toffee and almonds to shine through. Stick with unsalted butter for the best results in your Toffee Almond Cookies!

Toffee Almond Cookies

Toffee Almond Cookies: Creamy, Chewy Delight for Everyone

These Toffee Almond Cookies are a must-try with their irresistible combination of flavors and chewy toffee bits.
Prep Time 15 minutes
Cook Time 12 minutes
Cooling Time 5 minutes
Total Time 32 minutes
Servings: 24 cookies
Course: Dessert
Cuisine: American
Calories: 150

Ingredients
  

For the Batter
  • 1 cup Unsalted Butter softened
  • 3/4 cup Brown Sugar
  • 1/2 cup Granulated Sugar
  • 1 large Egg
  • 1 teaspoon Vanilla Extract pure recommended
  • 2 cups All-Purpose Flour can swap half for cake flour
  • 1 teaspoon Baking Powder
  • 1/2 teaspoon Baking Soda
  • 1/4 teaspoon Salt
For the Sweetness
  • 1 cup Toffee Bits variety based on preference
  • 1 cup Chopped Almonds toasted
  • pinch Sea Salt for sprinkling

Equipment

  • Electric mixer
  • Mixing bowls
  • Baking Sheets
  • Parchment Paper
  • Cookie Scoop

Method
 

Step-by-Step Instructions
  1. Preheat your oven to 350°F (175°C) and line two baking sheets with parchment paper.
  2. In a large mixing bowl, cream together unsalted butter, brown sugar, and granulated sugar for 2-3 minutes until light and fluffy.
  3. Add the egg and vanilla extract to the mixture and mix on low speed until just combined.
  4. In a separate bowl, whisk together all-purpose flour, baking powder, baking soda, and salt. Slowly combine with the wet mixture.
  5. Fold in toffee bits and chopped almonds until evenly distributed.
  6. Drop rounded balls of dough onto prepared baking sheets, spacing them 2 inches apart.
  7. Lightly sprinkle sea salt over each cookie dough ball.
  8. Bake for 10-12 minutes until edges are golden and centers are slightly soft.
  9. Cool on baking sheets for 5 minutes before transferring to wire racks.

Nutrition

Serving: 1cookieCalories: 150kcalCarbohydrates: 22gProtein: 2gFat: 6gSaturated Fat: 3gPolyunsaturated Fat: 1gMonounsaturated Fat: 2gCholesterol: 15mgSodium: 95mgPotassium: 60mgFiber: 1gSugar: 10gVitamin A: 300IUCalcium: 20mgIron: 0.5mg

Notes

Ensure butter is softened and avoid overmixing after adding dry ingredients for the best texture.

Tried this recipe?

Let us know how it was!

Irresistible Neapolitan Cake Recipe: A Flavorful Trio Treat

As I was sifting through my pantry, the vibrant colors of the cocoa, pureed strawberries, and smooth vanilla caught my eye, transforming a simple moment into a culinary inspiration. This inspired me to whip up a delightful Neapolitan Cake Recipe, featuring layers of chocolate, vanilla, and strawberry that not only look stunning but are surprisingly easy to make. Perfect for both novice bakers and seasoned pros, this layered treat is a crowd-pleaser at any gathering or a sweet indulgence for your next family dinner. Plus, the quick prep time means you can spend less time in the kitchen and more time savoring those precious moments with loved ones. Ready to dive into this colorful dessert adventure? Let’s get baking!

Why is Neapolitan Cake a Must-Bake?

Vibrant Layers: The stunning combination of chocolate, vanilla, and strawberry creates a feast for the eyes and the taste buds! Each slice reveals a beautiful spectrum of colors, ensuring your cake is the centerpiece of any celebration.

Crowd-Pleaser: This cake is perfect for gatherings, turning any ordinary occasion into something extraordinary. With its delightful blend of flavors, it appeals to both kids and adults alike!

Easy to Make: Even if you’re new to baking, this Neapolitan Cake Recipe has straightforward instructions that promise success. If you enjoy baking, you might also love whipping up a delectable Strawberry Cheesecake Dump or a classic Chocolate Chip Pancakes!

Customizable: The possibilities are endless! Feel free to swap out fruits or flavor extracts, giving you the creative freedom to make each cake unique.

Quick Prep Time: Spend less time in the kitchen and more time with loved ones, as this recipe is designed to streamline your baking process. Get ready to wow your guests with a treat that’s both delicious and impressive!

Neapolitan Cake Ingredients

For the Cake Layers

  • All-Purpose Flour – Provides structure to the cake; you can substitute with gluten-free flour for a gluten-free option.
  • Cocoa Powder – Adds rich chocolate flavor; for a lighter taste, mix with Dutch-processed cocoa.
  • Granulated Sugar – Sweetens the cake while aiding in browning; consider reducing sugar for a less sweet cake.
  • Baking Powder – Acts as a leavening agent; ensure it’s fresh for optimal rise.
  • Salt – Balances the sweetness, enhancing overall flavors.
  • Eggs – Bind the ingredients and contribute to a tender texture.
  • Milk – Adds moisture; almond or oat milk can be used for a dairy-free alternative.
  • Vanilla Extract – A classic flavor enhancer; substitute with vanilla bean paste for more depth.
  • Melted Chocolate – Enriches the chocolate layer; dark or semi-sweet works best.
  • Pureed Strawberries – Infuses a fruity layer; raspberries or blueberries can create a different flavor profile.

For the Frosting

  • Cream Cheese – Creates a smooth, rich frosting base; can use regular cream for a simple buttercream instead.
  • Confectioners’ Sugar – Sweetens and thickens the frosting; adjust to taste.
  • Butter – Adds richness; opt for unsalted to manage saltiness control.

Let your baking journey be filled with delightful flavors by trying this Neapolitan Cake Recipe!

Step‑by‑Step Instructions for Neapolitan Cake Recipe

Step 1: Preheat the Oven
Begin by preheating your oven to 350°F (175°C). While it warms up, take three round cake pans and grease them with butter or line them with parchment paper. This will ensure that your layers release easily after baking, setting you up for success as you dive into this delightful Neapolitan Cake Recipe.

Step 2: Combine the Dry Ingredients
In a large mixing bowl, whisk together the all-purpose flour, cocoa powder, granulated sugar, baking powder, and salt until evenly mixed. This dry mixture forms the foundation of your Neapolitan Cake, offering a delightful flavor base. Make sure there are no lumps, as this will keep your cake layers smooth and tender.

Step 3: Mix Wet Ingredients
In another bowl, whisk the eggs, milk, and vanilla extract until well combined. Gradually pour this wet mixture into your dry ingredients, stirring gently to combine. Be careful not to overmix; you want the batter just combined for a light, airy texture in your layers.

Step 4: Prepare Flavored Batter
Divide the batter evenly into three separate bowls. To create the chocolate layer, mix melted chocolate into one bowl until fully incorporated. Add pureed strawberries to the second bowl for the fruity layer, and leave the third bowl plain for vanilla. This step adds the vibrant flavors central to the Neapolitan Cake Recipe.

Step 5: Bake the Layers
Pour each flavored batter into the prepared cake pans, making sure to spread them evenly. Place them in the oven and bake for 25–30 minutes. You’ll know they are done when a toothpick inserted into the center comes out clean. Once baked, let the layers cool in the pans for about 10 minutes before transferring them to wire racks to cool completely.

Step 6: Frost and Assemble
Once your cake layers are cool, it’s time to assemble. Place the chocolate layer on a serving plate and spread a generous amount of cream cheese frosting on top. Stack the vanilla layer next, adding more frosting, followed by the strawberry layer. Finally, cover the entire cake with the remaining frosting, smoothing it out for a beautiful finish that highlights your stunning Neapolitan Cake Recipe.

What to Serve with Neapolitan Cake

To elevate your dessert experience, consider these delightful accompaniments that harmonize beautifully with the vibrant flavors of this layered treat.

  • Fresh Berries: The bright, juicy contrast of strawberries and blueberries brings a refreshing burst, enhancing the fruity elements of the cake. Pairing fresh berries with each slice makes every bite a harmonious blend of flavors.

  • Whipped Cream: A dollop of lightly sweetened whipped cream adds a cloud-like fluffiness that complements the creamy frosting. Its airy texture balances the richness of the cake, making each bite feel like a special occasion.

  • Coffee or Espresso: A warm cup of coffee or espresso provides a wonderful contrast to the sweetness of the cake. The robust flavors of coffee balance the dessert without overpowering its delightful layers, creating a cozy pairing for your afternoon treat.

  • Vanilla Ice Cream: Serve a scoop of vanilla ice cream alongside your slice for a classic dessert pairing. The creaminess of the ice cream melds perfectly with the cake, providing a silky texture that kids and adults will adore.

  • Chocolate Ganache: Drizzling chocolate ganache over the cake can intensify the chocolate layer while adding a silky richness. The gooey goodness will leave chocolate lovers swooning and elevates each slice to an entirely new level.

  • Mint Leaves: Fresh mint leaves not only add a pop of color but also a refreshing finish. Their coolness brightens the overall dessert experience while echoing the fruity flavors of the Neapolitan cake.

  • Sparkling Water or Mocktails: A glass of sparkling water or non-alcoholic mocktails with a hint of citrus can cleanse the palate between bites. The zestiness ensures your taste buds remain refreshed, fully enjoying the vibrant taste of the cake.

Let these serving suggestions turn your Neapolitan cake into an unforgettable feast for both the eyes and the palate!

Neapolitan Cake Recipe: Variations & Substitutions

Elevate your Neapolitan Cake Recipe by embracing these creative variations that invite you to customize each bite with delightful twists!

  • Fruit Fusion: Substitute pureed strawberries with raspberries or blueberries for a fresh twist. Their tartness will add a lovely contrast to the sweetness.

  • Chocolate Choices: Try using dark chocolate or even white chocolate to create different flavor profiles for each layer. The rich variations will entice chocolate lovers.

  • Cream Cheese Twists: Use flavored cream cheese like strawberry or chocolate for the frosting to elevate your cake into a uniquely decadent experience.

  • Dairy Alternatives: Opt for almond or coconut milk in place of regular milk for a dairy-free Neapolitan Cake Recipe, making it accessible to everyone!

  • Extract Experimentation: Swap vanilla extract with almond or coconut extract for a new layer of flavor that your palate will adore. The aroma alone is heavenly!

  • Sugar Swaps: Consider reducing the granulated sugar or substituting it with honey or maple syrup for a naturally sweetened cake.

  • Layer It Up: Add an extra layer! Make it a four-layer cake by halving each of your cake layers for added grandeur and an impressive presentation.

  • Spice It Up: For a hint of warmth and complexity, mix a pinch of cinnamon into the vanilla or chocolate layers. The unexpected flavor will captivate your guests.

Enjoy exploring these variations, and for more baking inspirations, don’t miss the delicious Chocolate Fudge Cupcakes or the delightful Easter Poke Cake recipe! Each of these treats will surely brighten up your baking days.

Expert Tips for Neapolitan Cake

  • Cool Layers Completely: Ensure each cake layer cools entirely before frosting. This prevents the cream cheese frosting from melting and helps maintain clean, beautiful layers.

  • Mix Gently: When combining ingredients, mix just until incorporated. Overmixing can lead to a dense cake texture, contrasting the lightness you want in your Neapolitan Cake Recipe.

  • Flavor Variations: Don’t hesitate to experiment with flavor extracts like almond or coconut, customizing your Neapolitan cake in delightful ways that suit your palate.

  • Baking Powder Freshness: Always check that your baking powder is fresh before use to ensure your cake rises beautifully. An old leavening agent can lead to disappointing, flat layers.

  • Decoration Ideas: Enhance your cake’s visual appeal with colorful sprinkles or fresh fruit on top. This small touch makes your Neapolitan cake not just delicious, but stunningly beautiful too!

Make Ahead Options

These Neapolitan Cake layers are fantastic for meal prep, allowing you to indulge in homemade goodness even on your busiest days! You can prepare the cake layers up to 24 hours in advance; simply bake, cool, and wrap them tightly in plastic wrap before refrigerating. The frosting can also be made ahead and stored in the fridge for up to 3 days. To maintain the cake’s moisture and flavor, be sure to let it cool completely before wrapping. When you’re ready to serve, allow the frosting to come to room temperature, then frost and assemble the layers for a delightful, multi-layered treat that’s just as delicious as if you made it on the spot!

How to Store and Freeze Neapolitan Cake

Fridge: Keep leftover Neapolitan cake in an airtight container for up to three days. This helps preserve its moisture while keeping those delightful flavors intact.

Freezer: For longer storage, wrap individual slices tightly in plastic wrap or aluminum foil, then place in a freezer-safe bag. Freeze for up to three months without losing taste.

Thawing: To enjoy frozen slices, transfer them to the fridge to thaw overnight or leave at room temperature for about an hour. Reheat in the microwave for 10-15 seconds if you prefer a warm treat.

Freshness Tip: Ensure your cake is well-wrapped to prevent freezer burn and retain the exciting layered flavors of your Neapolitan cake.

Neapolitan Cake Recipe FAQs

What kind of flour should I use for Neapolitan cake?
For this Neapolitan Cake Recipe, all-purpose flour is the go-to choice as it provides a sturdy structure. If you’re looking for a gluten-free option, feel free to substitute with a gluten-free flour blend. Ensure the blend includes xanthan gum for a light and fluffy texture.

How should I store leftover Neapolitan cake?
Absolutely! To keep your Neapolitan cake fresh, store any leftovers in an airtight container in the refrigerator for up to three days. This will help maintain its moisture and flavor. If you have slices leftover, you can wrap them tightly in plastic wrap or foil for optimal freshness.

Can I freeze Neapolitan cake?
Yes, you can freeze this delightful cake! To do so, wrap individual slices tightly in plastic wrap or aluminum foil, then place them in a freezer-safe bag. They will stay delicious for up to three months. Just remember to label the bag with the date!

What if my cake layers are too dense?
If your cake layers turn out too dense, it may be a result of overmixing the batter. When combining your wet and dry ingredients, mix gently until just combined. Additionally, make sure your baking powder is fresh; expired baking powder won’t help your cake rise.

Can I make any substitutions for dietary preferences?
Yes, indeed! If you’re accommodating dietary restrictions, you can easily make adjustments. Use almond or oat milk for a dairy-free option, and swap out eggs with flaxseed meal or applesauce for a vegan version. Just remember that these changes may slightly alter the taste and texture of your Neapolitan Cake.

What’s the best way to decorate my Neapolitan cake?
To enhance the beauty of your Neapolitan Cake, try topping it with colorful sprinkles or fresh fruits like strawberries, raspberries, or blueberries. You can also drizzle some melted chocolate on top for that extra touch of elegance. Let your creativity shine!

Neapolitan Cake Recipe

Irresistible Neapolitan Cake Recipe: A Flavorful Trio Treat

This Neapolitan Cake Recipe combines layers of chocolate, vanilla, and strawberry for a stunning, crowd-pleasing dessert.
Prep Time 20 minutes
Cook Time 30 minutes
Cooling Time 10 minutes
Total Time 1 hour
Servings: 12 slices
Course: Dessert
Cuisine: Italian
Calories: 450

Ingredients
  

Cake Layers
  • 2 cups All-Purpose Flour Can substitute with gluten-free flour.
  • 3/4 cup Cocoa Powder Use Dutch-processed for lighter taste.
  • 2 cups Granulated Sugar Adjust for less sweetness.
  • 1 tbsp Baking Powder Ensure it's fresh.
  • 1/2 tsp Salt
  • 4 large Eggs
  • 1 cup Milk Can substitute with almond or oat milk.
  • 2 tsp Vanilla Extract Substitute with vanilla bean paste for depth.
  • 4 oz Melted Chocolate Dark or semi-sweet preferred.
  • 1 cup Pureed Strawberries Raspberries or blueberries are alternatives.
Frosting
  • 8 oz Cream Cheese Regular cream can be used for buttercream.
  • 4 cups Confectioners' Sugar Adjust to taste.
  • 1/2 cup Butter Use unsalted for better salt control.

Equipment

  • Oven
  • Mixing bowls
  • whisk
  • Cake pans
  • spatula

Method
 

Preparation Steps
  1. Preheat your oven to 350°F (175°C). Grease three round cake pans or line them with parchment paper.
  2. In a large mixing bowl, whisk together the all-purpose flour, cocoa powder, granulated sugar, baking powder, and salt.
  3. In another bowl, whisk the eggs, milk, and vanilla extract. Gradually combine this wet mixture into the dry ingredients.
  4. Divide the batter into three bowls. Mix melted chocolate into one for chocolate, pureed strawberries in another for fruity, and leave the third plain for vanilla.
  5. Pour each flavored batter into the prepared cake pans and bake for 25-30 minutes. Cool in the pans for 10 minutes before transferring to wire racks.
  6. Once cooled, start assembling by placing the chocolate layer on a plate, spreading frosting, then stacking the vanilla and strawberry layers, frosting them in between.
  7. Cover the entire cake with the remaining frosting and smooth it out.

Nutrition

Serving: 1sliceCalories: 450kcalCarbohydrates: 65gProtein: 6gFat: 20gSaturated Fat: 10gPolyunsaturated Fat: 1gMonounsaturated Fat: 5gCholesterol: 85mgSodium: 300mgPotassium: 150mgFiber: 2gSugar: 30gVitamin A: 500IUVitamin C: 2mgCalcium: 100mgIron: 1mg

Notes

Ensure each layer cools completely before frosting to achieve clean layers. Feel free to customize flavors to your liking.

Tried this recipe?

Let us know how it was!

Crispy Louisiana Voodoo Fries with a Flavorful Kick

The aroma of spices wafts through the kitchen as I pull a tray of Crispy Louisiana Voodoo Fries from the oven, instantly transforming a simple potato into a mouthwatering snack. This recipe, infused with a delightful blend of seasonings and topped with gooey cheese, offers both beginners and seasoned home chefs a winning dish that’s perfect for any gathering. The secret? These fries are quick to prepare and can easily be tailored to your desired spice level, making them a fantastic option for everyone at the table. Whether you’re gearing up for game night or just need a satisfying snack, my Crispy Louisiana Voodoo Fries promise to be a hit. So, who’s ready to tackle this flavorful culinary adventure?

Why You’ll Crave These Fries

Irresistible flavor fusion: The blend of spices in these fries is a celebration of Southern cuisine, delivering a bold taste that keeps you coming back for more.
Customizable spice levels: You can easily adjust the cayenne pepper to make these as spicy or mild as you like, catering to everyone’s palate.
Crowd-pleaser: Perfect for gatherings, whether serving as a snack or a side; these fries bring joy to any occasion, just like my delicious Southern Fried Chicken.
Quick and easy: With a straightforward prep process, even beginners can whip these up in no time.
Cheesy goodness: Topped with melting cheddar cheese and crispy bacon, they provide a comforting, gooey layer that enhances each bite, reminiscent of a decadent Korean Fried Chicken dish.

Get ready to indulge in the deliciousness of my Crispy Louisiana Voodoo Fries!

Crispy Louisiana Voodoo Fries Ingredients

For the Fries
Russet Potatoes – These high-starch potatoes create a crispy exterior and fluffy interior perfect for frying.
Olive Oil – This oil promotes crunch and helps spices adhere; vegetable oil can be used for a lighter flavor.
Paprika – Adds warmth and color, enhancing the overall appeal of the fries.
Garlic Powder – Essential for a savory depth that makes every bite flavorful.
Onion Powder – Provides mild onion flavor, complementing the spices perfectly.
Cayenne Pepper – The star of the spice blend—adjust for your desired heat in these Voodoo fries!
Salt – Enhances all flavors, making it a key component in your fry seasoning.
Black Pepper – Adds a nice kick; feel free to adjust according to taste.

For the Toppings
Cheddar Cheese – Melts beautifully to create a gooey topping that brings joy to each bite. Try Monterey Jack or Pepper Jack for an extra kick!
Bacon – Adds a smoky crunch, but turkey bacon or a vegetarian option can work well too.
Green Onions – Provides a fresh, herby note that brightens the dish.
Jalapeños – Optional for a spicy kick; reduce or omit for milder fries.
Ranch or Voodoo Sauce – A delicious creamy finish; homemade or store-bought versions work just fine.

Prepare to embark on a culinary journey with these Crispy Louisiana Voodoo Fries, a delightful snack that promises to thrill your taste buds!

Step‑by‑Step Instructions for Crispy Louisiana Voodoo Fries

Step 1: Preheat the Oven
Begin by preheating your oven to 425°F (220°C) to ensure it’s hot enough for crisping the fries. This high temperature is essential for achieving that perfect golden exterior while keeping the insides fluffy. Once the oven reaches the desired temperature, prepare your potatoes.

Step 2: Prepare the Potatoes
Wash, peel, and slice the russet potatoes into uniform wedges, ensuring they cook evenly. Pat the potato pieces dry with a clean towel to remove excess moisture; this step is crucial for the Crispy Louisiana Voodoo Fries’ crunch. A dry surface allows the oil and spices to adhere better.

Step 3: Toss with Olive Oil
In a large mixing bowl, toss the dried potato wedges with olive oil until they are lightly coated. This not only promotes crispiness but also helps the spices stick to the surface of the fries. Make sure each wedge is well covered for superb flavor in your Crispy Louisiana Voodoo Fries.

Step 4: Whisk the Spices
In a separate bowl, whisk together paprika, garlic powder, onion powder, cayenne pepper, salt, and black pepper until evenly mixed. This fragrant spice blend is the heart of your Crispy Louisiana Voodoo Fries, providing that bold flavor signature to Southern cuisine. Prepare to sprinkle this over your oiled potatoes.

Step 5: Coat the Potatoes with Spices
Sprinkle the spice mixture over the oiled potato wedges, then toss everything together until each fry is evenly coated with the delicious seasoning blend. Ensure that no wedge is left unseasoned—the magic of these fries lies in their savory, smoky flavor profile.

Step 6: Arrange on Baking Sheet
Spread the seasoned potato wedges in a single layer on a parchment-lined baking sheet, ensuring there’s enough space between them for air circulation. This helps each fry to roast evenly, achieving that enticing crunch. Avoid overcrowding to keep your Crispy Louisiana Voodoo Fries from getting soggy.

Step 7: Bake the Fries
Place the baking sheet in the preheated oven and bake the fries for 30-35 minutes. Halfway through, flip the wedges to ensure they crisp up beautifully on all sides. You’ll know the fries are ready when they turn golden brown and feel crisp to the touch.

Step 8: Add the Cheese
Once the fries are done baking, immediately sprinkle shredded cheddar cheese over the hot fries. Return the baking sheet to the oven for an additional 2-3 minutes, allowing the cheese to melt perfectly. The gooey cheese adds a creamy layer that enhances the overall experience of your Crispy Louisiana Voodoo Fries.

Step 9: Top with Tasty Additions
After the cheese has melted, remove the fries from the oven and top them with crispy bacon bits, fresh green onions, and sliced jalapeños for an extra kick. Pop them back in the oven for 5 more minutes to warm the toppings through while maintaining that delightful crunch.

Step 10: Drizzle with Sauce
Finally, drizzle your favorite ranch or voodoo sauce over the plated Crispy Louisiana Voodoo Fries for a burst of creaminess. Serve these irresistible fries hot, and watch how they become the center of attention at your gathering, making your culinary adventure a resounding success!

Expert Tips for Crispy Louisiana Voodoo Fries

  • Spacing is Key: Ensure fries are spread out on the baking sheet for optimal air circulation, preventing sogginess and achieving that perfect crunch.
  • Dry Before Oil: Pat the potato wedges dry before tossing with olive oil. Moisture hinders crispiness, making a dry surface essential for the best Crispy Louisiana Voodoo Fries.
  • Adjust Spice Wisely: Experiment with the cayenne pepper to find your preferred heat level. Start with a small amount, as you can always add more if you desire a stronger kick.
  • Flip for Even Cooking: Remember to flip the fries halfway through baking for uniform crispness. This simple step ensures every side gets golden and crunchy.
  • Use the Right Cheese: Opt for good melting cheese like cheddar or Pepper Jack. This will create that irresistible gooeyness that elevates your fries to the next level.

How to Store and Freeze Crispy Louisiana Voodoo Fries

Fridge: Store leftovers in an airtight container in the refrigerator for up to 3 days. This keeps your Crispy Louisiana Voodoo Fries fresh and ready to enjoy later.

Freezer: For longer storage, freeze cooked fries in a single layer on a baking sheet until solid, then transfer to a freezer-safe bag for up to 2 months.

Reheating: To reheat, place fries on a baking sheet and warm in a 400°F (200°C) oven for about 10-15 minutes until crispy again. Avoid microwaving, as it can make them soggy.

Tips: For best results, re-season the fries lightly before reheating to refresh the flavor, ensuring each bite is just as delicious as when first made.

Make Ahead Options

These Crispy Louisiana Voodoo Fries are perfect for meal prep enthusiasts! You can slice the russet potatoes and toss them with olive oil and spices up to 24 hours in advance; simply refrigerate them in an airtight container to maintain their freshness. This lets the flavors meld beautifully while saving you time during busy weeknights. When you’re ready to bake, spread the prepped fries on a baking sheet and cook them at 425°F (220°C) for 30-35 minutes. Remember to add the cheddar cheese and toppings at the end, right before serving, to ensure they melt perfectly and deliver that signature gooey goodness in every bite!

What to Serve with Crispy Louisiana Voodoo Fries

Elevate your culinary experience with a delightful spread that complements these flavorful fries.

  • Cheesy Queso Dip: This warm, cheesy dip adds a creamy texture that pairs beautifully with the spicy fries, creating a perfect balance of flavors.

  • Spicy Remoulade Sauce: A tangy and zesty dipping sauce that enhances the bold seasonings of the fries, offering a refreshing twist after each bite.

  • Grilled Shrimp Skewers: Juicy, tender shrimp marinated in Cajun spices bring a burst of flavor that harmonizes with your Crispy Louisiana Voodoo Fries effortlessly.

  • Fresh Coleslaw: The crunchy, refreshing slaw adds a nice contrast to the fries’ richness, making each mouthful more exciting and well-rounded.

  • Classic Southern Fried Chicken: If you’re aiming for a feast, this crispy, savory chicken side will enhance the Southern flair of your meal.

  • Ice Cold Lemonade: The sweet and tart flavors of this thirst-quencher pair wonderfully with the heat of the fries, refreshing your palate with every sip.

Variations & Substitutions for Crispy Louisiana Voodoo Fries

Feel free to let your culinary creativity shine as you customize these crispy delights to suit your taste buds and dietary needs!

  • Cheese Swap: Replace cheddar cheese with a blend of mozzarella and parmesan for a different cheesy experience. The creaminess adds a wonderful layer to each bite.

  • Bacon Alternatives: Switch out regular bacon for turkey bacon or omit it entirely for a lighter, vegetarian-friendly option. Your fries will still shine with delicious toppings and spices.

  • Sauce Variety: Experiment with different sauces beyond ranch and voodoo sauce—try hot honey, barbecue, or even a creamy garlic sauce for a flavorful twist. The options are endless!

  • Spice Adjustments: Adjust the amount of cayenne pepper to control the heat level. For a milder version, you can even omit it entirely without sacrificing flavor.

  • Extra Crunch: For added texture, toss in some panko breadcrumbs before baking for a delightful crispy coating. You’ll love how they elevate the crunch factor!

  • Herb Infusion: Add fresh herbs, like cilantro or parsley, as a garnish for an additional burst of freshness and color. They not only elevate flavor but also enhance the dish’s appeal.

  • Veggie Toppers: Personalize your fries with sauteed bell peppers or mushrooms for an earthy and savory complement to the crispy base. It’s a delightful way to sneak in more vegetables!

These variations can take your Crispy Louisiana Voodoo Fries from simple to sensational! For other delicious ideas, check out my Crispy Feta Fried Eggs or try your hand at some Chicken Katsu Bowls. The delicious journey in your kitchen doesn’t have to stop here!

Crispy Louisiana Voodoo Fries Recipe FAQs

What type of potatoes are best for these fries?
Absolutely! Russet potatoes are ideal due to their high starch content, which creates that perfect crispy exterior and fluffy interior. Look for firm potatoes without dark spots or blemishes to ensure the best flavor and texture.

How should I store leftover Crispy Louisiana Voodoo Fries?
For sure! Store any leftovers in an airtight container in the refrigerator for up to 3 days. To keep them fresh, it’s essential to let them cool before sealing, as excess moisture can lead to sogginess.

Can I freeze the Crispy Louisiana Voodoo Fries?
Yes, you can! For freezing, let the cooked fries cool completely, then spread them in a single layer on a baking sheet to freeze until solid (about 1-2 hours). Once frozen, transfer them to a freezer-safe bag and enjoy them within 2 months. When ready to eat, reheat them directly from the freezer in a preheated 400°F (200°C) oven for about 15-20 minutes or until heated through and crispy again.

What if my fries come out soggy?
Very common! If your fries turn out soggy, it could be due to overcrowding the baking sheet or not drying the potato wedges sufficiently before oiling. Ensure even spacing and patting dry is key for achieving that crispy texture. If you find yourself in this situation, consider popping them back in the oven for a few extra minutes to regain that crunch!

Are these fries suitable for gluten-free diets?
Absolutely! Crispy Louisiana Voodoo Fries can be made gluten-free by using careful sauces and ensuring all your seasonings are gluten-free. Just check the labels on your sauces to confirm they meet your dietary needs!

Can I modify the spice level in this recipe?
Very easy! You can adjust the amount of cayenne pepper based on your heat preference. If you’re sensitive to spice, start with a smaller amount and add gradually until you reach the desired level. The more the merrier—isn’t that the motto?

Crispy Louisiana Voodoo Fries

Crispy Louisiana Voodoo Fries with a Flavorful Kick

Enjoy the mouthwatering Crispy Louisiana Voodoo Fries, infused with spices and topped with cheese. A perfect snack for any gathering.
Prep Time 15 minutes
Cook Time 35 minutes
Total Time 50 minutes
Servings: 4 servings
Course: Appetizers
Cuisine: Southern
Calories: 320

Ingredients
  

For the Fries
  • 3 large Russet Potatoes High-starch potatoes for crispiness
  • 2 tablespoons Olive Oil For coating the fries
  • 1 tablespoon Paprika Adds warmth and color
  • 1 teaspoon Garlic Powder For savory depth
  • 1 teaspoon Onion Powder Mild onion flavor
  • 1 teaspoon Cayenne Pepper Adjust for spice level
  • 1 teaspoon Salt Enhances flavors
  • 1 teaspoon Black Pepper For added kick
For the Toppings
  • 1 cup Cheddar Cheese Shredded, for topping
  • 4 slices Bacon Crispy, optional turkey bacon
  • 2 tablespoons Green Onions Chopped, for garnish
  • 1 jalapeño Jalapeños Sliced, optional
  • 2 tablespoons Ranch or Voodoo Sauce For drizzling

Equipment

  • Oven
  • Baking Sheet
  • Mixing Bowl
  • Parchment Paper

Method
 

Preparation
  1. Preheat your oven to 425°F (220°C).
  2. Wash, peel, and slice the russet potatoes into uniform wedges. Pat dry to remove moisture.
  3. Toss the dried potato wedges with olive oil in a mixing bowl until lightly coated.
  4. In a separate bowl, whisk together paprika, garlic powder, onion powder, cayenne pepper, salt, and black pepper.
  5. Sprinkle the spice mixture over the oiled potato wedges and toss until evenly coated.
  6. Spread the seasoned potato wedges in a single layer on a parchment-lined baking sheet.
  7. Bake the fries for 30-35 minutes, flipping halfway through for even cooking.
  8. Sprinkle cheddar cheese over the fries and return to oven for 2-3 minutes to melt the cheese.
  9. Top with bacon, green onions, and jalapeños, and bake for an additional 5 minutes.
  10. Drizzle with ranch or voodoo sauce before serving hot.

Nutrition

Serving: 1servingCalories: 320kcalCarbohydrates: 36gProtein: 6gFat: 18gSaturated Fat: 7gPolyunsaturated Fat: 2gMonounsaturated Fat: 7gCholesterol: 30mgSodium: 600mgPotassium: 850mgFiber: 4gSugar: 1gVitamin A: 10IUVitamin C: 15mgCalcium: 200mgIron: 2mg

Notes

For best results, ensure potatoes are dry before oiling and spread evenly on the baking sheet to prevent sogginess.

Tried this recipe?

Let us know how it was!

Delicious Porcupine Meatballs: Comfort Food Made Easy

There I was, rummaging through my pantry, desperately searching for something to whip up for dinner. After a long day, all I wanted was familiarity and comfort, and that’s when it hit me: Porcupine Meatballs! This delightful dish features juicy beef combined with rice, all nestled in a rich tomato sauce that warms the heart. Not only do they come together in under 30 minutes, but they also please palates both young and old, making them ideal for busy weeknights. Plus, with endless variations on the classic recipe—think turkey meatballs or an Asian-inspired twist—there’s something for everyone. Ready to dive into a comforting bowl of nostalgia that’s just as easy as it is satisfying? Let’s get cooking!

Why are Porcupine Meatballs so irresistible?

Comforting Experience: The rich tomato sauce envelops juicy meatballs, creating a warm, hearty meal perfect for family dinners.

Quick Prep: With a cooking time of under 30 minutes, you can serve this dish without the stress of time-consuming recipes.

Customizable Options: Whether you prefer turkey meatballs for a lighter option or want to explore an Asian-inspired twist, the possibilities are endless!

Kid-Friendly: Packed with flavor and appealing textures, these meatballs are a surefire hit for even the pickiest eaters.

Leftover Friendly: Make extra for busy weekdays; simply freeze and reheat whenever you’re short on time. For meal inspiration, you might also love our delicious Korean Bbq Meatballs to add to your repertoire!

Porcupine Meatballs Ingredients

For the Meatballs
Ground Beef – Provides protein and rich flavor; substitute with ground turkey for a lighter option.
Uncooked White Rice – Adds the perfect texture; ensure it’s unprocessed for the best consistency.
Onion (finely chopped) – Enhances the flavor base; can be replaced with shallots for a sweeter touch.
Milk – Keeps the meatballs moist and tender; replace with beef broth for added richness.
Salt – Essential for flavor enhancement; adjust to your taste preferences.
Black Pepper – Adds mild heat; freshly ground offers the best flavor.
Garlic Powder – Boosts the deliciousness; feel free to use fresh minced garlic as a substitute.
Worcestershire Sauce – Provides umami depth; soy sauce can be used if necessary.

For the Sauce
Tomato Sauce (15 oz can) – Forms the base of the sauce for acidity and richness; opt for homemade for a fresher taste.
Water – Helps dilute the sauce; replace half with beef stock for richer flavor.
Brown Sugar – Balances acidity in the tomatoes; honey is a great natural alternative if preferred.
Italian Seasoning – Adds aromatic herbal notes; customize with individual herbs like oregano and basil.

For Garnish
Fresh Parsley (optional) – Brings freshness to the dish; substitute with basil or simply omit if you don’t have any.

Dive into making these fantastic Porcupine Meatballs that are not only delicious but also a delightful blend of flavors and textures!

Step‑by‑Step Instructions for Porcupine Meatballs

Step 1: Preheat the Oven
Begin by preheating your oven to 350°F (175°C). This ensures that your Porcupine Meatballs will cook evenly and thoroughly. While the oven heats, gather your ingredients and equipment—a large mixing bowl, baking dish, and a whisk for the sauce.

Step 2: Prepare the Meatball Mixture
In a large mixing bowl, combine ground beef, uncooked white rice, finely chopped onion, milk, salt, black pepper, garlic powder, and Worcestershire sauce. Mix gently until just combined; this will keep your meatballs tender. Feel free to use your hands or a spatula for mixing.

Step 3: Form the Meatballs
Next, scoop the meat mixture and form it into 1 to 1.5-inch meatballs. Place them into a greased baking dish, ensuring they are spaced evenly. This helps the Porcupine Meatballs cook uniformly and prevents them from sticking together.

Step 4: Make the Sauce
In a separate bowl, whisk together the tomato sauce, water, brown sugar, and Italian seasoning until well blended. The mixture should be smooth and slightly thick. This delicious sauce will envelop your meatballs beautifully during baking, adding rich flavor.

Step 5: Combine the Meatballs and Sauce
Pour the prepared sauce over the meatballs in the baking dish, making sure each meatball is generously coated. This step is crucial as the sauce not only enhances flavor but also keeps the meatballs moist while they cook.

Step 6: Bake with Foil
Cover the baking dish tightly with aluminum foil and bake in the preheated oven for 30 minutes. This initial baking phase allows the flavors to meld and the meatballs to cook properly. You’ll notice the sauce bubbling around the edges when it’s ready for the next step.

Step 7: Finish Baking Uncovered
After 30 minutes, carefully remove the foil and return the baking dish to the oven. Bake for an additional 10-15 minutes, or until the meatballs are cooked through and the sauce has thickened nicely. The meatballs should feel firm to the touch and no longer pink inside.

Step 8: Garnish and Serve
Once baked to perfection, remove the Porcupine Meatballs from the oven and let them rest for a few minutes. For a fresh finishing touch, garnish with chopped fresh parsley before serving. Enjoy these comforting meatballs hot alongside your favorite side dishes!

Storage Tips for Porcupine Meatballs

Fridge: Store cooked Porcupine Meatballs in an airtight container for up to 3 days to maintain their flavor and moisture.

Freezer: For longer storage, freeze individual meatballs on a baking sheet first, then transfer them to a freezer-safe bag or container for up to 3 months.

Reheating: Thaw frozen meatballs overnight in the fridge. Reheat in a skillet with a splash of sauce or in the microwave until heated through, ensuring they’re hot and delicious!

Keep It Fresh: Always remember to let your meatballs cool completely before storing to prevent condensation, which can lead to spoilage.

Expert Tips for Porcupine Meatballs

Use Fresh Ingredients: Quality ingredients will elevate the flavors of your Porcupine Meatballs, making them more delicious and satisfying.

Don’t Overmix: Mix the meatball ingredients just until combined; overmixing can lead to tough meatballs. Keep them tender for the best experience!

Taste Test: Cook a small meatball to sample before baking to adjust seasoning. This step ensures your final dish bursts with flavor.

Add Veggies: Boost nutrition by incorporating finely chopped vegetables like bell peppers or spinach to the meat mixture without compromising texture.

Customize the Sauce: Feel free to enhance the tomato sauce with your favorite herbs or spices to create a unique flavor profile that you’ll love!

Make Ahead Options

These Porcupine Meatballs are perfect for meal prep enthusiasts! You can prepare the meatball mixture up to 24 hours in advance—just mix all the ingredients (ground beef, rice, onion, milk, and seasonings) and form the meatballs. Keep them covered in the refrigerator until ready to bake. The sauce can also be prepared a day ahead; simply store it in an airtight container. When it’s time to enjoy, just place the meatballs in your baking dish, pour the sauce over them, cover with foil, and bake as instructed. By prepping ahead, you’ll have comforting, homemade meatballs ready to go with minimal effort on busy weeknights!

Porcupine Meatballs Variations & Substitutions

Feel free to get creative and adjust this recipe for your family’s tastes!

  • Turkey Meatballs: Swap ground beef for ground turkey for a lighter, healthier option. They still pack a flavor punch and are just as juicy!

  • Asian Twist: Add ginger, sesame oil, and chopped green onions to the meat mixture; serve these with teriyaki sauce for a delightful flavor shift that everyone will love.

  • Cheesy Meatballs: Incorporate shredded mozzarella or cheddar into your meat mixture for a gooey, melty surprise in each bite that takes comfort food to the next level.

  • Spicy Option: Mix in diced jalapeños or a splash of sriracha into the meat mixture to elevate your dish with a kick that adventurous eaters will appreciate.

  • Herb Variation: Instead of Italian seasoning, use fresh or dried herbs like thyme, rosemary, or even dill for a unique herbal twist on flavors. This subtle switch can elevate the dish!

  • Gluten-Free: Substitute breadcrumbs with gluten-free oats or almond flour, and ensure your sauces are also gluten-free, creating a dish suitable for those with dietary restrictions.

  • Veggie-Loaded: Add finely chopped bell peppers or spinach to the meat mixture for added nutrition and vibrant color. It’s a clever way to sneak in some greens!

  • Bold Tomato Flavors: Consider using fire-roasted tomato sauce or adding a splash of balsamic vinegar to the sauce for an extra depth of flavor that brings your meatballs to life.

No matter which variation you choose, your take on these Porcupine Meatballs will surely be a hit. For a fun twist, you might also enjoy our Korean BBQ Meatballs as another delightful option for busy nights!

What to Serve with Easy Porcupine Meatballs

Set the stage for a cozy family dinner with comforting combinations that enhance every bite of your delicious Porcupine Meatballs.

  • Creamy Mashed Potatoes: The velvety texture of fluffy mashed potatoes pairs beautifully with the hearty tomato sauce, adding richness to each mouthful.

  • Garlic Bread: Crispy, buttery garlic bread is perfect for soaking up the extra sauce, making each meal feel like a treat.

  • Fresh Green Salad: A light, crisp salad adds a refreshing contrast to the warm and savory meatballs, balancing flavors beautifully.

  • Roasted Vegetables: Caramelized vegetables like zucchini and bell peppers offer a vibrant, nutritious side that complements the meatballs’ savory depth.

  • Steamed Broccoli: Bright green broccoli not only looks appealing on the plate but also provides a crunchy texture that contrasts the tender meatballs.

  • Pasta: Placing your Porcupine Meatballs over a bed of spaghetti creates a delightful twist on a classic Italian dish, ensuring maximum sauce coverage.

  • Coleslaw: A tangy coleslaw introduces an unexpected crunch and freshness, harmonizing with the meaty flavors in a refreshing way.

  • Wine Pairing: A glass of light red wine, such as Pinot Noir, enhances the meal’s rich flavors while adding a touch of sophistication.

  • Chocolate Chip Cookies: End the meal on a sweet note with warm, gooey chocolate chip cookies, a perfect finish to a cozy family dinner!

Porcupine Meatballs Recipe FAQs

What should I look for when choosing ground beef?
When selecting ground beef, aim for a lean cut that’s around 80/20 (meat to fat ratio) for optimal flavor and moisture. Look for beef that is bright red in color with minimal dark spots. If you prefer a healthier option, you can substitute ground turkey; just note that it may result in a slightly different texture.

How can I store cooked Porcupine Meatballs?
To store your cooked Porcupine Meatballs, place them in an airtight container, and they’ll stay fresh in the refrigerator for up to 3 days. It’s a good idea to separate layers with parchment paper to prevent sticking. Be sure to let them cool completely before sealing the container to maintain moisture!

Can I freeze Porcupine Meatballs for later use?
Absolutely! To freeze your Porcupine Meatballs, first allow them to cool completely. Then, place them in a single layer on a baking sheet and freeze until solid. Once frozen, transfer them to a freezer-safe bag or container, where they can last for up to 3 months. When you’re ready to enjoy them, thaw them overnight in the fridge and reheat as needed.

What if my meatballs fall apart during baking?
If your meatballs tend to fall apart, check that you’ve mixed the ingredients just until combined. Overmixing can lead to a less cohesive texture. Additionally, ensure your rice is uncooked and has a good texture; slightly undercooked rice can also help absorb moisture and bind the meatballs together during cooking.

Can I make Porcupine Meatballs gluten-free?
Yes! To make gluten-free Porcupine Meatballs, simply ensure that all your ingredients, including Worcestershire sauce and tomato sauce, are labeled gluten-free. You can also swap regular rice for a gluten-free grain alternative. This keeps the dish safe and delicious for those with gluten sensitivities.

Are there any allergy considerations with this recipe?
Definitely check for allergies related to ingredients! Common allergens in Porcupine Meatballs include milk and Worcestershire sauce if it contains allergens like soy. Opt for dairy-free milk and a suitable soy-free sauce if needed, or simply adjust the ingredients according to dietary restrictions.

Porcupine Meatballs

Delicious Porcupine Meatballs: Comfort Food Made Easy

Enjoy comfort with Porcupine Meatballs: juicy beef and rice in a rich tomato sauce, ready in under 30 minutes!
Prep Time 15 minutes
Cook Time 30 minutes
Total Time 45 minutes
Servings: 4 meatballs
Course: Dinner
Cuisine: American
Calories: 250

Ingredients
  

For the Meatballs
  • 1 lb Ground Beef or ground turkey for a lighter option
  • 1/2 cup Uncooked White Rice ensure it's unprocessed
  • 1 small Onion (finely chopped) can replace with shallots
  • 1/4 cup Milk or beef broth for added richness
  • 1 tsp Salt adjust to your taste preferences
  • 1/2 tsp Black Pepper freshly ground offers best flavor
  • 1 tsp Garlic Powder or fresh minced garlic as a substitute
  • 1 tbsp Worcestershire Sauce soy sauce can be used if necessary
For the Sauce
  • 1 can (15 oz) Tomato Sauce opt for homemade for a fresher taste
  • 1/2 cup Water replace half with beef stock for richer flavor
  • 1 tbsp Brown Sugar or honey as a natural alternative
  • 1 tbsp Italian Seasoning customize with individual herbs if desired
For Garnish
  • 2 tbsp Fresh Parsley (optional) or omit if unavailable

Equipment

  • Mixing Bowl
  • baking dish
  • whisk

Method
 

Step-by-Step Instructions
  1. Preheat your oven to 350°F (175°C). Gather your ingredients and equipment.
  2. Combine ground beef, uncooked white rice, finely chopped onion, milk, salt, black pepper, garlic powder, and Worcestershire sauce in a large mixing bowl. Mix gently.
  3. Form 1 to 1.5-inch meatballs and place them into a greased baking dish.
  4. Whisk together the tomato sauce, water, brown sugar, and Italian seasoning until well blended.
  5. Pour the sauce over the meatballs in the baking dish, ensuring they are coated.
  6. Cover the baking dish tightly with aluminum foil and bake for 30 minutes.
  7. Remove the foil and bake for an additional 10-15 minutes until the meatballs are cooked through.
  8. Garnish with chopped fresh parsley before serving.

Nutrition

Serving: 1meatballCalories: 250kcalCarbohydrates: 15gProtein: 20gFat: 15gSaturated Fat: 5gPolyunsaturated Fat: 0.5gMonounsaturated Fat: 9gCholesterol: 70mgSodium: 400mgPotassium: 300mgFiber: 1gSugar: 2gVitamin A: 200IUVitamin C: 2mgCalcium: 30mgIron: 2mg

Notes

Quality ingredients elevate flavors. Don't overmix the meatball mixture. Taste test for seasoning and feel free to add veggies.

Tried this recipe?

Let us know how it was!

Old Fashioned Goulash: Cozy One-Pot Delight for All

As I sliced into the fresh bell peppers, the vibrant colors reminded me of family dinners spent around a table, where laughter and love were inseparable parts of every meal. This Old Fashioned Goulash is not just a dish; it’s a nostalgic one-pot meal that brings warmth to your kitchen and comfort to your heart. With its savory ground beef, tender pasta, and rich tomato sauce, it’s customizable for everyone’s taste—from picky eaters to adventurous palates, making it perfect for busy weeknights. Plus, it’s budget-friendly, allowing you to feed your family without breaking the bank. What delightful twists will you add to make this dish your own?

What Makes Goulash a Family Favorite?

Comforting Creations: This Old Fashioned Goulash is the ultimate cozy meal, perfect for gathering around the dinner table.

Budget-Friendly: With its hearty ingredients, you can easily stretch your dollars without sacrificing flavor.

Customizable Options: Whether you prefer ground beef, turkey, or a medley of veggies, make it yours!

Quick and Easy: Ready in under 30 minutes, this one-pot dish is a lifesaver for busy nights.

Crowd-Pleaser: Kids and adults alike will adore the rich, comforting flavors and delightful pasta.

This recipe is your ticket to a warm, satisfying dinner that’s sure to become a cherished staple. And if you’re looking for ways to elevate your goulash, consider adding diced bell peppers or a sprinkle of red pepper flakes for an extra kick!

Old Fashioned Goulash Ingredients

  • For the Meat

  • Ground Beef or Turkey – Adds hearty protein; can use lean turkey for a lighter option.

  • For the Sauce

  • Minced Garlic – Provides a savory, aromatic base that elevates the flavor.

  • Yellow Onion (diced) – Adds sweetness and depth, making your goulash more flavorful.

  • Water – Helps cook the pasta and creates a saucy consistency essential for goulash.

  • Beef Broth – Enhances richness; substitute with vegetable broth for a vegetarian option.

  • Olive Oil – A touch of richness that prevents sticking to your pot.

  • Tomato Sauce (2 x 15-ounce cans) – Provides a robust tomato base, making the goulash satisfying.

  • Diced Tomatoes (2 x 14.5-ounce cans, undrained) – Adds texture and a tangy taste.

  • Soy Sauce – Boosts umami and enhances overall flavor of the goulash.

  • Italian Seasoning – Brings a hint of herby goodness to each bite.

  • Paprika – Adds a subtle smoky note for added depth.

  • Salt – Use to taste; essential for balancing flavors.

  • Black Pepper – Use to taste; adds warmth to the dish.

  • For the Pasta

  • Elbow Macaroni (uncooked) – A classic choice that absorbs the sauce wonderfully.

  • Optional Add-Ins

  • Shredded Cheese (cheddar or mozzarella) – Stir in before serving for a creamy indulgence.

  • Diced Bell Peppers – Introduces sweetness and crunch, making it extra appealing.

  • Red Pepper Flakes – For those who enjoy a bit of heat in their goulash.

Step‑by‑Step Instructions for OLD FASHIONED GOULASH

Step 1: Brown the Meat
Begin by heating a large pot or Dutch oven over medium heat. Once hot, add the ground beef or turkey, breaking it apart with a spatula. Cook until the meat is browned and cooked through, which should take about 5–7 minutes. Then, add the minced garlic and diced onion, and continue to sauté until the onion is soft and translucent, approximately 3–4 minutes. Drain any excess grease if needed.

Step 2: Build the Sauce
With the meat and aromatics ready, it’s time to build the sauce. Stir in the tomato sauce and diced tomatoes, followed by the water, beef broth, and olive oil. Then, add soy sauce, Italian seasoning, paprika, salt, and black pepper. Bring the mixture to a gentle boil, allowing all the flavors to meld, which should take about 5 minutes.

Step 3: Cook the Pasta
Once the sauce is bubbling, add the uncooked elbow macaroni. Stir firmly to ensure the pasta is fully submersed in the sauce. Reduce the heat to low, and let it simmer uncovered for 20–25 minutes, stirring occasionally. This prevents the pasta from sticking to the bottom, and you’ll know it’s ready when the pasta is tender and has absorbed the sauce.

Step 4: Taste and Adjust
After the pasta has cooked, taste the OLD FASHIONED GOULASH and check the seasoning. Adjust with more salt, black pepper, or a sprinkle of Italian seasoning to suit your preference. This is your chance to develop the flavors even further, ensuring each bite is beautifully balanced and satisfying.

Step 5: Serve
Finally, serve the goulash hot in bowls, garnished with optional toppings like shredded cheddar or mozzarella cheese for extra creaminess. You can also add a sprinkle of fresh parsley for a burst of color and flavor. This hearty dish is ready to bring warmth and comfort to your dinner table!

Storage Tips for Old Fashioned Goulash

  • Fridge: Store your Old Fashioned Goulash in an airtight container for up to 4 days. It’s delightful to reheat and enjoy again for lunch or dinner!
  • Freezer: You can freeze the goulash for up to 3 months. Ensure it’s in a freezer-safe container, and label it for easy identification later.
  • Reheating: When ready to enjoy your frozen goulash, let it thaw overnight in the fridge. Reheat on the stovetop with a splash of water to maintain the desired consistency.
  • Remember: Always check for freshness before consuming any leftovers, and when in doubt, use your senses to judge the quality.

Make Ahead Options

These Old Fashioned Goulash preparations are a lifesaver for busy weeknights! You can brown the ground beef or turkey and sauté the garlic and onions up to 24 hours in advance; simply refrigerate the mixture in an airtight container. You can also measure and mix the spices, ensuring they stay fresh, which saves time during cooking. When you’re ready to enjoy your goulash, just combine the prepped ingredients with the remaining items (tomato sauce, diced tomatoes, water, and broth) in the pot and follow the remaining steps. This way, you’ll have a delicious, comforting meal that’s just as satisfying and hearty, minimizing your time in the kitchen!

Tips for the Best Old Fashioned Goulash

  • Right Meat Choice: Use lean ground beef or turkey to keep the dish lighter without sacrificing flavor. This ensures a delicious, hearty Old Fashioned Goulash without excess grease.

  • Don’t Skip the Sauté: Sautéing the garlic and onion until soft enriches the base flavor. Skipping this step may leave your goulash tasting flat.

  • Taste as You Go: Before serving, always taste and adjust the seasoning. The right balance of salt and spice is key to a flavorful Old Fashioned Goulash.

  • Pasta Perfection: Stir occasionally while the pasta simmers to prevent sticking. This keeps your goulash cohesive and delicious rather than clumpy.

  • Customizable Add-Ins: Feel free to add veggies like bell peppers or corn during cooking, making the Old Fashioned Goulash a nutritional powerhouse without losing its charm.

What to Serve with Old Fashioned Goulash

As you prepare this hearty dish, let the comforting aromas fill your kitchen and ignite anticipation for a delicious meal ahead.

  • Garlic Bread: Crispy and buttery, it’s perfect for soaking up the rich tomato sauce, enhancing your goulash experience. The crunch of garlic bread contrasts beautifully with the soft pasta.

  • Simple Green Salad: A refreshing mix of greens and veggies adds a crisp texture and lightness, offsetting the goulash’s richness. Toss it with a zesty lemon vinaigrette for extra zing.

  • Roasted Vegetables: Seasonal roasted veggies bring a sweet, caramelized flavor to the table. Their slightly charred edges add depth, creating a delightful harmony with your goulash.

  • Shredded Cheese Topping: Consider serving with a bowl of shredded cheese on the side. As your guests spoon in their portions, they can customize their goulash for extra creaminess.

  • Bubbly Sparkling Water: A refreshing bubbly drink elevates the meal experience. Pour it chilled, and enjoy the sensation as it cleanses your palate between bites of delicious goulash.

  • Brownies for Dessert: For a sweet finish, serve hearty brownies. Their fudgy texture and rich chocolate flavor will be a comforting end to your cozy dinner.

These perfect pairings will not just complement your Old Fashioned Goulash, but create a heartwarming, memorable meal to cherish with loved ones.

Variations & Substitutions for OLD FASHIONED GOULASH

Feel free to get creative with this recipe; your taste buds will thank you for the adventure!

  • Meat Swap: Try lean turkey for a lighter option without compromising on flavor. It’s a great way to keep the dish hearty yet healthier.

  • Cheesy Delight: Add shredded cheddar or mozzarella right before serving for creamy richness that elevates every spoonful. The cheese melts beautifully and adds a delightful texture.

  • Veggie Boost: Toss in diced bell peppers or corn for a pop of color and added crunch. They not only enhance the flavor but also pack in essential nutrients for a more wholesome meal.

  • Different Pasta: Use shells or rotini instead of elbow macaroni for a fun twist on texture. These shapes hold the sauce wonderfully, making each bite a mini surprise!

  • Hearty Addition: Incorporate frozen peas for a natural sweetness; they cook well in the last few minutes and provide a nice contrast to the savory flavors.

  • Spicy Kick: For maximum flavor excitement, sprinkle in red pepper flakes to introduce some heat. Adjust according to your family’s preference; spice is easily tailored!

  • Seasonal Touch: Feel free to add zucchini or mushrooms for an earthy twist during summer or fall. It’s a fantastic way to use up garden veggies while keeping the dish fresh.

  • No-Cook Shortcut: If you’re in a hurry, try using pre-cooked meat like rotisserie chicken. Just add it when building the sauce; it’s a great time-saver without sacrificing taste!

Experiment and discover your favorite combinations—this Old Fashioned Goulash is all about making it uniquely yours! You can also enhance flavor further by adding some Italian seasoning or a touch of paprika for that classic goulash taste!

Old Fashioned Goulash Recipe FAQs

How do I choose the right meat for goulash?
Absolutely! For an Old Fashioned Goulash, I recommend using lean ground beef for its rich flavor. However, if you’re looking for a lighter option, ground turkey works beautifully too. Just ensure it’s fully browned and crumbled for the best texture.

How should I store leftover goulash?
Store your Old Fashioned Goulash in an airtight container in the refrigerator for up to 4 days. This makes it perfect for quick meals throughout the week! If you have more left over, you can freeze it—not only does it preserve flavor, but it’s also great for those busy nights when you need a delicious meal in a snap.

Can I freeze Old Fashioned Goulash?
Yes, you can freeze Old Fashioned Goulash for up to 3 months! Just be sure to use a freezer-safe container, ideally leaving some space for expansion. When you’re ready to enjoy it again, thaw it overnight in the refrigerator and reheat on the stovetop with a splash of water to help revive its creamy consistency.

What should I do if my goulash sauce is too thick?
Very! If you find that your sauce has thickened too much, simply add water or broth, one-quarter cup at a time, while stirring gently. Continue to simmer until it reaches your desired sauciness. Don’t worry; this happens to all of us sometimes!

Is goulash safe for kids and those with allergies?
Absolutely! Old Fashioned Goulash is generally safe for kids, but always be cautious with your chosen ingredients. If allergies are a concern, be mindful of any additives like soy sauce or optional ingredients. You can easily customize the recipe to cater to dietary restrictions, such as swapping out for gluten-free pasta or using vegetable broth to keep it vegetarian.

OLD FASHIONED GOULASH

Old Fashioned Goulash: Cozy One-Pot Delight for All

This Old Fashioned Goulash is a cozy, budget-friendly meal that brings warmth to your kitchen and comfort to your heart.
Prep Time 10 minutes
Cook Time 25 minutes
Total Time 35 minutes
Servings: 6 servings
Course: Dinner
Cuisine: American
Calories: 350

Ingredients
  

For the Meat
  • 1 pound Ground Beef or Turkey Adds hearty protein; can use lean turkey for a lighter option.
For the Sauce
  • 3 cloves Minced Garlic Provides a savory, aromatic base that elevates the flavor.
  • 1 medium Yellow Onion Diced; adds sweetness and depth.
  • 2 cups Water Helps cook the pasta and creates a saucy consistency.
  • 2 cups Beef Broth Enhances richness; substitute with vegetable broth for vegetarian option.
  • 1 tablespoon Olive Oil Prevents sticking to your pot.
  • 2 cans Tomato Sauce 15-ounce cans; provides a robust tomato base.
  • 2 cans Diced Tomatoes 14.5-ounce cans, undrained; adds texture.
  • 2 tablespoons Soy Sauce Boosts umami flavor.
  • 1 tablespoon Italian Seasoning Brings herby goodness.
  • 1 teaspoon Paprika Adds a subtle smoky note.
  • to taste teaspoon Salt Essential for balancing flavors.
  • to taste teaspoon Black Pepper Adds warmth.
For the Pasta
  • 2 cups Elbow Macaroni Uncooked; classic choice.
Optional Add-Ins
  • 1 cup Shredded Cheese Cheddar or mozzarella; for creaminess.
  • 1 cup Diced Bell Peppers Introduces sweetness and crunch.
  • to taste teaspoon Red Pepper Flakes For those who enjoy heat.

Equipment

  • Large Pot or Dutch Oven

Method
 

Step-by-Step Instructions
  1. Brown the meat by heating a large pot over medium heat. Add the ground beef or turkey, breaking it apart. Cook until browned, about 5–7 minutes. Add minced garlic and diced onion, sauté until soft, about 3–4 minutes.
  2. Build the sauce by stirring in tomato sauce and diced tomatoes, followed by water, beef broth, and olive oil. Add soy sauce, Italian seasoning, paprika, salt, and black pepper. Bring to a gentle boil, about 5 minutes.
  3. Cook the pasta by adding uncooked elbow macaroni. Stir to ensure pasta is submerged, reduce heat to low, and simmer uncovered for 20–25 minutes, stirring occasionally.
  4. Taste and adjust seasoning as needed with more salt, pepper, or Italian seasoning.
  5. Serve hot in bowls, garnished with optional shredded cheese and parsley.

Nutrition

Serving: 1bowlCalories: 350kcalCarbohydrates: 45gProtein: 25gFat: 10gSaturated Fat: 3gPolyunsaturated Fat: 0.5gMonounsaturated Fat: 2gCholesterol: 80mgSodium: 900mgPotassium: 800mgFiber: 4gSugar: 6gVitamin A: 10IUVitamin C: 15mgCalcium: 10mgIron: 20mg

Notes

For best results, choose lean meats, sauté aromatics well, and always adjust seasoning before serving.

Tried this recipe?

Let us know how it was!

Savory Salmon Patties with Zesty Creamy Sauce Delight

As I stood in my kitchen, pondering a quick yet satisfying meal, the vibrant scent of lemon wafted through the air, promising something delicious. That’s when I decided to whip up these Crispy Salmon Patties with Creamy Lemon-Garlic Sauce, a dish that never fails to impress. In just 25 minutes, you can create a protein-rich, gluten-free delight that feels both special and comforting. Whether you’re looking for a quick weeknight dinner or a fun crowd-pleaser for your next gathering, this versatile recipe checks all the boxes. The perfect blend of crispy texture and zesty creaminess will have everyone asking for seconds. Are you ready to dive into this seafood sensation?

Why are these salmon patties a must-try?

Quick and Easy: With only 25 minutes from start to finish, you can serve up this delightful dish any night of the week without a fuss. Perfect for Busy Nights!

Protein-Packed Goodness: Each bite is filled with nutritious salmon, providing healthy omega-3 fatty acids that your body craves. A meal that’s both satisfying and guilt-free!

Versatile Options: Whether you prefer frying for a crunch or baking for a healthier twist, this recipe adapts to your cooking style. You can also explore variations with Baked Salmon Honey for added inspiration!

Exciting Flavors: The combination of creamy lemon-garlic sauce and crispy patties offers a flavor explosion that will tantalize your taste buds. Impress your guests or treat yourself to this delicious meal.

Crowd-Pleaser: Perfect as an appetizer or main dish, these salmon patties are sure to be a hit at any gathering, making them a fantastic choice for parties or family dinners.

Salmon Patties Ingredients

• Get ready to create a mouthwatering dish that is both simple and delicious!

For the Patties

  • Salmon – Rich in protein and omega-3s; canned or fresh works perfectly!
  • Breadcrumbs – Helps bind the patties; use panko for an extra crunchy texture or gluten-free options as needed.
  • Egg – Essential for holding everything together; don’t skip this ingredient!
  • Onion – Adds moisture and flavor; shallots or scallions can be used as substitutes.
  • Parsley – Brightens the dish with freshness; feel free to swap with cilantro or omit if unavailable.
  • Garlic Powder – Enhances flavor; fresh garlic is a great alternative for an extra punch.
  • Salt & Black Pepper – Crucial for seasoning; adjust according to your taste preference.
  • Paprika – Provides depth; cayenne can be substituted for a spicy kick.
  • Dijon Mustard – Adds a lovely tang; yellow mustard is an effective alternative if needed.
  • Mayonnaise – Offers creaminess; Greek yogurt can lighten this up nicely.
  • Lemon Juice – Essential for brightening flavors; lime juice can work in a pinch.

For Cooking

  • Olive Oil – Perfect for frying; consider avocado oil for its high smoke point.

Create these delightful salmon patties that are sure to impress at any meal!

Step‑by‑Step Instructions for Crispy Salmon Patties with Creamy Lemon-Garlic Sauce

Step 1: Prepare the Salmon Mixture
In a large mixing bowl, combine flaked salmon, breadcrumbs, egg, finely chopped onion, parsley, garlic powder, onion powder, salt, black pepper, paprika, Dijon mustard, mayonnaise, and lemon juice. Stir the mixture thoroughly until everything is well combined, adding more breadcrumbs or mayonnaise if you need to adjust the moisture level. The mixture should hold together well when pressed.

Step 2: Form the Patties
Once your salmon mixture is ready, use your hands to form it into 8 small patties, each about 2-3 inches in diameter. As you shape the patties, ensure they are even and compact to help them hold together while cooking. Place them on a plate and let them rest for 5-10 minutes at room temperature; this will help them firm up for better frying.

Step 3: Heat the Oil
Place a skillet over medium heat and add enough olive oil to coat the bottom generously. Allow the oil to heat up for about 2-3 minutes until it’s shimmering; you can test readiness by dropping in a small breadcrumb, which should sizzle immediately. This step is crucial for achieving that golden, crispy crust on your salmon patties.

Step 4: Cook the Patties
Carefully add the prepared salmon patties to the hot skillet, ensuring not to overcrowd the pan to allow even cooking. Fry the patties for 3-4 minutes on one side until they turn golden brown and crispy. Gently flip them using a spatula, and continue cooking for another 3-4 minutes on the other side. If necessary, cook in batches for the best result.

Step 5: Prepare the Lemon-Garlic Sauce
While the patties are cooking, prepare the creamy lemon-garlic sauce. In a separate bowl, whisk together Greek yogurt, lemon juice, lemon zest, minced garlic, honey (if desired), Dijon mustard, and season with salt and pepper to taste. This tangy sauce will perfectly compliment the crispy salmon patties, enhancing their rich flavor profile.

Step 6: Serve and Garnish
Once the salmon patties are cooked to perfection, remove them from the skillet and drain briefly on paper towels. Serve the crispy salmon patties warm, either drizzled with the creamy lemon-garlic sauce or on the side for dipping. For an attractive presentation, garnish with freshly chopped parsley and lemon wedges, making this dish a delightful addition to your dinner table.

Salmon Patties Variations & Substitutions

Feel free to explore these delightful variations that will make your salmon patties even more amazing!

  • Tuna Swap: Substitute salmon with canned tuna for a budget-friendly option that offers similar flavors and textures.
  • Gluten-Free Breadcrumbs: Use gluten-free breadcrumbs or ground oats to ensure everyone can enjoy these delightful patties without worry. Pair them with a side salad for a complete meal!
  • Dairy-Free Alternative: Replace Greek yogurt with blended avocado or a dairy-free sour cream for a luscious, creamy texture that’s still guilt-free.
  • Veggie Boost: Mix in finely chopped bell peppers, spinach, or carrots for added nutrition and color that enhances both the flavor and presentation.
  • Spiced Up: Add a pinch of cayenne or chili flakes to the mixture for a little heat that will awaken your taste buds. The creamy sauce will help balance the spice beautifully!
  • Herb Variation: Swap out parsley for fresh dill or cilantro to switch up the flavor profile. Each herb brings a unique taste that will make your patties sing!
  • Baking Method: Opt for baking these patties instead of frying. Simply place them on a parchment-lined baking sheet and bake at 400°F for 12-15 minutes. This method is healthier and less messy!
  • Try it with Honey Garlic: Serve alongside or drizzle with a touch of Honey Garlic Salmon sauce for an exciting twist that everyone will love!

These variations open up a world of culinary possibilities right in your kitchen. Enjoy adapting this family-loved dish to fit your taste and dietary needs!

How to Store and Freeze Salmon Patties

Fridge: Keep leftover salmon patties in an airtight container for up to 3 days to maintain freshness.

Freezer: For long-term storage, freeze the cooled patties in a single layer on a baking sheet before transferring to a zip-top bag. They can last for up to 3 months.

Reheating: Thaw in the refrigerator overnight, then reheat in a skillet over medium heat to maintain crispiness. Avoid the microwave to prevent sogginess.

Storage Tip: Make sure to label your containers with the date, so you can enjoy your delicious salmon patties at their best quality!

Expert Tips for Salmon Patties

  • Ensure Proper Mixing: Mixing too little or too much can lead to inconsistency. Stir just until combined to maintain the patty’s texture and use healthy salmon.
  • Resting Time: Allow your patties to firm up before frying; this helps them hold together better and enhances the crust’s crispiness.
  • Don’t Overcrowd the Pan: Cook in batches to avoid steaming instead of frying. Each patty needs space to develop that beautiful golden crust.
  • Check Oil Temperature: If the oil isn’t hot enough, the patties may absorb too much oil and become greasy. Always test with a breadcrumb first.
  • Versatile Cooking Methods: For a healthier option, remember you can bake the salmon patties at 400°F for 12-15 minutes, flipping halfway to achieve crispiness without frying.

Make Ahead Options

These Crispy Salmon Patties with Creamy Lemon-Garlic Sauce are perfect for busy home cooks looking to save time during the week! You can prepare the salmon mixture and form the patties up to 24 hours in advance; simply refrigerate them in an airtight container. This not only helps the flavors meld but keeps the patties fresh and delicious. If you’re looking to extend their shelf life, you can freeze uncooked patties for up to 3 months. When you’re ready to cook, simply thaw in the refrigerator overnight and fry or bake until golden brown. Finish by adding the creamy lemon-garlic sauce just before serving for that fresh, zesty kick!

What to Serve with Crispy Salmon Patties with Creamy Lemon-Garlic Sauce

Open your table to a delightful spread that complements the flavors and textures of your crisp salmon patties, making dinner an unforgettable experience.

  • Creamy Mashed Potatoes: Creamy and buttery, they create a comforting contrast to the crispy patties, perfect for a cozy meal.

  • Roasted Asparagus: Lightly seasoned with olive oil and lemon, the fresh crunch offers a vibrant flavor that pairs beautifully with the rich sauce.

  • Quinoa Salad: Nutty, fluffy quinoa tossed with fresh veggies and herbs adds a refreshing touch, enhancing the meal’s wholesome essence.

  • Garlic Bread: Warm, toasty garlic bread with its crunchy exterior and soft center makes for a delicious sidekick to dip in your creamy sauce.

  • Mixed Green Salad: A simple salad with tangy vinaigrette provides a refreshing palate cleanser that complements the richness of the salmon patties.

  • Coleslaw: Crunchy, tangy, and slightly sweet coleslaw offers a delightful texture contrast and balances the savory flavors on your plate.

  • Chilled White Wine: A crisp Sauvignon Blanc or a light Pinot Grigio brings out the citrus notes, enhancing the whole dining experience with each sip.

  • Lemon Sorbet: Cleanse your palate with a zesty lemon sorbet for dessert, echoing the flavors of your dish while providing a refreshing finish.

Salmon Patties with Creamy Lemon-Garlic Sauce Recipe FAQs

What type of salmon should I use?
Absolutely! You can use either fresh or canned salmon for this recipe. Fresh salmon fillets offer a rich flavor, while canned salmon is convenient and budget-friendly. Just ensure that the salmon is fully flaked and any skin or bones are removed before mixing.

How long can I store leftover salmon patties?
After cooking, refrigerate any leftover salmon patties in an airtight container for up to 3 days. This will help preserve their flavor and texture. It’s best to allow them to cool completely before storing to prevent condensation.

Can I freeze salmon patties?
Yes, indeed! To freeze, first allow the cooked patties to cool completely. Place them in a single layer on a baking sheet and freeze until solid, then transfer them to a zip-top bag or airtight container. They can be kept in the freezer for up to 3 months. For reheating, thaw them overnight in the refrigerator and reheat in a skillet for the best texture.

What can I do if my patties are falling apart when cooking?
Very common! If your salmon patties are crumbling, it’s often due to insufficient binding. Try adding an extra egg or more breadcrumbs to the mixture. Additionally, make sure to let your patties rest for 5-10 minutes before cooking, as this helps them firm up. Also, avoid overcrowding the pan, as this can cause steaming instead of frying.

Can these salmon patties cater to special dietary needs?
Certainly! For a gluten-free option, simply use gluten-free breadcrumbs. If you want to keep it dairy-free, substitute Greek yogurt with blended avocado or a dairy-free yogurt alternative. Always check ingredient labels, especially for mustard and mayonnaise, to ensure they fit your dietary restrictions.

Is it safe for pets to eat salmon patties?
Most certainly! Having a small piece of cooked salmon is generally safe for pets, but be careful with seasonings. Avoid giving them any patties that contain garlic, onions, or high amounts of salt, as these can be harmful to pets. A plain, cooked salmon piece can be a tasty treat for them!

Salmon Patties

Savory Salmon Patties with Zesty Creamy Sauce Delight

These Salmon Patties are a quick, protein-rich delight that can be served with a zesty creamy sauce, perfect for any meal.
Prep Time 15 minutes
Cook Time 10 minutes
Resting Time 10 minutes
Total Time 25 minutes
Servings: 4 patties
Course: Dinner
Cuisine: Seafood
Calories: 250

Ingredients
  

For the Patties
  • 1 can Salmon canned or fresh
  • 1 cup Breadcrumbs use panko for extra crunch
  • 1 large Egg essential for binding
  • 1 small Onion finely chopped
  • 2 tablespoons Parsley freshly chopped
  • 1 teaspoon Garlic Powder or fresh garlic
  • 1 teaspoon Salt to taste
  • 1 teaspoon Black Pepper to taste
  • 1 teaspoon Paprika or cayenne for spice
  • 1 tablespoon Dijon Mustard for tang
  • 2 tablespoons Mayonnaise or Greek yogurt
  • 1 tablespoon Lemon Juice freshly squeezed
For Cooking
  • 2 tablespoons Olive Oil for frying

Equipment

  • Skillet
  • Mixing Bowl

Method
 

Prepare the Salmon Mixture
  1. In a large mixing bowl, combine flaked salmon, breadcrumbs, egg, finely chopped onion, parsley, garlic powder, onion powder, salt, black pepper, paprika, Dijon mustard, mayonnaise, and lemon juice. Stir until well combined.
Form the Patties
  1. Use your hands to form the mixture into 8 small patties, about 2-3 inches in diameter. Let them rest for 5-10 minutes.
Heat the Oil
  1. Heat a skillet over medium heat and add olive oil to coat the bottom. Allow the oil to shimmer.
Cook the Patties
  1. Carefully add the patties to the skillet. Fry for 3-4 minutes on one side until golden brown, then flip and cook for another 3-4 minutes.
Prepare the Lemon-Garlic Sauce
  1. In a bowl, whisk together Greek yogurt, lemon juice, lemon zest, minced garlic, honey, Dijon mustard, and seasoning.
Serve and Garnish
  1. Remove patties from skillet, drain briefly, and serve warm, drizzled with sauce or on the side. Garnish with parsley and lemon wedges.

Nutrition

Serving: 1pattyCalories: 250kcalCarbohydrates: 20gProtein: 15gFat: 12gSaturated Fat: 2gPolyunsaturated Fat: 4gMonounsaturated Fat: 5gCholesterol: 60mgSodium: 450mgPotassium: 300mgFiber: 1gSugar: 1gVitamin A: 200IUVitamin C: 5mgCalcium: 30mgIron: 1mg

Notes

Store leftover patties in an airtight container for up to 3 days. Freeze for long-term storage, lasting up to 3 months. Reheat in a skillet for best results.

Tried this recipe?

Let us know how it was!

Stay Connected

Get recipes via email: