Get my cookbooks

Teriyaki Ground Turkey Stir-Fry: A Quick, Tasty Recipe!

Introduction to Teriyaki Ground Turkey Stir-Fry

Teriyaki Ground Turkey Stir-Fry is the perfect go-to for a fast and flavorful meal that fits into any busy schedule. Combining tender ground turkey with a savory-sweet teriyaki glaze and crisp vegetables, this dish offers a satisfying blend of textures and tastes in just minutes. Whether you’re cooking for family or meal prepping for the week, this recipe delivers deliciousness without the hassle. Dive into this quick and tasty stir-fry and elevate your dinner routine today!

Why You’ll Love This Teriyaki Ground Turkey Stir-Fry

This Teriyaki Ground Turkey Stir-Fry is a lifesaver for busy evenings. It comes together in just 25 minutes, making it perfect for those nights when time is tight. The combination of tender turkey and crisp vegetables, all coated in a sweet and savory teriyaki sauce, is simply irresistible. Plus, it’s a healthy option that doesn’t skimp on flavor, ensuring everyone at the table leaves happy and satisfied!

Ingredients for Teriyaki Ground Turkey Stir-Fry

Gathering the right ingredients is key to making this Teriyaki Ground Turkey Stir-Fry a success. Here’s what you’ll need:

  • Ground Turkey: A lean protein that cooks quickly and absorbs flavors beautifully.
  • Vegetable Oil: Essential for sautéing; it helps achieve that perfect golden-brown color.
  • Broccoli Florets: These add a nice crunch and are packed with nutrients.
  • Bell Pepper: Choose any color you like! They bring sweetness and vibrant color to the dish.
  • Snap Peas: These little gems add a delightful snap and are a great source of fiber.
  • Carrot: Julienned for a pop of color and a hint of sweetness.
  • Green Onions: Chopped for a fresh, mild onion flavor that brightens the dish.
  • Garlic: Minced for that aromatic kick that makes everything taste better.
  • Fresh Ginger: Adds warmth and a zesty flavor that complements the teriyaki sauce.
  • Teriyaki Sauce: The star of the show! It brings that sweet and savory flavor we all love.
  • Sesame Oil: Just a drizzle enhances the nutty flavor profile of the dish.
  • Sesame Seeds (optional): For a little crunch and a touch of elegance on top.
  • Cooked Rice or Quinoa: Serve this stir-fry over your choice of grain for a complete meal.

For those looking to mix things up, you can easily substitute ground turkey with ground chicken or even tofu for a vegetarian option. If you want to spice things up, consider adding red pepper flakes or a splash of sriracha. Remember, the exact quantities of these ingredients are listed at the bottom of the article for your convenience!

How to Make Teriyaki Ground Turkey Stir-Fry

Now that you have all your ingredients ready, let’s dive into making this delicious Teriyaki Ground Turkey Stir-Fry! Follow these simple steps, and you’ll have a mouthwatering meal on the table in no time.

Step 1: Heat the Oil

Start by heating the vegetable oil in a large skillet or wok over medium-high heat. You want it hot enough to sizzle when you add the turkey. This step is crucial for achieving that lovely golden-brown color!

Step 2: Cook the Ground Turkey

Once the oil is shimmering, add the ground turkey. Cook it for about 5-7 minutes, breaking it apart with a spatula. You want it browned and cooked through. The aroma will start to fill your kitchen, and trust me, it’s a good sign!

Step 3: Add Garlic and Ginger

Next, toss in the minced garlic and ginger. Stir them in for about a minute until they become fragrant. This is where the magic happens! The combination of garlic and ginger will elevate the flavor of your stir-fry.

Step 4: Stir-Fry the Vegetables

Now it’s time to add the colorful veggies! Toss in the broccoli, bell pepper, snap peas, and carrot. Stir-fry everything for about 3-5 minutes until the vegetables are tender-crisp. You want them to retain their vibrant colors and crunch!

Step 5: Combine with Sauce

Pour the teriyaki sauce and sesame oil over the turkey and vegetables. Stir well to combine everything, ensuring that each piece is coated in that delicious sauce. Cook for an additional 2-3 minutes until everything is heated through. Your kitchen will smell heavenly!

Step 6: Serve and Enjoy

Finally, remove the skillet from heat. Sprinkle sesame seeds and chopped green onions on top for that extra flair. Serve your Teriyaki Ground Turkey Stir-Fry over cooked rice or quinoa. Enjoy every bite of this quick and tasty meal!

Tips for Success

  • Prep your ingredients ahead of time to save precious minutes during cooking.
  • Use a large skillet or wok for even cooking and to prevent overcrowding.
  • Don’t overcook the vegetables; they should be tender-crisp for the best texture.
  • Feel free to customize the veggies based on what you have on hand.
  • For extra flavor, marinate the turkey in teriyaki sauce for 15 minutes before cooking.

Equipment Needed

  • Large Skillet or Wok: Essential for stir-frying; a non-stick pan works too.
  • Spatula: For breaking up the turkey and stirring the ingredients.
  • Cutting Board: A must for chopping veggies safely.
  • Knife: A sharp one makes prep a breeze.
  • Measuring Cups and Spoons: Handy for precise ingredient measurements.

Variations

  • Spicy Teriyaki: Add red pepper flakes or a splash of sriracha for a fiery kick.
  • Vegetarian Option: Substitute ground turkey with crumbled tofu or tempeh for a plant-based meal.
  • Different Veggies: Experiment with other vegetables like zucchini, mushrooms, or bell peppers for a unique twist.
  • Whole Grain Swap: Use brown rice or quinoa for a heartier, more nutritious base.
  • Low-Sodium Version: Opt for low-sodium teriyaki sauce to reduce sodium intake without sacrificing flavor.

Serving Suggestions

  • Pair your Teriyaki Ground Turkey Stir-Fry with fluffy jasmine rice or nutty quinoa for a satisfying meal.
  • Serve with a side of steamed edamame for an extra protein boost.
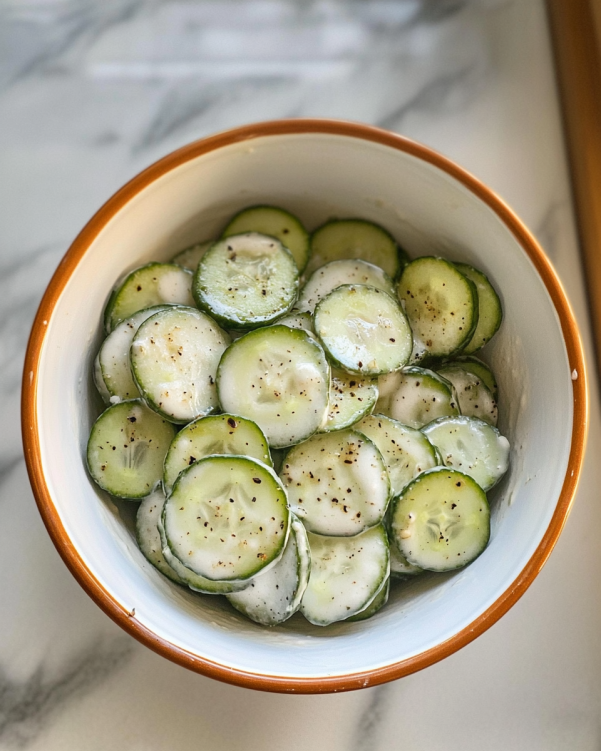
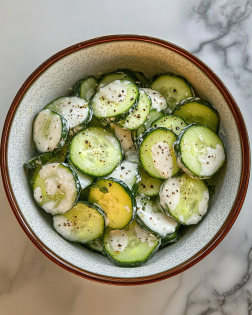
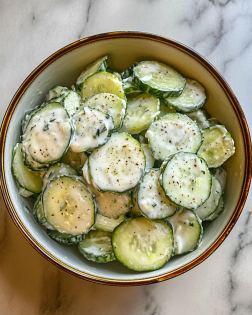
  • A crisp cucumber salad drizzled with rice vinegar complements the dish beautifully.
  • For drinks, try a refreshing iced green tea or a light white wine.
  • Garnish with extra sesame seeds and a wedge of lime for a pop of color and flavor.

FAQs about Teriyaki Ground Turkey Stir-Fry

Can I make this Teriyaki Ground Turkey Stir-Fry ahead of time?

Absolutely! You can prepare the stir-fry in advance and store it in the fridge for up to three days. Just reheat it in a skillet or microwave when you’re ready to enjoy it again.

What can I substitute for ground turkey?

If you’re looking for alternatives, ground chicken works wonderfully. For a vegetarian option, crumbled tofu or tempeh can be used instead. Both options will still deliver great flavor!

How can I make this dish spicier?

For those who love a bit of heat, adding red pepper flakes or a splash of sriracha will do the trick! Just sprinkle in as much as you like during the cooking process.

Can I freeze the leftovers?

Yes, you can freeze the Teriyaki Ground Turkey Stir-Fry! Just make sure to store it in an airtight container. It will keep well for up to three months. Thaw it in the fridge before reheating.

What should I serve with this stir-fry?

This dish pairs beautifully with fluffy rice or quinoa. You can also serve it alongside a fresh salad or steamed vegetables for a complete meal!

Final Thoughts

Cooking this Teriyaki Ground Turkey Stir-Fry is more than just preparing a meal; it’s about creating a moment of joy amidst the chaos of daily life. The vibrant colors and enticing aromas fill your kitchen, making it a warm and inviting space. Each bite is a delightful blend of flavors that brings smiles to the table. Plus, knowing it’s a healthy option makes it even better! Whether you’re feeding a family or enjoying a quiet dinner, this dish is sure to become a cherished favorite. So, roll up your sleeves and savor the joy of cooking!

“`

jhessica

Teriyaki Ground Turkey Stir-Fry: A Quick, Tasty Recipe!

A quick and tasty Teriyaki Ground Turkey Stir-Fry recipe that is perfect for a weeknight dinner.
Prep Time 10 minutes
Cook Time 15 minutes
Total Time 25 minutes
Servings: 4 servings
Course: Main Dish
Cuisine: Asian
Calories: 320

Ingredients
  

  • 1 pound ground turkey
  • 2 tablespoons vegetable oil
  • 1 cup broccoli florets
  • 1 bell pepper sliced (any color)
  • 1 cup snap peas
  • 1 carrot julienned
  • 3 green onions chopped
  • 3 cloves garlic minced
  • 1 tablespoon fresh ginger minced
  • 1/4 cup teriyaki sauce
  • 2 teaspoons sesame oil
  • 1 tablespoon sesame seeds optional
  • Cooked rice or quinoa for serving

Method
 

  1. Heat the vegetable oil in a large skillet or wok over medium-high heat.
  2. Add the ground turkey and cook until browned and cooked through, about 5-7 minutes.
  3. Add the minced garlic and ginger to the skillet, stirring for about 1 minute until fragrant.
  4. Add the broccoli, bell pepper, snap peas, and carrot to the skillet. Stir-fry the vegetables for about 3-5 minutes until they are tender-crisp.
  5. Pour the teriyaki sauce and sesame oil over the turkey and vegetables, stirring well to combine. Cook for an additional 2-3 minutes until everything is heated through.
  6. Remove from heat and sprinkle with sesame seeds and chopped green onions before serving.
  7. Serve the stir-fry over cooked rice or quinoa.

Nutrition

Serving: 1servingCalories: 320kcalCarbohydrates: 12gProtein: 28gFat: 18gSaturated Fat: 3gPolyunsaturated Fat: 15gCholesterol: 90mgSodium: 600mgFiber: 3gSugar: 5g

Notes

  • For a spicier kick, add red pepper flakes or sriracha to the stir-fry.
  • You can substitute the ground turkey with ground chicken or tofu for a vegetarian option.

Tried this recipe?

Let us know how it was!

Taco Stuffed Peppers: A Flavorful Recipe to Try Today!

Introduction to Taco Stuffed Peppers

Taco Stuffed Peppers bring together the bold, savory flavors of your favorite taco filling with the vibrant freshness of bell peppers for a meal that’s as colorful as it is delicious. This recipe offers a satisfying twist on traditional tacos, turning them into a wholesome, all-in-one dish that’s perfect for busy weeknights or casual gatherings. Easy to prepare and packed with flavor, these stuffed peppers are sure to become a new favorite in your recipe collection. Get ready to savor every bite of this tasty, crowd-pleasing delight!

Why You’ll Love This Taco Stuffed Peppers

Taco Stuffed Peppers are a delightful blend of ease and flavor. They come together quickly, making them perfect for busy weeknights. The best part? You can customize them to suit your family’s tastes! Whether you prefer beef, turkey, or a vegetarian twist, these peppers are versatile and satisfying. Plus, they’re a one-dish wonder, which means less cleanup for you. Who doesn’t love that?

Ingredients for Taco Stuffed Peppers

Gathering the right ingredients is key to making delicious Taco Stuffed Peppers. Here’s what you’ll need:

  • Ground Beef or Turkey: This is the protein base. Choose lean options for a healthier dish.
  • Cooked Rice: Adds bulk and texture. You can use white, brown, or even cauliflower rice for a low-carb option.
  • Black Beans: Rinsed and drained, they provide fiber and a hearty feel. Feel free to swap with pinto beans if you prefer.
  • Corn: Whether frozen or canned, corn adds a sweet crunch. It’s a great way to sneak in some veggies!
  • Taco Seasoning: This is where the magic happens! A packet of taco seasoning brings all the flavors together. You can also make your own blend for a personal touch.
  • Bell Peppers: Choose any color you like! They serve as the perfect edible bowl for your filling.
  • Salsa: Adds moisture and flavor. Use your favorite brand or homemade salsa for a fresh taste.
  • Shredded Cheese: Cheddar or a Mexican blend works beautifully. Cheese is the crowning glory that melts into gooey perfection.
  • Olive Oil: A little oil helps to brown the meat and adds richness to the filling.
  • Salt and Pepper: Essential for seasoning. Adjust to your taste for the best flavor.
  • Fresh Cilantro or Green Onions: Optional garnishes that add a pop of color and freshness to your dish.

For those looking for a vegetarian option, consider substituting the ground meat with lentils or quinoa. You can also add diced tomatoes or jalapeños to the filling for an extra kick. The exact quantities of these ingredients are listed at the bottom of the article for your convenience, ready for printing!

How to Make Taco Stuffed Peppers

Making Taco Stuffed Peppers is a straightforward process that yields delicious results. Follow these simple steps, and you’ll have a hearty meal ready in no time!

Step 1: Preheat the Oven

Start by preheating your oven to 375°F. Preheating is crucial because it ensures even cooking. You want those peppers to roast perfectly, and a hot oven helps achieve that golden, bubbly cheese topping!

Step 2: Cook the Meat

In a large skillet, heat a tablespoon of olive oil over medium heat. Add your ground beef or turkey, breaking it apart with a spoon. Cook until it’s browned, about 5-7 minutes. Make sure to drain any excess fat to keep your filling lean and tasty. This step is essential for a flavorful base!

Step 3: Prepare the Filling

Once the meat is cooked, stir in the cooked rice, black beans, corn, taco seasoning, and salsa. Mix everything well and let it cook for another 3-5 minutes until heated through. This is where you can get creative! Feel free to add diced tomatoes or jalapeños for an extra kick. Taste and adjust the seasoning with salt and pepper as needed.

Step 4: Prepare the Peppers

While your filling is cooking, it’s time to prep the bell peppers. Cut the tops off and remove the seeds and membranes. This creates a perfect little bowl for your delicious filling. Place the peppers upright in a baking dish, ready to be stuffed!

Step 5: Stuff the Peppers

Now comes the fun part! Spoon the taco filling into each bell pepper, packing it down slightly to ensure they’re filled to the brim. Don’t be shy—load them up! Top each pepper with a generous sprinkle of shredded cheese. This will melt beautifully during baking.

Step 6: Bake the Peppers

Cover the baking dish with aluminum foil and pop it in the preheated oven. Bake for 25 minutes, then remove the foil and bake for an additional 10-15 minutes. Keep an eye on them! You want the peppers to be tender and the cheese to be bubbly and golden. Once done, let them cool for a few minutes before serving.

Tips for Success

  • Use a meat thermometer to ensure your ground meat reaches 160°F for safety.
  • For extra flavor, sauté onions and garlic with the meat before adding other ingredients.
  • Don’t overstuff the peppers; leave a little room for the cheese to melt.
  • Let the stuffed peppers rest for a few minutes after baking for easier serving.
  • Experiment with different cheese blends for unique flavors!

Equipment Needed

  • Large Skillet: Essential for cooking the meat. A non-stick pan works well.
  • Baking Dish: Any oven-safe dish will do. A glass or ceramic dish is perfect.
  • Knife and Cutting Board: For prepping the bell peppers.
  • Spoon: To mix and stuff the filling.

Variations

  • Vegetarian Option: Swap the ground meat for lentils, quinoa, or a mix of sautéed mushrooms and spinach for a hearty filling.
  • Spicy Kick: Add diced jalapeños or a splash of hot sauce to the filling for those who love a bit of heat.
  • Cheesy Delight: Mix in cream cheese or sour cream with the filling for an extra creamy texture.
  • Southwestern Twist: Incorporate black olives, diced tomatoes, or avocado for a fresh, zesty flavor.
  • Low-Carb Version: Use zucchini boats instead of bell peppers for a lighter, low-carb alternative.

Serving Suggestions

  • Side Salad: Pair with a fresh green salad topped with avocado and lime dressing for a refreshing contrast.
  • Rice or Quinoa: Serve alongside cilantro-lime rice or quinoa for a wholesome meal.
  • Drinks: Enjoy with a chilled glass of iced tea or a light Mexican beer.
  • Presentation: Garnish with fresh cilantro or green onions for a pop of color.

FAQs about Taco Stuffed Peppers

Can I make Taco Stuffed Peppers ahead of time?

Absolutely! You can prepare the filling and stuff the peppers a day in advance. Just cover them and store them in the fridge. When you’re ready to bake, simply pop them in the oven. This makes for a quick dinner solution on busy nights!

What can I use instead of ground meat?

If you’re looking for a vegetarian option, lentils or quinoa work wonderfully as substitutes. You can also use crumbled tofu or tempeh for a protein-packed filling. The flavors will still shine through!

How do I store leftovers?

Leftover Taco Stuffed Peppers can be stored in an airtight container in the fridge for up to 3 days. Reheat them in the microwave or oven until warmed through. They make for a delicious lunch the next day!

Can I freeze Taco Stuffed Peppers?

Yes, you can freeze them! Just make sure to wrap them tightly in plastic wrap and then in aluminum foil. They can be frozen for up to 3 months. When you’re ready to enjoy, thaw them in the fridge overnight and bake as usual.

What sides pair well with Taco Stuffed Peppers?

These stuffed peppers are versatile! Pair them with a fresh salad, some tortilla chips with guacamole, or even a side of Mexican rice. The options are endless, and they complement the flavors beautifully!

Final Thoughts

Cooking Taco Stuffed Peppers is more than just preparing a meal; it’s about creating a joyful experience for you and your loved ones. The vibrant colors and mouthwatering aromas fill your kitchen with warmth, making it a perfect gathering dish. Each bite is a delightful explosion of flavors, reminding us of the simple pleasures in life. Plus, the ease of preparation means you can spend more time enjoying the company of family and friends. So, roll up your sleeves, embrace the mess, and let these stuffed peppers bring a little fiesta to your dinner table!

“`

jhessica

Taco Stuffed Peppers: A Flavorful Recipe to Try Today!

Taco Stuffed Peppers are a delicious and hearty dish filled with a flavorful mixture of ground meat, rice, beans, and spices, all baked in bell peppers and topped with cheese.
Prep Time 15 minutes
Cook Time 40 minutes
Total Time 55 minutes
Servings: 4 servings
Course: Main Dish
Cuisine: Mexican
Calories: 380

Ingredients
  

  • 1 pound ground beef or turkey
  • 1 cup cooked rice
  • 1 can 15 ounces black beans, rinsed and drained
  • 1 cup corn frozen or canned
  • 1 packet taco seasoning
  • 4 large bell peppers any color
  • 1 cup salsa
  • 1 cup shredded cheese cheddar or Mexican blend
  • 1 tablespoon olive oil
  • Salt and pepper to taste
  • Fresh cilantro or green onions for garnish optional

Method
 

  1. Preheat the oven to 375°F.
  2. In a large skillet, heat the olive oil over medium heat. Add the ground beef or turkey and cook until browned, breaking it apart with a spoon, about 5-7 minutes. Drain excess fat if necessary.
  3. Stir in the cooked rice, black beans, corn, taco seasoning, and salsa. Mix well and cook for an additional 3-5 minutes until heated through. Season with salt and pepper to taste.
  4. While the filling is cooking, prepare the bell peppers. Cut the tops off the peppers and remove the seeds and membranes. Place the peppers upright in a baking dish.
  5. Spoon the taco filling evenly into each bell pepper, packing it down slightly. Top each stuffed pepper with shredded cheese.
  6. Cover the baking dish with aluminum foil and bake in the preheated oven for 25 minutes. Remove the foil and bake for an additional 10-15 minutes, or until the peppers are tender and the cheese is bubbly and golden.
  7. Remove from the oven and let cool for a few minutes. Garnish with fresh cilantro or green onions if desired before serving.

Nutrition

Serving: 1stuffed pepperCalories: 380kcalCarbohydrates: 28gProtein: 28gFat: 18gSaturated Fat: 7gPolyunsaturated Fat: 8gCholesterol: 70mgSodium: 600mgFiber: 6gSugar: 3g

Notes

  • For a vegetarian option, substitute the ground meat with lentils or quinoa.
  • Add diced tomatoes or jalapeños to the filling for extra flavor and spice.

Tried this recipe?

Let us know how it was!

Hearty Chicken Stew: A Comforting Recipe to Savor!

Introduction to Hearty Chicken Stew

As the days grow shorter and the air turns crisp, there’s nothing quite like a warm bowl of Hearty Chicken Stew to wrap you in comfort. I remember those busy evenings when the kids would come home from school, their faces tired yet hungry. This stew became my go-to solution, a quick way to nourish my family while filling the house with delightful aromas. It’s not just a meal; it’s a hug in a bowl, perfect for impressing loved ones or simply enjoying a cozy night in. Trust me, this recipe will become a cherished favorite in your home!

Why You’ll Love This Hearty Chicken Stew

This Hearty Chicken Stew is a lifesaver for busy moms and professionals alike. It’s not only easy to prepare but also packed with flavor that warms the soul. In just an hour, you can create a dish that satisfies even the pickiest eaters. Plus, it’s a one-pot wonder, making cleanup a breeze. With every spoonful, you’ll savor the comforting taste of home, reminding you that good food can be simple and delightful.

Ingredients for Hearty Chicken Stew

Gathering the right ingredients is the first step to creating a delicious Hearty Chicken Stew. Here’s what you’ll need:

  • Olive oil: This is your base for sautéing, adding a rich flavor to the chicken and vegetables.
  • Boneless, skinless chicken thighs: Tender and juicy, they cook beautifully and absorb all the flavors.
  • Onion: Diced onions bring sweetness and depth to the stew, making it aromatic.
  • Garlic: Minced garlic adds a punch of flavor that elevates the dish.
  • Carrots: Sliced carrots add a touch of sweetness and vibrant color.
  • Potatoes: Diced potatoes provide heartiness and help thicken the stew naturally.
  • Green beans: These add a fresh crunch and a pop of green to your bowl.
  • Chicken broth: The soul of the stew, it infuses everything with savory goodness.
  • Dried thyme and rosemary: These herbs bring warmth and earthiness, enhancing the overall flavor.
  • Salt and pepper: Essential for seasoning, they help balance the flavors.
  • All-purpose flour (optional): If you like a thicker stew, this can be used to create a slurry.
  • Fresh parsley: Chopped parsley is perfect for garnishing, adding a fresh touch at the end.

For those who want to mix things up, consider adding a splash of heavy cream for a richer texture or a pinch of red pepper flakes for a spicy kick. You can find the exact quantities for each ingredient at the bottom of the article, ready for printing!

How to Make Hearty Chicken Stew

Now that you have your ingredients ready, let’s dive into the heart of the matter—making this Hearty Chicken Stew! Follow these simple steps, and you’ll have a comforting meal that warms both the belly and the soul.

Step 1: Brown the Chicken

Start by heating the olive oil in a large pot over medium heat. Once it’s shimmering, add the chicken pieces. Sear them until they’re golden brown on all sides, about 5-7 minutes. This step locks in the flavors and gives your stew a rich base. Once browned, remove the chicken and set it aside. Don’t worry if the pot looks a bit messy; those brown bits will add depth to your stew!

Step 2: Sauté the Aromatics

In the same pot, toss in the diced onion. Sauté it for about 3-4 minutes until it becomes translucent. The aroma will be heavenly! Next, stir in the minced garlic and cook for an additional minute. This is where the magic begins, as the garlic infuses the oil with its delightful flavor.

Step 3: Add the Vegetables

Now it’s time to bring in the veggies! Add the sliced carrots, diced potatoes, and trimmed green beans to the pot. Stir everything together, letting the vegetables mingle with the aromatic base. This colorful medley not only looks beautiful but also adds nutrition and texture to your Hearty Chicken Stew.

Step 4: Combine and Simmer

Return the browned chicken to the pot, and pour in the chicken broth. Sprinkle in the dried thyme and rosemary, along with salt and pepper to taste. Bring the mixture to a boil, then reduce the heat to low. Let it simmer for 30-35 minutes, or until the vegetables are tender. This slow cooking allows all the flavors to meld beautifully, creating a comforting dish that feels like a warm hug.

Step 5: Thicken the Stew (Optional)

If you prefer a thicker stew, this step is for you! Mix the all-purpose flour with a few tablespoons of water to create a slurry. Stir this into the stew during the last 5 minutes of cooking. It will give your Hearty Chicken Stew a luscious, velvety texture that’s simply irresistible.

Step 6: Final Touches

Once the stew is done simmering, taste it and adjust the seasoning if needed. Serve it hot, garnished with fresh parsley for a pop of color. This final touch not only enhances the presentation but also adds a fresh flavor that brightens the dish. Enjoy every spoonful of your Hearty Chicken Stew, and watch as it brings smiles to your family’s faces!

Tips for Success

  • Prep your ingredients ahead of time to save precious minutes during cooking.
  • Don’t rush the browning of the chicken; it adds depth to the flavor.
  • Feel free to swap in your favorite vegetables based on what you have on hand.
  • For extra flavor, consider using homemade chicken broth if available.
  • Let the stew sit for a few minutes before serving; it allows the flavors to deepen.

Equipment Needed

  • Large pot or Dutch oven: Essential for simmering your stew. A heavy-bottomed pot works well too.
  • Wooden spoon: Perfect for stirring and scraping up those flavorful bits.
  • Cutting board and knife: For chopping your vegetables and chicken.
  • Measuring cups and spoons: Handy for precise ingredient measurements.

Variations

  • Herb-Infused: Experiment with fresh herbs like basil or cilantro for a unique twist.
  • Vegetarian Option: Substitute chicken with chickpeas or lentils for a hearty plant-based stew.
  • Spicy Kick: Add diced jalapeños or a splash of hot sauce for those who love heat.
  • Seasonal Veggies: Incorporate seasonal vegetables like zucchini or squash for added flavor and nutrition.
  • Slow Cooker Version: Prepare the stew in a slow cooker for a hands-off approach; just combine all ingredients and cook on low for 6-8 hours.

Serving Suggestions

  • Pair your Hearty Chicken Stew with crusty bread for dipping; it’s a match made in heaven.
  • Serve alongside a fresh green salad to balance the richness of the stew.
  • A glass of crisp white wine complements the flavors beautifully.
  • For a cozy touch, serve in rustic bowls for a homey presentation.

FAQs about Hearty Chicken Stew

Can I use chicken breasts instead of thighs?

Absolutely! While I love the tenderness of chicken thighs, breasts work just as well. Just be mindful not to overcook them, as they can dry out more easily.

How can I make this stew gluten-free?

To keep your Hearty Chicken Stew gluten-free, simply omit the all-purpose flour or use a gluten-free thickening agent like cornstarch. It will still be delicious!

Can I freeze Hearty Chicken Stew?

Yes, this stew freezes beautifully! Just let it cool completely before transferring it to an airtight container. It can be stored for up to three months. When you’re ready to enjoy it, thaw in the fridge overnight and reheat on the stove.

What can I serve with Hearty Chicken Stew?

Crusty bread is a classic choice, but you can also serve it with a side salad or over rice for a heartier meal. The options are endless!

How long does it take to make Hearty Chicken Stew?

This comforting dish takes about an hour from start to finish, making it a perfect weeknight dinner option. You’ll have a warm, satisfying meal ready in no time!

Final Thoughts

There’s something truly magical about a bowl of Hearty Chicken Stew. It’s more than just a meal; it’s a moment of connection, a chance to gather around the table and share stories. As the rich flavors dance on your palate, you’ll find comfort in every spoonful. This recipe is a reminder that even on the busiest days, we can create something special for our loved ones. So, whether it’s a chilly evening or a simple family dinner, let this stew warm your heart and home. Trust me, it will become a cherished tradition in your kitchen!

“`

jhessica

Hearty Chicken Stew: A Comforting Recipe to Savor!

Hearty Chicken Stew is a comforting and flavorful dish perfect for any occasion.
Prep Time 15 minutes
Cook Time 45 minutes
Total Time 1 hour
Servings: 6 servings
Course: Main Course
Cuisine: American
Calories: 320

Ingredients
  

  • 2 tablespoons olive oil
  • 1 pound boneless skinless chicken thighs, cut into bite-sized pieces
  • 1 medium onion diced
  • 2 cloves garlic minced
  • 3 medium carrots sliced
  • 2 medium potatoes diced
  • 1 cup green beans trimmed and cut into 1-inch pieces
  • 4 cups chicken broth
  • 1 teaspoon dried thyme
  • 1 teaspoon dried rosemary
  • Salt and pepper to taste
  • 2 tablespoons all-purpose flour optional, for thickening
  • 1 tablespoon fresh parsley chopped (for garnish)

Method
 

  1. In a large pot, heat the olive oil over medium heat. Add the chicken pieces and cook until browned on all sides, about 5-7 minutes. Remove the chicken and set aside.
  2. In the same pot, add the diced onion and cook until translucent, about 3-4 minutes. Stir in the minced garlic and cook for an additional 1 minute.
  3. Add the carrots, potatoes, and green beans to the pot. Stir to combine.
  4. Return the browned chicken to the pot. Pour in the chicken broth and add the thyme, rosemary, salt, and pepper. Bring to a boil, then reduce the heat to low and let simmer for 30-35 minutes, or until the vegetables are tender.
  5. If you prefer a thicker stew, mix the flour with a few tablespoons of water to create a slurry. Stir this into the stew and cook for an additional 5 minutes until thickened.
  6. Taste and adjust seasoning if necessary. Serve hot, garnished with fresh parsley.

Nutrition

Serving: 1bowlCalories: 320kcalCarbohydrates: 22gProtein: 25gFat: 12gSaturated Fat: 3gPolyunsaturated Fat: 9gCholesterol: 80mgSodium: 600mgFiber: 4gSugar: 4g

Notes

  • For a creamier stew, add 1/2 cup of heavy cream during the last 5 minutes of cooking.
  • For a spicier kick, add 1/2 teaspoon of red pepper flakes when adding the herbs.

Tried this recipe?

Let us know how it was!

Ranch Cucumber Salad: Discover a Refreshing Delight!

Introduction to Ranch Cucumber Salad

Ranch Cucumber Salad offers a crisp and refreshing twist on a classic favorite. This vibrant dish combines cool, crunchy cucumbers with a creamy ranch dressing, creating a perfect balance of flavors that’s both light and satisfying. Ideal for warm days or as a quick side, this salad is a simple way to elevate your meals with fresh ingredients and a burst of zest. Get ready to enjoy a delightful, easy-to-make recipe that’s sure to become a staple in your kitchen!

Why You’ll Love This Ranch Cucumber Salad

This Ranch Cucumber Salad is a lifesaver for busy days! It’s incredibly easy to whip up, taking just 10 minutes of your time. The creamy, tangy dressing perfectly complements the crisp cucumbers, creating a refreshing taste that’s hard to resist. Plus, it’s versatile enough to pair with any meal, making it a go-to side dish for summer barbecues or family dinners. You’ll love how it brightens up your table!

Ingredients for Ranch Cucumber Salad

Gathering the right ingredients is key to making this delightful Ranch Cucumber Salad. Here’s what you’ll need:

  • Cucumbers: Fresh, crisp cucumbers are the star of this salad. They add a refreshing crunch that balances the creamy dressing.
  • Sour Cream: This provides a rich, tangy base for the dressing. It’s what makes the salad creamy and indulgent.
  • Mayonnaise: Adds a smooth texture and enhances the creaminess. You can use light mayo for a healthier twist.
  • Dried Dill Weed: This herb brings a lovely, aromatic flavor that pairs beautifully with cucumbers.
  • Garlic Powder: A sprinkle of garlic powder adds depth and a hint of savory goodness.
  • Onion Powder: This ingredient complements the garlic and enhances the overall flavor profile.
  • Salt: Essential for bringing out the flavors of the other ingredients. Adjust to your taste!
  • Black Pepper: A dash of pepper adds a subtle kick that elevates the dish.
  • Fresh Lemon Juice: This brightens the salad and adds a zesty freshness that cuts through the creaminess.
  • Chopped Fresh Chives (optional): These add a pop of color and a mild onion flavor. They’re a lovely garnish!

For those looking to lighten things up, consider substituting Greek yogurt for the sour cream and mayonnaise. You can also toss in some cherry tomatoes or bell peppers for extra color and crunch. The exact quantities for each ingredient are available at the bottom of the article for easy printing!

How to Make Ranch Cucumber Salad

Step 1: Prepare the Dressing

Start by grabbing a large mixing bowl. In it, combine the sour cream and mayonnaise. Then, sprinkle in the dried dill weed, garlic powder, onion powder, salt, and black pepper. Squeeze in the fresh lemon juice for that zesty kick. Mix everything together until it’s smooth and creamy. This dressing is the heart of your Ranch Cucumber Salad, so make sure it’s well blended!

Step 2: Add the Cucumbers

Now, it’s time to add the star of the show! Toss the sliced cucumbers into the bowl with the dressing. Gently stir them around until every slice is coated in that delicious creamy goodness. This step is crucial for ensuring each bite is bursting with flavor!

Step 3: Garnish

If you’re feeling fancy, sprinkle some chopped fresh chives over the top. Give it another gentle toss to mix them in. This adds a lovely pop of color and a mild onion flavor that elevates your salad!

Step 4: Chill

Cover the bowl with plastic wrap and pop it in the refrigerator. Let it chill for at least 30 minutes. This resting time allows the flavors to meld beautifully, making each bite even more delightful. Trust me, patience is key here!

Step 5: Serve

When you’re ready to enjoy, take the salad out of the fridge. Serve it chilled as a refreshing side dish. Your family and friends will love this cool, creamy treat!

Tips for Success

  • Use fresh, firm cucumbers for the best crunch and flavor.
  • Let the salad chill longer than 30 minutes if you can; it enhances the taste.
  • Adjust the seasoning to your preference; taste as you go!
  • For a creamier texture, blend the dressing ingredients in a food processor.
  • Experiment with herbs like parsley or cilantro for a unique twist.

Equipment Needed

  • Mixing Bowl: A large bowl is essential for combining the dressing and cucumbers. A glass or ceramic bowl works great!
  • Measuring Cups: Handy for accurate ingredient measurements. You can also use a kitchen scale if you prefer.
  • Spatula or Spoon: Use a spatula or a sturdy spoon to mix everything together smoothly.
  • Plastic Wrap: To cover the bowl while chilling. A lid works just as well!

Variations

  • Greek Yogurt Swap: For a lighter version, replace sour cream and mayonnaise with Greek yogurt. It adds protein and tang!
  • Colorful Additions: Toss in cherry tomatoes or diced bell peppers for a burst of color and extra crunch.
  • Herb Infusion: Experiment with fresh herbs like dill, parsley, or basil for a unique flavor twist.
  • Spicy Kick: Add a pinch of cayenne pepper or a dash of hot sauce for those who enjoy a little heat.
  • Vegan Option: Use vegan mayonnaise and coconut yogurt to create a dairy-free version that everyone can enjoy.

Serving Suggestions

  • Pair this Ranch Cucumber Salad with grilled chicken or fish for a complete meal.
  • Serve alongside burgers or hot dogs at your next barbecue for a refreshing contrast.
  • For drinks, consider iced tea or lemonade to complement the salad’s flavors.
  • Present in a colorful bowl to enhance its visual appeal!

FAQs about Ranch Cucumber Salad

Can I make Ranch Cucumber Salad ahead of time?

Absolutely! This salad is perfect for making ahead. Just prepare it a few hours in advance or even the night before. The flavors will meld beautifully, making it even tastier!

How long does Ranch Cucumber Salad last in the fridge?

Stored in an airtight container, this salad can last up to 3 days in the fridge. However, for the best taste and texture, I recommend enjoying it within 1-2 days.

Can I use different herbs in this salad?

Yes! Feel free to experiment with different herbs. Fresh dill, parsley, or even basil can add a unique twist to your Ranch Cucumber Salad. Just remember to adjust the quantities to your taste!

Is this salad suitable for a gluten-free diet?

Yes, this Ranch Cucumber Salad is naturally gluten-free! Just ensure that any mayonnaise you use is labeled gluten-free to keep it safe for those with gluten sensitivities.

What can I serve with Ranch Cucumber Salad?

This salad pairs wonderfully with grilled meats, sandwiches, or as part of a picnic spread. It’s a versatile side that complements many dishes, making it a great addition to any meal!

Final Thoughts

Making this Ranch Cucumber Salad is like capturing a bit of summer on your plate. The creamy dressing and crisp cucumbers create a delightful harmony that brings joy to any meal. Whether you’re serving it at a family barbecue or enjoying it as a light lunch, this salad is sure to impress. Plus, it’s so easy to whip up, even on the busiest days! I hope this recipe becomes a staple in your kitchen, just as it has in mine. Here’s to delicious, refreshing moments shared with loved ones!

“`

jhessica

Ranch Cucumber Salad: Discover a Refreshing Delight!

A refreshing and creamy Ranch Cucumber Salad perfect for summer gatherings.
Prep Time 10 minutes
Total Time 40 minutes
Servings: 4 servings
Course: Salad
Cuisine: American
Calories: 150

Ingredients
  

  • 2 large cucumbers sliced
  • 1 cup sour cream
  • 1/2 cup mayonnaise
  • 1 tablespoon dried dill weed
  • 1 teaspoon garlic powder
  • 1 teaspoon onion powder
  • 1 teaspoon salt
  • 1/2 teaspoon black pepper
  • 1 tablespoon fresh lemon juice
  • 1/4 cup chopped fresh chives optional

Method
 

  1. In a large bowl, combine the sour cream, mayonnaise, dried dill weed, garlic powder, onion powder, salt, black pepper, and lemon juice. Mix well until all ingredients are fully incorporated.
  2. Add the sliced cucumbers to the bowl and gently toss to coat them evenly with the dressing.
  3. If using, sprinkle the chopped chives over the top and give it another gentle toss.
  4. Cover the bowl with plastic wrap and refrigerate for at least 30 minutes to allow the flavors to meld.
  5. Serve chilled as a refreshing side dish.

Nutrition

Serving: 1servingCalories: 150kcalCarbohydrates: 4gProtein: 3gFat: 14gSaturated Fat: 3gPolyunsaturated Fat: 11gCholesterol: 10mgSodium: 300mgFiber: 1gSugar: 2g

Notes

  • For a lighter version, substitute Greek yogurt for the sour cream and mayonnaise.
  • Add cherry tomatoes or bell peppers for extra color and crunch.

Tried this recipe?

Let us know how it was!

Slow-Cooked Summer Beef Casserole: Discover Easy Cooking Tips!

Introduction to Slow-Cooked Summer Beef Casserole

Slow-Cooked Summer Beef Casserole is the ultimate comfort meal that brings rich flavors and tender textures together with minimal effort. Perfect for warm evenings when you crave hearty food without the hassle, this casserole uses simple ingredients and slow cooking techniques to deliver a satisfying dish full of depth and warmth. Dive into this easy recipe and uncover tips to make your summer dinners both effortless and unforgettable!

Why You’ll Love This Slow-Cooked Summer Beef Casserole

This Slow-Cooked Summer Beef Casserole is a game-changer for busy days. It’s incredibly easy to prepare, allowing you to focus on what truly matters—your family. The rich, savory flavors meld beautifully as it cooks, creating a dish that feels like a warm hug. Plus, it’s versatile enough to adapt to your family’s tastes, making it a go-to recipe for any occasion. Trust me, your taste buds will thank you!

Ingredients for Slow-Cooked Summer Beef Casserole

Gathering the right ingredients is the first step to creating a delicious Slow-Cooked Summer Beef Casserole. Here’s what you’ll need:

  • Beef chuck: This cut is perfect for slow cooking, becoming tender and flavorful as it simmers.
  • Olive oil: A splash of this adds richness and helps brown the beef, enhancing its flavor.
  • Onion: Diced onions bring a sweet, aromatic base to the dish.
  • Garlic: Minced garlic adds a punch of flavor that elevates the entire casserole.
  • Carrots: Sliced carrots add a touch of sweetness and vibrant color.
  • Celery: This crunchy vegetable contributes a fresh taste and texture.
  • Red bell pepper: Chopped red bell pepper adds a pop of color and a hint of sweetness.
  • Diced tomatoes: A can of these provides moisture and acidity, balancing the richness of the beef.
  • Beef broth: This is the liquid gold that keeps everything moist and flavorful.
  • Worcestershire sauce: A splash of this sauce adds depth and umami to the dish.
  • Dried thyme and oregano: These herbs infuse the casserole with a warm, earthy aroma.
  • Salt and pepper: Essential for seasoning, these enhance all the flavors in the dish.
  • Frozen peas: Added towards the end, they bring a burst of color and sweetness.
  • Fresh parsley: Chopped parsley is a lovely garnish that adds freshness and a pop of green.

Feel free to get creative! You can add your favorite vegetables like zucchini or mushrooms for extra flavor and nutrition. For exact measurements, check the bottom of the article where you can find everything available for printing.

How to Make Slow-Cooked Summer Beef Casserole

Now that you have all your ingredients ready, let’s dive into the steps to create this mouthwatering Slow-Cooked Summer Beef Casserole. Each step is simple, and I promise it will be worth the wait!

Step 1: Brown the Beef

Start by heating the olive oil in a large skillet over medium-high heat. Once the oil is shimmering, add the beef cubes. Brown them on all sides for about 5-7 minutes. This step is crucial as it locks in the flavors. Once browned, remove the beef from the skillet and set it aside. Don’t worry if some bits stick to the pan; they’ll add flavor later!

Step 2: Sauté the Vegetables

In the same skillet, toss in the diced onion and minced garlic. Sauté them until the onion turns translucent, which should take about 3-4 minutes. The aroma will be heavenly! This step builds a flavorful base for your casserole, so don’t rush it.

Step 3: Combine Ingredients in Slow Cooker

Now, grab your slow cooker. Combine the browned beef, sautéed onion, garlic, sliced carrots, celery, chopped red bell pepper, diced tomatoes, beef broth, Worcestershire sauce, thyme, oregano, salt, and pepper. Stir everything together until well mixed. This is where the magic begins!

Step 4: Cook to Perfection

Cover your slow cooker and set it to low for 6-8 hours or high for 3-4 hours. The longer, the better! This slow cooking allows the flavors to meld beautifully, making the beef incredibly tender. Just imagine coming home to that delicious aroma wafting through your house!

Step 5: Add Peas and Serve

About 30 minutes before you’re ready to serve, stir in the frozen peas. Cover and let them heat through. This final touch adds a pop of color and sweetness to your casserole. When it’s time to serve, garnish with fresh parsley for a lovely presentation. Enjoy your hearty meal!

Tips for Success

  • Always brown the beef for maximum flavor; it makes a world of difference!
  • Don’t skip the sautéing step; it builds a rich base for your casserole.
  • Feel free to experiment with seasonal vegetables for added nutrition.
  • For a thicker sauce, mix cornstarch with cold water and stir it in during the last 30 minutes.
  • Let leftovers cool completely before storing them in an airtight container.

Equipment Needed

  • Slow Cooker: The star of the show! If you don’t have one, a Dutch oven works too.
  • Large Skillet: For browning the beef; a non-stick pan is a great alternative.
  • Cutting Board: Essential for chopping veggies; any sturdy surface will do.
  • Sharp Knife: A good knife makes prep a breeze; a paring knife can work in a pinch.

Variations

  • Vegetarian Option: Substitute beef with hearty mushrooms or lentils for a plant-based twist.
  • Spicy Kick: Add diced jalapeños or a dash of cayenne pepper for some heat.
  • Herb Infusion: Experiment with fresh herbs like rosemary or basil for a fragrant touch.
  • Low-Carb Version: Replace carrots and peas with cauliflower and green beans for a lower-carb dish.
  • Global Flavors: Incorporate soy sauce and ginger for an Asian-inspired beef casserole.

Serving Suggestions

  • Crusty Bread: Serve with a warm, crusty baguette to soak up the delicious sauce.
  • Salad: Pair with a fresh garden salad for a light and refreshing contrast.
  • Wine: A glass of red wine complements the rich flavors beautifully.
  • Presentation: Serve in a colorful bowl and sprinkle with extra parsley for a pop of color.

FAQs about Slow-Cooked Summer Beef Casserole

Can I use a different cut of beef for this casserole?

Absolutely! While beef chuck is ideal for slow cooking, you can also use brisket or round steak. Just remember that the cooking time may vary slightly depending on the cut.

How can I make this Slow-Cooked Summer Beef Casserole gluten-free?

This recipe is already gluten-free! Just ensure that your Worcestershire sauce is gluten-free, as some brands may contain wheat. Always check the labels to be safe.

Can I prepare this casserole in advance?

Yes! You can prep all the ingredients the night before and store them in the fridge. Just combine everything in the slow cooker in the morning, and you’ll have a delicious meal waiting for you later!

What can I serve with this casserole?

This Slow-Cooked Summer Beef Casserole pairs wonderfully with crusty bread, a fresh salad, or even over rice or mashed potatoes for a heartier meal. The options are endless!

How do I store leftovers?

Let the casserole cool completely before transferring it to an airtight container. It will keep in the fridge for up to 3 days or can be frozen for up to 3 months. Just reheat thoroughly before serving!

Final Thoughts

Cooking is more than just a task; it’s a way to create memories and share love with those we cherish. My Slow-Cooked Summer Beef Casserole embodies that spirit, transforming simple ingredients into a comforting meal that warms the heart. The aroma wafting through the house as it cooks is like a gentle reminder of home. Whether it’s a busy weeknight or a family gathering, this dish brings everyone together around the table. I hope you find as much joy in making it as I do. Here’s to delicious meals and cherished moments with loved ones!

“`

jhessica

Slow-Cooked Summer Beef Casserole: Discover Easy Cooking Tips!

A hearty and flavorful slow-cooked beef casserole perfect for summer meals.
Prep Time 15 minutes
Servings: 6 servings
Course: Main Dish
Cuisine: American
Calories: 350

Ingredients
  

  • 2 pounds beef chuck cut into 1-inch cubes
  • 2 tablespoons olive oil
  • 1 large onion diced
  • 3 cloves garlic minced
  • 2 carrots sliced
  • 2 celery stalks sliced
  • 1 red bell pepper chopped
  • 1 can 14.5 ounces diced tomatoes, undrained
  • 1 cup beef broth
  • 1 tablespoon Worcestershire sauce
  • 1 teaspoon dried thyme
  • 1 teaspoon dried oregano
  • Salt and pepper to taste
  • 1 cup frozen peas
  • Fresh parsley chopped (for garnish)

Method
 

  1. In a large skillet, heat the olive oil over medium-high heat. Add the beef cubes and brown on all sides, about 5-7 minutes. Remove the beef and set aside.
  2. In the same skillet, add the onion and garlic. Sauté until the onion is translucent, about 3-4 minutes.
  3. In a slow cooker, combine the browned beef, sautéed onion and garlic, carrots, celery, red bell pepper, diced tomatoes, beef broth, Worcestershire sauce, thyme, oregano, salt, and pepper.
  4. Stir to combine all ingredients. Cover and cook on low for 6-8 hours or on high for 3-4 hours, until the beef is tender.
  5. About 30 minutes before serving, stir in the frozen peas. Cover and continue cooking until heated through.
  6. Serve hot, garnished with fresh parsley.

Nutrition

Serving: 1servingCalories: 350kcalCarbohydrates: 12gProtein: 30gFat: 20gSaturated Fat: 7gPolyunsaturated Fat: 13gCholesterol: 80mgSodium: 600mgFiber: 3gSugar: 4g

Notes

  • For a thicker sauce, mix 2 tablespoons of cornstarch with 2 tablespoons of cold water and stir it into the casserole during the last 30 minutes of cooking.
  • Add your favorite vegetables like zucchini or mushrooms for extra flavor and nutrition.

Tried this recipe?

Let us know how it was!

Grilled Chicken with Caramelized Pineapple Salsa Rice Bowl: A Flavorful Delight!

Introduction to Grilled Chicken with Caramelized Pineapple Salsa Rice Bowl

Grilled Chicken with Caramelized Pineapple Salsa Rice Bowl offers a perfect harmony of smoky, sweet, and savory flavors in every bite. Tender grilled chicken pairs beautifully with the rich, caramelized pineapple salsa, adding a tropical twist that elevates this vibrant rice bowl to a new level. Easy to prepare and bursting with fresh ingredients, this dish is sure to become a go-to favorite for those seeking a delicious and satisfying meal!

Why You’ll Love This Grilled Chicken with Caramelized Pineapple Salsa Rice Bowl

This Grilled Chicken with Caramelized Pineapple Salsa Rice Bowl is a game-changer for busy nights. It’s quick to prepare, taking just 30 minutes from start to finish. The combination of savory grilled chicken and sweet, tangy pineapple salsa creates a flavor explosion that will have your taste buds dancing. Plus, it’s a healthy option that doesn’t skimp on taste, making it a win-win for everyone at the table!

Ingredients for Grilled Chicken with Caramelized Pineapple Salsa Rice Bowl

Gathering the right ingredients is key to making this Grilled Chicken with Caramelized Pineapple Salsa Rice Bowl a success. Here’s what you’ll need:

  • Cooked white rice: The fluffy base of your bowl, providing a comforting texture.
  • Boneless, skinless chicken breasts: Lean protein that grills beautifully and absorbs flavors well.
  • Olive oil: Adds moisture and helps the spices stick to the chicken.
  • Garlic powder: A must-have for that aromatic kick.
  • Onion powder: Enhances the savory depth of the dish.
  • Paprika: Brings a subtle smokiness and vibrant color.
  • Salt and pepper: Essential seasonings to elevate all the flavors.
  • Fresh pineapple: The star of the salsa, offering sweetness and a tropical twist.
  • Brown sugar: Helps caramelize the pineapple, creating a delicious glaze.
  • Lime juice: Adds a zesty brightness that balances the sweetness.
  • Red onion: Provides a crunchy texture and a hint of sharpness.
  • Fresh cilantro: A fresh herb that adds a burst of flavor and color.
  • Avocado: Creamy slices that complement the dish perfectly.
  • Lime wedges: For serving, adding an extra squeeze of freshness.

Feel free to get creative! You can substitute the pineapple with mango or peach for a different fruity twist in the salsa. If you’re looking for a quicker option, pre-cooked rice can save you time. For exact measurements, check the bottom of the article where you can find everything available for printing.

How to Make Grilled Chicken with Caramelized Pineapple Salsa Rice Bowl

Now that you have all your ingredients ready, let’s dive into the steps to create this delightful Grilled Chicken with Caramelized Pineapple Salsa Rice Bowl. I promise, it’s easier than it sounds!

Step 1: Prepare the Chicken

First things first, preheat your grill to medium-high heat. This ensures that your chicken gets those beautiful grill marks and cooks evenly. In a small bowl, mix together the olive oil, garlic powder, onion powder, paprika, salt, and pepper. This spice mixture is like a warm hug for your chicken! Rub it all over the chicken breasts, making sure every inch is coated. Let it sit for a few minutes to soak in those flavors.

Step 2: Grill the Chicken

Once your grill is hot, it’s time to cook the chicken! Place the seasoned chicken breasts on the grill and cook for about 6-7 minutes on each side. You want them to reach an internal temperature of 165°F. To check for doneness, you can use a meat thermometer or cut into the thickest part to ensure it’s no longer pink. Once done, remove the chicken from the grill and let it rest for a few minutes. This helps keep it juicy!

Step 3: Caramelize the Pineapple

While the chicken is resting, grab a skillet and heat it over medium heat. Add the diced pineapple and sprinkle the brown sugar on top. Cook for about 5-7 minutes, stirring occasionally. You’ll know it’s ready when the pineapple is golden brown and caramelized. Just before removing it from the heat, stir in the lime juice for that zesty kick. Your kitchen will smell heavenly!

Step 4: Make the Pineapple Salsa

In a bowl, combine the caramelized pineapple, finely chopped red onion, and fresh cilantro. Mix everything well. This salsa is a burst of flavor that will elevate your rice bowl. The sweetness of the pineapple, the crunch of the onion, and the freshness of the cilantro create a perfect harmony!

Step 5: Assemble the Rice Bowls

Now comes the fun part! Grab four bowls and divide the cooked white rice among them. Top each bowl with sliced grilled chicken, a generous scoop of your pineapple salsa, and a few slices of creamy avocado. Serve with lime wedges on the side for an extra squeeze of freshness. Your Grilled Chicken with Caramelized Pineapple Salsa Rice Bowl is ready to be devoured!

Tips for Success

  • Marinate the chicken for at least 30 minutes to enhance flavor.
  • Use a meat thermometer to ensure perfect doneness.
  • Let the grilled chicken rest before slicing to keep it juicy.
  • Feel free to customize the salsa with your favorite fruits.
  • Prep your ingredients ahead of time to save on cooking time.

Equipment Needed

  • Grill: A gas or charcoal grill works well; a grill pan is a great indoor alternative.
  • Skillet: Any non-stick skillet will do for caramelizing the pineapple.
  • Meat thermometer: Essential for checking chicken doneness; a simple knife can also work.
  • Mixing bowls: Use any size for combining ingredients.
  • Serving bowls: Perfect for presenting your delicious rice bowls.

Variations

  • Spicy Kick: Add diced jalapeños or a sprinkle of cayenne pepper to the pineapple salsa for a spicy twist.
  • Grain Swap: Substitute white rice with quinoa or brown rice for a healthier grain option.
  • Vegetarian Delight: Replace chicken with grilled tofu or chickpeas for a plant-based version.
  • Herb Infusion: Experiment with different herbs like mint or basil in the salsa for a unique flavor profile.
  • Fruit Fusion: Try using different fruits like mango, peach, or even strawberries in the salsa for a seasonal twist.

Serving Suggestions

  • Side Salad: Pair your rice bowl with a light mixed greens salad for a refreshing crunch.
  • Drink Pairing: Enjoy with a chilled glass of iced tea or a fruity mocktail.
  • Presentation: Serve in colorful bowls and garnish with extra cilantro for a vibrant look.

FAQs about Grilled Chicken with Caramelized Pineapple Salsa Rice Bowl

Can I use frozen chicken for this recipe?

Absolutely! Just make sure to thaw it completely before marinating and grilling. Frozen chicken can be a lifesaver on busy days!

What can I substitute for pineapple in the salsa?

If pineapple isn’t your thing, mango or peach works beautifully too! They add a sweet and juicy twist that complements the chicken perfectly.

How can I make this dish spicier?

For a spicy kick, add diced jalapeños or a sprinkle of cayenne pepper to the pineapple salsa. It’ll elevate the flavor and add some heat!

Can I prepare this rice bowl in advance?

Yes! You can grill the chicken and caramelize the pineapple ahead of time. Just store them in the fridge and assemble the bowls when you’re ready to eat.

Is this recipe gluten-free?

Yes, this Grilled Chicken with Caramelized Pineapple Salsa Rice Bowl is naturally gluten-free! It’s a great option for those with dietary restrictions.

Final Thoughts

Creating this Grilled Chicken with Caramelized Pineapple Salsa Rice Bowl is more than just cooking; it’s about bringing joy to your table. The vibrant colors and delightful flavors make it a feast for the senses. I love how this dish transforms a simple weeknight into a special occasion. Plus, it’s a fantastic way to sneak in some healthy ingredients without sacrificing taste. Whether you’re sharing it with family or enjoying it solo, this rice bowl is sure to bring smiles and satisfaction. So, roll up your sleeves and dive into this culinary adventure—you won’t regret it!

“`

jhessica

Grilled Chicken with Caramelized Pineapple Salsa Rice Bowl: A Flavorful Delight!

A delicious and vibrant rice bowl featuring grilled chicken topped with caramelized pineapple salsa, perfect for a flavorful meal.
Prep Time 10 minutes
Cook Time 20 minutes
Total Time 30 minutes
Servings: 4 servings
Course: Main Course
Cuisine: American
Calories: 450

Ingredients
  

  • 2 cups cooked white rice
  • 1 pound boneless skinless chicken breasts
  • 1 tablespoon olive oil
  • 1 teaspoon garlic powder
  • 1 teaspoon onion powder
  • 1 teaspoon paprika
  • Salt and pepper to taste
  • 1 cup fresh pineapple diced
  • 1 tablespoon brown sugar
  • 1 tablespoon lime juice
  • 1/4 cup red onion finely chopped
  • 1/4 cup fresh cilantro chopped
  • 1 avocado sliced
  • Lime wedges for serving

Method
 

  1. Preheat the grill to medium-high heat. In a small bowl, mix together the olive oil, garlic powder, onion powder, paprika, salt, and pepper. Rub this mixture all over the chicken breasts.
  2. Grill the chicken for about 6-7 minutes on each side, or until fully cooked and the internal temperature reaches 165°F. Remove from the grill and let it rest for a few minutes before slicing.
  3. While the chicken is resting, heat a skillet over medium heat. Add the diced pineapple and brown sugar. Cook for about 5-7 minutes, stirring occasionally, until the pineapple is caramelized and golden brown. Remove from heat and stir in the lime juice.
  4. In a bowl, combine the caramelized pineapple, red onion, and cilantro. Mix well and set aside.
  5. To assemble the rice bowls, divide the cooked rice among four bowls. Top each bowl with sliced grilled chicken, a generous scoop of the pineapple salsa, and avocado slices. Serve with lime wedges on the side.

Nutrition

Serving: 1bowlCalories: 450kcalCarbohydrates: 45gProtein: 30gFat: 15gSaturated Fat: 2gPolyunsaturated Fat: 10gCholesterol: 70mgSodium: 300mgFiber: 3gSugar: 10g

Notes

  • For added flavor, marinate the chicken in the spice mixture for at least 30 minutes before grilling.
  • Substitute the pineapple with mango or peach for a different fruity twist in the salsa.

Tried this recipe?

Let us know how it was!

Spicy Black Pepper Chicken: Discover This Flavorful Recipe!

Introduction to Spicy Black Pepper Chicken

Spicy Black Pepper Chicken is a bold and zesty dish that brings a kick of heat and rich aroma to your plate. Featuring tender chicken pieces generously coated in a vibrant black pepper sauce, this recipe delivers a perfect balance of spice and savory flavors. Quick to make and irresistibly delicious, it’s an ideal choice for those craving a flavorful meal with a little extra punch!

Why You’ll Love This Spicy Black Pepper Chicken

This Spicy Black Pepper Chicken is a lifesaver for busy weeknights. It comes together in just 25 minutes, making it a quick solution for those hectic evenings. The combination of tender chicken and a zesty black pepper sauce creates a flavor explosion that will have everyone asking for seconds. Plus, it’s versatile enough to please even the pickiest eaters in your family. You’ll love how easy it is to make and how delicious it tastes!

Ingredients for Spicy Black Pepper Chicken

Gathering the right ingredients is key to making this Spicy Black Pepper Chicken a success. Here’s what you’ll need:

  • Vegetable oil: This is essential for frying the chicken and gives it a nice, crispy texture.
  • Boneless, skinless chicken thighs: I prefer thighs for their tenderness and flavor, but chicken breasts work too if you want a leaner option.
  • Salt: A pinch of salt enhances the overall flavor of the dish.
  • Cornstarch: This helps to create a lovely, glossy sauce that clings to the chicken.
  • Soy sauce: Adds a savory depth to the dish, making it truly irresistible.
  • Oyster sauce: This brings a rich umami flavor that complements the black pepper beautifully.
  • Rice vinegar: A splash of acidity balances the flavors and brightens the dish.
  • Black pepper: Freshly ground black pepper is a must for that signature spicy kick!
  • Garlic: Minced garlic adds a fragrant aroma and enhances the overall taste.
  • Ginger: Fresh ginger gives a warm, zesty flavor that pairs perfectly with the chicken.
  • Bell pepper: Sliced bell pepper adds color and a slight sweetness to the dish.
  • Green onions: Chopped green onions provide a fresh crunch and a pop of color when sprinkled on top.

For those who like it spicy, consider adding sliced fresh chili peppers or a dash of hot sauce. If you’re looking for a vegetarian option, tofu can be a great substitute for chicken. You can find the exact measurements for each ingredient at the bottom of the article, ready for printing!

How to Make Spicy Black Pepper Chicken

Now that you have all your ingredients ready, let’s dive into making this delicious Spicy Black Pepper Chicken! Follow these simple steps, and you’ll have a mouthwatering meal in no time.

Step 1: Heat the Oil

Start by heating 1 tablespoon of vegetable oil in a large skillet over medium-high heat. You want the oil hot enough to sizzle when the chicken hits the pan. This step is crucial for achieving that lovely golden-brown color!

Step 2: Cook the Chicken

Add the bite-sized chicken thighs to the skillet. Sprinkle them with a teaspoon of salt. Cook for about 5-7 minutes, stirring occasionally, until the chicken is browned and cooked through. Once done, remove the chicken from the skillet and set it aside. This keeps it juicy and tender!

Step 3: Prepare the Sauce

In a small bowl, mix together the cornstarch, soy sauce, oyster sauce, rice vinegar, and freshly ground black pepper. Stir until everything is well combined. This sauce is the heart of your Spicy Black Pepper Chicken, so make sure it’s mixed well!

Step 4: Sauté Garlic and Ginger

In the same skillet, add the remaining tablespoon of oil. Toss in the minced garlic and ginger, sautéing for about 30 seconds until fragrant. The aroma will fill your kitchen, making it hard to resist!

Step 5: Add Bell Pepper

Next, add the sliced bell pepper to the skillet. Cook for another 2-3 minutes until it’s slightly tender. The bell pepper adds a lovely crunch and a pop of color to your dish.

Step 6: Combine Chicken and Sauce

Return the cooked chicken to the skillet. Pour the sauce mixture over the chicken and vegetables. Stir well to coat everything evenly. This is where the magic happens, as the sauce thickens and clings to the chicken!

Step 7: Add Green Onions

Finally, toss in the chopped green onions and stir to combine. Cook for another minute, then remove the skillet from heat. The green onions add a fresh crunch that brightens the dish.

Step 8: Serve

Serve your Spicy Black Pepper Chicken hot over steamed rice or noodles. Enjoy the delightful flavors and watch your family devour every bite!

Tips for Success

  • Prep all your ingredients before starting to cook. It makes the process smoother!
  • Don’t skip the cornstarch; it’s key for a glossy sauce that clings to the chicken.
  • Adjust the black pepper to your taste. More for spice, less for a milder flavor.
  • Use a non-stick skillet to prevent sticking and make cleanup easier.
  • Feel free to add your favorite veggies for extra nutrition and color!

Equipment Needed

  • Large skillet: A non-stick skillet works best, but any large frying pan will do.
  • Cutting board: Essential for chopping your ingredients safely.
  • Knife: A sharp chef’s knife makes prep quick and easy.
  • Measuring spoons: For accurate ingredient measurements.
  • Mixing bowl: To combine your sauce ingredients effortlessly.

Variations

  • Spicy Kick: For those who crave heat, add sliced fresh chili peppers or a dash of your favorite hot sauce to the dish.
  • Vegetarian Delight: Swap out the chicken for tofu or tempeh for a delicious vegetarian version. Just adjust the cooking time accordingly.
  • Different Proteins: Try using shrimp or beef instead of chicken for a different flavor profile. Just be mindful of cooking times!
  • Extra Veggies: Incorporate other vegetables like broccoli, snap peas, or carrots for added nutrition and color.
  • Gluten-Free Option: Ensure your soy sauce and oyster sauce are gluten-free to keep this dish suitable for gluten-sensitive diets.

Serving Suggestions

  • Serve your Spicy Black Pepper Chicken over fluffy steamed rice or noodles for a satisfying meal.
  • Pair it with a crisp green salad dressed in a light vinaigrette to balance the spice.
  • A chilled glass of white wine or iced tea complements the flavors beautifully.
  • Garnish with extra green onions or sesame seeds for a lovely presentation.

FAQs about Spicy Black Pepper Chicken

Can I use chicken breasts instead of thighs for this recipe?

Absolutely! While I love the tenderness of chicken thighs, chicken breasts can be a leaner option. Just be sure to adjust the cooking time, as breasts may cook a bit faster.

How can I make this dish spicier?

If you’re looking for a fiery kick, consider adding sliced fresh chili peppers or a dash of your favorite hot sauce. You can also increase the amount of freshly ground black pepper for extra heat!

Can I prepare this dish in advance?

Yes! You can marinate the chicken in the sauce for a few hours or overnight for deeper flavor. Just cook it fresh when you’re ready to serve for the best texture.

What can I serve with Spicy Black Pepper Chicken?

This dish pairs wonderfully with steamed rice or noodles. A crisp green salad or some sautéed vegetables on the side can add a refreshing touch!

Is this recipe gluten-free?

Yes, it can be gluten-free! Just ensure that your soy sauce and oyster sauce are labeled gluten-free. This way, you can enjoy this delicious meal without worry!

Final Thoughts

Cooking this Spicy Black Pepper Chicken is more than just preparing a meal; it’s about creating a moment of joy for you and your loved ones. The vibrant flavors and delightful aroma fill your kitchen, making it a warm and inviting space. I love how this dish brings everyone together, whether it’s a busy weeknight or a special occasion. Plus, it’s so easy to customize, ensuring that everyone at the table leaves satisfied. So, roll up your sleeves, embrace the sizzle, and enjoy the deliciousness that this recipe brings to your home!

“`

jhessica

Spicy Black Pepper Chicken: Discover This Flavorful Recipe!

A flavorful and spicy dish featuring tender chicken thighs coated in a savory black pepper sauce.
Prep Time 10 minutes
Cook Time 15 minutes
Total Time 25 minutes
Servings: 4 servings
Course: Main Dish
Cuisine: Asian
Calories: 320

Ingredients
  

  • 2 tablespoons vegetable oil
  • 1 pound boneless skinless chicken thighs, cut into bite-sized pieces
  • 1 teaspoon salt
  • 1 tablespoon cornstarch
  • 1 tablespoon soy sauce
  • 1 tablespoon oyster sauce
  • 1 tablespoon rice vinegar
  • 1 tablespoon black pepper freshly ground
  • 3 cloves garlic minced
  • 1 inch ginger minced
  • 1 bell pepper sliced
  • 1 cup green onions chopped

Method
 

  1. Heat 1 tablespoon of vegetable oil in a large skillet over medium-high heat.
  2. Add the chicken pieces and season with salt. Cook until browned and cooked through, about 5-7 minutes. Remove the chicken from the skillet and set aside.
  3. In a small bowl, mix cornstarch, soy sauce, oyster sauce, rice vinegar, and black pepper. Stir until well combined.
  4. In the same skillet, add the remaining tablespoon of oil. Sauté the garlic and ginger for about 30 seconds until fragrant.
  5. Add the bell pepper and cook for another 2-3 minutes until slightly tender.
  6. Return the chicken to the skillet and pour the sauce mixture over it. Stir well to coat the chicken and vegetables.
  7. Cook for an additional 2-3 minutes until the sauce thickens slightly.
  8. Add the green onions and stir to combine. Cook for another minute, then remove from heat.
  9. Serve hot over steamed rice or noodles.

Nutrition

Serving: 1servingCalories: 320kcalCarbohydrates: 8gProtein: 25gFat: 18gSaturated Fat: 3gPolyunsaturated Fat: 15gCholesterol: 90mgSodium: 800mgFiber: 1gSugar: 2g

Notes

  • For a spicier kick, add sliced fresh chili peppers or a dash of hot sauce.
  • Substitute chicken thighs with chicken breast for a leaner option.
  • For a vegetarian version, replace chicken with tofu and adjust cooking times accordingly.

Tried this recipe?

Let us know how it was!

Crispy Garlic Chicken Fried Rice: A Flavor Explosion!

Introduction to Crispy Garlic Chicken Fried Rice

Crispy Garlic Chicken Fried Rice is a sensational dish that packs bold flavors and satisfying textures into every bite. With perfectly golden, crispy chicken pieces mingling with fragrant garlic and fluffy rice, this recipe transforms a classic favorite into an unforgettable meal. Quick to prepare and bursting with taste, it’s the perfect way to elevate your weeknight dinners!

Why You’ll Love This Crispy Garlic Chicken Fried Rice

This Crispy Garlic Chicken Fried Rice is a lifesaver for busy evenings. It’s quick to whip up, taking just 25 minutes from start to finish. The flavors are simply irresistible, with garlic dancing on your taste buds and chicken adding heartiness. Plus, it’s a one-pan wonder, which means less cleanup for you! Whether you’re feeding a family or impressing guests, this dish is sure to delight everyone at the table.

Ingredients for Crispy Garlic Chicken Fried Rice

Gathering the right ingredients is key to making the best Crispy Garlic Chicken Fried Rice. Here’s what you’ll need:

  • Cooked Rice: Day-old rice works best for that perfect texture. Freshly cooked rice can be too sticky.
  • Diced Chicken Breast: Tender and juicy, chicken adds protein and heartiness to the dish. You can substitute with tofu for a vegetarian option.
  • Garlic: Freshly minced garlic is a must! It infuses the dish with a fragrant aroma and rich flavor.
  • Soy Sauce: This adds a savory depth. For a gluten-free version, opt for tamari or coconut aminos.
  • Vegetable Oil: A neutral oil is perfect for frying. You can also use canola or sunflower oil.
  • Sesame Oil: Just a splash brings a nutty flavor that elevates the dish. Use it sparingly for a delightful finish.
  • Peas and Carrots: These add color and sweetness. Feel free to mix in other veggies like bell peppers or broccoli!
  • Green Onions: Chopped green onions provide a fresh crunch and a pop of color as a garnish.
  • Salt and Pepper: Essential for seasoning. Adjust to your taste for the perfect balance.

For exact measurements, check the bottom of the article where you can find everything listed for easy printing!

How to Make Crispy Garlic Chicken Fried Rice

Now that you have all your ingredients ready, let’s dive into the cooking process! Making Crispy Garlic Chicken Fried Rice is straightforward and fun. Follow these simple steps, and you’ll have a delicious meal in no time!

Step 1: Heat the Oil

Start by heating 1 tablespoon of vegetable oil in a large skillet over medium heat. You want the oil to shimmer but not smoke. This is the base for your stir-fry, so make sure it’s hot enough to get things sizzling!

Step 2: Sauté the Garlic

Once the oil is hot, add 4 cloves of minced garlic. Sauté it for about 30 seconds until it becomes fragrant. Be careful not to let it burn, as burnt garlic can turn bitter. This step is where the magic begins, filling your kitchen with an irresistible aroma!

Step 3: Cook the Chicken

Next, toss in 1 cup of diced chicken breast. Cook it for about 5-7 minutes, stirring occasionally, until it’s browned and cooked through. The chicken should be juicy and tender, adding a hearty element to your fried rice.

Step 4: Add Vegetables

Now, it’s time to add in ½ cup of peas and carrots. Stir them in and cook for another 2-3 minutes until they’re tender. You can also throw in any other veggies you have on hand, like bell peppers or broccoli, for extra color and nutrition!

Step 5: Mix in the Rice

Once your veggies are ready, it’s time to add the star of the show: 2 cups of cooked rice. Pour it in along with 2 tablespoons of soy sauce and 1 teaspoon of sesame oil. Mix everything together well, ensuring the rice is coated with the sauce and flavors.

Step 6: Crisp it Up

Here comes the fun part! Let the rice cook undisturbed for a few minutes. This allows it to get crispy on the bottom. Then, stir it occasionally to ensure even crispiness. You want that delightful crunch that makes this dish so special!

Step 7: Season and Garnish

Finally, season your fried rice with salt and pepper to taste. Once it’s perfectly seasoned, garnish with chopped green onions for a fresh touch. Serve it hot, and watch your family dig in with delight!

Tips for Success

  • Use day-old rice for the best texture; it’s drier and fries up beautifully.
  • Don’t overcrowd the pan; this helps achieve that crispy finish.
  • Feel free to customize with your favorite veggies or proteins.
  • Keep the heat at medium to avoid burning the garlic.
  • For extra flavor, add a splash of lime juice before serving.

Equipment Needed

  • Large Skillet: A non-stick skillet works best, but any large frying pan will do.
  • Spatula: A wooden or silicone spatula is perfect for stirring without scratching your pan.
  • Measuring Cups: Handy for measuring rice and other ingredients accurately.
  • Knife and Cutting Board: Essential for chopping chicken and veggies.

Variations

  • Vegetarian Option: Substitute chicken with tofu or tempeh for a delicious plant-based meal.
  • Spicy Kick: Add a teaspoon of chili paste or red pepper flakes for a spicy twist that will wake up your taste buds.
  • Different Proteins: Try shrimp, beef, or even leftover rotisserie chicken for a quick protein swap.
  • Extra Veggies: Incorporate bell peppers, zucchini, or snap peas for added color and nutrition.
  • Herb Infusion: Toss in fresh herbs like cilantro or basil at the end for a burst of freshness.

Serving Suggestions

  • Pair your Crispy Garlic Chicken Fried Rice with a light cucumber salad for a refreshing contrast.
  • Serve it alongside steamed dumplings or spring rolls for a delightful Asian-inspired meal.
  • For drinks, consider iced green tea or a crisp white wine to complement the flavors.
  • Garnish with extra green onions and sesame seeds for a beautiful presentation.

FAQs about Crispy Garlic Chicken Fried Rice

Can I use frozen vegetables in this recipe?

Absolutely! Frozen peas and carrots work perfectly in this Crispy Garlic Chicken Fried Rice. Just toss them in while cooking the chicken, and they’ll thaw and cook quickly.

What type of rice is best for fried rice?

Day-old rice is ideal for making fried rice. It’s drier and less sticky, which helps achieve that crispy texture. If you don’t have leftover rice, try to cool freshly cooked rice before using it.

Can I make this dish ahead of time?

Yes! You can prepare the ingredients ahead of time and store them in the fridge. Just stir-fry everything when you’re ready to eat. It’s a great way to save time on busy nights!

How can I make this dish gluten-free?

To make your Crispy Garlic Chicken Fried Rice gluten-free, simply substitute regular soy sauce with tamari or coconut aminos. Both options provide a delicious flavor without the gluten.

What can I serve with Crispy Garlic Chicken Fried Rice?

This dish pairs wonderfully with a light salad, steamed dumplings, or even a side of spring rolls. For drinks, try iced green tea or a refreshing lemonade!

Final Thoughts

Cooking Crispy Garlic Chicken Fried Rice is more than just preparing a meal; it’s about creating moments. The joy of watching my family gather around the table, their faces lighting up with each bite, is priceless. This dish is a reminder that even on the busiest days, we can enjoy a flavorful, satisfying meal together. Plus, it’s versatile enough to adapt to whatever ingredients you have on hand. So, whether you’re a seasoned chef or a kitchen novice, I hope this recipe brings you as much joy as it has brought to my family!

“`

Olivia

Crispy Garlic Chicken Fried Rice: A Flavor Explosion!

Crispy Garlic Chicken Fried Rice is a delicious and flavorful dish that combines tender chicken, fragrant garlic, and perfectly cooked rice, all stir-fried to crispy perfection.
Prep Time 10 minutes
Cook Time 15 minutes
Total Time 25 minutes
Servings: 4 servings
Course: Main Dish
Cuisine: Asian
Calories: 350

Ingredients
  

  • 2 cups cooked rice
  • 1 cup diced chicken breast
  • 4 cloves garlic minced
  • 2 tablespoons soy sauce
  • 1 tablespoon vegetable oil
  • 1 teaspoon sesame oil
  • 1/2 cup peas and carrots
  • 2 green onions chopped
  • Salt and pepper to taste

Method
 

  1. Heat vegetable oil in a large skillet over medium heat.
  2. Add minced garlic and sauté until fragrant.
  3. Add diced chicken and cook until browned and cooked through.
  4. Stir in peas and carrots, cooking until tender.
  5. Add cooked rice, soy sauce, and sesame oil, mixing well.
  6. Cook until the rice is crispy, stirring occasionally.
  7. Season with salt and pepper to taste.
  8. Garnish with chopped green onions before serving.

Nutrition

Serving: 1cupCalories: 350kcalCarbohydrates: 50gProtein: 20gFat: 10gSaturated Fat: 1.5gPolyunsaturated Fat: 8gCholesterol: 60mgSodium: 600mgFiber: 2gSugar: 2g

Notes

  • Use day-old rice for the best texture.
  • Feel free to add other vegetables like bell peppers or broccoli.
  • Adjust the amount of garlic according to your preference.

Tried this recipe?

Let us know how it was!

Strawberry Spinach Salad with Poppy Seed Dressing delights everyone!

Introduction to Strawberry Spinach Salad with Poppy Seed Dressing

Strawberry Spinach Salad with Poppy Seed Dressing offers a perfect balance of fresh, vibrant flavors that brighten any meal. The juicy sweetness of ripe strawberries combined with tender spinach leaves and a luscious, tangy poppy seed dressing creates a refreshing and irresistible salad. Whether served as a light lunch or a colorful side, this dish is sure to become a favorite at your table!

Why You’ll Love This Strawberry Spinach Salad with Poppy Seed Dressing

This Strawberry Spinach Salad with Poppy Seed Dressing is a true gem in my kitchen. It’s incredibly easy to make, taking just 10 minutes from start to finish. The combination of sweet strawberries and creamy feta creates a delightful contrast that dances on your palate. Plus, it’s a healthy option that doesn’t skimp on flavor, making it perfect for busy days when you want something nutritious yet satisfying.

Ingredients for Strawberry Spinach Salad with Poppy Seed Dressing

Gathering the right ingredients is key to making this Strawberry Spinach Salad with Poppy Seed Dressing shine. Here’s what you’ll need:

  • Fresh baby spinach: This leafy green is the base of our salad, providing a nutritious and vibrant backdrop.
  • Fresh strawberries: Sweet and juicy, these berries add a burst of flavor and color that’s hard to resist.
  • Red onion: Thinly sliced, it brings a mild sharpness that complements the sweetness of the strawberries.
  • Feta cheese: Crumbled feta adds a creamy, tangy element that balances the salad beautifully.
  • Pecans: Chopped and toasted, these nuts introduce a delightful crunch and nutty flavor.
  • Vegetable oil: This is the base for our dressing, helping to blend all the flavors together.
  • Apple cider vinegar: It adds a tangy kick that brightens the overall taste of the salad.
  • Honey: A touch of sweetness that enhances the dressing and ties all the flavors together.
  • Dijon mustard: This adds a subtle depth and a hint of spice to the dressing.
  • Poppy seeds: These tiny seeds add a lovely texture and a hint of nuttiness to the dressing.
  • Salt and pepper: Essential for seasoning, they help elevate all the flavors in the salad.

For those looking to mix things up, consider adding a handful of blueberries or raspberries for extra sweetness. If you want a heartier salad, grilled chicken or chickpeas can be great protein additions. You can find the exact quantities for each ingredient at the bottom of the article, ready for printing!

How to Make Strawberry Spinach Salad with Poppy Seed Dressing

Making this Strawberry Spinach Salad with Poppy Seed Dressing is a breeze! Follow these simple steps, and you’ll have a delicious dish ready in no time. Let’s dive in!

Step 1: Prepare the Dressing

Start by whisking together the dressing ingredients. In a small bowl, combine the vegetable oil, apple cider vinegar, honey, Dijon mustard, poppy seeds, salt, and pepper. Whisk until everything is well blended. This dressing is the heart of the salad, so take a moment to ensure it’s mixed thoroughly. The sweet and tangy flavors will elevate your salad!

Step 2: Combine the Salad Ingredients

Next, grab a large salad bowl. Add the fresh baby spinach, sliced strawberries, red onion, crumbled feta cheese, and toasted pecans. Each ingredient brings its own unique flavor and texture, creating a delightful medley. Don’t be shy—mix them gently with your hands or a salad spoon. This is where the magic begins!

Step 3: Toss with Dressing

Now it’s time to bring it all together! Drizzle the prepared poppy seed dressing over the salad. Toss everything gently to ensure the dressing coats all the ingredients evenly. This step is crucial; you want every bite to be bursting with flavor. If you prefer a lighter touch, start with half the dressing and add more as needed.

Step 4: Serve or Chill

Finally, you can serve your salad right away for the freshest taste. However, if you have a few minutes to spare, chilling it in the refrigerator for about 15 minutes can enhance the flavors even more. This Strawberry Spinach Salad with Poppy Seed Dressing is best enjoyed fresh, but it also holds up well if you need to prepare it ahead of time!

Tips for Success

  • Always wash and dry your spinach thoroughly to avoid a soggy salad.
  • Toast the pecans in a dry skillet for a few minutes to enhance their flavor.
  • Use ripe strawberries for the best sweetness and juiciness.
  • Feel free to adjust the dressing ingredients to suit your taste preferences.
  • Make the dressing ahead of time and store it in the fridge for convenience.

Equipment Needed

  • Mixing bowl: A medium-sized bowl works well for whisking the dressing.
  • Salad bowl: Use a large bowl to combine all the salad ingredients.
  • Whisk: A fork can also do the job if you don’t have a whisk.
  • Salad tongs: Great for tossing the salad; a large spoon works too.

Variations

  • Berry Medley: Mix in blueberries or raspberries for an extra burst of sweetness and color.
  • Protein Boost: Add grilled chicken, shrimp, or chickpeas for a heartier meal that’s still light and refreshing.
  • Nut-Free Option: Swap pecans for sunflower seeds or omit nuts entirely for a nut-free version.
  • Vegan Twist: Replace feta with avocado or a vegan cheese alternative to keep it plant-based.
  • Spicy Kick: Toss in some sliced jalapeños or a sprinkle of red pepper flakes for a spicy twist.

Serving Suggestions

  • Pair this salad with grilled chicken or fish for a complete meal.
  • Serve alongside crusty bread or a light quiche for a delightful brunch.
  • For drinks, a chilled white wine or sparkling water with lemon complements the flavors beautifully.
  • Garnish with extra strawberries or a sprinkle of feta for an eye-catching presentation.

FAQs about Strawberry Spinach Salad with Poppy Seed Dressing

As I’ve shared my love for this Strawberry Spinach Salad with Poppy Seed Dressing, I often get questions from fellow home cooks. Here are some of the most common inquiries I’ve encountered:

Can I make the dressing ahead of time?

Absolutely! You can prepare the poppy seed dressing a day in advance. Just store it in an airtight container in the fridge. Give it a good shake before using, as the ingredients may separate.

How long will the salad last in the fridge?

This salad is best enjoyed fresh, but if you have leftovers, it can last in the fridge for about 1-2 days. Just keep in mind that the spinach may wilt over time.

Can I use other greens instead of spinach?

Yes! If you’re not a fan of spinach, feel free to substitute with mixed greens, arugula, or kale. Each will bring a unique flavor and texture to the salad.

Is this salad suitable for meal prep?

Definitely! To make it meal prep-friendly, store the salad ingredients and dressing separately. Combine them just before serving to keep everything fresh and crisp.

What can I serve with this salad?

This Strawberry Spinach Salad pairs wonderfully with grilled meats, seafood, or even a light pasta dish. It’s versatile enough to complement many meals!

Final Thoughts

Creating this Strawberry Spinach Salad with Poppy Seed Dressing is more than just preparing a meal; it’s about bringing joy to the table. The vibrant colors and fresh flavors make it a feast for the eyes and the palate. I love how it effortlessly combines health and taste, making it a perfect choice for busy days or special gatherings. Each bite is a reminder that cooking can be simple yet delightful. So, whether you’re serving it for a family dinner or a picnic with friends, this salad is sure to bring smiles and satisfaction all around!

“`

Olivia

Strawberry Spinach Salad with Poppy Seed Dressing delights everyone!

A refreshing Strawberry Spinach Salad with Poppy Seed Dressing that delights everyone with its vibrant flavors and textures.
Prep Time 10 minutes
Total Time 10 minutes
Servings: 4 servings
Course: Salad
Cuisine: American
Calories: 250

Ingredients
  

  • 4 cups fresh baby spinach washed and dried
  • 2 cups fresh strawberries hulled and sliced
  • 1/2 cup red onion thinly sliced
  • 1/2 cup crumbled feta cheese
  • 1/2 cup pecans chopped and toasted
  • 1/4 cup vegetable oil for dressing
  • 2 tablespoons apple cider vinegar for dressing
  • 2 tablespoons honey for dressing
  • 1 teaspoon Dijon mustard for dressing
  • 1 tablespoon poppy seeds for dressing
  • Salt and pepper to taste for dressing

Method
 

  1. In a small bowl, whisk together the vegetable oil, apple cider vinegar, honey, Dijon mustard, poppy seeds, salt, and pepper until well combined. Set aside.
  2. In a large salad bowl, combine the baby spinach, sliced strawberries, red onion, crumbled feta cheese, and toasted pecans.
  3. Drizzle the poppy seed dressing over the salad and toss gently to combine.
  4. Serve immediately for the freshest taste, or chill in the refrigerator for about 15 minutes before serving to enhance the flavors.

Nutrition

Serving: 1servingCalories: 250kcalCarbohydrates: 12gProtein: 6gFat: 20gSaturated Fat: 3gPolyunsaturated Fat: 15gCholesterol: 10mgSodium: 200mgFiber: 3gSugar: 10g

Notes

  • For a sweeter touch, add a handful of blueberries or raspberries to the salad.
  • For a heartier version, include grilled chicken or chickpeas for added protein.

Tried this recipe?

Let us know how it was!

Cheesy Fried Egg Quesadilla: Quick, Delicious Recipe!

Introduction to Cheesy Fried Egg Quesadilla

Ready for a cheesy, crispy treat that comes together in minutes? This Cheesy Fried Egg Quesadilla is the perfect answer! With gooey melted cheese and a perfectly fried egg nestled inside a toasted tortilla, it’s a simple yet satisfying meal for any time of day. Whether you need a quick breakfast, a snack, or a light dinner, this quesadilla delivers big on flavor without the fuss. Let’s dive into this deliciously easy recipe!

Why You’ll Love This Cheesy Fried Egg Quesadilla

This Cheesy Fried Egg Quesadilla is a game-changer for busy mornings or quick snacks. It’s incredibly easy to make, taking just 15 minutes from start to finish. The combination of fluffy scrambled eggs and gooey cheese wrapped in a warm tortilla is simply irresistible. Plus, you can customize it with your favorite toppings, making it a versatile dish that everyone in the family will adore!

Ingredients for Cheesy Fried Egg Quesadilla

Gathering the right ingredients is the first step to creating a mouthwatering Cheesy Fried Egg Quesadilla. Here’s what you’ll need:

  • Large eggs: The star of the show! They provide protein and a fluffy texture.
  • Shredded cheddar cheese: This melty goodness adds a rich flavor and creaminess that makes every bite delightful.
  • Flour tortillas: These soft wraps hold everything together. You can use whole wheat or corn tortillas for a twist.
  • Butter: A little fat for cooking the eggs and crisping the tortillas. It adds a lovely flavor, too!
  • Salt and pepper: Essential seasonings to enhance the taste of the eggs.
  • Optional toppings: Get creative! Salsa, sour cream, or avocado can elevate your quesadilla to new heights.

For those who want to mix things up, consider adding diced bell peppers or onions to the scrambled eggs for extra flavor. If you like a bit of heat, jalapeños or hot sauce can spice things up nicely!

Exact quantities for each ingredient are available at the bottom of the article for easy printing. Happy cooking!

How to Make Cheesy Fried Egg Quesadilla

Now that you have your ingredients ready, let’s dive into the fun part—making your Cheesy Fried Egg Quesadilla! Follow these simple steps, and you’ll have a delicious meal in no time.

Step 1: Whisk the Eggs

Start by cracking the two large eggs into a small bowl. I like to use a fork for this part. Add a pinch of salt and pepper to taste. Then, whisk them together until the yolks and whites are fully combined. This step is crucial for fluffy eggs!

Step 2: Cook the Eggs

Next, heat a non-stick skillet over medium heat. Once it’s warm, add a tablespoon of butter. Let it melt and coat the pan. Pour in your whisked eggs. Stir gently with a spatula, cooking until the eggs are scrambled and just set, about 2-3 minutes. Remember, you want them soft and fluffy, not overcooked!

Step 3: Assemble the Quesadilla

Now it’s time to build your quesadilla! Lay one flour tortilla flat in the skillet. Sprinkle half of the shredded cheddar cheese evenly over the tortilla. Then, spoon the scrambled eggs over the cheese. Top it off with the remaining cheese and place the second tortilla on top. It’s like a cheesy egg hug!

Step 4: Cook the Quesadilla

Cook the quesadilla for about 3-4 minutes. You want the bottom tortilla to turn golden brown and the cheese to start melting. Carefully flip the quesadilla using a spatula. Cook for another 3-4 minutes on the other side until it’s golden and crispy. The aroma will be heavenly!

Step 5: Serve and Enjoy

Once both sides are perfectly golden and the cheese is gooey, remove the quesadilla from the skillet. Let it cool for a minute before cutting it into wedges. Serve with your favorite toppings like salsa, sour cream, or avocado. Enjoy every cheesy bite!

Tips for Success

  • Use fresh eggs for the best flavor and texture.
  • Don’t rush the cooking process; low and slow yields fluffier eggs.
  • Experiment with different cheeses like pepper jack for a spicy twist.
  • Keep the heat medium to avoid burning the tortillas.
  • Let the quesadilla cool slightly before cutting to prevent cheese from oozing out.

Equipment Needed

  • Non-stick skillet: Essential for cooking without sticking. A cast-iron skillet works too!
  • Spatula: Perfect for flipping your quesadilla. A wooden spoon can work in a pinch.
  • Mixing bowl: For whisking the eggs. Any bowl will do!
  • Fork or whisk: To mix the eggs. A fork is often easier to clean!

Variations

  • Veggie Delight: Add diced bell peppers, onions, or spinach to the scrambled eggs for a nutritious boost.
  • Spicy Kick: Incorporate jalapeños or a dash of hot sauce into the filling for those who love heat.
  • Cheese Lovers: Mix different cheeses like mozzarella, pepper jack, or feta for a unique flavor profile.
  • Protein-Packed: Add cooked bacon, sausage, or black beans for extra protein and heartiness.
  • Gluten-Free: Use corn tortillas instead of flour for a gluten-free option that’s just as delicious.

Serving Suggestions

  • Fresh Fruit: Serve with a side of sliced avocado or a fruit salad for a refreshing contrast.
  • Drinks: Pair with a glass of fresh orange juice or a warm cup of coffee.
  • Presentation: Cut the quesadilla into wedges and arrange them on a colorful plate for a vibrant look.

FAQs about Cheesy Fried Egg Quesadilla

Can I make Cheesy Fried Egg Quesadilla ahead of time?

Absolutely! You can prepare the scrambled eggs and assemble the quesadilla in advance. Just store it in the fridge and cook it when you’re ready to eat. It’s a great way to save time on busy mornings!

What can I use instead of cheddar cheese?

If cheddar isn’t your favorite, feel free to experiment! Mozzarella, pepper jack, or even crumbled feta can add a delightful twist to your Cheesy Fried Egg Quesadilla. The key is to choose a cheese that melts well.

How do I store leftovers?

Leftover quesadillas can be stored in an airtight container in the fridge for up to three days. Just reheat them in a skillet or microwave when you’re ready to enjoy them again!

Can I make this recipe vegan?

Yes! You can substitute the eggs with a plant-based egg alternative and use vegan cheese. This way, you can still enjoy a delicious Cheesy Fried Egg Quesadilla without the animal products.

What toppings do you recommend?

Get creative! I love topping my quesadilla with fresh salsa, creamy avocado, or a dollop of sour cream. You can also add fresh herbs like cilantro for an extra burst of flavor!

Final Thoughts

Making a Cheesy Fried Egg Quesadilla is more than just cooking; it’s about creating a moment of joy in your busy day. The aroma of melting cheese and fluffy eggs fills the kitchen, inviting everyone to gather around. This recipe is a reminder that delicious meals don’t have to be complicated or time-consuming. Whether it’s a quick breakfast or a late-night snack, this quesadilla brings comfort and satisfaction. I hope you enjoy every cheesy bite as much as I do, and that it becomes a cherished part of your family’s mealtime traditions!

“`

Olivia

Cheesy Fried Egg Quesadilla: Quick, Delicious Recipe!

A quick and delicious recipe for Cheesy Fried Egg Quesadilla, perfect for breakfast or a snack.
Prep Time 5 minutes
Cook Time 10 minutes
Total Time 15 minutes
Servings: 2 servings
Course: Breakfast
Cuisine: Mexican
Calories: 350

Ingredients
  

  • 2 large eggs
  • 1 cup shredded cheddar cheese
  • 2 flour tortillas 8-inch
  • 1 tablespoon butter
  • Salt and pepper to taste
  • Optional toppings: salsa sour cream, avocado

Method
 

  1. In a small bowl, crack the eggs and whisk them together with a pinch of salt and pepper until well combined.
  2. Heat a non-stick skillet over medium heat and add the butter. Once melted, pour in the whisked eggs. Cook, stirring gently, until the eggs are scrambled and just set, about 2-3 minutes. Remove from heat.
  3. Lay one tortilla flat in the skillet. Sprinkle half of the shredded cheese evenly over the tortilla.
  4. Spoon the scrambled eggs over the cheese, then top with the remaining cheese. Place the second tortilla on top.
  5. Cook the quesadilla for about 3-4 minutes, or until the bottom tortilla is golden brown and the cheese starts to melt. Carefully flip the quesadilla using a spatula and cook for another 3-4 minutes on the other side.
  6. Once both sides are golden and the cheese is melted, remove the quesadilla from the skillet and let it cool for a minute. Cut into wedges and serve with optional toppings.

Nutrition

Serving: 1quesadillaCalories: 350kcalCarbohydrates: 30gProtein: 18gFat: 22gSaturated Fat: 10gPolyunsaturated Fat: 8gCholesterol: 370mgSodium: 500mgFiber: 2gSugar: 1g

Notes

  • To enhance the flavor, add diced bell peppers or onions to the scrambled eggs.
  • For a spicy kick, sprinkle some jalapeños or hot sauce inside the quesadilla before cooking.

Tried this recipe?

Let us know how it was!

Stay Connected

Get recipes via email: