Get my cookbooks

Fiery Chicken Ramen with Creamy Garlic Sauce Recipe Awaits!

Introduction to Fiery Chicken Ramen with Creamy Garlic Sauce

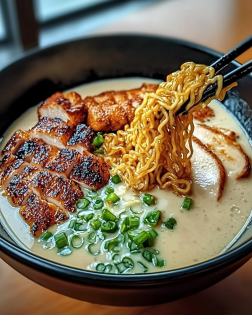
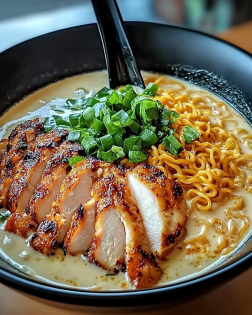
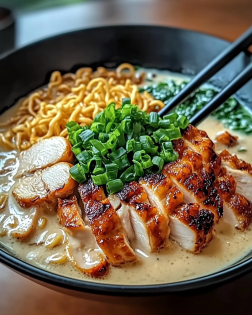
Picture this: a chilly evening, and you’re craving something warm and comforting. That’s where my Fiery Chicken Ramen with Creamy Garlic Sauce comes in! This dish is not just a meal; it’s a hug in a bowl. Perfect for busy weeknights or when you want to impress your loved ones, it combines tender chicken, spicy broth, and a luscious garlic sauce that dances on your taste buds. Trust me, this recipe will quickly become a go-to in your kitchen, bringing warmth and joy to your dinner table.

Why You’ll Love This Fiery Chicken Ramen with Creamy Garlic Sauce

This Fiery Chicken Ramen with Creamy Garlic Sauce is a game-changer for your weeknight dinners. It’s quick to whip up, taking just 35 minutes from start to finish. The combination of spicy and creamy flavors creates a delightful balance that will have everyone asking for seconds. Plus, it’s versatile! You can easily customize it to suit your family’s tastes, making it a perfect fit for any occasion.

Ingredients for Fiery Chicken Ramen with Creamy Garlic Sauce

Gathering the right ingredients is the first step to creating your Fiery Chicken Ramen with Creamy Garlic Sauce. Here’s what you’ll need:

  • Chicken broth: The flavorful base of your ramen, providing depth and warmth.
  • Soy sauce: Adds a savory umami kick that enhances the broth.
  • Sriracha: This spicy sauce is the star of the show! Adjust it to your heat preference.
  • Sesame oil: A drizzle of this fragrant oil brings a nutty aroma to the dish.
  • Ramen noodles: The heart of the meal, these noodles soak up all the delicious flavors.
  • Vegetable oil: Used for sautéing the chicken, it helps achieve that perfect golden-brown color.
  • Boneless, skinless chicken thighs: Tender and juicy, they cook quickly and absorb flavors beautifully.
  • Garlic: Freshly minced garlic adds a punch of flavor that’s hard to resist.
  • Ginger: Grated ginger brings warmth and a hint of spice to the dish.
  • Baby spinach: A nutritious addition that wilts perfectly into the ramen.
  • Green onions: Sliced for garnish, they add a fresh crunch and vibrant color.
  • Sesame seeds: Optional, but they add a delightful crunch and visual appeal.
  • Mayonnaise: The base for your creamy garlic sauce, it adds richness.
  • Sour cream: This adds tanginess and creaminess to the sauce.
  • Lemon juice: A splash of acidity brightens the creamy sauce.
  • Garlic powder: Enhances the garlic flavor in the sauce.
  • Salt and pepper: Essential for seasoning, adjust to your taste.

For exact measurements, check the bottom of the article where you can find everything listed for easy printing. Feel free to get creative with substitutions! For a vegetarian option, swap the chicken for tofu or shrimp for a seafood twist.

How to Make Fiery Chicken Ramen with Creamy Garlic Sauce

Now that you have all your ingredients ready, let’s dive into the cooking process! Making this Fiery Chicken Ramen with Creamy Garlic Sauce is straightforward and fun. Follow these steps, and you’ll have a delicious meal in no time!

Step 1: Prepare the Broth

In a medium saucepan, combine the chicken broth, soy sauce, sriracha, and sesame oil. Bring this mixture to a gentle simmer over medium heat. The aroma will start to fill your kitchen, making your mouth water in anticipation!

Step 2: Cook the Ramen Noodles

While the broth is simmering, grab another pot and cook the ramen noodles according to the package instructions. This usually takes just a few minutes. Once they’re done, drain them and set them aside. Remember, you want them al dente, so they hold up in the broth!

Step 3: Sauté the Chicken

In a large skillet, heat the vegetable oil over medium-high heat. Add the bite-sized chicken pieces, seasoning them with salt and pepper. Cook for about 5-7 minutes until they’re browned and cooked through. The sizzling sound is music to my ears!

Step 4: Add Garlic and Ginger

Once the chicken is cooked, toss in the minced garlic and grated ginger. Cook for an additional 1-2 minutes until fragrant. This step is crucial; the garlic and ginger will elevate the flavors of your ramen!

Step 5: Combine Spinach and Noodles

Next, stir in the baby spinach and the cooked ramen noodles. Mix everything well to ensure the spinach wilts and the noodles soak up all those delicious flavors. It’s like a colorful party in your skillet!

Step 6: Pour in the Broth

Now, it’s time to pour that simmering broth over the noodles and chicken. Stir everything together gently, allowing it to heat through. This is where the magic happens, and your kitchen will smell heavenly!

Step 7: Make the Creamy Garlic Sauce

In a small bowl, whisk together the mayonnaise, sour cream, lemon juice, garlic powder, salt, and pepper until smooth. This creamy garlic sauce is the perfect finishing touch, adding richness to your ramen.

Step 8: Serve and Garnish

Finally, serve the ramen in bowls, drizzling the creamy garlic sauce on top. Garnish with sliced green onions and sesame seeds if you like. Your Fiery Chicken Ramen with Creamy Garlic Sauce is ready to be devoured!

Tips for Success

  • Prep all your ingredients before starting to cook. It makes the process smoother!
  • Adjust the sriracha to your heat preference. Start with less if you’re unsure.
  • Don’t overcook the ramen noodles; they should be slightly firm to hold up in the broth.
  • Feel free to add extra veggies like bell peppers or mushrooms for more flavor.
  • For a richer broth, simmer it longer to deepen the flavors.

Equipment Needed

  • Medium saucepan: For simmering the broth. A large pot works too!
  • Large skillet: Essential for sautéing the chicken. A non-stick pan is ideal.
  • Pot: To cook the ramen noodles. Any pot will do.
  • Whisk: For mixing the creamy garlic sauce. A fork can work in a pinch!
  • Measuring cups and spoons: For accurate ingredient measurements.

Variations

  • Vegetarian Option: Swap the chicken for tofu or tempeh for a plant-based twist.
  • Seafood Delight: Use shrimp or scallops instead of chicken for a seafood version.
  • Extra Veggies: Add bell peppers, mushrooms, or bok choy for more color and nutrition.
  • Gluten-Free Noodles: Substitute traditional ramen noodles with gluten-free options like rice noodles.
  • Spicy Kick: For an extra fiery experience, toss in sliced jalapeños or a dash of chili oil.

Serving Suggestions

  • Side Salad: Pair your ramen with a light cucumber salad for a refreshing crunch.
  • Drink Pairing: Enjoy with a chilled iced tea or a crisp white wine to balance the spice.
  • Presentation: Serve in deep bowls, garnished with extra green onions and a lime wedge for a pop of color.

FAQs about Fiery Chicken Ramen with Creamy Garlic Sauce

Can I make this Fiery Chicken Ramen with Creamy Garlic Sauce ahead of time?

Absolutely! You can prepare the broth and cook the chicken in advance. Just store them separately in the fridge. When you’re ready to eat, reheat the broth and combine everything for a quick meal.

What can I substitute for chicken in this recipe?

If you’re looking for alternatives, tofu or shrimp work wonderfully! Both options will absorb the flavors beautifully, making your ramen just as delicious.

How can I adjust the spice level in this ramen?

To control the heat, start with less sriracha and gradually add more to your taste. You can also include sliced jalapeños for an extra kick!

Is this recipe gluten-free?

Yes, it can be! Just make sure to use gluten-free ramen noodles and check that your soy sauce is gluten-free as well.

Can I add more vegetables to my ramen?

Definitely! Feel free to toss in bell peppers, mushrooms, or bok choy. They’ll add color, nutrition, and extra flavor to your Fiery Chicken Ramen!

Final Thoughts

Cooking this Fiery Chicken Ramen with Creamy Garlic Sauce is more than just preparing a meal; it’s about creating a moment of joy. The warmth of the broth, the tender chicken, and that creamy garlic sauce come together to make a dish that feels like a cozy embrace. Whether you’re sharing it with family or enjoying a quiet night in, this ramen brings comfort and satisfaction. Plus, the versatility allows you to make it your own. So, roll up your sleeves, gather your ingredients, and let this delightful recipe bring a little spice and a lot of love to your table!

“`

jhessica

Fiery Chicken Ramen with Creamy Garlic Sauce Recipe Awaits!

A spicy and creamy ramen dish featuring tender chicken and a rich garlic sauce.
Prep Time 15 minutes
Cook Time 20 minutes
Total Time 35 minutes
Servings: 4 servings
Course: Main Course
Cuisine: Asian
Calories: 450

Ingredients
  

  • 2 cups chicken broth
  • 1 tablespoon soy sauce
  • 1 tablespoon sriracha adjust to taste
  • 1 teaspoon sesame oil
  • 8 ounces ramen noodles
  • 1 tablespoon vegetable oil
  • 1 pound boneless skinless chicken thighs, cut into bite-sized pieces
  • 4 cloves garlic minced
  • 1 teaspoon ginger grated
  • 1 cup baby spinach
  • 2 green onions sliced
  • 1 tablespoon sesame seeds optional
  • Salt and pepper to taste
  • 1/2 cup mayonnaise for creamy garlic sauce
  • 2 tablespoons sour cream for creamy garlic sauce
  • 1 tablespoon lemon juice for creamy garlic sauce
  • 1 teaspoon garlic powder for creamy garlic sauce
  • Salt and pepper to taste for creamy garlic sauce

Method
 

  1. In a medium saucepan, combine chicken broth, soy sauce, sriracha, and sesame oil. Bring to a simmer over medium heat.
  2. In a separate pot, cook ramen noodles according to package instructions. Drain and set aside.
  3. In a large skillet, heat vegetable oil over medium-high heat. Add chicken pieces, season with salt and pepper, and cook until browned and cooked through, about 5-7 minutes.
  4. Add minced garlic and grated ginger, cooking for an additional 1-2 minutes until fragrant.
  5. Stir in baby spinach and cooked ramen noodles, mixing well to combine.
  6. Pour the broth mixture over the noodles and chicken, stirring to heat through.
  7. For the creamy garlic sauce, whisk together mayonnaise, sour cream, lemon juice, garlic powder, salt, and pepper in a small bowl until smooth.
  8. Serve the ramen in bowls, drizzling the creamy garlic sauce on top. Garnish with sliced green onions and sesame seeds, if desired.

Nutrition

Serving: 1bowlCalories: 450kcalCarbohydrates: 40gProtein: 30gFat: 20gSaturated Fat: 3gPolyunsaturated Fat: 15gCholesterol: 90mgSodium: 800mgFiber: 2gSugar: 2g

Notes

  • For extra heat, add sliced jalapeños or more sriracha to the broth.
  • Substitute chicken with tofu or shrimp for a different protein option.

Tried this recipe?

Let us know how it was!

Creamy Honey Pepper Chicken Mac and Cheese Delight is Irresistible!

Introduction to Creamy Honey Pepper Chicken Mac and Cheese Delight

Picture this: a chilly evening, the aroma of something delicious wafting through your home, and the sound of laughter echoing from the kitchen. That’s the magic of my Creamy Honey Pepper Chicken Mac and Cheese Delight. It’s not just a meal; it’s a warm hug on a plate. Perfect for busy weeknights or when you want to impress your loved ones, this dish combines tender chicken, creamy cheeses, and a hint of sweetness from honey. Trust me, it’s a crowd-pleaser that will have everyone asking for seconds!

Why You’ll Love This Creamy Honey Pepper Chicken Mac and Cheese Delight

This dish is a lifesaver for busy evenings. It’s quick to whip up, taking just 25 minutes from start to finish. The creamy texture and delightful blend of flavors make it a comforting favorite for the whole family. Plus, it’s versatile! You can easily customize it to suit your taste or dietary needs. Trust me, once you try it, you’ll be adding it to your regular rotation!

Ingredients for Creamy Honey Pepper Chicken Mac and Cheese Delight

Gathering the right ingredients is the first step to creating this delightful dish. Here’s what you’ll need:

  • Elbow macaroni: The classic choice for mac and cheese, these little tubes hold onto the creamy sauce beautifully.
  • Olive oil: A healthy fat that adds flavor and helps cook the chicken to perfection.
  • Boneless, skinless chicken breasts: Tender and lean, they soak up the flavors of the seasonings.
  • Salt: Essential for enhancing the overall taste of the dish.
  • Black pepper: Adds a subtle kick that balances the sweetness of the honey.
  • Garlic powder: A must-have for that aromatic depth; it’s like a flavor hug!
  • Onion powder: Complements the garlic and adds a savory note.
  • Honey: The star of the show! It brings a touch of sweetness that elevates the dish.
  • Heavy cream: This is what makes the sauce luxuriously creamy and rich.
  • Sharp cheddar cheese: Provides a bold flavor that’s quintessential in mac and cheese.
  • mozzarella cheese: Adds a gooey, stretchy texture that everyone loves.
  • Parmesan cheese: A sprinkle of this brings a nutty finish to the dish.
  • Fresh parsley: Not just for garnish! It adds a pop of color and freshness.

For those looking to spice things up, consider adding a pinch of red pepper flakes while cooking the chicken. If you prefer a vegetarian option, swap the chicken for sautéed vegetables or cooked shrimp. You can find the exact quantities for each ingredient at the bottom of the article, ready for printing!

How to Make Creamy Honey Pepper Chicken Mac and Cheese Delight

Now that you have all your ingredients ready, let’s dive into the fun part—making this delicious dish! Follow these simple steps, and you’ll have a creamy, cheesy masterpiece in no time.

Step 1: Cook the Elbow Macaroni

Start by boiling a pot of salted water. Once it’s bubbling, add the elbow macaroni. Cook it according to the package instructions until it’s al dente, which means it should still have a slight bite to it. This is crucial because you’ll be mixing it with the creamy sauce later. After cooking, drain the macaroni well. You don’t want any excess water diluting your delicious sauce!

Step 2: Sauté the Chicken

In a large skillet, heat the olive oil over medium heat. Once it’s shimmering, toss in the diced chicken. Sprinkle with salt, black pepper, garlic powder, and onion powder. Cook the chicken for about 5-7 minutes, stirring occasionally, until it’s browned and cooked through. The seasonings will infuse the chicken with flavor, making every bite delightful!

Step 3: Create the Creamy Sauce

Now, reduce the heat to low. It’s time to make that creamy sauce! Add the honey, heavy cream, and all three cheeses—sharp cheddar, mozzarella, and Parmesan. Stir continuously until the cheeses melt and the sauce becomes smooth and creamy. This is where the magic happens, transforming your dish into a comforting delight!

Step 4: Combine Macaroni and Sauce

Once your sauce is ready, it’s time to bring everything together. Add the drained macaroni to the skillet and mix thoroughly. Make sure every piece of pasta is coated in that luscious sauce. Cook for an additional 2-3 minutes to heat everything through. Your kitchen will smell heavenly!

Step 5: Garnish and Serve

Finally, remove the skillet from heat. Don’t forget to garnish your Creamy Honey Pepper Chicken Mac and Cheese Delight with freshly chopped parsley. This adds a pop of color and a hint of freshness. Serve it warm, and watch as everyone digs in with smiles on their faces!

Tips for Success

  • Always taste as you go! Adjust seasonings to your preference.
  • For extra creaminess, add a splash more heavy cream if needed.
  • Don’t rush the cheese melting process; low heat is key.
  • Use freshly grated cheese for the best flavor and texture.
  • Let leftovers cool completely before storing in an airtight container.

Equipment Needed

  • Large pot: For boiling the macaroni. A Dutch oven works well too.
  • Skillet: A non-stick skillet is ideal for sautéing the chicken and making the sauce.
  • Colander: Essential for draining the macaroni after cooking.
  • Wooden spoon: Perfect for stirring and mixing everything together.
  • Measuring cups and spoons: For accurate ingredient measurements.

Variations

  • Spicy Twist: Add diced jalapeños or a pinch of cayenne pepper for a fiery kick.
  • Vegetarian Delight: Substitute the chicken with sautéed mushrooms, zucchini, or spinach for a hearty veggie version.
  • Cheesy Overload: Mix in a blend of your favorite cheeses, like gouda or pepper jack, for a unique flavor profile.
  • Gluten-Free Option: Use gluten-free elbow macaroni to make this dish suitable for gluten-sensitive diners.
  • Herb Infusion: Experiment with fresh herbs like thyme or basil for an aromatic touch.

Serving Suggestions

  • Side Salad: Pair with a crisp green salad dressed in a light vinaigrette for a refreshing contrast.
  • Garlic Bread: Serve with warm garlic bread for a comforting, hearty meal.
  • Wine Pairing: A chilled Chardonnay complements the creamy flavors beautifully.
  • Presentation: Serve in individual bowls, garnished with extra parsley for a pop of color.

FAQs about Creamy Honey Pepper Chicken Mac and Cheese Delight

Can I make this dish ahead of time?
Absolutely! You can prepare the Creamy Honey Pepper Chicken Mac and Cheese Delight in advance. Just store it in an airtight container in the fridge. When you’re ready to serve, reheat it on the stovetop, adding a splash of cream to restore its creaminess.

What can I substitute for chicken?
If you’re looking for alternatives, cooked shrimp or sautéed vegetables work wonderfully. You can even use shredded rotisserie chicken for a quicker option. The beauty of this dish is its versatility!

Is this recipe gluten-free?
Yes! To make it gluten-free, simply use gluten-free elbow macaroni. The rest of the ingredients are naturally gluten-free, so you can enjoy this creamy delight without worry.

How can I make it spicier?
For a spicy kick, add a pinch of red pepper flakes or diced jalapeños while cooking the chicken. This will elevate the flavor and give your Creamy Honey Pepper Chicken Mac and Cheese Delight a delightful heat!

Can I freeze leftovers?
Yes, you can freeze leftovers! Just make sure to cool the dish completely before transferring it to a freezer-safe container. When you’re ready to enjoy it again, thaw in the fridge overnight and reheat on the stovetop.

Final Thoughts

Creating my Creamy Honey Pepper Chicken Mac and Cheese Delight is more than just cooking; it’s about crafting memories. Each bite is a blend of comfort and joy, perfect for family gatherings or cozy nights in. The creamy texture and sweet hint of honey make it a dish that warms the heart. I love watching my loved ones savor every mouthful, their smiles lighting up the room. So, whether you’re a seasoned cook or just starting, this recipe is sure to bring happiness to your table. Dive in, and let the deliciousness unfold!

“`

jhessica

Creamy Honey Pepper Chicken Mac and Cheese Delight is Irresistible!

Creamy Honey Pepper Chicken Mac and Cheese Delight is a rich and flavorful dish that combines tender chicken, creamy cheeses, and a hint of sweetness from honey, all mixed with elbow macaroni.
Prep Time 10 minutes
Cook Time 15 minutes
Total Time 25 minutes
Servings: 4 servings
Course: Main Course
Cuisine: American
Calories: 620

Ingredients
  

  • 2 cups elbow macaroni
  • 2 tablespoons olive oil
  • 1 pound boneless skinless chicken breasts, diced
  • 1 teaspoon salt
  • 1/2 teaspoon black pepper
  • 1 teaspoon garlic powder
  • 1 teaspoon onion powder
  • 1/4 cup honey
  • 1 cup heavy cream
  • 2 cups shredded sharp cheddar cheese
  • 1 cup shredded mozzarella cheese
  • 1/2 cup grated Parmesan cheese
  • 1/4 cup chopped fresh parsley for garnish

Method
 

  1. Cook the elbow macaroni according to package instructions until al dente. Drain and set aside.
  2. In a large skillet, heat olive oil over medium heat. Add the diced chicken, salt, black pepper, garlic powder, and onion powder. Cook until the chicken is browned and cooked through, about 5-7 minutes.
  3. Reduce the heat to low and stir in the honey, heavy cream, and all three cheeses (cheddar, mozzarella, and Parmesan). Stir until the cheeses are melted and the sauce is creamy.
  4. Add the cooked macaroni to the skillet and stir until well combined. Cook for an additional 2-3 minutes to heat through.
  5. Remove from heat and garnish with chopped parsley before serving.

Nutrition

Serving: 1servingCalories: 620kcalCarbohydrates: 45gProtein: 38gFat: 36gSaturated Fat: 18gPolyunsaturated Fat: 10gCholesterol: 150mgSodium: 800mgFiber: 2gSugar: 10g

Notes

  • For a spicier kick, add a pinch of red pepper flakes to the chicken while cooking.
  • You can also substitute the chicken with cooked shrimp or sautéed vegetables for a vegetarian option.

Tried this recipe?

Let us know how it was!

Frito Corn Salad is the Perfect Summer Side Recipe!

Introduction to Frito Corn Salad

As summer rolls in, I find myself reminiscing about backyard barbecues and family gatherings. One dish that always steals the show is Frito Corn Salad. This delightful salad is not just a side; it’s a crunchy, refreshing experience that brings smiles to everyone’s faces. With its vibrant colors and a medley of flavors, it’s the perfect quick solution for busy days or a dish to impress your loved ones. Plus, it’s so easy to whip up that you’ll wonder why you didn’t make it sooner!

Why You’ll Love This Frito Corn Salad

This Frito Corn Salad is a game-changer for summer gatherings! It’s incredibly easy to make, taking just 15 minutes of prep time. The combination of sweet corn, crunchy Fritos, and zesty dressing creates a flavor explosion that’s hard to resist. Plus, it’s a crowd-pleaser, appealing to both kids and adults alike. Whether you’re hosting a barbecue or just need a quick side for dinner, this salad is your go-to solution!

Ingredients for Frito Corn Salad

Gathering the right ingredients is half the fun of making Frito Corn Salad! Here’s what you’ll need:

  • Sweet Corn: Canned sweet corn adds a burst of sweetness and is super convenient. You can also use fresh corn if you’re feeling adventurous!
  • Black Beans: Rinsed and drained, these beans provide protein and a lovely texture. They’re a great way to make the salad more filling.
  • Cherry Tomatoes: Halved for a pop of color and juiciness, cherry tomatoes brighten up the dish and add a fresh flavor.
  • Bell Pepper: Any color works! Diced bell pepper adds crunch and a hint of sweetness, making the salad even more vibrant.
  • Shredded Cheddar Cheese: This creamy addition brings richness to the salad. Feel free to swap it for a dairy-free cheese if needed.
  • Red Onion: Finely chopped, red onion gives a sharp bite that balances the sweetness of the corn and tomatoes.
  • Fritos Corn Chips: The star of the show! These crunchy chips add a delightful texture and salty flavor that makes this salad irresistible.
  • Mayonnaise: The creamy base for the dressing. You can substitute Greek yogurt for a lighter option or use a vegan mayo for a plant-based version.
  • Lime Juice: A splash of lime juice brightens the flavors and adds a zesty kick. Fresh lime juice is best, but bottled works in a pinch.
  • Chili Powder: This spice adds warmth and depth to the dressing. Adjust the amount to suit your taste!
  • Salt and Pepper: Essential for seasoning, these staples enhance all the flavors in the salad.

For exact measurements, check the bottom of the article where you can find everything listed for easy printing!

How to Make Frito Corn Salad

Making Frito Corn Salad is as easy as pie! Follow these simple steps, and you’ll have a delicious summer side dish ready in no time. Let’s dive in!

Step 1: Combine the Base Ingredients

Start by grabbing a large mixing bowl. Toss in the sweet corn, black beans, halved cherry tomatoes, diced bell pepper, shredded cheddar cheese, and finely chopped red onion. Use a spatula to gently stir everything together. You want to mix them well without squishing the tomatoes. This colorful medley is the heart of your Frito Corn Salad!

Step 2: Prepare the Dressing

In a separate small bowl, whisk together the mayonnaise, lime juice, chili powder, salt, and pepper. Make sure it’s smooth and creamy. This dressing is what brings all those vibrant flavors together. If you like a little kick, feel free to add more chili powder. Taste it as you go!

Step 3: Mix the Dressing with the Salad

Now, pour that luscious dressing over your corn mixture. Stir gently until everything is evenly coated. You want each bite to be bursting with flavor! This is where the magic happens, so take your time to ensure every ingredient is well-dressed.

Step 4: Add the Fritos

Just before serving, gently fold in the Fritos corn chips. This step is crucial! You want to keep them crunchy, so be careful not to crush them. The Fritos add that delightful crunch that makes this salad so special. Trust me, you’ll love the texture!

Step 5: Chill and Serve

Finally, cover the salad and chill it in the refrigerator for at least 30 minutes. This allows the flavors to meld beautifully. When you’re ready to serve, give it a quick stir, and enjoy the refreshing taste of summer in every bite!

Tips for Success

  • Use fresh ingredients for the best flavor. Fresh corn and ripe tomatoes make a big difference!
  • Chill the salad longer if you can. The flavors deepen and become even more delicious.
  • For a colorful twist, try adding diced avocado or fresh cilantro.
  • Make it ahead of time! This salad keeps well in the fridge for a day or two.
  • Adjust the seasoning to your taste. Don’t be afraid to experiment!

Equipment Needed

  • Large Mixing Bowl: Essential for combining all your ingredients. A salad bowl works great too!
  • Small Mixing Bowl: Perfect for whisking the dressing. A mason jar can double as a shaker!
  • Spatula: Use this for gentle mixing. A wooden spoon is a good alternative.
  • Measuring Cups and Spoons: Handy for precise measurements. You can eyeball it if you’re feeling adventurous!

Variations

  • Spicy Frito Corn Salad: Add diced jalapeños or a splash of hot sauce to the dressing for an extra kick!
  • Southwestern Twist: Incorporate diced avocado and fresh cilantro for a fresh, vibrant flavor.
  • Vegan Option: Substitute mayonnaise with a plant-based alternative and use dairy-free cheese for a vegan-friendly dish.
  • Quinoa Addition: Mix in cooked quinoa for added protein and a heartier salad.
  • Fruit Fusion: Toss in diced mango or pineapple for a sweet and tropical twist that complements the corn beautifully.

Serving Suggestions

  • Pair Frito Corn Salad with grilled chicken or burgers for a complete meal.
  • Serve it alongside tortilla chips and salsa for a fun appetizer spread.
  • For drinks, consider a refreshing iced tea or lemonade to complement the flavors.
  • Garnish with fresh cilantro or lime wedges for a vibrant presentation.

FAQs about Frito Corn Salad

As you dive into making this delightful Frito Corn Salad, you might have a few questions. Here are some common queries that can help you along the way!

Can I make Frito Corn Salad ahead of time?

Absolutely! This salad is perfect for making ahead. Just prepare it a few hours in advance and let it chill in the fridge. The flavors will meld beautifully, making it even tastier!

What can I substitute for mayonnaise?

If you’re looking for a lighter option, Greek yogurt works wonderfully as a substitute. For a vegan version, try using a plant-based mayonnaise. Both will keep your salad creamy and delicious!

How long does Frito Corn Salad last in the fridge?

This salad can last about 2-3 days in the fridge. Just keep it covered to maintain freshness. However, I recommend adding the Fritos just before serving to keep them crunchy!

Can I add other vegetables to the salad?

Definitely! Feel free to get creative. Diced cucumbers, shredded carrots, or even corn salsa can add extra flavor and texture to your Frito Corn Salad.

Is Frito Corn Salad gluten-free?

Fritos are generally gluten-free, but always check the packaging to be sure. If you want to make it completely gluten-free, you can substitute the Fritos with gluten-free corn chips!

Final Thoughts

Frito Corn Salad is more than just a dish; it’s a celebration of summer flavors and cherished memories. Each bite is a delightful crunch, a burst of sweetness, and a reminder of sunny days spent with loved ones. Whether you’re hosting a barbecue or enjoying a quiet dinner at home, this salad brings joy to the table. It’s easy to make, adaptable to your taste, and always a hit. So, gather your ingredients, whip up this refreshing salad, and let it transport you to those carefree summer moments. Trust me, your taste buds will thank you!

“`

jhessica

Frito Corn Salad is the Perfect Summer Side Recipe!

Frito Corn Salad is a refreshing and crunchy summer side dish that combines sweet corn, black beans, and Fritos corn chips, all tossed in a creamy dressing.
Prep Time 15 minutes
Total Time 45 minutes
Servings: 6 servings
Course: Salad
Cuisine: American
Calories: 220

Ingredients
  

  • 1 can 15 ounces sweet corn, drained
  • 1 can 15 ounces black beans, rinsed and drained
  • 1 cup cherry tomatoes halved
  • 1 cup diced bell pepper any color
  • 1 cup shredded cheddar cheese
  • 1/2 cup red onion finely chopped
  • 1 cup Fritos corn chips
  • 1/2 cup mayonnaise
  • 1 tablespoon lime juice
  • 1 teaspoon chili powder
  • Salt and pepper to taste

Method
 

  1. In a large mixing bowl, combine the sweet corn, black beans, cherry tomatoes, bell pepper, cheddar cheese, and red onion. Stir gently to mix the ingredients.
  2. In a separate small bowl, whisk together the mayonnaise, lime juice, chili powder, salt, and pepper until smooth.
  3. Pour the dressing over the corn mixture and stir until everything is evenly coated.
  4. Gently fold in the Fritos corn chips just before serving to keep them crunchy.
  5. Chill the salad in the refrigerator for at least 30 minutes before serving to allow the flavors to meld.

Nutrition

Serving: 1servingCalories: 220kcalCarbohydrates: 25gProtein: 7gFat: 10gSaturated Fat: 2gPolyunsaturated Fat: 8gCholesterol: 10mgSodium: 300mgFiber: 5gSugar: 3g

Notes

  • For a spicier kick, add diced jalapeños or a dash of hot sauce to the dressing.
  • Substitute Greek yogurt for mayonnaise for a lighter version, or use a dairy-free alternative for a vegan option.

Tried this recipe?

Let us know how it was!

Sweet Corn Salad: A Refreshing and Easy Recipe!

Introduction to Sweet Corn Salad

As summer rolls in, I can’t help but think of the vibrant flavors that come with it. One dish that always brings a smile to my face is Sweet Corn Salad. It’s like a burst of sunshine in a bowl! This refreshing salad is not only easy to whip up but also perfect for those busy days when you want something light yet satisfying. Whether you’re hosting a backyard barbecue or just looking for a quick side dish, this salad is sure to impress your loved ones and keep you cool during those warm summer nights.

Why You’ll Love This Sweet Corn Salad

This Sweet Corn Salad is a game-changer for your summer gatherings! It’s incredibly easy to make, taking just 15 minutes from start to finish. The combination of fresh ingredients creates a symphony of flavors that dance on your palate. Plus, it’s versatile enough to pair with any main dish or stand alone as a light meal. Trust me, once you try it, you’ll be hooked!

Ingredients for Sweet Corn Salad

Gathering the right ingredients is the first step to creating this delightful Sweet Corn Salad. Here’s what you’ll need:

  • Fresh corn kernels: The star of the show! Sweet, juicy corn adds a natural sweetness and crunch. You can use fresh corn from the cob or frozen corn if you’re in a pinch.
  • Cherry tomatoes: These little gems bring a burst of color and tangy flavor. Halved, they add a juicy pop to every bite.
  • Cucumber: Crisp and refreshing, diced cucumber balances the sweetness of the corn. It’s like a cool breeze on a hot day!
  • Red onion: Finely chopped, red onion adds a mild bite and a beautiful hue. If you prefer a milder flavor, soak them in cold water for a few minutes before adding.
  • Fresh cilantro: This herb brings a bright, zesty flavor that elevates the salad. If cilantro isn’t your thing, parsley is a great substitute.
  • Feta cheese: Crumbled feta adds a creamy, salty element. For a dairy-free option, try avocado for a rich texture.
  • Olive oil: A drizzle of good-quality olive oil ties everything together, adding richness and depth.
  • Lime juice: Fresh lime juice brightens the salad and enhances the flavors. You can also use lemon juice if you prefer.
  • Honey: Just a touch of honey balances the acidity and adds a hint of sweetness.
  • Salt and black pepper: Essential for seasoning, these two ingredients enhance all the flavors in the salad.

For those who love a little extra crunch, consider tossing in some diced bell peppers or radishes. And remember, if you want to check the exact quantities, they’re listed at the bottom of the article for easy printing!

How to Make Sweet Corn Salad

Now that you have all your ingredients ready, let’s dive into making this delightful Sweet Corn Salad! It’s a simple process that will have you enjoying fresh flavors in no time. Follow these easy steps, and you’ll be the star of your next summer gathering!

Step 1: Combine the Fresh Ingredients

Start by grabbing a large bowl. Add the fresh corn kernels, halved cherry tomatoes, diced cucumber, finely chopped red onion, fresh cilantro, and crumbled feta cheese. Gently mix everything together with a spatula or wooden spoon. The colors will be vibrant, and the aroma will be irresistible! This is where the magic begins, as all these fresh ingredients come together to create a beautiful salad.

Step 2: Prepare the Dressing

In a small bowl, whisk together the olive oil, fresh lime juice, honey, salt, and black pepper. Make sure to mix it well until everything is combined. The dressing should be smooth and slightly thick. This zesty dressing is what brings the Sweet Corn Salad to life, enhancing the flavors of the fresh ingredients.

Step 3: Toss the Salad

Now, pour the dressing over the salad mixture. Using your spatula, gently toss everything together until all the ingredients are evenly coated. Be careful not to mash the ingredients; you want to keep that lovely texture. This step is crucial, as it ensures every bite is bursting with flavor!

Step 4: Let It Rest

Once you’ve tossed the salad, let it sit for at least 15 minutes. This resting time allows the flavors to meld beautifully. For the best results, refrigerate the salad for about 30 minutes before serving. The coolness will enhance the refreshing taste, making it perfect for those hot summer days.

Step 5: Serve

When you’re ready to serve, you can enjoy this Sweet Corn Salad chilled or at room temperature. It’s versatile and pairs wonderfully with grilled meats, fish, or even as a light meal on its own. Just scoop it into a serving bowl, and watch it disappear!

Tips for Success

  • Use fresh corn for the best flavor; it makes a world of difference!
  • Chill the salad before serving to enhance its refreshing taste.
  • Feel free to customize with your favorite veggies or herbs.
  • For a sweeter touch, add diced mango or pineapple.
  • Make it ahead of time; it tastes even better the next day!

Equipment Needed

  • Large mixing bowl: Essential for combining all your fresh ingredients. A salad bowl works perfectly!
  • Small bowl: For whisking the dressing. Any bowl will do, even a coffee mug in a pinch!
  • Spatula or wooden spoon: Great for mixing without damaging the ingredients.
  • Whisk: Handy for blending the dressing smoothly. A fork can work too!

Variations of Sweet Corn Salad

  • Spicy Kick: Add diced jalapeños or a sprinkle of cayenne pepper for a zesty heat that complements the sweetness of the corn.
  • Southwestern Twist: Incorporate black beans, diced avocado, and a sprinkle of cumin for a hearty, flavorful variation.
  • Fruit Fusion: Toss in diced mango or strawberries for a sweet and fruity twist that brightens the salad.
  • Grilled Goodness: Grill the corn before adding it to the salad for a smoky flavor that elevates the dish.
  • Herb Medley: Experiment with different herbs like basil or mint for a refreshing change in flavor.

Serving Suggestions for Sweet Corn Salad

  • Pair it with grilled chicken or fish for a complete meal.
  • Serve alongside tortilla chips for a crunchy appetizer.
  • Drizzle with extra lime juice for a zesty finish.
  • Garnish with additional cilantro for a pop of color.
  • Enjoy with a refreshing iced tea or lemonade.

FAQs about Sweet Corn Salad

As you dive into making this Sweet Corn Salad, you might have a few questions. Here are some common queries that can help you along the way:

Can I use frozen corn instead of fresh?

Absolutely! Frozen corn is a great alternative. Just make sure to thaw and drain it before adding it to your salad. It’s a time-saver and still delicious!

How long can I store Sweet Corn Salad?

This salad is best enjoyed fresh, but you can store leftovers in an airtight container in the fridge for up to 2 days. The flavors will continue to meld, making it even tastier!

Can I make this salad ahead of time?

Yes! In fact, making it a few hours in advance allows the flavors to develop beautifully. Just remember to keep it chilled until serving.

What can I substitute for feta cheese?

If you’re looking for a dairy-free option, avocado works wonderfully! You can also try goat cheese or a vegan cheese alternative for a different flavor profile.

Is this Sweet Corn Salad suitable for a gluten-free diet?

Yes, this salad is naturally gluten-free! It’s a perfect choice for gatherings where dietary restrictions are a concern.

Final Thoughts

Creating this Sweet Corn Salad is more than just preparing a dish; it’s about bringing joy to your table. The vibrant colors and fresh flavors remind me of sunny days spent with family and friends. Each bite is a celebration of summer, evoking memories of laughter and shared meals. Whether you’re enjoying it at a picnic or as a side at dinner, this salad is sure to brighten your day. So, gather your ingredients, embrace the simplicity, and let this Sweet Corn Salad become a staple in your kitchen. Trust me, your taste buds will thank you!

“`

jhessica

Sweet Corn Salad: A Refreshing and Easy Recipe!

A refreshing and easy Sweet Corn Salad recipe perfect for summer gatherings.
Prep Time 15 minutes
Total Time 15 minutes
Servings: 6 servings
Course: Salad
Cuisine: American
Calories: 150

Ingredients
  

  • 2 cups fresh corn kernels about 4 ears of corn
  • 1 cup cherry tomatoes halved
  • 1 cup cucumber diced
  • 1/2 red onion finely chopped
  • 1/4 cup fresh cilantro chopped
  • 1/4 cup feta cheese crumbled
  • 1/4 cup olive oil
  • 2 tablespoons lime juice
  • 1 teaspoon honey
  • 1/2 teaspoon salt
  • 1/4 teaspoon black pepper

Method
 

  1. In a large bowl, combine the corn, cherry tomatoes, cucumber, red onion, cilantro, and feta cheese.
  2. In a small bowl, whisk together the olive oil, lime juice, honey, salt, and black pepper until well combined.
  3. Pour the dressing over the salad and toss gently to coat all the ingredients evenly.
  4. Let the salad sit for at least 15 minutes to allow the flavors to meld. For best results, refrigerate for 30 minutes before serving.
  5. Serve chilled or at room temperature.

Nutrition

Serving: 1servingCalories: 150kcalCarbohydrates: 10gProtein: 4gFat: 12gSaturated Fat: 2gPolyunsaturated Fat: 10gCholesterol: 10mgSodium: 200mgFiber: 2gSugar: 3g

Notes

  • For added crunch, toss in some diced bell peppers or radishes.
  • Substitute the feta cheese with avocado for a creamier texture and a dairy-free option.

Tried this recipe?

Let us know how it was!

Creamy Butter Chicken: Discover the Ultimate Recipe!

Introduction to Creamy Butter Chicken

Picture this: it’s a chilly evening, and the aroma of spices fills your kitchen, wrapping you in a warm embrace. That’s the magic of Creamy Butter Chicken. This dish is not just a meal; it’s a comforting hug on a plate. Perfect for busy weeknights or when you want to impress your loved ones, it’s a delightful blend of tender chicken and rich, creamy sauce. With just a few simple ingredients, you can create a restaurant-quality dish right at home. Trust me, your family will be begging for seconds!

Why You’ll Love This Creamy Butter Chicken

This Creamy Butter Chicken recipe is a lifesaver for busy evenings. It’s quick to prepare, taking just an hour from start to finish. The flavors are rich and satisfying, making it a hit with both kids and adults. Plus, it’s versatile! You can easily adjust the spice level to suit your family’s taste. With this dish, you’ll have a comforting meal that feels special without the fuss.

Ingredients for Creamy Butter Chicken

Gathering the right ingredients is the first step to creating your Creamy Butter Chicken. Here’s what you’ll need:

  • Boneless, skinless chicken thighs: These are juicy and tender, perfect for soaking up the rich sauce.
  • Salt and black pepper: Essential for seasoning, enhancing the natural flavors of the chicken.
  • Ground cumin: Adds a warm, earthy flavor that’s a staple in Indian cuisine.
  • Ground coriander: This spice brings a hint of citrus, balancing the richness of the dish.
  • Turmeric: Known for its vibrant color and health benefits, it adds a subtle warmth.
  • Garam masala: A fragrant blend of spices that gives the dish its signature taste.
  • Vegetable oil: Used for browning the chicken, it has a high smoke point and neutral flavor.
  • Onion: Finely chopped, it forms the base of the sauce, adding sweetness and depth.
  • Garlic and ginger: These aromatics are key to building flavor, providing a fragrant kick.
  • Crushed tomatoes: They create the sauce’s body, adding acidity and richness.
  • Heavy cream: This is what makes the dish creamy and indulgent, giving it that luxurious texture.
  • Unsalted butter: Adds richness and a silky finish to the sauce.
  • Fresh cilantro: A bright garnish that adds freshness and color to your dish.
  • Cooked basmati rice or naan: Perfect for soaking up the delicious sauce and completing the meal.

For those looking to spice things up, consider adding red chili powder or cayenne pepper for heat. If you prefer a dairy-free option, coconut milk can be a fantastic substitute for heavy cream. You can find all the exact measurements at the bottom of the article, ready for printing!

How to Make Creamy Butter Chicken

Step 1: Marinate the Chicken

Start by combining the chicken pieces with salt, black pepper, cumin, coriander, turmeric, and garam masala in a large bowl. This marination is crucial; it allows the spices to penetrate the chicken, enhancing its flavor. Let it sit for at least 30 minutes, or up to 2 hours in the refrigerator. The longer it marinates, the more delicious it becomes, ensuring every bite is packed with flavor.

Step 2: Brown the Chicken

Heat vegetable oil in a large skillet over medium-high heat. Add the marinated chicken in batches, ensuring not to overcrowd the pan. Cook until browned on all sides, about 5-7 minutes. Browning is essential; it creates a beautiful crust and adds depth to the dish. Once browned, remove the chicken and set it aside, keeping all those delicious flavors in the pan.

Step 3: Sauté Onions, Garlic, and Ginger

In the same skillet, add the finely chopped onion and cook until softened and golden, about 5 minutes. Then, stir in the minced garlic and ginger, cooking for an additional 1-2 minutes. These aromatics are the backbone of your sauce, infusing it with warmth and fragrance. Their rich flavors will elevate your Creamy Butter Chicken to new heights.

Step 4: Add Tomatoes and Simmer

Next, pour in the crushed tomatoes, stirring to combine. Bring the mixture to a simmer and let it cook for about 5 minutes. This step is vital; the tomatoes add acidity and richness to the sauce. You want to achieve a thick, luscious consistency that will cling beautifully to the chicken. Stir occasionally to prevent sticking.

Step 5: Combine Chicken and Cream

Return the browned chicken to the skillet, stirring well to coat it in the sauce. Reduce the heat to low and pour in the heavy cream, followed by the butter. Stir until melted and combined. Simmer for another 10-15 minutes, allowing the flavors to meld and the sauce to thicken. This final step transforms your dish into a creamy, dreamy delight that’s simply irresistible.

Tips for Success

  • Always marinate the chicken for at least 30 minutes to enhance flavor.
  • Use a heavy-bottomed skillet to ensure even cooking and prevent burning.
  • Don’t rush the browning process; it adds depth to the dish.
  • Adjust the spice levels to suit your family’s taste preferences.
  • Garnish with fresh cilantro just before serving for a burst of color and flavor.

Equipment Needed

  • Large skillet: A heavy-bottomed skillet works best, but a non-stick pan is a good alternative.
  • Mixing bowl: Any large bowl will do for marinating the chicken.
  • Wooden spoon: Perfect for stirring and scraping up those delicious bits.
  • Measuring cups and spoons: Essential for accurate ingredient measurements.

Variations of Creamy Butter Chicken

  • Spicy Butter Chicken: Add 1-2 teaspoons of red chili powder or cayenne pepper to the spice mix for an extra kick.
  • Coconut Butter Chicken: Substitute heavy cream with coconut milk for a dairy-free, tropical twist that still delivers creaminess.
  • Vegetable Butter Chicken: Replace chicken with a mix of your favorite vegetables like bell peppers, cauliflower, and peas for a hearty vegetarian option.
  • Butter Chicken Tacos: Use the creamy sauce as a filling for soft tortillas, topped with fresh cilantro and a squeeze of lime for a fun twist.
  • Butter Chicken Bowls: Serve the creamy chicken over quinoa or brown rice, topped with avocado and a sprinkle of sesame seeds for a nutritious meal.

Serving Suggestions for Creamy Butter Chicken

  • Basmati rice: Fluffy rice is perfect for soaking up the creamy sauce.
  • Naan bread: Soft, warm naan is ideal for dipping and enjoying every last bite.
  • Fresh salad: A light cucumber and tomato salad adds a refreshing crunch.
  • Chai tea: Pair with a warm cup of chai for a cozy meal experience.

FAQs about Creamy Butter Chicken

Can I use chicken breasts instead of thighs?
Absolutely! While I prefer the juiciness of thighs, chicken breasts can work too. Just be careful not to overcook them, as they can dry out more easily.

Is Creamy Butter Chicken spicy?
The spice level is adjustable! If you prefer a milder dish, simply reduce the amount of garam masala and skip the chili powder. It’s all about your taste!

Can I make this dish ahead of time?
Yes! You can prepare the sauce and marinate the chicken in advance. Just store them separately in the fridge. When you’re ready, combine and heat for a quick meal.

What can I serve with Creamy Butter Chicken?
This dish pairs beautifully with basmati rice or warm naan. A fresh salad or some roasted vegetables can also complement the rich flavors nicely.

How do I store leftovers?
Store any leftovers in an airtight container in the fridge for up to 3 days. Reheat gently on the stovetop or in the microwave, adding a splash of cream if needed to restore creaminess.

Final Thoughts

Cooking Creamy Butter Chicken is more than just preparing a meal; it’s about creating memories and sharing joy with those you love. The rich, velvety sauce and tender chicken come together to form a dish that warms the heart and satisfies the soul. Whether it’s a cozy family dinner or a gathering with friends, this recipe is sure to impress. Plus, the delightful aroma wafting through your kitchen will have everyone eagerly anticipating the feast. So roll up your sleeves, embrace the process, and enjoy every delicious bite of this comforting classic!

“`

jhessica

Creamy Butter Chicken: Discover the Ultimate Recipe!

A rich and creamy butter chicken recipe that is perfect for a comforting meal.
Prep Time 30 minutes
Cook Time 30 minutes
Total Time 1 hour
Servings: 6 servings
Course: Main Course
Cuisine: Indian
Calories: 450

Ingredients
  

  • 2 lbs boneless skinless chicken thighs, cut into bite-sized pieces
  • 1 teaspoon salt
  • 1 teaspoon black pepper
  • 1 teaspoon ground cumin
  • 1 teaspoon ground coriander
  • 1 teaspoon turmeric
  • 1 teaspoon garam masala
  • 2 tablespoons vegetable oil
  • 1 medium onion finely chopped
  • 4 cloves garlic minced
  • 1 tablespoon fresh ginger minced
  • 1 14 oz can crushed tomatoes
  • 1 cup heavy cream
  • 2 tablespoons unsalted butter
  • Fresh cilantro chopped (for garnish)
  • Cooked basmati rice or naan for serving

Method
 

  1. In a large bowl, combine the chicken pieces with salt, black pepper, cumin, coriander, turmeric, and garam masala. Mix well to coat the chicken evenly. Let it marinate for at least 30 minutes, or up to 2 hours in the refrigerator for better flavor.
  2. Heat the vegetable oil in a large skillet over medium-high heat. Add the marinated chicken in batches, cooking until browned on all sides, about 5-7 minutes. Remove the chicken from the skillet and set aside.
  3. In the same skillet, add the chopped onion and cook until softened and golden, about 5 minutes. Stir in the minced garlic and ginger, cooking for an additional 1-2 minutes until fragrant.
  4. Add the crushed tomatoes to the skillet, stirring to combine. Bring to a simmer and let it cook for about 5 minutes, allowing the flavors to meld.
  5. Return the browned chicken to the skillet and stir well. Reduce the heat to low and pour in the heavy cream. Add the butter and stir until melted and combined. Simmer for another 10-15 minutes, or until the chicken is cooked through and the sauce is thickened.
  6. Taste and adjust seasoning if necessary. Serve hot, garnished with fresh cilantro, alongside cooked basmati rice or naan.

Nutrition

Serving: 1servingCalories: 450kcalCarbohydrates: 6gProtein: 30gFat: 34gSugar: 6g

Notes

  • For a spicier version, add 1-2 teaspoons of red chili powder or cayenne pepper to the spice mix.
  • Substitute the heavy cream with coconut milk for a dairy-free option while still keeping it creamy.

Tried this recipe?

Let us know how it was!

Blueberry Muffins with Crumb Topping You Must Try Today!

Introduction to Blueberry Muffins with Crumb Topping

There’s something magical about the aroma of freshly baked blueberry muffins wafting through the house. It takes me back to lazy Sunday mornings, where the world outside felt still, and the only thing that mattered was a warm muffin and a cup of coffee. These Blueberry Muffins with Crumb Topping are not just a treat; they’re a quick solution for busy days or a delightful way to impress your loved ones. With their fluffy texture and sweet, crumbly topping, they’re perfect for breakfast or a snack. Trust me, once you try them, you’ll be hooked!

Why You’ll Love This Blueberry Muffins with Crumb Topping

These Blueberry Muffins with Crumb Topping are a dream come true for anyone juggling a busy schedule. They come together in just 15 minutes of prep time, making them a perfect choice for those hectic mornings. The burst of juicy blueberries paired with a sweet, crunchy topping creates a flavor explosion that’s hard to resist. Plus, they freeze beautifully, so you can always have a delicious snack on hand!

Ingredients for Blueberry Muffins with Crumb Topping

Gathering the right ingredients is the first step to creating these delightful Blueberry Muffins with Crumb Topping. Here’s what you’ll need:

  • All-purpose flour: The backbone of your muffins, providing structure and fluffiness.
  • Granulated sugar: Adds sweetness and helps create that lovely golden crust.
  • Baking powder: This leavening agent gives your muffins that perfect rise.
  • Baking soda: Works with the buttermilk to create a light texture.
  • Salt: Enhances the flavors and balances the sweetness.
  • Unsalted butter: Adds richness and moisture; melted for easy mixing.
  • Buttermilk: Contributes to a tender crumb and a slight tanginess.
  • Eggs: Bind the ingredients together and add moisture.
  • Vanilla extract: A splash of warmth and flavor that elevates the muffins.
  • Fresh blueberries: Bursting with flavor, they’re the star of the show! Frozen works too.

For the crumb topping, you’ll need:

  • All-purpose flour: Again, for structure in the crumb topping.
  • Brown sugar: Adds a deeper sweetness and a hint of caramel flavor.
  • Unsalted butter: Softened to create that crumbly texture.
  • Ground cinnamon: A warm spice that complements the blueberries beautifully.

Feel free to get creative! You can substitute half of the all-purpose flour with whole wheat flour for a healthier twist. A teaspoon of lemon zest can also brighten the flavor. For exact measurements, check the bottom of the article where you can find everything available for printing.

How to Make Blueberry Muffins with Crumb Topping

Now that you have all your ingredients ready, let’s dive into the fun part—making these scrumptious Blueberry Muffins with Crumb Topping. Follow these simple steps, and you’ll have a batch of warm, fluffy muffins in no time!

Step 1: Preheat the Oven

First things first, preheat your oven to 375°F (190°C). This ensures your muffins bake evenly and rise beautifully. While the oven warms up, prepare your muffin tin by lining it with paper liners or giving it a light grease. This will help your muffins pop out easily once they’re baked.

Step 2: Mix Dry Ingredients

In a large bowl, whisk together the all-purpose flour, granulated sugar, baking powder, baking soda, and salt. This step is crucial as it evenly distributes the leavening agents, ensuring your muffins rise perfectly. The mixture should look light and fluffy, ready to welcome the wet ingredients.

Step 3: Combine Wet Ingredients

In another bowl, combine the melted butter, buttermilk, eggs, and vanilla extract. Whisk them together until smooth. The melted butter adds richness, while the buttermilk gives a tender crumb. The eggs bind everything together, and the vanilla adds a lovely aroma that will make your kitchen smell divine!

Step 4: Combine Wet and Dry Ingredients

Now, pour the wet ingredients into the dry ingredients. Mix gently until just combined. Be careful not to overmix; a few lumps are perfectly fine! Once combined, gently fold in the fresh blueberries. This is where the magic happens—those juicy berries will burst with flavor in every bite!

Step 5: Prepare the Crumb Topping

In a separate bowl, prepare the crumb topping by mixing together the all-purpose flour, brown sugar, softened butter, and ground cinnamon. Use your fingers or a fork to mix until it resembles coarse crumbs. This topping adds a delightful crunch and sweetness that perfectly complements the soft muffins.

Step 6: Fill Muffin Tin

Scoop the muffin batter into the prepared muffin tin, filling each cup about two-thirds full. This allows room for the muffins to rise without overflowing. If you’re feeling adventurous, you can even add a few extra blueberries on top for a pop of color!

Step 7: Add Crumb Topping

Now, sprinkle the crumb topping generously over each muffin. Don’t be shy! This is what makes these muffins so special. The crumbly texture will create a beautiful contrast to the soft muffin beneath.

Step 8: Bake

Place the muffin tin in the preheated oven and bake for 18-22 minutes. Keep an eye on them! You’ll know they’re done when a toothpick inserted into the center comes out clean. The tops should be golden brown and slightly domed.

Step 9: Cool and Serve

Once baked, allow the muffins to cool in the pan for about 5 minutes. This makes them easier to remove. After that, transfer them to a wire rack to cool completely. The aroma will be irresistible, and you might find it hard to wait before diving in!

Tips for Success

  • Use room temperature ingredients for better mixing and texture.
  • Don’t overmix the batter; a few lumps are okay!
  • Gently fold in blueberries to prevent them from breaking.
  • For extra flavor, add a pinch of nutmeg to the batter.
  • Store leftover muffins in an airtight container to keep them fresh.

Equipment Needed

  • Muffin tin: A standard 12-cup muffin tin works best, but you can use silicone molds for easy removal.
  • Mixing bowls: A large bowl for dry ingredients and a medium bowl for wet ingredients.
  • Whisk: A whisk is perfect for mixing; a fork can work in a pinch.
  • Measuring cups and spoons: Essential for accurate ingredient measurements.
  • Cooling rack: Helps muffins cool evenly; a plate can substitute if needed.

Variations

  • Whole Wheat Flour: Substitute half of the all-purpose flour with whole wheat flour for a nuttier flavor and added fiber.
  • Vegan Option: Replace eggs with flaxseed meal mixed with water and use plant-based milk instead of buttermilk.
  • Nutty Delight: Add chopped walnuts or pecans to the batter for a crunchy texture and extra flavor.
  • Spiced Muffins: Incorporate a teaspoon of nutmeg or ginger for a warm, spiced twist.
  • Fruit Medley: Mix in other berries like raspberries or blackberries for a colorful and flavorful muffin.

Serving Suggestions

  • Pair your Blueberry Muffins with Crumb Topping with a hot cup of coffee or tea for a cozy breakfast.
  • Serve with a dollop of whipped cream or a scoop of vanilla ice cream for a delightful dessert.
  • Garnish with fresh blueberries or a sprinkle of powdered sugar for an elegant touch.

FAQs about Blueberry Muffins with Crumb Topping

Can I use frozen blueberries for this recipe?

Absolutely! Frozen blueberries work just as well as fresh ones. Just toss them in a bit of flour before adding them to the batter to prevent them from sinking. This way, you’ll still get those delightful bursts of flavor in every bite of your Blueberry Muffins with Crumb Topping.

How do I store leftover muffins?

To keep your muffins fresh, store them in an airtight container at room temperature for up to three days. If you want to keep them longer, freeze them! Just wrap each muffin in plastic wrap and place them in a freezer bag. They’ll be good for up to three months.

Can I make these muffins gluten-free?

Yes, you can! Substitute the all-purpose flour with a gluten-free flour blend. Just make sure it contains xanthan gum, which helps mimic the texture of regular flour. Your Blueberry Muffins with Crumb Topping will still be delicious!

What can I serve with blueberry muffins?

These muffins are perfect on their own, but you can elevate your breakfast by serving them with a side of yogurt or a fruit salad. A drizzle of honey or maple syrup can also add a sweet touch!

How can I make these muffins healthier?

For a healthier twist, consider using half whole wheat flour and adding a bit of applesauce to replace some of the butter. You can also reduce the sugar slightly without sacrificing flavor. Enjoy your guilt-free Blueberry Muffins with Crumb Topping!

Final Thoughts

There’s a certain joy that comes from baking these Blueberry Muffins with Crumb Topping. The process is simple, yet the results are nothing short of delightful. Each bite offers a warm hug of flavor, with the sweet blueberries and crunchy topping dancing together in perfect harmony. Whether you’re enjoying them fresh out of the oven or savoring them later in the week, these muffins bring a little sunshine to your day. So, gather your ingredients, embrace the mess, and let the aroma fill your home. You’ll find that these muffins are more than just a recipe; they’re a cherished moment waiting to happen.

“`

jhessica

Blueberry Muffins with Crumb Topping You Must Try Today!

Delicious blueberry muffins topped with a crumbly topping, perfect for breakfast or a snack.
Prep Time 15 minutes
Cook Time 22 minutes
Total Time 37 minutes
Servings: 12 muffins
Course: Breakfast
Cuisine: American
Calories: 210

Ingredients
  

  • 2 cups all-purpose flour
  • 1 cup granulated sugar
  • 2 teaspoons baking powder
  • 1/2 teaspoon baking soda
  • 1/2 teaspoon salt
  • 1/2 cup unsalted butter melted
  • 1 cup buttermilk
  • 2 large eggs
  • 1 teaspoon vanilla extract
  • 2 cups fresh blueberries or frozen, if preferred
For the crumb topping:
  • 1/2 cup all-purpose flour
  • 1/2 cup brown sugar packed
  • 1/4 cup unsalted butter softened
  • 1 teaspoon ground cinnamon

Method
 

  1. Preheat your oven to 375°F (190°C) and line a muffin tin with paper liners or grease it lightly.
  2. In a large bowl, whisk together the flour, granulated sugar, baking powder, baking soda, and salt.
  3. In another bowl, combine the melted butter, buttermilk, eggs, and vanilla extract.
  4. Pour the wet ingredients into the dry ingredients and mix until just combined. Gently fold in the blueberries.
  5. In a separate bowl, prepare the crumb topping by mixing together the flour, brown sugar, softened butter, and cinnamon until crumbly.
  6. Scoop the muffin batter into the prepared muffin tin, filling each cup about two-thirds full.
  7. Sprinkle the crumb topping generously over each muffin.
  8. Bake for 18-22 minutes, or until a toothpick inserted into the center comes out clean.
  9. Allow the muffins to cool in the pan for 5 minutes before transferring them to a wire rack to cool completely.

Nutrition

Serving: 1muffinCalories: 210kcalCarbohydrates: 30gProtein: 3gFat: 9gSaturated Fat: 5gPolyunsaturated Fat: 4gCholesterol: 40mgSodium: 200mgFiber: 1gSugar: 15g

Notes

  • This recipe makes 12 muffins.
  • For a lighter version, substitute half of the all-purpose flour with whole wheat flour.
  • You can also add a teaspoon of lemon zest to the batter for a refreshing citrus flavor.

Tried this recipe?

Let us know how it was!

Lemon Garlic Butter Salmon with Asparagus: A Tasty Delight!

Introduction to Lemon Garlic Butter Salmon with Asparagus

Picture this: it’s a busy weeknight, and you’re juggling work, family, and a to-do list that seems to grow by the minute. You want to serve something delicious, but you also need it to be quick and easy. Enter my Lemon Garlic Butter Salmon with Asparagus! This dish is not just a meal; it’s a delightful experience that brings the flavors of the sea and garden right to your table. With just a handful of ingredients and minimal prep, you can impress your loved ones while keeping your sanity intact. Trust me, this recipe is a game-changer!

Why You’ll Love This Lemon Garlic Butter Salmon with Asparagus

This Lemon Garlic Butter Salmon with Asparagus is a culinary dream come true! It’s not just quick to prepare; it’s bursting with flavor that will make your taste buds dance. In just 25 minutes, you can whip up a healthy, satisfying meal that feels gourmet. Plus, the vibrant colors of the salmon and asparagus make for a stunning presentation. It’s the perfect dish for busy nights or when you want to impress without the stress!

Ingredients for Lemon Garlic Butter Salmon with Asparagus

Gathering the right ingredients is the first step to culinary success! For this Lemon Garlic Butter Salmon with Asparagus, you’ll need a few fresh and flavorful items that come together beautifully. Here’s what you’ll need:

  • Salmon fillets: Rich in omega-3 fatty acids, salmon is the star of this dish, providing a buttery texture and delicious flavor.
  • Asparagus: This vibrant green vegetable adds a lovely crunch and is packed with vitamins. Trim the ends for the best bite!
  • Unsalted butter: Melting this into a sauce creates a luscious base for the dish. Unsalted allows you to control the seasoning.
  • Fresh lemon juice: The zesty acidity brightens the flavors and balances the richness of the salmon and butter.
  • Garlic: Minced garlic infuses the dish with a warm, aromatic flavor that complements the salmon perfectly.
  • Dried oregano: This herb adds an earthy note, enhancing the overall flavor profile of the dish.
  • Salt and black pepper: Essential seasonings that elevate the taste of all the ingredients, bringing everything together.
  • Lemon wedges: For serving, these add a fresh burst of flavor right before you dig in!

Feel free to get creative! You can substitute asparagus with broccoli or green beans for a different twist. If you want to add a pop of color, sprinkle some fresh parsley or dill over the salmon before serving. For exact measurements, check the bottom of the article where you can find everything available for printing.

How to Make Lemon Garlic Butter Salmon with Asparagus

Now that you have all your ingredients ready, let’s dive into the cooking process! Making Lemon Garlic Butter Salmon with Asparagus is as easy as pie, and I promise you’ll feel like a culinary rockstar. Follow these simple steps, and you’ll have a delicious meal on the table in no time!

Step 1: Preheat the Oven

First things first, preheat your oven to 400°F (200°C). This step is crucial because it ensures that your salmon and asparagus cook evenly. While the oven heats up, line a baking sheet with parchment paper. This little trick makes cleanup a breeze, so you can spend more time enjoying your meal and less time scrubbing!

Step 2: Prepare the Lemon Garlic Butter Mixture

In a small bowl, whisk together the melted butter, fresh lemon juice, minced garlic, oregano, salt, and black pepper. This mixture is the heart of the dish, infusing the salmon and asparagus with a burst of flavor. The garlic and lemon work together to create a zesty sauce that elevates the entire meal. Trust me, you’ll want to drizzle this goodness on everything!

Step 3: Arrange the Salmon and Asparagus

Now it’s time to arrange your ingredients on the baking sheet. Place the salmon fillets on one side and the trimmed asparagus on the other. Make sure to give them some space; they need room to breathe and cook properly. This layout not only looks appealing but also allows the flavors to mingle beautifully as they bake.

Step 4: Drizzle and Toss

Next, take half of your lemon garlic butter mixture and drizzle it over the salmon. Use the remaining sauce to coat the asparagus. Don’t be shy—make sure everything is evenly coated! Toss the asparagus gently to ensure every piece gets that delicious flavor. This step is key to achieving that mouthwatering taste in every bite.

Step 5: Bake to Perfection

Slide the baking sheet into your preheated oven and let it bake for 12-15 minutes. Keep an eye on it! You’ll know it’s done when the salmon flakes easily with a fork and the asparagus is tender yet still vibrant. The aroma wafting through your kitchen will be irresistible, and you’ll be counting down the minutes until you can dig in!

Step 6: Serve and Enjoy

Once everything is cooked to perfection, it’s time to serve! Plate the salmon and asparagus beautifully, and don’t forget to add those lemon wedges on the side. A squeeze of fresh lemon juice right before eating adds a delightful zing. Enjoy your Lemon Garlic Butter Salmon with Asparagus with a glass of white wine or a refreshing iced tea for a complete dining experience!

Tips for Success

  • Always use fresh ingredients for the best flavor—especially the salmon and asparagus.
  • Don’t skip the preheating step; it ensures even cooking.
  • For a crispy finish, broil the salmon for the last 2 minutes of baking.
  • Experiment with herbs like thyme or dill for a unique twist.
  • Let the dish rest for a minute before serving to enhance the flavors.

Equipment Needed

  • Baking sheet: A standard baking sheet works perfectly, but a cast-iron skillet can add a nice touch.
  • Parchment paper: This makes cleanup easy; aluminum foil is a good alternative.
  • Mixing bowl: Any bowl will do, but a whisking bowl is ideal for combining ingredients.
  • Measuring spoons: Essential for accuracy; you can use your regular kitchen spoons in a pinch.

Variations

  • Herb-Infused: Add fresh herbs like dill, thyme, or basil to the lemon garlic butter for an aromatic twist.
  • Spicy Kick: Incorporate a pinch of red pepper flakes into the butter mixture for a bit of heat.
  • Gluten-Free Option: This recipe is naturally gluten-free, making it perfect for those with dietary restrictions.
  • Vegetable Swap: Replace asparagus with seasonal veggies like zucchini, bell peppers, or Brussels sprouts for variety.
  • Marinade Option: Marinate the salmon in the lemon garlic mixture for 30 minutes before baking for deeper flavor.

Serving Suggestions

  • Side Dishes: Pair with fluffy quinoa or a light couscous salad for a wholesome meal.
  • Drinks: A crisp Sauvignon Blanc or sparkling water with lemon complements the dish beautifully.
  • Presentation: Serve on a colorful platter, garnished with fresh herbs for an eye-catching display.

FAQs about Lemon Garlic Butter Salmon with Asparagus

Can I use frozen salmon for this recipe?
Absolutely! Just make sure to thaw the salmon completely before cooking. Frozen salmon can be just as delicious when prepared correctly.

What can I substitute for asparagus?
If asparagus isn’t your favorite, feel free to swap it out for broccoli, green beans, or even zucchini. Each vegetable brings its own unique flavor and texture!

How do I know when the salmon is done cooking?
The salmon is perfectly cooked when it flakes easily with a fork and has an internal temperature of 145°F (63°C). Keep an eye on it to avoid overcooking!

Can I make this dish ahead of time?
While this dish is best enjoyed fresh, you can prepare the lemon garlic butter mixture in advance. Just store it in the fridge until you’re ready to cook.

What should I serve with Lemon Garlic Butter Salmon?
This dish pairs wonderfully with a light salad, quinoa, or even a side of roasted potatoes. A crisp white wine or sparkling water with lemon makes for a refreshing drink!

Final Thoughts

Cooking Lemon Garlic Butter Salmon with Asparagus is more than just preparing a meal; it’s about creating a moment of joy in your busy life. The vibrant colors and tantalizing aromas fill your kitchen, making it feel like a special occasion. Each bite is a delightful blend of flavors that transports you to a cozy seaside restaurant. Whether you’re sharing it with family or enjoying a quiet dinner alone, this dish brings warmth and satisfaction. So, roll up your sleeves, embrace the process, and let this recipe become a cherished part of your culinary repertoire!

“`

jhessica

Lemon Garlic Butter Salmon with Asparagus: A Tasty Delight!

A delicious and healthy recipe for Lemon Garlic Butter Salmon with Asparagus, perfect for a quick weeknight dinner.
Prep Time 10 minutes
Cook Time 15 minutes
Total Time 25 minutes
Course: Main Course
Cuisine: American
Calories: 350

Ingredients
  

  • 2 6-ounce salmon fillets
  • 1 pound asparagus trimmed
  • 3 tablespoons unsalted butter melted
  • 3 tablespoons fresh lemon juice
  • 4 cloves garlic minced
  • 1 teaspoon dried oregano
  • 1 teaspoon salt
  • ½ teaspoon black pepper
  • Lemon wedges for serving

Method
 

  1. Preheat your oven to 400°F (200°C). Line a baking sheet with parchment paper for easy cleanup.
  2. In a small bowl, whisk together the melted butter, lemon juice, minced garlic, oregano, salt, and black pepper.
  3. Place the salmon fillets on one side of the prepared baking sheet and the asparagus on the other side.
  4. Drizzle half of the lemon garlic butter mixture over the salmon and the other half over the asparagus. Toss the asparagus to coat evenly.
  5. Bake in the preheated oven for 12-15 minutes, or until the salmon flakes easily with a fork and the asparagus is tender.
  6. Serve immediately with lemon wedges on the side for extra flavor.

Nutrition

Serving: 1servingCalories: 350kcalCarbohydrates: 6gProtein: 34gFat: 20gSaturated Fat: 6gPolyunsaturated Fat: 14gCholesterol: 70mgSodium: 600mgFiber: 2gSugar: 1g

Notes

  • For added flavor, sprinkle some fresh parsley or dill over the salmon before serving.
  • Substitute the asparagus with broccoli or green beans for a different vegetable option.

Tried this recipe?

Let us know how it was!

Honey Garlic Steak Bites: A Quick and Tasty Treat!

Introduction to Honey Garlic Steak Bites

Picture this: it’s a busy weeknight, and you’re staring at the clock, wondering how to whip up something delicious in no time. Enter Honey Garlic Steak Bites! This dish is not just a quick solution; it’s a delightful treat that brings a burst of flavor to your table. With tender sirloin steak coated in a sweet and savory sauce, it’s sure to impress your loved ones. Whether you’re cooking for a family dinner or a casual gathering, these steak bites are the perfect way to satisfy cravings without spending hours in the kitchen.

Why You’ll Love This Honey Garlic Steak Bites

Let’s be honest: life can get hectic, and finding time to cook can feel like a challenge. That’s where these Honey Garlic Steak Bites shine! They’re not only quick to prepare, taking just 20 minutes from start to finish, but they also pack a flavor punch that will leave everyone asking for seconds. Plus, the sweet and savory combination is simply irresistible, making it a dish you’ll want to make again and again.

Ingredients for Honey Garlic Steak Bites

Gathering the right ingredients is the first step to creating these mouthwatering Honey Garlic Steak Bites. Here’s what you’ll need:

  • Sirloin steak: This cut is tender and flavorful, perfect for quick cooking. You can substitute with flank steak or tenderloin if you prefer.
  • Honey: Adds a natural sweetness that balances the savory elements. Feel free to use agave syrup for a vegan option.
  • Soy sauce: This brings a salty umami flavor. For a gluten-free version, opt for tamari or coconut aminos.
  • Minced garlic: Fresh garlic gives a robust flavor. You can use garlic powder in a pinch, but fresh is always best!
  • Olive oil: Used for cooking the steak, it adds richness. Canola or avocado oil are good alternatives.
  • Ground black pepper: A simple seasoning that enhances the overall taste. Adjust to your spice preference.
  • Red pepper flakes (optional): For those who like a little heat, these flakes add a nice kick. You can skip them if you prefer a milder dish.
  • Chopped green onions: These are for garnish, adding a fresh crunch and a pop of color to your dish.

For exact measurements, check the bottom of the article where you can find everything listed for easy printing!

How to Make Honey Garlic Steak Bites

Now that you have all your ingredients ready, let’s dive into the fun part: making these delicious Honey Garlic Steak Bites! Follow these simple steps, and you’ll have a mouthwatering dish in no time.

Step 1: Prepare the Sauce

Start by whisking together the honey, soy sauce, minced garlic, ground black pepper, and red pepper flakes in a medium bowl. This sauce is the heart of the dish, so make sure to mix it well. The sweet and savory flavors will blend beautifully, creating a sticky glaze that will coat the steak perfectly. Set this aside for now; it’ll be ready to work its magic soon!

Step 2: Cook the Steak

Heat olive oil in a large skillet over medium-high heat. Once the oil is shimmering, add the bite-sized pieces of sirloin steak in a single layer. Don’t overcrowd the pan; you want them to sear nicely. Cook for about 2-3 minutes until they’re browned on one side, then flip them over and cook for another 2-3 minutes. The goal is to get a nice crust while keeping the inside tender. If you like your steak more well-done, just give it a little extra time!

Step 3: Combine and Finish

Now it’s time to bring it all together! Pour the honey garlic sauce over the cooked steak bites in the skillet. Stir gently to coat each piece evenly. Let it cook for an additional 2-3 minutes, allowing the sauce to thicken slightly and cling to the steak. The aroma will be irresistible! Once done, remove from heat and garnish with chopped green onions for a fresh touch. Serve immediately and watch everyone dig in!

Tips for Success

  • Make sure your skillet is hot before adding the steak for a perfect sear.
  • Don’t skip the resting time after cooking; it helps the juices redistribute.
  • For extra flavor, marinate the steak in the sauce for 30 minutes before cooking.
  • Adjust the sweetness by adding more or less honey to suit your taste.
  • Serve with a side of steamed veggies for a balanced meal.

Equipment Needed

  • Large skillet: A non-stick skillet works best, but any heavy-bottomed pan will do.
  • Whisk: Essential for mixing the sauce; a fork can work in a pinch.
  • Cutting board: For chopping the steak and green onions.
  • Knife: A sharp chef’s knife makes cutting the steak a breeze.

Variations

  • Spicy Honey Garlic Steak Bites: Add a teaspoon of sriracha or your favorite hot sauce to the honey garlic sauce for an extra kick.
  • Vegetarian Option: Substitute the steak with firm tofu or tempeh, marinating them in the same honey garlic sauce for a delicious plant-based dish.
  • Herb-Infused: Mix in fresh herbs like rosemary or thyme into the sauce for an aromatic twist.
  • Sweet and Tangy: Incorporate a splash of balsamic vinegar into the sauce for a tangy flavor that complements the sweetness of the honey.
  • Asian-Inspired: Add sesame oil and sprinkle sesame seeds on top for a nutty flavor and a touch of crunch.

Serving Suggestions

  • Serve the Honey Garlic Steak Bites over a bed of fluffy rice or noodles for a complete meal.
  • Pair with steamed broccoli or sautéed green beans for a colorful, nutritious side.
  • A chilled glass of white wine or iced tea complements the dish beautifully.
  • Garnish with extra green onions and sesame seeds for an appealing presentation.

FAQs about Honey Garlic Steak Bites

As you embark on your culinary adventure with Honey Garlic Steak Bites, you might have a few questions. Here are some common queries that can help you along the way:

Can I use a different cut of steak?

Absolutely! While sirloin is my go-to for its tenderness, you can also use flank steak or tenderloin. Just remember that cooking times may vary slightly based on the cut.

How can I make these steak bites spicier?

If you love a bit of heat, consider adding a teaspoon of sriracha or your favorite hot sauce to the honey garlic sauce. It’ll give your dish a delightful kick!

Can I prepare the sauce in advance?

Yes! You can whisk together the honey garlic sauce ahead of time and store it in the fridge. Just give it a good stir before using it to ensure everything is well combined.

What should I serve with Honey Garlic Steak Bites?

These steak bites pair wonderfully with rice or noodles. You can also serve them alongside steamed vegetables for a balanced meal that’s both delicious and nutritious.

Are Honey Garlic Steak Bites gluten-free?

Yes, they can be! Just swap out regular soy sauce for tamari or coconut aminos, and you’ll have a gluten-free dish that everyone can enjoy.

Final Thoughts

Cooking should be a joyful experience, and these Honey Garlic Steak Bites embody that spirit perfectly. In just 20 minutes, you can create a dish that not only satisfies your hunger but also brings smiles to the faces of your loved ones. The sweet and savory flavors dance together, making every bite a delightful treat. Whether it’s a busy weeknight or a special occasion, this recipe is a reminder that delicious meals don’t have to be complicated. So, roll up your sleeves, gather your ingredients, and let the magic of cooking fill your kitchen with warmth and happiness!

“`

jhessica

Honey Garlic Steak Bites: A Quick and Tasty Treat!

Honey Garlic Steak Bites are a quick and tasty treat made with tender sirloin steak coated in a sweet and savory honey garlic sauce.
Prep Time 10 minutes
Cook Time 10 minutes
Total Time 20 minutes
Course: Main Dish
Cuisine: American
Calories: 320

Ingredients
  

  • 1 pound sirloin steak cut into bite-sized pieces
  • 1/4 cup honey
  • 1/4 cup soy sauce
  • 2 tablespoons minced garlic
  • 1 tablespoon olive oil
  • 1 teaspoon ground black pepper
  • 1/2 teaspoon red pepper flakes optional
  • Chopped green onions for garnish

Method
 

  1. In a medium bowl, whisk together honey, soy sauce, minced garlic, black pepper, and red pepper flakes (if using). Set aside.
  2. Heat olive oil in a large skillet over medium-high heat. Once hot, add the steak pieces in a single layer. Cook for about 2-3 minutes until browned, then flip and cook for another 2-3 minutes until browned on the other side.
  3. Pour the honey garlic sauce over the steak bites in the skillet. Stir to coat the steak evenly. Cook for an additional 2-3 minutes until the sauce thickens slightly and the steak is cooked to your desired doneness.
  4. Remove from heat and garnish with chopped green onions before serving.

Nutrition

Serving: 1servingCalories: 320kcalCarbohydrates: 12gProtein: 28gFat: 16gSaturated Fat: 4gPolyunsaturated Fat: 12gCholesterol: 70mgSodium: 800mgSugar: 12g

Notes

  • For a spicier kick, add a teaspoon of sriracha or your favorite hot sauce to the honey garlic sauce.
  • Serve the steak bites over rice or noodles to create a complete meal.

Tried this recipe?

Let us know how it was!

Mini Cheesecakes with Berry Topping: A Delicious Treat!

Introduction to Mini Cheesecakes with Berry Topping

These Mini Cheesecakes with Berry Topping offer the perfect balance of creamy richness and fruity freshness in every bite. Whether you’re hosting a party or simply craving a sweet treat, these individual desserts are easy to make and beautifully impressive. With a luscious cheesecake base crowned by vibrant, juicy berries, they’re a delightful way to satisfy your sweet tooth without the fuss. Get ready to enjoy a little moment of pure dessert bliss!

Why You’ll Love This Mini Cheesecakes with Berry Topping

These Mini Cheesecakes with Berry Topping are a dream come true for busy lives. They’re quick to prepare, taking just 20 minutes of hands-on time, and they bake in a flash! Plus, the creamy filling paired with the tartness of fresh berries creates a flavor explosion that’s simply irresistible. Whether it’s a family gathering or a cozy night in, these mini delights will surely impress and satisfy everyone’s sweet tooth!

Ingredients for Mini Cheesecakes with Berry Topping

Gathering the right ingredients is the first step to creating these delightful Mini Cheesecakes with Berry Topping. Here’s what you’ll need:

  • Graham cracker crumbs: These form the base of your cheesecake, providing a sweet and crunchy crust.
  • Granulated sugar: A touch of sweetness for both the crust and the creamy filling.
  • Unsalted butter: This binds the crust together and adds richness to the flavor.
  • Cream cheese: The star of the show! It gives the cheesecake its creamy texture and tangy taste.
  • Sour cream: Adds a lovely creaminess and a slight tang that balances the sweetness.
  • Eggs: These help set the filling, giving it that perfect cheesecake consistency.
  • Vanilla extract: A splash of this enhances the overall flavor, making it even more delicious.
  • Mixed berries: Fresh strawberries, blueberries, and raspberries create a vibrant topping that’s both beautiful and tasty.
  • Honey or maple syrup: A drizzle of this sweetener complements the berries and adds a touch of natural sweetness.

For those looking to get creative, consider these optional ingredients:

  • Cocoa powder: Add a chocolate twist to the filling for a rich flavor.
  • Citrus zest: A bit of lemon or lime zest can brighten the cheesecake, giving it a refreshing kick.

Exact measurements for these ingredients can be found at the bottom of the article, ready for printing!

How to Make Mini Cheesecakes with Berry Topping

Now that you have all your ingredients ready, let’s dive into the fun part: making these Mini Cheesecakes with Berry Topping! Follow these simple steps, and you’ll have a delightful dessert that’s sure to impress.

Step 1: Preheat and Prepare

First things first, preheat your oven to 325°F. This is crucial for getting that perfect bake. While the oven warms up, line a muffin tin with paper liners. This will make it easy to remove the cheesecakes later and keep them looking pretty!

Step 2: Make the Crust

In a medium bowl, combine your graham cracker crumbs, sugar, and melted butter. Mix until everything is well combined and the crumbs are evenly coated. Now, take about a tablespoon of this mixture and press it firmly into the bottom of each muffin liner. This forms the delicious crust that will hold your cheesecake filling.

Step 3: Prepare the Cheesecake Filling

In a large mixing bowl, beat the softened cream cheese until it’s smooth and creamy. This is where the magic happens! Next, add in the sour cream, sugar, eggs, and vanilla extract. Beat everything together until it’s well combined and creamy. Don’t forget to scrape down the sides of the bowl to ensure everything is mixed evenly.

Step 4: Fill and Bake

Now it’s time to fill those crusts! Spoon the cheesecake mixture over the crusts in the muffin tin, filling each liner about three-quarters full. This allows room for the cheesecakes to rise a bit. Bake them in the preheated oven for 18-20 minutes. You’ll know they’re done when the edges are set, but the centers are still slightly jiggly. That’s the perfect texture!

Step 5: Cool and Chill

Once they’re out of the oven, let the cheesecakes cool at room temperature for about 30 minutes. This helps them set up nicely. After that, pop them in the refrigerator for at least 2 hours. Chilling is essential for achieving that creamy cheesecake consistency!

Step 6: Prepare the Berry Topping

While your cheesecakes are chilling, it’s time to prepare the berry topping. In a small bowl, combine your mixed berries with honey or maple syrup. Gently toss them to coat the berries evenly. This simple topping adds a burst of freshness and color to your mini cheesecakes!

Step 7: Serve and Enjoy

Finally, once your cheesecakes are chilled and set, carefully remove them from the muffin tin. Top each mini cheesecake with the berry mixture just before serving. This adds a delightful finish that’s as beautiful as it is tasty. Enjoy every creamy, berry-filled bite!

Tips for Success

  • Make sure your cream cheese is at room temperature for easy mixing.
  • Don’t overmix the filling; just blend until smooth to avoid air bubbles.
  • Use a cookie scoop for even filling in each muffin liner.
  • Let the cheesecakes cool completely before refrigerating for the best texture.
  • Experiment with different berries for a unique topping each time!

Equipment Needed

  • Muffin tin: Essential for baking mini cheesecakes. A silicone muffin pan works great for easy removal.
  • Mixing bowls: Use a large bowl for the filling and a medium one for the crust.
  • Electric mixer: A hand mixer or stand mixer makes beating the cream cheese a breeze.
  • Measuring cups and spoons: Accurate measurements ensure perfect results.
  • Spatula: Handy for scraping down the sides of the bowl and serving.

Variations

  • Chocolate Mini Cheesecakes: Add 2 tablespoons of cocoa powder to the filling for a rich, chocolatey twist.
  • Fruit Swirl: Blend some of the mixed berries into the cheesecake filling for a fruity flavor throughout.
  • Gluten-Free Option: Substitute graham cracker crumbs with gluten-free cookie crumbs for a gluten-free dessert.
  • Vegan Version: Use vegan cream cheese and substitute eggs with flaxseed meal mixed with water for a plant-based treat.
  • Citrus Zest: Incorporate lemon or lime zest into the filling for a refreshing citrus kick.

Serving Suggestions

  • Pair your Mini Cheesecakes with a dollop of whipped cream for extra creaminess.
  • Serve alongside a refreshing fruit salad for a colorful plate.
  • Complement with a cup of herbal tea or a glass of sparkling water.
  • Garnish with mint leaves for a pop of color and freshness.

FAQs about Mini Cheesecakes with Berry Topping

Can I make Mini Cheesecakes with Berry Topping ahead of time?

Absolutely! These mini cheesecakes can be made a day in advance. Just store them in the refrigerator after they’ve cooled and set. Add the berry topping right before serving for the freshest taste.

What can I use instead of cream cheese?

If you’re looking for a lighter option, you can use Greek yogurt or a vegan cream cheese alternative. Just keep in mind that the texture and flavor may vary slightly.

How do I store leftover Mini Cheesecakes?

Store any leftovers in an airtight container in the refrigerator. They should stay fresh for up to 3 days. Just remember to add the berry topping before enjoying them again!

Can I freeze Mini Cheesecakes with Berry Topping?

Yes, you can freeze these mini cheesecakes! Just wrap them tightly in plastic wrap and place them in a freezer-safe container. Thaw them in the refrigerator before serving, and add the berry topping afterward.

What other toppings can I use besides berries?

The possibilities are endless! You can try chocolate sauce, caramel drizzle, or even a sprinkle of crushed nuts for added texture. Get creative and make it your own!

Final Thoughts

Making Mini Cheesecakes with Berry Topping is more than just a cooking task; it’s a delightful experience that brings joy to both the cook and the lucky eaters. Each bite is a creamy, fruity explosion that can brighten any day. Whether you’re celebrating a special occasion or simply treating yourself after a long week, these mini cheesecakes are sure to impress. Plus, they’re easy enough to whip up on a busy day! So, gather your ingredients, unleash your inner chef, and enjoy the sweet satisfaction of creating something truly special for your loved ones.

“`

jhessica

Mini Cheesecakes with Berry Topping: A Delicious Treat!

Mini Cheesecakes with Berry Topping are a delightful dessert featuring a creamy cheesecake filling on a graham cracker crust, topped with fresh mixed berries.
Prep Time 20 minutes
Cook Time 20 minutes
Total Time 2 hours 40 minutes
Servings: 12 servings
Course: Dessert
Cuisine: American
Calories: 210

Ingredients
  

  • 1 ½ cups graham cracker crumbs
  • ½ cup granulated sugar
  • ½ cup unsalted butter melted
  • 16 ounces cream cheese softened
  • ½ cup sour cream
  • ¾ cup granulated sugar
  • 2 large eggs
  • 1 teaspoon vanilla extract
  • 1 cup mixed berries strawberries, blueberries, raspberries
  • 2 tablespoons honey or maple syrup for topping

Method
 

  1. Preheat your oven to 325°F. Line a muffin tin with paper liners.
  2. In a medium bowl, combine graham cracker crumbs, ½ cup sugar, and melted butter. Mix until the crumbs are evenly coated. Press about 1 tablespoon of the mixture into the bottom of each muffin liner to form the crust.
  3. In a large mixing bowl, beat the softened cream cheese until smooth. Add the sour cream, ¾ cup sugar, eggs, and vanilla extract. Beat until well combined and creamy, scraping down the sides of the bowl as needed.
  4. Spoon the cream cheese mixture over the crusts in the muffin tin, filling each liner about ¾ full. Bake for 18-20 minutes, or until the edges are set and the centers are slightly jiggly.
  5. Remove from the oven and let cool at room temperature for 30 minutes, then refrigerate for at least 2 hours to set.
  6. While the cheesecakes are chilling, prepare the berry topping. In a small bowl, combine the mixed berries and honey or maple syrup. Gently toss to coat the berries.
  7. Once the cheesecakes are chilled and set, remove them from the muffin tin and top each mini cheesecake with the berry mixture before serving.

Nutrition

Serving: 1mini cheesecakeCalories: 210kcalCarbohydrates: 18gProtein: 3gFat: 14gSaturated Fat: 8gPolyunsaturated Fat: 6gCholesterol: 70mgSodium: 200mgFiber: 1gSugar: 10g

Notes

  • For a chocolate twist, add 2 tablespoons of cocoa powder to the cream cheese mixture.
  • For a citrus flavor, mix in the zest of one lemon or lime to the batter before baking.

Tried this recipe?

Let us know how it was!

Ground Turkey Taco Casserole: Delicious and Easy Recipe!

Introduction to Ground Turkey Taco Casserole

This Ground Turkey Taco Casserole brings together bold Mexican flavors and wholesome ingredients into one easy-to-make dish. Perfect for busy weeknights or casual gatherings, it layers seasoned ground turkey, melty cheese, and savory toppings for a comforting meal the whole family will love. Quick to prepare and packed with taste, this casserole is sure to become a favorite in your recipe rotation!

Why You’ll Love This Ground Turkey Taco Casserole

This Ground Turkey Taco Casserole is a lifesaver for busy nights! It’s incredibly easy to whip up, taking just 45 minutes from start to finish. The flavors are bold and satisfying, making it a hit with both kids and adults. Plus, it’s packed with protein and fiber, so you can feel good about serving it. With minimal prep and cleanup, it’s the perfect dish for any hectic weeknight!

Ingredients for Ground Turkey Taco Casserole

Gathering the right ingredients is key to making this Ground Turkey Taco Casserole a success. Here’s what you’ll need:

  • Olive oil: This healthy fat is perfect for sautéing and adds a lovely flavor.
  • Onion: Diced onions bring sweetness and depth to the dish.
  • Garlic: Minced garlic adds a fragrant kick that elevates the entire casserole.
  • Ground turkey: A lean protein that keeps the dish hearty without being heavy.
  • Taco seasoning: This spice blend is the star of the show, infusing the casserole with classic taco flavors.
  • Black beans: Packed with protein and fiber, they add a creamy texture and earthy taste.
  • Corn: Sweet corn brings a pop of color and sweetness to balance the spices.
  • Diced tomatoes with green chilies: These add moisture and a bit of heat, enhancing the overall flavor.
  • Cooked rice: Whether white or brown, rice helps to bulk up the casserole and makes it more filling.
  • Shredded cheddar cheese: Melty cheese on top creates a delicious, gooey finish.
  • Salsa: A zesty layer that adds moisture and flavor, making every bite delightful.
  • Salt and pepper: Essential seasonings to enhance all the flavors in the dish.
  • Fresh cilantro: A bright garnish that adds freshness and a pop of color before serving.

For those looking to customize, consider topping the casserole with sliced jalapeños or avocado for an extra kick. You can also swap out the ground turkey for ground beef or chicken if you prefer. If you like it spicy, opt for hot salsa or add diced green chilies to the mix. Exact quantities for each ingredient can be found at the bottom of the article, ready for printing!

How to Make Ground Turkey Taco Casserole

Now that you have all your ingredients ready, let’s dive into making this delicious Ground Turkey Taco Casserole! Follow these simple steps, and you’ll have a hearty meal on the table in no time.

Step 1: Preheat the Oven

First things first, preheat your oven to 350°F (175°C). This ensures it’s nice and hot when it’s time to bake your casserole, giving you that perfect golden cheese topping.

Step 2: Sauté the Onions and Garlic

In a large skillet, heat the olive oil over medium heat. Add the diced onion and sauté for about 3-4 minutes until softened. The aroma will fill your kitchen, making everyone curious about dinner!

Next, add the minced garlic and cook for another minute until fragrant. This step is crucial; garlic adds a wonderful depth of flavor that makes the casserole irresistible.

Step 3: Cook the Ground Turkey

Now, it’s time to add the ground turkey to the skillet. Break it apart with a spatula as it cooks. You want it browned and cooked through, which should take about 5-7 minutes. The turkey will soak up all those delicious flavors from the onions and garlic.

Step 4: Combine Ingredients

Once the turkey is cooked, stir in the taco seasoning, black beans, corn, diced tomatoes, and cooked rice. Mix everything well and let it simmer for about 5 minutes. This allows the flavors to meld beautifully.

Don’t forget to season with salt and pepper to taste. A little seasoning goes a long way in enhancing the overall flavor of your casserole!

Step 5: Transfer to Baking Dish

Now, transfer the mixture to a greased 9×13-inch baking dish. Spread the salsa evenly over the top. This adds a zesty layer that complements the other ingredients perfectly.

Step 6: Add Cheese and Bake

Sprinkle the shredded cheddar cheese generously over the salsa. Who doesn’t love a cheesy topping? Bake in the preheated oven for 20-25 minutes, or until the cheese is melted and bubbly. Your kitchen will smell heavenly!

Step 7: Cool and Garnish

Once it’s out of the oven, let it cool for a few minutes. This helps the casserole set a bit. Finally, garnish with fresh cilantro before serving. It adds a pop of color and freshness that makes the dish even more appealing!

Tips for Success

  • Prep your ingredients ahead of time to save precious minutes during cooking.
  • Use a non-stick skillet to prevent sticking and make cleanup easier.
  • Feel free to customize the spice level by adjusting the taco seasoning or salsa.
  • Let the casserole sit for a few minutes after baking for easier serving.
  • Store leftovers in an airtight container for up to three days for a quick lunch option.

Equipment Needed

  • Large skillet: A non-stick skillet works wonders for easy cooking and cleanup.
  • Baking dish: A 9×13-inch dish is ideal, but any oven-safe dish will do.
  • Spatula: Perfect for breaking up the turkey and mixing ingredients.
  • Measuring cups: Handy for measuring rice and cheese.

Variations

  • Vegetarian Option: Substitute ground turkey with lentils or a mix of your favorite vegetables for a hearty vegetarian version.
  • Spicy Kick: Add diced jalapeños or use spicy taco seasoning to turn up the heat.
  • Cheesy Delight: Experiment with different cheeses like pepper jack or Monterey Jack for a unique flavor twist.
  • Low-Carb Version: Replace rice with cauliflower rice to keep it low-carb while still being filling.
  • Southwestern Flair: Incorporate black olives and avocado for a fresh, southwestern touch.

Serving Suggestions

  • Pair with a simple green salad for a refreshing contrast.
  • Serve with tortilla chips and guacamole for a fun crunch.
  • A side of Mexican rice complements the flavors beautifully.
  • For drinks, consider a light beer or a fruity mocktail.
  • Garnish with extra cilantro and lime wedges for a vibrant presentation.

FAQs about Ground Turkey Taco Casserole

As you embark on your culinary adventure with this Ground Turkey Taco Casserole, you might have a few questions. Here are some common queries that can help you along the way:

Can I make this casserole ahead of time?

Absolutely! You can prepare the casserole a day in advance. Just assemble it, cover it tightly, and store it in the fridge. When you’re ready to bake, simply pop it in the oven, adding a few extra minutes to the cooking time.

What can I substitute for ground turkey?

If ground turkey isn’t your thing, feel free to swap it out for ground beef, chicken, or even a plant-based meat alternative. Each option brings its own unique flavor to the dish!

How do I store leftovers?

Leftovers can be stored in an airtight container in the fridge for up to three days. Just reheat in the microwave or oven until warmed through. It makes for a quick and satisfying lunch!

Can I freeze the casserole?

Yes, this casserole freezes beautifully! Just make sure to let it cool completely before wrapping it tightly in plastic wrap and aluminum foil. It can be frozen for up to three months. When you’re ready to enjoy it, thaw it in the fridge overnight and bake as directed.

What sides pair well with this casserole?

This Ground Turkey Taco Casserole is versatile! It pairs wonderfully with a fresh green salad, tortilla chips, or even some Mexican rice. You can also serve it with a dollop of sour cream or guacamole for added creaminess.

Final Thoughts

Cooking this Ground Turkey Taco Casserole is more than just preparing a meal; it’s about creating moments of joy and connection around the dinner table. The delightful aroma wafting through your home will draw your family in, sparking conversations and laughter. Each bite is a comforting reminder of home, filled with flavors that everyone loves. Plus, the ease of preparation means you can spend more time enjoying your meal and less time in the kitchen. I hope this recipe brings as much happiness to your family as it has to mine. Happy cooking!

“`

jhessica

Ground Turkey Taco Casserole: Delicious and Easy Recipe!

A delicious and easy Ground Turkey Taco Casserole recipe that combines ground turkey, black beans, corn, and cheese for a hearty meal.
Prep Time 15 minutes
Cook Time 30 minutes
Total Time 45 minutes
Servings: 6 servings
Course: Main Dish
Cuisine: Mexican
Calories: 350

Ingredients
  

  • 2 tablespoons olive oil
  • 1 medium onion diced
  • 2 cloves garlic minced
  • 1 pound ground turkey
  • 1 packet taco seasoning about 1 ounce
  • 1 can 15 ounces black beans, drained and rinsed
  • 1 can 15 ounces corn, drained
  • 1 can 10 ounces diced tomatoes with green chilies
  • 1 cup cooked rice white or brown
  • 1 cup shredded cheddar cheese
  • 1 cup salsa
  • Salt and pepper to taste
  • Fresh cilantro chopped (for garnish)

Method
 

  1. Preheat your oven to 350°F (175°C).
  2. In a large skillet, heat the olive oil over medium heat. Add the diced onion and sauté for about 3-4 minutes until softened.
  3. Add the minced garlic and cook for another minute until fragrant.
  4. Add the ground turkey to the skillet, breaking it apart with a spatula. Cook until browned and cooked through, about 5-7 minutes.
  5. Stir in the taco seasoning, black beans, corn, diced tomatoes, and cooked rice. Mix well and let it simmer for about 5 minutes. Season with salt and pepper to taste.
  6. Transfer the mixture to a greased 9×13-inch baking dish. Spread the salsa evenly over the top.
  7. Sprinkle the shredded cheddar cheese over the salsa.
  8. Bake in the preheated oven for 20-25 minutes, or until the cheese is melted and bubbly.
  9. Remove from the oven and let it cool for a few minutes. Garnish with fresh cilantro before serving.

Nutrition

Serving: 1servingCalories: 350kcalCarbohydrates: 30gProtein: 28gFat: 15gSaturated Fat: 5gPolyunsaturated Fat: 10gCholesterol: 80mgSodium: 600mgFiber: 8gSugar: 3g

Notes

  • For added flavor, consider topping the casserole with sliced jalapeños or avocado before serving.
  • You can substitute ground turkey with ground beef or chicken for a different taste.
  • If you prefer a spicier dish, use hot salsa or add diced green chilies to the mixture.

Tried this recipe?

Let us know how it was!

Stay Connected

Get recipes via email: