Delicious Easter Dirt Cups for a Fun Spring Treat

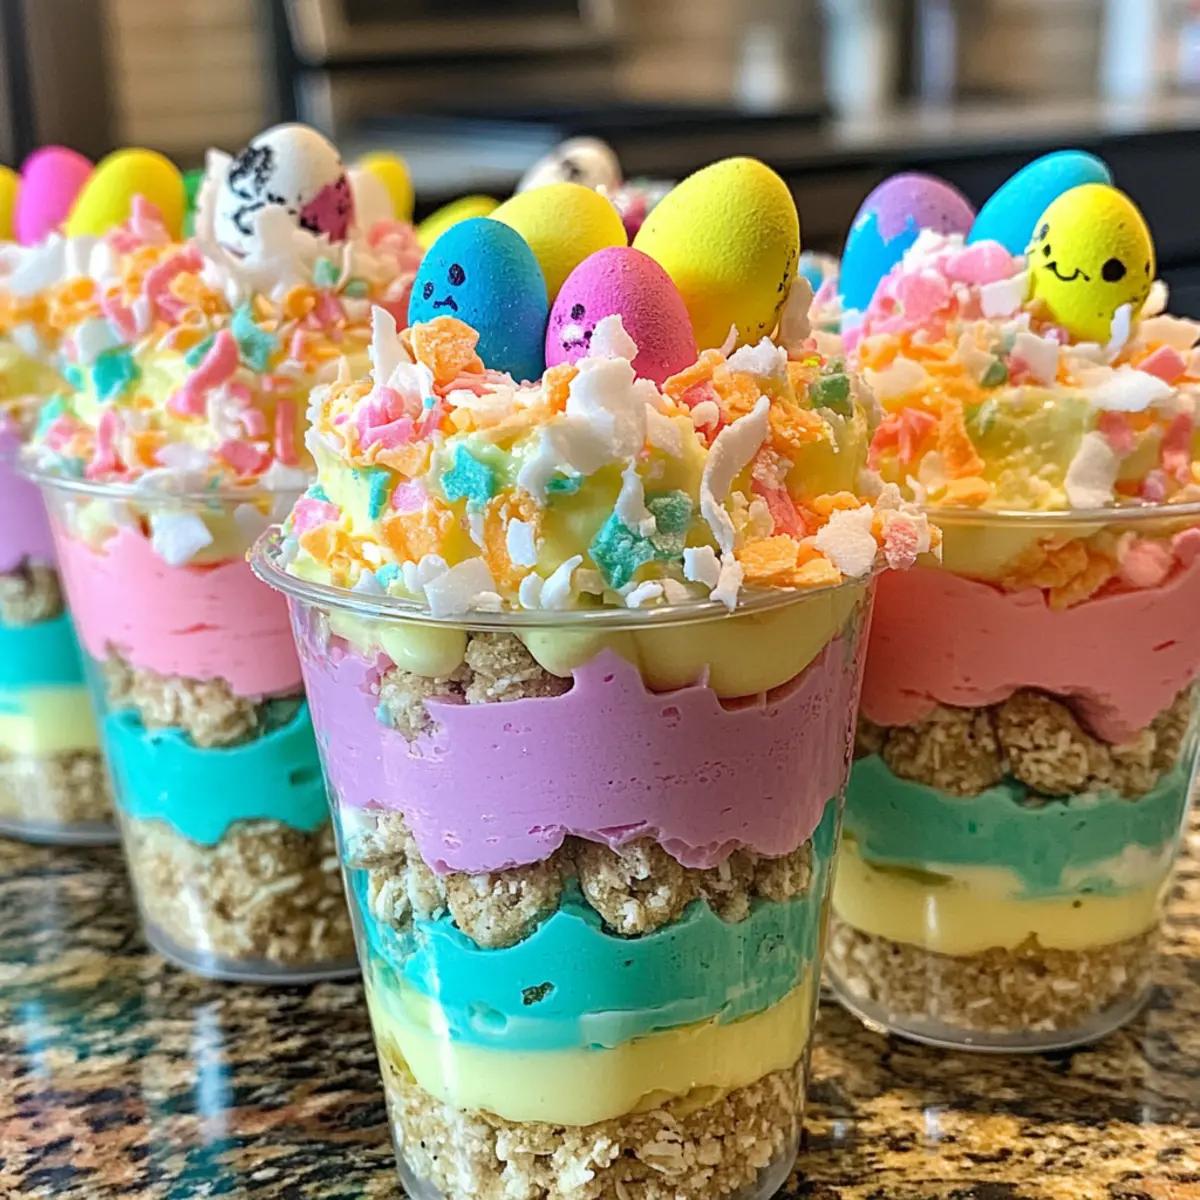
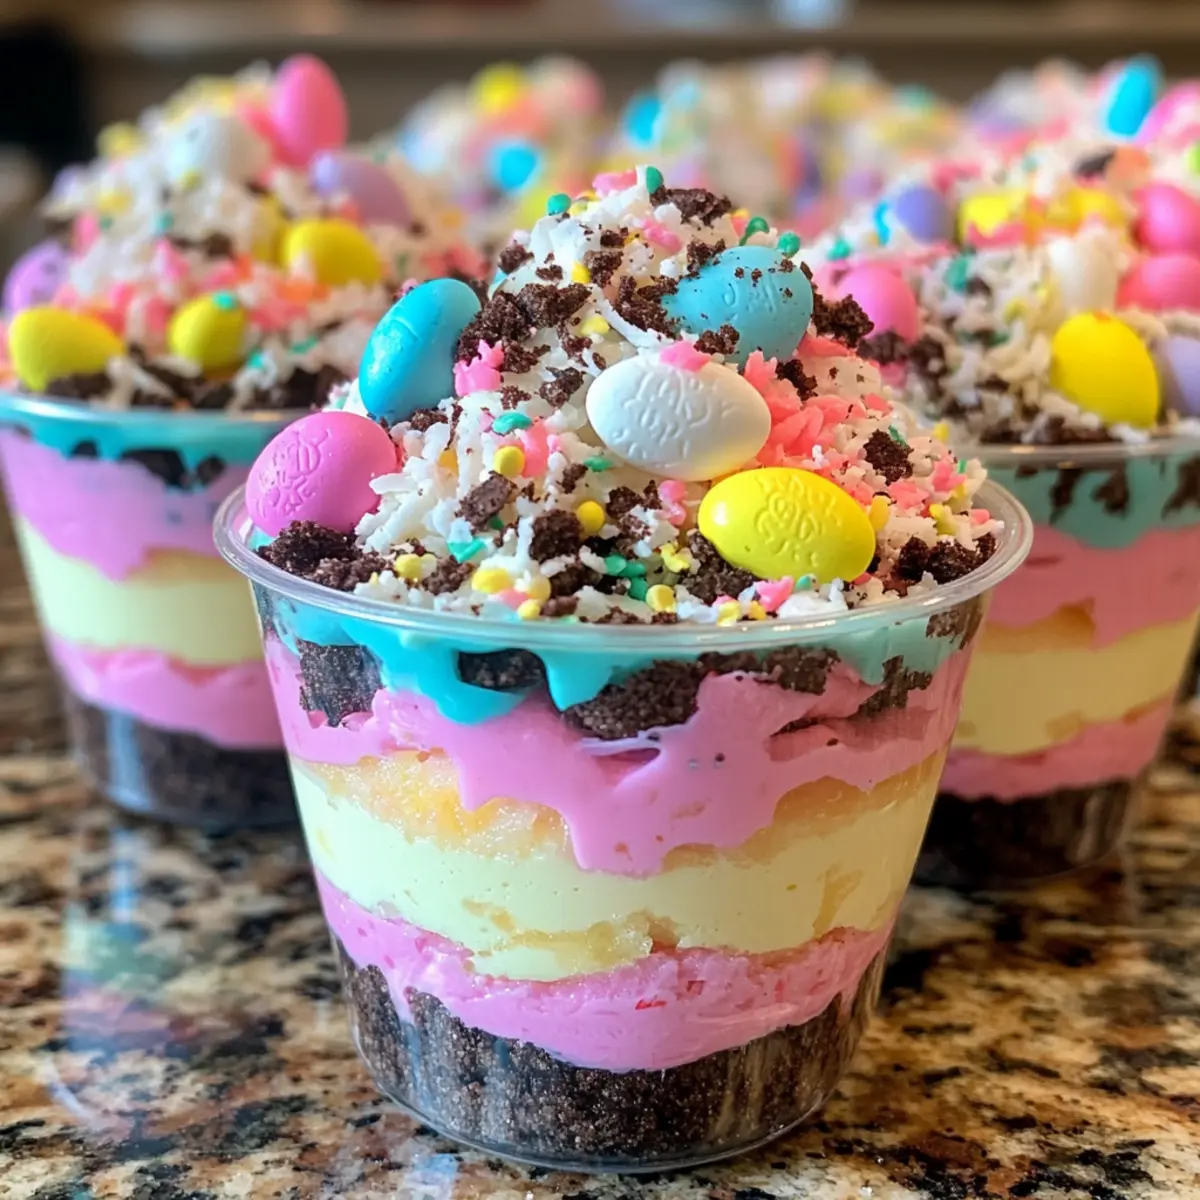
As I prepared to dive into spring, I found myself reminiscing about joyful Easter gatherings filled with laughter and vibrant decorations. Amid the festive atmosphere, one treat stood out like a beacon of delight: Easter Dirt Cups! This whimsical dessert layers creamy vanilla pudding, crunchy crushed Oreos, and playful pops of color—an irresistible combination that promises to win over both kids and adults alike. Not only are these Easter-themed treats incredibly simple to whip up (no baking required!), but they also serve as a charming centerpiece for your holiday table, inspiring smiles from everyone who indulges. Ready to bring some fun to your spring celebrations? Let’s get started on crafting your own colorful Easter Dirt Cups!

Why are Easter Dirt Cups a Must-Try?

Kid-Friendly Delight: These festive treats are perfect for children, making dessert a fun and interactive experience.
No-Bake Easy Recipe: Simply layer ingredients together without the hassle of baking – ideal for busy home cooks.
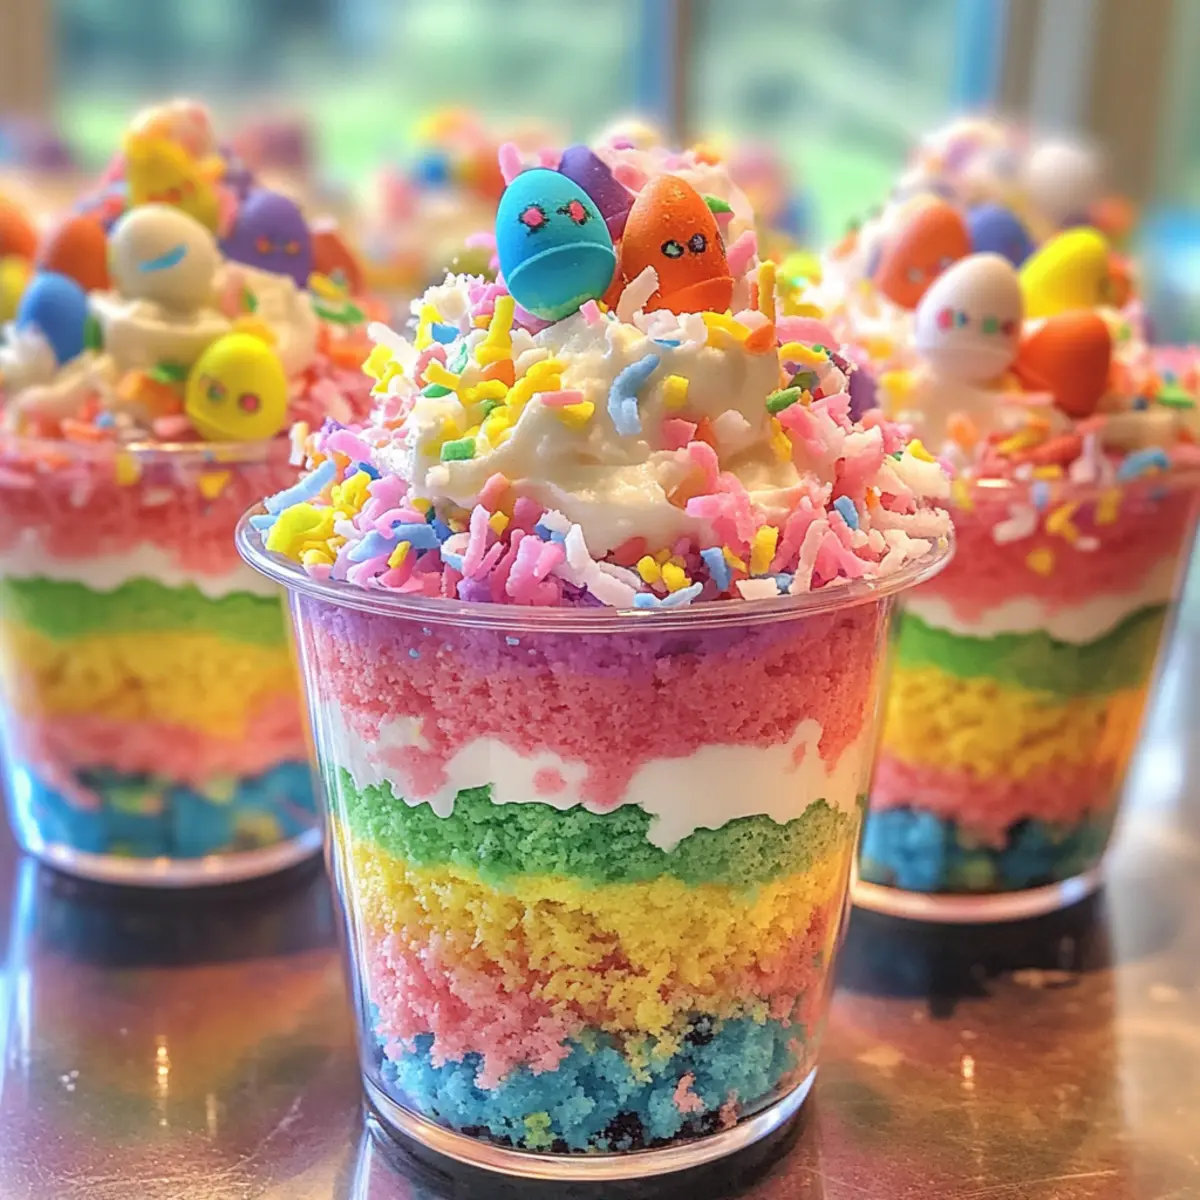
Colorful Visual Appeal: The vibrant layers of pudding and toppings create a stunning dessert that looks as good as it tastes.
Versatile Variations: Customize your cups using different cookies or flavored puddings for endless creativity—check out our ideas for adding fresh fruit!
Perfect for Gatherings: Whether it’s an Easter brunch or a spring gathering, these dirt cups will impress your guests and have them coming back for more.
Quick Prep Time: Whip up these delightful cups in under 30 minutes, leaving you plenty of time to enjoy the festivities!

Easter Dirt Cups Ingredients

  • For the Pudding Mixture
    Vanilla Instant Pudding Mix – Provides creaminess and sweetness; substitute with chocolate pudding for a fun twist.
    Cold Milk – Required for mixing with the pudding; use dairy-free milk for a lactose-free option.
    Cool Whip – Adds lightness and airiness; a dairy-free whipped topping can be used as a substitute.

  • For the “Dirt” Layer
    Oreo Cookies – Creates the “dirt” layer with a delightful crunch; any chocolate cookie can be used if Oreos aren’t available.
    Food Coloring – Enhances visual appeal with pastel shades; optional if you prefer a more natural look.

  • For Decoration
    Shredded Coconut – An optional decoration that mimics grass; colored coconut can add extra festivity.
    Candy Eggs and Peeps – Serve as fun, decorative toppings; feel free to substitute with other candies for variation, like chocolate eggs or marshmallows.

These delightful Easter Dirt Cups combine creamy layers and playful toppings, making them the perfect festive dessert for your spring celebrations!

Step‑by‑Step Instructions for Easter Dirt Cups with Colorful Layers

Step 1: Whisk the Pudding
In a medium bowl, whisk together the vanilla instant pudding mix and 2 cups of cold milk for 2 minutes until you achieve a smooth consistency. The mixture should thicken slightly; allow it to set for about 5 minutes. This initial step creates the creamy base for your delightful Easter Dirt Cups.

Step 2: Color the Pudding
Divide the pudding mixture evenly into two separate bowls. Add a few drops of food coloring to each bowl—consider using pastel shades like purple and pink for that festive touch. Mix gently until fully incorporated. The vibrant colors will playfully layer and lighten the appearance of your dirt cups.

Step 3: Fold in the Cool Whip
Now, it’s time to fold in the Cool Whip for that airy texture. Take one bowl of colored pudding and gently incorporate half of the Cool Whip using a spatula, being careful not to overmix. Repeat this process with the second bowl. This step brings a creamy lightness to the Easter Dirt Cups.

Step 4: Begin Layering the Cups
Grab your serving cups and start by adding one tablespoon of crushed Oreo cookies at the bottom of each cup. This will create the “dirt” layer that sets the foundation for your colorful creation. Ensure each cup has an even layer of crunch and texture for a satisfying bite.

Step 5: Create Colorful Layers
Carefully layer the colored pudding on top of the crushed Oreos. Alternate between the purple and pink pudding mixtures, adding a dollop of one color followed by a dollop of the other. Finish with a final layer of crushed Oreos on top to seal in all that deliciousness and create a visually stunning garnish.

Step 6: Prepare the Coconut Decoration
For the festive touch, color the shredded coconut. Use a few drops of food coloring in a small bowl, mixing well with the coconut until it reaches the desired hue. This shredded coconut will evoke the look of playful grass, adding an extra dimension to your Easter Dirt Cups.

Step 7: Add Final Touches Before Serving
Right before serving, sprinkle the colored shredded coconut evenly over the top of your dirt cups. Then, decorate each cup with candy eggs and Peeps according to your whimsy. This delightful finishing touch will make your Easter Dirt Cups stand out, ensuring a fun spring treat everyone will adore!

Expert Tips for Perfecting Easter Dirt Cups

  • Whisk Thoroughly: Ensure the pudding is whisked well to avoid lumps. A smooth texture is key to these delightful Easter Dirt Cups.
  • Chill Before Serving: Refrigerate the dirt cups for at least an hour before serving. This allows the flavors to meld and enhances the dessert’s overall texture.
  • Gentle Mixing: Be cautious not to overmix the Cool Whip with the pudding. Overmixing can lead to a loss of airiness, making the cups less fluffy and inviting.
  • Choose Clear Cups: Opt for clear serving cups to showcase the beautiful layers of your Easter Dirt Cups; it enhances the visual appeal and makes the dessert more enticing.
  • Experiment with Colors: Don’t hesitate to get creative with food coloring! Pastel shades add a cheerful touch, but you can also keep it natural for a different look.

How to Store and Freeze Easter Dirt Cups

Fridge: Keep your Easter Dirt Cups in an airtight container in the refrigerator for up to 2 to 3 days. This ensures they stay fresh and delicious, ready to be enjoyed.

Freezer: While freezing is not recommended for these cups due to the creamy texture of the pudding and Cool Whip, you can freeze the crushed Oreos separately. Just make sure they’re stored in an airtight container to maintain crunch.

Reheating: There’s no need for reheating; these delightful cups are best served cold. Just grab and enjoy straight from the fridge!

Make Ahead Options

Easter Dirt Cups are a fantastic option for meal prep, making spring celebrations a breeze! You can prepare the pudding mixture and layer it up to 24 hours in advance, ensuring that flavors meld beautifully. Simply whisk together the vanilla pudding mix and cold milk, allowing it to set, then fold in the Cool Whip for a light texture. Layer the crushed Oreos and colored pudding in your serving cups, but hold off on adding the shredded coconut and candies until just before serving to keep everything fresh and visually appealing. This way, your Easter Dirt Cups will maintain their whimsical charm and taste just as delicious as when they were first made!

What to Serve with Easter Dirt Cups

Delight in a feast that complements the whimsy of your colorful dessert, making your gathering unforgettable.

  • Spring Salad: A light and zesty salad with fresh greens and citrus adds a refreshing contrast to the creamy dessert.
  • Fruit Skewers: Colorful fruit on skewers provide a crunchy and sweet balance, perfect for a playful touch alongside the treats.
  • Chocolate Milkshake: This rich beverage mirrors the chocolate flavor of Oreos, creating a delightful indulgence for kids and adults alike.
  • Mini Quiches: These savory bites offer a comforting flavor contrast, making for a satisfying brunch option alongside your festive cups.
  • Carrot Cake: Embrace the spring theme with a slice of moist, spiced cake, harmonizing beautifully with the Easter celebration.
  • Lemonade Spritzer: A bubbly, tart drink invigorates the palate and keeps the festivities lively throughout your spring gathering.
  • Vanilla Ice Cream: Serve a scoop on the side for an extra creamy delight that balances out the dish’s playful textures.
  • Chocolate-Dipped Pretzels: These create a sweet and salty contrast, allowing guests to enjoy crunch with a whimsical touch.

Easter Dirt Cups Variations & Substitutions

Customize your Easter Dirt Cups to match your taste or dietary needs, creating a delightful twist on this festive treat!

  • Dairy-Free: Substitute dairy milk with almond or coconut milk, and choose a dairy-free whipped topping for a lighter version.
  • Gluten-Free: Use gluten-free chocolate sandwich cookies to keep the “dirt” layer deliciously crunchy.
  • Fruit-Filled Delight: Layer in fresh strawberries or blueberries between pudding layers for a refreshing burst of flavor.
  • Chocolate Lovers: Swap vanilla pudding for chocolate pudding to give an extra cocoa kick that chocolate lovers will adore!
  • Nutty Crunch: Mix in chopped nuts or granola with the crushed Oreos for added texture and a delightful crunch.
  • Natural Color: Skip the food coloring and consider a chocolate pudding base or fresh fruit purees for natural hues.
  • Extra Surprise: Hide a layer of mini marshmallows within for a fun surprise in every bite—the kids will love it!
  • Coconut Twist: Instead of colored coconut, toast the coconut for a nutty flavor that’ll elevate the dessert beautifully.

Feel free to explore these delicious options to make your Easter Dirt Cups uniquely yours! Don’t forget, the bright layers and fun toppings really shine through, making it perfect for any festive gathering. If you’re looking for more delightful desserts, check out our easy dessert ideas and fun kid-friendly recipes to keep the fun going!

Easter Dirt Cups Recipe FAQs

What type of pudding is best for making Easter Dirt Cups?
Absolutely, vanilla instant pudding mix is ideal for that creamy sweetness! However, you can easily switch things up by using chocolate pudding if you prefer a richer flavor. Both variations create a delightful base for your dessert.

How should I store leftover Easter Dirt Cups?
To keep your Easter Dirt Cups fresh, store them in an airtight container in the refrigerator. They will maintain their best quality for about 2 to 3 days. Just remember, the longer they sit, the more the layers may begin to blend together, but they will still taste great!

Can I freeze Easter Dirt Cups?
Very! It’s best not to freeze the completed Easter Dirt Cups since that can affect the creamy texture. However, if you want to prep ahead, you can freeze the crushed Oreos in an airtight container for up to 3 months. When you’re ready to assemble, simply thaw them, and then layer them as directed.

What if my Cool Whip isn’t holding its shape?
No worries! If you find that your Cool Whip is too runny, it might be due to overmixing when folding it into the pudding. For better results, fold the Cool Whip gently into the pudding mix; this will keep it light and fluffy. Additionally, ensure the Cool Whip is well-chilled before use, as this helps maintain its structure.

Are there any allergy considerations for Easter Dirt Cups?
Yes, indeed! Since this recipe contains dairy products, it’s essential to consider any lactose intolerances. Opt for dairy-free milk and use a dairy-free whipped topping to accommodate those needs. Also, be cautious if serving to small children, as candies like Peeps may contain allergens like corn syrup and gelatin.

How can I enhance the visual appeal of my Easter Dirt Cups?
For a more festive presentation, consider using a clear cup to show off those colorful layers! You can also experiment with different pastel food colorings beyond just purple and pink—try adding blue or yellow for a more vibrant look. Don’t forget to sprinkle shredded coconut and place your decorative candy eggs creatively on top!

undefined

Delicious Easter Dirt Cups for a Fun Spring Treat

Delicious Easter Dirt Cups, a fun and colorful dessert perfect for spring celebrations.
Prep Time 30 minutes
Total Time 30 minutes
Servings: 6 cups
Course: Dessert
Calories: 250

Ingredients
  

For the Pudding Mixture
  • 1 box Vanilla Instant Pudding Mix Substitute with chocolate pudding for variation.
  • 2 cups Cold Milk Use dairy-free milk for a lactose-free option.
  • 1 container Cool Whip A dairy-free whipped topping can be used.
For the 'Dirt' Layer
  • 1 package Oreo Cookies Any chocolate cookie can be substituted.
  • to taste Food Coloring Optional for enhancing visual appeal.
For Decoration
  • 1 cup Shredded Coconut Optional decoration that mimics grass.
  • to taste Candy Eggs and Peeps Feel free to substitute with other candies.

Equipment

  • medium bowl
  • spatula
  • serving cups

Method
 

Step-by-Step Instructions
  1. Whisk together the vanilla pudding mix and cold milk for 2 minutes until smooth. Let it set for 5 minutes.
  2. Divide pudding into two bowls, add food coloring to each, and mix until fully incorporated.
  3. Fold in half of the Cool Whip to one bowl of pudding, then fold in the other half to the second bowl.
  4. Add a tablespoon of crushed Oreos to the bottom of each serving cup.
  5. Layer the colored pudding mixtures on top of the crushed Oreos, alternating colors.
  6. Color the shredded coconut with food coloring and mix. Sprinkle on top of the dirt cups.
  7. Decorate with candy eggs and Peeps just before serving.

Nutrition

Serving: 1cupCalories: 250kcalCarbohydrates: 30gProtein: 3gFat: 12gSaturated Fat: 7gPolyunsaturated Fat: 1gMonounsaturated Fat: 2gCholesterol: 20mgSodium: 180mgPotassium: 200mgFiber: 1gSugar: 22gVitamin A: 500IUCalcium: 100mgIron: 1mg

Notes

Refrigerate for at least an hour before serving for best results.

Tried this recipe?

Let us know how it was!

Moist Southern-Style Banana Bread That’s Irresistibly Good

The warm, buttery aroma wafting through my kitchen always takes me back to my grandma’s house, where we would gather to enjoy freshly baked treats. This Moist Southern-Style Banana Bread with Sour Cream recipe embodies that nostalgic feeling, transforming overripe bananas into an irresistible comfort food. Not only is it a quick bread that requires just over an hour from start to finish, but the addition of sour cream ensures every slice is incredibly tender and rich. Perfect for breakfast or a cozy afternoon snack, this banana bread welcomes you to indulge in the simple pleasures of homemade goodness. Are you ready to create your own slice of comfort?

Why is this banana bread irresistible?

Nostalgic Delight: This banana bread evokes memories of cozy family gatherings, making it the ultimate comfort food.

Moist & Tender: Thanks to the sour cream, each slice boasts a beautiful moistness that melts in your mouth.

Quick & Easy: Perfect for busy days, this recipe takes just over an hour, allowing you to enjoy homemade goodness without the fuss.

Versatile Options: Customize with walnuts, chocolate chips, or nutmeg for a twist, catering to all taste preferences.

Crowd-Pleasing Appeal: Serve it warm at brunch or as an afternoon treat, and watch it disappear faster than you can say “banana bread!”

Dive into this delightful recipe and rediscover the joy of baking at home. Your kitchen will thank you for this luscious treat!

Banana Bread Ingredients

For the Batter

  • 1/3 cup softened butter – Adds richness and moisture to the bread.
    Note: Can be replaced with vegetable oil for a dairy-free option.
  • 1 1/4 cups white sugar – Provides sweetness.
    Tip: Brown sugar can be used for a deeper flavor.
  • 2 eggs – Acts as a binder while contributing to the structure of the bread.
    Substitution: 1/4 cup unsweetened applesauce can be used for egg replacement.
  • 4 large very ripe bananas, mashed – Key ingredient, contributing natural sweetness and moisture.
    Tip: Overripe bananas yield the best results; the browner, the better.
  • 1 cup sour cream – Adds tanginess and moisture, making the bread incredibly tender.
    Substitution: Greek yogurt can serve as a healthier alternative.
  • 1 tsp vanilla extract – Enhances flavor.
  • 2 1/2 cups all-purpose flour – Provides structure.
  • 1 tsp cinnamon – Adds warmth and depth to the flavor profile.
  • 2 tsp baking soda – Helps the bread rise.
  • 1/2 tsp salt – Balances sweetness.

Optional Add-ins

  • 1 cup chopped walnuts – Adds texture and nutty flavor.
    Note: Can be left out for a nut-free version or replaced with chocolate chips for a sweeter twist.

Dive into baking this Moist Southern-Style Banana Bread, and enjoy each melodious bite!

Step‑by‑Step Instructions for Moist Southern-Style Banana Bread with Sour Cream

Step 1: Preheat the Oven
Begin by preheating your oven to 350°F (175°C). While the oven warms up, take a moment to grease a standard loaf pan with softened butter or non-stick cooking spray. This will ensure your banana bread releases easily after baking, giving you that perfect golden-brown crust.

Step 2: Cream Butter and Sugar
In a large mixing bowl, cream together the softened butter and white sugar until the mixture is light and fluffy, about 3-5 minutes. Using a hand mixer or a stand mixer on medium speed works best for incorporating air, which adds to the bread’s moisture and richness. You’ll know it’s ready when it’s pale and increases in volume.

Step 3: Add the Eggs
Crack the eggs into your creamed butter and sugar, adding them one at a time. Mix well after each addition to ensure they integrate smoothly into the batter. This step is crucial for binding the ingredients together, contributing to the structure of your Moist Southern-Style Banana Bread.

Step 4: Mix in Bananas and Sour Cream
Gently fold in the mashed ripe bananas along with the sour cream and vanilla extract. Use a spatula to ensure even distribution without over-mixing; the batter should remain thick yet aerated. Your kitchen will soon be filled with the delightful scent of bananas, signaling you’re on the right track!

Step 5: Combine Dry Ingredients
In a separate bowl, whisk together the all-purpose flour, baking soda, cinnamon, and salt. This step helps to evenly distribute the leavening agent and spices, preventing clumps in the batter. It’s essential for achieving that perfectly moist texture in your banana bread.

Step 6: Blend Wet and Dry Mixtures
Gradually add the dry ingredients to the banana mixture, gently stirring until just combined. Be careful not to over-mix; a few lumps are perfectly acceptable and will help ensure the bread doesn’t become dense. The batter should be thick and creamy, hinting at the delicious banana and sour cream flavors.

Step 7: Add Optional Ingredients
If you’re using walnuts or chocolate chips, fold them in gently at this stage. They add a wonderful texture and flavor twist to your ol’ classic banana bread. Make sure they are spread evenly throughout the batter, enhancing every bite of your warm creation.

Step 8: Pour into Prepared Pan
Pour the batter into your greased loaf pan, using a spatula to smooth the top for an even bake. Tap the pan gently on the counter to release any air bubbles that might have formed. This ensures a nice rise and a beautifully shaped loaf of Moist Southern-Style Banana Bread.

Step 9: Bake to Perfection
Place the loaf pan in the preheated oven and bake for 60-70 minutes. Start checking for doneness at about the 60-minute mark; it’s ready when a toothpick inserted into the center comes out clean with a few moist crumbs attached. The bread should be a luscious golden-brown on top.

Step 10: Cool and Serve
Allow your banana bread to cool in the pan for about 10 minutes before transferring it to a wire rack. Letting it cool completely enhances the structure, making slicing a breeze. Serve warm, perhaps with a spread of butter, or enjoy the delightful aromas wafting through your home as you slice this classic comfort food!

Storage Tips for Moist Southern-Style Banana Bread

Room Temperature: Wrap your banana bread in plastic wrap or store it in an airtight container at room temperature for up to 3 days to maintain its moist texture.

Fridge: If you prefer a longer storage option, refrigerate the wrapped banana bread for up to a week; just note that it may dry out a bit compared to fresh.

Freezer: To freeze, slice the banana bread and wrap each piece in plastic wrap, then place in a freezer bag. It can be stored in the freezer for up to 3 months.

Reheating: When ready to enjoy, thaw slices in the fridge overnight or toast them directly from frozen for a warm, comforting treat that reminds you of that homemade goodness you love!

Banana Bread Variations & Substitutions

Feel free to make this banana bread uniquely yours, transforming each slice into a delightful experience!

  • Dairy-Free: Substitute the sour cream with coconut yogurt to maintain creaminess without dairy.
  • Nut-Free: Omit walnuts and replace them with sunflower seeds for a satisfying crunch that’s safe for nut allergies.
  • Low Sugar: Use honey or maple syrup instead of white sugar for a natural sweetness that’s still moist and delicious.
  • Whole Wheat: Swap all-purpose flour with whole wheat flour for a healthier, hearty twist that adds fiber.
  • Flavor Boost: Add a teaspoon of nutmeg or even a splash of orange juice for a delightful citrus aroma in every bite.
  • Chocolate Lovers: Mix in chocolate chips with the batter to create a rich, sweet variation that kids (and adults) will love!
  • Fruit Twists: Fold in shredded zucchini or chopped apples for an unexpected juicy layer of flavor and moisture.
  • Spicy Kick: Add a pinch of cayenne pepper for a surprising warmth that balances the sweet richness of the banana bread.

Remember, cooking is all about experimenting! Try different combinations, and if you love a hint of warmth, don’t forget to explore spicy recipes that can add a delightful twist to your dishes. Or perhaps, if you’re looking for something sweet, check out our dessert ideas that perfectly complement this treat! Happy baking!

Helpful Tricks for Banana Bread

  • Choose Ripe Bananas: Look for bananas with lots of brown spots. The riper they are, the sweeter and more flavorful your banana bread will be.

  • Avoid Over-Mixing: When combining wet and dry ingredients, mix until just combined. Over-mixing can lead to a dense texture, so be gentle!

  • Check for Doneness: Use the toothpick test—insert it into the center of the loaf; if it comes out clean or with a few moist crumbs, your banana bread is ready.

  • Moisture Boost: Incorporate sour cream for an incredibly moist banana bread. If unavailable, Greek yogurt works as a delightful alternative.

  • Customize Flavors: Don’t hesitate to experiment! Add chocolate chips, dried fruits, or spices like nutmeg to enrich your banana bread experience.

  • Storage Tips: Keep leftover banana bread wrapped in plastic at room temperature for up to 3 days. For longer storage, slice and freeze for up to 3 months!

Make Ahead Options

These Moist Southern-Style Banana Bread loaves are a busy cook’s dream for meal prep! You can prepare the batter up to 24 hours in advance by mixing all the wet and dry ingredients together, then refrigerating the mixture in an airtight container. This not only saves time but allows the flavors to meld beautifully. To maintain quality, mix in any optional ingredients like walnuts or chocolate chips just before baking. When you’re ready to enjoy this creamy, tender banana bread, pour the chilled batter into your greased loaf pan and bake as instructed. You’ll have a fresh, mouthwatering treat ready to go with minimal effort!

What to Serve with Moist Southern-Style Banana Bread?

There’s nothing quite like the comforting scent of freshly baked banana bread filling your home, inviting you to create the perfect meal experience around it.

  • Creamy Mashed Potatoes: This classic side dish adds a smooth, buttery texture that complements the sweet slices beautifully. Perfect for any meal pairing, its richness takes comfort food to a whole new level.

  • Fresh Berry Salad: A vibrant mix of seasonal berries and a light honey vinaigrette brings a burst of freshness to your table, balancing the sweetness of the banana bread.

  • Bacon-Wrapped Asparagus: The crunch of asparagus wrapped in savory bacon creates an irresistible contrast. This pairing balances the soft, sweet bread with something savory and satisfying.

  • Buttery Corn on the Cob: Sweet corn, brushed with butter, enhances the meal experience by adding a delightful sweetness and juicy texture that ties together the flavors wonderfully.

  • Spiced Chai Latte: A warm cup of chai with its comforting spices complements the banana bread brilliantly. Its creamy texture and aromatic qualities make it a delightful addition to your snack time.

  • Chocolate Chip Cookies: For those with a sweet tooth, offering warm chocolate chip cookies alongside banana bread creates a tempting dessert platter. You just can’t go wrong with this classic combo!

Let your imagination guide you as you pair your delicious banana bread with these satisfying side dishes and treats, creating warm memories one bite at a time.

Moist Southern-Style Banana Bread with Sour Cream Recipe FAQs

How do I know if my bananas are ripe enough?
Absolutely! For the best results, look for bananas that are heavily speckled with brown spots or even mostly brown. Overripe bananas produce more natural sweetness and moisture, which are essential for your banana bread’s delightful flavor and texture.

What’s the best way to store banana bread?
I recommend wrapping your banana bread tightly in plastic wrap or placing it in an airtight container. At room temperature, it will stay fresh for about 3 days. If you’d like it to last longer, refrigerate it for up to a week, although this may slightly affect its moisture.

Can I freeze banana bread, and how?
Very! To freeze your banana bread, it’s best to slice it first for easy serving later on. Wrap each slice tightly in plastic wrap and then place them in a freezer bag. This method prevents freezer burn and keeps your banana bread delightful for up to 3 months. When you’re ready to enjoy, simply thaw overnight in the refrigerator or pop slices in the toaster for a quick treat!

What should I do if my banana bread comes out too dense?
Don’t worry; you can troubleshoot! Dense banana bread often results from over-mixing the batter or not using ripe enough bananas. Be gentle when combining wet and dry ingredients, mixing until just blended. If you suspect your bananas weren’t ripe enough, next time aim for ones with plenty of dark spots for optimal sweetness and moisture.

Is there a nut-free option for this recipe?
Absolutely! If you prefer to skip nuts, simply omit the walnuts from the recipe. You can also replace them with chocolate chips for a delightful twist that adds sweetness to every slice without the crunch.

Can I substitute ingredients for dietary reasons?
Yes! For a dairy-free version, swap out the softened butter for vegetable oil. If you’d like to replace the eggs, use 1/4 cup of unsweetened applesauce per egg. Greek yogurt can also be a great alternative for the sour cream, maintaining that creamy texture while adding a health boost!

undefined

Moist Southern-Style Banana Bread That's Irresistibly Good

This Moist Southern-Style Banana Bread with Sour Cream transforms overripe bananas into an irresistible comfort food.
Prep Time 15 minutes
Cook Time 1 hour 10 minutes
Cooling Time 10 minutes
Total Time 1 hour 35 minutes
Servings: 10 slices
Course: Breakfast
Cuisine: Southern
Calories: 200

Ingredients
  

For the Batter
  • 1/3 cup softened butter Can be replaced with vegetable oil for a dairy-free option.
  • 1 1/4 cups white sugar Brown sugar can be used for a deeper flavor.
  • 2 eggs 1/4 cup unsweetened applesauce can be used for egg replacement.
  • 4 large very ripe bananas Overripe bananas yield the best results; the browner, the better.
  • 1 cup sour cream Greek yogurt can serve as a healthier alternative.
  • 1 tsp vanilla extract
  • 2 1/2 cups all-purpose flour
  • 1 tsp cinnamon
  • 2 tsp baking soda
  • 1/2 tsp salt Balances sweetness.
Optional Add-ins
  • 1 cup chopped walnuts Can be left out for a nut-free version or replaced with chocolate chips.

Equipment

  • Loaf Pan
  • Mixing Bowl
  • spatula
  • Hand mixer

Method
 

Step-by-Step Instructions
  1. Preheat your oven to 350°F (175°C) and grease a standard loaf pan.
  2. Cream together the softened butter and white sugar until light and fluffy.
  3. Add the eggs one at a time and mix well after each addition.
  4. Fold in the mashed bananas, sour cream, and vanilla extract.
  5. In a separate bowl, whisk together flour, baking soda, cinnamon, and salt.
  6. Gradually add the dry ingredients to the banana mixture and stir until just combined.
  7. Fold in walnuts or chocolate chips if using.
  8. Pour the batter into the greased loaf pan and smooth the top.
  9. Bake for 60-70 minutes, checking for doneness with a toothpick.
  10. Allow to cool in the pan for 10 minutes before transferring to a wire rack.

Nutrition

Serving: 1sliceCalories: 200kcalCarbohydrates: 30gProtein: 3gFat: 8gSaturated Fat: 4gMonounsaturated Fat: 3gCholesterol: 40mgSodium: 200mgPotassium: 250mgFiber: 1gSugar: 12gVitamin A: 2IUVitamin C: 10mgCalcium: 2mgIron: 6mg

Notes

For the best flavor, use ripe bananas with brown spots. Avoid over-mixing the batter to keep it light and airy.

Tried this recipe?

Let us know how it was!

Snickerdoodle Banana Bread: Sweet Treat for Overripe Bananas

Little did I know that my overripe bananas would turn into the star of the show! That’s right—cooking doesn’t have to be complicated to be satisfying. With this Snickerdoodle Banana Bread, you’ll be enveloped in the cozy aromas of cinnamon and sugar, transforming those neglected bananas into a deliciously moist loaf. This recipe not only brings a warmth to your kitchen but is perfect for a quick, homemade indulgence that’s both vegetarian-friendly and a clever way to reduce food waste. Plus, you have the versatility to make it gluten-free or vegan with just a few simple substitutions! What toppings will you sprinkle on yours? Let’s dive in and make some sweet memories together!

Why is This Banana Bread Unique?

Unique Twist: This Snickerdoodle Banana Bread takes a beloved dessert and mixes it with the comfort of a classic loaf. Who wouldn’t love that?

Delightful Aroma: The warm scents of cinnamon and sugar fill your kitchen, making it feel inviting and homey.

Perfectly Moist: The combination of ripe bananas and brown sugar ensures each slice is incredibly moist, tempting you to go back for more.

Easy to Customize: With options for gluten-free and vegan variations, it’s accessible for everyone! Try adding nuts or chocolate chips for a personal touch.

Quick Indulgence: In just an hour, you can transform overripe bananas into a delicious treat that pairs perfectly with your morning coffee or afternoon tea—everyone will be clamoring for seconds!

Snickerdoodle Banana Bread Ingredients

Get ready to create a cozy delight!

For the Bread

  • Ripe Bananas – Adds natural sweetness and moisture; choose heavily spotted ones for best results.
  • All-Purpose Flour – Provides structure; you can substitute with half whole wheat flour for a denser texture.
  • Granulated Sugar – Sweetens the bread; try honey or maple syrup for a lighter sweetness option.
  • Brown Sugar – Enhances moisture and depth of flavor, crucial for that delicious snickerdoodle taste.
  • Baking Soda – Acts as the leavening agent, ensuring your loaf rises perfectly.
  • Salt – Balances sweetness and enhances the overall flavor profile.
  • Ground Cinnamon – Key flavor element that gives the bread its signature snickerdoodle charm.
  • Eggs – Bind ingredients together; for a vegan option, use a flax egg instead.
  • Butter – Adds richness; consider a plant-based substitute for a dairy-free version.
  • Milk – Contributes moisture; non-dairy options like almond or oat milk work wonderfully.

For the Topping

  • Sugar for Topping – Optional sprinkling adds sweetness and crunch, making it that much better!

Step‑by‑Step Instructions for Snickerdoodle Banana Bread

Step 1: Preheat Oven
Begin by preheating your oven to 350°F (175°C). This ensures a perfectly baked Snickerdoodle Banana Bread. While the oven heats, gather all your ingredients and baking equipment, including a mixing bowl, a loaf pan, and measuring cups. Preparing your workspace will make the cooking process smoother and more enjoyable!

Step 2: Mash Bananas
In a large mixing bowl, take your ripe bananas and mash them until they are mostly smooth with a few lumps remaining. Aim for about 1 to 1 ½ cups of mashed bananas. The natural sweetness of the fruits is essential for the final flavor, so opt for those heavily spotted bananas. Set the bowl aside as you move on to the next step.

Step 3: Combine Wet Ingredients
In a separate bowl, whisk together the melted butter, eggs, and milk until fully incorporated. Pour this mixture over the mashed bananas, ensuring even distribution. This blend of wet ingredients will add richness and moisture, which is key for the Snickerdoodle Banana Bread’s texture. Mix until well combined, but do not over-mix to maintain fluffiness.

Step 4: Mix Dry Ingredients
In a third bowl, sift together the all-purpose flour, baking soda, salt, ground cinnamon, granulated sugar, and brown sugar. Mixing the dry ingredients ensures that the leavening agents are evenly distributed throughout the flour. Look for a uniform color and texture as you blend them, which will contribute to the overall flavor of the bread.

Step 5: Combine Mixtures
Gently fold the dry ingredients into the wet mixture until just combined. Be careful not to over-mix, as this can lead to a dense loaf. You want a few flour streaks remaining for the perfect Snickerdoodle Banana Bread. Scrape down the sides of the bowl, catching any stray bits, to ensure that everything is well-integrated.

Step 6: Prepare Loaf Pan
Grease a standard loaf pan with cooking spray or butter, ensuring that all sides are coated to prevent sticking. Pour the banana bread batter into the prepared pan, smoothing the top gently with a spatula. Make sure the batter is evenly distributed so it bakes uniformly, yielding a pleasing rise and shape to your banana bread.

Step 7: Add Topping
If you desire a sweet crunch, mix a small amount of sugar and ground cinnamon in a bowl, then sprinkle it evenly over the batter in the loaf pan. This topping not only enhances the visual appeal but also adds a delightful contrast in texture. Get creative with the amount based on your taste preferences!

Step 8: Bake
Place the loaf pan in the preheated oven, and bake for 50-60 minutes. Keep an eye on the bread as it bakes; it’s done when a toothpick inserted into the center comes out clean, with only a few moist crumbs. The top should be golden brown and slightly cracked, signaling that your Snickerdoodle Banana Bread is ready to come out.

Step 9: Cool
Once baked, remove the banana bread from the oven, and let it cool in the pan for about 10 minutes. This allows it to set up and makes it easier to transfer. After cooling, carefully turn it out onto a wire rack to cool completely. The delicious aromas will fill your kitchen, beckoning you to slice into this delightful loaf.

Make Ahead Options

These Snickerdoodle Banana Bread loaves are perfect for meal prep aficionados! You can mash the ripe bananas and mix the wet ingredients up to 24 hours in advance, storing them in the refrigerator to keep everything fresh and prevent browning. Additionally, you can measure and combine the dry ingredients and keep them in an airtight container for up to 3 days. When you’re ready to bake, simply combine the wet and dry mixtures, pour the batter into the loaf pan, and bake as per the instructions. This way, you’ll have a warm, delicious treat with minimal effort on busy weeknights, all while maintaining its delightful flavor and texture!

Storage Tips for Snickerdoodle Banana Bread

Room Temperature: Store the banana bread in an airtight container for up to 3 days to maintain its delightful moisture and flavor.

Fridge: If you want to extend its lifespan, keep the bread wrapped well in plastic or foil in the fridge for up to 1 week; this helps prevent it from drying out.

Freezer: Freeze any leftovers for up to 3 months. Wrap individual slices or the whole loaf tightly in plastic wrap, then foil, and thaw overnight in the fridge when you’re ready to enjoy a slice.

Reheating: To reheat, simply warm slices in the microwave for about 10-15 seconds or in a toaster oven, bringing back that cozy freshness. Enjoy your Snickerdoodle Banana Bread!

Snickerdoodle Banana Bread Variations

Feel free to personalize this recipe and let your taste buds guide you—it’s all about making it yours!

  • Gluten-Free: Substitute all-purpose flour with a gluten-free blend to enjoy a delightful loaf everyone can savor!

  • Vegan: Replace the eggs with a flax egg (1 tablespoon flaxseed meal mixed with 2.5 tablespoons water) for a plant-based twist that doesn’t compromise flavor.

  • Nutty Delight: Add in ½ cup of chopped walnuts or pecans for a satisfying crunch and extra heartiness in your bread.

  • Chocolate Lover’s: Fold in ½ cup of chocolate chips for a rich, indulgent variation that takes your banana bread to the next level!

  • Warm Spices: Bring in some nutmeg or ginger alongside the cinnamon to add warmth and complexity to your bread’s flavor profile.

  • Sweet Topping: Experiment with a topping of cinnamon-sugar and a sprinkle of chopped nuts for a beautiful crunch on top.

  • Fruit Fusion: Fold in some chopped apples or raisins for an extra burst of sweetness and texture, balancing the flavors beautifully.

With these variations, it’s easy to create a version that suits the whole family! For those craving a unique twist, you might also enjoy a slice alongside a warm cup of freshly brewed coffee or tea— perfect for making sweet memories at home.

Expert Tips for Snickerdoodle Banana Bread

Banana Selection: Use ripe, heavily spotted bananas for maximum sweetness and moisture. Avoid underripe bananas for the best flavor.

Mixing Technique: Combine wet and dry ingredients just until incorporated to prevent a dense loaf. Overmixing can ruin your Snickerdoodle Banana Bread’s delicate texture.

Bake Time Awareness: Ovens can vary in temperature; check your bread a few minutes early to avoid overcooking. Aim for a golden-brown top with a clean toothpick for doneness.

Topping Creativity: Feel free to get creative with your topping! A sprinkle of sugar and cinnamon adds delightful texture, but chopped nuts or chocolate chips can elevate your bread even more.

Storage Options: Keep your banana bread in an airtight container to maintain its moisture. It can stay fresh at room temperature for up to 3 days, or freeze for longer-lasting enjoyment.

What to Serve with Snickerdoodle Banana Bread?

Indulge in a delightful meal by pairing your warm, comforting bread with these mouthwatering options.

  • Creamy Butter: A generous pat of butter melts into the warm slices, adding rich flavor and a luscious texture that complements the cinnamon notes.

  • Fresh Fruit Salad: Bright, juicy fruits like berries and citrus provide a refreshing contrast, balancing the sweetness of the banana bread beautifully.

  • Coffee or Tea: A steaming cup of your favorite brew enhances the cozy experience, making every bite taste even better.

  • Greek Yogurt: The creamy tanginess of Greek yogurt adds a delightful creaminess and protein boost, perfect for breakfast or a snack.

  • Chopped Nuts: Sprinkle on some walnuts or pecans for an extra crunch, enriching the overall texture and adding a nutty flavor dimension.

  • Vanilla Ice Cream: A scoop on the side creates a heavenly dessert that transforms your banana bread into a memorable treat, especially when warmed.

  • Chocolate Drizzle: Drizzling melted chocolate over slices adds an indulgent touch, creating a decadent pairing that chocolate lovers will adore.

Each option adds a unique element, making your Snickerdoodle Banana Bread experience truly scrumptious!

Snickerdoodle Banana Bread Recipe FAQs

What kind of bananas should I use for this recipe?
Absolutely! For the best results, use heavily spotted or even blackened bananas. These ripe bananas will add natural sweetness and moisture to your Snickerdoodle Banana Bread, making it irresistibly delicious.

How should I store leftover banana bread?
To keep your Snickerdoodle Banana Bread fresh, store it in an airtight container at room temperature for up to 3 days. If you wish to extend its life, wrap it tightly in plastic wrap or foil and place it in the fridge for up to 1 week. This keeps it moist and flavorful!

Can I freeze Snickerdoodle Banana Bread?
Yes, you can freeze it! To do so, wrap the cooled loaf or individual slices tightly in plastic wrap, followed by aluminum foil. This helps prevent freezer burn. It will stay fresh for up to 3 months. Thaw overnight in the fridge before indulging again—it’s just as tasty!

What if my banana bread turns out too dense?
Very good question! If your Snickerdoodle Banana Bread ends up dense, it might be due to overmixing the batter. Be sure to mix your wet and dry ingredients just until combined, leaving a few flour streaks. Also, check your oven’s temperature; it may be running hotter than indicated, leading to a denser outcome.

Can I make this recipe vegan?
Absolutely! To make your Snickerdoodle Banana Bread vegan, substitute the eggs with a flax egg—just mix 1 tablespoon of ground flaxseed with 2.5 tablespoons of water and let it sit for about 5 minutes until it thickens. You can also use non-dairy milk and a plant-based butter alternative; this will still yield a deliciously moist loaf!

undefined

Snickerdoodle Banana Bread

Make this delightful Snickerdoodle Banana Bread with overripe bananas for a sweet, moist treat. Perfect for breakfast and easy to customize!
Prep Time 15 minutes
Cook Time 1 hour
Cooling Time 10 minutes
Total Time 1 hour 25 minutes
Servings: 8 slices
Course: Breakfast
Cuisine: American
Calories: 210

Ingredients
  

For the Bread
  • 3 medium Ripe Bananas Heavily spotted for best results.
  • 2 cups All-Purpose Flour Can substitute with half whole wheat flour.
  • 1 cup Granulated Sugar Try honey or maple syrup for a lighter option.
  • 1/2 cup Brown Sugar Enhances moisture and depth of flavor.
  • 1 teaspoon Baking Soda Leavening agent.
  • 1/2 teaspoon Salt Balances sweetness.
  • 1 teaspoon Ground Cinnamon Key flavor element.
  • 2 large Eggs For vegan option, use a flax egg.
  • 1/2 cup Butter Can use plant-based substitute.
  • 1/2 cup Milk Non-dairy options like almond or oat milk work great.
For the Topping
  • 2 tablespoons Sugar for Topping Optional for sweetness and crunch.

Equipment

  • Mixing Bowl
  • Loaf Pan
  • Measuring cups
  • whisk
  • spatula

Method
 

Step-by-Step Instructions
  1. Preheat your oven to 350°F (175°C). Gather all your ingredients and equipment.
  2. Mash the ripe bananas in a large bowl until mostly smooth with a few lumps remaining.
  3. Whisk together the melted butter, eggs, and milk in a separate bowl, then pour over the mashed bananas.
  4. Sift together the flour, baking soda, salt, cinnamon, granulated sugar, and brown sugar in another bowl.
  5. Gently fold the dry ingredients into the wet mixture until just combined.
  6. Grease a loaf pan and pour the batter into it, smoothing the top.
  7. Mix sugar and cinnamon for topping and sprinkle evenly over the batter.
  8. Bake for 50-60 minutes, checking with a toothpick for doneness.
  9. Let the bread cool in the pan for about 10 minutes, then turn out onto a wire rack to cool completely.

Nutrition

Serving: 1sliceCalories: 210kcalCarbohydrates: 32gProtein: 3gFat: 9gSaturated Fat: 5gMonounsaturated Fat: 4gCholesterol: 50mgSodium: 150mgPotassium: 200mgFiber: 1gSugar: 15gVitamin A: 300IUVitamin C: 3mgCalcium: 20mgIron: 0.7mg

Notes

For a gluten-free option, substitute all-purpose flour with a gluten-free blend. Feel free to add nuts or chocolate chips for extra flavor.

Tried this recipe?

Let us know how it was!

Irresistible Chocolate Banana Bread for Your Sweet Cravings

Walking past my kitchen, the intoxicating aroma of sweet bananas mingled with rich chocolate drew me back in. Today, I’m excited to share my favorite recipe for Chocolate Banana Bread, a deliciously easy recipe that transforms overripe bananas into pure bliss. Not only is this quick bread a perfect way to indulge your chocolate cravings, but it also serves as a fantastic way to use up those brown bananas sitting on your counter. With its moist texture and delightful flavor, this treat is equally suited for breakfast or a comforting snack any time of day. Best of all, you can customize it with your favorite nuts or spices for an extra twist! Ready to discover how to create this chocolatey delight? Let’s dive in!

Why is This Chocolate Banana Bread Irresistible?

Decadent Flavor: The perfect blend of chocolate and bananas creates an irresistible treat that satisfies sweet cravings.

Simple & Quick: With just a few easy steps, this recipe is ideal for novice bakers and busy home cooks alike.

Versatile Options: Customize your loaf by adding nuts or spices, allowing you to play with flavors every time you bake.

Moist & Tender Texture: The result is a soft, cake-like bread that’s absolutely delightful to enjoy, hot or cold.

Crowd-Pleasing Appeal: This chocolate banana bread is a guaranteed hit, welcome at breakfast, parties, or as an afternoon snack.

For more delicious bread options, check out quick banana bread recipes that take minutes to prepare!

Chocolate Banana Bread Ingredients

• Get ready to bake your new favorite treat.

For the Batter

  • Unsalted Butter – For richness and moisture; substitute with coconut oil for a dairy-free option.
  • Brown Sugar – Adds sweetness and moisture; feel free to use light brown or granulated sugar if needed.
  • Very Ripe Bananas – Provides natural sweetness and moisture; opt for darker bananas for a more intense flavor.
  • Eggs – Essential for binding and structure; you can use flax eggs as a vegan substitute.
  • Vanilla Extract – Enhances the flavor; use pure vanilla for a higher quality taste.
  • All-Purpose Flour – Gives structure to the bread; consider using gluten-free flour for an alternative.
  • Unsweetened Cocoa Powder – Provides that chocolate flavor; make sure it’s sifted to avoid lumps.
  • Baking Soda – Acts as the leavening agent; double-check its expiry for the best results.
  • Sea Salt – Balances sweetness and enhances flavor.
  • Semisweet Chocolate Chips – Adds bursts of chocolate in every bite; swap for dark chocolate chips for a richer experience.

Optional Additions

  • Chopped Walnuts or Pecans – Add ½ cup for a delightful crunchy texture.
  • Cinnamon or Nutmeg – Incorporate spices for a warm, aromatic twist.

Dive into your sweet cravings with this decadent chocolate banana bread!

Step‑by‑Step Instructions for Decadent Chocolate Banana Bread

Step 1: Preheat the Oven
Begin by preheating your oven to 350°F (175°C). While it warms up, prepare your loaf pan by greasing it with cooking spray or lining it with parchment paper to ensure your delicious chocolate banana bread releases easily after baking.

Step 2: Cream Butter and Sugar
In a medium mixing bowl, melt the unsalted butter and combine it with brown sugar using a hand mixer. Beat the mixture for about 2-3 minutes until it becomes light and fluffy, which will add air into the batter, creating a lovely texture in your bread.

Step 3: Incorporate Bananas, Eggs, and Vanilla
Next, mash the very ripe bananas in a separate bowl until they’re smooth. Add the mashed bananas to the butter-sugar mixture along with the eggs and vanilla extract. Mix everything together until smooth and well combined, forming a rich and creamy batter base for your chocolate banana bread.

Step 4: Add Dry Ingredients
Gradually sift in the all-purpose flour, unsweetened cocoa powder, baking soda, and sea salt into the banana mixture. Using a spatula, fold the dry ingredients in gently, just until combined. Avoid overmixing to ensure your bread stays light and fluffy with a tender crumb.

Step 5: Fold in the Chocolate Chips
Now, add the semisweet chocolate chips to the batter and gently fold them in. This step is crucial as it distributes the delicious chocolate throughout the bread, ensuring every bite is filled with rich flavor.

Step 6: Pour Batter into the Loaf Pan
Carefully pour the batter into your prepared loaf pan, using a spatula to smooth the top. This helps create an even loaf as it bakes, giving your chocolate banana bread a beautiful presentation once done.

Step 7: Bake the Bread
Place the loaf pan in the preheated oven and bake for 60 minutes. To check for doneness, insert a toothpick into the center. If it comes out clean or with just a few moist crumbs, your decadent chocolate banana bread is ready; if not, continue to bake for an additional 5 minutes.

Step 8: Cool and Slice
Once baked, remove the loaf from the oven and let it cool in the pan for about 10 minutes. After that, carefully transfer the chocolate banana bread to a wire cooling rack to cool for another 10-15 minutes. This cooling period helps enhance the texture, making it easier to slice and serve!

Make Ahead Options

Busy home cooks will love that this decadent Chocolate Banana Bread can be prepped ahead to save time! You can mash the very ripe bananas and mix them with the butter and brown sugar up to 24 hours in advance, then refrigerate the mixture until you’re ready to bake. You can also mix the dry ingredients (flour, cocoa powder, baking soda, and salt) ahead of time and store them in an airtight container for up to 3 days. To maintain the rich flavor and moisture, be sure to let the batter come to room temperature before baking. When it’s time to round off your baking, simply follow the remaining steps for mixing in the eggs and chocolate chips, then pour the batter into the pan and bake. You’ll be rewarded with just as delicious a loaf, perfect for busy weeknights!

What to Serve with Chocolate Banana Bread

Pair this delightful treat with complementary dishes, creating a complete and satisfying meal experience.

  • Creamy Mashed Potatoes: This classic side offers a velvety texture that balances the sweetness of the chocolate banana bread. The savory flavor enhances the overall meal experience.

  • Vanilla Ice Cream: A scoop of creamy vanilla ice cream pairs beautifully with the rich chocolate flavors, creating a decadent dessert combo that melts in your mouth.

  • Fresh Fruit Salad: Light and refreshing, a fruit salad offers a burst of brightness and acidity to offset the sweetness of the chocolate banana bread. The mix of flavors will awaken your taste buds!

  • Nutty Granola: Serve alongside a crunchy granola for breakfast—its earthy flavors and added texture enhance the soft, sweet bread sensation. A perfect start to your day!

  • Espresso or Coffee: A rich, bold coffee or a shot of espresso complements the fudge-like depth of chocolate banana bread, elevating your indulgent experience with every sip.

  • Chocolate Hazelnut Spread: Spread a layer of chocolate hazelnut for an extra layer of indulgence. This will amplify the chocolate flavor without overpowering the banana essence.

  • Spiced Chai Latte: Pair it with a warm cup of chai latte, where the spices blend beautifully against the backdrop of chocolate, heightening your enjoyment with aromatic warmth.

Create a cozy atmosphere with these pairings, and watch as your chocolate banana bread steals the spotlight!

Chocolate Banana Bread Variations

Feel free to experiment and make this chocolate banana bread uniquely yours with a few simple tweaks!

  • Nutty Delight: Add ½ cup of walnuts or pecans for a satisfying crunch in every slice. The nutty flavor enhances the sweetness of the bananas beautifully.

  • Healthier Twist: Swap half of the all-purpose flour for whole wheat flour to increase fiber content without compromising flavor. It’s an easy way to sneak in some extra nutrition!

  • Spicy Kick: Stir in a teaspoon of cinnamon or nutmeg for a cozy, warm aroma that complements the chocolate perfectly. These spices create an inviting flavor profile, especially in cooler months.

  • Muffin Version: Transform your batter into delightful banana bread muffins by baking in a muffin tin for 20-25 minutes. They make for an easy grab-and-go snack!

  • Fruit Fusion: Toss in ½ cup of dried fruits like cranberries or cherries for a sweet-tart burst of flavor. This adds a colorful touch and a delightful chewiness to each bite.

  • Chocolate Boost: Double up the chocolate by adding an additional ½ cup of chocolate chips or using mini chocolate chips for even more indulgence. A chocolate lover’s dream!

  • Coconut Surprise: Add shredded coconut for a tropical twist. It brings a chewy texture and a hint of sweetness that pairs wonderfully with the chocolate and banana.

  • Chili Chocolate: For those who love a hint of heat, consider adding a pinch of cayenne pepper. This will create an intriguingly spicy chocolate banana bread that surprises your taste buds!

For further exploration, check out more ideas in our quick banana bread recipes that promise delightful variations!

How to Store and Freeze Chocolate Banana Bread

Room Temperature: Keep your chocolate banana bread in an airtight container at room temperature for up to 3 days to maintain its delicious moisture.

Fridge: If you prefer your bread chilled, it can be refrigerated for up to 5 days. Just ensure it’s well wrapped to prevent it from drying out.

Freezer: For longer storage, wrap slices of chocolate banana bread in plastic wrap and place them in a freezer-safe bag. They will keep well for up to 3 months—perfect for enjoying later!

Reheating: To enjoy a warm slice, simply thaw in the fridge overnight and warm in the microwave for 10-15 seconds or in the oven at 350°F for about 5 minutes.

Expert Tips for Chocolate Banana Bread

  • Use Ripe Bananas: Choose overripe bananas for optimal sweetness and moisture; darker bananas elevate the flavor significantly.

  • Avoid Overmixing: Gently fold in dry ingredients to maintain a light, fluffy texture. Overmixing can lead to a dense chocolate banana bread.

  • Incorporate Add-Ins: For added texture and flavor, consider folding in a handful of chopped nuts or an extra sprinkle of chocolate chips before baking.

  • Cool Properly: Allow the bread to cool completely before storing to prevent mold; warm bread can create moisture in the container.

  • Check Doneness: Use a toothpick to test for doneness; it should come out clean or with a few crumbs, ensuring your chocolate banana bread is perfectly baked.

Chocolate Banana Bread Recipe FAQs

What kind of bananas should I use for this recipe?
Absolutely! Very ripe bananas with dark spots or even bruises are ideal for chocolate banana bread. They provide maximum sweetness and moisture, enhancing the overall flavor of the loaf. I recommend using bananas that are past their prime for the best results.

How do I store leftover chocolate banana bread?
To keep your chocolate banana bread fresh, store it in an airtight container at room temperature for up to 3 days. Alternatively, you can refrigerate it for up to 5 days. Just be sure to wrap it up well to prevent it from drying out!

Can I freeze chocolate banana bread?
Yes, you can! For freezing, slice the chocolate banana bread and wrap each piece tightly in plastic wrap. Place the wrapped slices in a freezer-safe bag, eliminating as much air as possible. It will stay delicious for up to 3 months. To enjoy, just thaw in the refrigerator overnight and warm in the microwave for a few seconds!

Why is my chocolate banana bread dense?
A common reason for dense chocolate banana bread is overmixing the batter. Make sure to combine the ingredients just until mixed; the batter should be slightly lumpy. Also, check that your baking soda is fresh, as old leavening agents may not perform effectively.

Can I make this recipe gluten-free?
Certainly! You can substitute the all-purpose flour with a 1-to-1 gluten-free flour blend. This works well in maintaining the moisture and texture of the chocolate banana bread. Remember to also measure it accurately for the best outcomes.

Is it safe for pets?
While chocolate banana bread is a delectable treat for humans, it’s not suitable for pets, especially dogs and cats. Chocolate can be toxic to pets, so it’s best to keep this bread out of their reach.

undefined

Irresistible Chocolate Banana Bread for Your Sweet Cravings

This chocolate banana bread satisfies sweet cravings with its moist texture and rich flavor.
Prep Time 15 minutes
Cook Time 1 hour
Cooling Time 15 minutes
Total Time 1 hour 30 minutes
Servings: 8 slices
Course: Dessert
Cuisine: American
Calories: 210

Ingredients
  

For the Batter
  • 1/2 cup Unsalted Butter Can substitute with coconut oil for dairy-free
  • 1 cup Brown Sugar Light brown or granulated sugar can be used
  • 3 large Very Ripe Bananas Opt for darker bananas for more flavor
  • 2 large Eggs Flax eggs can be used as a vegan substitute
  • 1 teaspoon Vanilla Extract Use pure vanilla for better flavor
  • 1 1/2 cups All-Purpose Flour Gluten-free flour can be an alternative
  • 1/3 cup Unsweetened Cocoa Powder Must be sifted to avoid lumps
  • 1 teaspoon Baking Soda Check expiry for best results
  • 1/4 teaspoon Sea Salt Enhances flavor
  • 1 cup Semisweet Chocolate Chips Can substitute with dark chocolate chips
Optional Additions
  • 1/2 cup Chopped Walnuts or Pecans For added crunch
  • 1 teaspoon Cinnamon or Nutmeg For a warm, aromatic twist

Equipment

  • Loaf Pan
  • Mixing Bowl
  • Hand mixer
  • spatula

Method
 

Step-by-Step Instructions
  1. Preheat the oven to 350°F (175°C) and prepare your loaf pan by greasing with cooking spray or lining it with parchment paper.
  2. Melt the unsalted butter and combine it with brown sugar using a hand mixer until light and fluffy.
  3. Mash the very ripe bananas until smooth and mix with the butter-sugar mixture, eggs, and vanilla extract.
  4. Sift in all-purpose flour, cocoa powder, baking soda, and sea salt, then fold gently until combined.
  5. Fold in the semisweet chocolate chips to distribute throughout the batter.
  6. Pour the batter into the prepared loaf pan and smooth the top.
  7. Bake for 60 minutes and check with a toothpick; continue baking for an additional 5 minutes if needed.
  8. Let cool in the pan for 10 minutes, then transfer to a wire rack to cool for another 10-15 minutes.

Nutrition

Serving: 1sliceCalories: 210kcalCarbohydrates: 32gProtein: 3gFat: 9gSaturated Fat: 5gPolyunsaturated Fat: 0.5gMonounsaturated Fat: 3gCholesterol: 35mgSodium: 150mgPotassium: 200mgFiber: 2gSugar: 14gVitamin A: 300IUVitamin C: 2mgCalcium: 30mgIron: 1mg

Notes

For best results, use overripe bananas and avoid overmixing to maintain a light texture.

Tried this recipe?

Let us know how it was!

Creamy Herb Chicken with Mashed Potatoes for Easy Comfort

The kitchen filled with laughter is a melody I cherish, especially during those cozy evenings when comfort food takes center stage. Today, I’m excited to share my beloved recipe for Creamy Herb Chicken with Mashed Potatoes and Glazed Carrots. This one-pot meal not only brings smiles to the dinner table, but it’s also an economical choice perfect for those bustling weeknights. Imagine tender, juicy chicken coated in a luscious herb cream sauce paired with buttery mashed potatoes and sweetly glazed carrots. It’s not just about the flavors, though—this dish is a time-saver, making cleanup a breeze so you can truly savor every moment. Ready to create a heartwarming experience with your loved ones? Let’s dive in!

Why is this recipe a family favorite?

Easy one-pot cooking: Effortlessly create a delicious meal with minimal cleanup, allowing more time for family fun!
Creamy, savory goodness: The rich herb sauce transforms regular chicken into a delightful feast that everyone will love.
Perfect for busy weeknights: Whip this up in under an hour, making it an ideal choice for those hectic evenings.
Comfort food at its finest: With fluffy mashed potatoes and sweet carrots, this dish evokes cozy memories of home-cooked meals.
Kid-approved flavors: The mild, comforting taste makes it a hit with picky eaters, ensuring no leftovers!
Discover more great family-friendly recipes on our blog that make cooking a joy!

Creamy Herb Chicken Ingredients

For the Chicken

  • Chicken Breasts (or Thighs) – Main protein; substitute with skinless pieces or ground turkey for variation.
  • Salt & Pepper – Essential seasoning; adjust to taste for personal preference.
  • Garlic Powder – Adds depth of flavor; fresh garlic can be used as an alternative.
  • Dried Thyme & Rosemary – Herbs for seasoning; fresh versions can provide a bolder flavor.
  • Olive Oil & Butter – Cooking fat; use less butter for a lighter dish.
  • Garlic – Fresh garlic, minced; provides aromatic flavor; omit if allergic.
  • Chicken Broth – Adds moisture and flavor; vegetable broth can be substituted for a plant-based option.
  • Heavy Cream (or Half-and-Half) – For creaminess in the sauce; Greek yogurt serves as a lighter alternative.
  • Grated Parmesan Cheese – Adds richness; nutritional yeast can substitute for a dairy-free option.
  • Dijon Mustard (optional) – Enhances flavor; omit for a milder taste.

For the Mashed Potatoes

  • Yukon Gold or Russet Potatoes – The star of the mashed goodness; instant potatoes are a quicker alternative.
  • Milk or Cream – For mashing; provides creaminess and any plant-based milk can be used.

For the Glazed Carrots

  • Baby Carrots or Sliced Carrots – Side dish; any fresh carrot can work well here.
  • Brown Sugar (or Honey) – For glazing; maple syrup is a possible substitute.
  • Salt & Optional Cinnamon or Thyme – Enhance the glaze with additional flavor.

Feel free to experiment with these delicious Creamy Herb Chicken ingredients that transform a simple meal into a family-friendly classic!

Step‑by‑Step Instructions for Creamy Herb Chicken with Mashed Potatoes & Glazed Carrots

Step 1: Prepare the Mashed Potatoes
Peel and cube the Yukon Gold or Russet potatoes, then place them in a large pot of salted water. Bring the water to a boil over medium-high heat and cook the potatoes for 15-20 minutes until they are tender and easily pierced with a fork. Drain the potatoes, then mash them with butter and milk until creamy and smooth, keeping them warm in the pot.

Step 2: Glaze the Carrots
In a medium saucepan, melt butter over medium heat and add brown sugar, salt, and the baby carrots. Stir in a splash of water and cover the pan. Let the carrots simmer for 10-12 minutes until they are tender and the liquid reduces, uncovering the pan for the last 2-3 minutes to thicken the glaze. The carrots should be sweet and glossy, ready to enhance your Creamy Herb Chicken meal.

Step 3: Cook the Chicken
Season the chicken breasts or thighs generously with salt, pepper, garlic powder, thyme, and rosemary. In a large skillet, heat olive oil and butter over medium heat. Sear the chicken for 4-5 minutes on each side until golden brown and cooked through, reaching an internal temperature of 165°F. Once done, transfer the chicken to a plate and set aside while you prepare the sauce.

Step 4: Make the Herb Cream Sauce
In the same skillet, add minced garlic over medium heat and sauté for about 30 seconds until fragrant. Pour in the chicken broth to deglaze the pan, scraping up any browned bits. Stir in the heavy cream, grated Parmesan cheese, and Dijon mustard. Let the mixture simmer for 3-5 minutes until it thickens slightly, creating a rich sauce that will be the perfect complement to your chicken.

Step 5: Final Assembly
Return the seared chicken to the skillet, spooning the creamy sauce over the top. Allow the chicken to simmer in the sauce for an additional 2 minutes, ensuring it is nicely coated and heated through. The flavors will meld beautifully, making the Creamy Herb Chicken irresistible.

Step 6: Serve with Mashed Potatoes and Glazed Carrots
Plate the fluffy mashed potatoes and glazed carrots alongside the chicken, drizzling any remaining herb sauce generously over the chicken. Garnish with chopped parsley or chives if desired. This one-pot wonder offers a comforting, delicious family meal, perfect for cozy gatherings.

How to Store and Freeze Creamy Herb Chicken

Fridge: Store leftovers in airtight containers for up to 3-4 days, keeping the chicken and sides together or separately as you prefer.

Freezer: For longer storage, freeze portions in airtight containers or freezer bags for up to 3 months. Label with the date to keep track.

Reheating: Reheat gently on the stove or in the microwave, adding a splash of milk or broth to restore the creaminess of the sauce.

Thawing: Always thaw frozen Creamy Herb Chicken in the fridge overnight before reheating to maintain the best texture and flavor.

What to Serve with Creamy Herb Chicken with Mashed Potatoes & Glazed Carrots

Imagine a beautiful dining table filled with comforting flavors that elevate your weeknight meals from ordinary to extraordinary.

  • Crispy Garlic Bread: The crunchy texture and buttery garlic flavor create a perfect contrast to the creamy chicken, making every bite a delightful experience.

  • Fresh Side Salad: A simple spinach salad drizzled with lemon vinaigrette adds a refreshing burst that balances the hearty richness, keeping your meal light and vibrant.

  • Roasted Brussels Sprouts: The savory, caramelized flavor of roasted Brussels sprouts enhances the dish’s depth, offering a nutritious touch that complements the creamy sauce beautifully.

  • Steamed Green Beans: Lightly seasoned and crisp-tender green beans introduce a fresh, vibrant element, providing a pop of color and texture to your plate.

  • Herbed Quinoa: This nutty, fluffy grain is a fantastic source of protein and pairs brilliantly with the delicious herb flavors, soaking up the creamy sauce effortlessly.

  • Chilled White Wine: A crisp Chardonnay or Sauvignon Blanc enhances the meal, refreshing the palate while accentuating the herbaceous notes of the chicken.

Serve your creamy herb chicken alongside these delightful sides and elevate your dining experience, creating warm memories that last long after the plates are cleared!

Expert Tips for Creamy Herb Chicken

  • Creamy Mashed Potatoes: For ultra-smooth mashed potatoes, consider using a potato ricer to achieve a velvety texture that elevates your creamy herb chicken dish.

  • Deglazing is Key: Don’t skip the deglazing step; scraping the browned bits from the skillet enhances the sauce’s depth and flavor, ensuring your dish is utterly delicious.

  • Flavor Boost: Adding a pinch of red pepper flakes gives your creamy herb chicken a delightful kick, balancing the richness of the dish with a hint of spice—perfect for adventurous eaters!

  • Leftover Love: When reheating the creamy herb chicken leftovers, stir in a touch of milk or broth to restore the creaminess and prevent the sauce from becoming too thick.

  • Season to Taste: Always adjust the amount of salt and pepper to suit your family’s preferences. After all, creating the perfect balance in flavor ensures it becomes a family favorite!

Make Ahead Options

These Creamy Herb Chicken with Mashed Potatoes & Glazed Carrots is perfect for meal prep enthusiasts! You can prepare the mashed potatoes and glazed carrots up to 24 hours in advance; simply cook them and store them in airtight containers in the refrigerator. The mashed potatoes should be covered to keep them fluffy, while the glazed carrots just need a gentle reheat to keep their sweetness intact. As for the chicken, season and sear it in advance, then store it separately. When you’re ready to serve, warm the chicken in the sauce for a few minutes, reheat the sides, and enjoy a comforting, home-cooked meal with minimal effort!

Creamy Herb Chicken Variations

Feel free to explore these creative twists that will tailor this delicious recipe to your family’s preferences and dietary needs!

  • Dairy-Free: Substitute heavy cream with coconut milk or cashew cream for a rich, dairy-free alternative.

  • Lightened-Up: Use Greek yogurt instead of heavy cream; it adds creaminess with fewer calories and a tangy flavor.

  • Extra Veggies: Fold in baby spinach or sautéed mushrooms into the cream sauce for added nutrients and a burst of flavor.

  • Herb Infusion: Try replacing thyme and rosemary with fresh basil or dill for a delightful change in flavor.

  • Spice It Up: Add a pinch of red pepper flakes or cayenne for a spicy kick that contrasts beautifully with the creamy sauce.

  • Honey Glaze: Optionally drizzle honey over the glazed carrots for a sweeter profile that complements the savory chicken.

  • Different Potatoes: Sweet potatoes can be used for a vibrant and nutritious twist on the classic mashed potatoes.

  • Quinoa Alternative: To make this dish gluten-free, serve the creamy herb chicken over a bed of fluffy quinoa instead of traditional sides.

By making these simple substitutions or additions, you can perfectly customize your Creamy Herb Chicken with Mashed Potatoes & Glazed Carrots to fit your family’s taste and dietary needs. For more inspiration, check out our delicious vegetarian meal options or explore quick weeknight dinners that offer fabulous variety!

Creamy Herb Chicken with Mashed Potatoes & Glazed Carrots Recipe FAQs

What should I look for when selecting chicken for this recipe?
Absolutely! When selecting chicken, go for fresh, plump breasts or thighs—look for a pale pink color with no dark spots. If you’re opting for frozen chicken, ensure it’s well-packaged and within its expiration date. For a cozy meal, I often prefer using chicken thighs for their rich flavor and juiciness!

How can I store leftovers of this dish?
Very easily! Store your leftover Creamy Herb Chicken in airtight containers in the fridge for about 3-4 days. If you want to enjoy it later, separate the chicken from the sides before storing. This way, the potatoes and glazed carrots will retain their texture and taste.

Can I freeze Creamy Herb Chicken? If so, how?
Definitely! You can freeze portions of the Creamy Herb Chicken for up to 3 months. To do this, ensure the dish has cooled completely. Transfer it into freezer-safe containers or bags, remove as much air as possible, and label them with the date. For a smooth experience later, thaw it overnight in the fridge before reheating.

What should I do if my sauce is too thick?
If your herb cream sauce turns out too thick, don’t fret! Simply add a splash of chicken broth or milk while whisking over low heat until you reach your desired consistency. This will help restore its creamy texture, making it perfect for drizzling over your chicken and sides.

Are there any dietary considerations I should be aware of?
Great question! If you’re making this dish for someone with lactose intolerance, you can substitute the heavy cream with a non-dairy alternative like coconut or oat milk. Additionally, feel free to use plant-based cheese for a dairy-free option. Always remember to check the labels for allergens if serving to guests or family members with specific dietary needs!

How can I enhance the flavors in this recipe?
To add more depth to the dish, I recommend incorporating fresh herbs like basil or dill in place of dried thyme and rosemary. You might also consider sautéing some spinach or mushrooms along with the garlic for added nutrients. Mixing things up perfectly complements the creamy chicken and vegetables!

undefined

Creamy Herb Chicken with Mashed Potatoes for Easy Comfort

Creamy Herb Chicken is a comforting one-pot meal perfect for busy weeknights and family gatherings.
Prep Time 10 minutes
Cook Time 40 minutes
Total Time 50 minutes
Servings: 4 servings
Course: Dinner
Cuisine: Comfort Food
Calories: 650

Ingredients
  

For the Chicken
  • 4 pieces Chicken Breasts or Thighs Substitute with skinless pieces or ground turkey
  • to taste Salt
  • to taste Pepper
  • 1 teaspoon Garlic Powder Fresh garlic can be used as an alternative
  • 1 teaspoon Dried Thyme Fresh versions can provide a bolder flavor
  • 1 teaspoon Dried Rosemary Fresh versions can provide a bolder flavor
  • 2 tablespoons Olive Oil
  • 2 tablespoons Butter Use less for a lighter dish
  • 2 cloves Garlic Minced; omit if allergic
  • 1 cup Chicken Broth Vegetable broth can be substituted
  • 1 cup Heavy Cream Greek yogurt serves as a lighter alternative
  • 1/2 cup Grated Parmesan Cheese Nutritional yeast can substitute for a dairy-free option
  • 1 tablespoon Dijon Mustard Optional
For the Mashed Potatoes
  • 2 pounds Yukon Gold or Russet Potatoes Instant potatoes are a quicker alternative
  • 1/2 cup Milk or Cream Any plant-based milk can be used
For the Glazed Carrots
  • 1 pound Baby Carrots or Sliced Carrots Any fresh carrot can work well
  • 1/4 cup Brown Sugar Maple syrup is a possible substitute
  • to taste Salt
  • 1/2 teaspoon Optional Cinnamon or Thyme Enhances the glaze

Equipment

  • Large pot
  • medium saucepan
  • Large skillet

Method
 

Directions
  1. Peel and cube the potatoes, place them in a salted pot of water, bring to a boil, and cook for 15-20 minutes until tender. Drain and mash with butter and milk, keeping warm.
  2. In a saucepan, melt butter over medium heat, add brown sugar and carrots. Stir in water, cover, and let simmer for 10-12 minutes until tender, uncovering last 2-3 minutes.
  3. Season the chicken with salt, pepper, garlic powder, thyme, and rosemary. Heat olive oil and butter in a skillet, sear the chicken for 4-5 minutes on each side until golden and cooked through.
  4. In the same skillet, add minced garlic and sauté for 30 seconds. Pour in chicken broth to deglaze, then stir in heavy cream, Parmesan, and mustard. Simmer for 3-5 minutes until thickened.
  5. Return chicken to skillet, spoon sauce over it, and simmer for another 2 minutes to meld flavors.
  6. Plate mashed potatoes and glazed carrots alongside the chicken, drizzling remaining herb sauce over chicken. Garnish with parsley or chives if desired.

Nutrition

Serving: 1plateCalories: 650kcalCarbohydrates: 45gProtein: 40gFat: 35gSaturated Fat: 20gPolyunsaturated Fat: 5gMonounsaturated Fat: 10gCholesterol: 150mgSodium: 900mgPotassium: 1000mgFiber: 5gSugar: 10gVitamin A: 500IUVitamin C: 15mgCalcium: 150mgIron: 2mg

Notes

For ultra-smooth mashed potatoes, consider using a potato ricer. Don't skip deglazing for enhanced flavor.

Tried this recipe?

Let us know how it was!

Buttery Cheese Garlic Rolls That Melt in Your Mouth

The aroma wafting through my kitchen was nothing short of magical as I prepared these Fluffy Buttery Cheese Garlic Rolls. As I kneaded the dough, I could already envision these golden-brown delights stealing the show at my next family dinner. Comfort food at its finest, these rolls merge the rich flavors of garlic and melted cheese into pillowy bites that are irresistibly addictive. Not only are they incredibly easy to whip up, but they also elevate any meal, making them perfect for impressing guests or savoring on a cozy night in. Imagine sinking your teeth into the soft, warm texture, with each roll pulling apart to reveal gooey layers of cheese. Are you ready to create some kitchen magic and make your taste buds dance? Let’s get started!

Why Are These Rolls So Irresistible?

Melt-in-your-mouth texture: These rolls are pillowy soft, creating a warm and comforting bite every time.

Garlic paradise: The roasted garlic infuses a mellow flavor, making each roll a savory delight.

Quick and easy: Crafted with simple ingredients, you’ll have these homemade rolls ready in no time, perfect for busy nights or last-minute gatherings.

Crowd-pleaser: Whether at family dinners or festive parties, these rolls are guaranteed to impress your guests and leave them asking for seconds!

Versatile pairing: Serve them alongside your favorite marinara sauce or as a side to hearty soups and salads for a complete meal. Each bite is sure to be a hit!

Buttery Cheese Garlic Rolls Ingredients

For the Dough

  • Milk – Adds moisture and activates yeast; use warm, at 110°F (43°C) for best results.
  • Active Dry Yeast – Provides leavening; make sure it’s fresh and bubbly.
  • Honey – Acts as a sweetener and aids yeast activation; maple syrup is a great substitute.
  • All-Purpose Flour – Provides structure; using bread flour enhances chewiness.
  • Bread Flour – Adds strength to the dough; if unavailable, just use more all-purpose flour.
  • Unsalted Butter – Adds richness and flavor; soften to room temperature or use olive oil for a dairy-free option.
  • Eggs – Contributes to dough structure and moisture; for egg-free, substitute with a flax egg (1 tablespoon ground flaxseed + 2.5 tablespoons water).
  • Salt – Enhances flavor and is essential for dough structure.
  • Granulated Sugar – Helps with browning and flavor; you can reduce it for less sweetness.

For the Filling

  • Parmesan Cheese – Adds a savory, nutty flavor; nutritional yeast can be used for a vegan alternative.
  • Mozzarella Cheese – Provides a gooey, stretchy texture; feel free to swap with any melting cheese.
  • Garlic – Rich, aromatic flavor when roasted; adjust the quantity based on your garlic preference.
  • Parsley – Adds freshness; substitute with chives for a different flavor touch.

For Roasting Garlic

  • Extra Virgin Olive Oil – Enhances flavor for roasted garlic; you can use any cooking oil for this purpose.

Step‑by‑Step Instructions for Buttery Cheese Garlic Rolls

Step 1: Roast the Garlic
Begin by preheating your oven to 302°F (150°C). Peel the garlic heads and place them in a ramekin, drizzling with extra virgin olive oil and a pinch of salt. Cover the ramekin with foil and roast in the oven for 1 hour and 45 minutes, until the garlic is golden and soft. This step is essential to bring out a sweet, mellow garlic flavor.

Step 2: Prepare the Dough
In a large mixing bowl, combine warm milk (at 110°F or 43°C), active dry yeast, and honey. Stir gently and let it sit for 10-15 minutes until it becomes frothy. This indicates that your yeast is active and ready to work its magic in the buttery cheese garlic rolls.

Step 3: Add the Ingredients
Once the yeast mixture is frothy, mix in the eggs, all-purpose flour, bread flour, salt, and granulated sugar. Using a stand mixer fitted with a dough hook or your hands, knead the dough until it becomes soft and slightly sticky, which should take about 8-10 minutes. You’ll know it’s ready when it springs back slightly after a gentle poke.

Step 4: Incorporate the Butter
After kneading, gradually add the softened unsalted butter into the dough during the last 10 minutes of kneading. Continue until the butter is fully incorporated, and the dough is smooth and elastic. The buttery richness will enhance the overall flavor of your buttery cheese garlic rolls.

Step 5: First Proof
Transfer the kneaded dough into a greased bowl, covering it with a kitchen towel or plastic wrap. Place it in a warm environment to rise for about 1 to 1.5 hours, or until it has doubled in size. The dough should feel light and airy, promising a fluffy texture in your rolls.

Step 6: Shape the Rolls
Once the dough has risen, punch it down gently to release air. Roll it out on a floured surface into a rectangle. Spread the roasted garlic and any remaining garlic butter evenly across the rolled dough, then sprinkle generously with mozzarella and parmesan cheese. Cut the dough into strips, roll each piece into a spiral, and place them in a greased baking pan.

Step 7: Second Proof
Cover the shaped rolls lightly with a towel and let them rise again for an additional 30 minutes in a warm spot. This second proof is crucial for achieving that pillowy-soft texture in your buttery cheese garlic rolls.

Step 8: Bake the Rolls
Preheat your oven to 355°F (180°C). Once preheated, brush the tops of the rolls with an egg wash for a golden finish. Bake for 25-30 minutes, or until the rolls are beautifully golden brown and your kitchen is filled with irresistibly inviting aromas.

Buttery Cheese Garlic Rolls Variations

Feel free to get creative with these buttery cheese garlic rolls and make them your own!

  • Cheese Swap: Try using gouda or cheddar for a richer flavor profile. The world of cheese is vast, and these options add a delightful depth to every bite.

  • Herb Delight: Add fresh thyme or rosemary to the dough for a fragrant twist. Just imagine the aroma as they bake—your kitchen will smell like a cozy herb garden.

  • Veggie Infusion: Toss in some sautéed spinach or caramelized onions for a hearty touch. These veggies not only enhance nutrition but also give the rolls a savory, earthy flavor.

  • Spicy Kick: Incorporate a dash of red pepper flakes in the garlic butter for a subtle heat. It’s a wonderful way to awaken your taste buds without overwhelming the original flavors.

  • Vegan Version: Use nutritional yeast instead of parmesan and substitute olive oil for butter. These rolls will still be wonderfully cheesy and guilt-free!

  • Nutty Twist: Add toasted walnuts or pecans for a delightful crunch. The nuts provide a nutty flavor that pairs excellently with the garlic and cheese.

  • Sweet Touch: For a hint of sweetness, mix in diced roasted red peppers. Their subtle sweetness complements the richness of the cheese perfectly.

  • Gluten-Free Option: Substitute the flours with a gluten-free blend to create a gluten-friendly version that still delivers on deliciousness. Always make sure the blend is suitable for yeast-based recipes.

These variations ensure that your rolls can cater to a wide range of tastes and dietary needs, just like when you’re making a comforting dish to warm your loved ones’ hearts. If you feel adventurous, consider pairing these rolls with a dip of warm marinara or a spread of olive tapenade to elevate your meal experience!

Expert Tips for Buttery Cheese Garlic Rolls

  • Activate Yeast Properly: Make sure the yeast mixture is frothy before adding other ingredients; this means your buttery cheese garlic rolls will rise perfectly.

  • Kneading Consistency: If your dough feels too dry, add more milk gradually. Conversely, if it’s too sticky, sprinkle in a bit more flour to achieve a smooth, elastic texture.

  • Roast Garlic Thoroughly: Roasting garlic is crucial for a mellow flavor. Don’t rush this step; it enhances the overall taste of your rolls significantly.

  • Proper Rising Time: Ensure the dough rises in a warm place until doubled in size, which can take 1 to 1.5 hours. Patience here results in fluffy rolls!

  • Egg Wash Benefits: Brush your rolls with an egg wash before baking for a beautiful golden-brown finish. It not only enhances appearance but adds a slight richness.

  • Storage Solutions: To keep your rolls fresh, wrap them tightly and freeze. They can be reheated in the microwave or oven for a quick, delicious snack later.

Make Ahead Options

These Fluffy Buttery Cheese Garlic Rolls are perfect for busy home cooks looking to save time during the week! You can prepare the dough up to 24 hours in advance; simply follow the recipe up until the first proof, and then cover the bowl tightly with plastic wrap and refrigerate. The next day, allow the dough to come to room temperature for about 30 minutes before continuing with shaping and baking. Additionally, you can shape the rolls and place them in the baking pan, then cover and refrigerate them overnight. When ready to bake, just let them rise for 30-60 minutes before brushing with egg wash and baking. With these make-ahead options, you’ll find that enjoying homemade deliciousness has never been easier!

How to Store and Freeze Buttery Cheese Garlic Rolls

  • Room Temperature: Store uncut rolls in an airtight container or wrapped in foil for up to 2-3 days. Enjoy them warm for the best taste!
  • Fridge: If keeping for longer, these rolls can be refrigerated for about 5 days. Reheat in the oven or microwave before serving to restore softness.
  • Freezer: For long-term storage, wrap cooled rolls tightly in plastic wrap and place them in a freezer bag for up to 3 months.
  • Reheating: To reheat, allow the frozen rolls to thaw in the fridge overnight. Warm in the oven at 350°F (175°C) for about 10-15 minutes for the best results.

What to Serve with Buttery Cheese Garlic Rolls

These rolls are the perfect gateway to a delightful meal, inviting warmth and flavor into every bite.

  • Creamy Tomato Soup: The rich, tangy blend pairs beautifully with the buttery texture, creating a comforting dip.

  • Garden Salad: Crisp, fresh greens add a crunchy contrast to the soft, cheesy rolls, enhancing the overall meal experience.

  • Garlic Butter Shrimp: Elevate the garlic flavor with succulent shrimp, making each bite a savory celebration of taste.

  • Marinara Sauce: A warm, zesty dip that complements the rolls’ cheesy goodness, creating a classic Italian-inspired pairing.

  • Roasted Vegetables: A mix of caramelized root veggies brings added sweetness, balancing the garlic-infused rolls beautifully.

  • Herbed Cream Cheese Spread: Serve alongside for a delightful, creamy option; the herby notes enrich the garlic flavor in each roll.

  • White Wine: A chilled glass of Sauvignon Blanc brings out the savory elements of the cheese and garlic rolls, offering a refreshing finish.

  • Lemon Sorbet: For dessert, a refreshing sorbet cleanses the palate beautifully after the rich, buttery rolls, leaving diners satisfied yet excited for more.

Buttery Cheese Garlic Rolls Recipe FAQs

How do I select ripe garlic for this recipe?
Absolutely! Choose garlic heads that are firm and unblemished. Avoid any with dark spots or signs of sprouting, as that can affect the flavor and texture of your rolls. The cloves should also be plump and dried out; fresh garlic is key for that aromatic goodness in your rolls.

What’s the best way to store leftover rolls?
You can store uncut buttery cheese garlic rolls at room temperature for 2-3 days in an airtight container or wrapped in aluminum foil. Just keep them in a cool area of your kitchen. If you want them to last longer, refrigerate them, and they’ll stay fresh for about 5 days. Always reheat them in the oven or microwave to bring back that delightful softness!

Can I freeze these garlic rolls?
Certainly! Once your rolls have cooled completely, you can wrap them tightly in plastic wrap and place them in a freezer-safe bag. They’ll keep well in the freezer for up to 3 months. To enjoy, let them thaw in the fridge overnight, then warm them in the oven at 350°F (175°C) for about 10-15 minutes to restore their bubbly texture.

What should I do if my dough is too sticky?
The more the merrier! If you find your dough is sticky when kneading, simply sprinkle in a little more all-purpose or bread flour, about a tablespoon at a time, until it reaches a smooth and elastic consistency. Kneading it a bit more will help bring it together as well, so don’t be afraid to get your hands in there!

Are there any allergy considerations for this recipe?
Yes, it’s important to consider! The buttery cheese garlic rolls contain dairy from the butter, cheese, and eggs. For those who are lactose intolerant or prefer dairy-free options, you can substitute the butter with olive oil, use plant-based cheese, and replace eggs with a flax egg (1 tablespoon ground flaxseed mixed with 2.5 tablespoons water). Always be sure to check all labels for potential allergens, especially if preparing for guests.

Can I use other types of cheese in this recipe?
Absolutely! These buttery cheese garlic rolls are quite versatile. You can swap in gouda, cheddar, or even a mix of your favorites for a unique flavor profile. Just ensure they melt well; you want that gooey, cheese pull in every mouthwatering bite!

undefined

Buttery Cheese Garlic Rolls That Melt in Your Mouth

These buttery cheese garlic rolls are soft, savory, and perfect for any meal, featuring garlic and cheese that meld seamlessly for irresistible bites.
Prep Time 20 minutes
Cook Time 30 minutes
First Proof 1 hour 30 minutes
Total Time 2 hours 20 minutes
Servings: 12 rolls
Course: Dinner
Cuisine: American
Calories: 220

Ingredients
  

For the Dough
  • 1 cup Milk Warm, at 110°F (43°C) for best results.
  • 2 teaspoons Active Dry Yeast Ensure it's fresh and bubbly.
  • 2 tablespoons Honey Maple syrup is a great substitute.
  • 3 cups All-Purpose Flour Using bread flour enhances chewiness.
  • 1 cup Bread Flour Use more all-purpose flour if unavailable.
  • 1/2 cup Unsalted Butter Softened to room temperature or use olive oil for dairy-free.
  • 2 large Eggs Substitute with a flax egg for egg-free option.
  • 1 teaspoon Salt Essential for dough structure.
  • 2 tablespoons Granulated Sugar Can reduce for less sweetness.
For the Filling
  • 1/2 cup Parmesan Cheese Nutritional yeast can be used for a vegan alternative.
  • 1 cup Mozzarella Cheese Feel free to swap with any melting cheese.
  • 4 cloves Garlic Adjust based on garlic preference.
  • 2 tablespoons Parsley Substitute with chives for different flavor.
For Roasting Garlic
  • 2 tablespoons Extra Virgin Olive Oil Can use any cooking oil for this purpose.

Equipment

  • Mixing Bowl
  • dough hook
  • Baking Pan
  • Ramekin

Method
 

Step-by-Step Instructions
  1. Preheat the oven to 302°F (150°C). Peel garlic and place in a ramekin, using olive oil and salt. Cover with foil and roast for 1 hour and 45 minutes.
  2. Combine warm milk, active dry yeast, and honey in a bowl. Stir gently and let sit for 10-15 minutes until frothy.
  3. Mix in the eggs, all-purpose flour, bread flour, salt, and sugar. Knead until soft and slightly sticky for 8-10 minutes.
  4. Gradually add softened unsalted butter into the dough during the last 10 minutes of kneading until fully incorporated.
  5. Transfer dough to a greased bowl, cover, and let rise in a warm place for about 1 to 1.5 hours until doubled in size.
  6. Punch down the risen dough, roll out into a rectangle, spread roasted garlic and garlic butter, then sprinkle with cheeses. Cut into strips and roll into spirals.
  7. Let the shaped rolls rise for another 30 minutes in a warm spot.
  8. Preheat your oven to 355°F (180°C). Brush rolls with an egg wash and bake for 25-30 minutes until golden brown.

Nutrition

Serving: 1rollCalories: 220kcalCarbohydrates: 25gProtein: 6gFat: 10gSaturated Fat: 6gPolyunsaturated Fat: 0.5gMonounsaturated Fat: 3gCholesterol: 40mgSodium: 250mgPotassium: 100mgFiber: 1gSugar: 2gVitamin A: 300IUVitamin C: 1mgCalcium: 150mgIron: 1mg

Notes

Store uncut rolls in an airtight container for 2-3 days at room temperature. For longer storage, refrigerate for about 5 days or freeze for up to 3 months.

Tried this recipe?

Let us know how it was!

Lemon Cream Cheese Puff Pastry Braid: Easy Sweet Perfection

As I stood in my kitchen, a delightful aroma wafted through the air—there’s something magical about baking that makes the heart sing, isn’t there? If you’re looking for a quick dessert that impresses without the fuss, then the Lemon Cream Cheese Puff Pastry Braid is your new go-to recipe. In just under 30 minutes, you can whip up this flaky, elegant treat that combines zesty lemon curd with creamy cheese, leaving your guests raving about your baking skills. Not only is this dessert a crowd-pleaser, but it’s also customizable—so whether you prefer a gluten-free or vegan twist, this recipe caters to every palate. What flavor combination will you choose for your own beautiful braid? Let’s dive in!

Why is this dessert a crowd-pleaser?

Simplicity reigns here! With minimal ingredients, you can create a stunning dessert without exhaustive prep. Flavor explosion awaits with the perfect blend of tangy lemon and rich creaminess. Customizable options ensure every palate can indulge—try gluten-free or vegan variations for inclusivity! Effortless elegance makes it ideal for brunch or gatherings, impressing guests while saving time. Quick and easy, this treat will turn any ordinary day into a delightful celebration!

Lemon Cream Cheese Puff Pastry Braid Ingredients

For the Braid

Ready Rolled Puff Pastry (13 oz/375g) – The base for a flaky, light pastry. Substitution: Use gluten-free puff pastry for a gluten-free version.
Lemon Curd (1/2 cup/170g) – Adds a tangy sweetness that complements the cream cheese perfectly. Note: Homemade or store-bought can be used.
Full Fat Cream Cheese (5 oz/140g) – Provides a rich and creamy texture that enhances the filling. Substitution: Low-fat cream cheese can be used, altering flavor slightly.
Icing/Powdered Sugar (3 tbsp) – Sweetens the filling just right. Note: Alternative sweeteners can be substituted at a 1:1 ratio.
Vanilla Extract (1/2 tsp) – Enhances the overall flavor profile with warmth.
Cornflour/Cornstarch (1/2 tbsp) – Helps stabilize the filling.
Medium Egg (1, lightly beaten) – Creates a beautiful golden finish on the braid.

Step‑by‑Step Instructions for Lemon Cream Cheese Puff Pastry Braid

Step 1: Preheat the Oven
Begin by preheating your oven to 200°C (400°F). While the oven warms up, line your baking tray with greaseproof paper. This will prevent the pastry from sticking, ensuring that your Lemon Cream Cheese Puff Pastry Braid comes out perfectly golden and flaky.

Step 2: Prepare the Puff Pastry
Unroll the ready-made puff pastry onto the prepared baking tray. Using a sharp knife, gently score the pastry into three equal sections lengthwise, leaving the middle section clear for your filling. Create a decorative touch by cutting diagonally into the outer thirds’ corners, which will allow for easy braiding later.

Step 3: Cut the Strips
Next, slice diagonal strips about 3/4 to 1-inch wide down each side of the puff pastry, making sure to stop just at the center where you’ve left the filling area. These strips will form the luscious braid for your Lemon Cream Cheese Puff Pastry Braid, so take your time to make them even for a beautiful look.

Step 4: Mix the Filling
In a mixing bowl, scoop the lemon curd into the middle section of the puff pastry. In another bowl, blend the cream cheese with icing sugar, vanilla extract, and cornflour until it’s smooth and creamy. Spread this delightful mixture over the lemon curd, creating a delicious layer that perfectly complements your pastry.

Step 5: Braid the Pastry
Beginning from one end, fold alternate strips over the filling, overlapping them in a crisscross pattern to create the braid effect. Ensure that the ends are sealed completely to prevent any filling from leaking out during baking. This will give your Lemon Cream Cheese Puff Pastry Braid that classic, eye-catching look.

Step 6: Apply the Egg Wash
Take a lightly beaten egg and brush it generously over the top of the pastry braid. This will give your dish a shiny, golden finish once baked. Make sure to cover all exposed pastry to achieve that perfect color and gloss, enhancing the visual appeal of your Lemon Cream Cheese Puff Pastry Braid.

Step 7: Bake the Braid
Carefully place the baking tray in the preheated oven and bake for 17-22 minutes. Keep an eye on it, and look for a golden and puffed-up appearance that indicates it’s done. If it starts browning too quickly, you can cover it loosely with aluminum foil to prevent burning while still cooking through.

Step 8: Cool and Serve
Once baked to perfection, remove your Lemon Cream Cheese Puff Pastry Braid from the oven and let it cool on a wire rack for about 30 minutes. This cooling time allows the pastry to set, making it easier to slice into beautiful pieces. Dust with powdered sugar, if desired, for an extra touch of sweetness before serving.

Expert Tips for the Best Lemon Cream Cheese Puff Pastry Braid

  • Maintain Temperature: Keep your puff pastry cold until you work with it; this ensures a flaky texture when baked.
  • Mind the Filling: Use the recommended amounts of lemon curd and cream cheese filling to avoid overflow and command a perfect shape.
  • Watch the Timer: Begin checking for doneness around 17 minutes to prevent over-baking; every oven varies, and you want that golden perfection!
  • Sealing is Key: Make sure to securely seal the ends of the braid to keep all that delicious filling inside where it belongs.
  • Egg Wash Magic: Generously apply the egg wash for a glossy, appetizing finish that elevates your Lemon Cream Cheese Puff Pastry Braid’s visual appeal.

What to Serve with Lemon Cream Cheese Puff Pastry Braid

Looking to create a delightful meal around your luscious lemon creation?

  • Fresh Fruit Salad: A vibrant mix of seasonal fruits brightens the palate and complements the tangy lemon with refreshing sweetness. Consider adding mint for an aromatic twist!

  • Greek Yogurt Parfait: This rich, creamy yogurt layered with granola and berries adds a delightful contrast to the pastry, enhancing your dessert experience with creaminess and crunch.

  • Warm Herbal Tea: A calming cup of chamomile or mint tea offers a soothing balance to the zesty flavors of the braid, making every bite feel extra special.

  • Lemonade or Citrus Spritzer: A fizzy citrus drink plays beautifully with the lemon notes of the braid, creating a cheerful and invigorating pairing for your brunch spread.

  • Classic Vanilla Ice Cream: The rich creaminess of vanilla ice cream alongside warm pastry gives you an indulgent treat, enhancing the overall sweet experience with every bite.

  • Dark Chocolate Dipped Strawberries: These sumptuous treats add a decadent, fruity touch that pairs perfectly with the bright flavors of your braid, making an elegant dessert duo.

  • Roasted Nuts: A small bowl of roasted almonds or walnuts provides a satisfying crunch that complements the softness of the pastry and enriches your snacking experience.

Consider these accompaniments to elevate your Lemon Cream Cheese Puff Pastry Braid into a memorable culinary creation!

How to Store and Freeze Lemon Cream Cheese Puff Pastry Braid

Room Temperature: Let the braid cool completely, then wrap it in parchment and store in an airtight container at room temperature for up to 2 days.

Fridge: For longer freshness, store leftovers in the fridge, wrapped tightly, for up to 3 days. This helps maintain the pastry’s flavor.

Freezer: Freeze the Lemon Cream Cheese Puff Pastry Braid whole or as slices, securely wrapped in plastic wrap and aluminum foil, for up to 2 months.

Reheating: When ready to enjoy, reheat in a preheated oven at 180°C (350°F) for about 10-15 minutes, until warmed through and crispy again.

Lemon Cream Cheese Puff Pastry Braid Variations

Feel free to get creative with this recipe! Your kitchen is a canvas, so let’s paint it with delightful flavors and textures that will make your Lemon Cream Cheese Puff Pastry Braid uniquely yours.

  • Gluten-Free Dough: Swap regular puff pastry for gluten-free puff pastry to cater to gluten-sensitive friends without compromising taste.
  • Vegan Twist: Use plant-based cream cheese and substitute the egg with a flaxseed egg or aquafaba for an animal-friendly version.
  • Berry Bliss: Replace lemon curd with berry preserves like raspberry or blueberry for a vibrant splash of sweetness and color.
  • Chocolate Delight: Add mini chocolate chips to the cream cheese mixture for a delightful surprise hidden within every flaky layer.
  • Nutty Crunch: Toss in some chopped nuts, like walnuts or almonds, for a crunchy texture and nutty flavor that pairs beautifully with the creaminess.
  • Tropical Vibes: Swap cream cheese with coconut cream for a deliciously tropical interpretation, inviting a taste of paradise into your home.
  • Fresh Herbs: Incorporate chopped fresh herbs, like mint or basil, for a fragrant and unexpected twist that brightens every bite.
  • Zesty Citrus Punch: Mix in some orange zest with the lemon curd for an extra burst of citrus flavor that brightens the filling beautifully.

Each variation opens a door to a new taste adventure, turning the humble braid into a showstopper worthy of any table. Happy baking!

Make Ahead Options

These Lemon Cream Cheese Puff Pastry Braid components are perfect for meal prep, saving you time and stress on busy days! You can prepare the filling—a mixture of cream cheese, lemon curd, icing sugar, and cornstarch—up to 3 days in advance and store it in an airtight container in the refrigerator. Additionally, you can assemble the braid up to 24 hours before baking; simply cover it with plastic wrap and refrigerate to keep it fresh. When you’re ready to enjoy it, let the braid sit at room temperature for about 15 minutes, brush with egg wash, and bake as directed. This way, you’ll still achieve that golden, flaky texture and delicious flavor with minimal effort on the day of serving!

Lemon Cream Cheese Puff Pastry Braid Recipe FAQs

What kind of puff pastry should I use?
Absolutely! I recommend using ready-rolled puff pastry for convenience, but you can opt for gluten-free puff pastry if needed. Just ensure it’s thawed properly before use for the best results.

How should I store leftover puff pastry braid?
To keep your Lemon Cream Cheese Puff Pastry Braid fresh, wrap it tightly in plastic wrap and store it in the fridge for up to 3 days. Alternatively, you can freeze it for up to 2 months—just make sure to wrap it well in foil or plastic to prevent freezer burn!

Can I freeze the Lemon Cream Cheese Puff Pastry Braid?
Yes, you can! To freeze, wrap the entire braid in plastic wrap followed by aluminum foil, sealing it well to avoid air exposure. It’s best to freeze it right after it’s cooled and before any powdered sugar is added. When you’re ready to enjoy, thaw it in the fridge overnight and reheat in a preheated oven for about 10-15 minutes at 180°C (350°F) until warm.

What should I do if my filling leaks out during baking?
If you’re having trouble with leaking, it’s usually due to overfilling or insufficient sealing. Always stick to the suggested filling amounts and ensure that the pastry’s ends are closed tightly. If it leaks, you can still slice and serve it—just consider drizzling a bit more icing or sauce on top to mask any imperfections!

Are there any dietary considerations for this recipe?
Very much so! You can make a vegan version by using plant-based cream cheese and an egg substitute like flaxseed meal mixed with water. It’s a fantastic way to cater to various dietary needs while still enjoying this delicious treat. Always double-check packaging for potential allergens as well!

undefined

Lemon Cream Cheese Puff Pastry Braid: Easy Sweet Perfection

This Lemon Cream Cheese Puff Pastry Braid is a quick dessert that dazzles with its flaky pastry and zesty filling.
Prep Time 10 minutes
Cook Time 20 minutes
Cooling Time 30 minutes
Total Time 1 hour
Servings: 8 slices
Course: Dessert
Cuisine: Baking
Calories: 250

Ingredients
  

For the Braid
  • 13 oz Ready Rolled Puff Pastry Substitution: Use gluten-free puff pastry for a gluten-free version.
  • 1/2 cup Lemon Curd Homemade or store-bought can be used.
  • 5 oz Full Fat Cream Cheese Substitution: Low-fat cream cheese can be used.
  • 3 tbsp Icing/Powdered Sugar Alternative sweeteners can be substituted at a 1:1 ratio.
  • 1/2 tsp Vanilla Extract
  • 1/2 tbsp Cornflour/Cornstarch
  • 1 medium Egg Lightly beaten for egg wash.

Equipment

  • Baking Tray
  • Mixing bowls
  • Sharp knife
  • Wire rack

Method
 

Step-by-Step Instructions
  1. Preheat your oven to 200°C (400°F) and line your baking tray with greaseproof paper.
  2. Unroll the ready-made puff pastry onto the prepared baking tray and score it into three equal sections lengthwise.
  3. Slice diagonal strips about 3/4 to 1-inch wide down each side of the puff pastry, stopping just at the center.
  4. In a mixing bowl, combine the lemon curd with cream cheese, icing sugar, vanilla extract, and cornflour until smooth.
  5. Fold alternate strips over the filling, overlapping them to create a braid effect.
  6. Brush the top of the pastry braid with a lightly beaten egg for a shiny finish.
  7. Bake in the preheated oven for 17-22 minutes until golden and puffed up.
  8. Allow to cool on a wire rack for about 30 minutes, then slice and serve.

Nutrition

Serving: 1sliceCalories: 250kcalCarbohydrates: 30gProtein: 4gFat: 12gSaturated Fat: 7gPolyunsaturated Fat: 1gMonounsaturated Fat: 3gCholesterol: 80mgSodium: 230mgPotassium: 60mgFiber: 1gSugar: 10gVitamin A: 500IUVitamin C: 1mgCalcium: 40mgIron: 1mg

Notes

Keep your puff pastry cold until you work with it for best results.

Tried this recipe?

Let us know how it was!

Warm and Comforting Bananas Foster Cobbler Delight

As I plopped down on the couch after a long day, the sweet scent of caramelized bananas wafted through the air, pulling me into the kitchen like a warm hug. That’s the magic of my Irresistible Bananas Foster Cobbler—a comforting dessert that takes just minutes to prepare and always leaves my guests in awe. With its gooey layer of caramel mingling beautifully with a buttery biscuit topping, it’s a soothing treat perfect for both cozy evenings and lively gatherings. Plus, this recipe is incredibly adaptable; whether you want to switch up the flavors with seasonal fruits or toss in some nuts for a delightful crunch, the options are endless. So, are you ready to bring some cozy sweetness into your home? Let’s dive into this heavenly recipe together!

Why is Bananas Foster Cobbler a Must-Try?

Comforting and indulgent, Bananas Foster Cobbler is the perfect remedy for a long day, bringing warmth and sweetness to your table. Quick to make, this recipe takes minimal time to prepare, making it a go-to for spontaneous gatherings. Versatile in nature, you can easily customize it with your favorite fruits or nuts, allowing each version to shine. Crowd-pleasing and rich in flavor, it never fails to impress guests, leaving them begging for seconds. Pair it with a scoop of vanilla ice cream, and you have an unforgettable dessert experience!

Bananas Foster Cobbler Ingredients

For the Cobbler

  • Ripe Bananas – Use slightly overripe bananas for the best flavor and natural sweetness.
  • Brown Sugar – Dark brown sugar adds deeper caramel notes; feel free to use light brown for a milder taste.
  • Unsalted Butter – Essential for richness; opt for unsalted butter to have better control over seasoning.
  • Cinnamon – Provides warmth; consider substituting with nutmeg for a different spice profile.
  • All-Purpose Flour – Essential for structure; make sure to measure accurately for the best texture.
  • Whole Milk – Adds moisture and creates a tender cobbler; the creaminess is perfect for this indulgent dessert.
  • Baking Powder – Helps the cobbler rise; check for freshness to ensure a fluffy texture.
  • Pinch of Salt – Balances sweetness and enhances overall flavor, making the dessert even more delightful.

For Serving

  • Vanilla Ice Cream – A perfect complement; it adds creaminess and enhances the warm, gooey goodness of the cobbler.
  • Whipped Cream – A dollop on top gives it a lightness and adds to the indulgent experience.

With these ingredients, you’re well on your way to creating a rich and delightful Bananas Foster Cobbler that is sure to warm your heart and satisfy your sweet tooth!

Step‑by‑Step Instructions for Irresistible Bananas Foster Cobbler

Step 1: Preheat the Oven
Start by preheating your oven to 350°F (175°C). This warm environment will help ensure your Bananas Foster Cobbler cooks evenly throughout. While the oven heats, take a moment to lightly grease a 9×13-inch baking dish with non-stick spray or butter, ensuring it’s ready for the batter.

Step 2: Prepare the Bananas
Peel and slice 3-4 ripe bananas into even rounds, aiming for about ½-inch thickness. In a medium mixing bowl, combine the banana slices with ½ cup of brown sugar and 1 teaspoon of cinnamon, tossing them gently until the bananas are well coated. Set this mixture aside to allow the bananas to release their natural sweetness.

Step 3: Make the Cobbler Batter
In a large bowl, whisk together 1 cup of all-purpose flour, 2 teaspoons of baking powder, and a pinch of salt to combine the dry ingredients. In another bowl, mix ½ cup of melted unsalted butter, ½ cup of brown sugar, ½ cup of whole milk, and 1 teaspoon of vanilla extract until smooth. Gradually fold the dry mixture into the wet ingredients until just combined, avoiding overmixing for a light cobbler.

Step 4: Assemble the Cobbler
Pour half of the Cobbler batter into the greased baking dish, spreading it evenly. Layer the caramelized bananas over this batter, ensuring an even distribution. Finally, dollop and pour the remaining batter over the bananas gently, smoothing it out to cover the fruit completely. This layering creates a gooey, delightful texture when baked.

Step 5: Bake the Cobbler
Place the baking dish in the preheated oven and bake for 30-35 minutes. You’ll know it’s done when the top is golden brown and bubbly—check for a toothpick inserted in the center which should come out clean or with just a few moist crumbs.

Step 6: Serve the Cobbler
Once baked, remove your Bananas Foster Cobbler from the oven and let it cool slightly for about 10 minutes. Serve it warm, optionally topped with a scoop of vanilla ice cream or a dollop of whipped cream, enhancing the warm, inviting flavors of this comforting dessert.

How to Store and Freeze Bananas Foster Cobbler

Fridge: Store leftover Bananas Foster Cobbler in an airtight container for up to 3 days. Keep it covered to maintain moisture and prevent it from drying out.

Freezer: For longer storage, freeze the cobbler by wrapping it tightly in plastic wrap and aluminum foil. It will keep well for up to 3 months. Proper wrapping prevents freezer burn.

Reheating: To enjoy it later, reheat individual portions in the microwave or place at 350°F (175°C) in the oven until warmed through. This will revive its gooey texture and delicious flavor.

Serving Suggestion: Always serve warm, topped with a scoop of ice cream or whipped cream, to enhance your delightful dessert experience!

Make Ahead Options

Preparing your Irresistible Bananas Foster Cobbler ahead of time is a fantastic way to simplify your meal planning! You can assemble the cobbler up to 24 hours in advance by layering the caramelized bananas and batter in the greased baking dish, then cover it tightly with plastic wrap or aluminum foil. This method allows the flavors to meld beautifully while ensuring the cobbler remains just as delicious when you’re ready to bake it. When it’s time to serve, simply remove the wrap and pop it into a preheated oven—there’s no need to adjust the baking time. You’ll have a warm, comforting dessert with minimal effort on busy weeknights!

Expert Tips for Bananas Foster Cobbler

  • Optimal Bananas: Use ripe bananas with brown spots for maximum sweetness; overripe bananas caramelize beautifully, enhancing the flavor of your cobbler.
  • Don’t Overmix: Gently fold the batter until just combined. Overmixing can lead to a dense cobbler rather than the light, fluffy texture you desire.
  • Fresh Baking Powder: Ensure your baking powder is fresh—stale powder can prevent your cobbler from rising properly, leaving it flat and heavy.
  • Layering Technique: Spread the banana layer evenly for consistent flavor throughout the cobbler. Any uneven distribution can lead to patches of flavorlessness.
  • Make it Ahead: Assemble the cobbler a day in advance and refrigerate. Just bake it directly from the fridge for a quick and convenient dessert!

Bananas Foster Cobbler Variations

Feel free to let your culinary creativity shine with these delightful twists on the classic recipe!

  • Fruit Swap: Try using peaches or apples in place of bananas for a seasonal twist. Each fruit brings its unique sweetness and flavor profile, offering a lovely update.

  • Nutty Addition: Add walnuts or pecans for extra crunch! Their toasty flavor complements the soft, sweet fruit brilliantly, making for a heartier cobbler.

  • Spice It Up: Experiment with nutmeg or ginger instead of cinnamon to introduce a different spice note. These aromatic spices can add warmth and a hint of zestiness to the dessert.

  • Non-Alcoholic Version: Swap rum for vanilla extract or apple juice to create a family-friendly dessert without compromising on flavor. The sweetness of apple juice pairs wonderfully with the caramelized bananas.

  • Gluten-Free Option: Use a 1:1 gluten-free flour blend in place of all-purpose flour for a gluten-free version that everyone can enjoy! It turns out just as delicious.

  • Chocolate Lovers: Drizzle melted chocolate over the cobbler before serving. The blend of chocolate and caramelized bananas creates an indulgent treat that chocolate lovers will adore.

  • Coconut Twist: Incorporate shredded coconut into the batter for added texture and a tropical flair! This pairing with bananas highlights a sweet and delightful contrast.

  • Berry Bliss: Mix in blueberries or raspberries for a refreshing fruity twist. Berries add a burst of tartness that balances the sweetness of the cobbler, making it a lively dessert.

Embrace these simple yet flavorful variations to create your own special version of Bananas Foster Cobbler. You may also want to explore making a delicious Brandy Butter Sauce to drizzle on top or serve it warm alongside a scoop of my favorite vanilla ice cream for an unforgettable treat!

What to Serve with Irresistible Bananas Foster Cobbler?

Indulge your senses by pairing this creamy cobbler with delightful additions that enhance its warm sweetness and textures.

  • Vanilla Ice Cream: This classic pairing transforms each bite into an unforgettable experience, balancing the warm cobbler’s gooey richness with cool creaminess.
  • Whipped Cream: Light and airy, a dollop of whipped cream elevates your dessert, adding a soft contrast to the tender topping.
  • Caramel Sauce Drizzle: A rich drizzle of caramel sauce brings an extra layer of sweetness, enhancing the buttery flavor of the cobbler.
  • Fresh Berries: Bright and juicy berries like raspberries or strawberries add a refreshing tartness, perfectly complementing the sweetness of the cobbler.
  • Pecans or Walnuts: The crunch from nuts adds a delightful texture, marrying beautifully with the cobbler’s softness while enhancing its nutty notes.
  • Hot Chocolate or Coffee: Pair a warm cup of hot chocolate or coffee with your dessert for a comforting finish, perfect for chilly evenings.

These options not only complement the Bananas Foster Cobbler but also create a vibrant and satisfying meal experience that’s sure to impress your guests or family!

Bananas Foster Cobbler Recipe FAQs

What type of bananas should I use for the best flavor?
I recommend using slightly overripe bananas with some brown spots. These bananas provide natural sweetness and caramelize beautifully when cooked, enhancing the flavor of your Bananas Foster Cobbler. Avoid using unripe bananas, as they won’t provide the same depth of flavor you want.

How should I store leftover Bananas Foster Cobbler?
Store any leftovers in an airtight container in the fridge for up to 3 days. Make sure it’s well-covered to maintain moisture and prevent it from drying out. When you’re ready to enjoy it again, reheat in the microwave or place in an oven preheated to 350°F (175°C) until warmed through, bringing back that gooey goodness!

Can I freeze Bananas Foster Cobbler, and if so, how?
Absolutely! To freeze your cobbler, wait for it to cool completely, then wrap individual portions tightly in plastic wrap and then in aluminum foil to prevent freezer burn. You can store it in the freezer for up to 3 months. When ready to eat, thaw it overnight in the refrigerator, then reheat using the oven for the best texture.

What are some common mistakes to avoid when making this cobbler?
One common mistake is overmixing the batter; this can lead to a dense cobbler instead of a light, fluffy one. Gently mix until just combined. Also, ensure your baking powder is fresh to allow for the right rise. If it’s stale, your cobbler may not puff up as expected, resulting in a disappointing texture.

Is this recipe suitable for people with dietary restrictions, such as allergies?
This recipe contains common allergens, including gluten, dairy, and eggs. For a gluten-free version, you can substitute all-purpose flour with a gluten-free flour blend. To make it dairy-free, you can use non-dairy milk and dairy-free butter alternatives. Always consult with your guests about their specific dietary needs and allergies before serving!

undefined

Warm and Comforting Bananas Foster Cobbler Delight

This irresistible Bananas Foster Cobbler is a comforting dessert combining caramelized bananas and a buttery biscuit topping, perfect for cozy evenings.
Prep Time 15 minutes
Cook Time 35 minutes
Cooling Time 10 minutes
Total Time 1 hour
Servings: 8 slices
Course: Dessert
Cuisine: American
Calories: 290

Ingredients
  

For the Cobbler
  • 3-4 pieces Ripe Bananas Use slightly overripe bananas for the best flavor.
  • 0.5 cup Brown Sugar Dark brown sugar adds deeper caramel notes.
  • 0.5 cup Unsalted Butter Melted for batter.
  • 1 teaspoon Cinnamon Consider substituting with nutmeg.
  • 1 cup All-Purpose Flour Measure accurately for the best texture.
  • 0.5 cup Whole Milk Adds moisture.
  • 2 teaspoons Baking Powder Check for freshness.
  • 1 pinch Salt Balances sweetness.
For Serving
  • 1 scoop Vanilla Ice Cream A perfect complement.
  • 1 dollop Whipped Cream To enhance indulgence.

Equipment

  • 9x13 inch baking dish
  • Mixing bowls
  • whisk
  • spatula

Method
 

Step-by-Step Instructions
  1. Preheat your oven to 350°F (175°C) and grease a 9x13-inch baking dish.
  2. Peel and slice 3-4 ripe bananas into even rounds, then combine with ½ cup of brown sugar and 1 teaspoon of cinnamon.
  3. In a large bowl, whisk together 1 cup of flour, 2 teaspoons of baking powder, and a pinch of salt. In another bowl, mix ½ cup of melted butter, ½ cup of brown sugar, ½ cup of whole milk, and 1 teaspoon of vanilla until smooth. Fold the dry ingredients into the wet ingredients.
  4. Pour half of the Cobbler batter into the baking dish, layer the bananas, and top with the remaining batter.
  5. Bake in preheated oven for 30-35 minutes until golden brown and bubbly.
  6. Let cool slightly for about 10 minutes before serving, optionally topped with vanilla ice cream or whipped cream.

Nutrition

Serving: 1sliceCalories: 290kcalCarbohydrates: 45gProtein: 3gFat: 12gSaturated Fat: 7gMonounsaturated Fat: 5gCholesterol: 35mgSodium: 170mgPotassium: 200mgFiber: 1gSugar: 20gVitamin A: 500IUVitamin C: 8mgCalcium: 50mgIron: 1mg

Notes

For best results, use ripe bananas with brown spots and avoid overmixing the batter to ensure a light texture.

Tried this recipe?

Let us know how it was!

Easter Bunny Crescent Bites: Fun and Festive Treats to Try

As I was skimming through the colorful aisles of spring produce, I couldn’t help but feel inspired by the season’s cheerful vibes. What better way to celebrate Easter than with a batch of delightful Easter Bunny Crescent Bites? This festive appetizer combines flaky crescent dough with a creamy spinach-artichoke filling that even the pickiest of eaters will adore. Not only are these bites visually charming, but they also come together in under 30 minutes, making them a perfect choice for last-minute gatherings. Plus, they’re vegetarian and kid-friendly, ensuring everyone can enjoy a tasty treat together. Ready to add a dash of whimsy to your celebration? Let’s hop into the kitchen and whip up these adorable snacks that are sure to bring smiles to your table!

Why Are These Bites So Irresistible?

Quick Preparation: In just under 30 minutes, you can have these delightful bites ready to impress your guests. Perfect for busy celebrations or spontaneous gatherings!

Festive Appeal: With their adorable bunny shape, these Crescent Bites are not just food—they’re a colorful centerpiece that adds joy to your Easter table.

Kid-Friendly: These bites are a hit with kids, thanks to their fun presentation and creamy filling. Plus, you’ll love how easy they are to make!

Vegetarian Delight: Packed with nutritious spinach and artichokes, these bites meet the needs of your vegetarian friends while ensuring no one misses the meat.

Versatile Options: Feel free to customize the filling with your favorite dips, such as buffalo chicken or cheese blends, for a personal touch. For even more ideas, check out other kid-friendly appetizers.

Easter Bunny Crescent Bites Ingredients

Prepare these delicious bites with ease!

For the Bites

  • Crescent Roll Dough – Provides a buttery, flaky base for the bites, perfect for shaping bunny ears!
  • Fresh Herbs (Parsley or Chives) – Adds color and flavor; substitute with any fresh herb you prefer.
  • Artichoke Hearts – Offers tanginess and unique texture; ensure they are well-drained and chopped.
  • Frozen Spinach – Adds vibrant color and nutrients; be sure to remove excess moisture to avoid sogginess.
  • Onion – Finely diced to contribute savory depth; shallots make a great mild alternative.
  • Cream Cheese – Creates a rich, creamy filling base; opt for vegan cream cheese for a plant-based choice.
  • Sour Cream – Provides tanginess for a smooth consistency; plain yogurt can serve as a substitute.
  • Parmesan Cheese – Adds a salty, nutty flavor; nutritional yeast works well for a vegan option.
  • Garlic – Enhances the overall flavor; garlic powder is a suitable replacement if needed.
  • Salt – Essential for enhancing flavors and rounding out the dish.

Step‑by‑Step Instructions for Adorable Easter Bunny Crescent Bites

Step 1: Preheat and Prepare
Begin by preheating your oven to 350°F (175°C). While the oven heats, prepare a mini-muffin tin by spraying it with nonstick cooking spray. Line a baking sheet with parchment paper to prevent sticking and to make cleanup easier. This step sets the foundation for your delightful Easter Bunny Crescent Bites!

Step 2: Shape the Dough
Unroll the crescent roll dough on a clean surface, pressing the seams together to form a solid rectangle. Using a cookie cutter, cut out 2-3 inch circles from the dough. Carefully place each circle into the muffin cups, ensuring they fit snugly. This will become the cute bunny body for your adorable Easter Bunny Crescent Bites!

Step 3: Create Bunny Ears
With the remaining dough, cut small strips about 1-1.5 inches tall to create pairs of bunny ears. Shape them into curved forms for an authentic look. Place the bunny ears on the lined baking sheet, ensuring there’s enough space between each pair for even baking. Now, let’s get these goodies into the oven!

Step 4: Bake the Dough
Pop the muffin tin and the baking sheet with bunny ears into the preheated oven. Bake the ears for about 3-5 minutes, watching closely for a light golden hue. The muffin cups will need around 8-10 minutes to puff up beautifully. The delightful smell of baking dough will fill your kitchen—what a treat!

Step 5: Prepare the Filling
Once the dough is done baking, create a small well in the center of each baked crescent cup. In a mixing bowl, combine the filling ingredients: artichoke hearts, frozen spinach (thawed and drained), cream cheese, sour cream, diced onion, garlic, Parmesan, and salt. Mix until the filling is smooth and creamy, inviting everyone to dive in!

Step 6: Fill the Crescent Cups
Spoon the rich spinach-artichoke mixture generously into each crescent cup, making sure to fill them well. With a gentle press, insert the crafted bunny ears into the filling, giving your Easter Bunny Crescent Bites their charming appearance. We’re almost ready to hop into the fun part—serving!

Step 7: Garnish and Serve
Once your adorable Easter Bunny Crescent Bites are assembled, garnish with fresh herbs for an added pop of color and flavor. Arrange them on a platter for a stunning presentation. Serve immediately while warm, letting the festive delight spread joy to everyone at your gathering!

Expert Tips for Easter Bunny Crescent Bites

  • Chill the Dough: Working with cold crescent dough prevents sticking and allows for cleaner cuts. If it gets too warm while shaping, pop it in the fridge briefly.

  • Drain Spinach Well: Excess moisture can lead to soggy bites. Thaw and thoroughly squeeze out as much water as possible from frozen spinach before mixing.

  • Uniform Baking: Ensure even cooking by rotating your baking pans halfway through. This will lead to beautifully golden bunny ears and cups.

  • Make-Ahead Option: Prepare the spinach-artichoke filling a day in advance and store it in the fridge. This tip saves you time on the day of your gathering.

  • Serve Fresh: Assemble and bake the Easter Bunny Crescent Bites close to serving time for the best texture and flavor. Enjoy them warm for maximum delight!

Make Ahead Options

These Easter Bunny Crescent Bites are perfect for meal prep, allowing you to enjoy quality time with your loved ones. You can prepare the spinach-artichoke filling up to 24 hours in advance; simply mix all the ingredients and store in an airtight container in the fridge. To maintain that delightful creamy texture, make sure to keep the filling chilled until you are ready to assemble. When it’s time to serve, fill the pre-baked crescent cups and add the bunny ears right before baking. This way, the bites will come out just as delicious and golden, making your holiday gathering a breeze!

Easter Bunny Crescent Bites Variations

Feel free to tailor these delightful bites to your taste buds and dietary needs for a truly personalized treat!

  • Flavor Swap: Substitute the spinach-artichoke filling with a creamy buffalo chicken or a cheesy spinach dip mixture for a zesty twist. This adds a fun kick that everyone loves!

  • Dough Alternative: Use homemade pastry dough for a flaky, artisanal base instead of crescent roll dough, giving your bites a handcrafted feel. The extra effort will surely impress your guests!

  • Gluten-Free: Swap regular crescent dough for a gluten-free dough to cater to gluten-sensitive guests. They’ll appreciate not missing out on these festive bites!

  • Vegan Delight: Replace all dairy ingredients with vegan alternatives, like coconut cream and nutritional yeast, to create a plant-based version. It’s deliciously rich and satisfying for everyone!

  • Add Vegetables: Diced bell peppers or sun-dried tomatoes can enhance the filling with vibrant colors and extra nutrients. This not only boosts flavor but adds a delightful crunch!

  • Herb Infusion: Experiment with fresh herbs like dill or basil mixed into the filling for a fragrant twist. This will elevate the flavor profile while offering a familiar herbaceous note.

  • Crispy Topping: Consider sprinkling panko breadcrumbs mixed with herbs on top before baking for a deliciously crunchy finish. It provides a delightful textural contrast to the creamy filling!

Exploring these variations can lead to unforgettable moments around the table, ensuring that no two gatherings are ever the same. For more fun ideas, check out these delicious kid-friendly appetizers that will surely spark joy in your kitchen!

Storage Tips for Easter Bunny Crescent Bites

Fridge: Store leftovers in an airtight container in the fridge for up to 2 days. This keeps the Crescent Bites nice and fresh for later enjoyment!

Freezer: Freezing filled bites is not recommended. However, you can freeze unfilled, baked crescent cups for future use. Just ensure they are fully cooled and wrapped tightly.

Reheating: When ready to enjoy, reheat the bites in a 350°F oven for about 10-15 minutes until warmed through and crispy again.

Leftover Filling: If you have extra filling, store it in a container in the fridge for up to 3 days. Use it as a spread on bread or crackers for a tasty snack!

What to Serve with Easter Bunny Crescent Bites

These festive bites are perfect for spring gatherings, inviting flavors that create the ultimate Easter feast.

  • Creamy Tomato Soup: A classic pairing that offers a comforting contrast to the flaky bites, perfect for dipping.
  • Mixed Green Salad: A fresh salad with seasonal veggies adds lightness to your meal, balancing the richness of the bites.
  • Oven-Roasted Asparagus: Tender, crispy asparagus enhances the dish’s vibrant appeal while providing a delightful crunch.
  • Sparkling Lemonade: This refreshing drink is both visually exciting and palate-cleansing, making it an ideal complement to the savory bites.
  • Mini Fruit Tarts: These sweet treats offer a bright, fruity contrast, completing your festive spread with a touch of whimsy.
  • Herbed Quinoa Salad: A nutrient-packed side that brings color and fresh flavors, enhancing the bite experience while keeping it wholesome.

Each of these pairings adds its unique charm and deliciousness to your Easter celebration, guaranteeing delightful memories for everyone involved.

Easter Bunny Crescent Bites Recipe FAQs

What herbs work best for the filling?
Absolutely! Fresh herbs like parsley or chives add a wonderful touch of flavor and color. However, you can substitute any fresh herb of your choice based on your preference—basil or dill can also work beautifully!

How should I store leftover Easter Bunny Crescent Bites?
Simply store any leftovers in an airtight container in the fridge for up to 2 days. This helps keep the Crescent Bites fresh and ready to enjoy later on.

Can I freeze these bites after baking?
It’s best not to freeze filled Easter Bunny Crescent Bites, as they may lose their delightful texture. However, you can freeze unfilled baked crescent cups for future use. Just cool them completely, wrap tightly, and place them in an airtight container for up to 3 months.

What if my spinach is too watery?
Very good question! It’s essential to squeeze out excess moisture from the thawed frozen spinach before adding it to your filling. I recommend placing the spinach in a clean kitchen towel and wringing it to ensure it’s as dry as possible, preventing soggy bites.

Are there any allergy considerations for these bites?
Definitely! This recipe contains dairy ingredients, such as cream cheese and Parmesan. For those with dairy allergies or those following a vegan diet, I suggest using vegan cream cheese and nutritional yeast as excellent substitutes to ensure everyone can enjoy these festive bites!

undefined

Easter Bunny Crescent Bites: Fun and Festive Treats to Try

Delightful Easter Bunny Crescent Bites combine flaky crescent dough with a creamy spinach-artichoke filling, ideal for festive gatherings.
Prep Time 15 minutes
Cook Time 10 minutes
Total Time 25 minutes
Servings: 12 bites
Course: Appetizers
Cuisine: American
Calories: 120

Ingredients
  

For the Bites
  • 1 tube Crescent Roll Dough Provides a buttery, flaky base for the bites
  • 1/4 cup Fresh Herbs (Parsley or Chives) Adds color and flavor; substitute with any fresh herb you prefer
  • 1 can Artichoke Hearts Ensure they are well-drained and chopped
  • 1 cup Frozen Spinach Be sure to remove excess moisture to avoid sogginess
  • 1/2 cup Onion Finely diced; shallots make a great alternative
  • 8 oz Cream Cheese Opt for vegan cream cheese for a plant-based choice
  • 1/4 cup Sour Cream Plain yogurt can serve as a substitute
  • 1/2 cup Parmesan Cheese Nutritional yeast works well for a vegan option
  • 2 cloves Garlic Enhances overall flavor; garlic powder is a suitable replacement if needed
  • 1/2 tsp Salt Essential for enhancing flavors and rounding out the dish

Equipment

  • Oven
  • mini muffin tin
  • Baking Sheet
  • Parchment Paper
  • Cookie cutter
  • Mixing Bowl

Method
 

Step-by-Step Instructions
  1. Preheat your oven to 350°F (175°C) and prepare a mini-muffin tin with nonstick spray and line a baking sheet with parchment paper.
  2. Unroll the crescent roll dough and press the seams together to form a solid rectangle. Cut out 2-3 inch circles and place them into the muffin cups.
  3. Cut small strips from the remaining dough to create pairs of bunny ears and shape them into curved forms.
  4. Bake the muffin tin for 8-10 minutes and the bunny ears for about 3-5 minutes until golden.
  5. Create a small well in each baked crescent cup, and mix filling ingredients until smooth.
  6. Spoon the spinach-artichoke mixture into each crescent cup and insert bunny ears into the filling.
  7. Garnish with fresh herbs and serve immediately while warm.

Nutrition

Serving: 1biteCalories: 120kcalCarbohydrates: 8gProtein: 3gFat: 8gSaturated Fat: 4gPolyunsaturated Fat: 0.5gMonounsaturated Fat: 2.5gCholesterol: 20mgSodium: 230mgPotassium: 120mgFiber: 1gSugar: 1gVitamin A: 1000IUVitamin C: 5mgCalcium: 150mgIron: 1mg

Notes

Chill dough to prevent sticking, drain spinach well, and serve fresh for best results.

Tried this recipe?

Let us know how it was!

Easter Hot Cross Buns with Zesty Orange Glaze Delight

As the tantalizing scent of freshly baked bread wafts through my kitchen, I can’t help but feel that warm embrace of nostalgia. Hot cross buns have always held a special place in my heart, and this Easter, I’m thrilled to share my recipe for Irresistible Easter Hot Cross Buns with Easy Zesty Orange Glaze. These soft, fluffy treats are a delightful twist on the traditional favorite, infused with aromatic spices and studded with dried fruit, all crowned with a brilliant citrus glaze. Not only do these buns bring a festive touch to your celebrations, but they also make for a cozy breakfast or snack that everyone will adore. Plus, you can easily customize them with different fruits or spices to suit your taste! Are you ready to fill your home with delicious aromas and delight your loved ones this Easter? Let’s dive in!

Why are these Hot Cross Buns special?

Irresistible Comfort: The combination of warm spices and soft texture creates a nostalgic treat that feels like a hug from your kitchen.

Zesty Brightness: Topped with a refreshing orange glaze, each bite bursts with delightful flavors, making them a must-have for your Easter table.

Versatile Options: Easily swap out dried fruits or add your favorite spices to create a personalized version that delights your taste buds.

Time-Saving Delight: With straightforward steps, you’ll have heavenly buns ready to impress family and friends without spending all day in the kitchen.

Festive Appeal: These beautiful buns not only taste great but also make for stunning additions to any festive brunch or celebration.

Ready to take your baking skills up a notch? Check out my tips on creating perfect baked goods to make your Easter unforgettable!

Hot Cross Buns Ingredients

• For the best flavor and texture in your Easter Hot Cross Buns, gather these essential ingredients!

For the Dough

  • Bread Flour – Provides structure and chewiness; substitute with all-purpose flour for a softer texture.
  • Instant Yeast – Leavens the dough for fluffy buns; active dry yeast can be used but requires proofing.
  • Milk – Adds moisture and richness; almond milk is a great dairy-free alternative.
  • Butter – Enhances flavor and softness; coconut oil can be used for a dairy-free version.
  • Sugar – Sweetens the dough; consider light brown sugar for a deeper flavor.
  • Salt – Balances flavors and strengthens gluten structure; must be included for best results.
  • Mixed Spices (Cinnamon, Nutmeg) – Adds warmth and complexity; experiment with ground cloves or cardamom for unique flavors.
  • Dried Fruit (Raisins, Currants) – Provides sweetness and texture; substitute cranberries or chopped apricots if desired.

For the Glaze

  • Orange Zest – Provides a citrusy brightness to the glaze; fresh zest is recommended for best flavor.
  • Orange Juice – Complements the zest for a flavorful glaze; use fresh juice for ultimate freshness.

Gather these ingredients to create delectable Hot Cross Buns that are perfect for your Easter celebrations!

Step‑by‑Step Instructions for Irresistible Easter Hot Cross Buns with Zesty Orange Glaze

Step 1: Dough Preparation
In a large mixing bowl, combine 4 cups of bread flour, 2 teaspoons of instant yeast, 1/4 cup of sugar, and 1 tablespoon of mixed spices (like cinnamon and nutmeg). Gradually pour in 1 cup of warm milk and 1/4 cup of melted butter, mixing until a shaggy dough forms. At this point, you should see the flour and liquids blending beautifully together.

Step 2: Kneading
Transfer the dough to a lightly floured surface and begin kneading for about 10 minutes until it becomes smooth and elastic. If using a stand mixer, knead with a dough hook on medium speed. The dough should stretch without tearing. Aim for a soft consistency, and avoid adding too much flour to keep the buns light and fluffy.

Step 3: First Rise
Place the kneaded dough in a lightly oiled bowl, covering it with a damp cloth or plastic wrap. Set it in a warm spot to rise until doubled in size, which should take about 1 to 2 hours. You’ll know it’s ready when it has visibly puffed up and feels soft to the touch.

Step 4: Shaping
Once the dough has risen, punch it down gently to release the air. Incorporate 1 cup of your choice of dried fruit, like raisins or currants, until evenly distributed. Divide the dough into 12 equal portions and shape each into a smooth bun, then place them on a lined baking tray, leaving space between them.

Step 5: Second Rise
Cover the shaped buns with a clean kitchen towel and allow them to rise for another 30 to 45 minutes. This final rise will make them puffy and ready to bake. Keep an eye out for their growth, as they should almost double in size and feel light when you gently poke them.

Step 6: Baking
Preheat your oven to 375°F (190°C). Once the buns have risen perfectly, place them in the oven and bake for 20 to 25 minutes, or until they turn a golden brown. You’ll know they’re done when they sound hollow when tapped on the bottom, promising a delightful texture.

Step 7: Glazing
As soon as the hot cross buns are out of the oven, prepare the zesty orange glaze by mixing 1/2 cup of orange juice with the zest of one orange. Brush this warm glaze generously over the hot buns for that shiny, sticky finish. Enjoy the burst of citrus as it seeps into the surface of each bun!

What to Serve with Irresistible Easter Hot Cross Buns?

Warm, fragrant, and freshly baked, these delightful buns are perfect for creating a memorable meal that everyone will cherish.

  • Clotted Cream: Spread this creamy indulgence on your buns for a rich and luxurious treat that complements the zesty glaze beautifully.

  • Fresh Fruit Salad: A colorful mix of seasonal fruits adds a refreshing touch, balancing the sweetness of the buns while providing a burst of natural flavors.

  • Herbal Tea: Sipping on a fragrant herbal tea can enhance your experience, offering warmth and comfort that pairs nicely with the spices in the buns.

  • Cinnamon Butter: This delectable spread made with softened butter and cinnamon adds a sweet, spiced flavor that elevates each bite to a new level of delight.

  • Cheese Platter: A selection of mild cheeses creates a savory contrast to the sweet richness of the hot cross buns, making for an enticing combination.

  • Classic Hot Chocolate: A warm cup of hot chocolate complements these festive buns perfectly, creating a cozy pairing that feels like a hug in a mug during Easter brunch.

  • Sparkling Lemonade: For a refreshing and fizzy option, this citrusy drink adds a bright, zesty kick that beautifully enhances the orange glaze of the buns.

  • Chocolate Eggs: Incorporate a playful element to your meal with these seasonal treats, adding a fun and festive touch that delights both kids and adults alike.

Make Ahead Options

These Irresistible Easter Hot Cross Buns are perfect for meal prep, giving busy cooks a head start during the festive season! You can prepare the dough up to 24 hours in advance by following all the steps up to the first rise; simply cover the dough tightly and refrigerate it. When you’re ready to bake, let the chilled dough sit at room temperature for about 30 minutes before shaping and proceeding with the second rise. Additionally, you can shape the buns and store them in the fridge for up to 3 days before baking. This way, you’ll have freshly baked hot cross buns without the last-minute stress, keeping them just as delicious and fluffy!

Expert Tips for Hot Cross Buns

  • Perfect Rise: Allow your dough to rise fully for the best texture; rushing this step may result in dense hot cross buns.
  • Fruit Prep: Soak dried fruit before adding to the dough to keep them plump and juicy, enhancing flavor and texture.
  • Kneading Caution: Avoid over-flouring during kneading; too much flour can lead to tough buns instead of soft and fluffy treats.
  • Weigh Ingredients: Utilize a kitchen scale for precise measurements; accuracy ensures consistent results in your hot cross buns.
  • Serve Warm: These buns are best enjoyed warm out of the oven, but can also be frozen for lasting enjoyment.

Hot Cross Buns Variations & Substitutions

Personalize your irresistible hot cross buns with delightful tweaks that awaken your culinary creativity!

  • Dried Fruit Swap: Replace raisins or currants with dried cranberries or chopped apricots for a fresh twist. The tartness of cranberries brings a unique flavor that elevates the traditional taste.

  • Spicy Kick: Add ground ginger or allspice to the dough for an exciting flavor boost. Imagine the warmth of spices dancing on your palate, inviting more cozy memories with every bite.

  • Nutty Addition: Incorporate finely chopped nuts, such as walnuts or pecans, for added texture and richness. The delightful crunch against the soft bun creates a balanced experience that’s hard to resist.

  • Citrus Variation: Experiment with lemon or grapefruit zest for a different citrus zing in your orange glaze. Each bite will offer a fresh burst of brightness, transforming your buns into a citrus celebration.

  • Vegan Delight: Substitute dairy ingredients with plant-based alternatives, like almond milk and coconut oil, for a fluffy, vegan-friendly version. The joy of homemade buns is now accessible to all, spreading more joy around the table.

  • Chocolate Lovers: Fold in mini chocolate chips for a sweet indulgence that will wow dessert lovers. Just picture those rich morsels melting into warm, fluffy dough—a marvelous treat for any occasion!

  • Herbal Infusion: Add minced fresh herbs like rosemary or thyme into the dough for a unique twist that enhances the flavor profile. Envision the aromatic herby scent wafting through your kitchen, infusing each bun with uplifting goodness.

  • Glaze Variations: Enhance the zesty glaze by mixing in a splash of rum or whiskey for an adult version. This sweet sophistication adds a layer of complexity that will be the talk of any gathering—perfect for festive occasions!

Feel free to explore these variations or create your own unique spin, and don’t forget to check out my tips on creating perfect baked goods for inspiration and guidance!

Storage Tips for Hot Cross Buns

Room Temperature: Store hot cross buns in an airtight container at room temperature for up to 3 days to maintain freshness and softness.

Fridge: If you prefer, you can refrigerate the buns, but this may dry them out; enjoy within 2 days for the best flavor.

Freezer: For longer storage, freeze individual buns wrapped in parchment paper, then place in an airtight container. They’ll keep well for up to 3 months.

Reheating: To enjoy them warm, reheat in the microwave for about 15-20 seconds or in the oven at 350°F (175°C) for 5-10 minutes until heated through.

Irresistible Easter Hot Cross Buns with Zesty Orange Glaze Recipe FAQs

What is the best way to choose ripe dried fruit for hot cross buns?
Absolutely! When selecting dried fruit, look for vibrant colors without dark spots or a sticky feel, which can indicate spoilage. You want plump, moisture-rich dried fruits like raisins or currants—avoid any that are hard or overly dried out. If you’re using apricots or cranberries, aim for softer varieties to ensure they add that delightful chew to your buns.

How should I store my hot cross buns after baking?
Very good question! To maintain their soft texture and delicious flavor, store your hot cross buns in an airtight container at room temperature. They will stay fresh for up to 3 days. Be sure to keep them away from sunlight and moisture, which can make them stale. If you need them to last longer, consider freezing them!

Can I freeze hot cross buns, and how do I do it correctly?
Absolutely! Freezing your hot cross buns is a great way to enjoy them later. First, allow the buns to cool completely. Then, wrap each bun individually in parchment paper and place them in a zip-top freezer bag or airtight container. This prevents freezer burn and keeps them delicious. They can be frozen for up to 3 months. When you’re ready to enjoy, just thaw at room temperature or reheat directly from frozen.

What should I do if my dough doesn’t rise properly?
It can be frustrating when dough doesn’t behave! If your hot cross bun dough isn’t rising, it may be due to either inactive yeast or temperature issues. First, check the expiration date on your yeast; if it’s old, you might need a fresh batch. Additionally, ensure your liquid ingredients are warm but not too hot—around 110°F (43°C) is ideal for activating yeast. If your kitchen is too cool, consider letting the dough rise in a slightly warmed oven (key: turn on the oven light rather than heating it) to create a cozy environment.

Are these hot cross buns suitable for people with allergies?
Very much so! This recipe can be adapted to accommodate various dietary considerations. For a dairy-free version, use almond milk and replace butter with coconut oil. If you’re sensitive to gluten, consider using a gluten-free flour blend. Always check your dried fruit for any added sugars or preservatives, which can sometimes contain allergens. Additionally, if you’re baking for a pet-friendly household, be cautious with raisins, as they can be toxic to some animals. Always prioritize safety!

undefined

Easter Hot Cross Buns with Zesty Orange Glaze Delight

Irresistible Easter Hot Cross Buns with a zesty orange glaze, perfect for celebrations and cozy breakfasts.
Prep Time 2 hours
Cook Time 25 minutes
Rising Time 30 minutes
Total Time 2 hours 55 minutes
Servings: 12 buns
Course: Breakfast
Cuisine: Baked Goods
Calories: 210

Ingredients
  

For the Dough
  • 4 cups bread flour Can substitute with all-purpose flour
  • 2 teaspoons instant yeast Active dry yeast can be used with proofing
  • 1/4 cup sugar Consider light brown sugar for deeper flavor
  • 1 tablespoon mixed spices (cinnamon, nutmeg) Can add ground cloves or cardamom
  • 1 cup milk Almond milk is a dairy-free alternative
  • 1/4 cup butter Coconut oil can be used for dairy-free version
  • 1 teaspoon salt
  • 1 cup dried fruit (raisins or currants) Can substitute cranberries or chopped apricots
For the Glaze
  • 1 tablespoon orange zest Fresh zest is recommended
  • 1/2 cup orange juice Use fresh juice for best flavor

Equipment

  • Mixing Bowl
  • Dough scraper
  • Baking Tray
  • Stand mixer

Method
 

Dough Preparation
  1. Combine 4 cups of bread flour, 2 teaspoons of instant yeast, 1/4 cup of sugar, and 1 tablespoon of mixed spices in a mixing bowl. Gradually pour in 1 cup of warm milk and 1/4 cup of melted butter, mixing until a shaggy dough forms.
  2. Transfer the dough to a lightly floured surface and knead for about 10 minutes until smooth and elastic.
  3. Place the kneaded dough in a lightly oiled bowl, cover, and set in a warm spot to rise until doubled in size, about 1 to 2 hours.
  4. Once risen, punch the dough down gently, incorporate 1 cup of your choice of dried fruit, then divide into 12 portions and shape into buns.
  5. Cover the shaped buns and allow them to rise for another 30 to 45 minutes.
  6. Preheat your oven to 375°F (190°C) and bake the buns for 20 to 25 minutes until golden brown.
  7. Prepare the glaze by mixing 1/2 cup of orange juice with the zest of one orange and brush it over the warm buns.

Nutrition

Serving: 1bunCalories: 210kcalCarbohydrates: 36gProtein: 4gFat: 5gSaturated Fat: 3gMonounsaturated Fat: 2gCholesterol: 15mgSodium: 150mgPotassium: 100mgFiber: 1gSugar: 8gVitamin A: 500IUVitamin C: 10mgCalcium: 50mgIron: 1mg

Notes

These buns are perfect warm from the oven, can be customized with different fruits and spices, and make a delightful addition to any festive celebration.

Tried this recipe?

Let us know how it was!