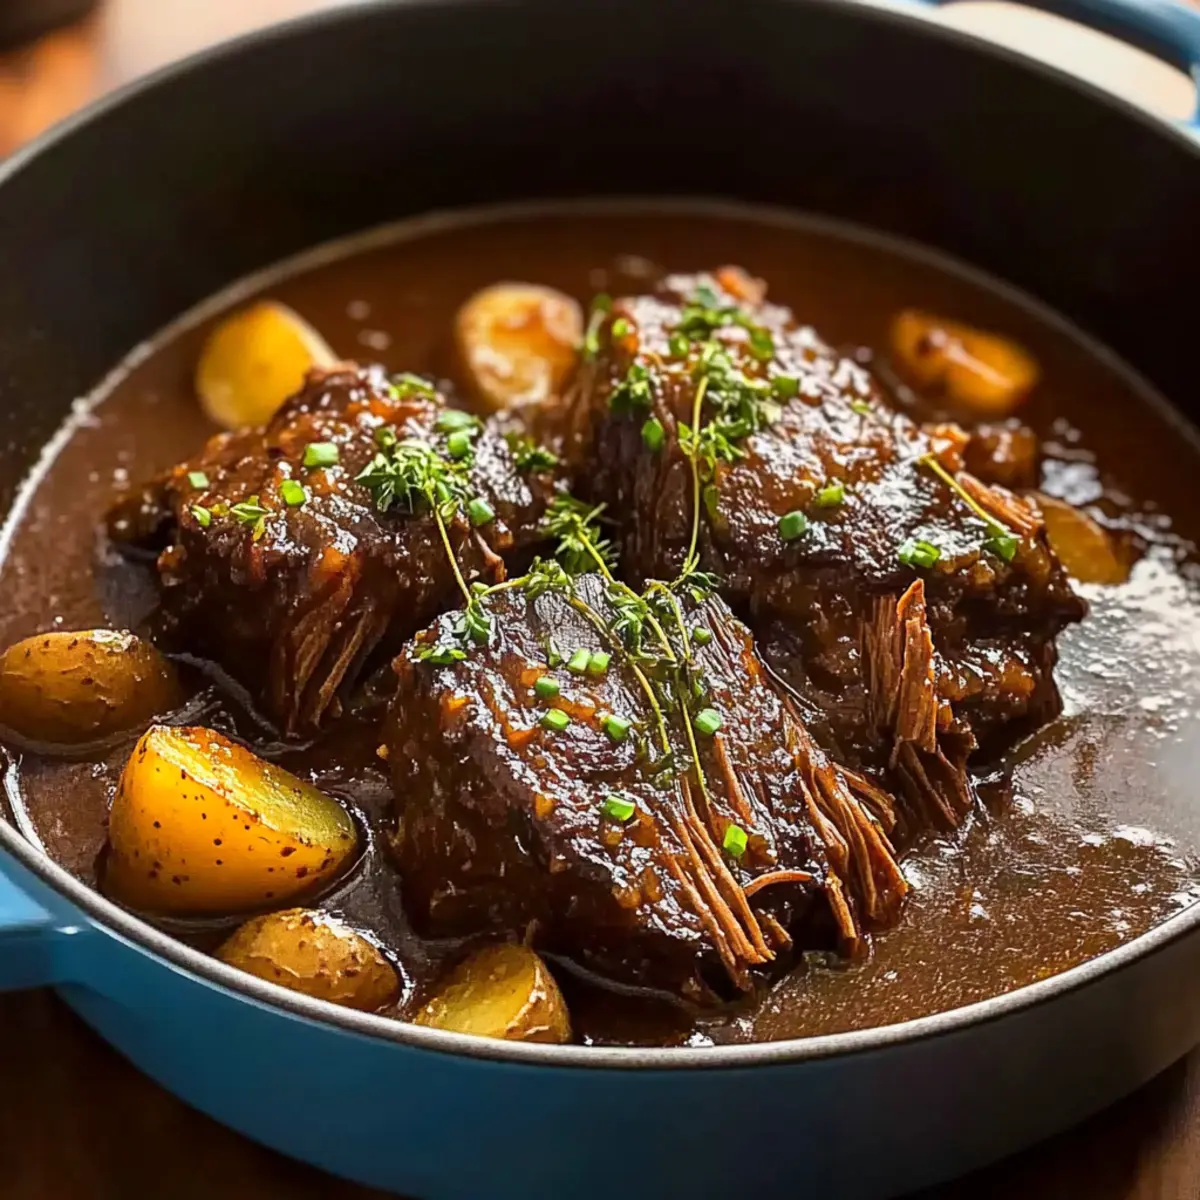
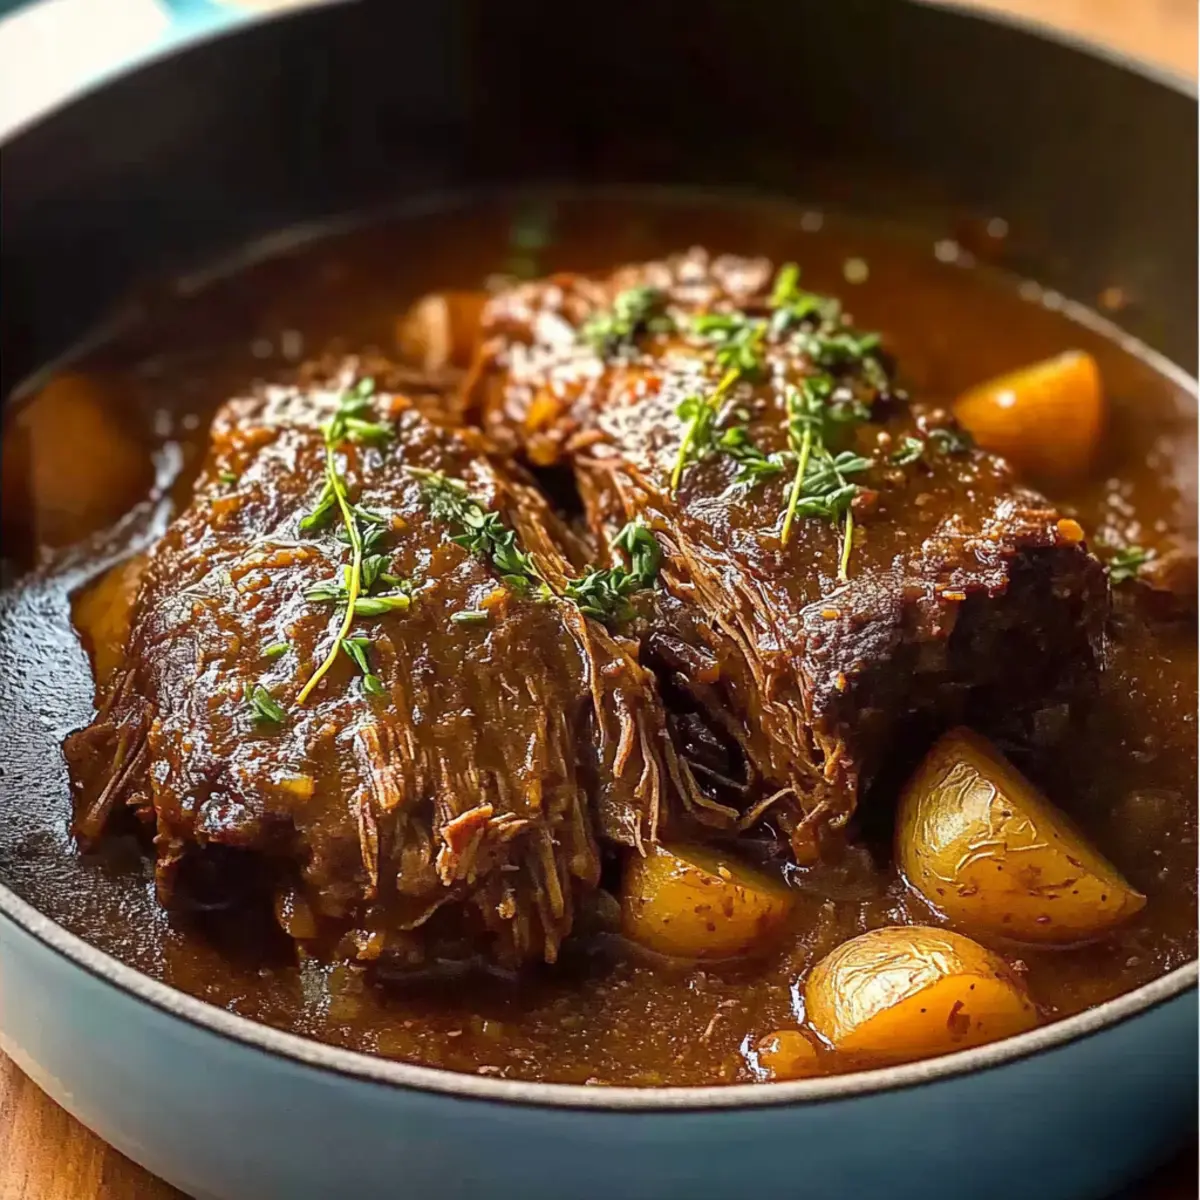
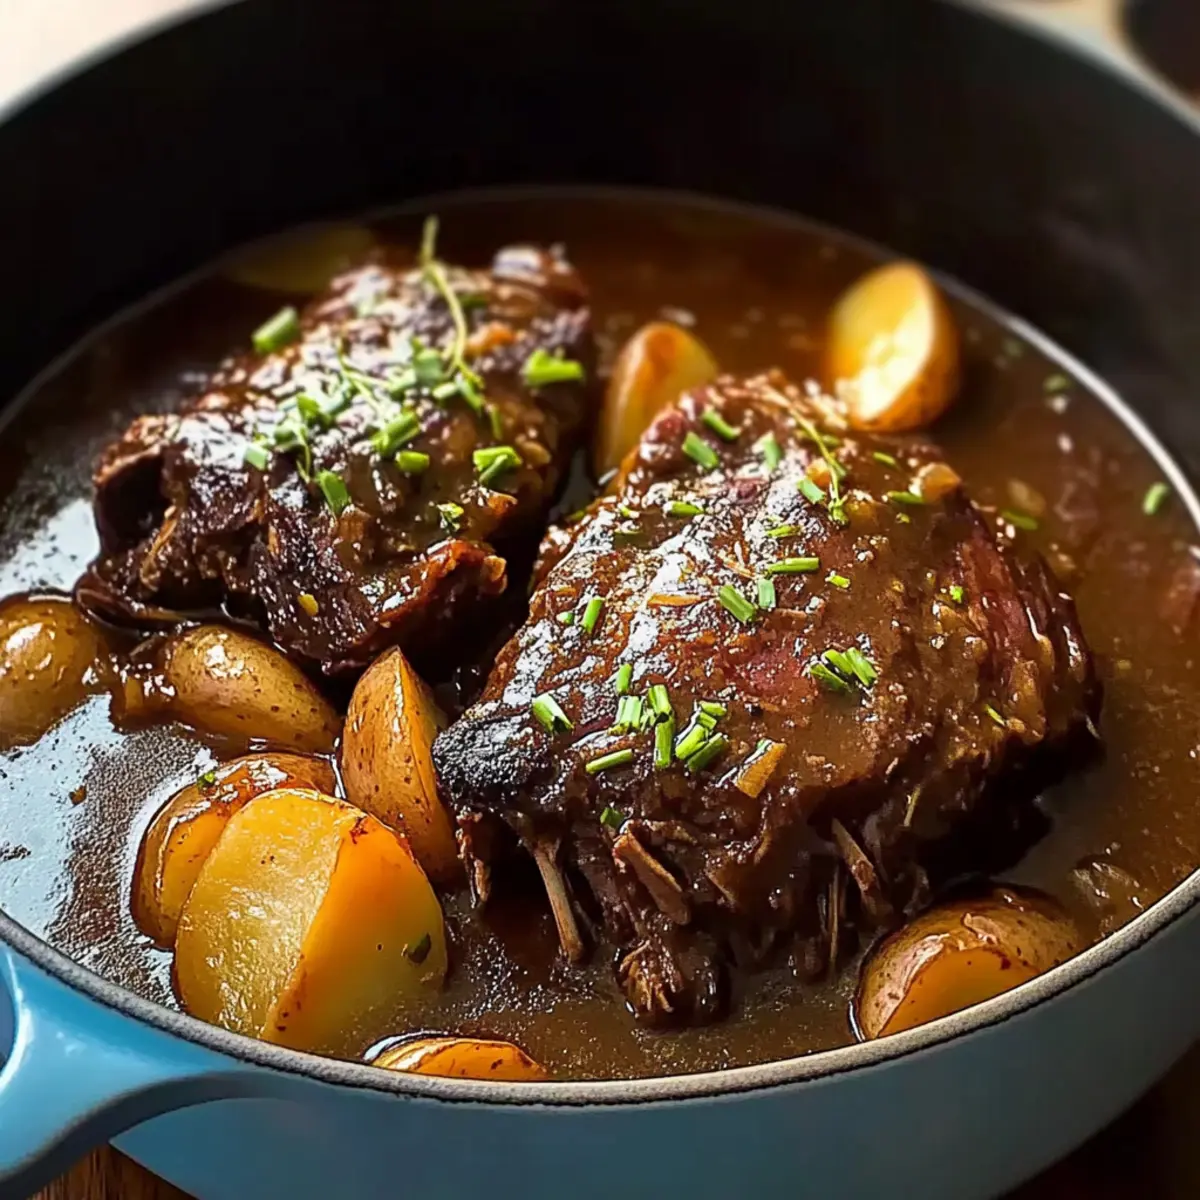
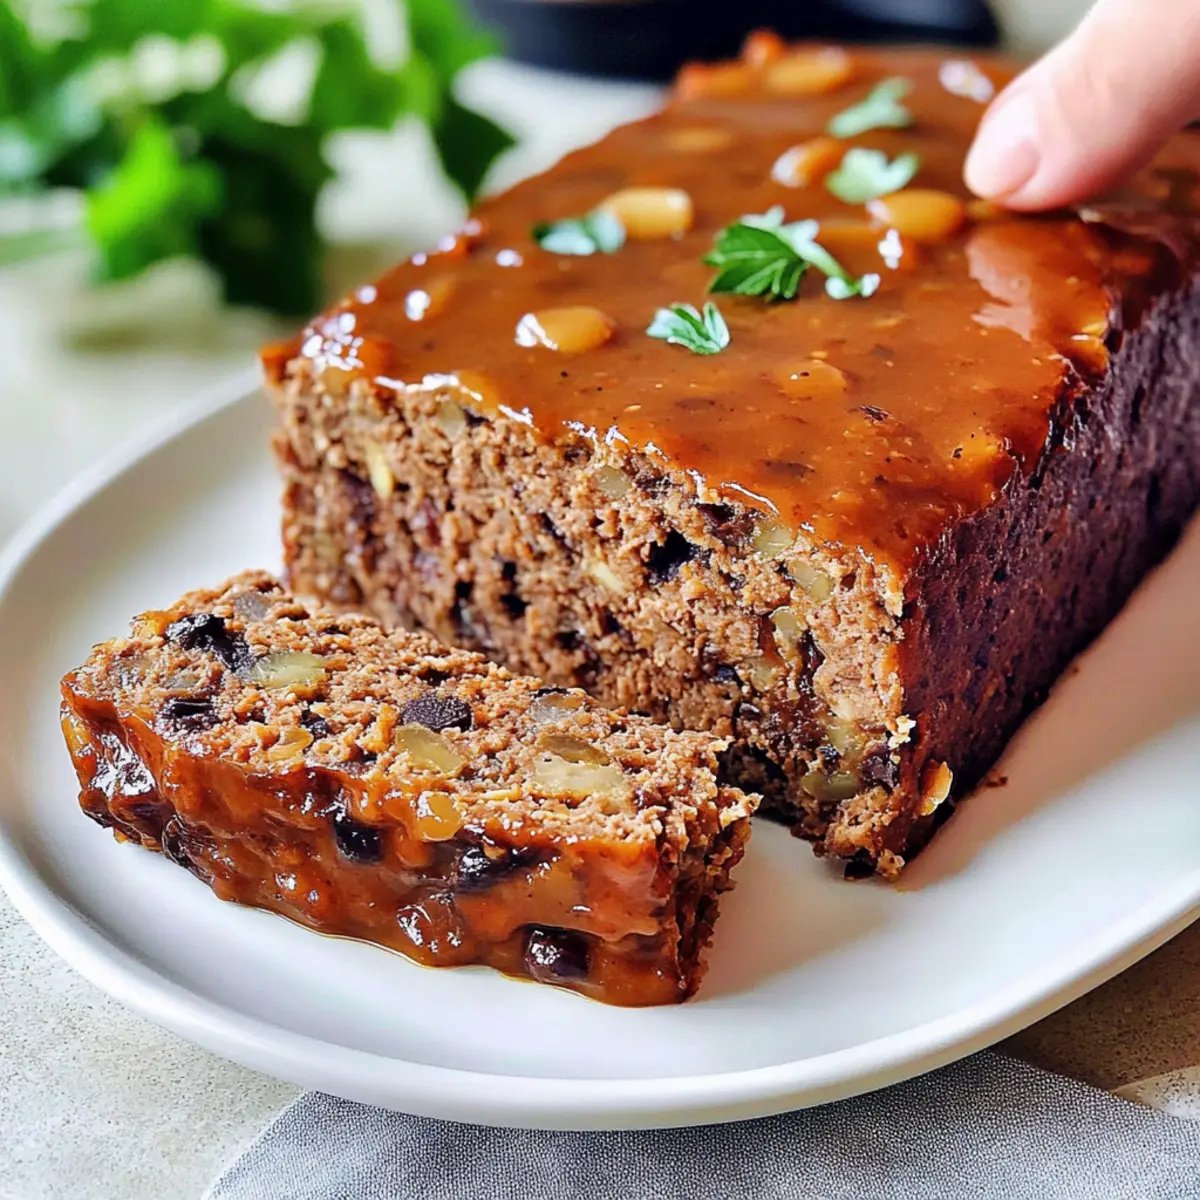
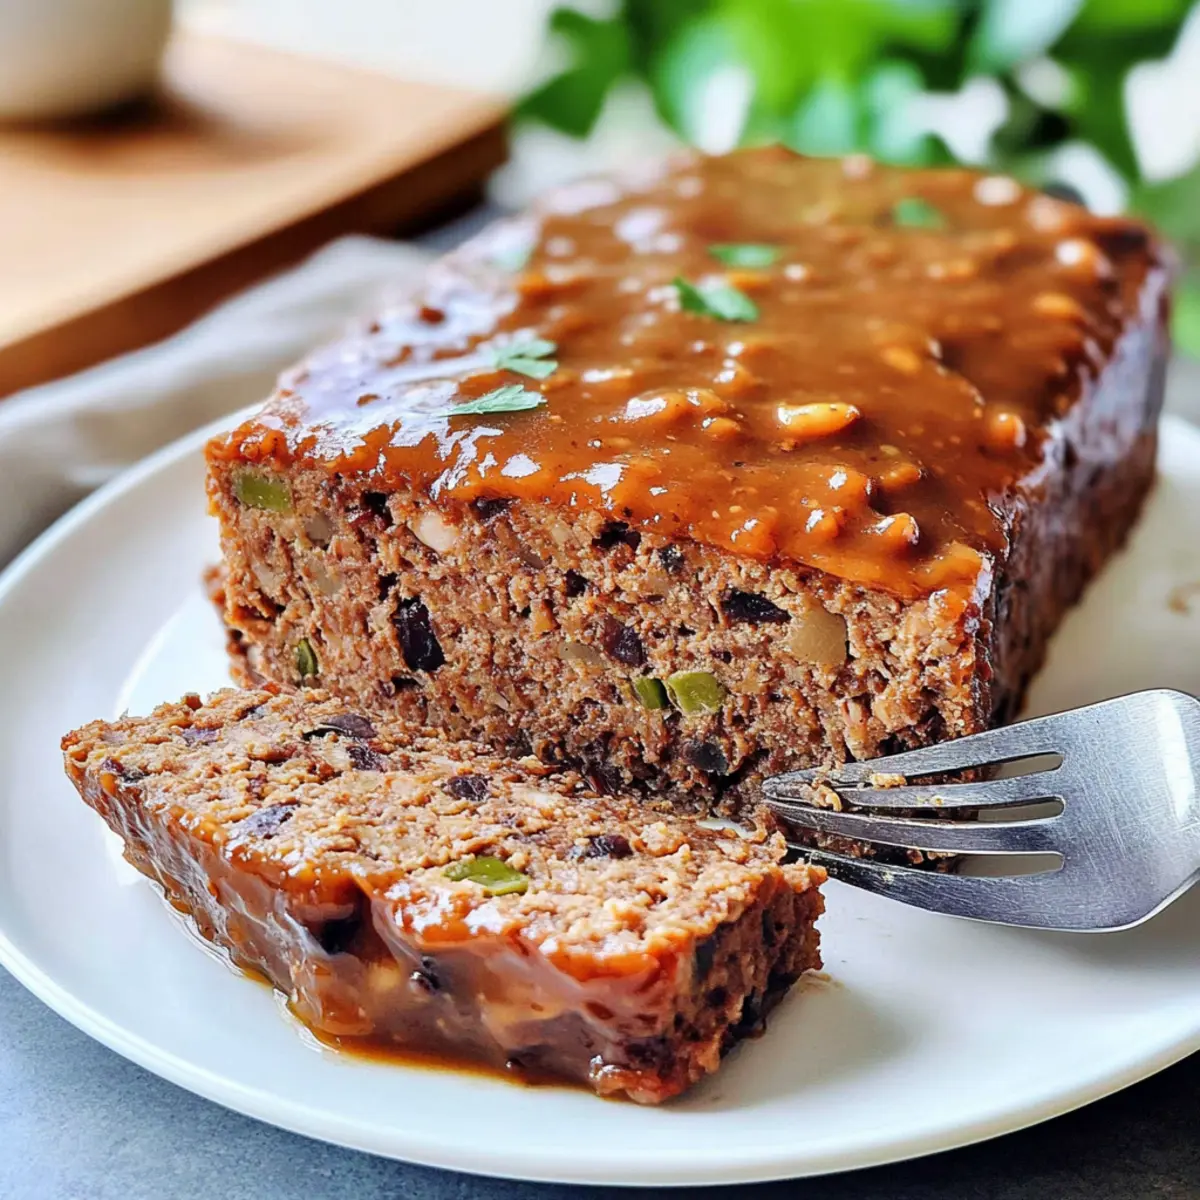
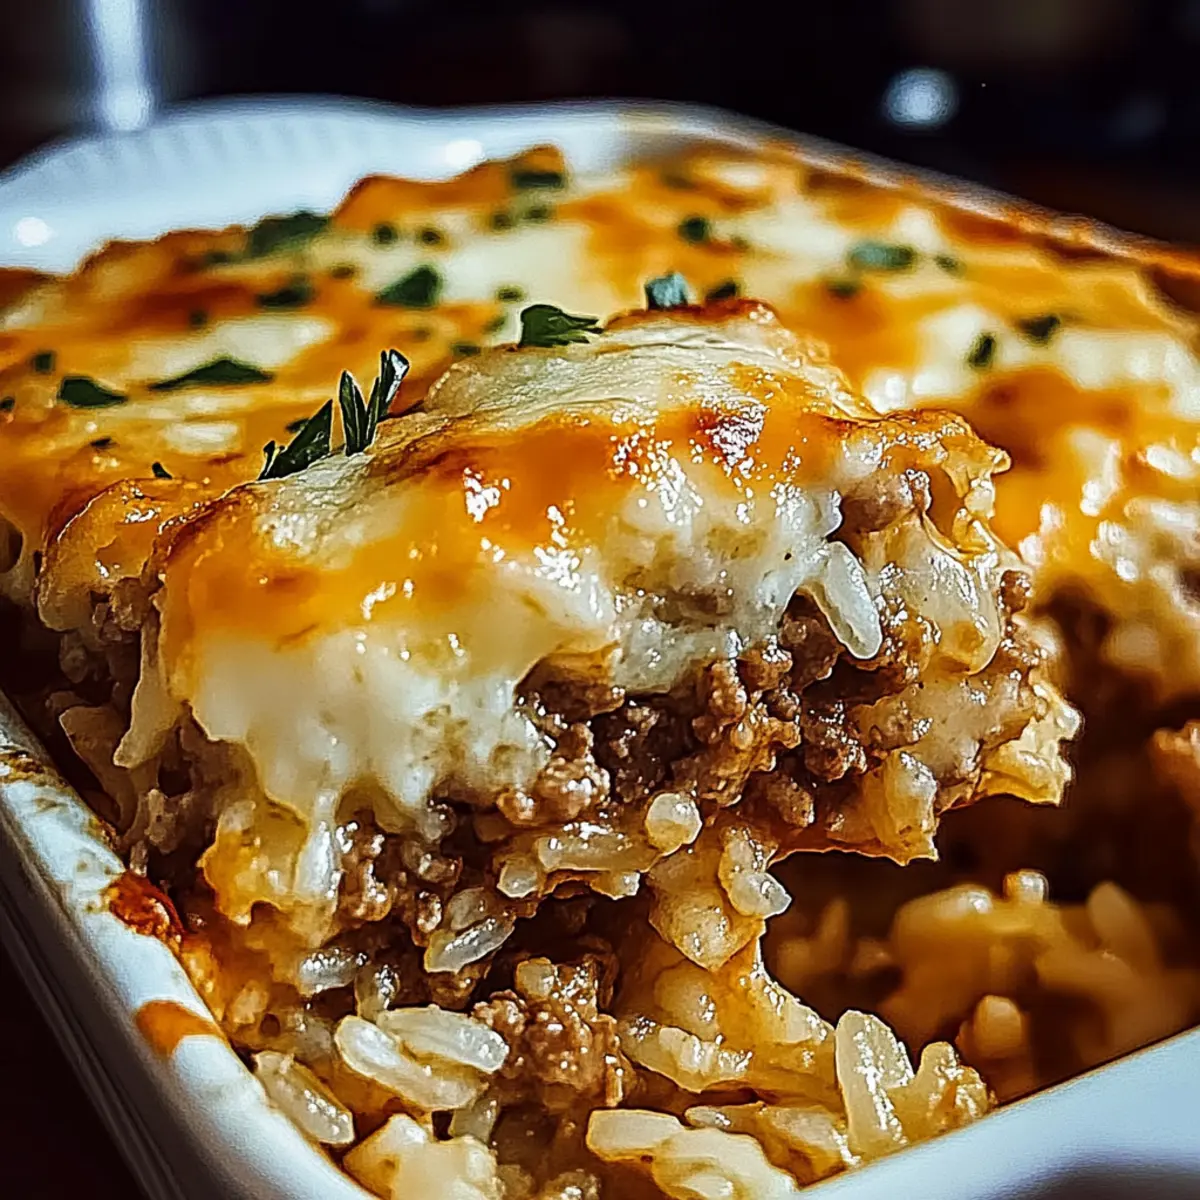
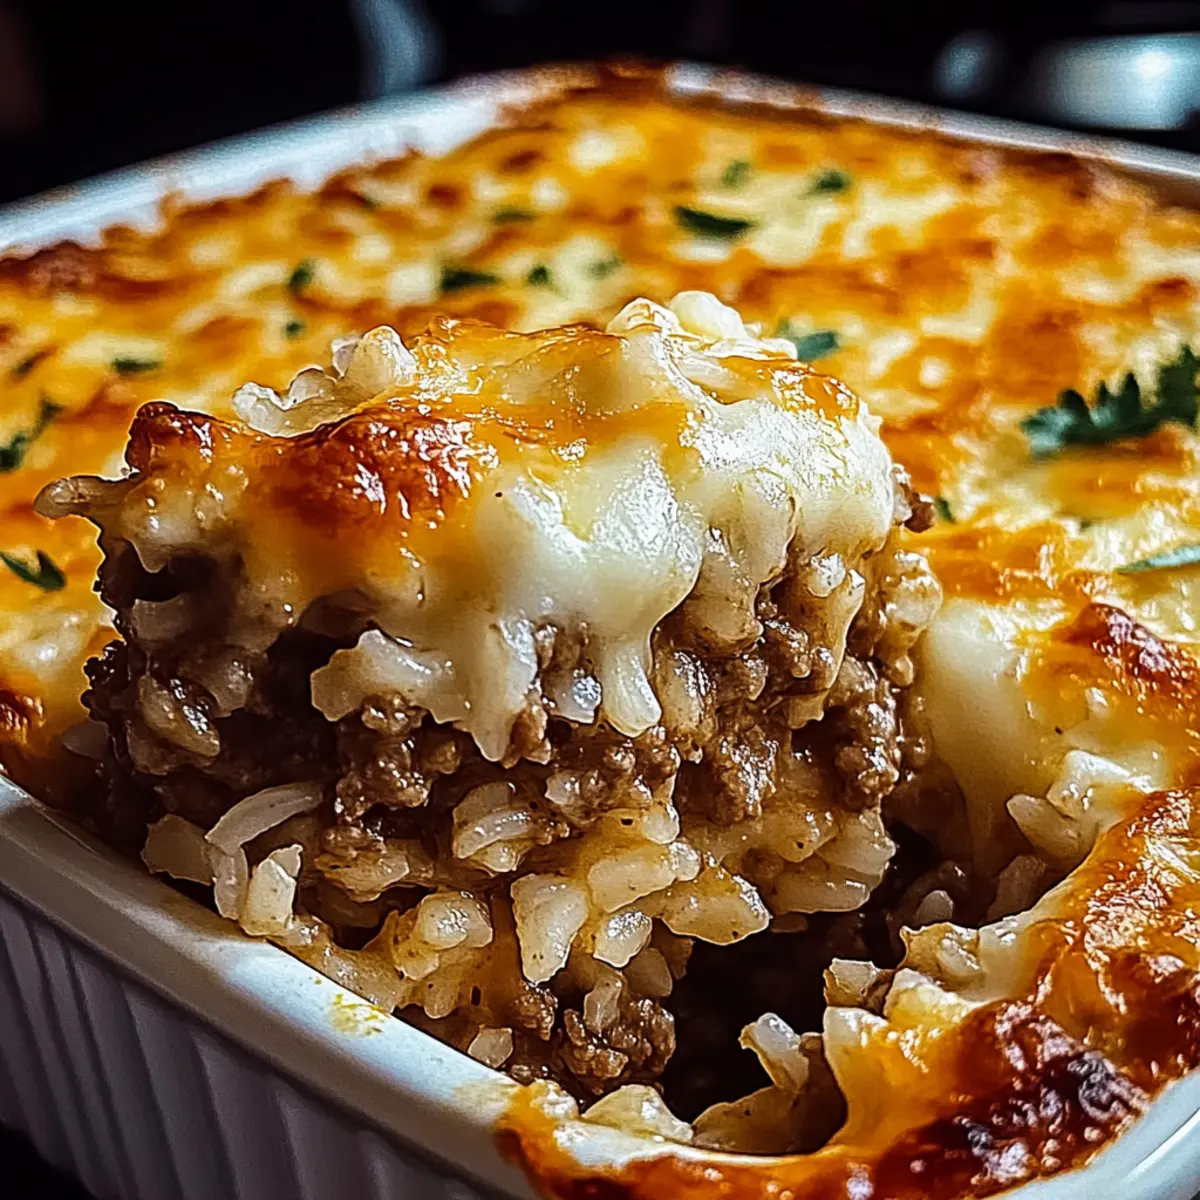
Irresistible Apple Cobbler Recipe with Buttery Biscuit Topping

As I unwrapped the warm, buttery biscuit topping of my latest creation, an inviting aroma of cinnamon and tender apples filled my kitchen, transporting me straight to autumn afternoons spent in my grandmother’s home. This No-Fail Gluten-Free Apple Cobbler is not just a delightful dessert; it’s a comforting treat that allows you to indulge without worry. Whether you’re a novice baker or a seasoned pro, this apple cobbler recipe is your ticket to effortless baking success. Perfect for gatherings or a cozy night in, it features juicy spiced apples beneath a fluffy, golden crust that delights the senses. Plus, it’s designed to easily accommodate dietary preferences, making it a versatile choice for any occasion. So, are you ready to create a dessert that feels like a warm hug? Let’s dive into this delicious recipe together!

Why is this Apple Cobbler a Must-Try?

Simplicity at its finest: This No-Fail Gluten-Free Apple Cobbler combines easy-to-follow steps with readily available ingredients, making it perfect for bakers of all levels.
Irresistible flavors await you: A delightful mix of sweet, spiced apples and flaky, buttery biscuit topping will have your taste buds singing.
Customizable options are endless: Whether you’re looking for a dairy-free treat or want to switch up the apple varieties, the flexibility of this recipe caters to your dietary needs.
Perfect for gatherings: Impress family and friends with this comforting dessert that’s sure to be the star of any event, reminiscent of cherished family gatherings.
Pair it with a scoop of ice cream or a dollop of whipped cream for an extra indulgent experience, just like with my Cheesy Hamburger Potato or Cozy Broccoli Cheddar recipes!

Apple Cobbler Recipe Ingredients

• Dive into this delightful Apple Cobbler Recipe with flavorful ingredients that create a comforting dessert experience!

For the Apple Filling

  • Granulated Sugar – Provides sweetness; coconut sugar can offer a lower glycemic option.
  • Brown Sugar – Adds depth and moisture; can be replaced with more granulated sugar if necessary.
  • Water – Creates a syrupy base for the filling; no substitution needed.
  • Lemon Juice – Brightens flavor and balances sweetness; lime juice works well as an alternative.
  • Cornstarch – Thickens the filling; arrowroot powder is a good substitute.
  • Vanilla Extract – Enhances flavor; try almond extract for a unique twist.
  • Ground Cinnamon – Adds warmth and spice; can reduce or replace it with nutmeg.
  • Ground Nutmeg – Provides a nutty flavor; allspice can be used if nutmeg is unavailable.
  • Salt – Balances flavors; it’s essential and should be included.
  • Golden Delicious Apples – Main flavor and structure of the cobbler; other baking apples like Fuji or Honeycrisp can also be used.

For the Biscuit Topping

  • Unsalted Butter – Enhances flavor and texture; substitute with vegan butter for a dairy-free version.
  • Gluten-Free All-Purpose Flour – Provides structure; Cup4Cup is a recommended brand, but be aware that other blends may need adjustments.
  • Baking Powder – Helps the topping rise; ensure it’s gluten-free.
  • Milk – Adds moisture; any plant-based milk can replace dairy milk for a dairy-free option.
  • Coarse Sugar – Optional topping for extra texture; regular sugar can work if coarse isn’t available.

For Serving

  • Ice Cream/Whipped Cream – Serving suggestion for added richness; consider dairy-free varieties if you need them.

Step‑by‑Step Instructions for No-Fail Gluten-Free Apple Cobbler with Buttery Biscuit Topping

Step 1: Preheat the Oven
Begin by preheating your oven to 400°F (200°C) and greasing an 11×7-inch or 2-quart baking dish with a little butter or cooking spray. This will help achieve that crispy, golden crust on your No-Fail Gluten-Free Apple Cobbler. Set the greased dish aside while you prepare the apple filling, letting the anticipation build!

Step 2: Prepare the Apple Filling
In a large mixing bowl, combine granulated sugar, brown sugar, water, lemon juice, cornstarch, ground cinnamon, nutmeg, and salt. Stir to mix thoroughly. Add the chopped apples and grated apple, ensuring they’re well-coated in the mixture. Transfer this delicious filling to your prepared baking dish. Pour melted butter over the top, cover the dish with foil, and bake for 20 minutes, allowing the apples to soften beautifully.

Step 3: Make the Biscuit Topping
While the apple filling is baking, grab a separate bowl and whisk together gluten-free all-purpose flour, granulated sugar, baking powder, and salt. Cut in the cold, unsalted butter using a pastry cutter or your fingers until the mixture resembles coarse crumbs. Gradually stir in milk until a soft, cohesive dough forms, ready to sit atop your apple delight.

Step 4: Assemble the Cobbler
After removing the apple filling from the oven, drop spoonfuls of the biscuit dough over the top, letting some apples peek through for that rustic appeal. Brush the tops of the biscuits lightly with milk and sprinkle with coarse sugar if you like a little extra crunch. This final touch will make your apple cobbler even more inviting!

Step 5: Bake the Cobbler
Return the uncovered baking dish to the oven and bake for an additional 35-40 minutes. You’ll know it’s ready when the biscuit topping is golden brown and a toothpick inserted into the center comes out clean. Enjoy the delicious aromas wafting through your kitchen as you wait for your No-Fail Gluten-Free Apple Cobbler to finish baking.

Step 6: Cool and Serve
Once baked, take the cobbler out of the oven and let it cool for about 30-60 minutes. This waiting time allows the filling to thicken up beautifully. Once cooled slightly, serve warm on its own or with a scoop of vanilla ice cream or a dollop of whipped cream for an indulgent treat that highlights the luscious apple filling and buttery topping!

Helpful Tricks for Apple Cobbler

  • Grate an Apple: Adding grated apple to the filling enhances texture and natural thickening, creating a luscious base for your cobbler.

  • Cover Initially: Covering the apple filling with foil for the first phase of baking helps steam the apples, softening them quickly and ensuring they absorb those delightful flavors.

  • Choose Your Flour Wisely: Ensure your gluten-free all-purpose flour contains a good binding agent. This prevents a crumbly topping and promotes a deliciously fluffy texture in your apple cobbler.

  • Let It Cool: Allow the cobbler to rest for 30-60 minutes before serving. This patience is key to achieving a beautifully thickened filling that holds up well on the plate.

  • Experiment with Apples: Use different apple varieties for varied flavors and textures, transforming your traditional apple cobbler into something uniquely delicious!

Apple Cobbler Recipe Variations

Feel free to explore your creativity with this recipe, making it truly your own with delightful twists!

  • Different Apples: Swap Golden Delicious for Granny Smith, Honeycrisp, or Fuji for a unique flavor profile.
  • Dairy-Free Delight: Use vegan butter and almond milk to adapt this recipe for a comforting dairy-free treat.
  • Nutty Crunch: Stir in chopped walnuts or pecans to the biscuit topping for an extra crunch that’ll surprise your taste buds.
  • Spicy Notes: Add a dash of ginger or cardamom to the apple filling for a fragrant twist that evokes cozy autumn vibes.
  • Crispy Topping: For added texture, sprinkle oats on top of the biscuit rounds before baking – perfect for a hearty finish!
  • Sweet Alternative: If you enjoy a richer sweetness, try substituting granulated sugar with maple syrup in the apple filling.
  • Berry Good: Mix in a handful of blueberries or raspberries with the apples for a burst of juicy flavor that’s both refreshing and sweet.
  • Caramel Drizzle: Before serving, drizzle warmed caramel sauce over the top for an indulgent touch that takes this cobbler to the next level.

This apple cobbler recipe is super versatile—if you’re in the mood for something hearty yet cozy, you might also enjoy my Mexican Taco Soup or Shepherd’s Pie Soup for a comforting twist on classic dishes!

How to Store and Freeze Apple Cobbler

  • Room Temperature: Keep the apple cobbler covered at room temperature for up to 3 days to maintain its delightful texture and flavor.

  • Fridge: Store in an airtight container in the refrigerator for up to 1 week. This will help preserve the freshness of the juicy fruit filling.

  • Freezer: For longer storage, wrap the cooled cobbler tightly in plastic wrap and then in aluminum foil. It can be frozen for up to 3 months.

  • Reheating: To enjoy your apple cobbler again, reheat it in the oven at 350°F (175°C) for about 15-20 minutes, until warmed through and the biscuit topping regains its fluffy texture.

Make Ahead Options

These No-Fail Gluten-Free Apple Cobblers are ideal for busy home cooks looking to streamline their meal prep! You can prepare the apple filling and biscuit topping separately and refrigerate them up to 24 hours in advance. To do this, simply mix the apple filling ingredients together and store it in an airtight container, while the prepared biscuit dough can be wrapped in plastic. When you’re ready to bake, take the filling out of the fridge and spread the biscuit topping over it before baking. This ensures your dessert is just as delicious and fresh as if made on the same day, saving you valuable time while keeping flavor intact!

What to Serve with No-Fail Gluten-Free Apple Cobbler with Buttery Biscuit Topping

Indulge in a heartwarming meal by pairing your delicious cobbler with simple sides that elevate the experience.

  • Vanilla Ice Cream: The cold creaminess provides a perfect contrast to the warm, baked apples, creating a comforting and classic dessert combination.
  • Whipped Cream: Light and fluffy, a dollop of whipped cream adds airiness and richness that complements the spiced filling beautifully.
  • Cinnamon Sugar Dusting: Sprinkle a little cinnamon sugar over the top for a delightful touch of sweetness that enhances the dessert’s warm, comforting flavors.
  • Fresh Berry Medley: A vibrant mix of raspberries, blueberries, and strawberries brings a refreshing balance while adding a pop of color to your plate.
  • Toasted Nuts: Add texture and a nutty flavor with toasted pecans or walnuts, offering a delicious crunch that contrasts perfectly with the soft biscuit topping.
  • Herbal Tea: Pair with a soothing cup of chamomile or ginger tea for a comforting beverage that complements the sweet and spiced apple flavors.
  • Cheddar Cheese Slice: For an unexpected twist, enjoy a slice of sharp cheddar cheese alongside your cobbler. The savory notes provide a delicious counterbalance to the sweetness.
  • Caramel Drizzle: Add a touch of decadence by drizzling warm caramel sauce over the cobbler for an extra indulgent experience.

No-Fail Gluten-Free Apple Cobbler with Buttery Biscuit Topping Recipe FAQs

How do I select the best apples for this recipe?
When choosing apples for your No-Fail Gluten-Free Apple Cobbler, opt for varieties like Golden Delicious, Fuji, or Honeycrisp. These apples not only provide a balanced sweetness but also hold their shape during baking, helping to create that perfect texture. Look for firm apples without dark spots or bruises, as these can affect the taste and quality of your cobbler.

What is the best way to store leftover apple cobbler?
To store your apple cobbler, keep it covered at room temperature for up to 3 days. If you wish to extend its shelf life, transfer it to an airtight container and refrigerate for up to a week. This method helps keep the flavors fresh and the filling juicy. When you’re ready to enjoy it again, simply reheat it in the oven for the best texture.

Can I freeze the apple cobbler for later?
Absolutely! To freeze your apple cobbler, let it cool completely after baking. Then, wrap it tightly in plastic wrap, followed by aluminum foil to prevent freezer burn. You can freeze it for up to 3 months. When you’re ready to enjoy it, thaw it overnight in the fridge, then reheat in the oven at 350°F (175°C) for about 15-20 minutes until warmed through.

What if my biscuit topping turns out too dry or crumbly?
If your biscuit topping ends up dry, it might be due to overmixing the dough or not using enough moisture. When making the topping, be sure to gently combine the ingredients until just blended. Additionally, if it seems too dry, you could add a splash more milk to achieve a softer dough. Remember to handle the mixture lightly to keep that fluffy texture!

Are there any allergy considerations for this recipe?
Yes, this No-Fail Gluten-Free Apple Cobbler is naturally free from gluten, making it a great choice for those with gluten intolerance. However, if you are catering to dairy allergies, make sure to substitute unsalted butter with a plant-based alternative and use non-dairy milk. Always double-check the labels on your gluten-free flour to ensure it meets your dietary needs.

What can I serve with the apple cobbler?
For an extra special treat, serve your apple cobbler warm with a scoop of vanilla ice cream or a dollop of whipped cream. If you’re looking for a dairy-free option, consider coconut ice cream or whipped coconut cream. The creamy addition beautifully complements the warm, spiced apples and buttery biscuit topping, elevating your dessert experience!

Apple Cobbler Recipe

Irresistible Apple Cobbler Recipe with Buttery Biscuit Topping

This no-fail Gluten-Free Apple Cobbler recipe features juicy spiced apples and a buttery biscuit topping for a delicious dessert experience.
Prep Time 20 minutes
Cook Time 55 minutes
Cooling Time 45 minutes
Total Time 2 hours
Servings: 8 servings
Course: Dessert
Cuisine: American
Calories: 250

Ingredients
  

Apple Filling
  • 1 cup Granulated Sugar Coconut sugar can offer a lower glycemic option.
  • 1/2 cup Brown Sugar Can be replaced with more granulated sugar if necessary.
  • 1/2 cup Water Creates a syrupy base for the filling; no substitution needed.
  • 2 tablespoons Lemon Juice Lime juice works well as an alternative.
  • 2 tablespoons Cornstarch Arrowroot powder is a good substitute.
  • 1 teaspoon Vanilla Extract Almond extract can be used for a unique twist.
  • 1 teaspoon Ground Cinnamon Can reduce or replace it with nutmeg.
  • 1/4 teaspoon Ground Nutmeg Allspice can be used if nutmeg is unavailable.
  • 1/4 teaspoon Salt Essential and should be included.
  • 6 cups Golden Delicious Apples Other baking apples like Fuji or Honeycrisp can also be used.
Biscuit Topping
  • 1/2 cup Unsalted Butter Substitute with vegan butter for a dairy-free version.
  • 2 cups Gluten-Free All-Purpose Flour Cup4Cup is a recommended brand.
  • 2 teaspoons Baking Powder Ensure it’s gluten-free.
  • 1 cup Milk Any plant-based milk can replace dairy milk.
  • 1 tablespoon Coarse Sugar Optional topping for extra texture.
For Serving
  • 1 scoop Ice Cream/Whipped Cream Consider dairy-free varieties if needed.

Equipment

  • 11x7-inch baking dish
  • Mixing bowls
  • pastry cutter

Method
 

Preparation Steps
  1. Preheat your oven to 400°F (200°C) and grease the baking dish.
  2. Combine the filling ingredients and transfer to the prepared baking dish.
  3. Make the biscuit topping, then drop spoonfuls over the apple filling.
  4. Bake uncovered for 35-40 minutes until the topping is golden brown.
  5. Let the cobbler cool for 30-60 minutes before serving.

Nutrition

Serving: 1sliceCalories: 250kcalCarbohydrates: 40gProtein: 3gFat: 10gSaturated Fat: 6gPolyunsaturated Fat: 1gMonounsaturated Fat: 3gCholesterol: 30mgSodium: 150mgPotassium: 150mgFiber: 2gSugar: 18gVitamin A: 500IUVitamin C: 5mgCalcium: 50mgIron: 1mg

Notes

This recipe is customizable for dietary preferences and is perfect for gatherings.

Tried this recipe?

Let us know how it was!

Savory Sweet Potato Casserole with Pecan Crunch Delight

As I shuffled through my kitchen, the aroma of roasted sweet potatoes wafted through the air, inviting warm memories of family gatherings and holiday feasts. In this recipe for Creamy Sweet Potato Casserole with Savory Pecan Crumble, we’re taking a delicious detour from the traditional marshmallow topping and opting for a crunchy, savory twist that truly elevates those naturally sweet potatoes. Not only is this casserole a fantastic make-ahead dish, perfect for those busy Thanksgiving preparations, but its simple ingredients transform into a beautiful centerpiece for any holiday table, ensuring everyone leaves satisfied. So, are you ready to create a comforting side dish that will have your loved ones asking for seconds? Let’s get cooking!

Why Is This Casserole So Irresistible?

Unique Twist: This savory sweet potato casserole offers a delightful break from conventional recipes, swapping sugary marshmallows for a crispy pecan crumble that adds texture and depth.
Crowd-Pleaser: Perfect for Thanksgiving or any holiday gathering, its rich flavors and beautiful presentation will impress your family and friends.
Make-Ahead Convenience: Prepare it in advance, saving you time on the big day—just reheat and serve.
Healthier Option: With nutritious sweet potatoes at its core, this dish is rich in vitamins A and C, making it a wholesome addition to your table.

For more comforting recipes, check out our Potato Bacon Soup and Cheesy Hamburger Potato dishes!

Sweet Potato Casserole Ingredients

• Here’s everything you need to make a scrumptious sweet potato casserole with ease.

For the Filling

  • Sweet Potatoes – These are the heart of the casserole; use 5 large sweet potatoes for that creamy base.
  • Extra-Virgin Olive Oil or Melted Butter – Adds richness; you’ll need 1 tablespoon for the filling and a drizzle for the top.
  • Milk – Ensures a silky texture; start with 1¼ cups, and substitute with non-dairy milk if desired.
  • Ground Ginger – Imparts warmth; a teaspoon is perfect for bringing flavor to your casserole.
  • Sea Salt & Black Pepper – Essential for enhancing taste; use ¾ teaspoon of salt and ¼ teaspoon of pepper.

For the Pecan Crumble

  • Whole Rolled Oats – The base for your topping, giving it a delightful crunch; use ⅔ cup for texture.
  • Pecans & Walnuts – Introduces crunch and flavor; combine ½ cup of each for a nutty topping.
  • Garlic Clove – Minced for savory depth; one clove will do wonders in the crumble.
  • Maple Syrup – Adds just a touch of sweetness to the topping; use 1 tablespoon plus a teaspoon.
  • Dried Thyme & Fresh Rosemary – Herbaceous flavors; ½ teaspoon each will elevate the crumble beautifully.

For Garnish

  • Fresh Sage Leaves – A lovely aromatic addition; use ¼ cup to garnish your casserole just before serving.

Bring your sweet potato casserole to life with these simple yet flavorful ingredients, and enjoy a dish that truly embraces the essence of heartwarming home-cooked meals!

Step‑by‑Step Instructions for Creamy Sweet Potato Casserole with Savory Pecan Crumble

Step 1: Bake Sweet Potatoes
Preheat your oven to 425°F (220°C). Carefully poke several holes in each sweet potato using a fork to allow steam to escape. Place them on a lined baking sheet and roast for about 60 minutes, or until they are very tender when pierced with a knife. The sweet potatoes should be caramelized and fragrant, making your kitchen smell delightful.

Step 2: Prepare Crumble Topping
While the sweet potatoes are baking, gather your food processor. In it, combine the whole rolled oats, pecans, walnuts, minced garlic, maple syrup, olive oil, dried thyme, minced rosemary, sea salt, and pepper. Pulse the mixture until it’s just combined, ensuring the texture remains somewhat coarse for a crunchy topping. Set the mixture aside and get ready for the next step.

Step 3: Blend Filling
Once your sweet potatoes have roasted and cooled slightly, scoop the flesh into a clean food processor. Add 1 tablespoon of olive oil, 1¼ cups of milk, ground ginger, sea salt, and black pepper. Blend everything until smooth and creamy, creating a luscious filling for your casserole. This will be the heart of your creamy sweet potato casserole, so make it as silky as possible.

Step 4: Assemble and Bake
Grease a 9×13-inch baking dish with a little olive oil to prevent sticking. Spread the smooth sweet potato mixture evenly into the dish. Next, sprinkle the crumble topping generously over the sweet potatoes, adding any extra nuts or herbs if desired. Drizzle a bit more olive oil over the top and place in the oven to bake for 20 minutes, or until the topping is golden brown and crisp. Enjoy the delightful aroma as it bakes!

How to Store and Freeze Sweet Potato Casserole

Fridge: Store leftovers in an airtight container for up to 4 days. This makes it easy to enjoy your savory sweet potato casserole even after the holiday feast.

Freezer: For longer storage, freeze the casserole before adding the topping. Wrap it tightly in plastic wrap and aluminum foil, and it will last for up to 3 months.

Reheating: When ready to enjoy, thaw in the fridge overnight, then bake at 350°F (175°C) for about 30 minutes, or until heated through. Add the topping right before baking for that crispy finish.

Make-Ahead: You can prepare the casserole up to 2 days in advance, storing the filling and topping separately in the fridge for ultimate convenience!

Expert Tips for Sweet Potato Casserole

  • Ensure Tenderness: Sweet potatoes should be very tender after baking to achieve the smoothest filling. Test with a knife before blending.
  • Avoid Boiling: Baking sweet potatoes concentrates their sweetness; boiling can dilute the flavor. Stick to roasting for the best results.
  • Crumble Texture: For the ideal crunchy topping, don’t over-process the crumble mix. It should retain some coarse texture for that satisfying crunch.
  • Season to Taste: Adjust the salt in your savory crumble topping according to your preference to ensure it complements rather than overpowers the other flavors.
  • Make-Ahead Perfect: Prepare the filling and topping in advance and store separately in the fridge. Reheat before baking to save time on busy days.

What to Serve with Savory Sweet Potato Casserole with Pecan Crumble

Elevate your holiday meal with delightful accompaniments that balance and enhance the flavors of your delectable casserole.

  • Herb-Roasted Turkey: Perfectly seasoned turkey complements the casserole’s sweetness while offering a savory, juicy contrast. The richness in each bite harmonizes beautifully.

  • Garlic Green Beans: Fresh green beans sautéed in garlic provide a crisp texture and vibrant color, making your plate pop with freshness and flavor.

  • Cranberry Sauce: A tangy-sweet cranberry sauce gives a refreshing burst that cuts through the creaminess of the casserole, creating a delightful contrast on your palate.

  • Creamy Coleslaw: The crunch of coleslaw brings a nice texture to the meal, while its zesty dressing cuts through the richness of the sweet potatoes.

  • Honey-Glazed Carrots: Sweet and tender, honey-glazed carrots offer a lovely complement to the savory pecan crumble, enhancing the overall sweetness of the dish without overpowering it.

  • Pumpkin Spice Muffins: For a cozy dessert option, these muffins balance spice and sweetness, creating a warm finish that echoes the season’s flavors.

  • Spiced Apple Cider: Serve warm to enhance the aromatic experience of your meal, while the subtle spices echo the comforting flavors of the casserole.

  • Bourbon Pecan Pie: This classic dessert’s nutty flavor pairs beautifully with the pecans in your casserole, making it a fitting close to your holiday feast.

Make Ahead Options

These Savory Sweet Potato Casseroles with Pecan Crumble are perfect for busy home cooks looking to save time during holiday preparations! You can prepare the sweet potato filling and store it in the refrigerator for up to 3 days in advance, ensuring a hassle-free assembly on the day of serving. Just make sure to let the mashed sweet potatoes cool completely before refrigerating to prevent any condensation. The crumble topping can also be made ahead and stored separately in an airtight container for up to 3 days. When you’re ready to bake, simply spread the filling into a greased baking dish, sprinkle the topping, and bake for 20 minutes at 350°F until golden and crisp. This way, you’ll have a comforting dish that’s just as delicious with minimal effort!

Sweet Potato Casserole Variations

Feel free to get creative with this recipe, adding your preferred flavors and textures to make it uniquely yours!

  • Vegan Delight: Swap out the milk for your favorite non-dairy option and use coconut oil instead of butter for a completely plant-based dish. Enjoy the same creamy goodness without any animal products!

  • Nut-Free Version: For those with nut allergies, simply replace the pecans and walnuts with sunflower seeds or pumpkin seeds to maintain that delightful crunch without the nuts.

  • Spice It Up: Add a teaspoon of cinnamon or nutmeg to the filling for a warm, cozy flavor that’s perfect for fall. This twist will have everyone reminiscing about their childhood holiday memories.

  • Cheesy Kick: If you love a cheesy flavor, sprinkle some shredded cheese on top of the sweet potato filling before adding the crumble. Bake until bubbly for a delightful richness to complement the sweetness.

  • Maple-Vanilla Infusion: Swap out maple syrup for a splash of vanilla extract in the filling for an aromatic twist. The combination of sweet and savory with a hint of vanilla will truly elevate your casserole experience.

  • Herbed Up: Mix in fresh herbs like parsley or chives into the sweet potato filling or sprinkle them on top before serving to add a fresh, vibrant touch that balances the richness beautifully.

  • Crunchy Topper: For an extra crunch, mix in some crushed crackers or breadcrumbs to the pecan crumble. This added texture will wow your guests and offer a satisfying bite.

Discover more wonderful recipe ideas, like our Sweet Savory Brown Sugar Pork Chops and explore the comforting layers of Tater Tot Casserole to keep your dining table diverse and exciting this holiday season.

Savory Sweet Potato Casserole with Pecan Crumble Recipe FAQs

What is the best way to choose sweet potatoes for this casserole?
Absolutely! When selecting sweet potatoes, look for firm ones without dark spots or blemishes. The sweeter varieties, like Garnet or Jewel, work best for this recipe. You’ll want to aim for around 3 pounds, or approximately 5 large sweet potatoes, to achieve that creamy texture.

How should I store leftover sweet potato casserole?
Store any leftovers in an airtight container in the refrigerator for up to 4 days. Make sure to let it cool completely before sealing to maintain its freshness. This way, you can savor the delightful flavors of your savory sweet potato casserole even after the holiday rush!

Can I freeze the sweet potato casserole?
Yes, you can! To freeze, prepare the casserole up to the assembly stage, then wrap it well in plastic wrap and aluminum foil. It can freeze beautifully for up to 3 months. When ready to enjoy, thaw it overnight in the refrigerator, then bake at 350°F (175°C) for about 30 minutes until heated through. Add the topping just before baking to maintain that delightful crunch!

What if my sweet potato filling is too runny?
If your filling ends up too runny, fear not! You can simply mix in a bit more mashed sweet potato or even some cornstarch mixed with water to thicken it. Blend until you achieve a smooth and creamy consistency. Additionally, ensure the sweet potatoes are baked thoroughly—overly moist sweet potatoes can lead to a runny filling.

Are there any dietary considerations I should keep in mind?
When crafting your savory sweet potato casserole, keep in mind that this dish is naturally gluten-free if you use oats or almond flour for the crumble. Also, if you’re catering to vegan diets, simply substitute milk with non-dairy options and use coconut oil instead of butter. Always double-check ingredient labels for allergens like nuts, especially if serving guests with allergies.

How long can I prepare this casserole ahead of time?
You can prepare your sweet potato casserole up to 2 days in advance! Simply keep the filling and crumble topping stored separately in the fridge. This make-ahead approach saves time and allows you to enjoy more moments with family and friends during the holidays.

Sweet Potato Casserole

Savory Sweet Potato Casserole with Pecan Crunch Delight

This Savory Sweet Potato Casserole offers a delightful alternative to tradition with its crunchy pecan topping, perfect for holiday feasts.
Prep Time 30 minutes
Cook Time 1 hour
Baking Time 20 minutes
Total Time 1 hour 50 minutes
Servings: 8 servings
Course: Casserole
Cuisine: American
Calories: 250

Ingredients
  

For the Filling
  • 5 large Sweet Potatoes These are the heart of the casserole.
  • 1 tablespoon Extra-Virgin Olive Oil or Melted Butter Adds richness.
  • 1.25 cups Milk Use non-dairy milk if desired.
  • 1 teaspoon Ground Ginger Imparts warmth.
  • 0.75 teaspoon Sea Salt Essential for enhancing taste.
  • 0.25 teaspoon Black Pepper Essential for enhancing taste.
For the Pecan Crumble
  • 0.67 cups Whole Rolled Oats The base for your topping.
  • 0.5 cups Pecans Introduces crunch and flavor.
  • 0.5 cups Walnuts Introduces crunch and flavor.
  • 1 clove Garlic Minced for savory depth.
  • 1 tablespoon Maple Syrup Added sweetness.
  • 1 teaspoon Dried Thyme Herbaceous flavor.
  • 0.5 teaspoon Fresh Rosemary Herbaceous flavor.
For Garnish
  • 0.25 cups Fresh Sage Leaves A lovely aromatic addition.

Equipment

  • Oven
  • Food Processor
  • baking dish
  • Baking Sheet

Method
 

Instructions
  1. Preheat your oven to 425°F (220°C). Poke holes in each sweet potato using a fork and roast for about 60 minutes until tender.
  2. In a food processor, combine oats, pecans, walnuts, minced garlic, maple syrup, olive oil, dried thyme, rosemary, sea salt, and pepper. Pulse until just combined.
  3. Scoop the roasted sweet potato flesh into a food processor. Add olive oil, milk, ground ginger, sea salt, and black pepper. Blend until smooth.
  4. Grease a 9x13-inch baking dish with olive oil. Spread the sweet potato mixture evenly, sprinkle with crumb topping, and drizzle more olive oil. Bake for 20 minutes until the topping is golden.

Nutrition

Serving: 1sliceCalories: 250kcalCarbohydrates: 35gProtein: 4gFat: 12gSaturated Fat: 2gPolyunsaturated Fat: 2gMonounsaturated Fat: 7gSodium: 150mgPotassium: 450mgFiber: 5gSugar: 6gVitamin A: 12000IUVitamin C: 20mgCalcium: 60mgIron: 1mg

Notes

Store leftovers in an airtight container for up to 4 days. Freeze before adding topping for up to 3 months.

Tried this recipe?

Let us know how it was!

Garlic Knots Recipe: Soft, Buttery Bites for Any Occasion

As the oven timer ticked down, the aroma of melting butter and garlic wafted through my kitchen, stirring memories of cozy nights spent with family over warm, buttery snacks. This Easy Garlic Knots Recipe is a fantastic way to make the ordinary extraordinary; they’re delightfully soft and irresistibly flavorful, perfect for dipping into your favorite marinara or slurping up soup leftovers. Not only are these knots quick to whip up, making them a lifesaver for unexpected guests or busy weeknights, they’re also kid-friendly—perfect for little hands eager to join in on the fun. Want to learn how to make these delicious bites that will surely be the star of your table? Let’s dive in!

Why Are Garlic Knots So Irresistible?

Comforting and satisfying, these garlic knots offer a warm embrace that’s perfect for any gathering, whether it’s a family dinner or a casual get-together. Quick to prepare, they come together in no time, making it easy for even the busiest of cooks to impress. Kid-friendly, kids will love helping out by tying the knots, making it a fun family activity. Versatile as well, you can customize them with fresh herbs or a sprinkle of cheese. Best of all, they pair wonderfully with your favorite sauces, such as Cheesy Garlic Chicken or classic marinara, ensuring they’ll be the highlight of any meal!

Garlic Knots Recipe Ingredients

For the Dough
Pizza Dough – This forms the delicious base for your knots; feel free to make it homemade or grab a package from the store.

For the Garlic Butter
Unsalted Butter – Adds a rich, buttery flavor to your knots; margarine can be used as a substitute if needed.
Garlic – Fresh cloves bring a wonderful aroma and taste; in a pinch, dried garlic works well too.
Parsley – Fresh parsley adds a burst of color and freshness; you can omit this if you prefer a simpler flavor.
Olive Oil – Helps create a beautiful glaze and golden color; vegetable oil can be swapped if desired.
Kosher Salt – Elevates the overall flavor of the garlic knots; adjust according to your taste.

Get ready to create this mouthwatering garlic knots recipe that will surely impress your family and friends!

Step‑by‑Step Instructions for Garlic Knots Recipe

Step 1: Prepare the Dough
Begin by preheating your oven to 400°F (200°C). If you’re using homemade pizza dough, roll it out to a thickness of about ½ inch on a floured surface. If you’re using store-bought dough, simply unfold it. Either way, ensure the dough is pliable and smooth, making it easy to work with and mold into delightful garlic knots.

Step 2: Cut the Dough
Carefully cut the pizza dough into strips that are roughly ½ to 1 inch thick. Use a sharp knife or a pizza cutter for clean edges. Once cut, you should have several strips ready to be shaped. Lay them flat on the counter, allowing enough space for tying each knot, ensuring they don’t stick together.

Step 3: Shape the Knots
Take one strip of dough and tie it into a knot by forming it into a loop, then pulling one end through the middle. This creates a beautiful twist that will puff up while baking. Place each knot on a parchment-lined baking sheet, making sure to leave some space between them to allow for expansion as they bake.

Step 4: Bake the Knots
Once all your garlic knots are tied and arranged on the baking sheet, place them in the preheated oven. Bake for about 12 minutes or until they are golden brown and puffed. Keep an eye on them during the last few minutes to ensure they don’t overbake, as you want that perfect soft interior with a slightly crisp exterior.

Step 5: Prepare the Garlic Butter
While the knots are baking, melt ½ cup of unsalted butter in a microwave-safe bowl. Stir in 2 tablespoons of olive oil and 3-4 minced garlic cloves for that tasty garlic butter glaze. You can also add a pinch of kosher salt and chopped fresh parsley for added flavor. Let the mixture sit for 5 minutes to allow the flavors to meld.

Step 6: Brush the Knots
As soon as your garlic knots are out of the oven, brush the buttery garlic mixture generously over each knot. Make sure to coat them well while they are still warm, as this will help the glaze soak in and enhance the garlicky flavor. The knots should shimmer beautifully with the buttery glaze, adding to their appetizing look.

Step 7: Serve and Enjoy
Finally, transfer the garlic knots to a serving plate and let them cool slightly before serving. They’re best enjoyed warm and can be paired with your favorite dipping sauces like marinara or ranch. Gather your family or friends and watch these delightful garlic knots disappear!

Make Ahead Options

These Easy Garlic Knots are perfect for busy home cooks looking to save time during the week! You can prepare the dough and shape the knots up to 24 hours in advance, storing them on a parchment-lined baking sheet covered tightly with plastic wrap in the refrigerator. To maintain their delightful texture, allow them to rest at room temperature for about 30 minutes before baking. Alternatively, you can also freeze the shaped knots on a baking sheet, then transfer them to a freezer bag for up to 3 months. When ready to bake, simply preheat your oven and follow the instructions as normal, enjoying the same soft, buttery flavor as if they were freshly made!

Garlic Knots Recipe: Creative Twists

Feel free to sprinkle your own magic on this garlic knots recipe and make it uniquely yours!

  • Cheesy Delight: Add ¼ cup of grated Parmesan cheese into the garlic butter for a rich, cheesy kick. The melted cheese mingling with the buttery garlic glaze will create a delightful explosion of flavor.

  • Herb-Infused: Stir in 1 teaspoon of dried herbs like oregano or thyme to the garlic butter for aromatic notes. This little change brings a warmth that elevates your knots from simple to extraordinary.

  • Spicy Kick: Add a pinch of red pepper flakes into the garlic glaze for a spicy twist. The heat will ignite your taste buds and add an exciting contrast to the buttery knots—perfect for those who adore a bit of zing!

  • Savory Swap: Replace the garlic with minced roasted garlic for a sweeter, nuttier flavor. Roasting mellows the pungency of garlic, resulting in a unique twist that’s surprisingly delightful.

  • Dough Alternative: Use store-bought biscuit dough instead of pizza dough for fluffy, biscuit-style knots. These knots will have a different texture but still deliver that irresistible buttery goodness.

  • Sweet & Savory: Brush the knots with a mix of garlic and balsamic glaze for a unique sweet-savory flavor combination. This twist pairs wonderfully with a layered dipping sauce like Garlic Parmesan Chicken.

  • Vegan Version: Swap the butter for dairy-free margarine and use olive oil as an alternative to the garlic butter glaze. Your flavorful knots won’t lose their charm while accommodating dietary preferences.

Experimenting with these variations promises delicious surprises, making your garlic knots even more irresistible!

How to Store and Freeze Garlic Knots

Fridge: Store leftover garlic knots in an airtight container for up to 1 week. This keeps them soft and fresh, ready to be enjoyed at your convenience.

Freezer: For longer storage, cool the garlic knots completely and freeze them on a baking sheet. After they’re frozen solid, transfer them to a freezer bag for up to 3 months.

Reheating: To reheat, simply place frozen garlic knots on a baking sheet and bake at 350°F (175°C) for about 10-15 minutes, or until heated through. Enjoy your delicious garlic knots recipe again!

Room Temperature: If serving at a party, garlic knots can sit out at room temperature for about 2 hours before needing to be refrigerated to ensure food safety.

Expert Tips for Garlic Knots Recipe

Dough Preparation: Allow your pizza dough to rest for 30 minutes if it’s tough to shape, ensuring your knots will be soft.

Flavor Boost: Let your garlic butter mixture sit for a few minutes before brushing it on to enhance the garlic aroma in your garlic knots.

Baking Time: Keep an eye on your knots as they bake; overbaking can lead to dry knots. Aim for that perfect golden brown color.

Glaze Generously: Don’t be shy with the garlic butter! A thorough brushing will elevate the flavor of your garlic knots, making them irresistible.

Storage Tips: Store leftover garlic knots in an airtight container for up to a week, or freeze them to enjoy later. Simply reheat them in the oven.

What to Serve with Easy Garlic Knots?

Picture a cozy family dinner, where warm bites of garlicky goodness steal the spotlight and the table is filled with delightful flavors.

  • Marinara Sauce: A classic pairing, its rich tomato flavor balances the garlic knots perfectly, making each bite a flavorful adventure.

  • Creamy Alfredo Dip: The velvety texture of Alfredo enhances the buttery richness of the knots, delivering a luscious taste experience.

  • Caesar Salad: Crisp romaine, creamy dressing, and crunchy croutons provide a refreshing contrast to the soft knots, bringing a well-rounded meal to the table.

  • Spicy Buffalo Wings: For a fun twist, pair these knots with spicy wings. The heat complements the fluffy knots beautifully, creating a lively flavor explosion.

  • Garlic Parmesan Roasted Vegetables: Served alongside, these veggies echo the garlic flavor while adding a delightful crunch, making your meal both healthy and satisfying.

  • Sparkling Lemonade: A bright, refreshing drink that cleanses the palate after each garlicky bite, enhancing your dining experience in a vibrant way.

  • Chocolate Chip Cookies: Wrap up the meal with something sweet, as warm cookies contrast the savory knots, offering a nostalgic finish to an unforgettable dinner.

Easy Homemade Garlic Knots with Zesty Garlic Butter Recipe FAQs

What type of pizza dough should I use for my garlic knots?
Absolutely! You can use either homemade pizza dough, which adds a personal touch, or store-bought dough for convenience. If you opt for homemade, ensure it’s rolled to about ½ inch thick, while store-bought should be unfolded and ready to shape. Both options yield delicious results!

How should I store leftover garlic knots?
Very easy! Simply place any leftover garlic knots in an airtight container and refrigerate them. They’ll stay fresh for up to 1 week. If you notice any drying out, consider wrapping them tightly with plastic wrap before placing them in the container for extra moisture retention.

Can I freeze my garlic knots for later use?
Definitely! To freeze, let the garlic knots cool completely after baking. Spread them in a single layer on a baking sheet and freeze them until solid. Then, transfer the frozen knots to a freezer bag, where they can be kept for up to 3 months. When you’re ready to enjoy them again, just reheat directly from frozen at 350°F (175°C) for about 10-15 minutes.

What if my garlic knots come out hard instead of soft?
No worries! If your garlic knots turn out hard, it could be due to overbaking or using dough that was too cold. To avoid this, keep an eye on them while baking, aiming for that beautiful golden brown color. Also, let your dough sit at room temperature for about 30 minutes before shaping to make it easier to work with, allowing for a softer texture.

Are garlic knots safe for dogs or pets?
While garlic knots are delicious for humans, garlic is toxic to dogs and other pets, so it’s best to keep these heavenly bites away from them. If you’re interested in a pet-friendly treat, consider simple baked breadsticks without garlic or salt instead.

Can I make these garlic knots gluten-free?
Absolutely! If you’re looking for a gluten-free option, you can use a gluten-free pizza dough available in stores. Alternately, there are excellent homemade gluten-free dough recipes using a blend of gluten-free flours. Just ensure all other ingredients, like butter and oil, are also gluten-free. Enjoy your delectable garlic knots recipe!

Garlic Knots Recipe

Garlic Knots Recipe: Soft, Buttery Bites for Any Occasion

This Garlic Knots Recipe is a deliciously easy snack, perfect for any occasion, combining buttery flavor with delightful garlic aroma.
Prep Time 30 minutes
Cook Time 12 minutes
Total Time 42 minutes
Servings: 8 knots
Course: Appetizers
Cuisine: Italian
Calories: 120

Ingredients
  

For the Dough
  • 1 package Pizza Dough homemade or store-bought
For the Garlic Butter
  • ½ cup Unsalted Butter can substitute margarine
  • 3-4 cloves Garlic minced, fresh or dried
  • 2 tablespoons Olive Oil can substitute vegetable oil
  • 1 tablespoon Kosher Salt adjust to taste
  • 1 tablespoon Parsley chopped, optional

Equipment

  • Baking Sheet
  • Oven
  • microwave-safe bowl
  • Pizza Cutter

Method
 

Step‑by‑Step Instructions
  1. Preheat your oven to 400°F (200°C). Roll out homemade pizza dough or unfold store-bought dough.
    Garlic Knots Recipe
  2. Cut the dough into strips that are about ½ to 1 inch thick.
    Garlic Knots Recipe
  3. Tie each strip of dough into a knot and place them on a parchment-lined baking sheet.
    Garlic Knots Recipe
  4. Bake the knots for about 12 minutes, until they are golden brown.
    Garlic Knots Recipe
  5. Melt butter, stir in olive oil and minced garlic for the garlic butter mixture.
    Garlic Knots Recipe
  6. Brush the garlic butter mixture generously over the warm garlic knots.
    Garlic Knots Recipe
  7. Serve the garlic knots warm with your favorite dipping sauces.
    Garlic Knots Recipe

Nutrition

Serving: 1knotCalories: 120kcalCarbohydrates: 15gProtein: 2gFat: 7gSaturated Fat: 4gPolyunsaturated Fat: 0.5gMonounsaturated Fat: 1.5gCholesterol: 15mgSodium: 250mgPotassium: 50mgVitamin A: 5IUCalcium: 1mgIron: 3mg

Notes

Store garlic knots in an airtight container for up to a week or freeze for later. Reheat in the oven at 350°F (175°C) for 10-15 minutes.

Tried this recipe?

Let us know how it was!

Delicious Fruit Salad with Zesty Honey-Lime Dressing

As I stood in the kitchen, a radiant summer sun poured in through the window, casting colorful patterns on the counter. That’s when I decided to whip up an Easy Summer Fruit Salad with Honey-Lime Dressing, the perfect antidote to heavy meals and monotonous fast food. This vibrant fruit salad is not only exceptionally fresh and inviting but also incredibly versatile, allowing you to swap in seasonal fruits or your family’s favorites with ease. It’s a breeze to prepare, making it a surefire crowd-pleaser for picnics or barbecues. And for those hot summer days, the bright, zesty honey-lime dressing adds a delightful burst of flavor that’s hard to resist. Are you ready to toss together something that’s as fun to make as it is to eat? Let’s dive into the recipe!

Why is this fruit salad a must-try?

Refreshing and vibrant, this Easy Summer Fruit Salad is the perfect way to enjoy the season’s best flavors. Kid-friendly, it invites little hands to help mix and match their favorite fruits. Easy to customize, swap in seasonal options or add a twist with grated ginger. Visually stunning, it creates a colorful centerpiece at any gathering and is a healthy alternative to fast food. Quick to prepare, you’ll have this dish ready in no time, making it an ideal choice for last-minute get-togethers. Pair it with other light bites like Blt Chicken Salad for a delicious feast!

Fruit Salad Ingredients

• Dive into the delightful world of a Fruit Salad that’s both fresh and easy to make!

For the Salad

  • Medium Pineapple – Adds sweetness and texture; prep by peeling, coring, and chopping into ½-inch pieces (about 5 cups).
  • Strawberries (1 lb) – Provides vibrant color and sweetness; prep by hulling and chopping before adding.
  • Kiwi (3) – Adds a tangy flavor and unique texture; prep by peeling, quartering lengthwise, and slicing.
  • Seedless Grapes (2 cups) – Contributes juicy bursts; prep by halving grapes for easy eating.
  • Blueberries (1 pint) – Provides sweetness and antioxidants; no prep necessary, just wash.
  • Mandarin Oranges (3) – Delivers a sweet citrus flavor; prep by peeling and segmenting.

For the Dressing

  • Juice of 1 Lime – Adds tanginess; substitution: use lemon juice if preferred.
  • Juice of 1 Mandarin Orange – Adds sweetness; substitution: use orange juice as an alternative.
  • Honey (1 tablespoon) – Sweetens the dressing; substitution: use maple syrup for a vegan option.

Step‑by‑Step Instructions for Easy Summer Fruit Salad with Honey-Lime Dressing

Step 1: Prepare the Fruits
Begin by prepping the fruits for your Easy Summer Fruit Salad. Peel, core, and chop the medium pineapple into ½-inch pieces, yielding about 5 cups. Hull and chop the strawberries, peel and slice the kiwis, and halve the seedless grapes. For the mandarin oranges, peel and segment them before assembling everything together in a large mixing bowl. The vibrant colors will set the stage for a delightful salad.

Step 2: Mix the Fruit
Once all your fruits are prepped, add the pineapple, strawberries, kiwi, grapes, blueberries, and mandarin oranges into your large bowl. Gently stir the mixture with a spatula, taking care not to mash the fruits. This step is key for ensuring your Easy Summer Fruit Salad maintains its beautiful texture and colorful presentation, showcasing a rainbow of flavors just waiting to burst in every bite.

Step 3: Prepare the Dressing
In a small bowl, whisk together the juice of 1 lime, the juice of 1 mandarin orange, and 1 tablespoon of honey until the mixture is well combined and smooth. The dressing should have a tangy and sweet aroma that complements the fruits beautifully. This zesty honey-lime dressing is what elevates your salad, making it a refreshingly vibrant addition to your summer meal.

Step 4: Combine and Toss
Pour the dressing over the fruit mixture in the large bowl. Use a gentle folding motion with a spatula to coat the fruits evenly, ensuring each piece is dressed without breaking apart. This step allows the flavors to meld and makes the salad even more delicious. You’ll know it’s ready when every fruit piece glistens with that bright honey-lime glaze.

Step 5: Chill Before Serving
For the best flavor, cover the bowl with plastic wrap and refrigerate your Easy Summer Fruit Salad for at least 2 hours before serving. This chilling time allows the dressing to seep into the fruits, enhancing their natural flavors and creating a refreshing dish that’s perfect for warm summer days. When ready to serve, a quick stir will redistribute the dressing beautifully.

Step 6: Serve and Enjoy
When it’s time to enjoy your fruit salad, remove it from the refrigerator and give it a gentle stir to mix the dressing again. Present it in a lovely bowl to showcase the colorful array of fruits. This Easy Summer Fruit Salad with Honey-Lime Dressing makes for a charming and healthy side that pairs well with barbecues, picnics, or just as a vibrant snack.

Fruit Salad Variations & Substitutions

Feel free to unleash your creativity and customize this delightful fruit salad to suit your taste buds!

  • Seasonal Swap: Replace fruits based on what’s in season, like using peaches or plums for a juicy bite.

  • Add a Kick: Spicy Twist: Mix in a pinch of cayenne or freshly chopped mint. It elevates the flavor and adds an unexpected hint of heat!

  • Berry Delight: Berries Galore: Substitute with raspberries, blackberries, or even pomegranate seeds for a fresh burst of flavor.

  • Creamy Addition: Yogurt Option: Incorporate a dollop of Greek yogurt on top for a creamy texture and protein boost.

  • Nutty Crunch: Nutty Crunch: Toss in some chopped nuts like almonds or walnuts for an added crunch and healthy fats.

  • Vegan Sweetener: Maple Alternative: Swap honey for agave syrup or maple syrup to keep it vegan-friendly without losing sweetness.

  • Extra Zest: Enhanced Flavor: Use the zest of the fruits (lime, mandarin, or orange) to intensify the flavors of your dressing.

  • Tropical Paradise: Tropical Vibe: Add diced mango or papaya for a sunny, tropical twist that your taste buds will thank you for.

Remember, each twist makes this dish uniquely yours, just like the celebrations you share it with! For a fuller meal experience, pair your fruit salad with something savory like a lovely Blt Chicken Salad. Enjoy!

What to Serve with Easy Summer Fruit Salad with Honey-Lime Dressing

Enhance your summer feast with delightful accompaniments that balance refreshment and flavor.

  • Grilled Chicken Skewers: Juicy and smoky, these skewers pair perfectly with the sweetness of the fruit salad, providing a satisfying protein boost.
  • Quinoa Salad: Light and nutritious, a quinoa salad with herbs adds a hearty element that complements the fruity freshness wonderfully.
  • Pasta Primavera: Colorful veggies tossed in olive oil create a hearty yet light contrast to the vibrant flavors of the fruit salad.

For a fun twist, serve with Mini Pancakes drizzled in honey. The sweetness harmonizes beautifully with the honey-lime dressing, appealing to both kids and adults. Don’t forget a refreshing Mojito Mocktail. Its minty burst will elevate your picnic vibe, making this meal an unforgettable gathering experience!

Expert Tips for Fruit Salad

  • Freshness Matters: Always choose ripe, fresh fruit for optimal flavor and texture. Thawed frozen or canned fruit may lead to a mushy fruit salad.

  • Uniform Size: Cut your fruits into similar sizes. This not only enhances the visual appeal but also ensures that every bite is perfectly balanced.

  • Extra Zest: Don’t skip the lime or mandarin zest! Adding a teaspoon can elevate the flavor profile of your fruit salad, making it even more enticing.

  • Dress Just Before Serving: To keep your fruit salad looking fresh and vibrant, add the honey-lime dressing right before serving, preventing sogginess.

  • Seasonal Substitutions: Embrace seasonal fruits for a refreshing twist! Swap in peaches or mangoes when the weather gets hot for a fun variation on your classic fruit salad.

Make Ahead Options

These Easy Summer Fruit Salad with Honey-Lime Dressing ingredients are perfect for meal prep, allowing you to save valuable time during busy days! You can prep the fruits—pineapple, strawberries, kiwi, and mandarin oranges—up to 24 hours in advance by chopping and storing them in an airtight container in the refrigerator. To maintain the utmost quality and prevent browning, refrigerate the prepared fruits separately from the dressing. When you’re ready to serve, simply combine the prepped fruits, whisk together the dressing, and gently toss everything just before enjoying your refreshing salad. This way, you’ll have a vibrant and delicious fruit salad ready with minimal effort!

How to Store and Freeze Fruit Salad

Fridge: Store your fruit salad in an airtight container in the refrigerator for up to 2 days. Avoid dressing it until just before serving to maintain freshness.

Freezer: Freezing is not recommended for fruit salad, as the texture will become mushy upon thawing. It’s best enjoyed fresh!

Reheating: There’s no need to reheat this dish; it’s intended to be served chilled, making it a refreshing option for warm days.

Serving Tips: For optimal freshness, give a gentle stir to redistribute the dressing before serving if the salad has been sitting in the fridge. Enjoy your delicious fruit salad!

Easy Summer Fruit Salad with Honey-Lime Dressing Recipe FAQs

How do I choose ripe fruits for this salad?
Absolutely! Look for fruits that have vibrant colors and are slightly firm to the touch. A ripe pineapple should have a sweet smell at the base and yield just a little when pressed. Strawberries should be bright red without any dark spots, while kiwis should feel slightly soft when ripe. If you opt for grapes, pick a bunch with plump, firm berries and bright green leaves; avoid any that are shriveled or have dark spots.

What’s the best way to store the fruit salad?
Very! Store your Easy Summer Fruit Salad in an airtight container in the refrigerator for up to 2 days. To prevent the fruits from becoming soggy, I recommend keeping the dressing on the side and only mixing it just before serving. This way, your salad stays as fresh and vibrant as when you first made it!

Can I freeze the fruit salad?
No, it’s best not to freeze this fruit salad! Freezing can change the texture, leaving the fruits mushy when thawed. I’ve found that the salad is at its best enjoyed fresh, so consider making smaller batches if you’re mindful of leftovers!

What if I have fruit leftovers, how do I repurpose them?
Great question! If you have any leftover fruits that you didn’t use, incorporate them into smoothies or yogurt parfaits for quick breakfasts. You can also blend them into a fruit puree to use as an ice cream topping or even use them to jazz up your morning oatmeal!

Can I make this fruit salad vegan?
Absolutely! For a vegan twist, simply replace the honey with maple syrup. This alternative adds the sweetness we love in the dressing without compromising the integrity of the salad’s refreshing flavors. It’s a delightful way to make this dish suitable for everyone!

Is this recipe suitable for kids with allergies?
Very! Just be cautious with fruits like strawberries and kiwis, which are common allergens. Always check with everyone at the gathering for any dietary restrictions. You can easily substitute those favorites with other safe fruits like bananas or apples!

Fruit Salad

Delicious Fruit Salad with Zesty Honey-Lime Dressing

This refreshing fruit salad is a must-try summer dish, combining seasonal fruits with a zesty honey-lime dressing.
Prep Time 15 minutes
Chilling Time 2 hours
Total Time 2 hours 15 minutes
Servings: 6 cups
Course: Salad
Cuisine: American
Calories: 150

Ingredients
  

For the Salad
  • 5 cups Medium Pineapple peeled, cored, and chopped into ½-inch pieces
  • 1 lb Strawberries hulled and chopped
  • 3 Kiwi peeled, quartered lengthwise, and sliced
  • 2 cups Seedless Grapes halved
  • 1 pint Blueberries washed
  • 3 Mandarin Oranges peeled and segmented
For the Dressing
  • 1 Juice of Lime or substitute with lemon juice
  • 1 Juice of Mandarin Orange or substitute with orange juice
  • 1 tablespoon Honey or substitute with maple syrup for a vegan option

Equipment

  • Mixing Bowl
  • whisk
  • spatula

Method
 

Step-by-Step Instructions
  1. Prepare the fruits by peeling, coring, and chopping the pineapple; hull and chop the strawberries; peel and slice the kiwis; halve the grapes; and peel and segment the mandarin oranges.
  2. Mix the pineapple, strawberries, kiwi, grapes, blueberries, and mandarin oranges in a large bowl and gently stir.
  3. Prepare the dressing by whisking together the lime juice, mandarin orange juice, and honey until smooth.
  4. Combine the dressing with the fruit mixture and gently fold to coat.
  5. Chill the salad in the refrigerator for at least 2 hours before serving.
  6. Serve with a gentle stir and enjoy your colorful fruit salad.

Nutrition

Serving: 1cupCalories: 150kcalCarbohydrates: 37gProtein: 1gSodium: 2mgPotassium: 250mgFiber: 3gSugar: 27gVitamin A: 500IUVitamin C: 50mgCalcium: 30mgIron: 0.5mg

Notes

For optimal freshness, add the dressing just before serving. Substitute seasonal fruits for a refreshing twist.

Tried this recipe?

Let us know how it was!

Creamy Homemade Mac and Cheese: A Comfort Food Delight

As I rummaged through my pantry one chilly evening, the comforting notion of homemade Baked Mac and Cheese crept into my mind. There’s something magical about this dish that transforms ordinary meals into heartwarming experiences, making it a staple in our household. This ultimate creamy delight is not just easy to prepare, but it’s a guaranteed crowd-pleaser, ideal for cozy dinners or festive gatherings. The combination of gooey cheese, a rich sauce, and a crunchy breadcrumb topping elevates this classic comfort food to new heights. Trust me, once you try this version of Homemade Mac and Cheese, you’ll never look at the boxed stuff the same way again! Are you ready to bring the warmth of this beloved dish into your kitchen?

Why is Homemade Mac and Cheese a Must-Try?

Unmatched Creaminess: The decadent sauce enveloping every macaroni piece creates a wonderfully rich texture that you’ll crave time and time again.
Irresistible Crunch: The crispy breadcrumb topping perfectly contrasts the gooey cheese, adding that satisfying bite.
Customizable Flavors: Feel free to mix in your favorite proteins or veggies to make it truly your own, just like our delicious Banana Grilled Cheese for a fun twist!
Quick and Simple: With just a handful of ingredients and straightforward steps, you’ll have this comforting dish ready in no time, making it a perfect weeknight dinner!
Genuine Comfort: This dish embodies the essence of home cooking, bringing warmth and nostalgia to every bite, making it the ideal companion for family gatherings—as seen in my cherished Homemade Corned Beef recipe.
Family Favorite: Once served, it’s bound to become a staple in your household—watch as everyone comes back for seconds!

Homemade Mac and Cheese Ingredients

For the Topping
Coarse Bread Crumbs – Adds a crispy topping; substitute with panko for extra crunch.
Extra-Virgin Olive Oil – Used to coat breadcrumbs for a richer flavor; any cooking oil can be substituted.

For the Cheese Sauce
Unsalted Butter – Provides richness and thickness to the sauce; use salted butter but adjust salt accordingly.
All-Purpose Flour – Thickens the béchamel sauce; gluten-free flour works for a gluten-free option.
Whole Milk – Creates a creamy sauce; substitute with heavy cream for a richer consistency or non-dairy milk for lactose-free choices.
Grated Garlic Clove – Adds a flavorful kick to the sauce; garlic powder can serve as a milder alternative.
Dijon Mustard – Provides a tangy flavor to elevate cheese richness; yellow mustard can be used as an alternative.
Smoked Paprika – Offers a subtle smokiness; regular paprika works in a pinch.
Sea Salt – Enhances the overall flavor; adjust according to taste preferences.
Sharp Cheddar Cheese – Key cheese for depth and richness; substitute with mild cheddar for a lighter flavor or any melty cheese.
Gruyère Cheese – Adds a nutty flavor and creaminess; can be substituted with more cheddar or Fontina cheese.

For the Pasta
Elbow Macaroni Noodles – The base pasta; alternative shapes like shells or cavatappi can create a fun twist.

Enjoy bringing this homemade mac and cheese masterpiece to your table!

Step‑by‑Step Instructions for Homemade Mac and Cheese

Step 1: Preheat the Oven
Begin your journey to the ultimate creamy baked mac and cheese by preheating your oven to 425°F (220°C). While the oven warms up, take a moment to butter a 9×13-inch baking dish thoroughly, ensuring a non-stick surface for your luscious dish.

Step 2: Prepare the Breadcrumb Topping
In a medium bowl, combine coarse bread crumbs and extra-virgin olive oil, mixing well until every crumb is coated. Then, sprinkle in the grated Pecorino cheese, blending it into the mixture. This creates a delicious, crunchy topping that will contrast beautifully with the creamy macaroni and cheese.

Step 3: Cook the Macaroni
Bring a large pot of salted water to a boil over high heat. Add the elbow macaroni and cook until just under al dente, around 6-8 minutes. Drain the pasta in a colander and toss it with a drizzle of olive oil to prevent sticking. Set it aside, as it will soak up all the cheesy goodness in the sauce.

Step 4: Make the Cheese Sauce
In a saucepan over medium heat, melt 4 tablespoons of unsalted butter until bubbly and golden. Whisk in all-purpose flour until smooth and slightly golden, about 1-2 minutes. Gradually pour in whole milk while whisking continuously until the mixture thickens, approximately 5-7 minutes. Add in the grated garlic, Dijon mustard, smoked paprika, and sea salt, stirring well.

Step 5: Add the Cheese
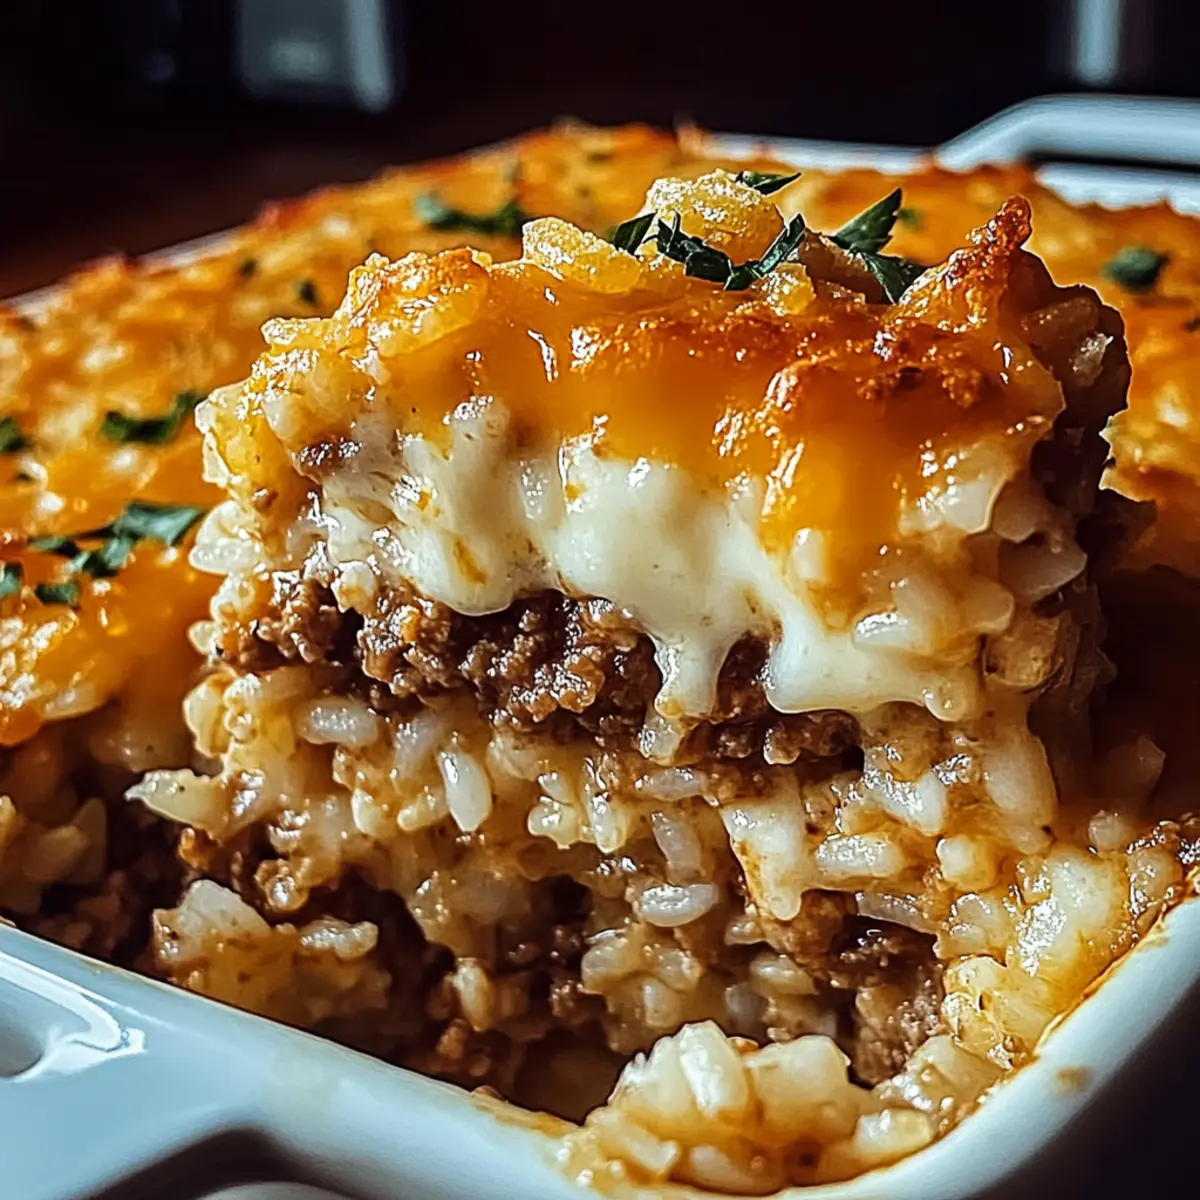
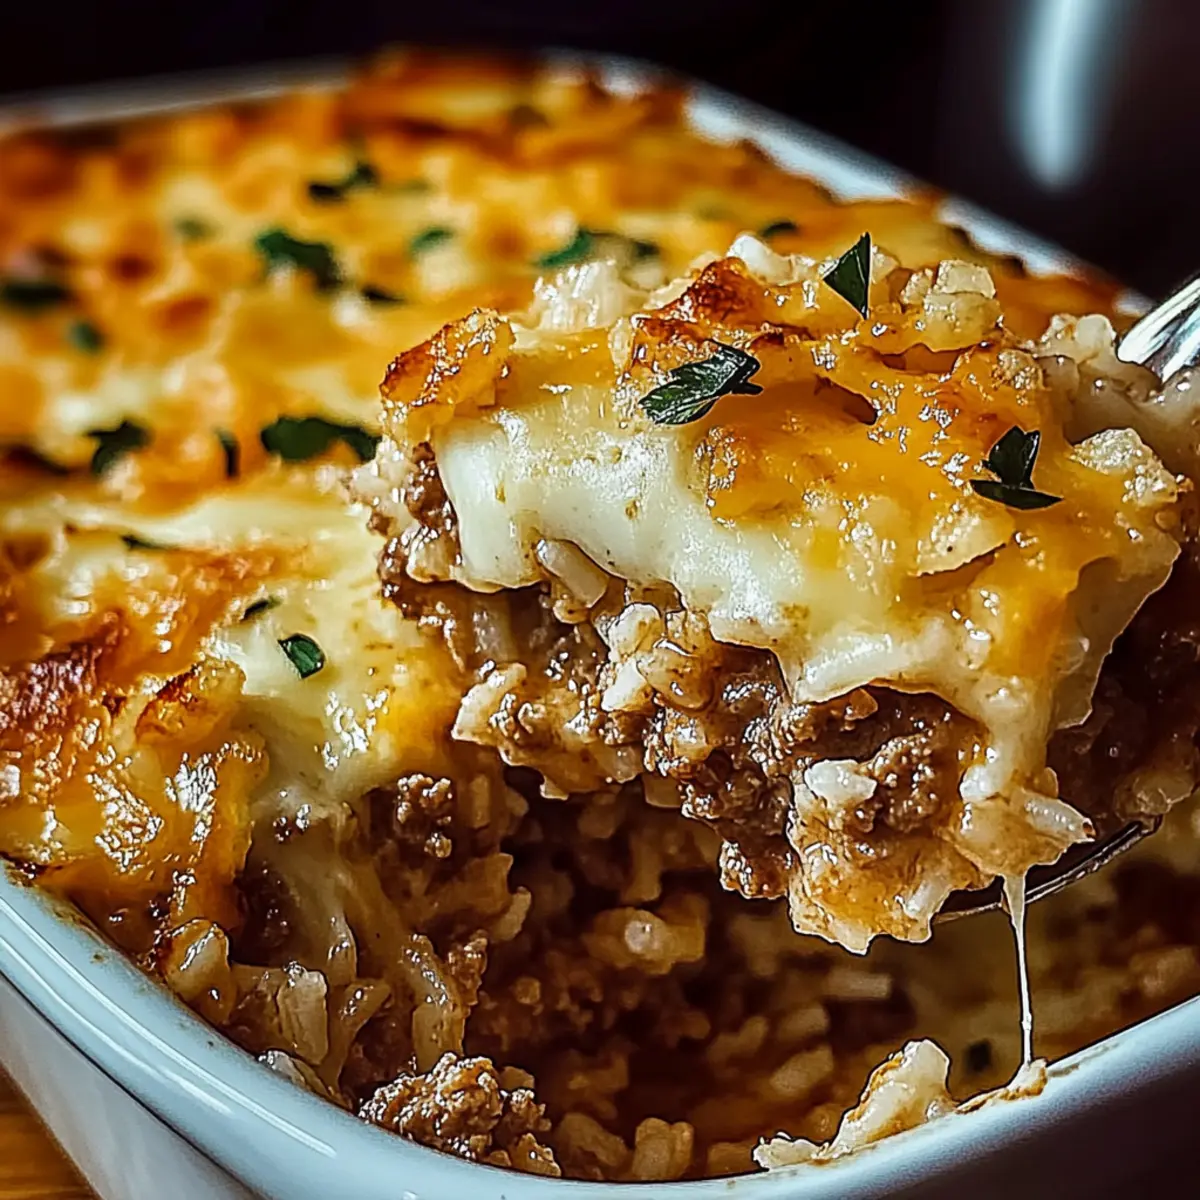
Once your sauce is thick and creamy, lower the heat, and mix in the sharp cheddar and Gruyère cheeses. Stir until both cheeses are completely melted and the sauce is smooth and velvety, demonstrating that perfect cheesy texture you are aiming for in your homemade mac and cheese.

Step 6: Combine the Macaroni with the Sauce
Carefully fold the cooked macaroni into the cheese sauce, ensuring that every piece is well coated in that indulgent mixture. Take your time here, as you want to guarantee that no macaroni is left unadorned by this heavenly cheese sauce.

Step 7: Assemble and Bake
Pour the macaroni mixture into your prepared baking dish, spreading it evenly across the bottom. Generously sprinkle your breadcrumb topping over the macaroni and cheese, ensuring it’s well-distributed. Bake in the preheated oven for about 20 minutes, or until the top is crispy and golden, and the cheese is bubbling with excitement.

Expert Tips for Homemade Mac and Cheese

  • Grate Your Own Cheese: Pre-shredded cheese often contains anti-caking agents that can affect melting. Grating fresh cheese ensures a smooth, creamy sauce in your homemade mac and cheese.
  • Avoid Curdling: Add the cheese to the sauce gradually, stirring continuously. This helps create that silky texture without curdling, which can ruin your cheese sauce.
  • Perfect Bread Crumb Topping: For an extra crispy finish, broil the mac and cheese for the last few minutes of baking. Just keep a close eye to prevent burning!
  • Salt the Pasta Water: Make sure your boiling water is salty before cooking the macaroni. This step infuses flavor into the pasta, enhancing the overall dish.
  • Serve Immediately: Homemade mac and cheese is best enjoyed fresh from the oven. If you must store leftovers, use an airtight container in the fridge for up to 3 days.

What to Serve with Ultimate Creamy Baked Mac and Cheese

Imagine a table filled with soothing colors and delightful aromas, ready to complement the creamy goodness of your homemade baked mac and cheese.

  • Garlic Bread: This fluffy, buttery delight adds a crunchy texture that’s perfect for scooping up cheesy goodness and soaking up savory flavors.

  • Garden Salad: A fresh green salad with crisp vegetables adds a refreshing crunch, balancing the richness of the mac and cheese beautifully. Toss in a tangy vinaigrette for an extra zing!

  • Roasted Broccoli: The slight char and nutty flavors of roasted broccoli provide a delicious contrast to the creamy dish, while adding some nutritious green to your plate.

  • Grilled Vegetables: Zucchini, bell peppers, and asparagus grilled to perfection not only deliver beautiful colors but also a smoky char that enhances every mouthful.

  • Sweet Corn on the Cob: Fresh, juicy corn brings a touch of sweetness and bright color, making every bite feel like a celebration of summer.

  • Chardonnay: A chilled glass of Chardonnay, with its crisp acidity, wonderfully cuts through the richness of the cheese sauce, creating a harmonious dining experience.

  • Chocolate Chip Cookies: End your meal on a sweet note! These warm, gooey cookies offer a delightful contrast to the savory main dish and are a nostalgic treat for all ages.

Make each of these pairings a centerpiece in your next family gathering and watch as joy and laughter fill the room alongside your ultimate creamy baked mac and cheese!

How to Store and Freeze Homemade Mac and Cheese

Fridge: Store leftovers in an airtight container for up to 3 days. Make sure to let it cool completely before sealing to avoid moisture buildup.

Freezer: You can freeze homemade mac and cheese for up to 2 months. Allow it to cool completely, then portion into freezer-safe bags or containers.

Reheating: To reheat, defrost in the fridge overnight, then warm in the oven at 350°F (175°C) until heated through, about 20-30 minutes. Add a splash of milk to revive creaminess.

Serving Fresh: For the best taste and texture, serve fresh out of the oven, creating a heartwarming meal that delights the whole family with your delicious homemade mac and cheese!

Homemade Mac and Cheese Variations

Feel free to add your own twist to this comforting classic, bringing your unique flair and flavors to the table.

  • Cheesy Blend: Combine different cheeses like mozzarella for extra meltiness or pepper jack for a spicy kick. Experimenting with cheeses adds layers of flavor and fun to your dish.

  • Protein Boost: Stir in cooked bacon, succulent lobster, or veggies like broccoli or spinach for added nutrition. This not only elevates your dish but makes it more filling and hearty.

  • Spicy Kick: Add sliced jalapeños or a few dashes of hot sauce to the cheese sauce for a fiery burst. The heat pairs beautifully with the creaminess of the mac and cheese.

  • Vegetarian Delight: Swap out meats for sautéed mushrooms or caramelized onions for a rich umami flavor. These options make your dish satisfying while keeping it vegetarian-friendly.

  • Gluten-Free Version: Use gluten-free pasta and flour to make your mac and cheese suitable for gluten-sensitive diets. This way, everyone can enjoy the creamy goodness.

  • Savory Extras: Fold in cooked sausage or shredded rotisserie chicken for a heartier meal. These additions turn your mac and cheese into a blissful one-pot wonder.

  • Baked Penne Twist: Try using penne pasta instead of elbow macaroni for a fun shape change. This variation keeps the cheese hugs in every crevice, similar to my beloved Strawberry Cheesecake Dump dessert but savory!

  • Herb Infusion: Add fresh herbs like thyme or parsley to the cheese sauce for a pop of freshness. Not only does this elevate the flavor, but it also adds a vibrant touch to your dish.

By embracing these variations, you’ll create a personalized mac and cheese that’s perfect for every occasion!

Make Ahead Options

These creamy homemade mac and cheese are perfect for meal prep enthusiasts! You can cook the macaroni and prepare the cheese sauce up to 24 hours in advance. Just cook the pasta until it is al dente, drain, and toss it with a bit of olive oil to prevent sticking. Store the sauce separately in an airtight container in the fridge. When you’re ready to serve, simply combine the pasta and cheese sauce in a baking dish, sprinkle with the breadcrumb topping, and bake directly from the fridge for about 25-30 minutes, until bubbly and golden. This approach not only saves precious time but ensures your mac and cheese are just as delicious as when made fresh!

Homemade Baked Mac and Cheese Recipe FAQs

How do I choose the best cheese for homemade mac and cheese?
Opt for sharp cheddar and Gruyère for a wonderful depth of flavor. If you prefer a milder taste, go for mild cheddar or even mozzarella for that gooey goodness. Just remember, the fresher the cheese, the creamier your sauce will be!

What is the best way to store leftover mac and cheese?
To keep your homemade mac and cheese at its best, store leftovers in an airtight container in the fridge for up to 3 days. Allow it to cool completely before sealing to prevent moisture buildup. This simple step helps maintain that creamy texture.

Can I freeze homemade mac and cheese?
Absolutely! Freezing is a fantastic way to enjoy this comfort food later. After cooling, portion the mac and cheese into freezer-safe bags or containers, sealing them tightly. It can be frozen for up to 2 months. When you’re ready to enjoy it, thaw it in the fridge overnight, then reheat in the oven at 350°F (175°C) for about 20-30 minutes, adding a splash of milk to revive its creaminess.

What if my cheese sauce is too thick?
No worries! If your cheese sauce is thicker than you’d like, simply whisk in a little more milk or cream over low heat until you achieve your desired consistency. This will bring back that velvety smoothness. Just take it slow and stir well!

Is homemade mac and cheese safe for my pet?
While the ingredients in this homemade mac and cheese are safe for humans, dairy can be hard for pets to digest. I recommend avoiding giving your furry friends any mac and cheese, especially because of the garlic and spices, which can be harmful to them.

How should I adjust this recipe for a gluten-free version?
To make this delicious homemade mac and cheese gluten-free, simply substitute regular flour with gluten-free all-purpose flour and use gluten-free pasta. The cooking method remains the same, ensuring you can enjoy this comforting dish worry-free!

Homemade Mac and Cheese

Creamy Homemade Mac and Cheese: A Comfort Food Delight

Discover the magic of Homemade Mac and Cheese, a creamy and comforting dish that transforms any meal into a delightful experience.
Prep Time 15 minutes
Cook Time 40 minutes
Total Time 55 minutes
Servings: 4 servings
Course: Casserole
Cuisine: American
Calories: 550

Ingredients
  

For the Topping
  • 1 cup Coarse Bread Crumbs Substitute with panko for extra crunch.
  • 2 tablespoons Extra-Virgin Olive Oil Any cooking oil can be substituted.
For the Cheese Sauce
  • 4 tablespoons Unsalted Butter Use salted butter but adjust salt accordingly.
  • 1/4 cup All-Purpose Flour Gluten-free flour works for a gluten-free option.
  • 3 cups Whole Milk Substitute with heavy cream or non-dairy milk.
  • 1 clove Grated Garlic Clove Garlic powder can serve as a milder alternative.
  • 1 tablespoon Dijon Mustard Yellow mustard can be used as an alternative.
  • 1 teaspoon Smoked Paprika Regular paprika works in a pinch.
  • 1 teaspoon Sea Salt Adjust according to taste preferences.
  • 2 cups Sharp Cheddar Cheese Substitute with mild cheddar or any melty cheese.
  • 1 cup Gruyère Cheese Can be substituted with more cheddar or Fontina cheese.
For the Pasta
  • 2 cups Elbow Macaroni Noodles Alternative shapes like shells or cavatappi can create a fun twist.

Equipment

  • 9x13 inch baking dish
  • Large pot
  • medium bowl
  • Saucepan
  • Colander

Method
 

Step-by-Step Instructions for Homemade Mac and Cheese
  1. Preheat your oven to 425°F (220°C) and butter a 9x13-inch baking dish thoroughly.
  2. In a medium bowl, combine coarse bread crumbs and extra-virgin olive oil, mixing until coated. Add grated Pecorino cheese and blend.
  3. Bring salted water to a boil in a large pot. Cook elbow macaroni until just under al dente, around 6-8 minutes. Drain and toss with olive oil to prevent sticking.
  4. In a saucepan over medium heat, melt unsalted butter until bubbly. Whisk in all-purpose flour until smooth (about 1-2 minutes). Gradually pour in whole milk, whisking continuously until thickened (5-7 minutes).
  5. Add grated garlic, Dijon mustard, smoked paprika, and sea salt, stirring well.
  6. Lower the heat and mix in sharp cheddar and Gruyère cheeses, stirring until completely melted and the sauce is smooth.
  7. Fold the cooked macaroni into the cheese sauce, ensuring every piece is well coated.
  8. Pour the macaroni mixture into the prepared baking dish, spreading it evenly. Sprinkle the breadcrumb topping generously over the macaroni. Bake for about 20 minutes until the top is crispy and golden.

Nutrition

Serving: 1servingCalories: 550kcalCarbohydrates: 45gProtein: 18gFat: 30gSaturated Fat: 15gPolyunsaturated Fat: 2gMonounsaturated Fat: 8gCholesterol: 70mgSodium: 800mgPotassium: 400mgFiber: 3gSugar: 4gVitamin A: 1000IUCalcium: 400mgIron: 1.5mg

Notes

For the best results, serve fresh out of the oven. Grate your own cheese for smooth melting and avoid curdling by adding cheese gradually to the sauce.

Tried this recipe?

Let us know how it was!

Savory Italian Chicken and Pasta in Your Crockpot Tonight

As I stood in my kitchen, the enticing aroma of Italian herbs and tomatoes lingered in the air, bringing me right back to bustling family dinners. This Easy Crockpot Italian Chicken Pasta recipe is my go-to for nights when I’m craving something comforting yet effortless. It’s crafted for those busy weekdays, effortlessly transforming tender chicken into a flavorful, kid-approved feast that everyone will adore. Not only does it save you precious time, but it’s also a delightful way to entice the whole family away from fast food. The slow cooker does the heavy lifting, allowing you to savor the moments that matter. Ready to discover how this simple dish can elevate your weeknight meals? Let’s dive in!

Why Is This Crockpot Recipe So Special?

Ease of Preparation: Simply toss your ingredients into the slow cooker and let it do all the work while you focus on other tasks or enjoy some downtime.

Rich, Flavorful Sauce: With crushed tomatoes, red wine, and Italian seasoning, this dish offers an irresistible depth of flavor that’s sure to satisfy.

Kid-Approved: Watch your little ones devour this meal! The combination of creamy sauce and pasta is always a hit with kids.

Versatile Options: Feel free to swap in gluten-free pasta or experiment with veggies like zucchini or peppers for a unique twist! If you’re craving variety, try pairing it with a side salad or garlic bread for a complete feast.

Family Dinner Staple: This recipe is perfect for busy weeknights, providing a hearty meal that brings everyone together—far better than that drive-thru! Plus, considering leftovers can be stored easily, this dish is a time-saver for the busy week ahead.

Italian Chicken and Pasta Ingredients

• Here’s everything you need for a delicious meal!

For the Chicken

  • Boneless Skinless Chicken Breasts – A great source of protein; can swap for thighs or tofu for a vegetarian option.
  • Olive Oil – Used for searing; any neutral oil can be a substitute.

For the Sauce

  • Canned Crushed Tomatoes (56 ounces) – Serves as a flavorful base; fresh chopped tomatoes can be used but may require longer cooking time.
  • Reduced-Sodium Chicken Broth (1 cup) – Enhances flavor without adding too much salt; vegetable broth works for a vegetarian choice.
  • Red Wine (¼ cup) – Adds depth; feel free to omit or replace with extra broth to keep it non-alcoholic.
  • Italian Seasoning – Provides aromatic herbal flavor; substitute with oregano and basil if needed.
  • Oregano (1 teaspoon) – Elevates the Italian flavor; fresh herbs can be used but increase the quantity.
  • Basil (1 teaspoon) – Adds sweetness; fresh basil brings a vibrant aroma.
  • Salt and Black Pepper – Essential for seasoning; adjust to your taste.

For the Creaminess

  • Plain Greek Yogurt (5 ounces) or Sour Cream – Adds creaminess; can use cream cheese mixed with heavy cream for similar texture.
  • Shredded or Grated Parmesan (1 cup) – Provides richness and umami; nutritional yeast is a good dairy-free alternative.

For the Pasta

  • Penne (16 ounces) – The main carbohydrate; gluten-free pasta works as a substitute.

For the Greens

  • Chopped Fresh or Frozen Spinach (1-2 cups) – Nutritional boost and color; kale or Swiss chard can be good alternatives.

Get ready to enjoy the goodness of this Italian Chicken and Pasta dish, which is bound to become a family favorite!

Step‑by‑Step Instructions for Easy Crockpot Italian Chicken and Pasta

Step 1: Season the Chicken
Start by seasoning your boneless skinless chicken breasts with a generous sprinkle of Italian seasoning, salt, and black pepper. Make sure the chicken is evenly coated to enhance the flavor throughout. This is an important foundation for your Easy Crockpot Italian Chicken and Pasta, so take a moment to ensure every piece is well-seasoned.

Step 2: Sear the Chicken
In a skillet, heat about two tablespoons of olive oil over medium-high heat. Once the oil is shimmering, carefully place the seasoned chicken in the skillet. Cook the chicken for 5-6 minutes until it forms a lovely golden-brown crust. This step adds depth to the dish, so keep an eye on it for that perfect visual cue before moving to the next step.

Step 3: Transfer to the Crockpot
After achieving a beautiful sear, transfer the chicken to your crockpot. In the same skillet, add 56 ounces of canned crushed tomatoes and 1 cup of reduced-sodium chicken broth. Pour in ¼ cup of red wine, and sprinkle in the oregano, basil, salt, and pepper. Stir this flavorful mixture together before pouring it over the chicken in the crockpot, ensuring every piece is well covered.

Step 4: Slow Cook the Chicken
Cover the crockpot with its lid and set it to high heat. Allow the chicken to cook for 3 hours, during which time the aromas will begin to fill your kitchen. This slow cooking method is what makes your Easy Crockpot Italian Chicken and Pasta so tender and incredibly flavorful, so resist the urge to peek too often!

Step 5: Shred the Chicken
Once the 3 hours are up, check that the chicken has reached an internal temperature of 165°F. Use two forks or a hand mixer to shred the chicken directly in the crockpot, ensuring it absorbs all that rich sauce. This step is crucial to creating that delightful texture and flavor that comes with your dish.

Step 6: Add Creaminess and Spinach
Next, stir in 1-2 cups of chopped fresh or frozen spinach along with 5 ounces of Greek yogurt and 1 cup of shredded Parmesan cheese. Let this mix cook for an additional 10 minutes with the lid on. The spinach will wilt down and thrive in the warm, creamy sauce, giving your Easy Crockpot Italian Chicken and Pasta the perfect finishing touch.

Step 7: Cook the Pasta
While the chicken mixture is finishing, cook 16 ounces of penne pasta according to the package directions in a separate pot. Once the pasta is al dente, drain it and add it to the crockpot. Give it a gentle stir to combine all the ingredients thoroughly, ensuring every bite is filled with rich chicken, creamy sauce, and pasta goodness.

Step 8: Serve and Enjoy
Once everything is blended, your Easy Crockpot Italian Chicken and Pasta is ready to be served. Consider serving it with a sprinkle of extra Parmesan and a dash of fresh basil for a vibrant finish. This hearty meal is perfect for bringing the family together around the dinner table, providing everyone with a comforting taste of Italy.

What to Serve with Easy Crockpot Italian Chicken Pasta

Elevate your dinner experience with delightful sides that complement the rich flavors of this comforting dish.

  • Garlic Bread: Perfect for sopping up the creamy sauce, garlic bread adds a satisfying crunch and aromatic flavor that pairs excellently with this pasta dish.

  • Italian Side Salad: Fresh greens topped with olives, tomatoes, and a light vinaigrette provide a refreshing contrast, balancing the heartiness of the chicken and pasta.

  • Roasted Vegetables: Oven-roasted seasonal veggies like zucchini and bell peppers not only add a burst of color but also bring out sweetness, enhancing the overall meal.

  • Creamy Polenta: Like a warm hug on a plate, creamy polenta adds a velvety base that absorbs the savory sauce, providing comfort in every bite.

  • Pesto Pasta Salad: For a vibrant and lighter option, toss cooked pasta with fresh pesto, cherry tomatoes, and mozzarella for a delightful side that complements the Italian flavors beautifully.

  • Red Wine: A glass of your favorite red wine will enhance the flavors of the dish while adding a touch of sophistication to your dinner, making it feel extra special.

  • Cheesy Garlic Biscuits: These fluffy delights are perfect for pairing with the Italian Chicken Pasta, delightful for soaking in sauce and absolutely kid-approved!

  • Tiramisu: End the meal on a sweet note with this timeless Italian dessert. Its coffee-infused layers will leave everyone satisfied and dreaming of Italy.

Make Ahead Options

These Easy Crockpot Italian Chicken and Pasta are perfect for meal prep enthusiasts! You can season and sear the chicken up to 24 hours in advance; just refrigerate it after cooking. The sauce can be combined and stored in an airtight container for up to 3 days before using. When ready to enjoy, simply transfer the chicken and sauce to the crockpot, let it cook on high for 3 hours, and shred the chicken. Stir in the spinach, yogurt, and Parmesan, then cook for an additional 10 minutes before adding the cooked pasta. This way, your dish will be just as delicious and flavorful, making dinner a breeze on busy nights!

Storage Tips for Italian Chicken and Pasta

Fridge: Store leftovers in an airtight container for up to 3-4 days to maintain freshness and flavor.

Freezer: For longer storage, freeze in well-sealed containers or freezer bags for up to 3 months. Portioning helps with quick reheats later!

Reheating: When ready to enjoy, thaw overnight in the fridge and reheat gently on the stovetop or in the microwave, adding a splash of broth to keep the sauce creamy.

Room Temperature: Avoid leaving the Italian Chicken and Pasta out at room temperature for more than 2 hours to prevent spoilage.

Expert Tips for Italian Chicken and Pasta

  • Choose Quality Ingredients: Using fresh, high-quality ingredients, like organic chicken and ripe tomatoes, can significantly enhance the flavor of your Italian Chicken and Pasta.

  • Searing Matters: Don’t rush the searing step. A proper golden-brown crust on the chicken boosts the dish’s flavor profile immensely, setting a delicious base for the slow cooker.

  • Adjust Seasoning: Taste before serving. Given the varying salt levels in broth and cheese, adjust the seasoning of your Italian Chicken and Pasta accordingly for a perfectly balanced meal.

  • Veggie Boost: For added nutrition and variety, feel free to toss in other vegetables like bell peppers or mushrooms right before the cooking phase to allow flavors to meld.

  • Leftover Storage Tips: Store leftovers in an airtight container. To rejuvenate the dish when reheating, add a splash of broth or water to keep the sauce creamy and flavorful.

  • Timing Is Key: Avoid opening the slow cooker frequently while cooking. Each peek lets heat escape and can impact the cooking time and final texture of your Italian Chicken and Pasta.

Italian Chicken and Pasta Variations

Feel free to get creative with this recipe and tailor it to your taste buds!

  • Spicy Twist: Add crushed red pepper flakes for a fiery kick that plays beautifully with the sweetness of the tomatoes. This heat will elevate the dish, embracing those who enjoy a little more zest in every bite.

  • Different Pasta Shapes: Swap out the penne for rotini or fusilli for a fun twist in texture. These shapes hold onto the sauce wonderfully, making each forkful a flavorful delight.

  • Vegetable Medley: Toss in cherry tomatoes, zucchini, or bell peppers for a colorful boost of nutrition and taste. This will not only enhance the flavor but also add vibrant colors, turning the dish into a feast for the eyes.

  • Herb Infusion: Fresh basil can replace the dried versions for a burst of aromatic goodness. Use a generous handful to bring a garden-fresh essence to your Italian Chicken and Pasta.

  • Creamy Vegan Option: Substitute Greek yogurt with cashew cream or coconut cream for a deliciously dairy-free version that’s just as satisfying. You won’t miss the creaminess, and it adds a unique twist!

  • Pasta Alternatives: Try using whole grain or chickpea pasta to up the health factor without sacrificing taste. These options offer a hearty texture while keeping the dish wholesome.

  • Rich Chicken Flavor: Enhance the chicken’s flavor by marinating it in Italian dressing before searing. This will give a deeper dimension to your Italian Chicken and Pasta, perfect for special occasions.

  • Italian Cheese Corner: Instead of just Parmesan, think about a fusion of cheeses like mozzarella and ricotta for a rich, melty indulgence throughout the dish. If you love cheese, this might quickly become your go-to upgrade!

By experimenting with these variations, you can keep family dinners exciting and continuously bring new flavors to the table. If you’re looking for more inspired recipes, don’t miss out on our delicious Bbq Chicken Sandwich or healthier options like Oven Chicken Rice. Enjoy the culinary journey!

Easy Crockpot Italian Chicken and Pasta Recipe FAQs

What type of chicken is best for this recipe?
I recommend using boneless skinless chicken breasts as they become tender and easy to shred in the crockpot. However, you can also use chicken thighs for a richer flavor or tofu for a vegetarian option, just ensure the cooking time remains similar.

How long can I store leftovers?
You can keep your Easy Crockpot Italian Chicken and Pasta in an airtight container in the fridge for up to 3-4 days. When storing, make sure to cool the dish to room temperature before sealing to maintain freshness.

Can I freeze this dish?
Absolutely! For freezing, portion the Italian Chicken and Pasta into well-sealed containers or freezer bags. This allows for easy reheating later and keeps the dish fresh for up to 3 months. To reheat, thaw it overnight in the fridge and warm it gently on the stovetop, adding a splash of broth to keep the sauce creamy.

My sauce is too thin; how can I thicken it?
If you find your sauce is on the thinner side, you can easily thicken it. A simple method is to mix one tablespoon of cornstarch with two tablespoons of cold water to make a slurry, then stir it into the sauce. Let it cook for about 10 minutes until thickened, or add a little more Greek yogurt or cheese to enhance creaminess and texture.

What should I do if my chicken isn’t shredding easily?
If your chicken isn’t shredding well, it may need a bit more cooking time; try cooking it for an additional 30 minutes and check again. Make sure to test the internal temperature, which should be at least 165°F. For a quick fix, using a hand mixer can help shred the chicken effortlessly right in the crockpot.

Is this recipe safe for my family with allergies?
While this Easy Crockpot Italian Chicken and Pasta is generally safe, always check for allergies! The recipe includes common allergens like dairy and gluten from the pasta. To accommodate allergies, use gluten-free pasta, and substitute yogurt with a dairy-free option like cashew cream. Always consult your family about their specific dietary needs.

Italian Chicken and Pasta

Savory Italian Chicken and Pasta in Your Crockpot Tonight

This Easy Crockpot Italian Chicken and Pasta is a comforting dish perfect for busy weeknights. Enjoy tender chicken in a flavorful sauce, ideal for the whole family.
Prep Time 15 minutes
Cook Time 3 hours
Total Time 3 hours 15 minutes
Servings: 6 servings
Course: Pasta
Cuisine: Italian
Calories: 450

Ingredients
  

For the Chicken
  • 4 pieces Boneless Skinless Chicken Breasts Can swap for thighs or tofu for vegetarian option.
  • 2 tablespoons Olive Oil Any neutral oil can be a substitute.
For the Sauce
  • 56 ounces Canned Crushed Tomatoes Fresh chopped tomatoes can be used but may require longer cooking time.
  • 1 cup Reduced-Sodium Chicken Broth Vegetable broth works for a vegetarian choice.
  • 0.25 cup Red Wine Feel free to omit or replace with extra broth.
  • Italian Seasoning Can substitute with oregano and basil.
  • 1 teaspoon Oregano Fresh herbs can be used but increase quantity.
  • 1 teaspoon Basil Fresh basil brings a vibrant aroma.
  • Salt and Black Pepper Adjust to taste.
For the Creaminess
  • 5 ounces Plain Greek Yogurt Can use sour cream or cream cheese mixed with heavy cream.
  • 1 cup Shredded or Grated Parmesan Nutritional yeast is a good dairy-free alternative.
For the Pasta
  • 16 ounces Penne Gluten-free pasta works as a substitute.
For the Greens
  • 1-2 cups Chopped Fresh or Frozen Spinach Kale or Swiss chard can be good alternatives.

Equipment

  • Crockpot
  • Skillet
  • Measuring cups
  • Measuring spoons
  • Forks

Method
 

Preparation Steps
  1. Season the chicken breasts with Italian seasoning, salt, and black pepper, ensuring they are evenly coated.
  2. In a skillet, heat olive oil over medium-high heat. Sear the chicken for 5-6 minutes until golden-brown.
  3. Transfer the chicken to the crockpot. In the same skillet, add crushed tomatoes, chicken broth, red wine, oregano, basil, salt, and pepper. Stir and pour over chicken.
  4. Cover the crockpot and cook on high for 3 hours.
  5. Once cooked, shred the chicken in the crockpot using two forks or a hand mixer.
  6. Stir in spinach, Greek yogurt, and Parmesan. Cook for an additional 10 minutes.
  7. Cook penne pasta according to package directions, drain, and stir into the crockpot.
  8. Serve with extra Parmesan and fresh basil on top.

Nutrition

Serving: 1servingCalories: 450kcalCarbohydrates: 65gProtein: 30gFat: 12gSaturated Fat: 3gPolyunsaturated Fat: 1gMonounsaturated Fat: 6gCholesterol: 75mgSodium: 900mgPotassium: 850mgFiber: 5gSugar: 7gVitamin A: 20IUVitamin C: 15mgCalcium: 15mgIron: 10mg

Notes

For best results, use quality ingredients and ensure proper seasoning. Leftovers can be stored in airtight containers for up to 3-4 days in the fridge or freeze for up to 3 months.

Tried this recipe?

Let us know how it was!

Savory Apple Cider Chicken for Cozy Autumn Nights

As the leaves turn and the air becomes crisp, I’m reminded of cozy nights filled with comforting aromas wafting from the kitchen. That’s where this Rosemary Apple Cider Chicken comes in—a dish that encapsulates the essence of a perfect autumn dinner. With tender, pan-seared chicken thighs infused with the delightful sweetness of Honeycrisp apples and a savory apple cider sauce, it’s hard to resist. What I love most about this recipe is its quick prep time, making it ideal for busy weeknights or an impressive meal for family gatherings. Plus, it’s made with fresh ingredients that brighten up the table and your spirit. Are you ready to bring a slice of fall into your kitchen with this irresistible dish?

Why is Apple Cider Chicken a Must-Try?

Comforting Flavors: This dish beautifully marries the sweet-tart flavors of Honeycrisp apples with savory chicken, creating a delightful fall-inspired meal.

Easy Preparation: With a simple searing method followed by a flavorful sauce, you’ll have dinner ready in no time, perfect for busy weeknights.

Fresh Ingredients: Utilizing seasonal produce like apples and fresh herbs not only enhances flavor but also promotes a wholesome dining experience.

Crowd-Pleasing Appeal: Whether for a family dinner or a gathering with friends, this dish is sure to impress and satisfy all palates.

Versatile Variations: Feel free to substitute chicken thighs for breasts or swap in your favorite seasonal veggies to suit your taste! It’s all about making it your own.

A cozy autumn meal awaits you, so why not serve this with a side of crusty bread or mashed potatoes to soak up that luscious sauce? If you enjoy this comforting recipe, you might also love my Sizzling Chicken Pepper for a quick flavorful family favorite!

Apple Cider Chicken Ingredients

• Dive into the deliciousness of this comforting dish with the following ingredients!

For the Chicken

  • Bone-In Chicken Thighs – A juicy and flavorful choice; skin-on keeps them crispy during cooking.
  • Olive Oil – Essential for searing; choose extra virgin for the best flavor.

For the Seasoning

  • Onion Powder – Adds savory depth; substitute with fresh onions for a robust kick.
  • Garlic Powder – Offers convenience; fresh garlic can elevate flavor even more!
  • Smoked Paprika – Introduces a mild smokiness; regular paprika works in a pinch.
  • Salt & Pepper – Basic seasonings to enhance overall taste; adjust to your preference.

For the Sauce

  • Salted Butter – Enriches the sauce; unsalted can be used, just monitor salt levels.
  • Red Onion – Provides a sweet, aromatic profile; can be substituted with shallots.
  • Honeycrisp Apples – Adds a sweet-tart balance; feel free to swap with any sweet apple.
  • Apple Cider – Infuses sweetness and acidity to the sauce; any quality cider will do.
  • Chicken Broth or White Wine – For added depth; use broth for a non-alcoholic option.
  • Dijon Mustard – Brings a tangy punch to the sauce; yellow mustard works nicely too.
  • Fresh Thyme & Rosemary – Perfect for that aromatic touch; use dried herbs if needed.

For Cooking

  • Garlic – Whole cloves heighten the dish’s flavor; pre-minced garlic can be a quick alternative.

Gather these ingredients to create a succulent Apple Cider Chicken that’ll warm your heart and home this autumn!

Step-by-Step Instructions for Savory Apple Cider Chicken

Step 1: Sear the Chicken
Begin by preheating your oven to 375°F (190°C). In a large, oven-safe skillet, heat 2 tablespoons of olive oil over medium-high heat until shimmering. Season the bone-in chicken thighs generously with salt, pepper, onion powder, garlic powder, and smoked paprika. Sear the chicken thighs, skin-side down, for about 5-7 minutes until golden brown. Flip and sear the other side for another 4-5 minutes, achieving a nice crust.

Step 2: Transfer to Oven
Once both sides are beautifully browned, carefully transfer the skillet to the preheated oven. Roast the chicken for 25–30 minutes or until it reaches an internal temperature of 165°F (74°C) and the juices run clear. This will ensure perfectly cooked chicken thighs that are tender and juicy. If you prefer, you can also cook the chicken entirely on the stovetop, adjusting the time accordingly.

Step 3: Prepare the Sauce
While the chicken is roasting, remove it from the skillet and place it on a plate. In the same skillet, melt 2 tablespoons of salted butter over medium heat, scraping up any browned bits. Add diced red onion and sauté for about 3-4 minutes until softened and fragrant. Then, stir in sliced Honeycrisp apples and minced garlic, cooking for another 3-4 minutes until the apples begin to soften.

Step 4: Thicken the Sauce
Next, pour in 1 cup of apple cider and ½ cup of chicken broth (or white wine) to the skillet. Bring the mixture to a gentle boil, then reduce heat and simmer for 5-7 minutes until slightly thickened. Stir in 2 tablespoons of Dijon mustard and season with salt and pepper to taste. This savory sauce, rich with layers of flavor, will perfectly complement your succulent Apple Cider Chicken.

Step 5: Combine
Finally, return the seared chicken thighs to the skillet, ensuring they are well-coated with the aromatic sauce. Let them simmer in the sauce for an additional 2-3 minutes to absorb all the flavors. Once the sauce has thickened to your liking, it’s time to serve your homemade Apple Cider Chicken hot. The blend of tender chicken and sweet apples awaits!

How to Store and Freeze Apple Cider Chicken

Fridge: Store leftovers in an airtight container for up to 3 days. Reheat gently in a skillet over low heat for the best texture and flavor.

Freezer: Place cooled apple cider chicken in a freezer-safe container and freeze for up to 3 months. To reheat, thaw in the fridge overnight and warm on the stovetop or microwave.

Wrapping: If planning to freeze, separate chicken from the sauce to preserve quality. Store sauce in a separate container to maintain its original flavor and consistency.

Reheating: Gently reheat your apple cider chicken on the stovetop for the most flavorful results, adding a splash of apple cider if needed to revive the sauce.

Make Ahead Options

Preparing the Savory Rosemary Apple Cider Chicken ahead of time is a fantastic way to save precious minutes, especially on busy weeknights! You can season the chicken and refrigerate it up to 24 hours in advance to enhance the flavors. Simply marinate the chicken thighs with salt, pepper, onion powder, garlic powder, and smoked paprika, then store them in an airtight container. The sauce can also be prepared in advance—sauté the onions and apples, then add the apple cider and broth, simmering until thickened. Refrigerate the sauce for up to 3 days. When you’re ready to serve, simply reheat the sauce in a skillet and finish cooking the marinated chicken in the skillet or oven until it reaches the right internal temperature. This way, you’ll have a cozy fall dinner with minimal last-minute effort, and just as delicious results!

Variations & Substitutions for Apple Cider Chicken

Feel free to play around with this recipe and make it your own—your kitchen adventure awaits!

  • Boneless Chicken Breasts: Substitute chicken thighs for boneless, skinless breasts for a lighter option. Cooking time may need adjusting since breasts cook faster.
  • Seasonal Veggie Medley: Add diced carrots or brussels sprouts for a nutritional boost, creating a heartier dish while showcasing beautiful autumn colors.
  • Herbal Twist: Incorporate fresh sage or oregano alongside rosemary for a delightful flavor enhancement that evokes the essence of fall.
  • Spicy Kick: For those who like a bit of heat, sprinkle in a pinch of cayenne pepper to the seasoning mix; it’ll elevate the dish with a warm, spicy finish.
  • Fruit Fusion: Swap Honeycrisp apples with pears or tart Granny Smith apples for a different sweet-tart balance that still complements the savory chicken.
  • Smoky Flavor: Exchange smoked paprika for chipotle powder to introduce a rich, smoky heat that adds an exciting depth to your sauce.
  • Gluten-Free Option: For a gluten-free alternative, ensure you select gluten-free chicken broth and enjoy this hearty meal without worry.
  • Vegan Variation: Try substituting chicken with hearty mushrooms like portobello for a savory, plant-based dish that simmers beautifully in the apple cider sauce.

Explore variations, and don’t forget to enjoy every step of the cooking process! If you love flavorful chicken dishes, check out my Garlic Chicken Gnocchi for another comforting meal or consider trying out my favorite Tuscan Chicken Soup that’s perfect for chilly nights. Enjoy your culinary journey!

Expert Tips for Apple Cider Chicken

Optimal Skillet Choice: Use a large, oven-safe skillet for searing; it ensures even cooking and makes for easy sauce preparation afterward.

Avoid Overcrowding: Don’t overcrowd the skillet while searing the chicken. This prevents steaming, allowing for a crispy crust—essential for a great Apple Cider Chicken!

Fresh Herbs Matter: Whenever possible, opt for fresh thyme and rosemary. They significantly enhance the dish’s flavor compared to dried herbs.

Witness Sauce Thickness: For a thicker sauce, mix cornstarch with cold water to create a slurry. Add it slowly to the simmering sauce, stirring constantly.

Taste as You Go: Always taste your sauce before serving. Adjust with additional salt, pepper, or a splash more apple cider for that perfect balance.

What to Serve with Rosemary Apple Cider Chicken

Serving this cozy dish can elevate your meal to a delightful family experience, bringing warmth and joy to your autumn dining.

  • Creamy Mashed Potatoes: The smooth texture perfectly complements the rich sauce, making it indulgent with every bite. They soak up the delicious flavors beautifully!

  • Roasted Brussels Sprouts: Their crispiness adds a wonderful crunch, while the slight bitterness balances the sweetness of the apples. A seasonal classic that brings vibrant color to your plate.

  • Fresh Green Salad: A light salad with mixed greens, nuts, and a tangy vinaigrette adds refreshing notes. It provides a delightful contrast to the savory chicken, ensuring a well-rounded meal.

  • Crusty Artisan Bread: Perfect for dipping in the luscious sauce, this warmth from the freshly baked bread will make each bite even more comforting.

  • Savory Stuffing: A moist and herb-infused stuffing infused with celery and onions enhances the rustic appeal of your dish. It’s a traditional favorite, making it cozy and hearty!

  • Cranberry Sauce: The tartness of cranberry sauce amplifies the sweetness of the apple cider sauce and adds a festive flair. A must-have for those fall-inspired gatherings!

  • Warm Apple Crisp: To round off your meal, indulge in a warm apple crisp topped with vanilla ice cream for a sweet finale. It creates a delightful harmony with the apple flavors in the chicken!

  • Chardonnay or Cider: A crisp glass of Chardonnay or a refreshing apple cider works wonders to contrast the rich flavors of this dish, making your meal even more enjoyable.

Embrace the season, and create a memorable autumn dinner with these delightful pairings!

Apple Cider Chicken Recipe FAQs

What type of apples are best for this recipe?
I recommend using Honeycrisp apples for their perfect sweet-tart balance. However, any sweet apple variety such as Fuji or Gala will work beautifully, too. Just make sure they are ripe and firm, avoiding any with dark spots or softness.

How should I store leftovers from the Apple Cider Chicken?
Store any leftover Apple Cider Chicken in an airtight container in the refrigerator for up to 3 days. For the best texture when reheating, do so gently in a skillet over low heat until warmed through. Adding a splash of apple cider can help bring the sauce back to life.

Can I freeze Apple Cider Chicken?
Absolutely! To freeze, allow the chicken to cool completely. Transfer the chicken and sauce into a freezer-safe container, separating them if desired to preserve the sauce’s consistency. It can be frozen for up to 3 months. When ready to eat, thaw overnight in the fridge and then gently reheat on the stovetop.

What can I do if my sauce isn’t thickening?
If your sauce isn’t thickening, a quick fix is to create a cornstarch slurry. Mix 1 tablespoon of cornstarch with 2 tablespoons of cold water, then add it to your simmering sauce. Stir constantly and bring it back to a gentle boil; it should thicken within a few minutes.

Are there any dietary considerations for this dish?
This dish is generally safe for most diets. However, watch out for allergens such as gluten in certain broth brands or apple cider. If you have pets, be cautious with leftovers, particularly the apple and onion components, as some fruits and alliums can be harmful to them. Always check for specific dietary needs and consult a professional if unsure.

Can I use boneless chicken instead of bone-in?
Yes, while bone-in chicken thighs add flavor and juiciness, boneless skinless chicken breasts can be used as a lighter alternative. Just adjust the cooking time accordingly; boneless chicken breasts will cook faster, usually about 20–25 minutes in the oven. Enjoy customizing this recipe to fit your preferences!

Apple Cider Chicken

Savory Apple Cider Chicken for Cozy Autumn Nights

A comforting Apple Cider Chicken dish with flavors of Honeycrisp apples, perfect for autumn meals.
Prep Time 15 minutes
Cook Time 35 minutes
Total Time 50 minutes
Servings: 4 servings
Course: Dinner
Cuisine: American
Calories: 450

Ingredients
  

For the Chicken
  • 4 pieces Bone-In Chicken Thighs skin-on
  • 2 tablespoons Olive Oil extra virgin for best flavor
For the Seasoning
  • 1 teaspoon Onion Powder or substitute with fresh onions
  • 1 teaspoon Garlic Powder or use fresh garlic
  • 1 teaspoon Smoked Paprika or regular paprika
  • to taste Salt
  • to taste Pepper
For the Sauce
  • 2 tablespoons Salted Butter or use unsalted
  • 1 piece Red Onion diced
  • 2 pieces Honeycrisp Apples sliced
  • 1 cup Apple Cider any quality cider
  • 1/2 cup Chicken Broth or White Wine choose broth for non-alcoholic
  • 2 tablespoons Dijon Mustard or yellow mustard
  • 1 tablespoon Fresh Thyme
  • 1 tablespoon Fresh Rosemary
For Cooking
  • 4 cloves Garlic whole cloves

Equipment

  • Oven-safe skillet

Method
 

Cooking Steps
  1. Preheat your oven to 375°F (190°C).
  2. In a large, oven-safe skillet, heat 2 tablespoons of olive oil over medium-high heat until shimmering.
  3. Season the bone-in chicken thighs generously with salt, pepper, onion powder, garlic powder, and smoked paprika.
  4. Sear the chicken thighs, skin-side down, for about 5-7 minutes until golden brown. Flip and sear the other side for another 4-5 minutes.
  5. Carefully transfer the skillet to the preheated oven and roast the chicken for 25–30 minutes until it reaches an internal temperature of 165°F (74°C).
  6. Remove the chicken from the skillet and place it on a plate.
  7. In the same skillet, melt 2 tablespoons of salted butter over medium heat and scrape up any browned bits.
  8. Add diced red onion and sauté for about 3-4 minutes until softened.
  9. Stir in sliced Honeycrisp apples and minced garlic and cook for another 3-4 minutes.
  10. Pour in 1 cup of apple cider and ½ cup of chicken broth (or white wine) and bring to a gentle boil. Reduce heat and simmer for 5-7 minutes until slightly thickened.
  11. Stir in 2 tablespoons of Dijon mustard and season with salt and pepper to taste.
  12. Return the seared chicken thighs to the skillet, ensuring they are well-coated with the sauce, and let them simmer for an additional 2-3 minutes.
  13. Serve your homemade Apple Cider Chicken hot.

Nutrition

Serving: 1servingCalories: 450kcalCarbohydrates: 20gProtein: 32gFat: 30gSaturated Fat: 10gPolyunsaturated Fat: 1gMonounsaturated Fat: 15gCholesterol: 100mgSodium: 700mgPotassium: 850mgFiber: 2gSugar: 5gVitamin A: 800IUVitamin C: 10mgCalcium: 30mgIron: 2mg

Notes

Serve with crusty bread or mashed potatoes to soak up the sauce.

Tried this recipe?

Let us know how it was!

Soft and Gooey Apple Cinnamon Rolls for Cozy Mornings

As the scent of cinnamon wafted through my kitchen, I couldn’t help but smile at the memories it stirred. It’s hard to resist the charm of Soft-Baked Apple Cinnamon Rolls, especially when they are warm and embracing freshly baked in the morning light. This delightful recipe offers an irresistible twist, blending gooey apple pie filling with a cozy brown sugar cinnamon layer and topped with luscious cream cheese frosting. Not only are these rolls an absolute crowd-pleaser, but they can also be prepared ahead of time, making your mornings feel extra special without the last-minute chaos. So, why not treat yourself and your loved ones to this delightful indulgence? You won’t want to miss the magic of these comforting rolls—are you ready to roll up your sleeves and create some cozy magic?

Why Are These Apple Cinnamon Rolls Irresistible?

Soft, Amazing Texture: Each roll is crafted with rich brioche dough, yielding an exceptionally soft and gooey center that melts in your mouth.
Delicious Flavor Combinations: The perfect blend of tender apple pie filling and warm brown sugar cinnamon creates a delightful taste experience.
Quick Assembly: Prepare the components the night before, so all you need to do in the morning is bake and frost—easy!
Customizable Enjoyment: Go nut-free by skipping the pecans or explore alternative fillings, such as mixed berries or pears, for a refreshing twist.
Family-Friendly Delight: These rolls are sure to be a hit at breakfast gatherings, reminiscent of classic favorites like Apple Crisp Cinnamon or Foster Cinnamon Rolls.
Treat your loved ones to an inviting start to their day—they’ll thank you for it!

Apple Cinnamon Rolls Ingredients

For the Dough

  • Brioche Dough – Provides a rich, soft texture; remember to cold rise for easy handling.

For the Filling

  • Apple Pie Filling – Adds moisture and sweet apple flavor; feel free to use homemade or store-bought for convenience.
  • Brown Sugar Cinnamon Filling – Enhances sweetness and warmth; using light or dark brown sugar can subtly change the flavor profile.

For the Crunch

  • Toasted Pecans – Adds a crunchy element and nutty flavor; walnuts or omitting them entirely work as good substitutions for nut allergies.

For the Frosting

  • Cream Cheese Frosting – Offers a smooth, tangy creaminess; ensure the cream cheese is at room temperature for easy mixing.

These Apple Cinnamon Rolls are not just a treat but an experience, inviting you to savor every bite!

Step‑by‑Step Instructions for Soft-Baked Apple Cinnamon Rolls

Step 1: Prepare the Dough
In a large mixing bowl, combine the ingredients for the brioche dough. Knead on a floured surface until smooth, approximately 8-10 minutes. Place the dough in a greased bowl, cover it with a clean kitchen towel, and let it rise in a warm spot until it has doubled in size, about 1 hour.

Step 2: Make the Apple Filling
While the dough is rising, prepare the apple filling. In a skillet, cook peeled and diced apples with sugar and spices over medium heat. Stir gently until the apples are tender, about 5-7 minutes, then remove from heat and allow to cool completely.

Step 3: Roll Out Dough
Once the brioche dough has risen, gently punch it down to release air. On a lightly floured surface, roll the dough into a rectangle about ¼ inch thick. Aim for an even thickness to ensure each roll bakes uniformly, creating a lovely texture for your Apple Cinnamon Rolls.

Step 4: Assemble Rolls
Spread the brown sugar filling evenly over the rolled dough, then layer the cooled apple filling and toasted pecans (if using) on top. Starting from one long edge, carefully roll the dough tightly into a log shape. Once rolled, cut the log into 12 equal pieces using a sharp knife.

Step 5: Second Rise
Place the cut rolls in a greased baking dish, leaving space between them for expansion. Cover the dish with a kitchen towel and let them rise for another 30-40 minutes, or until they have puffed up noticeably, ensuring a soft texture when baked.

Step 6: Bake
Preheat your oven to 350°F (175°C). Once heated, bake the rolls for 30-40 minutes, or until they are golden brown on top. Use an instant-read thermometer to check for doneness; the ideal internal temperature should reach 190°F (90°C) for perfect softness.

Step 7: Frost
After baking, allow the rolls to cool in the pan for about 10 minutes. Prepare your cream cheese frosting while waiting—mix the softened cream cheese until smooth. Drizzle or spread the frosting generously over the warm rolls, letting it melt into the gooey Apple Cinnamon Rolls for a delightful finish.

How to Store and Freeze Apple Cinnamon Rolls

Room Temperature: Store leftover rolls in an airtight container at room temperature for up to 3 days. The warmth of cinnamon will be a lovely reminder of the cozy morning they were baked!

Fridge: If you prefer longer storage, keep them in the fridge for up to a week. Just ensure they are well-wrapped to maintain freshness and prevent drying out.

Freezer: These Apple Cinnamon Rolls freeze beautifully! Wrap individual rolls tightly in plastic wrap and foil for up to 2 months. Thaw overnight in the fridge before baking to enjoy the same delightful flavors.

Reheating: For the best results, reheat rolls in a 350°F (175°C) oven for about 10 minutes, allowing that gooey filling to come back to life before serving with a drizzle of cream cheese frosting.

What to Serve with Soft-Baked Apple Cinnamon Rolls?

Delight in pairing these warm, gooey rolls with dishes that enhance their comforting flavors, transforming breakfast into a special feast.

  • Crispy Bacon: The savory, salty crunch of bacon balances the sweetness of the rolls, creating a perfect flavor contrast.

  • Fresh Fruit Salad: A vibrant blend of berries and citrus adds a refreshing touch and brightens the meal with colorful, juicy goodness.

  • Coffee or Tea: A steaming mug of coffee or herbal tea invites a cozy moment, enhancing the warmth of the morning with every sip.

  • Pecan Topping: For an extra crunch, enjoy crushed pecans sprinkled over the warm rolls; it beautifully complements the filling’s softness.

  • Maple Syrup Drizzle: Sweet maple syrup adds another layer of flavor, inviting you to savor every gooey bite even further.

  • Yogurt Parfait: Layer creamy yogurt with granola and fruit for a bright, tangy complement to the rich cinnamon rolls, offering a creamy contrast.

A thoughtfully curated spread encourages a comforting breakfast experience that celebrates the wonderful flavors of your Apple Cinnamon Rolls.

Apple Cinnamon Rolls Variations

Customize your Apple Cinnamon Rolls to suit your taste and occasions! Let your creativity flow as you explore these delightful twists.

  • Nut-Free: Omit toasted pecans entirely or swap them for seeds like sunflower or pumpkin for a crunchy texture without the nuts.
    Embrace the layers of flavor even without the extra crunch! You’ll still enjoy the warm, gooey core bursting with sweet apple goodness.

  • Fruit Filling: Experiment with other fruit fillings such as homemade pear or mixed berry compote.
    This delightful swap can elevate the flavor profile and add a refreshing twist to your breakfast rolls—perfect for using seasonal fruits!

  • Spicier Kick: Add a pinch of nutmeg or allspice to the brown sugar filling for added warmth.
    These subtle spices will elevate your rolls and provide an aromatic experience that complements the apples beautifully.

  • Gluten-Free: Substitute all-purpose flour with a 1:1 gluten-free baking blend in the brioche dough.
    With this simple swap, you can ensure everyone can indulge in these delicious rolls without missing out.

  • Vegan Version: Replace butter with coconut oil and use a flax egg or applesauce as a binding agent in the dough.
    These changes create a light and fluffy roll, ensuring everyone can partake in the delight of freshly baked treats!

  • Cinnamon Roll Ups: If you’re short on time, roll the filling in pre-made puff pastry instead of brioche for quick and flaky rolls.
    These shortcuts can deliver a scrumptious result that’ll please even the busiest of mornings while retaining that longstanding charm!

  • Cream Cheese Variations: Mix in a dash of vanilla or maple extract into the cream cheese frosting for an extra layer of flavor.
    These subtle enhancements make the frosting unforgettable, matching the loveliness of the rolls beneath!

  • Dinner Rolls: Transform this recipe into soft, spiced dinner rolls by removing the filling and simply rolling the dough into small balls.
    Serve these with a savory meal or snack for an unexpected and tasty twist that everyone will love!

Dive into these variations and share your favorites with family and friends! With choices to cater to all tastes, you’ll find the right twist for everyone, just like how many love a comforting dish like Foster Cinnamon Rolls!

Make Ahead Options

These Soft-Baked Apple Cinnamon Rolls are perfect for busy home cooks looking to save time in the morning! You can prepare the brioche dough and apple filling up to 24 hours in advance: simply store them separately in the refrigerator. When you’re ready to bake, allow the dough to come to room temperature while you let the filling warm slightly. Assemble and cut the rolls before their second rise, and let them sit covered at room temperature for about 30-40 minutes before baking. This method ensures your rolls will be just as delicious as if made fresh, giving you that warm, inviting aroma without the morning hustle!

Expert Tips for Apple Cinnamon Rolls

Perfect Dough Consistency: Ensure your brioche dough is kneaded until smooth; a well-kneaded dough results in soft, fluffy Apple Cinnamon Rolls.

Cool Apple Filling: Allow the apple filling to cool completely before adding it to the dough, preventing sogginess that can toughen your rolls.

Uniform Rolls: When cutting the rolls, use a sharp knife for clean edges; this helps each piece bake evenly and look more appealing.

Timing is Key: Baker’s note: Don’t rush the second rise! Allowing the rolls to puff ensures a light and fluffy texture, so be patient.

Monitor Baking Temperature: Keep a close eye on your rolls in the oven—every oven is different; watch for that golden-brown color to know you’re close!

Soft-Baked Apple Cinnamon Rolls Recipe FAQs

How do I select the best apples for the filling?
Absolutely! For the best flavor, choose firm apples like Granny Smith, Honeycrisp, or Fuji. They hold their shape after cooking and provide a delightful tartness that balances the sweetness of the brown sugar filling. Avoid soft apples that might turn into mush!

How should I store leftover Apple Cinnamon Rolls?
Very! Store any leftover rolls in an airtight container at room temperature for up to 3 days. This keeps them soft and tasty, reminiscent of that lovely morning aroma. If you want to keep them longer, you can refrigerate them for up to a week—just make sure they’re well-wrapped to prevent drying out.

Can I freeze the Apple Cinnamon Rolls? How?
Certainly! Wrap individual rolls tightly in plastic wrap and then foil to prevent freezer burn. These can be kept in the freezer for up to 2 months. When you’re ready to enjoy, thaw them overnight in the fridge, then reheat them in a 350°F (175°C) oven for about 10 minutes to bring back their gooey center.

What can I do if my dough doesn’t rise properly?
Oh, don’t worry! If your dough hasn’t risen, ensure that your yeast is fresh—expired yeast can be a culprit. Also, check the temperature of the environment; it should be warm, around 75-85°F (24-29°C). You might need to give it more time; sometimes, dough can take longer depending on factors like humidity.

Are there any dietary considerations I should keep in mind with this recipe?
Absolutely! If you’re making these rolls for a crowd, ask about nut allergies if you’re including pecans, as they are a common allergen. For gluten-sensitive diets, you can experiment with gluten-free flour blends, but keep in mind the texture might differ. Always check that your cream cheese frosting ingredients align with dietary needs as well.

Can I prepare the rolls ahead of time?
Yes, indeed! You can prepare and cut the rolls the night before. Simply cover them with plastic wrap and place them in the fridge overnight. In the morning, let them sit at room temperature for about 30 minutes before baking to ensure they puff up nicely in the oven. Enjoy the simplicity of fresh rolls with minimal morning fuss!

Apple Cinnamon Rolls

Soft and Gooey Apple Cinnamon Rolls for Cozy Mornings

Indulge in these Soft and Gooey Apple Cinnamon Rolls, perfect for cozy mornings filled with the scent of cinnamon and delightful flavors.
Prep Time 1 hour
Cook Time 40 minutes
Second Rise Time 40 minutes
Total Time 2 hours 20 minutes
Servings: 12 rolls
Course: Breakfast
Cuisine: American
Calories: 320

Ingredients
  

For the Dough
  • 1 batch Brioche Dough Provides a rich, soft texture; remember to cold rise for easy handling.
For the Filling
  • 1 can Apple Pie Filling Adds moisture and sweet apple flavor; feel free to use homemade or store-bought for convenience.
  • 1/2 cup Brown Sugar Cinnamon Filling Enhances sweetness and warmth; using light or dark brown sugar can subtly change the flavor profile.
For the Crunch
  • 1/2 cup Toasted Pecans Adds a crunchy element and nutty flavor; walnuts or omitting them entirely work as good substitutions for nut allergies.
For the Frosting
  • 8 oz Cream Cheese Frosting Offers a smooth, tangy creaminess; ensure the cream cheese is at room temperature for easy mixing.

Equipment

  • Mixing Bowl
  • Skillet
  • Rolling Pin
  • baking dish
  • Sharp knife

Method
 

Preparation Steps
  1. In a large mixing bowl, combine the ingredients for the brioche dough. Knead on a floured surface until smooth, approximately 8-10 minutes. Place the dough in a greased bowl, cover it with a clean kitchen towel, and let it rise in a warm spot until it has doubled in size, about 1 hour.
  2. While the dough is rising, prepare the apple filling. In a skillet, cook peeled and diced apples with sugar and spices over medium heat. Stir gently until the apples are tender, about 5-7 minutes, then remove from heat and allow to cool completely.
  3. Once the brioche dough has risen, gently punch it down to release air. On a lightly floured surface, roll the dough into a rectangle about ¼ inch thick. Aim for an even thickness to ensure each roll bakes uniformly, creating a lovely texture for your Apple Cinnamon Rolls.
  4. Spread the brown sugar filling evenly over the rolled dough, then layer the cooled apple filling and toasted pecans (if using) on top. Starting from one long edge, carefully roll the dough tightly into a log shape. Once rolled, cut the log into 12 equal pieces using a sharp knife.
  5. Place the cut rolls in a greased baking dish, leaving space between them for expansion. Cover the dish with a kitchen towel and let them rise for another 30-40 minutes, or until they have puffed up noticeably, ensuring a soft texture when baked.
  6. Preheat your oven to 350°F (175°C). Once heated, bake the rolls for 30-40 minutes, or until they are golden brown on top. Use an instant-read thermometer to check for doneness; the ideal internal temperature should reach 190°F (90°C) for perfect softness.
  7. After baking, allow the rolls to cool in the pan for about 10 minutes. Prepare your cream cheese frosting while waiting—mix the softened cream cheese until smooth. Drizzle or spread the frosting generously over the warm rolls, letting it melt into the gooey Apple Cinnamon Rolls for a delightful finish.

Nutrition

Serving: 1rollCalories: 320kcalCarbohydrates: 45gProtein: 5gFat: 14gSaturated Fat: 7gPolyunsaturated Fat: 2gMonounsaturated Fat: 5gCholesterol: 50mgSodium: 300mgPotassium: 150mgFiber: 2gSugar: 18gVitamin A: 500IUVitamin C: 2mgCalcium: 40mgIron: 1mg

Notes

Allow the apple filling to cool completely before adding it to the dough to prevent sogginess. Use a sharp knife for cutting rolls to ensure even baking and a clean appearance.

Tried this recipe?

Let us know how it was!

Delicious Butternut Squash Casserole for Cozy Fall Nights

As the leaves begin to crunch underfoot and the air grows crisp, I find myself craving cozy and comforting dishes that embrace the essence of fall. Enter my Butternut Squash Casserole, a heartwarming blend of roasted butternut squash, sweet apples, and a touch of caramelized fennel that just sings autumn. Not only is this casserole an easy make-ahead option for those busy weeknights, but it’s also a delightful crowd-pleaser for holiday gatherings—ideal for both vegetarians and meat-lovers alike! Topped with gooey Gruyere cheese, it creates a delightful harmony of textures and flavors that will have everyone reaching for seconds. Curious how it all comes together? Let’s dive into this scrumptious recipe!

Why is Butternut Squash Casserole a must-try?

Crowd-Pleasing Comfort: This dish is perfect for gatherings, impressing both friends and family with its rich, warm flavors.
Easy Preparation: With clear instructions and simple ingredients, you’ll be whipping this up in no time, whether you’re a novice or a seasoned chef.
Versatile Ingredients: Customize it with sausage for a heartier option or keep it vegetarian for a healthier twist!
Seasonal Delight: Using fresh fall ingredients, the sweet and savory balance makes this dish uniquely autumnal.
Leftover Heaven: It’s just as delicious the next day, making it ideal for meal prep or quick lunches post-holiday feast.

For further fall inspiration, check out my Apple Crisp Casserole or the delicious Cheesy Low Carb Chicken Casserole for a delightful meal option.

Butternut Squash Casserole Ingredients

For the Casserole
Butternut Squash – the star of the dish, bringing natural sweetness and creaminess; fresh is best!
Apples – for a burst of sweetness; choose firm varieties like Honeycrisp or pears as a substitute.
Sweet Italian Sausage – adds savory depth; easily omit for a vegetarian-friendly casserole.
Fennel – caramelized to enhance sweetness; substitute with extra onions if preferred.
Onion – enriches the flavors; yellow or sweet onions bring the best results.
Gruyere Cheese – for a gooey, rich finish; a sharper cheese can work for those who prefer a bolder flavor.
Pure Maple Syrup – balances the dish with sweetness; honey is a suitable alternative.
Olive Oil – aids in roasting and adds flavor.
Salt and Pepper – essential for bringing all the flavors together.

Optional Toppings
Fresh Herbs (Thyme or Sage) – for an aromatic boost; add these for extra flavor complexity.
Nuts (Pecans or Walnuts) – sprinkle on top for a delightful crunch and nutty flavor if desired.

This Butternut Squash Casserole is the epitome of fall comfort food, sure to delight everyone at the table!

Step‑by‑Step Instructions for Butternut Squash Casserole

Step 1: Prep the Ingredients
Start by peeling and cubing the butternut squash into bite-sized pieces. Next, slice the apples—firm varieties like Honeycrisp work wonderfully. Also, thinly slice the fennel and onion. This preparation can be done a few hours in advance, just be sure to toss the apples in a bit of lemon juice to prevent browning as you prepare for your cozy Butternut Squash Casserole.

Step 2: Roast the Vegetables
Preheat your oven to 400°F (200°C). In a large mixing bowl, toss the cubed butternut squash and sliced apples with a drizzle of maple syrup and olive oil until well coated. Spread the mixture onto a baking sheet lined with parchment paper, ensuring even spacing. Roast for 25-30 minutes, stirring halfway through, until the squash is fork-tender and lightly caramelized, filling your kitchen with a sweet aroma.

Step 3: Caramelize Fennel and Onion
While the squash roasts, heat a tablespoon of olive oil in a large skillet over medium heat. Add the sliced fennel and onions, cooking them slowly for about 10-15 minutes. Stir occasionally until they caramelize to a lovely golden-brown color and develop a sweet, fragrant aroma. This step adds a rich depth to your Butternut Squash Casserole.

Step 4: Combine Ingredients
Once the roasted vegetables have cooled slightly, transfer the butternut squash and apples into a greased baking dish. Layer on the caramelized fennel and onions, and if using, add the cooked Italian sausage for added protein. Gently mix the layers together to distribute the flavors evenly—this mix will be the hearty base for your creamy casserole.

Step 5: Add Cheese
Now, it’s time to top off your comforting Butternut Squash Casserole! Generously sprinkle shredded Gruyere cheese over the entire mixture. The cheese will melt into the layers, creating a gooey, rich finish that ties all the flavors together beautifully. Feel free to add more cheese if you like a cheesier bite!

Step 6: Bake
Preheat your oven to 350°F (175°C) if you haven’t already. Place the casserole in the oven and bake for 25-30 minutes, or until the cheese is bubbly and lightly golden. You want it to be heated through and perfectly melted—this enticing sight will have everyone eager to dig into your delicious Butternut Squash Casserole!

Expert Tips for Butternut Squash Casserole

  • Pick Fresh Ingredients: Use fresh butternut squash and apples for the best flavor. Frozen squash can become mushy and lose its texture in the casserole.
  • Don’t Rush Roasting: Ensure to roast the squash and apples until just tender. Over-roasting can lead to mushiness, compromising the final dish’s integrity.
  • Layer Wisely: When combining the ingredients, mix the layers gently but thoroughly to ensure even distribution of flavors throughout your Butternut Squash Casserole.
  • Cheese Variations: While Gruyere adds richness, feel free to experiment with sharper cheeses for a bolder flavor. Just remember, select a cheese that melts nicely!
  • Make Ahead: Assemble the casserole ahead of time without cheese, cover, and refrigerate. Add cheese just before baking—this helps in flavor melding and saves time on busy days.

What to Serve with Cozy Butternut Squash Casserole

Pair your dish with a delightful assortment that complements fall flavors and enhances the meal experience.

  • Crispy Green Salad: A fresh, crunchy salad with mixed greens and a tangy vinaigrette balances the casserole’s richness, adding a light contrast.
  • Roasted Brussels Sprouts: These nutty, caramelized bites provide an earthy flavor that pairs beautifully with the sweetness of the butternut squash.
  • Garlic Breadsticks: Serve warm, buttery breadsticks to scoop up the casserole; their soft, chewy texture brings joy to every mouthful.
  • Caramelized Apples: For a sweet dessert touch, serve sautéed apples with a sprinkle of cinnamon to echo the warmth of the dish.
  • Mulled Cider: This warm, spiced drink elevates your gathering, offering comforting notes that meld seamlessly with the autumn ambiance.
  • Quinoa Pilaf: Fluffy quinoa mixed with herbs and cranberries adds a wholesome side filled with protein while enhancing the meal’s nourishing appeal.

Imagine a cozy dinner table surrounded by laughter, where your Butternut Squash Casserole steals the show, accompanied by these delightful pairings!

Butternut Squash Casserole Variations

Feel free to get creative with this comforting casserole and make it your own!

  • Gluten-Free: Use gluten-free breadcrumbs or cornmeal on top for added crunch without any gluten.

  • Dairy-Free: Substitute Gruyere cheese with a dairy-free cheese alternative, or use nutritional yeast for a cheesy flavor.

  • Protein Boost: Add cooked lentils or chickpeas for a hearty vegetarian protein punch that works beautifully with the spices.

  • Herbed Delight: Stir in fresh herbs like rosemary or sage for an aromatic twist that elevates the seasonal essence of your casserole.

  • Nutty Crunch: Top with toasted pecans or walnuts before baking to add a delightful crunch that contrasts with the creamy squash.

  • Heat Level: Add a sprinkle of red pepper flakes or diced jalapeños for a warm kick that brings an exciting depth of flavor.

  • Veggie Medley: Incorporate chopped spinach, kale, or even carrots for more colorful veggies—just make sure to sauté them first to remove excess moisture.

Consider trying these variations next time you prepare this dish or as you enjoy it alongside a French Toast Casserole for an amazing brunch spread. Happy cooking!

Make Ahead Options

These Butternut Squash Casserole options are perfect for busy home cooks looking to save time during the week! You can chop the butternut squash, apples, fennel, and onion up to 24 hours in advance. Just remember to toss the apples in a little lemon juice to prevent browning. Additionally, you can combine and layer the roasted vegetables with the sausage (if using) a day ahead. Simply cover the assembled casserole tightly with foil and refrigerate. When you’re ready to bake, remove from the fridge, sprinkle with Gruyere cheese, and pop it in the oven for 25-30 minutes, achieving that delicious, comforting flavor with minimal effort!

How to Store and Freeze Butternut Squash Casserole

Fridge: Store any leftovers in an airtight container in the fridge for up to 3 days. When ready to enjoy, reheat in the oven at 350°F until warmed through.

Freezer: While it’s best to avoid freezing the casserole for optimal texture, if necessary, it can be frozen for up to 2 months without the cheese. Thaw overnight in the fridge and bake at 350°F, adding cheese before heating.

Reheating: To reheat refrigerated casserole, cover with aluminum foil and warm in a 350°F oven for 20-25 minutes or until heated thoroughly and cheese is melty again.

Make Ahead: You can assemble the Butternut Squash Casserole a day in advance, refrigerate, and bake just before serving for a hassle-free meal.

Butternut Squash Casserole Recipe FAQs

How do I select the best butternut squash for my casserole?
Absolutely! Look for a butternut squash that feels heavy for its size, with a smooth, even skin. Avoid any that have dark spots or blemishes, as these can indicate spoilage. The color should be a consistent tan, and the stem should be dry; a fresh stem might mean it’s picked too young.

Can I prepare the casserole ahead of time?
Very! You have the option to prep your Butternut Squash Casserole up to a day in advance. Simply assemble the casserole without adding cheese, cover it tightly, and store it in the refrigerator. When you’re ready, add the cheese on top before baking it at 350°F for about 25-30 minutes, allowing it to heat through and the cheese to melt.

How should I store leftovers of the casserole?
Store any leftovers in an airtight container in the refrigerator for up to 3 days. When you’re ready to enjoy them, simply reheat in an oven set to 350°F, covered with aluminum foil to keep the moisture in, for about 20-25 minutes or until warmed through.

Can I freeze Butternut Squash Casserole?
While I recommend avoiding freezing for the best texture, you can freeze it without cheese for up to 2 months if necessary. To do this, prepare the casserole as usual, but leave off the cheese. Wrap it tightly in plastic wrap and aluminum foil to prevent freezer burn. When ready, thaw it overnight in the fridge, and then reheat in a 350°F oven, adding cheese on top before baking until bubbling.

What if my casserole comes out too mushy?
This can happen, especially if the squash or apples are over-roasted. To prevent this next time, ensure your vegetables are roasted just until they are tender but not falling apart. Also, I recommend using fresh vegetables rather than frozen to maintain their texture.

Is this casserole suitable for vegetarians or those with allergies?
Yes! This Butternut Squash Casserole can easily be made vegetarian by omitting the Italian sausage. If you have specific allergies, always check your cheese and ingredients to ensure they meet your dietary needs. Gruyere is a good cheese for flavor but can be swapped with a dairy-free option if necessary. Be mindful of any nut allergies if you decide to add optional toppings like pecans or walnuts.

Butternut Squash Casserole

Delicious Butternut Squash Casserole for Cozy Fall Nights

This Butternut Squash Casserole is a delightful autumn dish perfect for gatherings and meal prep.
Prep Time 15 minutes
Cook Time 55 minutes
Total Time 1 hour 10 minutes
Servings: 6 servings
Course: Casserole
Cuisine: American
Calories: 350

Ingredients
  

For the Casserole
  • 1 medium Butternut Squash fresh is best
  • 2 cups Apples firm varieties like Honeycrisp
  • 1 pound Sweet Italian Sausage optional for vegetarian
  • 1 medium Fennel caramelized
  • 1 medium Onion yellow or sweet
  • 1 cup Gruyere Cheese shredded
  • 1/4 cup Pure Maple Syrup or honey as alternative
  • 2 tablespoons Olive Oil
  • 1 teaspoon Salt
  • 1/2 teaspoon Pepper
Optional Toppings
  • 2 tablespoons Fresh Herbs (Thyme or Sage) for added flavor
  • 1/2 cup Nuts (Pecans or Walnuts) for crunch

Equipment

  • Oven
  • Mixing Bowl
  • Baking Sheet
  • Skillet
  • baking dish

Method
 

Step‑by‑Step Instructions
  1. Prep the Ingredients: Peel and cube the butternut squash, slice the apples, and thinly slice the fennel and onion, tossing apples in lemon juice to prevent browning.
  2. Roast the Vegetables: Preheat oven to 400°F. Toss butternut squash and apples with maple syrup and olive oil, spread on baking sheet and roast for 25-30 minutes.
  3. Caramelize Fennel and Onion: In skillet, heat olive oil, add fennel and onions, cooking for 10-15 minutes until golden-brown.
  4. Combine Ingredients: Transfer roasted squash and apples to baking dish, layer with caramelized fennel and onion, and mix gently.
  5. Add Cheese: Sprinkle shredded Gruyere cheese over the mixture.
  6. Bake: Preheat oven to 350°F. Bake casserole for 25-30 minutes until cheese is bubbly and lightly golden.

Nutrition

Serving: 1servingCalories: 350kcalCarbohydrates: 30gProtein: 12gFat: 20gSaturated Fat: 8gPolyunsaturated Fat: 2gMonounsaturated Fat: 10gCholesterol: 35mgSodium: 400mgPotassium: 600mgFiber: 5gSugar: 8gVitamin A: 1500IUVitamin C: 15mgCalcium: 200mgIron: 2mg

Notes

This casserole is great for meal prep and can be made ahead of time. Adjust cheese according to preference.

Tried this recipe?

Let us know how it was!

Fall-Ready Braised Pork Shoulder That Melts in Your Mouth

As the first leaves start to tumble down and the air turns crisp, an enticing aroma wafts through my kitchen—it’s the perfect cue for a cozy meal. I can always count on this Apple Cider Braised Pork Shoulder to warm me up and bring comfort to those chilly evenings. This one-pot wonder transforms a simple pork shoulder into a tender masterpiece, allowing delightful flavors of apple cider and aromatic herbs to mingle as they slowly cook together. Best of all, it’s budget-friendly and can easily feed a crowd, making it ideal for gatherings or a quiet night in. Are you ready to embrace the ultimate fall comfort food and elevate your dinner table?

Why Is This Recipe a Must-Try?

Simplicity at Its Best: This recipe is deceptively easy, requiring minimal prep work. It’s perfect for home cooks at any level.

Fall Flavors Highlighted: The delightful blend of apple cider and tender pork is a celebration of autumn tastes, making your meals feel like a warm hug.

Versatile Cooking Methods: Whether you prefer the slow cooker, Instant Pot, or traditional oven, this recipe fits your cooking style.

Affordable Ingredients: Budget-friendly yet impressive, this dish makes it easy to entertain or enjoy a lovely dinner without breaking the bank.

Crowd-Pleasing Appeal: Ideal for family gatherings or cozy nights, it’s guaranteed to leave everyone asking for seconds!

Braised Pork Shoulder Ingredients

For the Meat
Pork Shoulder Roast (4-5 lbs) – Main protein providing rich flavor and texture; bone-in offers a richer broth, while boneless cooks faster.

For the Cooking Liquid
Neutral Oil (2 tbsp) – Used for searing the pork to develop flavor and color; can substitute with olive oil or vegetable oil.
Fresh Apple Cider (2 cups) – Adds sweetness and acidity, enhancing flavor; it’s essential, so avoid substituting with apple cider vinegar.
Chicken Stock or Broth (2 cups) – Provides depth and moisture during braising; vegetable broth can be a great alternative if seeking vegetarian options.
Dijon Mustard (2 tbsp) – Contributes tanginess and complexity to flavor; yellow mustard can work as a substitute.
Dehydrated Minced Onion (1 tbsp) – Adds onion flavor without the texture; fresh chopped onion can be used if you prefer a different consistency.

For Aromatics
Garlic (1 head, top sliced off) – Introduces aromatic depth to the dish; fresh garlic cloves are ideal; avoid pre-minced for best results.
Rosemary Sprigs (3) – Provide an earthy flavor; fresh thyme can substitute for a slightly different herbal note.
Thyme Sprigs (4) – Complements the rosemary with subtle earthiness; adjust quantity according to your taste preference.
Red Onion (1, cut into thick slices) – Adds sweetness and texture; can be swapped with yellow or white onion if needed.

For the Sweetness
Firm Apples (2, peeled and cut into wedges) – Provide sweetness and tartness; go for varieties like Honeycrisp or Gala, steering clear of overly soft apples.

For Seasoning
Kosher Salt and Freshly Cracked Black Pepper – Essential for enhancing all the flavors throughout the cooking process.

Step‑by‑Step Instructions for Apple Cider Braised Pork Shoulder

Step 1: Preheat Oven
Begin by preheating your oven to 325°F (163°C). This temperature is perfect for achieving tender, melt-in-your-mouth braised pork shoulder. Make sure your oven is fully heated before moving on to the next steps, as this will ensure even cooking throughout the dish.

Step 2: Prepare Pork
While the oven heats, trim any excess fat from your pork shoulder, cutting it into large pieces if necessary. Pat the pork dry with paper towels to promote better browning. Generously season all sides with kosher salt and freshly cracked black pepper—this will enhance the flavors of the braised pork shoulder during cooking.

Step 3: Sear Pork
In a large Dutch oven, heat 2 tablespoons of neutral oil over medium-high heat. Once the oil is shimmering, carefully add the seasoned pork pieces, working in batches if needed. Sear the pork for about 4-5 minutes on each side, until golden brown. This step develops a rich flavor base that will enhance your Apple Cider Braised Pork Shoulder.

Step 4: Mix Braising Liquid
While the pork is searing, whisk together 2 cups of fresh apple cider, 2 cups of chicken stock, 2 tablespoons of Dijon mustard, and 1 tablespoon of dehydrated minced onion in a separate bowl. This vibrant mixture will provide the essential flavors for braising. Set the liquid aside for the next step, ensuring everything is well combined.

Step 5: Tie Herbs
Gather 3 sprigs of rosemary and 4 sprigs of thyme, then use kitchen twine to bundle them together. Tying the herbs will make them easier to remove later while still imparting their wonderful flavors into the braising liquid and pork shoulder throughout the cooking process.

Step 6: Combine and Braise
Once the pork is seared, carefully pour the prepared braising liquid over the meat in the Dutch oven. Add the herb bundle and the head of garlic with the top sliced off. Cover the pot with a tight-fitting lid and transfer it to the preheated oven, allowing the flavors to mingle and the pork to start braising.

Step 7: Cook
Let the pork braise for approximately 3 hours, checking for doneness at around 2.5 hours if using boneless shoulder. Halfway through the cooking time, gently flip the meat to ensure even cooking. You’ll know it’s ready when the pork is fork-tender and falls apart with ease.

Step 8: Add Onions and Apples
When the pork is nearly done, remove the pot from the oven and add in the thick slices of red onion and the wedges of firm apples. Make sure they are evenly distributed over the pork. Cover the pot again and return it to the oven to braise for an additional 30 to 45 minutes until everything is tender and flavorful.

Step 9: Rest and Serve
Once the braising is complete, remove the pot from the oven and let the Apple Cider Braised Pork Shoulder rest in the liquid for about 30 minutes. This resting time helps the flavors settle. Before serving, squeeze the roasted garlic into the broth for extra richness, then serve the succulent pork shoulder with the braised onions and apples.

What to Serve with Apple Cider Braised Pork Shoulder

Elevate your cozy dinner by pairing this delicious dish with comforting and vibrant sides that complement its rich flavors.

  • Creamy Mashed Potatoes: These buttery potatoes act as a perfect canvas, soaking up the savory sauce from the tender braised pork.

  • Roasted Brussels Sprouts: Caramelized with a hint of balsamic glaze, they add a delightful crunch and a slightly bitter contrast to the sweet apple cider notes.

  • Apple and Walnut Salad: Fresh greens tossed with crisp apples and crunchy walnuts offer a bright, refreshing palate cleanser after each savory bite.

  • Homemade Dinner Rolls: Soft and warm, these fluffy rolls are perfect for mopping up the luscious sauce left behind on your plate.

  • Savory Gravy: Enhance the pork shoulder experience by serving it with a rich, homemade gravy that adds an extra layer of flavor.

  • Spiced Pumpkin Soup: Start your meal with a bowl of this warm, velvety soup that embodies fall flavors and creates a comforting atmosphere.

  • Red Wine Pairing: A glass of full-bodied red wine, such as Cabernet Sauvignon, will deepen the meal’s richness and enhance the dining experience.

  • Apple Crisp: End on a sweet note with an easy-to-make dessert that combines warm baked apples and a crunchy topping—perfect with a scoop of vanilla ice cream.

Make Ahead Options

These Apple Cider Braised Pork Shoulder preparations are perfect for busy weeknights! You can season and sear the pork up to 24 hours in advance, allowing it to marinate in its own flavors. Simply refrigerate the pork after searing, then when ready to cook, combine with the braising liquid and follow the recipe steps. Additionally, the onions and apples can be chopped and stored separately in the fridge for up to 3 days; just add them during the last 30-45 minutes of cooking to maintain their texture and flavor. This way, you’ll enjoy a comforting, home-cooked meal without the last-minute rush!

Expert Tips for Braised Pork Shoulder

  • Choosing the Right Cut: Opt for bone-in pork shoulder for richer flavors and better moisture retention, but boneless cooks faster without sacrificing tenderness.

  • Braising Time Matters: Timings can vary greatly; always check for fork-tender meat before finishing the cook to ensure perfectly braised pork shoulder.

  • Cooking Method Versatility: Don’t hesitate to use a slow cooker or Instant Pot—both methods yield delicious results! Adjust cooking time as needed for these options.

  • Don’t Rush the Sear: Searing the pork develops essential depth of flavor; ensure a good crust forms before braising to enhance the final taste.

  • Watch the Apples: Add firm apples during the last cooking phase to prevent them from getting mushy, maintaining their sweet and tart contrast to the pork.

Braised Pork Shoulder Variations

Feel free to unleash your creativity and adapt this recipe to suit your tastes or dietary needs!

  • Gluten-Free: Use gluten-free broth and ensure all added ingredients are certified gluten-free, perfect for those with gluten sensitivities.
  • Apple Variations: Experiment with different apple varieties like Fuji or Granny Smith for varying levels of sweetness and tartness, making the dish uniquely yours.
  • Herb Swaps: Instead of rosemary and thyme, try fresh sage or parsley for a different flavor profile that can change the entire dish experience.
  • Spicy Kick: If you love heat, add sliced jalapeños or a dash of red pepper flakes to the braising liquid to give your dish a delightful spicy twist!
  • Sweetener Additions: A couple of tablespoons of brown sugar, maple syrup, or honey can deepen the sweetness and caramelization in the sauce—perfect for those who enjoy a sweeter touch.
  • Quick Method: For a faster version, use an Instant Pot for tender pork in just about an hour while still keeping that incredible flavor intact. You can find more about this in my article on using the slow cooker for cooking!
  • Side Twists: Serve with roasted Brussels sprouts or sautéed green beans for added freshness and a colorful side dish bursting with nutrition!
  • Serve with Bread: Instead of standard sides, consider serving perfect little sliders using small buns to create a fun, crowd-pleasing meal that’s perfect for gatherings!

Storage Tips for Braised Pork Shoulder

Fridge: Store leftovers in an airtight container for up to 4-6 days, ensuring the pork is fully cooled before sealing.

Freezer: You can freeze the braised pork shoulder for up to 3 months. Portion it into meal-sized servings for easy defrosting later.

Reheating: For the best flavor, reheat the pork in a skillet over low heat with a splash of broth to keep it moist, stirring occasionally until heated through.

Meal Prep Ideas: This braised pork shoulder is perfect for meal prep—great for making sandwiches, tacos, or served over rice, so feel free to divide into portions!

Apple Cider Braised Pork Shoulder Recipe FAQs

What should I look for when selecting pork shoulder?
Absolutely! When choosing pork shoulder, look for a cut that has a good amount of marbling — this fat will melt during cooking and keep the meat tender and juicy. A bone-in roast often provides a richer flavor and better moisture retention, while a boneless option is quicker to cook. Aim for a cut that feels firm and has a bright pink color; avoid any that look dry or have dark spots all over.

How should I store leftovers from my braised pork shoulder?
Very good question! Leftovers should be stored in an airtight container and kept in the fridge for up to 4-6 days. Make sure the pork is completely cooled before sealing it, which helps maintain its texture. If you want to save it for longer, you can freeze the pork for up to 3 months. Just be sure to portion it out for easy reheating in the future!

Can I freeze the braised pork shoulder? If so, how?
Indeed! Freezing braised pork shoulder is a fantastic way to preserve leftovers. To do this, allow the dish to cool completely, then portion it into airtight, freezer-safe bags or containers. Label with the date, and it will keep well in the freezer for up to 3 months. When ready to enjoy, thaw overnight in the fridge, then reheat gently on the stovetop with a splash of broth for moisture; this will help the pork regain its juicy texture.

What are some common issues when cooking pork shoulder and how do I troubleshoot them?
The most common issue is undercooked pork, which can happen if the cut is too large or if your oven’s temperature is off. Make sure to always check for tenderness; it should pull apart easily with a fork when fully cooked. If you’re finding the meat isn’t tender enough, continue braising until fork-tender, checking every 30 minutes. If the sauce is too thin, remove the pot from the oven and place it on the stove to simmer uncovered until thickened to your liking.

Are there any dietary concerns I should consider with this recipe?
Absolutely! When cooking for others, make sure to ask about allergies. Some individuals may be sensitive to garlic, mustard, or certain fruits. For those who follow a vegetarian or vegan diet, consider substituting the pork shoulder with a hearty vegetable like jackfruit or mushrooms, and use vegetable broth instead of chicken stock. Always double-check labels for any added ingredients, especially if allergies are a concern.

How can I adjust this recipe if I have different cooking equipment?
Very easily! For the Instant Pot, after searing the pork, you would add all ingredients and cook under high pressure for about 60 minutes. Allow for natural release before opening the lid. For a slow cooker, you can add everything after searing and cook on high for about 4-5 hours or on low for 6-8 hours. Regardless of the method, the key is to ensure the pork is tender!

Braised Pork Shoulder

Fall-Ready Braised Pork Shoulder That Melts in Your Mouth

This Apple Cider Braised Pork Shoulder is a must-try, combining comfort and flavor in a cozy dish perfect for fall dinners.
Prep Time 20 minutes
Cook Time 3 hours
Resting Time 30 minutes
Total Time 3 hours 50 minutes
Servings: 6 servings
Course: Dinner
Cuisine: American
Calories: 400

Ingredients
  

For the Meat
  • 4-5 lbs Pork Shoulder Roast Bone-in offers a richer broth, while boneless cooks faster.
For the Cooking Liquid
  • 2 tbsp Neutral Oil Can substitute with olive oil or vegetable oil.
  • 2 cups Fresh Apple Cider Essential for flavor; avoid using vinegar.
  • 2 cups Chicken Stock or Broth Vegetable broth can be used for vegetarian options.
  • 2 tbsp Dijon Mustard Yellow mustard can work as a substitute.
  • 1 tbsp Dehydrated Minced Onion Fresh chopped onion can be used for a different consistency.
For Aromatics
  • 1 head Garlic Top sliced off; fresh cloves are ideal.
  • 3 sprigs Rosemary Fresh thyme can be used as a substitute.
  • 4 sprigs Thyme Adjust quantity according to taste preference.
  • 1 Red Onion Cut into thick slices; can use yellow or white onion.
For the Sweetness
  • 2 Firm Apples Peeled and cut into wedges; Honeycrisp or Gala recommended.
For Seasoning
  • Kosher Salt Essential for enhancing flavors.
  • Freshly Cracked Black Pepper Essential for enhancing flavors.

Equipment

  • Dutch oven

Method
 

Step-by-Step Instructions
  1. Preheat your oven to 325°F (163°C).
  2. Trim excess fat from the pork shoulder and cut it into large pieces. Pat dry and season with salt and pepper.
  3. Heat 2 tablespoons of neutral oil in a large Dutch oven over medium-high heat. Sear pork pieces until golden brown for about 4-5 minutes on each side.
  4. Whisk together apple cider, chicken stock, Dijon mustard, and dehydrated minced onion in a bowl. Set aside.
  5. Tie rosemary and thyme sprigs with kitchen twine for easy removal later.
  6. Pour braising liquid over the seared pork, add the herb bundle and garlic. Cover and transfer to the oven.
  7. Let braise for approximately 3 hours, checking for fork-tender meat.
  8. Add red onion slices and apple wedges to the pot halfway through and return to oven for an additional 30-45 minutes.
  9. Remove from oven and let rest for 30 minutes. Squeeze roasted garlic into the broth before serving.

Nutrition

Serving: 1servingCalories: 400kcalCarbohydrates: 20gProtein: 30gFat: 25gSaturated Fat: 10gCholesterol: 100mgSodium: 800mgPotassium: 900mgFiber: 2gSugar: 8gVitamin C: 10mgCalcium: 2mgIron: 15mg

Notes

Perfect for meal prep - great for sandwiches, tacos, or served over rice.

Tried this recipe?

Let us know how it was!