Creamy Beef Rotini: Your New Go-To Quick Dinner Delight

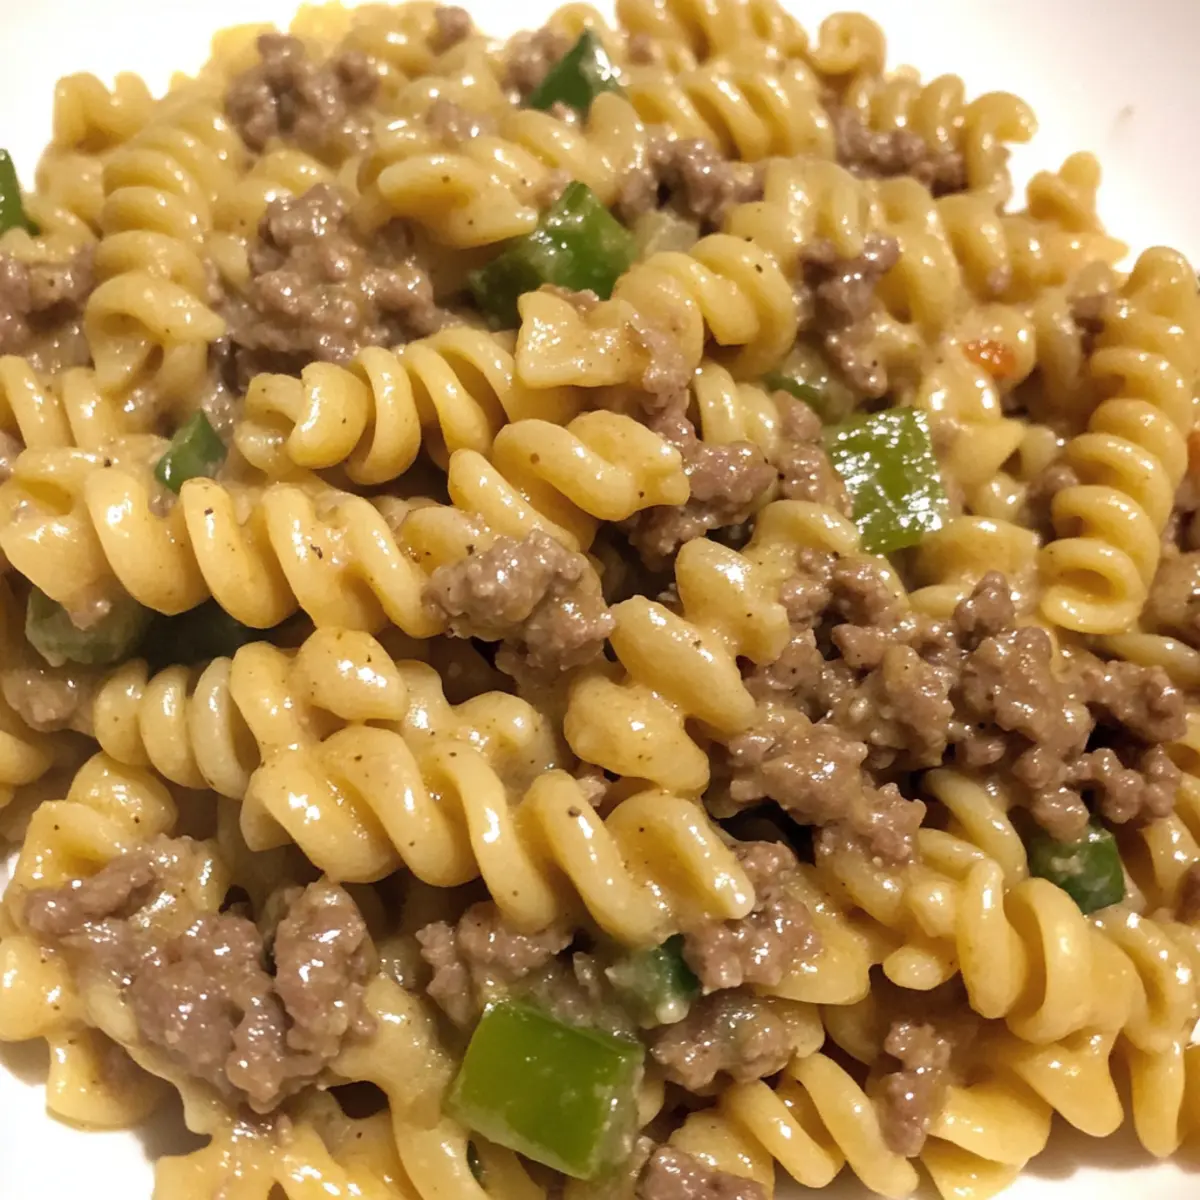
As the aroma of sautéed garlic and onions fills the kitchen, I can’t help but smile, knowing that dinner is just a short time away. Welcome to my take on Creamy Beef Rotini, a delightful dish that turns a simple weeknight into something special without breaking the bank. This quick meal is perfect for busy nights, combining tender rotini pasta with a creamy, flavorful sauce that’s both satisfying and budget-friendly. With just 25 minutes on the clock, you’ll have a hearty, all-in-one meal that pleases everyone at the table. Plus, it’s a fantastic way to use up those veggies hanging out in your fridge! Ready to whip up your new favorite comfort food? Let’s dive into this tasty adventure together!

Why is Creamy Beef Rotini a Must-Try?

Quick Preparation: In just 25 minutes, you can serve up a hearty meal that everyone will love!

Budget-Friendly: With a minimal amount of lean ground beef and colorful veggies, this recipe is an economical choice for families.

Flavorful Creaminess: The rich combination of smoked gouda and seasonings creates a delightful sauce that envelops every bite of pasta.

Versatile Ingredients: Feel free to use whatever vegetables you have on hand or substitute the ground beef for turkey; this recipe is totally customizable!

Crowd-Pleaser: Perfect for family dinners or a meal with friends, this creamy dish is bound to impress anyone at your table.

For another delicious option, check out my Sticky Beef Noodles or try the comforting Korean Ground Beef for a twist on traditional flavors!

Creamy Beef Rotini Ingredients

For the Pasta
Cooked Rotini Noodles – This base ingredient provides structure; feel free to substitute with fusilli, penne, or bowtie pasta for variety.

For the Sauce
Olive Oil – Used for sautéing and enhances flavors; can substitute with vegetable oil if preferred.
Garlic Cloves – Adds aromatic flavor; dice or slice for even distribution throughout the dish.
Yellow Onion – Contributes sweetness and depth; diced for even cooking and flavor.
Diced Green Bell Pepper – Adds crunch and vibrant color; try multi-colored bell peppers for added zest.
Lean Ground Beef – The main protein source; use turkey for a leaner option and still enjoy the Creamy Beef Rotini recipe.
Milk – Provides creaminess in the sauce; opt for dairy-free milk for a lactose-free version.
Shredded Smoked Gouda – Offers a lovely smoky depth to the sauce; replace with cheddar or mozzarella if unavailable.
Low Sodium Vegetable Broth – Enhances flavor without the excess sodium; homemade or store-bought work perfectly.
Flour – Thickens the sauce; cornstarch can be used as a gluten-free alternative.

For Seasoning
Sea Salt and Black Pepper – Essential seasonings for flavor balance; adjust to taste as needed.
Smoked Paprika – Introduces a subtle smokiness; you can use regular paprika as a substitute.
Dried Basil and Garlic Powder – Adds aromatic flavor; fresh herbs can be substituted in smaller amounts for a brighter taste.

Step‑by‑Step Instructions for Creamy Beef Rotini

Step 1: Cook the Rotini
Bring a large pot of salted water to a rolling boil. Add the cooked rotini noodles and cook for about 8-10 minutes until al dente. Once done, drain the noodles and set aside in a large bowl, ensuring they’re ready to soak up that rich sauce in your Creamy Beef Rotini.

Step 2: Prepare the Sauce Ingredients
While the pasta cooks, gather your vegetables and sauce ingredients. Dice the garlic, onion, and green bell pepper finely. In a separate bowl, mix together the milk, shredded smoked gouda, low sodium vegetable broth, and seasonings. This will create a creamy, flavor-packed sauce that complements the rotini beautifully.

Step 3: Sauté the Vegetables
In a large skillet, heat 2 tablespoons of olive oil over medium heat. Add the diced garlic, onion, and bell pepper, sautéing for about 3 minutes until they soften and become fragrant. Stir occasionally to prevent browning, as you want these vegetables to infuse the oil with their delicious flavors for your Creamy Beef Rotini.

Step 4: Cook the Ground Beef
Add the lean ground beef to the skillet with the sautéed vegetables. Use a wooden spoon to break the meat into small pieces and cook for about 4-5 minutes until it’s browned throughout. You’ll know it’s ready when the beef is no longer pink, and the savory aroma fills your kitchen, promising a hearty meal.

Step 5: Combine the Sauce with Beef
Pour the prepared sauce mixture over the browned beef in the skillet. Stir gently to combine, ensuring the flavors meld together perfectly. Cover the skillet and let it simmer for about 4 minutes, or until the sauce thickens slightly and the cheese melts, creating a creamy consistency that envelops your beef.

Step 6: Mix in the Rotini
Once the sauce has thickened, it’s time to add the cooked rotini noodles to the skillet. Stir everything together until the pasta is well-coated in the creamy beef sauce. If preferred, you can also combine the noodles in a large bowl for easier serving. The transformation into Creamy Beef Rotini is almost complete!

Step 7: Serve and Enjoy
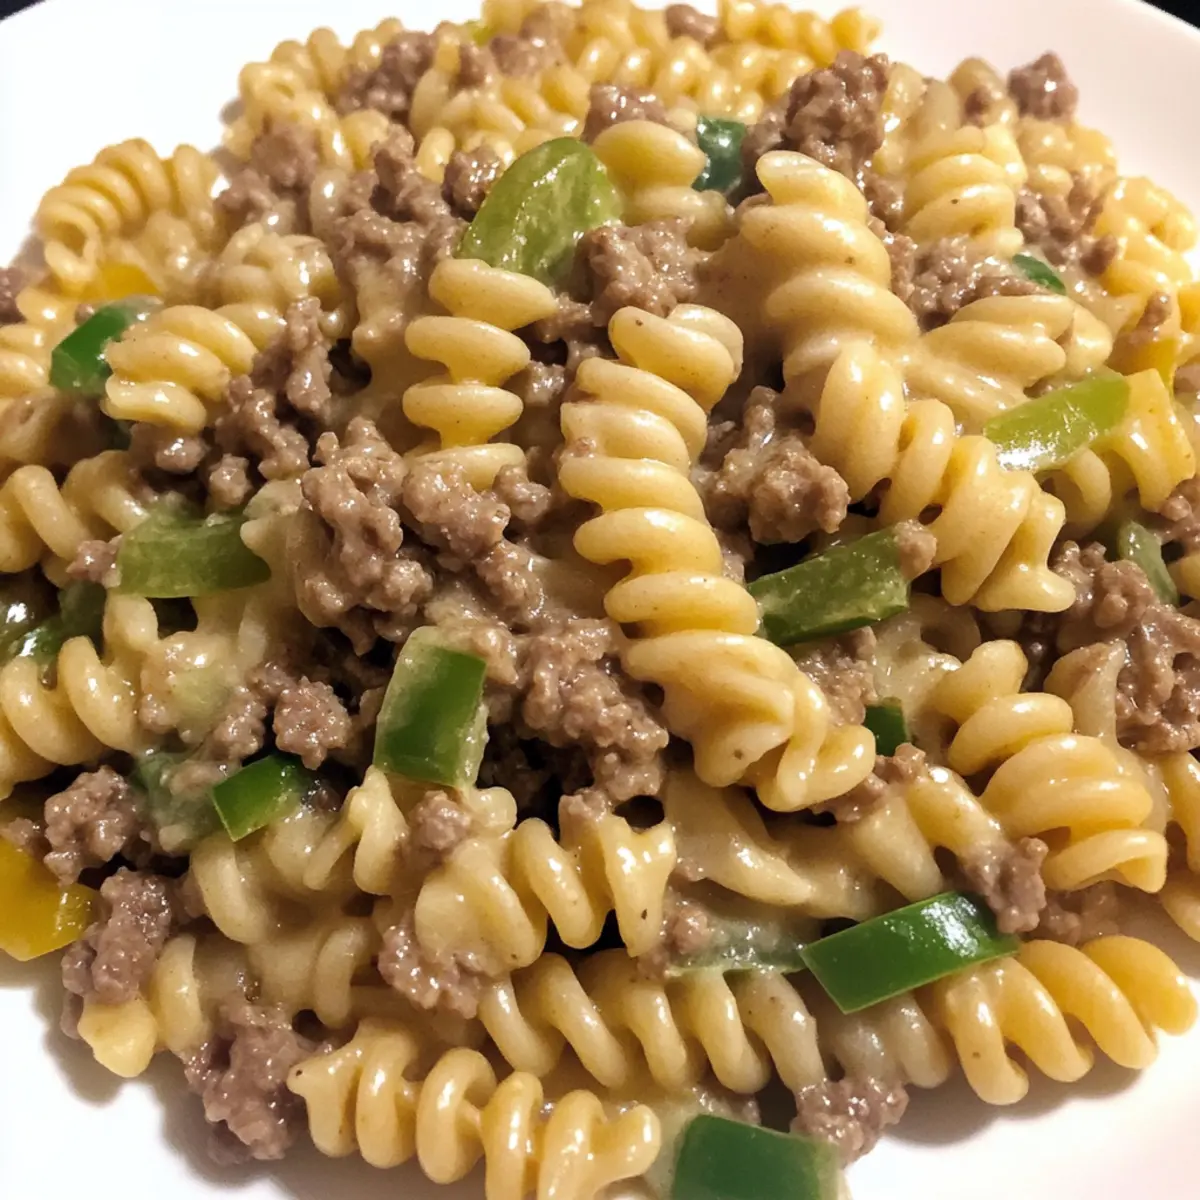
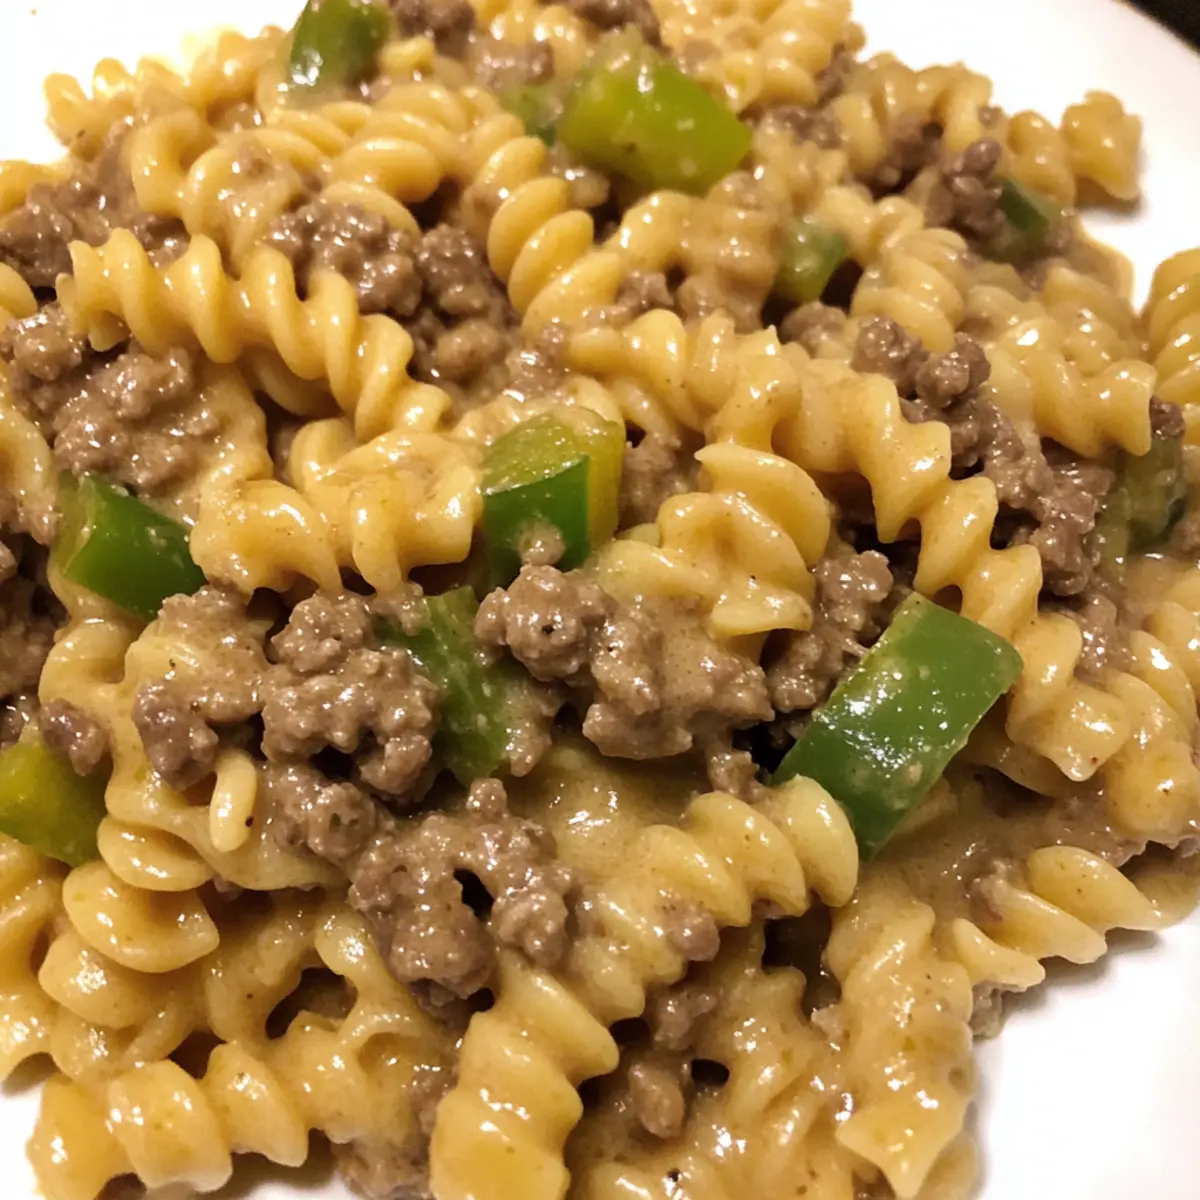
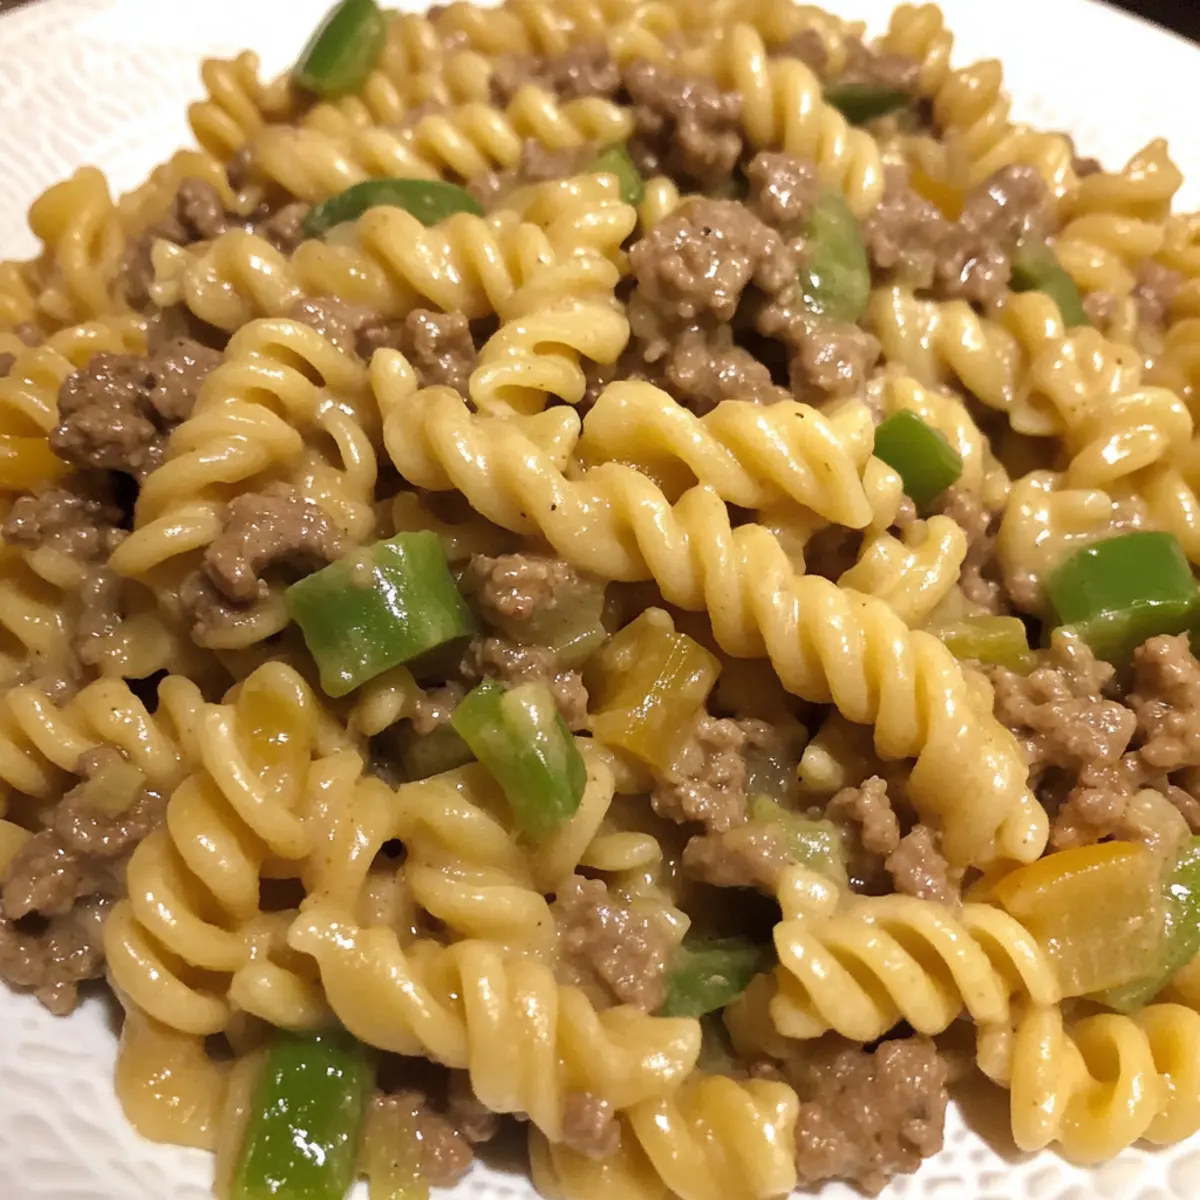
Serve your Creamy Beef Rotini hot, garnishing with a sprinkle of red pepper flakes for added zest, if desired. The dish is ready to impress your family or friends, loaded with creamy goodness and fulfilling flavors. Enjoy this delightful meal that’s both comforting and easy to prepare!

Expert Tips for Creamy Beef Rotini

  • Cook Al Dente: Ensure you cook the rotini noodles just until al dente to maintain a pleasant chewy texture; overcooking can lead to mushy pasta.

  • Sauté with Care: When sautéing the garlic, onion, and bell pepper, stir frequently to prevent burning and allow flavors to develop beautifully in your Creamy Beef Rotini.

  • Thickening Strategy: Stir the sauce continuously as it simmers to prevent sticking, especially in cast iron skillets; this helps achieve a creamy consistency without any sticking mishaps.

  • Vegetable Substitutions: Don’t hesitate to incorporate different vegetables based on what’s in your fridge; this adds nutritional value and minimizes waste while keeping the dish fresh.

  • Spice it Up: For extra flavor, consider adding a pinch of crushed red pepper flakes or Italian seasoning to the sauce, giving your Creamy Beef Rotini an exciting twist.

What to Serve with Creamy Beef Rotini?

As you dive into the rich, creamy goodness of this dish, think about rounding out your meal with a few delightful sides that create the perfect dining experience.

  • Garlic Bread: This crispy delight is the ultimate companion, perfect for sopping up that creamy sauce while adding a satisfying crunch.

  • Caesar Salad: A fresh, crisp salad with romaine, parmesan, and tangy dressing brings a refreshing contrast to the creamy rotini, balancing the meal.

  • Roasted Vegetables: Consider tender roasted broccoli and carrots seasoned with herbs; they add a wholesome touch and vibrant colors to your plate.

  • Steamed Green Beans: Lightly steamed green beans provide a fresh, crunchy texture that perfectly complements the creamy, soft pasta.

  • Grilled Chicken: For a protein boost, juicy grilled chicken seasoned with Italian spices can complement your dish nicely without overpowering the flavors.

  • White Wine: Pair with a chilled glass of Sauvignon Blanc; its crisp acidity cuts through the creaminess while enhancing the overall dining experience.

Enjoy exploring these delightful options to elevate your Creamy Beef Rotini meal into an unforgettable occasion!

Make Ahead Options

These Creamy Beef Rotini are a fantastic choice for busy home cooks looking to save time during meal prep! You can chop all your vegetables and mix the sauce ingredients up to 24 hours in advance. Simply refrigerate them in airtight containers to maintain their freshness and prevent browning. Additionally, you can cook the rotini noodles and store them separately for up to 3 days. When you’re ready to enjoy, just sauté the prepped vegetables with the ground beef, add the sauce, and then stir in your cooked noodles. This method ensures your meal stays just as delicious as when freshly made, offering a comforting dinner with minimal effort!

Variations & Substitutions for Creamy Beef Rotini

Feel free to get creative and make this comforting dish truly your own with these delightful variations.

  • Turkey Swap: Substitute lean ground beef with turkey for a lighter, equally delicious option.
  • Vegetable Medley: Add in veggies like mushrooms, broccoli, or spinach to amp up the nutrition and flavor.
  • Cheese Twist: Experiment with different cheeses like pepper jack or mozzarella for a unique, melty experience.
  • Spicy Kick: For a little heat, stir in some crushed red pepper flakes or a splash of hot sauce in the sauce.
  • Gluten-Free Option: Use quinoa or gluten-free pasta instead of rotini to enjoy this meal without any gluten worries.
  • Creamy Vegan: Swap milk for coconut or almond milk and use cashew cheese to create a creamy vegan version.
  • Herbs & Spices: Fresh herbs like basil or parsley can brighten the dish. Add them just before serving for an aromatic touch.
  • Less Creamy: If you prefer it less rich, reduce the amount of cheese and milk for a lighter sauce.

This dish is so versatile! For another comforting idea, don’t miss my Mexican Soup or try the Chilli Beef Experience for a flavorful adventure!

How to Store and Freeze Creamy Beef Rotini

Fridge: Store leftovers in an airtight container for up to 3 days. This ensures the flavors stay vibrant while keeping the creamy sauce intact.

Freezer: For longer storage, freeze the creamy beef rotini in a freezer-safe container for up to 3 months. Just be sure to let it cool completely before sealing.

Reheating: When ready to enjoy, thaw the frozen dish in the fridge overnight. Reheat on the stovetop, adding a splash of milk to restore creaminess, or microwave until heated through.

Portion Control: Consider dividing the dish into single-serving containers before freezing. This makes it easy to grab a quick, delicious meal whenever you need a fast fix!

Creamy Beef Rotini Recipe FAQs

How do I select the best ingredients for my Creamy Beef Rotini?
Absolutely! When choosing your ingredients, look for firm and vibrant vegetables. For the bell pepper, avoid those with dark spots or wrinkles; they should be smooth and brightly colored. With ground beef, aim for lean cuts (like 90% lean) for a healthier dish, and check the expiration date on the milk and broth to ensure freshness.

How should I store leftovers from my Creamy Beef Rotini?
Very simple! Store any leftovers in an airtight container and place it in the refrigerator, where it will keep well for up to 3 days. This helps maintain the flavor and texture of your delicious meal. Remember, it’s best to reheat gently on the stovetop with a splash of milk to regain that lovely creaminess!

Can I freeze Creamy Beef Rotini for later?
Yes, you can! To freeze, let the dish cool completely before transferring it into a freezer-safe container. Make sure it’s tightly sealed to prevent freezer burn, and you can enjoy it for up to 3 months. When ready to eat, thaw overnight in the fridge and reheat on the stovetop, adding a little milk to bring back the creaminess.

What should I do if my sauce is too thick while cooking?
If you find your sauce thickening too much, don’t worry! Simply add a splash of low-sodium vegetable broth or milk and stir well. This will help to loosen it up and make it creamier. If it becomes too soupy, allow it to simmer a little longer to thicken again to your liking.

Are there any dietary considerations I should be aware of?
Definitely! If you’re cooking for someone with lactose intolerance, substitute regular milk and cheese with dairy-free alternatives like almond milk and vegan cheese. Additionally, for gluten-free diets, use cornstarch instead of flour for thickening the sauce. Just always check for any allergies in the family, particularly with ingredients like cheese or specific vegetables.

How can I enhance the flavors of my Creamy Beef Rotini?
To amp up the flavor, consider adding a pinch of crushed red pepper flakes or Italian herbs into the sauce. You can also toss in a handful of fresh spinach or mushrooms during the sautéing phase. The more, the merrier—your Creamy Beef Rotini will be bursting with taste, making it even more delectable!

Creamy Beef Rotini

Creamy Beef Rotini: Your New Go-To Quick Dinner Delight

Creamy Beef Rotini is a delightful dish that turns a simple weeknight into something special without breaking the bank, ready in just 25 minutes.
Prep Time 10 minutes
Cook Time 15 minutes
Total Time 25 minutes
Servings: 4 servings
Course: Pasta
Cuisine: American
Calories: 550

Ingredients
  

For the Pasta
  • 8 oz Rotini Noodles can substitute with fusilli, penne, or bowtie pasta
For the Sauce
  • 2 tbsp Olive Oil can substitute with vegetable oil
  • 2 cloves Garlic diced
  • 1 Yellow Onion diced
  • 1 cup Diced Green Bell Pepper can use multi-colored bell peppers
  • 1 lb Lean Ground Beef can substitute with turkey
  • 1 cup Milk use dairy-free milk for lactose-free
  • 1 cup Shredded Smoked Gouda can replace with cheddar or mozzarella
  • 1 cup Low Sodium Vegetable Broth
  • 2 tbsp Flour can use cornstarch as gluten-free alternative
For Seasoning
  • 1 tsp Sea Salt to taste
  • 1 tsp Black Pepper to taste
  • 1 tsp Smoked Paprika can use regular paprika
  • 1 tsp Dried Basil can substitute with fresh herbs
  • 1 tsp Garlic Powder can substitute with fresh garlic

Equipment

  • Large pot
  • Skillet
  • Mixing Bowl

Method
 

Step-by-Step Instructions
  1. Bring a large pot of salted water to a rolling boil. Add the rotini noodles and cook for about 8-10 minutes until al dente. Drain the noodles and set aside.
  2. While the pasta cooks, gather your vegetables and sauce ingredients. Dice the garlic, onion, and green bell pepper. Mix together the milk, shredded smoked gouda, vegetable broth, and seasonings in a separate bowl.
  3. In a large skillet, heat 2 tablespoons of olive oil over medium heat. Add the diced garlic, onion, and bell pepper, sautéing for about 3 minutes until they soften.
  4. Add the lean ground beef to the skillet with the sautéed vegetables. Cook for about 4-5 minutes until browned throughout.
  5. Pour the prepared sauce mixture over the browned beef. Stir gently, cover, and let it simmer for about 4 minutes until the sauce thickens slightly.
  6. Add the cooked rotini noodles to the skillet. Stir everything together until the pasta is well-coated in the creamy beef sauce.
  7. Serve hot, garnished with red pepper flakes if desired.

Nutrition

Serving: 1servingCalories: 550kcalCarbohydrates: 55gProtein: 30gFat: 25gSaturated Fat: 10gPolyunsaturated Fat: 2gMonounsaturated Fat: 10gCholesterol: 80mgSodium: 500mgPotassium: 700mgFiber: 3gSugar: 5gVitamin A: 600IUVitamin C: 30mgCalcium: 250mgIron: 3mg

Notes

For best results, cook the rotini al dente and stir frequently to prevent burning while sautéing the vegetables.

Tried this recipe?

Let us know how it was!

Lobster Biscuit Chicken Pot Pie for Cozy Family Nights

As the savory aroma wafted through my kitchen, I was instantly transported to those cozy nights spent at my favorite seafood restaurant. This Red Lobster Biscuit Chicken Pot Pie captures that feeling beautifully, combining tender chicken and vibrant mixed vegetables with a creamy sauce, all topped with warm Cheddar Bay-style biscuits. It’s the ultimate comfort food that brings a touch of indulgence to a classic dish. Not only is it a one-pan wonder that simplifies cleanup, but it’s also freezer-friendly, making it an easy choice for busy weeknights. So gather your loved ones around the table for a dish that feels like a warm hug on a plate! What’s your favorite twist on a classic comfort food?

Why Is This Pot Pie So Special?

Comforting, this Lobster Biscuit Chicken Pot Pie blends tender chicken and fresh vegetables in a creamy filling that evokes feelings of nostalgia. Time-saving, the one-pan design means less cleanup, making it perfect for busy weeknights. Adaptable, you can easily create a gluten-free or vegetarian version to suit various dietary needs. Crowd-pleasing, this dish is sure to impress family or guests and can be served alongside a refreshing salad or some delicious garlic bread for the ultimate meal. Experience the joy of cozy family nights with every delicious bite!

Lobster Biscuit Chicken Pot Pie Ingredients

For the Filling
Cooked Chicken – Provides protein and substance; use rotisserie chicken for quicker prep.
Frozen Mixed Vegetables – Adds color and nutrition; customize with seasonal veggies like peas or carrots.
Cream of Chicken Soup – Forms the creamy base; can use homemade or low-fat version for a healthier option.
Garlic Powder – Enhances flavor; fresh garlic can deliver a more intense taste.
Onion Powder – Adds depth of flavor; fresh onions sautéed can offer a different texture.
Salt and Pepper – Season to taste.
Chicken Broth – Keeps the filling moist; choose low-sodium broth for a healthier option.

For the Biscuit Topping
All-Purpose Flour – Provides structure for the biscuits; gluten-free flour can be used if needed.
Baking Powder – Helps the biscuits rise.
Unsalted Butter – Creates a flaky biscuit texture; ensure butter is cold for best results.
Shredded Cheddar Cheese – Adds flavor and richness; use dairy-free cheese for a vegan option.
Milk – Binds the biscuit dough; opt for almond milk or other plant-based options for dairy-free diets.

Dive into this delightful Lobster Biscuit Chicken Pot Pie and enjoy every comforting bite!

Step‑by‑Step Instructions for Lobster Biscuit Chicken Pot Pie

Step 1: Preheat the Oven
Begin by preheating your oven to 375°F (190°C). This step is crucial as it ensures your Lobster Biscuit Chicken Pot Pie will bake evenly and develop that lovely golden-brown color. While the oven warms up, gather your baking dishes and prepare to fill them with comfort!

Step 2: Prepare the Filling
In a large mixing bowl, combine the cooked chicken, frozen mixed vegetables, cream of chicken soup, garlic powder, onion powder, salt, pepper, and chicken broth. Stir this mixture well, ensuring that every piece of chicken and vegetable is coated in the creamy sauce. The mixture should be thick but smooth, ready to become the hearty filling of your pot pie.

Step 3: Transfer the Filling
Carefully pour the chicken and vegetable filling into a casserole or pie dish, using a spatula to spread it evenly across the bottom. This even distribution helps ensure each bite of your Lobster Biscuit Chicken Pot Pie will have just the right balance of flavors.

Step 4: Make the Biscuit Dough
In a separate bowl, whisk together the all-purpose flour, baking powder, and salt for the biscuit topping. Next, take your cold unsalted butter and cut it into the flour mixture until it resembles coarse crumbs. This process is key to achieving fluffy biscuits that rise beautifully over the filling.

Step 5: Add Cheese and Milk
Once the butter is properly incorporated, stir in the shredded cheddar cheese and a sprinkle of garlic powder for added flavor. Gradually add the milk, mixing until just combined; be careful not to overmix! The dough should be somewhat sticky, forming a soft and fluffy biscuit batter ready to grace the top of your pie.

Step 6: Spoon the Biscuit Dough
Using a spoon or your hands, dollop the biscuit dough over the chicken filling, ensuring it covers the mixture evenly. It’s okay if the dough isn’t perfectly smooth—those rustic bits will bake up beautifully. This layer of biscuits is what will create that classic pot pie experience!

Step 7: Bake the Pot Pie
Place your assembled Lobster Biscuit Chicken Pot Pie in the preheated oven and bake for approximately 30 minutes. Keep an eye on it; the biscuits should puff up and turn a lovely golden brown, while the filling bubbles enticingly beneath.

Step 8: Cool Before Serving
After baking, remove the pot pie from the oven and allow it to cool for about 10 minutes. This resting period is essential for letting the filling set slightly, making it easier to serve. Enjoy the delightful aroma wafting through your kitchen as you prepare for a cozy meal!

What to Serve with Lobster Biscuit Chicken Pot Pie

Enhance your comforting dinner with delightful sides that beautifully complement every warm, buttery bite of your pot pie.

  • Simple Green Salad: A fresh mix of greens adds a crisp contrast to the richness of the pie. Toss in some cherry tomatoes for a burst of color!

  • Garlic Bread Sticks: Crunchy and flavorful, these pairs wonderfully with the creamy filling, providing an additional layer of comfort to your meal.

  • Steamed Broccoli: Bright green florets offer a nutritious counterpart, balancing the hearty dish while bringing a refreshing crunch.

  • Honey-Butter Cornbread: Soft, sweet cornbread with a hint of honey is a delightful treat, perfect for soaking up any leftover filling.

  • Crispy Roasted Potatoes: With a crunchy exterior and fluffy interior, these potatoes add a lovely texture and pair well with the creamy goodness of your pot pie.

  • Chilled Applesauce: The lightness and sweetness of applesauce offer a lovely contrast to the savory dish, perfect for an unexpected but delightful side.

  • Sparkling Lemonade: Refreshing and tangy, this drink cleanses the palate between bites, bringing an added zest to your cozy family night.

Make Ahead Options

These Lobster Biscuit Chicken Pot Pie are perfect for busy home cooks looking to save time! You can prepare the filling up to 3 days in advance by mixing together the cooked chicken, mixed vegetables, cream of chicken soup, and seasonings, then refrigerate in an airtight container. For the biscuit topping, make the dough ahead and store it wrapped tightly in the refrigerator for up to 2 days. When you’re ready to enjoy the pot pie, simply spread the filling in your dish, top with the prepared biscuit dough, and bake directly from the refrigerator until golden and bubbly. This way, you’ll have a comforting meal that’s just as delicious with minimal effort!

Lobster Biscuit Chicken Pot Pie Variations

Feel free to get creative and tailor this comforting recipe to your taste and dietary needs!

  • Vegetarian: Substitute chicken with tofu, tempeh, or chickpeas, and use plant-based cheese and dairy alternatives for a hearty, veggie-packed dish. It’s just as satisfying while keeping that delicious creaminess!

  • Gluten-Free: Replace all-purpose flour with your favorite gluten-free flour blend and be sure to use a gluten-free biscuit mix for the topping. This way, everyone can enjoy the cozy flavors without any tummy troubles!

  • Individual Pies: Bake in ramekins for personal servings – a delightful idea for guests or for leftovers that are easy to reheat. Plus, it adds a charming touch to your dinner table.

  • Flavor Boost: Experiment with herbs and spices like thyme, rosemary, or even a dash of cayenne pepper for some heat. It’s a great way to infuse different tastes each time you make it!

  • Extra Creaminess: Stir in a little cream cheese or sour cream into the filling for a richer texture that will leave everyone raving about your pot pie. It’s a simple twist that makes a world of difference!

  • Seasonal Veggies: Use a mix of seasonal vegetables instead of frozen. Think fresh zucchini, bell peppers, or even sweet potatoes for added nutrition and flavor.

  • Cheddar Alternatives: If you’re avoiding dairy, try using a dairy-free shredded cheese that melts well. It’s an easy substitution that keeps the flavors creamy and satisfying.

  • Topping Twists: Instead of traditional biscuit topping, use puff pastry or cornbread for a unique spin. Each topping brings a new layer of texture to the classic dish.

Don’t forget to try pairing your pot pie with a refreshing salad or some delicious garlic bread for a complete meal experience!

Expert Tips for Lobster Biscuit Chicken Pot Pie

  • Thicker Filling: Ensure the filling is not too runny to avoid soggy biscuits. Cook the sauce longer to achieve a thicker consistency.

  • Cold Ingredients: Use cold butter and milk when making the biscuit dough. This promotes flakiness and a perfect rise for your Lobster Biscuit Chicken Pot Pie.

  • Don’t Overmix: When combining the biscuit ingredients, mix until just combined. Overmixing can lead to dense biscuits instead of fluffy ones.

  • Rest Before Serving: Allow the pot pie to cool for about 10 minutes after baking. This helps the filling set and makes slicing easier.

  • Personal Touch: Feel free to customize your filling with your favorite vegetables or herbs. This will lend a unique flavor profile to your Lobster Biscuit Chicken Pot Pie.

How to Store and Freeze Lobster Biscuit Chicken Pot Pie

Fridge: Store any leftover Lobster Biscuit Chicken Pot Pie in an airtight container for up to 3 days. Reheat in the oven at 350°F (175°C) until warmed through.

Freezer: Assemble the pot pie but do not bake. Cover tightly with plastic wrap and foil, and freeze for up to 2 months. Thaw overnight in the fridge before baking.

Reheating: To reheat frozen pot pie, bake directly from frozen for about 50 minutes at 375°F (190°C) or until bubbles form and biscuits are golden brown.

Make-Ahead Tip: The filling and biscuit dough can be prepared separately and stored in the fridge for up to 2 days before assembling and baking.

Lobster Biscuit Chicken Pot Pie Recipe FAQs

How do I choose the best chicken for this recipe?
Absolutely! For optimal flavor and tenderness, I recommend using cooked chicken from a rotisserie. It’s wonderfully seasoned and saves time. If you have leftover grilled or roasted chicken at home, that works beautifully too. Just ensure it’s cut into bite-sized pieces.

How should I store leftover Lobster Biscuit Chicken Pot Pie?
Very! Store any leftover Lobster Biscuit Chicken Pot Pie in an airtight container in the refrigerator for up to 3 days. When you’re ready to enjoy it, simply reheat it in the oven at 350°F (175°C) until it’s warmed through; this way, your biscuits stay delightfully fluffy!

Can I freeze Lobster Biscuit Chicken Pot Pie?
Of course! To freeze, assemble the pot pie but don’t bake it. Cover tightly with plastic wrap and foil to prevent freezer burn, and it’ll keep for up to 2 months. When you’re ready to bake, thaw it overnight in the fridge before popping it into a preheated oven at 375°F (190°C) for about 30-35 minutes until golden brown.

What if my filling is too runny?
The key to a perfect pot pie! If your filling seems too runny, don’t worry. You can thicken it before baking by simmering it on the stove for a few minutes until it reduces. Alternatively, adding a bit of extra cooking time while it bakes can help the filling set.

Can I make a gluten-free version of this pot pie?
Absolutely! Substitute the all-purpose flour with a gluten-free flour blend when making the biscuit topping. Ensure the other ingredients, like the cream of chicken soup and chicken broth, are also gluten-free. This way, you can enjoy a comforting meal without worry!

Are there any dietary substitutions I should consider?
Very! If you’re looking to make it plant-based, substitute chicken with tofu, tempeh, or chickpeas, and use dairy-free cheese and almond milk in the biscuits. Be creative with your veggie mix, adding seasonal favorites to enhance flavor and nutrition!

Lobster Biscuit Chicken Pot Pie

Lobster Biscuit Chicken Pot Pie for Cozy Family Nights

This Lobster Biscuit Chicken Pot Pie is a comforting and indulgent dish, blending tender chicken and mixed vegetables in a creamy sauce, all topped with Cheddar Bay-style biscuits.
Prep Time 20 minutes
Cook Time 30 minutes
Cooling Time 10 minutes
Total Time 1 hour
Servings: 6 servings
Course: Casserole
Cuisine: American
Calories: 450

Ingredients
  

For the Filling
  • 2 cups Cooked Chicken Use rotisserie chicken for quicker prep.
  • 2 cups Frozen Mixed Vegetables Customize with seasonal veggies like peas or carrots.
  • 1 can Cream of Chicken Soup Can use homemade or low-fat version for a healthier option.
  • 1 teaspoon Garlic Powder Fresh garlic can deliver a more intense taste.
  • 1 teaspoon Onion Powder Fresh onions sautéed can offer a different texture.
  • to taste Salt
  • to taste Pepper
  • 1 cup Chicken Broth Choose low-sodium broth for a healthier option.
For the Biscuit Topping
  • 2 cups All-Purpose Flour Gluten-free flour can be used if needed.
  • 1 tablespoon Baking Powder
  • 1/2 cup Unsalted Butter Ensure butter is cold for best results.
  • 1 cup Shredded Cheddar Cheese Use dairy-free cheese for a vegan option.
  • 1/2 cup Milk Opt for almond milk or other plant-based options for dairy-free diets.

Equipment

  • casserole dish
  • Mixing Bowl
  • spatula
  • whisk
  • Oven

Method
 

Step‑by‑Step Instructions
  1. Preheat your oven to 375°F (190°C).
  2. In a large mixing bowl, combine the cooked chicken, frozen mixed vegetables, cream of chicken soup, garlic powder, onion powder, salt, pepper, and chicken broth. Stir well until coated.
  3. Pour the filling into a casserole or pie dish, spreading evenly across the bottom.
  4. In a separate bowl, whisk together the all-purpose flour, baking powder, and salt. Cut in the cold unsalted butter until the mixture resembles coarse crumbs.
  5. Stir in the shredded cheddar cheese and garlic powder, then gradually add milk until just combined; don’t overmix.
  6. Dollop the biscuit dough over the chicken filling, covering it evenly.
  7. Bake for approximately 30 minutes or until the biscuits are puffed and golden brown.
  8. Allow to cool for about 10 minutes before serving.

Nutrition

Serving: 1sliceCalories: 450kcalCarbohydrates: 35gProtein: 25gFat: 25gSaturated Fat: 12gPolyunsaturated Fat: 1gMonounsaturated Fat: 10gCholesterol: 70mgSodium: 900mgPotassium: 800mgFiber: 3gSugar: 2gVitamin A: 800IUVitamin C: 10mgCalcium: 200mgIron: 3mg

Notes

Feel free to customize your filling with your favorite vegetables or herbs for a unique flavor profile.

Tried this recipe?

Let us know how it was!

Crispy Mini Baked Chicken Tacos in Just 30 Minutes

“Did you hear?” I overheard my friend saying, “Taco Tuesday is about to get a major upgrade!” Intrigued, I leaned in closer, ready to capture her secret. She went on to rave about the unbelievable ease of making Mini Baked Chicken Tacos, perfect for a weeknight dinner that won’t leave you exhausted. Trust me, these delightful bites combine crispy tortillas with a creamy, mildly spicy filling made from rotisserie chicken and melty cheese, truly a game-changer on busy nights. You can whip them up in just 30 minutes, making them not only delicious but also a lifesaver for those hectic evenings. Plus, everyone loves a fun, handheld treat that only requires minimal cleanup! Ready to transform your Taco Tuesday into something extraordinary? Let’s dive into this quick and easy recipe that’s sure to become a go-to for your family!

Why You’ll Crave These Tacos

Quick Dinner Solution: In just 30 minutes, you can have a delicious meal on the table—perfect for busy weeknights!

Flavor Explosion: Each bite delivers a delightful mix of savory chicken, creamy cheese, and a hint of spice that will keep your taste buds dancing.

Crowd-Pleasing Appeal: Whether it’s a casual family dinner or entertaining friends, these mini tacos are sure to impress everyone at the table.

Versatile Ingredients: Feel free to swap out the rotisserie chicken for ground turkey or beef, and customize with your favorite toppings from guacamole to salsa.

Minimal Cleanup: With only one baking sheet needed, you’ll spend less time washing up and more time enjoying your delicious creation.

And if you’re looking for other quick yet flavorful options, don’t miss out on trying Sizzling Chicken Pepper or the mouthwatering BBQ Chicken Grilled Cheese.

Mini Baked Chicken Tacos Ingredients

For the Filling
Cooked Shredded Chicken (1 lb) – Use rotisserie chicken for a quick and convenient protein source.
Chili Powder (1 teaspoon) – This adds a wonderful warmth and depth to the taco filling.
Paprika (1 teaspoon) – Contributes a mellow sweetness and lovely color to each bite.
Garlic Powder (1 teaspoon) – Imparts that irresistible savory aroma that makes everyone hungry.
Onion Powder (1/2 teaspoon) – A subtle hint of onion enhances the overall flavor profile.
Ground Cumin (1/2 teaspoon) – This earthy spice ties all the flavors together beautifully.
Oregano (1/2 teaspoon) – It adds an aromatic herby note that’s perfect for these mini tacos.
Kosher Salt (1/2 teaspoon) – Balances the flavors and elevates the taste of the filling.
Chopped Green Chiles (1 can / 4 ounces) – Introduces a mild heat and enjoyable texture.
Sour Cream (1/2 cup) – Creates a rich creaminess, balancing the spices perfectly.
Monterey Jack Cheese (2 1/2 cups shredded) – Adds creamy, melty goodness—1 cup for the filling and the rest for topping.

For the Taco Shells
Corn Tortillas (12 small) – Ideal for a perfect handheld treat; warm them to enhance flexibility.
Olive Oil (2-3 tbsp) – Helps achieve that crispy texture when baked.

These Mini Baked Chicken Tacos not only make for a quick dinner but are also packed with flavor, ensuring a delightful meal that everyone will love!

Step‑by‑Step Instructions for Mini Baked Chicken Tacos

Step 1: Preheat the Oven
Start by preheating your oven to 425°F (220°C), ensuring a perfect baking environment for the Mini Baked Chicken Tacos. While the oven warms, prepare two baking sheets by spraying them with olive oil or nonstick cooking spray, which will help achieve that golden, crispy texture.

Step 2: Mix the Filling
In a large mixing bowl, combine 1 pound of cooked shredded chicken with 1 teaspoon each of chili powder, paprika, garlic powder, and ½ teaspoon each of onion powder, ground cumin, oregano, and kosher salt. Stir well until all the spices blend beautifully into the chicken, creating a flavorful filling for your tacos.

Step 3: Add Creaminess
To the chicken mixture, gently fold in a can of chopped green chiles, ½ cup of sour cream, and 1 cup of shredded Monterey Jack cheese. This creamy combination elevates the filling, adding richness and a delightful layer of flavor. Mix until all ingredients are well incorporated and ready to transform into delicious tacos.

Step 4: Prepare the Tortillas
Warm the 12 small corn tortillas by briefly microwaving a stack covered with a damp paper towel for 30–60 seconds. This step ensures the tortillas are pliable and easy to fold without cracking. Set them aside as you get ready to fill them, creating a perfect base for your Mini Baked Chicken Tacos.

Step 5: Fill the Tortillas
Lay out each warmed tortilla and place approximately ¼ cup of the chicken mixture on one side of each tortilla. Sprinkle a little additional shredded Monterey Jack cheese on top of the chicken filling for extra gooeyness. This filling of savory, creamy goodness is what will make these tacos irresistible!

Step 6: Fold and Brush
Carefully fold each tortilla in half over the filling, creating a taco shape. Brush both the top and bottom of each folded taco with olive oil to enhance crispiness while baking. Then, place each oil-brushed taco, olive oil side down, onto the prepared baking sheets, ensuring they fit snugly.

Step 7: Bake the Tacos
Slide the baking sheets into your preheated oven and bake the Mini Baked Chicken Tacos for 12-15 minutes. Keep an eye on them as they bake; the tortillas should turn golden brown, and the cheese should be bubbly and melted, creating an enticing and irresistible aroma.

Step 8: Cool for Crispness
Once baked to perfection, remove the tacos from the oven and let them cool for a few minutes. This brief resting time allows the shells to become even crispier, giving you that satisfying crunch with every bite of your delicious Mini Baked Chicken Tacos!

Make Ahead Options

These Mini Baked Chicken Tacos are perfect for meal prep, providing a quick and delicious option for busy weeknights! You can prepare the filling up to 24 hours in advance; just mix the cooked shredded chicken with spices, green chiles, sour cream, and cheese, then refrigerate in an airtight container. To maintain quality, seal the container tightly to prevent moisture loss. When you’re ready to serve, warm the filling slightly, assemble the tacos in fresh tortillas, brush with olive oil, and bake as directed. This way, you’ll enjoy delightful, crispy tacos with minimal effort, transforming mealtime into a breeze!

What to Serve with 30 Minute Mini Baked Chicken Tacos

Elevate your Taco Tuesday experience with these delightful pairings that bring even more flavor and fun to your meal.

  • Crispy Corn Elotes: A zesty twist on traditional corn, these elotes add a charred flavor and a creamy finish that complements the tacos beautifully.

  • Guacamole & Tortilla Chips: The creamy, avocado goodness of guacamole pairs perfectly with the crispy texture of the tacos, creating a party in your mouth!

  • Fresh Mango Salsa: Sweet and tangy, this salsa brings a burst of freshness that enhances the savory notes of the tacos effortlessly.

  • Cilantro Lime Rice: This fragrant, fluffy rice adds a citrusy lift, making it the ideal side to round out your Mexican feast.

  • Refried Black Beans: Creamy and hearty, these beans provide a rich contrast to the crispy tacos, making every bite satisfying and filling.

  • Peach-Mango Smoothie: A refreshing drink that perfectly balances the spiciness of the tacos while soothing your palate with every sip.

  • Churros with Chocolate Sauce: A sweet ending to your meal! These crispy pastries dipped in smooth chocolate will have everyone reaching for seconds.

Each of these delightful dishes and drinks brings something unique to the table, ensuring that your meal is not just a dinner, but a celebration of flavors and textures!

Expert Tips for Mini Baked Chicken Tacos

  • Don’t Skip the Soften: Warm tortillas before filling to prevent cracking. Microwave them with a damp paper towel for 30-60 seconds.

  • Watch the Bake Time: Keep an eye on your tacos; they can go from golden to overdone quickly. Aim for a perfect crispness in 12-15 minutes!

  • Balance Your Filling: Avoid overstuffing the tacos; too much filling can make them hard to fold and may cause bursting during baking.

  • Cheese Variety: Experiment with different cheeses like pepper jack or sharp cheddar to switch up the flavor profile of your Mini Baked Chicken Tacos.

  • Garnish Wisely: Top the tacos with fresh garnishes like cilantro or avocado to elevate the dish and add freshness.

Mini Baked Chicken Tacos Variations

Feel free to let your creativity shine while preparing these delightful Mini Baked Chicken Tacos and make them your own!

  • Ground Turkey: Substitute rotisserie chicken with ground turkey for a lighter option that’s still packed with flavor.
    You can sauté the turkey with the seasonings before mixing it with the other ingredients for a delicious alternative.

  • Different Cheeses: Experiment with flavors by swapping Monterey Jack with cheddar, pepper jack, or even a creamy goat cheese.
    Each cheese brings its own character to the tacos, allowing for endless delicious combinations!

  • Vegetarian Option: Replace the chicken with black beans, lentils, or grilled vegetables for a satisfying vegetarian twist.
    This option is not only healthy but also adds a rich earthiness to your mini tacos.

  • Heat Level: Kick the spice up a notch by adding diced jalapeños or a sprinkle of cayenne pepper to the filling.
    This fiery twist is perfect for those who crave an extra kick in their tacos!

  • Add More Veggies: Toss in some diced bell peppers or corn for added texture and nutrition—and you’ll enjoy every bite even more!
    These colorful additions not only enhance the flavor but increase the veggie content for a healthier meal.

And if you love these flavorful tacos, you might want to check out the comforting Tuscan Chicken Soup or the savory Chili Chicken Takeout recipes for a complete weeknight meal solution!

  • Sweet Touch: Drizzle some honey or add a touch of sweet barbecue sauce for a sweet and savory flavor explosion.
    This unique spin will surprise your taste buds and leave everyone asking for more!

  • Crunchy Toppings: Don’t forget to top your tacos with crushed tortilla chips or crispy onions for an inviting crunch that elevates every bite.
    The extra texture will enhance your taco experience and satisfy those craving a little extra crisp!

Storage Tips for Mini Baked Chicken Tacos

Fridge: Store leftovers in an airtight container or wrapped in foil for up to 3 days. This will help keep the tacos fresh and tasty.

Reheating: When it’s time to enjoy your leftovers, reheat the mini baked chicken tacos in a 350°F oven for about 10 minutes. This will revive their crispiness and melty cheese.

Freezer: While freezing is not recommended to maintain texture, you can freeze unused filling for up to 1 month. Just thaw before reheating.

Assembly Tip: If you prefer to prep ahead, assemble the tacos without baking and store in the fridge for up to 24 hours before baking for a quick weeknight meal!

Mini Baked Chicken Tacos Recipe FAQs

How should I select ripe ingredients?
Absolutely! For the best flavors in your Mini Baked Chicken Tacos, choose ingredients with care. Look for avocados that yield to gentle pressure for ripeness, and select green chiles that are vibrant in color with no dark spots. Fresh chicken should be shredded and moist. Utilizing a rotisserie chicken ensures your main ingredient is ready to go!

What is the best way to store leftovers?
Very! Store any leftover Mini Baked Chicken Tacos in an airtight container or wrapped in foil in the fridge for up to 3 days. This method preserves the flavor while preventing drying. If reheating, pop them in a preheated 350°F oven for about 10 minutes, allowing the shells to crisp back up!

Can I freeze the Mini Baked Chicken Taco filling?
Of course! While the tacos should not be frozen after baking for texture reasons, you can freeze the unused chicken filling. Portion it into airtight containers and freeze for up to 1 month. When you’re ready to use it, simply thaw overnight in the refrigerator before reheating.

What if my tortillas split while folding?
A common issue that can certainly happen! If your tortillas split, it usually means they weren’t warmed enough. Be sure to microwave them for 30-60 seconds covered with a damp paper towel. This step adds flexibility, making them easier to fold without breaking.

Are these tacos suitable for a gluten-free diet?
Yes, indeed! To make your Mini Baked Chicken Tacos gluten-free, opt for corn tortillas, which are naturally gluten-free. This allows everyone in your family or friend group to indulge in these tasty treats without worry!

Mini Baked Chicken Tacos

Crispy Mini Baked Chicken Tacos in Just 30 Minutes

Quick and flavorful Mini Baked Chicken Tacos make for the perfect weeknight dinner.
Prep Time 10 minutes
Cook Time 15 minutes
Cooling Time 5 minutes
Total Time 30 minutes
Servings: 4 tacos
Course: Dinner
Cuisine: Mexican
Calories: 250

Ingredients
  

For the Filling
  • 1 lb Cooked Shredded Chicken Use rotisserie chicken for a quick and convenient protein source.
  • 1 teaspoon Chili Powder Adds warmth and depth to the filling.
  • 1 teaspoon Paprika Contributes a mellow sweetness and lovely color.
  • 1 teaspoon Garlic Powder Imparts an irresistible savory aroma.
  • 1/2 teaspoon Onion Powder Enhances the overall flavor profile.
  • 1/2 teaspoon Ground Cumin Ties all the flavors together.
  • 1/2 teaspoon Oregano Adds an aromatic herby note.
  • 1/2 teaspoon Kosher Salt Balances flavors.
  • 1 can (4 oz) Chopped Green Chiles Introduces mild heat.
  • 1/2 cup Sour Cream Creates a rich creaminess.
  • 2 1/2 cups Monterey Jack Cheese Shredded, 1 cup for filling, the rest for topping.
For the Taco Shells
  • 12 small Corn Tortillas Warm them to enhance flexibility.
  • 2-3 tablespoons Olive Oil Helps achieve a crispy texture.

Equipment

  • Oven
  • Mixing Bowl
  • Baking Sheets
  • Microwave

Method
 

Step‑by‑Step Instructions
  1. Preheat the oven to 425°F (220°C) and spray two baking sheets with olive oil.
  2. In a large mixing bowl, combine cooked shredded chicken and spices until well blended.
  3. Fold in green chiles, sour cream, and cheese until well incorporated.
  4. Warm corn tortillas in the microwave for 30-60 seconds to make them pliable.
  5. Fill each tortilla with approximately 1/4 cup of the chicken mixture and a sprinkle of cheese.
  6. Fold the tortillas in half, brush with olive oil, and place them on the baking sheets.
  7. Bake the tacos for 12-15 minutes until golden brown and cheese is melted.
  8. Let the tacos cool for a few minutes to enhance crispiness.

Nutrition

Serving: 1tacoCalories: 250kcalCarbohydrates: 20gProtein: 15gFat: 15gSaturated Fat: 7gPolyunsaturated Fat: 1gMonounsaturated Fat: 3gCholesterol: 50mgSodium: 500mgPotassium: 150mgFiber: 2gSugar: 1gVitamin A: 10IUVitamin C: 5mgCalcium: 20mgIron: 5mg

Notes

Store leftovers in an airtight container for up to 3 days. Reheat at 350°F for 10 minutes.

Tried this recipe?

Let us know how it was!

Big Mac Wraps Recipe: A Fun Twist on a Fast Food Classic

Crispy, late-night cravings may just be calling your name, and I’ve got just the remedy! These Big Mac Wraps are inspired by the classic fast-food favorite but come together in a flash. With tender ground beef, a tangy homemade special sauce, and fresh veggies all tucked into a soft tortilla, this Big Mac Wraps recipe is a stress-free meal perfect for busy weeknights. Not only are these wraps a quick fix for your comfort food urges, but they also bring that iconic burger flavor to your kitchen without the drive-thru hassle. Curious about how you can whip this up in no time? Let’s dive into the delicious details!

Why You’ll Love These Big Mac Wraps?

Quick and Easy: The Big Mac Wraps come together in just minutes, making them perfect for busy weeknights or late-night cravings.

Guilt-Free Comfort: Enjoy all the classic flavors of your favorite burger in a healthier, customizable format that satisfies your comfort food cravings without the fast-food guilt.

Versatile Filling: Feel free to swap ground beef for turkey or chicken, and add your favorite toppings. You can easily make them your own!

Crowd Pleaser: Perfect for family dinners or gatherings, these wraps will impress everyone at the table. Pair them with some French fries or a fresh coleslaw for a complete meal.

Simple Ingredients: With only a few basic ingredients, they’re easy to whip up anytime, ensuring you can enjoy homemade comfort anytime the craving strikes!

Big Mac Wraps Ingredients

For the Special Sauce

  • Mayonnaise – Base for the sauce, providing creaminess. Substitution: Greek yogurt for a tangy, protein-rich option.
  • Dill Pickles – Adds tangy flavor to the sauce and crunch to the wrap. Use chopped gherkins if unavailable.
  • Yellow Mustard – Provides acidity and a hint of spice. Can substitute with Dijon mustard for a different flavor nuance.
  • White Vinegar – Enhances the flavor of the sauce. Lemon juice can be used as an alternative.
  • Paprika – Adds warmth and color to the sauce. Smoked paprika can provide a deeper flavor.
  • Garlic Powder – Flavors the special sauce. Fresh minced garlic can be used for a bolder taste.
  • Onion Powder – Enhances the overall flavor profile. Fresh onion can substitute but adjust quantity to taste.

For the Wrap Filling

  • Lean Ground Beef – Main protein, providing a hearty element. Ground turkey can be used for a leaner alternative.
  • Onion (finely chopped) – Adds sweetness and moisture to the beef. Shallots can be substituted for a milder taste.
  • Salt and Pepper – Essential seasonings to enhance flavors. Adjust to taste.

For Assembly

  • Flour Tortillas (large) – Wrap base, holding all fillings together. Corn tortillas work for a gluten-free option.
  • Shredded Lettuce – Provides crunch and freshness. Spinach can be used for a nutrient boost.
  • Shredded Cheddar Cheese – Adds creaminess and richness. Monterey Jack or mozzarella can substitute for a milder flavor.
  • Dill Pickle Slices (optional) – Additional garnish for crunch and tang. Sweet pickles can be used for a different flavor.
  • Olive Oil – Used for cooking beef and onions. Can use vegetable oil if preferred.

Dive into this delicious Big Mac Wraps recipe and savor every bite!

Step‑by‑Step Instructions for Big Mac Wraps Recipe

Step 1: Prepare the Special Sauce
In a mixing bowl, combine 1 cup of mayonnaise, 2 tablespoons of finely chopped dill pickles, 1 tablespoon of yellow mustard, 1 tablespoon of white vinegar, 1 teaspoon of paprika, 1/2 teaspoon of garlic powder, and 1/2 teaspoon of onion powder. Stir the mixture until smooth and well-blended. For the best flavor, refrigerate the sauce for at least 30 minutes while you prepare the other ingredients.

Step 2: Cook the Beef
Heat 1 tablespoon of olive oil in a large skillet over medium heat. Add 1/2 cup of finely chopped onion and sauté for about 3–4 minutes until soft and translucent. Next, add 1 pound of lean ground beef to the skillet. Season with salt and pepper to taste, breaking the beef apart with a spatula. Cook for 5–7 minutes until it is browned and fully cooked. Drain any excess grease from the skillet.

Step 3: Assemble the Wraps
To make wrapping easier, briefly warm 4 large flour tortillas in a clean skillet over low heat for 20 seconds on each side. Spread a generous tablespoon of the special sauce onto each tortilla. Next, layer with about 1/4 cup of the cooked beef mixture, followed by a handful of shredded lettuce and a sprinkle of shredded cheddar cheese. If using, add a few dill pickle slices for extra crunch.

Step 4: Wrap and Serve
Carefully fold in the sides of each tortilla, then roll it tightly from the bottom up to create a secure wrap. To help maintain their shape, slice each wrap in half with a sharp knife. Serve your delicious Big Mac Wraps immediately, enjoying their creamy, tangy flavor and satisfying crunch!

Big Mac Wraps Recipe Substitutes

Feel free to get creative with your Big Mac Wraps; there are countless ways to personalize this delicious dish!

  • Dairy-Free: Substitute shredded cheese with a plant-based cheese alternative or skip it entirely for a lighter option.
    Many people love to explore dairy-free alternatives, making these wraps enjoyable for everyone!

  • Gluten-Free: Swap regular flour tortillas for gluten-free tortillas made from corn or almond flour.
    This small change allows those with gluten sensitivities to enjoy the same delightful flavors without worry.

  • Protein Swap: Use ground turkey or chicken instead of beef for a leaner protein source.
    You’ll still get that satisfying taste with fewer calories.

  • Extra Veggies: Add diced tomatoes, diced bell peppers, or avocado for a flavor boost and nutritional oomph.
    Each additional ingredient adds its unique crunch and flavor, making each bite exciting!

  • Spicy Kick: For a bit of heat, toss in diced jalapeños or add a few dashes of your favorite hot sauce to the special sauce.
    This twist elevates the dish, bringing out bold flavors anyone can enjoy!

  • Tortilla Variety: Use lettuce leaves instead of tortillas for a fresh and low-carb alternative.
    Wrapping with lettuce gives a crunch like a taco while reducing carbs significantly.

  • Healthy Sauce: Replace mayonnaise with Greek yogurt for a tangier, healthier special sauce.
    This easy switch brings premium creaminess while sneaking in extra protein!

Feeling inspired? If you loved these wraps, why not try some additional comfort food options like Mexican Taco Soup or Garlic Chicken Wraps for your next meal? Enjoy cooking!

Make Ahead Options

These Big Mac Wraps are an excellent choice for meal prep! You can prepare the special sauce and the cooked beef mixture up to 3 days in advance. Simply refrigerate the sauce and beef separately in airtight containers to maintain their flavors and textures. When you’re ready to serve, warm the tortillas slightly (20 seconds in a skillet is perfect), spread the sauce, add the beef, lettuce, and cheese, and roll them up tightly. This way, you’ll have a quick and satisfying meal that tastes just as delicious as when made fresh—perfect for busy weeknights!

How to Store and Freeze Big Mac Wraps

Fridge: Store leftover Big Mac Wraps in an airtight container for up to 3 days to maintain freshness and flavor.

Freezer: For longer storage, wrap the beef mixture tightly in plastic wrap and place it in a freezer-safe bag for up to 2 months. Reheat from frozen before assembling.

Reheating: To reheat, warm individual wraps in the microwave for about 30 seconds, or in a skillet over medium heat until heated through, ensuring the tortillas don’t become soggy.

Tip: If you plan to freeze, consider holding off on adding lettuce and cheese until you’re ready to serve for the best texture.

Expert Tips for Big Mac Wraps

  • Fresh Ingredients: Use fresh produce and quality meat for the best flavor. Fresh lettuce and cheese will enhance the enjoyment of your Big Mac Wraps.

  • Customize Your Sauce: Feel free to tweak the sauce by adding more mustard for a tangy kick or extra dill pickles for crunch.

  • Don’t Overcook the Beef: Cook the ground beef just until browned to prevent it from becoming dry. Drain excess grease to avoid soggy wraps.

  • Warm Tortillas: Warm the tortillas before wrapping to make them more pliable, ensuring your Big Mac Wraps hold together without tearing.

  • Garnish Smartly: Experiment with optional toppings like jalapeños for heat or tomatoes for added freshness—this is your opportunity to get creative!

What to Serve with Big Mac Wraps

A satisfying meal is just around the corner with these flavorful wraps ready to shine alongside your favorite sides!

  • Crispy French Fries: The classic side, golden and crunchy, pairs perfectly with the wraps’ savory flavors, making each bite irresistible.

  • Homemade Coleslaw: This crunchy, creamy side adds freshness and texture, balancing out the rich richness of the wraps with its zesty taste.

  • Sweet Potato Fries: A sweet twist that offers a touch of earthiness, these fries complement the wraps beautifully while adding a vibrant color to your plate.

  • Garlic Breadsticks: Soft and buttery, these sticks deliver a delightful garlic aroma, inviting you to savor the wraps in a comforting and cozy manner.

  • Fresh Garden Salad: Crisp greens and colorful veggies dressed in a light vinaigrette create a refreshing counterpoint to the hearty, creamy wraps.

  • Cheesy Queso Dip: This warm, cheesy dip adds fun and excitement to your meal. Dip your wraps for a decadent flavor explosion!

  • Refreshing Lemonade: A tangy drink elevates the meal experience, cleansing your palate between bites of the deliciously rich wraps.

  • Chocolate Chip Cookies: For a sweet finish, these warm, gooey cookies spark joy and nostalgia, rounding off your meal on a deliciously happy note.

Big Mac Wraps Recipe FAQs

What should I look for when selecting ground beef?
When choosing ground beef, look for meat that’s bright red with minimal dark spots. Opt for lean varieties (90% or higher) for a healthier wrap. If you’re sensitive to fat, ground turkey or chicken can act as a splendid alternative, providing a lighter option without sacrificing flavor.

How should I store leftover Big Mac Wraps?
Absolutely! Store any leftover Big Mac Wraps in an airtight container in the refrigerator for up to 3 days. Make sure they cool down before sealing to maintain freshness. For optimal taste, reheat in a skillet to avoid sogginess.

Can I freeze the ingredients for my Big Mac Wraps?
Yes! If you’d like to pre-prep, wrap the cooked beef mixture tightly in plastic wrap or a freezer-safe bag. It can be frozen for up to 2 months. To use, simply thaw it in the fridge overnight and reheat before assembling your wraps. I often freeze the beef and whip up fresh fixings for a quick meal!

What dietary substitutions can I make for this recipe?
For a gluten-free option, substitute flour tortillas with corn tortillas. If you have dairy allergies, swap out the shredded cheese for avocado or omit it completely. Additionally, Greek yogurt can replace mayonnaise for a healthier spin on the special sauce—fun and nutritious!

Why are my Big Mac Wraps falling apart?
This can happen if the tortillas are too cold or if you’ve overfilled them. I recommend warming your tortillas for about 20 seconds on each side, which makes them more pliable. Also, be cautious not to overflow your fillings; a quarter cup of meat and a mount of toppings should do the trick for a perfect wrap!

Big Mac Wraps Recipe

Big Mac Wraps Recipe: A Fun Twist on a Fast Food Classic

Enjoy flavorful Big Mac Wraps that bring the essence of a classic burger in a quick and easy wrap format.
Prep Time 30 minutes
Cook Time 10 minutes
Total Time 40 minutes
Servings: 4 wraps
Course: Lunch
Cuisine: American
Calories: 400

Ingredients
  

Special Sauce
  • 1 cup mayonnaise Substitution: Greek yogurt for a tangy, protein-rich option.
  • 2 tablespoons dill pickles Use chopped gherkins if unavailable.
  • 1 tablespoon yellow mustard Can substitute with Dijon mustard for a different flavor nuance.
  • 1 tablespoon white vinegar Lemon juice can be used as an alternative.
  • 1 teaspoon paprika Smoked paprika can provide a deeper flavor.
  • 1/2 teaspoon garlic powder Fresh minced garlic can be used for a bolder taste.
  • 1/2 teaspoon onion powder Fresh onion can substitute but adjust quantity to taste.
Wrap Filling
  • 1 pound lean ground beef Ground turkey can be used for a leaner alternative.
  • 1/2 cup onion (finely chopped) Shallots can be substituted for a milder taste.
  • to taste salt Essential seasoning to enhance flavors.
  • to taste black pepper Essential seasoning to enhance flavors.
Assembly
  • 4 large flour tortillas Corn tortillas work for a gluten-free option.
  • 1 cup shredded lettuce Spinach can be used for a nutrient boost.
  • 1 cup shredded cheddar cheese Monterey Jack or mozzarella can substitute for a milder flavor.
  • to taste dill pickle slices (optional) Sweet pickles can be used for a different flavor.
  • 1 tablespoon olive oil Can use vegetable oil if preferred.

Equipment

  • Large skillet
  • Mixing Bowl

Method
 

Preparation Steps
  1. In a mixing bowl, combine mayonnaise, dill pickles, yellow mustard, white vinegar, paprika, garlic powder, and onion powder. Stir until smooth and refrigerate for at least 30 minutes.
  2. Heat olive oil in a large skillet over medium heat. Add chopped onion and sauté for 3-4 minutes until soft. Add ground beef, season with salt and pepper, and cook for 5-7 minutes until browned. Drain excess grease.
  3. Warm tortillas in a skillet for 20 seconds on each side. Spread special sauce on each tortilla, then add cooked beef, shredded lettuce, and cheddar cheese. Add dill pickle slices if desired.
  4. Fold in the sides of each tortilla and roll tightly. Slice each wrap in half and serve immediately.

Nutrition

Serving: 1wrapCalories: 400kcalCarbohydrates: 30gProtein: 20gFat: 22gSaturated Fat: 5gPolyunsaturated Fat: 1gMonounsaturated Fat: 14gCholesterol: 60mgSodium: 800mgPotassium: 300mgFiber: 2gSugar: 2gVitamin A: 500IUVitamin C: 5mgCalcium: 200mgIron: 2mg

Notes

Use fresh ingredients for the best flavor. Customize your sauce or toppings to enhance the experience.

Tried this recipe?

Let us know how it was!

Delightful Spam Musubi: Your New Favorite Hawaiian Snack

As I strolled through a bustling Hawaiian market, the warm aroma of savory snacks enveloped me, leading me to the radiant colors of Spam Musubi. Each bite of this handheld delicacy combines the umami of soy-glazed Spam with fluffy, sticky rice, all expertly wrapped in a delicate nori strip. What I love most about this Easy Spam Musubi recipe is its flexibility; you can enhance it with scrambled eggs or grilled pineapple to suit your cravings. Plus, it’s a breeze to whip up, making it the ultimate snack for a busy day or a delightful addition to a picnic spread. Are you ready to bring a touch of Hawaiian sunshine to your kitchen?

Why is Spam Musubi so popular?

Handheld Convenience: Perfectly portable, Spam musubi is an ideal snack for busy days, picnics, or lunchboxes.

Flavorful Layers: Experience the delightful contrast of savory Spam and fluffy rice, enhanced by a flavorful soy glaze.

Customization Galore: Tailor your musubi to your taste by adding scrambled eggs, grilled pineapple, or even your favorite toppings like furikake.

Quick and Easy: This simple recipe relies on basic cooking skills, making it achievable for everyone – from novice cooks to seasoned chefs!

Cultural Comfort: As a beloved Hawaiian dish influenced by Japanese cuisine, enjoying Spam musubi feels like a cozy hug from the islands.

Perfect for Sharing: Bring joy to friends and family with this delicious treat that’s sure to impress at gatherings or parties.

Spam Musubi Ingredients

• Get ready to create a delightful Hawaiian snack!

For the Rice

  • Uncooked short-grain white rice – Provides a sticky base, essential for holding the musubi together; substitute with Calrose for similar results.
  • Water – Necessary for cooking rice; ensure the right ratio for the perfect fluffy texture.

For the Spam Glaze

  • Spam – The star protein; slice into rectangular pieces for a satisfying bite; alternatives include turkey Spam or other canned meats.
  • Soy sauce – Adds umami and saltiness to the glaze; opt for low-sodium for a healthier choice.
  • Dark brown sugar – Provides sweetness and enhances caramelization; honey or light brown sugar can be used as a substitute.
  • Mirin – Adds mild acidity and depth; can be replaced with sugar mixed with water if unavailable.
  • Seasoned rice vinegar (optional) – Adds extra tang to the rice; skip if you don’t have it on hand.
  • Sesame oil (optional) – Contributes nuttiness; can be omitted if desired.

For Frying and Wrapping

  • Vegetable oil – Essential for pan-frying Spam; alternatives include olive or canola oil.
  • Sushi nori – Holds everything together; can be cut into strips for a neat presentation; plain nori works as a substitute.
  • Furikake (optional) – A tasty topping that adds umami; feel free to swap with sesame seeds or omit it altogether.

With these ingredients in hand, you’re set to bring the taste of Hawaii right to your kitchen with this irresistible Spam Musubi!

Step‑by‑Step Instructions for Spam Musubi

Step 1: Cook the Rice
Begin by rinsing 2 cups of uncooked short-grain white rice under cold water until the water runs clear, removing excess starch. Next, combine the rinsed rice and 2 cups of water in a rice cooker or pot. Bring it to a boil, then reduce the heat and cover to simmer for 15 minutes. Once cooked, let it steam off heat for an additional 10 minutes, until fluffy.

Step 2: Cut the Spam
While the rice is cooking, slice the Spam into 8 rectangular pieces, each about 3/8-inch thick. Use a sharp knife for clean cuts, allowing each piece to be uniform for even cooking. Set the slices aside on a cutting board, ready for frying. This step is crucial as it ensures that each bite of your Spam Musubi has a satisfying texture.

Step 3: Make the Glaze
In a medium bowl, whisk together ¼ cup of soy sauce, 2 tablespoons of dark brown sugar, 1 tablespoon of mirin, 1 teaspoon of seasoned rice vinegar, and 1 teaspoon of sesame oil (if using). Combine until the sugar is dissolved, creating a glossy glaze that will enhance the flavor of your Spam. Keep this mixture handy as it will be added shortly to make your Spam Musubi deliciously savory.

Step 4: Sear the Spam
Heat 2 tablespoons of vegetable oil in a large skillet over medium-high heat. Once hot, add the sliced Spam and fry each piece for about 2-3 minutes per side until golden brown and slightly crispy. Be sure to watch for that rich caramelization, as it adds depth to the Spam’s flavor. After frying, transfer the Spam slices to a plate.

Step 5: Add the Glaze
Pour the prepared glaze into the hot skillet and stir gently as it bubbles. Coat the fried Spam pieces in the glaze, simmering for about 1-2 minutes per side until it thickens slightly. This step enriches your Spam with flavorful, sticky goodness, making it irresistible. Once ready, remove the Spam from heat and set aside.

Step 6: Cut the Nori
While the Spam cools slightly, take your sushi nori sheets and cut them into strips approximately 2 inches wide. You’ll need enough strips to wrap each piece of Spam Musubi, so prepare a few extras in case you need them. This nori will provide a delicious contrast to the savory Spam and fluffy rice.

Step 7: Build the Musubi
To assemble, first take a musubi mold (or use your hands) and fill it with the warm, fluffy rice, pressing down firmly to create a compact layer about ¾ to 1 inch thick. Place a slice of glazed Spam on top of the rice and then repeat with another layer of rice if desired. Ensure a good balance of rice and Spam in each portion for perfect Spam Musubi.

Step 8: Wrap
Carefully slide the nori strip under the assembled musubi, then fold the nori over the rice and Spam. Use a little water on your fingers to moisten the edge of the nori to help it seal together tightly. This wrapping technique is key for holding everything intact, ensuring your Spam Musubi stays together when handled.

Step 9: Serve
Your Spam Musubi is now ready to enjoy! While they are best served warm, you can wrap them individually for on-the-go snacking or pack them in lunchboxes. Whether it’s a picnic or a quick snack at home, delight in every comforting bite of this portable Hawaiian treat!

Expert Tips for Spam Musubi

  • Rinse Thoroughly: Rinsing the short-grain rice until the water runs clear is essential to eliminate excess starch, preventing a gummy texture in your Spam Musubi.

  • Perfect Sear: Ensure your Spam slices are golden brown by frying them over medium-high heat. This enhances flavor while avoiding sogginess – nobody wants that!

  • Musubi Mold Magic: Using a musubi mold helps achieve uniform shapes. If you don’t have one, a clean can or your hands will work in a pinch for shaping.

  • Seal it Right: When wrapping with nori, use a bit of water to moisten the edge so it seals properly. This prevents unwrapping when you’re ready to enjoy your delicious Spam Musubi.

  • Customize with Ease: Don’t hesitate to personalize your Spam Musubi by adding scrambled eggs or grilled pineapple. Make it truly yours while savoring that Hawaiian influence!

How to Store and Freeze Spam Musubi

Room Temperature: Wrapped individually, Spam Musubi can be stored at room temperature for up to 3 days; be sure to keep them in an airtight container to maintain freshness.

Fridge: For longer storage, place the wrapped musubi in the fridge, where they will stay fresh for up to a week. Reheat in the microwave before serving for best results.

Freezer: Freeze unmarred musubi for up to 3 months. Wrap each piece tightly in plastic wrap and aluminum foil, removing as much air as possible to prevent freezer burn.

Reheating: To reheat, unwrap and microwave on low power in short increments, keeping an eye on them to avoid overheating. Enjoy the delightful flavors of Spam Musubi any time!

Make Ahead Options

These Easy Spam Musubi are perfect for meal prep enthusiasts! You can prepare the rice and glaze up to 24 hours in advance, storing them separately in the refrigerator. Cook the rice and let it cool before placing it in an airtight container to maintain its fluffy texture. The glaze should be stored in a sealed jar to keep the flavors intact. Additionally, you can slice the Spam and store it in the fridge for up to 3 days. When you’re ready to serve, simply pan-fry the sliced Spam, coat it with the glaze until sticky, and assemble your musubi. This way, you’ll enjoy delicious, homemade Spam Musubi with minimal effort on busy days!

Spam Musubi Variations & Substitutions

Feel free to unleash your creativity with this delightful snack and customize it to your heart’s content!

  • Eggy Addition: Stir in scrambled eggs for a protein-packed twist, perfect for breakfast lovers. The creamy, fluffy texture elevates the musubi, creating a delightful morning treat.

  • Tropical Sweetness: Incorporate grilled pineapple slices for an irresistible sweet contrast to savory Spam. This addition brings a sunny flavor reminiscent of Hawaiian beaches, making every bite a mini-vacation!

  • Vegan Friendly: Swap Spam for marinated tofu or tempeh for a plant-based version. Seasoning is key; ensure it’s well marinated to layer in flavors that match the savory essence of traditional Spam.

  • Sushi-Inspired: Add avocado slices for a creamy texture and added nutrients. The richness of avocado complements the dish beautifully, bringing a little California twist to this Hawaiian classic.

  • Spice It Up: Add jalapeño slices or chili oil for a spicy kick. For those who enjoy heat, this variation will bring your musubi to life with vibrant flavors that dance on your taste buds.

  • Different Grains: Experiment with brown rice or quinoa for a heartier base. These swaps add a nutty flavor while providing extra fiber, making your snack even healthier.

  • Flavor Boost: Mix some furikake or toasted sesame seeds into the rice for an umami punch. This small addition transforms the simple rice layer into something unforgettable.

  • Nutritional Boost: Stir in some spinach or kale into the rice before wrapping. This vibrant addition not only adds a pop of color but also a nutritious element to your snack!

With so many delicious variations, you can enjoy Spam Musubi tailored to your taste preferences. Embrace the creativity and enjoy your cooking adventure! For additional inspiration, check out our other recipes that highlight fun twists on classic flavors.

What to Serve with Easy Spam Musubi?

There’s nothing quite like the comforting allure of a homemade meal, especially when it’s paired with delightful accompaniments that elevate your lunch or snack experience.

  • Coconut Rice: The subtle sweetness and creaminess of coconut rice enhance the savory notes of Spam musubi, creating a tropical harmony on your plate. It’s like a mini-vacation in every bite!

  • Grilled Pineapple Slices: Adding juicy, caramelized pineapple adds a refreshing sweetness that contrasts beautifully with the salty Spam, making every bite an explosion of flavors.

  • Edamame Beans: These lightly salted, tender beans provide a pleasing crunch and fresh flavor, balancing out the rich Spam musubi while offering a protein-packed boost.

  • Seaweed Salad: With its umami taste and vibrant texture, seaweed salad complements the dish’s flavors, introducing a pleasant oceanic touch, perfect for any Hawaiian-themed meal.

  • Pickled Vegetables: Adding some tangy, crunchy pickled vegetables can cut through the richness of the musubi, offering a delightful textural contrast and a zesty kick.

  • Mango Lassi: A refreshing mango lassi can provide a sweet coolness that perfectly offsets the savory musubi, creating a delightful beverage pairing that captures the essence of the islands.

  • Hibiscus Iced Tea: This vibrant drink brings floral and fruity notes while cooling down the palate, making it a delightful companion that refreshes and invigorates your meal.

  • Chocolate-Covered Macadamia Nuts: For a sweet treat, these nutty delights offer a crunchy texture and a touch of decadence, wrapping up your meal with a satisfying and flavorful finish.

Spam Musubi Recipe FAQs

How do I choose ripe ingredients for Spam Musubi?
Absolutely! For the best Spam Musubi, using fresh ingredients is key. Look for short-grain white rice that is free from any dark spots or damage; it should feel clean and free-flowing. When selecting Spam, ensure the can is undamaged and within its expiration date. For nori sheets, choose ones that are dark green and free from discoloration, as this indicates freshness.

What is the best way to store Spam Musubi?
Very important! Wrap each Spam Musubi individually in plastic wrap and place them in an airtight container. They can stay fresh at room temperature for up to 3 days. If you wish to store them longer, place the wrapped musubi in the fridge for up to a week. When ready to enjoy, simply reheat in the microwave for about 30 seconds, checking to ensure they’re warm but not overcooked.

Can I freeze Spam Musubi?
Certainly! To freeze Spam Musubi, wrap each piece tightly in plastic wrap followed by aluminum foil, sealing out as much air as possible to prevent freezer burn. They can be frozen for up to 3 months. When ready to eat, thaw them overnight in the fridge and heat them in the microwave for about 1 minute or until warmed through. Enjoy your delightful Hawaiian snack anytime!

What should I do if my Spam becomes soggy?
No worries! To avoid soggy Spam, ensure you sear the slices until they are golden brown and crispy on the outside. If your Spam does end up soggy, try reheating it in a pan over medium heat for a few minutes, allowing the moisture to evaporate and revive its crispy texture. It’s all about patience and care—just like with any cherished family recipe!

Are there any dietary considerations for Spam Musubi?
Absolutely! If you or your loved ones have allergies, it’s crucial to check the labels of your ingredients, especially the soy sauce, which often contains wheat. For gluten-free options, look for gluten-free soy sauce. Also, for those following a vegetarian or vegan diet, consider substituting Spam with grilled tofu or other favored proteins. There’s flexibility in this recipe to cater to various dietary needs!

Can I customize my Spam Musubi?
The more the merrier! Spam Musubi is highly customizable to suit your cravings. You can add layers of scrambled eggs for extra protein or incorporate grilled pineapple for a sweet, tropical twist. Feel free to experiment with different toppings like furikake or sesame seeds to elevate the flavor profile further. Enjoy making this dish your own!

Spam Musubi

Delightful Spam Musubi: Your New Favorite Hawaiian Snack

Experience the delightful taste of Spam Musubi, a savory Hawaiian snack combining soy-glazed Spam with sticky rice, wrapped in nori.
Prep Time 20 minutes
Cook Time 30 minutes
Cooling Time 10 minutes
Total Time 1 hour
Servings: 8 pieces
Course: Lunch
Cuisine: Hawaiian
Calories: 250

Ingredients
  

For the Rice
  • 2 cups uncooked short-grain white rice Substitute with Calrose for similar results.
  • 2 cups water Necessary for cooking rice.
For the Spam Glaze
  • 1 can Spam Slice into rectangular pieces. Alternatives include turkey Spam.
  • 1/4 cup soy sauce Opt for low-sodium for a healthier choice.
  • 2 tablespoons dark brown sugar Honey or light brown sugar can be used as a substitute.
  • 1 tablespoon mirin Can be replaced with sugar mixed with water.
  • 1 teaspoon seasoned rice vinegar Optional.
  • 1 teaspoon sesame oil Optional.
For Frying and Wrapping
  • 2 tablespoons vegetable oil Alternatives include olive or canola oil.
  • 4 sheets sushi nori Can be cut into strips.
  • 1 tablespoon furikake Optional; can substitute with sesame seeds.

Equipment

  • Rice cooker
  • Large skillet
  • Musubi mold

Method
 

Step-by-Step Instructions
  1. Rinse 2 cups of uncooked short-grain white rice under cold water until clear. Combine with 2 cups of water in a rice cooker or pot and cook.
  2. Slice Spam into 8 pieces, each about 3/8-inch thick. Set aside.
  3. In a bowl, whisk together 1/4 cup soy sauce, 2 tablespoons dark brown sugar, 1 tablespoon mirin, 1 teaspoon seasoned rice vinegar, and 1 teaspoon sesame oil until sugar dissolves.
  4. Heat 2 tablespoons vegetable oil in a skillet. Add Spam slices and fry for 2-3 minutes until golden brown.
  5. Pour glaze into the skillet and coat Spam, simmering for 1-2 minutes until it thickens.
  6. Cut sushi nori into strips approximately 2 inches wide.
  7. To assemble, fill a musubi mold with warm rice, press down, place a slice of glazed Spam on top, and add another layer of rice if desired.
  8. Wrap with nori; moistening the edges to seal.
  9. Serve warm or wrap individually for on-the-go snacking.

Nutrition

Serving: 1pieceCalories: 250kcalCarbohydrates: 40gProtein: 10gFat: 7gSaturated Fat: 2gCholesterol: 30mgSodium: 800mgPotassium: 200mgFiber: 1gSugar: 5gCalcium: 1mgIron: 6mg

Notes

Customize your Spam Musubi by adding scrambled eggs or grilled pineapple for a unique twist.

Tried this recipe?

Let us know how it was!

Fridge Pickled Vegetables: Quick, Crisp, and Full of Flavor

With the crunch of fresh vegetables and a zingy flavor that dances on your palate, these Quick Fridge Pickled Vegetables are the ideal addition to your mealtime repertoire. You won’t believe how quickly they come together—ready in just 17 minutes—making them a fantastic option for busy weeknights or impromptu gatherings. Whether you’re enhancing tacos, salads, or simply craving a healthy snack, this recipe offers both a vibrant taste and a low-calorie boost to your dishes. Plus, the beauty of fridge pickling is that you don’t need any canning equipment—you can enjoy your delightful, tangy treats right away! What veggie combinations are you excited to try?

Why make fridge pickled vegetables?

Quick and Easy: You can whip up these crisp goodies in just 17 minutes, making them a no-brainer for busy days.
Customizable: Feel free to swap in your favorite vegetables, such as zucchini or bell peppers, to create flavors that fit your taste.
Crisp and Crunchy: Enjoy the satisfying bite of fresh vegetables infused with a zesty pickling liquid that elevates any meal.
Healthy Snack: With low calories and packed with nutrients, these fridge pickled vegetables are a guilt-free way to satisfy your cravings.
No Canning Required: Skip the canning hassle and enjoy immediate gratification! Just make, chill, and serve—perfect for spontaneous gatherings.
Vibrant Flavor: The blend of vinegar, garlic, and herbs creates an explosion of taste, enhancing everything from tacos to salads. So, what are you waiting for? Give this a try today!

Fridge Pickled Vegetables Ingredients

For the Vegetables

  • Carrots – Adds sweetness and crunch; you can use pre-shredded for time-saving convenience.
  • Cucumber – Provides a refreshing crunch, but feel free to substitute with zucchini or bell peppers for variety.
  • Radish – Introduces a peppery flavor and vibrant color; optional to swap with jicama for a milder taste.
  • Onion – Offers a savory depth; red onion can add a hint of sweetness.
  • Garlic – Infuses aromatic flavor; adjust the amount according to your preferred intensity.

For the Pickling Liquid

  • Vinegar – Essential for creating the tangy base; try white wine, apple cider, or rice vinegar for distinct flavors.
  • Sea Salt – Enhances flavor and aids in preservation.
  • Sugar – Balances acidity; it can be reduced or replaced with honey or agave for natural sweetness.
  • Oregano – Adds herbal notes; feel free to substitute with dill or thyme for different flavor profiles.

Enjoy experimenting with these fridge pickled vegetables, as they make for a quick preparation that you can relish immediately!

Step‑by‑Step Instructions for Quick Fridge Pickled Vegetables

Step 1: Prepare the Jar
Start by washing a medium-large mason jar thoroughly with hot, soapy water, then rinse well. Ensure it’s completely dry before using, as any moisture can affect the pickling process. This will be the vessel for your fridge pickled vegetables, so a clean jar sets the stage for delicious results.

Step 2: Slice the Vegetables
If you’re not using pre-shredded carrots, take whole carrots and slice them into matchsticks along with cucumbers and radishes. Aim for uniform pieces to ensure even pickling and a beautiful presentation. As you chop, enjoy the vibrant colors and crisp textures of your fresh vegetables that will make these fridge pickled vegetables a delight to eat!

Step 3: Heat the Pickling Liquid
In a medium saucepan, combine equal parts water and vinegar. Heat the mixture over medium-high until it reaches a gentle boil, producing steam and small bubbles. This step is vital for dissolving the sugar and salt, which helps create a flavorful pickling brine that penetrates your vegetables beautifully.

Step 4: Mix in Seasonings
Once boiling, carefully add chopped green onion, minced garlic, sea salt, oregano, and sugar to the saucepan. Stir continuously until the sugar dissolves, which takes about 1-2 minutes. Once everything is smoothly blended, remove the pot from the heat and let it cool down for about 5-10 minutes. You want it warm, not scalding, to protect the veggies’ crunch.

Step 5: Pack the Vegetables
Gently pack the sliced vegetables into the prepared mason jar. Tightly layer them to maximize space without crushing them. This meticulous arrangement ensures that each crunchy bite of your fridge pickled vegetables is luscious and flavorful, as every piece will soak in the brine marinated in the jar.

Step 6: Add the Pickling Liquid
Carefully pour the cooled pickling liquid over the packed vegetables, ensuring all pieces are submerged. If needed, use a spoon to help push them down gently. This step is crucial for the brining process, allowing the flavors to meld beautifully with the vegetables in your fridge pickled vegetables.

Step 7: Cool and Refrigerate
Allow the jar to cool to room temperature for about 10-15 minutes. Once it’s cooled, seal it tightly with the lid and place it in the refrigerator. The quick fridge pickled vegetables will be ready to enjoy within a few hours, but waiting overnight enhances their flavor even more!

Step 8: Serve and Enjoy
After letting the vegetables marinate, they are ready to accompany your meals. Enjoy them as toppings for tacos, in salads, or as a crunchy snack on their own. The vibrant colors and tangy flavors of your quick fridge pickled vegetables will bring joy and freshness to any dish you create.

What to Serve with Quick Fridge Pickled Vegetables

Discover the delightful pairings that will elevate your meal and complement the vibrant crunch of these pickled delights.

  • Grilled Chicken: The smoky flavor from the grill perfectly contrasts the tanginess of the pickles, adding depth to your meal.
  • Crispy Fish Tacos: The crunchy pickles work wonders as a refreshing topping, cutting through the richness of the fish and enhancing every bite.
  • Quinoa Salad: A light and nutritious base that harmonizes the zesty flavors of the pickled vegetables, creating a filling yet refreshing dish.
  • Roasted Shrimp Skewers: The sweet and savory shrimp pairs beautifully with the zesty crunch of the pickles, making for a delightful summer meal.
  • Spicy Black Bean Soup: Add a dollop of these fridge pickled vegetables on top to introduce a bright contrast to the robust flavors of the soup.
  • Cheese and Charcuterie Board: Include these pickled veggies to give the board a zing that harmonizes with creamy cheeses and savory meats.
  • Craft Beer: A light lager or citrusy IPA can beautifully complement the tangy flavors, enhancing your dining experience significantly.
  • Fresh Fruit Salad: Serve sliced fruits alongside for a refreshing contrast to the pickles; the natural sweetness balances their tanginess perfectly.
  • Chips and Guacamole: The pickles add a crisp texture against the creaminess of guacamole, making it the ultimate snacking combo for gatherings.

Fridge Pickled Vegetables: Flavorful Variations!

Feel free to tailor your fridge pickled vegetables to your taste and cravings with these exciting swaps and enhancements!

  • Spicy Kick: Add sliced jalapeños or red pepper flakes for a delightful heat that elevates the flavor profile.
    With just a touch of spice, you’ll awaken your taste buds and make these pickles a zesty highlight in your meals!

  • Herb Infusion: Experiment with fresh herbs like dill or cilantro instead of oregano for unique aromatic layers.
    Infusing fresh herbs brings a bright, garden-fresh essence to your pickles, making each bite even more delightful.

  • Fruit Twist: Mix in thin slices of fruits like pears or apples for a sweet contrast against the tanginess.
    Imagine the sweetness of fruit paired with the crisp vegetables—it’s a cheerful and surprising treat that brightens your palate!

  • Alternative Vinegars: Swap out traditional vinegar for flavored versions such as balsamic or red wine for varied tastes.
    A different vinegar can completely transform the flavor experience, giving you endless opportunities to please your palate!

  • Crunch Boost: Include cauliflower florets or asparagus in addition to your veggies for extra texture and crunch.
    The variety of shapes and crunch levels makes each serving a colorful adventure, perfect for snacking or salads.

  • Sweetness Adjustment: Use honey or agave syrup instead of sugar to keep it refined-sugar-free yet delightful.
    Adjusting the sweetness creates a compelling balance while catering to your dietary preferences.

  • Pickling Broth Depth: Introduce spices like mustard seeds or coriander to your pickling liquid for an aromatic twist.
    These spices deepen the flavor and create a complex experience with every crunchy bite of your pickles!

Whichever variation you choose, these quick fridge pickled vegetables will never let you down! Mix and match to suit your meals, and relish the creative process!

Make Ahead Options

These Quick Fridge Pickled Vegetables are ideal for meal prep enthusiasts seeking flavorful, time-saving solutions! You can slice the vegetables and prepare the pickling liquid up to 24 hours in advance, allowing you to enjoy fresh pickles with less hassle. Simply store the chopped veggies in an airtight container and refrigerate them until you’re ready to assemble. When you’re ready to enjoy, heat the pickling liquid, combine it with the pre-prepped vegetables, and allow them to marinate at least 3 hours, or overnight for deeper flavor. This way, you’ll have bright, crunchy pickles on hand to enhance your meals whenever you need a quick and zesty addition!

Tips for the Best Fridge Pickled Vegetables

  • Rinse Thoroughly: Always rinse each vegetable individually before slicing. This helps maintain their crisp texture and cleanliness, ensuring the best fridge pickled vegetables.

  • Monitor Vinegar Heat: Heat the vinegar-sugar mixture just enough to dissolve the sugar. Overcooking can lead to a bitter taste, so keep it warm, not boiling.

  • Pack Tightly: When packing your vegetables in the mason jar, layer them tightly without crushing. This promotes even flavor absorption over time in your fridge pickled vegetables.

  • Cooling Time Matters: Allow the pickling liquid to cool properly before pouring over the vegetables. Pouring hot liquid can soften the veggies too much, losing that delightful crunch.

  • Flavor Variations: Don’t hesitate to experiment with different herbs, spices, or even add some heat with jalapeños. This allows you to customize your fridge pickled vegetables to your taste!

  • Storage Tips: Store your fridge pickled vegetables in an airtight jar in the refrigerator for up to two weeks. They’ll stay crisp while enhancing your meals!

Storage Tips for Fridge Pickled Vegetables

Fridge: Keep your fridge pickled vegetables stored in an airtight mason jar for up to two weeks. This ensures they stay fresh and maintain their crunchy texture while soaking up delicious flavors.

Room Temperature: Avoid leaving pickled vegetables at room temperature, as they should be refrigerated to preserve their quality and prevent spoilage.

Serving: To enjoy them at their best, serve your fridge pickled vegetables cold. If desired, you can leave them out for a few minutes before serving to take off the chill, enhancing their vibrant flavors.

Freezer: It’s best not to freeze pickled vegetables, as freezing can lead to a mushy texture and diminish their delightful crunch upon thawing.

Fridge Pickled Vegetables Recipe FAQs

How should I select ripe vegetables for my fridge pickled vegetables?
Absolutely! When choosing vegetables, opt for firm and vibrant options. Look for carrots that are crisp and free from dark spots, cucumbers that are smooth without blemishes, and radishes that are bright in color. Freshness is key to achieving that satisfying crunch in your fridge pickled vegetables!

How long can I store my fridge pickled vegetables?
You can keep your fridge pickled vegetables in an airtight mason jar for up to two weeks in the refrigerator. To maintain their delicious crunch, ensure the lid is sealed tight, and check for any signs of spoilage before consuming. They’re best enjoyed within the first week for that ultimate freshness!

Can I freeze my fridge pickled vegetables?
No, it’s not recommended to freeze pickled vegetables. Freezing tends to break down the cell walls, resulting in a mushy texture that can ruin their delightful crunch. Pickling is all about enjoying that fresh, crisp bite, so stick to refrigerating for the best results.

What should I do if my pickling liquid doesn’t cover the vegetables completely?
If the pickling liquid doesn’t cover the vegetables entirely, don’t worry! You can easily remedy this. Just mix a little more vinegar and water in equal proportions, then heat it up until warm and pour it over the veggies until they’re fully submerged. This extra step will ensure that every piece is infused with that zesty flavor!

Are these fridge pickled vegetables pet-friendly?
While fridge pickled vegetables are safe for humans, it’s essential to note that certain ingredients like garlic can be harmful to pets. Always make sure to keep your pickled jar away from curious pets and opt for plain, fresh veggies for your furry friends.

Can I customize the herbs and spices used in the recipe?
Very much! Feel free to get creative with your fridge pickled vegetables. You can substitute oregano with dill or thyme for unique flavors or even add some jalapeños for a spicy kick. The beauty of this recipe is the flexibility it provides for your taste preferences!

Fridge Pickled Vegetables

Fridge Pickled Vegetables: Quick, Crisp, and Full of Flavor

Fridge Pickled Vegetables are quick to prepare and packed with flavor, making them a perfect addition to meals.
Prep Time 17 minutes
Cooling Time 15 minutes
Total Time 32 minutes
Servings: 4 cups
Course: Appetizers
Cuisine: American
Calories: 50

Ingredients
  

For the Vegetables
  • 2 cups Carrots Shredded or sliced into matchsticks
  • 2 cups Cucumber Sliced
  • 1 cup Radish Sliced, optional to substitute with jicama
  • 1 medium Onion Red onion preferred for sweetness
  • 2 cloves Garlic Minced
For the Pickling Liquid
  • 1 cup Vinegar White wine, apple cider, or rice vinegar
  • 1 tablespoon Sea Salt
  • 1 tablespoon Sugar Can be reduced or replaced with honey
  • 1 teaspoon Oregano Substitute with dill or thyme if desired

Equipment

  • medium-large mason jar
  • medium saucepan

Method
 

Step-by-Step Instructions
  1. Prepare the jar by washing and drying a medium-large mason jar thoroughly.
  2. Slice the vegetables into uniform pieces for even pickling.
  3. Heat the pickling liquid by combining equal parts water and vinegar in a saucepan until it boils.
  4. Mix in the seasonings: add garlic, sea salt, oregano, and sugar to the boiling liquid.
  5. Pack the sliced vegetables into the mason jar tightly.
  6. Add the cooled pickling liquid over the packed vegetables, ensuring they are submerged.
  7. Cool to room temperature, then seal the jar and refrigerate.
  8. Serve after allowing the flavors to meld, ideally after a few hours or overnight.

Nutrition

Serving: 1cupCalories: 50kcalCarbohydrates: 10gProtein: 1gSodium: 300mgPotassium: 300mgFiber: 2gSugar: 3gVitamin A: 100IUVitamin C: 20mgCalcium: 5mgIron: 2mg

Notes

These fridge pickled vegetables can be customized with your favorite vegetables and stored in an airtight jar for up to two weeks.

Tried this recipe?

Let us know how it was!

Delicious Air Fryer Garlic Flatbread You Can’t Resist

As I plucked the golden Air Fryer Garlic Flatbread from the machine, the enticing aroma of garlic and herbs instantly transported me to a sun-drenched Mediterranean kitchen. This recipe has quickly become a staple in my home, not just for its delightful taste but for its amazing convenience. In under 30 minutes, you can whip up these light, fluffy creations that make perfect appetizers or serve as a wonderful base for your favorite toppings. The best part? It’s a healthier alternative to traditional flatbreads, using Greek yogurt and minimal oil without sacrificing flavor. So, are you ready to transform your next meal with this easy-to-make delight? Let’s dive in!

Why is this flatbread a must-try?

Quick and Easy: This Air Fryer Garlic Flatbread is ready in under 30 minutes, making it a fantastic choice for busy weeknights or spontaneous gatherings.

Healthier Alternative: With Greek yogurt and minimal oil, it’s a nutritious option that doesn’t compromise on flavor.

Versatile: Use it as a base for your favorite toppings or serve alongside delicious dips like hummus or tzatziki for a delightful snack.

Flexible Ingredients: Feel free to swap in whole wheat flour or add cheese for a unique twist.

Crowd-Pleaser: Its savory aroma and crispy texture will impress guests and family alike, making it a favorite at any table.

Air Fryer Garlic Flatbread Ingredients

For the Flatbread
All-purpose flour – Provides structure and chewiness. Substitution: Whole wheat flour for a denser flatbread.
Greek yogurt – Adds moisture and protein. Substitution: Regular yogurt, strained to remove excess water.
Baking powder – Helps the flatbread rise and become fluffy.
Salt – Enhances the flavor of the dough.

For the Flavoring
Olive oil – Contributes healthy fats for flavor and texture.
Garlic – Infuses flavor and offers health benefits.
Fresh parsley – Adds freshness and color.
Dried oregano – Provides a herby flavor profile.
Black pepper – Adds warmth and spice.

Step‑by‑Step Instructions for Air Fryer Garlic Flatbread

Step 1: Combine Dry Ingredients
In a large mixing bowl, whisk together 2 cups of all-purpose flour, 1 tablespoon of baking powder, and 1 teaspoon of salt until well blended. This mixture forms the base for your Air Fryer Garlic Flatbread, providing structure and chewiness. Make sure to incorporate the dry ingredients thoroughly to avoid any pockets of baking powder.

Step 2: Mix in Greek Yogurt
Add 1 cup of Greek yogurt to the flour mixture, gently folding it in using a spoon or your hands. Continue mixing until a dough forms; it should become slightly sticky but manageable. If the mixture appears too dry, feel free to add a tablespoon of water at a time until the dough reaches the right consistency.

Step 3: Knead the Dough
Turn the dough out onto a floured surface and knead it for about 5 minutes. Use the palms of your hands to roll and press the dough until it’s smooth and elastic. This step is crucial for developing the texture of the Air Fryer Garlic Flatbread, so don’t skip it. You’ll know it’s ready when the dough springs back when poked gently.

Step 4: Shape the Dough
Divide the kneaded dough into 6 equal portions, rolling each one into a ball. Flatten each ball slightly with your palms. This will make it easier to roll out later. Ensure each piece is uniform in size for even cooking in the air fryer, leading to perfectly crispy flatbreads.

Step 5: Roll Out Flatbreads
Using a rolling pin, roll each dough ball out into a flatbread shape, aiming for a thickness of about 1/4 inch. Dust the surface with a little flour to prevent sticking. Each Air Fryer Garlic Flatbread should be evenly shaped for consistent cooking and an appealing presentation when plated.

Step 6: Prepare Garlic Mixture
In a small bowl, combine 2 tablespoons of olive oil, 3 minced garlic cloves, 2 tablespoons of chopped fresh parsley, 1 teaspoon of dried oregano, and a pinch of black pepper. Mix well so that the garlic and herbs can infuse the oil. This flavorful mixture will elevate the taste of your flatbreads with aromatic goodness.

Step 7: Preheat the Air Fryer
Preheat your air fryer to 375°F (190°C). Allow it to heat for about 5 minutes, ensuring it reaches the right temperature for even cooking. A well-preheated air fryer guarantees that the Air Fryer Garlic Flatbread develops that crispy exterior you’re craving.

Step 8: Brush with Garlic Mixture
Using a brush, generously coat one side of each flatbread with the prepared garlic mixture. Place the flatbreads in the air fryer basket in a single layer, being careful not to overcrowd them to allow proper air circulation. This will ensure each piece crisps up beautifully.

Step 9: Air Fry the Flatbreads
Air fry the flatbreads for 5-7 minutes, or until they turn golden brown and crispy on the edges. Keep an eye on them towards the end to prevent overcooking. The inviting aroma of garlic and herbs will fill your kitchen, signaling they are almost ready.

Step 10: Cool and Serve
Once golden and crisp, carefully remove the flatbreads from the air fryer and let them cool for a minute or two. This brief cooling period allows the steam to escape, ensuring each bite is perfectly fluffy inside. Serve warm as a delicious appetizer or a versatile base for your favorite toppings.

Storage Tips for Air Fryer Garlic Flatbread

  • Room Temperature: Keep leftover flatbreads in an airtight container at room temperature for up to 3 days. This will maintain their flavor and texture.
  • Fridge: For longer storage, refrigerate in an airtight container for up to 5 days. Allow them to come to room temperature before reheating.
  • Freezer: You can freeze the flatbreads for up to 2 months. Wrap each one individually in plastic wrap and place them in a freezer-safe bag.
  • Reheating: To revive the crispiness of your Air Fryer Garlic Flatbread, simply reheat them in the air fryer for 2-3 minutes at 350°F (175°C) before serving.

Make Ahead Options

These Air Fryer Garlic Flatbreads are a fantastic choice for meal prep, allowing busy home cooks to enjoy fresh flavors with minimal effort. You can prepare the dough up to 24 hours in advance; just wrap it tightly in plastic wrap and refrigerate. Additionally, you may roll out the flatbreads and store them between sheets of parchment paper in an airtight container for up to 3 days. To ensure they stay fresh, keep them in a cool, dry place and avoid stacking them directly. When ready to cook, simply brush with the garlic mixture and air fry as directed. You’ll have restaurant-quality flatbreads ready to enjoy with your favorite dips or as a meal base!

What to Serve with Air Fryer Garlic Flatbread

Imagine a delightful spread of color and flavor, perfect for rounding out your meal and pleasing every palate.

  • Hummus: This creamy, savory dip pairs beautifully, enhancing the flatbread’s garlic flavors while offering a healthy, plant-based option.

  • Tzatziki Sauce: The refreshing yogurt and cucumber blend contrasts wonderfully with the warm flatbread, balancing its rich, savory taste.

  • Grilled Chicken Skewers: Juicy, tender chicken adds protein to your meal, while the smoky flavors match the garlic intensity of the flatbread.

  • Mediterranean Salad: A mix of fresh veggies, feta, and olives creates a bright, vibrant side that complements the flatbread beautifully, both in color and flavor.

  • Eggplant Dip (Baba Ganoush): This smoky, creamy dip adds depth to your spread, making each bite a flavorful adventure. Don’t forget to garnish with fresh herbs!

  • Marinara Sauce: Perfect for those who want a heartier meal, this classic pairing allows you to enjoy your flatbread like a pizza base, bursting with flavor.

Expert Tips for Air Fryer Garlic Flatbread

  • Well-Kneaded Dough: Ensure your dough is kneaded enough to develop gluten; this gives the flatbread its pleasant chewiness and texture.

  • Avoid Overcrowding: Air fry in batches if necessary. Overcrowding can lead to uneven cooking, leaving some flatbreads undercooked.

  • Flavor Variations: Don’t hesitate to play around with herbs like rosemary or basil in the garlic mixture for a different twist on your Air Fryer Garlic Flatbread.

  • Consistent Thickness: Roll each flatbread to about 1/4 inch to ensure even cooking. Thicker pieces may not cook through properly.

  • Perfectly Crispy: Keep an eye on your flatbreads as they cook; every air fryer can heat differently, impacting the final crispiness.

Air Fryer Garlic Flatbread Variations

Feel free to explore new flavors and textures that can make your Air Fryer Garlic Flatbread even more delightful!

  • Whole Wheat: Swap all-purpose flour for whole wheat for an earthy, nutritious twist. The denser texture brings a heartiness to each bite.

  • Cheesy: Add shredded cheese like mozzarella or feta directly into your dough for a melty interior surprise. The oozy goodness elevates any flatbread experience!

  • Herb-Infused: Toss in fresh herbs like basil or rosemary for an aromatic touch that compliments the garlic wonderfully. These additions create a burst of freshness.

  • Spicy Kick: Mix in red pepper flakes or chopped jalapeños to the garlic mixture for a delightful heat that elevates the ordinary to extraordinary. Perfect for those who love a bit of spice!

  • Pizza Style: Transform your flatbread into a quick pizza by topping it with marinara sauce, mozzarella cheese, and your favorite toppings. Bake to get the cheese bubbly and golden.

  • Garlic Parmesan: Sprinkle grated Parmesan cheese on top before air frying for an extra layer of flavor. This cheesy garlic delight will tantalize your taste buds.

  • Sweet Variation: For an unexpected treat, brush with melted butter and a sprinkle of cinnamon sugar after air frying. It adds a sweet twist that’s perfect for breakfast or dessert!

Remember to experiment with these variations, and don’t forget to pair them with dips like hummus or tzatziki for a complete experience!

Air Fryer Garlic Flatbread Recipe FAQs

How do I choose ripe garlic for this recipe?
Absolutely! Look for garlic bulbs that are firm, dry, and without any dark spots or green shoots. The cloves should feel solid, as soft or sprouted garlic can have a bitter taste. Fresh garlic adds the delicious flavor that makes this Air Fryer Garlic Flatbread truly irresistible.

What is the best way to store leftovers?
You can store your leftover Air Fryer Garlic Flatbread in an airtight container at room temperature for up to 3 days. This method keeps it fresh and retains its flavor. If you’d like to keep it longer, place it in the refrigerator for up to 5 days, letting it come to room temperature before serving again.

Can I freeze the flatbread?
Yes! You can absolutely freeze your Air Fryer Garlic Flatbread for up to 2 months. Here’s how: First, wrap each flatbread individually in plastic wrap. Then, place them into a freezer-safe bag and squeeze out as much air as possible before sealing. To reheat, just pop them into the air fryer at 350°F (175°C) for 2-3 minutes, and they’ll come out crispy and delicious.

What should I do if my dough is too sticky or dry?
If your dough is too sticky, don’t worry! You can add a little more flour, about one tablespoon at a time, until it reaches a manageable consistency. On the flip side, if it’s too dry, gradually add water, one tablespoon at a time, until it holds together nicely. Kneading it well helps develop the right texture, so take your time with that step.

Is this recipe suitable for people with dietary restrictions?
Very! This Air Fryer Garlic Flatbread can be made suitable for various dietary preferences. To accommodate gluten-free diets, use a gluten-free flour blend. If you’re making it for those with dairy allergies, you can substitute Greek yogurt with a dairy-free alternative, making sure it is thick enough for the dough. Just remember to check the labels for allergies.

Can I add different flavors or toppings to the flatbread?
Of course! The more the merrier! Feel free to experiment with different herbs like rosemary or basil. You could even add shredded cheese to the dough for a cheesy twist or top the finished flatbreads with marinara sauce and mozzarella for a quick flatbread pizza. Get creative!

Air Fryer Garlic Flatbread

Delicious Air Fryer Garlic Flatbread You Can’t Resist

This Air Fryer Garlic Flatbread is a delightful and healthier alternative perfect for appetizers or toppings.
Prep Time 10 minutes
Cook Time 7 minutes
Total Time 30 minutes
Servings: 6 flatbreads
Course: Appetizers
Cuisine: Mediterranean
Calories: 150

Ingredients
  

For the Flatbread
  • 2 cups all-purpose flour Substitution: Whole wheat flour for a denser flatbread.
  • 1 cup Greek yogurt Substitution: Regular yogurt, strained to remove excess water.
  • 1 tablespoon baking powder
  • 1 teaspoon salt
For the Flavoring
  • 2 tablespoons olive oil
  • 3 cloves garlic minced
  • 2 tablespoons fresh parsley chopped
  • 1 teaspoon dried oregano
  • 1 pinch black pepper

Equipment

  • Air Fryer

Method
 

Step-by-Step Instructions for Air Fryer Garlic Flatbread
  1. Combine 2 cups of all-purpose flour, 1 tablespoon of baking powder, and 1 teaspoon of salt in a large mixing bowl until well blended.
  2. Add 1 cup of Greek yogurt to the flour mixture, gently folding it in until a dough forms.
  3. Turn the dough out onto a floured surface and knead for about 5 minutes until smooth and elastic.
  4. Divide the dough into 6 equal portions, roll into balls, and flatten slightly.
  5. Roll each ball into a flatbread shape, aiming for a thickness of about 1/4 inch.
  6. In a small bowl, combine 2 tablespoons of olive oil, 3 minced garlic cloves, 2 tablespoons of chopped fresh parsley, 1 teaspoon of dried oregano, and a pinch of black pepper. Mix well.
  7. Preheat your air fryer to 375°F (190°C) for about 5 minutes.
  8. Brush one side of each flatbread with the garlic mixture and place in the air fryer basket.
  9. Air fry the flatbreads for 5-7 minutes until golden brown and crispy.
  10. Remove the flatbreads from the air fryer and cool for a minute or two before serving.

Nutrition

Serving: 1flatbreadCalories: 150kcalCarbohydrates: 30gProtein: 5gFat: 3gSaturated Fat: 0.5gPolyunsaturated Fat: 1gMonounsaturated Fat: 1gSodium: 200mgPotassium: 100mgFiber: 1gSugar: 1gCalcium: 20mgIron: 1mg

Notes

Keep leftover flatbreads in an airtight container at room temperature for up to 3 days or refrigerate for up to 5 days.

Tried this recipe?

Let us know how it was!

Japanese Egg Sandwich: A Creamy Twist on Comfort Food

There’s something magical about the way a perfectly cooked egg transforms into a comforting dish, and that’s exactly the allure of the Japanese Egg Sandwich, also known as Tamago Sando. With its rich, buttery egg mayonnaise tucked between soft, fluffy shokupan, each bite is an inviting embrace of creamy goodness and airy bread. This delightful sandwich not only serves as a quick snack but also stands out as a light lunch option that showcases the beauty of Japanese convenience store cuisine, now made effortlessly in your own kitchen. What’s more, it’s a vegetarian treat that fits seamlessly into any meal plan, appealing to all food lovers. Are you ready to bring a taste of Japan to your table? Let’s dive into this simple yet soul-satisfying recipe!

Why is Tamago Sando So Irresistible?

Simplicity: This Japanese Egg Sandwich is a breeze to make. With minimal ingredients, it’s perfect for those who crave a homemade meal without fussing over complicated techniques.

Creamy Goodness: The silky egg mayonnaise, enhanced by Kewpie mayo, creates an indulgent flavor that’s impossible to resist. Each bite offers a delightful balance of richness and lightness.

Versatile Fillings: Feel free to personalize your Tamago Sando by adding fresh herbs or vegetables for an exciting twist. It’s adaptable to suit your taste preferences!

Crowd-Pleaser: Whether for a family meal or a gathering with friends, this sandwich satisfies cravings and sparks conversations, making it a fantastic addition to your menu.

Quick Snack: Ready in under 30 minutes, it’s the ideal solution for busy days when you need something delicious and fulfilling. If you’re looking for more easy recipes, you might also enjoy the Honey Banana Sandwich or the Avocado Melt Sandwich!

Japanese Egg Sandwich Ingredients

• Here’s what you need for the perfect homemade Tamago Sando.

For the Egg Filling

  • Large-sized eggs (6) – Essential for a creamy filling; use room temperature eggs for even cooking.
  • Large-sized egg (1, optional) – Medium-boiled for a rich and runny yolk; enhances visual appeal.
  • Whole milk (2 tsp) – Adds extra creaminess; can be substituted with any milk or omitted for a dairy-free version.
  • Kewpie Japanese Mayonnaise (4 tbsp) – Provides a unique flavor that’s essential for an authentic taste.
  • White granulated sugar (½ tsp) – Balances savory and sweet notes in the filling.
  • Salt (¾ tsp, preferably Diamond Crystal) – Brings out the flavors; adjust if using table salt.
  • Black pepper (¼ tsp) – Adds a subtle kick; can be adjusted or omitted to suit preferences.

For the Sandwich Assembly

  • Shokupan (4 slices, crusts removed) – Soft, fluffy bread that forms the base of your sandwich; substitute with fresh white bread if needed.
  • Unsalted butter – For spreading on the bread; enriches the flavor, though it can be omitted for a lighter option.
  • Chives (1 tbsp, finely chopped, optional) – Adds color and a mild onion flavor to elevate the sandwich aesthetic.

For Cooking

  • Water – Essential for boiling the eggs; ensure there’s enough to fully cover them.
  • Ice – Creates an ice bath to halt cooking after boiling, ensuring the perfect texture.

Step‑by‑Step Instructions for Japanese Egg Sandwich

Step 1: Prepare Eggs
To begin making your Japanese Egg Sandwich, bring a pot of water to a boil over medium heat. Gently add six large eggs and let them boil for 9 minutes for hard-boiling. After the time is up, promptly transfer the eggs to an ice bath for at least 5 minutes to stop the cooking process, resulting in perfect, creamy yolks. If using one medium-boiled egg, boil it for 7 minutes and 30 seconds before placing it in the ice bath.

Step 2: Make Filling
Once the hard-boiled eggs have cooled, peel them and slice in half. In a mixing bowl, mash the yolks and whites together until you achieve a creamy consistency. Stir in 2 teaspoons of whole milk, 4 tablespoons of Kewpie mayonnaise, ½ teaspoon of sugar, ¾ teaspoon of salt, and ¼ teaspoon of black pepper. Mix until everything is well combined, then refrigerate the filling for 10 minutes to allow the flavors to meld beautifully.

Step 3: Assemble Sandwich
Prepare your shokupan by cutting off the crusts from the four slices, creating a neat edge. Butter one side of each slice generously for added richness. On the buttered side of two slices, place the medium-boiled egg, then spread the chilled egg filling evenly over the eggs. This creamy mixture is the star of your Japanese Egg Sandwich, making sure to add enough for a hearty bite.

Step 4: Finish
Top your assembled fillings with the remaining two buttered slices, ensuring the buttered side is facing down. Press gently to help the sandwich hold together, then slice the sandwiches in half diagonally for a beautiful presentation. Serve immediately for the best texture, allowing that rich, creamy filling to shine in each delightful bite of your homemade Tamago Sando.

Japanese Egg Sandwich Variations

Embrace creativity with these delightful twists and substitutions for your Tamago Sando, each bite a chance to explore new flavors!

  • Dairy-Free: Swap whole milk with almond or oat milk and omit butter for a lighter, vegan-friendly sandwich.
  • Herb-Infused: Stir in fresh dill or parsley into your egg filling for a fragrant twist that elevates each delightful bite.
  • Spicy Kick: Add a dash of sriracha or a pinch of chili flakes to the filling for a little heat that brings excitement to your palate.
  • Avocado Creaminess: Mash in ripe avocado alongside the eggs for a luscious richness that pairs beautifully with the creamy filling.
  • Crunchy Veggies: Include finely chopped cucumbers or radishes in the mix for added crunch and refreshing flavors, reminiscent of a crisp garden.
  • Savory Umami: Mix in a bit of finely chopped nori (seaweed) to give your sandwich the subtle oceanic flavor found in Japanese cuisine.
  • Texture Play: Try using a crusty baguette instead of shokupan for a delightful contrast of soft filling and crunchy exterior.
  • Sweet Surprise: Incorporate a spoonful of sweet pickles or relish into the mixture for a tangy-sweet contrast that brightens the flavors.

Let your imagination run wild! And if you’re looking for something equally scrumptious, you might also enjoy a delightful Croissant Breakfast Sandwich or an indulgent Bbq Chicken Sandwich.

How to Store and Freeze Japanese Egg Sandwich

Fridge: Keep any leftover Tamago Sando in an airtight container for up to 3 days. Ensure the filling is well-covered to prevent it from drying out.

Freezer: While not ideal, you can freeze the sandwich for up to 1 month. Wrap tightly in plastic wrap and then in foil to avoid freezer burn.

Reheating: Thaw overnight in the fridge before reheating. Use the microwave for 15-30 seconds on medium power, but enjoy freshly made sandwiches for the best flavor and texture.

Serving Suggestion: For the best taste experience, eat your Japanese Egg Sandwich fresh; the creaminess of the filling and fluffiness of the bread are unbeatable!

Make Ahead Options

These Japanese Egg Sandwiches are perfect for meal prep enthusiasts! You can prepare the egg filling up to 24 hours in advance by boiling and mashing the eggs as described in the recipe. After mixing in the Kewpie mayonnaise, milk, sugar, salt, and pepper, refrigerate the filling in an airtight container to keep it fresh and flavorful. You can also slice the shokupan and butter the bread ahead of time, storing it in the refrigerator for a few hours. When you’re ready to serve, simply assemble the sandwiches by layering the medium-boiled egg and chilled filling between the bread. This way, you’ll enjoy delicious, homemade Tamago Sando with minimal effort, perfect for busy weeknights!

What to Serve with Japanese Egg Sandwich

Imagine a delightful spread that brings out the comforting flavors and textures of your Tamago Sando, enhancing your meal experience.

  • Green Tea: This warm, earthy beverage complements the creamy egg filling beautifully, offering a soothing balance to the meal’s richness.

  • Japanese Pickles (Tsukemono): Their crunchy and tangy profile brightens each bite of the sandwich, providing a refreshing contrast to the creamy texture.

  • Cucumber Salad: Light and crisp, a simple cucumber salad tossed in rice vinegar adds brightness and cuts through the richness of the egg sandwich.

  • Fruits like Strawberries or Melon: Juicy, sweet fruits serve as a perfect palate cleanser, enhancing the overall dining experience with freshness.

Enjoying your Tamago Sando with these accompaniments not only creates a well-rounded meal but also adds layers of flavor and texture that elevate simple comfort food into a delightful feast!

Expert Tips for Japanese Egg Sandwich

  • Egg Boiling Time: Adjust boiling times based on egg size; larger eggs may need an extra 30 seconds to achieve perfect hard-boiled texture.

  • Kewpie Mayo Importance: Don’t substitute regular mayonnaise! Kewpie’s unique creaminess and slight sweetness elevate the flavors of the Japanese Egg Sandwich significantly.

  • Cooling Technique: Always use an ice bath after boiling to stop the cooking. This step ensures your yolks remain creamy and prevent overcooking.

  • Bread Choices: While shokupan is ideal, a soft white bread can suffice. Just make sure it’s fresh and fluffy for the best sandwich experience.

  • Mashing Eggs: Mash the boiled eggs well for a creamier filling. If you leave larger chunks, it can disrupt the delightful texture.

Japanese Egg Sandwich Recipe FAQs

What type of eggs should I use for the Japanese Egg Sandwich?
Absolutely! Using large-sized eggs is essential for creating a creamy filling. Opt for room temperature eggs to ensure even cooking throughout.

How should I store leftover Tamago Sando?
Store any leftover sandwiches in an airtight container in the refrigerator for up to 3 days. Make sure the filling is covered to prevent it from drying out and losing its delightful creaminess.

Can I freeze Japanese Egg Sandwiches?
You can! While not ideal, wrap the sandwiches tightly in plastic wrap and then in foil to prevent freezer burn. They can be frozen for up to 1 month. Thaw overnight in the fridge and reheat gently in the microwave before serving for the best results.

What if my eggs are difficult to peel?
Very! If you find that your hard-boiled eggs are challenging to peel, try using slightly older eggs. They tend to peel more easily than fresh ones. Additionally, remember to place the boiled eggs in an ice bath immediately after cooking—this halts the cooking process and can also help with peeling.

Can I customize the filling for the Tamago Sando?
Of course! Feel free to add finely chopped chives, herbs, or even veggies like cucumber for a fresh twist. Personalizing your sandwich not only enhances flavor but also adds a delightful touch to your homemade Tamago Sando.

Is Kewpie mayonnaise necessary for this recipe?
Yes, it’s a must! Kewpie mayonnaise contributes a rich, unique flavor that is different from regular mayonnaise, making your Japanese Egg Sandwich truly authentic. If unavailable, a regular mayonnaise can be used, but the taste will vary.

Japanese Egg Sandwich

Japanese Egg Sandwich: A Creamy Twist on Comfort Food

A delectable Japanese Egg Sandwich featuring creamy egg mayonnaise and fluffy shokupan, perfect for a quick snack or light lunch.
Prep Time 10 minutes
Cook Time 20 minutes
Chilling Time 10 minutes
Total Time 40 minutes
Servings: 4 sandwiches
Course: Lunch
Cuisine: Japanese
Calories: 250

Ingredients
  

Egg Filling
  • 6 large Eggs Use room temperature for even cooking.
  • 1 large Egg Medium-boiled, optional.
  • 2 teaspoons Whole milk Can be substituted or omitted for dairy-free.
  • 4 tablespoons Kewpie Japanese Mayonnaise Essential for authentic taste.
  • ½ teaspoon White granulated sugar Balances flavors.
  • ¾ teaspoon Salt Preferably Diamond Crystal.
  • ¼ teaspoon Black pepper Adjust to taste.
Sandwich Assembly
  • 4 slices Shokupan Crusts removed; substitute with fresh white bread if needed.
  • 1 tablespoon Unsalted butter For spreading on bread.
  • 1 tablespoon Chives Finely chopped, optional.
Cooking
  • 1 pot Water Enough to cover eggs for boiling.
  • 1 bowl Ice For ice bath to stop cooking.

Equipment

  • Pot
  • Mixing Bowl
  • Spoon
  • Knife
  • Cutting board

Method
 

Preparation
  1. Bring a pot of water to a boil over medium heat. Add six large eggs and boil for 9 minutes. Transfer to an ice bath for 5 minutes to stop cooking.
  2. If using a medium-boiled egg, boil it for 7 minutes and 30 seconds.
Filling
  1. Peel the cooled hard-boiled eggs and slice in half. Mash yolks and whites in a bowl until creamy.
  2. Stir in milk, Kewpie mayonnaise, sugar, salt, and pepper. Mix until combined and refrigerate for 10 minutes.
Assembly
  1. Cut the crusts off the shokupan. Butter one side of each slice. On two slices, place the medium-boiled egg.
  2. Spread the chilled egg filling over the eggs. Top with remaining buttered slices, buttered side down, and press gently.
  3. Slice sandwiches in half diagonally for presentation and serve immediately.

Nutrition

Serving: 1sandwichCalories: 250kcalCarbohydrates: 30gProtein: 8gFat: 12gSaturated Fat: 4gPolyunsaturated Fat: 1gMonounsaturated Fat: 5gCholesterol: 220mgSodium: 450mgPotassium: 200mgFiber: 1gSugar: 3gVitamin A: 500IUCalcium: 50mgIron: 1mg

Notes

Best served fresh to enjoy the creamy filling and fluffy bread.

Tried this recipe?

Let us know how it was!

Churro Stuffed French Toast: Your New Favorite Breakfast Indulgence

There’s nothing quite like the warm embrace of a cozy breakfast that transports you to another world, and that’s exactly what you’ll experience with my Churro Stuffed French Toast. This Mexican-inspired delight combines the comforting texture of thick brioche with a luscious cream cheese filling, all coated in a joyful cinnamon-sugar blanket. It’s a perfect choice for those leisurely weekends or special brunches when you want to impress without breaking a sweat—trust me, it’s both quick and easy to whip up! Your family will feel truly spoiled for breakfast, while you savor the compliments that come your way. Are you ready to dive into this sweet culinary adventure?

Why is Churro Stuffed French Toast a Must-Try?

Indulgent and Decadent: This Churro Stuffed French Toast is not just any ordinary breakfast; it’s a treat that will leave everyone craving more.
Quick and Easy: With a straightforward preparation method, you can have this delightful dish ready in no time, making it perfect for busy mornings or last-minute brunch guests.
Versatile Flavor Options: Feel free to experiment—switching up the fillings or toppings, like adding Nutella or fresh fruits, will keep this recipe fresh and exciting!
Crowd-Pleasing Appeal: Whether it’s a cozy family gathering or a festive brunch, this dish is sure to win hearts and bring smiles to the table. Pair it with a side of whipped cream or serve it alongside your favorite fresh fruit for an extra special touch. Explore more delicious breakfast ideas by checking out our Blueberry French Toast or indulge in the Creme Brulee French for a sweet twist!

Churro Stuffed French Toast Ingredients

For the French Toast

  • Thick-Cut Brioche or Challah – This bread yields a deliciously soft and crispy texture perfect for holding the filling.
  • Cream Cheese – Provides a rich, creamy filling; for a lighter option, use dairy-free cream cheese.
  • Granulated Sugar – Sweetens the filling and the coating; coconut sugar is a healthier substitute.
  • Cinnamon – Adds that signature churro flavor; feel free to adjust the amount to suit your taste.
  • Eggs – These are essential for creating that custardy, smooth texture.
  • Milk – Ensures the custard mixture is silky; almond milk works well for a dairy-free option.
  • Vanilla Extract – Enhances the overall flavor profile with warm sweetness.
  • Butter – Vital for frying to a golden-brown crispy finish.

For Coating and Serving

  • Cinnamon-Sugar Mixture – A delightful coating that gives your French toast that classic churro feel—don’t skip this step!
  • Maple Syrup or Chocolate Sauce – These toppings add an extra touch of sweetness and indulgence, elevating your breakfast experience.

Whether you’re treating yourself to a cozy weekend breakfast or hosting a joyful brunch, this Churro Stuffed French Toast will surely become a new favorite in your culinary repertoire!

Step‑by‑Step Instructions for Churro Stuffed French Toast

Step 1: Preheat Skillet
Begin your adventure in making Churro Stuffed French Toast by preheating a large skillet or griddle over medium heat. Add a tablespoon of butter and let it melt completely, creating a glistening surface that will prevent sticking. This sets the stage for achieving that perfect golden-brown crust later on, so keep an eye on the butter to prevent it from burning.

Step 2: Prepare Filling
While the skillet warms, take a mixing bowl and combine cream cheese, granulated sugar, and vanilla extract. Use a fork or whisk to blend these ingredients until smooth and creamy. Once you’re satisfied with the texture, spread this luscious filling generously over one slice of thick-cut brioche or challah, then place another slice on top to create a delightful sandwich, ensuring the filling is encased nicely.

Step 3: Make Egg Mixture
In a shallow dish, whisk together eggs, milk, cinnamon, and a splash of vanilla extract to form a rich custard mixture. This will coat your sandwiches, infusing each bite of your Churro Stuffed French Toast with warmth and flavor. Whisk until the mixture is well combined and slightly frothy, which should take about 1-2 minutes, ensuring no lumps remain.

Step 4: Dip Sandwiches
Carefully dip each sandwich into the egg mixture, allowing it to soak for just a few seconds on each side. This step is crucial for capturing the custardy goodness inside while keeping the bread’s texture intact. Aim for an even coverage, but be cautious not to let it sit too long to prevent sogginess. You want just the right amount of moisture to make this treat indulgent.

Step 5: Cook
Once dipped, gently place the stuffed sandwiches onto your preheated skillet. Cook for 3-4 minutes on each side, or until they turn a beautiful, golden-brown color and develop a crispy exterior. As they cook, listen for that satisfying sizzle and keep an eye on them, flipping only when ready to ensure you achieve that desired crispiness all around.

Step 6: Coat in Cinnamon Sugar
After cooking, immediately toss the warm Churro Stuffed French Toast in a mixture of cinnamon and granulated sugar. This creates a delightful outer layer that captures the essence of churros. Roll each piece around in this sugary blend until it’s generously coated, ensuring that every bite is packed with that familiar sweet and spicy flavor reminiscent of your favorite churros.

Step 7: Serve
Finally, slice your Churro Stuffed French Toast into manageable pieces and serve them immediately. Drizzle with maple syrup or chocolate sauce for an extra touch of decadence if you desire. Pair it with fresh fruit or a dollop of whipped cream for a truly indulgent breakfast experience. Enjoy the bliss of your homemade creation!

What to Serve with Churro Stuffed French Toast?

Indulging in Churro Stuffed French Toast is an experience best enjoyed as part of a well-rounded breakfast or brunch spread. Imagine the delightful contrast of flavors and textures that will further elevate your meal!

  • Fresh Berries:
    A medley of strawberries, blueberries, and raspberries adds a bright, tangy burst that beautifully contrasts the sweetness of the French toast.

  • Whipped Cream:
    Light and fluffy, whipped cream enhances the richness and is perfect for dolloping on top, creating a dreamy plate that invites you in.

  • Crispy Bacon or Sausage:
    The savory, salty crunch of crispy bacon or sausage balances the sweet flavors, making it a satisfying breakfast experience.

  • Coconut Yogurt:
    A creamy dollop of coconut yogurt serves as a refreshing, dairy-free complement, adding a hint of tropical flavor that pairs wonderfully with cinnamon.

  • Fruit Salad:
    A colorful fruit salad with melons, kiwi, and citrus gives a refreshing zest that lightens up your meal and offers a variety of textures.

  • Maple Syrup or Chocolate Sauce:
    Offering a sweet drizzle option, maple syrup or rich chocolate sauce amplifies the indulgence factor, making every bite truly heavenly.

  • Chai Latte or Coffee:
    Warm beverages like chai lattes or freshly brewed coffee are wonderful companions, as their spiced or deep flavors pair seamlessly with cinnamon and sugar.

Elevate your breakfast experience by mixing and matching these sides, creating a feast that feels special every time!

Churro Stuffed French Toast Variations & Substitutions

Embrace your inner chef and customize this delightful recipe to make it your own!

  • Dairy-Free: Substitute cream cheese with dairy-free cream cheese and use almond milk for the egg mixture for a lighter version.
  • Nutty Twist: Add a tablespoon of almond or hazelnut spread inside the sandwiches for a deliciously nutty flavor that complements the cinnamon.
  • Spicy Kick: Sprinkle a little cayenne pepper into the cinnamon-sugar coating for an unexpected spicy surprise that contrasts wonderfully with the sweetness.
  • Fruit-Infused: Layer in sliced strawberries or bananas before pressing the sandwich together; the fruit adds a fresh burst to each bite.
  • Whole Wheat: Swap the brioche for whole wheat bread for a healthier twist that still offers a delightful taste and texture.
  • Churro Style: For an even more authentic churro flavor, mix a bit of cocoa powder into the cream cheese filling to create a chocolate churro experience.
  • Cinnamon Raisin Bread: Use cinnamon raisin bread instead of brioche for an added depth of flavor; it’ll feel like an indulgent twist on French toast.
  • Chocolate Drizzle: Finish your plate with a drizzle of chocolate sauce or caramel for an extra touch of decadence; it’s perfect for special occasions!

Feel free to explore these exciting options to enhance your Creme Brulee French toast experience, or whip up some classic Stuffed Bell Peppers for a different flavor adventure!

Make Ahead Options

These Churro Stuffed French Toast sandwiches are perfect for busy mornings and can be prepped in advance to save valuable time! You can assemble the sandwiches by spreading the cream cheese filling between slices of thick-cut brioche or challah up to 24 hours ahead. Once assembled, wrap them tightly in plastic wrap and refrigerate. When you’re ready to enjoy, simply dip the sandwiches in the egg mixture and cook them in a heated skillet. For longer storage, you can freeze the cooked French toast for up to 1 month; just reheat them in an air fryer or toaster oven for that just-made taste. With these make-ahead options, your breakfast will be both delicious and stress-free!

Expert Tips for Churro Stuffed French Toast

Bread Choice Matters: Use thick-cut brioche or challah, as they provide the perfect soft yet crispy texture essential for a delightful Churro Stuffed French Toast experience.

Don’t Soak Too Long: Avoid sogginess by dipping the sandwiches in the egg mixture just long enough for even coverage, but not so long that they become overly soaked.

Mind the Heat: Keep the skillet at medium heat to ensure a golden-brown crust while preventing the outside from burning before the inside cooks through.

Cinnamon-Sugar Perfection: Toss the cooked French toast in cinnamon sugar while warm to ensure the coating sticks well, maximizing that delicious churro flavor.

Make Ahead Tip: Prepare the sandwiches in advance and store them in the fridge overnight. Just cook them fresh in the morning for a quick breakfast treat!

Explore Variations: Feel free to experiment with fillings and toppings—adding Nutella, fresh fruit, or a sprinkle of powdered sugar can transform your Churro Stuffed French Toast into new favorites!

Storage Tips for Churro Stuffed French Toast

Fridge: Store leftover Churro Stuffed French Toast in an airtight container in the fridge for up to 3 days. Reheat in a skillet or microwave before serving.

Freezer: For longer storage, freeze the cooked French toast wrapped in plastic wrap and placed in a zip-top bag for up to 1 month.

Reheating: When ready to enjoy, reheat from frozen in an air fryer or toaster oven at 350°F (175°C) for about 10-15 minutes until warm and crispy.

Make-Ahead: You can prepare the stuffed sandwiches and keep them in the fridge overnight, cooking them fresh each morning for a delightful breakfast experience!

Churro Stuffed French Toast Recipe FAQs

What type of bread is best for Churro Stuffed French Toast?
Thick-cut brioche or challah is ideal for this recipe because they provide the perfect balance of softness and crispiness, holding the filling without becoming too soggy. You can also experiment with other bread types, like cinnamon raisin, for an exciting spin!

How do I store leftover Churro Stuffed French Toast?
Store leftover Churro Stuffed French Toast in an airtight container in the refrigerator for up to 3 days. When you’re ready to enjoy, simply reheat it in a skillet or microwave until warmed through for a quick breakfast treat—deliciousness awaits!

Can I freeze Churro Stuffed French Toast?
Absolutely! To freeze, wrap the cooked French toast in plastic wrap and place it in a zip-top bag, sealing it tightly. They can be frozen for up to 1 month. When you’re ready to enjoy, reheat straight from the freezer using an air fryer or toaster oven at 350°F (175°C) for about 10-15 minutes until crispy.

How can I prevent the bread from becoming too soggy during preparation?
To avoid sogginess, dip each sandwich into the egg mixture just long enough for even coverage—usually just a couple of seconds on each side. This way, you’ll capture the custardy goodness without compromising the bread’s texture. Remember, less is more!

What are some allergy considerations with this recipe?
For those with dairy allergies, you can substitute the cream cheese with a dairy-free alternative and use almond milk instead of regular milk. If you’re concerned about gluten, opt for gluten-free bread to ensure this delightful breakfast can accommodate your dietary needs!

How long should I let the cooked French toast sit after cooking?
After cooking, toss the warm Churro Stuffed French Toast in the cinnamon-sugar mixture immediately. This helps the coating stick well, enhancing the overall flavor. Enjoy it fresh, which is when it’s at its best—warm and crispy, just like churros!

Churro Stuffed French Toast

Churro Stuffed French Toast: Your New Favorite Breakfast Indulgence

Churro Stuffed French Toast is a deliciously indulgent breakfast that's quick and easy to make, perfect for impressing guests and satisfying cravings.
Prep Time 15 minutes
Cook Time 15 minutes
Total Time 30 minutes
Servings: 4 slices
Course: Breakfast
Cuisine: Mexican
Calories: 350

Ingredients
  

For the French Toast
  • 4 slices Thick-Cut Brioche or Challah This bread yields a deliciously soft and crispy texture perfect for holding the filling.
  • 8 oz Cream Cheese Provides a rich, creamy filling; for a lighter option, use dairy-free cream cheese.
  • 2 tbsp Granulated Sugar Sweetens the filling and the coating; coconut sugar is a healthier substitute.
  • 1 tsp Cinnamon Adds that signature churro flavor; feel free to adjust the amount to suit your taste.
  • 2 large Eggs These are essential for creating that custardy, smooth texture.
  • 1/2 cup Milk Ensures the custard mixture is silky; almond milk works well for a dairy-free option.
  • 1 tsp Vanilla Extract Enhances the overall flavor profile with warm sweetness.
  • 2 tbsp Butter Vital for frying to a golden-brown crispy finish.
For Coating and Serving
  • 1/4 cup Cinnamon-Sugar Mixture A delightful coating that gives your French toast that classic churro feel.
  • Maple Syrup or Chocolate Sauce These toppings add an extra touch of sweetness and indulgence.

Equipment

  • Skillet
  • Mixing Bowl
  • whisk
  • shallow dish

Method
 

Step‑by‑Step Instructions for Churro Stuffed French Toast
  1. Preheat a large skillet or griddle over medium heat. Add a tablespoon of butter and melt completely.
  2. Combine cream cheese, granulated sugar, and vanilla extract in a mixing bowl. Blend until smooth, then spread over one slice of bread and top with another slice to create a sandwich.
  3. In a shallow dish, whisk together eggs, milk, cinnamon, and a splash of vanilla extract to form a custard mixture.
  4. Dip each sandwich into the egg mixture for a few seconds on each side.
  5. Cook the stuffed sandwiches on the skillet for 3-4 minutes on each side until golden-brown.
  6. Toss the cooked French toast in a mixture of cinnamon and granulated sugar for coating.
  7. Slice and serve immediately, drizzled with maple syrup or chocolate sauce, and optionally pair with fresh fruit or whipped cream.

Nutrition

Serving: 1sliceCalories: 350kcalCarbohydrates: 45gProtein: 8gFat: 15gSaturated Fat: 9gPolyunsaturated Fat: 1gMonounsaturated Fat: 4gCholesterol: 120mgSodium: 300mgPotassium: 200mgFiber: 2gSugar: 12gVitamin A: 500IUCalcium: 75mgIron: 1mg

Notes

Feel free to experiment with fillings and toppings—adding Nutella, fresh fruit, or a sprinkle of powdered sugar can transform this recipe into new favorites!

Tried this recipe?

Let us know how it was!

Crispy Sweet Potato Hash Browns for Breakfast Bliss

As the aroma of sizzling sweet potatoes fills the kitchen, it’s impossible not to feel a wave of nostalgia wash over me. There’s something truly special about Crispy Savory Sweet Potato Hash Browns that transforms any breakfast into a celebration. This delightful recipe fuses the natural sweetness of sweet potatoes with savory notes, making it not just a great morning boost, but a versatile side for any meal. One of the standout perks of this dish is how effortlessly it comes together, ensuring that even on busy mornings, you can whip up a homemade masterpiece without the fuss. Plus, with its vegan-friendly and gluten-free options, this hash browns recipe welcomes everyone to the table. Are you ready to elevate your breakfast game and impress guests with a healthier twist on an all-time favorite? Let’s dive into the delicious details!

Why are Sweet Potato Hash Browns Special?

Crispy Texture: The outside becomes wonderfully crispy while the inside remains tender, delivering a delightful crunch with every bite.
Versatile and Flavorful: Perfect for any meal, these hash browns can easily complement a side of poached eggs or even stand alone with a dollop of Greek yogurt.
Healthy Twist: With their naturally sweet flavor and lower calorie count compared to regular hash browns, they make a nutritious yet indulgent option.
Quick Preparation: Whip these up in less than 30 minutes, making them a fantastic choice for busy mornings or last-minute meals.
Vegan-Friendly Option: Adapt the recipe using flax eggs for a delicious vegan treat that everyone can enjoy.
Whether you’re looking for a hearty breakfast idea or a savory side dish, these Crispy Sweet Potato Hash Browns are sure to please!

Sweet Potato Hash Browns Ingredients

For the Hash Browns
Sweet Potatoes – the star of the dish, choose orange-fleshed varieties for optimal sweetness and texture.
Onions – they infuse the mixture with savory depth; shallots can be a milder alternative.
Eggs – these bind the ingredients together for a perfect texture; use flax eggs for a vegan version.
Flour – this adds structure; for a gluten-free option, opt for almond or coconut flour.
Oil – necessary for frying, providing that beautiful crispy exterior; vegetable or olive oil works wonderfully.
Salt & Pepper – essential for enhancing flavor; don’t forget to adjust these to taste!

With these simple yet impactful ingredients, you’ll be on your way to creating delightful Sweet Potato Hash Browns that everyone will love!

Step‑by‑Step Instructions for Crispy Sweet Potato Hash Browns

Step 1: Preheat the Oven
Begin your adventure by preheating the oven to 350°F (175°C). This will ensure your sweet potato hash browns stay crispy after frying. While the oven is warming up, you can use this time to prep your ingredients and set up your cooking space.

Step 2: Grate the Sweet Potatoes
Next, coarsely grate your sweet potatoes using a grater or food processor. Place the grated sweet potatoes in a bowl of cold water, allowing them to soak for about 10 minutes. This step is crucial to help remove excess starch, which can lead to sogginess in your crispy sweet potato hash browns.

Step 3: Drain & Squeeze Dry
After soaking, thoroughly drain the sweet potatoes and transfer them to a kitchen towel. Squeeze out as much moisture as possible to ensure they cook up crispy. You want them to be relatively dry; excess moisture can lead to uneven cooking and integrate with the final texture of your hash browns.

Step 4: Combine the Ingredients
In a mixing bowl, combine the grated sweet potatoes, finely chopped onions, eggs, flour, salt, and pepper. Stir gently until you achieve a uniform mixture. This blended consistency ensures that every bite of your sweet potato hash browns is packed with flavor and holds together beautifully when cooking.

Step 5: Heat the Oil
In a large non-stick skillet, heat a few tablespoons of oil over medium heat. You’ll know the oil is ready when it shimmers but does not smoke. This step is essential to achieve that golden-brown, crispy exterior that makes these hash browns so delightful.

Step 6: Form Hash Brown Patties
Using a spoon, scoop heaping tablespoons of the sweet potato mixture into the skillet. Flatten each scoop gently with the back of the spoon to form patties. Make sure to leave some space between them to prevent overcrowding, which can lead to steaming instead of frying.

Step 7: Fry Until Golden Brown
Fry the hash brown patties for about 3-4 minutes on one side, or until they are a beautiful golden brown. Carefully flip them over with a spatula and cook for another 3-4 minutes on the other side. This ensures your sweet potato hash browns are crispy and cooked through.

Step 8: Bake for Extra Crispiness
Once the hash browns are golden and crispy, transfer them to a baking sheet. Place them in your preheated oven to bake for an additional 10-12 minutes, ensuring the centers are fully cooked and the outsides remain crisp. This final step elevates the texture to perfection.

Step 9: Serve Hot
Finally, remove your crispy sweet potato hash browns from the oven and enjoy them hot. They are perfect on their own or served with toppings like sour cream, avocado slices, or a side of fresh eggs. Get ready to savor this delicious breakfast treat!

Expert Tips for Sweet Potato Hash Browns

  • Moisture Control: Squeeze out excess moisture from the grated sweet potatoes to prevent sogginess in your hash browns. This step is crucial for achieving that perfect crispiness!

  • Cook in Batches: Avoid overcrowding the skillet while frying. This ensures even cooking and browning, helping your sweet potato hash browns become delightfully crispy rather than steamed.

  • Optimal Heat: Maintain a medium heat throughout cooking. Too high a flame can burn the exterior before the inside cooks through, leading to unevenly cooked hash browns.

  • Freezing for Later: For easy meal prep, freeze uncooked patties layered with parchment paper. This way, you can enjoy the goodness of sweet potato hash browns any time you need a quick meal.

  • Spice It Up: Feel free to experiment with spices like paprika or cayenne pepper in the mixture for an extra flavor kick. This little twist can elevate your hash browns to a whole new level!

What to Serve with Crispy Sweet Potato Hash Browns

As you savor the delicious crunch of these hash browns, think about what delightful pairings can elevate your breakfast or brunch experience.

  • Poached Eggs: The runny yolk adds richness, creating a perfect balance of flavors with the hash browns.
  • Crispy Bacon: The salty crunch complements the sweetness of the sweet potatoes, making for a truly indulgent meal.
  • Avocado Slices: Creamy avocado adds a healthy fat that enriches the overall dish while providing freshness.
  • Greek Yogurt: Serve it as a tangy dipping sauce, enhancing the flavors while keeping it light and refreshing.
  • Fresh Fruit Salad: A mix of seasonal fruits brightens the plate with color and offers a sweet contrast to the savory hash browns.
  • Mixed Green Salad: A light herb vinaigrette brings a refreshing sharpness that complements the earthiness of the sweet potatoes.
  • Herb-infused Tea: A fragrant herbal tea, like mint or chamomile, pairs beautifully with the breakfast setting, enhancing the meal experience.
  • Coffee or Espresso: A robust cup of coffee adds a comforting element, elevating your morning ritual to new heights.
  • Maple Syrup Drizzle: A touch of maple syrup on the side brings a delightful sweetness that pairs unexpectantly well with the savory hash browns.
  • Smoothie: A vibrant smoothie made with greens or berries provides a deliciously healthy drink to accompany your meal.

Elevate your breakfast table with these satisfying pairings that play off the flavors and textures of the crispy sweet potato hash browns!

Sweet Potato Hash Browns Variations

Feel free to explore the delightful twists you can add to customize your sweet potato hash browns!

  • Squash Swap:
    Instead of sweet potatoes, try using butternut squash for a unique taste and an equally delightful texture. The sweetness of the squash adds a warm depth to your dish, making it an exciting alternative.

  • Herbal Infusion:
    Add fresh herbs like chives, cilantro, or parsley to the mix for a burst of freshness. Herbs elevate the flavor profile, giving a deliciously aromatic twist that pairs beautifully with eggs or as a standalone snack.

  • Spicy Kick:
    Incorporating spices such as cayenne pepper or smoked paprika will add a zesty heat to your hash browns. Just a pinch can transform the dish, delivering a delightful surprise with every crispy bite.

  • Vegan Magic:
    Use flax eggs in place of regular eggs for a scrumptious vegan version of this classic. This swap keeps the integrity of the dish while making it friendly for plant-based diets.

  • Cheesy Addition:
    Grate your favorite dairy-free cheese into the mixture for an ooey-gooey sensation. The melted cheese will create an indulgent layer of flavor that complements the sweetness of the potatoes.

  • Nutty Crunch:
    Sprinkle in some chopped nuts like pecans or walnuts for an unexpected crunch. The added texture not only enhances the eating experience but also provides a lovely contrast to the crispy outside.

  • Sweet Harmony:
    Drizzle some maple syrup or serve with a side of apple compote for a sweet-savory combination. This twist creates a lovely balance and adds gourmet flair to your breakfast plate.

These flavorful variations invite endless creativity! Serve your sweet potato hash browns alongside fried eggs or topped with a dollop of sour cream for a truly delightful brunch. If you’re looking to expand your breakfast repertoire, why not also try the wholesome Cheesy Hamburger Potato Soup or treat yourself to a sweet morning with Sweet Escape Charm for an indulgent start?

Make Ahead Options

These Crispy Sweet Potato Hash Browns are fantastic for meal prep, saving you precious time on busy mornings! You can prep the grated sweet potatoes and onions up to 24 hours in advance; simply keep them in an airtight container with a paper towel to absorb excess moisture and prevent browning. The mixture can also be formed into patties and refrigerated for up to 3 days. When you’re ready to cook, just heat the oil and fry the patties directly from the fridge, following the original cooking instructions. This way, you’ll still achieve that delightful crispy texture without compromising quality—perfect for a quick, homemade breakfast!

Storage Tips for Sweet Potato Hash Browns

  • Fridge: Store leftover sweet potato hash browns in an airtight container for up to 3 days. To maintain crispiness, place a paper towel inside to absorb moisture.

  • Freezer: For longer storage, freeze uncooked hash brown patties layered with parchment paper. This allows you to grab and cook them whenever a craving strikes, preserving freshness and texture.

  • Reheating: When ready to enjoy, reheat hash browns in a skillet over medium heat for about 3-4 minutes on each side until warmed through and crispy.

  • Make-Ahead: Prepare the mixture and form patties a day in advance, sealing them in the fridge. Cooking them fresh the next day ensures delightful crispy sweet potato hash browns!

Sweet Potato Hash Browns Recipe FAQs

How do I choose the right sweet potatoes for my hash browns?
Absolutely! For the best results, select orange-fleshed sweet potatoes, such as Beauregard or Jewel varieties, known for their sweetness and moist texture. Look for potatoes that are firm, with smooth skin and no dark spots or blemishes, as these can indicate spoilage.

What’s the best way to store leftover Sweet Potato Hash Browns?
To keep them fresh, store leftover sweet potato hash browns in an airtight container in the fridge for up to 3 days. For added moisture control, place a paper towel inside the container. When reheating, warm them in a skillet over medium heat for about 3-4 minutes on each side for that crispy finish!

Can I freeze my hash brown patties?
Very! Freezing your uncooked hash brown patties is a great way to save time. Simply layer them between sheets of parchment paper in an airtight container. They can be frozen for up to 3 months. When you’re ready to enjoy them, cook directly from frozen, adding a couple of extra minutes to the frying time.

What if my sweet potato hash browns turn out soggy?
Oh, no! If your hash browns are soggy, it’s likely due to excess moisture. Make sure you thoroughly squeeze out any water from the grated sweet potatoes before combining them with the other ingredients. Additionally, frying in batches and maintaining a medium heat will help achieve that desired crispy texture.

Are sweet potato hash browns suitable for those with dietary restrictions?
Absolutely! To keep this recipe vegan-friendly, substitute regular eggs with flax eggs (1 tablespoon ground flaxseed mixed with 2.5 tablespoons of water, let it sit for 5 minutes). Also, for a gluten-free option, simply use almond or coconut flour in place of regular flour, ensuring everyone can enjoy this delicious meal.

Sweet Potato Hash Browns

Crispy Sweet Potato Hash Browns for Breakfast Bliss

Delight in the crispy, vegan-friendly Sweet Potato Hash Browns that turn breakfast into a celebration.
Prep Time 15 minutes
Cook Time 15 minutes
Baking Time 10 minutes
Total Time 40 minutes
Servings: 4 servings
Course: Breakfast
Cuisine: Vegan
Calories: 150

Ingredients
  

For the Hash Browns
  • 2 cups Grated Sweet Potatoes Preferably orange-fleshed varieties.
  • 1 cup Chopped Onions Shallots can be a milder alternative.
  • 2 large Eggs Use flax eggs for a vegan version.
  • 1/4 cup Flour Substitute with almond or coconut flour for gluten-free.
  • 3 tablespoons Oil Vegetable or olive oil works well.
  • to taste Salt
  • to taste Pepper

Equipment

  • Grater or Food Processor
  • Mixing Bowl
  • Large Non-Stick Skillet
  • Baking Sheet

Method
 

Step‑by‑Step Instructions
  1. Preheat the oven to 350°F (175°C).
  2. Coarsely grate the sweet potatoes and soak in cold water for 10 minutes.
  3. Drain and squeeze out moisture from sweet potatoes using a kitchen towel.
  4. Combine grated sweet potatoes, onions, eggs, flour, salt, and pepper in a bowl.
  5. Heat oil in a skillet over medium heat until it shimmers.
  6. Scoop tablespoons of the mixture into the skillet and flatten gently to form patties.
  7. Fry until golden brown, 3-4 minutes per side.
  8. Transfer to a baking sheet and bake for 10-12 minutes for extra crispiness.
  9. Serve hot with toppings if desired.

Nutrition

Serving: 1servingCalories: 150kcalCarbohydrates: 30gProtein: 3gFat: 4gSaturated Fat: 1gPolyunsaturated Fat: 1gMonounsaturated Fat: 2gCholesterol: 50mgSodium: 200mgPotassium: 500mgFiber: 3gSugar: 5gVitamin A: 10000IUVitamin C: 30mgCalcium: 20mgIron: 1mg

Notes

Maintain moisture control for optimal crispiness. Cook in batches to avoid overcrowding.

Tried this recipe?

Let us know how it was!