Get my cookbooks

Melt-in-Your-Mouth Turkey Melt with Cheddar, Spinach, and Bacon

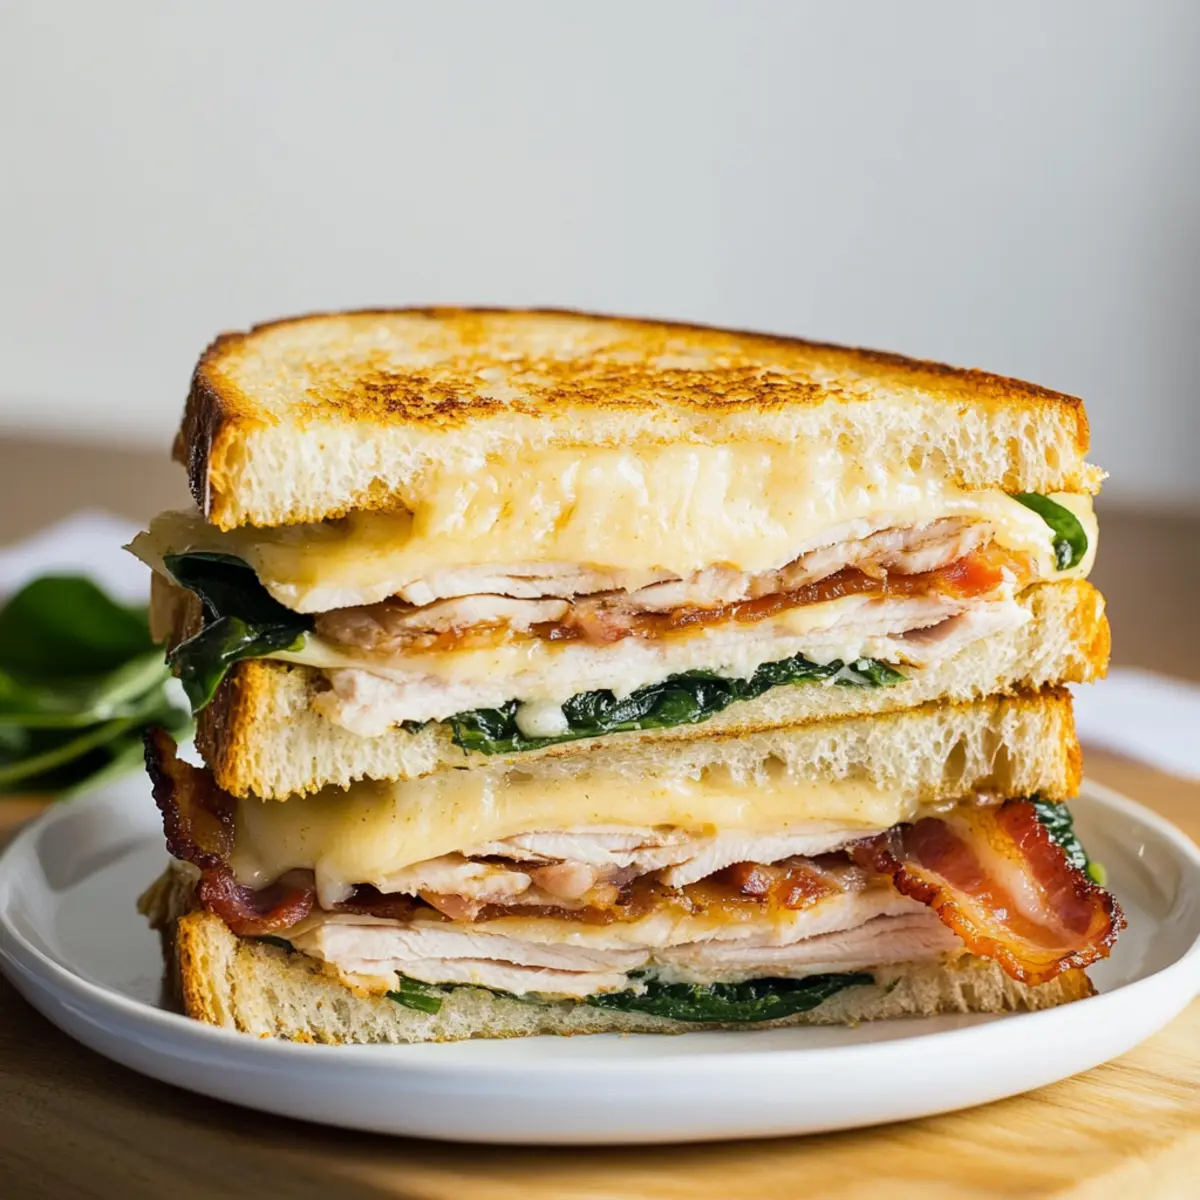
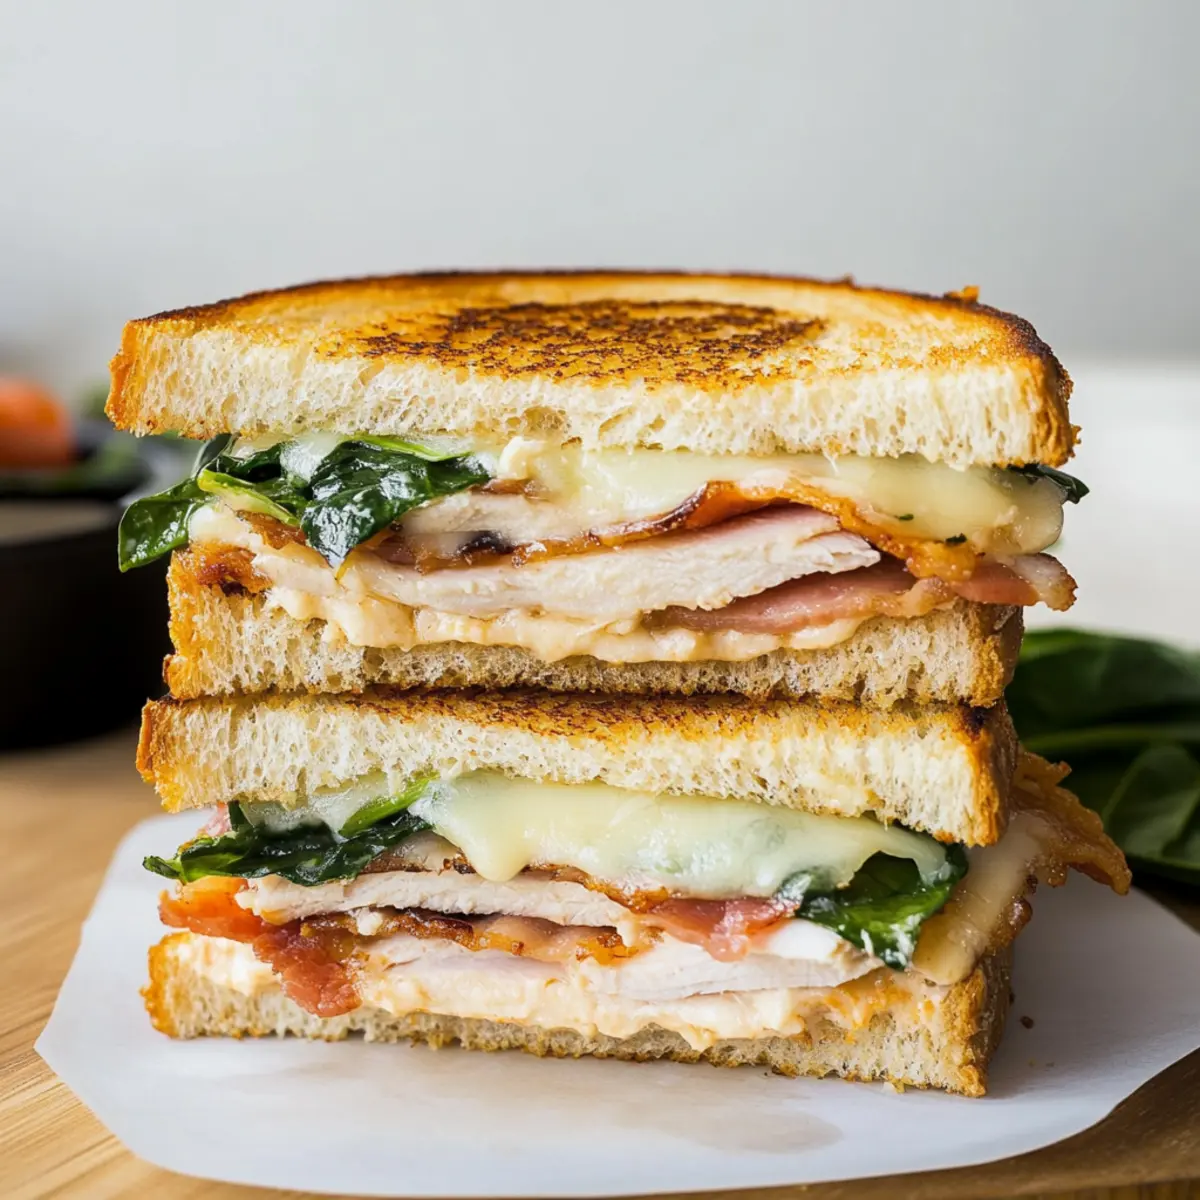
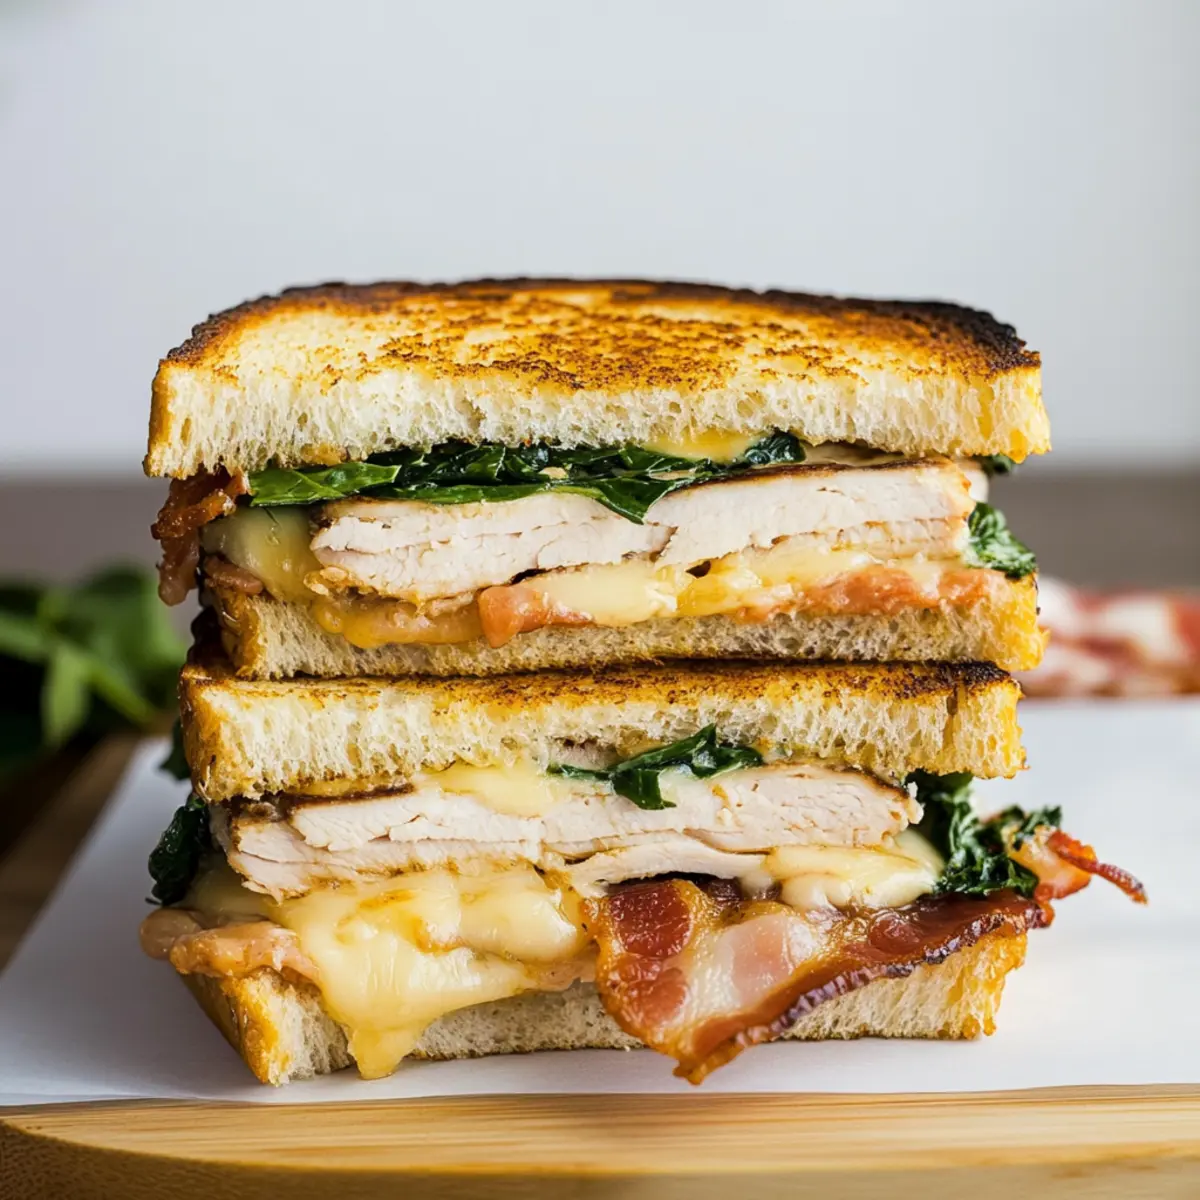
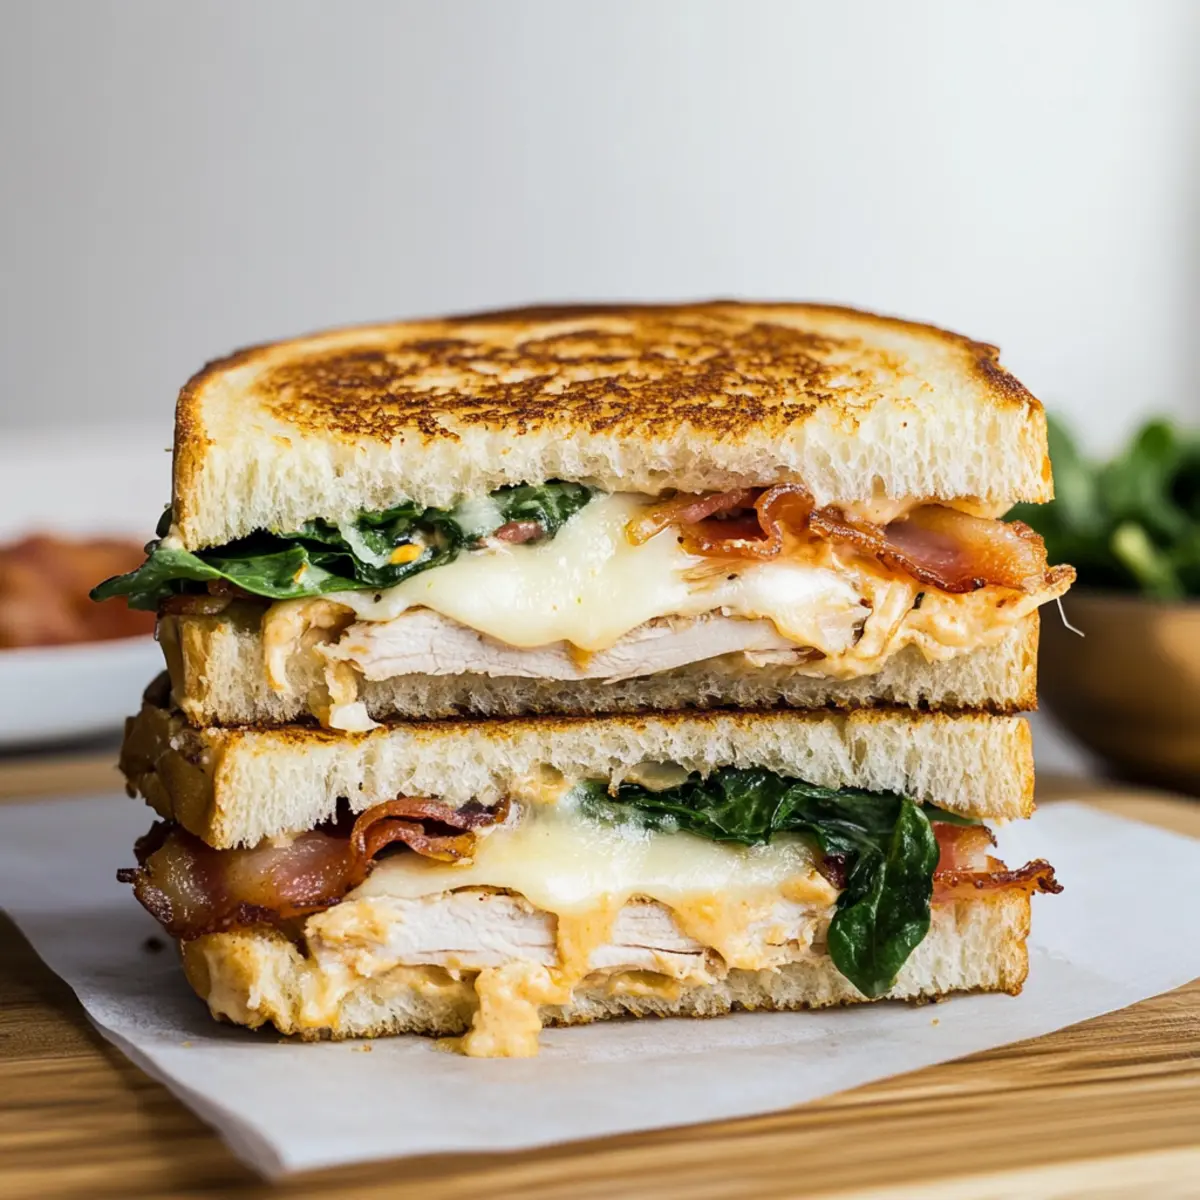
As I filled my kitchen with the comforting aroma of melting cheese and sizzling bacon, I couldn’t help but smile at the thought of sharing this delightful Turkey Melt with Cheddar, Spinach, and Bacon. On those crisp, chilly days, nothing truly beats the satisfaction of sinking your teeth into a warm sandwich, perfectly toasted on the outside with gooey goodness hiding inside. This easy-to-make meal not only offers a wholesome twist on classic comfort food, but it also brings together fresh ingredients for a nutritious option that’s great for busy weeknights. Picture crispy bacon intertwined with vibrant spinach and rich cheddar, all nestled between thick slices of sourdough bread—doesn’t that sound irresistible? Are you ready to get started on this delicious journey?

Why Will You Adore This Turkey Melt?

Unmatched Comfort: Nothing says comfort food like this warm, gooey Turkey Melt with Cheddar, Spinach, and Bacon. It’s the perfect hug in sandwich form on a chilly day.

Quick and Easy: With simple steps and just a handful of ingredients, you can whip this sandwich together in no time, making it ideal for busy weeknights.

Flavorful Layers: Each bite bursts with rich flavors—from creamy cheddar to the smoky crunch of bacon, complemented perfectly by fresh spinach and zesty honey mustard.

Versatile Options: Don’t hesitate to personalize! Swap in your choice of deli meats or even add avocado slices for a creamy upgrade—this recipe adapts beautifully.

Perfect Pairing: Enjoy it with a bowl of creamy tomato soup or a crisp salad for a satisfying meal that’ll please everyone at your table.

Make-Ahead Friendliness: Assemble ahead and grill when you’re ready. This turkey melt is not just a quick meal but can also be prepped in advance, making it a convenient go-to dish!

Turkey Melt Ingredients

For the Sandwich

  • Sourdough Bread – Provides a sturdy, crunchy base for the melt. Substitute with any thick, crusty bread for a similar texture.
  • Honey Mustard – Adds a sweet and tangy flavor that makes each bite pop. Can be replaced with any preferred spread.
  • White Cheddar Cheese – Offers rich creaminess and flavor for the ultimate melt. For a dairy-free option, use dairy-free cheese.
  • Deli Turkey – The primary protein that keeps it hearty. Any other deli meat like chicken or ham can be substituted for variety.
  • Tomato Slices – Contributes freshness and moisture to balance the richness. Use any ripe tomato variety for the best flavor.
  • Fresh Baby Spinach – Provides nutrition and a burst of color in every bite. Could substitute with other leafy greens like arugula or kale.
  • Cooked Bacon – Adds a smoky, crispy element that elevates the whole sandwich. Can be swapped with turkey bacon or omitted for a vegetarian option.
  • Butter – Enhances richness and helps achieve a golden crust while grilling. Dairy-free butter can be used for a dairy-free version.

Optional Additions

  • Avocado Slices – For an extra creamy texture and healthy fats.
  • Swiss Cheese – Swap with cheddar for a milder flavor option if preferred.

Step‑by‑Step Instructions for Turkey Melt with Cheddar, Spinach, and Bacon

Step 1: Prepare the Bread
Start by laying out four slices of thick sourdough bread on a clean surface. This sturdy base will hold all of the delicious ingredients. Take a moment to admire the fresh bread, knowing it will become the heart of your Turkey Melt with Cheddar, Spinach, and Bacon.

Step 2: Spread the Mustard
Generously spread about half a tablespoon of honey mustard on the top side of each slice. This adds a tangy pop of flavor that perfectly complements the turkey and cheese. Make sure to cover the bread evenly to ensure each bite of the Turkey Melt bursts with taste.

Step 3: Add the Cheese and Turkey
Layer half slices of white cheddar cheese over each bread slice. Follow with a generous portion of deli turkey, ensuring that each slice is well-covered. The creamy cheese and tender turkey are essential ingredients, making your Turkey Melt truly mouthwatering.

Step 4: Include Fresh Vegetables
Next, add juicy tomato slices and a handful of fresh baby spinach on top of the turkey. These vibrant veggies not only add freshness but also elevate the nutritional value of your Turkey Melt with Cheddar, Spinach, and Bacon. The colors should be bright and appealing.

Step 5: Finish with Bacon and Cheese
Sprinkle crispy cooked bacon on top of the spinach, then place the remaining slices of cheddar cheese over each sandwich. This final cheesy layer locks in all the wonderful flavors. Carefully place another slice of bread on top, mustard side facing in, creating a delicious sandwich stack.

Step 6: Butter the Outside
Spread a light layer of butter on the outside of each sandwich. This will give the Turkey Melt a beautiful golden crust when grilled. The butter also adds richness that wonderfully balances the flavors of the cheese and bacon.

Step 7: Toast in a Skillet
Heat a non-stick skillet over medium heat. Carefully place the sandwiches in the skillet and toast for about 3-4 minutes per side, pressing down gently with a spatula. Keep an eye on them to ensure they reach a beautiful golden brown color and the cheese melts to gooey perfection.

Step 8: Serve Warm
Once both sides are perfectly toasted and the cheese is melty, remove the sandwiches from the skillet. Allow them to cool slightly before slicing in half. Serve your Turkey Melt with Cheddar, Spinach, and Bacon warm, perhaps alongside a comforting bowl of soup for a complete meal.

Make Ahead Options

These Turkey Melt with Cheddar, Spinach, and Bacon sandwiches are ideal for meal prep enthusiasts! You can assemble the sandwiches up to 24 hours in advance by layering the ingredients between the slices of bread, ensuring you spread the honey mustard evenly. To maintain their freshness, wrap each assembled sandwich tightly in plastic wrap or place them in an airtight container and refrigerate. When you’re ready to enjoy, simply heat a skillet over medium heat and grill the sandwiches until golden brown and the cheese is gooey, which takes about 3-4 minutes per side. This way, you’ll have a scrumptious, homemade meal with minimal effort on busy weeknights!

Expert Tips for Turkey Melt Perfection

  • Use Fresh Cheese: Freshly sliced cheese from the deli enhances flavor and texture, making your Turkey Melt with Cheddar, Spinach, and Bacon truly exceptional.

  • Spread Mustard Wisely: Always spread the mustard inside the sandwich to prevent burning on the skillet. This keeps the flavors intact and your sandwich perfectly toasted.

  • Monitor the Heat: Keep an eye on skillet temperature to avoid burning the bread. Medium heat is ideal for achieving that perfect golden crust while allowing the cheese to melt nicely.

  • Layer Generously: Don’t skimp on the fillings! A well-layered turkey melt not only tastes better but also provides a satisfying bite with every mouthful.

  • Customize Your Greens: Feel free to swap spinach with other leafy greens like arugula or kale to suit your taste. Each green offers unique flavors and nutrition to your Turkey Melt.

Turkey Melt with Cheddar Variations

Feel free to explore these delightful twists on your Turkey Melt, making it even more irresistible!

  • Swiss Cheese: Swap cheddar for Swiss for a milder yet creamy flavor that melts beautifully. This subtle change adds a gourmet touch to your sandwich.

  • Roast Beef Switch: Experiment with roast beef in place of deli turkey for a heartier version. The richer flavor will take your Turkey Melt to new savory heights.

  • Avocado Delight: Add creamy avocado slices for extra richness and healthy fats. This not only enhances the melt but also provides a delicious, smooth texture.

  • Spicy Kick: For a flavor boost, include jalapeño slices or a dash of hot sauce. This will transform your Turkey Melt into a spicy delight, perfect for heat lovers!

  • Garlic Butter: Swap regular butter for garlic-infused butter to add a fragrant flavor. This simple swap can elevate your sandwich to a whole new level of taste.

  • Vegetarian Option: Omit the bacon and turkey and add grilled vegetables like zucchini and bell peppers for a hearty vegetarian alternative. The smoky flavor of grilled veggies pairs beautifully with the cheese.

  • Pesto Spread: Instead of honey mustard, spread pesto on the inside of the bread for an herby twist that infuses your Turkey Melt with aromatic flavors. It’s a fresh take that truly delights!

  • Wrap It Up: Transform your melt into a wrap using a large tortilla or spinach wrap instead of bread. This makes for a lighter meal while still keeping all those fabulous flavors intact.

Whether you’re preparing a cozy family dinner or a quick lunch, these variations are sure to inspire your creativity in the kitchen. If you’re in the mood for something classic, try pairing your Turkey Melt with a bowl of creamy tomato soup. Happy cooking!

What to Serve with Turkey Melt with Cheddar, Spinach, and Bacon

Nothing pairs better with a warm sandwich than these delightful sides, perfect for building a cozy meal.

  • Creamy Tomato Soup: Ideal for dipping, this classic soup brings rich flavors that complement the turkey melt’s crunch and gooeyness. It’s a perfect match for those chilly evenings.

  • Simple Green Salad: A fresh side salad with crisp greens and a light vinaigrette adds brightness to each bite of melt. The crunchy texture balances the sandwich’s richness beautifully.

  • Sweet Potato Fries: These crispy, slightly sweet fries offer a delicious contrast to the savory flavors of the turkey melt. They are easy to make and always a family favorite.

  • Pickle Platter: Tangy pickles provide a zesty crunch that cuts through the savory richness of the melt. This adds an enjoyable pop of flavor to your meal.

  • Coleslaw: Creamy coleslaw adds a cool, crunchy texture to your dining experience, contrasting with the warmth of the melt while bringing a delightful flavor profile.

  • Sparkling Apple Cider: This refreshing drink perfectly complements the savory notes of the turkey melt. Its Bubble and sweetness enhance the overall experience, making it even more enjoyable.

How to Store and Freeze Turkey Melt

Fridge: Keep any leftover Turkey Melt wrapped tightly in foil or an airtight container for up to 3 days. This will help maintain its delicious flavor and texture.

Freezer: For longer storage, freeze assembled but ungrilled sandwiches wrapped tightly in plastic wrap and foil. They can be frozen for up to 1 month.

Reheating: To reheat, allow the frozen Turkey Melt to thaw overnight in the fridge. Grill in a skillet over medium heat for 4-5 minutes per side until golden and heated through.

Make-Ahead Tip: You can prep sandwiches in advance, wrap them, and refrigerate for up to 24 hours before grilling—making mealtime a breeze!

Turkey Melt with Cheddar, Spinach, and Bacon Recipe FAQs

How do I select ripe tomatoes for my Turkey Melt?
Choose tomatoes that are firm yet slightly soft to the touch. Look for vibrant colors without any dark spots, as these can indicate overripeness. Ripe tomatoes will add the perfect touch of moisture and sweetness to your Turkey Melt!

What is the best way to store leftover Turkey Melt?
Wrap any leftover Turkey Melt tightly in foil or place it in an airtight container. Properly stored, it will keep in the fridge for up to 3 days. Just make sure it cools down to room temperature before refrigerating to maintain its taste and texture.

Can I freeze Turkey Melt sandwiches?
Absolutely! For freezing, assemble the sandwiches but leave them ungrilled. Wrap them tightly in plastic wrap and then in foil. They can be frozen for up to 1 month. When you’re ready to enjoy, thaw overnight in the fridge and grill as usual until golden brown and heated through—this method preserves the flavors beautifully!

What if my bacon isn’t crispy enough?
No worries! If you find that your bacon isn’t crispy when you’re ready to assemble your sandwich, you can pop it in a hot skillet for a couple of minutes until it reaches your desired crunch. Alternatively, you can bake the bacon in the oven at 400°F (200°C) for about 15-20 minutes on a baking sheet lined with parchment paper for evenly cooked, crispy bacon.

Can I make this Turkey Melt vegetarian?
Certainly! To create a vegetarian version of the Turkey Melt, simply omit the bacon and turkey. You can replace the turkey with a thicker slice of hearty vegetables like roasted zucchini or portobello mushrooms. The key is to maintain flavor and texture, so don’t hesitate to load it up with your favorite veggies and perhaps some avocado slices for added creaminess!

Is this Turkey Melt safe for pets?
While the ingredients in the Turkey Melt are generally safe for humans, they are not suitable for pets, especially cooked bacon and certain cheeses, which can upset their stomachs. Always keep special treats for your furry friends and enjoy this delectable melt yourself!

Turkey Melt with Cheddar, Spinach, and Bacon

Melt-in-Your-Mouth Turkey Melt with Cheddar, Spinach, and Bacon

Indulge in a comforting Turkey Melt with Cheddar, Spinach, and Bacon, perfect for those chilly days.
Prep Time 10 minutes
Cook Time 8 minutes
Total Time 18 minutes
Servings: 2 sandwiches
Course: Lunch
Cuisine: American
Calories: 650

Ingredients
  

For the Sandwich
  • 4 slices Sourdough Bread Substitute with any thick, crusty bread
  • 0.5 tablespoon Honey Mustard Can be replaced with any preferred spread
  • 4 slices White Cheddar Cheese For a dairy-free option, use dairy-free cheese
  • 8 ounces Deli Turkey Any other deli meat can be substituted
  • 4 slices Tomato Use any ripe tomato variety
  • 1 cup Fresh Baby Spinach Can substitute with other leafy greens
  • 4 slices Cooked Bacon Can be swapped with turkey bacon or omitted
  • 1 tablespoon Butter Dairy-free butter can be used
Optional Additions
  • 1 whole Avocado For an extra creamy texture
  • 4 slices Swiss Cheese For a milder flavor option

Equipment

  • Skillet

Method
 

Step-by-Step Instructions
  1. Start by laying out four slices of thick sourdough bread on a clean surface.
  2. Generously spread about half a tablespoon of honey mustard on the top side of each slice.
  3. Layer half slices of white cheddar cheese over each bread slice, followed by a generous portion of deli turkey.
  4. Add juicy tomato slices and a handful of fresh baby spinach on top of the turkey.
  5. Sprinkle crispy cooked bacon on top of the spinach, then place the remaining slices of cheddar cheese over each sandwich.
  6. Spread a light layer of butter on the outside of each sandwich.
  7. Heat a non-stick skillet over medium heat and toast the sandwiches for about 3-4 minutes per side.
  8. Once toasted, remove from the skillet, allow to cool slightly, slice in half, and serve warm.

Nutrition

Serving: 1sandwichCalories: 650kcalCarbohydrates: 45gProtein: 30gFat: 35gSaturated Fat: 18gPolyunsaturated Fat: 5gMonounsaturated Fat: 10gCholesterol: 90mgSodium: 1300mgPotassium: 600mgFiber: 5gSugar: 3gVitamin A: 25IUVitamin C: 15mgCalcium: 30mgIron: 10mg

Notes

Use fresh ingredients for the best flavor and texture. You can assemble and grill them later for a convenient meal.

Tried this recipe?

Let us know how it was!

Delicious Chicken Salad with Grapes for Summer Picnics

Feeling the summer sun on my skin always brings back memories of iconic picnics filled with laughter, delicious food, and the blissful crunch of fresh ingredients. One dish that stands out is my Easy Chicken Salad with Grapes—an effortless blend of tender shredded chicken and the delightful sweetness of juicy grapes. This recipe isn’t just about bringing comfort on a plate; it’s a quick, family-friendly option ready in just 10 minutes, perfect for those busy weeknights or sunny outings. With its creamy finish and flavor balance, it’s an easy favorite that’ll have everyone reaching for seconds. Want to elevate your summer meals with this beloved classic? Let’s dive in!

Why is this Chicken Salad a Must-Try?

Simplicity at its finest: This Chicken Salad requires just a few ingredients and can be made in under 10 minutes, making it a perfect choice for busy weeknights or spontaneous picnics.

Sweet and Savory flavor: The combination of juicy red grapes with tender chicken creates a delightful contrast that tantalizes your taste buds.

Versatile options: Serve it on croissants, wraps, or a bed of greens—it’s adaptable to any meal occasion, just like my BBQ Chicken Grilled Cheese Sandwich or Sizzling Chicken Pepper Stir Fry.

Crowd-pleaser: With its balance of flavors and textures, this salad appeals to all ages, ensuring that everyone at your picnic leaves happy!

Healthy without compromise: Packed with protein and nutrients, this dish proves you can indulge without guilt, making it a perfect light summer meal.

Chicken Salad Ingredients

• Dive into this easy Chicken Salad recipe that bursts with flavor and crunch!

For the Chicken Salad

  • Cooked Chicken (3 cups) – Provides protein and substance; you can use shredded rotisserie chicken for added convenience.
  • Red Grapes (1 cup) – Adds sweetness and crunch for a refreshing twist; consider dried cranberries for a unique flavor profile.
  • Red Onion (½ small, diced) – Contributes a mild, sweet onion flavor; substitute with green onions for a lighter taste.
  • Celery (2 stalks, diced) – Offers a fresh crunch that complements the other ingredients; chopped pickles can be used for a tangier option.
  • Mayonnaise (½ cup, light recommended) – Binds the salad and adds creaminess; Greek yogurt can make for a lighter option.
  • Lemon Juice (1 tablespoon) – Enhances flavor with a fresh citrus note; omit for a less tangy result.
  • Salt (½ teaspoon) – Enhances overall flavor; adjust to taste for your preference.
  • Garlic Powder (½ teaspoon) – Adds depth of flavor; feel free to omit if desired.
  • Onion Powder (½ teaspoon) – Complements the red onion flavor; this is optional based on preference.
  • Black Pepper (¼ teaspoon) – Adds seasoning and a subtle kick; adjust for your taste.

Step‑by‑Step Instructions for Easy Chicken Salad with Grapes

Step 1: Combine the Main Ingredients
In a large mixing bowl, place 3 cups of tender shredded chicken, 1 cup of halved red grapes, ½ small diced red onion, and 2 diced celery stalks. Use a fork to gently toss the ingredients together until they are evenly distributed. Aim for a colorful mix, with the crimson grapes contrasting against the chicken and vegetables—this beautiful medley is the base of your delicious chicken salad.

Step 2: Prepare the Creamy Dressing
In a separate small bowl, whisk together ½ cup of mayonnaise, 1 tablespoon of fresh lemon juice, ½ teaspoon of salt, ½ teaspoon of garlic powder, ½ teaspoon of onion powder, and ¼ teaspoon of black pepper. Continue whisking until the mixture is smooth and creamy, with a consistent texture that promises to coat the chicken salad beautifully. Now you have a tangy and flavorful dressing ready to elevate the salad.

Step 3: Dress the Chicken Mixture
Pour the creamy dressing over the chicken mixture in the large bowl. Use a spatula to gently fold the dressing into the ingredients, ensuring every piece of chicken, grape, and celery is well-coated without breaking apart. This should take about 1-2 minutes, and until you see all the elements glistening with that creamy goodness—a comforting sign of a well-prepared chicken salad.

Step 4: Adjust Seasoning and Serve
Take a moment to taste the delicious chicken salad; feel free to adjust the seasoning by adding more salt or pepper if needed. The flavor should be balanced and inviting. For the freshest serving, you can serve it immediately in sandwich form, on crisp lettuce, or atop a refreshing bed of greens. Enjoy the flavors or store it securely!

Step 5: Store the Salad
If you don’t serve all the chicken salad right away, transfer any leftovers to an airtight container. Remember, this easy chicken salad can be stored in the refrigerator for about 3-5 days. Keep it chilled to maintain freshness and quality; just be sure to discard it if left out for more than 2 hours. This way, you can enjoy your delicious chicken salad throughout the week!

How to Store and Freeze Chicken Salad

Fridge: Store your chicken salad in an airtight container for up to 3-5 days to maintain freshness and flavor.

Room Temperature: If left out, be sure to discard the chicken salad if it has been sitting at room temperature for more than 2 hours to ensure safety.

Reheating: While typically served chilled, if you have any warm chicken salad leftovers, you can gently reheat it on the stove over low heat until warmed through, but it’s best enjoyed cold.

Freezer: It’s not recommended to freeze chicken salad as mayonnaise-based dishes don’t freeze well, resulting in a change in texture upon thawing.

Make Ahead Options

These Easy Chicken Salad with Grapes is perfect for meal prep enthusiasts looking to save time during busy weekdays! You can prep the chicken, grapes, red onion, and celery up to 24 hours in advance; simply store them chopped and covered in the refrigerator. For the best flavor, mix the creamy dressing (mayonnaise, lemon juice, salt, and spices) separately and keep it in an airtight container. When it’s time to eat, combine the prepped ingredients with the dressing, and gently toss until everything is coated. This method ensures that your chicken salad remains fresh and just as delicious, making weeknight meals a breeze!

Expert Tips for Chicken Salad

  • Perfectly Shredded Chicken: Use cooked chicken that’s been well-shredded; this allows the dressing to cling better, keeping your chicken salad flavorful and delicious.

  • Balance Sweetness: Don’t hesitate to adjust the amount of grapes based on your taste; too few may leave your salad lacking that delicious sweetness that harmonizes with the chicken.

  • Chill It First: For the best flavor, let the chicken salad sit in the fridge for at least 30 minutes before serving, allowing the ingredients to meld beautifully.

  • Dress Just Before Serving: If you’re planning to store leftovers, consider dressing only what you’ll eat right away to prevent the salad from getting soggy.

  • Customize and Enjoy: Feel free to add your favorite ingredients like nuts for crunch or herbs for freshness, making your chicken salad a personal hit for summer picnics!

Chicken Salad Variations to Try

Feel free to get creative with this Chicken Salad—there’s a world of flavor just waiting for you!

  • Dried Cranberries: Swap out the grapes for dried cranberries for a chewier, sweeter twist that’s perfect for fall picnics.
  • Nuts Galore: Add chopped walnuts or pecans for an extra crunch that gives a delightful contrast to the creaminess.
  • Greek Yogurt: Use Greek yogurt instead of mayonnaise for a lighter, protein-packed option without sacrificing creaminess.
  • Herb Infusion: Toss in fresh herbs like dill or parsley to brighten the flavor and bring a burst of freshness.
  • Lettuce Cups: For a low-carb offering, serve the chicken salad in lettuce cups, creating a crunchy and refreshing bite.
  • Spicy Kick: Incorporate diced jalapeños or a dash of hot sauce for those who crave a bit of heat—it’s a flavor adventure!
  • Croissant Delight: Use flaky croissants instead of regular bread for an indulgent sandwich that feels like a special treat.
  • Tropical Twist: Add diced pineapple or mango for a sweet, tropical element that pairs beautifully with the chicken.

These variations will surely spice up your meal times! With flavors inspired by favorites like Garlic Chicken Gnocchi Skillet or a crisp Tuscan Chicken Soup, your chicken salad can be a new dish each time you make it. Enjoy your culinary journey!

What to Serve with Easy Chicken Salad with Grapes

There’s nothing quite like complementing a refreshing salad with a few delightful side dishes to create a summer meal.

  • Crispy Potato Wedges: These golden, seasoned potato wedges provide a crispy contrast, perfect for balancing the creamy texture of the salad.

  • Classic Coleslaw: A tangy and crunchy coleslaw adds brightness and a refreshing bite that pairs wonderfully with the sweet elements of the chicken salad.

  • Savory Quinoa Salad: Packed with protein and fresh herbs, a quinoa salad adds a nutty flavor and texture that harmonizes beautifully with the chicken salad.

  • Fresh Fruit Platter: A mix of juicy watermelon, sweet cantaloupe, and berries brings a burst of hydration and sweetness, enhancing your picnic experience.

  • Garlic Breadsticks: Soft and warm breadsticks provide a delightful opportunity to scoop up extra chicken salad, making each bite satisfying and fun!

  • Iced Lemonade: A chilled glass of lemonade is the ideal thirst-quencher, perfectly complementing the flavors of your chicken salad while adding a refreshing zing.

  • Sliced Cucumbers with Dill Dip: Crisp cucumbers add a refreshing crunch, while a dill yogurt dip offers a creamy herbal twist to balance the rich flavors of your meal.

Chicken Salad Recipe FAQs

How do I know if my chicken is cooked properly?
Absolutely! Using a meat thermometer is key—ensure your cooked chicken reaches an internal temperature of 165°F. This guarantees that it’s safe to eat while remaining tender and juicy for your salad.

What should I look for when selecting grapes?
The more the merrier when it comes to grapes! Choose plump red grapes without dark spots or wrinkles. Ideally, they should be firm and crisp, indicating freshness. If you can’t find red grapes, dried cranberries are a delightful alternative that gives a different but equally pleasant sweetness.

How should I store leftover chicken salad?
I often make extra to enjoy throughout the week! Store your chicken salad in an airtight container in the refrigerator for up to 3-5 days. Keeping it chilled will maintain its freshness and flavor. Just be aware to discard any leftovers if they’ve been left out for more than 2 hours.

Can I freeze chicken salad?
It’s best to avoid freezing chicken salad since mayonnaise-based dishes do not freeze well. The mayonnaise can separate upon thawing, leaving you with an unappetizing texture. Instead, I recommend enjoying your chicken salad fresh or stored in the fridge for lasting enjoyment!

What if I have dietary restrictions or allergies?
Very important! If you or someone you’re serving has allergies, always double-check ingredient labels. For those avoiding dairy or eggs, Greek yogurt is an excellent substitute for mayonnaise, offering a creamy texture without the allergens. Feel free to personal customize your salad according to taste and dietary needs!

Will adding nuts affect the texture?
Definitely! Adding toasted nuts like sliced almonds or chopped walnuts not only enhances the crunch but also enriches the flavor profile. Just be sure to add them before serving; otherwise, they may become soggy if stored for too long!

Chicken Salad

Delicious Chicken Salad with Grapes for Summer Picnics

This Chicken Salad with Grapes is a quick, flavorful dish perfect for summer picnics.
Prep Time 10 minutes
Total Time 10 minutes
Servings: 4 servings
Course: Salad
Cuisine: American
Calories: 350

Ingredients
  

Chicken Salad Ingredients
  • 3 cups Cooked Chicken Shredded rotisserie chicken recommended.
  • 1 cup Red Grapes Halved for added texture.
  • ½ small Red Onion Diced.
  • 2 stalks Celery Diced.
  • ½ cup Mayonnaise Light mayonnaise recommended.
  • 1 tablespoon Lemon Juice Freshly squeezed.
  • ½ teaspoon Salt Adjust to taste.
  • ½ teaspoon Garlic Powder Optional.
  • ½ teaspoon Onion Powder Optional.
  • ¼ teaspoon Black Pepper Adjust for taste.

Equipment

  • Mixing Bowl
  • whisk
  • spatula

Method
 

Step-by-Step Instructions
  1. Combine the main ingredients in a large mixing bowl: shredded chicken, halved red grapes, diced red onion, and diced celery. Toss gently.
  2. In a separate bowl, whisk together mayonnaise, lemon juice, salt, garlic powder, onion powder, and black pepper until smooth.
  3. Pour the dressing over the chicken mixture and gently fold until well-coated.
  4. Taste and adjust seasoning as needed, then serve immediately or refrigerate for 30 minutes before serving.
  5. Store leftovers in an airtight container in the fridge for up to 3-5 days.

Nutrition

Serving: 1cupCalories: 350kcalCarbohydrates: 14gProtein: 30gFat: 20gSaturated Fat: 3gPolyunsaturated Fat: 2gMonounsaturated Fat: 15gCholesterol: 75mgSodium: 400mgPotassium: 400mgFiber: 2gSugar: 6gVitamin A: 2IUVitamin C: 10mgCalcium: 40mgIron: 1mg

Notes

For the best flavor, chill before serving and consider adding your favorite ingredients like nuts or fresh herbs.

Tried this recipe?

Let us know how it was!

Crispy Air Fryer Sweet Potato Fries for a Guilt-Free Snack

Stepping into the kitchen, I can’t help but think about the endless possibilities of cooking, especially when it comes to healthy snacks. My latest obsession? Air Fryer Sweet Potato Fries! Within just 25 minutes, you can whip up a batch of these delightfully crispy fries that are not only a healthier alternative to the classic deep-fried variety but also bursting with flavor. They’re perfect for any occasion, whether as a side for a juicy burger or a solo crunch while binge-watching your favorite show. Plus, the air fryer makes everything so easy—who wouldn’t love that? Are you ready to transform humble sweet potatoes into a crunchy delight that will have everyone asking for seconds?

Why Will You Love These Fries?

Crispy Texture: These Air Fryer Sweet Potato Fries achieve that perfect crunch without the guilt of deep frying.

Quick and Easy: In just 25 minutes, you have a delicious snack or side dish ready to go, making them a timesaver in your busy schedule.

Flavorful Seasoning: Expertly seasoned with onion powder and paprika, every bite is bursting with flavor—adjust spices to suit your taste!

Healthy Alternative: Gluten-free and packed with nutrients, these fries are not just tasty but also a wholesome option compared to fast food.

Crowd Pleaser: Serve them at gatherings, and watch how quickly they disappear—everyone loves a good fry! Pair with a dipping sauce like ketchup or try a spicy mayo blend for an extra kick.

Imagine serving these alongside dishes like Cheesy Hamburger Potato soup, or for a comforting taste, how about them with Potato Bacon Soup? The options are endless!

Air Fryer Sweet Potato Fries Ingredients

For the Fries
Sweet Potatoes – The star of the show, offering natural sweetness and a satisfying texture.
Oil – Use 1 1/2 tablespoons of a light cooking oil to help achieve that perfectly crispy exterior; olive oil adds a healthy twist.
Onion Powder – Adds a savory depth that elevates the flavors; feel free to swap for garlic powder for a different kick.
Paprika – Provides a delightful hint of smokiness; consider smoked paprika for a richer flavor.
Salt and Pepper – Essential seasonings that enhance the overall taste; adjust to your personal preference for flavor seasoned fries.

Now, let’s dive into the easy process of making these delightful Air Fryer Sweet Potato Fries!

Step‑by‑Step Instructions for Air Fryer Sweet Potato Fries

Step 1: Preheat the Air Fryer
Begin by preheating your air fryer to 375°F (190°C) for about 5 minutes. This crucial step ensures your Air Fryer Sweet Potato Fries cook evenly and achieve that desired crispy texture. While the air fryer heats up, you can prepare your sweet potatoes, streamlining your cooking process.

Step 2: Prepare the Sweet Potatoes
Wash and peel the sweet potatoes, then slice them into 1/4-inch-wide strips, aiming for uniform thickness. Place the cut fries in a large mixing bowl. Take a moment to admire the vibrant color of the sweet potato strips before proceeding to the next step—this visual cue reminds you of the deliciousness to come!

Step 3: Season the Fries
Drizzle 1 1/2 tablespoons of your chosen light cooking oil over the sweet potato strips. Add onion powder, paprika, salt, and pepper according to your taste. Toss everything together gently until each strip is evenly coated in the oil and spices, creating a flavorful base for your Air Fryer Sweet Potato Fries.

Step 4: Arrange in the Air Fryer
Carefully arrange the seasoned sweet potato fries in the air fryer basket in a single layer, ensuring they don’t overlap. This preparation promotes even cooking and crispiness. Set the timer for 15 to 20 minutes, and let the air fryer do its magic while you sit back and anticipate those golden, crispy fries.

Step 5: Shake for Even Cooking
At the halfway mark, around 8-10 minutes, give the basket a gentle shake. This action ensures that all sides of the Air Fryer Sweet Potato Fries crisp up beautifully. Continue cooking until they turn a lovely golden-brown and are tender on the inside—your sense of smell will also tell you when they’re ready!

Step 6: Check for Doneness
As the cooking time approaches its end, check the fries for crispiness. If they need a bit more time for that perfect texture, feel free to extend the cooking for an additional 2-3 minutes. Remember, the ideal sweet potato fries will be both crispy on the outside and fluffy within.

Step 7: Serve Hot
Once cooked to perfection, carefully remove the Air Fryer Sweet Potato Fries from the basket. If desired, sprinkle with a touch more salt to enhance the flavors. Serve immediately while they’re hot, alongside your favorite dipping sauce like ketchup or aioli for a delightful experience!

What to Serve with Crispy Air Fryer Sweet Potato Fries

Transform your meal with delightful pairings that elevate the flavors of these crispy fries.

  • Creamy Avocado Dip: A smooth, rich dip that balances the sweetness of the fries, making for a flavor-packed experience. This is a perfect crunchy companion, allowing for a delightful contrast in textures.

  • Zesty Coleslaw: A refreshing and tangy coleslaw adds brightness to the dish while providing a crunchy texture that your taste buds will adore. It’s an easy way to sneak some veggies into your meal, complementing the sweet potato goodness.

  • Savory Chicken Tenders: Pair with crispy, seasoned chicken tenders for a hearty meal that the whole family will love. The combination of flavors and textures makes it a winning dinner option.

  • Spicy Mayo Sauce: Drizzling some spicy mayo on your fries introduces a kick that takes them to the next level, enhancing their deliciousness. It also serves as a great dipping sauce for both fries and other dim sum!

  • Grilled Salmon: The smoky flavors from grilled salmon create a sophisticated pairing with sweet potato fries, making this combo perfect for a dinner party or special occasion. Each bite will have your guests asking for the recipe!

  • Crisp Garden Salad: A light and crisp garden salad with a zesty vinaigrette complements the richness of the fries, providing balance. The fresh flavors are a great way to round out your meal without feeling too heavy.

  • Honey Mustard Dip: A sweet and tangy dip that pairs wonderfully with the fries, adding an extra layer of flavor that delights the palate. This is especially great for those who enjoy a dip that’s on the sweeter side.

  • Cucumber Lime Sparkler: For a refreshing drink, consider serving a cucumber lime spritzer alongside the fries, providing a clean and citrusy contrast to the meal. It’s an uplifting choice that keeps things light and fresh.

  • Dark Chocolate Brownies: End your meal on a sweet note with fudgy brownies. The rich chocolate flavor contrasts beautifully with the sweet and savory fries, ensuring a satisfied palate. Always a crowd-pleaser!

Make Ahead Options

These Air Fryer Sweet Potato Fries are fantastic for meal prep, saving you precious time during busy weeknights! You can peel and cut the sweet potatoes into strips up to 24 hours in advance; just remember to refrigerate them in an airtight container to keep them fresh. For the best flavor, toss the cut fries with oil and seasonings right before air frying. When you’re ready to enjoy your crispy fries, simply preheat the air fryer and cook them as directed, resulting in just as delicious homemade fries with minimal effort. Embrace this make-ahead tip to elevate your snacking game!

Expert Tips for Air Fryer Sweet Potato Fries

  • Uniform Cuts: Ensure sweet potato strips are even in size for consistent cooking, preventing some fries from being overcooked while others are undercooked.

  • Oil Measurement: Don’t skip the oil! It’s essential for achieving that crispy texture. Too little will lead to soggy fries, while too much can make them greasy.

  • Airflow Matters: Avoid overcrowding the air fryer basket. Frying in a single layer allows hot air to circulate, ensuring all your Air Fryer Sweet Potato Fries crisp up nicely.

  • Watch the Time: Keep an eye on the fries as they cook. Cooking times may vary based on the thickness of your fries and the specific model of your air fryer.

  • Experiment with Spices: Get creative! Try different seasonings like chili powder or Parmesan cheese to add unique flavors to your Air Fryer Sweet Potato Fries.

How to Store and Freeze Air Fryer Sweet Potato Fries

Fridge: Store leftover Air Fryer Sweet Potato Fries in an airtight container in the refrigerator for up to 3 days to maintain their freshness and flavor.

Freezer: To freeze, lay cooked fries in a single layer on a baking sheet and freeze until solid. Then, transfer to a freezer bag for up to 2 months for best quality.

Reheating: For the crispiest results, reheat from frozen in the air fryer at 375°F (190°C) for 8-10 minutes, shaking the basket halfway through for even crispiness.

Room Temperature: If left out, consume the fries within 2 hours for food safety. Enjoy your fries fresh for the best taste!

Air Fryer Sweet Potato Fries Variations

Feel free to get creative and customize your Air Fryer Sweet Potato Fries to make them uniquely yours!

  • Herb-Infused: Add finely chopped fresh herbs like rosemary or thyme for a fragrant twist—perfect for herb lovers seeking an aromatic touch.

  • Sweet and Spicy: Drizzle honey and sprinkle cayenne pepper for a sweet kick. This delightful combination adds a surprising layer of flavor that will leave you reaching for more.

  • Cheesy: Toss freshly grated Parmesan cheese before air frying for a savory, golden crust. The melted cheese adds a rich flavor, making these fries utterly irresistible.

  • Zesty Lime: Squeeze fresh lime juice over fries after cooking for a refreshing zing. Pairing zesty lime with sweet fries creates a delightful contrast that brightens up your snack!

  • Chili-Lime: Mix chili powder, lime zest, and salt for a Mexican-inspired flavor bomb. This combination is a great way to elevate your fries with just a few spice swaps.

  • Asian Twist: Toss with sesame oil and sprinkle with sesame seeds before air frying. This adds a nutty flavor and excellent texture, perfect for a fun fusion dish.

  • Spicy Garlic: Incorporate a bit of crushed red pepper and garlic powder for an extra kick. This variation brings warmth and depth to your fries, satisfying those spice cravings.

  • Vegetable Swap: Replace sweet potatoes with zucchini or carrots for a different flavor and texture. These alternatives maintain the deliciousness while offering a fun twist on a classic.

Serving these flavorful fries alongside other dishes like Sweet Chili Chicken or Potato Bacon Soup creates a delightful and hearty meal. Enjoy exploring these variations!

Air Fryer Sweet Potato Fries Recipe FAQs

What type of sweet potatoes should I use for the best results?
Absolutely! Look for sweet potatoes that are firm, with a smooth skin and no dark spots or blemishes. The flesh should be vibrant orange and free from any soft or mushy areas. Avoid sweet potatoes with dark spots all over, as they can indicate spoilage.

How do I store leftover Air Fryer Sweet Potato Fries?
Store any leftover fries in an airtight container in the refrigerator for up to 3 days. This helps maintain their freshness and flavor. When you’re ready to enjoy them again, simply reheat in the air fryer at 375°F (190°C) for about 5-8 minutes to bring back that delightful crispiness!

Can I freeze Air Fryer Sweet Potato Fries?
Definitely! To freeze your sweet potato fries, begin by cooking them as directed. Lay the cooked fries in a single layer on a baking sheet and freeze until solid—this usually takes about 1-2 hours. Once they’re firm, transfer them to a freezer bag, and they’ll stay good for up to 2 months. When ready to eat, just reheat them straight from the freezer in the air fryer for 8-10 minutes at 375°F (190°C).

What if my fries are soggy after cooking?
No worries! If your fries end up soggy, it could be due to overcrowding the air fryer basket or not using enough oil. For the best results, ensure the fries are in a single layer and adequately coated with oil. If they aren’t crispy after the initial cooking time, you can always pop them back in the air fryer for a few more minutes until they reach that desirable crispness.

Are Air Fryer Sweet Potato Fries healthy for pets?
While sweet potatoes are generally safe for dogs in moderation, I recommend avoiding seasoning, especially salt or spices, when sharing with pets. Always check with your vet before introducing new foods to your furry friend’s diet to ensure it’s appropriate for them.

Can I use any oil for the fries?
Very! You can use light cooking oils such as canola, grapeseed, or even avocado oil for Air Fryer Sweet Potato Fries. I often recommend olive oil due to its health benefits and rich flavor. Just be mindful that some oils have lower smoke points, so choose one that works best for air frying.

Air Fryer Sweet Potato Fries

Crispy Air Fryer Sweet Potato Fries for a Guilt-Free Snack

Make crispy air fryer sweet potato fries for a guilt-free snack bursting with flavor in just 25 minutes.
Prep Time 10 minutes
Cook Time 15 minutes
Total Time 25 minutes
Servings: 4 servings
Course: Appetizers
Cuisine: American
Calories: 120

Ingredients
  

For the Fries
  • 2 medium Sweet Potatoes The star of the show, offering natural sweetness and a satisfying texture.
  • 1.5 tablespoons Oil Use a light cooking oil like olive oil.
  • 1 teaspoon Onion Powder Savory depth that elevates flavors.
  • 1 teaspoon Paprika Provides a delightful hint of smokiness.
  • to taste Salt Essential seasoning to enhance taste.
  • to taste Pepper Essential seasoning to enhance taste.

Equipment

  • Air Fryer

Method
 

Step-by-Step Instructions for Air Fryer Sweet Potato Fries
  1. Preheat the Air Fryer to 375°F (190°C) for about 5 minutes.
  2. Wash and peel the sweet potatoes, then slice them into 1/4-inch-wide strips.
  3. Drizzle 1 1/2 tablespoons of oil over the sweet potato strips. Add onion powder, paprika, salt, and pepper.
  4. Arrange the seasoned sweet potato fries in the air fryer basket in a single layer.
  5. At the halfway mark, give the basket a gentle shake for even cooking.
  6. Check for doneness; cook for an additional 2-3 minutes if needed.
  7. Remove from basket and serve hot with your favorite dipping sauce.

Nutrition

Serving: 1servingCalories: 120kcalCarbohydrates: 27gProtein: 2gSodium: 200mgPotassium: 400mgFiber: 4gSugar: 5gVitamin A: 184IUVitamin C: 30mgCalcium: 4mgIron: 4mg

Notes

Ensure sweet potato strips are even in size for consistent cooking and avoid overcrowding the air fryer basket.

Tried this recipe?

Let us know how it was!

Irresistible Croissant Breakfast Sandwiches for Weekend Bliss

The last time I bit into a warm, flaky croissant, it transported me straight to a charming Parisian café—one that whispered the secrets of lazy mornings over good food. These Croissant Breakfast Sandwiches promise that same bliss, filled with softly scrambled eggs, savory ham, and melting cheese, all drizzled with a sweet, tangy honey-mustard spread. Not only are these sandwiches perfect for brunch gatherings, but they also offer the flexibility of being customizable to suit any craving! Whether you want a hearty breakfast or a quick snack, these buttery delights can be prepped ahead and stored, making them a lifesaver during busy weekdays. Curious about how you can create this simple yet satisfying dish in your own kitchen? Let’s dive in!

Why Are These Sandwiches So Irresistible?

Endless Customization: The beauty of these Croissant Breakfast Sandwiches lies in their versatility. You can easily swap in your favorite fillings—whether it’s crispy bacon, fresh veggies, or a range of cheeses. Quick Prep: With just a few steps, they’re ready to enjoy, making them a perfect option for busy mornings. Crowd-Pleasing Appeal: These sandwiches are sure to impress guests at brunches or family gatherings, bringing the charm of a café to your table. Hearty and Satisfying: Each bite is packed with protein and flavor, ensuring you start your day right. Want to try other delicious creations? Check out my Comforting Charm Croissants or the quick and nutritious Banana Blueberry Breakfast.

Croissant Breakfast Sandwiches Ingredients

For the Butter Spread

  • Dijon Mustard – Adds tanginess and depth to the butter spread; substitute with yellow mustard if needed.
  • Salted Butter – Creates a rich, flavorful coating for the croissants; can be replaced with unsalted butter but adjust salt to taste.
  • Honey – Provides sweetness and balances the flavors in the butter spread; consider using maple syrup for a different flavor profile.

For the Sandwich

  • Large Croissants (4) – The flaky base of the sandwich; choose fresh or frozen, ensuring they’re heated before use.
  • Cheese (8 slices, e.g., Gouda, Swiss, Cheddar) – Melts beautifully, adding creaminess; opt for any good melting cheese of your choice.
  • Deli-Sliced Ham (½ pound) – Provides protein and savory flavor; replace with turkey or chicken for a lighter option.
  • Cooked Bacon (8 slices) – Adds crunch and smokiness; substitute with turkey bacon or omit for a vegetarian version.
  • Large Eggs (5) – Key filling that supplies protein and texture; consider using egg whites for a lighter option.
  • Splash of Milk – Helps make the scrambled eggs creamy; substitute with cream for richer eggs or plant-based milk for a dairy-free version.
  • Salt and Pepper – Enhances the taste of the scrambled eggs; adjust to personal preference.
  • Fresh Chives (optional) – Garnish providing a fresh burst of flavor; use parsley or omit as preferred.

Dive into the joy of making these Croissant Breakfast Sandwiches, where endless customization awaits!

Step‑by‑Step Instructions for Croissant Breakfast Sandwiches

Step 1: Preheat the Oven
Begin by preheating your oven to 350°F (175°C). This temperature is ideal for baking the croissants to a perfect golden brown while ensuring the cheese inside melts beautifully. Line a baking sheet with parchment paper for easy cleanup and to prevent sticking.

Step 2: Prepare the Butter Spread
In a small bowl, combine 2 tablespoons of Dijon mustard, 4 tablespoons of melted salted butter, and 1 tablespoon of honey. Mix until smooth and well-blended, creating a rich, flavorful spread that will enhance the croissant breakfast sandwiches. Set this aside for later use.

Step 3: Slice the Croissants
Take 4 large croissants and carefully slice them in half horizontally. Ensure you don’t cut all the way through, allowing the top to hinge open. This will create a cozy pocket for the delicious fillings. Lay them cut-side up on your prepared baking sheet.

Step 4: Apply the Butter Mixture
Generously brush the butter and mustard mixture onto the cut sides of each croissant. This step adds flavor and helps achieve a beautifully crispy texture during baking. The warmth of the butter will begin to melt into the flaky croissants immediately, setting the stage for the sandwich assembly.

Step 5: Layer the Sandwich Fillings
On the bottom half of each croissant, layer 2 slices of your chosen cheese, followed by 2 ounces of deli-sliced ham. If you’re including bacon, add 2 slices on top of the ham, then place another slice of cheese down. The layering will ensure a gooey, melty sandwich once baked. Place the tops back on each croissant.

Step 6: Bake the Sandwiches
Place the assembled croissant sandwiches in the preheated oven and bake for 10-15 minutes. You’ll want to bake them until the croissants are golden brown and the cheese is melty, creating an enticing aroma that fills the air as they cook.

Step 7: Scramble the Eggs
While the croissants are baking, crack 5 large eggs into a bowl, add a splash of milk, and season with salt and pepper to taste. Whisk this mixture until well combined and frothy. The fluffiness of the eggs will add a delightful texture to your Croissant Breakfast Sandwiches.

Step 8: Cook the Scrambled Eggs
In a non-stick skillet, melt 1 tablespoon of butter over medium heat. Pour in the egg mixture and gently scramble the eggs. Stir slowly until they are just set but still slightly soft; this typically takes about 3-5 minutes. Remove from heat, as the eggs will continue cooking off the heat.

Step 9: Assemble and Serve
Once the croissants are baked to perfection, remove them from the oven and gently open each sandwich. Spoon the soft scrambled eggs onto the bottom half, garnish with fresh chives if desired, and then close the sandwiches. Serve immediately for an irresistible breakfast experience.

What to Serve with Croissant Breakfast Sandwiches

These buttery, flaky delights are just the beginning of a delightful morning experience, perfect for turning breakfast into a special occasion.

  • Fresh Fruit Salad:
    Bright, juicy fruit adds a refreshing touch, balancing the richness of the sandwiches and providing a burst of natural sweetness.

  • Mixed Green Salad:
    A light salad with seasonal greens and a tangy vinaigrette complements the savory sandwich, adding crunch and color to your table.

  • Crispy Hash Browns:
    Golden, crispy hash browns offer a hearty side that pairs perfectly with the soft textures of the sandwiches, making each bite more satisfying.

  • Avocado Slices:
    Creamy avocado brings a healthy twist, enhancing the overall flavor and texture of your meal while providing nutritious fats.

  • Sweet Pastry Bites:
    Consider serving buttery pastry bites alongside for an extra indulgent breakfast treat. Their light sweetness enhances the savory elements of the sandwiches.

  • Coffee or Tea:
    A warm cup of coffee or herbal tea enhances the comforting vibe, making your breakfast inviting and energizing.

  • Mimosa:
    For a fancy touch, serve a chilled mimosa. The fruity, bubbly drink adds an elegant flare to your brunch gathering.

  • Herb-Infused Cream Cheese:
    Spreadable cream cheese with fresh herbs makes a delightful dip for any leftover croissant ends, ensuring nothing goes to waste while enriching your meal.

Croissant Breakfast Sandwiches Variations

Feel free to mix and match ingredients to create a breakfast sandwich just for you!

  • Vegetarian Delight: Swap ham and bacon for sautéed spinach, mushrooms, or bell peppers for a vibrant veggie option. Burst with flavors, this variation is perfect for those who prefer a lighter meal.

  • Spicy Kick: Replace your usual cheese with pepper jack for a zesty twist. The heat and creaminess pair beautifully with the other savory elements, ramping up the flavor in each bite!

  • Sweet and Savory: Add sliced strawberries or figs for a delightful contrast. The sweetness from the fruit complements the savory aspects, creating a delicious balance that’s sure to surprise your palate.

  • Avocado Boost: Top your sandwich with creamy avocado slices. Not only does it enhance the texture, but it also adds healthy fats that keep you fuller for longer.

  • Herb-Infused: Mix fresh herbs like basil or cilantro into your scrambled eggs. It’s amazing how a handful of herbs can elevate the freshness and brightness of your breakfast.

  • Cheese Lovers’ Dream: Go wild by layering multiple cheese types such as Gouda, cheddar, or even blue cheese. The combination creates an indulgent melting experience that cheese enthusiasts will adore.

For more delicious variations and ways to enjoy croissants, try making a quick grab-and-go breakfast with my delightful Banana Blueberry Breakfast or dive into our comforting baked offerings with the Comforting Charm Croissants. Mix it up, and breakfast will never be boring again!

How to Store and Freeze Croissant Breakfast Sandwiches

Fridge: Store leftover Croissant Breakfast Sandwiches in an airtight container for up to 3 days. To maintain freshness, it’s best to wrap them individually in plastic wrap before placing them in the container.

Freezer: For longer storage, wrap assembled sandwiches tightly in plastic wrap and place them in a freezer-safe bag. They can be frozen for up to 1 month without losing quality.

Reheating: When ready to enjoy, thaw sandwiches in the fridge overnight, then reheat in a preheated oven at 350°F (175°C) for about 10-15 minutes until heated through and crispy.

Make-Ahead: Consider prepping the sandwiches without the eggs, covering them, and storing them in the fridge. Add scrambled eggs fresh on the day you plan to serve for optimal taste.

Make Ahead Options

These Croissant Breakfast Sandwiches are perfect for meal prep enthusiasts! You can assemble the sandwiches without the eggs and refrigerate them for up to 3 days. Just keep them tightly covered to maintain their freshness and prevent the croissants from becoming soggy. When you’re ready to serve, simply bake the sandwiches as directed (about 10-15 minutes at 350°F) until golden brown, then add the scrambled eggs just before serving. If you prefer a longer storage option, fully assemble the sandwiches—including the eggs—and wrap them tightly. Freeze for up to 1 month, then thaw them in the refrigerator overnight before reheating for equally delicious results!

Expert Tips for Croissant Breakfast Sandwiches

  • Egg Cooking: Avoid overcooking the scrambled eggs. They should be removed from heat while slightly undercooked to maintain creaminess and fluffiness.

  • Custom Fillings: Customize your sandwiches by using turkey, spinach, or a variety of cheeses. This makes each Croissant Breakfast Sandwich uniquely yours!

  • Make-Ahead Magic: Assemble the sandwiches without eggs ahead of time, cover well, and store in the refrigerator. Bake them fresh and add eggs on the day of serving for optimal flavor.

  • Baking Perfection: Bake until cheese is bubbly and croissants are golden. This ensures a deliciously melty and crispy sandwich that’s sure to delight your taste buds.

  • Storage Tips: If you want to enjoy leftovers, these Croissant Breakfast Sandwiches can be refrigerated for up to three days or frozen for a month. Just reheat them in the oven!

Croissant Breakfast Sandwiches Recipe FAQs

What type of croissants should I use for these sandwiches?
Absolutely! For the best texture and flavor, use large, flaky croissants—freshly baked or thawed from frozen. Look for ones that are golden brown and slightly crispy on the outside, which will hold up beautifully against the fillings.

How do I store Croissant Breakfast Sandwiches?
To keep your delicious sandwiches fresh, wrap them individually in plastic wrap and store in an airtight container in the fridge for up to 3 days. If you’re saving some for later, you can also freeze them for up to a month. Just make sure to give them a quick reheat in the oven for that freshly-baked taste!

Can I freeze Croissant Breakfast Sandwiches?
Yes, you can! To freeze, assemble the sandwiches completely, then tightly wrap each one in plastic wrap and place them in a freezer-safe bag or container. They’ll stay fresh for about a month. When you’re ready to enjoy them, thaw overnight in the fridge and reheat in the oven at 350°F for about 10-15 minutes.

What if my scrambled eggs turn out dry?
Very! To avoid dry scrambled eggs, cook them gently over medium heat and remove them from the skillet while they’re still soft and slightly undercooked. They will continue to cook off the heat, resulting in tender, creamy eggs for your Croissant Breakfast Sandwiches.

Are there any dietary considerations I should keep in mind?
Definitely! When making these sandwiches, be mindful of any food allergies or dietary restrictions. For a gluten-free option, look for gluten-free croissants. If someone has a dairy allergy, using dairy-free cheese and butter alternatives can work beautifully. The fillings can also be easily adjusted to suit vegetarian diets by skipping the ham and bacon or including more vegetables instead!

Can I customize the fillings in my Croissant Breakfast Sandwiches?
Absolutely! The more the merrier! Feel free to swap out the ham for turkey or chicken, add sautéed vegetables like bell peppers or spinach, or use different cheeses like pepper jack for a spicy twist. These delicious sandwiches are all about playing with your favorites!

Croissant Breakfast Sandwiches

Irresistible Croissant Breakfast Sandwiches for Weekend Bliss

These Croissant Breakfast Sandwiches are a delightful combination of fluffy eggs, savory ham, and melted cheese, perfect for a satisfying breakfast.
Prep Time 15 minutes
Cook Time 15 minutes
Total Time 30 minutes
Servings: 4 sandwiches
Course: Breakfast
Cuisine: French
Calories: 450

Ingredients
  

For the Butter Spread
  • 2 tablespoons Dijon Mustard Substitute with yellow mustard if needed.
  • 4 tablespoons Salted Butter Can be replaced with unsalted butter but adjust salt to taste.
  • 1 tablespoon Honey Consider using maple syrup for a different flavor profile.
For the Sandwich
  • 4 large Croissants Choose fresh or frozen, ensuring they're heated before use.
  • 8 slices Cheese (e.g., Gouda, Swiss, Cheddar) Opt for any good melting cheese of your choice.
  • ½ pound Deli-Sliced Ham Replace with turkey or chicken for a lighter option.
  • 8 slices Cooked Bacon Substitute with turkey bacon or omit for a vegetarian version.
  • 5 large Eggs Consider using egg whites for a lighter option.
  • 1 splash Milk Substitute with cream for richer eggs or plant-based milk for a dairy-free version.
  • Salt Adjust to personal preference.
  • Pepper Adjust to personal preference.
  • Fresh Chives Garnish providing a fresh burst of flavor; use parsley or omit as preferred.

Equipment

  • Oven
  • Baking Sheet
  • Parchment Paper
  • Non-stick skillet
  • Mixing Bowl

Method
 

Step-by-Step Instructions for Croissant Breakfast Sandwiches
  1. Preheat your oven to 350°F (175°C). Line a baking sheet with parchment paper for easy cleanup.
  2. Combine 2 tablespoons of Dijon mustard, 4 tablespoons of melted salted butter, and 1 tablespoon of honey in a small bowl. Mix until smooth and set aside.
  3. Slice the 4 large croissants in half horizontally without cutting all the way through. Arrange them cut-side up on the baking sheet.
  4. Brush the butter and mustard mixture generously onto the cut sides of each croissant.
  5. Layer 2 slices of cheese, followed by 2 ounces of deli-sliced ham on the bottom half of each croissant. Add bacon if desired and top with another slice of cheese.
  6. Bake the assembled sandwiches for 10-15 minutes or until golden brown and the cheese is melted.
  7. While croissants are baking, whisk together 5 large eggs with a splash of milk, salt, and pepper until frothy.
  8. In a skillet, melt 1 tablespoon of butter over medium heat and scramble the egg mixture until just set, about 3-5 minutes.
  9. Remove croissants from the oven, spoon scrambled eggs onto the bottom half, garnish with fresh chives if desired, and close the sandwiches.

Nutrition

Serving: 1sandwichCalories: 450kcalCarbohydrates: 30gProtein: 20gFat: 25gSaturated Fat: 15gPolyunsaturated Fat: 2gMonounsaturated Fat: 5gCholesterol: 180mgSodium: 750mgPotassium: 300mgFiber: 2gSugar: 5gVitamin A: 500IUVitamin C: 2mgCalcium: 300mgIron: 2mg

Notes

Customize your sandwiches with different fillings such as turkey, spinach, or various cheeses. Assemble ahead of time for convenient cooking.

Tried this recipe?

Let us know how it was!

Creamy Cowboy Butter Chicken Linguine for Ultimate Comfort

The first bite of Cowboy Butter Chicken Linguine is like a warm embrace on a chilly evening, swirling together the rich, buttery goodness of the cowboy butter sauce and perfectly tender chicken. This dish isn’t just a meal; it’s a speedy escape into creamy comfort food territory, making it ideal for hectic weeknights when you want something hearty yet hassle-free. With just a handful of ingredients, you can transform your kitchen into a cozy haven that satisfies your cravings and warms your heart. Plus, this recipe is incredibly versatile—feel free to swap the linguine for your favorite pasta or add a fiery Cajun twist if you’re in the mood for some spice. Are you ready to dive into a bowl of pure satisfaction?

Why is Cowboy Butter Chicken Linguine a Must-Try?

Flavorful Comfort: This Cowboy Butter Chicken Linguine melds rich, buttery flavors with tender chicken, making every bite a satisfying experience.
Quick & Easy: Perfect for busy weeknights, this dish comes together in under 30 minutes without compromising on taste.
Versatile Options: Whether you prefer penne or a spicy Cajun kick, feel free to customize this recipe to suit your palate.
Creamy Indulgence: The silky cowboy butter sauce envelops the pasta beautifully, ensuring a luscious texture that feels indulgent yet comforting.
Crowd-Pleasing Delight: Ideal for family gatherings or dinner parties, this dish has a way of impressing everyone at the table, leaving them wanting seconds or even thirds! If you love creamy, savory dishes, be sure to also check out my Butter Baked Chicken or the mouthwatering Sizzling Chicken Pepper for more delicious inspiration.

Cowboy Butter Chicken Linguine Ingredients

For the Pasta

  • 8 oz (225g) linguine pasta – The main carbohydrate base; substitute with penne or fettuccine for different textures.

For the Chicken

  • 1 pound (450g) boneless, skinless chicken breast, sliced – A protein-packed choice; pre-cooked chicken or turkey can be a quick alternative.

For Cooking

  • 2 tablespoons olive oil – Essential for cooking the chicken; canola or avocado oil works well too.
  • 1 teaspoon salt – Enhances all flavors; adjust accordance to your taste preferences.
  • ½ teaspoon black pepper – Adds a touch of mild heat; white pepper is a great substitute for a lighter flavor.

For the Seasoning

  • ½ teaspoon garlic powder – Infuses a warm, savory depth; fresh garlic is a wonderful swap for a stronger punch.
  • ½ teaspoon onion powder – Complements the garlic beautifully; consider using fresh onions for a fresh twist.

For the Sauce

  • ½ cup (120ml) heavy cream – Creates that beloved creamy texture; opt for half-and-half or whole milk for a lighter sauce.
  • ½ cup (50g) grated Parmesan cheese – Adds rich flavor and depth; Pecorino Romano can elevate the dish with a sharper taste.
  • ½ teaspoon crushed red pepper flakes (optional) – Perfect for those who like a kick; adjust based on your spice tolerance.

For Garnish

  • ¼ cup chopped fresh basil or parsley – Brings freshness and brightens the dish; cilantro provides a unique flavor twist for those adventurous with herbs.

This Cowboy Butter Chicken Linguine is a delightful blend of flavors that will make any weeknight dinner feel special!

Step‑by‑Step Instructions for Cowboy Butter Chicken Linguine

Step 1: Boil Pasta
Start by bringing a large pot of salted water to a rolling boil over high heat. Once boiling, add the 8 oz (225g) of linguine pasta and cook for about 9-11 minutes, or until al dente, stirring occasionally. Carefully reserve ½ cup of the pasta water for later, then drain the linguine and set it aside in a large bowl.

Step 2: Prepare Cowboy Butter Sauce
In a medium bowl, whisk together ½ cup melted butter, 2 teaspoons minced garlic, 1 tablespoon Dijon mustard, 1 tablespoon Worcestershire sauce, 1 teaspoon smoked paprika, ¼ teaspoon crushed red pepper flakes, the juice of ½ lemon, 2 tablespoons chopped parsley, 1 teaspoon salt, and ½ teaspoon black pepper until smooth. Set this vibrant cowboy butter sauce aside as you move onto the chicken.

Step 3: Cook Chicken
Heat 2 tablespoons of olive oil in a large skillet over medium heat. Season the sliced chicken breast (1 pound or 450g) with 1 teaspoon salt, ½ teaspoon black pepper, ½ teaspoon garlic powder, and ½ teaspoon onion powder. Once the oil is hot, add the chicken to the skillet and cook for 5-6 minutes, until golden brown and cooked through. Remove the chicken from the skillet and set it aside on a plate.

Step 4: Make Creamy Sauce
In the same skillet, add the prepared cowboy butter sauce over medium heat and let it simmer for about 1 minute. Slowly pour in ½ cup of heavy cream, stirring continuously, to blend it into the sauce. Once combined, add in ½ cup of grated Parmesan cheese and mix until everything is smooth and creamy, creating a luscious coating for your Cowboy Butter Chicken Linguine.

Step 5: Combine
Add the reserved chicken back into the skillet with the creamy sauce and stir to coat it evenly. Then, gently fold in the cooked linguine, tossing everything together until the pasta is fully coated in the rich sauce. If the sauce appears too thick, add a little bit of your reserved pasta water to reach the desired consistency.

Step 6: Serve
Finally, serve your Cowboy Butter Chicken Linguine immediately, garnishing each plate with a sprinkle of chopped fresh basil or parsley for an added burst of flavor and color. Enjoy the creamy goodness warm—it’s sure to become a family favorite!

How to Store and Freeze Cowboy Butter Chicken Linguine

  • Fridge: Store leftovers in an airtight container for up to 3 days. Make sure to cool it down before sealing to maintain freshness.

  • Freezer: For longer storage, freeze the Cowboy Butter Chicken Linguine in individual portions. It can last up to 2 months without losing flavor.

  • Reheating: Thaw overnight in the fridge before reheating. Warm it on the stovetop over low heat, adding a splash of cream or reserved pasta water for creaminess.

  • Tip: Avoid freezing with fresh herbs as they can lose their texture. Add them just before serving for a fresh touch!

Expert Tips for Cowboy Butter Chicken Linguine

  • Chicken Perfection: Ensure your chicken is cooked until golden without drying it out. Overcooking can lead to tough, chewy bites in your Cowboy Butter Chicken Linguine.

  • Creamy Consistency: If your sauce thickens too much, don’t hesitate to stir in your reserved pasta water gradually. This trick keeps your dish creamy and perfectly sauced.

  • Use Fresh Ingredients: Opt for fresh garlic and herbs whenever possible, as they dramatically enhance the flavors of your Cowboy Butter Chicken Linguine. Dried herbs can lack depth.

  • Adjust the Spice Level: For those who enjoy a kick, you can amp up the heat by doubling the crushed red pepper flakes or incorporating Cajun seasoning for a zesty variation.

  • Flavorful Pasta: While linguine is delicious, don’t shy away from experimenting with other pasta types, like penne or fettuccine, to find your family’s favorite texture.

Cowboy Butter Chicken Linguine Variations

Feel free to get creative with this recipe and add a personal touch that tantalizes your taste buds!

  • Pasta Type: Swap linguine for penne or fettuccine for a different bite and texture. Embrace the comfort of pasta as you explore new shapes, allowing your favorite sauce to cling beautifully.

  • Spice Level: Incorporate Cajun seasoning for a Southern kick that’ll send your taste buds dancing. Adding a bit of spice not only elevates the flavors but also transports you to a sunny, vibrant kitchen.

  • Healthier Option: Use half-and-half instead of heavy cream for a lighter, guilt-free version of this creamy dish. Your palate will still enjoy richness while you maintain a lighter twist that’s just as soothing.

  • Vegetarian Version: Substitute chicken with mushrooms or seasonal roasted vegetables to make a hearty vegetarian option. Rich, earthy flavors enhance this dish, proving that comfort food isn’t exclusive to meat!

  • Cheesy Transformation: Experiment with mozzarella cheese on top before baking for a gooey, cheesy twist. Melty goodness will provide a lovely contrast to the creamy sauce, creating a fun, indulgent experience.

  • Herb Infusion: Add fresh thyme or oregano in place of basil or parsley to bring a different herbal note to the dish. Your dish will take on delightful, aromatic undertones that are sure to impress.

  • Citrus Zest: Squeeze some lemon or lime juice into the sauce for a bright, refreshing kick. This lightens the dish and adds a lovely tang that perfectly balances the creaminess.

If you’re looking for more flavor-packed dishes, don’t miss my recipe for Cowboy Butter Chicken or try whipping up the delightful Chilli Chicken Takeout for a satisfying evening meal!

Make Ahead Options

These Cowboy Butter Chicken Linguine are perfect for busy home cooks looking to save time during the week! You can prep the cowboy butter sauce and cook the chicken up to 24 hours in advance. Simply cool them down, then store them separately in airtight containers in the refrigerator. This way, the sauce stays creamy, and the chicken remains juicy without drying out. When you’re ready to serve, just reheat the chicken in a skillet over medium heat, stir in the pre-made sauce, and toss with freshly cooked linguine. Add a splash of reserved pasta water as needed to bring everything back to that silky, luscious texture you love!

What to Serve with Cowboy Butter Chicken Linguine?

To create a full dining experience, consider these delightful accompaniments that elevate your meal and tickle your taste buds.

  • Garlic Bread: A warm, crusty loaf brushed with butter and garlic is the perfect tool for soaking up that creamy sauce. The combination is simply divine!
  • Caesar Salad: Crisp romaine lettuce with a tangy dressing adds a refreshing crunch that contrasts beautifully with the rich linguine. Plus, it’s a classic pairing!
  • Roasted Vegetables: Seasoned seasonal veggies like zucchini and bell peppers bring vibrant colors and healthy fiber, balancing the dish’s creaminess.
  • Pesto Caprese Salad: Fresh tomatoes, mozzarella, and basil drizzled with pesto create a light, flavorful side that’s simply irresistible.
  • White Wine: A chilled glass of Sauvignon Blanc or Chardonnay complements the creamy sauce perfectly, enhancing the overall dining experience with light acidity.
  • Chocolate Mousse: End your meal on a sweet note with a fluffy chocolate mousse that contrasts the savory flavors while providing a luxurious finish.
  • Lemon Sorbet: A refreshing, citrusy sorbet serves as a palate cleanser, brightening your meal with its zesty notes while offering a lighter dessert option.
  • Sparkling Water with Lime: For a bubbly refreshment, sparkling water with a splash of lime is a non-alcoholic option that adds a hint of zest without overpowering the meal.

Cowboy Butter Chicken Linguine Recipe FAQs

How should I select the best chicken for this recipe?
Absolutely! For the best results in your Cowboy Butter Chicken Linguine, I recommend using boneless, skinless chicken breasts, as they are tender and cook evenly. Look for chicken that is pink in color, with no dark spots or a foul odor. Fresh chicken should not feel slimy. If possible, opt for organic or free-range options for enhanced flavor and quality.

What’s the best way to store leftovers?
Very good question! Store your Cowboy Butter Chicken Linguine in an airtight container in the fridge for up to 3 days. Be sure to let it cool to room temperature before sealing the container to avoid condensation, which can make your pasta mushy. I often enjoy reheating it on the stovetop with a splash of cream or reserved pasta water to restore its creamy texture.

Can I freeze Cowboy Butter Chicken Linguine?
Of course! You can freeze your Cowboy Butter Chicken Linguine for up to 2 months. To do this, let the dish cool, then divide it into individual portions in freezer-safe containers. Make sure to label them with the date. When you’re ready to enjoy it again, thaw it overnight in the fridge and reheat gently on the stovetop, adding a bit of cream or reserved pasta water to revitalize the sauce.

What if my sauce turns out too thick?
No worries at all! If you find your creamy sauce for the Cowboy Butter Chicken Linguine gets too thick, simply stir in some of the reserved pasta water, a little at a time, while gently heating it. This will loosen the sauce without losing its creamy consistency. Just remember to add only a small amount until you reach your desired thickness!

Are there any dietary considerations I should be aware of?
Absolutely thoughtful! This recipe can be modified to accommodate various dietary needs. For those with dairy allergies, you can substitute heavy cream with a non-dairy alternative like cashew cream or coconut cream. If you’re looking for a gluten-free option, use gluten-free pasta instead. For vegetarians, feel free to substitute the chicken with sautéed mushrooms or roasted seasonal vegetables to enjoy this comforting dish without compromising on flavor.

How spicy can I make the Cowboy Butter Chicken Linguine?
Very! If you enjoy a hearty kick in your dishes, you can amp up the spice by adding extra crushed red pepper flakes or even incorporate Cajun seasoning for a delicious Southern twist. Start with a small amount, taste it, and add more according to your spice tolerance. The more the merrier when it comes to flavor!

Cowboy Butter Chicken Linguine

Creamy Cowboy Butter Chicken Linguine for Ultimate Comfort

Indulge in the rich flavors of Cowboy Butter Chicken Linguine—a creamy, comforting dish perfect for weeknights.
Prep Time 10 minutes
Cook Time 20 minutes
Total Time 30 minutes
Servings: 4 servings
Course: Pasta
Cuisine: American
Calories: 560

Ingredients
  

For the Pasta
  • 8 oz linguine pasta Substitute with penne or fettuccine for different textures.
For the Chicken
  • 1 pound boneless, skinless chicken breast, sliced Pre-cooked chicken or turkey can be a quick alternative.
For Cooking
  • 2 tablespoons olive oil Canola or avocado oil works well too.
  • 1 teaspoon salt Enhances all flavors; adjust to taste.
  • ½ teaspoon black pepper White pepper is a great substitute.
For the Seasoning
  • ½ teaspoon garlic powder Fresh garlic is a wonderful swap.
  • ½ teaspoon onion powder Consider using fresh onions.
For the Sauce
  • ½ cup heavy cream Opt for half-and-half or whole milk for a lighter sauce.
  • ½ cup grated Parmesan cheese Pecorino Romano can give a sharper taste.
  • ½ teaspoon crushed red pepper flakes Optional for those who like a kick.
For Garnish
  • ¼ cup chopped fresh basil or parsley Cilantro provides a unique flavor twist.

Equipment

  • Large pot
  • medium bowl
  • Large skillet
  • whisk
  • Measuring cups
  • Measuring spoons

Method
 

Making Cowboy Butter Chicken Linguine
  1. Start by bringing a large pot of salted water to a rolling boil over high heat. Once boiling, add the linguine pasta and cook for about 9-11 minutes, or until al dente. Carefully reserve ½ cup of the pasta water for later, then drain the linguine and set it aside in a large bowl.
  2. In a medium bowl, whisk together melted butter, minced garlic, Dijon mustard, Worcestershire sauce, smoked paprika, crushed red pepper flakes, lemon juice, chopped parsley, salt, and black pepper until smooth. Set this vibrant cowboy butter sauce aside.
  3. Heat olive oil in a large skillet over medium heat. Season the sliced chicken breast with salt, black pepper, garlic powder, and onion powder. Once the oil is hot, add the chicken to the skillet and cook for 5-6 minutes, or until golden brown and cooked through. Remove the chicken from the skillet and set it aside.
  4. In the same skillet, add the prepared cowboy butter sauce over medium heat and let it simmer for about 1 minute. Slowly pour in heavy cream, stirring continuously, to blend it into the sauce. Add in grated Parmesan cheese and mix until smooth and creamy.
  5. Add the reserved chicken back into the skillet with the creamy sauce and stir to coat evenly. Fold in the cooked linguine, tossing until the pasta is fully coated. If the sauce is too thick, add reserved pasta water to reach the desired consistency.
  6. Serve immediately, garnishing with chopped fresh basil or parsley. Enjoy the creamy goodness warm!

Nutrition

Serving: 1servingCalories: 560kcalCarbohydrates: 45gProtein: 35gFat: 30gSaturated Fat: 15gPolyunsaturated Fat: 5gMonounsaturated Fat: 10gCholesterol: 110mgSodium: 750mgPotassium: 800mgFiber: 3gSugar: 2gVitamin A: 500IUVitamin C: 15mgCalcium: 300mgIron: 2mg

Notes

For the best results, use fresh ingredients and adjust spice levels to personal preference. Store leftovers in an airtight container for up to 3 days in the fridge.

Tried this recipe?

Let us know how it was!

Elevate Dinner with Sun-Dried Tomato Pasta Salad Bliss

As I tossed those vibrant sun-dried tomatoes into my mixing bowl, the kitchen filled with a tantalizing aroma that promised delightful flavors. This Quick & Flavorful Sun-Dried Tomato Pasta Salad is a testament to how easy and rewarding it can be to whip up a satisfying dish in under 30 minutes. Not only does it burst with the Mediterranean essence of sun-dried tomatoes and fresh spinach, but it also serves as a beautiful meal prep solution that will have everyone asking for seconds. With minimal chopping and versatile ingredient options, this pasta salad adapts to your mood, making it the perfect side for summer barbecues or a quick, light lunch. Are you ready to bring a touch of sunshine to your table?

Why is this pasta salad a must-try?

Quick Preparation: This Sun-Dried Tomato Pasta Salad comes together in under 30 minutes, making it ideal for busy weeknights or unexpected guests.

Flavor Explosion: The medley of sun-dried tomatoes, fresh basil, and tangy balsamic dressing delivers a burst of Mediterranean flavor that will transport your taste buds.

Versatile Options: You can easily customize the recipe by adding grilled chicken or veggies, ensuring it satisfies everyone’s preferences.

Crowd-Pleasing Appeal: Perfect as a light lunch or a side at barbecues, everyone will love this colorful dish.

Minimal Chopping: The prep is simple, leaving you with more time to relax while your salad does the talking—just like with this Cajun Sausage Pasta or Marry Me Shrimp Pasta.

Sun-Dried Tomato Pasta Salad Ingredients

Get ready to create a flavor-filled bowl of joy with this easy Sun-Dried Tomato Pasta Salad!

For the Pasta

  • 16 oz. short pasta – This serves as the hearty base; feel free to use rigatoni, rotini, or bowtie pasta for variety.

For the Freshness

  • 3 oz. baby spinach – Adds a vibrant green color; substitute with arugula for a peppery twist.
  • 10 oz. cherry tomatoes – These provide sweetness and juiciness; grape tomatoes work well as an alternative.
  • 1/2 red onion, diced – Introduces a crunchy bite; switch to green onions for a milder taste.
  • 1/3 cup chopped basil – Offers aromatic notes; parsley can be used if basil is unavailable.

For the Zesty Flavor

  • 1 jar sun-dried tomatoes in oil (8.5 oz) – Infuses the salad with a robust flavor; utilize the oil in your dressing for more depth.
  • 1/2 cup shredded parmesan – Enhances savory richness; opt for grated pecorino or nutritional yeast to keep it dairy-free.
  • 8 oz. mozzarella pearls – Introduces a creamy texture; omit if watching dairy intake.

For the Dressing

  • 1/3 cup extra virgin olive oil – Adds richness; you could substitute with the oil from sun-dried tomatoes for added flavor.
  • 1/3 cup oil drained from sun-dried tomatoes – Provides further depth of flavor.
  • 2 tbsp balsamic vinegar – Brings a zesty acidity; use white balsamic for a milder taste.
  • 2 garlic cloves, minced – Delivers a delightful pungency; garlic powder can substitute if needed.
  • 1 tsp Italian seasoning – Enriches the dish with herby goodness; replace dried herbs with fresh for an extra touch.
  • 1/2 tsp pepper – Season to your preference for optimal flavor.
  • 1/2 tsp salt – Essential for bringing out all the flavors; reduce for low-sodium diets.

Step‑by‑Step Instructions for Sun-Dried Tomato Pasta Salad

Step 1: Cook the Pasta
Bring a large pot of salted water to a boil and add the short pasta, cooking it according to package instructions for about 10 minutes, or until al dente. Once cooked, drain the pasta and toss it gently with the baby spinach in the pot; the residual heat will slightly wilt the spinach. Rinse under cool water to stop the cooking process and prevent it from becoming mushy.

Step 2: Combine Ingredients
In a spacious mixing bowl, combine the cooled pasta and wilted spinach with the chopped basil, diced red onion, julienned sun-dried tomatoes, halved cherry tomatoes, shredded parmesan, and mozzarella pearls if included. Mix everything gently until well blended, ensuring that the ingredients are evenly distributed for a vibrant Sun-Dried Tomato Pasta Salad that looks as good as it tastes.

Step 3: Mix Dressing
In a separate bowl, whisk together the extra virgin olive oil, drained oil from the sun-dried tomatoes, balsamic vinegar, minced garlic, Italian seasoning, salt, and pepper. This delicious dressing will elevate the flavors of your pasta salad. Aim for a well-emulsified mixture, and taste it for seasoning, adjusting with more salt or pepper if needed to suit your preference.

Step 4: Toss and Chill
Pour about three-quarters of the dressing over the pasta mixture and toss gently to coat everything evenly. Reserve the remaining dressing for later. Cover the bowl with plastic wrap or a lid, and refrigerate the salad for at least 30 minutes, allowing the flavors to meld beautifully while the salad chills to a refreshing temperature, perfect for serving.

Step 5: Serve
Before serving the chilled Sun-Dried Tomato Pasta Salad, give it a gentle toss and drizzle the reserved dressing over the top. This final touch enhances the salad’s flavors just before it hits the table, ensuring each bite is sumptuous and flavorful. Serve it at your next gathering, and watch it disappear as your guests savor every morsel!

How to Store and Freeze Sun-Dried Tomato Pasta Salad

Fridge: Store in an airtight container for up to 3-4 days. This keeps the Sun-Dried Tomato Pasta Salad fresh while allowing the flavors to meld beautifully.

Room Temperature: If serving at a gathering, let the salad sit at room temperature for about 15 minutes to restore the olive oil’s consistency before serving.

Refrigerate: Before serving, give the salad a gentle toss and drizzle any reserved dressing over it for added flavor and moisture.

Freezing: It’s best not to freeze this pasta salad, as the texture can change and become mushy when thawed. Enjoy fresh!

What to Serve with Sun-Dried Tomato Pasta Salad

Elevate your meal experience by pairing this delightful pasta salad with complementary dishes that enhance its vibrant flavors and textures.

  • Garlic Bread: The warm, buttery goodness of garlic bread offers a satisfying crunch that contrasts beautifully with the tenderness of the salad. Perfect for soaking up those extra flavors.

  • Grilled Vegetable Platter: A colorful medley of grilled veggies adds freshness and a smoky flavor, creating a harmony of taste that complements the sun-dried tomatoes. These veggies are not only visually appealing but add nutritional value too.

  • Caprese Skewers: Cherry tomatoes, mozzarella, and fresh basil come together for a bright and refreshing bite-sized snack. Their familiar flavors tie in nicely with the pasta salad, making them a popular choice for gatherings.

  • Lemon Herb Grilled Chicken: The zesty brightness of grilled chicken infused with herbs provides a protein-packed complement to the pasta salad’s rich flavors. This heartier pairing makes it a well-rounded meal.

  • Crispy Caesar Salad: A crisp Caesar salad with romaine lettuce and crunchy croutons creates a delightful contrast in texture. The creamy dressing accentuates the Mediterranean flavors—truly a match made in heaven.

  • Sparkling Lemonade: A glass of refreshing sparkling lemonade serves as a delightful palate cleanser, balancing the savory elements of your dish with its zesty and effervescent notes.

  • Fruit Salad: A light, refreshing fruit salad brings a sweet, juicy element that offers a welcome contrast to the richness of the pasta salad. Seasonal fruits like berries and melon make this a colorful accompaniment.

Expert Tips for Sun-Dried Tomato Pasta Salad

  • Cook Pasta Al Dente: Ensure your pasta is slightly firm when cooked; overcooked pasta can lead to a mushy salad texture.
  • Cool Before Mixing: Allow the pasta to cool before adding delicate ingredients like mozzarella to avoid melting.
  • Adjust Seasoning: Taste your dressing before tossing it with the salad; adjust salt, pepper, or vinegar to enhance the flavor of the Sun-Dried Tomato Pasta Salad.
  • Extra Dressing: If the salad appears dry after chilling, add the reserved dressing or a splash of olive oil for extra moisture and flavor.
  • Storage Tip: Enjoy your salad fresh within 3-4 days for the best taste; store in an airtight container to preserve flavor and freshness.

Sun-Dried Tomato Pasta Salad Variations

Embrace the joy of creativity in your kitchen, and let your palate guide you to delicious possibilities!

  • Dairy-Free: Swap out parmesan and mozzarella for nutritional yeast and a dairy-free cheese alternative for a creamy yet guilt-free treat.

  • Protein Boost: For a heartier salad, toss in grilled chicken or chickpeas. This not only adds protein but turns the salad into a complete meal.

  • Veggie Lovers: Add grilled vegetables or artichoke hearts for extra flavor and nutrition, creating a lovely medley of textures that will make every bite a delight.

  • Herb Infusion: Try mixing in fresh dill or cilantro instead of basil for a unique twist that brightens the salad’s flavor profile.

  • Zesty Kick: Include crushed red pepper flakes or sliced olives for a touch of heat and brininess. This adds an interesting layer of flavor that is sure to impress.

  • Pasta Variety: Choose a different short pasta like orzo or farfalle for a fun texture change. Each shape carries the flavors uniquely, making your salad feel fresh and new.

  • Nutty Flavor: Add a sprinkle of toasted pine nuts or walnuts for an extra crunch and a nutty richness that complements the tangy tomatoes beautifully.

  • Cold Salad Twist: Transform it into a refreshing cold pasta salad by adding diced cucumber and bell peppers, making it perfect for summer picnics and barbecues.

As you explore these variations, you can serve this pasta salad alongside other favorites like Blt Chicken Salad for a balanced meal that everyone will enjoy!

Make Ahead Options

This Sun-Dried Tomato Pasta Salad is a fantastic recipe for meal prep enthusiasts looking to simplify busy weeknights! You can cook the pasta and toss it with the spinach up to 24 hours in advance, then store it in the refrigerator. Additionally, chop your vegetables and prepare the dressing ahead of time—both can be refrigerated for up to 3 days. To maintain quality, keep the remaining dressing separate until just before serving to prevent the salad from becoming soggy. When you’re ready to enjoy your salad, simply combine everything, toss it with the reserved dressing, and you’ll have a fresh, delicious dish that’s just as delightful as if made the same day!

Sun-Dried Tomato Pasta Salad Recipe FAQs

How do I choose the right ripe ingredients for this pasta salad?
Absolutely! When selecting cherry or grape tomatoes, look for ones that are plump and firm with no dark spots or wrinkles. They should be vibrant in color, indicating freshness. For sun-dried tomatoes, avoid jars with visible mold or strange odors, and choose those that are packed in oil for added flavor. Fresh basil leaves should be bright green and fragrant.

What’s the best way to store leftovers of my Sun-Dried Tomato Pasta Salad?
Store your pasta salad in an airtight container, and it will happily stay fresh in the fridge for up to 3-4 days. If you need to keep it longer, store the dressing separately to prevent the pasta from becoming soggy. Just remember, it’s best served cold, so allow it to sit out for about 15 minutes at room temperature before digging in.

Can I freeze my Sun-Dried Tomato Pasta Salad?
I do not recommend freezing this pasta salad, as the texture of the ingredients can change after thawing. The pasta may become mushy, and the fresh ingredients won’t hold up well in the freezer. Instead, enjoy the vibrant flavors fresh, or prepare just enough to eat within a few days!

What should I do if my salad ends up dry after chilling?
Don’t worry! If you find the salad has dried out after being in the fridge, you can easily salvage it. Just drizzle some extra dressing or plain olive oil over the salad and toss it gently to moisten everything up before serving. This quick fix can revitalize the salad and enhance its flavor!

Are there any dietary considerations for this recipe?
Yes! This Sun-Dried Tomato Pasta Salad is vegetarian, making it a great option for meat-free meals, but it’s always wise to check for any allergies the guests may have. For instance, if you’re catering to a dairy-free crowd, swap the parmesan and mozzarella for nutritional yeast or vegan cheese alternatives. If you’re serving it to pets (like dogs), be cautious with ingredients like onions and garlic as they can be harmful to them.

Can I customize the salad further for added nutrition?
Very! Add grilled vegetables such as zucchini or bell peppers for more nutrients and vibrant colors. For protein, feel free to toss in grilled chicken or chickpeas. If you crave some heat, consider adding red pepper flakes or sliced olives to take the flavor profile up a notch. The more the merrier when it comes to your culinary creativity!

Sun-Dried Tomato Pasta Salad

Elevate Dinner with Sun-Dried Tomato Pasta Salad Bliss

This Sun-Dried Tomato Pasta Salad is a quick and flavorful dish that embodies Mediterranean essence and is perfect for any occasion.
Prep Time 15 minutes
Cook Time 10 minutes
Chill Time 30 minutes
Total Time 55 minutes
Servings: 4 servings
Course: Pasta
Cuisine: Mediterranean
Calories: 350

Ingredients
  

For the Pasta
  • 16 oz short pasta Choose rigatoni, rotini, or bowtie pasta.
For the Freshness
  • 3 oz baby spinach Substitute with arugula if desired.
  • 10 oz cherry tomatoes Grape tomatoes can be used instead.
  • 1/2 red onion Diced; green onions can be used for a milder flavor.
  • 1/3 cup chopped basil Substitute with parsley if unavailable.
For the Zesty Flavor
  • 1 jar sun-dried tomatoes in oil 8.5 oz for robust flavor.
  • 1/2 cup shredded parmesan Grated pecorino or nutritional yeast as dairy-free alternative.
  • 8 oz mozzarella pearls Omit if avoiding dairy.
For the Dressing
  • 1/3 cup extra virgin olive oil Use oil from sun-dried tomatoes for added flavor.
  • 1/3 cup oil drained from sun-dried tomatoes Provides depth of flavor.
  • 2 tbsp balsamic vinegar Use white balsamic for a milder taste.
  • 2 cloves garlic Minced; garlic powder can be used as substitute.
  • 1 tsp Italian seasoning Replace with fresh herbs for an extra touch.
  • 1/2 tsp pepper Season to taste.
  • 1/2 tsp salt Adjust for low-sodium diets.

Equipment

  • Large pot
  • Mixing Bowl
  • whisk

Method
 

Step-by-Step Instructions
  1. Cook the Pasta: Bring a large pot of salted water to a boil. Add the short pasta and cook according to package instructions for about 10 minutes until al dente. Drain, toss gently with baby spinach in the pot, and rinse under cool water.
  2. Combine Ingredients: In a mixing bowl, combine cooled pasta and wilted spinach with chopped basil, diced red onion, julienned sun-dried tomatoes, halved cherry tomatoes, shredded parmesan, and mozzarella pearls. Mix gently until well blended.
  3. Mix Dressing: In a separate bowl, whisk together extra virgin olive oil, drained oil from sun-dried tomatoes, balsamic vinegar, minced garlic, Italian seasoning, salt, and pepper. Taste and adjust seasoning as needed.
  4. Toss and Chill: Pour about three-quarters of the dressing over the pasta mixture and toss gently. Cover and refrigerate for at least 30 minutes.
  5. Serve: Give the salad a gentle toss and drizzle remaining dressing over the top before serving.

Nutrition

Serving: 1servingCalories: 350kcalCarbohydrates: 40gProtein: 12gFat: 18gSaturated Fat: 4gPolyunsaturated Fat: 2gMonounsaturated Fat: 10gCholesterol: 15mgSodium: 500mgPotassium: 300mgFiber: 3gSugar: 2gVitamin A: 1000IUVitamin C: 15mgCalcium: 200mgIron: 1.5mg

Notes

For best results, enjoy the salad fresh within 3-4 days, stored in an airtight container.

Tried this recipe?

Let us know how it was!

Caramelised Soy Chicken: Your New Favorite Comfort Dish

As I lifted the lid off my pot, the rich aroma of caramelized soy chicken mingled with the sharpness of garlic and the warmth of ginger, instantly transporting me to a cozy kitchen bustling with life. This Caramelised Soy Chicken in Garlic Ginger Broth with Jasmine Rice is more than just a dish; it’s a comforting one-pot meal that’s both satisfying and easy to whip up on any busy evening. With tender chicken thighs simmered to perfection, the savory broth envelops each bite, making it a delicious alternative to takeout that you can feel good about serving. Not only is this recipe a true crowd-pleaser, but it’s also perfect for meal prep, ensuring hearty leftovers for days. Ready to dive into a bowl of cozy goodness? Let’s get cooking!

Why is this recipe a must-try?

Comforting Flavors: The savory soy sauce and sweet brown sugar make each bite irresistibly rich, while the garlic and ginger add a delightful warmth that wraps you in comfort.

One-Pot Wonder: Say goodbye to the hassle of multiple dishes! This easy recipe allows you to create a hearty meal without the chaos of cleanup.

Hearty & Satisfying: With tender chicken thighs and fluffy jasmine rice, this dish is perfect for cozy evenings or gatherings with loved ones.

Versatile Option: Feel free to swap in your favorite veggies or proteins to suit your taste. You can even try it alongside a fresh salad or with a side of Sizzling Chicken Pepper for extra variety!

Meal Prep Friendly: This recipe stores well, making it a great choice for meal prep. Enjoy comforting leftovers, just like with the delightful Tuscan Chicken Soup.

Get ready to enjoy a comforting and flavorful experience that’s perfect for any occasion!

Caramelised Soy Chicken Ingredients

For the Chicken
Chicken Thighs – Provide rich flavor and tenderness; opt for bone-in and skin-on for maximal juiciness.
Vegetable Oil – Used for searing chicken to achieve crispy skin; substitute with olive oil if preferred.
Salt and Pepper – To season the chicken; adjust according to taste preferences.

For the Broth
Soy Sauce – Adds umami and saltiness; consider low-sodium soy sauce for a healthier option.
Brown Sugar – Balances the saltiness of the soy sauce with caramelized sweetness; can be replaced with honey or maple syrup.
Ginger (minced) – Introduces warmth and spice; fresh ginger is preferred for optimal flavor.
Garlic (minced) – Contributes aromatic depth; use fresh garlic for best results.
Chicken Broth – Forms the base of the broth, enhancing the chicken’s flavor; use vegetable broth for a vegetarian option.
Sesame Oil – Adds a nutty aroma; can be replaced with more vegetable oil if unavailable.
Cornstarch (optional) – For thickening the broth; can omit if a thinner broth is preferred.

For Serving
Jasmine Rice – Fluffy texture pairs excellently with the broth; substitute basmati rice if necessary.
Green Onions – Fresh garnish that adds a mild onion flavor; can replace with chives if needed.
Fresh Cilantro – Complements flavors with freshness; omit for those who dislike the flavor.

Get ready to savor a comforting dish that’s not just about the flavors but also the warmth of home-cooked meals!

Step‑by‑Step Instructions for Caramelised Soy Chicken

Step 1: Prep the Chicken
Begin by patting the chicken thighs dry with paper towels to ensure they crisp nicely while cooking. Season both sides generously with salt and pepper. This simple step brings out the flavors in the chicken and prepares it for the delicious Caramelised Soy Chicken experience ahead.

Step 2: Heat Oil
In a large, heavy-bottomed pot, heat 2 tablespoons of vegetable oil over medium-high heat. Give the oil a moment to warm up until it shimmers, indicating it’s ready for searing. This crucial step will help achieve that crispy, golden skin on the chicken thighs, creating a beautiful base for your broth.

Step 3: Sear Chicken
Carefully place the seasoned chicken thighs skin-side down into the hot oil within the pot. Allow them to sear undisturbed for 5-7 minutes, or until the skin turns a deep golden brown and crisps up delightfully. Resist the urge to move the chicken for all that time to ensure a perfect crust.

Step 4: Make Sauce
Once the chicken is beautifully seared, flip each thigh over to the other side. Add in the rich soy sauce, brown sugar, minced garlic, and ginger. Stir the mixture gently to combine everything, allowing the sugar to start dissolving and flavors to meld together, enriching your Caramelised Soy Chicken dish.

Step 5: Add Broth
Pour in 2 cups of chicken broth, making sure all chicken pieces are well submerged. Raise the heat to bring the broth to a gentle boil. Cover the pot with a lid as it heats, which helps to lock in flavors while preparing for the next essential simmering step.

Step 6: Simmer
Reduce the heat to low and cover the pot. Let everything simmer for approximately 20 minutes, or until the chicken is cooked through and tender. You’ll know it’s ready when the chicken juices run clear and it reaches an internal temperature of 165°F (75°C).

Step 7: Cook Rice
While the chicken is simmering, rinse 1 cup of jasmine rice under cold water to remove excess starch. This will ensure your rice is fluffy when cooked. Set it aside for a moment while you prepare the next steps in your delicious journey to some comforting Caramelised Soy Chicken.

Step 8: Prepare Rice
In a separate pot, bring 2 cups of water to a boil. Add the rinsed jasmine rice, cover with a tight-fitting lid, and reduce the heat to low. Let it simmer for about 15-20 minutes until the rice has absorbed all the water and is tender. Fluff with a fork once done.

Step 9: Thicken Broth (Optional)
If you prefer a thicker broth, mix 1 tablespoon of cornstarch with 2 tablespoons of cold water in a small bowl to create a slurry. Stir this mixture into your pot and let it cook for an additional 2-3 minutes, enabling the broth to thicken to a luscious consistency.

Step 10: Garnish and Serve
Remove the chicken from the pot and slice it into bite-sized pieces. Serve the tender chicken over a generous scoop of fluffy jasmine rice, pouring the rich broth over the top. Finish with a sprinkle of chopped green onions and fresh cilantro, transforming your Caramelised Soy Chicken into a beautiful, comforting dish.

Expert Tips for Caramelised Soy Chicken

  • Dry Chicken: Make sure to pat the chicken thighs dry before seasoning. This helps achieve maximum crispiness when searing, preventing a soggy texture.

  • Don’t Rush the Sear: Allow the chicken to sear undisturbed for 5-7 minutes. Moving it too soon can result in a less crispy skin, diminishing the flavor.

  • Seasoning Check: Adjust salt and pepper during preparation based on your taste preferences. This step significantly influences the final flavor of your Caramelised Soy Chicken.

  • Broth Consistency: Keep an eye on the broth’s thickness when adding cornstarch. Start with less and add more if you desire a thicker consistency to avoid over-thickening.

  • Rice Rinsing: Don’t skip rinsing the jasmine rice. This step removes excess starch and ensures the rice cooks up fluffy and perfect, complementing the broth beautifully.

Make Ahead Options

These Caramelised Soy Chicken in Garlic Ginger Broth are perfect for busy home cooks looking to save time on hectic evenings! You can season and sear the chicken thighs up to 24 hours in advance, storing them in an airtight container in the refrigerator to maintain their crispiness. Additionally, the flavorful broth can be prepared up to 3 days ahead; simply refrigerate it after cooking. When you’re ready to serve, reheat the broth, add the prepped chicken, and let it simmer until heated through. This ensures that you have a comforting and delicious meal with minimal effort, perfect for those who want home-cooked flavor fast!

What to Serve With Caramelised Soy Chicken in Garlic Ginger Broth

Elevate your cozy meal experience by pairing delightful sides and drinks that complement this comforting dish beautifully.

  • Steamed Bok Choy: This vibrant green vegetable adds a delightful crunch and a touch of freshness, balancing the richness of the broth.
  • Simple Cucumber Salad: Crisp cucumber salad with a bit of vinegar provides a refreshing contrast, cleansing the palate between bites.
  • Garlic Naan: Warm, fluffy naan offers a wonderful vehicle for soaking up the savory broth, making every bite satisfying.
  • Sesame Green Beans: Tender green beans tossed in sesame oil and sesame seeds contribute nutty flavors and vibrant color.

Integrating these sides creates a well-rounded meal. Consider serving a glass of coconut water or ginger tea for a delightful beverage choice. Each pairing enhances the flavor journey, allowing the Caramelised Soy Chicken to shine even brighter!

How to Store and Freeze Caramelised Soy Chicken

Fridge: Store leftovers in an airtight container for up to 3 days. To maintain the flavor, reheat thoroughly before serving, adding a splash of broth if needed.

Freezer: For longer storage, freeze the Caramelised Soy Chicken in an airtight container for up to 3 months. Thaw in the fridge overnight before reheating.

Reheating: When ready to enjoy, reheat the chicken and broth on the stove over low heat until piping hot. Stir gently to prevent sticking and ensure even heating.

Proper Container: Use a glass or BPA-free plastic container to store your chicken; this helps preserve flavors and textures while preventing freezer burn.

Caramelised Soy Chicken Variations

Feel free to explore different twists and swaps to make this recipe your own!

  • Vegetarian Option: Substitute chicken thighs with firm tofu. Simply press and cube the tofu, then sauté until golden for a delightful plant-based alternative.

  • Low-Carb Delight: Replace jasmine rice with cauliflower rice. It cooks quickly and adds a healthy, grain-free twist that pairs wonderfully with the savory broth.

  • Add Extra Veggies: Toss in bok choy or bell peppers to the broth while it simmers. This not only boosts nutrition but also adds vibrant color and texture to your meal.

  • Spicy Kick: Infuse some heat by adding sliced red chili or a dash of sriracha to the broth. This spicy upgrade complements the sweet and savory flavors beautifully!

  • Coconut Twist: Swap half of the chicken broth with coconut milk for a creamy, tropical flavor. Just imagine the rich richness enveloping that tender chicken!

  • Garlic-Lovers Version: Up the garlic ante by doubling the minced garlic in the broth. It amplifies the aromatic goodness, creating an irresistible dish perfect for garlic fans.

When you’re ready to join in on this comforting culinary adventure, consider pairing your meal with a side of BLT Chicken Salad or enjoy a warm bowl of Tuscan Chicken Soup as delightful companions. Each variation offers unique flavors and textures while staying true to the comforting essence of the original dish. Enjoy customizing your cooking experience!

Caramelised Soy Chicken Recipe FAQs

What type of chicken is best for this recipe?
I highly recommend using bone-in and skin-on chicken thighs for the best flavor and tenderness. The bones and skin help keep the chicken juicy, creating a rich flavor profile that elevates your Caramelised Soy Chicken dish. If you prefer a healthier option, boneless, skinless chicken thighs can be used, but you may need to adjust cooking time to ensure they don’t dry out.

How should I store leftovers?
To store leftovers, place the Caramelised Soy Chicken and remaining broth in an airtight container. They can be kept in the refrigerator for up to 3 days. Make sure to reheat thoroughly on the stove before enjoying, and feel free to add a splash of chicken broth to revive the creaminess of the sauce during reheating.

Can I freeze Caramelised Soy Chicken?
Absolutely! You can freeze your Caramelised Soy Chicken in an airtight container for up to 3 months. To ensure the best texture, allow it to cool completely before sealing. When you’re ready to enjoy, simply thaw it in the fridge overnight. Then, reheat on the stove over low heat until heated through, stirring gently to avoid sticking.

What if my broth is too thin?
If you find your broth is thinner than you like, the cornstarch slurry is your best friend! Mix 1 tablespoon of cornstarch with 2 tablespoons of cold water until smooth, then stir this into the simmering broth. Let it cook for another 2-3 minutes, and you’ll notice the broth thickening beautifully. Just remember to taste and adjust seasoning if necessary!

Can I use substitutes for any ingredients?
Certainly! If you don’t have jasmine rice on hand, feel free to substitute it with basmati or long-grain white rice, which will work just as well. For ginger, fresh is ideal, but if you’re in a pinch, ground ginger can replace minced ginger—just use about 1/4 teaspoon instead. Likewise, if soy sauce isn’t available, coconut aminos can provide a similar flavor profile for a soy-free alternative.

Is this dish suitable for dietary restrictions?
If there are dietary concerns, this recipe can be customized. For a gluten-free option, swap regular soy sauce for a gluten-free version. You can also replace chicken broth with vegetable broth for a vegetarian alternative. Just be sure to check the ingredients on any packaged items to avoid any allergens.

Caramelised Soy Chicken

Caramelised Soy Chicken: Your New Favorite Comfort Dish

Savor the rich flavors of Caramelised Soy Chicken in a cozy garlic ginger broth, making it your new favorite comfort dish.
Prep Time 15 minutes
Cook Time 40 minutes
Total Time 55 minutes
Servings: 4 servings
Course: Dinner
Cuisine: Asian
Calories: 450

Ingredients
  

For the Chicken
  • 4 pieces Chicken Thighs bone-in and skin-on for maximum juiciness
  • 2 tablespoons Vegetable Oil or olive oil
  • Salt to taste
  • Pepper to taste
For the Broth
  • 1/2 cup Soy Sauce consider low-sodium for a healthier option
  • 2 tablespoons Brown Sugar or honey/maple syrup
  • 1 tablespoon Ginger (minced) fresh preferred
  • 2 cloves Garlic (minced) use fresh for best results
  • 2 cups Chicken Broth or vegetable broth for a vegetarian option
  • 1 tablespoon Sesame Oil or more vegetable oil if unavailable
  • 1 tablespoon Cornstarch optional for thickening
For Serving
  • 1 cup Jasmine Rice or basmati rice
  • 2 tablespoons Green Onions chopped, can replace with chives
  • 2 tablespoons Fresh Cilantro omit if disliked

Equipment

  • Large Heavy-Bottomed Pot
  • Separate Pot for Rice

Method
 

Step-by-Step Instructions for Caramelised Soy Chicken
  1. Begin by patting the chicken thighs dry with paper towels and season with salt and pepper.
  2. In a large pot, heat the vegetable oil over medium-high heat until shimmering.
  3. Sear the chicken thighs skin-side down for 5-7 minutes until golden brown, undisturbed.
  4. Flip the chicken, then add soy sauce, brown sugar, garlic, and ginger, stirring to combine.
  5. Pour in chicken broth, ensuring chicken is submerged, and raise the heat to boil.
  6. Cover and simmer on low heat for approximately 20 minutes until chicken is cooked through.
  7. Rinse jasmine rice under cold water to remove excess starch.
  8. In a separate pot, bring water to boil, add rinsed rice, cover, and reduce heat to simmer for 15-20 minutes.
  9. For thickening, mix cornstarch with cold water, stir into the pot, and cook for 2-3 minutes.
  10. Slice the chicken and serve over rice, pouring broth on top and garnishing with green onions and cilantro.

Nutrition

Serving: 1servingCalories: 450kcalCarbohydrates: 50gProtein: 30gFat: 15gSaturated Fat: 4gPolyunsaturated Fat: 3gMonounsaturated Fat: 8gCholesterol: 100mgSodium: 850mgPotassium: 600mgFiber: 2gSugar: 8gVitamin C: 2mgCalcium: 2mgIron: 10mg

Notes

Ensure to pat chicken dry for maximum crispiness during cooking. Adjust seasonings to taste and rinse rice for fluffiness.

Tried this recipe?

Let us know how it was!

Creamy Honey Pepper Chicken Mac and Cheese Delight You’ll Love

A sweet and spicy aroma fills the kitchen as I drizzle honey over sizzling chicken, and the anticipation for my Creamy Honey Pepper Chicken Mac and Cheese Delight reaches a fever pitch. This dish isn’t just another weeknight meal; it’s a celebration of comfort, combining creamy macaroni and gooey cheese with crispy, honey-glazed chicken that will make your taste buds dance. With its quick prep and ability to impress family and friends alike, this recipe is perfect for those wishing to elevate their dining experiences without spending hours in the kitchen. As the mac and cheese melds with the zesty chicken, you’ll discover a delightful twist on traditional comfort food. Curious to see how you can transform your dinner table with this indulgent creation? Let’s dive into the details!

Why is this dish a must-try?

Creamy Comfort: Each forkful of this dish envelops you in a velvety embrace of cheesy goodness that screams indulgence.

Flavor Explosion: Sweet honey and spicy black pepper meld beautifully with savory chicken, creating a taste experience that excites your palate.

Easy to Make: Whip it up in no time, making it perfect for busy weeknights or unexpected guests—your family won’t believe how quickly it comes together.

Incredible Crowd-Pleaser: This recipe is guaranteed to impress at your next gathering, standing out among ordinary mac and cheese recipes.

For more delicious ideas, why not pair it with a side salad or check out the Crack Chicken Penne for an equally delightful meal?

Creamy Honey Pepper Chicken Mac and Cheese Ingredients

• Elevate your dish with these key ingredients!

For the Mac and Cheese

  • Macaroni – The sturdy base that absorbs all the creamy goodness; elbow pasta works best!
  • Cheese (e.g., Cheddar, Mozzarella) – Adds that luxurious creaminess; feel free to substitute with Gouda for a unique twist.
  • Butter – Gives richness to your sauce; olive oil can be used for a lighter alternative.
  • Milk or Heavy Cream – This is key for a rich sauce; consider low-fat milk if you’re watching calories.
  • Garlic Powder – Enhances the flavor profile; swapping for fresh minced garlic adds a lovely zing.
  • Onion Powder – Provides depth to the cheese sauce; diced onions can be a flavorful substitute.

For the Chicken

  • Chicken Breasts – The star protein that holds it all together; for a juicier option, chicken thighs are splendid.
  • Honey – Adds a sweet touch to the glaze; maple syrup is a great substitute if you want to switch it up.
  • Black Pepper – Delivers the heat and excitement; adjust based on your spice preference.

Now you’re equipped with all the essential ingredients for the Creamy Honey Pepper Chicken Mac and Cheese Delight! Get ready to create a meal that’s sure to become a family favorite.

Step‑by‑Step Instructions for Creamy Honey Pepper Chicken Mac and Cheese Delight

Step 1: Prepare the Chicken
Start by seasoning two chicken breasts with salt and freshly cracked black pepper. Heat a skillet over medium heat and add a tablespoon of oil. Sear the chicken for about 6-7 minutes on each side, or until golden brown and cooked through, reaching an internal temperature of 165°F. Once cooked, remove the chicken from the skillet and set it aside to rest while you prepare the glaze.

Step 2: Make the Honey Pepper Glaze
In a small saucepan, combine ¼ cup of honey and 1 tablespoon of black pepper. Heat the mixture over low-medium heat for about 3-4 minutes, stirring occasionally, until it thickens slightly. When ready, take the skillet off the heat and coat the rested chicken breasts in the honey pepper glaze, ensuring they are thoroughly covered for a sweet and spicy kick.

Step 3: Cook the Macaroni
Bring a large pot of salted water to a boil, adding 8 ounces of macaroni. Cook the pasta until al dente, usually about 7-9 minutes depending on the package instructions. Once cooked, drain the macaroni and set it aside. This is the perfect base for your Creamy Honey Pepper Chicken Mac and Cheese Delight!

Step 4: Prepare the Cheese Sauce
In a separate saucepan, melt 3 tablespoons of butter over medium heat. Once melted, whisk in 2 cups of milk, stirring until well combined. Gradually add in 2 cups of shredded cheese (such as Cheddar and Mozzarella), continuing to stir until the cheese melts smoothly, taking about 4-5 minutes. Mix well with garlic powder and onion powder to enhance the cheesiness.

Step 5: Combine Macaroni and Cheese Sauce
Once the cheese sauce is creamy and homogenous, stir in the cooked macaroni, ensuring each piece is enrobed in cheese. Continue cooking on low for an additional 2-3 minutes, allowing the flavors to meld beautifully together. This rich and creamy mixture is the star of your Creamy Honey Pepper Chicken Mac and Cheese Delight.

Step 6: Assemble the Dish
Preheat your oven to 350°F. In a greased baking dish, layer the creamy macaroni evenly across the bottom. Next, chop the glazed chicken into bite-sized pieces and scatter it generously over the macaroni. This layering creates a harmonious blend of flavors that will delight everyone at the dinner table.

Step 7: Bake to Perfection
Place the assembled dish in the preheated oven and bake for 15-20 minutes. Keep an eye on it—you’re looking for the cheese to bubble and the top to turn a lovely golden color. Once i it achieves that delightful visual cue, remove it from the oven and let it sit for a few minutes before serving, allowing the flavors to settle in.

Expert Tips for Creamy Honey Pepper Chicken Mac and Cheese

  • Chicken Perfection: For juicy chicken, use chicken thighs instead of breasts; they stay moister when cooked.

  • Cheese Choices: Experimenting is key! Try different cheeses like Gouda or Pepper Jack for unique flavors in your creamy dish.

  • Glaze Balance: Be careful not to overheat the honey glaze; it should be thick but not burnt, keeping the flavor just right for your chicken.

  • Macaroni Cooking: Avoid mushy macaroni by cooking it al dente; it will continue to soften in the oven when baked with the cheese sauce.

  • Chef’s Touch: Top your dish with breadcrumbs before baking for a delightful crunchy texture that contrasts with the creamy honey pepper chicken mac and cheese.

What to Serve with Creamy Honey Pepper Chicken Mac and Cheese Delight

Elevate your dining experience with delightful sides that harmonize beautifully with this creamy, sweet, and spicy dish.

  • Garlic Bread: The buttery, garlicky flavors create a perfect balance with the rich mac and cheese, making each bite a slice of heaven.

  • Caesar Salad: Crisp romaine and tangy dressing contrast with the creaminess, adding a refreshing crunch that brightens your plate.

  • Roasted Vegetables: Colorful veggies like carrots and bell peppers roast to sweet perfection, complementing the honey in the chicken and adding a wholesome touch.

  • Steamed Broccoli: The slight bitterness of broccoli helps cut through the richness of the mac and cheese, providing both texture and nutrition.

  • Sweet Corn on the Cob: Juicy, buttery corn brings a touch of sweetness, harmonizing with the honey glaze while enhancing the overall comfort food experience.

  • Sparkling Lemonade: A refreshing drink that offers a zesty kick, cleansing your palate between bites and beautifully matching the dish’s bold flavors.

Storage Tips for Creamy Honey Pepper Chicken Mac and Cheese Delight

Fridge: Store leftovers in an airtight container for up to 3 days to maintain freshness. Ensure it’s completely cooled before sealing to prevent condensation.

Freezer: You can freeze the dish for up to 2 months. Portion into freezer-safe containers and allow to cool completely before wrapping tightly.

Reheating: Reheat in the oven at 350°F for about 20-25 minutes until heated through. Consider adding a splash of milk to restore creaminess and avoid dryness.

Freshness Check: Before consuming, always verify that the creamy honey pepper chicken mac and cheese delight has a pleasant smell and appearance to ensure it’s safe to eat.

Make Ahead Options

These Creamy Honey Pepper Chicken Mac and Cheese Delight are perfect for meal prep enthusiasts! You can prepare the mac and cheese mix up to 24 hours in advance; simply cook the macaroni, make the cheese sauce, and combine them. Store this mixture in an airtight container in the refrigerator to maintain its creamy consistency. The chicken can also be cooked, glazed, and stored separately for 3 days; remember to reheat it in the oven for optimal texture. When it’s time to serve, layer the chicken on top of the macaroni and bake at 350°F for 15-20 minutes. This ensures you have a delicious, comforting meal with minimal effort!

Variations & Substitutions for Creamy Honey Pepper Chicken Mac and Cheese

Feel free to adapt this delightful recipe to suit your tastes and dietary needs!

  • Shrimp Substitute: Replace chicken with shrimp for a seafood twist. Cook shrimp until pink and toss in the same honey pepper glaze for a quick sea-inspired meal.

  • Vegetarian Option: Swap chicken for tofu or tempeh, marinating them in the glaze for flavor. This adds protein to your dish while keeping it plant-based and heartwarming.

  • Cheese Variety: Experiment with different cheeses like Gouda or Pepper Jack for a flavor boost. Each variety brings unique creaminess and depth to your comforting mac and cheese.

  • Extra Veggies: Add in vibrant vegetables like spinach or broccoli for nutrition. Just blanch them before mixing in to keep them bright and fresh!

  • Gluten-Free Pasta: Use gluten-free macaroni for a celiac-friendly version. Rice or corn-based pasta works well and creates a satisfying texture without the gluten.

  • Spicy Kick: Amp up the heat by mixing in some diced jalapeños or a pinch of cayenne pepper. This fiery twist complements the sweetness of the honey beautifully.

  • Herb Infusion: Fresh herbs like thyme or basil can elevate your dish further! Sprinkle some chopped herbs into the cheese sauce for a fragrant touch that brightens every bite.

For a well-rounded meal, consider serving this indulgent creamy mac with a fresh side salad, or check out the delicious Sizzling Chicken Pepper for more ideas!

Creamy Honey Pepper Chicken Mac and Cheese Recipe FAQs

What type of macaroni should I use?
Absolutely! Elbow pasta is the classic choice, but feel free to experiment with other shapes like shells or cavatappi to add some fun to your dish. Just make sure whatever pasta you choose can hold onto that creamy cheese sauce.

How should I store leftovers?
To keep your Creamy Honey Pepper Chicken Mac and Cheese Delight fresh, refrigerate leftovers in an airtight container for up to 3 days. I recommend letting it cool completely before sealing it up to avoid any sogginess from condensation.

Can I freeze this dish?
Very! To freeze, let the dish cool completely, then portion it into freezer-safe containers. It can last in the freezer for up to 2 months. When you’re ready to enjoy, let it thaw in the refrigerator overnight, then reheat in the oven at 350°F for about 20-25 minutes until heated through.

What if my cheese sauce is grainy?
If your sauce ends up grainy, it’s usually due to the cheese being added too quickly or at too high of a temperature. The best way to fix this is to lower the heat and add your cheese gradually while stirring constantly to help it melt smoothly. Patience is key! Also, ensure you’re using freshly shredded cheese for optimal melting.

Can I modify this recipe for dietary needs?
Definitely! If you have dietary restrictions, you can easily adjust this recipe. Swap out chicken for tofu or shrimp for a different protein. For dairy-free options, use plant-based cheese and milk alternatives. Just remember to check the ingredients to ensure they suit your specific allergies or preferences.

How can I enhance the flavor of my dish?
I often make this dish even more exciting with added elements! Consider sprinkling some smoked paprika or fresh herbs like basil or parsley for a pop of color and flavor. You can also add sautéed vegetables, such as spinach or bell peppers, to elevate the nutrition and taste.

Creamy Honey Pepper Chicken Mac and Cheese Delight

Creamy Honey Pepper Chicken Mac and Cheese Delight You’ll Love

Savor the Creamy Honey Pepper Chicken Mac and Cheese Delight, a comforting dish combining creamy macaroni with honey-glazed chicken.
Prep Time 20 minutes
Cook Time 30 minutes
Resting Time 5 minutes
Total Time 55 minutes
Servings: 4 servings
Course: Casserole
Cuisine: American
Calories: 600

Ingredients
  

For the Mac and Cheese
  • 8 ounces Macaroni Elbow pasta works best.
  • 2 cups Cheese (e.g., Cheddar, Mozzarella) Feel free to substitute with Gouda.
  • 3 tablespoons Butter Olive oil can be used for a lighter alternative.
  • 2 cups Milk or Heavy Cream Consider low-fat milk if you're watching calories.
  • 1 teaspoon Garlic Powder Swapping for fresh minced garlic adds a lovely zing.
  • 1 teaspoon Onion Powder Diced onions can be a flavorful substitute.
For the Chicken
  • 2 pieces Chicken Breasts Chicken thighs are a juicier option.
  • 1/4 cup Honey Maple syrup is a great substitute.
  • 1 tablespoon Black Pepper Adjust based on your spice preference.

Equipment

  • Skillet
  • Saucepan
  • Large pot
  • baking dish

Method
 

Step-by-Step Instructions
  1. Season chicken breasts with salt and black pepper. Sear in a skillet with oil for 6-7 minutes per side until cooked through.
  2. Combine honey and black pepper in a saucepan over low-medium heat for 3-4 minutes until slightly thickened. Coat the cooked chicken in the glaze.
  3. Cook macaroni in salted boiling water for 7-9 minutes until al dente. Drain and set aside.
  4. Melt butter in a saucepan over medium heat. Whisk in milk and gradually add cheese, stirring until melted. Mix with garlic and onion powder.
  5. Stir cooked macaroni into the cheese sauce, cooking for an additional 2-3 minutes.
  6. Preheat oven to 350°F. Layer macaroni in a greased baking dish, top with chopped glazed chicken.
  7. Bake for 15-20 minutes until the cheese bubbles and turns golden. Let it sit for a few minutes before serving.

Nutrition

Serving: 1servingCalories: 600kcalCarbohydrates: 50gProtein: 30gFat: 25gSaturated Fat: 15gPolyunsaturated Fat: 3gMonounsaturated Fat: 10gCholesterol: 100mgSodium: 800mgPotassium: 700mgFiber: 2gSugar: 10gVitamin A: 500IUVitamin C: 2mgCalcium: 300mgIron: 2mg

Notes

Store leftovers in an airtight container for up to 3 days. For longer storage, freeze for up to 2 months.

Tried this recipe?

Let us know how it was!

Healthy Garlic Parmesan Chicken Pasta Recipe for Guilt-Free Indulgence

As I twisted the strands of pasta around my fork, I couldn’t help but savor the creamy dream that is my Healthy Garlic Parmesan Chicken Pasta recipe. Whether you’re looking to satisfy your comfort food cravings or need a quick post-workout meal, this dish ticks all the boxes. With a secret swap of heavy cream for Greek yogurt and low-fat milk, it manages to be both indulgent and guilt-free. Plus, you’ll whip it up in just about 30 minutes, making it perfect for those busy weeknights when time is of the essence. So, what’s stopping you from diving into this high-protein delight that’s sure to leave you feeling energized and satisfied? Let’s get cooking!

Why Choose Healthy Garlic Parmesan Chicken Pasta?

Flavorful Delight: This dish combines rich garlic and Parmesan in a creamy sauce that delivers on taste without the guilt.
Quick & Easy: With a prep time of just 30 minutes, it’s your go-to recipe for busy weeknights or post-workout meals.
High Protein Boost: Packed with chicken breast and Greek yogurt, it provides the protein your body craves after a workout.
Clean Eating: Made with whole wheat pasta and low-fat ingredients, it aligns perfectly with your clean eating goals.
Versatile Dish: Feel free to customize with veggies like spinach or switch up the protein with shrimp for a fresh twist! For more delicious options, check out Garlic Parmesan Chicken or Garlic Butter Baked.

Healthy Garlic Parmesan Chicken Pasta Ingredients

• Discover the secrets behind this delicious dish!

For the Pasta

  • Whole Wheat Pasta – A source of complex carbohydrates and fiber that keeps you full longer.

For the Chicken

  • Chicken Breast – Lean protein that supports muscle recovery after workouts.
  • Salt – Elevates flavor; adjust based on taste preferences.
  • Pepper – Adds a hint of spice to enhance the chicken’s taste.
  • Paprika – Offers a mild warmth and vibrant color to the dish.
  • Italian Seasoning – A blend that enriches the overall flavor profile.

For the Sauce

  • Olive Oil – Healthy fats that give the sauce a silky, rich texture.
  • Garlic – Infuses a fragrant aroma and robust flavor into the dish.
  • Whole Wheat Flour – Used to thicken the sauce without heavy calories.
  • Chicken Broth – Provides depth and richness; opt for low-sodium for a healthier choice.
  • Low-Fat Milk – Ensures creaminess while keeping calories in check.
  • Greek Yogurt – Adds a creamy touch and extra protein; substitute it with plain yogurt if needed.
  • Parmesan Cheese – Offers a classic rich flavor; nutritional yeast can be a lighter alternative.

Optional Ingredients

  • Spinach – Packed with nutrients; feel free to swap with kale for added health benefits.
  • Parsley – Adds a pop of color and freshness as a garnish.

Enjoy crafting your Healthy Garlic Parmesan Chicken Pasta recipe with these delightful ingredients!

Step‑by‑Step Instructions for Healthy Garlic Parmesan Chicken Pasta Recipe

Step 1: Cook the Pasta
Bring a large pot of salted water to a rolling boil over high heat. Once boiling, add the whole wheat pasta and cook according to the package instructions until al dente, usually about 8–10 minutes. Before draining, reserve 1/4 cup of the pasta water to adjust the sauce’s thickness later. Drain the pasta and set it aside, keeping it warm.

Step 2: Sear the Chicken
In a large skillet, heat 2 tablespoons of olive oil over medium-high heat. Add the cubed chicken breast seasoned with salt, pepper, paprika, and Italian seasoning. Cook for about 5–6 minutes, stirring occasionally, until the chicken is golden brown and fully cooked. Remove the chicken from the skillet and set it aside, leaving any drippings.

Step 3: Sauté the Garlic
In the same skillet, reduce heat to medium and add a little more olive oil if needed. Add 4 minced garlic cloves and sauté for 30–60 seconds until fragrant, making sure not to brown the garlic as this can lead to a bitter taste. You should see a lovely golden color, signaling that it’s time for the next step.

Step 4: Make the Sauce Base
Stir in 2 tablespoons of whole wheat flour to create a light roux with the garlic, cooking for about 1 minute to eliminate the raw flour taste. Gradually whisk in 1 cup of chicken broth, ensuring no lumps form. Keep stirring until the mixture is smooth and starts to thicken slightly.

Step 5: Incorporate the Creaminess
Slowly whisk in 1 cup of low-fat milk into the sauce base. Continue to cook on low heat for 2–3 minutes until the sauce thickens to your desired consistency. Once ready, remove the skillet from the heat and mix in 1/2 cup of Greek yogurt until fully incorporated, creating that creamy texture for your Healthy Garlic Parmesan Chicken Pasta.

Step 6: Add the Cheese
Return the skillet to low heat and add 1/2 cup of grated Parmesan cheese. Stir until the cheese melts completely and the sauce is creamy and smooth. If the sauce is too thick for your liking, gradually whisk in some reserved pasta water until you reach the desired consistency.

Step 7: Combine All Ingredients
Add the cooked chicken back into the skillet, tossing to coat in the sauce. Next, gently fold in the cooked pasta until everything is well combined. If you’re using spinach, add it now and stir until it wilts, adding a nice burst of color and nutrients to your Healthy Garlic Parmesan Chicken Pasta.

Step 8: Serve with Garnish
Once everything is mixed thoroughly, remove the skillet from heat. Plate the pasta and garnish with chopped parsley and extra Parmesan cheese for a lovely finish. Enjoy the rich, garlic-infused flavors of your Healthy Garlic Parmesan Chicken Pasta!

How to Store and Freeze Healthy Garlic Parmesan Chicken Pasta

Fridge: Store your Healthy Garlic Parmesan Chicken Pasta in an airtight container in the refrigerator for up to 3 days. This ensures it stays fresh and ready for a quick meal.

Freezer: If you want to store for longer, freeze the pasta in individual portion sizes. It can last for about 2-3 months. Make sure to use freezer-safe containers to prevent freezer burn.

Reheating: To reheat, simply microwave individual servings with a splash of low-fat milk to loosen the sauce, or warm it gently on the stovetop over low heat until heated through.

Meal Prep: This dish is great for meal prepping! Prepare a batch at the start of the week and enjoy it on busy days without the need for unhealthy fast food.

What to Serve with Healthy Garlic Parmesan Chicken Pasta?

Creating a delicious meal is all about balance and complements. These pairings will elevate your dining experience!

  • Fresh Side Salad: A crisp, leafy greens salad provides a refreshing contrast to the creamy pasta, enhancing each bite. You can mix in colorful veggies, nuts, or cheese for an extra crunch and depth of flavor.

  • Garlic Bread: Tantalizingly warm and crispy, garlic bread is a comforting classic that pairs perfectly with the savory garlic sauce. It’s great for soaking up any leftover sauce left on your plate!

  • Roasted Vegetables: Roasted broccoli, zucchini, or bell peppers add a delightful charred flavor that complements the pasta’s creaminess while boosting your nutrient intake.

  • Steamed Asparagus: The light, bright flavor of steamed asparagus brings a fresh touch that balances the richness of the dish. Plus, it adds a beautiful pop of color!

  • Italian White Wine: A chilled glass of Pinot Grigio or Sauvignon Blanc enhances the flavors of the meal, making each sip a delightful accompaniment. Its acidity elegantly cuts through the creaminess, refreshing your palate.

  • Chocolate Mousse: For dessert, a light chocolate mousse is a delightful way to end the meal on a sweet note. Its airy texture contrasts beautifully with the hearty pasta!

With these accompaniments, your Healthy Garlic Parmesan Chicken Pasta dinner will be a memorable feast everyone will love!

Expert Tips for Healthy Garlic Parmesan Chicken Pasta

  • Avoid Garlic Bitterness: Make sure not to brown the garlic when sautéing; it can become bitter. Keep a close eye on it!
  • Smooth Sauce: Whisk constantly while adding liquids to the sauce, ensuring a smooth, lump-free consistency for your Healthy Garlic Parmesan Chicken Pasta.
  • Season to Taste: Always taste as you go! Adjust seasoning to your personal preference for the perfect flavor balance in your dish.
  • Perfect Pasta Texture: Cook the whole wheat pasta until just al dente; it will continue to cook slightly when combined with the sauce.
  • Creamy Consistency: If the sauce thickens too much, gradually add back the reserved pasta water until it reaches your desired creaminess.

Make Ahead Options

These Healthy Garlic Parmesan Chicken Pasta meal prep options are perfect for busy home cooks! You can cook the whole wheat pasta and refrigerate it in an airtight container for up to 3 days. Similarly, the chicken can be seasoned and cooked ahead of time, then stored for the same duration. When you’re ready to enjoy this delicious dish, simply reheat the pasta and chicken in a skillet over medium heat, adding a splash of low-fat milk to ensure the sauce remains creamy and avoid clumping. For the best results, mix in the freshly made sauce just before serving for that delightful, restaurant-quality finish. Enjoy the ease of having this nutritious meal ready to go!

Healthy Garlic Parmesan Chicken Pasta Variations

Embrace your inner chef and let your creativity shine by customizing this dish with some delightful tweaks!

  • Dairy-Free: Substitute Greek yogurt and Parmesan with nutritional yeast and cashew cream for a creamy, cheeseless delight.
  • Vegetarian Swap: Replace chicken with sautéed mushrooms or tofu for a plant-based twist; both options bring their own unique textures.
  • Gluten-Free Option: Use gluten-free pasta instead of whole wheat to make the recipe accessible for gluten-sensitive individuals.
  • Extra Veggies: Boost nutrients by adding broccoli or zucchini; simply toss them in during the last minute of pasta cooking.
  • Spicy Kick: Add red pepper flakes to the sauce for a flavorful heat that will awaken your taste buds.
  • Herb Infusion: Incorporate fresh basil or thyme – just a handful will elevate the herbaceous notes in your dish beautifully.
  • Nutty Addition: Sprinkle in toasted pine nuts or walnuts for that extra crunch and nutty flavor that beautifully complements the creamy sauce.

Feeling inspired? As you explore these variations, don’t forget to check out Cheesy Garlic Chicken or Garlic Chicken Gnocchi for more mouthwatering ideas!

Healthy Garlic Parmesan Chicken Pasta Recipe FAQs

How do I select the best whole wheat pasta?
Choose whole wheat pasta that has a rich, nutty aroma and a firm texture. Look for brands that have a high protein content and minimal additives. I recommend checking the ingredient list to ensure that it lists whole wheat flour as the first ingredient for the best nutritional value.

What’s the best way to store leftover Healthy Garlic Parmesan Chicken Pasta?
Store your pasta in an airtight container in the refrigerator for up to 3 days. This will keep it fresh and ready for quick meals. Be sure to allow it to cool down to room temperature before sealing it in the container to prevent moisture buildup.

Can I freeze Healthy Garlic Parmesan Chicken Pasta?
Absolutely! To freeze, portion the pasta into individual servings, and place them in freezer-safe containers. It can last for up to 3 months. When you’re ready to enjoy it, defrost in the fridge overnight and reheat gently on the stovetop, adding a splash of low-fat milk to help loosen the sauce.

What should I do if my sauce is too thick?
If your sauce turns out too thick, don’t worry! Gradually add in some of the reserved pasta water while stirring until you reach your desired consistency. The starch from the pasta water will help create a creamy texture.

Are there any dietary considerations for this recipe?
For allergies, this recipe contains dairy, so if you have lactose intolerance, consider using plant-based milk and a dairy-free yogurt alternative. Additionally, if you’re preparing this dish for pets, avoid giving them any garlic, as it can be toxic to dogs and cats.

How can I add extra nutrition to my Healthy Garlic Parmesan Chicken Pasta?
You can easily increase the nutrients by adding more vegetables! Consider tossing in bell peppers, zucchini, or broccoli along with the spinach. This not only enhances the dish visually but also boosts fiber and vitamins. Feel free to get creative with your veggie choices!

Healthy Garlic Parmesan Chicken Pasta Recipe

Healthy Garlic Parmesan Chicken Pasta Recipe for Guilt-Free Indulgence

A creamy, high-protein dish that's quick to prepare, satisfying comfort food cravings without guilt.
Prep Time 30 minutes
Cook Time 15 minutes
Total Time 45 minutes
Servings: 4 servings
Course: Pasta
Cuisine: Italian
Calories: 400

Ingredients
  

For the Pasta
  • 8 ounces Whole Wheat Pasta
For the Chicken
  • 1 pound Chicken Breast Cubed
  • 1 teaspoon Salt
  • 1 teaspoon Pepper
  • 1 teaspoon Paprika
  • 1 teaspoon Italian Seasoning
For the Sauce
  • 2 tablespoons Olive Oil
  • 4 cloves Garlic Minced
  • 2 tablespoons Whole Wheat Flour
  • 1 cup Chicken Broth Preferably low-sodium
  • 1 cup Low-Fat Milk
  • 1/2 cup Greek Yogurt Or plain yogurt as substitute
  • 1/2 cup Parmesan Cheese Grated
Optional Ingredients
  • 1 cup Spinach Or substitute with kale
  • 2 tablespoons Parsley Chopped, for garnish

Equipment

  • Large pot
  • Large skillet
  • Measuring cups
  • Measuring spoons
  • whisk

Method
 

Step-by-Step Instructions
  1. Bring a large pot of salted water to a rolling boil over high heat. Add the whole wheat pasta and cook until al dente, about 8–10 minutes. Reserve 1/4 cup of pasta water before draining and setting the pasta aside.
  2. In a large skillet, heat 2 tablespoons of olive oil over medium-high heat. Add the cubed chicken breast seasoned with salt, pepper, paprika, and Italian seasoning. Cook for 5–6 minutes until golden brown and fully cooked. Remove from skillet.
  3. In the same skillet, reduce heat to medium and add more olive oil if needed. Add 4 minced garlic cloves and sauté for 30–60 seconds until fragrant.
  4. Stir in 2 tablespoons of whole wheat flour to create a light roux with the garlic, cooking for about 1 minute. Gradually whisk in 1 cup of chicken broth until smooth.
  5. Slowly whisk in 1 cup of low-fat milk, cooking on low heat for 2–3 minutes until thickened. Remove from heat and mix in 1/2 cup of Greek yogurt.
  6. Return to low heat, add 1/2 cup of grated Parmesan cheese and stir until melted and smooth. Adjust sauce thickness with reserved pasta water if needed.
  7. Add the cooked chicken back into the skillet, tossing to coat with the sauce. Gently fold in the cooked pasta and spinach if using.
  8. Plate the pasta and garnish with chopped parsley and extra Parmesan cheese. Serve warm.

Nutrition

Serving: 1servingCalories: 400kcalCarbohydrates: 45gProtein: 30gFat: 10gSaturated Fat: 3gPolyunsaturated Fat: 1gMonounsaturated Fat: 7gCholesterol: 70mgSodium: 600mgPotassium: 700mgFiber: 6gSugar: 5gVitamin A: 500IUVitamin C: 8mgCalcium: 250mgIron: 3mg

Notes

Ensure to not brown the garlic to avoid bitterness and whisk constantly for a smooth sauce.

Tried this recipe?

Let us know how it was!

Queso Smothered Chicken and Rice for Cozy Family Dinners

As I whisked the cheese into a bubbling pot, the aroma of melting queso filled my kitchen, creating an inviting atmosphere that felt like a warm hug. This Queso Smothered Chicken and Rice, also known as Pollo con Queso, is my go-to recipe for cozy family dinners and effortless meal prep. Juicy chicken sautéed to golden perfection, paired with fluffy homemade Spanish rice, is smothered in a rich, creamy queso sauce that transforms any weeknight into a fiesta. Not only is it a delicious comfort food option, but it’s also freezer-friendly, making it perfect for busy days when you crave something hearty. Ready to dive into cheesy, savory bliss? Let’s explore how to whip up this delightful dish together!

Why Is This Recipe a Must-Try?

Flavor Explosion: The zesty melding of spices with creamy cheese makes each bite a carnival of taste that will have everyone asking for seconds.

Easy to Make: With straightforward steps, you can whip up this comforting dish in no time, making it perfect for weeknights or family gatherings.

Meal Prep Friendly: Perfect for busy schedules, store leftovers in an airtight container and enjoy them throughout the week. This dish pairs wonderfully with Oven Chicken Rice.

Versatile Ingredients: Customize it easily by swapping chicken for shrimp or tofu, and feel free to add veggies like corn for an extra nutritional boost.

Family Favorite: Its rich, cheesy goodness is sure to please both kids and adults, creating memorable mealtime moments. Don’t forget to serve it with a side of guacamole or warm tortillas for an added touch!

Queso Smothered Chicken and Rice Ingredients

For the Chicken
Chicken Breast or Thighs – A lean protein providing the base for this flavorful dish; swap with tofu for a vegetarian option.
Oil (2 tablespoons) – Essential for sautéing the chicken to achieve that golden sear; olive oil or avocado oil works beautifully.
Taco or Fajita Seasoning (1 packet) – Adds a burst of flavor to the chicken; use homemade spices like cumin and paprika if you prefer a personal touch.

For the Queso Sauce
Boar’s Head White American Cheese (2/3 lb) – This is the key to a smooth, creamy queso; Velveeta Queso Blanco can be a great alternative.
Pepper Jack or Monterey Jack Cheese (1/2 lb) – Provides a delightful hint of spice and richness; swap for mozzarella if you want a milder flavor.
Rotel Tomatoes with Green Chilies (1 can, drained) – Brings moisture and flavor to the queso; fresh tomatoes and diced green chilies can serve as a substitute.
Salt (1/4 teaspoon) – Enhances the overall flavor; adjust to your taste.
Jalapeño (1, diced) – Adds a little heat to the queso; omit for a milder dish or replace with bell pepper for sweetness.
Evaporated Milk (1 can, 12 oz) – Creates a beautifully creamy texture for the queso; half-and-half or whole milk can also work.
Green Chilies (1 can, 4 oz) – Adds another layer of flavor to the queso; fresh chilies can be subbed in.
Cilantro (for garnish) – Delivers freshness and a pop of color; feel free to omit if you’re not a fan.

For the Spanish Rice
Homemade Spanish Rice – Complement this dish with fluffy Spanish rice; check the linked recipe below to create it from scratch.

Every rich bite of Queso Smothered Chicken and Rice is guaranteed to bring smiles to the table!

Step‑by‑Step Instructions for Queso Smothered Chicken and Rice

Step 1: Prepare Spanish Rice
Begin by preparing your homemade Spanish rice according to the linked recipe. This essential base will enhance the Queso Smothered Chicken and Rice. Follow the instructions carefully, allowing the rice to cook fully until fluffy and fragrant. Once done, fluff the rice with a fork and set it aside, keeping it warm for assembly later.

Step 2: Sauté Chicken
Slice your chicken breasts or thighs into even strips, ensuring they cook uniformly. Heat 2 tablespoons of oil in a large skillet over medium-high heat. Once shimmering, add the seasoned chicken strips, searing them for about 3-4 minutes per side until golden brown and cooked through. Remove the chicken from the skillet and allow it to rest, keeping the juices locked in.

Step 3: Make the Queso
In the same skillet, reduce the heat to medium-low, and add the drained Rotel tomatoes and diced jalapeño, stirring to incorporate the flavors. Next, pour in the can of evaporated milk. Gradually add the Boar’s Head White American cheese and Pepper Jack cheese, stirring continuously until fully melted and creamy. Add the green chilies, cooking for an additional 5 minutes while stirring to achieve a silky texture.

Step 4: Assemble Dish
Now it’s time to assemble your Queso Smothered Chicken and Rice! On each plate, spoon a generous portion of the fluffy Spanish rice as the base. Top it with the sautéed chicken strips, and then drizzle the luscious queso sauce generously over the chicken. To finish, garnish each dish with fresh cilantro, adding a delightful pop of color and flavor.

How to Store and Freeze Queso Smothered Chicken and Rice

Fridge: Store leftovers in an airtight container for up to 3 days, ensuring the queso sauce remains creamy and the chicken stays juicy.

Freezer: You can freeze the Queso Smothered Chicken and Rice for up to 3 months. Store it in freezer-safe containers, separating the rice, chicken, and queso if desired.

Reheating: When ready to enjoy, thaw overnight in the fridge. Reheat on the stove over low heat, adding a splash of milk to restore creaminess to the queso sauce.

Make-Ahead: Prepare the queso sauce ahead of time and store it in the fridge for up to 2 days. Layer it over warm chicken and rice right before serving for easy mealtime magic.

Make Ahead Options

These Queso Smothered Chicken and Rice are perfect for meal prep enthusiasts! You can prepare the Spanish rice up to 3 days in advance, storing it in an airtight container in the refrigerator. Additionally, cook the chicken and make the queso sauce ahead of time, allowing them to cool before refrigerating for up to 24 hours. To maintain the creamy texture of the queso, reheat it gently on the stove, adding a splash of evaporated milk if needed. When ready to serve, simply reheat the chicken, rice, and queso together until warmed through, and enjoy a restaurant-quality meal with minimal effort during your busy weeknights!

Expert Tips for Queso Smothered Chicken and Rice

  • Rice Rinsing: Rinse the rice before cooking to remove excess starch; this helps achieve a fluffy texture and prevents it from becoming gummy during cooking.

  • Avoid Overcrowding: When sautéing the chicken, ensure the pieces aren’t crowded in the skillet. Overcrowding can lead to steaming rather than achieving that beautiful golden sear.

  • Fresh Grating: Use block cheese and grate it yourself for the smoothest queso sauce. Pre-shredded cheese often contains anti-caking agents that can make your queso grainy.

  • Slow Reheating: If you have leftovers, reheat the queso slowly on the stove or in the microwave. Adding a splash of milk helps restore its creamy texture.

  • Season As You Go: Always taste as you go! Adjust the seasoning of your queso smothered chicken and rice to create the perfect blend of flavors that suits your palate.

What to Serve with Queso Smothered Chicken and Rice

Treat your taste buds to a delightful array of sides that elevate this cheesy, savory meal.

  • Warm Tortillas: Soft, fresh tortillas make the perfect vehicle for scooping up delicious bites. Roll them up with extra queso and chicken for a handheld delight.

  • Guacamole: The creamy avocado dip adds a refreshing contrast to the rich queso sauce, balancing flavors that delight with every bite.

  • Corn Salsa: Bright and zesty, corn salsa bursts with sweet and tangy flavors that complement the dish’s heartiness, lending a lively crunch.

  • Refried Beans: Creamy refried beans provide a luscious, protein-packed side that pairs wonderfully with the cheesy chicken, adding hearty satisfaction to your meal.

  • Mexican Street Corn (Elote): Grilled corn smeared with creamy sauce and sprinkled with cheese and spices brings a smoky, sweet element that enhances the flavor profile of your dinner.

  • Lime Wedges: A squeeze of lime adds a zesty brightness that lifts the entire dish and balances the richness of the queso, making every bite more vibrant.

  • Churros: For dessert, these crispy, cinnamon-dusted pastries offer a sweet finish that rounds out your meal in delightful sugary bliss.

Queso Smothered Chicken and Rice Variations

Feel free to jazz up your Queso Smothered Chicken and Rice by trying out these delightful variations that cater to your taste!

  • Seafood Swap: Replace chicken with shrimp for a seafood twist. Sauté the shrimp until pink, then drizzle with queso.

  • Vegetarian Delight: Opt for firm tofu or sautéed Tempeh instead of chicken. It soaks up flavors beautifully, providing a satisfying meatless option.

  • Spicy Kick: Add in more jalapeños or a splash of hot sauce to the queso for an extra layer of heat. Spice lovers won’t be able to resist!

  • Creamy Cheddar: Swap the White American cheese for sharp cheddar for a richer flavor. Its boldness complements the dish nicely.

  • Veggie Boost: Toss in veggies like corn, diced bell peppers, or zucchini into the queso for brighter flavors and added nutrients. These colorful additions make every bite a treat!

  • Herb Infusion: Mix in some fresh herbs like oregano or thyme into your queso or as a topping for a burst of freshness that brightens everything.

  • Corn Tortilla Crust: Layer the bottom of your baking dish with corn tortillas, add the chicken and queso, then bake for a cheesy casserole-style dinner—comfort food at its best!

  • Freezer Friendly: Prepare extra portions to freeze for those busy evenings. A creamy delight awaits you in no time with a few gentle reheating steps!

Remember, great dishes like Forgotten Chicken Rice and Corn Chicken Rice can also bring excitement to your meal rotation, so don’t hesitate to explore!

Queso Smothered Chicken and Rice Recipe FAQs

How do I know if my chicken is fresh?
Absolutely! When selecting chicken, look for a vibrant pink color without any dark spots or gray patches. The flesh should feel firm, and there should be no unpleasant odors. Fresh chicken should never feel slimy or tacky.

What’s the best way to store leftovers?
Very! After serving, let your Queso Smothered Chicken and Rice cool to room temperature. Transfer it into an airtight container and store it in the refrigerator for up to 3 days. This way, the chicken stays juicy and the queso sauce remains creamy.

Can I freeze Queso Smothered Chicken and Rice?
Absolutely! To freeze, divide the Queso Smothered Chicken and Rice into individual portions. Place them in freezer-safe containers or zip-top bags, removing as much air as possible. You can freeze it for up to 3 months. When ready, thaw overnight in the fridge and reheat gently on the stove, adding a splash of milk to restore the queso’s creamy goodness.

What if my queso sauce is too thick?
Don’t worry; it happens to the best of us! If your queso sauce ends up too thick, simply add a splash of evaporated milk or regular milk while reheating. Stir continuously over low heat until it reaches your desired consistency. The goal is a smooth, silky sauce that coats your delicious chicken and rice perfectly.

Are there any dietary concerns with this recipe?
Yes! Be mindful of dietary restrictions—it’s a precautionary step. If you’re serving this dish to kids or those who cannot handle spicy food, omit the jalapeños and choose a mild cheese option instead. Also, confirm that all cheese and seasoning ingredients comply with your dietary preferences to create a meal that’s enjoyable for everyone!

Can I use other types of cheese for the queso?
Absolutely! Feel free to get creative with your cheese choices. If you’re after a sharper flavor, cheddar cheese can be a wonderful substitute. You can also blend in other creamy cheeses, such as Gouda or Havarti, for unique taste variations that everyone will love!

Queso Smothered Chicken and Rice

Queso Smothered Chicken and Rice for Cozy Family Dinners

This Queso Smothered Chicken and Rice is a rich, comforting dish perfect for family dinners, featuring melted queso and juicy chicken.
Prep Time 15 minutes
Cook Time 30 minutes
Total Time 45 minutes
Servings: 4 servings
Course: Dinner
Cuisine: Mexican
Calories: 600

Ingredients
  

For the Chicken
  • 2 tablespoons Oil olive oil or avocado oil works beautifully
  • 1 packet Taco or Fajita Seasoning adds a burst of flavor
  • 2 pounds Chicken Breast or Thighs lean protein base; swap with tofu for vegetarian option
For the Queso Sauce
  • 2/3 lb Boar’s Head White American Cheese key for a smooth, creamy queso
  • 1/2 lb Pepper Jack or Monterey Jack Cheese adds spice and richness; can swap for mozzarella
  • 1 can Rotel Tomatoes with Green Chilies drained; fresh tomatoes and chilies as substitute
  • 1/4 teaspoon Salt enhances flavor; adjust to taste
  • 1 Jalapeño diced; omit for milder dish
  • 1 can Evaporated Milk 12 oz; creates creamy texture
  • 1 can Green Chilies adds flavor; fresh chilies can be substituted
  • Cilantro for garnish; optional
For the Spanish Rice
  • Homemade Spanish Rice complement this dish; check linked recipe

Equipment

  • Large skillet
  • Fork

Method
 

Step-by-Step Instructions
  1. Begin by preparing your homemade Spanish rice according to the linked recipe. Once done, fluff the rice with a fork and set it aside.
  2. Slice your chicken into even strips. Heat oil in a skillet over medium-high heat, add chicken, sear for 3-4 minutes per side until cooked. Remove chicken and let rest.
  3. In the same skillet, reduce heat to medium-low, add drained Rotel tomatoes and diced jalapeño. Pour in evaporated milk and gradually add cheeses, stir until melted. Add green chilies and cook for 5 minutes while stirring.
  4. Assemble the dish! On each plate, spoon fluffy Spanish rice as a base, top with chicken strips, and drizzle generously with queso sauce. Garnish with fresh cilantro.

Nutrition

Serving: 1servingCalories: 600kcalCarbohydrates: 50gProtein: 35gFat: 30gSaturated Fat: 15gPolyunsaturated Fat: 2gMonounsaturated Fat: 10gCholesterol: 100mgSodium: 800mgPotassium: 800mgFiber: 4gSugar: 5gVitamin A: 600IUVitamin C: 15mgCalcium: 500mgIron: 2mg

Notes

This dish is freezer-friendly and makes for excellent meal prep. Store leftovers in an airtight container and reheat as desired.

Tried this recipe?

Let us know how it was!

Stay Connected

Get recipes via email: