Get my cookbooks

Strawberry Rhubarb Basil Jam Rolls: Delightful Recipe Tips!

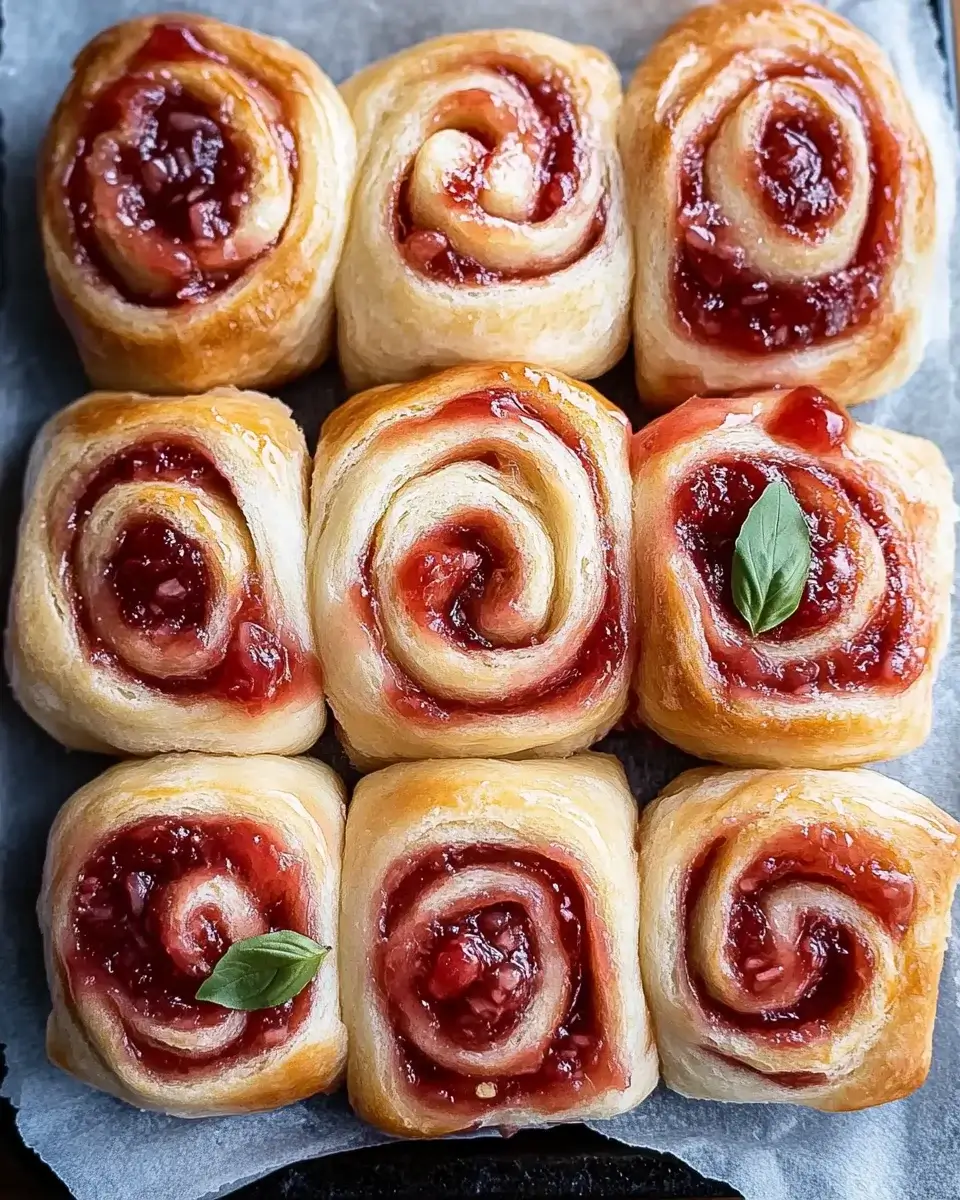
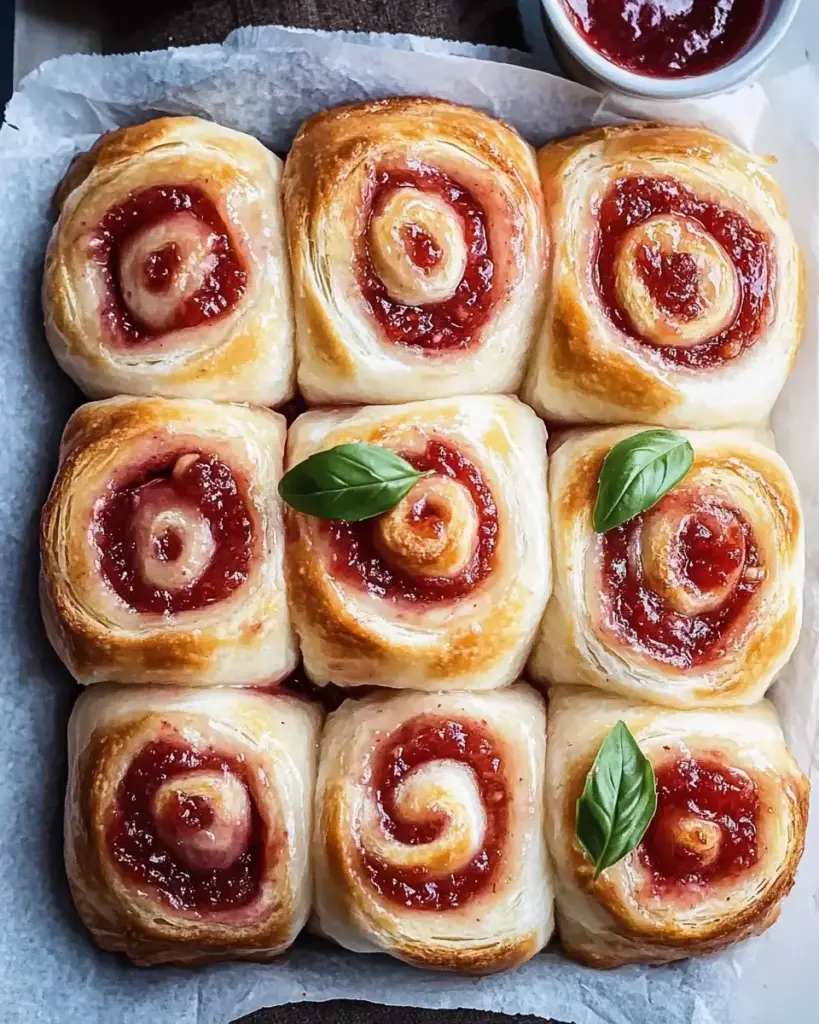
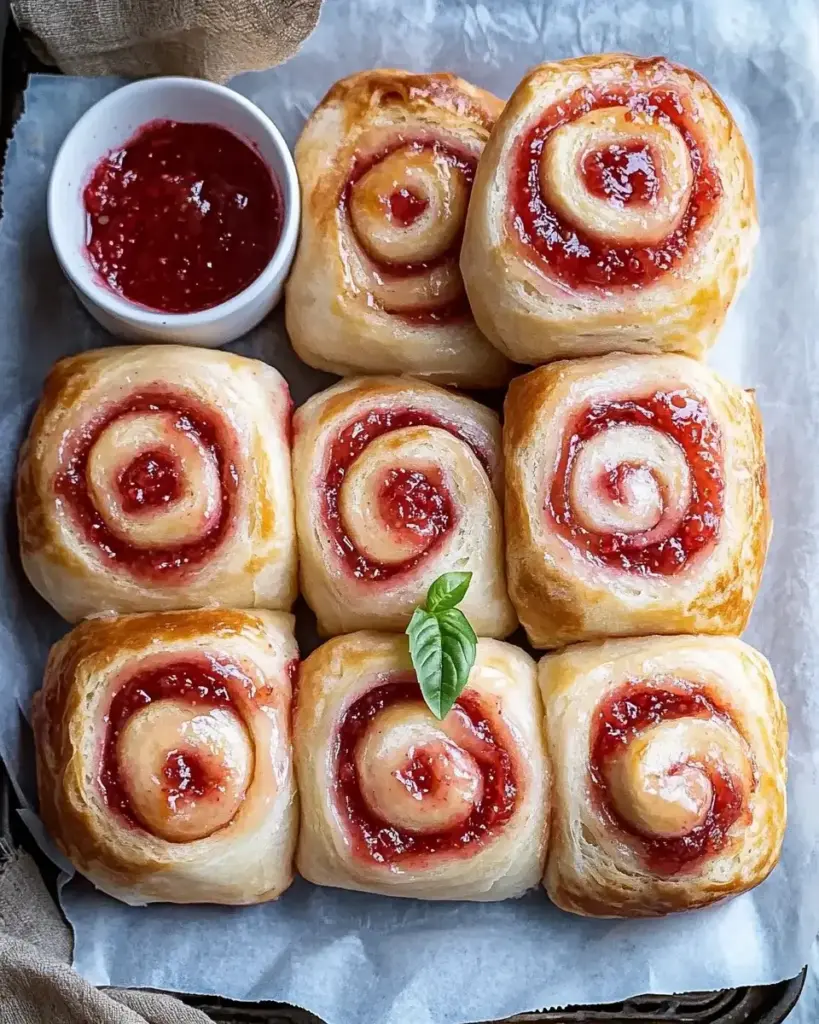
Introduction to Strawberry Rhubarb Basil Jam Rolls

There’s something magical about the combination of sweet strawberries, tart rhubarb, and fragrant basil.

These Strawberry Rhubarb Basil Jam Rolls are not just a treat for the taste buds; they’re a delightful way to bring a little joy into your day.

Whether you’re looking for a quick solution for a busy morning or a dish to impress your loved ones at brunch, these rolls fit the bill perfectly.

With just a handful of ingredients and a bit of love, you can create a warm, inviting aroma that fills your kitchen and warms your heart.

Why You’ll Love This Strawberry Rhubarb Basil Jam Rolls

These Strawberry Rhubarb Basil Jam Rolls are a game-changer for any home cook.

They’re incredibly easy to whip up, making them perfect for those busy mornings or last-minute gatherings.

The delightful blend of flavors creates a taste sensation that’s both comforting and refreshing.

Plus, they bake up golden and fluffy, making them a visual treat that’s sure to impress family and friends alike.

Ingredients for Strawberry Rhubarb Basil Jam Rolls

Creating these delightful Strawberry Rhubarb Basil Jam Rolls starts with gathering a few simple ingredients.

Here’s what you’ll need:

  • All-purpose flour: The backbone of your rolls, providing structure and fluffiness.
  • Baking powder: This leavening agent helps your rolls rise to perfection.
  • Salt: A pinch enhances the flavors, balancing the sweetness of the jam.
  • Granulated sugar: Adds a touch of sweetness to the dough, making it irresistible.
  • Unsalted butter: Cold and cubed, it creates a tender texture and rich flavor.
  • Milk: This moistens the dough, bringing everything together for a soft roll.
  • Strawberry rhubarb basil jam: The star of the show! Use store-bought or homemade for a burst of flavor.
  • Egg: Beaten, it serves as an egg wash for a golden finish on top.
  • Fresh basil leaves: Optional, but they add a lovely touch of color and flavor when garnished.

Feel free to get creative! You can substitute the strawberry rhubarb basil jam with any fruit jam you love, like blueberry or peach, for a different twist.

For exact measurements, check the bottom of the article where you can find everything available for printing.

How to Make Strawberry Rhubarb Basil Jam Rolls

Step 1: Preheat and Prepare

Preheat your oven to 400°F (200°C).

While it warms up, line a baking sheet with parchment paper.

This simple step ensures your rolls won’t stick, making cleanup a breeze.

Trust me, you’ll appreciate this little effort later!

Step 2: Mix Dry Ingredients

In a large mixing bowl, whisk together the all-purpose flour, baking powder, salt, and granulated sugar.

This blend is the foundation of your rolls, creating a light and fluffy texture.

Make sure everything is well combined for even flavor throughout.

Step 3: Incorporate Butter

Add the cold, cubed butter to your flour mixture.

Using a pastry cutter or your fingers, work the butter into the flour until it resembles coarse crumbs.

This step is crucial for achieving that tender, flaky texture we all love in rolls.

Step 4: Add Milk

Pour in the milk and stir gently until just combined.

Be careful not to overmix; a slightly sticky dough is what you want.

This will help keep your rolls soft and delicious after baking.

Step 5: Knead and Roll

Turn the dough out onto a floured surface.

Gently knead it a few times until it comes together, then roll it into a rectangle about 1/2 inch thick.

This is where the magic begins, as you prepare to fill your rolls with that delightful jam.

Step 6: Spread the Jam

Spread the strawberry rhubarb basil jam evenly over the dough, leaving a small border around the edges.

This ensures that the jam doesn’t ooze out while baking.

The sweet and tangy flavor will be the star of your rolls!

Step 7: Roll and Slice

Starting from one long side, carefully roll the dough into a tight log.

Pinch the seams to seal it well.

Then, slice the log into 1-inch thick rolls and place them cut-side up on the prepared baking sheet.

Step 8: Bake

Brush the tops of the rolls with the beaten egg for a golden finish.

Bake for 20-25 minutes, or until they’re golden brown and cooked through.

The aroma wafting through your kitchen will be irresistible!

Tips for Success

  • Use cold butter for a flaky texture; it makes all the difference!
  • Don’t overmix the dough; a little stickiness is okay.
  • Let the rolls cool slightly before serving to enhance their flavor.
  • Experiment with different jams for unique flavor combinations.
  • For a sweeter twist, sprinkle a bit of cinnamon into the dough.

Equipment Needed

  • Mixing bowl: A large bowl for combining ingredients; any size will do.
  • Whisk: Essential for mixing dry ingredients; a fork works in a pinch.
  • Pastry cutter: Great for incorporating butter; your fingers can also do the job.
  • Baking sheet: A standard sheet works best; a glass dish can be an alternative.
  • Parchment paper: Helps prevent sticking; aluminum foil can be used if needed.

Variations

  • Berry Medley: Swap the strawberry rhubarb basil jam for a mix of your favorite berries, like blueberries and raspberries, for a vibrant twist.
  • Herb Infusion: Add a teaspoon of finely chopped fresh mint or thyme to the dough for an aromatic surprise.
  • Gluten-Free Option: Use a gluten-free all-purpose flour blend to make these rolls suitable for gluten-sensitive friends.
  • Vegan Version: Replace the butter with coconut oil and use a plant-based milk for a delicious vegan treat.
  • Spiced Delight: Incorporate a dash of nutmeg or cardamom into the dough for a warm, spiced flavor profile.

Serving Suggestions

  • Pair these rolls with a dollop of whipped cream or a scoop of vanilla ice cream for a decadent dessert.
  • Serve alongside a fresh fruit salad for a refreshing brunch option.
  • Complement with a cup of herbal tea or a chilled glass of lemonade.
  • For a beautiful presentation, dust with powdered sugar and garnish with fresh basil leaves.

FAQs about Strawberry Rhubarb Basil Jam Rolls

Can I use store-bought jam for these rolls?

Absolutely! Using store-bought strawberry rhubarb basil jam saves time and still delivers delicious flavor. Just make sure to choose a high-quality jam for the best results.

How do I store leftover rolls?

Store any leftover Strawberry Rhubarb Basil Jam Rolls in an airtight container at room temperature for up to two days. For longer storage, refrigerate them for up to a week or freeze for up to three months.

Can I make the dough ahead of time?

Yes! You can prepare the dough a day in advance. Just wrap it tightly in plastic wrap and refrigerate. When you’re ready to bake, let it sit at room temperature for about 15 minutes before rolling it out.

What can I substitute for basil in this recipe?

If basil isn’t your thing, try using mint or even a hint of lemon zest for a refreshing twist. Each herb brings its own unique flavor to the rolls!

Are these rolls suitable for a vegetarian diet?

Yes! These Strawberry Rhubarb Basil Jam Rolls are vegetarian-friendly. Just ensure that the jam you use is also vegetarian, as some brands may contain gelatin.

Final Thoughts

Baking these Strawberry Rhubarb Basil Jam Rolls is more than just a culinary task; it’s an experience that fills your kitchen with warmth and joy.

The delightful aroma wafting through the air invites everyone to gather around, eager to share in the deliciousness.

Each bite offers a perfect balance of sweet and tangy flavors, making them a hit at any gathering.

Whether enjoyed with family at breakfast or shared with friends at a brunch, these rolls create lasting memories.

So roll up your sleeves, embrace the process, and let the joy of baking fill your heart!

jhessica

Strawberry Rhubarb Basil Jam Rolls: Delightful Recipe Tips!

Delightful Strawberry Rhubarb Basil Jam Rolls that are easy to make and perfect for any occasion.
Prep Time 15 minutes
Cook Time 25 minutes
Total Time 40 minutes
Servings: 8 rolls
Course: Dessert
Cuisine: American
Calories: 210

Ingredients
  

  • 2 cups all-purpose flour
  • 1 tablespoon baking powder
  • 1/2 teaspoon salt
  • 1/4 cup granulated sugar
  • 1/2 cup unsalted butter cold and cubed
  • 1/2 cup milk
  • 1 cup strawberry rhubarb basil jam store-bought or homemade
  • 1 egg beaten (for egg wash)
  • Fresh basil leaves for garnish optional

Method
 

  1. Preheat your oven to 400°F (200°C) and line a baking sheet with parchment paper.
  2. In a large mixing bowl, whisk together the flour, baking powder, salt, and sugar until well combined.
  3. Add the cold, cubed butter to the flour mixture. Using a pastry cutter or your fingers, work the butter into the flour until the mixture resembles coarse crumbs.
  4. Pour in the milk and stir until just combined. Do not overmix; the dough should be slightly sticky.
  5. Turn the dough out onto a floured surface and gently knead it a few times until it comes together. Roll the dough into a rectangle about 1/2 inch thick.
  6. Spread the strawberry rhubarb basil jam evenly over the dough, leaving a small border around the edges.
  7. Starting from one long side, carefully roll the dough into a tight log. Pinch the seams to seal.
  8. Slice the log into 1-inch thick rolls and place them cut-side up on the prepared baking sheet.
  9. Brush the tops of the rolls with the beaten egg for a golden finish.
  10. Bake for 20-25 minutes, or until the rolls are golden brown and cooked through.
  11. Allow to cool slightly before serving. Garnish with fresh basil leaves if desired.

Nutrition

Serving: 1rollCalories: 210kcalCarbohydrates: 30gProtein: 3gFat: 9gSaturated Fat: 5gPolyunsaturated Fat: 4gCholesterol: 30mgSodium: 150mgFiber: 1gSugar: 5g

Notes

  • For a sweeter twist, add a sprinkle of cinnamon to the dough before rolling.
  • You can substitute the strawberry rhubarb basil jam with any fruit jam of your choice, such as blueberry or peach, for different flavor profiles.

Tried this recipe?

Let us know how it was!

Grilled BBQ Chicken Wings: Unlock Flavor with Ease!

Introduction to Grilled BBQ Chicken Wings

There’s something magical about the aroma of grilled BBQ chicken wings wafting through the air.

As a kid, I remember summer evenings spent in my backyard, where the grill was the centerpiece of family gatherings.

These wings are not just a meal; they’re a ticket to nostalgia, laughter, and good times.

Whether you’re hosting a game day party or just looking for a quick solution for a busy weeknight, this recipe is your go-to.

With minimal prep and maximum flavor, these grilled BBQ chicken wings will impress your loved ones and satisfy your cravings.

Why You’ll Love This Grilled BBQ Chicken Wings

These grilled BBQ chicken wings are a game-changer for any home cook.

They come together in just 35 minutes, making them perfect for those busy weeknights or spontaneous gatherings.

The combination of spices and barbecue sauce creates a flavor explosion that will have everyone coming back for seconds.

Plus, they’re easy to customize, so you can cater to your crowd’s taste buds without breaking a sweat.

Ingredients for Grilled BBQ Chicken Wings

To whip up these delicious grilled BBQ chicken wings, you’ll need a handful of simple ingredients that pack a punch.

Here’s what you’ll gather:

  • Chicken Wings: The star of the show! Choose fresh or frozen wings, but if you go frozen, make sure to thaw them properly.
  • Salt: A must-have for enhancing flavor. It brings out the natural taste of the chicken.
  • Black Pepper: Adds a subtle kick. Freshly ground is best for that extra zing.
  • Garlic Powder: This brings a savory depth. It’s a pantry staple that elevates any dish.
  • Onion Powder: Complements the garlic and adds sweetness. It’s a flavor enhancer that’s hard to beat.
  • Barbecue Sauce: Your favorite brand will do! This is where the magic happens, so pick one that excites your taste buds.
  • Olive Oil: Helps the spices stick and keeps the wings moist while grilling. You can substitute with vegetable oil if needed.
  • Apple Cider Vinegar: A splash of acidity balances the richness of the wings. It’s a secret weapon for flavor!

For those who like to experiment, consider marinating the wings in the seasoning mixture for an hour or even overnight.

And if you’re feeling adventurous, try different barbecue sauces like spicy, honey mustard, or teriyaki for a unique twist.

Exact quantities for each ingredient are available at the bottom of the article for easy printing.

How to Make Grilled BBQ Chicken Wings

Making grilled BBQ chicken wings is a straightforward process that anyone can master.

Follow these simple steps, and you’ll be on your way to serving up a plate of mouthwatering wings that will have everyone raving.

Step 1: Preheat the Grill

Start by preheating your grill to medium-high heat.

This is crucial for achieving that perfect crispy skin.

If you’re using a charcoal grill, let the coals burn until they’re covered with white ash.

For gas grills, simply turn on the burners and close the lid for about 10 minutes.

A hot grill is your best friend for these grilled BBQ chicken wings!

Step 2: Prepare the Chicken Wings

In a large bowl, toss the chicken wings with salt, black pepper, garlic powder, onion powder, olive oil, and apple cider vinegar.

Make sure every wing is coated evenly.

This seasoning mix is where the flavor begins.

If you have time, let the wings marinate for at least an hour.

This extra step will deepen the flavors and make your wings even more delicious.

Step 3: Grill the Wings

Once your grill is hot, place the wings on the grates.

Cook them for about 20-25 minutes, turning occasionally.

You want them to be crispy and cooked through, reaching an internal temperature of 165°F.

Keep an eye on them to avoid flare-ups.

Nothing ruins a good wing like a charred exterior!

Step 4: Add the BBQ Sauce

During the last 5 minutes of grilling, brush the wings with your favorite barbecue sauce.

Turn them to coat evenly.

This is where the magic happens!

The sauce caramelizes slightly, creating a sticky, flavorful glaze that’s hard to resist.

Feel free to get generous with the sauce; it’s all about that flavor!

Step 5: Rest and Serve

Once the wings are done, remove them from the grill and let them rest for a few minutes.

This allows the juices to redistribute, making them even juicier.

Serve them with extra barbecue sauce on the side for dipping.

Your friends and family will be lining up for seconds, trust me!

Tips for Success

  • For extra crispy wings, pat them dry with paper towels before seasoning.
  • Use a meat thermometer to ensure they reach 165°F for safe eating.
  • Experiment with different barbecue sauces to find your favorite flavor profile.
  • Let the wings marinate for a few hours or overnight for deeper flavor.
  • Keep a close eye on the grill to prevent burning; turn the wings frequently.

Equipment Needed

  • Grill: A gas or charcoal grill works perfectly. If you don’t have one, a grill pan can do the trick.
  • Tongs: Essential for flipping the wings without losing any deliciousness.
  • Meat Thermometer: To check the internal temperature for safety. A simple kitchen thermometer will suffice.
  • Large Bowl: For mixing the wings and seasoning. Any mixing bowl will do!

Variations

  • Spicy Wings: Add cayenne pepper or hot sauce to the seasoning mix for a fiery kick.
  • Honey Garlic Wings: Mix honey with your barbecue sauce for a sweet and savory glaze.
  • Lemon Pepper Wings: Substitute the barbecue sauce with a lemon pepper seasoning for a zesty twist.
  • Teriyaki Wings: Use teriyaki sauce instead of barbecue sauce for an Asian-inspired flavor.
  • Herb-Infused Wings: Add fresh herbs like rosemary or thyme to the seasoning for an aromatic touch.

Serving Suggestions

  • Classic Sides: Pair your wings with coleslaw or potato salad for a refreshing contrast.
  • Dip It: Serve with ranch or blue cheese dressing for an extra layer of flavor.
  • Drink Pairing: Enjoy with a cold beer or iced tea to complement the smoky taste.
  • Presentation: Arrange wings on a platter with fresh parsley for a pop of color.

FAQs about Grilled BBQ Chicken Wings

Can I use frozen chicken wings for this recipe?

Absolutely! Just make sure to thaw them completely before seasoning. This ensures even cooking and better flavor absorption.

What’s the best way to store leftover wings?

Store any leftover grilled BBQ chicken wings in an airtight container in the fridge for up to three days. Reheat them in the oven for the best texture.

Can I make these wings in the oven instead of on the grill?

Yes! Preheat your oven to 400°F and bake the wings on a lined baking sheet for about 40-45 minutes, flipping halfway through. Brush with BBQ sauce during the last 5 minutes.

How can I make my wings spicier?

For a spicy kick, add cayenne pepper or your favorite hot sauce to the seasoning mix. You can also use a spicy barbecue sauce for extra heat.

What’s the ideal internal temperature for chicken wings?

The internal temperature should reach 165°F for safe eating. A meat thermometer is your best friend here!

Final Thoughts

Grilled BBQ chicken wings are more than just a dish; they’re a celebration of flavor and togetherness.

Each bite transports you back to those carefree summer nights, filled with laughter and good company.

The joy of sharing these wings with friends and family is unmatched.

Whether you’re grilling for a crowd or enjoying a quiet evening at home, these wings deliver satisfaction every time.

So fire up that grill, embrace the smoky aroma, and let the deliciousness unfold.

Trust me, once you serve these, they’ll become a staple at every gathering!

jhessica

Grilled BBQ Chicken Wings: Unlock Flavor with Ease!

Delicious and easy-to-make grilled BBQ chicken wings that are perfect for any gathering.
Prep Time 10 minutes
Cook Time 25 minutes
Total Time 35 minutes
Servings: 4 servings
Course: Appetizer
Cuisine: American
Calories: 350

Ingredients
  

  • 2 pounds chicken wings
  • 1 teaspoon salt
  • 1 teaspoon black pepper
  • 1 teaspoon garlic powder
  • 1 teaspoon onion powder
  • 1 cup barbecue sauce your favorite brand
  • 1 tablespoon olive oil
  • 1 tablespoon apple cider vinegar

Method
 

  1. Preheat your grill to medium-high heat.
  2. In a large bowl, combine the chicken wings, salt, black pepper, garlic powder, onion powder, olive oil, and apple cider vinegar. Toss until the wings are evenly coated.
  3. Place the wings on the grill and cook for about 20-25 minutes, turning occasionally, until they are crispy and cooked through (internal temperature should reach 165°F).
  4. During the last 5 minutes of grilling, brush the wings with barbecue sauce, turning them to coat evenly.
  5. Remove the wings from the grill and let them rest for a few minutes before serving. Serve with extra barbecue sauce on the side for dipping.

Nutrition

Serving: 1servingCalories: 350kcalCarbohydrates: 5gProtein: 25gFat: 25gSaturated Fat: 7gPolyunsaturated Fat: 18gCholesterol: 80mgSodium: 800mgSugar: 5g

Notes

  • For extra flavor, marinate the wings in the seasoning mixture for at least 1 hour or overnight in the refrigerator.
  • Try different barbecue sauces for varied flavors, such as spicy, honey mustard, or teriyaki.

Tried this recipe?

Let us know how it was!

Irish Apple Cake: Discover a Slice of Tradition!

Introduction to Irish Apple Cake

There’s something magical about the aroma of freshly baked goods wafting through the kitchen. When I think of comfort food, Irish Apple Cake instantly comes to mind. This delightful dessert is not just a treat; it’s a slice of tradition that brings warmth to any gathering. Whether you’re looking to impress your loved ones or simply want a quick solution for a busy day, this cake fits the bill perfectly. With tender apples and warm spices, it’s a recipe that’s sure to become a favorite in your home, just like it has in mine.

Why You’ll Love This Irish Apple Cake

This Irish Apple Cake is a game-changer for any home cook. It’s incredibly easy to whip up, making it perfect for those busy weeknights or last-minute gatherings. The combination of sweet apples and warm spices creates a flavor explosion that will have everyone asking for seconds. Plus, it’s a versatile dessert that pairs beautifully with coffee or tea, making it a delightful treat for any occasion.

Ingredients for Irish Apple Cake

Gathering the right ingredients is the first step to creating this delightful Irish Apple Cake. Here’s what you’ll need:

  • All-purpose flour: The backbone of the cake, providing structure and a tender crumb.
  • Baking powder and baking soda: These leavening agents help the cake rise, giving it that fluffy texture.
  • Ground cinnamon: A warm spice that adds depth and a comforting aroma to the cake.
  • Salt: Just a pinch enhances the flavors and balances the sweetness.
  • Unsalted butter: Adds richness and moisture; make sure it’s softened for easy mixing.
  • Granulated sugar: Sweetens the cake and contributes to its lovely golden color.
  • Eggs: They bind the ingredients together and help with the cake’s structure.
  • Vanilla extract: A splash of this adds a lovely, aromatic flavor that complements the apples.
  • Buttermilk: This ingredient keeps the cake moist and tender, with a slight tang.
  • Apples: The star of the show! Use your favorite variety for sweetness and texture.
  • Raisins (optional): For a chewy texture and added sweetness, toss them in if you like.
  • Lemon juice: A splash helps prevent the apples from browning and adds a hint of brightness.
  • Powdered sugar (optional): A light dusting on top makes for a beautiful presentation.

For exact measurements, check the bottom of the article where you can find everything listed for easy printing. Happy baking!

How to Make Irish Apple Cake

Now that you have your ingredients ready, let’s dive into the fun part: making this delicious Irish Apple Cake! Follow these simple steps, and you’ll have a warm, comforting dessert that will impress everyone.

Step 1: Preheat the Oven

First things first, preheat your oven to 350°F (175°C). This ensures your cake bakes evenly. While the oven warms up, prepare your baking pan by greasing and flouring it or lining it with parchment paper. This little step makes for easy cleanup later!

Step 2: Mix Dry Ingredients

In a large bowl, whisk together the all-purpose flour, baking powder, baking soda, ground cinnamon, and salt. This dry mixture is the foundation of your cake. Set it aside for now, letting those dry ingredients mingle and get to know each other.

Step 3: Cream Butter and Sugar

In another bowl, cream the softened butter and granulated sugar together until it’s light and fluffy, about 3-4 minutes. This step is crucial; it incorporates air into the mixture, giving your cake that delightful texture. You’ll know it’s ready when it looks pale and fluffy!

Step 4: Add Eggs and Vanilla

Next, add the eggs one at a time, mixing well after each addition. This helps to create a smooth batter. Stir in the vanilla extract, which adds a lovely aroma and flavor that pairs perfectly with the apples.

Step 5: Combine Mixtures

Now, it’s time to bring it all together! Gradually add the flour mixture to the butter mixture, alternating with the buttermilk. Start and end with the flour mixture. Mix until just combined; overmixing can lead to a dense cake, and we want it light and fluffy!

Step 6: Prepare Apples

In a separate bowl, toss the chopped apples with lemon juice and raisins (if you’re using them). The lemon juice prevents the apples from browning and adds a hint of brightness. Gently fold the apple mixture into the batter until evenly distributed. You want those apples to be well-loved in the batter!

Step 7: Bake the Cake

Pour the batter into your prepared baking pan and spread it evenly. Bake for 45-50 minutes, or until a toothpick inserted in the center comes out clean. The smell wafting through your kitchen will be heavenly, trust me!

Step 8: Cool and Serve

Once baked, allow the cake to cool in the pan for about 10 minutes. Then, transfer it to a wire rack to cool completely. If you like, dust the top with powdered sugar before serving. This adds a lovely touch and makes it look even more inviting!

Tips for Success

  • Use a mix of sweet and tart apples for a balanced flavor.
  • Don’t skip the lemon juice; it brightens the apples and prevents browning.
  • Check your cake a few minutes early to avoid overbaking.
  • Let the cake cool completely for easier slicing.
  • For extra flavor, consider adding a pinch of nutmeg or allspice to the dry ingredients.

Equipment Needed

  • Mixing bowls: A set of various sizes is handy; you can use any large bowl if you’re in a pinch.
  • Whisk: Essential for mixing dry ingredients; a fork can work in a bind.
  • Measuring cups and spoons: Accurate measurements are key; use any standard kitchen measuring tools.
  • Baking pan: A 9×13-inch pan is ideal; a round cake pan can also work.
  • Cooling rack: Helps cool the cake evenly; a plate can substitute if needed.

Variations

  • Spiced Apple Cake: Add ½ teaspoon of nutmeg or allspice to the dry ingredients for an extra layer of warmth.
  • Whole Wheat Option: Substitute half of the all-purpose flour with whole wheat flour for a heartier texture and added nutrition.
  • Gluten-Free Version: Use a gluten-free all-purpose flour blend to make this cake suitable for those with gluten sensitivities.
  • Nutty Twist: Fold in ½ cup of chopped walnuts or pecans for a delightful crunch.
  • Vegan Adaptation: Replace eggs with flax eggs and use plant-based butter and non-dairy milk for a vegan-friendly version.

Serving Suggestions

  • Pair with a scoop of vanilla ice cream for a delightful contrast of temperatures.
  • Serve alongside a steaming cup of Irish breakfast tea for a cozy afternoon treat.
  • Top with whipped cream for an indulgent finish.
  • Garnish with fresh mint leaves for a pop of color.
  • Dust with powdered sugar just before serving for an elegant touch.

FAQs about Irish Apple Cake

As you embark on your baking journey with this Irish Apple Cake, you might have a few questions. Here are some common queries that can help you along the way:

Can I use different types of apples for this cake?

Absolutely! A mix of sweet and tart apples works best. Varieties like Granny Smith and Honeycrisp create a delightful balance of flavors.

How do I store leftover Irish Apple Cake?

Store any leftovers in an airtight container at room temperature for up to three days. For longer storage, refrigerate it for up to a week.

Can I freeze Irish Apple Cake?

Yes, you can freeze this cake! Wrap it tightly in plastic wrap and then in aluminum foil. It can last up to three months in the freezer.

What can I serve with Irish Apple Cake?

This cake pairs wonderfully with vanilla ice cream, whipped cream, or a cup of hot tea. It’s a versatile dessert that complements many flavors!

Is this Irish Apple Cake suitable for vegetarians?

Yes, this recipe is vegetarian-friendly! It contains no meat or meat products, making it a great dessert option for vegetarians.

Final Thoughts

Baking this Irish Apple Cake is more than just following a recipe; it’s about creating memories and sharing joy. The warm spices and tender apples come together to form a comforting dessert that feels like a hug in every bite. Whether you’re enjoying it with family after dinner or sharing it with friends at a gathering, this cake brings people together. It’s a slice of tradition that reminds us of the simple pleasures in life. So, roll up your sleeves, embrace the process, and let the delightful aroma fill your kitchen. Happy baking!

jhessica

Irish Apple Cake: Discover a Slice of Tradition!

A traditional Irish dessert, this Irish Apple Cake is a delightful blend of tender apples and warm spices, perfect for any occasion.
Prep Time 20 minutes
Cook Time 50 minutes
Total Time 1 hour 10 minutes
Servings: 12 servings
Course: Dessert
Cuisine: Irish
Calories: 220

Ingredients
  

  • 3 cups all-purpose flour
  • 1 teaspoon baking powder
  • 1 teaspoon baking soda
  • 1 teaspoon ground cinnamon
  • ½ teaspoon salt
  • ¾ cup unsalted butter softened
  • 1 cup granulated sugar
  • 2 large eggs
  • 1 teaspoon vanilla extract
  • 1 cup buttermilk
  • 4 medium apples peeled, cored, and chopped (about 4 cups)
  • ½ cup raisins optional
  • 1 tablespoon lemon juice
  • Powdered sugar for dusting optional

Method
 

  1. Preheat your oven to 350°F (175°C). Grease and flour a 9×13-inch baking pan or line it with parchment paper.
  2. In a large bowl, whisk together the flour, baking powder, baking soda, cinnamon, and salt. Set aside.
  3. In another bowl, cream the softened butter and granulated sugar until light and fluffy, about 3-4 minutes.
  4. Add the eggs one at a time, mixing well after each addition. Stir in the vanilla extract.
  5. Gradually add the flour mixture to the butter mixture, alternating with the buttermilk. Start and end with the flour mixture, mixing until just combined.
  6. In a separate bowl, toss the chopped apples with lemon juice and raisins (if using). Gently fold the apples into the batter until evenly distributed.
  7. Pour the batter into the prepared baking pan and spread it evenly. Bake for 45-50 minutes, or until a toothpick inserted in the center comes out clean.
  8. Allow the cake to cool in the pan for 10 minutes before transferring it to a wire rack to cool completely. Dust with powdered sugar before serving if desired.

Nutrition

Serving: 1sliceCalories: 220kcalCarbohydrates: 30gProtein: 3gFat: 9gSaturated Fat: 5gPolyunsaturated Fat: 4gCholesterol: 40mgSodium: 200mgFiber: 1gSugar: 10g

Notes

  • For a spiced twist, add ½ teaspoon of nutmeg or allspice to the dry ingredients.
  • Substitute half of the all-purpose flour with whole wheat flour for a heartier texture.

Tried this recipe?

Let us know how it was!

Creamy Wild Rice and Morel Mushroom Soup is Delicious!

Introduction to Creamy Wild Rice and Morel Mushroom Soup

There’s something magical about a warm bowl of soup on a chilly evening.

Creamy Wild Rice and Morel Mushroom Soup is not just a meal; it’s a hug in a bowl.

I remember my grandmother making a similar soup, filling the kitchen with earthy aromas that danced in the air.

This recipe is perfect for those busy days when you crave comfort without spending hours in the kitchen.

With its rich flavors and creamy texture, it’s sure to impress your loved ones and become a staple in your home.

Why You’ll Love This Creamy Wild Rice and Morel Mushroom Soup

This Creamy Wild Rice and Morel Mushroom Soup is a game-changer for your weeknight dinners.

It’s incredibly easy to whip up, taking just an hour from start to finish.

The combination of wild rice and morel mushrooms creates a depth of flavor that’s simply irresistible.

Plus, it’s a vegetarian delight, making it perfect for everyone at the table.

You’ll find yourself reaching for seconds, and maybe even thirds!

Ingredients for Creamy Wild Rice and Morel Mushroom Soup

Creating this Creamy Wild Rice and Morel Mushroom Soup is a delightful journey through flavors and textures.

Here’s what you’ll need to bring this comforting dish to life:

  • Olive oil: A staple in many kitchens, it adds richness and helps sauté the aromatics.
  • Onion: Diced onion brings sweetness and depth, forming the base of your soup.
  • Garlic: Minced garlic adds a punch of flavor that elevates the entire dish.
  • Morel mushrooms: These unique mushrooms offer an earthy taste that’s hard to resist. If you can’t find them, feel free to substitute with shiitake or cremini mushrooms.
  • Wild rice: This nutty grain is the star of the show, providing a chewy texture and a hearty feel.
  • Vegetable broth: A flavorful base that enhances the soup. Homemade broth is ideal, but store-bought works just fine.
  • Heavy cream: This is what makes the soup creamy and luxurious. For a lighter version, you can use half-and-half or coconut milk.
  • Dried thyme: A pinch of this herb adds a lovely aroma and complements the mushrooms beautifully.
  • Salt and black pepper: Essential seasonings that enhance all the flavors in the soup.
  • Fresh parsley: Chopped parsley is perfect for garnishing, adding a pop of color and freshness.

Feel free to get creative! You can add diced carrots and celery for extra flavor and nutrition.

For exact measurements, check the bottom of the article where you can find everything available for printing.

How to Make Creamy Wild Rice and Morel Mushroom Soup

Making this Creamy Wild Rice and Morel Mushroom Soup is a straightforward process that fills your kitchen with delightful aromas.

Let’s dive into the steps that will lead you to a comforting bowl of goodness.

Step 1: Sauté the Aromatics

Start by heating the olive oil in a large pot over medium heat.

Once the oil shimmers, toss in the diced onion.

Sauté it for about 5 minutes until it turns translucent.

The sweet scent of onion will start to fill the air, setting the stage for the flavors to come.

Add the minced garlic next, stirring for about 30 seconds until fragrant.

This is where the magic begins!

Step 2: Cook the Morel Mushrooms

Now, it’s time to add the sliced morel mushrooms.

Cook them for 3 to 4 minutes, stirring occasionally.

You want them tender and slightly browned.

Their earthy aroma will make your mouth water, promising a rich flavor in your soup.

Step 3: Add the Wild Rice

Next, stir in the rinsed wild rice.

Mix it well with the sautéed onions and mushrooms.

This nutty grain is the heart of your soup, adding texture and substance.

Let it mingle with the aromatics for a minute or two.

Step 4: Simmer with Broth

Pour in the vegetable broth, bringing the mixture to a boil.

Once boiling, reduce the heat to low, cover the pot, and let it simmer.

This should take about 45 minutes, or until the wild rice is tender.

Keep an eye on it, stirring occasionally to prevent sticking.

Step 5: Stir in Cream and Seasonings

Once the rice is cooked, it’s time to make it creamy!

Stir in the heavy cream, dried thyme, salt, and black pepper.

Let the soup heat through for another 5 minutes.

This is where the flavors meld together, creating a luscious, comforting bowl of soup.

Step 6: Serve and Garnish

Finally, ladle the soup into bowls.

Garnish with fresh parsley for a pop of color and freshness.

Serve it hot, and watch as everyone gathers around the table, eager for a taste.

This Creamy Wild Rice and Morel Mushroom Soup is sure to be a hit!

Tips for Success

  • Always rinse wild rice before cooking to remove excess starch and improve texture.
  • For a deeper flavor, sauté the mushrooms until golden brown.
  • Don’t skip the fresh parsley; it brightens the soup beautifully.
  • Adjust the thickness by adding more broth or cream, depending on your preference.
  • Let leftovers sit overnight; the flavors deepen and improve!

Equipment Needed

  • Large pot: A sturdy pot is essential for simmering the soup. A Dutch oven works great too.
  • Wooden spoon: Perfect for stirring and preventing the rice from sticking.
  • Measuring cups: Handy for accurate ingredient portions.
  • Cutting board and knife: Essential for chopping vegetables and mushrooms.

Variations of Creamy Wild Rice and Morel Mushroom Soup

  • Protein Boost: Add cooked chicken or turkey for a heartier soup. Shredded rotisserie chicken works well!
  • Herb Infusion: Experiment with fresh herbs like rosemary or sage for a different flavor profile.
  • Spicy Kick: Toss in a pinch of red pepper flakes or a dash of hot sauce for some heat.
  • Vegan Option: Substitute heavy cream with coconut milk and use vegetable broth for a creamy, dairy-free version.
  • Extra Veggies: Incorporate diced zucchini or spinach for added nutrition and color.

Serving Suggestions for Creamy Wild Rice and Morel Mushroom Soup

  • Crusty Bread: Serve with a warm, crusty baguette or sourdough for dipping.
  • Salad Pairing: A light mixed greens salad with vinaigrette complements the richness of the soup.
  • Wine Selection: A crisp white wine, like Sauvignon Blanc, enhances the earthy flavors.
  • Presentation: Serve in rustic bowls and sprinkle extra parsley for a beautiful touch.

FAQs about Creamy Wild Rice and Morel Mushroom Soup

Can I use other types of mushrooms in this soup?

Absolutely! While morel mushrooms add a unique flavor, you can substitute them with shiitake, cremini, or even button mushrooms. Each will bring its own character to the Creamy Wild Rice and Morel Mushroom Soup.

How can I make this soup gluten-free?

This recipe is naturally gluten-free as long as you use gluten-free vegetable broth. Always check the labels to ensure your ingredients are safe for a gluten-free diet.

Can I freeze the Creamy Wild Rice and Morel Mushroom Soup?

Yes, you can freeze this soup! Just make sure to let it cool completely before transferring it to an airtight container. When you’re ready to enjoy it, thaw in the fridge overnight and reheat on the stove.

What can I serve with this soup?

This soup pairs wonderfully with crusty bread, a fresh salad, or even a light sandwich. The creamy texture complements a variety of sides, making it a versatile meal option.

How long does this soup last in the fridge?

Stored in an airtight container, your Creamy Wild Rice and Morel Mushroom Soup will last about 3 to 4 days in the fridge. Just give it a good stir before reheating!

Final Thoughts

There’s something truly special about sharing a bowl of Creamy Wild Rice and Morel Mushroom Soup with family and friends.

The rich, earthy flavors and creamy texture create a comforting experience that warms the soul.

Whether it’s a chilly evening or a casual gathering, this soup brings people together.

I love how it transforms a simple meal into a memorable occasion.

So, roll up your sleeves, gather your ingredients, and let the aromas fill your kitchen.

This recipe is not just about food; it’s about creating moments that linger long after the last spoonful.

jhessica

Creamy Wild Rice and Morel Mushroom Soup is Delicious!

A rich and creamy soup made with wild rice and morel mushrooms, perfect for a comforting meal.
Prep Time 10 minutes
Cook Time 50 minutes
Total Time 1 hour
Servings: 6 servings
Course: Soup
Cuisine: American
Calories: 320

Ingredients
  

  • 2 tablespoons olive oil
  • 1 medium onion diced
  • 2 cloves garlic minced
  • 1 cup morel mushrooms cleaned and sliced
  • 1 cup wild rice rinsed
  • 4 cups vegetable broth
  • 1 cup heavy cream
  • 1 teaspoon dried thyme
  • 1 teaspoon salt
  • ½ teaspoon black pepper
  • ¼ cup fresh parsley chopped (for garnish)

Method
 

  1. In a large pot, heat the olive oil over medium heat. Add the diced onion and sauté until translucent, about 5 minutes.
  2. Stir in the minced garlic and sliced morel mushrooms, cooking for an additional 3-4 minutes until the mushrooms are tender.
  3. Add the rinsed wild rice to the pot and stir to combine with the onion and mushrooms.
  4. Pour in the vegetable broth and bring the mixture to a boil. Reduce heat to low, cover, and simmer for about 45 minutes, or until the wild rice is tender.
  5. Once the rice is cooked, stir in the heavy cream, dried thyme, salt, and black pepper. Allow the soup to heat through for another 5 minutes.
  6. Serve hot, garnished with fresh parsley.

Nutrition

Serving: 1cupCalories: 320kcalCarbohydrates: 30gProtein: 6gFat: 20gSaturated Fat: 10gPolyunsaturated Fat: 8gCholesterol: 60mgSodium: 800mgFiber: 2gSugar: 2g

Notes

  • For a vegetarian version, substitute the vegetable broth with homemade broth or water.
  • Add diced carrots and celery for extra vegetables and flavor; sauté them with the onions in step 1.

Tried this recipe?

Let us know how it was!

Philly Cheesesteak Sloppy Joes: A Flavorful Twist!

Introduction to Philly Cheesesteak Sloppy Joes

There’s something magical about a meal that combines comfort and convenience, and that’s exactly what Philly Cheesesteak Sloppy Joes deliver.

After a long day, the last thing I want is to spend hours in the kitchen.

This recipe is a quick solution for busy evenings, yet it still impresses with its rich flavors.

Imagine sinking your teeth into a juicy, cheesy sandwich that feels like a warm hug.

Whether you’re feeding a hungry family or hosting friends, these Sloppy Joes are sure to become a favorite.

Why You’ll Love This Philly Cheesesteak Sloppy Joes

These Philly Cheesesteak Sloppy Joes are a game-changer for any weeknight dinner.

They come together in just 30 minutes, making them perfect for those hectic evenings.

The combination of savory ground beef, melty provolone, and sautéed veggies creates a flavor explosion that will have everyone asking for seconds.

Plus, they’re messy in the best way possible, adding a fun twist to your dinner table.

Who doesn’t love a meal that’s both quick and delicious?

Ingredients for Philly Cheesesteak Sloppy Joes

Creating these Philly Cheesesteak Sloppy Joes is a breeze, especially with the right ingredients.

Here’s what you’ll need to whip up this delicious dish:

  • Ground Beef: The star of the show, providing that hearty flavor and protein punch.
  • Onion: Diced for sweetness and depth, it adds a lovely aroma as it cooks.
  • Green Bell Pepper: This adds a fresh crunch and a pop of color to your Sloppy Joes.
  • Garlic: Minced for a fragrant kick that elevates the overall taste.
  • Mushrooms: Sliced for an earthy flavor and a meaty texture that complements the beef.
  • Worcestershire Sauce: A splash of this sauce brings umami richness to the mix.
  • Soy Sauce: Adds a savory depth, enhancing the overall flavor profile.
  • Salt and Black Pepper: Essential seasonings to bring all the flavors together.
  • Provolone Cheese: Shredded for that gooey, melty goodness that makes every bite irresistible.
  • Hamburger Buns: The perfect vessel for your cheesy filling, choose your favorite type.
  • Fresh Parsley: Chopped for garnish, it adds a touch of freshness and color.

For those looking to spice things up, consider adding sliced jalapeños or a dash of hot sauce.

If you prefer a leaner option, ground turkey or chicken works well, and low-fat cheese can help cut calories.

Exact quantities for each ingredient are available at the bottom of the article for easy printing.

How to Make Philly Cheesesteak Sloppy Joes

Making Philly Cheesesteak Sloppy Joes is as easy as pie, or should I say, as easy as a delicious sandwich?

Follow these simple steps, and you’ll have a mouthwatering meal ready in no time.

Step 1: Brown the Ground Beef

Start by heating a large skillet over medium heat.

Add the ground beef and cook it until it’s browned, about 5-7 minutes.

Make sure to break it apart with a spatula as it cooks.

Once it’s fully cooked, drain any excess fat.

This step is crucial for keeping your Sloppy Joes from being too greasy.

Step 2: Sauté the Vegetables

Next, toss in the diced onion, green bell pepper, and sliced mushrooms.

Sauté these veggies for about 5-6 minutes until they’re tender and fragrant.

The aroma will fill your kitchen, making it hard to resist sneaking a taste.

This mix adds a fresh crunch and depth to your Philly Cheesesteak Sloppy Joes.

Step 3: Add Garlic and Seasonings

Now, stir in the minced garlic and let it cook for an additional minute.

You want that garlic to become fragrant but not burnt.

Then, add the Worcestershire sauce, soy sauce, salt, and black pepper.

Mix everything well and let it simmer for 2-3 minutes.

This is where the magic happens, as the flavors meld together beautifully.

Step 4: Incorporate Cheese

Remove the skillet from heat and stir in the shredded provolone cheese.

Watch as it melts into the mixture, creating a gooey, cheesy delight.

This step is what truly transforms your Sloppy Joes into a Philly cheesesteak experience.

Make sure every bite is packed with that melty goodness.

Step 5: Toast the Buns

While the cheese is melting, it’s time to toast the hamburger buns.

You can do this in a separate skillet or under the broiler for a minute.

Toasting adds a nice crunch and prevents the buns from getting soggy.

Trust me, it’s worth the extra step!

Step 6: Assemble the Sloppy Joes

Now comes the fun part!

Spoon the cheesy beef mixture onto the toasted buns.

Don’t be shy—load them up!

Garnish with fresh parsley for a pop of color and flavor.

Serve immediately and watch your family dig in with delight.

These Philly Cheesesteak Sloppy Joes are sure to be a hit!

Tips for Success

  • Use lean ground beef to reduce excess fat without sacrificing flavor.
  • Don’t skip toasting the buns; it adds texture and keeps them from getting soggy.
  • Feel free to customize with your favorite veggies like spinach or jalapeños for extra kick.
  • Make a double batch and freeze leftovers for a quick meal later.
  • Serve with a side of crispy fries or a fresh salad for a complete meal.

Equipment Needed

  • Large Skillet: Essential for browning the beef and sautéing veggies. A non-stick skillet works great.
  • Spatula: Perfect for breaking up the meat and mixing ingredients.
  • Measuring Cups: Handy for measuring cheese and sauces.
  • Toaster or Broiler: For toasting the buns to perfection.

Variations

  • Spicy Kick: Add sliced jalapeños or a dash of hot sauce for a fiery twist.
  • Vegetarian Option: Substitute ground beef with lentils or black beans for a hearty plant-based version.
  • Cheese Lovers: Experiment with different cheeses like cheddar or pepper jack for unique flavors.
  • Low-Carb Version: Serve the mixture in lettuce wraps instead of buns for a lighter meal.
  • BBQ Style: Mix in some barbecue sauce for a smoky, sweet flavor profile.

Serving Suggestions

  • Crispy Fries: Serve with a side of golden, crispy fries for that classic diner feel.
  • Coleslaw: A refreshing coleslaw adds crunch and balances the richness of the Sloppy Joes.
  • Beer Pairing: Enjoy with a cold lager or pale ale to complement the flavors.
  • Presentation: Serve on a wooden board for a rustic touch that impresses guests.

FAQs about Philly Cheesesteak Sloppy Joes

Can I make Philly Cheesesteak Sloppy Joes ahead of time?

Absolutely! You can prepare the beef and veggie mixture in advance. Just store it in the fridge and reheat when you’re ready to serve. This makes for a quick weeknight dinner!

What can I substitute for ground beef?

If you’re looking for a leaner option, ground turkey or chicken works well. For a vegetarian twist, try using lentils or black beans instead. Both options will still deliver great flavor!

How can I make these Sloppy Joes spicier?

For a spicy kick, add sliced jalapeños or a few dashes of your favorite hot sauce to the meat mixture. You can also use pepper jack cheese for an extra layer of heat.

Can I freeze leftovers?

Yes! These Philly Cheesesteak Sloppy Joes freeze beautifully. Just store the mixture in an airtight container. When you’re ready to enjoy, thaw and reheat on the stove or in the microwave.

What sides pair well with Philly Cheesesteak Sloppy Joes?

These Sloppy Joes are delicious with crispy fries, a fresh salad, or even coleslaw. They balance the richness of the sandwich perfectly!

Final Thoughts

Creating Philly Cheesesteak Sloppy Joes is more than just cooking; it’s about bringing joy to the table.

The blend of savory beef, melty cheese, and vibrant veggies creates a symphony of flavors that delights the senses.

Each bite is a reminder of the simple pleasures in life, like sharing a meal with loved ones.

Whether it’s a casual weeknight dinner or a gathering with friends, these Sloppy Joes are sure to impress.

So roll up your sleeves, dive into this recipe, and enjoy the deliciousness that awaits.

Your taste buds will thank you!

jhessica

Philly Cheesesteak Sloppy Joes: A Flavorful Twist!

A delicious twist on the classic Philly cheesesteak, these Sloppy Joes are packed with flavor and easy to make.
Prep Time 10 minutes
Cook Time 20 minutes
Total Time 30 minutes
Servings: 4 servings
Course: Main Dish
Cuisine: American
Calories: 450

Ingredients
  

  • 1 pound ground beef
  • 1 medium onion diced
  • 1 medium green bell pepper diced
  • 2 cloves garlic minced
  • 1 cup sliced mushrooms
  • 1 teaspoon Worcestershire sauce
  • 1 teaspoon soy sauce
  • 1 teaspoon salt
  • 1/2 teaspoon black pepper
  • 1 cup provolone cheese shredded
  • 4 hamburger buns
  • Fresh parsley chopped (for garnish)

Method
 

  1. In a large skillet over medium heat, brown the ground beef until fully cooked, about 5-7 minutes. Drain any excess fat.
  2. Add the diced onion, bell pepper, and mushrooms to the skillet. Sauté for 5-6 minutes until the vegetables are tender.
  3. Stir in the minced garlic and cook for an additional minute until fragrant.
  4. Add Worcestershire sauce, soy sauce, salt, and black pepper to the mixture. Stir well to combine and let it simmer for 2-3 minutes.
  5. Remove the skillet from heat and stir in the shredded provolone cheese until melted and well incorporated.
  6. Toast the hamburger buns lightly on a separate skillet or under the broiler for a minute if desired.
  7. Spoon the cheesesteak mixture onto the toasted buns and garnish with fresh parsley.

Nutrition

Serving: 1sandwichCalories: 450kcalCarbohydrates: 30gProtein: 28gFat: 28gSaturated Fat: 12gPolyunsaturated Fat: 16gCholesterol: 80mgSodium: 800mgFiber: 2gSugar: 3g

Notes

  • For a spicier kick, add sliced jalapeños or a dash of hot sauce to the meat mixture.
  • Substitute ground turkey or chicken for a leaner option, and use low-fat cheese to reduce calories.

Tried this recipe?

Let us know how it was!

Lemony Feta Egg Salad Toast: A Delightful Recipe to Try!

Introduction to Lemony Feta Egg Salad Toast

There’s something special about a dish that combines simplicity with flavor, and that’s exactly what you’ll find in this Lemony Feta Egg Salad Toast. Whether you’re rushing through a busy morning or looking for a light lunch that impresses, this recipe has you covered. The creamy feta and zesty lemon dressing create a delightful balance that makes each bite a refreshing experience. Plus, it’s quick to whip up, so you can spend less time in the kitchen and more time enjoying your meal. Trust me, your taste buds will thank you!

Why You’ll Love This Lemony Feta Egg Salad Toast

This Lemony Feta Egg Salad Toast is a game-changer for anyone seeking a quick yet satisfying meal. It’s not just about speed; the vibrant flavors will elevate your lunch experience. With minimal prep and cook time, you can enjoy a delicious, nutritious dish in under 30 minutes. Plus, it’s versatile enough to suit any occasion, whether it’s a casual snack or a fancy brunch with friends. You’ll love how easy it is!

Ingredients for Lemony Feta Egg Salad Toast

Gathering the right ingredients is key to making a delicious Lemony Feta Egg Salad Toast. Here’s what you’ll need:

  • Large eggs: The star of the show! Eggs provide protein and a creamy base for the salad.
  • Crumble feta cheese: This tangy cheese adds a rich flavor and creamy texture that pairs perfectly with the eggs.
  • Mayonnaise: A classic binding agent that brings everything together, adding creaminess to the mix.
  • Greek yogurt: This adds a healthy twist, enhancing the creaminess while keeping it light.
  • Fresh lemon juice: The zesty kick that brightens the dish and balances the richness of the feta.
  • Dijon mustard: A hint of sharpness that elevates the flavor profile of the egg salad.
  • Garlic powder: For a subtle depth of flavor without overpowering the dish.
  • Salt and pepper: Essential seasonings to enhance all the flavors in the salad.
  • Whole grain bread: The perfect base for your egg salad, providing a hearty crunch.
  • Fresh arugula or spinach: A peppery or mild green that adds freshness and color to your toast.
  • Sliced radishes (optional): For a pop of color and a crunchy texture, these are a delightful garnish.

For those looking to mix things up, consider adding a pinch of cayenne pepper for heat or swapping feta for goat cheese for a creamier texture. You can find the exact quantities for each ingredient at the bottom of the article, ready for printing!

How to Make Lemony Feta Egg Salad Toast

Creating the perfect Lemony Feta Egg Salad Toast is a breeze! Follow these simple steps, and you’ll have a delicious meal ready in no time. Let’s dive in!

Step 1: Boil the Eggs

Start by placing the large eggs in a saucepan. Cover them with water, ensuring they’re submerged. Bring the water to a boil over medium-high heat. Once it’s bubbling, cover the pan and remove it from the heat. Let the eggs sit for 12 minutes. This method gives you perfectly cooked eggs with a creamy yolk, avoiding that greenish ring around the yolk.

Step 2: Cool and Chop the Eggs

After 12 minutes, it’s time to cool those eggs down. Transfer them to an ice bath for about 5 minutes. This step not only stops the cooking process but also makes peeling easier. Once cooled, gently tap the eggs on a hard surface and peel them under running water. Chop the eggs into small pieces, making them easier to mix into the salad.

Step 3: Mix the Ingredients

In a mixing bowl, combine the chopped eggs with crumbled feta cheese, mayonnaise, Greek yogurt, fresh lemon juice, Dijon mustard, garlic powder, salt, and pepper. Stir everything together until well combined. The creamy texture from the feta and yogurt will make your egg salad rich and satisfying. Don’t be afraid to taste and adjust the seasoning to your liking!

Step 4: Toast the Bread

While you’re mixing, it’s a great time to toast your whole grain bread. Aim for a golden brown color, which adds a delightful crunch to your toast. You can use a toaster or a skillet for this. If using a skillet, add a little olive oil or butter for extra flavor. The toast should be sturdy enough to hold the egg salad without getting soggy.

Step 5: Assemble the Toast

Now comes the fun part! Spread a generous amount of the egg salad mixture on each slice of toast. Top it off with fresh arugula or spinach for a pop of color and nutrition. If you’re feeling fancy, add sliced radishes for a crunchy garnish. Serve immediately and enjoy the burst of flavors!

Tips for Success

  • Use fresh eggs for the best flavor and texture.
  • Don’t skip the ice bath; it makes peeling easier.
  • Adjust the seasoning to your taste; a little extra lemon juice can brighten the flavors.
  • For a heartier meal, add sliced avocado on top.
  • Make extra egg salad; it keeps well in the fridge for a quick snack!

Equipment Needed

  • Medium saucepan: For boiling the eggs. A large pot works too.
  • Mixing bowl: To combine the ingredients. Any bowl will do!
  • Ice bath container: A large bowl filled with ice and water for cooling the eggs.
  • Toaster or skillet: For toasting the bread. Both options yield delicious results.
  • Knife and cutting board: Essential for chopping the eggs and garnishes.

Variations of Lemony Feta Egg Salad Toast

  • Spicy Kick: Add a pinch of cayenne pepper or diced jalapeños for a fiery twist.
  • Herb Infusion: Mix in fresh herbs like dill, parsley, or chives for an aromatic boost.
  • Avocado Delight: Top your egg salad with sliced avocado for added creaminess and healthy fats.
  • Vegan Option: Substitute eggs with mashed chickpeas and use vegan mayo for a plant-based version.
  • Cheese Swap: Try goat cheese instead of feta for a different flavor profile and creamier texture.

Serving Suggestions for Lemony Feta Egg Salad Toast

  • Pair with a light salad, like a cucumber and tomato mix, for a refreshing side.
  • Serve with a chilled glass of iced tea or lemonade to complement the flavors.
  • For a brunch spread, add fresh fruit or yogurt on the side.
  • Garnish with extra arugula or microgreens for a beautiful presentation.

FAQs about Lemony Feta Egg Salad Toast

Can I make Lemony Feta Egg Salad Toast ahead of time?

Absolutely! You can prepare the egg salad mixture in advance and store it in the fridge for up to three days. Just toast the bread fresh when you’re ready to serve for the best texture.

What can I substitute for feta cheese?

If feta isn’t your thing, goat cheese is a fantastic alternative. It offers a creamy texture and a slightly different flavor that pairs well with the lemon dressing.

Is this recipe suitable for meal prep?

<pDefinitely! This Lemony Feta Egg Salad Toast is perfect for meal prep. Just keep the egg salad and bread separate until you’re ready to eat to avoid sogginess.

Can I add more vegetables to the egg salad?

<pYes! Feel free to mix in diced cucumbers, bell peppers, or even some chopped olives for added flavor and crunch. It’s a great way to customize your egg salad!

How can I make this dish gluten-free?

To make a gluten-free version, simply swap the whole grain bread for your favorite gluten-free bread. The rest of the recipe remains the same and just as delicious!

Final Thoughts

Creating Lemony Feta Egg Salad Toast is more than just whipping up a meal; it’s about savoring the little moments in life. Each bite bursts with flavor, reminding me of sunny days and shared laughter. This dish is a celebration of simplicity, perfect for any occasion, whether it’s a quick lunch or a leisurely brunch with friends. The combination of creamy feta and zesty lemon is a delightful twist on a classic favorite. I hope you find as much joy in making and sharing this recipe as I do. Enjoy every delicious moment!

jhessica

Lemony Feta Egg Salad Toast: A Delightful Recipe to Try!

A refreshing and flavorful egg salad toast featuring creamy feta and a zesty lemon dressing, perfect for a light meal or snack.
Prep Time 15 minutes
Cook Time 12 minutes
Total Time 27 minutes
Servings: 4 servings
Course: Lunch
Cuisine: Mediterranean
Calories: 250

Ingredients
  

  • 6 large eggs
  • 1/4 cup crumbled feta cheese
  • 2 tablespoons mayonnaise
  • 1 tablespoon Greek yogurt
  • 1 tablespoon fresh lemon juice
  • 1 teaspoon Dijon mustard
  • 1/4 teaspoon garlic powder
  • Salt and pepper to taste
  • 4 slices of whole grain bread
  • Fresh arugula or spinach for topping
  • Sliced radishes for garnish optional

Method
 

  1. Place the eggs in a saucepan and cover them with water. Bring to a boil over medium-high heat. Once boiling, cover the pan, remove it from heat, and let it sit for 12 minutes.
  2. After 12 minutes, transfer the eggs to an ice bath to cool for about 5 minutes. Once cooled, peel the eggs and chop them into small pieces.
  3. In a mixing bowl, combine the chopped eggs, feta cheese, mayonnaise, Greek yogurt, lemon juice, Dijon mustard, garlic powder, salt, and pepper. Mix until well combined.
  4. Toast the slices of whole grain bread until golden brown.
  5. Spread a generous amount of the egg salad mixture on each slice of toast.
  6. Top with fresh arugula or spinach and garnish with sliced radishes if desired. Serve immediately.

Nutrition

Serving: 1sliceCalories: 250kcalCarbohydrates: 20gProtein: 12gFat: 16gSaturated Fat: 4gPolyunsaturated Fat: 12gCholesterol: 370mgSodium: 400mgFiber: 3gSugar: 1g

Notes

  • For a spicier kick, add a pinch of cayenne pepper or some chopped jalapeños to the egg salad.
  • Swap out the feta for goat cheese for a creamier texture and a different flavor profile.

Tried this recipe?

Let us know how it was!

Pesto Rigatoni Pasta Salad: A Refreshing Summer Delight!

Introduction to Pesto Rigatoni Pasta Salad

There’s something magical about summer gatherings, isn’t there? The laughter, the sunshine, and of course, the food. This Pesto Rigatoni Pasta Salad is my go-to dish for those warm afternoons. It’s not just a meal; it’s a celebration of flavors that brings everyone together.

Whether you’re hosting a barbecue or just looking for a quick solution for a busy day, this salad is perfect. With its vibrant colors and fresh ingredients, it impresses without demanding hours in the kitchen. Trust me, your friends and family will be asking for seconds!

Why You’ll Love This Pesto Rigatoni Pasta Salad

This Pesto Rigatoni Pasta Salad is a game-changer for summer meals.

It’s incredibly easy to whip up, taking just about 25 minutes from start to finish.

The flavors are fresh and vibrant, making every bite a delight.

Plus, it’s versatile! You can serve it as a side or a main dish.

With minimal cleanup, you’ll have more time to enjoy the sunshine and good company.

Ingredients for Pesto Rigatoni Pasta Salad

Creating a delicious Pesto Rigatoni Pasta Salad starts with fresh, quality ingredients. Here’s what you’ll need:

  • Rigatoni Pasta: This tubular pasta holds onto the pesto beautifully, making every bite flavorful.
  • Cherry Tomatoes: Their sweetness adds a burst of flavor and color to the salad.
  • Fresh Mozzarella Balls: Creamy and mild, they provide a delightful contrast to the tangy pesto.
  • Fresh Basil Leaves: The star of the show! Basil brings a fragrant, herbal note that elevates the dish.
  • Pesto Sauce: You can use store-bought or homemade. It’s the heart of this salad, packed with flavor.
  • Extra Virgin Olive Oil: A drizzle adds richness and helps the dressing cling to the pasta.
  • Red Wine Vinegar: This adds a touch of acidity, balancing the richness of the cheese and pesto.
  • Salt and Pepper: Essential for enhancing all the flavors in the salad.
  • Parmesan Cheese: Optional, but a sprinkle on top adds a nice finishing touch.

Feel free to get creative! For added protein, consider mixing in grilled chicken or chickpeas. If you want to switch things up, diced bell peppers or olives can replace the cherry tomatoes for a different flavor profile.

Exact quantities for each ingredient are available at the bottom of the article for easy printing.

How to Make Pesto Rigatoni Pasta Salad

Making Pesto Rigatoni Pasta Salad is a breeze! Follow these simple steps, and you’ll have a refreshing dish ready in no time.

Step 1: Cook the Rigatoni Pasta

Start by boiling a pot of salted water. Once it’s bubbling, add the rigatoni pasta.

Cook it according to the package instructions until it’s al dente.

This means it should be firm to the bite, not mushy.

After draining the pasta, rinse it under cold water.

This step is crucial! It stops the cooking process and cools the pasta down, making it perfect for a salad.

Step 2: Combine the Ingredients

In a large mixing bowl, combine the cooled rigatoni, halved cherry tomatoes, mozzarella balls, and chopped basil.

Toss them gently to mix.

The colors will pop, and the aroma will be irresistible!

Make sure everything is evenly distributed for a balanced flavor in every bite.

Step 3: Prepare the Dressing

In a small bowl, whisk together the pesto sauce, extra virgin olive oil, red wine vinegar, salt, and pepper.

This dressing is where the magic happens!

The pesto brings a burst of flavor, while the olive oil adds richness.

Taste it as you go, adjusting the seasoning to your liking.

Step 4: Toss and Chill

Pour the dressing over the pasta mixture.

Gently toss everything together until the pasta is well coated.

Now, here’s the secret: chill the salad in the refrigerator for at least 30 minutes.

This allows the flavors to meld beautifully.

Serve it cold or at room temperature, and watch it disappear!

Tips for Success

  • Always salt your pasta water; it enhances the flavor of the rigatoni.
  • Use fresh ingredients for the best taste; quality matters!
  • Let the salad chill longer if you can; it improves the flavor.
  • Mix in proteins like grilled chicken or chickpeas for a heartier meal.
  • Experiment with different veggies to keep it exciting!

Equipment Needed

  • Large Pot: For boiling the rigatoni. A Dutch oven works well too.
  • Colander: To drain the pasta. A fine mesh strainer can be a good substitute.
  • Mixing Bowl: A large bowl for combining ingredients. Any large bowl will do.
  • Whisk: For mixing the dressing. A fork can work in a pinch.

Variations of Pesto Rigatoni Pasta Salad

  • Grilled Chicken: Add sliced grilled chicken for a protein boost and a heartier meal.
  • Chickpeas: Toss in canned chickpeas for a vegetarian protein option that adds texture.
  • Roasted Vegetables: Incorporate roasted bell peppers, zucchini, or asparagus for a smoky flavor.
  • Olives: Add sliced black or green olives for a briny kick that complements the pesto.
  • Spinach or Arugula: Mix in fresh spinach or arugula for an extra layer of greens and nutrition.
  • Sun-Dried Tomatoes: Include chopped sun-dried tomatoes for a tangy, sweet flavor that brightens the dish.
  • Vegan Option: Use a dairy-free pesto and substitute mozzarella with vegan cheese for a plant-based delight.

Serving Suggestions for Pesto Rigatoni Pasta Salad

  • Pair with grilled chicken skewers for a satisfying meal.
  • Serve alongside a crisp green salad for added freshness.
  • Complement with a chilled white wine, like Sauvignon Blanc.
  • Garnish with extra basil leaves and a sprinkle of Parmesan for a beautiful presentation.

FAQs about Pesto Rigatoni Pasta Salad

Can I make Pesto Rigatoni Pasta Salad ahead of time?

Absolutely! This salad is perfect for meal prep. You can make it a day in advance and store it in the refrigerator. Just give it a good toss before serving to refresh the flavors.

What can I substitute for pesto sauce?

If you don’t have pesto on hand, you can use a homemade version with basil, garlic, nuts, and olive oil. Alternatively, a store-bought sun-dried tomato spread can add a unique twist!

How long does Pesto Rigatoni Pasta Salad last in the fridge?

This salad can last up to 3 days in the fridge. Just keep it in an airtight container to maintain freshness. The flavors will continue to develop, making it even tastier!

Is this salad gluten-free?

To make a gluten-free version, simply swap the rigatoni pasta for a gluten-free pasta alternative. There are plenty of great options available that taste just as good!

Can I add more vegetables to the salad?

Definitely! Feel free to get creative. Adding veggies like bell peppers, cucumbers, or even roasted zucchini can enhance the flavor and nutrition of your Pesto Rigatoni Pasta Salad.

Final Thoughts

Creating this Pesto Rigatoni Pasta Salad is more than just cooking; it’s about bringing people together.

The vibrant colors and fresh flavors evoke the essence of summer, making every bite a joyful experience.

Whether it’s a backyard barbecue or a simple family dinner, this dish is sure to impress.

It’s quick, easy, and adaptable, allowing you to make it your own.

So, grab your ingredients, and let the laughter and good times roll.

With this salad on the table, you’re not just serving food; you’re sharing love and memories. Enjoy every delicious moment!

jhessica

Pesto Rigatoni Pasta Salad: A Refreshing Summer Delight!

A refreshing and flavorful Pesto Rigatoni Pasta Salad perfect for summer gatherings.
Prep Time 15 minutes
Cook Time 10 minutes
Total Time 55 minutes
Servings: 4 servings
Course: Salad
Cuisine: Italian
Calories: 320

Ingredients
  

  • 8 ounces rigatoni pasta
  • 1 cup cherry tomatoes halved
  • 1 cup fresh mozzarella balls halved
  • 1 cup fresh basil leaves chopped
  • 1/2 cup pesto sauce
  • 1/4 cup extra virgin olive oil
  • 1 tablespoon red wine vinegar
  • Salt and pepper to taste
  • Parmesan cheese for garnish optional

Method
 

  1. Cook the rigatoni pasta according to package instructions until al dente. Drain and rinse under cold water to cool.
  2. In a large mixing bowl, combine the cooled rigatoni, cherry tomatoes, mozzarella balls, and chopped basil.
  3. In a small bowl, whisk together the pesto sauce, olive oil, red wine vinegar, salt, and pepper.
  4. Pour the dressing over the pasta mixture and toss gently until everything is well coated.
  5. Taste and adjust seasoning if needed.
  6. Chill the pasta salad in the refrigerator for at least 30 minutes before serving to allow the flavors to meld.
  7. Serve cold or at room temperature, garnished with Parmesan cheese if desired.

Nutrition

Serving: 1servingCalories: 320kcalCarbohydrates: 30gProtein: 12gFat: 18gSaturated Fat: 4gPolyunsaturated Fat: 14gCholesterol: 15mgSodium: 200mgFiber: 2gSugar: 3g

Notes

  • For added protein, consider mixing in grilled chicken or chickpeas.
  • Substitute the cherry tomatoes with diced bell peppers or olives for a different flavor profile.

Tried this recipe?

Let us know how it was!

Chicken Parmesan: Discover the Perfect Recipe Today!

Introduction to Chicken Parmesan

There’s something undeniably comforting about Chicken Parmesan. This classic Italian-American dish brings back memories of family dinners, laughter, and the aroma of bubbling cheese wafting through the kitchen. Whether you’re looking for a quick solution for a busy weeknight or a dish to impress your loved ones, Chicken Parmesan fits the bill perfectly. With its crispy breaded chicken, rich marinara sauce, and gooey melted cheese, it’s a meal that satisfies both the heart and the stomach. Let’s dive into this delightful recipe that’s sure to become a staple in your home cooking repertoire!

Why You’ll Love This Chicken Parmesan

This Chicken Parmesan recipe is a game-changer for busy nights. It’s quick to prepare, taking just 45 minutes from start to finish. The combination of crispy chicken, savory marinara, and melted cheese creates a flavor explosion that will have everyone asking for seconds. Plus, it’s versatile enough to please picky eaters and impress guests alike. Trust me, once you try it, you’ll be hooked!

Ingredients for Chicken Parmesan

Gathering the right ingredients is key to making a delicious Chicken Parmesan. Here’s what you’ll need:

  • Boneless, skinless chicken breasts: The star of the dish, providing a tender and juicy base.
  • All-purpose flour: This helps create a light coating on the chicken, ensuring the breadcrumbs stick.
  • Large eggs: They act as a binding agent, helping the breadcrumbs adhere perfectly.
  • Italian-style breadcrumbs: For that authentic flavor and crunch, these are a must. You can also use plain breadcrumbs if needed.
  • Marinara sauce: A rich, flavorful sauce that brings everything together. Store-bought works great, but homemade is even better!
  • Shredded mozzarella cheese: This melty goodness is essential for that gooey topping we all love.
  • Grated Parmesan cheese: Adds a sharp, nutty flavor that elevates the dish.
  • Garlic powder: A sprinkle of this adds depth and enhances the overall taste.
  • Dried oregano: This herb brings a touch of Italian flair to the dish.
  • Salt and black pepper: Essential seasonings to enhance the flavors of the chicken.
  • Olive oil: Used for frying the chicken, it adds richness and helps achieve that golden crust.
  • Fresh basil leaves: Optional, but they make a beautiful garnish and add a fresh flavor.

For exact quantities, check the bottom of the article where you can find everything listed for easy printing. Feel free to get creative with your ingredients; for instance, you can add sautéed vegetables like spinach or mushrooms for extra flavor and nutrition!

How to Make Chicken Parmesan

Now that you have your ingredients ready, let’s get cooking! Making Chicken Parmesan is a straightforward process that will fill your kitchen with mouthwatering aromas. Follow these steps, and you’ll have a delicious meal on the table in no time.

Step 1: Preheat the Oven

Start by preheating your oven to 375°F (190°C). This step is crucial because it ensures that your Chicken Parmesan cooks evenly. A hot oven helps the cheese melt beautifully and the chicken to cook through without drying out. Trust me, you want that gooey, bubbly cheese on top!

Step 2: Prepare the Chicken

Next, take your boneless, skinless chicken breasts and place them between two sheets of plastic wrap. Using a meat mallet or rolling pin, pound the chicken to an even thickness of about 1/2 inch. This technique not only tenderizes the meat but also ensures it cooks evenly. No one likes a dry piece of chicken!

Step 3: Set Up the Breading Station

Now it’s time to create your breading station. Set up three shallow dishes: one with flour, another with beaten eggs, and the last with a mixture of breadcrumbs, garlic powder, oregano, salt, and pepper. This setup is essential for achieving that perfect crispy coating. It keeps the process organized and makes breading a breeze!

Step 4: Bread the Chicken

Take each chicken breast and dredge it in the flour, shaking off any excess. Then, dip it into the beaten eggs, allowing the excess to drip off. Finally, coat it with the breadcrumb mixture, pressing gently to ensure it sticks well. This three-step process creates a deliciously crunchy texture that’s hard to resist!

Step 5: Cook the Chicken

In a large skillet, heat the olive oil over medium heat. Once hot, carefully add the breaded chicken breasts. Cook for about 4-5 minutes on each side until they turn a beautiful golden brown. This frying step adds flavor and texture, making your Chicken Parmesan truly irresistible. Just keep an eye on them to avoid burning!

Step 6: Assemble the Dish

After frying, transfer the chicken to a baking dish. Spoon marinara sauce generously over each piece, then sprinkle with shredded mozzarella and grated Parmesan cheese. Layering the sauce and cheese this way ensures every bite is packed with flavor. It’s like a warm hug on a plate!

Step 7: Bake to Perfection

Place the baking dish in your preheated oven and bake for 20-25 minutes. You’ll know it’s done when the cheese is bubbly and golden, and the chicken reaches an internal temperature of 165°F. Let it rest for a few minutes before serving. This resting time allows the juices to redistribute, making each bite even more delicious!

Tips for Success

  • Use a meat thermometer to ensure your chicken is cooked to 165°F for safety.
  • Let the chicken rest after baking for juicier results.
  • Experiment with different cheeses like provolone for a unique twist.
  • For extra crunch, try adding panko breadcrumbs to your mixture.
  • Don’t rush the frying; a medium heat ensures a golden crust without burning.

Equipment Needed

  • Meat mallet or rolling pin: For pounding the chicken. A heavy skillet can work in a pinch.
  • Three shallow dishes: Essential for the breading station. Any plates will do!
  • Large skillet: For frying. A non-stick pan makes cleanup easier.
  • Baking dish: To finish cooking in the oven. A casserole dish works great.
  • Meat thermometer: To check chicken doneness. A simple knife can also help cut into the chicken.

Variations of Chicken Parmesan

  • Eggplant Parmesan: Swap out chicken for slices of breaded and fried eggplant for a delicious vegetarian option.
  • Whole Wheat Breadcrumbs: Use whole wheat breadcrumbs for a healthier twist that still delivers on flavor.
  • Spicy Chicken Parmesan: Add crushed red pepper flakes to the breadcrumb mixture for a kick of heat.
  • Gluten-Free Version: Substitute regular breadcrumbs with gluten-free breadcrumbs or crushed gluten-free crackers.
  • Stuffed Chicken Parmesan: Stuff the chicken breasts with spinach and ricotta cheese before breading for an extra layer of flavor.

Serving Suggestions for Chicken Parmesan

  • Pasta: Serve over a bed of spaghetti or fettuccine for a classic pairing.
  • Salad: A fresh Caesar or mixed greens salad complements the richness of the dish.
  • Wine: Pair with a glass of Chianti or a light Pinot Grigio.
  • Presentation: Garnish with fresh basil and a sprinkle of extra Parmesan for a restaurant-style finish.

FAQs about Chicken Parmesan

What is Chicken Parmesan traditionally served with?

Chicken Parmesan is often served with pasta, like spaghetti or fettuccine, and a side salad. The combination of flavors creates a well-rounded meal that’s both satisfying and delicious.

Can I make Chicken Parmesan ahead of time?

Absolutely! You can prepare the chicken and bread it in advance. Just store it in the fridge until you’re ready to fry and bake. This makes it a great option for meal prep!

Is Chicken Parmesan gluten-free?

To make a gluten-free version, simply substitute regular breadcrumbs with gluten-free breadcrumbs or crushed gluten-free crackers. This way, everyone can enjoy this classic dish!

How do I store leftovers?

Store any leftover Chicken Parmesan in an airtight container in the fridge for up to three days. Reheat in the oven for the best results, ensuring the chicken stays crispy.

Can I use chicken thighs instead of breasts?

Yes, chicken thighs can be used for a juicier option! Just adjust the cooking time slightly, as thighs may take a bit longer to cook through.

Final Thoughts

Cooking Chicken Parmesan is more than just preparing a meal; it’s about creating memories and sharing joy with those you love. The crispy chicken, rich marinara, and gooey cheese come together to form a dish that warms the heart and satisfies the soul. Whether it’s a weeknight dinner or a special occasion, this recipe is sure to impress. I hope you find as much joy in making it as I do. So roll up your sleeves, gather your ingredients, and let the delicious aroma fill your kitchen. Happy cooking!

jhessica

Chicken Parmesan: Discover the Perfect Recipe Today!

A classic Italian-American dish featuring breaded chicken breasts topped with marinara sauce and melted cheese.
Prep Time 15 minutes
Cook Time 30 minutes
Total Time 45 minutes
Servings: 4 servings
Course: Main Course
Cuisine: Italian-American
Calories: 450

Ingredients
  

  • 2 boneless skinless chicken breasts (about 1 pound total)
  • 1 cup all-purpose flour
  • 2 large eggs
  • 1 cup breadcrumbs preferably Italian-style
  • 1 cup marinara sauce
  • 1 cup shredded mozzarella cheese
  • 1/2 cup grated Parmesan cheese
  • 1 teaspoon garlic powder
  • 1 teaspoon dried oregano
  • 1 teaspoon salt
  • 1/2 teaspoon black pepper
  • 1/4 cup olive oil
  • Fresh basil leaves for garnish optional

Method
 

  1. Preheat the oven to 375°F (190°C).
  2. Place the chicken breasts between two sheets of plastic wrap and pound them to an even thickness, about 1/2 inch thick.
  3. Set up a breading station: In one shallow dish, place the flour. In a second dish, beat the eggs. In a third dish, combine the breadcrumbs, garlic powder, oregano, salt, and pepper.
  4. Dredge each chicken breast in flour, shaking off the excess. Dip into the beaten eggs, then coat with the breadcrumb mixture, pressing gently to adhere.
  5. In a large skillet, heat the olive oil over medium heat. Add the breaded chicken breasts and cook for about 4-5 minutes on each side, until golden brown.
  6. Transfer the chicken to a baking dish. Spoon marinara sauce over each piece, then sprinkle with mozzarella and Parmesan cheese.
  7. Bake in the preheated oven for 20-25 minutes, or until the cheese is bubbly and the chicken is cooked through (internal temperature should reach 165°F).
  8. Remove from the oven and let it rest for a few minutes. Garnish with fresh basil leaves if desired.

Nutrition

Serving: 1pieceCalories: 450kcalCarbohydrates: 20gProtein: 35gFat: 25gSaturated Fat: 8gPolyunsaturated Fat: 15gCholesterol: 150mgSodium: 800mgFiber: 2gSugar: 5g

Notes

  • For a healthier version, bake the breaded chicken instead of frying it.
  • You can add sautéed vegetables like spinach or mushrooms on top of the chicken before adding the sauce and cheese for extra flavor and nutrition.

Tried this recipe?

Let us know how it was!

Beef Osso Buco: Discover the Secrets to Perfection!

Introduction to Beef Osso Buco

There’s something magical about a dish that warms both the heart and the home. Beef Osso Buco is one of those treasures. This classic Italian recipe features tender beef shanks braised to perfection, enveloped in a rich sauce that sings with flavor. Whether you’re looking to impress your loved ones or simply want a comforting meal after a long day, this dish is your answer. The aroma wafting through your kitchen will have everyone gathering around the table, eager to dig in. Trust me, once you try it, you’ll be hooked!

Why You’ll Love This Beef Osso Buco

This Beef Osso Buco recipe is a game-changer for any home cook. It’s surprisingly easy to make, yet it delivers a restaurant-quality meal that will wow your family and friends. The slow braising process allows the flavors to meld beautifully, creating a dish that’s rich and satisfying. Plus, the hands-off cooking time means you can kick back and relax while it does its magic in the oven!

Ingredients for Beef Osso Buco

Gathering the right ingredients is the first step to creating a memorable Beef Osso Buco. Each component plays a vital role in building the dish’s rich flavor profile. Here’s what you’ll need:

  • Beef shanks: The star of the show! Look for thick slices with a good amount of marrow for that melt-in-your-mouth texture.
  • Salt and black pepper: Essential for seasoning the beef, enhancing its natural flavors.
  • All-purpose flour: A light dusting helps create a beautiful crust when browning the beef, adding depth to the dish.
  • Olive oil: This adds richness and helps in browning the meat and sautéing the vegetables.
  • Onion, carrot, and celery: These aromatic vegetables form the base of the sauce, providing sweetness and depth.
  • Garlic: A must-have for that aromatic kick that elevates the entire dish.
  • Dry white wine: This adds acidity and complexity, helping to deglaze the pot and lift those flavorful bits stuck to the bottom.
  • Beef broth: A flavorful liquid that keeps the meat moist and infuses it with savory goodness.
  • Diced tomatoes: They add a touch of sweetness and acidity, balancing the richness of the beef.
  • Tomato paste: Concentrated flavor that thickens the sauce and deepens the color.
  • Dried thyme and bay leaf: These herbs bring an earthy aroma, enhancing the overall flavor profile.
  • Lemon zest: A bright note that cuts through the richness, adding freshness to the dish.
  • Fresh parsley: For garnish, it adds a pop of color and a hint of freshness.

For those looking to experiment, consider adding a tablespoon of balsamic vinegar for a richer flavor. You can find the exact quantities for each ingredient at the bottom of the article, ready for printing!

How to Make Beef Osso Buco

Creating Beef Osso Buco is a rewarding experience that fills your kitchen with mouthwatering aromas. Follow these simple steps, and you’ll be on your way to a delicious meal that impresses everyone at the table.

Step 1: Preheat the Oven

Start by preheating your oven to 325°F (160°C). This temperature is perfect for braising, allowing the beef to cook slowly and become tender. Preheating ensures that your dish begins cooking evenly right from the start.

Step 2: Season and Prepare the Beef

Next, season the beef shanks generously with salt and black pepper. This step is crucial as it enhances the meat’s natural flavors. After seasoning, dust the shanks lightly with all-purpose flour, shaking off any excess. This flour coating will help create a lovely crust when you brown the meat.

Step 3: Brown the Beef Shanks

In a large Dutch oven, heat the olive oil over medium-high heat. Once hot, add the beef shanks, browning them on all sides for about 3-4 minutes per side. This browning process is essential; it develops a rich flavor that will elevate your Beef Osso Buco to new heights.

Step 4: Sauté the Vegetables

After browning the beef, remove the shanks and set them aside. In the same pot, add the diced onion, carrot, celery, and minced garlic. Sauté these vegetables for about 5-7 minutes until they soften. This step builds a flavorful base for your sauce, making every bite of the dish more delicious.

Step 5: Deglaze the Pot

Now it’s time to deglaze the pot. Pour in the dry white wine, scraping the bottom to lift those flavorful bits stuck to the pan. Let it simmer for 2-3 minutes. This process adds depth to your sauce and enhances the overall flavor of the Beef Osso Buco.

Step 6: Combine Ingredients

Stir in the beef broth, diced tomatoes, tomato paste, dried thyme, and bay leaf. Mix everything well, then return the beef shanks to the pot, ensuring they are submerged in the liquid. This combination of ingredients is what makes the dish so rich and comforting.

Step 7: Braise in the Oven

Cover the pot with a lid and transfer it to your preheated oven. Let it braise for 2 to 2.5 hours. You’ll know it’s done when the meat is tender and falling off the bone. This slow cooking process allows the flavors to meld beautifully, creating a dish that’s simply irresistible.

Step 8: Finish and Serve

Once the cooking time is up, carefully remove the pot from the oven. Discard the bay leaf and stir in the lemon zest and fresh parsley for a burst of brightness. Serve your Beef Osso Buco hot, and watch as everyone digs in with delight!

Tips for Success

  • Don’t rush the browning process; it’s key for flavor.
  • Use a heavy pot like a Dutch oven for even heat distribution.
  • Let the dish rest for a few minutes before serving to enhance flavors.
  • Pair with creamy polenta or mashed potatoes to soak up the sauce.
  • Feel free to adjust herbs and spices to suit your taste.

Equipment Needed

  • Dutch oven: Ideal for braising; a heavy pot with a lid works too.
  • Wooden spoon: Perfect for stirring and scraping the pot.
  • Meat thermometer: Optional, but great for checking doneness.
  • Cutting board and knife: Essential for prepping your ingredients.

Variations

  • Herb Variations: Experiment with fresh herbs like rosemary or oregano for a different flavor profile.
  • Spicy Kick: Add a pinch of red pepper flakes for a subtle heat that complements the richness of the dish.
  • Vegetarian Option: Substitute beef shanks with hearty vegetables like portobello mushrooms and use vegetable broth for a plant-based version.
  • Different Liquids: Swap the white wine for red wine or even a splash of stout for a deeper flavor.
  • Slow Cooker Adaptation: Prepare the dish in a slow cooker for an easy, hands-off approach; just follow the same steps and cook on low for 6-8 hours.

Serving Suggestions

  • Creamy polenta: A perfect base to soak up the rich sauce.
  • Mashed potatoes: Classic comfort food that pairs beautifully with the dish.
  • Crusty bread: Ideal for sopping up every last drop of sauce.
  • Red wine: A glass of Chianti or Merlot complements the flavors wonderfully.
  • Garnish: Fresh parsley adds a pop of color and freshness to the plate.

FAQs about Beef Osso Buco

What cut of beef is best for Osso Buco?
The best cut for Beef Osso Buco is beef shanks, specifically the cross-cut shanks. They contain marrow, which adds richness and flavor to the dish.

Can I make Beef Osso Buco in a slow cooker?
Absolutely! You can adapt this recipe for a slow cooker. Just follow the same steps and cook on low for 6-8 hours for tender, flavorful results.

What should I serve with Beef Osso Buco?
This dish pairs wonderfully with creamy polenta, mashed potatoes, or crusty bread to soak up the delicious sauce. A glass of red wine, like Chianti, complements the flavors beautifully.

How do I store leftovers?
Store any leftovers in an airtight container in the refrigerator for up to 3 days. Reheat gently on the stove or in the microwave, adding a splash of broth if needed.

Can I freeze Beef Osso Buco?
Yes, you can freeze Beef Osso Buco! Just let it cool completely, then transfer it to a freezer-safe container. It can be frozen for up to 3 months. Thaw in the refrigerator before reheating.

Final Thoughts

Cooking Beef Osso Buco is more than just preparing a meal; it’s about creating an experience that brings people together. The rich aromas that fill your kitchen, the tender meat that falls off the bone, and the joy of sharing it with loved ones make this dish truly special. Each bite is a reminder of the comfort food that warms the soul. Whether it’s a cozy family dinner or a gathering with friends, this classic Italian recipe is sure to impress. So roll up your sleeves, embrace the process, and enjoy the delicious rewards of your culinary adventure!

jhessica

Beef Osso Buco: Discover the Secrets to Perfection!

A classic Italian dish featuring tender beef shanks braised with vegetables and aromatic herbs.
Prep Time 20 minutes
Total Time 2 hours 20 minutes
Course: Main Course
Cuisine: Italian
Calories: 450

Ingredients
  

  • 2 pounds beef shanks cut into 1.5-inch thick slices
  • 1 teaspoon salt
  • 1/2 teaspoon black pepper
  • 1/4 cup all-purpose flour
  • 2 tablespoons olive oil
  • 1 medium onion diced
  • 1 medium carrot diced
  • 1 medium celery stalk diced
  • 3 cloves garlic minced
  • 1 cup dry white wine
  • 1 cup beef broth
  • 1 14.5-ounce can diced tomatoes, undrained
  • 1 tablespoon tomato paste
  • 1 teaspoon dried thyme
  • 1 bay leaf
  • Zest of 1 lemon
  • 2 tablespoons fresh parsley chopped

Method
 

  1. Preheat your oven to 325°F (160°C).
  2. Season the beef shanks with salt and pepper, then dust them lightly with flour, shaking off any excess.
  3. In a large Dutch oven, heat the olive oil over medium-high heat. Add the beef shanks and brown them on all sides, about 3-4 minutes per side. Remove the shanks and set them aside.
  4. In the same pot, add the onion, carrot, celery, and garlic. Sauté until the vegetables are softened, about 5-7 minutes.
  5. Pour in the white wine, scraping the bottom of the pot to deglaze it. Let it simmer for about 2-3 minutes.
  6. Stir in the beef broth, diced tomatoes, tomato paste, thyme, and bay leaf. Bring the mixture to a simmer.
  7. Return the beef shanks to the pot, ensuring they are submerged in the liquid. Cover the pot with a lid and transfer it to the preheated oven.
  8. Cook for 2 to 2.5 hours, or until the meat is tender and falling off the bone.
  9. Remove the pot from the oven and discard the bay leaf. Stir in the lemon zest and parsley before serving.

Nutrition

Serving: 1servingCalories: 450kcalCarbohydrates: 10gProtein: 40gFat: 25gSaturated Fat: 8gPolyunsaturated Fat: 15gCholesterol: 100mgSodium: 600mgFiber: 2gSugar: 3g

Notes

  • For a richer flavor, add a tablespoon of balsamic vinegar to the sauce before baking.
  • Serve with creamy polenta or mashed potatoes to soak up the delicious sauce.

Tried this recipe?

Let us know how it was!

Tomato Basil Bruschetta: A Tasty Recipe to Try Today!

Introduction to Tomato Basil Bruschetta

There’s something magical about the aroma of fresh basil mingling with ripe tomatoes.

Tomato Basil Bruschetta is not just a dish; it’s a celebration of simple ingredients coming together to create something extraordinary.

Whether you’re hosting friends or just looking for a quick snack after a long day, this recipe is your go-to solution.

It’s easy to whip up, and the vibrant flavors will impress anyone lucky enough to share it with you.

Let’s dive into this delightful appetizer that’s perfect for any occasion!

Why You’ll Love This Tomato Basil Bruschetta

This Tomato Basil Bruschetta is a game-changer for anyone who loves delicious food without the fuss.

In just 20 minutes, you can create a mouthwatering appetizer that’s bursting with flavor.

The combination of fresh ingredients makes it a healthy choice, too.

Plus, it’s versatile enough to suit any gathering, from casual get-togethers to elegant dinners.

Trust me, once you try it, you’ll be hooked!

Ingredients for Tomato Basil Bruschetta

Creating the perfect Tomato Basil Bruschetta starts with fresh, quality ingredients.

Here’s what you’ll need:

  • French baguette: This classic bread provides a crispy base. You can also try ciabatta or sourdough for a twist.
  • Ripe tomatoes: Choose juicy, flavorful tomatoes. Heirloom or vine-ripened varieties work wonders.
  • Fresh basil leaves: The star of the show! Fresh basil adds a fragrant, aromatic touch.
  • Garlic: Minced garlic brings a punch of flavor. Adjust the amount based on your taste.
  • Extra virgin olive oil: A drizzle of high-quality olive oil enhances the dish’s richness.
  • Balsamic vinegar: This adds a tangy depth. If you prefer, a splash of lemon juice can brighten the flavors.
  • Salt and pepper: Essential for seasoning. Use sea salt for a gourmet touch.
  • Shredded mozzarella cheese (optional): For those who love a cheesy twist, this is a delightful addition.

For exact measurements, check the bottom of the article where you can find everything available for printing.

With these ingredients, you’re well on your way to creating a delicious appetizer that will impress everyone!

How to Make Tomato Basil Bruschetta

Creating Tomato Basil Bruschetta is a straightforward process that anyone can master.

Follow these simple steps, and you’ll have a delicious appetizer ready in no time!

Step 1: Preheat the Oven

Start by preheating your oven to 400°F (200°C).

This step is crucial for even cooking.

A hot oven ensures that your baguette slices toast perfectly, giving them that delightful crunch.

Step 2: Prepare the Baguette

Next, grab your French baguette and slice it into 1/2-inch pieces.

Make sure to cut straight across for even toasting.

Once sliced, place the pieces on a baking sheet and brush each side lightly with extra virgin olive oil.

This will help them crisp up beautifully in the oven.

Step 3: Toast the Baguette

Now, it’s time to toast those baguette slices!

Slide the baking sheet into your preheated oven and let them toast for about 5-7 minutes.

Keep an eye on them; you want them golden brown and crispy, not burnt.

The aroma will be irresistible!

Step 4: Mix the Tomato Topping

While the bread is toasting, let’s whip up the tomato topping.

In a mixing bowl, combine your diced tomatoes, chopped basil, minced garlic, and balsamic vinegar.

Drizzle in the remaining olive oil and season with salt and pepper to taste.

Give it a gentle stir to mix everything together.

This fresh mixture is the heart of your bruschetta!

Step 5: Assemble the Bruschetta

Once your baguette slices are toasted, remove them from the oven and let them cool slightly.

Now, it’s time to assemble!

Spoon the tomato mixture generously onto each toasted baguette slice.

Don’t be shy; pile it on for maximum flavor!

Step 6: Optional Cheese Melting

If you’re a cheese lover, this step is for you!

Sprinkle shredded mozzarella cheese on top of the tomato mixture.

Return the bruschetta to the oven for an additional 2-3 minutes.

This will melt the cheese just enough to create a gooey, delicious topping.

Step 7: Serve Immediately

Finally, serve your Tomato Basil Bruschetta right away while it’s warm.

The combination of crispy bread and fresh toppings is best enjoyed fresh out of the oven.

Trust me, your taste buds will thank you!

Tips for Success

  • Use ripe tomatoes for the best flavor; they make all the difference.
  • Don’t skip the olive oil; it adds richness and helps with toasting.
  • Let the toasted baguette cool slightly before adding the topping to prevent sogginess.
  • Experiment with different herbs like oregano or parsley for a unique twist.
  • For a spicy kick, add red pepper flakes to the tomato mixture.

Equipment Needed

  • Baking sheet: A standard sheet works well, but a pizza stone can enhance crispiness.
  • Mixing bowl: Any bowl will do, but a glass bowl lets you see the vibrant colors.
  • Knife: A sharp chef’s knife is perfect for slicing the baguette.
  • Brush: A pastry brush helps evenly coat the baguette with olive oil.

Variations of Tomato Basil Bruschetta

  • Caprese Style: Add slices of fresh mozzarella and a drizzle of balsamic glaze for a classic Caprese twist.
  • Avocado Bruschetta: Top with mashed avocado for a creamy texture and a boost of healthy fats.
  • Roasted Red Pepper: Incorporate roasted red peppers into the tomato mixture for a smoky flavor.
  • Vegan Option: Omit the cheese and use a sprinkle of nutritional yeast for a cheesy flavor without dairy.
  • Herbed Variations: Experiment with different herbs like cilantro or mint for a fresh twist.

Serving Suggestions for Tomato Basil Bruschetta

  • Pair with a crisp white wine like Pinot Grigio for a refreshing complement.
  • Serve alongside a simple arugula salad drizzled with lemon vinaigrette.
  • For a rustic touch, arrange bruschetta on a wooden board with olives and cured meats.
  • Garnish with extra basil leaves for a pop of color.

FAQs about Tomato Basil Bruschetta

Can I make Tomato Basil Bruschetta ahead of time?

While it’s best enjoyed fresh, you can prepare the tomato mixture a few hours in advance. Just keep it covered in the fridge. Toast the baguette slices right before serving for that perfect crunch!

What type of tomatoes are best for bruschetta?

Heirloom or vine-ripened tomatoes are ideal for Tomato Basil Bruschetta. Their juicy, sweet flavor elevates the dish, making every bite a delight.

Can I use dried basil instead of fresh?

While fresh basil is recommended for its vibrant flavor, you can use dried basil in a pinch. Just remember, dried herbs are more concentrated, so use less than you would of fresh.

How do I store leftover bruschetta?

Store any leftover tomato mixture in an airtight container in the fridge for up to two days. However, the toasted baguette will lose its crispness, so it’s best to keep them separate until you’re ready to enjoy!

What can I serve with Tomato Basil Bruschetta?

This delicious appetizer pairs wonderfully with a light salad, a glass of white wine, or even as a topping for grilled chicken. The possibilities are endless!

Final Thoughts

Tomato Basil Bruschetta is more than just an appetizer; it’s a delightful experience that brings people together.

The vibrant colors and fresh flavors create a feast for the senses, making every bite a celebration.

Whether you’re enjoying it at a gathering or savoring it solo, this dish has a way of brightening your day.

It’s quick, easy, and oh-so-satisfying.

So, roll up your sleeves, gather your ingredients, and let the magic of Tomato Basil Bruschetta transform your next meal into something special.

Trust me, you’ll be glad you did!

jhessica

Tomato Basil Bruschetta: A Tasty Recipe to Try Today!

A delicious and easy-to-make Tomato Basil Bruschetta recipe perfect for appetizers or snacks.
Prep Time 10 minutes
Cook Time 10 minutes
Total Time 20 minutes
Servings: 6 servings
Course: Appetizer
Cuisine: Italian
Calories: 180

Ingredients
  

  • 1 French baguette sliced into 1/2-inch pieces
  • 4 medium ripe tomatoes diced
  • 1/4 cup fresh basil leaves chopped
  • 2 cloves garlic minced
  • 1/4 cup extra virgin olive oil
  • 1 teaspoon balsamic vinegar
  • Salt and pepper to taste
  • 1/2 cup shredded mozzarella cheese optional

Method
 

  1. Preheat your oven to 400°F (200°C).
  2. Arrange the sliced baguette on a baking sheet and brush each piece lightly with olive oil.
  3. Toast the baguette slices in the oven for about 5-7 minutes or until they are golden brown and crispy.
  4. In a mixing bowl, combine the diced tomatoes, chopped basil, minced garlic, balsamic vinegar, and the remaining olive oil. Season with salt and pepper to taste.
  5. Remove the toasted baguette from the oven and let it cool slightly.
  6. Spoon the tomato mixture generously onto each toasted baguette slice. If desired, sprinkle shredded mozzarella cheese on top.
  7. Return the bruschetta to the oven for an additional 2-3 minutes to melt the cheese, if using.
  8. Serve immediately while warm.

Nutrition

Serving: 1pieceCalories: 180kcalCarbohydrates: 20gProtein: 4gFat: 8gSaturated Fat: 2gPolyunsaturated Fat: 6gCholesterol: 10mgSodium: 200mgFiber: 2gSugar: 3g

Notes

  • For a spicy kick, add a pinch of red pepper flakes to the tomato mixture.
  • Try using different types of bread, such as ciabatta or sourdough, for a unique flavor and texture.

Tried this recipe?

Let us know how it was!

Stay Connected

Get recipes via email: