Get my cookbooks

Cheesy BBQ Smoked Meatloaf: A Flavorful Comfort Dish

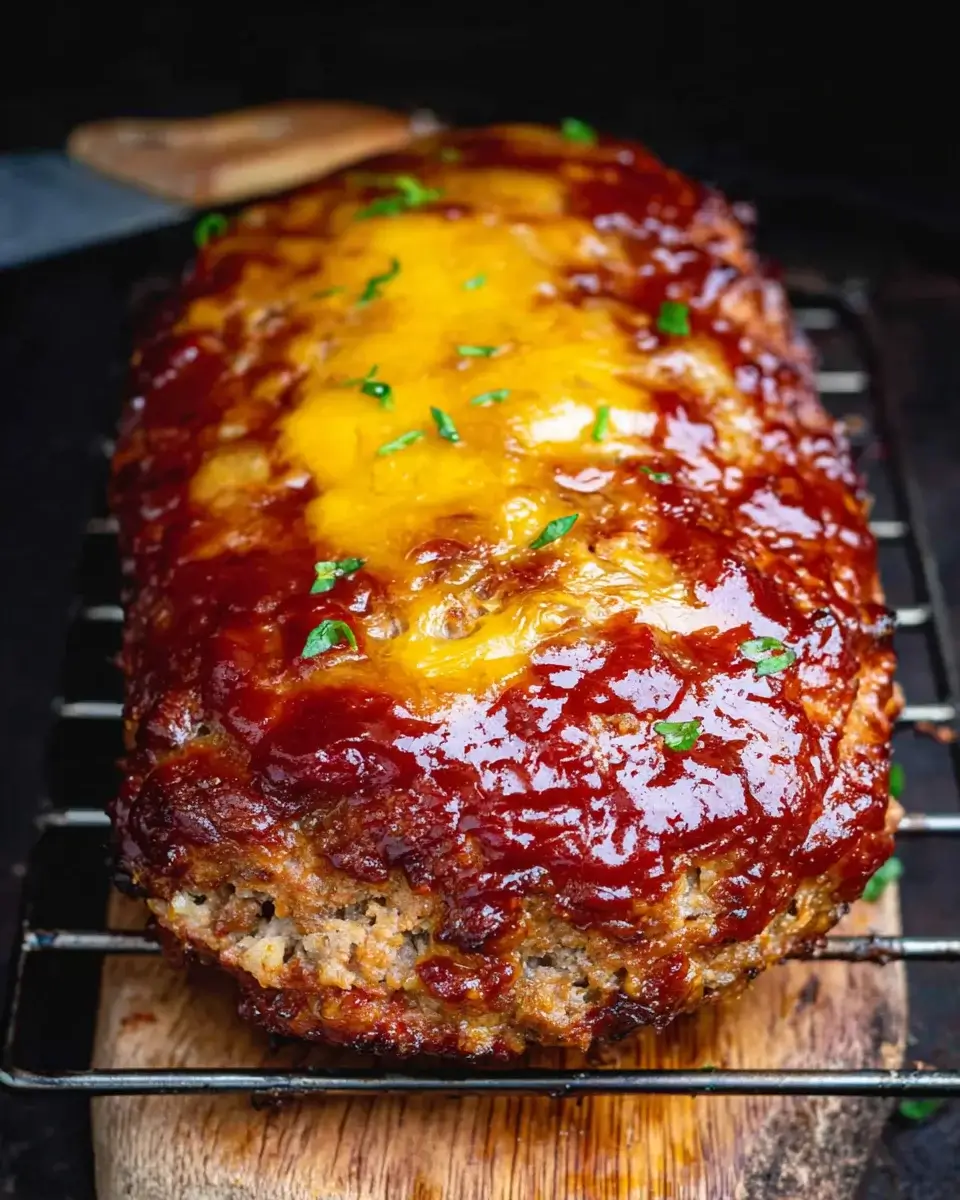
Introduction to Cheesy BBQ Smoked Meatloaf

There’s something undeniably comforting about a hearty meatloaf, especially when it’s infused with smoky flavors and gooey cheese. My journey with Cheesy BBQ Smoked Meatloaf began on a chilly evening, craving a dish that would warm both my heart and my home. This recipe is perfect for those busy weeknights when you want to impress your loved ones without spending hours in the kitchen. With just a few simple ingredients and a smoker, you can create a flavorful masterpiece that will have everyone asking for seconds. Trust me, this dish is a game-changer!

Why You’ll Love This Cheesy BBQ Smoked Meatloaf

This Cheesy BBQ Smoked Meatloaf is a true crowd-pleaser. It combines the rich flavors of beef and pork with the irresistible allure of melted cheese and tangy barbecue sauce. Not only is it easy to prepare, but it also cooks slowly in the smoker, allowing the flavors to meld beautifully. Plus, it’s a fantastic way to bring the family together around the dinner table, making it a perfect choice for any occasion.

Ingredients for Cheesy BBQ Smoked Meatloaf

Gathering the right ingredients is the first step to creating a delicious Cheesy BBQ Smoked Meatloaf. Here’s what you’ll need:

  • Ground beef: This is the heart of your meatloaf, providing rich flavor and texture.
  • Ground pork: Adds moisture and a hint of sweetness, balancing the beef perfectly.
  • Breadcrumbs: These help bind the meatloaf together, ensuring it holds its shape while cooking.
  • Shredded cheddar cheese: Melts beautifully, adding a creamy, cheesy goodness that elevates the dish.
  • Diced onion: Brings a savory depth of flavor, enhancing the overall taste.
  • Diced bell pepper: Adds a pop of color and a slight sweetness, making each bite more enjoyable.
  • Large eggs: Acts as a binder, helping to hold everything together.
  • Barbecue sauce: A key ingredient for that smoky, tangy flavor; you’ll also use it for topping.
  • Worcestershire sauce: Adds a complex umami flavor that deepens the taste profile.
  • Garlic powder: A must-have for that aromatic kick.
  • Onion powder: Enhances the onion flavor without the texture of fresh onions.
  • Salt and black pepper: Essential seasonings that bring all the flavors together.
  • Smoked paprika: Infuses a subtle smokiness, complementing the smoking process.

For those looking to spice things up, consider adding cayenne pepper for a kick. If you prefer a different cheese, pepper jack can provide a delightful twist. You can find the exact quantities for each ingredient at the bottom of the article, ready for printing!

How to Make Cheesy BBQ Smoked Meatloaf

Creating the perfect Cheesy BBQ Smoked Meatloaf is a rewarding experience. Follow these simple steps to ensure your meatloaf turns out flavorful and juicy. Let’s dive in!

Step 1: Preheat the Smoker

Preheating your smoker is crucial for achieving that smoky flavor. Set your smoker to 250°F. This low and slow method allows the meatloaf to cook evenly, ensuring every bite is tender and infused with flavor. Trust me, this step is non-negotiable!

Step 2: Prepare the Meat Mixture

In a large bowl, combine the ground beef, ground pork, breadcrumbs, cheddar cheese, diced onion, diced bell pepper, eggs, barbecue sauce, Worcestershire sauce, garlic powder, onion powder, salt, black pepper, and smoked paprika. Mix gently until everything is just combined. Overmixing can lead to a dense meatloaf, and nobody wants that!

Step 3: Shape the Meatloaf

Now it’s time to shape your meatloaf. Transfer the mixture onto a piece of parchment paper. Form it into a loaf shape, about 2 inches thick. This thickness helps it cook evenly. Make sure the ends are sealed to keep all that cheesy goodness inside!

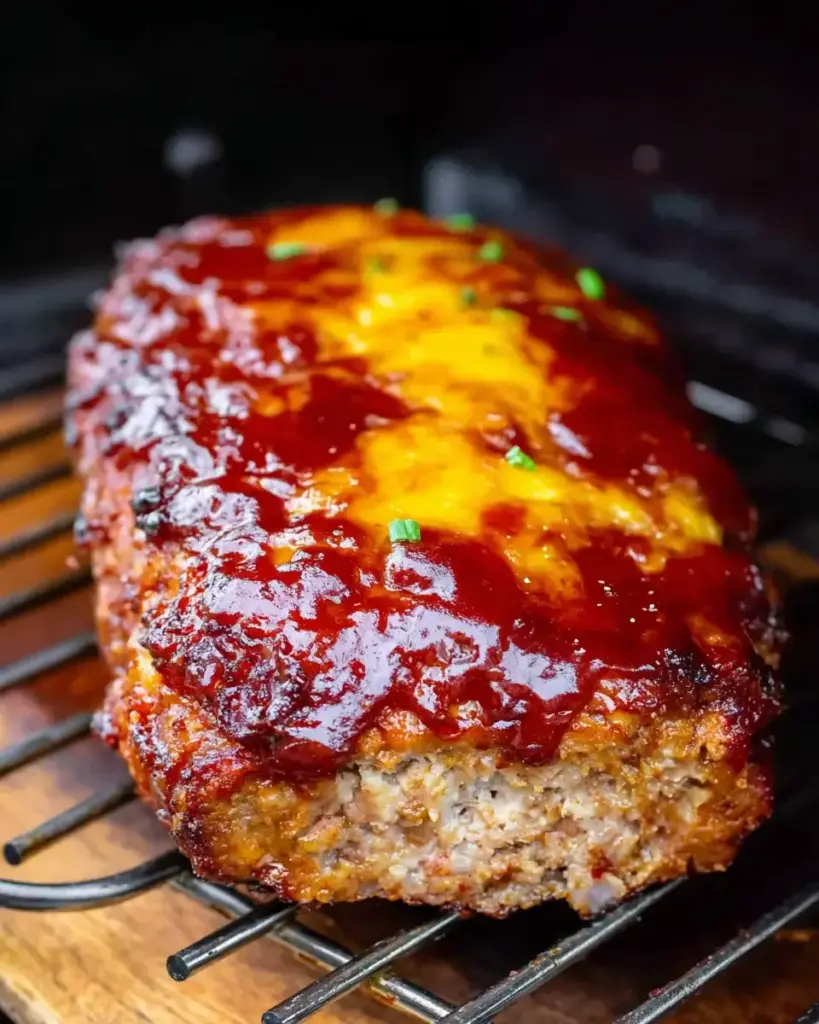
Step 4: Smoke the Meatloaf

Place the shaped meatloaf in the smoker. Close the lid and let it smoke for about 2 to 2.5 hours. Use a meat thermometer to monitor the internal temperature. You’re aiming for 160°F. This ensures it’s cooked through while remaining juicy and flavorful.

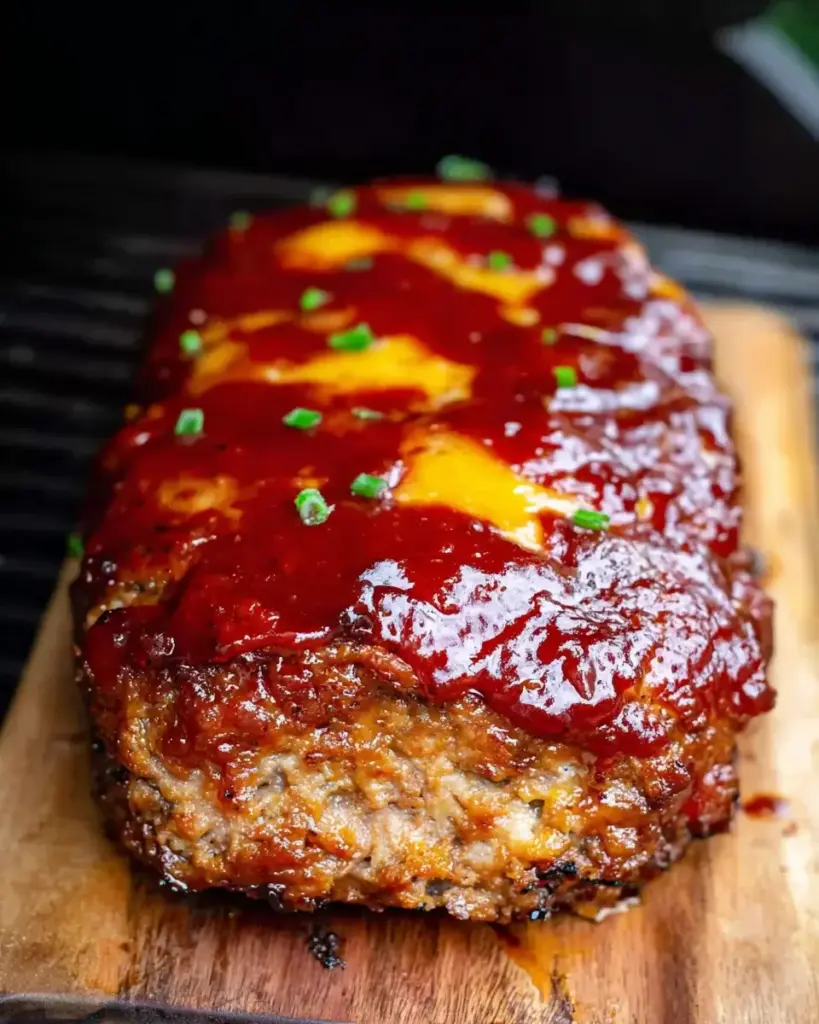
Step 5: Add BBQ Sauce

During the last 30 minutes of cooking, brush additional barbecue sauce on top of the meatloaf. This adds a sticky, sweet glaze that enhances the flavor. It’s the finishing touch that takes your Cheesy BBQ Smoked Meatloaf to the next level!

Step 6: Rest and Slice

Once your meatloaf reaches the desired temperature, remove it from the smoker. Let it rest for about 10 minutes before slicing. This resting period allows the juices to redistribute, ensuring each slice is moist and delicious. Patience pays off here!

Tips for Success

  • Use a meat thermometer to ensure perfect doneness; it’s your best friend in the kitchen.
  • Let the meatloaf rest before slicing to keep it juicy and flavorful.
  • Experiment with different cheeses for unique flavor profiles.
  • Don’t skip the parchment paper; it makes transferring the meatloaf easier.
  • For extra flavor, consider adding chopped herbs like parsley or thyme.

Equipment Needed

  • Smoker: A dedicated smoker works best, but a charcoal or gas grill can also do the job.
  • Meat thermometer: Essential for checking doneness; a simple instant-read thermometer will suffice.
  • Parchment paper: Helps with shaping and transferring the meatloaf easily.
  • Mixing bowl: A large bowl for combining ingredients.

Variations of Cheesy BBQ Smoked Meatloaf

  • Spicy Kick: Add 1/2 teaspoon of cayenne pepper or diced jalapeños for a fiery twist.
  • Cheese Swap: Try pepper jack or gouda instead of cheddar for a different flavor profile.
  • Vegetarian Option: Substitute ground beef and pork with a mix of lentils, mushrooms, and quinoa for a hearty meatless version.
  • BBQ Sauce Variations: Experiment with different barbecue sauces, like honey mustard or chipotle, for unique flavors.
  • Herb Infusion: Incorporate fresh herbs like basil or cilantro for a fresh, aromatic touch.

Serving Suggestions for Cheesy BBQ Smoked Meatloaf

  • Classic Sides: Serve with creamy mashed potatoes or buttery corn on the cob for a comforting meal.
  • Fresh Salad: A crisp garden salad adds a refreshing contrast to the rich meatloaf.
  • Drink Pairing: Enjoy with a cold beer or a glass of sweet iced tea.
  • Presentation: Garnish with fresh parsley for a pop of color and serve on a rustic wooden board.

FAQs about Cheesy BBQ Smoked Meatloaf

Can I use only ground beef for this recipe?

Absolutely! While the combination of ground beef and pork adds depth, you can use just ground beef if that’s what you have on hand. Just remember, it might be a bit less moist.

How do I know when the meatloaf is done?

The best way to check is by using a meat thermometer. You want the internal temperature to reach 160°F. This ensures your Cheesy BBQ Smoked Meatloaf is safe to eat and perfectly cooked.

Can I make this meatloaf ahead of time?

Yes! You can prepare the meat mixture a day in advance and store it in the fridge. Just shape it into a loaf when you’re ready to smoke it. This makes for a quick dinner solution!

What can I serve with Cheesy BBQ Smoked Meatloaf?

This dish pairs wonderfully with classic sides like mashed potatoes, coleslaw, or a fresh garden salad. You can also enjoy it with a side of baked beans for a true barbecue experience.

Can I freeze leftovers?

Definitely! Wrap the leftover meatloaf tightly in plastic wrap and then in aluminum foil. It can be frozen for up to three months. Just thaw and reheat when you’re ready to enjoy it again!

Final Thoughts

Cooking this Cheesy BBQ Smoked Meatloaf is more than just preparing a meal; it’s about creating memories. The aroma wafting through your kitchen as it smokes is enough to make anyone’s mouth water. Each slice reveals a delightful blend of flavors, with the cheese melting into the savory meat. It’s a dish that brings family and friends together, sparking laughter and conversation around the table. Whether it’s a casual weeknight dinner or a weekend gathering, this meatloaf is sure to impress. So fire up that smoker and enjoy the joy this recipe brings to your home!

jhessica

Cheesy BBQ Smoked Meatloaf: A Flavorful Comfort Dish

A flavorful and comforting dish that combines ground beef and pork with cheese and barbecue sauce, smoked to perfection.
Prep Time 15 minutes
Total Time 2 hours 45 minutes
Servings: 6 servings
Course: Main Dish
Cuisine: American
Calories: 350

Ingredients
  

  • 1 pound ground beef
  • 1 pound ground pork
  • 1 cup breadcrumbs
  • 1/2 cup shredded cheddar cheese
  • 1/2 cup diced onion
  • 1/2 cup diced bell pepper
  • 2 large eggs
  • 1/4 cup barbecue sauce plus extra for topping
  • 1 tablespoon Worcestershire sauce
  • 1 teaspoon garlic powder
  • 1 teaspoon onion powder
  • 1 teaspoon salt
  • 1/2 teaspoon black pepper
  • 1/2 teaspoon smoked paprika

Method
 

  1. Preheat your smoker to 250°F.
  2. In a large bowl, combine the ground beef, ground pork, breadcrumbs, cheddar cheese, onion, bell pepper, eggs, barbecue sauce, Worcestershire sauce, garlic powder, onion powder, salt, black pepper, and smoked paprika.
  3. Mix until well combined, but do not overmix.
  4. Shape the mixture into a loaf and place it on a piece of parchment paper.
  5. Transfer the meatloaf to the smoker and cook for about 2 to 2.5 hours, or until the internal temperature reaches 160°F.
  6. During the last 30 minutes of cooking, brush additional barbecue sauce on top of the meatloaf for added flavor.
  7. Once cooked, remove from the smoker and let it rest for 10 minutes before slicing.

Nutrition

Serving: 1sliceCalories: 350kcalCarbohydrates: 10gProtein: 25gFat: 22gSaturated Fat: 10gPolyunsaturated Fat: 8gCholesterol: 100mgSodium: 600mgFiber: 1gSugar: 3g

Notes

  • For a spicier kick, add 1/2 teaspoon of cayenne pepper to the meat mixture.
  • You can substitute the cheddar cheese with pepper jack cheese for a different flavor profile.

Tried this recipe?

Let us know how it was!

Garlic Butter Shrimp and Rice: Easy Recipe to Try!

Introduction to Garlic Butter Shrimp and Rice

There’s something magical about a dish that comes together in a flash, especially after a long day. Garlic Butter Shrimp and Rice is just that—a delightful meal that’s both quick and satisfying. I remember the first time I made this dish; the aroma of garlic sizzling in butter filled my kitchen, instantly lifting my spirits. This recipe is perfect for busy weeknights or when you want to impress someone special without spending hours in the kitchen. With just a handful of ingredients, you can create a comforting, flavorful meal that everyone will love.

Why You’ll Love This Garlic Butter Shrimp and Rice

This Garlic Butter Shrimp and Rice recipe is a game-changer for anyone who craves a delicious meal without the fuss. It’s incredibly easy to whip up, taking just 30 minutes from start to finish. The rich, buttery flavor combined with the succulent shrimp and fluffy rice creates a dish that’s not only satisfying but also impressive. Perfect for a weeknight dinner or a casual gathering, it’s sure to become a favorite in your kitchen.

Ingredients for Garlic Butter Shrimp and Rice

Gathering the right ingredients is the first step to culinary success. For this Garlic Butter Shrimp and Rice, you’ll need:

  • Shrimp: Large, peeled, and deveined shrimp are ideal. They cook quickly and soak up all that delicious garlic butter.
  • Jasmine Rice: This fragrant rice adds a lovely texture and aroma. You can substitute it with basmati or long-grain rice if needed.
  • Chicken Broth: Using broth instead of water infuses the rice with flavor. Vegetable broth works well for a lighter option.
  • Unsalted Butter: The star of the show! It creates a rich sauce that coats the shrimp beautifully. Feel free to use olive oil for a healthier twist.
  • Garlic: Freshly minced garlic is a must for that aromatic punch. Garlic powder can be used in a pinch, but fresh is best.
  • Paprika: This spice adds a subtle smokiness and a pop of color. You can swap it for cayenne if you like a bit of heat.
  • Salt and Black Pepper: Essential for seasoning. Adjust to your taste preferences.
  • Fresh Parsley: Chopped parsley adds a fresh, vibrant touch. You can also use cilantro for a different flavor profile.
  • Lemon: A squeeze of lemon juice brightens the dish and balances the richness of the butter.

For those looking to mix things up, consider adding a pinch of red pepper flakes for heat or swapping shrimp for chicken or tofu for a different protein option. The exact quantities for each ingredient are listed at the bottom of the article, ready for you to print and take to the kitchen!

How to Make Garlic Butter Shrimp and Rice

Now that you have your ingredients ready, let’s dive into the cooking process. This Garlic Butter Shrimp and Rice recipe is straightforward, making it perfect for both novice cooks and seasoned chefs. Follow these simple steps, and you’ll have a delicious meal on the table in no time!

Step 1: Prepare the Rice

Start by bringing the chicken broth to a boil in a medium saucepan. The broth is key; it adds depth to the rice. Once boiling, add the jasmine rice, then reduce the heat to low. Cover the pot and let it simmer for about 15 minutes. This is when the magic happens—the rice absorbs all that flavorful broth. After 15 minutes, remove it from heat and let it sit, covered, for another 5 minutes. This resting time makes the rice fluffy and perfect.

Step 2: Sauté the Garlic

While the rice is cooking, grab a large skillet and heat 2 tablespoons of unsalted butter over medium heat. Once the butter is melted and bubbly, toss in the minced garlic. Sauté it for about a minute, just until it becomes fragrant. Be careful not to burn it; burnt garlic can turn bitter and ruin the dish. The aroma will fill your kitchen, making your mouth water!

Step 3: Cook the Shrimp

Next, add the peeled and deveined shrimp to the skillet. Season them with paprika, salt, and black pepper. Cook the shrimp for about 2-3 minutes on each side. You’ll know they’re done when they turn pink and opaque. This is the moment to stir in the remaining 2 tablespoons of butter and the fresh lemon juice. Mix everything well, ensuring the shrimp are coated in that luscious garlic butter sauce.

Step 4: Combine and Serve

Now it’s time to bring it all together! Fluff the cooked rice with a fork and divide it among your serving plates. Top each plate with the garlic butter shrimp, making sure to drizzle some of that buttery sauce over the rice. Finally, sprinkle with fresh parsley for a pop of color and flavor. Your Garlic Butter Shrimp and Rice is ready to impress!

Tips for Success

  • Always use fresh garlic for the best flavor; it makes a world of difference.
  • Don’t overcrowd the skillet when cooking shrimp; this ensures even cooking.
  • Let the rice rest after cooking; it helps achieve that perfect fluffy texture.
  • Adjust seasoning to your taste; everyone’s palate is different!
  • For a quick cleanup, line your baking sheets with parchment paper.

Equipment Needed

  • Medium Saucepan: Essential for cooking the rice. A pot with a lid works too.
  • Large Skillet: Needed for sautéing the garlic and shrimp. A non-stick pan is ideal.
  • Measuring Cups and Spoons: For accurate ingredient measurements. You can use any standard kitchen measuring tools.
  • Fork: Perfect for fluffing the rice. A spoon can work in a pinch.

Variations

  • Spicy Garlic Butter Shrimp: Add a pinch of red pepper flakes or diced jalapeños for a fiery kick.
  • Vegetable Medley: Toss in some bell peppers, snap peas, or broccoli for added color and nutrition.
  • Herb-Infused Rice: Mix in fresh herbs like basil or thyme into the rice for an aromatic twist.
  • Low-Carb Option: Substitute rice with cauliflower rice for a lighter, low-carb meal.
  • Asian-Inspired: Use soy sauce and sesame oil instead of butter for a different flavor profile.

Serving Suggestions

  • Side Salad: A crisp green salad with a light vinaigrette complements the richness of the dish.
  • Garlic Bread: Serve with warm garlic bread to soak up the delicious sauce.
  • Wine Pairing: A chilled white wine, like Sauvignon Blanc, enhances the flavors beautifully.
  • Presentation: Serve in shallow bowls for an elegant touch, garnished with lemon wedges.

FAQs about Garlic Butter Shrimp and Rice

Can I use frozen shrimp for this recipe?

Absolutely! Frozen shrimp work just fine. Just make sure to thaw them completely before cooking. This will help them cook evenly and absorb all that delicious garlic butter flavor.

What can I substitute for jasmine rice?

If jasmine rice isn’t available, you can easily swap it for basmati or long-grain rice. Both options will still give you a lovely texture and taste in your Garlic Butter Shrimp and Rice.

How can I make this dish spicier?

For a spicy kick, add a pinch of red pepper flakes or diced jalapeños when cooking the shrimp. This will elevate the flavor and give your dish a nice heat!

Can I make this recipe ahead of time?

While it’s best enjoyed fresh, you can prepare the rice and shrimp separately ahead of time. Just reheat them together before serving for a quick meal.

Is Garlic Butter Shrimp and Rice gluten-free?

Yes! This dish is naturally gluten-free, making it a great option for those with dietary restrictions. Just double-check your broth to ensure it’s gluten-free as well.

Final Thoughts

Cooking Garlic Butter Shrimp and Rice is more than just preparing a meal; it’s about creating a moment of joy in your kitchen. The rich aroma of garlic and butter wafting through the air brings back memories of family dinners and laughter. This dish is a reminder that you don’t need to spend hours to create something special. With its vibrant flavors and comforting textures, it’s perfect for any occasion. Whether you’re impressing guests or enjoying a cozy night in, this recipe is sure to become a beloved staple in your culinary repertoire.

jhessica

Garlic Butter Shrimp and Rice: Easy Recipe to Try!

A delicious and easy recipe for Garlic Butter Shrimp and Rice, perfect for a quick weeknight dinner.
Prep Time 10 minutes
Cook Time 20 minutes
Total Time 30 minutes
Servings: 4 servings
Course: Main Course
Cuisine: American
Calories: 350

Ingredients
  

  • 1 pound large shrimp peeled and deveined
  • 1 cup jasmine rice
  • 2 cups chicken broth
  • 4 tablespoons unsalted butter
  • 4 cloves garlic minced
  • 1 teaspoon paprika
  • 1 teaspoon salt
  • ½ teaspoon black pepper
  • 2 tablespoons fresh parsley chopped
  • 1 lemon juiced

Method
 

  1. In a medium saucepan, bring the chicken broth to a boil.
  2. Add the jasmine rice, reduce the heat to low, cover, and simmer for about 15 minutes or until the rice is tender and the liquid is absorbed.
  3. Remove from heat and let it sit covered for 5 minutes.
  4. While the rice is cooking, heat 2 tablespoons of butter in a large skillet over medium heat.
  5. Add the minced garlic and sauté for about 1 minute until fragrant, being careful not to burn it.
  6. Add the shrimp to the skillet, season with paprika, salt, and black pepper.
  7. Cook for about 2-3 minutes on each side until the shrimp are pink and opaque.
  8. Stir in the remaining 2 tablespoons of butter and the lemon juice, mixing well to coat the shrimp.
  9. Remove from heat.
  10. Fluff the cooked rice with a fork and divide it among serving plates.
  11. Top each serving with the garlic butter shrimp and sprinkle with fresh parsley.

Nutrition

Serving: 1servingCalories: 350kcalCarbohydrates: 40gProtein: 25gFat: 12gSaturated Fat: 7gPolyunsaturated Fat: 3gCholesterol: 200mgSodium: 800mgFiber: 1gSugar: 1g

Notes

  • For a spicy kick, add a pinch of red pepper flakes when cooking the shrimp.
  • You can substitute the shrimp with chicken or tofu for a different protein option.

Tried this recipe?

Let us know how it was!

Smoky Salmon Cream Cheese Dip: A Delicious Treat!

Introduction to Smoky Salmon Cream Cheese Dip

There’s something magical about a dip that brings people together.

The *Smoky Salmon Cream Cheese Dip* is just that—a creamy, flavorful delight that’s perfect for any gathering or a cozy night in.

I remember the first time I made this dip for a game night with friends. The way they devoured it, paired with crunchy crackers and fresh veggies, was a sight to behold.

This recipe is not only quick to whip up, but it also impresses with its rich flavors.

Whether you’re hosting a party or just need a snack, this dip is your go-to solution.

Why You’ll Love This Smoky Salmon Cream Cheese Dip

This *Smoky Salmon Cream Cheese Dip* is a game-changer for any occasion.

It’s incredibly easy to make, taking just 10 minutes of your time.

The rich, smoky flavor of the salmon combined with the creamy texture of the cheese creates a taste sensation that’s hard to resist.

Plus, it’s a crowd-pleaser, making it perfect for parties or casual get-togethers.

You’ll find yourself making it again and again!

Ingredients for Smoky Salmon Cream Cheese Dip

Creating the *Smoky Salmon Cream Cheese Dip* is a breeze, thanks to its simple yet flavorful ingredients.

Here’s what you’ll need:

  • Cream Cheese: The base of our dip, it adds a rich, creamy texture that balances the smokiness of the salmon.
  • Smoked Salmon: This is the star of the show! Its deep, smoky flavor elevates the dip and gives it that gourmet touch.
  • Sour Cream: Adds a tangy creaminess that complements the other ingredients beautifully.
  • Fresh Dill: This herb brings a refreshing note. If fresh isn’t available, dried dill works just fine.
  • Lemon Juice: A splash of acidity brightens the flavors and cuts through the richness.
  • Worcestershire Sauce: Just a dash adds depth and umami, enhancing the overall flavor profile.
  • Garlic Powder: For a hint of savory goodness, garlic powder is a must. It’s easy to mix in and packs a punch.
  • Salt and Pepper: Essential for seasoning, these will help bring all the flavors together.
  • Capers (optional): If you’re feeling adventurous, chopped capers add a briny kick that pairs wonderfully with the salmon.
  • Vegetable Sticks, Crackers, or Bagel Chips: These are perfect for serving and dipping, providing a satisfying crunch.

For exact measurements, check the bottom of the article where you can find everything listed for easy printing.

With these ingredients, you’re well on your way to creating a dip that will have everyone coming back for more!

How to Make Smoky Salmon Cream Cheese Dip

Making the *Smoky Salmon Cream Cheese Dip* is as easy as pie.

With just a few simple steps, you’ll have a delicious dip ready to impress your friends and family.

Let’s dive into the process!

Step 1: Prepare the Base

Start by taking your softened cream cheese and placing it in a mixing bowl.

Add the sour cream and lemon juice.

Using a hand mixer or a sturdy spatula, blend these ingredients until they’re smooth and creamy.

This base is the heart of your dip, so make sure it’s well combined.

The creaminess will set the stage for the smoky flavors to come.

Step 2: Mix in the Salmon and Seasonings

Next, it’s time to introduce the star of the show: the smoked salmon.

Chop it into bite-sized pieces and fold it into your creamy mixture.

Then, sprinkle in the fresh dill, Worcestershire sauce, and garlic powder.

If you’re using capers, now’s the moment to add them too.

Gently stir everything together until well combined.

The colors and aromas will start to come alive!

Step 3: Adjust the Flavor

Now, it’s time to taste your creation.

Add salt and pepper to your liking.

If you want a little extra kick, consider a dash of hot sauce or cayenne pepper.

This step is crucial; it’s where you can make the dip truly yours.

Feel free to adjust the flavors until it sings!

Step 4: Chill and Serve

Transfer your dip to a serving bowl and cover it with plastic wrap.

Chill it in the refrigerator for at least 30 minutes.

This allows the flavors to meld beautifully.

When you’re ready to serve, pair it with vegetable sticks, crackers, or bagel chips.

Watch as everyone dives in, eager for a taste of your delicious *Smoky Salmon Cream Cheese Dip*!

Tips for Success

  • Make sure your cream cheese is softened for easy mixing; leave it out for about 30 minutes before starting.
  • For a smoother dip, use a hand mixer instead of a spatula.
  • Let the dip chill longer than 30 minutes if you can; it enhances the flavors even more.
  • Experiment with different herbs like chives or parsley for a unique twist.
  • Always taste and adjust seasoning before serving; it makes a world of difference!

Equipment Needed

  • Mixing Bowl: A medium-sized bowl works best. If you don’t have one, any large container will do.
  • Hand Mixer or Spatula: A hand mixer makes it easier, but a sturdy spatula will get the job done.
  • Measuring Cups: Essential for accuracy. If you’re in a pinch, use a regular cup for rough estimates.
  • Serving Bowl: Any attractive bowl will showcase your dip beautifully.

Variations

  • Spicy Twist: Add a dash of sriracha or a pinch of cayenne pepper for a spicy kick that elevates the flavor.
  • Herb Infusion: Swap out dill for fresh chives or parsley for a different herbal note that brightens the dip.
  • Smoked Trout: For a change of pace, use smoked trout instead of salmon for a unique flavor profile.
  • Vegan Option: Substitute cream cheese with a plant-based alternative and use smoked tofu for a delicious vegan dip.
  • Cheesy Delight: Mix in some shredded cheddar or crumbled feta for an extra cheesy experience.

Serving Suggestions

  • Pair the dip with crunchy vegetable sticks like carrots, celery, or bell peppers for a fresh contrast.
  • Serve alongside an assortment of crackers or bagel chips for a satisfying crunch.
  • For drinks, consider a crisp white wine or a light beer to complement the flavors.
  • Garnish with extra dill or capers for a beautiful presentation that impresses your guests.

FAQs about Smoky Salmon Cream Cheese Dip

Can I make Smoky Salmon Cream Cheese Dip ahead of time?

Absolutely! This dip can be made a day in advance. Just store it in the refrigerator, covered, to let the flavors meld beautifully. It’s a great time-saver for parties!

What can I substitute for smoked salmon?

If you don’t have smoked salmon on hand, canned tuna is a fantastic alternative. It will give you a different flavor profile but still create a delicious dip.

How long does the dip last in the fridge?

Your *Smoky Salmon Cream Cheese Dip* will stay fresh for about 3 days in the fridge. Just make sure it’s stored in an airtight container to maintain its flavor.

Can I freeze this dip?

While it’s best enjoyed fresh, you can freeze the dip for up to a month. Just thaw it in the fridge overnight before serving, and give it a good stir to bring back the creaminess.

What should I serve with the dip?

Pair it with crunchy vegetable sticks, crackers, or bagel chips. These options provide a satisfying crunch that complements the creamy dip perfectly!

Final Thoughts

Creating the *Smoky Salmon Cream Cheese Dip* is more than just whipping up a snack; it’s about sharing joy and flavor with those you care about.

Each bite is a delightful blend of creamy, smoky goodness that sparks conversations and laughter.

Whether it’s a casual gathering or a special occasion, this dip has a way of making moments memorable.

I love how it brings people together, encouraging everyone to dip in and enjoy.

So, roll up your sleeves, gather your ingredients, and let this dip be the star of your next get-together!

jhessica

Smoky Salmon Cream Cheese Dip: A Delicious Treat!

A creamy and flavorful dip made with smoked salmon and cream cheese, perfect for parties or as a snack.
Prep Time 10 minutes
Total Time 40 minutes
Servings: 6 servings
Course: Appetizer
Cuisine: American
Calories: 150

Ingredients
  

  • 8 ounces cream cheese softened
  • 4 ounces smoked salmon chopped
  • 2 tablespoons sour cream
  • 2 tablespoons fresh dill chopped (or 1 tablespoon dried dill)
  • 1 tablespoon lemon juice
  • 1 teaspoon Worcestershire sauce
  • 1 teaspoon garlic powder
  • Salt and pepper to taste
  • 1 tablespoon capers drained and chopped (optional)
  • Vegetable sticks crackers, or bagel chips for serving

Method
 

  1. In a mixing bowl, combine the softened cream cheese, sour cream, and lemon juice. Mix until smooth and creamy.
  2. Add the chopped smoked salmon, dill, Worcestershire sauce, garlic powder, and capers (if using) to the bowl. Stir until all ingredients are well incorporated.
  3. Season with salt and pepper to taste. Adjust seasoning as needed.
  4. Transfer the dip to a serving bowl and cover with plastic wrap. Chill in the refrigerator for at least 30 minutes to allow the flavors to meld.
  5. Serve with vegetable sticks, crackers, or bagel chips.

Nutrition

Serving: 1/6 of the dipCalories: 150kcalCarbohydrates: 3gProtein: 8gFat: 12gSaturated Fat: 6gPolyunsaturated Fat: 4gCholesterol: 30mgSodium: 300mgSugar: 1g

Notes

  • For a spicier kick, add a dash of hot sauce or a pinch of cayenne pepper to the mix.
  • You can also substitute the smoked salmon with canned tuna for a different flavor profile.

Tried this recipe?

Let us know how it was!

Spicy Bayou Deviled Eggs: A Flavorful Recipe Guide

Introduction to Spicy Bayou Deviled Eggs

Deviled eggs have always held a special place in my heart, evoking memories of family gatherings and summer picnics. Now, when I whip up a batch of Spicy Bayou Deviled Eggs, it’s like bringing a little piece of the South to my kitchen. This recipe is not just about flavor; it’s a quick solution for those busy days when you want to impress your loved ones without spending hours in the kitchen. With a delightful kick and creamy texture, these deviled eggs are sure to be a hit at any gathering, making them a must-try for every home cook.

Why You’ll Love This Spicy Bayou Deviled Eggs

These Spicy Bayou Deviled Eggs are a game-changer for any occasion. They’re incredibly easy to make, taking just 27 minutes from start to finish. The combination of creamy yolks and zesty Cajun seasoning creates a flavor explosion that will have your guests coming back for more. Plus, they’re gluten-free, making them a perfect appetizer for everyone. Trust me, once you try them, you’ll be hooked!

Ingredients for Spicy Bayou Deviled Eggs

Gathering the right ingredients is key to making these Spicy Bayou Deviled Eggs shine. Here’s what you’ll need:

  • Large eggs: The star of the show! Fresh eggs yield the best flavor and texture.
  • Mayonnaise: This adds creaminess and richness to the filling. You can use regular or light, depending on your preference.
  • Dijon mustard: A touch of tanginess that elevates the flavor profile. It’s a must for that classic deviled egg taste.
  • Hot sauce: Adjust this to your heat tolerance. It brings the spicy kick that makes these eggs special.
  • Cajun seasoning: This blend of spices adds depth and a Southern flair. Feel free to experiment with your favorite brand.
  • Green onions: Finely chopped, they add a fresh crunch and a pop of color to the filling.
  • Salt and pepper: Essential for seasoning. Don’t skip these; they enhance all the flavors.
  • Paprika: A sprinkle on top not only adds color but also a hint of smokiness. You can use smoked paprika for an extra layer of flavor.

For those looking to mix things up, consider substituting the Cajun seasoning with Old Bay seasoning for a different twist. All ingredient quantities are listed at the bottom of the article for easy reference and printing.

How to Make Spicy Bayou Deviled Eggs

Creating Spicy Bayou Deviled Eggs is a straightforward process that anyone can master. Follow these simple steps, and you’ll have a delicious appetizer ready in no time. Let’s dive in!

Step 1: Boil the Eggs

Start by placing the large eggs in a saucepan. Cover them with cold water, ensuring the water is about an inch above the eggs. Bring the water to a boil over medium-high heat. Once it reaches a rolling boil, cover the pot and remove it from the heat. Let the eggs sit for 12 minutes. This method ensures perfectly cooked yolks without that greenish ring around them.

Step 2: Cool the Eggs

After the timer goes off, it’s time to cool those eggs down. Transfer them to an ice bath—just a bowl filled with ice and water. This step is crucial. It stops the cooking process and makes peeling the eggs a breeze. Let them chill for about 5 minutes. Trust me, your fingers will thank you later!

Step 3: Prepare the Filling

Once the eggs are cool, gently tap them on a hard surface to crack the shell. Peel the eggs under running water for easier removal. Slice each egg in half lengthwise and carefully scoop out the yolks into a mixing bowl. Mash the yolks with a fork until they’re crumbly. Then, add the mayonnaise, Dijon mustard, hot sauce, Cajun seasoning, green onions, salt, and pepper. Mix everything until it’s smooth and creamy. Taste and adjust the seasoning if needed; this is your moment to shine!

Step 4: Fill the Egg Whites

Now comes the fun part—filling the egg whites! You can either spoon the yolk mixture back into the egg halves or use a piping bag for a fancier look. If you’re using a bag, cut a small hole in one corner and pipe the filling in. Aim for a nice swirl on top; it adds a touch of elegance. Don’t worry if it’s not perfect; it’s all about the taste!

Step 5: Garnish and Serve

To finish off your Spicy Bayou Deviled Eggs, sprinkle a little paprika on top for color and a hint of smokiness. You can also add a few extra green onions for a pop of freshness. Arrange them on a platter, and they’re ready to impress! Serve them chilled, and watch as they disappear at your next gathering.

Tips for Success

  • Use fresh eggs for the best flavor and easier peeling.
  • Adjust the hot sauce to your preferred spice level; taste as you go!
  • For a creamier filling, let the mayonnaise sit at room temperature before mixing.
  • Experiment with different garnishes like chives or crispy bacon bits for added flair.
  • Make these deviled eggs a day ahead; they taste even better after chilling overnight!

Equipment Needed

  • Medium saucepan: For boiling the eggs. A large pot works too.
  • Mixing bowl: To combine the yolk filling. Any bowl will do.
  • Fork: For mashing the yolks. A potato masher can work in a pinch.
  • Ice bath container: A large bowl or sink filled with ice water.
  • Piping bag or spoon: For filling the egg whites. A zip-top bag can substitute.

Variations

  • Smoky Bayou Deviled Eggs: Add a dash of smoked paprika to the yolk mixture for a deeper flavor.
  • Spicy Sriracha Deviled Eggs: Swap the hot sauce for Sriracha for a different kind of heat and a hint of sweetness.
  • Avocado Deviled Eggs: Replace half of the mayonnaise with mashed avocado for a creamy, healthier twist.
  • Herbed Deviled Eggs: Mix in fresh herbs like dill or cilantro for a refreshing flavor boost.
  • Vegan Deviled Eggs: Use silken tofu blended with mustard and spices as a substitute for the yolk mixture.

Serving Suggestions

  • Pair your Spicy Bayou Deviled Eggs with a crisp green salad for a refreshing contrast.
  • Serve alongside a zesty cocktail, like a Bloody Mary, to complement the flavors.
  • For presentation, arrange the eggs on a colorful platter with fresh herbs for a pop of color.
  • Consider offering a variety of hot sauces on the side for guests to customize their spice level.

FAQs about Spicy Bayou Deviled Eggs

Can I make Spicy Bayou Deviled Eggs ahead of time?

Absolutely! These deviled eggs can be made a day in advance. Just store them in the refrigerator, covered, and they’ll taste even better after chilling overnight. Just remember to garnish them right before serving for that fresh look!

What can I substitute for Cajun seasoning?

If Cajun seasoning isn’t your thing, you can easily swap it out for Old Bay seasoning. It offers a different flavor profile while still keeping that Southern charm. You can also create your own blend with paprika, garlic powder, and a pinch of cayenne.

How do I prevent the eggs from cracking while boiling?

To avoid cracked eggs, make sure to start with cold water and bring it to a boil gradually. Adding a splash of vinegar to the water can also help seal any cracks that might form during cooking.

Can I use a different type of mustard?

Definitely! While Dijon mustard adds a nice tang, you can use yellow mustard for a milder flavor or even spicy brown mustard for an extra kick. It’s all about your personal taste!

How do I store leftover Spicy Bayou Deviled Eggs?

Store any leftovers in an airtight container in the refrigerator. They’re best enjoyed within 2-3 days, but I doubt they’ll last that long with how delicious they are!

Final Thoughts

Making Spicy Bayou Deviled Eggs is more than just a cooking task; it’s an experience filled with flavor and nostalgia. Each bite transports me back to those lively family gatherings, where laughter and good food were the stars of the show. The joy of sharing these zesty, creamy delights with friends and family is unmatched. Whether it’s a casual get-together or a festive celebration, these deviled eggs are sure to steal the spotlight. So, roll up your sleeves, embrace the spice, and let these little bites of happiness bring warmth and flavor to your table!

jhessica

Spicy Bayou Deviled Eggs: A Flavorful Recipe Guide

A flavorful recipe for Spicy Bayou Deviled Eggs, perfect for gatherings and parties.
Prep Time 15 minutes
Cook Time 12 minutes
Total Time 27 minutes
Servings: 6 servings
Course: Appetizer
Cuisine: Southern
Calories: 120

Ingredients
  

  • 6 large eggs
  • 3 tablespoons mayonnaise
  • 1 teaspoon Dijon mustard
  • 1 teaspoon hot sauce adjust to taste
  • 1 teaspoon Cajun seasoning
  • 1 tablespoon finely chopped green onions
  • Salt and pepper to taste
  • Paprika for garnish

Method
 

  1. Place the eggs in a saucepan and cover them with cold water. Bring to a boil over medium-high heat. Once boiling, cover the pot, remove it from heat, and let it sit for 12 minutes.
  2. After 12 minutes, transfer the eggs to an ice bath to cool for about 5 minutes. This will make peeling easier.
  3. Once cooled, peel the eggs and slice them in half lengthwise. Remove the yolks and place them in a mixing bowl.
  4. Mash the yolks with a fork and add the mayonnaise, Dijon mustard, hot sauce, Cajun seasoning, green onions, salt, and pepper. Mix until smooth and creamy.
  5. Spoon or pipe the yolk mixture back into the egg whites.
  6. Sprinkle with paprika for garnish and serve chilled.

Nutrition

Serving: 1egg halfCalories: 120kcalCarbohydrates: 1gProtein: 6gFat: 10gSaturated Fat: 2gPolyunsaturated Fat: 8gCholesterol: 186mgSodium: 150mg

Notes

  • For a smoky flavor, add a dash of smoked paprika to the yolk mixture.
  • Substitute the Cajun seasoning with Old Bay seasoning for a different flavor profile.

Tried this recipe?

Let us know how it was!

Crack Corn Salad: A Tasty Recipe You Must Try!

Introduction to Crack Corn Salad

There’s something magical about summer gatherings, where laughter fills the air and delicious food brings everyone together. One dish that never fails to impress is Crack Corn Salad. This vibrant salad combines sweet corn with fresh veggies, creating a refreshing side that’s perfect for any occasion. Whether you’re hosting a backyard barbecue or just looking for a quick solution for a busy day, this salad is your go-to. It’s easy to whip up, and trust me, your friends and family will be asking for seconds!

Why You’ll Love This Crack Corn Salad

This Crack Corn Salad is a game-changer for busy cooks. It comes together in just 15 minutes, making it a breeze for any gathering. The combination of sweet corn and crisp veggies creates a burst of flavor that’s hard to resist. Plus, it’s versatile! You can serve it as a side dish or a light meal. Trust me, once you try it, you’ll want to make it a staple in your kitchen.

Ingredients for Crack Corn Salad

Gathering the right ingredients is the first step to creating this delightful Crack Corn Salad. Here’s what you’ll need:

  • Frozen sweet corn: The star of the show! Thaw it for a burst of sweetness.
  • Cherry tomatoes: Their juicy pop adds color and freshness.
  • Diced cucumber: Crisp and refreshing, it balances the sweetness of the corn.
  • Red onion: A touch of sharpness that enhances the overall flavor.
  • Mayonnaise: This creamy base brings everything together.
  • Sour cream: Adds tanginess and richness to the dressing.
  • Apple cider vinegar: A splash of acidity that brightens the salad.
  • Garlic powder: For a hint of savory depth.
  • Onion powder: Enhances the onion flavor without overpowering.
  • Salt and black pepper: Essential seasonings to elevate the taste.
  • Crumble bacon (optional): For those who love a smoky crunch.
  • Shredded cheddar cheese (optional): Adds a creamy, cheesy element.
  • Fresh cilantro or parsley: A sprinkle for garnish that adds a pop of color and freshness.

Feel free to get creative! You can substitute Greek yogurt for sour cream for a healthier twist or even add diced jalapeños for a spicy kick. For exact measurements, check the bottom of the article where you can find everything available for printing.

How to Make Crack Corn Salad

Creating this Crack Corn Salad is as easy as pie. Follow these simple steps, and you’ll have a delicious dish ready in no time. Let’s dive in!

Step 1: Combine the Vegetables

Start by grabbing a large mixing bowl. Toss in the thawed sweet corn, halved cherry tomatoes, diced cucumber, and finely chopped red onion. Stir gently until everything is well mixed. The colors alone will make your mouth water!

Step 2: Prepare the Dressing

In a separate bowl, whisk together the mayonnaise, sour cream, apple cider vinegar, garlic powder, onion powder, salt, and black pepper. Keep whisking until the mixture is smooth and creamy. This dressing is the secret sauce that ties all the flavors together!

Step 3: Mix Everything Together

Pour the dressing over the vegetable mixture. Stir carefully to ensure every piece is coated. This is where the magic happens! The creamy dressing clings to the veggies, making each bite a flavor explosion.

Step 4: Add Optional Ingredients

If you’re feeling adventurous, fold in the crumbled bacon and shredded cheddar cheese. These additions bring a delightful crunch and richness to the salad. But hey, if you prefer to keep it lighter, feel free to skip them!

Step 5: Chill and Serve

Cover the salad and pop it in the fridge for at least 30 minutes. This chilling time allows the flavors to meld beautifully. When you’re ready to serve, give it a good stir and garnish with fresh cilantro or parsley. Your Crack Corn Salad is now ready to impress!

Tips for Success

  • Use fresh ingredients for the best flavor. Fresh veggies make a noticeable difference!
  • Let the salad chill longer if you can. The flavors deepen and become more vibrant.
  • Adjust the seasoning to your taste. Don’t be afraid to add more salt or pepper!
  • For a creamier texture, add more mayonnaise or sour cream.
  • Experiment with herbs like dill or basil for a unique twist.

Equipment Needed

  • Large mixing bowl: Essential for combining all your ingredients. A sturdy pot can work in a pinch.
  • Whisk: Perfect for mixing the dressing. A fork can do the job if you don’t have one.
  • Measuring cups: For precise ingredient amounts. Use a regular cup if you’re in a hurry.
  • Cutting board and knife: Necessary for chopping veggies. A sturdy plate can substitute in a bind.

Variations

  • Spicy Twist: Add diced jalapeños or a splash of hot sauce to the dressing for a kick that’ll wake up your taste buds.
  • Healthier Option: Swap out the mayonnaise and sour cream for Greek yogurt. It’s lighter but still creamy!
  • Vegan Delight: Use a dairy-free mayonnaise and skip the bacon for a plant-based version that everyone can enjoy.
  • Herb Infusion: Experiment with fresh herbs like dill, basil, or chives to elevate the flavor profile.
  • Fruit Addition: Toss in diced avocado or even some sweet pineapple for a tropical twist that complements the corn.

Serving Suggestions

  • Pair with Grilled Meats: This salad complements grilled chicken, steak, or fish beautifully.
  • Perfect Picnic Dish: Serve it at picnics alongside sandwiches or wraps for a refreshing side.
  • Chill in Style: Present in a clear bowl to showcase the vibrant colors.
  • Drink Pairing: Enjoy with a cold beer or a refreshing lemonade for a summer vibe.

FAQs about Crack Corn Salad

Got questions about this delightful Crack Corn Salad? You’re not alone! Here are some common queries that might pop up as you whip up this tasty dish.

Can I make Crack Corn Salad ahead of time?

Absolutely! In fact, making it a few hours in advance allows the flavors to meld beautifully. Just keep it covered in the fridge until you’re ready to serve.

Is Crack Corn Salad suitable for vegetarians?

Yes! This salad is vegetarian-friendly, especially if you skip the optional bacon. It’s a great way to enjoy fresh veggies and sweet corn.

How long does Crack Corn Salad last in the fridge?

Stored in an airtight container, it can last up to 3 days. Just give it a good stir before serving again, as the dressing may separate.

Can I customize the ingredients?

Definitely! Feel free to add or substitute ingredients based on your preferences. Try adding diced bell peppers or even some black beans for extra flavor and texture.

What can I serve with Crack Corn Salad?

This salad pairs wonderfully with grilled meats, sandwiches, or even as a light lunch on its own. It’s versatile enough to complement any meal!

Final Thoughts

Crack Corn Salad is more than just a dish; it’s a celebration of flavors and memories. Each bite transports you to sunny days filled with laughter and good company. The vibrant colors and fresh ingredients make it a feast for the eyes as much as the palate. Whether you’re serving it at a family gathering or enjoying it on a quiet evening, this salad brings joy and satisfaction. It’s easy to make, delicious, and adaptable to your taste. So, roll up your sleeves and dive into this delightful recipe. Your taste buds will thank you!

jhessica

Crack Corn Salad: A Tasty Recipe You Must Try!

A delicious and refreshing Crack Corn Salad that combines sweet corn, fresh vegetables, and a creamy dressing, perfect for any gathering.
Prep Time 15 minutes
Total Time 45 minutes
Servings: 6 servings
Course: Salad
Cuisine: American
Calories: 210

Ingredients
  

  • 2 cups frozen sweet corn thawed
  • 1 cup cherry tomatoes halved
  • 1 cup diced cucumber
  • 1/2 cup red onion finely chopped
  • 1/2 cup mayonnaise
  • 1/4 cup sour cream
  • 1 tablespoon apple cider vinegar
  • 1 teaspoon garlic powder
  • 1 teaspoon onion powder
  • 1/2 teaspoon salt
  • 1/4 teaspoon black pepper
  • 1/4 cup crumbled bacon optional
  • 1/4 cup shredded cheddar cheese optional
  • 1/4 cup chopped fresh cilantro or parsley for garnish

Method
 

  1. In a large mixing bowl, combine the thawed corn, cherry tomatoes, cucumber, and red onion. Stir until well mixed.
  2. In a separate bowl, whisk together the mayonnaise, sour cream, apple cider vinegar, garlic powder, onion powder, salt, and black pepper until smooth.
  3. Pour the dressing over the corn mixture and stir until everything is evenly coated.
  4. If using, gently fold in the crumbled bacon and shredded cheddar cheese.
  5. Cover the salad and refrigerate for at least 30 minutes to allow the flavors to meld.
  6. Before serving, give the salad a good stir and garnish with chopped cilantro or parsley.

Nutrition

Serving: 1servingCalories: 210kcalCarbohydrates: 10gProtein: 4gFat: 18gSaturated Fat: 3gPolyunsaturated Fat: 15gCholesterol: 10mgSodium: 300mgFiber: 2gSugar: 3g

Notes

  • For a spicy kick, add diced jalapeños or a dash of hot sauce to the dressing.
  • Substitute Greek yogurt for sour cream for a healthier option, or use a dairy-free alternative for a vegan version.

Tried this recipe?

Let us know how it was!

Crispy Salmon Croquettes: A Delicious Recipe to Try!

Introduction to Crispy Salmon Croquettes

There’s something special about a dish that brings back memories of family gatherings and laughter. Crispy Salmon Croquettes do just that for me. These delightful patties are not only a quick solution for a busy day but also a fantastic way to impress your loved ones. With their golden, crunchy exterior and tender, flavorful center, they’re perfect for any occasion. Whether you’re whipping them up for a casual weeknight dinner or serving them as an appetizer at your next gathering, these croquettes are sure to be a hit. Let’s dive into this delicious recipe!

Why You’ll Love This Crispy Salmon Croquettes

These Crispy Salmon Croquettes are a game-changer in the kitchen. They come together in just 30 minutes, making them perfect for those hectic weeknights. The combination of flaked salmon and crunchy breadcrumbs creates a delightful texture that’s hard to resist. Plus, they’re versatile enough to serve as a snack, appetizer, or main dish. Trust me, once you try them, they’ll become a staple in your cooking repertoire!

Ingredients for Crispy Salmon Croquettes

Gathering the right ingredients is the first step to creating these mouthwatering Crispy Salmon Croquettes. Here’s what you’ll need:

  • Pink Salmon: The star of the show! Canned pink salmon is convenient and packed with flavor. You can also use fresh salmon if you prefer.
  • Breadcrumbs: These add the perfect crunch. Use plain or seasoned breadcrumbs for extra flavor.
  • Onion: Finely chopped onion brings a sweet and savory depth to the croquettes.
  • Bell Pepper: A pop of color and a hint of sweetness. Feel free to use any color you like!
  • Mayonnaise: This adds moisture and richness. Greek yogurt can be a lighter alternative.
  • Egg: A binder that helps hold everything together. If you’re looking for a vegan option, try a flax egg.
  • Dijon Mustard: A touch of tanginess that elevates the flavor profile.
  • Lemon Juice: Freshens up the dish with a zesty kick. You can also use lime juice if you prefer.
  • Garlic Powder: For that aromatic touch. Fresh minced garlic works too, just use less.
  • Salt and Black Pepper: Essential seasonings to enhance all the flavors.
  • Vegetable Oil: Used for frying, it gives the croquettes that golden, crispy finish. Olive oil is a great alternative.

For exact measurements, check the bottom of the article where you can find everything listed for easy printing. Now that you have your ingredients ready, let’s move on to the fun part—making these delicious croquettes!

How to Make Crispy Salmon Croquettes

Step 1: Prepare the Mixture

Let’s get our hands a little messy! In a large mixing bowl, combine the flaked salmon, breadcrumbs, chopped onion, and bell pepper. Add in the mayonnaise, beaten egg, Dijon mustard, lemon juice, garlic powder, salt, and black pepper. Mix everything together until it’s well combined. You want a cohesive mixture that holds together nicely. If it feels too dry, a splash more mayo can help. This is where the magic begins, and the aroma will start to fill your kitchen!

Step 2: Shape the Patties

Now, it’s time to shape our mixture into patties. Grab a handful of the mixture and form it into small patties, about 2-3 inches in diameter. You should aim for about 8-10 patties. Don’t worry about making them perfect; a little rustic charm adds character!

Step 3: Heat the Oil

In a large skillet, heat the vegetable oil over medium heat. You want enough oil to cover the bottom of the skillet, creating a nice frying surface. To test if the oil is hot enough, drop a small piece of the mixture in. If it sizzles, you’re ready to go!

Step 4: Fry the Patties

Carefully add the patties to the hot oil, making sure not to overcrowd the skillet. Fry them for about 4-5 minutes on each side, or until they turn a beautiful golden brown and crispy. The sound of sizzling is music to my ears! Once they’re cooked, use a slotted spatula to flip them gently. This step is crucial for that perfect crispy texture. Keep an eye on them; you want them golden, not burnt!

Step 5: Drain and Serve

Once the croquettes are golden brown, remove them from the skillet and place them on a paper towel-lined plate. This will help drain any excess oil. Serve them warm, and don’t forget your favorite dipping sauce or a squeeze of fresh lemon juice. Enjoy every crispy bite!

Tips for Success

  • Make sure your oil is hot enough before frying to achieve that perfect crispiness.
  • Don’t overcrowd the skillet; fry in batches if necessary for even cooking.
  • For extra flavor, consider adding fresh herbs like dill or parsley to the mixture.
  • Let the patties rest for a minute after frying to enhance their texture.
  • Experiment with different dipping sauces to find your favorite pairing!

Equipment Needed

  • Large Mixing Bowl: Essential for combining ingredients. A sturdy pot can work in a pinch.
  • Skillet: A non-stick skillet is ideal for frying. Cast iron works great too!
  • Slotted Spatula: Perfect for flipping and removing croquettes. A regular spatula can suffice.
  • Paper Towels: For draining excess oil. A clean kitchen cloth can be a good alternative.

Variations

  • Spicy Kick: Add some diced jalapeños or a dash of hot sauce to the mixture for a spicy twist.
  • Herb-Infused: Mix in fresh herbs like dill, cilantro, or chives for an aromatic flavor boost.
  • Cheesy Delight: Incorporate shredded cheese, such as cheddar or feta, for a creamy texture and rich taste.
  • Vegetarian Option: Substitute the salmon with canned chickpeas or black beans for a plant-based version.
  • Asian Flair: Add soy sauce and sesame oil to the mixture, and serve with a soy-based dipping sauce.
  • Fresh Salad: Pair your croquettes with a crisp green salad for a refreshing contrast.
  • Dipping Sauces: Serve with tartar sauce, aioli, or a zesty remoulade for added flavor.
  • Drink Pairing: Enjoy with a cold beer or a light white wine to complement the dish.
  • Presentation: Garnish with lemon wedges and fresh herbs for a vibrant touch.

FAQs about Crispy Salmon Croquettes

Can I use fresh salmon instead of canned?
Absolutely! Fresh salmon can be used for a richer flavor. Just make sure to cook it first and flake it before mixing.

How do I store leftover croquettes?
Store any leftovers in an airtight container in the fridge for up to 3 days. Reheat in the oven for that crispy texture!

Can I freeze the croquettes?
Yes! Freeze the uncooked patties on a baking sheet, then transfer them to a freezer bag. They can be cooked straight from frozen; just add a few extra minutes to the frying time.

What dipping sauces pair well with these croquettes?
Tartar sauce, aioli, or a spicy remoulade are fantastic choices. You can also try a simple squeeze of lemon for a fresh touch!

Are these croquettes suitable for a low-calorie diet?
Yes! With the right ingredients, Crispy Salmon Croquettes can be a low-calorie option. Just keep an eye on the oil used for frying.

Final Thoughts

Cooking is more than just a task; it’s a way to connect with those we love. Crispy Salmon Croquettes embody that spirit perfectly. They’re not just delicious; they’re a canvas for creativity and a chance to share a meal that warms the heart. Whether you’re enjoying them on a busy weeknight or serving them at a gathering, these croquettes bring smiles and satisfaction. The joy of watching friends and family savor each crispy bite is truly rewarding. So, roll up your sleeves, get cooking, and let these croquettes become a cherished part of your culinary adventures!

jhessica

Crispy Salmon Croquettes: A Delicious Recipe to Try!

Crispy Salmon Croquettes are delicious patties made from flaked salmon, breadcrumbs, and a blend of seasonings, perfect for a quick meal or appetizer.
Prep Time 15 minutes
Cook Time 15 minutes
Total Time 30 minutes
Servings: 4 servings
Course: Appetizer
Cuisine: American
Calories: 220

Ingredients
  

  • 1 can 14.75 oz pink salmon, drained and flaked
  • 1/2 cup breadcrumbs
  • 1/4 cup finely chopped onion
  • 1/4 cup finely chopped bell pepper
  • 1/4 cup mayonnaise
  • 1 large egg beaten
  • 1 teaspoon Dijon mustard
  • 1 teaspoon lemon juice
  • 1/2 teaspoon garlic powder
  • 1/2 teaspoon salt
  • 1/4 teaspoon black pepper
  • 1/4 cup vegetable oil for frying

Method
 

  1. In a large mixing bowl, combine the flaked salmon, breadcrumbs, chopped onion, chopped bell pepper, mayonnaise, beaten egg, Dijon mustard, lemon juice, garlic powder, salt, and black pepper. Mix until well combined.
  2. Shape the mixture into small patties, about 2-3 inches in diameter. You should get approximately 8-10 patties.
  3. Heat the vegetable oil in a large skillet over medium heat. Once hot, carefully add the salmon patties to the skillet, cooking in batches if necessary to avoid overcrowding.
  4. Fry the patties for about 4-5 minutes on each side or until golden brown and crispy.
  5. Remove the croquettes from the skillet and place them on a paper towel-lined plate to drain excess oil.
  6. Serve warm with your favorite dipping sauce or a squeeze of lemon juice.

Nutrition

Serving: 1croquetteCalories: 220kcalCarbohydrates: 12gProtein: 18gFat: 12gSaturated Fat: 2gPolyunsaturated Fat: 8gCholesterol: 70mgSodium: 500mgFiber: 1gSugar: 1g

Notes

  • For added flavor, mix in some chopped fresh herbs like dill or parsley.
  • Substitute canned tuna for salmon if you prefer a different taste or if salmon is not available.

Tried this recipe?

Let us know how it was!

Frozen Strawberry Yogurt Bites: A Healthy Treat Recipe!

Introduction to Frozen Strawberry Yogurt Bites

There’s something magical about a simple treat that can brighten your day. Frozen Strawberry Yogurt Bites are just that—a delightful blend of fresh strawberries and creamy Greek yogurt that’s both refreshing and healthy. Whether you’re looking for a quick snack after a workout or a sweet dessert to share with family, these bites are perfect. They’re easy to whip up, and the best part? You can customize them to suit your taste. Let’s dive into this delicious recipe that’s sure to become a favorite in your home!

Why You’ll Love This Frozen Strawberry Yogurt Bites

These Frozen Strawberry Yogurt Bites are a game-changer for busy days. They come together in just minutes, making them a quick and easy treat. The combination of sweet strawberries and creamy yogurt is not only delicious but also guilt-free. Plus, they’re perfect for satisfying those late-night cravings without derailing your healthy eating goals. Trust me, once you try them, you’ll be hooked!

Ingredients for Frozen Strawberry Yogurt Bites

Gathering the right ingredients is the first step to creating these delightful Frozen Strawberry Yogurt Bites. Here’s what you’ll need:

  • Fresh strawberries: These juicy gems are the star of the show. Look for ripe, sweet strawberries for the best flavor.
  • Plain Greek yogurt: This creamy base adds protein and a tangy taste. It’s thicker than regular yogurt, making it perfect for coating the strawberries.
  • Honey or maple syrup: A touch of sweetness is essential. Use honey for a classic flavor or maple syrup for a unique twist.
  • Vanilla extract: Just a splash enhances the overall flavor, giving your bites a warm, inviting aroma.
  • Pinch of salt: This might seem small, but it balances the sweetness and elevates the flavors.

For those looking to mix things up, consider adding a tablespoon of lemon zest for a citrusy kick or a handful of mini chocolate chips for a sweet surprise. You can also swap out strawberries for other fruits like blueberries, raspberries, or diced peaches to create your own fruity variations.

Exact measurements for these ingredients can be found at the bottom of the article, ready for printing!

How to Make Frozen Strawberry Yogurt Bites

Creating these Frozen Strawberry Yogurt Bites is a breeze! Follow these simple steps, and you’ll have a delicious treat ready in no time. Let’s get started!

Step 1: Prepare the Yogurt Mixture

In a medium bowl, combine the plain Greek yogurt, honey (or maple syrup), vanilla extract, and a pinch of salt. Mix everything together until it’s smooth and creamy. This mixture is the heart of your bites, so make sure it’s well combined. The sweetness of the honey or maple syrup will balance perfectly with the tangy yogurt.

Step 2: Fold in Strawberries

Now, gently fold in the sliced strawberries into the yogurt mixture. Use a spatula to ensure each strawberry piece is evenly coated. This step is crucial because you want those juicy strawberries to shine through in every bite. Take your time; the more evenly coated they are, the better the flavor!

Step 3: Portion the Mixture

Line a baking sheet with parchment paper. Using a spoon or a small cookie scoop, drop spoonfuls of the strawberry-yogurt mixture onto the prepared baking sheet. Make sure to space them about an inch apart. This will help them freeze evenly and make it easier to pop them off later.

Step 4: Freeze the Bites

Place the baking sheet in the freezer for about 2-3 hours. You want the bites to be completely frozen before moving on. This is the hardest part—waiting! But trust me, the end result will be worth it. You’ll be rewarded with a refreshing treat that’s perfect for any occasion.

Step 5: Store the Bites

Once the bites are frozen solid, remove them from the baking sheet. Transfer them to an airtight container or a freezer bag for storage. They can last in the freezer for up to two months. Just grab a few whenever you need a quick snack or a sweet treat!

Tips for Success

  • Use ripe strawberries for the best flavor and sweetness.
  • Don’t rush the freezing process; ensure they’re fully frozen for the best texture.
  • Experiment with different fruits to find your favorite combination.
  • For a creamier texture, let the yogurt sit at room temperature for a few minutes before mixing.
  • Keep the bites spaced apart on the baking sheet to prevent sticking.

Equipment Needed

  • Medium bowl: Any mixing bowl will do, but a glass bowl lets you see the mixture’s consistency.
  • Spatula: A rubber spatula is great for folding in strawberries, but a wooden spoon works too.
  • Baking sheet: A standard baking sheet lined with parchment paper is essential for freezing.
  • Spoon or cookie scoop: Use either to portion out the yogurt mixture easily.

Variations

  • Berry Medley: Swap out strawberries for a mix of blueberries, raspberries, and blackberries for a colorful twist.
  • Citrus Burst: Add a tablespoon of lemon or orange zest to the yogurt mixture for a refreshing citrus flavor.
  • Nutty Delight: Stir in a tablespoon of almond or peanut butter for a creamy, nutty flavor that pairs well with the yogurt.
  • Chocolate Lovers: Mix in mini chocolate chips or drizzle melted dark chocolate over the frozen bites before serving.
  • Vegan Option: Use coconut yogurt and maple syrup to create a dairy-free version that’s just as delicious.

Serving Suggestions

  • Pair these Frozen Strawberry Yogurt Bites with a refreshing glass of iced tea or lemonade for a perfect summer treat.
  • Serve them on a colorful platter for a fun dessert at parties or family gatherings.
  • Top with a drizzle of honey or a sprinkle of granola for added texture and flavor.

FAQs about Frozen Strawberry Yogurt Bites

Can I use frozen strawberries instead of fresh?

Absolutely! While fresh strawberries are ideal for flavor, frozen strawberries can work too. Just make sure to thaw and drain them well to avoid excess moisture in your yogurt bites.

How long do these Frozen Strawberry Yogurt Bites last in the freezer?

These bites can be stored in an airtight container or freezer bag for up to two months. Just grab a few whenever you need a quick snack!

Can I make these yogurt bites dairy-free?

Yes! Simply substitute the plain Greek yogurt with a dairy-free alternative like coconut yogurt. This way, you can enjoy a delicious treat without the dairy.

What other fruits can I use in this recipe?

You can get creative! Try using blueberries, raspberries, or even diced peaches. Each fruit brings its own unique flavor, making your yogurt bites even more exciting.

Are these Frozen Strawberry Yogurt Bites healthy?

Definitely! They’re low in calories and packed with protein from the Greek yogurt. Plus, you’re getting the natural sweetness and nutrients from the strawberries, making them a guilt-free treat!

Final Thoughts

Creating Frozen Strawberry Yogurt Bites is more than just a recipe; it’s an experience that brings joy to your kitchen. The vibrant colors of fresh strawberries and the creamy yogurt blend together to create a treat that’s not only delicious but also healthy. Each bite is a reminder that simple ingredients can lead to delightful moments. Whether you’re enjoying them on a hot summer day or sharing them with loved ones, these bites are sure to bring smiles. So, roll up your sleeves and dive into this fun, easy recipe that’s bound to become a staple in your home!

jhessica

Frozen Strawberry Yogurt Bites: A Healthy Treat Recipe!

A refreshing and healthy treat made with fresh strawberries and Greek yogurt, perfect for a snack or dessert.
Prep Time 10 minutes
Course: Dessert
Cuisine: American
Calories: 90

Ingredients
  

  • 1 cup fresh strawberries hulled and sliced
  • 1 cup plain Greek yogurt
  • 2 tablespoons honey or maple syrup
  • 1 teaspoon vanilla extract
  • Pinch of salt

Method
 

  1. In a medium bowl, combine the Greek yogurt, honey (or maple syrup), vanilla extract, and a pinch of salt. Mix until smooth and well combined.
  2. Gently fold in the sliced strawberries until they are evenly coated with the yogurt mixture.
  3. Line a baking sheet with parchment paper. Using a spoon or a small cookie scoop, drop spoonfuls of the strawberry-yogurt mixture onto the prepared baking sheet, spacing them about 1 inch apart.
  4. Place the baking sheet in the freezer for about 2-3 hours, or until the yogurt bites are completely frozen.
  5. Once frozen, remove the bites from the baking sheet and store them in an airtight container or freezer bag in the freezer for up to 2 months.

Nutrition

Serving: 1servingCalories: 90kcalCarbohydrates: 8gProtein: 6gFat: 2gSaturated Fat: 1gPolyunsaturated Fat: 1gCholesterol: 5mgSodium: 30mgFiber: 1gSugar: 6g

Notes

  • For added flavor, try mixing in a tablespoon of lemon zest or a handful of mini chocolate chips.
  • Substitute the strawberries with other fruits like blueberries, raspberries, or diced peaches for a different taste.

Tried this recipe?

Let us know how it was!

Irish Scones with Raisins: Deliciously Easy Recipe!

Introduction to Irish Scones with Raisins

There’s something magical about the aroma of freshly baked Irish scones with raisins wafting through the kitchen. It takes me back to my childhood, where my grandmother would whip up a batch every Sunday morning. These delightful scones are not just a treat; they’re a warm hug on a plate. Perfect for a quick breakfast or a cozy tea time, this recipe is a simple solution for busy days. With just a handful of ingredients, you can impress your loved ones and create a moment of joy that lingers long after the last crumb is gone.

Why You’ll Love This Irish Scones with Raisins

These Irish scones with raisins are a game-changer for any home cook. They come together in just 35 minutes, making them perfect for those hectic mornings or unexpected guests. The taste? A delightful balance of sweetness and buttery goodness that pairs beautifully with your morning coffee or afternoon tea. Plus, they’re versatile enough to adapt to your pantry staples, ensuring you can whip them up anytime the craving strikes.

Ingredients for Irish Scones with Raisins

Gathering the right ingredients is the first step to creating these delightful Irish scones with raisins. Here’s what you’ll need:

  • All-purpose flour: The backbone of your scones, providing structure and a light texture.
  • Granulated sugar: Just a touch of sweetness to balance the flavors and enhance browning.
  • Baking powder: This leavening agent helps the scones rise, giving them that fluffy interior.
  • Salt: A pinch to elevate the flavors and bring out the sweetness of the raisins.
  • Unsalted butter: Cold and cubed, it adds richness and flakiness to the scones.
  • Raisins: These little gems provide bursts of sweetness and a chewy texture.
  • Whole milk: Adds moisture and richness, making the scones tender.
  • Large egg: Binds the ingredients together and adds a lovely golden color.
  • Vanilla extract: A splash of this enhances the overall flavor, making each bite irresistible.

For those looking to mix things up, consider substituting half of the raisins with chopped dried cranberries or apricots for a fruity twist. A teaspoon of cinnamon can also be added to the dry ingredients for a warm spice note. If you want to elevate your scones even further, drizzle them with honey or serve with clotted cream.

Exact measurements for these ingredients can be found at the bottom of the article, ready for printing!

How to Make Irish Scones with Raisins

Making Irish scones with raisins is a delightful journey that’s as simple as it is rewarding. Follow these steps, and you’ll have a batch of warm, fluffy scones ready to enjoy in no time!

Step 1: Preheat and Prepare

Start by preheating your oven to 400°F (200°C). This ensures your scones bake evenly. While the oven warms up, line a baking sheet with parchment paper. This little step makes cleanup a breeze!

Step 2: Mix Dry Ingredients

In a large mixing bowl, whisk together the all-purpose flour, granulated sugar, baking powder, and salt. This forms the base of your scones, creating a light and fluffy texture. Make sure everything is well combined for the best results.

Step 3: Incorporate Butter

Add the cold, cubed butter to the flour mixture. Using a pastry cutter or your fingers, blend until it resembles coarse crumbs. This step is crucial for achieving that flaky texture we all love in scones.

Step 4: Add Raisins

Now, stir in the raisins until they are evenly distributed throughout the mixture. These little bursts of sweetness will elevate your scones, making each bite a delightful experience.

Step 5: Combine Wet Ingredients

In a separate bowl, whisk together the whole milk, large egg, and vanilla extract. This mixture brings moisture and flavor to your scones, ensuring they’re tender and delicious.

Step 6: Mix Wet and Dry

Pour the wet ingredients into the dry ingredients. Mix gently until just combined. Be careful not to overmix; this is key to keeping your scones tender and light.

Step 7: Knead the Dough

Turn the dough out onto a lightly floured surface. Knead gently for about 1 minute until it comes together. This helps develop the dough without making it tough.

Step 8: Shape the Scones

Pat the dough into a circle about 1 inch thick. You can cut it into wedges or use a round cutter for classic scone shapes. Either way, they’ll look fantastic!

Step 9: Bake

Place the scones on the prepared baking sheet. Brush the tops with a little milk for that golden finish. Bake for 15-20 minutes, or until they’re lightly golden on top. The aroma will be irresistible!

Step 10: Cool and Serve

Once baked, allow the scones to cool slightly on a wire rack. This enhances the flavor and makes them easier to handle. Serve warm, and enjoy the delightful taste of your homemade Irish scones with raisins!

Tips for Success

  • Use cold butter for flakier scones; it creates those lovely layers.
  • Don’t overmix the dough; a gentle hand keeps them tender.
  • For extra flavor, let the raisins soak in warm water for 10 minutes before adding.
  • Experiment with spices like cinnamon or nutmeg for a unique twist.
  • Serve them warm for the best taste experience!

Equipment Needed

  • Mixing bowls: A large bowl for dry ingredients and a smaller one for wet ingredients.
  • Whisk: Essential for combining ingredients; a fork works in a pinch.
  • Pastry cutter: Great for blending butter; your fingers can do the job too.
  • Baking sheet: A standard one will do; consider using a cast iron skillet for a rustic touch.
  • Parchment paper: Helps with easy cleanup; aluminum foil is a good alternative.

Variations

  • Fruit Medley: Swap half of the raisins for chopped dried cranberries, apricots, or even cherries for a fruity explosion.
  • Nutty Delight: Add a handful of chopped walnuts or pecans for a crunchy texture and nutty flavor.
  • Spiced Scones: Incorporate a teaspoon of cinnamon or nutmeg into the dry ingredients for a warm, aromatic twist.
  • Gluten-Free Option: Use a gluten-free all-purpose flour blend to make these scones suitable for gluten-sensitive friends.
  • Vegan Version: Replace the egg with a flax egg and use plant-based milk and butter for a delicious vegan treat.

Serving Suggestions

  • Tea Time: Pair your scones with a steaming cup of Irish breakfast tea for a classic experience.
  • Spread Options: Serve with clotted cream, butter, or a drizzle of honey for added richness.
  • Fresh Fruit: Complement with fresh berries or sliced apples for a refreshing contrast.
  • Presentation: Arrange on a rustic wooden board for a charming display.

FAQs about Irish Scones with Raisins

Can I use other dried fruits instead of raisins?

Absolutely! You can substitute raisins with dried cranberries, apricots, or even cherries. Each fruit brings its unique flavor, making your Irish scones with raisins even more delightful.

How do I store leftover scones?

To keep your scones fresh, store them in an airtight container at room temperature for up to three days. For longer storage, freeze them in a zip-top bag, and they’ll be good for up to three months.

Can I make the dough ahead of time?

Yes! You can prepare the dough and shape the scones, then refrigerate them for up to 24 hours before baking. This is a great time-saver for busy mornings!

What can I serve with Irish scones?

These scones pair wonderfully with clotted cream, butter, or a drizzle of honey. A cup of tea or coffee complements them perfectly, making for a delightful breakfast or afternoon treat.

Why are my scones dense?

Dense scones often result from overmixing the dough or using warm butter. Remember, a gentle hand is key! Keep the butter cold and mix just until combined for that light, fluffy texture.

Final Thoughts

Making Irish scones with raisins is more than just baking; it’s about creating memories and sharing joy. The process is simple, yet the results are nothing short of delightful. Each bite transports you to a cozy café in Ireland, where the warmth of freshly baked goods fills the air. Whether enjoyed with a cup of tea or as a quick breakfast, these scones bring a touch of comfort to any day. So, roll up your sleeves, gather your ingredients, and let the magic unfold in your kitchen. You’ll be rewarded with smiles and satisfied taste buds!

jhessica

Irish Scones with Raisins: Deliciously Easy Recipe!

Deliciously easy Irish scones with raisins, perfect for breakfast or tea time.
Prep Time 15 minutes
Cook Time 20 minutes
Total Time 35 minutes
Servings: 8 scones
Course: Baking
Cuisine: Irish
Calories: 180

Ingredients
  

  • 2 cups all-purpose flour
  • 1/4 cup granulated sugar
  • 1 tablespoon baking powder
  • 1/2 teaspoon salt
  • 1/4 cup unsalted butter cold and cubed
  • 1/2 cup raisins
  • 1/2 cup whole milk
  • 1 large egg
  • 1 teaspoon vanilla extract

Method
 

  1. Preheat your oven to 400°F (200°C) and line a baking sheet with parchment paper.
  2. In a large mixing bowl, whisk together the flour, sugar, baking powder, and salt.
  3. Add the cold, cubed butter to the flour mixture. Use a pastry cutter or your fingers to blend until the mixture resembles coarse crumbs.
  4. Stir in the raisins until evenly distributed.
  5. In a separate bowl, whisk together the milk, egg, and vanilla extract.
  6. Pour the wet ingredients into the dry ingredients and mix gently until just combined. Do not overmix.
  7. Turn the dough out onto a lightly floured surface and knead gently for about 1 minute until it comes together.
  8. Pat the dough into a circle about 1 inch thick. Cut into wedges or use a round cutter to shape the scones.
  9. Place the scones on the prepared baking sheet and brush the tops with a little milk for a golden finish.
  10. Bake for 15-20 minutes, or until the scones are lightly golden on top.
  11. Allow to cool slightly on a wire rack before serving.

Nutrition

Serving: 1sconeCalories: 180kcalCarbohydrates: 28gProtein: 3gFat: 7gSaturated Fat: 4gPolyunsaturated Fat: 2gCholesterol: 30mgSodium: 150mgFiber: 1gSugar: 6g

Notes

  • For a richer flavor, substitute half of the raisins with chopped dried cranberries or apricots.
  • You can also add a teaspoon of cinnamon to the dry ingredients for a warm spice note.
  • For a sweeter treat, drizzle with honey or serve with clotted cream.

Tried this recipe?

Let us know how it was!

Moose Farts: Try This Fun & Creamy Recipe Today!

Introduction to Moose Farts

There’s something undeniably delightful about a dessert that brings a smile to your face, and Moose Farts is just that! This fun and creamy drink combines ice cream, milk, and chocolate into a treat that’s perfect for any occasion. Whether you’re looking to impress your friends at a gathering or simply want a quick solution for a busy day, this recipe has you covered. It’s a playful nod to childhood whimsy, and trust me, it’s as delicious as it sounds. Let’s dive into this delightful concoction that’s sure to become a favorite!

Why You’ll Love This Moose Farts

Moose Farts is the ultimate dessert drink that checks all the boxes. It’s incredibly easy to whip up, taking just five minutes from start to finish. The rich, creamy texture and delightful chocolatey flavor will have you savoring every sip. Plus, it’s a fun way to indulge your sweet tooth without spending hours in the kitchen. Perfect for busy weeknights or a spontaneous treat, this recipe is sure to please everyone!

Ingredients for Moose Farts

Gathering the right ingredients is the first step to creating this delightful dessert drink. Here’s what you’ll need:

  • Vanilla ice cream: The creamy base that adds sweetness and richness.
  • Milk: This helps blend everything smoothly, making it easy to sip.
  • Chocolate syrup: A must for that luscious chocolate flavor that makes this drink irresistible.
  • Peanut butter: Adds a nutty twist and extra creaminess, elevating the flavor profile.
  • Whipped cream: For that fluffy topping that makes everything feel special.
  • Crushed peanuts (optional): A crunchy garnish that adds texture and a nutty kick.
  • Chocolate shavings (optional): A decorative touch that enhances the chocolatey goodness.

If you’re looking for alternatives, consider using coconut or almond milk ice cream and a non-dairy milk for a dairy-free version. Want to add a fruity twist? Toss in a banana while blending for an extra layer of flavor. For exact measurements, check the bottom of the article where you can find everything available for printing!

How to Make Moose Farts

Creating Moose Farts is a breeze! With just a few simple steps, you’ll have a creamy dessert drink that’s sure to impress. Let’s get blending!

Step 1: Blend the Base

Start by grabbing your blender. Toss in the vanilla ice cream, milk, chocolate syrup, and peanut butter. Blend everything together until it’s smooth and creamy. The key here is to ensure there are no lumps. If you want a thicker drink, add a bit more ice cream. For a lighter version, just a splash of milk will do!

Step 2: Pour into Glass

Once your mixture is perfectly blended, it’s time to pour! Grab a tall glass and fill it with the creamy concoction. Don’t be shy—let it swirl and fill to the brim. The sight of that rich, chocolatey goodness is already making my mouth water!

Step 3: Add Toppings

Now comes the fun part—toppings! Generously dollop whipped cream on top. If you’re feeling adventurous, sprinkle some crushed peanuts and chocolate shavings for that extra flair. These little touches not only make it look fantastic but also add delightful textures to each sip.

Step 4: Serve and Enjoy

Your Moose Farts are ready to be enjoyed! Serve it immediately with a straw or a spoon. Gather your friends or family around, and watch their faces light up as they take their first sip. This dessert drink is not just a treat; it’s a moment of joy!

Tips for Success

  • Use a high-quality vanilla ice cream for the creamiest texture.
  • Blend in a banana for added creaminess and a fruity twist.
  • Adjust the sweetness by adding more or less chocolate syrup to taste.
  • For a thicker drink, freeze the milk beforehand.
  • Experiment with different nut butters like almond or cashew for unique flavors.

Equipment Needed

  • Blender: A standard blender works great, but an immersion blender can also do the job.
  • Tall glass: Any glass will do, but a fun, colorful cup adds to the experience.
  • Spoon or straw: Use a spoon for a thicker drink or a straw for easy sipping.

Variations of Moose Farts

  • Chocolate Mint Moose Farts: Add a few drops of peppermint extract for a refreshing minty twist.
  • Berry Blast Moose Farts: Blend in a handful of fresh or frozen berries for a fruity flavor explosion.
  • Nutty Moose Farts: Swap peanut butter for almond or hazelnut butter for a different nutty profile.
  • Vegan Moose Farts: Use coconut or almond milk ice cream and a non-dairy milk for a completely plant-based treat.
  • Spicy Moose Farts: Add a pinch of cayenne pepper or cinnamon for a surprising kick that complements the sweetness.

Serving Suggestions for Moose Farts

  • Pair with a warm chocolate chip cookie for a delightful contrast of temperatures.
  • Serve alongside a slice of rich chocolate cake for the ultimate indulgence.
  • Garnish with a sprig of mint for a pop of color and freshness.
  • Enjoy with a cold glass of milk or a hot cup of coffee.

FAQs about Moose Farts

What is Moose Farts?

Moose Farts is a fun and creamy dessert drink that combines ice cream, milk, chocolate syrup, and peanut butter. It’s a playful treat that’s perfect for satisfying your sweet tooth!

Can I make Moose Farts dairy-free?

Absolutely! Simply substitute the vanilla ice cream and milk with coconut or almond milk ice cream and a non-dairy milk. You won’t miss the dairy one bit!

How can I customize my Moose Farts?

There are plenty of ways to make Moose Farts your own! Add a banana for extra creaminess, or try different nut butters like almond or cashew for a unique flavor twist.

Is Moose Farts suitable for kids?

Definitely! This dessert drink is a hit with kids and adults alike. Just keep an eye on the sugar content if you’re serving it to little ones.

How long does Moose Farts last in the fridge?

For the best taste, enjoy your Moose Farts immediately. If you have leftovers, store them in the fridge for a few hours, but the texture may change. It’s best fresh!

Final Thoughts

Creating Moose Farts is more than just whipping up a dessert drink; it’s about sharing joy and laughter with those around you. Each sip is a delightful reminder of carefree days, where fun and flavor collide in the most delicious way. Whether you’re treating yourself after a long day or impressing friends at a gathering, this creamy concoction is sure to bring smiles. So, gather your ingredients, fire up that blender, and let the good times roll. Trust me, once you try Moose Farts, it’ll become a cherished recipe in your home!

jhessica

Moose Farts: Try This Fun & Creamy Recipe Today!

A fun and creamy dessert drink that combines ice cream, milk, and chocolate for a delicious treat.
Prep Time 5 minutes
Total Time 5 minutes
Servings: 2 servings
Course: Dessert
Cuisine: American
Calories: 450

Ingredients
  

  • 1 cup vanilla ice cream
  • 1/2 cup milk
  • 1/4 cup chocolate syrup
  • 1/4 cup peanut butter
  • 1/4 cup whipped cream
  • 1 tablespoon crushed peanuts optional
  • 1 tablespoon chocolate shavings optional

Method
 

  1. In a blender, combine the vanilla ice cream, milk, chocolate syrup, and peanut butter. Blend until smooth and creamy.
  2. Pour the mixture into a tall glass.
  3. Top with whipped cream, and sprinkle crushed peanuts and chocolate shavings if desired.
  4. Serve immediately with a straw or a spoon.

Nutrition

Serving: 1servingCalories: 450kcalCarbohydrates: 45gProtein: 10gFat: 25gSaturated Fat: 10gPolyunsaturated Fat: 15gCholesterol: 50mgSodium: 150mgFiber: 2gSugar: 35g

Notes

  • For a dairy-free version, substitute the vanilla ice cream and milk with coconut or almond milk ice cream and a non-dairy milk.
  • Add a banana to the blender for a fruity twist and extra creaminess.

Tried this recipe?

Let us know how it was!

Cream Cheese Babka: Discover This Easy Recipe Today!

Introduction to Cream Cheese Babka

There’s something magical about the aroma of freshly baked bread wafting through the house.

When I first discovered Cream Cheese Babka, it felt like unearthing a hidden treasure.

This delightful treat combines a soft, sweet dough with a rich cream cheese filling, making it perfect for any occasion.

Whether you’re looking to impress guests or simply want a cozy dessert for a quiet evening, this recipe is your go-to.

It’s easy to make, and the results are nothing short of spectacular.

Trust me, your taste buds will thank you!

Why You’ll Love This Cream Cheese Babka

This Cream Cheese Babka is a game-changer for any home cook.

It’s not just about the taste—though, let me tell you, it’s heavenly.

The ease of preparation means you can whip it up even on a busy day.

Plus, the delightful combination of creamy filling and soft dough will have everyone asking for seconds.

It’s a sweet treat that brings joy without the fuss, making it perfect for any occasion!

Ingredients for Cream Cheese Babka

Creating a delicious Cream Cheese Babka starts with gathering the right ingredients.

Here’s what you’ll need:

  • All-purpose flour: The backbone of your dough, providing structure and softness.
  • Granulated sugar: Adds sweetness and helps with browning during baking.
  • Salt: Enhances flavor and balances the sweetness of the dough.
  • Active dry yeast: The magic ingredient that makes your dough rise and become fluffy.
  • Whole milk: Warmed to activate the yeast, it adds richness to the dough.
  • Unsalted butter: For a tender texture and a rich flavor, melted into the dough.
  • Large egg: Binds the ingredients together and adds moisture.
  • Vanilla extract: A splash of this elevates the flavor profile, making it aromatic.
  • Cream cheese: The star of the show! Softened for easy mixing, it creates a luscious filling.
  • Powdered sugar: Sweetens the cream cheese filling and gives it a smooth texture.
  • Chocolate chips (optional): For those who crave a little extra sweetness and richness.
  • Beaten egg (for egg wash): Gives the babka a beautiful golden finish when baked.

Feel free to get creative!

You can substitute chocolate chips with dried fruit or nuts for a different twist.

For exact measurements, check the bottom of the article where you can find everything listed for easy printing.

How to Make Cream Cheese Babka

Making Cream Cheese Babka is a delightful journey that fills your kitchen with warmth and sweet aromas.

Let’s dive into the steps that will lead you to this delicious creation!

Step 1: Prepare the Dough

Start by grabbing a large bowl.

Combine the all-purpose flour, granulated sugar, salt, and active dry yeast.

Mix them well to ensure even distribution.

In a separate bowl, whisk together the warm milk, melted butter, egg, and vanilla extract.

Pour this wet mixture into the dry ingredients.

Stir until a dough begins to form.

It might be a bit sticky, but that’s okay!

Just flour your hands and knead the dough on a floured surface for about 5-7 minutes.

You want it to be smooth and elastic, like a soft pillow.

Step 2: Let the Dough Rise

Once your dough is ready, place it in a greased bowl.

Cover it with a kitchen towel and let it rise in a warm spot for about an hour.

You’re looking for it to double in size.

This is where the magic happens!

If your kitchen is chilly, try placing the bowl near a warm oven or on a sunny windowsill.

Step 3: Make the Cream Cheese Filling

While the dough is rising, it’s time to whip up the filling.

In a bowl, mix the softened cream cheese and powdered sugar until smooth.

If you’re feeling adventurous, fold in some chocolate chips for an extra treat.

This filling is what makes your Cream Cheese Babka so irresistible!

Step 4: Roll and Shape the Babka

After the dough has risen, punch it down gently to release the air.

Roll it out on a floured surface into a rectangle about 1/4 inch thick.

Spread the cream cheese mixture evenly over the dough, leaving a small border around the edges.

Now, starting from one long edge, roll the dough tightly into a log.

Pinch the seams to seal it well.

Next, cut the rolled dough in half lengthwise to reveal that beautiful filling.

Twist the two halves together and place them in a greased loaf pan.

Step 5: Final Rise and Bake

Cover the twisted dough and let it rise for another 30 minutes.

This second rise helps create that fluffy texture we all love.

While it’s rising, preheat your oven to 350°F.

Once ready, brush the top with the beaten egg for a golden finish.

Bake for 30-35 minutes, or until it’s golden brown and your kitchen smells heavenly.

Let it cool in the pan for about 10 minutes before transferring it to a wire rack.

Now, take a moment to admire your creation before slicing into it!

Tips for Success

  • Ensure your milk is warm, not hot, to activate the yeast without killing it.
  • Don’t skip the second rise; it’s crucial for a light and fluffy texture.
  • Use a sharp knife to cut the dough; this helps maintain the shape.
  • Experiment with fillings—cinnamon or nuts can add a delightful twist.
  • Store leftovers in an airtight container to keep them fresh longer.

Equipment Needed

  • Mixing bowls: A large bowl for the dough and a smaller one for the filling.
  • Measuring cups and spoons: Essential for accuracy; a kitchen scale can work too.
  • Rolling pin: For rolling out the dough; a wine bottle can substitute in a pinch.
  • Loaf pan: A standard 9×5 inch pan works best; any similar-sized pan will do.
  • Kitchen towel: To cover the dough while it rises; plastic wrap is a good alternative.

Variations of Cream Cheese Babka

  • Cinnamon Swirl: Add a teaspoon of cinnamon to the cream cheese filling for a warm, spiced flavor.
  • Fruit-Filled: Substitute chocolate chips with dried fruits like cranberries or apricots for a fruity twist.
  • Nuts Galore: Mix in chopped walnuts or pecans to the filling for added crunch and flavor.
  • Gluten-Free Option: Use a gluten-free all-purpose flour blend to make this recipe suitable for gluten-sensitive friends.
  • Chocolate Babka: Replace half of the cream cheese with melted chocolate for a rich, decadent filling.

Serving Suggestions for Cream Cheese Babka

  • Fresh Fruit: Serve with a side of berries or sliced bananas for a refreshing contrast.
  • Coffee or Tea: Pair with a hot cup of coffee or herbal tea to enhance the flavors.
  • Dusting of Powdered Sugar: A light sprinkle on top adds a touch of elegance.
  • Whipped Cream: A dollop of whipped cream can elevate your babka experience.
  • Ice Cream: Serve warm slices with a scoop of vanilla ice cream for a decadent dessert.

FAQs about Cream Cheese Babka

Can I make Cream Cheese Babka ahead of time?

Absolutely! You can prepare the dough and filling a day in advance. Just store them separately in the fridge. When you’re ready to bake, let the dough come to room temperature before proceeding with the recipe.

What can I substitute for cream cheese?

If you’re looking for alternatives, mascarpone cheese works beautifully. You can also use ricotta for a lighter filling, but it may require a bit more powdered sugar to achieve the desired sweetness.

How do I store leftover Cream Cheese Babka?

To keep your babka fresh, wrap it tightly in plastic wrap or store it in an airtight container. It can last for up to three days at room temperature or up to a week in the fridge.

Can I freeze Cream Cheese Babka?

Yes, you can freeze it! Wrap the cooled babka tightly in plastic wrap and then in aluminum foil. It can be frozen for up to three months. Just thaw it overnight in the fridge before serving.

What’s the best way to reheat Cream Cheese Babka?

The best way to reheat is to slice it and warm it in the oven at 350°F for about 10 minutes. This will help restore its soft texture and bring back that fresh-baked aroma!

Final Thoughts

Baking Cream Cheese Babka is more than just a recipe; it’s an experience that fills your home with warmth and joy.

Each slice reveals a beautiful swirl of creamy goodness, inviting you to savor every bite.

Whether you’re sharing it with family or enjoying it solo with a cup of coffee, this babka brings a sense of comfort and indulgence.

It’s a delightful way to connect with your culinary roots while creating new memories.

So, roll up your sleeves, embrace the process, and let this Cream Cheese Babka become a cherished part of your baking repertoire!

jhessica

Cream Cheese Babka: Discover This Easy Recipe Today!

A delicious and easy-to-make Cream Cheese Babka recipe that combines a rich cream cheese filling with a soft, sweet dough.
Prep Time 20 minutes
Cook Time 35 minutes
Total Time 1 hour 55 minutes
Servings: 8 servings
Course: Dessert
Cuisine: Eastern European
Calories: 220

Ingredients
  

  • 2 cups all-purpose flour
  • 1/4 cup granulated sugar
  • 1/2 teaspoon salt
  • 1 packet 2 1/4 teaspoons active dry yeast
  • 1/2 cup whole milk warmed to about 110°F
  • 1/4 cup unsalted butter melted
  • 1 large egg
  • 1 teaspoon vanilla extract
  • 8 ounces cream cheese softened
  • 1/4 cup powdered sugar
  • 1/4 cup chocolate chips optional
  • 1 egg beaten (for egg wash)

Method
 

  1. In a large bowl, combine the flour, granulated sugar, salt, and yeast.
  2. In a separate bowl, mix the warm milk, melted butter, egg, and vanilla extract.
  3. Pour the wet ingredients into the dry ingredients and stir until a dough forms.
  4. Knead the dough on a floured surface for about 5-7 minutes until smooth and elastic.
  5. Place the dough in a greased bowl, cover with a kitchen towel, and let it rise in a warm place for about 1 hour or until doubled in size.
  6. Prepare the filling by mixing the softened cream cheese and powdered sugar in a bowl until smooth. If desired, fold in the chocolate chips.
  7. Once the dough has risen, punch it down and roll it out on a floured surface into a rectangle about 1/4 inch thick.
  8. Spread the cream cheese mixture evenly over the dough.
  9. Starting from one long edge, roll the dough tightly into a log and pinch the seams to seal.
  10. Preheat the oven to 350°F.
  11. Cut the rolled dough in half lengthwise to expose the filling.
  12. Twist the two halves together and place in a greased loaf pan.
  13. Cover and let rise for another 30 minutes.
  14. Brush the top with the beaten egg.
  15. Bake for 30-35 minutes, or until golden brown.
  16. Let cool in the pan for 10 minutes before transferring to a wire rack to cool completely.

Nutrition

Serving: 1sliceCalories: 220kcalCarbohydrates: 28gProtein: 5gFat: 10gSaturated Fat: 5gPolyunsaturated Fat: 3gCholesterol: 40mgSodium: 150mgFiber: 1gSugar: 8g

Notes

  • For a richer flavor, add a teaspoon of cinnamon to the cream cheese filling.
  • You can substitute the chocolate chips with dried fruit or nuts for a different twist.

Tried this recipe?

Let us know how it was!

Stay Connected

Get recipes via email: