Get my cookbooks

Oreo Milkshake Delight: Indulge in a Creamy Treat!

Introduction to Oreo Milkshake Delight

There’s something magical about a creamy treat that can instantly lift your spirits. The Oreo Milkshake Delight is just that—a delightful blend of nostalgia and indulgence. Whether you’re winding down after a long day or looking to impress friends at a casual gathering, this milkshake is your go-to solution. It’s quick to whip up, requiring just a few ingredients, and it’s sure to satisfy even the most stubborn sweet tooth. Trust me, once you take that first sip, you’ll be transported back to carefree days filled with laughter and joy.

Why You’ll Love This Oreo Milkshake Delight

This Oreo Milkshake Delight is a dream come true for anyone craving a quick and delicious dessert. It’s incredibly easy to make, taking just 10 minutes from start to finish. The rich, creamy texture combined with the crunch of Oreo cookies creates a flavor explosion that’s hard to resist. Plus, it’s a fantastic way to treat yourself or impress guests without spending hours in the kitchen. Who wouldn’t love that?

Ingredients for Oreo Milkshake Delight

Gathering the right ingredients is the first step to creating your Oreo Milkshake Delight. Here’s what you’ll need:

  • Vanilla Ice Cream: The creamy base of your milkshake. It adds sweetness and a rich texture.
  • Whole Milk: This helps achieve that perfect milkshake consistency. You can substitute with almond or oat milk for a dairy-free option.
  • Oreo Cookies: The star of the show! Crushed Oreos bring that iconic flavor and delightful crunch.
  • Vanilla Extract: A splash of this enhances the overall flavor, making it even more delicious.
  • Whipped Cream: For topping, it adds a light, airy finish to your milkshake.
  • Chocolate Syrup: A drizzle on top not only looks great but adds an extra layer of sweetness.
  • Additional Oreo Cookies: Use these for garnish to make your milkshake look as good as it tastes.

For those looking to mix things up, consider adding a few drops of peppermint extract for a minty twist or experimenting with different ice cream flavors like cookies and cream or chocolate. The exact quantities for each ingredient can be found at the bottom of the article, ready for printing!

How to Make Oreo Milkshake Delight

Creating your Oreo Milkshake Delight is a breeze! Follow these simple steps, and you’ll have a delicious treat ready in no time. Let’s dive in!

Step 1: Blend the Base

Start by tossing the vanilla ice cream, whole milk, crushed Oreo cookies, and vanilla extract into your blender. Blend everything on high until it’s smooth and creamy. The sound of the blender whirring is music to my ears, signaling that a delightful treat is on the way!

Step 2: Adjust Consistency

Now, here’s where you can customize your milkshake. If you like it thick, add a bit more ice cream. For a thinner milkshake, just pour in some extra milk. It’s all about finding that perfect balance that suits your taste buds.

Step 3: Serve the Milkshake

Once you’ve achieved your desired consistency, it’s time to pour the milkshake into tall glasses. Watching that creamy goodness swirl into the glass is almost as satisfying as drinking it!

Step 4: Add Toppings

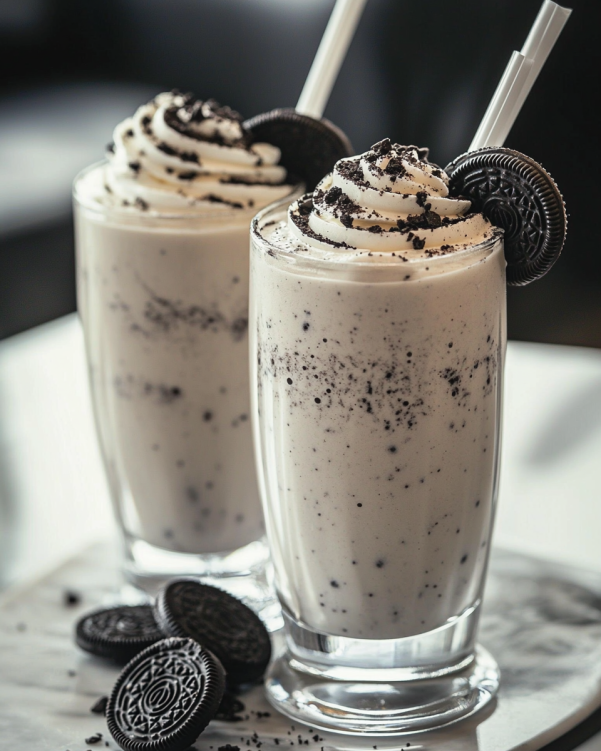
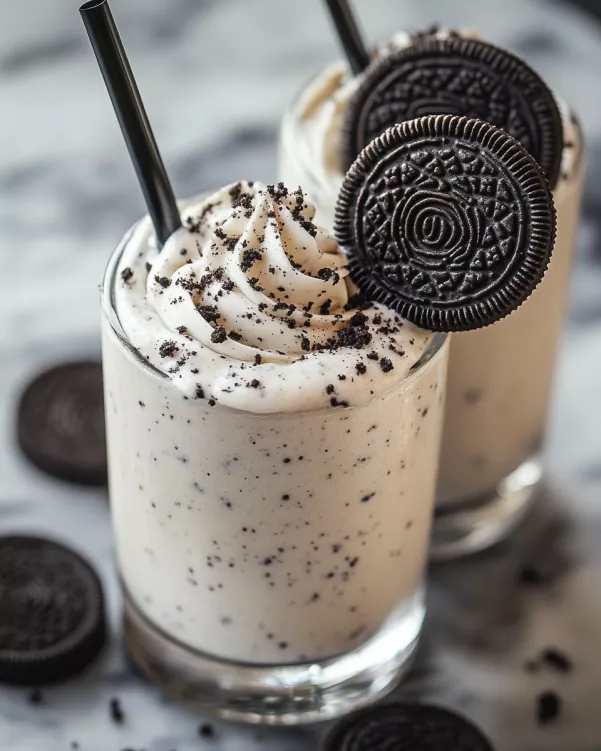
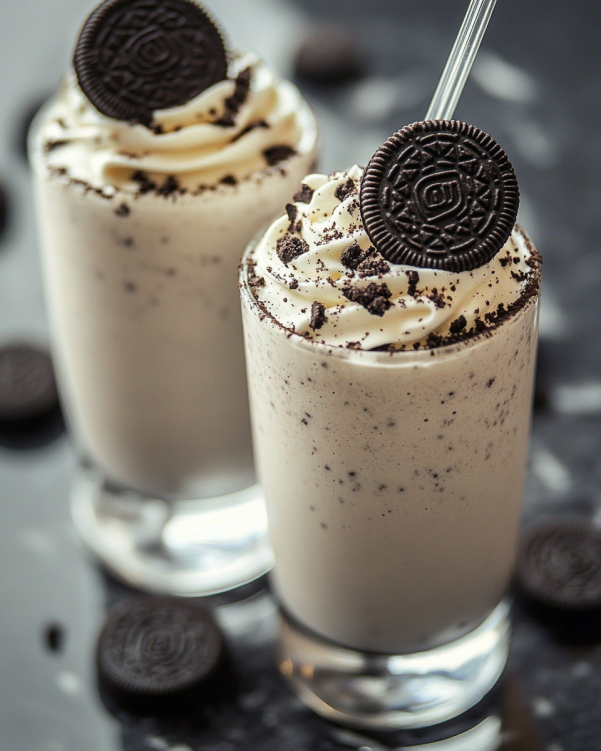
Now for the fun part! Top each milkshake with a generous dollop of whipped cream. Drizzle some chocolate syrup over the top, and don’t forget to add a whole Oreo cookie for garnish. It’s like the cherry on top, but way better!

Step 5: Enjoy Immediately

Serve your Oreo Milkshake Delight right away with a straw or a long spoon. Trust me, you won’t want to wait. The combination of flavors and textures is simply irresistible!

Tips for Success

  • Use high-quality vanilla ice cream for the creamiest texture.
  • Chill your glasses in the freezer for a frosty presentation.
  • Experiment with different cookie brands for unique flavors.
  • Blend in some chocolate chips for an extra chocolatey kick.
  • Don’t rush the blending; let it mix until perfectly smooth.

Equipment Needed

  • Blender: A high-speed blender works best, but a regular one will do.
  • Tall Glasses: Use any glass you have on hand; mason jars add a fun touch.
  • Spoon or Straw: A long spoon is perfect for scooping, while a straw makes sipping easy.

Variations of Oreo Milkshake Delight

  • Mint Oreo Milkshake: Add a few drops of peppermint extract for a refreshing twist.
  • Chocolate Lovers: Use chocolate ice cream instead of vanilla for a richer flavor.
  • Nutty Delight: Blend in some crushed nuts like almonds or hazelnuts for added crunch.
  • Vegan Option: Substitute vanilla ice cream with coconut or almond milk ice cream and use plant-based milk.
  • Cookie Dough Surprise: Mix in edible cookie dough chunks for a fun texture contrast.

Serving Suggestions for Oreo Milkshake Delight

  • Pair your milkshake with warm chocolate chip cookies for a delightful dessert duo.
  • Serve alongside a slice of rich chocolate cake for an indulgent treat.
  • For a fun presentation, use mason jars and colorful straws.
  • Offer a side of fresh fruit for a refreshing contrast.

FAQs about Oreo Milkshake Delight

Can I make Oreo Milkshake Delight ahead of time?

While it’s best enjoyed fresh, you can prepare the base and store it in the fridge for a few hours. Just give it a quick blend before serving to restore that creamy texture.

What can I use instead of whole milk?

If you’re looking for alternatives, almond milk, oat milk, or even coconut milk work well. Each will give your milkshake a unique flavor twist!

How can I make this milkshake healthier?

To lighten it up, consider using low-fat ice cream or yogurt. You can also reduce the number of cookies or use sugar-free options for a guilt-free treat.

Can I use other cookies besides Oreos?

Absolutely! Feel free to experiment with other cookies like chocolate sandwich cookies or even peanut butter cookies for a different flavor profile.

What’s the best way to store leftovers?

If you have any leftovers, store them in an airtight container in the freezer. Just remember to let it sit out for a few minutes before enjoying again, as it will be quite solid!

Final Thoughts

Creating an Oreo Milkshake Delight is more than just whipping up a dessert; it’s about reliving those sweet moments that make life a little brighter. Each sip is a reminder of carefree days, laughter, and the joy of sharing something delicious with friends and family. This milkshake is a simple yet indulgent treat that can turn an ordinary day into something special. So, whether you’re treating yourself after a long week or celebrating a small victory, this creamy delight is sure to bring a smile to your face. Enjoy every last drop!

jhessica

Oreo Milkshake Delight: Indulge in a Creamy Treat!

Oreo Milkshake Delight is a creamy and indulgent treat made with vanilla ice cream and crushed Oreo cookies, perfect for satisfying your sweet tooth.
Prep Time 10 minutes
Total Time 10 minutes
Servings: 2 servings
Course: Dessert
Cuisine: American
Calories: 600

Ingredients
  

  • 2 cups vanilla ice cream
  • 1 cup whole milk
  • 6 Oreo cookies crushed
  • 1 teaspoon vanilla extract
  • Whipped cream for topping
  • Chocolate syrup for drizzling
  • Additional Oreo cookies for garnish

Method
 

  1. In a blender, combine the vanilla ice cream, whole milk, crushed Oreo cookies, and vanilla extract. Blend on high until smooth and creamy.
  2. If you prefer a thicker milkshake, add more ice cream; for a thinner consistency, add more milk.
  3. Pour the milkshake into tall glasses.
  4. Top each milkshake with whipped cream, a drizzle of chocolate syrup, and a whole Oreo cookie for garnish.
  5. Serve immediately with a straw or a long spoon.

Nutrition

Serving: 1servingCalories: 600kcalCarbohydrates: 75gProtein: 10gFat: 30gSaturated Fat: 18gPolyunsaturated Fat: 8gCholesterol: 80mgSodium: 200mgFiber: 2gSugar: 60g

Notes

  • For a minty twist, add a few drops of peppermint extract or blend in some mint chocolate chip ice cream.
  • Try using different flavors of ice cream, like cookies and cream or chocolate, for a unique taste experience.

Tried this recipe?

Let us know how it was!

Flavor-Packed Street Corn Chicken Rice Bowl that Delights!

Introduction to Flavor-Packed Street Corn Chicken Rice Bowl

There’s something magical about a meal that brings together vibrant flavors and comforting textures. The Flavor-Packed Street Corn Chicken Rice Bowl does just that! It’s a dish that’s not only quick to whip up but also a surefire way to impress your loved ones. Whether you’re coming home after a long day or hosting friends for a casual dinner, this bowl is your go-to solution. With tender chicken, sweet corn, and a creamy dressing, it’s a delightful explosion of taste that will have everyone asking for seconds. Let’s dive into this culinary adventure!

Why You’ll Love This Flavor-Packed Street Corn Chicken Rice Bowl

This dish is a game-changer for busy weeknights. It comes together in just 30 minutes, making it perfect for those evenings when time is tight. The combination of juicy chicken and sweet corn creates a flavor explosion that’s hard to resist. Plus, it’s customizable! You can easily tweak ingredients to suit your taste or dietary needs. Trust me, this bowl will quickly become a family favorite!

Ingredients for Flavor-Packed Street Corn Chicken Rice Bowl

Gathering the right ingredients is the first step to creating your Flavor-Packed Street Corn Chicken Rice Bowl. Here’s what you’ll need:

  • Cooked white rice: This serves as the hearty base of your bowl, providing a comforting texture.
  • Boneless, skinless chicken breasts: Tender and juicy, they soak up all the spices beautifully.
  • Olive oil: A must for cooking the chicken, adding richness and flavor.
  • Chili powder: This spice brings a warm kick, enhancing the overall taste.
  • Cumin: Earthy and aromatic, it adds depth to the dish.
  • Garlic powder: A pantry staple that infuses a savory note.
  • Salt and pepper: Essential for seasoning, bringing all the flavors together.
  • Corn: Fresh, frozen, or canned, it adds sweetness and crunch.
  • Mayonnaise: This creamy base helps create a luscious dressing.
  • Sour cream: Adds tanginess and creaminess to the dressing.
  • Lime juice: A splash of acidity that brightens the flavors.
  • Cotija cheese: Crumbled on top, it adds a salty, crumbly texture.
  • Fresh cilantro: A burst of freshness that complements the dish.
  • Avocado: Sliced for creaminess and healthy fats.
  • Lime wedges: For serving, they provide an extra zing when squeezed over the bowl.

For those looking to spice things up, consider adding diced jalapeños or a dash of hot sauce to the creamy dressing. If you’re watching your carbs, quinoa or cauliflower rice can be great substitutes while keeping the flavors intact. You can find exact measurements for these ingredients at the bottom of the article, ready for printing!

How to Make Flavor-Packed Street Corn Chicken Rice Bowl

Step 1: Cook the Chicken

Start by heating olive oil in a large skillet over medium heat. While it warms up, season your boneless, skinless chicken breasts with chili powder, cumin, garlic powder, salt, and pepper. This spice blend is where the magic begins!

Once the oil is shimmering, add the chicken to the skillet. Cook for about 6-7 minutes on each side. You want it golden brown and cooked through, with no pink in the center. After cooking, let the chicken rest for a few minutes before slicing it into bite-sized pieces. This helps keep it juicy!

Step 2: Prepare the Corn

While the chicken is sizzling away, it’s time to focus on the corn. If you’re using fresh corn, grill or sauté it in a separate pan until it’s slightly charred. That char adds a delightful smoky flavor!

If you’re opting for frozen or canned corn, simply heat it in a small saucepan until warmed through. Either way, the corn will add a sweet crunch to your bowl.

Step 3: Make the Creamy Dressing

In a mixing bowl, combine mayonnaise, sour cream, lime juice, and a pinch of salt. This creamy dressing is what ties all the flavors together. Stir until smooth and well blended. If you like a little heat, feel free to add diced jalapeños or a dash of hot sauce to the mix!

Step 4: Assemble the Bowls

Now comes the fun part! Start with a generous base of cooked white rice in each bowl. Top it with the sliced chicken, followed by the prepared corn. Drizzle that creamy dressing over everything, and don’t forget to sprinkle crumbled cotija cheese on top. Add sliced avocado and a handful of chopped cilantro for that fresh touch.

Step 5: Serve with Lime Wedges

Finally, serve your Flavor-Packed Street Corn Chicken Rice Bowl with lime wedges on the side. A squeeze of lime adds a burst of brightness that elevates the entire dish. Enjoy every bite!

Tips for Success

  • Prep your ingredients ahead of time to save on cooking time.
  • Use a meat thermometer to ensure chicken reaches 165°F for perfect doneness.
  • Don’t skip the resting time for the chicken; it keeps it juicy.
  • Feel free to customize the toppings based on your preferences.
  • For extra flavor, try marinating the chicken for an hour before cooking.

Equipment Needed

  • Large skillet: Essential for cooking the chicken. A non-stick pan works well too.
  • Mixing bowl: For preparing the creamy dressing. Any bowl will do!
  • Cutting board and knife: For slicing the chicken and avocado.
  • Meat thermometer: Optional, but great for checking chicken doneness.

Variations

  • Spicy Kick: Add diced jalapeños or a splash of hot sauce to the creamy dressing for an extra kick.
  • Vegetarian Option: Substitute the chicken with grilled portobello mushrooms or chickpeas for a hearty, meat-free meal.
  • Low-Carb Twist: Use cauliflower rice instead of white rice to keep it light and low-carb.
  • Grilled Flavor: Grill the chicken and corn for a smoky flavor that enhances the dish.
  • Herb Variations: Experiment with different herbs like parsley or basil instead of cilantro for a unique twist.

Serving Suggestions

  • Side Salad: Pair your bowl with a light mixed greens salad dressed in a citrus vinaigrette.
  • Refreshing Drink: Serve with a cold Mexican lager or a zesty limeade for a perfect match.
  • Presentation: Use colorful bowls to showcase the vibrant ingredients and garnish with extra cilantro.

FAQs about Flavor-Packed Street Corn Chicken Rice Bowl

Can I make the Flavor-Packed Street Corn Chicken Rice Bowl ahead of time?

Absolutely! You can prepare the chicken and corn in advance. Just store them separately in the fridge. When you’re ready to eat, reheat them and assemble your bowl. It’s a great meal prep option!

What can I substitute for cotija cheese?

If you can’t find cotija cheese, feta or queso fresco works well as a substitute. Both will add that creamy, salty touch to your dish.

Is this recipe gluten-free?

Yes! The Flavor-Packed Street Corn Chicken Rice Bowl is naturally gluten-free. Just ensure that any sauces or dressings you use are also gluten-free.

Can I use brown rice instead of white rice?

Definitely! Brown rice adds a nutty flavor and extra fiber. Just keep in mind that it may take a bit longer to cook than white rice.

How can I make this dish spicier?

If you’re looking for a spicy kick, add diced jalapeños to the corn or mix some hot sauce into the creamy dressing. You can also sprinkle some cayenne pepper on top for an extra punch!

Final Thoughts

Creating the Flavor-Packed Street Corn Chicken Rice Bowl is more than just cooking; it’s about bringing joy to the table. Each bite bursts with flavor, reminding me of summer barbecues and family gatherings. The vibrant colors and textures make it a feast for the eyes, while the creamy dressing ties everything together beautifully. Whether you’re enjoying it solo or sharing with friends, this dish is sure to spark smiles and satisfied bellies. So, roll up your sleeves and dive into this culinary adventure. Trust me, you’ll be savoring every delicious moment!

jhessica

Flavor-Packed Street Corn Chicken Rice Bowl that Delights!

A delicious and vibrant street corn chicken rice bowl that combines tender chicken, sweet corn, and a creamy dressing for a flavor-packed meal.
Prep Time 15 minutes
Cook Time 15 minutes
Total Time 30 minutes
Servings: 4 servings
Course: Main Course
Cuisine: Mexican
Calories: 550

Ingredients
  

  • 2 cups cooked white rice
  • 1 pound boneless skinless chicken breasts
  • 1 tablespoon olive oil
  • 1 teaspoon chili powder
  • 1 teaspoon cumin
  • 1 teaspoon garlic powder
  • Salt and pepper to taste
  • 1 cup corn fresh, frozen, or canned
  • 1/2 cup mayonnaise
  • 1/4 cup sour cream
  • 1 tablespoon lime juice
  • 1/4 cup crumbled cotija cheese
  • 1/4 cup chopped fresh cilantro
  • 1 avocado sliced
  • Lime wedges for serving

Method
 

  1. In a large skillet, heat olive oil over medium heat. Season the chicken breasts with chili powder, cumin, garlic powder, salt, and pepper. Add the chicken to the skillet and cook for 6-7 minutes on each side, or until fully cooked and no longer pink in the center. Remove from heat and let rest for a few minutes before slicing.
  2. While the chicken is cooking, prepare the corn. If using fresh corn, grill or sauté it in a separate pan until slightly charred. If using frozen or canned corn, heat it in a small saucepan until warmed through.
  3. In a bowl, mix together the mayonnaise, sour cream, lime juice, and a pinch of salt. This will be your creamy dressing.
  4. To assemble the bowls, start with a base of cooked rice. Top with sliced chicken, corn, a drizzle of the creamy dressing, crumbled cotija cheese, sliced avocado, and chopped cilantro.
  5. Serve with lime wedges on the side for an extra burst of flavor.

Nutrition

Serving: 1bowlCalories: 550kcalCarbohydrates: 45gProtein: 30gFat: 25gSaturated Fat: 4gPolyunsaturated Fat: 20gCholesterol: 80mgSodium: 600mgFiber: 3gSugar: 3g

Notes

  • For a spicier kick, add diced jalapeños or a dash of hot sauce to the creamy dressing.
  • Substitute quinoa or cauliflower rice for a lower-carb option while keeping the flavors intact.

Tried this recipe?

Let us know how it was!

Hot Honey Chicken Sandwiches: A Flavorful Recipe Reveal!

Introduction to Hot Honey Chicken Sandwiches

There’s something magical about a sandwich that combines sweet and spicy flavors, and that’s exactly what you’ll find in these Hot Honey Chicken Sandwiches. As a busy home cook, I know how challenging it can be to whip up something delicious after a long day. This recipe is a lifesaver! With tender chicken thighs simmering in a sweet and spicy sauce, it’s a dish that will impress your loved ones without keeping you in the kitchen for hours. Perfect for game day or a cozy family dinner, these sandwiches are sure to become a favorite!

Why You’ll Love This Hot Honey Chicken Sandwiches

These Hot Honey Chicken Sandwiches are a game-changer for any home cook. They’re incredibly easy to make, thanks to the slow cooker, which does all the heavy lifting for you. The combination of sweet and spicy flavors creates a taste explosion that will have everyone coming back for seconds. Plus, they’re perfect for busy weeknights or casual gatherings, making them a versatile addition to your recipe repertoire.

Ingredients for Hot Honey Chicken Sandwiches

Gathering the right ingredients is the first step to creating these mouthwatering Hot Honey Chicken Sandwiches. Here’s what you’ll need:

  • Boneless, skinless chicken thighs: These are juicy and tender, perfect for soaking up the sweet and spicy sauce.
  • Chicken broth: This adds depth and flavor to the sauce, ensuring your chicken is moist and delicious.
  • Hot honey: The star of the show! It brings that sweet heat that makes these sandwiches irresistible. You can buy it or make your own.
  • Soy sauce: This adds a savory umami kick, balancing the sweetness of the honey.
  • Apple cider vinegar: A splash of acidity brightens the flavors and cuts through the richness.
  • Garlic powder: For that aromatic punch that elevates the dish.
  • Onion powder: It complements the garlic and adds a subtle sweetness.
  • Black pepper and salt: Essential seasonings that enhance all the flavors.
  • Hamburger buns: Choose your favorite type; toasted buns provide a perfect base for the chicken.
  • Cheddar cheese: Optional, but a slice melted on the bun adds creaminess and richness.
  • Coleslaw mix: This is optional but adds a crunchy texture and freshness to the sandwich.
  • Pickles: A tangy addition that can elevate the flavor profile even further.

For exact measurements, check the bottom of the article where you can find everything listed for easy printing. Happy cooking!

How to Make Hot Honey Chicken Sandwiches

Creating these Hot Honey Chicken Sandwiches is a breeze, especially with the help of a slow cooker. Follow these simple steps, and you’ll have a delicious meal ready to impress!

Step 1: Prepare the Sauce

Start by grabbing your slow cooker. Combine the chicken broth, hot honey, soy sauce, apple cider vinegar, garlic powder, onion powder, black pepper, and salt. Stir everything together until well mixed. This sauce is the heart of your dish, so make sure it’s blended nicely!

Step 2: Add Chicken Thighs

Next, take your boneless, skinless chicken thighs and place them in the slow cooker. Ensure they are fully submerged in that flavorful sauce. This is where the magic happens! Cover the slow cooker with its lid, sealing in all those delicious aromas.

Step 3: Cook the Chicken

Now, it’s time to let the slow cooker do its thing. You can choose to cook on low for 6-8 hours or on high for 3-4 hours. Either way, the chicken will become tender and easy to shred. Just resist the urge to peek too often; let it work its magic!

Step 4: Shred the Chicken

Once the cooking time is up, carefully remove the chicken from the slow cooker. Using two forks, shred the chicken into bite-sized pieces. Return the shredded chicken to the slow cooker and stir it back into the sauce. This step ensures every piece is coated in that sweet and spicy goodness.

Step 5: Toast the Buns

While the chicken is soaking up the flavors, it’s time to prepare the buns. Lightly toast your hamburger buns until they’re golden brown. If you’re feeling indulgent, add a slice of cheddar cheese on the bottom half of each bun while they’re still warm. The cheese will melt just enough to create a creamy layer!

Step 6: Assemble the Sandwiches

Now comes the fun part! Spoon generous amounts of the hot honey chicken onto the toasted buns. If you like, add coleslaw mix and pickles for extra crunch and flavor. Place the top half of the bun on each sandwich, and voilà! Your Hot Honey Chicken Sandwiches are ready to be devoured.

Tips for Success

  • For extra flavor, marinate the chicken in the sauce overnight before cooking.
  • Adjust the heat by adding more or less hot honey to suit your taste.
  • Use a meat thermometer to ensure chicken reaches 165°F for safety.
  • Experiment with different toppings like jalapeños or avocado for a twist.
  • Make a double batch and freeze leftovers for a quick meal later!

Equipment Needed

  • Slow Cooker: Essential for this recipe; a Dutch oven can work too, but cooking time will vary.
  • Measuring Cups: For accurate ingredient measurements; a kitchen scale is a great alternative.
  • Two Forks: Perfect for shredding chicken; you can also use a hand mixer for quicker shredding.
  • Toasting Pan: For buns; a skillet or grill works well too.

Variations

  • Spicy Hot Honey: Add more crushed red pepper flakes to the sauce for an extra kick.
  • BBQ Twist: Substitute hot honey with your favorite BBQ sauce for a smoky flavor.
  • Healthier Option: Use skinless chicken breasts instead of thighs for a leaner sandwich.
  • Vegetarian Version: Replace chicken with grilled portobello mushrooms or crispy tofu for a plant-based delight.
  • Gluten-Free: Use gluten-free buns to make this dish suitable for gluten-sensitive diets.

Serving Suggestions

  • Fries: Serve with crispy French fries or sweet potato fries for a classic combo.
  • Coleslaw: A side of coleslaw complements the sandwich’s flavors and adds crunch.
  • Beer: Pair with a cold beer or iced tea for a refreshing drink.
  • Presentation: Serve on a wooden board for a rustic touch that impresses guests.

FAQs about Hot Honey Chicken Sandwiches

Can I use chicken breasts instead of thighs for this recipe?

Absolutely! While chicken thighs provide a juicier texture, chicken breasts can be used for a leaner option. Just keep an eye on the cooking time, as breasts may cook faster.

How can I make my Hot Honey Chicken Sandwiches spicier?

If you crave more heat, simply add crushed red pepper flakes to the sauce mixture. You can also drizzle extra hot honey on top before serving for an added kick!

Can I prepare the chicken in advance?

Yes! You can cook the chicken ahead of time and store it in the fridge for up to three days. Just reheat it in the slow cooker or on the stove before assembling your sandwiches.

What toppings do you recommend for these sandwiches?

For a delicious crunch, I suggest adding coleslaw mix and pickles. You can also try jalapeños, avocado, or even a drizzle of ranch dressing for a unique twist!

Are Hot Honey Chicken Sandwiches gluten-free?

They can be! Just make sure to use gluten-free buns and check that your hot honey and soy sauce are gluten-free as well. Enjoy without worry!

Final Thoughts

There’s a certain joy that comes from biting into a Hot Honey Chicken Sandwich. The sweet heat dances on your taste buds, while the tender chicken and toasted bun create a comforting embrace. This recipe isn’t just about food; it’s about gathering around the table with friends and family, sharing laughter and stories. Whether it’s a casual weeknight dinner or a weekend gathering, these sandwiches bring people together. I hope you enjoy making them as much as I do. Trust me, once you take that first bite, you’ll be hooked on this delightful flavor combination!

jhessica

Hot Honey Chicken Sandwiches: A Flavorful Recipe Reveal!

A delicious recipe for Hot Honey Chicken Sandwiches featuring tender chicken thighs cooked in a sweet and spicy sauce, served on toasted buns with optional toppings.
Prep Time 15 minutes
Servings: 4 servings
Course: Sandwich
Cuisine: American
Calories: 450

Ingredients
  

  • 2 pounds boneless skinless chicken thighs
  • 1 cup chicken broth
  • 1/2 cup hot honey store-bought or homemade
  • 1/4 cup soy sauce
  • 1 tablespoon apple cider vinegar
  • 1 teaspoon garlic powder
  • 1 teaspoon onion powder
  • 1/2 teaspoon black pepper
  • 1/2 teaspoon salt
  • 4 hamburger buns
  • 4 slices of cheddar cheese
  • 1 cup coleslaw mix optional
  • Pickles optional, for serving

Method
 

  1. In a slow cooker, combine the chicken broth, hot honey, soy sauce, apple cider vinegar, garlic powder, onion powder, black pepper, and salt. Stir well to combine.
  2. Add the chicken thighs to the slow cooker, ensuring they are submerged in the sauce. Cover and cook on low for 6-8 hours or on high for 3-4 hours, until the chicken is tender and easily shredded.
  3. Once cooked, remove the chicken from the slow cooker and shred it using two forks. Return the shredded chicken to the slow cooker and stir to coat with the sauce.
  4. Toast the hamburger buns lightly. If using, place a slice of cheddar cheese on the bottom half of each bun.
  5. Spoon the hot honey chicken onto the buns, and top with coleslaw mix and pickles if desired. Place the top half of the bun on each sandwich and serve immediately.

Nutrition

Serving: 1sandwichCalories: 450kcalCarbohydrates: 30gProtein: 30gFat: 20gSaturated Fat: 8gPolyunsaturated Fat: 12gCholesterol: 100mgSodium: 800mgFiber: 2gSugar: 15g

Notes

  • For a spicier kick, add a teaspoon of crushed red pepper flakes to the sauce mixture.
  • Substitute the chicken thighs with chicken breasts for a leaner option, adjusting the cooking time if necessary.

Tried this recipe?

Let us know how it was!

Slow Cooker Shawarma Chicken: Easy Recipe to Try Today!

Introduction to Slow Cooker Shawarma Chicken

There’s something magical about the aroma of spices wafting through the kitchen, isn’t there? When I think of my favorite meals, Slow Cooker Shawarma Chicken always comes to mind. It’s not just a dish; it’s a warm hug on a plate. Perfect for those busy weeknights or when you want to impress friends with minimal effort, this recipe is a game-changer. With just a few simple ingredients and a slow cooker, you can create a flavorful meal that feels like a culinary adventure. Trust me, your taste buds will thank you!

Why You’ll Love This Slow Cooker Shawarma Chicken

This Slow Cooker Shawarma Chicken is a lifesaver for anyone juggling a busy schedule. It’s incredibly easy to prepare, allowing you to toss everything in the slow cooker and forget about it. The flavors meld beautifully as it cooks, creating a dish that’s bursting with taste. Plus, it’s versatile! Serve it in wraps, over rice, or in salads. You’ll find yourself craving it again and again!

Ingredients for Slow Cooker Shawarma Chicken

Gathering the right ingredients is the first step to culinary success. For this Slow Cooker Shawarma Chicken, you’ll need a mix of spices and fresh elements that come together to create a symphony of flavors. Here’s what you’ll need:

  • Boneless, skinless chicken thighs: Tender and juicy, they soak up the spices beautifully.
  • Olive oil: This adds richness and helps the spices adhere to the chicken.
  • Ground cumin: A warm, earthy spice that’s essential for that authentic shawarma flavor.
  • Ground coriander: Adds a citrusy note that brightens the dish.
  • Ground paprika: For a hint of sweetness and vibrant color.
  • Ground turmeric: This golden spice not only adds color but also a subtle warmth.
  • Ground cinnamon: A surprising twist that enhances the overall flavor profile.
  • Garlic powder: For that savory depth without the fuss of fresh garlic.
  • Onion powder: Adds a sweet, aromatic flavor that complements the spices.
  • Salt: Essential for bringing out all the flavors in the dish.
  • Black pepper: A must-have for a little kick.
  • Cayenne pepper (optional): If you like heat, this will spice things up!
  • Lemon juice: Freshly squeezed for brightness and acidity.
  • Minced garlic: Fresh garlic adds a punch of flavor that’s hard to beat.
  • Chicken broth: Keeps the chicken moist and adds depth to the sauce.

For those looking to experiment, consider adding a teaspoon of smoked paprika for a smoky flavor. You can also serve this dish with a side of tahini sauce or a yogurt-based sauce for an extra layer of creaminess. Exact measurements for each ingredient can be found at the bottom of the article, ready for printing!

How to Make Slow Cooker Shawarma Chicken

Now that you have all your ingredients ready, let’s dive into the fun part: making this delicious Slow Cooker Shawarma Chicken! Follow these simple steps, and you’ll have a mouthwatering meal that’s sure to impress.

Step 1: Prepare the Spice Mix

Start by grabbing a small bowl. In it, combine the ground cumin, coriander, paprika, turmeric, cinnamon, garlic powder, onion powder, salt, black pepper, and cayenne pepper if you’re feeling adventurous. Mix them well until they’re evenly blended. This spice mix is the heart of your shawarma, so don’t skip this step!

Step 2: Coat the Chicken

Next, take your boneless, skinless chicken thighs and place them in a large bowl. Drizzle the olive oil over the chicken, ensuring each piece gets a nice coating. Then, sprinkle the spice mix over the chicken. Use your hands to rub the spices into the meat, making sure every inch is covered. This step is crucial for infusing flavor into the chicken.

Step 3: Assemble in the Slow Cooker

Now it’s time to bring everything together. Place the seasoned chicken thighs in the slow cooker. Add the minced garlic, freshly squeezed lemon juice, and chicken broth. The broth will keep the chicken moist and create a delicious sauce. Make sure everything is well distributed, so the flavors meld beautifully as it cooks.

Step 4: Cook the Chicken

Cover your slow cooker and set it to cook. If you’re short on time, choose the high setting and let it cook for 3-4 hours. For a more leisurely approach, set it to low and let it simmer for 6-8 hours. Either way, the chicken will become tender and easy to shred. You’ll know it’s ready when it falls apart effortlessly with a fork.

Step 5: Shred and Serve

Once the chicken is cooked, remove it from the slow cooker and place it on a cutting board. Use two forks to shred the chicken into bite-sized pieces. Return the shredded chicken to the slow cooker and mix it with the juices. This step ensures every bite is packed with flavor. Serve warm with pita bread, rice, or in a salad, and don’t forget to garnish with fresh herbs or a dollop of yogurt!

Tips for Success

  • For maximum flavor, marinate the chicken in the spice mix for a few hours or overnight.
  • Don’t skip the lemon juice; it brightens the dish and balances the spices.
  • Use a meat thermometer to ensure the chicken reaches 165°F for perfect doneness.
  • Feel free to adjust the spice levels to suit your taste.
  • Leftovers can be stored in the fridge for up to 3 days—perfect for meal prep!

Equipment Needed

  • Slow Cooker: A must-have for this recipe; any size will do, but a 6-quart is ideal.
  • Mixing Bowls: Use a large bowl for the chicken and a small one for the spice mix.
  • Measuring Spoons: Essential for accurate spice measurements.
  • Forks: Two forks are perfect for shredding the chicken.

Variations

  • Spicy Shawarma: Add more cayenne pepper or a dash of hot sauce to kick up the heat.
  • Vegetarian Option: Substitute chicken with chickpeas or cauliflower for a plant-based twist.
  • Herb-Infused: Mix in fresh herbs like cilantro or parsley for a burst of freshness.
  • Greek Style: Serve with tzatziki sauce and a side of Greek salad for a Mediterranean flair.
  • Low-Carb Version: Skip the pita and serve over a bed of greens for a keto-friendly meal.

Serving Suggestions

  • Pita Bread: Warm up some pita for a delightful wrap experience.
  • Rice: Serve over fluffy basmati or jasmine rice to soak up the juices.
  • Salad: Pair with a fresh salad for a light, crunchy contrast.
  • Drinks: Enjoy with a refreshing mint lemonade or a cold beer.
  • Garnish: Top with fresh herbs or a dollop of yogurt for added flavor.

FAQs about Slow Cooker Shawarma Chicken

As you embark on your culinary journey with Slow Cooker Shawarma Chicken, you might have a few questions. Here are some common queries that can help you make the most of this delicious recipe.

Can I use chicken breasts instead of thighs?

Absolutely! While chicken thighs are juicier and more flavorful, chicken breasts can work too. Just keep an eye on the cooking time, as they may dry out faster.

How can I store leftovers?

Leftovers can be stored in an airtight container in the fridge for up to three days. Reheat gently in the microwave or on the stovetop to keep the chicken moist.

Can I freeze Slow Cooker Shawarma Chicken?

Yes! This dish freezes well. Just let it cool completely, then transfer it to a freezer-safe container. It can be frozen for up to three months. Thaw in the fridge before reheating.

What can I serve with Shawarma Chicken?

There are plenty of options! Serve it with pita bread, rice, or a fresh salad. You can also pair it with tahini sauce or yogurt for added creaminess.

Can I make this recipe in advance?

Definitely! You can prepare the spice mix and coat the chicken a day ahead. Just store it in the fridge until you’re ready to cook. This will enhance the flavors even more!

Final Thoughts

Cooking Slow Cooker Shawarma Chicken is more than just preparing a meal; it’s about creating an experience. The tantalizing aroma fills your home, inviting everyone to gather around the table. Each bite is a burst of flavor, transporting you to a bustling Middle Eastern market. Whether you’re enjoying it with family or impressing friends at a gathering, this dish brings joy and satisfaction. Plus, the ease of preparation means you can focus on what truly matters—sharing good food and great company. So, roll up your sleeves and dive into this culinary adventure; your taste buds will thank you!

jhessica

Slow Cooker Shawarma Chicken: Easy Recipe to Try Today!

A delicious and easy recipe for Slow Cooker Shawarma Chicken, perfect for a flavorful meal.
Prep Time 15 minutes
Course: Main Dish
Cuisine: Middle Eastern
Calories: 320

Ingredients
  

  • 2 pounds boneless skinless chicken thighs
  • 2 tablespoons olive oil
  • 2 teaspoons ground cumin
  • 2 teaspoons ground coriander
  • 1 teaspoon ground paprika
  • 1 teaspoon ground turmeric
  • 1 teaspoon ground cinnamon
  • 1 teaspoon garlic powder
  • 1 teaspoon onion powder
  • 1 teaspoon salt
  • ½ teaspoon black pepper
  • ¼ teaspoon cayenne pepper optional for heat
  • 1 lemon juiced
  • 4 cloves garlic minced
  • 1 cup chicken broth

Method
 

  1. In a small bowl, mix together the cumin, coriander, paprika, turmeric, cinnamon, garlic powder, onion powder, salt, black pepper, and cayenne pepper.
  2. In a large bowl, coat the chicken thighs with olive oil and the spice mixture until evenly covered.
  3. Place the seasoned chicken in the slow cooker. Add the minced garlic, lemon juice, and chicken broth.
  4. Cover and cook on low for 6-8 hours or on high for 3-4 hours, until the chicken is tender and easily shredded.
  5. Once cooked, shred the chicken with two forks and mix it with the juices in the slow cooker.
  6. Serve warm with pita bread, rice, or in a salad, garnished with fresh herbs or yogurt if desired.

Nutrition

Serving: 1servingCalories: 320kcalCarbohydrates: 2gProtein: 30gFat: 20gSaturated Fat: 4gPolyunsaturated Fat: 16gCholesterol: 100mgSodium: 600mg

Notes

  • For a smoky flavor, add 1 teaspoon of smoked paprika to the spice mix.
  • Serve with a side of tahini sauce or a yogurt-based sauce for added creaminess and flavor.

Tried this recipe?

Let us know how it was!

Zesty Chicken Enchilada Pasta Salad that’s Irresistibly Flavorful!

Introduction to Zesty Chicken Enchilada Pasta Salad

There’s something magical about a dish that brings together vibrant flavors and a sense of comfort. My Zesty Chicken Enchilada Pasta Salad does just that! It’s the perfect solution for those busy weeknights when you want something quick yet satisfying. With its colorful ingredients and zesty dressing, this salad is not just a meal; it’s a celebration on a plate. Whether you’re feeding a hungry family or impressing friends at a gathering, this recipe is sure to become a favorite. Let’s dive into this delightful dish that’s as easy to make as it is delicious!

Why You’ll Love This Zesty Chicken Enchilada Pasta Salad

This Zesty Chicken Enchilada Pasta Salad is a game-changer for anyone who craves flavor without the fuss. It’s quick to whip up, taking just 25 minutes from start to finish. The combination of tender chicken, hearty beans, and fresh veggies creates a satisfying meal that’s bursting with taste. Plus, it’s perfect for meal prep, making it an ideal choice for busy days or casual gatherings. You’ll find yourself reaching for this recipe time and again!

Ingredients for Zesty Chicken Enchilada Pasta Salad

Gathering the right ingredients is the first step to creating this vibrant Zesty Chicken Enchilada Pasta Salad. Each component plays a crucial role in delivering that irresistible flavor. Here’s what you’ll need:

  • Rotini pasta: This spiral-shaped pasta holds onto the dressing and ingredients beautifully, making every bite flavorful.
  • Olive oil: A splash of this healthy fat adds richness and helps the dressing cling to the pasta.
  • Cooked chicken breast: Shredded chicken provides protein and heartiness. You can use leftover chicken or rotisserie for convenience.
  • Black beans: Rinsed and drained, these beans add fiber and a satisfying texture to the salad.
  • Corn: Whether frozen or canned, corn brings a sweet crunch that balances the dish.
  • Cherry tomatoes: Halved for freshness, these juicy gems add a pop of color and flavor.
  • Red onion: Diced finely, it contributes a sharp bite that complements the other ingredients.
  • Shredded cheddar cheese: This creamy cheese adds richness and a comforting element to the salad.
  • Cilantro: Chopped fresh cilantro brings a burst of herbal brightness that elevates the dish.
  • Lime juice: A zesty squeeze of lime juice brightens everything up and ties the flavors together.
  • Taco seasoning: This blend of spices infuses the salad with that classic Mexican flavor profile.
  • Salt and pepper: Essential for seasoning, these staples enhance all the flavors in the salad.

For those looking to add a little extra crunch, consider mixing in some diced bell peppers or creamy avocado. You can find the exact quantities for each ingredient at the bottom of the article, ready for printing!

How to Make Zesty Chicken Enchilada Pasta Salad

Creating this Zesty Chicken Enchilada Pasta Salad is a breeze! Follow these simple steps, and you’ll have a delicious dish ready in no time. Let’s get cooking!

Step 1: Cook the Pasta

Start by boiling a pot of water. Once it’s bubbling, add the rotini pasta. Cook it according to the package instructions until it’s al dente. This usually takes about 8-10 minutes. When it’s done, drain the pasta and rinse it under cold water. This helps cool it down and stops the cooking process. Trust me, you want that perfect bite!

Step 2: Combine the Ingredients

In a large mixing bowl, combine the cooled pasta with the shredded chicken, black beans, corn, cherry tomatoes, red onion, cheddar cheese, and cilantro. Each ingredient adds its own flair, creating a colorful and inviting salad. Don’t be shy—mix it all together gently, so everything is evenly distributed.

Step 3: Prepare the Dressing

In a small bowl, whisk together the lime juice, olive oil, taco seasoning, salt, and pepper. This zesty dressing is what brings the whole dish to life! Make sure to taste it; you can adjust the seasoning if needed. A little extra lime juice can brighten it up even more!

Step 4: Mix Everything Together

Pour the dressing over the pasta salad. Now, it’s time to toss everything together! Use a spatula or large spoon to gently combine the ingredients. You want every piece to be coated in that delicious dressing. It’s like a flavor hug for your pasta salad!

Step 5: Chill and Serve

Cover the bowl with plastic wrap or a lid and pop it in the fridge for at least 30 minutes. This chilling time allows the flavors to meld beautifully. When you’re ready to serve, you can enjoy it chilled or at room temperature. Either way, it’s going to be a hit!

Tips for Success

  • Always rinse the pasta after cooking to prevent it from becoming mushy.
  • For a creamier texture, add a dollop of sour cream or Greek yogurt to the dressing.
  • Letting the salad chill longer enhances the flavors even more.
  • Feel free to customize with your favorite veggies or proteins.
  • Use fresh lime juice for the best zesty flavor.

Equipment Needed

  • Large pot: For boiling the pasta. A deep skillet can work too.
  • Colander: To drain the pasta. A fine mesh strainer is a good alternative.
  • Mixing bowl: A large bowl for combining ingredients. A salad bowl or even a pot can suffice.
  • Whisk: For mixing the dressing. A fork can do the job in a pinch.
  • Spatula or large spoon: To toss everything together. Tongs can also be handy!

Variations

  • Spicy Kick: Add diced jalapeños or a splash of hot sauce for an extra kick of heat.
  • Vegetarian Option: Substitute the chicken with grilled zucchini or extra black beans for a hearty meatless version.
  • Cheesy Delight: Mix in crumbled queso fresco or pepper jack cheese for a different cheesy flavor.
  • Grain Swap: Use quinoa or farro instead of rotini for a nutritious twist.
  • Herb Infusion: Experiment with fresh herbs like parsley or basil to change up the flavor profile.

Serving Suggestions

  • Pair this Zesty Chicken Enchilada Pasta Salad with crispy tortilla chips for a delightful crunch.
  • Serve alongside grilled corn on the cob for a true summer feast.
  • Complement with a refreshing margarita or iced tea to enhance the flavors.
  • For presentation, garnish with extra cilantro and lime wedges for a pop of color.

FAQs about Zesty Chicken Enchilada Pasta Salad

Can I make this Zesty Chicken Enchilada Pasta Salad ahead of time?

Absolutely! This salad is perfect for meal prep. You can make it a day in advance and store it in the fridge. The flavors will deepen and meld together, making it even tastier!

What can I substitute for chicken in this pasta salad?

If you’re looking for a vegetarian option, try using grilled zucchini or extra black beans. You can also use shredded rotisserie chicken for a quick and easy alternative.

How long does this salad last in the fridge?

This Zesty Chicken Enchilada Pasta Salad can last up to 3 days in the fridge. Just make sure to keep it covered to maintain freshness.

Can I add more vegetables to the salad?

<pDefinitely! Feel free to mix in diced bell peppers, avocado, or even some spinach for added nutrition and crunch. The more colorful, the better!

Is this pasta salad gluten-free?

<pYes! As long as you use gluten-free rotini pasta, this Zesty Chicken Enchilada Pasta Salad is a delicious gluten-free option that everyone can enjoy.

Final Thoughts

Creating this Zesty Chicken Enchilada Pasta Salad is more than just cooking; it’s about bringing joy to the table. Each bite bursts with flavor, reminding me of sunny days and shared laughter. This dish is perfect for any occasion, whether it’s a casual family dinner or a lively gathering with friends. The vibrant colors and zesty taste make it a feast for the eyes and the palate. I hope you enjoy making it as much as I do. Trust me, once you try it, this salad will become a staple in your kitchen!

jhessica

Zesty Chicken Enchilada Pasta Salad that’s Irresistibly Flavorful!

A flavorful and refreshing Zesty Chicken Enchilada Pasta Salad that combines rotini pasta, shredded chicken, and a variety of colorful ingredients, perfect for a light meal or side dish.
Prep Time 15 minutes
Cook Time 10 minutes
Total Time 25 minutes
Servings: 6 servings
Course: Salad
Cuisine: Mexican
Calories: 320

Ingredients
  

  • 2 cups rotini pasta
  • 1 tablespoon olive oil
  • 1 pound cooked chicken breast shredded
  • 1 can 15 ounces black beans, rinsed and drained
  • 1 cup corn frozen or canned
  • 1 cup cherry tomatoes halved
  • 1/2 cup red onion diced
  • 1 cup shredded cheddar cheese
  • 1/2 cup cilantro chopped
  • 1/4 cup lime juice
  • 1 tablespoon taco seasoning
  • Salt and pepper to taste

Method
 

  1. Cook the rotini pasta according to package instructions. Drain and rinse under cold water to cool.
  2. In a large bowl, combine the cooled pasta, shredded chicken, black beans, corn, cherry tomatoes, red onion, cheddar cheese, and cilantro.
  3. In a small bowl, whisk together the lime juice, olive oil, taco seasoning, salt, and pepper.
  4. Pour the dressing over the pasta salad and toss gently to combine all ingredients evenly.
  5. Cover and refrigerate for at least 30 minutes to allow the flavors to meld.
  6. Serve chilled or at room temperature.

Nutrition

Serving: 1servingCalories: 320kcalCarbohydrates: 30gProtein: 25gFat: 10gSaturated Fat: 3gPolyunsaturated Fat: 7gCholesterol: 70mgSodium: 400mgFiber: 6gSugar: 2g

Notes

  • For added crunch, consider mixing in some diced bell peppers or avocado.
  • Substitute the chicken with shredded rotisserie chicken for a quicker option.

Tried this recipe?

Let us know how it was!

Hearty Beef Stew: Discover a Comforting Recipe Now!

Introduction to Hearty Beef Stew

There’s something magical about a pot of hearty beef stew simmering on the stove. The aroma wafts through the house, wrapping you in warmth like a cozy blanket. This dish is more than just a meal; it’s a comforting hug on a chilly day. Whether you’re coming home from a long day at work or gathering with family, this hearty beef stew is the perfect solution. It’s easy to make, packed with flavor, and sure to impress your loved ones. Let’s dive into this delightful recipe that will have everyone asking for seconds!

Why You’ll Love This Hearty Beef Stew

This hearty beef stew is a game-changer for busy weeknights. It’s not just about the rich flavors; it’s about the simplicity. With minimal prep and a hands-off cooking process, you can focus on what really matters—spending time with family or unwinding after a long day. Plus, the leftovers taste even better, making it a perfect meal for meal prep. Trust me, this stew will become a staple in your kitchen!

Ingredients for Hearty Beef Stew

Gathering the right ingredients is the first step to creating a delicious hearty beef stew. Here’s what you’ll need:

  • Beef Chuck: This cut is perfect for stewing. It becomes tender and flavorful as it cooks.
  • Olive Oil: A splash of this adds richness and helps brown the beef beautifully.
  • Onion: Chopped onions provide a sweet base flavor that enhances the stew.
  • Garlic: Minced garlic adds a punch of flavor that elevates the dish.
  • Carrots: Sliced carrots bring sweetness and color, making the stew visually appealing.
  • Potatoes: Diced potatoes add heartiness and help thicken the stew as they cook.
  • Beef Broth: This is the soul of the stew, providing depth and richness.
  • Red Wine: Optional, but it adds a layer of complexity. You can substitute with more beef broth if preferred.
  • Tomato Paste: A small amount enhances the stew’s flavor and gives it a beautiful color.
  • Dried Thyme and Rosemary: These herbs infuse the stew with aromatic flavors that are classic in comfort food.
  • Bay Leaves: They add a subtle depth of flavor; just remember to remove them before serving!
  • Salt and Pepper: Essential for seasoning, adjust to your taste.
  • Frozen Peas: Optional, but they add a pop of color and sweetness at the end.
  • Fresh Parsley: Chopped parsley is a lovely garnish that brightens up the dish.

For exact measurements, check the bottom of the article where you can find everything listed for easy printing. Happy cooking!

How to Make Hearty Beef Stew

Now that you have your ingredients ready, let’s get cooking! Making a hearty beef stew is a straightforward process that fills your kitchen with mouthwatering aromas. Follow these simple steps, and you’ll have a delicious meal ready in no time.

Step 1: Brown the Beef

Start by heating the olive oil in a large pot or Dutch oven over medium-high heat. Once the oil is shimmering, add the beef cubes in batches. Don’t overcrowd the pot; this helps achieve that beautiful brown crust. Brown the beef on all sides, which should take about 5-7 minutes. Once done, remove the beef and set it aside. This step is crucial for building flavor in your hearty beef stew!

Step 2: Sauté the Aromatics

In the same pot, toss in the chopped onion and minced garlic. Sauté them for about 3-4 minutes until the onion turns translucent. The smell will be incredible! This is where the magic begins, as the aromatics lay the foundation for your stew’s flavor.

Step 3: Add Vegetables

Next, add the sliced carrots and diced potatoes to the pot. Stir everything together and let it cook for another 5 minutes. This step not only adds color but also enhances the stew’s heartiness. The vegetables will soak up all those delicious flavors!

Step 4: Combine Ingredients

Now it’s time to bring it all together. Return the browned beef to the pot and stir in the beef broth, red wine (if using), tomato paste, dried thyme, dried rosemary, bay leaves, salt, and pepper. Bring the mixture to a boil. This is where your hearty beef stew starts to take shape, with all those flavors mingling beautifully.

Step 5: Simmer to Perfection

Once boiling, reduce the heat to low, cover the pot, and let it simmer for about 1.5 to 2 hours. This slow cooking process is key to tenderizing the beef and allowing the flavors to deepen. Stir occasionally, and don’t be surprised if you find yourself sneaking a taste along the way!

Step 6: Final Touches

In the last 10 minutes of cooking, if you’re using frozen peas, add them to the pot. They’ll add a lovely pop of color and sweetness. Before serving, remember to remove the bay leaves. Garnish your hearty beef stew with fresh parsley for a touch of brightness. Now, dig in and enjoy the comforting flavors of your creation!

Tips for Success

  • For extra flavor, marinate the beef in red wine for a few hours before cooking.
  • Don’t rush the browning process; it adds depth to your stew.
  • Feel free to experiment with seasonal vegetables for variety.
  • Adjust the seasoning gradually; taste as you go!
  • Let the stew cool before storing leftovers for better flavor development.

Equipment Needed

  • Large Pot or Dutch Oven: Essential for even cooking. A heavy-bottomed pot works too.
  • Wooden Spoon: Perfect for stirring without scratching your pot.
  • Cutting Board: A must for chopping your ingredients safely.
  • Sharp Knife: For easy and precise cutting.
  • Measuring Cups and Spoons: Handy for accurate ingredient portions.

Variations of Hearty Beef Stew

  • Vegetable-Loaded Stew: Add green beans, mushrooms, or bell peppers for extra nutrition and flavor.
  • Spicy Kick: Toss in some diced jalapeños or a dash of cayenne pepper for a heat boost.
  • Herb Infusion: Experiment with fresh herbs like basil or oregano for a different aromatic profile.
  • Gluten-Free Option: Ensure all ingredients, especially broth and wine, are certified gluten-free.
  • Slow Cooker Version: Brown the beef and then transfer everything to a slow cooker for 6-8 hours on low for a hands-off approach.

Serving Suggestions for Hearty Beef Stew

  • Crusty Bread: Serve with a warm, crusty baguette or sourdough for dipping.
  • Salad: A fresh green salad with a tangy vinaigrette complements the richness of the stew.
  • Wine Pairing: Enjoy with a glass of red wine, like Cabernet Sauvignon, to enhance the flavors.
  • Garnish: Top with a sprinkle of fresh parsley for a pop of color.

FAQs about Hearty Beef Stew

Can I use a different cut of beef for this hearty beef stew?

Absolutely! While beef chuck is ideal for its tenderness, you can also use brisket or round. Just remember that tougher cuts may need a bit more time to become tender.

How can I thicken my hearty beef stew?

If you prefer a thicker stew, mix cornstarch with water and stir it in during the last 10 minutes of cooking. Alternatively, you can mash some of the potatoes to naturally thicken the broth.

Can I make this stew in a slow cooker?

Yes! Brown the beef first, then transfer everything to a slow cooker. Cook on low for 6-8 hours for a hands-off approach that still delivers delicious flavors.

What can I serve with hearty beef stew?

Pair it with crusty bread, a fresh salad, or even over a bed of rice or mashed potatoes. The options are endless!

How long will leftovers last?

Your hearty beef stew can be stored in the fridge for up to 3-4 days. Just make sure to cool it completely before refrigerating. It also freezes well for up to 3 months!

Final Thoughts

Cooking this hearty beef stew is more than just preparing a meal; it’s about creating memories. The rich aromas that fill your kitchen evoke warmth and comfort, inviting everyone to gather around the table. Each spoonful is a reminder of home, of love, and of shared moments. Whether you’re enjoying it on a chilly evening or serving it to friends, this stew brings joy and satisfaction. It’s a dish that warms the heart and nourishes the soul, making it a cherished recipe in your culinary repertoire. So, roll up your sleeves and let the magic unfold!

jhessica

Hearty Beef Stew: Discover a Comforting Recipe Now!

A comforting and hearty beef stew recipe perfect for cold days.
Prep Time 20 minutes
Cook Time 2 hours
Total Time 2 hours 20 minutes
Servings: 6 servings
Course: Main Course
Cuisine: American
Calories: 350

Ingredients
  

  • 2 pounds beef chuck cut into 1-inch cubes
  • 2 tablespoons olive oil
  • 1 large onion chopped
  • 3 cloves garlic minced
  • 4 carrots sliced
  • 3 potatoes diced
  • 2 cups beef broth
  • 1 cup red wine optional, can substitute with additional beef broth
  • 2 tablespoons tomato paste
  • 1 teaspoon dried thyme
  • 1 teaspoon dried rosemary
  • 2 bay leaves
  • Salt and pepper to taste
  • 1 cup frozen peas optional
  • Fresh parsley chopped (for garnish)

Method
 

  1. In a large pot or Dutch oven, heat the olive oil over medium-high heat. Add the beef cubes in batches, browning them on all sides. Remove the beef and set aside.
  2. In the same pot, add the chopped onion and garlic. Sauté for about 3-4 minutes until the onion is translucent.
  3. Add the carrots and potatoes to the pot, stirring to combine. Cook for another 5 minutes.
  4. Return the browned beef to the pot. Stir in the beef broth, red wine (if using), tomato paste, thyme, rosemary, bay leaves, salt, and pepper. Bring to a boil.
  5. Reduce the heat to low, cover, and let simmer for about 1.5 to 2 hours, or until the beef is tender. Stir occasionally.
  6. If using, add the frozen peas during the last 10 minutes of cooking.
  7. Remove bay leaves before serving. Garnish with fresh parsley and enjoy!

Nutrition

Serving: 1servingCalories: 350kcalCarbohydrates: 20gProtein: 30gFat: 15gSaturated Fat: 5gPolyunsaturated Fat: 10gCholesterol: 80mgSodium: 600mgFiber: 3gSugar: 3g

Notes

  • For a thicker stew, mix 2 tablespoons of cornstarch with 2 tablespoons of water and stir it into the stew during the last 10 minutes of cooking.
  • Add other vegetables like green beans or mushrooms for extra flavor and nutrition.

Tried this recipe?

Let us know how it was!

Slow Cooker Chicken and Gravy: A Simple, Delicious Meal!

Introduction to Slow Cooker Chicken and Gravy

There’s something incredibly comforting about a warm plate of Slow Cooker Chicken and Gravy. It reminds me of family dinners where the aroma filled the house, drawing everyone to the table. This recipe is a lifesaver for those busy days when you want a hearty meal without spending hours in the kitchen. Just toss everything into the slow cooker, and let it work its magic while you tackle your day. Whether you’re feeding a crowd or just looking for a cozy dinner, this dish is sure to impress your loved ones and satisfy those hunger pangs.

Why You’ll Love This Slow Cooker Chicken and Gravy

This Slow Cooker Chicken and Gravy is a game-changer for anyone juggling a busy schedule. It’s incredibly easy to prepare, requiring just a few minutes of your time. The slow cooker does all the heavy lifting, transforming simple ingredients into a rich, flavorful dish. Plus, the tender chicken practically melts in your mouth, making it a hit with the whole family. You’ll love how it brings everyone together around the dinner table!

Ingredients for Slow Cooker Chicken and Gravy

Gathering the right ingredients is the first step to creating a delicious Slow Cooker Chicken and Gravy. Here’s what you’ll need:

  • Boneless, skinless chicken breasts: The star of the dish, they cook up tender and juicy.
  • Ranch dressing mix: Adds a zesty flavor that elevates the dish.
  • Brown gravy mix: This brings a rich, savory depth to the sauce.
  • Chicken broth: A flavorful base that keeps everything moist and delicious.
  • Cream of chicken soup: This adds creaminess and enhances the overall taste.
  • Garlic powder: A must-have for that aromatic kick.
  • Black pepper: Just a pinch for a subtle heat.
  • Onion powder: It complements the other flavors beautifully.
  • Olive oil: Helps to keep the chicken moist and adds richness.
  • Salt: To taste, enhancing all the flavors.

For those looking to mix things up, consider tossing in some chopped vegetables like carrots or potatoes for added nutrition and flavor. If you prefer a different taste, you can substitute the cream of chicken soup with cream of mushroom soup.

For exact quantities, check the bottom of the article where you can find everything available for printing!

How to Make Slow Cooker Chicken and Gravy

Creating this Slow Cooker Chicken and Gravy is as easy as pie. Follow these simple steps, and you’ll have a delicious meal ready to enjoy. Let’s dive in!

Step 1: Prepare the Chicken

Start by placing the boneless, skinless chicken breasts in your slow cooker. Lay them in a single layer for even cooking. This is the foundation of your dish, so make sure they’re fresh and ready to soak up all those flavors!

Step 2: Mix the Sauce

In a medium bowl, whisk together the ranch dressing mix, brown gravy mix, chicken broth, cream of chicken soup, garlic powder, black pepper, onion powder, and olive oil. This mixture is where the magic happens! It’ll create a rich, savory sauce that envelops the chicken.

Step 3: Combine in Slow Cooker

Pour the sauce over the chicken in the slow cooker. Make sure every piece is well coated. This step is crucial for ensuring that the chicken absorbs all those delicious flavors as it cooks.

Step 4: Cook to Perfection

Cover the slow cooker and set it to cook on low for 6-7 hours or on high for 3-4 hours. The longer, the better! You want the chicken to be tender and easy to shred. The aroma will fill your kitchen, making it hard to resist sneaking a taste!

Step 5: Shred and Serve

Once the chicken is cooked through, use two forks to shred it right in the slow cooker. Stir it back into the gravy, adjusting the salt to your liking. Serve this delightful dish over rice, mashed potatoes, or with some crusty bread for dipping. Enjoy every bite!

Tips for Success

  • Always use fresh chicken for the best flavor and texture.
  • Don’t skip the olive oil; it keeps the chicken moist.
  • For extra flavor, sear the chicken in a pan before adding it to the slow cooker.
  • Feel free to adjust the seasoning to suit your taste.
  • Leftovers can be stored in the fridge for up to three days.

Equipment Needed

  • Slow Cooker: The star of the show! Any size will do, but a 6-quart is perfect for this recipe.
  • Medium Bowl: For mixing your sauce; a whisk works best.
  • Two Forks: Essential for shredding the chicken.
  • Measuring Cups: Handy for precise ingredient amounts.

Variations of Slow Cooker Chicken and Gravy

  • Vegetable Medley: Add chopped carrots, potatoes, or green beans for a hearty, nutritious twist.
  • Spicy Kick: Mix in some diced jalapeños or a dash of hot sauce for a spicy version.
  • Herb Infusion: Toss in fresh herbs like thyme or rosemary to elevate the flavor profile.
  • Low-Carb Option: Serve over cauliflower rice instead of traditional rice or potatoes for a low-carb meal.
  • Gluten-Free Adaptation: Ensure all mixes and broths are certified gluten-free for a safe option.

Serving Suggestions for Slow Cooker Chicken and Gravy

  • Rice: Serve over fluffy white or brown rice to soak up the delicious gravy.
  • Mashed Potatoes: Creamy mashed potatoes make a perfect base for this savory dish.
  • Crusty Bread: Offer some warm, crusty bread for dipping into the gravy.
  • Green Salad: A fresh green salad adds a nice crunch and balances the meal.
  • Wine Pairing: A light white wine, like Sauvignon Blanc, complements the flavors beautifully.

FAQs about Slow Cooker Chicken and Gravy

Can I use frozen chicken for this recipe?

Yes, you can use frozen chicken breasts! Just increase the cooking time by an hour or so. The slow cooker will still work its magic, ensuring the chicken is tender and flavorful.

What can I substitute for cream of chicken soup?

If you’re looking for alternatives, cream of mushroom soup works great! You can also use homemade white sauce or even a dairy-free option if you prefer.

How do I store leftovers?

Leftovers can be stored in an airtight container in the fridge for up to three days. Just reheat gently on the stove or in the microwave when you’re ready to enjoy it again!

Can I make this dish ahead of time?

Absolutely! You can prepare everything the night before and store it in the fridge. Just pop it in the slow cooker in the morning, and you’ll have a delicious meal waiting for you by dinner time.

What sides pair well with Slow Cooker Chicken and Gravy?

This dish goes wonderfully with rice, mashed potatoes, or even a fresh green salad. The gravy is perfect for dipping crusty bread, too!

Final Thoughts

Cooking Slow Cooker Chicken and Gravy is more than just preparing a meal; it’s about creating memories. The aroma wafting through your home, the anticipation building as dinner time approaches, and the joy of gathering around the table with loved ones make this dish truly special. It’s a simple recipe that delivers big on flavor and comfort, perfect for any occasion. Whether it’s a busy weeknight or a cozy Sunday dinner, this dish brings warmth and satisfaction. I hope you enjoy every bite as much as I do, and may it become a cherished favorite in your home!

jhessica

Slow Cooker Chicken and Gravy: A Simple, Delicious Meal!

A simple and delicious slow cooker recipe for chicken and gravy that is perfect for any meal.
Prep Time 10 minutes
Servings: 6 servings
Course: Main Dish
Cuisine: American
Calories: 320

Ingredients
  

  • 2 pounds boneless skinless chicken breasts
  • 1 packet 1 ounce ranch dressing mix
  • 1 packet 1 ounce brown gravy mix
  • 1 cup chicken broth
  • 1/2 cup cream of chicken soup
  • 1/2 teaspoon garlic powder
  • 1/2 teaspoon black pepper
  • 1/2 teaspoon onion powder
  • 1 tablespoon olive oil
  • Salt to taste

Method
 

  1. In a slow cooker, place the chicken breasts in a single layer.
  2. In a medium bowl, whisk together the ranch dressing mix, brown gravy mix, chicken broth, cream of chicken soup, garlic powder, black pepper, onion powder, and olive oil until well combined.
  3. Pour the mixture over the chicken in the slow cooker, ensuring the chicken is well coated.
  4. Cover and cook on low for 6-7 hours or on high for 3-4 hours, until the chicken is cooked through and tender.
  5. Once cooked, shred the chicken using two forks and stir it back into the gravy. Adjust salt to taste.
  6. Serve over rice, mashed potatoes, or with bread for dipping.

Nutrition

Serving: 1servingCalories: 320kcalCarbohydrates: 5gProtein: 30gFat: 18gSugar: 1g

Notes

  • For added flavor, toss in some chopped vegetables like carrots or potatoes before cooking.
  • Substitute the cream of chicken soup with cream of mushroom soup for a different taste.

Tried this recipe?

Let us know how it was!

Korean Ground Beef Over Wilted Napa Slaw for Dinner Bliss

Introduction to Korean Ground Beef Over Wilted Napa Slaw

After a long day, the last thing I want is to spend hours in the kitchen. That’s where my go-to dish, Korean Ground Beef Over Wilted Napa Slaw, comes in. It’s a delightful blend of savory beef and fresh veggies that’s not only quick to whip up but also bursting with flavor. This recipe is perfect for impressing your loved ones or simply treating yourself to a satisfying meal. With just a few ingredients and minimal prep, you can create a dinner that feels special without the fuss. Let’s dive into this culinary adventure!

Why You’ll Love This Korean Ground Beef Over Wilted Napa Slaw

This dish is a game-changer for busy weeknights. It comes together in just 30 minutes, making it a lifesaver when time is tight. The combination of tender ground beef and crisp Napa slaw creates a satisfying texture that keeps you coming back for more. Plus, the sweet and savory flavors dance on your palate, ensuring every bite is a delight. Trust me, this recipe will quickly become a family favorite!

Ingredients for Korean Ground Beef Over Wilted Napa Slaw

Gathering the right ingredients is the first step to culinary success. For this Korean Ground Beef Over Wilted Napa Slaw, you’ll need a mix of fresh and pantry staples that come together beautifully. Here’s what you’ll need:

  • Ground Beef: The star of the dish, providing rich flavor and protein. You can also use ground turkey or chicken for a lighter option.
  • Vegetable Oil: Essential for cooking the beef. It helps achieve that perfect sear without overpowering the dish.
  • Garlic: Minced garlic adds a punch of flavor. Fresh is best, but jarred works in a pinch.
  • Ginger: Fresh ginger brings warmth and a hint of spice. If you don’t have fresh, ground ginger can be a substitute.
  • Soy Sauce: This salty, umami-rich sauce is key to the dish’s flavor profile. For a gluten-free option, use tamari.
  • Brown Sugar: Balances the saltiness of the soy sauce with a touch of sweetness. You can swap it for honey or maple syrup if desired.
  • Sesame Oil: Adds a nutty aroma and depth of flavor. A little goes a long way!
  • Red Pepper Flakes: For those who like a kick, adjust the amount to your heat preference.
  • Black Pepper: A simple seasoning that enhances the overall taste.
  • Napa Cabbage: The base of the slaw, it’s tender yet crunchy, making it perfect for wilting.
  • Carrot: Julienned for color and sweetness, it complements the cabbage beautifully.
  • Green Onions: Chopped for garnish, they add a fresh, mild onion flavor.
  • Sesame Seeds: A finishing touch that adds a delightful crunch and visual appeal.

For exact measurements, check the bottom of the article where you can find everything listed for easy printing. Now that you have your ingredients ready, let’s get cooking!

How to Make Korean Ground Beef Over Wilted Napa Slaw

Now that you have your ingredients ready, let’s get into the fun part—cooking! This dish is straightforward and quick, making it perfect for any night of the week. Follow these simple steps, and you’ll have a delicious meal on the table in no time.

Step 1: Brown the Ground Beef

Start by heating a large skillet over medium-high heat. Add the vegetable oil and let it warm up for a minute. Then, toss in the ground beef. As it cooks, break it apart with a spatula. You want it nicely browned, which should take about 5-7 minutes. If there’s excess fat, drain it off. This step is crucial for a leaner dish!

Step 2: Add Garlic and Ginger

Once the beef is browned, it’s time to amp up the flavor. Stir in the minced garlic and ginger. Cook for another 1-2 minutes until fragrant. The aroma will fill your kitchen, making it hard to resist sneaking a taste. This combination is what gives the dish its signature Korean flair!

Step 3: Combine Sauces and Simmer

Next, add the soy sauce, brown sugar, sesame oil, red pepper flakes, and black pepper to the skillet. Stir everything together until well combined. Let it simmer for about 5 minutes. This allows the flavors to meld beautifully. You’ll notice the sauce thickening slightly, which is just what you want!

Step 4: Wilt the Napa Slaw

In a separate large pan, add the sliced Napa cabbage and julienned carrot. Cook over medium heat, stirring occasionally. You want the cabbage to wilt but still retain a bit of crunch—about 3-4 minutes should do the trick. This step adds a fresh, vibrant element to your dish.

Step 5: Serve and Garnish

Now comes the best part! On a plate, place a generous portion of the wilted Napa slaw. Top it with the savory Korean ground beef mixture. For a finishing touch, sprinkle chopped green onions and sesame seeds on top. This not only adds flavor but also makes your dish look restaurant-worthy!

Tips for Success

  • Prep your ingredients ahead of time. It makes cooking smoother and faster.
  • Don’t skip draining excess fat from the beef for a healthier dish.
  • Adjust the red pepper flakes to suit your heat preference—start small!
  • For extra crunch, toss in some sliced bell peppers or snap peas with the slaw.
  • Garnish generously with green onions and sesame seeds for a pop of flavor.

Equipment Needed

  • Large Skillet: Essential for browning the beef. A non-stick skillet works well too.
  • Spatula: Perfect for breaking apart the meat and stirring.
  • Cutting Board: A must for chopping veggies safely.
  • Knife: A sharp chef’s knife makes prep a breeze.
  • Measuring Cups: Handy for accurate ingredient portions.

Variations

  • Protein Swap: Use ground turkey, chicken, or even tofu for a vegetarian option. Each brings a unique flavor and texture.
  • Spicy Kick: Add sliced jalapeños or a dash of sriracha to the beef mixture for an extra layer of heat.
  • Veggie Boost: Incorporate other vegetables like bell peppers, snap peas, or broccoli into the slaw for added nutrition and color.
  • Gluten-Free: Ensure your soy sauce is gluten-free by opting for tamari or coconut aminos.
  • Herb Infusion: Toss in fresh herbs like cilantro or basil just before serving for a fresh twist.

Serving Suggestions

  • Rice: Serve over steamed jasmine or brown rice for a hearty meal.
  • Pickled Vegetables: Add a side of pickled cucumbers or radishes for a tangy contrast.
  • Drink Pairing: Enjoy with a cold beer or a refreshing iced tea.
  • Presentation: Use a colorful plate to showcase the vibrant slaw and beef.

FAQs about Korean Ground Beef Over Wilted Napa Slaw

Can I make Korean Ground Beef Over Wilted Napa Slaw ahead of time?

Absolutely! You can prepare the beef mixture in advance and store it in the fridge for up to three days. Just reheat it when you’re ready to serve. The Napa slaw is best made fresh, but you can chop the veggies ahead of time to save on prep.

Is this dish gluten-free?

Yes, it can be gluten-free! Just make sure to use gluten-free soy sauce, like tamari or coconut aminos. This way, you can enjoy the delicious flavors without any gluten concerns.

What can I serve with Korean Ground Beef Over Wilted Napa Slaw?

This dish pairs wonderfully with steamed rice or quinoa. You can also add a side of pickled vegetables for a tangy contrast. A cold beer or iced tea complements the meal perfectly!

Can I use other vegetables in the slaw?

Definitely! Feel free to add bell peppers, snap peas, or even shredded radishes for extra crunch and color. The more veggies, the better!

How can I adjust the spice level?

If you prefer a milder dish, start with fewer red pepper flakes. You can always add more later. For those who love heat, consider adding sliced jalapeños or a dash of sriracha to the beef mixture for an extra kick!

Final Thoughts

Cooking Korean Ground Beef Over Wilted Napa Slaw is more than just preparing a meal; it’s about creating a moment of joy. The vibrant colors and enticing aromas fill your kitchen, making it a welcoming space for family and friends. Each bite offers a delightful balance of flavors and textures, reminding me of the simple pleasures in life. Whether it’s a busy weeknight or a special gathering, this dish brings everyone together. I hope you enjoy making it as much as I do, and that it becomes a cherished recipe in your home, just like it is in mine!

jhessica

Korean Ground Beef Over Wilted Napa Slaw for Dinner Bliss

A delicious and savory dish featuring Korean ground beef served over wilted Napa slaw, perfect for a satisfying dinner.
Prep Time 10 minutes
Cook Time 20 minutes
Total Time 30 minutes
Course: Dinner
Cuisine: Korean
Calories: 350

Ingredients
  

  • 1 pound ground beef
  • 1 tablespoon vegetable oil
  • 3 cloves garlic minced
  • 1 tablespoon fresh ginger minced
  • 1/4 cup soy sauce
  • 1/4 cup brown sugar
  • 1 tablespoon sesame oil
  • 1 teaspoon red pepper flakes adjust to taste
  • 1/2 teaspoon black pepper
  • 1 head Napa cabbage thinly sliced
  • 1 carrot julienned
  • 2 green onions chopped
  • 1 tablespoon sesame seeds for garnish

Method
 

  1. In a large skillet, heat the vegetable oil over medium-high heat. Add the ground beef and cook until browned, breaking it apart with a spatula, about 5-7 minutes. Drain excess fat if necessary.
  2. Stir in the minced garlic and ginger, cooking for an additional 1-2 minutes until fragrant.
  3. Add the soy sauce, brown sugar, sesame oil, red pepper flakes, and black pepper to the skillet. Stir well to combine and simmer for about 5 minutes, allowing the flavors to meld.
  4. In a separate large pan, add the sliced Napa cabbage and julienned carrot. Cook over medium heat, stirring occasionally, until the cabbage is wilted but still slightly crunchy, about 3-4 minutes.
  5. To serve, place a generous portion of the wilted Napa slaw on a plate and top with the Korean ground beef mixture. Garnish with chopped green onions and sesame seeds.

Nutrition

Serving: 1servingCalories: 350kcalCarbohydrates: 10gProtein: 25gFat: 20gSaturated Fat: 7gPolyunsaturated Fat: 13gCholesterol: 70mgSodium: 800mgFiber: 2gSugar: 10g

Notes

  • For a lighter version, substitute ground turkey or chicken for the beef.
  • Add sliced bell peppers or snap peas to the Napa slaw for extra crunch and color.

Tried this recipe?

Let us know how it was!

Savory Chicken and Apple Sausage Sheet Pan Dinner Awaits!

Introduction to Savory Chicken and Apple Sausage Sheet Pan Dinner

After a long day, the last thing I want to do is spend hours in the kitchen. That’s where my Savory Chicken and Apple Sausage Sheet Pan Dinner comes in. It’s a delightful blend of flavors that’s not only easy to prepare but also a crowd-pleaser. Picture this: tender chicken, juicy apple sausage, and vibrant veggies all roasted together, creating a symphony of taste. This dish is perfect for busy weeknights or when you want to impress your loved ones without breaking a sweat. Trust me, your taste buds will thank you!

Why You’ll Love This Savory Chicken and Apple Sausage Sheet Pan Dinner

This Savory Chicken and Apple Sausage Sheet Pan Dinner is a game-changer for anyone juggling a busy schedule. It’s quick to prepare, taking just 10 minutes of your time before it goes into the oven. The combination of savory chicken and sweet apple sausage creates a flavor explosion that will have everyone asking for seconds. Plus, cleanup is a breeze—just one pan to wash! What’s not to love?

Ingredients for Savory Chicken and Apple Sausage Sheet Pan Dinner

Gathering the right ingredients is the first step to creating this delicious dish. Here’s what you’ll need:

  • Olive oil: This adds richness and helps everything roast beautifully.
  • Chicken breast: Cut into bite-sized pieces, it’s the star protein that soaks up all the flavors.
  • Apple chicken sausage: Sliced for convenience, it brings a sweet and savory twist to the dish.
  • Brussels sprouts: Trimmed and halved, these little gems add a delightful crunch and earthy flavor.
  • Sweet potatoes: Peeled and diced, they provide a natural sweetness that balances the savory elements.
  • Garlic powder: A must-have for that aromatic kick.
  • Onion powder: It enhances the overall flavor profile without the hassle of chopping onions.
  • Smoked paprika: This adds a subtle smokiness that elevates the dish.
  • Salt and pepper: Essential for seasoning, adjust to your taste.
  • Fresh parsley: Chopped for garnish, it adds a pop of color and freshness.

For those looking to mix things up, consider substituting the Brussels sprouts with green beans or broccoli. You can also squeeze fresh lemon juice over the dish before serving for an extra zing. Exact quantities for each ingredient are available at the bottom of the article for easy printing!

How to Make Savory Chicken and Apple Sausage Sheet Pan Dinner

Creating this Savory Chicken and Apple Sausage Sheet Pan Dinner is a breeze. Follow these simple steps, and you’ll have a delicious meal ready in no time!

Step 1: Preheat the Oven

Start by preheating your oven to 400°F (200°C). Preheating is crucial because it ensures that your chicken and sausage cook evenly. A hot oven helps to lock in flavors and gives your veggies that perfect roasted texture. Trust me, you want that sizzle!

Step 2: Prepare the Ingredients

Next, it’s time to prep your ingredients. Cut the chicken breast into bite-sized pieces, making them easy to eat. Slice the apple chicken sausage into rounds. For the Brussels sprouts, trim the ends and cut them in half. Finally, peel and dice the sweet potatoes into uniform pieces. This way, everything cooks at the same rate, ensuring a harmonious blend of flavors.

Step 3: Combine Ingredients

In a large bowl, combine the chicken, sausage, Brussels sprouts, and sweet potatoes. Drizzle the olive oil over the mixture, then sprinkle in the garlic powder, onion powder, smoked paprika, salt, and pepper. Toss everything together until well coated. This step is key! An even coating means every bite will be bursting with flavor.

Step 4: Spread on Baking Sheet

Now, grab a large baking sheet and spread the mixture evenly across it. Make sure not to overcrowd the pan; this allows the heat to circulate and helps everything roast nicely. If you have to, use two sheets. You want that golden-brown finish, not steamed veggies!

Step 5: Bake to Perfection

Slide the baking sheet into your preheated oven and bake for 25-30 minutes. Halfway through, give everything a good stir to ensure even cooking. To check for doneness, make sure the chicken is cooked through and the veggies are tender. You’re looking for that perfect balance of crispy and tender.

Step 6: Garnish and Serve

Once it’s out of the oven, let it cool for a few minutes. Garnish with fresh parsley for a pop of color and freshness. Serve it straight from the pan for a rustic feel, or plate it up for a more polished presentation. Either way, your Savory Chicken and Apple Sausage Sheet Pan Dinner is ready to impress!

Tips for Success

  • Use a sharp knife for easy cutting of chicken and veggies.
  • Don’t skip the preheating; it’s key for even cooking.
  • Experiment with spices—add your favorites for a personal touch.
  • For extra crispiness, broil for the last 2-3 minutes.
  • Let leftovers cool before storing them in an airtight container.

Equipment Needed

  • Baking sheet: A large, rimmed baking sheet is ideal. If you don’t have one, a roasting pan works too.
  • Mixing bowl: Any large bowl will do for combining ingredients.
  • Sharp knife: Essential for cutting chicken and veggies. A good pair of kitchen scissors can also help.
  • Spatula: Use it for tossing and serving your delicious meal.

Variations

  • Spicy Kick: Add a pinch of cayenne pepper or red pepper flakes for a spicy twist.
  • Herb Infusion: Toss in fresh herbs like rosemary or thyme for an aromatic boost.
  • Vegetarian Option: Substitute chicken and sausage with chickpeas and your favorite plant-based sausage.
  • Sweet and Savory: Add diced apples or pears for a touch of sweetness that complements the savory flavors.
  • Low-Carb Version: Replace sweet potatoes with cauliflower for a lighter, low-carb alternative.

Serving Suggestions

  • Side Salad: A crisp green salad with a tangy vinaigrette pairs perfectly.
  • Crusty Bread: Serve with warm, crusty bread to soak up the delicious juices.
  • Wine Pairing: A chilled white wine, like Sauvignon Blanc, complements the dish beautifully.
  • Presentation: Serve directly from the pan for a rustic feel or plate individually for a more elegant touch.

FAQs about Savory Chicken and Apple Sausage Sheet Pan Dinner

Can I use different vegetables in this sheet pan dinner?

Absolutely! While Brussels sprouts and sweet potatoes are fantastic, feel free to swap them out for green beans, broccoli, or even carrots. The key is to choose vegetables that roast well and complement the savory chicken and apple sausage.

How do I store leftovers from this dish?

Leftovers can be stored in an airtight container in the fridge for up to three days. Just make sure to let them cool completely before sealing. Reheat in the oven or microwave until warmed through.

Can I make this dish ahead of time?

Yes! You can prep everything a day in advance. Just combine the ingredients and store them in the fridge. When you’re ready to eat, simply spread them on the baking sheet and bake as directed. It’s a great way to save time on busy nights!

Is this recipe gluten-free?

Yes, this Savory Chicken and Apple Sausage Sheet Pan Dinner is gluten-free! Just ensure that the apple sausage you choose is labeled gluten-free, and you’re good to go.

What can I serve with this dish?

This meal is hearty enough on its own, but you can enhance it with a side salad or some crusty bread. A light vinaigrette salad pairs beautifully, balancing the savory flavors of the dish.

Final Thoughts

Cooking should be a joyful experience, and my Savory Chicken and Apple Sausage Sheet Pan Dinner embodies that spirit. It’s not just about the delicious flavors; it’s about the memories created around the table. This dish brings family and friends together, making weeknight dinners feel special. The ease of preparation means you can focus on what truly matters—sharing stories and laughter. Plus, the delightful aroma wafting through your kitchen will have everyone eagerly anticipating mealtime. So, roll up your sleeves, embrace the process, and enjoy every bite of this comforting, hearty meal!

jhessica

Savory Chicken and Apple Sausage Sheet Pan Dinner Awaits!

A delicious and easy-to-make sheet pan dinner featuring savory chicken and apple sausage, paired with Brussels sprouts and sweet potatoes.
Prep Time 10 minutes
Cook Time 30 minutes
Total Time 40 minutes
Servings: 4 servings
Course: Dinner
Cuisine: American
Calories: 350

Ingredients
  

  • 2 tablespoons olive oil
  • 1 pound chicken breast cut into bite-sized pieces
  • 1 pound apple chicken sausage sliced
  • 2 cups Brussels sprouts trimmed and halved
  • 2 cups sweet potatoes peeled and diced
  • 1 teaspoon garlic powder
  • 1 teaspoon onion powder
  • 1 teaspoon smoked paprika
  • Salt and pepper to taste
  • Fresh parsley chopped (for garnish)

Method
 

  1. Preheat the oven to 400°F (200°C).
  2. In a large bowl, combine the chicken pieces, sliced apple sausage, Brussels sprouts, and sweet potatoes.
  3. Drizzle the olive oil over the mixture and sprinkle with garlic powder, onion powder, smoked paprika, salt, and pepper. Toss everything together until well coated.
  4. Spread the mixture evenly on a large baking sheet.
  5. Bake in the preheated oven for 25-30 minutes, or until the chicken is cooked through and the vegetables are tender, stirring halfway through.
  6. Remove from the oven and let it cool for a few minutes. Garnish with fresh parsley before serving.

Nutrition

Serving: 1servingCalories: 350kcalCarbohydrates: 28gProtein: 30gFat: 15gSaturated Fat: 4gPolyunsaturated Fat: 10gCholesterol: 80mgSodium: 600mgFiber: 4gSugar: 5g

Notes

  • For added flavor, squeeze fresh lemon juice over the dish before serving.
  • You can substitute the Brussels sprouts with green beans or broccoli for a different vegetable option.

Tried this recipe?

Let us know how it was!

Sweet and Savory Slow Cooker Teriyaki Chicken Recipe Awaits!

Introduction to Sweet and Savory Slow Cooker Teriyaki Chicken

After a long day, the last thing I want to do is spend hours in the kitchen. That’s where my Sweet and Savory Slow Cooker Teriyaki Chicken comes to the rescue! This dish is not just a meal; it’s a warm hug on a plate. With minimal prep and a slow cooker doing all the heavy lifting, you can enjoy a delicious dinner without the fuss. Whether you’re looking to impress your family or just want a quick solution for a busy weeknight, this recipe is your go-to. Trust me, your taste buds will thank you!

Why You’ll Love This Sweet and Savory Slow Cooker Teriyaki Chicken

This recipe is a game-changer for anyone who craves flavor without the fuss. The beauty of Sweet and Savory Slow Cooker Teriyaki Chicken lies in its simplicity. Just toss everything in the slow cooker, and let it work its magic. In a few hours, you’ll have tender, juicy chicken bathed in a rich, savory sauce. It’s perfect for busy nights or when you want to impress without breaking a sweat!

Ingredients for Sweet and Savory Slow Cooker Teriyaki Chicken

Gathering the right ingredients is the first step to culinary success. For this Sweet and Savory Slow Cooker Teriyaki Chicken, you’ll need a few key players that come together to create a symphony of flavors.

  • Boneless, skinless chicken thighs: These are the stars of the show, offering tenderness and rich flavor.
  • Soy sauce: This salty, umami-packed ingredient forms the base of our teriyaki sauce.
  • Brown sugar: It adds a touch of sweetness, balancing the saltiness of the soy sauce.
  • Rice vinegar: This brings a tangy brightness that cuts through the richness.
  • Minced garlic: A must-have for depth and aroma, garlic elevates the dish.
  • Minced ginger: This adds a warm, spicy note that complements the other flavors beautifully.
  • Sesame oil: A drizzle of this nutty oil enhances the overall taste and aroma.
  • Cornstarch: Used to thicken the sauce, giving it that perfect glossy finish.
  • Water: Helps create the cornstarch slurry for thickening.
  • Chopped green onions: These are for garnish, adding a fresh crunch and pop of color.
  • Sesame seeds: A final touch that adds texture and a nutty flavor.

For those looking to mix things up, consider substituting half of the brown sugar with honey or maple syrup for a healthier twist. You can also toss in some steamed broccoli or bell peppers during the last hour of cooking for added nutrition and flavor. Exact measurements for these ingredients can be found at the bottom of the article, ready for printing!

How to Make Sweet and Savory Slow Cooker Teriyaki Chicken

Now that you have all your ingredients ready, let’s dive into the fun part: making your Sweet and Savory Slow Cooker Teriyaki Chicken. This process is straightforward and rewarding. Follow these simple steps, and you’ll be on your way to a delicious meal!

Step 1: Prepare the Chicken

Start by placing the boneless, skinless chicken thighs in your slow cooker. Make sure they’re spread out evenly. This helps them cook uniformly. If you prefer, you can trim any excess fat for a leaner dish. Trust me, the chicken will soak up all that teriyaki goodness!

Step 2: Make the Teriyaki Sauce

In a medium bowl, whisk together the soy sauce, brown sugar, rice vinegar, minced garlic, minced ginger, and sesame oil. This is where the magic happens! The combination of these ingredients creates a rich, flavorful sauce that will coat your chicken beautifully. Make sure everything is well mixed.

Step 3: Combine Chicken and Sauce

Pour the teriyaki sauce over the chicken in the slow cooker. Use a spatula to ensure every piece of chicken is well coated. This step is crucial for flavor. The more sauce that clings to the chicken, the tastier your dish will be!

Step 4: Cook the Chicken

Cover the slow cooker and set it to cook. You can choose low for 6-7 hours or high for 3-4 hours. I usually opt for low; it allows the flavors to meld beautifully. Just let it do its thing while you tackle other tasks or relax!

Step 5: Shred the Chicken

Once the cooking time is up, carefully remove the chicken from the slow cooker. Use two forks to shred it into bite-sized pieces. It should fall apart easily. This step adds a nice texture to your dish, making it perfect for serving over rice or noodles.

Step 6: Thicken the Sauce

In a small bowl, mix the cornstarch with water to create a slurry. Stir this mixture into the remaining sauce in the slow cooker. Turn the heat to high and let it cook for an additional 10-15 minutes. This will thicken the sauce, giving it that glossy finish we all love!

Step 7: Serve and Enjoy

Return the shredded chicken to the slow cooker and stir to combine it with the thickened sauce. Serve your Sweet and Savory Slow Cooker Teriyaki Chicken over a bed of rice or noodles. Don’t forget to garnish with chopped green onions and sesame seeds for that extra flair. Enjoy every bite!

Tips for Success

  • Always use boneless, skinless chicken thighs for the best flavor and tenderness.
  • Don’t skip the cornstarch slurry; it’s key for that luscious sauce texture.
  • Feel free to adjust the sweetness by varying the brown sugar or using honey.
  • For added flavor, marinate the chicken in the sauce for a few hours before cooking.
  • Experiment with veggies like bell peppers or snap peas for a colorful twist!

Equipment Needed

  • Slow Cooker: The star of the show! A 6-quart model works great, but any size will do.
  • Medium Bowl: For mixing your teriyaki sauce. A whisk or fork will suffice.
  • Two Forks: Essential for shredding the chicken. You can also use tongs if you prefer.
  • Spatula: Handy for coating the chicken with sauce.

Variations

  • Spicy Teriyaki: Add a teaspoon of red pepper flakes or sriracha to the sauce for a kick of heat.
  • Pineapple Teriyaki: Toss in some pineapple chunks during the last hour of cooking for a sweet and tangy twist.
  • Vegetarian Option: Substitute chicken with firm tofu or tempeh for a plant-based version.
  • Low-Carb Version: Serve over cauliflower rice instead of traditional rice for a healthier alternative.
  • Herb-Infused: Add fresh herbs like cilantro or basil at the end for a burst of freshness.

Serving Suggestions

  • Serve your Sweet and Savory Slow Cooker Teriyaki Chicken over fluffy white rice or noodles for a hearty meal.
  • Pair with steamed broccoli or snap peas for a colorful, nutritious side.
  • A chilled cucumber salad complements the dish perfectly.
  • For drinks, try a light beer or iced green tea.

FAQs about Sweet and Savory Slow Cooker Teriyaki Chicken

Can I use chicken breasts instead of thighs?

Absolutely! While I prefer boneless, skinless chicken thighs for their tenderness, chicken breasts can work too. Just keep an eye on the cooking time, as they may dry out faster.

How can I make this recipe gluten-free?

To make your Sweet and Savory Slow Cooker Teriyaki Chicken gluten-free, simply use tamari instead of soy sauce. It has a similar flavor without the gluten.

Can I prepare this dish in advance?

Yes! You can marinate the chicken in the teriyaki sauce the night before. Just pop it in the slow cooker the next day for an easy meal.

What can I serve with teriyaki chicken?

This dish pairs wonderfully with steamed rice, noodles, or even a fresh salad. You can also add some sautéed vegetables for a complete meal.

How do I store leftovers?

Store any leftovers in an airtight container in the fridge for up to 3 days. Reheat gently in the microwave or on the stovetop, adding a splash of water if needed to keep it moist.

Final Thoughts

Cooking should be a joyful experience, and my Sweet and Savory Slow Cooker Teriyaki Chicken embodies that spirit. It’s not just about the delicious flavors; it’s about the memories created around the dinner table. This dish brings family and friends together, transforming an ordinary evening into something special. The ease of preparation allows you to focus on what truly matters—sharing laughter and stories. So, whether it’s a busy weeknight or a weekend gathering, this recipe is sure to impress. Dive in, savor every bite, and relish the joy of home-cooked goodness!

jhessica

Sweet and Savory Slow Cooker Teriyaki Chicken Recipe Awaits!

A delicious and easy recipe for Sweet and Savory Slow Cooker Teriyaki Chicken that is perfect for any meal.
Prep Time 15 minutes
Servings: 6 servings
Course: Main Dish
Cuisine: Asian
Calories: 320

Ingredients
  

  • 2 pounds boneless skinless chicken thighs
  • 1 cup soy sauce
  • 1/2 cup brown sugar
  • 1/4 cup rice vinegar
  • 1 tablespoon minced garlic
  • 1 tablespoon minced ginger
  • 1 tablespoon sesame oil
  • 1 tablespoon cornstarch
  • 2 tablespoons water
  • 1/4 cup chopped green onions for garnish
  • Sesame seeds for garnish

Method
 

  1. Place the chicken thighs in the slow cooker.
  2. In a medium bowl, whisk together the soy sauce, brown sugar, rice vinegar, garlic, ginger, and sesame oil until well combined.
  3. Pour the sauce over the chicken in the slow cooker, ensuring the chicken is well coated.
  4. Cover and cook on low for 6-7 hours or on high for 3-4 hours, until the chicken is tender and cooked through.
  5. Once cooked, remove the chicken from the slow cooker and shred it using two forks.
  6. In a small bowl, mix the cornstarch and water to create a slurry. Stir this into the remaining sauce in the slow cooker.
  7. Turn the slow cooker to high and cook for an additional 10-15 minutes, or until the sauce thickens.
  8. Return the shredded chicken to the slow cooker and stir to combine with the thickened sauce.
  9. Serve the teriyaki chicken over rice or noodles, garnished with chopped green onions and sesame seeds.

Nutrition

Serving: 1servingCalories: 320kcalCarbohydrates: 10gProtein: 30gFat: 15gSugar: 10g

Notes

  • For a healthier option, substitute half of the brown sugar with honey or maple syrup.
  • Add steamed broccoli or bell peppers to the slow cooker during the last hour of cooking for added vegetables and flavor.

Tried this recipe?

Let us know how it was!

Stay Connected

Get recipes via email: