Get my cookbooks

Korean Ground Beef Over Wilted Napa Slaw for Dinner Bliss

Introduction to Korean Ground Beef Over Wilted Napa Slaw

After a long day, the last thing I want is to spend hours in the kitchen. That’s where my go-to dish, Korean Ground Beef Over Wilted Napa Slaw, comes in. It’s a delightful blend of savory beef and fresh veggies that’s not only quick to whip up but also bursting with flavor. This recipe is perfect for impressing your loved ones or simply treating yourself to a satisfying meal. With just a few ingredients and minimal prep, you can create a dinner that feels special without the fuss. Let’s dive into this culinary adventure!

Why You’ll Love This Korean Ground Beef Over Wilted Napa Slaw

This dish is a game-changer for busy weeknights. It comes together in just 30 minutes, making it a lifesaver when time is tight. The combination of tender ground beef and crisp Napa slaw creates a satisfying texture that keeps you coming back for more. Plus, the sweet and savory flavors dance on your palate, ensuring every bite is a delight. Trust me, this recipe will quickly become a family favorite!

Ingredients for Korean Ground Beef Over Wilted Napa Slaw

Gathering the right ingredients is the first step to culinary success. For this Korean Ground Beef Over Wilted Napa Slaw, you’ll need a mix of fresh and pantry staples that come together beautifully. Here’s what you’ll need:

  • Ground Beef: The star of the dish, providing rich flavor and protein. You can also use ground turkey or chicken for a lighter option.
  • Vegetable Oil: Essential for cooking the beef. It helps achieve that perfect sear without overpowering the dish.
  • Garlic: Minced garlic adds a punch of flavor. Fresh is best, but jarred works in a pinch.
  • Ginger: Fresh ginger brings warmth and a hint of spice. If you don’t have fresh, ground ginger can be a substitute.
  • Soy Sauce: This salty, umami-rich sauce is key to the dish’s flavor profile. For a gluten-free option, use tamari.
  • Brown Sugar: Balances the saltiness of the soy sauce with a touch of sweetness. You can swap it for honey or maple syrup if desired.
  • Sesame Oil: Adds a nutty aroma and depth of flavor. A little goes a long way!
  • Red Pepper Flakes: For those who like a kick, adjust the amount to your heat preference.
  • Black Pepper: A simple seasoning that enhances the overall taste.
  • Napa Cabbage: The base of the slaw, it’s tender yet crunchy, making it perfect for wilting.
  • Carrot: Julienned for color and sweetness, it complements the cabbage beautifully.
  • Green Onions: Chopped for garnish, they add a fresh, mild onion flavor.
  • Sesame Seeds: A finishing touch that adds a delightful crunch and visual appeal.

For exact measurements, check the bottom of the article where you can find everything listed for easy printing. Now that you have your ingredients ready, let’s get cooking!

How to Make Korean Ground Beef Over Wilted Napa Slaw

Now that you have your ingredients ready, let’s get into the fun part—cooking! This dish is straightforward and quick, making it perfect for any night of the week. Follow these simple steps, and you’ll have a delicious meal on the table in no time.

Step 1: Brown the Ground Beef

Start by heating a large skillet over medium-high heat. Add the vegetable oil and let it warm up for a minute. Then, toss in the ground beef. As it cooks, break it apart with a spatula. You want it nicely browned, which should take about 5-7 minutes. If there’s excess fat, drain it off. This step is crucial for a leaner dish!

Step 2: Add Garlic and Ginger

Once the beef is browned, it’s time to amp up the flavor. Stir in the minced garlic and ginger. Cook for another 1-2 minutes until fragrant. The aroma will fill your kitchen, making it hard to resist sneaking a taste. This combination is what gives the dish its signature Korean flair!

Step 3: Combine Sauces and Simmer

Next, add the soy sauce, brown sugar, sesame oil, red pepper flakes, and black pepper to the skillet. Stir everything together until well combined. Let it simmer for about 5 minutes. This allows the flavors to meld beautifully. You’ll notice the sauce thickening slightly, which is just what you want!

Step 4: Wilt the Napa Slaw

In a separate large pan, add the sliced Napa cabbage and julienned carrot. Cook over medium heat, stirring occasionally. You want the cabbage to wilt but still retain a bit of crunch—about 3-4 minutes should do the trick. This step adds a fresh, vibrant element to your dish.

Step 5: Serve and Garnish

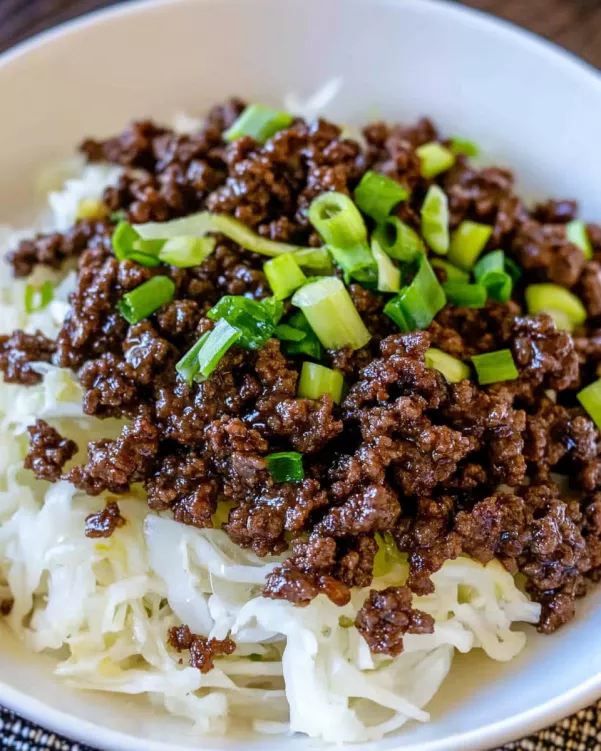
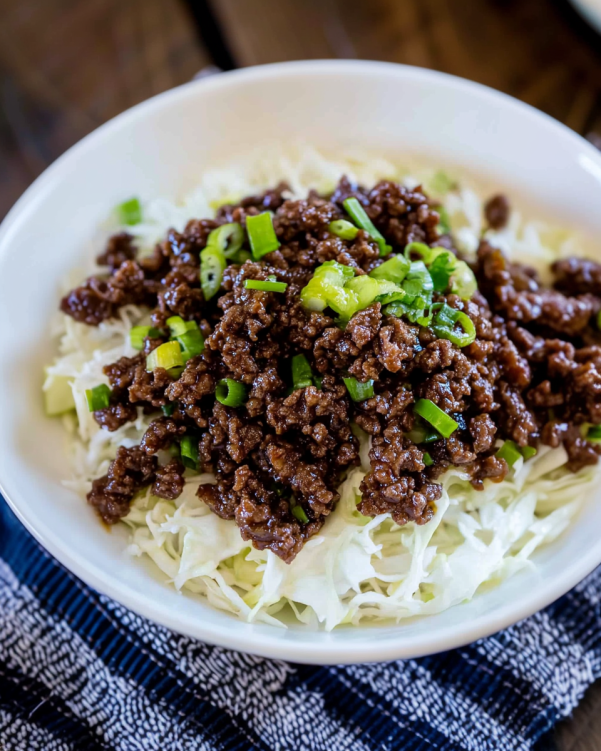
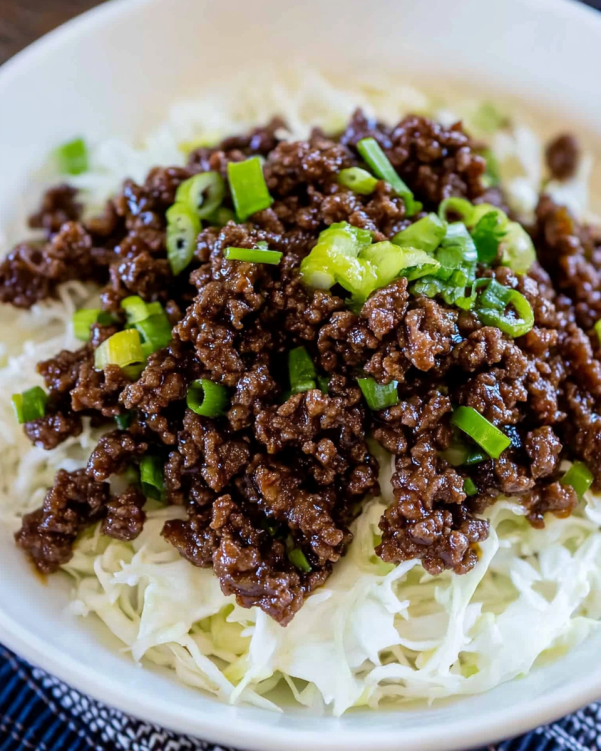
Now comes the best part! On a plate, place a generous portion of the wilted Napa slaw. Top it with the savory Korean ground beef mixture. For a finishing touch, sprinkle chopped green onions and sesame seeds on top. This not only adds flavor but also makes your dish look restaurant-worthy!

Tips for Success

  • Prep your ingredients ahead of time. It makes cooking smoother and faster.
  • Don’t skip draining excess fat from the beef for a healthier dish.
  • Adjust the red pepper flakes to suit your heat preference—start small!
  • For extra crunch, toss in some sliced bell peppers or snap peas with the slaw.
  • Garnish generously with green onions and sesame seeds for a pop of flavor.

Equipment Needed

  • Large Skillet: Essential for browning the beef. A non-stick skillet works well too.
  • Spatula: Perfect for breaking apart the meat and stirring.
  • Cutting Board: A must for chopping veggies safely.
  • Knife: A sharp chef’s knife makes prep a breeze.
  • Measuring Cups: Handy for accurate ingredient portions.

Variations

  • Protein Swap: Use ground turkey, chicken, or even tofu for a vegetarian option. Each brings a unique flavor and texture.
  • Spicy Kick: Add sliced jalapeños or a dash of sriracha to the beef mixture for an extra layer of heat.
  • Veggie Boost: Incorporate other vegetables like bell peppers, snap peas, or broccoli into the slaw for added nutrition and color.
  • Gluten-Free: Ensure your soy sauce is gluten-free by opting for tamari or coconut aminos.
  • Herb Infusion: Toss in fresh herbs like cilantro or basil just before serving for a fresh twist.

Serving Suggestions

  • Rice: Serve over steamed jasmine or brown rice for a hearty meal.
  • Pickled Vegetables: Add a side of pickled cucumbers or radishes for a tangy contrast.
  • Drink Pairing: Enjoy with a cold beer or a refreshing iced tea.
  • Presentation: Use a colorful plate to showcase the vibrant slaw and beef.

FAQs about Korean Ground Beef Over Wilted Napa Slaw

Can I make Korean Ground Beef Over Wilted Napa Slaw ahead of time?

Absolutely! You can prepare the beef mixture in advance and store it in the fridge for up to three days. Just reheat it when you’re ready to serve. The Napa slaw is best made fresh, but you can chop the veggies ahead of time to save on prep.

Is this dish gluten-free?

Yes, it can be gluten-free! Just make sure to use gluten-free soy sauce, like tamari or coconut aminos. This way, you can enjoy the delicious flavors without any gluten concerns.

What can I serve with Korean Ground Beef Over Wilted Napa Slaw?

This dish pairs wonderfully with steamed rice or quinoa. You can also add a side of pickled vegetables for a tangy contrast. A cold beer or iced tea complements the meal perfectly!

Can I use other vegetables in the slaw?

Definitely! Feel free to add bell peppers, snap peas, or even shredded radishes for extra crunch and color. The more veggies, the better!

How can I adjust the spice level?

If you prefer a milder dish, start with fewer red pepper flakes. You can always add more later. For those who love heat, consider adding sliced jalapeños or a dash of sriracha to the beef mixture for an extra kick!

Final Thoughts

Cooking Korean Ground Beef Over Wilted Napa Slaw is more than just preparing a meal; it’s about creating a moment of joy. The vibrant colors and enticing aromas fill your kitchen, making it a welcoming space for family and friends. Each bite offers a delightful balance of flavors and textures, reminding me of the simple pleasures in life. Whether it’s a busy weeknight or a special gathering, this dish brings everyone together. I hope you enjoy making it as much as I do, and that it becomes a cherished recipe in your home, just like it is in mine!

jhessica

Korean Ground Beef Over Wilted Napa Slaw for Dinner Bliss

A delicious and savory dish featuring Korean ground beef served over wilted Napa slaw, perfect for a satisfying dinner.
Prep Time 10 minutes
Cook Time 20 minutes
Total Time 30 minutes
Course: Dinner
Cuisine: Korean
Calories: 350

Ingredients
  

  • 1 pound ground beef
  • 1 tablespoon vegetable oil
  • 3 cloves garlic minced
  • 1 tablespoon fresh ginger minced
  • 1/4 cup soy sauce
  • 1/4 cup brown sugar
  • 1 tablespoon sesame oil
  • 1 teaspoon red pepper flakes adjust to taste
  • 1/2 teaspoon black pepper
  • 1 head Napa cabbage thinly sliced
  • 1 carrot julienned
  • 2 green onions chopped
  • 1 tablespoon sesame seeds for garnish

Method
 

  1. In a large skillet, heat the vegetable oil over medium-high heat. Add the ground beef and cook until browned, breaking it apart with a spatula, about 5-7 minutes. Drain excess fat if necessary.
  2. Stir in the minced garlic and ginger, cooking for an additional 1-2 minutes until fragrant.
  3. Add the soy sauce, brown sugar, sesame oil, red pepper flakes, and black pepper to the skillet. Stir well to combine and simmer for about 5 minutes, allowing the flavors to meld.
  4. In a separate large pan, add the sliced Napa cabbage and julienned carrot. Cook over medium heat, stirring occasionally, until the cabbage is wilted but still slightly crunchy, about 3-4 minutes.
  5. To serve, place a generous portion of the wilted Napa slaw on a plate and top with the Korean ground beef mixture. Garnish with chopped green onions and sesame seeds.

Nutrition

Serving: 1servingCalories: 350kcalCarbohydrates: 10gProtein: 25gFat: 20gSaturated Fat: 7gPolyunsaturated Fat: 13gCholesterol: 70mgSodium: 800mgFiber: 2gSugar: 10g

Notes

  • For a lighter version, substitute ground turkey or chicken for the beef.
  • Add sliced bell peppers or snap peas to the Napa slaw for extra crunch and color.

Tried this recipe?

Let us know how it was!

Savory Chicken and Apple Sausage Sheet Pan Dinner Awaits!

Introduction to Savory Chicken and Apple Sausage Sheet Pan Dinner

After a long day, the last thing I want to do is spend hours in the kitchen. That’s where my Savory Chicken and Apple Sausage Sheet Pan Dinner comes in. It’s a delightful blend of flavors that’s not only easy to prepare but also a crowd-pleaser. Picture this: tender chicken, juicy apple sausage, and vibrant veggies all roasted together, creating a symphony of taste. This dish is perfect for busy weeknights or when you want to impress your loved ones without breaking a sweat. Trust me, your taste buds will thank you!

Why You’ll Love This Savory Chicken and Apple Sausage Sheet Pan Dinner

This Savory Chicken and Apple Sausage Sheet Pan Dinner is a game-changer for anyone juggling a busy schedule. It’s quick to prepare, taking just 10 minutes of your time before it goes into the oven. The combination of savory chicken and sweet apple sausage creates a flavor explosion that will have everyone asking for seconds. Plus, cleanup is a breeze—just one pan to wash! What’s not to love?

Ingredients for Savory Chicken and Apple Sausage Sheet Pan Dinner

Gathering the right ingredients is the first step to creating this delicious dish. Here’s what you’ll need:

  • Olive oil: This adds richness and helps everything roast beautifully.
  • Chicken breast: Cut into bite-sized pieces, it’s the star protein that soaks up all the flavors.
  • Apple chicken sausage: Sliced for convenience, it brings a sweet and savory twist to the dish.
  • Brussels sprouts: Trimmed and halved, these little gems add a delightful crunch and earthy flavor.
  • Sweet potatoes: Peeled and diced, they provide a natural sweetness that balances the savory elements.
  • Garlic powder: A must-have for that aromatic kick.
  • Onion powder: It enhances the overall flavor profile without the hassle of chopping onions.
  • Smoked paprika: This adds a subtle smokiness that elevates the dish.
  • Salt and pepper: Essential for seasoning, adjust to your taste.
  • Fresh parsley: Chopped for garnish, it adds a pop of color and freshness.

For those looking to mix things up, consider substituting the Brussels sprouts with green beans or broccoli. You can also squeeze fresh lemon juice over the dish before serving for an extra zing. Exact quantities for each ingredient are available at the bottom of the article for easy printing!

How to Make Savory Chicken and Apple Sausage Sheet Pan Dinner

Creating this Savory Chicken and Apple Sausage Sheet Pan Dinner is a breeze. Follow these simple steps, and you’ll have a delicious meal ready in no time!

Step 1: Preheat the Oven

Start by preheating your oven to 400°F (200°C). Preheating is crucial because it ensures that your chicken and sausage cook evenly. A hot oven helps to lock in flavors and gives your veggies that perfect roasted texture. Trust me, you want that sizzle!

Step 2: Prepare the Ingredients

Next, it’s time to prep your ingredients. Cut the chicken breast into bite-sized pieces, making them easy to eat. Slice the apple chicken sausage into rounds. For the Brussels sprouts, trim the ends and cut them in half. Finally, peel and dice the sweet potatoes into uniform pieces. This way, everything cooks at the same rate, ensuring a harmonious blend of flavors.

Step 3: Combine Ingredients

In a large bowl, combine the chicken, sausage, Brussels sprouts, and sweet potatoes. Drizzle the olive oil over the mixture, then sprinkle in the garlic powder, onion powder, smoked paprika, salt, and pepper. Toss everything together until well coated. This step is key! An even coating means every bite will be bursting with flavor.

Step 4: Spread on Baking Sheet

Now, grab a large baking sheet and spread the mixture evenly across it. Make sure not to overcrowd the pan; this allows the heat to circulate and helps everything roast nicely. If you have to, use two sheets. You want that golden-brown finish, not steamed veggies!

Step 5: Bake to Perfection

Slide the baking sheet into your preheated oven and bake for 25-30 minutes. Halfway through, give everything a good stir to ensure even cooking. To check for doneness, make sure the chicken is cooked through and the veggies are tender. You’re looking for that perfect balance of crispy and tender.

Step 6: Garnish and Serve

Once it’s out of the oven, let it cool for a few minutes. Garnish with fresh parsley for a pop of color and freshness. Serve it straight from the pan for a rustic feel, or plate it up for a more polished presentation. Either way, your Savory Chicken and Apple Sausage Sheet Pan Dinner is ready to impress!

Tips for Success

  • Use a sharp knife for easy cutting of chicken and veggies.
  • Don’t skip the preheating; it’s key for even cooking.
  • Experiment with spices—add your favorites for a personal touch.
  • For extra crispiness, broil for the last 2-3 minutes.
  • Let leftovers cool before storing them in an airtight container.

Equipment Needed

  • Baking sheet: A large, rimmed baking sheet is ideal. If you don’t have one, a roasting pan works too.
  • Mixing bowl: Any large bowl will do for combining ingredients.
  • Sharp knife: Essential for cutting chicken and veggies. A good pair of kitchen scissors can also help.
  • Spatula: Use it for tossing and serving your delicious meal.

Variations

  • Spicy Kick: Add a pinch of cayenne pepper or red pepper flakes for a spicy twist.
  • Herb Infusion: Toss in fresh herbs like rosemary or thyme for an aromatic boost.
  • Vegetarian Option: Substitute chicken and sausage with chickpeas and your favorite plant-based sausage.
  • Sweet and Savory: Add diced apples or pears for a touch of sweetness that complements the savory flavors.
  • Low-Carb Version: Replace sweet potatoes with cauliflower for a lighter, low-carb alternative.

Serving Suggestions

  • Side Salad: A crisp green salad with a tangy vinaigrette pairs perfectly.
  • Crusty Bread: Serve with warm, crusty bread to soak up the delicious juices.
  • Wine Pairing: A chilled white wine, like Sauvignon Blanc, complements the dish beautifully.
  • Presentation: Serve directly from the pan for a rustic feel or plate individually for a more elegant touch.

FAQs about Savory Chicken and Apple Sausage Sheet Pan Dinner

Can I use different vegetables in this sheet pan dinner?

Absolutely! While Brussels sprouts and sweet potatoes are fantastic, feel free to swap them out for green beans, broccoli, or even carrots. The key is to choose vegetables that roast well and complement the savory chicken and apple sausage.

How do I store leftovers from this dish?

Leftovers can be stored in an airtight container in the fridge for up to three days. Just make sure to let them cool completely before sealing. Reheat in the oven or microwave until warmed through.

Can I make this dish ahead of time?

Yes! You can prep everything a day in advance. Just combine the ingredients and store them in the fridge. When you’re ready to eat, simply spread them on the baking sheet and bake as directed. It’s a great way to save time on busy nights!

Is this recipe gluten-free?

Yes, this Savory Chicken and Apple Sausage Sheet Pan Dinner is gluten-free! Just ensure that the apple sausage you choose is labeled gluten-free, and you’re good to go.

What can I serve with this dish?

This meal is hearty enough on its own, but you can enhance it with a side salad or some crusty bread. A light vinaigrette salad pairs beautifully, balancing the savory flavors of the dish.

Final Thoughts

Cooking should be a joyful experience, and my Savory Chicken and Apple Sausage Sheet Pan Dinner embodies that spirit. It’s not just about the delicious flavors; it’s about the memories created around the table. This dish brings family and friends together, making weeknight dinners feel special. The ease of preparation means you can focus on what truly matters—sharing stories and laughter. Plus, the delightful aroma wafting through your kitchen will have everyone eagerly anticipating mealtime. So, roll up your sleeves, embrace the process, and enjoy every bite of this comforting, hearty meal!

jhessica

Savory Chicken and Apple Sausage Sheet Pan Dinner Awaits!

A delicious and easy-to-make sheet pan dinner featuring savory chicken and apple sausage, paired with Brussels sprouts and sweet potatoes.
Prep Time 10 minutes
Cook Time 30 minutes
Total Time 40 minutes
Servings: 4 servings
Course: Dinner
Cuisine: American
Calories: 350

Ingredients
  

  • 2 tablespoons olive oil
  • 1 pound chicken breast cut into bite-sized pieces
  • 1 pound apple chicken sausage sliced
  • 2 cups Brussels sprouts trimmed and halved
  • 2 cups sweet potatoes peeled and diced
  • 1 teaspoon garlic powder
  • 1 teaspoon onion powder
  • 1 teaspoon smoked paprika
  • Salt and pepper to taste
  • Fresh parsley chopped (for garnish)

Method
 

  1. Preheat the oven to 400°F (200°C).
  2. In a large bowl, combine the chicken pieces, sliced apple sausage, Brussels sprouts, and sweet potatoes.
  3. Drizzle the olive oil over the mixture and sprinkle with garlic powder, onion powder, smoked paprika, salt, and pepper. Toss everything together until well coated.
  4. Spread the mixture evenly on a large baking sheet.
  5. Bake in the preheated oven for 25-30 minutes, or until the chicken is cooked through and the vegetables are tender, stirring halfway through.
  6. Remove from the oven and let it cool for a few minutes. Garnish with fresh parsley before serving.

Nutrition

Serving: 1servingCalories: 350kcalCarbohydrates: 28gProtein: 30gFat: 15gSaturated Fat: 4gPolyunsaturated Fat: 10gCholesterol: 80mgSodium: 600mgFiber: 4gSugar: 5g

Notes

  • For added flavor, squeeze fresh lemon juice over the dish before serving.
  • You can substitute the Brussels sprouts with green beans or broccoli for a different vegetable option.

Tried this recipe?

Let us know how it was!

Sweet and Savory Slow Cooker Teriyaki Chicken Recipe Awaits!

Introduction to Sweet and Savory Slow Cooker Teriyaki Chicken

After a long day, the last thing I want to do is spend hours in the kitchen. That’s where my Sweet and Savory Slow Cooker Teriyaki Chicken comes to the rescue! This dish is not just a meal; it’s a warm hug on a plate. With minimal prep and a slow cooker doing all the heavy lifting, you can enjoy a delicious dinner without the fuss. Whether you’re looking to impress your family or just want a quick solution for a busy weeknight, this recipe is your go-to. Trust me, your taste buds will thank you!

Why You’ll Love This Sweet and Savory Slow Cooker Teriyaki Chicken

This recipe is a game-changer for anyone who craves flavor without the fuss. The beauty of Sweet and Savory Slow Cooker Teriyaki Chicken lies in its simplicity. Just toss everything in the slow cooker, and let it work its magic. In a few hours, you’ll have tender, juicy chicken bathed in a rich, savory sauce. It’s perfect for busy nights or when you want to impress without breaking a sweat!

Ingredients for Sweet and Savory Slow Cooker Teriyaki Chicken

Gathering the right ingredients is the first step to culinary success. For this Sweet and Savory Slow Cooker Teriyaki Chicken, you’ll need a few key players that come together to create a symphony of flavors.

  • Boneless, skinless chicken thighs: These are the stars of the show, offering tenderness and rich flavor.
  • Soy sauce: This salty, umami-packed ingredient forms the base of our teriyaki sauce.
  • Brown sugar: It adds a touch of sweetness, balancing the saltiness of the soy sauce.
  • Rice vinegar: This brings a tangy brightness that cuts through the richness.
  • Minced garlic: A must-have for depth and aroma, garlic elevates the dish.
  • Minced ginger: This adds a warm, spicy note that complements the other flavors beautifully.
  • Sesame oil: A drizzle of this nutty oil enhances the overall taste and aroma.
  • Cornstarch: Used to thicken the sauce, giving it that perfect glossy finish.
  • Water: Helps create the cornstarch slurry for thickening.
  • Chopped green onions: These are for garnish, adding a fresh crunch and pop of color.
  • Sesame seeds: A final touch that adds texture and a nutty flavor.

For those looking to mix things up, consider substituting half of the brown sugar with honey or maple syrup for a healthier twist. You can also toss in some steamed broccoli or bell peppers during the last hour of cooking for added nutrition and flavor. Exact measurements for these ingredients can be found at the bottom of the article, ready for printing!

How to Make Sweet and Savory Slow Cooker Teriyaki Chicken

Now that you have all your ingredients ready, let’s dive into the fun part: making your Sweet and Savory Slow Cooker Teriyaki Chicken. This process is straightforward and rewarding. Follow these simple steps, and you’ll be on your way to a delicious meal!

Step 1: Prepare the Chicken

Start by placing the boneless, skinless chicken thighs in your slow cooker. Make sure they’re spread out evenly. This helps them cook uniformly. If you prefer, you can trim any excess fat for a leaner dish. Trust me, the chicken will soak up all that teriyaki goodness!

Step 2: Make the Teriyaki Sauce

In a medium bowl, whisk together the soy sauce, brown sugar, rice vinegar, minced garlic, minced ginger, and sesame oil. This is where the magic happens! The combination of these ingredients creates a rich, flavorful sauce that will coat your chicken beautifully. Make sure everything is well mixed.

Step 3: Combine Chicken and Sauce

Pour the teriyaki sauce over the chicken in the slow cooker. Use a spatula to ensure every piece of chicken is well coated. This step is crucial for flavor. The more sauce that clings to the chicken, the tastier your dish will be!

Step 4: Cook the Chicken

Cover the slow cooker and set it to cook. You can choose low for 6-7 hours or high for 3-4 hours. I usually opt for low; it allows the flavors to meld beautifully. Just let it do its thing while you tackle other tasks or relax!

Step 5: Shred the Chicken

Once the cooking time is up, carefully remove the chicken from the slow cooker. Use two forks to shred it into bite-sized pieces. It should fall apart easily. This step adds a nice texture to your dish, making it perfect for serving over rice or noodles.

Step 6: Thicken the Sauce

In a small bowl, mix the cornstarch with water to create a slurry. Stir this mixture into the remaining sauce in the slow cooker. Turn the heat to high and let it cook for an additional 10-15 minutes. This will thicken the sauce, giving it that glossy finish we all love!

Step 7: Serve and Enjoy

Return the shredded chicken to the slow cooker and stir to combine it with the thickened sauce. Serve your Sweet and Savory Slow Cooker Teriyaki Chicken over a bed of rice or noodles. Don’t forget to garnish with chopped green onions and sesame seeds for that extra flair. Enjoy every bite!

Tips for Success

  • Always use boneless, skinless chicken thighs for the best flavor and tenderness.
  • Don’t skip the cornstarch slurry; it’s key for that luscious sauce texture.
  • Feel free to adjust the sweetness by varying the brown sugar or using honey.
  • For added flavor, marinate the chicken in the sauce for a few hours before cooking.
  • Experiment with veggies like bell peppers or snap peas for a colorful twist!

Equipment Needed

  • Slow Cooker: The star of the show! A 6-quart model works great, but any size will do.
  • Medium Bowl: For mixing your teriyaki sauce. A whisk or fork will suffice.
  • Two Forks: Essential for shredding the chicken. You can also use tongs if you prefer.
  • Spatula: Handy for coating the chicken with sauce.

Variations

  • Spicy Teriyaki: Add a teaspoon of red pepper flakes or sriracha to the sauce for a kick of heat.
  • Pineapple Teriyaki: Toss in some pineapple chunks during the last hour of cooking for a sweet and tangy twist.
  • Vegetarian Option: Substitute chicken with firm tofu or tempeh for a plant-based version.
  • Low-Carb Version: Serve over cauliflower rice instead of traditional rice for a healthier alternative.
  • Herb-Infused: Add fresh herbs like cilantro or basil at the end for a burst of freshness.

Serving Suggestions

  • Serve your Sweet and Savory Slow Cooker Teriyaki Chicken over fluffy white rice or noodles for a hearty meal.
  • Pair with steamed broccoli or snap peas for a colorful, nutritious side.
  • A chilled cucumber salad complements the dish perfectly.
  • For drinks, try a light beer or iced green tea.

FAQs about Sweet and Savory Slow Cooker Teriyaki Chicken

Can I use chicken breasts instead of thighs?

Absolutely! While I prefer boneless, skinless chicken thighs for their tenderness, chicken breasts can work too. Just keep an eye on the cooking time, as they may dry out faster.

How can I make this recipe gluten-free?

To make your Sweet and Savory Slow Cooker Teriyaki Chicken gluten-free, simply use tamari instead of soy sauce. It has a similar flavor without the gluten.

Can I prepare this dish in advance?

Yes! You can marinate the chicken in the teriyaki sauce the night before. Just pop it in the slow cooker the next day for an easy meal.

What can I serve with teriyaki chicken?

This dish pairs wonderfully with steamed rice, noodles, or even a fresh salad. You can also add some sautéed vegetables for a complete meal.

How do I store leftovers?

Store any leftovers in an airtight container in the fridge for up to 3 days. Reheat gently in the microwave or on the stovetop, adding a splash of water if needed to keep it moist.

Final Thoughts

Cooking should be a joyful experience, and my Sweet and Savory Slow Cooker Teriyaki Chicken embodies that spirit. It’s not just about the delicious flavors; it’s about the memories created around the dinner table. This dish brings family and friends together, transforming an ordinary evening into something special. The ease of preparation allows you to focus on what truly matters—sharing laughter and stories. So, whether it’s a busy weeknight or a weekend gathering, this recipe is sure to impress. Dive in, savor every bite, and relish the joy of home-cooked goodness!

jhessica

Sweet and Savory Slow Cooker Teriyaki Chicken Recipe Awaits!

A delicious and easy recipe for Sweet and Savory Slow Cooker Teriyaki Chicken that is perfect for any meal.
Prep Time 15 minutes
Servings: 6 servings
Course: Main Dish
Cuisine: Asian
Calories: 320

Ingredients
  

  • 2 pounds boneless skinless chicken thighs
  • 1 cup soy sauce
  • 1/2 cup brown sugar
  • 1/4 cup rice vinegar
  • 1 tablespoon minced garlic
  • 1 tablespoon minced ginger
  • 1 tablespoon sesame oil
  • 1 tablespoon cornstarch
  • 2 tablespoons water
  • 1/4 cup chopped green onions for garnish
  • Sesame seeds for garnish

Method
 

  1. Place the chicken thighs in the slow cooker.
  2. In a medium bowl, whisk together the soy sauce, brown sugar, rice vinegar, garlic, ginger, and sesame oil until well combined.
  3. Pour the sauce over the chicken in the slow cooker, ensuring the chicken is well coated.
  4. Cover and cook on low for 6-7 hours or on high for 3-4 hours, until the chicken is tender and cooked through.
  5. Once cooked, remove the chicken from the slow cooker and shred it using two forks.
  6. In a small bowl, mix the cornstarch and water to create a slurry. Stir this into the remaining sauce in the slow cooker.
  7. Turn the slow cooker to high and cook for an additional 10-15 minutes, or until the sauce thickens.
  8. Return the shredded chicken to the slow cooker and stir to combine with the thickened sauce.
  9. Serve the teriyaki chicken over rice or noodles, garnished with chopped green onions and sesame seeds.

Nutrition

Serving: 1servingCalories: 320kcalCarbohydrates: 10gProtein: 30gFat: 15gSugar: 10g

Notes

  • For a healthier option, substitute half of the brown sugar with honey or maple syrup.
  • Add steamed broccoli or bell peppers to the slow cooker during the last hour of cooking for added vegetables and flavor.

Tried this recipe?

Let us know how it was!

Garlic Parmesan Chicken and Potatoes: A Tasty Delight!

Introduction to Garlic Parmesan Chicken and Potatoes

There’s something magical about the aroma of garlic wafting through the kitchen, isn’t there? It takes me back to family dinners where laughter mingled with the scent of delicious food. This Garlic Parmesan Chicken and Potatoes recipe is a delightful way to recreate that warmth. Perfect for a busy weeknight or a cozy weekend gathering, it combines juicy chicken thighs with tender baby potatoes, all baked to golden perfection. Whether you’re cooking for yourself or impressing loved ones, this dish is sure to become a favorite in your home. Let’s dive into this culinary adventure!

Why You’ll Love This Garlic Parmesan Chicken and Potatoes

This Garlic Parmesan Chicken and Potatoes recipe is a game-changer for anyone who craves flavor without the fuss. It’s quick to prepare, taking just 10 minutes of your time, and the oven does the rest. The combination of savory garlic and rich Parmesan creates a mouthwatering taste that will have everyone asking for seconds. Plus, it’s a one-pan wonder, making cleanup a breeze. What’s not to love?

Ingredients for Garlic Parmesan Chicken and Potatoes

Gathering the right ingredients is the first step to culinary success. For this Garlic Parmesan Chicken and Potatoes dish, you’ll need a few key players that come together to create a symphony of flavors.

  • Bone-in, skin-on chicken thighs: These are juicy and flavorful, perfect for roasting. The skin crisps up beautifully, adding texture.
  • Baby potatoes: Their small size means they cook quickly and evenly. Halving them allows for a crispy exterior and tender inside.
  • Olive oil: This adds richness and helps the seasonings stick. It’s a heart-healthy fat that enhances flavor.
  • Garlic: Freshly minced garlic brings a robust flavor that’s hard to beat. It’s the star of this dish!
  • Dried Italian seasoning: A blend of herbs that adds depth. If you have fresh herbs, feel free to use those instead!
  • Salt and black pepper: Essential for seasoning. They enhance the natural flavors of the chicken and potatoes.
  • Grated Parmesan cheese: This adds a salty, nutty flavor and a delightful crust when baked. It’s the finishing touch that elevates the dish.
  • Fresh parsley: A sprinkle of this vibrant herb not only adds color but also a fresh taste that brightens the dish.

For those looking to mix things up, consider adding vegetables like green beans or carrots to the baking sheet. You can also swap chicken thighs for breasts if you prefer a leaner option. Exact measurements for these ingredients can be found at the bottom of the article, ready for printing!

How to Make Garlic Parmesan Chicken and Potatoes

Now that you have your ingredients ready, let’s get cooking! This Garlic Parmesan Chicken and Potatoes recipe is straightforward and rewarding. Follow these steps, and you’ll have a delicious meal in no time.

Step 1: Preheat the Oven

Start by preheating your oven to 425°F (220°C). Preheating is crucial because it ensures that your chicken and potatoes cook evenly. A hot oven helps achieve that crispy skin on the chicken and perfectly roasted potatoes. Trust me, you want that golden-brown goodness!

Step 2: Prepare the Garlic Mixture

In a large bowl, combine 4 tablespoons of olive oil, 4 minced garlic cloves, 1 teaspoon of dried Italian seasoning, 1 teaspoon of salt, and ½ teaspoon of black pepper. Mix it well until everything is combined. This mixture is the flavor powerhouse of your dish, so don’t skip this step!

Step 3: Coat the Chicken

Add the bone-in, skin-on chicken thighs to the bowl with the garlic mixture. Toss them around until they’re evenly coated. Make sure every piece is covered in that garlicky goodness. This step is key to infusing flavor into the chicken as it bakes.

Step 4: Prepare the Potatoes

In a separate bowl, toss the halved baby potatoes with a drizzle of olive oil, a pinch of salt, and a dash of pepper. This simple seasoning will enhance their natural flavor. You want them to be well-coated but not swimming in oil. Just enough to make them shine!

Step 5: Arrange on Baking Sheet

Grab a large baking sheet and arrange the chicken thighs skin-side up. Scatter the seasoned baby potatoes around the chicken. Make sure they’re not overcrowded; this allows for even cooking and crispiness. Give them some space to breathe!

Step 6: Add Parmesan Cheese

Now, sprinkle ½ cup of grated Parmesan cheese evenly over the chicken and potatoes. This cheese is the magic touch that adds a salty, nutty flavor and creates a delightful crust as it bakes. It’s what takes this dish from good to absolutely irresistible!

Step 7: Bake to Perfection

Place the baking sheet in your preheated oven and bake for 35-40 minutes. To check for doneness, use a meat thermometer; the chicken should reach an internal temperature of 165°F. The potatoes should be tender and golden. If you want extra crispiness, broil for an additional 2-3 minutes at the end.

Step 8: Garnish and Serve

Once done, remove the baking sheet from the oven and let it rest for about 5 minutes. This resting time allows the juices to redistribute in the chicken. Before serving, sprinkle some fresh parsley on top for a pop of color and freshness. Now, dig in and enjoy your delicious Garlic Parmesan Chicken and Potatoes!

Tips for Success

  • Use a meat thermometer to ensure your chicken is perfectly cooked.
  • For extra flavor, marinate the chicken in the garlic mixture for a few hours.
  • Don’t overcrowd the baking sheet; give everything room to crisp up.
  • Feel free to experiment with different herbs or spices to suit your taste.
  • Leftovers can be stored in the fridge for up to three days—perfect for meal prep!

Equipment Needed

  • Baking sheet: A large, rimmed baking sheet works best. If you don’t have one, a roasting pan is a great alternative.
  • Mixing bowls: Use at least two bowls for mixing the garlic mixture and potatoes. Any size will do!
  • Meat thermometer: This ensures your chicken is cooked perfectly. A simple knife can also help check doneness.

Variations of Garlic Parmesan Chicken and Potatoes

  • Vegetable Medley: Add colorful veggies like bell peppers, zucchini, or asparagus to the baking sheet for a nutritious boost.
  • Spicy Kick: Incorporate red pepper flakes into the garlic mixture for a spicy twist that will wake up your taste buds.
  • Herb Infusion: Swap out the dried Italian seasoning for fresh herbs like rosemary or thyme for a fragrant flavor profile.
  • Cheesy Delight: Mix in different cheeses like mozzarella or feta for a unique cheesy experience.
  • Low-Carb Option: Substitute baby potatoes with cauliflower florets for a lower-carb version that still delivers on flavor.

Serving Suggestions for Garlic Parmesan Chicken and Potatoes

  • Fresh Salad: Pair with a crisp green salad dressed in a light vinaigrette for a refreshing contrast.
  • Wine Pairing: A chilled Chardonnay complements the richness of the dish beautifully.
  • Presentation: Serve on a rustic wooden board for a cozy, inviting look.

FAQs about Garlic Parmesan Chicken and Potatoes

As you embark on your culinary journey with this Garlic Parmesan Chicken and Potatoes recipe, you might have a few questions. Here are some common queries that can help you along the way.

Can I use chicken breasts instead of thighs?

Absolutely! While chicken thighs provide a juicy flavor, chicken breasts can be a leaner option. Just keep an eye on the cooking time, as breasts may cook faster.

What can I substitute for Parmesan cheese?

If you’re out of Parmesan, try Pecorino Romano or even a sprinkle of nutritional yeast for a dairy-free option. Both will add a nice flavor to the dish.

How do I store leftovers?

Leftovers can be stored in an airtight container in the fridge for up to three days. Reheat in the oven for the best texture, or use the microwave for a quick meal.

Can I add more vegetables to this dish?

Definitely! Feel free to toss in your favorite veggies like green beans, carrots, or bell peppers. Just make sure they’re cut to a similar size for even cooking.

Is this recipe gluten-free?

Yes! This Garlic Parmesan Chicken and Potatoes recipe is naturally gluten-free, making it a great option for those with dietary restrictions.

Final Thoughts

Cooking this Garlic Parmesan Chicken and Potatoes is more than just preparing a meal; it’s about creating memories. The aroma fills your kitchen, inviting everyone to gather around the table. Each bite is a delightful blend of flavors, from the crispy chicken skin to the tender, cheesy potatoes. It’s a dish that brings comfort and satisfaction, perfect for any occasion. Whether you’re enjoying a quiet dinner or hosting friends, this recipe is sure to impress. So roll up your sleeves, embrace the joy of cooking, and let this dish become a staple in your home!

jhessica

Garlic Parmesan Chicken and Potatoes: A Tasty Delight!

A delicious and easy-to-make Garlic Parmesan Chicken and Potatoes recipe that combines juicy chicken thighs with tender baby potatoes, all baked to perfection.
Prep Time 10 minutes
Cook Time 40 minutes
Total Time 50 minutes
Servings: 4 servings
Course: Main Course
Cuisine: American
Calories: 480

Ingredients
  

  • 2 pounds bone-in skin-on chicken thighs
  • 1 pound baby potatoes halved
  • 4 tablespoons olive oil
  • 4 cloves garlic minced
  • 1 teaspoon dried Italian seasoning
  • 1 teaspoon salt
  • ½ teaspoon black pepper
  • ½ cup grated Parmesan cheese
  • 2 tablespoons fresh parsley chopped (for garnish)

Method
 

  1. Preheat your oven to 425°F (220°C).
  2. In a large bowl, combine the olive oil, minced garlic, Italian seasoning, salt, and black pepper. Mix well.
  3. Add the chicken thighs to the bowl and toss to coat them evenly with the garlic mixture.
  4. In a separate bowl, toss the halved baby potatoes with a little olive oil, salt, and pepper.
  5. Arrange the chicken thighs skin-side up on a large baking sheet. Scatter the potatoes around the chicken.
  6. Sprinkle the grated Parmesan cheese evenly over the chicken and potatoes.
  7. Bake in the preheated oven for 35-40 minutes, or until the chicken is cooked through (internal temperature of 165°F) and the potatoes are tender.
  8. For extra crispiness, broil for an additional 2-3 minutes at the end of cooking.
  9. Remove from the oven and let it rest for 5 minutes. Garnish with fresh parsley before serving.

Nutrition

Serving: 1servingCalories: 480kcalCarbohydrates: 15gProtein: 35gFat: 30gSaturated Fat: 8gPolyunsaturated Fat: 20gCholesterol: 150mgSodium: 800mgFiber: 2gSugar: 1g

Notes

  • For a twist, try adding some vegetables like green beans or carrots to the baking sheet for a complete meal.
  • You can also substitute chicken thighs with chicken breasts for a leaner option.

Tried this recipe?

Let us know how it was!

Honey Dijon Baked Chicken: A Simple Recipe for Success

Introduction to Honey Dijon Baked Chicken

There’s something magical about the aroma of chicken baking in the oven, isn’t there? The scent wafts through the house, wrapping you in warmth and comfort. Honey Dijon Baked Chicken is my go-to recipe for those busy weeknights when I want to impress my family without spending hours in the kitchen. This dish is not just simple; it’s a delightful blend of sweet and tangy flavors that will have everyone asking for seconds. Whether it’s a casual dinner or a special occasion, this recipe is sure to become a favorite in your home.

Why You’ll Love This Honey Dijon Baked Chicken

This Honey Dijon Baked Chicken is a lifesaver for anyone juggling a busy schedule. It’s incredibly easy to prepare, taking just minutes to whip up the marinade. The sweet and tangy flavors meld beautifully as it bakes, creating a dish that’s both satisfying and impressive. Plus, it’s versatile enough to pair with any side, making it a perfect choice for family dinners or gatherings with friends.

Ingredients for Honey Dijon Baked Chicken

Gathering the right ingredients is the first step to culinary success. For this Honey Dijon Baked Chicken, you’ll need:

  • Bone-in, skin-on chicken thighs: These provide rich flavor and moisture, making them perfect for baking.
  • Dijon mustard: Adds a sharp, tangy kick that balances the sweetness of the honey.
  • Honey: This natural sweetener caramelizes beautifully, giving the chicken a lovely glaze.
  • Olive oil: Helps to keep the chicken moist and enhances the overall flavor.
  • Apple cider vinegar: A splash of acidity brightens the dish and complements the honey.
  • Garlic powder: Adds depth and a savory note without the fuss of fresh garlic.
  • Onion powder: Provides a subtle sweetness and enhances the overall flavor profile.
  • Salt and black pepper: Essential for seasoning, bringing out the natural flavors of the chicken.
  • Dried thyme (optional): This herb adds an earthy aroma, perfect for a comforting dish.

For those looking to mix things up, consider substituting maple syrup for honey for a unique twist. You can find all the exact measurements at the bottom of the article, ready for printing!

How to Make Honey Dijon Baked Chicken

Creating this Honey Dijon Baked Chicken is a breeze. Follow these simple steps, and you’ll have a delicious meal ready in no time. Let’s dive in!

Step 1: Preheat the Oven

Start by preheating your oven to 375°F. This step is crucial for even cooking. A hot oven ensures that the chicken cooks through properly while developing that beautiful golden skin. Trust me, you don’t want to skip this part!

Step 2: Prepare the Honey Dijon Mixture

In a mixing bowl, whisk together the Dijon mustard, honey, olive oil, apple cider vinegar, garlic powder, onion powder, salt, black pepper, and thyme. Each ingredient plays a role: the mustard adds tang, the honey brings sweetness, and the olive oil keeps everything moist. This mixture is the heart of your dish, so make sure it’s well combined!

Step 3: Coat the Chicken

Place the chicken thighs in a large baking dish. Pour the honey Dijon mixture over them, ensuring each piece is well coated. This step is vital for flavor. The marinade seeps into the chicken, making every bite deliciously savory and sweet. Don’t be shy—use your hands to rub the mixture in if you need to!

Step 4: Bake Covered

Cover the baking dish with aluminum foil and pop it in the oven for 30 minutes. Covering the dish helps retain moisture, ensuring the chicken stays juicy. It’s like giving your chicken a warm, cozy blanket while it cooks!

Step 5: Bake Uncovered

After 30 minutes, remove the foil and let the chicken bake uncovered for an additional 20-25 minutes. This is where the magic happens! Uncovering allows the skin to crisp up beautifully, creating that irresistible texture we all love. Keep an eye on it; you want that golden brown finish!

Step 6: Rest Before Serving

Once the chicken reaches an internal temperature of 165°F, take it out of the oven and let it rest for 5 minutes. Resting is crucial; it allows the juices to redistribute throughout the meat, ensuring every bite is juicy and tender. Trust me, it’s worth the wait!

Tips for Success

  • Always use a meat thermometer to check for doneness; it should read 165°F.
  • For extra flavor, marinate the chicken for a few hours or overnight.
  • Don’t skip the resting time; it makes a big difference in juiciness.
  • Experiment with herbs like rosemary or oregano for a different twist.
  • Pair with seasonal veggies for a complete meal.

Equipment Needed

  • Baking dish: A 9×13 inch dish works well, but any oven-safe dish will do.
  • Mixing bowl: Use a medium-sized bowl for whisking the marinade.
  • Whisk: A fork can substitute if you don’t have a whisk handy.
  • Aluminum foil: Essential for covering the dish while baking.
  • Meat thermometer: A must for checking chicken doneness; a simple knife can work in a pinch.

Variations

  • Maple Dijon Chicken: Swap honey for maple syrup for a unique, earthy sweetness.
  • Spicy Honey Dijon: Add a pinch of cayenne pepper or red pepper flakes for a kick of heat.
  • Herb-Infused: Mix in fresh herbs like rosemary or parsley for an aromatic twist.
  • Low-Carb Option: Use skinless chicken thighs and reduce honey for a lower sugar content.
  • Vegetarian Version: Substitute chicken with hearty vegetables like cauliflower or portobello mushrooms, adjusting baking time accordingly.

Serving Suggestions

  • Roasted Vegetables: Pair with seasonal roasted veggies like carrots, Brussels sprouts, or asparagus for a colorful plate.
  • Rice or Quinoa: Serve over fluffy rice or quinoa to soak up the delicious honey Dijon sauce.
  • Refreshing Salad: A crisp green salad with a light vinaigrette complements the rich flavors beautifully.
  • Wine Pairing: Enjoy with a chilled white wine, like Sauvignon Blanc, for a delightful dining experience.

FAQs about Honey Dijon Baked Chicken

As you embark on your culinary adventure with Honey Dijon Baked Chicken, you might have a few questions. Here are some common queries that can help you along the way:

Can I use boneless chicken thighs instead of bone-in?

Absolutely! Boneless chicken thighs will work just fine. Just keep an eye on the cooking time, as they may cook a bit faster.

How can I make this dish spicier?

If you’re looking for a kick, add cayenne pepper or red pepper flakes to the honey Dijon mixture. It’ll give your chicken a delightful heat!

Can I prepare the marinade in advance?

Yes! You can mix the marinade a day ahead and store it in the fridge. Just remember to coat the chicken before baking.

What should I do with leftovers?

Leftover Honey Dijon Baked Chicken can be stored in an airtight container in the fridge for up to three days. It’s great in salads or sandwiches!

Is this recipe gluten-free?

Yes, this Honey Dijon Baked Chicken is naturally gluten-free! Just ensure that your Dijon mustard is gluten-free, and you’re all set.

Final Thoughts

Cooking Honey Dijon Baked Chicken is more than just preparing a meal; it’s about creating moments. The sweet and tangy flavors dance together, bringing joy to your table and smiles to your loved ones. Each bite is a reminder that simple ingredients can lead to extraordinary experiences. Whether it’s a weeknight dinner or a gathering with friends, this dish is sure to impress. I hope you find as much joy in making it as I do. So roll up your sleeves, embrace the process, and let the delicious aroma fill your home. Happy cooking!

jhessica

Honey Dijon Baked Chicken: A Simple Recipe for Success

A simple and delicious recipe for Honey Dijon Baked Chicken that is easy to prepare and perfect for any occasion.
Prep Time 10 minutes
Cook Time 55 minutes
Total Time 1 hour 5 minutes
Servings: 4 servings
Course: Main Dish
Cuisine: American
Calories: 320

Ingredients
  

  • 2 pounds bone-in skin-on chicken thighs
  • 1/4 cup Dijon mustard
  • 1/4 cup honey
  • 2 tablespoons olive oil
  • 1 tablespoon apple cider vinegar
  • 1 teaspoon garlic powder
  • 1 teaspoon onion powder
  • 1/2 teaspoon salt
  • 1/2 teaspoon black pepper
  • 1 teaspoon dried thyme optional

Method
 

  1. Preheat the oven to 375°F.
  2. In a mixing bowl, whisk together the Dijon mustard, honey, olive oil, apple cider vinegar, garlic powder, onion powder, salt, black pepper, and thyme until well combined.
  3. Place the chicken thighs in a large baking dish and pour the honey Dijon mixture over them, ensuring they are well coated.
  4. Cover the baking dish with aluminum foil and bake in the preheated oven for 30 minutes.
  5. Remove the foil and bake for an additional 20-25 minutes, or until the chicken is cooked through and the skin is golden brown. The internal temperature should reach 165°F.
  6. Let the chicken rest for 5 minutes before serving.

Nutrition

Serving: 1chicken thighCalories: 320kcalCarbohydrates: 6gProtein: 24gFat: 22gSaturated Fat: 5gPolyunsaturated Fat: 15gCholesterol: 100mgSodium: 500mgSugar: 6g

Notes

  • For a crispy skin, broil the chicken for the last 2-3 minutes of cooking.
  • Try substituting maple syrup for honey for a different flavor profile.

Tried this recipe?

Let us know how it was!

Sweet and Savory Teriyaki Chicken: A Delicious Recipe!

Introduction to Sweet and Savory Teriyaki Chicken

Cooking can sometimes feel like a race against the clock, especially on those busy weeknights. That’s where my Sweet and Savory Teriyaki Chicken comes in, a dish that’s not only quick to whip up but also bursting with flavor. I remember the first time I made this recipe; the aroma filled my kitchen, and my family couldn’t wait to dig in. It’s perfect for impressing loved ones or simply treating yourself after a long day. With tender chicken thighs coated in a rich teriyaki sauce, this meal is sure to become a favorite in your home.

Why You’ll Love This Sweet and Savory Teriyaki Chicken

This Sweet and Savory Teriyaki Chicken is a game-changer for your dinner routine. It’s incredibly easy to make, taking just a few minutes of prep and a quick cook time. The balance of sweet and savory flavors will have your taste buds dancing. Plus, it’s versatile enough to please picky eaters and impress guests alike. You’ll find yourself making this dish again and again!

Ingredients for Sweet and Savory Teriyaki Chicken

Gathering the right ingredients is the first step to creating a delicious Sweet and Savory Teriyaki Chicken. Here’s what you’ll need:

  • Boneless, skinless chicken thighs: These are juicy and tender, perfect for soaking up the teriyaki sauce.
  • Soy sauce: The backbone of the marinade, providing that essential umami flavor.
  • Brown sugar: Adds sweetness and helps caramelize the chicken during cooking.
  • Honey: Enhances the sweetness and gives a lovely glaze to the chicken.
  • Minced garlic: A must-have for depth of flavor; it brings a savory punch.
  • Minced ginger: Adds a warm, spicy note that complements the sweetness beautifully.
  • Cornstarch: Used to thicken the sauce, giving it a luscious texture.
  • Water: Helps dissolve the cornstarch and balance the sauce consistency.
  • Sesame oil: Adds a nutty aroma and richness to the dish.
  • Sesame seeds (optional): For garnish, they add a nice crunch and visual appeal.
  • Green onions: Sliced for garnish, they provide a fresh, crisp contrast to the rich flavors.

For those looking to mix things up, you can substitute chicken thighs with chicken breasts or even tofu for a vegetarian option. If you want a spicy kick, consider adding red pepper flakes to the marinade. You can find the exact measurements for these ingredients at the bottom of the article, ready for printing!

How to Make Sweet and Savory Teriyaki Chicken

Now that you have your ingredients ready, let’s dive into the fun part: making your Sweet and Savory Teriyaki Chicken. Follow these simple steps, and you’ll have a delicious meal on the table in no time!

Step 1: Prepare the Marinade

Start by whisking together the soy sauce, brown sugar, honey, minced garlic, and minced ginger in a medium bowl. This marinade is the heart of your dish, so make sure it’s well combined. The sweet and savory notes will create a flavor explosion that your chicken will soak up beautifully.

Step 2: Marinate the Chicken

Next, place the chicken thighs in a large resealable plastic bag or a shallow dish. Pour the marinade over the chicken, ensuring every piece is coated. Seal the bag or cover the dish, then refrigerate for at least one hour. If you have time, letting it marinate overnight will deepen the flavors even more.

Step 3: Cook the Chicken

When you’re ready to cook, preheat your grill or a large skillet over medium-high heat. Remove the chicken from the marinade, but don’t toss that marinade just yet! Cook the chicken for about 6-7 minutes on each side, or until it reaches an internal temperature of 165°F. The sizzling sound as it cooks is music to any home cook’s ears!

Step 4: Thicken the Sauce

While the chicken is cooking, take the reserved marinade and pour it into a small saucepan. In a separate bowl, mix the cornstarch with water until smooth, then add it to the saucepan. Bring the mixture to a boil over medium heat, stirring constantly. In just 2-3 minutes, you’ll have a thick, glossy sauce that’s perfect for drizzling over your chicken.

Step 5: Serve and Enjoy

Once the chicken is cooked, let it rest for a few minutes before slicing. This helps keep it juicy. Drizzle the thickened teriyaki sauce over the sliced chicken, and don’t forget to garnish with sesame seeds and sliced green onions. Your Sweet and Savory Teriyaki Chicken is now ready to impress!

Tips for Success

  • Always marinate the chicken for at least an hour; overnight is even better for flavor.
  • Use a meat thermometer to ensure your chicken reaches 165°F for perfect doneness.
  • Don’t skip the resting time after cooking; it keeps the chicken juicy.
  • Feel free to customize the sauce with your favorite spices or add-ins.
  • Serve with steamed rice or veggies for a complete meal.

Equipment Needed

  • Grill or Skillet: Either works well; a grill adds a smoky flavor, while a skillet is great for indoor cooking.
  • Medium Bowl: For mixing the marinade; any mixing bowl will do.
  • Meat Thermometer: Ensures perfect chicken doneness; a simple knife can also check if juices run clear.
  • Small Saucepan: For thickening the sauce; a small pot can be used as an alternative.
  • Resealable Plastic Bag or Shallow Dish: For marinating; any container with a lid works too.

Variations

  • Spicy Teriyaki Chicken: Add a teaspoon of red pepper flakes to the marinade for a fiery kick.
  • Vegetarian Option: Substitute chicken thighs with firm tofu, marinating and cooking it the same way.
  • Grilled Pineapple: Add slices of pineapple to the grill for a sweet, caramelized side that pairs perfectly.
  • Teriyaki Chicken Bowls: Serve the chicken over rice or quinoa, topped with steamed veggies for a hearty meal.
  • Low-Sodium Version: Use low-sodium soy sauce to reduce the salt content without sacrificing flavor.

Serving Suggestions

  • Steamed Rice: A classic pairing that soaks up the delicious teriyaki sauce.
  • Stir-Fried Vegetables: Colorful veggies add crunch and nutrition to your meal.
  • Cold Beer: A light lager or pale ale complements the sweet and savory flavors.
  • Presentation: Serve on a large platter, garnished with extra green onions and sesame seeds for a stunning look.

FAQs about Sweet and Savory Teriyaki Chicken

Can I use chicken breasts instead of thighs for this recipe?

Absolutely! While I love the juiciness of chicken thighs, chicken breasts can work just as well. Just keep an eye on the cooking time, as breasts may cook a bit faster.

How can I make this Sweet and Savory Teriyaki Chicken gluten-free?

To make this dish gluten-free, simply use tamari instead of regular soy sauce. It has a similar flavor profile and works perfectly in the marinade.

Can I prepare the teriyaki sauce in advance?

Yes! You can make the teriyaki sauce ahead of time and store it in the fridge for up to a week. Just reheat it before drizzling over your chicken.

What sides pair well with Sweet and Savory Teriyaki Chicken?

Steamed rice, stir-fried vegetables, or a fresh salad are fantastic options. They complement the flavors beautifully and make for a well-rounded meal.

Can I freeze the leftovers?

Definitely! Leftover teriyaki chicken can be frozen for up to three months. Just make sure to store it in an airtight container for the best results.

Final Thoughts

Cooking this Sweet and Savory Teriyaki Chicken is more than just preparing a meal; it’s about creating moments. The joy of watching your loved ones savor each bite, the laughter shared around the table, and the satisfaction of mastering a delicious recipe are priceless. This dish brings a delightful balance of flavors that can brighten any weeknight dinner or special occasion. Whether you’re a seasoned chef or just starting out, this recipe is a reminder that great food can be simple, fun, and incredibly rewarding. So, roll up your sleeves and enjoy the culinary adventure!

jhessica

Sweet and Savory Teriyaki Chicken: A Delicious Recipe!

A delicious recipe for Sweet and Savory Teriyaki Chicken that combines tender chicken thighs with a flavorful teriyaki sauce.
Prep Time 10 minutes
Cook Time 15 minutes
Total Time 1 hour 25 minutes
Servings: 4 servings
Course: Main Dish
Cuisine: Asian
Calories: 350

Ingredients
  

  • 2 pounds boneless skinless chicken thighs
  • 1 cup soy sauce
  • 1/2 cup brown sugar
  • 1/4 cup honey
  • 1 tablespoon minced garlic
  • 1 tablespoon minced ginger
  • 2 tablespoons cornstarch
  • 1/4 cup water
  • 2 tablespoons sesame oil
  • 1 tablespoon sesame seeds optional
  • 2 green onions sliced (for garnish)

Method
 

  1. In a medium bowl, whisk together soy sauce, brown sugar, honey, minced garlic, and minced ginger until well combined.
  2. Place the chicken thighs in a large resealable plastic bag or a shallow dish and pour the marinade over the chicken. Seal the bag or cover the dish and refrigerate for at least 1 hour, or up to overnight for more flavor.
  3. Preheat your grill or a large skillet over medium-high heat. Remove the chicken from the marinade, reserving the marinade for later.
  4. Cook the chicken on the grill or in the skillet for about 6-7 minutes per side, or until the internal temperature reaches 165°F.
  5. While the chicken is cooking, pour the reserved marinade into a small saucepan. In a separate bowl, mix cornstarch and water until smooth, then add to the saucepan.
  6. Bring the marinade to a boil over medium heat, stirring constantly until it thickens, about 2-3 minutes.
  7. Once the chicken is cooked, remove it from the heat and let it rest for a few minutes before slicing.
  8. Drizzle the thickened teriyaki sauce over the sliced chicken and garnish with sesame seeds and sliced green onions before serving.

Nutrition

Serving: 1servingCalories: 350kcalCarbohydrates: 12gProtein: 28gFat: 20gSugar: 12g

Notes

  • For a spicy kick, add a teaspoon of red pepper flakes to the marinade.
  • Substitute chicken thighs with chicken breasts or tofu for a different protein option.

Tried this recipe?

Let us know how it was!

Parmesan Crusted Chicken Sheet Pan Dinner: Quick & Easy!

Introduction to Parmesan Crusted Chicken Sheet Pan Dinner

After a long day, the last thing I want is to spend hours in the kitchen. That’s where my go-to recipe, the Parmesan Crusted Chicken Sheet Pan Dinner, comes into play. It’s a lifesaver for busy evenings, combining juicy chicken breasts with vibrant roasted vegetables. This dish not only satisfies the taste buds but also makes cleanup a breeze. Whether you’re cooking for family or just treating yourself, this meal is sure to impress. Let’s dive into this quick and easy recipe that brings comfort and flavor to your table!

Why You’ll Love This Parmesan Crusted Chicken Sheet Pan Dinner

This Parmesan Crusted Chicken Sheet Pan Dinner is a game-changer for anyone who craves deliciousness without the fuss. It’s quick to prepare, taking just 40 minutes from start to finish. The combination of crispy chicken and tender veggies is a flavor explosion that will have your taste buds dancing. Plus, with minimal cleanup, you can spend more time enjoying your meal and less time scrubbing pots and pans!

Ingredients for Parmesan Crusted Chicken Sheet Pan Dinner

Gathering the right ingredients is the first step to creating this delightful dish. Here’s what you’ll need:

  • Boneless, skinless chicken breasts: The star of the show! They’re juicy and cook quickly, making them perfect for a weeknight dinner.
  • Grated Parmesan cheese: This adds a rich, nutty flavor and a crispy texture to the chicken. Freshly grated is best, but pre-grated works too.
  • Panko breadcrumbs: These Japanese-style breadcrumbs give an extra crunch. They’re lighter and crispier than regular breadcrumbs.
  • Garlic powder: A must-have for that savory kick. It infuses the chicken with flavor without the hassle of chopping fresh garlic.
  • Onion powder: This adds depth to the dish, enhancing the overall flavor profile.
  • Italian seasoning: A blend of herbs that brings a taste of Italy to your kitchen. It’s a convenient way to add complexity.
  • Salt and pepper: Essential for seasoning. Adjust to your taste for the perfect balance.
  • Broccoli florets: These vibrant greens not only add color but also provide a nutritious crunch. Feel free to swap them out for asparagus or green beans!
  • Cherry tomatoes: Their sweetness complements the savory chicken beautifully. Halving them allows for even roasting.
  • Olive oil: This helps the breadcrumbs adhere to the chicken and adds moisture to the veggies.
  • Fresh lemon juice: A splash of acidity brightens the dish and enhances the flavors.
  • Dried basil (optional): If you have it on hand, this herb adds a lovely aroma and flavor.

For exact measurements, check the bottom of the article where you can find everything listed for easy printing. Happy cooking!

How to Make Parmesan Crusted Chicken Sheet Pan Dinner

Now that you have your ingredients ready, let’s get cooking! This Parmesan Crusted Chicken Sheet Pan Dinner is straightforward and fun to make. Follow these simple steps, and you’ll have a delicious meal on the table in no time.

Step 1: Preheat the Oven

First things first, preheat your oven to 400°F. This step is crucial for achieving that perfect crispy crust on the chicken. While the oven heats up, line a large baking sheet with parchment paper. This makes cleanup a breeze and prevents the chicken from sticking. Trust me, your future self will thank you!

Step 2: Prepare the Coating

In a shallow bowl, combine the grated Parmesan cheese, panko breadcrumbs, garlic powder, onion powder, Italian seasoning, salt, and pepper. Mix everything together until well combined. This coating is what gives the chicken its irresistible crunch and flavor. Feel free to get creative and add your favorite spices!

Step 3: Coat the Chicken

Pat the chicken breasts dry with paper towels. This helps the coating stick better. Dip each chicken breast into the breadcrumb mixture, pressing gently to ensure it adheres evenly on both sides. Don’t be shy—make sure every inch is covered! This is where the magic happens, and you’ll end up with a flavorful crust.

Step 4: Arrange on the Baking Sheet

Place the coated chicken breasts on one side of the prepared baking sheet. Make sure to leave some space between them for even cooking. On the other side, you’ll be adding your veggies. This layout allows everything to roast beautifully without overcrowding.

Step 5: Toss the Vegetables

In a mixing bowl, toss the broccoli florets and halved cherry tomatoes with olive oil, lemon juice, salt, and pepper. This simple seasoning enhances their natural flavors. Spread the seasoned vegetables on the other side of the baking sheet. The olive oil will help them caramelize and become tender while roasting.

Step 6: Bake to Perfection

Now it’s time to bake! Place the baking sheet in the preheated oven and let it cook for 25-30 minutes. Keep an eye on the chicken; it should reach an internal temperature of 165°F. The veggies should be tender and slightly charred. This is the moment when your kitchen will start smelling heavenly!

Step 7: Broil for Extra Crispiness

If you want that extra crispy finish, turn on the broiler for the last 2-3 minutes of cooking. Just watch closely to avoid burning. This step adds a delightful crunch to the chicken that you won’t want to miss!

Step 8: Serve and Enjoy

Once everything is cooked to perfection, let the chicken rest for a few minutes before slicing. This helps keep it juicy. Serve the chicken alongside the roasted vegetables, and enjoy the fruits of your labor. You’ve just created a meal that’s not only delicious but also visually appealing!

Tips for Success

  • Always pat the chicken dry before coating for better adherence.
  • Feel free to customize the vegetable mix based on what you have on hand.
  • For extra flavor, marinate the chicken in lemon juice and olive oil for 30 minutes.
  • Use a meat thermometer to ensure the chicken is perfectly cooked.
  • Let the chicken rest before slicing to keep it juicy.

Equipment Needed

  • Baking sheet: A large one is ideal, but a smaller one works too if you’re cooking for fewer people.
  • Parchment paper: This makes cleanup easy; aluminum foil can be a substitute.
  • Shallow bowl: For mixing the coating; any bowl will do.
  • Meat thermometer: Essential for checking chicken doneness; a simple knife can work in a pinch.

Variations

  • Herb-Infused Chicken: Add fresh herbs like rosemary or thyme to the breadcrumb mixture for an aromatic twist.
  • Spicy Kick: Mix in some red pepper flakes or cayenne pepper to the coating for a spicy version that packs a punch.
  • Cheesy Delight: Combine mozzarella or cheddar cheese with the Parmesan for an extra cheesy crust.
  • Vegetarian Option: Substitute chicken with thick slices of eggplant or zucchini, following the same coating process.
  • Gluten-Free: Use gluten-free breadcrumbs instead of panko to make this dish suitable for gluten-sensitive diets.

Serving Suggestions

  • Pair with a light salad, like arugula with lemon vinaigrette, for a refreshing contrast.
  • Serve with crusty bread to soak up any delicious juices.
  • A chilled glass of white wine, such as Sauvignon Blanc, complements the flavors beautifully.
  • Garnish with fresh parsley or basil for a pop of color.

FAQs about Parmesan Crusted Chicken Sheet Pan Dinner

Can I use frozen chicken breasts for this recipe?

While fresh chicken is ideal, you can use frozen chicken breasts. Just make sure to thaw them completely before coating and baking. This ensures even cooking and a crispy crust.

What can I substitute for Parmesan cheese?

If you don’t have Parmesan on hand, you can use Pecorino Romano or even a blend of mozzarella and cheddar for a different flavor profile. Just keep in mind that the texture may vary slightly.

How do I store leftovers?

Store any leftovers in an airtight container in the fridge for up to three days. Reheat in the oven for the best results, ensuring the chicken stays crispy.

Can I make this dish ahead of time?

Absolutely! You can prepare the chicken and vegetables in advance, then store them in the fridge. When you’re ready to eat, just pop them in the oven for a quick bake.

What other vegetables work well in this sheet pan dinner?

Feel free to get creative! Bell peppers, zucchini, or even Brussels sprouts can be great additions. Just remember to cut them into similar sizes for even cooking.

Final Thoughts

Cooking the Parmesan Crusted Chicken Sheet Pan Dinner is more than just preparing a meal; it’s about creating a moment of joy. The aroma wafting through your kitchen as everything bakes is simply irresistible. This dish brings together the satisfaction of crispy chicken and vibrant veggies, all while keeping cleanup to a minimum. Whether you’re sharing it with family or enjoying a quiet night in, this recipe is a reminder that delicious food doesn’t have to be complicated. So, roll up your sleeves, embrace the process, and savor every bite of this delightful dinner!

jhessica

Parmesan Crusted Chicken Sheet Pan Dinner: Quick & Easy!

A quick and easy Parmesan Crusted Chicken Sheet Pan Dinner that combines juicy chicken breasts with roasted vegetables for a delicious meal.
Prep Time 10 minutes
Cook Time 30 minutes
Total Time 40 minutes
Servings: 4 servings
Course: Dinner
Cuisine: American
Calories: 360

Ingredients
  

  • 2 large boneless skinless chicken breasts (about 1 pound total)
  • 1 cup grated Parmesan cheese
  • 1 cup panko breadcrumbs
  • 1 teaspoon garlic powder
  • 1 teaspoon onion powder
  • 1 teaspoon Italian seasoning
  • Salt and pepper to taste
  • 2 cups broccoli florets
  • 1 cup cherry tomatoes halved
  • 2 tablespoons olive oil
  • 1 tablespoon fresh lemon juice
  • 1 teaspoon dried basil optional

Method
 

  1. Preheat your oven to 400°F. Line a large baking sheet with parchment paper for easy cleanup.
  2. In a shallow bowl, combine the Parmesan cheese, panko breadcrumbs, garlic powder, onion powder, Italian seasoning, salt, and pepper. Mix well.
  3. Pat the chicken breasts dry with paper towels. Dip each chicken breast into the breadcrumb mixture, pressing gently to adhere the coating evenly on both sides.
  4. Place the coated chicken breasts on one side of the prepared baking sheet.
  5. In a mixing bowl, toss the broccoli florets and cherry tomatoes with olive oil, lemon juice, salt, and pepper. Spread the vegetables on the other side of the baking sheet.
  6. Bake in the preheated oven for 25-30 minutes, or until the chicken is cooked through (internal temperature of 165°F) and the vegetables are tender.
  7. For extra crispiness, broil the chicken for an additional 2-3 minutes at the end of cooking.
  8. Let the chicken rest for a few minutes before slicing. Serve with the roasted vegetables on the side.

Nutrition

Serving: 1servingCalories: 360kcalCarbohydrates: 10gProtein: 36gFat: 20gSaturated Fat: 5gPolyunsaturated Fat: 15gCholesterol: 100mgSodium: 500mgFiber: 2gSugar: 3g

Notes

  • For added flavor, consider marinating the chicken in lemon juice and olive oil for 30 minutes before coating.
  • You can also substitute the broccoli with asparagus or green beans for a different vegetable option.

Tried this recipe?

Let us know how it was!

Creamy Chicken Tortilla Soup: A Delightful Recipe to Try!

Introduction to Creamy Chicken Tortilla Soup

There’s something magical about a warm bowl of soup, especially when it’s a creamy chicken tortilla soup. This dish wraps you in comfort, making it perfect for those chilly evenings or busy weeknights. I remember my mom whipping up a similar recipe when I was a kid, filling the house with mouthwatering aromas. It’s a quick solution for a busy day, yet impressive enough to share with friends. With its rich flavors and delightful toppings, this soup is sure to become a favorite in your home, just like it is in mine.

Why You’ll Love This Creamy Chicken Tortilla Soup

This creamy chicken tortilla soup is a game-changer for your dinner routine. It’s not just delicious; it’s incredibly easy to make. In about 45 minutes, you can whip up a comforting meal that warms the soul. The combination of spices and creamy goodness creates a flavor explosion that will have everyone asking for seconds. Plus, it’s versatile enough to adapt to your taste, making it a perfect fit for any occasion.

Ingredients for Creamy Chicken Tortilla Soup

Gathering the right ingredients is key to making a delicious creamy chicken tortilla soup. Here’s what you’ll need:

  • Olive oil: This is your base for sautéing, adding a rich flavor to the soup.
  • Onion: Diced onion brings sweetness and depth to the dish.
  • Garlic: Minced garlic adds a fragrant kick that elevates the overall taste.
  • Bell pepper: Any color works! It adds crunch and a pop of color.
  • Ground cumin: This spice gives a warm, earthy flavor that’s essential in Mexican cuisine.
  • Chili powder: A must for that classic chili flavor, it adds a bit of heat.
  • Smoked paprika: This ingredient introduces a subtle smokiness that enhances the soup.
  • Diced tomatoes: Canned tomatoes provide acidity and a juicy texture, making the soup hearty.
  • Chicken broth: The foundation of your soup, it adds richness and depth.
  • Cooked chicken: Shredded chicken is the star protein, making the soup filling.
  • Black beans: These add fiber and a creamy texture, making the soup even more satisfying.
  • Corn: Whether frozen or canned, corn adds sweetness and a nice crunch.
  • Heavy cream: This is what makes the soup creamy and indulgent.
  • Salt and pepper: Essential for seasoning, adjust to your taste.
  • Tortilla strips: These provide a delightful crunch on top, adding texture.
  • Shredded cheddar cheese: A sprinkle of cheese adds richness and flavor.
  • Fresh cilantro: Chopped cilantro gives a fresh, herbal note that brightens the dish.
  • Lime wedges: A squeeze of lime before serving adds a zesty finish.

For those looking to spice things up, consider adding diced jalapeños or a dash of hot sauce. If you want a lighter version, you can swap the heavy cream for coconut milk or simply omit it for a broth-based soup. Exact measurements for these ingredients can be found at the bottom of the article, ready for printing!

How to Make Creamy Chicken Tortilla Soup

Creating a creamy chicken tortilla soup is a straightforward process that brings joy to your kitchen. Follow these simple steps, and you’ll have a delicious meal ready in no time!

Step 1: Sauté the Aromatics

Start by heating the olive oil in a large pot over medium heat. Once it’s shimmering, toss in the diced onion. Sauté for about 5 minutes until it softens and becomes translucent. The aroma will start to fill your kitchen, making your mouth water. Add the minced garlic and cook for another minute. This step is crucial; it builds the flavor base for your soup.

Step 2: Add the Vegetables and Spices

Next, stir in the diced bell pepper, ground cumin, chili powder, and smoked paprika. Cook this mixture for 3-4 minutes until the bell pepper is tender. The spices will create a fragrant cloud that envelops you, hinting at the deliciousness to come. Don’t rush this step; let those flavors meld together!

Step 3: Incorporate the Tomatoes and Broth

Now, pour in the can of diced tomatoes along with their juice and the chicken broth. Bring the mixture to a gentle simmer. This is where the soup starts to take shape. The tomatoes add acidity, balancing the creaminess that’s coming later. Let it bubble away for a few minutes, allowing the flavors to deepen.

Step 4: Mix in the Chicken, Beans, and Corn

Time to add the shredded chicken, black beans, and corn. Stir everything together and let the soup simmer for about 10 minutes. This step ensures that all the ingredients are heated through and the flavors meld beautifully. The soup should start looking hearty and inviting!

Step 5: Stir in the Cream and Season

Reduce the heat to low and gently stir in the heavy cream. This is what transforms your soup into a creamy delight. Season with salt and pepper to taste. Take a moment to taste it; adjust the seasoning if needed. This is your chance to make it just right!

Step 6: Serve and Garnish

Finally, ladle the soup into bowls. Top each serving with crispy tortilla strips, a sprinkle of shredded cheddar cheese, and fresh cilantro. Don’t forget to squeeze a lime wedge over the top for that zesty finish. Your creamy chicken tortilla soup is now ready to be enjoyed!

Tips for Success

  • Prep your ingredients ahead of time to streamline the cooking process.
  • Use rotisserie chicken for a quick shortcut without sacrificing flavor.
  • Adjust the spice level by adding more chili powder or jalapeños if you like it hot.
  • For a thicker soup, let it simmer a bit longer to reduce the liquid.
  • Garnish with avocado slices for an extra creamy touch!

Equipment Needed

  • Large pot: A sturdy pot is essential for simmering the soup. A Dutch oven works great too.
  • Wooden spoon: Perfect for stirring and scraping the bottom of the pot.
  • Measuring cups and spoons: Handy for accurate ingredient measurements.
  • Knife and cutting board: Essential for chopping vegetables and shredding chicken.

Variations of Creamy Chicken Tortilla Soup

  • Spicy Kick: Add diced jalapeños or a splash of hot sauce for an extra layer of heat.
  • Vegetarian Option: Substitute the chicken with extra beans or lentils and use vegetable broth.
  • Low-Carb Version: Replace corn with zucchini or cauliflower for a lighter soup.
  • Cheesy Delight: Mix in cream cheese or a dollop of sour cream for added creaminess.
  • Herb Infusion: Experiment with fresh herbs like oregano or thyme for a unique flavor twist.

Serving Suggestions for Creamy Chicken Tortilla Soup

  • Pair with warm, crusty bread or homemade cornbread for a satisfying meal.
  • Serve alongside a fresh garden salad to balance the richness of the soup.
  • For drinks, consider a light beer or a refreshing margarita.
  • Garnish with extra lime wedges and avocado slices for a beautiful presentation.

FAQs about Creamy Chicken Tortilla Soup

Can I make creamy chicken tortilla soup ahead of time?

Absolutely! This soup actually tastes even better the next day as the flavors meld together. Just store it in an airtight container in the fridge. When you’re ready to enjoy it, reheat on the stovetop over low heat, adding a splash of broth if it thickens too much.

Is creamy chicken tortilla soup gluten-free?

Yes, this creamy chicken tortilla soup is gluten-free! Just ensure that the chicken broth and tortilla strips you use are labeled gluten-free. You can easily find gluten-free tortilla strips at most grocery stores.

Can I freeze creamy chicken tortilla soup?

Yes, you can freeze it! Just make sure to leave out the heavy cream before freezing. Add it in when you reheat the soup. Store in freezer-safe containers, and it should last for up to three months.

What can I use instead of heavy cream?

If you’re looking for a lighter option, you can substitute heavy cream with coconut milk or even Greek yogurt. Both will add creaminess without the extra calories. Just stir them in at the end to keep their texture smooth.

How can I make this soup spicier?

For a spicier kick, add diced jalapeños or a few dashes of your favorite hot sauce while cooking. You can also increase the amount of chili powder for an extra layer of heat. Adjust it to your taste!

Final Thoughts

There’s a special kind of joy that comes from sharing a bowl of creamy chicken tortilla soup with loved ones. The warmth of the soup, combined with the vibrant toppings, creates a comforting experience that brings everyone together. Whether it’s a cozy weeknight dinner or a gathering with friends, this recipe is sure to impress. Plus, the ease of preparation means you can focus on what really matters—enjoying good food and great company. So, roll up your sleeves, gather your ingredients, and let the delightful aromas fill your kitchen. You won’t regret it!

jhessica

Creamy Chicken Tortilla Soup: A Delightful Recipe to Try!

A creamy and flavorful chicken tortilla soup that is perfect for a comforting meal.
Prep Time 15 minutes
Cook Time 30 minutes
Total Time 45 minutes
Servings: 6 servings
Course: Soup
Cuisine: Mexican
Calories: 320

Ingredients
  

  • 2 tablespoons olive oil
  • 1 medium onion diced
  • 2 cloves garlic minced
  • 1 bell pepper diced (any color)
  • 1 teaspoon ground cumin
  • 1 teaspoon chili powder
  • 1/2 teaspoon smoked paprika
  • 1 can 14.5 ounces diced tomatoes, undrained
  • 4 cups chicken broth
  • 2 cups cooked chicken shredded
  • 1 can 15 ounces black beans, rinsed and drained
  • 1 cup corn frozen or canned
  • 1/2 cup heavy cream
  • Salt and pepper to taste
  • 1 cup tortilla strips store-bought or homemade
  • 1/2 cup shredded cheddar cheese
  • 1/4 cup fresh cilantro chopped
  • Lime wedges for serving

Method
 

  1. In a large pot, heat the olive oil over medium heat. Add the diced onion and sauté for about 5 minutes until softened. Stir in the minced garlic and cook for an additional minute until fragrant.
  2. Add the diced bell pepper, cumin, chili powder, and smoked paprika. Cook for another 3-4 minutes until the bell pepper is tender.
  3. Pour in the diced tomatoes with their juice and the chicken broth. Bring the mixture to a simmer.
  4. Stir in the shredded chicken, black beans, and corn. Let the soup simmer for about 10 minutes to heat through.
  5. Reduce the heat to low and stir in the heavy cream. Season with salt and pepper to taste.
  6. Serve the soup hot, topped with tortilla strips, shredded cheddar cheese, and fresh cilantro. Squeeze lime juice over each bowl before enjoying.

Nutrition

Serving: 1bowlCalories: 320kcalCarbohydrates: 20gProtein: 25gFat: 18gSaturated Fat: 8gPolyunsaturated Fat: 10gCholesterol: 70mgSodium: 800mgFiber: 6gSugar: 3g

Notes

  • For a spicier kick, add diced jalapeños or a dash of hot sauce to the soup.
  • To make it lighter, substitute the heavy cream with coconut milk or omit it entirely for a broth-based soup.

Tried this recipe?

Let us know how it was!

Creamy Chicken Sausage Pasta: A Delightful Recipe to Try!

Introduction to Creamy Chicken Sausage Pasta

After a long day, nothing beats the comfort of a warm, hearty meal. That’s where my Creamy Chicken Sausage Pasta comes in. This dish is not just a recipe; it’s a hug in a bowl. Perfect for busy weeknights or when you want to impress your loved ones, it combines the rich flavors of chicken sausage with creamy goodness. Plus, it’s quick to whip up, making it an ideal choice for anyone juggling work, family, and life. Trust me, once you try this, it’ll become a staple in your kitchen!

Why You’ll Love This Creamy Chicken Sausage Pasta

This Creamy Chicken Sausage Pasta is a game-changer for your dinner routine. It’s not only quick to prepare, but it also packs a punch of flavor that will leave your taste buds dancing. The creamy sauce envelops the pasta beautifully, making every bite a delight. Plus, with just one skillet to clean, you’ll have more time to relax after a busy day. It’s comfort food at its finest!

Ingredients for Creamy Chicken Sausage Pasta

Gathering the right ingredients is the first step to creating a delicious Creamy Chicken Sausage Pasta. Here’s what you’ll need:

  • Olive oil: A staple in many kitchens, it adds richness and helps sauté the sausage and veggies.
  • Chicken sausage: This is the star of the dish! It’s flavorful and leaner than traditional sausage, making it a healthier choice.
  • Onion: Diced onion brings sweetness and depth to the dish, enhancing the overall flavor.
  • Garlic: Minced garlic adds a fragrant kick that elevates the taste profile.
  • Red bell pepper: This adds a pop of color and sweetness, balancing the savory elements.
  • Cherry tomatoes: Halved cherry tomatoes provide juiciness and a burst of freshness.
  • Italian seasoning: A blend of herbs that brings an authentic Italian flavor to the dish.
  • Red pepper flakes (optional): For those who like a little heat, these add a spicy kick.
  • Heavy cream: This is what makes the sauce creamy and indulgent. For a lighter option, consider half-and-half or a plant-based cream.
  • Chicken broth: It adds depth and moisture to the sauce, enhancing the overall flavor.
  • Penne pasta: The perfect shape for holding onto the creamy sauce. You can substitute with gluten-free pasta if needed.
  • Parmesan cheese: Grated Parmesan adds a salty, nutty flavor that ties everything together.
  • Salt and pepper: Essential for seasoning to taste, ensuring every bite is delicious.
  • Fresh basil (optional): A lovely garnish that adds a fresh aroma and a touch of color.

For exact measurements, check the bottom of the article where you can find everything listed for easy printing!

How to Make Creamy Chicken Sausage Pasta

Creating this Creamy Chicken Sausage Pasta is a breeze! Follow these simple steps, and you’ll have a delicious meal ready in no time. Let’s dive in!

Step 1: Sauté the Chicken Sausage

Start by heating two tablespoons of olive oil in a large skillet over medium heat. Once the oil is shimmering, add the sliced chicken sausage. Cook it for about 5-7 minutes until it’s nicely browned. This step is crucial; it adds a depth of flavor to your dish. Once done, remove the sausage from the skillet and set it aside.

Step 2: Cook the Aromatics

In the same skillet, toss in the diced onion. Sauté it for about 3-4 minutes until it turns translucent. The aroma will be heavenly! Next, stir in the minced garlic and cook for an additional minute. This will infuse the oil with a fragrant kick that makes your kitchen smell amazing.

Step 3: Add the Vegetables

Now, it’s time to add some color! Toss in the diced red bell pepper and halved cherry tomatoes. Cook these for another 3-4 minutes until they soften. The tomatoes will release their juices, creating a lovely base for your sauce. Don’t rush this step; let those flavors meld together!

Step 4: Combine the Ingredients

Sprinkle in the Italian seasoning and red pepper flakes if you’re feeling adventurous. Return the cooked chicken sausage to the skillet. Pour in the heavy cream and chicken broth, stirring everything together. Bring this mixture to a gentle simmer. The sauce will start to thicken, and your kitchen will be filled with mouthwatering scents.

Step 5: Cook the Pasta

While your sauce is simmering, cook the penne pasta according to the package instructions until it’s al dente. This usually takes about 8-10 minutes. Remember to salt the water; it’s the only chance to season the pasta itself. Once cooked, drain the pasta and set it aside.

Step 6: Mix Everything Together

Once the sauce is bubbling and thickened, add the cooked pasta to the skillet. Toss everything together, ensuring the pasta is well coated in that creamy goodness. Finally, stir in the grated Parmesan cheese, allowing it to melt into the sauce. Season with salt and pepper to taste. Serve hot, garnished with fresh basil if desired. Enjoy your delicious Creamy Chicken Sausage Pasta!

Tips for Success

  • Prep all your ingredients before starting. It makes the cooking process smoother.
  • Don’t skip the browning step for the sausage; it adds incredible flavor.
  • Adjust the creaminess by adding more or less heavy cream to suit your taste.
  • For extra nutrition, toss in some spinach or kale during the last few minutes of cooking.
  • Always taste and adjust seasoning before serving for the best flavor.

Equipment Needed

  • Large skillet: Essential for sautéing and combining ingredients. A non-stick pan works well too.
  • Wooden spoon: Perfect for stirring and mixing without scratching your skillet.
  • Measuring cups: Handy for measuring out liquids like cream and broth.
  • Colander: Useful for draining the pasta once it’s cooked.

Variations

  • Spicy Kick: Add more red pepper flakes or a splash of hot sauce for an extra kick.
  • Vegetarian Option: Substitute chicken sausage with plant-based sausage or sautéed mushrooms for a hearty alternative.
  • Cheesy Delight: Mix in additional cheeses like mozzarella or goat cheese for a creamier texture.
  • Herb Infusion: Experiment with fresh herbs like thyme or oregano for a fragrant twist.
  • Low-Carb Version: Swap penne pasta for zucchini noodles or spaghetti squash to cut carbs.

Serving Suggestions

  • Garlic Bread: Serve with warm, buttery garlic bread for a classic pairing.
  • Side Salad: A fresh green salad with a light vinaigrette complements the richness of the pasta.
  • Wine Pairing: Enjoy with a crisp white wine like Pinot Grigio for a delightful contrast.
  • Presentation: Garnish with extra Parmesan and fresh basil for a beautiful finish.

FAQs about Creamy Chicken Sausage Pasta

Can I use regular sausage instead of chicken sausage?

Absolutely! While I love the leaner profile of chicken sausage, you can use any sausage you prefer. Just keep in mind that the flavor and fat content may vary, so adjust your cooking time accordingly.

How can I make this dish gluten-free?

To make this Creamy Chicken Sausage Pasta gluten-free, simply swap out the penne pasta for a gluten-free variety. There are many great options available that taste just as good!

Can I prepare this dish ahead of time?

Yes! You can prepare the sauce and cook the pasta ahead of time. Just store them separately in the fridge. When you’re ready to eat, reheat the sauce and mix in the pasta for a quick meal.

What can I add for extra vegetables?

Great question! You can add spinach, kale, or even zucchini. Just toss them in during the last few minutes of cooking to keep them vibrant and fresh.

How do I store leftovers?

Store any leftovers in an airtight container in the fridge for up to three days. Reheat gently on the stove or in the microwave, adding a splash of cream or broth to loosen the sauce if needed.

Final Thoughts

Cooking this Creamy Chicken Sausage Pasta is more than just preparing a meal; it’s about creating a moment of joy. The rich, creamy sauce envelops the pasta, making every bite a comforting experience. Whether you’re sharing it with family or enjoying a quiet night in, this dish brings warmth and satisfaction. Plus, it’s quick enough to fit into your busy schedule, allowing you to savor the little things in life. So, roll up your sleeves, gather your ingredients, and let this delightful recipe become a cherished part of your culinary repertoire!

jhessica

Creamy Chicken Sausage Pasta: A Delightful Recipe to Try!

A creamy and flavorful pasta dish featuring chicken sausage, perfect for a comforting meal.
Prep Time 10 minutes
Cook Time 25 minutes
Total Time 35 minutes
Servings: 4 servings
Course: Main Course
Cuisine: Italian
Calories: 550

Ingredients
  

  • 2 tablespoons olive oil
  • 1 pound chicken sausage sliced
  • 1 medium onion diced
  • 3 cloves garlic minced
  • 1 red bell pepper diced
  • 1 cup cherry tomatoes halved
  • 1 teaspoon Italian seasoning
  • 1/2 teaspoon red pepper flakes optional
  • 1 cup heavy cream
  • 1 cup chicken broth
  • 8 ounces penne pasta
  • 1 cup grated Parmesan cheese
  • Salt and pepper to taste
  • Fresh basil for garnish optional

Method
 

  1. In a large skillet, heat the olive oil over medium heat. Add the sliced chicken sausage and cook until browned, about 5-7 minutes. Remove the sausage from the skillet and set aside.
  2. In the same skillet, add the diced onion and cook until translucent, about 3-4 minutes. Stir in the minced garlic and cook for an additional 1 minute until fragrant.
  3. Add the diced red bell pepper and cherry tomatoes to the skillet. Cook for another 3-4 minutes until the vegetables are tender.
  4. Stir in the Italian seasoning and red pepper flakes (if using). Return the cooked chicken sausage to the skillet.
  5. Pour in the heavy cream and chicken broth, stirring to combine. Bring the mixture to a simmer.
  6. Meanwhile, cook the penne pasta according to package instructions until al dente. Drain and set aside.
  7. Once the sauce is simmering, add the cooked pasta to the skillet along with the grated Parmesan cheese. Toss everything together until the pasta is well coated. Season with salt and pepper to taste.
  8. Serve hot, garnished with fresh basil if desired.

Nutrition

Serving: 1servingCalories: 550kcalCarbohydrates: 40gProtein: 25gFat: 30gSaturated Fat: 15gPolyunsaturated Fat: 10gCholesterol: 100mgSodium: 800mgFiber: 2gSugar: 3g

Notes

  • For a lighter version, substitute heavy cream with half-and-half or a plant-based cream alternative.
  • Add spinach or kale for extra greens; stir them in during the last few minutes of cooking until wilted.

Tried this recipe?

Let us know how it was!

“Slow Cooker Shredded Beef Enchiladas: Easy Dinner Delight”

Introduction to Slow Cooker Shredded Beef Enchiladas

After a long day, the last thing I want to do is spend hours in the kitchen. That’s where my Slow Cooker Shredded Beef Enchiladas come to the rescue! This dish is not just a meal; it’s a warm hug on a plate. Imagine tender, flavorful beef wrapped in soft tortillas, all topped with gooey cheese. It’s the perfect solution for busy weeknights or when you want to impress your loved ones without breaking a sweat. Trust me, once you try this recipe, it’ll become a staple in your dinner rotation!

Why You’ll Love This Slow Cooker Shredded Beef Enchiladas

These Slow Cooker Shredded Beef Enchiladas are a game-changer for any home cook. They’re incredibly easy to prepare, allowing you to set it and forget it while the flavors meld together. The taste? Out of this world! With tender beef and melted cheese, every bite is a delight. Plus, they’re perfect for feeding a crowd or meal prepping for the week. Who wouldn’t love that?

Ingredients for Slow Cooker Shredded Beef Enchiladas

Gathering the right ingredients is the first step to culinary success. For these Slow Cooker Shredded Beef Enchiladas, you’ll need a few key players:

  • Beef chuck roast: This cut is perfect for slow cooking, becoming tender and flavorful as it simmers.
  • Olive oil: A splash of this adds richness and helps sauté the aromatics.
  • Onion: Diced onions bring sweetness and depth to the dish.
  • Garlic: Minced garlic adds a fragrant kick that elevates the flavor profile.
  • Chili powder: This spice gives the enchiladas their signature warmth and color.
  • Cumin: Earthy and aromatic, cumin enhances the overall taste.
  • Smoked paprika: This adds a subtle smokiness that complements the beef beautifully.
  • Salt and black pepper: Essential for seasoning, these enhance all the flavors.
  • Beef broth: A flavorful base that keeps the beef moist during cooking.
  • Red enchilada sauce: This is the star of the show, adding a rich, tangy flavor.
  • Flour tortillas: Large tortillas are perfect for wrapping up all that delicious filling.
  • Shredded cheese: Cheddar or a Mexican blend melts beautifully, creating a gooey topping.
  • Sour cream: A dollop on top adds creaminess and balances the spices.
  • Fresh cilantro: Chopped cilantro is a bright garnish that adds freshness.

For those looking to spice things up, consider adding diced jalapeños to the beef mixture before cooking. If you prefer a lighter option, shredded chicken or black beans can be great substitutes. You can find the exact quantities for each ingredient at the bottom of the article, ready for printing!

How to Make Slow Cooker Shredded Beef Enchiladas

Now that you have your ingredients ready, let’s dive into the fun part: making these Slow Cooker Shredded Beef Enchiladas. Follow these simple steps, and you’ll have a delicious dinner that will impress everyone at the table.

Step 1: Sauté the Aromatics

Start by heating a tablespoon of olive oil in a large skillet over medium-high heat. Once the oil is shimmering, toss in the diced onion. Sauté it for about five minutes until it turns translucent. Then, add the minced garlic and cook for another minute. The aroma will fill your kitchen, making it hard to resist sneaking a taste!

Step 2: Season the Beef

While the onions and garlic are cooking, grab your beef chuck roast. In a small bowl, mix together chili powder, cumin, smoked paprika, salt, and black pepper. Rub this spice blend all over the beef. This step is crucial; it’s where the flavor begins to build. Don’t be shy—get your hands in there!

Step 3: Slow Cook the Beef

Place the seasoned beef in your slow cooker. Top it with the sautéed onion and garlic mixture. Pour in the beef broth and red enchilada sauce, ensuring the beef is well-coated. Cover the slow cooker and set it to cook on low for eight hours or high for four hours. The longer, the better! You want that beef to be fork-tender.

Step 4: Shred the Beef

Once the cooking time is up, carefully remove the beef from the slow cooker. Use two forks to shred it into bite-sized pieces. It should fall apart easily. Return the shredded beef to the slow cooker and mix it with the sauce. This is where the magic happens; the beef absorbs all those delicious flavors!

Step 5: Assemble the Enchiladas

Preheat your oven to 350°F. Grab a large flour tortilla and fill it with a generous amount of the shredded beef mixture and a sprinkle of cheese. Roll it up tightly and place it seam-side down in a greased 9×13 inch baking dish. Repeat this process with the remaining tortillas. Don’t worry if they’re not perfect; they’ll taste amazing regardless!

Step 6: Bake and Serve

Pour any remaining sauce from the slow cooker over the top of the enchiladas. Sprinkle with the remaining cheese, and pop the dish in the oven. Bake for 20-25 minutes, until the cheese is melted and bubbly. Serve hot, topped with a dollop of sour cream and a sprinkle of fresh cilantro. Enjoy every bite of your homemade Slow Cooker Shredded Beef Enchiladas!

Tips for Success

  • Don’t rush the slow cooking; it’s key for tender beef.
  • Feel free to adjust the spices to match your heat preference.
  • Use fresh tortillas for a better texture and flavor.
  • Let the enchiladas sit for a few minutes after baking for easier serving.
  • Double the recipe for leftovers; they reheat beautifully!

Equipment Needed

  • Slow Cooker: Essential for tenderizing the beef. A Dutch oven can work too, but it requires more attention.
  • Large Skillet: For sautéing the onions and garlic. A non-stick pan makes cleanup easier.
  • 9×13 Inch Baking Dish: Perfect for assembling and baking the enchiladas. Any oven-safe dish will do.
  • Two Forks: Ideal for shredding the beef. You can also use a hand mixer for a quicker option.

Variations

  • Spicy Enchiladas: Add diced jalapeños or a splash of hot sauce to the beef mixture for an extra kick.
  • Vegetarian Option: Substitute the beef with shredded black beans or lentils for a hearty, meat-free meal.
  • Cheesy Delight: Mix in cream cheese or pepper jack cheese with the shredded beef for a creamier filling.
  • Whole Wheat Tortillas: Use whole wheat tortillas for a healthier twist that adds fiber.
  • Different Sauces: Experiment with green enchilada sauce or mole for a unique flavor profile.

Serving Suggestions

  • Side Salad: A fresh green salad with avocado and lime dressing complements the enchiladas perfectly.
  • Rice: Serve with Mexican rice or cilantro-lime rice for a hearty meal.
  • Drinks: Pair with a cold cerveza or a refreshing margarita.
  • Presentation: Garnish with extra cilantro and lime wedges for a vibrant touch.

FAQs about Slow Cooker Shredded Beef Enchiladas

Can I use a different cut of beef for this recipe?

Absolutely! While beef chuck roast is ideal for its tenderness, you can also use brisket or round roast. Just keep in mind that cooking times may vary slightly.

How can I make these enchiladas spicier?

If you’re looking for a kick, add diced jalapeños or a few dashes of hot sauce to the beef mixture. You can also use spicy enchilada sauce for an extra layer of heat.

Can I prepare the beef ahead of time?

Yes! You can cook the beef in advance and store it in the fridge for up to three days. Just reheat it before assembling the enchiladas.

What can I substitute for tortillas?

If you’re looking for a gluten-free option, corn tortillas work great. You can also use lettuce wraps for a low-carb alternative.

How do I store leftovers?

Store any leftover Slow Cooker Shredded Beef Enchiladas in an airtight container in the fridge for up to four days. They reheat beautifully in the oven or microwave!

Final Thoughts

Cooking these Slow Cooker Shredded Beef Enchiladas is more than just preparing a meal; it’s about creating memories. The aroma wafting through your home as the beef simmers is pure comfort. Each bite is a celebration of flavors, bringing family and friends together around the table. Whether it’s a busy weeknight or a special gathering, this dish never fails to impress. Plus, the ease of preparation means you can focus on what truly matters—enjoying the moment. So roll up those tortillas and savor the joy of homemade enchiladas; you’ve earned it!

jhessica

“Slow Cooker Shredded Beef Enchiladas: Easy Dinner Delight”

Slow Cooker Shredded Beef Enchiladas are a delicious and easy dinner option, featuring tender shredded beef wrapped in tortillas and topped with cheese.
Prep Time 15 minutes
Servings: 8 servings
Course: Dinner
Cuisine: Mexican
Calories: 450

Ingredients
  

  • 2 pounds beef chuck roast
  • 1 tablespoon olive oil
  • 1 medium onion diced
  • 3 cloves garlic minced
  • 1 tablespoon chili powder
  • 1 teaspoon cumin
  • 1 teaspoon smoked paprika
  • 1 teaspoon salt
  • 1/2 teaspoon black pepper
  • 1 cup beef broth
  • 1 can 10 ounces red enchilada sauce
  • 8 large flour tortillas
  • 2 cups shredded cheese cheddar or Mexican blend
  • 1/2 cup sour cream
  • 1/4 cup fresh cilantro chopped (for garnish)

Method
 

  1. In a large skillet, heat the olive oil over medium-high heat. Add the diced onion and sauté until translucent, about 5 minutes. Add the minced garlic and cook for an additional minute until fragrant.
  2. In a small bowl, mix together the chili powder, cumin, smoked paprika, salt, and black pepper. Rub this spice mixture all over the beef chuck roast.
  3. Place the seasoned roast in the slow cooker. Top with the sautéed onion and garlic mixture, then pour in the beef broth and red enchilada sauce.
  4. Cover and cook on low for 8 hours or on high for 4 hours, until the beef is tender and easily shredded with a fork.
  5. Once cooked, remove the beef from the slow cooker and shred it with two forks. Return the shredded beef to the slow cooker and mix it with the sauce.
  6. Preheat your oven to 350°F.
  7. To assemble the enchiladas, take a tortilla and fill it with a generous amount of the shredded beef mixture and a sprinkle of cheese. Roll it up tightly and place it seam-side down in a greased 9×13 inch baking dish. Repeat with the remaining tortillas.
  8. Pour any remaining sauce from the slow cooker over the top of the enchiladas and sprinkle with the remaining cheese.
  9. Bake in the preheated oven for 20-25 minutes, until the cheese is melted and bubbly.
  10. Serve hot, topped with sour cream and garnished with fresh cilantro.

Nutrition

Serving: 1enchiladaCalories: 450kcalCarbohydrates: 30gProtein: 30gFat: 25gSaturated Fat: 10gPolyunsaturated Fat: 15gCholesterol: 80mgSodium: 800mgFiber: 2gSugar: 2g

Notes

  • For a spicier kick, add diced jalapeños to the beef mixture before cooking.
  • You can also substitute the beef with shredded chicken or black beans for a vegetarian option.

Tried this recipe?

Let us know how it was!

Stay Connected

Get recipes via email: