Get my cookbooks

Parmesan Chopped Salad: A Refreshing Recipe to Try!

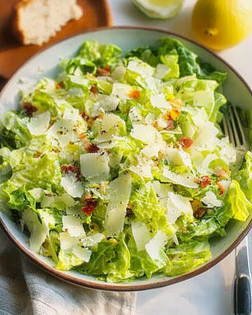
Introduction to Parmesan Chopped Salad

When I think of a dish that brings a burst of freshness and color to the table, the Parmesan Chopped Salad immediately comes to mind.

This salad is not just a side; it’s a vibrant celebration of flavors that can brighten up any meal.

Whether you’re looking for a quick solution for a busy day or a dish to impress your loved ones, this salad fits the bill perfectly.

With its crisp vegetables and a sprinkle of Parmesan, it’s a delightful way to enjoy healthy eating without sacrificing taste.

Let’s dive into this refreshing recipe!

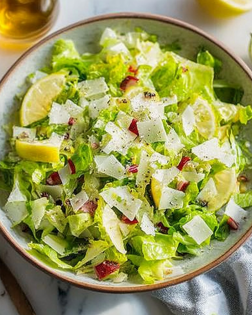
Why You’ll Love This Parmesan Chopped Salad

This Parmesan Chopped Salad is a game-changer for anyone who craves a quick, delicious meal.

It comes together in just 15 minutes, making it perfect for those hectic weeknights.

The combination of fresh veggies and savory Parmesan creates a taste explosion that’s hard to resist.

Plus, it’s versatile enough to pair with any main dish or stand alone as a light lunch.

You’ll find yourself reaching for this recipe time and again!

Ingredients for Parmesan Chopped Salad

Creating a delicious Parmesan Chopped Salad starts with fresh, vibrant ingredients.

Here’s what you’ll need:

  • Romaine lettuce: This leafy green forms the base of your salad, providing a crisp texture.
  • Cherry tomatoes: Sweet and juicy, they add a pop of color and flavor.
  • Cucumber: Cool and refreshing, diced cucumber brings a satisfying crunch.
  • Red onion: Finely chopped, it adds a zesty bite that balances the salad.
  • Bell pepper: Any color works! It contributes sweetness and a vibrant hue.
  • Shredded carrots: These add a touch of sweetness and a lovely orange color.
  • Parmesan cheese: Grated for a savory finish, it’s the star of this salad.
  • Olives: Black or green, they introduce a briny flavor that enhances the dish.
  • Fresh parsley: Chopped parsley adds a fresh, herbal note that brightens everything up.
  • Olive oil: A drizzle of this rich oil helps to bring all the flavors together.
  • Red wine vinegar: This tangy vinegar adds depth and balances the richness of the cheese.
  • Dijon mustard: Just a teaspoon adds a subtle kick to the dressing.
  • Salt and pepper: Essential for seasoning, they enhance the natural flavors of the ingredients.

Feel free to get creative!

For added protein, consider tossing in grilled chicken, chickpeas, or hard-boiled eggs.

If you’re in the mood for a different flavor profile, substitute the Parmesan with feta or goat cheese.

You can find the exact quantities for each ingredient at the bottom of the article, ready for printing!

How to Make Parmesan Chopped Salad

Making a Parmesan Chopped Salad is as easy as pie, and trust me, it’s just as satisfying!

Follow these simple steps, and you’ll have a colorful, delicious salad ready in no time.

Step 1: Prepare the Vegetables

Start by washing all your fresh veggies.

Chop the romaine lettuce into bite-sized pieces and place it in a large bowl.

Next, halve the cherry tomatoes and dice the cucumber.

Finely chop the red onion and bell pepper, then shred the carrots.

Add all these vibrant ingredients to the bowl.

Toss them gently to mix everything evenly.

The colors alone will make your mouth water!

Step 2: Make the Dressing

In a small bowl, whisk together the olive oil, red wine vinegar, and Dijon mustard.

Add a pinch of salt and pepper to taste.

Whisk until the mixture is well combined and slightly emulsified.

This dressing is the magic that ties all the flavors together, so don’t skip this step!

Step 3: Combine and Toss

Pour the dressing over the mixed vegetables in your large bowl.

Now, it’s time to get your hands in there!

Gently toss everything together until the veggies are well coated with the dressing.

This is where the salad starts to come alive, so make sure every piece gets some love!

Step 4: Add the Parmesan

Sprinkle the grated Parmesan cheese over the top of the salad.

Give it a final toss to incorporate the cheese throughout.

The cheese adds a savory richness that elevates the entire dish.

You’ll want to make sure every bite has that cheesy goodness!

Step 5: Serve or Chill

You can serve the salad immediately for a fresh crunch.

However, if you have a few minutes to spare, chill it in the refrigerator for about 15 minutes.

This allows the flavors to meld beautifully.

Either way, you’re in for a treat with this Parmesan Chopped Salad!

Tips for Success

  • Use fresh, crisp vegetables for the best flavor and texture.
  • Chill the salad before serving to enhance the flavors.
  • Adjust the dressing to your taste; add more vinegar for tang or mustard for a kick.
  • Mix in proteins like grilled chicken or chickpeas for a heartier meal.
  • Experiment with different cheeses for unique flavor profiles.

Equipment Needed

  • Large mixing bowl: Essential for combining all your ingredients. A salad bowl works great too.
  • Small bowl: Perfect for whisking the dressing. A mason jar can double as a shaker.
  • Cutting board and knife: Necessary for chopping veggies. A good chef’s knife makes the job easier.
  • Whisk or fork: For mixing the dressing. A fork will do in a pinch!

Variations of Parmesan Chopped Salad

  • Greek Twist: Add Kalamata olives, diced cucumbers, and crumbled feta cheese for a Mediterranean flair.
  • Protein-Packed: Toss in grilled chicken, shrimp, or chickpeas to make it a complete meal.
  • Spicy Kick: Incorporate sliced jalapeños or a dash of hot sauce in the dressing for some heat.
  • Seasonal Veggies: Swap in seasonal produce like asparagus in spring or roasted butternut squash in fall.
  • Herb-Infused: Experiment with fresh herbs like basil or cilantro for a unique flavor profile.

Serving Suggestions for Parmesan Chopped Salad

  • Pair with grilled chicken or fish for a satisfying meal.
  • Serve alongside crusty bread or garlic knots for a delightful crunch.
  • Complement with a light white wine, like Sauvignon Blanc, for a refreshing drink.
  • Garnish with extra Parmesan shavings for an elegant touch.

FAQs about Parmesan Chopped Salad

Can I make Parmesan Chopped Salad ahead of time?

Absolutely! You can prepare the salad a few hours in advance. Just keep the dressing separate until you’re ready to serve. This way, the veggies stay crisp and fresh.

What can I substitute for Parmesan cheese?

If you’re looking for a different flavor, feta or goat cheese works wonderfully. They add a unique twist while still keeping the salad delicious.

Is this salad suitable for meal prep?

Yes! This Parmesan Chopped Salad is perfect for meal prep. Just store the ingredients separately and combine them when you’re ready to eat. It stays fresh for a few days!

Can I add more vegetables to the salad?

Definitely! Feel free to get creative. Add veggies like radishes, zucchini, or even avocado for extra flavor and nutrition.

How can I make this salad vegan?

To make a vegan version, simply omit the Parmesan cheese and replace it with nutritional yeast for a cheesy flavor. You can also add more nuts or seeds for protein.

Final Thoughts

Creating a Parmesan Chopped Salad is more than just whipping up a dish; it’s about embracing the joy of fresh ingredients and vibrant flavors.

Each bite is a delightful crunch, a burst of color, and a reminder that healthy eating can be both satisfying and delicious.

Whether you’re serving it at a family gathering or enjoying it solo, this salad brings a refreshing twist to any meal.

I hope you find as much joy in making and sharing this recipe as I do.

So grab your ingredients, and let’s celebrate the simple pleasure of a great salad!

jhessica

Parmesan Chopped Salad: A Refreshing Recipe to Try!

A refreshing and colorful Parmesan Chopped Salad perfect for any occasion.
Prep Time 15 minutes
Total Time 15 minutes
Servings: 4 servings
Course: Salad
Cuisine: Mediterranean
Calories: 180

Ingredients
  

  • 2 cups romaine lettuce chopped
  • 1 cup cherry tomatoes halved
  • 1 cup cucumber diced
  • 1/2 cup red onion finely chopped
  • 1/2 cup bell pepper diced (any color)
  • 1/2 cup shredded carrots
  • 1/2 cup grated Parmesan cheese
  • 1/4 cup olives black or green, sliced
  • 1/4 cup fresh parsley chopped
  • 1/4 cup olive oil
  • 2 tablespoons red wine vinegar
  • 1 teaspoon Dijon mustard
  • Salt and pepper to taste

Method
 

  1. In a large bowl, combine the chopped romaine lettuce, cherry tomatoes, cucumber, red onion, bell pepper, shredded carrots, olives, and parsley. Toss gently to mix the vegetables evenly.
  2. In a small bowl, whisk together the olive oil, red wine vinegar, Dijon mustard, salt, and pepper until well combined.
  3. Pour the dressing over the salad and toss to coat all the ingredients evenly.
  4. Sprinkle the grated Parmesan cheese on top and give the salad a final toss.
  5. Serve immediately or chill in the refrigerator for about 15 minutes to allow the flavors to meld before serving.

Nutrition

Serving: 1servingCalories: 180kcalCarbohydrates: 6gProtein: 6gFat: 15gSaturated Fat: 3gPolyunsaturated Fat: 12gCholesterol: 10mgSodium: 200mgFiber: 2gSugar: 3g

Notes

  • For added protein, consider adding grilled chicken, chickpeas, or hard-boiled eggs.
  • Substitute the Parmesan cheese with feta or goat cheese for a different flavor profile.

Tried this recipe?

Let us know how it was!

Hawaiian Shoyu Chicken: Discover the Perfect Recipe!

Introduction to Hawaiian Shoyu Chicken

There’s something magical about the aroma of Hawaiian Shoyu Chicken wafting through the kitchen. It takes me back to family gatherings where laughter and delicious food filled the air. This dish is not just a meal; it’s a celebration of flavors that brings everyone together. Perfect for a quick weeknight dinner or a special occasion, this recipe is a delightful blend of savory and sweet. With just a few simple ingredients, you can create a dish that impresses your loved ones and satisfies your cravings. Trust me, once you try it, you’ll be hooked!

Why You’ll Love This Hawaiian Shoyu Chicken

This Hawaiian Shoyu Chicken is a game-changer for busy weeknights. It’s incredibly easy to prepare, requiring minimal effort while delivering maximum flavor. The sweet and savory marinade seeps into the chicken, creating a mouthwatering dish that’s sure to impress. Plus, it’s versatile enough to pair with your favorite sides, making it a go-to recipe for any occasion. You’ll love how quickly it comes together, leaving you more time to enjoy with family and friends!

Ingredients for Hawaiian Shoyu Chicken

Gathering the right ingredients is the first step to creating this delicious Hawaiian Shoyu Chicken. Each component plays a vital role in building that irresistible flavor profile. Here’s what you’ll need:

  • Bone-in chicken thighs, skin-on: These are juicy and flavorful, perfect for soaking up the marinade.
  • Soy sauce: The backbone of the marinade, providing that savory umami kick.
  • Brown sugar: Adds sweetness and helps caramelize the chicken during baking.
  • Water: Balances the marinade, ensuring it’s not too salty.
  • Rice vinegar: Offers a tangy note that brightens the overall flavor.
  • Garlic: Freshly minced, it infuses the dish with aromatic goodness.
  • Fresh ginger: Grated ginger adds a warm, spicy depth to the marinade.
  • Black pepper: A simple seasoning that enhances the dish without overpowering it.
  • Red pepper flakes (optional): For those who like a little heat, these add a nice kick.
  • Green onions: Chopped for garnish, they add a fresh crunch and vibrant color.
  • Sesame seeds: A finishing touch that adds a nutty flavor and visual appeal.

For those looking to switch things up, consider adding a splash of pineapple juice to the marinade for an extra layer of sweetness. You can find all the exact measurements at the bottom of the article, ready for printing!

How to Make Hawaiian Shoyu Chicken

Now that you have your ingredients ready, let’s dive into the steps to create this mouthwatering Hawaiian Shoyu Chicken. Each step is straightforward, making it easy for anyone to follow along. Trust me, the end result will be worth every minute spent in the kitchen!

Step 1: Prepare the Marinade

Start by grabbing a large bowl. Combine the soy sauce, brown sugar, water, rice vinegar, minced garlic, grated ginger, black pepper, and optional red pepper flakes. Whisk everything together until the sugar dissolves completely. This marinade is the heart of your dish, so make sure it’s well mixed!

Step 2: Marinate the Chicken

Next, take your bone-in chicken thighs and place them in a resealable plastic bag or a shallow dish. Pour the marinade over the chicken, ensuring every piece is well coated. Seal the bag or cover the dish tightly. Refrigerate for at least 1 hour, but if you can, let it marinate overnight. This allows the flavors to really penetrate the chicken, making it even more delicious!

Step 3: Preheat the Oven

While the chicken is soaking up all that flavor, it’s time to preheat your oven. Set it to 375°F (190°C). This temperature is perfect for baking the chicken to juicy perfection.

Step 4: Bake the Chicken

Once your oven is preheated, remove the chicken from the marinade. Place the thighs in a baking dish, skin side up. Discard the leftover marinade for now. Bake the chicken in the oven for 30 minutes. The aroma will start to fill your kitchen, and you’ll know you’re on the right track!

Step 5: Prepare the Marinade Sauce

While the chicken is baking, take the reserved marinade and pour it into a saucepan. Bring it to a boil over medium heat. Once boiling, reduce the heat and let it simmer for about 10 minutes until it thickens slightly. This sauce will be your secret weapon for basting!

Step 6: Baste and Finish Baking

After 30 minutes, it’s time to baste the chicken. Use a brush or spoon to coat the chicken with the thickened marinade. This step adds an extra layer of flavor and helps achieve that beautiful golden brown color. Bake for an additional 15-20 minutes, or until the chicken reaches an internal temperature of 165°F (74°C).

Step 7: Rest and Garnish

Once the chicken is done, remove it from the oven and let it rest for about 5 minutes. This allows the juices to redistribute, keeping the chicken moist. Before serving, garnish with chopped green onions and a sprinkle of sesame seeds for that perfect finishing touch!

Tips for Success

  • For maximum flavor, marinate the chicken overnight.
  • Use a meat thermometer to ensure the chicken is cooked to 165°F (74°C).
  • Don’t skip the resting time; it keeps the chicken juicy.
  • Feel free to adjust the sweetness by adding more or less brown sugar.
  • Experiment with different garnishes like cilantro or lime for a fresh twist.

Equipment Needed

  • Baking dish: A 9×13 inch dish works well, but any oven-safe dish will do.
  • Mixing bowl: A large bowl for combining the marinade; a whisk is handy too.
  • Resealable plastic bag: Great for marinating; a shallow dish can be used as an alternative.
  • Meat thermometer: Essential for checking chicken doneness; a simple knife can also help.

Variations

  • Pineapple Shoyu Chicken: Add pineapple chunks to the marinade for a tropical twist that enhances sweetness.
  • Spicy Shoyu Chicken: Increase the red pepper flakes or add a dash of sriracha for a fiery kick.
  • Teriyaki Style: Substitute half of the soy sauce with teriyaki sauce for a sweeter, thicker glaze.
  • Vegetarian Option: Use firm tofu or tempeh instead of chicken, marinating and baking them the same way.
  • Gluten-Free Version: Swap regular soy sauce with tamari or coconut aminos to keep it gluten-free.

Serving Suggestions

  • Steamed Rice: Serve with fluffy white or brown rice to soak up the delicious sauce.
  • Stir-Fried Vegetables: A colorful mix of bell peppers, broccoli, and snap peas adds crunch and nutrition.
  • Refreshing Salad: Pair with a light cucumber salad for a crisp contrast.
  • Drink Pairing: Enjoy with a cold beer or a tropical cocktail for a true Hawaiian experience.

FAQs about Hawaiian Shoyu Chicken

As you embark on your culinary journey with Hawaiian Shoyu Chicken, you might have a few questions. Here are some common queries that can help you navigate this delicious recipe:

Can I use boneless chicken thighs instead of bone-in?

Absolutely! Boneless chicken thighs will work just fine. They may cook a bit faster, so keep an eye on them to avoid overcooking.

How long can I marinate the chicken?

For the best flavor, marinate the chicken for at least 1 hour, but overnight is ideal. This allows the marinade to penetrate deeply, enhancing the taste.

What can I substitute for soy sauce to make it gluten-free?

You can use tamari or coconut aminos as a gluten-free alternative. Both options provide a similar savory flavor without the gluten.

Can I make this dish in advance?

Yes! You can marinate the chicken a day ahead and bake it when you’re ready. Just remember to store it in the fridge until you’re set to cook.

What sides pair well with Hawaiian Shoyu Chicken?

This dish goes wonderfully with steamed rice, stir-fried vegetables, or a refreshing salad. The options are endless, so feel free to get creative!

Final Thoughts

Cooking Hawaiian Shoyu Chicken is more than just preparing a meal; it’s about creating memories and sharing joy with those you love. The sweet and savory flavors dance together, making each bite a delightful experience. Whether it’s a casual weeknight dinner or a gathering with friends, this dish brings a taste of the islands right to your table. I hope you enjoy the process as much as the result. So, roll up your sleeves, embrace the aromas, and let this recipe become a cherished part of your culinary repertoire. Happy cooking!

jhessica

Hawaiian Shoyu Chicken: Discover the Perfect Recipe!

A delicious Hawaiian dish featuring chicken thighs marinated in a savory and sweet soy sauce mixture, baked to perfection.
Prep Time 1 hour
Cook Time 45 minutes
Total Time 1 hour 45 minutes
Servings: 4 servings
Course: Main Dish
Cuisine: Hawaiian
Calories: 320

Ingredients
  

  • 2 pounds bone-in chicken thighs skin-on
  • 1 cup soy sauce
  • 1/2 cup brown sugar
  • 1/2 cup water
  • 1/4 cup rice vinegar
  • 4 cloves garlic minced
  • 1 tablespoon fresh ginger grated
  • 1 teaspoon black pepper
  • 1/2 teaspoon red pepper flakes optional
  • 2 green onions chopped (for garnish)
  • Sesame seeds for garnish

Method
 

  1. In a large bowl, combine soy sauce, brown sugar, water, rice vinegar, minced garlic, grated ginger, black pepper, and red pepper flakes (if using). Whisk until the sugar is dissolved.
  2. Place the chicken thighs in a large resealable plastic bag or a shallow dish. Pour the marinade over the chicken, ensuring all pieces are well coated. Seal the bag or cover the dish and refrigerate for at least 1 hour, preferably overnight for maximum flavor.
  3. Preheat your oven to 375°F (190°C).
  4. Remove the chicken from the marinade and place it in a baking dish. Reserve the marinade for later use.
  5. Bake the chicken in the preheated oven for 30 minutes.
  6. While the chicken is baking, pour the reserved marinade into a saucepan and bring it to a boil over medium heat. Reduce the heat and let it simmer for about 10 minutes until slightly thickened.
  7. After 30 minutes, baste the chicken with the thickened marinade and bake for an additional 15-20 minutes, or until the chicken reaches an internal temperature of 165°F (74°C) and is golden brown.
  8. Remove the chicken from the oven and let it rest for 5 minutes before serving. Garnish with chopped green onions and sesame seeds.

Nutrition

Serving: 1piece of chickenCalories: 320kcalCarbohydrates: 8gProtein: 24gFat: 20gSaturated Fat: 5gPolyunsaturated Fat: 15gCholesterol: 100mgSodium: 1500mgSugar: 8g

Notes

  • For a sweeter flavor, add a splash of pineapple juice to the marinade.
  • Serve with steamed rice and a side of stir-fried vegetables for a complete meal.

Tried this recipe?

Let us know how it was!

Honey Mustard Quinoa Apple Salad with Crispy Shallots: A Refreshing Delight!

Introduction to Honey Mustard Quinoa Apple Salad with Crispy Shallots

When I think of a dish that brings a burst of freshness and flavor, the Honey Mustard Quinoa Apple Salad with Crispy Shallots comes to mind.

This salad is not just a meal; it’s a celebration of textures and tastes.

Whether you’re looking for a quick solution for a busy day or a dish to impress your loved ones, this salad fits the bill perfectly.

With its vibrant colors and delightful crunch, it’s a feast for the eyes and the palate.

Let’s dive into this refreshing recipe that’s as nutritious as it is delicious!

Why You’ll Love This Honey Mustard Quinoa Apple Salad with Crispy Shallots

This Honey Mustard Quinoa Apple Salad with Crispy Shallots is a game-changer for busy weeknights.

It’s quick to whip up, taking just 35 minutes from start to finish.

The combination of sweet apples, crunchy nuts, and tangy dressing creates a flavor explosion that will leave your taste buds dancing.

Plus, it’s packed with nutrients, making it a guilt-free indulgence you can enjoy any day of the week!

Ingredients for Honey Mustard Quinoa Apple Salad with Crispy Shallots

Creating the Honey Mustard Quinoa Apple Salad with Crispy Shallots is a delightful journey through fresh and wholesome ingredients.

Here’s what you’ll need:

  • Quinoa: This protein-packed grain serves as the base, offering a nutty flavor and fluffy texture.
  • Water: Essential for cooking the quinoa to perfection.
  • Salt: A pinch enhances the flavors of the salad.
  • Apple: Choose a sweet variety like Honeycrisp or tart like Granny Smith for a refreshing crunch.
  • Dried cranberries: These add a burst of sweetness and chewy texture.
  • Nuts (walnuts or pecans): They provide a satisfying crunch and healthy fats.
  • Feta cheese (optional): Crumbled feta adds a creamy, tangy element, but feel free to skip it for a vegan option.
  • Fresh parsley: This herb brightens the dish with its fresh flavor and vibrant color.
  • Honey: A natural sweetener that balances the tangy dressing.
  • Dijon mustard: Adds a zesty kick to the honey mustard vinaigrette.
  • Apple cider vinegar: This tangy ingredient enhances the dressing and complements the apples.
  • Olive oil: A healthy fat that brings the dressing together.
  • Black pepper: A dash adds warmth and depth to the flavors.
  • Shallot: Thinly sliced shallots become crispy and provide a savory crunch.
  • Buttermilk (or milk): Soaking the shallots in buttermilk helps them crisp up beautifully.
  • All-purpose flour: This coats the shallots for frying, creating that irresistible crunch.
  • Paprika: A sprinkle adds a hint of smokiness to the shallots.
  • Oil for frying: Choose a neutral oil for frying the shallots until golden brown.

For exact measurements, check the bottom of the article where you can find everything available for printing.

With these ingredients, you’re well on your way to creating a salad that’s not only delicious but also a feast for the senses!

How to Make Honey Mustard Quinoa Apple Salad with Crispy Shallots

Step 1: Cook the Quinoa

Start by rinsing the quinoa under cold water.

This removes any bitterness.

In a medium saucepan, combine the rinsed quinoa, water, and a pinch of salt.

Bring it to a boil over medium-high heat.

Once boiling, reduce the heat to low, cover, and let it simmer for about 15 minutes.

When the water is absorbed, remove it from heat and let it sit for 5 minutes.

Fluff the quinoa with a fork and let it cool while you prepare the other ingredients.

Step 2: Prepare the Crispy Shallots

While the quinoa cooks, it’s time to make those crispy shallots.

Soak the thinly sliced shallots in buttermilk for about 10 minutes.

This step is key for achieving that perfect crunch.

In a separate bowl, mix the all-purpose flour and paprika.

Heat oil in a frying pan over medium heat.

Dredge the soaked shallots in the flour mixture, shaking off any excess.

Fry them in the hot oil until golden brown, about 3-4 minutes.

Once crispy, drain them on paper towels to remove excess oil.

Step 3: Make the Honey Mustard Dressing

Now, let’s whip up the honey mustard dressing.

In a small bowl, whisk together honey, Dijon mustard, apple cider vinegar, and olive oil.

Add a pinch of salt and pepper to taste.

This dressing is the heart of the salad, bringing all the flavors together.

Taste it and adjust the sweetness or tanginess to your liking.

Step 4: Combine the Salad Ingredients

In a large bowl, combine the cooled quinoa, diced apple, dried cranberries, and chopped nuts.

If you’re using feta cheese, sprinkle it in now.

Pour the honey mustard dressing over the salad and toss gently to combine.

Make sure everything is well-coated in that delicious dressing.

Add the fresh parsley for a pop of color and flavor.

Step 5: Serve with Crispy Shallots

Just before serving, top the salad with the crispy shallots.

This keeps them crunchy and adds a delightful texture.

Serve it chilled or at room temperature.

This Honey Mustard Quinoa Apple Salad with Crispy Shallots is ready to impress!

Enjoy the burst of flavors and textures in every bite.

Tips for Success

  • Rinse quinoa thoroughly to remove bitterness and enhance flavor.
  • Let the quinoa cool completely before mixing to prevent wilting the salad.
  • For extra crunch, fry shallots in small batches to avoid overcrowding the pan.
  • Adjust the dressing ingredients to suit your taste; add more honey for sweetness or mustard for tang.
  • Feel free to experiment with different nuts or fruits for a unique twist!

Equipment Needed

  • Medium saucepan: A pot for cooking quinoa; a small stockpot works too.
  • Frying pan: Essential for crispy shallots; a cast-iron skillet is a great alternative.
  • Mixing bowls: Use various sizes for combining ingredients; any bowl will do.
  • Whisk: Perfect for mixing the dressing; a fork can work in a pinch.
  • Measuring cups and spoons: For accuracy; you can eyeball it if you’re feeling adventurous!

Variations

  • Vegan Option: Omit the feta cheese and substitute maple syrup for honey in the dressing for a plant-based delight.
  • Fruit Swap: Try adding seasonal fruits like pears or pomegranate seeds for a burst of color and flavor.
  • Nut Alternatives: Use almonds or sunflower seeds instead of walnuts or pecans for a different crunch.
  • Grain Swap: Substitute quinoa with farro or bulgur for a unique texture and taste.
  • Spice It Up: Add a pinch of cayenne pepper to the dressing for a spicy kick that complements the sweetness.

Serving Suggestions

  • Pair this salad with grilled chicken or fish for a complete meal.
  • Serve alongside crusty bread or a warm baguette to soak up the dressing.
  • For drinks, a crisp white wine or sparkling water with lemon complements the flavors.
  • Garnish with extra parsley or apple slices for a beautiful presentation.

FAQs about Honey Mustard Quinoa Apple Salad with Crispy Shallots

Can I make this salad ahead of time?

Absolutely! You can prepare the quinoa and dressing in advance. Just store them separately in the fridge. Combine everything just before serving to keep the crispy shallots crunchy.

Is this salad gluten-free?

Yes, the Honey Mustard Quinoa Apple Salad with Crispy Shallots is gluten-free, as quinoa is a gluten-free grain. Just ensure that the flour used for frying the shallots is also gluten-free.

How can I store leftovers?

Store any leftovers in an airtight container in the fridge for up to 3 days. However, it’s best to keep the crispy shallots separate to maintain their crunch.

Can I use other fruits in this salad?

Definitely! Feel free to swap in seasonal fruits like pears or even berries. They’ll add a delightful twist to the flavor profile.

What can I serve with this salad?

This salad pairs wonderfully with grilled meats, fish, or even as a light lunch on its own. It’s versatile enough to complement many dishes!

Final Thoughts

Creating the Honey Mustard Quinoa Apple Salad with Crispy Shallots is more than just cooking; it’s an experience that brings joy to the table.

Each bite is a delightful mix of flavors and textures, from the nutty quinoa to the sweet apples and crunchy shallots.

This salad is perfect for any occasion, whether it’s a casual weeknight dinner or a gathering with friends.

It’s a dish that not only nourishes the body but also warms the heart.

So, roll up your sleeves and enjoy the process of making this refreshing salad that everyone will love!

jhessica

Honey Mustard Quinoa Apple Salad with Crispy Shallots: A Refreshing Delight!

A refreshing and nutritious salad featuring quinoa, apples, and crispy shallots, dressed in a honey mustard vinaigrette.
Prep Time 20 minutes
Cook Time 15 minutes
Total Time 35 minutes
Servings: 4 servings
Course: Salad
Cuisine: American
Calories: 320

Ingredients
  

  • 1 cup quinoa rinsed
  • 2 cups water
  • 1/2 teaspoon salt
  • 1 large apple diced (such as Honeycrisp or Granny Smith)
  • 1/2 cup dried cranberries
  • 1/4 cup chopped walnuts or pecans
  • 1/4 cup feta cheese crumbled (optional)
  • 1/4 cup fresh parsley chopped
  • 1/4 cup honey
  • 2 tablespoons Dijon mustard
  • 2 tablespoons apple cider vinegar
  • 1/4 cup olive oil
  • Salt and pepper to taste
  • 1 large shallot thinly sliced
  • 1/2 cup buttermilk or milk
  • 1/2 cup all-purpose flour
  • 1/2 teaspoon paprika
  • Oil for frying

Method
 

  1. In a medium saucepan, combine quinoa, water, and salt. Bring to a boil, then reduce heat to low, cover, and simmer for 15 minutes or until water is absorbed. Remove from heat and let sit for 5 minutes, then fluff with a fork and let cool.
  2. While the quinoa is cooking, prepare the crispy shallots. Soak the sliced shallots in buttermilk for 10 minutes. In a separate bowl, mix flour and paprika. Heat oil in a frying pan over medium heat. Dredge the soaked shallots in the flour mixture and fry until golden brown, about 3-4 minutes. Drain on paper towels and set aside.
  3. In a small bowl, whisk together honey, Dijon mustard, apple cider vinegar, olive oil, salt, and pepper to create the dressing.
  4. In a large bowl, combine the cooled quinoa, diced apple, dried cranberries, chopped nuts, feta cheese (if using), and parsley. Drizzle with the honey mustard dressing and toss to combine.
  5. Top the salad with crispy shallots just before serving to maintain their crunch.

Nutrition

Serving: 1servingCalories: 320kcalCarbohydrates: 45gProtein: 8gFat: 12gSaturated Fat: 2gPolyunsaturated Fat: 10gCholesterol: 5mgSodium: 200mgFiber: 5gSugar: 20g

Notes

  • For a vegan version, omit the feta cheese and substitute maple syrup for honey in the dressing.
  • Add in other seasonal fruits like pears or pomegranate seeds for extra flavor and texture.

Tried this recipe?

Let us know how it was!

Slow Cooker Chicken Breasts with Gravy for Easy Meals

Introduction to Slow Cooker Chicken Breasts with Gravy

After a long day, the last thing I want to do is spend hours in the kitchen. That’s where my go-to recipe for Slow Cooker Chicken Breasts with Gravy comes in. It’s a lifesaver for busy weeknights, offering a warm, comforting meal with minimal effort. Just toss everything in the slow cooker, and let it work its magic while you unwind. This dish not only fills your belly but also warms your heart, making it perfect for family dinners or impressing friends. Trust me, once you try it, you’ll wonder how you ever lived without it!

Why You’ll Love This Slow Cooker Chicken Breasts with Gravy

This recipe is a game-changer for anyone juggling a busy schedule. The beauty of Slow Cooker Chicken Breasts with Gravy lies in its simplicity. You can prep it in just 15 minutes, and then let the slow cooker do the heavy lifting. The result? Tender, juicy chicken smothered in rich gravy that’s bursting with flavor. It’s comfort food at its finest, making weeknight dinners a breeze!

Ingredients for Slow Cooker Chicken Breasts with Gravy

Gathering the right ingredients is the first step to creating a delicious meal. For this Slow Cooker Chicken Breasts with Gravy, you’ll need a few staples that pack a punch of flavor.

  • Boneless, skinless chicken breasts: The star of the show! They cook up tender and juicy, perfect for soaking up that gravy.
  • Salt and black pepper: Essential seasonings that enhance the chicken’s natural flavor.
  • Garlic powder: Adds a savory depth that elevates the dish.
  • Onion powder: Complements the garlic and brings a subtle sweetness.
  • Chicken broth: The base for your gravy, providing moisture and flavor. Use low-sodium if you’re watching your salt intake.
  • Cream of chicken soup: This adds creaminess and richness to the gravy. You can substitute with a homemade version if you prefer.
  • Worcestershire sauce: A splash of this tangy sauce adds complexity and umami.
  • Olive oil: Used for searing the chicken, it helps lock in moisture and flavor.
  • Sliced mushrooms (optional): For an earthy flavor and added texture. They’re a great way to sneak in some veggies!
  • Chopped onions (optional): They caramelize beautifully during cooking, adding sweetness and depth.
  • Frozen peas (optional): A pop of color and sweetness that brightens the dish.

For exact measurements, check the bottom of the article where you can find everything listed for easy printing. Happy cooking!

How to Make Slow Cooker Chicken Breasts with Gravy

Now that you have your ingredients ready, let’s dive into the steps for making this delightful Slow Cooker Chicken Breasts with Gravy. It’s straightforward, and I promise you’ll feel like a kitchen pro by the end!

Step 1: Season the Chicken

Start by seasoning the chicken breasts. Sprinkle salt, black pepper, garlic powder, and onion powder evenly over both sides. This simple step is crucial; it enhances the chicken’s flavor and sets the stage for a delicious meal. Don’t be shy—get in there and rub those spices in!

Step 2: Sear the Chicken

Next, heat a tablespoon of olive oil in a large skillet over medium-high heat. Once the oil is shimmering, carefully add the seasoned chicken breasts. Sear them for about 2-3 minutes on each side until they’re golden brown. This step locks in moisture and adds a lovely color. The aroma will have your mouth watering!

Step 3: Place in Slow Cooker

Once the chicken is beautifully seared, transfer it to your slow cooker. This is where the magic happens! Make sure to arrange the chicken in a single layer for even cooking. It’s like giving your chicken a cozy bed to simmer in.

Step 4: Prepare the Gravy Mixture

In a separate bowl, mix together the chicken broth, cream of chicken soup, and Worcestershire sauce. Whisk until smooth. This mixture is the heart of your gravy, bringing richness and flavor. If you want to get fancy, you can add a pinch of herbs here too!

Step 5: Combine Ingredients

Pour the gravy mixture over the chicken in the slow cooker. If you’re using optional ingredients like sliced mushrooms, chopped onions, or frozen peas, now’s the time to add them. They’ll cook down beautifully and add extra flavor and texture to your dish.

Step 6: Cook

Cover the slow cooker and set it to cook on low for 6-7 hours or on high for 3-4 hours. The longer, the better! You want the chicken to be tender and easily shred with a fork. Just let it do its thing while you kick back and relax.

Step 7: Shred and Serve

When the cooking time is up, remove the chicken from the slow cooker. Use two forks to shred it into bite-sized pieces. Stir the gravy to combine everything well. Serve it over rice, mashed potatoes, or noodles for a comforting meal that’s sure to please!

Tips for Success

  • Don’t skip the searing step; it adds flavor and color to the chicken.
  • For extra creaminess, add a splash of heavy cream or sour cream before serving.
  • Feel free to experiment with herbs like thyme or rosemary for added depth.
  • Make it a complete meal by serving with a side of steamed veggies.
  • Leftovers? Store them in an airtight container for up to three days!

Equipment Needed

  • Slow Cooker: The star of the show! Any size will do, but a 6-quart is ideal.
  • Skillet: For searing the chicken. A non-stick or cast iron works great.
  • Mixing Bowl: To combine the gravy ingredients. A large bowl is best.
  • Measuring Cups: For accurate ingredient portions.
  • Forks: Essential for shredding the chicken at the end.

Variations

  • Herb-Infused: Add fresh herbs like thyme, rosemary, or parsley for a burst of flavor.
  • Spicy Kick: Toss in some red pepper flakes or a dash of hot sauce for a spicy twist.
  • Vegetarian Option: Substitute chicken with hearty vegetables like portobello mushrooms or chickpeas for a plant-based version.
  • Low-Carb Delight: Serve the chicken over cauliflower rice instead of traditional rice or noodles.
  • Asian Flair: Replace the cream of chicken soup with coconut milk and add soy sauce for an Asian-inspired dish.

Serving Suggestions

  • Rice: Serve the chicken and gravy over fluffy white or brown rice for a hearty meal.
  • Mashed Potatoes: Creamy mashed potatoes are perfect for soaking up that delicious gravy.
  • Steamed Vegetables: Add a side of steamed broccoli or green beans for a pop of color and nutrition.
  • Crusty Bread: A slice of crusty bread is great for mopping up any leftover gravy.
  • Refreshing Salad: Pair with a light salad to balance the richness of the dish.

FAQs about Slow Cooker Chicken Breasts with Gravy

Can I use frozen chicken breasts for this recipe?

Yes, you can! Just keep in mind that frozen chicken breasts may require a longer cooking time. Ensure they reach an internal temperature of 165°F for safety.

What can I substitute for cream of chicken soup?

If you prefer a healthier option, you can use homemade cream of chicken soup or a mixture of sour cream and chicken broth. This will still give you that creamy texture!

How do I store leftovers?

Store any leftovers in an airtight container in the fridge for up to three days. Reheat gently on the stove or in the microwave, adding a splash of broth if needed.

Can I make this dish ahead of time?

Absolutely! You can prep everything the night before and store it in the fridge. Just pop it in the slow cooker in the morning for a hassle-free dinner.

What sides pair well with Slow Cooker Chicken Breasts with Gravy?

This dish goes wonderfully with rice, mashed potatoes, or steamed vegetables. You can also serve it with a light salad for a refreshing contrast!

Final Thoughts

Cooking should be a joy, not a chore, and my Slow Cooker Chicken Breasts with Gravy recipe embodies that philosophy. It’s more than just a meal; it’s a comforting hug on a plate, perfect for those hectic weeknights. The tender chicken, enveloped in rich gravy, brings smiles to the table and warms the heart. Plus, the ease of preparation means you can spend more time with loved ones instead of slaving away in the kitchen. So, grab your slow cooker and let this dish transform your dinner routine into something special. You deserve it!

jhessica

Slow Cooker Chicken Breasts with Gravy for Easy Meals

A delicious and easy recipe for Slow Cooker Chicken Breasts with Gravy, perfect for busy weeknights.
Prep Time 15 minutes
Servings: 6 servings
Course: Main Dish
Cuisine: American
Calories: 320

Ingredients
  

  • 2 pounds boneless skinless chicken breasts
  • 1 teaspoon salt
  • 1 teaspoon black pepper
  • 1 teaspoon garlic powder
  • 1 teaspoon onion powder
  • 1 cup chicken broth
  • 1 can 10.5 ounces cream of chicken soup
  • 1 tablespoon Worcestershire sauce
  • 1 tablespoon olive oil
  • 1 cup sliced mushrooms optional
  • 1 cup chopped onions optional
  • 1 cup frozen peas optional

Method
 

  1. Season the chicken breasts with salt, pepper, garlic powder, and onion powder.
  2. In a large skillet, heat the olive oil over medium-high heat. Sear the chicken breasts for 2-3 minutes on each side until golden brown.
  3. Place the seared chicken breasts in the slow cooker.
  4. In a bowl, mix together the chicken broth, cream of chicken soup, and Worcestershire sauce. Pour this mixture over the chicken in the slow cooker.
  5. If using, add the sliced mushrooms, chopped onions, and frozen peas on top of the chicken.
  6. Cover and cook on low for 6-7 hours or on high for 3-4 hours, until the chicken is cooked through and tender.
  7. Once done, shred the chicken with two forks and stir the gravy to combine.
  8. Serve over rice, mashed potatoes, or noodles.

Nutrition

Serving: 1servingCalories: 320kcalCarbohydrates: 8gProtein: 36gFat: 15gSaturated Fat: 3gPolyunsaturated Fat: 12gCholesterol: 100mgSodium: 800mgFiber: 1gSugar: 2g

Notes

  • For a creamier gravy, add a splash of heavy cream or sour cream before serving.
  • To add more flavor, toss in some fresh herbs like thyme or rosemary during cooking.

Tried this recipe?

Let us know how it was!

Crispy Orange Chicken: Discover the Perfect Recipe!

Introduction to Crispy Orange Chicken

There’s something magical about the aroma of crispy orange chicken wafting through the kitchen. It takes me back to family dinners where laughter filled the air, and everyone eagerly awaited the first bite. This crispy orange chicken recipe is not just a meal; it’s a quick solution for those busy weeknights or a dish to impress your loved ones on special occasions. With its perfect balance of sweet and tangy flavors, it’s bound to become a favorite in your home. Let’s dive into this delightful culinary adventure together!

Why You’ll Love This Crispy Orange Chicken

This crispy orange chicken is a game-changer for your dinner routine. It’s quick to whip up, taking just about 50 minutes from start to finish. The combination of tender chicken and a zesty orange sauce creates a flavor explosion that will have everyone asking for seconds. Plus, it’s a crowd-pleaser, making it perfect for family gatherings or casual get-togethers with friends. Trust me, you’ll want to keep this recipe close at hand!

Ingredients for Crispy Orange Chicken

Gathering the right ingredients is the first step to creating this mouthwatering crispy orange chicken. Here’s what you’ll need:

  • Boneless, skinless chicken thighs: These are juicy and tender, perfect for frying. You can also use chicken breasts if you prefer a leaner option.
  • All-purpose flour: This helps create a crispy coating. It’s the base for dredging the chicken.
  • Salt and black pepper: Essential for seasoning, they enhance the chicken’s natural flavors.
  • Eggs: Beaten eggs act as a binder, helping the breadcrumbs stick to the chicken.
  • Panko breadcrumbs: These give the chicken its signature crunch. They’re lighter and crispier than regular breadcrumbs.
  • Orange juice: Freshly squeezed is best for that vibrant, tangy flavor that defines this dish.
  • Sugar: Balances the acidity of the orange juice, creating a sweet and tangy sauce.
  • Soy sauce: Adds depth and umami to the sauce, enhancing the overall flavor.
  • Rice vinegar: This adds a subtle tanginess that complements the sweetness of the sauce.
  • Cornstarch: Used to thicken the sauce, giving it a glossy finish.
  • Minced garlic and ginger: These aromatics bring warmth and depth to the sauce, making it irresistible.
  • Sesame oil: A little goes a long way, adding a nutty flavor that rounds out the dish.
  • Vegetable oil: For frying, it needs to be hot enough to create that crispy exterior.
  • Chopped green onions and sesame seeds: These are optional garnishes that add a pop of color and flavor.

For those looking to spice things up, consider adding red pepper flakes to the sauce. You can find the exact quantities for each ingredient at the bottom of the article, ready for printing!

How to Make Crispy Orange Chicken

Now that you have all your ingredients ready, let’s get cooking! This crispy orange chicken recipe is straightforward and fun. Follow these steps, and you’ll have a delicious meal in no time.

Step 1: Prepare the Chicken

Start by cutting your boneless, skinless chicken thighs into bite-sized pieces. This ensures they cook evenly and get that perfect crispy texture. Pat them dry with paper towels to remove excess moisture. This little trick helps the coating stick better!

Step 2: Dredge and Coat

In a large bowl, mix the all-purpose flour, salt, and black pepper. Dredge each piece of chicken in this mixture, shaking off any excess flour. Next, dip the floured chicken into the beaten eggs, allowing any extra to drip off. Finally, coat the chicken with panko breadcrumbs, pressing gently to ensure they adhere well. This three-step process is key to achieving that crispy exterior!

Step 3: Fry the Chicken

Heat about 2 inches of vegetable oil in a large skillet or deep fryer over medium-high heat. You want it to reach around 350°F. Carefully add the chicken pieces in batches, making sure not to overcrowd the pan. Fry them for about 5-7 minutes until they’re golden brown and cooked through. Use a slotted spoon to remove the chicken and let it drain on paper towels. This step is where the magic happens—crispy chicken awaits!

Step 4: Make the Orange Sauce

While the chicken is frying, let’s whip up that irresistible orange sauce. In a saucepan over medium heat, combine the orange juice, sugar, soy sauce, rice vinegar, minced garlic, minced ginger, and sesame oil. Stir it all together and bring it to a gentle simmer. The aroma will be heavenly!

Step 5: Thicken the Sauce

In a small bowl, mix the cornstarch with 2 tablespoons of water to create a slurry. This will help thicken your sauce. Stir the slurry into the simmering sauce and cook for about 2-3 minutes until it thickens. You want it to be glossy and coat the chicken beautifully.

Step 6: Combine Chicken and Sauce

Once your chicken is fried and the sauce is thickened, it’s time to bring them together. Toss the crispy chicken pieces in the orange sauce until they’re well coated. Make sure every piece gets that delicious glaze. This is where the flavors meld together, creating a dish that’s simply irresistible!

Step 7: Serve and Garnish

Now for the best part—serving! Plate the crispy orange chicken and garnish it with chopped green onions and sesame seeds for a pop of color and flavor. Serve it hot, and watch as everyone digs in with delight. This dish is sure to impress!

Tips for Success

  • Ensure your oil is hot enough before frying; a drop of water should sizzle when it hits the oil.
  • Don’t overcrowd the pan while frying; this helps maintain the oil temperature for crispiness.
  • For extra crunch, let the coated chicken rest for 10 minutes before frying.
  • Adjust the sweetness of the sauce by adding more or less sugar to taste.
  • Experiment with garnishes like chopped cilantro for a fresh twist!

Equipment Needed

  • Large skillet or deep fryer: A deep fryer is ideal, but a heavy skillet works just as well.
  • Slotted spoon: Perfect for removing the chicken from the oil.
  • Mixing bowls: You’ll need a few for dredging and mixing the sauce.
  • Measuring cups and spoons: Essential for accurate ingredient measurements.
  • Paper towels: Great for draining excess oil from the fried chicken.

Variations

  • Spicy Orange Chicken: Add a teaspoon of red pepper flakes to the sauce for a fiery kick that balances the sweetness.
  • Gluten-Free Option: Use gluten-free flour and panko breadcrumbs to make this dish suitable for gluten-sensitive diners.
  • Vegetarian Version: Substitute chicken with crispy tofu or cauliflower for a plant-based twist that still delivers on flavor.
  • Orange Zest: Incorporate some freshly grated orange zest into the sauce for an extra burst of citrus flavor.
  • Honey Orange Chicken: Replace sugar with honey for a natural sweetness that pairs beautifully with the orange juice.

Serving Suggestions

  • Steamed Rice: Serve your crispy orange chicken over a bed of fluffy steamed rice to soak up the delicious sauce.
  • Stir-Fried Vegetables: Pair it with colorful stir-fried veggies for a balanced meal.
  • Cold Beer: A light lager or pale ale complements the dish perfectly.
  • Presentation: Use a white plate to make the vibrant colors pop!

FAQs about Crispy Orange Chicken

Can I use chicken breasts instead of thighs for this crispy orange chicken recipe?

Absolutely! Chicken breasts can be used for a leaner option. Just remember that they may cook a bit faster, so keep an eye on them while frying.

How can I make the orange sauce spicier?

If you’re looking to add some heat, simply mix in a teaspoon of red pepper flakes to the orange sauce. It’ll give your dish a delightful kick!

Can I prepare the orange sauce in advance?

Yes, you can make the orange sauce ahead of time. Just store it in the fridge and reheat it when you’re ready to toss it with the chicken. It’s a great time-saver!

Is this crispy orange chicken gluten-free?

To make this dish gluten-free, swap out the all-purpose flour and panko breadcrumbs for gluten-free alternatives. It’s just as delicious!

What sides pair well with crispy orange chicken?

Steamed rice and stir-fried vegetables are perfect companions for this dish. They balance the flavors and make for a complete meal!

Final Thoughts

Cooking this crispy orange chicken is more than just preparing a meal; it’s about creating memories. The joy of watching your loved ones savor each bite, their faces lighting up with delight, is truly priceless. This dish brings a burst of flavor and warmth to your table, making it perfect for any occasion. Whether it’s a casual weeknight dinner or a gathering with friends, this recipe is sure to impress. So roll up your sleeves, embrace the process, and enjoy the delicious rewards of your culinary adventure. Trust me, you’ll be glad you did!

jhessica

Crispy Orange Chicken: Discover the Perfect Recipe!

A delicious and crispy orange chicken recipe that combines tender chicken thighs with a sweet and tangy orange sauce.
Prep Time 20 minutes
Cook Time 30 minutes
Total Time 50 minutes
Servings: 4 servings
Course: Main Course
Cuisine: Chinese
Calories: 450

Ingredients
  

  • 2 pounds boneless skinless chicken thighs, cut into bite-sized pieces
  • 1 cup all-purpose flour
  • 1 teaspoon salt
  • 1 teaspoon black pepper
  • 2 large eggs beaten
  • 1 cup panko breadcrumbs
  • 1 cup orange juice
  • 1/2 cup sugar
  • 1/4 cup soy sauce
  • 1 tablespoon rice vinegar
  • 1 tablespoon cornstarch
  • 1 teaspoon minced garlic
  • 1 teaspoon minced ginger
  • 1 tablespoon sesame oil
  • Vegetable oil for frying
  • Chopped green onions and sesame seeds for garnish

Method
 

  1. In a large bowl, combine the flour, salt, and pepper. Dredge the chicken pieces in the flour mixture, shaking off any excess.
  2. Dip the floured chicken into the beaten eggs, then coat with panko breadcrumbs, pressing gently to adhere.
  3. In a large skillet or deep fryer, heat about 2 inches of vegetable oil over medium-high heat until hot (about 350°F). Fry the chicken in batches until golden brown and cooked through, about 5-7 minutes per batch. Remove and drain on paper towels.
  4. In a saucepan over medium heat, combine the orange juice, sugar, soy sauce, rice vinegar, garlic, ginger, and sesame oil. Bring to a simmer.
  5. In a small bowl, mix the cornstarch with 2 tablespoons of water to create a slurry. Stir this into the sauce and cook until it thickens, about 2-3 minutes.
  6. Toss the fried chicken pieces in the orange sauce until well coated.
  7. Serve hot, garnished with chopped green onions and sesame seeds.

Nutrition

Serving: 1servingCalories: 450kcalCarbohydrates: 30gProtein: 30gFat: 20gSaturated Fat: 3gPolyunsaturated Fat: 15gCholesterol: 150mgSodium: 600mgFiber: 1gSugar: 20g

Notes

  • For a spicier kick, add a teaspoon of red pepper flakes to the orange sauce.
  • Substitute chicken thighs with chicken breasts for a leaner option.

Tried this recipe?

Let us know how it was!

Garlic Herb Beef Tenderloin: Elevate Your Dinner Tonight!

Introduction to Garlic Herb Beef Tenderloin

Cooking can sometimes feel like a chore, especially after a long day. But let me tell you, the Garlic Herb Beef Tenderloin is a game changer. This dish is not just about feeding your family; it’s about creating a moment. Imagine the aroma of garlic and fresh herbs wafting through your kitchen, instantly lifting your spirits. It’s perfect for impressing your loved ones or simply treating yourself to something special. With just a few ingredients and minimal effort, you can elevate your dinner to a whole new level. Trust me, this recipe will become a staple in your home!

Why You’ll Love This Garlic Herb Beef Tenderloin

This Garlic Herb Beef Tenderloin is a culinary delight that combines ease and flavor in one stunning package. It’s quick to prepare, making it perfect for busy weeknights or special occasions. The tender, juicy beef paired with aromatic herbs creates a taste sensation that will have everyone asking for seconds. Plus, it’s a dish that looks impressive without requiring hours in the kitchen. You’ll love how simple it is to create a restaurant-quality meal at home!

Ingredients for Garlic Herb Beef Tenderloin

Gathering the right ingredients is the first step to culinary success. For this Garlic Herb Beef Tenderloin, you’ll need a few key players that work together to create a mouthwatering dish.

  • Beef Tenderloin: The star of the show! This cut is known for its tenderness and rich flavor, making it perfect for roasting.
  • Olive Oil: A must for adding moisture and helping the herb paste stick to the meat. It also enhances the overall flavor.
  • Garlic: Freshly minced garlic brings a robust aroma and taste that elevates the dish. It’s a classic pairing with beef.
  • Fresh Rosemary: This herb adds a piney, earthy flavor that complements the beef beautifully. If fresh isn’t available, dried works too.
  • Fresh Thyme: Another aromatic herb that adds depth. Its subtle flavor balances the richness of the beef.
  • Salt: Essential for enhancing all the flavors. It’s the magic ingredient that brings everything together.
  • Black Pepper: Freshly cracked pepper adds a hint of heat and complexity to the dish.
  • Dijon Mustard: This adds a tangy kick and helps the herb paste adhere to the meat.
  • Balsamic Vinegar: A splash of this vinegar adds a touch of sweetness and acidity, brightening the overall flavor profile.

For those looking to experiment, consider marinating the beef in the herb mixture for a few hours or overnight. You can also add a tablespoon of Worcestershire sauce to the herb paste for an extra depth of flavor. If you can’t find fresh herbs, don’t worry! You can substitute them with dried herbs—just use about two teaspoons of each.

Exact quantities for these ingredients are available at the bottom of the article for easy printing!

How to Make Garlic Herb Beef Tenderloin

Now that you have your ingredients ready, let’s dive into the steps for making this Garlic Herb Beef Tenderloin. Each step is simple, yet crucial for achieving that perfect roast. Follow along, and you’ll be savoring a delicious meal in no time!

Step 1: Preheat the Oven

First things first, preheat your oven to 400°F. This step is essential because it ensures that the beef cooks evenly. A hot oven helps to sear the outside of the tenderloin, locking in those juicy flavors. Trust me, you want that perfect crust!

Step 2: Prepare the Herb Paste

In a small bowl, combine the minced garlic, chopped rosemary, thyme, salt, pepper, Dijon mustard, and balsamic vinegar. Mix them well to create a fragrant herb paste. This paste is the secret to infusing the beef with incredible flavor. Each ingredient plays a role, enhancing the overall taste of the dish.

Step 3: Rub the Beef Tenderloin

Next, take your trimmed beef tenderloin and rub it all over with olive oil. This not only adds moisture but also helps the herb paste stick. Once coated, spread the herb paste evenly over the entire surface of the meat. Make sure every inch is covered; this is where the magic happens!

Step 4: Roast the Beef

Place the beef tenderloin on a roasting pan or baking sheet. Roast it in the preheated oven for about 25-30 minutes. For medium-rare, aim for an internal temperature of 135°F. Use a meat thermometer to check; it’s the best way to ensure your beef is cooked just right. No one likes overcooked meat!

Step 5: Rest and Slice

Once your beef is cooked to perfection, remove it from the oven and cover it loosely with aluminum foil. Let it rest for 10-15 minutes. This resting period is crucial; it allows the juices to redistribute throughout the meat, making each slice tender and juicy. When you’re ready, slice the tenderloin into medallions and serve it up!

Tips for Success

  • Always use a meat thermometer to check for doneness; it takes the guesswork out of cooking.
  • Let the beef rest after cooking to ensure maximum juiciness in every bite.
  • For extra flavor, consider marinating the beef overnight in the herb paste.
  • Don’t skip the olive oil; it helps the herbs adhere and adds moisture.
  • Experiment with different herbs to find your perfect flavor combination!

Equipment Needed

  • Roasting Pan: A sturdy roasting pan is ideal, but a baking sheet works too.
  • Meat Thermometer: Essential for checking doneness; a simple instant-read thermometer will do.
  • Mixing Bowl: Any bowl will suffice for mixing the herb paste.
  • Aluminum Foil: Useful for resting the meat after cooking.

Variations

  • Herb Swap: Try using fresh sage or parsley instead of rosemary and thyme for a different flavor profile.
  • Spicy Kick: Add a pinch of red pepper flakes to the herb paste for a bit of heat.
  • Gluten-Free Option: Ensure all ingredients, especially condiments, are certified gluten-free.
  • Stuffed Tenderloin: For a twist, butterfly the tenderloin and stuff it with spinach and feta before roasting.
  • Grilled Version: Marinate the beef and grill it for a smoky flavor instead of roasting.

Serving Suggestions

  • Classic Sides: Pair your Garlic Herb Beef Tenderloin with roasted vegetables or creamy mashed potatoes for a comforting meal.
  • Fresh Salad: A crisp arugula salad with a lemon vinaigrette complements the richness of the beef.
  • Wine Pairing: Serve with a bold red wine, like Cabernet Sauvignon, to enhance the flavors.
  • Presentation: Slice the tenderloin into medallions and arrange them on a platter, garnished with fresh herbs for a stunning display.

FAQs about Garlic Herb Beef Tenderloin

As you embark on your culinary journey with Garlic Herb Beef Tenderloin, you might have a few questions. Here are some common queries that can help you navigate this delicious recipe.

Can I use a different cut of beef?

Absolutely! While beef tenderloin is the star for its tenderness, you can use cuts like ribeye or sirloin. Just adjust the cooking time accordingly, as these cuts may require longer to reach the desired doneness.

How do I know when the beef is done?

The best way to check for doneness is with a meat thermometer. For medium-rare, aim for an internal temperature of 135°F. Remember, the beef will continue to cook slightly while resting.

Can I make this dish ahead of time?

Yes! You can prepare the herb paste and rub it on the beef a day in advance. Just cover it and refrigerate. This allows the flavors to meld beautifully, making your dinner even more delicious!

What should I serve with Garlic Herb Beef Tenderloin?

Pair it with roasted vegetables, creamy mashed potatoes, or a fresh salad. A bold red wine, like Cabernet Sauvignon, complements the rich flavors perfectly.

Can I freeze leftovers?

Definitely! Wrap the sliced beef tightly in plastic wrap and then in aluminum foil. It can be frozen for up to three months. Just thaw it in the fridge before reheating.

Final Thoughts

Cooking the Garlic Herb Beef Tenderloin is more than just preparing a meal; it’s about creating memories around the dinner table. The rich flavors and tender texture make every bite a celebration. Whether you’re impressing guests or enjoying a quiet night in, this dish brings warmth and joy to any occasion. The aroma fills your kitchen, inviting everyone to gather and share stories. Plus, the simplicity of the recipe means you can focus on what truly matters—connecting with loved ones over a delicious meal. Trust me, this recipe will become a cherished favorite in your home!

jhessica

Garlic Herb Beef Tenderloin: Elevate Your Dinner Tonight!

A delicious and flavorful Garlic Herb Beef Tenderloin recipe that elevates your dinner with its rich taste and tender texture.
Prep Time 15 minutes
Cook Time 30 minutes
Total Time 45 minutes
Servings: 6 servings
Course: Main Course
Cuisine: American
Calories: 320

Ingredients
  

  • 2 pounds beef tenderloin trimmed
  • 2 tablespoons olive oil
  • 4 cloves garlic minced
  • 2 tablespoons fresh rosemary chopped
  • 2 tablespoons fresh thyme chopped
  • 1 tablespoon salt
  • 1 teaspoon black pepper
  • 2 tablespoons Dijon mustard
  • 1 tablespoon balsamic vinegar

Method
 

  1. Preheat your oven to 400°F.
  2. In a small bowl, mix together the minced garlic, rosemary, thyme, salt, pepper, Dijon mustard, and balsamic vinegar to create a herb paste.
  3. Rub the olive oil all over the beef tenderloin. Then, spread the herb paste evenly over the entire surface of the meat.
  4. Place the beef tenderloin on a roasting pan or a baking sheet. Roast in the preheated oven for about 25-30 minutes for medium-rare, or until the internal temperature reaches 135°F.
  5. Once cooked to your desired doneness, remove the tenderloin from the oven and cover it loosely with aluminum foil. Let it rest for 10-15 minutes before slicing.
  6. Slice the beef tenderloin into medallions and serve with your favorite sides.

Nutrition

Serving: 1servingCalories: 320kcalProtein: 40gFat: 18gSaturated Fat: 5gPolyunsaturated Fat: 13gCholesterol: 100mgSodium: 500mg

Notes

  • For a more intense flavor, marinate the beef in the herb mixture for a few hours or overnight in the refrigerator.
  • For a variation, try adding a tablespoon of Worcestershire sauce to the herb paste for an extra depth of flavor.
  • You can substitute the fresh herbs with 2 teaspoons of dried herbs if fresh ones are not available.

Tried this recipe?

Let us know how it was!

Slow-Roasted Barbecue Brisket: Delight in Every Bite!

Introduction to Slow-Roasted Barbecue Brisket

There’s something magical about the aroma of slow-roasted barbecue brisket wafting through the house. It takes me back to family gatherings, where laughter mingled with the scent of tender meat. This recipe is not just about cooking; it’s about creating memories. Whether you’re hosting a weekend barbecue or simply craving comfort food, this slow-roasted barbecue brisket is your go-to dish. It’s easy to prepare, and the results are nothing short of spectacular. Your loved ones will be impressed, and you’ll feel like a culinary hero without spending all day in the kitchen.

Why You’ll Love This Slow-Roasted Barbecue Brisket

This slow-roasted barbecue brisket is a game-changer for any home cook. It’s incredibly easy to make, requiring minimal hands-on time while the oven does the heavy lifting. The result? A melt-in-your-mouth brisket that’s bursting with flavor. Perfect for gatherings or a cozy family dinner, it’s a dish that brings everyone together. Plus, the leftovers (if there are any) make for amazing sandwiches the next day!

Ingredients for Slow-Roasted Barbecue Brisket

Gathering the right ingredients is the first step to creating your slow-roasted barbecue brisket masterpiece. Here’s what you’ll need:

  • Brown Sugar: Adds a touch of sweetness and helps create a caramelized crust.
  • Paprika: This spice brings a rich color and a mild, smoky flavor to the brisket.
  • Garlic Powder: A must-have for that savory depth, enhancing the overall taste.
  • Onion Powder: Complements the garlic and adds a subtle sweetness.
  • Ground Black Pepper: Provides a bit of heat and balances the sweetness of the sugar.
  • Salt: Essential for seasoning, it helps to bring out the flavors of the meat.
  • Cayenne Pepper (optional): For those who like a kick, this adds a spicy punch.
  • Beef Brisket: The star of the show! Look for a well-marbled cut for the best flavor and tenderness.
  • Barbecue Sauce: Use your favorite brand to slather on at the end for that classic barbecue taste.
  • Beef Broth: Keeps the brisket moist during roasting and adds extra flavor.

For exact measurements, check the bottom of the article where you can find everything listed for easy printing. Feel free to experiment with different spices or sauces to make this recipe your own!

How to Make Slow-Roasted Barbecue Brisket

Now that you have your ingredients ready, let’s dive into the steps for making this mouthwatering slow-roasted barbecue brisket. Each step is straightforward, ensuring you can enjoy the process as much as the final dish. Let’s get cooking!

Step 1: Preheat the Oven

First things first, preheat your oven to 300°F. This low and slow cooking method is key to achieving that tender brisket. While the oven warms up, you can focus on the next steps without feeling rushed.

Step 2: Prepare the Spice Rub

In a small bowl, mix together the brown sugar, paprika, garlic powder, onion powder, black pepper, salt, and cayenne pepper if you’re feeling adventurous. This spice rub is what gives your brisket that incredible flavor. The sweetness from the brown sugar and the smokiness from the paprika create a perfect balance.

Step 3: Rub the Brisket

Now, take that beautiful beef brisket and generously rub the spice mixture all over it. Make sure to cover every inch, as this is where the magic happens. The spices will penetrate the meat, infusing it with flavor as it cooks. Don’t be shy—get your hands in there!

Step 4: Roast the Brisket

Place the seasoned brisket in a large roasting pan, fat side up. This allows the fat to baste the meat as it cooks, keeping it juicy. Pour the beef broth around the brisket, but be careful not to wash off your hard work with the rub. Cover the pan tightly with aluminum foil and slide it into the preheated oven. Roast for 4 to 5 hours, or until the brisket is tender and shreds easily with a fork. The smell will be irresistible!

Step 5: Rest and Slice

Once your brisket is done, remove it from the oven and let it rest for about 20 minutes. This step is crucial; it allows the juices to redistribute throughout the meat. After resting, slice the brisket against the grain. This ensures each bite is tender and easy to chew.

Step 6: Add Barbecue Sauce and Finish

While the brisket is resting, crank up the oven temperature to 400°F. Place the sliced brisket back in the roasting pan and pour your favorite barbecue sauce over the top. Return it to the oven for an additional 15-20 minutes, uncovered. This will caramelize the sauce, creating a deliciously sticky coating. Trust me, your taste buds will thank you!

Tips for Success

  • Marinate the brisket overnight with the spice rub for deeper flavor.
  • Use a meat thermometer to check for doneness; aim for an internal temperature of 195°F.
  • Let the brisket rest before slicing to keep it juicy.
  • Experiment with different barbecue sauces for unique flavor profiles.
  • Save any leftover brisket for sandwiches or tacos the next day!

Equipment Needed

  • Roasting Pan: A large, sturdy pan is essential. If you don’t have one, a deep baking dish works too.
  • Aluminum Foil: This helps keep the brisket moist while roasting. Parchment paper can be a substitute.
  • Meat Thermometer: For checking doneness. A simple knife can work if you don’t have one.
  • Cutting Board: A good surface for slicing the brisket. Any clean, flat surface will do.

Variations

  • Spicy Kick: Add more cayenne pepper or a dash of hot sauce to the spice rub for an extra kick.
  • Herb Infusion: Incorporate fresh herbs like rosemary or thyme into the spice rub for a fragrant twist.
  • Smoky Flavor: If you have a smoker, use it for the initial cooking process to infuse a deep, smoky flavor.
  • Gluten-Free Option: Ensure your barbecue sauce is gluten-free to keep this dish suitable for gluten-sensitive guests.
  • Vegetarian Alternative: Try using a large portobello mushroom cap with the same spice rub for a hearty vegetarian option.

Serving Suggestions

  • Classic Coleslaw: A crunchy, tangy side that complements the richness of the brisket.
  • Grilled Corn on the Cob: Sweet and smoky, it’s a perfect summer pairing.
  • Potato Salad: Creamy and satisfying, it balances the flavors beautifully.
  • Beer or Iced Tea: Refreshing drinks that enhance the barbecue experience.
  • Presentation Tip: Serve the brisket on a wooden board for a rustic touch.

FAQs about Slow-Roasted Barbecue Brisket

Can I use a different cut of meat for this recipe?
Absolutely! While brisket is the traditional choice, you can use chuck roast or even pork shoulder. Just keep in mind that cooking times may vary based on the cut.

How do I store leftovers?
Store any leftover slow-roasted barbecue brisket in an airtight container in the fridge for up to four days. You can also freeze it for up to three months. Just make sure to slice it before freezing for easier reheating!

What’s the best way to reheat brisket?
To reheat, place the brisket slices in a baking dish with a splash of beef broth. Cover with foil and warm in a 300°F oven until heated through. This keeps the meat moist and flavorful.

Can I make this brisket in a slow cooker?
Yes! If you prefer a slow cooker, season the brisket and place it in the cooker with the beef broth. Cook on low for 8-10 hours. The result will be just as tender and delicious!

What sides pair well with slow-roasted barbecue brisket?
This dish goes wonderfully with classic sides like coleslaw, baked beans, or cornbread. You can also serve it with grilled vegetables for a lighter option.

Final Thoughts

Cooking slow-roasted barbecue brisket is more than just a meal; it’s an experience that brings people together. The tender, flavorful meat paired with your favorite barbecue sauce creates a symphony of tastes that will have everyone coming back for seconds. Each bite is a reminder of the joy of sharing good food with family and friends. Whether it’s a casual weeknight dinner or a festive gathering, this recipe is sure to impress. So roll up your sleeves, embrace the process, and enjoy the delicious rewards of your culinary adventure. Trust me, your taste buds will thank you!

jhessica

Slow-Roasted Barbecue Brisket: Delight in Every Bite!

A delicious slow-roasted barbecue brisket that is tender and flavorful, perfect for any gathering.
Prep Time 15 minutes
Total Time 4 hours 15 minutes
Servings: 8 servings
Course: Main Course
Cuisine: American
Calories: 350

Ingredients
  

  • 2 tablespoons brown sugar
  • 2 tablespoons paprika
  • 1 tablespoon garlic powder
  • 1 tablespoon onion powder
  • 1 tablespoon ground black pepper
  • 1 tablespoon salt
  • 1 teaspoon cayenne pepper optional
  • 5 pounds beef brisket
  • 1 cup barbecue sauce your favorite brand
  • 1 cup beef broth

Method
 

  1. Preheat your oven to 300°F.
  2. In a small bowl, mix together the brown sugar, paprika, garlic powder, onion powder, black pepper, salt, and cayenne pepper (if using).
  3. Rub the spice mixture all over the brisket, ensuring it is evenly coated.
  4. Place the brisket in a large roasting pan, fat side up. Pour the beef broth around the brisket, being careful not to wash off the rub.
  5. Cover the roasting pan tightly with aluminum foil and place it in the preheated oven. Roast for 4 to 5 hours, or until the brisket is tender and easily shreds with a fork.
  6. Remove the brisket from the oven and let it rest for 20 minutes before slicing.
  7. While the brisket is resting, increase the oven temperature to 400°F.
  8. Slice the brisket against the grain and place the slices back in the roasting pan. Pour the barbecue sauce over the slices and return to the oven for an additional 15-20 minutes, uncovered, until the sauce is bubbly and caramelized.
  9. Serve warm with your favorite sides.

Nutrition

Serving: 1sliceCalories: 350kcalCarbohydrates: 6gProtein: 30gFat: 24gSaturated Fat: 10gPolyunsaturated Fat: 14gCholesterol: 90mgSodium: 800mgSugar: 6g

Notes

  • For added flavor, try marinating the brisket overnight with the spice rub.
  • If you prefer a smoky flavor, consider using a smoker instead of the oven for the initial cooking process.

Tried this recipe?

Let us know how it was!

Old-Fashioned Chicken and Dumplings: Taste the Tradition!

Introduction to Old-Fashioned Chicken and Dumplings

There’s something magical about a steaming bowl of Old-Fashioned Chicken and Dumplings. It takes me back to my grandmother’s kitchen, where the aroma of simmering chicken filled the air. This dish is more than just a meal; it’s a warm hug on a chilly evening. Perfect for busy weeknights or a cozy Sunday dinner, it brings comfort and nostalgia to the table. With tender chicken and fluffy dumplings swimming in a creamy broth, this recipe is sure to impress your loved ones. Trust me, once you try it, you’ll want to make it a family tradition!

Why You’ll Love This Old-Fashioned Chicken and Dumplings

This Old-Fashioned Chicken and Dumplings recipe is a lifesaver for busy days. It’s quick to whip up, taking just 45 minutes from start to finish. The rich, creamy broth and fluffy dumplings create a comforting dish that warms the soul. Plus, it’s a crowd-pleaser! Whether you’re feeding a family or hosting friends, this dish is sure to bring smiles and satisfied bellies to the table.

Ingredients for Old-Fashioned Chicken and Dumplings

Gathering the right ingredients is the first step to creating this comforting dish. Here’s what you’ll need:

  • Cooked, shredded chicken: This is the star of the show! Use leftover rotisserie chicken or poach your own for a fresh taste.
  • Chicken broth: A rich broth adds depth. Homemade is best, but store-bought works in a pinch.
  • Milk: This adds creaminess to the broth. Whole milk is ideal, but you can use low-fat if you prefer.
  • Onion: Diced onion brings sweetness and flavor. You can substitute with shallots for a milder taste.
  • Carrots: Sliced carrots add color and sweetness. Feel free to swap in parsnips for a unique twist.
  • Celery: This crunchy veggie enhances the broth’s flavor. If you’re not a fan, you can skip it.
  • Garlic powder: A quick way to infuse garlic flavor without the fuss of fresh cloves.
  • Onion powder: This complements the fresh onion, adding a deeper flavor profile.
  • Dried thyme: A classic herb that pairs beautifully with chicken. Fresh thyme can be used if you have it on hand.
  • Salt and black pepper: Essential for seasoning. Adjust to your taste preferences.
  • All-purpose flour: The base for your dumplings. You can use whole wheat flour for a healthier option.
  • Baking powder: This helps the dumplings rise and become fluffy.
  • Unsalted butter: Adds richness to the dumpling batter. Margarine can be a substitute if needed.

For those who like to experiment, consider adding peas or green beans for extra nutrition and color. You can find the exact measurements for each ingredient at the bottom of the article, ready for printing!

How to Make Old-Fashioned Chicken and Dumplings

Step 1: Prepare the Chicken Mixture

Start by grabbing a large pot. Pour in the chicken broth and add your cooked, shredded chicken. Next, toss in the diced onion, sliced carrots, and celery. These veggies not only add flavor but also a pop of color. Sprinkle in the garlic powder, onion powder, dried thyme, salt, and black pepper. Stir everything together and bring it to a gentle simmer over medium heat. Let it cook for about 15 minutes. This allows the vegetables to soften and the flavors to meld beautifully. Trust me, your kitchen will smell amazing!

Step 2: Make the Dumpling Batter

While the chicken mixture simmers, it’s time to whip up the dumpling batter. In a mixing bowl, combine the all-purpose flour, baking powder, and salt. Give it a quick whisk to blend the dry ingredients. Then, pour in the melted butter and ¾ cup of milk. Stir until just combined. Don’t overmix; you want the dough to be thick and slightly lumpy. This is what makes your dumplings fluffy and delightful. Set the batter aside while the chicken mixture continues to simmer. The anticipation is half the fun!

Step 3: Cook the Dumplings

Now comes the exciting part! With the chicken mixture bubbling away, it’s time to drop in the dumpling batter. Use a spoon to scoop out generous dollops of the batter and gently place them on top of the simmering broth. Don’t worry about making them perfect; they’ll spread out a bit as they cook. Once all the batter is in, cover the pot with a lid. Let the dumplings steam for 15-20 minutes without lifting the lid. This is crucial for achieving that fluffy texture. Patience is key here!

Step 4: Final Touches

After the dumplings have cooked, it’s time for the final flourish. Carefully lift the lid and stir in 1 cup of milk to create a creamy consistency. This step elevates the dish, making it rich and comforting. Taste the broth and adjust the seasoning if needed. A little extra salt or pepper can make a world of difference. Once everything is well combined, serve it hot. Your Old-Fashioned Chicken and Dumplings are ready to warm hearts and fill bellies!

Tips for Success

  • Use leftover rotisserie chicken for a quick shortcut.
  • Don’t lift the lid while the dumplings are cooking; it lets the steam escape.
  • For extra flavor, sauté the onions and veggies in butter before adding the broth.
  • Adjust the thickness of the broth by adding more or less milk to your taste.
  • Experiment with herbs like parsley or rosemary for a fresh twist.

Equipment Needed

  • Large pot: A Dutch oven works great, but any heavy-bottomed pot will do.
  • Mixing bowl: Use a standard bowl or even a large measuring cup for mixing the dumpling batter.
  • Spoon: A regular spoon for dropping the dumplings; a cookie scoop can make it easier.
  • Lid: Essential for steaming the dumplings; any pot lid that fits will work.

Variations

  • Herb-Infused Dumplings: Add fresh herbs like parsley or dill to the dumpling batter for an aromatic twist.
  • Vegetarian Option: Substitute chicken with hearty vegetables like mushrooms and zucchini, and use vegetable broth instead.
  • Spicy Kick: Incorporate a pinch of cayenne pepper or red pepper flakes into the broth for a bit of heat.
  • Cheesy Dumplings: Mix in shredded cheese, like cheddar or mozzarella, into the dumpling batter for a cheesy delight.
  • Gluten-Free Version: Use a gluten-free all-purpose flour blend to make the dumplings suitable for gluten-sensitive diets.

Serving Suggestions

  • Crusty Bread: Serve with a warm, crusty baguette or homemade cornbread to soak up the delicious broth.
  • Salad: A light green salad with a tangy vinaigrette complements the richness of the dish.
  • Drink Pairing: Enjoy with a chilled glass of white wine or a refreshing iced tea.
  • Presentation: Garnish with fresh parsley for a pop of color and added flavor.

FAQs about Old-Fashioned Chicken and Dumplings

Can I use frozen chicken for this recipe? Absolutely! Just make sure to thaw it first. You can also cook the chicken directly in the broth for added flavor.

How do I store leftovers? Store any leftovers in an airtight container in the fridge for up to three days. Reheat gently on the stovetop, adding a splash of milk if needed.

Can I make this dish ahead of time? Yes! You can prepare the chicken mixture in advance and store it in the fridge. Just add the dumplings when you’re ready to serve.

What can I substitute for chicken broth? If you don’t have chicken broth, vegetable broth works well. You can also use water, but the flavor won’t be as rich.

Are there any dietary adaptations for this recipe? Definitely! You can make it gluten-free by using a gluten-free flour blend for the dumplings. For a lighter version, use low-fat milk and reduce the butter.

Final Thoughts

Cooking Old-Fashioned Chicken and Dumplings is more than just preparing a meal; it’s about creating memories. The warmth of the creamy broth and the fluffy dumplings brings a sense of comfort that’s hard to beat. Each spoonful is a reminder of family gatherings and cozy nights in. This dish invites you to slow down, savor the flavors, and share with loved ones. Whether it’s a chilly evening or a busy weeknight, this recipe is your go-to for a hearty, satisfying meal. Trust me, once you serve this, it’ll become a cherished favorite in your home!

jhessica

Old-Fashioned Chicken and Dumplings: Taste the Tradition!

A comforting and traditional dish featuring tender chicken and fluffy dumplings in a creamy broth.
Prep Time 15 minutes
Cook Time 30 minutes
Total Time 45 minutes
Servings: 6 servings
Course: Main Course
Cuisine: American
Calories: 350

Ingredients
  

  • 3 cups cooked shredded chicken
  • 4 cups chicken broth
  • 1 cup milk
  • 1 medium onion diced
  • 2 carrots sliced
  • 2 celery stalks sliced
  • 1 teaspoon garlic powder
  • 1 teaspoon onion powder
  • 1 teaspoon dried thyme
  • 1 teaspoon salt
  • ½ teaspoon black pepper
  • 2 cups all-purpose flour
  • 1 tablespoon baking powder
  • ½ teaspoon salt
  • ½ cup unsalted butter melted
  • ¾ cup milk

Method
 

  1. In a large pot, combine the chicken broth, cooked chicken, diced onion, sliced carrots, sliced celery, garlic powder, onion powder, thyme, salt, and pepper.
  2. Bring to a simmer over medium heat and cook for about 15 minutes until the vegetables are tender.
  3. In a mixing bowl, whisk together the flour, baking powder, and salt.
  4. Add the melted butter and ¾ cup milk, stirring until just combined. The dough will be thick.
  5. Drop spoonfuls of the dumpling batter into the simmering chicken mixture.
  6. Cover the pot and let the dumplings cook for 15-20 minutes without lifting the lid.
  7. Once the dumplings are done, stir in 1 cup of milk to create a creamy consistency.
  8. Adjust seasoning if needed and serve hot.

Nutrition

Serving: 1servingCalories: 350kcalCarbohydrates: 30gProtein: 25gFat: 15gSaturated Fat: 8gPolyunsaturated Fat: 5gCholesterol: 70mgSodium: 800mgFiber: 2gSugar: 3g

Notes

  • For a richer flavor, add a splash of heavy cream to the broth before serving.
  • You can customize the vegetables by adding peas or green beans for extra color and nutrition.

Tried this recipe?

Let us know how it was!

Guy Fieri’s Macaroni Salad: A Flavorful Recipe You’ll Love!

Introduction to Guy Fieri’s Macaroni Salad

There’s something about a creamy, flavorful macaroni salad that brings back memories of summer barbecues and family gatherings. Guy Fieri’s Macaroni Salad is not just a dish; it’s a celebration of flavors that can turn any meal into a festive occasion. Whether you’re looking for a quick solution for a busy day or a dish to impress your loved ones at your next picnic, this recipe has you covered. With its vibrant colors and delightful crunch, it’s sure to be a hit. Let’s dive into this delicious creation that’s as easy to make as it is to enjoy!

Why You’ll Love This Guy Fieri’s Macaroni Salad

This Guy Fieri’s Macaroni Salad is a game-changer for any gathering. It’s quick to whip up, taking just about 25 minutes from start to finish. The creamy dressing perfectly complements the crunchy veggies, creating a delightful contrast in every bite. Plus, it’s versatile! You can easily customize it to suit your taste or dietary needs. Trust me, this salad will become a staple at your summer cookouts and family picnics!

Ingredients for Guy Fieri’s Macaroni Salad

Gathering the right ingredients is the first step to creating this delicious macaroni salad. Here’s what you’ll need:

  • Elbow macaroni: The star of the dish, these small pasta shapes hold the creamy dressing beautifully.
  • Mayonnaise: This creamy base adds richness and moisture, making every bite indulgent.
  • Dijon mustard: A touch of tanginess that elevates the flavor profile and adds depth.
  • Apple cider vinegar: This brings a zesty kick, balancing the creaminess of the mayo.
  • Garlic powder: A sprinkle of this adds a subtle, savory note without overpowering the dish.
  • Onion powder: Similar to garlic powder, it enhances the overall flavor with a hint of sweetness.
  • Salt and black pepper: Essential seasonings that bring all the flavors together.
  • Diced celery: For that satisfying crunch and a fresh, crisp texture.
  • Diced bell pepper: Any color works! It adds sweetness and vibrant color to the salad.
  • Diced red onion: This gives a sharp bite and a pop of color, enhancing the salad’s appeal.
  • Sweet pickle relish: A sweet and tangy addition that complements the other flavors perfectly.
  • Chopped fresh parsley: This brightens the dish and adds a fresh herbal note.
  • Grated Parmesan cheese (optional): For those who love a cheesy twist, this adds a savory depth.

For exact measurements, check the bottom of the article where you can find everything listed for easy printing. Feel free to get creative with your ingredients! You can swap in different veggies or even add proteins like diced chicken or ham for a heartier salad.

How to Make Guy Fieri’s Macaroni Salad

Now that you have all your ingredients ready, let’s get cooking! Making Guy Fieri’s Macaroni Salad is straightforward and fun. Follow these simple steps, and you’ll have a delicious dish that everyone will love.

Step 1: Cook the Elbow Macaroni

Start by boiling a pot of salted water. Once it’s bubbling, add the elbow macaroni. Cook it according to the package instructions until it’s al dente—firm but not hard. This usually takes about 7-9 minutes. After draining the pasta, rinse it under cold water. This step is crucial! Rinsing cools the macaroni and stops the cooking process, ensuring it doesn’t turn mushy.

Step 2: Prepare the Dressing

In a large mixing bowl, combine the mayonnaise, Dijon mustard, apple cider vinegar, garlic powder, onion powder, salt, and black pepper. Whisk everything together until it’s smooth and creamy. This dressing is the heart of Guy Fieri’s Macaroni Salad, so make sure it’s well mixed. The tangy flavors will perfectly complement the pasta and veggies.

Step 3: Combine Macaroni and Dressing

Once your macaroni is cool, add it to the bowl with the dressing. Stir gently but thoroughly to coat every piece of pasta. You want that creamy goodness to cling to the macaroni. This is where the magic begins, as the flavors start to meld together beautifully.

Step 4: Add Vegetables and Relish

Now it’s time to fold in the diced celery, bell pepper, red onion, and sweet pickle relish. These ingredients add crunch and a burst of flavor. Gently mix everything until well combined. The colors will pop, making your salad not just tasty but visually appealing too!

Step 5: Chill and Serve

Cover the bowl with plastic wrap and refrigerate the salad for at least one hour. This chilling time allows the flavors to meld together, creating a more delicious dish. When you’re ready to serve, give it a quick stir and enjoy the refreshing taste of Guy Fieri’s Macaroni Salad!

Tips for Success

  • Always rinse the macaroni under cold water to prevent it from becoming mushy.
  • Let the salad chill for at least an hour; this enhances the flavors.
  • Feel free to customize with your favorite veggies or proteins for added texture.
  • For a creamier salad, add a bit more mayonnaise or a splash of milk.
  • Use fresh herbs for a vibrant flavor boost!

Equipment Needed

  • Large pot: For boiling the macaroni. A deep skillet can work too.
  • Colander: To drain the pasta. A fine mesh strainer is a good alternative.
  • Mixing bowl: A large bowl for combining ingredients. Any bowl will do!
  • Whisk: For mixing the dressing. A fork can also get the job done.
  • Plastic wrap: To cover the salad while it chills. A lid works just as well.

Variations

  • Protein-Packed: Add diced cooked chicken, ham, or even tuna for a heartier salad.
  • Veggie Delight: Toss in peas, corn, or shredded carrots for extra color and nutrition.
  • Spicy Kick: Mix in diced jalapeños or a dash of hot sauce for a zesty twist.
  • Herb Infusion: Experiment with fresh herbs like dill or chives for a unique flavor profile.
  • Gluten-Free Option: Substitute elbow macaroni with gluten-free pasta for a suitable alternative.

Serving Suggestions

  • Pair with grilled burgers or hot dogs for a classic summer cookout.
  • Serve alongside crispy fried chicken for a delightful picnic spread.
  • Complement with a refreshing lemonade or iced tea to balance the flavors.
  • Garnish with extra parsley for a pop of color and freshness.

FAQs about Guy Fieri’s Macaroni Salad

Can I make Guy Fieri’s Macaroni Salad ahead of time?

Absolutely! This salad is perfect for making ahead. In fact, letting it chill in the fridge for a few hours or overnight allows the flavors to meld beautifully. Just give it a quick stir before serving!

What can I substitute for mayonnaise in this recipe?

If you’re looking for a lighter option, Greek yogurt works great as a substitute for mayonnaise. It adds creaminess while cutting down on calories. You can also try avocado for a unique twist!

How long does Guy Fieri’s Macaroni Salad last in the fridge?

This salad can last up to 3-5 days in the refrigerator if stored in an airtight container. Just keep an eye on the veggies; they may lose some crunch over time.

Can I add more vegetables to the salad?

<pDefinitely! Feel free to get creative. Adding ingredients like peas, corn, or even diced cucumbers can enhance the texture and flavor. Just remember to chop them small for even distribution.

Is this macaroni salad suitable for a vegetarian diet?

<pYes, Guy Fieri’s Macaroni Salad is vegetarian-friendly! It’s packed with veggies and can be customized to fit various dietary preferences. Just skip any meat additions, and you’re good to go!

Final Thoughts

Guy Fieri’s Macaroni Salad is more than just a side dish; it’s a celebration of flavors and memories. Each bite transports you to sunny days filled with laughter and good company. The creamy dressing, crunchy veggies, and customizable options make it a versatile favorite for any occasion. Whether you’re hosting a backyard barbecue or simply enjoying a quiet dinner at home, this salad brings joy to the table. So, roll up your sleeves, gather your ingredients, and create a dish that will surely impress your family and friends. Trust me, they’ll be asking for seconds!

jhessica

Guy Fieri’s Macaroni Salad: A Flavorful Recipe You’ll Love!

A delicious and flavorful macaroni salad recipe by Guy Fieri, perfect for gatherings and picnics.
Prep Time 15 minutes
Cook Time 10 minutes
Total Time 1 hour 25 minutes
Servings: 6 servings
Course: Salad
Cuisine: American
Calories: 320

Ingredients
  

  • 2 cups elbow macaroni
  • 1 cup mayonnaise
  • 1 tablespoon Dijon mustard
  • 1 tablespoon apple cider vinegar
  • 1 teaspoon garlic powder
  • 1 teaspoon onion powder
  • 1/2 teaspoon salt
  • 1/4 teaspoon black pepper
  • 1 cup diced celery
  • 1 cup diced bell pepper any color
  • 1/2 cup diced red onion
  • 1/2 cup sweet pickle relish
  • 1/4 cup chopped fresh parsley
  • 1/4 cup grated Parmesan cheese optional

Method
 

  1. Cook the elbow macaroni according to package instructions until al dente. Drain and rinse under cold water to cool.
  2. In a large mixing bowl, combine the mayonnaise, Dijon mustard, apple cider vinegar, garlic powder, onion powder, salt, and black pepper. Mix until smooth.
  3. Add the cooled macaroni to the bowl with the dressing and stir to coat evenly.
  4. Fold in the diced celery, bell pepper, red onion, sweet pickle relish, and parsley. Mix until all ingredients are well combined.
  5. If using, sprinkle the grated Parmesan cheese over the top and gently mix it in.
  6. Cover the bowl with plastic wrap and refrigerate for at least 1 hour to allow the flavors to meld. Serve chilled.

Nutrition

Serving: 1servingCalories: 320kcalCarbohydrates: 30gProtein: 6gFat: 20gSaturated Fat: 3gPolyunsaturated Fat: 15gCholesterol: 10mgSodium: 400mgFiber: 1gSugar: 3g

Notes

  • For a protein boost, add diced cooked chicken or ham to the salad.
  • Experiment with different vegetables like peas or corn for added color and texture.

Tried this recipe?

Let us know how it was!

Grilled Mango Pineapple Chicken: A Tropical Delight Recipe

Introduction to Grilled Mango Pineapple Chicken

There’s something magical about the combination of sweet and savory flavors, especially when it comes to grilled dishes. Grilled Mango Pineapple Chicken is a delightful way to bring a taste of the tropics to your dinner table. Whether you’re looking for a quick solution for a busy weeknight or a dish to impress your loved ones at a weekend barbecue, this recipe has you covered. The juicy chicken, paired with the vibrant sweetness of mango and pineapple, creates a symphony of flavors that will have everyone asking for seconds. Let’s dive into this tropical delight!

Why You’ll Love This Grilled Mango Pineapple Chicken

This Grilled Mango Pineapple Chicken is not just a meal; it’s an experience. It’s incredibly easy to whip up, making it perfect for those hectic evenings when time is short. The vibrant flavors transport you to a sunny beach, even if you’re just in your backyard. Plus, it’s a crowd-pleaser! Your family and friends will rave about the juicy chicken and tropical twist, making it a go-to recipe for any occasion.

Ingredients for Grilled Mango Pineapple Chicken

Gathering the right ingredients is the first step to creating this tropical masterpiece. Here’s what you’ll need:

  • Chicken Breasts: The star of the show! Choose large, boneless chicken breasts for juicy results.
  • Fresh Pineapple: Diced into sweet chunks, it adds a refreshing burst of flavor.
  • Ripe Mango: This fruit brings a tropical sweetness that perfectly complements the chicken.
  • Soy Sauce: A savory base for the marinade, enhancing the overall flavor profile.
  • Honey: Adds a touch of natural sweetness and helps caramelize the chicken on the grill.
  • Olive Oil: Keeps the chicken moist and helps the marinade stick.
  • Garlic: Minced for a punch of flavor that elevates the dish.
  • Ground Ginger: A warm spice that adds depth and a hint of heat.
  • Black Pepper: For a subtle kick that balances the sweetness.
  • Salt: Enhances all the flavors, making each bite delicious.
  • Lime Juice: Freshly squeezed for a zesty brightness that ties everything together.
  • Fresh Cilantro: Optional, but it adds a lovely herbal note and a pop of color for garnish.

For those looking to mix things up, consider substituting chicken with shrimp or firm tofu. Just adjust the cooking time accordingly. You can find all the exact quantities for these ingredients at the bottom of the article, ready for printing!

How to Make Grilled Mango Pineapple Chicken

Now that you have all your ingredients ready, it’s time to bring this tropical dish to life! Follow these simple steps to create a mouthwatering Grilled Mango Pineapple Chicken that will impress everyone at your table.

Step 1: Prepare the Marinade

Start by combining the diced pineapple and mango in a medium bowl. Add the soy sauce, honey, olive oil, minced garlic, ground ginger, black pepper, salt, and lime juice. Mix everything well until the ingredients are fully blended. This marinade is where the magic happens, infusing the chicken with a burst of tropical flavor.

Step 2: Marinate the Chicken

Next, take your chicken breasts and place them in a resealable plastic bag or a shallow dish. Pour the marinade over the chicken, ensuring it’s well coated. Seal the bag or cover the dish, then refrigerate for at least 1 hour. If you have time, letting it marinate for up to 4 hours will deepen the flavors even more.

Step 3: Preheat the Grill

While the chicken is soaking up all that delicious marinade, preheat your grill to medium-high heat. This step is crucial for achieving those beautiful grill marks and ensuring the chicken cooks evenly. A hot grill will also help lock in the juices, keeping your chicken tender and flavorful.

Step 4: Grill the Chicken

Once your grill is ready, remove the chicken from the marinade, allowing any excess to drip off. Place the chicken on the grill and cook for 6-7 minutes on each side. You’re looking for an internal temperature of 165°F to ensure it’s fully cooked. If you have leftover marinade, feel free to brush it on during the last few minutes of grilling for an extra flavor boost.

Step 5: Rest and Serve

After grilling, remove the chicken from the grill and let it rest for about 5 minutes. This resting period allows the juices to redistribute, making each bite juicy and tender. Once rested, slice the chicken and serve it topped with the fresh mango and pineapple mixture. Garnish with cilantro if desired, and enjoy your tropical feast!

Tips for Success

  • Always let the chicken marinate for at least an hour for maximum flavor.
  • Use a meat thermometer to check for doneness; 165°F is the magic number.
  • Don’t skip the resting time after grilling; it keeps the chicken juicy.
  • Experiment with different fruits in the marinade for a unique twist.
  • For extra flavor, grill some extra pineapple and mango to serve alongside.

Equipment Needed

  • Grill: A gas or charcoal grill works perfectly. If you don’t have one, a grill pan on the stovetop will do.
  • Medium Bowl: For mixing the marinade. Any mixing bowl will suffice.
  • Resealable Plastic Bag or Shallow Dish: For marinating the chicken.
  • Meat Thermometer: Essential for checking the chicken’s doneness.
  • Grilling Tongs: To flip the chicken easily without losing juices.

Variations

  • Spicy Twist: Add a teaspoon of red pepper flakes to the marinade for a kick of heat.
  • Herb-Infused: Incorporate fresh herbs like basil or mint into the marinade for a fragrant twist.
  • Fruit Swap: Try using peaches or papaya instead of mango and pineapple for a different flavor profile.
  • Low-Carb Option: Substitute chicken with firm tofu or zucchini slices for a lighter, vegetarian version.
  • Grilled Skewers: Cut the chicken and fruits into chunks, thread them onto skewers, and grill for fun, bite-sized pieces.

Serving Suggestions

  • Side Dishes: Pair with coconut rice or a fresh green salad for a light meal.
  • Drinks: Serve with a chilled tropical cocktail or a refreshing iced tea.
  • Presentation: Garnish with lime wedges and extra cilantro for a vibrant look.

FAQs about Grilled Mango Pineapple Chicken

Can I use frozen fruit for the marinade?
While fresh fruit is ideal for the best flavor, you can use frozen mango and pineapple in a pinch. Just make sure to thaw and drain any excess liquid before adding them to the marinade.

How long can I marinate the chicken?
For optimal flavor, marinate the chicken for at least 1 hour. However, you can let it sit for up to 4 hours. Just avoid marinating for too long, as the acidity from the lime juice can start to break down the chicken.

What can I serve with Grilled Mango Pineapple Chicken?
This tropical chicken pairs beautifully with coconut rice, a fresh green salad, or grilled vegetables. You can also serve it with a tropical cocktail for a complete experience!

Can I make this recipe ahead of time?
Absolutely! You can marinate the chicken a day in advance and store it in the fridge. Just grill it when you’re ready to serve for a quick and delicious meal.

Is Grilled Mango Pineapple Chicken gluten-free?
Yes, this recipe is gluten-free as long as you use gluten-free soy sauce. It’s a great option for those with dietary restrictions!

Final Thoughts

Grilled Mango Pineapple Chicken is more than just a meal; it’s a celebration of flavors that transports you to a sun-soaked paradise. The juicy chicken, paired with the sweetness of tropical fruits, creates a dish that’s both satisfying and refreshing. Whether you’re grilling for family or friends, this recipe is sure to spark joy and create lasting memories around the table. Plus, it’s easy enough to whip up on a busy weeknight or to impress guests at a summer gathering. Dive into this tropical delight and savor every bite—you won’t regret it!

jhessica

Grilled Mango Pineapple Chicken: A Tropical Delight Recipe

A delicious and tropical grilled chicken recipe featuring mango and pineapple.
Prep Time 10 minutes
Cook Time 15 minutes
Total Time 1 hour 25 minutes
Servings: 4 servings
Course: Main Course
Cuisine: Tropical
Calories: 280

Ingredients
  

  • 2 large chicken breasts about 1 pound
  • 1 cup fresh pineapple diced
  • 1 cup ripe mango diced
  • 1/4 cup soy sauce
  • 2 tablespoons honey
  • 2 tablespoons olive oil
  • 2 cloves garlic minced
  • 1 teaspoon ground ginger
  • 1/2 teaspoon black pepper
  • 1/4 teaspoon salt
  • Juice of 1 lime
  • Fresh cilantro for garnish (optional)

Method
 

  1. In a medium bowl, combine the diced pineapple, mango, soy sauce, honey, olive oil, minced garlic, ground ginger, black pepper, salt, and lime juice. Mix well to create a marinade.
  2. Place the chicken breasts in a resealable plastic bag or shallow dish and pour the marinade over the chicken. Seal the bag or cover the dish and refrigerate for at least 1 hour, or up to 4 hours for more flavor.
  3. Preheat your grill to medium-high heat. Remove the chicken from the marinade, allowing excess marinade to drip off.
  4. Grill the chicken for 6-7 minutes on each side, or until the internal temperature reaches 165°F. During the last few minutes of grilling, you can add any leftover marinade to the grill for added flavor, ensuring it cooks thoroughly.
  5. Once cooked, remove the chicken from the grill and let it rest for 5 minutes before slicing.
  6. Serve the grilled chicken topped with the fresh mango and pineapple mixture and garnish with cilantro if desired.

Nutrition

Serving: 1servingCalories: 280kcalCarbohydrates: 10gProtein: 30gFat: 12gSaturated Fat: 2gPolyunsaturated Fat: 10gCholesterol: 70mgSodium: 600mgFiber: 1gSugar: 10g

Notes

  • For a spicier kick, add a teaspoon of red pepper flakes to the marinade or serve with a spicy dipping sauce.
  • Substitute the chicken with shrimp or firm tofu for a different protein option, adjusting the cooking time as needed.

Tried this recipe?

Let us know how it was!

Stay Connected

Get recipes via email: