Get my cookbooks

Irresistible Crab Dip Croissants for Your Next Brunch Treat

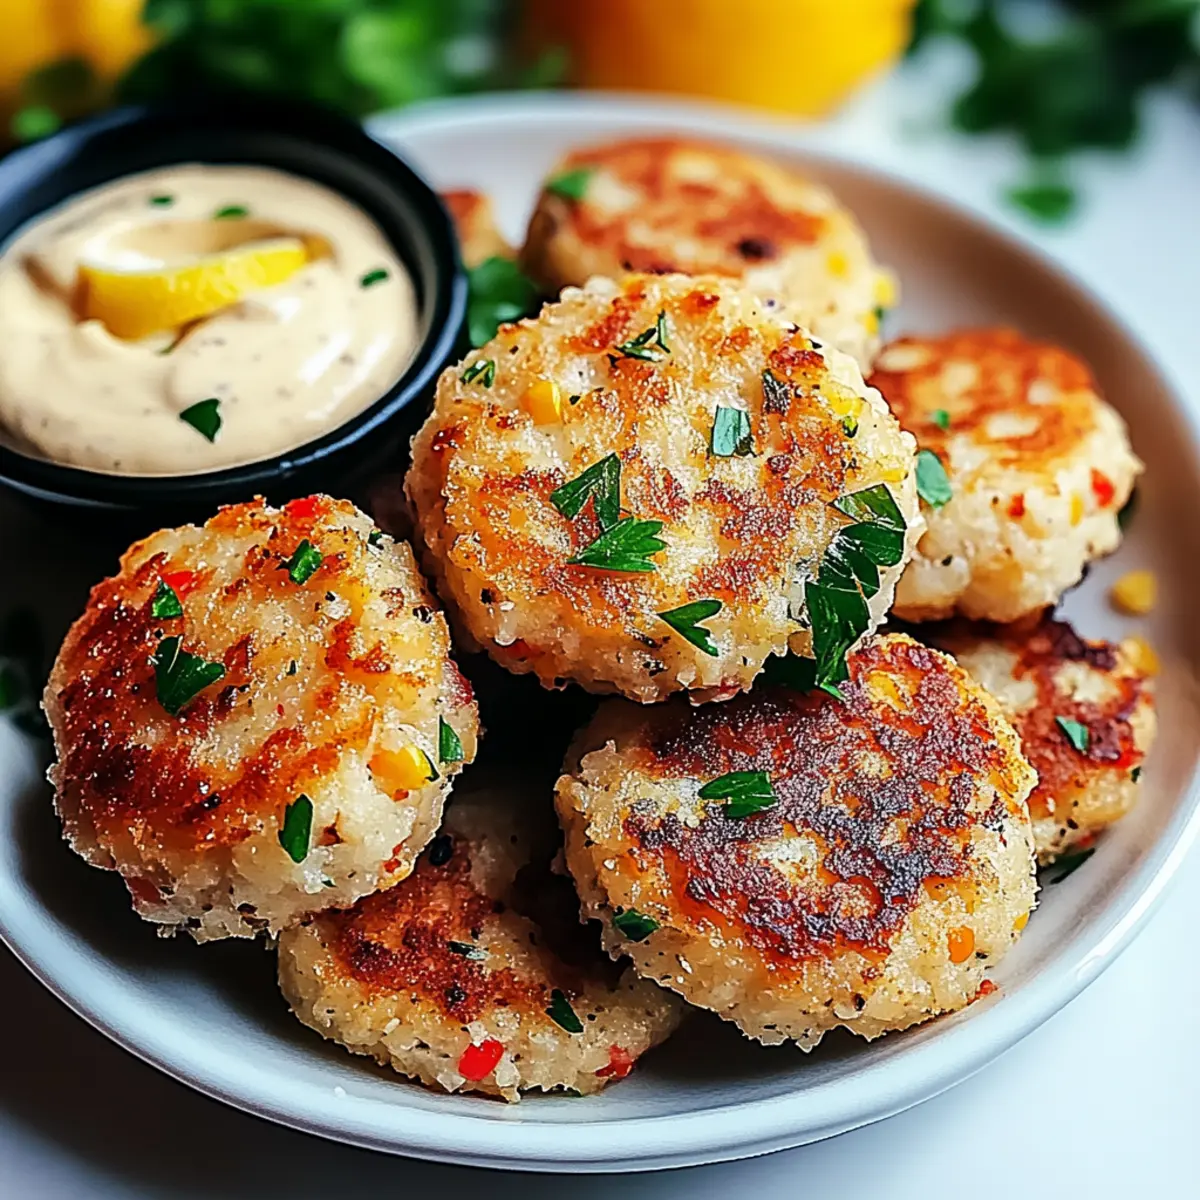
As I hurriedly flipped through my recipe book, a wave of savory aromas pulled me back to my favorite coastal brunch spots. It was time to recreate that deliciously indulgent Crab Dip Croissants—a crowd-pleaser that combines the light, flaky texture of golden croissants with a rich crab dip that’s simply unforgettable. Not only are these treats incredibly simple to make, but they also serve as a delightful appetizer or a standout dish for any gathering. Imagine the compliments you’ll receive as friends and family dive into these scrumptious bites, each filled with tender lump crab meat and a touch of Old Bay seasoning. What little twist will you add to make this already amazing recipe even more your own?

Why are Crab Dip Croissants a Must-Try?

Flavor Explosion: With a luscious crab dip nestled inside buttery croissants, every bite is pure bliss.

Quick and Easy: Perfect for busy mornings or last-minute gatherings—these croissants come together effortlessly.

Versatile Delight: Serve them as brunch, appetizers, or even late-night snacks; they fit any occasion beautifully.

Crowd-Pleaser: Your friends and family won’t be able to resist these scrumptious treats, making them perfect for parties or casual get-togethers.

Make-Ahead Option: Stuff your croissants in advance and pop them in the oven right before serving for the ultimate convenience.

A Touch of Elegance: Elevate your dining experience with this simple yet sophisticated dish that captures the heart of coastal flavors. For more delightful variations with a twist, check out our Comforting Charm Croissants.

Crab Dip Croissants Ingredients

For the Croissants
Croissants – Store-bought saves time, but homemade adds a gourmet touch.

For the Crab Dip
Cream Cheese (16 oz, softened) – Ensures rich creaminess; it should be at room temperature for smooth mixing.
Lump Crab Meat (8 oz) – The star of the dish; fresh is best, but canned works in a pinch—just drain well.
Claw Crab Meat (4 oz) – Adds extra flavor and texture; use a mix for depth.
Mozzarella (1/2 cup, shredded) – Provides delightful stretch; provolone offers a nice twist if you’re feeling adventurous.
Sharp White Cheddar (1/2 cup, shredded) – Brings a zesty sharpness; Colby Jack is a milder substitute.
Mayonnaise (1/4 cup) – Adds moisture and depth; Greek yogurt is a lighter option if desired.
Shallot (1/4 cup, minced) – Offers a lovely touch of sweetness; green onion can replace it for a milder taste.
Fresh Parsley (1 tbsp, chopped) – Brightens the dish with freshness; dried herbs are a backup in a pinch.
Chives (1 tbsp, minced) – Adds extra color and flavor—fresh is best!
Worcestershire Sauce (1 tsp) – Enhances umami flavors; omit if you don’t have it on hand.
Garlic (1 tsp, minced) – Infuses sweetness and depth; fresh is preferable, but powdered can work in a hurry.
Old Bay Seasoning (1 tsp) – A classic for a seafood twist; optional if you prefer more subtle spices.
Pepper (1 tsp) – Adds mild heat; adjust according to your taste.

For the Garlic Butter
Unsalted Butter (5 tbsp, melted) – Brushed on top for richness; olive oil can be a dairy-free alternative.
Salt (1/4 tsp) – Elevates all the flavors.

Now that you have everything you need, get ready to whip up these irresistible crab dip croissants that everyone will talk about!

Step‑by‑Step Instructions for Crab Dip Croissants

Step 1: Prepare Garlic Butter
In a small mixing bowl, whisk together 5 tablespoons of melted unsalted butter, 1 teaspoon of minced garlic, and a pinch of salt until well combined. This flavorful garlic butter will add a golden, aromatic touch to your crab dip croissants. Set the mixture aside so the flavors can meld while you prepare the filling.

Step 2: Make Crab Dip Filling
In a large mixing bowl, combine 16 ounces of softened cream cheese, ½ cup each of shredded mozzarella and sharp white cheddar, and ¼ cup mayonnaise. Stir in ¼ cup minced shallots, 1 tablespoon each of chopped fresh parsley and minced chives, 1 teaspoon Worcestershire sauce, and 1 teaspoon minced garlic. Gently fold in 12 ounces of lump and claw crab meat until just incorporated, taking care to maintain the crab’s texture.

Step 3: Stuff Croissants
Preheat your oven to 350°F (175°C) as you prepare the croissants. Carefully slice open each croissant along the side, making 4-5 shallow cuts without cutting all the way through. Using a piping bag or a ziplock bag with the corner snipped off, pipe the creamy crab dip filling generously into each croissant, ensuring they’re well-stuffed for a delicious bite.

Step 4: Bake Croissants
Place the stuffed croissants on a parchment-lined baking sheet, ensuring they have some space in between for even cooking. Brush the tops with your prepared garlic butter for a rich finish. Bake in the preheated oven for 10-12 minutes, or until the croissants are golden brown and flaky, emitting an irresistible aroma.

Step 5: Finish and Serve
Once baked, remove the croissants from the oven and brush any remaining garlic butter over the tops for extra flavor. Sprinkle with additional chopped chives for a touch of color before serving. These crab dip croissants are best enjoyed warm, allowing the creamy filling to shine in every delightful bite.

Make Ahead Options

These Crab Dip Croissants are perfect for busy cooks eager to save time! You can prepare the filling and stuff the croissants up to 24 hours in advance. Simply make the crab dip filling and fill each croissant, then cover tightly with plastic wrap and refrigerate. This keeps the croissants fresh and prevents sogginess. When it’s time to serve, preheat the oven and bake the stuffed croissants directly from the fridge. Brush with garlic butter and bake for 10-12 minutes until golden brown. By prepping ahead, you’ll have warm, mouthwatering croissants ready to impress your guests with minimal last-minute effort!

Expert Tips for Perfect Crab Dip Croissants

  • Softened Cream Cheese: Always ensure your cream cheese is at room temperature; this makes for a smoother mixture and prevents lumps in your crab dip.

  • Gentle Mixing: Be careful when mixing in the crab meat. Gently fold it into the dip to maintain those lovely lumps that add texture to your crab dip croissants.

  • Correct Stuffing: Avoid overstuffing your croissants, as it may cause the filling to leak out during baking. Aim for a generous, yet controlled, amount of crab dip filling.

  • Piping Ease: Using a piping bag or a ziplock bag with a cut tip makes stuffing easier and cleaner, ensuring each croissant is uniformly filled with delicious crab dip.

  • Watch the Bake Time: Keep an eye on your croissants while baking. You want them golden brown and flaky, so adjust the baking time as needed based on your oven’s temperament.

  • Optional Seasonings: Feel free to customize the flavor by adding a pinch of cayenne pepper or smoked paprika to the crab dip, enhancing your crab dip croissants with an extra depth of flavor.

What to Serve with Crab Dip Croissants

Imagine a delightful spread of flavors and textures that perfectly complements the savory richness of your crab dip croissants.

  • Fresh Garden Salad: A crisp salad with mixed greens and a light vinaigrette balances the richness of the croissants and adds refreshing crunch.
  • Creamy Tomato Soup: Serve alongside a warm bowl of tomato soup for a comforting and satisfying combination that enhances the flavors of the crab dip.
  • Chilled White Wine: A glass of chilled Sauvignon Blanc or a light Pinot Grigio elevates the meal, highlighting the seafood elements superbly.
  • Garlic Butter Pasta: Dine on spaghetti coated in garlic butter; its simplicity and flavor pair beautifully with the croissants, creating a cohesive meal.
  • Fruit Platter: Brighten up your table with a selection of fresh fruits like berries and citrus; their natural sweetness contrasts nicely with the savory bites.
  • Shrimp Cocktail: For a luxe touch, serve with shrimp cocktail; its chilled, zesty vibe complements the warm, creamy croissants.
  • Mini Quiches: These bite-sized savory treats add variety to your spread and are delightful companions at brunch or as appetizers.
  • Chocolate Mousse: End on a sweet note with velvety chocolate mousse, offering a rich and satisfying dessert that pairs beautifully with your meal.
  • Spiced Apple Cider: A warm, spiced apple cider can be a lovely sippable option that not only complements the dish but also creates a cozy atmosphere.
  • Champagne: Celebrate any occasion with bubbly champagne—its effervescence cuts through the richness, making it the perfect beverage choice.

Crab Dip Croissants Variations & Substitutions

Feel free to get creative and personalize these delectable croissants to suit your taste buds!

  • Seafood Twist: Substitute crab meat with shrimp or lobster for a delightful twist on the classic filling. Each variation brings its unique flavor and texture, perfect for seafood lovers wanting something fresh!

  • Spicy Kick: Add diced jalapeños or green chilies into the filling for a zesty heat. This fiery addition not only elevates the flavors but also adds a fun dimension to your croissants that guests will love!

  • Cheese Experimentation: Try different cheeses, like feta or Gouda, to create unique flavors. Mixing and matching opens the door to unexpected taste combinations, making your croissants even more exciting!

  • Vegetable Medley: Incorporate sautéed spinach or artichoke hearts into the mix for a veggie-packed filling. This makes for a colorful and nutritious option, without sacrificing any of that delicious creaminess.

  • Dairy-Free Delight: Use cashew cream or dairy-free cheese instead of traditional dairy for a lactose-free alternative. Your guests won’t miss the dairy at all, as the flavor will still shine through!

  • Herb Infusion: Experiment with fresh herbs like dill or tarragon, in addition to, or instead of, parsley and chives. This can produce a fragrant and flavorful layer in your crab dip croissants that will tantalize the taste buds.

  • Umami Boost: Add a splash of soy sauce or fish sauce for a deeper umami profile. This infusion creates a rich complexity that can make your dish stand out in any gathering!

  • Make-Ahead Option: Prepare the crab dip the night before and store it in the fridge. Cozy brunches or gatherings could use a head start, allowing you to simply stuff and bake the croissants as guests arrive.

For more delightful variations, be sure to check out our Comforting Charm Croissants for a taste of another crowd-pleaser!

How to Store and Freeze Crab Dip Croissants

Fridge: Store baked crab dip croissants in an airtight container for up to 3 days. Reheat in the oven at 350°F (175°C) for about 10 minutes to restore their flaky texture.

Freezer: For longer storage, freeze unbaked stuffed croissants for up to 2 months. Wrap each tightly in plastic wrap and place them in a freezer-safe bag. Bake directly from the freezer when ready, adding a few extra minutes to the baking time.

Reheating: If you have leftover baked croissants, reheat them in the oven instead of the microwave for a crispier finish. Just 10 minutes at 350°F (175°C) will do the trick!

Make-Ahead: You can prepare crab dip croissants and keep them in the fridge for up to 24 hours before baking. They make for an easy and impressive last-minute treat!

Crab Dip Croissants Recipe FAQs

How do I select the best crab meat for my croissants?
Absolutely! When choosing crab meat, look for lump crab meat for the best texture and flavor. Fresh is ideal, but if you’re in a pinch, high-quality canned crab meat works too. Just be sure to drain it well to avoid excess moisture, which can make your filling too runny.

How should I store leftover crab dip croissants?
You can store baked crab dip croissants in an airtight container in the fridge for up to 3 days. To reheat, pop them in the oven at 350°F (175°C) for about 10 minutes to regain that flaky, delicious texture. They’re best enjoyed warm!

Can I freeze crab dip croissants?
Certainly! For freezer-friendly options, wrap unbaked stuffed croissants tightly in plastic wrap and place them in a freezer-safe bag. They can be frozen for up to 2 months. When you’re ready to bake, you can put them right into the oven from the freezer—just remember to add an extra few minutes to the baking time for best results.

What if my crab dip filling is too loose?
If you find your crab dip filling is too loose, try adding a little extra cream cheese or a tablespoon of cornstarch to thicken it up. This helps maintain the right consistency for piping into the croissants. Gently fold in your ingredients to avoid breaking up the crab meat!

Are crab dip croissants safe for people with shellfish allergies?
No, crab dip croissants contain shellfish and should be avoided by those with shellfish allergies. If you’re looking for a safer alternative, consider making a chicken or vegetable dip instead and using the same technique for stuffing the croissants to create a delicious variation.

Can I make crab dip croissants ahead of time?
Yes! You can prepare the crab dip filling and stuff the croissants, storing them in the fridge for up to 24 hours before baking. This way, you’ll have an impressive and delicious dish ready to pop in the oven for your brunch or gathering—convenience at its best!

Crab Dip Croissants

Irresistible Crab Dip Croissants for Your Next Brunch Treat

These Crab Dip Croissants are a flavorful, crowd-pleasing appetizer perfect for any gathering.
Prep Time 20 minutes
Cook Time 12 minutes
Total Time 32 minutes
Servings: 8 croissants
Course: Appetizers
Cuisine: Coastal
Calories: 320

Ingredients
  

For the Croissants
  • 8 croissants Store-bought croissants homemade adds a gourmet touch
For the Crab Dip
  • 16 oz Cream Cheese softened and at room temperature
  • 8 oz Lump Crab Meat fresh is best, but canned works
  • 4 oz Claw Crab Meat adds extra flavor and texture
  • 0.5 cup Mozzarella shredded; provolone is a nice twist
  • 0.5 cup Sharp White Cheddar shredded; Colby Jack is a milder substitute
  • 0.25 cup Mayonnaise adds moisture; Greek yogurt is lighter
  • 0.25 cup Shallot minced; can replace with green onion
  • 1 tbsp Fresh Parsley chopped; dried herbs are a backup
  • 1 tbsp Chives minced; fresh is best
  • 1 tsp Worcestershire Sauce optional
  • 1 tsp Garlic minced; fresh is preferable
  • 1 tsp Old Bay Seasoning optional for a seafood twist
  • 1 tsp Pepper adjust according to taste
For the Garlic Butter
  • 5 tbsp Unsalted Butter melted
  • 0.25 tsp Salt to elevate flavors

Equipment

  • Mixing Bowl
  • Piping Bag
  • Oven
  • Baking Sheet

Method
 

Step-by-Step Instructions for Crab Dip Croissants
  1. Prepare Garlic Butter: Whisk together melted unsalted butter, minced garlic, and salt. Set aside.
    Crab Dip Croissants
  2. Make Crab Dip Filling: Combine softened cream cheese, shredded mozzarella and cheddar, mayonnaise, minced shallots, parsley, chives, Worcestershire sauce, minced garlic, lump crab meat, and claw crab meat. Mix gently.
    Crab Dip Croissants
  3. Stuff Croissants: Slice open each croissant and use piping bag to fill with crab dip mixture.
    Crab Dip Croissants
  4. Bake Croissants: Brush tops with garlic butter, place on baking sheet, and bake at 350°F (175°C) for 10-12 minutes until golden brown.
    Crab Dip Croissants
  5. Finish and Serve: Brush with remaining garlic butter, sprinkle with chives, and serve warm.
    Crab Dip Croissants

Nutrition

Serving: 1croissantCalories: 320kcalCarbohydrates: 20gProtein: 9gFat: 25gSaturated Fat: 15gPolyunsaturated Fat: 2gMonounsaturated Fat: 8gCholesterol: 70mgSodium: 580mgPotassium: 150mgFiber: 1gSugar: 2gVitamin A: 600IUVitamin C: 2mgCalcium: 200mgIron: 1mg

Notes

These croissants are best enjoyed warm, allowing the creamy filling to shine in every delightful bite.

Tried this recipe?

Let us know how it was!

Chocolate Marshmallow Swirl Cookies for Cozy Nights In

A delightful aroma wafts through the kitchen as the oven timer dings, signaling the birth of my newest obsession: Chocolate Marshmallow Swirl Cookies. These cookies perfectly blend the warmth of soft marshmallows with the rich decadence of chocolate, making them an indulgent homemade dessert like no other. What I love most is how effortlessly they come together, transforming cozy evenings into sweet celebrations. Plus, they’re equally charming at gatherings or just as a sweet escape from everyday life. With their stunning swirls and satisfying chewiness, these cookies are bound to become a family favorite. Ready to bring a little magic to your baking? Let’s dive into the recipe and create something truly special together!

Why are these cookies a must-bake?

Decadent Indulgence: These Chocolate Marshmallow Swirl Cookies deliver a deliciously rich experience, merging soft, gooey marshmallows with deep chocolate flavor.

Embrace Ease: With simple ingredients and straightforward steps, even novice bakers can shine. These cookies can be whipped up in under an hour!

Family Appeal: Perfect for cozy nights or family gatherings, they’re sure to please both kids and adults alike.

Versatile Variations: You can easily customize this recipe by mixing in nuts or even switching up the chocolate types. For variations like Chocolate Chip Pancakes for breakfast or Blueberry Breakfast Cookies for a fruity twist, consider this an irresistible starting point.

Irresistibly Chewy: Each bite offers a delightful combination of textures, leaving you with a chewy, satisfying cookie experience that you won’t forget.

Chocolate Marshmallow Swirl Cookies Ingredients

For the Cookie Base

  • All-purpose flour – this gives the structure; use gluten-free flour for a gluten-free option.
  • Cocoa powder – adds rich chocolate flavor; Dutch-process cocoa can deepen this taste.
  • Baking soda – acts as a leavening agent; ensure it’s fresh for the best rise.
  • Salt – enhances the overall flavor; consider sea salt for a different taste profile.
  • Butter (softened) – contributes moisture and richness; margarine can be a dairy-free substitute.
  • Granulated sugar – provides sweetness; substitute with brown sugar for a hint of molasses flavor or coconut sugar for a healthier option.
  • Brown sugar – adds moisture and depth to the cookie base.
  • Egg – binds the ingredients together; use a flax egg for a vegan version.
  • Vanilla extract – elevates the cookie’s flavor profile with its aromatic notes.

For the Chocolate and Marshmallow

  • Semi-sweet chocolate chips – create melty bursts of chocolate; milk or dark chocolate can also be used.
  • Mini marshmallows – add a sweet and gooey texture; larger marshmallows can be cut into smaller pieces as a substitute.
  • Marshmallow fluff (optional) – gives extra gooeyness and sweetness; could be omitted for a less sweet cookie.

These Chocolate Marshmallow Swirl Cookies are not just delicious, but they’re also incredibly customizable to suit your taste!

Step‑by‑Step Instructions for Chocolate Marshmallow Swirl Cookies

Step 1: Preheat the Oven
Begin by preheating your oven to 350°F (175°C). While it warms, line two baking sheets with parchment paper. This will prevent your delicious Chocolate Marshmallow Swirl Cookies from sticking while they bake. Preheating the oven ensures an even rise for the cookies, setting you up for success right from the start!

Step 2: Combine the Dry Ingredients
In a medium-sized bowl, whisk together 1 ¾ cups of all-purpose flour, ½ cup of cocoa powder, 1 teaspoon of baking soda, and ½ teaspoon of salt. This dry mix forms the foundation of your cookies, providing the structure and rich chocolate flavor. Once combined, set it aside so it’s ready for incorporation with the wet ingredients.

Step 3: Cream the Butters and Sugars
In a large mixing bowl, cream together ½ cup of softened butter, ½ cup of granulated sugar, and ½ cup of brown sugar using a hand mixer or stand mixer at medium speed. Beat for 2-3 minutes until light and fluffy, a visual indication that the sugars have fully integrated with the butter. This step is crucial for achieving the desirable texture in your cookies.

Step 4: Add Egg and Vanilla
Next, mix in one large egg and 1 teaspoon of vanilla extract into the butter-sugar mixture. Beat until everything is well combined, scraping down the sides of the bowl as needed. The mixture should have a smooth consistency, indicating that the flavor of the Chocolate Marshmallow Swirl Cookies is beginning to come together harmoniously.

Step 5: Incorporate the Dry Ingredients
Gradually add the dry ingredient mixture to the wet ingredients, mixing at a low speed until just combined. Be careful not to overmix, as this could lead to tough cookies. You want to see streaks of flour remaining for that perfect soft texture. This is where the magic of your cookies starts to take shape!

Step 6: Fold in Chocolate and Marshmallows
Gently fold in 1 cup of semi-sweet chocolate chips and 1 cup of mini marshmallows into the dough using a spatula. If you’re using marshmallow fluff, add it now for an extra layer of gooey sweetness. Aim to maintain some visible streaks of chocolate and marshmallow for that delightful swirl effect in your Chocolate Marshmallow Swirl Cookies.

Step 7: Scoop the Dough
Using a cookie scoop or tablespoon, drop rounded balls of dough onto the prepared baking sheets, spacing them about 2 inches apart. This allows room for the cookies to spread while baking. The dough should look soft and generous, reflecting the indulgent nature of the Chocolate Marshmallow Swirl Cookies you’re creating.

Step 8: Bake Until Perfect
Bake the cookies in your preheated oven for 8-10 minutes, until the edges are set and the centers remain soft. The perfect doneness will have a slight golden hue around the edges. Keep an eye on the cookies as they bake; you want them to look invitingly gooey!

Step 9: Cool and Transfer
Once baked, allow the cookies to cool on the baking sheets for about 5 minutes. This gives them time to firm up slightly. Then, transfer them onto a wire rack to cool completely. Letting the cookies rest ensures they maintain their soft, chewy texture, which is the hallmark of your Chocolate Marshmallow Swirl Cookies.

Chocolate Marshmallow Swirl Cookies Variations

Feel free to customize your Chocolate Marshmallow Swirl Cookies to match your taste preferences and dietary needs!

  • Gluten-Free: Swap all-purpose flour for a gluten-free flour blend to make these cookies friendly for gluten-sensitive eaters.

  • Dairy-Free: Substitute butter with coconut oil or dairy-free margarine to create a delicious dairy-free treat without sacrificing flavor.

  • Nutty Addition: Mix in a handful of chopped walnuts or pecans for an added crunch and rich flavor contrast against the marshmallows.

  • White Chocolate Twist: Replace semi-sweet chocolate chips with white chocolate chips for a sweeter, creamier flavor that pairs beautifully with the marshmallows.

  • Espresso Kick: Add a teaspoon of espresso powder to the dry ingredients for a delightful coffee flavor that enhances the richness of the chocolate.

  • Caramel Drizzle: Drizzle melted caramel over the baked cookies for an extra layer of indulgence that complements the chocolate and marshmallows beautifully.

Experimenting with variations allows for creativity in the kitchen! Whether you’re whipping up a batch for a cozy night in or a gathering, these cookies offer endless options. For a lighter sweet treat, check out Chocolate Fudge Cupcakes that can satisfy your sweet tooth. Or, indulge in the fruity goodness of Blueberry Breakfast Cookies for a refreshing morning option!

Make Ahead Options

These Chocolate Marshmallow Swirl Cookies are perfect for meal prep enthusiasts! You can prepare the cookie dough up to 3 days in advance and store it in the refrigerator, ensuring it remains fresh and ready to bake. Simply scoop the dough into balls and place them on a parchment-lined baking sheet before refrigerating. When you’re ready to enjoy these delicious treats, bake them straight from the fridge for an extra soft texture, adjusting the baking time by a minute or two if needed. This way, you always have a warm, gooey dessert at your fingertips, making family gatherings or cozy nights in even sweeter!

Storage Tips for Chocolate Marshmallow Swirl Cookies

Room Temperature: Keep baked cookies in an airtight container at room temperature for up to 5 days. This helps maintain their chewy texture and delicious flavor.

Fridge: If you’d like to extend the life of your Chocolate Marshmallow Swirl Cookies, store them in the refrigerator for up to 1 week. Just make sure they’re well-wrapped to prevent them from drying out.

Freezer: For longer storage, freeze the cookies in an airtight container or freezer bag for up to 3 months. Layer parchment paper between cookies to prevent sticking.

Reheating: To enjoy your cookies warm, place them in the microwave for 10-15 seconds. This will bring back that delightful gooeyness that makes these Chocolate Marshmallow Swirl Cookies so irresistible!

What to Serve with Chocolate Marshmallow Swirl Cookies

Indulging in these gooey bites creates the perfect opportunity to enhance your dessert experience with delightful pairings.

  • Vanilla Ice Cream:
    A scoop of creamy vanilla ice cream provides a refreshing contrast to the chocolatey warmth of the cookies, making each bite a heavenly delight.

  • Hot Chocolate:
    A steaming cup of rich hot chocolate will amplify the cozy vibe, complementing the sweet marshmallow flavors while warming you up inside.

  • Fresh Berries:
    Juicy strawberries or raspberries add a refreshing tartness, balancing the sweetness of the cookies beautifully, and bringing a pop of color to your plate.

  • Chocolate Milk:
    This classic drink adds nostalgia to your dessert, allowing chocolate lovers to revel in an extra chocolatey experience that’s both fun and indulgent.

  • Peanut Butter Dip:
    Dipping your cookie into creamy peanut butter adds a delightful nutty flavor and extra richness. It’s a sweet and salty match made in heaven.

  • Coconut Milk Whipped Cream:
    Light and fluffy coconut whipped cream offers a subtle tropical flavor, perfectly enhancing the marshmallow profile while keeping things dairy-free.

  • Homemade Fruit Compote:
    A warm fruit compote creates a burst of fruity goodness, contrasting the cookies’ texture, and adds a touch of sophistication to your sweet spread.

  • Iced Coffee:
    The refreshing bitterness of iced coffee cuts through the cookie’s richness, creating a sophisticated pairing that elevates your afternoon treat.

Each of these options brings a unique taste experience to your Chocolate Marshmallow Swirl Cookies, making your dessert moments truly unforgettable!

Expert Tips for Chocolate Marshmallow Swirl Cookies

  • Measure Accurately: Ensure you measure all ingredients accurately, especially flour and cocoa powder, to avoid dense or dry cookies.

  • Chill the Dough: If time permits, chill the dough for about 30 minutes before baking. This step can enhance the flavors and improve the cookie’s texture.

  • Don’t Overmix: When combining ingredients, mix until just combined to keep your Chocolate Marshmallow Swirl Cookies soft and chewy. Overmixing can lead to a tough texture.

  • Watch the Bake Time: Start checking your cookies at the 8-minute mark. Remove them when the edges are set but the centers are still soft for that perfect gooey bite.

  • Use Fresh Ingredients: Make sure your baking soda is fresh for the best rise. Stale ingredients can impact the final outcome, leading to flat cookies.

  • Experiment with Add-ins: Feel free to customize your cookies with nuts or different types of chocolate for a unique twist. Enjoy the creative process!

Chocolate Marshmallow Swirl Cookies Recipe FAQs

What type of marshmallows should I use for the best texture?
For the ultimate gooey experience, mini marshmallows work wonderfully. They melt beautifully during baking, creating that soft, chewy texture. If you have only larger marshmallows on hand, don’t worry! You can cut them into smaller pieces to use instead.

How should I store my Chocolate Marshmallow Swirl Cookies?
These delightful cookies can be stored in an airtight container at room temperature for up to 5 days. If you want to keep them fresh longer, refrigerate them for up to 1 week. Just ensure they’re wrapped well to prevent dryness.

Can I freeze Chocolate Marshmallow Swirl Cookies?
Absolutely! These cookies can be frozen for up to 3 months. To freeze, place them in an airtight container or freezer bag, putting parchment paper between layers to avoid sticking. When you’re ready to enjoy them, just reheat them in the microwave for 10-15 seconds to bring back that marvelous gooey texture.

What should I do if my cookies spread too much during baking?
If your cookies spread too much, it may be due to overly soft butter or not enough flour. Make sure your butter is just softened (not melted) and try refrigerating the dough for about 30 minutes before baking to help them retain their shape.

Are these cookies suitable for people with dietary restrictions?
Yes! You can easily make these Chocolate Marshmallow Swirl Cookies vegan by substituting the egg with a flax egg (1 tablespoon ground flaxseed mixed with 3 tablespoons water, let sit for a few minutes until it thickens). For dairy-free options, use margarine instead of butter. Just keep in mind your choice of marshmallows, as some brands may contain gelatin.

Chocolate Marshmallow Swirl Cookies

Chocolate Marshmallow Swirl Cookies for Cozy Nights In

Indulge in Chocolate Marshmallow Swirl Cookies, a perfect blend of soft marshmallows and rich chocolate for delightful cozy nights.
Prep Time 10 minutes
Cook Time 10 minutes
Cooling Time 5 minutes
Total Time 25 minutes
Servings: 24 cookies
Course: Dessert
Cuisine: American
Calories: 150

Ingredients
  

For the Cookie Base
  • 1.75 cups all-purpose flour use gluten-free flour for a gluten-free option
  • 0.5 cups cocoa powder Dutch-process cocoa can deepen this taste
  • 1 teaspoon baking soda ensure it’s fresh for the best rise
  • 0.5 teaspoon salt consider sea salt for a different taste profile
  • 0.5 cups butter (softened) margarine can be a dairy-free substitute
  • 0.5 cups granulated sugar substitute with brown sugar for a hint of molasses flavor or coconut sugar for a healthier option
  • 0.5 cups brown sugar adds moisture and depth to the cookie base
  • 1 large egg use a flax egg for a vegan version
  • 1 teaspoon vanilla extract
For the Chocolate and Marshmallow
  • 1 cups semi-sweet chocolate chips milk or dark chocolate can also be used
  • 1 cups mini marshmallows larger marshmallows can be cut into smaller pieces as a substitute
  • 1 cups marshmallow fluff optional for extra gooeyness and sweetness

Equipment

  • Mixing Bowl
  • Baking Sheet
  • spatula
  • Cookie Scoop
  • Hand mixer
  • Parchment Paper

Method
 

Step-by-Step Instructions
  1. Preheat your oven to 350°F (175°C) and line two baking sheets with parchment paper.
  2. In a medium-sized bowl, whisk together the all-purpose flour, cocoa powder, baking soda, and salt. Set aside.
  3. In a large bowl, cream together the softened butter, granulated sugar, and brown sugar until light and fluffy.
  4. Add the egg and vanilla extract, mixing until well combined.
  5. Gradually add the dry ingredients to the wet ingredients, mixing at low speed until just combined.
  6. Fold in the chocolate chips and mini marshmallows. If using marshmallow fluff, add it now.
  7. Drop rounded balls of dough onto the prepared baking sheets, spacing them about 2 inches apart.
  8. Bake for 8-10 minutes until the edges are set and the centers remain soft.
  9. Allow cookies to cool on the baking sheet for about 5 minutes before transferring to a wire rack to cool completely.

Nutrition

Serving: 1cookieCalories: 150kcalCarbohydrates: 20gProtein: 2gFat: 7gSaturated Fat: 4gPolyunsaturated Fat: 0.5gMonounsaturated Fat: 1.5gCholesterol: 20mgSodium: 100mgPotassium: 50mgFiber: 1gSugar: 10gVitamin A: 100IUCalcium: 20mgIron: 1mg

Notes

These cookies can be customized with nuts or different types of chocolate for a unique twist!

Tried this recipe?

Let us know how it was!

Shrimp Cakes with Lemon Aioli: A Flavorful Coastal Delight

As I sifted through my favorite seafood recipes, the idea of making Shrimp Cakes with Lemon Aioli leapt off the page. The light crunch of each golden cake, paired with the vibrant zing of the aioli, creates an unforgettable experience that feels like a coastal breeze right at your dining table. These delectable shrimp cakes come together in under an hour, making them the perfect weeknight indulgence or a show-stopping appetizer for guests. Plus, with about 350 calories per serving, you can indulge without the guilt. Who would have thought you could elevate your dinner table so easily? Ready to dive into this seafood sensation?

Why are Shrimp Cakes a Must-Try?

Crispy Delight: The golden, crispy exterior encases a succulent, tender shrimp filling that’s a joy to bite into.
Zesty Flavor Kick: Each cake is perfectly complemented by the zingy lemon aioli, taking your taste buds on a coastal adventure.
Quick Preparation: With just under an hour to whip up, these shrimp cakes can effortlessly elevate any weeknight dinner.
Crowd-Pleasing Appeal: They make an impressive appetizer for gatherings, just like my delightful Shrimp Avocado Bowls that your friends will love.
Versatile Options: Feel free to swap ingredients or add spices, offering delightful variations to suit every palate.

Shrimp Cakes with Lemon Aioli Ingredients

For the Shrimp Cakes

  • Shrimp – Fresh or thawed shrimp provides the primary protein and natural sweetness essential for flavor.
  • Panko Breadcrumbs – Creates a light, crispy texture; regular breadcrumbs can be used as a substitute if needed.
  • Mayonnaise – Acts as a binder for the cakes and adds creaminess; Greek yogurt can be a lighter alternative.
  • Egg – Binds the mixture to keep the cakes intact while cooking.
  • Parsley – Brightens the flavor and adds visual appeal; other herbs like cilantro or chives can be substituted.
  • Dijon Mustard – Infuses a tangy punch to balance the other flavors beautifully.
  • Lemon Juice – Adds the acidity that brightens the overall flavor profile; lime can be used as a substitute for a different twist.
  • Old Bay Seasoning – Offers a blend of coastal spices; if unavailable, a homemade seasoning mix can be an alternative.
  • Garlic Powder – Enhances the flavor without being overpowering; using fresh garlic will intensify the taste.
  • Salt and Pepper – Essential for enhancing the overall taste of the cakes.
  • Olive Oil – Perfect for frying, achieving that golden-brown crust we crave in delightful shrimp cakes.

For the Lemon Aioli

  • Mayonnaise – Forms the creamy base of the aioli, providing a smooth texture.
  • Lemon Juice – Brightens and balances the creaminess with zesty notes; for variety, try lime juice instead.
  • Lemon Zest – Intensifies the citrus flavor, bringing freshness to each bite.
  • Minced Garlic – Lends a stronger flavor kick; feel free to adjust depending on your garlic preference.
  • Salt and Pepper – Basic seasonings that elevate the flavor profile, ensuring every component shines.

Enjoy creating these mouthwatering Shrimp Cakes with Lemon Aioli, a delightful treat that’s sure to impress!

Step‑by‑Step Instructions for Shrimp Cakes with Lemon Aioli

Step 1: Prepare the Shrimp
Start by taking your peeled and deveined shrimp and chopping them into small pieces. If you prefer a finer texture for your shrimp cakes, pulse the shrimp briefly in a food processor until they reach a coarse consistency. This will help distribute the shrimp evenly throughout your cakes and enhance their flavor.

Step 2: Combine the Mixture
In a large mixing bowl, combine the chopped shrimp with panko breadcrumbs, mayonnaise, egg, parsley, Dijon mustard, lemon juice, Old Bay seasoning, garlic powder, salt, and pepper. Use a fork to mix everything thoroughly, ensuring each ingredient is evenly distributed. This mixture should be moist yet hold together when formed into cakes.

Step 3: Adjust Consistency
If the shrimp mixture appears too wet and doesn’t hold its shape, begin adding more panko breadcrumbs a little at a time. Mix after each addition until the mixture achieves a moldable consistency, allowing you to form shrimp cakes without them falling apart during cooking.

Step 4: Shape Patties
With clean hands, take the mixture and scoop out portions to form small patties, approximately 2-3 inches wide. Place the formed shrimp cakes on a plate, being careful to leave space between them, as this will aid in the frying process later.

Step 5: Heat the Oil
In a large skillet, pour in olive oil and heat it over medium heat until shimmering, which should take about 2-3 minutes. To ensure your shrimp cakes fry to a perfect golden brown, wait for the oil to be hot enough for a drop of the batter to sizzle upon contact.

Step 6: Fry Cakes
Carefully add the shrimp cakes to the skillet in batches, ensuring not to overcrowd the pan. Fry each cake for about 3-4 minutes on one side, or until they are golden brown and crispy, then flip and cook the other side for an additional 3-4 minutes. Drain excess oil by placing the cooked cakes onto paper towels.

Step 7: Prepare the Aioli
While the shrimp cakes are frying, whisk together the mayonnaise, lemon juice, lemon zest, minced garlic, salt, and pepper in a small bowl until the mixture is smooth and well-combined. This zesty lemon aioli will complement your shrimp cakes beautifully with its creamy texture and bright flavor.

Step 8: Serve and Enjoy
On a serving platter, arrange your beautiful shrimp cakes and serve with the lemon aioli on the side for dipping. This vibrant presentation not only looks inviting but allows everyone to enjoy the delightful crispiness of the shrimp cakes alongside the refreshing aioli.

Expert Tips for Shrimp Cakes

  • Quality Shrimp: Use fresh or properly thawed shrimp for the best flavor. Frozen shrimp can lead to a watery mixture that affects texture.

  • Crispy Texture: Ensure your oil is sufficiently hot before adding cakes; if not, they may become soggy instead of forming a crisp exterior.

  • Avoid Overcrowding: Frying too many cakes at once lowers oil temperature, resulting in uneven cooking. Fry in batches for optimal results.

  • Check for Doneness: Ensure cakes are golden brown, and the shrimp has turned opaque inside, reaching an internal temperature of 145°F for safety.

  • Customizable Aioli: Adjust the garlic and lemon in the aioli to match your taste preferences; adding fresh herbs can also enhance its flavor.

  • Storage Tips: Store any leftovers in an airtight container in the refrigerator for up to 2-3 days, keeping the shrimp cakes fresh and ready to enjoy later.

Shrimp Cakes with Lemon Aioli Variations

Feel free to unleash your culinary creativity with these adaptable shrimp cakes that can easily cater to your taste buds and dietary needs!

  • Crab Cakes: Swap shrimp for lump crab meat to create a different yet equally delicious flavor, capturing that glorious seaside essence.

  • Spicy Version: Add diced jalapeños or a pinch of cayenne for a delightful kick. This twist introduces a mouthwatering heat that complements the zesty aioli beautifully.

  • Mediterranean Spin: Mix in finely chopped sun-dried tomatoes and feta cheese for a sunny, herby flavor profile. This variation captures the essence of Mediterranean cuisine, bringing a bright flair to your plate.

  • Vegetable Boost: Toss in shredded zucchini or corn for added texture and nutrition. Not only do these ingredients enhance taste, but they also make the cakes even more colorful and appealing.

  • Gluten-Free Option: Replace panko with crushed gluten-free crackers or almond flour to ensure gluten-free enthusiasts can enjoy these delightful cakes without compromise.

  • Herb Showcase: Experiment with fresh dill or basil instead of parsley for a fragrant twist. Aromatic herbs can elevate the flavor profile, adding brightness to each bite.

  • Tangy Aioli: For a twist on the classic aioli, mix in chipotle or smoked paprika to make it a smoky and spicy dip. This dynamic flavor can take the dish to a whole new level.

  • Hearty Add-in: Incorporate a bit of cooked quinoa for a heartier texture that also packs a nutritional punch. This addition makes the shrimp cakes more filling and satisfying—perfect for a substantial meal.

No matter which variation you choose, these shrimp cakes will transport your dinner to coastal heights, akin to my savory Garlic Parmesan Roasted Shrimp that delivers robust flavors that your palate will adore. Dive into a culinary journey today!

What to Serve with Shrimp Cakes with Lemon Aioli

Enhance your dining experience by complementing the delightful crunch of shrimp cakes with bright and flavorful sides.

  • Crispy Arugula Salad: Adds a fresh, peppery crunch that balances the richness of the shrimp cakes perfectly. Toss with a light lemon vinaigrette for an extra zing.

  • Garlic Butter Asparagus: These tender spears bring a savory, buttery flavor, enhancing the coastal theme of your meal. The crispness pairs beautifully with the soft, juicy shrimp cakes.

  • Coleslaw with a Twist: A tangy, creamy slaw brings a crunchy contrast to the crispy shrimp cakes, making every bite satisfying. Consider adding pineapple or mango for a tropical touch.

  • Roasted Sweet Potatoes: Their sweetness and fluffy texture create a delightful contrast to the savory shrimp cakes. Season simply with olive oil, salt, and pepper to let their natural flavor shine.

  • Zesty Couscous: This fluffy grain has a wonderful texture and can soak up the delicious lemon aioli. Adding chopped herbs or dried fruits will elevate its flavor profile even further.

  • Chilled White Wine: A glass of chilled Sauvignon Blanc pairs well with shrimp cakes, enhancing the overall refreshing nature of the dish. Its crisp acidity complements the tangy lemon aioli beautifully.

How to Store and Freeze Shrimp Cakes

  • Fridge: Store cooked shrimp cakes in an airtight container for up to 2-3 days. Ensure they are completely cooled before sealing to prevent moisture buildup.

  • Freezer: For long-term storage, flash-freeze uncooked patties on a baking sheet. Once solid, transfer them to a freezer bag, where they can be kept for up to 3 months.

  • Reheating: To reheat cooked shrimp cakes, place them in a preheated oven at 375°F for about 10-12 minutes until warmed through and crispy. Avoid microwaving as it may make them soggy.

Make Ahead Options

These Shrimp Cakes with Lemon Aioli are perfect for busy cooks looking to save time! You can prepare the shrimp cake mixture up to 24 hours in advance; simply combine the ingredients and shape the patties, then refrigerate them on a plate covered with plastic wrap to maintain freshness. The lemon aioli can also be made ahead and stored in an airtight container for up to 3 days in the refrigerator. When you’re ready to enjoy, just heat the oil and fry the cakes directly from the fridge to achieve a crispy, golden exterior. This way, you can savor delicious homemade flavors with minimal effort, even on the busiest of weeknights!

Shrimp Cakes with Zesty Lemon Aioli Recipe FAQs

What type of shrimp should I use for the shrimp cakes?
Using fresh or properly thawed shrimp is essential for the best flavor and texture in your shrimp cakes. Fresh shrimp retains moisture and natural sweetness, enhancing the overall taste. If you only have frozen shrimp, be sure to thaw them completely and pat them dry to avoid excess water in your mixture!

How do I store leftover shrimp cakes?
Store any cooked shrimp cakes in an airtight container in the refrigerator for up to 2-3 days. Ensure they are completely cooled before sealing to prevent moisture buildup, which could make them soggy. I often enjoy them cold as a snack!

Can I freeze the shrimp cakes before cooking?
Absolutely! For freezing uncooked shrimp cakes, flash-freeze them on a baking sheet until solid, about 1-2 hours. Then, transfer the frozen cakes into a freezer bag, squeezing out as much air as possible. They can last up to 3 months. When ready to cook, no need to thaw; just fry them for a few extra minutes!

What should I do if my shrimp cake mixture is too wet?
If you find the mixture is too wet to hold its shape, gradually add more panko breadcrumbs, about a tablespoon at a time, mixing until you reach a moldable consistency. It’s crucial so your cakes can hold together while frying. This little step can make all the difference in the end result!

Can shrimp cakes be made gluten-free?
Yes! You can make your shrimp cakes gluten-free by replacing the panko breadcrumbs with gluten-free breadcrumbs or even crushed rice crackers. This substitution will still provide a similar crispy texture without compromising the flavor.

Is the lemon aioli safe for pets?
While the lemon aioli is delicious for humans, it’s best to keep it away from pets. Ingredients like garlic can be toxic to pets, particularly dogs. So, stick to safe human snacks for your furry friends, and let them watch you enjoy these shrimp cakes instead!

Shrimp Cakes with Lemon Aioli

Shrimp Cakes with Lemon Aioli: A Flavorful Coastal Delight

Discover a delightful recipe for Shrimp Cakes with Lemon Aioli that combines crispy textures with zesty flavors.
Prep Time 15 minutes
Cook Time 20 minutes
Total Time 35 minutes
Servings: 4 cakes
Course: Appetizers
Cuisine: Coastal
Calories: 350

Ingredients
  

For the Shrimp Cakes
  • 1 lb Fresh or thawed shrimp peeled and deveined
  • 1 cup Panko Breadcrumbs can substitute with regular breadcrumbs
  • 1/4 cup Mayonnaise or Greek yogurt for a lighter option
  • 1 large Egg
  • 1/4 cup Fresh parsley chopped
  • 1 tbsp Dijon Mustard
  • 2 tbsp Lemon Juice or lime juice as a substitute
  • 1 tbsp Old Bay Seasoning
  • 1 tsp Garlic Powder or fresh garlic for stronger flavor
  • 1 tsp Salt
  • 1 tsp Black Pepper
  • 1/2 cup Olive Oil for frying
For the Lemon Aioli
  • 1/2 cup Mayonnaise
  • 2 tbsp Lemon Juice or lime juice
  • 1 tbsp Lemon Zest
  • 1 clove Minced Garlic
  • 1 tsp Salt
  • 1 tsp Black Pepper

Equipment

  • large mixing bowl
  • Skillet
  • Food Processor
  • whisk
  • Measuring cups
  • Measuring spoons
  • Plates

Method
 

Step-by-Step Instructions
  1. Prepare the Shrimp: Chop the peeled and deveined shrimp into small pieces or pulse in a food processor for a finer texture.
  2. Combine the Mixture: In a large mixing bowl, mix the chopped shrimp with panko breadcrumbs, mayonnaise, egg, parsley, Dijon mustard, lemon juice, Old Bay seasoning, garlic powder, salt, and pepper.
  3. Adjust Consistency: If too wet, add more panko breadcrumbs gradually until the mixture achieves a moldable consistency.
  4. Shape Patties: Form small patties from the mixture, about 2-3 inches wide, and place them on a plate.
  5. Heat the Oil: Heat olive oil in a skillet over medium heat until shimmering, about 2-3 minutes.
  6. Fry Cakes: Fry cakes in batches for 3-4 minutes on each side until golden brown and crispy.
  7. Prepare the Aioli: Whisk together mayonnaise, lemon juice, lemon zest, minced garlic, salt, and pepper in a small bowl until smooth.
  8. Serve and Enjoy: Arrange the shrimp cakes on a serving platter with the lemon aioli for dipping.

Nutrition

Serving: 1cakeCalories: 350kcalCarbohydrates: 18gProtein: 20gFat: 25gSaturated Fat: 4gPolyunsaturated Fat: 1gMonounsaturated Fat: 18gCholesterol: 130mgSodium: 600mgPotassium: 300mgFiber: 1gSugar: 1gVitamin A: 200IUVitamin C: 5mgCalcium: 30mgIron: 2mg

Notes

Store cooked shrimp cakes in an airtight container in the fridge for up to 2-3 days. For longer storage, freeze uncooked patties on a baking sheet and transfer to a freezer bag after solidifying.

Tried this recipe?

Let us know how it was!

Delicious White Chocolate Orange Creamsicle Truffles to Savor

As I stood in my kitchen, sunlight streaming through the window, I couldn’t resist the urge to create something that would transport me back to carefree summer days. Enter my White Chocolate Orange Creamsicle Truffles—a no-bake delight that captures the essence of those nostalgic orange and vanilla ice cream bars we all know and love. Whipping these truffles together is a breeze, making them a go-to treat for busy afternoons or impromptu gatherings. Plus, their creamy texture and bold citrus kick promise to make everyone’s taste buds dance! Whether you’re planning a sweet surprise for guests or just indulging in some well-deserved “me time,” these little bites of sunshine will surely brighten your day. Ready to embark on this delicious journey with me? Let’s dive into the recipe!

Why are These Truffles So Irresistible?

Easy to Make: With just a handful of ingredients and no baking required, these White Chocolate Orange Creamsicle Truffles are perfect for any skill level.
Nostalgic Flavors: They evoke memories of warm summer days and childhood treats, bringing a cheerful vibe to any gathering.
Versatile Treat: Feel free to customize flavors—switch to lemon or raspberry for a twist, or experiment with different chocolate coatings.
Perfect for Sharing: Whether served at a party or gifted in pretty boxes, these truffles are guaranteed crowd pleasers.
Store and Enjoy: Make in advance and store them in the fridge, so you’re always ready for a sweet craving! For more dazzling treats, check out my delicious Chocolate Fudge Cupcakes or uplifting Easter Chocolate Lasagna.

White Chocolate Orange Creamsicle Truffles Ingredients

Discover the delightful ingredients that make these truffles a true treat!

For the Truffle Mixture

  • White Chocolate – Provides a creamy, smooth base and rich sweetness. Use high-quality bars for best melting texture; avoid chips.
  • Cream Cheese – Adds a signature creamy texture with a slight tang that cuts through sweetness. Ensure it’s fully softened before use.
  • Orange Zest – Adds bright, natural citrus oils that enhance the flavor. Fresh zest is preferred for optimal aroma and taste.
  • Orange Extract – Deepens the orange essence, enhancing the creamsicle flavor profile. Substitutions can include lemon or raspberry extract for different flavors.
  • Vanilla Extract – Brings warmth and balances the citrus notes. A must for a rounded flavor.
  • Powdered Sugar – Adds sweetness and helps thicken the mixture for a melt-in-your-mouth texture.
  • Salt – A pinch to balance sweetness and brighten flavor.

For the Optional Garnish

  • Orange Sanding Sugar – Adds a festive and crunchy touch for decorating truffles.
  • Melted White Chocolate – Use for dipping or drizzling to enhance visual appeal and flavor.

Embrace the magic of making your own White Chocolate Orange Creamsicle Truffles and let every bite bring joy into your day!

Step‑by‑Step Instructions for White Chocolate Orange Creamsicle Truffles

Step 1: Melt the Chocolate
Begin by chopping high-quality white chocolate into small, even pieces for smooth melting. Use a double boiler or microwave, heating in short bursts of 20-30 seconds, stirring vigorously between each interval until fully melted and silky without any lumps. Let it cool slightly while you prepare the other ingredients.

Step 2: Mix the Creamy Filling
In a large mixing bowl, combine softened cream cheese, fresh orange zest, orange extract, vanilla extract, powdered sugar, and a pinch of salt. Use an electric mixer on medium speed to beat the mixture until it becomes smooth, fluffy, and well combined—about 2-3 minutes. This creamy base will be the delightful center of your White Chocolate Orange Creamsicle Truffles.

Step 3: Combine and Chill
Once your chocolate has cooled but is still pourable, gently fold it into the cream cheese mixture using a spatula. Be careful to incorporate everything fully without over-mixing, as that can lead to a soupy texture. Cover the bowl with plastic wrap and refrigerate for at least 1 hour, allowing the mixture to firm up and become easier to handle.

Step 4: Shape the Truffles
After chilling, use a cookie scoop or your hands to scoop out portions of the mixture. Roll each scoop into a smooth ball, about 1 inch in diameter, and place them on a parchment-lined tray. The colder the mixture, the easier it will be to shape. Keep rolling until all the mixture is formed into delicious truffles.

Step 5: Decorate the Truffles
For an added touch, melt some additional white chocolate in the microwave or double boiler. Dip each truffle into the melted chocolate or roll them in orange sanding sugar for a festive look. Lay the decorated truffles back on the parchment-lined tray and return them to the refrigerator for another 30 minutes to set before serving.

Make Ahead Options

These White Chocolate Orange Creamsicle Truffles are perfect for meal prep, making them an ideal choice for busy days! You can prepare the truffle mixture up to 24 hours in advance; simply follow the instructions up to Step 3 (combine and chill) and refrigerate the mixture. To maintain quality, cover the bowl tightly with plastic wrap to prevent drying out. When you’re ready to serve, scoop, roll into truffles, and decorate as desired. If you prefer, you can also shape the truffles and store them in an airtight container for up to 3 days in the fridge. Just chill them for 30 minutes before serving to bring back their delightful flavors!

Expert Tips for White Chocolate Orange Creamsicle Truffles

  • Choose Quality Chocolate: Always opt for high-quality white chocolate bars rather than chips; they’ll melt smoother and give a richer taste to your truffles.

  • Beat, Don’t Overmix: When mixing the cream cheese and other ingredients, beat until smooth but avoid over-mixing after adding melted chocolate, as that can lead to a mixture that’s too soft.

  • Chill Time is Key: Don’t skip the chilling stage! This step is crucial for forming and rolling the truffles easily. If too soft, refrigerate longer.

  • Zest Freshly: For the best flavor, always use freshly grated orange zest. Pre-packaged zest lacks the vibrant oils that bring your White Chocolate Orange Creamsicle Truffles to life.

  • Experiment with Variations: Feel free to swap orange for other flavors like lemon or raspberry to create different versions of these delightful truffles.

What to Serve with White Chocolate Orange Creamsicle Truffles

Transform your truffles into a memorable dessert spread that delights the senses.

  • Zesty Fruit Salad: Fresh oranges, strawberries, and berries add a bright, tangy contrast that enhances the creamy richness of the truffles.
  • Creamy Vanilla Ice Cream: A scoop of velvety ice cream offers a cool, delightful counterpart that complements the citrus notes in the truffles.
  • Decadent Chocolate Cake: The rich chocolate flavor provides a perfect pairing, adding depth and indulgence to the dessert table.
  • Sparkling Wine: A glass of bubbly elevates the dessert experience, cutting through the sweetness and brightening every bite with its effervescence.
  • Almond Biscotti: These crunchy treats add a delightful textural contrast, making them an excellent choice for dipping or nibbling alongside the truffles.
  • Mint Tea: A warm, fragrant cup of mint tea complements the citrus flavor beautifully, providing a refreshing finish to your dessert spread.
  • Coconut Macarons: These chewy, sweet bites bring an island flair, harmonizing with the creamsicle truffles while adding visual appeal.
  • Chocolate Dipped Strawberries: Juicy freshness and chocolate richness pair well, creating a nostalgic vibe that echoes the flavors of the truffles.

How to Store and Freeze White Chocolate Orange Creamsicle Truffles

Fridge: Store your truffles in an airtight container for up to 1 week. This keeps them fresh and delicious, ready to bring a smile whenever you crave a treat.

Freezer: If you want to prolong their enjoyment, freeze truffles for up to 2 months. Place them in a single layer in a freezer-safe container, ensuring they don’t stick together.

Thawing: When ready to enjoy, let the truffles sit at room temperature for about 15 minutes after removing from the freezer. This helps them regain their creamy, rich texture before savoring.

Reheating: There’s no need to reheat these no-bake delights. Simply enjoy them chilled straight from the fridge or poured into a delightful box for gifting!

White Chocolate Orange Creamsicle Truffles Variations

Feel free to let your creativity flourish as you customize these delightful truffles to suit your taste!

  • Citrus Swap: Replace orange zest and extract with lemon or raspberry for a refreshing twist. The bright flavors will still evoke that nostalgic summer vibe!

  • Choco-Lover’s Delight: Swap white chocolate for milk or dark chocolate to give your truffles a deeper, richer flavor that chocolate lovers will adore.

  • Vegan Version: Use vegan white chocolate and substitute cream cheese with coconut cream for a dairy-free treat that everyone can enjoy.

  • Textured Bliss: Roll the truffles in crushed nuts or even unsweetened shredded coconut for an added crunch. The contrast will enhance each creamy bite!

  • Spiced Indulgence: Add a pinch of cinnamon or a dash of ginger to the creamy filling for a warm flavor twist. The spices will give your truffles an unexpected kick!

  • Decadent Drizzle: Drizzle melted dark chocolate on top for an elegant touch. This contrast not only looks fabulous but elevates the flavor game!

  • Fruity Fusion: Incorporate finely diced dried fruits like apricots or cranberries into the mixture for bursts of chewy sweetness. Fruit and creaminess make a beautiful pair!

For more delightful ideas, check out my tasty Chocolate Chip Pancakes that are always a crowd pleaser, or try my indulgent Easter Chocolate Lasagna for a fun family dessert!

White Chocolate Orange Creamsicle Truffles Recipe FAQs

How do I select the best white chocolate for this recipe?
Absolutely! For the best results, choose high-quality white chocolate bars over chips. Bars have a smoother melting texture that results in a luxurious, creamy finish. Look for brands that list cocoa butter as a primary ingredient, ensuring pure white chocolate flavor without additives.

How long can I store the truffles, and what is the best way?
You can keep your White Chocolate Orange Creamsicle Truffles in an airtight container in the refrigerator for up to 1 week. Make sure they are properly sealed to maintain their freshness. If storage extends beyond that, freezing is an excellent option.

Can I freeze the truffles? How do I do it?
Absolutely! To freeze your truffles, place them in a single layer on a baking sheet and freeze for 1-2 hours until firm. Then, transfer them to a freezer-safe container with parchment paper between layers to prevent sticking. These truffles can last up to 2 months in the freezer. When you’re ready to enjoy, let them thaw at room temperature for about 15 minutes for the best texture.

What should I do if the mixture is too soft to shape?
Very! If you find the truffle mixture too soft to shape after chilling, simply refrigerate it for a bit longer, about 15-30 minutes. Alternatively, you can place it in the freezer for about 10 minutes. If it’s still challenging, adding a bit more powdered sugar can help firm it up, but I recommend chilling first for best results.

Are these truffles suitable for people with dietary restrictions?
Indeed! These truffles are vegetarian-friendly and can also be adapted for specific dietary needs. You can substitute the cream cheese with a dairy-free alternative like vegan cream cheese to make them dairy-free. If you’re concerned about allergies, ensure that all ingredients, especially the white chocolate, are free from your specific allergens.

Can I substitute the orange flavoring in the truffles?
Yes, feel free to switch things up! You can replace the orange zest and extract with lemon or raspberry for a fresh twist. Just keep in mind that altering flavors may slightly change the overall sweetness or tartness, so taste as you go to find your perfect balance!

White Chocolate Orange Creamsicle Truffles

Delicious White Chocolate Orange Creamsicle Truffles to Savor

Enjoy White Chocolate Orange Creamsicle Truffles, a no-bake delight that captures nostalgic summer flavors.
Prep Time 20 minutes
Chilling Time 1 hour
Total Time 1 hour 20 minutes
Servings: 12 truffles
Course: Dessert
Cuisine: American
Calories: 150

Ingredients
  

For the Truffle Mixture
  • 8 ounces White Chocolate Use high-quality bars for best melting texture; avoid chips.
  • 8 ounces Cream Cheese Ensure it’s fully softened before use.
  • 1 tablespoon Orange Zest Fresh zest is preferred for optimal aroma and taste.
  • 1 teaspoon Orange Extract Substitutions can include lemon or raspberry extract for different flavors.
  • 1 teaspoon Vanilla Extract A must for a rounded flavor.
  • 1 cup Powdered Sugar
  • 1 pinch Salt To balance sweetness and brighten flavor.
For the Optional Garnish
  • 1 tablespoon Orange Sanding Sugar Adds a festive and crunchy touch for decorating truffles.
  • 4 ounces Melted White Chocolate Use for dipping or drizzling.

Equipment

  • double boiler
  • Mixing Bowl
  • Electric mixer
  • Cookie Scoop
  • Parchment Paper

Method
 

Step-by-Step Instructions
  1. Begin by chopping high-quality white chocolate into small, even pieces for smooth melting. Use a double boiler or microwave, heating in short bursts of 20-30 seconds, stirring vigorously between each interval until fully melted and silky without any lumps. Let it cool slightly while you prepare the other ingredients.
  2. In a large mixing bowl, combine softened cream cheese, fresh orange zest, orange extract, vanilla extract, powdered sugar, and a pinch of salt. Use an electric mixer on medium speed to beat the mixture until it becomes smooth, fluffy, and well combined—about 2-3 minutes.
  3. Once your chocolate has cooled but is still pourable, gently fold it into the cream cheese mixture using a spatula. Be careful to incorporate everything fully without over-mixing. Cover the bowl with plastic wrap and refrigerate for at least 1 hour.
  4. After chilling, use a cookie scoop or your hands to scoop out portions of the mixture. Roll each scoop into a smooth ball, about 1 inch in diameter, and place them on a parchment-lined tray.
  5. For an added touch, melt some additional white chocolate. Dip each truffle into the melted chocolate or roll them in orange sanding sugar for a festive look. Lay the decorated truffles back on the parchment-lined tray and return them to the refrigerator for another 30 minutes to set before serving.

Nutrition

Serving: 1truffleCalories: 150kcalCarbohydrates: 20gProtein: 1gFat: 8gSaturated Fat: 5gMonounsaturated Fat: 3gCholesterol: 20mgSodium: 50mgPotassium: 20mgSugar: 14gVitamin A: 200IUVitamin C: 1mgCalcium: 30mgIron: 0.2mg

Notes

Store your truffles in an airtight container for up to 1 week in the fridge or freeze for up to 2 months. Let thaw at room temperature before enjoying.

Tried this recipe?

Let us know how it was!

Delicious Ramen Noodle Salad: A Crunchy Refreshing Twist

As the aroma of baked vegetables mingles with the warmth of spices, I’m transported to a bustling Southern kitchen, where comfort food reigns supreme. My Hearty Vegetarian Southern Casserole brings together the best of this beloved cuisine in a dish that’s as satisfying as it is nourishing. With layers of tender veggies and a creamy texture, this casserole is not only quick to prepare but also a perfect low-carb meal to enjoy on busy weeknights. Imagine sharing this delightful creation with family and friends, all while feeling a deep sense of satisfaction knowing you’re serving up something wholesome and delicious. So, are you ready to dive into this comforting classic and discover the cozy flavors of Southern cooking?

Why is this casserole a must-try?

Comforting flavors come together in this Hearty Vegetarian Southern Casserole, making it perfect for any occasion. Versatile enough to customize with your favorite veggies, it caters to all palates. Low-carb yet satisfying, this dish keeps your meal plan on track. Quick and easy to prepare, it’s ideal for busy weeknights or casual gatherings with friends. For an extra crunch, consider pairing it with a refreshing Ramen Noodle Salad that’s sure to impress!

Vegetarian Casserole Ingredients

Discover the essential elements that make this dish a delightful comfort food experience!

For the Vegetables

  • Zucchini – adds moisture and a tender texture; feel free to swap with seasonal favorites.
  • Bell Peppers – provide a sweet crunch; mix colors for a vibrant presentation.
  • Kale – boosts nutrition and fiber; collard greens or spinach are great alternatives.

For the Cheese

  • Cheddar – gives a rich, creamy flavor; use a dairy-free cheese for a vegan version.
  • Mozzarella – melts beautifully for a gooey texture; try feta for a tangier taste.

For the Creamy Base

  • Cream – creates a luscious consistency; replace with almond milk for a lighter option.
  • Pureed Cashews – introduces a nutty depth; Greek yogurt can be used for a similar effect.

For Binding

  • Eggs – hold everything together; if vegan, opt for flax eggs for a perfect glue.

For Flavor Enhancements

  • Thyme – infuses a warm earthy flavor; substitute with dried thyme if fresh isn’t available.
  • Paprika – adds a hint of warmth and color; smoked paprika can elevate the taste even further.
  • Salt & Pepper – necessary for balanced seasoning; adjust according to your taste preferences.

This Vegetarian Casserole is your next go-to dish, providing heartiness and comfort in every bite!

Step‑by‑Step Instructions for Hearty Vegetarian Southern Casserole

Step 1: Preheat the Oven
Begin by preheating your oven to 350°F (175°C) to ensure it reaches the perfect temperature for baking your Hearty Vegetarian Southern Casserole. This step is crucial as it helps achieve that golden-brown top and cooks the dish evenly. While the oven warms up, gather all your ingredients and prep your casserole dish by lightly greasing it.

Step 2: Sauté the Vegetables
In a large skillet over medium heat, add a splash of olive oil and sauté your chopped zucchini, bell peppers, and kale for about 5-7 minutes, or until they become tender and vibrant. Stir occasionally and watch for the vegetables to soften and release their natural juices. This step enhances their flavor and texture, making them a delightful base for your casserole.

Step 3: Prepare the Creamy Mixture
In a mixing bowl, whisk together your eggs, cream or pureed cashews, thyme, paprika, and a pinch of salt and pepper until smooth and well-combined. This creamy mixture serves as the binding agent for your casserole. Ensure there are no lumps, so the texture remains velvety. Setting this aside will allow the flavors to meld wonderfully while you layer the rest of the ingredients.

Step 4: Layer the Ingredients
Take your sautéed vegetables and evenly spread them across the bottom of your greased casserole dish. Next, sprinkle a layer of cheese (cheddar or mozzarella) over the vegetables for a rich, creamy experience. This layering not only adds flavor but also creates a beautiful presentation once baked, as the cheese will melt and form a delightful crust.

Step 5: Add the Egg Mixture
Pour the creamy egg mixture over the layered vegetables and cheese, using a spatula to ensure it distributes evenly. This step is essential, as it binds all the ingredients together and provides the luscious texture characteristic of a great casserole. Look for the mixture to settle into the nooks and crannies, enveloping everything.

Step 6: Bake the Casserole
Place the casserole in the preheated oven and bake for 30-35 minutes. Keep an eye out for the edges to turn golden brown and for the center to become firm. You can gently shake the dish; it should jiggle slightly but not appear liquid. A toothpick inserted in the center should come out clean when it’s ready.

Step 7: Cool and Serve
Once your Hearty Vegetarian Southern Casserole is beautifully golden and set, remove it from the oven and let it cool for about 10 minutes. This cooling period allows the casserole to firm up and makes it easier to cut into perfect squares. Serve warm, possibly garnished with fresh herbs, and enjoy the wonderful comfort of Southern-inspired cooking.

What to Serve with Hearty Vegetarian Southern Casserole?

Imagine your dining table adorned with vibrant colors and delightful aromas, perfectly complementing the warmth of each bite.

  • Creamy Mashed Potatoes: A classic, smooth indulgence that balances the casserole’s texture beautifully, making every spoonful a delight.

  • Crisp Green Salad: Fresh, crunchy greens tossed with a zesty vinaigrette create a refreshing contrast, enhancing the hearty feel of the casserole. Pair it with cherry tomatoes and cucumbers for added pop.

  • Garlic Bread: Golden-crusted with rich garlic butter, this side offers a satisfying crunch, perfect for dipping in any leftover creamy sauce.

  • Roasted Brussels Sprouts: These caramelized bites add a slightly nutty flavor and a delightful char that complements the rich casserole without overpowering it.

  • Coleslaw: Tangy and crunchy, coleslaw brings an excellent freshness to the meal, pairing well with the warmth of the baked casserole. The mix of textures adds an exciting element to every bite.

  • Sweet Tea: A refreshing Southern classic, its sweetness and subtle flavor refresh the palate, making it the perfect drink to enjoy with your comforting casserole.

  • Pecan Pie: For dessert, a slice of this traditional dessert can tie the meal together, providing a sweet, nutty crunch that contrasts beautifully with the savory casserole.

Variations & Substitutions for Vegetarian Casserole

Feel free to personalize the Hearty Vegetarian Southern Casserole with your favorite ingredients and flavors. Let’s make it uniquely yours!

  • Seasonal Swap: Use different veggies based on what’s in season, like asparagus in spring or butternut squash in fall.
  • Dairy-Free: Substitute traditional cheese with vegan options like cashew cheese or nutritional yeast for a cheesy flavor.
  • Whole Grain Base: Swap in quinoa or brown rice instead of basmati for added texture and nuttiness.
  • Protein Boost: Add cooked lentils, chickpeas, or black beans to enhance the heartiness and make it more filling.
  • Herb Variations: Experiment with fresh basil, rosemary, or even cilantro for a delightful twist on the flavor profile. Fresh herbs can elevate this casserole to a whole new level.
  • Spicy Kick: Toss in diced jalapeños or a drizzle of hot sauce to bring some heat and excitement to the flavors.
  • Nuts & Seeds: For a lovely crunch, sprinkle some toasted pine nuts or sunflower seeds on top just before serving. They add a wonderful texture that contrasts beautifully with the creamy filling.

Feeling inspired? Alongside this casserole, why not try a refreshing Ramen Noodle Salad for a delightful meal combination? It’s a perfect pairing that will have your taste buds dancing!

Expert Tips for Hearty Vegetarian Southern Casserole

Mix Vegetables Wisely: Choose a variety of vegetables for diverse textures and flavors. Mixing zucchini, bell peppers, and kale adds depth to your casserole.

Avoid Overcooking: A common mistake is overcooking your vegetables before layering. Aim for just tender veggies to prevent a mushy casserole.

Use a Whisk: For the egg and cream mixture, use a whisk to ensure smooth blending. This creates a fluffy texture in your casserole.

Layer Cheese Evenly: Sprinkle cheese in an even layer to maximize creaminess in every bite. This helps achieve that delightful gooey topping.

Chill Before Serving: Allow the casserole to cool for about 10 minutes before slicing. This helps it set and makes for cleaner, more appealing portions.

Explore Variations: Feel free to incorporate additional protein like lentils or beans. This adds nutrients without compromising the delicious vegetarian appeal.

Proper Storage for Vegetarian Casserole

Fridge: Store leftovers in an airtight container for up to 3 days. Make sure to let the casserole cool completely before sealing to maintain its freshness.

Freezer: For longer storage, freeze the casserole after it has cooled. Wrap it tightly in plastic wrap and then in aluminum foil for up to 3 months.

Reheating: When ready to enjoy, thaw overnight in the fridge. Reheat in the oven at 350°F (175°C) for about 20-25 minutes, until heated through and the cheese is bubbly.

Make-Ahead Tip: Prepare the vegetarian casserole a day in advance and store it in the fridge before baking. This allows flavors to meld beautifully, making it a perfect time-saver for busy days!

Make Ahead Options

These Hearty Vegetarian Southern Casserole preparations are perfect for busy home cooks looking to save time! You can chop and sauté your vegetables up to 3 days in advance, storing them in an airtight container in the refrigerator to maintain their freshness. Additionally, the creamy egg mixture can be whisked together and refrigerated for 24 hours before baking. When you’re ready to enjoy your casserole, simply layer the prepared veggies and cheese, pour the cold egg mixture over top, and bake as directed. This method keeps everything just as delicious while significantly reducing your time in the kitchen, making your weeknight meal planning a breeze!

Hearty Vegetarian Southern Casserole Recipe FAQs

How do I choose the best vegetables for this casserole?
Absolutely! When selecting vegetables, look for fresh, vibrant options. Choose zucchini and bell peppers that are firm with no dark spots; kale should be deep green and crisp. Opt for seasonal veggies for the best flavor. You can even experiment with veggies like asparagus or sweet potatoes for a different twist.

What’s the best way to store leftover casserole?
To keep your casserole fresh, allow leftovers to cool completely before transferring them to an airtight container. You can store it in the fridge for up to 3 days. If you want to keep it longer, wrap it tightly in plastic wrap and then aluminum foil, moving it to the freezer where it can last up to 3 months.

Can I freeze the casserole after baking?
Yes, you can! Once your Hearty Vegetarian Southern Casserole has cooled, carefully wrap it in plastic wrap followed by aluminum foil to prevent freezer burn. When you’re ready to enjoy, thaw it overnight in the fridge. Reheat in a preheated oven at 350°F (175°C) for about 20-25 minutes until warmed through and the cheese is bubbly.

What if my vegetables turn mushy in the casserole?
Very! The key to avoiding mushy vegetables is to sauté them just until tender rather than fully cooked. This allows them to maintain some bite during baking. Keep an eye on them while cooking, aiming for about 5-7 minutes on medium heat until they are vibrant and bright, not soggy.

Are there any dietary considerations I should keep in mind?
Definitely. Always check for food allergies, especially with ingredients like cheese and eggs. For those avoiding dairy, simply use vegan cheese and flax eggs as substitutes. If cooking for young children or pets, ensure all ingredients are safe and appropriate for their consumption.

Can I prepare this casserole a day in advance?
Yes, indeed! You can assemble the Hearty Vegetarian Southern Casserole a day beforehand. Just cover it well and keep it in the fridge. The next day, pop it in the oven directly for baking. This method not only saves time but allows flavors to meld beautifully, making it even more delicious!

Ramen Noodle Salad

Delicious Ramen Noodle Salad: A Crunchy Refreshing Twist

This Ramen Noodle Salad is a refreshing twist that complements any meal, delivering a delightful crunch and vibrant flavors.
Prep Time 15 minutes
Cook Time 10 minutes
Total Time 25 minutes
Servings: 4 servings
Course: Salad
Cuisine: Asian
Calories: 250

Ingredients
  

Vegetables
  • 2 cups Zucchini chopped
  • 1 cup Bell Peppers mixed colors, chopped
  • 2 cups Kale chopped
Cheese
  • 1 cup Cheddar Cheese shredded
  • 1 cup Mozzarella Cheese shredded
Creamy Base
  • 1/2 cup Cream or almond milk
  • 1/2 cup Pureed Cashews or Greek yogurt
Binding
  • 3 large Eggs or flax eggs for vegan
Flavor Enhancements
  • 1 teaspoon Thyme dried or fresh
  • 1 teaspoon Paprika smoked recommended
  • to taste Salt
  • to taste Pepper

Equipment

  • Large bowl
  • Skillet
  • whisk

Method
 

Preparation
  1. Preheat the oven to 350°F (175°C).
  2. In a skillet, sauté zucchini, bell peppers, and kale until tender (5-7 minutes).
  3. In a bowl, whisk together eggs, cream, thyme, paprika, salt, and pepper until smooth.
  4. Layer sautéed vegetables and then cheese in a greased casserole dish.
  5. Pour the egg mixture over the layered vegetables and cheese.
  6. Bake in the oven for 30-35 minutes until golden brown.
  7. Cool for 10 minutes before serving warm.

Nutrition

Serving: 1sliceCalories: 250kcalCarbohydrates: 16gProtein: 12gFat: 18gSaturated Fat: 10gPolyunsaturated Fat: 2gMonounsaturated Fat: 4gCholesterol: 100mgSodium: 400mgPotassium: 300mgFiber: 3gSugar: 2gVitamin A: 500IUVitamin C: 25mgCalcium: 200mgIron: 2mg

Notes

Feel free to customize with your favorite vegetables and ensure cheese is evenly layered for maximum creaminess.

Tried this recipe?

Let us know how it was!

Chewy Sugar Cookies That Melt in Your Mouth – No Chill Needed

The sweet scent of cookies wafting through the house is one of those universal joys that brightens any day. These Soft and Chewy Sugar Cookies make that magic happen in no time at all, thanks to their simple no-chill dough! Imagine indulging in a rich, buttery cookie that strikes the perfect balance between chewiness and sweetness, bringing a festive cheer that’s perfect for any occasion. With effortless preparation and minimal fuss, this recipe is ideal for both seasoned bakers and those just stepping into the kitchen. Plus, it’s a crowd-pleaser that’s sure to charm family and friends alike. Ready to elevate your baking game and spread some joy? Let’s dive into making these delightful chewy sugar cookies!

Why Are These Cookies So Irresistible?

Irresistible Chewiness: The unique no-chill dough ensures these cookies turn out perfectly chewy every time, giving you that delightful texture that melts in your mouth.

Quick and Easy: With simple ingredients and minimal steps, baking these cookies is as effortless as it gets—perfect for busy days or spontaneous baking sessions.

Sweet Symphony of Flavors: The duo of vanilla and optional almond extract creates a rich flavor profile that entices all the taste buds.

Celebrate Any Occasion: Whether it’s a family gathering or holiday party, these cookies will shine at any event—just like they do alongside a warm cup of Savory Brown Sugar.

Crowd-Pleasing Treat: Everyone loves a classic, and these cookies are bound to impress friends and family, making them an instant favorite!

Chewy Sugar Cookies Ingredients

Get ready to whip up magic in the kitchen with these fantastic chewy sugar cookies that don’t require chilling!

For the Batter

  • Butter – Adds richness and moisture to cookies; use softened butter for better creaming with sugar.
  • Granulated Sugar – Provides sweetness and contributes to the cookie’s chewy texture; essential for rolling before baking.
  • Egg – Binds the ingredients together and helps with the rise; opt for a fresh large egg for the best results.
  • Vanilla Extract – Enhances the flavor profile; opt for pure vanilla for a more authentic taste.
  • Almond Extract – Adds depth of flavor; can be omitted if preferred.
  • All-Purpose Flour – Provides structure to the cookies; avoid substituting with whole wheat for the best texture.
  • Baking Soda – Acts as a leavening agent; ensure it’s fresh for the best results.
  • Baking Powder – Works in tandem with baking soda for proper rising; double-check expiration for efficacy.
  • Salt – Balances sweetness and enhances flavor; use fine salt for even distribution.

For Dipping

  • Granulated Sugar for Dipping – Adds a delightful crunch and sweetness on the exterior; roll the cookie dough before baking for added texture.

Now that you have everything you need, it’s time to make these delightful chewy sugar cookies!

Step‑by‑Step Instructions for Chewy Sugar Cookies

Step 1: Preheat the Oven
Begin by preheating your oven to 350°F (177°C) while you prepare your baking area. Line a baking sheet with parchment paper, ensuring it’s ready to catch all that deliciousness that’s about to emerge from the oven. The warm kitchen will set the mood for creating Chewy Sugar Cookies that everyone will adore.

Step 2: Cream Butter and Sugar
In a large mixing bowl, combine softened butter and granulated sugar. Using a hand mixer or stand mixer, beat the mixture on medium speed for about 1 minute until it becomes light and fluffy. This step is crucial as it aerates the butter, contributing to the perfect texture of your chewy sugar cookies.

Step 3: Add the Wet Ingredients
Next, crack an egg into the bowl along with the vanilla extract and optional almond extract. Mix on low speed until everything is fully combined. You will notice a rich and creamy mixture forming, an essential base for your delightful cookies that will ensure a burst of flavor in every bite.

Step 4: Incorporate the Dry Ingredients
Gradually add the all-purpose flour, baking soda, baking powder, and salt into the wet mixture. Mix just until the dry ingredients are incorporated, being careful not to overmix. The dough should pull away from the sides of the bowl, showing that your chewy sugar cookie mixture is perfectly combined and ready for the next step!

Step 5: Roll the Dough
Scoop out portions of dough and roll them into 1-inch balls using your hands. This step helps shape the cookies and ensures even baking. Then, roll each dough ball in granulated sugar to create a sweet, crunchy exterior that everyone loves on chewy sugar cookies, enhancing both flavor and texture.

Step 6: Arrange on Baking Sheet
Place the sugar-coated cookie balls on the prepared baking sheet, leaving about 2 inches of space between each ball. This spacing allows the cookies to spread evenly while baking, achieving that perfectly tender center combined with a slightly crisp edge we all love in a chewy sugar cookie.

Step 7: Bake to Perfection
Bake the cookies in your preheated oven for 10-11 minutes. Watch for the edges to set while the centers remain soft; they should look lightly underbaked as they will continue to cook on the sheet. The classic aroma of chewy sugar cookies wafting through your kitchen is the ultimate reward!

Step 8: Cool and Serve
Once baked, remove the cookies from the oven and let them cool on the sheet for a few minutes. This brief cooling period is essential, allowing them to firm up before transferring to a wire rack. Once cooled completely, feel free to enjoy your delightful chewy sugar cookies or package them up as gifts!

What to Serve with Chewy Sugar Cookies

The aroma of freshly baked cookies can create an irresistible atmosphere, but pairing them right can elevate any occasion!

  • Hot Cocoa: The rich, creamy texture of hot cocoa perfectly complements the sweetness of the sugary cookies, making for a cozy treat.

  • Peppermint Mocha: The refreshing mint flavor mingles beautifully with the buttery sweetness of the cookies, adding a festive twist.

  • Vanilla Ice Cream: A scoop of creamy vanilla ice cream on the side creates a delightful contrast to the chewy texture of the cookies.

  • Fruit Salad: A vibrant, fresh fruit salad introduces a bright, juicy contrast that enhances the indulgent sugar cookies.

  • Coffee or Tea: Pair with a warm cup of coffee or herbal tea; the warmth and slight bitterness balance the cookie’s sweetness beautifully.

  • Milk: This classic pairing ensures that each bite of your chewy sugar cookies becomes a nostalgic and comforting experience.

Treating yourself or sharing these delightful combinations can turn an ordinary day into a cherished memory!

Chewy Sugar Cookies Variations

Feel free to explore these delightful twists on your chewy sugar cookies that will impress everyone at the table!

  • Nut-Free: Simply omit the almond extract for a classic cookie flavor, perfect for those with nut allergies.
  • Cocoa Love: Add 1/4 cup of cocoa powder to the dry ingredients for a chocolatey version that still retains that chewy goodness.
  • Festive Spice: Incorporate 1 teaspoon of cinnamon or nutmeg into your dough for a warm, spiced twist that’s perfect for holiday gatherings.
  • Chocolate Chip Delight: Fold in 1 cup of chocolate chips for a melty, sweet addition that complements the chewy texture beautifully.
  • Zesty Lemon: Substitute almond extract with lemon extract for a refreshing citrusy flavor that brightens up every bite.
  • Sprinkle Joy: Roll your dough balls in colorful sprinkles instead of granulated sugar for a fun and festive look—couldn’t you just imagine these at a birthday party?
  • Oatmeal Cookie Twist: Mix in 1 cup of rolled oats for a hearty texture that provides a delightful chew while adding a bit of fiber.
  • Mix-and-Match: Combine any of these variations! For example, lemon extract with chocolate chips creates a wonderful blend of flavors that will keep everyone guessing.

Feel inspired to try variations of your own? These chewy sugar cookies are versatile and perfect for any occasion, just like pairing them with a cozy cup of hot cocoa or exploring delightful recipes like Blueberry Breakfast Cookies. Dive in, get creative, and enjoy every sweet moment!

Make Ahead Options

These Chewy Sugar Cookies are perfect for meal prep enthusiasts looking to save time during the busy holiday season! You can prepare the cookie dough up to 24 hours in advance. Simply follow the recipe until you’ve rolled the dough into balls, then place them in an airtight container and refrigerate. To maintain their quality, ensure the dough is tightly sealed to prevent drying out. When you’re ready to bake, just take the dough balls out, roll them in granulated sugar, and bake as instructed—no need to thaw! This way, you’ll have freshly baked cookies ready to share with family and friends, all with minimal effort.

Expert Tips for Chewy Sugar Cookies

Chewy Perfection: Keep an eye on baking time; slightly underbaked cookies ensure that chewy texture. Remove them when edges are set but centers are still soft.

Use Room Temperature Ingredients: Ensure butter and egg are at room temperature to achieve a smooth mixture. Cold ingredients can lead to uneven consistency.

Don’t Overmix Dough: Mix just until combined. Overmixing can lead to tough cookie texture instead of the soft and chewy goodness you want.

Fresh Ingredients Matter: Use fresh eggs, baking soda, and baking powder for optimal results in your chewy sugar cookies.

Dough Ball Size: Don’t skip the 1-inch ball rule—this helps with even baking and promotes that delightful chewiness.

Fun Variations: Feel free to get creative! Substitute almond extract or add chocolate chips for a new twist on these chewy sugar cookies.

Storage Tips for Chewy Sugar Cookies

Room Temperature: Store cookies in an airtight container at room temperature for up to 1 week to maintain their delightful chewiness.

Fridge: If you prefer, you can refrigerate the cookies for up to 2 weeks; just remember to keep them in a sealed container to avoid drying out.

Freezer: For longer storage, freeze cookie dough balls. Wrap them well in plastic wrap or place in an airtight container and freeze for up to 3 months. Bake fresh as needed!

Reheating: To enjoy warm cookies later, reheat in the microwave for 5-10 seconds or in the oven at 350°F (177°C) for a few minutes until warmed through—perfect for those irresistible Chewy Sugar Cookies!

Chewy Sugar Cookies Recipe FAQs

What type of butter should I use for the dough?
Absolutely! Softened unsalted butter is best for this recipe, as it helps to create that rich texture while allowing the sugar to cream properly. This not only enhances the flavor but also lends to the chewiness that makes these cookies so delightful.

How should I store my Chewy Sugar Cookies after baking?
To keep your cookies fresh, store them in an airtight container at room temperature for up to 1 week. If you find that they begin to dry out, feel free to pop a slice of bread into the container; this will help retain moisture and keep those cookies perfectly chewy!

Can I freeze the cookie dough for later use?
Yes, indeed! To freeze the dough, simply roll the cookie dough into 1-inch balls, then wrap them tightly in plastic wrap or place them in an airtight container. You can freeze them for up to 3 months. When you’re ready to bake, just take them out and bake straight from the freezer for a quick and easy treat!

What should I do if my cookie dough is too sticky?
If you find your dough is too sticky to roll into balls, don’t worry! This can happen due to humidity or warmer kitchen temperatures. Simply sprinkle a bit more flour into the dough—about a tablespoon at a time—until it’s manageable. Remember to mix gently to prevent tough cookies!

Are these cookies safe for pets or those with allergies?
It’s best to keep these Chewy Sugar Cookies away from pets, especially dogs, due to the sugar content and possible almond extract. Additionally, if you’re baking for individuals with allergies, be cautious with ingredients like egg and flour; using an egg substitute can help create a safer alternative for those with egg allergies. Always check labels if baking for someone with food sensitivities!

Can I make these cookies gluten-free?
Absolutely, with a few adjustments! You can substitute the all-purpose flour with a gluten-free flour blend specifically formulated for baking. Ensure that the blend contains a binding agent like xanthan gum to mimic the structure and texture that gluten provides. Enjoy these naturally chewy treats without the gluten!

Chewy Sugar Cookies

Chewy Sugar Cookies That Melt in Your Mouth – No Chill Needed

Delight in these chewy sugar cookies that don’t require chilling, perfect for any occasion.
Prep Time 15 minutes
Cook Time 11 minutes
Cooling Time 5 minutes
Total Time 31 minutes
Servings: 24 cookies
Course: Dessert
Cuisine: American
Calories: 120

Ingredients
  

For the Batter
  • 1 cup softened butter Adds richness and moisture
  • 1 cup granulated sugar Provides sweetness
  • 1 large egg Binds ingredients together
  • 1 teaspoon vanilla extract Enhances flavor
  • 1/2 teaspoon almond extract Optional
  • 2 cups all-purpose flour Provides structure
  • 1 teaspoon baking soda Leavening agent
  • 1 teaspoon baking powder Works with baking soda
  • 1/2 teaspoon salt Balances sweetness
For Dipping
  • 1/4 cup granulated sugar Adds crunch and sweetness

Equipment

  • Oven
  • Mixing Bowl
  • Hand mixer
  • Baking Sheet
  • Parchment Paper

Method
 

Step-by-Step Instructions
  1. Preheat your oven to 350°F (177°C) and line a baking sheet with parchment paper.
  2. In a large bowl, cream together the softened butter and granulated sugar until light and fluffy.
  3. Add the egg, vanilla extract, and optional almond extract, mixing until combined.
  4. Gradually incorporate the all-purpose flour, baking soda, baking powder, and salt until just combined.
  5. Roll dough into 1-inch balls and coat in granulated sugar before placing on baking sheet.
  6. Leave about 2 inches of space between each dough ball on the baking sheet.
  7. Bake for 10-11 minutes, until edges are set and centers appear soft.
  8. Allow cookies to cool on the sheet for a few minutes before transferring to a wire rack.

Nutrition

Serving: 1cookieCalories: 120kcalCarbohydrates: 16gProtein: 1gFat: 6gSaturated Fat: 4gCholesterol: 20mgSodium: 50mgPotassium: 30mgSugar: 8gVitamin A: 200IUCalcium: 10mgIron: 0.5mg

Notes

Watch baking time closely to ensure chewy texture. Use room temperature ingredients for best results.

Tried this recipe?

Let us know how it was!

Decadent Salted Caramel Pear Cake for Ultimate Indulgence

As I unwrapped a beautifully ripe pear and took a deep breath, the sweet aroma whisked me away to cozy autumn afternoons. Creating a Salted Caramel Pear Layer Cake was a delightful way to celebrate the changing seasons, blending the comforting flavors of spiced pear cake with that indulgent salted caramel. This cake, with its three luscious layers, is not just a treat for the taste buds; it’s a feast for the eyes. Besides being the perfect centerpiece for any gathering, it boasts the irresistible perk of being a crowd-pleaser, ensuring compliments from all your friends and family. Plus, it’s surprisingly simple to make, promising a fun baking adventure in your kitchen. Are you ready to dive into the sweet world of homemade decadence?

What Makes This Cake So Special?

Indulgent Flavor: The combination of spiced pear and luscious salted caramel creates a rich taste that is simply unforgettable.
Visually Stunning: With three layers adorned in velvety vanilla buttercream, this cake is a showstopper that will impress your guests.
Crowd-Pleasing Delight: Perfect for gatherings, this cake guarantees smiles and compliments from everyone at the table.
Easy to Assemble: Don’t worry about complicated steps! This recipe allows even novice bakers to shine, ensuring fun in the kitchen.
Seasonal Treat: Embrace autumn with this cozy dessert that captures the essence of the season. Pair it with a scoop of vanilla ice cream or try it alongside a slice of Honeybun Carrot Cake for an unbeatable dessert spread!

Salted Caramel Pear Cake Ingredients

• Here’s everything you’ll need for this indulgent Salted Caramel Pear Cake!

For the Cake Layers

  • All-Purpose Flour – Provides structure and a tender crumb; swap for a gluten-free blend if needed.
  • Light Brown Sugar – Adds moisture and flavor depth; dark brown sugar works too for a richer taste.
  • Cinnamon – Infuses warm spice notes; adjust based on your personal preference.
  • Ground Ginger – Adds a zesty kick; you can substitute fresh ginger for a more vibrant flavor.
  • Allspice – Offers a warming flavor profile that complements the other spices; feel free to omit if preferred.
  • Salt – Balances the cake’s flavors; don’t skip it for the best results!
  • Eggs (8 large) – Acts as a binding agent; for a vegan version, flax eggs or commercial egg replacers work well.
  • Unsalted Butter (3 cups) – Creates moisture and richness; salted butter can also be used for a hint of savory.
  • Full-Fat Buttermilk – Keeps the cake moist and tender; you can substitute with plain yogurt mixed with vinegar.
  • Pears (4, such as Anjou or Bosc) – Adds natural sweetness and moisture; choose firm varieties for the best texture.
  • Baking Powder & Baking Soda – Essential leavening agents for rising; make sure they’re fresh for optimal results.

For the Salted Caramel Sauce

  • White Sugar – Sweetness and caramelization; brown sugar can add depth if desired.
  • Water – Assists in melting sugar during caramel preparation.
  • Unsalted Butter (9 tbsp) – Collaborates with sugar to create that rich caramel flavor; replace with salted if you enjoy that salty twist.
  • Heavy Cream – Smoothens the caramel; whole milk can substitute for a lighter option.
  • Kosher Salt – Enhances the sweet-salty profile of the caramel; use sea salt if you prefer.

For the Vanilla Buttercream Frosting

  • Unsalted Butter (3 cups) – Achieves a creamy, fluffy frosting; substitute with dairy-free butter for a vegan version.
  • Confectioners’ Sugar – Sweetness and texture; ensuring it’s sifted will give a smooth finish.
  • Heavy Cream – Lends a silky consistency; milk can be used in its place if you prefer.
  • Vanilla Extract – Adds a warm, aromatic flavor; pure vanilla is recommended for the best taste.

Now that you have all the ingredients for your Salted Caramel Pear Cake, get ready to create a delicious masterpiece that will have everyone asking for seconds!

Step‑by‑Step Instructions for Salted Caramel Pear Cake

Step 1: Prepare Salted Caramel
In a medium saucepan, combine 1 cup of white sugar and ¼ cup of water over medium heat, stirring gently until the sugar dissolves. Increase the heat to medium-high and let it boil, without stirring, for about 10 minutes or until it reaches a deep amber color. Remove from heat, whisk in 9 tablespoons of unsalted butter, ½ cup of heavy cream, 1 teaspoon of vanilla extract, and ½ teaspoon of kosher salt until smooth. Allow to cool to room temperature.

Step 2: Preheat Oven & Prepare Cake Pans
Preheat your oven to 350°F (175°C). Grease and line three 8-inch springform pans with parchment paper to prevent sticking. Set them aside while you prepare the cake batter to ensure an easy release after baking.

Step 3: Make Cake Batter
In a stand mixer, cream together ¾ cup of unsalted butter and 1 cup of light brown sugar until fluffy and light, about 5 minutes. Add 8 large eggs one at a time, mixing well after each addition, followed by 1 teaspoon of vanilla extract. In a separate bowl, whisk together 2 cups of all-purpose flour, 1 teaspoon of baking powder, 1 teaspoon of baking soda, and ½ teaspoon of salt.

Step 4: Combine Wet & Dry Ingredients
Gradually add the dry mixture to the creamed butter mixture, alternating with 1 cup of full-fat buttermilk; mix until just combined. Gently fold in 4 cups of peeled and diced pears. The batter should be smooth but not overmixed, as this could lead to a dense cake.

Step 5: Bake the Cake Layers
Divide the batter evenly among the prepared pans. Bake in the preheated oven for about 45 minutes, or until a toothpick inserted into the center comes out clean. The cake should be lightly golden on top. Allow the layers to cool in their pans for 10 minutes before inverting onto wire racks to cool completely.

Step 6: Prepare Vanilla Buttercream
In a mixing bowl, beat 3 cups of room-temperature unsalted butter until fluffy and pale, about 4 minutes. Gradually incorporate 4 cups of confectioners’ sugar, mixing until smooth and creamy. Add 2 tablespoons of heavy cream and 2 teaspoons of vanilla extract, then continue beating until well-combined and light.

Step 7: Assemble the Cake
Once the cake layers are completely cooled, trim the tops to level them if necessary. Place the first layer on a serving plate, pipe a dam of vanilla buttercream around the edge, and fill with a generous layer of salted caramel. Repeat this process with the second layer and place the third layer on top.

Step 8: Frost the Entire Cake
Using an offset spatula, apply a thin coat of vanilla buttercream around the entire cake to create a crumb coat. Chill for 20 minutes to set. Then, frost the top and sides with additional buttercream, creating a smooth finish. Drizzle remaining salted caramel over the top for a decadent touch.

Step 9: Final Touches and Serve
Complete your Salted Caramel Pear Cake with optional decorative swirls of buttercream or a sprinkle of flaky sea salt for contrast. Cut into slices and serve, enjoying the luscious mix of flavors and textures that this beautiful cake offers at your next gathering!

What to Serve with Salted Caramel Pear Layer Cake

Indulging in a slice of this cake is only half the fun; let’s explore some enchanting pairings to elevate your dessert experience.

  • Vanilla Ice Cream: A scoop of creamy vanilla ice cream melts beautifully over the warm cake, adding a delightful contrast of temperature and flavor.
  • Whipped Cream: Light and airy, a dollop of freshly whipped cream enhances the richness of the cake, making each bite even more decadent.
  • Caramel Drizzle: A drizzle of extra salted caramel on top intensifies the sweet-salty experience, turning an already luscious slice into an irresistible treat.
  • Coffee: A warm cup of coffee pairs perfectly, balancing the sweetness with a hint of bitterness that brings all the flavors together.

A slice of cake with a cup of coffee is a match made in heaven, creating a delightful end to any meal or a relaxing afternoon treat.

  • Spiced Chai Tea: The warm spices of chai complement the cake’s flavors beautifully, creating a cozy, aromatic pairing perfect for autumn gatherings.
  • Hazelnut Milk: For a nutty twist, try serving it with hazelnut milk—a deliciously creamy and slightly sweet beverage that enhances the cake’s flavors.
  • Chocolate Mousse: To take indulgence up a notch, pair your cake with light and airy chocolate mousse for a rich, chocolatey contrast that balances fruitiness perfectly.
  • Pumpkin Pie: For a festive touch, offer a slice of pumpkin pie alongside the cake—two autumn favorites that will surely have your guests raving.

Each pairing contributes its own charm, transforming your Salted Caramel Pear Layer Cake into the star of a beautiful dessert spread!

Salted Caramel Pear Cake Variations

Feel free to explore and personalize this delightful recipe with these fun and tasty variations!

  • Pecan Crunch: Add chopped toasted pecans to the batter for a satisfying crunch and nutty flavor.
  • Maple Flavor: Swap out vanilla extract in the frosting for maple syrup to create a uniquely sweet twist on your cake.
  • Chocolate Drizzle: Top the frosted cake with a rich chocolate ganache for a decadent touch that pairs beautifully with the salted caramel.
  • Spiced Pear: Enhance the spice blend by adding a pinch of nutmeg or cardamom to the batter for a warm, aromatic essence.
  • Dairy-Free: Use almond or coconut milk and dairy-free butter in the frosting for a delightful vegan treat. You can also try this with recipes like Nutella Pancakes Blend for a cozy breakfast option!
  • Caramel Crunch: Sprinkle crushed cookies or toffee bits between the layers for delightful bursts of flavor and texture.
  • Fruit Fusion: Replace pears with diced apples or peaches for a fruity twist that celebrates seasonal fruits.
  • Spicy Kick: Add a dash of cayenne pepper to the caramel sauce to introduce an unexpected hint of heat that perfectly contrasts the sweetness.

With each variation, you’re sure to capture the hearts and palates of your loved ones, turning every baking adventure into a deliciously joyful experience!

How to Store and Freeze Salted Caramel Pear Cake

Fridge: Store the cake covered in the refrigerator for up to 5 days to maintain its moistness and flavor.

Freezer: Freeze individual slices wrapped in plastic wrap and foil for up to 3 months. Thaw in the fridge overnight before serving to preserve texture.

Airtight Container: If storing a whole cake, place it in an airtight container to prevent drying out and absorbing odors from the fridge.

Reheating: For a warm slice, gently microwave for 10-15 seconds or warm in a preheated oven at 300°F for about 5-10 minutes. Enjoy the delightful flavors of the Salted Caramel Pear Cake!

Make Ahead Options

These Salted Caramel Pear Layer Cakes are perfect for busy home cooks looking to save time without sacrificing flavor! You can bake the cake layers up to 3 days in advance and freeze them for optimal freshness; just wrap them tightly in plastic wrap to prevent freezer burn. The salted caramel can also be made up to 1 week ahead; store it in the refrigerator in an airtight container. When you’re ready to assemble the cake, simply thaw the layers at room temperature and whip up the vanilla buttercream—this cake will still be just as delightful! Finish by assembling and frosting the cake just before serving to maintain its lovely taste and texture.

Tips for the Best Salted Caramel Pear Cake

  • Sugar Dissolving: Ensure the sugar completely dissolves in the water before increasing the heat. Undissolved sugar can lead to grainy caramel.
  • Temperature Checks: Use a candy thermometer for the caramel; it should reach about 350°F for perfect consistency. Too dark can lead to bitterness.
  • Egg Temperature: Let your eggs come to room temperature before mixing, ensuring a smoother batter and better rise in your Salted Caramel Pear Cake.
  • Mixing Technique: Avoid overmixing the batter once you combine the dry and wet ingredients. This helps maintain a light, fluffy texture in your cake.
  • Chill Between Layers: Allow the cake to chill after applying the crumb coat; this will help the final frosting set nicely and keep layers intact when you slice.

Salted Caramel Pear Layer Cake Recipe FAQs

How do I select the perfect pears for this cake?
Absolutely! Look for firm, ripe pears such as Anjou or Bosc for the best results. They should yield slightly to pressure but not feel mushy—avoid any with dark spots or wrinkles. Firm pears will hold their shape during baking, providing that lovely texture you want in each slice.

What’s the best way to store leftovers of this cake?
Very! Store the cake covered in the refrigerator, where it will stay fresh for up to 5 days. Make sure it’s in an airtight container or wrapped tightly to prevent it from drying out or absorbing any unwanted odors from the fridge.

Can I freeze the Salted Caramel Pear Cake, and if so, how?
Yes, indeed! To freeze, wrap individual slices in plastic wrap followed by foil to keep them airtight. This will ensure the cake maintains its flavor and moisture. You can freeze the slices for up to 3 months. When you’re ready to enjoy a piece, just thaw it in the fridge overnight for optimal texture.

What should I do if my caramel sauce turns grainy?
No worries! If your caramel sugar crystallizes and becomes grainy, it may not have fully dissolved before boiling. Always stir gently until you see a clear mixture before increasing the heat. If that happens anyway, try re-melting the caramel gently on low heat, whisking continuously to smooth it out. If all else fails, a small amount of water can often help – just remember to do this slowly!

Are there any dietary substitutions I should consider?
Certainly! For a vegan version, you can swap regular eggs for flax eggs or a commercial egg replacer. Likewise, use plant-based butter for the frosting and heavy cream. Gluten-free bakers can use a 1:1 gluten-free flour blend to achieve a similar structure. These substitutions ensure that everyone can enjoy a slice of your delightful Salted Caramel Pear Layer Cake!

How long does homemade caramel sauce last?
Homemade caramel sauce can be stored in the fridge for up to 2 weeks in an airtight container. Just feel free to warm it slightly on the stove or in the microwave before using it again, as it thickens when chilled.

Salted Caramel Pear Cake

Decadent Salted Caramel Pear Cake for Ultimate Indulgence

Indulge in this Salted Caramel Pear Cake, a perfect blend of sweet pears and rich salted caramel that offers a visually stunning and crowd-pleasing dessert.
Prep Time 30 minutes
Cook Time 45 minutes
Cooling Time 20 minutes
Total Time 1 hour 35 minutes
Servings: 12 slices
Course: Dessert
Cuisine: American
Calories: 450

Ingredients
  

For the Cake Layers
  • 2 cups All-Purpose Flour Can be substituted with gluten-free blend if needed.
  • 3/4 cup Unsalted Butter Room temperature.
  • 1 cup Light Brown Sugar Dark brown sugar can also be used.
  • 8 large Eggs Room temperature.
  • 1 cup Full-Fat Buttermilk Can be replaced with plain yogurt and vinegar.
  • 4 cups Pears Peeled and diced; choose firm varieties.
  • 1 teaspoon Baking Powder Ensure freshness for optimal results.
  • 1 teaspoon Baking Soda Ensure freshness for optimal results.
  • 1/2 teaspoon Salt Essential for balancing flavors.
  • 1 teaspoon Cinnamon Adjust based on personal preference.
  • 1 teaspoon Ground Ginger Can substitute with fresh ginger.
  • 1 teaspoon Allspice Optional based on taste.
For the Salted Caramel Sauce
  • 1 cup White Sugar Brown sugar can also be used.
  • 1/4 cup Water
  • 9 tablespoons Unsalted Butter Can use salted butter.
  • 1/2 cup Heavy Cream Whole milk can be used as a substitute.
  • 1/2 teaspoon Kosher Salt Or use sea salt.
For the Vanilla Buttercream Frosting
  • 3 cups Unsalted Butter Room temperature; can use dairy-free butter.
  • 4 cups Confectioners' Sugar Sift for a smooth finish.
  • 2 tablespoons Heavy Cream Milk can be substituted.
  • 2 teaspoons Vanilla Extract Use pure vanilla for best flavor.

Equipment

  • springform pans
  • medium saucepan
  • Stand mixer
  • Mixing bowls

Method
 

Step-by-Step Instructions
  1. In a medium saucepan, combine 1 cup of white sugar and 1/4 cup of water over medium heat, stirring gently until the sugar dissolves. Increase the heat to medium-high and let it boil, without stirring, for about 10 minutes or until it reaches a deep amber color. Remove from heat, whisk in 9 tablespoons of unsalted butter, 1/2 cup of heavy cream, 1 teaspoon of vanilla extract, and 1/2 teaspoon of kosher salt until smooth. Allow to cool to room temperature.
  2. Preheat your oven to 350°F (175°C). Grease and line three 8-inch springform pans with parchment paper to prevent sticking. Set them aside while you prepare the cake batter.
  3. In a stand mixer, cream together 3/4 cup of unsalted butter and 1 cup of light brown sugar until fluffy and light, about 5 minutes. Add 8 large eggs one at a time, mixing well after each addition, followed by 1 teaspoon of vanilla extract.
  4. In a separate bowl, whisk together 2 cups of all-purpose flour, 1 teaspoon of baking powder, 1 teaspoon of baking soda, and 1/2 teaspoon of salt.
  5. Gradually add the dry mixture to the creamed butter mixture, alternating with 1 cup of full-fat buttermilk; mix until just combined. Gently fold in 4 cups of peeled and diced pears. The batter should be smooth but not overmixed.
  6. Divide the batter evenly among the prepared pans. Bake in the preheated oven for about 45 minutes, or until a toothpick inserted into the center comes out clean. The cake should be lightly golden on top. Allow the layers to cool in their pans for 10 minutes before inverting onto wire racks to cool completely.
  7. In a mixing bowl, beat 3 cups of room-temperature unsalted butter until fluffy and pale, about 4 minutes. Gradually incorporate 4 cups of confectioners’ sugar, mixing until smooth and creamy. Add 2 tablespoons of heavy cream and 2 teaspoons of vanilla extract, then continue beating until well-combined and light.
  8. Once the cake layers are completely cooled, trim the tops to level them if necessary. Place the first layer on a serving plate, pipe a dam of vanilla buttercream around the edge, and fill with a generous layer of salted caramel. Repeat this process with the second layer and place the third layer on top.
  9. Using an offset spatula, apply a thin coat of vanilla buttercream around the entire cake to create a crumb coat. Chill for 20 minutes to set. Then, frost the top and sides with additional buttercream, creating a smooth finish. Drizzle remaining salted caramel over the top.
  10. Complete your Salted Caramel Pear Cake with optional decorative swirls of buttercream or a sprinkle of flaky sea salt. Cut into slices and serve.

Nutrition

Serving: 1sliceCalories: 450kcalCarbohydrates: 60gProtein: 4gFat: 22gSaturated Fat: 13gPolyunsaturated Fat: 2gMonounsaturated Fat: 5gCholesterol: 80mgSodium: 220mgPotassium: 200mgFiber: 2gSugar: 38gVitamin A: 750IUVitamin C: 2mgCalcium: 50mgIron: 1mg

Notes

Let the eggs come to room temperature before mixing for better rise. Avoid overmixing the batter once the dry and wet ingredients are combined to maintain a light texture.

Tried this recipe?

Let us know how it was!

Decadent Chocolate Zucchini Cake That’s Vegan and Fudgy

The first time I took a bite of Chocolate Zucchini Cake, I was floored by how deliciously rich and fudgy it was, completely forgetting that it contained zucchini! This ultimate moist chocolate zucchini cake is my go-to recipe for turning an abundant harvest into a delightful dessert that surprises both family and friends. Not only does this cake embrace the spirit of summer cooking, but it also boasts customization at its best—choose from various frosting options or take it à la mode for an even sweeter treat. With its wholesome ingredients and a secret veggie twist, it’s a guilt-free indulgence that proves you can satisfy your sweet tooth while sneaking in some nutrients. Are you ready to dive into this delectable creation?

Why is Chocolate Zucchini Cake a Must-Try?

Decadent, this cake seems too good to be true—with rich chocolate flavors masking the surprise ingredient. Moist and fudgy, it offers a delightful texture that everyone will love, regardless of dietary preferences. Vegan-friendly and easily customizable, you can mix in chocolate chips or top it with Matcha Cashew Frosting for a unique twist. Perfect for gatherings, it’ll impress your guests and become a staple at summer parties. Pair it with some vanilla ice cream, or try my Easter Chocolate Lasagna as a fun dessert variation!

Chocolate Zucchini Cake Ingredients

For the Batter

  • Ground Flaxseed – Acts as an egg substitute for binding; you can replace it with 1 egg for a non-vegan version.
  • Water – Hydrates the flaxseed to create a gel-like consistency, essential for moisture.
  • Apple Cider Vinegar – Reacts with baking soda to provide lift and tenderize the cake perfectly.
  • Almond Milk – Adds moisture; yogurt or oat milk are great alternatives if you prefer.
  • All-Purpose Flour – Forms the cake’s structure; feel free to use a mix of white and whole wheat flour if desired.
  • Cocoa Powder – Imparts a deep chocolate flavor; ideally, you want to stick to this for authenticity.
  • Baking Powder & Baking Soda – Leavening agents that work to help the cake rise beautifully.
  • Sea Salt – Enhances all the flavors for a balanced taste.
  • Coconut Oil – Contributes richness; you can swap for another oil if that’s what you have on hand.
  • Maple Syrup – Sweetens the cake while adding moisture; agave or regular sugar can act as substitutes.
  • Vanilla Extract – Provides depth of flavor; truly enhances the overall experience.
  • Zucchini (finely shredded, unpeeled) – Adds moisture and nutrients; don’t squeeze out the water to preserve texture.

For the Frosting (Optional)

  • Matcha Powder – Offers a vibrant green color and unique flavor; consider this if you’re feeling adventurous!
  • Cashews (soaked) – Blend with matcha and other frosting ingredients for a creamy topping option.
  • Chocolate Chips – Feel free to mix these into the batter or sprinkle them on top for extra indulgence!

Embrace the magic of this Chocolate Zucchini Cake as you create a savory delight that’s easy to customize, ensuring every bite is as sweet as the last!

Step‑by‑Step Instructions for Chocolate Zucchini Cake

Step 1: Preheat and Prepare
Begin by preheating your oven to 350°F (177°C). While the oven heats, grease a 9×13-inch baking dish with coconut oil to ensure easy removal of your delicious Chocolate Zucchini Cake once baked. This step sets the stage for a perfect cake that rises beautifully.

Step 2: Flaxseed Mixture
In a small bowl, combine 2 tablespoons of ground flaxseed with 6 tablespoons of water. Stir well and let it sit for about 5 minutes to thicken into a gel-like consistency. This will bind the ingredients and is key to achieving the cake’s moist texture, making it a delightful vegan option.

Step 3: Milk Mixture
Next, take a separate bowl and mix 1 tablespoon of apple cider vinegar into 1 cup of almond milk. Set this aside for a few minutes. The vinegar reacts with the baking soda to create lift, ensuring your Chocolate Zucchini Cake is light and tender.

Step 4: Dry Ingredients
In a large mixing bowl, whisk together 1 ½ cups of all-purpose flour, ½ cup of cocoa powder, 1 teaspoon of baking powder, 1 teaspoon of baking soda, and ¼ teaspoon of sea salt. Make sure there are no clumps in the flour mixture, as this will help achieve an even rise and rich flavor in your cake.

Step 5: Combine Wet Ingredients
In another bowl, whisk together the thickened flaxseed mixture, the almond milk mixture, ⅓ cup of melted coconut oil, ½ cup of maple syrup, and 2 teaspoons of vanilla extract. Blend until smooth and well combined, allowing all the flavors to meld nicely for a deliciously fudgy Chocolate Zucchini Cake.

Step 6: Mix Ingredients
Pour the wet ingredients into the bowl of dry ingredients and gently stir until just combined. Be careful not to overmix, as this could lead to a dense cake. Fold in 1 ½ cups of finely shredded zucchini, ensuring it’s evenly distributed throughout the batter for added moisture.

Step 7: Bake the Cake
Transfer the batter into the prepared baking dish, spreading it out evenly. Place it in your preheated oven and bake for 30-35 minutes. Check for doneness by gently pressing in the center—the cake should spring back when touched and you may see a slight crack on top.

Step 8: Cool Down
Once baked, remove the cake from the oven and allow it to cool in the pan for about 10 minutes. Then, transfer it to a wire rack to cool completely. This step is essential before frosting to avoid melting your delicious topping.

Step 9: Prepare Optional Frosting
If you wish to frost your Chocolate Zucchini Cake, soak 1 cup of cashews in water for at least 4 hours, then drain. Blend the soaked cashews with matcha powder and sweetener of choice until smooth to create a creamy frosting that pairs wonderfully with the cake’s fudgy texture.

How to Store and Freeze Chocolate Zucchini Cake

Room Temperature: Store the un-frosted Chocolate Zucchini Cake in an airtight container at room temperature for up to 3 days, ensuring it remains moist and delicious.

Fridge: If you’ve frosted your cake, keep it in the refrigerator for up to a week. Cover it loosely with foil or plastic wrap to maintain flavor and texture.

Freezer: Freeze the un-frosted Chocolate Zucchini Cake by wrapping it tightly in plastic wrap and then in aluminum foil. It can last for up to 3 months.

Reheating: To enjoy frozen cake, thaw it in the fridge overnight. For a warm treat, gently reheat individual slices in the microwave for about 15-20 seconds.

What to Serve with Chocolate Zucchini Cake?

Experience a delightful journey through flavors and textures while elevating your Chocolate Zucchini Cake into a memorable meal!

  • Creamy Vanilla Ice Cream: A scoop of creamy vanilla ice cream adds a contrasting coldness that beautifully complements the rich, fudgy cake.

  • Fresh Berries Medley: Serve with a mix of raspberries, strawberries, or blueberries for a refreshing burst of flavor and a touch of tartness, balancing the sweetness perfectly.

  • Whipped Coconut Cream: This light, fluffy topping enhances the chocolate decadence with a subtle coconut flavor, making it a perfect dairy-free pairing for a vegan delight.

  • Homemade Chocolate Sauce: Drizzle warm chocolate sauce over each slice for an indulgent touch that amplifies the cocoa notes of your cake—and who wouldn’t love extra chocolate?

  • Fruit Salad: A vibrant fruit salad with citrus and melon offers a bright counterpoint to the cake, keeping everything light and cheerful.

  • Earl Grey Tea: The fragrant notes of Earl Grey tea bring a sophisticated touch, creating an elegant atmosphere alongside your lovely dessert.

Each pairing ensures your Chocolate Zucchini Cake is enjoyed in delightful company, making every bite an experience worth savoring!

Expert Tips for Chocolate Zucchini Cake

Cool Completely: Allow the cake to cool fully before frosting; this prevents any melting and ensures a beautiful presentation.

Moist Zucchini: Don’t squeeze the moisture out of the zucchini; it’s vital for the cake’s moist texture and overall deliciousness.

Gluten-Free Adjustments: If using a gluten-free flour blend, remember that results may vary, so check your baking time and texture closely.

Check for Doneness: When baking, gently press the center of the cake; it should spring back when fully cooked. Adjust the baking time accordingly for cupcakes (about 18-20 minutes).

Experiment with Flavors: Feel free to add chocolate chips or nuts to the batter for delightful surprises in every bite of your Chocolate Zucchini Cake.

Make Ahead Options

These Chocolate Zucchini Cakes are a fantastic option for busy home cooks looking to save time without sacrificing flavor! You can make the cake itself up to 3 days in advance; simply allow it to cool completely, then wrap it tightly in plastic wrap or store it in an airtight container. This helps maintain its moist, fudgy consistency, so it stays just as delicious when you’re ready to serve. If you’re planning to frost the cake, prepare the Matcha Cashew Frosting up to 24 hours ahead and refrigerate it in an airtight container. When you’re set to treat your family or guests, simply frost the cake and serve—it’s guaranteed to impress with minimal hassle!

Chocolate Zucchini Cake Variations & Substitutions

Feel free to get creative with this moist and fudgy chocolate zucchini cake, exploring different flavors and textures!

  • Carrot Cake Twist: Substitute shredded zucchini with grated carrots for a colorful and sweet variation. This option gives a delightful hint of spice and sweetness, adding surprises for the taste buds.

  • Gluten-Free Flour: Swap all-purpose flour with a gluten-free blend for a safe cake alternative. Be sure to check the blend’s baking instructions, as some may require different liquid ratios or baking times.

  • Nut-Free Frosting: Use a creamy coconut cream frosting in place of the matcha cashew option for a nut-free dessert. The light and airy finish will still bring excitement while keeping everyone at the table happy.

  • Extra Chocolate Boost: Fold in ½ cup of chocolate chips into the batter for an extra indulgent version of this cake. The chocolate chips melt slightly during baking, creating pockets of luscious chocolate goodness in every bite!

  • Cacao Nibs: Swap some of the cocoa powder for cacao nibs for a crunchy texture and additional layers of chocolate flavor. This adds a delightful contrast to the moistness of the cake that everyone will love.

  • Non-Frosted Delight: Serve this cake unadorned for a simple, guilt-free treat that highlights the rich chocolate flavors. Pair it with a scoop of vanilla ice cream for a deliciously contrasting bite!

  • Matcha Whole Trifecta: Top your cake with not just Matcha Cashew Frosting, but also sprinkle some matcha powder on top for a vibrant green surprise. The combination visually appeals as much as it tastes!

  • Spicy Kick: Add a pinch of cayenne or chili powder to the batter for a subtle spicy kick. This unexpected warmer flavor will provide an exciting twist that can charm adventurous eaters, elevating your cake to new heights.

Whether it’s a simple backyard BBQ or an elegant celebration, this chocolate zucchini cake is destined to be a showstopper. Don’t forget to pair it with my delightful Strawberry Cheesecake Dump Cake or sink your fork into a slice of Honeybun Carrot Cake for a perfectly sweet dessert spread!

Chocolate Zucchini Cake Recipe FAQs

What should I look for when selecting zucchini for the cake?
Absolutely! Choose firm zucchinis that are unblemished and have shiny skins. Avoid ones with dark spots or soft areas, as they can indicate overripeness. The ideal zucchini is actually medium-sized, as larger ones can be watery.

How should I store my Chocolate Zucchini Cake?
You can store your un-frosted Chocolate Zucchini Cake in an airtight container at room temperature for up to 3 days. If frosted, it’s best to refrigerate it, where it can stay fresh for up to a week. Just ensure it’s loosely covered to maintain its delectable texture!

Can I freeze the Chocolate Zucchini Cake?
Absolutely! To freeze your un-frosted Chocolate Zucchini Cake, wrap it tightly in plastic wrap, followed by aluminum foil to prevent freezer burn. It can be stored for up to 3 months. When you’re ready to enjoy it, simply thaw it in the fridge overnight, and warm it up in the microwave for about 15-20 seconds if you prefer!

What if my Chocolate Zucchini Cake turns out too moist?
If your cake is too moist, it may be due to excess moisture from the zucchini. Remember to avoid squeezing the zucchini before adding it to the batter. Additionally, an oven that isn’t fully preheated can lead to uneven baking. Always check for doneness by gently pressing the center; if it spring backs, it’s ready!

Are there any dietary concerns I should be aware of with this recipe?
Yes! This Chocolate Zucchini Cake is vegan, but for those with nut allergies, consider substituting almond milk with oat milk or another nut-free milk. Additionally, if you’re using chocolate chips, make sure they are dairy-free to keep the recipe fully vegan-friendly.

Can I customize the frosting for dietary restrictions?
Very much so! If you need a nut-free option, consider making a simple glaze with powdered sugar and a splash of non-dairy milk. Alternatively, a cream cheese frosting (using dairy-free cream cheese) is also delicious and pairs wonderfully with the cake’s rich flavors!

Chocolate Zucchini Cake

Decadent Chocolate Zucchini Cake That's Vegan and Fudgy

This Chocolate Zucchini Cake is deliciously rich, fudgy, and completely vegan, making it a must-try dessert.
Prep Time 15 minutes
Cook Time 35 minutes
Cooling Time 10 minutes
Total Time 1 hour
Servings: 12 slices
Course: Dessert
Cuisine: Vegan
Calories: 200

Ingredients
  

For the Batter
  • 2 tablespoons Ground Flaxseed Acts as an egg substitute for binding
  • 6 tablespoons Water Hydrates the flaxseed
  • 1 tablespoon Apple Cider Vinegar Helps provide lift when reacting with baking soda
  • 1 cup Almond Milk Adds moisture; can substitute with yogurt or oat milk
  • 1.5 cups All-Purpose Flour Forms the cake’s structure
  • 0.5 cup Cocoa Powder Imparts a deep chocolate flavor
  • 1 teaspoon Baking Powder Leavening agent for rising
  • 1 teaspoon Baking Soda Leavening agent for rising
  • 0.25 teaspoon Sea Salt Enhances flavors
  • 0.33 cup Coconut Oil Contributes richness
  • 0.5 cup Maple Syrup Sweetens and adds moisture
  • 2 teaspoons Vanilla Extract Provides depth of flavor
  • 1.5 cups Zucchini (finely shredded, unpeeled) Adds moisture and nutrients
For the Frosting (Optional)
  • 1 tablespoon Matcha Powder For vibrant color and flavor
  • 1 cup Cashews (soaked) Blend for a creamy frosting
  • Chocolate Chips Optional, can mix into batter or top for indulgence

Equipment

  • Oven
  • Mixing bowls
  • whisk
  • baking dish
  • blender

Method
 

Step‑By‑Step Instructions
  1. Preheat your oven to 350°F (177°C) and grease a 9x13-inch baking dish with coconut oil.
  2. In a small bowl, combine 2 tablespoons of ground flaxseed with 6 tablespoons of water and let it thicken.
  3. Mix 1 tablespoon of apple cider vinegar into 1 cup of almond milk and set aside.
  4. In a large bowl, whisk together 1.5 cups of flour, 0.5 cup of cocoa powder, 1 teaspoon of baking powder, 1 teaspoon of baking soda, and 0.25 teaspoon of salt.
  5. In another bowl, whisk together the flaxseed mixture, almond milk mixture, 0.33 cup of melted coconut oil, 0.5 cup of maple syrup, and 2 teaspoons of vanilla until smooth.
  6. Pour the wet ingredients into the dry ingredients and gently stir until just combined. Fold in 1.5 cups of zucchini.
  7. Transfer the batter to the prepared baking dish and bake for 30-35 minutes. Check for doneness.
  8. Allow the cake to cool in the pan for 10 minutes, then transfer it to a wire rack to cool completely.
  9. For frosting, soak 1 cup of cashews in water for at least 4 hours, then blend with matcha powder until smooth.

Nutrition

Serving: 1sliceCalories: 200kcalCarbohydrates: 30gProtein: 4gFat: 8gSaturated Fat: 5gPolyunsaturated Fat: 1gMonounsaturated Fat: 2gSodium: 150mgPotassium: 200mgFiber: 2gSugar: 10gVitamin A: 200IUVitamin C: 5mgCalcium: 40mgIron: 1mg

Notes

Cake can be stored at room temperature for up to 3 days, or in the refrigerator for up to a week if frosted.

Tried this recipe?

Let us know how it was!

Delicious Peppermint Red Velvet Cake for Your Holiday Table

As the golden hour of the holidays approaches, the scent of peppermint and cocoa fills the air, sparking memories of cozy gatherings and warm smiles. I can’t help but feel the excitement as I whip up this easy-to-make Peppermint Red Velvet Cake, a festive showstopper that’s simply a delight for any celebration. With its moist, fluffy texture and a refreshing peppermint cream cheese frosting, this cake not only tantalizes the taste buds but also makes holiday baking effortlessly enjoyable. Whether you’re hosting a festive gathering or surprising friends with a homemade treat, this vibrant cake is sure to impress. Are you ready to bring a sweet touch of joy to your holiday table?

Why is this cake a holiday must-have?

Festive Appeal: This Peppermint Red Velvet Cake is a stunning centerpiece that brings vibrant color and cheer to any holiday gathering.
Irresistible Flavor: The blend of rich cocoa and refreshing peppermint creates a flavor experience that feels both nostalgic and on-trend.
Effortless Baking: With its simple ingredients and straightforward steps, even novice bakers can create this delicious treat with ease.
Versatile Options: Whether you want to keep it traditional or explore variations, this cake is adaptable—try it with vanilla for a classic twist, or swap in vegan alternatives without sacrificing taste.
Crowd-Pleaser: This cake not only looks beautiful but tastes divine, ensuring satisfied guests and happy smiles around the table. Pair it with a warm cup of cocoa, or check out options like Strawberry Cheesecake Dump for more festive inspiration!

Peppermint Red Velvet Cake Ingredients

• Get ready to bake with these simple ingredients!

For the Cake

  • All-Purpose Flour – Provides structure and texture for the cake.
  • Granulated Sugar – Adds sweetness and moisture to the cake.
  • Cocoa Powder – Contributes chocolate flavor and color to the red velvet cake.
  • Clabber Girl Baking Powder – Acts as a leavening agent for lift and tenderness.
  • Baking Soda – Works with vinegar to enhance the cake’s rise.
  • Salt – Balances sweetness and enhances overall flavor.
  • Crisco® Pure Vegetable Oil – Keeps the cake moist and tender.
  • Buttermilk – Provides acidity to react with baking soda and enriches flavor.
  • Large Eggs – Contributes moisture and helps bind ingredients together.
  • Spice Island Pure Vanilla Extract – Adds rich flavor to the cake.
  • White Vinegar – Adds acidity, helping achieve the characteristic red color of red velvet.
  • No Taste Red Gel Food Coloring – Enhances the red color without altering flavor.

For the Frosting

  • Cream Cheese – Forms the base of the frosting, contributing tanginess and creaminess.
  • Unsalted Butter – Adds flavor and richness to the frosting.
  • Crisco® All-Vegetable Shortening – Enhances the texture of the frosting, making it smooth and easy to pipe.
  • Peppermint Extract – Adds a refreshing hint of peppermint to the frosting.
  • Heavy Cream – Ensures smooth consistency in the frosting.
  • Powdered Sugar – Provides sweetness and stability to the frosting.

For Garnish

  • Peppermints or Candy Canes – Used as a decorative and flavorful garnish.
  • Fresh Rosemary – Optional garnish to represent festive “Christmas trees.”

With these delightful ingredients, your Peppermint Red Velvet Cake will be the star of any holiday celebration!

Step‑by‑Step Instructions for Peppermint Red Velvet Cake

Step 1: Preheat & Prepare Pans
Preheat your oven to 350°F (175°C). As the oven warms up, prepare your three 8-inch cake pans by spraying them generously with Baker’s Joy baking spray to ensure easy removal after baking. This step is crucial for achieving a flawless Peppermint Red Velvet Cake, so don’t skip it!

Step 2: Mix Dry Ingredients
In a large mixing bowl, whisk together 2 cups of all-purpose flour, 1 ½ cups of granulated sugar, ¾ cup of cocoa powder, 1 teaspoon of baking powder, 1 teaspoon of baking soda, and 1 teaspoon of salt. This blend will form the foundation of your cake and must be thoroughly mixed to ensure even texture and flavor in your festive treat.

Step 3: Combine Wet Ingredients
In a separate bowl, combine 1 cup of vegetable oil, 1 cup of buttermilk, 2 large eggs, 1 teaspoon of vanilla extract, and 1 tablespoon of white vinegar. Gradually pour this mixture into the dry ingredients while mixing on low speed until just combined. Stir in 1 tablespoon of no taste red gel food coloring until the batter is beautifully vibrant—this is where your Peppermint Red Velvet Cake gains its signature color!

Step 4: Bake
Divide the vibrant batter evenly among your prepared cake pans. Bake in your preheated oven for 22 to 25 minutes, or until a toothpick inserted in the center comes out clean. You’ll know your cakes are ready when they spring back gently when pressed. Remove them from the oven and let the pans cool on a wire rack for about 10 to 15 minutes.

Step 5: Cool
Carefully remove the cakes from the pans and allow them to cool completely on the wire rack, which should take approximately 4 hours. Proper cooling is essential for optimal stacking and frosting, ensuring that your Peppermint Red Velvet Cake maintains its moist, tender texture without collapsing under the weight of the frosting.

Step 6: Make Frosting
While the cakes cool, prepare the frosting. In a stand mixer, beat together 8 ounces of cream cheese, ½ cup of unsalted butter, and ½ cup of vegetable shortening on medium speed until creamy and smooth. Gradually mix in ½ teaspoon of peppermint extract, ¼ cup of heavy cream, and 4 cups of powdered sugar until well combined, achieving a fluffy, spreadable consistency perfect for your festive cake.

Step 7: Assemble Cake
Once the cakes are thoroughly cooled, use a serrated knife to trim the domed tops for a flat surface. Layer your peppermint frosting generously between each cake layer, then apply a crumb coat all around the outside. Chill the cake in the refrigerator for about 30 minutes to firm up before applying the final layer of frosting, ensuring a professional finish on your Peppermint Red Velvet Cake.

Step 8: Decorate and Serve
After chilling, use the remaining frosting to decorate the top and sides of your cake, creating a smooth finish. For a festive touch, garnish with crushed peppermint candies or candy canes, and add sprigs of fresh rosemary if desired to represent Christmas trees. Slice, serve, and enjoy the delightful flavors of your Peppermint Red Velvet Cake during your holiday gatherings!

How to Store and Freeze Peppermint Red Velvet Cake

Room Temperature: Keep your Peppermint Red Velvet Cake at room temperature for up to 1 day, tightly covered to prevent drying out.

Fridge: Store in the refrigerator for up to 3 days, ensuring it’s loosely covered or in an airtight container to retain moisture and flavor.

Freezer: For longer storage, freeze the cake by wrapping individual slices or the whole cake tightly in plastic wrap followed by aluminum foil. It can be frozen for up to 3 months.

Reheating: To enjoy slices from the freezer, thaw overnight in the fridge and let it sit at room temperature for about 30 minutes before serving for optimal taste!

What to Serve with Peppermint Red Velvet Cake?

As you prepare to delight friends and family with the vibrant flavors of this festive cake, consider these delightful pairings to create a memorable holiday feast.

  • Creamy Mashed Potatoes: The buttery richness offers a comforting contrast to the cake’s sweet peppermint frosting.

  • Roasted Brussels Sprouts: Their natural earthiness and slight bitterness balance the sweetness of the cake, making each bite harmonious.

  • Spiced Winter Fruit Salad: A refreshing blend of citrus and spices provides brightness and a zesty kick that complements the rich cocoa flavor.

  • Gingerbread Cookies: These classic treats bring warmth and nostalgia, making them perfect to nibble on alongside slices of peppermint red velvet.

  • Mulled Wine: The aromatic spices in this seasonal drink echo the cake’s festive flavors, creating a cozy sips-and-bites moment.

  • Peppermint Hot Chocolate: For a double dose of peppermint pleasure, serve this warm beverage to pair perfectly with the sweet cake.

  • Vanilla Ice Cream: Scoops of smooth, creamy ice cream provide a cooling contrast to the warm notes of chocolate and peppermint.

  • Hibiscus Iced Tea: This floral, refreshing drink cleanses the palate and enhances the celebratory feel of your dessert spread.

Embrace these delightful pairings to elevate your holiday gathering, making each bite a memorable experience!

Expert Tips for Peppermint Red Velvet Cake

  • Perfect Cooling: Allow the cakes to cool completely on a wire rack before frosting to prevent melting and slipping. This step is key for a beautiful Peppermint Red Velvet Cake!
  • Color Boost: If you desire a deeper red hue, add a few extra drops of red gel food coloring while mixing the batter. A vibrant color enhances the festive presentation!
  • Frosting Supremacy: Ensure your cream cheese and butter are at room temperature to achieve a smooth, creamy frosting that pipes beautifully and flavors every slice.
  • Layer Neatly: Trim the tops of your cooled cakes for even stacking. This helps the layers align perfectly and gives a polished look to your cake!
  • Garnish Wisely: Be creative with your toppings! Crushed peppermint candies not only add flavor but also provide a delightful crunch and festive appeal to your Peppermint Red Velvet Cake.

Peppermint Red Velvet Cake Variations

Let your creativity shine as you customize this festive cake, making it uniquely yours and bursting with flavors!

  • Vegan Version: Swap dairy cream cheese and butter with plant-based alternatives for a delicious vegan Peppermint Red Velvet Cake.
    Plant-based baking can be delightful, bringing the same richness and flavor without animal products!

  • Gluten-Free Twist: Use a gluten-free all-purpose flour blend to create a gluten-free version without sacrificing taste.
    This adaptation allows everyone to enjoy the cake, ensuring no one misses out on this holiday delight.

  • Minty Freshness: Add crushed mint candies to the batter for an extra burst of minty flavor throughout the cake.
    Imagine that refreshing crunch in every bite—it’s a joyful surprise that elevates this holiday treat!

  • Chocolate Peppermint Delight: Fold in mini chocolate chips for an indulgent chocolate-peppermint fusion.
    The melty chocolate bits harmonize beautifully with the peppermint, creating layers of flavor.

  • Nutty Crunch: Incorporate chopped walnuts or pecans into the cake batter for added texture and flavor.
    Nuts bring both a delightful crunch and a warm, earthy flavor that complements the sweetness perfectly.

  • Creamy Frosting Upgrade: For an extra decadent touch, mix in some mascarpone cheese with your cream cheese frosting.
    This twist adds richness and a creamy tang that will leave everyone asking for seconds!

  • Layer It Up: Create a four-layer cake using the same recipe, stacking layers for a dramatic presentation.
    The more layers, the more festive, plus it allows for more frosting and decoration!

Feeling inspired? Whether you’re in the mood for vanilla undertones like in a Strawberry Cheesecake or a minty chocolate blend, let these variations guide you as you create your own festive masterpiece!

Make Ahead Options

These Peppermint Red Velvet Cakes are perfect for busy home cooks looking to simplify their holiday baking! You can prepare the cake layers up to 24 hours in advance; simply bake, cool, and wrap them tightly in plastic wrap before refrigerating to maintain their moist texture. The peppermint cream cheese frosting can also be made ahead and stored in an airtight container in the refrigerator for up to 3 days. Just give it a quick mix to restore its fluffy consistency before frosting the cake. When you’re ready to serve, assemble the layers with the frosting and add your festive garnishes for a showstopping treat that’s just as delicious as if you had made it fresh!

Peppermint Red Velvet Cake Recipe FAQs

How do I choose the right ingredients for the Peppermint Red Velvet Cake?
Absolutely! For the best results, ensure your ingredients are fresh. Use all-purpose flour with a good texture and check your cocoa powder for freshness—older cocoa can lose its flavor. Choose vibrant, pure red gel food coloring, as this will make your cake beautifully festive. Lastly, opt for quality cream cheese and butter for the frosting to achieve a delightful creaminess.

How should I store my Peppermint Red Velvet Cake?
Very important! Store the cake loosely covered in the refrigerator for up to 3 days to keep it fresh and moist. If you want to store it at room temperature, you can keep it covered for up to 1 day. Always check for any signs of drying out or spoilage before serving.

Can I freeze the Peppermint Red Velvet Cake, and how?
Certainly! To freeze your cake, wrap individual slices or the whole cake tightly in plastic wrap, followed by aluminum foil to prevent freezer burn. It can be frozen for up to 3 months. When you’re ready to enjoy it, simply thaw it overnight in the fridge and let it sit at room temperature for about 30 minutes before serving to restore its delightful flavors.

What if my cake is too dry or crumbly?
Don’t worry! If your cake turns out dry, there are a few fixes. Ensure you’ve measured flour accurately, as too much can lead to a drier cake. Next time, consider adding a bit more buttermilk to the batter, as this helps maintain moisture. If it’s too late, serve your slices with a drizzle of chocolate syrup, whipped cream, or even a scoop of ice cream to enhance the moisture!

Are there any dietary considerations for Peppermint Red Velvet Cake?
Absolutely! For those with dairy allergies, you can easily substitute plant-based cream cheese and buttery alternatives in the frosting. The cake itself can be made vegan by using flax eggs instead of regular eggs and swapping buttermilk for a plant-based milk mixed with vinegar or lemon juice, which behaves similarly. Just ensure the peppermint extract is allergy-friendly!

What type of decorations can I use for the Peppermint Red Velvet Cake?
The more the merrier! For festive flair, I recommend using crushed peppermint candies or candy canes on top of your frosting. Fresh rosemary sprigs also add a charming touch, resembling mini Christmas trees. You might even consider gluten-free alternatives for your toppings if allergy considerations arise!

Peppermint Red Velvet Cake

Delicious Peppermint Red Velvet Cake for Your Holiday Table

This Peppermint Red Velvet Cake is a festive dessert that delights with its moist texture and vibrant flavors, perfect for holiday celebrations.
Prep Time 30 minutes
Cook Time 25 minutes
Cooling Time 4 hours
Total Time 4 hours 55 minutes
Servings: 12 slices
Course: Dessert
Cuisine: American
Calories: 350

Ingredients
  

For the Cake
  • 2 cups All-Purpose Flour
  • 1.5 cups Granulated Sugar
  • 0.75 cups Cocoa Powder
  • 1 teaspoon Clabber Girl Baking Powder
  • 1 teaspoon Baking Soda
  • 1 teaspoon Salt
  • 1 cup Crisco® Pure Vegetable Oil
  • 1 cup Buttermilk
  • 2 large Eggs
  • 1 teaspoon Spice Island Pure Vanilla Extract
  • 1 tablespoon White Vinegar
  • 1 tablespoon No Taste Red Gel Food Coloring
For the Frosting
  • 8 ounces Cream Cheese
  • 0.5 cup Unsalted Butter
  • 0.5 cup Crisco® All-Vegetable Shortening
  • 0.5 teaspoon Peppermint Extract
  • 0.25 cup Heavy Cream
  • 4 cups Powdered Sugar
For Garnish
  • Peppermints or Candy Canes Used as a decorative and flavorful garnish.
  • Fresh Rosemary Optional garnish.

Equipment

  • Stand mixer
  • 8-inch cake pans
  • whisk
  • Mixing Bowl
  • Wire rack

Method
 

Step‑by‑Step Instructions
  1. Preheat your oven to 350°F (175°C) and prepare three 8-inch cake pans with baking spray.
  2. In a large mixing bowl, whisk together the dry ingredients.
  3. In a separate bowl, combine the wet ingredients and mix with the dry ingredients until just combined.
  4. Divide the batter among the prepared pans and bake for 22 to 25 minutes.
  5. Allow the cakes to cool in the pans for 10 to 15 minutes before transferring to a wire rack.
  6. Prepare the frosting while the cakes cool, mixing until creamy and smooth.
  7. Trim the tops of the cooled cakes, layer with frosting, and chill to firm up.
  8. Decorate with remaining frosting and garnishes before serving.

Nutrition

Serving: 1sliceCalories: 350kcalCarbohydrates: 46gProtein: 3gFat: 16gSaturated Fat: 8gPolyunsaturated Fat: 0.5gMonounsaturated Fat: 2gCholesterol: 50mgSodium: 300mgPotassium: 120mgFiber: 1gSugar: 30gVitamin A: 400IUCalcium: 20mgIron: 1mg

Notes

Allow cakes to cool completely before frosting to prevent melting. Trim tops for even stacking.

Tried this recipe?

Let us know how it was!

Irresistible White Chocolate Snowflakes in Just 15 Minutes

As I stood in my kitchen, the gentle aroma of melting white chocolate wafted around me, instantly transporting me to my childhood holiday baking days. There’s something magical about creating these Easy 15-Minute White Chocolate Snowflakes that combines the sweetness of creamy chocolate with the satisfying crunch of Rice Krispies. In just a quarter of an hour, you’ll have a nostalgic treat that’s perfect for last-minute holiday gifting or indulging on cozy evenings. Not only are these delightful bites quick to whip up, but they also bring a fun twist to traditional snacking with their sweet-salty contrast. Ready to add a sprinkle of joy to your next gathering? Let’s dive into the recipe!

Why Are White Chocolate Snowflakes Irresistible?

Simplicity reigns supreme in this delightful recipe, requiring just a few ingredients and minimal time. Versatile options mean you can easily customize them; swap white chocolate for dark or even use Cheerios instead of Rice Krispies! Quick and easy to prepare, these treats are ready in just 15 minutes – perfect for unexpected guests or holiday parties. Nostalgic vibes are sure to create cherished memories as you whip up these sweet bites, reminiscent of joyous moments in your kitchen. Enjoy them with a warm cup of cocoa or gift them during the festive season. For more delicious holiday recipes, check out my Chocolate Fudge Cupcakes and Easter Chocolate Lasagna.

White Chocolate Snowflakes Ingredients

• Create your delicious White Chocolate Snowflakes with this simple ingredient list!

For the Treats

  • White Chocolate – The star of the show, providing a creamy, sweet delight; feel free to substitute with dark or milk chocolate for a different taste.
  • Rice Krispies – Adds a satisfying crunch; use Cheerios if you’re looking for an alternative cereal option.
  • Salted Peanuts – They introduce a lovely salty contrast to the sweetness; unsalted nuts can be used for a milder flavor, or pretzels can add extra crunch.

Optional Add-ons

  • Dried Fruits – For a chewy surprise, mix in your choice of dried fruits such as cranberries or raisins.
  • Flavored Extracts – A splash of peppermint or vanilla can elevate the flavor profile, adding a unique twist to your snowflakes!

Step‑by‑Step Instructions for White Chocolate Snowflakes

Step 1: Melt the White Chocolate
Begin by setting up a double boiler: fill a pot with about an inch of water and bring it to a gentle simmer over low heat. Place a heatproof bowl on top, ensuring it doesn’t touch the water. Add your white chocolate to the bowl and stir continuously for 5-7 minutes until it’s fully melted and silky smooth. Keep a close eye to avoid overheating; you want it perfectly melted, not burnt!

Step 2: Combine the Ingredients
Once your white chocolate is smooth, remove the bowl from the heat. Quickly add in the Rice Krispies and salted peanuts, stirring gently to coat every morsel evenly in the delicious chocolate. This should take about 1-2 minutes. Make sure the crunch of the Rice Krispies stays intact while mixing, creating a delightful texture for your White Chocolate Snowflakes.

Step 3: Shape the Snowflakes
Prepare a baking sheet by lining it with parchment paper for easy cleanup and to prevent sticking. Using a rounded teaspoon, scoop mounds of the chocolate mixture and drop them onto the prepared baking sheet. Space them a few inches apart to allow for slight spreading. Aim for about 12-15 mounds, forming delightful clusters resembling snowflakes!

Step 4: Chill to Set
Place the baking sheet in the refrigerator and allow the White Chocolate Snowflakes to chill uncovered for at least 30 minutes. This cooling step is crucial as it helps the chocolate harden and firm up, ensuring your treats have the perfect crisp finish. After this time, check that the chocolate has set completely before serving.

Step 5: Serve and Enjoy
Once the White Chocolate Snowflakes are hardened, they are ready to be enjoyed! You can present them on a festive plate for gatherings or package them as sweet gifts. Store any leftovers in an airtight container in the refrigerator to maintain their delightful crunch, and savor these treats over the following week as a comforting snack.

What to Serve with Easy 15-Minute Chocolate-Covered Snowflakes

Create a memorable dessert spread that charms the senses and elevates any gathering.

  • Festive Fruit Salad: A refreshing mix of seasonal fruits adds a vibrant contrast to the richness of the snowflakes, balancing sweetness with natural acidity. Toss in a hint of mint for a burst of freshness!

  • Creamy Hot Cocoa: Cozy up with steaming mugs of rich hot cocoa, perfectly pairing the snowflakes’ sweetness with chocolatey warmth, making every bite feel like a warm hug.

  • Caramelized Apples: Warm, buttery caramelized apples offer a delightful, sweet-sour contrast. The smooth and silky texture complements the crunch of the snowflakes beautifully.

  • Spiced Chai Latte: Infuse your dessert table with the aromatic flavors of spiced chai. This warm drink complements the creamy white chocolate snowflakes and adds a touch of warmth and comfort.

  • Gingerbread Cookies: These spiced treats bring a cozy winter vibe and contrast well with the sweet and salty flavors of the snowflakes. They make for a delightful pairing during the holiday season.

  • Mini Cheesecakes: Silky and rich, mini cheesecakes provide a creamy counterpart to the crunchy texture of the chocolate-covered snowflakes. These little delights are an impressive addition to any dessert spread.

  • Milk or Dark Chocolate Dipping Sauce: Enhance your snacking experience by serving a warm chocolate sauce for dipping, adding layers of indulgence that deepens the delightful flavors of the snowflakes.

  • Coffee or Espresso: A cup of rich, dark coffee sharpens the sweetness of the snowflakes, making every bite a satisfying experience. The bitterness of the coffee enhances the sweetness delicately.

White Chocolate Snowflakes Variations & Substitutions

Feel free to let your creativity shine with these delightful variations that will elevate your White Chocolate Snowflakes!

  • Dark Chocolate: Switch white chocolate for dark chocolate for a richer, deeper flavor that perfectly complements the sweetness.

  • Milk Chocolate: Opt for milk chocolate instead of white for a creamier taste—delicious for chocolate lovers!

  • Nut Alternatives: Substitute peanuts with almonds or walnuts for a different nutty crunch. Try mixing multiple nuts for an even more satisfying texture!

  • Cereal Swaps: Use Cheerios, Cornflakes, or even crushed pretzels to add a little extra flavor and crunch to your treats. Each cereal brings a unique twist to the experience.

  • Dried Fruits: Fold in dried cranberries or cherries to introduce a chewy and tangy aspect that balances the sweetness beautifully.

  • Flavored Extracts: Enhance your recipe with a teaspoon of peppermint or orange extract for a festive flair! This gives a refreshing taste that makes these treats truly stand out.

  • Spicy Kick: For those who love a bit of heat, sprinkle some cayenne pepper or chili powder into the mixture. It’s a surprising twist that can make them even more enjoyable.

  • Serving Idea: For a snowy presentation, dust your White Chocolate Snowflakes with powdered sugar before serving. It adds an elegant touch and resembles fresh snowfall!

Don’t forget to pair these delightful treats with a warm drink, like cocoa or a comforting spiced chai. Looking for more indulgent ideas? Check out my Chocolate Granola Cups or whip up some tasty Chocolate Chip Pancakes for a comforting breakfast option!

How to Store and Freeze White Chocolate Snowflakes

Airtight Container: Store your White Chocolate Snowflakes in an airtight container in the refrigerator to maintain their delightful crunch, best enjoyed within 1 week.

Freezer: For longer storage, freeze the snowflakes by placing them in a freezer-safe container, separating layers with parchment paper, where they can last for up to 2 months.

Reheating: If you prefer a soft texture, let the frozen treats thaw in the fridge overnight before enjoying. Avoid reheating in the microwave, as it can melt the chocolate coating.

Room Temperature: These treats are best kept in the fridge, but if you plan to serve them at a gathering, they can sit at room temperature for about 2 hours before the chocolate begins to soften.

Make Ahead Options

These White Chocolate Snowflakes are a fantastic treat to prepare ahead of time, making your busy days a little sweeter! You can mix the chocolate with the Rice Krispies and salted peanuts up to 24 hours in advance, then drop the mounds onto the baking sheet. Just cover them with plastic wrap and refrigerate until you’re ready to chill and set them. This keeps the treats fresh and prevents the chocolate from melting. When you’re ready to serve, simply pop them in the fridge for about 30 minutes to firm up, and you’ll have delightful, homemade treats that are just as delicious as when freshly made!

Expert Tips for White Chocolate Snowflakes

  • Use Quality Chocolate: Choose high-quality white chocolate for the best flavor. Avoid chocolate chips, as they often have stabilizers that can impact melting.

  • Gentle Heat: When melting the chocolate, use low heat and stir continuously to prevent it from seizing. High heat can burn the chocolate quickly, ruining the texture.

  • Proper Coating: Ensure Rice Krispies are well-coated in chocolate. If the mixture appears dry, add more melted chocolate to enhance both taste and binding—this helps create cohesive White Chocolate Snowflakes.

  • Chill Thoroughly: Allow enough time for the treats to chill completely in the refrigerator. Uneven cooling can lead to a soft center instead of a satisfying crunch.

  • Experiment with Flavors: Don’t hesitate to add a splash of flavored extracts or dried fruits. This can elevate your White Chocolate Snowflakes and make them uniquely yours!

  • Storage Tips: Store your snowflakes in an airtight container. This keeps them fresh and crunchy; they’re best enjoyed within a week for optimal taste!

White Chocolate Snowflakes Recipe FAQs

How do I know if my white chocolate is the right consistency?
Absolutely! When melted correctly, quality white chocolate should be smooth and glossy without any lumps. If it looks grainy or thick, you may have overheated it. Always melt at a low temperature and stir continuously for a silky finish.

How should I store leftovers?
To keep your White Chocolate Snowflakes fresh and crunchy, store them in an airtight container in the refrigerator. They’re best enjoyed within one week to maintain their delightful texture.

Can I freeze the White Chocolate Snowflakes?
Yes! For longer storage, freeze your snowflakes in a freezer-safe container, layering parchment paper between them to prevent sticking. They can last up to 2 months in the freezer. When you’re ready to enjoy, let them thaw in the fridge overnight for the best texture.

What if my chocolate seizes while melting?
Very tricky! If your white chocolate seizes and becomes grainy, it usually means it came into contact with moisture. Try adding a small amount of vegetable oil or melted cocoa butter to salvage it. Otherwise, start fresh with a new batch and ensure your bowl and utensils are completely dry.

Can I make these treats gluten-free or vegan?
Certainly! To make gluten-free White Chocolate Snowflakes, ensure your Rice Krispies are labeled gluten-free. For a vegan option, use plant-based chocolate and substitute the salted peanuts with roasted seeds or dairy-free crunch options.

What can I do if I want to add more flavor?
Absolutely, the more the merrier! For an extra flavor twist, consider adding a splash of vanilla or almond extract when mixing in the Rice Krispies and peanuts. Dried fruits like cranberries or apricots also provide a lovely chewy contrast, elevating your snowflakes to a personalized treat!

White Chocolate Snowflakes

Irresistible White Chocolate Snowflakes in Just 15 Minutes

These White Chocolate Snowflakes combine creamy sweetness with a satisfying crunch, making them perfect for holiday gifting.
Prep Time 15 minutes
Chilling Time 30 minutes
Total Time 15 minutes
Servings: 12 snowflakes
Course: Dessert
Cuisine: American
Calories: 150

Ingredients
  

For the Treats
  • 8 oz White Chocolate Feel free to substitute with dark or milk chocolate
  • 3 cups Rice Krispies Use Cheerios if preferred
  • 1 cup Salted Peanuts Unsalted nuts or pretzels can be used
Optional Add-ons
  • 1 cup Dried Fruits Mix in cranberries or raisins
  • 1 tsp Flavored Extracts Peppermint or vanilla can be used

Equipment

  • double boiler
  • Heatproof bowl
  • Baking Sheet
  • Parchment Paper

Method
 

Step-by-Step Instructions
  1. Begin by setting up a double boiler and melt the white chocolate, stirring continuously for 5-7 minutes until smooth.
  2. Once melted, remove from heat and quickly stir in the Rice Krispies and salted peanuts, coating them evenly.
  3. Prepare a lined baking sheet and scoop mounds of the mixture onto it, forming clusters resembling snowflakes.
  4. Chill the baking sheet in the refrigerator for at least 30 minutes until the chocolate hardens.
  5. Once hardened, serve on a festive plate or package them as gifts.

Nutrition

Serving: 1snowflakeCalories: 150kcalCarbohydrates: 20gProtein: 2gFat: 7gSaturated Fat: 3gPolyunsaturated Fat: 2gMonounsaturated Fat: 2gCholesterol: 2mgSodium: 80mgPotassium: 50mgFiber: 1gSugar: 12gCalcium: 2mgIron: 4mg

Notes

Store snowflakes in an airtight container in the refrigerator for best freshness. They can last up to a week.

Tried this recipe?

Let us know how it was!

Stay Connected

Get recipes via email: