Get my cookbooks

Roasted Delicata Squash Salad for a Cozy Fall Feast

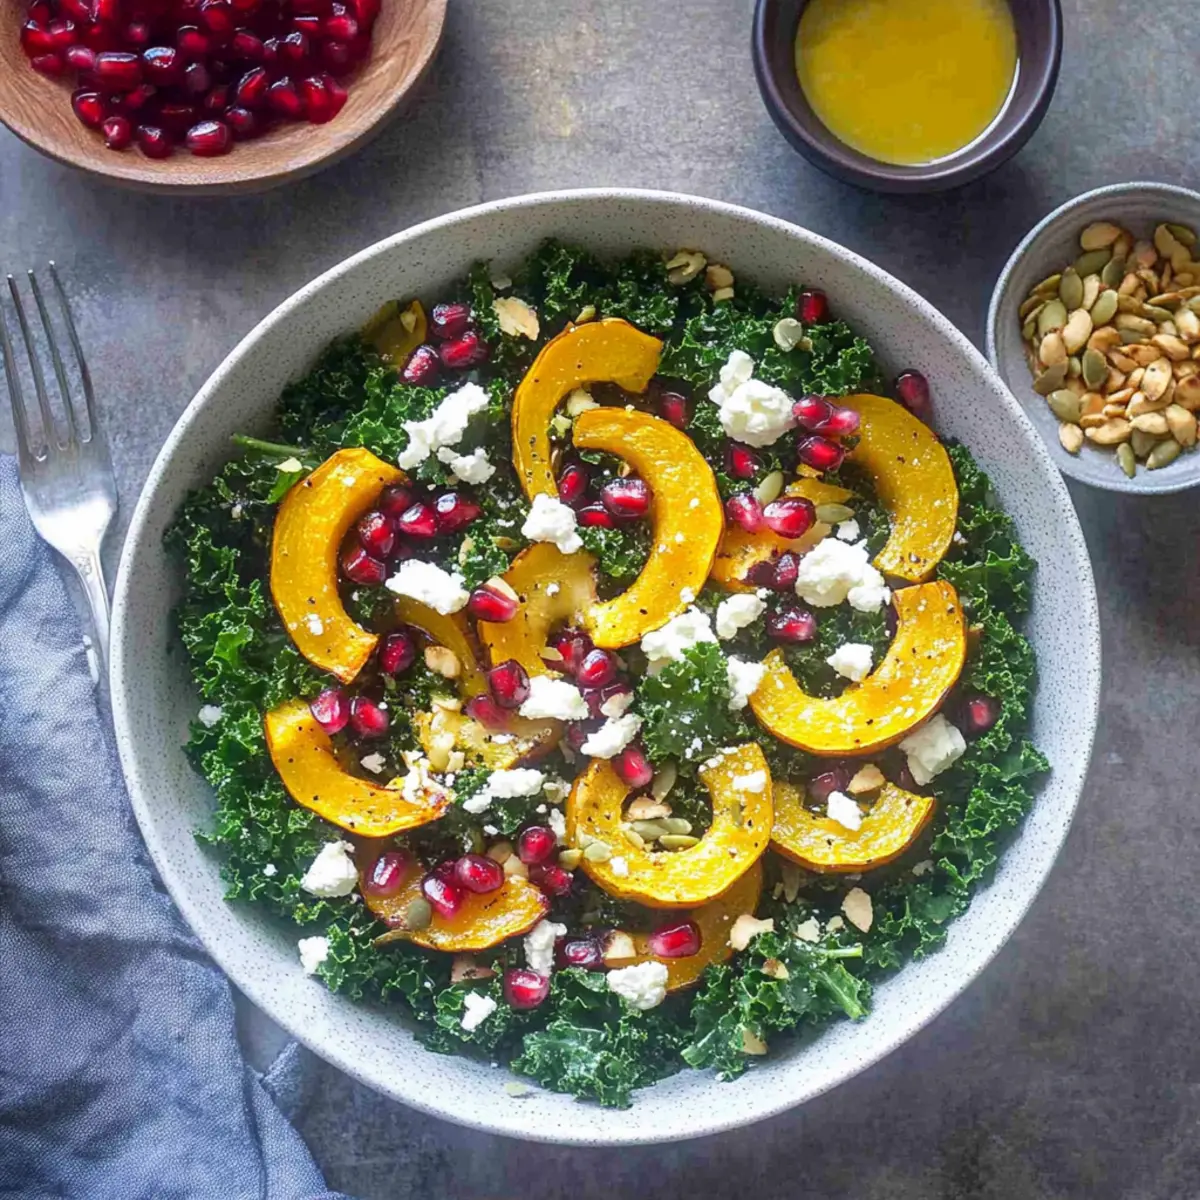
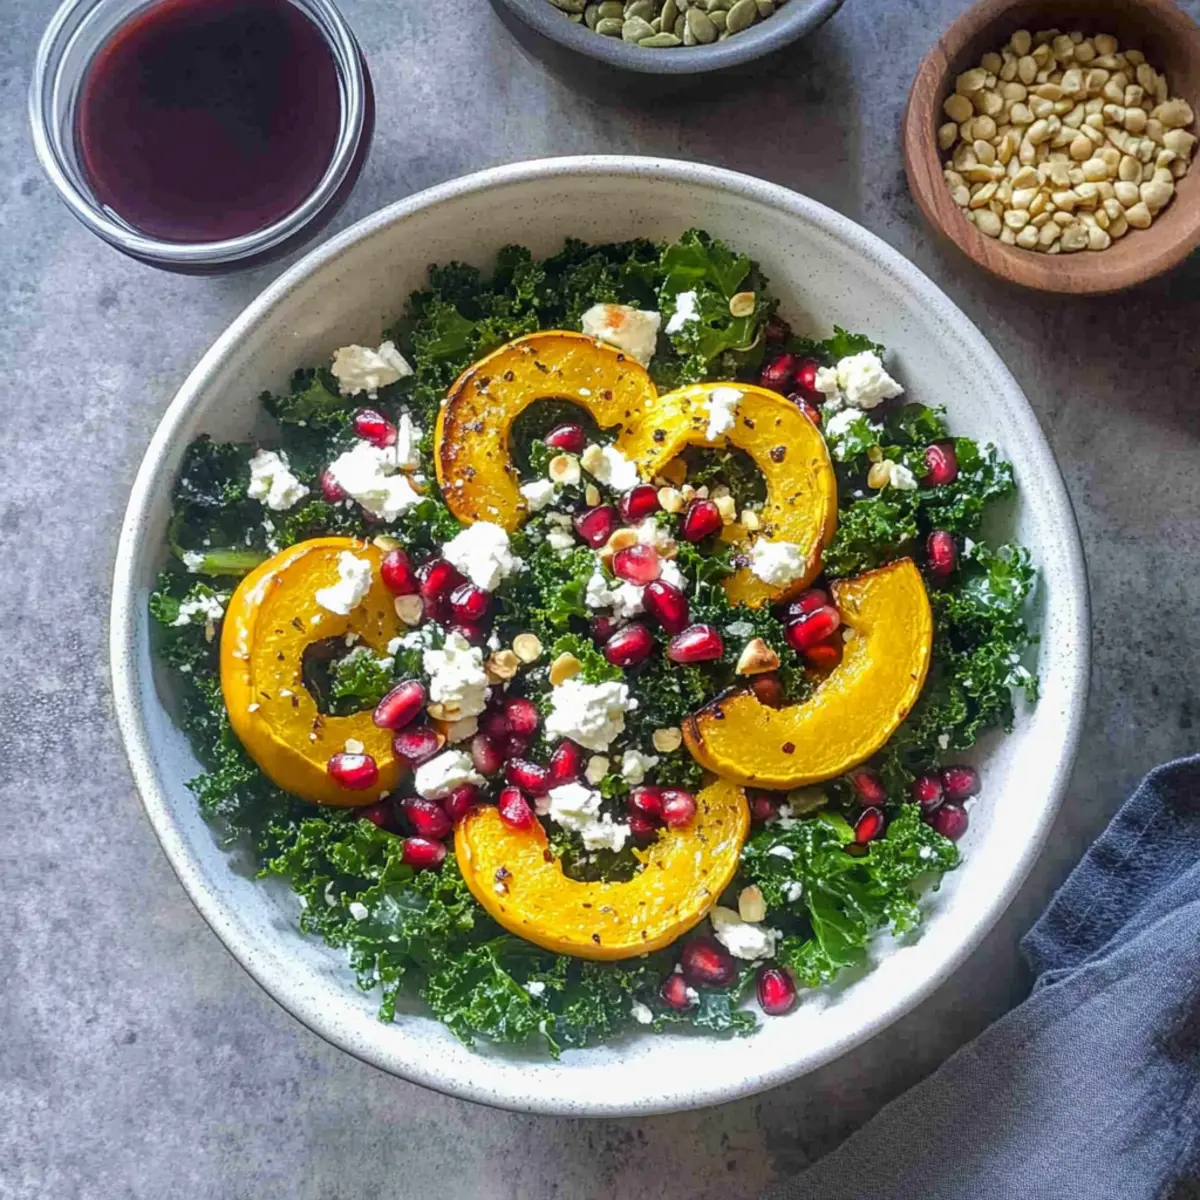
As the crisp air of fall settles in, my kitchen transforms into a cozy haven filled with the sweet, nutty aroma of roasted delicata squash. This vibrant Roasted Delicata Squash Salad is not just a feast for the eyes; it combines crisp kale, tangy feta, and juicy pomegranate arils for a burst of seasonal flavors you’ll adore. What shines about this salad is its versatility—whether you’re aiming for a quick lunch or dressing up your holiday table, it’s a delightful addition that even your non-vegetarian friends will crave. Plus, it offers a nutritious twist, packed with vitamins and healthy fats. Are you curious to discover how easy it is to create this beautiful dish? Let’s dive in!

Why is this salad a must-try?

Vibrant Colors: This Roasted Delicata Squash Salad is a stunning centerpiece with its bright hues and textures, making it perfect for any occasion.
Nutritious Delight: Packed with vitamins A and C, this salad is a healthy choice that doesn’t skimp on flavor.
Easy Preparation: With simple steps and minimal ingredients, you’ll whip this up quickly, leaving more time to enjoy with loved ones.
Versatile Dish: Perfect as a hearty lunch or a festive side, this salad impresses both vegetarians and meat-eaters alike. Pair it with a delicious Garlic Parmesan Roasted protein for a complete meal!
Seasonal Treat: Celebrate the best of fall with ingredients that embody the flavors of the season. This dish is a joyful way to highlight autumn’s bounty!

Roasted Delicata Squash Salad Ingredients

• Here’s everything you need to create this delightful dish!

For the Salad

  • Delicata Squash – Adds a sweet, nutty flavor and smooth texture; the skin is edible for added chewiness.
  • Curly Kale – Offers robust texture and holds up well to dressing; massage to soften it for the best experience.
  • Pomegranate Arils – Introduces a burst of sweetness and vibrant color; consider buying pre-deseeded for convenience.
  • Feta Cheese – Brings creamy, salty goodness; swap it for goat cheese or omit for a vegan option.
  • Pepitas (Pumpkin Seeds) – Provide a delightful crunch; try toasting raw nuts or sunflower seeds for variety.

For the Dressing

  • Olive Oil – Enhances roasting and adds richness; swap in avocado oil for a unique flavor twist.
  • Maple Syrup – Balances the savory elements with sweetness; can be replaced with honey if desired.
  • Apple Cider Vinegar – Ties all flavors together with its sweet-tangy profile; feel free to use a honey champagne vinaigrette as a substitute.
  • Salt & Black Pepper – Essential for elevating flavors; sea salt can add a mineral-rich touch.

Step‑by‑Step Instructions for Roasted Delicata Squash Salad

Step 1: Preheat the Oven
Begin by preheating your oven to 400°F (200°C) to ensure it’s hot enough for roasting the delicata squash. This temperature will help caramelize the sugars in the squash, giving it a deliciously sweet flavor and golden-brown exterior. As the oven preheats, gather your ingredients and equipment, including a large baking sheet for roasting.

Step 2: Prepare the Delicata Squash
Next, take your delicata squash and slice off both ends. Carefully cut the squash in half lengthwise and scoop out the seeds with a spoon. Then, slice the squash into ½-inch half moons; this shape will ensure even roasting. Set the sliced squash aside while you mix the seasoning, as it’s essential for flavoring your Roasted Delicata Squash Salad.

Step 3: Season and Roast the Squash
In a mixing bowl, toss the sliced delicata squash with 1 tablespoon of olive oil, maple syrup, salt, and black pepper until evenly coated. Spread the seasoned squash in a single layer on the prepared baking sheet. Roast in the preheated oven for 25-30 minutes, flipping halfway through, until the squash is tender and caramelized, with a lovely golden-brown color. Once done, allow it to cool slightly as you prepare the kale.

Step 4: Prepare the Kale
While the squash is roasting, tear or chop enough curly kale to yield about four cups, discarding any tough stems. Rinse the kale thoroughly in cold water to remove any dirt and then dry it completely using a salad spinner or paper towels. To enhance the texture of the kale for your salad, drizzle the remaining tablespoon of olive oil and gently massage the leaves for a couple of minutes until they soften and become vibrant.

Step 5: Combine Ingredients in a Bowl
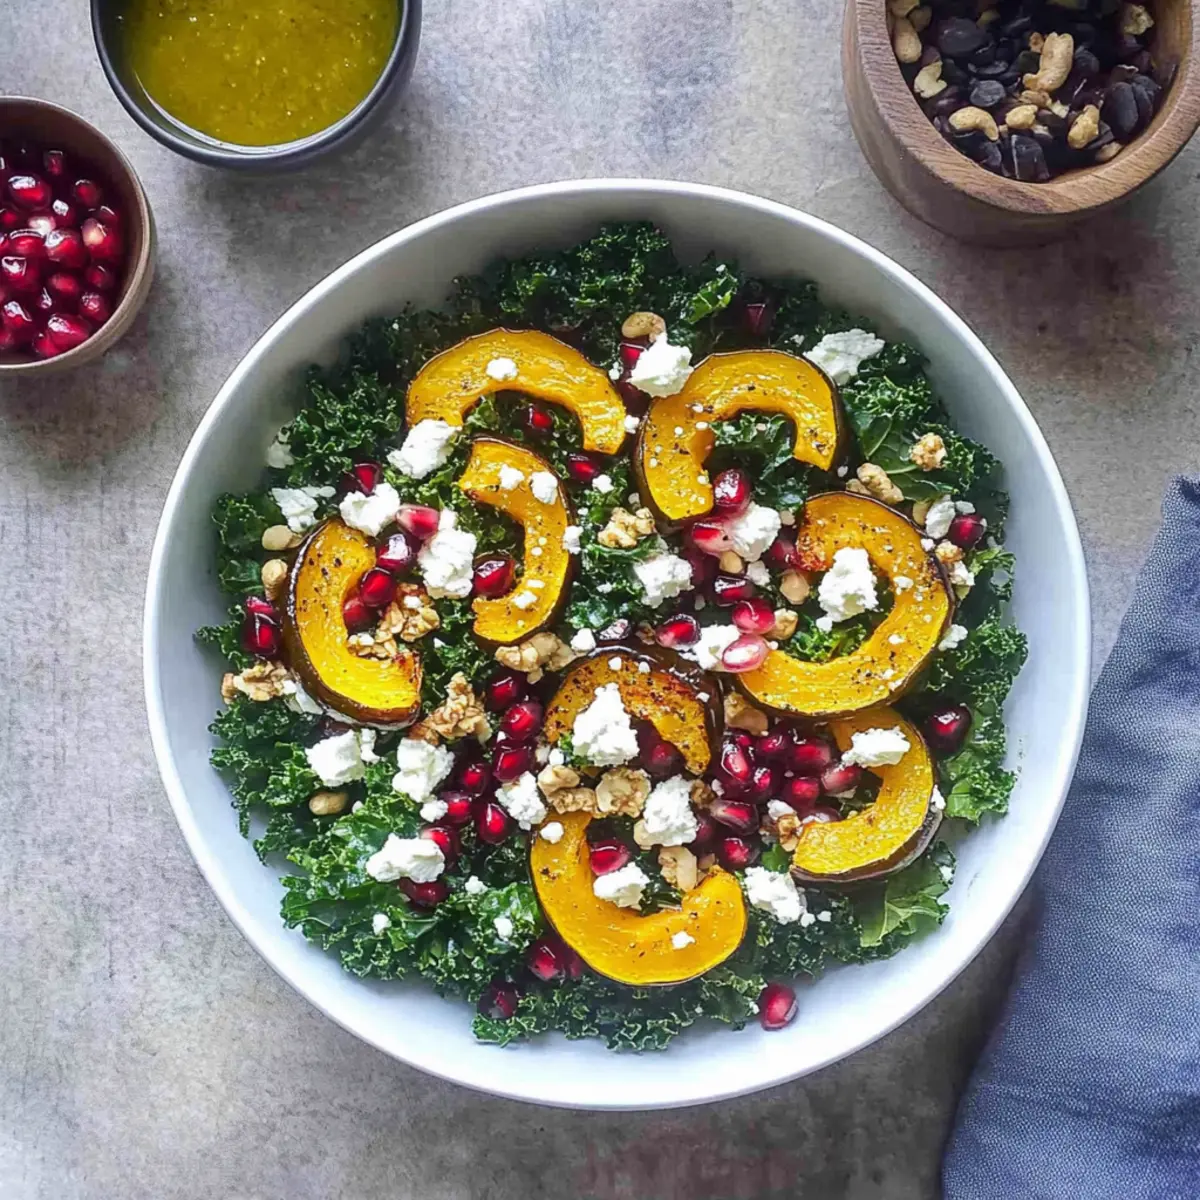
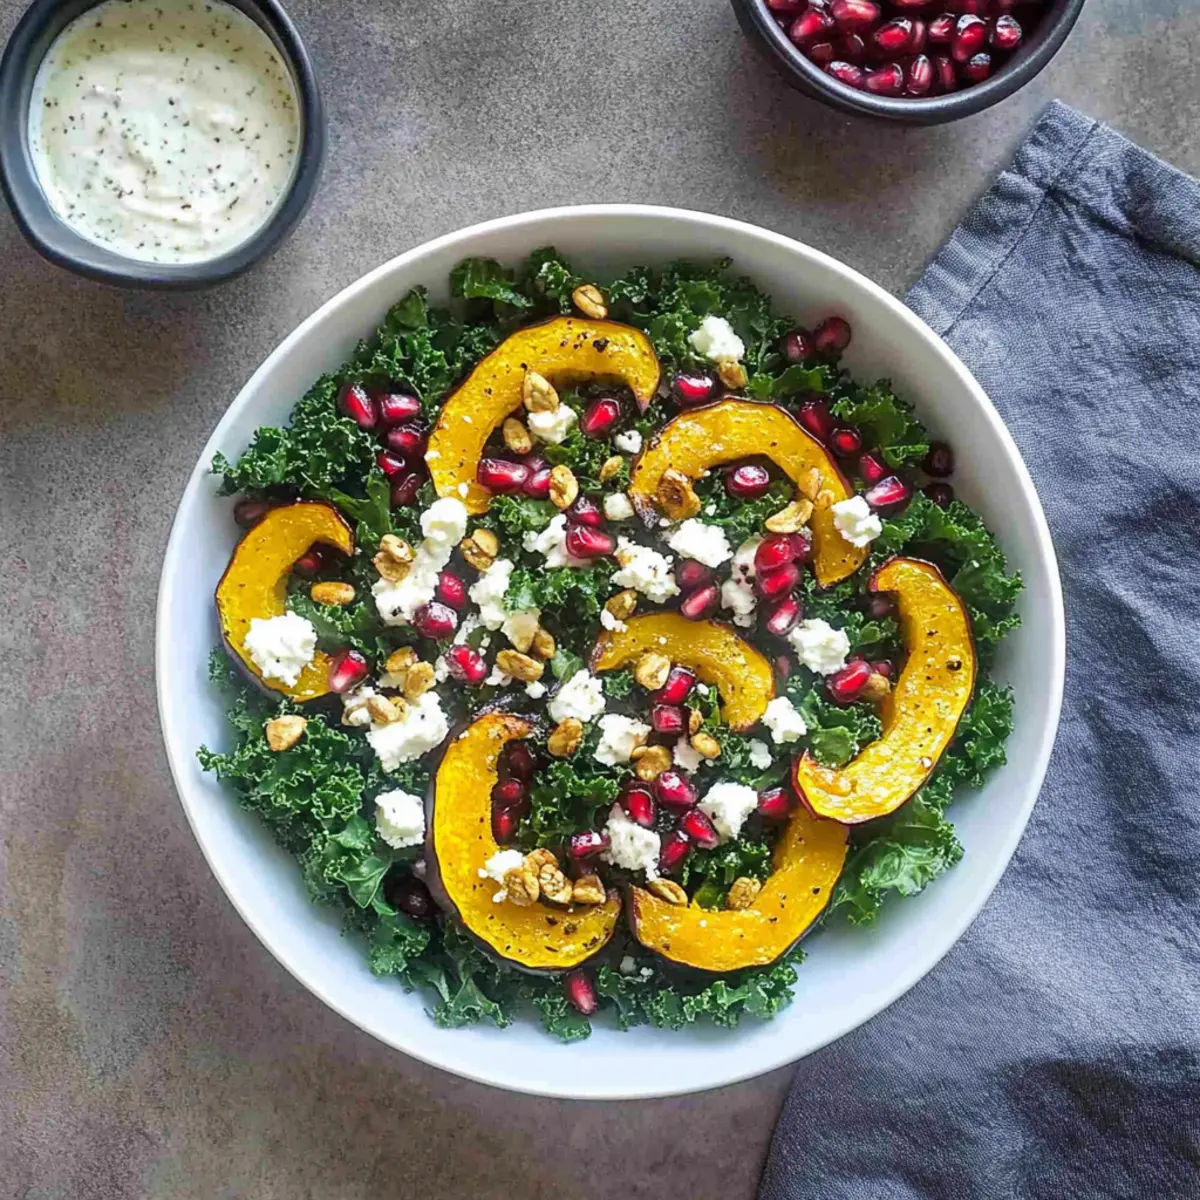
In a large mixing bowl, combine the roasted delicata squash, massaged kale, pomegranate arils, crumbled feta cheese, and pepitas. This mixture highlights the beautiful colors and various textures that make the Roasted Delicata Squash Salad appealing. Gently toss all the ingredients together, taking care not to break the squash too much, ensuring each bite is packed with flavor.

Step 6: Dress the Salad
Finally, drizzle the salad with the sweet and tangy apple cider vinegar dressing. Toss once more to evenly coat all the components while maintaining the integrity of the ingredients. Taste the salad and adjust seasonings or dressing as desired for optimal flavor before serving. This Roasted Delicata Squash Salad is ready to shine as a delightful centerpiece for your table!

Expert Tips for Roasted Delicata Squash Salad

  • Prepare in Advance: Roasting the delicata squash and massaging the kale ahead of time can save you precious minutes on busy days.

  • Watch the Roast: Keep an eye on the squash during roasting to avoid burning. It should be tender and caramelized but not overly dark.

  • Taste Test: Before serving, always taste the salad and adjust the dressing as needed; it enhances the flavor profile of your Roasted Delicata Squash Salad.

  • Store Wisely: Leftovers can be stored in the fridge for up to 2 days. Because kale holds up well, your salad will still be crunchy and fresh!

  • Embrace Variations: Don’t hesitate to experiment with different ingredients, like adding roasted chickpeas for protein or swapping feta with goat cheese for a twist.

What to Serve with Roasted Delicata Squash Salad

Elevate your dining experience by complementing this visually stunning salad with delightful pairings throughout the fall season.

  • Creamy Potatoes: Mashed potatoes with a hint of garlic bring a comforting creaminess that pairs beautifully with the salad’s textures.
  • Herb Grilled Chicken: Tender, juicy chicken seasoned with fresh herbs enhances the flavor without overpowering the vibrant salad. The light, grilled notes are a perfect contrast.
  • Quinoa Pilaf: Nutty quinoa seasoned with lemon and herbs adds a warm, hearty element, making each bite balanced and satisfying. This dish complements the fresh ingredients wonderfully!
  • Honey Balsamic Brussels Sprouts: These roasted sprouts offer a sweet-tangy flavor that echoes the salad’s dressing, creating a harmonious theme. Their caramelized edges provide delightful crunchiness.
  • Toasted Nuts: A mix of walnuts and almonds sprinkled over the salad adds an extra layer of crunch and boosts the flavor profile with nutty richness.
  • Sparkling Cider: An effervescent, refreshing cider will brighten your meal and complement the salad’s sweet-tart notes beautifully—perfect for holiday gatherings.
  • Caramel Tart: For dessert, a caramel tart drizzled with sea salt resonates with the fall theme, providing a sweet conclusion to your meal that balances the salad’s flavors.

How to Store and Freeze Roasted Delicata Squash Salad

Room Temperature: Keep any uneaten salad at room temperature for no more than 2 hours to prevent spoilage.

Fridge: Store leftover Roasted Delicata Squash Salad in an airtight container in the fridge for up to 2 days, ensuring the flavors meld beautifully without wilting.

Freezer: While it’s best enjoyed fresh, you can freeze components like roasted squash separately for up to 3 months. Just reheat before adding to the salad!

Reheating: If you have leftover roasted squash, gently reheat it in the oven to keep its texture intact, then toss with fresh ingredients for a quick meal.

Make Ahead Options

These Roasted Delicata Squash Salad components are perfect for meal prep! You can roast the delicata squash up to 24 hours in advance; just ensure it’s completely cooled and stored in an airtight container in the refrigerator to maintain its flavorful caramelization. The massaged kale can also be prepped and stored for up to 3 days—this helps the flavors develop without wilting. When it’s time to serve, simply combine the roasted squash, kale, pomegranate arils, feta, and pepitas in a bowl, drizzle with the dressing, and toss gently. This way, you’ll have a stunning and delicious salad ready to impress your family any busy weeknight!

Variations & Substitutions for Roasted Delicata Squash Salad

Feel free to make this delightful Roasted Delicata Squash Salad your own with these tasty twists and swaps!

  • Butternut Squash: Swap delicata squash for butternut squash or even roasted pumpkin for a similar sweet flavor.

  • Protein Boost: Add roasted chickpeas for extra protein; they complement the salad’s texture and flavor beautifully.

  • Greens Twist: Use arugula or baby spinach for a lighter take; these greens offer a peppery note that brightens every bite.

  • Nutty Flavor: Substitute pepitas with toasted walnuts or sunflower seeds for a crunchy texture that adds variety.

  • Dairy-Free Option: Replace feta cheese with avocado or a dairy-free cream cheese for a creamy, plant-based twist.

  • Dressing Variation: Experiment with a honey champagne vinaigrette for a slightly sweeter and more sophisticated dressing.

  • Spice It Up: Add a pinch of cayenne pepper or red pepper flakes to introduce a touch of heat that elevates the flavor profile.

  • Herb Infusion: Toss in fresh herbs like cilantro or mint for a burst of freshness that contrasts with the roasted veggies.

Pair this salad with a delicious Blt Chicken Salad for a complete meal that everyone will love! Enjoy the creativity in the kitchen!

Roasted Delicata Squash Salad Recipe FAQs

How do I choose ripe delicata squash?
Absolutely! When selecting delicata squash, look for ones that are firm with a creamy yellow color and green stripes. Avoid squash with dark spots or soft areas, as they may indicate overripeness. Ideally, it should feel heavy for its size and have a smooth skin.

What’s the best way to store leftover salad?
Very! Store your Roasted Delicata Squash Salad in an airtight container in the refrigerator for up to 2 days. Since kale holds its texture well, it will remain fresh and crunchy. If possible, keep the dressing separate to maintain the salad’s vibrancy until you’re ready to serve.

Can I freeze roasted delicata squash?
Yes, you can! To freeze roasted delicata squash, allow it to cool completely and then place it in a freezer-safe bag or container. Lay it flat to save space, and be sure to remove as much air as possible. The squash can be frozen for up to 3 months. When you’re ready to use it, thaw overnight in the fridge and gently reheat in the oven for best results!

What if my kale seems tough?
No worries! If your kale is tough, you can massage it longer with olive oil—about 3-5 minutes—that will break down the fibers, making it more tender and enjoyable. If you’re short on time, consider using young or baby kale, which is naturally more tender and ready to eat without the massage.

Is this salad suitable for those with allergies?
Absolutely! This Roasted Delicata Squash Salad is vegetarian and gluten-free, making it friendly for many diets. However, if you have nut allergies, substitute pepitas with sunflower seeds or omit them entirely. Also, if using feta cheese, be sure to check for lactose sensitivity; you can easily swap it out with vegan cheese or omit it for a dairy-free option.

How long should I let the squash cool before adding it to the salad?
Great question! After roasting, allow the delicata squash to cool for about 10-15 minutes. This cooling step helps prevent wilting the kale and ensures the flavors meld beautifully when combined. Letting it rest briefly also helps retain that delicious texture!

Roasted Delicata Squash Salad

Roasted Delicata Squash Salad for a Cozy Fall Feast

This vibrant Roasted Delicata Squash Salad combines crisp kale, tangy feta, and juicy pomegranate arils for a burst of seasonal flavors you’ll adore.
Prep Time 15 minutes
Cook Time 30 minutes
Cooling Time 5 minutes
Total Time 50 minutes
Servings: 4 servings
Course: Salad
Cuisine: American
Calories: 280

Ingredients
  

For the Salad
  • 1 medium Delicata Squash Adds a sweet, nutty flavor and smooth texture; the skin is edible.
  • 4 cups Curly Kale Offers robust texture; massage to soften.
  • 1 cup Pomegranate Arils Introduces sweetness and vibrant color.
  • 1/2 cup Feta Cheese Brings creamy, salty goodness; swap for goat cheese for a vegan option.
  • 1/4 cup Pepitas (Pumpkin Seeds) Provides a delightful crunch.
For the Dressing
  • 2 tablespoons Olive Oil Enhances roasting and adds richness.
  • 1 tablespoon Maple Syrup Balances savory elements with sweetness.
  • 1 tablespoon Apple Cider Vinegar Ties all flavors together.
  • to taste Salt Essential for elevating flavors.
  • to taste Black Pepper Essential for elevating flavors.

Equipment

  • Oven
  • Baking Sheet
  • Mixing Bowl
  • Salad Spinner

Method
 

Step-by-Step Instructions
  1. Preheat your oven to 400°F (200°C). Gather your ingredients and equipment.
  2. Slice both ends off the delicata squash, cut it in half lengthwise, and scoop out the seeds. Slice into ½-inch half moons.
  3. Toss the sliced squash with olive oil, maple syrup, salt, and black pepper. Spread on a baking sheet and roast for 25-30 minutes, flipping halfway through.
  4. Tear or chop curly kale to yield about 4 cups. Rinse thoroughly and dry. Drizzle with olive oil and massage the leaves until soft.
  5. Combine roasted squash, massaged kale, pomegranate arils, crumbled feta, and pepitas in a large bowl. Gently toss to mix.
  6. Drizzle the salad with apple cider vinegar dressing and toss gently. Adjust flavors as needed before serving.

Nutrition

Serving: 1servingCalories: 280kcalCarbohydrates: 30gProtein: 8gFat: 16gSaturated Fat: 3gPolyunsaturated Fat: 2gMonounsaturated Fat: 10gCholesterol: 15mgSodium: 200mgPotassium: 500mgFiber: 6gSugar: 5gVitamin A: 12000IUVitamin C: 60mgCalcium: 200mgIron: 2mg

Notes

Leftovers can be stored in the fridge for up to 2 days. This salad holds up well due to the kale's resilience.

Tried this recipe?

Let us know how it was!

Crispy Smashed Potatoes: Irresistibly Crunchy, Easy to Make

The aroma wafting from the kitchen was enough to stop anyone in their tracks. “What’s that?” my partner asked, peering over my shoulder with a curious grin. I was putting the finishing touches on my Crispy Smashed Potatoes with Garlic and Rosemary—a side dish that promises not only a stunning presentation but also a delightful crunch that no one can resist. These golden gems are both fluffy inside and crunchy outside, making them a fantastic crowd-pleaser for gatherings or weeknight dinners. You’ll love how effortlessly they come together—perfect for when you’re looking to elevate your meal without spending hours in the kitchen. Are you ready to discover the secret to creating the ultimate crispy texture? Let’s dive into this delicious recipe together!

What makes these potatoes so special?

Addictive Texture: The crispy outer layer gives a satisfying crunch, while the soft, fluffy interior creates the perfect bite.

Versatile Flavor: Not only is this recipe a delicious base, but you can easily customize it with different herbs like thyme or even spices like smoked paprika for a unique twist.

Quick and Easy: With just a few simple steps and minimal ingredients, you can whip up this dish in no time—ideal for busy weeknights.

Crowd-Pleaser: Whether at a family dinner or a festive gathering, these potatoes are sure to impress and satisfy your guests, just like our Comfort Garlic Potatoes or Parmesan Chicken Potatoes.

Healthy Side Dish: Gluten-free and vegetarian, these potatoes fit seamlessly into a balanced diet without sacrificing flavor.

Try serving them alongside your favorite grilled meats or with a creamy dip, and watch everyone come back for seconds!

Crispy Smashed Potatoes Ingredients

• Discover the essential ingredients for making perfectly crispy smashed potatoes.

For the Potatoes

  • Baby Gold Potatoes – Their creamy interior is perfect for smashing; feel free to swap in red or purple potatoes for variety.

For the Seasoning

  • Extra Virgin Olive Oil – Adds richness and aids in achieving that ideal crispiness; can be replaced with avocado oil or melted butter for a different flavor.
  • Chopped Fresh Rosemary (or Dried) – Grants aromatic flavor; thyme or oregano are great alternatives if you prefer a different herb.
  • Garlic Powder – Elevates the flavor with a mild essence of garlic; substitute fresh minced garlic for a bolder taste.
  • Salt – Enhances all the flavors in the dish; adjust to your personal taste for best results.
  • Freshly Ground Black Pepper – Adds a touch of spice; using white pepper can give a different flavor profile.

Make these crispy smashed potatoes to impress your family and friends while enjoying a delicious, gluten-free side dish!

Step‑by‑Step Instructions for Crispy Smashed Potatoes

Step 1: Preheat the Oven
Begin by preheating your oven to 425°F (220°C). This high temperature will ensure your Crispy Smashed Potatoes achieve that delightful crunch on the outside. While the oven heats, you can prepare the potatoes, making sure everything is ready for roasting.

Step 2: Boil the Potatoes
Place the baby gold potatoes in a large pot and cover them with cold water. Bring the water to a rolling boil over high heat, then reduce to a simmer. Cook until they are fork-tender, typically about 10–12 minutes. Once done, drain the potatoes thoroughly and let them dry for a few minutes to avoid sogginess.

Step 3: Season the Potatoes
Return the drained potatoes to the pot while they are still warm. Add a generous drizzle of extra virgin olive oil, along with chopped fresh rosemary, garlic powder, salt, and freshly ground black pepper. Shake the pot gently to coat the potatoes evenly with the seasoning. This step is crucial for infusing flavor into your crispy smashed potatoes.

Step 4: Smash and Roast
Transfer the seasoned potatoes to a large baking sheet lined with parchment paper. Using a fork or the bottom of a glass, gently smash each potato to create a flat, irregular shape. Drizzle a little extra oil on top to help them crisp up, then place the baking sheet in the preheated oven. Roast for 30–45 minutes, turning the potatoes halfway through until they are golden brown and crispy.

Step 5: Check for Doneness
As the potatoes roast, keep an eye on them, especially towards the end of the cooking time. You want them to have a lovely golden color and a satisfying crunch. Adjust the roasting time as needed—each oven may vary slightly. Once they’re perfectly crispy, remove them from the oven.

Step 6: Serve and Enjoy
Allow the Crispy Smashed Potatoes to cool for a minute before serving. These golden gems make a fantastic side dish or appetizer. Whether accompanying a hearty entrée or enjoyed as a standalone treat, their addictive crunch is sure to please your family and friends.

What to Serve with Crispy Smashed Potatoes

There’s nothing quite like the crunch of these golden gems to elevate your meal; let’s explore the perfect pairings to complement their deliciousness.

  • Grilled Lemon Chicken: The zesty flavor cuts through the richness of the potatoes, making for a balanced plate. This pairing creates a harmonious mix of textures and tastes, leaving everyone satisfied.

  • Roasted Asparagus: Lightly seasoned, these green spears add a fresh, vibrant note to your meal. Their tender-crisp bite beautifully contrasts the crispy smashed potatoes.

  • Creamy Garlic Dip: A rich and savory side, perfect for those who love to dip! This creamy sauce enhances the potatoes while adding a wonderful garlicky richness.

  • Beef Tenderloin: With its juicy tender bites, this upscale meat option brings a touch of elegance to your table. The flavors together create an unforgettable dining experience.

  • Chilled Cucumber Salad: A refreshing, crisp side that cools down the palate. The bright flavors of cucumbers and herbs pair wonderfully with the hearty potatoes.

  • Red Wine: A fruity red complements the earthy tones of the potatoes, enhancing their flavor profile. Wine lovers will enjoy the bold marriage of flavors at any dinner table.

  • Chocolate Mousse: End your meal on a rich, creamy note. The decadent chocolate sweetness beautifully contrasts the savory crispy potatoes.

  • Garlic Aioli: This silky dip adds an irresistible garlic kick to every bite. It’s the perfect balance to enhance the flavors of these crunchy potatoes.

Choose any of these delicious companions for your crispy smashed potatoes and create a joyful gathering around your dinner table!

Make Ahead Options

These Crispy Smashed Potatoes are a fantastic option for busy home cooks looking to save time! You can prepare the potatoes by boiling and seasoning them up to 24 hours in advance. After boiling until fork-tender, drain and let them cool completely, then toss them with olive oil, garlic powder, rosemary, salt, and pepper. Store them in an airtight container in the refrigerator. When you’re ready to enjoy, simply smash them on a baking sheet, drizzle with a bit more oil, and roast in a preheated oven at 425°F (220°C) for 30–45 minutes until golden and crisp. This way, you’ll still have that delightful crunch without the last-minute fuss!

How to Store and Freeze Crispy Smashed Potatoes

Fridge: Store leftover crispy smashed potatoes in an airtight container for up to 2 days. This helps preserve their flavor while minimizing moisture absorption.

Freezer: For longer storage, freeze cooled potatoes in a single layer on a baking sheet. Once frozen solid, transfer to a freezer bag for up to 3 months.

Reheating: To regain their delightful crunch, reheat from the fridge or frozen in a preheated oven at 400°F (200°C) until heated through—about 10-15 minutes. Enjoy those crispy smashed potatoes like they were just made!

Freshness Tip: For the best quality, try to enjoy your crispy smashed potatoes right after cooking, as that’s when they are at their most irresistible.

Tips for the Best Crispy Smashed Potatoes

  • Dry Potatoes Well: After boiling, ensure that your potatoes are dried properly to prevent sogginess. Moisture is the enemy of crispiness!

  • Smash Creatively: Use a fork or the bottom of a glass to smash the potatoes. Varying the shape creates more edges that will crisp up deliciously.

  • Watch the Clock: Keep an eye on the potatoes as they roast, especially during the last 10 minutes, to achieve your desired level of crispiness without burning.

  • Customize the Seasoning: Feel free to experiment with different herbs or spices like smoked paprika. This versatility can elevate your crispy smashed potatoes to a whole new level!

  • Use a Good Baking Sheet: A heavy-duty baking sheet helps distribute heat evenly, ensuring every potato gets that perfect golden crunch.

Crispy Smashed Potatoes Variations

Feel free to get creative with this recipe and make it your own—there are so many delicious ways to switch things up!

  • Potato Variety: Swap baby gold potatoes for red, purple, or even sweet potatoes for a fun twist. Each variety brings its unique flavor and texture.

  • Herb Swap: Use thyme or dill instead of rosemary for a refreshing aroma. Experimenting with herbs can entirely change the essence of your potatoes!

  • Smoky Flavor: Add smoked paprika to the seasoning for a delightful smoky kick. This spice adds a depth of flavor that perfectly complements the crispy texture.

  • Cheesy Twist: Sprinkle grated Parmesan or crumbled feta on top during the last few minutes of roasting for a savory, cheesy finish. It’s a flavor explosion that’s hard to resist!

  • Spicy Kick: Mix in some cayenne pepper or red pepper flakes for those who like it hot. Adjust the heat level according to your family’s preference for an exciting flavor profile.

  • Vegan Option: Swap out the olive oil for avocado oil and use nutritional yeast instead of cheese for a vegan-friendly take that’s bursting with flavor.

  • Garlic Boost: Instead of garlic powder, use fresh minced garlic for a more intense, aromatic flavor. Just toss it in with the seasoning before roasting.

  • Extra Crispy: For an ultra-crispy edge, give these potatoes a light dusting of cornstarch or baking powder before roasting. They’ll turn out even crunchier!

Dive into these variations and make these crispy smashed potatoes a cherished staple in your home, just like our mouthwatering Chilli Beef Experience or Korean Fried Chicken. Enjoy the journey of flavors!

Crispy Smashed Potatoes Recipe FAQs

What kind of potatoes are best for crispy smashed potatoes?
Absolutely! Baby gold potatoes are ideal for this recipe since they have a creamy interior that holds up beautifully when smashed. You can also use red or purple potatoes for a colorful twist, giving a unique taste and texture.

How should I store leftover crispy smashed potatoes?
Very simply! Place your leftover crispy smashed potatoes in an airtight container and store them in the refrigerator for up to 2 days. This keeps them delicious while preventing them from absorbing moisture.

Can I freeze crispy smashed potatoes?
Yes, you can! First, allow the potatoes to cool completely. Then, place them in a single layer on a baking sheet to freeze solid. Once frozen, transfer the potatoes to a freezer bag and store them for up to 3 months. It’s a great way to enjoy them later!

How do I reheat crispy smashed potatoes?
Reheating is key to regaining that delicious crunch! From the fridge, preheat your oven to 400°F (200°C). Place the potatoes on a baking sheet and bake for about 10-15 minutes, or until heated through and crispy again. If they were frozen, they may need an extra few minutes.

What if my smashed potatoes are soggy?
Not to worry! If your potatoes turn out soggy, it often means they weren’t dried enough after boiling. Next time, make sure to drain them well and let them dry for a few minutes before seasoning and roasting. You can also give them an extra roast for additional crispness!

Are crispy smashed potatoes safe for people with dietary restrictions?
Absolutely! This recipe is gluten-free and vegetarian, making it a great choice for diverse diets. Just be sure to check any seasoning blends or additional sauces for hidden gluten or allergens if you are serving others with special dietary needs.

Crispy Smashed Potatoes

Crispy Smashed Potatoes: Irresistibly Crunchy, Easy to Make

Crispy Smashed Potatoes are delightful with a crunchy exterior and fluffy interior, perfect for any gathering.
Prep Time 15 minutes
Cook Time 45 minutes
Total Time 1 hour
Servings: 4 potatoes
Course: Appetizers
Cuisine: American
Calories: 180

Ingredients
  

For the Potatoes
  • 2 lbs Baby Gold Potatoes can substitute red or purple potatoes
For the Seasoning
  • 3 tbsp Extra Virgin Olive Oil or avocado oil or melted butter
  • 1 tbsp Chopped Fresh Rosemary or dried, thyme or oregano can be used
  • 1 tsp Garlic Powder can substitute with fresh minced garlic
  • 1 tsp Salt to taste
  • 1/2 tsp Freshly Ground Black Pepper can use white pepper as an alternative

Equipment

  • Large pot
  • Baking Sheet
  • Parchment Paper

Method
 

Step-by-Step Instructions
  1. Preheat your oven to 425°F (220°C).
  2. Boil the baby gold potatoes in a large pot of cold water until fork-tender, about 10–12 minutes. Drain and let dry.
  3. Return dried potatoes to pot. Add olive oil, rosemary, garlic powder, salt, and pepper. Shake to coat evenly.
  4. Transfer potatoes to a lined baking sheet and smash each potato. Drizzle with more oil and roast for 30–45 minutes until golden brown and crispy, turning halfway.
  5. Check for doneness by ensuring they are golden and crispy. Adjust roasting time as necessary.
  6. Cool for a minute before serving. Enjoy with your favorite entrees or as a snack.

Nutrition

Serving: 1potatoCalories: 180kcalCarbohydrates: 35gProtein: 4gFat: 5gSaturated Fat: 1gPolyunsaturated Fat: 0.5gMonounsaturated Fat: 4gSodium: 200mgPotassium: 450mgFiber: 3gSugar: 1gVitamin C: 15mgCalcium: 2mgIron: 6mg

Notes

Ensure potatoes are dried well after boiling to maintain crispiness. Customize seasoning as desired.

Tried this recipe?

Let us know how it was!

Baked Cranberry Oatmeal: A Cozy Holiday Breakfast Delight

The cozy scent of warm spices and fresh cranberries fills the air as I pull a baking dish from the oven, revealing a golden masterpiece—my Baked Cranberry Oatmeal with Orange Cream Cheese Glaze. This recipe transforms your typical breakfast into a festive feast, perfect for holiday mornings or for those days when you crave a special treat. Not only is it incredibly easy to prepare, but its freezer-friendly nature also makes it a lifesaver for busy weeks. Imagine skipping the fast-food drive-thru and instead enjoying a nourishing, homemade meal that warms your soul. Are you excited to bring this delightful dish to your breakfast table? Let’s dive into the recipe!

Why Baked Cranberry Oatmeal?

Comforting Warmth: Your kitchen will be enveloped in the cozy aromas of cinnamon and orange, making every bite of this Baked Cranberry Oatmeal feel like a warm hug.
Versatile Delight: Easily swap in your favorite nuts or fruits to tailor the recipe to your taste, like blueberries or almonds for a change of pace.
Quick Prep: It takes less than 10 minutes to prepare before popping it in the oven—perfect for busy mornings!
Meal Prep Friendly: Make a batch ahead of time and enjoy for breakfast all week long. Pair it with a drizzle of maple syrup or serve with yogurt for added creaminess, just like I do in my Comforting Charm Baked recipe.
Festive Flavor: The tart cranberries and citrus glaze bring joy to each bite, making it ideal for holiday brunches. Say goodbye to fast food, and hello to a nourishing homemade meal that will surely impress!

Baked Cranberry Oatmeal Ingredients

• Perfectly delicious for any holiday breakfast!

For the Oatmeal

  • Unsweetened Almond Milk – Liquid base that can be swapped for any milk of choice to fit your dietary needs.
  • Large Egg – Binds all the ingredients together while adding a touch of richness.
  • Maple Syrup – A natural sweetener that can be substituted with honey or agave syrup for different flavor profiles.
  • Orange Zest – Infuses a bright, zesty flavor enhancing the overall taste of the oatmeal.
  • Vanilla Extract – Elevates sweetness and aroma, making it even more comforting.
  • Old Fashioned Rolled Oats – The main component providing texture; quick oats can be used but may change the final product’s consistency.
  • Baking Powder – Acts as a leavening agent to help the oatmeal rise and become fluffy.
  • Ground Cinnamon – Adds warmth and spice; feel free to increase or swap in nutmeg for a unique touch.
  • Sea Salt – Balances the sweetness perfectly for a delicious bite.
  • Fresh Cranberries – The star ingredient bringing tartness; frozen cranberries can also be used directly in the mix without thawing.
  • Pecan Pieces – Contributes a delightful crunch and nuttiness; substitute with any nut you prefer.

For the Orange Cream Cheese Glaze

  • Cream Cheese – The base for the glaze that adds luxurious creaminess; can be replaced with Neufchâtel or dairy-free options.
  • Powdered Sugar – Sweetens the glaze; try a sugar substitute for a lower-calorie alternative.
  • Fresh Orange Juice – Elevates the flavor of the glaze, making it refreshing and perfect for drizzling.

Bring this scrumptious Baked Cranberry Oatmeal to your kitchen and enjoy a heartwarming breakfast that transforms your morning routine!

Step‑by‑Step Instructions for Baked Cranberry Oatmeal

Step 1: Preheat and Prepare
Preheat your oven to 350°F (175°C) and prepare an 8×8 inch baking dish by lightly greasing it with cooking spray. This step ensures your delicious Baked Cranberry Oatmeal won’t stick as it bakes, making clean-up much easier later. While the oven warms up, gather your ingredients, so you’re ready for the mixing.

Step 2: Whisk the Wet Ingredients
In a medium mixing bowl, whisk together 2 cups of unsweetened almond milk, 1 large egg, 1/4 cup of maple syrup, the zest of 1 orange, and 1 teaspoon of vanilla extract until you achieve a smooth, consistent mixture. This combination creates a flavorful base for the oatmeal and adds that lovely hint of orange that complements the cranberries perfectly.

Step 3: Combine Dry Ingredients
Next, to the wet mixture, add 2 cups of old-fashioned rolled oats, 1 tablespoon of baking powder, 1 teaspoon of ground cinnamon, and a pinch of sea salt. Stir everything together until just combined, ensuring the oats are evenly coated with the wet mixture. You’ll see the oats start to absorb the liquid, giving a good hint of the delightful texture to come.

Step 4: Incorporate the Cranberries
Gently stir in half of the fresh cranberries (about 1 cup) into the oatmeal mixture. This addition will allow some of the berries to burst and infuse the oatmeal with tart sweetness as it bakes. Once incorporated, it’s time to transfer this scrumptious mixture to the prepared baking dish, smoothing it out evenly with a spatula.

Step 5: Add Toppings
Sprinkle the remaining fresh cranberries and 1/2 cup of pecan pieces generously on top of the oatmeal mixture. These additions will create a beautiful, inviting contrast in flavor and texture once baked. The pecans will toast slightly in the oven, adding a delightful crunch to your finished Baked Cranberry Oatmeal.

Step 6: Bake to Perfection
Place the baking dish in the preheated oven and bake for 30-35 minutes. You’ll know it’s ready when the top is golden brown and a toothpick inserted in the center comes out clean. Allow your Baked Cranberry Oatmeal to cool slightly in the dish, letting the flavors meld together while you prepare the glaze.

Step 7: Prepare the Cream Cheese Glaze
In a mixing bowl, beat 4 ounces of softened cream cheese until it’s smooth and creamy. Gradually add in 1 cup of powdered sugar along with 2 tablespoons of fresh orange juice and the zest of 1 orange. Mix until everything is well combined; the glaze should be thick but pourable, ready to add a luscious finish to your oatmeal.

Step 8: Drizzle and Serve
Once your Baked Cranberry Oatmeal has cooled for a few minutes, drizzle the orange cream cheese glaze generously over the top. Cut into squares and serve warm, and feel free to garnish with extra pecans or a dollop of yogurt if desired. This delightful dish will not only warm your heart but also fill your home with sweet, inviting aromas.

How to Store and Freeze Baked Cranberry Oatmeal

Fridge: Store leftover Baked Cranberry Oatmeal in an airtight container for up to 5 days. Reheat individual portions in the microwave for about 1-2 minutes, or until warmed through.

Freezer: For longer storage, freeze portions wrapped tightly in plastic wrap and then placed in a freezer-safe bag for up to 3 months. Thaw overnight in the fridge before reheating.

Reheating: To enjoy your stored oatmeal, reheat in the microwave for 1-2 minutes or pop it in a preheated oven at 350°F (175°C) for about 15 minutes until heated evenly.

Make-Ahead: Preparing this oatmeal in advance is perfect for busy mornings; simply reheat and enjoy the comforting flavors whenever you need a quick, nutritious breakfast!

What to Serve with Baked Cranberry Oatmeal

The perfect breakfast experience should be just as satisfying as the dish itself, inviting warmth and joy with every pairing.

  • Creamy Yogurt: Pair with a dollop of Greek or plant-based yogurt for a tangy contrast that enhances the oatmeal’s flavors.

  • Fresh Fruit Salad: A mix of seasonal fruits like oranges, apples, and berries adds freshness and a pop of color to your meal.

  • Maple Syrup Drizzle: A light drizzle of maple syrup brings extra sweetness to every bite, enhancing the holiday flavors.

  • Nutty Granola: Sprinkle some nutty granola on top for an extra crunch, providing texture and a delightful nutty flavor.

  • Warm Spiced Tea: Serve alongside a cup of warm spiced tea, which complements the cinnamon and creamy glaze, creating a comforting atmosphere.

  • Chai Latte: The warm spices in a chai latte mirror the flavors of your oatmeal, making each sip feel like a cozy embrace.

  • Sugar Cookies: For a sweet touch, serve with festive sugar cookies, adding a cheerful and indulgent element to your breakfast table.

  • Almond Milk Latte: An almond milk latte pairs beautifully, echoing the flavors in your dish while providing a creamy, energizing boost.

Make Ahead Options

Baked Cranberry Oatmeal is a fantastic choice for meal prep and can save you precious time on busy mornings! You can prepare the oatmeal mixture up to 24 hours in advance by following the first five steps, then cover and refrigerate the unbaked dish. This not only enhances the flavors but also means you can pop it directly into a preheated oven. Additionally, you can make the orange cream cheese glaze and refrigerate it for up to 3 days before serving; just give it a good stir before drizzling. This way, you’ll have a wonderful, warm breakfast ready with minimal effort!

Expert Tips for Baked Cranberry Oatmeal

  • Prep Ahead: Prepare the oatmeal the night before and refrigerate, making your morning routine even simpler for busy holiday mornings.
  • Glaze Alternatives: The orange cream cheese glaze is optional. For a simpler option, drizzle with maple syrup or serve plain for a wholesome meal.
  • Using Frozen Cranberries: If you opt for frozen cranberries, add them directly without thawing to prevent excess moisture in your baked oatmeal.
  • Bake Time Is Key: Ensure you bake the oatmeal long enough for it to set; otherwise, it may be too soft to slice neatly.
  • Adjust for Texture: Modify the almond milk quantity based on desired consistency—less milk yields a firmer texture, perfect for larger batches.

Baked Cranberry Oatmeal Variations

Feel free to get creative with this delightful Baked Cranberry Oatmeal and explore different flavors and textures!

  • Swap Fruits: Substitute cranberries with blueberries or diced apples for a sweet twist; each choice brings its unique charm.

  • Nutty Options: Change up the pecans by mixing in walnuts, almonds, or even pumpkin seeds for a different crunch. Experimenting with your favorite nuts can add depth to this cozy dish.

  • Steel Cut Twist: Use steel-cut oats for a hearty, chewy version. Be sure to adjust the ratios and cooking time as needed for perfect results.

  • Dairy-Free Delight: Replace the cream cheese with a dairy-free alternative or use a simple vanilla yogurt for a lighter glaze option without compromising taste.

  • Sweetener Diversity: Instead of maple syrup, try sweeteners like honey or agave syrup for a different flavor profile. The result will still be a deliciously sweet finish!

  • Spice it Up: Boost the warmth by doubling the cinnamon or adding a hint of nutmeg or pumpkin spice for a seasonal twist. Play with spices to match your mood or the seasons!

  • Gluten-Free Friendly: Make a completely gluten-free version by ensuring all your oats and baking ingredients are certified gluten-free. It’s a wonderful option for those with dietary restrictions.

Make sure to savor every bite of your customized Baked Cranberry Oatmeal, and if you’re looking for more mouthwatering options, consider trying my Baked Salmon Honey or Garlic Butter Baked recipes for a delightful meal experience.

Baked Cranberry Oatmeal Recipe FAQs

What is the best way to select ripe cranberries?
Absolutely! When selecting fresh cranberries, look for firm, plump berries that have a bright red color. Avoid any that are soft or have dark spots, as these can be overripe. If you can’t find fresh cranberries, frozen ones work perfectly without the need to thaw them first.

How should I store leftover Baked Cranberry Oatmeal?
Very good question! Store your leftover Baked Cranberry Oatmeal in an airtight container in the fridge for up to 5 days. To reheat, simply pop a portion in the microwave for about 1-2 minutes, or until it’s warm throughout. This makes breakfast quick and easy throughout the week!

Can I freeze Baked Cranberry Oatmeal?
Certainly! To freeze, cut the oatmeal into portions and wrap each piece tightly in plastic wrap. Then, place the wrapped pieces into a freezer-safe bag. It can be stored in the freezer for up to 3 months. When you’re ready to enjoy it, thaw overnight in the fridge and reheat as needed.

What if my oats turn out too watery?
No worries! If you notice your baked oatmeal feels a bit too moist, there could be a few culprits. Ensure you’re using the correct measurements and that you’ve allowed it enough time to bake. It should be golden brown on top and set in the center. Next time, consider reducing the almond milk slightly or adding an extra 5 minutes to the baking time for firmer results.

Can I make this oatmeal gluten-free?
Absolutely! This Baked Cranberry Oatmeal recipe is naturally gluten-free when using gluten-free oats, which are available at many grocery stores. Just check the packaging to ensure that the oats have not been cross-contaminated with gluten products. It’s a fantastic choice for those with gluten sensitivities or celiac disease.

Is there a way to make this recipe vegan?
Yes, you can easily modify this recipe to be vegan! Simply substitute the large egg with a flax egg (1 tablespoon of ground flaxseed mixed with 2.5 tablespoons of water, left to sit until it thickens). Use a plant-based cream cheese alternative for the glaze to keep the whole dish vegan-friendly. Enjoy!

Baked Cranberry Oatmeal

Baked Cranberry Oatmeal: A Cozy Holiday Breakfast Delight

Baked Cranberry Oatmeal is a delightful and easy recipe perfect for holiday breakfasts, filled with warm spices and fresh cranberries.
Prep Time 10 minutes
Cook Time 35 minutes
Total Time 45 minutes
Servings: 8 slices
Course: Breakfast
Calories: 250

Ingredients
  

For the Oatmeal
  • 2 cups Unsweetened Almond Milk Can be swapped for any milk.
  • 1 large Egg Binds the ingredients.
  • 1/4 cup Maple Syrup Natural sweetener.
  • 1 tablespoon Orange Zest For a zesty flavor.
  • 1 teaspoon Vanilla Extract Enhances aroma.
  • 2 cups Old Fashioned Rolled Oats Quick oats can be used.
  • 1 tablespoon Baking Powder Leavening agent.
  • 1 teaspoon Ground Cinnamon Can swap with nutmeg.
  • 1 pinch Sea Salt Balances sweetness.
  • 2 cups Fresh Cranberries Can use frozen directly.
  • 1/2 cup Pecan Pieces Substitute with your choice of nuts.
For the Orange Cream Cheese Glaze
  • 4 ounces Cream Cheese Can use dairy-free options.
  • 1 cup Powdered Sugar Can use sugar substitute.
  • 2 tablespoons Fresh Orange Juice For elevating the flavor.

Equipment

  • Oven
  • baking dish
  • Mixing Bowl
  • whisk
  • spatula

Method
 

Basic Instructions
  1. Preheat your oven to 350°F (175°C) and lightly grease an 8x8 inch baking dish.
  2. In a medium mixing bowl, whisk together the almond milk, egg, maple syrup, orange zest, and vanilla extract.
  3. Add the oats, baking powder, ground cinnamon, and sea salt to the wet mixture and stir until just combined.
  4. Gently stir in half of the cranberries into the oatmeal mixture and transfer to the prepared baking dish.
  5. Sprinkle the remaining cranberries and pecan pieces on top.
  6. Bake for 30-35 minutes until golden brown and a toothpick comes out clean.
  7. Allow to cool slightly in the dish.
  8. In a mixing bowl, beat the cream cheese until smooth, then add the powdered sugar and orange juice to combine.
  9. Drizzle the cream cheese glaze over the cooled oatmeal and serve warm.

Nutrition

Serving: 1sliceCalories: 250kcalCarbohydrates: 35gProtein: 5gFat: 10gSaturated Fat: 2gPolyunsaturated Fat: 3gMonounsaturated Fat: 5gCholesterol: 50mgSodium: 200mgPotassium: 180mgFiber: 4gSugar: 8gVitamin A: 355IUVitamin C: 5mgCalcium: 180mgIron: 1mg

Notes

For best results, prepare ahead of time and refrigerate, or serve with maple syrup for simplicity.

Tried this recipe?

Let us know how it was!

Irresistibly Soft Cut Out Sugar Cookies for Holiday Joy

As I took a deep breath, the sweet aroma of vanilla and freshly baked dough filled my kitchen, transporting me to childhood Christmases filled with warmth and laughter. These Soft Christmas Cut Out Sugar Cookies are a holiday treasure, blending the perfect soft texture with a delicate crisp around the edges. This recipe is not only a fantastic way to embrace the festive spirit, but it also allows for creativity as you decorate with vibrant sprinkles and easy icing. Whether you’re hosting a holiday gathering or looking for a thoughtful gift, these cookies are a delightful crowd-pleaser that can be made in stages for ultimate convenience. Want to learn how to create these charming treats that melt in your mouth? Let’s dive into the magic of holiday baking together!

Why Are These Cookies a Holiday Favorite?

Soft, Classic Delight: These Soft Christmas Cut Out Sugar Cookies bring nostalgic joy during the festive season, thanks to their airy texture and sweet flavor.

Customizable Creations: With easy decorations using icing and sprinkles, you can personalize each cookie to match your holiday spirit, making them perfect for sharing.

Easy Prep: This recipe simplifies holiday baking, allowing you to prepare in advance, chilling the dough for flexible baking timelines.

Crowd-Pleasing Treats: Everyone loves a good cookie! These cookies are sure to be the star of holiday gatherings, leaving your family and friends craving more. If you’re looking for more festive treats, check out these Savory Brown Sugar options that will pair nicely!

Cut Out Sugar Cookies Ingredients

• Creating these delicious Cut Out Sugar Cookies requires a few key ingredients that ensure a soft and tender texture, perfect for the holidays.

For the Cookie Dough

  • Unsalted Butter – Provides richness and moisture; can substitute with margarine if desired.
  • Granulated Sugar – Sweetens the cookies and contributes to their crisp edges; no substitutions recommended.
  • Large Eggs – Acts as a binder, providing structure; alternative: can use flax eggs for a vegan version.
  • Pure Vanilla Extract – Enhances flavor; use almond extract for a delightful twist.
  • All Purpose Flour – Forms the base and structure of the cookies; whole wheat flour can be substituted for a nuttier flavor.
  • Baking Powder – Provides leavening for the soft cookies; no substitutes recommended.
  • Salt – Balances sweetness and enhances flavor; essential for a well-rounded taste.

For the Icing

  • Powdered Sugar – Used for the icing, providing sweetness and a smooth texture; cornstarch can be blended for a softer icing.
  • Hot Water – Helps to dissolve the powdered sugar for icing; milk can be used for a creamier texture.
  • Light Corn Syrup – Adds sheen and a sticky consistency to the icing; can substitute with honey, but results will vary.

Step‑by‑Step Instructions for Soft Christmas Cut Out Sugar Cookies

Step 1: Prepare Dough
Begin by creaming 1 cup of unsalted butter and 1 ½ cups of granulated sugar in a large mixing bowl until the mixture is light and fluffy, which should take about 3-4 minutes. Then, add 2 large eggs and 1 tablespoon of pure vanilla extract, mixing until smooth. In a separate bowl, whisk together 3 ½ cups of all-purpose flour, 2 teaspoons of baking powder, and ½ teaspoon of salt. Gradually incorporate the dry mixture into the wet ingredients until a dough forms. Divide the dough, flatten it into disks, wrap in plastic, and chill for at least 1 hour, or up to 3 days, to firm up.

Step 2: Roll and Cut
Preheat your oven to 375°F (190°C), ensuring it’s ready for baking your Soft Christmas Cut Out Sugar Cookies. On a lightly floured surface, roll out the chilled dough to a thickness of about ¼ inch for soft cookies, or ⅛ inch if you prefer a crisper texture. Use cookie cutters to cut the dough into festive shapes, and transfer the cut-outs onto parchment-lined baking sheets. Optionally, sprinkle a little granulated sugar on top for added sweetness before their time in the oven.

Step 3: Bake
Place the prepared baking sheets in the preheated oven and bake for 6-8 minutes. Keep an eye on them: the edges should just begin to turn a light golden brown while the tops remain unchanged. Once done, remove the cookies from the oven and let them cool on the baking sheets for a few minutes before transferring them to a wire rack to cool completely—this prevents any sogginess and helps maintain their delightful texture.

Step 4: Make Icing
While the cookies cool, prepare the icing by whisking together 2 cups of powdered sugar, 2 tablespoons of hot water, 1 tablespoon of light corn syrup, and 1 teaspoon of vanilla extract in a medium bowl. Mix until the icing is smooth and has a spreadable consistency. If it’s too thick, add more hot water, a teaspoon at a time, until you achieve your desired texture for decorating the cookies.

Step 5: Decorate
Once the cookies have cooled completely, spread or pipe the prepared icing onto the surfaces of your Soft Christmas Cut Out Sugar Cookies. Before the icing sets, feel free to sprinkle on colorful sprinkles or festive toppings to add that holiday cheer. Let the decorating dry for 30 minutes to 1 hour, ensuring your creations are perfect and ready for gifting or sharing during your festive celebrations.

Make Ahead Options

These Soft Christmas Cut Out Sugar Cookies are perfect for busy home cooks looking to streamline their holiday baking! You can prepare the dough up to 3 days in advance, simply chilling it in the fridge wrapped tightly in plastic to maintain its freshness. If you’re short on time, you can also roll and cut the shapes a day ahead, just remember to refrigerate them on the baking sheet until you’re ready to bake to keep their festive form intact. When you’re ready to enjoy your cookies, simply preheat the oven and bake as directed. With these make ahead options, you’ll have more time to spend with family and friends during the holiday season, while still enjoying delicious homemade treats!

Expert Tips for Cut Out Sugar Cookies

  • Chill the Dough: Allowing the dough to chill not only makes it easier to roll out but also prevents spreading during baking, ensuring your cookies hold their shape.

  • Watch Baking Time: Keep a close eye on the baking time; cookies should be removed from the oven when the edges are lightly browned to achieve that perfect soft texture.

  • Rolling Technique: For evenly baked cookies, try to roll the dough to a consistent thickness of about ¼ inch. This helps all cookies bake at the same rate.

  • Cookie Cutter Care: Lightly flour your cookie cutters before cutting to help them release the dough easily, avoiding any dough sticking to the cutters.

  • Decorating Tips: For more intricate designs, use piping bags to create lovely icing patterns. Consider using different colored icing for a beautiful visual presentation!

  • Storage Wisdom: Keep decorated cookies in an airtight container for up to 5-7 days at room temperature. To maintain freshness, store undecorated cookies in the freezer for up to three months.

What to Serve with Soft Christmas Cut Out Sugar Cookies

Indulging in festive delights is even better when paired with thoughtful accompaniments that elevate your holiday experience.

  • Hot Cocoa Bar: Cozy up with a DIY hot cocoa station featuring whipped cream, marshmallows, and peppermint sticks. The rich warmth contrasts beautifully with the sweet, soft cookies.

  • Eggnog: This seasonal favorite adds a creamy, spiced touch to your cookie spread, perfectly complementing the sweet flavors of the cut-out sugar cookies and making for a wonderfully festive drink.

  • Spiced Tea: A cup of warm spiced tea, rich with cinnamon and cloves, provides a delightful balance to the sweetness of the cookies, creating a comforting holiday atmosphere.

  • Fruit Platter: Fresh fruits like cranberries and oranges add brightness and a refreshing acidity that cuts through the richness of the cookies, providing a well-rounded snacking experience.

  • Cheese Platter: Include a selection of mild cheeses for a savory addition. The creaminess of cheese offers a unique contrast to the sweet frosting, enhancing all the flavors on your plate.

  • Candied Nuts: Sweet and crunchy, candied nuts are a brilliant pairing that adds texture and complexity, making your holiday dessert table even more enticing.

  • Gingerbread Men: Pair your cookies with other holiday favorites like gingerbread men to create a festive cookie platter, ensuring there’s a variety that everyone will love.

  • Milk: The classic pairing! Serve a cold glass of milk to round out the experience, enhancing the nostalgia of enjoying cookies fresh from the oven.

How to Store and Freeze Cut Out Sugar Cookies

Room Temperature: Store decorated cookies in an airtight container at room temperature for up to 5-7 days to keep them fresh and delicious.

Fridge: If you’re in a warm climate, consider refrigerating decorated cookies for added freshness, keeping them sealed in a container for up to a week.

Freezer: Undecorated cookies can be frozen for up to three months. Allow them to cool completely, then wrap tightly in plastic wrap and a layer of aluminum foil.

Reheating: When ready to enjoy, thaw cookies in the refrigerator overnight, then allow them to come to room temperature before decorating or serving.

Cut Out Sugar Cookies Variations

Feel free to let your creativity shine by customizing these delightful cookies. The options for flavor and texture are endless!

  • Vegan Version: Substitute eggs with flax eggs to create a dairy-free treat without sacrificing taste.

  • Whole Wheat: Swap all-purpose flour for whole wheat flour for a nuttier flavor and a healthier twist!

  • Chocolate Cookies: Replace ½ cup of flour with cocoa powder for a rich, chocolatey version of these festive cookies.

    Imagine the joy of biting into a chocolatey cut-out cookie topped with vibrant icing—it’s pure bliss during the holidays!

  • Spiced Delight: Add 1 teaspoon of ground cinnamon or nutmeg to the dough for that warm, holiday flavor that fills the air with festivity.

  • Lemon Zest: A tablespoon of freshly grated lemon zest brightens the flavor, giving these cookies a refreshing twist.

  • Gluten-Free: Use a 1:1 gluten-free flour blend to ensure everyone can enjoy these delectable treats.

    The culture of baking is about inclusivity and togetherness, allowing everyone a seat at the table!

  • Swap Icing: Replace traditional icing with a cream cheese frosting for a tangy and rich layer that pairs perfectly with the sweetness.

  • Heat it Up: If you’re feeling adventurous, sprinkle a pinch of cayenne pepper in the dough for a surprisingly delightful kick!

For more delightful ideas in the kitchen, check out these Blueberry Breakfast Cookies to start your day with a smile or try creating an exquisite Inside Out Egg roll bowl for lunch!

Soft Christmas Cut Out Sugar Cookies Recipe FAQs

What is the best way to select ripe ingredients for this recipe?
Absolutely! When selecting ingredients like butter, always choose unsalted for the best control over flavor. Ensure your butter is fresh and at room temperature, which typically means it should be slightly soft to the touch but not greasy. For eggs, look for ones that are large and have a clean, intact shell. If you’re opting for flour, check for freshness by looking at the expiration date; it should be stored in a cool, dry place.

How should I store my decorated cookies?
Very! To keep your decorated cookies fresh, store them in an airtight container at room temperature for up to 5-7 days. If you live in a humid climate, consider refrigerating them to maintain their texture. Just ensure they’re well-sealed to prevent them from drying out.

Can I freeze my Soft Christmas Cut Out Sugar Cookies?
Definitely! To freeze undecorated cookies, let them cool completely, then layer them with parchment paper in an airtight container or wrap each cookie tightly in plastic wrap. You can freeze for up to 3 months. When you’re ready to enjoy them, just thaw in the refrigerator overnight, letting them come to room temperature before decorating or serving.

What should I do if my cookie dough is too firm after chilling?
No worries! If your dough is too firm after chilling, simply let it sit at room temperature for about 15-20 minutes. This will soften it enough to make rolling out easier without affecting the final texture of your cookies. Also, if it’s still challenging, you can work in a small amount of softened butter to loosen it.

Can I use alternative ingredients due to dietary restrictions?
Of course! If you have dietary restrictions, you can make several adjustments. For a vegan version, replace the eggs with flax eggs (1 tablespoon of ground flaxseed mixed with 2.5 tablespoons of water per egg, let stand until thickened). Use margarine instead of butter, and consider replacing all-purpose flour with a gluten-free blend if needed. Always check labels for potential allergens, especially when it comes to your icing ingredients.

How can I improve my cookie’s texture and prevent spreading during baking?
To achieve the best texture and prevent spreading, ensure you chill your dough thoroughly before rolling it out. This step is crucial! After cutting your cookies, if you have time, chill them again for at least 10-15 minutes before placing them in the oven. Baking on parchment paper helps as well, as it can prevent sticking and allow for even baking. Lastly, avoid over-mixing your dough once you add the flour to keep them tender and soft!

Cut Out Sugar Cookies

Irresistibly Soft Cut Out Sugar Cookies for Holiday Joy

Delightful Soft Cut Out Sugar Cookies perfect for the holiday season, customizable with icing and sprinkles.
Prep Time 15 minutes
Cook Time 8 minutes
Chilling Time 1 hour
Total Time 1 hour 23 minutes
Servings: 24 cookies
Course: Dessert
Cuisine: American
Calories: 150

Ingredients
  

For the Cookie Dough
  • 1 cup Unsalted Butter Can substitute with margarine if desired.
  • 1.5 cups Granulated Sugar No substitutions recommended.
  • 2 large Eggs Can substitute with flax eggs for a vegan version.
  • 1 tablespoon Pure Vanilla Extract Can use almond extract for a twist.
  • 3.5 cups All Purpose Flour Can substitute with whole wheat flour.
  • 2 teaspoons Baking Powder No substitutes recommended.
  • 0.5 teaspoon Salt Essential for flavor.
For the Icing
  • 2 cups Powdered Sugar Can blend with cornstarch for softer icing.
  • 2 tablespoons Hot Water Milk can be used for creamier icing.
  • 1 tablespoon Light Corn Syrup Can substitute with honey, results may vary.

Equipment

  • Mixing Bowl
  • whisk
  • Cookie Cutters
  • Baking Sheets
  • Parchment Paper
  • Wire rack

Method
 

Step-by-Step Instructions
  1. Cream unsalted butter and granulated sugar until light and fluffy. Add eggs and vanilla, mix until smooth.
  2. In a separate bowl, whisk together all-purpose flour, baking powder, and salt. Gradually incorporate into wet ingredients to form dough.
  3. Divide the dough into disks, wrap in plastic, and chill for at least 1 hour.
  4. Preheat your oven to 375°F (190°C). Roll out chilled dough to ¼ inch thickness. Cut cookie shapes and place on baking sheets.
  5. Bake cookies for 6-8 minutes until edges are lightly golden. Cool on baking sheets before transferring to a wire rack.
  6. Prepare icing by whisking powdered sugar, hot water, corn syrup, and vanilla until smooth. Adjust with hot water for desired consistency.
  7. Once cookies are cool, decorate with icing and sprinkles. Allow to dry for 30 minutes to 1 hour.

Nutrition

Serving: 1cookieCalories: 150kcalCarbohydrates: 20gProtein: 2gFat: 7gSaturated Fat: 4gPolyunsaturated Fat: 0.5gMonounsaturated Fat: 2gCholesterol: 30mgSodium: 70mgPotassium: 30mgSugar: 9gVitamin A: 300IUCalcium: 10mgIron: 0.5mg

Notes

Chill the dough to prevent spreading and maintain shape. Store decorated cookies in an airtight container for freshness.

Tried this recipe?

Let us know how it was!

Cranberry Orange Biscotti: Crunchy Holiday Delight to Share

The scent of citrus mingling with the warmth of almonds instantly transports me to cozy holiday gatherings, where homemade treats steal the spotlight. These Cranberry Orange Biscotti bring that festive spirit to life, perfectly crunchy and studded with tangy cranberries. They’re not only a delightful companion for your morning coffee but also an impressive gift for friends and family. With a quick prep time and endless variations, this recipe makes holiday baking effortless and fun. Imagine adding your favorite nuts or spices to create a biscotti that’s uniquely yours. So, ready to transform your kitchen into a holiday haven with these tasty treats? Let’s dive in!

Why are Cranberry Orange Biscotti Irresistible?

Crunchy Delight: These biscotti boast a perfect balance of crunch and chew, making them the ideal snack for any time of the day.

Festive Flavor: The blend of bright orange zest and tart cranberries captures the essence of the holiday season in each bite.

Customizable Options: Easily swap in your favorite nuts or dried fruits, allowing you to tailor the recipe to your taste. Got a nut allergy? Try my gluten-free biscotti recipe.

Quick Prep Time: Whip these up in just a few simple steps, making holiday baking more manageable and fun!

Gift-Worthy Treat: Packaged beautifully, these biscotti make perfect gifts for friends, family, or even office colleagues, spreading cheer and deliciousness!

Cranberry Orange Biscotti Ingredients

• Dive into the delightful world of baking with these essential ingredients!

For the Biscotti Dough

  • All-Purpose Flour – Provides structure and crunch. Substitute with a gluten-free flour blend for a gluten-free option.
  • Baking Powder – Leavening agent to help the biscotti rise slightly; can be replaced with baking soda, adjusting other ingredients as needed.
  • Salt – Enhances flavor; kosher or sea salt works best.
  • Unsalted Butter – Adds moisture and richness; coconut oil can be used for a dairy-free version.
  • Granulated Sugar – Sweetens the biscotti; brown sugar can deepen the flavor.
  • Orange Zest – Infuses a fragrant citrus flavor; lime or lemon zest are great substitutes.
  • Large Eggs – Binds the ingredients together; for an egg-free option, consider chia or flaxseed eggs.
  • Pure Vanilla Extract – Adds depth of flavor; almond extract is a lovely alternative.

For the Mix-ins

  • Toasted Almonds – Provides crunch and nuttiness; pecans or walnuts can be used as well.
  • Dried Cranberries – Adds chewiness and tartness; feel free to substitute with apricots or raisins if desired.

For the White Chocolate Drizzle

  • White Chocolate – Dipping ingredient that enhances sweetness; dark chocolate can be used for a less sweet option perfect for your Cranberry Orange Biscotti.

Step‑by‑Step Instructions for Cranberry Orange Biscotti

Step 1: Preheat the Oven
Start by preheating your oven to 350°F (175°C). While the oven warms up, line two baking sheets with parchment paper to prevent sticking. This step ensures that your Cranberry Orange Biscotti will bake evenly and come out with a lovely golden color.

Step 2: Mix Dry Ingredients
In a medium bowl, whisk together 2 cups of all-purpose flour, 1 teaspoon of baking powder, and a pinch of salt. This mixture provides structure to your biscotti, balancing the sweetness from the sugar and adding depth. Setting this aside will allow the flavors to meld beautifully when combined with the wet ingredients.

Step 3: Cream Butter and Sugar
In a large mixing bowl, cream together ½ cup of unsalted butter and ¾ cup of granulated sugar until light and fluffy, about 2-3 minutes with an electric mixer. The mixture should be pale and airy, which is essential for the texture of your Cranberry Orange Biscotti. Next, add in the zest of one orange and continue to beat, infusing the batter with citrus brightness.

Step 4: Incorporate Eggs and Vanilla
Add two large eggs, one at a time, mixing well after each addition until fully incorporated. Then, stir in 1 teaspoon of pure vanilla extract, enhancing the flavors. This addition creates a rich, moist base that binds all your ingredients together while uplifting the overall taste of your biscotti.

Step 5: Combine Dry and Wet Ingredients
Gradually add the dry ingredient mixture to the wet ingredients, mixing until just combined. Be careful not to overmix, as you want your dough to stay tender. Gently fold in ½ cup of toasted almonds and ½ cup of dried cranberries, ensuring an even distribution of these delicious and festive flavors throughout the dough.

Step 6: Form the Biscotti Logs
Divide the dough in half and transfer each piece onto the prepared baking sheets. Form each portion into a log approximately 12 inches long and 2 inches wide. Make sure the logs are even and smooth, as this will help them bake uniformly into crunchy Cranberry Orange Biscotti deliciously ready for slicing.

Step 7: First Bake
Bake the logs in the preheated oven for 30-35 minutes, or until they turn golden brown and slightly firm to the touch. The delightful aroma of orange and toasted almonds will fill your kitchen as they bake! Once done, remove the logs from the oven and let them cool for about 10 minutes before slicing.

Step 8: Slice and Second Bake
Using a serrated knife, slice the logs diagonally into ½-inch thick pieces while they are still warm. Arrange the slices cut-side down on the baking sheet. Return the sliced biscotti to the oven and reduce the temperature to 275°F (135°C). Bake for an additional 30-40 minutes, or until they are crisp and dried out; they should snap lightly when broken in half.

Step 9: Cool and Dip in Chocolate
After the second bake, remove the biscotti from the oven and let them cool completely on a wire rack. While they cool, melt your white chocolate using a double boiler or microwave. Once melted, dip the ends of each cooled biscotti into the chocolate, allowing the excess to drip off. This delightful topping enhances their festive appeal and adds a luxurious finish to your Cranberry Orange Biscotti.

Cranberry Orange Biscotti Variations

Feel free to get creative and personalize your biscotti with these delicious twists and substitutes!

  • Nutty Alternative: Swap almonds for toasted pecans or walnuts for a different flavor and texture. The nuttiness will blend seamlessly with the orange zest.
  • Dried Fruit Swap: Use dried cherries or apricots in place of cranberries. This will add a unique sweetness and color to your biscotti, changing up the taste profile.
  • Citrus Zest Twist: Replace orange zest with lemon or even grapefruit zest for a refreshing citrus kick. Each variation will bring its own bright character to the biscotti!
  • Spicy Addition: Add a pinch of cinnamon or nutmeg to the dough for a warm hug of spice perfect for holiday vibes. This simple addition can truly elevate your treat.
  • Dairy-Free Option: Substitute coconut oil for unsalted butter and use a plant-based white chocolate for a delightful dairy-free biscotti that everyone can enjoy.
  • Chocolate Lover’s Delight: Dip biscotti in dark or even peppermint chocolate for a festive seasonal flair. These variations can add a decadent touch that chocolate lovers will adore!
  • Gluten-Free: Enjoy a gluten-free version by using a reliable 1:1 gluten-free flour blend. It will still yield that cherished crunchy texture while being accessible to those with dietary needs.
  • Extra Crunch: Add crushed pistachios to the dough for added crunch and a beautiful pop of color, enhancing both aesthetics and flavor. Your biscotti will be a feast for the eyes and the palate!

Dive into these customization options to make your Cranberry Orange Biscotti uniquely yours! Enjoy experimenting while getting inspired by delicious flavors. If you need more ideas, consider checking out my gluten-free biscotti recipe or exploring my chocolate variations for even more delightful options.

Make Ahead Options

These Cranberry Orange Biscotti are perfect for meal prep, allowing you to enjoy delicious homemade treats with minimal fuss! You can prepare the dough up to 24 hours in advance; simply wrap it tightly in plastic wrap and refrigerate. Alternatively, shape the logs and refrigerate them for up to 3 days before baking. To maintain their crunchy texture, slice and bake them fresh, ensuring they lose no quality. When ready to enjoy, just follow the second bake instructions to crisp them up and dip them in white chocolate for a delightful finishing touch. With these options, the festive treats are just a quick bake away!

Expert Tips for Cranberry Orange Biscotti

  • Knead Gently: Overworking the dough can lead to tough biscotti. Knead just until combined for the perfect texture.

  • Slice Warm: Always slice the biscotti while they are still warm. This prevents crumbling and ensures neat, clean cuts, creating beautiful pieces.

  • Freeze for Freshness: If you have extra dough, freeze it for future baking. Thaw completely before slicing and baking as per the instructions for delicious cranberry orange biscotti anytime!

  • Chocolate Variations: Experiment with different chocolate types for dipping! Dark chocolate provides a less sweet option, perfect for balancing the biscotti’s flavors.

  • Flavors Galore: Feel free to customize with your favorite dried fruits or nuts. This versatility makes each batch uniquely yours, capturing your personal flavor profile!

  • Storage Matters: For the best flavor and crunch, store your biscotti in an airtight container at room temperature. Enjoy them for up to three weeks!

What to Serve with Cranberry Orange Biscotti

These delightful biscotti are perfect for crafting a heartwarming holiday spread that pairs beautifully with your favorite drinks and sides.

  • Hot Coffee: The rich bitterness of coffee complements the sweet, crunchy texture of the biscotti, enriching each bite with aromatic warmth.
  • Creamy Hot Chocolate: Indulge in the luscious creaminess of hot chocolate, creating a delicious balance to the crispy biscotti.
  • Herbal Tea: A calming herbal tea offers a lighter alternative that allows the orange and cranberry flavors to shine through.
  • Cheese Plate: A selection of mild cheeses contrasts nicely with the biscotti’s sweetness, adding savory elements to your snack time.
  • Fruit and Nut Medley: Pair with fresh fruits like pears or apples to refresh your palate, while nuts enhance the flavors without overpowering them.
  • Festive Fruit Compote: Serve alongside warm fruit compote for a delightful dip, blending sweet, tart flavors in each crunchy bite.
  • Spiced Eggnog: This rich, festive drink enhances the warm spices of the holiday season, making every dunk a cozy experience.
  • Ice Cream Sandwiches: Consider using biscotti as a unique base for ice cream sandwiches; the crunch adds an exciting texture to homemade treats!

Storage Tips for Cranberry Orange Biscotti

Room Temperature: Store your biscotti in an airtight container at room temperature for up to 3 weeks. This helps maintain their delightful crunchiness and flavor.

Freezer: If you want to enjoy your biscotti later, freeze them without the chocolate for up to 3 months. Wrap each biscotti in plastic wrap and place in a freezer-safe bag.

Reheating: To restore crispness, place frozen biscotti in a preheated oven at 300°F (150°C) for about 5-10 minutes. Enjoy them warm with your favorite beverage!

Chocolate Storage: If already dipped in chocolate, consume within a week for the best flavor, as the chocolate may lose its snap over time.

Cranberry Orange Biscotti Recipe FAQs

How do I select the best dried cranberries for my biscotti?
When choosing dried cranberries, look for plump, moist berries without added sugars or preservatives. The best ones will have a rich color and a soft texture, which ensures that they contribute the right amount of chewiness to your Cranberry Orange Biscotti.

What is the best way to store Cranberry Orange Biscotti?
To keep your biscotti fresh, store them in an airtight container at room temperature for up to 3 weeks. Placing a piece of parchment paper between layers can help maintain their crunch. If you want to enjoy them later, freeze your biscotti without the chocolate for up to 3 months. Wrap each piece in plastic wrap and then put them in a freezer-safe bag for optimal freshness.

Can I freeze the dough for my Cranberry Orange Biscotti?
Absolutely! To freeze the dough, shape it into logs and wrap each log tightly in plastic wrap. Place the wrapped logs in a freezer bag and store them for up to 3 months. When ready to bake, simply thaw the dough in the refrigerator overnight, slice, and follow the baking instructions as usual.

What should I do if my biscotti are too soft after the second bake?
If you find that your biscotti are still soft after the second bake, try placing them back in the oven for an additional 5-10 minutes at 275°F (135°C). Keep a close eye on them to prevent over-baking. The goal is to achieve that perfect crispy texture, and a little extra time can make all the difference!

Are there any dietary considerations for Cranberry Orange Biscotti?
Yes! If you have specific dietary needs, you can make adjustments to the recipe. Use gluten-free flour for a gluten-free version, coconut oil instead of butter for a dairy-free option, or replace eggs with chia or flaxseed eggs for an egg-free variety. Always double-check the ingredients in your dried cranberries and chocolate for allergens!

How can I customize the flavors of my Cranberry Orange Biscotti?
The beauty of these biscotti lies in their versatility! Feel free to mix in different types of nuts, such as pecans or walnuts, or swap out the cranberries for your favorite dried fruits like cherries or apricots. Adding spices like cinnamon or nutmeg can also elevate the flavor, especially during the festive season. Enjoy experimenting until you find your signature combination!

Cranberry Orange Biscotti

Cranberry Orange Biscotti: Crunchy Holiday Delight to Share

Cranberry Orange Biscotti are perfectly crunchy and tangy, making them an ideal holiday treat to share.
Prep Time 15 minutes
Cook Time 1 hour 10 minutes
Total Time 1 hour 25 minutes
Servings: 24 pieces
Course: Dessert
Cuisine: American
Calories: 120

Ingredients
  

For the Biscotti Dough
  • 2 cups all-purpose flour Substitute with gluten-free flour for a gluten-free option.
  • 1 teaspoon baking powder Can be replaced with baking soda.
  • 1 teaspoon salt Kosher or sea salt works best.
  • ½ cup unsalted butter Coconut oil can be used for a dairy-free version.
  • ¾ cup granulated sugar Brown sugar can deepen the flavor.
  • 1 tablespoon orange zest Lime or lemon zest are great substitutes.
  • 2 large eggs For an egg-free option, consider chia or flaxseed eggs.
  • 1 teaspoon pure vanilla extract Almond extract is a lovely alternative.
For the Mix-ins
  • ½ cup toasted almonds Pecans or walnuts can be used.
  • ½ cup dried cranberries Substitute with apricots or raisins if desired.
For the White Chocolate Drizzle
  • 1 cup white chocolate Dark chocolate can be used for a less sweet option.

Equipment

  • Oven
  • Mixing bowls
  • Baking Sheets
  • Parchment Paper
  • Electric mixer
  • Serrated Knife

Method
 

Step-by-Step Instructions
  1. Preheat your oven to 350°F (175°C) and line two baking sheets with parchment paper.
  2. In a medium bowl, whisk together flour, baking powder, and salt.
  3. In a large mixing bowl, cream together butter and sugar until light and fluffy, then add orange zest.
  4. Add eggs one at a time, mixing well after each, then stir in vanilla extract.
  5. Gradually add dry ingredients to wet ingredients, folding in almonds and cranberries.
  6. Divide the dough and form into logs, then place on baking sheets.
  7. Bake logs for 30-35 minutes until golden brown, then let cool for 10 minutes.
  8. Slice the logs diagonally into ½-inch thick pieces and arrange cut-side down.
  9. Reduce oven temperature to 275°F (135°C) and bake slices for 30-40 minutes until crisp.
  10. Cool completely, then dip ends in melted white chocolate and let excess drip off.

Nutrition

Serving: 1pieceCalories: 120kcalCarbohydrates: 15gProtein: 2gFat: 6gSaturated Fat: 4gPolyunsaturated Fat: 0.5gMonounsaturated Fat: 1.5gCholesterol: 20mgSodium: 70mgPotassium: 50mgFiber: 0.5gSugar: 6gVitamin A: 100IUCalcium: 10mgIron: 0.5mg

Notes

Store in an airtight container for up to 3 weeks.

Tried this recipe?

Let us know how it was!

Heavenly Plum Cake with Whipped Yogurt for Fall Bliss

Caught in a delightful aroma that swirls warmth through your kitchen, the essence of fall baking is alive in this Spiced Plum Cake with Whipped Yogurt. The moment I pulled my cake from the oven, the enticing scent of cinnamon and nutmeg wrapped itself around me like a cozy blanket, making it impossible to resist a taste. With its easy preparation, this rustic dessert marries moist butter cake with the creamy tang of Greek yogurt—making it not only a showstopper but also a healthier option for those craving something sweet. Adorned with beautifully arranged plums, each slice feels like a little celebration worthy of any gathering. Curious what makes this cake a go-to for busy bakers seeking effortless elegance? Let’s dive into how you can create this fall favorite!

Why is this Plum Cake a Must-Try?

Simplicity is key: You’ll whip up this delightful cake with ease, making it perfect for any home cook, whether you’re a seasoned chef or just starting out.

Irresistible flavors blend perfectly: The warm spices of cinnamon and nutmeg intertwine with the juicy plums and tangy yogurt, creating a taste sensation that captures the essence of fall.

Versatile serving options abound: Enjoy it warm with a dollop of whipped yogurt on top, or try it cold for a refreshing twist!

Nutritious indulgence: With Greek yogurt elevating the protein content, this cake offers a guilt-free treat for your sweet tooth.

Crowd-pleaser guaranteed: This cake is sure to impress guests at gatherings, just like my Strawberry Cheesecake Dump or festive Easter Poke Cake.

Transform any occasion into a celebration with this effortless Spiced Plum Cake, not just a dessert but a centerpiece!

Plum Cake with Whipped Yogurt Ingredients

For the Cake

  • Unsalted Butter (1/2 cup) – Adds richness and moisture; you can substitute with salted butter and adjust the salt if necessary.
  • Granulated Sugar (3/4 cup) – Sweetens the cake beautifully; brown sugar can be used for a deeper caramel flavor.
  • Eggs (2) – Provides structure and moisture; opt for a flax egg for a vegan twist.
  • All-Purpose Flour (1 1/2 cups) – Forms the base structure; use a 1:1 gluten-free flour blend for a gluten-free version.
  • Baking Powder (1 teaspoon) – Essential for a good rise; make sure it’s fresh for optimal results.
  • Salt (1/2 teaspoon) – Enhances sweetness; consider reducing to 1/4 teaspoon if using salted butter.
  • Cinnamon (1 teaspoon) – Infuses a warm, spicy note; feel free to increase for additional flavor.
  • Nutmeg (dash) – Complements the cinnamon well; can be substituted with pumpkin pie spice if you prefer.
  • Chobani Plain Greek Yogurt (1/2 cup) – Provides moisture and tanginess; switch to regular yogurt for a lighter taste.
  • Honey (1/4 cup) – A natural sweetener; you can replace it with maple syrup for a vegan alternative.
  • Vanilla Extract (1 teaspoon) – Enhances the overall flavor profile; it’s optional but highly recommended.
  • Ripe Plums (3-4, sliced) – Adds visual appeal and juiciness; apples or pears can also work well in this cake.

For the Whipped Yogurt Topping

  • Chobani Plain Greek Yogurt (1 cup) – The base for creamy texture; can be substituted with dairy-free yogurt for a non-dairy option.
  • Heavy Cream (1/2 cup) – Adds richness; for a lighter version, use a low-fat alternative.
  • Sugar (2 tablespoons) – Sweetens the topping; adjust to your taste for sweetness level.

With each delightful bite of this Plum Cake with Whipped Yogurt, you’ll find yourself wrapped in cozy autumn vibes, making it the perfect dessert for any gathering. Happy baking!

Step‑by‑Step Instructions for Spiced Plum Cake with Whipped Yogurt

Step 1: Preheat the Oven
Begin your journey to baking the Spiced Plum Cake by preheating your oven to 350°F (175°C). This is a crucial step to ensure that your cake bakes evenly and develops a beautiful golden crust. While the oven warms, gather your mixing bowls and a whisk, ready for the next steps.

Step 2: Cream the Butter and Sugar
In a large mixing bowl, cream together the unsalted butter and granulated sugar until the mixture is light and fluffy, about 3-4 minutes. This step will create a lovely base for your cake, allowing it to rise beautifully. Don’t rush; the creaming process is key to achieving a moist and tender crumb in your Spiced Plum Cake.

Step 3: Incorporate the Eggs
Add the eggs, one at a time, to the butter and sugar mixture. Mix well after each addition to fully incorporate the eggs, ensuring a smooth batter. You’ll know it’s ready when the mixture is well-blended and slightly lighter in color. This adds structure and moisture to your cake, setting up the base for flavorful enjoyment.

Step 4: Whisk the Dry Ingredients
In a separate bowl, whisk together the all-purpose flour, baking powder, salt, cinnamon, and nutmeg. This ensures an even distribution of the leavening agent and spices throughout the cake, creating a lovely warm flavor profile. Take a moment to inhale the spices; this is the aroma of fall coming to life!

Step 5: Combine Wet and Dry Ingredients
Gradually add the dry ingredients to the creamed mixture, alternating with the Greek yogurt, honey, and vanilla extract. Mix gently but thoroughly until just combined. Be careful not to overmix, as this can lead to a denser texture in your Spiced Plum Cake. The batter should appear thick, smooth, and fragrant.

Step 6: Prepare for Baking
Pour the batter into a prepared baking pan, smoothing the top with a spatula for an even surface. This preparation is essential for achieving an appealing finish and allows the cake to rise uniformly. The pan should ideally be greased or lined with parchment paper to prevent sticking and ensure effortless removal afterward.

Step 7: Arrange the Plums
Layer the sliced plums in a beautiful circular pattern on top of the batter. Press them gently into the surface so they meld into the cake as it bakes. This step offers a stunning visual appeal to your Spiced Plum Cake, as the juicy plums will caramelize and delight your taste buds with every bite.

Step 8: Bake the Cake
Bake the cake in the preheated oven for approximately 30-35 minutes. Check for doneness by inserting a toothpick into the center; it should come out clean or with a few moist crumbs. This aroma will fill your kitchen, drawing everyone to the source of this delightful autumn treat.

Step 9: Cool the Cake
Once baked, let the cake cool in the pan for about 10 minutes before transferring it onto a wire rack. This step helps to maintain the structure of your Spiced Plum Cake without it falling apart. Cooling allows the flavors to develop further, preparing it for the final delicious touches.

Step 10: Whip the Yogurt Topping
While the cake cools, prepare the whipped yogurt by whisking together Chobani Plain Greek Yogurt, heavy cream, and sugar until soft peaks form. This creamy topping perfectly balances the cake’s flavors and texture. Be sure to beat it until it’s airy and light, making each slice of cake even more irresistible.

Step 11: Serve and Enjoy
Slice your beautifully baked Spiced Plum Cake, then serve it warm with a generous dollop of the whipped yogurt topping. This harmonious combination creates a cozy and inviting dessert, perfect for gatherings or a charming evening treat. Sit back and enjoy the delightful smiles that this cake brings to your table!

Plum Cake with Whipped Yogurt Variations

Feel free to make this delightful cake your own with these fun twists and substitutions!

  • Seasonal Fruits: Swap out plums for other fruits like apples or pears to bring a different seasonal taste and texture.

  • Spice It Up: Boost the flavor by adding cloves or ginger instead of the cinnamon for a more spirited twist. Each spice brings a unique warmth that elevates the cake.

  • Gluten-Free: Use a 1:1 gluten-free flour blend in place of all-purpose flour to accommodate dietary needs without sacrificing flavor or texture.

  • Vegan Option: Replace the eggs with a flax egg, and use a dairy-free yogurt alternative in the batter for a plant-based version that doesn’t skimp on deliciousness.

  • Sweetener Swap: Opt for maple syrup in lieu of honey for a different natural sweetener that complements the fruit beautifully.

  • Extra Creaminess: Stir a little heavy cream into the whipped yogurt for a richer topping that adds an indulgent touch to every slice. It’s like a little cloud of happiness on your plate.

  • Mix in Nuts: Fold in some chopped walnuts or pecans into the batter for an added crunch that contrasts with the cake’s softness. Nutty and delicious—what’s not to love?

  • Zest it Up: Enhance the flavor with a sprinkle of lemon or orange zest either in the cake batter or the whipped yogurt; it brings a bright freshness that dances with the fall spices.

For more delightful baking ideas, don’t forget to check out my Honeybun Carrot Cake or try something fun like these Korean BBQ Meatballs. Each offers a little twist of comfort in your kitchen!

How to Store and Freeze Plum Cake with Whipped Yogurt

Airtight Container: Store leftover Plum Cake in an airtight container at room temperature for up to 3 days to keep it fresh and moist.

Refrigerator Storage: If you plan to keep the cake longer, refrigerate it for up to a week, ensuring it’s well-wrapped to prevent drying out.

Freezer Friendly: You can freeze the cake for up to 3 months. Wrap individual slices in plastic wrap, then place them in a freezer-safe bag to maintain flavor and texture.

Reheating Instructions: For best results, allow frozen slices to thaw in the refrigerator overnight before gently reheating in the oven at 350°F (175°C) for about 10 minutes. Enjoy your Plum Cake with Whipped Yogurt warmed!

Make Ahead Options

These Spiced Plum Cake with Whipped Yogurt are perfect for busy home cooks looking to save time without sacrificing flavor! You can bake the cake up to 24 hours in advance and store it in an airtight container at room temperature to keep it moist and flavorful. Additionally, the whipped yogurt can be prepared just before serving to ensure it maintains its light and airy texture. If you’re planning ahead, slice the cake and layer it with yogurt just before enjoying, which allows for a fresh presentation that still delights the senses. By prepping ahead, you’ll have a sumptuous homemade dessert ready for any occasion with minimal effort!

What to Serve with Spiced Plum Cake with Whipped Yogurt

Indulging in this delightful dessert calls for some equally delicious accompaniments to complete your fall feast.

  • Creamy Mashed Potatoes: Their buttery richness complements the spiced notes of the cake, making them a comforting side-by-side pairing. Imagine the contrast of warm, savory mash alongside the sweet cake.
  • Roasted Brussels Sprouts: Crisp-tender sprouts bring a subtle bitterness that balances the cake’s sweetness, enhancing your dining experience with earthy flavors. Roasting elevates their taste—perfectly caramelized and golden brown!
  • Honey-Glazed Carrots: The gentle sweetness of caramelized carrots matches the cake’s fruitiness, creating a beautifully harmonious connection on your plate. Their warm, inviting aroma would make any gathering feel special.
  • Apple Cider: A chilled glass of apple cider offers a refreshing contrast to the dense warmth of the cake. The bright, tart flavors of the cider playfully dance with the cinnamon and yogurt, uplifting your palate.
  • Warm Spiced Tea: Cozying up with a cup of spiced tea enhances that autumnal vibe, echoing the cake’s flavors. Picture yourself wrapped in a blanket, savoring these delightful sips alongside the cake.
  • Vanilla Ice Cream: A scoop of vanilla ice cream adds a creamy element that enriches the moist cake, creating a melting experience of sweetness and warmth. It’s a classic pairing everyone loves!
  • Chocolate Drizzle: Drizzling chocolate over each slice introduces a luscious contrast that offers richness and decadence to your dessert table. You’ll create a visually stunning piece everyone will want to dig into!
  • Spiced Pumpkin Muffins: For a delightful brunch option, serve miniature spiced pumpkin muffins. Their moist texture and aromatic spices complement the plum cake while enhancing the festivity of the season.

These thoughtful pairings not only elevate the flavors of the Spiced Plum Cake with Whipped Yogurt but also embrace the cozy warmth of fall and the joy of sharing a meal with loved ones.

Expert Tips for Spiced Plum Cake

  • Perfect Butter Prep: Ensure your unsalted butter is at room temperature for easier creaming with sugar, which creates a light and fluffy texture in the Plum Cake with Whipped Yogurt.

  • Fresh Ingredients Matter: Use fresh spices for a more vibrant flavor; old spices can dull the taste and take away the cake’s delightful essence.

  • Monitor Mixing: Be careful not to overmix your batter when combining wet and dry ingredients—excessive mixing can lead to a dense cake instead of light and tender crumb.

  • Avoid Overbaking: Keep an eye on your cake while it bakes; using a toothpick test about 5 minutes before the recommended time can prevent dryness.

  • Creative Toppings: Feel free to experiment with your yogurt topping! Adding a splash of vanilla or a hint of citrus zest can elevate your experience with each slice.

  • Cooling is Key: Let the cake cool in the pan before transferring it to a wire rack; this step helps maintain its structure and prevents crumbling.

Plum Cake with Whipped Yogurt Recipe FAQs

How do I choose the right plums for this recipe?
Absolutely! When selecting plums, look for ones that have a deep color and are slightly soft to the touch. Ripe plums should have a fragrant aroma, and avoid any with dark spots or bruises. If you can find them, local, in-season plums tend to offer the best flavor for baking.

How should I store leftover Plum Cake?
Great question! For up to 3 days, store your leftover Plum Cake in an airtight container at room temperature to maintain its moisture. If you need to keep it longer, refrigerate it for up to a week, but make sure it’s well-wrapped to avoid drying out.

Can I freeze this cake for later use?
Yes, you can! To freeze your Plum Cake, first let it cool completely. Then, slice the cake and wrap each piece tightly in plastic wrap. Place the wrapped slices in a freezer-safe bag. It will maintain its delicious taste for up to 3 months. When you’re ready to enjoy, thaw the slices in the fridge overnight and reheat them gently in a 350°F (175°C) oven for about 10 minutes.

What can I do if my cake turns out too dense?
Very common! If your Plum Cake ends up dense, it could be due to overmixing the batter. Next time, try mixing until just combined when adding wet and dry ingredients. Also, ensure your baking powder is fresh, as expired leavening agents can impact the cake’s rise and texture.

Is this recipe suitable for someone with a dairy allergy?
Absolutely! You can easily make this Plum Cake with a dairy-free yogurt alternative. Just substitute the Chobani Greek Yogurt with a plant-based yogurt, like coconut or almond yogurt, and use dairy-free butter instead of regular butter. It will still yield a fluffy, delicious cake!

How do I make the yogurt topping even better?
So glad you asked! You can enhance the whipped yogurt topping by adding a splash of vanilla extract, a dash of cinnamon, or even a hint of citrus zest for an extra zing. Whisking the yogurt and cream in a chilled bowl can also help achieve that fluffy texture!

Plum Cake with Whipped Yogurt

Heavenly Plum Cake with Whipped Yogurt for Fall Bliss

Enjoy this delicious Plum Cake with Whipped Yogurt, a perfect fall dessert that combines rich flavors and wholesome ingredients.
Prep Time 20 minutes
Cook Time 35 minutes
Cooling Time 10 minutes
Total Time 1 hour 5 minutes
Servings: 8 slices
Course: Dessert
Cuisine: American
Calories: 280

Ingredients
  

For the Cake
  • 1/2 cup Unsalted Butter Adds richness and moisture; substitute with salted butter if necessary.
  • 3/4 cup Granulated Sugar Sweetens the cake beautifully.
  • 2 pieces Eggs Provides structure and moisture.
  • 1 1/2 cups All-Purpose Flour Forms the base structure.
  • 1 teaspoon Baking Powder Essential for a good rise.
  • 1/2 teaspoon Salt Enhances sweetness.
  • 1 teaspoon Cinnamon Infuses a warm, spicy note.
  • dash Nutmeg Complements the cinnamon well.
  • 1/2 cup Chobani Plain Greek Yogurt Provides moisture and tanginess.
  • 1/4 cup Honey A natural sweetener.
  • 1 teaspoon Vanilla Extract Enhances the flavor profile.
  • 3-4 pieces Ripe Plums Adds visual appeal and juiciness.
For the Whipped Yogurt Topping
  • 1 cup Chobani Plain Greek Yogurt The base for creamy texture.
  • 1/2 cup Heavy Cream Adds richness.
  • 2 tablespoons Sugar Sweetens the topping.

Equipment

  • Mixing bowls
  • whisk
  • Baking Pan
  • spatula

Method
 

Baking Instructions
  1. Preheat your oven to 350°F (175°C).
    Plum Cake with Whipped Yogurt
  2. Cream together the unsalted butter and granulated sugar until light and fluffy, about 3-4 minutes.
    Plum Cake with Whipped Yogurt
  3. Add the eggs, one at a time, mixing well after each addition.
    Plum Cake with Whipped Yogurt
  4. Whisk together the all-purpose flour, baking powder, salt, cinnamon, and nutmeg.
    Plum Cake with Whipped Yogurt
  5. Gradually add the dry ingredients to the creamed mixture, alternating with the Greek yogurt, honey, and vanilla extract.
    Plum Cake with Whipped Yogurt
  6. Pour the batter into a prepared baking pan and smooth the top with a spatula.
    Plum Cake with Whipped Yogurt
  7. Layer the sliced plums on top of the batter in a circular pattern.
    Plum Cake with Whipped Yogurt
  8. Bake for approximately 30-35 minutes, or until a toothpick comes out clean.
    Plum Cake with Whipped Yogurt
  9. Let the cake cool in the pan for about 10 minutes before transferring it to a wire rack.
    Plum Cake with Whipped Yogurt
  10. Whip together the Greek yogurt, heavy cream, and sugar until soft peaks form.
    Plum Cake with Whipped Yogurt
  11. Serve warm with a dollop of whipped yogurt topping.
    Plum Cake with Whipped Yogurt

Nutrition

Serving: 1sliceCalories: 280kcalCarbohydrates: 40gProtein: 5gFat: 12gSaturated Fat: 7gPolyunsaturated Fat: 1gMonounsaturated Fat: 4gCholesterol: 70mgSodium: 200mgPotassium: 200mgFiber: 2gSugar: 20gVitamin A: 10IUVitamin C: 5mgCalcium: 4mgIron: 6mg

Notes

Use fresh spices for better flavor and avoid overmixing to maintain a light texture.

Tried this recipe?

Let us know how it was!

Cranberry Orange Cupcakes That Elevate Your Holiday Desserts

As I pulled open the oven door, a cascade of citrusy warmth enveloped my kitchen, lifting my spirits instantly. These Fresh Cranberry Orange Cupcakes with Cream Cheese Frosting have become my go-to dessert for the holidays, transforming any gathering into a delightful celebration of flavor. Bursting with the tartness of real cranberries and a zesty hint of orange, each bite is like a cheerful reminder of autumn’s rich harvest. What I love most about these cupcakes is their quick prep time and the fact that they impress every guest—whether it’s Thanksgiving, Christmas, or just a cozy afternoon with friends. Plus, they’re vegetarian-friendly, making them a sweet treat for nearly everyone. Curious about how to create these festive delights? Let’s dive right into the recipe!

Why Are These Cupcakes a Must-Try?

Delightful flavors combine fresh cranberries and fragrant orange zest, creating a perfect holiday dessert that’s both festive and comforting. Effortless preparation allows you to whip these up quickly, ideal for busy holiday gatherings. Visually stunning, the cream cheese frosting and sugared cranberries make these cupcakes a crowd-pleaser. Plus, vegetarian-friendly, they cater to various dietary needs. Serve them alongside a cup of coffee or tea for a cozy treat, just like with our popular Chocolate Fudge Cupcakes. You won’t be disappointed!

Cranberry Orange Cupcake Ingredients

For the Cupcakes

  • Granulated Sugar – Provides sweetness to the cupcakes and can be substituted with coconut sugar for a less refined option.
  • Water – Used to create a simple syrup for sugaring cranberries.
  • Fresh Cranberries – Add tartness and texture; avoid dried cranberries as they alter the recipe’s profile.
  • All-Purpose Flour – Gives structure to the cupcakes; consider using a gluten-free blend as a substitute.
  • Table Salt – Enhances flavors in baked goods.
  • Baking Powder – Helps cupcakes rise and maintain a light, fluffy texture.
  • Orange Zest – Adds flavor and aroma; can substitute with lemon zest for a refreshing twist.
  • Unsalted Butter – Contributes to moisture and richness; ensure it’s softened but still cool.
  • Cream Cheese – Essential for the frosting and cupcake batter; Neufchâtel makes a lighter option.
  • Eggs – Provide structure and moisture; can replace with egg substitutes for a vegan version.
  • Vanilla Extract – Adds depth to the flavor profile of the cupcakes.

For the Frosting

  • Cream Cheese – Creates a luscious, tangy frosting that complements the cupcakes beautifully.
  • Unsalted Butter – Ensures a creamy texture in the frosting; must be softened for easy mixing.
  • Confectioners’ Sugar – Sweetens the frosting and helps achieve a smooth consistency.
  • Vanilla Extract – Enhances the frosting’s flavor, making it irresistible.

For Decoration

  • Sugared Cranberries – Decorate the cupcakes with these for a festive touch; they’re easy to make a day in advance.
  • Festive Sprinkles – Use to add a pop of color and joy to your holiday treat!

Now that you have everything you need, it’s time to create these delightful Cranberry Orange Cupcakes that will elevate your holiday desserts and leave your guests craving more!

Step‑by‑Step Instructions for Cranberry Orange Cupcakes

Step 1: Prepare Sugared Cranberries
Start by making the sugared cranberries to give your Cranberry Orange Cupcakes a festive touch. In a small saucepan, combine equal parts sugar and water; heat over medium until the sugar dissolves completely. Once syrupy, remove from heat and cool, then soak fresh cranberries in the syrup overnight. Drain and roll the cranberries in superfine sugar, then set them aside to dry on a wire rack.

Step 2: Preheat Oven
Preheat your oven to 350°F (175°C) while preparing your cupcake batter. Line a 12-cup muffin tin with paper liners to prevent sticking and encourage even baking. The oven should be fully heated to ensure your cupcakes rise beautifully and bake evenly, resulting in a perfect golden hue.

Step 3: Chop Cranberries
Take your fresh cranberries and roughly chop them for the batter. You can use a food processor for a quick job or chop by hand if you prefer more control. Aim for small pieces, keeping the texture intact, so each bite of your Cranberry Orange Cupcakes bursts with tartness and flavor.

Step 4: Mix Dry Ingredients
In a medium mixing bowl, whisk together all-purpose flour, baking powder, and salt to ensure an even distribution of ingredients in your batter. This step is crucial for light, fluffy cupcakes. Set the bowl aside while you work on the wet ingredients, which will come together shortly.

Step 5: Cream Butter and Sugar
In a large mixing bowl, beat softened unsalted butter, cream cheese, and granulated sugar together until the mixture is light and fluffy, about 3-5 minutes. The key here is to achieve a creamy texture, which helps incorporate air into your batter. Once fluffy, add eggs one at a time, making sure to mix well after each addition, then stir in the vanilla extract.

Step 6: Combine Ingredients
Carefully add the dry ingredients to the wet mixture, folding gently to combine. Be cautious not to overmix; you’re aiming for a smooth batter with visible lumps of the dry mix still present. Finally, fold in the chopped cranberries to ensure they’re evenly distributed throughout the batter, enhancing the flavors of your Cranberry Orange Cupcakes.

Step 7: Bake
Spoon the cupcake batter into the prepared muffin tin, filling each liner about two-thirds full. Bake in the preheated oven for 25-28 minutes, or until the cupcakes are golden and a toothpick inserted into the center comes out clean. Once baked, remove them from the oven and allow the cupcakes to cool in the tin for 5 minutes before transferring them to a wire rack.

Step 8: Frosting Preparation
While the cupcakes cool, prepare the cream cheese frosting. In a mixing bowl, whip together softened cream cheese and unsalted butter until light and fluffy. Gradually add confectioners’ sugar and mix until smooth, then add a splash of vanilla extract for extra flavor. This creamy frosting will complement the tangy cranberries beautifully.

Step 9: Decorate
Once your Cranberry Orange Cupcakes are completely cool, generously frost each cupcake with the cream cheese frosting. For a festive touch, top each cupcake with the previously prepared sugared cranberries or sprinkle with colorful festive sprinkles. This delightful presentation not only makes the cupcakes visually appealing but also enhances the festive spirit of your holiday gatherings.

Make Ahead Options

These Fresh Cranberry Orange Cupcakes are perfect for busy home cooks looking to save time! You can prepare the sugared cranberries up to 24 hours in advance; just soak them in simple syrup and roll them in superfine sugar before letting them dry. Additionally, the cream cheese frosting can be made 3 days ahead; simply store it in an airtight container in the refrigerator. When ready to bake, mix the dry and wet cupcake ingredients and fold in the chopped cranberries, then bake as directed. This way, you’ll have delicious cupcakes ready for any occasion, with minimal effort and just as delightful as if they were made fresh!

Expert Tips for Cranberry Orange Cupcakes

  • Perfect Butter Temperature: Ensure your butter is at the right temperature (60-65°F) for easy creaming, resulting in a light and fluffy texture in your cupcakes.

  • Careful Folding: When adding chopped cranberries, fold them into the batter gently to avoid breaking up the fruit and losing their delightful tartness in your Cranberry Orange Cupcakes.

  • Double the Frosting: To achieve a more decadent appearance and taste, consider doubling the cream cheese frosting recipe for a thicker, sweeter layer.

  • Make-Ahead Convenience: Prepare sugared cranberries a day in advance to save time on baking day, allowing flavors to meld beautifully.

  • Test for Doneness: Use a toothpick to check if your cupcakes are done; they should come out clean, ensuring they’re perfectly baked and ready for frosting.

How to Store and Freeze Cranberry Orange Cupcakes

Room Temperature: Store unfrosted cranberry orange cupcakes in an airtight container for up to 2 days to maintain their delightful texture and moisture.

Fridge: Once frosted, keep the cupcakes in the refrigerator for up to 5 days. Make sure they’re covered well to prevent them from drying out.

Freezer: You can freeze unfrosted cranberry orange cupcakes in a freezer-safe bag for up to 3 months. Thaw overnight in the fridge before frosting and serving.

Reheating: For best results, reheat individual cupcakes in the microwave for about 10-15 seconds, just until warm. Enjoy the delightful flavors fresh!

Cranberry Orange Cupcakes Variations

Feel free to get creative with these cupcakes, enhancing their delightful flavor and presentation!

  • Berry Twist: Replace cranberries with fresh blueberries or raspberries for a refreshing fruit alternative. These berries will still provide a burst of flavor and color.

  • Citrus Delight: Swap orange zest for lemon zest, bringing a zesty twist to each bite. The lemon’s brightness complements the cream cheese frosting beautifully.

  • Gluten-Free Option: Use a gluten-free flour blend instead of all-purpose flour. This way, everyone can enjoy these cupcakes without missing out on the holiday joy!

  • Nutty Flavor: Add chopped pecans or walnuts to the batter for a crunchy texture and nutty flavor contrast. They’ll add another layer of delight that family and friends will love.

  • Chocolatey Boost: Fold in mini chocolate chips along with the cranberries. This unexpected addition creates a rich, indulgent bite that pairs wonderfully with the tartness.

  • Frosting Variations: Experiment with different flavored cream cheese frostings, like vanilla bean or almond. They’ll elevate the frosting to match your unique taste.

  • Spicy Kick: Mix in a pinch of cinnamon or nutmeg into the cupcake batter for a warm spice note that complements the fruitiness.

  • Mini Cupcakes: Bake in a mini muffin pan for bite-sized treats perfect for holiday gatherings or gifting. They’re adorable and sure to be a hit!

Each of these variations offers a fabulous twist on the classic Cranberry Orange Cupcakes, ensuring that your dessert stands out at any celebration. For an additional treat, consider pairing them with our decadent Chocolate Fudge Cupcakes for a delightful dessert spread that everyone will enjoy!

What to Serve with Fresh Cranberry Orange Cupcakes?

The perfect pairing can elevate your cupcake experience and create a festive atmosphere for any gathering.

  • Creamy Mashed Potatoes: Their buttery richness complements the bright flavors of the cupcakes, bringing a comforting balance to your plate.
  • Savory Green Beans Almondine: These crisp green beans add a fresh, nutty crunch that beautifully contrast your sweet dessert.
  • Spiced Pumpkin Soup: The warm spices in this soup can enhance the holiday vibe, creating a warm embrace that pairs well with sweetness.
  • Cheese Platter: A selection of mild cheeses provides a creamy counterpart to the tartness of the cranberries, perfect for a varied spread.
  • Cranberry Sparkling Water: This refreshing drink echoes the cupcake’s flavors with its fruity notes, creating a delightful sensory experience.
  • Gingerbread Cookies: The warm spices in gingerbread resonate with the holiday spirit, making them a whimsical addition to your dessert table.
  • Chocolate Fondue: A rich dip invites guests to have fun, adding an indulgent touch that contrasts the tartness of the cupcakes.
  • Apple Cider: Whether hot or cold, this classic beverage brings an autumnal charm that harmonizes beautifully with the fruity treats.
  • Vanilla Ice Cream: A scoop of creamy vanilla enhances the cupcakes’ taste, delivering a delightful temperature play to each bite.
  • Pumpkin Spice Latte: This cozy drink wraps you in warmth and nostalgia, completing your festive gathering with seasonal notes.

Cranberry Orange Cupcakes Recipe FAQs

What type of cranberries should I use?
Absolutely, I recommend using fresh cranberries for this recipe. They provide the tartness and texture that makes these cupcakes special. Avoid using dried cranberries as they will alter the flavor and moisture content of the final product.

How can I store my cranberry orange cupcakes?
For unfrosted cupcakes, store them in an airtight container at room temperature for up to 2 days. Once frosted, it’s best to keep them in the refrigerator for up to 5 days to keep the cream cheese frosting fresh and creamy.

Can I freeze cranberry orange cupcakes?
Yes! You can freeze unfrosted cranberry orange cupcakes in a freezer-safe zip-top bag for up to 3 months. To enjoy them later, just thaw them overnight in the refrigerator. Once thawed, whip up some fresh frosting and decorate them for a delightful treat!

What can I do if my cupcakes don’t rise?
Very! If your cupcakes fail to rise, ensure that your baking powder is fresh and hasn’t expired—old baking powder can lead to dense cupcakes. Additionally, make sure to cream your butter and sugar well; this air incorporation is crucial for a fluffy texture. Also, avoid overmixing the batter once you add the dry ingredients, as this can create a tough cake.

Are these cupcakes suitable for vegans or those with egg allergies?
If you’re looking for a vegan version, you can replace the eggs with flaxseed meal or unsweetened applesauce. Use a ratio of 1 tablespoon of flaxseed meal combined with 3 tablespoons of water for each egg. This adjustment keeps the cupcakes moist and allows everyone to enjoy the festive flavors!

Can I make these cupcakes a day ahead?
Definitely! Preparing the cupcakes a day in advance can actually enhance the flavors. Just store unfrosted cupcakes in an airtight container at room temperature. The sugared cranberries and frosting can also be made ahead of time—just refrigerate them separately and frost before serving. This way, you can enjoy more time with your guests rather than being stuck in the kitchen!

Cranberry Orange Cupcakes

Cranberry Orange Cupcakes That Elevate Your Holiday Desserts

Delight in these Cranberry Orange Cupcakes, a festive holiday dessert bringing tart cranberries and zesty orange flavor to every bite.
Prep Time 20 minutes
Cook Time 28 minutes
Cooling Time 5 minutes
Total Time 53 minutes
Servings: 12 cupcakes
Course: Dessert
Cuisine: American
Calories: 250

Ingredients
  

For the Cupcakes
  • 1 cup Granulated Sugar Can be substituted with coconut sugar.
  • 1/2 cup Water For simple syrup.
  • 1 cup Fresh Cranberries Avoid dried cranberries.
  • 1 1/2 cups All-Purpose Flour Consider gluten-free blend as a substitute.
  • 1/2 teaspoon Table Salt Enhances flavors.
  • 2 teaspoons Baking Powder For rising.
  • 1 tablespoon Orange Zest Can substitute with lemon zest.
  • 1/2 cup Unsalted Butter Must be softened.
  • 8 oz Cream Cheese Essential for frosting.
  • 2 large Eggs Can replace with egg substitutes.
  • 1 teaspoon Vanilla Extract For flavor.
For the Frosting
  • 8 oz Cream Cheese For frosting.
  • 1/2 cup Unsalted Butter Must be softened.
  • 2 cups Confectioners' Sugar For sweetness.
  • 1 teaspoon Vanilla Extract Enhances frosting flavor.
For Decoration
  • 1 cup Sugared Cranberries Easy to prepare in advance.
  • 1 cup Festive Sprinkles For decoration.

Equipment

  • Muffin Tin
  • Mixing bowls
  • whisk
  • Saucepan
  • Wire rack

Method
 

Step-by-Step Instructions
  1. Prepare Sugared Cranberries: Combine equal parts sugar and water in a saucepan; heat until dissolved. Soak cranberries in syrup overnight. Roll in sugar and dry.
  2. Preheat Oven: Preheat oven to 350°F (175°C) and line a muffin tin with liners.
  3. Chop Cranberries: Roughly chop fresh cranberries for the batter.
  4. Mix Dry Ingredients: Whisk flour, baking powder, and salt together.
  5. Cream Butter and Sugar: Beat butter, cream cheese, and sugar until light. Add eggs one at a time and mix in vanilla.
  6. Combine Ingredients: Fold dry ingredients into wet mix, then fold in chopped cranberries.
  7. Bake: Fill muffin tin and bake for 25-28 minutes until golden.
  8. Frosting Preparation: Whip cream cheese and butter, then mix in confectioners' sugar and vanilla.
  9. Decorate: Frost cooled cupcakes and top with sugared cranberries or sprinkles.

Nutrition

Serving: 1cupcakeCalories: 250kcalCarbohydrates: 35gProtein: 2gFat: 12gSaturated Fat: 6gCholesterol: 40mgSodium: 150mgPotassium: 80mgFiber: 1gSugar: 18gVitamin A: 500IUVitamin C: 2mgCalcium: 50mgIron: 1mg

Notes

Ensure butter is at 60-65°F for easy creaming. Prepare sugared cranberries a day in advance for best flavor.

Tried this recipe?

Let us know how it was!

London Fog Cake – A Decadent Treat with Earl Grey Bliss

“Have you ever stumbled upon a dessert that immediately transports you to a cozy café in London?” The London Fog Cake is one such creation, where rich chocolate cake intertwines with the soothing essence of Earl Grey tea. This layered delight doesn’t just satisfy your sweet tooth; it elevates your dessert game with its elegant Earl Grey buttercream and a drizzle of homemade salted caramel, making it perfect for any occasion. With quick prep and impressive presentation, this recipe is designed for both novice and seasoned bakers looking to treat family and friends to something extraordinary. Ready to indulge in a slice that brings together warmth and sophistication? Let’s dive into the delicious details!

Why is London Fog Cake a must-try?

Indulgent, rich flavors: This cake masterfully combines moist chocolate with the subtlety of Earl Grey buttercream, creating a dessert that is both comforting and sophisticated.

Easy to make: With simple steps needed to layer the cake, even novice bakers will feel confident tackling this delicious treat.

Perfect for any occasion: Whether it’s a birthday, tea party, or just a sweet craving, this cake wows guests and loved ones alike, much like the enchanting Strawberry Cheesecake Dump or the delightful Honeybun Carrot Cake.

Versatile choices: Feel free to swap in different infused teas for unique flavor profiles or explore a seasonal twist with a fruity topping instead of salted caramel.

Impressive presentation: The stunning layers of chocolate and buttercream make for a beautiful display, showcasing your baking prowess effortlessly.

London Fog Cake Ingredients

For the Chocolate Cake
All-purpose flour – for structure; make sure to sift it for a lighter cake.
High-quality cocoa powder – use Dutch-process for a deeper chocolate flavor.
Granulated sugar – sweetens the cake and balances the rich cocoa.
Baking powder – ensures height and lightness in your cake layers.
Salt – enhances all the flavors in the cake.
Eggs – provide moisture and richness; room temperature is best for mixing.
Vegetable oil – keeps the cake moist; you can substitute with melted butter.
Whole milk – adds creaminess; for a dairy-free option, use almond milk.
Vanilla extract – for a warm, inviting flavor to complement the chocolate.

For the Earl Grey Buttercream
Unsalted butter – at room temperature for easy creaming and a creamy texture.
Powdered sugar – sweetens the buttercream; sift before measuring for a smooth finish.
Heavy cream – adds richness and helps in achieving the desired consistency.
Earl Grey tea – provides that signature flavor; use loose leaf or strong tea bags for infusion.

For the Salted Caramel Sauce
Granulated sugar – for creating that rich caramel color.
Unsalted butter – enhances the caramel’s creaminess; add it in cubes.
Heavy cream – gives the sauce its silky texture; warm it slightly before adding.
Sea salt – to create that irresistible sweet and salty contrast; adjust to taste.

The delightful London Fog Cake is waiting for you to bring its flavors to life!

Step‑by‑Step Instructions for London Fog Cake

Step 1: Prepare Chocolate Cake
Preheat your oven to 350°F (175°C) and grease two 9-inch round cake pans. In a large bowl, whisk together the all-purpose flour, cocoa powder, sugar, baking powder, and salt until combined. In another bowl, blend the eggs, vegetable oil, milk, and vanilla extract. Gradually mix the wet ingredients into the dry until just incorporated. Divide the batter evenly between the prepared pans and bake for 30-35 minutes, or until a toothpick inserted in the center comes out clean.

Step 2: Make Earl Grey Buttercream
While the cake layers are cooling, start on the Earl Grey buttercream. In a small saucepan, heat the heavy cream until steaming, then steep the Earl Grey tea for about 15 minutes. Remove the tea leaves and let the cream cool. In a medium bowl, beat the unsalted butter until creamy and light, about 5 minutes. Gradually add the sifted powdered sugar and cooled cream, mixing on low until fluffy and well combined.

Step 3: Prepare Salted Caramel Sauce
Next, focus on the indulgent salted caramel sauce. In a medium saucepan over medium heat, cook the granulated sugar, stirring constantly until it melts and turns a golden amber color, about 8-10 minutes. Carefully add the cubed butter and warm heavy cream, stirring until smooth. Remove from heat and stir in sea salt to taste. Let the caramel cool slightly to thicken before drizzling.

Step 4: Assemble the Cake
Once the chocolate cake layers are completely cool, level them using a serrated knife if necessary. Place one layer on a serving plate and spread a generous amount of Earl Grey buttercream on top. Carefully place the second cake layer on top and frost the entire cake with the remaining buttercream, smoothing the sides and top for an elegant finish. Finish by drizzling the salted caramel sauce over the cake, allowing it to cascade down the edges.

Step 5: Serve and Enjoy
For the best flavor and texture, let the assembled London Fog Cake sit at room temperature for about 30 minutes before slicing. This allows the buttercream and caramel to soften perfectly. Cut into slices and serve with a cup of tea or coffee for a delightful pair with this decadent treat. Enjoy the rich layers of chocolate and the aromatic notes of Earl Grey!

Make Ahead Options

The London Fog Cake is a fantastic dessert to make ahead, saving you time on busy days! You can prepare the chocolate cake layers up to 3 days in advance; simply wrap them tightly in plastic wrap and refrigerate to keep them moist. The Earl Grey buttercream can be made ahead and stored in the refrigerator for up to 1 week—just give it a quick whip before using to restore its fluffy texture. For the salted caramel sauce, it can be made 24 hours ahead; store it in an airtight container at room temperature for the best consistency. When you’re ready to assemble, layer the cake with buttercream, frost the exterior, and drizzle with caramel for an easy, impressive final touch!

London Fog Cake Variations

Feel free to play with this delightful recipe and cater it to your taste buds!

  • Dairy-Free: Substitute almond milk for whole milk in the cake to create a light, dairy-free option that doesn’t compromise flavor.
  • Flavored Buttercream: Experiment with different infused teas, like chai or lavender, in the buttercream for an aromatic twist. The smoky notes of chai can elevate the flavor beautifully, while lavender adds a floral touch.
  • Berry Compote: Instead of salted caramel, use a homemade berry compote for a fresh and fruity alternative. It’s a vibrant addition that balances out the richness of the chocolate and buttercream.
  • Gluten-Free: Swap all-purpose flour for a gluten-free blend to cater to gluten-sensitive friends, while still achieving that moist cake texture. Make sure to check your baking powder for any potential gluten content.
  • Extra Chocolate: Add chocolate chips or chunks to the batter for an extra decadent chocolate hit! This twist will make every bite a chocolate lover’s dream.
  • Nutty Flavor: Incorporate finely ground nuts, like almonds or hazelnuts, into the cake batter for a delightful crunch and depth of flavor.
  • Spiced Cake: Add warm spices such as cinnamon or nutmeg to the batter for a comforting twist that complements the Earl Grey beautifully.
  • Coffee Infusion: Substitute espresso for part of the water or milk for an energizing coffee kick that enhances the richness of the chocolate.

You can even make it a pairing journey by serving it alongside Strawberry Cheesecake or delightful Nutella Pancakes Blend for a sweets spread that will dazzle.

Expert Tips for London Fog Cake

  • Room Temperature Butter: Ensure your butter for the buttercream is at room temperature to achieve proper emulsification and a smooth texture.

  • Avoid Over-Mixing: When combining the wet and dry ingredients for the chocolate cake, mix until just combined to keep the cake light and fluffy.

  • Check for Doneness: Use a toothpick to test your cake layers; they should come out clean. Baking for too long can result in a dry cake.

  • Chill the Buttercream: If your Earl Grey buttercream is too thin, let it chill in the refrigerator for a short while before frosting the cake to help it firm up.

  • Layering Tips: Ensure the cake layers are completely cool before frosting to prevent the buttercream from melting and sliding off.

  • Storage Solutions: Store any leftovers in an airtight container in the refrigerator for up to 3-5 days, keeping the London Fog Cake fresh and delicious!

What to Serve with London Fog Cake

Pair this decadent dessert with delightful accompaniments to create a memorable experience for your taste buds.

  • Creamy Mashed Potatoes: Their buttery richness beautifully contrasts with the cake’s sweet, chocolatey layers. A lovely balance of flavors!

  • Fresh Fruit Salad: Bright, zesty fruits like strawberries and blueberries refresh the palate, making each bite of the cake even more delightful.

  • Vanilla Ice Cream: The creamy coldness of vanilla ice cream complements the warm flavors of the cake, creating a delightful contrast in temperature and taste.

  • Earl Grey Tea: To enhance the delicate tea notes in the cake, serve a warm cup of Earl Grey. It’s a comforting pairing that feels elegant.

  • Chocolate Ganache: For the chocolate lovers, a drizzle of rich chocolate ganache adds an indulgent touch, elevating the dessert experience.

  • Chocolate Covered Strawberries: These sweet bites add a fun and romantic element to your dessert table, balancing the cake’s richness while adding a touch of elegance.

  • Whipped Cream: Light and airy, whipped cream provides a refreshing counterpoint to the dense layers of cake, inviting you to indulge even more.

  • Coffee: Pairing a slice with a robust cup of coffee enriches the flavors, making your dessert moment feel even more sophisticated.

Each of these options will serve to enhance your delightful experience with a slice of London Fog Cake!

How to Store and Freeze London Fog Cake

Fridge: Store leftover London Fog Cake in an airtight container for up to 3-5 days, ensuring it stays moist and flavorful.

Freezer: If you want to keep the cake longer, wrap portions tightly in plastic wrap and aluminum foil. It can be frozen for up to one month.

Thawing: To enjoy your frozen cake, transfer it to the fridge overnight to defrost gently, preserving its texture.

Reheating: If desired, warm individual slices in the microwave for about 10-15 seconds. Enjoy the revived flavors of your luscious cake!

London Fog Cake Recipe FAQs

How do I select the right Earl Grey tea for the buttercream?
Absolutely! Look for high-quality loose leaf Earl Grey tea or strong tea bags with a prominent aroma of bergamot. This ensures your buttercream is richly flavored. If you’re in a pinch, any well-sourced Earl Grey will do, but avoid generic brands that may lack depth.

How should I store leftovers of the London Fog Cake?
Very simply! Store any leftover cake in an airtight container in the fridge, where it will stay fresh for about 3-5 days. This helps maintain the moisture and flavor, keeping it ready for late-night cravings or surprise guests!

Can I freeze the London Fog Cake?
Yes, indeed! To freeze, wrap each portion tightly in plastic wrap followed by aluminum foil to prevent freezer burn. The cake can be stored in the freezer for up to one month. When you’re ready to enjoy, simply place the wrapped cake in the fridge overnight to thaw, preserving its delicious texture.

What should I do if my buttercream is too thin?
If your buttercream is thinner than desired, don’t fret! Simply continue to mix it for another 5-10 minutes. This will help incorporate air for a fluffier texture. If it remains too warm, chill it in the refrigerator for about 15 minutes and then re-mix until fluffy and spreadable.

Are there any allergen concerns with this recipe?
Definitely worth noting! This London Fog Cake contains common allergens such as wheat (gluten), dairy, and eggs. If you have guests with allergies, consider using gluten-free flour, almond milk, or a vegan butter substitute in the buttercream to accommodate dietary needs.

Can I make and store the Earl Grey buttercream ahead of time?
Absolutely! You can prepare the Earl Grey buttercream up to a week in advance. Just store it in an airtight container in the refrigerator. Allow it to come to room temperature and re-whip briefly before frosting your cake — it’ll be just as fluffy and aromatic!

London Fog Cake

London Fog Cake - A Decadent Treat with Earl Grey Bliss

Indulge in the exquisite London Fog Cake, a delightful dessert infused with Earl Grey, perfect for any occasion.
Prep Time 20 minutes
Cook Time 35 minutes
Cooling Time 30 minutes
Total Time 1 hour 25 minutes
Servings: 8 slices
Course: Dessert
Cuisine: British
Calories: 450

Ingredients
  

Chocolate Cake
  • 2 cups all-purpose flour sifted
  • 3/4 cup high-quality cocoa powder Dutch-process recommended
  • 2 cups granulated sugar
  • 1 tablespoon baking powder
  • 1 teaspoon salt
  • 4 eggs room temperature
  • 1/2 cup vegetable oil can substitute with melted butter
  • 1 cup whole milk can substitute with almond milk
  • 2 teaspoons vanilla extract
Earl Grey Buttercream
  • 1 cup unsalted butter room temperature
  • 4 cups powdered sugar sifted
  • 1/4 cup heavy cream warmed
  • 2 bags Earl Grey tea or loose leaf
Salted Caramel Sauce
  • 1 cup granulated sugar
  • 1/2 cup unsalted butter cut into cubes
  • 1/2 cup heavy cream warmed
  • 1 teaspoon sea salt adjust to taste

Equipment

  • Oven
  • 9-inch round cake pans
  • Mixing bowls
  • whisk
  • Saucepan
  • Serrated Knife

Method
 

Instructions
  1. Preheat your oven to 350°F (175°C) and grease two 9-inch round cake pans. In a large bowl, whisk together the all-purpose flour, cocoa powder, sugar, baking powder, and salt until combined. In another bowl, blend the eggs, vegetable oil, milk, and vanilla extract. Gradually mix the wet ingredients into the dry until just incorporated. Divide the batter evenly between the prepared pans and bake for 30-35 minutes, or until a toothpick inserted in the center comes out clean.
  2. While the cake layers are cooling, start on the Earl Grey buttercream. In a small saucepan, heat the heavy cream until steaming, then steep the Earl Grey tea for about 15 minutes. Remove the tea leaves and let the cream cool. In a medium bowl, beat the unsalted butter until creamy and light, about 5 minutes. Gradually add the sifted powdered sugar and cooled cream, mixing on low until fluffy and well combined.
  3. Next, focus on the indulgent salted caramel sauce. In a medium saucepan over medium heat, cook the granulated sugar, stirring constantly until it melts and turns a golden amber color, about 8-10 minutes. Carefully add the cubed butter and warm heavy cream, stirring until smooth. Remove from heat and stir in sea salt to taste. Let the caramel cool slightly to thicken before drizzling.
  4. Once the chocolate cake layers are completely cool, level them using a serrated knife if necessary. Place one layer on a serving plate and spread a generous amount of Earl Grey buttercream on top. Carefully place the second cake layer on top and frost the entire cake with the remaining buttercream, smoothing the sides and top for an elegant finish. Finish by drizzling the salted caramel sauce over the cake, allowing it to cascade down the edges.
  5. For the best flavor and texture, let the assembled London Fog Cake sit at room temperature for about 30 minutes before slicing. This allows the buttercream and caramel to soften perfectly. Cut into slices and serve with a cup of tea or coffee for a delightful pair with this decadent treat.

Nutrition

Serving: 1sliceCalories: 450kcalCarbohydrates: 58gProtein: 5gFat: 22gSaturated Fat: 10gPolyunsaturated Fat: 1gMonounsaturated Fat: 7gCholesterol: 80mgSodium: 250mgPotassium: 200mgFiber: 2gSugar: 35gVitamin A: 500IUCalcium: 100mgIron: 2mg

Notes

Ensure your butter for the buttercream is at room temperature to achieve proper emulsification and a smooth texture. Store leftovers in an airtight container in the fridge for up to 3-5 days.

Tried this recipe?

Let us know how it was!

Delicious Mini Poinsettia Cakes: Festive Chocolate Treats

As I watched my little one carefully arrange the kitchen table with holiday decorations, I realized that the magic of the season isn’t just in the sights, but also in the flavors we share. Enter the delightful Mini Poinsettia Cakes—these adorable, bite-sized chocolate pastries are perfect for bringing festive cheer to any gathering. With their vibrant presentation and easy preparation, these holiday desserts make it a breeze to impress guests without hours of fuss. Not only will they satisfy your sweet tooth, but they also serve as a playful way to involve kids in the cooking process. Ready to turn your kitchen into a winter wonderland? Let’s dive into these delightful Mini Poinsettia Cakes and create some sweet memories together!

Why are Mini Poinsettia Cakes a must-try?

Festive Presentation: The vibrant colors and charming shapes make these treats a stunning centerpiece for any holiday gathering.

Kid-Friendly Fun: Involve your little helpers! Kids will love decorating their own Mini Poinsettia Cakes while honing essential baking skills.

Quick and Easy: With minimal fuss, you can whip up a batch in no time, perfect for those busy holiday schedules.

Versatile Flavors: Feel free to customize with different fillings or coatings, such as the chocolate cake pop filling or even the delicious Nutella Pancakes Blend.

Crowd-Pleasing Treats: These bite-sized desserts are perfect for sharing, guaranteed to impress family and friends at festive gatherings.

Get ready to delight your taste buds and wow your guests with these adorable Mini Poinsettia Cakes!

Mini Poinsettia Cakes Ingredients

For the Candy Coating

Orange Candy Coating – Adds sweetness and festive color; alternatively, use colored chocolate melts if unavailable.

For the Cakes

Mini Flower Pot Chocolate Mold – Essential for shaping the cakes; specialized molds provide the best results, but silicone molds may create similar shapes.
Brownies or Cake Pop Filling – Acts as the cake base; crumbled brownies give a rich texture, while the chocolate cake pop mix is a lighter option.

For the Decoration

Royal Icing Poinsettias – Provides decorative elements that enhance visual appeal; consider making homemade royal icing flowers in advance for authenticity.
Candy Foils – Used to wrap the pots for presentation; choose festive colors to match your holiday theme.

Whip up these delightful Mini Poinsettia Cakes and sprinkle your festivities with sweetness!

Step‑by‑Step Instructions for Mini Poinsettia Cakes

Step 1: Prepare Brownie Base
Begin by finely crumbling your brownies in a large mixing bowl until they reach a sand-like texture, allowing for easy molding. Alternatively, prepare your chocolate cake pop filling, mixing thoroughly until smooth. This will be the delicious base for your Mini Poinsettia Cakes and ensures a fudgy center that complements the festive exterior.

Step 2: Melt Candy Coating
In a microwave-safe bowl, add the orange candy coating and heat it at half power in 30-second intervals. Stir after each interval until the mixture is smooth and completely melted, approximately 1-2 minutes total. Be careful not to overheat; the candy should be glossy and fluid, ready for coating the molds.

Step 3: Coat Molds
Using a small paintbrush, apply a layer of the melted orange candy coating to the inside of the mini flower pot mold, creating a shell about 1/8 inch thick. Make sure to cover every corner for a uniform look. Once coated, place the molds in the refrigerator for about 5 minutes, allowing the candy to set firmly.

Step 4: Reinforce Coating
After chilling, carefully check for any thin spots in the candy coating. If you notice any areas needing reinforcement, use more melted candy to fill in these spots. Return the molds to the refrigerator for another 5 minutes to solidify the additional layer, ensuring a sturdy shell for your Mini Poinsettia Cakes.

Step 5: Fill Molds
Once the coating is set, gently press the brownie mixture or cake pop filling into the coated molds. Pack it down firmly to avoid air pockets, creating a solid base. Place the filled molds in the freezer for about 15 minutes, allowing them to firm up for easier removal and perfect shaping.

Step 6: Prepare Decoration
While the filled molds are freezing, prepare your decorations. Take your royal icing poinsettias and, using a bit of melted candy coating, dab it on the back of each icing flower. This will help them adhere beautifully to the top of your Mini Poinsettia Cakes once they’re ready.

Step 7: Final Presentation
Remove the filled molds from the freezer and gently pop out the Mini Poinsettia Cakes, ensuring you maintain their shape. Cut squares of candy foil to fit around each pot, then carefully wrap the foil around, tucking in the edges. Place each pot into the foil for an exquisite and festive presentation that’s sure to impress your guests!

Make Ahead Options

These Mini Poinsettia Cakes are perfect for holiday meal prep! You can prepare the chocolate candy coating and molds up to 24 hours in advance; simply coat the molds and refrigerate them until you’re ready to fill. The brownie base or cake pop filling can also be made and stored in the refrigerator for up to 3 days—just keep it tightly covered to maintain freshness and prevent drying out. When you’re ready to serve, simply fill the prepared molds, freeze for 15 minutes to set, and then add your beautiful royal icing flowers. With a little bit of advance prep, you’ll be able to impress your guests with these delightful treats with minimal last-minute effort!

How to Store and Freeze Mini Poinsettia Cakes

Room Temperature: Keep Mini Poinsettia Cakes in a cool, dry place for up to 3 days to maintain their freshness.

Fridge: If you need to store them longer, place the cakes in an airtight container in the fridge for up to a week. This helps retain their moisture and flavors.

Freezer: For extended storage, freeze unwrapped Mini Poinsettia Cakes in an airtight container for up to 2 months. Thaw in the refrigerator overnight before serving.

Reheating: To enjoy a warm treat, reheat in the microwave for 10-15 seconds on low power. This softens the candy coating while preserving the cake’s festive charm.

Expert Tips for Mini Poinsettia Cakes

  • Crumble Wisely: Ensure the brownie mixture is finely crumbled to avoid clumping. Large chunks can make it difficult to mold your Mini Poinsettia Cakes perfectly.

  • Melt with Care: Slowly melt the candy coating at half power to prevent burning. Overheating can ruin the texture and result in a grainy finish.

  • Check the Coating: After the initial set, inspect your candy coating for any thin spots. Reinforcing these areas will help maintain the integrity of your Mini Poinsettia Cakes.

  • Dab Smartly: When attaching royal icing flowers, use a small amount of melted candy on the back. This will help them stick and enhance your cakes’ overall aesthetic.

  • Wrap Neatly: When presenting, cut candy foil squares to size before wrapping. A clean presentation adds to the festive flair and charm of your treats!

What to Serve with Mini Poinsettia Cakes

These delightful treats will shine even brighter when paired with complementary sides, enticing your loved ones to indulge in every flavorful bite.

  • Festive Fruit Salad: A mix of seasonal fruits adds a refreshing and colorful contrast, enhancing the sweetness of the cakes.

  • Peppermint Hot Chocolate: This warm drink brings a cozy, festive flair, perfect for sipping alongside your sweet treats. It’s a comforting balance to the rich flavors!

  • Vanilla Ice Cream: A scoop of creamy vanilla ice cream provides a delightful contrast, melting beautifully against the fudgy interior of the cakes.

  • Chocolate Fondue: Try serving Mini Poinsettia Cakes with a side of chocolate fondue. Guests can dip their cakes, adding extra indulgence to the experience—the perfect way to get everyone interacting!

  • Gingerbread Cookies: These iconic holiday treats add a spicy crunch that harmonizes well with the chocolatey sweetness of the cakes, rounding out your dessert table beautifully.

  • Eggnog: This classic holiday drink’s creamy, spiced flavor pairs remarkably with chocolate desserts, enhancing the indulgent experience.

  • Mulled Wine: A warm glass of spiced mulled wine elevates the festive spirit and provides a cozy touch against the delicately sweet flavors of your Mini Poinsettia Cakes.

Mini Poinsettia Cakes Variations

Feel free to let your creativity shine and customize these delightful treats with these fun twists!

  • Cookie Base: Substitute brownies with crushed cookies, like Oreos, for a sweet and crunchy texture. This change adds a unique flavor that surprises every bite!

  • Colorful Coatings: Experiment with seasonal colors of candy coating, such as red or green, to fit your holiday theme. Your Mini Poinsettia Cakes can match any festive occasion!

  • Minty Freshness: Incorporate peppermint extract into the cake base for a refreshing holiday twist. It brings a hint of coolness that perfectly complements the sweetness.

  • Fruit Flavors: Add a tablespoon of orange zest or lemon juice to your filling for added brightness. This fruity note enhances the moist chocolate flavor with a zesty kick.

  • Spicy Heat: Include a pinch of cayenne pepper with the cocoa powder for a spicy surprise. This unexpected twist on the classic will leave your guests buzzing about the flavors!

  • Nutty Crunch: Mix in crushed nuts, like walnuts or pecans, into the brownie filling for a delightful crunch. This variation offers a heartier texture that elevates your Mini Poinsettia Cakes.

  • Chocolate Indulgence: Swap the candy coating for dark chocolate ganache for an extra indulgent treat. The rich chocolate pairing will make these cakes irresistible and gourmet!

  • Kids’ Favorites: Let the kids decorate their cakes using colorful sprinkles or edible glitter. This not only makes it fun for them but also adds a whimsical touch to your presentation.

For more sweet inspirations, consider trying your hand at Chocolate Fudge Cupcakes or the delightful Surprise Inside Cakes. Happy baking!

Mini Poinsettia Cakes Recipe FAQs

What type of brownie works best for Mini Poinsettia Cakes?
I recommend using fudgy brownies because they create a moist and rich base for your Mini Poinsettia Cakes. If you prefer a lighter texture, chocolate cake pop mix is a great alternative. Just ensure the brownies are finely crumbled to help mold the cake easily.

How should I store Mini Poinsettia Cakes to keep them fresh?
For keeping your Mini Poinsettia Cakes fresh, you can store them at room temperature in a cool, dry place for up to 3 days. If you need them to last longer, place them in an airtight container in the fridge, where they will stay fresh for up to a week.

Can I freeze Mini Poinsettia Cakes, and how do I do it?
Absolutely! To freeze your Mini Poinsettia Cakes, set them in an airtight container without any wrapping and pop them in the freezer for up to 2 months. Before serving, thaw them in the refrigerator overnight, allowing the flavors to come back without losing any moisture.

What if my candy coating is too thick or too thin?
No worries! If your candy coating is too thick, simply microwave it for a few seconds at low power, stirring frequently until it reaches a smooth, fluid consistency. For thin spots in your mold, you can reinforce the coating by applying additional melted candy in those areas, then refrigerating for a few minutes to set.

Are there any dietary considerations I should keep in mind?
Yes, if you’re concerned about allergies, be sure to check your candy melts and brownies for common allergens like gluten, dairy, and nuts. For a kid-friendly treat, be cautious with small decorations that may pose a choking hazard for younger children. Always adjust your ingredients based on the dietary needs of your guests.

Mini Poinsettia Cakes

Delicious Mini Poinsettia Cakes: Festive Chocolate Treats

Celebrate the season with Mini Poinsettia Cakes—delightful, bite-sized chocolate pastries that bring festive cheer to any gathering.
Prep Time 30 minutes
Cook Time 15 minutes
Chilling Time 10 minutes
Total Time 55 minutes
Servings: 12 cakes
Course: Dessert
Cuisine: American
Calories: 180

Ingredients
  

Candy Coating
  • 1 cup Orange Candy Coating Alternatively, use colored chocolate melts if unavailable.
Cakes
  • 1 mold Mini Flower Pot Chocolate Mold Essential for shaping the cakes.
  • 2 cups Brownies or Cake Pop Filling Crumbled brownies or cake pop mix.
Decoration
  • 12 pieces Royal Icing Poinsettias Homemade royal icing flowers enhance visual appeal.
  • 12 squares Candy Foils Choose festive colors to match your holiday theme.

Equipment

  • microwave-safe bowl
  • mini flower pot chocolate mold
  • Mixing Bowl
  • paintbrush
  • freezer

Method
 

Preparation Steps
  1. Begin by finely crumbling your brownies in a large mixing bowl until they reach a sand-like texture, or prepare chocolate cake pop filling until smooth.
  2. In a microwave-safe bowl, add the orange candy coating and heat it at half power in 30-second intervals, stirring until smooth and glossy.
  3. Using a small paintbrush, apply a layer of the melted orange candy coating to the inside of the mini flower pot mold, then refrigerate for 5 minutes.
  4. Check for thin spots in the coating and reinforce if necessary, then chill again for 5 minutes.
  5. Gently press the brownie mixture or cake pop filling into the molds, packing firmly to avoid air pockets, then freeze for 15 minutes.
  6. Prepare your decorations by attaching royal icing poinsettias with a bit of melted candy coating on the back.
  7. Remove the molds from the freezer, pop out the cakes, wrap with candy foil squares for presentation.

Nutrition

Serving: 1cakeCalories: 180kcalCarbohydrates: 23gProtein: 2gFat: 9gSaturated Fat: 4gPolyunsaturated Fat: 1gMonounsaturated Fat: 3gCholesterol: 10mgSodium: 80mgPotassium: 50mgFiber: 1gSugar: 12gVitamin A: 150IUCalcium: 20mgIron: 0.5mg

Notes

Store Mini Poinsettia Cakes at room temperature for up to 3 days or refrigerate for up to a week. For long-term storage, freeze unwrapped cakes for up to 2 months.

Tried this recipe?

Let us know how it was!

Lemon Fluff: A Light, Dreamy No-Bake Dessert in 15 Minutes

As I whisked together the ingredients for this No-Bake Lemon Fluff, I couldn’t help but feel a sense of nostalgia wash over me, reminding me of sun-soaked afternoons spent with family. This dessert captures the bright, tangy essence of lemons while offering a light and fluffy texture that’s utterly irresistible. With only a quick 15-minute prep time, it’s ideal for anyone seeking a hassle-free yet impressive treat. Plus, it’s kid-friendly, making it perfect for gatherings or just a sweet surprise for the little ones after dinner. Are you ready to dive into a creamy, citrus dream that will have everyone reaching for seconds?

Why is Lemon Fluff a Must-Try?

Simplicity: This no-bake dessert requires just 15 minutes of prep time, making it perfect for busy schedules.

Kid-Friendly: The light and creamy texture, combined with the citrus flavor, makes it a hit with kids and adults alike — no one can resist!

Versatility: Try using different flavored pudding mixes or even swap out the shortbread cookies for a chocolate twist to keep things exciting!

Crowd-Pleaser: Whether it’s a family dinner or a potluck, Lemon Fluff will impress and leave guests asking for the recipe.

Fresh Ingredients: Using freshly squeezed lemon juice enhances the flavor like nothing else, giving you that homemade taste similar to my delightful Lemon Blueberry Summery.

Perfect Texture: The airy fluffiness paired with the crunch of cookies creates a delightful experience in every bite.

Lemon Fluff Ingredients

For the Fluff

  • 1 (3.4-ounce) box instant lemon pudding mix – This is the star ingredient that brings citrus flavor and creaminess to your Lemon Fluff.
  • 1 ¾ cups cold heavy cream, divided – This provides the rich, luscious texture; opt for half-and-half if you prefer a lighter option.
  • 3 tablespoons freshly squeezed lemon juice (from 1 medium lemon) – This enhances the lemon flavor beautifully; fresh juice is best, but bottled can work in a pinch.
  • 2 tablespoons powdered sugar – Sweetens the fluff; feel free to adjust or omit it for a less sweet dessert.
  • ¼ teaspoon kosher salt – This balances out the sweetness perfectly; regular salt can be substituted if needed.
  • ½ cup marshmallow crème (such as Marshmallow Fluff) – Adds delightful fluffy sweetness; consider using whipped cream for a healthier twist.

For the Crunch

  • 1 ½ cups coarsely crushed shortbread cookies (4 ounces), plus more for garnish – These cookies add the needed texture and flavor; graham crackers or gluten-free cookies can work too.

For Garnish

  • Finely grated lemon zest (optional) – Elevates aroma and visual appeal; it’s a simple touch that makes a big difference to your Lemon Fluff!

Bring these ingredients together, and you’ll have an irresistibly light and creamy Lemon Fluff that’s sure to impress!

Step‑by‑Step Instructions for Lemon Fluff

Step 1: Whisk the Base
In a large mixing bowl, combine the instant lemon pudding mix, ¾ cup of cold heavy cream, and freshly squeezed lemon juice. Whisk them together vigorously until well blended, then let the mixture sit for about 5 minutes. This resting period will allow the pudding to thicken, becoming creamy and somewhat stiff—a perfect base for your Lemon Fluff.

Step 2: Beat the Cream
In a stand mixer, pour in the remaining 1 cup of cold heavy cream, along with the powdered sugar and kosher salt. Beat the mixture on medium speed for about 3-4 minutes, until soft peaks form and the cream is light and fluffy. This whipped cream will add a delightful airy texture to your Lemon Fluff, creating a contrast with the pudding mix.

Step 3: Incorporate Marshmallow Crème
Once you have soft peaks, add the marshmallow crème to the whipped cream in the mixer. Continue beating on medium speed for an additional 1-2 minutes, until stiff peaks form. The combination of whipped cream and marshmallow crème creates an irresistibly fluffy texture that enhances the overall creaminess of your Lemon Fluff.

Step 4: Combine Mixtures
Carefully fold the marshmallow crème mixture into the thickened lemon pudding base with a spatula. Gently incorporate it until just combined to maintain the light fluffiness. Be cautious not to overmix; the goal is a smooth, airy Lemon Fluff that retains its delightful texture and flavor.

Step 5: Add the Crunch
Now, fold in 1 ½ cups of coarsely crushed shortbread cookies into the lemon pudding mixture. Use a gentle folding motion until the cookies are evenly distributed without breaking them down too much. This step brings a satisfying crunch to your Lemon Fluff, enhancing both flavor and texture.

Step 6: Serve and Garnish
Spoon the luscious Lemon Fluff into individual serving cups and chill in the refrigerator for at least 30 minutes to set. Before serving, garnish each cup with extra crushed shortbread cookies and a sprinkle of finely grated lemon zest for an aromatic and visually appealing finish. Enjoy your refreshing Lemon Fluff dessert!

What to Serve with No-Bake Lemon Fluff?

Elevate your dessert experience and create a delightful spread that complements the light, tangy goodness of this creamy dessert.

  • Fresh Berries: The vibrant sweetness of strawberries or blueberries enhances the citrus notes while adding a refreshing touch.

  • Shortbread Cookies: These crunchy delights echo the dessert’s texture, inviting guests to savor the blend of flavors and textures.

  • Coconut Whipped Cream: A dollop of coconut cream adds a tropical twist, marrying beautifully with the lemony fluff while providing creaminess.

  • Sparkling Lemonade: A fizzy, citrusy drink enhances the overall experience, perfect for a warm gathering or summer brunch.

  • Mint Leaves: A sprinkle of fresh mint not only refreshes the palate but adds a pop of color that makes your Lemon Fluff stand out even more.

  • Chocolate Drizzle: A light drizzle of chocolate sauce introduces a decadent richness, making an enticing contrast to the lemon flavor.

  • Fruit Salad: A bowl of mixed fresh fruits adds a vibrant burst of color and texture, balancing out the sweetness of the Lemon Fluff beautifully.

Add these delightful accompaniments to transform your dining table into a feast of flavors and textures that everyone will love!

Make Ahead Options

These No-Bake Lemon Fluff desserts are perfect for meal prep, allowing you to whip them up in advance for busy weeknights or special occasions! You can prepare the entire mixture up to 24 hours ahead of time. Simply follow the instructions until you combine the marshmallow crème and pudding, then cover tightly and refrigerate. To maintain the light texture, avoid folding in the crushed shortbread cookies until just before serving. When you’re ready to impress, gently fold in the cookies, spoon into serving cups, and garnish with extra cookies and lemon zest. This way, you’ll have a delightful dessert that tastes just as fresh as the moment it was made!

Storage Tips for Lemon Fluff

Refrigerator: Store leftover Lemon Fluff in an airtight container in the fridge for up to 1 day. The cookies may soften, but the creamy texture will still be delightful!

Freezer: Freeze Lemon Fluff for up to 2 months by placing it in a freezer-safe container. Thaw it in the refrigerator overnight before serving, but note that the texture may change slightly.

Serving: For the best experience, serve chilled. If it’s been frozen, gently re-mix before serving to restore some fluffiness.

Preparation: You can prepare the Lemon Fluff up to 2 hours in advance, making it a convenient dessert option for gatherings or family dinners!

Expert Tips for Lemon Fluff

  • Chill Your Ingredients: Ensure your heavy cream is cold before whipping; it helps achieve the best volume and texture for the Lemon Fluff.

  • Avoid Overmixing: Be careful not to overmix when combining the pudding and marshmallow mixtures; this will help maintain the light and airy texture essential for a successful Lemon Fluff.

  • Garnish Wisely: Add your cookie garnish just before serving to keep them crispy and prevent them from becoming soggy in the creamy fluff.

  • Customize Sweetness: Adjust the amount of powdered sugar according to your taste; you can reduce it or even omit it for a less sweet version.

  • Fresh Juice Matters: Freshly squeezed lemon juice enhances the flavor significantly compared to bottled ones; opt for fresh for the best taste in your Lemon Fluff.

  • Experiment with Variations: Don’t hesitate to try different flavored pudding mixes or cookie bases; this Lemon Fluff can easily adapt to new ingredients for fresh twists!

Lemon Fluff Variations & Substitutions

Feel free to explore creative changes to personalize your Lemon Fluff and make it uniquely yours!

  • Chocolate Twist: Swap shortbread cookies for chocolate cookies to introduce a decadent flavor contrast. This twist adds a delightful richness that pairs surprisingly well with the lemon.

  • Flavor Boost: Use different flavored pudding mixes, such as vanilla or cheesecake, to alter the taste. Each flavor can offer a new twist, perfect for experimenting with seasonal fruit juices!

  • Berry Delight: Layer fresh berries like raspberries or strawberries on top for added texture and a burst of color. Not only do they enhance the dessert, but they also bring nourishment as well!

  • Dairy-Free: Substitute heavy cream with coconut cream or a blend of almond milk and aquafaba whipped until light. This option retains fluffiness while catering to dietary preferences.

  • Low-Carb: To lighten the dish, replace powdered sugar with a sugar substitute like erythritol or stevia. This swap ensures everyone can indulge without the guilt.

  • Citrus Medley: Incorporate other citrus juices—such as lime or orange—to create a citrus medley. This exploration transforms the flavor profile into a whole new world of fresh deliciousness!

  • Nutty Crunch: Add chopped nuts like almonds or pecans for an extra layer of crunch that enhances texture. It will take your Lemon Fluff to the next level, bringing a delightful surprise in every bite.

  • Graham Cracker Base: Consider using graham crackers instead of shortbread cookies for a classic texture twist. This simple change evokes the essence of summertime treats, reminiscent of long, bright days.

Each of these variations invites a new experience while keeping the delightful essence of this refreshing treat. For a close cousin of this light dessert, check out my Lemon Blueberry Summery for a fruitier version everyone will adore!

No-Bake Lemon Fluff Recipe FAQs

How do I select the best lemons for the recipe?
When choosing lemons, look for ones that feel heavy for their size and have a vibrant yellow color. Avoid any lemons with dark spots or a dull appearance, as they may be past their prime. Fresh, juicy lemons will yield the best flavor for your No-Bake Lemon Fluff!

How should I store leftover Lemon Fluff?
Store your leftover Lemon Fluff in an airtight container in the refrigerator for up to 1 day. While it may remain delicious, the shortbread cookies will soften as they sit in the creamy fluff. If you want to add freshness, consider serving it with a sprinkle of new crushed cookies just before enjoyment!

Can I freeze No-Bake Lemon Fluff?
Absolutely! To freeze your Lemon Fluff, transfer it into a freezer-safe container. Make sure to seal it tightly to prevent freezer burn, and it should last for up to 2 months. When you’re ready to enjoy it, thaw it overnight in the refrigerator. Just a gentle remMix will help restore some of that fluffy texture!

What if my heavy cream doesn’t whip properly?
If your heavy cream isn’t whipping up nicely, check to ensure it was cold enough before starting. Cold cream is crucial for proper whipping. If you struggled, try switching to a metal bowl or chilling your mixing equipment beforehand. Whipping for about 3-4 minutes on medium speed should get you those soft peaks; don’t overwhip, as it can turn grainy!

Is this Lemon Fluff safe for kids, and are there any allergens?
Yes, this No-Bake Lemon Fluff is kid-friendly and quite simple. However, it does contain dairy and marshmallow crème, so be cautious if you’re serving it to kids with allergies to dairy or gelatin. You can substitute with lactose-free heavy cream and ensure any alternatives match dietary needs for an enjoyable treat for all ages!

Lemon Fluff

Lemon Fluff: A Light, Dreamy No-Bake Dessert in 15 Minutes

Lemon Fluff is a delightful, no-bake dessert that captures the essence of lemons in a light, creamy texture, perfect for any occasion.
Prep Time 15 minutes
Chill Time 30 minutes
Total Time 45 minutes
Servings: 6 cups
Course: Dessert
Cuisine: American
Calories: 200

Ingredients
  

For the Fluff
  • 1 box (3.4-ounce) instant lemon pudding mix The star ingredient that brings citrus flavor and creaminess.
  • 1 ¾ cups cold heavy cream Divided; can use half-and-half for a lighter option.
  • 3 tablespoons freshly squeezed lemon juice From 1 medium lemon; enhances the flavor.
  • 2 tablespoons powdered sugar Sweetens the fluff; adjust to taste.
  • ¼ teaspoon kosher salt Balances out the sweetness.
  • ½ cup marshmallow crème Adds delightful fluffy sweetness; can substitute with whipped cream.
For the Crunch
  • 1 ½ cups coarsely crushed shortbread cookies Adds needed texture and flavor. Can substitute with graham crackers or gluten-free cookies.
For Garnish
  • finely grated lemon zest Optional; enhances aroma and visual appeal.

Equipment

  • large mixing bowl
  • Stand mixer
  • spatula

Method
 

Step-by-Step Instructions
  1. In a large mixing bowl, combine the instant lemon pudding mix, ¾ cup of cold heavy cream, and freshly squeezed lemon juice. Whisk until well blended, then let sit for about 5 minutes.
  2. In a stand mixer, pour in the remaining 1 cup of cold heavy cream, along with the powdered sugar and kosher salt. Beat on medium speed for about 3-4 minutes until soft peaks form.
  3. Add the marshmallow crème to the whipped cream in the mixer. Continue beating on medium speed for an additional 1-2 minutes until stiff peaks form.
  4. Carefully fold the marshmallow crème mixture into the thickened lemon pudding base with a spatula until just combined.
  5. Fold in the 1 ½ cups of coarsely crushed shortbread cookies until evenly distributed.
  6. Spoon the Lemon Fluff into individual serving cups and chill in the refrigerator for at least 30 minutes. Garnish before serving.

Nutrition

Serving: 1cupCalories: 200kcalCarbohydrates: 25gProtein: 2gFat: 10gSaturated Fat: 6gMonounsaturated Fat: 4gCholesterol: 30mgSodium: 150mgPotassium: 150mgSugar: 12gVitamin A: 250IUVitamin C: 10mgCalcium: 50mgIron: 1mg

Notes

Chill your ingredients for best whipping results. Adjust sweetness and use fresh lemon juice for optimal flavor. Experiment with toppings and flavors to customize your Lemon Fluff.

Tried this recipe?

Let us know how it was!

Stay Connected

Get recipes via email: