Khoresh Bademjan: Comforting Persian Eggplant Stew Recipe

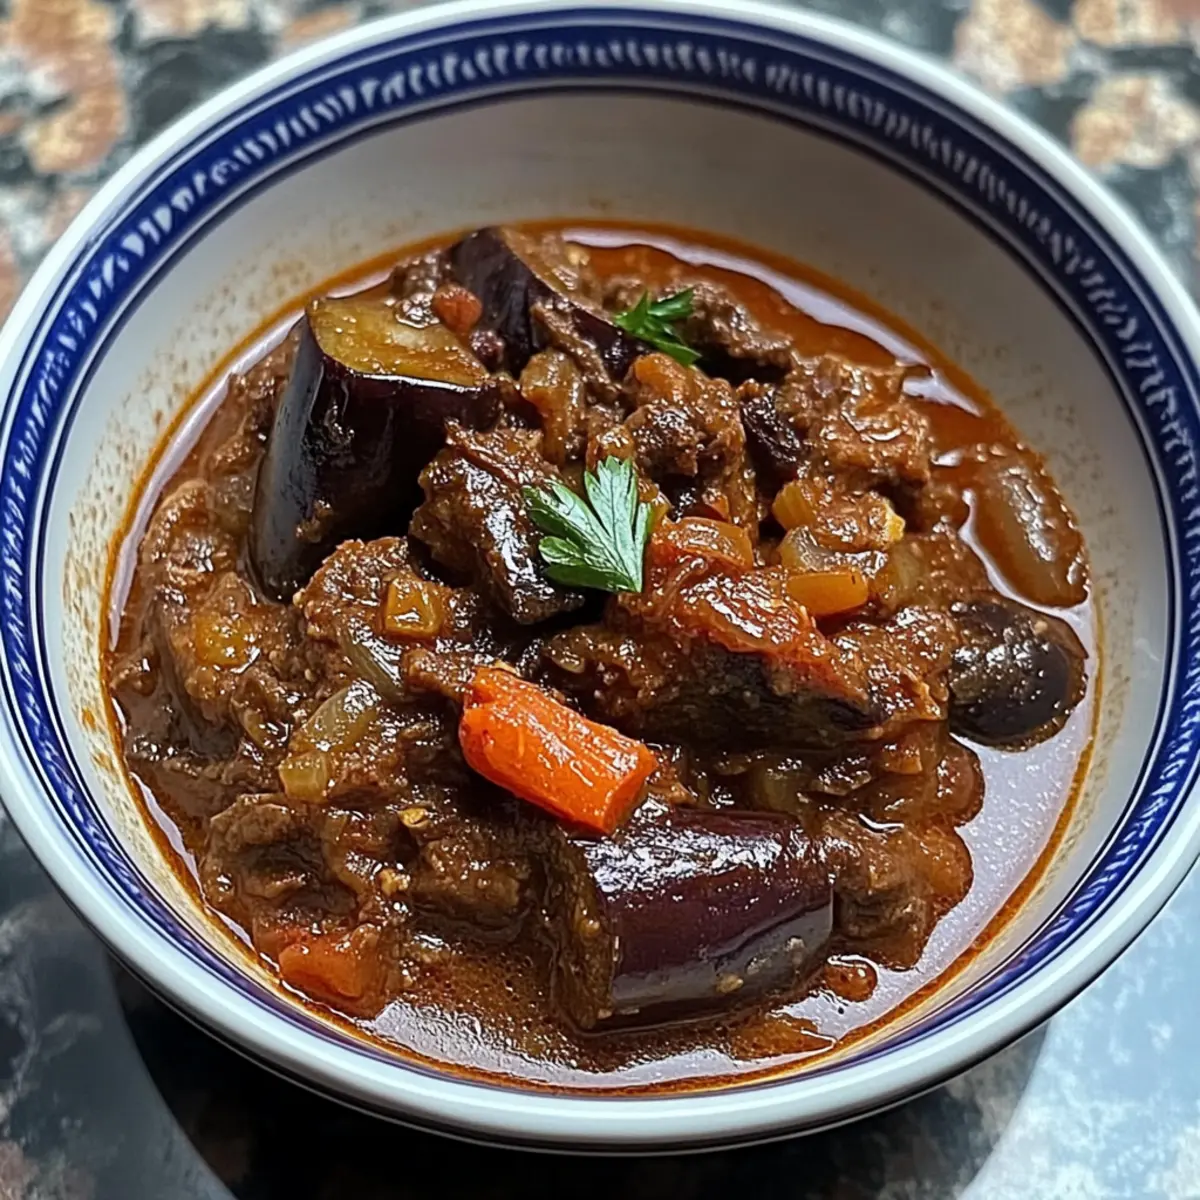
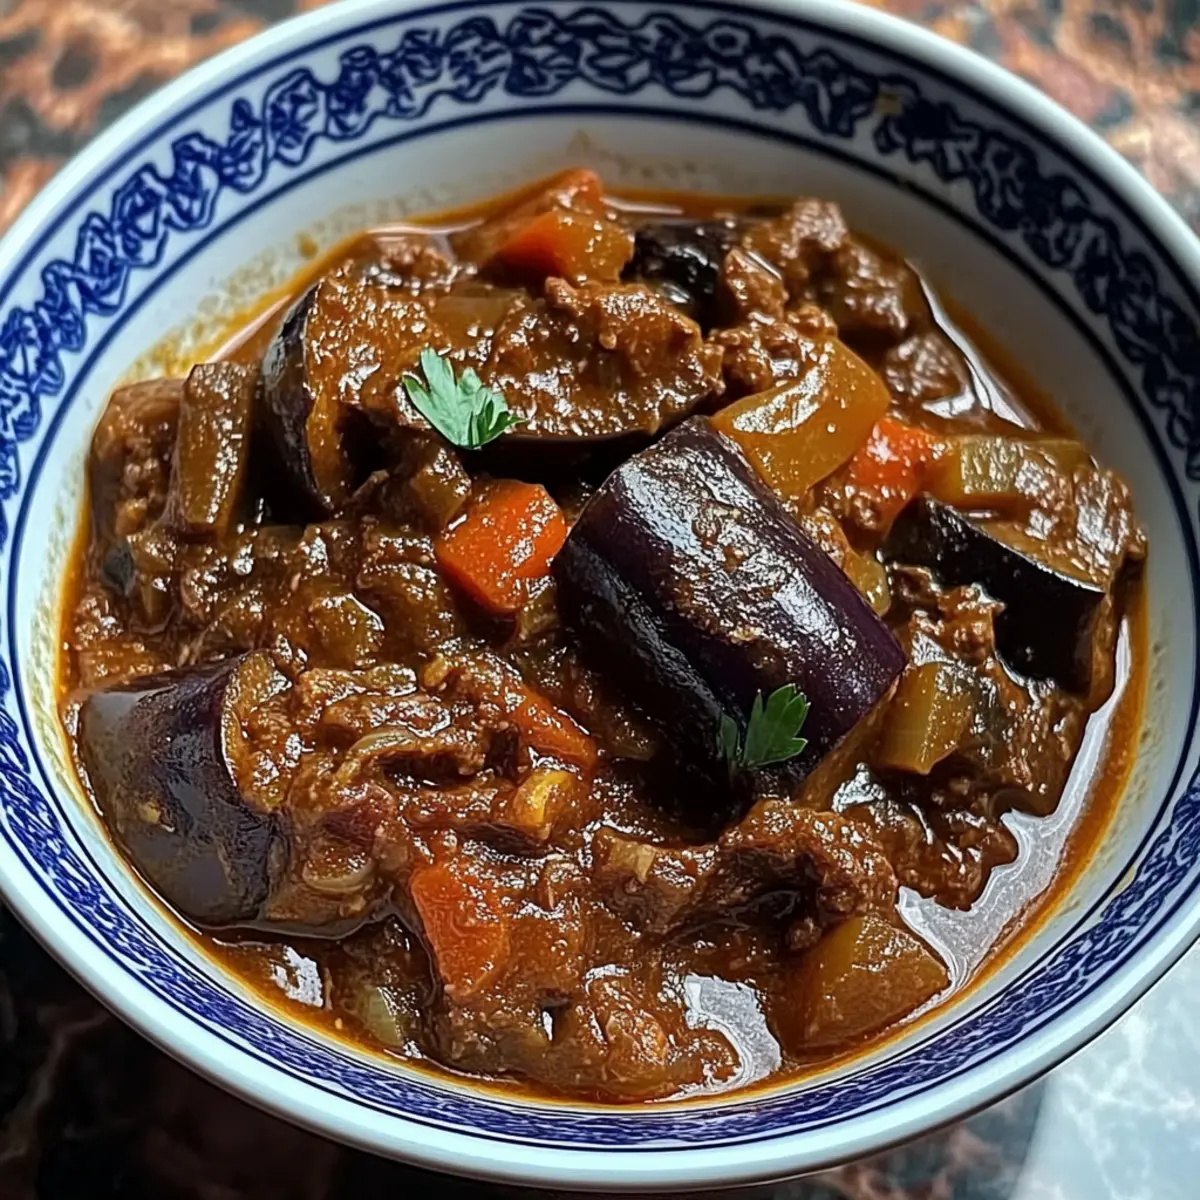
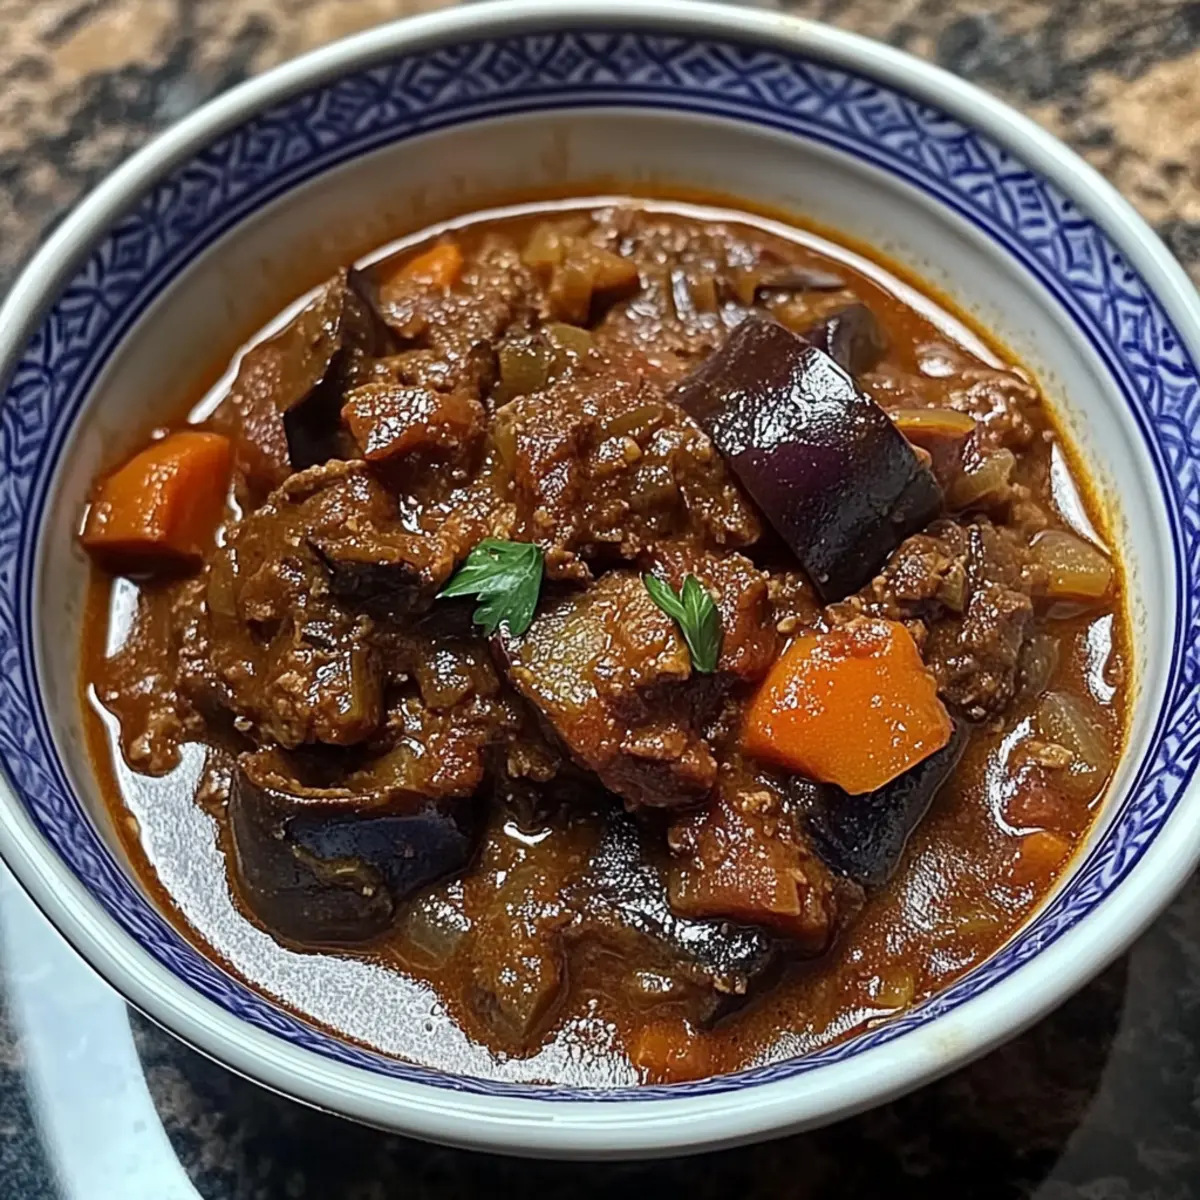
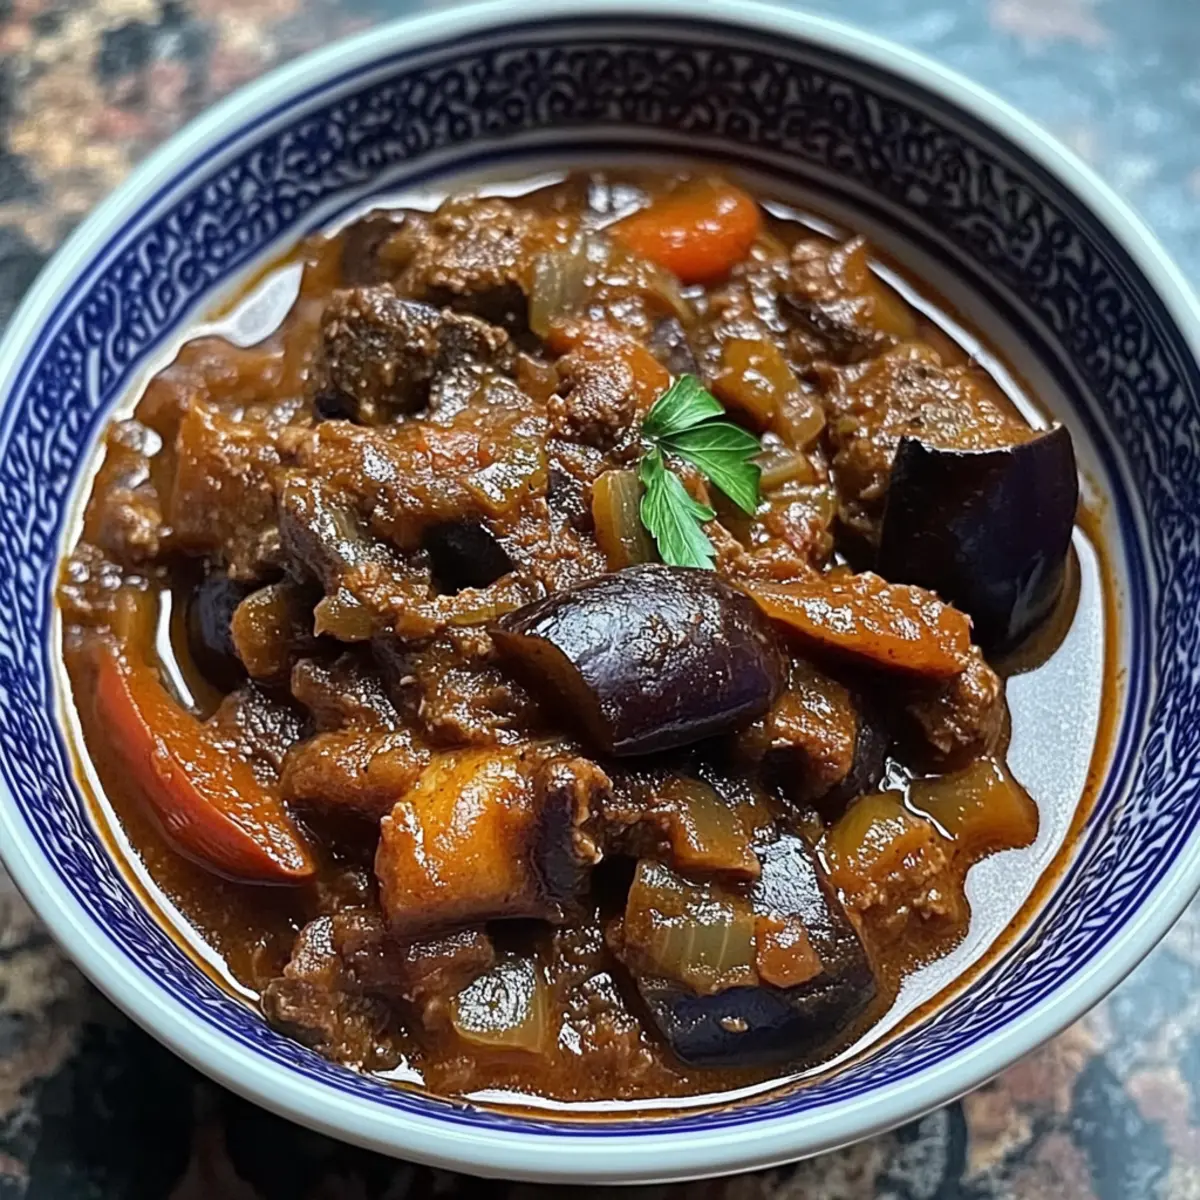
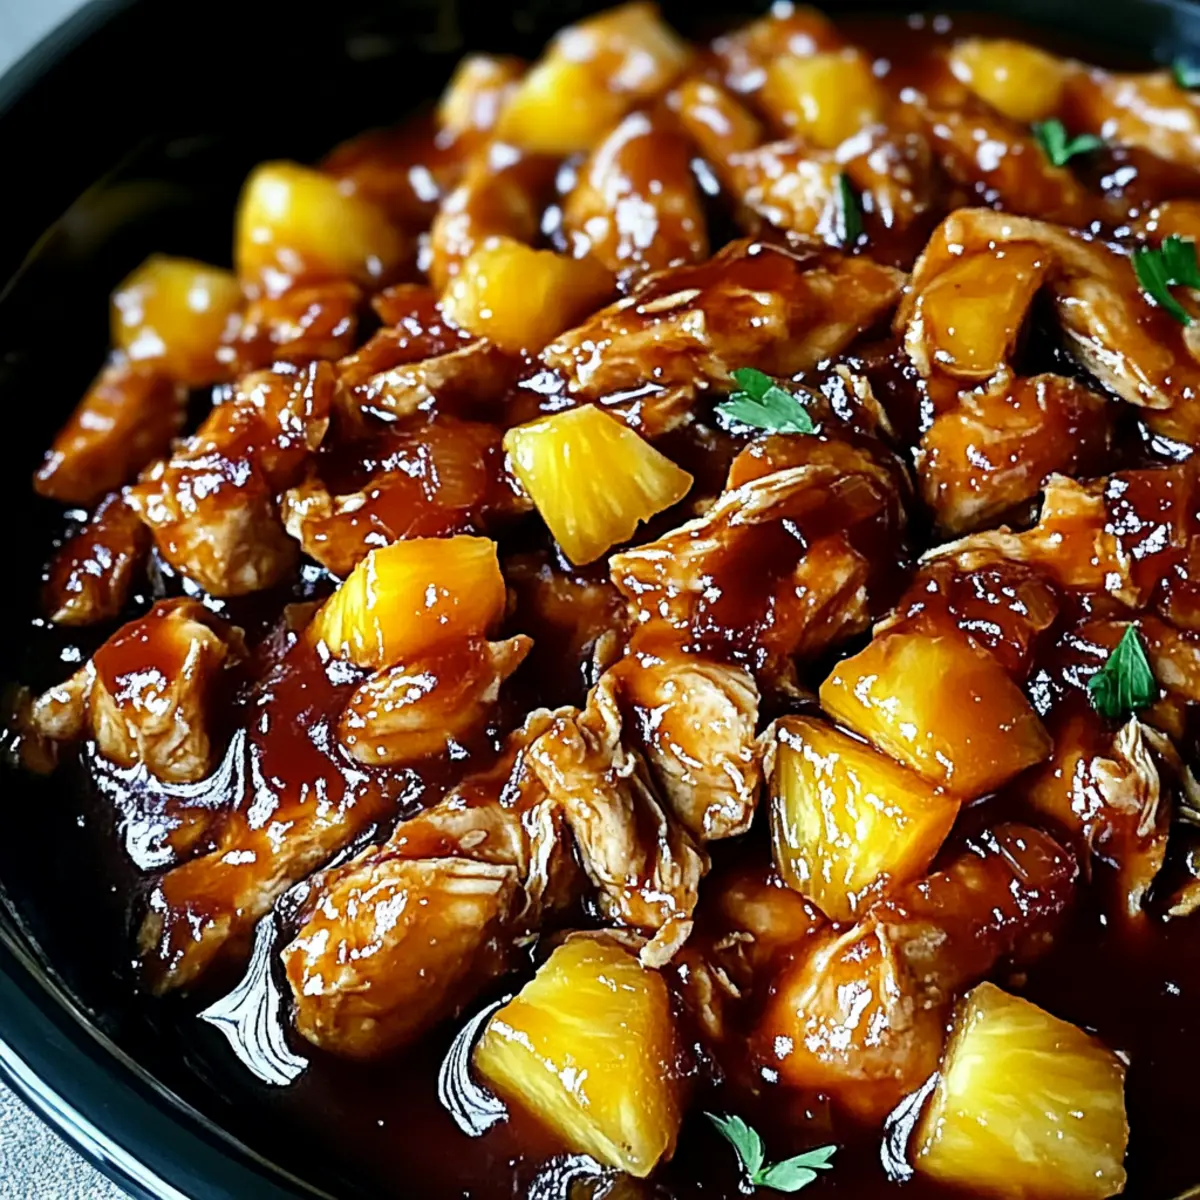
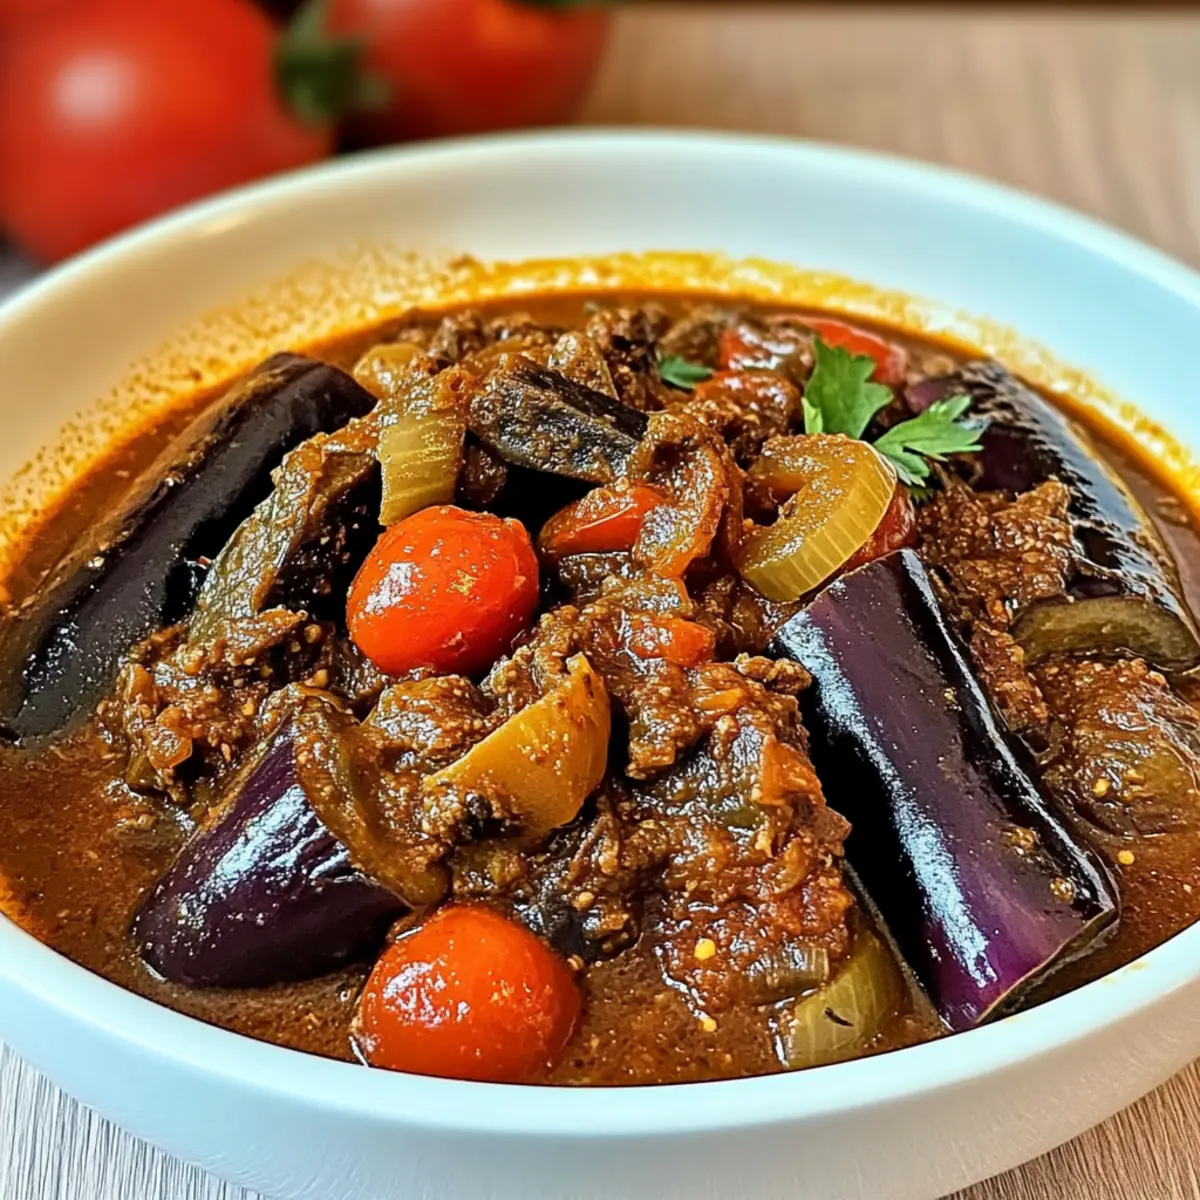
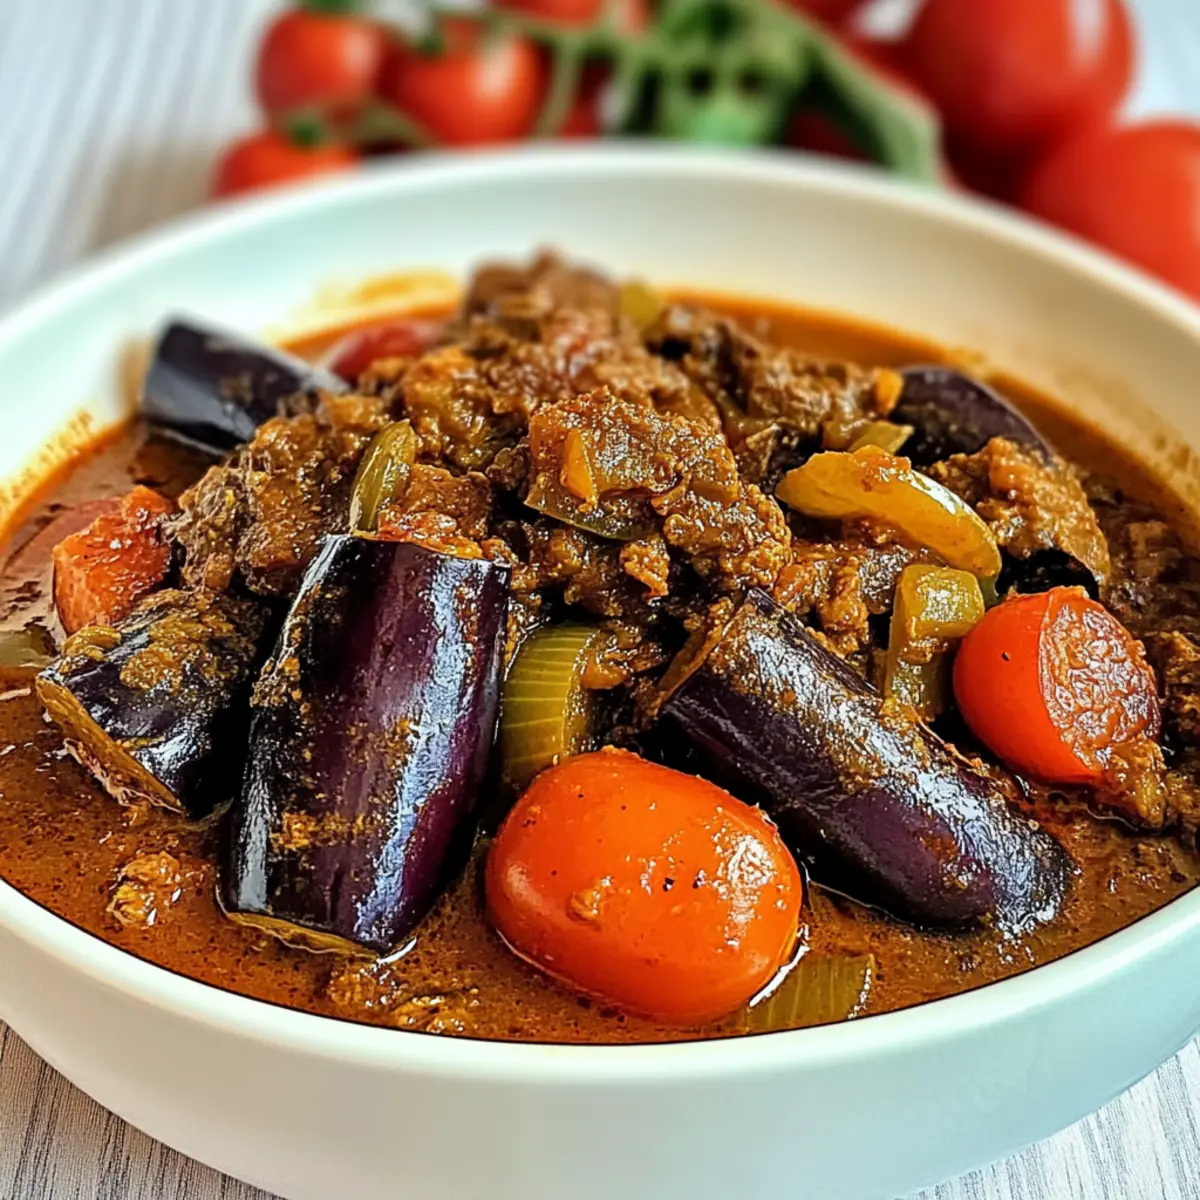
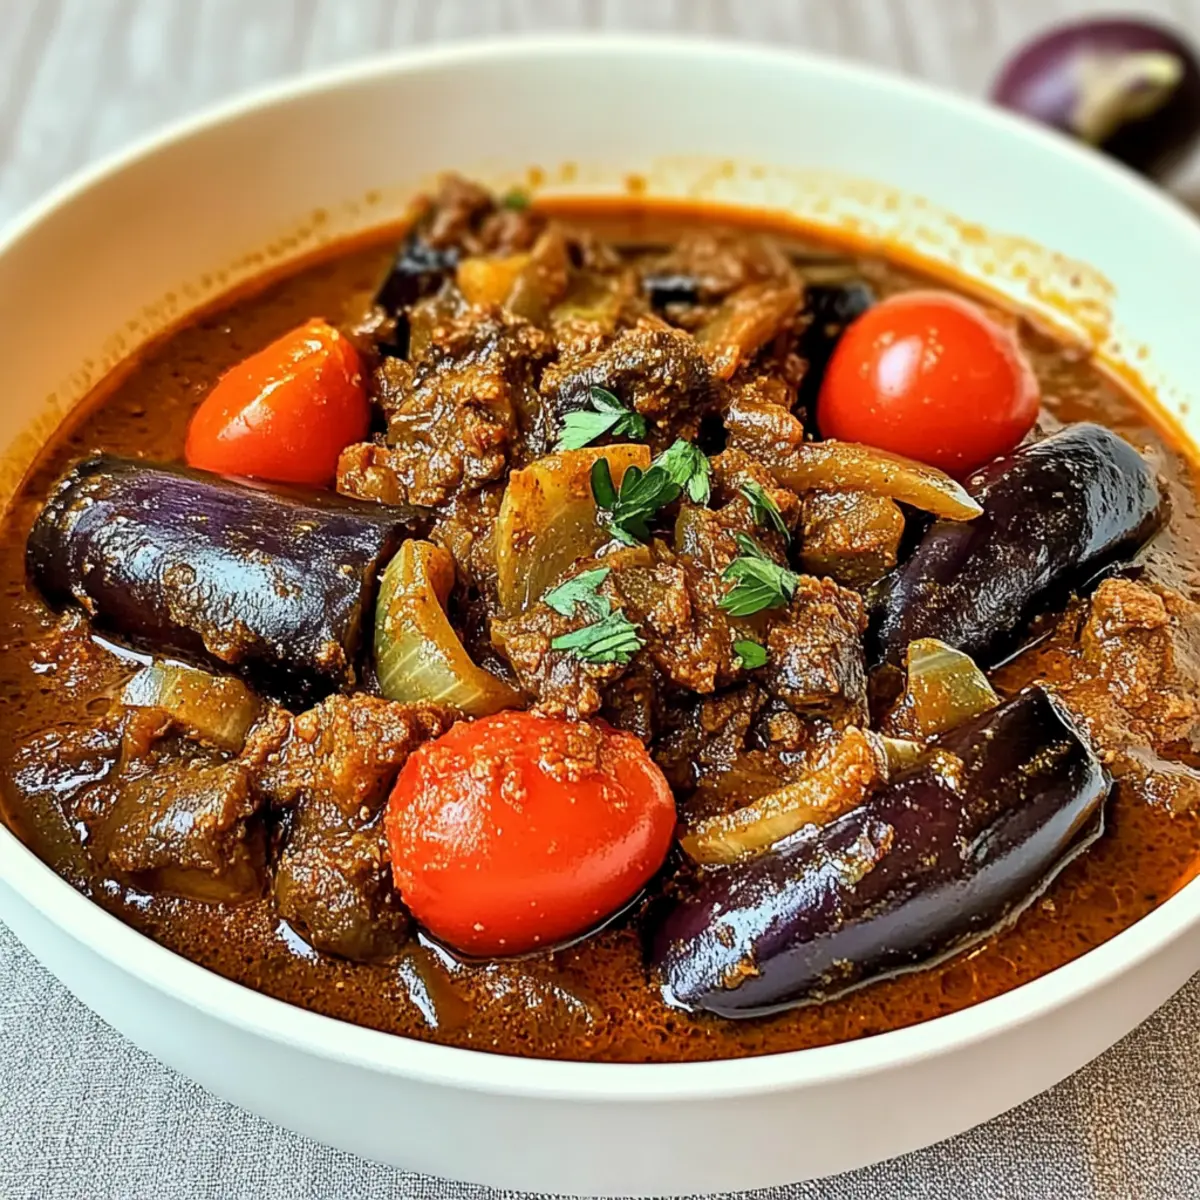
As the aroma of warm spices fills my kitchen, I can almost hear the laughter of family gathered around the table, eagerly anticipating dinner. This is the essence of Khoresh Bademjan, a Persian eggplant stew that wraps you in comfort with its rich flavors. Not only is this dish a delightful blend of tender eggplant and savory meat—featuring options like lamb, beef, or a nourishing vegan variation—but it’s also gluten-free and high in protein. Whether it’s a weeknight meal or a special occasion, Khoresh Bademjan is sure to impress, especially when paired with fluffy saffron rice and crispy tahdig. Are you ready to embark on a culinary adventure that will fill your home with warmth and joy?

Why is Khoresh Bademjan Irresistible?

Comforting: This Persian stew is the ultimate hug in a bowl, merging tender eggplant with savory meat or hearty legumes in a way that’s simply soul-satisfying.

Versatile: Customize it with lamb, beef, or chicken for meat lovers, or opt for a vegan version that still packs a protein punch with chickpeas or split peas. This dish truly caters to all dietary preferences.

Richly Aromatic: The array of spices, including advieh and turmeric, makes every bite an explosion of flavor, transporting you straight to a bustling Persian kitchen.

Easy to Prepare: With straightforward steps that allow you to prep ingredients in advance, you can whip up Khoresh Bademjan on busy weeknights or make it for a special feast.

Cultural Connection: More than just food, this dish represents Persian hospitality and warmth, often enjoyed during gatherings—making mealtime a cherished moment.

Pair it with fluffy saffron rice and crispy tahdig for the perfect finishing touch! You might also want to explore storage or make-ahead tips for this delightful dish to enjoy it at your convenience.

Khoresh Bademjan Ingredients

For the Stew

  • Olive Oil – Adds richness and aids in cooking; you can substitute with vegetable oil if needed.
  • Onions – Provides sweetness and depth; use yellow or white onions, or shallots as a substitution.
  • Cherry Tomatoes – Contributes acidity and flavor; grape tomatoes or canned tomatoes work well as alternatives.
  • Garlic – Enhances aroma and taste; minced garlic can replace grated garlic in a pinch.
  • Lamb Stew Meat – The main protein source for the stew; consider beef, chicken, or omit for a vegan version.
  • Advieh – A blend of Persian spices for depth; can be replaced with a mild spice blend if unavailable.
  • Turmeric – Adds earthy flavor and color; use as directed for best results.
  • Ground Black Pepper – Enhances seasoning; adjust according to your taste.
  • Salt – Essential for flavor balance; fine-tune to your preference.
  • Water – Necessary liquid for cooking; adjust for the desired stew consistency.
  • Tomato Sauce – Adds a rich tomato flavor; fresh chopped tomatoes can be a substitute.
  • Dried Limes – Provide tanginess; lime juice can work in a pinch if necessary.
  • Saffron (optional) – Important for authenticity and unique aroma; not indispensable for flavor.
  • Lime Juice – Brightens the stew; feel free to adjust to taste.
  • Eggplants – The star ingredient that absorbs flavors beautifully; use globe or any available variety.

For Serving

  • Saffron Rice – Complements the stew’s flavors beautifully.
  • Crispy Tahdig – Adds a delightful crunch to this comforting meal.

Dive into the world of Khoresh Bademjan and let its magnificent flavors transform your kitchen into a celebration of Persian cuisine!

Step‑by‑Step Instructions for Khoresh Bademjan

Step 1: Sauté Onions
In a Dutch oven, heat 3 tablespoons of olive oil over medium heat. Add a third of the sliced onions and sauté them until they turn golden brown, about 8-10 minutes. Stir occasionally to ensure even cooking and prevent burning. Once golden, transfer the onions to a plate and set aside, allowing the flavors to deepen.

Step 2: Char Tomatoes
Using the same pot, add the cherry tomatoes, cooking them over medium-high heat for about 5 minutes. Stir occasionally until they become slightly charred and fragrant. Their skins should blister and show signs of caramelization. Once done, remove the tomatoes and set them aside alongside the sautéed onions.

Step 3: Cook Onions and Garlic
With the heat still on, add the remaining sliced onions to the pot. Sauté for 5-7 minutes, until they are translucent and soft. Then, stir in the minced garlic for an additional minute, allowing it to release its aromatic flavors. This mixture will create a flavorful base for your Khoresh Bademjan.

Step 4: Sear Lamb
Now, introduce the lamb stew meat to the pot, increasing the heat to medium-high. Sear the meat for about 8-10 minutes, browning it on all sides. Look for a rich, caramelized surface, as this will add depth to your stew. Once browned, proceed to the next step without removing the meat.

Step 5: Add Spices and Liquid
Sprinkle the advieh, turmeric, ground black pepper, and salt over the meat, stirring to coat well. Pour in 2 cups of water and the tomato sauce, stirring everything together. Toss in the dried limes and bring the mixture to a boil. Once boiling, reduce the heat to low and let it simmer uncovered for about 1.5 hours, allowing the flavors to meld beautifully.

Step 6: Roast Eggplants
While the stew is simmering, preheat your oven to 425°F (220°C). Slice the eggplants and brush them lightly with olive oil. Spread them evenly on a baking sheet and roast for 25 minutes or until they are tender and slightly golden. This roasting will enhance their flavor and texture, making them the star of the Khoresh Bademjan.

Step 7: Combine Eggplants
Once the eggplants are ready, check the stew for seasoning. Add the roasted eggplants into the stew along with fresh lime juice to brighten the flavors. Stir gently to incorporate, then cover and let simmer for another 30 minutes. This final simmering period allows the eggplants to absorb the stew’s rich flavors.

Step 8: Serve
Before serving your Khoresh Bademjan, taste and adjust the seasoning as needed. Serve the stew hot, garnished with reserved sautéed onions and charred tomatoes. It pairs beautifully with fluffy saffron rice and crispy tahdig, creating a comforting meal that showcases the essence of Persian cooking.

Make Ahead Options

Khoresh Bademjan is a fantastic dish for meal prep, allowing you to savor its rich flavors even on your busiest days! You can chop the onions, roast the eggplants, and even sauté the base up to 24 hours in advance, storing them in airtight containers in the refrigerator to maintain freshness. The seasoning can also be combined ahead of time for a quick touch during cooking. When you’re ready to serve, simply simmer the prepped ingredients with the sautéed meat and liquid for 30 minutes, adding the roasted eggplants and lime juice at the end to keep them tender and flavorful. This prep-ahead strategy ensures that your Khoresh Bademjan is just as delicious and aromatic with minimal effort on hectic evenings!

Khoresh Bademjan Variations & Substitutions

Feel free to explore your creativity in the kitchen with these tasty options to customize your Khoresh Bademjan!

  • Different Meats: Swap lamb with beef or chicken for alternative flavors. Each choice provides its unique richness, adjusting the stew’s character beautifully.

  • Vegan Delight: For a meat-free version, replace the protein with chickpeas or yellow split peas. These legumes not only add protein but also a creamy texture, enhancing the stew’s heartiness.

  • Eggplant Variety: Experiment with different eggplant types, such as Japanese or Italian. Each variety brings its distinct flavor and texture, enriching the overall dish.

  • Spicy Kick: Add a pinch of cayenne pepper or a sprinkle of red pepper flakes for an exciting heat that elevates the stew’s flavor profile. It creates a delightful contrast to the savory and earthy tones.

  • Veggie Boost: Mix in extra vegetables like zucchini or bell peppers for added nutrition. A variety of colors not only makes your meal vibrant but also enhances the complex flavors and textures.

  • Richer Sauce: Stir in some tomato paste for a thicker, richer sauce that binds the flavors together even more, leading to a comforting, velvety finish.

  • Cinnamon Twist: Incorporate a dash of cinnamon for a warm, aromatic flavor that pairs beautifully with eggplant and enhances the stew’s depth.

  • Herbal Flair: Garnish with fresh herbs like cilantro or parsley right before serving for a burst of freshness. This sprinkling brightens the dish and complements the rich flavors wonderfully.

As you indulge in these variations, you can create your version of Khoresh Bademjan that will delight your taste buds. For those interested in eco-friendly cooking, check out some fantastic storage or make-ahead tips to enjoy your creation at your convenience!

Expert Tips for Khoresh Bademjan

  • Brown the Meat Well: Make sure to sear the lamb until it’s well-browned; this locks in moisture and enhances the rich flavor of the stew.

  • Roast Eggplants Thoroughly: Roast eggplants until they are golden and tender; this deepens their flavor and ensures they absorb the stew’s delicious spices well.

  • Adjust Seasoning Gradually: As you cook, taste and adjust the seasoning towards the end for a perfectly balanced Khoresh Bademjan that truly sings with flavor.

  • Use Quality Advieh: Opt for fresh Persian spice blends for the best aromatic results; if unavailable, a mild spice mix will work, but may not provide the same depth.

  • Garnish Thoughtfully: Garnish with crispy onions and tomatoes just before serving to add a pop of color and extra flavor to your hearty stew!

How to Store and Freeze Khoresh Bademjan

  • Fridge: Store leftover Khoresh Bademjan in an airtight container for up to 4-5 days. Gently reheat on the stove or in the microwave, stirring occasionally to maintain moisture.
  • Freezer: This flavorful stew freezes beautifully for up to 2 months. Portion into freezer-safe containers, allowing space for expansion, and thaw overnight in the fridge before reheating.
  • Reheating: Heat on the stove over medium heat, stirring gently, or use the microwave, covered, at medium power. Add a splash of water if it thickens too much during reheating to retain its comforting consistency.
  • Prep Ahead: For convenience, chop onions, eggplants, and spices in advance; keep them refrigerated. This reduces cooking time and makes it easy to whip up Khoresh Bademjan on busy days!

What to Serve with Khoresh Bademjan

Elevate your dining experience with delightful sides that enhance the flavors of this hearty Persian stew.

  • Fluffy Saffron Rice: The perfect accompaniment, it absorbs the rich stew and adds a subtle floral note to your meal. A staple in Persian cuisine, it brings elegance to your table.

  • Crispy Tahdig: This iconic Persian crispy rice adds a delightful crunch that contrasts with the stew’s tender textures. Your family will fight over the last piece!

  • Tangy Pickles: Sweet and tangy Persian pickles offer a zesty contrast to the richness of Khoresh Bademjan, cleansing the palate with each bite. They’re the perfect burst of flavor!

  • Herb-Infused Salad: A fresh salad sprinkled with herbs such as parsley, mint, and cilantro will brighten your meal and add a refreshing crunch. Toss with a simple lemon vinaigrette for a light touch.

  • Warm Pita Bread: Soft, warm pita is perfect for dipping into the stew and scooping up every last bit, making it a fantastic addition for a hands-on dining experience. It’s comfort food at its best!

  • Yogurt-Cucumber Mixture: Creamy yogurt mixed with diced cucumbers provides a cooling element that balances the warm spices of the stew. This refreshing side brings harmony to your meal.

Khoresh Bademjan Recipe FAQs

How do I choose the right eggplants for Khoresh Bademjan?
Absolutely! Look for eggplants that are firm and shiny, with no dark spots or blemishes. Globe eggplants are commonly used, but you can substitute with Italian or Japanese varieties. The fresher the eggplant, the better it will absorb the delicious flavors of your stew!

What should I do with leftovers of Khoresh Bademjan?
Very good question! Store your leftovers in an airtight container in the refrigerator for up to 4-5 days. To reheat, gently warm on the stove over medium heat or microwave, stirring occasionally. This way, it will retain its delicious flavor while preventing it from drying out.

Can I freeze Khoresh Bademjan?
Yes, you can! To freeze, portion out the stew into freezer-safe containers, leaving a little room for expansion, as it will thicken slightly when cooled. It can be stored for up to 2 months. When you’re ready to enjoy it again, simply thaw it overnight in the fridge and reheat gently on the stove, adding a splash of water if needed to maintain the consistency.

I find my Khoresh Bademjan too salty. How can I fix it?
No worries at all! If your stew turns out too salty, try adding some chopped potatoes or a handful of cooked rice to the pot. Let it simmer for about 15-20 minutes. The potatoes will absorb some saltiness, and you can remove them once they’re tender, balancing the flavors in the stew.

Are there any dietary considerations I should be aware of for Khoresh Bademjan?
Of course! This recipe is naturally gluten-free, making it suitable for various diets. If you’re preparing a vegan version, simply replace the meat with chickpeas or yellow split peas, and use vegetable broth instead of water for added flavor. Always check labels on any packaged ingredients to ensure they meet your dietary needs and preferences!

undefined

Khoresh Bademjan: Comforting Persian Eggplant Stew Recipe

Khoresh Bademjan is a comforting Persian eggplant stew, rich in flavors and suitable for various dietary preferences.
Prep Time 30 minutes
Cook Time 1 hour 30 minutes
Roasting Time 25 minutes
Total Time 2 hours 25 minutes
Servings: 6 servings
Course: Dinner
Cuisine: Persian
Calories: 450

Ingredients
  

For the Stew
  • 3 tablespoons Olive Oil Can substitute with vegetable oil
  • 2 medium Onions Yellow or white onions preferred
  • 2 cups Cherry Tomatoes Grape tomatoes or canned can be used
  • 4 cloves Garlic Minced garlic can be used as a substitute
  • 1.5 pounds Lamb Stew Meat Can use beef, chicken, or omit for vegan
  • 2 tablespoons Advieh Mild spice blend can be a substitute
  • 1 teaspoon Turmeric
  • 1 teaspoon Ground Black Pepper Adjust to taste
  • 1 tablespoon Salt Adjust to preference
  • 2 cups Water Adjust for desired stew consistency
  • 1 cup Tomato Sauce Fresh chopped tomatoes can be substituted
  • 3 pieces Dried Limes Lime juice can work as an alternative
  • 1 pinch Saffron (optional) Not necessary for flavor
  • 3 tablespoons Lime Juice Adjust to taste
  • 2 medium Eggplants Globe or any available variety
For Serving
  • 4 cups Saffron Rice
  • 1 cup Crispy Tahdig

Equipment

  • Dutch oven
  • Baking Sheet

Method
 

Step-by-Step Instructions
  1. In a Dutch oven, heat 3 tablespoons of olive oil over medium heat. Add a third of the sliced onions and sauté until golden brown, about 8-10 minutes. Set aside.
  2. Add the cherry tomatoes to the pot, cooking over medium-high heat for about 5 minutes until slightly charred. Remove and set aside.
  3. Add the remaining onions to the pot. Sauté for 5-7 minutes until translucent, then stir in minced garlic for 1 minute.
  4. Introduce the lamb stew meat to the pot. Sear for 8-10 minutes until browned.
  5. Add advieh, turmeric, ground black pepper, and salt. Stir well, then pour in water and tomato sauce. Add dried limes and bring to a boil, then simmer for 1.5 hours.
  6. Preheat the oven to 425°F (220°C). Slice eggplants, brush with olive oil, and roast for 25 minutes until golden.
  7. Once eggplants are ready, check seasoning of the stew. Add roasted eggplants and lime juice, stir, cover, and simmer for another 30 minutes.
  8. Serve hot, garnished with reserved sautéed onions and charred tomatoes paired with saffron rice and crispy tahdig.

Nutrition

Serving: 1bowlCalories: 450kcalCarbohydrates: 35gProtein: 30gFat: 25gSaturated Fat: 5gPolyunsaturated Fat: 10gMonounsaturated Fat: 10gCholesterol: 90mgSodium: 800mgPotassium: 900mgFiber: 10gSugar: 6gVitamin A: 500IUVitamin C: 30mgCalcium: 60mgIron: 4mg

Notes

Garnish with crispy onions and tomatoes for enhanced flavor and colors. Adjust seasonings gradually to suit your taste.

Tried this recipe?

Let us know how it was!

Hearty Lamb Stew with Roasted Eggplant for Cozy Nights

The aroma of simmering spices filled my kitchen, wrapping me in a warm embrace that transported me to cozy evenings spent with loved ones. I recently crafted this Comforting Lamb Stew with Roasted Eggplant, a dish that marries the tender richness of lamb with the smoky depth of roasted eggplant. This hearty meal not only encourages mindful cooking—perfect for a satisfying dinner—but also easily adapts to accommodate vegetarian cravings with simple swaps like chickpeas or lentils. With minimal hands-on time required, this stew stands ready to embrace your busy schedule, making it an ideal choice for meal prep too. Intrigued by how one dish can cater to so many tastes? Let’s dive into the savory details!

Why Is This Stew So Irresistible?

Versatile and Adaptable: This stew easily accommodates various dietary needs, allowing you to substitute lamb with chickpeas or lentils for a hearty vegetarian delight.

Time-Saving Meal Prep: Ideal for busy weeknights, this recipe can be prepped in advance, enabling you to enjoy a warm meal with minimal fuss.

Robust Flavors: With a blend of aromatic spices, including cinnamon and nutmeg, each bite bursts with savory goodness that warms the soul.

Comfort in Every Bowl: Thick and hearty, this stew is like a comforting hug, perfect for family dinners or cozy evenings at home.

Serve It Your Way: Pair with warm pita bread or a tangy Greek salad to complement the rich flavors and elevate your dining experience!

Lamb Stew Ingredients

• Explore the essential components of this comforting dish.

For the Stew

  • Eggplant – Adds a savory depth; replace with zucchini for a lighter option.
  • Olive Oil – Vital for sautéing and roasting; avocado oil can be used for higher smoke points.
  • Lamb (boneless, cubed) – The star of the dish, providing rich flavor; ground lamb or chickpeas make great vegetarian substitutes.
  • Onion – Offers a natural sweetness; yellow or white onions caramelize beautifully.
  • Garlic – For an aromatic foundation; fresh garlic is preferred, but garlic powder works too.
  • Red Wine – Elevates the stew’s flavor; substitute with grape juice or beef stock for a non-alcoholic twist.
  • Tomato Paste – Concentrates the tomato flavor; crushed fresh tomatoes can enhance the freshness.
  • Canned Tomatoes – Forms the stew’s base; seasonal fresh tomatoes can brighten the dish.
  • Lamb or Beef Stock – Adds depth and moisture; vegetable stock can lighten it up.
  • Bay Leaf – Infuses earthy undertones; if unavailable, try Italian seasoning as a substitute.
  • Black Pepper – For seasoning; feel free to omit or adjust to taste.
  • Thyme – Adds a herbal touch; dried thyme can replace fresh without losing much flavor.
  • Cinnamon Stick – Creates warmth; ground cinnamon can be substituted (use less).
  • Allspice – Enhances complexity; nutmeg can replace it though the flavor differs.
  • Nutmeg – Best when freshly grated; can be omitted if you prefer a subtler taste.
  • Salt – Essential for flavor; adjust based on preference.
  • Fresh Parsley – A vibrant garnish; cilantro is a wonderful alternative for a different flavor profile.

With these ingredients, you’re well on your way to creating a Lamb Stew that satisfies comforting cravings and is perfect for any table!

Step‑by‑Step Instructions for Comforting Lamb Stew with Roasted Eggplant

Step 1: Preheat Oven
Begin by preheating your oven to 400°F (200°C). This step is crucial for achieving that perfect roasted texture on the eggplant. While the oven heats up, gather your ingredients and prepare your baking sheet, so you’re ready to go when it’s time to roast.

Step 2: Roast Eggplant
Toss the diced eggplant with a drizzle of olive oil, making sure each piece is well-coated. Spread the eggplant evenly on a baking sheet and roast for about 20 minutes, or until it turns golden brown and tender. You’ll know it’s ready when the edges are slightly crisp and the flesh feels soft when pierced with a fork.

Step 3: Sear Lamb
In a large, heavy-bottomed pot, heat the remaining olive oil over medium-high heat. Add the cubed lamb and sear for about 5-7 minutes until it develops a rich, golden-brown crust on all sides. Once browned, remove the lamb from the pot and set it aside to retain its juices and flavors.

Step 4: Sauté Aromatics
In the same pot, reduce the heat to medium and add diced onion and minced garlic. Sauté for 4-5 minutes, stirring frequently, until the onions become translucent and caramelized. This creates a beautiful flavor base for your Lamb Stew, releasing all those aromatic goodness into the pot.

Step 5: Combine Ingredients
Return the seared lamb to the pot, adding the roasted eggplant, red wine, tomato paste, canned tomatoes, and your choice of stock. Toss in a bay leaf, pepper, thyme, cinnamon stick, allspice, nutmeg, and salt. Stir everything together well, ensuring all ingredients are combined, creating a deliciously fragrant mixture.

Step 6: Simmer
Cover the pot and let the stew simmer on low heat for 2.5 to 3 hours. Alternatively, if you prefer a slow cooker, you can set it for 4 to 8 hours. This gentle cooking allows all the flavors of the Comforting Lamb Stew to meld beautifully, resulting in a hearty and rich dish.

Step 7: Serve
Once the simmering is complete, remove the pot from heat and discard the bay leaf and cinnamon stick. Garnish your Lamb Stew with freshly chopped parsley for a pop of color. Serve it warm with fluffy rice or warm pita bread to soak up the deliciousness of this comforting meal.

Make Ahead Options

These Comforting Lamb Stew with Roasted Eggplant are perfect for busy home cooks looking to save time during the week! You can chop the vegetables (onions, garlic, and eggplant) and marinate the lamb up to 24 hours in advance, storing them separately in the refrigerator to maintain freshness. Alternatively, the entire stew can be assembled and refrigerated for up to 3 days; just keep it in an airtight container. When it’s time to serve, simply reheat the stew gently on the stove, stirring occasionally until warmed through, and garnish with fresh parsley. This technique preserves the hearty flavors and ensures that every bite remains just as delicious as freshly made!

What to Serve with Comforting Lamb Stew with Roasted Eggplant

Warm, inviting aromas waft through your kitchen, beckoning a comforting meal that wraps you in cozy flavors.

  • Creamy Mashed Potatoes: Perfectly fluffy and velvety, these potatoes soak up the rich stew, enhancing each bite with their buttery goodness.
  • Garlic Bread: Crisp and fragrant, garlic bread adds a delightful crunch, complementing the stew’s savory elements while inviting you to keep dipping.
  • Tangy Greek Salad: A refreshing contrast, this bright salad brings crunchy cucumbers, juicy tomatoes, and a zesty dressing to balance the dish’s warmth.
  • Fluffy Couscous: Light and airy, couscous absorbs flavors from the stew, offering a subtle nuttiness that rounds out the meal beautifully.
  • What About Wine? A glass of bold red wine elevates the overall experience, introducing a lovely depth that matches the stew’s rich spices.
  • Chocolate Mousse: End the meal on a sweet note with creamy chocolate mousse, creating a wonderful climax of flavors that pairs surprisingly well with the hearty stew.

How to Store and Freeze Lamb Stew

  • Fridge: Store leftover lamb stew in an airtight container for up to 3 days. Let it cool to room temperature before sealing to maintain freshness and flavor.
  • Freezer: Freeze lamb stew for up to 3 months. Portion it into freezer-safe containers, allowing space for expansion, and thaw overnight in the fridge when ready to reheat.
  • Reheating: To reheat, warm gently on the stove over low heat or in the microwave, stirring occasionally until heated through. Add a splash of stock or water if needed to maintain a nice consistency.
  • Make-Ahead: If preparing in advance, consider making the stew a day before serving. The flavors develop even more overnight, making it taste even better the next day!

Expert Tips for Lamb Stew

  • Roast Eggplant First: Roast the eggplant before adding it to the stew; this enhances its smoky flavor and tender texture, elevating your lamb stew experience.
  • Sear the Lamb Properly: Ensure the lamb is thoroughly browned to lock in flavors and moisture. Skipping this step can lead to a less flavorful stew.
  • Simmer Gently: A slow simmer allows flavors to meld beautifully. Avoid boiling, as it can toughen the meat and distort flavors in your comforting lamb stew.
  • Season to Taste: Always taste the stew before serving; adjust seasoning to your preference for the best balance and flavor.
  • Let It Rest Before Serving: Let the stew sit for about an hour after cooking; this resting period deepens the flavors and improves overall texture.

Lamb Stew with Roasted Eggplant Variations

Feel free to get creative and adjust this stew to fit your cravings or dietary needs. Let your imagination run wild!

  • Vegetarian: Substitute lamb with chickpeas or lentils for a fulfilling meat-free meal.

  • Add More Veggies: Toss in diced carrots or bell peppers for extra color, sweetness, and nutrition. They complement the smoky eggplant perfectly.

  • Spice it Up: For a fiery kick, add diced jalapeños or a pinch of red pepper flakes. This twist brings warmth without overpowering the rich flavor.

  • Herb Boost: Fresh rosemary or oregano can enhance the herbal notes of your stew. These herbs provide a delightful aroma and flavor different from thyme.

  • Smoky Flavor: Try including smoked paprika for a deeper, smoky essence that pairs beautifully with the roasted eggplant. Each bite will remind you of a campfire gather.

  • Creamy Texture: Add a splash of coconut milk at the end for a creamy finish. This surprise gives your stew a silky mouthfeel and balances the spices nicely.

  • Garnish with Flair: Instead of parsley, use fresh mint or cilantro to brighten up your dish. This subtle twist on the garnish can elevate the presentation and taste.

  • Nutty Crunch: Top with toasted pine nuts or slivered almonds before serving. This texture contrast adds a lovely crunch, making every spoonful exciting!

Remember, cooking is about exploration! For more delightful ideas, check out how to make your own vegetable stock or explore the world of meal prep to simplify your weeknight dinners!

Comforting Lamb Stew with Roasted Eggplant Recipe FAQs

How do I select the right eggplant for this recipe?
Look for eggplants that are firm, with smooth, shiny skin and a vibrant color. Avoid those with dark spots or blemishes, as these can indicate overripeness. A medium-sized eggplant is ideal for this stew, providing the perfect balance of flavor and texture.

What’s the best way to store leftover lamb stew?
Store your leftover lamb stew in an airtight container in the refrigerator for up to 3 days. Be sure to let it cool to room temperature before sealing to maintain its freshness and flavor. It’s a great option for quick meals in the following days!

Can I freeze this lamb stew, and if so, how?
Absolutely! Freeze your lamb stew for up to 3 months. First, allow it to cool completely, then portion it into freezer-safe containers, leaving some space at the top for expansion. When you’re ready to enjoy, thaw it overnight in the fridge and reheat gently on the stove or in the microwave until warmed through.

What if my stew turns out too thick?
If your lamb stew is too thick after cooking, simply stir in a bit of additional stock or water gradually until it reaches your desired consistency. For a smoother texture, you can blend a portion of the stew and mix it back in for a creamier result that still retains its hearty feel.

Are there any dietary considerations with this recipe for pets or allergies?
Yes, always check for any allergies to lamb or specific spices used in the stew. While this dish is delicious for humans, it is generally not suitable for pets, particularly dogs, as some ingredients (like garlic) can be toxic to them. If you’re preparing for someone with allergies, you may substitute ingredients carefully—like using vegetable broth instead of stock.

What should I do if I don’t have red wine for this stew?
No worries at all! You can replace red wine with beef stock or grape juice for a non-alcoholic version. Both options will maintain the moisture and richness needed in the stew while still delivering fantastic flavor. Adjust the seasoning slightly as needed to balance the flavors.

undefined

Hearty Lamb Stew with Roasted Eggplant for Cozy Nights

This hearty lamb stew combines tender lamb and smoky roasted eggplant, making it perfect for cozy dinners and easily adaptable for vegetarian diets.
Prep Time 20 minutes
Cook Time 3 hours
Resting Time 1 hour
Total Time 5 hours
Servings: 4 bowls
Course: Dinner
Cuisine: Mediterranean
Calories: 450

Ingredients
  

For the Stew
  • 1 large Eggplant Adds a savory depth; replace with zucchini for a lighter option.
  • 2 tablespoons Olive Oil Vital for sautéing and roasting; avocado oil can be used for higher smoke points.
  • 2 pounds Lamb (boneless, cubed) The star of the dish, providing rich flavor; ground lamb or chickpeas make great vegetarian substitutes.
  • 1 large Onion Offers a natural sweetness; yellow or white onions caramelize beautifully.
  • 4 cloves Garlic For an aromatic foundation; fresh garlic is preferred, but garlic powder works too.
  • 1 cup Red Wine Elevates the stew's flavor; substitute with grape juice or beef stock for a non-alcoholic twist.
  • 2 tablespoons Tomato Paste Concentrates the tomato flavor; crushed fresh tomatoes can enhance the freshness.
  • 1 can Canned Tomatoes Forms the stew's base; seasonal fresh tomatoes can brighten the dish.
  • 4 cups Lamb or Beef Stock Adds depth and moisture; vegetable stock can lighten it up.
  • 1 leaf Bay Leaf Infuses earthy undertones; if unavailable, try Italian seasoning as a substitute.
  • 1 teaspoon Black Pepper For seasoning; feel free to omit or adjust to taste.
  • 1 tablespoon Thyme Adds a herbal touch; dried thyme can replace fresh without losing much flavor.
  • 1 stick Cinnamon Stick Creates warmth; ground cinnamon can be substituted (use less).
  • 1 teaspoon Allspice Enhances complexity; nutmeg can replace it though the flavor differs.
  • 1/4 teaspoon Nutmeg Best when freshly grated; can be omitted if you prefer a subtler taste.
  • 1 teaspoon Salt Essential for flavor; adjust based on preference.
  • 1/4 cup Fresh Parsley A vibrant garnish; cilantro is a wonderful alternative for a different flavor profile.

Equipment

  • Oven
  • Large pot
  • Baking Sheet

Method
 

Cooking Steps
  1. Preheat your oven to 400°F (200°C). Gather your ingredients and prepare your baking sheet.
  2. Toss the diced eggplant with olive oil and spread evenly on a baking sheet. Roast for about 20 minutes until golden brown and tender.
  3. In a large pot, heat olive oil over medium-high heat. Add cubed lamb and sear for 5-7 minutes until browned. Remove and set aside.
  4. In the same pot, reduce heat to medium and sauté diced onion and minced garlic for 4-5 minutes until translucent.
  5. Return the seared lamb to the pot, along with roasted eggplant, red wine, tomato paste, canned tomatoes, and stock. Add bay leaf, black pepper, thyme, cinnamon stick, allspice, nutmeg, and salt. Stir well.
  6. Cover the pot and let the stew simmer on low heat for 2.5 to 3 hours.
  7. Remove from heat, discard bay leaf and cinnamon stick, garnish with parsley, and serve with rice or pita bread.

Nutrition

Serving: 1bowlCalories: 450kcalCarbohydrates: 30gProtein: 35gFat: 18gSaturated Fat: 5gPolyunsaturated Fat: 1gMonounsaturated Fat: 12gCholesterol: 90mgSodium: 800mgPotassium: 950mgFiber: 8gSugar: 6gVitamin A: 800IUVitamin C: 10mgCalcium: 50mgIron: 3.5mg

Notes

Roasting the eggplant enhances its smoky flavor. Let the stew rest for about an hour after cooking for the best flavor.

Tried this recipe?

Let us know how it was!

Creamy Pumpkin Spice Milk – Cozy Fall Indulgence to Savor

The crisp air of autumn whispers promises of cozy evenings and comforting delights, making it the perfect time to embrace the magic of seasonal flavors. That’s where my Creamy Pumpkin Spice Milk comes in—a delightful twist on your ordinary drink that incorporates real pumpkin and a blend of warm spices. In just 10 minutes, you can whip up this versatile treat, whether you prefer it steaming hot or served cold over ice. It’s easy to customize the sweetness to fit your taste, ensuring that everyone can enjoy a healthy indulgence without the guilt. Curious to learn how to craft this heartwarming elixir? Let’s dive into the recipe that will bring the essence of fall right into your cup!

Why is Pumpkin Spice Milk a Must-Try?

Warmth: This creamy drink captures the essence of fall, bringing you cozy vibes in every sip.

Customizable: You can adjust sweetness and choose your milk—almond, oat, or even coconut—making it perfect for any diet.

Quick Prep: Ready in just 10 minutes, it’s a fantastic way to whip up a homemade treat without fuss.

Guilt-Free Indulgence: Made with wholesome ingredients, it’s lower in calories than traditional pumpkin spice lattes, so you can indulge healthily.

Special Touch: Top with whipped cream and an extra sprinkle of pumpkin pie spice for a festive finish! Enjoy alongside fresh pastries or as a delightful drink at gatherings, ensuring it’ll be a hit with everyone.

Pumpkin Spice Milk Ingredients

For the Base
Milk – Use your favorite dairy or non-dairy variety like almond milk or oat milk for a delightful twist.
Pumpkin Puree – Essential for that signature pumpkin flavor; canned pumpkin makes it super easy!
Honey – Sweeten your drink naturally; feel free to substitute with agave nectar or maple syrup for a lower-calorie option.

For the Spice Blend
Pumpkin Pie Spice – A cozy mix of nutmeg, cinnamon, and ginger; use individual spices as substitutes if needed.

For Garnish
Whipped Cream – An optional luxurious topping; choose a dairy-free alternative if you prefer!

With these simple ingredients, you can whip up a heartwarming cup of Pumpkin Spice Milk that perfectly embodies the fall season—no guilt involved!

Step-by-Step Instructions for Creamy Pumpkin Spice Milk

Step 1: Combine Ingredients
In a medium saucepan, add 2 cups of your favorite milk, 1/2 cup of pumpkin puree, 2 tablespoons of honey, and 1 teaspoon of pumpkin pie spice. Stir everything together, ensuring the pumpkin puree is well incorporated without any lumps. This mixture will create the foundation for your creamy Pumpkin Spice Milk, beautifully blending flavors that evoke the essence of fall.

Step 2: Heat the Mixture
Place the saucepan over medium-low heat and gently whisk the mixture continuously. Keep an eye on it for about 5 minutes, allowing the drink to warm evenly without reaching a boil. You’ll know it’s ready when steam rises from the surface, and the flavors meld together, creating a comforting aroma that fills the kitchen.

Step 3: Serve the Drink
Once the Pumpkin Spice Milk is warm and velvety, carefully pour it into a large mug. This cozy beverage is perfect for savoring on a chilly evening, as its rich color and enticing scent resemble the gorgeous shades of autumn leaves. Take a moment to appreciate the warmth before proceeding to the final garnish.

Step 4: Add the Finishing Touch
Top your Creamy Pumpkin Spice Milk with a generous dollop of whipped cream for a luxurious finish. For an extra touch of fall flavor, sprinkle a pinch of pumpkin pie spice on top, inviting a visual delight as you prepare to enjoy it. Your homemade treat is now complete and ready to warm your heart!

What to Serve with Creamy Pumpkin Spice Milk

Experience a cozy culinary journey that transforms your Pumpkin Spice Milk into a delightful meal celebration.

  • Flaky Croissants: Perfectly buttery and airy, these pastries add a light, flaky contrast to the creamy drink. Try pairing them with a sprinkle of cinnamon sugar for extra warmth.
  • Spiced Pumpkin Muffins: These tender, moist muffins resonate with the flavors of your drink, creating a harmonious fall-themed pairing that delights every taste bud.
  • Gingerbread Cookies: With their spiced sweetness, these cookies perfectly complement the pumpkin spices, making every sip of your milk even more comforting. The crunch of the cookies balances the smoothness of the drink.
  • Apple Slices with Caramel Dip: Fresh, crisp apple slices drizzled with a touch of warm caramel create a refreshing, sweet treat that complements the creamy texture of the milk.
  • Chai Tea: The warm spice of chai adds depth and complexity, making it a perfect partner for the Pumpkin Spice Milk, uniting the essence of fall in each sip.
  • Roasted Chestnuts: Their buttery flavor and slightly sweet edge offer a delightful contrast, enhancing your cozy fall experience while indulging in the velvety milk.
  • Pecan Pie: This rich and nutty dessert brings a delightful sweetness that mirrors the warmth of pumpkin flavors, making each bite and sip a moment of pure bliss.
  • Maple Syrup-Glazed Bacon: Salty and sweet, this unexpected pairing adds a savory contrast to the sweetness of Pumpkin Spice Milk, creating a perfectly balanced meal.
  • Vanilla Ice Cream: A scoop of creamy vanilla ice cream stirred into the pumpkin spice milk creates a luscious dessert drink that feels indulgent yet comforting.
  • Warm Cinnamon Rolls: Soft, gooey rolls topped with cream cheese frosting are a delectable accompaniment, marrying beautifully with the pumpkin spices while being utterly comforting.

Pumpkin Spice Milk Variations & Substitutions

Explore the delightful ways you can make this pumpkin spice milk your own, adding a personal touch to every sip!

  • Dairy-Free: Swap traditional milk for almond, oat, or coconut milk for a creamy, plant-based alternative. You’ll enjoy the same luscious texture without the dairy, perfect for lactose sensitivity!

  • Natural Sweeteners: Replace honey with agave nectar, maple syrup, or stevia for a tailored sweetness that fits your dietary preferences. Each sweetener presents a unique flavor twist, opening a world of possibilities!

  • Enhanced Flavors: Add a splash of vanilla extract to deepen the flavor profile. This simple enhancement can elevate your drink to new heights, making each cup even more comforting.

  • Spice It Up: Boost the warmth by incorporating extra cinnamon or nutmeg. This simple tweak can offer a richer spice experience that evokes the essence of autumn even more vividly.

  • Iced Version: Blend the ingredients with ice for a refreshingly cool treat. This concoction is perfect for those warm days when you still crave that cozy pumpkin flavor without the heat.

  • Whipped Topping: Play with garnishes by using coconut whipped cream or a sprinkle of cacao nibs. This creates a visually stunning finish and introduces a hint of chocolate without losing the pumpkin essence.

  • Flavor Infusion: Try adding a hint of espresso for a pumpkin spice latte variation. The coffee’s boldness melds beautifully with the spices, creating a perfect morning pick-me-up.

  • Nutty Texture: Stir in some ground flaxseed or almond meal for added texture and nutrition. This subtle change not only enhances fiber but also adds a delightful nuttiness to each sip.

Let your imagination run wild with these variations, ensuring every cup of pumpkin spice milk reflects your personal taste and creativity! If you’re looking for more exciting twists, check out our seasonal drinks collection for inspiration.

How to Store and Freeze Pumpkin Spice Milk

Fridge: Store leftover pumpkin spice milk in an airtight container for up to 3 days. Be sure to shake or stir well before reheating to reincorporate ingredients.

Freezer: For longer storage, freeze pumpkin spice milk in ice cube trays. Once frozen, transfer the cubes to a sturdy bag for up to 3 months. Great for blending into smoothies!

Reheating: When ready to enjoy, reheat the chilled or frozen pumpkin spice milk gently over low heat, stirring constantly until warm. Avoid boiling to maintain that lovely velvety texture.

Customization: Feel free to adjust sweetness after reheating or enhance the flavors with a pinch of extra pumpkin pie spice for an even more delightful experience!

Expert Tips for Pumpkin Spice Milk

  • Whisk Constantly: Prevent scorching by whisking the mixture continuously while heating; this ensures a smooth, creamy texture without burnt bits.

  • Taste for Sweetness: Adjust the sweetness to your liking by tasting as you slowly add honey. Remember, you can always add more, but it’s hard to take it out!

  • Store Safely: Keep leftover pumpkin spice milk in an airtight container in the refrigerator for up to 3 days. Reheat gently, but avoid overheating to preserve the flavors.

  • Experiment Freely: Feel free to customize your pumpkin spice milk by trying different sweeteners or proportions of pumpkin pie spice, making the recipe truly yours.

  • Chill for Iced Version: If you prefer a colder drink, blend the ingredients with ice instead of heating them. Enjoy your refreshing twist on the classic pumpkin spice flavor!

Make Ahead Options

These Creamy Pumpkin Spice Milk preparations are perfect for busy home cooks looking to save time! You can prepare the base mixture (milk, pumpkin puree, honey, and pumpkin pie spice) up to 24 hours in advance. Simply combine these ingredients in a medium saucepan, whisking until smooth, and store the mixture in an airtight container in the refrigerator. When you’re ready to enjoy your drink, just reheat it gently over medium-low heat for about 5 minutes, whisking continuously to ensure it warms without scalding. This way, you’ll have a cozy, heartwarming beverage ready to enjoy with minimal effort—just as delightful as fresh!

Pumpkin Spice Milk Recipe FAQs

What type of pumpkin puree is best for this recipe?
Absolutely! I recommend using canned pumpkin puree for convenience and guaranteed flavor. Look for 100% pumpkin with no added sugars or spices to maintain control over your recipe. If you’re feeling adventurous, you can also make your own by roasting fresh pumpkin, scooping out the flesh, and pureeing it until smooth—just make sure it’s completely blended for the best texture!

How should I store leftover pumpkin spice milk?
Store your leftover pumpkin spice milk in an airtight container in the refrigerator for up to 3 days. Be sure to give it a good shake or stir before reheating, as the ingredients may separate. This will bring back that creamy, delightful texture that you loved when it was freshly made!

Can I freeze pumpkin spice milk for later use?
Yes, you can definitely freeze it! Pour your cooled pumpkin spice milk into ice cube trays and freeze until solid. Once frozen, transfer the cubes to a resealable bag for up to 3 months. These frozen cubes are perfect for adding to smoothies or blending with ice to create a refreshing iced version of your pumpkin spice milk.

What should I do if my pumpkin spice milk is too thick?
If you find your pumpkin spice milk is thicker than you’d like, no worries! Simply add a splash of milk—whether it’s dairy or a non-dairy alternative—while gently warming it up on the stove. Stir well to incorporate until you reach your desired consistency. The more the merrier when it comes to enjoying that velvety texture!

Is this recipe suitable for people with dietary restrictions?
Very! This pumpkin spice milk recipe is easily adaptable for various dietary needs. Use almond, oat, or coconut milk for a dairy-free option. For those managing sugar intake, you can substitute honey with agave nectar, maple syrup, or stevia. Always double-check ingredients for allergens if you’re serving it to guests; making it a safe and enjoyable treat for everyone!

Can pets have pumpkin spice milk?
While pumpkin is safe for dogs in moderation, you should never give your pets this recipe because of sweeteners and spices, especially nutmeg, which can be harmful to them. Always remember to keep special treats like these for human enjoyments only!

undefined

Creamy Pumpkin Spice Milk - Cozy Fall Indulgence to Savor

Delight in creamy pumpkin spice milk, a cozy fall drink rich in flavors, perfect for any dietary preference.
Prep Time 10 minutes
Cook Time 5 minutes
Total Time 15 minutes
Servings: 2 cups
Course: Drinks
Cuisine: American
Calories: 180

Ingredients
  

For the Base
  • 2 cups Milk any dairy or non-dairy variety
  • 1/2 cup Pumpkin Puree canned for convenience
  • 2 tablespoons Honey can substitute with agave nectar or maple syrup
For the Spice Blend
  • 1 teaspoon Pumpkin Pie Spice can use individual spices as substitutes
For Garnish
  • 1 dollop Whipped Cream optional, can choose a dairy-free alternative

Equipment

  • medium saucepan
  • whisk
  • Large mug

Method
 

Step-by-Step Instructions for Creamy Pumpkin Spice Milk
  1. In a medium saucepan, add 2 cups of your favorite milk, 1/2 cup of pumpkin puree, 2 tablespoons of honey, and 1 teaspoon of pumpkin pie spice. Stir everything together, ensuring the pumpkin puree is well incorporated without any lumps.
  2. Place the saucepan over medium-low heat and gently whisk the mixture continuously for about 5 minutes, allowing it to warm evenly without boiling.
  3. Once the Pumpkin Spice Milk is warm and velvety, carefully pour it into a large mug.
  4. Top your Creamy Pumpkin Spice Milk with a generous dollop of whipped cream and a sprinkle of pumpkin pie spice before serving.

Nutrition

Serving: 1cupCalories: 180kcalCarbohydrates: 30gProtein: 3gFat: 6gSaturated Fat: 3gCholesterol: 10mgSodium: 100mgPotassium: 250mgFiber: 1gSugar: 15gVitamin A: 500IUVitamin C: 2mgCalcium: 200mgIron: 0.5mg

Notes

Keep leftover milk in an airtight container for up to 3 days. Adjust sweetness as desired, and enjoy hot or iced.

Tried this recipe?

Let us know how it was!

Roasted Autumn Vegetable Pot Pies for Cozy Comfort

The sweet scent of roasted squash fills the kitchen, evoking cozy evenings spent surrounded by loved ones—this is the magic of Roasted Autumn Vegetable Pot Pies. Picture a golden, flaky crust enveloping a hearty blend of seasonal vegetables like butternut squash, carrots, and sweet potatoes, infused with aromatic herbs. This dish isn’t just comfort food; it embodies the essence of autumn flavors in a customizable, quick meal prep that will impress even the busiest home chefs. Plus, it’s a fantastic way to use up those seasonal vegetables, making it both practical and satisfying. Are you ready to add a touch of warmth to your dinner table? Let’s dive into making these delightful pot pies!

Why Are Pot Pies So Irresistible?

Warmth of Comfort Food: There’s nothing quite like the cozy feeling of digging into a pot pie, especially when it’s filled with seasonal vegetables.

Customizable Delight: You can easily tailor this recipe to your taste by swapping in your favorite veggies or making it vegan—adapt it to everyone’s preferences!

Quick and Easy: With a straightforward prep and bake process, it’s perfect for busy evenings, allowing you to serve a gourmet meal in under an hour.

A Seasonal Celebration: Each bite brings a taste of fall with the sweet and savory depths of roasted autumn vegetables.

Crowd-Pleasing Appeal: Whether for a family dinner or a gathering with friends, these pot pies are sure to impress your guests with their flaky crust and delicious filling.

Pair this dish with a mixed green salad or cranberry sauce for extra brightness, and don’t forget to check out our tips on meal prep ideas to save time during busy weeks!

Roasted Autumn Vegetable Pot Pie Ingredients

For the Filling

  • Butternut Squash – Adds rich sweetness and smooth texture; any sweet squash, like acorn or kabocha, can work.
  • Carrots – Provides a sweet crunch and vibrant color; baby carrots can be used for ease.
  • Parsnips – Contributes nuttiness and depth of flavor; turnips may serve as a unique alternative.
  • Sweet Potatoes – Offers a caramel-like flavor and velvety texture; Yukon gold potatoes can be used for a different texture.
  • Brussels Sprouts – Adds a savory bite and contrast in texture; broccoli florets can provide a different flavor profile.
  • Olive Oil – Coats vegetables for even roasting; any neutral oil can be substituted.
  • Salt and Pepper – Basic seasonings enhancing natural flavors; sea salt elevates flavor; use as needed.
  • Fresh Thyme and Rosemary – Provide aromatic depth and fragrance; dried herbs can be used in lesser amounts.
  • Butter – Enriches flavor in sautéed base; use vegan butter for a vegan version.
  • Onion – Creates a sweet and aromatic base; yellow onions are preferred; shallots can also work.
  • Garlic – Adds savory punch; fresh or powdered garlic can be used.

For the Sauce

  • All-Purpose Flour – Thickens the sauce; gluten-free flour blend can work.
  • Vegetable Broth – Forms the base of the sauce; chicken broth offers a meatier flavor.
  • Heavy Cream – Provides a creamy consistency; plant-based cream for a vegan option.

For the Crust

  • Puff Pastry – Creates the flaky lid; ensure it’s thawed before use.
  • Egg (for wash) – Gives a shiny finish to the crust; use plant-based milk for a vegan wash.

With these ingredients in hand, you’re well on your way to crafting cozy Roasted Autumn Vegetable Pot Pies that celebrate the comforting flavors of the season. Let’s get cooking!

Step‑by‑Step Instructions for Creamy Roasted Autumn Vegetable Pot Pies

Step 1: Preheat the Oven
Begin by preheating your oven to 400°F (200°C) and line a baking sheet with parchment paper. This step ensures a crispy base for your Roasted Autumn Vegetable Pot Pies. As the oven heats, get your other ingredients ready, allowing the flavors to meld beautifully during preparation.

Step 2: Prepare the Vegetables
In a large mixing bowl, toss together the diced butternut squash, carrots, parsnips, sweet potatoes, and Brussels sprouts. Drizzle generous olive oil over the vegetables, then season with salt, pepper, fresh thyme, and rosemary. This mixture will form the heart of your pot pie, so ensure every piece is well coated for optimal roasting.

Step 3: Roast the Vegetables
Spread the vegetable mixture evenly on the prepared baking sheet and roast for 25-30 minutes. You’ll know they’re ready when the veggies are tender and slightly caramelized, enhancing their natural sweetness. Stir midway through roasting to ensure even cooking, making the flavors truly pop in your Creamy Roasted Autumn Vegetable Pot Pies.

Step 4: Sauté Onions and Garlic
While the vegetables are roasting, melt butter in a large skillet over medium heat. Add finely chopped onions and minced garlic, sautéing them until they become translucent and fragrant, about 3-5 minutes. This aromatic base adds depth to your filling, setting the tone for a comforting pot pie experience.

Step 5: Make the Roux
Once the onions are ready, sprinkle all-purpose flour into the skillet, stirring continuously for 1-2 minutes. This will form a roux that will thicken the filling for your Roasted Autumn Vegetable Pot Pies. You want to cook the flour just enough to remove its raw taste without browning it.

Step 6: Prepare the Sauce
Slowly whisk in the vegetable broth into your roux until the mixture is well combined. Allow it to simmer for 3-4 minutes until thickened to a creamy consistency. This luxurious sauce ties your filling together, transforming the roasted vegetables into a rich, satisfying mixture perfect for the pot pies.

Step 7: Combine Filling
Remove the roasted vegetables from the oven and carefully fold them into the skillet with the sauce. Add heavy cream and stir until well combined, adjusting seasoning with more salt and pepper if desired. Your filling now embodies the inviting essence of autumn, ready to embrace the flaky crust of these delightful pot pies.

Step 8: Roll Out Pastry
On a lightly floured surface, roll out the thawed puff pastry to a thickness of about ¼ inch. Use a round cutter to create circles that are larger than your ramekins or pot pie bowls. This step is crucial as it ensures a lovely, puffy lid when you bake your Roasted Autumn Vegetable Pot Pies.

Step 9: Assemble Pot Pies
Spoon the creamy filling into your prepared ramekins, filling them just below the rim to prevent overflow. Drape the pastry circles over the bowls, pressing the edges down firmly to seal. This method locks in all the savory goodness, creating an irresistible aroma as they bake.

Step 10: Brush and Bake
Apply a blanket of egg wash over the pastry tops for a beautiful golden finish. Place the assembled pot pies into the preheated oven and bake for 20-25 minutes, or until the crust is puffed and deeply golden brown. The delightful fragrance wafting through your kitchen is a testament to the comfort food magic happening inside.

Step 11: Cool and Serve
Once baked, remove the pot pies from the oven and let them cool for 5-10 minutes. This waiting period allows the filling to set slightly, making for easier serving. Slice into the flaky crust to reveal the creamy filling, inviting everyone to gather ’round for a cozy meal of Roasted Autumn Vegetable Pot Pies.

Make Ahead Options

These Creamy Roasted Autumn Vegetable Pot Pies are fantastic for meal prep enthusiasts! You can roast the vegetables and prepare the filling up to 24 hours in advance; simply refrigerate them in an airtight container to keep them fresh. When you’re ready to enjoy the pot pies, just assemble and bake them as per the original instructions. If you plan to freeze, you can assemble the uncooked pot pies and wrap them in plastic wrap and foil for up to 2 months. This way, they retain their delicious flavors and flaky texture. When you’re ready to serve, bake them directly from the freezer, adding an extra 5-10 minutes to the cooking time for perfectly golden crusts every time.

What to Serve with Roasted Autumn Vegetable Pot Pies

Cozy dinners are best enjoyed with delightful sides that bring out the warm flavors of the season.

  • Mixed Green Salad: Tossed with a light vinaigrette, it adds freshness and balance to the rich, creamy pot pies.
  • Cranberry Sauce: The tanginess of cranberry sauce beautifully contrasts with the savory filling, creating a delightful burst of flavor.
  • Garlic Bread: Warm, crusty garlic bread is perfect for mopping up the creamy filling, making each bite even more satisfying.
  • Roasted Root Vegetables: A side of caramelized carrots and parsnips enhances the seasonal theme, echoing the flavors from the pot pie.
  • Mashed Sweet Potatoes: Creamy and slightly sweet, these provide a smooth texture that pairs wonderfully with the flaky crust.
  • Pumpkin Soup: A warming bowl of pumpkin soup can be a light, comforting starter, harmonizing with the autumn ingredients.
  • Herbal Tea: A cup of chamomile or peppermint tea after dinner can enhance the cozy experience, wrapping up your meal beautifully.
  • Apple Crisp: For dessert, warm apple crisp adds a lovely sweet finish, making it an irresistible way to end your autumn feast.

Variations & Substitutions for Roasted Autumn Vegetable Pot Pies

Feel free to let your creativity shine as you personalize this comforting recipe into something uniquely yours!

  • Seasonal Swap: Replace vegetables with whatever’s ripe in your area, like zucchini or mushrooms, for a fresh twist.
  • Vegan Delight: Use plant-based butter and cream; switch puff pastry for a vegan variety, keeping it equally delicious.
  • Hearty Grains: Stir in cooked quinoa or farro into the filling for an added nutritional boost and delightful texture.
  • Flavor Boost: Add spices like smoked paprika or cumin to your vegetable mixture for a warm, enticing flavor profile.
  • Herb Variance: Experiment with different herbs like sage or dill for fresh, seasonal flavors; they pair beautifully with root veggies.
  • Cheesy Goodness: Incorporate a handful of shredded cheese, like cheddar or mozzarella, into the filling for a creamy, cheesy finish.
  • Potato Love: Try russet potatoes instead of sweet potatoes for a heartier filling that complements the savory vegetables.
  • Spice it Up: If you enjoy heat, mix in diced jalapeños or a pinch of cayenne pepper to elevate the flavor with a kick.

Embrace these variations to create your own version of comforting pot pies! And if you’re looking for more plant-based inspiration, check out our guide on delicious vegan substitutes.

Storage Tips for Roasted Autumn Vegetable Pot Pies

Fridge: Store leftover pot pies in airtight containers for up to 3-4 days. Make sure they are completely cooled before sealing to maintain freshness.

Freezer: Wrap individual pot pies tightly in plastic wrap and foil or place in freezer bags. They can be frozen for up to 2 months without losing quality.

Reheating: To reheat, thaw overnight in the fridge, then bake at 350°F (175°C) for 15-20 minutes until heated through, perfect for enjoying your Roasted Autumn Vegetable Pot Pies again.

Serving Suggestions: These pot pies are best served fresh but make great leftovers too! Pair with a salad or cranberry sauce for a refreshing complement if you’re enjoying them later.

Expert Tips for Roasted Autumn Vegetable Pot Pies

  • Thoroughly Preheat: Ensure your oven reaches the right temperature before baking for a perfectly flaky crust. A hot oven is crucial for that desirable puff pastry texture!

  • Check Veggies: Roast vegetables until they’re fork-tender and caramelized for a richer flavor profile. Under-roasting can lead to a crunchy filling, which isn’t ideal for pot pies.

  • Adjust Consistency: If your filling seems too thick, whisk in a little extra vegetable broth. A creamy balance is key to achieving delicious Roasted Autumn Vegetable Pot Pies.

  • Seal Strongly: When assembling your pot pies, press the edges of the pastry firmly to avoid leakage during baking. A tight seal keeps all the savory goodness inside!

  • Don’t Rush Cooling: Allow the baked pot pies to cool for 5-10 minutes before serving. This resting time helps everything set and makes for a more enjoyable eating experience.

Roasted Autumn Vegetable Pot Pies Recipe FAQs

What vegetables should I use for roasting?
Absolutely! You can use any seasonal vegetables you have on hand. Butternut squash, carrots, sweet potatoes, Brussels sprouts, and parsnips create a beautiful flavor combination. If you’re looking for alternatives, consider using acorn squash or turnips based on your preference.

How long can I store leftovers?
Leftover Roasted Autumn Vegetable Pot Pies can be stored in airtight containers for up to 3-4 days in the refrigerator. Ensure they’re completely cooled before sealing to retain freshness.

Can I freeze the pot pies?
Very much so! To freeze, wrap individual pot pies tightly in plastic wrap and then in aluminum foil or place them in freezer bags. They can be kept frozen for up to 2 months. When you’re ready to enjoy, thaw them in the fridge overnight and reheat in the oven at 350°F (175°C) for about 15-20 minutes until heated through.

What if the filling turns out too thick?
If your filling seems overly thick, don’t worry! Simply whisk in a bit more vegetable broth to achieve your desired consistency. If the filling is too thin, just let it simmer a little longer until it thickens up nicely.

Are there any dietary considerations for pets or allergies?
Indeed! This recipe is vegetarian and can be easily adapted for vegans by swapping heavy cream with plant-based cream and using vegan butter and egg substitutes. It’s important to note that some vegetables like garlic can be harmful to pets, so keep leftovers safely stored away from four-legged friends.

How can I ensure my puff pastry turns out flaky?
To achieve that perfect flaky crust, ensure your oven is thoroughly preheated before baking. Moreover, keep the puff pastry chilled until right before you roll it out, and avoid overworking the dough. This will help every bite to be wonderfully light and crispy!

undefined

Roasted Autumn Vegetable Pot Pies for Cozy Comfort

Delight in the warm, comforting flavors of Roasted Autumn Vegetable Pot Pies, perfect for the fall season.
Prep Time 15 minutes
Cook Time 30 minutes
Cooling Time 10 minutes
Total Time 55 minutes
Servings: 4 pot pies
Course: Dinner
Cuisine: American
Calories: 450

Ingredients
  

For the Filling
  • 2 cups butternut squash
  • 2 cups carrots baby carrots can be used
  • 1 cup parsnips or turnips
  • 2 cups sweet potatoes or Yukon gold potatoes
  • 1 cup Brussels sprouts or broccoli florets
  • 2 tablespoons olive oil any neutral oil can be substituted
  • to taste salt and pepper use sea salt for enhanced flavor
  • 1 tablespoon fresh thyme or dried herbs in lesser amounts
  • 1 tablespoon fresh rosemary or dried herbs in lesser amounts
  • 2 tablespoons butter use vegan butter for a vegan version
  • 1 medium onion yellow onions preferred
  • 2 cloves garlic fresh or powdered
For the Sauce
  • 2 tablespoons all-purpose flour gluten-free flour blend can work
  • 2 cups vegetable broth or chicken broth
  • 1 cup heavy cream or plant-based cream for vegan option
For the Crust
  • 1 package puff pastry thawed
  • 1 large egg use plant-based milk for vegan wash

Equipment

  • Baking Sheet
  • Mixing Bowl
  • Skillet
  • ramekins
  • Round Cutter

Method
 

Step-by-Step Instructions
  1. Preheat your oven to 400°F (200°C) and line a baking sheet with parchment paper.
  2. In a large mixing bowl, toss together the diced butternut squash, carrots, parsnips, sweet potatoes, and Brussels sprouts. Drizzle olive oil over the vegetables, then season with salt, pepper, fresh thyme, and rosemary.
  3. Spread the vegetable mixture evenly on the prepared baking sheet and roast for 25-30 minutes, stirring midway through roasting.
  4. While the vegetables are roasting, melt butter in a large skillet over medium heat. Add chopped onions and minced garlic, sauté until translucent and fragrant, about 3-5 minutes.
  5. Sprinkle all-purpose flour into the skillet, stirring continuously for 1-2 minutes to form a roux.
  6. Slowly whisk in the vegetable broth until well combined. Allow it to simmer for 3-4 minutes until thickened.
  7. Remove the roasted vegetables from the oven and fold them into the skillet with the sauce. Stir in heavy cream, and adjust seasoning as desired.
  8. On a lightly floured surface, roll out the thawed puff pastry and use a round cutter to create circles larger than your ramekins.
  9. Spoon the creamy filling into your prepared ramekins, filling just below the rim. Drape the pastry circles over the bowls, pressing edges to seal.
  10. Apply an egg wash over the pastry tops and bake for 20-25 minutes, until the crust is puffed and golden brown.
  11. Allow the pot pies to cool for 5-10 minutes before serving.

Nutrition

Serving: 1pot pieCalories: 450kcalCarbohydrates: 50gProtein: 8gFat: 25gSaturated Fat: 10gPolyunsaturated Fat: 2gMonounsaturated Fat: 8gCholesterol: 100mgSodium: 500mgPotassium: 800mgFiber: 6gSugar: 8gVitamin A: 1200IUVitamin C: 30mgCalcium: 50mgIron: 2mg

Notes

Pair with a salad or cranberry sauce for extra brightness.

Tried this recipe?

Let us know how it was!

Easy Mini Pancake Poppers for a Quick, Customizable Breakfast

As I stood in my kitchen, the scent of vanilla wafting through the air, I knew I was on the verge of a breakfast breakthrough. These Easy Mini Pancake Poppers quickly became a go-to recipe for my busy mornings. Not only are they customizable to fit every craving—be it sweet chocolate chips or savory bacon—but they bake up in a mere 8-12 minutes, making them perfect for families on the move. Plus, with gluten-free and vegan options, everyone can indulge without a second thought. Imagine impressing your family with these adorable, fluffy bites that evoke the taste of pancakes in a fun, finger-friendly way. What delicious mix-ins will you try first?

Why Are These Pancake Poppers Amazing?

Customization, these mini pancake poppers can be tailored to satisfy every craving, whether you like sweet or savory. Quick to prepare, baked in just 8-12 minutes, they’re a lifesaver for busy mornings. Kid-friendly and perfect for family gatherings, everyone will love their fluffy texture. Versatile options mean you can effortlessly cater to dietary needs, with gluten-free and vegan substitutes readily available. Serving suggestions are endless; drizzle with syrup, yogurt, or fresh fruit for a delightful twist. Discover why these delightful bites are a breakfast game-changer!

Easy Mini Pancake Poppers Ingredients

  • For the Batter

  • Milk – Provides moisture and richness; substitute with plant-based milk for a dairy-free option.

  • Vinegar – Creates homemade buttermilk, which enhances the flavor and texture of your pancake poppers.

  • Oil (or Butter) – Adds richness and helps keep the poppers moist; use melted butter for extra flavor.

  • Egg (or Flaxseed Meal) – Binds the mixture together; for a vegan option, use 1 tbsp of flaxseed meal mixed with 3 tbsp of water.

  • All-Purpose Flour (or Gluten-Free Blend) – Ensures the structure and fluffiness of the batter; substitute for gluten-free needs.

  • Sugar – Adds a touch of sweetness; omit for savory versions of the pancake poppers.

  • Baking Powder and Baking Soda – Essential leavening agents for light texture; always use fresh.

  • Salt – Enhances flavors; optional for savory variations.

  • Optional Mix-Ins

  • Chocolate Chips – Great for sweet versions; an easy way to add a chocolatey delight.

  • Fresh Fruits – Berries or bananas can lend natural sweetness and flavor.

  • Bacon or Herbs – Perfect for a savory twist; crispy bacon adds delicious flavor while fresh herbs provide a fragrant touch.

Customize these Easy Mini Pancake Poppers to suit your family’s taste and dietary preferences!

Step-by-Step Instructions for Easy Mini Pancake Poppers

Step 1: Preheat and Prepare
Begin by preheating your oven to 375°F (190°C). While it warms up, take a mini muffin tin and coat it generously with cooking spray to prevent the pancake poppers from sticking. This will ensure that each delightful bite comes out effortlessly, retaining its fluffy texture.

Step 2: Create Buttermilk
In a mixing bowl, whisk together the milk and vinegar. Let this mixture rest for 5 minutes; this process turns your regular milk into a homemade buttermilk that deepens the flavor and texture of the Easy Mini Pancake Poppers, giving them that irresistible fluffiness.

Step 3: Combine Wet Ingredients
After your buttermilk has formed, stir in the oil and egg (or flaxseed meal for vegan) into the mixture. Whisk until it’s smooth and well combined. These ingredients will contribute to the richness and moisture of the batter, making every popper a treat that both kids and adults will enjoy.

Step 4: Mix Dry Ingredients
In a separate bowl, sift together the all-purpose flour, sugar, baking powder, baking soda, and salt. Ensure that these ingredients are well mixed to evenly distribute the leavening agents that will help give your pancake poppers their light and airy texture.

Step 5: Combine Wet and Dry Mixtures
Gradually fold the wet ingredients into the dry mixture using a spatula, being careful not to overmix. Gently combine until just blended; this keeps your Easy Mini Pancake Poppers fluffy and airy. You should see a few lumps, but that’s okay!

Step 6: Fill Muffin Tin
Spoon about 1 tablespoon of the batter into each mini muffin cup. If desired, add your favorite customize mix-ins, such as chocolate chips or pieces of bacon, to each cup for an extra burst of flavor. This is where you can get creative and make each popper unique!

Step 7: Bake the Poppers
Place the filled muffin tin in the preheated oven and bake for 8-12 minutes. Keep an eye on them; they should rise beautifully and turn golden. To check for doneness, press lightly in the center—the poppers should feel firm and spring back.

Step 8: Cool and Serve
Once baked, remove the muffin tin from the oven and allow the Easy Mini Pancake Poppers to cool slightly. After a few minutes, gently lift them out and serve warm. Pair them with syrup, yogurt, or fruit drizzles for a scrumptious breakfast treat everyone will love.

What to Serve with Easy Mini Pancake Poppers?

Start your morning off right by elevating these fluffy bites with delicious accompaniments that add flavor and variety to your breakfast spread.

  • Maple Syrup: Drizzle over warm poppers for that classic sweet touch that every pancake lover adores.
  • Greek Yogurt: Serve alongside for a creamy, protein-packed dip; it perfectly complements the fluffiness of each popper.
  • Fresh Berries: Brighten the plate with strawberries, blueberries, or raspberries; their tartness balances the sweetness beautifully.
  • Crispy Bacon: Add a savory contrast to your breakfast; its saltiness brings out the rich, comforting flavors of the poppers.
  • Nut Butter: Spread almond or peanut butter for a heartier option; it adds a delicious nutty flavor and creaminess.
  • Chia Seed Pudding: For a healthful side, a scoop of chia pudding will provide creaminess and a delightful crunch.
  • Smoothies: Pair with a refreshing fruit smoothie to create a complete breakfast bursting with flavor and nutrients.
  • Fruit Drizzle: Whip up a quick fruit sauce with pureed strawberries or peaches to add a sweet, fruity glaze.
  • Coconut Whipped Cream: For a bit of indulgence, this dairy-free option offers richness and sweetness that’ll delight everyone.
  • Fresh Mint Leaves: Garnish with mint for an aromatic touch; it adds a refreshing burst of flavor that enhances every bite.

Helpful Tricks for Easy Mini Pancake Poppers

  • Don’t Overmix: Mixing just until combined helps maintain a fluffy texture. Overmixing leads to dense poppers, so gently fold the batter.

  • Fresh Ingredients: Always check that your baking powder and baking soda are fresh. Expired leavening agents can result in flat pancake poppers.

  • Proper Baking Time: Every oven is different, so keep a close eye while baking. Aim for a golden color and a firm texture with a gentle spring back when touched.

  • Customize Wisely: When adding mix-ins, avoid adding too many at once to ensure even distribution of flavors without weighing down the batter.

  • Storage Tips: To keep your pancake poppers fresh, store them in an airtight container in the fridge for up to 4 days or freeze for later.

  • Serving Suggestions: Serve warm with syrup, yogurt, or fresh fruit to elevate flavors and make your pancake poppers even more delightful!

Storage Tips for Easy Mini Pancake Poppers

  • Fridge: Store in an airtight container for up to 4 days to maintain freshness. Enjoy them cold or reheat for a quick breakfast.

  • Freezer: Freeze the cooked pancake poppers in a single layer, then transfer to a freezer bag for up to 3 months. This allows for easy access to breakfast treats anytime!

  • Reheating: For a deliciously warm popper, microwave directly from frozen for 30-60 seconds, or use a toaster oven for a crispy exterior and soft interior. Enjoy your tasty Easy Mini Pancake Poppers whenever you’re hungry!

Make Ahead Options

These Easy Mini Pancake Poppers are perfect for meal prep enthusiasts! You can mix the dry ingredients and store them in an airtight container for up to 3 days. Additionally, you can prepare the wet ingredients (milk, vinegar, oil, and egg or flaxseed meal) in advance and refrigerate them for up to 24 hours. When you’re ready to serve, simply combine the wet and dry ingredients, fill the muffin tin, and bake. This method saves you valuable time on busy mornings while ensuring your pancake poppers taste just as delicious. Remember to avoid overmixing to maintain their fluffiness—your family will love these convenient, fresh bites!

Easy Mini Pancake Poppers Variations

Feel free to let your creativity shine as you customize these delightful pancake poppers to suit your taste buds!

  • Gluten-Free: Substitute all-purpose flour with a gluten-free blend for a delicious, inclusive option that doesn’t compromise on texture or flavor.
  • Vegan: Use plant-based milk and replace the egg with 1 tablespoon of flaxseed meal mixed with water for a delicious vegan treat.
  • Sweet & Fruity: Stir in fresh berries or chocolate chips to add a burst of sweetness that makes morning meals feel extra special.
  • Savory Delight: Add crispy bacon or finely chopped herbs to infuse your poppers with a savory twist; a great option for brunches with friends!
  • Flavor Boost: Incorporate spices like cinnamon or vanilla extract into your batter for additional layers of flavor that will tantalize your taste buds.
  • Nutty Texture: Mix in crushed nuts or seeds for a delightful crunch that pairs beautifully with the fluffy base, elevating the overall experience.
  • Spicy Kick: Add a dash of cayenne or chopped jalapeños for those who crave a little heat in their breakfast; it’s an unexpectedly fun twist!
  • Creative Toppings: Serve warm with unique toppings like yogurt, homemade fruit compote, or drizzles of honey for an indulgent finish.

Remember, the possibilities are endless! These mini pancake poppers are perfect for any occasion, so don’t hesitate to explore with different flavors and ingredients.

Easy Mini Pancake Poppers Recipe FAQs

What’s the best way to choose ripe ingredients for this recipe?
Absolutely! For fresh fruits, choose berries that are vibrant and firm, avoiding any with dark spots. If using bananas, opt for those that are just ripe with a few speckles; they provide the best sweetness. For bacon, make sure it’s crispy and well-cooked to ensure the right texture in your poppers.

How should I store leftover pancake poppers, and how long will they last?
You should store the Easy Mini Pancake Poppers in an airtight container in the fridge for up to 4 days. If you want to keep them longer, they freeze wonderfully! Just follow the freezing instructions below to make them last even longer.

How do I freeze Easy Mini Pancake Poppers?
To freeze, start by arranging the cooked pancake poppers in a single layer on a baking sheet. Place them in the freezer for about 1-2 hours until they’re solid. Then, transfer them to a freezer bag, removing as much air as possible. They’ll stay good for up to 3 months! When you’re ready to enjoy, simply microwave them directly from the freezer for about 30-60 seconds, or warm them in a toaster oven until heated through.

What if my pancake poppers come out too dense?
Very! If your poppers aren’t as fluffy as you’d like, it could be due to overmixing the batter. Gently fold the wet and dry ingredients together until just combined; a few lumps are perfectly fine. Also, ensure your baking powder and baking soda are fresh for the best rise!

Are there any dietary considerations I should be aware of?
Yes! This recipe can be easily adapted for various dietary needs. For a gluten-free option, simply substitute all-purpose flour with a gluten-free blend. To make them vegan, replace the egg with 1 tablespoon of flaxseed meal mixed with 3 tablespoons of water (allow it to sit until it thickens). Always double-check for any allergies related to the specific mix-ins you decide to use!

undefined

Easy Mini Pancake Poppers for a Quick, Customizable Breakfast

These Easy Mini Pancake Poppers are customizable and perfect for busy mornings, baking in just 8-12 minutes.
Prep Time 10 minutes
Cook Time 12 minutes
Resting Time 5 minutes
Total Time 27 minutes
Servings: 4 servings
Course: Breakfast
Cuisine: American
Calories: 180

Ingredients
  

For the Batter
  • 1 cup Milk Substitute with plant-based milk for a dairy-free option
  • 1 tablespoon Vinegar Creates homemade buttermilk
  • 2 tablespoons Oil (or Butter) Use melted butter for extra flavor
  • 1 large Egg (or Flaxseed Meal) For a vegan option, use 1 tbsp of flaxseed meal mixed with 3 tbsp of water
  • 1 cup All-Purpose Flour (or Gluten-Free Blend) Substitute for gluten-free needs
  • 2 tablespoons Sugar Omit for savory versions
  • 1 tablespoon Baking Powder Always use fresh
  • 1 teaspoon Baking Soda Always use fresh
  • 1 teaspoon Salt Optional for savory variations
Optional Mix-Ins
  • 1 cup Chocolate Chips Great for sweet versions
  • 1 cup Fresh Fruits Berries or bananas can lend natural sweetness
  • 1 cup Bacon or Herbs Crispy bacon adds flavor; fresh herbs provide fragrance

Equipment

  • mini muffin tin
  • Mixing bowls
  • whisk
  • spatula

Method
 

Preparation Steps
  1. Preheat your oven to 375°F (190°C) and coat a mini muffin tin with cooking spray.
  2. In a mixing bowl, whisk together the milk and vinegar and let it rest for 5 minutes.
  3. Stir in the oil and egg (or flaxseed meal) into the mixture and whisk until smooth.
  4. In a separate bowl, sift together the all-purpose flour, sugar, baking powder, baking soda, and salt.
  5. Gradually fold the wet ingredients into the dry mixture, being careful not to overmix.
  6. Spoon about 1 tablespoon of the batter into each mini muffin cup and add any mix-ins as desired.
  7. Bake for 8-12 minutes until they rise and turn golden. Press lightly to check for doneness.
  8. Remove from the oven, let cool slightly, and serve warm with your favorite toppings.

Nutrition

Serving: 2poppersCalories: 180kcalCarbohydrates: 24gProtein: 3gFat: 8gSaturated Fat: 1gCholesterol: 20mgSodium: 200mgPotassium: 120mgFiber: 1gSugar: 6gVitamin A: 500IUVitamin C: 1mgCalcium: 80mgIron: 1mg

Notes

These pancake poppers are perfect for busy mornings and can be customized with various mix-ins according to taste preferences.

Tried this recipe?

Let us know how it was!

Sweet Hawaiian Crockpot Chicken: Effortless Tropical Delight

As I stood in my kitchen, the warm tropical breeze from the open window swirled around me, carrying the enticing scents of my Sweet Hawaiian Crockpot Chicken. This dish has a way of instantly transporting me to sunny shores, with its comforting blend of tender chicken, sweet pineapple, and a tangy soy sauce that dances on the palate. Not only is it incredibly easy to prepare, making it a perfect weeknight solution for busy families, but it also allows for a world of delicious variations right in your slow cooker. Imagine savoring a meal that’s both satisfying and versatile, whether you’re serving it over rice, in tacos, or even tossed in a salad. Ready to dive into a delightful dinner adventure? Let’s get cooking!

Why is this recipe a game-changer?

Simplicity: You’ll love how easy it is to whip up this dish; just toss everything in the slow cooker and let it do the work for you!

Tropical Flavor Explosion: The delightful combination of pineapple and soy sauce creates a sweet and savory symphony that transports you to a beachside paradise with each bite.

Versatility: Perfect for family dinners, this recipe allows you to get creative—try it with tofu for a vegetarian twist or add vibrant veggies like bell peppers!

Meal Prep Friendly: Save time on busy weekdays by prepping this dish ahead of time; it also stores beautifully for delicious leftovers throughout the week.

Crowd-Pleasing: Whether you’re hosting a casual gathering or a weeknight meal, everyone will rave about this flavorful comfort food that hits all the right notes. For more slow-cooker inspiration, check out our must-try slow cooker recipes.

Sweet Hawaiian Crockpot Chicken Ingredients

For the Chicken Base
Chicken Breasts – This primary protein becomes incredibly tender when slow-cooked; feel free to use frozen chicken if you need to adjust cooking time.

For the Sweet Sauce
Pineapple Chunks – They add luscious sweetness and juiciness; fresh, canned, or frozen will work seamlessly in the recipe.
Soy Sauce – Provides an essential umami flavor; opt for low-sodium soy sauce for a healthier alternative.
Brown Sugar – Balances the savory soy sauce with sweetness; honey or maple syrup are great substitutes if preferred.
Apple Cider Vinegar – Gives a tangy lift to the dish; rice vinegar can be used in its place if needed.

For the Aromatics
Minced Garlic – Instills aromatic qualities into the dish; fresh garlic cloves pack the most flavor, but pre-minced garlic saves time.
Grated Ginger – Adds a warm kick; fresh ginger is best, but ground ginger can be a quick alternative if you’re in a pinch.
Red Pepper Flakes – Introduces a mild heat to the mix; feel free to omit them for a milder version.

For Thickening the Sauce
Cornstarch – Essential for thickening the sauce at the end; this is the preferred option for achieving the right consistency.

With these ingredients, you’re on your way to create a delightful Sweet Hawaiian Crockpot Chicken that the whole family will love!

Step‑by‑Step Instructions for Sweet Hawaiian Crockpot Chicken

Step 1: Prepare the Chicken
Begin by placing your chicken breasts at the bottom of the slow cooker. Ensure they are evenly spaced to allow for even cooking. This base layer will absorb all the delicious flavors from the sauce, making your Sweet Hawaiian Crockpot Chicken truly irresistible.

Step 2: Add the Pineapple
Next, add the pineapple chunks on top of the chicken breasts, spreading them out evenly. This will infuse the dish with sweetness and juiciness as it cooks. The vibrant yellow of the pineapple will bring a cheerful touch to your crockpot.

Step 3: Whisk the Sauce
In a separate bowl, whisk together the soy sauce, brown sugar, apple cider vinegar, minced garlic, grated ginger, and red pepper flakes until combined. This mixture should be smooth and slightly thick. The blend of sweet and tangy scents will fill your kitchen, setting the stage for a delightful meal.

Step 4: Pour the Sauce Mixture
Carefully pour the sauce mixture over the chicken and pineapple layers in the slow cooker. Ensure that the chicken is well-coated, as it will absorb all the flavors while cooking. The sauce should cover the pineapple entirely, creating a glorious base for your Sweet Hawaiian Crockpot Chicken.

Step 5: Slow Cook the Dish
Cover the slow cooker with its lid and set it to cook on low for 4 to 6 hours. Check for tenderness at the 4-hour mark; it should be easy to shred. The aroma should be incredibly inviting, hinting at the delicious meal that’s coming together.

Step 6: Shred the Chicken
Once the cooking time is complete, remove the chicken from the crockpot and place it on a cutting board. Using two forks, shred the chicken into bite-sized pieces. The meat will be incredibly tender, and shredding it will allow it to soak up even more of the flavorful sauce.

Step 7: Thicken the Sauce
In a small bowl, mix cornstarch with a little water until smooth. Add this mixture back into the slow cooker and stir well with the sauce. This step is crucial; it will thicken the sauce and add a luscious texture to your Sweet Hawaiian Crockpot Chicken.

Step 8: Final Cooking Step
Switch the cooker to high heat and cover it again for 10 to 15 minutes, allowing the sauce to thicken. Keep an eye on it, as this will create a rich, sticky glaze that clings to the chicken. The sauce will transform into a beautiful, glossy finish.

Step 9: Serve and Enjoy
Return the shredded chicken to the slow cooker. Stir everything together to combine thoroughly, allowing the chicken to absorb the flavorful sauce. Scoop it over steamed rice or your favorite side, and watch your family delight in this delicious Sweet Hawaiian Crockpot Chicken!

What to Serve with Sweet Hawaiian Crockpot Chicken?

Elevate your dining experience with complementary dishes that enhance the flavors of this tropical delight and create a well-rounded meal.

  • Steamed Jasmine Rice: The fluffy, fragrant rice absorbs the sweet and savory sauce beautifully, making each bite a harmonious experience.

  • Fresh Garden Salad: A crisp salad with mixed greens and a light vinaigrette adds a refreshing contrast and balances the richness of the chicken.

  • Roasted Vegetables: Colorful veggies like bell peppers and carrots bring vibrant flavors and textures, making your plate not only tasty but visually appealing too.

  • Coconut Rice: Adding coconut milk to your rice gives it a rich, creamy texture and a hint of sweetness that pairs perfectly with the dish’s tropical flavors.

  • Hawaiian Dinner Rolls: Soft and fluffy rolls make for a perfect side, great for soaking up the delicious sauce and complementing the meal’s sweet notes.

  • Pineapple Coleslaw: A tangy slaw with shredded carrots and pineapple pieces provides a crunchy element that adds brightness to your dinner table.

  • Mango Smoothie: For a delightful beverage, a chilled mango smoothie offers a tropical twist that echoes the dish’s island vibes and refreshes your palate.

  • Chocolate Lava Cake: End the meal on a sweet note with a warm chocolate dessert; its rich flavors make for a delightful contrast to the savory chicken.

Expert Tips for Sweet Hawaiian Crockpot Chicken

  • Check Doneness: Use a meat thermometer for chicken doneness; it should reach 165°F (74°C) for safe consumption.

  • Avoid Overcooking: Keep an eye on the cooking time to prevent the chicken from drying out; check for tenderness at the 4-hour mark.

  • Add Colorful Veggies: Incorporate bell peppers or carrots to boost nutrition and flavor; they add a nice crunch and balance the dish.

  • Proper Thicken: Mix cornstarch with water until smooth before adding to the sauce; this ensures a perfect, silky texture for your Sweet Hawaiian Crockpot Chicken.

  • Experiment with Variants: Don’t hesitate to swap chicken for tofu or chickpeas for a delightful vegetarian twist—get creative with spices too!

Sweet Hawaiian Crockpot Chicken Variations

Feel free to add your own twist to the Sweet Hawaiian Crockpot Chicken, enhancing its delightful flavor!

  • Vegetarian: Substitute chicken with tofu or chickpeas for a satisfying vegetarian option that still delivers on flavor.
    Get ready to explore plant-based goodness that will leave everyone at the table smiling.

  • Gluten-Free: Use tamari instead of soy sauce for a gluten-free version without sacrificing taste.
    This small switch allows you to enjoy every bite worry-free while keeping the flavor profiles enjoyably intact.

  • Spicy Kick: Add fresh sliced jalapeños or increase the red pepper flakes for a fiery twist.
    Embrace the warmth and make your dish sing with spicy notes that dance across the palate!

  • Citrus Twist: Incorporate the juice and zest of fresh oranges or lemons for a zesty brightness.
    The additional citrusy flavors complement the sweetness of the pineapple beautifully, creating a refreshing profile.

  • Add Veggies: Toss in colorful vegetables like bell peppers, snap peas, or carrots for a boost of nutrition and texture.
    Not only do they enhance the visual appeal, but they also bring additional flavor layers that elevate your meal.

  • Sweetener Swap: For a different sweetness, substitute brown sugar with honey or maple syrup, or use coconut sugar for a unique twist.
    These alternatives can subtly change the flavor while still allowing that sweet taste to shine through.

  • Crockpot Stew: Turn it into a delicious stew by adding diced potatoes and carrots before cooking.
    Your resulting dish will be hearty and comforting, perfect for chilly evenings that call for something special.

For more delicious transformation ideas, be sure to check out our lineup of satisfying meal prep recipes.

Make Ahead Options

Preparing Sweet Hawaiian Crockpot Chicken in advance is a fantastic way to save time on busy nights! You can marinate the chicken with the sauce up to 24 hours ahead, ensuring those flavors penetrate deeply for a mouthwatering result. Simply whisk together the soy sauce, brown sugar, vinegar, garlic, ginger, and red pepper flakes, then coat the chicken breasts and refrigerate until you’re ready to cook. For even more convenience, you can chop the pineapple and store it in the fridge for up to 3 days. When you’re ready to enjoy your meal, just add the chicken and pineapple to the crockpot and let the magic happen. This method not only saves you time but also guarantees your Sweet Hawaiian Crockpot Chicken is just as delicious!

How to Store and Freeze Sweet Hawaiian Crockpot Chicken

Fridge: Store leftovers in an airtight container for up to 4 days. This will keep the flavors fresh and delicious for your next meal.

Freezer: For longer storage, freeze portions in airtight bags or containers for up to 3 months. Remember to label them with the date for easy tracking!

Reheating: Thaw overnight in the fridge before reheating in the microwave or on the stovetop. Heat until warmed through and enjoy a taste of tropical goodness again!

Make-Ahead Tips: Prepare this Sweet Hawaiian Crockpot Chicken ahead of time and store it in the fridge overnight for a quick dinner solution the next day.

Sweet Hawaiian Crockpot Chicken Recipe FAQs

How do I pick the best chicken breasts for this recipe?
Absolutely! Look for chicken breasts that feel firm and have a pink color without any dark spots all over. Avoid chicken that is slimy or has a strong odor, as those are signs of spoilage. If you’re using frozen chicken, just remember to adjust the cooking time, adding an extra hour for best results!

What’s the best way to store leftovers of Sweet Hawaiian Crockpot Chicken?
Leftovers can be stored in an airtight container in the refrigerator for up to 4 days. If you’re planning to enjoy it later, this will keep the dish’s flavors vibrant and delicious. Make sure to let the chicken cool completely before sealing it to maintain its texture and taste.

Can I freeze Sweet Hawaiian Crockpot Chicken?
Yes, you can! For freezing, place the cooled chicken in airtight bags or containers and store for up to 3 months. To make reheating easier, consider portioning it out. When you’re ready to enjoy it again, just thaw it overnight in the fridge and reheat it in the microwave or stovetop until warmed through—delicious tropical goodness awaits!

What do I do if my chicken turns out dry?
Very commonly, overcooking can cause the chicken to dry out. Always check the doneness around the 4-hour mark using a meat thermometer; it should reach 165°F (74°C). If you find it dry after cooking, shred it and mix it back with the sauce, which will help restore some moisture.

Are there any dietary considerations when preparing this dish?
For those with allergies or specific dietary preferences, you can easily adapt this recipe! Substitute the chicken with tofu or chickpeas for a vegetarian option, and ensure you’re using gluten-free soy sauce if necessary. Always double-check your chosen ingredients for any potential allergens before you start cooking!

How can I enhance the flavors of my Sweet Hawaiian Crockpot Chicken?
I often recommend adding colorful veggies like bell peppers or carrots during cooking for added nutrition and flavor diversity. You can toss them in with the pineapple for a delightful zing. Adjusting the amount of red pepper flakes can also personalize the heat level to your taste!

undefined

Sweet Hawaiian Crockpot Chicken: Effortless Tropical Delight

This Sweet Hawaiian Crockpot Chicken is a delightful and effortless dish, perfect for busy weeknights with its tropical flavors and tender chicken.
Prep Time 15 minutes
Cook Time 6 hours
Total Time 6 hours 15 minutes
Servings: 4 servings
Course: Dinner
Cuisine: Hawaiian
Calories: 320

Ingredients
  

For the Chicken Base
  • 4 pieces Chicken Breasts Use fresh or frozen depending on preference.
For the Sweet Sauce
  • 1 cup Pineapple Chunks Fresh, canned, or frozen may be used.
  • 1/2 cup Soy Sauce Opt for low-sodium for a healthier option.
  • 1/4 cup Brown Sugar Honey or maple syrup can be substituted.
  • 1/4 cup Apple Cider Vinegar Rice vinegar is an alternative.
For the Aromatics
  • 3 cloves Minced Garlic Fresh is best, but pre-minced saves time.
  • 1 tablespoon Grated Ginger Fresh is preferable; ground ginger can work.
  • 1/2 teaspoon Red Pepper Flakes Omit for a milder flavor.
For Thickening the Sauce
  • 2 tablespoons Cornstarch Essential for thickening the sauce.

Equipment

  • Slow Cooker

Method
 

Step-by-Step Instructions
  1. Prepare the Chicken: Place chicken breasts at the bottom of the slow cooker, spaced evenly.
  2. Add the Pineapple: Spread pineapple chunks evenly on top of the chicken.
  3. Whisk the Sauce: In a bowl, combine soy sauce, brown sugar, apple cider vinegar, minced garlic, grated ginger, and red pepper flakes until smooth.
  4. Pour the Sauce Mixture: Pour over chicken and pineapple layers, ensuring even coating.
  5. Slow Cook the Dish: Cover and cook on low for 4 to 6 hours.
  6. Shred the Chicken: Remove chicken, shred with forks, and return to slow cooker.
  7. Thicken the Sauce: Mix cornstarch with water, stir into sauce, and mix well.
  8. Final Cooking Step: Switch to high heat, cover for 10 to 15 minutes to thicken the sauce.
  9. Serve and Enjoy: Return shredded chicken to the slow cooker, stir, and serve over rice.

Nutrition

Serving: 1cupCalories: 320kcalCarbohydrates: 45gProtein: 25gFat: 8gSaturated Fat: 2gPolyunsaturated Fat: 1gMonounsaturated Fat: 5gCholesterol: 75mgSodium: 800mgPotassium: 600mgFiber: 2gSugar: 15gVitamin A: 200IUVitamin C: 15mgCalcium: 30mgIron: 2mg

Notes

Check chicken doneness with a thermometer; should reach 165°F. This dish is great for meal prep and leftovers!

Tried this recipe?

Let us know how it was!

Keto Egg Roll in a Bowl: Flavorful Low-Carb Quick Meal

As I stirred that vibrant medley of veggies and savory ground meat in my skillet, the aroma of garlic and ginger filled my kitchen and instantly transported me back to the bustling streets of my favorite takeout spot. This Keto Egg Roll in a Bowl captures all the satisfying flavors of traditional egg rolls, minus the carbs. Not only is this scrumptious dish quick to prepare, making it a perfect weeknight dinner solution, but it’s also loaded with colorful, nutritious ingredients that make every bite a delight. Plus, it’s wonderfully adaptable; you can easily switch up the protein or add in any veggies you have on hand. How about throwing in some bell peppers or swapping in turkey for the ground meat? Your culinary creativity is the only limit! Ready to dive into this deliciously simple recipe? Let’s get cooking!

Why is This Recipe a Must-Try?

Simplicity: With just one skillet and a handful of fresh ingredients, you’ll have dinner on the table in no time!

Flavor Explosion: Packed with aromatic garlic and ginger, every bite bursts with savory goodness, reminiscent of your favorite takeout dish.

Versatile Ingredients: Feel free to customize with ground turkey, chicken, or even tofu; the choice is yours!

Crowd-Pleasing: This dish is sure to impress family and friends, making it an excellent option for gatherings.

Healthy Indulgence: Enjoy a satisfying meal that aligns with your Keto, Low-Carb, or Paleo lifestyle without sacrificing flavor.

Meal Prep Friendly: Making this dish ahead of time allows for easy reheating, perfect for those busy nights!

Don’t forget to pair it with some steamed broccoli or cauliflower rice for a balanced meal!

Keto Egg Roll in a Bowl Ingredients

• Gather these fresh ingredients to create a delicious Keto Egg Roll in a Bowl!

For the Meat

  • Ground Meat – Choose beef, turkey, chicken, or tofu for a vegetarian twist.

For the Vegetables

  • Green Cabbage – Shred it finely for quick cooking and a delightful crunch.
  • Julienned Carrots – Adds natural sweetness and vibrant color; swap with bell peppers for variation.
  • Garlic (minced) – Fresh garlic enhances aroma and flavor for a mouthwatering experience.
  • Ginger (minced) – A warm, zesty kick; ground ginger can be a handy substitute when fresh isn’t available.

For the Sauce

  • Soy Sauce – This adds umami goodness and moisture; use tamari for gluten-free or coconut aminos for a Paleo option.
  • Sesame Oil – Provides a nutty layer of flavor; it’s optional, but highly recommended.

For Seasoning

  • Salt & Pepper – Essential for flavor balance; adjust to your taste.
  • Red Pepper Flakes – Sprinkle in for a little heat, according to preference.

For Garnish

  • Green Onions – Add fresh, vibrant notes; serve them raw at the end for maximum flavor.

Enjoy this delightful, low-carb dish that perfectly caters to your Keto cravings!

Step-by-Step Instructions for Keto Egg Roll in a Bowl

Step 1: Preheat the Skillet
Begin by preheating a large skillet over medium-high heat for about 2-3 minutes. This important step ensures your Keto Egg Roll in a Bowl cooks evenly and allows for a nice sear on the meat. When the skillet is hot, you’ll notice a slight shimmering effect on its surface, indicating it’s ready for cooking.

Step 2: Cook the Ground Meat
Add your choice of ground meat to the sizzling skillet, using a spatula to break it apart. Cook for 5-7 minutes, stirring occasionally, until the meat is thoroughly browned and no longer pink. If necessary, drain any excess fat from the skillet to keep the dish light and delicious.

Step 3: Sauté Garlic and Ginger
Stir in the minced garlic and ginger, cooking for an additional 1-2 minutes. As they toast, their aromatics will fill your kitchen, creating an enticing fragrance. Be sure to continuously stir until the mixture becomes fragrant, which signals that it’s time to layer in the vegetables.

Step 4: Add Vegetables and Sauces
Mix in the shredded green cabbage and julienned carrots, along with the soy sauce and sesame oil. Continue cooking for 5-7 minutes, stirring frequently, so the vegetables soften but maintain a bit of crunch. You’ll know it’s ready when the cabbage volume reduces, making everything beautifully vibrant and colorful in the skillet.

Step 5: Season and Spice It Up
Sprinkle in salt, pepper, and any desired red pepper flakes to enhance the flavor profile. Stir well to combine all ingredients and taste for seasoning adjustments. The spices will elevate your Keto Egg Roll in a Bowl, giving it that extra zing and making the dish irresistibly delicious.

Step 6: Finish with Green Onions
Toss in the chopped green onions right at the end of cooking, stirring them into the mixture for just a minute. This addition adds a fresh crunch and vibrant color to your Keto Egg Roll in a Bowl. When they begin to wilt slightly, your dish is almost ready to serve.

Step 7: Serve Hot
Transfer the mix to serving bowls, garnishing with optional sesame seeds or a drizzle of sriracha mayo for a kick. Enjoy your vibrant Keto Egg Roll in a Bowl hot, soaking in all the delightful flavors and textures. This dish is perfect for a satisfying meal that feels indulgent while aligning with your dietary preferences.

Storage Tips for Keto Egg Roll in a Bowl

  • Fridge: Store leftovers in airtight containers for up to 3 days. This keeps your Keto Egg Roll in a Bowl fresh and ready for quick meals.

  • Freezer: For longer storage, freeze portions in freezer-safe containers for up to 2 months. Thaw overnight in the fridge before reheating.

  • Reheating: To enjoy your leftovers, gently reheat in a skillet over medium heat or in the microwave. This helps maintain the crunchy texture of the veggies.

  • Avoid Sogginess: When reheating, ensure you don’t overcook, as this can lead to soggy vegetables and a less appealing meal.

Make Ahead Options

These Keto Egg Roll in a Bowl are perfect for meal prep, making busy weeknights a breeze! You can chop the vegetables (cabbage, carrots, garlic, and ginger) and mix the sauce (soy sauce and sesame oil) up to 24 hours in advance, storing everything in airtight containers in the refrigerator. Additionally, if using ground meat, you can cook that ahead and refrigerate it for up to 3 days to save time. When you’re ready to serve, simply heat the prepared meat in a skillet, add the veggies, and cook until just tender—this keeps the ingredients fresh and delicious while cutting down on prep time. Enjoy a satisfying, homemade meal without the hassle!

What to Serve with Keto Egg Roll in a Bowl

Looking to complement this vibrant, flavorful dish? Here are some delicious options to create a complete meal!

  • Steamed Broccoli: A classic pairing, it adds a nutritious crunch and subtle flavor, lightening up your meal beautifully.

  • Cauliflower Rice: This low-carb alternative provides a fluffy base that soaks up the delicious savory sauce, enhancing every bite.

  • Spicy Sriracha Mayo: Drizzle this on top for a creamy kick that perfectly contrasts the freshness of your Keto Egg Roll in a Bowl.

  • Sesame Noodles: For a perfect balance, serve this flavorful noodle dish on the side, combining textures and flavors.

  • Crispy Eggroll Wrapper Chips: Enjoy a satisfying crunch by making baked chips from eggroll wrappers, perfect for scooping up the bowl.

  • Ginger Tea: A warm, soothing drink that complements the zesty ginger in the dish, adding a comforting finish to your meal.

  • Chilled Asian Cucumber Salad: This refreshing salad’s crispness enhances the meal while complementing the vibrant flavors of the egg roll bowl.

  • Fruit Salad: Cut into cubes, a colorful mix of melons or berries adds a sweet contrast, providing a burst of freshness and color.

Keto Egg Roll in a Bowl Variations & Substitutions

Feel like personalizing your Keto Egg Roll in a Bowl? Here are some delightful twists that will ignite your culinary creativity!

  • Turkey Option: Substitute ground beef with ground turkey for a leaner protein choice that’s just as satisfying.

  • Vegetable Swap: Use snap peas or sliced zucchini instead of cabbage for a fresh, crunchier alternative that complements the dish beautifully.

  • Flavor Boost: Add a tablespoon of hoisin sauce for a touch of sweetness. It’ll bring a delightful depth that pairs perfectly with the veggies.

  • Paleo-Friendly: Opt for coconut aminos instead of soy sauce to make this dish Paleo-compliant while maintaining the umami flavor profile.

  • Extra Spice: For a heat upgrade, feel free to toss in minced jalapeños or a dash of chili paste for an exciting kick!

  • Crunchy Toppings: Top your bowl with crushed nuts or seeds for an extra layer of texture and a delightful crunch.

  • Vegan Version: Swap out the meat for crumbled tempeh and boost flavor with a splash of liquid smoke for a satisfying, plant-based option.

  • Herb Infusion: Add fresh herbs like cilantro or basil right before serving to brighten up the flavors and give your bowl a vibrant herbal note.

Each of these variations opens the door to a unique dining experience, ensuring your Keto Egg Roll in a Bowl never feels boring. If you’re in the mood for more meal ideas, check out our vegetable stir-fry or our delicious low-carb cauliflower rice for awesome side options!

Expert Tips for Keto Egg Roll in a Bowl

  • Perfect Vegetable Prep: Shred your cabbage finely and julienne the carrots for faster cooking and a delightful crunch. This helps maintain a fresh texture in your Keto Egg Roll in a Bowl.

  • Seasoning Matters: Make sure to taste as you go! Adjust salt, pepper, and red pepper flakes according to your preference to avoid overpowering the dish.

  • Don’t Overcook: Keep an eye on your vegetables; overcooking can lead to sogginess. Aim for tender-crisp veggies for the best bite in your Keto Egg Roll in a Bowl.

  • Protein Variations: Want to keep it meatless? Try seasoning plant-based proteins like tofu or tempeh well, as they can absorb flavors beautifully, enhancing your dish.

  • Storage Solutions: Store leftovers in airtight containers and consume within 3 days, or freeze portions to enjoy later. Just remember to reheat gently to preserve texture!

Keto Egg Roll in a Bowl Recipe FAQs

What type of ground meat is best for this recipe?
Absolutely! You can use ground beef, turkey, or chicken based on your preference. If you’re looking for a vegetarian option, I recommend using tofu or tempeh, which can absorb flavors beautifully when well-seasoned.

How do I choose ripe vegetables for my Keto Egg Roll in a Bowl?
Very important! Select fresh vegetables that feel firm to the touch. For cabbage, avoid any heads with dark spots; they should feel heavy and have crisp, bright leaves. Carrots should be vibrant and crunchy, not limp or soft.

What’s the best way to store leftovers?
Store your Keto Egg Roll in a Bowl in airtight containers in the refrigerator for up to 3 days. If you plan to keep it longer, place portions in freezer-safe bags or containers for up to 2 months. Just be sure to thaw them overnight in the fridge before reheating!

Can I freeze this dish?
Absolutely! To freeze, allow the dish to cool completely, then portion it into airtight containers or freezer bags, making sure to remove as much air as possible. It will keep well for about 2 months. When you’re ready to enjoy it again, simply thaw in the fridge and reheat on the stovetop over low heat for the best texture.

How do I avoid overcooking the vegetables?
I often recommend keeping a close eye on your veggies while cooking. Aim for a tender-crisp texture by cooking for just 5-7 minutes, stirring occasionally. If the cabbage and carrots start to lose their vibrant color or become mushy, you know they’ve been on the heat too long!

Is this dish safe for dogs or people with soy allergies?
While the ingredients are healthy for humans, you should avoid giving your dog any soy sauce or sesame oil, as they might not digest well. Additionally, for those with soy allergies, you can substitute soy sauce with coconut aminos for a similar flavor without the allergen. Always check labels when using any pre-packaged sauces!

undefined

Keto Egg Roll in a Bowl: Flavorful Low-Carb Quick Meal

This Keto Egg Roll in a Bowl is a quick, delicious, and healthy meal bursting with flavorful ingredients, perfect for low-carb lovers.
Prep Time 10 minutes
Cook Time 20 minutes
Total Time 30 minutes
Servings: 4 servings
Course: Dinner
Cuisine: Asian
Calories: 350

Ingredients
  

For the Meat
  • 1 lb Ground Meat (beef, turkey, chicken or tofu) Choose your preferred protein
For the Vegetables
  • 4 cups Green Cabbage (shredded) Finely shredded for quick cooking
  • 1 cup Julienned Carrots Can substitute with bell peppers
  • 3 cloves Garlic (minced) Enhances aroma and flavor
  • 1 tbsp Ginger (minced) For a zesty kick
For the Sauce
  • 3 tbsp Soy Sauce Use tamari for gluten-free
  • 1 tbsp Sesame Oil Optional but recommended
For Seasoning
  • to taste Salt
  • to taste Pepper
  • 1 tsp Red Pepper Flakes Adjust for desired heat
For Garnish
  • 1 bunch Green Onions (chopped) Add fresh notes as garnish

Equipment

  • Skillet

Method
 

Cooking Instructions
  1. Preheat the skillet over medium-high heat for about 2-3 minutes.
  2. Add ground meat to the skillet and cook for 5-7 minutes, breaking it apart until browned.
  3. Stir in minced garlic and ginger, cooking for an additional 1-2 minutes until fragrant.
  4. Add shredded cabbage, julienned carrots, soy sauce, and sesame oil; cook for 5-7 minutes while stirring frequently.
  5. Sprinkle in salt, pepper, and red pepper flakes, then stir well for seasoning adjustment.
  6. Toss in chopped green onions and mix for about a minute; they should wilt slightly.
  7. Transfer to serving bowls and serve hot, garnished with optional sesame seeds or sriracha mayo.

Nutrition

Serving: 1bowlCalories: 350kcalCarbohydrates: 10gProtein: 25gFat: 20gSaturated Fat: 5gPolyunsaturated Fat: 2gMonounsaturated Fat: 2gCholesterol: 70mgSodium: 800mgPotassium: 800mgFiber: 4gSugar: 3gVitamin A: 150IUVitamin C: 75mgCalcium: 4mgIron: 15mg

Notes

For best results, enjoy fresh and adjust seasoning according to personal taste. This dish is perfect for meal prep, and leftovers can be stored in airtight containers for up to 3 days.

Tried this recipe?

Let us know how it was!

Candy Cane Striped Cake for a Festive Holiday Treat

As the first snowflakes begin to blanket the ground, I can’t help but think about the delightful treats that embody the warmth of the holiday season. Enter my Candy Cane Striped Cake, a festive showstopper that brings cheer to any gathering with its vibrant colors and sweet peppermint flavor. This cake is not only a visual feast—its light and fluffy texture is a delightful surprise that will leave your guests raving. Surprisingly easy to whip up, it’s perfect for those moments when you want something special without spending all day in the kitchen. Plus, it’s bound to carve a sweet spot in your holiday traditions. Ready to dive into dessert magic? Let’s get baking!

Why is this cake a holiday must-try?

Festive Appeal: This Candy Cane Striped Cake dazzles with its vibrant red and white swirls, making it an eye-catching centerpiece for any holiday gathering.

Easy to Make: Despite its impressive appearance, the recipe is straightforward, suitable for all skill levels, ensuring success every time.

Deliciously Unique: Combining fluffy cake with a refreshing peppermint twist, every bite offers a taste of the holiday spirit.

Crowd-Pleaser: Perfect for parties or family gatherings, this cake is sure to spark joy and conversation among your guests, just like these festive dessert ideas you might want to try!

Customizable Options: You can easily switch up the flavors and colors to match any occasion, allowing you to keep the magic alive throughout the year.

Candy Cane Striped Cake Ingredients

For the Cake Batter
Cooking Spray – Prevents cake from sticking; grease well for easy removal.
All-Purpose Flour (90 g) – Provides structure; can use gluten-free flour as a substitute.
Cornstarch (3 Tbsp) – Lightens the texture; no substitutions.
Baking Powder (1/2 tsp) – Leavening agent for rise; ensure it’s fresh for best results.
Kosher Salt (1/2 tsp) – Balances sweetness; sea salt can be a substitute.
Large Egg Whites (9) – Essential for meringue-like texture; room temperature eggs whip better.
Cream of Tartar (1/2 tsp) – Stabilizes egg whites; can omit if not available.
Granulated Sugar (200 g) – Adds sweetness and helps with meringue stability.
Peppermint Extract (1 tsp) – Provides mint flavor; vanilla extract can be used for a different profile.
Red Gel Food Coloring – Gives the cake its festive color; substitute with liquid food coloring in larger quantities.

For the Frosting
Confectioners’ Sugar (283 g) – Used for frosting; powdered sugar or icing sugar can be used interchangeably.
Unsalted Butter (3/4 cup) – Adds richness; can substitute with vegan butter for dairy-free options.
Cream Cheese (8 oz) – Gives the frosting creaminess; use a dairy-free cream cheese as an alternative.
Kosher Salt (1/4 tsp) – Enhances flavor of the frosting.
Small Drop Red Gel Food Coloring – For decorative touch on frosting.
Crushed Candy Canes (1/2 cup) – Adds crunch and festive decoration; can use chocolate shavings as an alternative.

For Decorating
Piping Bags – Essential for decorating; can also use resealable plastic bags.

Get ready to impress your family and friends with this Candy Cane Striped Cake—your holiday dessert has never been so deliciously festive!

Step‑by‑Step Instructions for Candy Cane Striped Cake

Step 1: Prepare Baking Sheets
Preheat your oven to 350°F (175°C). While it’s heating, spray two baking sheets with cooking spray and dust them with flour to prevent sticking. This foundational step is key to ensuring your Candy Cane Striped Cake releases easily once baked, so take your time getting them coated evenly.

Step 2: Make Cake Batter
In a large mixing bowl, whip 9 large egg whites with ½ teaspoon of cream of tartar until stiff peaks form, which should take about 5 minutes. Gradually add 200 grams of granulated sugar, continuing to whip until fully combined. Carefully fold in 90 grams of all-purpose flour, 3 tablespoons of cornstarch, ½ teaspoon of baking powder, and ½ teaspoon of kosher salt until just blended, keeping the mixture airy.

Step 3: Color Batter
Once your batter is created, divide it into two bowls. In one bowl, add red gel food coloring, mixing until you achieve your desired festive red hue. This candy cane twist is what makes your Candy Cane Striped Cake visually stunning, so ensure that the color is vibrant enough to shine through once baked.

Step 4: Pipe Batter
Arrange piping bags or resealable plastic bags to fill with the two batters. Begin by piping alternating stripes of white and red batter onto the prepared baking sheets, creating a striped effect that is both fun and appealing. Aim for a smooth and even application that will create the visual masterpiece when cut into slices.

Step 5: Bake and Cool
Bake the striped batters in the preheated oven for 15-20 minutes or until they spring back when gently pressed and are just set. Remove from the oven and allow them to cool slightly. While they’re still warm, carefully roll each sheet into a towel to form a spiral shape, avoiding cracks and ensuring they hold their shape for the final assembly.

Step 6: Prepare Frosting
For the frosting, beat together ¾ cup of unsalted butter and 8 oz of cream cheese until creamy. Gradually add in 283 grams of confectioners’ sugar along with 1 teaspoon of peppermint extract and ¼ teaspoon of kosher salt, adjusting sweetness as you mix until fluffy and smooth. This frosting will be the delightful coating that complements your Candy Cane Striped Cake perfectly.

Step 7: Assemble Cake
Once the cakes have cooled completely, unroll them gently. Spread a generous layer of the creamy peppermint frosting evenly across the surface before re-rolling each cake. This will create beautiful swirls of red and white that are a hallmark of the Candy Cane Striped Cake, ensuring each slice is festive.

Step 8: Decorate
Finally, coat the exterior of your rolled cake with the remaining frosting. Sprinkle crushed candy canes over the frosting for a crunchy festive touch. This decoration not only enhances the appearance of your Candy Cane Striped Cake but adds a delicious peppermint crunch that ties the entire dessert together beautifully.

Expert Tips for Candy Cane Striped Cake

  • Roll Warm: Always roll the cake while it’s still warm to prevent cracks. This helps maintain its beautiful spiral shape during assembly.
  • Beat with Care: Gently fold in your dry ingredients to keep the batter airy and light, ensuring a fluffy final texture in your Candy Cane Striped Cake.
  • Stable Piping: Use a tall glass to hold your piping bags open, making it easier to fill without making a mess.
  • Color Check: When adding red gel food coloring, mix until you achieve a vibrant hue—this is key for that festive look!
  • Frosting Adjustments: Taste your frosting as you go! Feel free to adjust the sweetness of the frosting to perfectly complement the cake’s peppermint flavor.

How to Store and Freeze Candy Cane Striped Cake

Fridge: Store your Candy Cane Striped Cake in an airtight container for up to a week, keeping it fresh and preventing it from drying out.

Freezer: Slice the cake and wrap individual pieces tightly in plastic wrap, then place them in a freezer bag for storage. It will stay delicious for up to 3 months.

Reheating: To enjoy frozen slices, simply thaw them in the fridge overnight and serve at room temperature, or warm them gently in a microwave for a few seconds for a cozy treat.

Wrap Properly: Ensure your cake is well-wrapped before freezing to avoid freezer burn, allowing it to maintain its delightful peppermint flavor and fluffy texture.

Make Ahead Options

These Candy Cane Striped Cakes are perfect for busy holiday preparations! You can prepare the cake layers up to 24 hours in advance—simply bake, cool, and store them in an airtight container in the refrigerator to maintain their moisture and light texture. The frosting can also be made a day ahead; just refrigerate it in a sealed container to keep it fresh and fluffy. When you’re ready to serve, simply unroll the cake, spread the frosting, and re-roll it. Finish by decorating with crushed candy canes just before presenting your stunning Candy Cane Striped Cake, and enjoy the festive delight without last-minute stress!

What to Serve with Candy Cane Striped Cake

As the sweet aroma of peppermint fills the air, it’s time to explore delightful accompaniments that will elevate your holiday dessert experience.

  • Hot Chocolate: A rich, creamy cup of hot chocolate complements the minty notes of the cake, creating a cozy pairing that warms your soul. The soothing chocolate blend melds beautifully with the sweet, fluffy cake.

  • Festive Fruit Salad: A vibrant mix of seasonal fruits adds a refreshing punch that balances the sweetness of the cake. Consider including pomegranate seeds and citrus segments for a burst of color and flavor.

  • Whipped Cream: Light and airy, a dollop of freshly whipped cream enhances the fluffy texture of your Candy Cane Striped Cake. It also brings a subtle contrast, making each bite even more delightful.

  • Chocolate Ganache: Drizzling warm chocolate ganache over each slice introduces a rich, indulgent layer that pairs perfectly with the peppermint. The smooth chocolate brings richness, enhancing the cake’s festive appeal.

  • Gingerbread Cookies: Spice up your dessert table with gingerbread cookies. Their warm, spicy flavors are a nostalgic reminder of holiday traditions, providing sweet harmony alongside the cake’s minty taste.

  • Peppermint Tea: A calming cup of peppermint tea refreshes the palate between sweet bites and extends the holiday spirit. Its delicate notes enhance the cake’s flavors, creating a beautifully balanced dessert experience.

  • Coffee: A steaming cup of coffee offers a robust counterpoint to the sweetness of your dessert, making it ideal for holiday gatherings. Whether you prefer it black or with a splash of cream, the combination is sheer bliss.

  • Molasses Crinkle Cookies: These chewy, spiced cookies add a delightful chewy texture and depth of flavor that complements the fluffy cake. They offer a contrast to the lightness of the Candy Cane Striped Cake while keeping the festive theme.

Candy Cane Striped Cake Variations

Feel free to let your creativity shine by customizing this delightful dessert for every occasion!

  • Gluten-Free: Swap all-purpose flour with a 1:1 gluten-free blend for a gluten-free alternative that maintains deliciousness.
  • Dairy-Free: Use vegan butter and dairy-free cream cheese in the frosting for a plant-based twist that everyone can enjoy.
  • Mint Chocolate: For a delicious chocolate flavor, substitute crushed candy canes with chocolate chips in the batter and frosting. The combination of mint with rich chocolate offers a festive surprise!
  • Different Colors: Experiment with other colors of gel food coloring to match different holidays, such as green and gold for St. Patrick’s Day. Your cake can become a canvas of celebration!
  • Fruity Twist: Add lemon or orange zest to the frosting for a fruity undertone that brightens the peppermint flavor—perfect for refreshing your palate!
  • Extra Crunch: Instead of crushed candy canes, try topping your cake with toasted nuts or pecans for a delightful crunch that contrasts with the softness of the cake.
  • Whipped Cream Layer: Consider adding a layer of whipped cream between the cake rolls for an added creaminess that enhances every slice. Whipped cream always elevates desserts!
  • Reduced Sugar: If you’re looking to reduce sugar, cut down the amount of granulated sugar by 25% without sacrificing flavor in your cake.

Explore the variations that speak to you, and don’t forget to check out these delightful festive dessert ideas to serve alongside your fabulous Candy Cane Striped Cake!

Candy Cane Striped Cake Recipe FAQs

How do I select fresh ingredients for my Candy Cane Striped Cake?
Absolutely! For the best results, choose bright red gel food coloring that isn’t dried out. Fresh egg whites are essential—if they’re clear and runny, they won’t whip as well, so aim for eggs with clean, unbroken shells. When picking peppermint extract, go for a natural variant for a deeper flavor.

What’s the best way to store my Candy Cane Striped Cake?
I recommend storing your Candy Cane Striped Cake in an airtight container to keep it moist. It can last in the fridge for up to a week. If you want to store it for more extended periods, slice it up and wrap each piece tightly in plastic wrap, then place them in a freezer bag. This way, it stays fresh for up to 3 months!

Can I freeze my Candy Cane Striped Cake?
Yes, absolutely! For freezing, allow the cake to cool completely before slicing it. Wrap each slice tightly in plastic wrap to prevent freezer burn and place them in a freezer bag or container. When you want to enjoy a slice, simply thaw it in the fridge overnight or warm it gently in the microwave.

What should I do if my cake cracks while rolling?
No worries! If your Candy Cane Striped Cake cracks, don’t panic. Try rolling it more gently or make sure it’s warm enough when you begin rolling. If it happens, you can hide the cracks with ample frosting and crushed candy canes on the outside. Every cake has its imperfections, and that’s part of its charm!

Is this Candy Cane Striped Cake safe for my dog/cats?
While it’s a festive treat for humans, I wouldn’t share it with your furry friends. Ingredients like sugar, cream cheese, and peppermint are not advisable for pets and may lead to upset stomachs. Always keep treats special for those adorable companions of yours!

Can I adjust the sweetness level in the frosting?
Very much so! If you find the frosting too sweet, feel free to reduce the amount of confectioners’ sugar by up to 25 grams. You can also add more cream cheese or unsalted butter for a creamier texture and a less sugary taste. Taste as you go to find your perfect sweet spot!

undefined

Candy Cane Striped Cake for a Festive Holiday Treat

This festive Candy Cane Striped Cake dazzles with red and white swirls, offering a delightful peppermint flavor perfect for holiday gatherings.
Prep Time 30 minutes
Cook Time 20 minutes
Cooling Time 10 minutes
Total Time 1 hour
Servings: 12 slices
Course: Dessert
Cuisine: Holiday
Calories: 350

Ingredients
  

For the Cake Batter
  • 2 Tbsp Cooking Spray Prevents cake from sticking
  • 90 g All-Purpose Flour Can use gluten-free flour as a substitute
  • 3 Tbsp Cornstarch No substitutions
  • 1/2 tsp Baking Powder Ensure it’s fresh for best results
  • 1/2 tsp Kosher Salt Sea salt can be a substitute
  • 9 large Egg Whites Room temperature eggs whip better
  • 1/2 tsp Cream of Tartar Can omit if not available
  • 200 g Granulated Sugar Adds sweetness and helps with meringue stability
  • 1 tsp Peppermint Extract Vanilla extract can be used for a different profile
  • Red Gel Food Coloring Substitute with liquid food coloring in larger quantities
For the Frosting
  • 283 g Confectioners’ Sugar Used for frosting
  • 3/4 cup Unsalted Butter Can substitute with vegan butter for dairy-free options
  • 8 oz Cream Cheese Use a dairy-free cream cheese as an alternative
  • 1/4 tsp Kosher Salt Enhances flavor of the frosting
  • Small Drop Red Gel Food Coloring For decorative touch on frosting
  • 1/2 cup Crushed Candy Canes Can use chocolate shavings as an alternative
For Decorating
  • Piping Bags Can also use resealable plastic bags

Equipment

  • Mixing bowls
  • Piping bags
  • Baking Sheets
  • Oven

Method
 

Step-by-Step Instructions
  1. Preheat your oven to 350°F (175°C) and spray two baking sheets with cooking spray, then dust with flour.
  2. In a large mixing bowl, whip 9 large egg whites with ½ teaspoon of cream of tartar until stiff peaks form, then gradually add 200 grams of sugar.
  3. Divide batter into two bowls, adding red gel food coloring to one, mixing until achieving a desired hue.
  4. Pipe alternating stripes of white and red batter onto the prepared baking sheets.
  5. Bake in the preheated oven for 15-20 minutes or until they spring back when gently pressed.
  6. Beat together unsalted butter and cream cheese, then gradually add confectioners’ sugar, peppermint extract, and salt until fluffy.
  7. Unroll cooled cakes gently, spread a layer of frosting across the surface, and re-roll each cake.
  8. Coat the exterior of your rolled cake with remaining frosting and sprinkle crushed candy canes on top.

Nutrition

Serving: 1sliceCalories: 350kcalCarbohydrates: 50gProtein: 3gFat: 15gSaturated Fat: 9gPolyunsaturated Fat: 1gMonounsaturated Fat: 3gCholesterol: 30mgSodium: 200mgPotassium: 150mgFiber: 1gSugar: 25gVitamin A: 200IUVitamin C: 1mgCalcium: 15mgIron: 1mg

Notes

Store the cake in an airtight container for up to a week. For longer storage, wrap slices tightly in plastic wrap and freeze for up to 3 months.

Tried this recipe?

Let us know how it was!

Savory Chicken Zucchini Bake for a Quick Gluten-Free Feast

One evening, as I rummaged through my fridge, I stumbled upon some fresh zucchini and leftover chicken—an unexpected pairing, but one that sparked inspiration! That’s how my Chicken Zucchini Bake came to life, a cozy, one-dish meal that’s not only gluten-free but also bursting with healthy goodness. It’s a lifesaver for busy weeknights, allowing you to whip up a dinner that’s both satisfying and full of flavor without spending hours in the kitchen. Plus, it’s designed to please the pickiest of eaters, making it a fantastic choice for family gatherings. So, if you’re on the hunt for a quick and nutritious dinner option, keep reading to uncover the secrets of this delicious bake! What surprising ingredients do you think make it even more special?

What makes this bake a family favorite?

Simplicity at Its Best: This one-dish wonder requires minimal effort and is perfect for weeknight cooking. Wholesome Ingredients: Packed with tender chicken and fresh veggies, it’s not just tasty—it’s nutritious too! Cheesy Goodness: The gooey mozzarella and crispy Parmesan create a mouthwatering topping everyone will love. Versatile Recipe: Personalize it by tossing in your favorite seasonal veggies or spices. Plus, you can easily adapt it to fit your dietary needs. Ready to elevate your mealtime? Check out the full instructions for this easy-peasy Chicken Zucchini Bake!

Chicken Zucchini Bake Ingredients

For the Chicken
Shredded Chicken – Provides protein and substance; use cooked rotisserie chicken for convenience.

For the Vegetables
Zucchini – Adds moisture and a nutritious base; substitute with yellow squash or broccoli if unavailable.
Cherry Tomatoes – Adds a burst of flavor and color; regular tomatoes can be diced as an alternative.

For the Cheese
Mozzarella Cheese – Contributes creaminess and stretch; cheddar or a non-dairy cheese can substitute for a different flavor.
Parmesan Cheese – Adds a crunchy, savory layer on top; nutritional yeast offers a vegan alternative.

For Cooking and Flavor
Olive Oil – Greases the baking dish and enhances flavor; can use cooking spray if preferred.
Salt and Pepper – Seasoning to enhance overall flavor; adjust per taste preference.

This Chicken Zucchini Bake is sure to become a favorite not only for its flavors but also for being a quick and gluten-free dinner option.

Step‑by‑Step Instructions for Healthy Chicken Zucchini Bake

Step 1: Preheat the Oven
Begin by preheating your oven to 375°F (190°C). This step is crucial as it ensures that your Chicken Zucchini Bake cooks evenly and thoroughly. Take a moment to prepare your baking dish, as it will need to be greased shortly to prevent sticking.

Step 2: Mix the Ingredients
In a large mixing bowl, combine the shredded chicken, sliced zucchini, and halved cherry tomatoes. Next, add in the mozzarella cheese and half of the Parmesan cheese. Stir gently until all the ingredients are evenly coated and mixed, creating a colorful and hearty blend that will form the base of your bake.

Step 3: Grease the Baking Dish
Drizzle a bit of olive oil into a greased 9×13 inch baking dish. Use your fingers or a paper towel to spread it evenly over the bottom and sides of the dish, ensuring a non-stick surface for your Chicken Zucchini Bake. This simple step will help keep the cheesy goodness intact and make cleanup easier later on.

Step 4: Transfer the Mixture
Carefully transfer the chicken and vegetable mixture into the prepared baking dish. Use a spatula to spread the mixture evenly across the dish, ensuring that the zucchini, chicken, and cheese are well-distributed. This will allow for consistent cooking and that beautiful golden finish you’re aiming for.

Step 5: Add the Finishing Touches
Sprinkle the remaining Parmesan cheese evenly over the top of the mixture. This layer will melt into a delightful crust, adding a crispy texture and savory flavor. The sight of this cheesy layer will truly make your Chicken Zucchini Bake mouthwatering before it even hits the oven.

Step 6: Bake and Watch
Place the baking dish in the preheated oven and bake for 25 to 30 minutes. You’ll know it’s done when the zucchini is tender and the cheese is bubbly with a gorgeous golden crust on top. Keep an eye on it during the last few minutes to ensure it reaches that perfect melty finish.

Step 7: Cool and Serve
Once baked, remove the dish from the oven and allow it to cool slightly before serving. This resting time helps the flavors meld together and makes the dish easier to slice. Consider garnishing with fresh basil for a pop of color and flavor that complements your Chicken Zucchini Bake beautifully.

Chicken Zucchini Bake Variations

Feel free to unleash your creativity in the kitchen as you transform this delightful bake into your personalized masterpiece!

  • Dairy-Free: Swap all cheese for non-dairy alternatives like cashew cheese or dairy-free mozzarella for a creamy taste without the cheese.

  • Spicy Kick: Add crushed red pepper flakes to the chicken and vegetable mix before baking! This simple addition will give your dish an exciting twist that satisfies spice lovers.

  • Veggie Boost: Mix in bell peppers or spinach for an extra punch of color and nutrition. These veggies not only enhance flavor but also create a vibrant dish that appeals to the eyes.

  • Lower Carb: Replace zucchini with cauliflower rice for a lighter, low-carb alternative. You’ll still enjoy all the comfort with a unique texture.

  • Herbal Infusion: Enhance the flavor profile by incorporating fresh herbs like thyme or rosemary! Their aromas will elevate the dish’s taste, bringing it to a whole new level.

  • Savory Meat Options: Add Italian sausage or ground turkey for a heartier meal. This twist will introduce robust flavors while still keeping things hearty and satisfying.

  • Sweet Element: Toss in baby corn or sweet peas to add an unexpected sweet crunch. This touch of sweetness balances the dish beautifully!

  • Freezing Ahead: If you love meal prep, consider doubling the recipe for freezing. Simply bake it, then freeze portions. You’ll have a delicious, ready-made dinner whenever cravings hit!

These variations make this Chicken Zucchini Bake not just a quick and healthy dinner option, but an exciting canvas for your culinary expression. For more ideas, dive into our suggestions on what to serve with it that perfectly complement the flavors!

Helpful Tricks for Chicken Zucchini Bake

Chicken Shredding Simplified: Use a rotisserie chicken for a quicker prep time; it saves you the hassle of cooking raw chicken beforehand.

Veggie Variations: Feel free to swap in other seasonal veggies like bell peppers or spinach; just keep an eye on different cooking times to ensure everything bakes evenly.

Cheese Choices: Experiment with different cheeses! Try cheddar for a sharp twist or load it up with mozzarella for maximum gooeyness; don’t forget to check labels for gluten-free options.

Cool Before Serving: Allow your Chicken Zucchini Bake to cool for a few minutes before serving. This helps the dish set and makes for cleaner slices.

Batch Cooking: Double the recipe for leftovers; it stores well in the fridge for 3-4 days, making it a perfect meal prep option for busy weeks.

How to Store and Freeze Chicken Zucchini Bake

Fridge: Store leftovers in an airtight container for up to 3-4 days. This keeps the chicken and zucchini fresh, ready for a tasty lunch or dinner.

Freezer: For long-term storage, freeze in an airtight container or freezer-safe bag. Enjoy it for up to 3 months; just thaw in the fridge before reheating.

Reheating: When ready to enjoy, reheat in the oven at 350°F (175°C) for about 20-25 minutes, ensuring the Chicken Zucchini Bake is heated through and cheese is melty again.

Make-Ahead: If you’re prepping ahead, assemble the dish and refrigerate before baking. Allow it to sit at room temperature for about 20 minutes, then bake to enjoy a warm, fresh meal!

What to Serve with Chicken Zucchini Bake

A delightful meal is just a few pairings away, complementing the comforting flavors and textures of this gluten-free dish.

  • Fresh Garden Salad: A crisp salad balances the warm, cheesy goodness with refreshing greens and a tangy vinaigrette.
  • Garlic Bread: Buttery, garlicky slices add satisfying crunch and aroma, perfect for mopping up every bit of cheesy sauce.
  • Steamed Broccoli: Tender, vibrant broccoli brings an extra layer of nutrition and a bright color contrast to your plate.
  • Quinoa: This nutty grain adds wholesome fiber and protein, making your meal heartier and more filling.
  • Roasted Sweet Potatoes: Their natural sweetness complements the savory chicken and zucchini while providing a comforting side.
  • Lemon Sorbet: To cleanse your palate after the rich flavors, a refreshing sorbet is a surprisingly delightful way to finish.
  • White Wine: A chilled glass of Sauvignon Blanc perfectly pairs with the dish, enhancing the flavors of chicken and vegetables alike.
  • Baked Apples: These warm, spiced desserts offer cozy sweetness, a fitting end to a delightful dinner showcasing seasonal produce.

Make Ahead Options

These Chicken Zucchini Bake preparations are perfect for meal prep enthusiasts! You can assemble the dish up to 24 hours in advance. Simply mix the shredded chicken, zucchini, cherry tomatoes, mozzarella, and half of the Parmesan cheese in your greased baking dish, cover tightly, and refrigerate. To maintain the dish’s quality and prevent the zucchini from becoming too watery, you may want to lightly salt them before mixing and keep them separate if possible. When ready to bake, let the dish sit at room temperature for about 20 minutes before popping it in the oven. This method ensures you’ll enjoy a delicious, home-cooked meal with minimal effort!

Chicken Zucchini Bake Recipe FAQs

What is the best way to select ripe zucchini?
Absolutely! When choosing zucchini, look for firm, smooth ones with vibrant skin. Avoid any with dark spots all over or soft blemishes, as they may be overripe. Ideally, zucchini should be medium-sized, about 6 to 8 inches long, for the best flavor and texture.

How should I store leftovers from the Chicken Zucchini Bake?
For optimal storage, keep leftovers in an airtight container in the refrigerator for up to 3-4 days. This ensures that your zucchini and chicken stay fresh and ready for a delicious reheated meal. You can reheat portions in the oven at 350°F (175°C) for about 20 minutes, giving that delightful cheese time to melt again!

Can I freeze the Chicken Zucchini Bake?
Very much! To freeze, let the bake cool completely. Then, transfer it into an airtight container or a freezer-safe bag, making sure to remove any excess air. It will keep well for up to 3 months. When you’re ready to enjoy it, simply thaw it in the fridge overnight before reheating in the oven as mentioned earlier.

What if my zucchini turns out watery?
No worries! If your zucchini releases too much moisture, it can lead to a watery bake. To avoid this, slice the zucchini and sprinkle it with salt for about 15 minutes, letting it drain in a colander. Afterward, pat the slices dry before adding them to your bake. This little step makes a big difference in achieving that perfect texture!

Is this Chicken Zucchini Bake suitable for gluten-free diets?
Absolutely! This recipe is naturally gluten-free as long as the cheeses and other ingredients adhere to gluten-free standards. Just double-check your labels to ensure they meet your dietary needs. It’s a fantastic option for those looking to enjoy a healthy, satisfying meal without any gluten concerns.

Can I add other vegetables to my Chicken Zucchini Bake?
The more the merrier! Feel free to customize your bake by adding bell peppers, spinach, or even broccoli. Just keep an eye on cooking times, as denser vegetables may need a bit longer in the oven. Mixing and matching veggies can keep the dish exciting and packed with flavors!

undefined

Savory Chicken Zucchini Bake for a Quick Gluten-Free Feast

A quick and nutritious gluten-free Chicken Zucchini Bake using fresh ingredients for a satisfying family dinner.
Prep Time 15 minutes
Cook Time 30 minutes
Cooling Time 10 minutes
Total Time 55 minutes
Servings: 6 slices
Course: Casserole
Cuisine: American
Calories: 300

Ingredients
  

For the Chicken
  • 2 cups Shredded Chicken Use cooked rotisserie chicken for convenience.
For the Vegetables
  • 2 cups Zucchini Or substitute with yellow squash or broccoli if unavailable.
  • 1 cup Cherry Tomatoes Regular tomatoes can be diced as an alternative.
For the Cheese
  • 1 cup Mozzarella Cheese Or substitute with cheddar or a non-dairy cheese.
  • 1/2 cup Parmesan Cheese Nutritional yeast offers a vegan alternative.
For Cooking and Flavor
  • 2 tablespoons Olive Oil Can use cooking spray if preferred.
  • to taste Salt Adjust per taste preference.
  • to taste Pepper Adjust per taste preference.

Equipment

  • 9x13 inch baking dish

Method
 

Step-by-Step Instructions
  1. Preheat your oven to 375°F (190°C). Prepare your baking dish by greasing it.
  2. In a large mixing bowl, combine the shredded chicken, sliced zucchini, halved cherry tomatoes, mozzarella cheese, and half of the Parmesan cheese. Stir gently until combined.
  3. Drizzle olive oil into the greased baking dish and spread it evenly.
  4. Transfer the mixture into the prepared baking dish and spread evenly.
  5. Sprinkle the remaining Parmesan cheese over the top.
  6. Bake in the preheated oven for 25 to 30 minutes, until the zucchini is tender and the cheese is bubbly.
  7. Allow to cool slightly before serving. Optionally garnish with fresh basil.

Nutrition

Serving: 1sliceCalories: 300kcalCarbohydrates: 10gProtein: 30gFat: 15gSaturated Fat: 8gPolyunsaturated Fat: 1gMonounsaturated Fat: 6gCholesterol: 85mgSodium: 350mgPotassium: 600mgFiber: 2gSugar: 4gVitamin A: 600IUVitamin C: 30mgCalcium: 250mgIron: 2mg

Notes

This dish is perfect for meal prep and can be stored in the fridge for 3-4 days. Freeze for long-term storage.

Tried this recipe?

Let us know how it was!

Peanut Butter Protein Oatmeal Cups for Busy Mornings

With a satisfying crunch followed by a creamy embrace, the aroma of baking oats and peanut butter takes me back to my childhood kitchen, where homemade treats were a cherished tradition. These Easy Peanut Butter Protein Oatmeal Cups embody the delightful memories of my favorite snacks while doubling as a quick breakfast solution for busy mornings. Filled with protein-packed goodness, they’re perfect for those of us looking to kick-start our day without the fuss of complicated prep work. Plus, they make a fantastic portable snack for kids and adults alike, ensuring everyone stays fueled and energized throughout the day. Who wouldn’t want a nutritious meal that can be customized based on what’s in the pantry? Dive into this gluten-free, meal prep-friendly recipe, and let’s satisfy that craving together—what variation will you try first?

Why are these oatmeal cups a must-try?

Convenience is key! These Easy Peanut Butter Protein Oatmeal Cups take just minutes to prepare, making them perfect for busy mornings when you need a quick breakfast. Customizable to your taste, you can swap in your favorite nut butters or add fruits for a unique twist. Nutrition-packed with protein and fiber, they’re not just healthy but also incredibly satisfying. Kid-approved, these cups double as a fun snack that will keep everyone energized throughout the day. Plus, they’re meal prep friendly—bake a batch and enjoy them all week!

Peanut Butter Protein Oatmeal Cup Ingredients

For the Base
Rolled Oats – A hearty base providing structure and fiber; opt for gluten-free oats if needed.
Peanut Butter – Creamy and protein-rich, regular peanut butter adds sweetness, while natural may require extra liquid.
Protein Powder – Boosts protein content; adjust flavor to your preference, choosing from vanilla, chocolate, or more.
Milk – Acts as a binder for ingredients; any type works, and you may need more if using natural peanut butter.

For the Topping
Chocolate Chips – Adds a touch of sweetness and indulgence; substitute with nuts or dried fruit for a different flavor profile.

These Peanut Butter Protein Oatmeal Cups offer a delightful blend of flavors and nutrition, ensuring a convenient breakfast or snack that keeps you fueled throughout your day!

Step‑by‑Step Instructions for Easy Peanut Butter Protein Oatmeal Cups

Step 1: Preheat the Oven
Begin by preheating your oven to 350°F (175°C). This ensures a consistent baking temperature, creating perfectly baked Easy Peanut Butter Protein Oatmeal Cups. While the oven warms up, gather your silicone muffin cups and place them on a baking tray for easy handling after mixing the ingredients.

Step 2: Combine the Dry Ingredients
In a large mixing bowl, combine rolled oats and protein powder. Stir these two ingredients together thoroughly, allowing the oats to absorb the flavors of the protein powder. This creates the base for your oatmeal cups, so ensure there are no clumps and everything is evenly mixed.

Step 3: Mix in the Wet Ingredients
Next, add creamy peanut butter and your chosen milk to the dry mixture. Using a spatula or wooden spoon, mix until a cohesive dough forms. The consistency should be sticky but pliable; if it’s too dense, this is where you can add a splash more milk to achieve the desired texture.

Step 4: Fill the Muffin Cups
Once your dough is ready, spoon it into the prepared silicone muffin cups, filling each about 2/3 full. Press the mixture firmly into each cup to form a solid base; this will help them hold their shape while baking. The pressing action also ensures a delightful texture that’s reminiscent of a muffin.

Step 5: Add the Topping
If you are including chocolate chips, melt them in a microwave-safe bowl for about 30 seconds to 1 minute, stirring until smooth. Drizzle the melted chocolate evenly over the filled oatmeal cups, adding a touch of sweetness that harmonizes beautifully with the peanut butter flavor.

Step 6: Bake to Perfection
Place the filled muffin cups in the oven and bake for approximately 12 minutes. Keep an eye on them, as you want them to set but not overbake. The tops should be slightly firm to the touch, indicating they’re ready to come out of the oven.

Step 7: Cool Before Serving
After baking, let the Easy Peanut Butter Protein Oatmeal Cups cool in the pan for at least 10 minutes. This step is crucial to avoid breakage when transferring them out of the silicone cups. The cooling will also enhance their flavor and texture, making them even more enjoyable to eat.

Peanut Butter Protein Oatmeal Cups Variations

Feel free to play around with this recipe and create your very own version of these delightful cups!

  • Nut Butter Swap: Substitute peanut butter with almond or cashew butter for a new, nutty flavor adventure!
    There’s something exciting about changing up the base. Each nut brings a unique essence that can transform the entire cup.

  • Protein Powder Options: Use flavored protein powder, such as chocolate or vanilla, to enhance sweetness and taste further.
    Imagine a rich chocolatey bite that feels indulgent yet remains wholesome. It’s a small change that packs a punch!

  • Add-in Options: Incorporate dried fruits, such as cranberries or raisins, for a sweet surprise in every nibble.
    The bursts of fruity flavor will not only taste amazing but also lend a delightful chewiness.

  • Choco-Free Variation: Skip the chocolate chips if you’d like a lower-sugar option and substitute with chopped nuts or seeds instead.
    This not only adds a satisfying crunch but also boosts the nutritional profile of each cup.

  • Oat Type Change: Use quick oats instead of rolled oats if you’re looking for a softer texture that bakes more quickly.
    It’s a simple switch that can transform the final product, making it easier for some to enjoy their yummy oatmeal cups.

  • Flavor Boost: Add a dash of cinnamon or a scoop of shredded coconut to your mixture for an extra layer of flavor.
    These little spices can evoke warm, comforting memories of cozy kitchens filled with delicious scents.

  • Spicy Kick: Sprinkle in some chili powder or cayenne pepper for a surprising spicy twist.
    If you’re feeling adventurous, this kicks things up a notch and adds an exciting twist that pairs wonderfully with sweet peanut butter.

  • Vegan-Friendly Option: Substitute the milk with almond or oat milk and use a plant-based protein to create a vegan delight.
    It’s a super easy way to enjoy these tasty cups while catering to those who prefer plant-based choices.

By making these variations, you’ll personalize the recipe to your taste while keeping the nourishing qualities intact. And if you’re ever curious about what else you can whip up in the kitchen, don’t forget to check out some of my other family-loved snacks like healthy energy bars or fruit and nut granola. Happy cooking!

How to Store and Freeze Peanut Butter Protein Oatmeal Cups

  • Room Temperature: Store the oatmeal cups in an airtight container at room temperature for up to 2–3 days. This keeps them fresh and ready for quick snacking.
  • Fridge: For longer storage, place them in the refrigerator, where they can last up to a week, maintaining their delicious taste and texture.
  • Freezer: If you want to extend their shelf life, freeze the cups for up to 3 months. Wrap each cup tightly in plastic wrap or place in a freezer-safe container.
  • Reheating: When you’re ready to enjoy your Peanut Butter Protein Oatmeal Cups, let them thaw overnight in the fridge. For a quick warm-up, microwave for 15-20 seconds before serving.

What to Serve with Easy Peanut Butter Protein Oatmeal Cups?

These delightful oatmeal cups are the perfect base for a nourishing meal, inviting a variety of pairings that enhance their flavor and nutrition.

  • Fresh Fruit: A medley of sliced bananas or berries adds vibrant colors and refreshing sweetness, brightening up your breakfast or snack.

  • Yogurt Parfait: Layer creamy Greek yogurt with granola and more fruits for a satisfying, texture-rich delight that complements the oatmeal cups nicely.

  • Smoothie: Pair with a protein-packed smoothie loaded with spinach and fruits for an energizing breakfast that blends seamlessly with your oatmeal cups.

  • Nuts & Seeds: A sprinkle of chopped almonds or chia seeds adds a delightful crunch and boosts the nutrient profile, enhancing the overall texture and flavor.

  • Nut Butter Drizzle: Drizzling a bit of extra peanut or almond butter over the oatmeal cups creates a rich, indulgent experience that satisfies any nut lover.

  • Herbal Tea: Enjoy a warm cup of chamomile or peppermint tea alongside to offer a soothing contrast and enhance the cozy feeling of your meal.

These pairings create a balanced, satisfying experience that beautifully complements the hearty, protein-packed goodness of your Easy Peanut Butter Protein Oatmeal Cups!

Expert Tips for Peanut Butter Protein Oatmeal Cups

  • Moisture is Key: Always ensure your mixture is moist enough to bind together; don’t skip the milk, as it’s crucial for the right texture.

  • Watch the Baking Time: Keep a close eye on your oatmeal cups while baking. Overbaking can lead to a dry texture that’s less enjoyable; check them at the 12-minute mark.

  • Let Them Cool: Allow the cups to cool completely in the pan for at least 10 minutes. This prevents breakage and ensures they hold their shape beautifully.

  • Fill Wisely: Avoid overfilling the muffin cups—aim for about 2/3 full. This allows space for rising and prevents mess during baking.

  • Customize Your Ingredients: Feel free to swap peanut butter for almond or cashew butter, or experiment with different mix-ins for a personalized flavor—your options are endless with these protein-packed cups!

Make Ahead Options

These Easy Peanut Butter Protein Oatmeal Cups are perfect for busy home cooks looking to save time and enjoy delicious breakfasts throughout the week! You can prepare the mixture and store it in the refrigerator for up to 24 hours. Simply combine the rolled oats, protein powder, peanut butter, and milk, then cover tightly and refrigerate. When you’re ready to bake, just scoop the mixture into your silicone muffin cups, add your chocolate chips, and bake for about 12 minutes. To maintain quality, ensure the cups are cooled completely before transferring them to an airtight container. You can also freeze the baked cups for up to 3 months; defrost them overnight in the fridge, and they’ll be just as delicious and satisfying as when freshly made!

Peanut Butter Protein Oatmeal Cups Recipe FAQs

What type of oats should I use for this recipe?
For the best results, use rolled oats as they provide great texture and structure. If you need a gluten-free option, make sure to select certified gluten-free oats.

How should I store these oatmeal cups after baking?
Store the Peanut Butter Protein Oatmeal Cups in an airtight container at room temperature for 2-3 days. For longer freshness, they can be refrigerated for up to a week.

Can I freeze the oatmeal cups? If so, how?
Absolutely! To freeze, wrap each individual peanut butter protein oatmeal cup tightly in plastic wrap or place them in a freezer-safe container. They can be frozen for up to 3 months. When you’re ready to enjoy one, let it thaw overnight in the fridge, and for a quick warm-up, microwave for about 15-20 seconds.

How can I tell if the oatmeal mixture is the right consistency?
The mixture should be sticky but pliable. If it’s too dry, add a little more milk until you achieve a cohesive dough that holds together without crumbling. Aim for a texture similar to cookie dough—moist enough to form a shape but not overly wet.

Are these oatmeal cups suitable for kids with allergies?
These oatmeal cups can be modified to accommodate dietary allergies. Ensure to use nut butter alternatives like sunflower seed butter for nut allergies, and double-check that all ingredients, especially the protein powder, are free from allergens. Always consult with a healthcare provider if allergies are a concern.

What can I use instead of chocolate chips?
If chocolate chips aren’t your thing, feel free to swap them for other tasty options like nuts, dried fruit, or seeds. This customization makes these Peanut Butter Protein Oatmeal Cups flexible to suit your taste preferences!

undefined

Peanut Butter Protein Oatmeal Cups for Busy Mornings

Easy Peanut Butter Protein Oatmeal Cups are the perfect blend of convenience and nutrition, ideal for busy mornings.
Prep Time 10 minutes
Cook Time 12 minutes
Cooling Time 10 minutes
Total Time 32 minutes
Servings: 12 cups
Course: Breakfast
Cuisine: American
Calories: 180

Ingredients
  

For the Base
  • 2 cups Rolled Oats opt for gluten-free oats if needed
  • 1 cup Peanut Butter regular adds sweetness, natural may require extra liquid
  • 1 scoop Protein Powder adjust flavor to preference
  • 1 cup Milk any type works, may need more if using natural peanut butter
For the Topping
  • 1 cup Chocolate Chips substitute with nuts or dried fruit for variety

Equipment

  • Silicone muffin cups
  • Mixing Bowl
  • spatula
  • Baking Tray

Method
 

Step-by-Step Instructions
  1. Preheat your oven to 350°F (175°C) and place silicone muffin cups on a baking tray.
  2. Combine rolled oats and protein powder in a large mixing bowl, stirring until evenly mixed.
  3. Add peanut butter and milk to the dry mixture, mixing until a sticky dough forms.
  4. Spoon the dough into muffin cups, filling each about 2/3 full and pressing firmly.
  5. Melt chocolate chips in a microwave-safe bowl, then drizzle over filled oatmeal cups.
  6. Bake in the oven for approximately 12 minutes, checking to ensure they don't overbake.
  7. Let cool in the pan for at least 10 minutes before transferring out of the cups.

Nutrition

Serving: 1cupCalories: 180kcalCarbohydrates: 25gProtein: 7gFat: 8gSaturated Fat: 2gPolyunsaturated Fat: 0.5gMonounsaturated Fat: 5gSodium: 90mgPotassium: 150mgFiber: 3gSugar: 5gCalcium: 5mgIron: 10mg

Notes

These Oatmeal Cups can be customized with different nut butters and mix-ins to suit your taste.

Tried this recipe?

Let us know how it was!