Pistachio Orange Blossom Overnight Oats for a Delightful Start

Sipping my morning coffee, I couldn’t shake the thought that breakfast could be more exciting. Enter Pistachio Orange Blossom Overnight Oats—a dish that captures the essence of dreamy mornings while being effortlessly easy to prepare. This recipe not only takes just 10 minutes to whip up but also serves as a versatile meal prep solution, ensuring you’re fueled for the day ahead without the hassle of fast food. Infused with the aromatic charm of orange blossom water and the delightful crunch of pistachios, these oats transform a simple breakfast into something truly special. Are you ready to elevate your mornings with this wholesome vegan delight? Let’s dive into breakfast bliss together!

Why Are Overnight Oats So Popular?

Convenience: Enjoy the luxury of a ready-made breakfast! With just 10 minutes of prep, you can whip up these oats and let them work their magic overnight.

Flavor Fusion: The unique combination of pistachios and orange blossom water brings a refreshing twist that is anything but ordinary.

Health Benefits: Packed with essential nutrients, these oats are a great source of fiber and healthy fats, making them a nutritious start to your day.

Customization: Whether you prefer coconut milk or want to switch up the nuts, the versatility of this recipe means you can easily make it your own.

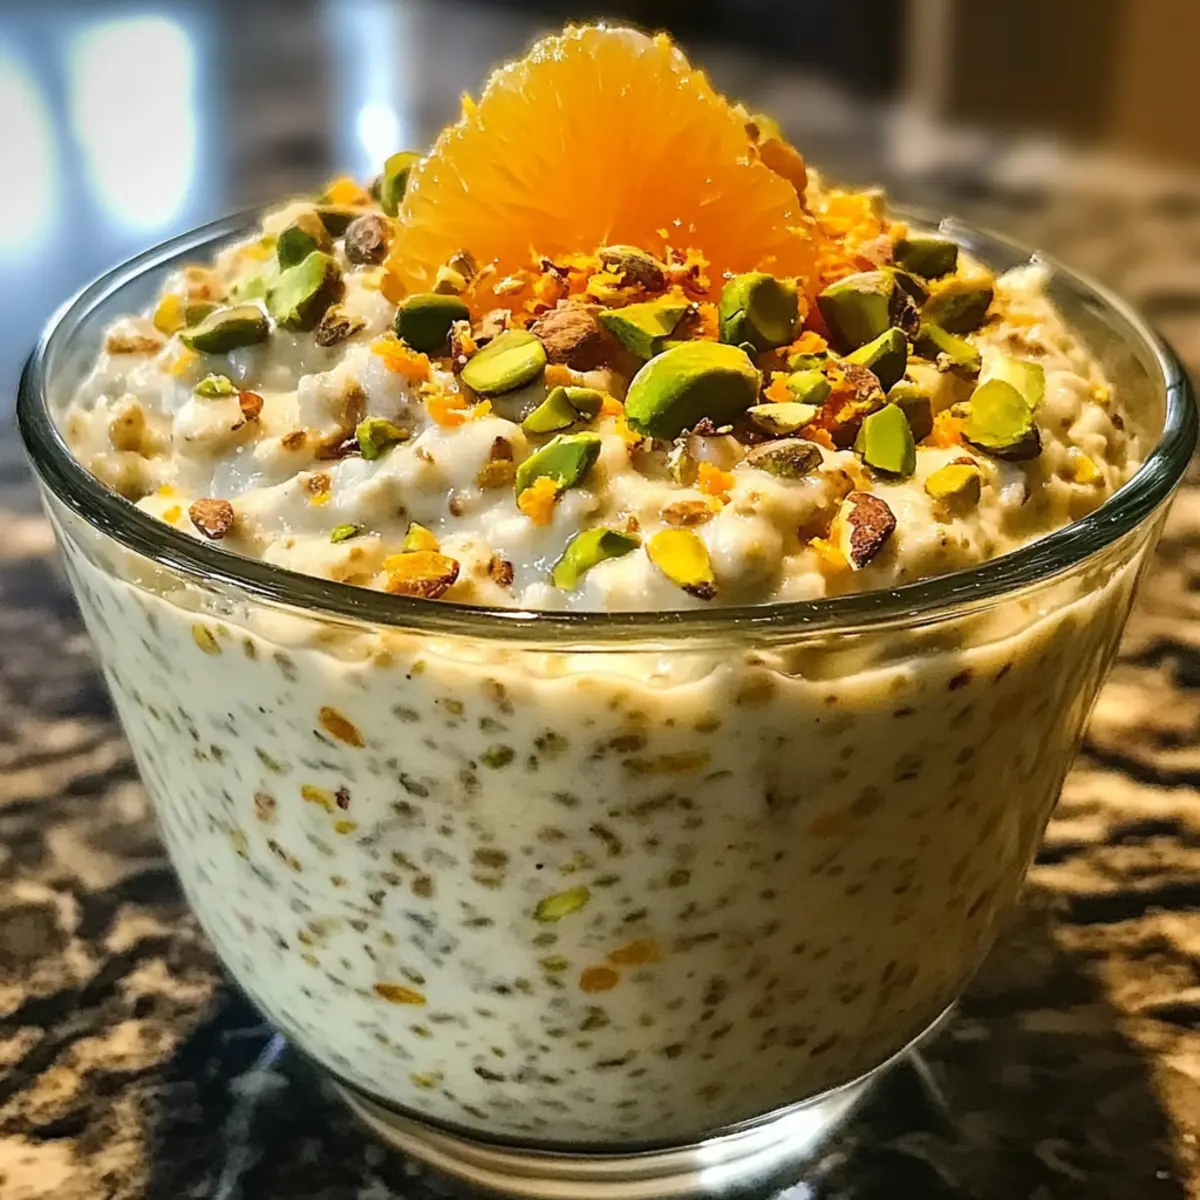
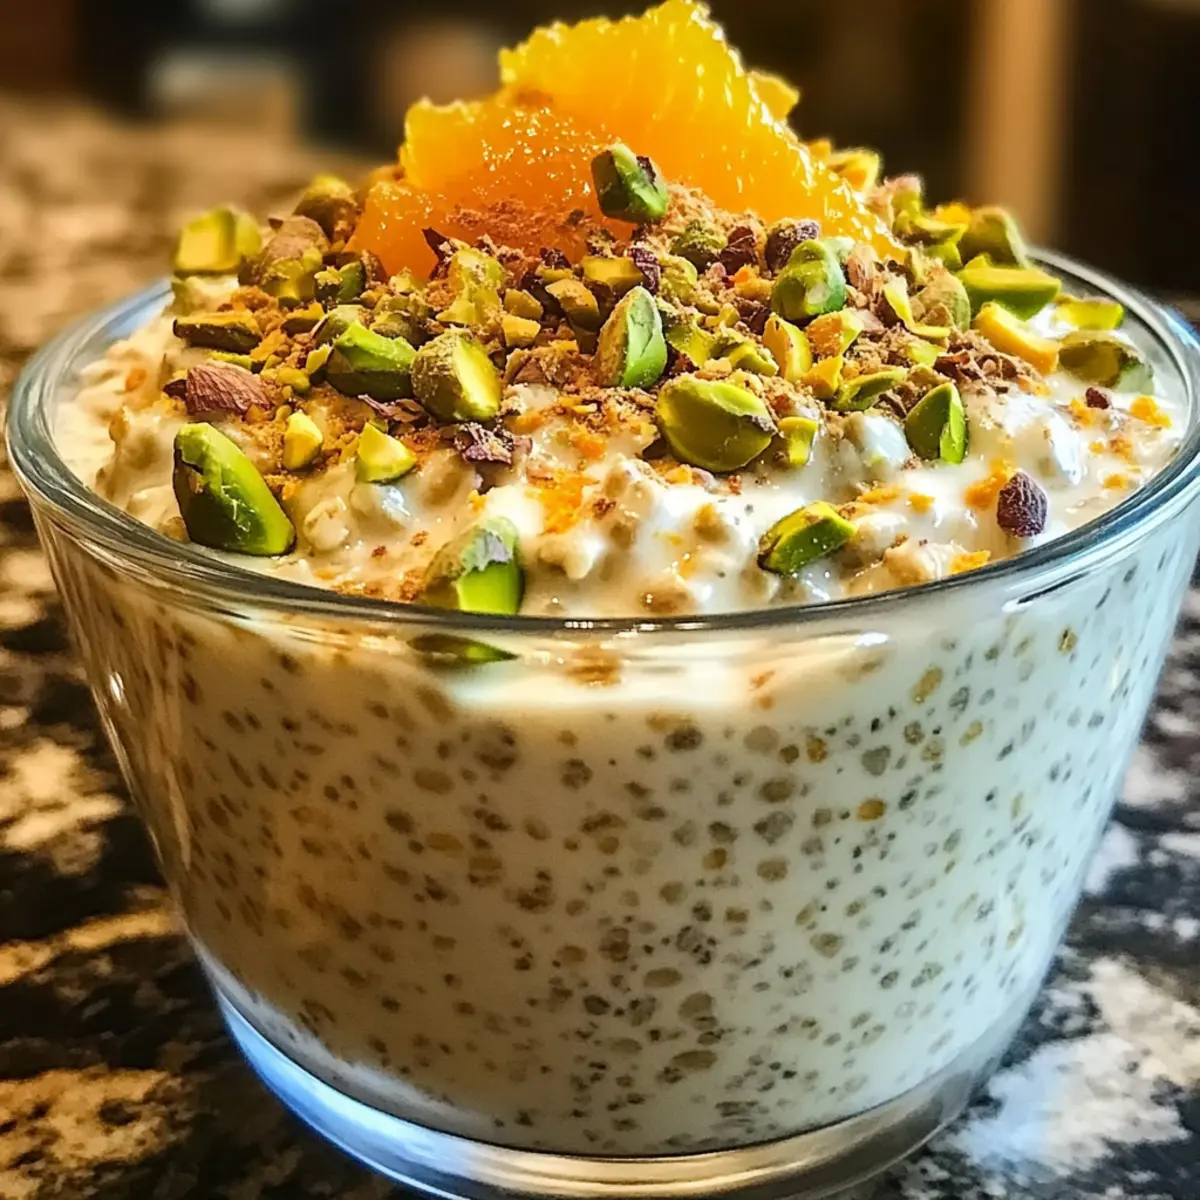
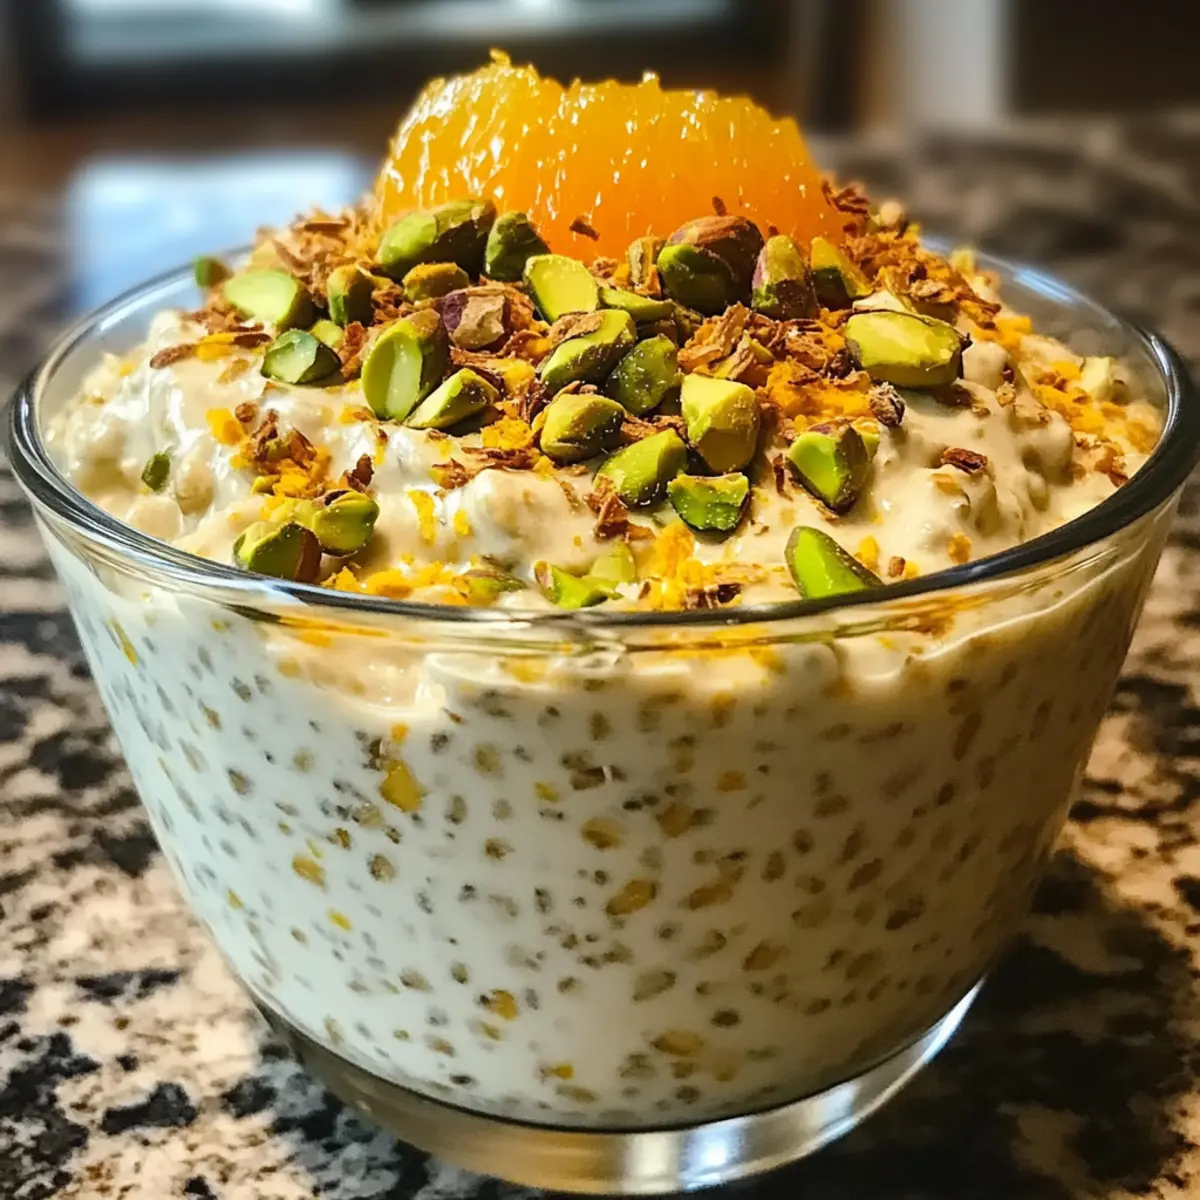
Impressive Presentation: Serve these oats topped with fresh orange segments for a beautiful, Instagram-worthy breakfast that will impress your family and friends.

Combine your love of wholesome meals with simple ingredients; check out my tips on meal prep to elevate your breakfast game even further!

Pistachio Orange Blossom Overnight Oats Ingredients

Discover the delightful ingredients that make this vegan breakfast a true winner!

For the Oats

  • Rolled Oats – Base of the dish, providing texture and heartiness; ensure gluten-free if necessary.
  • Almond Milk – Acts as the liquid to hydrate the oats; can be swapped with any preferred milk like oat or coconut.
  • Honey or Maple Syrup – Adds sweetness to balance the flavors; use maple syrup for a vegan option.
  • Salt – Balances the sweetness; just a pinch is sufficient for the perfect taste.

For Flavor

  • Orange Blossom Water – Imparts the unique floral aroma; if unavailable, orange juice is a good substitute.
  • Vanilla Extract – Enhances the overall flavor profile; optional but recommended for added depth.

For Topping

  • Chopped Pistachios – Provides crunch and nuttiness; feel free to swap with other nuts or seeds if desired.

Elevate your mornings with these delicious Pistachio Orange Blossom Overnight Oats that perfectly combine health and flavor!

Step-by-Step Instructions for Pistachio Orange Blossom Overnight Oats

Step 1: Combine the Base
In a mixing bowl, combine 1 cup of rolled oats with 1 cup of almond milk. Stir the mixture together using a whisk or spoon until the oats are completely submerged in the milk. The oats should begin absorbing the liquid almost immediately. Allow this to sit for a minute to ensure a well-mixed base, which will create the perfect texture for your Pistachio Orange Blossom Overnight Oats.

Step 2: Incorporate the Flavors
Next, stir in 2 tablespoons of honey or maple syrup, 1 tablespoon of orange blossom water, and 1 teaspoon of vanilla extract. Add a pinch of salt to balance the sweetness. Mix thoroughly until all the ingredients are evenly integrated, and the mixture is smooth. This step infuses your oats with delightful flavors that will meld beautifully overnight.

Step 3: Fold in the Nuts
Gently fold in 1/4 cup of chopped pistachios, ensuring they are evenly distributed throughout the oat mixture. The goal is to maintain the crunch of the pistachios while adding a nutty flavor to your Pistachio Orange Blossom Overnight Oats. Be careful not to overmix, as you want to preserve the integrity of the nut pieces.

Step 4: Chill for Flavor
Cover the bowl tightly with plastic wrap or transfer the mixture to an airtight container. Refrigerate the oats for at least 6 hours or overnight, allowing the flavors to meld and the oats to soften to a creamy consistency. This step is crucial for achieving the rich, indulgent texture that makes these overnight oats so special.

Step 5: Stir and Adjust
The next morning, remove the oats from the refrigerator and give them a good stir to combine any settled ingredients. If the mixture appears too thick for your liking, add a splash of almond milk to reach your desired consistency. This step ensures that your Pistachio Orange Blossom Overnight Oats are creamy and ready for serving.

Step 6: Serve and Enjoy
Spoon the prepared oats into bowls and top with fresh orange segments and a sprinkle of additional chopped pistachios for extra crunch and visual appeal. The vibrant colors and flavors make these oats not only nutritious but also a stunning breakfast option. Enjoy your delightful start to the day with this wholesome vegan treat!

Variations & Substitutions for Pistachio Orange Blossom Overnight Oats

Feel free to customize these delectable oats to suit your taste buds and dietary needs!

  • Coconut Milk: Substitute almond milk with coconut milk for a rich, tropical flavor that enhances the overall creaminess.
    Give it a try and feel summer vibes in every delicious bite!

  • Nut-Free: Swap out pistachios for sunflower seeds to create a nut-free version without sacrificing crunch or nutrition.
    This is perfect for those with nut allergies or anyone looking for a different texture!

  • Berry Bliss: Add a handful of mixed berries or sliced bananas for a fruity twist bursting with freshness.
    It’s amazing how fruits can elevate the flavor and visual appeal of your breakfast!

  • Sweetness Adjustments: Play around with the amount of honey or maple syrup to cater the sweetness to your preference.
    A little taste test can help you strike the perfect balance!

  • Spiced Up: Sprinkle in a dash of cinnamon or cardamom for a warm, spicy note that complements the floral orange blossom.
    These spices add a cozy richness—perfect for chilly mornings!

  • Protein Boost: Incorporate a scoop of your favorite protein powder to amp up the nourishment factor in your breakfast.
    Ideal for morning workouts, this addition smoothly integrates into the oats!

  • Chocolate Love: Stir in some cacao nibs or dark chocolate chips for a delectable chocolate flavor boost.
    It’s a sweet treat that will make your mornings feel extra indulgent!

  • Additional Crunch: Top your oats with granola or chia seeds for extra texture and a delightful crunch.
    Granola can add satisfying layers of flavor, making every bite an adventure!

For those wondering about meal prepping ideas, check out my tips on meal prep to ensure you’re ready for the busy week ahead!

Make Ahead Options

Pistachio Orange Blossom Overnight Oats are a stellar choice for meal prep enthusiasts! You can prepare the oats up to 3 days in advance, making them perfect for busy weeknights or mornings on the go. Simply combine the rolled oats, almond milk, honey or maple syrup, orange blossom water, vanilla extract, and salt in a mixing bowl, then fold in the chopped pistachios. Transfer the mixture to an airtight container and refrigerate it overnight (or for at least 6 hours) for optimum flavor infusion. When you’re ready to serve, give the oats a good stir and adjust the consistency with a splash of almond milk if needed. Enjoy a quick, delightful breakfast that remains just as delicious when made ahead!

Expert Tips for Pistachio Orange Blossom Overnight Oats

  • Soak for Creaminess: Allow your overnight oats to soak for a full 8 hours for the creamiest texture possible.
  • Stir Well: Before serving, stir the oats thoroughly to redistribute the flavors and ensure a balanced taste in every bite.
  • Bulk Prep: Consider making a larger batch by increasing ingredient quantities, and store in airtight containers for quick breakfasts all week.
  • Milk Substitutions: Feel free to use coconut milk for a richer flavor or oat milk for an equally delicious dairy-free option.
  • Taste Test: Adjust sweetness by tasting the mixture before chilling; increase honey or maple syrup to suit your preference.

What to Serve with Pistachio Orange Blossom Overnight Oats

Elevate your breakfast experience with delightful pairings that enhance the creamy, floral notes of your oats.

  • Fresh Fruit Salad: A colorful mix of seasonal fruits adds freshness and bright flavors, perfectly balancing the richness of the oats.

  • Crunchy Granola: The crunch of granola provides an extra textural contrast, making each bite a delightful journey of flavors.

  • Smoothie Bowl: A light smoothie loaded with greens or berries perfectly complements the nutty oats, creating a nutritious, vibrant breakfast.

  • Chia Seed Pudding: Pairing with chia seed pudding enhances the nutrition while offering a different texture that contrasts beautifully with the oats.

  • Coconut Yogurt: Creamy and tangy coconut yogurt offers a luxurious touch to your breakfast table while staying vegan-friendly.

  • Herbal Tea: A calming cup of chamomile or peppermint tea brings warmth and complements the floral hints of orange blossom.

  • Nut Butter Toast: Whole grain toast spread with almond or cashew butter adds a hearty component, creating a satisfying combination.

  • Dark Chocolate Shavings: A sprinkle of dark chocolate shavings on top offers indulgence and contrast, turning breakfast into a treat.

With these pairings, your Pistachio Orange Blossom Overnight Oats transform into a complete breakfast feast!

How to Store and Freeze Pistachio Orange Blossom Overnight Oats

Fridge: Store your overnight oats in an airtight container for up to 5 days in the refrigerator. Ensure they are tightly sealed to maintain freshness.

Freezer: For longer storage, freeze portions in individual containers for up to 2 months. Thaw in the refrigerator overnight before serving.

Reheating: When ready to enjoy, give the oats a good stir and add a splash of almond milk if needed to adjust the consistency for the perfect creamy texture.

Make-Ahead Tip: Prepare multiple batches to simplify your meal prep and have a nutritious breakfast ready to go throughout the week!

Pistachio Orange Blossom Overnight Oats Recipe FAQs

What type of oats should I use for overnight oats?
Absolutely! For overnight oats, I recommend using rolled oats as they absorb liquid well and provide a hearty texture. Steel-cut oats are too tough and won’t soften properly overnight, while quick oats can become too mushy. If gluten is a concern, make sure to select certified gluten-free rolled oats.

How should I store my leftover overnight oats?
You can store your Pistachio Orange Blossom Overnight Oats in an airtight container in the refrigerator for up to 5 days. Make sure the container is sealed tightly to maintain freshness. Just give your oats a good stir and add a splash of almond milk if needed to adjust the consistency before serving!

Can I freeze my overnight oats?
Very! Freezing is a great way to extend the shelf life of your overnight oats. To freeze, simply portion them into individual containers and store them in the freezer for up to 2 months. When you’re ready to enjoy, just transfer a container to the refrigerator the night before to thaw. In the morning, stir well and add a bit more almond milk if necessary.

What if my oats are too thick after refrigerating?
Don’t worry! If you find your oats too thick after refrigeration, it’s as easy as adding a splash of almond milk. Stir well to incorporate the milk and achieve your desired creamy consistency. You can also add a little more orange juice or water for an extra flavor twist.

Are there any allergy considerations for this recipe?
Yes, if you’re making these oats for someone with nut allergies, consider using oat milk instead of almond milk and substitute the pistachios with seeds like sunflower or pumpkin. This will keep the recipe nut-free while still providing a nutritious boost. Always check ingredient labels for possible allergens!

Can I use different sweeteners in this recipe?
Definitely! While honey or maple syrup works beautifully in this recipe, you can use agave syrup, coconut sugar, or any other sweetener you prefer. Just remember to adjust to taste, especially if you’re aiming for a vegan option—maple syrup is typically the sweetest and most recommended!

undefined

Pistachio Orange Blossom Overnight Oats for a Delightful Start

Experience the delightful Pistachio Orange Blossom Overnight Oats, a simple vegan breakfast that combines health and flavor effortlessly.
Prep Time 10 minutes
Chill Time 6 hours
Total Time 6 hours 10 minutes
Servings: 2 bowls
Course: Breakfast
Cuisine: Vegan
Calories: 250

Ingredients
  

For the Oats
  • 1 cup Rolled Oats ensure gluten-free if necessary
  • 1 cup Almond Milk can swap with any preferred milk
  • 2 tablespoons Honey or Maple Syrup use maple syrup for vegan option
  • 1 pinch Salt just a pinch is sufficient
For Flavor
  • 1 tablespoon Orange Blossom Water or orange juice if unavailable
  • 1 teaspoon Vanilla Extract optional but recommended for depth
For Topping
  • 1/4 cup Chopped Pistachios feel free to swap with other nuts or seeds

Equipment

  • Mixing Bowl
  • whisk
  • airtight container

Method
 

Step-by-Step Instructions
  1. In a mixing bowl, combine rolled oats and almond milk, stirring until fully mixed and oats are submerged.
  2. Stir in honey or maple syrup, orange blossom water, vanilla extract, and a pinch of salt until smooth.
  3. Gently fold in chopped pistachios, maintaining the crunch.
  4. Cover and refrigerate the mixture for at least 6 hours or overnight.
  5. Stir the oats the next morning and adjust consistency with almond milk if needed.
  6. Serve topped with fresh orange segments and additional chopped pistachios.

Nutrition

Serving: 1bowlCalories: 250kcalCarbohydrates: 40gProtein: 8gFat: 10gSaturated Fat: 1gPolyunsaturated Fat: 2gMonounsaturated Fat: 7gSodium: 100mgPotassium: 300mgFiber: 6gSugar: 8gVitamin A: 10IUVitamin C: 4mgCalcium: 20mgIron: 10mg

Notes

Allow oats to soak for a full 8 hours for the creamiest texture. Adjust sweetness to taste before chilling.

Tried this recipe?

Let us know how it was!

Vegan Mediterranean Roasted Vegetables Bowl for Comfort and Flavor

As the golden sun dips below the horizon, you can almost taste the warmth and richness of Mediterranean gardens bursting with color. That is precisely what I hoped to capture in this Vegan Mediterranean Roasted Vegetables Bowl with Herbed Yogurt Sauce. With hearty roasted potatoes, smoky chickpeas, and vibrant red peppers, this dish creates an irresistible harmony of crispy and creamy textures. Not only is it a vibrant feast for the eyes, but it’s also a quick meal prep winner that caters to both healthy eating and busy lifestyles. Plus, you can customize it with your favorite seasonal vegetables or creamy sauces! Ready to explore a wholesome bowl that sings with flavor? Let’s dive in!

Why is this recipe a must-try?

Simplicity and Versatility: This Vegan Mediterranean Roasted Vegetables Bowl is incredibly easy to prepare, perfect for both novice cooks and seasoned chefs. Flavor Explosion: The combination of crispy roasted vegetables harmonizes with a tangy herbed yogurt sauce, making each bite unforgettable. Meal Prep Friendly: Ideal for busy schedules, you can whip up several servings in advance, ensuring healthy meals throughout the week. Customizable: Tailor the dish to your liking by swapping in seasonal veggies or experimenting with different sauces like a tahini dressing. Eye-Catching Presentation: Not only does this bowl deliver on taste, but its vibrant colors make it a showstopper at any dining table!

Vegan Mediterranean Roasted Vegetables Bowl Ingredients

• Create a delightful array of flavors with these key ingredients.

For the Base

  • Yukon Gold Potatoes – Base of the bowl, providing a hearty, starchy texture. Can substitute sweet potatoes for a sweeter profile.
  • Chickpeas – Add protein and a crunchy element when roasted. Ensure they are dried thoroughly for optimal crispness.

For the Veggies

  • Red Bell Pepper – Contributes sweetness and color; enhances flavor harmony. Zucchini or eggplant can be added for more traditional Mediterranean flavors.
  • Red Onion – Adds a caramelized sweetness when roasted. Shallots can be used for a milder flavor.

For the Cooking

  • Extra Virgin Olive Oil – Essential for roasting and flavor infusion. Use a good quality oil for best results.
  • Spices (smoked paprika, cumin, coriander, garlic powder, oregano, salt, pepper, optional red pepper flakes) – Flavor base that brings depth to the dish. Adjust spice levels to taste.

For the Herbed Yogurt Sauce

  • Plant-Based Yogurt – Forms the creamy herbed sauce, offering a tangy contrast to the roasted elements. Can replace with tahini-lemon dressing for a richer flavor.
  • Tahini (optional) – Enhances creaminess and adds nuttiness.
  • Lemon Juice – Brightens flavors in the sauce. Fresh lemon is preferred for maximum zest.
  • Fresh Herbs (dill, parsley) – Provide freshness and enhance the overall flavor profile. Basil or mint can be good alternatives.

Step‑by‑Step Instructions for Vegan Mediterranean Roasted Vegetables Bowl

Step 1: Preheat the Oven
Start by preheating your oven to 425°F (220°C). This high temperature ensures the vegetables will roast to perfection, caramelizing beautifully while maintaining their vibrant colors. While the oven warms up, line a baking sheet with parchment paper to prevent sticking and make cleanup easy.

Step 2: Prepare the Potatoes
In a mixing bowl, toss the Yukon Gold potato wedges with 1 tablespoon of extra virgin olive oil and half of the spice blend (smoked paprika, cumin, coriander, garlic powder, oregano, salt, and pepper). Arrange the seasoned potatoes on one side of the lined baking sheet, cut-side down. Aim for a single layer to ensure even roasting.

Step 3: Mix the Chickpeas and Veggies
Next, in the same bowl, combine the drained chickpeas, chopped red bell pepper, and sliced red onion. Drizzle the remaining olive oil over the mixture, add the rest of the spices, and toss everything together until evenly coated. Spread these vibrant veggies on the opposite side of the baking sheet, incorporating as much space as possible for optimal roasting.

Step 4: Roast the Vegetables
Place the baking sheet in the preheated oven and roast for 25–35 minutes, giving the potatoes a flip halfway through while stirring the chickpeas and vegetables. Keep an eye on them; they should be golden brown and crispy, with the onion edges caramelizing nicely. This step is where your Vegan Mediterranean Roasted Vegetables Bowl starts to come together!

Step 5: Whisk Together the Sauce
While the vegetables are roasting, prepare the herbed yogurt sauce. In a clean bowl, whisk together the plant-based yogurt, tahini (if using), fresh lemon juice, minced garlic, and chopped dill and parsley. Season with a pinch of salt to enhance the flavors. Allow the sauce to chill for about 10 to 15 minutes to meld the flavors beautifully.

Step 6: Assemble the Bowls
Once the vegetables are perfectly roasted, remove them from the oven and let them cool slightly. In serving bowls, spread a generous layer of the herbed yogurt sauce at the base. Top with the hot roasted vegetables and chickpeas, creating a stunning display that captivates both the eye and the palate.

Step 7: Garnish and Serve
Finally, garnish your Vegan Mediterranean Roasted Vegetables Bowl with extra fresh herbs, a sprinkle of lemon zest, or a drizzle of olive oil for a finishing touch. Serve immediately for a warm meal that’s not only nourishing but also vibrant and colorful, bringing the essence of Mediterranean gardens right to your table!

Expert Tips for Vegan Mediterranean Roasted Vegetables Bowl

  • Crispy Chickpeas: Ensure chickpeas are thoroughly dried after rinsing to achieve that perfect crunch when roasted.
  • Don’t Overcrowd: Space the vegetables out on the baking sheet for even roasting; overcrowding can cause steaming instead of caramelization.
  • Adjusting Spices: Taste your spices before adding; start small, as everyone’s preference for heat varies, and you can always add more!
  • Chill the Sauce: Let the herbed yogurt sauce sit for 10-15 minutes before serving to enhance the flavors and make the dish even more delicious.
  • Variations Galore: Feel free to mix and match seasonal vegetables or different sauces—keeping it vibrant and exciting ensures your Vegan Mediterranean Roasted Vegetables Bowl stays fresh and satisfying!

Variations & Substitutions for Vegan Mediterranean Roasted Vegetables Bowl

Feel free to play around with your Vegan Mediterranean Roasted Vegetables Bowl and make it your own! Let your creativity blossom with these delightful variations.

  • Sweet Potato Swap: Replace Yukon Gold potatoes with sweet potatoes for a sweeter and more vibrant touch.

  • Protein Boost: Add baked tofu, grilled tempeh, or lentils to increase the protein content and make it even heartier. This added protein will keep you feeling full and satisfied.

  • Creamy Tahini Dressing: Transform the classic yogurt sauce into a tahini dressing for a rich, nutty flavor that deepens the Mediterranean essence.

  • Herb Alternatives: Fresh herbs like basil or mint can substitute dill and parsley, offering a unique flavor profile that keeps things interesting. Experiment with what’s fresh and available!

  • Umami Kick: Incorporate olives or capers to add a savory depth and enhance the authentic Mediterranean flavor—those little bites pack a flavorful punch!

  • Spicy Heat: For those who crave a bit of heat, sprinkle in some red pepper flakes or chopped jalapeños to up the spice level and invigorate your taste buds.

  • Seasonal Veggie Medley: Mix in seasonal vegetables like zucchini, eggplant, or cherry tomatoes for an exciting twist that bursts with freshness and preserves the Mediterranean flair.

  • Pasta Addition: Toss in some cooked quinoa, couscous, or whole grain pasta to turn your bowl into a heartier dish perfect for meal prep.

These variations can elevate your dish while accommodating dietary preferences. Explore combinations that resonate with your palate, including delicious fresh herbs or other delightful sauces like a tahini-lemon dressing for an added zing!

Make Ahead Options

These Vegan Mediterranean Roasted Vegetables Bowls are a dream for meal prep aficionados! You can roast the Yukon Gold potatoes, chickpeas, and vegetables up to 3 days in advance, storing them in airtight containers in the refrigerator. Prepare the herbed yogurt sauce and refrigerate separately up to 24 hours before serving; this helps maintain its creamy texture and flavor. When you’re ready to enjoy your meal, simply reheat the roasted vegetables in the oven or air fryer for about 10-15 minutes to revive their crispiness. This way, you’ll have a delicious, wholesome bowl ready with minimal effort—making healthy eating a breeze for your busy week!

What to Serve with Vegan Mediterranean Roasted Vegetables Bowl

Whether you’re hosting a cozy dinner or prepping for a week of nourishment, these pairings will elevate your meal experience.

  • Creamy Hummus: Smooth and rich, it adds a velvety contrast that complements the roasted textures perfectly. Pair it with warm pita for a delightful appetizer to start your meal on a flavorful note.

  • Quinoa Salad: This light and fluffy side is packed with protein and earthiness, balancing the bowl’s vibrant flavors while adding a refreshing crunch. Toss in extra veggies for color and nutrients.

  • Crispy Garlic Bread: Infusing your meal with buttery aromas, this crunchy delight offers a satisfying crunch, making it perfect for dipping into the herbed yogurt sauce.

  • Roasted Beet and Feta Salad: Bright beets and creamy feta provide a rich, tangy counterpart, ensuring a stunning pop of flavor and color that pairs beautifully with every bite of the bowl.

  • Grilled Vegetable Skewers: Seasonal veggies seasoned to perfection not only enhance the Mediterranean theme but also bring additional textures and smoky flavors to your table. They’re ideal for sharing or adding to your own bowl.

  • Chilled White Wine: A crisp Sauvignon Blanc or light Pinot Grigio brings a bright finish to your meal, balancing the earthy tones of the roasted vegetables and making each bite more enjoyable.

  • Fruit Sorbet: Light and refreshing, this sweet conclusion cleanses the palate and offers a bright burst of flavor after the savory bowl, creating a satisfying end to your dining experience.

How to Store and Freeze Vegan Mediterranean Roasted Vegetables Bowl

Fridge: Store the roasted vegetable components and herbed yogurt sauce separately in airtight containers for up to 4 days. This ensures maximum freshness and flavor retention.

Freezer: For a longer shelf life, freeze the roasted vegetables in a single layer on a baking sheet before transferring them to airtight freezer bags. Use within 2–3 months for optimal taste.

Reheating: To enjoy leftovers, reheat the vegetable mix in the oven or air fryer at 375°F (190°C) for about 10–15 minutes until crispy. The herbed yogurt sauce can be used cold directly from the fridge.

Meal Prep Tip: Prepare the elements ahead of time and combine them just before serving for a quick, satisfying meal that’s ready whenever you need it!

Vegan Mediterranean Roasted Vegetables Bowl Recipe FAQs

What vegetables are best for this recipe?
Absolutely! While the recipe calls for Yukon Gold potatoes, red bell peppers, and red onions, feel free to get creative. Seasonal vegetables like zucchini, cherry tomatoes, or even cauliflower work beautifully. Just remember to maintain a balance of sweet and savory to align with that Mediterranean flavor.

How should I store the leftovers?
To keep the flavors fresh, store the roasted vegetable components and herbed yogurt sauce separately in airtight containers in the fridge for up to 4 days. This prevents the veggies from getting soggy and ensures the herbed yogurt remains creamy.

Can I freeze the roasted vegetables?
Yes! For long-term storage, freeze the roasted vegetables after they’ve cooled down. Spread them in a single layer on a baking sheet and freeze until solid. After that, transfer them to airtight freezer bags, where they can last up to 2–3 months. When you’re ready to enjoy, just reheat in the oven or air fryer at 375°F (190°C) for about 10–15 minutes until crispy.

What if my chickpeas don’t get crispy?
Very common! To achieve that perfect crunch, ensure your chickpeas are thoroughly drained and dried after rinsing—no moisture should remain. If they’re still not crispy enough, consider roasting them a bit longer or adjusting the oven temperature. Just keep an eye on them to avoid burning!

Is this dish pet-friendly?
While the base ingredients are generally safe for pets, it’s best to avoid giving them the herbed yogurt sauce due to the garlic. Stick to plain roasted veggies if you want to share a little with your furry friend, but always consult with your veterinarian first.

Can I make this recipe gluten-free?
Absolutely! The Vegan Mediterranean Roasted Vegetables Bowl is naturally gluten-free. Just ensure that any sauces or additional ingredients you use also meet gluten-free standards, especially if you opt for alternative sauces like tahini. Enjoy a worry-free meal!

undefined

Vegan Mediterranean Roasted Vegetables Bowl for Comfort and Flavor

This Vegan Mediterranean Roasted Vegetables Bowl is a delightful mix of hearty veggies, chickpeas, and herbed yogurt, perfect for a satisfying and healthy meal.
Prep Time 15 minutes
Cook Time 35 minutes
Chilling Time 15 minutes
Total Time 1 hour 5 minutes
Servings: 4 bowls
Course: Dinner
Cuisine: Mediterranean
Calories: 350

Ingredients
  

For the Base
  • 4 cups Yukon Gold Potatoes Can substitute sweet potatoes for a sweeter profile.
  • 1 can Chickpeas Ensure they are dried thoroughly for optimal crispness.
For the Veggies
  • 1 large Red Bell Pepper Zucchini or eggplant can be added for more traditional Mediterranean flavors.
  • 1 medium Red Onion Shallots can be used for a milder flavor.
For the Cooking
  • 3 tablespoons Extra Virgin Olive Oil Use a good quality oil for best results.
  • 1 teaspoon smoked paprika Adjust spice levels to taste.
  • 1 teaspoon cumin Adjust spice levels to taste.
  • 1 teaspoon coriander Adjust spice levels to taste.
  • 1 teaspoon garlic powder Adjust spice levels to taste.
  • 1 teaspoon oregano Adjust spice levels to taste.
  • optional to taste red pepper flakes
For the Herbed Yogurt Sauce
  • 1 cup Plant-Based Yogurt Can replace with tahini-lemon dressing for a richer flavor.
  • 2 tablespoons Tahini Optional.
  • 2 tablespoons Lemon Juice Fresh lemon is preferred for maximum zest.
  • 2 tablespoons Fresh Herbs (dill, parsley) Basil or mint can be good alternatives.

Equipment

  • Oven
  • Baking Sheet
  • Parchment Paper
  • Mixing Bowl

Method
 

Step‑by‑Step Instructions
  1. Preheat your oven to 425°F (220°C). Line a baking sheet with parchment paper.
  2. Toss the Yukon Gold potato wedges with 1 tablespoon of extra virgin olive oil and half of the spices. Arrange on one side of the baking sheet.
  3. Combine chickpeas, chopped red bell pepper, and sliced red onion in a bowl. Drizzle remaining olive oil and add rest of spices, then toss and spread on the other side of the baking sheet.
  4. Roast for 25–35 minutes, flipping the potatoes halfway and stirring the chickpeas and veggies.
  5. Whisk together the plant-based yogurt, tahini (if using), lemon juice, minced garlic, and chopped dill and parsley in a clean bowl. Season with salt and chill for 10-15 minutes.
  6. Once roasted, let veggies cool slightly, then spread the herbed yogurt sauce in serving bowls and top with roasted vegetables and chickpeas.
  7. Garnish with extra fresh herbs, lemon zest, or a drizzle of olive oil and serve immediately.

Nutrition

Serving: 1bowlCalories: 350kcalCarbohydrates: 50gProtein: 12gFat: 15gSaturated Fat: 2gPolyunsaturated Fat: 3gMonounsaturated Fat: 10gSodium: 600mgPotassium: 800mgFiber: 10gSugar: 6gVitamin A: 1500IUVitamin C: 100mgCalcium: 50mgIron: 3mg

Notes

Ensure chickpeas are thoroughly dried for crispiness. Adjust spices to personal taste. Let the herbed yogurt sauce sit before serving to enhance flavors.

Tried this recipe?

Let us know how it was!

Fluffy McGriddle Bites: A Fun Breakfast for Busy Mornings

As I flipped through my old recipe book, a hidden gem caught my eye: McGriddle Bites. These delightful mini breakfast sandwiches blend fluffy pancake muffins with savory sausage, gooey cheese, and a whisper of maple syrup. Perfectly portable and incredibly family-friendly, they’re a fantastic way to shake up your morning routine or make brunch gatherings feel special. What’s great is that you can whip them up in no time—ideal for those hectic mornings when you still want a satisfying homemade breakfast. Ready to bring a twist to your traditional morning fare? Let’s dive into making these irresistible bites that will have everyone asking for seconds!

Why are McGriddle Bites a must-try?

Delightfully Portable: These mini bites are easy to grab and go, making them perfect for busy mornings or on-the-run snacks.

Family-Friendly Fun: Kids and adults alike will love the fluffy texture and sweet-savory flavor, turning your breakfast into a delightful family feast.

Quick Preparation: With just a few simple steps, you can have a delicious breakfast ready in under 30 minutes—perfect for last-minute weekend brunches!

Endless Customization: Feel free to mix and match ingredients—think jalapeños for a spicy twist or feta cheese for a tangy kick.

Make-Ahead Magic: Prepare a batch in advance, freeze, and simply reheat for a quick breakfast that doesn’t skimp on flavor. When stored properly, they can last for weeks!

McGriddle Bites Ingredients

For the Muffins

  • Pancake Mix – Provides the base for the muffins; consider using homemade pancake batter for a fresher taste.
  • Cooked Sausage – Adds savory flavor and protein; turkey or vegetarian sausage are great alternatives for a healthier option.
  • Shredded Cheese – Melts beautifully into the bites, enhancing flavor; cheddar or Monterey Jack works exceptionally well.
  • Maple Syrup – Infuses sweetness and signature McGriddle flavor; sugar-free syrup can be used for a lower-calorie option.
  • Eggs – Binds the ingredients and contributes to fluffiness; you can use egg substitutes for a vegan version.

These McGriddle Bites ingredients combine to create a deliciously fluffy breakfast experience that will delight your family!

Step‑by‑Step Instructions for McGriddle Bites

Step 1: Preheat Your Oven
Begin by preheating your oven to 350°F (175°C). This is an essential first step to ensure your McGriddle Bites bake evenly and develop that lovely golden-brown color. While the oven heats up, gather your ingredients and tools, including a mini muffin tin and mixing bowls, so you’re ready to go!

Step 2: Prepare the Muffin Tin
Grease the mini muffin tin with cooking spray or a bit of butter to prevent sticking. Ensure each cup is well-coated, as this will help your McGriddle Bites release easily once baked. Setting up the tin first makes it convenient to pour the batter in once it’s mixed.

Step 3: Mix the Batter
In a mixing bowl, combine the pancake mix, cooked sausage, shredded cheese, eggs, and maple syrup. Stir the ingredients until just combined—be careful not to overmix, as a few lumps are perfectly fine. This step is where the magic begins, creating the fluffy batter that will transform into delightful mini bites!

Step 4: Fill the Muffin Tins
Pour the batter into the prepared muffin tin, filling each cup about 3/4 full. It’s important not to overfill, as the mixture will rise while baking. Make sure the sausage and cheese are evenly distributed throughout the batter for that delicious, savory flavor in every bite.

Step 5: Bake the McGriddle Bites
Place the muffin tin in the preheated oven and bake for approximately 15 minutes. Keep an eye on them, and look for a golden brown color on top. A toothpick inserted in the center should come out clean, indicating they’re perfectly cooked and ready to take out of the oven.

Step 6: Cool and Serve
Once baked, remove the muffin tin from the oven and let the McGriddle Bites cool in the tin for a few minutes. This cooling time helps prevent them from sticking. After a short wait, gently remove the bites and serve them warm, ready for your family to enjoy as a delicious breakfast treat!

Make Ahead Options

These McGriddle Bites are perfect for meal prep enthusiasts! You can mix the batter and fill the muffin tins up to 24 hours in advance, covering them tightly to prevent drying out. Simply refrigerate them until you’re ready to bake. If you want to prep even further ahead, you can bake the bites and freeze them for up to 2 months. Just let them cool completely before placing in a zip-top bag or airtight container. When you’re ready to enjoy, reheat in the microwave or toaster oven until warmed through, ensuring they stay just as delicious as freshly made. This makes breakfast a breeze on those busy mornings!

What to Serve with McGriddle Bites

These fluffy bites create the perfect foundation for a delightful breakfast spread that will excite your taste buds.

  • Fresh Fruit Salad: Bright and zesty, a medley of seasonal fruits adds a refreshing contrast to the richness of the bites.
  • Greek Yogurt Parfait: Layered with granola and honey, this creamy treat offers a tangy balance that complements the sweetness of the muffins.
  • Crispy Hash Browns: The crispy texture of golden hash browns provides a satisfying crunch that perfectly pairs with the soft and fluffy McGriddle Bites.
  • Maple Syrup Drizzle: A classic pairing, a drizzle of warm maple syrup enhances the sweet and savory experience of each bite.
  • Savory Herb Scramble: Fluffy scrambled eggs mixed with fresh herbs or vegetables offer a protein-packed addition, making your breakfast more hearty.
  • Iced Coffee or Milk: Refreshing drinks like creamy iced coffee or a glass of cold milk make excellent companions, washing down the delicious bites perfectly.
  • Mini Pancakes: For a breakfast feast, serve alongside mini pancakes topped with berries and syrup for that pancake breakfast experience.
  • Sparkling Citrus Mocktail: A sparkling drink with a splash of citrus adds a bubbly and refreshing touch, perfect for elevating your morning meal.

Let the McGriddle Bites be the star of your breakfast table with these delightful accompaniments that everyone will adore!

How to Store and Freeze McGriddle Bites

Fridge: Store leftover McGriddle Bites in an airtight container for up to 4 days to maintain their freshness and flavor.

Freezer: For longer storage, freeze the bites for up to 2 months. Wrap each bite in plastic wrap and place them in a freezer bag to avoid freezer burn.

Reheating: Reheat in the microwave for 30 seconds to 1 minute or in a toaster oven until heated through. Enjoy as a quick breakfast without losing that fluffy texture!

Room Temperature: If serving at a gathering, keep the bites at room temperature for no more than 2 hours to ensure safety and flavor.

McGriddle Bites Variations & Substitutions

Explore exciting ways to customize your McGriddle Bites for added flair and flavor!

  • Dairy-Free: Use plant-based cheese alternatives to create a dairy-free version without sacrificing taste.
  • Veggie Boost: Add diced bell peppers or sautéed spinach for a colorful and nutritious twist to the recipe.
  • Spicy Kick: Incorporate diced jalapeños or spicy sausage to turn up the heat and create an exciting flavor experience.
  • Herb Infusion: Mix in fresh herbs like chives or parsley for a bright, fresh note that complements the savory elements beautifully.
  • Different Cheeses: Experiment with cheese varieties like feta or goat cheese for a tangy surprise that elevates each bite.
  • Gluten-Free Option: Swap pancake mix for a gluten-free alternative to cater to gluten-sensitive friends and family.
  • Sweet Surprise: Include small chocolate chips or fruit pieces for a sweet contrast that will delight kids and adults alike.
  • Overnight Prep: Prepare the batter the night before and refrigerate it. Just bake the next morning for an even quicker breakfast on busy days.

Feel free to explore these variations and make them your own! If you’re looking to switch things up further, why not serve your McGriddle Bites with a refreshing fruit salad or a side of yogurt? The possibilities are endless!

Expert Tips for McGriddle Bites

  • Mix Wisely: Avoid overmixing the batter; a few lumps help keep your McGriddle Bites light and fluffy, enhancing their delightful texture.

  • Grease Generously: Coat your muffin tin well to prevent sticking. This ensures that your mini bites come out easily, without crumbling.

  • Thaw Ingredients: If using frozen sausage, make sure to thaw and drain it well. Excess moisture can lead to soggy bites, ruining their perfect texture.

  • Watch the Time: Keep an eye on your McGriddle Bites as they bake. Oven times can vary, so start checking them a few minutes before the recommended time for the best result.

  • Customize with Care: Feel free to add ingredients like diced peppers or jalapeños, but remember to balance them with the main components for a harmonious flavor.

  • Serving Temperature: Serve warm for the best flavor and texture. They can be reheated in the microwave, but avoid overheating to keep them fluffy.

McGriddle Bites Recipe FAQs

How do I choose the best pancake mix for McGriddle Bites?
Absolutely! For the fluffiest McGriddle Bites, opt for a high-quality pancake mix that is light and fluffy. If you’re keen on a fresher taste, I recommend making your own pancake batter using flour, baking powder, milk, and a pinch of salt. This homemade option can really elevate your bites and leave you with a delightful texture!

How should I store leftover McGriddle Bites?
Very simple! Store your leftover McGriddle Bites in an airtight container in the refrigerator for up to 4 days. If you’re looking to enjoy them later, wrap each bite tightly in plastic wrap, then place them in a freezer bag to keep them fresh for up to 2 months. Just make sure to label your bag with the date so you can keep track!

Can I freeze McGriddle Bites? If so, how?
Absolutely! Freezing McGriddle Bites is a great way to prepare ahead for busy mornings. After they have cooled completely, wrap each individual bite in plastic wrap and place them in a freezer-safe bag or container. They can be stored for up to 2 months. When you’re ready to enjoy them, simply reheat in the microwave for 30 seconds to 1 minute or warm them in a toaster oven.

What if my batter turns out too thick?
If you find your pancake batter is thicker than expected, don’t fret! Simply add a tablespoon of milk at a time until you reach a smooth, pourable consistency. Remember, a few lumps are perfectly okay, as overmixing can lead to denser bites. Just keep it gentle, and you’ll still have that fluffy texture!

Are there any dietary considerations for McGriddle Bites?
Definitely! If you’re preparing for someone with dietary restrictions, you can easily adapt the McGriddle Bites. For a gluten-free option, look for a gluten-free pancake mix. Similarly, you can replace the eggs with flaxseed meal or a store-bought egg replacer for a vegan version. Additionally, consider using turkey or plant-based sausage to accommodate those looking for a healthier or vegetarian choice.

Can I use different types of cheese?
The more the merrier! While cheddar and Monterey Jack are fantastic choices, feel free to experiment with different cheeses. Feta adds a tangy flavor, while pepper jack can give you a spicy kick. Just remember that the amount of moisture and flavor varies with different cheeses, so adjust according to your taste preference!

undefined

Fluffy McGriddle Bites: A Fun Breakfast for Busy Mornings

Delightful mini breakfast sandwiches that combine fluffy pancake muffins with savory sausage, gooey cheese, and maple syrup, perfect for busy mornings.
Prep Time 15 minutes
Cook Time 15 minutes
Cooling Time 5 minutes
Total Time 35 minutes
Servings: 12 bites
Course: Breakfast
Cuisine: American
Calories: 150

Ingredients
  

For the Muffins
  • 2 cups Pancake Mix Consider using homemade pancake batter for a fresher taste.
  • 1 cup Cooked Sausage Turkey or vegetarian sausage are great alternatives for a healthier option.
  • 1 cup Shredded Cheese Cheddar or Monterey Jack works exceptionally well.
  • 1/4 cup Maple Syrup Sugar-free syrup can be used for a lower-calorie option.
  • 2 large Eggs You can use egg substitutes for a vegan version.

Equipment

  • mini muffin tin
  • Mixing bowls

Method
 

Step-by-Step Instructions for McGriddle Bites
  1. Preheat your oven to 350°F (175°C) to ensure even baking.
  2. Grease the mini muffin tin with cooking spray or butter.
  3. In a mixing bowl, combine the pancake mix, cooked sausage, shredded cheese, eggs, and maple syrup, stirring until just combined.
  4. Pour the batter into the prepared muffin tin, filling each cup about 3/4 full.
  5. Bake in the preheated oven for approximately 15 minutes until golden brown and a toothpick comes out clean.
  6. Allow to cool in the tin for a few minutes before gently removing and serving warm.

Nutrition

Serving: 1biteCalories: 150kcalCarbohydrates: 20gProtein: 6gFat: 5gSaturated Fat: 2gCholesterol: 30mgSodium: 300mgPotassium: 120mgFiber: 1gSugar: 2gVitamin A: 100IUCalcium: 100mgIron: 1mg

Notes

These McGriddle Bites can be customized with ingredients like jalapeños or feta cheese, and are best served warm.

Tried this recipe?

Let us know how it was!

Freezer Breakfast Burritos for Easy Mornings Anytime

On those early mornings when time seems to slip through my fingers, I often find myself wishing for a quick solution that’s both delicious and satisfying. Enter these Freezer Breakfast Burritos, a meal prep marvel that’s a total game changer! Not only are they freezer-friendly and perfect for those busy days, but they’re also completely customizable—so you can pack in your favorite ingredients without missing a beat. With just a little time set aside, you can whip up a batch to enjoy throughout the week, saving you from fast food temptations. Ready to elevate your breakfast routine? Let’s roll up our sleeves and dive into this delightful, make-ahead recipe that promises hearty mornings and happy taste buds! What will you stuff yours with?

Why Choose Freezer Breakfast Burritos?

Convenience at its Finest: These easy-to-make burritos are perfect for busy mornings, allowing you to grab a healthy meal in seconds.

Customizable Delights: With endless filling options like sautéed veggies and different cheeses, you can tweak each burrito to your taste.

Meal Prep Magic: Preparing a batch ahead saves time and keeps your mornings stress-free, letting you resist fast food cravings easily.

Built-in Nutrition: Packed with protein from eggs and sausage, these burritos are a balanced breakfast, ready to fuel your day.

Zero Waste: Freeze extras and enjoy them anytime, ensuring every bite counts toward your busy schedule. Why not start today with our easy-to-follow instructions?

Freezer Breakfast Burrito Ingredients

For the Egg Mixture

  • Eggs – The main protein source that gives the burritos a fluffy texture; consider using egg whites for a lighter option.
  • Milk – Helps create moist, fluffy eggs; you can use any non-dairy milk for lactose-free diets.
  • Salt & Pepper – Essential seasonings to enhance the egg flavor; adjust to your personal preference.

For the Filling

  • Sausage (cooked) – Adds heartiness and protein; turkey sausage or plant-based crumbles are great alternatives for a lighter or vegetarian option.
  • Cheddar Cheese – Provides creamy texture and rich flavor; feel free to substitute with Colby Jack or pepper jack for an extra kick.
  • Additional Veggies (optional) – Sautéed onions, bell peppers, or jalapeños add flavor and color; make sure to cook them down to avoid excess moisture.

For the Wrap

  • Tortillas – Perfect for holding all the delicious fillings; whole wheat or gluten-free tortillas can be excellent alternatives for dietary needs.

With these Freezer Breakfast Burrito Ingredients, you’ll be well-equipped to create a nutritious and satisfying breakfast that can be customized to your liking. Let’s get rolling!

Step‑by‑Step Instructions for Freezer Breakfast Burritos

Step 1: Prep the Egg Mixture
Begin by whisking together 6 large eggs, 1/4 cup of milk, and a pinch of salt and pepper in a bowl until well combined. Heat a non-stick skillet over medium heat, then pour in the egg mixture. Cook gently, stirring occasionally for about 5-7 minutes, until the eggs are just set and slightly moist, resembling soft curds.

Step 2: Warm the Tortillas
While the eggs cook, warm the tortillas to make them pliable. In another skillet or the microwave, heat 4 large tortillas for about 10-15 seconds until soft and flexible. This step is crucial for easy folding, allowing you to wrap the tortillas around your delicious filling without tearing.

Step 3: Assemble the Burritos
Once the eggs are ready and the tortillas are warm, it’s time to assemble your Freezer Breakfast Burritos. Place a generous spoonful of the cooked eggs in the center of each tortilla, top with sliced cooked sausage and a handful of shredded cheddar cheese. Fold in the sides and roll tightly from the bottom to create neat burritos.

Step 4: Wrap for Freezing
To prevent freezer burn, take each burrito and wrap it securely in plastic wrap. Follow this by wrapping it again in aluminum foil. Place the wrapped burritos in a freezer bag or airtight container. These can be stored in your freezer for up to 3 months, making them perfect for quick breakfasts on busy mornings.

Step 5: Reheat and Enjoy
When you’re ready to enjoy a Freezer Breakfast Burrito, remove the wrappings. Wrap the burrito in a damp paper towel and place it in the microwave. Heat for 1-2 minutes on high, flipping halfway through, until hot and steaming. This method ensures that your burrito stays fluffy without becoming soggy.

Make Ahead Options

These Freezer Breakfast Burritos are ideal for meal prep, letting you enjoy a hearty breakfast even on the busiest mornings! You can assemble the burritos and freeze them for up to 3 months, making them perfect for busy weekdays. To prepare ahead, simply make the filling (eggs, sausage, and any veggies) and allow it to cool completely before wrapping and freezing. This prevents moisture buildup and keeps the burritos just as delicious when reheated. When you’re ready to enjoy, remove the wrappings, wrap in a damp paper towel, and microwave for 1-2 minutes for a warm, fluffy breakfast that saves you time and energy!

What to Serve with Freezer Breakfast Burritos

Start your mornings on a delightful note with these easy-to-reheat burritos complemented by scrumptious sides that elevate your breakfast experience.

  • Fresh Fruit Salad: A colorful mix of seasonal fruits adds a refreshing crunch, balancing the savory flavors of the burrito.

  • Salsa or Pico de Gallo: A zesty salsa brings a burst of flavor, cutting through the richness of cheese and sausage, perfect for dipping or drizzling.

  • Avocado Slices: Creamy avocado adds a luscious texture and healthy fats, making each bite even more satisfying.

  • Crispy Hash Browns: The crunch of golden, crispy hash browns contrasts beautifully with the fluffy burrito, creating a delightful breakfast duet.

  • Greek Yogurt: A dollop of tangy Greek yogurt on the side adds creaminess plus protein, making your meal even more wholesome.

  • Coffee or Tea: Sip on a warm cup of coffee or herbal tea to round out the meal, igniting your senses and preparing you for a busy day ahead.

  • Smoothie: Blend up a fruity smoothie for a nutrient-rich drink that pairs wonderfully with the heartiness of the burrito, fueling your mornings.

  • Chili or Hot Sauce: For those who like an extra kick, a side of chili or your favorite hot sauce can brighten up each bite, adding a thrilling spice.

These pairings not only complement your freezer breakfast burritos but also bring a burst of flavor and freshness to your mornings!

Expert Tips for Freezer Breakfast Burritos

  • Egg Perfection: Ensure your eggs are cooked gently. Overcooking can lead to a dry texture upon reheating in the freezer.

  • Warm Tortillas: Heating tortillas beforehand is key. This prevents tearing and makes rolling your Freezer Breakfast Burritos much easier.

  • Filling Variety: Don’t hesitate to mix and match your filling! Adding ingredients like spinach or black beans can bring an extra nutritional punch to your breakfast.

  • Careful Wrapping: Double-wrap each burrito in plastic and foil to seal in freshness and avoid freezer burn. It’s essential for long-term storage.

  • Quick Reheat: Use a damp paper towel when microwaving to keep your burritos moist and prevent the tortillas from hardening.

  • Label and Date: Don’t forget to label your burritos with the date they were made. This will help you enjoy them at their best for up to three months!

Freezer Breakfast Burritos Variations

Feel free to get creative with these delicious burritos—your taste buds will thank you!

  • Vegetarian Delight: Swap sausage for black beans or sautéed mushrooms for a hearty, meat-free option.
    Imagine biting into a burrito with earthy flavors and satisfying protein—delicious!

  • Cheese Swap: Try feta or mozzarella in place of cheddar for a different flavor profile.
    Each cheese brings its own personality, giving you an exciting twist on classic burritos.

  • Extra Spice: Add diced jalapeños or a pinch of cayenne pepper to kick up the heat.
    Whether you like it mild or fiery, a little heat can elevate breakfast to a new level!

  • Breakfast Fiesta: Mix in corn or diced bell peppers for a vibrant burst of flavor and color.
    The added texture and sweetness from the corn will have you excited for each bite!

  • Herb Infusion: Toss in fresh herbs like cilantro or chives for an aromatic touch.
    They make the burritos feel fresh, brightening your morning routine.

  • Wrapped Greens: Consider wrapping burritos in large spinach or collard greens instead of tortillas.
    A wonderful, gluten-free alternative, they pack in extra nutrients too!

  • Sweet Twist: For a breakfast dessert, sprinkle in cinnamon and diced apples along with the eggs.
    Imagine a comforting bite that tastes like a sweet apple pie!

  • Add Nuts or Seeds: Sprinkle pumpkin seeds or crushed walnuts inside for an unexpected crunch.
    This adds not just flavor but also healthy fats, turning your burrito into a wholesome meal.

Feel inspired? Each of these variations makes your Freezer Breakfast Burritos uniquely yours, so tailor them to match your cravings! If you’re interested in more exciting ways to use plant-based ingredients, check out our post on Creative Plant-Based Breakfast Ideas. Enjoy the delicious journey!

How to Store and Freeze Freezer Breakfast Burritos

Fridge: Store unwrapped burritos in the fridge for up to 3 days. Ensure they’re in an airtight container to keep them fresh.

Freezer: Wrap burritos tightly in plastic wrap followed by foil. Store in a freezer bag or container for up to 3 months for optimal freshness.

Reheating: To enjoy, remove all wrappings, wrap in a damp paper towel, and microwave for 1-2 minutes until heated through, ensuring a fluffy texture without sogginess.

Thawing: For best results, thaw in the fridge overnight before reheating, but you can also reheat directly from frozen if you’re in a hurry.

Freezer Breakfast Burritos Recipe FAQs

What type of tortillas should I use for freezer breakfast burritos?
I recommend using flour tortillas for their pliability, which helps prevent tearing when you roll the burritos. However, whole wheat or gluten-free tortillas are wonderful alternatives if you’re looking for something a bit healthier or have dietary restrictions!

How long can I store freezer breakfast burritos?
These delicious burritos can be stored in the freezer for up to three months. Just make sure to wrap them tightly in plastic wrap and foil to prevent freezer burn, and you’ll be good to go!

Can I freeze leftover breakfast burritos after cooking them?
Absolutely! Just allow the burritos to cool completely before wrapping them in plastic wrap and foil. This way, they will retain their flavor and texture when you heat them up later. Properly wrapped breakfast burritos can last in the freezer for up to three months.

How do I reheat frozen breakfast burritos?
To reheat, simply take a burrito out of the freezer and remove all wrappings. Wrap it in a damp paper towel and microwave for 1-2 minutes, flipping halfway through to heat evenly. If you prefer a crisper texture, consider reheating them in the oven at 350°F (175°C) for about 15-20 minutes until warm!

Are there vegetarian options for freezer breakfast burritos?
Absolutely! You can easily make these burritos vegetarian by substituting the sausage with black beans, roasted vegetables, or plant-based sausage crumbles. Use any combination of yummy veggies you’d like, such as sautéed spinach, bell peppers, or mushrooms.

undefined

Freezer Breakfast Burritos for Easy Mornings Anytime

Make delicious and satisfying freezer breakfast burritos for quick, customizable meals that keep your mornings stress-free.
Prep Time 15 minutes
Cook Time 10 minutes
Total Time 25 minutes
Servings: 4 burritos
Course: Breakfast
Cuisine: American
Calories: 350

Ingredients
  

For the Egg Mixture
  • 6 large eggs Consider using egg whites for a lighter option.
  • 1/4 cup milk Use any non-dairy milk for lactose-free diets.
  • 1 pinch salt
  • 1 pinch pepper
For the Filling
  • 1 cup cooked sausage Turkey sausage or plant-based crumbles are great alternatives.
  • 1 cup cheddar cheese Feel free to substitute with Colby Jack or pepper jack.
  • 1 cup additional veggies Sautéed onions, bell peppers, or jalapeños.
For the Wrap
  • 4 large tortillas Whole wheat or gluten-free tortillas can be excellent alternatives.

Equipment

  • Non-stick skillet
  • Microwave
  • Mixing Bowl
  • airtight container
  • Plastic Wrap
  • Aluminum foil

Method
 

Preparation Instructions
  1. Whisk together eggs, milk, salt, and pepper in a bowl. Heat a non-stick skillet over medium heat and pour in the egg mixture. Cook for 5-7 minutes until set and moist.
  2. Warm the tortillas in a skillet or microwave for 10-15 seconds until soft.
  3. Assemble the burritos by placing cooked eggs, sausage, and cheese in the center of each tortilla, then fold and roll tightly.
  4. Wrap each burrito in plastic wrap and then in aluminum foil. Store in a freezer bag or airtight container.
  5. To reheat, unwrap, wrap in a damp paper towel, and microwave for 1-2 minutes until hot.

Nutrition

Serving: 1burritoCalories: 350kcalCarbohydrates: 30gProtein: 20gFat: 15gSaturated Fat: 7gPolyunsaturated Fat: 2gMonounsaturated Fat: 6gCholesterol: 180mgSodium: 600mgPotassium: 300mgFiber: 3gSugar: 2gVitamin A: 500IUVitamin C: 30mgCalcium: 200mgIron: 3mg

Notes

These burritos can be frozen for up to 3 months and are a perfect grab-and-go breakfast option.

Tried this recipe?

Let us know how it was!

Hearty Loaded Breakfast Bowl: Customizable & Delicious!

The morning sun peeked through my kitchen window as I pondered what to whip up for breakfast. That’s when I decided to create a Loaded Breakfast Bowl—a dish that’s as nourishing as it is delicious. Packed with crispy potatoes, hearty proteins, and fluffy eggs, this customizable meal not only energizes my day but can cater to any taste or dietary preference you may have. Whether you’re looking for a quick prep option that brings the family together or a healthy upgrade to start your day right, this recipe offers a delightful solution. From classic diner-style to high-protein venturing, it invites creativity and ensures no two bowls are ever the same. Ready to dive into the world of breakfast bowls that can brighten up your mornings? Let’s get cooking!

Why is this breakfast bowl irresistible?

Comforting, nutritious goodness: This loaded breakfast bowl is a delightful mix of textures and flavors, combining crispy potatoes with fluffy eggs and savory proteins. Customizable for everyone: Whether you’re a meat-lover or a vegetarian, you can easily adjust ingredients to fit your preferences. Meal prep superstar: This dish can be prepared in advance, making it perfect for busy mornings—or a cozy brunch with friends. Kid-friendly appeal: Even the pickiest eaters will love the versatility of toppings and flavors! Discover more exciting ways to enjoy breakfast by checking out our Meal Prep Ideas and sharing this easy recipe with family.

Loaded Breakfast Bowl Ingredients

• A colorful medley of health and flavor awaits!

For the Base

  • Diced Potatoes – Create a crunchy foundation; sweet potatoes can be used for a healthier twist.

For the Protein

  • Sausage or Bacon – Adds savory richness; opt for lean turkey sausage for a lighter choice.
  • Plant-Based Protein – Perfect for those craving a vegetarian option while keeping the flavors bold.

For the Eggs

  • Eggs – Bring creaminess and protein; prepare them scrambled or fried, based on your preference.

For the Veggies

  • Onions – Enhance flavor with sweet notes; substitutable with shallots if desired.
  • Peppers – Add a pop of color and sweetness; feel free to experiment with bell or jalapeño varieties.
  • Mushrooms – Contribute an earthy taste; swap for zucchini or spinach for versatility.
  • Leafy Greens – Elevate freshness with spinach or kale; these boost nutrients while adding vibrant color.

For the Toppings

  • Cheese – Introduce creaminess with cheddar or pepper jack; use nutritional yeast for a vegan alternative.
  • Avocado – For luscious texture and healthy fats; Greek yogurt can provide a tangy kick if preferred.
  • Toppings (salsa, green onions, etc.) – Spruce up each bowl; adjust toppings based on your cravings.

This loaded breakfast bowl meets all your needs for a delicious and customizable start to your day!

Step‑by‑Step Instructions for Loaded Breakfast Bowl

Step 1: Prepare Potatoes
Begin by heating a large skillet over medium heat. Add diced potatoes and drizzle with olive oil, seasoning them with salt, pepper, and paprika. Cook for about 15-20 minutes, stirring occasionally, until golden brown and crispy. You’ll know they’re ready when they have a delicious crunch on the outside and are tender inside.

Step 2: Cook Protein
In the same skillet, push the crispy potatoes to the side and add your choice of protein, such as sausage or bacon. Sauté over medium heat for 5-7 minutes, turning occasionally until fully browned and cooked through. The savory aroma should fill your kitchen, enhancing the comforting allure of your loaded breakfast bowl.

Step 3: Sauté Vegetables
Next, toss in chopped onions, peppers, and mushrooms into the skillet with the meat. Continue to cook for about 3-5 minutes, stirring frequently, until the veggies are softened and fragrant. Finally, fold in leafy greens and sauté for an additional 1-2 minutes, just until they are wilted and vibrant.

Step 4: Cook Eggs
In a separate skillet, prepare your eggs as desired—either scramble or fry them. Cook for about 3-5 minutes, ensuring they reach your preferred level of doneness. For scrambled eggs, aim for fluffy, softly set curds. Remove them from the heat when they’re still slightly glossy to avoid overcooking.

Step 5: Assemble Bowl
Now it’s time to build your loaded breakfast bowl! Start by layering the crispy potatoes at the base of a serving bowl. Next, add the sautéed vegetables and protein mix, followed by the cooked eggs on top.

Step 6: Add Toppings
Finish by sprinkling cheese over the warm ingredients, allowing it to melt slightly. Then, add slices of avocado and any additional toppings like salsa or green onions. This final touch not only enhances the flavor but also offers a beautiful presentation for your hearty loaded breakfast bowl.

Step 7: Serve Immediately
Serve your loaded breakfast bowl promptly while warm to enjoy the delightful blend of textures and flavors. Each spoonful promises a satisfying start to your day, perfect for breakfast or brunch.

What to Serve with Loaded Breakfast Bowl

Brighten your breakfast experience by pairing your hearty breakfast bowl with delightful sides and beverages that enhance every bite.

  • Crispy Toast: Perfectly toasted sourdough or whole grain provides a crunchy contrast, ideal for scooping up those savory ingredients.
  • Fresh Fruit Salad: A medley of seasonal fruits adds a refreshing touch, balancing the rich and hearty flavors of the bowl beautifully.
  • Yogurt Parfait: Layered with granola and berries, this creamy delight offers a sweet and tangy element that complements the savory breakfast bowl perfectly.
  • Smoothie: A vibrant fruit or green smoothie refreshes your palate and serves as a nutritious drink to energize your morning further.
  • Herbed Potatoes: For the potato lover, opt for rosemary or garlic roasted potatoes as a deliciously crispy side that plays well with the bowl’s texture.
  • Coffee or Tea: A warm cup of coffee or herbal tea enhances the cozy breakfast atmosphere and pairs well with the variety of flavors in your dish.
  • Breakfast Burrito: Roll up leftover ingredients in a tortilla to create a separate, portable breakfast option, allowing for on-the-go enjoyment of those delicious flavors.

Storage Tips for Loaded Breakfast Bowl

Fridge: Store cooked components separately in airtight containers for up to 4 days. This keeps all ingredients fresh and flavors intact.

Freezer: Freeze individual components like potatoes and proteins in freezer-safe bags for up to 2 months. Thaw them overnight in the fridge before reheating.

Reheating: When ready to enjoy, reheat each element separately in a skillet over medium heat or in the microwave. This preserves the textures of your loaded breakfast bowl.

Preparation in Advance: Consider prepping ingredients in advance for quick assembly on busy mornings. Cut vegetables and cook proteins ahead of time to save effort!

Make Ahead Options

These Loaded Breakfast Bowls are perfect for busy mornings or meal prep enthusiasts! You can prepare the crispy potatoes, protein, and sautéed vegetables up to 3 days in advance. Simply roast or pan-fry the potatoes, then store them in an airtight container in the fridge to maintain their crunch. Cook your chosen protein and sauté the vegetables, allowing them to cool before refrigerating as well. When you’re ready to enjoy, simply reheat each component in a skillet until warmed through (this helps retain texture), then top with freshly cooked eggs and your favorite toppings for a delicious breakfast that feels fresh and inviting!

Expert Tips for the Best Loaded Breakfast Bowl

  • Perfect Potatoes: Ensure you cut your potatoes into even pieces for uniform cooking. This prevents some pieces from being undercooked while others are crispy.

  • Choose Your Protein: Don’t hesitate to mix and match proteins for added flavor. Keep an eye out for lean options to maintain a healthy balance in your loaded breakfast bowl.

  • Egg-Cooking Techniques: Overcooked eggs can become rubbery. Monitor them closely and remove them from heat while they are still slightly runny for a fluffy texture.

  • Vegetable Varieties: Get creative with your veggies—fresh seasonal produce enhances the dish. Avoid soggy vegetables by sautéing them briefly for optimal texture.

  • Layering Matters: Build your bowl thoughtfully; placing crispy potatoes at the bottom helps maintain their texture while melding flavors from the top.

  • Experiment with Toppings: Explore diverse toppings like salsa, hot sauce, or even a dollop of Greek yogurt to personalize your loaded breakfast bowl to your taste!

Variations & Substitutions for Loaded Breakfast Bowl

Make your loaded breakfast bowl truly yours by savoring these delightful twists and swaps!

  • High-Protein Boost: Incorporate extra egg whites or add cottage cheese for a protein-packed start to your day. This simple tweak keeps your energy high!

  • Vegetarian Delight: Opt for roasted chickpeas or tempeh instead of meat for a satisfying vegetarian version. The added crunch pairs perfectly with classic flavors!

  • Lighter Option: Reduce the diced potatoes and replace them with additional leafy greens or spiralized zucchini to lighten things up without skimping on taste.

  • Southwestern Flavor: Bring a kick to your bowl with black beans, corn, and a splash of salsa. Your taste buds will dance with joy!

  • Classic Diner-Style: Use diced ham or crumbled bacon alongside a blend of classic seasonings to create a nostalgic breakfast experience that everyone will adore.

  • Cheese Swap: For a vegan option, swap out traditional cheese with nutritional yeast or cashew cheese. It adds a deliciously cheesy taste without dairy! If you still want some indulgence, give these cheese alternatives a try!

  • Texture Twist: Add crushed tortilla chips or toasted nuts as a crunchy topping. This extra layer makes each bite exciting and gives your breakfast bowl a satisfying crunch!

  • Spicy Kick: Sprinkle in some cayenne pepper or add jalapeños for those who love a little heat. It elevates the flavor profile and keeps things interesting!

Loaded Breakfast Bowl Recipe FAQs

How do I choose the best potatoes for my breakfast bowl?
Absolutely! Look for potatoes that are firm and free from dark spots or bruises. I recommend Yukon Gold or red potatoes for their creamy texture, but sweet potatoes offer a healthier alternative. The key is to ensure they’re fresh; if they have eyes or sprouting, it’s best to avoid them.

How should I store leftover breakfast bowl components?
Very straightforward! Store any cooked ingredients in separate airtight containers in the fridge for up to 4 days. This helps maintain their freshness and allows you to reheat them easily without losing texture. Just make sure to keep them cool, under 40°F (4°C) to prevent spoilage.

Can I freeze my loaded breakfast bowl components?
Of course! If you want to make it last longer, you can freeze individual components. I suggest portioning out the potatoes and proteins into freezer-safe bags for up to 2 months. To thaw, simply transfer them to the fridge the night before. When you’re ready to enjoy, reheat them separately for the best results!

What should I do if my eggs turn out rubbery?
Don’t worry, we’ve all been there! To avoid rubbery eggs, monitor their cooking closely. Cook them on low to medium heat, removing them from the pan while they are still slightly underdone, as they will continue cooking slightly after removed from heat. Aim for that fluffy texture by stirring gently while they cook.

Are there any dietary considerations for this recipe?
Absolutely! This loaded breakfast bowl can easily cater to a variety of dietary needs. For gluten-free options, ensure your proteins and toppings are gluten-free. If you’re vegan, simply replace eggs with tofu or chickpea scramble, and use plant-based cheese. Just be mindful of any allergies, such as dairy or eggs, when choosing your substitutions!

How can I make meal prep easier with this breakfast bowl?
Great question! Consider chopping vegetables and cooking proteins in advance. Store them in individual portions for quick assembly when you need a busy-morning breakfast. You can also roast a larger batch of potatoes to use throughout the week, ensuring you have a hearty base ready to go. Prep like this can save you time when mornings get hectic!

undefined

Hearty Loaded Breakfast Bowl: Customizable & Delicious!

A customizable and delicious loaded breakfast bowl filled with crispy potatoes, hearty proteins, and fluffy eggs, perfect for energizing your day.
Prep Time 15 minutes
Cook Time 30 minutes
Total Time 45 minutes
Servings: 4 bowls
Course: Breakfast
Cuisine: American
Calories: 450

Ingredients
  

For the Base
  • 4 cups Diced Potatoes Sweet potatoes can be used for a healthier twist.
For the Protein
  • 1 cup Sausage or Bacon Opt for lean turkey sausage for a lighter choice.
  • 1 cup Plant-Based Protein Perfect for a vegetarian option.
For the Eggs
  • 4 large Eggs Prepare them scrambled or fried.
For the Veggies
  • 1 medium Onion Substitutable with shallots.
  • 1 cup Peppers Can use bell or jalapeño varieties.
  • 1 cup Mushrooms Swap for zucchini or spinach for versatility.
  • 2 cups Leafy Greens Use spinach or kale.
For the Toppings
  • 1 cup Cheese Cheddar or pepper jack; nutritional yeast for a vegan alternative.
  • 1 medium Avocado Can substitute with Greek yogurt.
  • Toppings (salsa, green onions, etc.) Adjust based on your cravings.

Equipment

  • Large skillet
  • Separate skillet

Method
 

Step‑by‑Step Instructions
  1. Prepare Potatoes: Heat a large skillet over medium heat. Add diced potatoes, drizzle with olive oil, season with salt, pepper, and paprika. Cook for 15-20 minutes until golden and crispy.
  2. Cook Protein: Push potatoes aside, add protein like sausage or bacon. Sauté for 5-7 minutes until fully browned.
  3. Sauté Vegetables: Toss in onions, peppers, and mushrooms. Cook for 3-5 minutes until softened. Add leafy greens and sauté for 1-2 minutes.
  4. Cook Eggs: In a separate skillet, prepare eggs as desired—scrambled or fried for 3-5 minutes.
  5. Assemble Bowl: Layer crispy potatoes, then add sautéed veggies and protein mix, followed by cooked eggs on top.
  6. Add Toppings: Sprinkle cheese over the ingredients, add avocado and any extra toppings like salsa or green onions.
  7. Serve Immediately: Enjoy warm for a delightful start to your day.

Nutrition

Serving: 1bowlCalories: 450kcalCarbohydrates: 50gProtein: 20gFat: 20gSaturated Fat: 8gPolyunsaturated Fat: 2gMonounsaturated Fat: 8gCholesterol: 200mgSodium: 800mgPotassium: 800mgFiber: 7gSugar: 3gVitamin A: 600IUVitamin C: 40mgCalcium: 200mgIron: 3mg

Notes

Get creative with toppings and ingredients to personalize your loaded breakfast bowl to suit any taste or dietary preference.

Tried this recipe?

Let us know how it was!

Creamy Chicken Cordon Bleu: Comforting Delight in Every Bite

“Close your eyes and imagine a dinner table filled with laughter, the aroma of something delicious wafting through the air. That’s exactly the warm comfort you get with my Creamy Chicken Cordon Bleu. Tender chicken, lovingly wrapped around savory ham and gooey Swiss cheese, is encased in a crunchy panko crust, making it a crowd-pleaser for family dinners or special occasions. What I love most about this dish is not only its exquisite taste but also its quick prep time—perfect for busy nights when you want to impress without spending hours in the kitchen. Plus, it’s versatile enough for various cheese and breadcrumb variations to match your mood or pantry! Ready to elevate your cooking game and bring some comforting flair to your dinner table?”

Why is Creamy Chicken Cordon Bleu a Must-Try?

Comforting Experience: This dish embodies the essence of home-cooked comfort food, ensuring every bite feels like a warm hug.
Impressive Yet Easy: With just an intermediate skill level, you’ll look like a culinary pro without a complex approach!
Flavor Versatility: Swap cheeses and breadcrumbs to create your unique twist—mozzarella or whole wheat, the choice is yours!
Time-Saving Delight: Perfect for busy evenings, it comes together quickly, yet impresses like a five-star meal.
Crowd-Pleaser: Ideal for family dinners and special gatherings, its rich flavors are guaranteed to leave your guests raving.
Embrace the joy of cooking with this Creamy Chicken Cordon Bleu—it’s a dish you’ll adore for years to come!

Creamy Chicken Cordon Bleu Ingredients

• Get ready to create a comforting masterpiece!

For the Chicken

  • Chicken Breasts – Core protein for a tender centerpiece; boneless, skinless breasts work best.
  • Ham – Adds a savory depth; opt for thinly sliced cooked ham or turkey ham for a lighter twist.

For the Filling

  • Swiss Cheese – Provides creamy texture and nutty flavor; mozzarella makes a delightful alternative.

For the Coating

  • All-Purpose Flour – Creates a light, crispy exterior; gluten-free flour can be used for a friendly substitute.
  • Eggs – Binds ingredients together; ensure they are beaten smoothly for a clump-free coating.
  • Panko Breadcrumbs – Delivers that irresistible crunch; regular breadcrumbs can be used, although the texture will differ.

For the Cooking

  • Butter – Adds richness during frying and enhances the sauce; feel free to use lighter oils if preferred.
  • Olive Oil – Helps prevent burning while contributing flavor.

For the Cream Sauce

  • Milk – Forms the creamy base of the sauce; whole milk is ideal for the perfect consistency.
  • Parmesan Cheese – Enriches the sauce with sharp flavor; substitute Grana Padano for a unique twist.
  • Dijon Mustard – Brings a tangy element to the sauce; yellow mustard can work in a pinch.

Dive into this delightful Creamy Chicken Cordon Bleu recipe, and watch your family and friends savor every bite!

Step‑by‑Step Instructions for Creamy Chicken Cordon Bleu

Step 1: Preheat the Oven
Begin by preheating your oven to 350°F (175°C), allowing it to reach the perfect temperature while you prepare the chicken. This ensures even cooking later on, guiding you to a perfectly tender and golden result when baking your Creamy Chicken Cordon Bleu.

Step 2: Prepare the Chicken
Carefully pound the chicken breasts to a thickness of about 1/4-inch using a meat mallet or rolling pin, ensuring they are even for uniform cooking. Season both sides generously with salt and pepper, creating a flavorful foundation for the savory ham and Swiss cheese that will fill your delightful rolls.

Step 3: Assemble the Filling
On each chicken breast, layer two slices of Swiss cheese followed by two slices of ham. Make sure to spread them evenly across the breast, covering as much surface as possible. This combination is what brings that classic comforting flavor to your Creamy Chicken Cordon Bleu, so don’t skimp!

Step 4: Roll and Secure the Chicken
Carefully roll each chicken breast tightly from the narrow end, tucking in the filling as you go to prevent any from spilling out. Once rolled, secure each with toothpicks, ensuring they hold their shape and keep the delicious ingredients tightly packed inside while cooking.

Step 5: Set Up the Dredging Station
Prepare your dredging station with three shallow dishes: one with all-purpose flour, another with beaten eggs, and the third filled with panko breadcrumbs. This setup will help you create a crispy, golden coating for your Creamy Chicken Cordon Bleu, ensuring each piece is well covered.

Step 6: Coat the Chicken Rolls
Dredge each chicken roll in flour first, shaking off any excess before dipping it into the beaten eggs. Finally, coat it thoroughly with panko breadcrumbs to achieve that irresistible crunch. Place them aside on a plate, ready to be transformed into crispy delights in the next step.

Step 7: Brown the Chicken
In a large skillet, heat a mixture of butter and olive oil over medium heat. Once the butter has melted and the oil is shimmering, carefully add the coated chicken rolls to the pan. Brown them on all sides, which should take about 5-7 minutes, achieving a lovely golden color that enhances the overall presentation.

Step 8: Bake the Chicken
Transfer the browned chicken rolls to a baking dish, placing them seam-side down to keep the filling intact. Bake in your preheated oven for 20-25 minutes, or until the chicken reaches an internal temperature of 165°F (75°C). The rolls will be beautifully golden brown and cooked through, ready for the sauce.

Step 9: Make the Cream Sauce
While the chicken bakes, prepare your cream sauce by melting some butter in a saucepan over medium heat. Add flour and whisk vigorously to create a roux, cooking for about 1-2 minutes until it forms a smooth paste. This roux will give your sauce the desired thickness and flavor.

Step 10: Whisk in the Milk
Gradually whisk the milk into the roux, continuing to cook until the mixture thickens, about 3-5 minutes. As it warms, add in Parmesan cheese and Dijon mustard, stirring until fully melted and incorporated. Season with salt and pepper to taste, ensuring a rich and creamy sauce to accompany your Chicken Cordon Bleu.

Step 11: Serve and Enjoy
Once the chicken is baked, remove it from the oven and ensure any toothpicks are discarded. Serve each chicken roll drizzled generously with the creamy sauce, letting the comforting flavors and textures shine. Your Creamy Chicken Cordon Bleu is now ready to delight you and your loved ones!

How to Store and Freeze Creamy Chicken Cordon Bleu

  • Fridge: Store leftovers in airtight containers for up to 3-4 days. This keeps your Creamy Chicken Cordon Bleu fresh and ready to enjoy on busy weeknights!
  • Freezer: For longer storage, freeze individual chicken rolls after cooling. Wrap each tightly in plastic wrap and then place in a freezer-safe bag; they’ll last for up to 3 months.
  • Reheating: To reheat, place the chicken rolls in a preheated oven at 350°F (175°C) for about 20-25 minutes until heated through. This restores the crispy crust beautifully!

Creamy Chicken Cordon Bleu Variations

Feel free to personalize this recipe and make it truly yours—change up the flavors and textures to suit your taste!

  • Cheese Swap: Use mozzarella or provolone for a milder cheese experience than the nutty Swiss.
  • Health-Conscious Breadcrumbs: Whole wheat breadcrumbs provide a delightful crunch while boosting fiber. It’s a small switch with a big impact!
  • Turkey Tangle: Substitute turkey ham for the usual ham for a leaner option that doesn’t sacrifice flavor.
  • Gluten-Free: Opt for gluten-free flour and breadcrumbs to make this dish friendly for those with gluten sensitivities. It’s easy and delicious!
  • Creamy Boost: Add a splash of white wine to the cream sauce for a luxurious twist that brings a hint of sophistication to the meal.
  • Herb Infusion: Mix in fresh herbs like thyme or parsley into the cream sauce for a fresh, vibrant flavor kick that complements the chicken beautifully.
  • Spicy Kick: Add a pinch of crushed red pepper flakes to the cream sauce to bring some warmth and excitement to your plate.
  • Smoky Flavor: Incorporate smoked cheese into the filling, like gouda, for an intriguing twist that elevates this comforting classic.

Explore these variations to find the perfect combination that suits your family’s palate, and create unforgettable moments around the dinner table with this Creamy Chicken Cordon Bleu!

What to Serve with Creamy Chicken Cordon Bleu

Elevate your dinner table with delightful pairings that enhance the comforting flavors of this classic dish.

  • Creamy Mashed Potatoes:
    A luscious side that absorbs the rich sauce beautifully, providing a delightful contrast in texture.

  • Garlic Roasted Asparagus:
    Tender-crisp asparagus with garlic amplifies freshness and adds a pop of vibrant color to your plate.

  • Mixed Green Salad:
    A light salad with a zesty vinaigrette adds a refreshing element, balancing the dish’s richness perfectly.

  • Honey-Glazed Carrots:
    Sweet, tender carrots bring delightful warmth and a hint of sweetness to complement the savory chicken.

  • Crispy Brussels Sprouts:
    These add crunch and earthy flavors that enhance the overall dining experience with a touch of bitterness.

  • Herbed Rice Pilaf:
    Fluffy rice with fresh herbs brings a fragrant touch, creating a satisfying base for the creamy chicken.

  • White Wine:
    A crisp Chardonnay pairs beautifully, cutting through the richness and highlighting the flavors of the dish.

  • Chocolate Mousse:
    For dessert, a silky chocolate mousse rounds off the meal with a touch of elegance and indulgence.

These suggestions will not only complement your Creamy Chicken Cordon Bleu but will also create a memorable dining experience for you and your loved ones!

Expert Tips for Creamy Chicken Cordon Bleu

  • Pound Evenly: Properly pound the chicken to 1/4-inch thickness for even cooking and easy rolling, ensuring all ingredients blend perfectly inside.
  • Monitor Temperature: Use a meat thermometer to check that the chicken reaches an internal temperature of 165°F (75°C) for both safety and juiciness.
  • Avoid Crowding: Fry the chicken in batches to prevent overcrowding in the skillet; this ensures a crispy coating that doesn’t steam.
  • Versatile Cheeses: Feel free to experiment with different cheeses like mozzarella or provolone for varying flavor profiles, all while maintaining the comforting essence of this dish.
  • Prep Ahead: To save time, prepare the chicken rolls a day in advance and refrigerate until ready to bake, making this meal ideal for busy nights!

Make Ahead Options

Creamy Chicken Cordon Bleu is a fantastic option for meal prep, allowing you to enjoy homemade goodness without the last-minute stress. You can assemble the chicken rolls and refrigerate them up to 24 hours in advance—just ensure they are tightly wrapped in plastic wrap to maintain moisture and prevent drying out. If you prefer, you can also prepare the cream sauce and store it in an airtight container in the fridge for up to 3 days. When you’re ready to serve, simply bake the chicken as directed and warm the sauce on the stove until bubbly. This way, you’ll savor the same delicious warmth of Creamy Chicken Cordon Bleu while saving valuable time on busy weeknights!

Creamy Chicken Cordon Bleu Recipe FAQs

How do I choose the best chicken breasts for this recipe?
Absolutely! When selecting chicken breasts, look for boneless, skinless varieties that are plump and have a nice pink color. Avoid any with dark spots or an unpleasant odor, as these are signs of spoilage. If you can, buy organic or free-range chicken for a healthier and more flavorful dish.

What is the best way to store leftovers from this dish?
For optimal freshness, store any leftovers in airtight containers in the refrigerator for up to 3-4 days. This ensures that your Creamy Chicken Cordon Bleu maintains its delightful flavors. Don’t forget to let it cool completely before sealing to avoid moisture buildup!

Can I freeze Creamy Chicken Cordon Bleu for later use?
Yes, indeed! To freeze, allow the chicken rolls to cool completely, then individually wrap each roll tightly in plastic wrap. Place them inside a freezer-safe bag or container, and they can last in the freezer for up to 3 months. When you’re ready to enjoy again, simply reheat in a preheated oven at 350°F (175°C) for about 20-25 minutes until warmed through.

I’m worried about undercooking the chicken. What should I do?
Very valid concern! To ensure perfectly cooked chicken, use a meat thermometer to check the internal temperature. It should read 165°F (75°C) at the thickest part of the chicken roll. If you don’t have a thermometer, make sure the juices run clear and the meat is no longer pink inside.

What if I have a dairy allergy; can I make this recipe without dairy?
The more the merrier! To make this dairy-free, you can use non-dairy milk alternatives like almond or oat milk for the cream sauce. Instead of cheese, consider using dairy-free cheese options that melt well. For butter, coconut oil or a vegan butter substitute works beautifully!

Can I prepare the chicken rolls in advance?
Absolutely! You can assemble the chicken rolls a day ahead and refrigerate them until you’re ready to bake. Just cover them tightly with plastic wrap to retain moisture. This makes it super easy to have a delicious dinner ready in no time, especially on busy nights!

undefined

Creamy Chicken Cordon Bleu: Comforting Delight in Every Bite

This creamy Chicken Cordon Bleu is a comforting delight that combines tender chicken, savory ham, and gooey Swiss cheese in a crispy crust.
Prep Time 15 minutes
Cook Time 30 minutes
Total Time 45 minutes
Servings: 4 rolls
Course: Dinner
Cuisine: American
Calories: 450

Ingredients
  

For the Chicken
  • 4 pieces Chicken Breasts boneless, skinless
  • 8 slices Ham thinly sliced
For the Filling
  • 8 slices Swiss Cheese or mozzarella as an alternative
For the Coating
  • 1 cup All-Purpose Flour or gluten-free flour
  • 2 large Eggs beaten
  • 1 cup Panko Breadcrumbs or regular breadcrumbs
For the Cooking
  • 2 tablespoons Butter for frying
  • 2 tablespoons Olive Oil
For the Cream Sauce
  • 1 cup Milk whole milk preferred
  • 1/2 cup Parmesan Cheese or Grana Padano
  • 1 tablespoon Dijon Mustard or yellow mustard

Equipment

  • Oven
  • Skillet
  • Meat mallet
  • Knife
  • shallow dishes
  • toothpicks
  • Saucepan

Method
 

Step-by-Step Instructions
  1. Preheat your oven to 350°F (175°C).
  2. Pound the chicken breasts to a thickness of about 1/4-inch; season with salt and pepper.
  3. On each chicken breast, layer two slices of Swiss cheese followed by two slices of ham.
  4. Roll each chicken breast tightly from the narrow end and secure with toothpicks.
  5. Set up a dredging station with flour, beaten eggs, and panko breadcrumbs.
  6. Dredge each chicken roll in flour, then dip into beaten eggs, and finally coat with panko.
  7. In a skillet, heat butter and olive oil; brown the chicken rolls on all sides for 5-7 minutes.
  8. Transfer the chicken rolls to a baking dish and bake for 20-25 minutes until fully cooked.
  9. Prepare the cream sauce by melting butter, adding flour, and whisking to create a roux.
  10. Whisk in the milk, add Parmesan cheese and Dijon mustard, and season to taste.
  11. Serve each chicken roll drizzled with creamy sauce.

Nutrition

Serving: 1rollCalories: 450kcalCarbohydrates: 30gProtein: 35gFat: 20gSaturated Fat: 10gPolyunsaturated Fat: 2gMonounsaturated Fat: 6gCholesterol: 120mgSodium: 900mgPotassium: 600mgFiber: 2gSugar: 1gVitamin A: 500IUVitamin C: 2mgCalcium: 300mgIron: 2mg

Notes

Pound chicken evenly, monitor cooking temperature, and do not overcrowd the skillet for the best results.

Tried this recipe?

Let us know how it was!

Ranch Garlic Parmesan Chicken Skewers for Easy Grilling Bliss

The sizzling sound of chicken grilling takes me back to summer evenings spent on the patio, where every bite felt like a celebration. These Easy Ranch Garlic Parmesan Chicken Skewers are my go-to recipe for those moments—perfectly seasoned, juicy, and utterly simple to make. With a creamy tang from ranch dressing and a touch of garlicky goodness, they transform an ordinary meal into something extraordinary. This dish not only promises a quick prep time but also caters to a crowd, making it ideal for gatherings or a weekday dinner. And the best part? You can customize the flavors to match your cravings, whether you prefer a hint of spice or a sprinkle of fresh herbs. Ready to indulge in this grilled delight? Let’s get cooking!

Why Are These Skewers So Irresistible?

Simplicity at Its Core: With minimal ingredients and easy steps, you’ll find these skewers are a breeze to whip up for any occasion.

Flavor Explosion: The combination of ranch dressing, garlic, and parmesan creates a mouthwatering taste that your taste buds will adore.

Grilling Perfection: Achieving juicy, tender chicken with a deliciously crispy exterior is effortless, making you a grilling superstar!

Customizable Delights: Tailor these skewers to your liking—add herbs, switch up proteins, or use your favorite cheeses for endless variations.

Crowd Pleaser: Whether it’s a quick family dinner or a casual BBQ with friends, these skewers are sure to impress everyone at the table!

Enjoy more delectable options by checking out my other grilling favorites for a perfect pairing!

Ranch Garlic Parmesan Chicken Skewers Ingredients

• Transform your grilling with these delightful skewers!

For the Marinade

  • Chicken Breast – Boneless and skinless for easy grilling and tender bites.
  • Ranch Dressing – Adds creamy flavor; feel free to substitute with a homemade ranch mix for freshness.
  • Garlic – Fresh minced garlic enhances the flavor; use more if you love garlic’s aromatic punch!

For the Topping

  • Parmesan Cheese – Provides a savory, cheesy crust; try pecorino for a different twist.

Get ready to create mouthwatering Ranch Garlic Parmesan Chicken Skewers that are not only quick to make but also bursting with flavor!

Step-by-Step Instructions for Easy Ranch Garlic Parmesan Chicken Skewers

Step 1: Marinate Chicken
Begin by cutting the boneless, skinless chicken breast into evenly sized chunks, ensuring they will cook uniformly. In a medium bowl, combine the chicken pieces with ranch dressing and minced garlic. Allow the chicken to marinate for at least 30 minutes at room temperature or up to 2 hours in the refrigerator, allowing the flavors to meld beautifully.

Step 2: Assemble Skewers
After marinating, it’s time to assemble your Easy Ranch Garlic Parmesan Chicken Skewers. Thread the marinated chicken pieces onto soaked wooden skewers, leaving a little space between each piece for even cooking. For added color and flavor, feel free to intersperse with bell pepper or onion chunks. Aim for 4-5 pieces of chicken on each skewer for easy handling.

Step 3: Preheat Grill
Preheat your grill to medium-high heat, around 400°F (200°C). This ensures the skewers will get a lovely char while cooking. While the grill heats up, make sure to clean the grates thoroughly to prevent the chicken from sticking. A well-prepared grill is key to achieving those delicious grill marks!

Step 4: Grill Chicken
Once the grill is hot, place the skewers on the grates and grill for 10-15 minutes. Turn the skewers occasionally for even cooking. You’ll know they’re ready when the chicken is well-seared and reaches an internal temperature of 165°F (75°C). Look for a golden-brown crust and juicy insides to signal perfect doneness.

Step 5: Add Parmesan
During the last few minutes of grilling, sprinkle freshly grated parmesan cheese over the skewers. Close the grill lid to melt the cheese, creating a delightful crust on each skewer. The cheddar and garlic aroma will fill your outdoor space, enticing everyone to gather around for a taste of these scrumptious Easy Ranch Garlic Parmesan Chicken Skewers!

Ranch Garlic Parmesan Chicken Skewers Customization

Feel free to unleash your creativity in the kitchen and make these skewers uniquely yours with these delightful variations!

  • Dairy-Free: Swap out the parmesan cheese for nutritional yeast or leave it off entirely for a lighter option. You’ll still enjoy the rich flavor profile.

  • Spicy Kick: Add a sprinkle of cayenne pepper or red pepper flakes to the marinade for a fiery twist that will excite your taste buds!

  • Herb Infusion: Toss in chopped fresh herbs like dill, basil, or cilantro into the marinade for a burst of freshness. Each herb brings its own unique flair!

  • Veggie Love: Substitute chicken with hearty veggies like zucchini, bell peppers, or mushrooms. Make a vibrant veggie skewer packed with nutrients.

  • Shrimp Delight: Switch the protein to shrimp for a quick-cooking seafood alternative that’s just as delicious. Pair with a citrusy dipping sauce for extra zing.

  • Smoky Flavor: Brush the skewers with a bit of smoked paprika or add liquid smoke to the marinade for a robust, smoky essence that’s utterly addictive.

  • Cheese Twist: Experiment with different cheeses like mozzarella or gouda for a creamy finish. Each cheese will impart its unique flavor while remaining deliciously melty.

Feel free to check out my other grilling favorites to inspire your next culinary adventure!

Expert Tips for the Best Ranch Garlic Parmesan Chicken Skewers

  • Uniform Chicken Size: Ensure your chicken pieces are cut into similar sizes for even cooking, preventing some pieces from being undercooked or overcooked.

  • Soak Skewers: If using wooden skewers, soak them in water for at least 30 minutes before grilling. This helps avoid burning and keeps your skewers intact.

  • Watch the Grill: Keep an eye on the skewers while they grill. Overcooking can lead to dry chicken, so aim for that perfect golden-brown crust to ensure juicy bites.

  • Flavor Variations: Don’t hesitate to get creative! Add a touch of heat with red pepper flakes or a splash of lemon juice to elevate the flavors of your Ranch Garlic Parmesan Chicken Skewers.

  • Rest the Skewers: After grilling, let the skewers rest for a few minutes before serving. This helps the juices redistribute, making each bite tender and flavorful.

Make Ahead Options

These Easy Ranch Garlic Parmesan Chicken Skewers are perfect for busy weeknights or gatherings, allowing you to prep in advance and save valuable time. You can marinate the chicken in ranch dressing and garlic up to 24 hours ahead, just make sure to cover and refrigerate it to keep the flavors fresh and prevent browning. Additionally, you can assemble the skewers and store them in an airtight container in the fridge for up to 3 days. When it’s time to cook, just preheat your grill and grill the skewers as usual, adding parmesan cheese during the last few minutes. This makes for an effortless, delicious dish that’s just as enjoyable as when freshly made!

What to Serve with Easy Ranch Garlic Parmesan Chicken Skewers

The perfect sides can elevate your skewers into a complete, satisfying meal that tantalizes the taste buds.

  • Creamy Ranch Dip: A must-have for dipping, this ranch dip echoes the flavors of the skewers and adds a delightful creaminess.
  • Grilled Vegetables: Seasonal vegetables like zucchini, bell peppers, and onions bring a colorful, smoky flavor that pairs beautifully with the chicken. Toss them in olive oil, salt, and pepper before grilling for added flavor!
  • Crispy Potato Wedges: The crunchiness of potato wedges, seasoned with herbs and spices, provides a fantastic contrast to the juicy skewers. Serve them with a sprinkle of parmesan for extra indulgence.
  • Classic Caesar Salad: This crisp salad complements the richness of the skewers, balancing the meal with its creamy dressing and fresh romaine. The crunch of croutons also adds texture.
  • Coleslaw: A tangy, creamy coleslaw brings a refreshing crunch that counterbalances the grilled meat. It’s the ideal side for BBQ lovers!
  • Watermelon Feta Salad: The sweetness of watermelon, mixed with savory feta and fresh mint, creates a light, refreshing contrast that’s perfect for summer gatherings.
  • Sweet Tea or Lemonade: Refreshing drinks like sweet tea or homemade lemonade will quench your thirst and elevate the casual vibe of your meal.
  • Chocolate Chip Cookies: End the meal on a sweet note with warm, gooey chocolate chip cookies, invoking that nostalgic comfort food feeling everyone loves!

How to Store and Freeze Ranch Garlic Parmesan Chicken Skewers

  • Room Temperature: It’s best to enjoy your skewers fresh off the grill. If needed, let them cool for no more than 2 hours before storing.

  • Fridge: Store any leftover Ranch Garlic Parmesan Chicken Skewers in an airtight container in the refrigerator for up to 3 days. Be sure to keep them covered to maintain moisture.

  • Freezer: For longer storage, freeze the cooked skewers in a freezer-safe bag or container for up to 3 months. Wrap them tightly to prevent freezer burn.

  • Reheating: When ready to enjoy, reheat skewers in the oven at 350°F (175°C) for about 10-15 minutes, or grill them briefly to bring back their crispy finish.

Ranch Garlic Parmesan Chicken Skewers Recipe FAQs

How do I select ripe chicken breast for the skewers?
Absolutely! When choosing chicken breast, look for pieces that are pale pink and firm to the touch. The flesh should not have dark spots or any foul odor. Fresh chicken will ensure your skewers are juicy and delicious.

How should I store leftover Ranch Garlic Parmesan Chicken Skewers?
Very straightforward! Place the leftover skewers in an airtight container and store them in the refrigerator. They’ll stay fresh for up to 3 days. Just make sure they’re covered to keep moisture in, so they don’t dry out!

Can I freeze cooked Ranch Garlic Parmesan Chicken Skewers?
Absolutely! To freeze, let the cooked skewers cool completely. Then, wrap them tightly in plastic wrap or place them in a freezer-safe bag. They can be safely stored for up to 3 months. To reheat, simply place them in the oven at 350°F (175°C) for 10-15 minutes, and enjoy that crispy finish again!

What if the chicken is dry after grilling?
If your chicken turns out dry, it may have been overcooked. To ensure juicy bites, use an instant-read thermometer to check the internal temperature, aiming for 165°F (75°C). If it’s dry, don’t worry—serve with a creamy dipping sauce to add moisture back and enhance flavor!

Are these skewers safe for pets?
Great question! While chicken is generally safe for pets, you should avoid giving them skewers, as the wooden sticks can be a choking hazard. Always consult your vet for personalized advice on your pet’s diet and safety.

Can I substitute the ranch dressing with a different type?
Very much so! You can use a homemade ranch mix, or try swapping in creamy dressings like blue cheese or Caesar for a unique twist. Just keep in mind the flavor profile may change slightly, but experimentation is always fun in the kitchen!

undefined

Ranch Garlic Parmesan Chicken Skewers for Easy Grilling Bliss

These Easy Ranch Garlic Parmesan Chicken Skewers are a perfect blend of chicken, ranch dressing, and garlic, making them incredibly flavorful and simple to prepare for any gathering.
Prep Time 30 minutes
Cook Time 15 minutes
Marinating Time 2 hours
Total Time 2 hours 45 minutes
Servings: 4 skewers
Course: Appetizers
Cuisine: American
Calories: 250

Ingredients
  

For the Marinade
  • 1 pound boneless skinless chicken breast
  • 1/2 cup ranch dressing can substitute with homemade ranch
  • 3 cloves garlic minced
For the Topping
  • 1/2 cup parmesan cheese freshly grated, can substitute pecorino

Equipment

  • Grill
  • wooden skewers
  • Mixing Bowl

Method
 

Step-by-Step Instructions for Easy Ranch Garlic Parmesan Chicken Skewers
  1. Begin by cutting the chicken breast into evenly sized chunks. In a medium bowl, combine the chicken with ranch dressing and minced garlic. Marinate for at least 30 minutes or up to 2 hours.
  2. Thread the marinated chicken pieces onto soaked skewers, interspersing with bell pepper or onion if desired. Aim for 4-5 pieces of chicken per skewer.
  3. Preheat your grill to medium-high heat, around 400°F (200°C). Clean the grates thoroughly before cooking.
  4. Place the skewers on the grill and cook for 10-15 minutes, turning occasionally until chicken reaches an internal temperature of 165°F (75°C).
  5. During the last few minutes, sprinkle parmesan cheese over the skewers and close the grill lid to melt the cheese.

Nutrition

Serving: 1skewerCalories: 250kcalCarbohydrates: 2gProtein: 30gFat: 13gSaturated Fat: 4gPolyunsaturated Fat: 0.5gMonounsaturated Fat: 7gCholesterol: 90mgSodium: 800mgPotassium: 400mgSugar: 1gVitamin A: 200IUVitamin C: 5mgCalcium: 200mgIron: 1mg

Notes

For best results, ensure chicken pieces are uniform in size and soak wooden skewers prior to grilling. Let the skewers rest after grilling for juicy bites.

Tried this recipe?

Let us know how it was!

Savory High Protein Pepperoni Pizza Rolls You’ll Crave

As I pulled the warm, golden rolls from the oven, the aroma of pepperoni and melting cheese enveloped my kitchen like a comforting hug. These High Protein Pepperoni Pizza Rolls have become a go-to snack in my home—perfect for satisfying cravings without the guilt of traditional pizza. Packed with lean protein and a customizable filling, they make meal prep a breeze while ensuring everyone leaves the table smiling. Whether you’re a busy parent or just someone looking to embrace homemade goodness, these rolls are a fun way to indulge without sacrificing nutrition. Ready to roll? Let’s dive into this delicious recipe that’ll turn your weeknight dinners into cherished family moments!

Why Are These Pizza Rolls Irresistible?

Flavor-packed and satisfying: Each bite is a delightful dance of pepperoni and cheese, wrapping you in comforting flavors. Adaptable recipes mean you can easily swap in ground turkey for a leaner option or switch up the cheese for a dairy-free delight. Quick and easy to prepare, these rolls are perfect for an after-school snack or meal prep for busy weeknights. Crowd-pleasing appeal ensures everyone, from kids to adults, will be raving about this dish. If you’re intrigued by other tasty snacks, check out our cheesy pull-apart bread to keep the meal vibe alive!

High Protein Pepperoni Pizza Rolls Ingredients

• Get ready to create something delicious with these hearty pizza rolls, perfect for satisfying cravings!

For the Dough

  • Lean ground beef – Provides protein while keeping the rolls less greasy; substitute with ground turkey or chicken for a lighter option.
  • Low-fat mozzarella cheese – Creates a melty and creamy filling; can use dairy-free cheese if lactose intolerant.
  • Onion powder – Adds flavor depth; substitute with finely chopped onions if preferred.
  • Garlic powder – Enhances overall taste; fresh garlic can be used as an alternative.
  • Smoked paprika – Provides a subtle smoky flavor; regular paprika can be substituted.
  • Dried oregano – Essential for Italian flavor infusion; swap with Italian seasoning for a more herbal mix.

For the Filling

  • Pepperoni – Adds classic pizza flavor; adjust quantity for desired spice level or replace with turkey pepperoni for lower fat.
  • Crushed tomatoes & tomato paste – Creates a rich filling, necessary for moisture and flavor.
  • Flat-leaf parsley (optional) – For fresh herb flavor; can be omitted or replaced with basil.

These High Protein Pepperoni Pizza Rolls are a mouthwatering addition to your meal prep and snack collections!

Step-by-Step Instructions for Irresistible High Protein Pepperoni Pizza Rolls

Step 1: Mix Spices
In a medium bowl, combine onion powder, garlic powder, smoked paprika, and dried oregano. Stir well to ensure an even blend of flavors that will infuse your High Protein Pepperoni Pizza Rolls. This step should take about 2 minutes. Set the spice mix aside while you prepare the filling.

Step 2: Cook Beef
Spray a skillet with cooking oil and heat it over medium-high flame. Once hot, add the lean ground beef, breaking it apart with a spatula. Cook for approximately 5 minutes or until the meat is browned and no longer pink. Season with salt and pepper to taste, then remove from heat to drain any excess fat.

Step 3: Add Fillings
Return the skillet to low heat and mix the coarsely chopped pepperoni and the prepared spice mix into the browned beef. Cook for an additional 2 minutes until the mixture is aromatic. Stir in the crushed tomatoes and tomato paste, allowing the filling to simmer for 2-3 minutes until it thickens slightly and melds together.

Step 4: Assemble Rolls
Lay your wraps flat on a clean surface. Spoon about 3-4 tablespoons of the beef mixture into the center of each wrap, followed by a sprinkle of low-fat mozzarella cheese. If desired, drizzle with your favorite sauces. Roll the wrap tightly from one end to another, ensuring the filling is completely enclosed, resembling a burrito shape.

Step 5: Bake
Preheat your oven to 400°F (200°C). Line a baking tray with parchment paper and arrange the rolls seam-side down. Lightly spray the top of each roll with cooking oil to help them crisp. Bake in the preheated oven for 8-10 minutes, until the wraps are golden and crispy, giving a delightful crunch when bitten into.

Step 6: Cool & Serve
Once baked, carefully remove the High Protein Pepperoni Pizza Rolls from the oven and let them cool for a few minutes. This cooling period allows the cheese to set slightly. Slice each roll into manageable pieces and serve warm, accompanied by marinara or ranch dressing for dipping.

What to Serve with Irresistible High Protein Pepperoni Pizza Rolls

A deliciously satisfying meal starts with these crispy, cheese-filled delights, and the perfect accompaniments elevate the experience even more.

  • Caesar Salad: The crisp romaine and creamy dressing balance the richness of the pizza rolls while adding a fresh crunch.

  • Garlic Breadsticks: Dipping the soft, buttery sticks into marinara sauce creates a comforting flavor combination with your pizza rolls.

  • Mixed Green Salad: Light and zesty, topped with a tangy vinaigrette, it offers a refreshing contrast to the hearty rolls.

  • Marinara Sauce: Serve alongside for quick dipping, enhancing the Italian flavor profile and satisfying your pizza cravings even further.

  • Ranch Dressing: This cool and creamy dip adds a delightful zing without overpowering the savory elements of the rolls.

  • Fresh Fruit Platter: A platter of seasonal fruits, like berries and melons, cleanses the palate between bites while adding a sweet touch.

  • Sparkling Water with Lemon: Stay refreshed with a bubbly drink that’s lightly flavored, making every bite of pizza roll a festive occasion.

  • Homemade Potato Wedges: Crispy on the outside, soft on the inside, they complement the rolls’ texture and soak up extra flavors from the filling.

Expert Tips for High Protein Pepperoni Pizza Rolls

Avoid Soggy Wraps: Drain excess moisture from the cooked meat to keep wraps crisp and delicious.

Right Amount of Filling: Stick to 3-4 tablespoons of filling per wrap; too much can cause them to burst while baking.

Cool Filling First: Let the beef mixture cool slightly before wrapping; this will prevent the cheese from melting too early.

Seal Properly: Use a little water on the edges of the wraps to seal tightly, and always place seam-side down on the tray for best results.

Experiment Freely: Don’t hesitate to swap ingredients based on dietary preferences—these High Protein Pepperoni Pizza Rolls are customizable and adaptable!

Make Ahead Options

These High Protein Pepperoni Pizza Rolls are ideal for meal prep aficionados looking to save time without sacrificing flavor! You can easily prepare the filling up to 3 days in advance by cooking the beef and mixing in the pepperoni and spices; just cool it completely before refrigerating in an airtight container. The rolls can be assembled and refrigerated for up to 24 hours prior to baking, simply cover them tightly with plastic wrap to retain moisture. When ready to serve, bake them directly from the fridge for 8-10 minutes in a preheated oven at 400°F (200°C) until golden. This method ensures your rolls come out just as delicious, making weeknight dinners a delightful treat!

High Protein Pepperoni Pizza Rolls Variations

Feel free to let your creativity shine as you personalize these delicious rolls for your taste buds!

  • Dairy-Free: Substitute low-fat mozzarella with dairy-free cheese to make these rolls accessible for those with lactose intolerance. Enjoy the same gooey texture without the dairy!
  • Lean Meat: Swap lean ground beef for ground turkey or chicken to lighten them up—delicious and guilt-free. The different flavors can breathe new life into your meal!
  • Vegetarian Twist: Replace the meat filling entirely with roasted vegetables, such as bell peppers and mushrooms, ensuring a satisfying texture. A sprinkle of feta cheese can add a delightful tang!
  • Spice it Up: For those who love heat, toss in some sliced jalapeños or crushed red pepper flakes to the filling, bringing an added kick. Feeling bold? Try adding a drizzle of hot sauce before baking!
  • Extra Flavor: Incorporate different herbs, such as fresh basil or thyme, to elevate the Italian flavors further or add a personal touch. These can beautifully highlight the savory notes of your rolls!
  • Savory Sauces: Experiment with incorporating a variety of sauces, such as barbecue or pesto, for a unique flavor dimension. Just a spoonful can change the whole character of your rolls.
  • Increased Crunch: For an added texture contrast, include diced bell peppers or cooked bacon bits within the filling—great crunch and a flavor pop in every bite!
  • Sweet Surprise: Add a touch of sweetness by mixing in finely chopped sun-dried tomatoes or even a few slices of pineapple for a delightful fruity twist. It’s a fun nod to classic Hawaiian pizza!

Remember, the beauty of these High Protein Pepperoni Pizza Rolls is their adaptability, making them a versatile recipe for any occasion. For more engaging snacks, don’t forget to check out our cheesy pull-apart bread that will surely impress!

How to Store and Freeze High Protein Pepperoni Pizza Rolls

Fridge: Store your pizza rolls in an airtight container for up to 4 days. This keeps them fresh and ready for a quick snack or meal.

Freezer: For longer storage, wrap each roll tightly in plastic wrap, then place them in a freezer bag. They can be frozen for up to 3 months.

Reheating: When ready to enjoy, reheat in a preheated oven at 350°F for 10-15 minutes if refrigerated, or 20-25 minutes if frozen, to maintain a crispy texture.

Grab-and-Go: For convenient snacks, you can individually wrap the rolls to have tasty, high-protein bites ready whenever cravings strike!

High Protein Pepperoni Pizza Rolls Recipe FAQs

Can I use different types of meat for the filling?
Absolutely! You can substitute the lean ground beef with ground turkey or chicken for a lighter option. Both alternatives give you the same protein-packed goodness while personalizing the flavor to your taste.

How should I store leftover pizza rolls?
For optimal freshness, place your pizza rolls in an airtight container and store them in the refrigerator. They will remain delicious for up to 4 days. Individually wrapping them also works great for quick grab-and-go meals!

Can I freeze these pizza rolls?
Yes! To freeze your High Protein Pepperoni Pizza Rolls, wrap each roll tightly in plastic wrap, then place them in a freezer-safe bag. They can be stored in the freezer for up to 3 months. When you’re ready to indulge, simply reheat them in the oven for the best texture.

What if my filling is too watery?
To avoid soggy wraps, make sure to drain any excess moisture from the meat after cooking. It’s also crucial to allow the filling to cool slightly before adding it to the wraps. If you’ve overfilled and they burst while baking, consider using a bit less filling next time—3-4 tablespoons work best!

Are there any dietary substitutions I can make?
Definitely! If lactose intolerance is a concern, you can easily swap the low-fat mozzarella cheese for a dairy-free alternative. Furthermore, if you’re looking to reduce fat, using turkey pepperoni in place of traditional pepperoni will still give that classic pizza taste without compromising on health.

undefined

Savory High Protein Pepperoni Pizza Rolls You’ll Crave

These High Protein Pepperoni Pizza Rolls are a guilt-free snack packed with protein and flavor, perfect for weeknight dinners or satisfying cravings.
Prep Time 10 minutes
Cook Time 15 minutes
Cooling Time 5 minutes
Total Time 30 minutes
Servings: 8 rolls
Course: Appetizers
Cuisine: Italian
Calories: 250

Ingredients
  

For the Dough
  • 1 pound Lean ground beef can substitute with ground turkey or chicken
  • 1 cup Low-fat mozzarella cheese can use dairy-free cheese if lactose intolerant
  • 1 teaspoon Onion powder can substitute with finely chopped onions
  • 1 teaspoon Garlic powder fresh garlic can be used as alternative
  • 1 teaspoon Smoked paprika regular paprika can be substituted
  • 1 teaspoon Dried oregano can swap with Italian seasoning
For the Filling
  • 1 cup Pepperoni adjust quantity for spice level or use turkey pepperoni
  • 1 cup Crushed tomatoes
  • 2 tablespoons Tomato paste
  • 2 tablespoons Flat-leaf parsley optional, can replace with basil

Equipment

  • Skillet
  • Baking Tray
  • Mixing Bowl

Method
 

Step-by-Step Instructions
  1. In a medium bowl, combine onion powder, garlic powder, smoked paprika, and dried oregano. Stir well to ensure an even blend of flavors. Set the spice mix aside.
  2. Spray a skillet with cooking oil and heat it over medium-high flame. Add the lean ground beef, breaking it apart with a spatula. Cook for approximately 5 minutes or until browned. Season with salt and pepper to taste, then remove from heat to drain excess fat.
  3. Return the skillet to low heat and mix the coarsely chopped pepperoni and spice mix into the beef. Cook for 2 minutes until aromatic. Stir in crushed tomatoes and tomato paste, simmering for 2-3 minutes until thickened.
  4. Lay wraps flat, spoon 3-4 tablespoons of the beef mixture in each wrap, sprinkle with mozzarella, drizzle with sauces if desired, and roll tightly.
  5. Preheat oven to 400°F (200°C). Line a baking tray with parchment paper, arrange rolls seam-side down, spray tops with oil, and bake for 8-10 minutes until golden and crispy.
  6. Carefully remove from the oven, cool for a few minutes, slice into manageable pieces and serve warm with marinara or ranch dressing.

Nutrition

Serving: 1rollCalories: 250kcalCarbohydrates: 20gProtein: 15gFat: 12gSaturated Fat: 5gPolyunsaturated Fat: 2gMonounsaturated Fat: 3gCholesterol: 50mgSodium: 400mgPotassium: 300mgFiber: 2gSugar: 3gVitamin A: 500IUVitamin C: 2mgCalcium: 200mgIron: 2mg

Notes

For best results, allow the filling to cool before wrapping and ensure wraps are sealed properly to avoid bursting during baking.

Tried this recipe?

Let us know how it was!

Fluffy Cottage Cheese Pancakes: High-Protein Breakfast Bliss

Picture the aroma of pancakes sizzling away in your kitchen—a warm invitation to start your day right. Today, I’m excited to share my High-Protein Cottage Cheese Pancakes that are absolutely life-changing! Not only do these fluffy beauties come together in a flash, but they also deliver a satisfying dose of protein to power you through your morning. Whether you’re craving a savory twist or a sweet finish with fresh berries, these pancakes are easily adjustable to fit your mood. With options for gluten-free variations, there’s something for everyone to enjoy. Ready to elevate your breakfast game and delight your taste buds? Let’s dive into this feel-good recipe!

Why are Cottage Cheese Pancakes a Game-Changer?

Unique Taste: These pancakes blend flavors perfectly, with options to go sweet or savory to suit any palate.

High-Protein Delight: Packed with cottage cheese, they provide a protein boost, making breakfast both nutritious and satisfying.

Quick & Easy: Whip these up in no time for a hassle-free meal, ideal for busy mornings.

Versatile Recipe: Customize with chocolate chips for a sweet treat or herbs for a savory twist—your breakfast, your way!

Gluten-Free Friendly: Easily switch to gluten-free flour, ensuring everyone can indulge without worry.

Get ready to impress family or guests with this simple yet delicious recipe; they won’t believe how good these pancakes are!

Cottage Cheese Pancake Ingredients

For the Batter
Cottage Cheese – Rich in moisture and protein, use low-fat for a lighter pancake.
Eggs – Acts as a binder and adds richness; substitute with flax eggs for a vegan option.
Vanilla Extract – Introduces a delightful sweetness and aroma; omit for a savory version.
Sugar – Sweetens the batter; consider using honey or agave for a healthier alternative.
Baking Powder – Gives pancakes lift and a light texture; ensure it’s fresh for best results.
Flour – Provides structure; swap with oat or gluten-free flour for dietary restrictions.
Canola Oil – Used for frying to achieve crispy edges; alternative oils like coconut or avocado work, too.

Get ready to whip up delicious cottage cheese pancakes that are not just satisfying but full of flavor!

Step‑by‑Step Instructions for High-Protein Cottage Cheese Pancakes

Step 1: Prepare the Batter
In a large mixing bowl, combine 1 cup of cottage cheese, 2 eggs, 1 teaspoon of vanilla extract, and 2 tablespoons of sugar. Use a fork or whisk to mix until all ingredients are well incorporated and the mixture is creamy. This should take about 2-3 minutes. The cottage cheese will provide moisture, creating a deliciously rich base for your Cottage Cheese Pancakes.

Step 2: Mix Dry Ingredients
Once your wet ingredients are well mixed, sprinkle in 1 teaspoon of baking powder and 1 cup of your choice of flour. Gently fold the dry ingredients into the wet mixture using a spatula until just combined. Avoid over-mixing; the batter should remain slightly lumpy for perfectly fluffy pancakes. This step will ensure that your Cottage Cheese Pancakes have that delightful, airy texture.

Step 3: Preheat the Skillet
Place a non-stick skillet or frying pan over medium heat and allow it to warm up for about 3-4 minutes. Once heated, add about 1 tablespoon of canola oil, swirling it around to coat the surface evenly. It’s important to wait until the oil is shimmering, as this means your skillet is hot enough to create those crispy edges we love in our Cottage Cheese Pancakes.

Step 4: Cook the Pancakes
Using a cookie scoop or measuring cup, pour about 1/4 cup of batter onto the skillet for each pancake. Cook them for approximately 3-4 minutes, until the edges start to firm up and bubbles form on the surface. Keep an eye on them; once the bottoms are golden brown, it’s time to flip and let the other side cook for an additional 2-3 minutes.

Step 5: Serve and Enjoy
Carefully transfer your freshly cooked Cottage Cheese Pancakes to a warm plate. Serve them hot, drizzled with real maple syrup or topped with fresh fruits for that extra burst of flavor. These fluffy, protein-packed pancakes are best enjoyed immediately, bringing comfort and joy to your breakfast table.

What to Serve with High-Protein Cottage Cheese Pancakes?

Picture a breakfast spread that perfectly complements the soft, fluffy textures of these delightful pancakes, enticing you to indulge even more.

  • Crispy Bacon: The salty crunch of bacon adds a savory contrast, balancing the pancakes’ sweetness and providing a delicious crunch with every bite.

  • Fresh Berries: A medley of strawberries, blueberries, and raspberries adds a burst of vibrant color and sweetness, making your meal visually stunning and refreshing.

  • Greek Yogurt: Creamy and tangy, a dollop of Greek yogurt elevates the protein content and provides an extra layer of richness to your breakfast plate.

  • Maple Syrup: The classic syrup drizzle complements the pancakes’ flavors beautifully, bringing warmth and sweetness that no pancake can resist.

  • Avocado Slices: For a savory touch, serve with creamy avocado. It adds a nutritious element that pairs wonderfully with both sweet and savory versions of the pancakes.

  • Coffee or Tea: A warm cup of your favorite coffee or herbal tea perfectly rounds out the meal, making mornings feel cozy and inviting, inviting you to linger a little longer.

  • Eggs Any Style: Scrambled or poached eggs deliver additional protein and flavors that blend seamlessly with the pancakes, making for a truly hearty breakfast experience.

Enjoy these delightful pairings to create a complete breakfast that will leave you satiated and ready to take on the day!

Cottage Cheese Pancakes Variations & Substitutions

Feel free to unleash your creativity and customize these pancakes with exciting flavors and ingredients!

  • Dairy-Free: Use silken tofu blended until smooth instead of cottage cheese for a creamy, plant-based option.

  • Sweet Twist: Add a handful of chocolate chips or diced bananas to the batter for a delightful sweetness that will make your breakfast even more tempting. Surprising your loved ones with these sweetened creations will bring smiles all around!

  • Savory Herbs: Eliminate sugar and vanilla, and mix in fresh herbs like chives or spinach for a savory treat that’s perfect with a dollop of Greek yogurt. This variation is fantastic for brunch!

  • Nutty Addition: Stir in chopped nuts, such as walnuts or pecans, into the batter for an added crunch and nutritional boost. Each bite will provide a satisfying texture and nutty flavor!

  • Flavored Flour: Swap regular flour with almond flour or coconut flour for a unique taste and gluten-free alternative. This change will give your pancakes an exciting twist!

  • Fruit-Flavored: Blend pureed fruit (like applesauce or pumpkin) into the batter for added moisture and flavor without the extra sugar. You’ll be pleasantly surprised by the results!

  • Spicy Kick: For those who love heat, add a pinch of cayenne pepper or black pepper for a spicy pancake that pairs wonderfully with avocado or poached eggs.

Feel free to explore these tasty variations, and don’t forget, you can always experiment further! Make sure to check out our delicious syrup suggestions to elevate your pancake experience even more.

Storage Tips for Cottage Cheese Pancakes

Fridge: Store leftover pancakes in an airtight container for up to 3 days. Reheat on a skillet for best texture, adding a drop of oil if needed.

Freezer: For longer preservation, freeze pancakes in a single layer on a baking sheet, then transfer to a freezer bag. They’ll last up to 2 months.

Reheating: When ready to enjoy, reheat in the microwave for 30-60 seconds or pop them in a toaster oven until heated through, restoring that fluffy aspect of these cottage cheese pancakes.

Wrap Carefully: If refrigerating or freezing, ensure pancakes are completely cooled before wrapping to prevent moisture buildup.

Expert Tips for Cottage Cheese Pancakes

  • Preheat Properly: Ensure your skillet is hot before adding the batter. This helps achieve those crispy edges every pancake lover desires.

  • Mix Gently: Over-mixing can lead to dense pancakes. Fold the batter until just combined for those light, fluffy cottage cheese pancakes.

  • Check for Doneness: Look for set edges and a slight lift in the middle. If they seem too moist in the center, give them another minute.

  • Versatile Flour Choices: Use oat flour or gluten-free blends to cater to dietary needs, ensuring everyone can enjoy these delicious pancakes.

  • Customize Your Flavor: Don’t hesitate to experiment! Add blueberries or herbs to the batter for a delightful twist and make your breakfast uniquely yours.

Make Ahead Options

These Cottage Cheese Pancakes are a fantastic choice for busy home cooks looking to save time during hectic mornings! You can prepare the batter up to 24 hours in advance by mixing together the cottage cheese, eggs, and dry ingredients, then refrigerating it in an airtight container. To maintain the pancakes’ fluffy texture, be sure to gently fold in the flour and baking powder only until combined. When you’re ready to enjoy your pancakes, simply heat the skillet, scoop the batter, and cook them until they’re golden brown. With this approach, you’ll have delicious, high-protein pancakes ready with minimal effort, ensuring your breakfast is both nourishing and stress-free!

High-Protein Cottage Cheese Pancakes Recipe FAQs

What is the best type of cottage cheese to use for pancakes?
I recommend using low-fat or fat-free cottage cheese for a lighter option, but any variety works well. Just make sure it’s fresh and has a smooth consistency for the best texture in your pancakes.

How do I store leftover pancakes, and how long do they last?
Store leftover pancakes in an airtight container in the fridge for up to 3 days. To maintain their deliciousness, I often reheat them on a skillet with a little oil or butter to restore that crispy edge.

Can I freeze cottage cheese pancakes? If so, how?
Absolutely! To freeze, lay the pancakes flat on a baking sheet in a single layer and place them in the freezer for about 1 hour. Once frozen, stack them with parchment paper in between each layer and transfer to a freezer bag. They should stay good for up to 2 months. When you’re ready, reheat them directly from the freezer in a toaster oven for a quick and satisfying breakfast.

What can I do if my pancake batter is too thick?
If your batter seems too thick, don’t worry! Simply add a splash of milk or a little more egg to loosen it up. Start with a tablespoon at a time until you achieve the desired consistency; it should be pourable but still thick enough to hold some shape in the skillet.

Are cottage cheese pancakes suitable for people with gluten intolerance?
Yes! You can easily switch to gluten-free flour blends when making your High-Protein Cottage Cheese Pancakes. Look for certified gluten-free options in stores, and you’ll have a delicious and safe breakfast treat for everyone!

undefined

Fluffy Cottage Cheese Pancakes: High-Protein Breakfast Bliss

Enjoy these fluffy cottage cheese pancakes, packed with protein and perfect for a quick breakfast.
Prep Time 10 minutes
Cook Time 10 minutes
Total Time 20 minutes
Servings: 4 pancakes
Course: Breakfast
Cuisine: American
Calories: 150

Ingredients
  

For the Batter
  • 1 cup Cottage Cheese low-fat preferred
  • 2 large Eggs can substitute with flax eggs for vegan option
  • 1 teaspoon Vanilla Extract omit for savory version
  • 2 tablespoons Sugar or honey/agave for healthier option
  • 1 teaspoon Baking Powder ensure it's fresh
  • 1 cup Flour can swap with oat or gluten-free flour
  • 1 tablespoon Canola Oil for frying

Equipment

  • Mixing Bowl
  • whisk
  • Non-stick skillet
  • spatula

Method
 

Step‑by‑Step Instructions
  1. In a large mixing bowl, combine cottage cheese, eggs, vanilla extract, and sugar. Mix until creamy.
  2. Sprinkle in baking powder and flour. Fold gently until just combined; the batter should be slightly lumpy.
  3. Preheat a non-stick skillet over medium heat for 3-4 minutes. Add canola oil and coat the skillet.
  4. Pour about 1/4 cup of batter onto the skillet. Cook for 3-4 minutes, flip when golden brown, and cook for an additional 2-3 minutes.
  5. Serve pancakes hot, topped with maple syrup or fresh fruits.

Nutrition

Serving: 1pancakeCalories: 150kcalCarbohydrates: 20gProtein: 8gFat: 4gSaturated Fat: 1gPolyunsaturated Fat: 1gMonounsaturated Fat: 2gCholesterol: 70mgSodium: 300mgPotassium: 150mgFiber: 1gSugar: 3gVitamin A: 500IUCalcium: 150mgIron: 1mg

Notes

For best results, ensure the skillet is hot before cooking and avoid over-mixing the batter.

Tried this recipe?

Let us know how it was!

Creamy Avocado Soup Made Simple and Delicious in 20 Minutes

The first time I sipped on creamy avocado soup, a wave of cool, savory bliss washed over me. This delightful dish melds the refreshing essence of gazpacho with the luxurious richness of guacamole, creating a culinary experience I couldn’t forget. Perfect for those scorching days, this chilled soup can be made in just 20 minutes, making it an ideal choice for busy weeknights or last-minute gatherings. With its fresh ingredients, it’s not only a feast for the senses but also a nourishing option that can be easily adapted for vegetarian or vegan diets. Are you ready to elevate your dining game with this simple yet stunning Creamy Avocado Soup? Let’s dive into the recipe!

Why is Avocado Soup a Must-Try?

Freshness meets flavor: This creamy delight perfectly combines the mild taste of ripe avocados, zesty lime, and fragrant cilantro, resulting in a bowl of vibrant goodness.
Quick & Easy: With a preparation time of just 10 minutes and a total cooking time of 20 minutes, this soup is a lifesaver for busy individuals craving healthy homemade meals.
Versatile options: Enjoy it warm or chilled, with customizable toppings like crispy tortilla chips or crumbled cheese to cater to everyone’s preferences.
Healthy Choice: Packed with healthy fats, this soup aligns with various dietary needs, making it ideal for those on vegetarian or low-carb diets. For more delicious options, check out our guide on healthy soup recipes.
Crowd-Pleasing: Serve this refreshing bowl at gatherings or special occasions, and watch it vanish in no time—it’s an impressive dish that everyone will love!

Avocado Soup Ingredients

This creamy avocado soup is as delightful to make as it is to eat!

For the Soup

  • Vegetable Oil – Ideal for sautéing; swap with olive oil for extra flavor.
  • Medium Yellow Onion (1/2, diced) – Brings sweetness and depth; consider using sweet onion for a milder taste.
  • Garlic (2 cloves, thinly sliced) – Elevates flavor; fresh garlic provides the best impact.
  • Vegetable Broth (3 cups) – The soup’s base; for non-vegetarians, chicken broth works beautifully.
  • Heavy Cream (1 cup) – Adds a luxurious creaminess; substitute with coconut milk for a vegan option.
  • Fresh Lime Juice (1/4 cup) – Brightens the flavor profile; freshly squeezed juice is always best.
  • Fresh Cilantro (1/2 cup, packed) – Infuses freshness; parsley can be a great substitute.
  • Jalapeño (1, seeded, optional) – Adds a touch of heat; feel free to omit for a milder soup.
  • Ground Cumin (1/2 tsp) – Introduces an earthy note; chili powder can be an alternative for a different flavor.
  • Kosher Salt – Balances all the flavors; sea salt is another great choice.
  • Ripe Haas Avocados (4, pitted and peeled) – The star of the show, providing creamy goodness; any ripe avocado variety will do.

For Serving Garnishes

  • Hot Sauce – For those who love a spicy kick.
  • Crumbled Cotija Cheese – Adds a salty, creamy texture.
  • Crushed Tortilla Chips – Provides a satisfying crunch.
  • Chopped Cilantro – For an extra burst of freshness.

Dive into this delicious Creamy Avocado Soup and enjoy each spoonful bursting with flavor and nourishment!

Step-by-Step Instructions for Creamy Avocado Soup

Step 1: Heat the Oil
In a large pot, heat 2 tablespoons of vegetable oil over medium heat. Allow the oil to shimmer, indicating it’s hot enough for cooking. This ensures your onions sauté beautifully, giving the soup the right base flavor.

Step 2: Sauté the Onion
Add ½ diced medium yellow onion to the pot and sauté for about 5 minutes until it turns translucent and soft. Stir occasionally to prevent sticking. The sweetness released by the onions will create a lovely aroma, enhancing the overall taste of your Creamy Avocado Soup.

Step 3: Add Garlic
Stir in 2 thinly sliced garlic cloves and cook for an additional 1-2 minutes. As the garlic becomes fragrant and golden, its rich flavor will infuse the mixture. Make sure to keep an eye on it to avoid burning, which can impart a bitter taste to your soup.

Step 4: Combine the Broth and Dairy
Pour in 3 cups of vegetable broth and 1 cup of heavy cream. Then, add ¼ cup of fresh lime juice, ½ cup of packed cilantro, 1 seeded jalapeño (if using), ½ teaspoon ground cumin, and kosher salt to taste. Bring the mixture to a gentle simmer, allowing all the flavors to meld together beautifully.

Step 5: Incorporate the Avocados
Reduce the heat to low and add 4 ripe Haas avocados (pitted and peeled) to the pot. Stir gently until the avocados begin to break down, giving the soup a creamy texture. For an even smoother consistency, you can blend the mixture with an immersion blender for about 30 seconds.

Step 6: Serve and Garnish
Once everything is well mixed and heated through, it’s time to serve your Creamy Avocado Soup. Pour it into bowls while warm or chill in the refrigerator for a refreshing taste. Garnish with hot sauce, crumbled cotija cheese, crushed tortilla chips, and chopped cilantro for an extra burst of flavor and texture.

What to Serve with Creamy Avocado Soup

Pair your delightful avocado soup with these complementary dishes and drinks, creating a meal to savor.

  • Tortilla Chips: Their crunchy texture pairs beautifully with the smooth soup, giving each bite an exciting crunch.
  • Cilantro Lime Rice: This fragrant rice complements the lime in the soup, enhancing the fresh flavors in harmony.
  • Grilled Shrimp Skewers: The savory, smoky notes from grilled shrimp provide a delightful contrast to the creamy soup, making it a satisfying main.
  • Black Bean Salad: This hearty salad brings protein and earthiness, balancing the soup’s lightness while adding a burst of color to your table.
  • Fresh Garden Salad: Crisp greens, cucumbers, and tomatoes drizzled with a light vinaigrette brighten up the meal, creating a refreshing contrast.
  • Margaritas or Sparkling Water: The zesty notes and refreshing qualities of these drinks enhance your dining experience, perfectly complementing the flavors of the soup.
  • Churros: End your meal on a sweet note with these sugary treats, which contrast the soup’s savory elements and offer a delightful finish.

How to Store and Freeze Avocado Soup

Fridge: Store your Creamy Avocado Soup in an airtight container for up to 2 days. Make sure to press plastic wrap against the surface before sealing to minimize browning.

Freezer: If you want to freeze the soup, pour it into freezer-safe bags or containers. It can be frozen for up to 3 months. Just remember to leave space for expansion!

Thawing: When ready to enjoy, thaw the soup overnight in the fridge. You can reheat it gently on the stovetop over low heat, stirring frequently to maintain creaminess.

Serving: For the best flavor and texture, enjoy your avocado soup fresh! If it’s been frozen, consider adding a splash of fresh lime juice or extra cilantro after reheating for that vibrant taste.

Expert Tips for Creamy Avocado Soup

  • Choose Ripe Avocados: Make sure your avocados are ripe to achieve that creamy texture and rich flavor. A slightly soft touch indicates they’re ready to use.
  • Season After Blending: After blending, taste the soup and adjust seasoning as needed. This helps create a well-balanced flavor profile without overpowering the natural avocado taste.
  • Don’t Overcook: Avoid overcooking the soup after adding the avocados; this can lead to a grainy texture. Keep it on low heat just to warm through.
  • Experiment with Toppings: Customize your Creamy Avocado Soup with various garnishes such as fresh herbs, nuts, or spicy elements to cater to your personal taste.
  • Make It Ahead: This soup can be made in advance and stored in the refrigerator for up to 2 days. Just give it a stir before serving as flavors may develop beautifully over time.

Make Ahead Options

Busy home cooks will love how easy it is to prep this Creamy Avocado Soup in advance! You can prepare the soup base (everything except the avocados) up to 24 hours ahead. Simply sauté the onions and garlic, then combine with the vegetable broth, heavy cream, lime juice, cilantro, jalapeño, cumin, and salt. Store this mixture in the refrigerator in an airtight container. To maintain quality, avoid adding the avocados until you’re ready to serve. When you’re set to enjoy your soup, gently reheat the base and incorporate the ripe Haas avocados, blending until smooth. This simple strategy keeps meal prep efficient, allowing you to savor a refreshing bowl of soup with minimal effort!

Variations of Avocado Soup

Feel free to enjoy crafting your unique version of this creamy avocado soup, bursting with flavor!

  • Vegetarian Upgrade:
    Substitute chicken broth with vegetable broth for a hearty vegetarian option without sacrificing taste.

  • Vegan Delight:
    Replace heavy cream with coconut milk or almond milk for a tasty vegan-friendly twist that retains the soup’s luscious texture.

  • Fresh and Crunchy:
    Incorporate fresh corn kernels or diced cucumbers for added texture. This will give your soup a satisfying crunch that delights the palate!

  • Heat It Up:
    Add diced habanero or more jalapeños if you like your soup with a spicy kick. Just remember to adjust according to your heat preference.

  • Protein Boost:
    Top with grilled shrimp, poached chicken, or black beans to make this soup even more filling—who doesn’t love protein-packed goodies?

  • Herb Variations:
    Swap cilantro with fresh parsley or mint for a completely different flavor profile, adding a refreshing change to your chilled soup.

For more exciting ideas on experimenting with flavors, check out our guide on soup toppings!

Creamy Avocado Soup Recipe FAQs

How do I select ripe avocados for the soup?
Absolutely! Look for avocados that yield slightly to gentle pressure when squeezed. Avoid any with dark spots or dents. If you find them unripe, leave at room temperature for a few days until they soften. You can also speed up ripening by placing them in a paper bag with an apple or banana.

What’s the best way to store leftover avocado soup?
Very easy! Store your Creamy Avocado Soup in an airtight container in the refrigerator for up to 2 days. For extra protection against browning, press plastic wrap directly onto the surface of the soup before sealing. Stir well before serving to reintegrate the ingredients.

Can I freeze Creamy Avocado Soup?
Definitely! To freeze, pour the soup into freezer-safe bags or containers, leaving some space for expansion. It can be frozen for up to 3 months. When you’re ready to enjoy, thaw it overnight in the refrigerator and gently reheat on the stovetop over low heat while stirring frequently to maintain its creamy texture.

What if my avocado soup turns out too thick or grainy?
No worries! If the soup is too thick, simply stir in a little extra vegetable broth or water until you reach your desired consistency. If it’s grainy after blending, it may have been overcooked; gently warm it on low heat and blend again if necessary to smooth it out.

Are there any dietary considerations for serving this soup?
Yes! If you’re preparing the soup for guests, remember to ask about allergies. This recipe is vegetarian by using vegetable broth and can be made vegan by substituting heavy cream with coconut milk. Always opt for fresh ingredients to ensure everyone enjoys this nourishing dish without concern.

undefined

Creamy Avocado Soup Made Simple and Delicious in 20 Minutes

This creamy avocado soup combines fresh ingredients for a nourishing option that's ideal for busy weeknights, ready in just 20 minutes.
Prep Time 10 minutes
Cook Time 10 minutes
Total Time 20 minutes
Servings: 4 cups
Course: Dinner
Cuisine: Mexican
Calories: 300

Ingredients
  

For the Soup
  • 2 tbsp vegetable oil Ideal for sautéing; swap with olive oil for extra flavor.
  • 1/2 medium yellow onion, diced Brings sweetness; consider using sweet onion for milder taste.
  • 2 cloves garlic, thinly sliced Elevates flavor; fresh garlic provides the best impact.
  • 3 cups vegetable broth Base of the soup; chicken broth works for non-vegetarians.
  • 1 cup heavy cream Adds luxurious creaminess; substitute with coconut milk for vegan option.
  • 1/4 cup fresh lime juice Brightens flavor; freshly squeezed is best.
  • 1/2 cup fresh cilantro, packed Infuses freshness; parsley can substitute.
  • 1 jalapeño, seeded (optional) Adds heat; can be omitted for milder soup.
  • 1/2 tsp ground cumin Introduces earthy note; chili powder can be an alternative.
  • kosher salt Balances flavors; sea salt is another great choice.
  • 4 ripe Haas avocados, pitted and peeled The main ingredient providing creaminess.
For Serving Garnishes
  • hot sauce For those who love a spicy kick.
  • crumbled cotija cheese Adds salty, creamy texture.
  • crushed tortilla chips Provides a satisfying crunch.
  • chopped cilantro For an extra burst of freshness.

Equipment

  • Large pot

Method
 

Step-by-Step Instructions
  1. Heat 2 tablespoons of vegetable oil in a large pot over medium heat until shimmering.
  2. Add 1/2 diced medium yellow onion and sauté for about 5 minutes until translucent and soft, stirring occasionally.
  3. Stir in 2 thinly sliced garlic cloves and cook for 1-2 minutes until fragrant.
  4. Pour in 3 cups of vegetable broth and 1 cup of heavy cream; add 1/4 cup fresh lime juice, 1/2 cup packed cilantro, 1 seeded jalapeño, 1/2 teaspoon ground cumin, and kosher salt to taste. Bring to a gentle simmer.
  5. Reduce heat to low, add 4 ripe Haas avocados, and stir gently until they begin to break down. For a smoother consistency, blend with an immersion blender.
  6. Serve warm or chill in the refrigerator. Garnish with hot sauce, crumbled cotija cheese, crushed tortilla chips, and chopped cilantro.

Nutrition

Serving: 1cupCalories: 300kcalCarbohydrates: 18gProtein: 4gFat: 24gSaturated Fat: 12gPolyunsaturated Fat: 1gMonounsaturated Fat: 15gCholesterol: 40mgSodium: 600mgPotassium: 800mgFiber: 8gSugar: 2gVitamin A: 500IUVitamin C: 20mgCalcium: 50mgIron: 1mg

Notes

For best results, use ripe avocados and adjust seasoning after blending to balance flavors. Customize garnishes to cater to personal taste.

Tried this recipe?

Let us know how it was!