Get my cookbooks

Sweet & Salty Strawberry Pretzel Salad for Nostalgic Delights

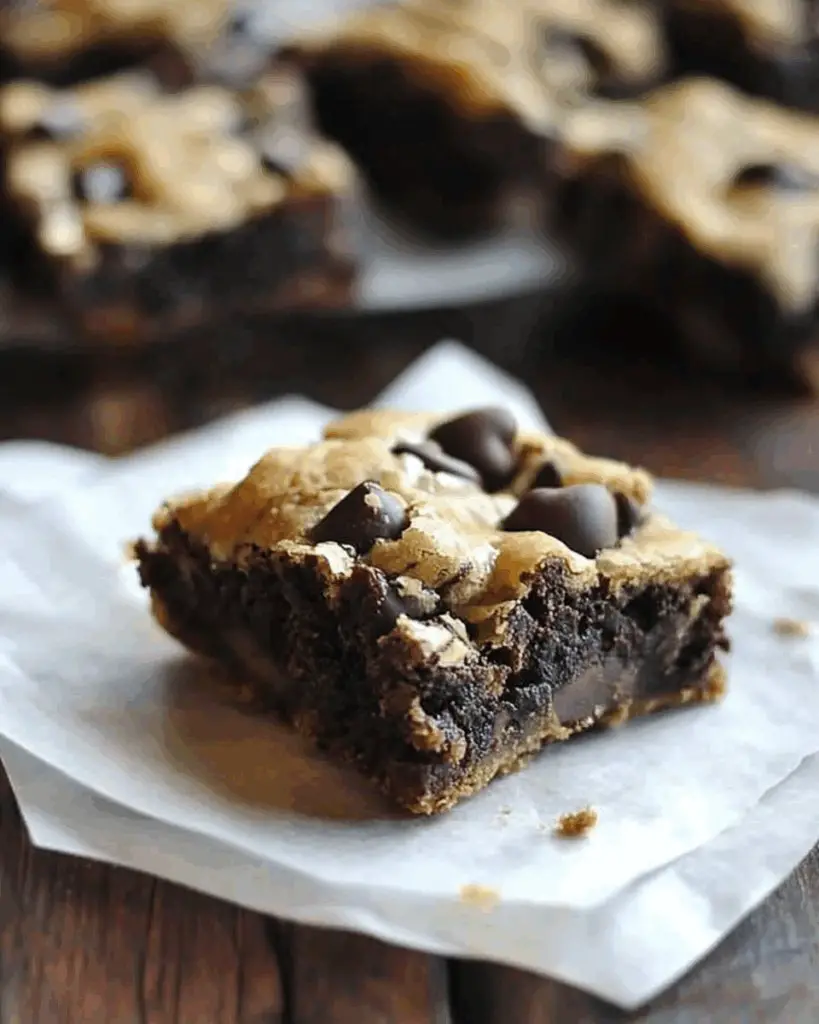
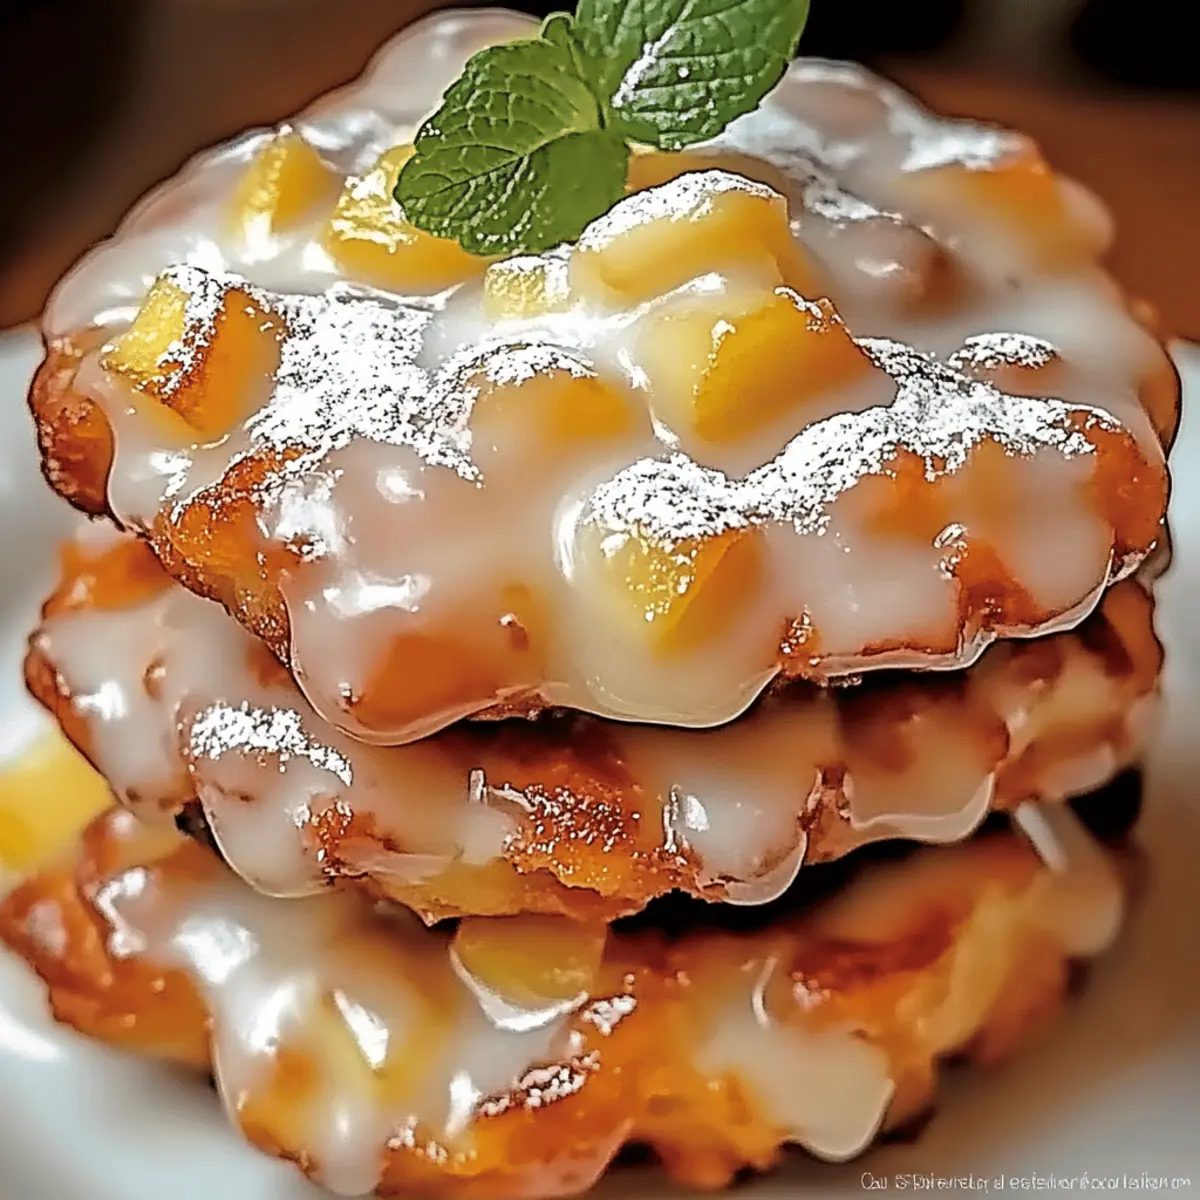
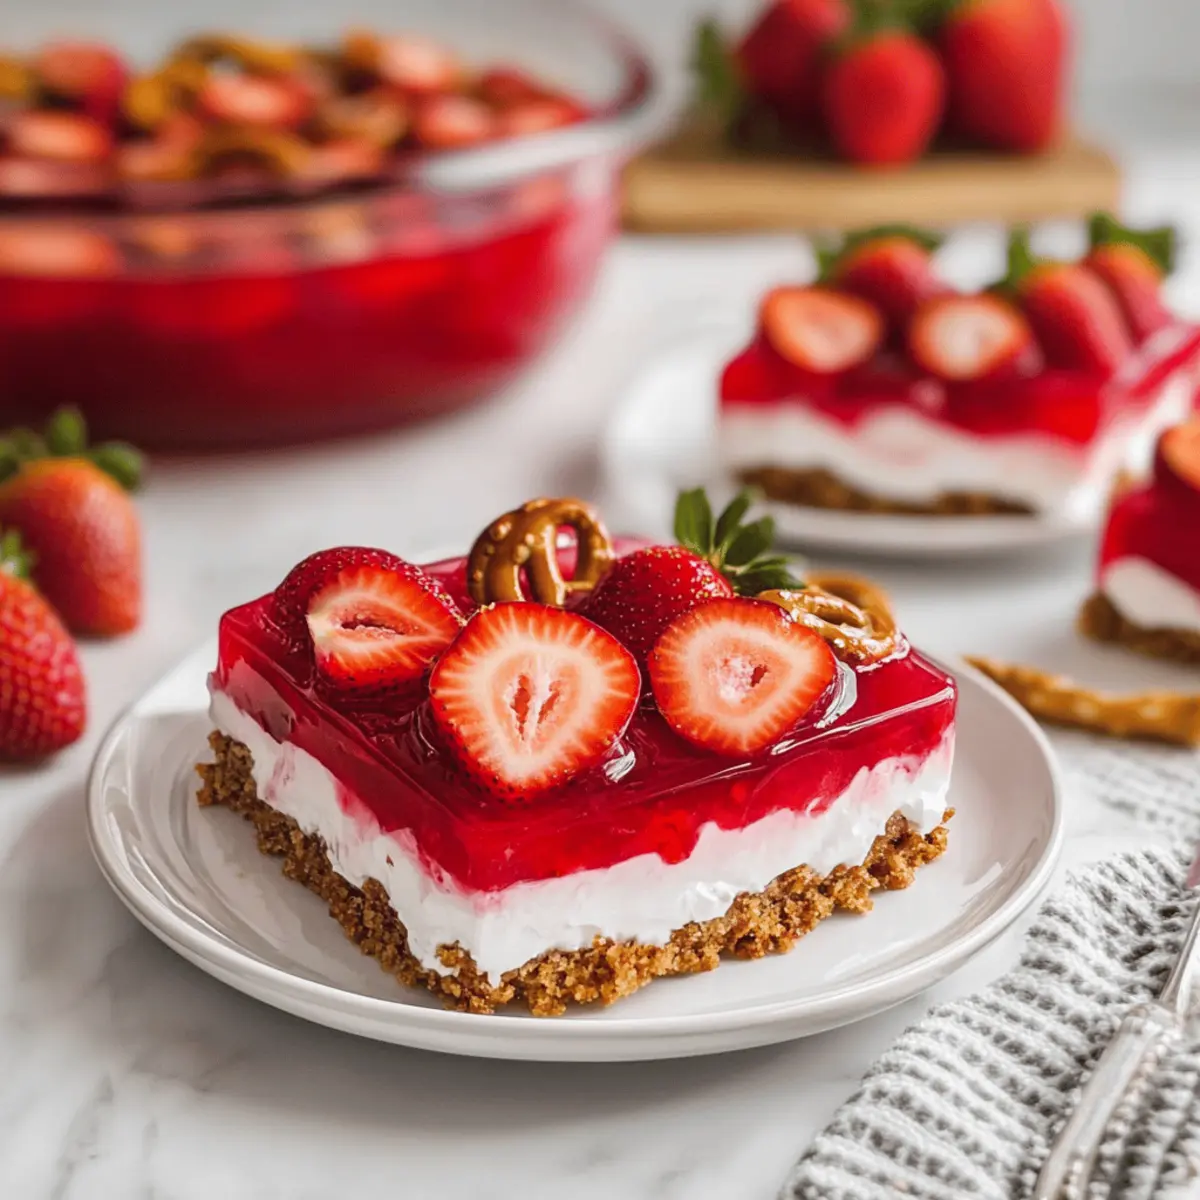
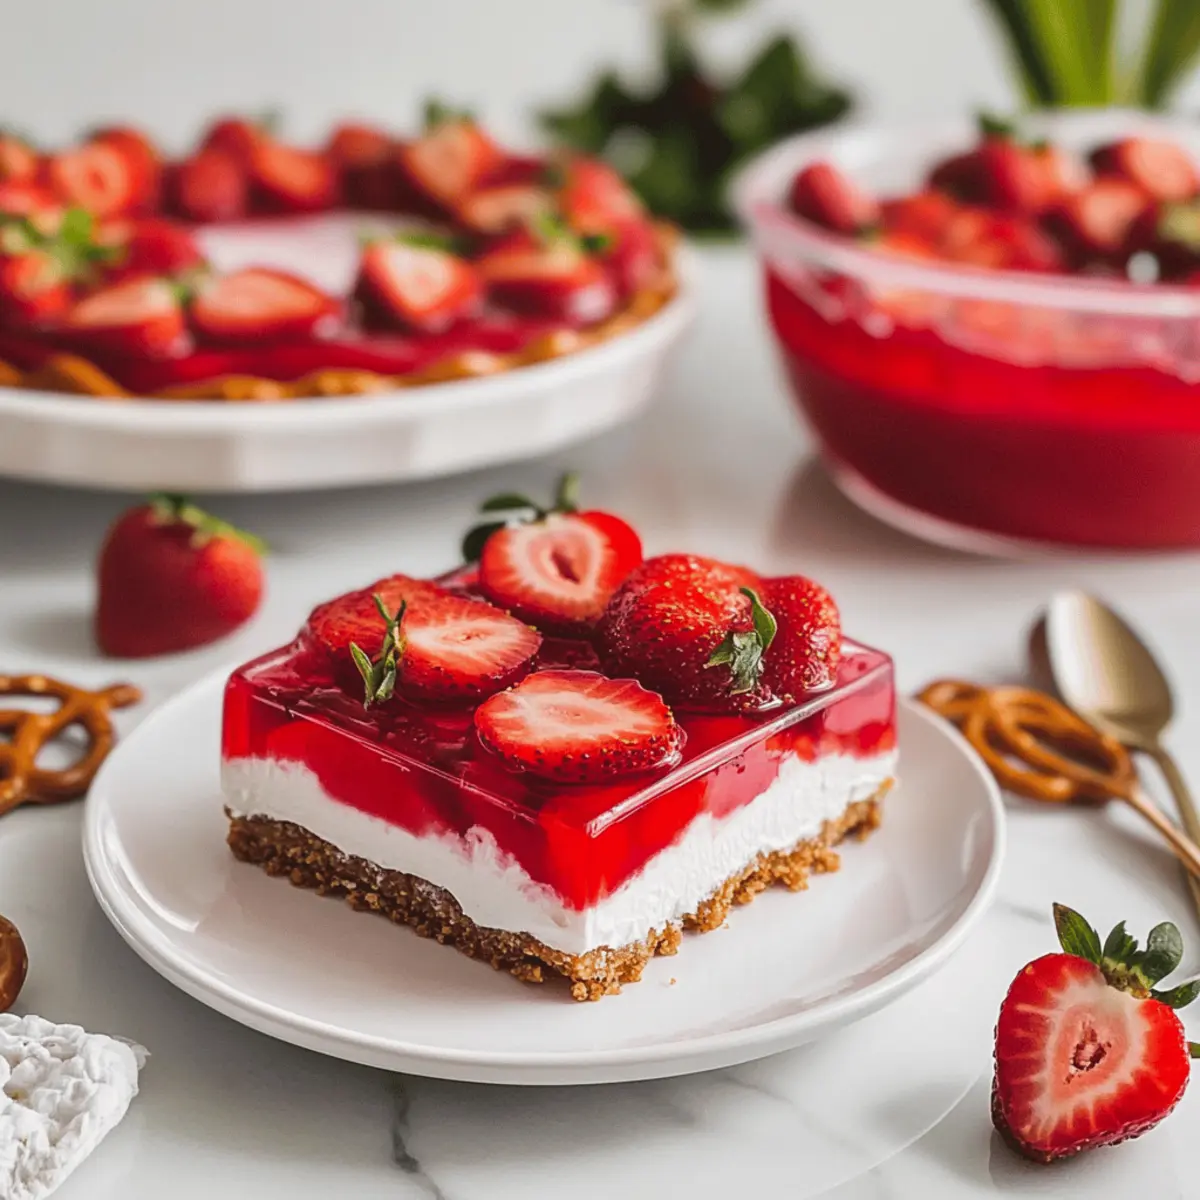
“Is that a salad or dessert?” I often hear this delightful question at potlucks when I bring my Strawberry Pretzel Salad. This unique dish is a nostalgic treasure, merging salty pretzels with sweet strawberries and creamy goodness, creating a showstopper that charms everyone. Plus, it’s surprisingly simple to make with ingredients you probably have in your pantry already. Not only does this dessert offer a delightful contrast of textures, but it also serves as a fantastic crowd-pleaser for summer picnics and gatherings. Ready to learn how to whip up this deliciously unconventional treat? Let’s dive into the recipe that will steal the spotlight at your next event!

Why Is This Recipe a Must-Try?

Nostalgic Delight: This Strawberry Pretzel Salad is a beloved classic that brings back memories of summer barbecues and family gatherings. Crowd-Pleaser: Its unique combination of salty and sweet makes it a guaranteed hit at any potluck or picnic. Versatile Ingredients: Easily adapt it with different fruits or sugar-free options to suit your dietary needs, just like in my Strawberry Cheesecake or Blt Chicken Salad recipes. Simple Preparation: With straightforward steps, you’ll whip this up in no time—even your kids can get involved! Stunning Presentation: Those vibrant layers not only taste good but look gorgeous on any table.

Strawberry Pretzel Salad Ingredients

Here’s what you’ll need to create this delightful dish that will leave your guests asking for more!

For the Jell-O Layer

  • Strawberry Jell-O Mix – Adds vibrant color and a fruity flavor; try using raspberry or cherry for a twist!
  • Boiling Water – Essential for dissolving the Jell-O mix before it cools.

For the Fruit Layer

  • Fresh or Frozen Strawberries – Bring a natural sweetness; slice and hull for the best look!

For the Crunchy Base

  • Salted Pretzels – Provides that satisfying crunch, complementing the sweet layers; opt for gluten-free pretzels if needed.
  • Unsalted Butter – Binds the pretzel crust together; coconut oil is a great dairy-free substitute.
  • Granulated Sugar – Sweetens the pretzel layer; feel free to reduce or swap with a sugar alternative like Splenda.

For the Creamy Filling

  • Cream Cheese – Adds richness and creaminess; ensure it’s softened for easy mixing and a smooth texture.
  • Cool Whip – Delivers lightness to the layer; use whipped cream if you prefer, but it may not hold its shape as well.

With these simple yet effective ingredients, you’re just a few steps away from serving up a slice of nostalgic delight with your Strawberry Pretzel Salad!

Step‑by‑Step Instructions for Strawberry Pretzel Salad

Step 1: Dissolve the Jell-O
In a medium bowl, combine the strawberry Jell-O mix with 2 cups of boiling water. Using a whisk, stir until the mix is fully dissolved. Once dissolved, set the bowl aside to cool at room temperature; this should take about 20–30 minutes. A well-cooled mixture will ensure a nice layer in your Strawberry Pretzel Salad.

Step 2: Preheat the Oven
While the Jell-O cools, preheat your oven to 350°F (175°C). This temperature is crucial for forming a perfectly crisp pretzel crust. As the oven heats, you can prepare the pretzel crumbs by crushing them, which we’ll tackle in the next step.

Step 3: Crush the Pretzels
Place the salted pretzels in a zip-top bag and seal it tightly. Using a rolling pin or mallet, crush the pretzels until they resemble fine crumbs. This should take about 5 minutes. Once complete, transfer the crumbs to a mixing bowl to prepare for the crust layer of your Strawberry Pretzel Salad.

Step 4: Melt the Butter and Mix
In a small saucepan over medium heat, melt ½ cup of unsalted butter with 3 tablespoons of granulated sugar. Stir the mixture until the sugar has fully dissolved, which should take about 2–3 minutes. Pour the melted compound into the bowl with crushed pretzels, mixing well until the pretzel crumbs are thoroughly coated.

Step 5: Bake the Pretzel Crust
Grease a 9×13-inch baking dish and evenly press the pretzel mixture into the bottom to form a crust. Bake in your preheated oven for 10 minutes, watching for a slight golden color to indicate it’s ready. Once baked, remove it from the oven and allow it to completely cool before adding the cream cheese layer.

Step 6: Prepare the Cream Cheese Layer
Using a hand mixer, beat 1 cup of softened cream cheese with ½ cup of granulated sugar for about 2 minutes until fluffy and smooth. Gradually fold in 8 ounces of Cool Whip, blending gently to maintain the lightness. This creamy mixture will form the second layer of your Strawberry Pretzel Salad, adding a delicious richness.

Step 7: Spread the Cream Cheese Mixture
Carefully spread the cream cheese layer over the cooled pretzel crust, ensuring you reach the edges to prevent Jell-O from seeping below. Doing this will help create distinct layers in your Strawberry Pretzel Salad. Smooth it out evenly with a spatula for that polished finish.

Step 8: Add Strawberries and Jell-O
Layer fresh, sliced strawberries on top of the cream cheese mixture. Gently pour the cooled Jell-O mixture over the strawberries, ensuring even distribution. The vibrant red of the strawberries will beautifully contrast the creaminess below, making your Strawberry Pretzel Salad visually appealing.

Step 9: Refrigerate
Cover the baking dish with plastic wrap, then place it in the refrigerator for at least 2–4 hours, or until the Jell-O is fully set. This step is essential to allowing the flavors to meld together while creating that lovely stability for your final dish.

Step 10: Serve and Enjoy
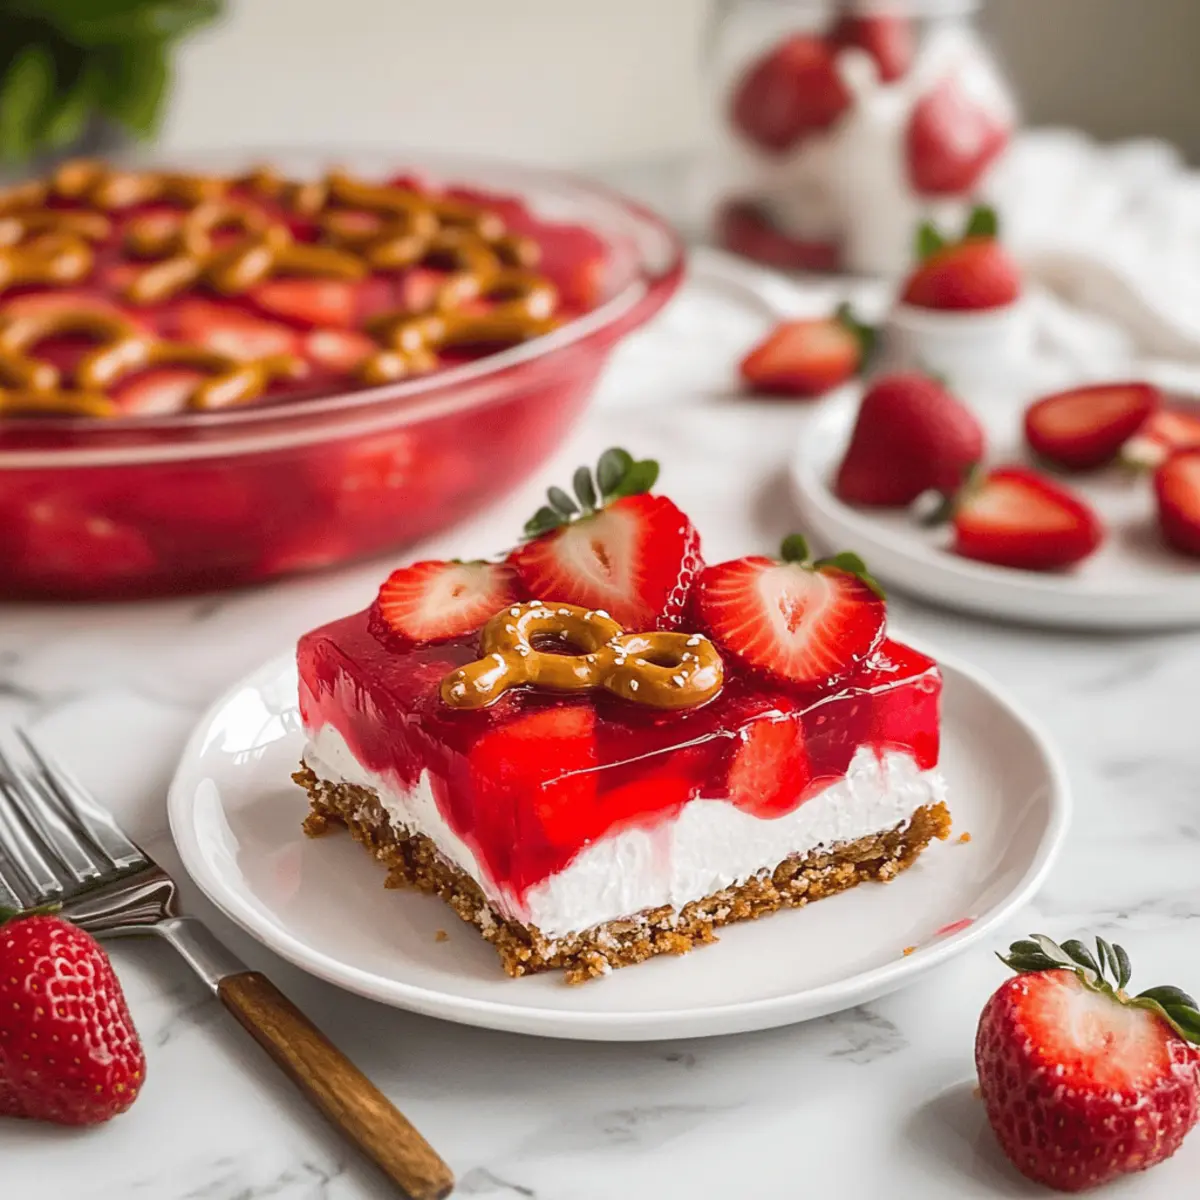
Once set, slice the Strawberry Pretzel Salad into squares and serve chilled. This delightful dessert is perfect for any gathering, and leftovers can be stored covered in the fridge for a few days. Enjoy the smiles that come with this sweet and salty treat!

Strawberry Pretzel Salad Variations

Feel free to customize your Strawberry Pretzel Salad to suit your taste and dietary preferences; the only limit is your imagination!

  • Fruit Swap: Replace strawberries with blueberries or diced peaches for different flavors. Each fruit adds its own unique sweetness and color.
  • Sugar-Free Option: Use sugar-free Jell-O and a sugar alternative like Splenda for a lighter dessert that still satisfies sweet cravings.
  • Dairy-Free Delight: Substitute cream cheese with a dairy-free cream cheese alternative and use coconut whipped cream for a creamy texture without the dairy.
  • Mini Servings: Create individual portions by layering in small cups for parties or gatherings; these cute servings are perfect for snacking.
  • Toasty Pretzels: For an extra crunch, toast the pretzel crust in the oven for a few additional minutes until it’s golden brown before adding cream cheese. This enhances the flavor and texture!
  • Nutty Twist: Add chopped pecans or almonds to the pretzel crust for added texture and nutty flavor that complements the sweetness.
  • Spicy Sweet: Drizzle a hint of hot honey or sriracha over the strawberries to balance sweetness and add an unexpected kick. This flavor contrast will surely surprise and delight!
  • Cool Whip Upgrade: Try using flavored whipped toppings, like strawberry or vanilla, to enhance the cream layer’s taste and aroma for a delightful twist.

Let your creativity shine and make this beloved dish your own! For more delicious ideas, you might also enjoy my Strawberry Cheesecake Dump or classic Blt Chicken Salad.

What to Serve with Strawberry Pretzel Salad

Elevate your dessert experience by pairing this sweet and salty treat with delicious sides and beverages.

  • Fresh Fruit Salad: A light and refreshing mix of seasonal fruits enhances the dessert’s sweetness while providing a vibrant color contrast.

  • Creamy Vanilla Ice Cream: A scoop of vanilla ice cream adds a delightful creaminess, making every bite feel indulgent and rich.

  • Homemade Whipped Cream: Top with fluffy whipped cream for an extra layer of sweetness and richness that balances perfectly with the strawberry layer.

  • Cold Lemonade: The citrusy zing of lemonade complements the sweetness of the salad and adds a refreshing twist to your meal.

  • Chocolate-Covered Pretzels: Keep the pretzel theme going with a sweet and salty snack that mirrors the flavors of your dessert.

  • Pecan Pie Bars: The nutty flavor and buttery crust of pecan pie bars provide a delightful contrast in texture and taste, enhancing your dessert spread.

  • Sparkling Water: A bubbly sip of sparkling water can cleanse the palate, perfectly balancing the sweet and salty elements of the Strawberry Pretzel Salad.

  • Peanut Butter Cookie Bites: Pairing with these chewy cookies creates a delightful mix of flavors that will delight your guests at any gathering.

These options not only enhance the overall experience but also make your meal feel complete and satisfying.

How to Store and Freeze Strawberry Pretzel Salad

Fridge: Store leftover Strawberry Pretzel Salad covered in the fridge for up to 3 days. This will keep it fresh and delicious.

Make-Ahead: You can prepare this delightful dish 1-2 days in advance for your gatherings, ensuring it stays chilled until serving time.

Freezer: Avoid freezing this dessert, as the texture of the pretzel crust may become soggy when defrosted, ruining that delightful crunch.

Reheating: There’s no need to reheat; simply serve your Strawberry Pretzel Salad cold straight from the fridge for the best taste and texture.

Tips for the Best Strawberry Pretzel Salad

  • Room Temperature Cream Cheese: Make sure cream cheese is softened to room temperature for a smooth mixture. Cold cream cheese can lead to lumps in your filling.

  • Crunchy Crust: For an ideal texture, don’t skip the baking step for the pretzel crust; it helps to hold everything together and adds extra crunch.

  • Layer Sealing: Spread the cream cheese mixture all the way to the edges of the crust to prevent Jell-O from seeping underneath; this keeps your Strawberry Pretzel Salad looking beautiful!

  • Chilling Time: Allow plenty of time for the Jell-O layer to set in the refrigerator. Rushing this step can lead to runny layers.

  • Adaptable Layers: Feel free to experiment with different fruits like blueberries or peaches, while keeping the balance of salty and sweet that makes the Strawberry Pretzel Salad special.

Make Ahead Options

These Strawberry Pretzel Salad components are perfect for meal prep! You can make the pretzel crust up to 24 hours in advance; simply bake and let it cool completely before refrigerating. The cream cheese layer can also be prepared ahead—mix it up to 3 days in advance and keep it covered in the fridge for maximum freshness. When you’re ready to assemble, spread the cream cheese layer over the crust, add the strawberries, and carefully pour the Jell-O mixture on top. Cover and refrigerate for at least 2-4 hours before serving, ensuring the Jell-O sets perfectly for that delightful texture. By prepping the key components in advance, you’ll save time and serve up a delicious dessert with ease!

Strawberry Pretzel Salad Recipe FAQs

What should I look for when choosing strawberries?
Absolutely! When selecting fresh strawberries, look for bright red berries with a fresh green cap and no dark spots or mushiness. Ideally, they should be firm and fragrant. Avoid strawberries with bruised or soft areas, as these can indicate overripeness.

How long will my Strawberry Pretzel Salad last in the fridge?
Very! When stored covered in the fridge, your Strawberry Pretzel Salad will stay fresh for up to 3 days. To keep it from drying out, ensure you cover it tightly with plastic wrap or a lid.

Can I freeze Strawberry Pretzel Salad?
I often recommend against it! Freezing this dessert isn’t ideal because the pretzel crust may become soggy once thawed. Instead, it’s best enjoyed fresh or refrigerated for up to 3 days.

What can I do if my Jell-O doesn’t set properly?
Don’t worry! If your Jell-O doesn’t set, it may be due to using too much liquid or not ensuring it cooled properly before pouring over the strawberries. Ensure you follow the recommended proportions and let it cool to room temperature before adding it to the dessert. If it’s still too runny, try letting it refrigerate a little longer—at least 4-6 hours can help with the setting.

Are there any dietary considerations for Strawberry Pretzel Salad?
Yes! For gluten-free eaters, simply substitute regular pretzels with gluten-free pretzels. You can also use dairy-free cream cheese and coconut oil to adjust for lactose intolerance. As for allergies, be cautious about anyone with nut allergies if you choose to incorporate any nut-based alternatives.

Can I make substitutions in the ingredients?
Definitely! Feel free to experiment with different fruit flavors in your Jell-O layer, such as raspberry or peach. If you prefer a lower-sugar version, use sugar-free Jell-O and a sweetener of your choice to maintain that delightful balance without compromising taste.

Strawberry Pretzel Salad

Sweet & Salty Strawberry Pretzel Salad for Nostalgic Delights

Strawberry Pretzel Salad merges salty pretzels and sweet strawberries into a delightful dessert.
Prep Time 30 minutes
Cook Time 10 minutes
Chilling Time 3 hours
Total Time 3 hours 40 minutes
Servings: 12 slices
Course: Dessert
Cuisine: American
Calories: 250

Ingredients
  

For the Jell-O Layer
  • 1 box Strawberry Jell-O Mix Try raspberry or cherry for a twist!
  • 2 cups Boiling Water Essential for dissolving the Jell-O mix.
For the Fruit Layer
  • 4 cups Fresh or Frozen Strawberries Slice and hull for best appearance.
For the Crunchy Base
  • 2 cups Salted Pretzels Opt for gluten-free pretzels if needed.
  • ½ cup Unsalted Butter Coconut oil is a great substitute.
  • 3 tablespoons Granulated Sugar Reduce or swap with sugar alternative if desired.
For the Creamy Filling
  • 1 cup Cream Cheese Ensure it's softened for easy mixing.
  • 8 ounces Cool Whip Use whipped cream if preferred, but may not hold shape.

Equipment

  • Mixing Bowl
  • Saucepan
  • Rolling Pin
  • baking dish
  • Hand mixer
  • Zip-top Bag

Method
 

Step-by-Step Instructions
  1. In a medium bowl, combine the strawberry Jell-O mix with 2 cups of boiling water. Stir until dissolved and cool for 20-30 minutes.
  2. Preheat your oven to 350°F (175°C) for the pretzel crust.
  3. Crush salted pretzels in a zip-top bag until they resemble fine crumbs.
  4. Melt ½ cup of unsalted butter with 3 tablespoons of granulated sugar in a saucepan, then combine with the crushed pretzels.
  5. Press the pretzel mixture into a greased 9x13-inch baking dish and bake for 10 minutes.
  6. Using a hand mixer, beat 1 cup of softened cream cheese with ½ cup of granulated sugar until fluffy. Fold in Cool Whip.
  7. Spread the cream cheese mixture over the cooled pretzel crust evenly.
  8. Layer fresh strawberries on top, then pour the cooled Jell-O mixture over them.
  9. Cover with plastic wrap and refrigerate for 2-4 hours or until Jell-O is set.
  10. Slice and serve chilled for a delightful dessert.

Nutrition

Serving: 1sliceCalories: 250kcalCarbohydrates: 30gProtein: 3gFat: 12gSaturated Fat: 7gPolyunsaturated Fat: 1gMonounsaturated Fat: 3gCholesterol: 30mgSodium: 200mgPotassium: 150mgFiber: 1gSugar: 15gVitamin A: 2IUVitamin C: 20mgCalcium: 4mgIron: 2mg

Notes

Ensure cream cheese is at room temperature for smooth mixing. Don't skip the baking step for a crunchy crust.

Tried this recipe?

Let us know how it was!

Comforting Rotisserie Chicken Mushroom Soup Ready in 20 Minutes

The comforting aroma of sautéed mushrooms and garlic wafts through my kitchen, instantly lifting my spirits. As a lover of homemade meals, I often seek quick and fulfilling options for busy weeknights, and this Quick & Easy Rotisserie Chicken Mushroom Soup has become my go-to. Not only is this recipe gluten-free, but it also comes together in just 20 minutes, making it a lifesaver when time is tight. Each spoonful captures the heartiness of tender rotisserie chicken mingled with vibrant spinach and the earthy allure of mushrooms. This soup is a warm hug on chilly evenings, satisfying both the palate and the soul. Are you ready to whip up a bowl of comfort that comes together in a flash?

Why is This Soup a Weeknight Winner?

Quick Preparation: This delightful rotisserie chicken mushroom soup is ready in just 20 minutes, making it ideal for busy evenings.

Gluten-Free Comfort: A perfect gluten-free option, it offers a satisfying taste without sacrificing dietary needs.

Flavorful Base: The combination of earthy mushrooms and rich chicken creates a savory depth that everyone will love.

Versatile Ingredients: Easily customize with your favorite vegetables or grains; options like adding peas or cooked rice make it adaptable for everyone’s preferences.

Hearty & Light: Each bowl is a warm hug, featuring tender chicken and vibrant spinach, striking a perfect balance between comfort and nutrition.

Pair it with a crusty bread or enjoy it alongside a refreshing BLT Chicken Salad for a complete meal experience.

Rotisserie Chicken Mushroom Soup Ingredients

For the Soup

  • Onion – Aromatic base for flavor; use yellow or white onions, or substitute with shallots for a milder taste.
  • Celery – Adds crunch and fresh flavor; can be replaced with chopped leeks for a sweeter taste.
  • Garlic – Enhances aroma and flavor; fresh garlic is recommended, though garlic powder works in a pinch.
  • Mushrooms (500g/1lb) – Main ingredient providing texture and umami; choose fresh or canned for convenience.
  • Fresh Thyme (2 tsp) – Adds fragrant herbal notes; dried thyme can be substituted, using half the amount.
  • Rotisserie Chicken – Pre-cooked protein source for quick assembly; freshly cooked shredded chicken can be used instead.
  • Stock (6 cups) – Liquid base for soup; any combination of chicken or vegetable stock works well, preferably low-sodium.
  • Cream (1 cup) – Adds richness and creaminess to the soup; substitute with half-and-half or coconut milk for a lighter version.
  • Spinach (3 cups) – Boosts nutrition and color; kale is a great alternative if you prefer.
  • Chili Flakes – Adds gentle heat; omit if you want a milder soup experience.
  • Salt and Pepper – To taste; adjust according to the saltiness of your stock.

For Garnish

  • Fresh Herbs – Parsley or thyme can elevate presentation and flavor; consider adding right before serving for freshness.
  • Crusty Bread – Perfect for dipping; a side of your favorite bread makes this soup even more comforting.

Dive into this delightful rotisserie chicken mushroom soup recipe and enjoy the flavors that speak comfort and warmth!

Step‑by‑Step Instructions for Rotisserie Chicken Mushroom Soup

Step 1: Heat the Base
In a large pot, heat 2 tablespoons of olive oil or butter over medium heat. Once shimmering, add 1 diced onion and 2 chopped celery stalks, sautéing for about 5 minutes until the onions are soft and translucent. Stir frequently to prevent sticking and enhance the aromatic flavors, setting the stage for your delicious rotisserie chicken mushroom soup.

Step 2: Sauté the Mushrooms
Add 500g of sliced mushrooms to the pot, stirring well to coat them in the flavorful base. Cook for about 5-7 minutes, until the mushrooms are golden brown and have released their moisture. This step brings out the earthy depth of the mushrooms, essential for creating a rich, hearty rotisserie chicken mushroom soup.

Step 3: Add Garlic and Herbs
Toss in 2 minced garlic cloves and 2 teaspoons of fresh thyme, stirring them into the mixture. Cook for an additional 1 minute until the garlic is fragrant and slightly golden. This aromatic blend infuses the soup with savory notes, complementing the tender chicken and vibrant vegetables beautifully.

Step 4: Bring in the Stock and Cream
Pour 6 cups of chicken or vegetable stock and 1 cup of cream into the pot, stirring to combine. Increase the heat to high and bring the mixture to a gentle simmer for about 5 minutes. As it simmers, watch for bubbling at the edges—this indicates the perfect stage of your comforting rotisserie chicken mushroom soup.

Step 5: Add Chicken and Spinach
Stir in 2 cups of shredded rotisserie chicken and 3 cups of fresh spinach, allowing them to mingle in the bubbling soup. Continue simmering for another 5 minutes until the spinach wilts and blends into the mix. This step not only increases the heartiness of your soup but also enhances its nutritional value with vibrant greens.

Step 6: Season and Serve
Taste and season with salt, pepper, and optional chili flakes. Adjust according to your preference, considering the saltiness of the stock. Once flavored to your liking, ladle the soup into bowls and garnish with fresh herbs. Serve immediately for a comforting experience that showcases the delightful flavors of your rotisserie chicken mushroom soup.

Make Ahead Options

These comforting rotisserie chicken mushroom soup features are perfect for meal prep! You can chop the onions, celery, and garlic up to 24 hours in advance; just refrigerate them in an airtight container to maintain freshness. Additionally, the mushrooms can be sliced and stored alongside, ensuring a quick assembly when you’re ready to cook. On the day of serving, simply sauté the prepped vegetables, then add the stock and cream, stirring in the shredded rotisserie chicken and fresh spinach. The soup will be just as delicious and full of flavor, saving you time during busy weeknights while still delivering that warm, home-cooked goodness!

What to Serve with Quick & Easy Rotisserie Chicken Mushroom Soup

A comforting bowl of warm soup invites a range of delightful companions to create a full meal experience.

  • Crusty Bread: Perfect for dipping, the crunchy exterior and soft inside of a fresh loaf enhance the soup’s rich flavors.
  • Garlic Breadsticks: Lightly toasted and flavored, these give a satisfying crunch alongside each spoonful of the creamy soup.
  • Caesar Salad: Crisp romaine and tangy dressing provide a refreshing contrast to the cozy, warm soup, balancing textures beautifully.
  • Herbed Rice: Fluffy rice flavored with fresh herbs can soak up the creamy broth, adding substance to your comforting meal.
  • Roasted Vegetables: Seasonal veggies bring sweetness and vibrant colors, offering a nutritious side that complements the soup’s comforting essence.
  • Savory Biscuits: Flaky and buttery, these tender biscuits are great for sopping up the broth, adding warmth to your dinner table.
  • Chilled White Wine: A glass of crisp white wine, like Sauvignon Blanc, refreshes your palate between bites of hearty soup.
  • Fruit Sorbet: For dessert, a light and refreshing fruit sorbet cleanses the palate perfectly after a rich soup, rounding out the meal.

Helpful Tricks for Rotisserie Chicken Mushroom Soup

Thicken Wisely: If you want a hearty soup, mix 1 tablespoon of cornstarch with milk and stir it in during the last few minutes of cooking for a delightful texture.

Season with Care: Always taste and adjust seasonings toward the end, especially when using pre-seasoned stock, to create a perfectly balanced rotisserie chicken mushroom soup.

Add a Splash: Enhance the flavor profile by incorporating a splash of white wine during the sautéing step; this can elevate your soup’s depth with ease.

Texture Variety: For a creamy consistency, use an immersion blender to puree part of the soup, creating a delightful mixture of textures amidst the tender chicken and vegetables.

Prep Ahead: To save time, chop your vegetables in advance, and keep them in the fridge for easy assembly on a busy weeknight.

How to Store and Freeze Rotisserie Chicken Mushroom Soup

Fridge: Store leftovers in an airtight container for up to 3 days. Ensure the soup has cooled to room temperature before sealing to preserve freshness.

Freezer: Freeze the soup in freezer-safe containers or bags for up to 3 months. Leave some space at the top to allow for expansion as it freezes.

Reheating: Thaw overnight in the fridge if frozen, then reheat on the stovetop over medium heat, stirring often, until heated through. Add a splash of stock or cream if it appears too thick.

Meal Prep: For quick weeknight dinners, consider portioning out servings before freezing, so you can grab a comforting bowl of rotisserie chicken mushroom soup whenever you need a cozy meal.

Rotisserie Chicken Mushroom Soup Variations

Feel free to get creative with this delightful soup, bringing your unique flair to the table!

  • Creamy Coconut: Replace cream with coconut milk for a tropical twist that’s dairy-free and delicious. The coconut flavor complements the earthy mushrooms beautifully.

  • Extra Vegetables: Toss in root vegetables like carrots or sweet potatoes for added sweetness and texture. They’ll not only boost nutrition but also add a cozy heartiness to the soup.

  • Spice it Up: Add freshly diced jalapeños or a teaspoon of sriracha for a spicy kick. The heat will transform your soup into a warm, comforting bowl of flavor.

  • Herb Bliss: Experiment with different herbs like rosemary or oregano instead of thyme, which can introduce new aromatic notes and enhance the overall flavor profile.

  • Grain Goodness: Incorporate cooked quinoa or farro for a nourishing texture and added protein. It’s a delightful way to make the soup heartier without feeling heavy.

  • Umami Boost: Include a splash of soy sauce or Worcestershire sauce to deepen the flavor. This trains the palate to experience a rich umami explosion with every spoonful.

  • Pasta Lover’s Delight: For a more filling meal, stir in cooked pasta, like small shells or orzo. This gives you that classic soup and pasta combo that’s comforting and satisfying.

  • Zesty Lemon: Squeeze in some fresh lemon juice right before serving for a burst of brightness. It dramatically enhances the overall flavor and adds a refreshing twist to each bite.

With these variations, every pot of this rotisserie chicken mushroom soup can become a new family favorite! For even more comforting options, consider trying out Chicken Noodle Soup or Tuscan Chicken Soup. Happy cooking!

Rotisserie Chicken Mushroom Soup Recipe FAQs

What kind of mushrooms should I use for this soup?
Absolutely! Fresh mushrooms are best for a rich texture and flavor. I recommend using cremini or button mushrooms, which provide a delightful earthiness. If you’re in a pinch, canned mushrooms can also work well, but fresh is always my first choice for that vibrant umami.

How do I store leftover rotisserie chicken mushroom soup?
Leftovers can be stored in an airtight container in the fridge for up to 3 days. Allow the soup to cool to room temperature before sealing to maintain its quality. If you notice any dark spots on the surface when reheating, it’s best to discard that portion for safety.

Can I freeze this soup?
Yes, indeed! To freeze, ladle the cooled soup into freezer-safe containers or bags, leaving about an inch of space at the top for expansion. The soup can be frozen for up to 3 months. When you’re ready to enjoy, thaw it overnight in the fridge and then reheat on the stovetop with a splash of stock or cream if it looks too thick.

What are some common mistakes when making this soup?
One common issue is overcooking the spinach, which can make it lose its vibrant color and fresh flavor. It’s best to add the spinach towards the end and let it just wilt. Also, always taste your soup at the end to adjust the seasoning, especially if you’re using pre-seasoned stock.

Are there any dietary considerations I should keep in mind?
Yes! This rotisserie chicken mushroom soup is naturally gluten-free, but always double-check your stock and cream for gluten-containing additives. If you’re serving anyone with allergies, I suggest keeping an eye on ingredients like chicken stock—opt for homemade or trusted brands. If you’re cooking for pets, avoid adding any garlic to their portion, as it’s not safe for them.

Rotisserie chicken mushroom soup

Comforting Rotisserie Chicken Mushroom Soup Ready in 20 Minutes

This rotisserie chicken mushroom soup combines tender chicken, earthy mushrooms, and fresh spinach for a gluten-free comfort dish that's ready in just 20 minutes.
Prep Time 10 minutes
Cook Time 10 minutes
Total Time 20 minutes
Servings: 4 bowls
Course: Dinner
Cuisine: American
Calories: 350

Ingredients
  

For the Soup
  • 1 medium Onion use yellow or white onions, or substitute with shallots
  • 2 stalks Celery can be replaced with chopped leeks
  • 2 cloves Garlic fresh garlic is recommended
  • 500 g Mushrooms choose fresh or canned for convenience
  • 2 tsp Fresh Thyme dried thyme can be substituted, using half the amount
  • 2 cups Rotisserie Chicken freshly cooked shredded chicken can be used
  • 6 cups Stock any combination of chicken or vegetable stock works well
  • 1 cup Cream substitute with half-and-half or coconut milk for a lighter version
  • 3 cups Spinach kale is a great alternative
  • Chili Flakes omit if you want a milder soup experience
  • Salt to taste
  • Pepper to taste
For Garnish
  • Fresh Herbs parsley or thyme
  • Crusty Bread perfect for dipping

Equipment

  • Large pot

Method
 

Step-by-Step Instructions
  1. Heat 2 tablespoons of olive oil or butter in a large pot over medium heat. Add 1 diced onion and 2 chopped celery stalks, sautéing for 5 minutes until soft.
  2. Add 500g of sliced mushrooms, stirring to coat. Cook for 5-7 minutes until golden brown.
  3. Toss in 2 minced garlic cloves and 2 teaspoons of fresh thyme, cooking for an additional minute until fragrant.
  4. Pour in 6 cups of stock and 1 cup of cream, stirring to combine. Bring to a gentle simmer for 5 minutes.
  5. Stir in 2 cups of shredded rotisserie chicken and 3 cups of fresh spinach, simmering for another 5 minutes until spinach wilts.
  6. Taste and season with salt, pepper, and optional chili flakes. Serve into bowls garnished with fresh herbs.

Nutrition

Serving: 1bowlCalories: 350kcalCarbohydrates: 25gProtein: 22gFat: 18gSaturated Fat: 10gPolyunsaturated Fat: 1gMonounsaturated Fat: 6gCholesterol: 75mgSodium: 650mgPotassium: 700mgFiber: 4gSugar: 2gVitamin A: 2000IUVitamin C: 15mgCalcium: 120mgIron: 2.5mg

Notes

This soup is perfect for quick weeknight dinners and can be customized with different vegetables or grains.

Tried this recipe?

Let us know how it was!

Irresistible Chocolate Chip Cookie Brownies You’ll Love

While flipping through an old cookbook, I stumbled upon a delightful fusion that brought back childhood memories—the irresistible combination of brownies and chocolate chip cookies. That’s right! The Ultimate Chocolate Chip Cookie Brownies perfectly marries these two beloved treats into one gooey, indulgent dessert. With an easy-to-follow recipe, you can whip these up in no time, making them an ideal solution for last-minute gatherings or cozy family nights. Plus, there’s a gluten-free option for those who need it, ensuring everyone gets a taste of this sweet magic. Ready to dive into a world of chewy, chocolaty bliss? Trust me, these brownies will have you and your loved ones coming back for more!

Why Are These Brownies So Special?

Decadent Fusion: The Ultimate Chocolate Chip Cookie Brownies are a dream come true, combining the best of both worlds into one blissful bite.

Easy Preparation: With a simple recipe that’s perfect for bakers of all skill levels, you can enjoy homemade indulgence without breaking a sweat.

Gluten-Free Options: Don’t miss out if you’re gluten-sensitive! This recipe offers a gluten-free twist that retains all the chewy goodness.

Crowd-Pleasing Treat: These brownies are perfect for parties! Who can resist warm, gooey brownies topped with chocolate chip cookies?

Make Ahead Bliss: You can whip these up ahead of time, and they freeze beautifully—ideal for spontaneous cravings or celebrations!

For more sweet inspiration, check out these delightful Chocolate Fudge Cupcakes or whip up some tasty Blueberry Breakfast Cookies for a fun twist!

Chocolate Chip Cookie Brownies Ingredients

• Get ready to indulge in the bliss of these Chocolate Chip Cookie Brownies!

For the Brownie Layer

  • Brownie Mix – A rich base for the dessert; store-bought mixes save time without compromising flavor.
  • Butter – Adds moisture and richness; substitute with coconut oil for a dairy-free version.
  • Eggs – Essential for binding; if you’re vegan, use flaxseed meal or applesauce as a replacement.

For the Cookie Topping

  • Flour – Key for creating a chewy texture; a gluten-free flour blend works perfectly for those avoiding gluten.
  • Brown Sugar – Provides sweetness and moisture; you can lighten it up with light brown sugar if desired.
  • Granulated Sugar – Sweetens the cookie topping; feel free to reduce slightly if you prefer a less sweet treat.
  • Chocolate Chips – The star of the cookie layer; mix in chopped nuts for an extra texture boost!

Optional Add-Ins

  • Optional Nuts (walnuts or pecans) – Offers a delightful crunch; feel free to omit for a nut-free version.

Get your ingredients ready, and let the sweet magic begin!

Step‑by‑Step Instructions for Ultimate Chocolate Chip Cookie Brownies

Step 1: Preheat the Oven
Begin by preheating your oven to the temperature indicated on the brownie mix package, typically around 350°F (175°C). While the oven warms up, grease a 9×13-inch baking pan or line it with parchment paper to ensure easy removal of your delicious Chocolate Chip Cookie Brownies once baked.

Step 2: Prepare the Brownie Batter
In a large mixing bowl, combine the brownie mix with the specified ingredients, which usually include melted butter and eggs. Stir vigorously until the mixture is smooth and well combined, ensuring there are no lumps. The consistency should be thick and fudgy, ready to form the base of your decadent dessert.

Step 3: Spread the Brownie Layer
Carefully pour the brownie batter into the prepared baking pan, using a spatula to spread it evenly across the bottom. Make sure it reaches all corners of the pan for a consistent bake. This rich layer forms the foundation of your Ultimate Chocolate Chip Cookie Brownies, providing a deliciously fudgy texture that contrasts perfectly with the cookie topping.

Step 4: Make the Cookie Dough
In a separate bowl, cream together softened butter, brown sugar, and granulated sugar until the mixture is light and fluffy. Add in eggs, mixing until smooth. Gradually incorporate flour and chocolate chips, stirring until just combined. This dough will create the chewy cookie layer that crowns your brownies, enhancing their flavor and texture.

Step 5: Layer the Cookie Dough
Spoon dollops of the prepared cookie dough over the brownie layer in the baking pan. Spread the dough gently with a spatula to form an even topping. It’s okay if some brownie batter peeks through; it will all blend together as it bakes into a luscious layer of Chocolate Chip Cookie Brownies!

Step 6: Bake the Brownies
Place the baking pan in the preheated oven and let it bake for 25-30 minutes. Keep an eye on the timer, and check for doneness using a toothpick inserted in the center; it should come out with a few moist crumbs attached, and the cookie layer should be golden brown.

Step 7: Cool and Cut
Once baked, remove the pan from the oven and allow it to cool on a wire rack for at least 20-30 minutes. This cooling period is essential, as it helps the brownies set so they can be easily cut into squares without falling apart. Once cooled, use a sharp knife to slice into generous portions and revel in the irresistible goodness of your Chocolate Chip Cookie Brownies.

Chocolate Chip Cookie Brownies Variations

Customize your Chocolate Chip Cookie Brownies to suit your taste and dietary needs with these delightful variations!

  • Gluten-Free: Swap the regular flour for a gluten-free blend, ensuring all can indulge in this treat.
  • Nut-Free: Omit optional nuts and enjoy a smooth texture that’s equally delicious without the crunch.
  • Dairy-Free: Use vegan butter and flaxseed as an egg replacement to create a dairy-free alternative everyone will love.
  • Flavor Boost: Mix in caramel chips or peanut butter for a rich, indulgent flavor that complements the chocolate perfectly.
  • Seasonal Twist: Add crushed peppermint candies for a festive touch during the holidays or sprinkle cinnamon for a warm flavor in the winter.
  • Cookie Layer Variance: Try using oatmeal instead of flour for the cookie dough for additional texture and flavor.
  • Spicy Kick: Add a pinch of cayenne or chili powder to the brownie batter for a surprising warmth that elevates the chocolate.

Explore these variations to create a dessert that’s uniquely yours! If you’re in the mood for more chocolatey goodness, be sure to check out these delightful Chocolate Fudge Cupcakes as well!

What to Serve with Ultimate Chocolate Chip Cookie Brownies

Indulge in a delightful spread that complements the rich, sweet flavor of these heavenly treats and creates a feast for the senses.


  • Vanilla Ice Cream: Creamy and cool, it balances the warm, gooey brownies beautifully while adding a luscious texture contrast.


  • Espresso: A robust shot of espresso brings out the chocolate’s richness, creating a delightful sweet and bitter contrast that’s irresistible.


  • Fresh Berries: Juicy strawberries or raspberries add a refreshing pop of tartness, enhancing each decadent bite with their bright flavors.


  • Whipped Cream: Light and fluffy, it adds a dose of creaminess that pairs wonderfully with the chewy brownie and cookie layers.


  • Caramel Sauce: Drizzling warm caramel elevates the flavor profile, providing a sweet, buttery richness that makes every bite unforgettable.


  • Milkshake: A rich chocolate or vanilla milkshake pairs perfectly, creating a delightful nostalgia that harkens back to childhood desserts.


  • Chocolate Sauce: For the true chocolate lover, igniting your brownies with extra chocolate sauce intensifies the flavors and enhances the indulgence.


  • Mint Tea: The soothing freshness of mint tea creates a lovely contrast, perfecting an after-dinner treat for a delightful experience.


How to Store and Freeze Chocolate Chip Cookie Brownies

Room Temperature: Store brownies in an airtight container at room temperature for up to 5 days to maintain their delightful chewy texture.

Freezer: Wrap brownies tightly in plastic wrap and place them in a freezer-safe container for up to 3 months. This allows you to enjoy their fudgy goodness whenever a craving strikes!

Thawing: When ready to enjoy, simply unwrap the brownies and let them thaw at room temperature for about 1 hour before serving. You can also warm them in the microwave for a few seconds for that fresh-out-of-the-oven experience.

Reheating: For an indulgent treat, reheat individual pieces in the microwave for 15-20 seconds, then serve with a scoop of ice cream or a drizzle of chocolate sauce!

Expert Tips for Chocolate Chip Cookie Brownies


  • Cool Before Cutting: Allow your brownies to cool completely to avoid crumbling when you slice them. Patience pays off for perfect squares!


  • Toothpick Test: Always perform a toothpick test; aim for a few moist crumbs for gooey brownies. Overbaking will lead to dry results.


  • Mix It Up: Feel free to add chopped nuts or different chocolate varieties to the brownie or cookie layer to elevate your Chocolate Chip Cookie Brownies.


  • Gluten-Free Swap: Use a certified gluten-free flour blend to keep this recipe suitable for those with dietary restrictions without sacrificing taste.


  • Store Properly: Keep brownies in an airtight container at room temperature for up to 5 days, or freeze for longer storage to enjoy later.


Make Ahead Options

These Chocolate Chip Cookie Brownies are perfect for busy home cooks looking to save time! You can prepare the brownie batter up to 24 hours in advance by mixing it and storing it in an airtight container in the fridge. The cookie dough can also be made beforehand and stored for up to 3 days; just refrigerate in a separate container. When you’re ready to bake, simply pour the brownie batter into your prepared pan, top with the chilled cookie dough, and bake as directed. This way, you can enjoy warm, freshly baked brownies without the last-minute rush!

Chocolate Chip Cookie Brownies Recipe FAQs

How do I choose the right brownie mix?
Absolutely! When selecting a brownie mix, look for one that promises a fudgy texture, as this will complement the chewy cookie layer. Check for any add-ins like chocolate chips or nuts to elevate the flavor. A good rule of thumb is to avoid mixes with overly processed ingredients—just simple, quality components will do wonders for your Chocolate Chip Cookie Brownies.

How should I store my brownies?
To keep your brownies fresh, store them in an airtight container at room temperature for up to 5 days. This helps maintain their chewy texture. If you’re looking to savor them later, you can freeze them! Wrap the brownies tightly in plastic wrap, then place them in a freezer-safe container or bag. They’ll stay delicious for up to 3 months!

Can I make these brownies gluten-free?
Very much! To adapt the Chocolate Chip Cookie Brownies for a gluten-free diet, simply use a certified gluten-free flour blend in lieu of regular flour for the cookie layer. The brownie layer typically relies on the mix, which usually offers a gluten-free option. This ensures no one misses out on the indulgent experience!

What should I do if my brownies crumble when cutting?
When this happens, it may be due to cutting them before they’ve cooled completely. Letting them cool for at least 20-30 minutes is key to ensuring they set properly. If they’re still crumbling, it’s likely they were overbaked, and the moisture level decreased. For future batches, aim for that perfect toothpick test—moist crumbs attached means they’re just right!

Can I freeze my brownies?
Yes, you can! After waiting for them to cool completely, tightly wrap the brownies in plastic wrap, making sure to cover all surfaces to prevent freezer burn. You’ll want to keep them in a freezer-safe container or a resealable plastic bag for added protection. To reheat, thaw at room temperature for about an hour, or pop them in the microwave for a quick warm-up to enjoy that delightful gooeyness again.

Are there any allergy considerations?
Absolutely! Be mindful of allergies, especially with common allergens like eggs, dairy, and nuts. For a vegan version, use flaxseed meal or applesauce instead of eggs and coconut oil in place of butter. Always check your ingredients for cross-contamination if you’re serving guests with food allergies, ensuring a safe and enjoyable treat for all!

Chocolate Chip Cookie Brownies

Irresistible Chocolate Chip Cookie Brownies You’ll Love

This recipe combines Chocolate Chip Cookies and Brownies into one gooey dessert that everyone will love.
Prep Time 20 minutes
Cook Time 30 minutes
Cooling Time 30 minutes
Total Time 1 hour 20 minutes
Servings: 12 slices
Course: Dessert
Cuisine: American
Calories: 200

Ingredients
  

For the Brownie Layer
  • 1 box Brownie Mix Store-bought
  • 1/2 cup Butter Melted; substitute with coconut oil for dairy-free
  • 2 large Eggs Or flaxseed meal/applesauce for vegan
For the Cookie Topping
  • 1 cup Flour Gluten-free flour blend works
  • 1/2 cup Brown Sugar Can use light brown sugar
  • 1/4 cup Granulated Sugar Reduce for less sweetness if desired
  • 1 cup Chocolate Chips Add chopped nuts if desired
Optional Add-Ins
  • 1/2 cup Optional Nuts Walnuts or pecans; omit for nut-free

Equipment

  • 9×13-inch baking pan
  • Mixing bowls
  • spatula
  • whisk
  • Measuring cups
  • Oven

Method
 

Preheat the Oven
  1. Preheat the oven to 350°F (175°C) and grease a 9×13-inch baking pan or line with parchment paper.
Prepare the Brownie Batter
  1. Combine brownie mix with melted butter and eggs in a mixing bowl. Stir until smooth and thick.
Spread the Brownie Layer
  1. Pour and spread the brownie batter evenly in the prepared baking pan.
Make the Cookie Dough
  1. Cream together softened butter, brown sugar, and granulated sugar until fluffy. Add eggs and mix smooth, then incorporate flour and chocolate chips.
Layer the Cookie Dough
  1. Spoon cookie dough dollops over the brownie layer, spreading it gently to create an even topping.
Bake the Brownies
  1. Bake for 25-30 minutes, checking doneness with a toothpick; it should have a few moist crumbs.
Cool and Cut
  1. Allow to cool for 20-30 minutes on a wire rack before slicing into squares.

Nutrition

Serving: 1sliceCalories: 200kcalCarbohydrates: 30gProtein: 3gFat: 9gSaturated Fat: 5gCholesterol: 40mgSodium: 100mgPotassium: 150mgFiber: 1gSugar: 20gVitamin A: 5IUCalcium: 2mgIron: 6mg

Notes

For best results, allow brownies to cool completely before cutting. Perform a toothpick test to check doneness and store in an airtight container for up to 5 days.

Tried this recipe?

Let us know how it was!

Baked Apple Fritters with Cinnamon – A Healthier Treat

As the aroma of cinnamon and baked apples fills the air, I can’t help but feel a wave of nostalgia wash over me. These Baked Apple Fritters are not just a treat; they’re a delightful nod to the comfort foods of our childhood, transformed into a healthier, guilt-free alternative that you can enjoy any time of day. With their fluffy texture and warm spices, these fritters are a perfect way to satisfy those cravings without the fuss or mess of frying. Plus, they can easily be made gluten-free or dairy-free, allowing you to tailor them to your dietary needs. Who wouldn’t want a scrumptious snack that’s both wholesome and delicious? Ready to explore this mouthwatering twist on a beloved classic?

Why Choose Baked Apple Fritters?

Healthier Alternative: These baked delights are a guilt-free way to indulge your sweet tooth without the excess calories from frying.

Customizable Options: With easy swaps for gluten-free or dairy-free versions, everyone can join in on the fun.

Irresistible Aroma: The scent of cinnamon and baked apples wafting through your kitchen is enough to bring everyone to the table!

Comfort Food Vibes: Perfect for breakfast, an afternoon snack, or dessert, these fritters evoke warm memories while satisfying your cravings.

Quick & Easy: In just a little over 30 minutes, you can whip up a batch that will impress your family and friends. If you’re also looking for delicious options like Garlic Butter Baked Chicken or Comforting Charm Baked Ham and Cheese Croissants, they’re great ideas to complement this treat!

Baked Apple Fritters Ingredients

For the Batter

  • All-Purpose Flour – Provides the structure that holds these fritters together; use gluten-free flour blend for a gluten-free version.
  • Granulated Sugar – Adds sweetness to balance the spices; try coconut sugar for a lower glycemic index option.
  • Baking Powder – Ensures the fritters rise beautifully; always check for freshness to achieve the best results.
  • Baking Soda – Works in tandem with baking powder for a fluffy texture.
  • Salt – A key component to enhance flavor and achieve balance in the overall taste.
  • Ground Cinnamon – Infuses the fritters with warm spice; consider using nutmeg to elevate the flavor profile.
  • Ground Nutmeg – Adds another layer of warmth; optional but enhances the autumnal vibes.
  • Eggs – Provide moisture and bind the ingredients; flax eggs can replace them for a vegan option.
  • Milk – Contributes to the batter’s moisture; almond milk works great for a dairy-free alternative.
  • Melted Butter – Enriches the flavor and texture; coconut oil serves as a dairy-free substitute too.
  • Vanilla Extract – Deepens the flavor and aroma; pure vanilla is the best for optimal taste.
  • Diced Apples – The star of our fritters, offering moisture and flavor; tart varieties like Granny Smith are perfect for balance.

For the Glaze

  • Powdered Sugar – The base for our sweet glaze; whisk with milk for a smooth consistency.
  • Milk – Helps achieve the right texture for the glaze; use almond milk for a dairy-free option.
  • Vanilla Extract – Just a splash more to infuse the glaze with flavor; essential for that homemade touch.

Think of these Baked Apple Fritters as a warm hug on a plate, inviting you to savor each bite while knowing they’re a healthier option perfect for any moment!

Step‑by‑Step Instructions for Baked Apple Fritters

Step 1: Preheat the Oven
Begin by preheating your oven to 375°F (190°C). While the oven warms, prepare a large baking sheet by lining it with parchment paper to prevent sticking. This will ensure your Baked Apple Fritters bake evenly, resulting in a golden, fluffy treat.

Step 2: Mix Dry Ingredients
In a spacious mixing bowl, whisk together 2 cups of all-purpose flour, 3/4 cup of granulated sugar, 2 teaspoons of baking powder, 1/2 teaspoon of baking soda, 1/2 teaspoon of salt, 1 teaspoon of ground cinnamon, and 1/4 teaspoon of ground nutmeg if using. The goal here is to create a thorough blend—this balance is essential for the growth and texture of your fritters.

Step 3: Combine Wet Ingredients
In a separate bowl, whisk together 2 large eggs, 1 cup of milk (or your preferred dairy-free alternative), 1/4 cup of melted butter, and 2 teaspoons of vanilla extract until smooth and well combined. This mixture adds moisture and richness, making your Baked Apple Fritters soft and delicious.

Step 4: Make the Batter
Carefully fold the dry ingredients into the wet mixture until just combined; it’s okay if there are a few lumps. Finally, gently incorporate 2 cups of diced apples, ensuring they’re evenly distributed throughout the batter. This step is crucial to achieve that delightful apple flavor in each bite.

Step 5: Shape & Bake
Using a spoon or an ice cream scoop, drop heaping spoonfuls of batter onto the prepared baking sheet, leaving space between each fritter for expansion. Bake in the preheated oven for 15 to 18 minutes, or until the fritters are golden brown on top and a toothpick inserted comes out clean, indicating they’re perfectly cooked through.

Step 6: Prepare the Glaze
While the fritters are baking, make the glaze by whisking together 1 cup of powdered sugar, 2 tablespoons of milk, and an additional 1/2 teaspoon of vanilla extract in a small bowl. Mix until the glaze is smooth and creamy, ready to drizzle over your warm Baked Apple Fritters.

Step 7: Glaze & Serve
Once your fritters have finished baking, allow them to cool on the baking sheet for about 5 minutes before glazing—this prevents the glaze from soaking in. Drizzle the glaze generously over the warm fritters, then serve them right away to enjoy the delightful taste and aroma!

Baked Apple Fritters Variations

Customize your Baked Apple Fritters to suit your taste preferences and dietary needs for an even more delightful treat!

  • Gluten-Free: Use a gluten-free all-purpose flour blend for a lighter version that still holds all the flavor and charm. You won’t miss the regular flour one bit!

  • Dairy-Free: Swap milk for almond or coconut milk and replace melted butter with coconut oil. This way, everyone can enjoy your fritters without worry!

  • Extra Spiced: Add a touch of ground cloves or allspice for a cozy flavor profile that elevates your fritters. Imagine the warm scent of spices filling your kitchen!

  • Chocolate Twist: Fold chocolate chips into the batter for a fun, sweet surprise in each bite. Who says you can’t have a little indulgence?

  • Cinnamon-Apple Oatmeal: Incorporate rolled oats into the batter for added texture and heartiness. It gives a delightful chew and makes your fritters even more satisfying!

  • Cranberry Apple: Add dried cranberries for a tart, fruity contrast to the sweet apples. The burst of flavor will keep everyone coming back for more!

  • Maple Flavor: Replace sugar with maple syrup for a natural sweetness; adjust the liquid ingredients slightly to maintain the batter’s consistency. It’s a sweet, earthy twist!

Feel free to experiment with these variations and make the recipe your own! If you’re loving these homemade delights, you might also want to explore some savory options like Garlic Butter Baked Chicken or sweet treats like Apple Crisp Cinnamon. Enjoy your delicious culinary journey!

Tips for the Best Baked Apple Fritters

  • Right Apple Choice: Use tart varieties like Granny Smith for a perfect balance of sweetness and tartness in your fritters.

  • Don’t Overmix: Stir the batter just until combined to keep your fritters fluffy; overmixing can lead to density.

  • Consistent Portions: Use an ice cream scoop for uniform fritters, ensuring even baking and a lovely presentation.

  • Cool Briefly: Allow fritters to cool for a few minutes before glazing, preventing the glaze from becoming too runny on hot fritters.

  • Test for Doneness: Stick a toothpick in the center; if it comes out clean, your Baked Apple Fritters are ready to enjoy!

Make Ahead Options

These Baked Apple Fritters are perfect for meal prep enthusiasts looking to save time on busy mornings! You can mix the dry ingredients (2 cups of all-purpose flour, 3/4 cup of sugar, and leavening agents) and store them in an airtight container for up to 3 days. Additionally, you can peel and dice the apples, keeping them in a bowl with a little lemon juice to prevent browning until you’re ready to assemble. When you’re ready to bake, simply combine the wet and dry ingredients with the apples and proceed with the recipe. You’ll enjoy just as delicious and fresh fritters with minimal effort!

What to Serve with Baked Apple Fritters?

There’s nothing quite like the warmth and sweetness of freshly baked treats, so let’s build a memorable meal around these delightful fritters.

  • Creamy Vanilla Ice Cream: A scoop of vanilla ice cream adds a rich, creamy contrast to the warm, spiced fritters, enhancing their sweetness.

  • Warm Coffee: Pairing your fritters with a cup of steaming coffee creates a perfect balance of flavors; the bitterness complements the sugary glaze beautifully.

  • Fresh Fruit Salad: A light fruit salad with citrus and berries adds a refreshing, bright element, cutting through the sweetness for a well-rounded bite.

  • Maple Syrup Drizzle: For added sweetness, drizzle with pure maple syrup. It complements the apple and cinnamon flavor while bringing a lovely richness.

  • Honey Yogurt Dip: A honey-sweetened yogurt dip offers a tangy, creamy foundation that enhances the spiced apple fritters, making each bite more indulgent.

  • Chai Tea: The aromatic spices in chai tea echo the flavors in your fritters, creating a harmonious pairing that’s both cozy and comforting.

  • Nutty Granola: Serve with crunchy granola sprinkled on top or alongside; its texture contrasts beautifully with the fluffiness of the fritters, adding a satisfying crunch.

Enjoy experimenting with these pairings to create a delightful experience every time you indulge in your Baked Apple Fritters!

How to Store and Freeze Baked Apple Fritters

Fridge: Store your Baked Apple Fritters in an airtight container for up to 3 days. To maintain their softness, layer them with parchment paper to avoid sticking.

Freezer: For longer storage, freeze fritters for up to 3 months. Place them in a single layer on a baking sheet to freeze initially, then transfer to a freezer-safe bag or container.

Reheating: When ready to enjoy, thaw overnight in the fridge, then reheat in the oven at 350°F (175°C) for about 10 minutes, or until warmed through.

Make-Ahead: Feel free to prepare the fritters a day ahead and glaze them just before serving for the freshest taste!

Baked Apple Fritters Recipe FAQs

How do I choose the best apples for baked apple fritters?
Absolutely! For baked apple fritters, I recommend using tart varieties like Granny Smith or Honeycrisp. These apples maintain their shape when baked and add a wonderful sweet-tart balance that elevates the flavor of your fritters. Look for apples that are firm and free of dark spots—just ripe enough for the best taste!

What is the best way to store leftovers?
To store your baked apple fritters, place them in an airtight container in the refrigerator for up to 3 days. I often layer them with parchment paper to prevent them from sticking together—this way, you can enjoy them fresh each day without any compromise on texture.

Can I freeze baked apple fritters?
Yes, you can! For freezing baked apple fritters, let them cool completely first. Then, lay them in a single layer on a baking sheet to freeze for about 2 hours. Once frozen, transfer the fritters to a freezer-safe bag or container, where they’ll keep well for up to 3 months. When you’re ready to enjoy them, simply thaw overnight in the fridge and reheat in the oven at 350°F (175°C) for about 10 minutes.

What should I do if my fritter batter is too thick?
Very! If you find that your batter is too thick, a good way to remedy this is to gradually add a splash of milk, a tablespoon at a time, while gently folding the batter. This will help achieve the right consistency without overmixing, ensuring your fritters come out light and fluffy.

Can these fritters be made gluten-free or dairy-free?
Definitely! For a gluten-free version, simply swap out the all-purpose flour for a gluten-free flour blend, and for a dairy-free option, replace regular milk with almond or coconut milk and use coconut oil instead of butter. These adaptations allow everyone to enjoy these delicious baked apple fritters without hesitation!

What’s the best way to serve baked apple fritters?
I recommend serving baked apple fritters warm, drizzled with the glaze right before eating. They are delicious on their own or served with a side of vanilla ice cream, a sprinkle of powdered sugar, or even a drizzle of honey or caramel for that extra touch of sweetness. Enjoy every delightful bite!

Baked Apple Fritters

Baked Apple Fritters with Cinnamon - A Healthier Treat

Baked Apple Fritters are a healthier alternative to fried treats, filled with warm spices and the delightful flavor of apples.
Prep Time 15 minutes
Cook Time 18 minutes
Total Time 33 minutes
Servings: 12 fritters
Course: Dessert
Cuisine: American
Calories: 200

Ingredients
  

For the Batter
  • 2 cups All-Purpose Flour Use gluten-free flour blend for a gluten-free version.
  • 3/4 cup Granulated Sugar Try coconut sugar for a lower glycemic index option.
  • 2 teaspoons Baking Powder Check for freshness.
  • 1/2 teaspoon Baking Soda
  • 1/2 teaspoon Salt
  • 1 teaspoon Ground Cinnamon Consider using nutmeg.
  • 1/4 teaspoon Ground Nutmeg Optional.
  • 2 large Eggs Flax eggs can replace for vegan option.
  • 1 cup Milk Almond milk works for dairy-free.
  • 1/4 cup Melted Butter Coconut oil serves as a dairy-free substitute.
  • 2 teaspoons Vanilla Extract Pure vanilla is best.
  • 2 cups Diced Apples Tart varieties like Granny Smith are perfect.
For the Glaze
  • 1 cup Powdered Sugar Whisk with milk for consistency.
  • 2 tablespoons Milk Use almond milk for dairy-free.
  • 1/2 teaspoon Vanilla Extract Essential for flavor.

Equipment

  • Mixing bowls
  • whisk
  • Baking Sheet
  • Parchment Paper
  • Ice cream scoop

Method
 

Step‑By‑Step Instructions
  1. Preheat your oven to 375°F (190°C) and line a baking sheet with parchment paper.
  2. In a mixing bowl, whisk together the dry ingredients: flour, sugar, baking powder, baking soda, salt, cinnamon, and nutmeg.
  3. In a separate bowl, whisk together the wet ingredients: eggs, milk, melted butter, and vanilla extract.
  4. Fold the dry mixture into the wet mixture until just combined. Gently incorporate the diced apples.
  5. Drop spoonfuls of batter onto the baking sheet and bake for 15 to 18 minutes until golden.
  6. For the glaze, whisk together powdered sugar, milk, and vanilla extract until smooth.
  7. Allow fritters to cool for 5 minutes before glazing and serve warm.

Nutrition

Serving: 1fritterCalories: 200kcalCarbohydrates: 30gProtein: 2gFat: 8gSaturated Fat: 5gPolyunsaturated Fat: 0.5gMonounsaturated Fat: 2gCholesterol: 35mgSodium: 150mgPotassium: 50mgFiber: 1gSugar: 10gVitamin A: 200IUVitamin C: 1mgCalcium: 50mgIron: 1mg

Notes

Best served warm with a drizzle of glaze for maximum flavor.

Tried this recipe?

Let us know how it was!

Lemon Pizza: A Bright & Zesty Twist for Summer Nights

As I stood in my kitchen on a sun-drenched afternoon, the scent of fresh lemons mingling with rich mozzarella sparked a culinary adventure that felt both unexpected and exciting. This is how my love affair with Lemon Pizza began—a delightful summer dish that transforms traditional pizza into a zesty masterpiece. With just a handful of simple ingredients, this vegetarian delight becomes a quick-prep meal ideally suited for those balmy evenings when you crave something light yet satisfying. Imagine impressing your family and friends with this unique twist on pizza that not only tantalizes the taste buds but also showcases seasonal ingredients. Are you ready to dive into this refreshing treat that promises to breathe new life into your summertime dining?

Why Choose Lemon Pizza Tonight?

Uniqueness: This recipe turns classic pizza on its head with a zesty lemon twist, offering a bright flavor profile you won’t find elsewhere.
Simplicity: With just a few basic ingredients and minimal prep time, even novice cooks will shine in the kitchen.
Perfectly Refreshing: Ideal for summer nights, this Lemon Pizza is a light yet satisfying option that pairs beautifully with a crisp salad or grilled veggies.
Crowd-Pleaser: Impress your guests with a dish that strays from the ordinary—this pizza is sure to be the talk of the table!
Endless Variations: Feel free to customize with different herbs or toppings, like fresh basil or even a sprinkle of chili flakes for a kick. For another refreshing option, check out my [Lemon Blueberry Summery](https://fhfoodhealth.com/lemon-blueberry-delight/) dish!

Lemon Pizza Ingredients

For the Dough

Pizza Dough – The base structure of the pizza; can use store-bought dough for convenience.

For the Brine

Extra Virgin Olive Oil – Adds fruity flavor and richness to the brine; regular olive oil is a good substitute.
Water – Hydrates the brine for an ideal texture.
Fresh Parsley – Adds freshness and color; can be replaced with basil or arugula for a twist.
Garlic – Infuses flavorful depth into the brine; use grated for even distribution.
Lemon Zest – Provides concentrated lemon flavor that brightens the dish.
Lemon Juice – Adds acidity and brightness that complements the other ingredients.
Fine Salt – Enhances the overall flavor profile of the dish.
Black Pepper – Adds warmth and depth to the flavor.

For the Toppings

Fresh Mozzarella (5 oz) – Creaminess that melts beautifully; can use shredded low-moisture mozzarella as a substitute.
Grated Parmesan Cheese (2 tbsp) – Nutty flavor finishing touch; vegan parmesan can be used to keep it vegetarian.
Freshly Ground Black Pepper – Adds an extra layer of seasoning for taste.

With these vibrant ingredients, your Lemon Pizza will come to life, creating a refreshing summer dish that’s both unique and satisfying!

Step‑by‑Step Instructions for Lemon Pizza

Step 1: Prepare Dough
Start by following your favorite no-knead pizza dough recipe, mixing the ingredients in a bowl until just combined. Allow the dough to rest for 1 hour at room temperature while you preheat your oven to a steamy 450°F (230°C). You want to achieve a slightly puffy dough, indicating it’s ready for shaping your Lemon Pizza.

Step 2: Prepare Cheese
If you’re using fresh mozzarella, slice it into ½-inch thick pieces and gently blot away any excess moisture with a clean kitchen towel. This step is crucial for preventing a soggy crust on your Lemon Pizza. Set the prepared cheese aside while you continue with the dough.

Step 3: Shape Dough
On a floured surface, roll out the rested dough into a rectangle measuring about 9×13 inches, making sure it’s an even thickness. Transfer the dough to a pizza peel or an inverted baking sheet lined with parchment paper. It should look inviting, with a slightly golden hue, ready for delicious toppings.

Step 4: Make Brine
In a jar, combine the extra virgin olive oil, water, finely chopped parsley, grated garlic, lemon zest, lemon juice, fine salt, and freshly cracked black pepper. Secure the lid and shake vigorously for about 30 seconds until all ingredients are well emulsified, creating a fragrant brine to enhance your Lemon Pizza.

Step 5: Add Toppings
Using your fingers, dimple the surface of the dough to create small wells for the brine to soak in. Pour the prepared brine evenly over the dimpled dough, ensuring it reaches every corner. Now, layer the mozzarella slices on top, allowing them to melt beautifully as they bake.

Step 6: Bake Pizza
Slide your assembled Lemon Pizza onto a preheated pizza stone or baking sheet. Bake it for 8-10 minutes, watching closely as the cheese becomes bubbly and the crust turns a gorgeous golden brown. The pizza is ready when it releases a tantalizing aroma and the edges look crispy.

Step 7: Finish and Serve
Once baked, remove your Lemon Pizza from the oven and drizzle with a touch of fresh lemon juice. Sprinkle grated parmesan cheese, additional chopped parsley, and a dash of black pepper or chili flakes over the top for an extra flavor boost. Slice it up and serve immediately for a delightful summer treat!

How to Store and Freeze Lemon Pizza

Fridge: Store leftover Lemon Pizza in an airtight container for up to 1 day to keep it fresh. Make sure to let it cool completely before sealing.

Freezer: For longer storage, wrap slices securely in plastic wrap and then place them in a zip-top freezer bag. Freeze for up to 3 months, ensuring maximum freshness.

Reheating: To enjoy your frozen Lemon Pizza, preheat the oven to 375°F (190°C) and bake for 10-15 minutes or until heated through, keeping the crust crispy.

Room Temperature: If serving at room temperature, it’s best enjoyed within 2 hours to maintain its delightful texture and flavor.

Lemon Pizza Variations & Substitutions

Feel free to sprinkle your creativity into this recipe and discover delightful new flavors!

  • Dairy-Free: Use vegan mozzarella and parmesan for a completely dairy-free version, keeping the delicious flavors intact. Your loved ones will enjoy this just as much, if not more!

  • Gluten-Free: Swap regular pizza dough for a gluten-free crust. It’s just as easy to make or find, and everyone can join in the fun.

  • Herb Infusion: Experiment with fresh herbs like basil or arugula instead of parsley for a unique twist in flavors. The fresh aromas will fill your kitchen and excite the senses!

  • Protein-Packed: Add grilled chicken or Italian sausage for a heartier meal. This variation transforms your Lemon Pizza into a filling delight perfect for meat lovers.

  • Zesty Upgrade: For an even more pronounced lemon flavor, layer thin lemon slices on top before baking. This adds a beautiful visual and an enjoyable zest with each bite.

  • Extra Crunch: Sprinkle some pine nuts or walnuts over the cheese just before baking for a delightful crunch that will have everyone reaching for seconds.

  • Spice It Up: If you like a bit of heat, sprinkle chili flakes or slices of jalapeño on top before baking. This will awaken both your palate and your spirit!

  • Savory Twist: Add sautéed mushrooms or roasted red peppers as toppings for extra texture and savoriness. These additional flavors complement the bright lemon beautifully.

For more bright and refreshing summer bites, you might enjoy my [Lemon Blueberry Summery](https://fhfoodhealth.com/lemon-blueberry-delight/). Happy cooking!

Expert Tips for Lemon Pizza

  • Oven Temperature: Preheat your oven as hot as possible; a higher temperature ensures a crispy crust and perfectly melted cheese for your Lemon Pizza.

  • Dough Handling: Be gentle when shaping the dough. Overworking or pressing too hard can deflate the air bubbles, which are essential for a light and airy crust.

  • Moisture Management: Ensure your fresh mozzarella is adequately dried to prevent a soggy pizza. Blotting away excess moisture is key to achieving that perfect texture.

  • Brine Balance: Experiment with the brine ingredients! If you prefer a stronger lemon flavor, add more lemon juice or zest, but be mindful not to overpower the other ingredients.

  • Fresh Herbs: For a burst of freshness, try using herbs like basil or arugula instead of parsley. This simple switch can enhance the flavor of your Lemon Pizza.

Make Ahead Options

Preparing your Lemon Pizza ahead of time is a fantastic way to save precious moments on busy weeknights! You can make the pizza dough up to 24 hours in advance; simply follow your favorite no-knead recipe, shape it, and store it in the refrigerator. Additionally, the brine can be mixed and stored in an airtight container for up to 3 days ahead—just give it a good shake before pouring it over the dough. When you’re ready to enjoy, roll out the chilled dough, add the brine and mozzarella, and bake for that perfect golden crust. With these make-ahead tips, you’ll achieve restaurant-quality Lemon Pizza with minimal effort!

What to Serve with Lemon Pizza?

Enhance your meal experience with delightful side dishes that complement the vibrant flavors of your Lemon Pizza.

  • Crispy Arugula Salad: A refreshing mix of peppery arugula, lemon vinaigrette, and shaved parmesan balances the pizza’s richness perfectly.
  • Grilled Vegetable Medley: Seasoned zucchini, bell peppers, and asparagus add smoky notes and texture that contrast beautifully with the creamy cheese.
  • Garlic Breadsticks: Crunchy on the outside and soft within, these buttery sticks provide a comforting, familiar touch to your meal.
  • Chilled White Wine: A crisp Sauvignon Blanc or Pinot Grigio enhances the bright citrus flavors of the pizza, making your summer evening feel special.
  • Lemon Sorbet: This light, icy treat cleanses the palate and echoes the zesty notes from the pizza, making it a refreshing dessert option.
  • Caprese Skewers: Cherry tomatoes, fresh mozzarella, and basil drizzled with balsamic glaze create a fun appetizer that pairs harmoniously with the pizza’s flavors.

Lemon Pizza Recipe FAQs

What type of dough should I use for Lemon Pizza?
You can use either homemade pizza dough or store-bought dough for convenience. If you’re opting for homemade, I recommend a no-knead recipe for ease. Just remember, a good pizza dough should be slightly puffy after resting, and it helps achieve that crispy texture we all love!

How should I store Lemon Pizza leftovers?
Store any leftover Lemon Pizza in an airtight container in the fridge for up to 1 day. Make sure to let it cool completely before sealing to retain its best texture.

Can I freeze Lemon Pizza? If so, how?
Absolutely! To freeze, wrap slices tightly in plastic wrap and then place them in a zip-top freezer bag. They can be frozen for up to 3 months. For reheating, preheat your oven to 375°F (190°C) and bake for 10-15 minutes or until heated through, ensuring that crispy crust you love!

What should I do if my dough is too sticky?
If you find your dough is sticky while shaping, simply dust it with a little more flour. This should help make it more manageable. Just be cautious not to add too much flour, as it can change the texture of your pizza dough.

Can I use a different cheese for Lemon Pizza?
Yes! While fresh mozzarella is perfect for its creaminess, you can substitute with low-moisture shredded mozzarella or even a vegan cheese option if you’re aiming for a plant-based dish. Just keep in mind that the melting properties might vary slightly!

Are there any allergies I should consider when making this Lemon Pizza?
If you’re cooking for guests, ensure to ask about any allergies! The Lemon Pizza contains dairy (mozzarella and parmesan), so people with lactose intolerance or a dairy allergy should be mindful. You can easily substitute these with vegan cheese alternatives for a delightful, dairy-free version!

Lemon Pizza

Lemon Pizza: A Bright & Zesty Twist for Summer Nights

Lemon Pizza is a refreshing twist on traditional pizza, perfect for summer evenings with its zesty lemon flavor and easy preparation.
Prep Time 1 hour
Cook Time 10 minutes
Resting Time 1 hour
Total Time 2 hours 10 minutes
Servings: 4 slices
Course: Dinner
Cuisine: Italian
Calories: 250

Ingredients
  

For the Dough
  • 1 package Pizza Dough can use store-bought dough for convenience
For the Brine
  • 3 tbsp Extra Virgin Olive Oil regular olive oil is a good substitute
  • 1 cup Water
  • 1 bunch Fresh Parsley can be replaced with basil or arugula
  • 2 cloves Garlic use grated for even distribution
  • 1 tbsp Lemon Zest
  • 2 tbsp Lemon Juice
  • 1 tsp Fine Salt
  • 1/2 tsp Black Pepper
For the Toppings
  • 5 oz Fresh Mozzarella can use shredded low-moisture mozzarella
  • 2 tbsp Grated Parmesan Cheese vegan parmesan can be used to keep it vegetarian
  • 1 tsp Freshly Ground Black Pepper

Equipment

  • Baking Sheet
  • Pizza Peel
  • Jar for brine

Method
 

Step‑by‑Step Instructions for Lemon Pizza
  1. Start by following your favorite no-knead pizza dough recipe, mixing the ingredients in a bowl until just combined. Allow the dough to rest for 1 hour at room temperature while you preheat your oven to a steamy 450°F (230°C).
  2. If you’re using fresh mozzarella, slice it into ½-inch thick pieces and gently blot away any excess moisture with a clean kitchen towel.
  3. On a floured surface, roll out the rested dough into a rectangle measuring about 9x13 inches, making sure it’s an even thickness.
  4. In a jar, combine the extra virgin olive oil, water, finely chopped parsley, grated garlic, lemon zest, lemon juice, fine salt, and freshly cracked black pepper. Secure the lid and shake vigorously for about 30 seconds until all ingredients are well emulsified.
  5. Using your fingers, dimple the surface of the dough to create small wells for the brine to soak in. Pour the prepared brine evenly over the dimpled dough.
  6. Slide your assembled Lemon Pizza onto a preheated pizza stone or baking sheet. Bake it for 8-10 minutes, watching closely as the cheese becomes bubbly and the crust turns a gorgeous golden brown.
  7. Once baked, remove your Lemon Pizza from the oven and drizzle with a touch of fresh lemon juice. Sprinkle grated parmesan cheese, additional chopped parsley, and a dash of black pepper or chili flakes over the top.

Nutrition

Serving: 1sliceCalories: 250kcalCarbohydrates: 30gProtein: 10gFat: 11gSaturated Fat: 3gPolyunsaturated Fat: 1gMonounsaturated Fat: 7gCholesterol: 15mgSodium: 300mgPotassium: 200mgFiber: 2gSugar: 2gVitamin A: 250IUVitamin C: 15mgCalcium: 250mgIron: 1mg

Notes

Make sure to preheat the oven correctly and manage moisture from the mozzarella to avoid a soggy pizza.

Tried this recipe?

Let us know how it was!

Savor Simple Chicken Zucchini Alfredo Pasta Tonight

The aroma of sizzling garlic and tender chicken fills my kitchen as I whip up a dinner that’s quick enough for a weeknight yet luxurious enough to impress. This Creamy Zucchini Noodle Chicken Alfredo is a delightful twist on the classic, proving that comfort food can be healthy too! With its low-carb zucchini noodles and a rich, velvety Parmesan sauce, this dish not only satisfies cravings but also makes sure you feel light and energized afterwards. Plus, it comes together in just 35 minutes, making it the perfect choice for busy nights when you want something simple yet delicious. Who says you can’t indulge without the guilt? How about giving this delightful recipe a try and surprising yourself with how easy it is to enjoy homemade comfort food?

Why Is This Zucchini Alfredo So Irresistible?

Quick Preparation: With just 35 minutes from start to finish, this dish is a true lifesaver for busy weeknights.

Low-Carb Delight: Enjoy all the creaminess of traditional Alfredo while keeping carbs in check, thanks to the zucchini noodles.

Flavorful Experience: Each bite features juicy chicken and a rich, cheesy sauce that tantalizes your taste buds.

Versatile Base: You can easily customize it with additional vegetables or proteins, making it a meal that suits your palate and pantry. For more fun variations, check out my Cajun Steak Alfredo or the Creamy Crack Chicken Penne for when you’re in a different mood!

Crowd-Pleasing Comfort: This dish is not just healthy; it’s a hit with the whole family, proving that wholesome can be delicious!

Simple Chicken Zucchini Alfredo Pasta Ingredients

• A delightful list of ingredients for a low-carb dinner adventure awaits!

For the Zucchini Noodles

  • Zucchini – Use 3 medium zucchini, spiralized or thinly sliced, for a light pasta substitute.

For the Chicken

  • Chicken Breasts – Two boneless, skinless breasts, thinly sliced for quick cooking and maximum flavor.
  • Butter – Essential for sautéing the chicken, imparting a rich, buttery taste.
  • Kosher Salt – Enhances the flavor of the chicken and sauce; add more to taste.
  • Black Pepper – Freshly ground, to elevate the dish with a zesty kick.
  • Garlic – Three cloves, minced; it adds a fragrant aroma and depth of flavor.

For the Alfredo Sauce

  • Heavy Cream – ¾ cup to create the ultra-creamy base of this delicious sauce.
  • Parmesan Cheese – One cup shredded for that cheesy goodness and thickness; keep some extra for garnish!
  • Fresh Parsley – Two tablespoons chopped, giving a bright, fresh finish to the dish.

This simple Chicken Zucchini Alfredo Pasta gathers all the charm of traditional comfort food while remaining low in carbs—perfect for health-conscious diners!

Step‑by‑Step Instructions for Simple Chicken Zucchini Alfredo Pasta

Step 1: Prepare Zucchini Noodles
Begin by spiralizing or thinly slicing the 3 medium zucchinis into noodle-shaped pieces. To remove excess moisture, place the zucchini in a microwave-safe dish and heat them on high for 1-2 minutes. After microwaving, drain any liquid to prevent a watery sauce, ensuring your Simple Chicken Zucchini Alfredo Pasta stays creamy and delicious.

Step 2: Cook Chicken
In a large skillet over medium heat, melt 2 tablespoons of butter until it bubbles gently. Add the thinly sliced chicken breasts, and season with kosher salt and black pepper to taste. Sauté the chicken for about 7 minutes, stirring occasionally, until it turns golden brown and is fully cooked through. Once done, remove the chicken from the skillet and set it aside momentarily.

Step 3: Make Alfredo Sauce
In the same skillet where you cooked the chicken, add ¾ cup of heavy cream, and bring it to a gentle boil while stirring frequently. Once bubbling, reduce the heat to low and whisk in 1 cup of shredded Parmesan cheese along with 2 tablespoons of chopped fresh parsley. Allow the sauce to simmer for about 3-5 minutes, stirring until it thickens and becomes velvety in texture.

Step 4: Combine & Serve
Return the cooked chicken to the skillet, then add the prepared zucchini noodles into the Alfredo sauce. Toss everything together gently, ensuring the zucchini noodles are well coated in the creamy sauce. Let it heat for another minute or two, making sure the zucchini noodles warm through without becoming mushy. Serve your Simple Chicken Zucchini Alfredo Pasta immediately, garnished with extra Parmesan and parsley for a delightful finish.

How to Store and Freeze Zucchini Noodle Chicken Alfredo

Fridge: Store leftovers in an airtight container for up to 3 days. Reheat gently on the stove or microwave, adding a splash of cream to maintain the sauce’s richness.

Freezer: To freeze, transfer cooled portions into freezer-safe bags or containers, ensuring they’re tightly sealed. They can be stored for up to 2 months. Thaw in the fridge overnight before reheating.

Reheating: For the best results, reheat in a skillet over medium-low heat. Stir frequently and add a little cream or broth to revive the creamy texture of your Zucchini Noodle Chicken Alfredo.

Simple Chicken Zucchini Alfredo Pasta Variations

Feel free to customize and elevate this delicious dish in several exciting ways!

  • Dairy-Free: Substitute heavy cream with coconut cream and Parmesan with nutritional yeast for a creamy, dairy-free version.
    This twist allows you to enjoy the rich flavors without compromising on dietary preferences.

  • Veggie Boost: Add in fresh spinach or colorful bell peppers for a nutrient-packed, vibrant meal.
    Not only does this enhance flavor, but it also adds an appealing visual element to your plate!

  • Protein Change: Swap chicken for shrimp or turkey for a delightful new take on this classic dish.
    Each protein brings unique flavors that can add variety to your weekly menu.

  • Herbal Twist: Use fresh basil or oregano instead of parsley to infuse the dish with fragrant, Italian-inspired herbs.
    This small change makes a big difference, transforming the flavor profile entirely!

  • Heat Things Up: Add a pinch of red pepper flakes to the sauce for a spicy kick that complements the creaminess.
    The heat can really elevate the dish and awaken your taste buds in a wonderful way.

  • Zucchini Medley: Blend in other spiralized veggies, such as carrots or sweet potatoes, for an exciting blend of textures.
    This not only makes it colorful but also increases nutritional value and taste!

  • Saucy Affair: Double up on the Alfredo sauce for an even richer, creamier experience that lovers of comfort food will adore.
    More sauce means more indulgence—perfect for those cozy, indulgent evenings!

For more delicious recipes that can satisfy your craving for homemade goodness, don’t forget to check out my Crispy Chilli Chicken Takeout or a quick and simple dish like Sizzling Chicken Pepper to spice up your weeknight dinners.

Tips for the Best Simple Chicken Zucchini Alfredo Pasta

  • Pat Dry Zucchini: After microwaving zucchini noodles, pat them dry to prevent excess moisture from diluting your Alfredo sauce.

  • Don’t Overcook: Keep zucchini noodles slightly firm when mixing them in; overcooking leads to a mushy texture that detracts from the dish.

  • Season Well: Adjusting the kosher salt and black pepper to your liking is crucial; a well-seasoned dish enhances flavors and improves the overall experience.

  • Double the Sauce: Make extra Alfredo sauce to save for later; it’s a versatile addition to other meals and makes weekday cooking a breeze.

  • Add Variety: Feel free to customize your Simple Chicken Zucchini Alfredo Pasta by incorporating veggies like spinach or bell peppers for added nutrition and flavor.

Make Ahead Options

These Simple Chicken Zucchini Alfredo Pasta are perfect for meal prep enthusiasts! You can spiralize the zucchini and sauté the chicken up to 24 hours in advance. Simply store the zucchini noodles and cooked chicken separately in airtight containers in the refrigerator. To maintain quality, pat the zucchini dry after cooking to avoid excess moisture. When you’re ready to enjoy this comforting dish, reheat the chicken and then combine it with the Alfredo sauce and zucchini noodles in a skillet for just a few minutes. This way, you’ll have a delicious, homemade meal ready in no time, with all the flavors intact and just as delicious!

What to Serve with Zucchini Noodle Chicken Alfredo

Transform your delightful dish into a full meal experience with these perfect pairings that balance flavors and textures.

  • Garlic Bread: A warm, buttery garlic bread is a classic companion, ideal for sopping up that creamy Alfredo sauce.

  • Simple Green Salad: A fresh salad filled with crisp greens, cherry tomatoes, and a zesty vinaigrette adds brightness and crunch, complementing the dish perfectly.

  • Roasted Vegetables: Roasting seasonal vegetables like asparagus or bell peppers brings out their natural sweetness, creating a delightful contrast to the richness of the Alfredo.

  • Steamed Broccoli: Tender steamed broccoli not only adds vibrant color but also provides a nutritious side that pairs wonderfully with the creamy texture of the pasta.

  • Chardonnay: A chilled glass of Chardonnay enhances the meal with its crisp flavors, harmonizing the cheese and cream beautifully.

  • Lemon Sorbet: For a refreshing dessert, serve lemon sorbet to cleanse the palate after your rich main course, leaving everyone feeling light and satisfied.

Zucchini Noodle Chicken Alfredo Recipe FAQs

How do I choose the right zucchini for this recipe?
Absolutely! Look for firm, shiny zucchini with no dark spots or blemishes. Medium-sized zucchinis are often the sweetest and best for spiralizing. If you can, pick organic ones, as they tend to have a more robust flavor.

What’s the best way to store leftover Zucchini Noodle Chicken Alfredo?
You can store leftovers in an airtight container in the refrigerator for up to 3 days. Be sure to reheat gently on the stove or microwave, adding a splash of cream to keep the sauce creamy and prevent dryness.

Can I freeze Zucchini Noodle Chicken Alfredo?
Yes! To freeze, allow the dish to cool completely and then transfer it to freezer-safe bags or containers, sealing tightly. It can be stored for up to 2 months. When ready to eat, thaw it overnight in the refrigerator before reheating it.

What if my sauce doesn’t thicken properly?
Very often! If your sauce doesn’t thicken, try simmering it on low heat for a few more minutes while stirring frequently. If that doesn’t work, you can whisk in a cornstarch slurry (1 tablespoon cornstarch mixed with 1 tablespoon of cold water) to help it thicken.

Is this recipe suitable for my family if someone has a dairy allergy?
Certainly! For a dairy-free option, simply substitute the heavy cream with coconut cream and replace the Parmesan cheese with nutritional yeast, which gives a cheesy flavor without the dairy. It’s a fantastic alternative that allows everyone to enjoy the dish!

How can I make sure my zucchini noodles aren’t mushy?
Great question! To avoid mushy zucchini noodles, pat them dry after microwaving to reduce moisture. Also, cook them just until they’re tender—this should take only 1-2 minutes once combined with the sauce—to maintain a bit of firmness.

Creamy Zucchini Noodle Chicken Alfredo

Savor Simple Chicken Zucchini Alfredo Pasta Tonight

Enjoy a guilt-free, low-carb dinner with this Simple Chicken Zucchini Alfredo Pasta recipe that combines zucchini noodles and creamy Parmesan sauce.
Prep Time 10 minutes
Cook Time 25 minutes
Total Time 35 minutes
Servings: 4 servings
Course: Pasta
Cuisine: Italian
Calories: 450

Ingredients
  

For the Zucchini Noodles
  • 3 medium Zucchini spiralized or thinly sliced
For the Chicken
  • 2 pieces Chicken Breasts boneless, skinless, thinly sliced
  • 2 tablespoons Butter for sautéing
  • to taste Kosher Salt enhances flavor
  • to taste Black Pepper freshly ground
  • 3 cloves Garlic minced
For the Alfredo Sauce
  • 0.75 cup Heavy Cream for the creamy base
  • 1 cup Parmesan Cheese shredded, keep some extra for garnish
  • 2 tablespoons Fresh Parsley chopped

Equipment

  • Large skillet
  • microwave-safe dish
  • Knife
  • Cutting board

Method
 

Step-by-Step Instructions
  1. Begin by spiralizing or thinly slicing the 3 medium zucchinis into noodle-shaped pieces. To remove excess moisture, place the zucchini in a microwave-safe dish and heat them on high for 1-2 minutes. After microwaving, drain any liquid to prevent a watery sauce.
  2. In a large skillet over medium heat, melt 2 tablespoons of butter until it bubbles gently. Add the thinly sliced chicken breasts, and season with kosher salt and black pepper to taste. Sauté the chicken for about 7 minutes, stirring occasionally, until golden brown and fully cooked. Remove the chicken from the skillet and set it aside.
  3. In the same skillet, add ¾ cup of heavy cream and bring it to a gentle boil while stirring. Once bubbling, reduce heat to low and whisk in 1 cup of shredded Parmesan cheese and 2 tablespoons of chopped parsley. Allow to simmer for 3-5 minutes until thickened.
  4. Return the cooked chicken to the skillet, then add the prepared zucchini noodles into the Alfredo sauce. Toss everything together gently, ensuring the noodles are well coated. Heat for another minute or two, serve immediately garnished with extra Parmesan and parsley.

Nutrition

Serving: 1servingCalories: 450kcalCarbohydrates: 10gProtein: 36gFat: 30gSaturated Fat: 15gPolyunsaturated Fat: 1gMonounsaturated Fat: 10gCholesterol: 100mgSodium: 600mgPotassium: 500mgFiber: 3gSugar: 5gVitamin A: 600IUVitamin C: 30mgCalcium: 400mgIron: 2mg

Notes

Pat dry zucchini noodles after microwaving to prevent excess moisture. Adjust seasoning to taste and don't overcook the zucchini noodles to maintain their texture. Consider doubling the sauce for future use.

Tried this recipe?

Let us know how it was!

Mouthwatering Easy Banana Cake with Creamy Frosting Delight

As I stood in my kitchen, the sweet aroma of baked bananas mingled with hints of cinnamon and vanilla, I knew I had stumbled upon something special. This Easy Banana Cake, crafted from ripened bananas, promises a delightful moisture that transforms any gathering into a celebration. With the added creamy touch of a rich cream cheese frosting, it’s not just an ordinary dessert—it’s a showstopper! Designed to be both effortless and incredibly rewarding, this cake is your go-to recipe for impromptu get-togethers or cozy nights in. Plus, it’s a fantastic way to use up those overripe bananas that you might otherwise let go to waste. Curious to see how the perfect slice can brighten your day? Let’s dive in!

Why is this Banana Cake a Must-Try?

Moisture is key: Made with ripe bananas, this cake offers an enticing moistness that’s hard to resist. Simplicity shines through: With straightforward steps, it’s perfect for bakers of all skill levels. Delightful flavor: The combination of sweet bananas and tangy cream cheese frosting takes dessert to the next level. Versatile for any occasion: Whether it’s a casual family gathering or a special event, this cake fits right in. Perfect for leftovers: Store it in the fridge, and it may even taste better the next day—ideal for those who love a quick and delicious treat!

Easy Banana Cake Ingredients

• Gather your ingredients and let’s start crafting this delightful treat!

For the Cake

  • Ripe Bananas (3 medium; 1 ¼ cups mashed) – These provide natural sweetness and moisture; use brown-speckled bananas for maximum flavor.
  • Butter (6 tablespoons; melted and cooled) – Adds richness and moisture; you can substitute with vegetable oil if necessary.
  • All-Purpose Flour (1 ½ cups; spooned and leveled) – The cake’s structure; gluten-free flour can be used as a substitute.
  • Granulated Sugar (1/4 cup) – Sweetens the cake; can be replaced with coconut sugar for a healthier version.
  • Baking Soda (1 teaspoon) – Provides leavening for that perfect rise.
  • Fine Sea Salt (1/4 teaspoon) – Balances sweetness and enhances flavor.
  • Ground Cinnamon (1/4 teaspoon) – Adds warmth and depth to the cake’s flavor.
  • Brown Sugar (3 tablespoons) – Contributes to moisture and a deeper flavor profile.
  • Vegetable Oil (2 tablespoons) – Adds moisture and acts as a binding agent; can be substituted with melted coconut oil.
  • Vanilla Extract (2 teaspoons) – Enhances overall flavor, making it more pronounced.
  • Eggs (2 large) – Provide structure and help bind all the ingredients together.
  • Sour Cream (1/4 cup) – Adds moisture and a slight tang; can be replaced with Greek yogurt for a similar effect.

For the Frosting

  • Cream Cheese (4.5 ounces; room temperature) – The base for the frosting, providing creaminess and flavor that pairs perfectly with a banana cake.
  • Butter (6 tablespoons; room temperature) – A key ingredient in the frosting that adds richness and body.
  • Powdered Sugar (1 ½ cups; sifted if lumpy) – Sweetens the frosting and gives it a light, airy texture.

With these Easy Banana Cake ingredients on hand, you’ll be ready to create a dessert that’s not only scrumptious but also a joy to share!

Step‑by‑Step Instructions for Easy Banana Cake

Step 1: Preheat and Prepare
Begin by preheating your oven to 350°F (180°C). While the oven heats, grease a 9×9-inch square baking pan with butter or line it with parchment paper for easy removal later. This step is crucial to ensure your Easy Banana Cake doesn’t stick to the pan and bakes evenly.

Step 2: Mix Dry Ingredients
In a large mixing bowl, whisk together 1 ½ cups of all-purpose flour, ¼ cup of granulated sugar, 1 teaspoon of baking soda, ¼ teaspoon of fine sea salt, and ¼ teaspoon of ground cinnamon. Stir until well combined, ensuring no lumps remain. This mixture creates the base for your cake, contributing to its perfect structure and flavor.

Step 3: Combine Wet Ingredients
In another bowl, mash 3 medium ripe bananas until smooth, then add 3 tablespoons of brown sugar, 2 tablespoons of vegetable oil, 2 teaspoons of vanilla extract, and 2 large eggs. Mix in ¼ cup of sour cream until everything is well blended. This combination of flavors is what makes the Easy Banana Cake so moist and delicious.

Step 4: Bring It All Together
Pour the banana mixture into the bowl with the dry ingredients and gently fold in 6 tablespoons of melted butter. Mix until just combined, being careful not to overmix. You want the batter to be slightly lumpy; this retains the cake’s tender texture.

Step 5: Bake the Cake
Transfer the batter into your prepared baking pan, smoothing the top with a spatula. Place it in the preheated oven and bake for 25 to 35 minutes, or until the cake is golden brown and springs back when gently pressed in the center. A toothpick inserted into the center should come out clean, signifying it’s done.

Step 6: Cool the Cake
After baking, let the cake cool in the pan for 10 minutes. This step allows it to set properly. Carefully turn it out onto a wire cooling rack to cool completely before frosting, ensuring you have the best texture and flavor for your Easy Banana Cake.

Step 7: Prepare the Frosting
For the luscious frosting, beat together 4.5 ounces of room temperature cream cheese and 6 tablespoons of softened butter until smooth and creamy. Gradually mix in 1 ½ cups of sifted powdered sugar until fluffy and well combined. This rich frosting not only complements the banana cake but elevates it to a new level of indulgence.

Step 8: Frost the Cake
Once your Easy Banana Cake is completely cool, spread the cream cheese frosting evenly across the top. Use a spatula to create smooth, decadent layers. The frosting adds a beautiful finish and an irresistible creaminess that balances the banana flavor perfectly.

Expert Tips for Easy Banana Cake

  • Choose Ripe Bananas: Use bananas with plenty of brown spots; they provide optimal sweetness and moisture for your cake.
  • Avoid Overmixing: Mix the batter just until combined. Overmixing can lead to a dense cake instead of the delightful lightness you’re aiming for.
  • Cool Completely: Ensure the cake cools fully before frosting to prevent the frosting from melting and sliding off, preserving that beautiful presentation.
  • Room Temperature Ingredients: Use room temperature cream cheese and butter for the frosting to ensure a smooth and creamy texture without lumps.
  • Storage Secrets: Keep your Easy Banana Cake covered in an airtight container in the fridge. This not only extends its shelf life but can enhance flavor as it sits.

Make Ahead Options

These Easy Banana Cakes are a dream for meal prep enthusiasts! You can mash the bananas and mix the wet ingredients up to 24 hours in advance; just store them in the refrigerator to maintain their freshness. Additionally, the cake itself can be baked and cooled, then wrapped tightly and refrigerated for up to 3 days—this will allow the flavors to develop and intensify. When it’s time to serve, simply bring the cake to room temperature, prepare the creamy frosting, and frost your cake for a delightful finish. This way, you’ll have a beautifully moist dessert ready for any occasion with minimal effort!

What to Serve with Easy Banana Cake

Imagine the sweet aroma of your kitchen mixing with comforting side dishes, creating a delightful feast that complements your cake perfectly.

  • Creamy Mashed Potatoes: The buttery, smooth texture offers a savory balance to the sweet cake, making it an unexpected pairing that delights the palate.

  • Fresh Fruit Salad: A light, vibrant mix of seasonal fruits adds refreshing flavors and textures, brightening up your dessert table beautifully.

  • Spiced Chai Tea: Warm and aromatic, this beverage enhances the cake’s cinnamon notes, offering a cozy drink to sip alongside your slice.

  • Whipped Greek Yogurt: This healthy alternative packs a tangy edge that contrasts deliciously with the cake’s sweetness, perfect for a lighter side option.

  • Caramel Sauce: Drizzled over your Easy Banana Cake, this adds an indulgent and rich sweetness that elevates the entire dessert experience.

  • Chocolate Chip Cookies: For an inviting dessert spread, these classic treats offer a nostalgic touch that will satisfy cookie lovers of all ages.

Pairing these delightful options with your Easy Banana Cake will create a well-rounded meal that turns any gathering into a memorable feast!

How to Store and Freeze Easy Banana Cake

Room Temperature: Store the cake in an airtight container at room temperature for up to 2 days, keeping it fresh and moist for immediate enjoyment.

Fridge: This Easy Banana Cake can be stored in the refrigerator for up to 5 days. Cover it well to prevent it from drying out and absorb other odors.

Freezer: For longer storage, freeze slices wrapped tightly in plastic wrap and then placed in a zip-top bag for up to 3 months. Thaw in the fridge overnight before serving.

Reheating: To enjoy a slice warm, gently reheat in the microwave for 10-15 seconds. Just enough time to bring back that fresh-baked goodness without overdoing it!

Easy Banana Cake: Customization Options

Feel free to explore delightful twists and turns with this Easy Banana Cake recipe, enhancing flavors and textures to suit your taste buds!

  • Gluten-Free Flour: Swap out all-purpose flour with a gluten-free blend to cater to dietary restrictions without sacrificing taste or texture.
  • Coconut Sugar: Replace granulated sugar with coconut sugar for a hint of caramel flavor and a healthier alternative.
  • Nutty Crunch: Add 1/2 cup of chopped walnuts or pecans to the batter for a delightful crunch and rich, nutty flavor that complements the moist cake beautifully.
  • Chocolate Lovers: Stir in 1/2 cup of chocolate chips into the batter before baking. The melted chocolate adds a sumptuous, sweet contrast to the banana flavor.
  • Spicy Kick: Incorporate 1/4 teaspoon of nutmeg along with the ground cinnamon for an extra layer of warmth and spiciness to enhance the cake’s flavor profile.
  • Dairy-Free Option: Use dairy-free cream cheese and butter substitutes for the frosting, making this recipe suitable for those with lactose intolerance.
  • Vanilla Almond: Substitute vanilla extract with almond extract for a unique flavor twist that adds a delightful nutty essence to your cake.
  • Fruity Addition: Consider folding in 1 cup of blueberries or raspberries into the batter for a delicious fruity burst that pairs wonderfully with bananas.

Now you’re equipped to personalize your Easy Banana Cake! And if you’re in the mood for another sweet adventure, be sure to check out my Honeybun Carrot Cake for a deliciously unique twist!

Easy Banana Cake Recipe FAQs

What type of bananas should I use for the best flavor?
Absolutely use ripe bananas! Look for medium-sized bananas that have brown spots all over; this indicates they are sweet and fully developed in flavor. Overripe bananas are the star of this cake, bringing out the natural sweetness and moisture that makes it so delectable.

How should I store leftover Easy Banana Cake?
To keep your cake fresh and moist, store it in an airtight container in the refrigerator for up to 5 days. I often find that the flavors develop and intensify after a day or two, making the cake even more irresistible!

Can I freeze leftover cake?
Yes, you can! To freeze your Easy Banana Cake, slice it up and wrap each piece tightly in plastic wrap, followed by placing them in a zip-top freezer bag. This way, it can stay fresh for up to 3 months. When ready to enjoy, just thaw in the fridge overnight and savor the flavors once again.

What if my cake comes out too dense?
If your cake turns out dense, it might be due to overmixing the batter or not having the bananas ripe enough. Aim to mix the wet and dry ingredients just until combined to maintain a light texture. In terms of bananas, remember—brown spots are your friend!

Is this cake suitable for people with allergies?
The Easy Banana Cake contains dairy and gluten, so it may not be ideal for those with allergies to these ingredients. However, you can modify it! Use a gluten-free flour blend and dairy-free cream cheese to create a version that works for your dietary needs, making it inclusive for everyone to enjoy.

How long does the cream cheese frosting last?
The cream cheese frosting can last in the refrigerator for about 5 days, just like the cake itself. Keep it in an airtight container to prevent it from absorbing other flavors in your fridge. If you have any leftover frosting, you might also use it as a delicious dip for fruits or to spread on toast!

Easy Banana Cake

Mouthwatering Easy Banana Cake with Creamy Frosting Delight

This Easy Banana Cake boasts delightful moisture and creamy frosting, making it the perfect dessert for any occasion.
Prep Time 15 minutes
Cook Time 30 minutes
Cooling Time 10 minutes
Total Time 55 minutes
Servings: 8 slices
Course: Dessert
Cuisine: American
Calories: 320

Ingredients
  

For the Cake
  • 3 medium Ripe Bananas 1 ¼ cups mashed
  • 6 tablespoons Butter melted and cooled
  • 1.5 cups All-Purpose Flour spooned and leveled
  • 0.25 cup Granulated Sugar
  • 1 teaspoon Baking Soda
  • 0.25 teaspoon Fine Sea Salt
  • 0.25 teaspoon Ground Cinnamon
  • 3 tablespoons Brown Sugar
  • 2 tablespoons Vegetable Oil
  • 2 teaspoons Vanilla Extract
  • 2 large Eggs
  • 0.25 cup Sour Cream
For the Frosting
  • 4.5 ounces Cream Cheese room temperature
  • 6 tablespoons Butter room temperature
  • 1.5 cups Powdered Sugar sifted if lumpy

Equipment

  • 9x9-inch baking pan
  • Mixing bowls
  • whisk
  • spatula
  • cooling rack

Method
 

Step-by-Step Instructions for Easy Banana Cake
  1. Preheat your oven to 350°F (180°C) and grease a 9x9-inch baking pan.
  2. In a large mixing bowl, whisk together the dry ingredients: flour, granulated sugar, baking soda, sea salt, and ground cinnamon.
  3. In another bowl, mash ripe bananas, then mix in brown sugar, vegetable oil, vanilla extract, eggs, and sour cream.
  4. Pour the banana mixture into the dry ingredients and fold in melted butter until just combined.
  5. Transfer the batter to the prepared baking pan and bake for 25 to 35 minutes until golden and a toothpick comes out clean.
  6. Let the cake cool in the pan for 10 minutes before turning it onto a cooling rack.
  7. For the frosting, beat cream cheese and butter until smooth, then gradually add powdered sugar until fluffy.
  8. Once the cake is completely cool, frost it evenly with the cream cheese frosting.

Nutrition

Serving: 1sliceCalories: 320kcalCarbohydrates: 45gProtein: 4gFat: 15gSaturated Fat: 9gPolyunsaturated Fat: 1gMonounsaturated Fat: 4gCholesterol: 50mgSodium: 150mgPotassium: 150mgFiber: 2gSugar: 20gVitamin A: 300IUVitamin C: 2mgCalcium: 30mgIron: 1mg

Notes

Store in an airtight container. For longer storage, freeze slices wrapped tightly.

Tried this recipe?

Let us know how it was!

Crispy Chicken Caesar Sandwich That’s Bursting with Flavor

As I watched the golden chicken cutlets sizzle in the pan, I couldn’t help but feel a wave of nostalgia for my favorite childhood meals. The Crispy Chicken Caesar Sandwich merges the timeless appeal of a classic salad with the joy of handheld convenience. With its crunchy coating, fresh romaine lettuce, and a creamy homemade dressing, this dish makes for an irresistible break from fast food. It’s perfect for a quick lunch or a relaxed dinner—whether you’re feeding the family or just treating yourself. Plus, you can whip it up in no time, making it a fantastic choice for busy weeknights. Who’s ready to indulge in the satisfying crunch and flavor of this delightful sandwich? Let’s dive in!

Why is this sandwich a must-try?

Crunchy Perfection: The golden-brown chicken cutlets provide a satisfying crunch that pairs beautifully with the creamy dressing and crisp lettuce.

Quick & Easy: Perfect for busy weeknights, this recipe is straightforward and can be made in under 30 minutes—ideal for kids and adults alike!

Homemade Goodness: With a simple homemade Caesar dressing, you’ll skip the store-bought options while adding fresh, robust flavors to your meal.

Versatile Delight: Feel free to experiment with proteins and greens, swapping chicken for grilled shrimp or adding toppings like crispy bacon or avocado.

Total Comfort Food: A classic Caesar salad gets a fun twist, making it a hit with everyone—perfect for family dinners or casual get-togethers. If you’re in the mood for more delicious chicken options, check out my Southern Fried Chicken or Chicken Avocado Melt!

Crispy Chicken Caesar Sandwich Ingredients

For the Caesar Dressing
Full-fat mayonnaise – Adds creaminess to the dressing.
Greek yogurt – Provides tang and reduces overall calories.
Dijon mustard – Injects a zesty kick into the flavor profile.
Worcestershire sauce – Enhances depth of flavor, elevating the dressing.
Lemon juice – Brightens up the dressing with a refreshing zest.
Freshly grated Parmesan cheese – Contributes richness; swap with Grana Padano for a milder taste.
Minced garlic – Adds savory depth; adjust for your garlic preference.
Black pepper – Simple seasoning that enhances overall flavor.
Sea salt – Essential for seasoning and balancing flavors.

For the Chicken Cutlets
Chicken cutlets – The main protein component; tender and juicy.
Sea salt – Crucial for seasoning the chicken evenly.
Ground black pepper – Another layer of seasoning to enhance flavor.
Oil for frying – Choose a high smoke point oil for the perfect fry.

For the Flour Mixture
All-purpose flour – Provides a base for the chicken’s crunchy coating.
Salt – Enhances the flavor of the breading.
Smoked paprika – Adds a subtly smoky flavor to the crust.

For the Egg Mixture
Eggs – Acts as a binding agent to help the breadcrumbs stick.
Salt – A must for seasoning the breading.

For the Breadcrumbs Mixture
Panko crumbs – Adds an extra crunch to the crispy coating.
Regular breadcrumbs – Contributes to the overall texture.
Dried parsley – For a touch of color and flavor.
Black pepper – Extra seasoning for the breadcrumbs.
Sea salt – Essential for flavor enhancement.
Dried oregano – Brings in an herbaceous note.
Garlic powder – Offers a hint of garlic flavor without the chunks.
Freshly grated Parmesan cheese – A final touch for buttery richness.

For the Assembly
Romaine lettuce – Offers freshness and crunch to the sandwich.
French baguettes – Holds everything together with a sturdy exterior, providing the perfect crunch.
Freshly grated Parmesan for topping – Adds a delightful finish and additional flavor.

Now, you’re all set with the ingredients for a delicious Crispy Chicken Caesar Sandwich! 🍽️

Step‑by‑Step Instructions for Crispy Chicken Caesar Sandwich

Step 1: Prepare the Caesar Dressing
In a mixing bowl, combine full-fat mayonnaise, Greek yogurt, Dijon mustard, Worcestershire sauce, lemon juice, freshly grated Parmesan cheese, minced garlic, black pepper, and sea salt. Whisk until smooth and creamy, ensuring all ingredients are well blended. Set aside a portion of the dressing to dress the romaine lettuce later. Refrigerate the remaining dressing until ready to use for the Crispy Chicken Caesar Sandwich.

Step 2: Season the Chicken Cutlets
Season the chicken cutlets generously with sea salt and freshly ground black pepper on both sides. If the cutlets are uneven in thickness, gently pound them using a meat mallet until they are about 1/2 inch thick. This ensures even cooking and tenderness. The perfectly seasoned chicken will enhance the flavors of your Crispy Chicken Caesar Sandwich.

Step 3: Set Up the Breading Station
Arrange three shallow plates side by side for breading. In the first plate, mix all-purpose flour with salt and smoked paprika. The second plate should contain beaten eggs and a pinch of salt. For the third plate, combine panko crumbs, regular breadcrumbs, dried parsley, black pepper, sea salt, dried oregano, garlic powder, and freshly grated Parmesan cheese. This setup will make breading the chicken efficient and fun!

Step 4: Heat the Oil
In a large frying pan, heat about 1/2 inch of oil over medium heat, ensuring it reaches a temperature of 175–180°C (350–360°F). You can test the oil by dropping a small piece of breadcrumb in it; if it sizzles, the oil is ready. This step is crucial for achieving the golden-brown and crispy texture of the chicken cutlets in your sandwich.

Step 5: Bread the Chicken Cutlets
Take each seasoned chicken cutlet and dredge it first in the flour mixture, coating both sides evenly. Next, dip it into the egg mixture, allowing any excess to drip off before transferring the cutlet to the breadcrumb mixture. Press the breadcrumbs onto the chicken to ensure a thick, crispy coating. Repeat this process with all the chicken cutlets.

Step 6: Fry the Chicken Cutlets
Carefully place the breaded chicken cutlets into the hot oil, frying in batches to avoid overcrowding the pan. Cook each cutlet for about 4-5 minutes on each side, or until they are golden brown and cooked through. The exterior should be crispy, and the chicken should reach an internal temperature of 75°C (165°F). Once done, transfer them to a wire rack to drain any excess oil.

Step 7: Assemble the Sandwich
Slice the French baguettes open and spread a generous layer of the reserved Caesar dressing on both cut sides. Place a crispy chicken cutlet on the bottom half of each baguette, adding a handful of dressed romaine lettuce for freshness and crunch. Sprinkle with extra Parmesan cheese before closing the sandwich. This assembly of the Crispy Chicken Caesar Sandwich creates a delightful balance of flavors and textures.

Step 8: Serve Immediately
Cut the sandwiches in half to make them easier to handle, and serve immediately while the chicken is still warm and crispy. Pair your Crispy Chicken Caesar Sandwich with crispy French fries or a refreshing side salad for a satisfying meal. Enjoy the warm flavors and delightful crunch as you relish this delicious handheld twist on a classic salad!

Crispy Chicken Caesar Sandwich Variations

Feel free to get creative with your Crispy Chicken Caesar Sandwich and make it your own with these fun variations!

  • Grilled Shrimp: Swap the chicken for grilled shrimp to add a sweet and smoky flavor. The juicy shrimp complements the creamy dressing perfectly!

  • Tofu Twist: For a vegetarian option, use marinated tofu instead of chicken. A crispy, golden tofu cutlet provides a delicious twist without sacrificing flavor.

  • Kale Greens: Replace romaine lettuce with kale for an earthy note. It adds a slightly different texture while still being crunchy and satisfying.

  • Bacon Lover’s Delight: Crispy bacon strips make a delightful addition! Layer them in with the chicken for an extra burst of flavor and crunch.

  • Avocado Boost: Add creamy avocado slices to each sandwich. The richness of the avocado pairs beautifully with the crispy chicken and tangy dressing.

  • Tomato Slice: Incorporate fresh tomato slices for added juiciness and color. A delicious way to elevate your sandwich with freshness!

  • Spicy Kick: Spice things up by adding sliced jalapeños or a drizzle of hot sauce to take your flavor experience to a whole new level.

  • Herbed Flavor: Mix fresh herbs like basil or cilantro into your Caesar dressing. It brightens the taste and adds a delightful aromatic quality to your sandwich.

For a spin on other chicken recipes, check out my succulent Korean Fried Chicken or for something quick and easy, try the Chilli Chicken Takeout!

How to Store and Freeze Crispy Chicken Caesar Sandwich

Fridge: Store leftover components separately in airtight containers. The chicken and dressing can last up to 3 days, while the romaine lettuce should be consumed within 1-2 days for freshness.

Freezer: If you have extra breaded chicken cutlets, freeze them in a single layer on a baking sheet before transferring to a zip-top bag. They can be frozen for up to 3 months.

Reheating: To reheat, place frozen chicken cutlets on a baking sheet and bake at 200°C (400°F) for 20-25 minutes, or until heated through and crispy. Assemble the sandwich with fresh ingredients just before serving for the best taste.

Assembly Tip: Avoid pre-assembling the entire sandwich for storage, as the baguette can become soggy. Instead, store ingredients separately and assemble when ready to enjoy your Crispy Chicken Caesar Sandwich!

Expert Tips for the Crispy Chicken Caesar Sandwich

  • Fresh Ingredients: Use fresh romaine lettuce and good quality chicken for the best flavor and texture in your Crispy Chicken Caesar Sandwich.

  • Prevent Sogginess: Assemble the sandwich just before serving to keep the bread crunchy and lettuce crisp.

  • Oil Temperature: Maintain the oil at the right temperature (175–180°C or 350–360°F) for perfectly golden, crispy chicken cutlets without greasiness.

  • Baking Option: For a healthier twist, brush the breaded chicken with oil and bake at 200°C (400°F) for 20-25 minutes, flipping halfway through.

  • Meat Thermometer: Always check the chicken’s internal temperature; it should reach 75°C (165°F) for safety and optimal juiciness.

Make Ahead Options

These Crispy Chicken Caesar Sandwiches are perfect for meal prep enthusiasts! You can prepare the Caesar dressing up to 3 days in advance, storing it in an airtight container in the refrigerator to keep it fresh and flavorful. The chicken cutlets can be breaded and fried up to 24 hours ahead; simply let them cool completely before refrigerating in a single layer to maintain their crispiness. When you’re ready to serve, just reheat the cutlets in the oven at 180°C (350°F) for about 10-15 minutes until warmed through. Assemble the sandwiches with dressed romaine and baguettes just before serving to ensure everything stays fresh and delicious. This way, you’ll enjoy restaurant-quality results with minimal effort, saving you precious time on busy weeknights!

What to Serve with Crispy Chicken Caesar Sandwich

Looking to create the perfect meal experience alongside your sandwich? Let’s complement the richness with delightful additions that elevate each bite.

  • Crispy French Fries:
    These golden delights add a perfect crunch and provide a satisfying contrast to the sandwich’s textures, making it a classic pairing.

  • Garlic Bread:
    Toasted with butter and garlic, it serves as a delicious side that echoes the sandwich’s Italian-inspired flavors. The crispy exterior and soft interior will have you reaching for seconds!

  • Caesar Side Salad:
    Enhance the Caesar theme with a simple side salad featuring romaine, croutons, and dressing. It brings a refreshing yet familiar taste that matches your Crispy Chicken Caesar Sandwich perfectly.

  • Coleslaw:
    The creamy, tangy coleslaw introduces a delightful crunch and sweetness, complementing the savory chicken and adding a refreshing touch to the meal.

  • Roasted Veggies:
    Seasoned and roasted vegetables like asparagus or bell peppers provide a colorful and nutritious side, rounding out the meal with vibrant flavors and textures.

  • Iced Lemonade:
    Cool and refreshing, this drink cleanses the palate and balances the rich flavors of the sandwich. A bright, zesty taste makes it an ideal companion for your meal.

  • Sweet Potato Wedges:
    These slightly sweet, crispy wedges offer a delicious twist on traditional fries, packing in some extra nutrients and flavor to complement the savory elements of the sandwich.

  • Chocolate Chip Cookies:
    End your meal on a sweet note with warm, gooey chocolate chip cookies. Their soft texture contrasts beautifully with the crispy sandwich, making for a comforting finish.

Each of these pairings enhances the enjoyment of your Crispy Chicken Caesar Sandwich, creating a satisfying and memorable feast.

Crispy Chicken Caesar Sandwich Recipe FAQs

How should I select ripe ingredients for my sandwich?
Absolutely! For the best flavor, choose fresh romaine lettuce that is crisp and vibrant green. When selecting your chicken, look for cutlets that are plump and have a creamy color. If you’re opting for a baguette, pick one that’s crusty on the outside, with no dark spots or signs of staleness. Avoid mayonnaise or yogurt that’s nearing its expiration date to ensure your dressing is fresh and tasty!

What is the best way to store leftovers?
Very! Store leftover chicken cutlets and Caesar dressing separately in airtight containers in the fridge. The chicken will stay fresh for up to 3 days, while the dressing can last about the same. However, plan to eat the romaine lettuce within 1-2 days for optimal crunch. Avoid pre-assembling the sandwich to prevent sogginess—keep everything separate until you’re ready to enjoy!

Can I freeze the crispy chicken?
Absolutely! If you have extra breaded chicken cutlets, freeze them in a single layer on a baking sheet for an hour to firm them up. Then, transfer to a zip-top freezer bag and store for up to 3 months. When you’re ready to eat, simply bake them at 200°C (400°F) for 20-25 minutes or until heated through and crispy. This makes meal prep a breeze!

What should I do if my chicken isn’t cooking evenly?
Oh no! If you find your chicken cutlets are cooking unevenly, it might be due to the thickness. Gently pound them to an even 1/2 inch thickness before seasoning. Additionally, make sure the oil is at the right temperature—around 175–180°C (350–360°F) is ideal. If they’re still not crispy, consider frying in smaller batches to maintain the oil temperature throughout the cooking process. This will ensure that every cutlet gets that perfect golden-brown crunch!

Are there any dietary concerns I should be aware of?
Very! If you or your guests have allergies, be sure to check all ingredients, especially for the dressing and breadcrumbs, which may contain gluten or eggs. For a gluten-free version, swap the bread with gluten-free options or use a lettuce wrap! Additionally, if you’re preparing this for pets, avoid sharing due to the garlic in the dressing, as it can be harmful to them. Always better to be safe!

Crispy Chicken Caesar Sandwich

Crispy Chicken Caesar Sandwich That's Bursting with Flavor

This Crispy Chicken Caesar Sandwich is a delightful handheld twist on a classic salad, perfect for a quick lunch or relaxed dinner.
Prep Time 15 minutes
Cook Time 15 minutes
Total Time 30 minutes
Servings: 4 sandwiches
Course: Lunch
Cuisine: American
Calories: 600

Ingredients
  

For the Caesar Dressing
  • 1 cup full-fat mayonnaise
  • 1/2 cup Greek yogurt provides tang
  • 1 tablespoon Dijon mustard injects zesty kick
  • 1 teaspoon Worcestershire sauce enhances flavor
  • 2 tablespoons lemon juice brightens dressing
  • 1/4 cup freshly grated Parmesan cheese richness
  • 1 clove minced garlic adjust for preference
  • 1 teaspoon black pepper to taste
  • 1 teaspoon sea salt for seasoning
For the Chicken Cutlets
  • 4 pieces chicken cutlets main protein
  • 1 teaspoon sea salt for seasoning
  • 1 teaspoon ground black pepper to taste
  • 1 cup oil for frying high smoke point
For the Flour Mixture
  • 1 cup all-purpose flour crunchy coating base
  • 1 teaspoon salt enhances flavor
  • 1 teaspoon smoked paprika adds smoky flavor
For the Egg Mixture
  • 2 large eggs binding agent
  • 1 teaspoon salt for seasoning
For the Breadcrumbs Mixture
  • 1 cup Panko crumbs extra crunch
  • 1/2 cup regular breadcrumbs for texture
  • 1 tablespoon dried parsley
  • 1 teaspoon black pepper to taste
  • 1 teaspoon sea salt for flavor
  • 1 teaspoon dried oregano herbaceous note
  • 1 teaspoon garlic powder for garlic flavor
  • 1/4 cup freshly grated Parmesan cheese for richness
For the Assembly
  • 4 leaves Romaine lettuce freshness and crunch
  • 2 pieces French baguettes holds everything together
  • 1/4 cup freshly grated Parmesan for topping delightful finish

Equipment

  • Mixing Bowl
  • Frying pan
  • Meat mallet
  • Shallow plates
  • Wire rack

Method
 

Step-by-Step Instructions
  1. In a mixing bowl, combine full-fat mayonnaise, Greek yogurt, Dijon mustard, Worcestershire sauce, lemon juice, freshly grated Parmesan cheese, minced garlic, black pepper, and sea salt. Whisk until smooth and creamy, and refrigerate until ready.
  2. Season the chicken cutlets with sea salt and freshly ground black pepper on both sides. Pound uneven cutlets to 1/2 inch thick for even cooking.
  3. Set up a breading station with three shallow plates: flour mixture, egg mixture, and breadcrumb mixture.
  4. Heat about 1/2 inch of oil in a frying pan to 175–180°C (350–360°F). Use a breadcrumb test to check readiness.
  5. Dredge each seasoned chicken cutlet in flour, then egg, and finally in the breadcrumb mixture, ensuring an even coating.
  6. Fry the breaded chicken cutlets in hot oil until golden brown and cooked through, about 4-5 minutes per side. Drain on wire rack.
  7. Slice the French baguettes, spread reserved Caesar dressing, and layer with chicken cutlet and dressed romaine lettuce. Sprinkle with Parmesan.
  8. Cut the sandwiches in half and serve immediately while warm. Pair with fries or salad.

Nutrition

Serving: 1sandwichCalories: 600kcalCarbohydrates: 45gProtein: 30gFat: 30gSaturated Fat: 8gPolyunsaturated Fat: 3gMonounsaturated Fat: 5gCholesterol: 120mgSodium: 1000mgPotassium: 600mgFiber: 3gSugar: 2gVitamin A: 15IUVitamin C: 20mgCalcium: 15mgIron: 10mg

Notes

Store leftover components separately. Chicken and dressing can last up to 3 days; romaine lettuce should be consumed within 1-2 days.

Tried this recipe?

Let us know how it was!

Irresistible S’mores Hand Pies for Campfire Magic at Home

As I wandered through a sun-drenched summer afternoon, memories of campfire evenings danced in my mind, each one steered by the enchanting aroma of s’mores. It’s that nostalgic feeling I captured in my Irresistible S’mores Hand Pies, where gooey marshmallows, rich chocolate, and crunchy graham crackers meet a flaky pastry crust. What makes these delightful treats so special is their effortless preparation and portability—perfect for picnics or cozy evenings at home. Whether you’re serving them at a gathering or indulging as a late-night snack, these hand pies bring the spirit of outdoor gatherings right to your kitchen. Who could resist that sweet nostalgia while enjoying every warm, gooey bite? Dive in to discover how easy it is to make this campfire classic reimagined!

Why Are These Hand Pies Irresistible?

Simplicity at Its Finest: With just a few ingredients, you can whip up these delightful treats in no time.

Perfectly Portable: Ideal for on-the-go snacking, they make excellent companions for picnics or road trips.

Nostalgic Flavor: Every bite evokes the warmth of summer nights spent around a campfire, bonding over sweet s’mores.

Versatile Options: Feeling adventurous? Try swapping in peanut butter or adding a sprinkle of cinnamon for unique flavor twists.

Crowd-Pleasing Delight: Whether for a party or a cozy night in, these hand pies are sure to impress everyone, just like my Korean Fried Sticky treats!

Ideal Dipping Partner: Serve them warm with a side of chocolate sauce or marshmallow cream for extra indulgence.

Irresistible S’mores Hand Pie Ingredients

• To recreate these delightful hand pies, gather the following essential ingredients:

For the Crust

  • Refrigerated Pie Crust – Ensures a flaky and tender outside; consider using homemade for a personal touch.

For the Filling

  • Chopped Chocolate Bars – Adds that rich chocolatey goodness; semi-sweet or milk chocolate both work wonders.
  • Miniature Marshmallows – Provides that gooey texture we all love; you can substitute with chopped regular marshmallows if needed.
  • Crushed Graham Crackers – Delivers the iconic s’mores flavor and a bit of crunch; gluten-free options are available for those who need them.

For the Topping

  • Melted Salted Butter – Gives a golden sheen and flavor to the crust; brush on just before baking.
  • Additional Crushed Graham Crackers – Sprinkling these on top adds an extra crunch and enhances that s’mores experience.

Crafting these Irresistible S’mores Hand Pies is a journey back to summer nights! Enjoy each crispy bite that brings a smile to your face and warmth to your heart.

Step‑by‑Step Instructions for Irresistible S’mores Hand Pies

Step 1: Prep Crust
Begin by removing the refrigerated pie crusts from their packaging, allowing them to soften for about 10-15 minutes at room temperature. Once pliable, use a 3-inch cookie cutter to cut out circles from the dough, keeping the shapes uniform for even baking. Set these dough circles aside on a lightly floured surface as you prepare the filling for your Irresistible S’mores Hand Pies.

Step 2: Mix Filling
In a mixing bowl, combine chopped chocolate bars, miniature marshmallows, and half of the crushed graham crackers. Stir together gently but thoroughly until all ingredients are well-mixed. The resulting filling should be chunky yet cohesive, ready to bring a gooey surprise to each hand pie. This delectable concoction embodies the rich flavors that make s’mores so beloved!

Step 3: Assemble Pies
Take one of your dough circles and spoon approximately 1 tablespoon of the filling onto its center. Moisten the edges of the circle with a bit of water to ensure a good seal. Carefully place a second dough circle on top and press down firmly around the edges. Use a fork to crimp the edges, sealing in the delightful filling as you create your Irresistible S’mores Hand Pies. Repeat this process for all dough circles.

Step 4: Prepare for Baking
Once assembled, place the hand pies on a parchment-lined baking sheet. Brush the tops with melted salted butter to enhance their golden color and flavor. Before baking, sprinkle the remaining crushed graham crackers evenly over the buttered tops for an extra hint of that classic s’mores texture.

Step 5: Air Fry
Preheat your air fryer to 350°F, ensuring it’s hot enough for the best results. Lightly spray the basket with cooking oil to prevent sticking, then arrange the hand pies in a single layer, leaving enough space between them for even cooking. Air fry the pies for about 10 minutes, or until they are golden brown and the filling has begun to ooze slightly.

Step 6: Cool and Serve
Once your Irresistible S’mores Hand Pies are beautifully golden, carefully transfer them to a wire rack to cool for several minutes. This allows the filling to set slightly while ensuring they remain flaky. Serve warm for the best experience, and offer optional side sauces like chocolate or marshmallow cream for dipping, enhancing the nostalgic flavor of your delightful hand pies!

Storage Tips for Irresistible S’mores Hand Pies

  • Room Temperature: Keep hand pies in an airtight container at room temperature for up to 2 days to preserve freshness.
  • Fridge: For extended storage, refrigerate in a sealed container for up to 4 days; this helps maintain their gooey filling without compromising taste.
  • Freezer: Freeze both unbaked and baked hand pies. Wrap them tightly in plastic wrap and aluminum foil for up to 2 months.
  • Reheating: To revive baked hand pies, reheat in a preheated oven at 350°F for about 10 minutes to restore their crispiness and warm the filling.

Irresistible S’mores Hand Pies Variations

Explore the delightful ways to customize your S’mores Hand Pies and make them uniquely yours!

  • Nut Butter: Swap chocolate bars for creamy peanut butter for a deliciously different flavor. The nutty richness complements the marshmallows beautifully.

  • Spiced Up: Sprinkle in a hint of cinnamon or nutmeg for a warm aroma and distinctive flavor. This simple addition transforms the classic into something comforting and cozy.

  • Fresh Fruit Twist: Add sliced strawberries or bananas to your filling for a refreshing fruity kick. This not only enhances the sweetness but provides a burst of freshness.

  • Dairy-Free Delight: Substitute traditional chocolate with a dairy-free version to accommodate dietary needs without sacrificing taste. Dive into your hand pies without worry, enjoying every bite!

  • S’mores with a Kick: Incorporate a dash of cayenne pepper or chili powder for a surprising level of heat. It’s a fun twist that elevates the classic flavors to new heights.

  • Chocolate Drizzle: Melt some extra chocolate and drizzle it over cooled hand pies for a decadent finish. It adds an extra layer of indulgence while making them visually appealing.

  • Other Crunch: Swap crushed graham crackers with crushed Oreo cookies for an exciting flavor fusion. The chocolatey richness pairs perfectly with the marshmallow!

If you’re feeling adventurous, why not serve these S’mores Hand Pies alongside my delectable Korean Fried Sticky treats for a fusion of flavors? They could also be enjoyed with some extra chocolate sauce for dipping or as a warm snack during movie nights. The possibilities are endless!

Make Ahead Options

These Irresistible S’mores Hand Pies are a fantastic choice for meal prep lovers! You can prepare the hand pie filling (chopped chocolate, miniature marshmallows, and crushed graham crackers) up to 24 hours in advance. Store the filling in an airtight container in the refrigerator to maintain its delicious quality. You can also assemble the hand pies, sealing them tightly, and refrigerate for up to 3 days before baking. When you’re ready to enjoy, simply air fry the hand pies as directed, and you’ll have that dreamy, gooey dessert ready to please everyone with minimal last-minute effort. This way, you save time and still deliver the nostalgic flavors everyone loves!

What to Serve with Irresistible S’mores Hand Pies

Looking to elevate your dessert experience with these delightful treats? Here’s the perfect lineup to complement their gooey, nostalgic flavor.

  • Creamy Vanilla Ice Cream: The cool creaminess enhances the warm, rich flavors of the hand pies, creating a delightful temperature contrast.
  • Raspberry Sauce: A drizzle of tart raspberry sauce brightens the sweetness, adding a fresh zing that cuts through the richness.
  • Chocolate Dipping Sauce: For an extra indulgent touch, serve alongside a warm chocolate sauce that guests can dip their pies in.
  • Fresh Berries: Strawberries or blueberries bring a refreshing pop of flavor and a burst of color to your dessert spread.
  • Whipped Cream: Light and airy, whipped cream provides a fluffy texture, perfectly balancing the rich filling of the hand pies.
  • Chilled Milk: Nothing complements a sweet dessert like a tall glass of cold milk, offering a classic pairing that everyone adores.
  • S’mores-Inspired Sundae: Layer scoops of vanilla ice cream with crushed graham crackers, chocolate syrup, and mini marshmallows for a fun twist.
  • Herbal Iced Tea: A refreshing herbal iced tea, infused with mint or lemon, provides a light, crisp contrast that enhances the enjoyment of the sweet pie.
  • Coconut Macaroons: For those who love a chewy texture, serve with these sweet, toasted treats that bring a tropical flair to the table.

Expert Tips for Irresistible S’mores Hand Pies

  • Don’t Overfill: Keep it to about one tablespoon of filling per pie; this prevents burst seams and messy outcomes.
  • Seal the Edges: Using water to moisten the edges before crimping ensures a tight seal; no one wants their filling leaking out.
  • Steam Release: Poke small holes in the tops of the pies before baking for proper steam escape, ensuring a flaky texture rather than a soggy one.
  • Watch the Clock: Air fry time can vary; keep a close eye on them around the 8-minute mark to avoid burning the filling.
  • Double Chocolate Delight: For an extra indulgent treat, add more chocolate to the filling for an ooey-gooey center in your Irresistible S’mores Hand Pies.

Irresistible S’mores Hand Pies Recipe FAQs

What kind of chocolate should I use for the filling?
Absolutely! You can use either semi-sweet or milk chocolate bars for your Irresistible S’mores Hand Pies, depending on your taste. The richness of semi-sweet chocolate adds depth, while milk chocolate provides a creamier sweetness. Feel free to choose according to your preference for the ultimate gooey filling!

How should I store the hand pies after baking?
To maintain their freshness, store your hand pies in an airtight container at room temperature for up to 2 days. If you’d like to keep them longer, transfer them to the refrigerator where they will stay good for up to 4 days. This method helps preserve the gooey filling while keeping the crust nice and tender.

Can I freeze the Irresistible S’mores Hand Pies?
Yes, you can freeze your hand pies both unbaked and baked. For unbaked pies, wrap each one tightly in plastic wrap and aluminum foil, then store them in a freezer-safe bag for up to 2 months. When you’re ready to bake, there’s no need to thaw; just pop them into the air fryer and adjust the cooking time slightly. If freezing baked hand pies, let them cool completely before wrapping and freezing. Reheat them in a preheated oven at 350°F for about 10 minutes to ensure they regain their crispiness.

What should I do if the filling leaks during baking?
If your filling leaks, it’s likely a case of overfilling. Make sure to only use about one tablespoon of filling per pie to prevent this. Additionally, thoroughly moisten the edges before sealing to ensure they stay closed during cooking. Poking small holes in the tops for steam release will also help minimize leakage.

Are these hand pies suitable for people with allergies?
It depends on the specific ingredients you choose! For those with gluten allergies, look for gluten-free pie crusts and graham crackers. For those with nut allergies, ensure that your chocolate and any other ingredients are free from cross-contamination. Always check ingredient labels, and feel free to substitute with alternatives that fit your dietary needs!

How do I achieve flaky pastry without cracking?
To ensure your refrigerated pie crusts remain pliable and easy to work with, let them sit at room temperature for 10-15 minutes before cutting. This helps the dough relax, preventing cracks when you roll it out or cut it into circles. If you’re making a homemade crust, be sure to use cold butter and minimal handling to keep the pastry tender!

Irresistible S’mores Hand Pies

Irresistible S'mores Hand Pies for Campfire Magic at Home

Try these Irresistible S’mores Hand Pies for a nostalgic taste of campfire evenings, combining marshmallows, chocolate, and graham crackers.
Prep Time 15 minutes
Cook Time 10 minutes
Cooling Time 5 minutes
Total Time 30 minutes
Servings: 8 pies
Course: Dessert
Cuisine: American
Calories: 220

Ingredients
  

For the Crust
  • 2 crusts Refrigerated Pie Crust Consider using homemade for a personal touch.
For the Filling
  • 2 bars Chopped Chocolate Bars Semi-sweet or milk chocolate both work.
  • 1 cup Miniature Marshmallows Can substitute with chopped regular marshmallows.
  • 1 cup Crushed Graham Crackers Gluten-free options available.
For the Topping
  • 2 tablespoons Melted Salted Butter Brush on just before baking.
  • 1/4 cup Additional Crushed Graham Crackers For sprinkling on top.

Equipment

  • Air Fryer
  • Mixing Bowl
  • Cookie cutter
  • Baking Sheet

Method
 

Step-by-Step Instructions
  1. Begin by removing the refrigerated pie crusts from their packaging and let soften for 10-15 minutes.
  2. Use a 3-inch cookie cutter to cut out circles from the dough.
  3. Combine chopped chocolate bars, miniature marshmallows, and half of the crushed graham crackers in a mixing bowl.
  4. Take one dough circle and spoon approximately 1 tablespoon of filling onto its center.
  5. Moisten the edges of the circle with water, place a second dough circle on top and press down to seal.
  6. Brush the tops with melted salted butter and sprinkle the remaining crushed graham crackers on top.
  7. Preheat air fryer to 350°F and spray the basket with cooking oil.
  8. Air fry for about 10 minutes or until golden brown and filling begins to ooze slightly.
  9. Cool on a wire rack for several minutes before serving warm.

Nutrition

Serving: 1pieCalories: 220kcalCarbohydrates: 30gProtein: 2gFat: 10gSaturated Fat: 4gPolyunsaturated Fat: 2gMonounsaturated Fat: 2gCholesterol: 15mgSodium: 150mgPotassium: 60mgFiber: 1gSugar: 10gVitamin A: 250IUCalcium: 20mgIron: 0.5mg

Notes

Feel free to customize by adding peanut butter or a sprinkle of cinnamon for unique flavors.

Tried this recipe?

Let us know how it was!

Marry Me Shrimp Pasta: The Creamy Dish to Win Hearts

As I stood over the stove, the comforting aroma of garlic and sun-dried tomatoes wafted through the air, immediately transporting me to a quaint Italian trattoria. Today, I’m excited to share my spin on the beloved Marry Me Shrimp Pasta, a gluten-free delight that’s creamy and utterly luxurious. Perfect for impressing your loved ones, this dish offers a quick prep time and the kind of mouthwatering flavors that turn an ordinary night into a special occasion. With succulent shrimp nestled in a velvety sauce, it’s a dish that’s bound to enchant even the toughest critics at your dinner table. Are you ready to discover how to make this romantic seafood masterpiece?

Why is Marry Me Shrimp Pasta irresistible?

Irresistible Creaminess: With a rich, velvety sauce that envelops perfectly cooked shrimp, this dish brings restaurant-quality flavors right to your kitchen.

Quick and Easy: You can whip up this gourmet meal in under 30 minutes, making it ideal for busy weeknights or impromptu dinner parties.

Gluten-Free Delight: Using gluten-free penne pasta allows everyone to enjoy this creamy treat without compromising on taste.

Crowd-Pleasing Flavor: The combination of sun-dried tomatoes and Italian herbs creates an enticing aroma that will have your guests coming back for seconds!

Versatile Options: Feel free to swap the shrimp with chicken or even add seasonal veggies for a unique twist. This recipe is as flexible as it is delicious!

Elevate your weeknight dinners with this show-stopping dish, and if you’re a fan of shrimp dishes, be sure to check out Shrimp Avocado Bowls or indulge in a classic Shrimp Scampi Pasta for more flavor-packed inspiration!

Marry Me Shrimp Pasta Ingredients

For the Pasta

  • 12 oz gluten-free penne – Choose any pasta shape you prefer; the gluten-free option means everyone can indulge!

For the Shrimp

  • 1 pound extra large shrimp – Ensure they’re peeled and deveined for easy cooking.
  • ½ tablespoon smoked paprika – Adds a delightful smoky flavor; regular paprika works if you’re in a pinch.
  • ¾ tablespoon Italian seasoning – This mix brings authentic Italian flavors to the dish.
  • ¼ teaspoon black pepper – Freshly ground pepper enhances the dish’s heat.
  • ¾ teaspoon salt – Adjust according to your taste; seasoning is key!

For the Sauce

  • 1½ tablespoon sun-dried tomato oil – Perfect for sautéing shrimp; olive oil is a solid substitute.
  • 2½ tablespoons Cento tomato paste – This will thicken your sauce and add richness.
  • ½ cup Cento sun-dried tomatoes, diced – Use any brand packed in oil or dry for sweetness.
  • 1 tablespoon Italian seasoning (for sauce) – For an extra flavor boost, use fresh herbs if available.
  • ⅓ teaspoon sweet smoked paprika – Adds flavor complexity; optional based on spice preference.
  • ½ teaspoon salt (for sauce) – Taste and adjust slowly for perfection.
  • ¾ teaspoon dried basil – Fresh basil can elevate the flavor even more.
  • 2 tablespoons gluten-free 1:1 flour – Thickens the sauce without gluten; you can use regular flour if desired.
  • 2 cups diced spinach – This brings nutrition and a pop of color to your dish.
  • 2 tablespoons butter – Adds richness; swap it with olive oil for a lactose-free option.
  • 2 tablespoons minced onion – Perfect for that fragrant aroma in the sauce; shallots are a fine alternative.
  • 2 tablespoons minced garlic – Essential for flavor; roasted garlic is a milder yet tasty option.
  • 2 cups vegetable broth – A nice liquid base; chicken broth works if you aren’t vegetarian.
  • 1 cup heavy cream – Creaminess at its best; half-and-half can lighten it up a bit.
  • 1 cup parmesan cheese – Provides that cheesy depth, or use nutritional yeast for a vegan twist.
  • Fresh basil (chopped for garnish) – Not just a garnish; it adds beautiful aroma and flavor.

This Marry Me Shrimp Pasta is a glorious combination of flavors and textures that your friends and family will adore. Enjoy the cooking journey as much as the delicious outcome!

Step‑by‑Step Instructions for Marry Me Shrimp Pasta

Step 1: Pasta Preparation
Begin by boiling a large pot of water. Add a pinch of salt, then cook the gluten-free penne according to package directions until al dente, roughly 8-10 minutes. Stir occasionally and taste a piece for a firm bite. Once ready, drain the pasta and set it aside while you prepare the shrimp and sauce.

Step 2: Shrimp Cooking
In a medium bowl, toss the peeled and deveined shrimp with smoked paprika, Italian seasoning, salt, and black pepper until well-coated. Heat 1½ tablespoons of sun-dried tomato oil in a large skillet over medium heat. Add the shrimp to the pan, cooking for about 2 minutes on each side until they turn opaque and curl into a C shape. Remove the shrimp from the skillet and set aside.

Step 3: Sauce Creation
In the same skillet, reduce the heat to medium-low and melt 2 tablespoons of butter. Once melted, add 2 tablespoons of minced onion and 2 tablespoons of minced garlic, sautéing until fragrant, about 1-2 minutes. Next, stir in ½ cup of diced sun-dried tomatoes and 2½ tablespoons of tomato paste, cooking for an additional 2 minutes to enrich the flavors.

Step 4: Thicken Sauce
Sprinkle 2 tablespoons of gluten-free flour over the mixture, stirring to combine and remove any lumps. Gradually pour in 2 cups of vegetable broth and 1 cup of heavy cream. Add 2 cups of diced spinach, stirring until the spinach wilts, and let the sauce simmer for about 5 minutes until thickened to your desired consistency.

Step 5: Combine Ingredients
Gently fold in 1 cup of grated parmesan cheese until melted and incorporated into the sauce. Then, carefully add the cooked penne and shrimp to the creamy sauce, mixing everything together until evenly coated. Allow the Marry Me Shrimp Pasta to heat through for 1-2 minutes, ensuring each bite is full of flavor.

Step 6: Garnish and Serve
Once all ingredients are combined and heated, remove the skillet from heat. Dish out the Marry Me Shrimp Pasta onto plates, garnishing with freshly chopped basil for a pop of color and freshness. Serve immediately, and watch as your loved ones enjoy every scrumptious bite.

Expert Tips for Marry Me Shrimp Pasta

  • Cook Shrimp Perfectly: Avoid rubbery shrimp by cooking until they are C-shaped and opaque, ensuring they reach an internal temperature of 165°F for safe consumption.

  • Flavor Balancing: Always taste your sauce before serving, adjusting seasonings such as salt and paprika to achieve the perfect flavor balance for this Marry Me Shrimp Pasta.

  • Prevent Mushy Pasta: When boiling the gluten-free penne, remove it 1-2 minutes earlier than the package instructions to maintain an ideal al dente texture once mixed with the sauce.

  • Herb Freshness: For added flavor, consider using fresh herbs instead of dried ones, particularly basil, for a vibrant finish that enhances the overall dish.

  • Prepare Ahead: To save time, prep ingredients like shrimp and vegetables in advance, allowing for a quicker cooking process when it’s time to enjoy this delightful pasta.

What to Serve with Marry Me Shrimp Pasta

Transform your family dinner into a culinary celebration with perfect side dishes that complement this exquisite pasta.

  • Garlic Bread: The crispy, buttery goodness of garlic bread is the ideal companion, perfect for savoring every last drop of the creamy sauce.

  • Arugula Salad: A fresh arugula salad tossed with a lemon vinaigrette adds a peppery kick and brightens the meal with its crunch and zesty flavor.

  • Steamed Asparagus: Tender steamed asparagus complements the rich pasta, providing a beautiful green element that’s both nutritious and delightful.

  • Roasted Cherry Tomatoes: Sweet and caramelized, these roasted cherry tomatoes add a burst of flavor that pairs wonderfully with the creamy shrimp pasta.

  • White Wine: A chilled glass of Sauvignon Blanc enhances the meal, its crisp acidity cutting through the richness of the dish beautifully.

  • Tiramisu: Conclude your meal on a sweet note with a slice of classic tiramisu; its coffee and cocoa flavors make for a dreamy finish to this romantic dinner.

  • Peach Sorbet: Light and refreshing, serve peach sorbet for a palate-cleansing dessert that offers a fruity contrast to the creamy pasta.

By combining these sides with your Marry Me Shrimp Pasta, you’ll create a delicious, multi-layered dining experience that lingers in the hearts of your loved ones.

Marry Me Shrimp Pasta Variations

Feel free to let your creativity shine by customizing this delightful dish just the way you like it!

  • Seafood Swap: Replace shrimp with scallops, crab, or even lobster for a luxurious twist on this dish. Each alternative offers a unique flavor while maintaining that beloved creaminess.

  • Chicken Variation: For those who prefer poultry, swap the shrimp with chicken breast. It’s just as mouthwatering, plus you can easily marinate the chicken for extra depth.

  • Spicy Kick: Amp up the heat by adding red pepper flakes or spicy diced peppers into the sauce. This simple addition transforms the dish into a spicy delight that will warm your heart.

  • Veggie Boost: Incorporate seasonal vegetables like zucchini, bell peppers, or even mushrooms. They not only add nutrition but also vibrant color and texture to your Marry Me Shrimp Pasta.

  • Plant-Based Twist: To cater to vegan eaters, substitute shrimp with hearty plant proteins like chickpeas or a vegan shrimp alternative, and swap cream and cheese for dairy-free alternatives.

  • Citrus Zing: Enhance the flavor profile with a splash of lemon juice or zest before serving. It brings a refreshing brightness that perfectly complements the richness of the sauce.

  • Herb Infusion: Don’t shy away from experimenting with fresh herbs! Basil, parsley, or chive additions can provide a burst of flavor that takes this dish to the next level.

  • Creamy Alternatives: If you’re looking for a lighter version, replace the heavy cream with half-and-half or coconut cream for that luscious texture without all the calories.

Feeling inspired? While you’re here, check out the delectable Cajun Sausage Pasta for a bold, flavorful experience, or dive into a classic Shrimp Scampi Pasta for more seafood magic!

How to Store and Freeze Marry Me Shrimp Pasta

Fridge: Refrigerate any leftovers in an airtight container for up to 3 days. Gently reheat on the stovetop over low heat to preserve the creamy texture.

Freezer: If you want to store it longer, freeze the pasta (without the shrimp) in an airtight container for up to 2 months. Thaw in the fridge overnight before reheating.

Reheating: When reheating, add a splash of vegetable broth or cream to restore moisture and avoid a dry texture. Heat slowly, stirring occasionally.

Portion Control: Consider freezing individual portions to make quick weeknight meals effortless! Just defrost and reheat your Marry Me Shrimp Pasta as needed.

Make Ahead Options

Preparing Marry Me Shrimp Pasta ahead of time is a game-changer for busy weeknights! You can marinate the shrimp with spices and store them in the refrigerator for up to 24 hours, ensuring they are flavorful when cooked. Additionally, the sauce can be made 1-2 days in advance; simply refrigerate it in an airtight container to maintain its creamy consistency. When you’re ready to enjoy, just reheat the sauce gently on the stovetop while cooking fresh gluten-free penne. Fold in the marinated shrimp and allow them to cook for a few minutes until heated through, and you’ll have a delightful dish that tastes just as amazing as when made fresh!

Marry Me Shrimp Pasta Recipe FAQs

How do I select the best shrimp for my Marry Me Shrimp Pasta?
Absolutely! When selecting shrimp, opt for extra-large, peeled, and deveined shrimp for a tender bite. Look for shrimp that are firm and have a slight salty ocean smell. Avoid shrimp with dark spots or a strong ammonia odor, as they may be spoiled.

What is the best way to store leftovers of Marry Me Shrimp Pasta?
Store any leftovers in an airtight container in the refrigerator for up to 3 days. Reheat gently on the stovetop over low heat, adding a splash of broth or cream to maintain its consistency. If you have a lot of leftovers, consider dividing them into individual portions for easy reheating later.

Can I freeze Marry Me Shrimp Pasta?
Yes! To freeze, I recommend separating the pasta and sauce (without shrimp) into airtight containers. This way, you can freeze it for up to 2 months. Thaw in the fridge overnight before reheating. To restore moisture and creaminess, add a splash of broth or cream when reheating in a pan.

What should I do if my sauce is too thick?
Very easy! If your sauce turns out thicker than expected, simply stir in a little warm broth or cream to loosen it up. Heat over low until you reach your desired consistency, stirring continuously. This will bring your Marry Me Shrimp Pasta back to a creamy and luscious state!

Are there any dietary considerations I should keep in mind?
For those with gluten sensitivities, using gluten-free penne, as the recipe suggests, is perfect. Additionally, if you’re preparing this dish for someone with dairy allergies, consider substituting heavy cream with coconut milk or cashew cream, and leave out the parmesan or use nutritional yeast as a dairy-free alternative. Always be cautious with seasonings, as some may contain gluten or allergens.

How long does it take to prepare Marry Me Shrimp Pasta?
This lovely dish can be ready in under 30 minutes! With its quick cooking time, it’s perfect for busy weeknights when you crave something delicious without spending hours in the kitchen. Enjoy experimenting with flavors while you go!

Marry Me Shrimp Pasta

Marry Me Shrimp Pasta: The Creamy Dish to Win Hearts

Marry Me Shrimp Pasta is a gluten-free delight that’s creamy and utterly luxurious, perfect for impressing loved ones.
Prep Time 10 minutes
Cook Time 20 minutes
Total Time 30 minutes
Servings: 4 servings
Course: Pasta
Cuisine: Italian
Calories: 600

Ingredients
  

For the Pasta
  • 12 oz gluten-free penne Choose any pasta shape you prefer.
For the Shrimp
  • 1 pound extra large shrimp Peeled and deveined.
  • ½ tablespoon smoked paprika Adds a delightful smoky flavor.
  • ¾ tablespoon Italian seasoning Brings authentic Italian flavors.
  • ¼ teaspoon black pepper Freshly ground enhances heat.
  • ¾ teaspoon salt Adjust according to your taste.
For the Sauce
  • tablespoon sun-dried tomato oil Perfect for sautéing shrimp.
  • tablespoons Cento tomato paste Thickens your sauce.
  • ½ cup Cento sun-dried tomatoes, diced Use any brand packed in oil.
  • 1 tablespoon Italian seasoning (for sauce) For extra flavor boost.
  • teaspoon sweet smoked paprika Adds flavor complexity.
  • ½ teaspoon salt (for sauce) Taste and adjust slowly.
  • ¾ teaspoon dried basil Fresh basil can elevate flavor.
  • 2 tablespoons gluten-free 1:1 flour Thickens the sauce.
  • 2 cups diced spinach Adds nutrition and color.
  • 2 tablespoons butter Adds richness.
  • 2 tablespoons minced onion For fragrant aroma.
  • 2 tablespoons minced garlic Essential for flavor.
  • 2 cups vegetable broth Chicken broth works if not vegetarian.
  • 1 cup heavy cream Creaminess at its best.
  • 1 cup parmesan cheese Provides cheesy depth.
  • Fresh basil (chopped for garnish) Adds aroma and flavor.

Equipment

  • Large pot
  • Skillet
  • Measuring spoons
  • Measuring cups
  • Mixing Bowl

Method
 

Step-by-Step Instructions
  1. Begin by boiling a large pot of water. Add a pinch of salt, then cook the gluten-free penne according to package directions until al dente, roughly 8-10 minutes. Drain and set aside.
  2. In a medium bowl, toss the peeled and deveined shrimp with smoked paprika, Italian seasoning, salt, and black pepper until well-coated. Heat 1½ tablespoons of sun-dried tomato oil in a large skillet over medium heat. Add the shrimp to the pan, cooking for about 2 minutes on each side until they turn opaque. Remove the shrimp and set aside.
  3. In the same skillet, reduce heat to medium-low and melt 2 tablespoons of butter. Add minced onion and garlic, sautéing until fragrant, about 1-2 minutes. Stir in diced sun-dried tomatoes and tomato paste, cooking for an additional 2 minutes.
  4. Sprinkle gluten-free flour over the mixture, stirring to combine. Gradually pour in vegetable broth and heavy cream. Add diced spinach and let the sauce simmer for about 5 minutes until thickened.
  5. Fold in grated parmesan cheese until melted. Carefully add cooked penne and shrimp to the sauce, mixing until evenly coated. Heat through for 1-2 minutes.
  6. Remove from heat, garnish with freshly chopped basil, and serve immediately.

Nutrition

Serving: 1plateCalories: 600kcalCarbohydrates: 65gProtein: 30gFat: 25gSaturated Fat: 15gPolyunsaturated Fat: 2gMonounsaturated Fat: 7gCholesterol: 150mgSodium: 800mgPotassium: 600mgFiber: 4gSugar: 3gVitamin A: 20IUVitamin C: 15mgCalcium: 15mgIron: 15mg

Notes

Enjoy the cooking journey as much as the delicious outcome! Refrigerate leftovers for up to 3 days and freeze without shrimp for up to 2 months.

Tried this recipe?

Let us know how it was!

Stay Connected

Get recipes via email: