Get my cookbooks

Homemade Starbucks Spinach Feta Wrap You’ll Love

One bite of this delicious copycat Starbucks Spinach Feta Wrap, and you’ll understand why it’s an instant breakfast favorite in my kitchen. Brimming with cheesy goodness and an array of vibrant Mediterranean flavors, this wrap is not only a quick and satisfying option for busy mornings, but it also packs in nearly double the protein of the store-bought version. Plus, it’s meal prep-friendly—perfect for those of us who want to savor wholesome, homemade meals without spending hours in the kitchen. Are you ready to elevate your morning routine with this delectable twist? Let’s unwrap the secrets to making this satisfying breakfast wrap.

Why is this wrap a game changer?

Packed with Protein: Each bite delivers a protein punch, helping you feel full and energized throughout your day.

Customizable Goodness: Whether you’re craving a gluten-free meal or a dairy-free option, this wrap adapts flawlessly to your dietary needs, ensuring no one misses out on the Mediterranean flavors.

Quick and Easy Prep: With simple steps and a short baking time, you can have this wrap ready to go in just minutes—perfect for busy mornings when you need a delicious breakfast on the fly.

Meal Prep Friendly: Make a batch ahead of time and store them for a quick reheat option, making week-ahead planning a breeze! For similar meal ideas, check out these delicious Garlic Chicken Wraps or try something different like Feta Fried Eggs.

Crowd-Pleasing Flavor: Elevate your breakfast game and impress your family with this Mediterranean twist that’s sure to satisfy everyone’s taste buds.

Starbucks Spinach Feta Wrap Ingredients

• Get ready for a delicious homemade masterpiece!

For the Wrap

  • Lavash Wrap – The perfect base; you can swap with a large burrito-style wrap for heartiness.

For the Filling

  • Oil from Sun-Dried Tomatoes – Adds moisture and richness; olive oil is a great substitute if needed.
  • Fresh Spinach – Packed with nutrients and color; feel free to use kale for a flavorful twist.
  • Sun-Dried Tomatoes – Introduces a sweet and tangy flavor profile; fresh tomatoes can be used if you’re in a pinch.
  • Garlic Powder – Delivers depth of flavor; use fresh minced garlic for a more robust taste.
  • Italian Seasoning – Complements the Mediterranean theme wonderfully; create your own blend for a unique touch.
  • Salt & Pepper – Essential for flavor enhancement; adjust them to suit your taste preferences.

For the Protein

  • Egg Whites – The main source of protein in this wrap; switch to whole eggs if you prefer a richer flavor.
  • Shredded Mozzarella – Provides creaminess and that delightful stretch; swap with dairy-free mozzarella for a vegan option.
  • Crumbled Feta – Offers a salty, tangy taste that shines; vegan feta is a perfect alternative for dairy-free needs.

With all these ingredients ready, you’re one step closer to enjoying your homemade Starbucks Spinach Feta Wrap!

Step‑by‑Step Instructions for Starbucks Spinach Feta Wrap

Step 1: Preheat and Prepare
Begin by preheating your oven to 400°F (200°C). While the oven is warming up, line a baking sheet with parchment paper to prevent sticking. This preparation sets the stage for your homemade Starbucks Spinach Feta Wrap, ensuring a crispy exterior and easy cleanup later.

Step 2: Sauté the Spinach
In a skillet, heat a tablespoon of oil from sun-dried tomatoes over medium heat. Add fresh spinach and sauté it for about 2-3 minutes until it’s wilted and vibrant green. Stir occasionally to ensure even cooking. This step enhances the flavor of the spinach, making it a delightful addition to your wrap.

Step 3: Add Flavors
Once the spinach is wilted, mix in sun-dried tomatoes, a sprinkle of garlic powder, Italian seasoning, and salt and pepper to taste. Stir the mixture for another 1-2 minutes to marry the flavors beautifully. This flavorful filling is the heart of your Starbucks Spinach Feta Wrap, packed with the essence of the Mediterranean.

Step 4: Create the Egg Patty
Pour egg whites over the cooked spinach mixture in the skillet. Stir gently to combine, then cover the skillet with a lid and let it cook for about 3-4 minutes, allowing the egg to set and form a delicious savoury patty. This gives your wrap a hearty protein boost that is essential for a fulfilling breakfast.

Step 5: Assemble the Wrap
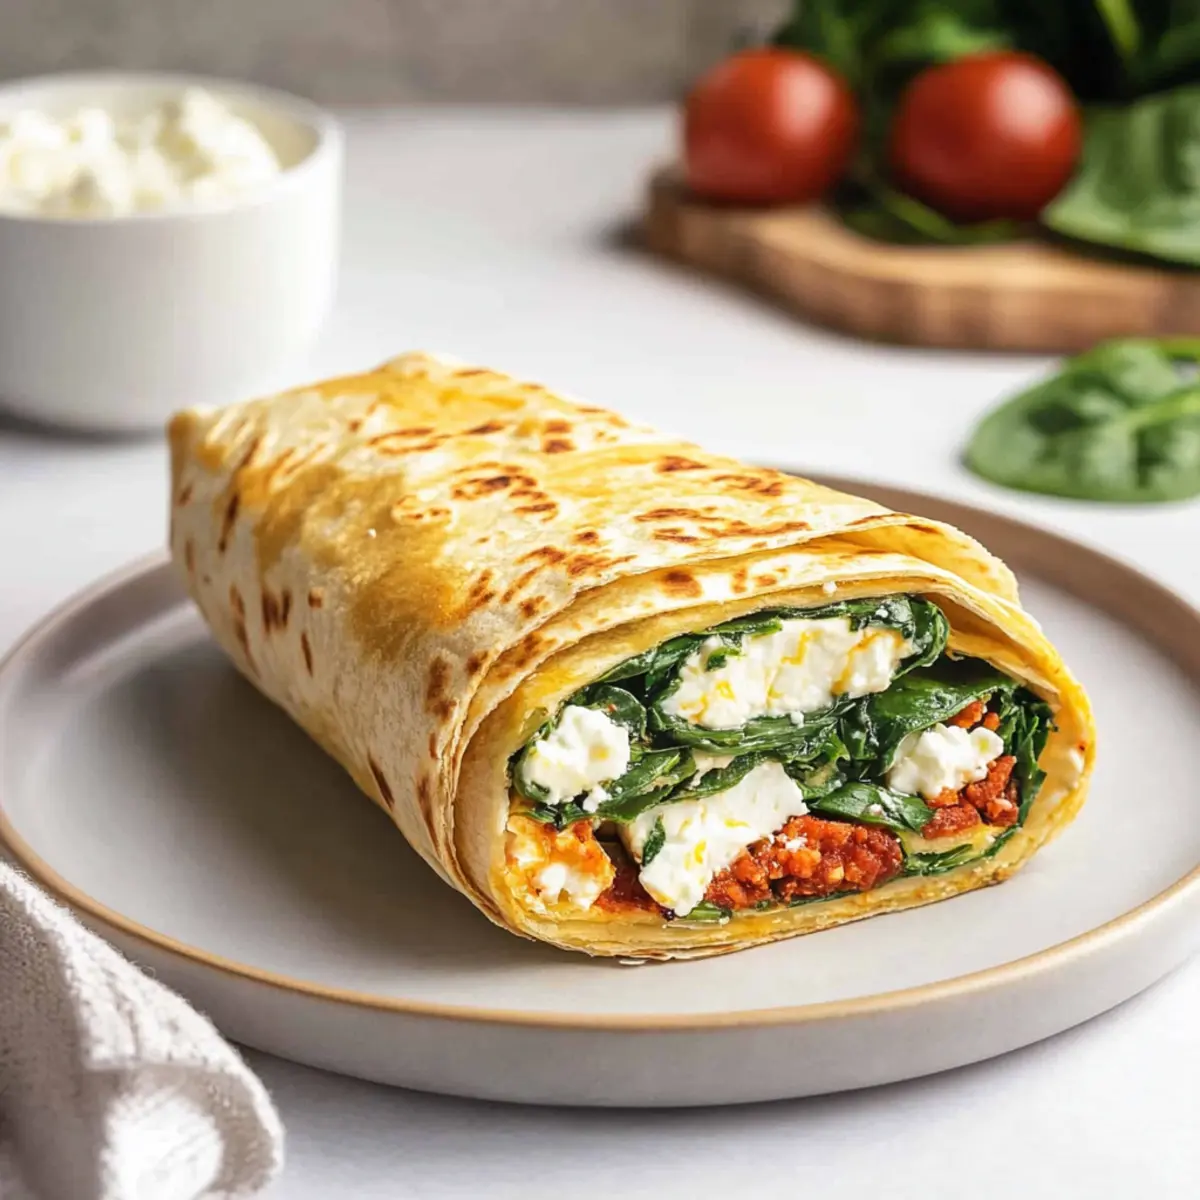
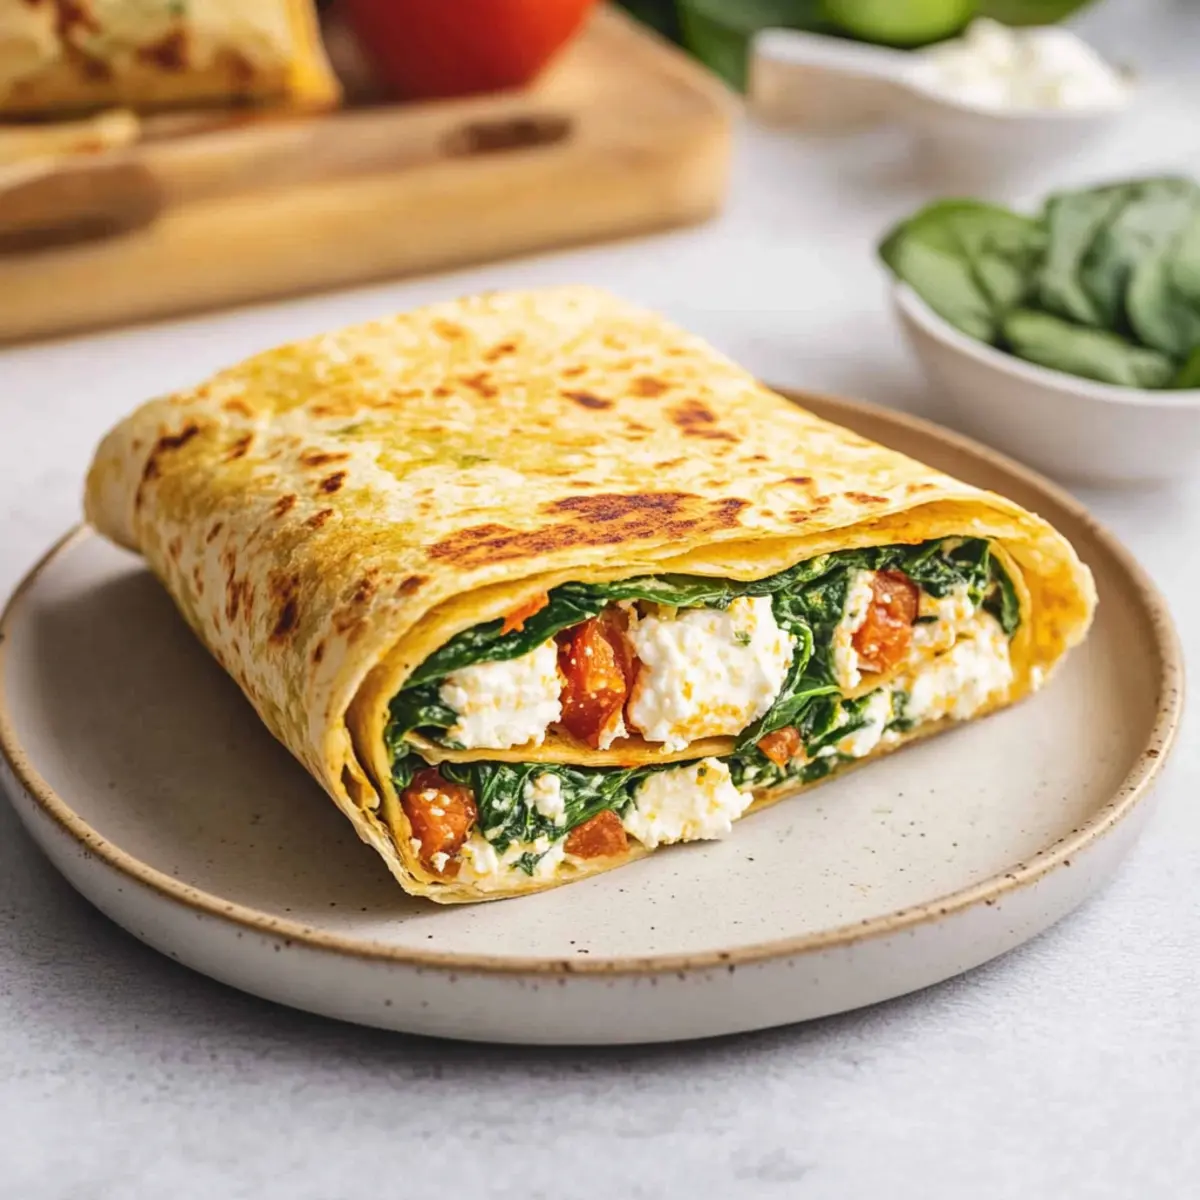
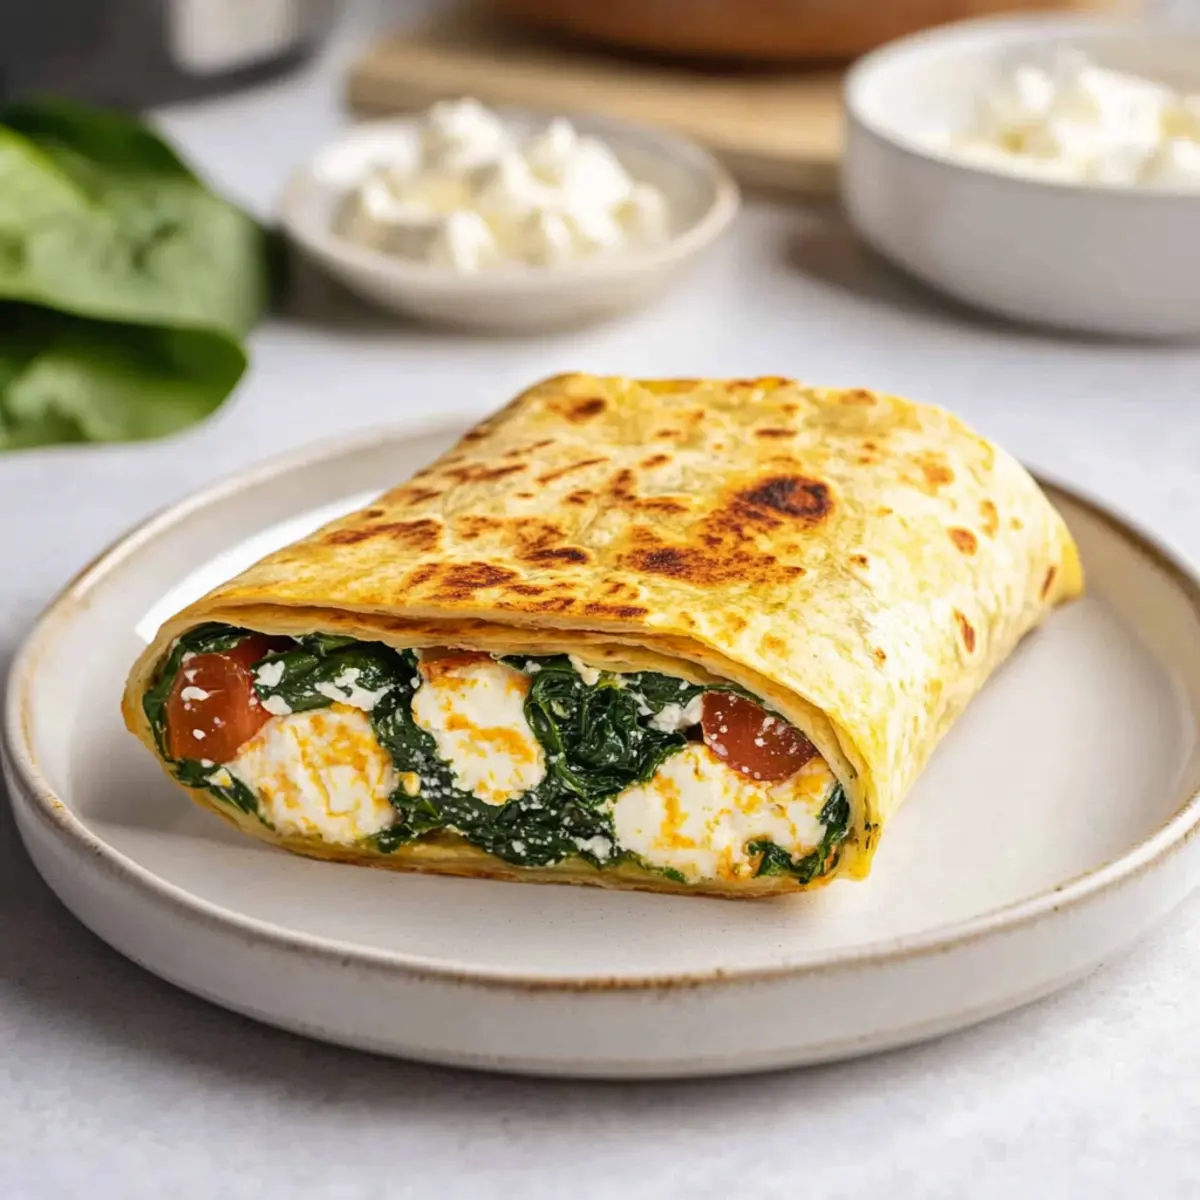
Once the egg patty is cooked, lay a lavash wrap flat on a clean surface. Carefully place the egg and spinach mixture in the center, then sprinkle shredded mozzarella and crumbled feta generously on top. This layered combination will ensure that your Starbucks Spinach Feta Wrap is both cheesy and nutritious.

Step 6: Roll It Up
Gently roll the lavash wrap tightly like a burrito, making sure to tuck in the sides to seal the filling inside. Once rolled, lightly spray the outside with cooking spray for even browning. This step ensures that your wrap retains its shape while baking, creating the perfect bite.

Step 7: Bake to Perfection
Place the rolled wrap seam-side down on the prepared baking sheet. Bake in the preheated oven for 5-10 minutes, flipping halfway through until the wrap is golden and crisp. You’ll know it’s done when the outside is beautifully browned, and the cheese is melted, creating a warm, inviting finish to your Starbucks Spinach Feta Wrap.

Step 8: Serve Warm
Remove the wrap from the oven and let it sit for a minute before slicing it in half. Serve warm, perhaps alongside fresh fruit or a light salad for a complete meal. Relish the flavors of your homemade Starbucks Spinach Feta Wrap as you enjoy every scrumptious bite!

How to Store and Freeze Starbucks Spinach Feta Wrap

Fridge: Store uneaten wraps in an airtight container for up to 5-7 days. This will keep them fresh and ready for quick breakfasts.

Freezer: For longer storage, tightly wrap the prepared wraps in plastic wrap or aluminum foil and freeze for up to 3 months. This makes meal prep super convenient!

Reheating: To reheat from frozen, bake at 350°F for about 15-20 minutes, or use an air fryer for a crispy finish. Enjoy your delicious Starbucks Spinach Feta Wrap anytime!

Make Ahead Options

These Homemade Starbucks Spinach Feta Wraps are perfect for meal prep enthusiasts! You can sauté the spinach and mix it with the sun-dried tomatoes, seasonings, and egg whites up to 24 hours in advance, storing the mixture in an airtight container in the fridge. The assembled wraps can also be rolled and refrigerated for up to 3 days. To maintain quality, be sure to place parchment paper between wraps to prevent sticking. When you’re ready to enjoy, simply bake the wraps at 400°F (200°C) for 5-10 minutes, flipping halfway, until they’re golden brown and crisp. This way, you can savor a hearty breakfast with minimal effort on busy mornings!

Expert Tips for Starbucks Spinach Feta Wrap

  • Sauté Spinach Well: Make sure to fully wilt the spinach to eliminate excess water, ensuring a crisp wrap that won’t get soggy.

  • Perfect Egg Patty: Allow the egg whites to set completely; stirring too much can prevent a firm patty from forming.

  • Choose Your Wrap: For a gluten-free option, opt for gluten-free lavash or a large, whole grain wrap to suit your dietary needs.

  • Flavor Variations: Experiment with different cheeses or herbs to customize your Starbucks Spinach Feta Wrap, making each batch uniquely yours.

  • Meal Prep Efficiency: Consider making several wraps at once to store in the fridge or freezer; reheat easily in the oven or air fryer for quick breakfasts.

  • Don’t Skip the Cooking Spray: Spraying the outside of the wrap ensures a beautifully golden brown finish, maximizing taste and presentation.

What to Serve with High-Protein Copycat Starbucks Spinach Feta Wrap

Elevate your breakfast experience with delightful sides and drinks that complement this Mediterranean-inspired wrap perfectly.

  • Fresh Fruit Salad: A vibrant medley of seasonal fruits adds sweetness and a refreshing crunch alongside the savory wrap.

  • Greek Yogurt: Creamy and tangy, a dollop of Greek yogurt on the side enhances the wrap’s Mediterranean flavors and boosts its protein content.

  • Zesty Cucumber Salad: This light and crunchy salad, drizzled with lemon vinaigrette, brings brightness and a refreshing contrast to the wrap.

  • Herbed Quinoa: Fluffy quinoa tossed with fresh herbs and olive oil creates a nutty flavor and adds texture, completing a nutritious breakfast spread.

  • Herbal Tea: A warm cup of herbal tea not only soothes but also harmonizes beautifully with the Mediterranean spices in the wrap.

  • Smoothie: A fruit and spinach smoothie can serve as a nutritious drink that echoes the wrap’s flavors while providing an extra boost.

  • Light Green Salad: A simple salad with mixed greens, cherry tomatoes, and a light dressing offers a crisp, fresh balance to the hearty wrap.

  • Sparkling Water: A refreshing glass of sparkling water with a splash of lemon cleanses the palate and keeps the meal light and invigorating.

Starbucks Spinach Feta Wrap Variations

Feel free to get creative and adapt this recipe to suit your taste buds or dietary needs!

  • Gluten-Free: Use a gluten-free wrap or lettuce leaves for a low-carb option, keeping all the Mediterranean flavors intact.
  • Dairy-Free: Swap mozzarella and feta with dairy-free alternatives for a vegan-friendly delight that remains rich and cheesy.
  • Spicy Kick: Add some diced jalapeños or a sprinkle of red pepper flakes to the filling for a spicier version that delivers an extra punch!
  • Herb Lovers: Experiment with fresh herbs like basil, dill, or cilantro to elevate the flavor profile and add a burst of freshness.
  • Different Greens: Instead of spinach, try arugula or Swiss chard for variety and a slight change in flavor.
  • Protein Boost: Add cooked chicken or turkey for an even higher protein content, making it a more substantial meal for busy mornings.
  • Flavorful Cheese: Swap out mozzarella for pepper jack or goat cheese for additional flavor dimensions and creaminess.
  • Nutty Twist: Incorporate some chopped nuts like walnuts or pine nuts for delightful crunch and an added layer of nutrition.

These variations offer endless possibilities to ensure that your homemade Starbucks Spinach Feta Wrap can be customized to your heart’s content! Enjoy experimenting with different combinations. If you’re in the mood for another cheesy recipe, don’t miss out on these wonderful Cheesy Spinach Artichoke bites!

Starbucks Spinach Feta Wrap Recipe FAQs

What is the best way to select fresh spinach for my wrap?
Absolutely! Look for spinach leaves that are vibrant green and crisp. Avoid any that have dark spots or wilting, as these indicate age. If you’re opting for kale instead, choose leaves that are firm and have a deep color.

How should I store my Starbucks Spinach Feta Wrap leftovers?
You can store uneaten wraps in an airtight container in the fridge for up to 5-7 days. This will keep them fresh and make for a quick grab-and-go breakfast option. I often use meal prep containers for easy access during busy mornings.

Can I freeze my Starbucks Spinach Feta Wrap?
Very much! For freezing, tightly wrap each prepared and cooled wrap in plastic wrap or aluminum foil, and place them in a freezer-safe bag. They can be stored for up to 3 months. To reheat from frozen, simply bake them at 350°F for about 15-20 minutes for a crispy result.

What should I do if my wrap turns soggy?
To prevent a soggy wrap, it’s essential to sauté the spinach thoroughly until all the water evaporates. If you find your wraps are still soggy after baking, check if you’ve overstuffed them—less is often more when it comes to the filling!

Are there any dietary considerations for the Starbucks Spinach Feta Wrap?
Yes! This recipe can be easily adapted for different dietary needs. For a gluten-free version, opt for gluten-free lavash or a large, whole grain wrap. Additionally, using dairy-free mozzarella and vegan feta allows those with dairy allergies to enjoy this delicious wrap as well. Don’t hesitate to mix and match based on your preferences!

How long can I keep the filling in the fridge before using it?
You can store any leftover filling in an airtight container in the fridge for up to 3 days. This makes it easy to assemble fresh wraps throughout the week. Just reheat the filling in a skillet before rolling it up, and you’re good to go!

Starbucks Spinach Feta Wrap

Homemade Starbucks Spinach Feta Wrap You’ll Love

Enjoy a quick and delicious Starbucks Spinach Feta Wrap, packed with Mediterranean flavors and protein for a satisfying breakfast.
Prep Time 10 minutes
Cook Time 15 minutes
Total Time 25 minutes
Servings: 2 wraps
Course: Breakfast
Cuisine: Mediterranean
Calories: 350

Ingredients
  

For the Wrap
  • 1 large Lavash Wrap or burrito-style wrap
For the Filling
  • 1 tablespoon Oil from Sun-Dried Tomatoes olive oil can be used as substitute
  • 2 cups Fresh Spinach kale can be used for a twist
  • 1/2 cup Sun-Dried Tomatoes fresh tomatoes can be used if needed
  • 1 teaspoon Garlic Powder use fresh minced garlic for stronger flavor
  • 1 teaspoon Italian Seasoning make your own blend for uniqueness
  • to taste Salt & Pepper adjust to preference
For the Protein
  • 1 cup Egg Whites whole eggs can be used for richer flavor
  • 1 cup Shredded Mozzarella dairy-free mozzarella can be swapped
  • 1/2 cup Crumbled Feta vegan feta is a good alternative

Equipment

  • Skillet
  • Oven
  • Baking Sheet
  • Parchment Paper

Method
 

Step-by-Step Instructions
  1. Preheat your oven to 400°F (200°C) and line a baking sheet with parchment paper.
  2. In a skillet, heat a tablespoon of oil from sun-dried tomatoes over medium heat. Add fresh spinach and sauté for about 2-3 minutes until wilted.
  3. Mix in sun-dried tomatoes, garlic powder, Italian seasoning, and salt and pepper. Stir for another 1-2 minutes.
  4. Pour egg whites over the spinach mixture in the skillet, cover with a lid and let cook for 3-4 minutes.
  5. Lay a lavash wrap flat and place the egg and spinach mixture in the center. Sprinkle mozzarella and feta on top.
  6. Roll the lavash wrap tightly like a burrito, ensuring to tuck in the sides. Lightly spray with cooking spray.
  7. Place the wrap seam-side down on the baking sheet and bake for 5-10 minutes until golden.
  8. Remove from the oven, let sit for a minute, slice in half, and serve warm.

Nutrition

Serving: 1wrapCalories: 350kcalCarbohydrates: 35gProtein: 25gFat: 15gSaturated Fat: 5gPolyunsaturated Fat: 2gMonounsaturated Fat: 8gSodium: 600mgPotassium: 500mgFiber: 4gSugar: 3gVitamin A: 1200IUVitamin C: 15mgCalcium: 250mgIron: 3mg

Notes

Sautéing the spinach well prevents a soggy wrap. Experiment with different cheeses for varied flavor.

Tried this recipe?

Let us know how it was!

Sausage and Cream Cheese Biscuit Bliss in Just 30 Minutes

As I was preparing for a cozy brunch with friends, I had a mini crisis: what could I whip up that would wow everyone without spending hours in the kitchen? That’s when these delightful Sausage and Cream Cheese Biscuits came to mind. With only four ingredients, they’re not just quick to make, but also incredibly satisfying as a hearty breakfast or finger-licking appetizer. Imagine soft, pillowy biscuits enveloping a creamy, savory filling—pure bliss! The blend of cream cheese with zesty sausage makes them a guaranteed crowd-pleaser. Plus, you can easily freeze any leftovers for a busy weeknight meal. Curious how quickly you can bring this simple yet delicious dish to your table? Let’s dive into the recipe!

Why Are These Biscuits So Irresistible?

Simplicity at Its Finest: With only four ingredients, you can create an impressive dish that doesn’t require expert cooking skills.

Quick to Make: In just 30 minutes, you can serve warm, savory biscuits that will steal the show.

Creamy and Savory: The combination of cream cheese and bold sausage filling creates an unforgettable flavor explosion.

Versatile Delight: Great for breakfast, an appetizer, or even a midnight snack! Pair with a side of scrambled eggs for a complete meal or enjoy with a fresh salad.

Make-Ahead Magic: Freeze extras for a quick, weeknight meal that saves time without skimping on taste. Trust me, your taste buds won’t be able to resist!

Sausage and Cream Cheese Biscuit Ingredients

For the Biscuit Base

  • Ground Breakfast Sausage – Provides a savory, hearty flavor; Italian sausage can add a spicy kick if you like a little heat.
  • Refrigerated Biscuits (Large “Grands”) – Forms the base and outer layer; you can use homemade biscuit dough for a fresh touch.

For the Filling

  • Cream Cheese – Adds rich creaminess and binds everything together; Neufchâtel cheese is a lighter alternative if desired.
  • Shredded Cheddar Cheese – Offers added flavor and richness; feel free to swap for any melty cheese like Monterey Jack or pepper jack for a different taste.

This delightful Sausage and Cream Cheese Biscuit recipe will have you amazed at how deliciously simple home-cooked meals can be!

Step‑by‑Step Instructions for Sausage and Cream Cheese Biscuits

Step 1: Cook the Sausage
Begin by heating a large skillet over medium heat, then add the ground breakfast sausage. Cook for about 5-7 minutes, breaking it apart with a spatula, until it’s browned and no longer pink. Ensure it’s well cooked, then drain any excess grease from the skillet to keep your Sausage and Cream Cheese Biscuits light and fluffy.

Step 2: Prepare Cream Cheese Mixture
Once your sausage is cooked, transfer it to a large mixing bowl to cool slightly. Add in the softened cream cheese and shredded cheddar cheese, mixing thoroughly until the ingredients are completely combined and creamy. This flavorful mixture is the heart of your Sausage and Cream Cheese Biscuits, so make sure it’s evenly blended for maximum taste.

Step 3: Prepare Muffin Tin
While the mixture cools, preheat your oven to 350°F (175°C). Grab a muffin tin and spray it generously with nonstick cooking spray to prevent sticking. Now, take one large refrigerated biscuit, pressing it into the bottom of each muffin cup, making sure to cover the base and part of the sides to create a nice little pocket for your filling.

Step 4: Fill Biscuits
Spoon the creamy sausage and cheese mixture into each biscuit-lined cup generously, being careful not to overfill. Aim for a rounded tablespoon of filling in each one. As you prepare your Sausage and Cream Cheese Biscuits, make sure the mixture is evenly distributed to ensure consistent flavor and texture in every bite.

Step 5: Bake
Place the muffin tin in the preheated oven and bake for about 18-20 minutes, or until the tops of the biscuits are golden brown and the filling is bubbling slightly. The delightful aroma of your Sausage and Cream Cheese Biscuits will fill your kitchen, providing a warm invitation to gather around the table.

Step 6: Serve
Once baked, remove the muffin tin from the oven and allow it to cool for a few minutes. Carefully run a butter knife around the edges to loosen each biscuit before gently lifting them out. Serve your warm Sausage and Cream Cheese Biscuits immediately, and enjoy the comforting blend of flavors with family and friends!

Storage Tips for Sausage and Cream Cheese Biscuits

Room Temperature: Store any leftover Sausage and Cream Cheese Biscuits at room temperature for up to 2 hours to keep them safe and delicious.

Fridge: If you want to keep them for longer, place the biscuits in an airtight container in the fridge for up to 3 days. Reheat gently in the oven to restore their fluffy texture.

Freezer: These biscuits can be frozen for up to 3 months! Just place them in a freezer-safe container or bag. Thaw in the fridge overnight before reheating.

Reheating: To bring back the warmth, simply reheat from frozen in the oven, adding a few extra minutes to the cook time for the perfect snack or meal!

Make Ahead Options

These Sausage and Cream Cheese Biscuits are perfect for meal prep enthusiasts! You can prepare the sausage and cream cheese filling up to 24 hours in advance by mixing it as directed and storing it in an airtight container in the refrigerator. The refrigerated biscuits can be kept in their packaging until you’re ready to use them. To maintain quality, be sure to cover the filling to prevent drying out. On the day you plan to serve, simply press the biscuits into a muffin tin, fill them with the prepped mixture, and bake as directed for a delightful, warm treat that’s just as delicious as if made fresh!

What to Serve with Sausage and Cream Cheese Biscuits

As the aroma of freshly baked biscuits fills your home, think about pairing these savory bites with delightful accompaniments to create a satisfying meal.

  • Scrambled Eggs: Soft, fluffy scrambled eggs add a protein boost and complement the creamy filling of the biscuits beautifully. You can even season them with a sprinkle of fresh herbs for added flavor.

  • Fresh Fruit Salad: The sweetness of a vibrant fruit salad brings a refreshing contrast to the savory richness of the biscuits. Try a mix of melons, berries, and citrus for a colorful presentation.

  • Crisp Green Salad: A light salad tossed with a zesty vinaigrette can provide a perfect balance to the biscuit’s hearty texture. Look for seasonal greens to keep it fresh and exciting.

  • Maple Syrup Drizzle: For a unique touch, drizzle warm maple syrup over your biscuits before serving. The sweetness perfectly enhances the savory flavors and creates an indulgent treat for brunch.

  • Buttery Corn on the Cob: Grilled or steamed corn brings a play of textures and an added sweetness that complements the biscuits wonderfully, making it feel like a cozy summer meal.

  • Lightly Roasted Vegetables: Roasting seasonal veggies like zucchini, bell peppers, and asparagus brings out their natural sweetness, providing a wholesome side that pairs nicely with the buttery biscuits.

  • Iced Coffee or Tea: Enjoy these biscuits with a refreshing glass of iced coffee or a fruity iced tea. Both drinks offer a cool, thirst-quenching balance to even the heartiest of bites.

  • Homemade Jam: Serve with a side of tart jam, like raspberry or peach, to spread on the biscuits. It’s a delightful way to elevate your savory biscuits into a breakfast sensation.

Expert Tips for Sausage and Cream Cheese Biscuits

  • Properly Soften Cream Cheese: Ensure your cream cheese is at room temperature to blend smoothly with the other ingredients, creating that delectable filling.

  • Avoid Overfilling: Be mindful not to overfill the muffin cups. This prevents the mixture from spilling over during baking and helps the biscuits rise perfectly.

  • Check Biscuit Moisture: If using homemade dough, be cautious with moisture levels. Too much liquid can lead to soggy biscuits instead of the fluffy texture you want for your Sausage and Cream Cheese Biscuits.

  • Bake Until Golden: Keep an eye on your biscuits while baking. The perfect golden-brown color indicates they’re ready, providing that delightful crunch on the outside.

  • Experiment with Ingredients: Don’t hesitate to try different kinds of cheese or sausage! Using spicy or flavored sausage can elevate your Sausage and Cream Cheese Biscuits to a whole new level.

Sausage and Cream Cheese Biscuit Variations

Feel free to get creative with these delightful Sausage and Cream Cheese Biscuits, adding your own personal touch to make them even more fabulous!

  • Spicy Twist: Stir in finely diced jalapeños for an exciting kick that will awaken your taste buds. The lingering heat perfectly complements the creamy filling.

  • Lean Option: Substitute turkey sausage to create a lighter version without sacrificing flavor. These biscuits remain tasty and satisfying while being a bit healthier.

  • Herb-Infused: Mix in some fresh herbs, like chives or parsley, to enhance the flavor profile with a refreshing note. It adds a garden freshness, making each bite feel vibrant.

  • Cheese Variety: Swap the shredded cheddar for other melty cheeses like Monterey Jack or pepper jack. Each cheese brings its own unique profile, so feel free to experiment!

  • Add Veggies: Stir in some finely chopped spinach or bell peppers. This not only boosts the nutrition but also introduces pleasing colors and textures.

  • Sweet Touch: For a delightful contrast, consider adding a hint of honey or maple syrup to the sausage mixture. It balances the savory with a touch of sweetness that’s irresistible.

  • Herbed Cream Cheese: Use flavored cream cheese instead of plain. Options like garlic and herb or garden vegetable can amplify the taste without extra effort!

Try out these variations and enjoy transforming your Sausage and Cream Cheese Biscuits into a new favorite! And if you’re looking to explore more delightful dishes, don’t miss out on our classic Sausage Tortellini Soup or the heartwarming flavors of a Sausage and Rice Skillet.

Sausage and Cream Cheese Biscuits Recipe FAQs

How do I select the right ground sausage for my biscuits?
Absolutely! For the best flavor, look for a ground breakfast sausage that has a nice mix of seasoning and fat. If you prefer a little more heat, Italian sausage is a great spicy alternative. Just check the label for any added sugars or preservatives you might want to avoid.

How should I store leftover Sausage and Cream Cheese Biscuits?
Very! You can store leftover biscuits in an airtight container at room temperature for up to 2 hours. For longer storage, place them in the fridge for up to 3 days. Just remember to reheat them gently in the oven to maintain that fluffy texture.

Can I freeze these biscuits for later?
Absolutely! You can freeze your Sausage and Cream Cheese Biscuits for up to 3 months. Just let them cool completely, then place them in a freezer-safe container or bag. When ready to enjoy, thaw them overnight in the fridge, then reheat in the oven to restore their warmth and flavor.

What if my cream cheese is too cold to mix properly?
If your cream cheese is too cold, it might not mix well, resulting in clumps. To soften it quickly, cut it into smaller chunks and microwave it for about 15-20 seconds. Keep an eye on it to avoid melting! Mixing until smooth is important for that creamy filling.

Are there any dietary considerations I should know about?
Yes! If you’re serving these biscuits to guests with dietary restrictions, you can easily swap out ingredients. For a lighter option, use Neufchâtel cheese in place of cream cheese, and consider turkey or chicken sausage instead of pork. Always check labels for allergens like gluten or dairy!

What should I do if my biscuits overflow during baking?
Don’t worry! If you accidentally overfill your biscuit cups, you can gently remove them from the oven and use a spoon to scoop out excess filling before putting them back in to finish baking. It’s a little extra work, but it ensures each bite is perfectly balanced!

Sausage and Cream Cheese Biscuit

Sausage and Cream Cheese Biscuit Bliss in Just 30 Minutes

Delightful Sausage and Cream Cheese Biscuits are quick to make and perfect for breakfast or appetizers.
Prep Time 10 minutes
Cook Time 20 minutes
Total Time 30 minutes
Servings: 12 biscuits
Course: Breakfast
Cuisine: American
Calories: 220

Ingredients
  

For the Biscuit Base
  • 1 pound Ground Breakfast Sausage Italian sausage can add a spicy kick if you like a little heat.
  • 1 can Refrigerated Biscuits (Large “Grands”) You can use homemade biscuit dough for a fresh touch.
For the Filling
  • 8 ounces Cream Cheese Neufchâtel cheese is a lighter alternative if desired.
  • 1 cup Shredded Cheddar Cheese Feel free to swap for any melty cheese like Monterey Jack or pepper jack.

Equipment

  • Large skillet
  • Mixing Bowl
  • Muffin Tin
  • nonstick cooking spray

Method
 

Step-by-Step Instructions for Sausage and Cream Cheese Biscuits
  1. Begin by heating a large skillet over medium heat, then add the ground breakfast sausage. Cook for about 5-7 minutes, breaking it apart with a spatula, until browned and no longer pink. Drain any excess grease.
  2. Transfer the cooked sausage to a large mixing bowl to cool slightly. Add in the softened cream cheese and shredded cheddar cheese, mixing thoroughly until combined and creamy.
  3. Preheat your oven to 350°F (175°C). Spray a muffin tin generously with nonstick cooking spray. Press a large refrigerated biscuit into the bottom of each muffin cup to create a pocket.
  4. Spoon the creamy sausage and cheese mixture into each biscuit-lined cup without overfilling. Aim for a rounded tablespoon of filling per cup.
  5. Bake for about 18-20 minutes, or until the tops are golden brown and the filling is bubbling slightly.
  6. Remove the muffin tin from the oven and let it cool for a few minutes. Run a butter knife around the edges to loosen each biscuit, then lift them out. Serve warm.

Nutrition

Serving: 1biscuitCalories: 220kcalCarbohydrates: 15gProtein: 10gFat: 15gSaturated Fat: 8gCholesterol: 40mgSodium: 600mgPotassium: 150mgFiber: 1gSugar: 1gVitamin A: 500IUCalcium: 100mgIron: 1mg

Notes

Store leftovers at room temperature for up to 2 hours, in the fridge for up to 3 days, or freeze for up to 3 months.

Tried this recipe?

Let us know how it was!

Baked Maple Donut Bars for Cozy Mornings Everyone Loves

The aroma of warm maple syrup wafting through my kitchen can turn even the dullest of mornings into a cozy celebration. Today, I’m excited to share my recipe for Soft Baked Maple Donut Bars, a scrumptious blend of tender, cake-like goodness with just a whisper of cinnamon. These delightful bars are not only incredibly easy to whip up—a perfect solution for those busy mornings—but they also make for a fun weekend treat that everyone will adore. In just about 50 minutes, you can serve up these comforting breakfast bars that strike the right balance between indulgent and sensible. Ready to turn your kitchen into a delightful haven? Let’s dive in!

Why Are These Donut Bars Irresistible?

Tender, Cake-like Goodness: The Soft Baked Maple Donut Bars are rich and soft, providing that satisfying bite that every donut lover craves. Easy to Make: These bars come together in just one bowl, making them perfect for busy days or impromptu brunch gatherings. Deliciously Versatile: Customize with chocolate chips or nuts to create a truly unique treat! Perfect for Sharing: Cut them into smaller pieces for a fun, shareable breakfast or snack. For a delightful pairing, consider serving with a cup of coffee or tea, much like you would with our Comforting Charm Baked options!

Baked Maple Donut Bars Ingredients

For the Bars

  • Unsalted Butter (1/2 cup) – Provides a rich, creamy foundation for the batter, ensuring a light and tender texture. Substitution: Use margarine for a dairy-free option.
  • Granulated Sugar (1/2 cup) – Adds sweetness and contributes to the classic tender crumb of the bars.
  • Light Brown Sugar (1/4 cup) – Offers a hint of molasses and depth of flavor while keeping the bars moist.
  • Eggs (2 large) – Act as a binding agent, essential for the structure and stability of the bars.
  • Pure Maple Syrup (1/2 cup) – Infuses the batter with true maple warmth and sweetness, key for flavor. Substitution: Use agave syrup if maple syrup is unavailable, though flavor will differ.
  • Vanilla Extract (1 tablespoon) – Enhances the flavors with its sweet aroma, contributing to overall taste.
  • All-Purpose Flour (2 cups) – Forms the backbone of the bars, giving them structure while ensuring a tender crumb.
  • Baking Powder (1 teaspoon) – Acts as a leavening agent to lift the bars gently and evenly.
  • Baking Soda (1/2 teaspoon) – Works alongside the baking powder for additional lift and contributes to the golden hue.
  • Salt (1/2 teaspoon) – Balances sweetness and enhances flavor.
  • Ground Cinnamon (1 teaspoon) – Adds warm, spicy undertones that beautifully complement the maple flavor.
  • Milk (1/2 cup) – Contributes moisture and helps achieve a silky batter.
  • Sour Cream (1/4 cup) – Introduces a subtle tang and extra richness, keeping the bars tender. Substitution: Greek yogurt or buttermilk can be used as alternatives.

For the Glaze

  • Powdered Sugar (1 cup) – Serves as the base for the smooth maple glaze, contributing to its sweetness and texture.
  • Additional Maple Syrup (2 tablespoons) – Enhances the glaze with maple flavor.
  • Milk (1-2 tablespoons) – Adjusts the consistency of the glaze to ensure smoothness.
  • Pinch of Salt – Balances sweetness in the glaze.
  • Vanilla Extract (1/4 teaspoon) – Adds aromatic sweetness to the glaze.

These Baked Maple Donut Bars are sure to warm your hearts and satisfy your sweet cravings!

Step‑by‑Step Instructions for Baked Maple Donut Bars

Step 1: Preheat and Prepare
Begin by preheating your oven to 350°F (175°C). While the oven warms up, take a 9×13 inch baking pan and line it with parchment paper for easy removal of your delicious Baked Maple Donut Bars later. Make sure the parchment paper hangs slightly over the edges, creating a neat handle you can use to lift the bars after baking.

Step 2: Cream the Butters and Sugars
In a large mixing bowl, cream together the softened unsalted butter, granulated sugar, and light brown sugar using an electric mixer on medium speed for about 3-5 minutes. You’re looking for a fluffy, pale mixture that has doubled in volume. This step is vital for creating the tender texture in your bars—so whip it well until the mixture is light and airy!

Step 3: Add the Eggs and Extracts
Next, add the eggs, one at a time, mixing thoroughly after each addition until fully incorporated. This helps build the structure of your Baked Maple Donut Bars. Then, blend in the pure maple syrup and vanilla extract until the mixture is smooth and well-combined, releasing a heavenly aroma that fills your kitchen!

Step 4: Combine the Dry Ingredients
In a separate bowl, whisk together the all-purpose flour, baking powder, baking soda, salt, and ground cinnamon. Make sure there are no lumps, as this prevents the bars from developing an uneven texture. Gradually introduce this dry mixture to your wet ingredients, alternating with the milk and sour cream, mixing just until everything is combined without overworking the batter.

Step 5: Pour and Smooth the Batter
Carefully pour the batter into the prepared baking pan, using a spatula to smooth the top evenly. This ensures that your Baked Maple Donut Bars bake uniformly and look great upon serving. Take a moment to appreciate the luscious, thick batter before transferring it to the oven.

Step 6: Bake to Perfection
Place the baking pan in the preheated oven and bake for 20-25 minutes. Keep an eye on them, and test for doneness by inserting a toothpick into the center; it should come out clean or with a few moist crumbs. The edges will turn a light golden brown when ready, indicating a soft and tender texture within.

Step 7: Cool the Bars
Once baked, remove the pan from the oven and let it cool in the pan on a wire rack. This is crucial as cooling prevents sogginess in your Baked Maple Donut Bars. Allow them to cool for about 15-20 minutes; you want them to continue setting but still warm for glazing.

Step 8: Prepare the Glaze
While the bars cool, whisk together the powdered sugar, additional maple syrup, milk, a pinch of salt, and vanilla extract in a small bowl. Aim for a smooth, pourable consistency—add more milk if necessary. This delightful glaze will add an irresistible finish to your bars, so take your time ensuring it’s well combined.

Step 9: Glaze and Slice
After the bars have cooled, drizzle the homemade glaze generously over the top, allowing it to flow down the sides for a beautiful finish. Let the glaze set for about 10 minutes before slicing into squares or rectangles. This makes for neat, clean cuts, perfect for serving your delightful Baked Maple Donut Bars!

Baked Maple Donut Bars: Customization Delights

Embrace the joy of making these Soft Baked Maple Donut Bars uniquely your own, filling your kitchen with delightful aromas and flavors!

  • Gluten-Free: Substitute all-purpose flour with a 1:1 gluten-free flour blend for a gluten-free version without sacrificing taste.
  • Nutty Twist: Fold in ½ cup of chopped walnuts or pecans for added crunch and a nutty flavor that pairs beautifully with maple.
  • Chocolaty Delight: Mix in ½ cup of chocolate chips to create a decadent chocolate-maple experience that everyone will love.
  • Cinnamon Sugar Crust: Before baking, sprinkle a mixture of cinnamon and sugar over the top for a sweet, crunchy layer that adds extra deliciousness.
  • Fruity Addition: Stir in ½ cup of dried cranberries or blueberries for a fruity burst that beautifully complements the maple flavor.
  • Dairy-Free: Swap the milk and sour cream with your favorite non-dairy alternatives, such as almond milk and coconut yogurt for a dairy-free treat.
  • Spiced Flavor: Experiment with spices like nutmeg or cardamom to give your bars a more complex flavor profile that dances on your palate.
  • Maple Cream Cheese Frosting: Top with a maple cream cheese frosting instead of the glaze for an indulgent variation that’s perfect for special occasions.

These variations will inspire you to make each batch of Baked Maple Donut Bars something fresh and exciting! For more delightful breakfast ideas, check out our Baked Salmon Honey for a savory twist or treat yourself to our Turtle Bars Decadent for dessert!

What to Serve with Soft Baked Maple Donut Bars

Pairing these delightful bars with complementary sides will elevate your breakfast experience to a new level of cozy comfort.

  • Fresh Fruit Salad: A colorful mix of seasonal fruits adds a refreshing, bright contrast, balancing out the sweetness of the donut bars.
  • Vanilla Yogurt: Creamy and tangy yogurt enhances the maple flavor while providing a pleasant texture. Consider adding a drizzle of honey for extra sweetness!
  • Coffee or Tea: A steaming cup of coffee or tea is the perfect companion, bringing warmth and depth to your brunch spread—curl up and enjoy that comforting vibe!
  • Eggs Benedict: The richness of poached eggs and hollandaise sauce creates a delightful savory counterpart to your sweet bars. It’s a brunch classic that will impress guests!
  • Cinnamon Sugar Toast: Simple yet nostalgic, this sweet-toast combination echoes the warm flavors found in the bars. Serve it alongside for a cozy breakfast experience.
  • Maple Bacon Burritos: Savory and sweet, this filling dish packs protein and flavor, creating an irresistible breakfast duo. They’re hearty and satisfying—perfect for those who love a full spread!
  • Chocolate Milkshake: Indulge in a sweet treat by pairing with a creamy chocolate milkshake for a delightful contrast. It evokes the joy of childhood—who wouldn’t want a milkshake with their breakfast?
  • Chai Latte: The spiced warmth of a chai latte complements the cinnamon notes of the bars beautifully, making for a comforting, aromatic beverage to sip on.

Storage Tips for Baked Maple Donut Bars

Room Temperature: Store the bars in an airtight container at room temperature for up to 3 days to maintain their freshness and soft texture.

Fridge: For extended freshness, refrigerate the Baked Maple Donut Bars for up to 1 week. Allow them to come to room temperature before serving for the best flavor.

Freezer: If you want to store them longer, freeze the bars for up to 3 months. Wrap each bar tightly in plastic wrap and place them in a freezer-safe bag.

Reheating: To enjoy them warm, microwave for 10-15 seconds or place in a preheated oven at 350°F (175°C) for a few minutes, ensuring they stay soft and delicious!

Make Ahead Options

These Soft Baked Maple Donut Bars are perfect for meal prep, allowing you to savor homemade goodness even on your busiest days! You can mix the batter and refrigerate it for up to 24 hours before baking, ensuring the flavors meld beautifully. Alternatively, you can bake the bars ahead of time and store them in an airtight container at room temperature for up to 3 days. To maintain their moistness, be sure to cool them completely before sealing the container. When ready to enjoy, simply drizzle the glaze over them once they’ve cooled, and you’ll have delightful breakfast treats ready to impress without any last-minute fuss!

Expert Tips for Baked Maple Donut Bars

  • Don’t Overmix: Avoid overmixing the batter after adding the flour. This will keep your bars light and fluffy, achieving that perfect tender texture.

  • Check for Doneness: Use a toothpick to test the center of the bars about 20 minutes into baking. If it comes out clean or with a few moist crumbs, they’re ready!

  • Cool Properly: Let the bars cool in the pan on a wire rack. This prevents them from becoming soggy and helps achieve that desirable soft texture.

  • Quality Ingredients: Use high-quality pure maple syrup for an authentic flavor. This can significantly elevate your baked maple donut bars from ordinary to extraordinary!

  • Glaze Setting Time: Allow the glaze to set fully before slicing. This will help get clean cuts and maintain the beautiful presentation of your delicious bars.

Baked Maple Donut Bars Recipe FAQs

How do I know if my ingredients are ripe or good to use?
For the freshest flavors and the best outcomes, it’s crucial to use quality ingredients. Check your eggs are fresh by placing them in water; if they sink, they’re good! Maple syrup should be pure and free of added sugars. When selecting butter, pick a good quality unsalted version for the best taste.

How should I store my Baked Maple Donut Bars?
Store your bars in an airtight container at room temperature for up to 3 days. To extend their shelf life, you can refrigerate them for up to a week. Just remember to allow them to come to room temperature before serving to keep that lovely softness!

Can I freeze the Baked Maple Donut Bars?
Absolutely! To freeze, wrap each bar tightly in plastic wrap and place them in a freezer-safe bag. They can be frozen for up to 3 months. When you’re ready to enjoy, thaw them in the refrigerator overnight, or for a quick warm-up, pop them in the microwave for 10-15 seconds before serving!

What if my Baked Maple Donut Bars come out too dense?
If your bars turn out denser than anticipated, remember a couple of things: avoid overmixing the batter once you add the flour, as this can activate the gluten and result in a tougher texture. Also, ensure you’re measuring your flour correctly—too much flour can lead to dense bars. Use the spoon-and-level method: spoon the flour into the measuring cup and level it with a knife instead of scooping directly from the bag.

Are there any dietary considerations I should know?
For those with dairy allergies, feel free to substitute unsalted butter with margarine or a dairy-free alternative. The sour cream can easily be replaced with Greek yogurt or buttermilk for a similar texture. If you’re concerned about gluten, you can use a gluten-free flour blend, but be wary of the texture changes; you may need to adjust the liquid content slightly.

What’s the best way to drizzle the glaze over the Baked Maple Donut Bars?
After cooling your bars, pour the glaze into a small bowl or cup to make it easier to drizzle. Use a spoon or a piping bag to create beautiful drizzles. Allow the glaze to flow over the edges, giving your treat that lovely, appetizing finish! Let the glaze set for about 10 minutes before cutting for cleaner, prettier slices.

Baked Maple Donut Bars

Baked Maple Donut Bars for Cozy Mornings Everyone Loves

Delightful Baked Maple Donut Bars that transform mornings into cozy celebrations. Soft, easy to make, and perfect for sharing.
Prep Time 15 minutes
Cook Time 25 minutes
Cooling Time 20 minutes
Total Time 50 minutes
Servings: 12 bars
Course: Dessert
Cuisine: American
Calories: 200

Ingredients
  

For the Bars
  • 1/2 cup Unsalted Butter Substitution: Use margarine for a dairy-free option.
  • 1/2 cup Granulated Sugar
  • 1/4 cup Light Brown Sugar
  • 2 large Eggs
  • 1/2 cup Pure Maple Syrup Substitution: Use agave syrup if maple syrup is unavailable, though flavor will differ.
  • 1 tablespoon Vanilla Extract
  • 2 cups All-Purpose Flour
  • 1 teaspoon Baking Powder
  • 1/2 teaspoon Baking Soda
  • 1/2 teaspoon Salt
  • 1 teaspoon Ground Cinnamon
  • 1/2 cup Milk
  • 1/4 cup Sour Cream Substitution: Greek yogurt or buttermilk can be used as alternatives.
For the Glaze
  • 1 cup Powdered Sugar
  • 2 tablespoons Additional Maple Syrup
  • 1-2 tablespoons Milk Adjusts the consistency of the glaze.
  • Pinch of Salt
  • 1/4 teaspoon Vanilla Extract

Equipment

  • 9x13-inch baking pan
  • Mixing Bowl
  • Electric mixer
  • whisk
  • spatula

Method
 

Step-by-Step Instructions
  1. Preheat your oven to 350°F (175°C) and line a 9x13 inch baking pan with parchment paper.
  2. Cream together the softened unsalted butter, granulated sugar, and light brown sugar until fluffy.
  3. Add the eggs one at a time, mixing thoroughly, then blend in the pure maple syrup and vanilla extract.
  4. Whisk together the all-purpose flour, baking powder, baking soda, salt, and ground cinnamon in a separate bowl. Gradually combine with wet ingredients, alternating with milk and sour cream.
  5. Pour the batter into the prepared baking pan and smooth the top evenly.
  6. Bake for 20-25 minutes, testing for doneness with a toothpick.
  7. Cool in the pan on a wire rack for about 15-20 minutes.
  8. Whisk together the glaze ingredients until smooth, then drizzle over the cooled bars.
  9. Allow the glaze to set for about 10 minutes before slicing into squares or rectangles.

Nutrition

Serving: 1barCalories: 200kcalCarbohydrates: 30gProtein: 2gFat: 9gSaturated Fat: 5gCholesterol: 35mgSodium: 150mgPotassium: 70mgFiber: 1gSugar: 12gVitamin A: 200IUCalcium: 30mgIron: 0.5mg

Notes

These Baked Maple Donut Bars are perfect for busy mornings and are versatile to customize with add-ins like chocolate chips or nuts.

Tried this recipe?

Let us know how it was!

Cheddar Cheese Bread: Warm, Comforting & So Easy to Make

As the aroma of freshly baked bread wafts through my kitchen, I can’t help but smile. This Cheddar Cheese Quick Bread is not just a remedy for a busy day but a delightful way to turn simple ingredients into heartwarming comfort food. It comes together in a flash, making it perfect for those evenings when you crave something homey yet satisfying. With a golden crust and a tender, cheesy interior that practically melts in your mouth, this quick bread is a charming accompaniment to soups and salads or simply enjoyed warm with a pat of butter. Plus, its customizable nature allows you to mix and match cheeses or add fresh herbs, ensuring it’s never the same twice! Are you ready to embrace the cozy vibes of homemade bread?

Why Is This Cheddar Cheese Bread Special?

Quick and Easy: Whip up this delightful bread in less than an hour! Perfect for busy cooks craving homemade comfort.

Irresistible Flavor: The sharpness of cheddar blends beautifully with hints of garlic, giving your taste buds a treat.

Customizable Delight: Try swapping in different cheeses like mozzarella or gouda for a unique twist each time.

Texture You’ll Love: With its golden crust and soft, cheesy interior, every bite feels like a warm hug.

Perfect Pairing: This bread complements soups, salads, or spreads like butter, making it an all-round favorite! Looking for more cozy recipes? Check out this delightful Cozy Broccoli Cheddar for the perfect pairing.

Cheddar Cheese Bread Ingredients

• Get ready to create a cozy masterpiece!

For the Batter

  • Cheddar Cheese – Provides sharp flavor and richness that makes this cheddar cheese bread truly delightful.
  • All-Purpose Flour – Offers structure to the bread; feel free to use a gluten-free blend for delicious results.
  • Baking Powder – Acts as a leavening agent, ensuring a perfect rise and fluffy texture.
  • Salt – Enhances the flavors in the bread; a crucial component for a well-balanced taste.
  • Garlic Powder – Adds depth and flavor; using fresh garlic brings a more pronounced taste.
  • Milk – Hydrates the flour and binds ingredients; adding extra can create an even moister crumb.
  • Egg (optional) – Aids in binding the batter; using a plant-based substitute makes it vegan-friendly.

Optional Extras

  • Fresh Herbs (e.g., chives, rosemary) – Infuse extra flavor and freshness to elevate this cheddar cheese bread.
  • Spices (e.g., red pepper flakes, jalapeños) – Add a little kick for those who crave heat!

With these ingredients, you’re just a step away from enjoying a delicious loaf of Cheddar Cheese Quick Bread right from your kitchen. Happy baking!

Step‑by‑Step Instructions for Cheddar Cheese Quick Bread

Step 1: Preheat the Oven
Begin by preheating your oven to 350°F (175°C). While it warms up, prepare a loaf pan by greasing it with butter or lining it with parchment paper to ensure easy removal later. The oven needs to be just right to create that perfectly baked Cheddar Cheese Quick Bread with a lovely golden crust.

Step 2: Mix the Dry Ingredients
In a large mixing bowl, combine 2 cups of all-purpose flour, 1 tablespoon of baking powder, 1 teaspoon of salt, and 1 teaspoon of garlic powder. Stir in 1 cup of shredded cheddar cheese until evenly distributed. This allows the flavors to mingle and ensures every bite of your Cheddar Cheese Quick Bread is packed with deliciousness.

Step 3: Combine the Wet Ingredients
In another bowl, whisk together 1 cup of milk and 1 egg (if using) until smooth. This step helps to hydrate the dry ingredients and bind everything together. The wet mixture is key to achieving a moist and tender interior for your Cheddar Cheese Quick Bread, so make sure it’s well mixed.

Step 4: Combine Mixtures
Now, pour the wet ingredients into the bowl with the dry mixture. Stir gently using a wooden spoon or spatula until just combined, being careful not to overmix. Overmixing can lead to a dense texture, and we want a soft, fluffy Cheddar Cheese Quick Bread.

Step 5: Transfer to Loaf Pan
Once the batter is combined, pour it into the prepared loaf pan, using a spatula to smooth the top. The batter should look thick and somewhat lumpy, but don’t worry; it will bake beautifully! Make sure it is evenly distributed in the pan to ensure even baking.

Step 6: Bake the Bread
Place the loaf pan in the preheated oven and bake for about 45 minutes. You’ll know it’s ready when the top is golden brown and a toothpick inserted into the center comes out clean. The tantalizing aroma of cheese and garlic will fill your kitchen, making it hard to wait!

Step 7: Cool the Bread
Once baked, remove the Cheddar Cheese Quick Bread from the oven and let it cool in the pan for about 5-10 minutes. Then, carefully transfer the bread to a wire rack to cool completely. This step allows the steam to escape, helping preserve the delightful texture of your homemade bread.

What to Serve with Cheddar Cheese Quick Bread

As you savor the deliciousness of this cheesy loaf, consider these pairings to create a delightful meal experience.

  • Creamy Tomato Soup: This classic combination brings together tangy tomato flavors with the cheesy goodness of the bread, making each bite comforting and familiar.

  • Garden Salad: A refreshing mix of greens with a light vinaigrette balances the richness of the cheddar bread, adding crispness to your meal.

  • Savory Herb Butter: Spread a dollop of this herbed butter on warm slices to elevate the cheesy flavor and add a creamy touch to each bite.

  • Spicy Chili: The heat and heartiness of chili complements the softness of the cheddar bread, creating a perfect harmony of textures and flavors.

  • Grilled Vegetables: Charred zucchini, bell peppers, and more provide a smoky, earthy contrast that enhances the cheese’s sharpness in your quick bread.

  • Crusty Breadsticks: For a fun twist, pair it with breadsticks for a textured experience; dipping them in marinara sauce adds an extra layer of flavor.

These delicious side dishes and accompaniments will enhance your Cheddar Cheese Quick Bread experience, creating warmth and joy at your table!

How to Store and Freeze Cheddar Cheese Bread

Fridge: Store your Cheddar Cheese Bread tightly wrapped in plastic wrap or an airtight container for up to 3 days, keeping it fresh and ready to enjoy.

Freezer: If you want to keep it longer, freeze the bread by wrapping it tightly in aluminum foil or freezer-safe wrap, lasting up to 3 months.

Reheating: To enjoy the bread again, simply thaw overnight in the fridge, then warm in a preheated oven at 350°F (175°C) for about 10-15 minutes until warmed through.

Avoid Sogginess: Make sure the bread is completely cooled before wrapping, as moisture can lead to a soggy texture when stored.

Make Ahead Options

This Cheddar Cheese Quick Bread is a fantastic option for meal prep, allowing you to savor homemade comfort with minimal effort. You can prepare the dry ingredients (flour, baking powder, salt, garlic powder, and cheese) and store them in an airtight container for up to 3 days. To maintain freshness, keep it in a cool, dry place. When you’re ready to bake, simply mix your wet ingredients (milk and egg) and combine them with your prepped dry mix. If you want to take it a step further, you can also bake the bread and refrigerate it for up to 3 days or freeze it for up to 3 months. Before serving, warm it up slightly in the oven to restore its delightful texture and enjoy this delicious homemade bread with any meal!

Expert Tips for Cheddar Cheese Bread

  • Don’t Overmix: Stir until just combined to keep your Cheddar Cheese Bread fluffy. Overmixing may lead to a dense loaf.

  • Use Fresh Ingredients: Ensure your baking powder is fresh for optimal rising. Outdated ingredients can affect bread texture and flavor.

  • Adjust Cheese Type: Feel free to experiment with different cheeses for unique flavors, but be mindful of moisture content to avoid a soggy loaf.

  • Check for Doneness: Insert a toothpick into the center; it should come out clean when the Cheddar Cheese Bread is baked perfectly.

  • Cool Properly: Allow the bread to cool in the pan before transferring it to a wire rack, which prevents excess moisture from ruining the crust.

Cheddar Cheese Bread: Exciting Variations

Feel free to unleash your creativity and customize this delectable cheddar cheese bread to suit your taste!

  • Different Cheese: Swap cheddar for gouda or mozzarella for a milder, creamy twist. This adjustment can completely transform the flavor profile.
  • Herb Infusion: Add fresh chopped herbs like chives or rosemary to enhance the aroma and taste—your kitchen will feel inviting!
  • Spicy Kick: Incorporate red pepper flakes or diced jalapeños for a zing that elevates each bite. A delightful option for those who love a little heat!
  • Nutty Addition: Fold in chopped nuts such as walnuts or pecans for added texture and personality. The crunch pairs wonderfully with the soft bread.
  • Savory Blend: Chopped sun-dried tomatoes or olives can add a savory Mediterranean flair. Imagine the burst of flavor with each slice!
  • Sweet Surprise: For a unique take, toss in some dried fruits like cranberries or apricots along with cheese—an intriguing sweet and savory combination!
  • Garlic Lovers: Double the garlic powder or add roasted garlic for an extra punch of flavor that resonates beautifully with cheese.
  • Gluten-Free Version: Use a gluten-free flour blend for a delightful alternative that doesn’t compromise on taste or texture!

Whether you’re serving it alongside a comforting bowl of Cozy Broccoli Cheddar or indulging in a warm slice as a snack, these adaptations will keep your cheddar cheese bread experience exciting. Enjoy the delicious journey!

Cheddar Cheese Bread Recipe FAQs

What’s the best type of cheddar cheese to use for this bread?
Absolutely! A sharp or aged cheddar is recommended as it adds a robust flavor to the bread. However, feel free to experiment with milder cheddars if you prefer a subtle taste, or try other cheeses like mozzarella or gouda to switch things up!

How should I store leftover Cheddar Cheese Bread?
To keep your Cheddar Cheese Bread fresh, wrap it tightly in plastic wrap or place it in an airtight container. It will last up to 3 days in the refrigerator. This keeps the moisture in and prevents it from drying out too quickly.

Can I freeze Cheddar Cheese Bread? How do I do it properly?
Very! To freeze your Cheddar Cheese Bread, allow it to cool completely first. Then, wrap it tightly in aluminum foil or freezer-safe wrap, ensuring no air gets in. It can be stored in the freezer for up to 3 months. When you’re ready to enjoy it again, simply thaw overnight in the fridge and reheat in a preheated oven at 350°F (175°C) for about 10-15 minutes until warmed through.

What if my cheese bread turns out dense?
Good question! Dense bread might stem from overmixing the batter. Make sure to mix until just combined to keep that fluffy texture. Additionally, using fresh baking powder can be crucial; old baking powder may not produce the desired rise. If this happens, don’t fret! It will still taste delicious, just with a different texture.

Is this recipe suitable for those with dietary restrictions?
Definitely! This Cheddar Cheese Bread is generally vegetarian. To make it vegan, simply swap the egg for a plant-based substitute, like a flax egg (1 tablespoon of ground flaxseed mixed with 2.5 tablespoons of water), and use plant-based cheese and milk. Always check for specific allergens if serving to guests with dietary concerns.

Cheddar Cheese Bread

Cheddar Cheese Bread: Warm, Comforting & So Easy to Make

Enjoy a quick and delightful Cheddar Cheese Bread, perfect for busy days and cozy meals.
Prep Time 10 minutes
Cook Time 45 minutes
Cooling Time 10 minutes
Total Time 55 minutes
Servings: 8 slices
Course: Breakfast
Cuisine: American
Calories: 180

Ingredients
  

For the Batter
  • 1 cup Shredded Cheddar Cheese Provides sharp flavor and richness
  • 2 cups All-Purpose Flour Can use gluten-free blend
  • 1 tablespoon Baking Powder Acts as a leavening agent
  • 1 teaspoon Salt Enhances flavors
  • 1 teaspoon Garlic Powder For added flavor
  • 1 cup Milk Hydrates flour and binds ingredients
  • 1 large Egg (optional) Aids in binding; use substitute for vegan
Optional Extras
  • Fresh Herbs (e.g., chives, rosemary) For extra flavor
  • Spices (e.g., red pepper flakes, jalapeños) For added kick

Equipment

  • Loaf Pan
  • Mixing bowls
  • whisk
  • spatula

Method
 

Step-by-Step Instructions
  1. Preheat your oven to 350°F (175°C). Prepare a loaf pan by greasing it with butter or lining it with parchment paper.
  2. In a large mixing bowl, combine all-purpose flour, baking powder, salt, and garlic powder. Stir in the shredded cheddar cheese until evenly distributed.
  3. In another bowl, whisk together milk and egg (if using) until smooth.
  4. Pour the wet ingredients into the bowl with the dry mixture. Stir gently until just combined.
  5. Pour the batter into the prepared loaf pan and smooth the top.
  6. Bake for about 45 minutes, until golden brown and a toothpick inserted comes out clean.
  7. Let the bread cool in the pan for about 5-10 minutes, then transfer to a wire rack to cool completely.

Nutrition

Serving: 1sliceCalories: 180kcalCarbohydrates: 23gProtein: 6gFat: 7gSaturated Fat: 4gCholesterol: 30mgSodium: 400mgPotassium: 120mgFiber: 1gSugar: 1gVitamin A: 8IUCalcium: 15mgIron: 6mg

Notes

Ensure not to overmix batter to maintain fluffy texture. Use fresh ingredients for best results.

Tried this recipe?

Let us know how it was!

Savory Farmer’s Casserole: Your Go-To Make-Ahead Breakfast

As the morning sun creeps into the kitchen, the aroma of sizzling potatoes and melting cheese dances in the air. This Hearty Farmer’s Casserole is my go-to for transitioning from chaotic weekdays to cozy family brunches. This recipe is a protein-rich, customizable dish that not only nourishes but also brings everyone together. It’s the ultimate make-ahead breakfast—prepare it the night before, and simply pop it in the oven for a warm, comforting meal that will impress. Whether served for a holiday gathering or a regular weekend, you can’t go wrong with this crowd-pleaser. Ready to dive into the secret of this hearty casserole that transforms the morning rush into a delightful experience? Let’s get cooking!

Why is this Farmer’s Casserole a must-try?

Simplicity at its Best: This recipe requires minimal prep, making it perfect for those hectic mornings or special family gatherings.

Protein-Packed: With eggs, cheese, and ham, it provides a hearty, satisfying start to your day, fueling you for whatever lies ahead.

Customizable: Feel free to swap out ingredients—add veggies or change the meat to fit your palate and dietary needs, just like in my delicious Cheesy Low Carb Chicken Casserole.

Make-Ahead Magic: Prep the night before, and simply pop it in the oven when you’re ready to eat!

Crowd-Pleaser: Perfect for any occasion, from weekday breakfasts to festive brunches. Everyone will love digging into this warm, flavorful dish.

This hearty casserole is here to redefine your mornings—get ready for compliments at the breakfast table!

Farmer’s Casserole Ingredients

• Get ready to create a delightful dish!

For the Base

  • Hash Browns – Essential for structure and heartiness; ensure they are evenly distributed for even cooking.

For the Filling

  • Eggs – Provide protein and richness; no substitutions needed as they are vital for binding the casserole.
  • Cheese – Adds creamy texture and flavor; try cheddar or mozzarella, or substitute with a dairy-free cheese for a lactose-free version.
  • Ham – Offers savory flavor and protein; you can also use bacon or sausage for different tastes.
  • Onions – Impart sweetness and depth; can easily be substituted with bell peppers or mushrooms for added flavor and nutrition.

Optional Add-Ins

  • Spinach – A nutritious boost; it blends beautifully with the egg mixture for extra greens.
  • Bell Peppers – For a colorful and crunchy addition that enhances flavor.

Feel free to mix and match ingredients to create your perfect version of this Farmer’s Casserole!

Step‑by‑Step Instructions for Farmer’s Casserole

Step 1: Prepare Ingredients
Begin by preheating your oven to 350°F (175°C). In a greased 9×13-inch baking dish, evenly spread the thawed hash browns in a single layer, ensuring they cover the bottom completely. This base will provide structure for your Farmer’s Casserole, so take a moment to make sure it looks even and well-distributed.

Step 2: Mix Filling
In a large mixing bowl, crack open your eggs and whisk them together until well combined. Stir in the shredded cheese, diced ham, and chopped onions, blending the ingredients until everything is evenly coated and the mixture appears creamy. This filling is the heart of your casserole, so make sure it’s thoroughly mixed for a consistent flavor throughout.

Step 3: Combine
Gently pour the egg mixture over the prepared hash browns in the baking dish, making sure to evenly cover the potatoes. Use a spatula to spread the mixture around if needed, allowing for a perfect union of flavors in every bite of your Farmer’s Casserole. This step ensures that every layer is infused with that savory goodness.

Step 4: Bake
Place the baking dish in the preheated oven and bake for approximately 45 minutes. Keep an eye on it towards the end; the casserole should be set and have a lovely golden-brown top. The aroma of the cheese melting and the hash browns crisping will let you know it’s almost done.

Step 5: Rest
Once baked, remove your Farmer’s Casserole from the oven and let it rest for about 10 minutes. This resting period allows the casserole to firm up and makes it much easier to cut into perfect squares. During this time, the flavors meld beautifully, creating that comforting dish you just can’t wait to serve.

Helpful Tricks for Farmer’s Casserole

  • Ingredient Prep: Chop and measure all ingredients before you start to ensure a smooth cooking process, helping to avoid any last-minute scrambles.

  • Layering Technique: Layer hash browns evenly on the bottom of the dish. An uneven base can lead to some areas cooking faster than others in your Farmer’s Casserole.

  • Optimal Baking Time: Keep an eye on the casserole as it bakes; you want that golden-brown top. If browning too quickly, cover it with foil to prevent burning.

  • Resting Period: Allow the casserole to rest for 10 minutes after baking. This step helps it hold its shape and enhances the flavors, making for a delightful slice.

  • Creative Customization: Don’t hesitate to add your favorite herbs or spices. A dash of paprika or fresh chives can elevate your Farmer’s Casserole with an extra layer of flavor!

Farmer’s Casserole Variations & Substitutions

Customize your Farmer’s Casserole for a flavor adventure that suits your taste preferences and dietary needs!

  • Veggie-Packed: Add diced bell peppers, mushrooms, or spinach for a nutritious boost. These colorful veggies not only enhance the flavor but also brighten up your dish.

  • Cheese Choices: Swap cheddar or mozzarella for feta or pepper jack to introduce a new dimension of flavor. Imagine the creamy tang of feta mingling with the other ingredients for a delightful twist!

  • Meat Swaps: Substitute ham with cooked bacon or sausage for a different flavor profile. Each meat brings its unique savoriness that can elevate your casserole experience.

  • Dairy-Free Delight: Use dairy-free cheese and almond milk to make this recipe suitable for lactose-free diets while still maintaining its deliciousness.

  • Zesty Kick: Sprinkle in some jalapeños or red pepper flakes to add heat. The spiciness can create an exciting contrast to the creamy goodness of the casserole.

  • Herb Infusion: Incorporate fresh herbs like parsley or chives for a burst of freshness. A sprinkle on top not only adds flavor but also enhances the presentation!

  • Hash Brown Alternatives: If you’re feeling adventurous, swap out traditional hash browns for sweet potatoes or zucchini for unique textures and flavors.

Don’t forget to check out my delectable French Toast Casserole or try adding your favorite seasonal ingredients for a twist on this classic. The only limit is your imagination—let’s make this morning masterpiece your own!

How to Store and Freeze Farmer’s Casserole

Fridge: Store leftovers in an airtight container for up to 3 days. This will keep your Farmer’s Casserole fresh and flavorful.

Freezer: For longer storage, freeze individual portions wrapped tightly in plastic wrap and foil for up to 3 months.

Reheating: Thaw overnight in the fridge before reheating. Warm in the oven at 350°F (175°C) for about 20 minutes or microwave until heated through.

Make-Ahead: Feel free to prepare the casserole the night before and assemble it in the fridge. Just pop it in the oven in the morning for an easy, warm breakfast!

Make Ahead Options

These Hearty Farmer’s Casserole is a fantastic option for meal prep enthusiasts! You can assemble the entire casserole up to 24 hours in advance, simply cover it with plastic wrap and refrigerate. To maintain the quality, ensure the hash browns are well-distributed and the egg mixture is completely blended for even flavor. When you’re ready to enjoy, just preheat your oven to 350°F (175°C) and bake the casserole straight from the fridge for about 50-55 minutes, adding a bit of extra time if it’s cold from the fridge. Enjoy the convenience of this hearty, protein-rich breakfast with minimal morning effort, perfect for bustling weekdays or lazy weekends!

What to Serve with Hearty Farmer’s Casserole?

As you revel in the warm, comforting vibes of this delightful breakfast, it’s time to consider what delicious sides can elevate your morning meal experience.

  • Fresh Fruit Salad: A vibrant mix of seasonal fruits adds a refreshing sweetness that balances the savory richness of the casserole. It brightens up the table!

  • Crispy Bacon: The smoky crunch of crispy bacon is an irresistible addition, enhancing the overall flavor profile while appealing to meat lovers.

  • Lightly Buttered Toast: Serve warm, slightly crisp toast with butter for a cozy, classic breakfast experience that pairs perfectly with the casserole.

  • Greek Yogurt Parfait: Layer creamy yogurt with granola and berries for a sweet, tangy contrast. It’s a nutritious, textural complement to the hearty casserole.

  • Savory Breakfast Sausages: Juicy breakfast sausages provide a delightful, hearty bite that perfectly balances the lighter flavors of your fruit or yogurt.

  • Herbed Breakfast Potatoes: Seasoned and roasted diced potatoes add a fantastic crispness and earthy flavor that echoes the hash brown base in the casserole.

These scrumptious sides will create a feast that warms the heart and brings joy to every bite, making your Hearty Farmer’s Casserole an even more memorable meal!

Farmer’s Casserole Recipe FAQs

How do I select the best hash browns for my Farmer’s Casserole?
Absolutely! Look for hash browns that are frozen and pre-shredded for convenience. Make sure they are evenly distributed in the baking dish to ensure even cooking. Fresh or homemade hash browns can also work; just make sure they are cooked until golden before using to provide a great texture.

How should I store leftovers of the Farmer’s Casserole?
Very simply! Store any leftovers in an airtight container in the refrigerator for up to 3 days. This way, you’ll keep your delicious Farmer’s Casserole fresh and ready for a quick meal at any time.

Can I freeze Farmer’s Casserole?
Of course! To freeze, allow the casserole to cool completely, then cut into individual portions. Wrap each portion tightly in plastic wrap and aluminum foil. You can freeze it for up to 3 months! When ready to enjoy, thaw overnight in the fridge and reheat in the oven at 350°F (175°C) for about 20 minutes or until heated through.

What if my casserole isn’t cooking evenly?
Ah, a common issue! This often happens if the hash browns aren’t spread evenly across the base. For future attempts, ensure you distribute them in a single, even layer. If you notice the top browning too quickly, tent it with aluminum foil to prevent burning while allowing the inside to cook through fully.

Is it safe for pets to eat Farmer’s Casserole?
While most ingredients are safe for pets in moderation, it’s best to avoid sharing this casserole with them. Ingredients like onions and excessive salt can be harmful to pets. Stick to their pet food for treats and keep the casserole all for yourself!

Can I adjust this recipe for dietary restrictions?
Absolutely! This Farmer’s Casserole is highly customizable. You can easily swap the cheese for a lactose-free option, use turkey or plant-based sausage instead of ham, and add your choice of vegetables like spinach or bell peppers for added nutrition. The more the merrier!

Farmer’s Casserole

Savory Farmer's Casserole: Your Go-To Make-Ahead Breakfast

This Farmer's Casserole is a make-ahead breakfast packed with protein and flavor, perfect for family gatherings or a cozy brunch.
Prep Time 15 minutes
Cook Time 45 minutes
Resting Time 10 minutes
Total Time 1 hour 10 minutes
Servings: 8 slices
Course: Breakfast
Cuisine: American
Calories: 300

Ingredients
  

For the Base
  • 1 package hash browns thawed
For the Filling
  • 6 large eggs
  • 2 cups shredded cheese cheddar or mozzarella
  • 1 cup diced ham or bacon/sausage
  • 1 medium onion chopped
Optional Add-Ins
  • 1 cup spinach fresh
  • 1 cup bell peppers diced

Equipment

  • 9x13 inch baking dish
  • Mixing Bowl
  • spatula

Method
 

Step-by-Step Instructions
  1. Preheat your oven to 350°F (175°C). Spread thawed hash browns in a greased 9x13-inch baking dish.
  2. In a large mixing bowl, whisk together the eggs. Stir in cheese, ham, and onions until mixed evenly.
  3. Pour the egg mixture over the hash browns, spreading to cover evenly.
  4. Bake for approximately 45 minutes until set and golden brown on top.
  5. Let the casserole rest for 10 minutes before serving.

Nutrition

Serving: 1sliceCalories: 300kcalCarbohydrates: 25gProtein: 20gFat: 15gSaturated Fat: 5gPolyunsaturated Fat: 2gMonounsaturated Fat: 5gCholesterol: 150mgSodium: 800mgPotassium: 350mgFiber: 2gSugar: 1gVitamin A: 600IUVitamin C: 10mgCalcium: 200mgIron: 2mg

Notes

Feel free to customize with your favorite vegetables and spices for a personalized touch.

Tried this recipe?

Let us know how it was!

Delicious Avocado Toast: 6 Customizable Breakfast Ideas

What if I told you that a single slice of bread could unlock an endless world of flavor? Yes, I’m talking about avocado toast! This quick and customizable breakfast has taken kitchens by storm, and it’s easy to see why. With just a few simple ingredients—ripe avocados, your favorite bread, and a sprinkle of creativity—you can whip up six delicious variations that are not just visually stunning but also packed with nutrients. Whether you’re craving the classic treatment or something a bit more adventurous, these avocado toast recipes are perfect for brunch, a light meal, or even a snack. Plus, they cater to dietary preferences, making them a fantastic choice for vegetarians and anyone looking to elevate their morning routine. Are you ready to dive into the most mouthwatering avocado toast combinations? Let’s get started!

Why is Avocado Toast So Irresistible?

Elevated Breakfast: Avocado toast transforms your morning routine into a delightful experience, combining health and flavor in one delicious package.
Endless Customization: With our six variations, you can cater to every taste—whether it’s classic, Caprese, or a spicy salsa twist.
Quick and Easy: Perfect for busy mornings, these recipes come together in minutes, making it easy to enjoy a fresh meal.
Nutrient-Packed: Each bite is loaded with healthy fats, fiber, and essential nutrients, ensuring you feel energized all day long.
Crowd-Pleasing Appeal: Whether you’re hosting brunch or just treating yourself, these avocado toasts are sure to impress friends and family alike.
Perfect Pairings: Serve alongside a refreshing salad or some fruit—like our Blueberry French Toast for a complete meal!

Avocado Toast Ingredients

For the Base

  • Bread – Choose sourdough, whole wheat, or gluten-free for a solid foundation.
  • Avocado – Use large Haas avocados for their creamy texture and rich flavor.

For Flavor Enhancements

  • Lemon Juice – Brightens the flavor while preventing the avocado from browning.
  • Kosher Salt – Enhances all the flavors and brings balance to the dish.
  • Black Pepper – Adds a touch of subtle warmth to your toast.
  • Extra-Virgin Olive Oil – Drizzle on top for added richness and depth of flavor.

For Classic Toppings

  • Chopped Parsley – A fresh garnish that adds color and a hint of earthiness.

For the Caprese Variation

  • Cherry Tomatoes – Adds freshness and a burst of sweetness to your toast.
  • Mozzarella Cheese – Use soft mozzarella for creaminess in the Caprese version.
  • Balsamic Vinegar Reduction – Provides a sweet and tangy touch that elevates the dish.

For the Salsa Variation

  • Lime Juice – A citrus twist that enhances the overall flavor profile.
  • Red Onion – Adds a sharp bite that complements the avocado beautifully.
  • Cilantro & Jalapeño – For a zesty kick that makes your salsa sing!
  • Radish – Offers a crunchy texture that contrasts wonderfully with the creamy avocado.

For the Smoked Salmon Toast

  • Cream Cheese – A rich, creamy spread that pairs perfectly with salmon.
  • Smoked Salmon – Delivers a luxurious protein boost for a more decadent breakfast.

For Savory Options

  • Bacon & Eggs – Classic ingredients that provide a hearty, savory flavor.
  • Everything Bagel Seasoning – Sprinkle on top for an extra savory note that resembles those beloved bagels.

For The Topping Texture

  • Poppy, White, and Black Sesame Seeds – Add texture and flavor for delightful crunch in your avocado toast.

These simple yet essential Avocado Toast ingredients will make your breakfast quick, flavorful, and oh-so-customizable!

Step‑by‑Step Instructions for Delicious Avocado Toast

Step 1: Toast the Bread
Start by toasting your chosen bread—sourdough, whole wheat, or gluten-free—using a toaster or broiler. If using a broiler, keep a close eye on it, checking every 30 seconds until golden brown and crisp. This will create the perfect crunchy base for your delicious avocado toast.

Step 2: Prepare the Avocado
While the bread is toasting, slice and scoop the flesh from ripe Haas avocados into a medium bowl. Add freshly squeezed lemon juice, a sprinkle of kosher salt, and a dash of black pepper. Mash everything together with a fork until it reaches a slightly chunky consistency, allowing for that creamy avocado texture.

Step 3: Build the Classic Variation
Spread the hearty avocado mash generously over your perfectly toasted bread. Drizzle a little extra-virgin olive oil on top and season further with salt and freshly ground pepper to taste. This classic avocado toast embodies simplicity while delivering a burst of delightful flavors that will kickstart your day.

Step 4: Assemble the Caprese Variation
For the Caprese twist, layer your toasted bread with the luscious avocado mash. Add halved cherry tomatoes and small pieces of fresh mozzarella cheese on top. Finally, drizzle with balsamic vinegar reduction and garnish with chopped parsley for an elegant finish that elevates your avocado toast experience.

Step 5: Create the Salsa Variation
In a bowl, mix together diced tomatoes, chopped red onion, minced jalapeño, and fresh cilantro, adding a splash of lime juice for brightness. Spread the creamy avocado mixture over the toast and generously layer the salsa on top. This variation offers a zesty kick, bringing a delightful freshness to your avocado toast.

Step 6: Prepare the Smoked Salmon Toast
Start this sumptuous variation by spreading cream cheese on the hot toasted bread. Next, add a layer of mashed avocado and top it with slices of smoked salmon and thinly sliced red onion. A sprinkle of capers and fresh dill will enhance this rich avocado toast, making it a luxurious breakfast choice.

Step 7: Assemble the Bacon & Eggs Toast
Cook crispy bacon in a skillet until golden brown and set aside. In the same pan, fry eggs to your preferred doneness. Spread the avocado mix on the toasted bread, then layer with the crispy bacon and the fried egg on top. This savory breakfast version of avocado toast is sure to satisfy.

Step 8: Create the Everything Bagel Toast
Spread a layer of cream cheese over your toasted bread as a base. Then, slice the avocado and layer it on top. Finish by generously sprinkling everything bagel seasoning, along with poppy, white, and black sesame seeds for a flavor-packed crunchy finish on your avocado toast.

Expert Tips for the Best Avocado Toast

  • Pick Ripe Avocados: Choose avocados that yield to gentle pressure for perfect mashing; underripe avocados will be hard, while overripe ones may be brown inside.

  • Prevent Browning: To keep your avocado toast looking fresh, add lemon or lime juice immediately after mashing the avocado to inhibit oxidation.

  • Toast Carefully: For the crispiest bread base, toast using a broiler but stay close—it’s easy to step away and accidentally burn a slice!

  • Layer Creatively: Don’t hesitate to mix and match toppings across different variations for a unique taste experience; the possibilities with avocado toast are endless!

  • Season Generously: Adjust salt and pepper according to your taste, as these enhance the flavor of both the avocado and the toppings you choose.

  • Experiment with Toppings: Consider adding different textures and flavors, like crushed nuts or seeds, to elevate your avocado toast and make it even more delightful.

Storage Tips for Avocado Toast

Room Temperature: If you have leftover avocado toast, it’s best to consume it within 1-2 hours to maintain its freshness and prevent browning.

Fridge: Store any unassembled components, like mashed avocado and toasted bread, separately in airtight containers. Mashed avocado can last up to 1 day in the refrigerator; add lemon juice to slow oxidation.

Freezer: For longer storage, freeze individual avocado slices layered between parchment paper. They’ll keep well for up to 3 months. Avoid freezing the toast itself, as the texture will suffer.

Reheating: To enjoy cold avocado toast, simply let it sit at room temperature for a few minutes. If reheating bread, use a toaster or broiler for best results, but avoid reheating the avocado.

Avocado Toast: Endless Customization!

Embrace your culinary creativity by personalizing your avocado toast with these scrumptious variations.

  • Caprese Twist: Swap mozzarella for burrata for an ultra-creamy texture that melts beautifully.

  • Mediterranean Flair: Top with feta, olives, and a sprinkle of oregano for a tangy, flavorful makeover. Serve it with a side of mixed greens for a refreshing balance.

  • Salsa Verde: Add a vibrant green salsa for a fresh herbaceous twist; perfect when paired with crunchy radishes for a delightful contrast.

  • Nutty Crunch: Sprinkle chopped walnuts or almonds on top of the avocado for added texture and a nutty flavor to each bite.

  • Spicy Delight: Mix in crushed red pepper flakes or sliced jalapeños to bring a spicy kick; it’s a fantastic complement to the creamy avocado.

  • Vegan Cream Cheese: Use a vegan cream cheese alternative with a splash of lemon zest for a refreshing variation that everyone can enjoy!

  • Tropical Dream: Add sliced mango or pineapple for a sweet twist that beautifully balances the richness of the avocado. Try serving it alongside our delicious Creme Brulee French Toast for a complete breakfast experience!

These variations allow you to explore the vibrant world of avocado toast while catering to your tastes—each bite becomes an adventure on your plate!

Make Ahead Options

These Avocado Toast variations are perfect for meal prep enthusiasts looking to simplify busy mornings! You can prepare the avocado mash up to 24 hours in advance; just add lemon juice to prevent browning and store it in an airtight container in the fridge. Additionally, the toppings, such as diced tomatoes or cooked bacon, can be prepped up to 3 days ahead—just keep them in separate containers to maintain their freshness. When you’re ready to serve, simply toast your bread, spread the avocado mash, and layer on your chosen toppings for a quick, satisfying meal. This way, you’ll enjoy all the delicious flavors without the morning rush!

What to Serve with Avocado Toast?

Crafting the perfect meal doesn’t stop at the toast—let’s explore delightful pairings that will transform your breakfast into a feast.

  • Mixed Greens Salad: Crisp greens with a light vinaigrette provide a refreshing contrast to rich avocado flavors.

  • Sweet Fresh Fruit: Slices of juicy watermelon or berries add a burst of sweetness, balancing the savory notes of the toast.

  • Herbed Yogurt Dip: A creamy yogurt infused with fresh herbs complements avocado’s creaminess and offers a delightful tang.

  • Crispy Sweet Potato Fries: The slight sweetness and texture of fries create a hearty side that pairs well with not just toast but your brunch vibe.

  • Smoothie Bowl: A berry or green smoothie bowl brings a delightful creaminess and vibrant color, making breakfast both nutritious and beautiful.

  • Chai Latte: A warm, spiced chai latte adds a comforting touch, enhancing the morning experience with its aromatic blend.

  • Coconut Chia Pudding: This chilled treat topped with mango or coconut flakes will enrich your meal with healthy fats and a tropical flair.

  • Savoring Scones: Savory scones, perhaps with cheese and herbs, provide a delicious accompaniment with a buttery texture, making your meal a comforting delight.

  • Sparkling Water: A refreshing glass of sparkling water adds a light fizz that cleanses your palate, perfect for complementing rich avocado.

These delightful pairings not only elevate your avocado toast experience but also ensure that every bite is a celebration of flavors and textures!

Avocado Toast Recipe FAQs

How do I choose ripe avocados?
Absolutely! Look for large Haas avocados that yield slightly to gentle pressure. If they’re hard, they need more time to ripen. If you see dark spots all over, they may be overripe. Ideally, you want a smooth and dark green skin.

How should I store leftover avocado toast?
The best practice for leftovers is to consume them within 1-2 hours for optimal freshness. If you have unassembled ingredients, keep the toasted bread and mashed avocado in separate airtight containers. The mashed avocado can last up to 1 day in the fridge; be sure to add lemon juice to help prevent browning.

Can I freeze avocado for later use?
Certainly! To freeze avocado, slice them and place each slice between parchment paper to prevent sticking. Store the slices in an airtight container or freezer bag for up to 3 months. Just remember that the toast itself doesn’t freeze well due to texture loss.

What should I do if my avocado browns too quickly?
Very! To slow down browning, always mix in lemon or lime juice into your avocado mash right after mashing. If the outer layer browns, you can scrape off the top layer, as the inner avocado remains green and fresh.

Can I modify these avocado toast recipes for dietary allergies?
Of course! For gluten-free options, simply choose gluten-free bread. If avoiding dairy, you can swap cream cheese and mozzarella for almond or cashew-based spreads. And for those with nut allergies, double-check all seasonings, as some may contain traces of nuts.

Avocado Toast

Delicious Avocado Toast: 6 Customizable Breakfast Ideas

Explore the delightful world of avocado toast with these 6 customizable breakfast ideas, packed with flavor and nutrients.
Prep Time 10 minutes
Cook Time 5 minutes
Total Time 15 minutes
Servings: 1 slice
Course: Breakfast
Cuisine: American
Calories: 250

Ingredients
  

For the Base
  • 1 slice Bread Sourdough, whole wheat, or gluten-free
  • 1 large Haas Avocado
For Flavor Enhancements
  • 1 tbsp Lemon Juice Prevents browning
  • 1 pinch Kosher Salt To taste
  • 1 pinch Black Pepper To taste
  • 1 tbsp Extra-Virgin Olive Oil
For Classic Toppings
  • 1 tbsp Chopped Parsley
For the Caprese Variation
  • 1/2 cup Cherry Tomatoes Halved
  • 1/4 cup Mozzarella Cheese Soft, for creaminess
  • 1 tbsp Balsamic Vinegar Reduction
For the Salsa Variation
  • 1 tbsp Lime Juice
  • 1 tbsp Red Onion Chopped
  • 1 tbsp Cilantro Chopped
  • 1 tbsp Jalapeño Minced
  • 1 radish Radish Diced
For the Smoked Salmon Toast
  • 2 tbsp Cream Cheese
  • 2 oz Smoked Salmon
For Savory Options
  • 2 slices Bacon Cooked
  • 2 large Eggs Cooked to preference
  • 1 tbsp Everything Bagel Seasoning
For The Topping Texture
  • 1 tbsp Poppy Seeds
  • 1 tbsp White Sesame Seeds
  • 1 tbsp Black Sesame Seeds

Equipment

  • Toaster
  • bowl
  • Fork
  • Skillet

Method
 

Preparation
  1. Toast the bread until golden brown and crisp.
  2. Slice and scoop out the avocado into a bowl. Mix in lemon juice, salt, and pepper. Mash to a chunky consistency.
Classic Variation
  1. Spread the avocado mash over the toast and drizzle with olive oil. Season to taste.
Caprese Variation
  1. Layer the mashed avocado, add cherry tomatoes, mozzarella, drizzle balsamic reduction, and garnish with parsley.
Salsa Variation
  1. Combine diced tomatoes, onion, jalapeño, cilantro, and lime juice. Layer the salsa on top of the avocado spread.
Smoked Salmon Variation
  1. Spread cream cheese on toasted bread, add avocado, top with smoked salmon and red onion.
Bacon & Eggs Variation
  1. Cook bacon until crispy. Fry eggs, then layer bacon and egg on top of the avocado spread.
Everything Bagel Variation
  1. Spread cream cheese, layer avocado, and top with everything seasoning and sesame seeds.

Nutrition

Serving: 1sliceCalories: 250kcalCarbohydrates: 27gProtein: 6gFat: 15gSaturated Fat: 2gPolyunsaturated Fat: 1gMonounsaturated Fat: 10gCholesterol: 70mgSodium: 400mgPotassium: 450mgFiber: 7gSugar: 1gVitamin A: 500IUVitamin C: 15mgCalcium: 100mgIron: 2mg

Notes

Freshly mashed avocado should be consumed shortly after preparation to prevent browning.

Tried this recipe?

Let us know how it was!

Crispy Strawberry Cheesecake Sandwiches for a Sweet Indulgence

“You’re frying what?!” I couldn’t help but overhear my friend’s surprise when I dared to turn breakfast into an indulgent affair with Fried Strawberry Cheesecake Sandwiches. This delightful recipe takes comfort food to new, crispy heights, where golden-brown bread hugs a luscious cream cheese filling paired with sweet, juicy strawberries. Perfect for brunch or a late-night treat, these sandwiches satisfy your cravings without the fuss of complicated preparations. Plus, they’re a great way to bring a little flair to your morning routine or elevate dessert beyond the ordinary. Who wouldn’t want a sweet, gooey surprise for breakfast? Intrigued? Let’s dive into the recipe that’s about to transform your kitchen into a dessert haven!

Why are these sandwiches so irresistible?

Crispy Texture: Each bite delivers a satisfying crunch, perfectly contrasting the creamy filling.
Decadent Flavor: Indulge in the rich combination of cream cheese and juicy strawberries that dance on your taste buds.
Versatile Treat: Whether for breakfast, a snack, or dessert, these sandwiches fit any occasion.
Quick and Easy: With minimal ingredients and straightforward steps, whipping up these delights is a breeze.
Crowd-Pleaser: Impress friends and family alike with this unique take on a classic dessert; they won’t believe how easy it was!
If you love this twist on strawberries, check out our Strawberry Cheesecake for more delicious ideas!

Strawberry Cheesecake Sandwiches Ingredients

• Ready to create your own delicious Fried Strawberry Cheesecake Sandwiches? Let’s gather the essentials!

For the Filling

  • Cream Cheese – Adds creamy richness to the filling; use full-fat for the best flavor.
  • Powdered Sugar – Sweetens the cream cheese filling; substitute with granulated sugar if needed, but whisk well for a smooth consistency.
  • Strawberries – Provides fresh sweetness; feel free to substitute with other berries for a twist.
  • Strawberry Jam – Enhances flavor and moisture; can be replaced with your favorite fruit jam.

For the Sandwich

  • Bread – Offers structure and a crispy exterior; use thick-sliced bread like brioche or Texas toast for better results.
  • Eggs – Binds the sandwiches during frying; no substitute recommended—consider an egg-free batter for alternative diets.
  • Milk – Brings creaminess to the egg mixture; you can use any milk, including plant-based options.
  • Butter – Used for frying, adding rich flavor; coconut oil can serve as a dairy-free substitute.

Ready to fry up some deliciousness? Let’s get cooking!

Step‑by‑Step Instructions for Strawberry Cheesecake Sandwiches

Step 1: Prepare Filling
In a mixing bowl, combine softened cream cheese and powdered sugar. Using a hand mixer, whip the mixture until smooth and creamy, making sure there are no lumps, which should take about 2-3 minutes. This rich filling will serve as the heart of your Strawberry Cheesecake Sandwiches, providing a decadent contrast to the crispy exterior.

Step 2: Assemble Sandwiches
Take two slices of thick-sliced bread; spread a generous layer of the cream cheese mixture on one slice. Scatter sliced strawberries evenly on top, then add a spoonful of strawberry jam before placing the second slice of bread on top. Press firmly to seal, creating a luscious sandwich filled with fruity goodness.

Step 3: Prepare Egg Mixture
In a shallow dish, whisk together the eggs and milk until well combined. Ensure there are no streaks of egg white, and the mixture is homogenous. This will be the coating that gives your Strawberry Cheesecake Sandwiches a beautifully golden exterior while they fry.

Step 4: Dip Sandwiches
Carefully submerge each assembled sandwich into the egg mixture, ensuring it’s completely coated on both sides. Allow any excess mixture to drip off before transferring it to the skillet. This coating will ensure a crispy and decadent crust once fried.

Step 5: Fry Sandwiches
In a large skillet, melt butter over medium heat until it starts to bubble. Gently place the coated sandwiches in the skillet without overcrowding. Fry each side for 2-3 minutes, or until they turn a beautiful golden brown. The aroma will be enticing as they cook, signaling that your Strawberry Cheesecake Sandwiches are nearly ready.

Step 6: Finish Up
Once perfectly golden, remove the sandwiches from the skillet and place them on paper towels to drain excess grease. Dust each sandwich with powdered sugar for an extra touch of sweetness. Serve warm for the best experience, and watch as everyone swoons over this delightful indulgence!

Strawberry Cheesecake Sandwiches Variations

Feel free to personalize this decadent recipe with delightful variations to suit your tastes and dietary needs!

  • Berry Delight: Swap strawberries for blueberries, blackberries, or raspberries for a burst of tangy flavors that bring a unique twist to each bite. Each berry introduces its own character, making a delightful treat for your palate.

  • Banana Bliss: Substitute sliced strawberries with ripe bananas for a creamy, tropical flavor explosion. Pairing the sweetness of bananas with the rich cream cheese filling will transport you straight to dessert paradise.

  • Cinnamon Spice: Add a sprinkle of cinnamon or nutmeg to the cream cheese filling for a warm, cozy aroma that complements the sweetness of the strawberries beautifully. This twist not only enhances the flavor but also adds a lovely visual appeal.

  • Chocolate Indulgence: Drizzle melted chocolate over the stuffed sandwiches before frying. This decadent addition transforms your breakfast treat into a luxurious dessert that chocolate lovers will adore.

  • Nutty Crunch: Incorporate crushed nuts—such as almonds or pecans—into the cream cheese filling for added texture and a nutritious boost. This golden combination provides a delightful crunch that perfectly contrasts the creamy interior.

  • Vegan Version: For a plant-based option, use a dairy-free cream cheese alternative and substitute the eggs with a thin batter made from flour and water. This adjustment maintains the lusciousness of the filling while making it suitable for everyone at the table.

  • Spicy Kick: For a surprising twist, add a pinch of cayenne pepper or chili powder into the cream cheese mixture. This surprising heat mingles beautifully with the sweetness, creating a flavor profile that will keep your guests guessing.

These creative variations can elevate your Fried Strawberry Cheesecake Sandwiches to delightful new heights! And if you’re looking for more berry-inspired desserts, be sure to check out our scrumptious Strawberry Cheesecake and the delightful Strawberry Cheesecake Dump for additional sweet inspirations!

Make Ahead Options

These Fried Strawberry Cheesecake Sandwiches are perfect for meal prep enthusiasts looking to save time during busy weekdays! You can prepare the cream cheese filling and assemble the sandwiches up to 24 hours in advance. Simply mix the cream cheese and powdered sugar, then spread it on the bread and layer with strawberries and jam. Wrap the assembled sandwiches tightly in plastic wrap and refrigerate them to maintain their freshness. When you’re ready to enjoy, just dip the sandwiches in the egg mixture and fry them until golden brown! This method not only saves you time but also keeps them just as delicious and indulgent when served warm.

What to Serve with Fried Strawberry Cheesecake Sandwiches

Create a delightful experience around your scrumptious sandwiches by pairing them with these mouthwatering complements.

  • Fresh Fruit Salad: A vibrant mix of seasonal fruits adds a refreshing contrast, enhancing the sweetness of the filling while providing a juicy crunch.

  • Whipped Cream: Light and airy, a dollop of whipped cream amplifies the indulgence of each bite, offering a luscious, creamy addition that mingles beautifully with the strawberries.

  • Vanilla Ice Cream: Serve warm sandwiches with a scoop of creamy vanilla ice cream. The melting contrast between hot and cold will have everyone swooning with delight.

  • Chocolate Drizzle: A drizzle of warm chocolate sauce over the sandwiches creates a decadent touch, elevating the flavor profile and making each bite feel like a special treat.

  • Maple Syrup: Add a drizzle of maple syrup for a hint of sweetness that balances the richness of the cream cheese. This note of flavor adds warmth and complexity.

  • Iced Coffee or Latte: A refreshing iced coffee or latte pairs perfectly, providing a caffeine kick that complements the sweetness of the sandwiches while adding depth to your breakfast or brunch spread.

  • Cinnamon Sugar Dusting: A sprinkle of cinnamon sugar over the sandwiches enhances their aroma and flavor, bringing a cozy, comforting touch reminiscent of fall desserts.

Indulging in these combinations will elevate your breakfast ritual or dessert, bringing joy to the table and hearts of those you care about!

Expert Tips for Strawberry Cheesecake Sandwiches

  • Perfect Bread Choice: Opt for thick-sliced brioche or Texas toast; these varieties hold up better against the filling and ensure a delightful crunch.

  • Chill Before Frying: Let the assembled sandwiches chill in the fridge for 15-30 minutes; this firms up the filling and prevents it from oozing out during frying.

  • Watch the Heat: Maintain medium heat while frying; too high can burn the outside while leaving the inside cold, so adjust as necessary.

  • Egg Mixture Consistency: Ensure the egg and milk mixture is well-blended without streaks to achieve a uniform coating, which helps create that perfect crispy texture.

  • Experiment with Fillings: Don’t hesitate to swap strawberries for blueberries or raspberries to personalize your Strawberry Cheesecake Sandwiches; the possibilities are endlessly delicious!

Storage Tips for Strawberry Cheesecake Sandwiches

Fridge: Store leftover sandwiches in an airtight container for up to 1 day. This keeps them fresh, though be aware the bread may lose some crispiness.

Freezer: For long-term storage, wrap sandwiches tightly in plastic wrap and place them in a freezer-safe bag. They can be frozen for up to 1 month.

Reheating: To regain that crispy texture, reheat frozen or refrigerated sandwiches in a skillet over medium heat for about 2-3 minutes per side, just until warmed through.

Enjoy Freshness: These Strawberry Cheesecake Sandwiches are best enjoyed fresh, so try to indulge as soon as possible for the ultimate experience!

Strawberry Cheesecake Sandwiches Recipe FAQs

What type of bread works best for these sandwiches?
For the best results, I recommend using thick-sliced bread like brioche or Texas toast. They provide the ideal structure to hold the creamy filling and crisp up beautifully during frying.

How should I store leftover Strawberry Cheesecake Sandwiches?
Store any leftover sandwiches in an airtight container in the fridge for up to 1 day. Although they may lose some crispiness, warming them in a skillet ensures they stay delicious. For longer storage, wrap them tightly in plastic wrap and freeze for up to 1 month.

Can I freeze the Fried Strawberry Cheesecake Sandwiches?
Absolutely! To freeze these sandwiches, wrap each one tightly in plastic wrap and place them in a freezer-safe bag. Label with the date, and they’ll keep well for up to 1 month. When you’re ready to enjoy, reheat them in a skillet over medium heat for about 2-3 minutes per side until they’re warmed through and crispy again.

What can I do if my sandwiches are oozing filling while frying?
If your filling is oozing, it might be due to too much jam or not chilling the sandwiches long enough before frying. To avoid this, make sure to spread a thin layer of jam and chill the assembled sandwiches in the fridge for 15-30 minutes prior to frying. This helps the filling firm up and prevent leaks during cooking.

Are there any common allergies I should consider with this recipe?
Yes! This recipe contains dairy (cream cheese, milk, and butter) and eggs, which are common allergens. For a dairy-free version, you can use cream cheese alternatives made from nuts or soy and replace butter with coconut oil. If you need an egg-free option, consider making a thin batter with flour and water to dip the sandwiches. Always check ingredient labels for allergies!

Can I use other fruits besides strawberries?
Very much! While strawberries add delightful sweetness, feel free to experiment by using blueberries, raspberries, or even sliced bananas. Each fruit brings its unique taste to the sandwiches, making this recipe incredibly versatile!

Strawberry Cheesecake Sandwiches

Crispy Strawberry Cheesecake Sandwiches for a Sweet Indulgence

Indulge in crispy sandwiches filled with cream cheese and strawberries. Perfect for brunch or dessert.
Prep Time 10 minutes
Cook Time 10 minutes
Chilling Time 30 minutes
Total Time 50 minutes
Servings: 4 sandwiches
Course: Dessert
Cuisine: American
Calories: 350

Ingredients
  

Filling
  • 8 oz Cream Cheese Use full-fat for best flavor
  • 1/2 cup Powdered Sugar Can substitute with granulated sugar
  • 1 cup Strawberries Feel free to substitute with other berries
  • 1/4 cup Strawberry Jam Can replace with your favorite fruit jam
Sandwich
  • 8 slices Bread Use thick-sliced brioche or Texas toast
  • 2 large Eggs No substitute recommended
  • 1/2 cup Milk Any milk including plant-based options
  • 2 tbsp Butter Can use coconut oil as a dairy-free substitute

Equipment

  • Mixing Bowl
  • Hand mixer
  • shallow dish
  • Skillet

Method
 

Preparation Steps
  1. In a mixing bowl, combine softened cream cheese and powdered sugar, and whip until smooth and creamy.
  2. Spread a generous layer of the cream cheese mixture on one slice of bread, add sliced strawberries and a spoonful of strawberry jam, then top with another slice of bread.
  3. In a shallow dish, whisk together eggs and milk until well combined.
  4. Dip each assembled sandwich into the egg mixture, ensuring it’s completely coated.
  5. In a skillet, melt butter over medium heat and fry the coated sandwiches for 2-3 minutes on each side until golden brown.
  6. Remove from skillet, drain on paper towels, and dust with powdered sugar before serving warm.

Nutrition

Serving: 1sandwichCalories: 350kcalCarbohydrates: 40gProtein: 6gFat: 18gSaturated Fat: 10gCholesterol: 120mgSodium: 350mgPotassium: 150mgFiber: 2gSugar: 15gVitamin A: 500IUVitamin C: 30mgCalcium: 100mgIron: 1mg

Notes

These sandwiches are best enjoyed fresh for the ultimate experience.

Tried this recipe?

Let us know how it was!

Cheesy Chicken Crescent Rolls: The Ultimate Comfort Appetizer

As I rolled out the buttery crescent dough, the anticipation was almost palpable. Cheesy Chicken Crescent Rolls were about to transform into the ultimate comfort food for my cozy gathering. Nestled inside those flaky layers is a luscious mixture of shredded chicken and melted cheese, making this dish not only delicious but incredibly easy to whip up. With just a handful of ingredients, you can create a delightful appetizer that’s sure to impress friends and family alike. Plus, these rolls can easily be made gluten-free if you use alternative dough! Whether for a quick weeknight dinner or an afternoon snack, you won’t want to miss out on these cheesy triumphs. Ready to dive into the recipe that will warm your kitchen and heart?

Why are Cheesy Chicken Crescent Rolls a must-try?

Delightful Flakiness: With a buttery crescent dough that bakes into a golden crust, every bite is a satisfying crunch leading to a warm, creamy filling.

Simplicity: This easy recipe uses common ingredients, making it a stress-free option for beginner bakers or busy cooking enthusiasts.

Versatile Filling: You can customize the filling with additional ingredients like spinach or jalapeños for a gourmet upgrade, or swap in different cheeses to suit your taste.

Crowd-Pleasing Appetizer: Perfect for gatherings or family dinners, these rolls are sure to be a hit, just like our Cheesy Garlic Chicken or Cheesy Spinach Artichoke dishes!

Make-Ahead Wonder: You can prepare these rolls in advance—freeze them or refrigerate before baking for a quick and delightful meal option whenever the craving strikes!

Cheesy Chicken Crescent Rolls Ingredients

For the Dough
Crescent Roll Dough – Provides the flaky, buttery exterior; alternatively, you can use puff pastry or biscuit dough for a different texture.

For the Filling
Cooked Shredded Chicken – Acts as the main protein component; for convenience, consider using rotisserie chicken.
Cream Cheese – Adds creaminess and richness to the filling; mascarpone can be used for a different flavor profile.
Shredded Cheddar Cheese – Enhances the cheesy flavor; mozzarella offers stretchiness, while pepper jack adds a spicy kick.
Garlic Powder – Infuses flavor into the filling; fresh minced garlic can provide a bolder taste.
Chopped Parsley – Gives a burst of freshness and color; feel free to substitute with green onions or omit entirely.
Salt & Pepper – Essential for seasoning; adjust according to your personal taste preferences.

Optional Add-Ins
Spinach – Incorporate cooked spinach for added nutrition and a flavor enhancement.
Diced Bell Peppers or Jalapeños – Mix these in for a delightful crunch and a touch of heat.

Enjoy crafting these delightful cheesy chicken crescent rolls, the perfect comfort food to bring warmth and joy to your table!

Step‑by‑Step Instructions for Cheesy Chicken Crescent Rolls

Step 1: Preheat Oven
Begin by preheating your oven to 375°F (190°C). While it warms up, prepare a baking sheet by greasing it lightly with cooking spray or parchment paper. This ensures your Cheesy Chicken Crescent Rolls will bake evenly and won’t stick while they transform into golden perfection.

Step 2: Prepare Filling
In a medium bowl, combine the cooked shredded chicken, cream cheese, shredded cheddar cheese, garlic powder, chopped parsley, salt, and pepper. Use a fork or spatula to mix until everything is well incorporated and creamy. This filling should be smooth with a delightful aroma—think cozy comfort food as you prepare to roll it up!

Step 3: Roll Out Dough
Open your crescent dough package and carefully unfold the dough on a clean surface, separating it into individual triangles. Gently press the seams to ensure they stick together, creating a smooth surface for filling. The dough should feel soft and pliable, ready to embrace the cheesy filling you just created.

Step 4: Assemble Rolls
Take a spoonful of the filling and place it at the wider end of each crescent triangle. Start rolling the dough towards the pointed end, tucking the sides in as you go to encase the filling snugly. Ensure that each Cheesy Chicken Crescent Roll is tightly rolled without excess filling spilling out to guarantee a beautiful shape during baking.

Step 5: Bake Rolls
Arrange the assembled rolls on your prepared baking sheet, spacing them evenly apart. Place the sheet in the preheated oven and bake for 12-15 minutes, or until the crescent rolls are puffed up and golden brown. Your kitchen will soon be filled with a mouthwatering aroma as these Cheesy Chicken Crescent Rolls come to life!

Step 6: Cool & Serve
Once baked, remove the rolls from the oven and allow them to cool for a few minutes on the baking sheet. This helps them firm up slightly for easier handling. Serve warm, paired with your favorite dips or sauces for an extra touch of flavor. These Cheesy Chicken Crescent Rolls will surely delight everyone at your table!

Cheesy Chicken Crescent Rolls: Personalize It!

Feel free to put your unique spin on these rolls and create a dish that excites your taste buds!

  • Spinach Boost: Stir in cooked spinach for added nutrition and a fresh pop of flavor. This hearty green pairs beautifully with the creamy filling.
  • Jalapeño Kick: Add diced jalapeños for a spicy twist. The heat contrasts beautifully with the creamy cheese, delivering a delightful surprise in each bite.
  • Cheese Switch-Up: Swap cheddar for mozzarella for a super stretchy texture, or introduce feta because its tanginess adds an exciting depth of flavor.
  • Dough Alternatives: Use puff pastry or biscuit dough instead of crescent rolls for a unique texture. Each option brings its own delightful characteristics you’ll love.
  • Herb Infusion: Experiment with fresh herbs like dill or chives instead of parsley. A handful of herbs can transform your creamy filling into a fragrant delight.
  • Sauce Selection: Ditch the usual dips and serve with salsa or honey mustard. These unique choices can elevate your appetizer experience.
  • Veggie Medley: Mix in diced bell peppers or carrots for a crunch. This added texture helps balance the richness of the cheesy filling.
  • Savory Seasoning: Sprinkle in a dash of smoked paprika or Italian seasoning. These spices elevate the flavor profile, making each bite unforgettable.

With these ideas, you’ll entertain friends and family with a delicious twist on the classic Cheesy Low Carb or perhaps serve alongside a refreshing BLT Chicken Salad. Enjoy your culinary adventure!

Make Ahead Options

These Cheesy Chicken Crescent Rolls are perfect for meal prep enthusiasts! You can assemble the rolls and refrigerate them for up to 24 hours before baking, allowing you to whip them up quickly during busy evenings. To prep in advance, simply prepare the filling and roll the dough as instructed; store the assembled rolls in an airtight container to maintain freshness and prevent them from drying out. Alternatively, you can freeze the uncooked rolls for up to 3 months; bake them straight from the freezer, adding a few extra minutes to the cooking time. When you’re ready to serve, just pop them in the oven until golden brown, and you’ll have delicious, comforting snacks ready to wow your family!

Expert Tips for Cheesy Chicken Crescent Rolls

  • Avoid Overfilling: Ensure you don’t put too much filling in each roll, as it may leak during baking, resulting in a messy outcome.

  • Even Baking: Space the rolls evenly on the baking sheet to allow hot air to circulate, ensuring your Cheesy Chicken Crescent Rolls bake evenly and become beautifully golden.

  • Make It Ahead: Assemble and refrigerate these rolls for up to 24 hours before baking. This is a great way to save time on busy days!

  • Reheating Leftovers: Store leftover Cheesy Chicken Crescent Rolls in an airtight container for 3-4 days. Reheat in the oven rather than the microwave for the best crispy texture.

  • Dough Alternatives: If you want a gluten-free option, use gluten-free dough. This allows anyone to enjoy these delicious rolls without sacrificing taste!

What to Serve with Cheesy Chicken Crescent Rolls

Start your meal off right with delightful sides that elevate these comforting rolls into a complete feast.

  • Garden Salad: A vibrant mix of greens and vegetables adds freshness, balancing the richness of the rolls with a crunchy texture.

  • Creamy Potato Salad: This classic side dish brings a comforting creamy contrast that pairs beautifully with the cheesy flavors of the rolls.

  • Roasted Vegetables: Slightly caramelized veggies provide a hearty, savory element, complementing the flaky dough and savory chicken filling.

  • Buffalo Sauce: For those who enjoy a spicy kick, serve with buffalo sauce on the side for dipping—an irresistible way to amp up the flavor!

  • Sweet and Tangy Dipping Sauce: Consider a honey mustard or barbecue sauce to offer a sweet contrast that harmonizes with the savory notes of the rolls.

  • Chilled Cucumber Soup: A refreshing soup can enhance your spread, giving a cool counterpoint that complements the warmth of the Cheesy Chicken Crescent Rolls.

  • Sparkling Lemonade: For a refreshing beverage, whip up some sparkling lemonade. Its zesty sparkle will brighten the meal and cleanse the palate between bites.

  • Chocolate Chip Cookies: End on a sweet note! These classic cookies are a beloved treat, offering a soft, chewy finish that rounds out your meal perfectly.

How to Store and Freeze Cheesy Chicken Crescent Rolls

Room Temperature: Keep baked Cheesy Chicken Crescent Rolls at room temperature for up to 2 hours before refrigerating. After that, store in the fridge for best freshness.

Fridge: Place leftover rolls in an airtight container, where they will stay fresh for 3-4 days. Reheat them in the oven for 5-7 minutes at 350°F (175°C) for optimal texture.

Freezer: Unbaked rolls can be frozen for up to 2-3 months. Place them on a baking sheet to freeze individually before transferring to a freezer bag. Bake from frozen, adding an extra 5-7 minutes to the cooking time.

Reheating: For best results, reheat leftover rolls in the oven rather than the microwave to maintain their flaky texture. Enjoy every cheesy bite!

Cheesy Chicken Crescent Rolls Recipe FAQs

How do I select the right chicken for the filling?
Absolutely! For the most convenient and flavorful option, I recommend using rotisserie chicken. It’s pre-cooked and saves you time in the kitchen. If you prefer to cook your own, aim for chicken breast or thighs, and make sure they are thoroughly cooked and shredded for the best texture in your filling.

What are the best storage methods for leftovers?
Very! After enjoying your Cheesy Chicken Crescent Rolls, store any leftovers in an airtight container in the fridge. They will stay fresh for 3-4 days. If you want to keep that flaky texture, reheat the rolls in the oven at 350°F (175°C) for 5-7 minutes, which makes them crispy again.

Can I freeze the Cheesy Chicken Crescent Rolls?
Absolutely! You can freeze uncooked rolls for up to 2-3 months. To do this, arrange them on a baking sheet and place them in the freezer until solid. Once frozen, transfer the rolls to a freezer bag. When you’re ready to enjoy them, bake directly from the freezer, just adding an extra 5-7 minutes to the cooking time.

What should I do if my rolls are leaking filling?
Ah, that’s a common issue! To avoid this, make sure you don’t overfill the crescent dough while assembling your rolls. Tuck and roll the edges tightly to secure the filling inside. If you do have some leakage during baking, it’s usually harmless—just be cautious next time to keep it all snug!

Are Cheesy Chicken Crescent Rolls gluten-free?
Very! If you or your guests are gluten-sensitive, simply use gluten-free crescent roll dough—it’s widely available in grocery stores. This way, everyone can enjoy these cheesy delights without compromising taste or texture!

Cheesy Chicken Crescent Rolls

Cheesy Chicken Crescent Rolls: The Ultimate Comfort Appetizer

Cheesy Chicken Crescent Rolls are a delightful appetizer that combines flaky dough with a creamy, cheesy chicken filling.
Prep Time 15 minutes
Cook Time 15 minutes
Total Time 30 minutes
Servings: 8 rolls
Course: Appetizers
Cuisine: American
Calories: 220

Ingredients
  

For the Dough
  • 1 package Crescent Roll Dough Can substitute with puff pastry or biscuit dough for different texture.
For the Filling
  • 2 cups Cooked Shredded Chicken Rotisserie chicken is convenient.
  • 8 oz Cream Cheese Can use mascarpone for a different flavor.
  • 1 cup Shredded Cheddar Cheese Mozzarella or pepper jack can also be used.
  • 1 tsp Garlic Powder Fresh minced garlic can be used for bolder flavor.
  • 1 tbsp Chopped Parsley Substitute with green onions or omit.
  • to taste Salt
  • to taste Pepper
Optional Add-Ins
  • 1 cup Spinach Incorporate cooked spinach for added nutrition.
  • 1 cup Diced Bell Peppers or Jalapeños Adds crunch and heat.

Equipment

  • Baking Sheet
  • Mixing Bowl

Method
 

Step-by-Step Instructions
  1. Preheat your oven to 375°F (190°C) and prepare a baking sheet by greasing it lightly.
  2. In a medium bowl, combine the cooked shredded chicken, cream cheese, shredded cheddar cheese, garlic powder, chopped parsley, salt, and pepper.
  3. Open your crescent dough package and unfold it on a clean surface, separating it into individual triangles.
  4. Place a spoonful of the filling at the wider end of each crescent triangle and roll towards the pointed end, tucking the sides in.
  5. Arrange the rolls on the baking sheet, spacing them evenly, and bake for 12-15 minutes until golden brown.
  6. Allow the rolls to cool for a few minutes before serving warm with dips or sauces.

Nutrition

Serving: 1rollCalories: 220kcalCarbohydrates: 12gProtein: 14gFat: 12gSaturated Fat: 7gPolyunsaturated Fat: 1gMonounsaturated Fat: 3gCholesterol: 40mgSodium: 300mgPotassium: 150mgFiber: 1gSugar: 1gVitamin A: 500IUVitamin C: 2mgCalcium: 200mgIron: 1mg

Notes

Avoid overfilling the rolls and ensure even spacing on the baking sheet for proper baking. Rolls can be refrigerated before baking for up to 24 hours.

Tried this recipe?

Let us know how it was!

Delightful Stuffed French Toast with Blueberries and Cream Cheese

There’s something magical about waking up to the sweet aroma of breakfast wafting through the house, and this Stuffed French Toast with Cream Cheese and Blueberries is just the dish to set the tone for a lovely morning. Each bite of this delightful creation is a perfect harmony of crispiness and softness, with a luscious creamy filling that will make everyone in your household rush to the table. Not only is this recipe family-friendly and customizable, making it easy to swap in your favorite fruits or breads, but it’s also a comforting way to elevate your weekend brunch. Whether you serve it with a drizzle of maple syrup or a dusting of powdered sugar, it’s sure to impress! Ready to transform your mornings into something special? Let’s dive into this delightful recipe!

Why is Stuffed French Toast a Must-Try?

Magic in Simplicity: This recipe combines minimal ingredients to create a stunning breakfast that feels gourmet.

Endless Customization: Whether you prefer brioche, challah, or gluten-free bread, the options are endless.

Mouthwatering Appeal: The creamy, sweet filling with fresh blueberries offers a taste experience that feels like a treat.

Perfect for Any Occasion: Ideal for family brunch, special occasions, or cozy weekend mornings, it brings everyone together.

Quick and Easy: With straightforward steps, you’ll have a delicious dish on the table in no time!

Rewind to Your Childhood: Each bite of this nostalgic delicacy will have you reminiscing childhood breakfasts while creating new memories.

Elevate your meal with a splash of Creme Brulee French or enjoy with a side of Sweet Escape Toast!

Stuffed French Toast Ingredients

• Create the perfect Stuffed French Toast with this delightful ingredient list!

For the Bread

  • Brioche or Challah – These breads provide a rich, soft texture that absorbs the egg mixture beautifully.
  • Gluten-Free Bread – Perfect for those with dietary restrictions; ensures everyone can join in on the fun.

For the Egg Mixture

  • Eggs – Essential for structure and a custardy texture; don’t skip these!
  • Whole Milk or Milk Alternative – Adds creaminess and moisture; choose your favorite or utilize what’s on hand.
  • Vanilla Extract – A splash enhances the flavor; opt for pure vanilla for the most aromatic experience.
  • Cinnamon – Optional, but a dash adds warmth that marries perfectly with the sweetness of the filling.

For the Cream Cheese Filling

  • Cream Cheese – Use softened cream cheese for easy mixing; Greek yogurt offers a lighter twist.
  • Sugar – Sweetens the filling; feel free to adjust based on your preferred sweetness.
  • Fresh Blueberries – The star of the filling, offering bursts of flavor; swap with other fruits like strawberries if desired.

For Cooking

  • Unsalted Butter – Preferred for frying, it gives a rich flavor; oil is fine if you want a dairy-free option.

Now you’re all set to bring joy to your breakfast table with this Stuffed French Toast!

Step‑by‑Step Instructions for Stuffed French Toast

Step 1: Prepare Ingredients
Start by letting the cream cheese sit at room temperature for about 15–20 minutes until it’s soft and easy to mix. This will ensure a smooth filling for your Stuffed French Toast. Meanwhile, gather all your other ingredients: bread, eggs, milk, vanilla, sugar, fresh blueberries, and butter for cooking.

Step 2: Mix Egg Mixture
In a medium bowl, whisk together 4 large eggs, 1 cup of milk (or milk alternative), a pinch of cinnamon, and half a teaspoon of vanilla extract until the mixture is fully combined and slightly frothy. This egg mixture will create a custardy texture for your French toast. Set it aside while you prep the filling.

Step 3: Make Filling
In another bowl, blend together the softened cream cheese, 2 tablespoons of sugar, and the remaining half teaspoon of vanilla extract. Mix until smooth and creamy; then gently fold in 1 cup of fresh blueberries, ensuring they’re evenly distributed without breaking them. This delicious filling will be the heart of your Stuffed French Toast.

Step 4: Assemble Sandwiches
Take two slices of your chosen bread and spread a generous amount of the cream cheese and blueberry mixture between them, forming a sandwich. Press the edges lightly to seal the filling inside. Repeat this with the remaining bread and filling until all sandwiches are ready for dipping.

Step 5: Dip and Cook
Preheat a skillet over low to medium heat and add 2 tablespoons of unsalted butter, allowing it to melt completely. While the skillet warms, dip each sandwich into the egg mixture, ensuring both sides are fully coated. Cook them in the skillet for about 3–4 minutes on each side, or until they’re beautifully golden brown and crispy.

Step 6: Serve
Once cooked, transfer your Stuffed French Toast to a serving plate. Top with additional fresh blueberries, a dusting of powdered sugar, and a drizzle of maple syrup if desired. This delightful breakfast is best enjoyed warm, sharing the joy with family or friends as you savor each delicious bite.

Variations & Substitutions for Stuffed French Toast

Feel free to explore these delightful twists, allowing your creativity to shine through with each bite!

  • Gluten-Free Bread: Use your favorite gluten-free bread for a delicious alternative to accommodate dietary needs.
  • Mixed Berries: Swap blueberries for a blend of strawberries, raspberries, or blackberries for a vibrant flavor profile. Don’t be afraid to mix and match; each berry brings its unique sweetness and charm!
  • Nutty Addition: Sprinkle in some chopped nuts, like walnuts or pecans, for an added crunch and nuttiness that elevates the texture beautifully. Picture that crispy exterior contrasted with a creamy filling—simply heavenly!
  • Spiced Variation: Incorporate a pinch of nutmeg or cardamom into the egg mixture for a warm, exotic twist. The additional spices enhance the overall aroma, wrapping the dish in comforting warmth.
  • Savory Style: Swap the cream cheese with a savory cheese like goat cheese or ricotta, and add herbs for a delicious brunch alternative. Imagine pairing a slice with a light salad for a more sophisticated dish!
  • Sweetener Swap: Use honey or maple syrup instead of sugar in the cream cheese mixture for a natural sweetness. Experimenting with different sweeteners opens the door to discover your favorite flavor!
  • Sourdough Delight: Try using sourdough bread for a tangy yet delightful flavor. This twist introduces a playful contrast between the sweet filling and the bread’s natural sour notes.
  • Apple Cinnamon Twist: For a delightful surprise, fold in diced apples and a dash of cinnamon in the cream cheese mixture. The warm, spiced aroma combined with sweet apple pieces makes breakfast feel like a cozy hug!

With these ideas, you’re well-equipped to bend and shape this already beloved recipe into something even more special. For another delicious breakfast darling, why not complement your meal with a side of Sweet Escape Toast? The options are as endless as your imagination!

Expert Tips for Stuffed French Toast

Bread Choice Matters: Using slightly stale bread helps it absorb the egg mixture without getting too soggy. Fresh bread can fall apart during cooking.

Room Temperature Cheese: Always allow your cream cheese to soften at room temperature. This makes mixing easier, ensuring a silky filling that spreads effortlessly.

Prevent Filling Spills: Lightly pressing the edges of the sandwiches before dipping helps seal them, preventing any delicious filling from leaking out while cooking.

Cook Low and Slow: Use a low heat setting while frying to achieve a golden brown exterior without burning. This ensures the insides cook thoroughly and remain fluffy.

Fruit Variability: Feel free to experiment with different fruits; raspberries, strawberries, or even diced apples can be delightful alternatives to blueberries in your Stuffed French Toast.

What to Serve with Stuffed French Toast

Start your breakfast adventure with delightful accompaniments that will elevate your meal to a cozy feast.

  • Maple Syrup: A warm drizzle of pure maple syrup adds sweetness, balancing the creamy filling and enhancing the overall experience.

  • Crispy Bacon: The salty crunch of crispy bacon contrasts beautifully with the soft, sweet French toast, creating the perfect harmony of flavors.

  • Fresh Fruit Salad: A vibrant bowl of mixed berries and melons adds a refreshing touch, brightening up the dish with juicy, lively flavors.

  • Whipped Cream: Light and airy, a dollop of whipped cream enhances the indulgence factor, making each bite feel like a treat.

  • Caramelized Apples: Sautéed in butter and brown sugar, caramelized apples bring a warm, comforting flavor that pairs perfectly with the creamy filling. They’re a decadent choice.

  • Cinnamon Dusting: A sprinkle of cinnamon on top not only adds a warming spice but also complements the whole breakfast experience with its inviting aroma.

  • Coffee or Tea: A steaming cup of coffee or tea makes for the perfect beverage, rounding out the breakfast with a soothing sip as you savor every bite.

Storage Tips for Stuffed French Toast

Fridge: Store any leftovers in an airtight container in the refrigerator for up to 2 days. This keeps the Stuffed French Toast fresh and maintains its delightful texture.

Freezer: For longer storage, freeze individual slices wrapped tightly in plastic wrap for up to 2 months. Thaw in the fridge overnight before reheating.

Reheating: Reheat slices in a skillet over low heat for a few minutes on each side until warmed through, or use a microwave for a quicker option, but this may soften the texture slightly.

Serving Suggestions: Although best enjoyed fresh, you can always refresh the flavors by adding a drizzle of maple syrup or a sprinkle of powdered sugar when serving reheated pieces.

Make Ahead Options

These Stuffed French Toasts are perfect for busy mornings or meal prep enthusiasts! You can prepare the cream cheese filling and assemble the sandwiches up to 24 hours in advance, keeping them wrapped tightly in plastic wrap or an airtight container in the refrigerator to maintain freshness. The egg mixture can also be whisked together ahead of time and stored in the fridge for up to 3 days. When you’re ready to enjoy, simply dip the assembled sandwiches into the egg mixture and cook them in a skillet as directed. This way, you can enjoy a delicious breakfast with minimal effort while ensuring every bite remains just as delightful and flavorful!

Stuffed French Toast with Cream Cheese and Blueberries Recipe FAQs

How do I choose the right bread for my Stuffed French Toast?
Absolutely! For the best results, opt for brioche or challah, as they create a rich, soft texture that absorbs the egg mixture beautifully. If you have dietary restrictions, gluten-free bread can be an excellent substitute. No matter your choice, ensure it’s slightly stale for optimal soaking.

What’s the best way to store leftover Stuffed French Toast?
Very! Store any leftovers in an airtight container in the refrigerator for up to 2 days. This will keep your Stuffed French Toast fresh. When ready to enjoy, you can reheat it in a skillet over low heat to maintain that lovely texture.

Can I freeze my Stuffed French Toast, and how should I do it?
Absolutely! To freeze, wrap individual slices tightly in plastic wrap, then place them in a freezer-safe bag or container. They can be frozen for up to 2 months. When you’re ready to eat, simply thaw them in the fridge overnight and reheat as desired.

What if my cream cheese filling is too thick?
No worries, that happens! If you find your cream cheese filling is too thick to spread, try adding a splash of milk or a tablespoon of yogurt to loosen it. Mix well until you reach your desired consistency; this will make it easier to incorporate into your Stuffed French Toast.

Are there any dietary considerations I should keep in mind?
Very! If you or a loved one has food allergies, be cautious of ingredients like cream cheese, which contains dairy. You can easily substitute with dairy-free cream cheese or Greek yogurt. If you prefer to reduce the sugar, feel free to adjust based on your taste preference. Always check your bread choice as well, as not all varieties are gluten-free.

How can I prevent my Stuffed French Toast from being soggy?
Great question! To prevent sogginess, use slightly stale bread, which absorbs the egg mixture without falling apart. Also, dipping the bread swiftly rather than soaking it for too long helps maintain texture. Lastly, cooking over low heat ensures it cooks evenly without becoming mushy.

Stuffed French Toast

Delightful Stuffed French Toast with Blueberries and Cream Cheese

This Stuffed French Toast combines cream cheese and blueberries for a delightful breakfast experience that everyone will love.
Prep Time 20 minutes
Cook Time 10 minutes
Total Time 30 minutes
Servings: 4 slices
Course: Breakfast
Cuisine: American
Calories: 350

Ingredients
  

For the Bread
  • 4 slices Brioche or Challah These breads provide a rich, soft texture.
  • 4 slices Gluten-Free Bread Perfect for dietary restrictions.
For the Egg Mixture
  • 4 large Eggs Essential for structure.
  • 1 cup Whole Milk or Milk Alternative Adds creaminess and moisture.
  • 1/2 teaspoon Vanilla Extract Opt for pure vanilla for better flavor.
  • 1 teaspoon Cinnamon Optional for warmth.
For the Cream Cheese Filling
  • 8 oz Cream Cheese Use softened for easy mixing.
  • 2 tablespoons Sugar Adjust based on sweetness preference.
  • 1 cup Fresh Blueberries The star of the filling.
For Cooking
  • 2 tablespoons Unsalted Butter Preferred for frying to give flavor.

Equipment

  • Skillet
  • Mixing bowls
  • whisk
  • spatula

Method
 

Preparation Steps
  1. Let the cream cheese sit at room temperature for 15-20 minutes until soft.
  2. Gather bread, eggs, milk, vanilla, sugar, blueberries, and butter.
Mix Egg Mixture
  1. Whisk together eggs, milk, cinnamon, and vanilla extract until fully combined and slightly frothy.
Make Filling
  1. Blend cream cheese, sugar, and vanilla until smooth, then fold in blueberries.
Assemble Sandwiches
  1. Spread the cream cheese and blueberry mixture between two slices of bread.
Dip and Cook
  1. Dip each sandwich into the egg mixture and cook in a preheated skillet with butter until golden brown on both sides.
Serve
  1. Transfer to a plate, top with blueberries, powdered sugar, and maple syrup if desired.

Nutrition

Serving: 1sliceCalories: 350kcalCarbohydrates: 40gProtein: 10gFat: 15gSaturated Fat: 8gCholesterol: 200mgSodium: 300mgPotassium: 200mgFiber: 2gSugar: 8gVitamin A: 500IUVitamin C: 5mgCalcium: 150mgIron: 1mg

Notes

Using stale bread enhances absorption; allow cream cheese to soften for easier mixing. Cook on low heat for the best results.

Tried this recipe?

Let us know how it was!

Irresistible Breakfast Fried Rice for a Hearty Morning Boost

Our mornings don’t always start off on the right foot, do they? After a whirlwind of alarm snoozes and hurried breakfasts, it’s easy to find yourself reaching for the same old boring options. But what if I told you that transforming your morning routine could be as simple as whipping up a bowl of Breakfast Fried Rice? This savory delight features smoky bacon, fluffy scrambled eggs, and a vibrant medley of veggies, cleverly combining everything we crave for a hearty breakfast. Not only is it quick to prepare, but it packs a high-protein punch that delivers lasting energy without weighing you down. Whether you’re fueling up before a busy day or indulging in a laid-back weekend brunch, this dish is a game changer. Ready to dive into this tasty twist on a classic?

Why is Breakfast Fried Rice a Must-Try?

Bold flavors blend seamlessly in this hearty dish, making it a favorite for any breakfast lover. Quick and easy to whip up, you’ll have a nutritious meal ready in no time — perfect for those busy mornings! Endless variations mean you can switch up ingredients based on what you have on hand, just like those delectable Banana Blueberry Breakfast delights. Crowd-pleasing and customizable, this savory breakfast will impress family and friends alike. Whether enjoyed solo or as a shared dish, Breakfast Fried Rice elevates your mornings to new flavorful heights!

Breakfast Fried Rice Ingredients

For the Bacon
Bacon – Provides rich, smoky flavor and protein; substitute with turkey bacon or omit for a vegetarian option.

For the Eggs
Eggs – Adds creaminess and protein; use firm scrambled tofu for a vegan alternative.

For the Seasoning
Kosher Salt – Enhances the overall flavor of the dish; adjust according to taste.
Ground Pepper – Offers a slight heat; black or white pepper can be substituted.

For the Sauté
Butter – Adds richness to the dish and helps sauté the vegetables; use olive oil for a dairy-free version.
White Onion – Provides sweetness and depth; shallots can serve as a substitute.
Garlic – Imparts aromatic qualities; fresh garlic is recommended but garlic powder can work in a pinch.

For the Rice Base
Cold Cooked Rice – Acts as the base for texture and bulk; leftover brown rice enhances nutrition.
Soy Sauce – Adds umami flavor; tamari can be used for a gluten-free option.
Toasted Sesame Oil – Contributes a distinctive nutty aroma and flavor; can be replaced with olive oil for a different profile.

For the Vegetables
Frozen Peas and Carrots – Provides color and nutrients; any frozen mixed vegetables can be a quick substitute.
Frozen Corn – Adds sweetness and texture; fresh corn can also be used when available.
Green Onions – Offers freshness and a mild onion flavor as a garnish; can substitute with chives.

Now, let’s get cooking and enjoy your delightful Breakfast Fried Rice!

Step‑by‑Step Instructions for Breakfast Fried Rice

Step 1: Cook the Bacon
Begin by chopping the bacon into small pieces and adding them to a cold skillet over medium heat. Allow the bacon to cook for about 10 minutes, stirring occasionally, until it becomes crispy and golden brown. Once done, use a slotted spoon to transfer it onto paper towels to drain excess fat, leaving a bit of rendered fat in the skillet for added flavor.

Step 2: Scramble the Eggs
In a bowl, crack the eggs and season with kosher salt and ground pepper. Beat the eggs until well mixed, then pour them into the skillet with the residual bacon fat over medium heat. Cook for about 4-5 minutes, gently stirring until you achieve fluffy scrambled eggs. Once cooked to your liking, remove the eggs from the skillet and set aside.

Step 3: Sauté the Onion and Garlic
Increase the heat to medium-high and add the butter to the skillet. Once melted, toss in the diced white onion, sautéing for about 5-6 minutes until it turns translucent and fragrant. Add the minced garlic and continue to cook for an additional minute until aromatic, creating a savory base for your Breakfast Fried Rice.

Step 4: Fry the Rice
Add the cold cooked rice to the skillet, smoothing it into an even layer. Let it fry undisturbed for about 4-5 minutes to develop crispy edges, enhancing both texture and flavor. Stir occasionally to prevent sticking, ensuring that each grain gets coated in the delicious onion and garlic mixture.

Step 5: Add the Soy Sauce and Vegetables
Pour the soy sauce over the crispy rice, using a spatula to fold it in, allowing each grain to absorb the savory flavor. Next, toss in the frozen peas, carrots, and corn, along with the toasted sesame oil. Mix everything together gently until the vegetables are heated through, adding pops of color and nutrition to your Breakfast Fried Rice.

Step 6: Combine All Ingredients
Remove the skillet from the heat and fold in the crispy bacon, fluffy scrambled eggs, and sliced green onions. Toss everything together until well combined, allowing the flavors to meld in this delightful Breakfast Fried Rice. Serve immediately, with extra soy sauce at the table for those who desire a little more flavor.

Breakfast Fried Rice Variations

Feel free to personalize your dish and make it truly your own with these delightful twists and substitutions!

  • Turkey Bacon: Substitute regular bacon with turkey bacon for a leaner, guilt-free option that still delivers on flavor.

  • Vegan Scramble: Use firm scrambled tofu instead of eggs to create a savory, plant-based breakfast that’s packed with protein.

  • Mixed Veggies: Switch out the peas and carrots for seasonal vegetables like bell peppers or zucchini to add a pop of color and flavor. The beauty of this dish is that it’s so versatile!

  • Cauliflower Rice: For a low-carb alternative, swap the cold cooked rice with cauliflower rice. It will absorb all the amazing flavors without the carbs!

  • Spicy Upgrade: Add a fresh kick by including diced jalapeños or a splash of hot sauce during cooking. This little addition can elevate the flavor profile beautifully.

  • Nuts and Seeds: Sprinkle some toasted sesame seeds or crushed cashews atop your finished dish for a delightful crunch and added nutrients.

  • Fresh Herbs: Toss in a handful of fresh cilantro or basil right before serving for a burst of freshness that brightens up the dish.

  • Sriracha Drizzle: Serve your Breakfast Fried Rice with a drizzle of sriracha for a spicy finish that takes your meal to the next level — perfect for those who love some heat!

With so many incredible variations, your Breakfast Fried Rice can be a delightful recurring dish without ever becoming boring! If you’re in the mood for more breakfast inspiration, try out these delicious options like Cheesy Fried Egg or Croissant Breakfast Sandwich. Enjoy cooking!

Storage Tips for Breakfast Fried Rice

Fridge: Store leftovers in an airtight container for up to 3 days. This helps keep the flavors fresh while minimizing moisture loss.

Freezer: Freeze any portion not consumed within 3 days in a freezer-safe container for up to 3 months. Ensure it’s sealed tightly to prevent freezer burn.

Reheating: Reheat in a skillet over medium heat for around 5-7 minutes, stirring occasionally to regain that crispy texture typical of freshly made Breakfast Fried Rice.

Portioning: Consider portioning out your Breakfast Fried Rice before freezing to make quick meal prep easy on busy mornings!

Make Ahead Options

Preparing Breakfast Fried Rice in advance is a fantastic way to save time on busy mornings! You can cook the bacon, scramble the eggs, and sauté the vegetables up to 24 hours ahead. Simply let the bacon cool and store it in an airtight container in the fridge, along with the cooked scrambled eggs and sautéed veggies. For the rice, make sure it’s completely cooled before refrigerating to prevent clumping. When you’re ready to enjoy your meal, just reheat the bacon and eggs in a skillet, toss in the rice, soy sauce, and vegetables, and cook until warmed through. This way, you’ll have a delicious and hearty breakfast ready in minutes!

Expert Tips for Breakfast Fried Rice

  • Rice Texture: Ensure the cooked rice is completely cooled before using, as this prevents clumping and ensures perfect crispy fried rice.

  • Indirect Heat: To achieve those golden bits, cook the rice without stirring too frequently. This allows it to develop that delightful crispy texture essential for Breakfast Fried Rice.

  • Veggie Flexibility: Feel free to customize the vegetable mix based on your preferences or what you have in your fridge. Almost any vegetable can add a tasty twist!

  • Egg Alternatives: For a dairy-free option, scramble firm tofu instead of eggs. It maintains the protein content while accommodating various diets.

  • Serving Suggestions: Elevate your meal with a dash of sriracha or your favorite hot sauce for a spicy kick. It enhances flavors beautifully!

  • Storage Tips: Leftovers of your Breakfast Fried Rice can stay fresh in an airtight container for up to 3 days. Reheat them in a skillet to maintain the desired texture.

What to Serve with Breakfast Fried Rice

Elevate your Breakfast Fried Rice experience with these delightful accompaniments that enhance flavors and textures.

  • Crispy Bacon Strips: The perfect addition, offering an extra crunch and smokiness that complements the fried rice beautifully.
  • Fresh Fruit Salad: The sweetness of seasonal fruits contrasts with savory flavors, adding a refreshing touch to your meal.
  • Avocado Slices: Creamy and rich, avocados bring a smooth texture that complements the dish and boosts healthy fats.
  • Sriracha or Hot Sauce: A drizzle of spicy kick balances the savory notes of the fried rice, making each bite exciting.
  • Edamame Beans: Lightly salted, these provide a fun pop of texture and protein that pairs wonderfully with the dish.
  • Cucumber Salad: Refreshing and crisp, a simple salad adds brightness and cuts through the richness of the fried rice.
  • Iced Green Tea: A chilled drink, offering a soothing contrast to the warmth of the dish while providing antioxidants.
  • Poached Egg: Adding an ooey-gooey egg on top can enhance the creaminess, making every bite a luxurious experience.
  • Soy Sauce Dipping Bowl: A small side of soy sauce allows everyone to personalize their flavor, enhancing the umami profile of the meal.
  • Mini Pancakes: For a touch of sweetness, serve with bite-sized pancakes topped with maple syrup for a fun twist on brunch.

Breakfast Fried Rice Recipe FAQs

What type of rice should I use for Breakfast Fried Rice?
I highly recommend using cold cooked rice, as this helps achieve the best texture. Leftover rice from the previous day works perfectly, as it tends to be drier and less sticky. If you’re making fresh rice, allow it to cool completely before using; spread it out on a baking sheet for about 30 minutes to help it dry properly.

How can I store leftover Breakfast Fried Rice?
To store your leftovers, place the Breakfast Fried Rice in an airtight container in the fridge for up to 3 days. This keeps the flavors locked in while ensuring the rice stays fresh. If you need to store it longer, you can freeze it for up to 3 months in a freezer-safe container. Just be sure to seal it tightly to prevent freezer burn.

Can I freeze Breakfast Fried Rice? How?
Absolutely! If you want to freeze your Breakfast Fried Rice, start by letting it cool to room temperature. Portion the rice into freezer-safe containers or resealable bags — that way, you can reheat just the amount you need later. Remember to label them with the date before placing them in the freezer. When ready to eat, thaw overnight in the fridge and then reheat in a skillet over medium heat for about 5-7 minutes, stirring occasionally.

What are some common problems when making Breakfast Fried Rice?
One common issue is the rice clumping together, which usually happens if the rice is too warm or fresh. To avoid this, make sure to use cold, leftover rice. Additionally, if you’re not getting those crispy edges you desire, try frying the rice without stirring it too frequently and allow it to develop a nice crust for added flavor and texture.

Is this Breakfast Fried Rice recipe diet-friendly?
Yes, indeed! This Breakfast Fried Rice is gluten-free and high in protein. If you want to make it vegan, simply replace the eggs with firm scrambled tofu and omit the bacon or use a vegetarian alternative like tempeh. It’s a versatile recipe that can easily accommodate various dietary needs while still being delicious!

Breakfast Fried Rice

Irresistible Breakfast Fried Rice for a Hearty Morning Boost

Discover how to make Breakfast Fried Rice, a quick, savory meal packed with flavor and protein for a fantastic start to your day.
Prep Time 10 minutes
Cook Time 30 minutes
Total Time 40 minutes
Servings: 4 servings
Course: Breakfast
Cuisine: Asian
Calories: 450

Ingredients
  

For the Bacon
  • 4 slices Bacon substitute with turkey bacon or omit for a vegetarian option
For the Eggs
  • 2 large Eggs use firm scrambled tofu for a vegan alternative
For the Seasoning
  • 1/2 teaspoon Kosher Salt adjust according to taste
  • 1/4 teaspoon Ground Pepper black or white pepper can be substituted
For the Sauté
  • 2 tablespoons Butter use olive oil for a dairy-free version
  • 1 medium White Onion shallots can serve as a substitute
  • 2 cloves Garlic fresh garlic is recommended; garlic powder can work in a pinch
For the Rice Base
  • 3 cups Cold Cooked Rice leftover brown rice enhances nutrition
  • 3 tablespoons Soy Sauce tamari can be used for a gluten-free option
  • 1 tablespoon Toasted Sesame Oil can be replaced with olive oil for a different profile
For the Vegetables
  • 1 cup Frozen Peas and Carrots any frozen mixed vegetables can be a quick substitute
  • 1/2 cup Frozen Corn fresh corn can also be used when available
  • 2 stalks Green Onions can substitute with chives

Equipment

  • Skillet
  • Mixing Bowl
  • spatula
  • slotted spoon

Method
 

Step-by-Step Instructions for Breakfast Fried Rice
  1. Chop the bacon into small pieces and add to a cold skillet over medium heat. Cook for about 10 minutes until crispy and golden brown. Transfer to paper towels to drain excess fat.
  2. In a bowl, crack the eggs and season with kosher salt and ground pepper. Beat until well mixed, then pour into the skillet with the residual bacon fat. Cook for about 4-5 minutes until fluffy. Remove from skillet and set aside.
  3. Increase heat to medium-high and add the butter. Once melted, add diced onion and sauté for 5-6 minutes until translucent. Add minced garlic and cook for additional minute.
  4. Add the cold cooked rice to the skillet, smoothing into an even layer. Let fry undisturbed for about 4-5 minutes to develop crispy edges. Stir occasionally to prevent sticking.
  5. Pour the soy sauce over the crispy rice and fold in. Toss in the frozen peas, carrots, corn, and toasted sesame oil. Mix until vegetables are heated through.
  6. Remove from heat and fold in crispy bacon, scrambled eggs, and sliced green onions. Toss until well combined and serve immediately.

Nutrition

Serving: 1servingCalories: 450kcalCarbohydrates: 60gProtein: 20gFat: 15gSaturated Fat: 7gPolyunsaturated Fat: 3gMonounsaturated Fat: 4gCholesterol: 220mgSodium: 800mgPotassium: 450mgFiber: 4gSugar: 2gVitamin A: 400IUVitamin C: 10mgCalcium: 60mgIron: 2mg

Notes

Ensure cooked rice is completely cooled before use to prevent clumping. Customize the vegetable mix based on preferences.

Tried this recipe?

Let us know how it was!

Stay Connected

Get recipes via email: