Get my cookbooks

Delicious Persimmon Salad with Creamy Maple Vinaigrette

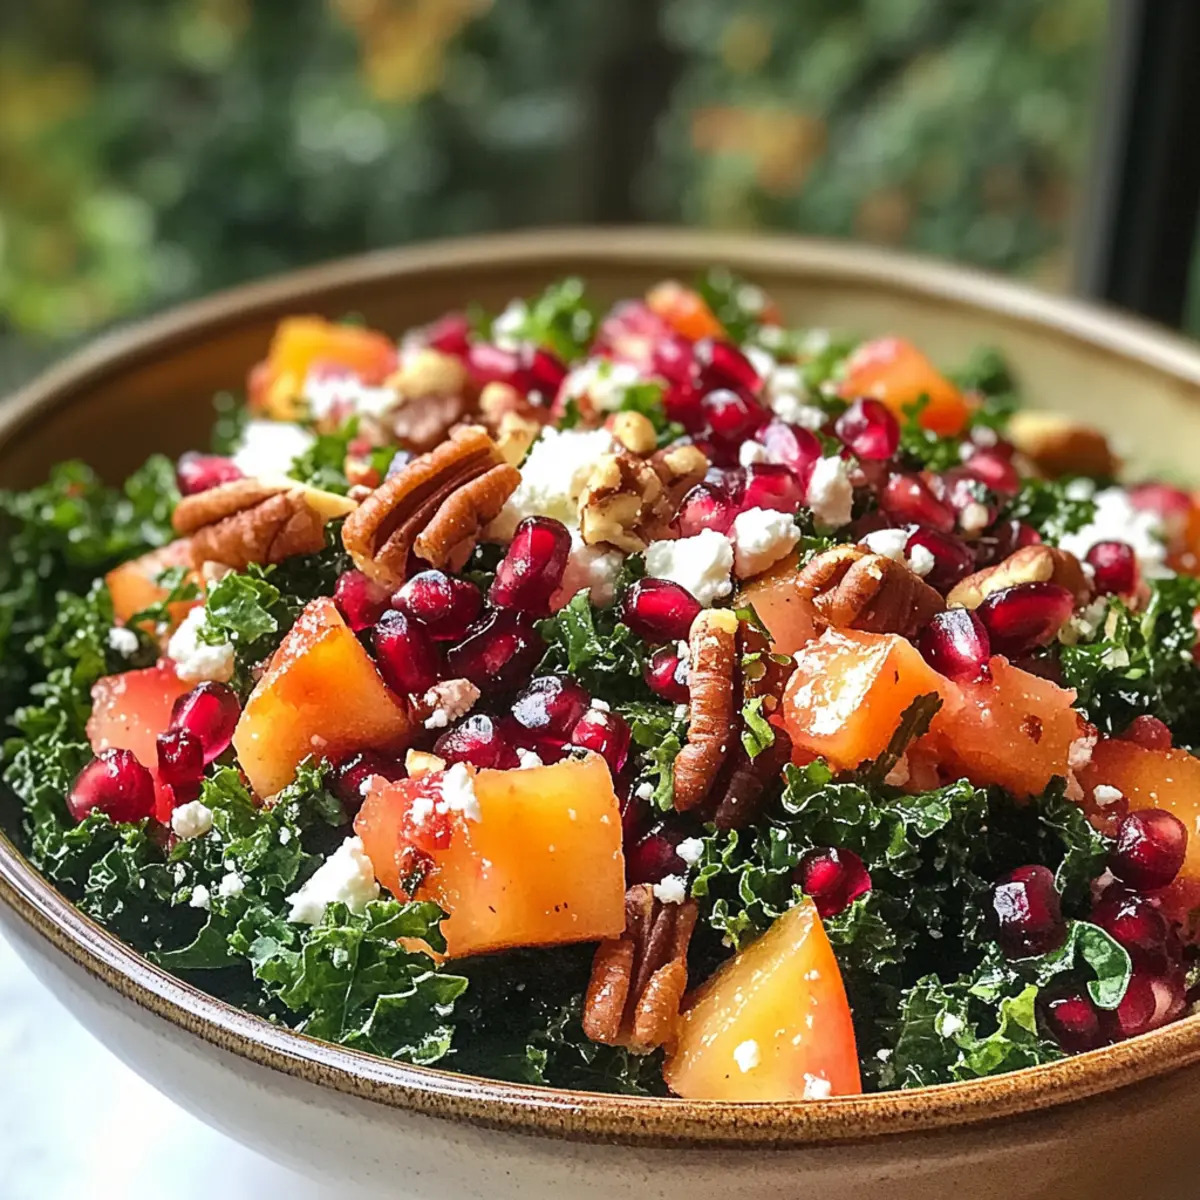
As I wandered through the vibrant farmers’ market, the bright orange glow of persimmons caught my eye, invoking memories of autumnal feasts filled with unexpected flavors. Inspired, I decided to whip up a quick and nutritious Sweet & Savory Persimmon Salad with Maple-Apple Cider Vinaigrette. This recipe not only highlights the delightful seasonal taste of persimmons but also comes together in just 10 minutes—perfect for those busy weeknights or when hosting friends. Packed with crunchy almonds and a creamy dressing, this salad is a fantastic way to elevate your meal without much fuss. Curious about how to incorporate this seasonal gem into your cooking routine? Let’s dive into this deliciously refreshing dish!

Why is this salad a must-try?

Simplicity in Preparation: This salad comes together in just 10 minutes, perfect for cooks of any skill level.

Colorful Presentation: Vibrant oranges and greens make this dish visually stunning, ideal for impressing guests.

Nutritious Ingredients: Packed with vitamins and healthy fats, this salad is not only delicious but also boosts your overall wellness.

Endless Customization: You can easily swap ingredients to suit your taste, like using kale instead of spinach or trying different nuts.

Perfect for Any Occasion: Whether it’s a family dinner or a holiday gathering, the Sweet & Savory Persimmon Salad fits seamlessly into any menu.

Add this salad to your collection of quick and healthy recipes, like our Quick Quinoa Salad for an even more satisfying meal!

Delicious Persimmon Salad Ingredients

For the Salad
Baby Spinach – Provides a fresh, leafy base; substitute with kale, arugula, or mixed greens for variety.
Fuyu Persimmon – Key ingredient offering sweetness; ensure you use flat-bottomed Fuyu persimmons and avoid the astringent Hachiya variety unless fully ripe.
Dried Cranberries – Adds a chewy texture and sweetness; feel free to substitute with other dried fruits like raisins or cherries.
Feta Cheese – Contributes creaminess and tanginess; consider swapping with goat cheese or omitting for a vegan option.
Sliced Almonds – Provides crunch and nuttiness; can be replaced with any nuts or seeds you prefer.

For the Dressing
Fresh Orange Juice – Imparts freshness and acidity to the vinaigrette.
Apple Cider Vinegar – Adds essential tang; crucial for balancing the vinaigrette.
Maple Syrup – Supplies sweetness to balance the flavors; honey can work as a great substitute.
Dijon Mustard – Enhances the dressing with depth; optional for a milder flavor.
Extra Virgin Olive Oil – Ensures a creamy texture in the dressing; avocado oil is a good alternative.
Salt and Pepper – Essential for seasoning to taste, amplifying all the flavors.

Unleash the potential of this Delicious Persimmon Salad by combining these ingredients for a quick, healthy, and beautiful meal!

Step-by-Step Instructions for Delicious Persimmon Salad with Creamy Maple Vinaigrette

Step 1: Toast the Almonds
Preheat your oven to 350°F (175°C). Spread sliced almonds evenly on a rimmed baking sheet, ensuring they lie flat for even toasting. Roast them for 8-10 minutes, stirring once halfway through. Watch closely after 8 minutes until they turn golden brown and fragrant. Once ready, remove from the oven and let them cool completely.

Step 2: Combine the Salad Ingredients
In a large mixing bowl, add a generous amount of baby spinach as the base for your Delicious Persimmon Salad. Chop the Fuyu persimmon into bite-sized pieces, add them along with dried cranberries and crumbled feta cheese. Finally, toss in the cooled, toasted almonds, mixing gently to avoid bruising the spinach or breaking the feta.

Step 3: Prepare the Dressing
In a small mason jar, pour in freshly squeezed orange juice, apple cider vinegar, maple syrup, Dijon mustard, and a drizzle of extra virgin olive oil for creaminess. Season with salt and pepper to taste. Seal the jar tightly and shake vigorously for about 30 seconds until all dressing ingredients are well integrated and emulsified.

Step 4: Dress and Serve the Salad
Carefully drizzle the creamy maple vinaigrette over your beautifully combined salad ingredients. Using tongs or two forks, gently toss everything together to ensure each component is coated with the luscious dressing. Serve immediately in a colorful bowl, allowing the vibrant colors to shine—a perfect acclamation for your Delicious Persimmon Salad!

Variations & Substitutions for Delicious Persimmon Salad

Elevate your salad experience by mixing things up with these delightful twists that cater to your taste buds and dietary preferences!

  • Leafy Greens: Swap baby spinach for kale or arugula to introduce a bolder flavor and different texture. Each green offers a unique nutritional profile too!

  • Nut Alternatives: If you’re not a fan of almonds, try walnuts or pecans for a richer taste. Their natural oils create a nice crunch that complements the sweetness of the persimmon.

  • Cheesy Options: Replace feta with goat cheese for a creamier, tangy twist, or use nutritional yeast for a vegan-friendly option. Both variations bring a delightful depth to the salad.

  • Dried Fruit Variety: Enhance sweetness with raisins or dried cherries instead of cranberries. The choice you make can add a different touch of flavor and chewiness to the dish.

  • Zesty Kick: For those who love a bit of heat, add a pinch of cayenne pepper or sliced jalapeños in your dressing to make the salad a bit more exciting!

  • Vinaigrette Flavor Boost: Infuse the dressing with flavors like ginger or garlic for an extra layer of complexity. A hint of these spices can elevate the overall taste experience.

  • Oil Alternatives: If you want to mix things up, try using avocado oil instead of olive oil for a smooth, buttery flavor. It pairs beautifully with the creamy dressing!

Consider incorporating these variations into your next meal, and if you’re looking for more fresh ideas, check out our Quick Quinoa Salad or consider adding roasted vegetables to this dish for extra texture and flavor.

Make Ahead Options

These Sweet & Savory Persimmon Salad preparations are perfect for busy home cooks looking to save time during the week! You can prepare the dressing up to 3 days in advance; simply combine all dressing ingredients in a mason jar and refrigerate. The toasted almonds can be made ahead and stored in an airtight container at room temperature for up to 1 week. For the salad components, wash and chop the spinach and persimmons, keeping them separate in the refrigerator for up to 24 hours before serving to ensure freshness. When you’re ready to enjoy the salad, simply toss everything together with the dressing, and you’ll have a delightful meal with minimal effort!

How to Store and Freeze Persimmon Salad

Refrigerator: Store unused salad components in an airtight container for 1-2 days. Keep the dressing separate until ready to serve to maintain freshness.

Freezer: This salad is not suitable for freezing, as the fresh ingredients can become mushy upon thawing. It’s best enjoyed fresh!

Reheating: If you’ve made the salad in advance and want to enjoy it later, do not reheat. Simply toss with dressing again to refresh the flavors before serving.

Pro Tip: When storing the Persimmon Salad, remember to layer the tougher ingredients on the bottom to prevent the more delicate items from wilting.

Expert Tips for Delicious Persimmon Salad

  • Choose the Right Persimmons: Always opt for Fuyu persimmons, as they provide the right sweetness; avoid Hachiya unless fully ripe to prevent astringency.

  • Make Dressing Ahead: Prepare the creamy maple vinaigrette in advance and store it in the fridge. This saves time and enhances flavors in your Delicious Persimmon Salad.

  • Toast Almonds Evenly: Ensure even toasting by spreading almonds in a single layer on the baking sheet. Keep a close eye while roasting to prevent burning—golden is the goal!

  • Customize Wisely: Feel free to swap out ingredients to suit your taste. Different greens or nuts can completely change the flavor profile while keeping the salad fresh and exciting.

  • Serve Fresh: For the best taste and texture, serve the salad immediately after dressing. If making ahead, store the dressing separately until just before serving.

What to Serve with Sweet & Savory Persimmon Salad

This vibrant salad pairs beautifully with a variety of dishes, enriching your table with autumnal flavors.

  • Grilled Chicken: Offers a savory contrast to the salad’s sweetness, making for a well-rounded meal.
  • Baked Salmon: The rich, fatty flavors of salmon complement the fresh, fruity elements in the salad.
  • Quinoa Pilaf: Adds a wholesome grain side that enhances the meal’s texture and nutritional value.
  • Vegetable Soup: A warm, hearty soup balances the cool, crisp salad for a comforting dining experience.
  • Cheese Platter: A selection of cheeses gives guests different tastes and textures to explore alongside the salad.
  • Roasted Brussels Sprouts: Their nutty flavor profile and crunchy texture bring harmony to the dish’s sweet notes.
  • Warm Bread: Serve this salad with crusty artisan bread to mop up the creamy vinaigrette. It enhances the dining experience and adds comfort.
  • Apple Cider: A refreshing drink that mirrors the salad’s sweetness, making every bite feel celebratory.
  • Pumpkin Pie: For dessert, it delights with its classic fall flavor, completing the dining experience with comforting warmth.

Delicious Persimmon Salad Recipe FAQs

How do I select ripe persimmons?
Absolutely! When choosing Fuyu persimmons, look for firm fruits with smooth skin and a vibrant orange color. Avoid any with dark spots or blemishes. A ripe Fuyu persimmon should feel slightly soft yet hold its shape. If they seem hard, let them ripen at room temperature for a few days.

How should I store leftover salad?
Very! After enjoying your Delicious Persimmon Salad, you can store any leftovers in an airtight container in the refrigerator for up to 1-2 days. Just make sure to keep the creamy maple vinaigrette in a separate container until you’re ready to serve again, to prevent the greens from wilting.

Can I freeze the salad?
No, it’s best to enjoy this salad fresh! Freezing the Delicious Persimmon Salad isn’t recommended, as the fresh ingredients can become mushy upon thawing. If you have leftover dressing, it can be stored in the fridge for up to a week, making it convenient for your next fresh salad!

What should I do if my salad dressing is too thick?
If your creamy maple vinaigrette turns out too thick, no worries! Simply add a teaspoon of water or more fresh orange juice, one tablespoon at a time, until you reach your desired consistency. Don’t forget to shake it again in the jar to emulsify!

Can I make this salad vegan?
Absolutely! To make the Delicious Persimmon Salad vegan, simply omit the feta cheese or substitute it with nutritional yeast or smashed avocado for creaminess. The salad will still be rich in flavors and textures while catering to your dietary preferences without sacrificing taste!

null

Delicious Persimmon Salad with Creamy Maple Vinaigrette

Enjoy a Sweet & Savory Persimmon Salad that's quick, nutritious, and perfect for any occasion.
Prep Time 10 minutes
Cook Time 10 minutes
Total Time 20 minutes
Servings: 4 servings
Course: Salad
Cuisine: American
Calories: 250

Ingredients
  

For the Salad
  • 4 cups Baby Spinach Substitute with kale, arugula, or mixed greens for variety.
  • 2 medium Fuyu Persimmon Ensure they are flat-bottomed and ripe.
  • 1 cup Dried Cranberries Substitute with other dried fruits like raisins or cherries.
  • 1/2 cup Feta Cheese Can substitute with goat cheese or omit for a vegan option.
  • 1/2 cup Sliced Almonds Can replace with any nuts or seeds you prefer.
For the Dressing
  • 1/4 cup Fresh Orange Juice
  • 2 tablespoons Apple Cider Vinegar
  • 2 tablespoons Maple Syrup Honey can work as a substitute.
  • 1 teaspoon Dijon Mustard Optional for a milder flavor.
  • 1/3 cup Extra Virgin Olive Oil Avocado oil is a good alternative.
  • to taste to taste Salt and Pepper Essential for seasoning.

Equipment

  • Oven
  • Mixing Bowl
  • Mason jar

Method
 

Step-by-Step Instructions
  1. Preheat your oven to 350°F (175°C). Spread sliced almonds evenly on a rimmed baking sheet, ensuring they lie flat for even toasting. Roast them for 8-10 minutes, stirring once halfway through. Watch closely after 8 minutes until they turn golden brown and fragrant. Once ready, remove from the oven and let them cool completely.
  2. In a large mixing bowl, add a generous amount of baby spinach as the base for your salad. Chop the Fuyu persimmon into bite-sized pieces, add them along with dried cranberries and crumbled feta cheese. Finally, toss in the cooled, toasted almonds, mixing gently to avoid bruising the spinach or breaking the feta.
  3. In a small mason jar, pour in freshly squeezed orange juice, apple cider vinegar, maple syrup, Dijon mustard, and a drizzle of extra virgin olive oil. Season with salt and pepper to taste. Seal the jar tightly and shake vigorously for about 30 seconds until all dressing ingredients are well integrated.
  4. Carefully drizzle the creamy maple vinaigrette over the combined salad. Using tongs or two forks, gently toss everything together to ensure each component is coated. Serve immediately in a colorful bowl to showcase the vibrant colors.

Nutrition

Serving: 1servingCalories: 250kcalCarbohydrates: 30gProtein: 5gFat: 12gSaturated Fat: 2gPolyunsaturated Fat: 1gMonounsaturated Fat: 7gCholesterol: 10mgSodium: 150mgPotassium: 300mgFiber: 4gSugar: 12gVitamin A: 1400IUVitamin C: 20mgCalcium: 150mgIron: 1mg

Notes

Store unused salad components in an airtight container for 1-2 days. Keep the dressing separate until ready to serve to maintain freshness.

Tried this recipe?

Let us know how it was!

Comforting Homemade Pasta That Transforms Dinner Nights

The kitchen was filled with the warm aroma of spices, making me forget about the chaos of the day as I simmered my way to a new creation. Today, I’m excited to share my beloved Chicken Tikka Masala recipe, a dish that not only delights the senses but also brings people together around the table. This comforting meal combines tender pieces of chicken in a creamy, spiced sauce that’s both easy to prepare and a guaranteed crowd-pleaser. Plus, it’s a fantastic way to elevate your weeknight dinners while keeping everyone coming back for seconds! If you’re ready to take a break from fast food and impress your loved ones with a homemade masterpiece, this recipe is your ticket. Curiosity piqued? Let’s dive into the comforting world of Chicken Tikka Masala!

Why is Chicken Tikka Masala so special?

Irresistible flavor: The creamy, spiced sauce envelops tender chicken, resulting in a taste that’s comforting and absolutely delicious.
Quick & Easy: With straightforward prep, you’re just 30 minutes away from a homemade dinner that beats takeout any day!
Crowd-Pleaser: Perfect for family dinners or entertaining guests, everyone will be raving about your culinary skills.
Versatile: Serve over rice, with naan, or even as a filling in wraps—this dish adapts to your meal needs.
Healthier Choice: Ditch the fast food and enjoy a nutrient-rich dinner packed with flavor that you can feel good about! Check out our homemade bread recipe for the perfect accompaniment!

Chicken Tikka Masala Ingredients

For the Chicken Marinade

  • Chicken Breasts – Use boneless, skinless pieces for easy cooking and tender bites.
  • Yogurt – The tanginess helps to tenderize the chicken and infuse flavor.
  • Garlic & Ginger Paste – Adds an aromatic depth to the marinade, enhancing the dish’s authenticity.
  • Spices (e.g., cumin, coriander, garam masala) – Essential for that classic Chicken Tikka Masala flavor profile!

For the Sauce

  • Coconut Milk or Heavy Cream – Choose coconut milk for a lighter option, or heavy cream for a rich, dairy-based sauce.
  • Diced Tomatoes – Provides acidity and balances the richness of the sauce beautifully.
  • Onion – Sautéed until golden, it adds a sweet undertone to the sauce.
  • Red Chili Powder – Adjust the amount for your desired spice level; it adds a lovely kick!

For Serving

  • Fresh Cilantro – A sprinkle on top brightens each serving and adds a fresh flavor contrast.
  • Basmati Rice or Naan – Perfect pairings to soak up the delectable sauce—making your meal truly comforting!

Embrace the joy of cooking with this comforting Chicken Tikka Masala that gets everyone around the table and leaves them craving more!

Step‑by‑Step Instructions for Comforting Homemade Chicken Tikka Masala

Step 1: Marinate the Chicken
In a large bowl, combine boneless, skinless chicken breasts with yogurt, garlic and ginger paste, and your selection of spices like cumin and garam masala. Mix well, ensuring each piece is coated thoroughly. Cover the bowl with plastic wrap and refrigerate for at least 30 minutes to let the flavors meld and the chicken tenderize.

Step 2: Sauté the Onions
In a large skillet, heat a tablespoon of oil over medium heat. Add finely chopped onions and sauté them until golden brown, about 5-7 minutes. Stir frequently to prevent burning; the onions should become sweet and aromatic. This step is crucial for building the rich base of your Chicken Tikka Masala sauce.

Step 3: Cook the Chicken
Add the marinated chicken to the skillet with the sautéed onions, cooking for about 8-10 minutes. Stir occasionally until the chicken is browned and cooked through, with no pink remaining. The spices will create a fragrant aroma, signaling that you’re on the right track to a comforting dinner.

Step 4: Add the Tomatoes
Pour in the diced tomatoes, scraping the bottom of the skillet to lift any flavorful bits. Cook for an additional 5 minutes, allowing the tomatoes to break down and combine with the chicken and spices, creating a deliciously chunky sauce. Your Kitchen will begin to fill with mouthwatering scents, enhancing the anticipation!

Step 5: Incorporate the Cream
Lower the heat to medium-low and stir in your choice of coconut milk or heavy cream. Let this simmer gently for 10 minutes, allowing flavors to blend beautifully and the sauce to thicken. The creamy texture is integral to making this Chicken Tikka Masala comforting and rich.

Step 6: Adjust Spices and Serve
Taste the sauce and adjust the seasonings by adding red chili powder for heat, if desired. Simmer for another 5 minutes, then remove from heat. Serve your delicious Chicken Tikka Masala over steamed basmati rice or with warm naan, garnished with fresh cilantro for a vibrant finish that elevates the dish beautifully.

What to Serve with Mini Lemon Cheesecakes with Gingersnap Crust

A delightful meal pairs beautifully with these creamy, tangy bites, bringing both sweetness and warmth to your table.

  • Fresh Berries: These juicy fruits add a burst of natural sweetness and vibrant color that compliments the lemony flavor.
  • Minty Fruit Salad: A refreshing mix of seasonal fruits topped with mint brightens the palate, enhancing the cheesecake experience.
  • Lemon Sorbet: This cool treat mirrors the cheesecake’s citrus notes, offering a light and refreshing contrast after the rich dessert.
  • Coffee or Herbal Tea: A warm beverage acts as the perfect end note, balancing the sweetness of the cheesecakes with cozy warmth.
  • Chocolate Dipped Strawberries: For a decadent twist, the chocolate richness pairs wonderfully with the lemon and gingersnap.
  • Cheese Platter: Include creamy cheeses like brie or goat cheese for an intriguing savory contrast alongside the dessert’s sweetness.
  • Sparkling Water or Lemonade: The fizz and slight tartness of these drinks refresh the palate and enhance the overall flavor experience.

Variations & Substitutions for Mini Lemon Cheesecakes

Feel free to get creative with these mini lemon cheesecakes, enhancing flavors and textures to suit your cravings!

  • Citrus Swap: Replace lemon with lime or orange juice for a vibrant twist that will excite your palate. Each citrus brings its unique zing, adding a refreshing layer to the cheesecake.
  • Gluten-Free: Use gluten-free gingersnap cookies, or try almond flour for the crust to cater to gluten sensitivities without compromising taste. Trust me, the flavor will still shine through!
  • Chocolate Delight: Top with a rich chocolate ganache instead of lemon curd for an indulgent treat that chocolate lovers will adore. The combination of chocolate and tangy cheesecake will have everyone asking for seconds!
  • Berry Burst: Add a layer of fresh berries on top before serving. Strawberries or blueberries will bring a fruity flair that pairs beautifully with the creamy filling. It’s a feast for the eyes, too!
  • Spice It Up: Mix in a dash of cinnamon or a pinch of nutmeg to the crust for a warm and cozy note that beautifully contrasts the fresh lemon flavor.
  • Nutty Crust: Consider using crushed nuts like almonds or pecans mixed with the gingersnap crumbs for added texture and a nutty taste that complements the creamy filling.
  • Vegan Version: Substitute cream cheese with a dairy-free cream cheese alternative and use a flax egg or aquafaba to mix in the filling. This keeps the spirit of cheesecake while making it plant-based!
  • Layered Flavors: Incorporate a fruit compote layer between the crust and cheesecake for an eye-catching presentation that’s bursting with flavor. Try raspberry or passionfruit for an exciting combo!

For even more delightful pairings, don’t forget to explore our homemade whipped cream recipe to top these cheesecakes with a fluffy finish!

Expert Tips for Chicken Tikka Masala

  • Perfect Marinade Time: Letting the chicken marinate for at least 30 minutes—preferably a few hours—ensures it absorbs maximum flavor and tenderness.
  • Onion Perfection: Sauté the onions until they’re golden brown, as this step builds an essential, sweet base for your sauce, enhancing the Chicken Tikka Masala.
  • Creamy Finish: Choose coconut milk for a lighter option or heavy cream for richness, but avoid boiling it after adding to prevent curdling the sauce.
  • Adjusting Spice Levels: Add red chili powder gradually, tasting as you go, so you can perfect the heat level to your liking without overwhelming the dish.
  • Fresh Garnish: Always finish with fresh cilantro for a pop of color and freshness that complements the comforting flavors of your Chicken Tikka Masala!

Make Ahead Options

These Mini Lemon Cheesecakes with Gingersnap Crust are a fantastic option for busy home cooks looking to save time without sacrificing flavor! You can prepare the gingersnap crust up to 24 hours in advance; simply mix the cookie crumbs with melted butter and press them into your mini cheesecake pan. For the cheesecake filling, whip it up and refrigerate it for up to 3 days. To maintain the creamy texture, keep it sealed in an airtight container. When you’re ready to serve, pour the filling into the crusts and bake. Assemble the cheesecakes with lemon curd and whipped cream just before serving to ensure they taste just as delightful and fresh!

How to Store and Freeze Mini Lemon Cheesecakes

Fridge: Store mini lemon cheesecakes in an airtight container for up to 5 days. This ensures they stay fresh while the flavors meld beautifully.

Freezer: For longer storage, freeze individually wrapped cheesecakes in plastic wrap, then place in an airtight container for up to 3 months. Thaw in the fridge before serving.

Reheating: If desired, you can briefly warm individual cheesecakes in the microwave for about 10-15 seconds for a slightly softened treat. Enjoy the delightful mini lemon cheesecakes fresh!

Pre-Assembly: Both the cheesecakes and lemon curd can be made in advance. Assemble them just prior to serving for the best texture and flavor.

Mini Lemon Cheesecakes with Gingersnap Crust Recipe FAQs

How do I select the best lemons for this recipe?
Absolutely! Choose lemons that are firm, bright yellow, and free from dark spots all over. They should feel heavy for their size, which indicates juiciness. Look for ones that smell fragrant, as this is a sign of flavor.

What is the best way to store leftover mini lemon cheesecakes?
I recommend keeping them in an airtight container in the refrigerator for up to 5 days. This way, they stay fresh, and the flavors continue to meld beautifully, making each bite even more delightful!

Can I freeze mini lemon cheesecakes? How?
Yes, very much! To freeze them, wrap each mini cheesecake tightly in plastic wrap and then place them in an airtight container. They can be frozen for up to 3 months! When you’re ready to enjoy, just thaw them in the fridge overnight. For a quick warm-up, pop them in the microwave for about 10-15 seconds.

What should I do if the cheesecakes are not setting properly?
No worries! If your cheesecakes aren’t setting, ensure your oven temperature was accurate; an oven thermometer can help. Check for doneness after about 10 minutes – they should be set but still a bit jiggly in the middle. Always allow them to cool in the pan before removing, as this helps them maintain their shape.

Are these cheesecakes safe for those with gluten allergies?
Absolutely! Since we are using gingersnap cookies, simply choose gluten-free gingersnap cookies or graham crackers as a base to make this dessert gluten-free. Just make sure to check the packaging for any potential allergens if you’re serving guests with dietary restrictions.

How can I enhance the flavor of the cheesecakes?
For an extra burst of flavor, consider adding a teaspoon of lemon zest into the filling or incorporating a splash of limoncello for a delightful zing! You can try varying the type of citrus by substituting lemon with lime or orange for a fresh twist, too!

null

Comforting Homemade Pasta That Transforms Dinner Nights

Delight in this Chicken Tikka Masala, a crowd-pleasing dish that's easy to prepare and full of comforting flavors.
Prep Time 30 minutes
Cook Time 30 minutes
Total Time 1 hour
Servings: 4 servings
Course: Dinner
Cuisine: Indian
Calories: 500

Ingredients
  

For the Chicken Marinade
  • 1 pound boneless, skinless chicken breasts
  • 1 cup yogurt preferably plain
  • 2 tablespoons garlic & ginger paste
  • 2 teaspoons spices (cumin, coriander, garam masala) to taste
For the Sauce
  • 1 can coconut milk or heavy cream
  • 1 cup diced tomatoes
  • 1 medium onion finely chopped
  • 1 teaspoon red chili powder adjust to taste
For Serving
  • 1/4 cup fresh cilantro for garnish
  • 2 cups basmati rice or naan

Equipment

  • Skillet
  • bowl
  • spatula

Method
 

Step-by-Step Instructions
  1. Combine chicken breasts with yogurt, garlic and ginger paste, and spices. Mix well, cover, and refrigerate for at least 30 minutes.
  2. Heat oil in a skillet and sauté onions until golden brown, about 5-7 minutes.
  3. Add marinated chicken and cook for about 8-10 minutes until browned and cooked through.
  4. Stir in diced tomatoes and cook for an additional 5 minutes.
  5. Add coconut milk or heavy cream, simmer for 10 minutes.
  6. Adjust spices with red chili powder, simmer for another 5 minutes, then serve over rice or with naan.

Nutrition

Serving: 1servingCalories: 500kcalCarbohydrates: 45gProtein: 30gFat: 20gSaturated Fat: 10gCholesterol: 80mgSodium: 700mgPotassium: 600mgFiber: 3gSugar: 5gVitamin A: 500IUVitamin C: 10mgCalcium: 250mgIron: 3mg

Notes

Letting the chicken marinate longer will enhance flavor. Sauté onions until golden for best results.

Tried this recipe?

Let us know how it was!

Delicious Homemade Comfort Food to Ditch Fast Food Cravings

As I stood in my kitchen, a delightful aroma wafting from the oven, I couldn’t help but smile—there’s something magical about baking homemade banana bread. This simple yet heartwarming recipe is my idea of comfort food, effortlessly combining ripe bananas with just a few pantry staples. Not only is it incredibly quick to whip up, but it also makes for a scrumptious treat that’ll have the whole family returning for seconds (or thirds!). With its moist texture and subtle sweetness, this banana bread is perfect for breakfast, snacks, or even dessert. Plus, it’s a wonderful way to reduce food waste and transform overripe bananas into a delicious masterpiece! Curious about how to bring this cozy classic into your own home? Let’s dive into the recipe that will surely become a staple in your kitchen!

Why Is Banana Bread So Beloved?

Warm, Inviting Aroma: As it bakes, your kitchen fills with an irresistible scent that wraps you up like a cozy hug.

Quick and Easy: This recipe is approachable, requiring minimal prep time and only a handful of ingredients. Perfect for even novice bakers!

Versatile Delight: Enjoy it as breakfast, a snack, or dessert, and feel free to customize with nuts or chocolate chips for an extra treat.

Family Favorite: Kids and adults alike will adore this banana bread, making it a guaranteed hit during family gatherings or casual brunches.

Waste Not, Want Not: Transforming overripe bananas into something delightful not only helps the environment but also shows that deliciousness can come from what’s often overlooked.

Healthy Twist: Swap out ingredients to make it gluten-free or add oats for a nutritional boost! It’s all about what suits your taste and lifestyle. Want to explore more homemade delights? Check out more comforting recipes that will satisfy your cravings!

Banana Bread Ingredients

For the Banana Bread
Ripe Bananas – The star of the recipe, overripe bananas add natural sweetness and moisture.
All-Purpose Flour – A staple that gives structure; consider whole wheat for a nuttier flavor.
Granulated Sugar – This enhances the sweetness; you can reduce or substitute with honey for a healthier option.
Baking Soda – This leavening agent helps the bread rise and gives it a light texture.
Salt – A pinch enhances all flavors, balancing out the sweetness.
Egg – Acts as a binding agent; flaxseed meal or applesauce can be used for a vegan option.
Unsalted Butter – Adds richness; you can exchange it for coconut oil for a dairy-free version.

Optional Mix-Ins
Chopped Nuts – Walnuts or pecans provide a lovely crunch and enhance the taste.
Chocolate Chips – A delightful addition for chocolate lovers, turning this banana bread into a dessert!
Cinnamon – Sprinkle some in to introduce a warm, cozy spice that complements the bananas perfectly.

With these delightful banana bread ingredients, you’ll soon be on your way to baking a comforting treat that far surpasses any fast food craving!

Step-by-Step Instructions for Delicious Homemade Banana Bread

Step 1: Preheat the Oven
Begin by preheating your oven to 350°F (175°C). This step is crucial as it ensures the banana bread bakes evenly and rises beautifully. While the oven warms up, gather your mixing bowl, whisk, and loaf pan, ready to transform those ripe bananas into a delicious homemade treat.

Step 2: Prepare the Bananas
In a large mixing bowl, mash 2-3 ripe bananas with a fork until smooth, leaving a few small lumps for texture. The bananas should be very soft and fragrant; this natural sweetness is what makes your banana bread so delightful. Set the mashed bananas aside as you move on to the next step.

Step 3: Mix the Wet Ingredients
Add 1/3 cup of melted unsalted butter to the mashed bananas, mixing well to combine. Then, add on 1 beaten egg and 3/4 cup of granulated sugar, and stir until everything is incorporated. The mixture should be smooth but not overmixed, creating the foundation for your delicious banana bread.

Step 4: Combine Dry Ingredients
In a separate bowl, whisk together 1 cup of all-purpose flour, 1 teaspoon of baking soda, and a pinch of salt. This step helps to ensure even distribution of the baking soda, giving your banana bread that perfect rise. Once mixed well, gradually add the dry ingredients to the wet mixture, folding gently to combine until just incorporated; avoid overmixing.

Step 5: Add Optional Mix-Ins
If desired, fold in 1/2 cup of chopped nuts, chocolate chips, or a sprinkle of cinnamon to the banana bread batter. The addition of these ingredients can elevate your banana bread experience, bringing textures and flavors that invite everyone to indulge. Once mixed, ensure no dry flour remains before moving to the next step.

Step 6: Pour into the Loaf Pan
Grease a 9×5-inch loaf pan lightly with butter or cooking spray, ensuring easy release after baking. Pour the banana bread batter into the prepared loaf pan, spreading it evenly to create a smooth top. This will allow it to rise and bake uniformly, promising a delectable homemade banana bread.

Step 7: Bake the Banana Bread
Place your loaf pan in the preheated oven and bake for 60-65 minutes, or until a toothpick inserted into the center comes out clean or with a few moist crumbs. As it bakes, your kitchen will fill with a warm, inviting aroma that signals deliciousness is on the way.

Step 8: Cool and Serve
Once baked, remove the banana bread from the oven and let it cool in the pan for about 10 minutes. Gently run a knife around the edges to release it, then invert onto a wire rack to cool completely. Once cooled, slice into thick pieces and savor the homemade comfort food that’s sure to satisfy your cravings!

Expert Tips for Perfect Banana Bread

Use Overripe Bananas: The riper the bananas, the sweeter and moister your banana bread will be. Look for bananas with brown spots for the best flavor.

Don’t Overmix: When combining the wet and dry ingredients, mix just until incorporated. Overmixing can result in a dense loaf instead of a fluffy banana bread.

Check for Doneness: Ovens can vary, so start checking your banana bread at 55 minutes. A toothpick should come out clean for perfect results.

Experiment with Mix-Ins: Feel free to customize your banana bread! Nuts, chocolate chips, or even dried fruit can create unique flavors and textures you’ll love.

Storage Secrets: To keep your banana bread fresh, store it in an airtight container at room temperature for up to 3 days. You can also freeze it for longer shelf life!

Embrace these tips, and your homemade banana bread will soon be the most cherished recipe in your kitchen!

Make Ahead Options

These Creamy Pumpkin Pecan Pies are perfect for those busy holiday seasons! You can prepare the pie crust up to 3 days ahead—just roll it out and store it in the refrigerator, wrapped tightly to maintain its freshness. The filling can also be made in advance, up to 24 hours, and kept in the fridge; this allows the flavors to meld beautifully. When you’re ready to bake, pour the filling into the prepared crust and bake as directed. Don’t forget to cover the edges with foil if they brown too quickly! This little prep can save you precious time, ensuring your dessert is just as delicious and stress-free when it’s time to serve.

What to Serve with Banana Bread?

There’s nothing quite like a slice of homemade banana bread, but elevating your meal can make it even more special.

  • Creamy Yogurt: A dollop of Greek yogurt adds a tangy contrast, enhancing the sweet flavors and offering a delightful creamy texture.

  • Fresh Berries: Juicy strawberries or blueberries bring a burst of freshness that complements the banana’s sweetness, brightening the plate beautifully.

  • Nutty Granola: Crunchy granola provides a satisfying texture contrast. Sprinkle it on top of sliced banana bread for added flavor and crunch.

  • Spiced Chai Latte: The warm spices of chai create a cozy pairing with banana bread, perfect for any time of day, especially in cooler months.

  • Honey Drizzle: A light drizzle of honey transforms each slice into a decadent treat, amplifying the natural sugars while adding a touch of extra sweetness.

  • Cinnamon Butter: Whip up some cinnamon butter for a rich, indulgent spread that enhances the beloved flavors of the banana bread.

  • Coffee or Tea: Enjoying a warm slice with a cup of coffee or tea creates a comforting ritual, making it an ideal afternoon pick-me-up.

  • Ice Cream: For a fun dessert twist, serve warm slices of banana bread with a scoop of vanilla ice cream, merging flavors in a delightful way.

Each of these pairings adds its own charm, transforming your banana bread into a feast that’s comforting and entirely satisfying.

Variations & Substitutions for Pumpkin Pecan Pie

Feel free to make this beloved recipe your own with delightful twists and substitutions that cater to your tastes and dietary needs!

  • Gluten-Free: Use a gluten-free flour blend for the pie crust and streusel topping to make it suitable for celiac guests without sacrificing flavor. Don’t forget to test the texture; it can be just as delicious!

  • Dairy-Free: Swap evaporated milk with coconut milk for a creamy, non-dairy version that captures the same rich flavors. The subtle coconut undertones offer a unique flair while keeping the pie indulgent.

  • Nut Variation: Replace pecans with walnuts for a different yet equally delightful crunch. Walnuts bring an earthy flavor, adding depth to the pumpkin filling that’s sure to surprise your family.

  • Sweetness Switch: Opt for honey or agave syrup in place of maple syrup for a lighter sweetness. This substitution can make the pie even more luscious while introducing a rich complexity to the flavor profile.

  • Spice It Up: Add a dash of cayenne pepper to the filling for a surprising kick. This slight heat can elevate the flavors and create an unexpected yet delightful contrast with the sweetness.

  • Bourbon Infusion: Consider incorporating a splash of bourbon to the filling for an adult twist. The warmth from the bourbon enhances the fall spices and creates a sophisticated layer that friends and family will adore.

  • Texture Boost: Incorporate finely chopped apples into the pumpkin filling for extra moisture and subtle crunch. Apples blend beautifully and contribute to a delightful surprise in each bite.

  • Maple Pecan Topping: Drizzle melted maple syrup over the pecans in the streusel before baking for an intensified sweet flavor. This extra layer of maple sweetness adds richness and lovely caramelization to the topping.

These variations not only enhance the classic flavors of your Pumpkin Pecan Pie but also allow you to tailor the recipe to suit any occasion. Interested in more recipe inspirations? Check out this guide to take your holiday desserts to the next level!

How to Store and Freeze Banana Bread

Room Temperature: Store your banana bread at room temperature in an airtight container for up to 3 days. This keeps it fresh and flavorful while making it easy to grab a slice anytime!

Fridge: If you want to extend its shelf life, place the banana bread in the fridge for up to a week. Make sure it’s wrapped well to prevent it from drying out.

Freezer: Freeze sliced banana bread by wrapping it tightly in plastic wrap followed by aluminum foil. It can last for up to 3 months. Thaw slices at room temperature or pop them in the microwave!

Reheating: For a warm treat, reheat banana bread slices in the microwave for about 15-20 seconds. It’s a comforting way to enjoy this homemade delight again!

Pumpkin Pecan Pie Recipe FAQs

How do I know if my pumpkin puree is ripe and suitable for this recipe?
Absolutely! When choosing your pumpkin puree, look for solid-packed canned pumpkin without any added sugars or spices. The puree should be vibrant orange and thick, not watery. If using fresh pumpkin, choose smaller varieties like Sugar Pie pumpkins, which are sweeter and more flavorful than larger ones.

What is the best way to store leftover pumpkin pecan pie?
Very! To keep your pumpkin pecan pie fresh, store it in the refrigerator for up to 4-5 days. Cover it with plastic wrap or place it in an airtight container to maintain its moisture and flavor. If you want to serve it cold, allow it to sit at room temperature for a bit before enjoying.

Can I freeze pumpkin pecan pie?
Absolutely! To freeze your pumpkin pecan pie, let it cool completely after baking. Wrap the pie tightly in plastic wrap and then again in aluminum foil to prevent freezer burn. It can be stored in the freezer for up to 3 months. When you’re ready to enjoy it, thaw it overnight in the fridge, then bring it to room temperature before serving.

What should I do if the edges of my pie crust brown too quickly?
Oh, no worries at all! If you notice your pie crust edges are browning too quickly, simply place a pie ring or strips of aluminum foil around the outer edge of the crust during the last 20-30 minutes of baking. This will shield the crust from direct heat while allowing the center to set perfectly.

Can this pumpkin pecan pie be made gluten-free?
The more the merrier! To make a gluten-free version of this delicious pumpkin pecan pie, substitute the all-purpose flour in the streusel topping with a gluten-free flour blend. Additionally, ensure that any pre-made crust you use is labeled gluten-free, or opt to make one from scratch using gluten-free flour.

Are there any dietary considerations for pets or allergies related to this recipe?
Very! While pumpkin itself is safe for many pets, it’s important to ensure your pie has no harmful ingredients for them, such as sugar or spices. If sharing a small bite with dogs, remember to keep it plain. For allergies, check the labels on ingredients like evaporated milk, and offer your pie to anyone with nut allergies carefully, since pecans are a primary ingredient.

null

Delicious Homemade Comfort Food to Ditch Fast Food Cravings

This comforting banana bread recipe is quick, versatile, and a great way to use overripe bananas.
Prep Time 15 minutes
Cook Time 1 hour 5 minutes
Cooling Time 10 minutes
Total Time 1 hour 30 minutes
Servings: 8 slices
Course: Dessert, Snack
Cuisine: American
Calories: 200

Ingredients
  

For the Banana Bread
  • 3 pieces Ripe Bananas The star of the recipe
  • 1 cup All-Purpose Flour Consider whole wheat for a nuttier flavor
  • 3/4 cup Granulated Sugar Enhances sweetness; can reduce or substitute with honey
  • 1 teaspoon Baking Soda Leavening agent for light texture
  • 1 pinch Salt Enhances all flavors
  • 1 piece Egg Acts as a binding agent; can substitute for vegan option
  • 1/3 cup Unsalted Butter Adds richness; can substitute with coconut oil
Optional Mix-Ins
  • 1/2 cup Chopped Nuts Walnuts or pecans provide crunch
  • 1/2 cup Chocolate Chips Optional for chocolate lovers
  • 1 teaspoon Cinnamon For warm spice flavor

Equipment

  • Mixing Bowl
  • whisk
  • Loaf Pan

Method
 

Step-by-Step Instructions
  1. Preheat your oven to 350°F (175°C).
  2. Mash 2-3 ripe bananas in a mixing bowl until smooth.
  3. Mix in 1/3 cup of melted unsalted butter, 1 beaten egg, and 3/4 cup of granulated sugar.
  4. In a separate bowl, whisk together 1 cup of all-purpose flour, 1 teaspoon of baking soda, and a pinch of salt.
  5. Gradually combine the dry ingredients with the wet mixture until just incorporated.
  6. Fold in 1/2 cup of chopped nuts, chocolate chips, or a sprinkle of cinnamon if desired.
  7. Pour the batter into a greased 9x5-inch loaf pan.
  8. Bake for 60-65 minutes, or until a toothpick comes out clean.
  9. Cool in the pan for 10 minutes before transferring to a wire rack to cool completely.

Nutrition

Serving: 1sliceCalories: 200kcalCarbohydrates: 30gProtein: 3gFat: 9gSaturated Fat: 4gPolyunsaturated Fat: 1gMonounsaturated Fat: 4gCholesterol: 30mgSodium: 150mgPotassium: 200mgFiber: 2gSugar: 10gVitamin A: 100IUVitamin C: 3mgCalcium: 20mgIron: 0.5mg

Notes

Use overripe bananas for best results and avoid overmixing for a fluffy loaf. Store in an airtight container for up to 3 days.

Tried this recipe?

Let us know how it was!

Savory Homemade Lasagna That Will Wow Your Taste Buds

The rich aroma of roasted garlic and herbs wafting through the kitchen is enough to make anyone’s mouth water. As I was prepping for tonight’s dinner, I realized how much I missed sharing the joy of a comforting homemade meal. That’s when I decided to whip up my favorite Creamy Tuscan Chicken. Not only is this dish impressively quick to prepare, taking less than 30 minutes from start to finish, but it’s also a delightful way to elevate weeknight dinners without hours of effort. The lush, creamy sauce paired with tender chicken is sure to become a new go-to in your culinary repertoire. Ready to dive into a plate that celebrates flavor and simplicity? Let’s stir up some magic and make this week a little more special!

Why Is Homemade Lasagna Better?

Irresistible flavor: The savory layers of this homemade lasagna bring a depth of flavor that’s hard to replicate with store-bought versions. Each bite is a celebration of rich, comforting ingredients.

Easily customizable: Add your favorite veggies, switch up the proteins, or mix in a variety of cheeses to suit your taste. This dish is versatile and fun for everyone involved!

Time-saving prep: With just a few simple steps, you can create a masterpiece in no time. Meal prepping allows you to savor delicious leftovers throughout the week.

Crowd-pleaser: Perfect for family dinners or cozy gatherings, this recipe will have guests raving about your cooking. It’s sure to impress without keeping you tied to the kitchen! For more quick and delightful dinner ideas, check out my Creamy Tuscan Chicken.

Savory Homemade Lasagna Ingredients

For the Pasta
Lasagna sheets – choose fresh or dried; fresh sheets cook faster and add a delicate texture.

For the Filling
Ground beef – use a mix of pork for a richer flavor, or substitute with lentils for a vegetarian option.
Ricotta cheese – adds creaminess; you can mix in an egg for a firmer texture.
Mozzarella cheese – opt for whole milk mozzarella for that gooey stretch and delicious melt.

For the Sauce
Crushed tomatoes – canned or fresh; ensure they’re high quality for the best flavor impact.
Garlic – freshly minced or dried; it brings an aromatic richness to the sauce.
Italian herbs – a blend of basil, oregano, and thyme adds depth; dried works great, but fresh elevates the taste.

For the Topping
Parmesan cheese – finely grated for an extra savory touch; you can also use nutritional yeast as a vegan alternative.

This Savory Homemade Lasagna is sure to be a hit at your table!

Step‑by‑Step Instructions for Savory Homemade Lasagna

Step 1: Prepare the Meat Sauce
In a large skillet, heat a splash of olive oil over medium heat. Add 1 pound of ground beef (or your choice of lentils) and cook until browned, about 5-7 minutes. Stir in 2 minced garlic cloves, 1 can of crushed tomatoes, and a mix of Italian herbs. Simmer for 15 minutes, allowing the sauce to thicken and the flavors to meld together beautifully.

Step 2: Mix the Ricotta Filling
In a mixing bowl, combine 15 ounces of ricotta cheese, 1 egg (optional for firmness), a pinch of salt, and a sprinkle of black pepper. Stir well until the mixture is smooth and creamy. This will create a luscious filling for the lasagna, enhancing its overall taste and texture.

Step 3: Preheat the Oven
Set your oven to 375°F (190°C) to preheat while you assemble the lasagna. This will ensure the dish cooks evenly and allows the cheese to melt into that perfect gooey goodness. Your kitchen will soon be filled with delightful aromas!

Step 4: Layer the Lasagna
In a large baking dish, start by spreading a layer of the meat sauce on the bottom. Place a layer of lasagna sheets on top, followed by half of the ricotta mixture and a generous sprinkle of mozzarella cheese. Repeat the layers, ending with a layer of meat sauce, more mozzarella, and a dusting of grated Parmesan for an irresistible finish.

Step 5: Bake to Perfection
Cover the baking dish with aluminum foil and place it in the preheated oven. Bake for 25 minutes, then remove the foil and bake for an additional 15 minutes until the cheese is golden and bubbling. Keep an eye on it towards the end for that lovely crispy top!

Step 6: Let It Rest
Once the lasagna is fully baked, remove it from the oven and let it rest for about 10-15 minutes. This step is crucial, as it allows the layers to set, making it easier to slice and serve. The anticipation will only add to the savory homemade lasagna experience!

Step 7: Serve and Savor
Slice your savory homemade lasagna into hearty portions and serve it warm. Garnish with fresh herbs if desired, and enjoy the comforting, rich flavors. This dish is perfect for sharing, bringing everyone to the table to enjoy your delicious effort!

Expert Tips for Savory Homemade Lasagna

Quality Ingredients: Use fresh and high-quality ingredients, especially for the cheese and tomatoes, as these contribute significantly to the flavor of your savory homemade lasagna.

Layering Technique: For even cooking, ensure your layers are even and well-distributed. Avoid overpacking, which can lead to uneven baking and soggy layers.

Resting Time: Let the lasagna rest after baking. This helps it set, preventing the layers from sliding apart when you serve.

Taste as You Go: Don’t skip tasting your meat sauce and ricotta filling! Adjust seasoning as needed to enhance your savory homemade lasagna and elevate its overall flavor.

Add Spinach: Sneak in some fresh or frozen spinach between layers for added nutrition and color without compromising flavor.

Baking Cover: If the top is browning too quickly, cover your lasagna loosely with foil during baking. This will ensure it cooks evenly while preserving that golden top.

Savory Homemade Lasagna Variations

Feel free to mix and match these ideas to create your own unique version of savory homemade lasagna that excites your palate!

  • Vegetarian Twist: Substitute the ground beef with roasted vegetables like zucchini, bell peppers, and mushrooms. This adds a delightful depth and colorful vibrancy to your dish.

  • Spicy Kick: Add crushed red pepper flakes or sliced jalapeños to the meat sauce for a zesty surprise that will have your taste buds dancing. The heat complements the creamy cheese perfectly!

  • Cheese Lover’s Delight: Experiment with different cheeses such as provolone or gouda for layers of flavor. Each cheese adds its character, resulting in a melty masterpiece.

  • Gluten-Free Option: Use gluten-free lasagna sheets or thinly sliced vegetables like zucchini and eggplant in place of pasta. This ingenious swap still delivers that comforting lasagna experience.

  • Pesto Surprise: Fold in a few tablespoons of pesto to the ricotta mixture for a fresh, herbal flavor that elevates this classic recipe. You’ll enjoy the burst of flavor with every bite!

  • Smoky Flavor: Incorporate smoked mozzarella into your layers for an unexpected smoky depth. This new twist adds complexity, making it truly memorable for your family and guests.

  • Pumpkin Addition: Mix canned pumpkin puree into the ricotta for added creaminess and a hint of sweetness. It pairs surprisingly well with traditional lasagna flavors.

  • Savory Herb Blend: Experiment with fresh herbs like thyme and rosemary mixed into your meat sauce. This aromatic upgrade will leave your kitchen smelling divine and your lasagna bursting with flavor.

With these variations, you can tailor your savory homemade lasagna to suit any taste preference or dietary need, ensuring every meal is a celebration! If you’d like more inspiration, consider trying out my Creamy Tuscan Chicken or adding a side of Garlic Bread for the perfect complement!

What to Serve with Savory Homemade Lasagna

Pair your homemade lasagna with delightful sides that enhance the meal experience and beckon everyone to the dinner table.

  • Garlic Bread: A crispy, buttery slice complements the lasagna, perfect for soaking up the delicious sauce.
  • Caesar Salad: Crisp romaine and tangy dressing balance the richness of the lasagna, adding a fresh crunch to your meal.
  • Roasted Vegetables: Caramelized seasonal veggies provide a delightful earthiness and contrast with the saucy layers of lasagna.
  • Caprese Salad: Fresh tomatoes, mozzarella, and basil introduce a light, refreshing element, creating an ideal counterpoint to the hearty dish.
  • Steamed Broccoli: Tender, slightly crisp broccoli offers a nutritious, vibrant touch, harmonizing beautifully with every cheesy bite.

Enjoying drinks with dinner? Opt for a glass of red wine; its bold flavors pair beautifully with the savory notes of your lasagna. Or, for a non-alcoholic option, try a sparkling lemon water to cleanse the palate. For dessert, a classic tiramisu beautifully rounds out this Italian feast, leaving everyone with sweet memories of the meal!

Make Ahead Options

These Gluten Free Peanut Butter Blossoms are fantastic for meal prep enthusiasts! You can prepare the cookie dough up to 24 hours in advance and refrigerate it in an airtight container to keep the flavors fresh and prevent any drying out. For an even quicker option, roll the dough into balls and coat them in granulated sugar, then place them on a baking sheet lined with parchment paper, cover, and refrigerate for up to 3 days. When you’re ready to bake, simply press a dark chocolate kiss into each cookie and bake them straight from the fridge, maintaining that delicious soft and chewy texture just as fresh as when they were made!

How to Store and Freeze Savory Homemade Lasagna

Fridge: Store leftover savory homemade lasagna in an airtight container for up to 3 days. Reheat individual portions in the microwave for a quick meal or pop it back in the oven to maintain its crispy top.

Freezer: For longer storage, wrap the lasagna tightly in plastic wrap and aluminum foil, then place it in the freezer. It can last up to 3 months, ready to be enjoyed whenever the craving strikes!

Thawing: To thaw frozen lasagna, move it to the fridge at least 24 hours before you plan to reheat. This ensures it defrosts evenly and maintains its delicious taste.

Reheating: Reheat your savory homemade lasagna in the oven at 350°F (175°C) for about 20-25 minutes, covered with foil to prevent drying out, then remove the foil for an additional 5-10 minutes for that perfect bubbling topping.

Savory Homemade Lasagna Recipe FAQs

How do I choose the best tomatoes for my lasagna?
Absolutely! For your homemade lasagna, selecting high-quality tomatoes is essential. Whether you go with canned or fresh, look for tomatoes that are vibrant and free from any blemishes. I personally love using San Marzano tomatoes for their rich sweetness, but any good-quality crushed tomatoes will do. If using fresh, ensure they are ripe and juicy for maximum flavor.

How should I store leftover lasagna?
You can store leftover savory homemade lasagna in an airtight container in the fridge for up to 3 days. Just remember to let it cool completely before sealing it up! For optimal enjoyment, reheat individual portions in the microwave for a quick meal or place the entire dish back in the oven to maintain that crispy top and warm center.

Can I freeze lasagna, and what’s the best way to do it?
Very much so! To freeze your savory homemade lasagna, wrap it tightly in plastic wrap and aluminum foil, ensuring no air pockets remain. This will help prevent freezer burn, allowing it to last up to 3 months. If you’re freezing a baked lasagna, you might want to under-bake it slightly to keep it from overcooking when you later reheat.

What can I do if my lasagna turns out too watery?
No worries! If your homemade lasagna is too watery, there are a few steps you can take. First, make sure to drain any excess liquid from the meat sauce after simmering. Using a thicker ricotta mixture, possibly adding a beaten egg, can help create a firmer filling. Lastly, baking the lasagna uncovered for the last 10-15 minutes can help evaporate any excess moisture for a nicely set texture.

Is there a way to make my lasagna gluten-free?
Absolutely! You can easily make your savory homemade lasagna gluten-free by substituting traditional wheat-based lasagna sheets with gluten-free alternatives available at most grocery stores. Always check the ingredients to ensure they match your dietary needs. Additionally, you can use zucchini slices in place of noodles for a delicious, low-carb option.

Can I add additional vegetables to my lasagna?
The more the merrier! You can add in or layer your favorite vegetables like spinach, mushrooms, or bell peppers for added nutrition and flavor. I often use sautéed zucchini or roasted eggplant between layers to sneak in more veggies. Just make sure to cook them first to avoid excess moisture in your lasagna!

null

Savory Homemade Lasagna That Will Wow Your Taste Buds

Homemade lasagna is better with its irresistible flavor, customization options, and quick preparation.
Prep Time 15 minutes
Cook Time 40 minutes
Resting Time 15 minutes
Total Time 1 hour 10 minutes
Servings: 6 slices
Course: Main Course
Cuisine: Italian
Calories: 450

Ingredients
  

For the Pasta
  • Lasagna sheets choose fresh or dried; fresh sheets cook faster
For the Filling
  • 1 pound Ground beef or substitute with lentils for vegetarian option
  • 15 ounces Ricotta cheese can mix in an egg for a firmer texture
  • Mozzarella cheese opt for whole milk mozzarella
For the Sauce
  • 1 can Crushed tomatoes ensure they're high quality
  • 2 cloves Garlic minced
  • Italian herbs blend of basil, oregano, and thyme
For the Topping
  • Parmesan cheese finely grated; can use nutritional yeast as a vegan alternative

Equipment

  • Large skillet
  • Mixing Bowl
  • baking dish
  • Oven

Method
 

Step‑by‑Step Instructions
  1. In a large skillet, heat olive oil over medium heat. Add ground beef and cook until browned, about 5-7 minutes.
  2. Stir in minced garlic, crushed tomatoes, and Italian herbs. Simmer for 15 minutes.
  3. In a mixing bowl, combine ricotta cheese, egg, salt, and pepper. Stir until smooth.
  4. Preheat oven to 375°F (190°C).
  5. In a baking dish, layer meat sauce, lasagna sheets, ricotta mixture, and mozzarella cheese. Repeat layers and top with more meat sauce, mozzarella, and Parmesan.
  6. Cover with foil and bake for 25 minutes, then remove foil and bake for an additional 15 minutes.
  7. Let the lasagna rest for 10-15 minutes before slicing and serving.

Nutrition

Serving: 1sliceCalories: 450kcalCarbohydrates: 40gProtein: 25gFat: 20gSaturated Fat: 10gPolyunsaturated Fat: 1gMonounsaturated Fat: 8gCholesterol: 80mgSodium: 600mgPotassium: 800mgFiber: 3gSugar: 5gVitamin A: 20IUVitamin C: 10mgCalcium: 25mgIron: 15mg

Notes

Use high-quality ingredients for the best flavor.

Tried this recipe?

Let us know how it was!

Irresistible Homemade Recipes to Elevate Your Cooking Game

As I reached for the last can of tomatoes from my shelf, the sweet aroma of herbs began to float through the air, igniting my cooking spark. This simple Italian Pasta Bake is my go-to remedy for those busy evenings when a home-cooked meal feels just out of reach. Not only does this dish come together in under an hour, but it’s a comforting mix of gooey cheese and perfectly al dente pasta that always leaves a lasting impression. Plus, it’s incredibly versatile—perfect for using up whatever ingredients you have on hand! Whether you’re expecting guests or just treating yourself to a cozy night in, this recipe guarantees satisfaction with minimal fuss. Ready to transform your ordinary weekday dinner into a delightful culinary experience?

Why is this pasta bake so special?

Simplicity reigns supreme: This dish comes together in just under an hour, using ingredients you likely already have at home.

Versatility is key: Feel free to swap in your favorite veggies or proteins for a personalized touch.

Comforting goodness: The gooey, melted cheese combined with perfectly al dente pasta creates a warm embrace for your taste buds.

Crowd-pleaser status: Whether you’re hosting friends or curling up solo, this dish never fails to impress.

Time-saving miracle: With minimal prep and clean-up, you can enjoy a homemade masterpiece without sacrificing your precious time. For more quick and delicious meals, check out these easy weeknight dinners.

Italian Pasta Bake Ingredients

For the Pasta

Pasta – opt for penne or rotini for great texture and sauce retention.
Salt – enhance the flavor of the pasta while cooking.

For the Sauce

Canned tomatoes – this is the star ingredient, providing a rich, tangy base for your sauce.
Olive oil – choose a good quality olive oil for a lovely depth of flavor.
Garlic – fresh minced garlic adds a wonderful aroma and taste.
Herbs (basil, oregano) – fresh or dried herbs elevate the flavor profile to a delightful Italian essence.

For the Fillings

Cheese (mozzarella & parmesan) – gooey mozzarella and salty parmesan create the perfect cheesy layer.
Vegetables (bell peppers, spinach) – add your favorites for a nutritious boost and vibrant color.
Protein (ground beef, sausage, or chicken) – choose your preferred protein for a heartier meal, or omit for a vegetarian version.

For the Topping

Breadcrumbs – sprinkle for a crunchy texture that contrasts beautifully with the creamy pasta.
Extra cheese – don’t hesitate to add a bit more cheese on top for an irresistible finish!

Now that you have the ingredients, you’re one step closer to enjoying your very own irresistible Italian Pasta Bake that will elevate your cooking game!

Step‑by‑Step Instructions for Italian Pasta Bake

Step 1: Cook the Pasta
Begin by bringing a large pot of salted water to a boil over high heat. Add your choice of penne or rotini and cook according to package instructions until al dente, usually about 8-10 minutes. Drain the pasta and set aside in a large bowl, allowing it to cool slightly while you prepare the sauce.

Step 2: Prepare the Sauce
In a large skillet, heat 2 tablespoons of olive oil over medium heat. Add 3 minced garlic cloves and sauté for about 1 minute, until fragrant. Then, pour in the canned tomatoes, along with 1 teaspoon of dried basil and 1 teaspoon of oregano. Simmer for 10 minutes, allowing the flavors to meld and the sauce to thicken slightly.

Step 3: Combine the Ingredients
Once the sauce is ready, add the cooked pasta to the skillet, stirring well to coat every piece with the rich tomato sauce. Mix in your choice of chopped vegetables like bell peppers or spinach, and if desired, cooked protein such as ground beef or sausage. Transfer this comforting mixture to a greased baking dish, spreading it evenly.

Step 4: Layer the Cheese
Sprinkle a generous layer of shredded mozzarella cheese over the pasta mixture, followed by a dusting of grated parmesan for that deliciously salty touch. To enhance the comfort factor of this Italian Pasta Bake, consider adding extra cheese if you’re feeling indulgent, making sure it covers the entire surface.

Step 5: Add the Crunchy Topping
To balance the creamy texture beneath, mix breadcrumbs with a splash of olive oil and a pinch of salt in a small bowl. Evenly sprinkle this mixture over the cheese layer for a delightful crunchy topping. Preheat your oven to 375°F (190°C) while you prepare to bake.

Step 6: Bake to Perfection
Place the baking dish in the preheated oven and let it bake for about 25-30 minutes. Keep an eye on it; you’ll know it’s ready when the cheese is bubbly and golden brown, creating an irresistible aroma that fills your kitchen. Remove from the oven and let it sit for a few minutes before serving.

Make Ahead Options

These Italian Pasta Bake preparations are perfect for busy weeknights! You can cook the pasta and prepare the sauce up to 24 hours in advance—just remember to cool the pasta completely before refrigerating to prevent sticking. Additionally, you can layer the pasta, sauce, and cheese in the baking dish at this time; simply cover and refrigerate. When you are ready to serve, preheat your oven and bake directly from the fridge, adding an extra 5-10 minutes to the cooking time to ensure it’s heated through. By planning ahead, you’ll save time without sacrificing the delicious flavor of this comforting Italian Pasta Bake!

Italian Pasta Bake Variations

Feel free to let your creativity shine with these delightful twists that will elevate your Italian Pasta Bake experience!

  • Gluten-Free: Substitute regular pasta with gluten-free options like rice or chickpea pasta for a wholesome alternative. The flavors remain vibrant while catering to dietary needs.

  • Veggie-Packed: Add extra veggies like zucchini, mushrooms, or broccoli for a nutritious boost. Just sauté them briefly before mixing them into your pasta to enhance their flavors.

  • Spicy Kick: Incorporate red pepper flakes or diced jalapeños for a subtle heat. This adds a tantalizing zing that pairs beautifully with the cheese!

  • Creamy Delight: Stir in a dollop of ricotta or a splash of heavy cream before baking. This adds creaminess, creating a luxurious texture everyone will love.

  • Herb Infusion: Experiment with different herbs, like fresh thyme or rosemary. These will elevate the aroma and add an exciting dimension to the dish.

  • Protein Swap: Use shredded rotisserie chicken or even shrimp for a savory protein boost. This keeps it interesting every time you make it!

  • Cheesy Overload: Mix in a blend of your favorite cheeses, such as gouda or fontina, for a delightful, gooey texture. Customize based on what you have in your fridge.

  • Savory Sauces: Try swapping the canned tomatoes for a jar of marinara sauce or pesto for a twist in flavor. It offers a fun new layer of deliciousness!

With so many delicious options, your Italian Pasta Bake can become a beloved family favorite in countless ways. Don’t forget to check out these easy weeknight dinners for more inspiration to keep your meals exciting!

What to Serve with Italian Pasta Bake

There’s something magical about complementing that gooey, cheesy bake with delightful sides that promise to enhance each bite.

  • Garlic Bread: The warm, buttery crunch of garlic bread is the perfect pairing, inviting you to scoop up every delicious bite.

  • Caesar Salad: Crisp romaine tossed in tangy dressing offers a refreshing contrast to the rich pasta, balancing comfort with crispness.

  • Roasted Vegetables: A medley of seasonal veggies adds vibrant colors and earthy flavors, enhancing the wholesome nature of your meal.

  • Red Wine: A glass of red wine harmonizes beautifully with the pasta bake, elevating the entire dining experience with every sip.

  • Tiramisu: End your meal on a luxurious note; this delightful coffee-flavored dessert is a classic Italian treat that’s always a hit.

  • Steamed Broccoli: Lightly steamed broccoli brings a tender crunch and bright color, adding nutrition and a lovely texture to your plate.

  • Sparkling Water: For a refreshing palate cleanser, enjoy a glass of sparkling water infused with lemon, balancing the richness of the dish.

  • Antipasto Platter: A platter filled with olives, cheeses, and cured meats kicks off your meal in a playful way, inviting friends and family to dig in together.

  • Fruit Sorbet: A light sorbet made from seasonal fruits serves as a refreshing, sweet finish after the savory flavors of the pasta.

  • Cheesy Garlic Biscuits: Fluffy, cheesy biscuits provide a delightful twist, begging to be dipped into sauce after every cheesy pasta bite.

How to Store and Freeze Italian Pasta Bake

Fridge: Store any leftover Italian Pasta Bake in an airtight container for up to 3 days. Allow it to cool completely before sealing to prevent condensation.

Freezer: Freeze portions in airtight containers for up to 3 months. Make sure to leave some space for expansion, as the dish will thicken when frozen.

Reheating: To reheat, defrost in the fridge overnight and then warm in the oven at 350°F (175°C) for about 20-25 minutes, or until heated through.

Room Temperature: If serving at a gathering, don’t leave the pasta bake out for more than 2 hours to ensure freshness and safety.

Expert Tips for Italian Pasta Bake

  • Perfect Pasta: Ensure you cook the pasta just until al dente. Overcooking it will result in mushy pasta once baked.

  • Flavor Boost: Sautéing the garlic until fragrant adds depth. Avoid browning it, as burnt garlic can turn bitter.

  • Cheese Magic: Use a blend of mozzarella and parmesan for best flavor. Don’t skimp on the cheese; a cheesy layer boosts the bake’s appeal!

  • Veggie Variations: Feel free to add seasonal vegetables, but be mindful of moisture. Avoid too much water-rich veggies like zucchini, which can dilute the sauce.

  • Even Baking: Spread the pasta mixture evenly in the baking dish. This ensures uniform cooking and melted cheese.

  • Rest Time: Let the dish sit for a few minutes after baking. This helps the flavors develop and makes serving easier. Enjoy your homemade Italian pasta bake!

Italian Pasta Bake Recipe FAQs

How do I select the best canned tomatoes for the sauce?
Absolutely! Look for canned tomatoes that are labeled “whole” or “crushed” without added sugars or preservatives. A well-known brand often has more robust flavors. You want a rich color and good quality, so check for any dark spots on the can, which can indicate spoilage.

What’s the best way to store leftover Italian Pasta Bake?
For sure! Store any leftover Italian Pasta Bake in an airtight container in the fridge for up to 3 days. Make sure it’s completely cooled before sealing to prevent condensation—nobody likes a soggy dish! If you plan to eat it later, it’s best to freeze it.

Can I freeze Italian Pasta Bake, and if so, how?
Yes, you can! Divide the pasta bake into individual portions or keep it whole, depending on your preference. Place it in airtight containers, leaving space at the top for expansion. It can be frozen for up to 3 months. When you’re ready to enjoy it, thaw it in the fridge overnight, then reheat in the oven at 350°F (175°C) for 20-25 minutes until heated through. Just remember, it may require a little extra time if it’s still slightly frozen in the center!

What should I do if my pasta bake turns out too dry?
Very! If your pasta bake comes out too dry, it may be a result of not enough sauce or cooking it for too long. Consider adding a splash of water or more canned tomatoes next time. If you’ve already cooked it, you can drizzle a bit of olive oil over the top or add extra sauce before reheating to bring back some moisture.

Is this Italian Pasta Bake suitable for those with dietary restrictions?
Yes! This recipe is quite versatile. You can easily make it vegetarian by omitting the meat and loading it with extra vegetables. Additionally, if there are cheese allergies, try dairy-free cheese alternatives. Feel free to swap gluten pasta for a gluten-free variety to cater to different diets! Always check the specific brands to avoid allergens, especially for canned goods and seasonings.

How can I enhance the flavors of my Italian Pasta Bake?
For a flavor boost, definitely consider sautéing your garlic until it’s fragrant but not brown, as burnt garlic can impart bitterness. Adding a splash of red wine to the sauce while it simmers can also deepen flavors and enhance the sauce’s richness. Don’t forget to taste and adjust seasonings, whether that means a pinch more salt or a sprinkle of chili flakes for a kick!

Irresistible Homemade Recipes to Elevate Your Cooking Game

Italian Pasta Bake is a comforting dish that's easy to prepare and packs flavor, making it perfect for any weeknight dinner.
Prep Time 15 minutes
Cook Time 30 minutes
Resting Time 5 minutes
Total Time 50 minutes
Servings: 4 servings
Course: Dinner
Cuisine: Italian
Calories: 350

Ingredients
  

For the Pasta
  • 2 cups Pasta (penne or rotini)
  • 1 tbsp Salt for cooking pasta
For the Sauce
  • 1 can Canned tomatoes star ingredient
  • 2 tbsp Olive oil good quality
  • 3 cloves Garlic (minced)
  • 1 tsp Herbs (dried basil)
  • 1 tsp Oregano dried or fresh
For the Fillings
  • 1 cup Cheese (mozzarella & parmesan) shredded mozzarella and grated parmesan
  • 1 cup Vegetables (bell peppers, spinach) or favorites
  • 1 cup Protein (ground beef, sausage, or chicken) optional
For the Topping
  • 1 cup Breadcrumbs for crunchy texture
  • 1 cup Extra cheese optional

Equipment

  • Large pot
  • Large skillet
  • baking dish

Method
 

Step-by-Step Instructions for Italian Pasta Bake
  1. Cook the Pasta: Bring a large pot of salted water to a boil. Add pasta and cook until al dente, about 8-10 minutes. Drain and set aside.
  2. Prepare the Sauce: In a skillet, heat olive oil. Sauté minced garlic until fragrant. Add canned tomatoes, basil, and oregano. Simmer for 10 minutes.
  3. Combine the Ingredients: Add cooked pasta to the skillet, mix well with sauce, and add chopped vegetables and protein if using. Transfer to a baking dish.
  4. Layer the Cheese: Sprinkle mozzarella over the pasta mixture, followed by parmesan and extra cheese if desired.
  5. Add the Crunchy Topping: Mix breadcrumbs with olive oil and salt, then sprinkle over cheese layer. Preheat oven to 375°F (190°C).
  6. Bake to Perfection: Bake for 25-30 minutes until cheese is bubbly and golden. Let sit for a few minutes before serving.

Nutrition

Serving: 1servingCalories: 350kcalCarbohydrates: 45gProtein: 20gFat: 15gSaturated Fat: 7gPolyunsaturated Fat: 1gMonounsaturated Fat: 4gCholesterol: 40mgSodium: 800mgPotassium: 400mgFiber: 3gSugar: 5gVitamin A: 15IUVitamin C: 30mgCalcium: 20mgIron: 10mg

Notes

Ensure pasta is cooked al dente and avoid too much moisture from vegetables for optimal results.

Tried this recipe?

Let us know how it was!

Savory Homemade Pasta That Will Steal Your Heart

As I flipped through an old recipe book, the scent of rosemary and garlic wafted through my mind, transporting me to countless family dinners filled with laughter and love. Today, I’m excited to share my twist on classic roasted chicken and vegetables, a dish that not only champions the art of home cooking but also brings people together around the table. This recipe is perfect for busy weeknights, combining quick prep with a satisfying outcome that will impress even the pickiest eaters. Plus, it’s a fantastic way to sneak in some healthy veggies without anyone noticing! Ready to bring that heartwarming aroma to your kitchen? Let’s dive into the comforting world of roasting, where less really is more, and discover how simple ingredients can create memorable meals. What’s your favorite way to enjoy a homemade roast?

Why is homemade pasta irresistible?

Freshness takes center stage as you craft this pasta from scratch, elevating every dish with unmatched flavor. Time-saving yet decadent, it quickly transforms weeknight dinners into gourmet experiences. Versatile, it pairs perfectly with any sauce, be it rich marinara or a light pesto. Crowd-pleasing by nature, expect compliments at the dinner table. And if you’re curious about transforming your meals further, check out my guide on easy homemade sauces for a delightful pairing!

Roasted Chicken and Vegetables Ingredients

• The magic of this dish lies in its simplicity!

For the Chicken

  • Whole chicken – A juicy whole chicken is perfect for roasting, ensuring tender meat and crispy skin.
  • Olive oil – This adds a golden finish and enhances the flavor of the chicken.
  • Salt – Essential for seasoning and bringing out the natural flavors of the chicken.
  • Pepper – A dash of freshly cracked pepper enhances the overall taste.
  • Garlic cloves – Whole garlic cloves infuse the dish with rich aroma and depth.
  • Fresh rosemary – A fragrant herb that complements the chicken beautifully, adding an earthy note.

For the Vegetables

  • Carrots – Sweet, earthy carrots develop a lovely caramelization when roasted.
  • Potatoes – Use baby potatoes for a fluffy interior and crispy exterior once roasted.
  • Bell peppers – Their sweetness and vibrant colors brighten up the dish.
  • Onions – These lend a sweet, savory flavor as they roast down.
  • Zucchini – Adds a subtle flavor and a pop of color, perfect for healthy meals.

Optional Add-ons

  • Lemon wedges – Squeeze over chicken right before serving for a zesty kick!
  • Balsamic vinegar – Drizzle over vegetables before roasting to deepen the flavor profile.

Each ingredient plays a vital role in crafting the perfect roasted chicken and vegetables that will steal your heart and satisfy your senses!

Step‑by‑Step Instructions for Savory Homemade Pasta That Will Steal Your Heart

Step 1: Prepare the Chicken
Begin by preheating your oven to 425°F (220°C). Pat the whole chicken dry with paper towels, ensuring a crispy skin. Rub it generously with olive oil, then season with salt and freshly cracked pepper. Place whole garlic cloves and fresh rosemary inside and around the chicken for flavor. This initial prep is essential for juicy roasted chicken.

Step 2: Chop the Vegetables
While the chicken rests, chop your carrots, baby potatoes, bell peppers, onions, and zucchini into bite-sized pieces. Aim for uniform sizes to ensure even cooking. Toss the chopped veggies in a drizzle of olive oil, salt, and pepper, creating a colorful medley that complements the savory homemade pasta perfectly as they roast alongside the chicken.

Step 3: Arrange for Roasting
In a large roasting pan, nestle the prepared chicken in the center, surrounded by the vibrant vegetables. Make sure the veggies are spread out for even roasting. This setup allows the chicken juices to flavor the vegetables, creating a rich, delicious base. Slide the pan into your preheated oven and roast for 1 hour and 15 minutes.

Step 4: Check for Doneness
After about an hour of roasting, use a meat thermometer to check the thickest part of the chicken, aiming for 165°F (74°C). If the chicken is golden and juices run clear, it’s ready. If not, continue roasting, checking every 10 minutes until it reaches that perfect temperature. This ensures your homemade roasted chicken will be both tender and flavorful.

Step 5: Let it Rest
Once fully roasted, remove the chicken and vegetables from the oven, then tent them with foil. Allow them to rest for 10–15 minutes, letting the juices redistribute throughout the chicken. This step is crucial for achieving that juicy, delectable flavor that truly makes this dish a family favorite.

Step 6: Serve and Enjoy
Carve the chicken into pieces and plate it alongside the roasted vegetables. For an extra touch, serve with lemon wedges or a drizzle of balsamic vinegar on the vegetables. Each bite of this roasted chicken and vegetables is infused with warmth and flavor, perfect for creating memorable meals around your dining table.

What to Serve with Roasted Chicken and Vegetables

Envision a cozy dinner filled with warmth and love, where every bite dances with harmony on your palate.

  • Creamy Mashed Potatoes: Their buttery richness adds comfort, making every bite of chicken more delightful and satisfying.

  • Garlic Bread: This crunchy, garlic-infused delight complements the savory flavors of the chicken while providing a satisfying bite.

  • Roasted Brussels Sprouts: Their slight bitterness balances the sweetness of the roasted vegetables, creating a wonderfully balanced dish that invites seconds.

  • Caesar Salad: A crisp Caesar salad brings a refreshing crunch that pairs perfectly with the hearty roast, enhancing the meal’s overall vibrancy.

  • Honey-Glazed Carrots: Sweet and tender, these add a pop of color and a sugary twist that contrasts beautifully with the savory chicken.

  • Herb-Infused Rice: Light and fluffy, this rice soaks up the chicken’s delicious juices, making it a comforting side dish you’ll adore.

  • Chardonnay: A glass of chilled Chardonnay elevates the meal, marrying well with the rich flavors of both the chicken and vegetables for a delightful pairing.

  • Apple Crisp: For dessert, this warm, cinnamon-infused treat offers the ideal sweet finish after a hearty main course, rounding out your family meal perfectly.

Storage Tips for Roasted Chicken and Vegetables

Room Temperature: Allow the roasted chicken and vegetables to cool for no more than 2 hours before storing. This helps prevent bacterial growth and keeps your meal safe.

Fridge: Store leftover roasted chicken and vegetables in an airtight container for up to 3 days. Be sure to separate the chicken from the vegetables to maintain their textures and flavors.

Freezer: For longer storage, freeze your cooked chicken and vegetables in freezer-safe bags for up to 3 months. Thaw in the fridge overnight before reheating for best results.

Reheating: When ready to enjoy leftovers, reheat in the oven at 350°F (175°C) until heated through (about 20–30 minutes). This will help revive the flavors in your delicious roasted chicken and vegetables.

Make Ahead Options

These roasted chicken and vegetables are perfect for meal prep enthusiasts looking to save time during busy weeknights! You can season the whole chicken and chop the veggies up to 24 hours in advance, storing them in an airtight container in the refrigerator to maintain freshness. The key is to keep them separate until you’re ready to roast, as this prevents the vegetables from becoming soggy. When it’s time to serve, simply arrange the chicken and veggies in the roasting pan, roast at 425°F (220°C) for 1 hour and 15 minutes, and enjoy restaurant-quality results with minimal effort. Your family will be delighted, and you’ll have a delectable meal ready to go!

Savory Homemade Pasta Variations

Feel free to make this delicious recipe your own by experimenting with different flavors and textures!

  • Herb-Infused: Add fresh thyme or oregano to the chicken for a refreshing twist. The fragrant herbs brighten the dish beautifully.
  • Spice it Up: Incorporate chili flakes or paprika for a hint of heat that makes each bite exciting. It’s an easy way to bring warmth to the meal!
  • Vegetable Swap: Tackle seasonal produce by substituting sweet potatoes or Brussels sprouts; they add a lovely twist to your roasting game. Try using what you have handy for maximum freshness!
  • Citrus Burst: Try adding orange or lime slices alongside the garlic for a tangy surprise; this sweetness balances the savory elements perfectly.
  • Creamy Hummus Base: For a non-traditional touch, spread hummus in the roasting pan before arranging chicken and vegetables. It adds a lovely creaminess while roasting.
  • Nutty Crunch: Toss in some chopped nuts like walnuts or pecans just before serving; they offer a delightful crunch that complements the tender roasted veggies beautifully.
  • Quinoa or Rice Side: Serve alongside a fluffy quinoa or brown rice to soak up all those delicious juices. It’ll turn your dish into a wholesome, heartwarming meal.
  • Balsamic Glaze Drizzle: Finish with a drizzle of balsamic glaze after roasting. It enhances the natural sweetness of your vegetables, tying all the flavors together beautifully.

For even more inspiration, check out my recommendations for easy homemade sauces that pair wonderfully with this dish. You’ll love exploring the flavorful possibilities!

Expert Tips for Roasted Chicken and Vegetables

  • Pat Dry: Always pat the chicken dry before seasoning. This helps achieve that crispy skin, making your roasted chicken a true star.

  • Cut Evenly: When chopping vegetables, try to cut them into uniform sizes. This ensures they roast evenly and enhances the overall presentation of the dish.

  • Resting Time: Don’t skip the resting step after roasting. Allowing the chicken to rest for 10–15 minutes makes it juicier, ensuring every bite is a flavor-packed delight.

  • Use a Thermometer: Invest in a meat thermometer for perfect doneness. Aim for 165°F (74°C) in the thickest part of the chicken to avoid any surprises!

  • Flavor Infusion: To elevate your roasted chicken and vegetables further, consider adding herbs or spices to the vegetable mix. A sprinkle of thyme or paprika can add delightful layers to your meal!

Roasted Chicken and Vegetables Recipe FAQs

How can I select the best whole chicken for roasting?
When choosing a whole chicken, look for one that has smooth, unblemished skin, without any dark spots. A good weight is around 3.5 to 4.5 pounds, which ensures even cooking. I often prefer organic or free-range chickens, as they tend to offer more flavor and a better texture.

What’s the best way to store leftover roasted chicken and vegetables?
Absolutely! Allow your roasted chicken and vegetables to cool for no more than 2 hours before storing them in airtight containers. You can keep the leftovers in the fridge for up to 3 days. For optimal taste, I recommend separating the chicken from the vegetables, as it helps maintain their textures.

Can I freeze roasted chicken and vegetables?
Yes! To freeze, place the cooled chicken and vegetables in freezer-safe bags, ensuring all excess air is removed. They can be stored for up to 3 months. When you’re ready to enjoy them, thaw in the fridge overnight. To reheat, bake at 350°F (175°C) until warmed through, which should take about 20–30 minutes.

What should I do if the chicken skin isn’t crispy after roasting?
If your chicken skin isn’t as crispy as you’d like, don’t fret! Here’s a step-by-step fix: After roasting, increase the oven temperature to 450°F (230°C) and place the chicken back in the oven for an additional 10-15 minutes. This extra heat will enhance the crispiness. Just make sure to keep an eye on it so it doesn’t burn!

Are there any dietary considerations for this roasted chicken and vegetables recipe?
Very! If you’re cooking for someone with allergies, always double-check ingredient labels, especially for pre-packaged items like broth or seasonings. This recipe is gluten-free and can be made dairy-free easily; just ensure no dairy-based ingredients are included in your seasonings. If you’re pet-friendly, be cautious about sharing; certain spices (like garlic) can be harmful to pets.

Savory Homemade Pasta That Will Steal Your Heart

A heartwarming roasted chicken and vegetables recipe that brings family together with freshness and flavor.
Prep Time 15 minutes
Cook Time 1 hour 15 minutes
Resting Time 15 minutes
Total Time 1 hour 45 minutes
Servings: 4 servings
Course: Main Dish
Cuisine: Italian
Calories: 450

Ingredients
  

For the Chicken
  • 1 whole chicken juicy whole chicken
  • 3 tablespoons olive oil for rubbing
  • 1 teaspoon salt for seasoning
  • 1/2 teaspoon black pepper freshly cracked
  • 4 cloves garlic whole
  • 2 sprigs fresh rosemary for flavor
For the Vegetables
  • 3 medium carrots
  • 1 pound baby potatoes
  • 2 medium bell peppers
  • 1 large onion
  • 1 medium zucchini
Optional Add-ons
  • 2 pieces lemon wedges for serving, optional
  • 2 tablespoons balsamic vinegar for drizzling

Equipment

  • Roasting Pan
  • meat thermometer
  • Cutting board
  • Knife

Method
 

Step-by-Step Instructions
  1. Preheat your oven to 425°F (220°C). Pat the whole chicken dry with paper towels, ensuring a crispy skin. Rub it generously with olive oil, then season with salt and freshly cracked pepper. Place whole garlic cloves and fresh rosemary inside and around the chicken for flavor.
  2. While the chicken rests, chop your carrots, baby potatoes, bell peppers, onions, and zucchini into bite-sized pieces. Toss the chopped veggies in a drizzle of olive oil, salt, and pepper.
  3. In a large roasting pan, nestle the prepared chicken in the center, surrounded by the vibrant vegetables. Slide the pan into your preheated oven and roast for 1 hour and 15 minutes.
  4. After about an hour of roasting, check the thickest part of the chicken, aiming for 165°F (74°C). If the chicken is golden and juices run clear, it’s ready.
  5. Remove the chicken and vegetables from the oven, then tent them with foil. Allow them to rest for 10–15 minutes.
  6. Carve the chicken into pieces and plate it alongside the roasted vegetables. Serve with lemon wedges or a drizzle of balsamic vinegar.

Nutrition

Serving: 1servingCalories: 450kcalCarbohydrates: 30gProtein: 35gFat: 20gSaturated Fat: 5gPolyunsaturated Fat: 1gMonounsaturated Fat: 14gCholesterol: 95mgSodium: 700mgPotassium: 900mgFiber: 5gSugar: 3gVitamin A: 150IUVitamin C: 70mgCalcium: 2mgIron: 10mg

Notes

Always pat the chicken dry before seasoning to achieve crispy skin. Ensure vegetables are cut into uniform sizes for even roasting.

Tried this recipe?

Let us know how it was!

Outside my window, the sun was setting in a shimmer of golden light, casting shadows that danced around my kitchen. It was one of those moments when inspiration strikes; that’s when I decided to whip up my beloved homemade Butternut Squash Soup. This cozy, heartwarming dish is not only a delightful way to celebrate the flavors of fall, but it also boasts quick prep and comforting warmth that feels like a hug in a bowl. With a combination of savory and slightly sweet notes, this soup is sure to become a favorite in your rotation, perfect for cozy dinners or as a starter for gatherings. Plus, it’s freezer-friendly, allowing you to savor its goodness whenever the craving strikes! Ready to transform simple ingredients into a dish that will leave everyone asking for seconds? Let’s dive into this culinary adventure together!

Why is this soup a must-try?

Comforting and Cozy: Each spoonful of this Butternut Squash Soup wraps you in a warm embrace, perfect for chilly evenings.
Easy Preparation: With just a handful of ingredients and straightforward steps, you can create something spectacular without stress.
Versatile Flavor Profile: The unique combination of savory herbs and natural sweetness makes it a standout choice, whether enjoyed solo or paired with crusty bread.
Meal-Prep Friendly: Stock your freezer with this delicious soup, so you always have a comforting meal ready to go. Perfect for those busy days!
Crowd-Pleasing: It’s a dish that delights everyone, making it an ideal starter or main for family gatherings or cozy get-togethers.
Don’t forget to check out my tips on freezing soups for maximum convenience!

Butternut Squash Soup Ingredients

Get ready to create a comforting bowl of butternut squash soup!

For the Soup Base
Butternut Squash – the star of this dish, bringing natural sweetness and a velvety texture.
Onion – adds depth and savoriness; use yellow or sweet onion for best results.
Garlic – enhances flavor; fresh is best, but garlic powder can be a good substitute if needed.
Vegetable Broth – provides a rich, savory foundation; chicken broth can also work for added flavor.
Olive Oil – for sautéing; can be swapped with butter for a creamier taste.

For Seasoning
Salt – balances the sweetness of the squash; taste as you go to perfect the seasonings.
Pepper – freshly ground gives a warm kick; feel free to adjust to your spice preference.
Nutmeg – just a hint elevates the flavor profile with a subtle warmth; cinnamon could be an interesting alternative.
Thyme – complements the soup beautifully; try fresh for a burst of vibrant flavor or dried if that’s what you have.

For Garnishing (Optional)
Pumpkin Seeds – add a delightful crunch and extra nutrition; toast them for enhanced flavor.
Cream or Coconut Milk – swirl in for creaminess; coconut milk offers a dairy-free option with a hint of sweetness.
Fresh Herbs – a sprinkle of parsley or cilantro brightens up the dish and adds freshness.

Now, with these simple yet delightful ingredients, you’re set to create a soothing bowl of butternut squash soup that will warm your heart and home!

Step‑by‑Step Instructions for Butternut Squash Soup

Step 1: Prepare the Ingredients
Begin by gathering all your ingredients for the Butternut Squash Soup. Carefully peel and dice one medium butternut squash into small cubes—aim for roughly 1-inch pieces for even cooking. Chop one medium onion and mince two cloves of garlic. Set these ingredients aside, ready to transform into a warm, comforting soup that will soothe your soul.

Step 2: Sauté the Aromatics
In a large pot, heat two tablespoons of olive oil over medium heat for about 2 minutes until shimmering. Add the diced onion, stirring frequently for about 5 minutes until it becomes soft and translucent. Then, incorporate the minced garlic and continue to sauté for another minute, allowing that delicious aroma to fill your kitchen.

Step 3: Add the Squash and Broth
Once your aromatics are ready, it’s time to add the star of the show! Toss the cubed butternut squash into the pot, mixing it with the onions and garlic for about 2 minutes. Pour in four cups of vegetable broth, bringing the mixture to a gentle simmer. Cover the pot, and let it cook for about 15-20 minutes or until the squash is fork-tender and colorful.

Step 4: Blend the Soup
After the butternut squash has cooked through, use an immersion blender to puree the soup directly in the pot until it achieves a smooth and velvety texture—about 1-2 minutes of blending should do the trick. If you prefer a chunkier soup, blend only half of it for added texture.

Step 5: Season to Perfection
Stir in salt, pepper, a pinch of nutmeg, and fresh thyme to taste, allowing the flavors to meld together beautifully over medium heat. Taste as you go, adjusting the seasonings to suit your preference and enriching the Butternut Squash Soup with personalized warmth.

Step 6: Serve and Garnish
Ladle the soup into bowls and garnish with optional toppings of toasted pumpkin seeds, a swirl of cream or coconut milk, and a sprinkle of fresh herbs like parsley or cilantro. This adds not only a delightful presentation but also layers of flavor. Enjoy the comforting embrace of your homemade Butternut Squash Soup!

What to Serve with Butternut Squash Soup

There’s nothing quite like crafting a full meal around the cozy goodness of a velvety soup that warms the heart and fills the soul.

  • Crusty Bread: A warm, artisan loaf adds delightful texture and is perfect for dipping into the creamy soup.
  • Simple Salad: A fresh green salad with a tangy vinaigrette balances the sweetness of the soup, creating a harmonious flavor profile.
  • Roasted Vegetables: Caramelized, roasted vegetables bring depth and earthy flavors, enhancing the overall meal experience. Roasting brings out their natural sweetness, complementing the soup beautifully.
  • Savory Grilled Cheese: The gooey, melty cheese paired with crispy bread creates a comforting classic that’s simply irresistible alongside the soup.
  • Apple Cider: A glass of chilled apple cider introduces a refreshing sweetness that dances with the soup’s rich flavors, making for a unique pairing.
  • Spicy Sausage: Adding a spicy sausage on the side introduces a hearty, savory note, elevating the meal with contrasting flavors. The robust taste of sausage brings warmth that harmonizes beautifully.
  • Roasted Nuts: A bowl of mixed roasted nuts offers a crunchy snack, providing a delightful contrast to the creamy soup.
  • Pumpkin Pie: For dessert, a slice of pumpkin pie brings a festive touch, echoing the autumnal vibes of your meal while offering a sweet finale.
  • Herb-Infused Water: Serve refreshing herb-infused water for a light, fragrant twist that complements the flavors without overpowering.

How to Store and Freeze Butternut Squash Soup

Fridge: Keep your Butternut Squash Soup in an airtight container for up to 5 days. Reheat gently on the stove over low heat, stirring occasionally to maintain its creamy texture.

Freezer: Portion the cooled soup into freezer-safe containers or zip-top bags. It can be frozen for up to 3 months. Remember to leave some space for expansion as it freezes.

Thawing: To thaw, transfer the soup to the fridge overnight or use the microwave’s defrost setting. Reheat on the stove, adding a splash of broth if needed to restore creaminess.

Reheating: Always reheat your Butternut Squash Soup over medium heat, stirring regularly until warmed through. Adjust seasoning as necessary before serving.

Make Ahead Options

These Butternut Squash Soup preparations are ideal for busy weeknights or meal prepping enthusiasts! You can chop the vegetables (butternut squash, onion, garlic) and refrigerate them for up to 24 hours in advance. This will save you valuable time when you’re ready to cook. You may also prepare the soup base, blending all the ingredients together, and store it in an airtight container for up to 3 days in the fridge. When it’s time to serve, simply reheat the soup on the stove over medium heat, adding a splash of broth if necessary for a smooth consistency. Rest assured, your Butternut Squash Soup will remain just as delicious, making it perfect for a cozy meal when you need it most!

Butternut Squash Soup Variations

Feel free to put your own spin on this delightful Butternut Squash Soup, enhancing its flavors and textures according to your preferences!

  • Dairy-Free: Substitute coconut milk for cream to keep it rich and creamy with a tropical twist.
    Replace heavy cream with coconut milk for a velvety texture that’s dairy-free and delicious. You’ll love the hint of sweetness it brings!

  • Spicy Kick: Add a pinch of cayenne pepper for a warm, spicy note.
    For those who enjoy a little heat, a pinch of cayenne can elevate your soup. Just sprinkle in and adjust to taste for that perfect cozy warmth.

  • Herb Infusion: Experiment with fresh herbs like sage or rosemary for added complexity.
    Try stirring in some fresh sage or rosemary towards the end of cooking to give your soup an aromatic boost. The fragrant herbs harmonize beautifully with the squash!

  • Chunky Style: Reserve some roasted squash pieces for a heartier texture.
    For a lovely contrast, roast extra squash cubes and stir them in just before serving. This gives your soup a delightful chunky surprise!

  • Nutty Flavor: Incorporate tahini for an earthy richness and creaminess.
    Mix in a spoonful of tahini along with the other ingredients for a nutty, creamy feel that deepens the flavor profile wonderfully.

  • Sweet Twist: Add a chopped apple or pear while cooking for extra sweetness and depth.
    Dicing up an apple and cooking it with the squash can introduce a lovely hint of sweetness that marries well with the savory. A sweet surprise in every spoonful!

  • Citrus Zest: Brighten up with a splash of orange juice or zest during blending.
    Just a hint of citrus can brighten your soup and balance its sweet flavors. This refreshing addition may just become your new favorite twist!

  • Roasted Garlic: Try adding roasted garlic instead of minced for a deeper flavor.
    Roasting your garlic before adding it to the soup adds a caramelized sweetness. It’s a flavorful enhancement that pairs perfectly with butternut squash!

Experiment with these variations and make this Butternut Squash Soup your own! For some additional tips on enhancing your soup experience, check out my ideas on pairing sides with soup or learn how to master the art of seasoning. Enjoy the journey of flavors!

Expert Tips for Butternut Squash Soup

• **Choosing Squash: ** Look for firm, heavy butternut squashes with a smooth skin for the best flavor and texture. Avoid any with soft spots or blemishes.

Sautéing Aromatics: Don’t rush this step! Taking time to sauté the onions and garlic builds a rich, complex flavor base that elevates your soup.

Adjusting Consistency: If the soup is too thick after blending, feel free to add a bit more broth or water to reach your desired creaminess.

Seasoning Balance: Taste as you go! Adjust salt, pepper, and nutmeg to ensure your Butternut Squash Soup achieves the perfect balance of sweetness and savoriness.

Freezing Savvy: Portion leftover soup into airtight containers and freeze for up to three months. To reheat, simply thaw and warm on the stove!

Butternut Squash Soup Recipe FAQs

How do I choose the best butternut squash?
Absolutely! When selecting a butternut squash, look for one that is firm and heavy with smooth, unblemished skin. Avoid any squashes with soft spots, dark blemishes, or signs of mold. A ripe butternut squash should have a deep, even color without any cracks.

How long can I store Butternut Squash Soup in the fridge?
You can store your homemade Butternut Squash Soup in an airtight container in the refrigerator for up to 5 days. Just be sure to reheat it gently on the stove over low heat, stirring occasionally to keep that creamy texture intact.

Can I freeze Butternut Squash Soup, and how do I do it?
Yes, you can! To freeze your Butternut Squash Soup, allow it to cool completely first. Then, portion it out into freezer-safe containers or zip-top bags, leaving some space for expansion – about an inch works well. It can be frozen for up to 3 months. For best results, label your containers with the date and soup name!

How do I thaw and reheat frozen Butternut Squash Soup?
To thaw frozen soup, transfer it to the refrigerator the night before you plan to enjoy it. If you’re short on time, you can also use the microwave’s defrost setting. Once thawed, reheat it on the stove over medium heat, stirring regularly. If it seems a bit thick, simply add a splash of vegetable broth to restore that lovely creaminess.

Can my dog have Butternut Squash Soup?
Very! Butternut squash is safe and healthy for dogs in moderation. However, this soup contains seasonings and potentially harmful ingredients like garlic, which can be toxic to pets. If you want to share some, set aside a plain portion of the cooked squash and blend it without any seasonings for your furry friend!

What should I do if my Butternut Squash Soup is too thick?
If your soup turns out thicker than you’d like, don’t worry. Start by gradually adding a little more vegetable broth or water while reheating, stirring well to combine. You can also use an immersion blender to break down any chunky bits. Keep tasting as you go until you reach your desired consistency!

Butternut Squash Soup

A comforting and easy recipe for Butternut Squash Soup, perfect for fall.
Prep Time 10 minutes
Cook Time 20 minutes
Total Time 30 minutes
Servings: 4 cups
Course: Soup
Cuisine: American
Calories: 200

Ingredients
  

For the Soup Base
  • 1 medium Butternut Squash peeled and diced
  • 1 medium Onion chopped
  • 2 cloves Garlic minced
  • 4 cups Vegetable Broth
  • 2 tablespoons Olive Oil
For Seasoning
  • 1 teaspoon Salt
  • 1 teaspoon Pepper
  • 1 pinch Nutmeg
  • 1 teaspoon Thyme fresh or dried
For Garnishing (Optional)
  • 1/4 cup Pumpkin Seeds toasted
  • 1/2 cup Cream or Coconut Milk for swirling
  • 1 tablespoon Fresh Herbs parsley or cilantro

Equipment

  • Large pot
  • Immersion blender

Method
 

Preparation Steps
  1. Prepare your ingredients by peeling and dicing the butternut squash, chopping the onion, and mincing the garlic.
  2. In a large pot, heat olive oil and sauté the onion until soft, then add garlic and sauté briefly.
  3. Add the cubed butternut squash and vegetable broth to the pot, bringing it to a simmer. Cover and cook until squash is tender.
  4. Blend the soup until smooth using an immersion blender, or blend in batches as needed.
  5. Stir in seasoning and adjust to taste, allowing flavors to meld.
  6. Serve in bowls and garnish with optional toppings.

Nutrition

Serving: 1cupCalories: 200kcalCarbohydrates: 35gProtein: 3gFat: 7gSaturated Fat: 1gMonounsaturated Fat: 6gSodium: 500mgPotassium: 700mgFiber: 5gSugar: 6gVitamin A: 15000IUVitamin C: 30mgCalcium: 100mgIron: 1mg

Notes

For freezing, portion into airtight containers and freeze for up to three months. Reheat gently on the stove.

Tried this recipe?

Let us know how it was!

Fluffy Cranberry Orange Muffins for Guilt-Free Mornings

As the oven timer ticks down, the delightful aroma of citrus and tartness fills my kitchen, instantly lifting my spirits. It’s time for a treat that combines both nutrition and indulgence: Healthy Cranberry Orange Muffins! These fluffy delights are perfect for those moments when you crave something sweet, yet guilt-free. Crafted with wholesome almond flour and naturally sweetened with fresh orange juice and maple syrup, they’re not just an explosion of flavor but also gluten-free, dairy-free, and Paleo-friendly. The best part? You can whip them up in just one bowl, making cleanup a breeze! Are you ready to brighten your breakfast table with these cheerful muffins that are sure to impress family and friends? Let’s dive in!

Why are Cranberry Orange Muffins so special?

Fluffy Texture: These muffins boast a light and airy crumb that melts in your mouth.

Vibrant Flavor: The zesty orange and tart cranberry harmoniously dance on your taste buds, creating a refreshing treat.

Guilt-Free Indulgence: Made with almond flour and natural sweeteners, they fit perfectly into various diets like gluten-free and Paleo.

One-Bowl Wonder: Experience the simplicity of mixing everything in one bowl, making it easier than ever to whip up a delicious batch.

Crowd Pleaser: Serve them at brunch or as a snack, and watch friends and family ask for seconds! Check out more quick and healthy recipes to keep the good vibes flowing.

Cranberry Orange Muffin Ingredients

• These muffins are a delicious way to enjoy the tangy sweetness of cranberries and oranges!

For the Muffins

  • Large Eggs – Provides structure and moisture; no easy vegan substitutions unless you get creative!
  • Olive Oil (or preferred oil) – Adds moisture and richness; can use coconut oil or melted butter if you prefer.
  • Orange Zest – Enhances the fresh orange flavor; use freshly grated zest for optimal taste.
  • Fresh Orange Juice – Main source of natural sweetness and flavor; freshly squeezed is best for true vibrancy.
  • Maple Syrup – Natural sweetener that replaces refined sugar; honey or agave can work as well if desired.
  • Almond Flour – Gives a tender crumb and keeps the muffins gluten-free; make sure it’s finely ground!
  • Baking Powder – Helps achieve fluffiness; ensure it’s fresh for the best rise.
  • Baking Soda – Works with the orange juice to enhance rising; use alongside baking powder for optimal puff.
  • Salt – Balances sweetness and elevates overall flavor; don’t skip this important ingredient!
  • Fresh Cranberries – Add a nice tartness and texture; fresh is preferred, but if using frozen, be sure to thaw and blot them dry.

Perfect for a guilt-free breakfast or snack, these Cranberry Orange Muffins brighten any day!

Step‑by‑Step Instructions for Cranberry Orange Muffins

Step 1: Preheat the Oven
Begin by preheating your oven to 350°F (175°C). While it warms up, line a standard muffin pan with paper liners to prevent sticking. This preparation will ensure that your Cranberry Orange Muffins bake evenly and maintain a lovely shape as they rise beautifully in the oven.

Step 2: Mix Wet Ingredients
In a large mixing bowl, whisk together 2 large eggs, 1/3 cup of olive oil, the zest of one orange, 1/2 cup of freshly squeezed orange juice, and 1/4 cup of maple syrup. Make sure everything is well-combined and smooth. This mixture creates a vibrant and flavorful base for your muffins, bringing that zesty orange goodness to life!

Step 3: Combine Dry Ingredients
In a separate bowl, mix together 2 cups of almond flour, 1 tablespoon of baking powder, 1/2 teaspoon of baking soda, and 1/4 teaspoon of salt until evenly blended. This step ensures that the leavening agents are distributed throughout, giving your Cranberry Orange Muffins that delightful rise and soft texture as they bake.

Step 4: Combine Wet and Dry Mixtures
Gradually add the dry mixture into the wet ingredients, whisking gently until no lumps remain. The batter should be thick but smooth, creating a perfect base for your muffins. Take care not to over-mix, as this can affect the fluffy texture of your Cranberry Orange Muffins.

Step 5: Fold in Cranberries
Gently fold in 1 cup of fresh cranberries into the batter using a spatula. This adds a lovely tartness and visually appealing color to your muffins. Ensure the cranberries are evenly distributed throughout the batter, so every bite is filled with that delightful zing!

Step 6: Fill Muffin Cups
Divide the batter evenly among the prepared muffin cups, filling each about three-quarters full for even rising. Using a scoop can help maintain consistency across your Cranberry Orange Muffins, ensuring that they all bake to perfection and have the same delightful size and shape.

Step 7: Bake to Perfection
Place the muffin tin in the preheated oven and bake for 15 to 20 minutes. You’ll know they’re done when they turn lightly golden brown and a toothpick inserted into the center comes out clean. Enjoy the wonderful aroma wafting through your kitchen as they bake, adding to the excitement of tasting your fresh muffins!

Step 8: Cool the Muffins
Once baked, remove the muffin tin from the oven and allow it to cool for about 10 minutes on a wire rack. This brief cooling period helps them set, making it easier to transfer them to the rack without breaking. Allow them to cool completely, and then enjoy your delectable Cranberry Orange Muffins!

Make Ahead Options

These Healthy Cranberry Orange Muffins are perfect for meal prep enthusiasts! You can mix the dry ingredients (2 cups of almond flour, 1 tablespoon of baking powder, 1/2 teaspoon of baking soda, and 1/4 teaspoon of salt) and store them in an airtight container for up to 3 days. Additionally, prepare the wet mixture (2 large eggs, 1/3 cup of olive oil, zest and juice of one orange, and 1/4 cup of maple syrup) and refrigerate it for up to 24 hours. When you’re ready to bake, simply combine the prepped wet and dry ingredients, fold in 1 cup of fresh cranberries, and bake as directed. This method not only saves you time but also ensures your muffins remain just as delicious!

How to Store and Freeze Cranberry Orange Muffins

Airtight Container: Keep your Cranberry Orange Muffins in an airtight container at room temperature for up to 3-5 days to maintain their fluffy texture and freshness.

Fridge Storage: For longer freshness, store the muffins in the refrigerator for up to 1 week. Allow them to come to room temperature before serving for the best flavor.

Freezer Tips: Wrap individual muffins in plastic wrap and place them in a freezer-safe bag or container. They can be frozen for up to 3 months, perfect for on-the-go snacks!

Reheating: To enjoy your frozen muffins, simply thaw them overnight in the fridge and reheat in the microwave for 15-20 seconds, or enjoy them at room temperature for a delightful treat.

Expert Tips for Cranberry Orange Muffins

  • Fresh Ingredients Matter: Always use fresh orange juice and zest for the best flavor. Bottled juices often lack the vibrant taste needed for these muffins.

  • Avoid Excess Moisture: If using frozen cranberries, be sure to thaw and blot them dry before adding to the batter. This prevents soggy muffins.

  • Don’t Overmix: When combining wet and dry ingredients, mix gently until just combined. Overmixing can lead to tough muffins instead of fluffy Cranberry Orange Muffins.

  • Use Proper Baking Powder: Double-check that your baking powder is fresh for the best rise. If unsure, replace it with a new container to ensure perfect results.

  • Storage Secrets: Store these muffins in an airtight container at room temperature for 3-5 days, or freeze them for delicious snacks later on!

What to Serve with Healthy Cranberry Orange Muffins

These delightful muffins are the highlight of any meal, inviting endless pairings to elevate your dining experience.

  • Greek Yogurt: A creamy and protein-rich option that balances the tartness of the muffins, perfect for breakfast or a snack.

  • Fresh Berries: Brightening your plate, a medley of strawberries and blueberries adds a pop of color and freshness to complement the flavors.

  • Nut Butter: Spread some almond or cashew butter for a rich and satisfying addition, enhancing both taste and nutrition.

  • Hot Herbal Tea: Enjoy a calming contrast with a fragrant cup of chamomile or peppermint, creating a cozy atmosphere for your muffin indulgence.

  • Honey Drizzle: A touch of natural sweetness transforms each bite, harmonizing with the tangy cranberries and zesty orange.

  • Breakfast Quinoa: Transform your meal into a powerhouse with a nutty bowl of quinoa, adding texture and heartiness alongside the fluffy cranberry orange muffins.

Cranberry Orange Muffins Variations & Substitutions

Feel free to get creative and customize these muffins to suit your tastes and dietary preferences!

  • Berry Bliss: Substitute cranberries with fresh blueberries for a sweeter twist. The bursts of blueberry flavor will add a delightful surprise in every bite. You can even mix half blueberries and half cranberries for a lovely combination.

  • Nutty Crunch: Add 1/2 cup of chopped walnuts or pecans for a crunchy texture. The nuts not only introduce a wonderful bite but also enhance the muffins’ nutritional profile, making them heartier and more satisfying.

  • Zesty Spice: Sprinkle in 1 teaspoon of cinnamon or nutmeg for a cozy, warm flavor. These spices will create a lovely aromatic lift and a hint of autumn that pairs beautifully with oranges and cranberries.

  • Citrus Duo: Combine the zest of both orange and lemon for an extra zing. The bright lemon notes will elevate the citrus flavor, making these muffins even more refreshing and vibrant.

  • Vegan Twist: Swap the eggs with flax or chia eggs for a vegan option. Each “egg” can be made by mixing 1 tablespoon of flaxseed or chia seeds with 2.5 tablespoons of water and letting it sit until gel-like. This alternative keeps the muffins moist and fluffy while adhering to plant-based standards.

  • Gluten-Free Glee: If almond flour isn’t available, use a gluten-free all-purpose flour blend. Ensure the blend contains xanthan gum for structure, so your muffins stay just as fluffy and delicious.

  • Sweet Heat: Add a pinch of cayenne pepper or red pepper flakes for a subtle kick. This unexpected heat will create an exciting flavor contrast to the sweet oranges and tart cranberries.

  • Chocolate Delight: Stir in some dairy-free chocolate chips (or regular, if preferred) to introduce a rich chocolate flavor. The sweet bursts of chocolate will complement the tartness of the cranberries beautifully.

Each combination not only opens up new flavor profiles but also allows the recipe to match different dietary needs beautifully. Get inspired and make these muffins uniquely yours, or try them alongside other favorite recipes like my Savory Spinach Feta Muffins for a delightful brunch spread!

Cranberry Orange Muffins Recipe FAQs

How do I choose the right cranberries?
Absolutely! When selecting fresh cranberries for your muffins, look for firm, plump berries with a vibrant red color. Avoid any that are mushy or have dark spots, as this may indicate they are overripe. Fresh cranberries are ideal, but if you opt for frozen, ensure they are thawed and blotted dry before using to maintain the muffins’ texture.

What is the best way to store leftover muffins?
Very! You can store your Cranberry Orange Muffins in an airtight container at room temperature for 3-5 days to keep them fresh and fluffy. If you want to extend their life, consider refrigerating them, where they will stay good for up to a week. Just remember to bring them back to room temperature before enjoying for the best flavor!

Can I freeze Cranberry Orange Muffins?
Of course! To freeze your muffins, first allow them to cool completely. Then, wrap each muffin individually in plastic wrap and place them in a freezer-safe bag or container. They can be stored in the freezer for up to 3 months. When you’re ready to enjoy one, simply thaw it overnight in the refrigerator or reheat it in the microwave for about 15-20 seconds.

What if my muffins didn’t rise?
It happens to the best of us! If your muffins didn’t rise, the likely culprit could be stale baking powder or baking soda. Always check their expiration dates to ensure they are fresh. Additionally, make sure you are measuring the almond flour properly; too much flour can lead to denser muffins. Be gentle while mixing the batter to keep it light and fluffy.

Are these muffins suitable for people with allergies?
Absolutely! These Cranberry Orange Muffins are naturally gluten-free, dairy-free, and refined sugar-free, making them a great option for various dietary needs. However, if you or anyone you’re serving has nut allergies, I recommend using sunflower seed flour instead of almond flour as a substitute. Always double-check the ingredients in your maple syrup to ensure it aligns with any specific dietary restrictions.

Can I use a different flour?
Yes, you can! While almond flour is best for achieving that perfect fluffy texture, you can experiment with a gluten-free all-purpose flour blend. Just keep in mind that the texture may differ slightly. If you’re unsure, it’s always a good idea to follow up with the specific blend’s package instructions for better results!

Cranberry Orange Muffins

Fluffy Cranberry Orange Muffins for Guilt-Free Mornings

These Cranberry Orange Muffins are a guilt-free breakfast option, combining nutrition and indulgence for a delightful morning treat.
Prep Time 10 minutes
Cook Time 20 minutes
Cooling Time 10 minutes
Total Time 40 minutes
Servings: 12 muffins
Course: Breakfast
Cuisine: American
Calories: 150

Ingredients
  

For the Muffins
  • 2 large Eggs Provides structure and moisture
  • 1/3 cup Olive Oil Can use coconut oil or melted butter
  • 1 tablespoon Orange Zest Use freshly grated zest
  • 1/2 cup Fresh Orange Juice Freshly squeezed is best
  • 1/4 cup Maple Syrup Natural sweetener
  • 2 cups Almond Flour Finely ground for best texture
  • 1 tablespoon Baking Powder Ensure fresh for best rise
  • 1/2 teaspoon Baking Soda Works with orange juice
  • 1/4 teaspoon Salt Balances sweetness
  • 1 cup Fresh Cranberries Fresh preferred, or thawed if frozen

Equipment

  • Oven
  • muffin pan
  • Mixing Bowl
  • whisk
  • spatula

Method
 

Step-by-Step Instructions
  1. Preheat your oven to 350°F (175°C) and line a muffin pan with paper liners.
  2. In a large mixing bowl, whisk together 2 large eggs, 1/3 cup olive oil, 1 tablespoon orange zest, 1/2 cup fresh orange juice, and 1/4 cup maple syrup until smooth.
  3. In a separate bowl, mix 2 cups almond flour, 1 tablespoon baking powder, 1/2 teaspoon baking soda, and 1/4 teaspoon salt until blended.
  4. Gradually add the dry mixture to the wet ingredients, whisking gently until no lumps remain.
  5. Fold in 1 cup of fresh cranberries gently using a spatula.
  6. Divide the batter evenly among the muffin cups, filling each about three-quarters full.
  7. Bake in the preheated oven for 15 to 20 minutes until golden brown and a toothpick comes out clean.
  8. Cool the muffins in the tin for about 10 minutes, then transfer to a wire rack to cool completely.

Nutrition

Serving: 1muffinCalories: 150kcalCarbohydrates: 24gProtein: 3gFat: 7gSaturated Fat: 1gPolyunsaturated Fat: 0.5gMonounsaturated Fat: 5gCholesterol: 30mgSodium: 150mgPotassium: 150mgFiber: 2gSugar: 6gVitamin A: 5IUVitamin C: 15mgCalcium: 3mgIron: 5mg

Notes

Store muffins in an airtight container at room temperature for 3-5 days, or freeze for up to 3 months.

Tried this recipe?

Let us know how it was!

Decadent Peppermint Bark Recipe with Just 3 Ingredients

As the holidays roll in, I often find myself overwhelmed by the unending list of goodies to whip up for friends and family. Amidst the chaos, there’s one crowd-pleaser that never fails to sparkle on my cookie tray—my 3-Ingredient Peppermint Bark Recipe. This delightful treat combines rich dark and sweet white chocolate, topped with crunchy candy canes that add a refreshing minty zing. Not only is it incredibly easy to prepare, requiring just a few minutes of your time, but it also makes for a charming homemade gift that will warm anyone’s heart. Whether you’re looking to impress at a gathering or simply indulge in a cozy evening at home, this holiday staple is sure to brighten your festivities. Ready to discover how simple it is to create this deliciously festive treat? Let’s dive in!

Why is Peppermint Bark a Must-Make?

Simplicity: With just three ingredients, you’ll whip this up in no time, perfect for busy holiday schedules.
Decadent Flavor: The contrast of rich dark chocolate and sweet white chocolate creates a heavenly taste experience.
Festive Touch: The crunchy candy canes not only add flavor but also make your treats festive and appealing!
Gift-Friendly: Package this delightful bark in a decorative box or jar, making it a charming homemade gift for loved ones.
Crowd-Pleaser: Whether at a party or cozy night in, this Peppermint Bark is sure to impress and satisfy, just like Cheesy Hamburger Potato soup does at gatherings!

Peppermint Bark Ingredients

Note: This Peppermint Bark Recipe is not only simple but also incredibly delicious and festive!

  • For the Chocolate Layers

  • Bittersweet Chocolate – Provides a deep, rich chocolate flavor that balances the sweetness of white chocolate. Substitute semi-sweet chocolate if preferred, but avoid milk chocolate as it may be overly sweet.

  • White Chocolate – Adds sweetness and creaminess, creating a luxurious texture that contrasts with the dark chocolate. Use high-quality white chocolate bars, avoiding varieties with additives for the best results.

  • For the Topping

  • Crushed Candy Canes – Offers a crunchy texture and minty flavor, enhancing the festive spirit of the bark. You may substitute with peppermint crunch for varied presentation.

Step‑by‑Step Instructions for Peppermint Bark Recipe

Step 1: Prepare the Baking Sheet
Start by lining a small rimmed baking sheet or an 8×8 square dish with parchment paper or foil, ensuring it hangs over the edges for easy removal later. This will create a non-stick surface for your Peppermint Bark and help achieve perfectly shaped pieces.

Step 2: Melt Dark Chocolate
Using a double boiler, melt the bittersweet chocolate over simmering water on medium heat, stirring continuously until smooth and glossy. This process typically takes about 5-8 minutes. Once melted, stir in half of the crushed candy canes, allowing their minty flavor to infuse the dark chocolate.

Step 3: Set Dark Chocolate Layer
Pour the melted dark chocolate mixture into the prepared pan, spreading it evenly to create a layer about 1/4 inch thick. Gently tap the pan on the counter to remove air bubbles and level the surface. Chill in the refrigerator for 10-15 minutes until the dark chocolate is firm but not completely set.

Step 4: Melt White Chocolate
In the same double boiler, melt the white chocolate over medium heat, stirring patiently until it becomes silky smooth—this usually takes another 5-8 minutes. Keep an eye on the white chocolate, as it can scorch easily. Once melted, it’s ready to layer on top of the dark chocolate.

Step 5: Layer White Chocolate
Carefully pour the smooth melted white chocolate over the chilled dark chocolate layer, using a spatula to spread it evenly without mixing the two layers. This beautiful contrast creates a stunning visual for your Peppermint Bark. After spreading, sprinkle the remaining crushed candy canes on top for that festive flair.

Step 6: Chill to Set
Return the entire baking sheet to the refrigerator, allowing the Peppermint Bark to chill for at least 30 minutes until fully set and firm to the touch. Once set, let it sit at room temperature for about 15-20 minutes before cutting into pieces, ensuring clean edges for a delightful presentation.

What to Serve with 3-Ingredient Peppermint Bark?

There’s nothing like rounding out your Peppermint Bark experience with delightful touches that awaken the senses during the holidays.

  • Hot Cocoa: A warm, comforting drink that blends perfectly with the minty crunch of the bark, enhancing its festive flavor.
  • Coffee: The rich, bold flavor of freshly brewed coffee complements the sweet chocolate and mint, creating a cozy pairing for any gathering.
  • Charcuterie Board: Pairing slices of creamy brie and savory meats adds a delightful contrast to the sweetness of the bark, balancing the flavors beautifully.
  • Chocolate-Dipped Strawberries: Fresh berries dipped in chocolate bring a juicy, fruity element that cuts through the richness, making for an elegant presentation.
  • Christmas Cookies: A plate of assorted holiday cookies adds texture and variety, inviting guests to explore different sweet flavors while enjoying the Peppermint Bark.
  • Sparkling Water with Lime: A refreshing drink that cleanses the palate and elevates the dining experience with its zesty brightness, ideal for contrasting the bark’s sweetness.
  • Nutty Trail Mix: Crunchy mixed nuts add a healthy element and a satisfying crunch that pairs wonderfully with the smooth chocolate layers of the bark.
  • Ice Cream Sundae: A scoop of vanilla ice cream topped with warm chocolate syrup creates an indulgent dessert that harmonizes with the festive spirit of peppermint.
  • Cheese Platter: Include sharp cheddar or aged gouda to create a delightful interplay of sweet and salty, making each bite a new experience.

Expert Tips for Peppermint Bark

  • Chocolate Quality: Use high-quality bittersweet and white chocolate for the best flavor. Cheap chocolates can result in a dull taste and undesirable texture.

  • Proper Setting: Allow the dark chocolate layer to cool just enough before adding the white chocolate—if it sets completely, they might not meld well, making separation a common mistake.

  • Layer Thickness: Keep your chocolate layers to about 1/4 inch thick for a balanced bite. Too thick can be overwhelming, while too thin may break easily.

  • Storage Considerations: Store your Peppermint Bark in an airtight container in the refrigerator to maintain its freshness and prevent it from becoming too soft.

  • Chill Timings: Adjust chilling times based on your refrigerator’s temperature and the thickness of the layers. Ensure they’re firm to the touch but still slightly soft when layering.

  • Festive Variations: Think about adding toppings like crushed nuts or colored sprinkles on top of the white chocolate, taking your Peppermint Bark recipe to the next level of festive charm!

Make Ahead Options

This Peppermint Bark Recipe is perfect for busy holiday cooks looking to save time! You can prepare the dark and white chocolate layers up to 24 hours in advance. Simply melt and layer the chocolates as instructed, then refrigerate until set. To maintain quality, be sure to wrap the bark tightly in plastic wrap or store it in an airtight container to prevent moisture from affecting its texture. When you’re ready to serve, remove it from the fridge and let it sit at room temperature for about 15-20 minutes before cutting into pieces. This ensures your bark retains its deliciously creamy texture, ready to impress your holiday guests with minimal effort!

How to Store and Freeze Peppermint Bark

Fridge: Store your Peppermint Bark in an airtight container in the refrigerator for up to two weeks to keep it cool and firm.

Freezer: For longer storage, freeze the bark in a single layer, separated by parchment paper, for up to three months. Thaw in the fridge before serving.

Cutting Tips: When ready to enjoy, let it sit at room temperature for about 15-20 minutes for easier cutting into pieces.

Gift-Friendly Storage: If gifting, package the Peppermint Bark in decorative boxes or jars right after it’s set, ensuring it’s sealed for freshness!

Peppermint Bark Recipe Variations

Feel free to get creative with this Peppermint Bark recipe and make it your own with some delightful twists!

  • Sweet Swap: Substitute half of the bittersweet chocolate with semi-sweet chocolate for a sweeter bark. This can really change the flavor profile and cater to those who enjoy a less intense chocolate experience.

  • Nutty Delight: Add crushed walnuts or pecans on top for a nutty crunch to complement the smooth chocolate. The richness of nuts pairs wonderfully with the minty freshness!

  • Flavored Chocolate: Use flavored chocolate, like peppermint or mocha, in place of bittersweet chocolate. This added layer of flavor can take the traditional recipe to new heights.

  • Sprinkled Joy: Top your bark with colorful sprinkles or edible glitter for a festive touch! It adds visual appeal and makes your bark not just delicious, but a feast for the eyes too.

  • Double Chocolate: For an indulgent twist, layer in some drizzled white chocolate over the cooled dark chocolate instead of just layering it. This creates a marble effect that’s both beautiful and tasty.

  • Spicy Kick: Add a pinch of cayenne pepper to the melting dark chocolate for a surprising kick. This could be the perfect conversation starter at your holiday party, appealing to those who love a twist on traditional flavors.

  • Minty Refresh: Amp up the mint flavor by adding a few drops of peppermint extract to the melted white chocolate. This is a great option for mint lovers wanting that extra flavor boost.

  • Fruit Infusion: You can sprinkle dried cranberries or chopped dried cherries on top for a fruity contrast. Their tartness pairs beautifully with the sweet chocolate and candy canes!

However you choose to customize your Peppermint Bark, remember this versatile treat can be easily adapted to fit every taste preference, just as Shepherds Pie Bowl caters to hearty appetites!

Peppermint Bark Recipe FAQs

How do I choose the best chocolate for my Peppermint Bark?
Absolutely! For the best results, use high-quality bittersweet and white chocolate. Look for chocolate bars with a higher cocoa content—around 60% for bittersweet. Avoid milk chocolate, as it can make the bark overly sweet and alter the flavor profile. Always check ingredient labels for additives; pure chocolate will yield a rich, decadent bark!

How long can I store Peppermint Bark?
You can store your Peppermint Bark in an airtight container in the refrigerator for up to two weeks, keeping it cool and firm. It’s essential to ensure it’s sealed tightly to prevent moisture absorption and preserve the taste. If you notice any surface condensation, it’s best to consume it quickly!

Can I freeze Peppermint Bark?
Very! To freeze your Peppermint Bark, place it in a single layer, separated by parchment paper, in an airtight container or wrapped tightly in plastic wrap. It can last for up to three months in the freezer. When you’re ready to enjoy, simply transfer it to the refrigerator to thaw for a few hours, bringing back its delightful texture and flavor.

What if my chocolate seizes during melting?
Don’t worry! If your chocolate seizes—looking grainy or clumpy—it’s often due to moisture. To rescue it, add a teaspoon of vegetable oil or shortening while stirring gently over low heat. This helps loosen it up. In the future, ensure that your mixing tools and bowls are completely dry, and avoid getting any water into the melting chocolate.

Is Peppermint Bark safe for my pets?
Not at all! Chocolate can be toxic to pets, especially dogs, due to the presence of theobromine. Always ensure that your Peppermint Bark is out of reach of your furry friends. If you suspect your pet has ingested chocolate, contact your veterinarian immediately for advice.

Can I customize my Peppermint Bark with other toppings?
Absolutely! The more the merrier! In addition to crushed candy canes, consider adding crushed nuts, sprinkles, or even a drizzle of caramel for an extra indulgent treat. Just remember to sprinkle them on before the white chocolate sets for the best adhesion!

Peppermint Bark Recipe

Decadent Peppermint Bark Recipe with Just 3 Ingredients

This Peppermint Bark Recipe is a festive treat combining rich chocolate flavors with crunchy candy canes for a delightful dessert.
Prep Time 15 minutes
Cook Time 15 minutes
Chilling Time 30 minutes
Total Time 1 hour
Servings: 12 pieces
Course: Dessert
Cuisine: American
Calories: 200

Ingredients
  

For the Chocolate Layers
  • 8 ounces Bittersweet Chocolate Substitute semi-sweet chocolate if preferred, avoid milk chocolate.
  • 8 ounces White Chocolate Use high-quality bars without additives.
For the Topping
  • 1/2 cup Crushed Candy Canes May substitute with peppermint crunch.

Equipment

  • double boiler
  • Baking Sheet
  • spatula

Method
 

Step-by-Step Instructions for Peppermint Bark Recipe
  1. Line a small rimmed baking sheet with parchment paper or foil.
  2. Melt bittersweet chocolate in a double boiler, stirring continuously until smooth. Stir in half of the crushed candy canes.
  3. Pour the melted dark chocolate into the prepared pan and chill for 10-15 minutes.
  4. Melt white chocolate in the same double boiler until silky smooth.
  5. Pour the melted white chocolate over the chilled dark chocolate layer and sprinkle remaining crushed candy canes on top.
  6. Chill for 30 minutes until fully set, then let sit at room temperature for 15-20 minutes before cutting into pieces.

Nutrition

Serving: 1pieceCalories: 200kcalCarbohydrates: 25gProtein: 2gFat: 10gSaturated Fat: 6gMonounsaturated Fat: 4gCholesterol: 15mgSodium: 25mgPotassium: 100mgFiber: 1gSugar: 20gVitamin A: 200IUCalcium: 30mgIron: 1mg

Notes

Store in an airtight container in the refrigerator for up to two weeks, or freeze for up to three months. Allow to sit at room temperature for easier cutting.

Tried this recipe?

Let us know how it was!

Deliciously Chewy Persimmon Cookies for Your Holiday Table

As I pulled the batch of Soft & Chewy Persimmon Cookies from the oven, the sweet, earthy aroma enveloped my kitchen like a warm hug. Made with ripe Hachiya persimmons, these delightful cookies are an easy way to embrace the flavors of the holiday season. They boast a chewy texture, thanks to the wholesome rolled oats, and a pleasantly tart surprise from dried cranberries and crunchy pecans. Perfect for those busy days leading up to Christmas, this recipe is not only quick and straightforward but also freezer-friendly, allowing you to prepare a stash for impromptu gatherings or cozy evenings at home. Are you ready to fill your home with the scent of nostalgia and create delicious memories? Let’s get baking!

Why Are Persimmon Cookies So Special?

Irresistible Flavor: The unique sweetness of ripe persimmons blends perfectly with tart cranberries and crunchy pecans, creating an unforgettable taste experience.

Effortlessly Simple: This recipe is straightforward, making it perfect for bakers of all skill levels. If you’re also looking for quick snacks, check out my delicious Blueberry Breakfast Cookies for a delightful treat anytime!

Perfect for the Holidays: These cookies are a fantastic addition to your holiday cookie platter, offering a beautiful alternative to typical festive treats.

Freezer Friendly: You can prepare dough in advance and freeze it, making last-minute baking a breeze.

Versatile Ingredients: Feel free to swap in different nuts or dried fruits to customize each batch according to your preferences!

Let the enticing aroma of these Persimmon Cookies fill your kitchen while you create treasured moments with family and friends.

Persimmon Cookies Ingredients

For the Cookie Dough
Hachiya Persimmons – Use very ripe ones, as they provide sweetness and moisture; approximately 3 large yield 1 cup of pulp.
Unsalted Butter – Ensures rich flavor and a chewy texture; make sure it’s softened for easier mixing.
Coconut Sugar – Adds a caramel-like sweetness; feel free to substitute with brown or granulated sugar if desired.
Orange Zest – Brightens the flavor with citrus notes; lemon zest works just as well for a different twist.
Egg – Gives structure and moisture; make sure it’s at room temperature for better incorporation into the dough.
Vanilla Extract – Infuses depth and warmth into the mix.
All-Purpose Flour – The backbone of the cookie texture; it’s essential for binding the ingredients.
Baking Soda – Acts as a leavening agent to help the cookies rise to fluffy perfection.
Ground Cinnamon – Introduces a warm, cozy spice; substitute with pumpkin spice for an autumnal variation.
Salt – Balances and enhances the flavors beautifully.
Rolled Oats – Adds a delightful chewiness and heartiness; they are key for that classic cookie texture.
Dried Cranberries – Provides a tangy sweetness; you can swap them for raisins or dried cherries as you like.
Pecan Pieces – Contributes a lovely crunch; walnuts can be used as an alternative if preferred.

Enjoy making these Persimmon Cookies and savor the festive joy they bring to your table!

Step‑by‑Step Instructions for Persimmon Cookies

Step 1: Prepare the Persimmon Pulp
Begin by cutting the very ripe Hachiya persimmons in half and scooping out the flesh with a spoon. Place the pulp in a blender and blend until smooth, ensuring there are no lumps. You’ll need about 1 cup of this luscious pulp for your cookies, which will provide sweetness and moisture.

Step 2: Preheat the Oven
Preheat your oven to 350°F (175°C) and prepare your baking sheets by lining them with parchment paper. This simple step ensures that your persimmon cookies will bake evenly and won’t stick. When your oven is ready, you’ll get that lovely warm aroma of baking that fills your kitchen.

Step 3: Cream the Butter and Sugar
In a large mixing bowl, beat the softened unsalted butter and coconut sugar together until the mixture is light and fluffy, typically about 2-3 minutes. The creamy texture at this stage is essential for adding richness to your Persimmon Cookies. Mix in the fresh orange zest for a delightful citrus aroma.

Step 4: Add the Egg and Persimmon
Next, add the room-temperature egg to the butter and sugar mixture, blending until thoroughly incorporated—even if it looks a bit curdled. Then, gently mix in the persimmon pulp and vanilla extract. This combination will add depth and moisture, making your cookies irresistibly chewy.

Step 5: Combine Dry Ingredients
Gradually add the all-purpose flour, baking soda, ground cinnamon, and salt to the wet ingredients. Mix until just combined, being careful not to overmix, which is key for keeping your Persimmon Cookies soft and chewy. Look for a thick, cohesive dough that comes together beautifully.

Step 6: Fold in Oats, Cranberries, and Pecans
Delicately fold in the rolled oats, dried cranberries, and pecan pieces until evenly distributed throughout the dough. This mixture will provide amazing texture and flavor to your cookies, adding a satisfying chew and delightful crunch.

Step 7: Scoop and Shape the Cookies
Using a cookie scoop or a spoon, drop the dough onto your prepared baking sheets, leaving about 2 inches between each scoop. Lightly flatten the dough mounds, as they won’t spread much during baking. This will ensure a uniform shape and extra chewiness in your finished Persimmon Cookies.

Step 8: Bake to Perfection
Place the baking sheets in the preheated oven and bake for 12-15 minutes, or until the edges are lightly golden, and the centers are no longer shiny. Rotate the pans halfway through baking for even cooking. The smell will be delightful, signaling that your cookies are close to done!

Step 9: Cool and Enjoy
Once baked, remove the cookies from the oven and let them cool on the baking sheets for a few minutes before transferring them to wire racks. Allow them to cool completely, which allows the flavors to meld beautifully. Now, it’s time to share these delightful Persimmon Cookies with friends or simply enjoy them yourself!

Expert Tips for Persimmon Cookies

  • Use Very Ripe Persimmons: Ensure your Hachiya persimmons are extremely ripe for maximum sweetness and moisture, enhancing the flavor of your cookies.

  • Avoid Overmixing: Once you add flour, mix until just combined to maintain a soft and chewy texture in your Persimmon Cookies.

  • Cool on Wire Racks: Allow cookies to cool completely on wire racks to help them set properly, ensuring they’re perfectly chewy and not too soft.

  • Batch Preparation: Make extra dough and freeze it for up to 3 months; you can bake fresh cookies anytime with minimal effort.

  • Experiment with Add-ins: Customize your cookies by swapping nuts or dried fruits; this allows endless variations while keeping the original persimmon flavor.

What to Serve with Soft & Chewy Persimmon Cookies

As you indulge in the delightful sweetness of these cookies, consider complementing them with tasty pairings to create a memorable spread.

  • Glass of Milk: The classic companion for cookies, milk balances the sweetness perfectly and enhances the chewy texture.

  • Hot Tea: A warm cup of spiced chai or herbal tea provides a cozy contrast to the flavors of persimmons, cranberries, and pecans.

  • Fruit Salad: A refreshing mix of seasonal fruits brightens the palate and adds a burst of freshness alongside the cookies. Think citrus, berries, and pomegranate!

  • Cheese Platter: Pair with creamy brie or aged cheddar for a unique sweet and savory combination, elevating your cookie moment to gourmet heights.

  • Vanilla Ice Cream: Serve warm cookies with a scoop of creamy vanilla for a delightful dessert experience — the warm and cold contrast is irresistible!

  • Coffee or Espresso: The rich bitterness of coffee beautifully offsets the sweetness of the cookies, making for a delightful afternoon treat.

  • Holiday Punch: A fruity holiday punch or spiced apple cider enhances the festive vibe, making your cookie sharing feel even more special.

Let your taste buds dance with these complementary offerings, turning your persimmon cookies into a cherished gathering experience.

Make Ahead Options

These Persimmon Cookies are perfect for meal prep enthusiasts looking to save time during the busy holiday season! You can prepare the persimmon pulp up to 3 days in advance and store it in the refrigerator, or freeze it for up to 3 months for added convenience. Additionally, you can mix the dry ingredients (flour, baking soda, cinnamon, and salt) and keep them in an airtight container for easy incorporation later. When you’re ready to bake, simply combine the wet and dry ingredients, fold in the oats, cranberries, and pecans, scoop the dough onto baking sheets, and bake for 12-15 minutes. This way, you’ll enjoy delicious, homemade Persimmon Cookies with minimal effort and just as much flavor!

Persimmon Cookies Variations & Substitutions

Customize your Persimmon Cookies to match your taste buds or dietary needs!

  • Nut-Free: Swap pecans for sunflower seeds or omit nuts altogether for a delightful, allergy-friendly version.
    Add a creamy, nut-like flavor without nuts for those allergic but still craving texture.

  • Higher Fiber: Substitute half the all-purpose flour with whole wheat flour for a nutritious twist.
    This minor change can increase fiber and give your cookies a heartier feel without losing moisture.

  • Vegan: Replace the egg with a flax egg (1 tbsp flaxseed meal + 3 tbsp water) and use vegan butter.
    You won’t compromise on taste or texture, ensuring everyone can enjoy these delightful cookies!

  • Spice It Up: Swap ground cinnamon for ginger or nutmeg for a warming seasonal twist.
    Discover how a single spice can elevate your cookie experience and embrace different flavor profiles!

  • Chocolate Lovers: Mix in dark chocolate chips or chunks along with dried cranberries for extra decadence.
    The rich cocoa will complement the persimmon flavor beautifully, creating a cookie that feels indulgent.

  • Zesty Twist: Replace orange zest with lemon or lime zest for a refreshing citrusy kick.
    It brightens the flavor profile, transforming the classic recipe into something uniquely exciting!

  • Add Oats: Incorporate 1/2 cup of toasted coconut for added texture and a tropical flavor.
    This delightful twist can transport you to sunny shores while you savor those chewy bites!

  • Dried Fruit Mix-Up: Use dried raspberries or chopped dried apricots instead of cranberries for varied taste.
    Experimenting with dried fruits can yield exciting flavor combinations – think of it as a fruity adventure!

For another quick treat, consider whipping up my Blueberry Breakfast Cookies when you need something wholesome and sweet. Enjoy the process of making these cookies truly your own!

How to Store and Freeze Persimmon Cookies

Room Temperature: Keep your Persimmon Cookies in an airtight container at room temperature for up to 3 days. This helps maintain their delightful chewiness.

Fridge: If you’d like to extend their freshness, store them in the refrigerator for up to a week. Place them in a sealed container to prevent drying out.

Freezer: These cookies freeze beautifully! Store them in a single layer in a freezer-safe bag or container for up to 3 months. Thaw in the fridge overnight or warm in the microwave for a few seconds before enjoying.

Reheating: To bring back their delicious texture, warm frozen cookies in the microwave for 10-15 seconds, or place them in a preheated oven at 350°F for a few minutes.

Persimmon Cookies Recipe FAQs

What kind of persimmons should I use for these cookies?
Absolutely! Make sure to use very ripe Hachiya persimmons for these Persimmon Cookies. They are known for their sweet, honey-like flavor and will provide the moisture needed for this recipe. You’ll need about 3 large persimmons to yield 1 cup of pulp. Avoid underripe persimmons as they can be astringent and won’t blend well.

How should I store my persimmon cookies after baking?
For the best taste, store your Persimmon Cookies in an airtight container at room temperature for up to 3 days. If you want to keep them for longer, they’re also great in the fridge for about a week! Just make sure to seal them well to prevent any drying.

Can I freeze the dough or baked cookies?
Absolutely! You can freeze the cookie dough for up to 3 months. Just scoop the dough onto a baking sheet, freeze until solid, then transfer the mounds to a freezer-safe bag. For baked cookies, line them in a single layer in a freezer-safe container, separating layers with parchment paper. They can also stay frozen for up to 3 months. To enjoy, simply warm them in the microwave for 10-15 seconds or pop them in a preheated oven at 350°F for a few minutes.

What should I do if my cookies turn out too dry?
Very! If your cookies come out dry, try checking the moisture level of your persimmons next time. It’s essential to use ripe ones! Additionally, make sure not to overmix the dough after adding flour, or you might end up with tough cookies. Keeping an eye on your baking time is crucial too—don’t overbake them!

Are these cookies safe for people with nut allergies?
If you have specific nut allergies, it’s wise to avoid adding nuts to these cookies. Instead of pecans, you can use seeds like pumpkin or sunflower for added crunch without the allergy concern. Be sure to double-check the other ingredients as well if you’re cooking for someone with food sensitivities.

Can I use a different type of sugar?
Yes, you can substitute the coconut sugar with brown sugar or granulated sugar according to your preference. Brown sugar will add a lovely caramel-like flavor too! Just keep in mind that the texture might vary slightly, but they’ll still be delicious!

Persimmon Cookies

Deliciously Chewy Persimmon Cookies for Your Holiday Table

These Persimmon Cookies are a delightful treat, combining ripe persimmons, cranberries, and pecans for a chewy, festive cookie experience.
Prep Time 15 minutes
Cook Time 15 minutes
Cooling Time 10 minutes
Total Time 40 minutes
Servings: 24 cookies
Course: Dessert
Cuisine: American
Calories: 120

Ingredients
  

For the Cookie Dough
  • 1 cup Hachiya Persimmons (pulp) Very ripe, approx 3 large persimmons yield this amount.
  • 1/2 cup Unsalted Butter Softened
  • 1 cup Coconut Sugar Can be substituted with brown or granulated sugar
  • 1 tablespoon Orange Zest Can use lemon zest as an alternative
  • 1 large Egg Room temperature
  • 1 teaspoon Vanilla Extract
  • 2 cups All-Purpose Flour
  • 1 teaspoon Baking Soda
  • 1 teaspoon Ground Cinnamon Can substitute with pumpkin spice
  • 1/2 teaspoon Salt
  • 1 cup Rolled Oats
  • 1/2 cup Dried Cranberries Can be substituted with raisins or dried cherries
  • 1/2 cup Pecan Pieces Can substitute with walnuts

Equipment

  • blender
  • Mixing Bowl
  • Cookie Scoop
  • Baking Sheets
  • Parchment Paper

Method
 

Step-by-Step Instructions
  1. Prepare the persimmon pulp by cutting the very ripe Hachiya persimmons in half and scooping out the flesh. Blend until smooth, about 1 cup needed.
  2. Preheat your oven to 350°F (175°C) and line your baking sheets with parchment paper.
  3. In a mixing bowl, beat softened butter and coconut sugar until light and fluffy, about 2-3 minutes. Mix in orange zest.
  4. Add the egg to the mixture, blending until incorporated, then mix in the persimmon pulp and vanilla extract.
  5. Gradually add flour, baking soda, cinnamon, and salt to the wet ingredients. Mix until just combined.
  6. Fold in oats, cranberries, and pecans until evenly distributed.
  7. Scoop dough onto prepared sheets, leaving 2 inches between scoops. Lightly flatten the mounds.
  8. Bake for 12-15 minutes until edges are golden and centers are no longer shiny.
  9. Cool cookies on the sheets for few minutes before transferring to wire racks to cool completely.

Nutrition

Serving: 1cookieCalories: 120kcalCarbohydrates: 15gProtein: 1gFat: 6gSaturated Fat: 4gPolyunsaturated Fat: 1gMonounsaturated Fat: 2gCholesterol: 20mgSodium: 80mgPotassium: 50mgFiber: 1gSugar: 6gVitamin A: 200IUCalcium: 10mgIron: 0.5mg

Notes

Use very ripe persimmons for best flavor. Avoid overmixing for a soft texture. Cookies can be frozen for up to 3 months.

Tried this recipe?

Let us know how it was!

Stay Connected

Get recipes via email: