Get my cookbooks

Blackberry Goat Cheese Puff Pastry Twists for Effortless Entertaining

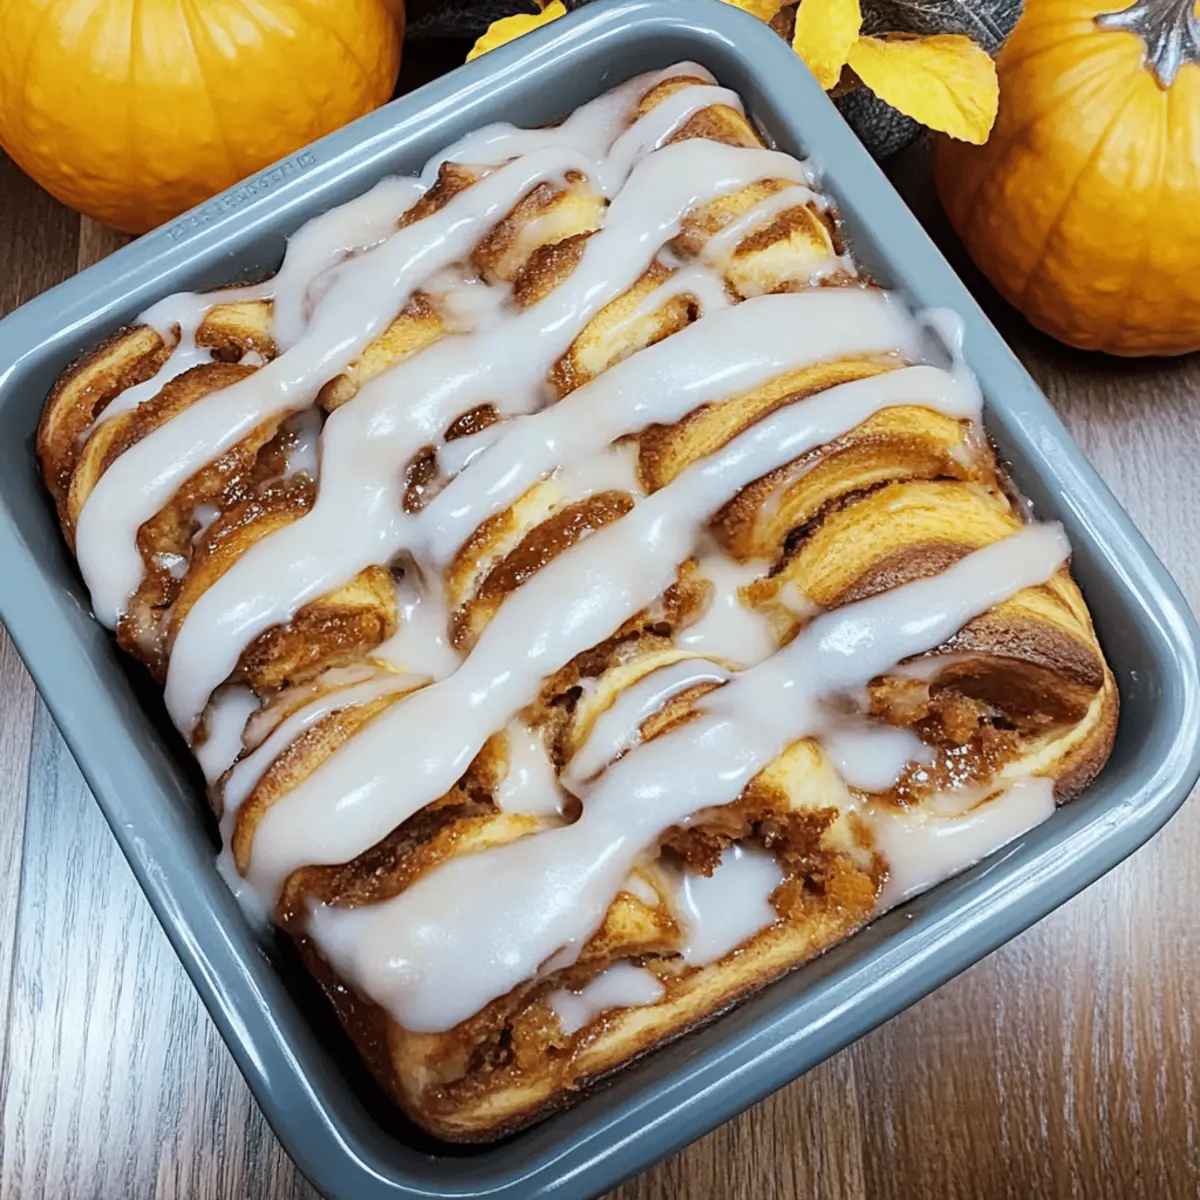
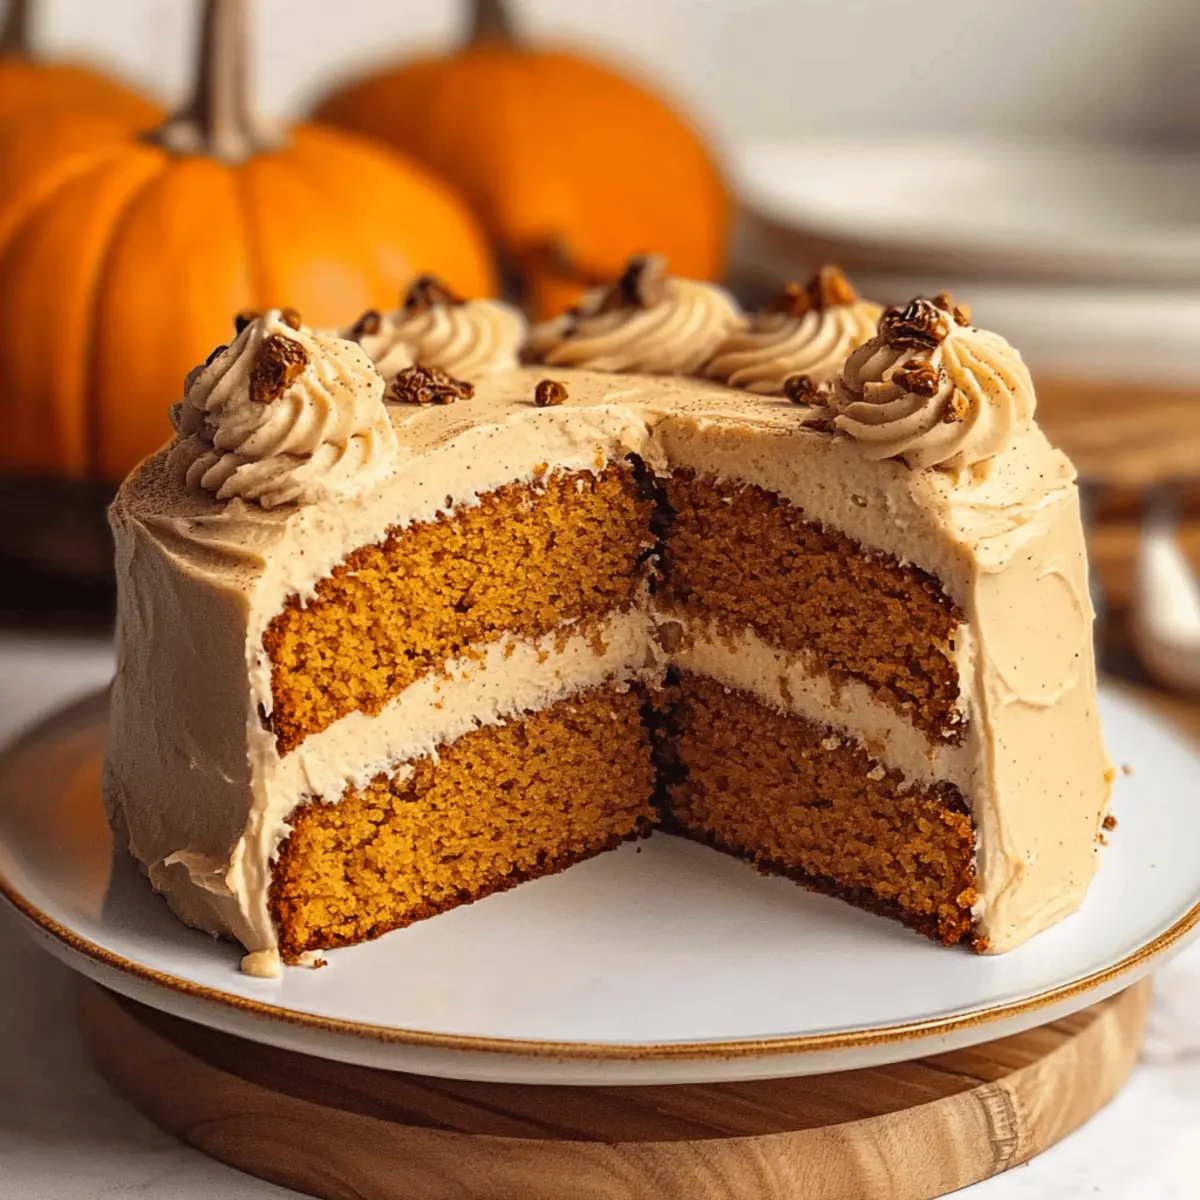
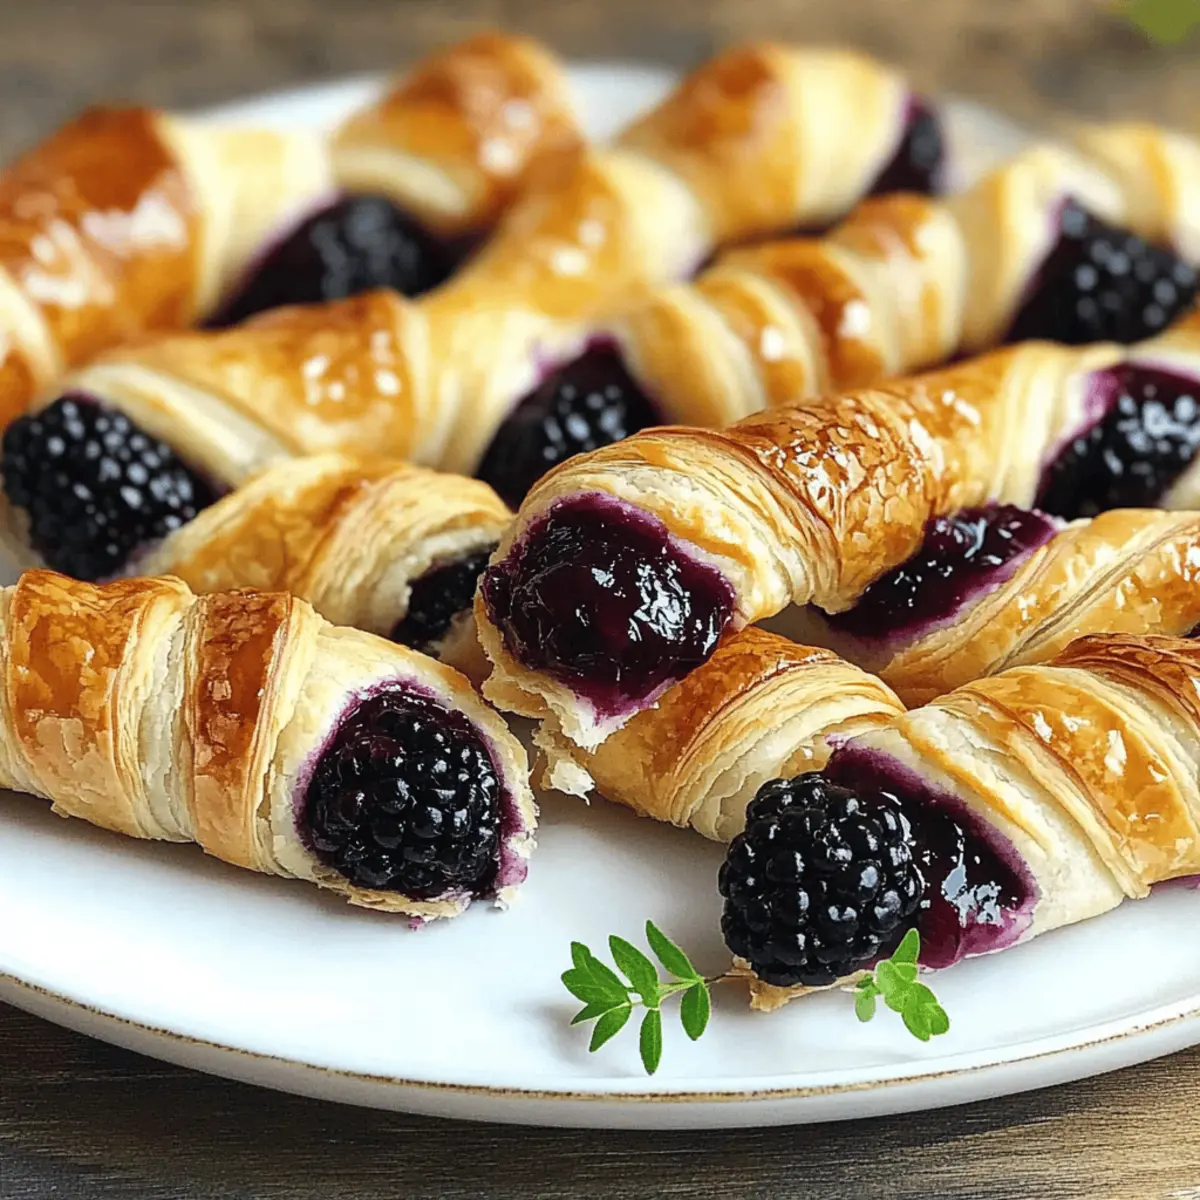
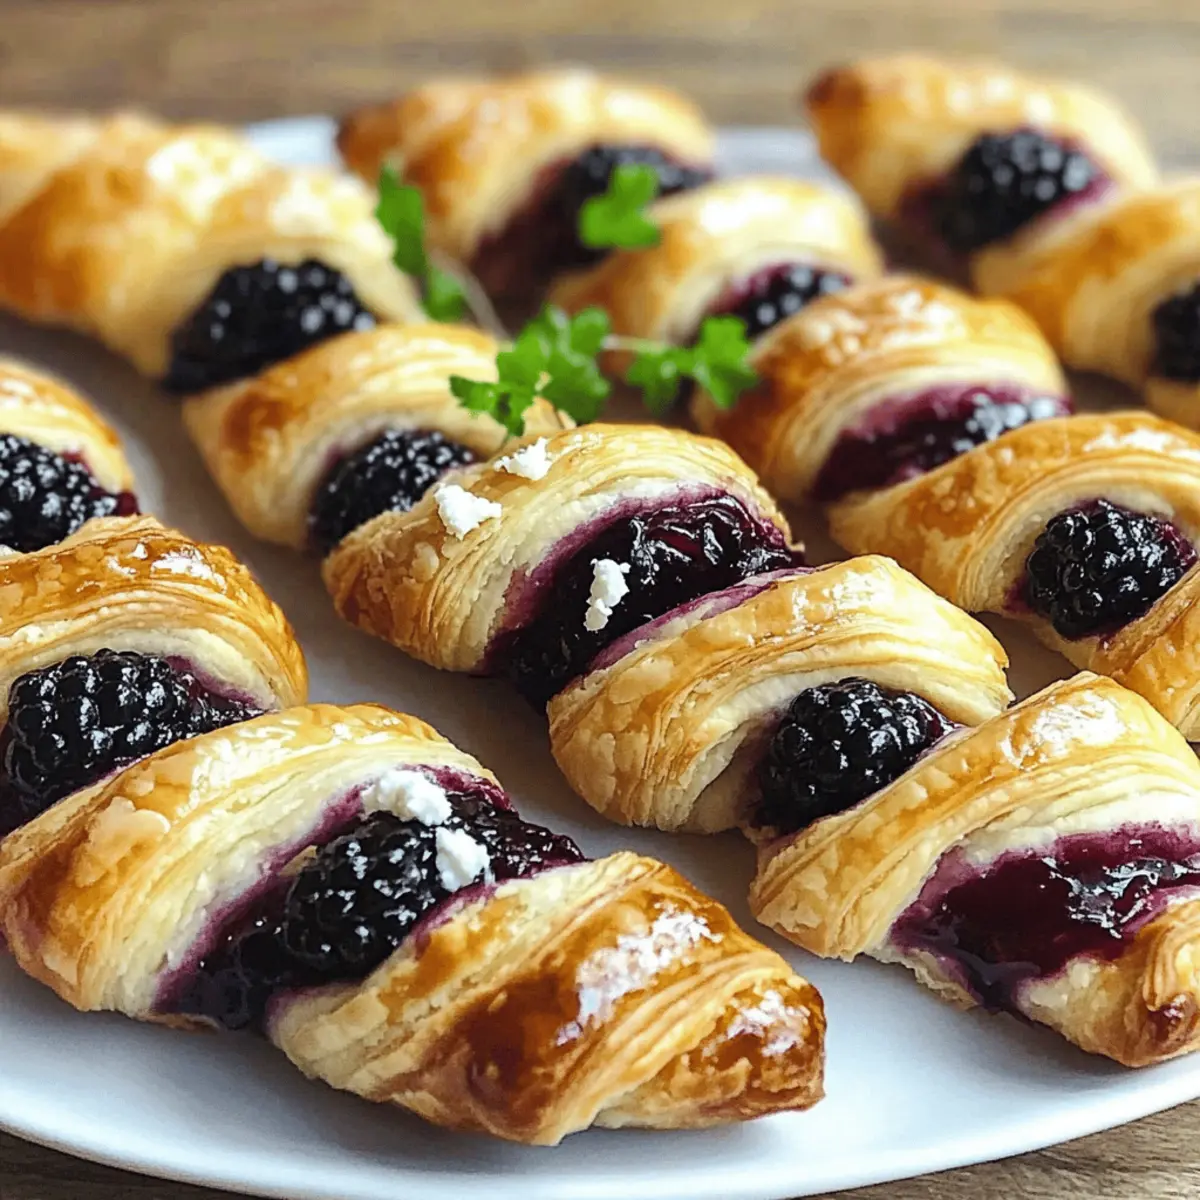
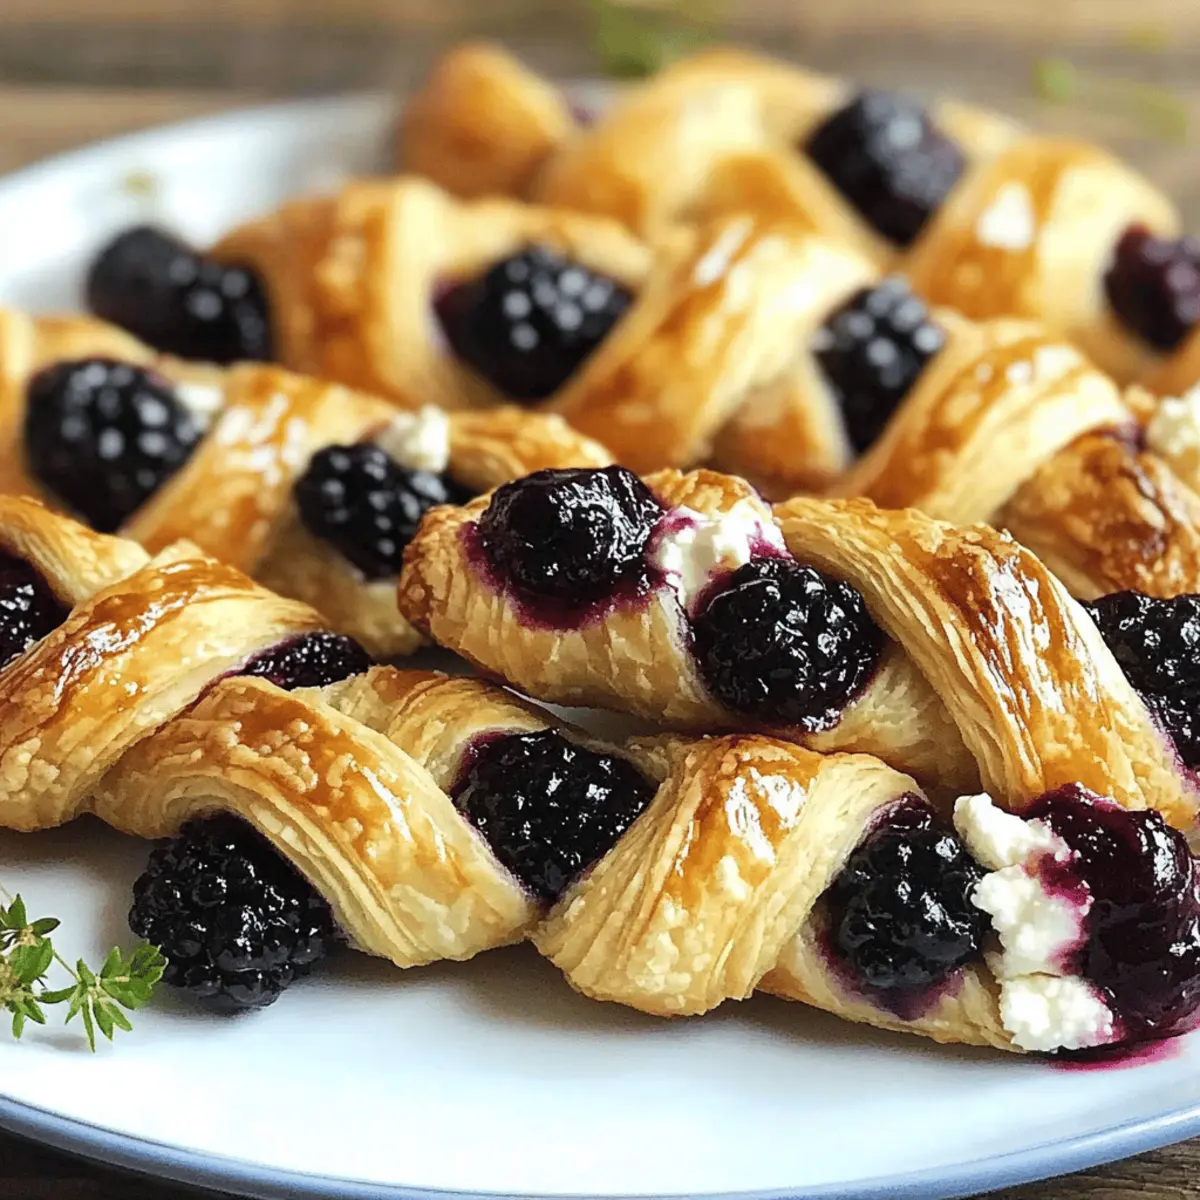
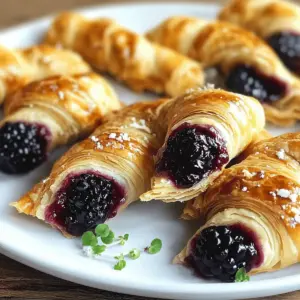
As I stood in my kitchen, the delightful scent of toasted puff pastry filled the air, making my mouth water with anticipation. I had just created my newest culinary obsession: Blackberry Goat Cheese Puff Pastry Twists. These delectable bites showcase the perfect harmony of creamy goat cheese and sweet blackberry jam, all embraced by that irresistible flaky pastry. Not only are they a breeze to prepare, but they also come together beautifully, making them ideal for impressing guests at your next gathering. To elevate their appeal even further, a sprinkle of lemon-thyme sugar adds a touch of elegance and warmth. Ready to indulge in these enticing treats and discover how to make your gatherings unforgettable? Let’s dive in!

Why are these twists a must-try?

Easy Preparation: You don’t need to be a culinary master to make these crowd-pleasers—simple instructions make assembly a breeze!

Elegant Flavor Fusion: The combination of creamy goat cheese and sweet blackberry jam creates a delightful contrast that is sure to captivate your taste buds.

Versatile Ingredients: Swap out the blackberries for mixed berries or use cream cheese for a milder taste—these twists cater to your preferences!

Perfect for Entertaining: Whether it’s a bridal shower or a spontaneous get-together, Blackberry Goat Cheese Puff Pastry Twists elevate any occasion with their stunning presentation and irresistible aroma.

Make-Ahead Option: Prepare them in advance and bake right before your event for that freshly-baked warmth and comfort!

Crowd Appeal: These delightful bites are vegetarian-friendly and sure to please even the pickiest eaters, making them your go-to choice for gatherings.

Blackberry Goat Cheese Puff Pastry Twists Ingredients

• Discover the perfect blend of flavors!

For the Pastry

  • Puff Pastry – Creates a flaky, buttery texture; remember to thaw properly to prevent stickiness.

For the Filling

  • Blackberries – Provide natural sweetness and flavor; feel free to substitute with mixed berries or a cup of store-bought jam.
  • Goat Cheese – Adds tang and creaminess; swap it for cream cheese if you prefer a milder taste.
  • Lemon Juice – Balances the sweetness of the jam with a necessary acidity.
  • Sugar – Sweetens the blackberry filling; adjust based on the berries’ ripeness.

For the Topping

  • Lemon Zest – Enhances the freshness and aroma of the twists.
  • Fresh Thyme – Contributes a fragrant, herbal note for a delightful finish.
  • Raw Sugar – Adds both crunch and sweetness when sprinkled on top.
  • Egg – Creates a beautiful golden brown crust when brushed over the pastry.

For the Jam Mixture

  • Water – Helps cook the jam mixture until it thickens beautifully.

Embrace the delicious journey of making these Blackberry Goat Cheese Puff Pastry Twists, a symphony of flavors that will captivate your guests and your taste buds alike!

Step‑by‑Step Instructions for Blackberry Goat Cheese Puff Pastry Twists

Step 1: Prepare the Jam
In a medium saucepan over medium heat, combine 2 cups of blackberries, 2 tablespoons of water, 1 tablespoon of lemon juice, and 1/4 cup of sugar. Allow the mixture to cook for about 20-30 minutes, stirring occasionally until it thickens and the blackberries break down. You’ll know it’s ready when it coats the back of a spoon. Once thickened, remove from heat and let it cool to room temperature.

Step 2: Thaw Puff Pastry
While the jam cools, take 1 sheet of puff pastry from the freezer and let it thaw on the counter for 20-25 minutes. Once pliable, sprinkle flour on a clean surface and roll the pastry out into a rectangle measuring about 12×10 inches. This will help achieve that iconic flaky texture in your Blackberry Goat Cheese Puff Pastry Twists.

Step 3: Assemble Twists
Place the rolled-out puff pastry onto a parchment-lined baking sheet. Spread half of the cooled blackberry jam over the pastry, leaving a 1-inch border along the edges. Crumble 4 ounces of goat cheese evenly over the jam, and then cut the pastry into 12 equal strips. Fold each strip in half lengthwise and gently twist each one two to three times to create a beautiful spiral.

Step 4: Prepare for Baking
Preheat your oven to 400°F (200°C) while you brush each twist with an egg wash made from one beaten egg. This will give your twists a lovely, golden-brown glaze as they bake. Sprinkle each twist with a mixture of raw sugar, lemon zest, and finely chopped fresh thyme for an aromatic finish that complements the blackberry jam beautifully.

Step 5: Bake
Carefully place the prepared baking sheet into the preheated oven and bake the twists for 16-18 minutes, or until they are puffed and golden brown. The delightful aroma of baked pastry and sweet blackberries will fill your kitchen. Keep an eye on them, as oven temperatures can vary; you want them crispy and golden without burning.

Step 6: Cool and Serve
Once the Blackberry Goat Cheese Puff Pastry Twists are done baking, remove the baking sheet from the oven and let them cool on a wire rack for about 5-10 minutes. This cooling period ensures the twists maintain their flaky texture. Serve warm or at room temperature, paired with prosecco or fresh berries for a delightful appetizer!

Make Ahead Options

These Blackberry Goat Cheese Puff Pastry Twists are a fantastic choice for meal prep! You can prepare the blackberry jam and refrigerate it up to 3 days in advance, ensuring it thickens beautifully and stays fresh. The assembled twists can also be made ahead; simply prepare everything up to the baking step, cover with plastic wrap, and refrigerate for up to 24 hours. To maintain their flaky quality, brush with the egg wash just before baking. When you’re ready to serve, preheat the oven and bake directly from the fridge; they’ll come out just as delicious and golden, making your entertaining effortless!

Storage Tips for Blackberry Goat Cheese Puff Pastry Twists

Room Temperature: Store leftover twists at room temperature for up to 1 day. Keep them loosely covered to maintain crispiness but avoid sealing them tight.

Fridge: If you need to store them longer, place the twists in an airtight container in the fridge for up to 3 days. Reheat to restore texture before serving.

Freezer: For longer storage, wrap the twists individually in plastic wrap and place them in a freezer-safe bag. They can be frozen for up to 2 months; bake from frozen with an additional 2-3 minutes of cooking time.

Reheating: To reheat, preheat your oven to 325°F (165°C) and bake for 10-15 minutes, ensuring your delicious Blackberry Goat Cheese Puff Pastry Twists are warm and crispy again!

Expert Tips for Blackberry Goat Cheese Puff Pastry Twists

  • Egg Wash Essential: A generous brush of egg wash will ensure your twists achieve that beautiful golden color. Don’t skip this step!

  • Chill Your Pastry: If the puff pastry becomes too warm while assembling, pop it back in the fridge for a few minutes to keep it from becoming soggy.

  • Custom Jam Variations: Feel free to experiment with flavors—using store-bought blackberry jam can save time, yet homemade jam often tastes better!

  • Mind the Baking Time: Every oven is different; keep an eye on the twists to prevent burning. They should be puffed and golden brown, which might take a minute less or more.

  • Optimal Cooling: Allowing the twists to cool for a few minutes after baking preserves their flaky texture, making for a delightfully crisp bite.

  • Perfect Storage: If you have leftovers, store them on the counter for up to one day, and reheat in the oven to maintain the crispiness of your Blackberry Goat Cheese Puff Pastry Twists.

Blackberry Goat Cheese Puff Pastry Twists Variations

Mix up your experience with these delightful treats by exploring the many ways to customize your twists!

  • Dairy-Free: Use a plant-based cream cheese to enjoy a vegan version that’s just as creamy and delightful.

  • Berry Medley: Swap out blackberries for a mix of strawberries, blueberries, or raspberries for a burst of color and flavor.

  • Sweet Heat: Add a pinch of cayenne pepper or a drizzle of honey for a sweet and spicy twist that keeps everyone guessing.

  • Nutty Flavor: Incorporate crushed nuts like walnuts or pecans into your filling for an extra crunch and earthy flavor.

  • Savory Option: Try blending the goat cheese with a bit of garlic and herbs for a savory version that pairs well with a charcuterie board.

  • Mini Tarts: Use a muffin tin to create mini pastry tarts – simply fill each cup with the same delightful mixture for bite-sized elegance.

  • Jam Variations: Experiment with different jams, like apricot or fig, to change the flavor profile and bring a unique surprise to your twists.

  • Savory Sprinkle: Dust the twists with everything bagel seasoning before baking for a surprise burst of flavor that’s delightful with cream cheese.

These variations will surely pique your curiosity and let you enjoy the flexibility of these twists! If you’re looking for more delightful recipes, don’t forget to check out my Banana Grilled Cheese or indulge in the comforting notes of Carrot Cake Cheesecake for your next gathering.

What to Serve with Blackberry Goat Cheese Puff Pastry Twists

Enhance your delightful gathering with these elegant puff pastry twists, perfectly paired for a memorable dining experience.

  • Creamy Tomato Basil Soup: The warm, rich flavors of this classic soup provide a comforting contrast to the sweet and savory twists. Serve it alongside for a cozy appetizer combination.

  • Chilled Prosecco: This sparkling wine adds a refreshing touch and complements the tartness of the blackberry jam, making each bite even more enjoyable.

  • Mixed Green Salad: A light salad with a tangy vinaigrette balances the richness of the goat cheese, offering a fresh burst of flavors with each mouthful.

  • Aged Cheese Platter: Pair your twists with a selection of aged cheeses like sharp cheddar or brie for a sophisticated cheese board that leaves guests wanting more.

  • Roasted Vegetables: The earthy tones of roasted seasonal vegetables create a delightful harmony, offering a savory counterpart to the sweet blackberry flavors.

  • Chocolate-Dipped Strawberries: For dessert, these sweet treats add a romantic touch that echoes the flavor profile of your twists while providing a decadent finish to the meal.

  • Herb-Infused Olive Oil: Drizzling this fragrant oil over warm, crusty bread creates a lovely side and enhances the overall dining experience with its aromatic quality.

  • Sweet Iced Tea: A sweetened version of this refreshing drink will balance out the rich flavors of the twists, providing a thirst-quenching option that guests will appreciate.

Blackberry Goat Cheese Puff Pastry Twists Recipe FAQs

How do I choose ripe blackberries for this recipe?
Absolutely! When selecting blackberries, look for ones that are plump, shiny, and deep purple to black in color. Avoid any that are overly soft or have dark spots all over, as these may be overripe. Fresh blackberries should be fragrant, displaying a sweet aroma.

How should I store leftover puff pastry twists?
Very! To keep your leftover Blackberry Goat Cheese Puff Pastry Twists fresh, store them at room temperature for up to 1 day. Simply cover them loosely to maintain some crispiness. For longer storage, place them in an airtight container in the fridge for up to 3 days but remember to reheat them gently for the best texture.

Can I freeze these twists, and how do I do it?
Absolutely! You can freeze your Blackberry Goat Cheese Puff Pastry Twists for up to 2 months. Wrap each twist individually in plastic wrap and place them in a freezer-safe bag. When you’re ready to enjoy them, bake directly from frozen in a preheated oven at 400°F (200°C) for an additional 2-3 minutes, until they’re warmed through and crispy.

What should I do if my pastry isn’t puffing up as expected?
If your twists don’t puff as they should, it may be due to the puff pastry being overly warm. Make sure to keep your pastry cold while working with it, and if it becomes too warm, pop it in the fridge for a few minutes before baking. Baking at the right temperature (400°F) is also crucial for achieving that glorious puffiness, so keep a close eye on your oven!

Are these twists suitable for those with dietary restrictions?
The more the merrier! These Blackberry Goat Cheese Puff Pastry Twists are vegetarian-friendly, and you can easily adapt them for dietary needs by swapping goat cheese for dairy-free cream cheese alternatives. Simply check for any allergies related to the berries or the pastry ingredients to ensure everyone can enjoy these delectable bites.

Blackberry Goat Cheese Puff Pastry Twists

Blackberry Goat Cheese Puff Pastry Twists for Effortless Entertaining

Delight your guests with Blackberry Goat Cheese Puff Pastry Twists, combining creamy goat cheese and sweet blackberry jam for a perfect appetizer.
Prep Time 30 minutes
Cook Time 18 minutes
Cooling Time 10 minutes
Total Time 58 minutes
Servings: 12 twists
Course: Appetizers
Cuisine: American
Calories: 160

Ingredients
  

For the Pastry
  • 1 sheet Puff Pastry Thaw properly to prevent stickiness.
For the Filling
  • 2 cups Blackberries Substitute with mixed berries or store-bought jam if desired.
  • 4 ounces Goat Cheese Can be replaced with cream cheese for a milder taste.
  • 1 tablespoon Lemon Juice Balances sweetness of the jam.
  • 1/4 cup Sugar Adjust based on the ripeness of berries.
For the Topping
  • 1 tablespoon Lemon Zest Enhances freshness and aroma.
  • 1 tablespoon Fresh Thyme Finely chopped for sprinkling.
  • 1 tablespoon Raw Sugar For topping, adds crunch and sweetness.
  • 1 large Egg Beaten, for the egg wash.
For the Jam Mixture
  • 2 tablespoons Water Helps thicken the jam rapidly.

Equipment

  • medium saucepan
  • Baking Sheet
  • Parchment Paper
  • Rolling Pin

Method
 

Step-by-Step Instructions
  1. In a medium saucepan over medium heat, combine 2 cups of blackberries, 2 tablespoons of water, 1 tablespoon of lemon juice, and 1/4 cup of sugar. Cook for 20-30 minutes until thickened.
    Blackberry Goat Cheese Puff Pastry Twists
  2. Thaw 1 sheet of puff pastry on the counter for 20-25 minutes. Roll out into a rectangle measuring about 12x10 inches.
    Blackberry Goat Cheese Puff Pastry Twists
  3. Place the pastry onto a parchment-lined baking sheet. Spread half of the cooled blackberry jam over, leaving a 1-inch border. Crumble 4 ounces of goat cheese over the jam, cut into 12 strips, fold, and twist.
    Blackberry Goat Cheese Puff Pastry Twists
  4. Preheat oven to 400°F (200°C) and brush each twist with beaten egg. Sprinkle with raw sugar, lemon zest, and thyme.
    Blackberry Goat Cheese Puff Pastry Twists
  5. Bake for 16-18 minutes until golden brown and puffed. Monitor closely to avoid burning.
    Blackberry Goat Cheese Puff Pastry Twists
  6. Allow twists to cool on a wire rack for 5-10 minutes before serving. Serve warm with prosecco or fresh berries.
    Blackberry Goat Cheese Puff Pastry Twists

Nutrition

Serving: 1twistCalories: 160kcalCarbohydrates: 20gProtein: 3gFat: 8gSaturated Fat: 4gMonounsaturated Fat: 3gCholesterol: 35mgSodium: 120mgPotassium: 85mgFiber: 1gSugar: 4gVitamin A: 180IUVitamin C: 5mgCalcium: 80mgIron: 0.5mg

Notes

These twists are best served fresh but can be stored at room temperature for up to 1 day, in the fridge for 3 days, or frozen for 2 months.

Tried this recipe?

Let us know how it was!

Delightful Pumpkin Cheesecake Pie: Easy No-Fuss Dessert

As the aroma of autumn fills the air, I find myself reminiscing about cozy family gatherings and the treats that make them memorable. This Quick Pumpkin Cheesecake Pie with Biscoff Crust is a delightful fusion of creamy cheesecake and spiced pumpkin goodness, all wrapped up in a sweet and crunchy crust. What sets this dessert apart is its effortless preparation—no water bath required! The pie can be made ahead, freeing you to enjoy more time with loved ones during those busy holiday festivities. It’s a no-fuss dessert that’s guaranteed to impress. Who wouldn’t want to indulge in a slice of this creamy, decadent pie? Ready to dive into the flavors of fall? Let’s whip up this delightful treat together!

Why is Pumpkin Cheesecake Pie a Must-Try?

Delicious Flavor Fusion: This pie masterfully combines creamy cheesecake with the warming spices of pumpkin, making each bite an indulgent delight.

Time-Saving Delight: With no water bath required, you’ll find it quicker than traditional recipes, allowing you to focus on creating cherished memories this season.

Make-Ahead Magic: The convenience of preparing it up to two days in advance means you can easily keep stress at bay when hosting.

Crowd-Pleasing Appeal: Its delightful taste and beautiful presentation will surely impress your guests—perfect for holiday celebrations or cozy family dinners.

Versatile Variations: Whether you choose to switch the crust or add accent flavors, this pie is adaptable to suit your personal taste. Looking for more festive inspiration? Check out my Strawberry Cheesecake Dump or Shepherd’s Pie Soup for additional crowd-pleasing recipes!

Pumpkin Cheesecake Pie Ingredients

For the Crust
Biscoff Cookies – This adds a unique caramelized flavor to the crust, perfect for pairing with pumpkin cheesecake pie.
Butter – Use unsalted butter for better control of saltiness, binding the crumbs together.

For the Filling
Cream Cheese – Make sure it’s softened to achieve a luxuriously smooth texture in your cheesecake filling.
Pumpkin Puree – Adds moisture and flavor; opt for homemade if you want that personal touch!
Sugar – Brown sugar can be substituted for a deeper flavor profile in the filling.
Eggs – These help to set the filling while contributing to the creamy consistency; use a flax egg for a vegan alternative.
Pumpkin Spice – A key ingredient for that signature fall flavor; cinnamon and nutmeg make great substitutes if you’re out.
Vanilla Extract – Opt for pure vanilla extract to elevate all flavors in the pie.

Extra Touches
Whipped Cream – A dollop on top of the pie adds a light, fluffy contrast to the dense filling.
Caramel Sauce – Drizzle over the pie for an indulgent finish that complements the flavors beautifully.

This pumpkin cheesecake pie is bound to be a hit at your next gathering. Enjoy creating this easy, no-fuss dessert!

Step‑by‑Step Instructions for Pumpkin Cheesecake Pie

Step 1: Prepare the Crust
Begin by preheating your oven to 350°F (175°C). In a food processor, crush the Biscoff cookies into fine crumbs. Combine the crumbs with melted unsalted butter until fully blended. Press the mixture firmly into the bottom and up the sides of a 9-inch pie dish. Bake for 10 minutes, then remove it from the oven and allow it to cool slightly while you prepare the filling.

Step 2: Make the Filling
In a large mixing bowl, blend the softened cream cheese and sugar using an electric mixer until smooth and creamy, about 2 minutes. Add in the pumpkin puree, eggs, pumpkin spice, and vanilla extract. Continue to mix on medium speed until the filling is fully combined and uniform, ensuring there are no lumps. This rich and creamy mixture is the heart of your pumpkin cheesecake pie!

Step 3: Bake the Pie
Pour the filling into the prepared crust, spreading it evenly with a spatula. Bake the pie in the preheated oven for approximately 50 minutes, or until the center is set with a slight jiggle. Keep a close eye on it as baking progresses; a golden hue on the edges is a good sign that your pie is ready.

Step 4: Cool and Chill
Once baked, remove the pumpkin cheesecake pie from the oven and let it cool at room temperature for about 1 hour. This cooling period is essential for setting the flavors. After it has cooled, cover and refrigerate the pie for at least 2 hours. This chilling time enhances the creaminess, making it a delightful treat when served.

Pumpkin Cheesecake Pie Variations & Substitutions

Feel free to get creative and customize this delightful pie to your heart’s content!

  • Graham Cracker Crust: Swap the Biscoff with classic graham cracker crumbs for a familiar flavor. This twist gives you that classic cheesecake vibe.

  • Nut-Free Option: Replace the butter with a dairy-free alternative and ensure the crust is made from gluten-free cookies for a nut-free dessert.

  • Vegan Version: Use a flax egg in place of traditional eggs. Substitute dairy cream cheese with a vegan cream cheese for a completely plant-based pie.

  • Sugar-Free Delight: Try monk fruit or erythritol as a low-calorie sweetener to reduce sugar while still achieving a delicious taste. Your guests might not even notice the difference!

  • Caramel Addition: Drizzle caramel sauce over the pumpkin filling before baking for an extra layer of indulgence. This will elevate your pie to a whole new level of sweetness.

  • Chocolate Lovers’ Dream: Fold in mini chocolate chips into the filling for a sweet surprise in every slice. The combination of chocolate and pumpkin is truly delightful!

  • Spice It Up: If you love a little heat, add a pinch of cayenne pepper to the filling for a spicy kick that complements the sweet pumpkin flavor beautifully.

  • Zesty Citrus: Incorporate some fresh orange zest into the filling to brighten the flavors. It adds a lovely contrast to the warm spices, putting a refreshing spin on the classic.

Looking for more delicious ideas to impress your family and friends? Check out how to create a stunning Strawberry Cheesecake or try my comforting Shepherd’s Pie Soup.

Make Ahead Options

These Quick Pumpkin Cheesecake Pies are perfect for meal prep enthusiasts looking to save time during the busy holiday season! You can prepare the crust and filling up to 24 hours in advance, which allows you to focus on other tasks before serving. Simply make the crust, press it into the pie dish, and refrigerate it. Next, prepare the filling and store it separately in an airtight container in the fridge. When you’re ready to bake, simply pour the filling into the chilled crust and bake as directed. This approach ensures that the pie maintains its delicious flavor and creamy texture, making your dessert just as delightful as when freshly made! Enjoy effortless entertaining with this make ahead method.

How to Store and Freeze Pumpkin Cheesecake Pie

Fridge: Store your pumpkin cheesecake pie in the refrigerator for up to 3 days. Cover it with plastic wrap or a pie lid to maintain its freshness and prevent odors from mingling.

Freezer: If you need to keep it longer, the pie can be frozen for up to 2 months. Wrap it tightly in plastic wrap and then in aluminum foil to protect against freezer burn.

Reheating: To enjoy leftovers, allow the pie to thaw in the fridge overnight. Serve chilled, or for a warmed treat, place individual slices in the microwave for about 15-20 seconds.

Make-Ahead: The pumpkin cheesecake pie can be made up to 2 days in advance, making it a convenient option for your holiday gatherings.

Tips for the Best Pumpkin Cheesecake Pie

  • Room Temperature Cream Cheese: Ensure your cream cheese is at room temperature for a smooth filling, avoiding any lumps that can ruin the texture of your pumpkin cheesecake pie.

  • Don’t Open the Oven: Be sure to keep the oven door closed while baking. Opening it can lead to cracks in the filling, detracting from the creamy appearance and texture.

  • Perfect Baking Time: Watch for a slight jiggle in the center as the baking time nears completion. This signature wobble indicates it’s perfectly set and ready to chill.

  • Cooling Matters: Allow the pie to cool at room temperature before refrigerating. This helps meld the flavors together beautifully and sets the filling for perfect slices.

  • Decorative Finish: For an elegant touch, pipe whipped cream around the edge and sprinkle with pumpkin pie spice before serving, enhancing the pumpkin cheesecake pie’s visual appeal.

What to Serve with Quick Pumpkin Cheesecake Pie

As the rich, creamy aroma of your pumpkin cheesecake pie fills the air, a medley of delightful side dishes can elevate your dessert experience to new heights.

  • Whipped Cream:
    A dollop of freshly whipped cream enhances the pie’s silkiness, adding lightness for balance with each decadent slice.

  • Salted Caramel Sauce:
    Drizzling warm salted caramel on top intensifies the flavor, bringing a rich, buttery sweetness that complements the pumpkin spice perfectly.

  • Ginger Snap Cookies:
    The spiced snap of ginger cookies provides a crunchy contrast, echoing the warm spices in your cheesecake, delivering a delightful texture twist.

  • Hot Apple Cider:
    Steaming apple cider infused with cinnamon wraps you in warm autumn vibes, while its sweetness balances the rich pie flavor beautifully.

  • Pecan Pie Bars:
    These bars add a delightful contrast with their nutty flavor and chewy texture, creating a diverse dessert spread that’s irresistible!

  • Seasonal Fruit Salad:
    A refreshing fruit salad with apples, pears, and pomegranate seeds brings brightness and a touch of sweetness to your dessert table.

  • Chocolate Stout Cake:
    The richness of a chocolate stout cake provides an indulgent option alongside your pumpkin cheesecake pie, offering a deep flavor pairing that guests will adore.

  • Spiced Chai Latte:
    A warm spiced chai latte offers a cozy beverage option that harmonizes seamlessly with the spiced flavors of the pumpkin cheesecake, enhancing your meal’s overall ambiance.

Serve your pumpkin cheesecake pie alongside these delightful pairings to create a memorable dining experience!

Pumpkin Cheesecake Pie Recipe FAQs

How do I choose ripe pumpkin puree for my Pumpkin Cheesecake Pie?
Absolutely! Look for pumpkin puree that is a vibrant orange color and has a smooth texture. If using fresh pumpkin, choose a sugar pumpkin or pie pumpkin, which has a sweeter, denser flesh. Avoid any that have dark spots or are overly soft.

What is the best way to store leftovers of my Pumpkin Cheesecake Pie?
You can keep your pumpkin cheesecake pie in the refrigerator for up to 3 days, protected with plastic wrap or a pie lid to maintain freshness. This not only helps prevent it from absorbing other odors but also keeps it from drying out.

Can I freeze my Pumpkin Cheesecake Pie, and if so, how?
Yes! You can freeze the pie for up to 2 months. Allow it to cool completely, then wrap it tightly in plastic wrap and cover with aluminum foil. This method helps prevent freezer burn. When you’re ready to enjoy it, transfer it to the fridge a day before serving to thaw.

What should I do if my pumpkin cheesecake pie cracks during baking?
Don’t worry—this can happen! Be sure to bake your pie at the recommended temperature and avoid opening the oven door during baking. If cracks do appear, once cooled, you can enhance the aesthetics by covering them with homemade whipped cream or a drizzle of caramel sauce.

Are there any dietary considerations I should be aware of with this recipe?
If you’re accommodating dietary restrictions, note that this pie contains cream cheese and eggs. For a vegan alternative, substitute the cream cheese with a plant-based variety and use a flax egg (1 tablespoon of ground flaxseed mixed with 2.5 tablespoons of water, set aside for 5 minutes). Always check for allergies regarding the specific ingredients like Biscoff cookies as they may contain allergens.

Can I make my Pumpkin Cheesecake Pie in advance?
Very much so! You can prepare your pie up to 2 days in advance, making it a fantastic make-ahead dessert for holiday gatherings. Just store it covered in the fridge, and it will be ready to serve when you are!

Pumpkin Cheesecake Pie

Delightful Pumpkin Cheesecake Pie: Easy No-Fuss Dessert

Enjoy a Pumpkin Cheesecake Pie that combines creamy cheesecake with spiced pumpkin flavors for an effortless, crowd-pleasing dessert.
Prep Time 20 minutes
Cook Time 50 minutes
Cooling Time 2 hours
Total Time 3 hours 10 minutes
Servings: 8 slices
Course: Dessert
Cuisine: American
Calories: 320

Ingredients
  

For the Crust
  • 24 cookies Biscoff Cookies Crushed into fine crumbs
  • 1/2 cup unsalted Butter Melted
For the Filling
  • 8 oz Cream Cheese Softened
  • 1 cup Pumpkin Puree Use homemade for a personal touch
  • 3/4 cup Sugar Brown sugar can be substituted
  • 2 large Eggs Flax egg can be used for a vegan alternative
  • 1 tbsp Pumpkin Spice Cinnamon and nutmeg are great substitutes
  • 1 tsp Vanilla Extract Use pure vanilla extract
Extra Touches
  • 1 cup Whipped Cream For topping
  • 1/4 cup Caramel Sauce For drizzling on top

Equipment

  • 9-inch Pie Dish
  • Food Processor
  • Electric mixer

Method
 

Preparation Steps
  1. Preheat your oven to 350°F (175°C). Crush Biscoff cookies into fine crumbs in a food processor.
  2. Combine crumbs with melted unsalted butter until fully blended. Press mixture into a 9-inch pie dish and bake for 10 minutes.
  3. In a large bowl, blend softened cream cheese and sugar until smooth. Add pumpkin puree, eggs, pumpkin spice, and vanilla, mixing until fully combined.
  4. Pour the filling into the prepared crust and bake for approximately 50 minutes, until center is set with a slight jiggle.
  5. Cool at room temperature for 1 hour, then cover and refrigerate for at least 2 hours.

Nutrition

Serving: 1sliceCalories: 320kcalCarbohydrates: 40gProtein: 5gFat: 18gSaturated Fat: 11gPolyunsaturated Fat: 1gMonounsaturated Fat: 5gCholesterol: 70mgSodium: 250mgPotassium: 200mgFiber: 2gSugar: 18gVitamin A: 5000IUVitamin C: 2mgCalcium: 80mgIron: 1mg

Notes

Ensure cream cheese is at room temperature for smooth filling. Watch for jiggle during baking. Decorate with whipped cream and pumpkin pie spice before serving.

Tried this recipe?

Let us know how it was!

No-Bake Vampire Halloween Trifle: Effortless Family Fun

As I rummaged through my pantry for a festive Halloween treat, I stumbled upon a pack of King’s Hawaiian rolls just waiting to be transformed. Thus, the No-Bake Vampire Halloween Trifle was born! This fun and easy dessert blends layers of sweet rolls, creamy puddings, and colorful decorations to create a spooky yet scrumptious masterpiece. Not only does it come together in no time, making it perfect for last-minute gatherings, but it also offers a delightful twist on traditional trifles that everyone will adore. Whether you’re putting together a ghoulish gathering or just treating the kids, this trifle checks all the boxes for a delicious and visually stunning dessert. Curious about how to whip up this treat and impress your ghosts and goblins? Let’s dive in!

Why Make a No-Bake Vampire Trifle?

Effortless Preparation: With no baking required, this dessert is quick to assemble, ideal for busy cooks or those craving a speedy sweet fix.
Unique Ingredients: Utilizing King’s Hawaiian rolls offers a delightful sweetness that sets this trifle apart from traditional recipes.
Kid-Friendly Fun: This recipe is perfect for involving kids in the kitchen; let them layer and decorate to unleash their creativity!
Versatile Flavors: Feel free to switch up the puddings or add fruit layers for a personalize twist that caters to your family’s favorite tastes.
Crowd-Pleasing Presentation: The striking layers, topped with festive decorations, make it a showstopper at any Halloween gathering—who wouldn’t want a taste of this spooky delight?

For more fun and simple desserts, you might enjoy our recipe for Easy Pumpkin Spice No-Bake Cheesecake.

No-Bake Vampire Halloween Trifle Ingredients

• Transform this festive treat with the following ingredients for a flawless No-Bake Vampire Halloween Trifle!

For the Trifle Base

  • King’s Hawaiian Rolls – Provides a unique sweetness that enhances the trifle’s flavor and texture.
  • Pudding Mix (Chocolate/Vanilla) – Adds creaminess and can be swapped for any preferred flavor to suit your taste.

For the Layers

  • Whipped Cream – Light and sweet, perfect for layering and topping; use Cool Whip as a convenient substitute.
  • Candy Corn or Decor – Enhances the Halloween vibe with some crunch; seasonal candy works wonderfully for decoration.
  • Sprinkles (Optional) – Add some festive flair to your dessert with Halloween-themed sprinkles for an eye-catching finish.

Now you’re set to bring this delightful No-Bake Vampire Halloween Trifle to life!

Step‑by‑Step Instructions for No-Bake Vampire Halloween Trifle

Step 1: Prepare Rolls
Begin by cutting the King’s Hawaiian rolls into uniform cubes, approximately one inch in size. This will help create even layers in your No-Bake Vampire Halloween Trifle. Aim to have around 4 cups of roll cubes ready for layering. Set the cubes aside in a large mixing bowl, allowing them to air out slightly while you prepare the pudding.

Step 2: Make Puddings
Following the package instructions, prepare your chocolate and vanilla pudding mixes in two separate bowls. Whisk each pudding mix with the required amount of cold milk (typically 2 cups) for about 2 minutes, or until thickened. Once done, let the puddings sit for 5 minutes to firm up, providing a creamy base for your trifle.

Step 3: Layer Ingredients
In a large trifle dish or clear glass bowl, start layering your No-Bake Vampire Halloween Trifle. Begin with a layer of the roll cubes, followed by a generous spoonful of chocolate pudding. Add a layer of whipped cream next, spreading it gently to create a delicate texture. Repeat this layering process until your dish is full, ending with whipped cream on top.

Step 4: Decorate
Once your trifle is assembled, it’s time to decorate! Generously top the final layer of whipped cream with candy corn and festive sprinkles, adding a colorful burst that captures the Halloween spirit. Feel free to get creative with your decorations—the more vibrant, the better! This step transforms the trifle into a visually captivating centerpiece.

Step 5: Chill
Cover the assembled No-Bake Vampire Halloween Trifle with plastic wrap and refrigerate for at least 1 hour before serving. This chilling time allows the flavors to meld together beautifully, enhancing the overall taste. If you can, let it chill for up to 4 hours for an even richer flavor experience.

Make Ahead Options

These No-Bake Vampire Halloween Trifles are perfect for busy home cooks looking to save time while still impressing their guests! You can prepare the individual components, like cutting the King’s Hawaiian rolls into cubes and mixing the puddings, up to 24 hours in advance. Store the roll cubes in an airtight container to keep them fresh, and refrigerate the prepared puddings in separate bowls. When you’re ready to assemble the trifle, simply layer the prepped ingredients and finish with whipped cream and decorations just before serving. This way, you’ll ensure the trifle remains just as delightful and visually appealing, making your Halloween festivities a breeze!

No-Bake Vampire Halloween Trifle Variations

Feel free to unleash your creativity and customize this delightful dessert to suit your tastes or dietary needs!

  • Pumpkin Swap: Replace chocolate pudding with pumpkin pudding for a festive fall twist. The warm spices will elevate the trifle, making it truly seasonal!

  • Graham Cracker Base: Use crushed graham crackers in place of King’s Hawaiian rolls for a crunchy layer. This adds texture and a delightful hint of cinnamon, perfect for autumn flavors.

  • Fruit Addition: Incorporate fresh fruit like sliced strawberries or blueberries between layers for added sweetness and color. The burst of fruitiness complements the creaminess beautifully.

  • Nutty Crunch: Sprinkle chopped nuts like pecans or walnuts in between layers for a satisfying crunch. This added texture creates a delightful contrast with the soft rolls and creamy pudding.

  • Vegan Version: Swap out the pudding for your favorite plant-based alternative and use coconut cream instead of whipped cream for a tasty vegan-friendly option. Everyone can enjoy this spooky treat!

  • Chocolate Drizzle: Add a drizzle of chocolate sauce on top of the final layer for a richer flavor. It’s an extra indulgent touch that will impress your guests.

  • Spicy Heat: For those who like a kick, mix in a pinch of cayenne pepper or chili powder into the pudding. It’s a bold twist that can intrigue adventurous palates!

  • Mini Trifles: Serve individual portions in small glasses for a charming presentation. It makes for a fun dessert option at gatherings, and everyone loves their own little treat!

If you’re interested in exploring more fun dessert options, be sure to check out our recipe for Easy Pumpkin Spice No-Bake Cheesecake.

How to Store and Freeze No-Bake Vampire Halloween Trifle

  • Fridge: Store leftovers in an airtight container for up to 2 days. Keep in mind that the texture will soften as it sits, but it will still taste delicious!
  • Freezer: For longer storage, freeze individual portions in freezer-safe containers for up to 1 month. Thaw in the fridge overnight before serving.
  • Reheating: Not applicable for this no-bake dessert; simply enjoy it chilled straight from the fridge or after thawing.
  • Wrapping: If you need to cover the trifle, use plastic wrap or a lid to maintain freshness and prevent any odor absorption from the fridge.

What to Serve with No-Bake Vampire Halloween Trifle

Looking to create a festive spread that perfectly complements your delightful dessert?

  • Ghostly Fruit Cups: Light and refreshing, these cups filled with seasonal fruits add a vibrant, healthy touch to your spooky feast.
  • Witch’s Brew Punch: A fruity punch with a hint of fizz keeps the spirit fun, creating a playful drink that perfectly balances the sweetness of the trifle.
  • Crispy Caramel Apple Slices: The crunchy apples paired with sweet caramel provide a delightful texture contrast that echoes the trifle’s layers.
  • Chocolate-Dipped Pretzels: These sweet and salty treats offer a satisfying crunch and a fun bite-sized option that are sure to please your Halloween crowd.
  • Pumpkin Spice Cookies: Soft and spiced, these cookies pair beautifully with the rich creaminess of the trifle, enhancing your seasonal dessert table.
  • Gummy Worm Cupcakes: For added whimsy, these playful cupcakes amp up the fun factor and coordinate thematically with your Halloween delight!
  • Spiced Hot Apple Cider: This warm, comforting drink option is perfect for colder nights, creating a cozy atmosphere alongside the sweetness of the trifle.
  • Haunted Brownies: Fudgy, gooey brownies dotted with festive decorations provide an indulgent and rich contrast to your trifle, perfect for chocolate lovers.
  • Autumn Salad with Pomegranate: Crisp mixed greens topped with pomegranate seeds offer a fresh, tangy contrast, lightening up the dessert-laden table.

Expert Tips for No-Bake Vampire Halloween Trifle

  • Fresh Rolls Matter: Ensure your King’s Hawaiian rolls are fresh for the best flavor and texture in your trifle layers. Stale rolls can make your dessert soggy.
  • Pudding Consistency: Whisk the pudding well to achieve a smooth consistency. If it doesn’t thicken, it may need additional chilling time.
  • Layering Technique: Start with a layer of rolls for stability. Avoid overfilling; you want to create distinct layers that are visually appealing.
  • Chilling Time: Be patient! Chilling for at least 1 hour helps the flavors meld and improves the overall experience of your No-Bake Vampire Halloween Trifle.
  • Decorate Wisely: Keep decorations light and fun—overloading on candy can make it too sweet and mask the layers’ flavors.

No-Bake Vampire Halloween Trifle Recipe FAQs

How do I choose the right King’s Hawaiian rolls?
When selecting King’s Hawaiian rolls for your No-Bake Vampire Halloween Trifle, ensure they are fresh and soft. Look for a package with no visible dark spots or tears. Fresh rolls will provide the best texture and flavor. If you can’t find them, angel food cake is a delightful alternative for a lighter option!

What’s the best way to store leftovers?
Store any leftovers of your No-Bake Vampire Halloween Trifle in an airtight container in the refrigerator for up to 2 days. Keep in mind that the texture will become softer over time, but believe me, it still tastes delicious! Always make sure to cover it well to avoid any fridge odors affecting your dessert.

Can I freeze the No-Bake Vampire Halloween Trifle?
Yes! For longer storage, freeze individual portions of your No-Bake Vampire Halloween Trifle in freezer-safe containers. It can be kept frozen for up to 1 month. When you’re ready to enjoy it, simply thaw it in the refrigerator overnight. This way, you can still savor that spooky sweetness even after Halloween!

What if my pudding doesn’t thicken properly?
If your pudding mix doesn’t thicken, it may need a bit more time cooling down. Follow these steps: After whisking the mix with milk, allow it to rest for 5-10 minutes. If it’s still not thickening, try placing it in the fridge for another 10 minutes. Make sure you’re using the correct ratio of mix to milk as specified on the package.

Are there any allergy considerations with this recipe?
Absolutely! When preparing your No-Bake Vampire Halloween Trifle, check ingredient labels for common allergens, especially if serving guests. If anyone has a dairy allergy, you can substitute the pudding and whipped cream with dairy-free alternatives. Additionally, be cautious with decorations since candy corn may contain allergens like gluten or nuts.

How long should I chill the trifle before serving?
Chill your assembled No-Bake Vampire Halloween Trifle for at least 1 hour to let the flavors meld together beautifully. However, if time allows, letting it chill for up to 4 hours will provide an even richer taste experience. This patience pays off in flavor, and you’ll be treating yourself and your guests to a truly delightful dessert!

No-Bake Vampire Halloween Trifle

No-Bake Vampire Halloween Trifle: Effortless Family Fun

Enjoy the festive No-Bake Vampire Halloween Trifle, a delightful blend of layers, perfect for Halloween gatherings.
Prep Time 15 minutes
Chilling Time 1 hour
Total Time 1 hour 15 minutes
Servings: 8 servings
Course: Dessert
Cuisine: American
Calories: 250

Ingredients
  

For the Trifle Base
  • 4 cups King's Hawaiian Rolls Cut into uniform cubes
  • 1 pack Pudding Mix (Chocolate/Vanilla) Prepared according to package instructions
For the Layers
  • 2 cups Whipped Cream Use Cool Whip as a substitute
  • 1 cup Candy Corn or Decor For decoration
  • 1 cup Sprinkles (Optional) Halloween-themed for decoration

Equipment

  • Trifle dish or clear glass bowl

Method
 

Step-by-Step Instructions
  1. Begin by cutting the King’s Hawaiian rolls into uniform cubes, approximately one inch in size.
  2. Prepare your chocolate and vanilla pudding mixes in two separate bowls following package instructions.
  3. In a large trifle dish or clear glass bowl, layer the roll cubes, followed by chocolate pudding, then whipped cream.
  4. Top with candy corn and festive sprinkles to decorate.
  5. Cover with plastic wrap and refrigerate for at least 1 hour before serving.

Nutrition

Serving: 1servingCalories: 250kcalCarbohydrates: 35gProtein: 3gFat: 12gSaturated Fat: 7gCholesterol: 25mgSodium: 180mgPotassium: 150mgFiber: 1gSugar: 20gVitamin A: 500IUCalcium: 50mgIron: 1mg

Notes

Allowing the trifle to chill enhances the flavors. Fresh rolls yield the best texture. Avoid overloading on decorations to maintain balance in flavor.

Tried this recipe?

Let us know how it was!

Pumpkin Cinnamon Roll Pull-Apart Bread for Cozy Mornings

The moment I pulled the warm, fragrant loaf from the oven, my kitchen transformed into a cozy autumn retreat. This Easy Pumpkin Cinnamon Roll Pull-Apart Bread perfectly blends the sweetness of pumpkin with the warm, familiar spice of cinnamon, creating a delightful centerpiece for any breakfast or brunch. Not only is it a joy to share with loved ones, but its make-ahead nature means you can prep it the night before, leaving you free to enjoy those precious morning moments. You’ll savor every pillowy bite as you reach for another piece—trust me, it’s that irresistible! Are you ready to create a new fall tradition in your kitchen?

Why is this recipe a must-try?

Comforting and flavorful, this Pumpkin Cinnamon Roll Pull-Apart Bread is the ultimate excuse to indulge in the season’s best flavors. Easy to prepare, combining simple ingredients, it showcases how homemade comfort food can beat fast food any day. Versatile enough for breakfast, brunch, or even dessert, this dish is perfect alongside a warm cup of coffee or tea. Plus, its make-ahead nature means less stress in the morning—just bake and enjoy! If you love breakfast treats, you might also enjoy making a Crisp Cinnamon Roll or Foster Cinnamon Rolls for your next gathering!

Pumpkin Cinnamon Roll Pull-Apart Bread Ingredients

For the Bread

  • Cinnamon Rolls – Use store-bought or homemade for a sweet base.
  • Pumpkin Puree – Adds delightful moisture and rich pumpkin flavor.
  • Cinnamon – Enhances warm spice; feel free to adjust to your taste.
  • Sugar – Sweetens the mixture; consider brown sugar for a deeper taste.

For the Icing (optional)

  • Icing – Drizzle on top for extra sweetness and visual appeal; can be omitted for a less sweet option.

This recipe is your perfect guide to crafting a delicious Pumpkin Cinnamon Roll Pull-Apart Bread that will become the highlight of your fall gatherings!

Step‑by‑Step Instructions for Pumpkin Cinnamon Roll Pull-Apart Bread

Step 1: Prepare the Cinnamon Rolls
Begin by preparing your cinnamon rolls according to the package instructions, adjusting for a pull-apart method if using store-bought. Preheat your oven to 350°F (175°C) while the rolls are resting. If making homemade rolls, roll out your dough and spread cinnamon and sugar evenly before slicing. You want the dough to be soft and slightly puffy, ready to absorb the pumpkin goodness.

Step 2: Prepare the Pumpkin Mixture
In a mixing bowl, combine the pumpkin puree with cinnamon and sugar to create a creamy, fragrant mixture. Ensure everything is evenly blended and smooth, allowing the rich pumpkin flavor to meld with the warm spice. This will be the delicious, moist element that you layer with the cinnamon rolls, so take a moment to appreciate its inviting aroma.

Step 3: Grease the Pan
Generously grease a loaf pan with butter or non-stick spray to prevent sticking and facilitate easy removal later. This is essential for achieving that perfect pull-apart texture. The visual cue here is a shiny, slick surface ready to cradle the layers of dough and pumpkin mixture, ensuring every bite of your Pumpkin Cinnamon Roll Pull-Apart Bread can be savored without fuss.

Step 4: Assemble the Layers
Stack the cinnamon rolls in the greased loaf pan, alternating with generous spoonfuls of the pumpkin mixture. Aim for a compact arrangement that allows each roll to be enveloped in the creamy pumpkin goodness. This layering process should resemble a beautiful, swirly arrangement, filling your kitchen with warm, inviting scents as you prep for baking.

Step 5: Bake
Carefully place the assembled bread in the preheated oven and bake for approximately 30-40 minutes. Watch closely as the top turns a lovely golden brown and the rolls rise into a fluffy mound. The internal temperature should reach around 190°F (88°C) for perfect doneness. Allow your Pumpkin Cinnamon Roll Pull-Apart Bread to puff majestically—this is where the magic happens!

Step 6: Cool & Drizzle
Once baked, remove the loaf pan from the oven and let the pull-apart bread cool for about 10-15 minutes before gently inverting it onto a serving platter. If desired, prepare your icing while it cools, mixing with a bit of milk for the perfect drizzle consistency. Pour or drizzle the icing over the slightly warm bread, enhancing its sweetness and visual appeal to make it even more irresistible.

Expert Tips for Pumpkin Cinnamon Roll Pull-Apart Bread

  • Baking Time Reminder: Longer baking required: This method takes longer than individual rolls, so avoid underbaking to ensure your pull-apart bread is fully cooked.

  • Layer Generously: Don’t skimp: Make sure to pack the pumpkin mixture generously between rolls for that rich, delicious flavor throughout every layer.

  • Make Ahead Magic: Prep overnight: Consider preparing this dish the night before for a richer flavor and less morning stress—just bake fresh when you’re ready!

  • Icing Consistency: Drizzle with care: If using icing, mix it to a smooth consistency to ensure it drizzles beautifully over the warm bread for that tempting finish.

  • Check Internal Temp: Use a thermometer: The internal temperature should reach around 190°F. This helps avoid that potentially doughy finish in your Pumpkin Cinnamon Roll Pull-Apart Bread.

How to Store and Freeze Pumpkin Cinnamon Roll Pull-Apart Bread

Room Temperature: Keep your bread in an airtight container or wrapped in plastic wrap at room temperature for up to 3 days. This ensures it stays soft and fresh.

Fridge: If you’d like to extend its freshness, store the bread in the fridge for up to a week, wrapped well to prevent drying out.

Freezer: For longer storage, wrap the bread tightly in plastic wrap and then foil, freezing it for up to 2 months. Thaw overnight in the fridge before reheating.

Reheating: To enjoy your Pumpkin Cinnamon Roll Pull-Apart Bread, reheat slices in a toaster oven or microwave until warm. Drizzle with icing before serving for that fresh-baked feel!

Make Ahead Options

Preparing your Pumpkin Cinnamon Roll Pull-Apart Bread ahead of time is a fantastic way to save cherished moments in the morning! You can assemble the bread, layer the cinnamon rolls and pumpkin mixture, and refrigerate it up to 24 hours before baking. To keep the bread moist and flavorful, cover the loaf pan tightly with plastic wrap. When you’re ready to enjoy, simply pop it in the oven straight from the fridge and bake as directed, adding a few extra minutes to ensure it’s puffed and golden. This make-ahead approach means you can savor a warm, delectable breakfast with minimal effort, allowing you to enjoy those cozy fall mornings to the fullest!

Pumpkin Cinnamon Roll Pull-Apart Bread Variations

Feel free to let your creativity shine as you customize this recipe to fit your taste and dietary needs!

  • Sweet Potato Twist: Swap pumpkin puree for sweet potato puree for a different yet delicious flavor profile.

  • Nuts Galore: Add chopped pecans or walnuts between layers for added crunch and texture. The delightful contrast will surprise your taste buds!

  • Spiced Up: Introduce a pinch of nutmeg or ginger for an extra kick of warmth; it’s like bringing the cozy fall spices right into your kitchen.

  • Savory Spin: Consider adding a sprinkle of crumbled bacon or sharp cheddar cheese to the mix. This unexpected twist will elevate your pull-apart bread to new savory heights!

  • Dried Fruit Delight: Toss in some chopped dried cranberries or raisins for a sweet surprise in every bite. They’ll add a delightful chewiness that complements the pumpkin perfectly.

  • Cinnamon Roll Crunch: Top the assembled bread with a sprinkle of crushed cinnamon cereal before baking for a delightful crunch. It offers a fun texture contrast to the soft rolls.

  • Stuffed Surprise: Inject the center of each cinnamon roll with a dollop of cream cheese before layering for a rich, creamy surprise within every piece. It’s like a secret treasure waiting to be discovered!

  • Warm and Cozy: Enhance the warming spices by mixing in a teaspoon of pumpkin spice for that classic fall flavor. Pair it with a warm beverage for an undeniably comforting experience.

These variations can turn your pumpkin cinnamon roll pull-apart bread into a unique masterpiece ready to impress family and friends! And if you’re looking for more delicious baked wonders, why not try making a Sweet Escape Charm next?

What to Serve with Pumpkin Cinnamon Roll Pull-Apart Bread

Cozy up your breakfast or brunch table with these delightful complements that enhance every bite of this spiced sweet treat.

  • Creamy Mashed Potatoes: The velvety texture adds a savory contrast to the sweet flavors of your bread.
  • Fresh Fruit Salad: A mix of berries and citrus balances the warmth of cinnamon with refreshing zest.
  • Maple Bacon: The salty, crispy pieces provide a savory punch, creating a wonderful flavor fusion with the sweet bread.
  • Spiced Chai Latte: This aromatic drink enhances the cinnamon notes in your pull-apart bread, offering a comforting sipper.
  • Roasted Pecans: Their crunchy texture and slight sweetness meld beautifully, adding depth to each soft piece.
  • Caramel Drizzle: A sweet, gooey topping elevates this dish into dessert territory, enticing guests for a second helping.
  • Hot Chocolate: A warm, rich drink that pairs perfectly with the bread’s comforting nature during chilly mornings.
  • Pumpkin Spice Muffins: For a delightful, cohesive theme, serve alongside muffins that echo the beloved flavors of fall.

Pumpkin Cinnamon Roll Pull-Apart Bread Recipe FAQs

How do I choose the best pumpkin puree for this recipe?
Absolutely! For the creamiest and richest flavor, I recommend using pure pumpkin puree, either fresh or canned. When selecting canned puree, look for brands without added sugars or spices to maintain control over your flavor profiles. If using fresh pumpkin, choose ones that feel heavy for their size, with smooth skin and no dark spots. A sugar pumpkin works best for its natural sweetness.

How should I store leftover Pumpkin Cinnamon Roll Pull-Apart Bread?
Very! You can keep your leftover bread at room temperature by placing it in an airtight container or wrapping it in plastic wrap for up to 3 days. If you’d like to keep it fresh longer, opt for refrigeration; it can last up to a week if well-wrapped.

Can I freeze Pumpkin Cinnamon Roll Pull-Apart Bread?
Absolutely! To freeze, wrap the bread tightly in plastic wrap followed by aluminum foil, ensuring it’s sealed against air. This method prevents freezer burn, allowing you to enjoy it for up to 2 months. When you’re ready to indulge, simply thaw it overnight in the fridge and reheat in a microwave or toaster oven for that freshly-baked taste.

What should I do if my bread turns out too dense?
No worries! If your bread seems dense, make sure to check your ingredients and measurements; too much flour can lead to density. Ensure that the cinnamon rolls were adequately risen and fluffy before assembly. If you over-mixed the pumpkin mixture, it might lead to a heavier texture. For next time, gently fold ingredients to maintain airiness.

Is this recipe safe for pets or people with allergies?
Very! This Pumpkin Cinnamon Roll Pull-Apart Bread is primarily vegetarian-friendly. However, it contains sugar and cinnamon, which aren’t suitable for pets like dogs and cats. If anyone in your household has allergies, be sure to check the labels for any allergens in the cinnamon rolls or icing. Make substitutions where necessary, such as gluten-free options for those with gluten intolerance. Enjoy safely!

Pumpkin cinnamon roll pull-apart bread

Pumpkin Cinnamon Roll Pull-Apart Bread for Cozy Mornings

This Pumpkin Cinnamon Roll Pull-Apart Bread is a cozy, sweet, and spiced treat perfect for breakfast or brunch.
Prep Time 15 minutes
Cook Time 40 minutes
Cooling Time 15 minutes
Total Time 1 hour 10 minutes
Servings: 8 slices
Course: Breakfast
Cuisine: American
Calories: 230

Ingredients
  

For the Bread
  • 1 package Cinnamon Rolls Use store-bought or homemade for a sweet base.
  • 1 cup Pumpkin Puree Adds delightful moisture and rich pumpkin flavor.
  • 1 teaspoon Cinnamon Enhances warm spice; feel free to adjust to your taste.
  • 1/2 cup Sugar Consider brown sugar for a deeper taste.
For the Icing (optional)
  • 1 cup Icing Drizzle on top for extra sweetness; can be omitted.

Equipment

  • Loaf Pan
  • Mixing Bowl
  • Oven

Method
 

Step‑by‑Step Instructions
  1. Prepare cinnamon rolls according to package instructions, preheat oven to 350°F (175°C).
  2. Combine pumpkin puree with cinnamon and sugar for the mixture.
  3. Grease a loaf pan with butter or non-stick spray.
  4. Assemble layers of cinnamon rolls and pumpkin mixture in the greased loaf pan.
  5. Bake for approximately 30-40 minutes until golden brown.
  6. Cool for 10-15 minutes and drizzle with icing if desired.

Nutrition

Serving: 1sliceCalories: 230kcalCarbohydrates: 34gProtein: 3gFat: 10gSaturated Fat: 3gPolyunsaturated Fat: 1gMonounsaturated Fat: 4gCholesterol: 20mgSodium: 180mgPotassium: 100mgFiber: 1gSugar: 10gVitamin A: 3800IUVitamin C: 1mgCalcium: 30mgIron: 1mg

Notes

For best results, prepare the night before or check internal temperature to ensure doneness.

Tried this recipe?

Let us know how it was!

Delightful Pumpkin Cheesecake Truffles You’ll Love All Fall

As I strolled through the local farmer’s market, the vibrant hues of pumpkin and spices beckoned me, reminiscent of cozy autumn evenings. That’s when I decided to whip up a batch of No-Bake Pumpkin Cheesecake Truffles, the perfect indulgence for anyone craving a touch of fall magic. These delectable little bites blend the creamy richness of cream cheese with the warmth of pumpkin spice, making them the ultimate crowd-pleaser for your upcoming Halloween or Thanksgiving festivities. Not only are they beautifully simple to prepare, but they also promise a delightful no-bake experience, freeing you from the oven’s heat while still filling your home with enticing aromas. Curious to see how easy it is to create these pumpkin-themed gems? Let’s dive into the recipe!

Why Will You Adore These Truffles?

Irresistible Fall Flavor: Each bite of these Pumpkin Cheesecake Truffles bursts with the warmth of pumpkin spice, evoking delightful autumn memories.

No-Bake Convenience: Skip the oven and enjoy a simple, no-bake recipe that saves time while delivering incredible taste.

Crowd-Pleaser Appeal: Perfect for gatherings, these truffles are sure to wow your friends at Halloween parties or Thanksgiving dinners.

Customization Galore: Feel free to experiment by swapping white chocolate for dark, or adding a hint of maple syrup for unique flavor twists!

Easy to Make Ahead: Prepare them in advance and store in the fridge for a convenient treat that’s ready to impress anytime! For more festive delights, you might also enjoy Strawberry Cheesecake Dump or Carrot Cake Cheesecake.

Pumpkin Cheesecake Truffles Ingredients

For the Truffles

  • Cream Cheese – Provides creaminess and a rich texture; for a dairy-free option, use vegan cream cheese.
  • Canned Pumpkin Puree – Adds moisture, flavor, and the signature pumpkin element; make sure it’s 100% pumpkin puree for authentic taste.
  • Graham Cracker Crumbs – Acts as a binding agent, giving sweetness and crunch; opt for gluten-free graham crackers if needed.
  • White Chocolate Chips – Adds sweetness and helps bind the mixture; substitute with dark chocolate for a richer flavor if desired.
  • Sweetened Condensed Milk – Essential for moisture and sweetness, helping to thicken the mixture; consider coconut condensed milk for a dairy-free alternative.

For the Decoration

  • Granulated Sugar – Coats the truffles for a sweet sparkle; roll them just before serving to maintain freshness.
  • Chocolate Chips – Used as a “stem” when pressed on top, adding a cute decorative touch; feel free to use a different type of chocolate.

Create these delightful Pumpkin Cheesecake Truffles and celebrate fall in every creamy, indulgent bite!

Step‑by‑Step Instructions for Pumpkin Cheesecake Truffles

Step 1: Prepare the Pumpkin Mixture
In a medium skillet, over medium-low heat, combine the cream cheese, canned pumpkin puree, butter, pumpkin pie spice, and sweetened condensed milk. Stir constantly for about 5–7 minutes, ensuring the mixture is smooth and thickened. You’re looking for a creamy consistency that clings to the spatula, embodying the essence of these Pumpkin Cheesecake Truffles.

Step 2: Incorporate the Chocolate and Crumbs
Add the white chocolate chips and graham cracker crumbs to the warm pumpkin mixture, stirring well for another 2–3 minutes. Mix until the dough starts to pull away from the sides of the pan and forms a cohesive ball. The decadent aroma will fill your kitchen, and the texture should be thick yet pliable, perfect for shaping truffles.

Step 3: Chill the Mixture
Spread the mixture evenly onto a buttered baking sheet, smoothing it out to about ½ inch thick. Place the baking sheet in the refrigerator for at least 2 hours, allowing the mixture to firm up. Once chilled, it should have a manageable texture for rolling into balls, making these Pumpkin Cheesecake Truffles a delightful treat to prepare.

Step 4: Form the Truffles
After chilling, remove the mixture from the refrigerator. Use a spoon or your hands, lightly buttered to prevent sticking, to scoop out small portions and roll them into 1-inch balls. As you form the truffles, observe how easily they maintain their shape, showcasing the rich filling inside that captures the fall flavors beautifully.

Step 5: Roll in Sugar
Immediately roll each truffle in granulated sugar to give them a sweet sparkle. This step not only enhances flavor but also enhances the visual appeal, making them look inviting. Ensure the sugar coats the outside evenly, resulting in a delightful crunch that complements the creamy center of your Pumpkin Cheesecake Truffles.

Step 6: Decorate and Serve
To add a touch of whimsy, press the side of a toothpick around each truffle to create charming grooves, resembling miniature pumpkins. Finally, place a chocolate chip on top as a cute “stem.” Serve these truffles immediately or keep them refrigerated until ready to enjoy, letting their festive spirit shine during your holiday celebrations.

Make Ahead Options

These Pumpkin Cheesecake Truffles are perfect for meal prep enthusiasts! You can prepare the mixture up to 24 hours in advance, storing it in the refrigerator wrapped tightly in plastic wrap to prevent moisture loss. Additionally, the rolled truffles can be kept in the fridge for up to 3 days before serving. Just remember to roll them in sugar just before serving to maintain their delightful sparkle and avoid any moisture accumulation. When ready to impress your guests, simply take the truffles out of the fridge and enjoy them chilled or at room temperature—just as delicious and ready to celebrate the flavors of fall!

What to Serve with Pumpkin Cheesecake Truffles

Elevate your festive gatherings with delightful pairings that complement the rich, creamy flavor of these treats.

  • Warm Apple Cider: The sweet and spice notes of cider harmonize beautifully with the pumpkin cheesecake truffles, wrapping you in cozy autumn vibes.

  • Ginger Snap Cookies: Their spiced crunch creates a perfect textural contrast, enhancing the Truffles’ creamy interior while adding extra warmth.

  • Whipped Cream: A dollop on the side offers a light and airy balance, providing a lovely contrast to the rich cheesecake flavors.

  • Caramel Sauce: Drizzling this sweet sauce over the truffles adds an indulgent touch, introducing a luxurious layering of flavor that’s hard to resist.

  • Chocolate-Dipped Pretzels: Salty and crunchy, these pretzels add unique texture and flavor balance, offering a delightful sweet-and-salty experience.

  • Pecan Pie Bars: The nutty sweetness parallels the pumpkin beautifully, creating a luscious dessert combination that’ll wow your guests.

  • Spiced Tea: A warm cup of spiced tea enhances the autumn festivities, with herbal notes providing a comforting backdrop to your delicious truffles.

  • Vanilla Ice Cream: Serve a scoop on the side for a creamy, cool contrast that perfectly offsets the rich truffles’ sweetness.

  • Pumpkin Spice Latte: For the ultimate autumn experience, pair your truffles with this beloved drink, enhancing those seasonal flavors in every bite.

Helpful Tricks for Pumpkin Cheesecake Truffles

  • Stir Constantly: Always stir the mixture as it heats to avoid lumps forming in the cream cheese. A smooth mixture ensures perfectly creamy Pumpkin Cheesecake Truffles.

  • Butter Your Hands: Lightly buttering your hands will prevent the mixture from sticking while rolling into balls, making the process much easier and more enjoyable!

  • Sugar Tip: Roll the truffles in sugar just before serving to keep them looking fresh and prevent moisture from causing a “sweaty” appearance.

  • Freezer Friendly: If you plan to freeze your Pumpkin Cheesecake Truffles, skip the sugar coating beforehand. Simply coat them in sugar post-thaw for optimal texture!

  • Experiment with Flavors: Don’t hesitate to swap white chocolate for dark chocolate, or add your favorite spices. Customizing your truffles really brings out your personal touch!

Variations & Substitutions for Pumpkin Cheesecake Truffles

Feel free to get creative and personalize these truffles to your taste! The possibilities are endless, and your taste buds will thank you.

  • Dairy-Free: Substitute cream cheese with vegan cream cheese and use coconut condensed milk for a completely dairy-free delight.
  • Chocolate Swap: Opt for dark chocolate chips in place of white chocolate for a richer, more intense flavor. It adds depth and a hint of bitterness that contrasts beautifully with the sweetness.
  • Pumpkin Alternative: Replace canned pumpkin with pureed butternut squash for a different take on flavor. Both are rich and creamy, making for an equally delightful treat.
  • Spice It Up: Experiment with different spices by adding cinnamon or nutmeg for a twist on the traditional pumpkin spice profile. Each spice brings its own warmth and depth to your truffles.
  • Nutty Crunch: Incorporate chopped nuts, like pecans or walnuts, into the mixture for an added crunch that complements the creamy interior. It’s a perfect combination that enhances texture.
  • Maple Sweetness: Swap sweetened condensed milk with maple syrup for a natural, rich sweetness that aligns beautifully with the fall flavors. It’s a warm, inviting twist!
  • Graham Crackers Alternatives: Use crushed oat cookies or gluten-free graham crackers to accommodate dietary needs while maintaining that sweet, crunchy goodness.
  • Add Some Heat: If you love a hint of spice, mix in a pinch of cayenne pepper or chili powder for an unexpected kick that spices things up without overpowering the flavors.

For another fall-inspired treat, don’t forget to check out our Strawberry Cheesecake Dump or combine your love of cake and cheesecake in our Carrot Cake Cheesecake recipe!

How to Store and Freeze Pumpkin Cheesecake Truffles

Refrigerator: Store your Pumpkin Cheesecake Truffles in an airtight container in the fridge for up to 1 week. This keeps them fresh and ready to enjoy!

Freezer: For longer storage, freeze uncoated truffles for up to 2 months. Place them in a single layer on a baking sheet, then transfer to an airtight container once solid.

Thawing: To enjoy frozen truffles, thaw them overnight in the refrigerator before rolling in sugar. This preserves their texture and flavor beautifully.

Serving: After thawing, roll the truffles in sugar just before serving to maintain a delightful crunch and prevent any moisture buildup!

Pumpkin Cheesecake Truffles Recipe FAQs

How do I choose the best pumpkin puree?
Absolutely! Always opt for 100% canned pumpkin puree, avoiding pumpkin pie filling, which contains added sugars and spices. Look for brands with minimal ingredients for the best flavor. Organic options can also enhance your dish with rich, natural taste.

What’s the best way to store these truffles?
I recommend keeping your Pumpkin Cheesecake Truffles in an airtight container in the refrigerator for up to 1 week. This helps keep them fresh and delicious, making them ready to enjoy whenever a sweet craving strikes!

Can I freeze these truffles for later?
Yes! For freezing, form the truffles but do not coat them in sugar. Place them on a baking sheet in a single layer and freeze until solid (about 1-2 hours). Then, transfer the truffles to an airtight container and they will keep for up to 2 months. Thaw them overnight in the refrigerator before rolling in sugar.

What should I do if my truffle mixture is too soft?
Very good question! If your mixture seems too soft to roll, return it to the refrigerator for an additional 30 minutes to allow it to firm up. If you need immediate results, consider adding a bit more graham cracker crumbs to achieve a better consistency without compromising flavor.

Are these truffles safe for my pets and allergy-friendly?
Absolutely! While the ingredients in these Pumpkin Cheesecake Truffles are safe for humans, they contain cream cheese and chocolate, which are harmful to pets. As for allergies, if using gluten-free graham crackers and ensuring all ingredients align with dietary restrictions, you can create a delightful treat suitable for those avoiding gluten or dairy. However, keep in mind the importance of checking individual ingredient labels for potential allergens.

Can I customize the flavors of these truffles?
The more the merrier! Feel free to experiment with different spices like cinnamon or nutmeg to enhance the fall flavor. You can also swap the white chocolate with dark chocolate or leave it out entirely for a less sweet option. Adding nuts or chocolate chips can also provide a delightful texture twist!

Pumpkin Cheesecake Truffles

Delightful Pumpkin Cheesecake Truffles You'll Love All Fall

These Pumpkin Cheesecake Truffles are no-bake treats that blend cream cheese and pumpkin spice for a delightful fall indulgence.
Prep Time 15 minutes
Cook Time 10 minutes
Chill Time 2 hours
Total Time 2 hours 25 minutes
Servings: 12 truffles
Course: Dessert
Cuisine: American
Calories: 120

Ingredients
  

For the Truffles
  • 8 oz Cream Cheese For a dairy-free option, use vegan cream cheese.
  • 1 cup Canned Pumpkin Puree Ensure it’s 100% pumpkin puree for authentic taste.
  • 1 cup Graham Cracker Crumbs Opt for gluten-free graham crackers if needed.
  • 1 cup White Chocolate Chips Substitute with dark chocolate for a richer flavor.
  • 1 can Sweetened Condensed Milk Consider coconut condensed milk for a dairy-free alternative.
For the Decoration
  • 1 cup Granulated Sugar Roll the truffles just before serving.
  • 1 cup Chocolate Chips Used as a “stem” on top.

Equipment

  • Medium skillet
  • Baking Sheet
  • Refrigerator

Method
 

Step-by-Step Instructions for Pumpkin Cheesecake Truffles
  1. In a medium skillet, over medium-low heat, combine the cream cheese, canned pumpkin puree, butter, pumpkin pie spice, and sweetened condensed milk. Stir constantly for about 5–7 minutes until smooth and thickened.
  2. Add the white chocolate chips and graham cracker crumbs to the warm pumpkin mixture, stirring well for another 2–3 minutes.
  3. Spread the mixture evenly onto a buttered baking sheet, smoothing it out to about ½ inch thick, and refrigerate for at least 2 hours.
  4. After chilling, scoop out portions and roll into 1-inch balls.
  5. Immediately roll each truffle in granulated sugar to give them a sweet sparkle.
  6. Press a chocolate chip on top as a cute “stem” and serve immediately.

Nutrition

Serving: 1truffleCalories: 120kcalCarbohydrates: 15gProtein: 1gFat: 7gSaturated Fat: 4gMonounsaturated Fat: 3gCholesterol: 20mgSodium: 60mgPotassium: 50mgSugar: 10gVitamin A: 10IUVitamin C: 2mgCalcium: 2mgIron: 2mg

Notes

Roll the truffles in sugar just before serving to keep them from looking 'sweaty'. Freeze uncoated truffles for longer storage, rolling in sugar post-thaw.

Tried this recipe?

Let us know how it was!

Comforting Cattle Drive Casserole: Hearty and Customizable Delight

There’s something magical about gathering friends and family around a warming meal that feels like a big, comforting hug. That’s why I love making Cattle Drive Casserole, a hearty dish inspired by the rugged spirit of cowboy cooking. The beauty of this casserole lies not only in its layers of savory ground beef, vibrant veggies, and oozing cheese but also in its incredible versatility—whether you’re hosting a lively dinner party or just looking for a cozy weeknight dinner, this recipe is a true crowd-pleaser. It beautifully blends comfort food with convenient preparation, allowing you to customize it to your dietary preferences, whether gluten-free or vegetarian. So, are you ready to learn how to create this delicious cowboy-inspired casserole that will leave everyone at your table begging for seconds?

Why is Cattle Drive Casserole a Must-Try?

Genuine Comfort: This dish wraps you in warmth with every bite, perfectly embodying the spirit of hearty cowboy cuisine.

Customizable Delight: With options for vegetarian or gluten-free variations, it’s easily tailored to fit your dietary needs, as seen in our delicious Cheesy Low Carb Chicken Casserole.

Flavor Explosion: A rich fusion of ground beef, zesty diced green chiles, and gooey cheese makes it a flavor-packed favorite.

Quick Prep Time: Thanks to simple ingredients and straightforward prep, you can have this casserole in the oven in no time.

Crowd-Pleasing Appeal: Perfect for family gatherings or a cozy weeknight, your loved ones won’t be able to resist going back for more!

Cattle Drive Casserole Ingredients

There’s nothing quite like the warm, hearty flavors of Cattle Drive Casserole to make your mouth water!

For the Casserole Base

  • Lean Ground Beef – Main protein source providing heartiness and flavor; substitute with plant-based meat for a vegetarian option.
  • Red Bell Pepper – Adds sweetness and texture; any color bell pepper or vegetables like zucchini can be used as substitutions.
  • Yellow Onion – Contributes depth of flavor; shallots or green onions work well in its place.
  • Taco Seasoning Mix – Provides essential spices and flavoring; try homemade seasoning for a personalized touch or omit for a milder casserole.
  • Biscuit Mix (e.g., Bisquick) – Acts as the base fortifying the casserole; gluten-free options are also available.
  • Water – Hydrates the biscuit mix; using low-sodium broth could enhance the flavor further.
  • Cooking Spray – Prevents sticking; olive oil or butter is a great alternative if you prefer.

For the Creamy Mixture

  • Sour Cream – Adds creaminess and a hint of tang; Greek yogurt is a healthier substitute.
  • Mayonnaise – Enhances creaminess; you can use extra sour cream or Greek yogurt instead.
  • Diced Green Chiles – Infuses a mild pepper flavor; replace with jalapeños for heat or omit for a milder dish.

For the Topping

  • Cheddar Cheese (Fiesta Blend) – Gives a gooey texture; other cheese blends like Monterey Jack or Pepper Jack work well too.
  • Garlic Powder – Elevates the dish with a mild aromatic note; feel free to use fresh minced garlic for a stronger flavor.
  • Salsa – Adds moisture and zest; any variety suits this casserole, or you can omit it for a simpler taste.

Embrace the comforting goodness of Cattle Drive Casserole, perfect for any gathering or cozy meal at home!

Step‑by‑Step Instructions for Cattle Drive Casserole

Step 1: Preheat the Oven
Begin by preheating your oven to 350°F (175°C). This warm-up stage is crucial for ensuring that your Cattle Drive Casserole bakes evenly and achieves that perfect golden top. While your oven heats up, you can move on to preparing the ground beef filling.

Step 2: Brown the Ground Beef
In a large skillet over medium heat, add 1 pound of lean ground beef. Cook the beef for about 5–7 minutes, breaking it apart with a spatula until it’s browned and no longer pink. The meat should be sizzling and fragrant. Once browned, stir in 1 chopped yellow onion and 1 diced red bell pepper, cooking until they’re softened, approximately another 3–4 minutes.

Step 3: Add Seasonings
Next, sprinkle in your taco seasoning mix and add 1 cup of water. Stir well to combine all the ingredients, allowing the mixture to simmer for about 5 minutes. The liquid should reduce slightly, creating a savory filling that offers a deliciously rich aroma, signaling it’s time to assemble your casserole.

Step 4: Prepare the Biscuit Mixture
In a separate mixing bowl, combine 2 cups of biscuit mix with 1 cup of sour cream, ¼ cup of mayonnaise, and 1 can of diced green chiles. Stir until everything is well blended and no dry mix remains. The batter should be thick and creamy, providing a sturdy base for your Cattle Drive Casserole layers.

Step 5: Layer the Ingredients
Now, spray a 9×13-inch baking dish with cooking spray to prevent sticking. Start layering by spreading half of the ground beef mixture at the bottom, followed by half of the biscuit mixture. Sprinkle half of the cheddar cheese on top. Repeat these layers, finishing with the remaining cheese to create a beautifully cheesy topping.

Step 6: Bake the Casserole
Place your assembled Cattle Drive Casserole in the preheated oven and bake for 30–35 minutes. Keep an eye on it—it’s ready when the top is golden brown and set. You’ll know it’s done when you can see the cheese bubbling and slightly crispy, inviting everyone with its delightful aroma.

Step 7: Cool and Serve
Once baked, remove the casserole from the oven and let it cool for about 10 minutes. This resting period allows the flavors to meld and makes serving easier. Slice into portions and serve warm, enjoying the comforting layers that make Cattle Drive Casserole a hearty meal perfect for any occasion.

Storage Tips for Cattle Drive Casserole

Fridge: Store any leftovers in an airtight container for up to 3 days. Make sure to cool the casserole completely before refrigerating to maintain freshness.

Freezer: If you’d like to extend the life of your Cattle Drive Casserole, freeze it before baking. Wrap it tightly in plastic wrap and aluminum foil, and it can last up to 3 months.

Reheating: To reheat, bake from frozen at 350°F (175°C) for about 45-60 minutes, or until heated through. If thawed, reheat in the oven for 20-30 minutes, ensuring it’s piping hot before serving.

Airtight Packaging: For best results, ensure that the casserole is well-wrapped to prevent freezer burn and maintain its delicious flavors when stored.

Make Ahead Options

Cattle Drive Casserole is a fantastic choice for busy weeknights, allowing you to prep in advance for a home-cooked meal with minimal effort! You can prepare the ground beef filling and the creamy biscuit mixture up to 24 hours in advance; simply refrigerate them separately in airtight containers. When you’re ready to serve, layer the beef and biscuit mixtures in your baking dish, sprinkle on the cheese, and pop it in the oven. This ensures that the casserole is just as delicious as when made fresh. If you prefer, you can also assemble the entire casserole ahead of time, cover it tightly, and refrigerate it for up to 3 days before baking! Just remember to let it rest at room temperature for about 30 minutes before baking to ensure even cooking and warm, comforting flavors.

Expert Tips for Cattle Drive Casserole

  • Layering Wisely: Ensure even distribution of the filling and biscuit layers to prevent a dry top and a soggy bottom during baking.

  • Watch the Bake Time: Keep an eye on your casserole; it’s best to check for doneness at the 30-minute mark to avoid overcooking.

  • Cook Ground Beef Thoroughly: Don’t rush browning the meat; this step adds key flavor and helps the ground beef develop great texture.

  • Customize Wisely: Remember that substitutions can change the dish’s dynamics; ensure swaps complement the flavors of the Cattle Drive Casserole.

  • Cooling Benefits: Allow the casserole to cool slightly before cutting into it; this helps the layers set and makes serving cleaner.

Cattle Drive Casserole: Customize It Your Way

Let your creativity take the reins as you transform this classic dish into something uniquely yours, bursting with exciting flavors!

  • Vegetarian: Swap half the ground beef for black beans or lentils, complementing the dish with plant-based cheese for a delicious twist. The heartiness remains while catering to veggie lovers!

  • Gluten-Free: Use a gluten-free biscuit mix instead of regular, ensuring everyone can indulge in this comforting casserole. It’s easy to make it suitable for all dietary needs without compromising taste.

  • Southwestern Flair: Add corn and diced jalapeños to the beef mixture to elevate flavors, and finish with crispy tortilla strips on top for a delightful crunch. This spicy addition will awaken your taste buds!

  • Extra Veggies: Toss in spinach or zucchini when sautéing the veggies, creating a colorful medley that boosts nutrition without sacrificing flavor. The more, the merrier—your family won’t even realize they’re eating their greens.

  • Creamy Variations: For added richness, use cream cheese in place of some sour cream or mayonnaise. It adds a luscious consistency that’s hard to resist. With every bite, feel the luxurious creaminess melting in your mouth!

  • Heat Levels: Adjust your spice game by using hotter salsa or fresh chili peppers according to your family’s preference. If you’re feeling adventurous, experimenting with different heat levels keeps things exciting.

  • Cheese Swap: Try a combination of cheeses like Pepper Jack and Gouda for a smoky, tangy flavor that elevates the dish. A cheese blend adds depth and a delightful gooeyness while staying true to the casserole’s heartiness.

  • Taco Seasoning Substitute: Make your unique spice blend at home with cumin, paprika, and garlic powder for a customized flair that resonates with your family’s taste—tailoring each layer to your liking. Don’t hesitate to mix things up for a personal touch!

With these variations, your Cattle Drive Casserole can shine in countless ways, resembling vibrant options like a French Toast Casserole or the delightful Tater Tot Casserole. Each one is waiting to be discovered by your family!

What to Serve with Cattle Drive Casserole

There’s nothing quite like the aroma of a home-cooked meal filling the air, inviting everyone to gather around the table.

  • Garlicky Green Beans: The tender crunch of green beans tossed in garlic butter brings a fresh contrast that balances the richness of the casserole. These vibrant veggies make every bite diverse and satisfying.

  • Warm Cornbread Muffins: Soft, sweet, and slightly crumbly, cornbread muffins are a delightful pairing that soaks up the casserole’s creamy sauce perfectly while adding a delightful hint of sweetness.

  • Mixed Green Salad: A crisp salad with a zesty vinaigrette brightens the plate. The cool, refreshing greens offer a nice contrast to the warm, hearty casserole, enhancing the entire meal.

  • Creamy Coleslaw: The crunchy and tangy coleslaw adds an extra layer of texture, perfect for cutting through the heaviness while offering creamy comfort in every bite.

  • Chili Lime Roasted Potatoes: These crispy potatoes seasoned with chili and lime introduce a burst of flavor that complements the casserole’s Southwestern flair. They add a punch of taste that’s hard to resist!

  • Margaritas or Sweet Tea: A refreshing margarita or a glass of sweet tea ties the meal together, enhancing the atmosphere with flavors that echo the spirit of the Southwest.

  • Chocolate Chip Cookies: End the meal on a sweet note with warm cookies. Their gooey chocolate complements the robust flavors of the casserole, making it an unforgettable dining experience that brings warmth and happiness to all.

Cattle Drive Casserole Recipe FAQs

What type of ground beef should I use for Cattle Drive Casserole?
Absolutely! I recommend using lean ground beef, as it provides a hearty flavor without too much grease. If you prefer a lighter option, you can easily substitute it with plant-based ground meat for a delicious vegetarian alternative.

How long can I store leftovers of Cattle Drive Casserole?
Very! You can store any leftovers in an airtight container for up to 3 days in the refrigerator. Just make sure to let the casserole cool completely before sealing it up to maintain the best freshness.

Can I freeze Cattle Drive Casserole? How do I do it?
Definitely! To freeze it, prepare the casserole up to the baking step. Wrap it tightly in plastic wrap and aluminum foil. This way, it can last up to 3 months! When you’re ready to bake, simply remove it from the freezer, unwrap, and bake at 350°F (175°C) for 45-60 minutes if frozen, or 20-30 minutes for a thawed version.

What should I do if my Cattle Drive Casserole turns out too soggy?
Oh no! If you find your casserole is too soggy, it might be due to overusing liquids or the ingredients not baking long enough. Make sure to drain any excess liquid from the meat mixture. If you’re using vegetables that release moisture (like zucchini), consider pre-cooking them to reduce water content before adding them to the casserole.

Are there any common allergens in Cattle Drive Casserole?
Yes, it’s important to note that this casserole contains dairy (sour cream, cheese, and mayonnaise) and gluten (biscuit mix). For those with dietary restrictions, opt for lactose-free products and gluten-free biscuit mixes to ensure everyone can enjoy this flavorful dish!

What can I substitute for the taco seasoning mix in Cattle Drive Casserole?
Great question! If you want to avoid store-bought taco seasoning, you can easily make your own by blending spices such as chili powder, cumin, garlic powder, onion powder, paprika, and a pinch of salt. This way, you can adjust the flavors to your liking!

Cattle Drive Casserole

Comforting Cattle Drive Casserole: Hearty and Customizable Delight

Delight in the comforting layers of Cattle Drive Casserole, a versatile crowd-pleaser that blends hearty flavors and customizable ingredients.
Prep Time 15 minutes
Cook Time 35 minutes
Cooling Time 10 minutes
Total Time 1 hour
Servings: 8 slices
Course: Casserole
Cuisine: American
Calories: 350

Ingredients
  

For the Casserole Base
  • 1 pound Lean Ground Beef Substitute with plant-based meat for vegetarian option.
  • 1 Red Bell Pepper Any color bell pepper or vegetables like zucchini can be used as substitutions.
  • 1 Yellow Onion Shallots or green onions work well in its place.
  • 1 packet Taco Seasoning Mix Try homemade seasoning for a personalized touch or omit for milder casserole.
  • 2 cups Biscuit Mix (e.g., Bisquick) Gluten-free options are also available.
  • 1 cup Water Using low-sodium broth could enhance the flavor further.
  • 1 spray Cooking Spray Olive oil or butter is a great alternative.
For the Creamy Mixture
  • 1 cup Sour Cream Greek yogurt is a healthier substitute.
  • ¼ cup Mayonnaise Extra sour cream or Greek yogurt can be used instead.
  • 1 can Diced Green Chiles Replace with jalapeños for heat or omit for milder dish.
For the Topping
  • 2 cups Cheddar Cheese (Fiesta Blend) Other cheese blends like Monterey Jack or Pepper Jack work well.
  • 1 teaspoon Garlic Powder Feel free to use fresh minced garlic for a stronger flavor.
  • 1 Salsa Any variety suits this casserole or can be omitted.

Equipment

  • Large skillet
  • Mixing Bowl
  • 9x13 inch baking dish

Method
 

Step-by-Step Instructions
  1. Preheat your oven to 350°F (175°C).
  2. In a large skillet over medium heat, add 1 pound of lean ground beef. Cook for about 5-7 minutes until browned. Stir in 1 chopped yellow onion and 1 diced red bell pepper; cook until softened, about 3-4 minutes.
  3. Sprinkle in your taco seasoning mix and add 1 cup of water. Stir well and simmer for about 5 minutes.
  4. In a mixing bowl, combine 2 cups of biscuit mix, 1 cup of sour cream, ¼ cup of mayonnaise, and 1 can of diced green chiles. Stir until blended.
  5. Spray a 9x13-inch baking dish with cooking spray. Layer half of the ground beef mixture, half of the biscuit mixture, and half of the cheddar cheese. Repeat, finishing with the remaining cheese.
  6. Bake for 30-35 minutes until the top is golden brown and set.
  7. Let cool for about 10 minutes before slicing and serving warm.

Nutrition

Serving: 1sliceCalories: 350kcalCarbohydrates: 30gProtein: 20gFat: 20gSaturated Fat: 10gCholesterol: 60mgSodium: 800mgPotassium: 500mgFiber: 3gSugar: 2gVitamin A: 10IUVitamin C: 15mgCalcium: 20mgIron: 15mg

Notes

Ensure even distribution of layers to prevent dryness and sogginess. Customize wisely to maintain flavor dynamics.

Tried this recipe?

Let us know how it was!

Easy Cowboy Butter Chicken Linguine Recipe for Cozy Nights

As I stood in my kitchen, the tantalizing aroma of melted butter and spices danced through the air, instantly transporting me to a cozy family gathering. This Easy Cowboy Butter Chicken Linguine Recipe has become a staple in my home, perfect for those busy weeknights when I crave something special yet quick to whip up. With its creamy sauce and tender chicken, this dish is not only a comforting hug on a plate but also a family-friendly meal that even the pickiest eaters can’t resist. Whether you’re looking to impress friends or simply want a delightful dinner after a hectic day, this recipe delivers on all fronts. Are you ready to turn dinner into a memorable experience? Let’s dive into this flavorful journey together!

Why will you adore this recipe?

Comforting Familiarity: This Easy Cowboy Butter Chicken Linguine Recipe wraps you in warmth, making it the perfect go-to for family dinners or gatherings.

Quick Preparation: With straightforward steps, you can prepare a delicious meal without hours in the kitchen. Ideal for busy weeknights!

Endless Versatility: Feel free to swap linguine for your favorite pasta or toss in seasonal veggies like spinach or bell peppers for added nutrition.

Crowd-Pleasing Flavor: The rich buttery sauce is a sure hit, ensuring even the pickiest eaters will come back for seconds.

Elegant Simplicity: You can impress your guests with minimal effort while enjoying the satisfaction of a home-cooked meal; it’s a culinary win!

With a touch of creativity, try pairing it with a crisp green salad or serving alongside Garlic Butter Baked Chicken for a complete meal that everyone will love.

Easy Cowboy Butter Chicken Linguine Ingredients

For the Pasta
Linguine – The base of the dish, providing a hearty and chewy texture; feel free to substitute with penne or spaghetti for a twist.

For the Chicken
Chicken breasts – Choose fresh, well-seasoned cuts to ensure a filling and flavorful protein source.

For the Sauce
Butter – Adds richness and flavor; unsalted butter works well, or use a mix with olive oil for a lighter version.
Garlic – Fresh minced garlic is recommended for the best aromatic flavor.
Paprika – This spice enhances color and adds mild smokiness; adjust to balance spice levels to your preference.
Italian seasoning – A mix of dried herbs that complement the dish’s Italian inspiration; fresh herbs can be a delightful alternative.
Heavy cream – Creates a luscious creamy sauce; swap in half-and-half for a lighter option.

For the Garnish
Parmesan cheese – Adds umami and a salty finish to the dish; optional, but can be replaced with nutritional yeast for a dairy-free version.
Fresh parsley – Brightens the dish and adds freshness as a lovely garnish.

This Easy Cowboy Butter Chicken Linguine Recipe has everything you need for a comforting family dinner!

Step‑by‑Step Instructions for Easy Cowboy Butter Chicken Linguine Recipe

Step 1: Prep Ingredients
Start by gathering all your ingredients for the Easy Cowboy Butter Chicken Linguine. Mince 2-3 cloves of fresh garlic and chop a handful of parsley for garnish. Fill a large pot with water, salt it generously, and bring it to a rolling boil for the linguine while you prepare the chicken.

Step 2: Cook Pasta
Once your water is boiling, add the linguine and cook according to package instructions, usually around 9-11 minutes until al dente. Stir occasionally to prevent sticking, and reserve about a cup of pasta water before draining. This starchy water will help adjust the sauce’s consistency.

Step 3: Sauté Chicken
In a large skillet, melt half of the butter (about 4 tablespoons) over medium heat. Season the chicken breasts with salt and pepper, then add them to the skillet. Cook for 5-7 minutes until they are golden brown and cooked through, reaching an internal temperature of 165°F. Remove chicken from the skillet and let it rest on a cutting board.

Step 4: Add Garlic & Spices
Using the same skillet, add the minced garlic and sauté for about 30 seconds until fragrant. Sprinkle in a teaspoon of paprika and a teaspoon of Italian seasoning, stirring until the spices release their aromas. This step enhances the flavor profile of your Easy Cowboy Butter Chicken Linguine.

Step 5: Create Sauce
Pour in the heavy cream and add the remaining butter to the skillet, stirring well until the butter melts and the sauce thickens slightly. Let this simmer for 2-3 minutes on low heat, allowing the flavors to meld together beautifully. The sauce should be creamy and silky.

Step 6: Combine
Slice the cooked chicken into bite-sized pieces, then return it to the skillet with the sauce. Next, add the drained linguine and a splash of reserved pasta water. Toss everything together until the pasta is fully coated with the creamy sauce, adjusting the consistency as needed with more pasta water.

Step 7: Serve
Plate your Easy Cowboy Butter Chicken Linguine right away while it’s hot. Garnish generously with fresh parsley and a sprinkle of Parmesan cheese, if desired. The vibrant colors and creamy texture make it a delightful dish that’s as appealing to the eye as it is to the palate.

Easy Cowboy Butter Chicken Linguine Variations

Feel free to let your creativity shine while cooking this dish! Discover delightful tweaks that elevate your experience and cater to your family’s preferences.

  • Alternative Pasta: Swap the linguine for spaghetti or penne for a new twist—each pasta shape will bring its unique texture to the dish.
  • Veggie Boost: Incorporate vibrant veggies like spinach or bell peppers into the mix for added nutrition and a pop of color. They add not just nutrition but brightness to the dish!
  • Spicy Kick: For some heat, sprinkle in red pepper flakes or diced jalapeños while sautéing; adjust based on your spice tolerance for a flavorful surprise.
  • Creamy Dream: Use coconut milk in place of heavy cream for a rich, dairy-free alternative that adds a tropical twist to your sauce.
  • Herb Infusion: Replace dried Italian seasoning with a mix of fresh herbs like basil and thyme, enhancing the dish’s aroma and flavor. Fresh herbs introduce a whole new layer of vibrancy, making each bite sing!
  • Cheesy Goodness: Try crumbling feta or goat cheese on top instead of Parmesan for a tangy flair that pairs beautifully with the creamy sauce.
  • Chicken Variations: Use shredded rotisserie chicken for a quicker option, or substitute with shrimp or tofu for a new protein perspective that changes up the dish completely.
  • Nutty Crunch: Add toasted pine nuts or slivered almonds as a finishing touch for an enjoyable crunchy texture that contrasts the creamy sauce.

Pairing this dish with a crisp green salad or enjoying it alongside Cowboy Butter Chicken can really elevate your dining experience. Enjoy the journey of flavors!

Make Ahead Options

These Easy Cowboy Butter Chicken Linguine are perfect for meal prep enthusiasts seeking to streamline their weeknight cooking! You can chop the garlic and parsley, and even cook the chicken up to 24 hours in advance; simply refrigerate them in airtight containers. The sauce can also be prepared ahead and stored, but it’s best to combine everything just before serving to maintain the creamy texture of the linguine. When you’re ready to enjoy, reheat the chicken and sauce gently on the stove, then toss in the linguine along with a splash of reserved pasta water to bring it all back to life. This way, you’ll have a delicious, stress-free meal waiting for you, just as comforting as if you made it fresh!

What to Serve with Easy Cowboy Butter Chicken Linguine?

Looking to create a complete and delightful dining experience? Here are some perfect pairings to elevate your meal.

  • Crisp Green Salad: A light salad with mixed greens and a tangy vinaigrette adds a refreshing contrast to the creamy pasta. The crisp textures and zesty flavors will awaken your palate.

  • Garlic Bread: Warm, buttery garlic bread is always a favorite, providing a crunchy delight to scoop up extra sauce. This pairing ensures no morsel of your creamy linguine goes uneaten!

  • Roasted Vegetables: Seasonal roasted veggies like asparagus or bell peppers bring a pop of color and extra nutrition to the table. Their sweet, caramelized flavors will enhance your comforting dish.

  • Chilled White Wine: A glass of chilled Chardonnay or Sauvignon Blanc complements the richness of the sauce while adding a touch of elegance to dinner. The crisp notes of the wine work beautifully with this easy Cowboy Butter Chicken Linguine.

  • Dessert Pairing: End the meal on a sweet note with a light panna cotta or fresh fruit tart. These treats provide a delightful contrast, balancing the richness of your main course.

  • Cheesy Garlic Mashed Potatoes: For an indulgent twist, serve creamy mashed potatoes alongside. They add extra comfort and pair heavenly with the buttery sauce, creating a truly satisfying plate.

Storage Tips for Easy Cowboy Butter Chicken Linguine

Fridge: Store leftovers in an airtight container for up to 3 days. This keeps your creamy linguine fresh and flavorful.

Freezer: You can freeze the dish for up to 2 months. Portion it out in freezer-safe containers, leaving space for expansion.

Reheating: To reheat, thaw overnight in the fridge for best results. Warm gently on the stove, adding a splash of reserved pasta water to revive the sauce.

Serving Freshness: Always taste the dish after reheating; a sprinkle of fresh parsley can brighten the flavors of your Easy Cowboy Butter Chicken Linguine!

Expert Tips for Easy Cowboy Butter Chicken Linguine

  • Golden Sear: Ensure to sear the chicken until golden brown for enhanced flavor, as the Maillard reaction creates a rich, savory note in your Easy Cowboy Butter Chicken Linguine.

  • Reserving Pasta Water: Always reserve some pasta water before draining; it’s your secret weapon for adjusting the sauce consistency and ensuring it clings to each strand of pasta.

  • Watch Your Pasta: Avoid overcooking your linguine! Cook it al dente to retain its texture, which will stand up beautifully against the creamy sauce.

  • Spice It Up: Feel free to adjust the paprika based on your spice tolerance; it allows you to cater this Easy Cowboy Butter Chicken Linguine to your preferred flavor profile.

  • Fresh Herbs: For a brighter taste, swap out dried Italian seasoning for fresh herbs when possible, adding a burst of flavor to your dish.

Easy Cowboy Butter Chicken Linguine Recipe FAQs

How do I choose the best chicken for this recipe?
When selecting chicken breasts for your Easy Cowboy Butter Chicken Linguine, look for cuts that are pink and plump, with no dark spots. Fresh chicken should feel firm to the touch but not hard. Aim for organic or free-range chicken if possible, as they often have better flavor and texture.

How long can I store leftovers, and what’s the best way?
You can store leftovers of this delicious dish in an airtight container in the fridge for up to 3 days. Ensure the container is sealed tightly to maintain freshness. When reheating, warm gently on the stove with a splash of reserved pasta water to restore the creamy sauce’s consistency.

Can I freeze Easy Cowboy Butter Chicken Linguine?
Absolutely! To freeze your Easy Cowboy Butter Chicken Linguine, portion it into freezer-safe containers, leaving some space for expansion, as liquids can expand when frozen. It should last for up to 2 months. When you’re ready to enjoy it, simply thaw overnight in the fridge, then reheat gently on the stove.

What can I do if my sauce is too thick?
If your sauce turns out too thick, don’t worry! Just take some of the reserved pasta water you set aside before draining your linguine and stir a little into the sauce. Add gradually until it reaches your desired creaminess, ensuring each strand of pasta is coated beautifully.

Are there any dietary considerations I should be aware of?
If you’re cooking for someone with dairy allergies, you can substitute the heavy cream with coconut milk or a dairy-free cream alternative. Similarly, if someone has gluten sensitivities, opt for gluten-free pasta to ensure everyone can enjoy this comforting dish.

Can I add more vegetables to this recipe?
Yes, the more the merrier! You can absolutely mix in spinach, bell peppers, or even zucchini to give your Easy Cowboy Butter Chicken Linguine extra texture and nutrition. Just sauté them with the garlic before adding the cream for a colorful and wholesome addition!

Easy Cowboy Butter Chicken Linguine Recipe

Easy Cowboy Butter Chicken Linguine Recipe for Cozy Nights

This Easy Cowboy Butter Chicken Linguine Recipe combines creamy sauce and tender chicken for a comforting family meal.
Prep Time 15 minutes
Cook Time 25 minutes
Total Time 40 minutes
Servings: 4 servings
Course: Pasta
Cuisine: American, Italian
Calories: 550

Ingredients
  

For the Pasta
  • 8 oz Linguine Feel free to substitute with penne or spaghetti.
For the Chicken
  • 2 pcs Chicken breasts Fresh and well-seasoned.
For the Sauce
  • 4 tbsp Butter Unsalted or mix with olive oil for a lighter version.
  • 2-3 cloves Garlic Minced for best flavor.
  • 1 tsp Paprika Adjust to taste.
  • 1 tsp Italian seasoning Dried or fresh herbs.
  • 1 cup Heavy cream Use half-and-half for a lighter option.
For the Garnish
  • 1/4 cup Parmesan cheese Optional or use nutritional yeast.
  • 1/4 cup Fresh parsley Chopped for garnish.

Equipment

  • Large pot
  • Skillet
  • Cutting board
  • Knife

Method
 

Step-by-Step Instructions
  1. Start by gathering all your ingredients. Mince the garlic and chop parsley for garnish. Fill a pot with water, salt it generously, and bring to a boil.
  2. Add the linguine to the boiling water and cook for 9-11 minutes until al dente, stirring occasionally. Reserve about a cup of pasta water before draining.
  3. Melt half of the butter (about 4 tablespoons) in a skillet over medium heat. Season chicken breasts with salt and pepper, then cook for 5-7 minutes until golden and cooked through.
  4. Remove the chicken from the skillet. In the same skillet, add minced garlic and sauté for 30 seconds. Add paprika and Italian seasoning.
  5. Pour in the heavy cream and add the remaining butter. Stir until melted and the sauce thickens, simmering for 2-3 minutes.
  6. Slice the chicken and return it to the skillet. Add drained linguine and a splash of reserved pasta water, tossing until fully coated.
  7. Serve immediately, garnishing with parsley and Parmesan cheese if desired.

Nutrition

Serving: 1servingCalories: 550kcalCarbohydrates: 45gProtein: 30gFat: 30gSaturated Fat: 18gMonounsaturated Fat: 8gCholesterol: 100mgSodium: 600mgPotassium: 500mgFiber: 3gSugar: 2gVitamin A: 500IUVitamin C: 2mgCalcium: 150mgIron: 2mg

Notes

Store leftovers in an airtight container for up to 3 days. Can freeze for 2 months. Reheat gently with reserved pasta water added back to the sauce.

Tried this recipe?

Let us know how it was!

Cozy Up with the Best Tortellini with Roasted Butternut Squash

As the leaves begin to swirl and the air turns crisp, nothing quite warms the heart like a bowl of comforting pasta. Enter my Best Tortellini with Roasted Butternut Squash—a cozy melody of flavors that beckons to be enjoyed on chilly evenings. This dish stars the natural sweetness of tender roasted butternut squash, paired perfectly with cheese-filled tortellini. What’s more, it comes together in a flash and is a fantastic option for lunch leftovers the next day. With its rich brown butter and aromatic sage sauce, each bite envelops you in warmth, making it the ultimate comfort food for any home chef. Curious how to create this delightful dish? Let’s dive in!

Why is this tortellini recipe a must-try?

Comforting Warmth: The cozy embrace of roasted butternut squash perfectly complements the rich flavors of cheese-filled tortellini, making it an irresistible meal.

Quick and Easy: With simple steps and minimal prep, you can whip this dish up in no time, perfect for busy weeknights.

Endless Versatility: Feel free to experiment by swapping in different tortellini types or adding grilled chicken for a heartier fare.

Flavor-Packed: The rich brown butter and crispy sage elevate this dish to gourmet status while remaining delightfully homey.

Leftover Delights: Enjoy easy lunches the next day, as this dish tastes just as delicious when reheated.

Pair this with a refreshing arugula salad or some crusty garlic bread, and you’ll have a complete meal that wows!

Best Tortellini with Roasted Butternut Squash Ingredients

For the Sauce
Butter – Adds richness and creates that luscious brown butter sauce; make sure to use unsalted for better seasoning control.
Fresh Sage Leaves – Provides an aromatic burst; while dried sage works in a pinch, fresh brings the best flavor.

For the Roasted Vegetables
Olive Oil – Ideal for sautéing the squash; enhances flavor beautifully—can swap with any other cooking oil if preferred.
Butternut Squash – Acts as the star vegetable, lending sweetness and fantastic texture; sweet potatoes or zucchini can be used as substitutes for variety.
Kosher Salt – Elevates all the flavors in your dish; sea salt is a great alternative if you don’t have kosher.
Black Pepper – Adds warmth and contrast to the dish; white pepper works for those who prefer a milder taste.
Garlic Powder – Intensifies the flavor profile; fresh minced garlic can be swapped for a more robust taste.

For the Tortellini
Cheese Tortellini (20 oz) – The heart of the dish, offering both carbs and protein; consider using spinach and ricotta or three-cheese tortellini for a fun twist.
Parmesan Cheese (1/4 cup, plus extra for serving) – Brings in savory depth and enhances the overall taste; if needed, Pecorino Romano can be a flavorful substitute.

This recipe for the Best Tortellini with Roasted Butternut Squash is a celebration of cozy comfort food—each ingredient plays a role in creating a harmonious and delightful dish. Ready to whisk these together?

Step‑by‑Step Instructions for Best Tortellini with Roasted Butternut Squash

Step 1: Brown the Butter
In a skillet over medium heat, melt 1/2 cup of unsalted butter until it begins to bubble. Stir occasionally for about 5 minutes until the butter turns a golden brown with small bits forming at the bottom. Be mindful of its color; once it’s nutty and fragrant, promptly remove it from heat to avoid bitterness.

Step 2: Infuse the Sage
Add a handful of fresh sage leaves into the browned butter, stirring gently for about 30 seconds to infuse the flavor. The leaves will sizzle and crisp up, brightening the aroma of your cozy tortellini dish. Set this aromatic mixture aside while you prepare the squash.

Step 3: Sauté the Squash
In the same skillet, drizzle in 2 tablespoons of olive oil and toss in 4 cups of cubed butternut squash. Season with kosher salt, black pepper, and garlic powder; sauté for 8-10 minutes, stirring occasionally, until the squash is golden brown and tender. This step transforms the squash’s sweetness, creating a delightful contrast with the tortellini.

Step 4: Cook the Tortellini
While the squash is cooking, bring a large pot of salted water to a boil. Add 20 ounces of cheese tortellini and cook according to package directions, usually about 4-5 minutes. Stir occasionally, and test for al dente texture; it should be firm yet tender, perfectly complementing the roasted butternut squash.

Step 5: Combine the Ingredients
Once the tortellini is cooked, drain it, reserving a cup of pasta water for later. In the skillet with cooked squash, gently fold in the drained tortellini. Lovingly toss to combine, ensuring that every piece is coated in the buttery goodness and tender squash pieces fill every bite.

Step 6: Toss with Brown Butter and Sage
Pour the reserved brown butter and crispy sage leaves over the tortellini and squash mixture. Give it a gentle toss to coat everything thoroughly. If the dish appears dry, incorporate a little reserved pasta water to achieve your desired consistency, making this the Best Tortellini with Roasted Butternut Squash you’ve ever made.

Step 7: Serve the Dish
Transfer your warm tortellini to serving bowls and finish with a sprinkle of freshly grated Parmesan cheese. Enjoy this comforting dish hot, and feel free to add more Parmesan on top for an extra touch of savory delight, making each bite a flavorful hug.

Expert Tips for Best Tortellini with Roasted Butternut Squash

Uniform Cubes: Cut butternut squash into uniform 1-inch cubes to ensure even cooking throughout, helping maintain a perfect texture.

Brown Butter Precision: Don’t rush the browning process; once the butter is golden, remove it from heat immediately to avoid turning bitter.

Pasta Water Magic: Always reserve a cup of pasta water before draining the tortellini; this starchy water is perfect to adjust sauce consistency later.

Gentle Mixing: When combining the tortellini and squash, toss gently to avoid breaking the delicate cheese-filled pasta, maintaining the dish’s integrity.

Opt for Fresh Sage: While dried sage can be used, fresh leaves elevate the dish’s flavor significantly—don’t skip this simple but impactful choice!

Make Ahead Options

Preparing the Best Tortellini with Roasted Butternut Squash in advance is a fantastic way to save time on busy nights! You can roast the butternut squash and make the brown butter sage sauce up to 24 hours ahead of time. Simply store the roasted squash in an airtight container in the refrigerator, and keep the brown butter sage mixture in a separate container. When it’s time to serve, just reheat the squash and sauce in a skillet over medium heat, cook the tortellini according to package instructions, and then combine everything together. This approach ensures that the flavors remain rich and delightful, making your cozy dinner just as scrumptious with minimal effort!

Storage Tips for Best Tortellini with Roasted Butternut Squash

Fridge: Store any leftovers in an airtight container for up to 3 days. Make sure to cool them to room temperature before sealing to maintain freshness.

Freezer: Portion the dish into freezer-safe containers, adding a little extra butter or oil to combat dryness. It will keep well for up to 2 months.

Reheat: To enjoy the best tortellini with roasted butternut squash, reheat gently on the stove or in the microwave, adding a splash of water or broth to prevent dryness. Cover with a damp paper towel while microwaving to maintain moisture.

Best Tortellini with Roasted Butternut Squash Variations

Feel free to play around with this cozy recipe and create your perfect pasta dish!

  • Dairy-Free: Use coconut oil instead of butter and swap cheese tortellini for a dairy-free alternative for a lighter option.
  • Heartier Add-ins: Add grilled chicken or Italian sausage to make this a protein-packed meal, perfect for satisfying appetites on chilly nights.
  • Gluten-Free: Use gluten-free tortellini and ensure your cooking cream or broth options are gluten-free to accommodate dietary needs.
  • Extra Veggies: Toss in spinach or kale just before serving for added color and nutrients; they’ll wilt perfectly with the heat!
  • Flavor Explosion: Add crushed red pepper flakes for a delightful kick; this elevates the cozy dish into a spicy, flavorful experience.
  • Roasted Garlic: Instead of garlic powder, roast whole garlic cloves in the oven with the squash, then mash into the butter for depth.
  • Herb Variations: Experiment with different herbs like thyme or rosemary for a unique flavor profile that can make your dish stand out.
  • Nutty Twist: Sprinkle with crushed pecans or walnuts before serving for an extra crunch that complements the creamy tortellini beautifully.

When you discover your favorite way to enjoy this dish, share it with loved ones or try it alongside a refreshing arugula salad with lemon vinaigrette. Want more cozy recipes? Consider making that delightful Sausage Tortellini Soup next for another comforting meal!

What to Serve with Best Tortellini with Roasted Butternut Squash

Pairing this delightful dish with complementary sides will enhance your meal experience and create a cozy dining atmosphere.

  • Arugula Salad: A refreshing salad with zesty lemon vinaigrette lightens up the meal and adds a peppery crunch. The citrus complements the sweetness of the squash.
  • Garlic Bread: Crispy, buttery garlic bread is the perfect vehicle for savoring every last drop of that rich brown butter sauce. A comforting favorite!
  • Roasted Brussels Sprouts: The caramelized edges of Brussels sprouts provide a satisfying crunch and a hint of bitterness that beautifully balances the sweetness of the tortellini.
  • Red Wine: A glass of smooth red wine, such as Chianti or Merlot, complements the earthy flavors of the dish while elevating the entire dining experience.
  • Mushroom Risotto: Creamy mushroom risotto offers a rich, velvety side that echoes the comforting nature of the tortellini while adding a delightful umami depth.
  • Pumpkin Pie: End your meal on a sweet note with classic pumpkin pie, where the flavors of fall resonate perfectly with the cozy essence of your dinner.

Best Tortellini with Roasted Butternut Squash Recipe FAQs

What is the best way to select butternut squash?
Absolutely! When choosing butternut squash, look for ones that feel heavy for their size, have a smooth, unblemished skin, and a deep tan color. Avoid squashes with soft spots or those that are overly green. The perfect squash will have a uniform shape and be free of large blemishes or dark spots.

How long can I store leftovers of this tortellini dish?
You can store leftovers of the Best Tortellini with Roasted Butternut Squash in an airtight container for up to 3 days in the refrigerator. Be sure to let it cool to room temperature before sealing to help maintain the freshest flavors and textures.

Can I freeze the tortellini dish, and if so, how?
Very! To freeze, portion the dish into freezer-safe containers, making sure to add an extra drizzle of butter or olive oil to prevent it from drying out. Seal tightly and label with the date. It will stay good for up to 2 months. When you’re ready to eat, simply thaw in the refrigerator overnight and reheat gently on the stove, adding a splash of water or broth to keep it moist.

What should I do if my brown butter burns?
Oh no! If your brown butter starts to burn, quickly remove it from heat and transfer it to a cool bowl to stop the cooking process. If it’s not yet bitter, you can salvage it by straining out any burnt bits. For next time, lower the heat and stir more frequently to achieve that perfect nutty aroma without overcooking.

Is this sauce suitable for vegans or those with dairy allergies?
Absolutely! You can make the Best Tortellini with Roasted Butternut Squash vegan by substituting the butter with plant-based margarine or olive oil. For a dairy-free tortellini, look for brands that make pasta filled with vegetables or plant-based cheese. You can also use nutritional yeast as a flavorful substitute for Parmesan cheese.

Best Tortellini with Roasted Butternut Squash

Cozy Up with the Best Tortellini with Roasted Butternut Squash

This Best Tortellini with Roasted Butternut Squash recipe offers a comforting blend of flavors perfect for chilly evenings.
Prep Time 15 minutes
Cook Time 25 minutes
Total Time 40 minutes
Servings: 4 servings
Course: Pasta
Cuisine: Italian
Calories: 450

Ingredients
  

For the Sauce
  • 1/2 cup unsalted butter Adds richness and creates brown butter sauce
  • 1 handful fresh sage leaves Provides an aromatic burst
For the Roasted Vegetables
  • 2 tablespoons olive oil Ideal for sautéing the squash
  • 4 cups butternut squash Acts as the star vegetable
  • 1 teaspoon kosher salt Elevates all flavors
  • 1 teaspoon black pepper Adds warmth and contrast
  • 1 teaspoon garlic powder Intensifies flavor profile
For the Tortellini
  • 20 ounces cheese tortellini The heart of the dish
  • 1/4 cup Parmesan cheese Brings savory depth

Equipment

  • Skillet
  • Large pot

Method
 

Step-by-Step Instructions
  1. In a skillet over medium heat, melt the butter until it begins to bubble, stirring occasionally for about 5 minutes until it turns golden brown.
  2. Add fresh sage leaves to the browned butter and stir gently for about 30 seconds.
  3. In the same skillet, drizzle in olive oil and toss in cubed butternut squash. Season with salt, black pepper, and garlic powder; sauté for 8-10 minutes until tender.
  4. Bring a large pot of salted water to a boil. Add cheese tortellini and cook according to package directions, about 4-5 minutes.
  5. Drain the tortellini, reserving a cup of pasta water. Fold the drained tortellini into the skillet with cooked squash.
  6. Pour the reserved brown butter and crispy sage over the tortellini and squash mixture, toss to coat. Adjust with reserved pasta water if necessary.
  7. Transfer to serving bowls and finish with a sprinkle of Parmesan cheese. Enjoy hot.

Nutrition

Serving: 1bowlCalories: 450kcalCarbohydrates: 60gProtein: 15gFat: 20gSaturated Fat: 10gPolyunsaturated Fat: 1gMonounsaturated Fat: 8gCholesterol: 40mgSodium: 700mgPotassium: 800mgFiber: 5gSugar: 4gVitamin A: 12000IUVitamin C: 25mgCalcium: 150mgIron: 2mg

Notes

Cut butternut squash into uniform 1-inch cubes for even cooking. Reserve pasta water for sauce consistency.

Tried this recipe?

Let us know how it was!

Gryffindor Firewhisky Chocolate Trifle: A Spellbinding Delight

As I pulled the warm chocolate cake from the oven, nostalgia washed over me, transporting me to cozy evenings spent with friends and magical tales from far-off lands. Introducing the Gryffindor Firewhisky Chocolate Trifle—a dessert that perfectly unites the whimsy of the wizarding world with the comfort of homemade indulgence. Each layer features moist chocolate cake, sumptuous Firewhisky-infused custard, and a burst of vibrant berries, creating a treat that’s sure to dazzle your guests. What’s even better? This contraption is not only a showstopper at themed gatherings, but it can be made kid-friendly by simply swapping out the Firewhisky. Whether you’re hosting a Wizards’ Night In or planning a birthday bash, this delightful dessert combines the best of festive celebration with effortless preparation. Ready to conjure up some magic in your kitchen? Let’s get started!

Why is this trifle a must-try?

Indulgent layers: The Gryffindor Firewhisky Chocolate Trifle boasts rich chocolate cake, creamy custard, and fresh berries that shine in every bite.
Customizable flavors: Easily swap the Firewhisky for vanilla extract in the kid-friendly version, ensuring everyone can enjoy this magical treat.
Perfect for gatherings: This showstopper will wow your guests at birthday parties or Harry Potter-themed events, making it an instant hit.
Quick assembly: Save time with a straightforward assembly process—it’s a breeze to whip up, leaving you free to enjoy the festivities.
Serve with flair: Complete this enchanting experience by pairing your trifle with delightful treats like Chocolate Fudge Cupcakes or a cozy cup of butterbeer.

Ingredients for Gryffindor Firewhisky Chocolate Trifle

For the Cake

  • All-purpose flour – Main structure component; gluten-free flour can be a great substitute.
  • Granulated sugar – Adds the perfect sweetness to both the cake and custard.
  • Unsweetened cocoa powder – Provides a rich chocolate flavor that everyone loves.
  • Baking powder – Acts as a leavening agent for a fluffy cake.
  • Salt – Enhances the overall flavor and brings out the sweetness.
  • Milk – Keeps the cake moist; try using dairy-free milk for a vegan option.
  • Vegetable oil – Ensures the cake remains delightfully moist and tender.
  • Eggs – Binds the ingredients together, contributing to the cake’s structure.
  • Vanilla extract – Adds depth to the flavor profile.

For the Custard

  • Heavy cream – Essential for rich custard and whipped cream layers.
  • Egg yolks – These provide a creamy, thick texture to the custard.
  • Cornstarch – Thickens the custard to perfection.
  • Firewhisky – Infuses the custard with a unique flavor; substitute with vanilla for a kid-friendly version.

For the Topping

  • Mixed berries (strawberries, blueberries, raspberries) – Adds freshness and a pop of color to the trifle.
  • Whipped cream – A luxurious topping that elevates the dessert’s richness.
  • Edible gold glitter – A decorative touch that brings a sparkle reminiscent of Gryffindor’s colors.

Step‑by‑Step Instructions for Gryffindor Firewhisky Chocolate Trifle

Step 1: Prepare the chocolate cake
Preheat your oven to 350°F (175°C) and grease an 8-inch round cake pan. In a large mixing bowl, whisk together the all-purpose flour, granulated sugar, unsweetened cocoa powder, baking powder, and salt until well combined. In another bowl, mix the milk, vegetable oil, eggs, and vanilla extract. Gradually combine the wet ingredients into the dry mixture, stirring until just combined. Pour the batter into the prepared pan and bake for 25–30 minutes, or until a toothpick inserted in the center comes out clean. Let the cake cool completely.

Step 2: Make the Firewhisky custard
While the cake cools, prepare the Firewhisky-infused custard. In a saucepan, gently warm the heavy cream over medium heat until just steaming, not boiling. In a separate bowl, whisk together the egg yolks, sugar, and cornstarch until smooth. Gradually whisk the warm cream into the egg mixture to temper the yolks, then pour everything back into the saucepan. Cook over low heat, stirring continuously until the mixture thickens and coats the back of a spoon, about 5–7 minutes. Remove from heat and stir in the Firewhisky (or vanilla for the kid-friendly version). Allow the custard to cool slightly.

Step 3: Assemble the trifle
Once the cake is completely cooled, slice it into two even layers. Place the bottom layer in the bottom of your trifle dish. If desired, brush the layer with a bit more Firewhisky for added flavor. Spoon a generous portion of the Firewhisky custard over the cake layer, spreading it evenly. Next, add a layer of mixed berries on top of the custard. Repeat the layering process by adding the second layer of cake, finishing with custard and a delightful array of berries as your top layer of the Gryffindor Firewhisky Chocolate Trifle.

Step 4: Decorate the trifle
To crown your beautiful trifle, dollop a generous amount of whipped cream on top, creating a fluffy and decorative layer. For finishing touches, sprinkle edible gold glitter over the whipped cream to add a touch of sparkle reminiscent of Gryffindor’s colors. You can also add a few extra berries for a pop of color. Chill the trifle in the refrigerator for 1–2 hours to allow the flavors to meld and to set before serving.

Make Ahead Options

The Gryffindor Firewhisky Chocolate Trifle is a perfect candidate for busy home cooks looking to save time without sacrificing flavor! You can bake the chocolate cake and prepare the Firewhisky custard up to 24 hours in advance. Simply allow the cake to cool completely, wrap it tightly in plastic wrap, and store it in the refrigerator. The custard can also be covered and refrigerated overnight. When you’re ready to serve, slice the cake, layer it with custard and mixed berries just before assembling, and top it with whipped cream. This strategy ensures that your dessert maintains its fresh taste and delightful textures, making your magical gathering stress-free and enjoyable!

Gryffindor Firewhisky Chocolate Trifle Variations

Feel free to let your imagination run wild and adjust this recipe to suit your taste!

  • Kid-Friendly: Replace Firewhisky with vanilla extract and a pinch of smoked paprika for a unique twist. Everyone can enjoy the magic!
  • Gluten-Free: Substitute all-purpose flour with a gluten-free flour blend, allowing those with dietary restrictions to enjoy this delightful dessert.
  • Vegan Option: Use a plant-based milk and replace eggs with flax eggs; for the custard, try a rich coconut milk alternative for extra creaminess.
  • Fruit Variations: Incorporate other fruits like banana slices or diced mango for a tropical vibe that adds a lovely contrast to the rich chocolate.
  • Boozy Alternatives: Try bourbon or dark rum in place of Firewhisky to create a completely different flavor profile that boosts the indulgence level.
  • Chocolate Boost: Add chocolate chips between layers for an even richer chocolate experience that will delight the chocolate lovers in your life.
  • Spiced Touch: Mix in a dash of cinnamon or nutmeg in the custard for a warm, aromatic flavor that elevates your dessert’s profile.
  • Serving Suggestions: Pair your trifle with delightful treats like Easter Chocolate Lasagna for an unforgettable spread or enjoy with Chocolate Granola Cups for a crunchy balance.

What to Serve with Gryffindor Firewhisky Chocolate Trifle

Looking to create a magical feast that complements the enchanting flavors of your trifle?

  • Butterbeer: A creamy, sweet concoction that evokes warmth and nostalgia, perfect alongside the rich chocolate layers.
  • Pumpkin Pasties: These savory pastries add a festive touch, balancing the sweetness of the trifle with their savory flavor.
  • Chocolate Fudge Cupcakes: Decadent and rich, they mirror the trifle’s chocolate profile and add a delightful texture contrast.

Elevate your gathering with a cozy cup of butterbeer, or offer delightful pumpkin pasties for a whimsical touch. These delightful pairings make your dessert shine even brighter, ensuring a feast fit for wizards and Muggles alike.

  • Mixed Berry Salad: A refreshing side that brings brightness and acidity, complementing the sweetness of the trifle.
  • Spiced Apple Cider: Warm and aromatic, this beverage enhances cozy vibes while harmonizing with the dessert’s rich flavors.
  • Gryffindor-themed Cookies: Fun and thematic, they complete your magical spread, ensuring guests leave enchanted by both tastes and presentation.

Expert Tips for Gryffindor Firewhisky Chocolate Trifle

  • Chill Time Matters: Allow the trifle to chill for at least 1–2 hours before serving; this helps the flavors meld and the textures to set beautifully.
  • Layering Technique: To prevent sogginess in your Gryffindor Firewhisky Chocolate Trifle, ensure each cake layer is brushed lightly with custard or Firewhisky for taste without over-soaking.
  • Temperature Control: Always let the cake cool completely before assembling; warm cake can cause the custard to break down, ruining the trifle’s texture.
  • Vibrant Berries: Choose ripe mixed berries for an added tartness and freshness; if using frozen berries, thaw and drain excess moisture before layering.
  • Piping Perfection: Use a piping bag for decorating with whipped cream; this adds a magical touch to the presentation and allows for more control.

Storage Tips for Gryffindor Firewhisky Chocolate Trifle

  • Room Temperature: For best taste, this trifle is best enjoyed chilled. Avoid leaving it at room temperature for more than 2 hours to ensure food safety.

  • Fridge: Store any leftovers in an airtight container in the refrigerator for up to 2 days. This keeps the layers fresh and maintains their magical flavors.

  • Freezer: For longer storage, you can freeze the cake layers. Wrap them tightly in plastic wrap before freezing for up to 1 month. However, it’s best to assemble the Gryffindor Firewhisky Chocolate Trifle fresh before serving.

  • Reheating: If you have frozen cake layers, thaw in the refrigerator overnight before assembling. Do not freeze the custard or toppings, as they will lose texture when thawed.

Gryffindor Firewhisky Chocolate Trifle Recipe FAQs

How do I choose the right ripeness of berries for the trifle?
Absolutely! When selecting mixed berries, look for ones that are firm and plump with vibrant colors. Avoid any berries with dark spots or signs of mold, as these can affect both the taste and presentation of your trifle. Fresh, ripe strawberries, blueberries, and raspberries will add a refreshing burst of flavor.

What’s the best way to store leftover Gryffindor Firewhisky Chocolate Trifle?
Very! Store any leftovers in an airtight container in the refrigerator for up to 2 days. Keeping it covered will maintain the flavor and moisture, ensuring you can still enjoy this magical dessert a bit longer. Remember, it’s best served chilled!

Can I freeze the Gryffindor Firewhisky Chocolate Trifle?
Definitely! While it’s best to assemble the trifle fresh, you can freeze the cake layers separately. Wrap the cooled cake in plastic wrap before placing it in a freezer-safe container for up to 1 month. When you’re ready to serve, thaw the layers in the refrigerator overnight before assembling your trifle—the custard and toppings, however, should not be frozen.

What should I do if my custard curdles while making it?
Not a problem—this can happen! If you notice your custard has curdled, it’s likely because the cream was too hot when mixed. To recover, immediately strain the mixture through a fine sieve into a clean saucepan, which removes the curds. Return it to low heat, stirring continuously until you achieve a smooth consistency again. Remember, slow and steady wins the race when tempering eggs!

Are there any dietary modifications for the Gryffindor Firewhisky Chocolate Trifle?
Absolutely! If you’re preparing this dessert for kids or those avoiding alcohol, simply omit the Firewhisky. Substitute it with vanilla extract and add a pinch of smoked paprika for a unique twist. Additionally, ensure your whipped cream is dairy-free if allergies are a concern; there are fantastic alternatives on the market that work beautifully in this recipe!

Gryffindor Firewhisky Chocolate Trifle

Gryffindor Firewhisky Chocolate Trifle: A Spellbinding Delight

Gryffindor Firewhisky Chocolate Trifle combines decadent layers of chocolate cake, custard, and berries for an enchanting dessert experience.
Prep Time 30 minutes
Cook Time 30 minutes
Chill Time 2 hours
Total Time 3 hours
Servings: 8 slices
Course: Dessert
Cuisine: Wizarding
Calories: 400

Ingredients
  

For the Cake
  • 1 cup All-purpose flour Gluten-free flour can be a substitute.
  • 1 cup Granulated sugar Adds sweetness to the cake and custard.
  • 1/2 cup Unsweetened cocoa powder Provides a rich chocolate flavor.
  • 2 tsp Baking powder Acts as a leavening agent.
  • 1/2 tsp Salt Enhances sweetness.
  • 1 cup Milk Try dairy-free milk for a vegan option.
  • 1/2 cup Vegetable oil Keeps the cake moist.
  • 2 large Eggs Binds the ingredients together.
  • 1 tsp Vanilla extract Adds depth to flavor.
For the Custard
  • 1 cup Heavy cream Essential for rich custard.
  • 5 large Egg yolks Provides creamy texture.
  • 2 tbsp Cornstarch Thickens the custard.
  • 1/4 cup Firewhisky Infuses unique flavor; substitute with vanilla for kid-friendly version.
For the Topping
  • 2 cups Mixed berries (strawberries, blueberries, raspberries) Adds freshness.
  • 1 cup Whipped cream A luxurious topping.
  • 1 tbsp Edible gold glitter Decorative touch.

Equipment

  • 8-inch round cake pan
  • Mixing bowls
  • Saucepan
  • whisk
  • Trifle dish

Method
 

Step-by-Step Instructions
  1. Preheat your oven to 350°F (175°C) and grease an 8-inch round cake pan. In a large mixing bowl, whisk together the flour, sugar, cocoa powder, baking powder, and salt. In another bowl, mix milk, vegetable oil, eggs, and vanilla. Combine wet into dry ingredients, pour into pan. Bake for 25-30 minutes.
  2. While the cake cools, prepare the custard. Warm heavy cream in a saucepan. In a bowl, whisk egg yolks, sugar, and cornstarch. Gradually combine warm cream into yolks. Pour back into saucepan, cook over low heat until thickened, about 5-7 minutes. Stir in Firewhisky and cool slightly.
  3. Once the cake is cool, slice into two layers. Place the bottom layer in the trifle dish, brush with Firewhisky. Spoon custard over, add a layer of mixed berries. Repeat with the second cake layer, finishing with custard and berries.
  4. Dollop whipped cream on top and sprinkle with edible gold glitter. Chill for 1-2 hours before serving to meld flavors.

Nutrition

Serving: 1servingCalories: 400kcalCarbohydrates: 50gProtein: 5gFat: 20gSaturated Fat: 10gPolyunsaturated Fat: 2gMonounsaturated Fat: 5gCholesterol: 100mgSodium: 150mgPotassium: 200mgFiber: 2gSugar: 30gVitamin A: 500IUVitamin C: 15mgCalcium: 100mgIron: 2mg

Notes

For best results, allow the trifle to chill adequately to meld flavors. Store leftovers in the refrigerator for up to 2 days.

Tried this recipe?

Let us know how it was!

Indulge in Fluffy Vegan Pumpkin Cake Bliss This Fall

As I sifted through a basket of bright orange pumpkins at the farmers’ market, a cozy, nostalgic feeling washed over me, transporting me back to autumn days filled with laughter and warmth. This Vegan Pumpkin Cake is the heart of that memory, capturing the essence of the season in every slice. Not only is it an easy-to-make dessert perfect for gatherings, but it’s also a guilt-free indulgence that caters to those following vegan or gluten-free diets. Topped with a creamy maple cinnamon frosting, this cake offers a delightful combination of spice and sweetness that will have everyone reaching for seconds. Curious about how to create this slice of fall magic in your own kitchen? Let’s dive into the recipe that’s sure to become a seasonal staple!

Why will you adore this cake?

Comforting, nostalgic flavors: Infused with warm spices, this Vegan Pumpkin Cake evokes fond autumn memories with every bite.
Simple to make: With straightforward ingredients and easy instructions, even novice bakers can create this delightful dessert.
Crowd-pleaser: Perfect for gatherings or potlucks, it caters to vegan and gluten-free diets, ensuring everyone can enjoy a slice.
Moist and fluffy texture: The cake’s light crumb and luscious maple cinnamon frosting make it an irresistible treat.
Versatile decorating options: Add your personal flair with seasonal toppings, or simply savor it as is for a classic experience.

This cake pairs beautifully with a cup of tea or coffee, making it an ideal companion for a cozy afternoon!

Vegan Pumpkin Cake Ingredients

• Here’s everything you’ll need to create this delightful Vegan Pumpkin Cake!

For the Cake

  • Pumpkin Puree – Adds moisture and flavor; use homemade for a thicker consistency if desired.
  • Dairy-Free Milk – Provides moisture and tenderness; soy milk works best, but almond or oat milk are great alternatives.
  • Neutral Flavored Oil – Keeps the cake moist; consider substituting half with melted vegan butter for richer flavor.
  • Light Brown Sugar – Offers sweetness and depth; granulated sugar can work in its place, or use coconut sugar for a refined sugar-free option.
  • Granulated Sugar – Contributes to sweetness and fluffiness; feel free to use more brown sugar if you prefer a richer taste.
  • Apple Cider Vinegar – Enhances the cake’s rise; lemon juice can serve as a substitution if necessary.
  • Vanilla Extract – Adds warm notes of flavor; no need for a substitute, it’s just perfect as is!
  • All-Purpose Flour – Provides structure; use a gluten-free measure-for-measure flour if needed, adjusting baking time accordingly.
  • Pumpkin Pie Spice – Delivers that signature warming spice; make your own blend for a personalized touch.
  • Ground Cinnamon – Deepens flavor and aroma; you can amp up the pumpkin pie spice if you adore those fall flavors.
  • Baking Powder/Baking Soda – Essential leavening agents that help the cake rise beautifully.
  • Salt – A touch enhances all the flavors; it’s optional but recommended!

For the Frosting

  • Vegan Block Butter – Essential for a creamy frosting; make sure it’s at room temperature for easy blending.
  • Powdered Sugar – Sweetens the frosting; adjust based on your sweetness preference.
  • Maple Syrup – Adds a delightful flavor and helps achieve the perfect frosting consistency; adjust to taste.

Optional Decoration

  • Biscoff Pumpkins – These cute decor pieces add a seasonal flair; customize them for added aesthetic appeal.

This Vegan Pumpkin Cake is not only a delightful treat but also a fantastic way to embrace the fall season!

Step‑by‑Step Instructions for Vegan Pumpkin Cake

Step 1: Preheat the Oven
Begin by preheating your oven to 355°F (180°C). As the oven warms up, prepare two 8-inch round cake pans by greasing them with a neutral oil or lining them with parchment paper. This setup ensures your fluffy Vegan Pumpkin Cake releases easily once baked, leading to a beautifully finished dessert.

Step 2: Combine Wet Ingredients
In a large mixing bowl, whisk together the wet ingredients: pumpkin puree, dairy-free milk, neutral oil, light brown sugar, granulated sugar, apple cider vinegar, and vanilla extract. Blend these ingredients until they are well combined and smooth, forming a warm and inviting mixture that will give your cake its delightful moisture and flavor.

Step 3: Mix in Dry Ingredients
To the wet mixture, sift in the pumpkin pie spice, ground cinnamon, baking powder, and baking soda. Stir gently until everything is well-integrated, making sure the warm spices and leavening agents are thoroughly combined. The aromatic blend will elevate the flavor profile of your Vegan Pumpkin Cake, filling your kitchen with comforting scents.

Step 4: Add Flour and Salt
Gradually add the all-purpose flour and a pinch of salt to the mixture. Stir until just combined, taking care not to overmix, which can lead to a denser texture. You want to achieve a smooth batter that remains light and airy, so stop mixing as soon as no dry flour is visible.

Step 5: Bake the Cake
Divide the batter evenly between the prepared cake pans, smoothing the tops with a spatula. Place the pans in the preheated oven and bake for 33 to 38 minutes. Check for doneness by inserting a toothpick in the center; it should come out clean, signaling that your fluffy Vegan Pumpkin Cake is ready to be removed.

Step 6: Cool the Cakes
Once baked, allow the cakes to cool in the pans for 15 to 20 minutes. After this resting period, carefully transfer them to a wire rack to cool completely. This step is crucial for ensuring your cakes maintain their fluffy texture and are easy to frost later.

Step 7: Make the Frosting
While the cakes are cooling, prepare the maple cinnamon frosting. In a mixing bowl, beat the vegan block butter until it’s light and fluffy. Gradually add the powdered sugar and ground cinnamon, mixing well before incorporating maple syrup until you reach your desired frosting consistency. This creamy frosting will complement your Vegan Pumpkin Cake perfectly.

Step 8: Assemble the Cake
Once the cakes are completely cooled, level the tops if needed using a serrated knife. Place one layer on a serving plate and generously frost the top. Add the second layer on top and frost the entire cake, covering both the top and sides to create a beautiful finish.

Step 9: Decorate and Serve
Lastly, decorate your Vegan Pumpkin Cake with Biscoff pumpkins or any desired toppings for a festive touch. Depending on your climate, store the cake at room temperature or refrigerate if it’s warm. Take a moment to admire your creation before slicing into it for a delightful dessert experience!

What to Serve with Fluffy Vegan Pumpkin Cake?

As you indulge in a slice of this soft and spiced cake, think about how to elevate your experience with delightful sides that awaken your senses.

  • Creamy Coconut Whipped Cream: This luscious topping brings a tropical twist that beautifully complements the warm spices in the cake. An airy dollop adds richness and balances sweetness for a perfect bite.

  • Spiced Chai Latte: The warm, aromatic spices in chai, like cardamom and cinnamon, echo those in the pumpkin cake, creating a harmonious pairing that feels like a warm embrace on a chilly day.

  • Candied Ginger Crumble: A crunchy, sweet-tangy topping made from candied ginger adds texture and contrasting flavors, enhancing each bite of the cake while giving it a playful zing.

  • Toasty Almonds: Lightly toasted almonds lend a satisfying crunch and a nutty aroma that transcends the flavors of the cake, offering a delightful textural contrast and elevating the overall eating experience.

  • Autumn Harvest Salad: Featuring hearty greens, roasted squash, and a tangy vinaigrette, this fresh salad adds a vibrant crunch and lightness that perfectly balances the cake’s richness.

  • Maple Pecan Ice Cream: Rich, creamy ice cream swirled with crunchy pecans enhances the cake’s maple frosting, creating a memorable dessert that begs for a scoop on the side.

Each pairing enhances your experience, making the Vegan Pumpkin Cake not just a dessert but a centerpiece of a truly delightful fall feast.

Helpful Tricks for Vegan Pumpkin Cake

  • Proper Flour Measurement: Use the spoon and level method to measure your flour. This avoids packing and prevents a dense Vegan Pumpkin Cake.

  • Room Temperature Ingredients: Allow dairy-free milk and vegan butter to come to room temperature before mixing. This helps create a smooth batter and ensures better blending.

  • Watch the Baking Time: If using gluten-free flour, increase your baking time to 38-43 minutes for optimal results. Keep an eye on your cake and check doneness with a toothpick.

  • Avoid Overmixing: Stir the batter gently until just combined. Overmixing can lead to a denser texture, which is not desirable for this fluffy Vegan Pumpkin Cake.

  • Cooling Properly: Let the cakes cool completely before frosting. This prevents the frosting from melting and sliding off, ensuring a beautifully finished dessert.

Vegan Pumpkin Cake: Delicious Twists!

Feel free to unleash your creativity and make this recipe your own by adding your favorite flavors or ingredients!

  • Gluten-Free: Swap all-purpose flour for a gluten-free measure-for-measure flour blend to cater to gluten-sensitive friends.

  • Nutty Addition: Stir in chopped walnuts or pecans into the batter for a delightful crunch with every bite; they complement the pumpkin beautifully.

  • Chocolate Lovers: Drizzle some melted dark vegan chocolate over the frosting for a rich, decadent twist, creating an irresistible pairing with the spice.

  • Spice It Up: Add a dash of cayenne pepper or chili powder to the batter for an unexpected heat that balances the sweetness.

  • Fruity Surprise: Incorporate diced apples or sliced bananas for an added layer of flavor and moisture; the combination of pumpkin and fruit creates a delightful surprise!

  • Maple Lovers: Use pure maple sugar instead of granulated sugar for a natural caramel hint; it elevates the cake to autumn perfection.

  • Creamy Variants: Swap the maple cinnamon frosting for a coconut whipped cream topping for a lighter option that still satisfies your sweet tooth.

Embrace these variations to personalize your Vegan Pumpkin Cake experience! Whether you’re whipping it up for a cozy gathering or treating yourself, find more delightful recipes like Honeybun Carrot Cake or Strawberry Cheesecake Dump to inspire your next culinary creation!

How to Store and Freeze Vegan Pumpkin Cake

Room Temperature: Keep the cake covered at room temperature for up to 2 days in a cool, dry place. This will maintain its fluffy texture and flavor.

Fridge: Store in an airtight container in the fridge for up to 5 days. This helps keep the Vegan Pumpkin Cake fresh and moist, especially in warmer climates.

Freezer: For longer storage, wrap individual slices or the whole cake tightly in plastic wrap, then aluminum foil. It will stay delicious in the freezer for up to 1 month.

Reheating: Thaw overnight in the fridge before serving. To enjoy a slice warm, gently reheat in the microwave for about 10-15 seconds, enhancing its cozy flavors!

Make Ahead Options

These Fluffy Vegan Pumpkin Cakes are perfect for meal prep enthusiasts! You can prepare the cake layers up to 3 days in advance by baking, cooling, and tightly wrapping each layer in plastic wrap before refrigerating. This helps maintain their moisture and flavor, ensuring they remain just as delicious when it’s time to frost. The maple cinnamon frosting can also be made up to 24 hours ahead; store it in an airtight container in the fridge. When ready to serve, simply frost the cooled cake layers and enjoy your effortlessly delightful Vegan Pumpkin Cake! With these make-ahead tips, busy weeknights become a breeze!

Vegan Pumpkin Cake Recipe FAQs

What kind of pumpkin puree should I use?
Absolutely! Using canned pumpkin puree is convenient and effective, but if you prefer a more homemade touch, you can make your own. Just roast a pumpkin until it’s tender, scoop out the flesh, and blend until smooth, ensuring it’s thick and not watery.

How should I store my Vegan Pumpkin Cake?
For short-term storage, keep your cake covered at room temperature for up to 2 days, away from direct sunlight. If you want to keep it longer, an airtight container in the fridge will maintain its moisture and freshness for up to 5 days.

Can I freeze leftover Vegan Pumpkin Cake?
Yes, you can! To freeze the cake, wrap individual slices tightly in plastic wrap followed by aluminum foil. This ensures they stay fresh and protected. It can be safely frozen for up to 1 month. Thaw overnight in the fridge and reheat if desired.

What do I do if my cake comes out dense?
Very! If your Vegan Pumpkin Cake turns out dense, it’s commonly due to overmixing the batter—mix just until combined. Also, double-check that your leavening agents (baking powder and baking soda) are fresh, as expired leavening can affect the rise.

Is this recipe suitable for those with allergies?
Yes! This Vegan Pumpkin Cake can cater to various dietary needs. It’s entirely dairy-free and can be made gluten-free by using a measure-for-measure gluten-free flour. Just remember to also check labels for any allergens in the ingredients you choose, especially for the dairy-free milk or vegan butter.

Can pets eat any part of this cake?
I recommend not sharing the Vegan Pumpkin Cake with pets, as ingredients like sugar and certain spices can be harmful. Stick to plain pumpkin (not spiced) if you want to treat your furry friends, which is a safer alternative!

Vegan Pumpkin Cake

Indulge in Fluffy Vegan Pumpkin Cake Bliss This Fall

Enjoy this Vegan Pumpkin Cake, a guilt-free dessert perfect for gatherings, topped with creamy maple cinnamon frosting.
Prep Time 20 minutes
Cook Time 35 minutes
Cooling Time 20 minutes
Total Time 1 hour 15 minutes
Servings: 12 slices
Course: Dessert
Cuisine: Vegan
Calories: 250

Ingredients
  

For the Cake
  • 1 cup Pumpkin Puree Use homemade for thicker consistency
  • 1 cup Dairy-Free Milk Soy milk preferred
  • 1/3 cup Neutral Flavored Oil Substitute half with melted vegan butter for richer flavor
  • 1/2 cup Light Brown Sugar Granulated sugar can also be used
  • 1/2 cup Granulated Sugar Optional to use more brown sugar
  • 1 tsp Apple Cider Vinegar Lemon juice can be substituted
  • 1 tsp Vanilla Extract
  • 2 cups All-Purpose Flour Use gluten-free flour if needed
  • 2 tsp Pumpkin Pie Spice Make your own blend for personalization
  • 1 tsp Ground Cinnamon
  • 1 tsp Baking Powder
  • 1/2 tsp Baking Soda
  • 1/4 tsp Salt Optional
For the Frosting
  • 1/2 cup Vegan Block Butter At room temperature
  • 2 cups Powdered Sugar Adjust based on sweetness preference
  • 1/4 cup Maple Syrup Adjust to taste
Optional Decoration
  • as desired Biscoff Pumpkins For seasonal flair

Equipment

  • Mixing bowls
  • whisk
  • Cake pans
  • spatula
  • Oven

Method
 

Step-by-Step Instructions
  1. Preheat your oven to 355°F (180°C) and prepare two 8-inch round cake pans.
  2. In a large bowl, whisk the wet ingredients until smooth: pumpkin puree, dairy-free milk, neutral oil, light brown sugar, granulated sugar, apple cider vinegar, and vanilla extract.
  3. Sift in the pumpkin pie spice, cinnamon, baking powder, and baking soda to the wet mixture, stirring gently.
  4. Gradually add the flour and salt, stirring until just combined.
  5. Divide the batter between the prepared pans and bake for 33 to 38 minutes. Check for doneness with a toothpick.
  6. Let the cakes cool in the pans for 15 to 20 minutes before transferring to a wire rack to cool completely.
  7. Prepare the frosting by beating the vegan butter, then adding powdered sugar, cinnamon, and maple syrup until well combined.
  8. Level the tops of the cooled cakes if necessary, frost the top of one layer, place the second on top, and frost the entire cake.
  9. Decorate with Biscoff pumpkins or toppings of choice before serving.

Nutrition

Serving: 1sliceCalories: 250kcalCarbohydrates: 34gProtein: 2gFat: 11gSaturated Fat: 2gPolyunsaturated Fat: 1gMonounsaturated Fat: 7gSodium: 150mgPotassium: 300mgFiber: 2gSugar: 15gVitamin A: 1200IUVitamin C: 2mgCalcium: 50mgIron: 1mg

Notes

Use the spoon and level method for flour, ensure room temperature ingredients, and avoid overmixing for best results.

Tried this recipe?

Let us know how it was!

Stay Connected

Get recipes via email: