Get my cookbooks

Cava-Inspired Honey Harissa Chicken Bowls Recipe Unveiled!

Introduction to Cava-Inspired Honey Harissa Chicken Bowls

When I think about weeknight dinners, I often crave something that’s not just quick but also bursting with flavor. That’s where my Cava-Inspired Honey Harissa Chicken Bowls come in. This dish is a delightful blend of marinated chicken, fluffy quinoa, and vibrant veggies, making it a perfect solution for busy days.

Whether you’re looking to impress your loved ones or simply want a healthy meal that doesn’t skimp on taste, these bowls are a winner. Trust me, once you try this recipe, it’ll become a staple in your kitchen rotation!

Why You’ll Love This Cava-Inspired Honey Harissa Chicken Bowls

These Cava-Inspired Honey Harissa Chicken Bowls are a game changer for anyone juggling a busy schedule.

They come together in just 35 minutes, making them perfect for those hectic weeknights.

The combination of sweet honey and spicy harissa creates a flavor explosion that will have your taste buds dancing.

Plus, they’re packed with nutrients, ensuring you’re fueling your body with something delicious and healthy.

Ingredients for Cava-Inspired Honey Harissa Chicken Bowls

Creating these Cava-Inspired Honey Harissa Chicken Bowls is a breeze, especially with the right ingredients on hand.

Here’s what you’ll need:

  • Boneless, skinless chicken breasts: The star of the show, providing lean protein that’s juicy and tender.
  • Harissa paste: This North African chili paste adds a spicy kick and depth of flavor.
  • Honey: Balances the heat of the harissa with its natural sweetness, creating a delightful glaze.
  • Olive oil: Helps to keep the chicken moist while adding richness to the dish.
  • Garlic powder: A pantry staple that enhances the overall flavor without the fuss of fresh garlic.
  • Onion powder: Adds a subtle sweetness and depth, complementing the other spices.
  • Smoked paprika: Infuses a smoky flavor that elevates the dish to new heights.
  • Salt and pepper: Essential for seasoning, bringing all the flavors together.
  • Cooked quinoa: A nutritious base that’s gluten-free and packed with protein and fiber.
  • Cherry tomatoes: Their juicy sweetness adds freshness and color to the bowls.
  • Cucumber: Crisp and refreshing, it provides a nice crunch.
  • Baby spinach: A nutrient-dense green that adds a pop of color and health benefits.
  • Feta cheese: Crumbled on top, it adds a tangy creaminess that complements the dish.
  • Hummus: A dollop of this creamy spread enhances flavor and adds a Middle Eastern touch.
  • Fresh parsley: Chopped for garnish, it brightens the dish and adds a fresh finish.

Feel free to get creative! For a vegetarian option, swap the chicken for roasted chickpeas or grilled tofu marinated in the same harissa mixture.

You can also add sliced avocado or roasted sweet potatoes for extra flavor and nutrition.

Exact quantities for each ingredient are available at the bottom of the article for easy printing.

How to Make Cava-Inspired Honey Harissa Chicken Bowls

Making Cava-Inspired Honey Harissa Chicken Bowls is a straightforward process that brings together vibrant flavors and healthy ingredients.

Let’s dive into the steps!

Step 1: Preheat the Oven

Start by preheating your oven to 400°F (200°C).

This step is crucial because it ensures even cooking.

While the oven heats up, line a baking sheet with parchment paper.

This will make cleanup a breeze and prevent the chicken from sticking.

Step 2: Prepare the Harissa Mixture

In a small bowl, mix together the harissa paste, honey, olive oil, garlic powder, onion powder, smoked paprika, salt, and pepper.

This mixture is the heart of the dish, infusing the chicken with a sweet and spicy flavor.

Make sure everything is well combined for an even coating.

Step 3: Coat the Chicken

Place the chicken breasts on the prepared baking sheet.

Generously brush the harissa mixture over both sides of the chicken.

Don’t be shy! The more you coat, the more flavor you’ll get.

Make sure every inch is covered for that delicious glaze.

Step 4: Bake the Chicken

Now, pop the chicken into the preheated oven.

Bake for 20-25 minutes, or until the chicken is cooked through and reaches an internal temperature of 165°F (75°C).

To check doneness, use a meat thermometer or cut into the thickest part of the chicken.

It should be juicy and no longer pink inside.

Step 5: Cook the Quinoa

While the chicken is baking, prepare the quinoa according to package instructions if it’s not already cooked.

Quinoa is simple to make—just rinse it, add water, and let it simmer.

In about 15 minutes, you’ll have a fluffy, nutritious base for your bowls.

Step 6: Combine the Vegetables

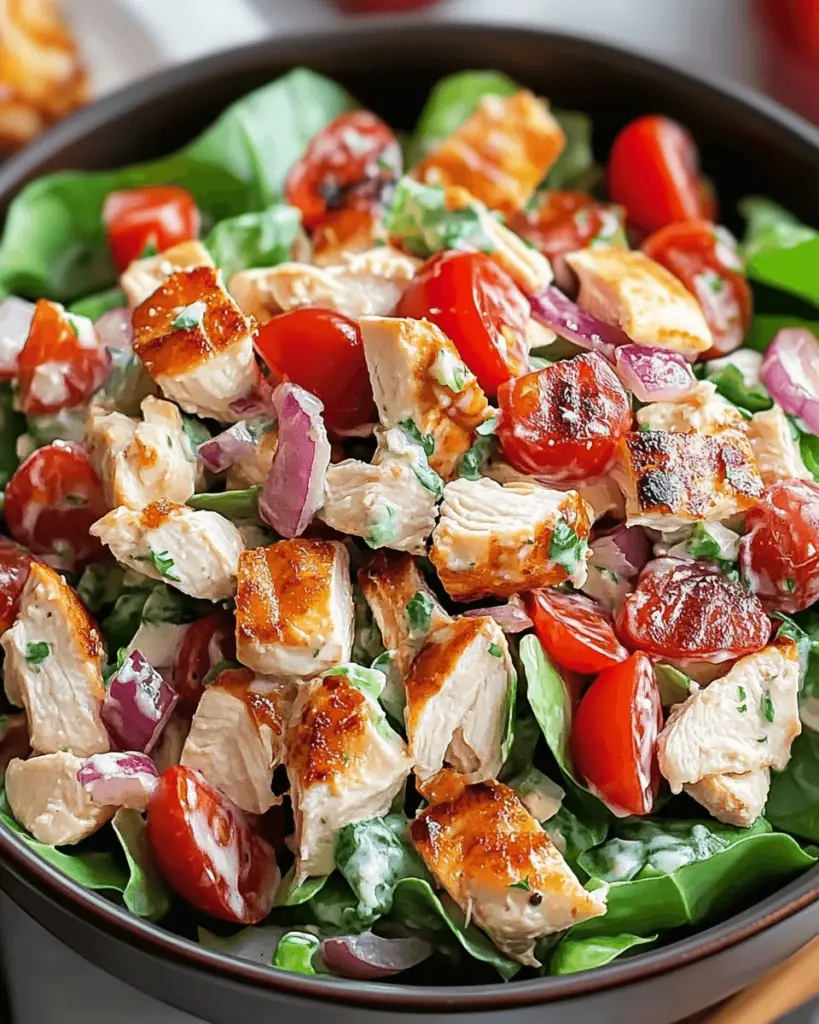
In a large bowl, combine the cooked quinoa, halved cherry tomatoes, diced cucumber, and baby spinach.

Toss gently to mix everything together.

This fresh medley adds color and crunch, making your bowls visually appealing and nutritious.

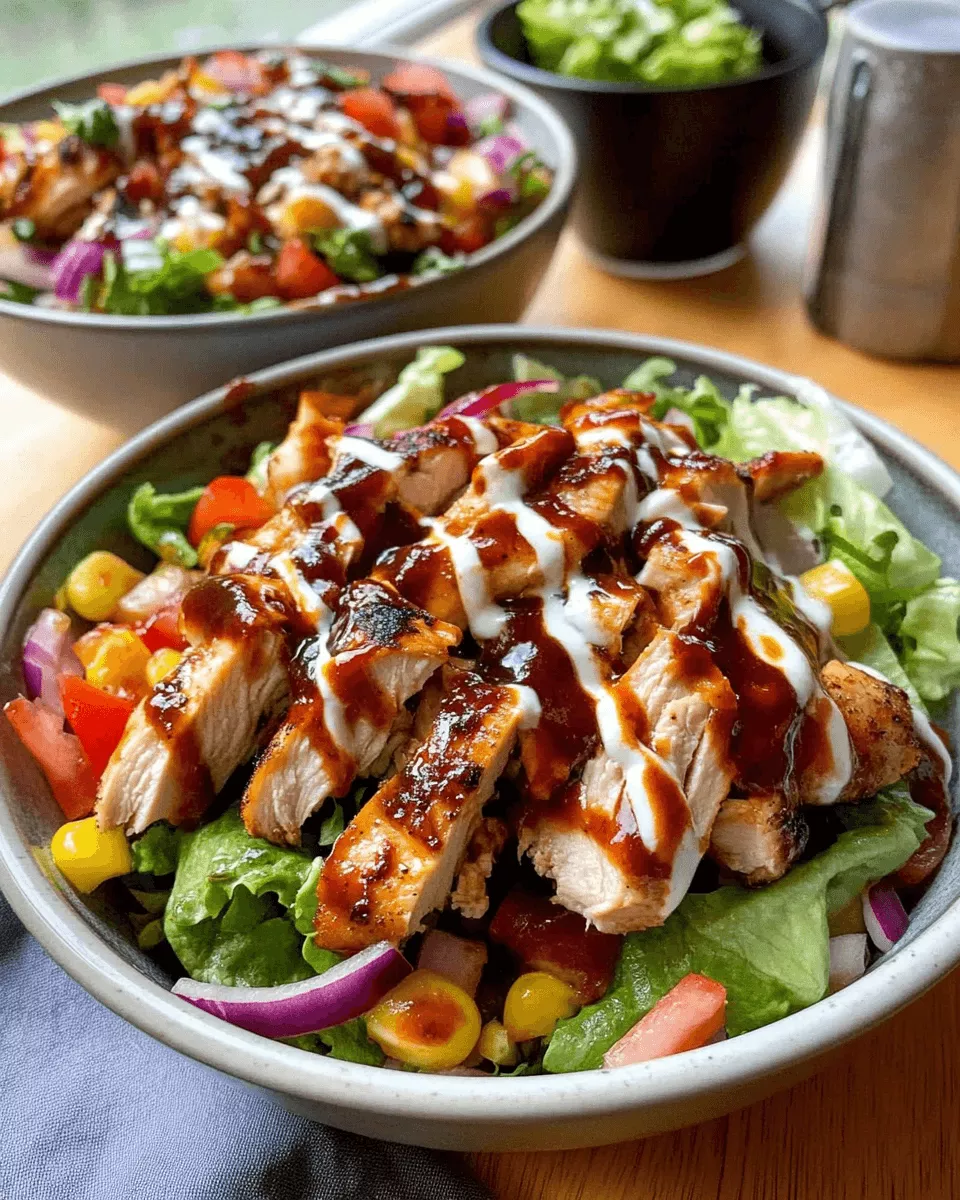
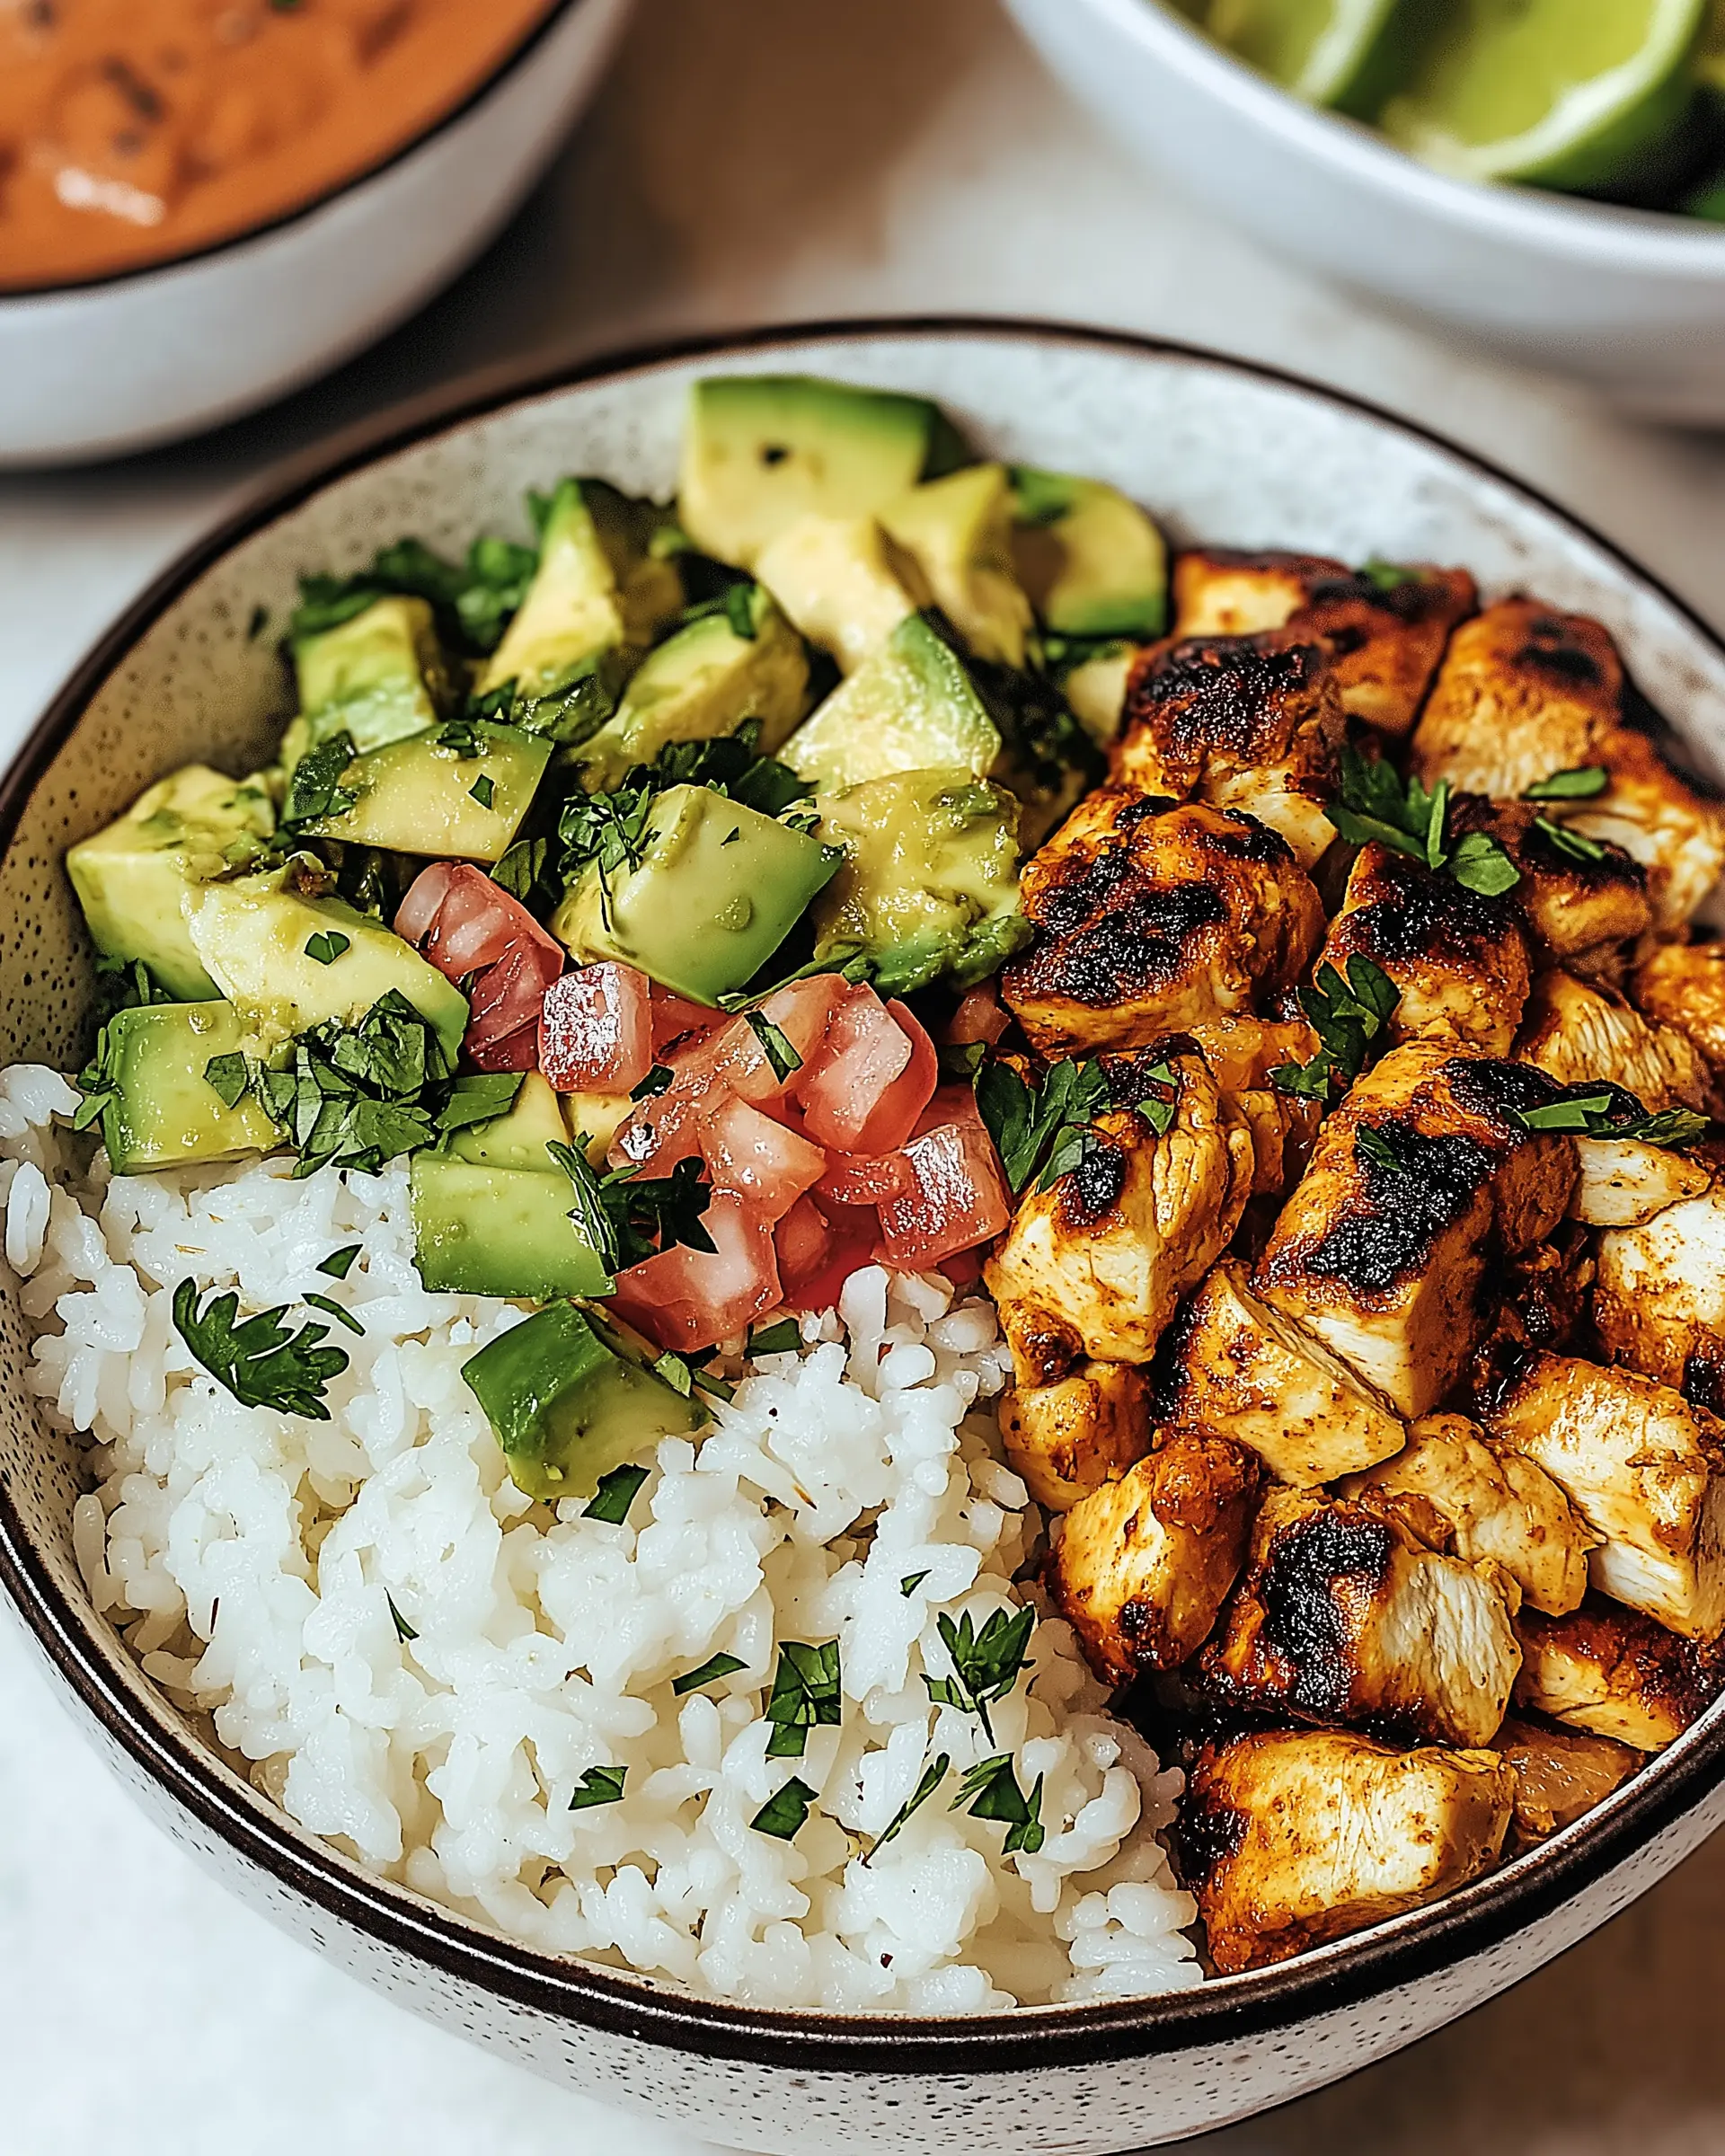
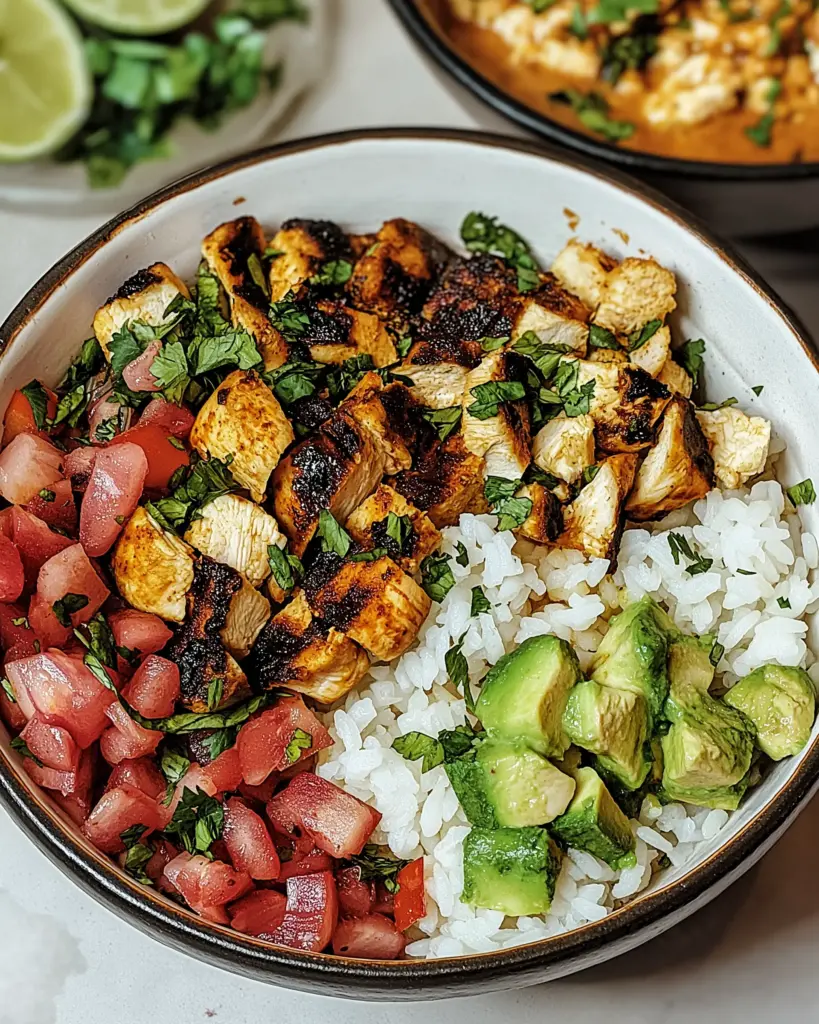
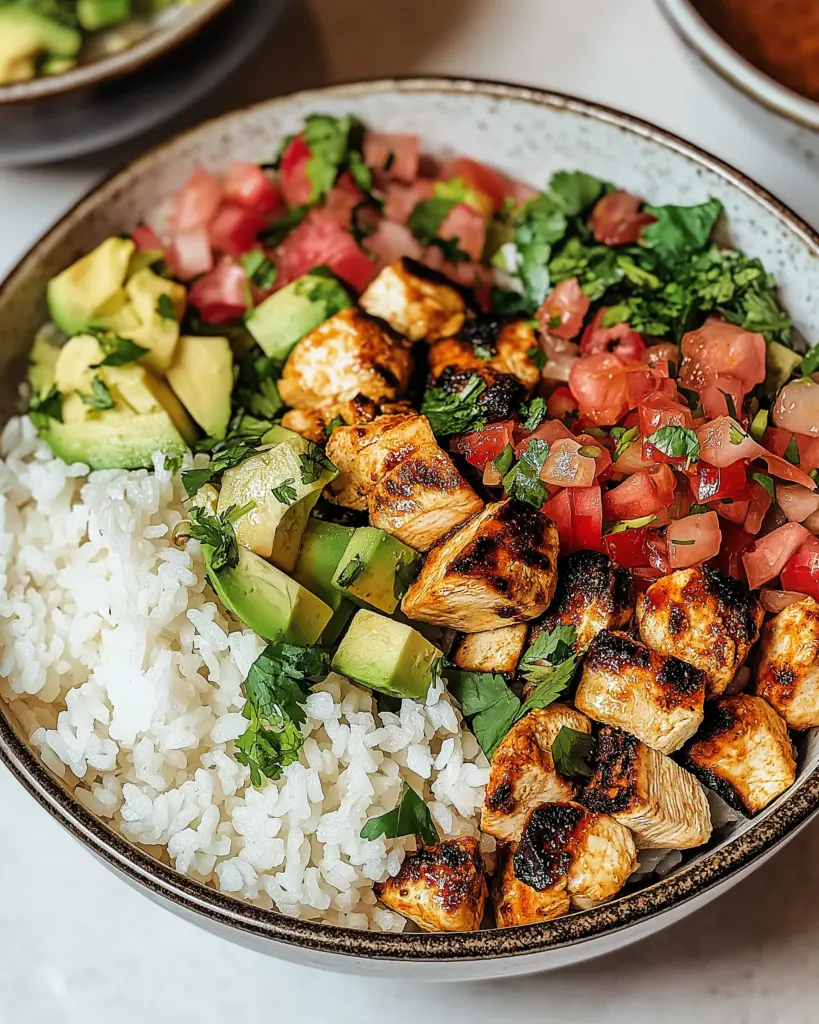
Step 7: Assemble the Bowls

To assemble, divide the quinoa mixture among four bowls.

Top each bowl with sliced chicken, a dollop of hummus, and a sprinkle of crumbled feta cheese.

Garnish with fresh parsley for that extra pop of color.

Your Cava-Inspired Honey Harissa Chicken Bowls are now ready to impress!

Tips for Success

  • Marinate the chicken for at least 30 minutes for deeper flavor.
  • Use a meat thermometer to ensure perfect doneness.
  • Feel free to customize the veggies based on what you have on hand.
  • For extra crunch, add some toasted nuts or seeds on top.
  • Make a double batch of quinoa for easy meal prep throughout the week.

Equipment Needed

  • Baking sheet: A standard sheet works, but a cast-iron skillet can add a nice sear.
  • Parchment paper: Use aluminum foil if you’re out; it’ll still keep things from sticking.
  • Mixing bowl: Any bowl will do, but a large one makes mixing easier.
  • Meat thermometer: Essential for checking chicken doneness; a simple knife will work in a pinch.

Variations

  • Vegetarian Delight: Swap the chicken for roasted chickpeas or grilled tofu marinated in the harissa mixture for a hearty plant-based option.
  • Spicy Kick: Add sliced jalapeños or a sprinkle of red pepper flakes to the harissa mixture for an extra layer of heat.
  • Grain Swap: Use farro, brown rice, or cauliflower rice instead of quinoa for a different texture and flavor.
  • Herb Infusion: Experiment with fresh herbs like mint or cilantro to brighten the dish and add a fresh twist.
  • Seasonal Veggies: Incorporate seasonal vegetables like bell peppers, zucchini, or roasted sweet potatoes for added nutrition and flavor.

Serving Suggestions

  • Side Salad: Pair with a light arugula salad dressed in lemon vinaigrette for a refreshing contrast.
  • Drink Pairing: Enjoy with a crisp white wine or sparkling water infused with lemon.
  • Presentation: Serve in colorful bowls to enhance the visual appeal and make mealtime more inviting.

FAQs about Cava-Inspired Honey Harissa Chicken Bowls

Can I make the Cava-Inspired Honey Harissa Chicken Bowls ahead of time?

Absolutely! You can prepare the chicken and quinoa in advance. Just store them separately in the fridge. When you’re ready to eat, reheat the chicken and quinoa, then assemble your bowls with fresh veggies.

What can I substitute for harissa paste?

If you can’t find harissa paste, a mix of chili paste and a touch of honey can work in a pinch. You can also use sriracha for a different flavor profile, but it will be spicier.

Is this recipe gluten-free?

Yes! The Cava-Inspired Honey Harissa Chicken Bowls are naturally gluten-free, especially when you use quinoa as the base. Just ensure any additional ingredients, like hummus, are also gluten-free.

How can I make this dish spicier?

For an extra kick, add sliced jalapeños or a sprinkle of red pepper flakes to the harissa mixture. You can also drizzle some hot sauce over the finished bowls for that added heat.

Can I use other proteins instead of chicken?

Definitely! You can swap the chicken for grilled shrimp, turkey, or even a plant-based protein like tofu or tempeh. Just adjust the cooking time accordingly to ensure everything is cooked through.

Final Thoughts

Cooking is more than just a necessity; it’s a way to express love and creativity.

With these Cava-Inspired Honey Harissa Chicken Bowls, you’re not just serving a meal; you’re creating an experience.

The vibrant colors, the tantalizing aromas, and the explosion of flavors come together to make every bite a joy.

Whether you’re sharing with family or enjoying a quiet dinner alone, this dish brings warmth and satisfaction.

So, roll up your sleeves, embrace the process, and let these bowls become a cherished part of your culinary journey.

You won’t regret it!

jhessica

Cava-Inspired Honey Harissa Chicken Bowls Recipe Unveiled!

A delicious and healthy recipe for Cava-Inspired Honey Harissa Chicken Bowls featuring marinated chicken, quinoa, and fresh vegetables.
Prep Time 10 minutes
Cook Time 25 minutes
Total Time 35 minutes
Servings: 4 servings
Course: Main Course
Cuisine: Mediterranean
Calories: 450

Ingredients
  

  • 2 boneless skinless chicken breasts (about 1 pound)
  • 2 tablespoons harissa paste
  • 2 tablespoons honey
  • 1 tablespoon olive oil
  • 1 teaspoon garlic powder
  • 1 teaspoon onion powder
  • 1 teaspoon smoked paprika
  • Salt and pepper to taste
  • 2 cups cooked quinoa
  • 1 cup cherry tomatoes halved
  • 1 cucumber diced
  • 1 cup baby spinach
  • 1/4 cup feta cheese crumbled
  • 1/4 cup hummus
  • Fresh parsley chopped (for garnish)

Method
 

  1. Preheat your oven to 400°F (200°C). Line a baking sheet with parchment paper.
  2. In a small bowl, mix together the harissa paste, honey, olive oil, garlic powder, onion powder, smoked paprika, salt, and pepper.
  3. Place the chicken breasts on the prepared baking sheet. Brush the harissa mixture generously over both sides of the chicken.
  4. Bake in the preheated oven for 20-25 minutes, or until the chicken is cooked through and reaches an internal temperature of 165°F (75°C). Let it rest for 5 minutes before slicing.
  5. While the chicken is baking, prepare the quinoa according to package instructions if not already cooked.
  6. In a large bowl, combine the cooked quinoa, cherry tomatoes, cucumber, and baby spinach. Toss gently to mix.
  7. To assemble the bowls, divide the quinoa mixture among four bowls. Top each with sliced chicken, a dollop of hummus, and a sprinkle of feta cheese. Garnish with fresh parsley.

Nutrition

Serving: 1bowlCalories: 450kcalCarbohydrates: 35gProtein: 30gFat: 18gSaturated Fat: 4gPolyunsaturated Fat: 14gCholesterol: 70mgSodium: 500mgFiber: 5gSugar: 10g

Notes

  • For a vegetarian option, substitute the chicken with roasted chickpeas or grilled tofu marinated in the same harissa mixture.
  • Add sliced avocado or roasted sweet potatoes for extra flavor and nutrition.

Tried this recipe?

Let us know how it was!

Philly Cheesesteak Sloppy Joes: Quick & Tasty Recipe!

Introduction to Philly Cheesesteak Sloppy Joes

There’s something magical about combining two beloved dishes into one, and that’s exactly what you get with Philly Cheesesteak Sloppy Joes. This recipe is a game-changer for those busy weeknights when you want to impress your family without spending hours in the kitchen. The rich, savory flavors of a classic cheesesteak meet the comforting ease of sloppy joes, creating a meal that’s both satisfying and quick. Whether you’re feeding a crowd or just looking for a cozy dinner, these sandwiches are sure to become a favorite in your home.

Why You’ll Love This Philly Cheesesteak Sloppy Joes

These Philly Cheesesteak Sloppy Joes are a dream come true for anyone craving flavor without the fuss. They come together in just 25 minutes, making them perfect for those hectic evenings. The combination of juicy beef, sautéed veggies, and gooey cheese creates a taste explosion that will have everyone asking for seconds. Plus, they’re easy to customize, so you can make them your own!

Ingredients for Philly Cheesesteak Sloppy Joes

Gathering the right ingredients is the first step to creating these mouthwatering Philly Cheesesteak Sloppy Joes. Here’s what you’ll need:

  • Ground beef: The star of the show, providing that hearty, meaty flavor. You can also use ground turkey or chicken for a lighter option.
  • Onion: Diced for sweetness and depth, it adds a wonderful aroma as it cooks.
  • Green bell pepper: This adds a fresh crunch and a pop of color to your dish.
  • Garlic: Minced for a fragrant kick that elevates the overall taste.
  • Mushrooms: Diced to bring an earthy flavor and a nice texture to the mix.
  • Worcestershire sauce: A splash of this sauce adds umami and richness, tying all the flavors together.
  • Salt and black pepper: Essential seasonings that enhance the natural flavors of the ingredients.
  • Paprika: For a hint of smokiness and a touch of color.
  • Provolone cheese: Shredded and melted, it’s the gooey goodness that makes these sandwiches irresistible.
  • Hamburger buns: The perfect vessel for your cheesy filling. Choose whole grain for a healthier twist.
  • Fresh parsley: Chopped for garnish, it adds a burst of freshness and a nice visual touch.

For those who like a bit of heat, consider adding diced jalapeños or a splash of hot sauce to the meat mixture. And if you’re looking to make it healthier, swapping out the ground beef for turkey or chicken and using whole grain buns can be a great option. You can find the exact quantities for each ingredient at the bottom of the article, ready for printing!

How to Make Philly Cheesesteak Sloppy Joes

Now that you have your ingredients ready, let’s dive into the fun part: making these Philly Cheesesteak Sloppy Joes! This process is straightforward and quick, perfect for a weeknight dinner. Follow these steps, and you’ll have a delicious meal in no time.

Step 1: Brown the Ground Beef

Start by heating a large skillet over medium heat. Add the ground beef and cook it until it’s browned, about 5-7 minutes. Make sure to break it up with a spatula as it cooks. This step is crucial for developing that rich flavor. Once it’s fully cooked, drain any excess fat. You want the beef to be juicy, not greasy!

Step 2: Sauté the Vegetables

Next, toss in the diced onion, green bell pepper, and mushrooms. Sauté these veggies for about 5 minutes until they soften. The aroma will fill your kitchen, making it hard to resist sneaking a taste. This step adds a wonderful texture and flavor to your Philly Cheesesteak Sloppy Joes.

Step 3: Add Garlic and Seasonings

Now, stir in the minced garlic and let it cook for an additional minute. Garlic brings a fragrant kick that elevates the dish. Then, add Worcestershire sauce, salt, black pepper, and paprika. Mix everything well and let it cook for another 2-3 minutes. This is where the magic happens, as all those flavors meld together beautifully.

Step 4: Melt the Cheese

Reduce the heat to low and sprinkle the shredded provolone cheese over the meat mixture. Cover the skillet and let it sit for 2-3 minutes. This allows the cheese to melt into gooey perfection. The sight of that melted cheese is enough to make anyone’s mouth water!

Step 5: Prepare the Buns

While the cheese is melting, you can toast the hamburger buns if you like. A little crunch adds a nice contrast to the soft filling. Just pop them in a toaster or on a skillet for a minute or two. This step is optional, but trust me, it’s worth it!

Step 6: Assemble and Serve

Now it’s time to put it all together! Spoon the cheesy meat mixture onto the bottom half of each bun. Top with the other half and garnish with fresh parsley for a pop of color. Serve these Philly Cheesesteak Sloppy Joes immediately, and watch them disappear!

Tips for Success

  • Don’t rush the browning of the beef; it adds depth to the flavor.
  • Feel free to mix in your favorite veggies, like spinach or zucchini, for added nutrition.
  • For extra flavor, let the meat mixture sit for a few minutes before serving.
  • Experiment with different cheeses, like cheddar or Swiss, for a unique twist.
  • Keep the buns warm in the oven while you prepare the filling for a cozy touch.

Equipment Needed

  • Large skillet: A non-stick skillet works great, but any heavy-bottomed pan will do.
  • Spatula: Use a wooden or silicone spatula for easy stirring and breaking up the meat.
  • Knife and cutting board: Essential for chopping your veggies.
  • Toaster or skillet: For toasting the buns, a toaster is quick, but a skillet adds flavor.

Variations

  • Spicy Kick: Add diced jalapeños or a splash of hot sauce to the meat mixture for an extra layer of heat.
  • Vegetarian Option: Substitute the ground beef with lentils or a plant-based meat alternative for a delicious vegetarian version.
  • Cheese Lovers: Experiment with different cheeses like cheddar, gouda, or even a spicy pepper jack for a unique flavor twist.
  • Whole Grain Buns: Use whole grain or gluten-free buns to make this dish healthier and cater to dietary needs.
  • Loaded Style: Top your Sloppy Joes with sautéed onions, pickles, or even a drizzle of ranch dressing for added flavor.

Serving Suggestions

  • Classic Fries: Serve with crispy French fries or sweet potato fries for a satisfying crunch.
  • Coleslaw: A refreshing coleslaw adds a nice crunch and balances the richness of the sandwiches.
  • Beer Pairing: Enjoy with a cold lager or pale ale to complement the flavors.
  • Presentation: Serve on a wooden board for a rustic touch, garnished with extra parsley.

FAQs about Philly Cheesesteak Sloppy Joes

Can I make Philly Cheesesteak Sloppy Joes ahead of time?

Absolutely! You can prepare the meat mixture in advance and store it in the fridge for up to three days. Just reheat it on the stove before serving. This makes for a quick dinner solution on busy nights!

What can I substitute for ground beef in this recipe?

If you’re looking for a lighter option, ground turkey or chicken works well. For a vegetarian twist, try using lentils or a plant-based meat alternative. Both options will still deliver great flavor!

How can I make these Sloppy Joes spicier?

For a spicy kick, add diced jalapeños or a splash of your favorite hot sauce to the meat mixture. You can also use pepper jack cheese instead of provolone for an extra layer of heat.

What sides pair well with Philly Cheesesteak Sloppy Joes?

These sandwiches go great with classic fries, coleslaw, or even a simple green salad. A cold beer or soda can also complement the meal perfectly!

Can I freeze the leftovers?

Yes, you can freeze the meat mixture for up to three months. Just thaw it in the fridge overnight before reheating. This makes for a convenient meal option when you’re short on time!

Final Thoughts

Creating Philly Cheesesteak Sloppy Joes is more than just cooking; it’s about bringing joy to the table. The blend of savory beef, melted cheese, and fresh veggies wrapped in a soft bun is a comforting hug for your taste buds. Whether you’re enjoying a casual weeknight dinner or impressing friends at a gathering, these sandwiches deliver satisfaction with every bite. Plus, the ease of preparation means you can focus on what really matters—sharing good food and great moments with loved ones. Dive into this recipe, and let the flavors spark joy in your kitchen!

jhessica

Philly Cheesesteak Sloppy Joes: Quick & Tasty Recipe!

A quick and tasty recipe for Philly Cheesesteak Sloppy Joes that combines the classic flavors of a cheesesteak with the convenience of sloppy joes.
Prep Time 10 minutes
Cook Time 15 minutes
Total Time 25 minutes
Servings: 4 servings
Course: Main Dish
Cuisine: American
Calories: 450

Ingredients
  

  • 1 pound ground beef
  • 1 medium onion diced
  • 1 green bell pepper diced
  • 2 cloves garlic minced
  • 1 cup mushrooms diced
  • 1 tablespoon Worcestershire sauce
  • 1 teaspoon salt
  • 1/2 teaspoon black pepper
  • 1 teaspoon paprika
  • 1 cup provolone cheese shredded
  • 4 hamburger buns
  • Fresh parsley chopped (for garnish)

Method
 

  1. In a large skillet over medium heat, brown the ground beef until fully cooked, about 5-7 minutes. Drain excess fat.
  2. Add the diced onion, green bell pepper, and mushrooms to the skillet. Sauté for about 5 minutes until the vegetables are softened.
  3. Stir in the minced garlic and cook for an additional minute until fragrant.
  4. Add Worcestershire sauce, salt, black pepper, and paprika. Mix well and cook for another 2-3 minutes to combine flavors.
  5. Reduce the heat to low and sprinkle the shredded provolone cheese over the meat mixture. Cover the skillet and let it sit for 2-3 minutes until the cheese is melted.
  6. Toast the hamburger buns lightly, if desired.
  7. Spoon the cheesesteak mixture onto the bottom half of each bun. Top with the other half of the bun and garnish with fresh parsley.
  8. Serve immediately and enjoy!

Nutrition

Serving: 1sandwichCalories: 450kcalCarbohydrates: 30gProtein: 28gFat: 28gSaturated Fat: 12gPolyunsaturated Fat: 16gCholesterol: 80mgSodium: 800mgFiber: 2gSugar: 3g

Notes

  • For a spicier kick, add diced jalapeños or a splash of hot sauce to the meat mixture.
  • To make it a bit healthier, substitute ground turkey or chicken for the beef and use whole grain buns.

Tried this recipe?

Let us know how it was!

BBQ Chicken Salad: A Delicious and Healthy Twist!

Introduction to BBQ Chicken Salad

There’s something special about a meal that feels like a warm hug on a plate. The BBQ Chicken Salad is just that—a delightful blend of flavors and textures that brings comfort and satisfaction. Whether you’re racing against the clock after a long day or looking to impress friends at a weekend gathering, this salad is your go-to solution. It’s quick, easy, and packed with nutrients, making it perfect for busy weeknights or laid-back lunches. Plus, who can resist the smoky sweetness of BBQ sauce mingling with fresh veggies? Let’s dive into this delicious recipe!

Why You’ll Love This BBQ Chicken Salad

This BBQ Chicken Salad is a game-changer for anyone who craves flavor without the fuss. It comes together in just 15 minutes, making it a lifesaver on busy days. The combination of tender chicken, crisp veggies, and zesty dressings creates a taste explosion that’s hard to resist. Plus, it’s versatile enough to suit any palate, whether you’re a meat lover or a veggie enthusiast. You’ll find yourself reaching for this recipe time and again!

Ingredients for BBQ Chicken Salad

Gathering the right ingredients is the first step to creating a mouthwatering BBQ Chicken Salad. Here’s what you’ll need:

  • Cooked chicken, shredded: The star of the show! Use rotisserie chicken for convenience or grill your own for a smoky flavor.
  • Romaine lettuce: Crisp and refreshing, it forms the base of your salad, adding a satisfying crunch.
  • Mixed greens: A blend of flavors and textures, these greens elevate the salad and provide extra nutrients.
  • Cherry tomatoes: Sweet and juicy, they add a pop of color and freshness to each bite.
  • Corn: Whether canned or frozen, corn brings a touch of sweetness and a delightful crunch.
  • Black beans: Packed with protein and fiber, they add heartiness and a rich flavor to the mix.
  • Red onion: Thinly sliced for a mild bite, it enhances the overall flavor profile without overpowering.
  • Shredded cheddar cheese: Creamy and tangy, it adds richness and a comforting touch to the salad.
  • BBQ sauce: The key ingredient that ties everything together with its smoky, sweet goodness.
  • Ranch dressing: A creamy counterpart to the BBQ sauce, it adds a zesty kick that complements the flavors.
  • Salt and pepper: Essential for seasoning, they enhance the natural flavors of the ingredients.
  • Avocado (optional): Creamy and nutritious, it adds a luxurious texture and healthy fats.
  • Tortilla strips (optional): For a crunchy garnish, they provide an extra layer of texture and fun.

For exact quantities, check the bottom of the article where you can find the full recipe available for printing. Feel free to mix and match ingredients based on your preferences or what you have on hand!

How to Make BBQ Chicken Salad

Creating a BBQ Chicken Salad is as easy as pie, and trust me, it’s just as satisfying! Follow these simple steps to whip up a delicious meal that’s sure to impress.

Step 1: Combine the Base Ingredients

Start by grabbing a large bowl. Toss in the shredded chicken, romaine lettuce, and mixed greens. Add the cherry tomatoes, corn, black beans, and red onion. Gently mix everything together. You want to ensure each ingredient gets to know its neighbors. The colors alone will make your mouth water!

Step 2: Add Dressings

Now, it’s time to bring the flavors together. Drizzle the BBQ sauce and ranch dressing over your salad. Don’t be shy—this is where the magic happens! Toss everything again until the salad is well coated. The BBQ sauce adds that smoky sweetness, while the ranch gives it a creamy kick.

Step 3: Season to Taste

Here’s where you can elevate your salad. Sprinkle in some salt and pepper. Taste as you go! This simple step enhances all the flavors and makes each bite pop. Remember, seasoning is key to a great dish!

Step 4: Add Optional Toppings

If you’re feeling fancy, slice up an avocado and add it on top. It brings a creamy texture that pairs beautifully with the other ingredients. For an extra crunch, toss in some tortilla strips. They add a fun twist and make the salad even more enjoyable!

Step 5: Serve or Chill

Now, you have a choice. You can serve the salad immediately for a fresh crunch, or chill it in the refrigerator for about 30 minutes. Chilling allows the flavors to meld together, creating a more harmonious dish. Either way, you’re in for a treat!

Tips for Success

  • Use rotisserie chicken for a quick and flavorful base.
  • Don’t skip the seasoning; it makes a world of difference!
  • Feel free to customize with your favorite veggies or proteins.
  • For a smoky flavor, try grilling the chicken before shredding.
  • Make it ahead of time for easy meal prep—just add the dressing before serving.

Equipment Needed

  • Large mixing bowl: Essential for combining all your ingredients. A salad spinner can work too!
  • Cutting board: Perfect for chopping veggies and slicing avocado.
  • Sharp knife: A must for easy and safe cutting.
  • Measuring cups: Handy for portioning out ingredients, though you can eyeball it!

Variations

  • Spicy BBQ Chicken Salad: Add diced jalapeños or a splash of hot sauce for a fiery kick.
  • Vegetarian Option: Substitute grilled tofu or chickpeas for the chicken to create a hearty plant-based salad.
  • Southwestern Twist: Incorporate diced bell peppers and cilantro for a fresh, zesty flavor.
  • Fruit Addition: Toss in some diced mango or pineapple for a sweet contrast to the savory elements.
  • Low-Carb Version: Replace corn with diced cucumbers and skip the beans for a lighter salad.

Serving Suggestions

  • Pair your BBQ Chicken Salad with a side of crispy sweet potato fries for a satisfying crunch.
  • Serve it alongside a refreshing iced tea or a cold craft beer to complement the flavors.
  • For presentation, use a large platter and arrange the salad in a colorful display.

FAQs about BBQ Chicken Salad

Can I make BBQ Chicken Salad ahead of time?

Absolutely! You can prepare the salad ingredients in advance. Just keep the dressings separate until you’re ready to serve. This way, everything stays fresh and crunchy!

What can I substitute for chicken in this salad?

If you’re looking for alternatives, grilled shrimp or tofu work wonderfully. Both options add a unique flavor while keeping the salad hearty and satisfying.

Is BBQ Chicken Salad gluten-free?

Yes, this BBQ Chicken Salad is gluten-free! Just ensure that your BBQ sauce and any additional dressings are labeled gluten-free to keep it safe for those with dietary restrictions.

How can I make this salad spicier?

For a spicy kick, add diced jalapeños or a splash of your favorite hot sauce. It’ll elevate the flavor profile and give your taste buds a thrill!

What are some good sides to serve with BBQ Chicken Salad?

Consider pairing it with crispy sweet potato fries or a refreshing fruit salad. Both options complement the smoky flavors of the BBQ Chicken Salad beautifully!

Final Thoughts

Creating this BBQ Chicken Salad is more than just whipping up a meal; it’s about bringing joy to your table. Each bite bursts with flavor, reminding me of summer cookouts and family gatherings. The combination of fresh ingredients and zesty dressings makes it a dish that’s both satisfying and nourishing. Whether you’re enjoying it solo or sharing it with loved ones, this salad is sure to become a favorite. It’s quick, easy, and packed with goodness, making it a perfect choice for any occasion. Dive in and savor the deliciousness—you won’t regret it!

jhessica

BBQ Chicken Salad: A Delicious and Healthy Twist!

A delicious and healthy BBQ Chicken Salad that combines shredded chicken with fresh vegetables and a tangy dressing.
Prep Time 15 minutes
Total Time 15 minutes
Servings: 4 servings
Course: Salad
Cuisine: American
Calories: 350

Ingredients
  

  • 2 cups cooked chicken shredded
  • 1 cup romaine lettuce chopped
  • 1 cup mixed greens
  • 1/2 cup cherry tomatoes halved
  • 1/2 cup corn canned or frozen (thawed)
  • 1/2 cup black beans rinsed and drained
  • 1/4 cup red onion thinly sliced
  • 1/4 cup shredded cheddar cheese
  • 1/4 cup BBQ sauce
  • 2 tablespoons ranch dressing
  • Salt and pepper to taste
  • 1 avocado sliced (optional)
  • Tortilla strips for garnish optional

Method
 

  1. In a large bowl, combine the shredded chicken, romaine lettuce, mixed greens, cherry tomatoes, corn, black beans, red onion, and cheddar cheese. Toss gently to mix all the ingredients evenly.
  2. Drizzle the BBQ sauce and ranch dressing over the salad. Toss again until the salad is well coated with the dressings.
  3. Season with salt and pepper to taste.
  4. If using, top the salad with sliced avocado and garnish with tortilla strips for added crunch.
  5. Serve immediately or chill in the refrigerator for about 30 minutes to let the flavors meld together.

Nutrition

Serving: 1servingCalories: 350kcalCarbohydrates: 20gProtein: 30gFat: 15gSaturated Fat: 5gPolyunsaturated Fat: 8gCholesterol: 70mgSodium: 500mgFiber: 6gSugar: 3g

Notes

  • For a spicier kick, add diced jalapeños or a splash of hot sauce to the salad.
  • Substitute grilled shrimp or tofu for the chicken to create a different protein option.

Tried this recipe?

Let us know how it was!

BLT Chicken Salad: A Flavorful Twist You’ll Love!

Introduction to BLT Chicken Salad

There’s something magical about a salad that feels like a hug on a plate. The BLT Chicken Salad is just that—a delightful blend of flavors that brings together the classic taste of a BLT sandwich with tender chicken and fresh veggies. Whether you’re racing against the clock on a busy weekday or looking to impress friends at a weekend gathering, this salad is your go-to solution. It’s quick, satisfying, and bursting with flavor, making it perfect for any occasion. Trust me, once you try it, you’ll wonder how you ever lived without it!

Why You’ll Love This BLT Chicken Salad

This BLT Chicken Salad is a game-changer in the kitchen. It’s incredibly easy to whip up, taking just 25 minutes from start to finish. The combination of crispy bacon, juicy chicken, and fresh veggies creates a flavor explosion that’s hard to resist. Plus, it’s versatile enough to serve as a light lunch or a hearty dinner. You’ll love how it satisfies your cravings without weighing you down!

Ingredients for BLT Chicken Salad

Gathering the right ingredients is key to making a delicious BLT Chicken Salad. Here’s what you’ll need:

  • Cooked chicken breast: Shredded or diced, this is the star of the show, providing protein and heartiness.
  • Bacon: Crispy and crumbled, it adds that irresistible smoky flavor that makes everything better.
  • Cherry tomatoes: Halved for sweetness and color, they bring a juicy burst to each bite.
  • Romaine lettuce: Chopped for crunch, it’s the perfect base that holds everything together.
  • Cucumber: Diced for a refreshing crunch, it balances the richness of the bacon and dressing.
  • Red onion: Finely chopped, it adds a zesty kick that elevates the overall flavor profile.
  • Mayonnaise: Creamy and rich, it serves as the base for the dressing, binding all the ingredients.
  • Dijon mustard: Just a touch adds a tangy depth that complements the other flavors beautifully.
  • Apple cider vinegar: A splash for acidity, it brightens the salad and enhances the taste.
  • Salt and pepper: Essential for seasoning, they help bring out the flavors of each ingredient.

For those looking to mix things up, consider adding avocado slices for extra creaminess or substituting Greek yogurt for half of the mayonnaise for a lighter version. You can find the exact quantities for each ingredient at the bottom of the article, ready for printing!

How to Make BLT Chicken Salad

Creating a delicious BLT Chicken Salad is a breeze! Follow these simple steps, and you’ll have a vibrant dish ready in no time. Let’s dive in!

Step 1: Combine the Chicken and Vegetables

Start by grabbing a large mixing bowl. Toss in the cooked chicken, crumbled bacon, halved cherry tomatoes, chopped romaine lettuce, diced cucumber, and finely chopped red onion. The colors alone will make your mouth water! Gently mix everything together, ensuring the ingredients are evenly distributed. This is where the magic begins, as the flavors start to mingle.

Step 2: Prepare the Dressing

In a separate small bowl, whisk together the mayonnaise, Dijon mustard, apple cider vinegar, salt, and pepper. This dressing is the secret sauce that ties everything together. Whisk until it’s smooth and creamy. The tanginess from the mustard and vinegar will elevate the salad, making each bite a delight.

Step 3: Mix Everything Together

Now, pour that luscious dressing over your chicken and vegetable mixture. Gently toss everything together until every piece is well coated. You want to see that creamy goodness hugging each ingredient. This step is crucial for ensuring that every bite is packed with flavor!

Step 4: Taste and Adjust

Here’s where you can get a little creative. Take a moment to taste your salad. Does it need a pinch more salt or a dash of pepper? Adjust the seasoning to your liking. This is your salad, after all! Don’t be shy about making it perfect for your palate.

Step 5: Serve or Chill

Finally, you have a choice. You can serve your BLT Chicken Salad immediately for a fresh crunch, or you can refrigerate it for about 30 minutes. Chilling allows the flavors to meld beautifully, creating a more harmonious dish. Either way, you’re in for a treat!

Tips for Success

  • Use leftover rotisserie chicken for a quick shortcut.
  • Cook the bacon until crispy for the best texture.
  • Chill the salad before serving to enhance the flavors.
  • Feel free to customize with your favorite veggies.
  • For extra crunch, add some toasted nuts or seeds.

Equipment Needed

  • Large mixing bowl: Essential for combining all your ingredients. A sturdy salad bowl works too.
  • Small bowl: Perfect for whisking the dressing. A mason jar can double as a mixing container.
  • Whisk: Ideal for blending the dressing smoothly. A fork can do the job in a pinch.
  • Cutting board and knife: Necessary for chopping veggies and chicken. A good-quality chef’s knife makes it easier.

Variations

  • Spicy Kick: Add diced jalapeños or a splash of hot sauce to the dressing for a fiery twist.
  • Herb Infusion: Mix in fresh herbs like basil or cilantro for an aromatic boost.
  • Low-Carb Option: Swap out the mayonnaise for avocado or a low-carb dressing to keep it light.
  • Grilled Veggies: Toss in grilled zucchini or bell peppers for a smoky flavor.
  • Quinoa Boost: Add cooked quinoa for extra protein and a hearty texture.

Serving Suggestions

  • Pair your BLT Chicken Salad with crispy garlic bread for a satisfying crunch.
  • Serve alongside a chilled glass of iced tea or lemonade to refresh your palate.
  • For a beautiful presentation, serve in individual bowls topped with extra bacon and cherry tomatoes.
  • Consider adding a side of fruit salad for a sweet contrast.

FAQs about BLT Chicken Salad

Can I use canned chicken for this salad?

Absolutely! Canned chicken is a convenient option. Just drain it well and shred it before mixing it into your BLT Chicken Salad. It saves time and still tastes great!

How long does BLT Chicken Salad last in the fridge?

Your BLT Chicken Salad can last up to three days in the fridge. Just make sure to store it in an airtight container to keep it fresh. The flavors will continue to meld, making it even tastier!

Can I make this salad ahead of time?

Yes! You can prepare the salad a few hours in advance. Just keep the dressing separate until you’re ready to serve. This way, the veggies stay crisp, and the flavors remain vibrant.

What can I substitute for mayonnaise?

If you’re looking for a lighter option, Greek yogurt is a fantastic substitute. It adds creaminess while cutting down on calories. You can also try avocado for a rich, buttery flavor in your BLT Chicken Salad.

Is this salad suitable for meal prep?

<pDefinitely! The BLT Chicken Salad is perfect for meal prep. Just portion it out into containers for easy grab-and-go lunches throughout the week. It’s a healthy, satisfying choice that keeps you fueled!

Final Thoughts

Creating a BLT Chicken Salad is more than just whipping up a meal; it’s about bringing joy to your table. Each bite is a delightful reminder of summer picnics and family gatherings, where laughter and good food go hand in hand. This salad is not only quick and easy but also a canvas for your creativity. Whether you’re enjoying it solo or sharing it with loved ones, it’s bound to become a favorite. So, roll up your sleeves, dive into this recipe, and savor the deliciousness that awaits. You won’t regret it!

jhessica

BLT Chicken Salad: A Flavorful Twist You’ll Love!

A delicious and refreshing BLT Chicken Salad that combines the classic flavors of a BLT sandwich with tender chicken and fresh vegetables.
Prep Time 15 minutes
Cook Time 10 minutes
Total Time 25 minutes
Servings: 4 servings
Course: Salad
Cuisine: American
Calories: 350

Ingredients
  

  • 1 cup cooked chicken breast shredded or diced
  • 4 slices of bacon cooked and crumbled
  • 1 cup cherry tomatoes halved
  • 1 cup romaine lettuce chopped
  • 1/2 cup cucumber diced
  • 1/4 cup red onion finely chopped
  • 1/2 cup mayonnaise
  • 1 tablespoon Dijon mustard
  • 1 tablespoon apple cider vinegar
  • Salt and pepper to taste

Method
 

  1. In a large mixing bowl, combine the cooked chicken, crumbled bacon, cherry tomatoes, romaine lettuce, cucumber, and red onion.
  2. In a separate small bowl, whisk together the mayonnaise, Dijon mustard, apple cider vinegar, salt, and pepper until smooth.
  3. Pour the dressing over the chicken mixture and gently toss until everything is well coated.
  4. Taste and adjust seasoning if necessary.
  5. Serve immediately or refrigerate for about 30 minutes to let the flavors meld.

Nutrition

Serving: 1servingCalories: 350kcalCarbohydrates: 5gProtein: 30gFat: 22gSaturated Fat: 5gPolyunsaturated Fat: 15gCholesterol: 80mgSodium: 600mgFiber: 1gSugar: 3g

Notes

  • For a lighter version, substitute Greek yogurt for half of the mayonnaise.
  • Add avocado slices for extra creaminess and healthy fats.

Tried this recipe?

Let us know how it was!

Garlic Lemon Butter Salmon: A Flavorful Delight Recipe

Introduction to Garlic Lemon Butter Salmon

There’s something magical about a dish that comes together in a flash, isn’t there? Garlic Lemon Butter Salmon is just that—a delightful meal that’s both quick and impressive. I remember the first time I made it; the aroma of garlic and lemon filled my kitchen, and my family couldn’t wait to dig in. This recipe is perfect for those busy weeknights when you want to serve something special without spending hours in the kitchen. With just a handful of ingredients, you can create a flavorful dish that will have everyone asking for seconds.

Why You’ll Love This Garlic Lemon Butter Salmon

This Garlic Lemon Butter Salmon is a game-changer for your dinner routine. It’s incredibly easy to whip up, taking just 25 minutes from start to finish. The combination of garlic and lemon creates a bright, zesty flavor that elevates the salmon to new heights. Plus, it’s a healthy option packed with protein, making it perfect for those who want to eat well without sacrificing taste. Trust me, your taste buds will thank you!

Ingredients for Garlic Lemon Butter Salmon

Gathering the right ingredients is the first step to culinary success. For this Garlic Lemon Butter Salmon, you’ll need:

  • Salmon fillets: Fresh salmon is the star of the show. Look for vibrant, firm fillets. You can also use trout or cod if you’re feeling adventurous.
  • Unsalted butter: This adds richness and depth. Melted butter is essential for that luscious sauce.
  • Garlic: Freshly minced garlic brings a punch of flavor. It’s aromatic and pairs beautifully with lemon.
  • Lemon: Both the zest and juice are used here. The zest adds a fragrant brightness, while the juice gives a tangy kick.
  • Dried oregano: This herb adds an earthy note. It complements the salmon and enhances the overall flavor.
  • Salt: A must for seasoning. It brings out the natural flavors of the salmon.
  • Black pepper: Freshly cracked pepper adds a subtle heat and depth.
  • Fresh parsley: Chopped parsley is for garnish. It adds a pop of color and freshness to the dish.
  • Lemon slices: These are not just for garnish; they can be squeezed over the salmon for an extra burst of flavor.

For those who want to mix things up, consider adding seasonal vegetables like asparagus or broccoli on the baking sheet. They roast beautifully alongside the salmon, creating a complete meal. You can find the exact quantities for each ingredient at the bottom of the article, ready for printing!

How to Make Garlic Lemon Butter Salmon

Creating this Garlic Lemon Butter Salmon is a breeze. Follow these simple steps, and you’ll have a delicious meal ready in no time. Let’s dive in!

Step 1: Preheat the Oven

Start by preheating your oven to 400°F. This step is crucial because it ensures even cooking. While the oven heats up, line a large baking sheet with parchment paper or give it a light grease. This will prevent the salmon from sticking and make cleanup a snap.

Step 2: Prepare the Garlic Lemon Butter Mixture

In a small bowl, combine the melted butter, minced garlic, lemon zest, and lemon juice. Add the dried oregano, salt, and black pepper. Mix everything well until it’s nicely blended. This sauce is the heart of the dish, infusing the salmon with rich, zesty flavors that will make your taste buds dance.

Step 3: Arrange the Salmon Fillets

Place the salmon fillets skin-side down on the prepared baking sheet. This positioning helps keep the fish moist while it cooks. Brush the garlic lemon butter mixture generously over each fillet. Don’t be shy—this sauce is what makes the dish shine!

Step 4: Bake the Salmon

Slide the baking sheet into the preheated oven and bake the salmon for 12-15 minutes. Keep an eye on it! You’ll know it’s done when the salmon flakes easily with a fork and reaches an internal temperature of 145°F. If you like a crispy finish, consider broiling it for the last 2-3 minutes.

Step 5: Garnish and Serve

Once the salmon is out of the oven, let it rest for a couple of minutes. This helps the juices redistribute. Garnish with fresh parsley and lemon slices for a pop of color and flavor. Serve it up, and watch your family’s faces light up with delight!

Tips for Success

  • Always use fresh ingredients for the best flavor. Fresh salmon and garlic make a world of difference.
  • Don’t skip the resting time after baking. It allows the salmon to become even more tender.
  • Experiment with herbs! Fresh dill or thyme can add a unique twist to the dish.
  • For a quick cleanup, line your baking sheet with foil instead of parchment paper.
  • Pair with a light salad for a refreshing contrast to the rich salmon.

Equipment Needed

  • Baking sheet: A large one is ideal. If you don’t have one, a casserole dish works too.
  • Parchment paper: This helps with easy cleanup. Aluminum foil is a good substitute.
  • Mixing bowl: Any bowl will do for combining the sauce ingredients.
  • Brush: A pastry brush is perfect for applying the garlic lemon butter. A spoon can work in a pinch.

Variations

  • Herb-Infused: Swap out oregano for fresh dill or basil for a different flavor profile.
  • Spicy Kick: Add a pinch of red pepper flakes to the garlic lemon butter for a spicy twist.
  • Honey Glaze: Drizzle a bit of honey into the butter mixture for a sweet and savory combination.
  • Vegetarian Option: Use portobello mushrooms instead of salmon for a hearty, plant-based alternative.
  • Citrus Medley: Mix in orange or lime zest and juice for a vibrant citrus flavor.

Serving Suggestions

  • Pair with a light quinoa salad for a nutritious side.
  • Serve alongside roasted asparagus or garlic green beans for a colorful plate.
  • A crisp white wine, like Sauvignon Blanc, complements the flavors beautifully.
  • For presentation, arrange lemon slices artfully around the salmon.

FAQs about Garlic Lemon Butter Salmon

Curious about this delightful dish? Here are some common questions I often hear about Garlic Lemon Butter Salmon, along with my answers to help you out.

Can I use frozen salmon for this recipe?

Absolutely! Just make sure to thaw it completely before cooking. Frozen salmon can be just as delicious when prepared correctly.

What can I substitute for butter in this recipe?

If you’re looking for a dairy-free option, olive oil works well. It won’t have the same richness, but it will still deliver great flavor.

How do I know when the salmon is done cooking?

The best way to check is by using a fork. If the salmon flakes easily and reaches an internal temperature of 145°F, it’s ready to enjoy!

Can I make this dish ahead of time?

While it’s best served fresh, you can prepare the garlic lemon butter mixture in advance. Just store it in the fridge until you’re ready to cook.

What sides pair well with Garlic Lemon Butter Salmon?

Light salads, roasted vegetables, or even a creamy risotto make excellent companions. They balance the flavors beautifully!

Final Thoughts

Cooking Garlic Lemon Butter Salmon is more than just preparing a meal; it’s about creating a moment. The vibrant flavors and enticing aromas fill your kitchen, inviting everyone to gather around the table. This dish is a celebration of simplicity and taste, perfect for impressing guests or enjoying a cozy family dinner. Each bite is a reminder that good food doesn’t have to be complicated. So, whether you’re a seasoned chef or a kitchen novice, this recipe will surely bring joy and satisfaction to your dining experience. Dive in and savor the deliciousness!

jhessica

Garlic Lemon Butter Salmon: A Flavorful Delight Recipe

A flavorful and easy-to-make Garlic Lemon Butter Salmon recipe that is perfect for a quick dinner.
Prep Time 10 minutes
Cook Time 15 minutes
Total Time 25 minutes
Servings: 4 servings
Course: Main Course
Cuisine: American
Calories: 350

Ingredients
  

  • 2 pounds salmon fillets
  • 4 tablespoons unsalted butter melted
  • 4 cloves garlic minced
  • 1 lemon zested and juiced
  • 1 teaspoon dried oregano
  • 1 teaspoon salt
  • ½ teaspoon black pepper
  • 1 tablespoon fresh parsley chopped (for garnish)
  • Lemon slices for garnish

Method
 

  1. Preheat your oven to 400°F. Line a large baking sheet with parchment paper or lightly grease it.
  2. In a small bowl, combine the melted butter, minced garlic, lemon zest, lemon juice, oregano, salt, and black pepper. Mix well.
  3. Place the salmon fillets skin-side down on the prepared baking sheet. Brush the garlic lemon butter mixture generously over the salmon fillets.
  4. Bake the salmon in the preheated oven for 12-15 minutes, or until the salmon flakes easily with a fork and reaches an internal temperature of 145°F.
  5. Remove the salmon from the oven and let it rest for a couple of minutes. Garnish with fresh parsley and lemon slices before serving.

Nutrition

Serving: 1filletCalories: 350kcalProtein: 34gFat: 22gSaturated Fat: 8gPolyunsaturated Fat: 14gCholesterol: 100mgSodium: 500mg

Notes

  • For a crispy finish, broil the salmon for the last 2-3 minutes of cooking.
  • You can substitute the salmon with other fish like trout or cod for a different flavor.
  • Add seasonal vegetables like asparagus or broccoli on the baking sheet for a complete meal.

Tried this recipe?

Let us know how it was!

Creamy Butter Chicken: A Must-Try Flavor Explosion!

Introduction to Creamy Butter Chicken

There’s something magical about the aroma of spices wafting through the kitchen, isn’t there? Creamy Butter Chicken is one of those dishes that can transform an ordinary evening into a culinary adventure. It’s rich, flavorful, and oh-so-comforting, making it perfect for a cozy dinner or a gathering with friends.

Whether you’re a seasoned cook or just starting out, this recipe is a quick solution for a busy day. With just a few simple steps, you can impress your loved ones with a dish that feels like a warm hug on a plate. Let’s dive into this flavor explosion!

Why You’ll Love This Creamy Butter Chicken

This Creamy Butter Chicken is not just a meal; it’s an experience. It’s incredibly easy to whip up, making it perfect for those weeknights when time is tight. The rich, velvety sauce envelops tender chicken, creating a taste that dances on your palate. Plus, it’s a crowd-pleaser! Whether you’re cooking for family or friends, this dish will have everyone asking for seconds. Trust me, it’s a flavor journey you won’t want to miss!

Ingredients for Creamy Butter Chicken

Gathering the right ingredients is the first step to creating a delicious Creamy Butter Chicken. Here’s what you’ll need:

  • Boneless, skinless chicken thighs: These are juicy and tender, perfect for soaking up the flavors.
  • Plain yogurt: This helps to marinate the chicken, making it tender and flavorful.
  • Lemon juice: A splash of acidity brightens the dish and balances the richness.
  • Ground cumin: Adds a warm, earthy flavor that’s essential in Indian cuisine.
  • Ground coriander: This spice brings a citrusy note that complements the other spices.
  • Garam masala: A blend of spices that adds depth and warmth to the dish.
  • Turmeric: Not only does it give a beautiful color, but it also adds a subtle earthiness.
  • Paprika: For a hint of sweetness and a touch of color.
  • Salt and black pepper: Essential for enhancing all the flavors.
  • Unsalted butter: This is the star of the show, creating a rich, creamy sauce.
  • Onion: Finely chopped, it adds sweetness and depth when sautéed.
  • Garlic and ginger: These aromatics are key for that signature flavor profile.
  • Tomato puree: Forms the base of the sauce, providing richness and acidity.
  • Heavy cream: This is what makes the sauce creamy and indulgent.
  • Fresh cilantro: A garnish that adds a pop of color and freshness.

For those who like a bit of heat, consider adding cayenne pepper or red chili flakes to the marinade.

You can find all the exact measurements for these ingredients at the bottom of the article, ready for printing. Happy cooking!

How to Make Creamy Butter Chicken

Now that you have your ingredients ready, let’s get cooking! Making Creamy Butter Chicken is a straightforward process that will fill your kitchen with mouthwatering aromas. Follow these steps, and you’ll have a delicious meal in no time.

Step 1: Marinate the Chicken

Start by marinating the chicken. In a large bowl, combine the yogurt, lemon juice, and spices. This mixture is crucial; it tenderizes the chicken and infuses it with flavor. Add the chicken pieces, ensuring they are well-coated. Cover the bowl and let it marinate in the fridge for at least an hour. If you have time, letting it sit overnight will deepen the flavors even more.

Step 2: Sauté the Aromatics

Next, heat the butter in a large skillet over medium heat. Once melted, toss in the finely chopped onion. Sauté it until it’s soft and translucent, about five minutes. This step builds the foundation of flavor. Then, add the minced garlic and ginger, cooking for another minute or two. You want them fragrant but not burnt—keep stirring!

Step 3: Cook the Chicken

Now it’s time to add the marinated chicken to the skillet. Spread it out evenly and let it brown on all sides, which should take about five to seven minutes. This browning adds a lovely depth of flavor to your dish. Don’t rush this step; it’s where the magic begins!

Step 4: Add Tomato Puree

Once the chicken is nicely browned, pour in the tomato puree. Stir it well to combine everything. Bring the mixture to a gentle simmer, then reduce the heat to low. Cover the skillet and let it cook for about 20 minutes. This simmering allows the flavors to meld beautifully, creating a rich sauce.

Step 5: Stir in the Cream

After the chicken has cooked through, it’s time to add the heavy cream. Pour it in slowly, stirring to achieve that creamy consistency we all love. Let it simmer for another five to ten minutes. This step is essential for thickening the sauce and making it luxuriously smooth.

Step 6: Garnish and Serve

Finally, it’s time to plate your masterpiece! Garnish with fresh cilantro for a pop of color and freshness. Serve your Creamy Butter Chicken with basmati rice or warm naan to soak up that delicious sauce. Trust me, your taste buds will thank you!

Tips for Success

  • Marinate the chicken overnight for maximum flavor and tenderness.
  • Use a heavy-bottomed skillet to ensure even cooking.
  • Don’t rush the sautéing process; it builds essential flavor.
  • Adjust the spice levels to your taste; add cayenne for heat.
  • Serve immediately for the best texture and flavor.

Equipment Needed

  • Large bowl: For marinating the chicken. A mixing bowl works too.
  • Skillet or saucepan: A heavy-bottomed skillet is ideal for even cooking.
  • Measuring cups and spoons: Essential for accurate ingredient measurements.
  • Wooden spoon: Perfect for stirring and mixing.
  • Knife and cutting board: For chopping onions, garlic, and ginger.

Variations of Creamy Butter Chicken

  • Vegetarian Option: Substitute chicken with paneer or chickpeas for a delicious vegetarian twist.
  • Spicy Version: Add more cayenne pepper or fresh green chilies to kick up the heat.
  • Coconut Cream: Replace heavy cream with coconut cream for a dairy-free alternative that adds a tropical flavor.
  • Low-Carb Adaptation: Serve over cauliflower rice instead of traditional rice for a low-carb meal.
  • Herb Infusion: Experiment with fresh herbs like mint or basil for a unique flavor profile.

Serving Suggestions for Creamy Butter Chicken

  • Basmati Rice: Fluffy rice is perfect for soaking up the creamy sauce.
  • Warm Naan: Soft naan bread is ideal for dipping and adds a delightful texture.
  • Fresh Salad: A light cucumber and tomato salad balances the richness.
  • Chai Tea: Pair with a warm cup of chai for a comforting meal.

FAQs about Creamy Butter Chicken

What is the origin of Creamy Butter Chicken?

Creamy Butter Chicken, or “Murgh Makhani,” hails from India, specifically Delhi. It was created in the 1950s by the chefs at the Moti Mahal restaurant. They combined leftover chicken with a rich tomato sauce, and the rest is history!

Can I make Creamy Butter Chicken ahead of time?

Absolutely! You can prepare the dish a day in advance. Just reheat gently on the stove, adding a splash of cream if needed to maintain that luscious texture. It often tastes even better the next day as the flavors meld.

Is Creamy Butter Chicken spicy?

The spice level can be adjusted to your preference. The traditional recipe is mild, but you can easily add cayenne pepper or red chili flakes for a kick. Just remember, a little goes a long way!

What can I serve with Creamy Butter Chicken?

This dish pairs wonderfully with basmati rice or warm naan. You can also serve it with a fresh salad or roasted vegetables for a balanced meal.

Can I freeze Creamy Butter Chicken?

Yes, you can freeze it! Just let it cool completely, then store it in an airtight container. It will keep well for up to three months. Thaw in the fridge overnight before reheating.

Final Thoughts

Cooking Creamy Butter Chicken is more than just preparing a meal; it’s about creating memories. The rich, aromatic sauce and tender chicken come together to form a dish that warms the heart and soul. Whether you’re sharing it with family or enjoying a quiet night in, this recipe brings a sense of comfort and joy.

Each bite is a reminder of the flavors of India, transporting you to a bustling market filled with spices. So roll up your sleeves, embrace the process, and let this Creamy Butter Chicken become a cherished part of your culinary repertoire!

jhessica

Creamy Butter Chicken: A Must-Try Flavor Explosion!

Creamy Butter Chicken is a rich and flavorful dish made with marinated chicken cooked in a creamy tomato sauce, perfect for serving with rice or naan.
Prep Time 1 hour
Cook Time 30 minutes
Total Time 1 hour 30 minutes
Servings: 6 servings
Course: Main Course
Cuisine: Indian
Calories: 450

Ingredients
  

  • 2 pounds boneless skinless chicken thighs, cut into bite-sized pieces
  • 1 cup plain yogurt
  • 2 tablespoons lemon juice
  • 1 tablespoon ground cumin
  • 1 tablespoon ground coriander
  • 1 tablespoon garam masala
  • 1 teaspoon turmeric
  • 1 teaspoon paprika
  • 1 teaspoon salt
  • 1/2 teaspoon black pepper
  • 4 tablespoons unsalted butter
  • 1 medium onion finely chopped
  • 4 cloves garlic minced
  • 1 tablespoon fresh ginger minced
  • 1 can 15 ounces tomato puree
  • 1 cup heavy cream
  • Fresh cilantro for garnish

Method
 

  1. In a large bowl, combine yogurt, lemon juice, cumin, coriander, garam masala, turmeric, paprika, salt, and black pepper. Add the chicken pieces and mix well to coat. Cover and marinate in the refrigerator for at least 1 hour, or overnight for best flavor.
  2. In a large skillet or saucepan, melt the butter over medium heat. Add the chopped onion and sauté until soft and translucent, about 5 minutes.
  3. Stir in the minced garlic and ginger, cooking for an additional 1-2 minutes until fragrant.
  4. Add the marinated chicken to the skillet, cooking until browned on all sides, about 5-7 minutes.
  5. Pour in the tomato puree and bring to a simmer. Reduce heat to low and cover, cooking for 20 minutes, stirring occasionally.
  6. Stir in the heavy cream and simmer for another 5-10 minutes until the sauce is thickened and the chicken is cooked through.
  7. Garnish with fresh cilantro before serving.

Nutrition

Serving: 1servingCalories: 450kcalCarbohydrates: 6gProtein: 30gFat: 30gSaturated Fat: 18gPolyunsaturated Fat: 8gCholesterol: 120mgSodium: 800mgFiber: 1gSugar: 6g

Notes

  • For a spicier version, add 1-2 teaspoons of cayenne pepper or red chili flakes to the marinade.
  • Serve with basmati rice or naan bread to soak up the delicious sauce.

Tried this recipe?

Let us know how it was!

Fluffy Oat Flour Pancakes: Discover the Perfect Recipe!

Introduction to Fluffy Oat Flour Pancakes

There’s something magical about pancakes, isn’t there? The way they puff up on the griddle, golden and inviting, makes breakfast feel like a special occasion. Fluffy oat flour pancakes are my go-to for those busy mornings when I want to whip up something delicious without a fuss.

These pancakes are not just easy to make; they’re also a healthier twist on a classic favorite. Whether you’re feeding a family or treating yourself, this recipe is sure to impress. So grab your mixing bowl and let’s dive into a breakfast that’s both satisfying and wholesome!

Why You’ll Love This Fluffy Oat Flour Pancakes

These fluffy oat flour pancakes are a game changer for breakfast lovers.

They come together in just 25 minutes, making them perfect for busy mornings.

The taste? Absolutely delightful!

With a light, airy texture and a hint of nuttiness, they’ll have you coming back for seconds.

Plus, they’re versatile enough to cater to various dietary needs, ensuring everyone at the table can enjoy them.

What’s not to love?

Ingredients for Fluffy Oat Flour Pancakes

Creating fluffy oat flour pancakes starts with gathering the right ingredients.

Here’s what you’ll need:

  • Oat Flour: The star of the show! It gives these pancakes their unique flavor and fluffy texture. You can easily make your own by blending rolled oats until fine.
  • Sugar: Just a touch to balance the flavors. Feel free to use coconut sugar or maple syrup for a healthier option.
  • Baking Powder: This is your leavening agent, ensuring the pancakes rise beautifully. Make sure it’s fresh for the best results.
  • Salt: A pinch enhances all the flavors. It’s a small but mighty ingredient!
  • Milk: Whether you choose dairy or a non-dairy alternative, this adds moisture. Almond or oat milk works great here.
  • Egg: This binds everything together and adds richness. For a vegan option, a flax egg is a perfect substitute.
  • Melted Butter or Oil: Adds a lovely richness. Use coconut oil for a tropical twist or keep it classic with butter.
  • Vanilla Extract: A splash of this elevates the flavor, making your pancakes taste like a treat.

For those who want to get creative, consider adding mix-ins like blueberries or chocolate chips.

You’ll find the exact quantities for each ingredient at the bottom of the article, ready for printing!

How to Make Fluffy Oat Flour Pancakes

Making fluffy oat flour pancakes is a breeze! Follow these simple steps, and you’ll have a stack of delicious pancakes in no time.

Step 1: Combine Dry Ingredients

Start by grabbing a large mixing bowl.

Whisk together the oat flour, sugar, baking powder, and salt until everything is well combined.

This step is crucial; it ensures that the baking powder is evenly distributed, which helps your pancakes rise perfectly.

Step 2: Mix Wet Ingredients

In a separate bowl, mix the milk, egg, melted butter (or oil), and vanilla extract.

Stir until the mixture is smooth and creamy.

This is where the magic begins! The wet ingredients will bring moisture and flavor to your pancakes.

Step 3: Combine Mixtures

Now, pour the wet ingredients into the bowl with the dry ingredients.

Gently stir until just combined.

Don’t worry about a few lumps; overmixing can lead to dense pancakes.

Trust me, a little texture is perfectly fine!

Step 4: Preheat the Skillet

Heat a non-stick skillet or griddle over medium heat.

If needed, lightly grease it with butter or oil.

You want the surface hot enough that a drop of water sizzles when it hits.

This ensures a nice golden-brown crust on your pancakes.

Step 5: Cook the Pancakes

Pour about 1/4 cup of batter onto the skillet for each pancake.

Watch for bubbles to form on the surface, which usually takes about 2-3 minutes.

When you see those bubbles, it’s time to flip! Cook for another 1-2 minutes until golden brown.

Adjust the heat as necessary to avoid burning.

Step 6: Serve and Enjoy

Once cooked, stack those fluffy oat flour pancakes high on a plate.

Top with your favorite syrup, fresh fruit, or a sprinkle of powdered sugar.

Dig in and savor every bite!

These pancakes are not just a meal; they’re a delightful experience that brings joy to your breakfast table.

Tips for Success

  • Use fresh baking powder for maximum fluffiness.
  • Let the batter rest for a few minutes; this helps the pancakes rise better.
  • Keep the heat at medium to avoid burning while ensuring a nice golden color.
  • Experiment with mix-ins like nuts or spices for added flavor.
  • Serve immediately for the best texture; pancakes can get soggy if left too long.

Equipment Needed

  • Mixing Bowls: A large bowl for dry ingredients and a smaller one for wet. Any bowls will do!
  • Whisk: Essential for combining ingredients. A fork works in a pinch.
  • Non-Stick Skillet or Griddle: Perfect for cooking pancakes. A regular skillet with a bit of oil can work too.
  • Measuring Cups: For accurate ingredient portions. Use any cup you have handy!

Variations for Fluffy Oat Flour Pancakes

  • Blueberry Bliss: Fold in 1/2 cup of fresh or frozen blueberries for a burst of fruity flavor.
  • Chocolate Chip Delight: Add 1/2 cup of chocolate chips to satisfy your sweet tooth.
  • Spiced Pumpkin: Mix in 1/2 cup of pumpkin puree and a teaspoon of cinnamon for a fall-inspired twist.
  • Nutty Banana: Mash a ripe banana and stir it into the batter for natural sweetness and added moisture.
  • Vegan Option: Use a flax egg and non-dairy milk to make these pancakes completely plant-based.
  • Protein Boost: Stir in a scoop of your favorite protein powder for a hearty breakfast.

Serving Suggestions for Fluffy Oat Flour Pancakes

  • Fresh Fruit: Serve with sliced bananas, strawberries, or a medley of berries for a refreshing touch.
  • Maple Syrup: Drizzle with pure maple syrup or honey for that classic sweetness.
  • Yogurt: A dollop of Greek yogurt adds creaminess and protein.
  • Nuts: Sprinkle chopped nuts for a satisfying crunch.
  • Presentation: Stack pancakes high and dust with powdered sugar for a beautiful brunch display.

FAQs about Fluffy Oat Flour Pancakes

Can I use regular flour instead of oat flour?

Absolutely! While oat flour gives these pancakes a unique flavor and texture, you can substitute it with all-purpose flour. Just keep in mind that the pancakes may not be as fluffy or have the same nutty taste.

How can I make these pancakes gluten-free?

To make fluffy oat flour pancakes gluten-free, ensure you use certified gluten-free oat flour. This way, you can enjoy the same deliciousness without the gluten!

Can I prepare the batter in advance?

Yes, you can prepare the batter ahead of time! Just store it in the fridge for up to 24 hours. Give it a gentle stir before cooking, as it may thicken slightly.

What can I add to the batter for extra flavor?

Mix-ins like chocolate chips, nuts, or spices can elevate your pancakes. Try adding cinnamon or vanilla extract for a delightful twist!

How do I store leftover pancakes?

Store any leftover pancakes in an airtight container in the fridge for up to three days. You can also freeze them for longer storage. Just reheat in the toaster or microwave when you’re ready to enjoy!

Final Thoughts

Fluffy oat flour pancakes are more than just a breakfast option; they’re a delightful way to start your day.

Each bite is a warm hug, filled with flavor and comfort.

Whether you’re enjoying them solo or sharing with family, these pancakes create moments worth savoring.

The ease of preparation means you can whip them up any day of the week, making breakfast feel special.

So, gather your ingredients, fire up that skillet, and indulge in a stack of joy.

Trust me, once you try these, they’ll become a beloved staple in your kitchen!

jhessica

Fluffy Oat Flour Pancakes: Discover the Perfect Recipe!

Delicious and fluffy pancakes made with oat flour, perfect for breakfast or brunch.
Prep Time 10 minutes
Cook Time 15 minutes
Total Time 25 minutes
Servings: 4 servings (about 8 pancakes)
Course: Breakfast
Cuisine: American
Calories: 180

Ingredients
  

  • 1 cup oat flour
  • 2 tablespoons sugar
  • 1 tablespoon baking powder
  • 1/4 teaspoon salt
  • 1 cup milk dairy or non-dairy
  • 1 large egg
  • 2 tablespoons melted butter or oil
  • 1 teaspoon vanilla extract

Method
 

  1. In a large mixing bowl, whisk together the oat flour, sugar, baking powder, and salt until well combined.
  2. In a separate bowl, mix the milk, egg, melted butter (or oil), and vanilla extract until smooth.
  3. Pour the wet ingredients into the dry ingredients and stir until just combined. Be careful not to overmix; a few lumps are okay.
  4. Preheat a non-stick skillet or griddle over medium heat. Lightly grease with butter or oil if necessary.
  5. Pour about 1/4 cup of batter onto the skillet for each pancake. Cook until bubbles form on the surface, about 2-3 minutes. Flip and cook for an additional 1-2 minutes, or until golden brown.
  6. Repeat with the remaining batter, adjusting the heat as needed to prevent burning.

Nutrition

Serving: 2pancakesCalories: 180kcalCarbohydrates: 28gProtein: 5gFat: 6gSaturated Fat: 2gPolyunsaturated Fat: 4gCholesterol: 30mgSodium: 150mgFiber: 3gSugar: 2g

Notes

  • For added flavor, mix in 1/2 cup of blueberries or chocolate chips to the batter before cooking.
  • To make these pancakes vegan, substitute the egg with a flax egg (1 tablespoon ground flaxseed mixed with 2.5 tablespoons water) and use a non-dairy milk.

Tried this recipe?

Let us know how it was!

Steak and Cheese Sandwich with Mushrooms: Try This Recipe!

Introduction to Steak and Cheese Sandwich with Mushrooms

There’s something undeniably comforting about a hearty Steak and Cheese Sandwich with Mushrooms. It takes me back to those lazy Sunday afternoons, when the aroma of sizzling steak would fill the kitchen, making everyone gather around the table. This recipe is not just a meal; it’s a quick solution for busy days or a way to impress your loved ones with minimal effort. With tender steak, savory mushrooms, and gooey cheese, it’s a flavor explosion that satisfies every craving. Let’s dive into this delicious adventure together!

Why You’ll Love This Steak and Cheese Sandwich with Mushrooms

This Steak and Cheese Sandwich with Mushrooms is a game-changer for your weeknight dinners. It’s quick to whip up, taking just 25 minutes from start to finish. The combination of juicy steak, caramelized veggies, and melted cheese creates a mouthwatering experience that’s hard to resist. Plus, it’s versatile enough to please everyone at the table, making it a perfect choice for family meals or casual gatherings with friends.

Ingredients for Steak and Cheese Sandwich with Mushrooms

Gathering the right ingredients is the first step to crafting a mouthwatering Steak and Cheese Sandwich with Mushrooms. Here’s what you’ll need:

  • Flank steak: This cut is lean and flavorful, perfect for quick cooking. It’s tender when sliced thinly against the grain.
  • Olive oil: A splash of this golden liquid helps to sear the steak and sauté the veggies, adding richness.
  • Onion: Sweet and aromatic, onions bring depth to the dish. Sautéing them enhances their natural sweetness.
  • Mushrooms: These earthy gems add a savory umami flavor. I prefer cremini or button mushrooms for their texture.
  • Bell pepper: Any color works! They add a pop of sweetness and crunch, balancing the richness of the cheese.
  • Hoagie rolls: The perfect vessel for your sandwich. Look for fresh, crusty rolls that can hold all the delicious fillings.
  • Provolone cheese: This melty cheese is a classic choice, but feel free to swap it for mozzarella or cheddar if you prefer.
  • Salt and pepper: Essential for seasoning, these staples enhance the flavors of your ingredients.
  • Optional: Hot sauce or mustard can add a spicy kick, so keep them handy if you like a little heat!

For exact measurements, check the bottom of the article where you can find everything listed for easy printing.

How to Make Steak and Cheese Sandwich with Mushrooms

Creating a delicious Steak and Cheese Sandwich with Mushrooms is easier than you might think. Follow these simple steps, and you’ll have a mouthwatering meal ready in no time!

Step 1: Prepare the Steak

Start by heating a tablespoon of olive oil in a large skillet over medium-high heat. Once the oil shimmers, add the thinly sliced flank steak. Season it generously with salt and pepper. Cook for about 3-4 minutes, stirring occasionally, until the steak is browned but not overcooked. Remove the steak from the skillet and set it aside. This step is crucial; you want that perfect sear to lock in the flavors!

Step 2: Sauté the Vegetables

In the same skillet, toss in the sliced onion, mushrooms, and bell pepper. Sauté them for about 5-7 minutes. You’re looking for that beautiful caramelization, which brings out the natural sweetness of the veggies. Stir occasionally to ensure even cooking. The aroma will be irresistible, and your kitchen will feel like a cozy bistro!

Step 3: Combine Steak and Vegetables

Once the vegetables are softened and golden, return the cooked steak to the skillet. Mix everything together, allowing the flavors to meld for an additional 2-3 minutes. This is where the magic happens! The steak absorbs the savory goodness of the veggies, creating a filling that’s bursting with flavor.

Step 4: Prepare the Hoagie Rolls

While the steak and veggies are mingling, preheat your oven broiler. Slice the hoagie rolls in half lengthwise and place them on a baking sheet. This step is essential for achieving that crispy exterior while keeping the inside soft and chewy. You want a sturdy roll that can hold all that delicious filling!

Step 5: Assemble the Sandwiches

Now it’s time to build your masterpiece! Divide the steak and vegetable mixture evenly among the hoagie rolls. Top each one generously with slices of provolone cheese. The cheese will melt beautifully, creating that gooey, comforting layer we all crave in a great sandwich.

Step 6: Broil the Sandwiches

Place the baking sheet under the broiler for 2-3 minutes. Keep a close eye on them! You want the cheese to melt and bubble, but not burn. Once they’re golden and gooey, remove them from the oven. Let them cool for a minute before serving. Trust me, the anticipation will be worth it!

Tips for Success

  • Slice the flank steak against the grain for maximum tenderness.
  • Don’t rush the sautéing process; caramelization adds depth to the flavor.
  • Experiment with different cheeses like cheddar or pepper jack for a twist.
  • For extra flavor, marinate the steak in your favorite spices before cooking.
  • Keep an eye on the broiler; it can turn from perfect to burnt in seconds!

Equipment Needed

  • Large skillet: A non-stick or cast-iron skillet works best for even cooking.
  • Baking sheet: Any sturdy baking sheet will do for broiling the sandwiches.
  • Sharp knife: Essential for slicing the steak and hoagie rolls.
  • Cutting board: A must-have for safe and easy prep.

Variations

  • Spicy Kick: Add sliced jalapeños or a sprinkle of crushed red pepper flakes to the vegetable mixture for an extra layer of heat.
  • Different Proteins: Swap the flank steak for grilled chicken, turkey, or even tofu for a vegetarian option.
  • Cheese Choices: Experiment with different cheeses like sharp cheddar, pepper jack, or even a creamy blue cheese for a unique twist.
  • Veggie Lovers: Load up on more vegetables like spinach, zucchini, or roasted red peppers for added nutrition and flavor.
  • Herb Infusion: Toss in fresh herbs like basil or parsley at the end for a burst of freshness.

Serving Suggestions

  • Side Salads: A crisp Caesar or garden salad pairs perfectly with the richness of the sandwich.
  • Chips: Serve with kettle-cooked potato chips for a satisfying crunch.
  • Drinks: An ice-cold beer or a refreshing iced tea complements the flavors beautifully.
  • Presentation: Serve on a wooden board for a rustic touch, garnished with fresh herbs.

FAQs about Steak and Cheese Sandwich with Mushrooms

Can I use a different type of steak for this sandwich?

Absolutely! While flank steak is a great choice, you can also use sirloin or ribeye for a richer flavor. Just make sure to slice it thinly for the best texture in your Steak and Cheese Sandwich with Mushrooms.

How can I make this sandwich healthier?

To lighten things up, consider using whole grain hoagie rolls and reducing the amount of cheese. You can also load up on more veggies or swap the steak for grilled chicken or tofu. This way, you still enjoy a delicious meal without the extra calories!

What can I serve with my Steak and Cheese Sandwich?

Pair your sandwich with a fresh side salad, crispy potato chips, or even some sweet potato fries. A cold beer or iced tea makes for a refreshing drink that complements the flavors perfectly.

Can I prepare the filling in advance?

Yes! You can cook the steak and vegetable mixture ahead of time. Just store it in the fridge and reheat it when you’re ready to assemble your sandwiches. This makes for a quick and easy meal on busy nights!

What’s the best way to store leftovers?

Store any leftover Steak and Cheese Sandwich filling in an airtight container in the fridge for up to three days. Reheat it on the stove or in the microwave before serving it again. Just be sure to toast your hoagie rolls fresh for the best experience!

Final Thoughts

Creating a Steak and Cheese Sandwich with Mushrooms is more than just cooking; it’s about bringing people together. The sizzling sounds, the mouthwatering aroma, and the gooey cheese melting over tender steak create a sensory experience that warms the heart. Whether you’re enjoying it on a busy weeknight or serving it at a weekend gathering, this sandwich is sure to impress. It’s a dish that invites laughter, conversation, and satisfaction. So, roll up your sleeves, gather your ingredients, and let this recipe become a cherished part of your culinary repertoire. You won’t regret it!

jhessica

Steak and Cheese Sandwich with Mushrooms: Try This Recipe!

A delicious Steak and Cheese Sandwich with Mushrooms, perfect for a hearty meal.
Prep Time 10 minutes
Cook Time 15 minutes
Total Time 25 minutes
Servings: 4 servings
Course: Sandwich
Cuisine: American
Calories: 450

Ingredients
  

  • 1 pound flank steak thinly sliced
  • 1 tablespoon olive oil
  • 1 medium onion thinly sliced
  • 8 ounces mushrooms sliced
  • 1 bell pepper thinly sliced (any color)
  • 4 hoagie rolls
  • 8 ounces provolone cheese sliced
  • Salt and pepper to taste
  • Optional: hot sauce or mustard for serving

Method
 

  1. In a large skillet, heat the olive oil over medium-high heat. Add the sliced flank steak, season with salt and pepper, and cook for about 3-4 minutes until browned. Remove the steak from the skillet and set aside.
  2. In the same skillet, add the sliced onion, mushrooms, and bell pepper. Sauté for about 5-7 minutes until the vegetables are softened and caramelized.
  3. Return the cooked steak to the skillet with the vegetables and mix well. Cook for an additional 2-3 minutes to heat through.
  4. Preheat your oven broiler. Slice the hoagie rolls in half lengthwise and place them on a baking sheet.
  5. Divide the steak and vegetable mixture evenly among the hoagie rolls. Top each with provolone cheese.
  6. Place the baking sheet under the broiler for 2-3 minutes, or until the cheese is melted and bubbly. Keep a close eye to prevent burning.
  7. Remove from the oven and serve immediately, adding hot sauce or mustard if desired.

Nutrition

Serving: 1sandwichCalories: 450kcalCarbohydrates: 30gProtein: 35gFat: 20gSaturated Fat: 8gPolyunsaturated Fat: 10gCholesterol: 70mgSodium: 800mgFiber: 2gSugar: 3g

Notes

  • For a spicier kick, add sliced jalapeños to the vegetable mixture.
  • Substitute the flank steak with grilled chicken or tofu for a different protein option.

Tried this recipe?

Let us know how it was!

Sweet and Spicy Ground Turkey Broccoli Bowls to Delight You!

Introduction to Sweet and Spicy Ground Turkey Broccoli Bowls

After a long day, the last thing I want is to spend hours in the kitchen. That’s where my Sweet and Spicy Ground Turkey Broccoli Bowls come in. This dish is a lifesaver, combining the lean goodness of ground turkey with vibrant broccoli and a sauce that packs a punch. It’s quick, healthy, and bursting with flavor, making it perfect for busy weeknights or impressing friends at dinner. Trust me, once you try this recipe, it’ll become a staple in your home, bringing smiles and satisfied bellies to the table.

Why You’ll Love This Sweet and Spicy Ground Turkey Broccoli Bowls

These Sweet and Spicy Ground Turkey Broccoli Bowls are a game-changer for anyone juggling a busy schedule. They come together in just 25 minutes, making them a perfect weeknight meal. The combination of savory turkey, crisp broccoli, and a sweet-spicy sauce creates a flavor explosion that’s hard to resist. Plus, they’re healthy and satisfying, so you can enjoy a delicious dinner without the guilt. What’s not to love?

Ingredients for Sweet and Spicy Ground Turkey Broccoli Bowls

Gathering the right ingredients is the first step to creating these delightful Sweet and Spicy Ground Turkey Broccoli Bowls. Here’s what you’ll need:

  • Ground Turkey: A lean protein that cooks quickly and absorbs flavors beautifully.
  • Broccoli Florets: Fresh and vibrant, they add crunch and a wealth of nutrients to the dish.
  • Olive Oil: A healthy fat for sautéing, it enhances the flavors of the aromatics.
  • Soy Sauce: This adds a savory umami kick, balancing the sweetness of the honey.
  • Honey: A natural sweetener that brings a touch of sweetness to the sauce.
  • Sriracha: For those who love a bit of heat, this sauce adds a spicy kick. Adjust to your taste!
  • Garlic: Minced garlic infuses the dish with a fragrant aroma and depth of flavor.
  • Ginger: Freshly grated ginger adds warmth and a hint of spice, elevating the overall taste.
  • Rice Vinegar: This tangy ingredient brightens the sauce and balances the sweetness.
  • Salt and Pepper: Essential seasonings to enhance all the flavors in the dish.
  • Cooked Rice or Quinoa: Serve as a base for the turkey and broccoli, making it a complete meal.

For those looking to mix things up, consider adding chopped peanuts or cashews for a crunchy topping. If you prefer, you can substitute ground turkey with ground chicken or beef for a different flavor profile. Remember, the exact quantities of these ingredients are listed at the bottom of the article for easy printing!

How to Make Sweet and Spicy Ground Turkey Broccoli Bowls

Now that you have your ingredients ready, let’s dive into the cooking process. Making these Sweet and Spicy Ground Turkey Broccoli Bowls is straightforward and fun. Follow these simple steps, and you’ll have a delicious meal in no time!

Step 1: Sauté Aromatics

Start by heating a tablespoon of olive oil in a large skillet over medium heat. Once the oil is shimmering, add the minced garlic and grated ginger. Sauté them for about a minute until they become fragrant. This step is crucial; it sets the flavor foundation for your dish. The aroma will fill your kitchen, making your mouth water!

Step 2: Cook the Ground Turkey

Next, add the pound of ground turkey to the skillet. Use a spatula to break it apart as it cooks. Stir it occasionally, allowing it to brown evenly. This should take about 5 to 7 minutes. Season with salt and pepper to taste. The turkey should be cooked through and no longer pink. This lean protein is not only quick to cook but also absorbs the flavors beautifully.

Step 3: Steam the Broccoli

While the turkey is cooking, it’s time to steam the broccoli florets. You can do this in a steamer basket or even in the microwave with a splash of water. Steam them for about 4 to 5 minutes until they are tender but still bright green. This keeps them crunchy and vibrant, adding a lovely texture to your bowls.

Step 4: Prepare the Sauce

In a small bowl, whisk together the soy sauce, honey, sriracha, and rice vinegar. This sweet and spicy sauce is what makes the dish shine. Once the turkey is cooked, pour this mixture over it. Stir well to combine everything, letting it simmer for 2 to 3 minutes. This allows the flavors to meld together, creating a delicious coating for your turkey.

Step 5: Combine and Serve

Finally, it’s time to assemble your bowls! Start with a base of cooked rice or quinoa. Top it with the sweet and spicy turkey mixture, and don’t forget to add the steamed broccoli on top. For an extra crunch, sprinkle some chopped peanuts or cashews if you like. Serve immediately and enjoy the delightful flavors of your Sweet and Spicy Ground Turkey Broccoli Bowls!

Tips for Success

  • Prep your ingredients ahead of time to streamline the cooking process.
  • Don’t overcook the broccoli; it should be tender yet crisp for the best texture.
  • Adjust the sriracha to your spice preference; start with less if you’re unsure.
  • For a meal prep option, store the turkey and broccoli separately from the rice.
  • Experiment with different veggies like bell peppers or snap peas for variety.

Equipment Needed

  • Large Skillet: Essential for sautéing the turkey and aromatics. A non-stick pan works well too.
  • Spatula: Perfect for breaking apart the turkey as it cooks.
  • Steamer Basket or Microwave-Safe Bowl: For steaming the broccoli quickly.
  • Small Bowl: To whisk together the sauce ingredients.

Variations

  • Spicy Kick: Add more sriracha or a dash of red pepper flakes for an extra heat boost.
  • Vegetarian Option: Substitute ground turkey with crumbled tofu or tempeh for a plant-based version.
  • Whole Grain Base: Swap out white rice for brown rice or farro for added fiber and nutrients.
  • Asian Twist: Incorporate sesame oil in place of olive oil and garnish with sesame seeds for a nutty flavor.
  • Seasonal Veggies: Use seasonal vegetables like bell peppers, snap peas, or carrots to keep things fresh and exciting.

Serving Suggestions

  • Pair your Sweet and Spicy Ground Turkey Broccoli Bowls with a refreshing cucumber salad for a crunchy contrast.
  • Serve with a chilled glass of iced green tea to complement the flavors.
  • For presentation, garnish with sesame seeds and fresh cilantro for a pop of color.

FAQs about Sweet and Spicy Ground Turkey Broccoli Bowls

Can I make Sweet and Spicy Ground Turkey Broccoli Bowls ahead of time?

Absolutely! You can prepare the turkey and broccoli in advance. Just store them separately from the rice or quinoa. When you’re ready to eat, reheat everything together for a quick meal.

What can I substitute for ground turkey?

If ground turkey isn’t your thing, feel free to swap it out for ground chicken or even beef. Each option brings its own unique flavor to the dish.

How can I adjust the spice level?

To control the heat, start with a smaller amount of sriracha. You can always add more later if you want that extra kick. Remember, it’s easier to add than to take away!

Is this recipe suitable for meal prep?

Yes! These Sweet and Spicy Ground Turkey Broccoli Bowls are perfect for meal prep. Just portion them out in containers for easy grab-and-go lunches throughout the week.

Can I use frozen broccoli instead of fresh?

Definitely! Frozen broccoli works well in this recipe. Just steam it according to package instructions, and you’ll have a quick and convenient option without sacrificing flavor.

Final Thoughts

Cooking should be a joyful experience, and my Sweet and Spicy Ground Turkey Broccoli Bowls embody that spirit. They’re not just a meal; they’re a celebration of flavors and a reminder that healthy eating can be delicious and satisfying. Whether you’re whipping them up for a quick weeknight dinner or impressing friends at a gathering, these bowls deliver every time. The vibrant colors, enticing aromas, and delightful taste will have everyone coming back for seconds. So grab your skillet, and let’s make some memories in the kitchen with this easy, flavorful dish!

jhessica

Sweet and Spicy Ground Turkey Broccoli Bowls to Delight You!

A delicious and healthy recipe for Sweet and Spicy Ground Turkey Broccoli Bowls that combines ground turkey, broccoli, and a flavorful sauce.
Prep Time 10 minutes
Cook Time 15 minutes
Total Time 25 minutes
Servings: 4 servings
Course: Main Dish
Cuisine: American
Calories: 350

Ingredients
  

  • 1 pound ground turkey
  • 4 cups broccoli florets
  • 1 tablespoon olive oil
  • 1 tablespoon soy sauce
  • 2 tablespoons honey
  • 1 tablespoon sriracha adjust to taste
  • 2 cloves garlic minced
  • 1 teaspoon ginger grated
  • 1 tablespoon rice vinegar
  • Salt and pepper to taste
  • Cooked rice or quinoa for serving about 2 cups

Method
 

  1. In a large skillet, heat the olive oil over medium heat. Add the minced garlic and grated ginger, sautéing for about 1 minute until fragrant.
  2. Add the ground turkey to the skillet, breaking it apart with a spatula. Cook until browned and cooked through, about 5-7 minutes. Season with salt and pepper.
  3. While the turkey is cooking, steam the broccoli florets until tender but still bright green, about 4-5 minutes. You can do this in a steamer basket or in the microwave with a little water.
  4. In a small bowl, whisk together the soy sauce, honey, sriracha, and rice vinegar. Pour this mixture over the cooked turkey and stir to combine. Let it simmer for 2-3 minutes to allow the flavors to meld.
  5. Serve the sweet and spicy turkey mixture over a bed of cooked rice or quinoa, topped with steamed broccoli.

Nutrition

Serving: 1bowlCalories: 350kcalCarbohydrates: 30gProtein: 28gFat: 12gSaturated Fat: 2gPolyunsaturated Fat: 8gCholesterol: 80mgSodium: 500mgFiber: 3gSugar: 10g

Notes

  • For added crunch, sprinkle some chopped peanuts or cashews on top before serving.
  • Substitute ground turkey with ground chicken or beef for a different flavor profile.
  • Adjust the spice level by adding more or less sriracha based on your preference.

Tried this recipe?

Let us know how it was!

Teriyaki Ground Turkey Stir-Fry: Easy Recipe for Dinner!

Introduction to Teriyaki Ground Turkey Stir-Fry

When life gets hectic, finding a quick and delicious dinner solution can feel like a challenge. That’s where my Teriyaki Ground Turkey Stir-Fry comes in. This dish is not just easy to whip up; it’s packed with flavor and nutrition, making it perfect for busy weeknights or when you want to impress your loved ones.

With just a handful of ingredients and minimal prep time, you can create a meal that’s both satisfying and healthy. Trust me, once you try this recipe, it’ll become a go-to in your kitchen rotation!

Why You’ll Love This Teriyaki Ground Turkey Stir-Fry

This Teriyaki Ground Turkey Stir-Fry is a game-changer for your dinner routine.

It’s quick, taking just 25 minutes from start to finish, which means you can spend less time in the kitchen and more time enjoying your meal.

The combination of savory turkey and vibrant veggies creates a taste explosion that’s hard to resist.

Plus, it’s a healthy option that doesn’t skimp on flavor, making it perfect for everyone at the table!

Ingredients for Teriyaki Ground Turkey Stir-Fry

Gathering the right ingredients is the first step to a successful Teriyaki Ground Turkey Stir-Fry. Here’s what you’ll need:

  • Ground Turkey: A lean protein that cooks quickly and absorbs flavors beautifully.
  • Vegetable Oil: Essential for sautéing; it helps achieve that perfect golden-brown color.
  • Broccoli Florets: These add a nice crunch and are packed with vitamins.
  • Bell Pepper: Choose any color you like! They bring sweetness and vibrant color to the dish.
  • Snap Peas: These add a delightful snap and are a great source of fiber.
  • Carrot: Julienned for a pop of color and a hint of sweetness.
  • Garlic: Freshly minced for that aromatic kick that elevates the dish.
  • Fresh Ginger: Adds warmth and a zesty flavor that complements the teriyaki sauce.
  • Soy Sauce: The backbone of the teriyaki flavor; it brings saltiness and umami.
  • Honey: For a touch of sweetness that balances the savory elements.
  • Rice Vinegar: Adds acidity and brightness to the sauce.
  • Sesame Oil: A little goes a long way in adding a nutty flavor.
  • Cornstarch: Mixed with water, it helps thicken the sauce for a glossy finish.
  • Green Onions: Sliced for garnish; they add freshness and a mild onion flavor.
  • Sesame Seeds: Optional, but they add a nice crunch and visual appeal.
  • Cooked Rice or Quinoa: Serve as a base to soak up all that delicious sauce.

For exact measurements, check the bottom of the article where you can find everything listed for easy printing. Feel free to get creative with your ingredients! You can swap ground turkey for ground chicken or even tofu for a vegetarian twist.

How to Make Teriyaki Ground Turkey Stir-Fry

Creating a delicious Teriyaki Ground Turkey Stir-Fry is easier than you might think.

Follow these simple steps, and you’ll have a mouthwatering meal ready in no time!

Step 1: Brown the Ground Turkey

Start by heating the vegetable oil in a large skillet or wok over medium-high heat.

Once the oil is hot, add the ground turkey.

Cook it for about 5-7 minutes, breaking it apart with a spatula as it browns.

Make sure to drain any excess fat if needed.

This step is crucial for achieving that savory base flavor!

Step 2: Add Garlic and Ginger

Next, toss in the minced garlic and ginger.

Stir them into the turkey for about 1-2 minutes until they become fragrant.

The aroma will fill your kitchen, making it hard to resist.

This combination adds depth to your stir-fry, enhancing the overall taste.

Step 3: Stir in the Vegetables

Now it’s time to add the colorful veggies!

Stir in the broccoli, bell pepper, snap peas, and julienned carrot.

Cook everything together for 3-4 minutes until the vegetables are tender-crisp.

You want them to retain some crunch for that satisfying bite.

This is where the dish really starts to come alive!

Step 4: Prepare the Sauce

In a small bowl, whisk together the soy sauce, honey, rice vinegar, and sesame oil.

Once mixed, pour this flavorful sauce over the turkey and vegetables.

Stir well to ensure everything is coated evenly.

This sauce is the heart of your Teriyaki Ground Turkey Stir-Fry, bringing all the flavors together.

Step 5: Thicken the Sauce

To achieve that perfect glossy finish, add the cornstarch mixture to the skillet.

Cook for another 2-3 minutes, stirring constantly until the sauce thickens.

This step is key for that restaurant-quality texture.

You’ll know it’s ready when it clings beautifully to the turkey and veggies.

Step 6: Garnish and Serve

Remove the skillet from heat and get ready to serve!

Garnish your stir-fry with sliced green onions and a sprinkle of sesame seeds.

Serve it over cooked rice or quinoa for a complete meal.

This final touch not only adds flavor but also makes your dish look stunning.

Enjoy every bite of your homemade Teriyaki Ground Turkey Stir-Fry!

Tips for Success

  • Prep all your ingredients before you start cooking to streamline the process.
  • Use a wok if you have one; it helps with even cooking and high heat.
  • Don’t overcrowd the pan; cook in batches if necessary for better browning.
  • Feel free to customize the veggies based on what you have on hand.
  • For extra flavor, marinate the turkey in soy sauce for 15 minutes before cooking.

Equipment Needed

  • Large Skillet or Wok: A non-stick skillet works well if you don’t have a wok.
  • Spatula: Use a wooden or silicone spatula to avoid scratching your cookware.
  • Measuring Cups and Spoons: Essential for accurate ingredient measurements.
  • Cutting Board and Knife: For chopping veggies and prepping ingredients.

Variations

  • Spicy Teriyaki: Add a teaspoon of red pepper flakes or a splash of sriracha to the sauce for a fiery kick.
  • Vegetarian Option: Substitute ground turkey with crumbled tofu or tempeh for a plant-based version.
  • Different Proteins: Try using ground chicken, beef, or shrimp for a different flavor profile.
  • Extra Veggies: Incorporate other vegetables like zucchini, mushrooms, or bell peppers for added nutrition and color.
  • Gluten-Free: Use tamari instead of soy sauce to make this dish gluten-free without sacrificing flavor.

Serving Suggestions

  • Pair your Teriyaki Ground Turkey Stir-Fry with fluffy white rice or quinoa for a hearty meal.
  • Serve with a side of steamed edamame for a protein boost.
  • A crisp cucumber salad drizzled with rice vinegar complements the dish perfectly.
  • For drinks, try a light beer or green tea to enhance the flavors.

FAQs about Teriyaki Ground Turkey Stir-Fry

Can I use a different protein instead of ground turkey?

Absolutely! Ground chicken, beef, or even tofu work great in this Teriyaki Ground Turkey Stir-Fry. Each option brings its own unique flavor and texture, so feel free to experiment!

How can I make this dish spicier?

If you’re looking for a kick, add a teaspoon of red pepper flakes or a splash of sriracha to the sauce. It’ll elevate the flavor and give your stir-fry a nice heat!

Can I prepare this stir-fry in advance?

Yes, you can prep the ingredients ahead of time! Chop your veggies and store them in the fridge. When you’re ready to cook, it’ll take just 25 minutes to whip up this delicious meal.

What can I serve with Teriyaki Ground Turkey Stir-Fry?

This dish pairs wonderfully with fluffy white rice or quinoa. You can also serve it alongside a fresh cucumber salad or steamed edamame for a complete meal.

Is this recipe suitable for meal prep?

Definitely! This Teriyaki Ground Turkey Stir-Fry stores well in the fridge for up to three days. Just reheat it in the microwave or on the stovetop when you’re ready to enjoy it again!

Final Thoughts

Cooking can be a delightful escape from the daily grind, and my Teriyaki Ground Turkey Stir-Fry embodies that joy.

It’s not just a meal; it’s a celebration of flavors and colors that brings the family together.

The ease of preparation means you can focus on what truly matters—sharing good food and laughter around the table.

Whether you’re a seasoned chef or a kitchen novice, this dish is sure to impress.

So, roll up your sleeves, embrace the sizzle, and enjoy every bite of this delicious stir-fry adventure!

jhessica

Teriyaki Ground Turkey Stir-Fry: Easy Recipe for Dinner!

A quick and easy Teriyaki Ground Turkey Stir-Fry recipe perfect for dinner.
Prep Time 10 minutes
Cook Time 15 minutes
Total Time 25 minutes
Servings: 4 servings
Course: Dinner
Cuisine: Asian
Calories: 320

Ingredients
  

  • 1 pound ground turkey
  • 2 tablespoons vegetable oil
  • 1 cup broccoli florets
  • 1 bell pepper sliced (any color)
  • 1 cup snap peas
  • 1 carrot julienned
  • 3 cloves garlic minced
  • 1 tablespoon fresh ginger minced
  • 1/4 cup soy sauce
  • 2 tablespoons honey
  • 1 tablespoon rice vinegar
  • 1 teaspoon sesame oil
  • 1 tablespoon cornstarch mixed with 2 tablespoons water
  • 2 green onions sliced (for garnish)
  • Sesame seeds for garnish
  • Cooked rice or quinoa for serving

Method
 

  1. In a large skillet or wok, heat the vegetable oil over medium-high heat. Add the ground turkey and cook until browned, breaking it apart with a spatula, about 5-7 minutes. Drain any excess fat if necessary.
  2. Add the minced garlic and ginger to the skillet, cooking for an additional 1-2 minutes until fragrant.
  3. Stir in the broccoli, bell pepper, snap peas, and carrot. Cook for 3-4 minutes until the vegetables are tender-crisp.
  4. In a small bowl, whisk together the soy sauce, honey, rice vinegar, and sesame oil. Pour this mixture over the turkey and vegetables, stirring to combine.
  5. Add the cornstarch mixture to the skillet and cook for another 2-3 minutes, stirring constantly until the sauce thickens.
  6. Remove from heat and garnish with sliced green onions and sesame seeds. Serve over cooked rice or quinoa.

Nutrition

Serving: 1servingCalories: 320kcalCarbohydrates: 15gProtein: 30gFat: 15gSaturated Fat: 3gPolyunsaturated Fat: 12gCholesterol: 90mgSodium: 600mgFiber: 3gSugar: 10g

Notes

  • For a spicier kick, add a teaspoon of red pepper flakes or a splash of sriracha to the sauce.
  • Substitute ground turkey with ground chicken or tofu for a vegetarian option.

Tried this recipe?

Let us know how it was!

Stay Connected

Get recipes via email: